

Page 1

JO-1MDW
Master monitor station
OPERATION MANUAL
Read this "Operation Manual" prior to usage to ensure safe and correct operation. Keep this in a safe place for future
reference.
The illustrations used in this manual may differ from the actual ones.
Page 2
PRECAUTIONS
Prohibited
Do not dismantle unit
WARNING
(Negligence could result in death or serious injury.)
1. Do not disassemble or modify the station. Fire or electric shock could
result.
2. Do not put any metal and fl ammable material into the station through
the openings. Fire or electric shock could result.
3. Keep the station away from water or any other liquid. Fire or electric
shock could result.
4. If there is smoke, unusual odors, or abnormal sounds, or if the station is
dropped or damaged, unplug and remove power immediately. These
may result in fi re or electric shock.
5. For power supply, use Aiphone power supply model specifi ed for use
with system.
If non-specifi ed product is used, fi re or malfunction could result.
6. Do not, under any circumstances, open up the station.
Voltage within some internal components may cause electrical shock.
7. Do not disconnect the station. Electric shock could result.
8. Do not use the station in the following locations or under the following
conditions. Ignoring these may result in malfunction.
• This product is not intended for commercial applications, such as
factories or hospitals.
• Near an electric medical equipment and locations such as Operating
Rooms, ICU, or CCU.
• Near automatic control equipment such as auto doors or fi re alarm
panels.
• In an area within 15cm of a cardiac pacemaker.
CAUTION
(Negligence could result in injury to people or damage to
property.)
1. Do not put anything on the station or cover the station with cloth, etc.
Fire or station trouble could result.
2. Do not apply excess pressure to the LCD screen. If the screen is
punctured it may result in injury.
3. If the LCD is punctured, do not allow skin contact with the liquid
crystal inside. Infl ammation could result.
* If liquid crystal is ingested, immediately gargle with water and seek
medical attention.
* If contact with the eyes or skin occurs, clean with pure water and
seek medical attention.
4. Do not puncture the LCD screen with a sharp object. If the screen is
punctured if my result in injury.
5. Maintain a reasonable distance from the speaker. Placing your ear on
the speaker may cause harm.
General Precautions
1. Read this manual prior to usage to ensure safe and correct operation.
Keep this in a safe place for future reference.
2. Keep the station more than 20 cm (7-7/8") away from wireless devices
such as wireless routers, or cordless telephones. It may cause the image or
sound distortion.
3. Keep the station more than 1 m (3.3') away from radio or TV set. It may
cause interference and unwanted noise.
4. Move to within 30cm (12") or less of the station for communication.
Standing too far away may make it diffi cult for the other party to hear the
communication.
5. Keep the intercom wires more than 30cm (12'') away from AC 100-240V
wiring. AC induced noise and/or unit malfunction could result.
6. When installing or using the station, consider to the privacy as the
responsibility of customer.
Keep unit away from water
7. In order to prevent sensitive information stored in the station from being
lost or stolen, it is the customer's responsibility to delete settings, recorded
video/audio, and other information stored in the station, when discarding,
transferring, or returning the station. Refer to page 24, 25 and 35 of this
manual for how to erase the information.
8. As to other 3rd party devices (such as sensor, detectors, door releases)
used with this system, comply with the Specifi cations and Warranty
conditions that the manufacturers or venders present.
9. Avoid using the station in places under direct sunlight. If it is unavoidable,
block out light during use.
Be sure to follow the instruction
Notice
• The illustrations and images used in this manual may differ from the actual
ones.
• Aiphone will under no conditions be liable for any damages or losses
resulting from this product's contents or specifi cations.
• Aiphone will under no conditions be liable for damage occurring due to the
inability to communicate due to malfunctions, problems, or operational
errors in this product.
• The station is inoperative during power failure.
• If the station is used in areas where there are business-use wireless devices
such as a transceiver or mobile phones, it may cause malfunction.
• It must be noted in advance that the LCD panel, though manufactured with
very high precision techniques, inevitably will have a very small portion of
its picture elements always lit or not lit it at all. This is not considered a
station malfunction.
• Hands-free calls are a method of automatically switching between the
transmitter and receiver so that the louder of the two is prioritized, making
it audible by the quieter of the two. If the surrounding area is loud, the call
may be interrupted, making it diffi cult to respond.
• During communication, the voice may not come through clearly when
speaking before the other party has fi nished talking. Communication will
proceed smoothly when waiting until the other party has fi nished before
speaking.
• When wall-mounted, the top of the station may darken. This does not
indicate a malfunction.
• If warm-color lighting is shining on the camera, the tint of the image
displayed on the screen may be affected.
• Warm-color lighting shining on the video door station may change the tint
of the image on the screen.
• If glare from an LED light or fl uorescent light, etc. enters the camera, black
stripes may appear on the liquid crystal display of the master station, the
screen may fl icker, and colors may differ. This is not a malfunction.
• When outside temperature lowers sharply after rainfall, etc., the inside of
the camera may fog up slightly, causing a blurry images, but this is not a
malfunction. Normal operation will be restored when moisture evaporates.
• Aiphone assumes no responsibility for corruption of saved information
(such as changes to or deletion of saved information).
• If the surface of a video door station freezes during wintertime, the image
may become diffi cult to see or the call button (including the call button of
video door station) may not move, but this is not a malfunction.
• If the power is turned off for at least 15 minutes in an event such as a power
outage, the date and time will revert back to the default setting.
- 2 -
Page 3

Table of Contents
PRECAUTIONS .......................................................... 2
PREPARATION
System confi guration ........................................................ 4
Part names and functions ................................................ 5
Operation panel ............................................................... 5
How to read screen .......................................................... 6
Initial set-up ......................................................................... 7
Setting the current date and time .................................. 7
Changing the display language ...................................... 7
Preparing a microSDHC card .......................................... 8
About microSDHC card ................................................. 8
Inserting/removing a microSDHC card ........................ 8
Formatting a microSDHC card ...................................... 9
Connecting with a mobile device................................. 10
Flow of the settings ........................................................ 10
Connecting the station with Wi-Fi ............................... 11
Connecting using "Auto Connect (WPS)" .......................... 11
Connecting using "Manual Setup" ...................................... 11
Connection check ................................................................ 13
Confi rming the current network settings ............................. 13
Enabling or disabling the network connection .................... 14
Selecting the antenna ........................................................... 14
Connecting a mobile device with a Wi-Fi router ........ 16
Registering a mobile device to the station ................... 16
Downloading the App to the mobile device ........................ 16
Registering a mobile device to the station ........................... 16
Deleting the mobile device from the station ....................... 18
USING THE STATION
Receiving a call................................................................. 19
Answering a call ............................................................ 19
Operation during receiving a call or communication
Adjusting the screen brightness ........................................... 20
Adjusting the receiving volume ........................................... 20
Changing the display to the full-screen mode ..................... 20
Communication using touch-to-talk .................................... 21
Recording ............................................................................ 21
Monitoring the door station ........................................... 22
Playing recordings........................................................... 23
Screens and icons ........................................................... 23
Playing recordings ......................................................... 24
Protecting recordings .................................................... 24
To protect a recording on the recording list......................... 24
To protect the currently-selected recording
while in standby................................................................... 24
Deleting a recording ...................................................... 25
To delete a recording ........................................................... 25
To delete all recordings ....................................................... 26
Copying recordings from the built-in memory
onto a microSDHC card................................................ 26
Notifi cation ......................................................................... 27
... 20
SETTINGS
Settings list ........................................................................ 28
Adjusting screen brightness......................................... 29
Changing the sound settings ....................................... 30
Adjusting receiving volume .......................................... 30
Adjusting ringtone volume ........................................... 30
Enabling/Disabling the touch sound ............................ 30
Changing the time settings ........................................... 31
Setting the current date and time ................................ 31
Selecting the display format of the date and time ...... 31
Setting the time zone ..................................................... 31
Setting daylight saving time.......................................... 32
Changing the display language ................................... 32
Setting the talk duration time ....................................... 32
Cleaning mode .................................................................. 32
Setting of door release/option ...................................... 33
Setting of notifi cation LED ............................................ 33
Other settings ................................................................... 34
Registering/Deleting a mobile device ........................... 34
Setting a microSDHC card ........................................... 34
Adjusting video quality ................................................. 34
Viewing station information ......................................... 35
Viewing a notifi cation for updating the station ................... 35
Confi guring the settings for automatically
updating the station ............................................................. 35
Confi guring network settings ....................................... 36
Initializing user settings ................................................ 36
Confi rming the related regulations .............................. 36
Confi rming information about Protection
of Personal Information ................................................ 36
Administrator settings .................................................. 37
Exporting the log fi le to the microSDHC card .................... 37
Setting Door Release duration ............................................. 37
Setting Option Output duration ........................................... 38
Restoring all settings to the factory default ......................... 38
FOR PROPER USE OF THE STATION
Updating a fi rmware of the station .............................. 39
Automatic update through the network ...................... 39
Receiving a notifi cation for available updates
through the network ...................................................... 39
Updating the station by using a microSDHC card on
which the newest version of the fi rmware is stored .... 40
Cleaning .............................................................................. 40
Cleaning the exterior surfaces ...................................... 40
Cleaning the screen ....................................................... 40
Troubleshooting ............................................................... 41
Technical precautions ..................................................... 41
Specifi cations ................................................................... 42
Regulations ........................................................................ 42
Warranty ............................................................................. 43
- 3 -
Page 4
PREPARATION
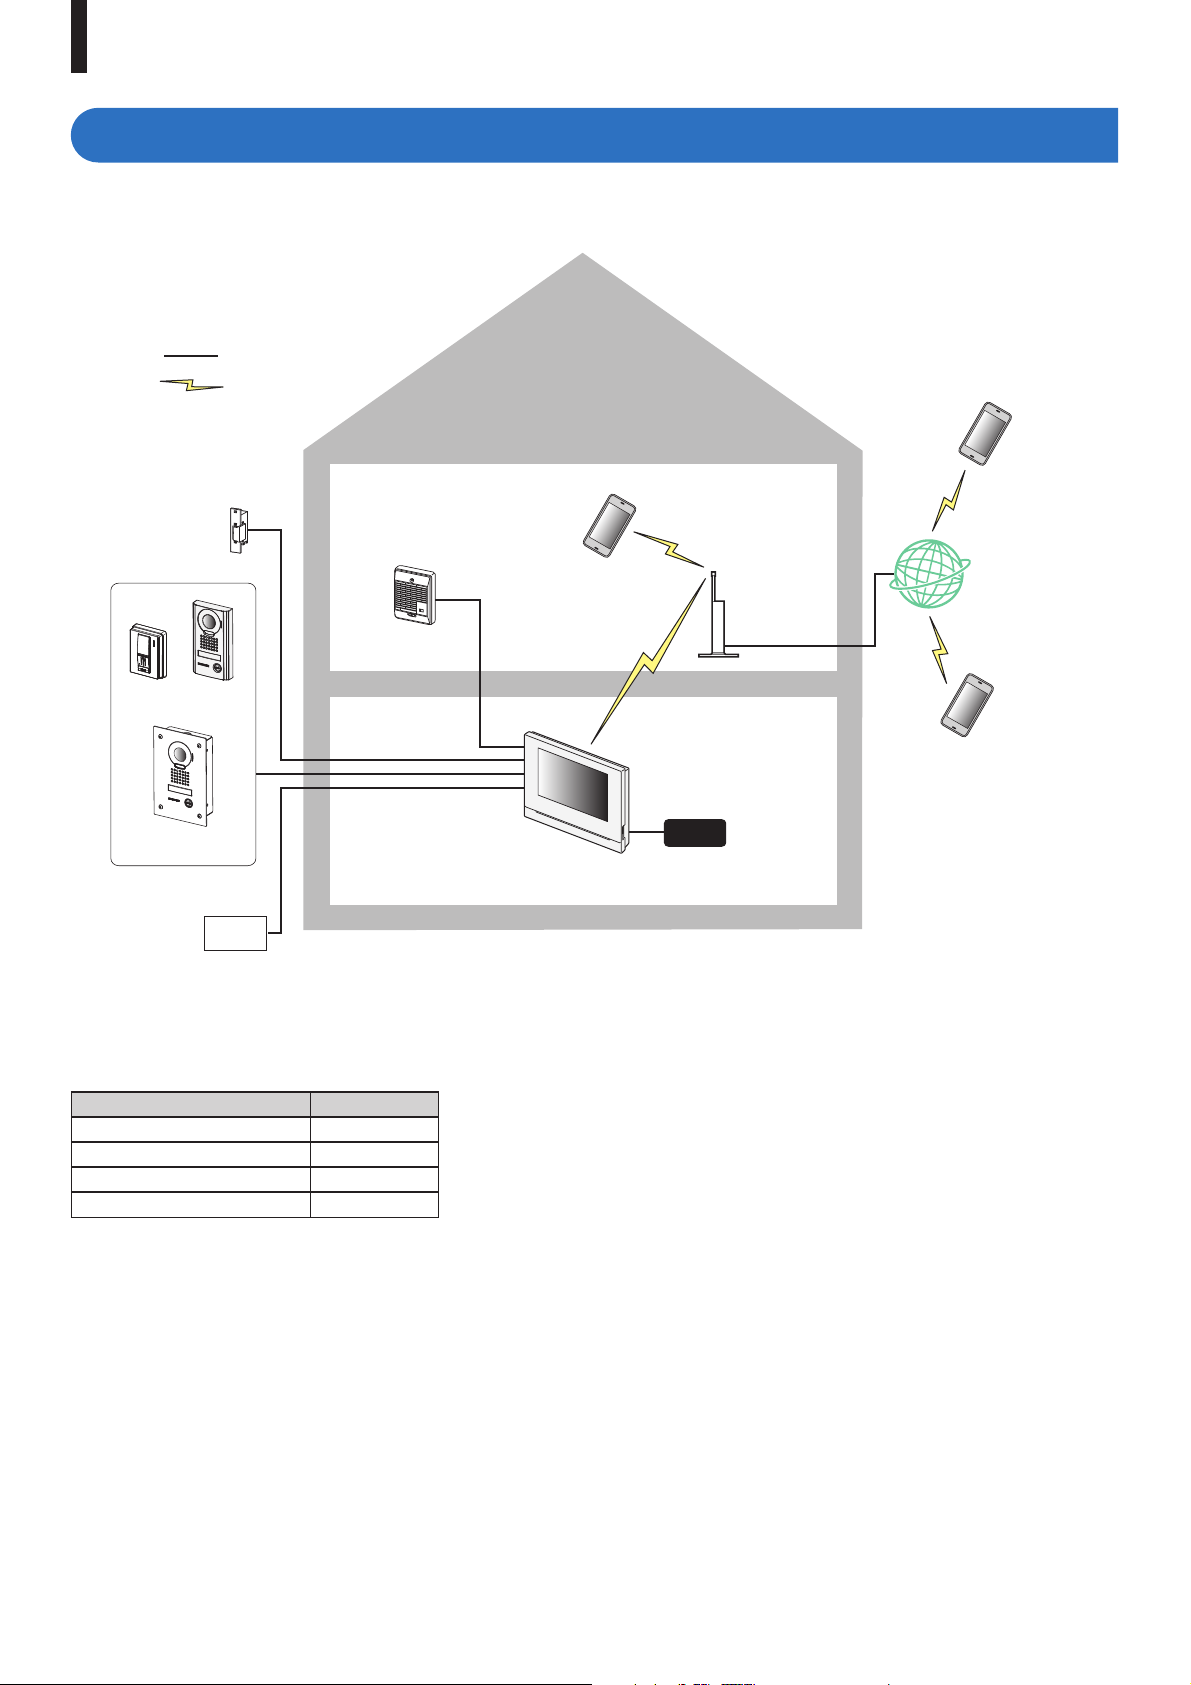
System confi guration
The fi gure below is a system confi guration example.
: Hard wired
: Wireless
Mobile device
Electric lock
JO-DA
Video door station
JO-DV
JO-DVF
External unit such as
lighting equipment
Call extension speaker
IER-2
Mobile device
親機
住宅用火災警報器または
コールボタン
Master monitor station
JO-1MDW
無線
LAN
ルーター
Internet
Wireless LAN
router
Mobile device
呼出
PS18
Maximum number of each device available in a system
Device
Video door station 1
Master monitor station 1
Mobile device 8
Expansion monitor station 1
* When you will connect an expansion monitor station (JO-1FD),
refer to "JO-1FD INSTALLATION & OPERATION MANUAL".
* Refer to "JO Series INTERCOM APP Type B OPERATION
MANUAL" for how to use the INTERCOM APP Type B.
Max. number
- 4 -
Page 5
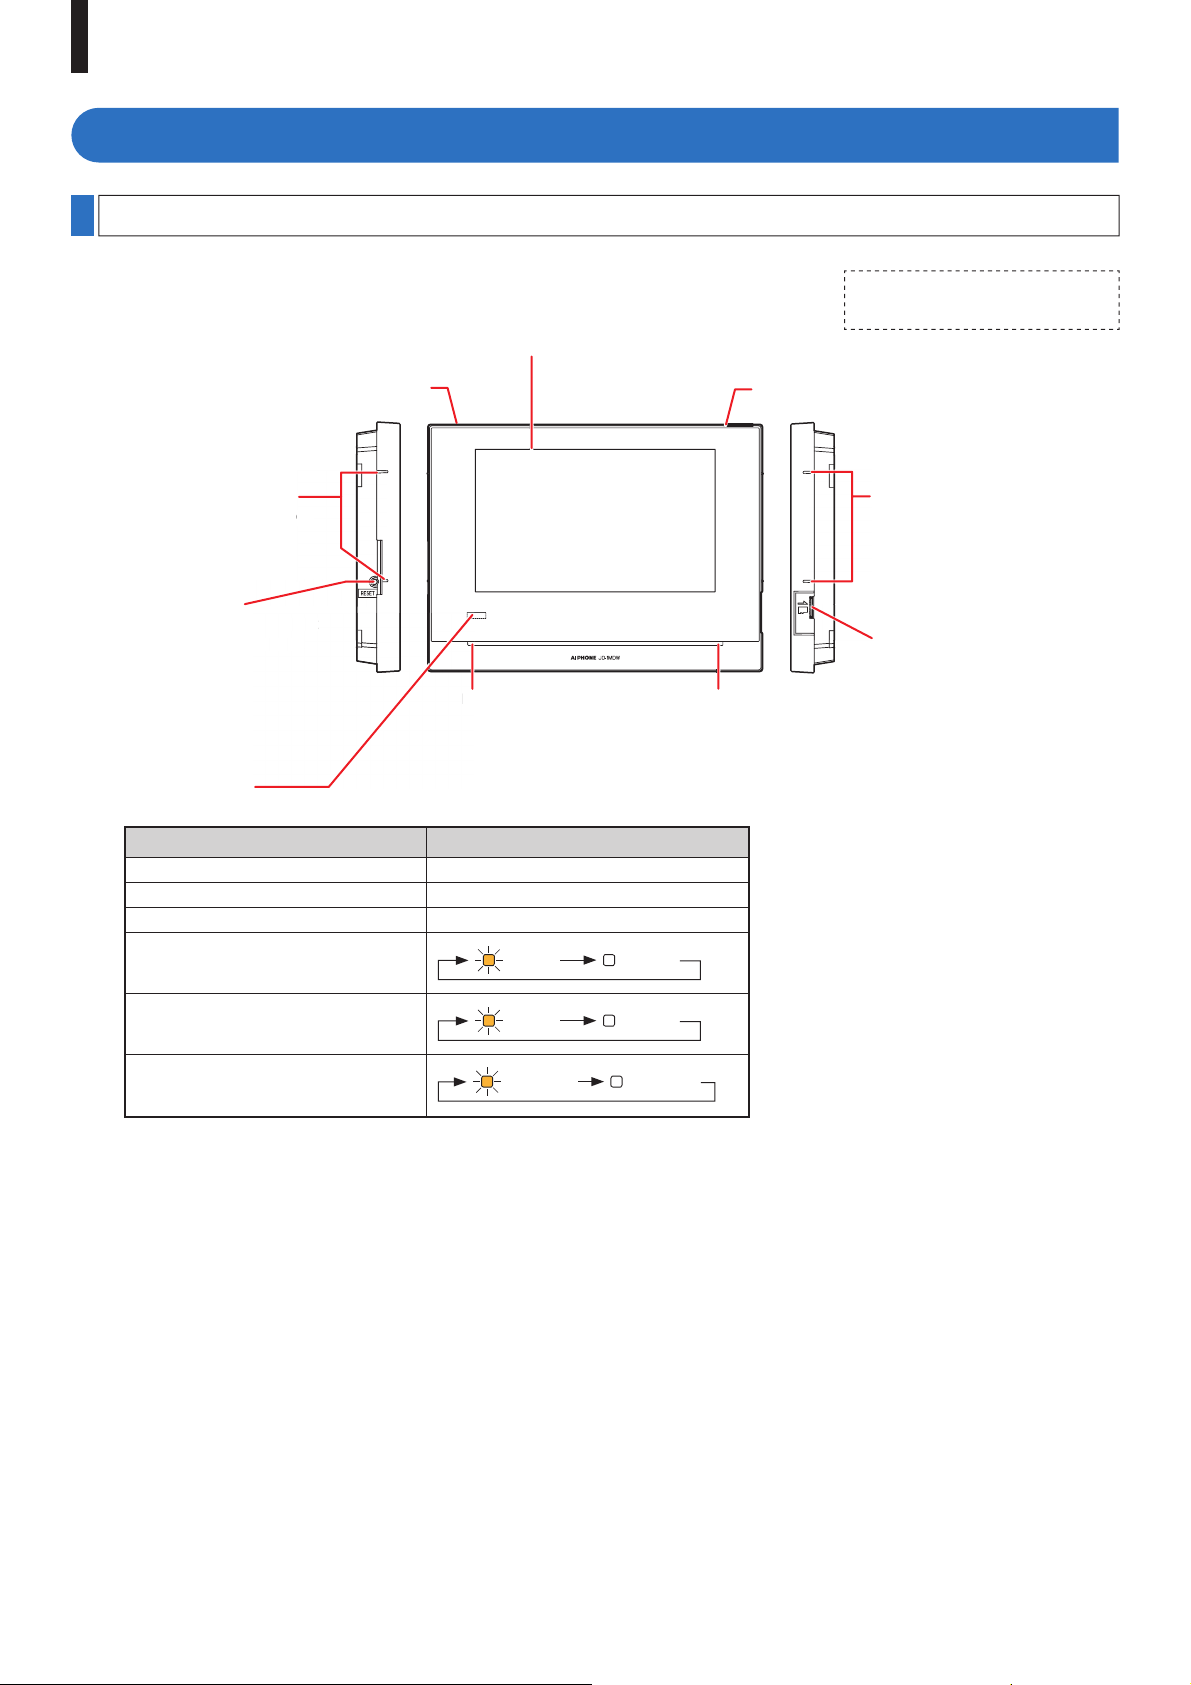
PREPARATION
M
eboo
ot
Part names and functions
Operation panel
Color LCD touchscreen
See the next page for details.
Remove protective fi lm before
use.
Wireless LAN antenna A
Button position guide
to r
t is n
d
t
Microphone
(1 sec.)
(1 sec.)
(0.25 sec.)
(1 sec.)
(1 sec.)
(0.25 sec.)
for the visually-impaired
RESET button
Press this button to reboot
the station when it is not
responding.
Notifi cation LED
Indicates the current status of the station by lighting up or fl ashing.
Station status Indication pattern
Current date and time have not been set. Solid light
Rebooting. Solid light
Updating the fi rmware. Solid light
Some recordings have not been viewed.
Some notifi cations have not been
viewed.
A short-circuit is detected.
Wireless LAN antenna B
Button position guide for
the visually-impaired
microSD card slot (→P. 8 )
Speaker
- 5 -
Page 6
PREPARATION
o
en a
ved
.
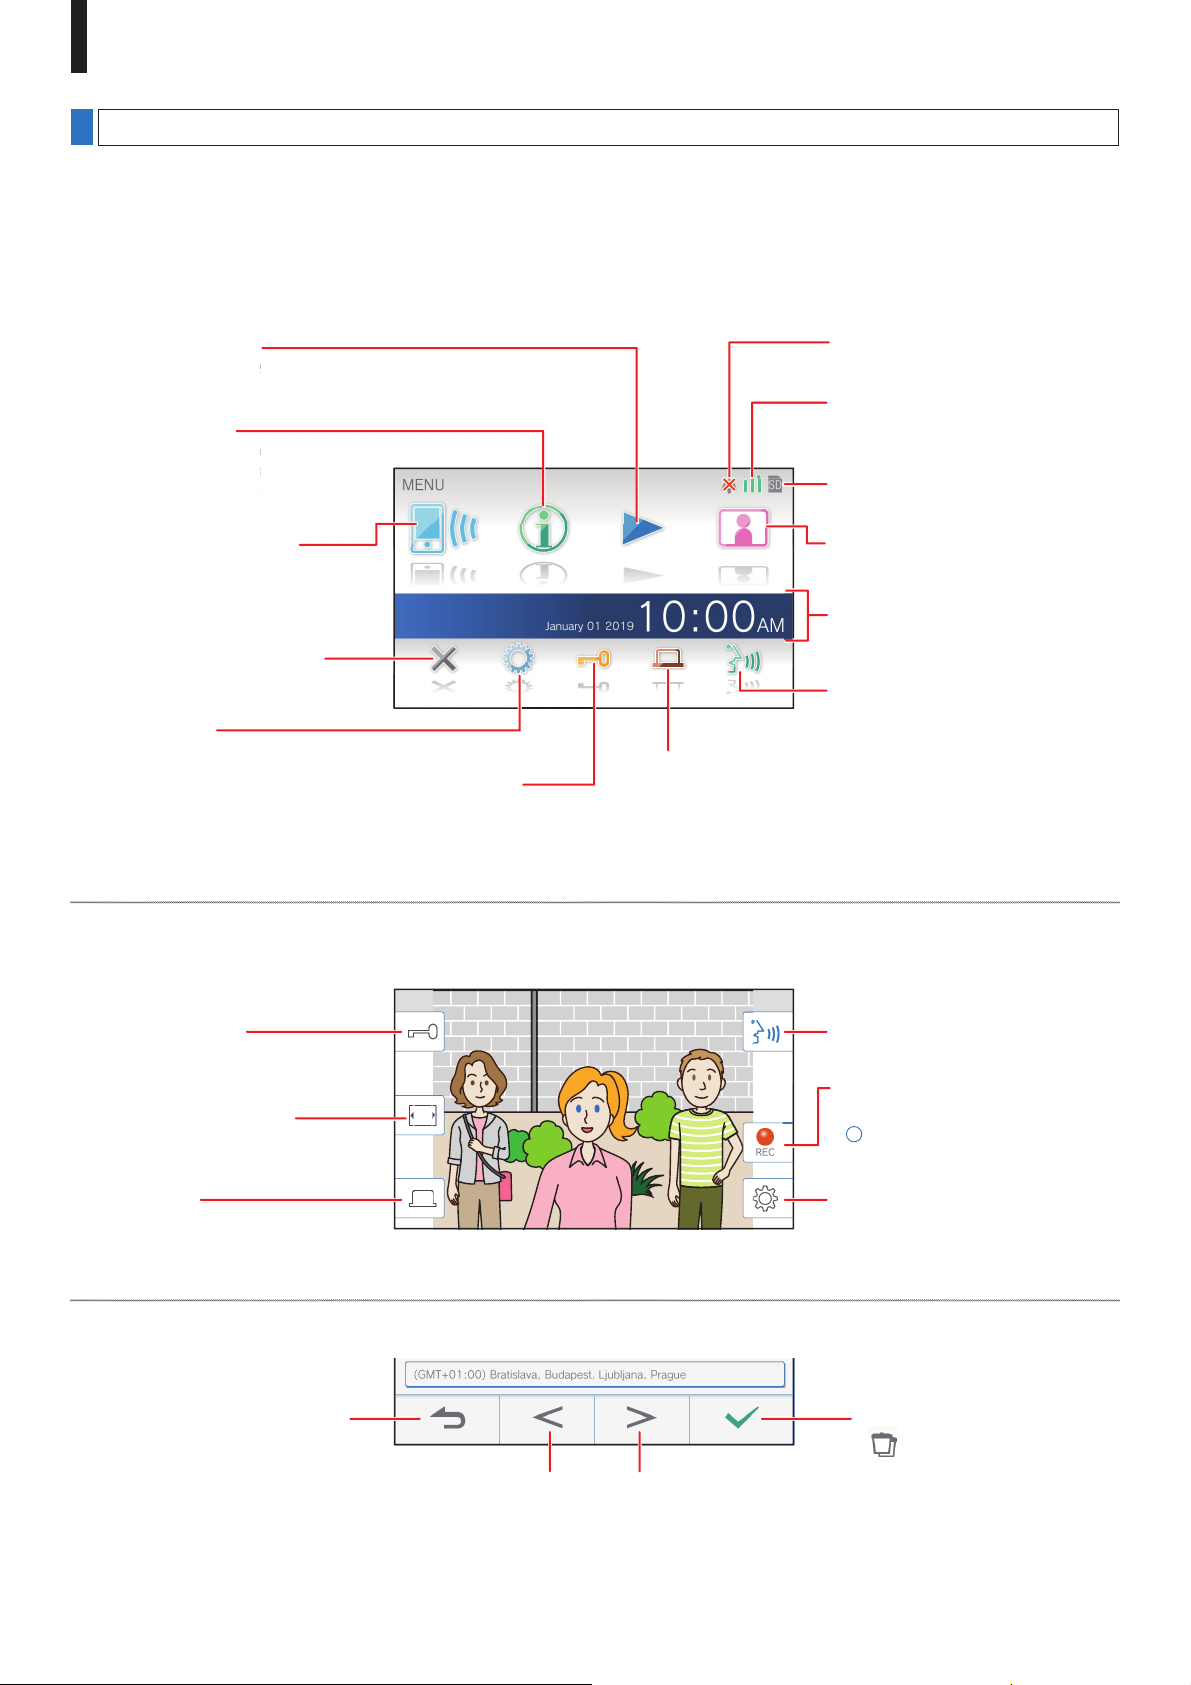
How to read screen
The screen of the station is a touchscreen. Simply tap the icons or buttons displayed on the screen.
The following are examples of typical screens and icons.
* The displayed screens and icons may differ depending on the devices connected to this system.
■ MENU screen
This screen appears when the monitor is turned on.
Recording List (→P. 23)
Tap this to play recordings.
* This icon blinks when there is a recording that has not been played yet.
Notifi cation (→P. 27)
Tap this to display the notifi cation list.
* This icon blinks when a new
notifi cation has arrived.
Set whether or not to enable
mobile device to receive calls
from the door station.
Off
Tap this to turn the monitor off.
Settings (→P. 28)
Tap this to confi gure the settings.
s.
here is a recording that has not been played yet.
e n
tifi cation list.
new
Door release (→P. 19)
Tap this to unlock the door at the
door station.
* Depending on settings, this icon
may not be shown.
Displayed when the ringtone is set to
mute.
Indicates the Wi-Fi signal strength
when the station is connected to the
network. (→P. 10)
Displayed when a microSDHC card is
installed and available.
Monitor (→P. 22)
Tap this to monitor the outside of the
door.
Current date and time
By tapping this, you can set the
current date and time. (→P. 31)
Tap this to communicate with the
door station.
Option (→P. 19)
Tap this to activate the connected
external device.
* Depending on settings, this icon
may not be shown.
■ While communicating with a video door station
Door release (→P. 19)
Tap this to unlock the door at the
door station.
Tap this to switch full-screen.
Option (→P. 19)
Tap this to activate a connected
external device.
■ Navigation buttons
Tap to return to previous screen or
undo the last action.
Tap to return to the previous page. Tap to move to the next page.
Tap this to answer a call.
Tap this to record the currently
displayed video.
*
will be lit in red while recording.
Tap this to confi gure screen
brightness and receiving volume.
(→P. 20)
Tap to apply or confi rm.
(deleting all recordings) will
*
be shown when the recording list
is displayed.
NOTE:
Do not puncture the LCD screen with a sharp object. If the screen is punctured it may result in injury.
- 6 -
Page 7

PREPARATION
Initial set-up
Setting the current date and time
When the station is powered up for the fi rst time, set the
current date and time.
1 If the monitor is off, tap the screen to turn on the
MENU screen.
2 Tap
Set date and time
.
■ To correct date and time
Correct the current date and time any time by following the
procedure below.
→
1 From the MENU screen, tap
→
Current Time
.
Date/Time
2 Set the month, day, year, hour, and minute
individually by tapping or .
3 When the setting has fi nished, tap
NOTE:
• A maximum of 60 seconds time gain/loss can occur in the
displayed time over a month. It is recommended to correct the
time periodically.
• When the station is connected to the internet, the date and time
are automatically corrected.
• If there is no power supply for 15 minutes or more, the date and
time return to default.
Changing the display language
.
3 Tap the proper time zone from the list of time
zones.
>
* Tap
4 Tap
The CURRENT TIME screen is shown.
<
or
to apply changes.
to change the pages of the list.
5 Set the month, day, year, hour, and minute
individually by taping or .
The display language for the screen is set to English by
default. First, select a language as follows.
→
1 From the MENU screen, tap
The LANGUAGE screen is shown.
2 Tap desired language, then tap
Language
.
.
Month Day Year Hour Minute
6 When the setting has fi nished, tap
.
- 7 -
Page 8
PREPARATION
Preparing a microSDHC card
About microSDHC card
A microSDHC card is not included with the station.
Choose a microSDHC card using the recommended
specifi cations below.
Specifi cations
Standard microSDHC
Storage Capacity 4 to 32 GB
Format FAT32
Speed Class 10
The recordings are stored in a microSDHC card.
If a microSDHC card is not installed, recordings are saved in
the built-in memory. Up to 10 recordings can be saved in the
built-in memory.
* The maximum number of recordings that can be saved in
the microSDHC card depends on its storage capacity.
* Up to 1,000 recordings can be saved.
NOTE:
• Use a card complying with the SD standard.
Some cards may not perform correctly.
• If a microSDXC card is inserted in the station and formatted with
the station, it will not be identifi ed as a microSDXC card.
• Be sure to format a microSDHC card when using it in the station
for the fi rst time. If there remain some data other than recordings
in the card, a recording may fail because of a shortage of memory.
• Do not remove a microSDHC card or reboot the station while
recording, formatting a card or copying recordings onto a card,
otherwise the card may fail to perform properly when recording or
playing videos. Should this occur, reformat the card.
• Aiphone is not responsible for the performance of a microSDHC
card.
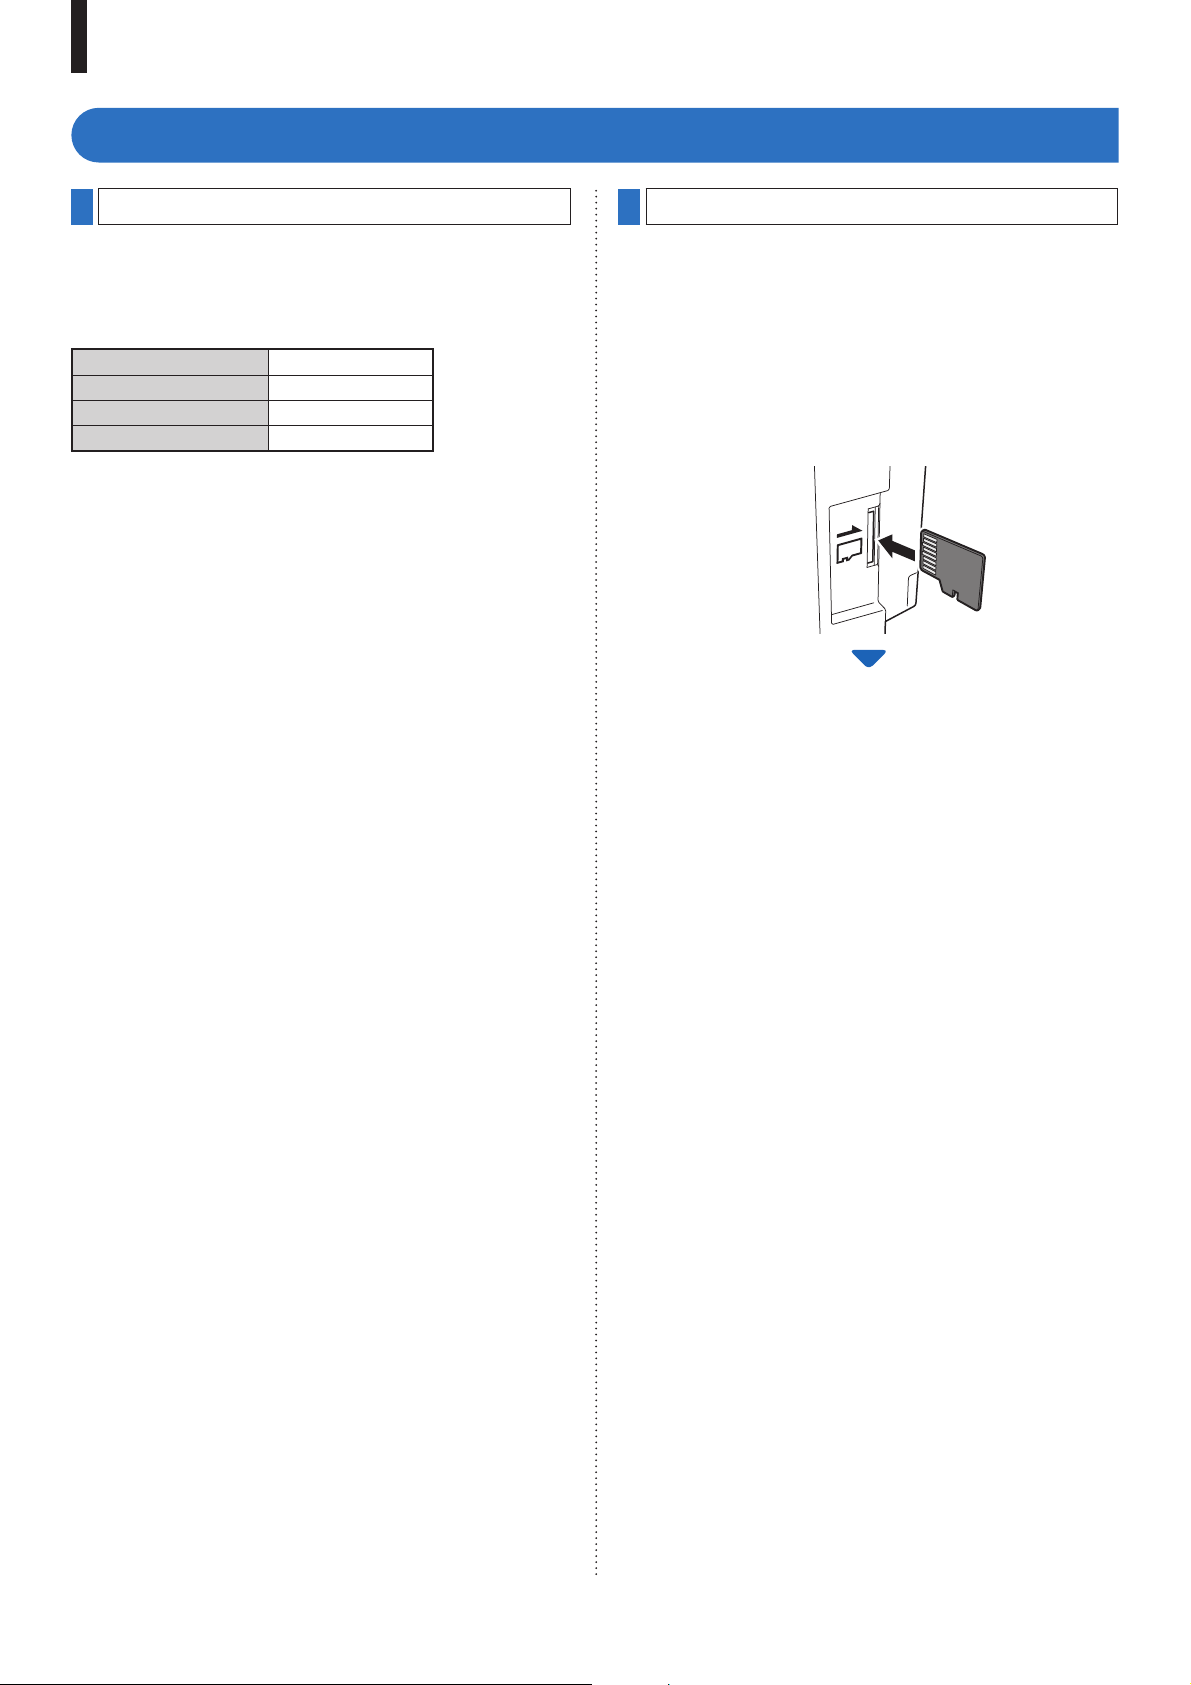
Inserting/removing a microSDHC card
NOTE:
Be sure to insert or remove a microSDHC card when the station is in
standby mode, and not communicating with video door station.
■ Inserting a microSDHC card
In standby mode, insert a microSDHC card into the
card slot.
Insert the card in the way shown below.
• If compatible, a message will appear saying the card has
been recognized.
• A message may appear to format the card. If so, see page 9.
■ Removing a microSDHC card
Lightly push on the card to pop out.
- 8 -
Page 9
PREPARATION
Formatting a microSDHC card
MicroSDHC card may require to be formatted when used with
the station for the fi rst time.
* Previously formatted microSDHC card may not work with the
station. Be sure to format a microSDHC card using the
station.
* Note that formatting a microSDHC card deletes all existing
data.
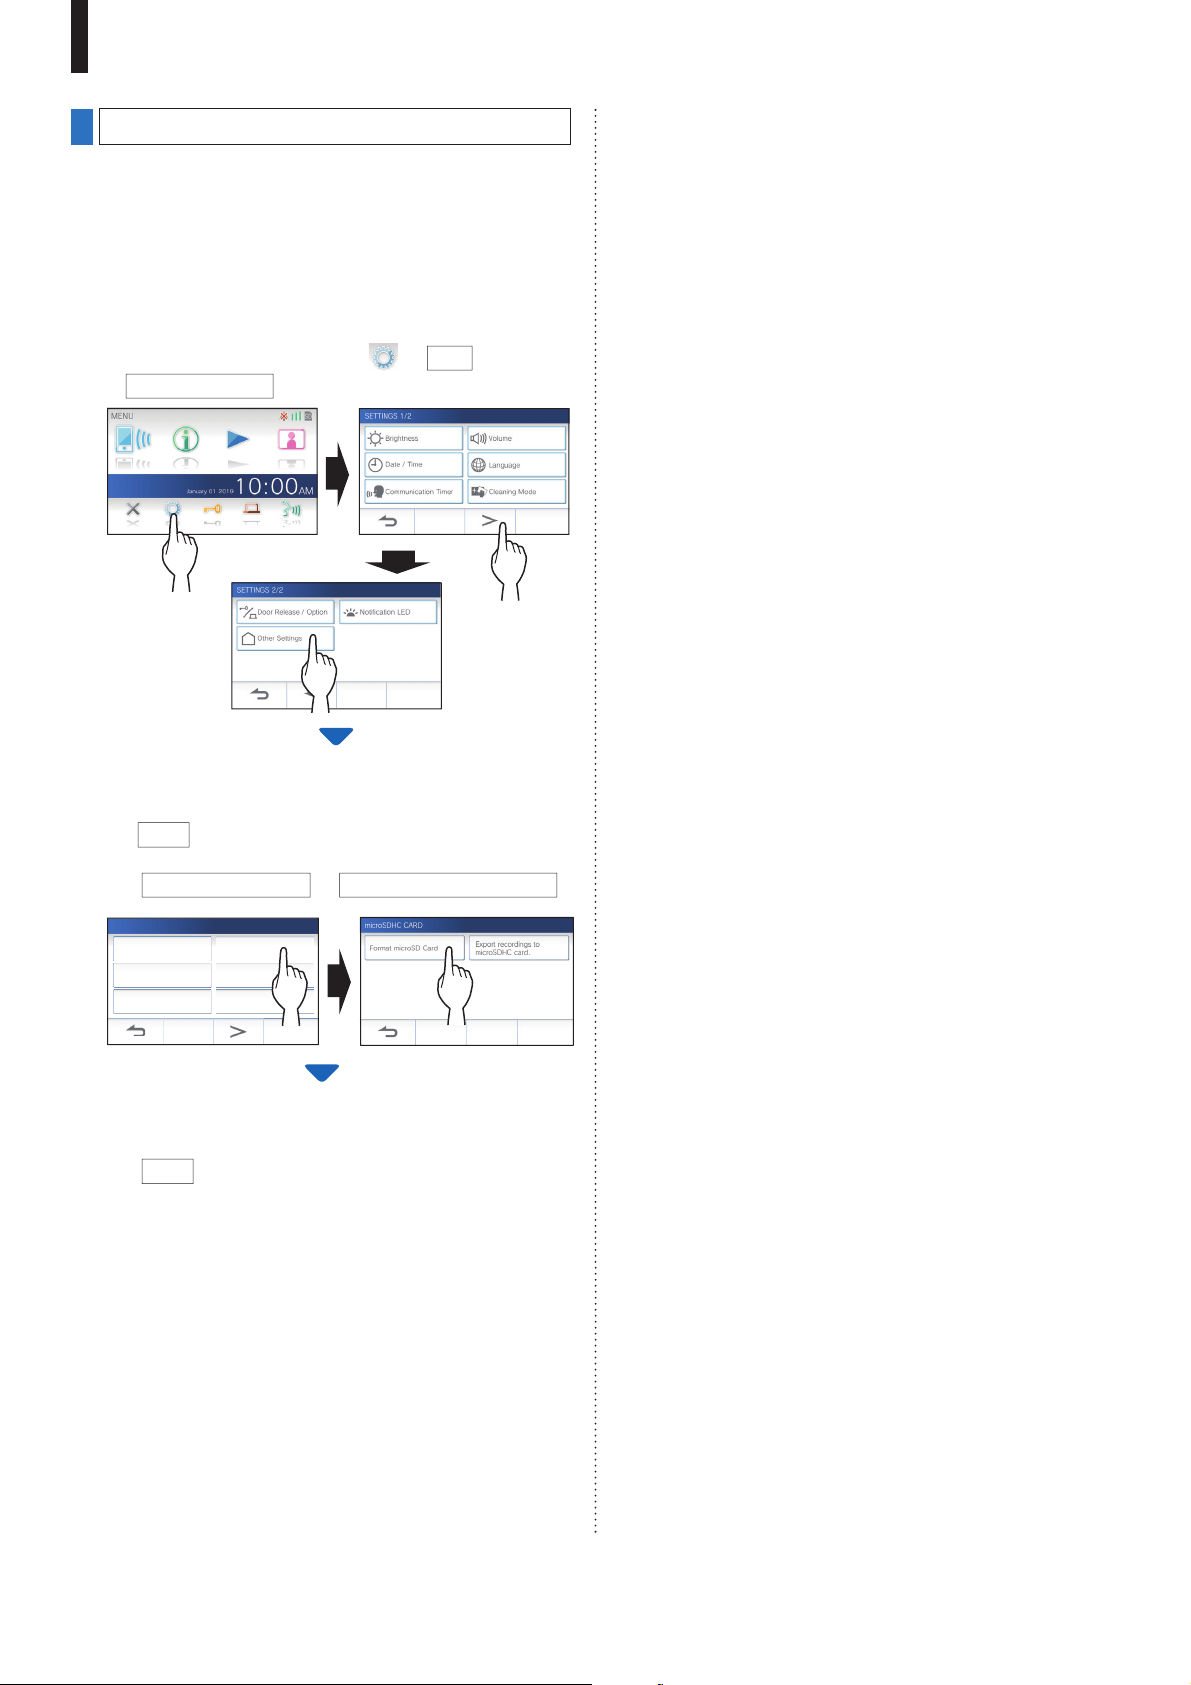
→
1 From the MENU screen, tap
→
Other Settings
.
>
1
3
A message will appear asking whether or not to proceed.
2 To continue formatting a microSDHC card,
tap
3 Tap
OTHER SETTINGS 1/2
Register / Delete apps microSDHC card
Video Quality Station Information
Network Default User Settings
A message will appear asking whether to continue
formatting a microSDHC card or not.
.
microSDHC card
1
Format microSD Card
→
2
2
.
4 Tap
When completed, "The microSDHC Card has been
formatted." will be shown.
* This process may take an extended amount of time.
.
- 9 -
Page 10
PREPARATION
Connecting with a mobile device
Flow of the settings
The following settings are needed to establish a connection link with a mobile device.
Connect the station with Wi-Fi. (→ P. 11)
Connect a mobile device with the Wi-Fi.
(See the instruction manual of each mobile device.)
Register a mobile device to the station. (→ P. 16)
NOTE:
• Prepare a commercially available Wi-Fi router for connecting the system to the internet. A Wi-Fi router is not included with this product.
• The master monitor station uses radio waves in the 2.4 GHz band.
• Using a microwave oven may affect Wi-Fi communication in 2.4 GHz band.
• The bandwidth required for connecting to Internet is as follows (when only the station is connected to Wi-Fi):
Minimum Internet connection bandwidth
Video quality In upload (Mbps) In download (Mbps)
Low 0.5 0.2
Medium 0.8 0.2
High 1.3 0.2
• Be sure to set the current date and time on the station in advance. If the set time differs from the current time for more than 1 month, the
Aiphone app may not work correctly.
• Up to 8 mobile devices can be registered to the station.
Features:
• A call and video from the door station can be received with a mobile device.
Communication between the door station and a mobile device is also possible.
• Recordings on the station can be played and viewed with a mobile device.
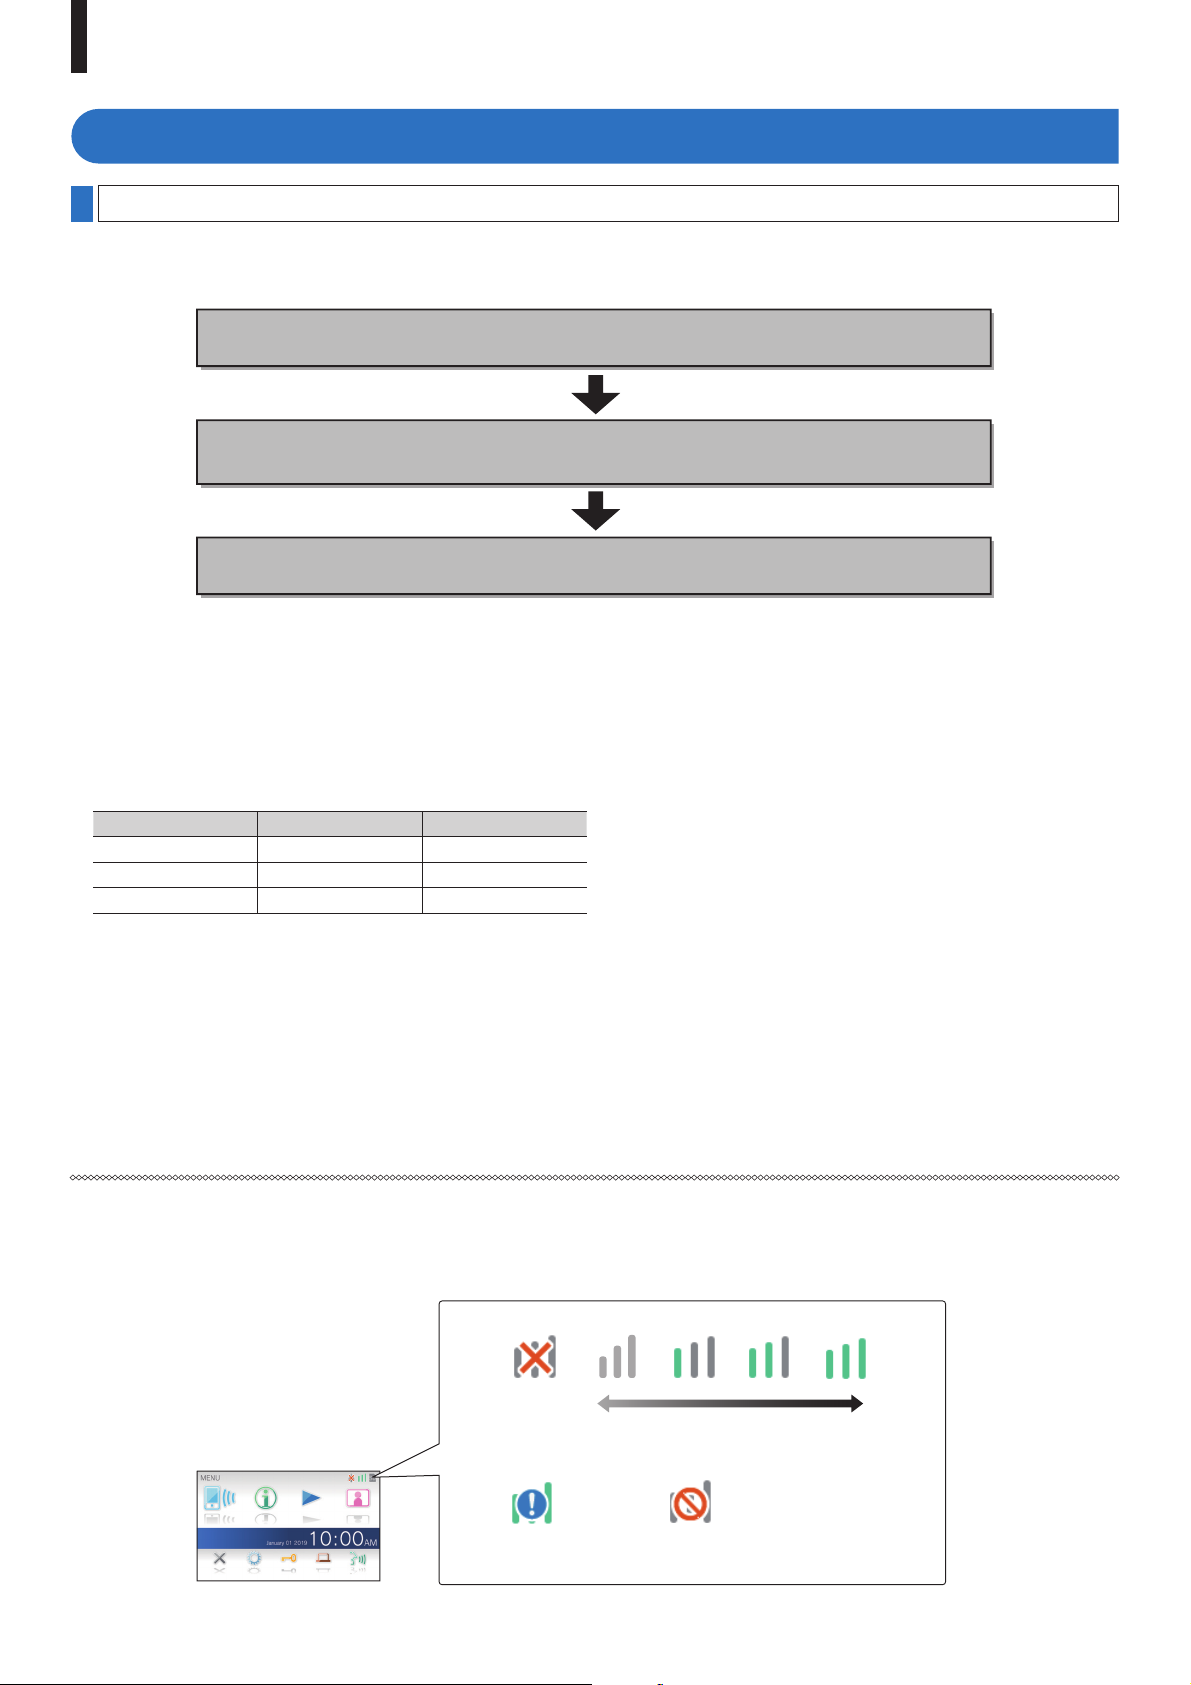
Checking the signal strength:
The connection status between the station and the network can be checked on the MENU screen.
When the connection settings have been completed, confirm whether the connection is successful.
Out of range
Not connected to
the server
- 10 -
Weak
The Wi-Fi function
is disabled.
Strong
Page 11
PREPARATION
Connecting the station with Wi-Fi
There are two connecting methods available.
• Auto Connect (WPS)
• Manual Setup
Connecting using "Auto Connect (WPS)"
This method connects to a Wi-Fi network using the "Wi-Fi
Protected Setup
method when it is not required detailed settings.
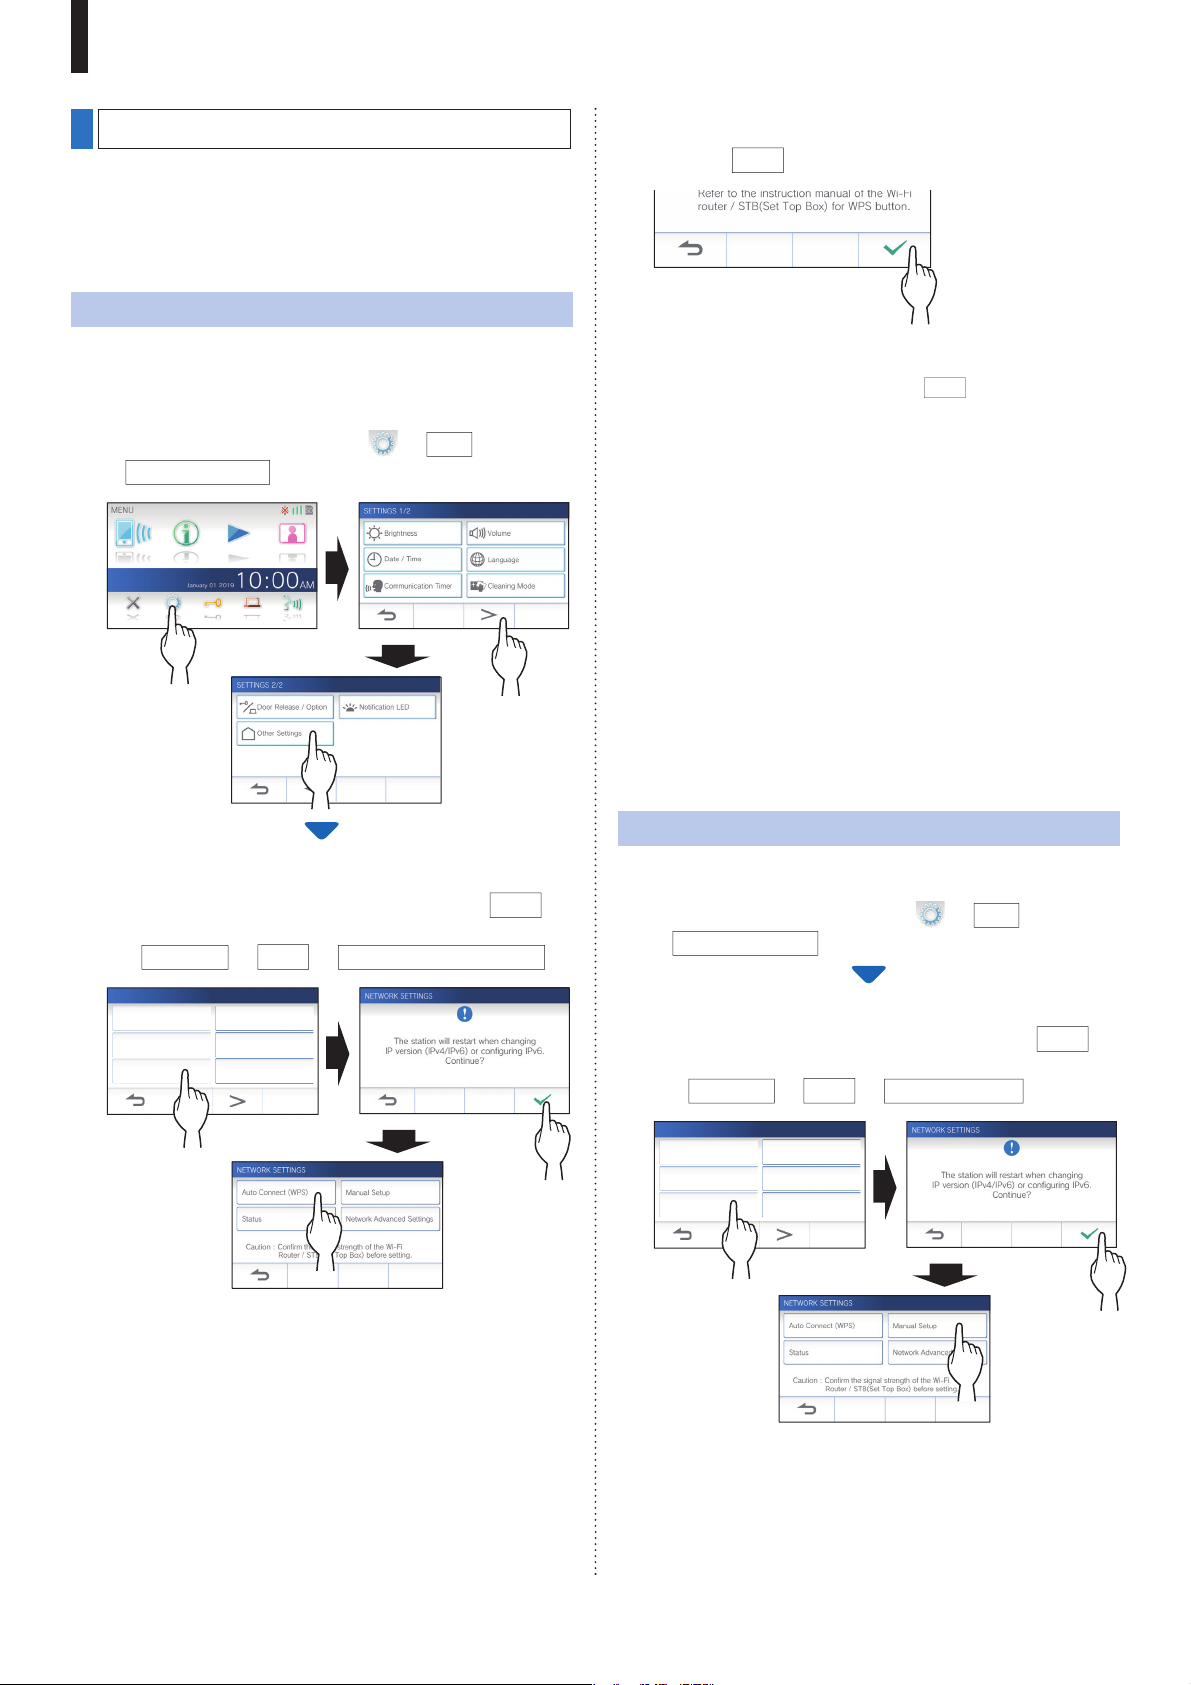
1 From the MENU screen, tap
→
Other Settings
TM
" function of a router/STB. Select this
.
1
3
→
>
2
4 Press the WPS button on the Wi-Fi router, and
tap
.
before pressing
then
Connection between the master monitor station and
wireless router is established automatically. (In some
cases, it may be necessary to tap
the WPS button on the wireless router.)
When "The Wi-Fi router has been connected." is shown,
the connection is successful.
■ If the connection is failed
"Connection failed" will be shown.
Confi rm the current network settings and change the settings
properly. (→ P. 13)
If the connection cannot be established properly, use the
"Manual Setup" method.
* If you connect the station to the Wi-Fi router by using the
"Auto Connect (WPS)" method after the IP address was set
by using "Manual Setup" method, initialization of the user
setting is necessary. (→ P. 36)
A message will appear asking whether or not to proceed.
2 To continue confi guring the settings, tap
1
→
Auto Connect (WPS)
→
3
3 Tap
Network
OTHER SETTINGS 1/2
Register / Delete apps microSDHC card
Video Quality Station Information
Network Default User Settings
.
.
2
Connecting using "Manual Setup"
Select this method to confi gure the detailed settings.
→
1 From the MENU screen, tap
→
Other Settings
A message will appear asking whether or not to proceed.
.
>
2 To continue confi guring the settings, tap
3 Tap
Network
OTHER SETTINGS 1/2
Register / Delete apps microSDHC card
Video Quality Station Information
Network Default User Settings
1
→
→
Manual Setup
3
.
.
2
- 11 -
Page 12
PREPARATION
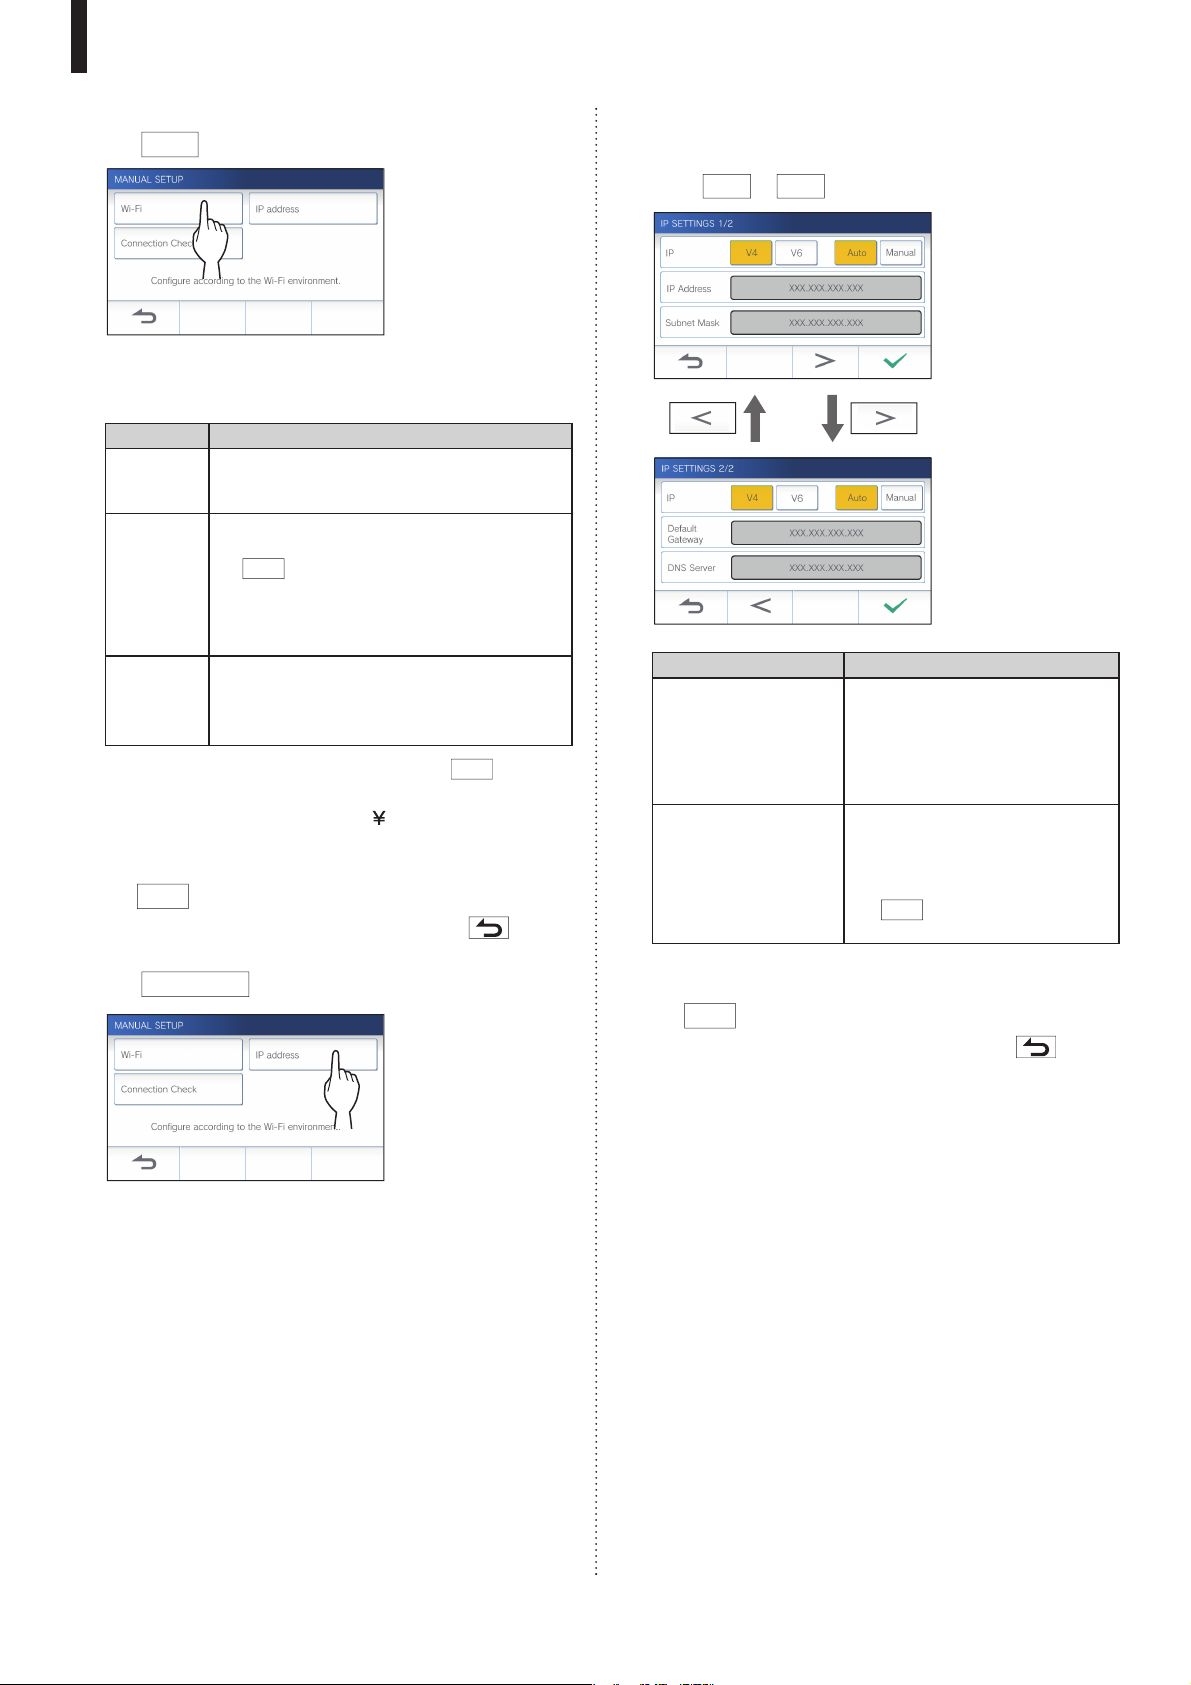
4 Tap
Wi-Fi
.
The setting items will be shown.
5 Confi gure the settings for each item.
Item Description
SSID Tapping the entry field displays the keyboard.
(→ P. 15) Use the keyboard to enter the SSID
of the wireless LAN router.
Encryption
method
Password Tapping the entry field displays the keyboard.
*
When using the keyboard, be sure to tap
fi lling out the entry fi eld to determine the contents.
* Do not use the character " and for setting the SSID.
Tapping the entry field displays the choices.
Select the appropriate encryption method, and
tap
Settings: None / WEP / WPA-PSK(TKIP/AES) /
Default: WPA2-PSK(AES)
(→ P. 15) Use the keyboard to enter the
password.
* Hexadecimal key format is not supported.
.
WPA2-PSK(AES)
after
6 When the Wi-Fi settings have been completed,
tap
If returns to the MANUAL SETUP screen, tap .
.
8 Confi gure the settings for each item
>
* Tap
Item Description
IP Select the IP version (v4 or v6) and
IP Address/
Subnet Mask (v4 only)/
Prefix (v6 only)/
Default Gateway/
DNS Server
or
<
to change the page of the item list.
the setting method (Auto or
Manual).
* When "Auto" is selected, the
settings are automatically
confi gured and grayed out.
It can be configured only when IP is
set to "Manual".
Tapping the entry field displays the
keyboard. (→ P. 15)
Tap
fi eld to determine the values.
after fi lling out the entry
.
7 Tap
IP address
The setting items will be shown.
.
9 When the IP settings have been completed,
tap
If returns to the MANUAL SETUP screen, tap .
NOTE:
• The station will restart when changing IP version (IPv4/IPv6) or
confi guring IPv6.
• If you connect the station to the Wi-Fi router by using the "Auto
Connect (WPS)" method after the IP address was set by using
"Manual Setup" method, initialization of the user setting is
necessary. (
.
→ P. 36)
- 12 -
Page 13
PREPARATION
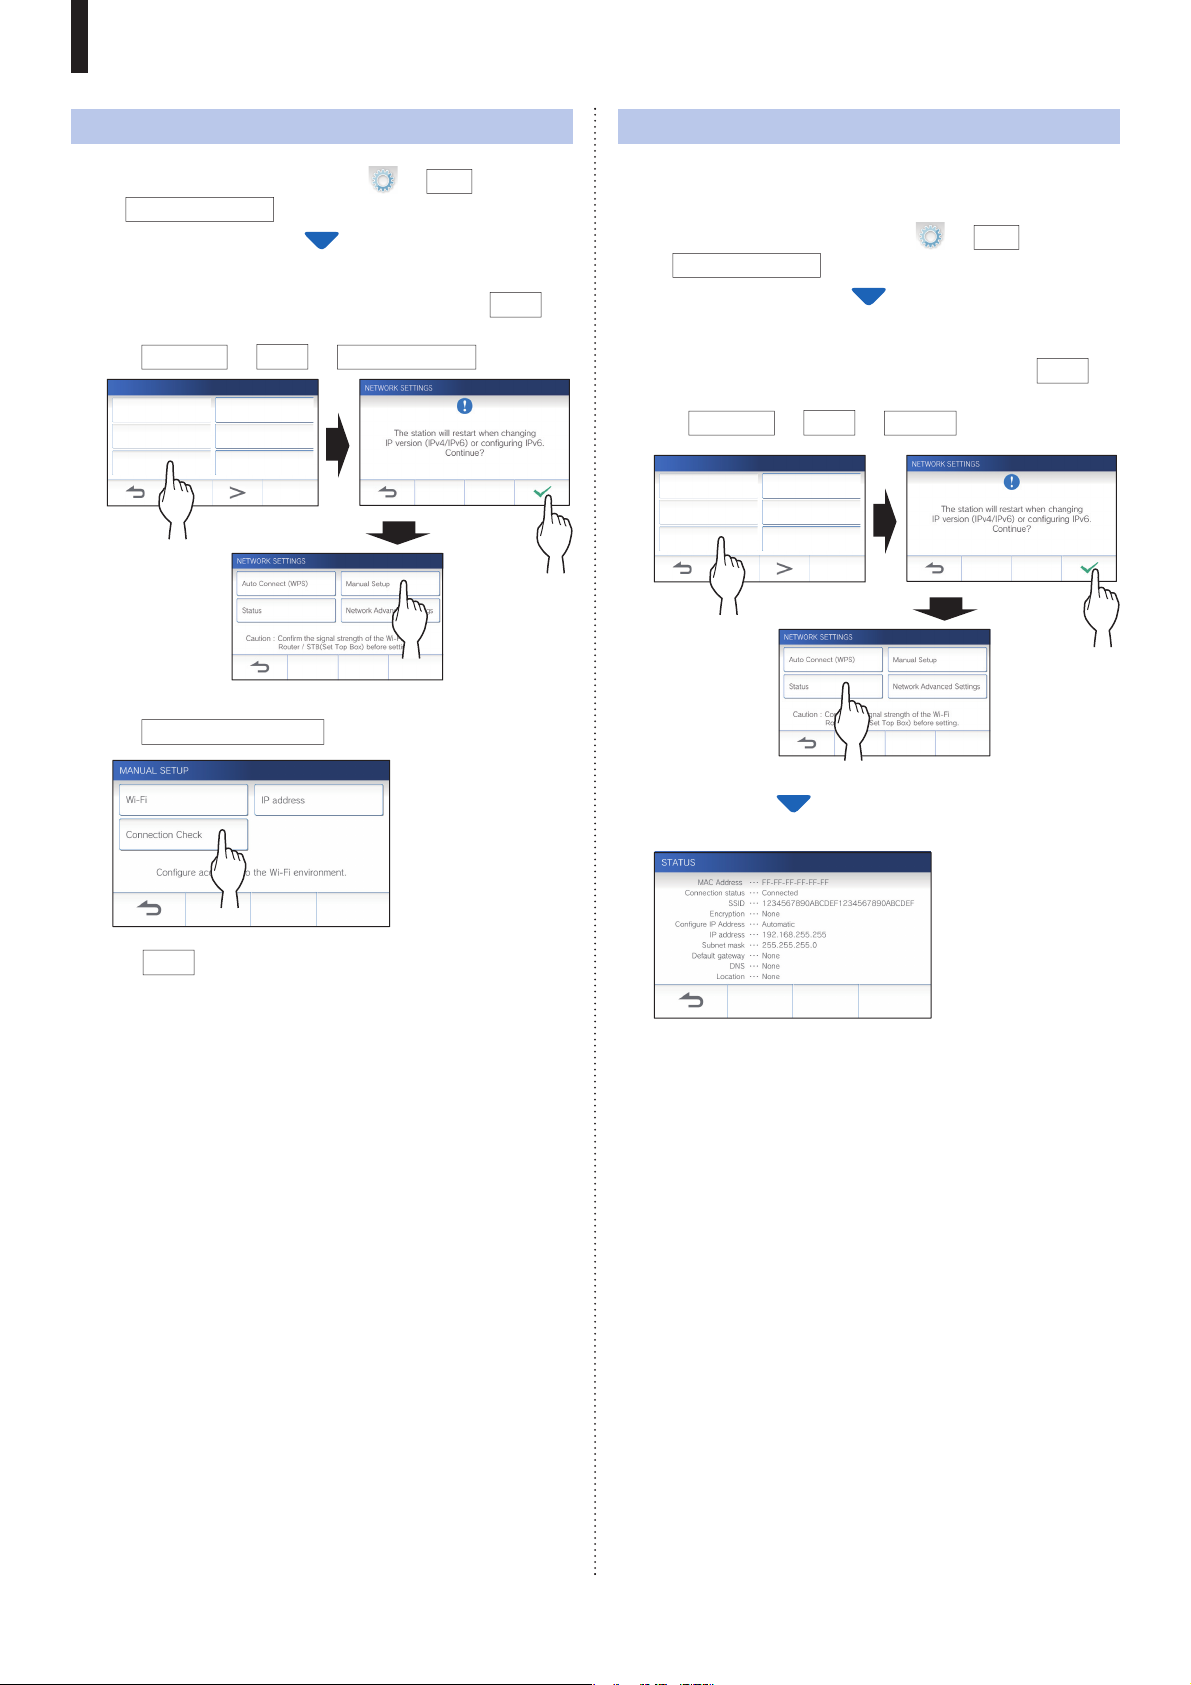
Connection check
→
1 From the MENU screen, tap
→
Other Settings
A message will appear asking whether or not to proceed.
.
>
2 To continue confi guring the settings, tap
3 Tap
Network
OTHER SETTINGS 1/2
Register / Delete apps microSDHC card
Video Quality Station Information
Network Default User Settings
1
→
Manual Setup
→
3
Confi rming the current network settings
Confi rm the current network settings when the network
connection is unstable.
→
1 From the MENU screen, tap
→
Other Settings
.
A message will appear asking whether or not to proceed.
.
.
2 To continue confi guring the settings, tap
→
→
Status
2
3 Tap
Network
OTHER SETTINGS 1/2
Register / Delete apps microSDHC card
Video Quality Station Information
Network Default User Settings
1
>
.
.
2
4 Tap
5 T
Connection Check
ap
The master monitor station will check the wireless
network connection.
When "The Wi-Fi router has been connected." is shown,
the connection is successful.
.
.
■ If the connection is failed
Confi rm the current network settings and adjust if needed.
(→ P. 13)
3
The current settings will be shown.
* If required, change the settings (→ P. 11).
- 13 -
Page 14

PREPARATION
Enabling or disabling the network
connection
If necessary, disable or enable the network connection.
→
1 From the MENU screen, tap
→
Other Settings
A message will appear asking whether or not to proceed.
.
>
2 To continue confi guring the settings, tap
1
→
Wi-Fi
→
.
3 Tap
Network
→
Network Advanced Settings
OTHER SETTINGS 1/2
Register / Delete apps microSDHC card
Video Quality Station Information
Network Default User Settings
.
2
Selecting the antenna
Antenna of the station can be selected according to the
reception status or the location of the station or Wi-Fi router.
→
1 From the MENU screen, tap
→
Other Settings
A message will appear asking whether or not to proceed.
.
2 To continue confi guring the settings, tap
1
→
.
3 Tap
Network
→
Network Advanced settings
→
Antenna selection
OTHER SETTINGS 1/2
Register / Delete apps microSDHC card
Video Quality Station Information
Network Default User Settings
>
.
2
4 Tap either
Enable
3
or
Disable
4
, and tap
4
3
.
4 Tap either
* The Wi-Fi signal strength of the selected antenna will be
shown.
Antenna A
.
Antenna B
or
, and tap
- 14 -
Page 15

PREPARATION
Using the keyboard
Full keyboard
Alphanumeric input mode (lower case)
Cursor
(yellow highlight)
Cancel and return to
the previous screen.
(lower case).
Switches to the alphanumeric
input mode (upper case).
Backspace key
Applies the inputted value and
closes the keyboard
Moves the cursor
Alphanumeric input mode (upper case)Symbol input mode
Switches to the symbol input mode.Switches to the alphanumeric input mode
For number input For hexadecimal number input
Moves the cursor Moves the cursor
* The use of each key is the same with the full keyboard.
- 15 -
Page 16

PREPARATION
Connecting a mobile device with a
Wi-Fi router
Registering a mobile device to the station, the mobile device
must be connected to the same Wi-Fi router as the one
connected to the station. Refer to the instruction manual of the
mobile device for how to connect the mobile device to a Wi-Fi
router.
Registering a mobile device to the
station
NOTE:
• Ensure the mobile device is connected to the Wi-Fi network.
• The screen images in this manual may differ from the actual
product.
• A confi rmation screen may be shown during registering or after
registration. Read the contents carefully and tap "Agree". Cannot
receive notices for the intercom app without confi rmation.
• When registering the fi rst mobile device, the location setting is
required.
Registering a mobile device to the station
Operation with a mobile device
1 Run the
the Home screen
INTERCOM APP Type B
.
from the icon on
2 Allow this app to send notifi cations.
3 Set the display language.
Select the language by tapping the screen.
Downloading the App to the mobile
device
Operation with the station
→
1 From the MENU screen, tap
→
Other Settings
A message will appear asking whether or not to proceed.
.
2 To continue confi guring the settings, tap
3 Tap
Register / Delete Apps
Aiphone intercom app information is shown on the screen.
→
>
App Info
.
.
Operation with a mobile device
4 Search "Intercom App Type B" and download the
Aiphone INTERCOM APP Type B.
4 Read the license agreement carefully and tap
Agree
* Cannot use the intercom app without agreement.
.
Download from the following:
• iOS device: App Store
• Android device: Google Play
* App Store is trademark of Apple Inc. in the United States and/
or other countries.
* Google Play is trademark of Google Inc. in the United States
and/or other countries.
- 16 -
Page 17

PREPARATION
5 Read the screen for the End User Licence
Agreement carefully and tap
Operation with the station
6 From the MENU screen, tap
→
Other Settings
A message will appear asking whether or not to proceed.
.
Next
→
.
>
7 To continue confi guring the settings, tap
Operation with a mobile device
11 Tap
Start
at the bottom of the instruction
.
Confi rmation with the station
12 One-time password will be shown.
One-time password Expiration time
*
If the steps 1 to 11 have not been completed with the
mobile device, the below screen will be shown. Confi rm
.
and follow steps 1 to 11 again.
8 Tap
9 Tap the location,
10 Select
Register / Delete Apps
and tap
* Another area will be shown on the next page. tap
<
or
* When registering the second and subsequent mobile
devices, the location setting is unnecessary.
to change the page.
Agree
Disagree
or
Register Apps
→
.
and tap
.
Operation with a mobile device
>
13 Enter the one-time password displayed on the
screen of the station within the expiration time,
and tap
.
Next
.
Enter one-time password.
- 17 -
Page 18

PREPARATION
14 Enter the user name of the mobile device and
Register
tap
Name is limited to 12 characters.
.
Enter user name
15 Follow the on-screen instructions.
"Initial Settings has been set." is shown with registration is
successful.
16 Try to receive a call from the door station.
Deleting the mobile device from the
station.
→
1 From the MENU screen, tap
→
Other Settings
A message will appear asking whether or not to proceed.
.
>
2 To continue confi guring the settings, tap
3 Tap
Register / Delete Apps
Delete Apps
→
4 Tap the mobile device to delete.
* The 7th and 8th mobile devices will be shown on the
next page. Tap
>
or
<
to change the page.
.
.
•
If you will perform an operation confi rmation after the
registration has been completed, fi rst return to the
MENU screen.
• For more information on using the app and detailed
settings, refer to the instructions provided with the app.
• To register another mobile device, repeat the process
starting at step 1.
The confi rmation message will be shown.
5 To delete App, tap
When "App has been deleted." is shown, the deletion has
succeeded.
.
- 18 -
Page 19

USING THE STATION
Receiving a call
When receiving a call from a door station
Answering a call
• The ringtone sounds.
• The video at the door station is
displayed.
• Automatic recording begins.
■ To answer the call
1 Tap .
2 Speak to the visitor.
* Speaking simultaneously may cause intermittent audio.
* Talk duration is 60 seconds by default. It can be
adjusted up to 180 seconds. (→ P. 32)
* The screen turns off after approx. 45 seconds if there is
no operation.
■ To release the door
While being called or communicating, tap .
* Available only when an electric door lock is installed at the
door and connected to the station.
* Please refer to the installation manual for details how to
connect an electric lock to the master monitor station.
■ To end the communication
Tap .
Other features
Screen brightness and receiving volume can be adjusted
•
during a call. (→ P. 20)
• When the ambient noise is loud enough to interrupt the
audio, the touch-to-talk method is recommended. (→ P. 21)
• An automatic recording begins when receiving a call. Manual
recording is also available. (→ P. 21)
* When communication ends, recording does as well.
• If the call button of the door station is pressed when the
surroundings of the door station is dark, the LED on the door
station illuminates.
NOTE:
Keep a distance of more than 20 cm (7-7/8") from person's body
while speaking.
■ To activate an external unit such as lightning
equipment
While being called or communicating, tap .
* Available only when an external device, such as a light, is
connected to the station.
* Please refer to the installation manual for details how to
connect an external unit such as lightning equipment to the
master monitor station.
- 19 -
Page 20

USING THIS STATION
Operation during receiving a call or communication
Adjusting the screen brightness
1 Tap .
The brightness adjusting bar will be shown.
2 Tap
+
to adjust the screen brighter, and
to adjust the screen darker.
Changing the display to the full-screen
mode
Tap .
The display size is extended and the icons are hidden
from the screen.
The default value is 3, with a minimum of 1 and a
maximum of 5.
Adjusting the receiving volume
The receiving volume can only be adjusted while in
communication.
1 Tap .
The volume adjusting bar will be shown.
■ To restore the normal display mode.
Tap the screen.
* The screen automatically returns to the normal display mode
after 10 seconds.
2 Tap
+
to adjust the volume higher, and to
adjust the volume lower.
The default value is 2, with a minimum of 1 and a
maximum of 3.
- 20 -
Page 21

USING THIS STATION
Communication using touch-to-talk
Touch-to-talk is a method of communication in which manual
control of incoming and outgoing audio is used. Touch-to-talk
is recommended in loud or noisy environments.
Tap .
The touch-to-talk method is enabled.
To speak, tap .
The will change to .
* Door station audio is muted.
Recording
■ Automatic recording
The station automatically records video and sounds at the door
station after the elapse of a certain period of time after
receiving a call.
While recording,
* The recording time is up to 10 seconds.
* When the communication ends, the recording also ends.
NOTE:
• Automatic recording cannot be cancelled.
• Automatic recording does not begin while monitoring a door
station. To record video while monitoring, use the manual
recording method.
• If answered with a mobile device during automatic image and
sound recording, the sound recording will end in the middle.
changes to
REC
.
REC
To listen, tap
* The will change to .
* Master monitor station audio is muted.
.
■ Manual recording
Video can be manually recorded during communication.
Tap
* Manual recording is possible only when
the screen.
* The recording quality is the same as automatic recording.
NOTE:
Manual recording cannot be performed during automatic recording.
More Information
The recordings are stored in a microSDHC card.
•
If a microSDHC card is not installed, recordings are saved in
the built-in memory. Up to 10 recordings can be saved in the
built-in memory.
• The recording time is up to 10 seconds per recording.
• The status LED will fl ash when there are recordings that
have not been played yet. The LED will turn off when the
MENU screen is shown.
• Up to 1,000 recordings will be possible when using a
microSDHC card with enough capacity. When the number of
recordings is reached to the maximum, the oldest recording
will be deleted.
- 21 -
when a video is displayed.
REC
is shown on
REC
Page 22

USING THIS STATION
Monitoring the door station
1 From the MENU screen, tap .
Video and audio from the door station will be received at
the master monitor station.
* Audio from the master monitor station is muted.
2 To end monitoring, tap .
* The monitoring will end automatically after the elapse of
about 60 seconds from the start of monitoring.
Available functions during monitoring
•
: Talk (→ P. 19)
•
: Door release (
•
: Manual recording (
REC
• : Adjusting the screen brightness and receiving volume
(→ P. 20)
• : Changing to the full-screen mode (
• : Activating the external unit such as lightning
equipment (→ P. 19)
NOTE:
Keep a distance of more than 20 cm (7-7/8") from person's body
while monitoring.
→
P. 19)
→
P. 21)
→
P. 20)
- 22 -
Page 23

USING THIS STATION
yg
ta
l p
ages of the list
Playing recordings
Screens and icons
■ Recording list
The recordings are shown in order.
* When a microSDHC card is installed, only the recordings in a microSDHC card will be shown. To display the recordings
stored in the built-in memory, remove the microSDHC card.
Recorded date and time
Current page/the total pages of the list
The mark
recording has not been played
yet.
Returns to the MENU screen.
Displays the previous page.
* If you touch and hold the previous page button, the recording
list will skip pages by 5, continue to hold the button and it will
skip pages by 25.
shows this
■ During play or play standby
: Shows this recording is not
protected. Tap this to protect this
recording.
: Shows this recording is
protected. (→P. 24)
Tap this to cancel the protection.
Deletes this recording. (→P. 25)
Deletes all recordings in the list.
(→P. 26)
Displays the next page.
* If you touch and hold the next page button, the recording list
will skip pages by 5, continue to hold the button and it will
skip pages by 25.
The currently-selected recording number/the total number of the recordings.
Displayed when the currently-selected recording is protected.
Recorded date and time of the currently-selected recording
Current status of the station
The mark
currently-selected recording has
not been played yet.
Deletes the currently-selected
recording. (→P. 25)
Selects a newer recording
every time tapped.
Returns to the recording list.
shows the
ing has
Playback 1/1000
12 December 2020 11:55 AM
Protect
OFFON
Displayed when a microSDHC
card is installed. (→P. 8 )
* When a microSDHC card is
installed, it can play recordings
stored in the card only. To play a
recording stored in the built-in
memory, remove the microSDHC
card.
Play (→P. 24)
Tap this to play the currentlyselected recording.
Selects an older recording every
time tapped.
Tap this to display the setting
tools below.
Protects the currently-selected recording
or cancels the protection. (→P. 2 4)
Adjusts the receiving volume (→P. 20)
Adjusts the screen brightness (→P. 20)
- 23 -
Page 24

USING THIS STATION
1/1000
Playing recordings
1 From the MENU screen, tap .
The recording list screen will be shown.
2 Tap the recording to view.
The standby screen of the selected recording will be
shown.
Protecting recordings
Protect recordings from being accidentally overwritten.
To protect a recording on the recording
list
1 From the MENU screen, tap .
The recording list screen will be shown.
2 Tap of the recording to protect.
: Shows this recording is protected.
Tap this to cancel the protection.
: Shows this recording is not protected.
Tap this to protect this recording.
>
* Tap
* If you touch and hold
will skip pages by 5, continue to hold and it will skip
pages by 25.
or
<
to change the pages of the list.
>
or
<
, the recording list
3 To play, tap .
Playback 1/1000
* The icons shown can be used while viewing the
recording. (→ P. 23)
12 December 2020 11:55 AM
4 To cancel playing, tap .
NOTE:
• The station can only play video fi les recorded by the station. A
video fi le loaded onto a microSDHC card by another device
cannot be viewed.
• When a microSDHC card is installed in the station, you can play
videos stored in the microSDHC card only. To play a video stored
in the built-in memory, remove the microSDHC card.
• If you resume playing a recording after a pause, only the video
will start playing and the audio will not be played.
To protect the currently-selected
recording while in standby
1 While in standby, tap .
Playback 1/1000
The setting tools will be shown.
2 Tap
12 December 2020 11:55 AM
ON
.
Protect
will be shown.
ON OFF
1/100012 December 2020 11:55 AM
- 24 -
Page 25

USING THIS STATION
■ To cancel the protection of the currently-
selected recording
1 While in standby, tap .
2 Tap
NOTE:
• A protected recording cannot be manually deleted or overwritten
• The maximum number of recordings that can be protected differs
• If the number of the protected recordings exceeds the maximum,
OFF
.
Protect
will disappear to show the selected recording is no
longer protected.
by a new recording.
depending on the storage.
microSDHC card: up to 100
Built-in memory: up to 5
"Cannot protect. Max 100." is shown (if an SDHC card is not
inserted, "Cannot protect. Max 5" is shown), and no further
recordings can be protected.
OFFON
Deleting a recording
NOTE:
A protected recording cannot be deleted. To delete, the protection
must be removed.
To delete a recording
■ To delete a recording from the recording list
1 On the recording list, tap
recording to delete.
A confirmation screen will be shown.
2 To delete, tap
The recording will be deleted.
* To cancel deleting, tap
YES
.
NO
.
icon of the
■ To delete the currently-selected recording in
standby
1 In standby, tap .
Playback 1/1000
A confirmation screen will be shown.
2 To delete, tap
Pause
12 December 2020 11:55 AM
YES
.
Delete the recording?
The deleted recordings
cannot be recovered.
YESNO
1/100012 December 2020 11:55 AM
- 25 -
The selected recording will be deleted.
* To cancel deleting, tap
NO
.
Page 26

USING THIS STATION
M
2020
2020 10:25 PM
2020 2:25
y
y
202
0 9:
To delete all recordings
Deleting all the recordings can be performed separately to
microSDHC card and the built-in memory.
1 Insert the microSDHC card into the master
monitor station.
To delete all the recordings in the built-in
memory, remove any microSDHC card inserted in
the master monitor station.
2 On the recording list, tap .
A confirmation screen will be shown.
Copying recordings from
the built-in memory onto
a microSDHC card
→
1 From the MENU screen, tap
→
Other Settings
A message will appear asking whether or not to proceed.
2 To proceed, tap
3 Tap
microSDHC card
Export recordings to microSDHC card
OTHER SETTINGS 1/2
Register / Delete apps microSDHC card
Video Quality Station Information
Network Default User Settings
A confi rmation screen will be shown.
.
.
→
1
>
.
2
3 To delete, tap
RECORDING LIST 2/15
ؙؙ
25 December 2020 10:25 PM
cember
12 December 2020 11:55 AM
December
Protected recordings will not
03 December 2020 2:25 PM
December
01 May 2020 9:10 AM
* To cancel, tap
YES
11:55 AM
Delete all recordings?
PM
be deleted.
NO
NO
.
.
YES
NOTE:
Protected recordings will not be deleted.
4 Tap
to continue copying.
* To cancel, tap .
When "Recordings have been exported." is shown,
copying has been completed.
* When completed, an "EXPORT" folder is created on the
microSDHC card, and a folder with a 9-digit numeric
name (e.g. 000000001) is created in it. Copied
recordings are stored with the following fi le names:
e.g.:
AI000000001.264
9-digit number
AI000000001.odd
(video fi le)
(audio fi le)
NOTE:
• After copying, the original recordings remain in the built-in
memory.
• This action will overwrite all the existing recordings in the
"EXPORT" folder on the microSDHC card.
• If there is insuffi cient memory on the microSDHC card, the
copied recordings cannot be stored and the message "microSDHC
card capacity is insuffi cient. Initialize the microSDHC card or
delete unnecessary data." will be displayed.
• The recordings copied onto a microSDHC card cannot be played
on the station. Use a PC, etc. to play them.
• Recordings on a microSDHC card cannot be copied into the
built-in memory.
• In order to play a recording on a PC, a special tool for recording
and playback is necessary. It can be downloaded from the
Aiphone website (www.aiphone.net).
• The timestamp of the exported recordings will be displayed in
Coordinated Universal Time (UTC).
- 26 -
Page 27

USING THIS STATION
Notifi cation
Checking for updates.
1 From the MENU screen, tap .
The notification list will be shown.
2 Tap
Check
The details of the notification will be shown.
* The mark shows this notifi cation has not been
confi rmed.
of the notifi cation to view.
- 27 -
Page 28

SETTINGS
Settings list
The following are all of the available settings. These settings can be adjusted at any time.
Item Details
Brightness Adjusts the screen brightness. 29
Volume Receive Adjusts the receiving volume. 30
Ringtone Adjusts the incoming ringtone volume. 30
Touch sounds Enables or Disables the touch sound made whenever the touchscreen is
used.
Date / Time Current Time Sets the current date and time. 7
Date / Time Format Sets the display format of date and time on the screen. 31
Time Zone Sets the time zone. 31
Daylight Saving Time Enables or disables daylight saving time. 32
Language Sets the display language. 7
Communication Timer Sets the talk duration time. 32
Cleaning Mode Turns the screen into the cleaning mode. 40
Door release / Option Sets whether to display the door release icon and option output icon on the
MENU screen.
Notifi cation LED Sets whether to display (ON) the notifi cation LED when a new notifi cation
arrives.
* The icon on the MENU screen blinks when a new notifi cation has arrived.
Other Settings Register / Delete apps Registering a mobile device to, or deleting a mobile device form the master
monitor station.
microSDHC card Formats a microSDHC card.
Copies recordings from the built-in memory onto a microSDHC card.
Video Quality Adjusts the video quality of the station. 34
Station Information Displays fi rmware update notifi cation for the master monitor station. Also
allows confi guration of automatic fi rmware updating for the master monitor
station.
Network Confi gures network settings. 11
Default User Settings Initializes all the user settings to default. 36
Regulatory Displays the related regulations. 36
Privacy Policy Displays information about Protection of Personal Information. 36
Administrator Settings These settings had been completed at the system installation. Do not
change the settings.
Maintenance Exports the operation log of the station to the microSDHC card. 37
Door Release Sets the unlocking duration time of the electric door lock. 37
Option Output Sets the option output duration time. 38
Factory Reset Initializes all settings. 38
Relevant
page
30
33
33
16
9, 26
35
37
NOTE:
• The station will enter standby mode after approx. one minute of no operation. If this occurs, any unfi nished setting changes will be lost.
• For settings other than "Other Settings":
If an incoming call is received, any unfi nished setting changes will be lost.
• For the settings in "Other Settings":
If there is a call during confi guration, the station will not receive the call.
• The above list is a brief overview of the setting items available on the station. The descriptions, and the style and order of descriptions do not
necessarily represent the full scope of the settings.
- 28 -
Page 29

SETTINGS
Adjusting screen brightness
Settings 1 to 5
Default 3
1 From the MENU screen, tap .
The SETTINGS 1/2 screen will be shown.
2 Tap
3 Tap
4 T
Brightness
The brightness adjusting bar will be shown.
+
to adjust the screen brighter, and
to adjust the screen darker.
ap
.
to apply changes
.
- 29 -
Page 30

SETTINGS
Changing the sound settings
Adjusting receiving volume
Settings 1 to 3
Default 2
1 From the MENU screen, tap
→
Receive
The volume adjusting bar will be shown.
2 Tap
3 T
adjust the volume lower.
ap
.
+
to adjust the volume higher, and to
to apply changes.
→
Volume
Enabling/Disabling the touch
sound
Enable (ON) or disable (OFF) the touch sound made whenever
the touchscreen is used.
Settings ON/OFF
Default ON
1 From the MENU screen, tap
→
Touch sounds
2 Tap
sound.
3 T
ap
ON
to enable or
to apply changes.
.
OFF
to disable the touch
→
Volume
Adjusting ringtone volume
Settings 0 to 3
Default 2
1 From the MENU screen, tap
→
Ringtone
The volume adjusting bar will be shown.
2 Tap
3 T
+
adjust the volume lower.
ap
.
to adjust the volume higher, and to
to apply changes
.
→
Volume
- 30 -
Page 31

SETTINGS
Changing the time settings
Setting the current date and time
(→ P. 7 )
Selecting the display format of the
date and time
Select the display format of the date and time on the screen.
Settings Display example
mm/dd/yyyy(12h)
mm/dd/yyyy(24h)
dd/mm/yyyy(12h)
dd/mm/yyyy(24h)
Default: mm/dd/yyyy(12h)
1 From the MENU screen, tap
→
Date / Time Format
January 25 2020
(12-hour notation)
January 25 2020
(24-hour notation)
25 January 2020
(12-hour notation)
25 January 2020
(24-hour notation)
.
10:25 PM
22:25
10:25 PM
22:25
→
Date/Time
2 Tap the preferred display format.
3 T
1 From the MENU screen, tap
ap
to apply changes.
Setting the time zone
→
Time Zone
.
→
Date/Time
ap
to apply changes.
to
None
(→ P. 32).
3 T
* When one of the following time zone is set, the daylight
saving time setting is automatically applied, so set
Daylight Saving Time
List of time zones
(GMT-10:00) Alaska (Adak)
(GMT-09:00) Alaska
(GMT-08:00) Pacifi c Standard Time (U.S.), Tijuana
(GMT-08:00) Pacifi c Standard Time (Canada)
(GMT-07:00) Mountain Standard Time (U.S., Canada)
(GMT-06:00) Mexico City
(GMT-06:00) Central Standard Time (U.S., Canada)
(GMT-05:00) Eastern Indiana
(GMT-05:00) Eastern Standard Time (U.S., Canada)
(GMT-04:00) Santiago
(GMT-04:00) Atlantic Standard Time (Canada)
(GMT-03:30) Newfoundland
(GMT-03:00) Greenland
(GMT-03:00) Buenos Aires
(GMT-03:00) Brasilia
(GMT-01:00) Azores
(GMT 00:00) Dublin, Edinburgh, Lisbon, London
(GMT+01:00) Amsterdam, Berlin, Bern, Rome, Stockholm
(GMT+01:00) Sarajevo, Skopje, Warsaw, Zagreb, Belgrade
(GMT+01:00) Bratislava, Budapest, Ljubljana, Prague
(GMT+01:00) Brussels, Madrid, Copenhagen, Paris
(GMT+02:00) Sofi a, Vilnius
(GMT+02:00) Athens, Istanbul
(GMT+02:00) Jerusalem
(GMT+02:00) Cairo
(GMT+02:00) Bucharest
(GMT+02:00) Helsinki, Riga, Tallinn
(GMT+03:00) Tehran
(GMT+09:30) Adelaide
(GMT+10:00) Canberra, Melbourne
(GMT+10:00) Sydney
(GMT+10:00) Hobart
(GMT+12:00) Auckland, Wellington
2 Tap the proper time zone from the list of time
zones.
* Tap
>
or
<
to change the pages of the list.
- 31 -
Page 32

SETTINGS
Setting daylight saving time
Set whether to utilize daylight saving time (+1(h)) or not
(None).
Settings Description
None Daylight saving time is not utilized.
+1(h) Daylight saving time is utilized for 1 hour.
→
1 From the MENU screen, tap
→
Daylight Saving Time
.
Date/Time
2 Set whether to utilize daylight saving time.
ap
to apply changes.
3 T
Changing the display
language
(→ P. 7 )
Setting the talk
duration time
Settings 60 sec./180 sec.
Default 60 sec.
1 From the MENU screen, tap
→
Communication Timer
2 Tap
60 sec.
or
180 sec.
.
.
ap
to apply changes.
3 T
Cleaning mode
(→ P. 40)
- 32 -
Page 33

SETTINGS
Setting of
door release/option
Set whether to display the door release icon and option output
icon on the MENU screen.
Door release Option output
Settings Enable/Disable Enable/Disable
Default Enable Enable
→
1 From the MENU screen, tap
→
Door release / Option
1
.
3
>
2
Setting of notifi cation
LED
Set whether to display (ON) the notifi cation LED when a new
notifi cation arrives.
Settings ON/OFF
Default ON
→
3
>
2
1 From the MENU screen, tap
→
Notifi cation LED
1
.
2 Tap
3 T
Enable
hide the icons.
ap
to display the icon, or
to apply changes.
Disable
to
2 Tap
3 T
ON
to turn notifi cation LED on, or
turn the notifi cation LED off.
ap
to apply changes.
OFF
to
- 33 -
Page 34

SETTINGS
Other settings
ATTENTION:
While confi guring the settings in "Other Settings", the station will not respond to an incoming call and will not sound ringtone.
Registering/Deleting a mobile
device
• Downloading the App to the mobile device
(→ P. 16)
• Registering a mobile device to the station
(→ P. 16)
• Deleting the mobile device from the station
(→ P. 18)
Setting a microSDHC card
• Formating a microSDHC card (→ P. 9)
• Copying recordings from the built-in memory onto
a microSDHC card (→ P. 26)
Adjusting video quality
Adjust the quality of video displayed on the mobile device and
recording.
3 Tap
4 Tap
Video Quality
OTHER SETTINGS 1/2
Register / Delete apps microSDHC card
Video Quality Station Information
Network Default User Settings
+ to improve the quality or to lower
the quality.
ap
to apply changes.
5 T
.
Settings Low / Medium / High
Default Medium
→
1 From MENU screen, tap
→
Other Settings
.
>
1
3
A message will appear asking whether or not to proceed.
2 To continue confi guring the settings, tap
2
NOTE:
• Depending on the network connection, the video may not be
displayed properly on a mobile device. Adjust the Video quality
lower.
• The bandwidth required for connecting to Internet is as follows
(when only the station is connected to Wi-Fi):
Minimum Internet connection bandwidth
Video quality In upload (Mbps) In download (Mbps)
Low 0.5 0.2
Medium 0.8 0.2
High 1.3 0.2
• The master monitor station’s video quality is not adjustable.
• Depending on the version of fi rmware, the video quality adjusting
function is disabled.
• Make the fi rmware up-to-date. (
→
P. 39)
.
- 34 -
Page 35

SETTINGS
Viewing station information
View a notifi cation for updating the fi rmware of the station. If an
update is available, continue to update the station. It is also
possible to confi gure the settings to automatically update the
station.
Viewing a notifi cation for updating the
station
→
1 From the MENU screen, tap
→
Other Settings
A message will appear asking whether or not to proceed.
2 To continue, tap
3 Tap
Station Information
OTHER SETTINGS 1/2
Register / Delete apps microSDHC card
Video Quality Station Information
Network Default User Settings
.
1
.
Check for FW Update
→
>
2
Confi guring the settings for automatically
updating the station
* To enable the automatic update, the station must be
connected to the network.
The station and the server will communicate periodically for
updating.
Settings Update Automatically/Notify Only/No Check
Default Notify Only
1 From the MENU screen, tap
→
Other Settings
A message will appear asking whether or not to proceed.
2 To continue, tap
.
3 Tap
→
Automatic FW update
OTHER SETTINGS 1/2
Register / Delete apps microSDHC card
Video Quality Station Information
Network Default User Settings
Station Information
.
.
.
1
→
>
2
When updating is available
A message will appear and to ask whether to update the
station.
• To update, tap
* When the updating has been completed, the station
will reboot after 5 seconds, and then returns to the
MENU screen.
* If the update has failed, an icon will appear along
with the cause of the failure will be shown.
after reading the message carefully.
• To cancel update, tap .
When the fi rmware is up to date
A message will appear to show the fi rmware is up to date.
Tap
to return to
Station Information
.
4 Tap one of the selections below.
UpdateAutomatically NotifyOnly
Update Automatically
Select this to enable the automatic update.
* The update will happen without prior notice. While
updating, all the functions of the station will not be
properly function, including receiving an incoming call.
Notify Only
Select this to be notifi ed only about the latest fi rmware and
update at a desired time.
The notifi cation can be confi rmed by tapping
MENU screen. (→ P. 39)
No Check
Select this if you do not want both automatic update and
notifi cation when the station is connected to the network.
(→ P. 39)
Select this if you do not connect the station to the network.
:
:
:
on the
- 35 -
5 T
ap
to apply settings.
Page 36

SETTINGS
Confi guring network settings
• Connecting using "Auto Connect (WPS)" (→ P. 11 )
• Connecting using "Manual Setup" (→ P. 11 )
• Confi rming the current network settings (→ P. 13)
• Other Wi-Fi settings (→ P. 14)
Initializing user settings
This will reset all the settings to default, except for the
following.
• Administrator settings
• Recordings stored in a microSDHC card and the built-in
memory
→
1 From the MENU screen, tap
→
Other Settings
A message will appear asking whether or not to proceed.
2 To continue, tap
.
.
>
Confi rming the related regulations
→
1 From the MENU screen, tap
→
Other Settings
A message will appear asking whether or not to proceed.
2 To continue, tap
3 Tap
>
→
OTHER SETTINGS 1/2
Register / Delete apps microSDHC card
Video Quality Station Information
Network Default User Settings
The related regulations will be shown.
4 After confi rmation, t
OTHER SETTINGS 1/2 screen
.
Regulatory
1
ap to return to the
.
.
>
2
.
3 Tap
Default User Settings
OTHER SETTINGS 1/2
Register / Delete apps microSDHC card
Video Quality Station Information
Network Default User Settings
A message will appear asking whether or not to proceed.
.
4 To continue initializing the user settings, tap
.
When "The user settings have been reset." is shown, the
initializing has been completed, and will return to the
screen of step 3.
NOTE:
It is recommended that user settings, recordings and logs are deleted
if ownership of this station changes.
(→ P. 38)
Confi rming information about
Protection of Personal Information
→
1 From the MENU screen, tap
→
Other Settings
A message will appear asking whether or not to proceed.
2 To continue, tap
3 Tap
>
→
OTHER SETTINGS 1/2
Register / Delete apps microSDHC card
Video Quality Station Information
Network Default User Settings
"Please read the end user license agreement in the app."
is shown. Confi rm the contents with the INTERCOM APP
Type B and select "Agree" or "Disagree".
.
.
Privacy Policy
1
.
>
2
4 After confi rmation, t
MENU screen
NOTE:
If the station is not connected to the network, you cannot confi rm
Privacy Policy.
- 36 -
.
ap to return to the
Page 37

SETTINGS
Administrator settings
These settings had been completed at the system installation.
Do not change the settings.
Exporting the log fi le to the microSDHC
card
→
1 From the MENU screen, tap
→
Other Settings
A message will appear asking whether or not to proceed.
2 To continue, tap
3 Tap
>
→
OTHER SETTINGS 1/2
Register / Delete apps microSDHC card
Video Quality Station Information
Network Default User Settings
.
.
Administrator Settings
1
>
.
2
Setting Door Release duration
Settings 1 to 30 (sec.)
Default 5
→
1 From the MENU screen, tap
→
Other Settings
A message will appear asking whether or not to proceed.
2 To continue, tap
3 Tap
>
→
OTHER SETTINGS 1/2
Register / Delete apps microSDHC card
Video Quality Station Information
Network Default User Settings
A message will appear asking whether or not to proceed.
.
.
Administrator Settings
1
>
.
2
A message will appear asking whether or not to proceed.
4 To continue, tap
5 Tap
6 Tap
Maintenance
Export Logs
7 To continue, tap
.
.
.
.
4 To continue, tap
5 Tap
6 Tap
7 T
Door release
duration.
ap
or to adjust the door release
to apply changes.
.
.
* To cancel, tap .
When "The log data has been exported." is shown,
exporting has been completed.
- 37 -
Page 38

SETTINGS
Setting Option Output duration
Settings 1 to 30 (sec.)
Default 5
→
1 From the MENU screen, tap
→
Other Settings
A message will appear asking whether or not to proceed.
2 To continue, tap
3 Tap
>
→
OTHER SETTINGS 1/2
Register / Delete apps microSDHC card
Video Quality Station Information
Network Default User Settings
.
.
Administrator Settings
1
>
.
2
Restoring all settings to the factory
default
* This operation also deletes all the recordings including
protected ones.
→
1 From the MENU screen, tap
→
Other Settings
A message will appear asking whether or not to proceed.
2 To continue, tap
3 Tap
>
→
OTHER SETTINGS 1/2
Register / Delete apps microSDHC card
Video Quality Station Information
Network Default User Settings
.
.
Administrator Settings
1
>
.
2
A message will appear asking whether or not to proceed.
4 To continue, tap
5 Tap
6 Tap
Option Output
duration.
or to adjust the option output
.
.
A message will appear asking whether or not to proceed.
4 To continue, tap
5 Tap
6 Tap
NOTE:
It is recommended that user settings, recordings and logs are deleted
if ownership of this station changes.
Factory Reset
to continue initializing the settings.
* To cancel, tap .
When "The station has been initialized." is shown, the
initializing has been completed, and will return to the
screen of step 5.
.
.
7 T
ap
to apply changes.
- 38 -
Page 39

FOR PROPER USE OF THE STATION
Updating a fi rmware of the station
The fi rmware of the station must be updated periodically. The following methods are available for updating.
• Automatic update through the network.
• Receiving a notifi cation for available updates through the network.
• Updating the station by using a microSDHC card on which the newest version of the fi rmware is stored.
NOTE:
For selecting the updating method, see "Confi guring the settings for automatically updating the station"
ATTENTION:
• While updating, the station will not respond to an incoming call and will not sound ringtone.
• Do not turn off power during updating.
(→ P. 35)
Automatic update through the
network
An update is automatically performed when the station detects
the newest fi rmware.
ATTENTION:
The updating is performed without prior notice.
Receiving a notifi cation for
available updates through the
network
Use this method when updating the station manually.
1 From the MENU screen, tap .
3 To update, tap
4 Tap
.
The updating begins.
.
The notification list will be shown.
2 Tap
Check
available.".
A message will appear to ask whether you will update the
station.
of the notifi cation "New fi rmware
When "The fi rmware has been updated. The station will
restart in 5 sec." is shown, the update has been
completed, and the station reboots after 5 seconds.
- 39 -
Page 40

FOR PROPER USE OF THIS STATION
Updating the station by using a
microSDHC card on which the
newest version of the fi rmware is
stored
Use this method when the station is not connected to the
network.
In advance, download the newest version of the fi rmware from
the Aiphone website to a microSDHC card.
1 Install a microSDHC card on which the newest
version of the fi rmware is stored.
A message appears to show whether the microSDHC
card has been recognized.
2 When the microSDHC card is recognized, tap
.
A message appears to ask whether to update the station.
3 To perform the updating, tap
The updating begins.
When "The fi rmware has been updated. The station will
restart in 5 sec." is shown, the updating has been
completed, and the station reboots after 5 seconds.
.
Cleaning
Cleaning the exterior surfaces
Clean the station with a soft cloth dampened with a neutral
household cleanser. Do not use any abrasive cleaner or cloth.
CAUTION:
Do not use chemicals such as thinner or benzine. In addition, do
not use a scrub brush, sandpaper, etc. The station surface could
be damaged or discolored.
Cleaning the screen
1 From the MENU screen, tap
→
Cleaning Mode
The screen will turn into the cleaning mode.
.
2 Clean the screen while the screen below is
shown (for about 10 seconds).
* To wipe off dirt on the screen, use a commercially-
available eyeglass cleaning cloth etc.
The screen returns to the MENU screen after 10 seconds.
NOTE:
The CLEANING MODE screen is shown while you are touching the
screen. It returns to the MENU screen about 15 seconds after
touching is fi nished.
- 40 -
Page 41

FOR PROPER USE OF THIS STATION
Troubleshooting
If issues with the station occur, refer to the following information to determine whether the issue can be corrected by the suggested
testing and solutions. For further help and assistance, contact your installer or service provider.
Problem Cause Solution Page
The screen is black. The monitor is off in standby mode. The monitor turns on by touching the
screen.
The screen is white or displaying white
vertical lines or rings.
The screen is too dark or too bright,
and it is diffi cult to view.
The ringtone from the door station
does not sound.
Communication cannot be heard even
if
is tapped.
Communication is interrupted, or it
becomes a one-way conversation.
The other party cannot hear your
voice at all (but can hear the other
party's voice).
The station has a black screen and
does not respond to touch.
The status LED is fl ashing during
standby.
Recording is not possible. A memory card that cannot be used on
A notice of fi rmware confi rmation
failure is shown in the notifi cation list.
The lens of the door station is in direct
sunlight or another bright light source.
(This is not a malfunction.)
The screen brightness may be
incorrectly set.
The ringtone volume is set to "0". Adjust the ringtone volume. 30
The receiving volume is set to "1". Adjust the receiving volume during
Loud sounds around the station or the
door station.
The touch-to-talk is selected. When using touch-to-talk, the visitor can
The power may be off. Contact your installer or service
There may be recordings that have not
been played or notifi cations that have
not been confi rmed.
the station is installed.
There is a damage or dirt on the
microSDHC card.
A network error has occurred (e.g.
router power-off, external network
error).
Install the door station in a location
where it is not pointing direct sunlight.
Adjust the screen brightness. 20, 29
communication.
Because of auto-voice actuation, audio
may be interrupted when a surrounding
sound is loud. In that case, enable the
touch-to-talk method.
only hear incoming audio if the user is
tapping
technician.
Check the related page in addition to the
indication patterns of the status LED.
Install a microSDHC card complying with
the SD standard.
Replace the microSDHC card. 8
Confi rm the network settings and the
equipment used.
.
6
_
20
21
21
_
5
8
_
Technical precautions
• The video image may distort when door release is activated. This is not a station malfunction.
• If you resume playing a recording after a pause, only the video will start playing and the audio will not be played.
• If door release operation or option is performed during communication with the door station, noise will be produced at the door
station. This is not a malfunction.
• If there is a system malfunction, contact a qualifi ed technician for service.
- 41 -
Page 42

FOR PROPER USE OF THIS STATION
Specifi cations
Power supply DC18V (from power supply)
Current consumption (MAX) Approx. 450mA
Communication
Ambient temperature 0 - 40°C (32°F - 104°F)
Wirelss LAN interface IEEE802.11b/g/n
Screen 7 inch TFT LCD touch screen
Hands-free (Auto-voice actuation)
Touch-to-talk
Regulations
FCC
This device complies with part 15 of the FCC Rules. Operation
is subject to the following two conditions: (1) This device may
not cause harmful interference, and (2) this device must accept
any interference received, including interference that may
cause undesired operation.
Changes or modifi cations not expressly approved by the party
responsible for compliance could void the user's authority to
operate the equipment.
NOTE: This equipment has been tested and found to comply
with the limits for a Class B digital device, pursuant to part 15
of the FCC Rules. These limits are designed to provide
reasonable protection against harmful interference in a
residential installation. This equipment generates, uses and
can radiate radio frequency energy and, if not installed and
used in accordance with the instructions, may cause harmful
interference to radio communications. However, there is no
guarantee that interference will not occur in a particular
installation. If this equipment does cause harmful interference
to radio or television reception, which can be determined by
turning the equipment off and on, the user is encouraged to try
to correct the interference by one or more of the following
measures:
• Reorient or relocate the receiving antenna.
• Increase the separation between the equipment and
receiver.
• Connect the equipment into an outlet on a circuit different
from that to which the receiver is connected.
• Consult the dealer or an experienced radio/TV technician for
help.
INDUSTRY CANADA
Mounting Wall-mount
Material Self-extinguishing resin
Color White
Dimensions
Mass Approx. 620 g (1.37 lbs.)
RED
Hereby, Aiphone Co., Ltd. declares that the radio equipment
type [JO-1MDW] is in compliance with Directive 2014/53/EU.
The full text of the EU declaration of conformity is available at
the following internet address:
https://www.aiphone.net/
2412 - 2472MHz Max.15.5dBm
WEEE
The object area of is the EU.
NCC
The model number for Taiwan is [JO-1MDW-TW].
電信法第48條
低功率電波輻射性電機管理辦法
第十二條
經型式認證合格之低功率射頻電機,非經許可,公司、商號或
使用者均不得擅自變更頻率、加大功率或變更原設計之特性及
功能。
第十四條
低功率射頻電機之使用不得影響飛航安全及干擾合法通信;經
發現有干擾現象時,應立即停用,並改善至無干擾時方得繼續
使用。
前項合法通信,指依電信法規定作業之無線電通信。
低功率射頻電機須忍受合法通信或工業、科學及醫療用電波輻
射性電機設備之干擾。
NBTC
This telecommunication equipment is in compliance with NBTC
requirements.
155 (H) × 210 (W) × 27 (D) (mm)
6-1/8 (H) × 8-1/4 (W) × 1-1/16 (D) (inches)
CAN ICES-3 (B)/NMB-3(B)
This device contains licence-exempt transmitter(s)/receiver(s)
that comply with Innovation, Science and Economic
Development Canada’s licence-exempt RSS(s). Operation is
subject to the following two conditions:
(1) This device may not cause interference.
(2) This device must accept any interference, including
interference that may cause undesired operation of the
device.
TRA
REGISTEREDNo:ER69452/19
- 42 -
DEALER
No:DA80713/19
Page 43

FOR PROPER USE OF THIS STATION
Warranty
Aiphone warrants its products to be free from defects of material and workmanship under normal use and service for a period of 2
years after delivery to the ultimate user and will repair free of charge or replace at no charge, should it become defective upon
which examination shall disclose to be defective and under warranty. Aiphone reserves unto itself the sole right to make the fi nal
decision whether there is a defect in materials and/or workmanship; and whether or not the product is within the warranty. This
warranty shall not apply to any Aiphone product which has been subject to misuse, neglect, accident, power surge, or to use in
violation of instructions furnished, nor extended to units which have been repaired or altered outside of the factory. This warranty
does not cover batteries or damage caused by batteries used in connection with the unit. This warranty covers bench repairs only,
and any repairs must be made at the shop or place designated in writing by Aiphone. This warranty is limited to the standard
specifi cations listed in the operation manual. This warranty does not cover any supplementary function of a third party product that
is added by users or suppliers. Please note that any damage or other issues caused by failure of function or interconnection with
Aiphone products is also not covered by this warranty. Aiphone will not be responsible for any costs incurred involving on site
service calls. Aiphone will not provide compensation for any loss or damage incurred by the breakdown or malfunction of its
products during use, or for any consequent inconvenience or losses that may result.
Issue Date: July 2019
D P0719 HZ 62061
https://www.aiphone.net/
AIPHONE CO.,LTD.,
10th fl oor Meiji Yasuda Seimei Nagoya Building,
1-1 Shinsakae-machi, Naka-ku, Nagoya, Aichi, 460-0004, JAPAN
- 43 -
 Loading...