

Page 1
EZ-Guide™ Ag Leader Technology® EZ-Guide™
Getting Started
1. Plug in power connection. Lightbar display should
illuminate. The current swath setting will appear.
2. Press to increase or decrease swath. Use
to switch between increase/decrease. Press
to accept new swath setting.
3.
"# Sats" or "No Diff" may be displayed. It may
take 2-3 minutes to acquire a signal.
4. If "Set A" is displayed the EZ Guide is ready for
use.
5. Optional step: To set Headland warning distance
press
until CONFIG is displayed and then
press press until HLNDWARN is
display and then press . Press until the
desired warning distance is set. After the desired
distance is set press
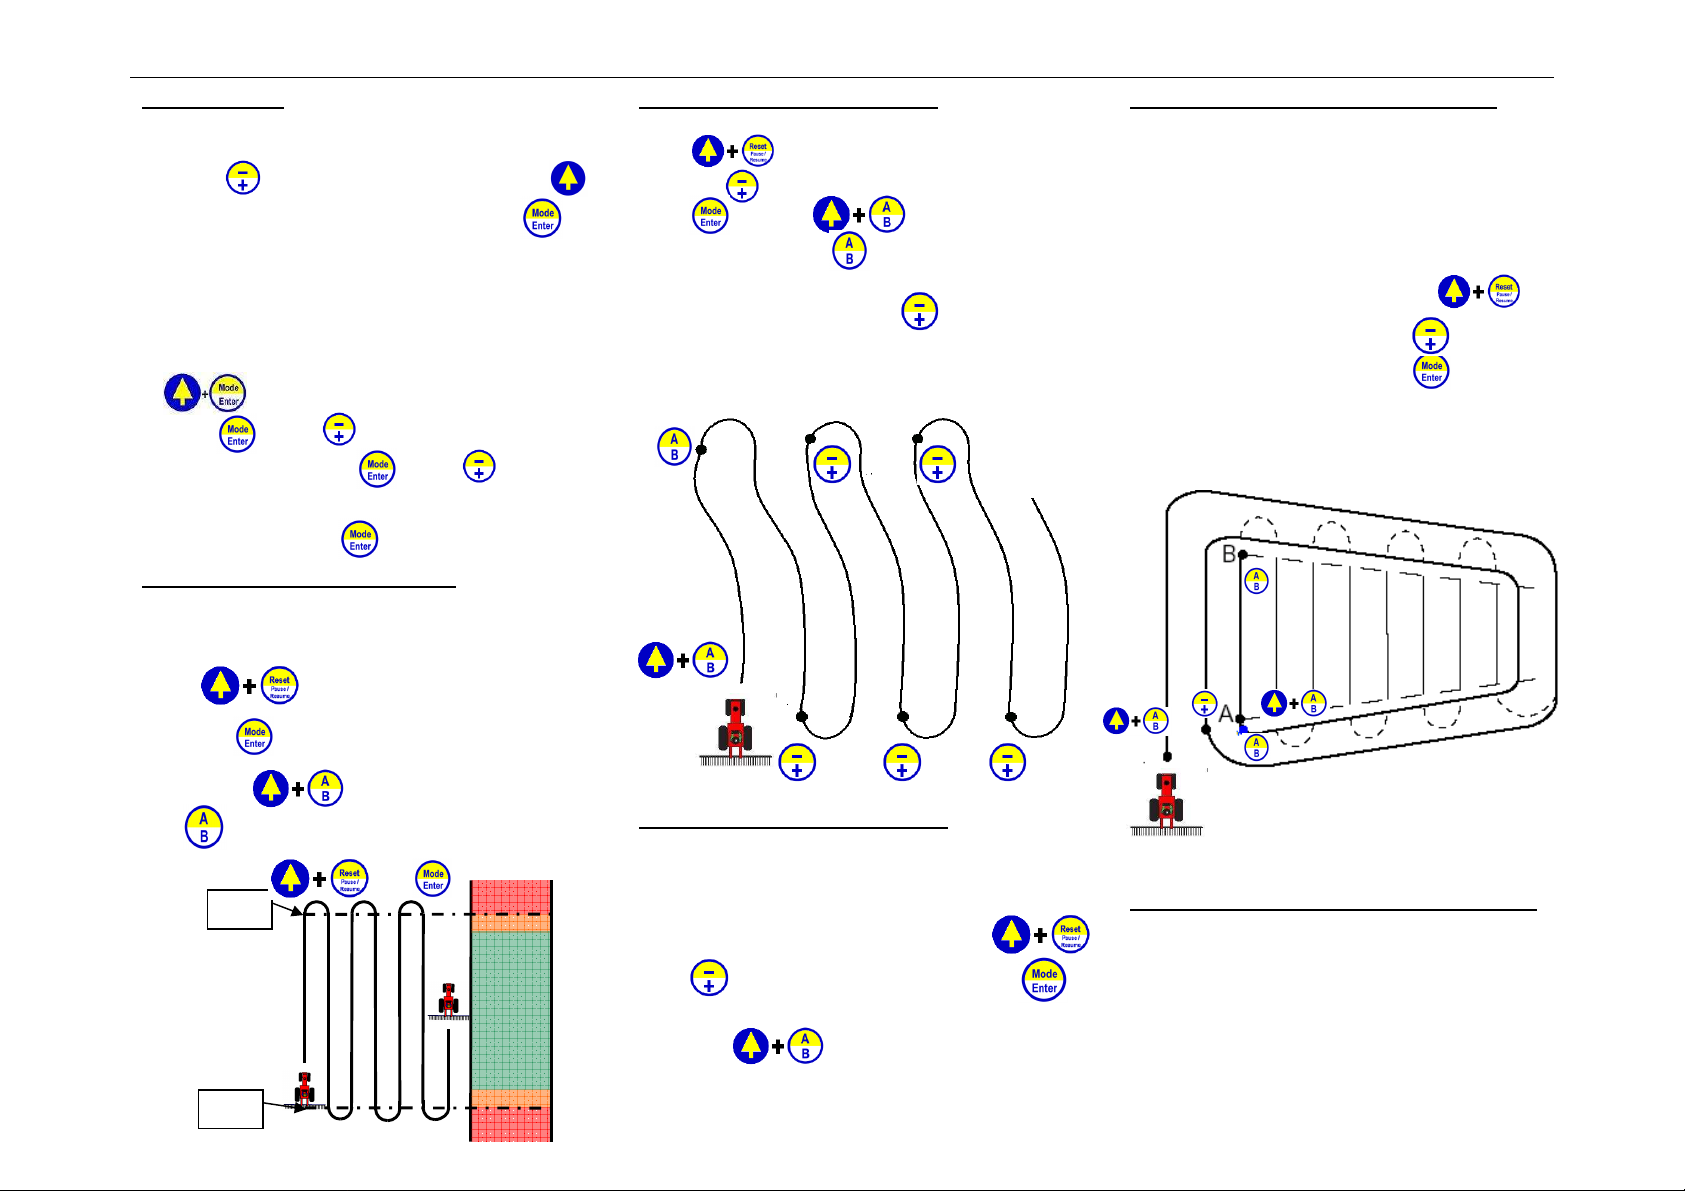
Straight Line Guidance NEW A-B
Guidance is performed by defining an A-B line. To
establish an A-B line, drive to the field and perform
the following button presses:
Press until NEW A-B is displayed
then press . When set A is displayed on the
lightbar press at beginning of pass
and at end of pass to set A-B line. To reset
A-B line, press then
Set B
Headland
Zone
Warning
Spray
Zone
Set A
Warning
Headland
Zone
Curve Guidance – NEWCURVE
Press until NEW A-B is displayed and
then press until NEWCURVE is displayed and
press . Press at the beginning of
the pass and then press at the end. You must
manually increment your pass before beginning your
turn into a new pass, by pressing .
Note Diagram displays correct button presses
Optional – Shifting Your A-B line
If guidance starts to wonder or shift because of row
spacing differences or obstructions in your field, you
can shift the A-B line parallel from its original line to
your current position.
Drive to new location for A-B line and press
Press until "New A+" is displayed. Press
to shift A-B line to current location.
Then press . "A-B Good" should now be
on the display.
Note: AB line must be set to use this option
Guidance with Headlands - NEWHLND
For straight line swaths inside the headland, drive at
least one headland pass around the outside of the
field and then set A and B points.
When you approach the headland the approach LED
indicates your distance to the end of the swath if you
have set the HDLNWARN setting.
Getting started for NEWHLND: Press
When NEW A-B is displayed press until
NEWHLND is displayed and press .. From this
point follow the diagram button presses:
Note: Diagram displays correct button presses
Connecting EZ Guide to Ag Leader Monitor
An adapter cable available from Ag Leader
Technology is required to connect a Yield Monitor
2000,or PF monitor to the 9-pin GPS Output
connector on the EZ Guide cable.
A separate cable is also available through Ag Leader
that allows the GPS antenna to moved by itself (no
lightbar or button box conection) to another vehicle
such as a combine.
Page 2

EZ-Guide™ Ag Leader Technology® EZ-Guide™
Button Functions
Press Shift Key and then function
key to perform function in yellow
Set A – Start reference pass
Set B – End reference pass
Reset reference pass
Pause or Resume Guidance
Clear Area Points
Add Area Point
Select Guidance, Area or
Configuration Mode
Accept Configuration setting
Increase pass number
Scroll through configuration
items or values when in
part or top half of key.
Decrease pass number
-or-
configuration mode.
.Calculating Area
To calculate the acreage of your field, drive the
perimeter of the field and press at each corner of
the field. To view area later, press until
"Area" is displayed. To clear Area, press
To return to guidance press twice or until
“Guide” is displayed.
Tip
Area points must be added in order as you drive the
perimeter of the field. Acreage calculations are
based on outside edge of the swath. A maximum of
99 corner points can be set. Area is displayed after
the third point is set.
Brightness of Display
Press and hold Shift Key until desired
brightness level is achieved.
Ag Leader Technology
2202 S. Riverside Dr.
Ames, IA 50010
515-232-5363 ext. 1 – Technical Support
515-232-3595 – fax
For Additional Information, Tips and Troubleshooting
visit our web site.
www.agleader.com/ez-guide.htm
1.
To configure, press the following
keys until CONFIG appears
2.
Select Configuration Option
3.
Display configuration setting
4.
5.
Change configuration setting
Accept new configuration
settings
6. Return to Step 2 or press until
"Guide" is displayed.
Configuration Options
WIDTH: Set swath width to slightly less than the
total boom width. (About 1 foot, ensures no skips)
LED MODE: Chase or Pull
SPACING: Distance represented by one LED
HLNDWARN: Distance at which Approach Led
will indicate headland
XTE WARN Distance off-swath at which the alarm
sounds
BMOFFSET Distance of boom in front or behind
LKAHEAD: Look ahead time in seconds. Default is
1 sec. 0 to 8 mph – 1sec 8 to 15 mph 2 sec
MOUNT: DASH or CEILING
TEXT: Guidance display: SWTH&XTE – swath
number and cross-track error. SWTH&SPD – swath
number and current speed. HDG&SPD – current
heading and speed. DEMO – sales demo mode.
SNAPSWTH: ON – snap to swath is on, Lightbar
automatically guides to nearest swath. OFF – snap
to swath is off, use -/+ keys to change swath
DIFF SRC: Location of differential satellite
DIFF GPS: AUTO – Guidance without differential
correction allowed, no warning.
UNITS: US – feet, miles per hour, acres. METRIC
– meters, Kilometers per hour, hectares.
Language: English Espanol Portuges
DEFAULTS: Return all configurations settings
to factory defaults.
 Loading...