

Page 1

IPD Vi ewer
Software
User manual
Page 2

IPD V
IEWER SOFTWARE
© Agfa-Gevaert N.V. 2001.
No parts of this document may be reproduced, copied, adapted or transmitted in any form or by any means
without the written permission of Agfa-Gevaert N.V.
Agfa-Gevaert N.V. makes no warra nties or re presentat ion, expres sed or impl ied, with respect to the accu-
racy, completeness or usefulness of the in formation c ontained in this d ocument and speci fically discla ims
warranties of suitability for any particular purpose. Agfa-Gevaert N.V. shall under no circumstances be liable
for any damage arising from the use or inability to use any information, apparatus, method or process disclosed in this document.
Agfa-Gevaert N.V. reserves the right to make changes to this document without prior notice.
Agfa-Gevaert N.V., Septestraat 27, B-2640 Mortsel, Belgium.
®
Windows
and Windows®NT are trademarks of Microsoft Corporation.
Jaz® is a trademark of iomega.
IPD Viewer Software is a trademark of Agfa-Gevaert N.V., Belgium.
Agfa and Agfa-Rhombus are trademarks of Agfa-Gevaert AG, Germany.
2
2264A GB 20010618
Page 3

IPD V
Table of contents
Chapter 1: Introducing the IPD Viewer Software............................................. 5
About the IPD Viewer Software .......................................................................6
IPD Viewer Software features.................................... .......... ............................7
Modes of the IPD Viewer Software............................ .......... ............................8
Selector mode................................................................. ........... .......... ....... 9
Viewer mode .................................... .......... ........... .......... ........... .......... ..... 10
Starting the IPD Viewer Software ................................................... .......... ..... 11
Using the online Help.................................................................................... 12
Switching between Selector mode and Viewer mode....................................13
Quitting the IPD Viewer Software ................... ........... .................................... 15
Chapter 2: Selecting studies (Selector mode).......................................... ..... 17
Searching the local database ......................................................... .......... ..... 18
Searching remote databases.......................... ..................... ........... ............... 19
Selecting a study or an image .................................................................. ..... 20
Selecting a study.......................................................................................21
Selecting an image....................................................................................23
Protecting a study........................................... ............................................... 24
Transferring an image to another study......................................................... 26
Printing a study or an image...... ........... ..................... .......... ..................... ..... 27
Print using the default layout (Quick Print).................................................. 27
Print using a custom layout (Print Composer)............................................. 28
IEWER SOFTWARE
Chapter 3: Viewing studies (Viewe r mode)....................................................29
Viewing a study for on-screen diagnosis ....................................................... 30
Processing an image..................................................................................... 31
Transfo rmi ng an ima ge..................................................................................33
Adding annotations to an image............................................................... ..... 35
Saving an image........................................................ ....................................37
Printing a study............................................... ..................... ........... ............... 38
Print using the default layout (Quick Print).................................................. 38
Print using a custom layout (Print Composer)............................................. 39
2264A GB 200106 18
3
Page 4

IPD V
IEWER SOFTWARE
4
2264A GB 20010618
Page 5

Introducing the IPD Viewer
This chapter covers the following topics:
Chapter
Software
1
q About the IPD Viewer Software
q IPD Viewer Software features
q Modes of the IPD Viewer Software
q Starting the IPD Viewer Software
q Using the online Help
q Switching between Selector mode and Viewer
mode
q Quitting the IPD Viewer Software
Page 6

IPD VIEWER SOFTWARE
About the IPD Viewer Software
The IPD Viewer Software is one of the major modules of the ADC Quality
System.
The IPD Viewer Software User manual provides general and concise
practical information on using the IPD Viewer Software. For full details on
using the IPD Viewer Software, refer to the Reference manual or the online
Help of the IPD Viewer Software.
6
Introducing the IPD Viewer Software
2264A GB 20010618
Page 7

IPD VIEWER SOFTWARE
IPD Viewer Software features
v
A number of features are only available with certai n licences. Refer to the
Licence document for more information.
The IPD Viewer Software offers the following features:
n Searching for studies in the local database and in remote databases.
The IPD Viewer Software allows you to specify a number of search criteria for
searching the local database or remote databases. You can customize these
searches to suit your specific needs, and store searches for future use.
n Viewing studies for on-screen diagnosis.
Once you have retrieved a number of studies from the database, you can
select a specific study and display it for on-screen diagnosis. You can
customize the viewing environment according to your preferences.
n Interactively processing images and adding annotations.
The IPD Viewer Software offers you an extensive range of image processing
and diagnosis-assisting functions.
n Printing studies and images.
Several printing options are available; you can c hoose between printing using
the default layout, a non-default layout, or a custom layout.
2264A GB 200106 18
Introducing the IPD Viewer Software
7
Page 8

IPD VIEWER SOFTWARE
Modes of the IPD Viewer Software
The IPD Viewer Software has two operating modes:
• The Selector mode.
• The Viewer mode.
You can seamlessly switch from Selector mode to Viewer mode and vice
versa.
8
Introducing the IPD Viewer Software
2264A GB 20010618
Page 9
IPD VIEWER SOFTWARE
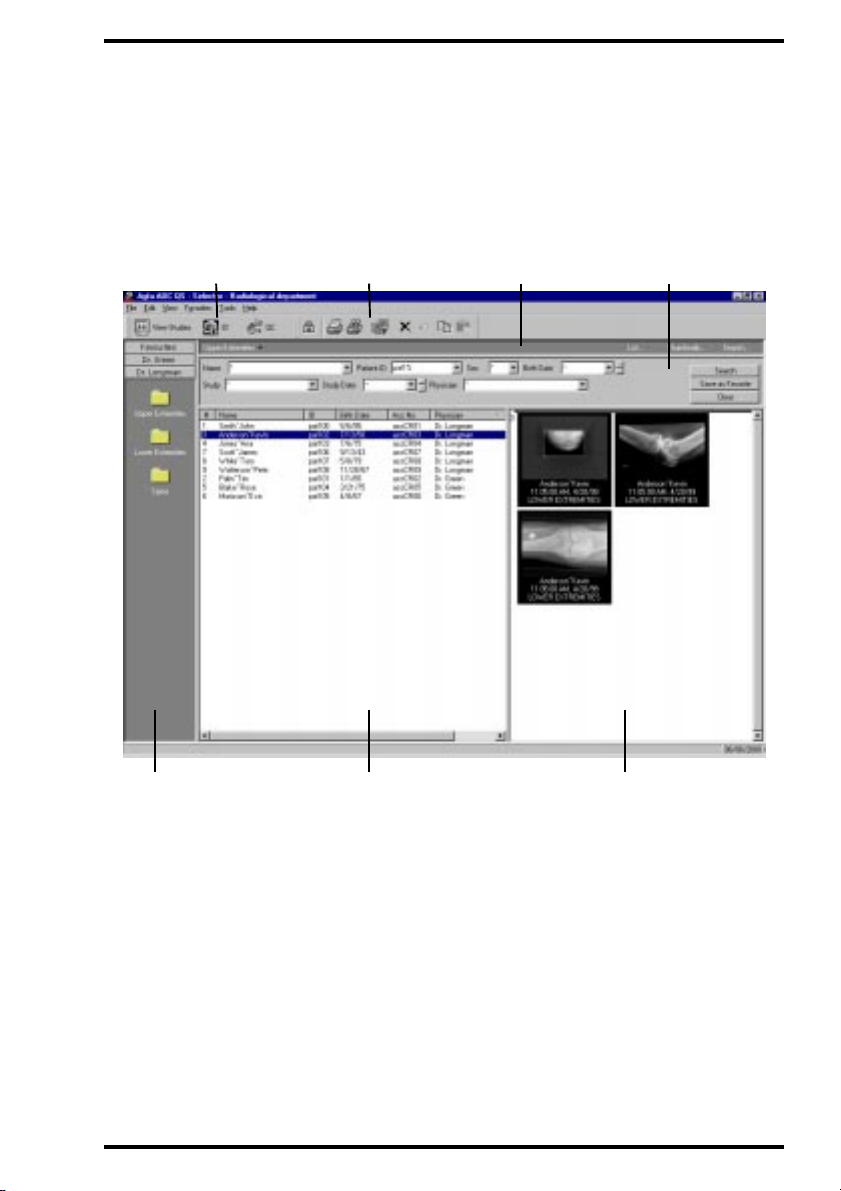
Selector mode
The Selector mode allows you to retrieve studies from the local database or
from remote databases by means of search criteria. From the resulting list,
you can subsequently select one or more studies.
Favorites p ane
Standard toolbarSwitch toolbar
List view pane Thumbnail pane
Search paneShortcut pane
2264A GB 200106 18
Introducing the IPD Viewer Software
9
Page 10
IPD VIEWER SOFTWARE
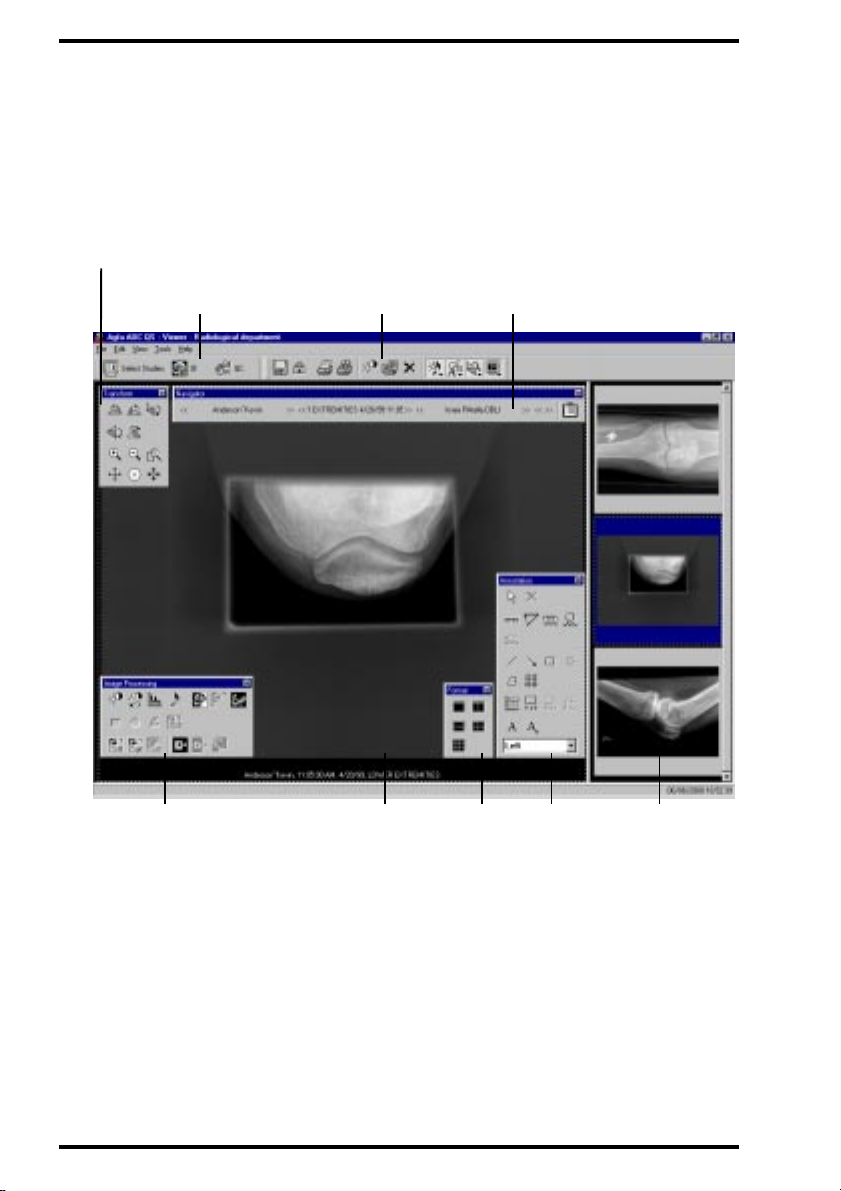
Viewer mode
The Viewer mode allows you to view the studies which you have selected in
Selector mode. The Viewer mode offers you a range of interactive image
processing and diagnosis-assisting functions.
Transformation toolbar
Image processing to ol ba r
Standard toolbarSwitch toolbar
Image pane
Format
toolbar
Navigation bar
Annotation
toolbar
Study
overview pane
10
Introducing the IPD Viewer Software
2264A GB 20010618
Page 11

IPD VIEWER SOFTWARE
Starting the IPD Viewer Software
To start the IPD Viewer Software, you need a username and a password.
Contact your system administrator . For information on creating us ers, refer to
the Reference manual of the Configuration Viewer.
To start the IPD Viewer Software:
1 Do one of the following:
• Double-click the ADC QS icon.
• Click the Start button, and then point to Agfa. Point to the ADC QS folder,
and then click Start ADC-QS.
The Login dialog box is displayed.
2 Type a valid username and password and click OK.
The ADC Quality System is st arted.
• If you start the ADC Quali ty S ystem fo r the f irst ti me, th e mai n window of the QC
Viewer Software is displayed.
• If you have used the ADC Quali ty System bef ore, the main wi ndow of the modul e
which you used the previous time - either the ID Sof tware, the QC Viewer
Software, or the IPD Vi ewer Software - is displayed.
2264A GB 200106 18
Introducing the IPD Viewer Software
11
Page 12
IPD VIEWER SOFTWARE
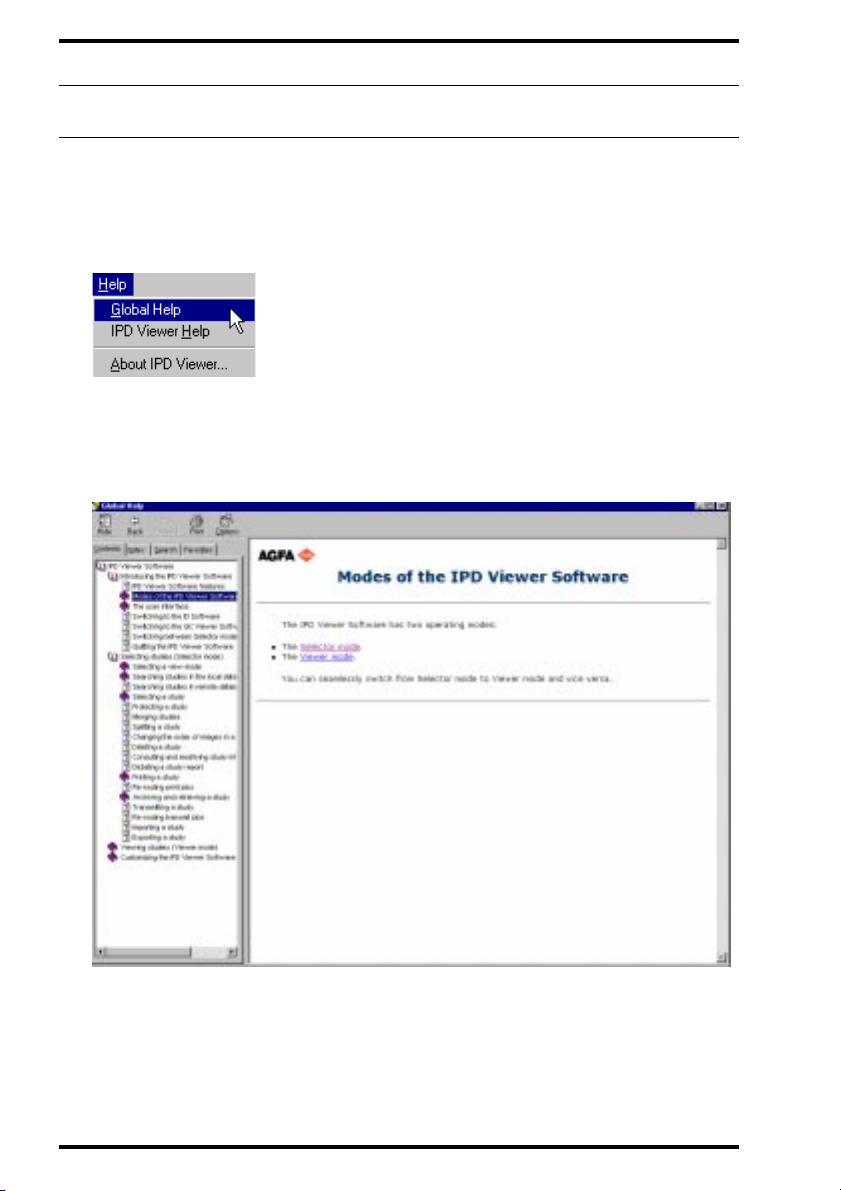
Using the online Help
You can invoke Help on the functions of the IPD V iewer Software via the Help
menu. You can choose between Help on the IPD Viewer Software and Help
on the global ADC Quality System (Global Help).
The online Help allows you to quickly and easily locate information; it has a
table of contents, an index, a full-text search function, and a favorites function
via which you can define favorite topics.
12
Introducing the IPD Viewer Software
Online Help
2264A GB 20010618
Page 13

IPD VIEWER SOFTWARE
Switching between Selector mode and Viewer mode
The Selector mode allows you to retrieve studies from the local database or
from remote databases on the basis of search criteria. From the resulting lis t,
you can subsequently select a number of studies.
Once you have selected studies, you can view them in Viewer mode. This
mode offers you a range of interactive image processing and diagnosisassisting functions.
To switch from Selector mode to Viewer mode:
1 In Selector mode, select one or more studies.
Refer to
2 To switch to Viewer mode, do one of the following:
• On the File menu, click View Studies.
• Click the View Studies button on the Switch toolbar.
’Selecting a study’
on page21.
If you have selected only one study, you can also do one of the following:
• Double-click the study in the list view pane.
• Double-click a thumbnail of the study in the thumbnail pane.
v
When you are working in Viewer mode, the navigation bar allows you to
switch between the studies which you have selected in Selector mode.
You do not need to return to Selector mode. For more information, refer
to the IPD Viewer Software Reference manual.
2264A GB 200106 18
Introducing the IPD Viewer Software
13
Page 14

IPD VIEWER SOFTWARE
To switch from Viewer mode to Selector mode:
On the File menu, click Select.
Alternatively, you can click the Select Studies button on the Switch toolbar.
The IPD Viewer Software switches to Selector mode.
14
Introducing the IPD Viewer Software
2264A GB 20010618
Page 15
IPD VIEWER SOFTWARE
Quitting the IPD Viewer Software
Both in Selector mode and in Viewer mode, you can close the IPD Viewer
Software.
If you have not save d cha nges to an imag e, sa ve t hem be fore qui ttin g. No
warning message is displayed if you quit the IPD Viewer Software.
To quit the IPD Viewer Software:
1 If you have modified an image and you wish to save your changes, either
replace the existing image or save the changed image as a new image.
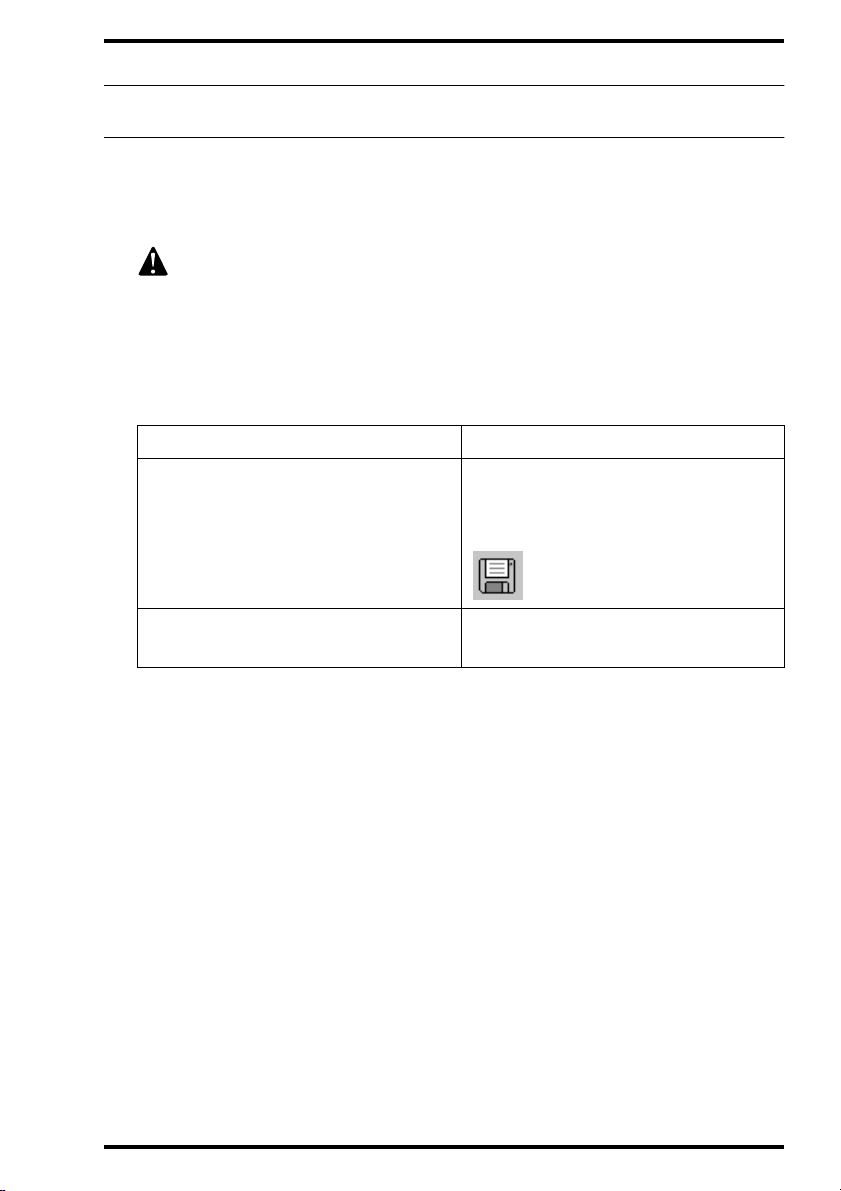
To Do this
On the File menu, click Save.
Replace the existing image with the
changed image
Alternatively, you can click the Save
button on the Standard toolbar.
Save the changed image as a new
image which is added to the study
The image is stored in the local database.
2 On the File menu, click Exit.
The IPD Viewer Software is closed.
2264A GB 200106 18
On the File menu, click Save as New.
Introducing the IPD Viewer Software
15
Page 16

IPD VIEWER SOFTWARE
16
Introducing the IPD Viewer Software
2264A GB 20010618
Page 17

Selecting studies
(Selector mode)
This chapter covers the following topics:
Chapter
2
q Searching the local database
q Searching remote databases
q Selecting a study or an image
q Protecting a study
q Transferring an image to another study
q Printing a study or an image
Page 18

IPD VIEWER SOFTWARE
Searching the local database
To search for studies in the local database, you must specify a set of search
criteria in the search pane in the Selector mode. The resulting set of studies
will be displayed in the list view pane and the thumbnail pane.
To define a search:
1 Type or select for each search field a search criterion in the search pane.
Search pane
2 Click the Search button in the search pane.
If the list view pane is turned on, the resulting set of studies is displayed in the list
view pane.
If the list view p ane is turned off, the th umbnails of the resultin g set of studies are
displayed in the thumbnail pane. The studies are automatically selected.
É Once you have defined a search, you can save it for future use by saving
it as a favorite. Refer to the Reference manual.
É Sets of favorites can be grouped according to a common characteristic.
For more information, refer to the Reference manual.
18
Selecting studies (Selector mode)
2264A GB 20010618
Page 19

Searching remote databases
Apart from searching the local database, you can search databases on
remote volumes in the Selector mode.
IPD VIEWER SOFTWARE
2264A GB 200106 18
Selecting studies (Selector mode)
19
Page 20

IPD VIEWER SOFTWARE
Selecting a study or an image
Selecting a study is necessary when you wish to perform actions such as:
• Viewing a study for on-screen diagnosis.
• Printing a study.
• Transmitting a study to a DICOM review or archive station.
• Deleting a study.
• Consulting and modifying study information, etc.
In Selector mode, you can also select a single image. A limited number of
actions are possible on an image basis:
• Deleting an image.
• Printing an image.
• Transmitting an image to a DICOM review or archive station.
• Exporting the image data to a Rislink file.
20
Selecting studies (Selector mode)
2264A GB 20010618
Page 21

IPD VIEWER SOFTWARE
Selecting a study
The way you select studies depends on whether or not the list view pane is
turned on.
• If the list view pane is turned on, you can either manual ly select studies via
the list view pane, or you can work in automatic selection mode.
• If the list view pane is turned off, the studies which you retrieve from the
database will be selected automatically.
To manually select one or more studies if the list view pane is turned
on:
1 Define a search with the appropriate search criteria.
Refer to
displayed in the list view pane.
2 Select the studies:
’Searching the local database’
T o select Do this
on page18. The resulting set of studies is
A single study
Multiple nonadjacent studies
Multiple adjacent studies
Click the study in the list view pane.
Click a single study, and then hold
down the CTRL key while you click
other studies which y ou wish to sele ct.
Click a single study, and then hold
down the SHIFT key while you click
the last study of the range of studies
which you wish to select.
All studies On the Edit menu, click Select All.
Selected studies are highlighted in the list view pane. If the thumbnail pane is
turned on, the thumbna il s of the sele cted studies will be displa ye d i n the th u mbn a il
pane.
2264A GB 200106 18
Selecting studies (Selector mode)
21
Page 22

IPD VIEWER SOFTWARE
To automatically select studies if the list view pane is turned on:
1 On the Edit menu, click Auto Select All.
A check mark means that automatic selection of search crit eria is turned on.
2 Define a search with the appropriate search criteria.
Refer to
displayed in the list view pane. All studies are automatically selected.
To automatically select studies if the list view pane is turned off:
’Searching the local database’
on page18. The resulting set of studies is
1 Make sure that the thumbnail pane is turned on.
2 Define a search with the appropriate search criteria.
Refer to
displayed in the list view pane. All studies are automatically selected.
’Searching the local database’
on page18. The resulting set of studies is
22
Selecting studies (Selector mode)
2264A GB 20010618
Page 23

IPD VIEWER SOFTWARE
Selecting an image
The way you select images depends on whether or not the list view pane is
turned on.
• If the list view pane is turned on, first select the studies and then the
images within the studies.
• If the list view pane is turned off, you can directly select the images via the
thumbnail pane.
To select one or more images if the list view pane is turned on:
1 Make sure that the thumbnail pane is turned on.
2 Select the studies for which you wish to select images.
Refer to
3 Click the thumbnails of the images which you wish to select.
The thumbnails of selec ted images are highlighted in t he thumbnail pane.
To deselect a selected image, click the thumbnai l.
’Selecting a study’
on page21.
To select one or more images if the list view pane is turned off:
1 Make sure that the thumbnail pane is turned on.
2 Define a search with the appropriate search criteria.
Refer to
resulting set of studies are displayed in the thumbnail pane. All studies are
automatically selected.
’Searching the local database’
on page18. The thumbnail images of the
3 Click the thumbnails of the images which you wish to select.
The thumbnails of selec ted images are highlighted in t he thumbnail pane.
To deselect a selected image, click the thumbnail.
2264A GB 200106 18
Selecting studies (Selector mode)
23
Page 24

IPD VIEWER SOFTWARE
Protecting a study
Studies are stored on the hard disk of the ADC QS Station. However, as the
capacity of the hard disk is limited, only a certain number of studies can be
stored. As the used space of the hard disk reaches the full capacity, the data
of the oldest studies are automatically deleted and replaced with data from
recent studies. You can, however, protect a study against automatic removal.
To protect one or more studies:
1 Select the studies which you wish to protect.
Refer to
To protect a range of studies, at least one study must be unprotected. A stu dy is
unprotected if the Protect button on the Standard toolbar is not pressed.
2 On the File menu, click Mark as Protected.
Alternatively, you can click the Protect button on the Standard toolbar.
The Protect button is pr essed: the studies are protected.
’Selecting a study’
on page21.
v
If you select a range of studies for which at least one study has not been
protected, the Protect button on the Standard toolbar will not be pressed,
although other studies in the range may be protected.
24
Selecting studies (Selector mode)
2264A GB 20010618
Page 25

IPD VIEWER SOFTWARE
To remove the protection from one or more studies:
1 Select the protected studies from which you wish to remove the protection.
Refer to
To remove the prot ection from a range of studies, all studies must be protected. A
study is protected i f the Protect button on the Standard toolbar is pressed.
v
’Selecting a study’
on page21.
If you select a range of studies for which at least one study has not been
protected, the Protect button on the Standard toolbar will not be pressed,
although other studies in the range may be protected.
2 On the File menu, click Mark as Protected.
Alternatively, you can click the Protect button on the Standard toolbar.
The Protect button is i n its normal state: the studies are unprotected.
2264A GB 200106 18
Selecting studies (Selector mode)
25
Page 26

IPD VIEWER SOFTWARE
Transferring an image to another study
If an image is allocated in a wrong study, you can move the image to the
correct study via image transfer.
To transfer an image to another study:
1 On the Tools menu, click Enable Image Transfer.
v
The transfer is only valid for 1 image, so you have to enable this function
every time to use it.
2 Go to the study folder with the image you wish to transfer.
Refer to
’Selecting a study or an image’
on page20.
3 Drag the image to the correct study folder and release it.
A pop up window will warn you that the imag e will be erased from the ori ginal study.
Click OK if you want to confirm the transfer, or Cancel to leave the situation
unchanged.
The image transfer is now compl ete.
Tips:
v
v
If an image is transferred out of a single image study then you will be left
with an empty study. You can then delete the folder to remove it (refer to
‘Deleting a study or an image’ on page 61 of the Apparatus Reference
manual.
To create an new empty study folder to transfer an image to, identify a
cassette (with the correct study information) an put it trough the digitizer.
26
Selecting studies (Selector mode)
2264A GB 20010618
Page 27

IPD VIEWER SOFTWARE
Printing a study or an image
In Selector mode you can print studies or single images according to your
specific needs.
You can either:
• Print using the default layout via Quick Print.
• Print using a non-default or a custom layout via the Print Composer.
Print using the default layout (Quick Print)
Your ADC Quality System can be configured so that each study type is
associated with a default printer and a default layout. If for a specific study
type no default printer and/or default layout has been configured, the system
default printer and/or layout will be considered to be the default.
To print using the default layout on the default printer:
1 Select the studies or images which you wish to print.
Refer to
’Selecting a study or an image’
on page20.
2 Click the Quick Print button on the Standard toolbar.
Depending on the configuration of your ADC Quality Sy stem, the studies or images
will be printed on the config ure d or th e sy s te m de fa ul t pri nt e r us in g the configured
or the system default layout.
2264A GB 200106 18
Selecting studies (Selector mode)
27
Page 28

IPD VIEWER SOFTWARE
Print using a custom lay out (Print Composer)
Via the Print Composer, you can print on factory defined layouts or on
previously saved custom layouts. You can print either a range of studies or a
selection of images.
To print using a non-default or a custom layout:
1 Select the studies or images which you wish to print.
Refer to
2 On the File menu, click Print Composer.
Alternatively, you can click the Print Composer button on the Standard toolbar.
The Print Composer main window is displayed.
If you have selected one or more studies, all images of the sel ected studies are
displayed in the print preview.
If you have selected one or more images, all selected images are displayed in the
print previe w.
’Selecting a study or an image’
on page20.
3 Set the print options such as the printer, the film format and the film layout.
Refer to the Reference manual of the Print Composer.
4 On the File menu of the Print Composer, click Print.
Alternatively, you can click the Print button on the toolbar of the Print Composer.
The Print dialog box is displayed.
5 Set the print options such as the film range and the number of copies.
Refer to the Reference manual of the Print Composer.
6 Click OK.
28
Selecting studies (Selector mode)
2264A GB 20010618
Page 29

Viewing studies
(Viewer mode)
This chapter covers the following topics:
Chapter
3
q Viewing a study for on-screen diagnosis
q Processing an image
q Transforming an image
q Adding annotations to an image
q Saving an image
q Printing a study
Page 30

IPD VIEWER SOFTWARE
Viewing a study for on-screen diagnosis
The Viewer mode allows you to view studies and offers you a range of
interactive image processing and diagnosis-assisting functions.
The most straightforward way to view a study in Viewer mode is to first select
one or more studies in Selector mode and then switch to Viewer mode. All
studies which you have selected in Selector mode will be available in the
navigation bar in Viewer mode, allowing for easy navigation.
To view a study:
1 Select one or more studies in Selector mode.
Refer to
2 To switch to Viewer mode, do one of the following:
• On the File menu, click View Studies.
• Click the View Studies button on the Switch toolbar.
’Selecting a study’
on page21.
If you have selected only one study, you can also do one of the following:
• Double-click the study in the list view pane.
• Double-click a thumbnail of the study in the thumbnail pane.
All studies which you have selecte d in Selector mode are avai lable in the navigat ion
bar in Viewer mode. You can switch between the images of the study under
examination or between studies.
3 To optimize the ADC QS Station for on-screen diagnosis, select an
appropriate on-screen presentation.
Refer to the IPD Viewer Software Reference manual.
30
Viewing studies (Viewer mode)
2264A GB 20010618
Page 31
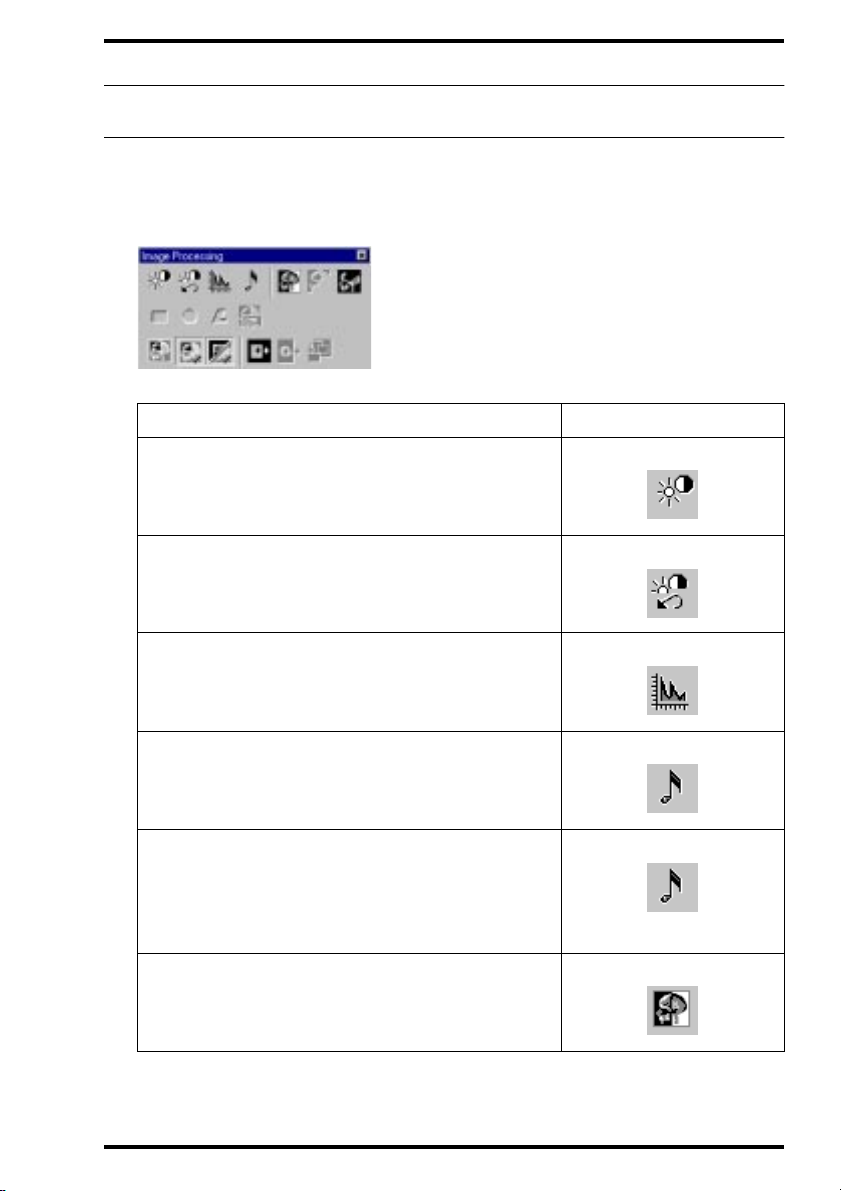
Processing an image
To process an image you can access the interactive image processing
functions via the buttons on the Image Processing toolbar.
Image Processing toolbar
To Use button(s)
Change the global contrast and intensity of an
image (window/level)
Revert to the original window/level
IPD VIEWER SOFTWARE
Display the histogram and the sensitometric curve
Change the study type related processing (basic
MUSICA processing)
Adjust the image processing parameters
(advanced MUSICA processing)
Invert an image
2264A GB 200106 18
and click Advanced.
Viewing studies (Viewer mode)
31
Page 32

IPD VIEWER SOFTWARE
To Use button(s)
Invert the saturated parts of an image (burn)
Collimate an image manually (rectangular area)
Collimate an image manually (circular area)
Collimate an image manually (polygonal area)
Collimate an image automatically
Show/hide collimation
Show/Hide collimation borders
Apply shutters around a region of interest (ROI)
For detailed information, refer to the IPD Viewer Software Reference manual.
32
Viewing studies (Viewer mode)
2264A GB 20010618
Page 33

IPD VIEWER SOFTWARE
Transforming an image
You can access the image transformation functions via the buttons on the
Transformation toolbar.
Transformation toolbar
To Use button
Rotate an image 90° clockwise
Rotate an image 90° anti-clockwise
Rotate an image 180°
Flip around the
Flip around the vertical axis
Zoom in on an image
Zoom out on an image
2264A GB 200106 18
horizontal axis
Viewing studies (Viewer mode)
33
Page 34

IPD VIEWER SOFTWARE
To Use button
Magnify part of an image
Roam over a zoomed image
Center the zoomed image in the image cell
Revert to the full image
For detailed information, refer to the IPD Viewer Software Reference manual.
34
Viewing studies (Viewer mode)
2264A GB 20010618
Page 35

IPD VIEWER SOFTWARE
Adding annotations to an image
You can access the annotation functions via the buttons on the Annotation
toolbar.
Annotation toolbar
To Use button
Select an annotation
Delete an annotation
Measure a distance
Measure an angle
Calibrate distance measurements via linear
calibration
Calibrate distance measurements via circular
calibration
Draw a line
Draw an arrow
2264A GB 200106 18
Viewing studies (Viewer mode)
35
Page 36

IPD VIEWER SOFTWARE
To Use button
Draw a rectan gle
Draw an ellipse
Draw a polygon
Show/Hide grid lines and define grid spacing
Calculate a density profile
Calculate the scan average level within a region
of interest (ROI)
Add custom text
Set predefined text
Add predefined text
For detailed information, refer to the IPD Viewer Software Reference manual.
36
Viewing studies (Viewer mode)
2264A GB 20010618
Page 37

IPD VIEWER SOFTWARE
Saving an image
If you have modified an image via interactive image processing or
transformation or have added annotations, and you wish to save these
changes, save the image manually on disk.
To save an image:
1 Make the image the active image.
2 Perform any interactive processing or transformation operations and/or add
annotations.
3 Save the image:
To Do this Button
On the File menu, click
Replace the existing image with the
changed image
Save.
Alternat ively, you can
click the Save butt on o n
the Standard toolbar.
Save the changed image as a new
image which is added to the study
The image is stored in the local database.
2264A GB 200106 18
On the File menu, click
Save as New.
Viewing studies (Viewer mode)
_
37
Page 38

IPD VIEWER SOFTWARE
Printing a study
In Viewer mode you can print studies according to your specific needs.
You can either:
• Print using the default layout via Quick Print.
• Print using a non-default or a custom layout via the Print Composer.
Print using the default layout (Quick Print)
Your ADC Quality System can be configured so that each study type is
associated with a default printer and a default layout. If for a specific study
type no default printer and/or default layout has been configured, the system
default printer and/or layout will be considered to be the default.
To print using the default layout on the default printer:
1 View the study which you wish to print.
Refer to
’Viewing a study for on-screen diagnosis’
on page30.
2 Click the Quick Print button on the Standard toolbar.
Depending on the configuration of your ADC Quality Sy stem, the studies or images
will be printed on the confi gu re d or the sy s te m defa ul t printer using the configu re d
or the system default layout.
É For information on configuring the printers of your ADC Quality System,
refer to the Reference manual of the Configuration Viewer.
38
Viewing studies (Viewer mode)
2264A GB 20010618
Page 39

IPD VIEWER SOFTWARE
Print using a custom layout (Print Composer)
Via the Print Composer, you can print on factory defined layouts or on
previously saved custom layouts. You can fully customize the layout of the
images on the film.
É For information on defining custom layouts, refer to the Reference
manual of the Print Composer.
To print using a non-default layout or a custom layout:
1 View the study which you wish to print.
Refer to
2 On the File menu, click Print Composer.
Alternatively, you can click the Print Composer button on the Standard toolbar.
’Viewing a study for on-screen diagnosis’
on page30.
The Print Composer main window is displayed.
All images of the study are displayed in the preview of the Print Composer .
3 Set the print options such as the printer, the film format and the film layout.
Refer to the Reference manual of the Print Composer.
4 If you wish to add images, drag them from the study overview pane or the
image pane to the preview of the Print Composer.
To Do this
Add an image to the preview of the
Print Composer
2264A GB 200106 18
Drag the image from the image pane
or the study overview pane to the
preview.
Viewing studies (Viewer mode)
39
Page 40

IPD VIEWER SOFTWARE
5 Removing images from the preview pane:
To Do one of the following
• Drag another image from the im age
pane or the study overview pane
Remove an image from the preview
of the Print Composer
pane
onto the image.
• Right-click the imag e in the preview
and then click Delete on the
shortcut menu.
6 On the File menu of the Print Composer, click Print.
Alternatively, you can click the Print button on the toolbar of the Print Composer.
The Print dialog box is displayed.
7 Set the print options such as the film range and the number of copies.
Refer to the Reference manual of the Print Composer.
8 Click OK.
40
Viewing studies (Viewer mode)
2264A GB 20010618
Page 41

IPD VIEWER SOFTWARE
2264A GB 200106 18
Viewing studies (Viewer mode)
41
Page 42

Printed in Belgium
Published by Agfa-Gevaert N.V., B-2640 Mortsel-Belgium
2264A GB 20010618
 Loading...