

Page 1
P a g e | 1
Installer Manual
DO NOT GIVE TO HOME OWNER.
FOR PROFESSIONAL USE ONLY .
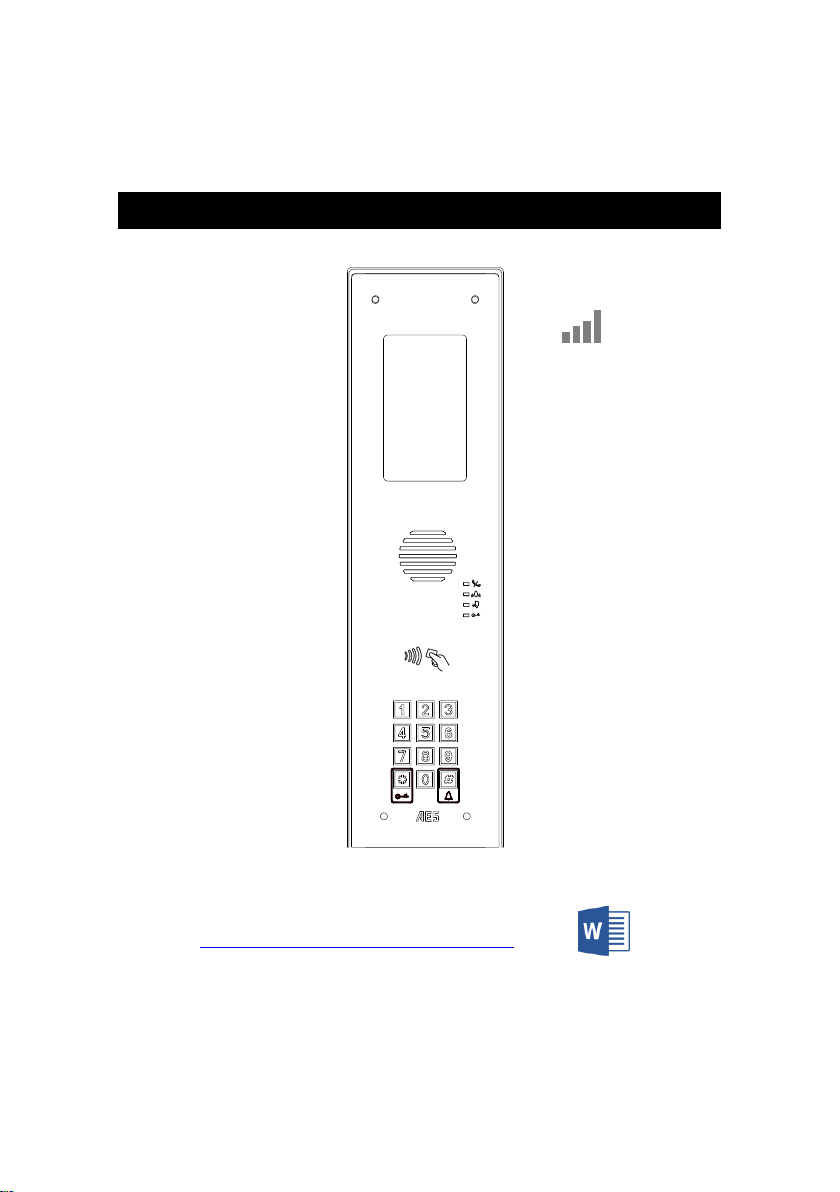
4G Multicom Lite GSM/Cellular Intercom System
Note: For legal reasons, telephone technical support is for registered and
qualified product installers only. Home owners and end-users should contact
their installer for product technical support.
LTE Ready
4G
1.Jones
2.Smith
3.Thomp.
4.Goldberg
5.Adams
6.Cole
7.Henry
8.Obrien
9.Clinton
10.Klein
11.Cali
12.Straw
13.Sheridan
14.Vacant
Download Multicom Lite Nameplate template HERE
https://www.aesglobalonline.com/downloads
Page 2

P a g e | 2
Contents
Really Important things (site survey)
…………….Pg 3
Overview of outside of product
…………….Pg 4
Overview of Inside
…………….Pg 5
Cellular module in detail
…………….Pg 6
Wiring relays
…………….Pg 6
Keypad/Prox modules in detail
…………….Pg 7
Connecting slave devices
…………….Pg 7
Inserting the SIM card
…………….Pg 8
Powering up & LEDs
…………….Pg 8
Installing the programming APP
…………….Pg 9
Program a NEW or Existing job site
…………….Pg 10
Change engineer & manager pass codes
…………….Pg 11
Programming
…………….Pg 12
Step1: Check reception
…………….Pg 12
Step2: Add a family
…………….Pg 13
Step2b: Edit family details
…………….Pg 14
Step3: Activate auto sync
…………….Pg 15
Step4: Add visitor access
…………….Pg 15
Keypad codes
…………….Pg 16
Prox cards
…………….Pg 17
CallerID
…..…….Pg 18
Do not disturb
…………….Pg 19
Access control options
…………….Pg 19
Auto opening
…………….Pg 20
Enquire resident info
…………….Pg 21
Concierge / assistance button
…………….Pg 21
More settings screen
…………….Pg 22
Volumes
…………….Pg 22
Dialling times
…………….Pg 23
Relay times
…………….Pg 23
Information screen
…………….Pg 24
Manager control of gate / door
…………….Pg 25
Receiving a call from the intercom
…………….Pg 26
Caller ID
…………….Pg 26
Complete list of parameters
…………….Pg 27
Warranty terms
…………….Pg 31
Page 3

P a g e | 3
Really Important things you Need to Know..
Please read this entire manual before installing
this product.
To be installed by certified and qualified
personnel / gate automation dealer only. Not
for DIY install!
Ensure there is good network signal at the
gate/door of the install site BEFORE installing
this product. (2G/3G/4G Europe, 3G/4G
Australia & USA)
Set up on a bench in workshop BEFORE going
to site. Program the unit in the comfort of your
work bench and call technical support should
you have questions.
This product requires a SIM.
The SIM should be a voice and text plan.
Do not use a DATA only SIM.
Ensure your SIM has VOLTE if you only have
4G service (HD Voice calling service is
enabled).
Manufacturer warranty does NOT cover lighting
/ storm damage. In lightning prone areas, you
MUST fit external surge protection and
lightning rod in order to maintain warranty on
this product. Evidence of surge protection will
be requested on generation of RGA numbers.
5
1
2
3
4
6
7
Fit proper power cable as per instructions!
Do not use CAT5 to power this device as
this will damage the product.
Warranty will be VOID!
Page 4
P a g e | 4
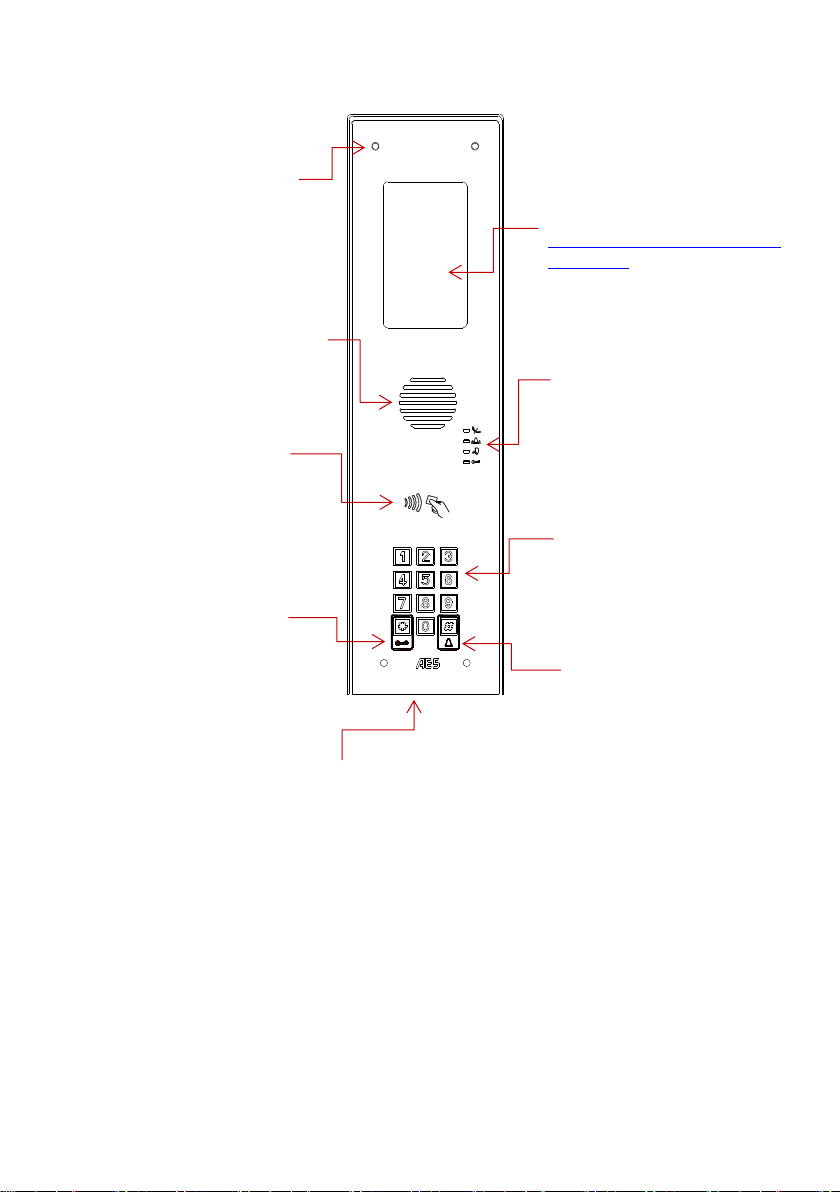
Now lets have a look around the product…
Keypad for dialling
apartment / house
number
Speaker grill
Security Screw Access
(Open top screws only)
Call status LEDs
(for DDA hearing
impaired visitors)
Illuminated nameplate holder
or information screen
Optional Prox badge
reader
CALL button to dial
apartment / house
Hinged front door
Download Nameplate template:
https://www.aesglobalonline.com
/downloads
Code confirm
button
Page 5
P a g e | 5
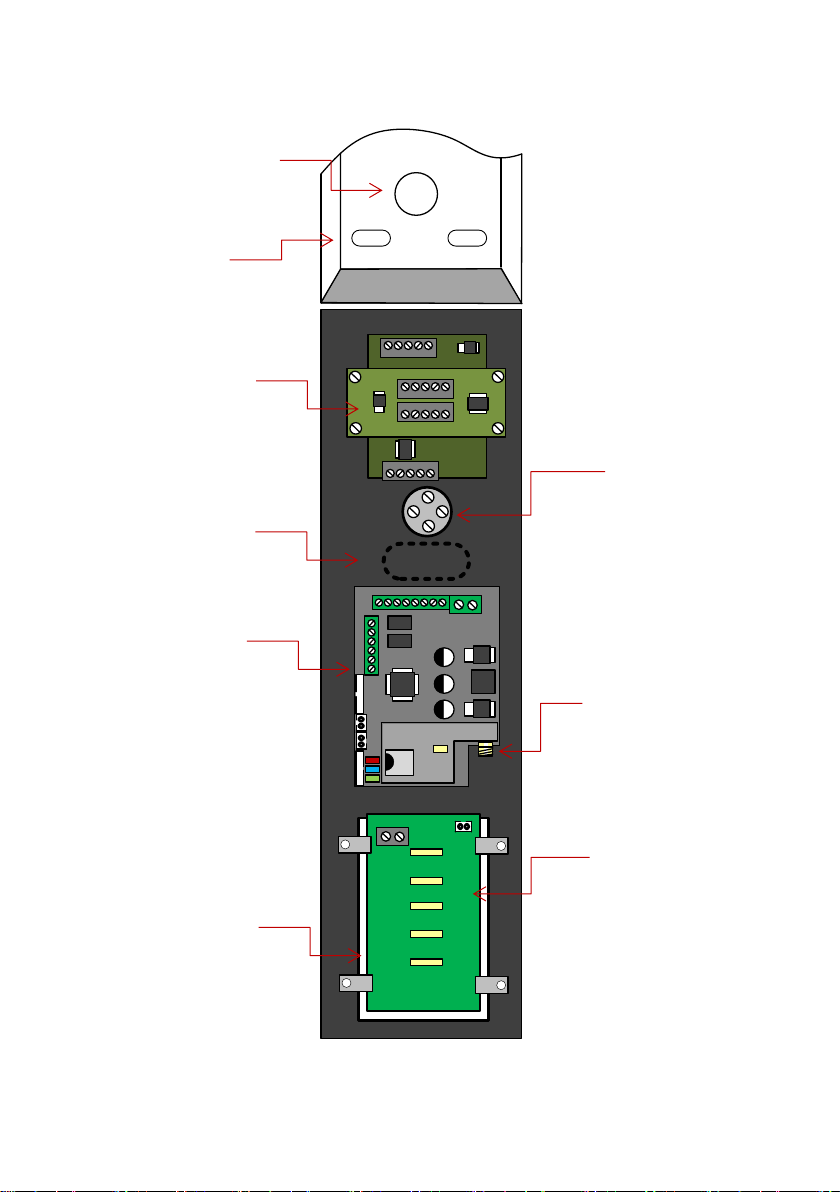
Overview of Inside…
Push button
Antenna
Connection
Optional Prox
reader module
Optional
Prox Coil
Cable Entry
Hole
Mounting
Holes
GSM / Cellular
PCB Module
Name window
holder
Illumination
PCB for name
window
Page 6
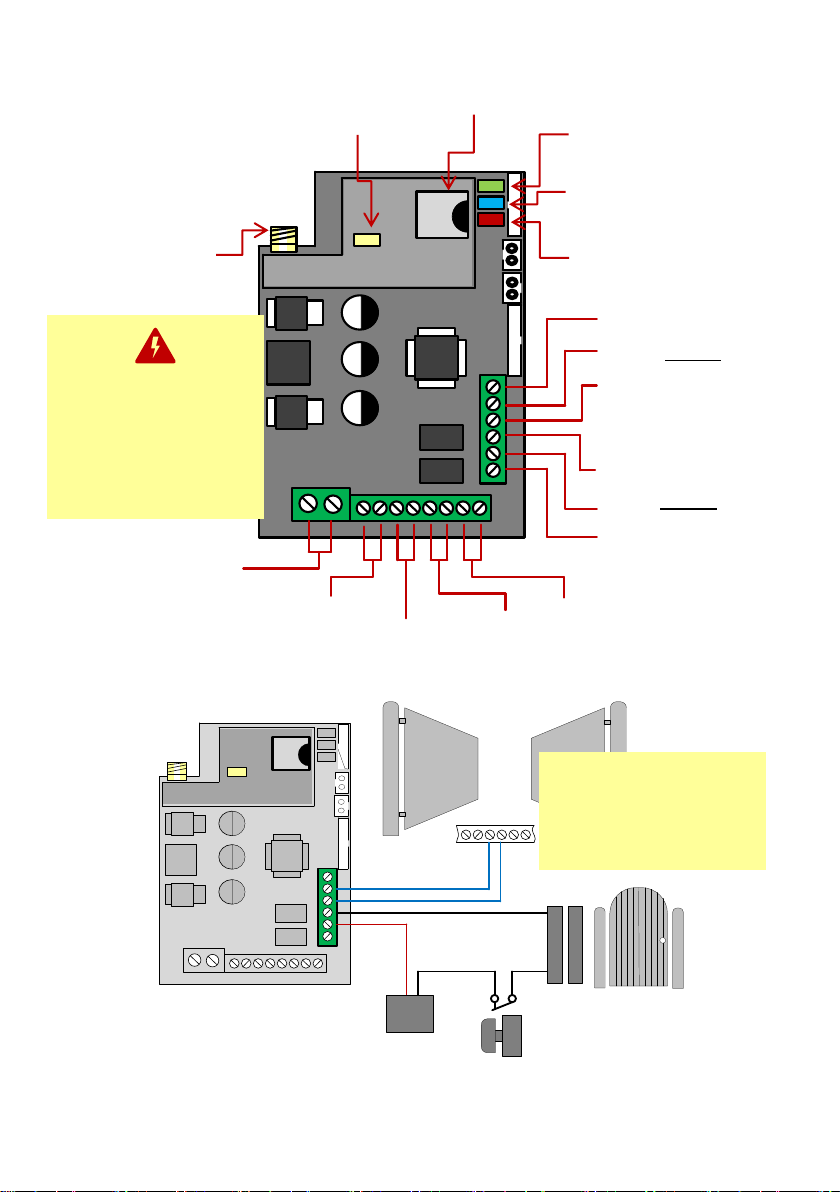
P a g e | 6
Relay 2
Exit Button
To Call
Button
12v dc 100mA
(backlighting)
24v dc IN
From PSU provided
Relay 1
Note: The manufacturer is
not responsible for wiring to
third party devices. Please
consult an experienced
security installer.
Electric Gates
Gate Position
Limit switch
(optional)
Pedestrian
gates or door
Signal Status
Power
Magnetic
lock
CPU Status
Cellular
Module in
Detail…
Exit button
SIM holder
Modem Status
Antenna
connection
Wiring
Relays
N/O
Separate lock Power
supply (not supplied)
COM
Start
N/C
N/O
Common
COM
N/C
Do NOT use CAT5 to
power this device as
damage will occur.
0-6ft - 0.5mm2 (20 gauge)
6-12ft - 0.75mm2 (18 gauge)
12-24ft - 1mm2 (16 gauge)
Page 7
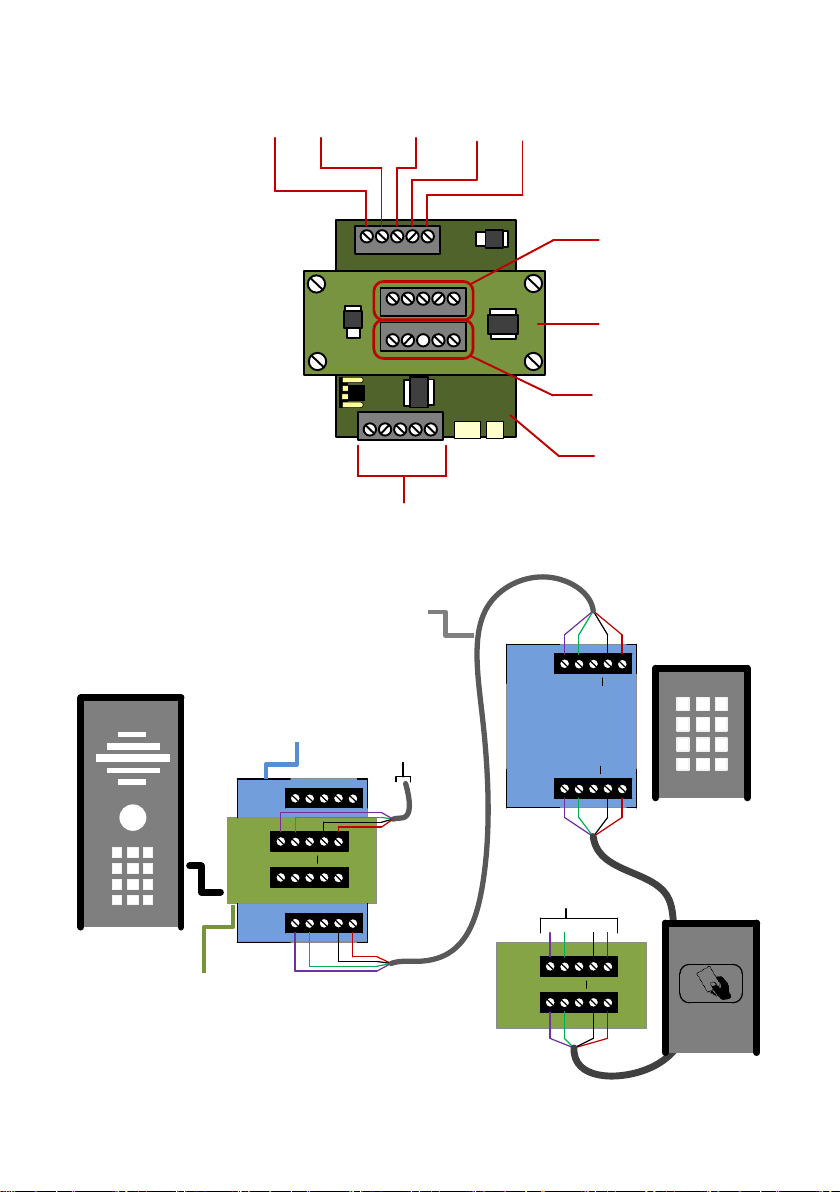
P a g e | 7
1 2 3 24v
OUT
IN
OUT
IN
OUT
IN
1 2 3 24v
OUT
IN
1 2 3 24v
1 2 3 24v
Slave IN connections
Slave IN
Slave OUT
Optional
PROX
module
Keypad
Module
Connecting
Slave
Devices
Keypad /
PROX
Modules
in
Detail…
1
2
Slave OUT connections
3
To next
device
Optional
Keypad
Optional
Prox reader
Optional Slave
Keypad
24v out
Optional Slave
Prox Reader
CAT5 (30ft max)
300ft if device powered
separately
To next
device
GND
Page 8
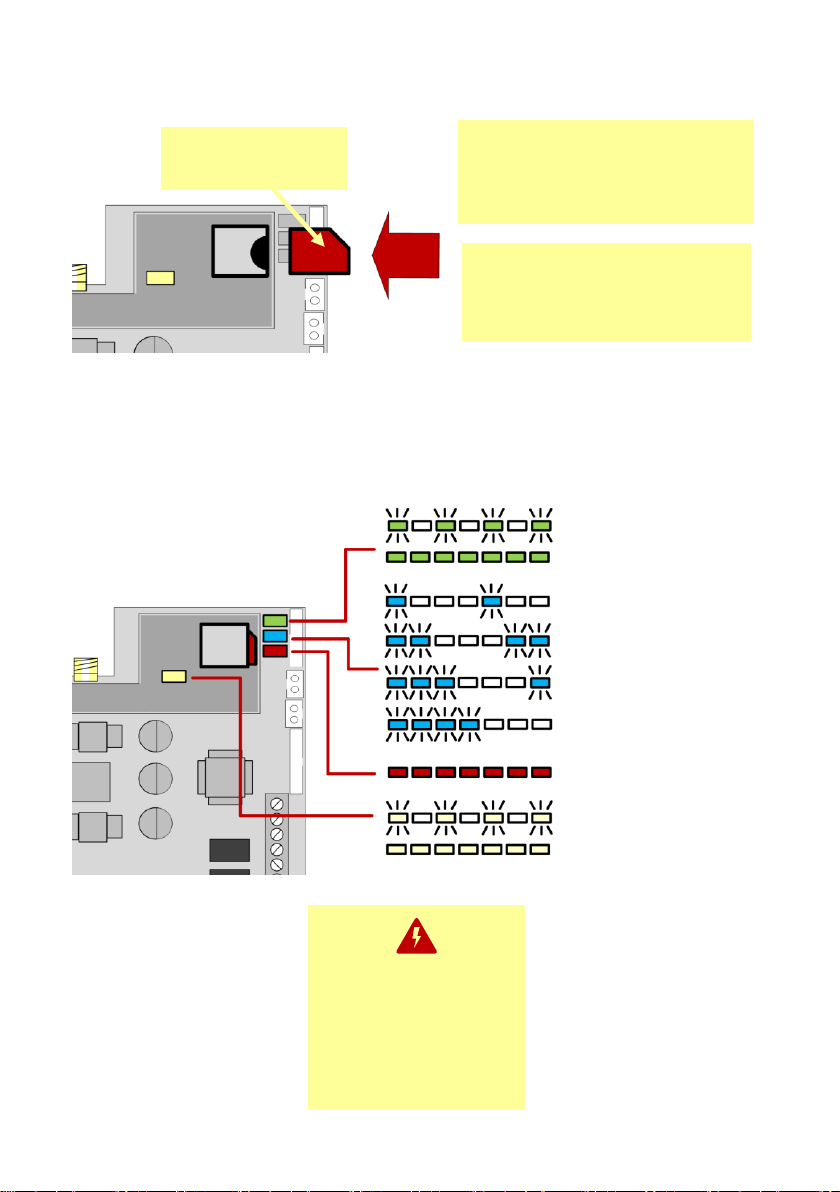
P a g e | 8
Inserting the SIM card
Powering Up & LEDs
Perform a final check of wiring and ensure the antenna is connected before switching on the
power. Once the power is switched on, the power LED should illuminate.
WARNING
Ensure power is OFF. Do not hot
insert or remove while power on.
45 chamfer OUT
Pads DOWN
Ensure SIM is activated.
Pre-pay SIM will need credit first.
At&T preferred. T-Mobile also
compatible in certain areas.
CPU
Flashing = standby
Constant ON/OFF = busy
SIGNAL STRENGTH
1 flash = poor (1 bar)
2 flashes = low (2 bars)
3 flashes = good (3 bars)
4 flashes = Strong (4 bars)
5 flashes = searching
POWER
MODEM
Flashing = standby
Constant ON/OFF = searching
Do NOT use CAT5 to
power this device as
damage will occur.
0-6ft - 0.5mm2 (20 gauge)
6-12ft - 0.75mm2 (18 gauge)
12-24ft - 1mm2 (16 gauge)
Page 9

P a g e | 9
Installing the Programmer APP for the first time
Download the smartphone app to program this unit. Search for MULTICOM 4G and look for the
icon below...
Accept and allow all
permissions (Android
version shown)
To register first time,
enter your name, email
and cell phone number.
After you send the
registration email, go
back to the app screen
& press SETTINGS
4G
Page 10

P a g e | 10
NOTE: Do not change
engineers or managers
codes on the APP unless
they have already been
changed in the intercom
Now you are ready to begin programming!
Program a NEW
or EXISTING Job
Site
Press SETTINGS to reveal the
screen shown. Choose to
create a NEW site or edit an
existing one. Then you can
begin programming.
ANDROID Press & HOLD
Iphone use the “i” symbol
Page 11

P a g e | 11
Select or Create a new Job Site
App AND Intercom Update
Use to change either the manager or
engineer programming codes on BOTH
the intercom and the APP.
App ONLY update
Use to update the APP, typically
when another user has changed the
programming codes on the intercom
from another phone.
Note: This app sends
SMS programming
strings to the intercom
as shown and it should
reply with OK
message. On iphones,
due to restrictions by
Apple, you must
confirm the SMS as
shown. Android
devices will auto send
the SMS in the
background.
Page 12

P a g e | 12
Programming
Now that you have either entered a new client, or selected an existing client from the client list,
you are now ready to begin programming.
Note: SMS string= *20#
Step 1: Check Reception
Go to MORE>INFORMATION to reveal the screen shown.
Press the reception check button. On Android the app will
automatically send a SMS string (*20#) to the intercom.
On iphone, users will be taken to their SMS screen to
confirm before sending the string.
The intercom should reply with a signal level between 1 & 31.
1-12
Poor
13-20
Medium
21-31
Good
For good performance, signal level should be at least 13 or
better on 3G or 4G and 14 or better on 2G.
TIP: If signal is lower than recommended, then take IMMEDIATE
action. Change network if possible, or use an optional high gain
antenna. Check power cable is within recommended
specification. (Poor power cable can lower reception).
SMS message sent to intercom.
SMS reply to your phone.
Page 13

P a g e | 13
Select Multi for multi family system
Note: Keypad codes for residents
MUST BE 6 DIGITS LONG!
SMS String:
Step2: Add a Family(s)
Add up to 3 numbers for a family or resident, one code,
and up to 3 proximity cards (Note: cards have serial
numbers printed on them which can be added to the
fields as shown).
Add Optional Prox Cards
Add card by serial number as
shown.
9999#10#12345#Jones#987654321,987654321,987654321#123456#serial,serial,serial#
Passcode
Apartment number
(up to 5 digits)
Command
(add family)
Family name
(14 digits max)
Phone numbers
(3 max, comma separated)
Keypad code
(must be 6 digits)
Optional PROX card
serial numbers
Page 14

P a g e | 14
Delete a Family & all details
9999#25#apartmentnumber#
Step2b: Edit family
Details if needed
Edit just the name, phone numbers,
prox cards or keypad code individually
for any family with the following
buttons..
SMS Strings
Change Family Name
9999#11#apartmentnumber#newname#
Edit or add first Phone Number
9999#12#apartmentnumber#phonenumber#
Edit or add second Phone Number
9999#13#apartmentnumber#phonenumber#
Edit or add third Phone Number
9999#14#apartmentnumber#phonenumber#
Edit or Add Family Door Code
9999#15#apartmentnumber#doorcode#
Edit or add family Prox Card 1
9999#16#apartmentnumber#serialnumber#
Edit or add family Prox Card 2
9999#17#apartmentnumber#serialnumber#
Edit or add family Prox Card 3
9999#18#apartmentnumber#serialnumber#
Page 15

P a g e | 15
Step4: Add visitor access
You can add visitor keypad codes, or visitor caller ID access,
and proximity cards for any visitors who are non-residents.
CallerID (enter by calling intercom and CLIP caller
recognition)
Proximity card access for visitors
Keypad code access for visitors
Step3: Activate Auto Sync
If you are using time sensitive features, such as time
restricted access control, or auto opening and closing of
gates at pre-set times of the day and week, then it is
important to activate the auto sync.
This intercom reads the current date and time from an
incoming SMS message and re-calibrates its time from that.
Activating this button sends the intercom its OWN
SIM card phone number. The intercom will then send
ITSELF an SMS after a power loss to re-establish
correct time.
Use this feature to have the intercom send itself a
SMS on a schedule. This is useful to maintain proper
time for summer daylight saving for example.
NOTE: Network charges may apply for SMS
messages. Check with your provider.
SMS Strings
Store Intercom OWN phone number for time sync after reboot
9999#54#SIMphonenumber#
Activate Scheduled SMS
9999#55#days# (00=no SMS, 01=daily, 02=every 2 days etc)
Page 16

P a g e | 16
SMS Strings
Store permanent code
9999#81#Y#code#time# (Y= 1 or 2 for relay 1 or 2, code = 4 digit keypad code, time = relay time
in secs from 1-99. 0 = latch code)
Store temporary code
9999#82#hours#code# (hours = number of hours a code is active for, from 1 – 999 hours)
Store time restricted code
9999#83#day,day,day#time1,time2# code# (day=mon,tue,wed,thu,fri etc. Time1=start time,
Time2= end time. Code = 4 digit keypad code)
Delete Code
9999#84#code# (delete a known code) or 9999#84#*# (delete all stored codes)
Note: Times of day are
military format with no colon.
E.g. 1130 pm = 1130
A closer look at Keypad
codes..
There are 3 types of visitor keypad codes..
1. 50 permanent codes which can be
used 24/7.
2. 20 temporary codes, which auto
expire in a pre-set number of hours.
3. 20 time restricted codes which can
only be used at pre-set times and
days of the week.
Page 17

P a g e | 17
A closer look at Prox cards
There are 3 types of visitor cards..
1. 50 permanent cards which can be used 24/7.
2. 20 temporary cards, which auto expire in a
pre-set number of hours.
3. 20 time restricted cards which can only be
used at pre-set times and days of the week.
1234567890
Cards have a 10 digit serial
number printed as shown.
Enter this to add a card.
SMS Strings
Store permanent card
9999#61#Y#serial# (Y= 1 or 2 for relay 1 or 2, serial = 10 digit prox card number)
Store temporary card
9999#62#hours#serial# (hours = number of hours a code is active for, from 1 – 999 hours)
Store time restricted card
9999#63#day,day,day#time1,time2# serial# (day=mon,tue,wed,thu,fri etc. Time1=start time,
Time2= end time, serial = 10 digit prox card number)
Delete Card
9999#64#serial# (delete a known code) or 9999#64#*# (delete all stored codes)
Page 18

P a g e | 18
A closer look at CallerID
IMPORANT:
All resident phone numbers that are stored can
automatically have callerID access without having to
store the numbers in this section again. Go to
CONCIERGE/ACCESS CONTROL to activate CallerID
for all residents.
There are 3 types of CallerID access for VISITORS:
1. 50 visitor phone numbers with 24/7 access.
2. 20 visitors with temporary access (expires
automatically after pre-set time)
3. 20 time restricted phone numbers which can
only be used to gain access at pre-set times
and days of the week.
SMS Strings
Store permanent callerID phone numbers
9999#71#Y#phonenumber# (Y=1 or 2 for relay 1 or 2)
Store temporary phone number
9999#72#hours#phonenumber# (hours = 1-999 hours then this number is auto deleted again)
Store time restricted phone number
9999#73#day,day,day#time1,time2# phonenumber# (day=mon,tue,wed,thu,fri etc. Time1=start
time, Time2= end time)
Delete Phone number
9999#74#phonenumber# (delete a known code) or 9999#74#*# (delete all stored visitor
Page 19

P a g e | 19
Access Control
If residents are to be able to use callerID to open the
gate or door, then enable here. Take care, as
residents can miss-dial the intercom in error!
Enable if residents should be able to latch or hold
open gates or door. This is not recommended on
larger installs as frequently a gate can be latched in
error and result in a service call.
Quick delete a resident and all details.
SMS Strings
Enable callerID for residents
9999#35#X# (X=0 to disable. X=1 to enable)
Enable latching ability on received calls by residents
9999#36#X# (X=0 to disable. X=1 to enable)
Quick Delete a resident to prevent access
9999#25#apartment#
Do Not Disturb
On this screen you can prevent residents receiving calls
from visitors after a set time at night. This can be useful if
there are antisocial callers or residents do not want
disturbed at weekends.
Enter time in 24hr format, no colon. Eg 8.20am =
0820. 11.40pm = 2340.
Visitors can receive calls BETWEEN the START and
FINISH times only on the days selected.
SMS Strings
Add Do Not Disturb Time
9999#90#day,day,day#time1,time2#
(day=mon,tue,wed,thu,fri etc. Time1=start time, Time2=
end time)
Delete all Do Not Disturb Times
9999#90#*#*#
Page 20

P a g e | 20
Auto Opening
You can use the internal time clock feature to hold open gates
at pre-set times and days of the week. For gates that are on
step by step operation, set trigger times to activate opening
and closing. For auto-closing gates, set LATCH times to open,
and then set separate UNLATCH times to close again. Up to
9 SMS event messages can be sent in total.
Enter time in 24hr format, no colon. Eg
8.20am = 0820. 11.40pm = 2340.
Toggle between trigger, latch and unlatch
Add Auto opening / closing times
5555#X#day,day,day,day#time#
Manager Pass code
1= Relay 1 trigger
2= Relay 1 latch
3= Relay 1 unlatch
4= Relay 2 trigger
5= Relay 2 latch
6= Relay 2 unlatch
Add days, 3 digits, e.g.
mon,tue,wed,thu,fri,sat,sun.
Separated by comma.
Time in 24hr format. No
colon. E.g. 11.15pm = 2315
SMS Strings
Delete all automatic relay events
5555#*#
Page 21

P a g e | 21
Enter a number here which will be called when a visitor
needs assistance. Useful for car parks and barriers etc.
Calling time to ring the assistance number before
cancelling and ending the call.
SMS Strings
Enter Concierge / help or assistance number
9999#56#1#phonenumber#
Delete Concierge / help or assistance number
9999#56#1#*#
Set ringing time to call number
9999#57#XX# (XX = seconds, default = 20)
Enquire Resident Info
Enter the apartment or house number and the intercom
will reply with all data, numbers and codes stored against
that resident.
SMS String
Enquire resident
9999#26#apartment#
Concierge / assistance
Used in panels with a HELP / Assistance or concierge
button.
Page 22

P a g e | 22
More Settings Screen
Check status of relays,
signal strength, stored
codes and much more.
Adjust speaker &
microphone volume
Adjust ringing times
before rolling to next
phone number
Set global relay trigger
times, useful for magnetic
locks
Volumes
If residents experience significant echo, reduce the microphone
and speaker levels as low as possible. Default setting = 5.
Range = 1-9.
SMS Strings
Set Speaker Volume
9999#30#X# (X = 1-9, default = 5)
Set Microphone Volume
9999#31#X# (X = 1-9, default = 5)
Set ring tone Volume (not used yet)
9999#32#XX (X = 1-9, default = 5)
Page 23

P a g e | 23
Dialling Times
Use these to adjust the ringing time the intercom will call a
number before it will stop and call the next. This is useful to
avoid voicemail from picking up a call.
Default dialling time is 20 seconds (from button press)
SMS Strings
Set first ringing time
9999#21#XX# (Default = 20. Range = 1-99)
Set second ringing time
9999#22#XX# (Default = 20. Range = 1-99)
Set third ringing time
9999#23#XX# (Default = 20. Range = 1-99)
Relay Times
Adjust relay times to suit perhaps a magnetic lock that requires
a 7-10 second unlock time to allow pedestrians time to press the
door and open.
Default relay time is 1 second.
SMS Strings
Set Relay 1 time:
9999#50#XXXX# (XXXX = time in secs from 1-9999)
Set Relay 2 time:
9999#51#XXXX# (XXXX = time in secs from 1-9999)
Page 24

P a g e | 24
Information Screen
This screen allows the engineer or manager to be able to check multiple things on the intercom.
Please note the following points..
-5555 is the default managers code shown.
-Stored callerID numbers, keypad codes and prox users are VISITOR credentials only. These do
not list RESIDENT credentials. To do that, enquire on each resident individually in the appropriate
screen.
In the activity log screen, each event is stored under a code. For example if a visitor uses caller ID
to open the gate, it will be shown as date – time – number – CID. If a keypad code is used, it will
be shown on the next line as date – time – pin number – CODE.
Page 25

P a g e | 25
Manager Controls of Gate / Door
This screen allows the installer or manager to manually trigger the gate.
RELAY 2
Momentary trigger
SMS – 5555#4#
RELAY 2
Latch / Hold Open
SMS – 5555#5#
RELAY 2
Unlatch / Unhold
SMS – 5555#6#
RELAY 1
Momentary trigger
SMS – 5555#1#
RELAY 1
Latch / Hold Open
SMS – 5555#2#
RELAY 1
Unlatch / Unhold
SMS – 5555#3#
Page 26

P a g e | 26
Receiving A Call and Opening Gates / Door
Visitors can press the call button, which will initiate a call from your intercom to the designated
phone numbers which will have been programmed by your installer.
1.Press call button
2.Intercom calls up to 4
phones in sequence
3.Answer the call, speak to visitor,
and grant access with telephone.
Access Control by Calling the intercom (CallerID)
This is usually main gate/door.
Press 1 to open
Press 2 to hold open
Press 3 to un-hold
(Note: Hold open features are only
available if enabled by manager /
engineer)
This can be pedestrian gate,
driveway lights or other.
Press 4 to open/activate
Press 5 to hold open/on
Press 6 to un-hold/off
(Note: Hold open features are only
available if enabled by manager /
engineer)
Output 1
Output 2
All residents can call the intercom to gain access at no call charge
using CallerID (CLIP) display. However, this feature is only available
to residents if enabled by the engineer or manager.
To open, simply call the intercom phone number from a stored
number and the relay will trigger as per programmed.
Page 27

P a g e | 27
Complete list of parameters
The table below show the complete list of features. Programming messages below must begin
with 9999# (assuming 9999 is still the programming passcode)…
Edit a family name
9999#11#12345#Jones#
Edit or add family number
9999#12#12345#number# (edit first dialled number)
9999#13#12345#number# (edit second dialled number)
9999#14#12345#number# (edit third dialled number)
Edit a family door code
9999#15#12345#code#
Edit or add a family card
9999#16#12345#serial#
9999#17#12345#serial#
9999#18#12345#serial#
Set ringing time to call first number
9999#21#XX#
Set ringing time to call second number
9999#22#XX#
Set ringing time to call third number
9999#23#XX#
Delete a family and all details
9999#25#12345#
Enquire details on a family
9999#26#12345# (This will reply with all the details stored about this apartment).
Set Speaker Volume
9999#30#X# (X=1-9)
Set Mic Volume
9999#31#X# (X=1-9)
Enable / Disable caller ID for residents
9999#35#1# (1=ON, 0=OFF. Default=0)
Enable / Disable latching ability by residents
9999#36#1# (1=Enabled, 0=Disabled. Default=0)
Change Engineers programming code
9999#40#XXXX# (Default 9999)
Change managers user code
9999#41#XXXX# (Default 5555)
Change Relay 1 trigger time
9999#50#XXXX#
Change relay 2 trigger time
9999#51#XXXX#
Store intercom own phone number for AUTO self SMS sending on reboot.
9999#54#XXXXXXXXXX#
Activate auto SMS sending (to re-calibrate time every day)
9999#55#XX# (0=off, 1=SMS every day, 2=SMS every 2 days etc)
Page 28

P a g e | 28
Store phone number for manager / concierge / assistance call button to call when pressed
9999#56#1#XXXXXXXXX#
Delete manager phone number
9999#56#1#*#
Store ringing time for manager / concierge / assistance phone number
9999#57#XX#
SMS control messages
Either engineer or of manager can control the relays by SMS but users cannot.
9999#1# - Trigger relay 1
9999#2# - Latch relay 1
9999#3# - unlatch relay 1
9999#4# - Trigger relay 2
9999#5# - Latch relay 2
9999#6# - Unlatch relay 2
Same commands can be carried out with 5555 passcode.
To store a visitor code (50 max)
9999#81#Y#code#time# (Y= 1 or 2 for relay 1 or 2, time=relay trigger time, 1-99 seconds)
To store a temporary visitor code (20 max):
9999#82#hours#code# (hours is number of hours code is active for, max 999 hours)
To store a time restricted visitor code (20 max):
9999#83#day,day,day,day,day,day,day#time1,time2#code#
To delete a visitor code:
9999#84#code#
To delete all visitor codes:
9999#84#*#
To store visitor caller ID number (50 max)
9999#71#Y#telephone# (Y = 1 or 2 for relay 1 or 2)
To store visitor temporary called ID number (20 max)
9999#72#hours# telephone # (hours is qty of hours the caller ID number can work for 999 max)
To store a visitor time restricted caller ID number (20 max)
9999#73#day,day,day,day,day#time1,time2#telephone#
To delete a visitor caller ID number:
9999#74#number#
To delete all visitor caller ID numbers:
9999#74#*#
To store prox card (50 max)
9999#61#Y#serial# (Y = 1 or 2 for relay 1 or 2)
To store temporary visitor Prox card (20 max)
9999#62#hours#serial# (hours can be up to 999 max)
To store time restricted prox card (20 max)
9999#63#day,day,day,day,day#time1,time2#serial#
To delete a prox card:
9999#64#serial#
To delete All prox card:
9999#64#*#
Page 29

P a g e | 29
SMS Checking messages
*20# (check reception, version and date etc)
5555*21# (Check stored visitor caller ID numbers only. Do not check stored family numbers).
5555*22# (Check gate status)
5555*23# (shows last 20 events)
5555*24# (Check stored visitor keypad codes)
5555*25# (Check stored visitor prox cards)
To Add an automatic relay event
5555#1#day,day,day#time#
To delete all auto relay events..
5555#*#
To set Do Not Disturb Times
9999#90#day,day,day#time1,time2#
To delete all Do Not Disturb Times
9999#90#*#*#
Complete restore defaults on unit
9999#99#
Troubleshooting guide
Q. The unit will not power up. No LEDs on.
A. Check power supply voltage at intercom is 23.4v DC or more. Cable length from PSU to
intercom should be less than 25 feet and in 14 gauge for longer distances. See guide. Check the
fuse.
Q. The unit powers up but is not showing network reception or will not respond to SMS.
A. This means the unit is not able to detect the network for some reason.
-Power off the unit, remove the SIM and check it in a mobile phone to verify it can make a call and
has calling credit.
-Disable any PIN code request if active on the SIM card.
-Check the SIM is a standard voice capable SIM. If you are unsure, contact your SIM card
provider to verify. Compatible networks are At&T and T-Mobile.
-Check the reception is medium or good. Poor reception is not sufficient.
-Power off, remove the SIM, use fine sand paper to lightly sand the SIM pads and contacts on the
GSM unit, lightly bend the contacts upwards so that they make better contact with the SIM and try
again.
Q. The unit calls the first number, but there is not enough time to answer before it diverts
to the next number.
A. Increase the no answer time as per programming instructions.
Q. The unit calls the first number but voicemail comes on before it can ring the second
number.
A. Decrease the no answer time as per programming instructions.
Page 30

P a g e | 30
Q. The caller ID part does not work.
A. Residents have Caller ID disabled by default. Ensure this is activated if you want residents to
use caller ID. If your number is a private or number withheld, then it will not work.
-Ensure the number is entered as you would normally dial it from another phone.
-For US customers, ensure the numbers have been entered with a leading 1. If this does not work,
try again without the leading 1.
Q. There is no audio from the gate, but the person at the gate can hear ok.
A. This can be due to low reception or excessively long power cables.
-Check reception level by *20#.
-Change SIM card if necessary to another network which may have better coverage.
-Purchase a high gain antenna.
This may also be caused by a defective microphone, water on a microphone from a sprinkler for
example, or dirt/insects blocking the microphone hole. If reception is optimum and the problem
persists, contact your supplier or installer.
Q. The audio quality that can be heard on the remote telephone is poor or humming
(buzzing).
A. A small amount of GSM buzz can be considered normal on GSM intercoms, but not so much
that causes inability to hear the person speaking. This is a symptom of poor reception. Try above
steps on checking and improving reception. Consider fitting an external high gain antenna. Move
the antenna further away. Remove any short bends in the antenna. Ensure the spare antenna
cable is not rolled up inside the call station.
Q. The trigger keys do not work when the intercom calls a phone.
A. Check if you can hear the relay clicking at the gate when the keys are pressed during a call. If it
can be heard, then the system is working, check wiring between the relay and the lock or gate
panel. If the relays do not make a clicking sound, then check this feature on a different mobile cell
phone or landline. If it works on a different phone, check the settings on the phone in question
under DTMF tones.
Failure of DTMF tones to operate correctly is also a symptom of low reception or insufficient
power cabling. Check steps above on improving reception or addressing the power problem.
-Also check that the relays are not already latched with the *22# command. If they are latched,
they need unlatched before the trigger keys will work.
-Sometimes excessively long power cables or thin power cables can cause this problem. Prove it
by connecting a temporary extension lead and the power supply directly to the unit.
Q. The system was operating the gates fine, but now it will not trigger the gates.
99% of the time, this is cause by the user accidentally latching the relay. This latches the output
relay permanently on. Send the intercom the following SMS *22#. The intercom should reply with
a message detailing the relay status.. If it has been latched, then the message will state “the relay
is ON”. In this case refer to the user guide to read how to unlatch it again.
Q. The unit no longer calls out to phones but I can make a call to it from my phone.
A – Check there is balance on the SIM card.
A – Switch off the power, remove the SIM, put it into a phone, and check that a call can be made
from a phone. This will verify if the SIM is still working and in service.
Page 31

P a g e | 31
Q. The Android App shows an error message “Command Failed” when I try to use a
function.
A – Go to phone settings/application manager/cellbox prime/permissions, and ensure all
permissions are turned ON. Also ensure the app settings screen has a valid phone number
stored.
Change History
Key:
P = Panel version H = Hardware PCB version S = Software version
Version
Reason for change
Date
P H S 1 1
2.6
Warranty Terms
Please note, by installing this product, you are accepting the following warranty terms:
1. The manufacturer’s warranty is a “return to base” 2 year warranty from date of manufacture. This means that
any suspected defective components or items are returned to the manufacturer’s agent for investigation and
diagnosis, and returned at the cost of the customer.
2. The warranty does not cover, nor is the manufacturer or agent responsible for any of the following
whatsoever: Storm damage, lightning or surge damage, flooding, accidental damage, vandalism or deliberate
damage, un-explained corrosion or unusually harsh environments, failure of telephone networks, future uninteroperability between the product and network providers which cause mal-function due to changes
implemented by the phone providers after manufacture of the product, or that which is outside of control of the
manufacturer (e.g. 2G, 3G switch off, removal or inability to obtain VOLTE service), and damage due to not
proper installation.
3. The manufacture in no way accepts liability for any of the following incurred due to a product defect: Cost of
attending site, inconveniences, labour rates, time lost, loss to or damage to property, security breaches, late
payment clauses or breaches of any contracts between the installer and the client.
4. This is a profession install product only. The product is a component of an overall system. Therefore, it is the
responsibility of the installer to certify the safety and compliance of the overall finished system. As soon as this
product is fixed to another item, or connected to another third-party device, then the product has been modified,
and compliance with local regulations in the country of install is strictly the responsibility of the installer.
5. Re-stocking fees may apply to items returned that are found to be non-defective. Complete units will also
attract a re-stocking fee if returned for credit, regardless if a defect is discovered or not. Re-stocking fees may
vary depending on the condition of the item being returned, and whether it can be determined as in brand new
condition. The warranty terms do not entitle customers to an automatic full refund. For more details on returns
procedures and re-stocking fees, contact the agent.
6. Items with physical signs of surge damage are not covered by warranty. Items without visible signs of surge
damage will only be covered by warranty provided photographic evidence is provided from site showing surge
protection has been installed as per instructions in this manual.
Page 32

P a g e | 32
EU-RED Declaration of Conformity
Manufacturer: Advanced Electronic Solutions Global Ltd
Address: Unit 4C, Kilcronagh Business Park, Cookstown, Co Tyrone, BT809HJ, United Kingdom
We/I declare, that the following equipment (GSM Cellular Intercom System), part numbers:
Multiple Model kit part numbers: PRIME6-MULTI-LT-4GE.
Complies with the following essential requirements for 2014/53/EU:
ETSI draft EN 301 489-1 V2.1.1 (2017-02) (Electromagnetic compatibility)
ETSI draft EN 301 489-52 (2016-11) (Electromagnetic compatibility, specific to cellular)
(2G bands 900/1800, 3G band 1,8 LTE bands 1, 3, 7, 8, 20).
Test report number LCS181101028AEA
ETSI EN 301 511 V12.5.1 (2017-03) (3.2 of directive 2014/53/EU)
ETSI TS 151 010-1 V12.8.0 (2016-05) (Digital cellular telecoms compliance)
Test report number LCS181101028AEB
ETSI EN 301 908-1 V11.1.1 (2016-07) (IMT Cellular networks, 3.2 of directive 2014/53/EU)
ETSI EN 301 908-2 V11.1.2 (2016-07) (CDMA spread / UTRA FDD)
Test report number LCS181101028AEC
ETSI EN 301 908-13 V11.1.2 (2017-07) (E-UTRA and UE standards)
Test report number LCS181101028AED
EN 62311 :2008 (Electromagnetic safety and human exposure)
Test report number: LCS181101028AEE
EN 60950-1, (A1, A11, A12, A2)
EN 62311
IEC 60950 (IT equipment safety)
Test report number: LCS181101029AS
The notified body is: Micom Labs (CAB number 2280).
This declaration is issued under the sole responsibility of the manufacturer.
Signed by:
Paul Creighton, Managing Director. Date: 4th Dec 2018
Note: For legal reasons, telephone technical support is for registered
and qualified product dealers only. Home owners and end users should
contact their local dealer for product technical support.
2280
FCC ID: 2ALPX-PE-4GA
Main Model No: PRIME6-PROX-IMPK-PE-4GA
Caution: This device complies with part 15 of the
FCC Rules. Operation is subject to the following two
conditions: (1) This device may not cause harmful
interference, and (2) this device must accept any
interference received, including interference that
may cause undesired operation.
 Loading...