

Page 1
P a g e | 1
Homeowner User Manual
For
Advanced GSM Intercom System
For Service, Warranty and Support Contact:
Installed By:
Install Company Name:
Installer Phone Number:
Installer Email Address:
Date of Install:
Note: For legal and safety reasons, the manufacturer cannot offer telephone
technical support to un-certified or non-qualified persons. Technical support
can only be delivered via a qualified gate-safe installer.
Page 2

P a g e | 2
Contents
Overview of System
…………….Pg 3
Receiving a call and opening gates / door
…………….Pg 3
Access control by caller ID (CLIP)
…………….Pg 3
Using the APP
…………….Pg 4
Summary of APP home screen
…………….Pg 5
Opening gate by APP
…………….Pg 6
Adding Keypad Codes
…………….Pg 6
Time Restricted Codes
…………….Pg 7
Auto Expiring Codes
…………….Pg 8
Adding Proximity Cards
…………….Pg 8
Permanent 24/7 Cards
…………….Pg 9
Time Restricted Cards
…………….Pg 10
Auto Expiring Cards
…………….Pg 10
Auto Opening & Closing
………….Pg 11
Status Options
……….Pg 12
24/7 CallerID Access
…………….Pg 14
Time Restricted CallerID
…………….Pg 14
Notifications
…………….Pg 15
Do Not Disturb
…………….Pg 15
After Hours
…………….Pg 16
Page 3
P a g e | 3
Overview of System
Thank you for purchasing an AES Intercom system. This product is a GSM Intercom system,
which operates on GSM phone networks.
You will need to ensure you have adequate cellular coverage at your location before using this
product. You will also need to ensure that this product has an active SIM card inside. Failure to
maintain the SIM card plan will render the product un-operational until cellular service is restored.
Receiving A Call and Opening Gates / Door
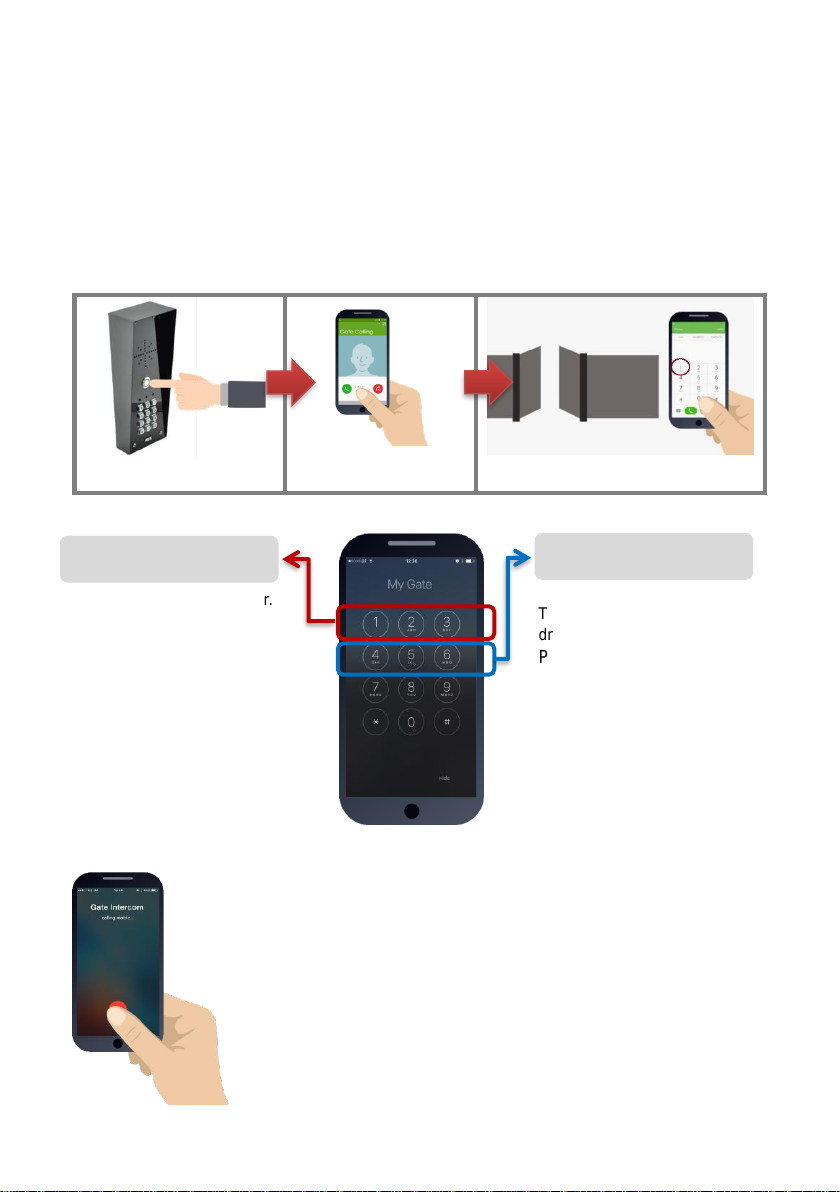
Visitors can press the call button, which will initiate a call from your intercom to the designated
phone numbers which will have been programmed by your installer.
1.Press call button
2.Intercom calls up to 4
phones in sequence
3.Answer the call, speak to visitor,
and grant access with telephone.
Access Control by Calling the intercom (CallerID)
This is usually main gate/door.
Press 1 to open
Press 2 to hold open
Press 3 to un-hold
(Note: Hold open features are only
available on certain gate/door
systems. Contact your installer for
details)
This can be pedestrian gate,
driveway lights or other.
Press 4 to open/activate
Press 5 to hold open/on
Press 6 to un-hold/off
(Note: Hold open features are only
available on certain gate/door
systems. Contact your installer for
details)
Output 1
Output 2
This product can store up to 100 phone numbers, which we shall call
“Authorized phone users”. While these users will not receive a call
from the intercom on visitor arrival, they can call the intercom from
their phone which will trigger output 1 and open the gate/door.
To open your gate or door (output1), simply call the sim card
number of the intercom from your phone.
If your number has been stored by your installer, then relay 1 will
trigger and open the gate or door and the call will be rejected,
making this a free call.
Page 4
P a g e | 4
Using the Cellcom Prime App
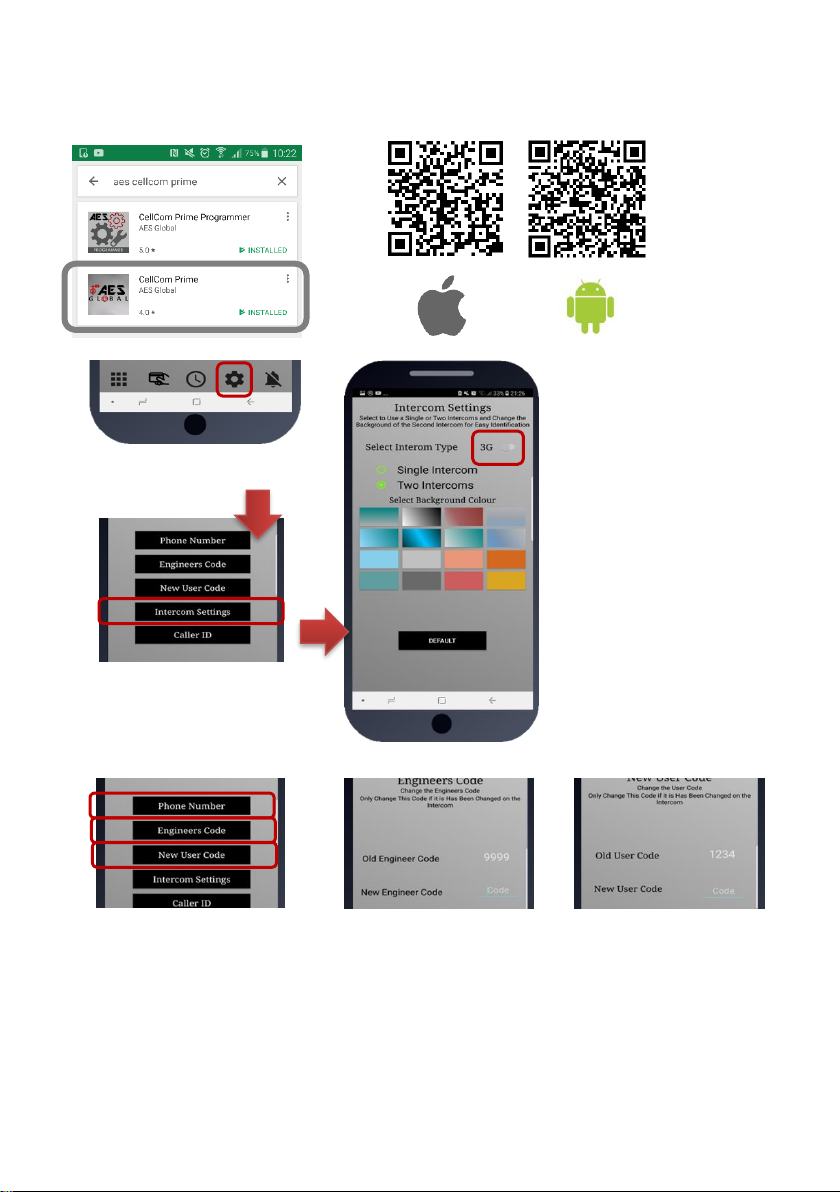
You can use the free Cellcom Prime app on Android phones and iphones. Look for the for the icon
below or scan the QR code..
1. Install + launch the app, &
accept all permissions. Press
SETTINGS.
2. Select your intercom
type 2G/3G or 4G (this
changes how the
Proximity part works)
3. Select Single Intercom
if you have only one
intercom and one
entrance. Select two
intercoms if you have 2
gate entrances with
intercoms fitted. You can
select different
background colour for
dual intercom operation
so that you know which
intercom you are
controlling.
4. Store the phone number of
the intercom SIM card in the
phone number screen.
5. If the installer has
changed the engineers
code, they can enter it
here.
6. If the user code has
been changed, enter it
here.
IMPORTANT: Android users, if you receive an error message “Command Failed”, go to
Phone Settings/Application Manager/Permissions, and turn on all permissions for the app
& check the intercom phone number is stored in the app.
Page 5
P a g e | 5
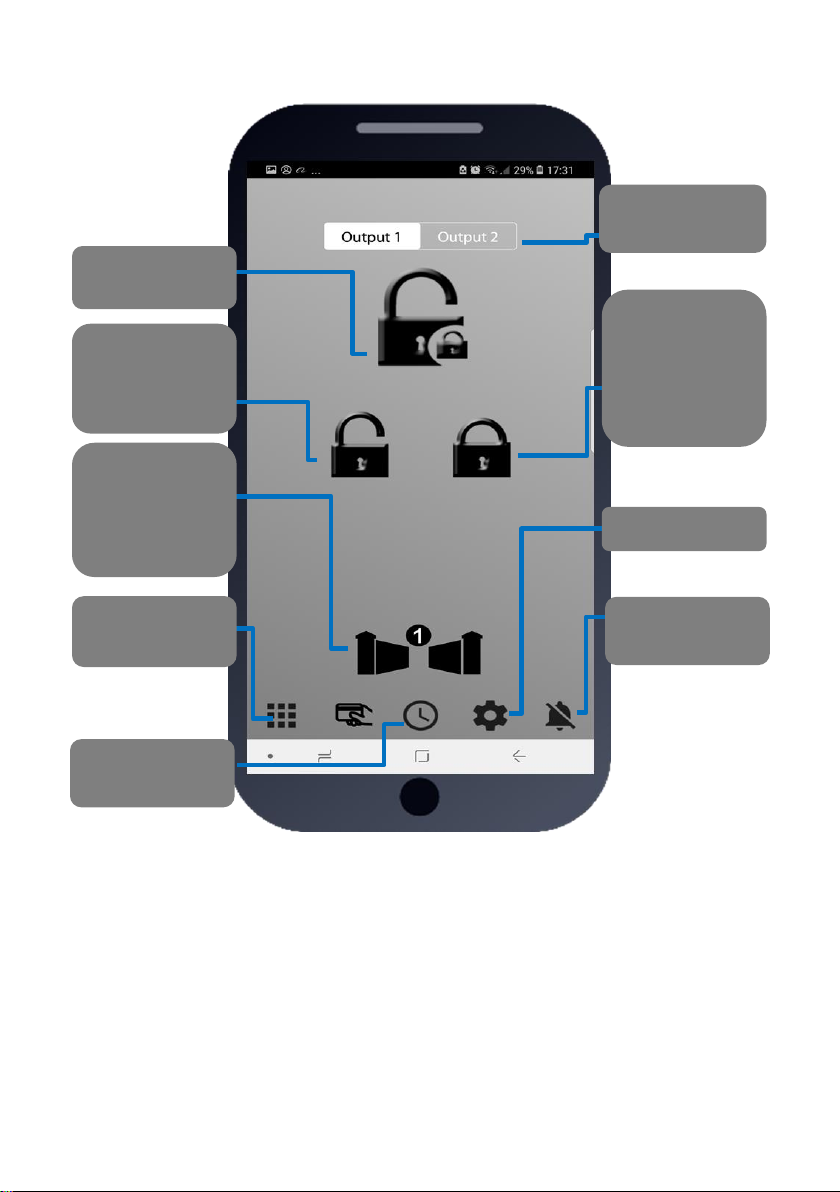
Summary of the App Home Screen
Iphone users! Please note that due to security restrictions by
apple, any SMS button commands will take you to your native
SMS screen where you must re-confirm the SMS before it will
send. Android devices will send the SMS automatically.
Switch between
output 1 and 2
Unlatch (allow
held open gates
to close). This
will send SMS
string to the
intercom.
Latch (hold open
gates). This will
send SMS string
to the intercom.
Keypad code
management
Change from
gate 1 to gate 2
(when more
than 1 gate
controlled)
Settings
SMS
Notifications
Timing functions,
status and other
Speed dial gates
to open
Page 6

P a g e | 6
Opening the gate by App
Press the main button as shown. On Android phones it will
automatically call the intercom and trigger the gate/door. For
iphones, it will take you to your dialling screen with the number
pre-loaded and you can press to dial (this is a security feature by
apple).
Note: Your installer will need to store your phone number in the
intercom before this speed dial feature will open the gate.
Adding Keypad Pin codes (Keypad models only)
Use this to add up to 200 permanent 24/7
codes.
20 time-restricted codes (only work during
pre-set days and times of the week.
30 auto-expiring temporary codes.
Delete any code.
Check stored keypad codes (will send
SMS reply with list of codes.
NORM = Normal codes, can be used
24/7.
TEMP = Temporary codes which will auto
expire.
PLAN = Time restricted codes
Page 7

P a g e | 7
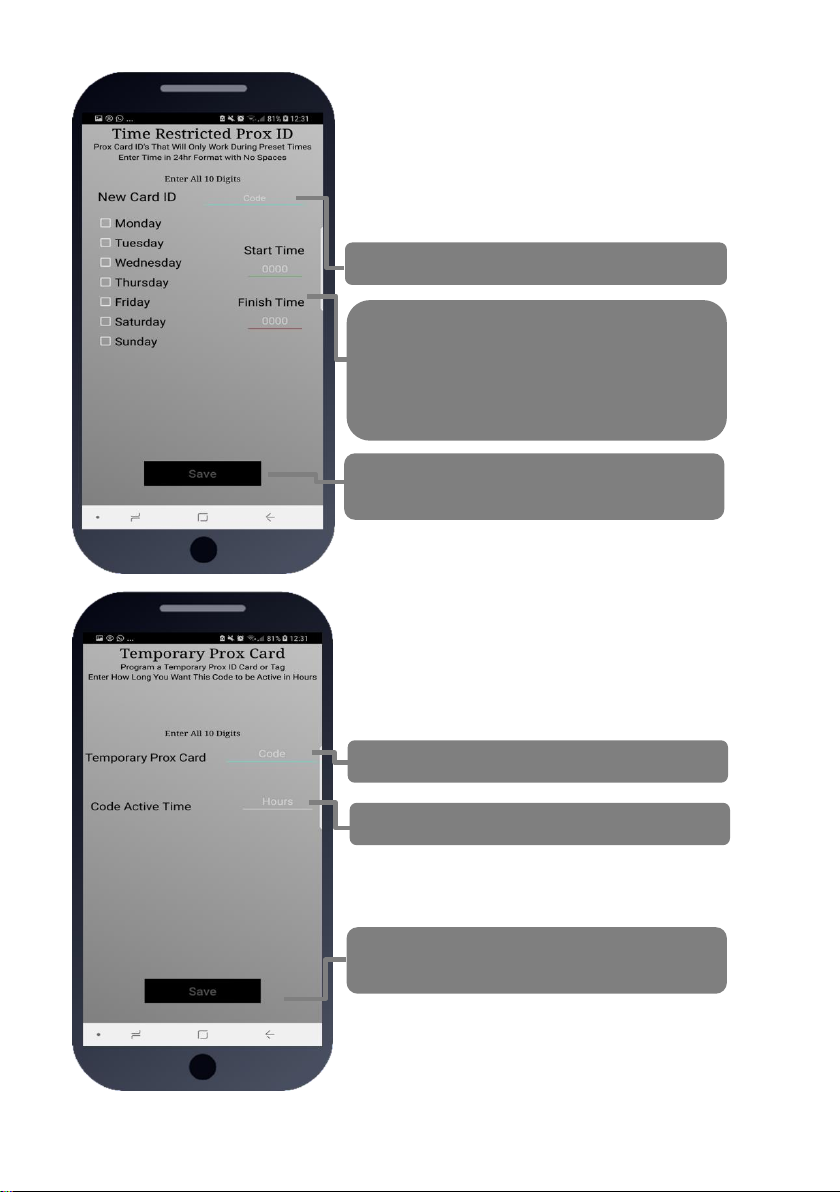
Time Restricted Keypad Pin Codes
Up to 20 codes can be added which will only operate during
pre-set times and days of the week. This is useful to
improve security by giving pin codes which will only work
during desired hours and days of the week.
Permanent Codes (2G or 3G device)
Add a new code (up to 4 digits)
Enter 1 for the main output relay, or 2 for the
secondary output (ask your installer if this is
being used)
Can be 1 to 9999 seconds (2.7 hours).
For Automatic Gates
Enter 0 for a latching code (hold open).
Enter 1 sec to trigger normally.
Enter 3600 for a 1 hour hold open code.
Note: Latching and hold open only work for
selected types of gate installs (ask your
installer).
For Strike Locks enter 1 sec, mag locks 7
secs
Add a new code (up to 4 digits)
Select the days during which the pin code
should work, and between which times. Note:
Enter time in 24 hr military format with no
colons.
E.g. 9am = 0900. 5pm = 1700.
Press Save to send SMS (iphone users must
also confirm from SMS screen).
Page 8

P a g e | 8
Auto-Expiring Temporary Codes
Up to 30 codes can be entered along with an auto expiry
time in hours, from 1 hour to 168 hours (1 week). Once
the time has expired, the keypad code will automatically
be deleted from the memory.
Add a new code (up to 4 digits)
Enter the expiry time in hours (1-168)
Press Save to send SMS (iphone users must
also confirm from SMS screen).
Adding Proximity Cards (prox capable models only)
Delete Prox cards
Add up to 200 proximity cards (24/7 access).
Add up to 20 time restricted prox cards (only
work pre-set times and days of the week).
Add up to 30 temporary auto-expiring prox cards
Check stored Prox cards (will send SMS reply
with list of card serial numbers.
NORM = Normal codes, can be used 24/7.
TEMP = Temporary codes which will auto
expire.
PLAN = Time restricted codes
Page 9

P a g e | 9
Add a new card (enter all 10 digits)
Enter 1 for the main output relay, or 2 for the
secondary output (ask your installer if this is
being used)
Can be 1 to 9999 seconds (2.7 hours).
For Automatic Gates
Enter 0 for a latching code (hold open).
Enter 1 sec to trigger normally.
Enter 3600 for a 1 hour hold open code.
Note: Latching and hold open only work for
selected types of gate installs (ask your
installer).
For Strike Locks enter 1 sec, mag locks 7
secs
Permanent 24/7 cards/tags
Permanent Cards/tags (4G version)
The 4G version has one addition or
difference to the 2G&3G models. It can store
a 6 character nickname along with the card
ID. This is useful when using the activity log
to determine which card was used and at
what time. E.G. PaulH, JohnS, AndyH etc.
These names will show in the activity log for
the 4G version rather than the card serial
number.
Page 10
P a g e | 10
Time Restricted Prox Cards
Up to 20 cards can be added which will only operate during
pre-set times and days of the week. This is useful to
improve security by restricting access to certain times.
Add a new card (enter 10 digit serial number)
Select the days during which the card should
work, and between which times. Note: Enter
time in 24 hr military format with no colons.
E.g. 9am = 0900. 5pm = 1700.
Press Save to send SMS (iphone users must
also confirm from SMS screen).
Auto-Expiring Prox Cards
Up to 30 cards can be entered along with an auto expiry
time in hours, from 1 hour to 168 hours (1 week). Once
the time has expired, the card will automatically be
deleted from the memory.
Add a new card
Enter the expiry time in hours (1-168)
Press Save to send SMS (iphone users must
also confirm from SMS screen).
Page 11
P a g e | 11
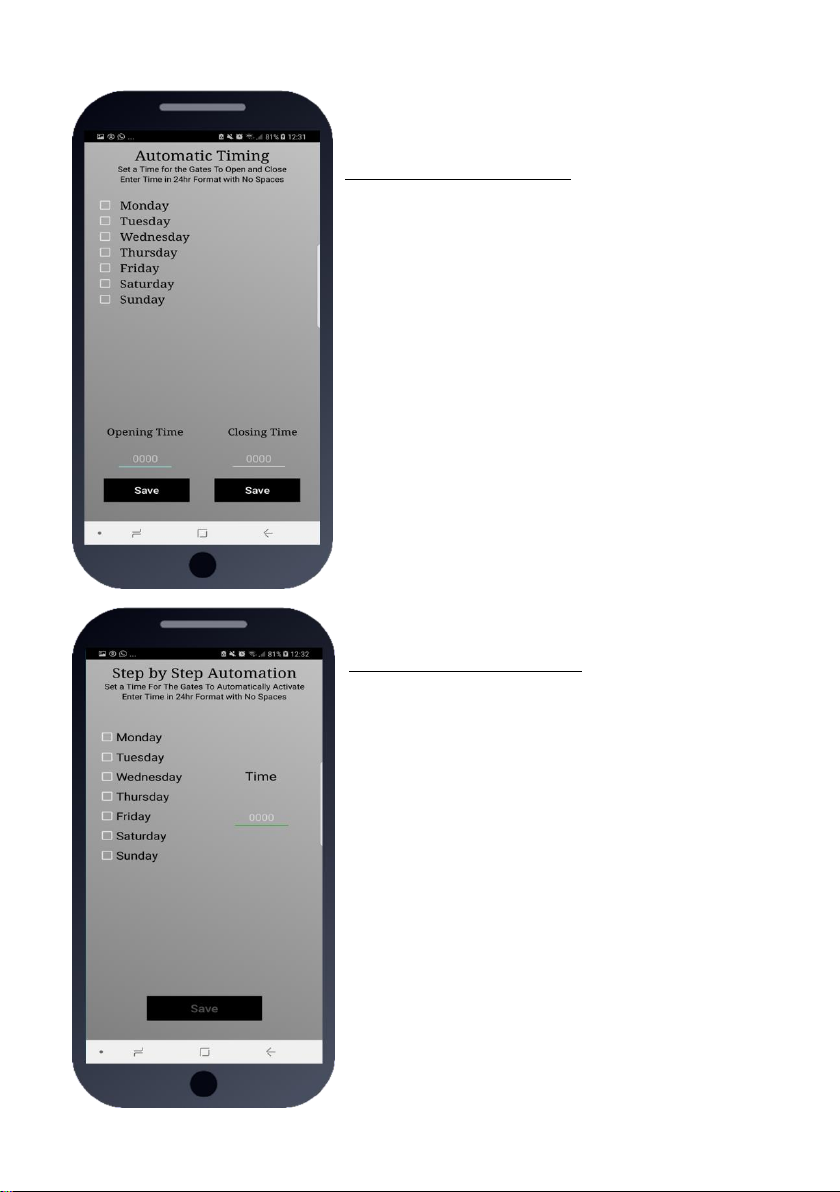
Time Clock opening and closing of
gates
timeclock/automatic/autoclosing
Note: There are 2 main ways your installer can set up
gate automation. 1: Automatic closing – this is when you
typically open your gates via intercom or fob, and they
close automatically again after a pre-set time delay. If
your gates operate in this way, then you can use this
screen to control them to open and close at pre-set
times of the day and week.
Step1 – Select the days you wish to open, and type in
an opening time in 24hr format, e.g. 830am = 0830.
Press SAVE. This will automatically latch on the main
relay 1 on the intercom at that time for each day
selected.
Step2 – Select the days and times that you may wish for
the gates to close automatically again, say for example
at night, and enter that time in the CLOSING TIME
Step-by-Step Gates
timeclock/automatic/step-by-step
This screen is used for gates where typically if you use
the intercom or a fob to trigger your gates to open, they
remain open until such times you decide to close them
again and press the fob or trigger from intercom again.
You can select days and times to trigger the gates
automatically so you don’t have to. For example, some
home owners keep their gates open all of the time, but
would like them to close automatically at night. In this
example, select all the days, and enter time. E.g.
11.30pm = 2330. Press SAVE.
This will send a momentary command to the gate each
day at the set time and trigger it to open if it is already
closed, or close if it is already open.
You may have up to 4 opening or closing events per
day.
Page 12
P a g e | 12
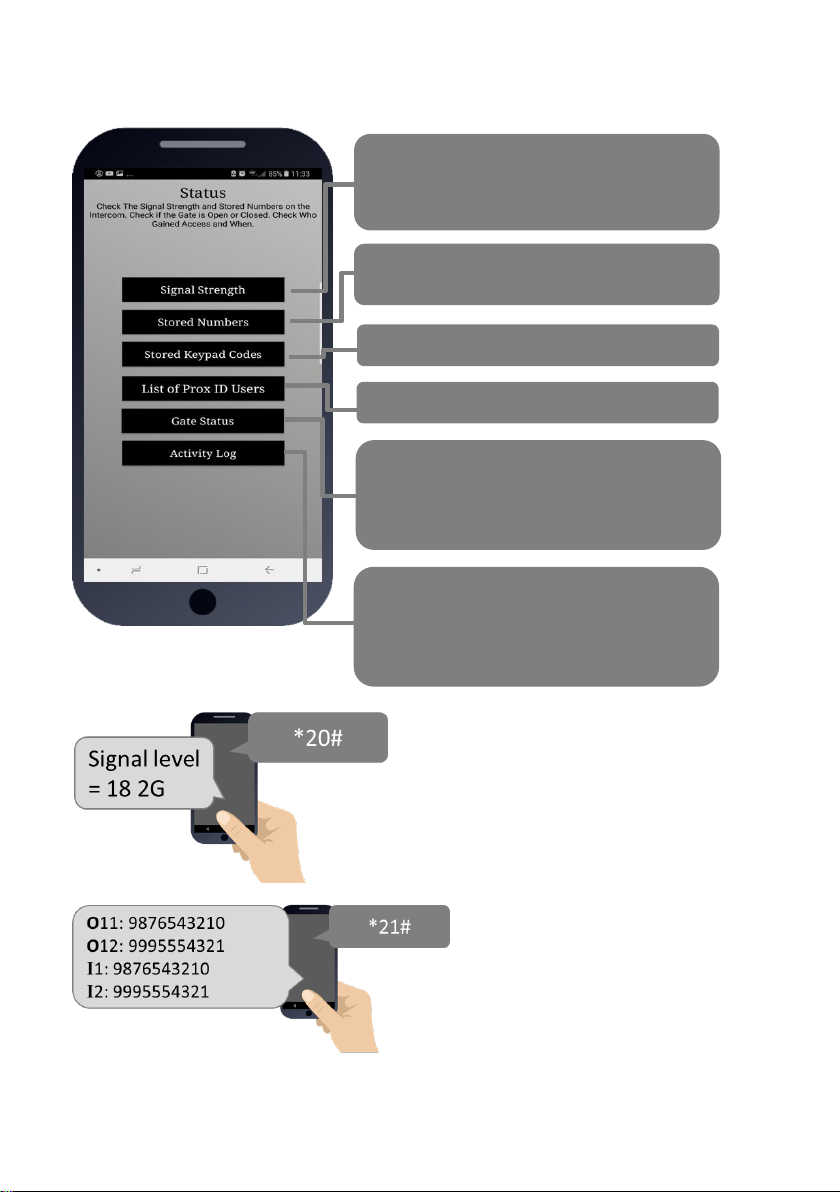
Status Options (Press Clock button, then Status)
These buttons are useful to manage your intercom, visitors, access, and the current
status of the gates for example.
Can be used to check if the intercom
reception is ok. You will receive a SMS reply
with a signal level on a scale of 1-31
Check stored keypad codes
Check stored phone numbers for dial out and
CallerID access.
Used to check if your gates are open or
closed, depending on your configuration. If in
doubt, ask your installer how this feature can
be used.
Used to check who opened or triggered your
gates and when. Get a SMS reply with pin
codes, prox cards, and caller ID access used
with time and date.
Check stored proximity card users
Signal Strength
This button will send the SMS *20# to the
intercom. It should reply as shown and will
indicate network type and for some versions will
show firmware version. Should it read below
level 10, talk to your installer about a high gain
antenna to boost reception or discuss trying an
alternative network provider.
Stored Phone Numbers
This button will send an SMS string to the
intercom to check the phone numbers which
are stored in the unit.
O11 = first dial out number. O12 = second.
O21 = Button 2, first dial out number etc.
I=dial in CallerID numbers.
Page 13

P a g e | 13
Stored Keypad Codes
This button will send an SMS string to
the intercom to check the keypad codes
which are stored in the unit.
NORM = Normal codes, can be used 24/7.
TEMP = Temporary codes which will auto expire.
PLAN = Time restricted codes.
Stored Prox cards
This button will send an SMS string to
the intercom to check the serial
numbers of stored cards.
NORM = Normal codes, can be used 24/7.
TEMP = Temporary codes which will auto expire.
PLAN = Time restricted codes.
Gate Status
This button will send an SMS string to the
intercom to check the state of both relays and
the optional “Status” input (gate can have a
limit switch fitted for the status feature).
Activity Log
This button will ask the intercom to
send a series of SMS messages to
your phone which will indicate the
last 20 events that have occurred
on the intercom, starting with the
most recent. This can be used to
see who gained access and when.
If any relay is ON, it is possible your gates are held OPEN
by the intercom. You can press the UNLATCH button on
the home screen to send the UNLATCH command and
then check again the status of the gate. Speak to your
installer if you have questions on this feature.
CODE = Keypad PIN code used to gain access (only last 2 digits of code shown).
CID = A known user used called the intercom to gain access with Caller ID.
USER = This person answered their phone to the visitor (Last 6 digits of phone number).
CAUTION
Please refrain from pressing the LOG button more than once at a time, as doing so can
overload the intercom with message requests and it may need powered off and on again to
resume normal operation. Thank you!
Page 14

P a g e | 14
24/7 Caller ID access
(Settings button/caller ID)
This intercom can store up to 100 visitor phone numbers
which can call the intercom at any time. The intercom
will recognise their incoming number, hang up, and grant
Enter up to 4 phone numbers at a time, and
press SAVE to send the programming SMS.
Enter the phone number which is to have
time restricted access.
Select the day or days in which they should
have access.
Enter the start and finish time for access in
24hr format. E.g. 830am = 0830. 11:20pm =
2320.
Press SAVE to send the SMS string.
Time Restricted Caller ID Access
This intercom can store up to 20 phone numbers for
visitors whom you wish to grant time restricted callerID
access, e.g. maintenance person, gardener, etc.
Page 15

P a g e | 15
Notifications
ONE PHONE can receive a SMS notification when the
intercom triggers the gates.
Remember only one phone at a time can use this
feature.
IMPORTANT: Activating notifications will mute the
keypad confirmation tones.
Turn this feature on and off quickly with this
button.
Enter your cell phone number here
Enter a SMS message which will be sent each
time the gates are triggered. E.g. “Gates
Opened”
Press Save to send SMS (iphone users must
also confirm from SMS screen).
Do Not Disturb
This feature can be used to prevent calls during
unsociable hours or at weekends. Simply turn the
feature ON and then enter ACTIVE times which you
want the call button to work for. Outside of these times
the intercom can still be used for caller ID access or pin
codes but the push button will not operate.
Quick turn ON or OFF. Note: turning ON without any
times being entered will disable the call button all of
the time!
Select the start and finish time for button activity and
select the days.
TIP: To have the call button active from 9am to 10pm
Monday to Friday, select the 5 days, enter 0900 as a
start time, and 2200 as a finish time and press SAVE.
Page 16

P a g e | 16
Troubleshooting
Problems installing the APP
Ensure that the full phone number of the intercom is entered in the settings screen, and that the pass codes
used are correct. Your installer can inform you of what the pass codes are for using this app.
Android users – see install instructions at the beginning of this manual, especially the reference to permissions.
On an iphone it does not activate the commands without first taking me to my dialling screen or SMS
screen.
This is a security feature implemented by Apple and not a restriction of the app itself. Apple block direct SMS or
dialling from any app and require the user to confirm SMS sending or call generation before it will occur.
My gates are opened and will not close.
This may or may not be caused by the intercom. It could be some other piece of hardware connected to the gate
which is holding open the gates. To check, use the Gate Status button. If either relay is ON, then go to the home
screen and press the UNLATCH button to restore the relays to their normal state.
My intercom is not responding to SMS messages.
This can be caused by poor reception, by insufficient power cable from the transformer to the intercom, or a
service issue with your network provider. Some SIM cards can get de-activated by the provider due to a long
period of inactivity. Check with your provider and contact your installer for support.
My intercom is no longer operating at all.
Contact your installer for support.
After Hours (Out of Hours)
Once the do not disturb is set above, users can
program the intercom to call an alternative phone
number during do not disturb times rather than call no
one. This is used for calling a security guard, site
manager, or a different phone outside normal hours.
Enter the alternative phone number.
Some intercoms have more than one button for multifamily shared gates or doors. Enter the button
number here (if in doubt check with your installer
before programming this feature).
Press Save to send SMS (iphone users must also
confirm from SMS screen).
 Loading...