


Quick Start
Guide
English
Simple Steps
To Get Your


 PRO100
Up and Growing
THIS |
GUIDE! |
|
|
KEEP |
|
Congratulations
On your purchase of the AeroGarden PRO100!
With this beautiful, brushed stainless-steel AeroGarden you get all the features of the original AeroGarden, enhanced with…
•Adaptive Intelligence – which automatically adjusts the amount of light and water plants receive at every stage of your plant’s life
•“24-Hour Light” Setting – that lets you override the built-in light timer and decide how much light your plants receive (see details on page 10).
•“Replace Grow Bulbs” Indicator – alerts you to replace Grow Bulbs. With this feature, you’ll be sure plants are always getting the right intensity and full spectrum of light needed for optimal growth.
|
|
|
Model #s: 100710-BSS |
Date Code: |
|
Input Voltage: 115V, 60Hz, 1.5A |
|
|
|
|
|
|
|
|

IMPORTANT SAFETY INSTRUCTIONS
(Save These Instructions)
When using this AeroGarden PRO100 electrical furnishing, basic precautions should always be followed, including the following:
Read all instructions before using this AeroGarden furnishing.
1. To reduce the risk of electric shock, the AeroGarden PRO100 has a specific plug. Do not change the plug in any way.
DANGER– to reduce risk of electric shock:
2. Always unplug AeroGarden PRO100 from electrical outlet before cleaning or changing Grow Bulbs (light bulbs). WARNING– to reduce risk of burns, fire, electric shock, or injury to persons:
3.Unplug AeroGarden PRO100 from outlet before putting on or taking off parts.
4.Close supervision is necessary when AeroGarden PRO100 is used by or near children, invalids, or disabled persons.
5.Use AeroGarden PRO100 only for its intended use as described in the instructions. Do not use attachments not recommended by manufacturer.
6.Never operate AeroGarden PRO100 if it has a damaged cord or plug, if it is not working properly, if it has been dropped and damaged, or if it has been dropped in water. If any of these conditions occur/exist, contact www.aerogardensupport.com or your country’s local distributor for instructions.
7.Keep cord away from heated surfaces.
8.Never operate furnishing with air openings blocked. Keep air openings free of lint, hair, and the like.
9.Never drop or insert any object into any electrical openings.
10.Do not use outdoors.
11.Do not operate where aerosol (spray) products are being used or where oxygen is being administered.
12.Do not touch moving parts or hot parts such as pumps, bulbs, reflective surfaces, and the like.
13.To disconnect, remove plug from outlet.
14.Do not place or submerse base, cord, plug, or lamp hood in water or other liquid to clean it.
15.Do not allow water to contact hot light bulbs.
16.Use only approved and supplied parts and accessories. Use only lamp model 100629 (N. America) or 200629 (Europe & Australia) Grow Bulbs with this AeroGarden model. Use of any other kind of accessory is not recommended. Replacement parts can be ordered from www.aerogardensupport.com or from your retailer.
17.Do not use AeroGarden PRO100 for other than intended purpose.
18.This product is intended for household and residential use only. This product is not approved for commercial applications.
19.Read and follow all important notices on the AeroGarden PRO100 and in the accompanying literature.
20.If supply cord is damaged, it must be replaced by manufacturer, its service agent, or similarly qualified technician in order to avoid a hazard.
21.Electrical wiring must be in accordance with local regulations.
22.This appliance is not intended for use by persons (including children) with reduced physical, sensory or mental capabilities, or lack of experience and knowledge, unless they have been given supervision or instruction concerning use of appliance by a person responsible for their safety.
23.Children should be supervised to ensure they do not play with the appliance.
Save These Instructions
1

1 Quick Start Assembly (No tools required)
A Unpack Your AeroGarden |
B Insert Lamp Arm |
PRO100 |
into Base |
Lamp Hood
(front view)
Bowl
(front view)
Base
(front view)
Push |
|
Lamp Arm |
|
down until |
Lamp Arm |
you hear |
(back view) |
a “click.” |
|
Lamp Arm
(back view)
Base
(back view)
Master Gardener
|
|
|
|
|
|
|
|
|
|
|
|
|
|
|
|
|
|
|
|
|
|
|
|
|
|
|
|
|
|
|
|
|
|
|
|
|
|
|
|
|
|
|
|
|
|
|
|
|
|
|
|
|
|
|
|
|
|
|
|
|
|
|
|
|
|
Grow Bulbs (2) |
|
Seed Kit |
||||||||
CInsert Grow Bulbs into Lamp Hood
Lamp Hood (bottom view)
Push straight in.
DO NOT TWIST BULBS!
Remember to replace Grow Bulbs every 6 months.
DPlug Lamp Cord into Lamp Hood
Push Lamp Cord firmly into socket in Lamp Hood.
Lamp
Cord
Instructions Continued On Next Page |
|
2 |
|
||
|
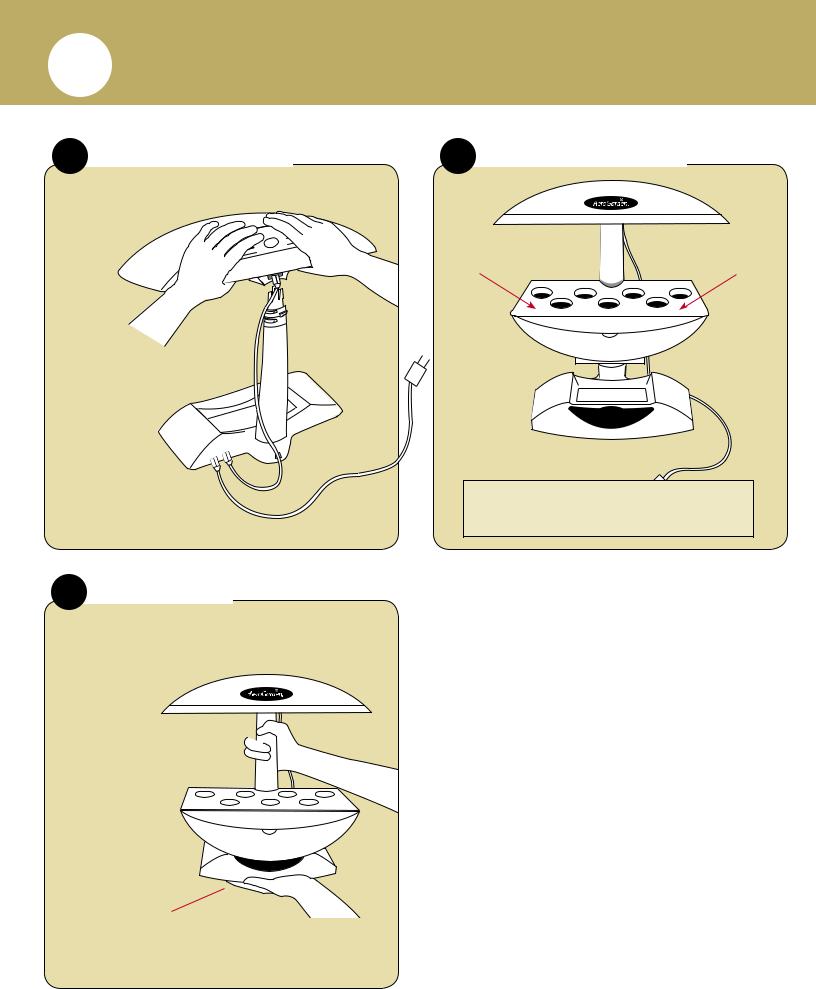
1 Quick Start Assembly (continued)
EPlace Lamp Hood on Lamp Arm
Center hands
over Lamp Arm |
(back view) |
and push Lamp |
|
Hood down |
|
until you hear a |
|
“click.” |
|
GMoving Your AeroGarden PRO100
Use one hand to 
 grasp Lamp Arm.
Gently slide AeroGarden toward the surface edge and place other hand under Base.
F Set Bowl into Base
(front view)
Check to be sure that Bowl is securely in place.
Need Additional HELP?
For supplies and information, visit… www.aerogardensupport.com
3

H Place Your Garden
Under: A space that allows 22” (56cm) clearance for the full height of raised lamp
On: A sturdy, watertolerant surface
(Metal surfaces may cause noise due to vibration)
In: A 60-75°F (16-24°C) environment
(optimal)
Near: A standard electrical outlet, per local regulations
68°F/20°C
Note: Do not place beneath under-cabinet lights.
Wonderful |
Stuff |
Away From
Reach of children and pets
Direct sources of heat (e.g., stove, furnace vents)
Direct sources of cold air (e.g., window drafts, A/C vents)
For Optimal Tending & Harvesting, Also Consider
Easy access to un-softened water
4
 Loading...