

Page 1

SANTO 70290-8 DT
Dubbeldeurs-koelautomaat
Combiné réfrigérateur-congélateur
Fridge freezer
Gebruiksaanwijzing
Mode d’emploi
Operating Instructions
Page 2
2
Geachte klant,
Lees eerst aandachtig de gebruiksaanwijzing door voordat u uw nieuwe
koelapparaat in gebruik neemt. Hierin staat belangrijke informatie over een
veilig gebruik, over het opstellen en over het onderhoud van het apparaat.
De gebruiksaanwijzing s.v.p. bewaren voor latere naslag. Aan eventuele
volgende bezitters van het apparaat doorgeven.
Met de waarschuwingsdriehoek en/of door signaalwoorden
(Waarschuwing!, Voorzichtig!, Let op!) wordt de aandacht gevestigd op
aanwijzingen die belangrijk zijn voor uw veiligheid of voor het juist
functioneren van het apparaat. Hier absoluut op letten.
Na dit symbool wordt uitleg gegeven over de bediening en het prak-tisch
gebruik van het apparaat.
Met het klaverblad worden tips en aanwijzingen voor een econo-mischen
milieuvriendelijk gebruik van het apparaat aangegeven.
Voor eventueel optredende storingen staan in de handleiding aanwijzingen
om deze zelf op te lossen, zie Hoofdstuk "Wat te doen als...". Als deze
aanwijzingen niet voldoende informatie bieden staat onze klantendienst u
te allen tijde ter beschikking.
Page 3

3
Inhoud
Veiligheid . . . . . . . . . . . . . . . . . . . . . . . . . . . . . . . . . . . . . . . . . . . . . . .4
Weggooien . . . . . . . . . . . . . . . . . . . . . . . . . . . . . . . . . . . . . . . . . . . . . .5
Informatie over de verpakking van het apparaat . . . . . . . . . . . . . . . . . .5
Weggooien van oude apparaten . . . . . . . . . . . . . . . . . . . . . . . . . . . . . . . .5
Transportbescherming verwijderen . . . . . . . . . . . . . . . . . . . . . . . . . . .6
Opstellen . . . . . . . . . . . . . . . . . . . . . . . . . . . . . . . . . . . . . . . . . . . . . . .6
Opstelplaats . . . . . . . . . . . . . . . . . . . . . . . . . . . . . . . . . . . . . . . . . . . . . . . . .6
Uw koeltoestel heeft lucht nodig . . . . . . . . . . . . . . . . . . . . . . . . . . . . . . .7
Muur-afstandshouders . . . . . . . . . . . . . . . . . . . . . . . . . . . . . . . . . . . . . . . .7
Deurdraairichting . . . . . . . . . . . . . . . . . . . . . . . . . . . . . . . . . . . . . . . . . . . . .8
Elektrische aansluiting . . . . . . . . . . . . . . . . . . . . . . . . . . . . . . . . . . .10
Voor ingebruikname . . . . . . . . . . . . . . . . . . . . . . . . . . . . . . . . . . . . .10
In gebruik nemen en temperatuurregeling . . . . . . . . . . . . . . . . . . .10
Interieur . . . . . . . . . . . . . . . . . . . . . . . . . . . . . . . . . . . . . . . . . . . . . . .11
Legvlakken . . . . . . . . . . . . . . . . . . . . . . . . . . . . . . . . . . . . . . . . . . . . . . . . .11
Variable binnendeur . . . . . . . . . . . . . . . . . . . . . . . . . . . . . . . . . . . . . . . . .11
Koelen van levensmiddelen . . . . . . . . . . . . . . . . . . . . . . . . . . . . . . .12
Invriezen en diepgevroren opslaan . . . . . . . . . . . . . . . . . . . . . . . . . .12
Diepvrieskalender . . . . . . . . . . . . . . . . . . . . . . . . . . . . . . . . . . . . . . .13
Ontdooiing van het toestel . . . . . . . . . . . . . . . . . . . . . . . . . . . . . . . .14
Apparaat uitzetten . . . . . . . . . . . . . . . . . . . . . . . . . . . . . . . . . . . . . . .14
Reiniging en onderhoud . . . . . . . . . . . . . . . . . . . . . . . . . . . . . . . . . .15
Tips om energie te besparen . . . . . . . . . . . . . . . . . . . . . . . . . . . . . . .16
Wat te doen als . . . . . . . . . . . . . . . . . . . . . . . . . . . . . . . . . . . . . . . . .16
Hulp bij storingen . . . . . . . . . . . . . . . . . . . . . . . . . . . . . . . . . . . . . . . . . . .16
Lamp verwisselen . . . . . . . . . . . . . . . . . . . . . . . . . . . . . . . . . . . . . . . . . . . .18
Doel, normen, richtlijnen . . . . . . . . . . . . . . . . . . . . . . . . . . . . . . . . .18
Page 4

4
Veiligheid
De veiligheid van onze apparaten voldoet aan de Europese en Nederlandse
normen. Desondanks zien wij ons genoodzaakt u met de volgende veiligheidsaanwijzingen vertrouwd te maken:
Reglementaire toepassing
• Het apparaat is voor huishoudelijk gebruik bestemd. Het is geschikt voor het
koelen, invriezen en diepgevroren bewaren van levensmiddelen en voor het
maken van ijs. Als het apparaat voor andere doeleinden gebruikt wordt kan
de fabrikant geen verantwoording nemen voor eventuele schaden.
• Het ombouwen van of veranderingen aan het koelapparaat aanbrengen
is uit veiligheidsoverwegingen niet toegestaan.
• Als het apparaat commercieel of voor andere doeleinden dan voor het
koelen, diepgevroren bewaren en invriezen van levens-middelen gebruikt
wordt, s.v .p. letten op de hiervoor van kracht zijnde wettelijke bepalingen.
Voordat het apparaat voor de eerste keer in gebruik genomen
wordt
• Controleer het apparaat op transportschaden. Een beschadigd appar aat in
geen geval aansluiten! Wend u in geval van schade tot de leverancier.
Koelmiddelen
Het apparaat bevat in het koelvloeistofcircuit de koelvloeistof Isobutan
(R600a), een natuurlijk, zeer milieuvriendelijk gas, dat echter wel brandbaar is.
• Bij het transport en het opstellen van het apparaat erop letten dat geen
onderdelen van het koelvloeistofcircuit beschadigd worden.
• Bij beschadiging van het koelvloeistofcircuit:
– open vuur en brandhaarden absoluut vermijden;
– het vertrek waar het apparaat staat goed ventileren.
Veiligheid van kinderen
• Verpakkingsdelen (bijv. foliën, piepschuim) kunnen voor kinderen
gevaarlijk zijn. Stikgevaar! Verpakkingsmateriaal van kinderen
weghouden!
• Oude apparaten voor het weggooien onbruikbaar maken. Stekker uit het
stopcontact trekken, stroomkabel doorknippen, eventueel aanwe-zige
snap– of grendelsloten verwijderen of kapotmaken. Daardoor wordt
voorkomen dat spelende kinderen in het apparaat opgesloten raken
(stikgevaar!) of in andere levensgevaarlijke situaties terecht komen.
• Dit apparaat is niet bedoeld voor gebruik door kinderen, personen met
verminderde lichamelijke, zintuigelijke of geestelijke capaciteiten of een
gebrek aan kennis en ervaring, tenzij er toezicht is ingesteld door de
persoon die verantwoordelijk is voor hun veiligheid of tenzij zij van deze
persoon instructies hebben gekregen over het gebruik. Laat kinderen niet
zonder toezicht in de buurt van het apparaat..
Page 5

5
Bij dagelijks gebruik
• Containers met brandbare gassen of vloeistoffen kunnen lek raken door
de inwerking van koude. Explosiegevaar! Leg geen containers met
brandbare stoffen zoals bijv. spraybussen, aanstekers, navullin-gen van
aanstekers etc. in het koelapparaat.
• Flessen en blikken mogen niet in het vriesvak. Ze kunnen springen als de
inhoud bevriest – bij koolzuurhoudende inhoud zelfs exploderen! Leg noit
limonades, sappen, bier, wijn, champagne etc. in het vriesvak.
Uitzondering: sterke drank met een zeer hoog alcohol percentage kan in
het vriesvak gelegd worden.
• Consumptie-ijs en ijsblokjes niet direct vanuit de vriesruimte in de mond
steken. Zeer koud ijs kan aan de lippen of de tong vastvriezen en
verwondingen veroorzaken.
• Niet met natte handen aan diepvriesartikelen komen. De handen kunnen
daaraan vastvriezen.
• Geen elektrische apparaten (bijv . elektrische ijsmachines, mixers etc.) in het
koelapparaat gebruiken.
• Voor het schoonmaken het apparaat altijd uitzetten en de stekker uit het
stopcontact trekken of de zekering in de woning uitschakelen c.q. er uit
draaien.
• De stekker altijd aan de stekker zelf uit het stopcontact trekken, nooit aan
het snoer.
Bij storing
• Als er een storing aan het apparaat optreedt eerst in de gebruiksaanwijzing kijken onder “Wat te doen als ...”. Als de daar gegeven
aanwijzingen niet verder helpen zelf niet verder aan het apparaat werken.
• Koelapparaten mogen alleen dooor geschoold personeel gerepareerd
worden. Door ondeskundige reparaties kunnen grote gevaren ont-staan.
Wend u zich bij reparaties tot uw vakhandel of tot onze klantendienst.
Weggooien
Informatie over de verpakking van het apparaat
Alle gebruikte grondstoffen zijn milieuvriendelijk! Ze kunnen zonder gevaar
weggegooid of in de vuilverbrandingsoven verbrand worden!
De grondstoffen: de kunststoffen kunnen ook opnieuw gebruikt worden en
worden als volgt gekarakteriseerd:
>PE< voor polyethyleen, bijv. bij de buitenste verpakking en de zakken
binnen in.
>PS< voor schuimpolystyrol, bijv . bij de bekledingsdelen, in principe FCKW-vrij.
De kartonnen delen zijn van oud papier gemaakt en kunnen ook weer bij
het oud-papier gedaan worden.
Page 6
6
Weggooien van oude apparaten
Wegens milieuredenen dienen koelapparaten vakkundig ontmanteld te
worden. Dit geldt voor Uw huidige apparaat en - als het ook aan vervanging
toe is - ook voor Uw nieuwe apparaat.
Waarschuwing! Apparaten die hun tijd gehad hebben onbruikbaar maken
voordat ze weggegooid worden. Stekker er afhalen, netsnoer doorknippen,
eventuele snap- of grendelsloten verwijderen of kapot-maken. Hierdoor
wordt voorkomen dat spelende kinderen in het apparaat opgesloten wor den
(verstikkingsgevaar!) of in andere levensgevaarlijke situaties terechtkomen.
Aanwijzingen voor het weggooien:
• Het apparaat mag niet bij het huis- of grofvuil gezet worden.
• Het koelvloeistofcircuit, in het bijzonder de warmtewisselaar aan de
achterkant, mag niet beschadigd worden.
• Het symbool op het product of op de verpakking wijst erop dat dit
product niet als huishoudafval mag worden behandeld, maar moet
worden afgegeven bij een verzamelpunt waar elektrische en elektronische
apparatuur wordt gerecycled. Als u ervoor zorgt dat dit product op de
juiste manier wordt verwijderd, voorkomt u mogelijk negatieve gevolgen
voor mens en milieu die zich zouden kunnen voordoen in geval van
verkeerde afvalverwerking. Voor gedetailleerdere informatie over het
recyclen van dit product, kunt u contact opnemen met de gemeente, de
gemeentereiniging of de winkel waar u het product hebt gekocht.
Transportbescherming verwijderen
Het apparaat alsmede de onderdelen van het interieur zijn voor het
transport beschermd.
• Alle plakband alsmede bekledingsdelen uit het interieur verwijderen.
Opstellen
Opstelplaats
Het apparaat in een goed geventileerde en droge ruimte neerzetten.
De omgevingstemperatuur heeft invloed op het stroomverbruik.
Het apparaat daarom
– niet aan directe straling van de zon blootstellen;
– niet bij radiatoren, naast een kachel of andere warmtebronnen plaatsen;
– alleen op een plaats neerzetten waarvan de omgevingstemperatuur
overeenkomt met de klimaatcategorie waarvoor het apparaat is ontworpen.
Page 7
7
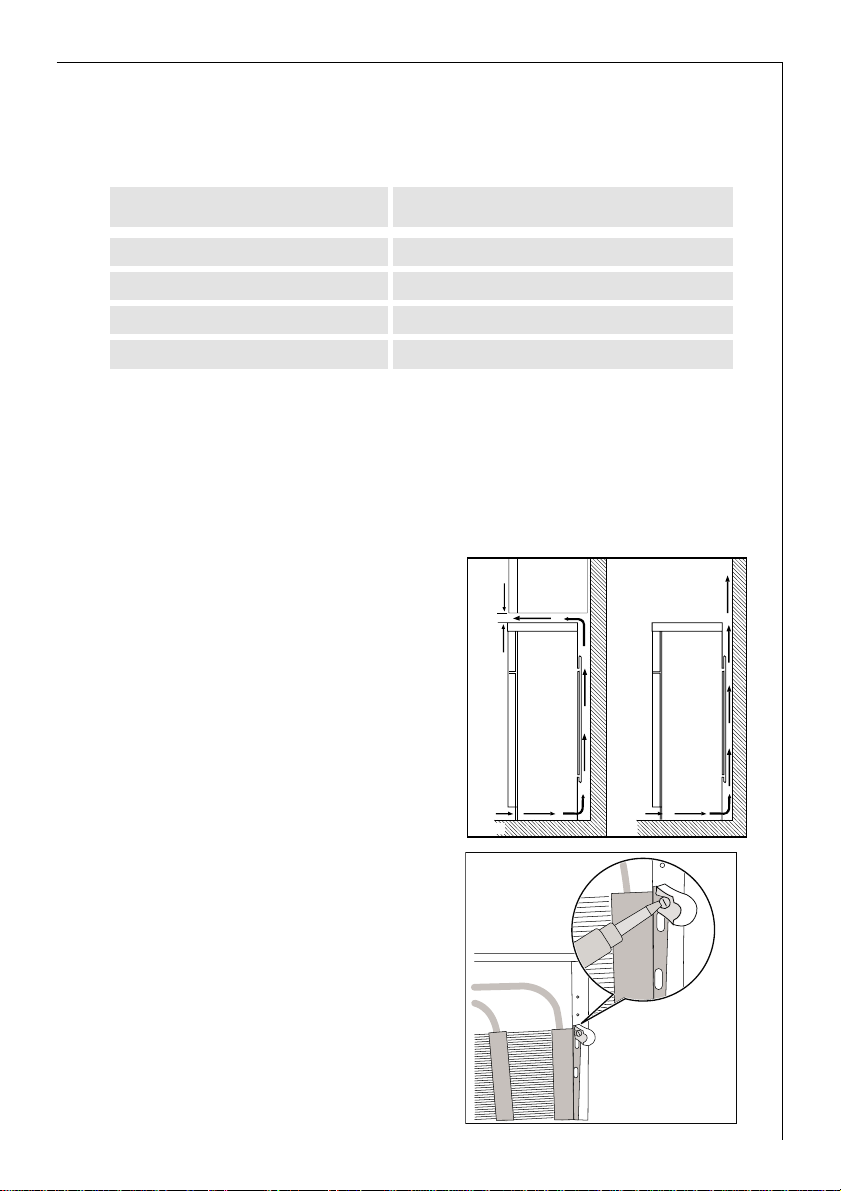
Klimaatcategorie voor een omgevingstemperatuur van
SN +10 tot +32 °C
N +16 tot +32 °C
ST +18 tot +38 °C
T +18 tot +43 °C
Als het onvermijdelijk is het apparaat naast een warmtebron te plaat-sen,
aan weerszijden minimaal de volgende afstanden aanhouden:
– tot elektrische kachels 3 cm;
– tot olie- en kolenkachels 30 cm.
Als men zich niet aan deze afstanden kan houden, is een warmte-
isolatieplaat tussen kachel en koelapparaat aan te bevelen.
Als het koelapparaat naast een ander
koel- of diepvriesapparaat staat, is
een afstand van 5 cm aan
weerszijden aan te bevelen, zodat
zich geen condens vormt aan de
buitenkant van de apparaten.
Uw apparaat heeft lucht nodig
Om veiligheidsredenen moet de
ventilatie zodanig zijn als
aangegeven in Fig.
Attentie: zorg ervoor dat de
ventilatie openingen tijdens
gebruik niet woden afgedekt.
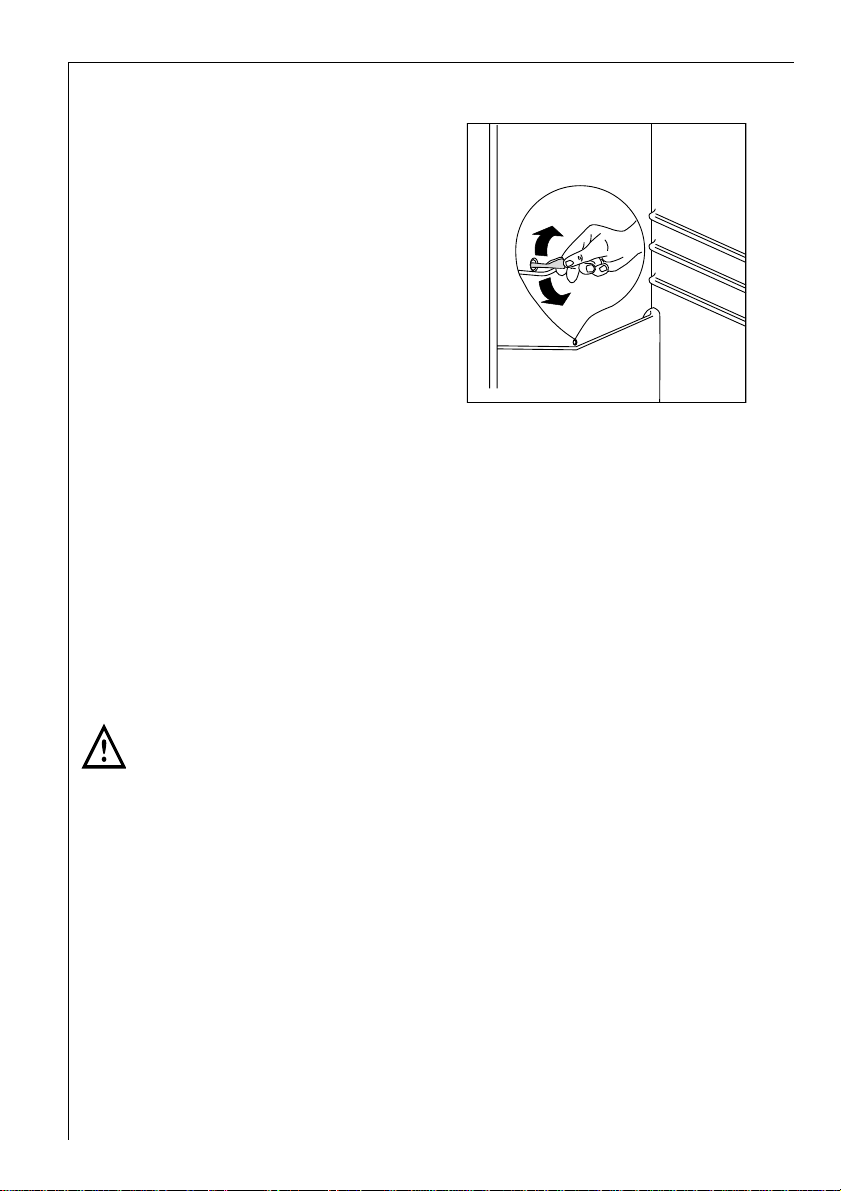
Muur-afstandshouders
In het apparaat bevinden zich
twee afstandshouders die in de
bovenste hoeken aan de
achterzijde geplaatst dienen te
worden. Draai de schroeven los,
steek de afstandshouders onder
de schroefkop en draai de
schroeven weer vast.
De klimaatcategorieën staan op het merk- en type-aanduidingsplaatje dat
zich links aan de binnenkant van het apparaat bevindt.
De volgende tabel geeft aan welke omgevingstemperatuur bij welke
klimaatcategorie behoort:
100 mm10 mm
A
NP005
B
10 mm
Page 8
8
G
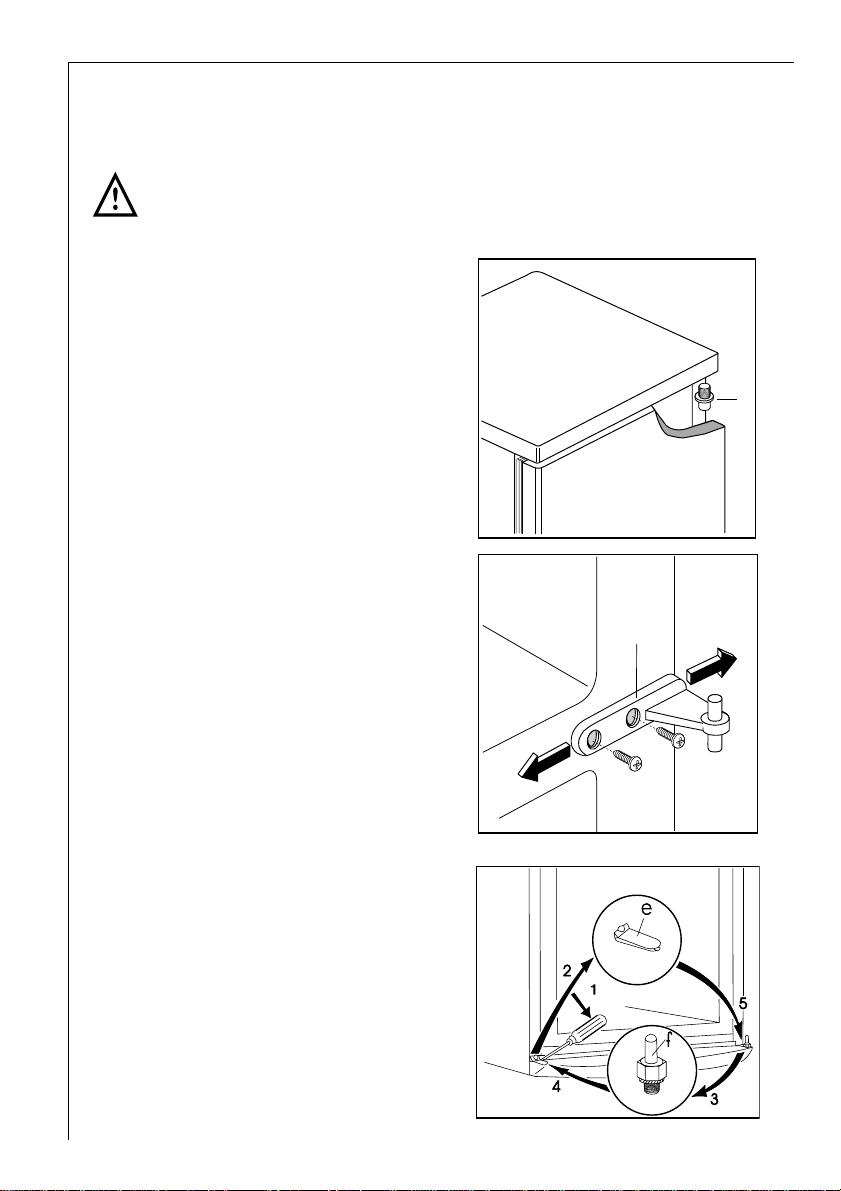
Deurdraairichting
Het deurscharnier kan van rechts (stand waarin hij wordt afgeleverd) naar
links gewisseld worden als dat voor de opstelplaats nodig is.
Waarschuwing! Bij het wisselen van de deurscharnieren mag het apparaat
niet op het lichtnet aangesloten zijn. Van te voren de stekker uit het
stopcontact halen.
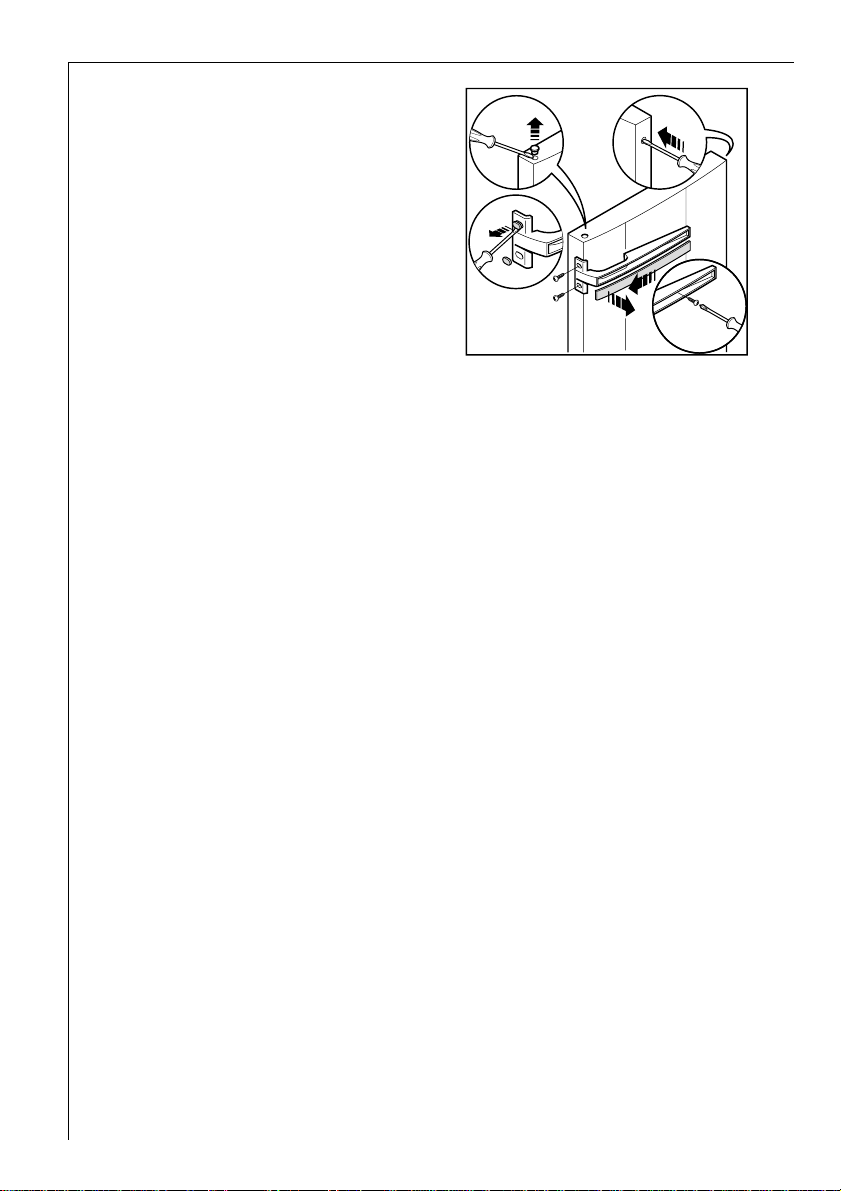
U gaat als volgt te werk:
Wij raden u aan met twee personen
het deurscharnier om te zetten. De
tweede persoon kan dan de deuren
van het apparaat stevig vasthouden.
- Deuren openen, middelste
scharnier (H) losschroeven en
uitnemen door het geleidelijk aan
van de koelkast weg te trekken,
terwijl u de twee deuren iets schuin
houdt. Kunststof pin onder het
scharnier verwijderen.
- Deur van de vriesruimte losnemen
door hem iets naar beneden te
trekken.
- Deur van de koelruimte losnemen
door hem iets naar boven te trekken.
- Bovenste kunststof pen van de
deur van de vriesruimte verwijderen
en op de tegenoverliggende kant
weer aanbrengen.
- Bovenste kunststof pen van de
deur van de koelruimte verwijderen
en op de tegenoverliggende kant
weer aanbrengen.
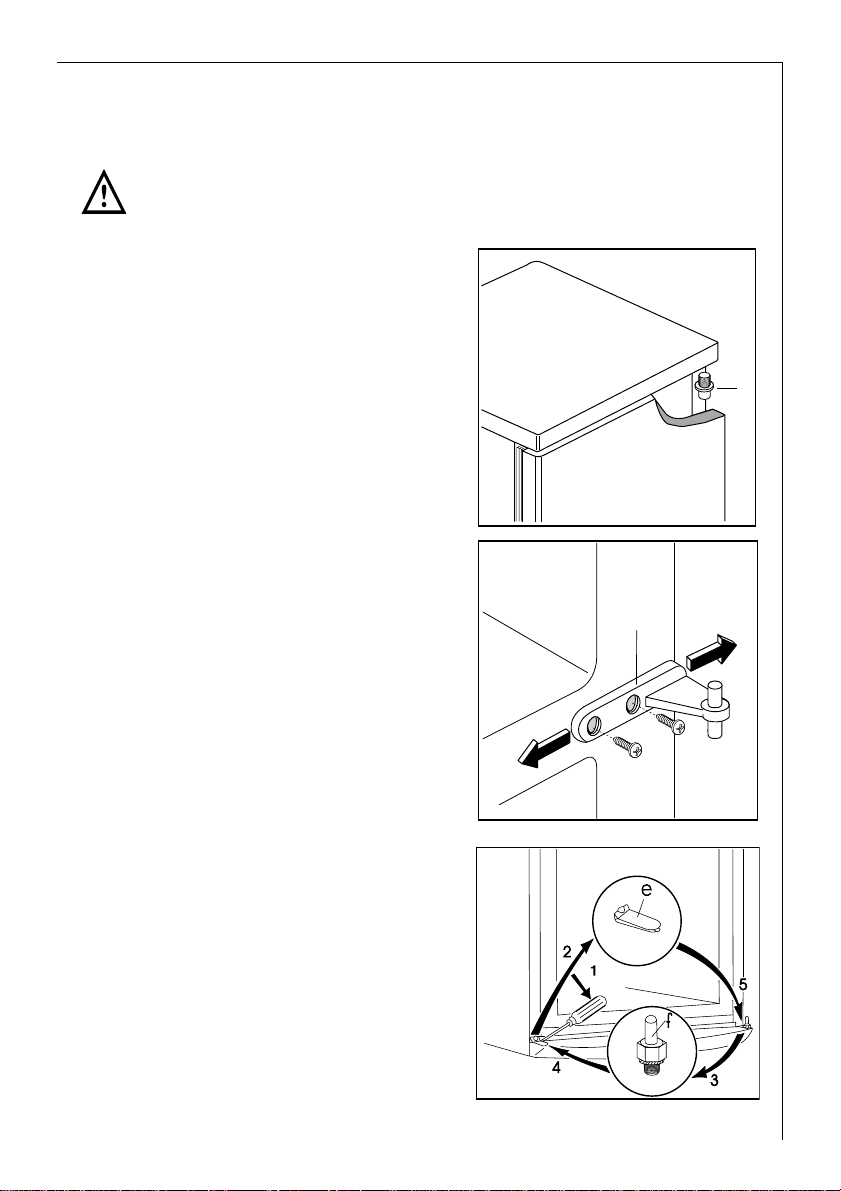
- Bovenste scharnierpen (G)
uitdraaien en op de
tegenoverliggende kant weer
indraaien.
- M.b.v. gereedschap het afdekkapje
(e) verwijderen, onderste
scharnierpen (F) uitdraaien en op de
tegenoverliggende kant weer
indraaien.
- Afdekkapje (e) op de
tegenoverliggende kant weer
aanbrengen.
H
Page 9

9
- Middelste scharnierpen in de
opening links op de deur van de
koelruimte aanbrengen.
- Deur van de koelruimte op de
onderste scharnierpen (f)
aanbrengen.
- Deur van de vriesruimte op de
bovenste scharnierpen aanbrengen,
de deuren iets schuin houden en de
middelste scharnierpen in de
opening links op de deur van de
vriesruimte aanbrengen.
- Deuren openen, middelste
scharnier op de linkerkant met twee
schroeven bevestigen. Vergeet niet
de kunststof pin onder het middelste
scharnier (H) te plaatsen.
- Controleren of de bovenkant van de deuren parallel loopt met het
bovenblad.
- Apparaat weer op z'n plek zetten, waterpas zetten en de stekker in het
stopcontact steken.
-Demonteer de handgrepen door de handgreepbedekking weg te
nemen en de bevestigingsschroeven aan de zijkant en in het midden
los te draaien en deze vervolden los te draaien en deze vervolgens aan
de tegengestelde kant te monteren. De niet gebruikte gaten worden
gemaskerd door kunststof dopjes die zich in het zakje met toebehoren
bevinden.
U kunt het deurscharnier ook tegen betaling door een vakman laten
omzetten. Neem dan contact op met onze service-afdeling.
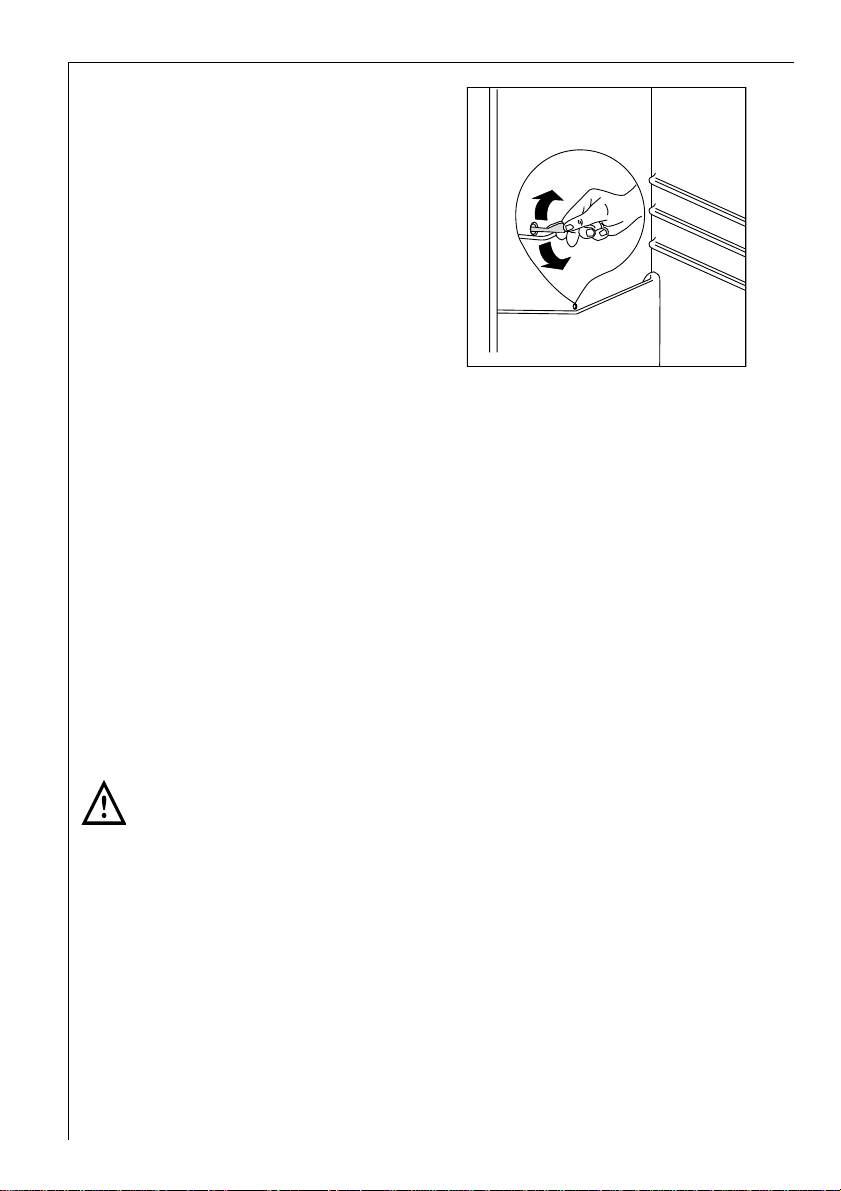
.Belangrijk
Na het omkeren van de deurdraairichting moet u controleren of het
deurrubber rondom goed op de sponning sluit. In een koud vertrek (in de
winter) kan het gebeuren dat dat niet het geval is. Na enkele dagen zal het
rubber zich echter aangepast hebben. Wilt u dat bespoedigen, dan kunt u
het rubber warm maken met een föhn.
1
2
Page 10

10
Elektrische aansluiting
Voor de elektrische aansluiting is een volgens de voorschriften geïnstalleerde
beschermcontactdoos vereist.
De contactdoos moet zodanig worden geïnstalleerd, dat de steker altijd uit de
contactdoos kan worden getrokken.
De elektrische zekering dient minstens 10 Ampère te zijn.
Indien het stopcontact bij een ingebouwd apparaat niet meer toegan-kelijk
is, dient een maatregel in de elektrische installatie er voor te zorgen dat het
apparaat van de stroom kan worden afgesloten (bijv. zekering,
beveiligingsschakelaar, aardlekschakelaar of dergelijke met een
contactopeningsbreedte van minimaal 3 mm).
• Voor ingebruikneming op het merk– en type–aanduidingsplaatje van het
apparaat controleren of de netspanning en stroomsoort over-eenkomen
met de waarden van het lichtnet op de plaats waar het apparaat komt te
staan.
Bijv.: AC 230 ... 240 V 50 Hz of
230 ... 240 V~ 50 Hz
(d.w.z. 230 tot 240 Volt wisselstroom, 50 Hertz)
Het typeplaatje bevindt zich links aan de binnenkant van het apparaat.
Voor ingebruikname
• Het interieur van het apparaat en alle accessoires schoonmaken voor het
eerste gebruik (zie Hoofdstuk “Reiniging en Onderhoud”).
In gebruik nemenen temperatuurregeling
• U steekt de steker van de koelkast in een contactdoos met randaarde. Als u
de koelkastdeur opent, wordt de binnenverlichting ingeschakeld. De
draaiknop voor de temperatuukeuze bevindt zich rechts in de koelruimte.
Stand „0“ betekent: uit.
Stand „1“ betekent: hoogste binnentemperatuur , warmste instelling.
Stand „6“ betekent: laagste binnentemperatuur , koudste instelling.
Bij het instellen van de juiste stand dient u er rekening mee te houden dat de
temperatuur in het apparaat afhankelijk is van:
- de kamertemperatuur;
- de frequentie waarmee de deuren geopend worden;
Page 11

11
- de hoeveelheid levensmiddelen in de kast;
- de plaats van het apparaat.
De temperaturen in koelruimte en vriesvak kunnen niet gescheiden geregeld
worden.
Als verse levensmiddelen snel moeten worden ingevroren, kunt u stand „6“
kiezen. Let u erop, dat de temperatuur in de koelruimte niet beneden 0°C
komt en zet de temperatuurregelaar tijdig op stand „3“ of „4“ terug.
Belangrijk!
Hoge omgevingstemperatuur (bijv . op hete zomerdagen) en koude instelling
van de temperatuurregelaar (stand “5” tot “6”) kunnen er voor zorgen dat
de compressor continu werkt.
Zet in dat geval de temperatuurregelaar op een warmere stand (stand “3”
tot “4”). Bij deze instelling wordt de compressor geregeld en begint het
ontdooien weer automatisch.
Interieur
Legvlakken
Naargelang het model is het
apparaat voorzien van glas
legvlakken.
Het legvlak van glas boven de
groente- en fruitbakken moet altijd
op die plaats blijven liggen, opdat
groente en fruit langer vers blijven.
De overige legvlakken zijn in hoogte
verstelbaar:
Daartoe de legvlak zover naar voren trekken tot hij naar boven of onderen
bewogen kan worden en eruit gehaald kan worden.
Om de legvlakken op een andere hoogte te zetten in omgekeerde volgorde
te werk gaan.
Variabele binnendeur
Naargelang de behoefte kunnen de deurvakbodems er naar boven
uitgenomen worden en op andere plaatsen gezet worden.
D338
Page 12

12
Koelen van levensmiddelen
Voor een optimaal gebruik van de koelruimte adviseren wij u de volgende
eenvoudige regels in acht te nemen:
• Plaats geen warme of dampende spijzen of dranken in de koelruimte;
• dek vooral sterk geurend voedsel af of verpak het;
• plaats de levensmiddelen zo, dat de lucht vrij eromheen kan circuleren.
Enkele belangrijke tips:
Vlees (alle soorten): wordt in plastic zakjes op de glazen plaat boven de
groentelade geplaatst.
Bewaar vlees niet langer dan één of twee dagen.
Gekookt voedsel, koude schotels enz.: kunnen, goed afgedekt, op elk
rooster geplaatst worden.
Fruit en groente: worden schoongemaakt in de groentelade(n) gelegd.
Boter en kaas: worden, om blootstelling aan de lucht te voorkomen, in
speciale koeldozen bewaard of in plastic- of aluminiumfolie verpakt.
Flessen melk: worden, goed gesloten, in het flessenrek geplaatst.
Bewaar niet-luchtdicht verpakte bananen, aardappelen, uien of knoflook
niet in de koelkast.
Invriezenen en diepgevroren opslaan
In uw koelapparaat kunt u diepvriesproducten bewaren en verse
levensmiddelen zelf invriezen.
Attentie!
• Voor het invriezen van levensmiddelen dient de temperatuur in de
vriesruimte –18 °C of lager te zijn.
• Let op het op het typeplaatje aangegeven vriesvermogen. Het vries-
vermogen is de maximale hoeveelheid verse waren die binnen 24 uur
ingevroren kunnen worden. Als er gedurende meerdere dagen achter
elkaar ingevroren wordt, neem dan slechts 2/3 tot 3/4 van de hoeveelheid
aangegeven op het typeplaatje. De kwaliteit is beter, als de
levensmiddelen snel tot in de kern bevriezen.
• Warme levensmiddelen voor het invriezen laten afkoelen. De warmte leidt
tot verhoogde ijsvorming en verhoogt het energieverbruik.
• Bij het bewaren van kantenklare diepvriesproducten dient u zich beslist
aan de door de fabrikant opgegeven bewaartijd te houden.
• Eenmaal ontdooide levensmiddelen zonder verdere verwerking (bereiden
tot panklare gerechten) in geen geval een tweede keer invriezen.
• Containers met brandbare gassen of vloeistoffen kunnen lek raken door
de inwerking van koude. Explosiegevaar! Leg geen containers met
brandbare stoffen zoals bijv. spraybussen, aanstekers, navullingen van
aanstekers etc. in het vriesapparaat.
Page 13
13
• Flessen en blikken mogen niet in de vriesruimte. Ze kunnen springen als
de inhoud bevriest – bij koolzuurhoudende inhoud zelfs exploderen! Leg
noit limonades, sappen, bier, wijn, champagne etc. in de vriesruimte.
Uitzondering: sterke drank met een zeer hoog alcoholpercentage kan in
de vriesruimte gelegd worden.
• Alle levensmiddelen voor het invriezen luchtdicht verpakken, zodat ze
niet uitdrogen, de smaak niet verloren gaat en de smaak niet op andere
diepvriesproducten overgebracht wordt.
• Daardoor heeft u een beter overzicht, wordt het lang openen van de deur
voorkomen en wordt stroom bespaard.
• Niet-bevroren artikelen mogen niet in aanraking komen met reeds
bevroren waren omdat anders de bevroren artikelen kunnen ontdooien.
Voorzichtig! Diepvriesartikelen niet met natte handen aanraken. De handen
kunnen daaraan vast vriezen.
1. Plaats de in te vriezen levensmiddelen op het rek in dedipevriesvak
Diepvrieskalender
• De symbolen geven de diverse soorten diep-vriesproducten aan.
• De getallen geven voor iedere soort diepvriesproduct de opslagtijd in
maanden aan. Of de hoogste of de laagste waarde van de aangegeven
opslagtijd geldt, hangt af van de kwaliteit van de levensmiddelen en de
behandeling voorafgaand aan het invriezen. Voor levensmiddelen met een
hoog vetgehalte geldt altijd de laagste waarde.
Page 14
14
Ontdooiing van het toestel
Het ontdooien van de koelruimte
Het ontdooien van de koelkast heeft
automatisch plaats. Het dooiwater
wordt via een afvoerkanaaltje
opgevangen in een bakje dat zich
aan de achterkant bevindt. Hier
verdampt het water.
Wij raden u aan het gaatje in het
afvoerkanaal regelmatig schoon te
maken. Gebruik voor het
doorprikken het staafje dat zich in
het gaatje bevindt.
Het ontdooien van de vriesruimte
In het vriesvak dient u echter de rijp te verwijderen, wanneer deze een laag
van circa 4 mm vormt. Gebruik hiervoor het plastic spatel. Wanneer zich een
dikke laag ijs gevormd heeft, dient u het gehele apparaat te ontdooien.
Ga als volgt te werk:
1. draai de thermostaaaknop op “0” of trek de steker uit het stopcontact;
2. omwikkel de levensmiddelen met meerdere kranten;
3. laat de deur openstaan
4. droog na het ontdooien het vriesvak zorgvuldig;
5. draai de thermostaatknop in de gewenste stand of steek de steker weer in
het stopcontact. Na twee of drie uur kunt u de diepvriesprodukten weer
terugplaatsen.
Belangrijk
Gebruik voor het verwijderen van de rijp nooit metalen voorwerpen; u zou
uw koelkast kunnen beschadigen.
Geen voorwerpen of methodes gebruiken om het ontdooiproces te
versnellen die niet door de fabrikant zijn aangegeven.
Temperatuurstijging van diepvriesproducten kan hun houdbaarheids-duur
verkorten.
Apparaat uitzetten
Als het apparaat gedurende langere tijd niet gebruikt wordt:
1. Levensmiddelen uit koelruimte en vriesvak nemen.
2. Apparaat uitzetten, daartoe de temperatuurregelaar op stand “0” draaien.
3. Stekker uit het stopcontact halen of zekering uitschakelen, er resp. uithalen.
4. Diepvriesruimte ontdooien en grondig reinigen (zie hoofdstuk “Reini-ging
en onderhoud”).
5. Deuren daarna open laten om geurvorming te voorkomen.
D037
Page 15

15
Reiniging en onderhoud
Om hygiënische redenen dient het apparaat aan de binnenkant met
toebehoren geregeld gereinigd te worden.
Waarschuwing!
• Het apparaat mag tijden het schoonmaken niet op het electrikiteits-net
aangesloten zijn. Gevaar voor schokken! Zet voor het schoonmaken het
apparaat uit en trek de stekker uit het stopcontact of schakel c.q. draai de
zekering er uit.
• Het apparaat nooit met stoomreinigingsapparaten schoonmaken. Er kan
vocht in de elektrische onderdelen komen. Gevaar voor schokken! Hete
damp kan kunstoffen onderdelen beschadigen.
• Het apparaat dient droog te zijn voordat het weer in gebruik genomen
wordt.
Let op!
• Etherische oliën en organische oplosmiddelen kunnen kunststof
onderdelen aantasten, bijv.
– Sap van citroen– of sinaasappelschillen;
–boterzuur;
– schoonmaakmiddelen die azijnzuren bevatten.
Dergelijke substanties niet in contact brengen met apparaatonderdelen.
• Geen schurende schoonmaakmiddelen gebruiken.
1. Koel– en diepvriesartikelen er uit halen. Diepvriesartikelen in meerdere
lagen kranten verpakken. Alles afgedekt op een koele plaats leggen.
2. Vriesvak voor het schoonmaken ontdooien (zie hoofdstuk “Ontdooien”).
3. Apparaat uitzetten en de stekker uit het stopcontact halen of de zeke-ring
uitschakelen c.q. er uitdraaien.
4. Apparaat en interieur met een doek en lauwwarm water schoonmaken.
Eventueel een beetje normaal afwasmiddel gebruiken.
5. Daarna met schoon water afnemen en droogmaken.
Stof op de condensor verhoogt het energieverbruik. Daarom eenmaal per
jaar de condensor aan de achterkant van het apparaat met een zachte
borstel of met de stofzuiger voorzichtig schoonmaken.
6. Het dooiwater-afvoergat aan de achterwand van de koelruimte controleren.
Een verstopt dooiwater-afvoergat met behulp van het groene stopje dat
met het toestel is meegeleverd schoonmaken.
7. Als alles droog is, de levens-middelen er weer in doen en het apparaat weer
in bedrijf nemen.
Page 16

16
Tips om energie te besparen
• Het apparaat niet in de buurt van kachels, verwarmingselementen of
andere warmtebronnen plaatsen. Bij een hoge omgevingstemperatuur
werkt de compressor vaker en langer.
• Zorgen voor voldoende be- en ontluchting aan de onderkant van het
apparaat. Ventilatieopeningen nooit afdekken.
• Geen warme spijzen in het apparaat zetten. Warme spijzen eerst laten
afkoelen.
• Deur slechts zo lang open laten als nodig is.
• De temperatuur niet lager dan nodig instellen.
• Diepvriesartikelen voor het ontdooien in de koelruimte leggen. De koude
in de diepvriesartikelen wordt zo voor koeling van de koelruimte gebruikt.
• Houd de warmte afgevende verdamper, het metalen rooster aan de
achterzijde van het toestel, schoon.
Wat te doen als ...
Hulp bij storingen
Het kan bij een storing om kleine defecten gaan die zelf u aan de hand van
de volgende aanwijzingen kunt oplossen. Voer zelf geen verdere
werkzaamheden uit als de volgende informatie in concrete gevallen niet
verder helpt.
Waarschuwing! Reparaties aan het koelapparaat mogen alleen door
geschoold personeel uitgevoerd worden. Door ondeskundige reparaties
kunnen grote gevaren ontstaan voor de gebruiker. Wend u bij reparatie tot
onze klantendienst.
Storing Mogelijke oorzaken Verhelpen
Apparaat werkt niet.
Apparaat is niet aangezet. Apparaat aanzetten.
Stekker zit niet in het
stopcontact of zit los.
Stekker in stopcontact steken.
Zekering is los of kapot.
Zekering controleren,eventueel
vernieuwen
Stopcontact is kapot.
Storingen in het lichtnet door
Uw elektrovakman laten
verhelpen.
Page 17

17
Sterke rijpvorming in het
apparaat, eventueel ook aan
de deurafdichting.
Deurafdichting is lek
(eventueel na het verwisselen
van de deuraanslag).
Op de ondichte plaatsen de
deurafdichting voorzichtig met
een föhn® verwarmen (niet
heter dan ca. 50 °C).
Tegelijkertijd de verwarmde
deurafdichting met de hand zo
in vorm trekken dat hij weer
helemaal sluit.
Ongewone geluiden.
Apparaat komt tegen de muur
of tegen andere voorwerpen
aan.
Apparaat staat niet recht.
Een onderdeel, bijv . een leiding,
aan de achterkant van het
apparaat komt tegen een
ander onderdeel van het
apparaat aan of tegen de
muur.
De compressor start na enige
tijd automatisch.
Zie hoofdstuk “Reiniging en
onderhoud”.
Dit is normaal, het betreft
geen storing.
Na het wijzigen van de
temperatuurinstelling start de
compressor niet direct.
Water op de bodem van de
koelruimte of op de legvlakken.
Ontdooiwaterafvoer is
verstopt.
Dit onderdeel voorzichtig
wegbuigen.
Apparaat iets wegtrekken.
Stelvoetjes bijstellen.
De levensmiddelen zijn te
warm.
Binnenverlichting werkt niet.
Het apparaat staat naast een
warmtebron.
Temperatuur is niet juist
ingesteld.
Zie hoofdstuk “Ingebruikname”.
Lamp is kapot.
Zie hoofdstuk “Lamp
verwisselen”.
Temperatuurregelaar op een
koudere stand zetten.
Deur heeft te lang
opengestaan.
Zie hoofdstuk “Opstelplaats”.
In de laatste 24 uur zijn
grotere hoeveelheden warme
levensmiddelen opgeslagen.
Deur slechts zo lang open
laten als nodig is.
Apparaat koelt te sterk.
Temperatuur is te laag
ingesteld.
Temperatuurregelaar tij-delijk
op een hogere stand zetten.
Storing Mogelijke oorzaken Verhelpen
Page 18

18
Lamp verwisselen
Waarschuwing!Gevaar voor elektrische schok! Voor het verwisselen van de
lamp het apparaat uitzetten en de stekker uit het stopcontact trekken of de
zekering uitschakelen c.q. eruit draaien.
Lampgegevens: 220-240 V, max. 15 W
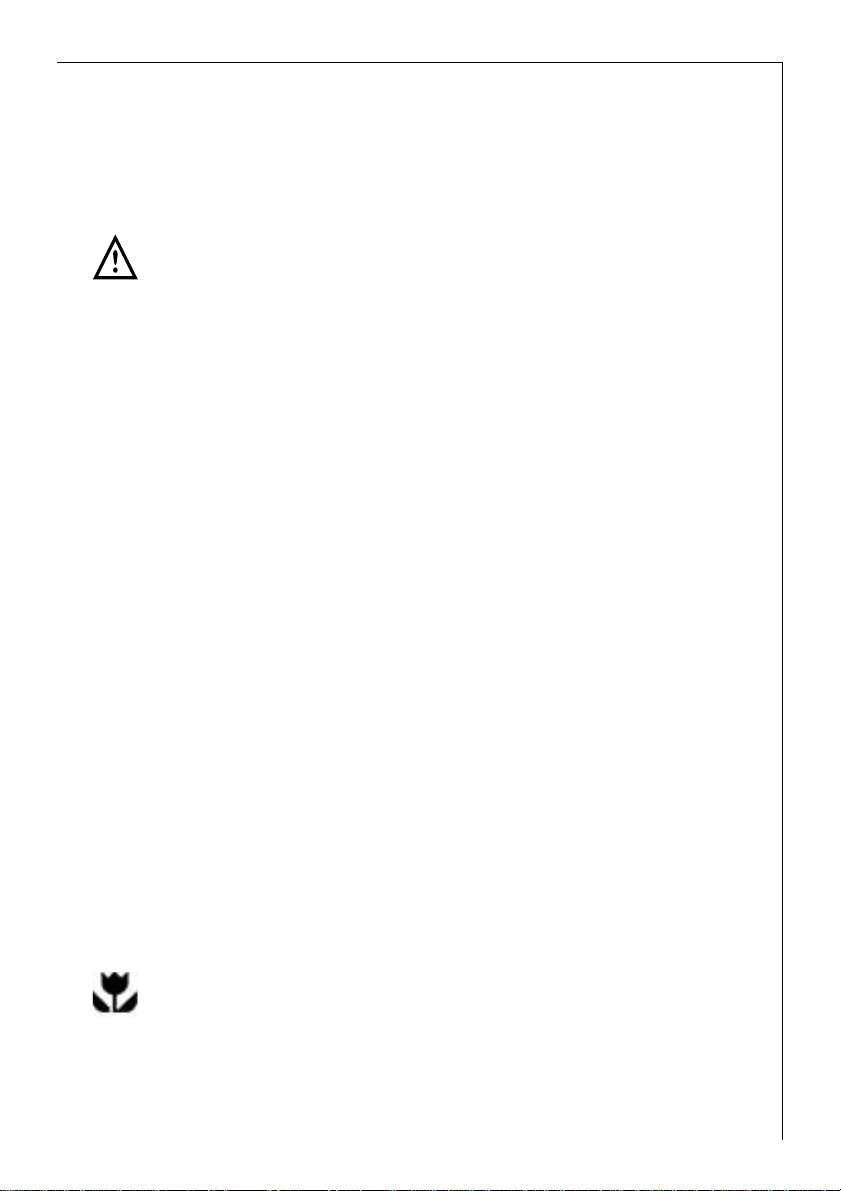
1. Om het apparaat uit te zetten de
temperatuurregelaar op stand „0"
draaien.
2. Stekker uit het stopcontact trekken.
3. Voor het verwisselen van de lamp de
schroef die de afdekking van het
lampje bevestigt, eruit draaien.
4. Op de afdekking van het lampje
drukken en deze achteruit laten
glijden.
5. Defecte lamp verwisselen.
6. De afdekking weer monteren en de
bevestigingsschroef aandraaien.
7. De koelkast aanzetten.
Doel, normen, richtlijnen
Het koelapparaat is voor huishoudelijk gebruik bestemd en is met inachtneming van de voor deze apparaten geldende normen gemaakt. Bij de
fabricage zijn speciaal die maatregelen genomen die vereist zijn volgens de
Duitse wet op de veiligheid van toestellen (GSG), volgens de Duitse
voorschriften ter voorkoming van ongevallen bij koude-installaties (VBG 20)
en volgens de bepalingen van de vereniging van Duitse elektotechnici (VDE).
De koudecirculatie is op dichtheid getest.
Dit apparaat voldoet aan de volgende EG-richtlijnen:
– 73/23/EWG van 19.2.1973 - Laagspanningsrichtlijn0
– 89/336/EWG van 3.5.1989
(met inbegrip van Wijzigingsrichtlijn 92/31/EWG) - EMC-richtlijn
D411
Page 19
19
Chère Cliente, Cher Client
Avant de mettre votre nouvel appareil en mar che, veuillez lireattentivement
le présent mode d’emploi. Vous y trouverez desinformations importantes sur
la sécurité d’utilisation, l’installation etl’entretien de l’appareil.
Conservez le mode d’emploi de manière à pouvoir le consulter par lasuite.
Remettez-le à un éventuel nouveau propriétaire de l’appareil.
Le triangle d’avertissement et/ou des indications correspondantes
(Avertissement ! Prudence ! Attention !) signalent les informations
importantes pour votre sécurité ou le bon fonctionnement del’appareil.
Observez impérativement ces indications.
Ce symbole précède des informations complémentaires sur l’utilisation et
l’application pratique de l’appareil.
Le fleur signale les conseils et informations relatifs à une utilisation
économique et non polluante de l’appareil.
Le mode d’emploi contient des indications qui permettent de remédier soimême à d’éventuels dérangements. Voir "Que faire si ...". Si ces indications
ne suffisent pas, notre service après vente se tient à votre disposition.
Page 20

20
Contenu
Sécurité . . . . . . . . . . . . . . . . . . . . . . . . . . . . . . . . . . . . . . . . . . . . . . 21
Elimination . . . . . . . . . . . . . . . . . . . . . . . . . . . . . . . . . . . . . . . . . . . . .22
Information sur l’emballage de l’appareil . . . . . . . . . . . . . . . . . . . . . . . .22
Elimination des vieux appareil . . . . . . . . . . . . . . . . . . . . . . . . . . . . . . . . .23
Retrait de la protection pour le transport . . . . . . . . . . . . . . . . . . . .23
Installation . . . . . . . . . . . . . . . . . . . . . . . . . . . . . . . . . . . . . . . . . . . . .24
Lieu d’installation . . . . . . . . . . . . . . . . . . . . . . . . . . . . . . . . . . . . . . . . . . .24
Votre appareil a besoin d’air . . . . . . . . . . . . . . . . . . . . . . . . . . . . . . . . . .24
Entretoises postérieures . . . . . . . . . . . . . . . . . . . . . . . . . . . . . . . . . . . . . .24
Changement du côté d’ouverture de la porte . . . . . . . . . . . . . . . . . . . .25
Raccordement électrique . . . . . . . . . . . . . . . . . . . . . . . . . . . . . . . . . .26
Avant la mise en service . . . . . . . . . . . . . . . . . . . . . . . . . . . . . . . . . .26
Mise en service et réglage de la température . . . . . . . . . . . . . . . . .27
Equipement intérieur . . . . . . . . . . . . . . . . . . . . . . . . . . . . . . . . . . . .27
Tablettes en verre . . . . . . . . . . . . . . . . . . . . . . . . . . . . . . . . . . . . . . . . . . .27
Porte intérieure réglable . . . . . . . . . . . . . . . . . . . . . . . . . . . . . . . . . . . . . .27
Réfrigération . . . . . . . . . . . . . . . . . . . . . . . . . . . . . . . . . . . . . . . . . . .28
Congélation et conservation . . . . . . . . . . . . . . . . . . . . . . . . . . . . . . .28
Calendrier de congélation . . . . . . . . . . . . . . . . . . . . . . . . . . . . . . . .29
Dégivrage . . . . . . . . . . . . . . . . . . . . . . . . . . . . . . . . . . . . . . . . . . . . . .30
Mettre l’appareil hors service . . . . . . . . . . . . . . . . . . . . . . . . . . . . . .30
Nettoyage et entretien . . . . . . . . . . . . . . . . . . . . . . . . . . . . . . . . . . .31
Conseils d’économie d’énergie . . . . . . . . . . . . . . . . . . . . . . . . . . . . .32
Que faire si... . . . . . . . . . . . . . . . . . . . . . . . . . . . . . . . . . . . . . . . . . . .32
Remèdes en cas de dérangements . . . . . . . . . . . . . . . . . . . . . . . . . . . . . .32
Remplacement de la lampe . . . . . . . . . . . . . . . . . . . . . . . . . . . . . . . . . . .34
Règlements, normes, directives . . . . . . . . . . . . . . . . . . . . . . . . . . . . .34
Page 21

21
Sécurité
La sécurité de nos appareils est conforme aux règles reconnues de la
technique et à la loi sur la sécurité des appareils. Nous nous voyons
cependant obligés de vous familiariser avec les conseils de sécurité suivants :
Utilisation conforme à la destination
• L’appareil est conçu pour une utilisation domestique. Il est adapté à la
réfrigération, à la congélation de produits alimentaires, au stockage des
aliments surgelés, ainsi qu’à la préparation de glaçons. En cas d’emploi
non conforme de l’appareil, le fabricant ne peut endosser aucune
responsabilité en cas de dommages éventuels.
• Pour des raisons de sécurité, il est interdit de modifier ou de transformer
l’appareil frigorifique.
• Si l’appareil est utilisé pour un usage professionnel ou dans des buts autres
que la réfrigération, la conservation et la congélation d’aliments, observer
les dispositions légales correspondantes en vigueur.
Avant la première mise en service
• Contrôlez l’appareil pour dégâts de transport éventuels. Ne brancher en
aucun cas un appareil endommagé ! En cas de dommage, veuillez vous
adresser au fournisseur.
Frigorigène
Le circuit frigorifique de l’appareil contient un frigorigène, l’isobutane
(R600a), un gaz naturel peu polluant mais inflammable.
• Lors du transport et de l’installation de l’appareil, veiller à n’endommager
aucune partie du circuit frigorifique.
• En cas d’endommagement du circuit frigorifique :
– éviter impérativement les flammes ouvertes et les sources d’inflammation;
– bien ventiler la pièce dans laquelle se trouve l’appareil.
Sécurité des enfants
• Les matériaux d’emballage (p. ex. films, mousse de polystyrène) peuvent
être dangereux pour les enfants. Danger de suffocation ! Maintenir les
matériaux d’emballage hors de portée des enfants.
• Veuillez rendre inutilisables les appareils arrivés en fin de vie avant de les
éliminer. Enlever la fiche de la prise de courant, couper le cordon
d’alimentation, enlever ou détruire les fermetures à coulisse ou à verrou
éventuellement présentes. Vous évitez de la sorte que des enfants qui
jouent puissent s’enfermer dans l’appareil (Danger de suffocation!) ou ne
se mettent dans d’autres types de situation de danger mortel.
• Cet appareil n'est pas destiné à être utilisé par des enfants ou des
personnes dont les capacités physiques, sensorielles ou mentales, ou le
manque d'expérience et de connaissance les empêchent d'utiliser
l'appareil sans risque lorsqu'ils sont sans surveillance ou en l'absence
d'instruction d'une personne responsable qui puisse leur assurer une
utilisation de l'appareil sans danger.
Page 22

22
Dans le cadre du fonctionnement quotidien
• Les récipients contenant des gaz ou des liquides sous pression peuvent
devenir inétanches sous l’effet du froid. Danger d’explosion ! N’entreposez
pas de récipients contenant des substances inflammables tels que
bombes, briquets, cartouches de recharge, etc. dans l’appareil.
• Les bouteilles et boîtes n’ont pas leur place dans le compartiment surgélateur. Elles peuvent éclater lorsque le contenu gèle – en cas de liquide
chargé en gaz carbonique, même exploser ! Ne placez jamais de limonade,
jus, bière, vin, mousseux, etc. dans le compartiment surgélateur.
Exception: les spiritueux à teneur élevée en alcool peuvent être entreposés
dans le compartiment surgélateur.
• Ne pas placer de crème glacée ni de glaçons directement dans le
compartiment surgélateur. La glace très froide peut coller à la langue ou
aux lèvres et provoquer des gelures.
• Ne pas toucher les aliments congelés à mains nues. Les mains pour-raient
y coller par le froid.
• Ne pas faire fonctionner d’appareils électriques (par ex. de sorbetières
électriques, de mélangeurs, etc.) à l’intérieur de l’appareil frigorifique.
• Avant tous travaux de nettoyage, mettre par principe l’appareil hors
service et tirer la fiche de la prise ou couper le fusible ou le tirer.
• Tirer toujours sur la fiche pour débrancher celle–ci, jamais sur le câble.
En cas de dérangement
• Si votre appareil devait un jour présenter un défaut, veuillez consulter
d’abord ce mode d’emploi à la section "Que faire si ...". Si les indications
qui y sont mentionnées ne vous aident pas, n’exécutez pas de travaux par
vous–même.
• Les appareils peuvent uniquement être réparés par des spécialistes. Des
réparations incorrectes peuvent être sour ce de danger s très graves. En cas
de réparation, adressez–vous à votre revendeur spécialisé ou à notre
service après–vente.
Elimination
Information sur l’emballage de l’appareil
Tous les matériaux utilisés sont non polluants ! Ils peuvent être déposés sans
danger à une décharge ou incinérés !
Matériaux : Les matières plastiques peuvent également être recyclées et sont
repérées de la manière suivante:
>PE< pour le polyéthylène, par ex. pour l’enveloppe extérieure et les sachets
à l’intérieur.
>PS< pour la mousse de polystyrène, par ex. pour les éléments de
rembourrage, toujours sans CFC.
Les éléments en carton sont réalisés à partir de papier recyclé et doi-vent
être ramenés à la collecte de vieux papiers.
Page 23

23
Elimination des vieux appareils
Pour des raisons de protection de l’environnement, les appareils frigorifiques doivent être éliminés dans les règles de l’art. Cette règle s’appli-que à
votre appareil précédent ainsi qu’à votre nouvel appar eil, lor squ’il ne servir a
plus.
Attention ! Avant l’élimination, rendre les vieux appareils inutilisables.
Débrancher la fiche secteur, sectionner le câble d’alimentation, retirer ou
détruire les éventuelles fermetures à houssette ou à verrou. Ceci a pour but
d’empêcher des enfants de s’enfermer dans l’appareil par jeu (risque
d’asphyxie !) ou de se mettre dans d’autres situations dangereu-ses pouvant
être mortelles.
Consignes d’élimination :
• L’appareil ne doit pas être mis avec les ordures ménagères ou les déchets
encombrants.
• Le circuit frigorifique, en particulier l’échangeur thermique au dos de
l’appareil, ne doit pas être endommagé.
•Le symbole sur le produit ou son emballage indique que ce
produit ne peut être traité comme déchet ménager. Il doit plutôt être
remis au point de ramassage concerné, se chargeant du recyclage du
matériel électrique et électronique. En vous assurant que ce produit
est éliminé correctement, vous favorisez la prévention des
conséquences négatives pour l’environnement et la santé humaine
qui, sinon, seraient le résultat d’un traitement inapproprié des déchets
de ce produit. Pour obtenir plus de détails sur le recyclage de ce
produit, veuillez prendre contact avec le bureau municipal de votre
région, votre service d’élimination des déchets ménagers ou le
magasin où vous avez acheté le produit.
Retrait de la protection pour le transport
L’appareil et certaines parties de l’équipement intérieur sont protégés
pour le transport.
• Enlever toutes les bandes autocollantes et rembourrages de l’intérieur de
l’appareil.
Page 24

24
Classe climatique pour une température ambiante de
SN +10 bis +32 °C
N +16 bis +32 °C
ST +18 bis +38 °C
T +18 bis +43 °C
Installation
Lieu d’installation
L’appareil doit être placé dans un local bien ventilé et sec.
La température ambiante agit sur la consommation de courant.
Par conséquent
– ne pas exposer directement l’appareil au soleil;
– ne pas placer l’appareil à côté d’un poêle ou autre source de chaleur;
– ne placer l’appareil qu’à un endroit dont la température ambiante
correspond à la classe climatique pour lequel il est prévu.
La classe climatique est indiquée sur la plaque signalétique qui se trouve à
l’intérieur de l’appareil. Le tableau ci-après indique quelle température ambiante
correspond àquelle classe climatique:
Si l’installation à côté d’une source de chaleur est inévitable, observer les distances
latérales minimales suivantes:
– avec des cuisinières électriques 3 cm;
– avec des poêles à mazout et à charbon 30 cm.
S’il n’est pas possible d’observer ces distances,
une plaque isolante doit être placée entre la
source de chaleur et l’appareil frigorifique. Si
l’appareil est placé à côté d’un autre
réfrigérateur ou congélateur, une distance
latérale de 5 cm est nécessaire pour éviter la
formation decondensation sur les côtés des
appareils.
Votre appareil a besoin d’air
Pour des raisons de sécurité, la ventilation
doit être prévue comme indiqué dans la Fig.
Attention: veillez à ne pas obstruer les
overtures de ventilation.
Entretoises postérieures
Vous trouverez deux entretoises jointes à
l'appareil qui doivent être installées comme
indiqué sur la figure
Procédez comme indiqué sur les figures.
A
NP005
100 mm10 mm
B
10 mm
Page 25
25
G
Changement du côté d’ouverture de la porte
La butée de porte peut être déplacée de la droite (position d’origine) à la
gauche si le lieu d’installation le nécessite.
Attention ! Pendant le déplacement de la butée de porte, l’appareil ne doit
pas être branché sur le secteur. Débrancher préalablement la fiche secteur .
Procéder comme suit:
1. Débranchez l'appareil.
2. Ouvrez les portes et dévissez la
charnière centrale (H) en retirant
les 2 vis. Retirez la charnière tout
en prenant soin que la porte
supérieure ne tombe pas.
3. Retirez la porte supérieure en la
tirant légèrement vers le bas.
4. Retirez la porte inférieure en la
tirant légèrement vers le haut.
5. Retirez le bouchon se trouvant sur la
base supérieure de la porte du
compartiment réfrigérateur et placezle sur le côté opposé de la porte.
6. Retirez le bouchon se trouvant sur la
base supérieure de la porte du
compartiment congélateur et placezle sur le côté opposé de la porte.
7. Dévissez le pivot supérieur (G) et
montez-le sur le côté opposé.
8. Retirez le cache (e) de la plinthe.
9. Dévissez le pivot inférieur (f) et
montez-le sur le côté opposé.
10. Replacez le cache (e) sur le côté
opposé.
11. Placez le pivot de la charnière
centrale (H) dans l'emplacement
prévu sur la porte du
compartiment réfrigérateur.
12. Engagez la porte du
compartiment réfrigérateur sur le
pivot inférieur (f).
13. Engagez la porte du
compartiment congélateur sur le
pivot (G). Puis en relevant
légèrement les portes, insérez le
pivot de la charnière centrale (H)
H
Page 26
26
Raccordement électrique
Une prise de courant avec contact de terre installée réglementaire-ment est
nécessaire pour le raccor-dement électrique. Il devrait être placée de façon
à pouvoir retirer la fiche du câble d’alimentation.
La protection électrique doit admettre un courant d’au moins 10 ampères.
Si la prise de courant n’est plus accessible lorsque l’appareil est mis en place,
un dispositif approprié de l’installation électronique doit garantir que
l’appareil puisse être coupé du réseau (p. ex. fusible, disjoncteur, disjoncteur
différentiel ou équivalent avec ouverture de contact d’au moins 3 mm).
• Avant la mise en service, vérifier sur la plaque signalétique de l’appareil si
la tension d’alimentation et le type de courant correspondent aux valeurs
du réseau électrique du lieu d’installation.
P.ex.: AC 230 ... 240 V 50 Hz ou
230 ... 240 V~ 50 Hz
(c–à–d courant alternatif 230 à 240 volts, 50 Hertz)
La plaque signalétique se trouve à gauche à l’intérieur de l’appareil.
Avant la mise en service
• Nettoyer l’intérieur de l’appareil et tous les équipements avant la pre-
mière mise en service (voir “Nettoyage et entretien”).
1
2
dans l'emplacement prévu sur la
porte du compartiment
congélateur.
14. Tout en maintenant les portes
ouvertes, fixez la charnière
centrale (H) à l'aide des vis sans
oublier d'intercaler également la
pièce plastique. Alignez
correctement les portes.
Faites attention afin que les portes
soient paralleles
Si ne voulez pas faire les operations
vous pouvez contacter le Service
Après-Vente en payant..
15. Démontez les poignées en dévissant le couvrépoigneé, les vis laterales
et centrale de fixation. Remontez-les de l’autre côté après avoir percé
les caches avec un poinçon. Couvrez les trous libres avec les caches
contenus dans le sachet de la documentation.
Attention: La réversibilité des portes une fois effectuée, contrôlez que les
joints magnétiques adhèrent à la carrosserie. Si la températur e à l’intérieur de
la pièce est trop basse (en hiver, par exemple), il se peut que les joints
n’adhèrent pas parfaitement. Dans ce cas, si on ne veut pas attendre que les
joints reprennent leurs dimensions naturelles après un certain temps, on
pourra accélérer ce processus en chauffant la partie intéressée à l’aide d’un
sèche-cheveux.
Page 27

27
Mise en service et réglage de la température
• Brancher la fiche du câble d’alimentation dans la prise à contacts de
sécurité. L’éclairage inférieur est branché à l’ouverture de la porte du
réfrigérateur. Le bouton rotatif pour la sélection de la temperature se
trouve dans le volume réfrigérateur, à droite.
Position «0» signifie: arrêt.
Position «1» signifie: température la plus élevée, réglage le plus chaud.
Position «6» (butée) s ignifie:température la plus basse, réglage le plus froid.
L’exacte position doit être réprée en considér ant que la températur e interne
dépend des facteurs suivants:
– quantité et température d’aliments conservés ;
– fréquence d’ouverture des portes;
Les températures dans le volume réfrigérateur et dans le compartiment
congélation ne peuvent pas être réglées séparément.
Si vous devez faire congeler des denrées alimentaires rapidement, vous
pouvez régler sur la position «6». Surveillez que la température dans le
volume réfrigérateur ne baisse pas en dessous de 0°C et ramenez le
thermostat en temps utile sur la position «3» ou «4».
Important !
Une température ambiante élevée (p. ex. lors de chaudes journées d’été) et
un réglage sur une température très froide (position "5" à "6") peuvent
conduire au fonctionnement permanent du compresseur.
Dans ce cas, mettre le régulateur de température sur un réglage plus chaud
(position "3" à "4"). Pour ce réglage, le compresseur est régulé et le pr ocessus
de dégivrage a de nouveau lieu automatiquement.
Equipement intérieur
Tablettes en verre
L’appareil est équipé soit de tablettes
de rangement en verre de
rangement. La surface de rangement
en verre au-dessus du compartiment
à fruits et légumes doit toujours
rester dans cette position, afin que
les fruits et légumes restent frais plus
longtemps.
Les autres tablettes de rangement sont réglables en hauteur:
Pour ce faire, tirer la tablette en avant jusqu’à pouvoir la basculer vers le
haut ou le bas et la retirer.
Pour la mise en place à une autre hauteur, procéder dans l’ordre inverse.
Porte intérieure réglable
Si nécessaire, les rangements de la porte peuvent être r etirés vers le haut et
placés dans d’autres logements.
D338
Page 28

28
Réfrigération
Pour obtenir le meilleur rendement du compartiment réfrigérateur:
• n’introduisez pas d’aliments encore chauds ou de liquides en évaporation
dans la cuve;
• couvrez les aliments, surtout s’ils sont aromatiques;
• placez les denrées de façon à ce que l'air puisse circuler tout autour.
Où placer les denrées?
Viandes (de toutes sortes): enveloppez-la dans des sachets en plastique
et placez-la sur la tablette en verre au-dessus du(des) bac(s) à légumes.
La période de conservation est de 1 à 2 jours au maximum.
Aliments cuits, plats froids, etc.: placez-les, bien couverts, sur une clayette.
Fruits et légumes: bac(s) à légumes (une fois nettoyés).
Beurre et fromage: enveloppez-les soigneusement dans des feuilles
d’aluminium ou de polyéthylène et mettez-les dans les casiers appropriés.
Lait en bouteille: à placer dans l’un des balconnets de la contreporte.
Bananes, pommes de terre, oignon et ail ne doi-vent pas être placés
dans le réfrigérateur, s’ils ne sont pas conditionnés.
Congélation et conservation
Dans votre congélateur-armoire vous pouvez conserver des produits
surgelés et congelés et congeler vous meme des denrées alimenta res
fraîches.
Attention !
• Avant de congeler des aliments, la température dans le compartiment
surgélateur doit être de –18 °C ou inférieure.
• Prière de respecter la capacité de congélation indiquée sur la plaque
signalétique. La capacité de congélation est la quantité maximum
d’aliments frais pouvant être congelés en 24 heures. Si vous congelez
pendant plusieurs jours d’affilée, veuillez n’introduire que les 2/3 ou les
3/4 de la quantité indiquée sur la plaque signalétique. Vous obtenez une
meilleure qualité en congelant les denrées alimentaires rapidement, à
coeur.
• Laissez refroidir les aliments chauds avant de les congeler. La chaleur
provoque une formation renforcée de givre et augmente la
consommation énergétique.
• Il faut observer absolument les dates limites de conservation indi-quées
par le fabricant.
• Les aliments décongelés sans autre transformation (préparation de plats
finis) ne doivent jamais être congelés une seconde fois.
• Les récipients contenant des gaz ou des liquides sous pression peu-vent
Page 29
29
devenir inétanches sous l’effet du froid. Danger d’explosion ! N’entreposez
pas de récipients contenant des substances inflammables tels que
bombes, briquets, cartouches de recharge, etc. dans l’appareil de
congélation.
• Les bouteilles et boîtes n’ont pas leur place dans l’appareil de congélation.
Elles peuvent éclater lorsque le contenu gèle – en cas de liquide chargé en
gaz carbonique, même exploser ! Ne placez jamais de limonade, jus, bière,
vin, mousseux, etc. dans l’appareil de congélation. Exception : les
spiritueux à teneur élevée en alcool peuvent être entreposés dans
l’appareil de congélation.
• Emballer hermétiquement tous les aliments avant de les congeler pour les
empêcher de dessécher, de perdre leur goût et pour éviter que le goût ne
soit transmis à d’autres aliments congelés.
• Vous éviterez de longues ouvertures de porte et vous économiserez du
courant.
• Les aliments non congelés ne peuvent pas toucher les aliments congelés,
sinon ceux–ci pourraient dégeler localement.
Attention ! Ne touchez pas les aliments surgelés avec des mains humides.
Les mains pourraient y rester collées.
1. Placez les aliments à congeler sur le clayette dans le compartiment
congélateur.
Calendrier de congélation
• Les symboles qui figurent à différents types de produits congelés.
• Les chiffres indiquent la durée de conservation en mois du type correspondant de produit. La durée de conservation supérieure ou inférieur e est
valable en fonction de la qualité des aliments et du traitement qu’ils ont
subi avant la congélation. La valeur inférieure s’applique toujours aux
aliments contenant un fort pourcentage de graisse.
Page 30
30
Dégivrage
Réfrigérateur
Le dégivrage du compartiment
réfrigérateur s’effectue
automatiquement, à chaque arrêt du
compresseur. L’eau de dégivrage est
évacuée dans un bac situé dans la
partie postérieure de l’appareil où
elle s’évapore sans intervention.
Congélateur
Le givre qui se forme dans le compartiment congélateur sera éliminé
périodiquement à l’aide de une spatule en matière plastique. Il ne sera pas
nécessaire de débrancher le réfrigérateur ou d’enlever les pr oduits contenus
dans le compartiment. Chaque fois que l’épaisseur de la couche de givre
excède 5 mm env. nous vous recommandons de procéder au dégivrage
complet:
1. débranchez l’appareil ou mettez le thermostat sur la position «O»;
2. sortez le bac à glaçons et éventuellement les produits congelés. Enveloppez
ceux-ci dans plusieurs feuilles de papier journal. Conservez-les dans un
endroit frais;
3. maintenez la porte ouverte
4. Le dégivrage une fois terminé; épongez et séchez soigneusement et
rebranchez l’appareil si nécessaire.
5. Réglez le thermostat sur la position de froid maximum pendant 2 heures
env. puis ramenez-le sur la position d’utilisation habituelle.
6. Replacez les produits congelés s’il y a lieu.
Important
Pour cette opération n’utilisez jamais d’objet métallique qui risquerait de
détériorer l’appareil.
N’utilisez jamais de dispositifs mécaniques ou autres moyens artificiels pour
accélérer le dégivrage, à part ceux préconisés.
L’élevation de température des denrées congelées peut diminuer
notablement la durée de conservation.
Mettre l’appareil hors service
Si l’appareil doit rester longtemps hors service :
1. Enlever les produits à réfrigérer ainsi que les bacs à glaçons.
2. Mettre l’appareil hors service, à cet effet tourner le régulateur de
temperature sur “0”.
3. Débrancher la fiche secteur ou déconnecter ou dévisser le fusible.
D037
Page 31
31
4. Dégivrer le congélateur et le nettoyer soigneusement (voir “Nettoyage et
entretien”).
5. Laisser ensuite les portes ouvertes afin d’éviter la formation d’odeurs.
Nettoyage et entretien
Pour des raisons d’hygiène, il est nécessaire de nettoyer régulière ment
l’intérieur de l’appareil, y compris les équipements intérieurs.
Avertissement !
• Pendant le nettoyage, l’appareil ne peut pas être raccordé au secteur.
Danger d’électrocution ! Avant tous travaux de nettoyage, mettre
l’appareil hors service et tirer la fiche de la prise ou couper le fusible ou le
tirer .
• Ne jamais nettoyer l’appareil à l’aide d’appareils de nettoyage à l’aide de
vapeur sous pression. L’humidité pourrait pénétrer dans des éléments
électriques. Danger d’électrocution ! La vapeur chaude peut endommager
les parties en matière plastique.
• L’appareil doit être sec avant la remise en marche.
Attention !
• Les huiles essentielles et les solvants organiques peuvent agresser les pièces
en plastique, par ex.
– le jus de citron ou les pelures d’orange ;
– l’acide butyrique ;
– les agents de nettoyage contenant de l’acide acétique.
Ne pas amener de telles substances en contact avec les partiess de l’appareil.
• Ne pas utiliser de produits de nettoyage abrasifs..
1. Enlever les aliments refroidis et surgelés. Envelopper les aliments surgelés
dans plusieurs couches de papier journal. Entreposer le tout couvert dans un
endroit frais.
2. Dégivrer le compartiment surgélateur avant le nettoyage.
3. Mettre l’appareil hors service et tirer le cordon d’alimentation de laprise ou
débrancher/dévisser le fusible.
4. Nettoyer l’appareil ainsi que les parties intérieures à l’aide d’un chiffon et
d’eau tiède. Ajouter éventuellement quelques gouttes d’un produit de
nettoyage de la vaisselle du commerce.
5. Essuyer ensuite avec de l’eau pure et sécher.
Les dépôts de poussière sur le condenseur augmentent la consommation
d’énergie. Par conséquent, nettoyer prudemment le condenseur à l’arrière
de l’appareil avec une brosse souple ou un aspirateur une fois par an.
6. Contrôler le trou d’écoulement de l’eau de dégivrage dans la paroi arrièr e du
compartiment frigo. S’il est bouché, vous pouvez déboucher le trou
d’écoulement de l’eau de dégivrage à l’aide de bouchon vert.
Page 32

32
7. Lorsque tout est sec, replacer les aliments et remettre l’appareil en service.
Conseils d’économie d’énergie
• En cas de température ambiante élevée, le compresseur tourne plus
souvent et plus longtemps.
• Veiller à une ventilation suffisante du socle de l’appareil. Ne jamais
recouvrir les ouvertures de ventilation.
• Ne pas placer d’aliments chauds dans l’appareil. Laisser d’abord refr oidir les
aliments chauds.
• Ne pas ouvrir la porte plus longtemps que nécessaire.
• Ne pas régler la température plus bas que nécessaire.
• Placer les aliments surgelés dans le compartiment frigo pour les dégeler.
Le froid des aliments surgelés est ainsi utilisé pour le refroi-dissement du
compartiment frigo.
• Tenez bien prope le condenseur dégageant de la chaleur, la grille
métallique sur la paroi arrière de votre appareil.
Que faire si ...
Remèdes en cas de dérangements
Le dérangement n’est peut-être qu’un petit défaut auquel vous pouvez
remédier vous-même à l’aide des indications suivantes. N’effectuez pas de
travaux vous-même si les informations suivantes ne vous aident pas de
manière concrète.
Avertissement! Les réparations à l’appareil de congélation peuvent
uniquement être effectuées par des spécialistes. Des réparations incor-rectes
peuvent être source de dangers graves pour l’utilisateur. En cas de
réparation, adressez-vous à votre distributeur ou à notre service aprèsvente.
Dérangement Cause possible Remède
L’appareil ne fonctionne pas.
L’appareil n’est pas mis en
service.
Mettre l’appareil en service.
La fiche n’est pas branchée ou
ne donne pas de contact.
Brancher la fiche secteur .
Le fusible a déclenché ou est
défectueux.
Vérifier le fusible, remplacer le
cas échéant.
La prise de courant est
défectueuse.
Les dérangements du réseau
électrique doivent être
supprimés par votre électricien.
Page 33

33
Formation importante de givre
dans l’appareil, éventuellement
aussi au joint de porte.
Le joint de porte n’est pas
étanche (après changement du
sens d’ouverture de la porte).
A l’aide d’un sèche-cheveux,
réchauffer avec pré-caution le
joint de porte aux endroits des
fuites (pas plus chaud qu’env.
50 °C). Remettre en même
temps le joint de porte en
forme à la main de manière à
ce qu’il soit de nouveau en
position correcte.
Dérangement Cause possible Remède
Le compresseur se met en
marche de lui même au bout
d’un certain temps.
Voir section "Nettoyage et
Entretien".
Ceci est normal, il ne s’agit pas
d’un dérangement.
Après modification du réglage
de température, le
compresseur ne démarre pas
immédiatement.
Il y a de l’eau au fond du
compartiment surgélateur ou
sur les surfaces de rangement.
Le trou d’écoulement de l’eau
de dégivrage est bou-ché.
Bruits anormaux.
L’appareil est en contact avec
la paroi ou d’autres objets.
L’appareil n’est pas d’aplomb.
Une partie de l’appareil, p. ex.
un tuyau, est en contact avec
une autre partie de l’appareil
ou la paroi à l’arrière de
l’appareil
Le cas échéant, plier cette
partie avec précaution pour
l’éloigner.
Déplacer légèrement l’appareil.
Ajuster les pieds réglables.
Les aliments sont trop chauds.
L’appareil se tr ouve à côté
d’une source de chaleur .
La température est mal réglée.
Veuillez consulter la section
"Mise en service".
Mettre temporairement le
régulateur de température sur
un réglage plus froid.
La porte est restée ouverte
trop longtemps.
Veuillez consulter la section
"Lieu d’installation".
De trop grandes quantités
d’aliments ont été sées au
cours des dernières 24 heures.
Ne pas ouvrir la porte plus
longtemps que nécessaire.
L’appareil r efroidit trop
fortement.
La température est réglée trop
bas.
Mettre temporairement le
régulateur de température sur
une température plus élevée.
L’éclairage intérieur ne
pasfonctionne
La lampe est défectueuse.
Veuillez consulter la section
"Changer la lampe".
Page 34

34
Remplacement de la lampe
Attention! Danger d'électrocution! Avant de remplacer la lampe,
débrancher l'appareil et tirer la fiche de la prise de courant ou débrancher
ou retirer le fusible. Données de la lampe: 220-240 V, max. 15 W.
1. Pour débrancher l'appareil, tourner le régulateur de température sur „0".
2. Tirer la fiche de la prise de courant.
3. Pour remplacer la lampe, dévisser la vis.
4. Excer une pression sur le cache de
l’ampoule, comme l’indique la fig., et le
faire glisser vers l’arrière.
5. Remplacer la lampe défectueuse.
6. Remonter le cache de l’ampoule et
revisser la vis de fixation.
7. Remettre en marche le réfrigérateur.
Règlements, normes, directives
L’appareil frigorifique est destiné à un usage domestique et a été fabriqué
en respect des normes s’appliquant à ce type d’appareils. La fabrication tient
en particulier compte des mesures prévues par la loi allemande sur la
sécurité des appareils (GSG), le règlement préventif contre les accidents pour
les installations frigorifiques (VBG 20) et les dispositions de l’union des
électrotechniciens allemands (VDE). L’étanchéité du cir cuit frigorifique a été
contrôlée.
Cet appareil est conforme aux directives européennes suivantes :
– 73/23/CEE du 19.2.1973 - Directive sur les basses tensions
– 89/336/CEE du 3.5.1989
(y compris la directive de modification 92/31/CEE) - Directive de CEM
D411
Page 35

35
Dear customer,
Before placing your appliance into operation please read these operating
instructions carefully. They contain important information for safe use, for
installation and for care of the appliance.
Please keep these operating instructions for future reference. Pass them on
to possible new owners of the appliance.
Notes which are important for your safety or for the proper functioning of
the appliance are stressed with a warning triangle and/or with signal words
(Warning!, Caution!, Attention!). Please observe the following carefully.
Supplementary information regarding operation and practical applications
of the appliance appear after this symbol.
Tips and notes concerning economical and environmentally sound use of
the appliance are marked with the flower.
The operating instructions contain instructions for the correction of possible
malfunctions by the user in the section "What to do if ...". If these
instructions should not be sufficient, our customer service department is
always available to you.
Page 36

36
Contents
Safety . . . . . . . . . . . . . . . . . . . . . . . . . . . . . . . . . . . . . . . . . . . . . . . . .37
Disposal . . . . . . . . . . . . . . . . . . . . . . . . . . . . . . . . . . . . . . . . . . . . . . .38
Appliance Packaging Information . . . . . . . . . . . . . . . . . . . . . . . . . . . . . .38
Disposal of old Appliances . . . . . . . . . . . . . . . . . . . . . . . . . . . . . . . . . . . .39
Remove transport safeguard . . . . . . . . . . . . . . . . . . . . . . . . . . . . . . .39
Installation . . . . . . . . . . . . . . . . . . . . . . . . . . . . . . . . . . . . . . . . . . . . .40
Installation Location . . . . . . . . . . . . . . . . . . . . . . . . . . . . . . . . . . . . . . . . .40
Your appliance needs air . . . . . . . . . . . . . . . . . . . . . . . . . . . . . . . . . . . . .40
Rear spacers . . . . . . . . . . . . . . . . . . . . . . . . . . . . . . . . . . . . . . . . . . . . . . . .41
Rehingeing the door . . . . . . . . . . . . . . . . . . . . . . . . . . . . . . . . . . . . . . . . .41
Electrical Connection . . . . . . . . . . . . . . . . . . . . . . . . . . . . . . . . . . . . .43
Prior to Initial Start–Up . . . . . . . . . . . . . . . . . . . . . . . . . . . . . . . . . .43
Starting up and temperature regulation . . . . . . . . . . . . . . . . . . . . .43
Interior Accessories . . . . . . . . . . . . . . . . . . . . . . . . . . . . . . . . . . . . . .44
Storage shelves . . . . . . . . . . . . . . . . . . . . . . . . . . . . . . . . . . . . . . . . . . . .44
Variable Inner Door . . . . . . . . . . . . . . . . . . . . . . . . . . . . . . . . . . . . . . . . . .44
Fresh food refrigeration . . . . . . . . . . . . . . . . . . . . . . . . . . . . . . . . . .45
Freezing and storing frozen food . . . . . . . . . . . . . . . . . . . . . . . . . . .45
Freezing Calender . . . . . . . . . . . . . . . . . . . . . . . . . . . . . . . . . . . . . . .46
Defrosting . . . . . . . . . . . . . . . . . . . . . . . . . . . . . . . . . . . . . . . . . . . . .47
Switching off the appliance . . . . . . . . . . . . . . . . . . . . . . . . . . . . . . .47
Cleaning and Care . . . . . . . . . . . . . . . . . . . . . . . . . . . . . . . . . . . . . . .48
Energy Saving Tips . . . . . . . . . . . . . . . . . . . . . . . . . . . . . . . . . . . . . . .49
What to do if . . . . . . . . . . . . . . . . . . . . . . . . . . . . . . . . . . . . . . . . . . .49
Correcting Malfunctions . . . . . . . . . . . . . . . . . . . . . . . . . . . . . . . . . . . . . .49
Changing the light bulb . . . . . . . . . . . . . . . . . . . . . . . . . . . . . . . . . . . . . .51
Regulations, Standards, Guidelines . . . . . . . . . . . . . . . . . . . . . . . . .51
Page 37
37
Safety
The safety aspects of our appliance comply with accepted technical
standards and the German Appliance Safety Law . Nevertheless, we consider
it our obligation to make you aware of the following safety information:
Intended use
• The appliance is intended for use in the home. It is suitable for the cooling,
freezing and storing of frozen food, as well as for making ice. If the
appliance is used for purposes other than those intended or used
incorrectly, no liability can be accepted by the manufacturer for any
damage that may be caused.
• Alterations or changes to the appliance are not permitted for reasons of
safety.
• If you use the appliance in a commercial application or forpurposes other
than the cooling, freezing or frozen storage of foods,please observe all
valid legal regulations for your application.
Prior to initial start–up
• Check the appliance for transport damage. Under no circumstance should
a damaged appliance be plugged in! In the event of damage, please contact
the vendor.
Refrigerant
The refrigerant isobutane (R600a) is contained within the refriger ant cir cuit
of the appliance, a natural gas with a high level of environmental
compatibility, which is nevertheless flammable.
• During transportation and installation of the appliance, be certain that
none of the components of the refrigerant circuit become damaged.
• If the refrigerant circuit should become damaged:
– avoid open flames and sources of ignition;
– thoroughly ventilate the room in which the appliance is situated.
Safety of children
• Packaging (e.g. wraps, polystyr ene) can be dangerous for childr en. There is
a risk of suffocation! Keep packaging material away from children!
• Please make old appliances unusable prior to disposal. Pull out the mains
plug, cut off the mains cable, break or remove spring or boltcatches, if
fitted. By doing this you ensure that children cannot lock themselves in
the appliance when playing (there is risk of suffocation!)or get themselves
into other dangerous situations.
• This appliance is not intended for use by persons (including children) with
reduced physical, sensory or mental capabilities, or lack of experience and
knowledge, unless they have been given supervision or instruction
concerning use of the appliance by a person responsible for their safety.
Page 38

38
Children should be supervised to ensure that they do not play with the
appliance. !
Daily Operation
• Containers with flammable gases or liquids can leak at low temperatures.
There is a risk of an explosion! Do not store any containers with flammable
materials such as, for example, spray cans, fire extinguisher refill
cartridges etc in the refrigerator/freezer.
• Bottles and cans must not be placed in the freezer compartment. They can
burst when the contents freeze, high carbonate content drinks can even
explode! Never store lemonade, juices, beer, wine, sparkling wine etc. in
the freezer compartment. Exception: high alcohol content spirits can be
stored in the freezer compartment.
• Do not put ice creams or ice cubes in the mouth immediately after
removal from the freezer compartment. V ery cold ice can freeze to the lips
or tongue and cause injury.
• Do not touch frozen food with wet hands. Your hands could fr eeze to the
food.
• Do not operate any electrical appliances in the refrigerator/freezer (e.g.
electric ice cream makers, mixers etc.).
• Before cleaning the appliance, always switch off the appliance and unplug
it, or pull the house fuse or switch off the circuit breaker.
• When unplugging always pull the plug from the mains socket, do not pull
on the cable.
In case of malfunction
• If the a malfunction occurs on the appliance, please look first in the "What
to do if ..." section of these instructions. If the information given there
does not help, please do not perform any further repairs yourself.
• Applianeces may only be repaired by qualified service engineers. Impr oper
repairs can give rise to significant hazards. If your appliance needs
repairing, please contact your specialist dealer or our Customer Service.
Disposal
Appliance Packaging Information
All materials are environmentally sound! They can be dumped or burned at
an incinerating plant without danger!
About the materials: The plastics can be recycled and are identified as
follows:
>PE< for polyethylene, e.g. the outer covering and the bags in the interior.
>PS< for polystyrene foam, e.g. the pads, which are all free of
chlorofluorocarbon.
Page 39

39
The carton parts are made from recycled paper and should be disposed of
at a waste-paper recycling collection location.
Disposal of old Appliances
For environmental reasons, refrigeration appliances must be disposed of
properly. This applies to your old appliance, and - at the end of its service
life - for your new appliance as well.
Warning! Before disposing of old appliances make them inoperable. Remove
plug from mains, sever the power cable, remove or destroy any snap or latch
closures. This eliminates the danger that playing children lock themselves
into the appliance (danger of suffocation!) or place themselves into other
life-endangering situations.
Dispos al:
• The appliance may not be disposed of with domestic waste or bulky refuse.
• The refrigerant circuit, especially the heat exchanger at the back of the
appliance, may not be damaged.
• The symbol on the product or on its packaging indicates that
this product may not be treated as household waste. Instead it shall
be handed over to the applicable collection point for the recycling
of electrical and electronic equipment. By ensuring this product is
disposed of correctly, you will help prevent potential negative
consequences for the environment and human health, which could
otherwise be caused by inappropriate waste handling of this
product. For more detailed information about recycling of this
product, please contact your local city office, your household waste
disposal service or the shop where you purchased the product.
Remove transport safeguard
The appliance and the interior fittings are protected for transport.
• Remove all adhesive tape and packing pieces from the interior of the
appliance.
Page 40

40
Installation
Installation Location
The appliance should be set up in a well ventilated, dry room.
Energy use is affected by the ambient temperature. The appliance should
therefore
– not be exposed to direct sunlight;
– not be installed next to radiators, cookers or other sources of heat;
– only be installed at a location whose ambient temperature corresponds to
the climate classification, for which the appliance is designed.
The climate classification can be found on the serial plate, which is located
at the left on the inside of the appliance.
The following table shows which ambient temperature is correct for each
climate classification: each climate classification:
Climate classification for an ambient temperature of
SN +10 bis +32 °C
N +16 bis +32 °C
ST +18 bis +38 °C
T +18 bis +43 °C
If installation next to a source of heat is unavoidable, the following minimum
clearances must be maintained at the sides of the appliance:
– for electric cookers 3 cm;
– for oil and coal fired ranges 30 cm.
If these clearances cannot be maintained a heat insulating pad is required
between the cooker and the refrigeration appliance.
If the refrigeration appliance is installed next to another refrigerator or
freezer a clearance of 5 cm at the sides is required, in order to prevent the
formation of condensation on the outside of the appliance.
Your appliance needs air
For safety reasons, minimum
ventilation must be as shown Fig.
Attention: keep ventilation
openings clear of obstruction;
100 mm10 mm
NP005
10 mm
Page 41

41
Rehingeing the door
The side at which the door opens can be changed from the right side
(factory adjustment) to the left side, if the installation site requires.
Warning! When changing the side at which the door opens, the appliance
may not be connected to the mains. Remove plug from the mains
beforehand.
Procced as follows:
To carry out the following
operations, we suggest that this be
made with another person that will
keep a firm hold on the doors of the
appliance during the operations.
- Open the doors, unscrew and
remove the middle hinge (H) pulling
away gradually from the refrigerator
cabinet, tilting slightly the two doors.
pay attention to remove the plastic
spacer inserted under the hinge.
- Take off the freezer door pulling
slightly downwards.
- Take off the refrigerator door
pulling slightly upwards the top.
- Remove the upper plastic plug of
the freezer door and reinsert on the
opposite side.
- Remove the upper plastic plug of
the refrigerator door and reinsert on
the opposite side.
- Unscrew the upper hinge pivot (G)
of the refrigerator and rescrew it on
the opposite side.
Rear spacers
Inside the appliance you find two
spacers which must be fitted.
Slacken the screws and insert the
spacer under the screw head, then
re-tighten the screws.
G
H
Page 42
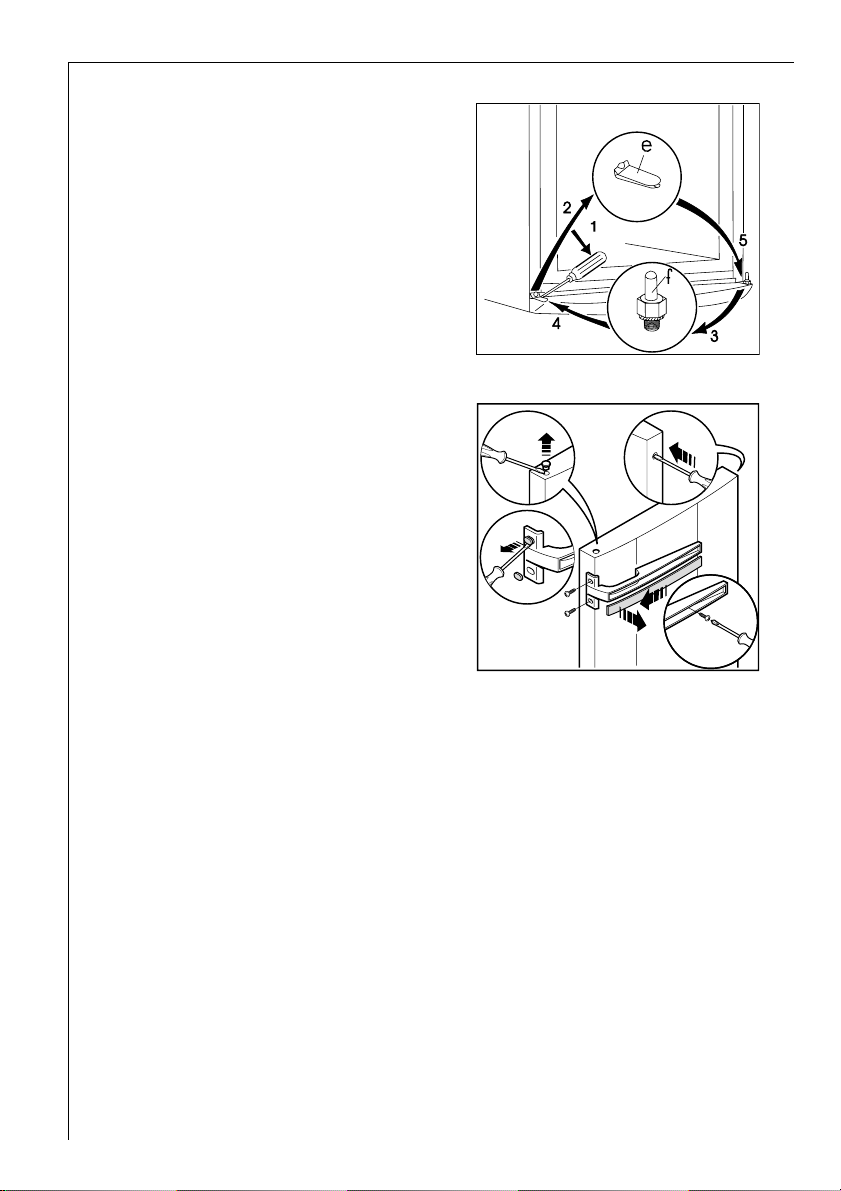
42
- Remove with a tool the cover (e)
unscrew the lower hinge pivot (f)
and rescrew on the opposite side
- Refit the cover (e) on the opposite
side.
- Insert the middle hinge pivot into
hole on the left of the refrigerator
door.
- Insert the refrigerator door on the
lower hinge pivot (f) .
- Insert the freezer door on the upper
hinge pivot and tilt slightly the doors
and insert the middle hinge pivot
into the hole on the left side of the
freezer door.
- Opening the doors, fix the middle
hinge on the left side with two
screws. Do not forget the plastic
spacer that must be placed under the
middle hinge (H).
- Dismantle the handles, by sliding
the handle-cover, by unscrewing
its side and middle screws and
reassemble them on the opposite
side. Cover the holes left open
with the plugs contained in the
documentation pack.
Pay attention that the border of the doors are parallel to the top border.
Reposition, level the appliance and connect it to the mains socket.
In any case you do not want to carry out the above mentioned operations,
contact the nearest After Sales Service Force.. The After Sales Service
specialist will carry out the reversibility of the doors at your cost.
Attention:
After having reversed the opening direction of the doors check that all the
screws are properly tightened and that the magnetic seal adheres to the
cabinet. If the ambient temperature is cold (i.e. in Winter), the gasket may
not fit perfectly to the cabinet. in that case, wait for the natural fitting of
the gasket or accelerate this process by heating up the part involved with a
normal hairdrier.
1
2
Page 43

43
Electrical connection
Before initial start-up, refer to the appliance rating plate to ascertain if
supply voltage and current values correspond with those of the mains at the
installation location.
e.g.: AC 230 ... 240 V 50 Hz or
230 ... 240 V~ 50 Hz
(i.e. 230 to 240 volts alternating current, 50 Hertz)
The rating plate is inside the appliance on the left.
A correctly installed, earthed socket is required for the electrical supply. The
supply must have a fuse rating of at least 10 Amps.
If the socket is not accessible once the appliance is built in, the electrical
installation must include suitable means of isolating the appliance from the
mains (e.g. fuse, cut-out, current trip or similar with a minimum contact
separation of 3 mm).
Attention: The mains connection cable may only be replaced by a skilled
electrician. Please contact your dealer or our customer service department
for repairs.
Prior to Initial Start–Up
• Please clean the appliance interior and all accessories prior to initial start-
up (see section: “Cleaning and Care”).
Starting up and temperature regulation
• Insert the plug of the connection lead into the plug socket with protective
earth contact. When the refrigerator compartment door is opened, the
internal lighting is switched on. The temperature selector knob is located
on the RH side of the refrigerator compartment.
Setting „0“ means: Off.
Setting „1“ means: Hightest temperature, (warmest setting).
Setting „6“ (end-stop) means: Lowest temperature, (coldest setting).
Page 44

44
However, the exact setting should be chosen keeping in the mind that the
temperature inside the refrigerator depends on:
-the quantity of food stored
-how often the door is opened
The temperatures in the refrigerator compartment and freezer
compartment cannot be independently regulated.
Set the thermostat on a medium position 3-4. This provides in the freezer -
18°C or colder and in the fridge about +5°C. This position is usally adequate
for everyday use.
Important!
High ambient temperatures (e.g. on hot summer days) and a cold setting on
the temperature regulator (position"5" to "6") can cause the compressor to
run continuously.
If this happens, turn the temperature regulator back to a warmer setting
(position "3" to "4"). At this setting the compressor will be switched on and
off as usual and automatic defrosting recommenced.
Interior Accessories
Storage Shelves
The glass shelf above the fruit and
vegetable compartment should
always remain in position, to ensure
fruit and vegetables stay fresh
longer.
The remaining storage shelves can be
adjusted to various heights:
Pull the storage shelf forward until it
can be tipped up or down and
removed.
To insert at a different height use the same procedure in reverse.
Variable Inner Door
The door compartments can be pulled up and removed, and inserted at
other positions as needed.
D338
Page 45

45
Fresh food refrigeration
To obtain the best performance:
• do not store warm food or evaporating liquide in the refrigeator
• do cover or wrap the food, particularly if it has a strong flavour.
• Position food so that air can circuiate freely round it.
Useful hints:
Meat (all types): wrap in polythene bags and place on the glass shelf above
the vegetable drawer(s)For safety, store in this way only one or two days
at the most.
Cooked foods, cold dishes , etc: these should be covered and may be placed
on any shelf.
Fruit and vegetables: these should be thoroughly cleaned and placed in
the special drawer(s) provided.
Butter and cheese: these should be placed in special airtight containers or
wapped in aluminium foil or polythene bags to exclude as much air as
possible.
Milk bootles: these should have a cap and should be stored in the bottle
rack on the door.
Bananas, potatoes, onions and garlic, if not packed, mu st not be kept in
the refrigerator.
Freezing and storing frozen food
You can use your freezer for freezing fresh food yourself.
• For any freezing of fresh food the temperature in the freezer
compartment must be -18°C or colder. Please adjust the thermostat
accordingly in advance.
• To achieve faster freezing of food or to freeze the maximum quantity as
indicated on the rating plate it is necessary to adjust 24 hours in advance
the thermostat to a colder position between 4 and 5, thus the
temperature should be in the range of -19°C to -20°C.
• Place all already frozen food close together on the bottom of the
compartment.
• The wire shelf has to be put in the top most position.
• Place the fresh food on the wire shelf.
• After finishing freezing don´t forget to adjust back the thermostat on the
usual used position.
• Please observe the freezing capacity given on the rating plate. The
freezing capacity is the maximum quantity of fresh food that can be
frozen within a period of 24 hours. If you wish to freeze food sever al days
in a row, please observe a maximum capacity of only 2/3 to 3/4 of that
Page 46

46
on the rating plate. The quality of the food is best preserved when it is
frozen right through to the core as quickly as possible.
• Allow warm food to cool down before freezing. The warmth will cause
increased ice formation and increase the power consumption.
• Please note the maximum storage times specified by the manufacturer.
• Thawed foods which have not been processed further (cooked into meals)
may not under any circumstances be frozen a second time.
• Containers with flammable gases or liquids can leak at low temperatures.
There is a risk of an explosion! Do not store any containers with flammable
materials such as, for example, spray cans, fire extinguisher refill
cartridges etc in the refrigerator/freezer.
• Bottles and cans must not be placed in the freezer. They can burst when
the contents freeze, high carbonate content drinks can even explode!
Never store lemonade, juices, beer , wine, sparkling wine etc. in the freezer .
Exception: high alcohol content spirits can be stored in the freezer.
• All foods must be packed air tight prior to freezing, so that they do not
dry out or lose their flavour, and so that no flavour contamination of
other frozen goods occurs.
• Not open the door frequently or leave it open longer than absolutely
necessary.
• Unfrozen food must not touch items already frozen, otherwise the fr ozen
food could begin to defrost.
Caution! Do not touch frozen food with wet hands. Your hands could freeze
to the food.
11. Place the food to be frozen on the freezer shelf.
Freezing Calendar
• The symbols show different types of frozen goods.
• The numbers indicate storage times in months for the appropriate types
of frozen goods. Whether the upper or lower value of the indicated storage
time is valid depends on the quality of the foods and pre-treating before
freezing. The lower value applies to foods with high fat content.
Page 47
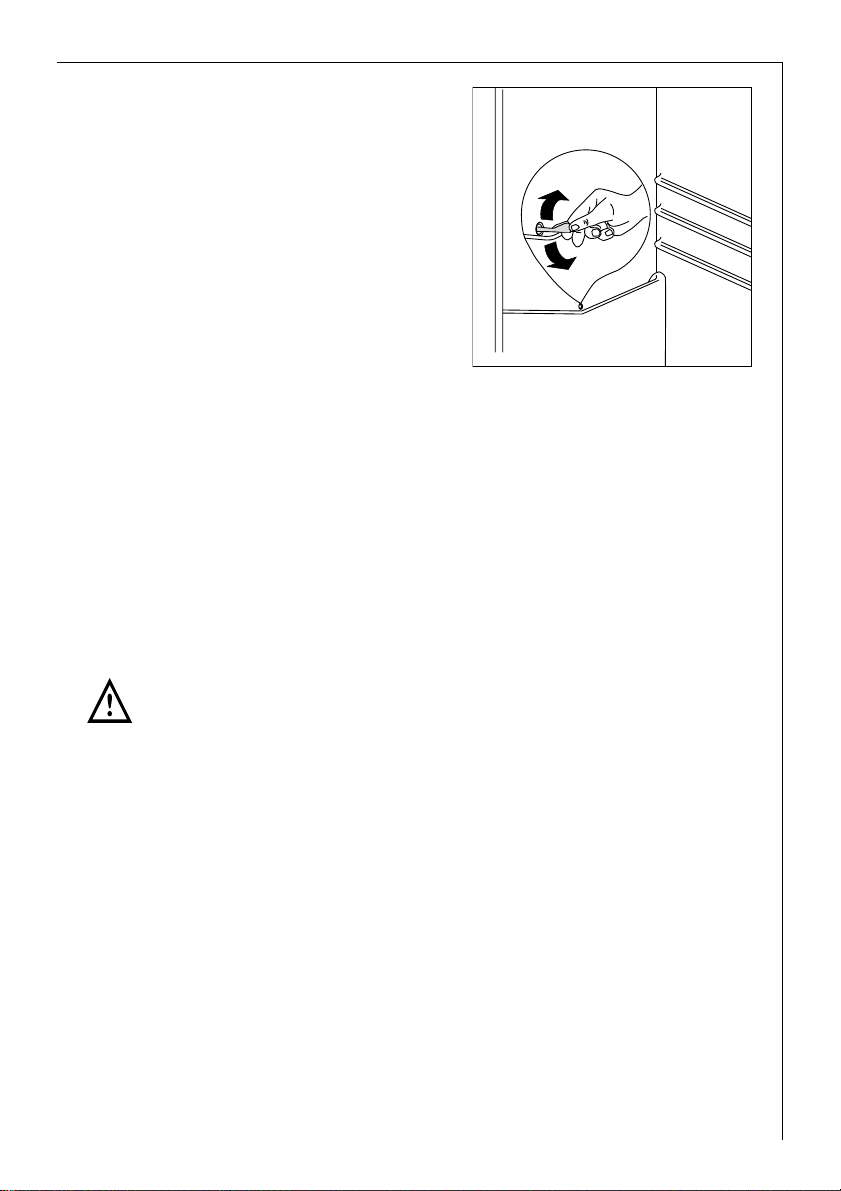
47
Defrosting
Refrigerator
Frost is automatically eliminated
during normal use. The defrost water
drains out through a trough into a
special container at the back of the
appliance, where it evaporates.
We recommend that you peridically
clean the defrost-water drainage
outlet with the cleaner provided,
located in the center of the drainage
groove.
Freezer
The freezer compartment, will become progrssively covered with frost. This
should be removed with al plastic scraper. Whenever the tickness of the
frost exceeds 4 mm complete defrosting should be carried out as follows:
1. pull out the plug from the wall socket or turn the thermostat knob to th “0”
setting.
2. remove any stored food, wrap it in several layers newspaper and put it in a
coll place.
3. leave the door open.
4. when defrosting is completed, dry the interior thoroughly
5. turn the thermostat knob to the required setting or raplace the plug in the
power socket.
Attention
Never use sharp metal tools to scrape off frost from the evaporator as you
could damage it.
Do not use a mechanical device or any artificial means to speed up the
thawing process other than those recommended by the manufacturer.
A temperature rise of the frozen food packs, during defr osting , may shorten
their safe storage life.
Switching off the appliance
To switch off the appliance, turn the temperature regulator to position "0".
If the appliance is not going to be used for an extended period:
1. Remove all refrigerated and deep-frozen packages as well as ice trays.
2. Switch off the appliance .
3. Remove the mains plug or switch off or turn out the circuit breaker or fuse.
4. Defrost freezer compartment and clean thoroughly (see section: “Cleaning
and Care”).
5. Leave the door open to avoid the build up of odours.
D037
Page 48

48
Cleaning and Care
Outside of the appliance
Important: Do not use cleaning agents for stainless steel or other aggressive
or abrasive cleaning agents. The protective coat of lacquer on the stainless
steel surface can be damaged by these.
The coat of lacquer protects against finger prints and therefore additional
cleaning agents and maintenance products are no longer required.
• Clean the appliance with a cloth and lukewarm water. Commercially
available dish washing detergents may also be used.
• After cleaning wipe with fresh water and rub dry.
For hygienic reasons the appliance interior, including interior accessories,
should be cleaned regularly.
Warning!
• The appliance may not be connected to the mains during cleaning. Danger
of electrical shock! Before cleaning switch the appliance offand rem ve
the plug from the mains, or switch off or turn out the circuit breaker or
fuse.
• Never clean the appliance with a steam cleaner. Moisture could
accumulate in electrical components, danger of electrical shock! Hot
vapours can lead to the damage of plastic parts.
• The appliance must be dry before it is placed back into service.
Attention!
• Ethereal oils and organic solvents can attack plastic parts, e.g.
– lemon juice or the juice from orange peals;
– butyric acid;
– cleansers which contain acetic acid.
Do not allow such substances to come into contact with appliance parts.
• Do not use any abrasive cleansers.
1. Remove frozen food and the food from the refrigerator. Wrap frozen food
in several layers of newspaper. Store it in a cool place, well covered.
2. Defrost the freezer compartment prior to cleaning (see "Defrosting"
section).
3. Switch the appliance off and remove the plug from the mains, or switch off
or turn out the circuit breaker or fuse.
4. Clean the appliance and the interior accessories with a cloth and lukewarm
water. Commercially available dish washing detergents may also be used.
5. After cleaning wipe with fresh water and rub dry.
Page 49

49
Accumulation of dust at the condenser increases energy consumption. For
this reason carefully clean the condenser at the back of the appliance once
a year with a soft brush or a vacuum cleaner.
6. Check the water drain hole on the rear wall of the fridge. Clear a blocked
drain hole with the aid of the green peg included with the appliance.
7. After everything is dry place appliance back into service.
Energy Saving Tips
• Do not install the appliance near cookers, radiators or other sources of
warmth. High ambient temperatures cause longer, more frequent
operation of the compressor.
• Ensure sufficient air circulation and exhaust at the appliance base and at
the back wall of the appliance. Never cover air vent openings.
• Do not place warm foods into the appliance. Allow warm foods to cool
first.
• Only leave door open as long as necessary.
• Do not set temperature any colder than necessary.
• Put frozen food in the fridge to defrost. The cold in the frozen food will
then be used to cool the fridge.
• Keep the heat emitting condenser, the metall grille on the rear wall of
your appliance, always clean.
What to do if ...
Correcting Malfunctions
A malfunction may be caused by only a minor fault that you can rectify
yourself using the following instructions. Do not perform any other work on
the appliance if the following information does not provide assistance in
your specific case.
Warning! Repairs to refrigerators/freezers may only be performed by
qualified service engineers. Improper repairs can give rise to significant
hazards for the user. If your appliance needs repairing, please contact your
specialist dealer or our Customer Service.
Page 50

50
Interior lighting does not
work.
Light bulb is defective. Please look in the "Changing
the Light Bulb" section.
Heavy build up of frost,
possibly also on the door seal.
Door seal is not air tight
(possibly after changing over
the hinges).
Carefully warm the leaking
sections of the door seal with
a hair dryer (not hotter than
approx. 50 °C). At the same
time shape the warmed door
seal by hand such that it sits
correctly .
Unusual noises.
The appliance is touching the
wall or other objects.
Appliance is not level.
A component, e.g. a pipe, on
the rear of the appliance is
touching another part of the
appliance or the wall.
The compressor starts after a
period of time.
This is normal, no error has
occurred.
The compressor does not start
immediately after changing
the temperature setting.
If necessary, car efully bend
the component out of the
way.
Move the appliance slightly.
Readjust the feet.
See the "Cleaning and Care"
section.
Water on the floor or on
storage shelves.
Water drain hole is blocked.
Malfunction Possible Cause Remedy
The food is too warm.
The appliance is near a heat
source.
Temperature is not pr operly
adjusted.
Please look in the "Initial Start
Up" section.
Turn the temperature
regulator to a colder setting
temporarily .
Door was open for an
extended period.
Please look in the "Installation
location" section.
A large quantity of warm
food was placed in the
appliance within the last 24
hours.
Open the door only as long as
necessary.
Appliance does not work.
Appliance is not switched on Switch on the appliance.
Mains plug is not plugged in
or is loose.
Insert mains plug.
Fuse has blown or is defective.
Check fuse, replace if
necessary.
Socket is defective.
Mains malfunctions are to be
corrected by an electrician.
Appliance cools too much. Temperature is set too cold.
Turn the temperature
regulator to a warmer setting
temporarily .
Page 51

51
Changing the light bulb
Warning! There is a risk of electric shocks! Before changing the light bulb,
switch off the appliance and unplug it, or pull the fuse or the circuit breaker .
Light bulb data: 220-240 V, max. 15 W
1. To switch off the appliance, turn the temperature regulator to position "0".
2. Unplug the mains plug.
3. To change the light bulb, undo the
screw .
4. Press the light bulb cover as shown
and slide it backwards.
5. Change the defective light bulb.
6. Refit the light bulb cover and the
screw .
7. Put the refrigerator back into
operation.
Regulations, Standards, Guidelines
This appliance was designed for household use and was manufactured in
accordance with the appropriate standards. The necessary measures in
accordance with appliance safety legislation regulations (GSG), accident
prevention regulations for refrigeration appliances (VBG 20) and the
regulations of the German Society of Electrical Engineers (VDE) were
observed in the manufacture of this appliance.
The refrigerant circuit has been checked for leaks.
This appliance is in accordance with the following EU guidelines:
– 73/23/EWG dated 19 February 1973 - low voltage guidelines.
– 89/336/EWG dated 3 May 1989
(including guideline change notice 92/31/EWG) - EMV guideline
D411
Page 52

AEG Hausgeräte GmbH
Postfach 1036
D-90327 Nürnberg
http://www.aeg.hausger aete.de
© Copyright by AEG Wijzigingen voorbehouden
Sous reserve de modifications
2223 400-65 04/09 Subject to change without notice
 Loading...