

Page 1
FAVORIT 55002 IMOP
FAVORIT 55002 IWOP
FAVORIT 55002 IDOP
EN User manual 2
IT Istruzioni per l’uso 17
PL Instrukcja obsługi 33
TR Kullanma Kılavuzu 49
Page 2

www.aeg.com
2
CONTENTS
1. SAFETY INSTRUCTIONS . . . . . . . . . . . . . . . . . . . . . . . . . . . . . . . . . . . . . . . . . . . . . . . . . . . . . . 3
2. PRODUCT DESCRIPTION . . . . . . . . . . . . . . . . . . . . . . . . . . . . . . . . . . . . . . . . . . . . . . . . . . . . . 5
3. CONTROL PANEL . . . . . . . . . . . . . . . . . . . . . . . . . . . . . . . . . . . . . . . . . . . . . . . . . . . . . . . . . . . 6
4. PROGRAMMES . . . . . . . . . . . . . . . . . . . . . . . . . . . . . . . . . . . . . . . . . . . . . . . . . . . . . . . . . . . . . 6
5. OPTIONS . . . . . . . . . . . . . . . . . . . . . . . . . . . . . . . . . . . . . . . . . . . . . . . . . . . . . . . . . . . . . . . . . . 7
6. BEFORE FIRST USE . . . . . . . . . . . . . . . . . . . . . . . . . . . . . . . . . . . . . . . . . . . . . . . . . . . . . . . . . . 8
7. DAILY USE . . . . . . . . . . . . . . . . . . . . . . . . . . . . . . . . . . . . . . . . . . . . . . . . . . . . . . . . . . . . . . . . 10
8. HINTS AND TIPS . . . . . . . . . . . . . . . . . . . . . . . . . . . . . . . . . . . . . . . . . . . . . . . . . . . . . . . . . . . 12
9. CARE AND CLEANING . . . . . . . . . . . . . . . . . . . . . . . . . . . . . . . . . . . . . . . . . . . . . . . . . . . . . . 13
10. TROUBLESHOOTING . . . . . . . . . . . . . . . . . . . . . . . . . . . . . . . . . . . . . . . . . . . . . . . . . . . . . . . 14
11. TECHNICAL INFORMATION . . . . . . . . . . . . . . . . . . . . . . . . . . . . . . . . . . . . . . . . . . . . . . . . . 15
12. ENVIRONMENT CONCERNS . . . . . . . . . . . . . . . . . . . . . . . . . . . . . . . . . . . . . . . . . . . . . . . . . 16
FOR PERFECT RESULTS
Thank you for choosing this AEG product. We have created it to give you impeccable
performance for many years, with innovative technologies that help make life simpler –
features you might not find on ordinary appliances. Please spend a few minutes reading to get
the very best from it.
Visit our website for:
Get usage advice, brochures, trouble shooter, service information:
www.aeg.com
Register your product for better service:
www.aeg.com/productregistration
Buy Accessories, Consumables and Original spare parts for your appliance:
www.aeg.com/shop
CUSTOMER CARE AND SERVICE
We recommend the use of original spare parts.
When contacting Service, ensure that you have the following data available.
The information can be found on the rating plate. Model, PNC, Serial Number.
Warning / Caution-Safety information
General information and tips
Environmental information
Subject to change without notice.
Page 3
ENGLISH 3
1.
SAFETY INSTRUCTIONS
Before the installation and use of the appliance, carefully read the supplied instructions. The manufacturer is not responsible if an incorrect installation and
use causes injuries and damages. Always
keep the instructions with the appliance
for future reference.
1.1 Children and vulnerable
people safety
WARNING!
Risk of suffocation, injury or permanent disability.
• Do not let persons, children included,
with reduced physical sensory, reduced mental functions or lack of experience and knowledge use the appliance. They must have supervision or
instruction for the operation of the appliance by a person who is responsible
for their safety. Do not let children
play with the appliance.
• Keep all packaging away from children.
• Keep all detergents away from children.
• Keep children and pets away from the
appliance door when it is open.
1.2 Installation
• Remove all the packaging.
• Do not install or use a damaged appliance.
• Do not install or use the appliance
where the temperature is less than 0
°C.
• Obey the installation instruction supplied with the appliance.
• Make sure that the appliance is installed below and adjacent to safe structures.
Water connection
• Make sure not to cause damage to the
water hoses.
• Before you connect the appliance to
new pipes or pipes not used for a long
time, let the water flow until it is clean.
• The first time you use the appliance,
make sure that there is no leakage.
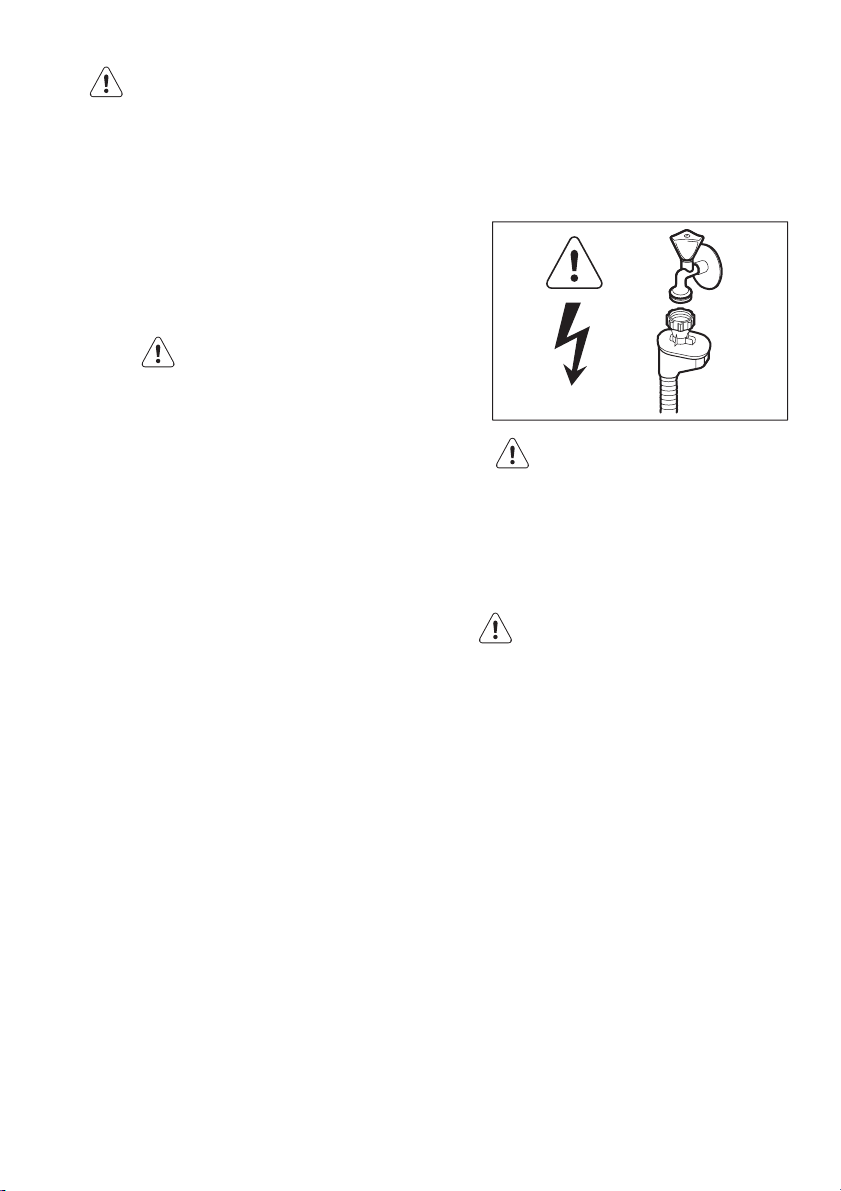
• The water inlet hose has a safety valve
and a sheath with an inner mains cable.
WARNING!
Dangerous voltage.
• If the water inlet hose is damaged, immediately disconnect the mains plug
from the mains socket. Contact the
service to replace the water inlet hose.
Electrical connection
WARNING!
Risk of fire and electrical shock.
• The appliance must be earthed.
• Make sure that the electrical information on the rating plate agrees with
the power supply. If not, contact an
electrician.
• Always use a correctly installed shockproof socket.
• Do not use multi-plug adapters and
extension cables.
• Make sure not to cause damage to the
mains plug and to the mains cable.
Contact the Service or an electrician to
change a damaged mains cable.
• Connect the mains plug to the mains
socket only at the end of the installation. Make sure that there is access to
the mains plug after the installation.
• Do not pull the mains cable to disconnect the appliance. Always pull the
mains plug.
Page 4
www.aeg.com
4
1.3 Use
• This appliance is intended to be used
in household and similar applications
such as:
– Staff kitchen areas in shops, offices
and other working environments
– Farm houses
– By clients in hotels, motels and oth-
er residential type environments
– Bed and breakfast type environ-
ments.
WARNING!
Risk of injury.
• Do not change the specification of this
appliance.
• Put knives and cutlery with sharp
points in the cutlery basket with the
points down or in a horizontal position.
• Do not keep the appliance door open
without supervision to prevent to fall
on it.
• Do not sit or stand on the open door.
• Dishwasher detergents are dangerous.
Obey the safety instructions on the
detergent packaging.
• Do not drink and play with the water in
the appliance.
• Do not remove the dishes from the
appliance until the programme is
completed. There can be detergent
on the dishes.
WARNING!
Risk of electrical shock, fire or
burns.
• Do not put flammable products or
items that are wet with flammable
products in, near or on the appliance.
• Do not use water spray and steam to
clean the appliance.
• The appliance can release hot steam if
you open the door while a programme
operates.
1.4 Disposal
WARNING!
Risk of injury or suffocation.
• Disconnect the appliance from the
mains supply.
• Cut off the mains cable and dispose of
it.
• Remove the door catch to prevent
children and pets to get closed in the
appliance.
Page 5
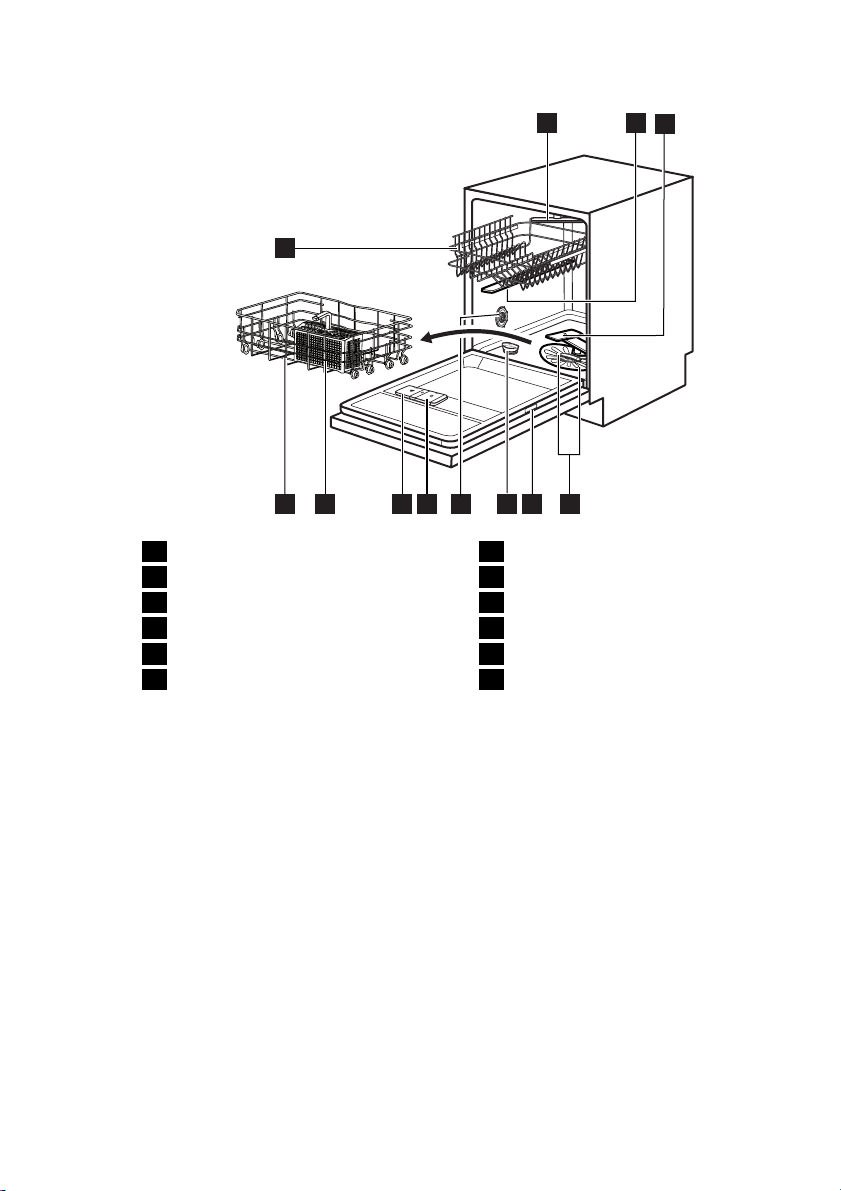
2. PRODUCT DESCRIPTION
ENGLISH 5
Top spray arm
1
Upper spray arm
2
Lower spray arm
3
Filters
4
Rating plate
5
Salt container
6
12
11
10
1
7
8
9
6
7
8
9
10
11
12
4
5
Water hardness dial
Rinse aid dispenser
Detergent dispenser
Cutlery basket
Lower basket
Upper basket
3
2
Page 6

www.aeg.com
6
3. CONTROL PANEL
1
On/off button
1
Programme guide
2
Programme marker
3
Indicators
4
Display
5
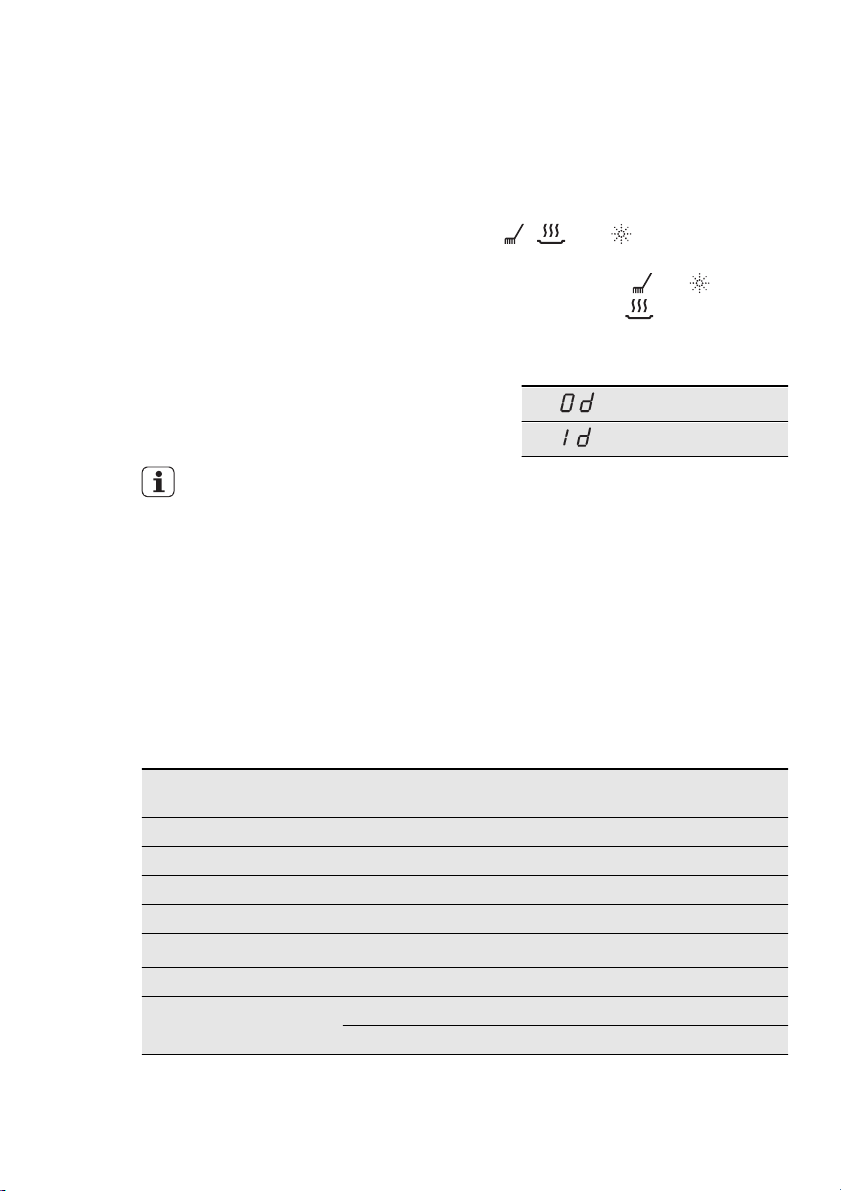
Indicators Description
Washing phase indicator.
Drying phase indicator.
2
Start button
6
Delay button
7
Multitab button
8
Programme knob
9
3
4
5
8
9
7
6
4. PROGRAMMES
Programme
1)
2)
Degree of
soil
Type of load
All
Crockery, cutlery, pots and
pans
Rinse aid indicator. This indicator is off while the
programme operates.
Salt indicator. This indicator is off while the programme operates.
Multitab indicator.
Programme
phases
Prewash
Duration
(min)
Energy
(kWh)
Water
(l)
90 - 160 0.9 - 1.7 8 - 15
Wash 45 °C or 70
°C
Rinses
Dry
Page 7
ENGLISH 7
Programme
1)
3)
Degree of
soil
Type of load
Fresh soil
Crockery and
Programme
phases
Wash 60 °C
Rinse
Duration
(min)
Energy
(kWh)
30 0.9 9
Water
(l)
cutlery
4)
Normal soil
Crockery and
cutlery
Prewash
Wash 50 °C
Rinses
165 - 175 0.9 - 1.0 9 - 11
Dry
5)
Heavy soil
Crockery, cutlery, pots and
pans
All Prewash 14 0.1 4
6)
1)
The pressure and the temperature of the water , the variations of the mains supply, the
options and the quantity of dishes can change the programme duration and the
consumption values.
2)
The appliance senses the degree of soil and the quantity of items in the baskets. It
automatically adjusts the temperature and quantity of the water, the energy
consumption and the programme duration.
3)
With this programme you can wash a load with fresh soil. It gives good washing results
in a short time.
4)
With this programme you have the most efficient use of water and energy consumption
for crockery and cutlery with normal soil. (This is the standard programme for test
institutes).
5)
This programme has a high temperature rinsing phase for better hygiene results. During
the rinsing phase, the temperature stays at 70 °C for 10 to 14 minutes.
6)
Use this programme to quickly rinse the dishes. This prevents the remaining food to
bond on the dishes and bad odours to come out from the appliance.
Do not use detergent with this programme.
Information for test institutes
For all the necessary information for test performance. send an email to:
info.test@dishwasher-production.com
Write down the product number (PNC) that is on the rating plate.
Prewash
Wash 70 °C
Rinses
Dry
150 - 160 1.4 - 1.6 13 - 14
5. OPTIONS
5.1 Multitab option
Activate this option only when you use
the combi detergent tablets.
This option deactivates the flow of rinse
aid and salt. The related indicators are
off.
The programme duration can increase.
Activating the Multitab option
Activate or deactivate the Multitab option before the start of a
programme. You cannot activate
or deactivate this option while a
programme operates.
1. Press the on/off button to activate
the appliance. Make sure that the appliance is in setting mode. Refer to
Page 8
www.aeg.com
8
‘SETTING AND STARTING A PROGRAMME'.
2. Press Multitab, the Multitab indicator
comes on.
The option stays on until you deactivate it. Press Multitab, the
Multitab indicator goes off.
If you stop to use the combi
detergent tablets, before you start to
use separately detergent, rinse aid
and dishwasher salt, do these steps:
1. Deactivate the Multitab option.
6. BEFORE FIRST USE
2. Set the water softener to the highest
level.
3. Make sure that the salt container and
the rinse aid dispenser are full.
4. Start the shortest programme with a
rinsing phase, without detergent and
without dishes.
5. Adjust the water softener to the water hardness in your area.
6. Adjust the released quantity of rinse
aid.
1. Make sure that the set level of the
water softener agrees with the water
hardness in your area. If not, adjust
the water softener. Contact your local
water authority to know the water
hardness in your area.
2. Fill the salt container.
3. Fill the rinse aid dispenser.
4. Open the water tap.
5. Processing residues can stay in the
appliance. Start a programme to remove them. Do not use detergent
and do not load the baskets.
If you use the combi detergent
tablets, activate the multitab option.
6.1 Adjusting the water softener
Water hardness
German
degrees
(°dH)
French
degrees
(°fH)
mmol/l Clarke
degrees
51 - 70 91 - 125 9.1 - 12.5 64 - 88
43 - 50 76 - 90 7.6 - 9.0 53 - 63
37 - 42 65 - 75 6.5 - 7.5 46 - 52
29 - 36 51 - 64 5.1 - 6.4 36 - 45
23 - 28 40 - 50 4.0 - 5.0 28 - 35
19 - 22 33 - 39 3.3 - 3.9 23 - 27
15 - 18 26 - 32 2.6 - 3.2 18 - 22 1 4
11 - 14 19 - 25 1.9 - 2.5 13 - 17 1 3
4 - 10 7 - 18 0.7 - 1.8 5 - 12 1 2
< 4 < 7 < 0.7 < 5
1)
Factory position.
Water softener
adjustment
Manual Elec-
1)
2
1)
2
1)
2
1)
2
1)
2
1)
2
2)
1
tronic
10
9
8
7
6
1)
5
2)
1
Page 9
2)
Do not use salt at this level.
You must adjust the water softener manually and electronically.
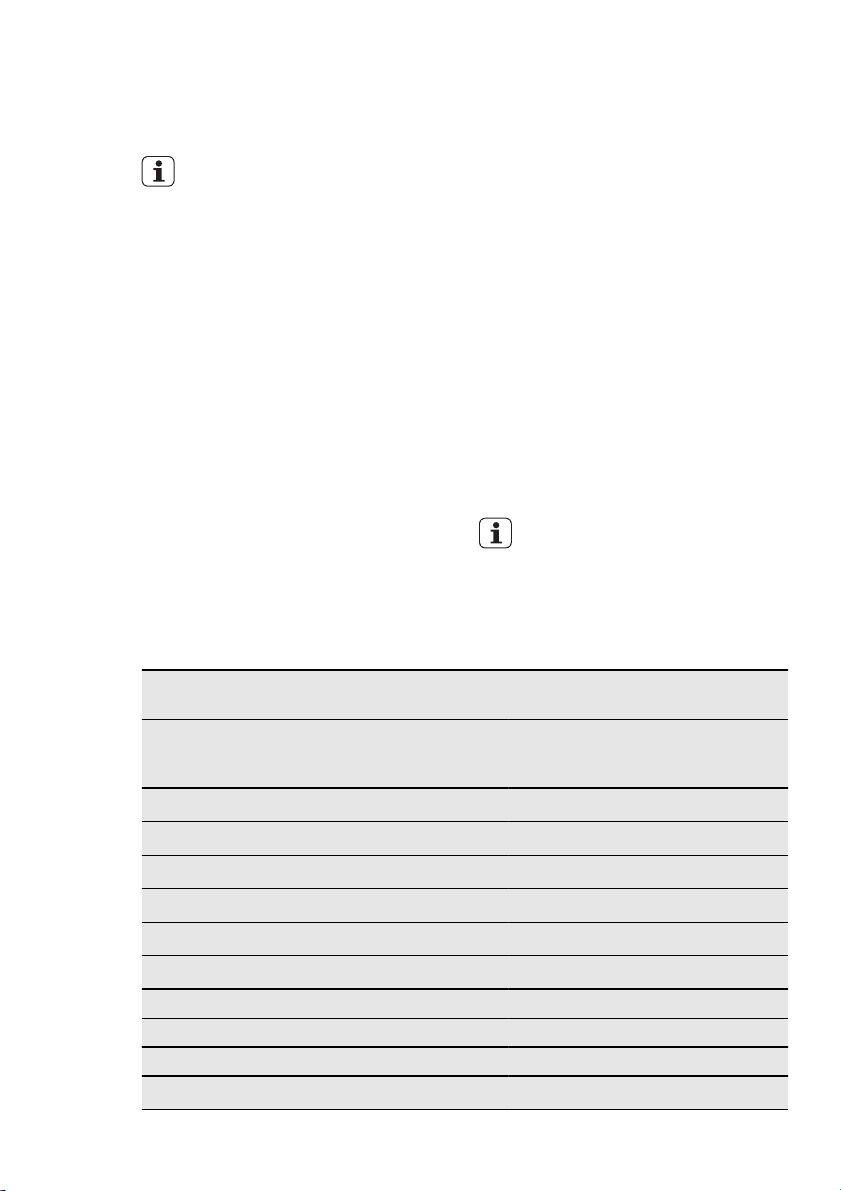
Manual adjustment
ENGLISH 9
Turn the water hardness dial to the position 1 or 2.
Electronic adjustment
1. Press the on/off button to activate
the appliance. Make sure that the appliance is in setting mode. Refer to
‘SETTING AND STARTING A PROGRAMME’.
2. Turn the programme knob until the
display shows two horizontal status
bars.
3. Press and hold Multitab and Delay
at the same time until the indicators
, , and flash.
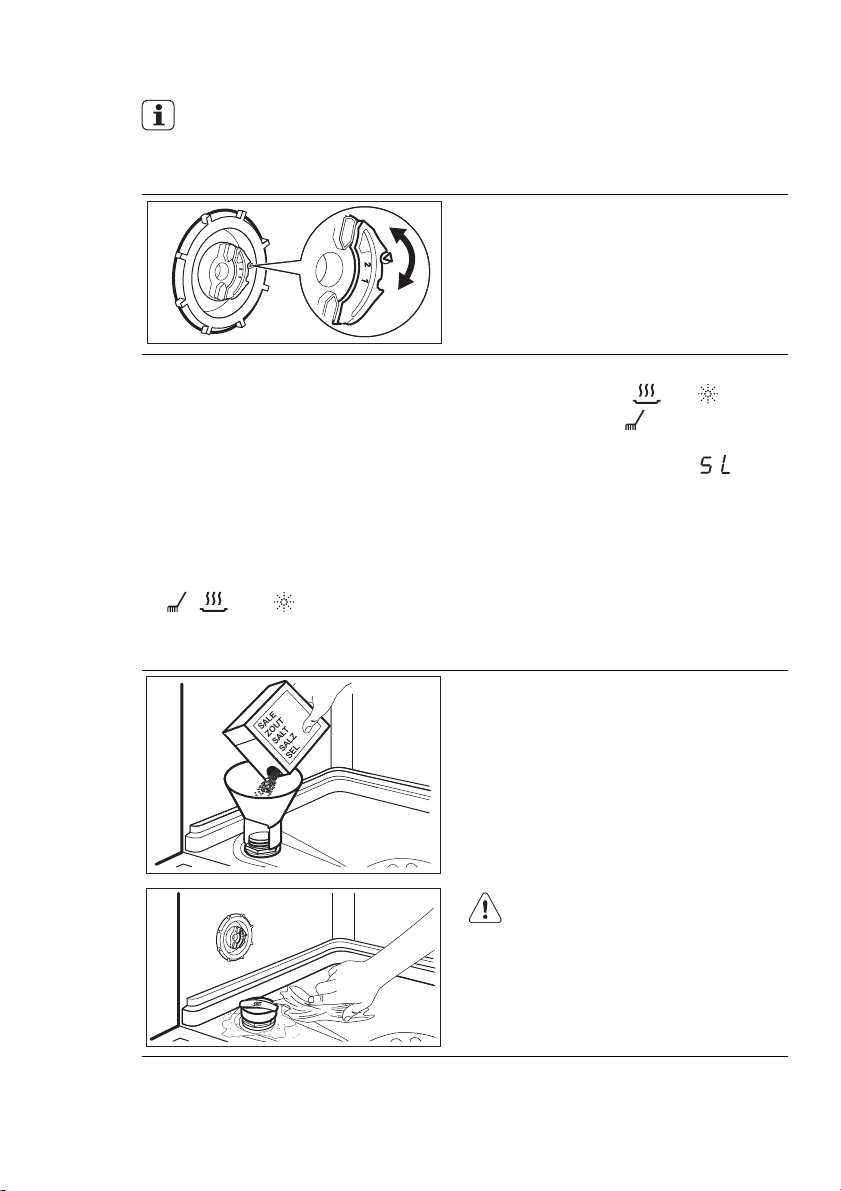
6.2 Filling the salt container
4. Press Multitab.
•
The indicators
•
The indicator continues to flash.
• The display shows the setting of
the water softener, e.g.
5.
5. Press Multitab again and again to
change the setting.
6. Deactivate the appliance to confirm
the setting.
1.
Turn the cap counterclockwise and
open the salt container.
2.
Put 1 litre of water in the salt container (only for the first time).
3.
Fill the salt container with dishwasher salt.
4.
Remove the salt around the opening
of the salt container.
5.
Turn the cap clockwise to close the
salt container.
CAUTION!
Water and salt can come out
from the salt container when you
fill it. Risk of corrosion. To prevent it, after you fill the salt container, start a programme.
and go off.
= level
Page 10
M
A
X
1
2
3
4
+
-
www.aeg.com
10
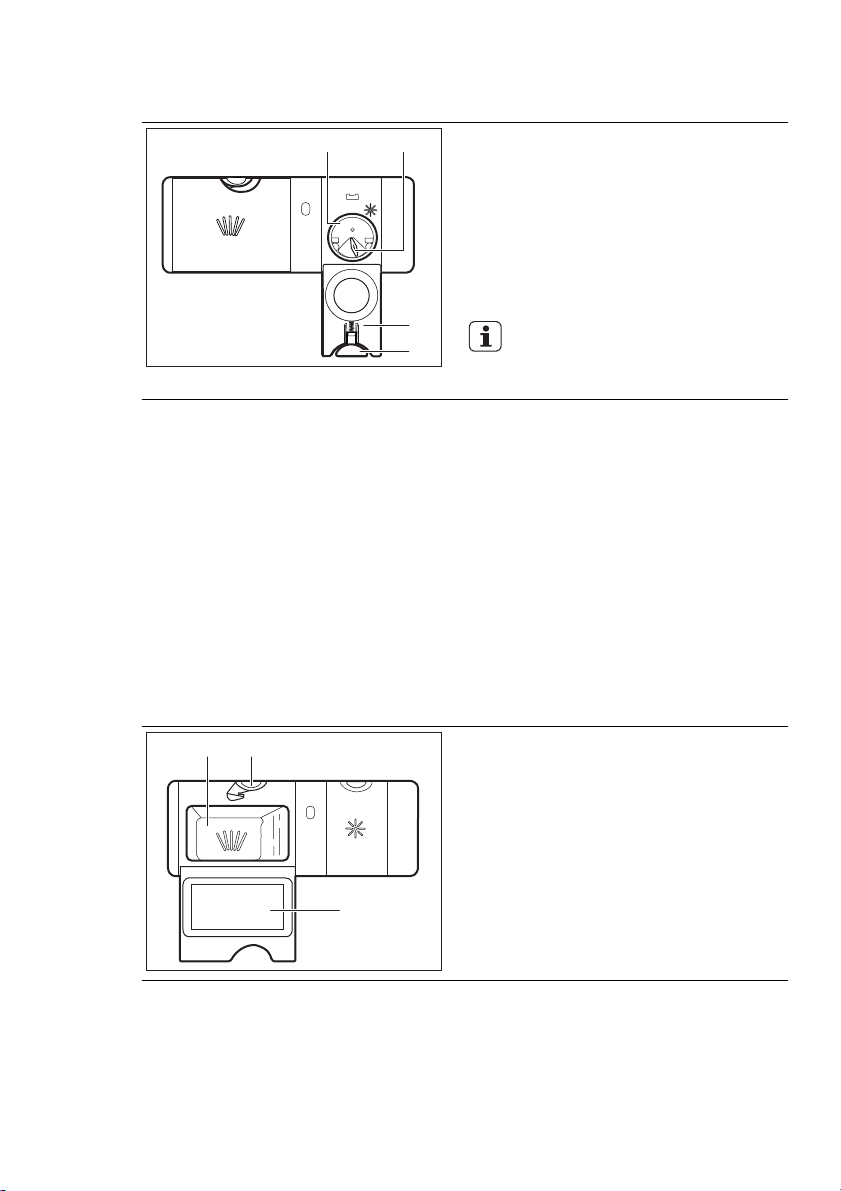
6.3 Filling the rinse aid dispenser
7. DAILY USE
1.
A
B
Press the release button (D) to open
the lid (C).
2.
Fill the rinse aid dispenser (A), no
more than the mark 'max'.
A
X
M
2
1
3
4
+
-
3.
Remove the spilled rinse aid with an
absorbent cloth to prevent too much
foam.
4.
Close the lid. Make sure that the release button locks into position.
C
D
You can turn the selector of the
released quantity (B) between
position 1 (lowest quantity) and
position 4 (highest quantity).
1. Open the water tap.
2. Press the on/off button to activate
the appliance. Make sure that the appliance is in setting mode, refer
to ’SETTING AND STARTING A PROGRAMME’.
• If the salt indicator is on, fill the salt
container.
7.1 Using the detergent
B
A
30
20
C
7.2 Setting and starting a
programme
Setting mode
The appliance must be in setting mode
to accept some operations.
• If the rinse aid indicator is on, fill
the rinse aid dispenser.
3. Load the baskets.
4. Add the detergent.
5. Set and start the correct programme
for the type of load and the degree
of soil.
1.
Press the release button (B) to open
the lid (C).
2.
Put the detergent in the compartment (A) .
3.
If the programme has a prewash
phase, put a small quantity of detergent on the inner part of the appliance door.
4.
If you use detergent tablets, put the
tablet in the compartment (A).
5.
Close the lid. Make sure that the release button locks into position.
The appliance is in setting mode when,
after the activation all the phase indicators come on. The time of the last set
programme flashes in the display.
If the control panel shows other conditions, press and hold Multitab and De-
lay at the same time until the appliance
is in setting mode.
Page 11
ENGLISH 11
Starting a programme without
delay start
1. Open the water tap.
2. Press the on/off button to activate
the appliance. Make sure that the appliance is in setting mode.
3. Close the appliance door.
4. Turn the programme knob until the
marker on the knob is aligned with
the programme you want to set.
• The programme duration flashes in
the display.
• The phase indicators of the set
programme come on.
5. Press Start. The programme starts.
• Only the indicator of the phase in
operation stays on.
• The display shows the programme
duration that decreases with steps
of 1 minute.
Starting a programme with
delay start
1. Set the programme.
2. Press Delay again and again until the
display shows the delay time you
want to set (from 1 to 24 hours).
• The delay time flashes in the display.
3. Press Start. The countdown starts.
• The display shows the countdown
of the delay start that decreases
with steps of 1 hour.
• The phase indicators of the set
programme go off.
• When the countdown is completed,
the programme starts.
– The indicator of the phase in opera-
tion comes on.
Opening the door while the
appliance operates
If you open the door, the appliance
stops. When you close the door, the appliance continues from the point of interruption.
Cancelling the delay start
while the countdown operates
1. Press and hold Multitab and Delay
at the same time until:
• The programme duration flashes in
the display.
• The phase indicators come on.
2. Press Start. The programme starts.
Cancelling the programme
Press and hold Multitab and Delay at
the same time until:
• The programme duration flashes in
the display.
• The phase indicators come on.
Make sure that there is detergent
in the detergent dispenser before you start a new programme.
At the end of the programme
When the programme is completed, the
phase indicators go off and the display
shows 0.
1. Press the on/off button to deactivate
the appliance.
2. Close the water tap.
If you do not press the on/off
button, the AUTO OFF device
automatically deactivates the appliance after some minutes. This
helps to decrease the energy
consumption.
• Let the dishes become cold
before you remove them from
the appliance. Hot dishes can
be easily damaged.
• First remove the items from
the lower basket, then from
the upper basket.
• There can be water on the
sides and on the door of the
appliance. Stainless steel becomes cool more quickly than
the dishes.
Page 12
www.aeg.com
12
8. HINTS AND TIPS
8.1 The water softener
Hard water contains a high quantity of
minerals that can cause damage to the
appliance and bad washing results. The
water softener neutralises these minerals.
The dishwasher salt keeps the water
softener clean and in good conditions. It
is important to set the right level of the
water softener. This makes sure that the
water softener uses the correct quantity
of dishwasher salt and water.
8.2 Loading the baskets
Refer to the supplied leaflet with
examples of the load of the baskets.
• Only use the appliance to wash items
that are dishwasher-safe.
• Do not put in the appliance items
made of wood, horn, aluminium, pewter and copper.
• Do not put in the appliance items that
can absorb water (sponges, household
cloths).
• Remove remaining food from the
items.
• To remove easily remaining burned
food, soak pots and pans in water before you put them in the appliance.
• Put hollow items (cups, glasses and
pans) with the opening down.
• Make sure that cutlery and dishes do
not bond together. Mix spoons with
other cutlery.
• Make sure that glasses do not touch
other glasses.
• Put the small items in the cutlery basket.
• Put the light items in the upper basket. Make sure that they do not move.
• Make sure that the spray arms can
move freely before you start a programme.
8.3 Using salt, rinse aid and
detergent
• Only use salt, rinse aid and detergent
for dishwasher. Other products can
cause damage to the appliance.
• The rinse aid helps, during the last
rinsing phase, to dry the dishes without streaks and stains.
• Combi detergent tablets contain detergent, rinse aid and other added
agents. Be sure that these tablets are
applicable to the water hardness in
your area. Refer to the instructions on
the packaging of the products.
• Detergent tablets do not fully dissolve
with short programmes. To prevent
detergent residues on the tableware,
we recommend that you use the tablets with long programmes.
Do not use more than the correct
quantity of detergent. Refer to
the instructions on the detergent
packaging.
8.4 Before starting a
programme
Make sure that:
• The filters are clean and correctly installed.
• The spray arms are not clogged.
• The position of the items in the baskets is correct.
• The programme is applicable for the
type of load and for the degree of soil.
• The correct quantity of detergent is
used.
• There is dishwasher salt and rinse aid
(unless you use combi detergent tablets).
• The cap of the salt container is tight.
Page 13
9. CARE AND CLEANING
ENGLISH 13
WARNING!
Before maintenance, deactivate
the appliance and disconnect the
mains plug from the mains socket.
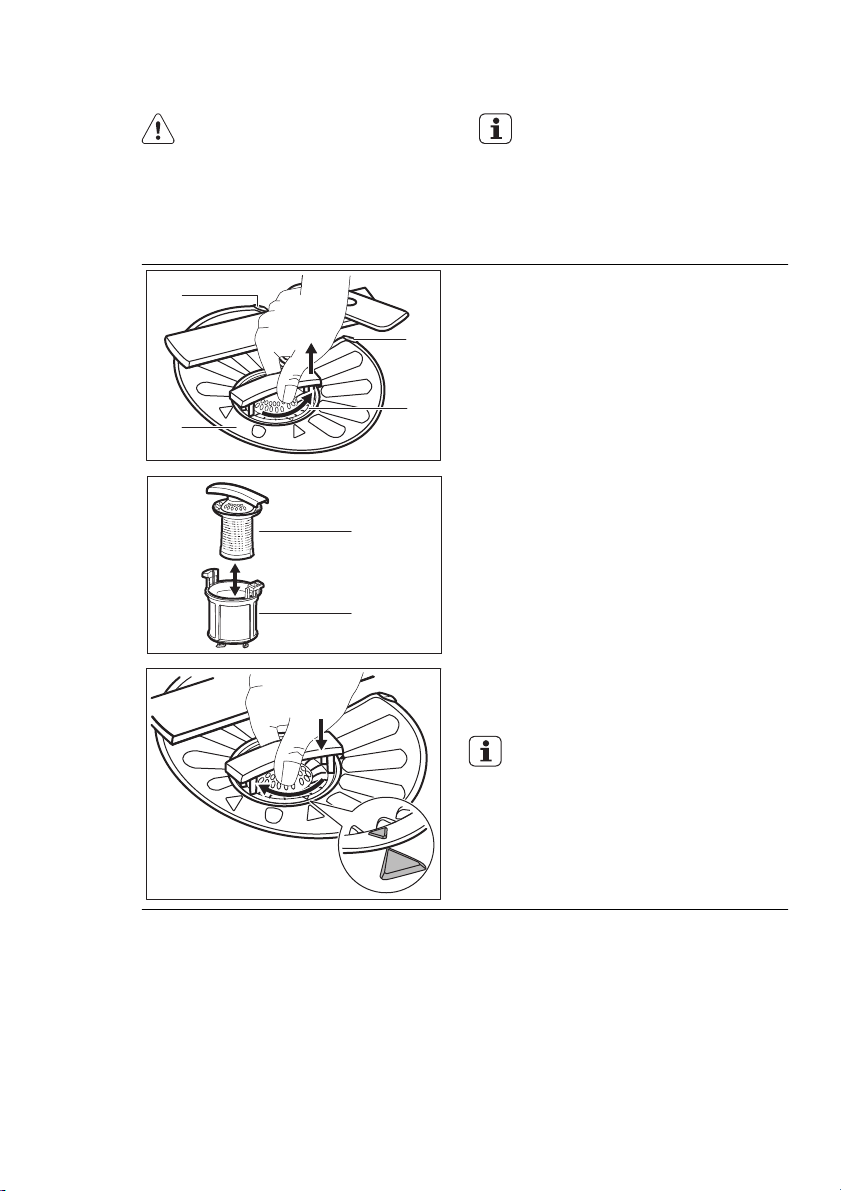
9.1 Cleaning the filters
C
B
A1
A2
Dirty filters and clogged spray
arms decrease the washing results.
Make a check regularly and, if
necessary, clean them.
1.
Turn the filter (A) counterclockwise
and remove it.
C
A
2.
To disassemble the filter (A), pull
apart (A1) and (A2).
3.
Remove the filter (B).
4.
Wash the filters with water.
5.
Put the filter (B) to its initial position.
Make sure that it assembles correctly under the two guides (C).
6.
Assemble the filter (A) and put it into position in filter (B). Turn it clockwise until it locks.
An incorrect position of the filters
can cause bad washing results
and damage to the appliance.
9.2 Cleaning the spray arms
Do not remove the spray arms.
If the holes in the spray arms are clogged, remove remaining parts of soil with
a thin pointed object.
9.3 External cleaning
Clean the appliance with a moist soft
cloth.
Only use neutral detergents. Do not use
abrasive products, abrasive cleaning
pads or solvents.
Page 14
www.aeg.com
14
10. TROUBLESHOOTING
The appliance does not start or it stops
during operation.
Before you contact the Service, refer to
the information that follows for a solution to the problem.
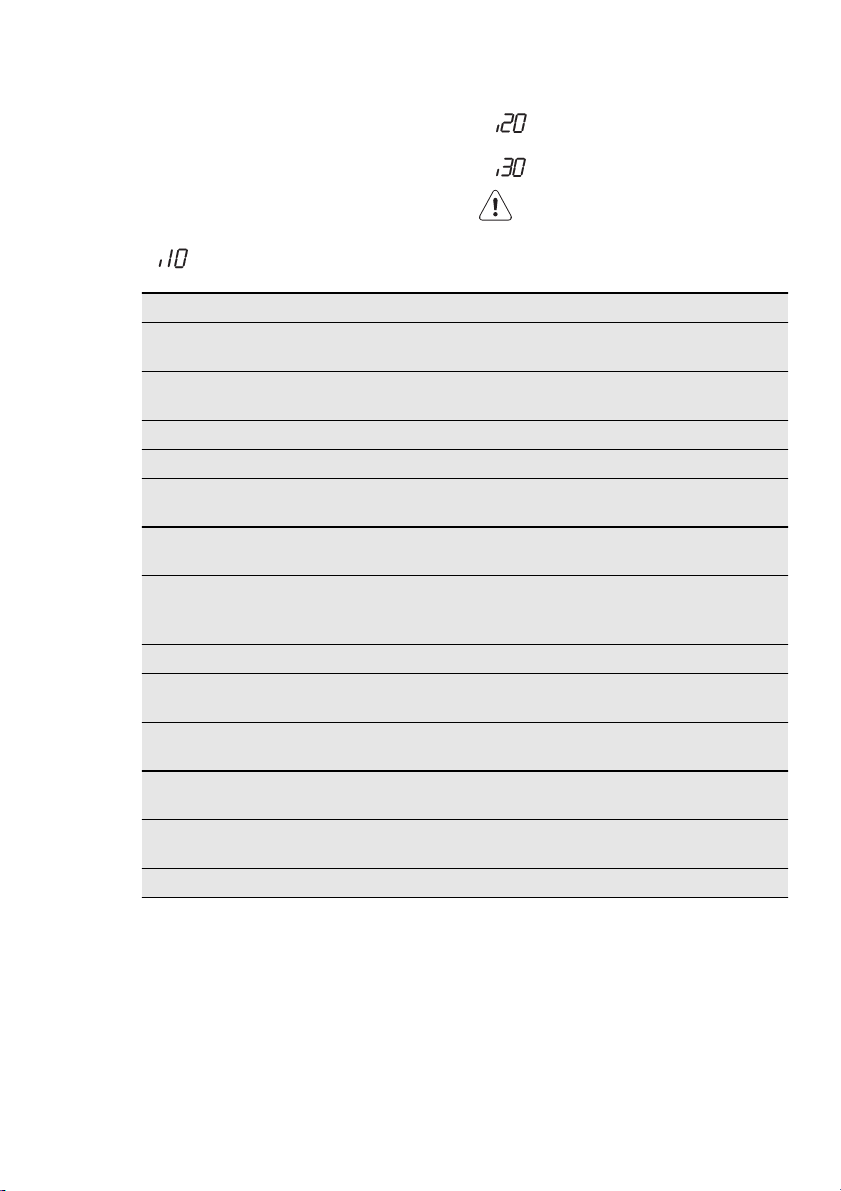
With some problems, the display
shows an alarm code:
•
- The appliance does not fill with
water.
•
- The appliance does not drain
the water.
•
- The anti-flood device is on.
WARNING!
Deactivate the appliance before
you do the checks.
Problem Possible solution
You cannot activate the appliance.
Make sure that the mains plug is connected
to the mains socket.
Make sure that there is not a damaged fuse
in the fuse box.
The programme does not start. Make sure that the appliance door is closed.
Press Start.
If the delay start is set, cancel the setting or
wait for the end of the countdown.
The appliance does not fill with
Make sure that the water tap is open.
water.
Make sure that the pressure of the water
supply is not too low. For this information,
contact your local water authority.
Make sure that the water tap is not clogged.
Make sure that the filter in the inlet hose is
not clogged.
Make sure that the inlet hose has no kinks or
bends.
The appliance does not drain
the water.
Make sure that the sink spigot is not clog-
ged.
Make sure that the drain hose has no kinks
or bends.
The anti-flood device is on. Close the water tap and contact the Service.
After the checks are completed, activate
the appliance. The programme continues from the point of interruption.
If the problem occurs again, contact the
Service.
If the display shows other alarm codes,
contact the Service.
10.1 If the washing and drying
results are not satisfactory
Whitish streaks or bluish layers on
glasses and dishes
• The released quantity of rinse aid is
too much. Adjust the rinse aid selector
to a lower position.
• The quantity of detergent is too much.
Page 15
Stains and dry water drops on glasses
and dishes
• The released quantity of rinse aid is
not sufficient. Adjust the rinse aid selector to a higher position.
• The quality of the detergent can be
the cause.
Dishes are wet
• The programme is without a drying
phase or with a low temperature drying phase.
• The rinse aid dispenser is empty.
• The quality of the rinse aid can be the
cause.
• The quality of the combi detergent
tablets can be the cause. Try a different brand or activate the rinse aid dispenser and use rinse aid together with
the combi detergent tablets.
Refer to ‘HINTS AND TIPS’ for
other possible causes.
10.2 Activating the rinse aid
dispenser with the multitab
option activated
1. Press the on/off button to activate
the appliance. Make sure that the ap-
ENGLISH 15
pliance is in setting mode, refer to
‘SETTING AND STARTING A PROGRAMME’.
2. Turn the programme knob until the
display shows two horizontal status
bars.
3. Press and hold Multitab and Delay
at the same time until the indicators
, , and start to flash.
4. Press Delay.
•
The indicators
•
The indicator
flash.
• The display shows the setting of
the rinse aid dispenser.
and go off.
continues to
Off
On
5. Press Delay again and again to
change the setting.
6. Deactivate the appliance to confirm
the setting.
11. TECHNICAL INFORMATION
Dimensions Width / Height / Depth
Electrical connection Refer to the rating plate.
Voltage 220-240 V
Frequency 50 Hz
Water supply pressure Min. / max. (bar / MPa) (0.5 / 0.05 ) / (8 / 0.8 )
Water supply
1)
Capacity Place settings 12
Power consumption Left-on mode 0.10 W
1)
Connect the water inlet hose to a water tap with a 3/4'' thread.
2)
If the hot water comes from alternative sources of energy, (e.g. solar panels, aeolian
energy), use the hot water supply to decrease energy consumption.
(mm)
Cold water or hot water
Off-mode 0.10 W
596 / 818 - 898 / 575
2)
max. 60 °C
Page 16

www.aeg.com
16
12. ENVIRONMENT CONCERNS
Recycle the materials with the
symbol
applicable containers to recycle it.
Help protect the environment and
human health and to recycle waste
of electrical and electronic
. Put the packaging in
appliances. Do not dispose
appliances marked with the symbol
with the household waste. Return the
product to your local recycling
facility or contact your municipal
office.
Page 17

ITALIANO 17
INDICE
1. ISTRUZIONI DI SICUREZZA . . . . . . . . . . . . . . . . . . . . . . . . . . . . . . . . . . . . . . . . . . . . . . . . . . . 18
2. DESCRIZIONE DEL PRODOTTO . . . . . . . . . . . . . . . . . . . . . . . . . . . . . . . . . . . . . . . . . . . . . . 20
3. PANNELLO DEI COMANDI . . . . . . . . . . . . . . . . . . . . . . . . . . . . . . . . . . . . . . . . . . . . . . . . . . 21
4. PROGRAMMI . . . . . . . . . . . . . . . . . . . . . . . . . . . . . . . . . . . . . . . . . . . . . . . . . . . . . . . . . . . . . . 21
5. OPZIONI . . . . . . . . . . . . . . . . . . . . . . . . . . . . . . . . . . . . . . . . . . . . . . . . . . . . . . . . . . . . . . . . . . 22
6. PREPARAZIONE AL PRIMO UTILIZZO . . . . . . . . . . . . . . . . . . . . . . . . . . . . . . . . . . . . . . . . . . 23
7. UTILIZZO QUOTIDIANO . . . . . . . . . . . . . . . . . . . . . . . . . . . . . . . . . . . . . . . . . . . . . . . . . . . . . 25
8. CONSIGLI E SUGGERIMENTI UTILI . . . . . . . . . . . . . . . . . . . . . . . . . . . . . . . . . . . . . . . . . . . . 27
9. PULIZIA E CURA . . . . . . . . . . . . . . . . . . . . . . . . . . . . . . . . . . . . . . . . . . . . . . . . . . . . . . . . . . . . 28
10. RISOLUZIONE DEI PROBLEMI . . . . . . . . . . . . . . . . . . . . . . . . . . . . . . . . . . . . . . . . . . . . . . . . 29
11. DATI TECNICI . . . . . . . . . . . . . . . . . . . . . . . . . . . . . . . . . . . . . . . . . . . . . . . . . . . . . . . . . . . . . 31
12. CONSIDERAZIONI AMBIENTALI . . . . . . . . . . . . . . . . . . . . . . . . . . . . . . . . . . . . . . . . . . . . . . 32
PER RISULTATI PERFETTI
Grazie per aver scelto di acquistare questo prodotto AEG. Lo abbiamo creato per fornirvi
prestazioni impeccabili per molti anni, grazie a tecnologie innovative che vi semplificheranno
la vita - funzioni che non troverete sui normali elettrodomestici. Vi invitiamo di dedicare
qualche minuto alla lettura per sapere come trarre il massimo dal vostro elettrodomestico.
Visitate il nostro sito web per:
ricevere consigli, scaricare i nostri opuscoli, eliminare eventuali anomalie, ottenere
informazioni sull'assistenza.
www.aeg.com
registrare il vostro prodotto e ricevere un servizio migliore:
www.aeg.com/productregistration
acquistare accessori, materiali di consumo e ricambi originali per la vostra
apparecchiatura:
www.aeg.com/shop
SERVIZIO CLIENTI E MANUTENZIONE
Consigliamo sempre l’impiego di ricambi originali.
Quando si contatta l'Assistenza, accertarsi di disporre dei seguenti dati.
Le informazioni si trovano sulla targhetta di identificazione. Modello, numero dell'apparecchio
(PNC), numero di serie.
Avvertenza / Attenzione - Importanti Informazioni di Sicurezza
Informazioni e consigli generali
Informazioni in materia di sicurezza ambientale
Con riserva di modifiche.
Page 18

www.aeg.com
18
1.
ISTRUZIONI DI SICUREZZA
Leggere attentamente le istruzioni fornite prima di installare e utilizzare l'apparecchiatura. Il produttore non è responsabile se un'installazione ed un uso non
corretto dell'apparecchiatura provocano
lesioni e danni. Tenere sempre le istruzioni a portata di mano in caso di necessità durante l'utilizzo.
1.1 Sicurezza dei bambini e
delle persone vulnerabili
AVVERTENZA!
Rischio di soffocamento, lesioni o
invalidità permanente.
• Non permettere alle persone, compresi i bambini, con capacità fisiche,
sensoriali o mentali ridotte, o con
mancanza di esperienza e conoscenza
di utilizzare l'apparecchiatura, a meno
che tale utilizzo non avvenga sotto la
supervisione o la guida di una persona
responsabile della loro sicurezza. Non
consentire ai bambini di giocare con
l'apparecchiatura.
• Tenere i materiali di imballaggio fuori
dalla portata dei bambini.
• Tenere i detersivi fuori dalla portata
dei bambini.
• Tenere i bambini e gli animali domestici lontano dalla porta dell'apparecchiatura quando è aperta.
Collegamento dell’acqua
• Accertarsi di non danneggiare i tubi di
carico e scarico dell'acqua.
• Prima di collegare l’apparecchiatura a
tubazioni nuove o non utilizzate per un
lungo periodo, far scorrere l’acqua finché non è limpida.
• La prima volta che si usa l’apparecchiatura, accertarsi che non vi siano
perdite.
• Il tubo di carico dell'acqua dispone di
una valvola di sicurezza e una guaina
con un cavo elettrico interno.
AVVERTENZA!
Pericolo di tensione.
• Se il tubo di carico è danneggiato,
scollegare immediatamente la spina
dalla presa elettrica. Contattare il Centro di Assistenza per sostituire il tubo
di carico dell’acqua.
1.2 Installazione
• Rimuovere tutti i materiali di imballaggio.
• Non installare e utilizzare l'apparecchiatura se è danneggiata.
• Non collocare o usare l’apparecchiatura in un luogo in cui la temperatura
possa scendere al di sotto di 0°C.
• Osservare le istruzioni per l'installazione fornite con l'apparecchiatura.
• Assicurarsi che l'apparecchiatura sia
installata sotto e vicino a parti adeguatamente ancorate a una struttura fissa.
Collegamento elettrico
AVVERTENZA!
Rischio di incendio e scossa elettrica.
• L'apparecchiatura deve disporre di
una messa a terra.
• Verificare che i dati elettrici riportati
sulla targhetta del modello corrispondano a quelli dell'impianto. In caso
contrario, contattare un elettricista.
• Utilizzare sempre una presa antishock
elettrico correttamente installata.
• Non utilizzare prese multiple e prolunghe.
• Accertarsi di non danneggiare la spina
e il cavo di alimentazione. Contattare
il Centro di Assistenza o un elettricista
Page 19

qualificato per sostituire un cavo danneggiato.
• Inserire la spina di alimentazione nella
presa solo al termine dell'installazione.
Verificare che la spina di alimentazione rimanga accessibile dopo l'installazione.
• Non tirare il cavo di alimentazione per
scollegare l’apparecchiatura. Tirare solo la spina.
1.3 Uso dell’apparecchiatura
• L'apparecchiatura è destinata all'uso
domestico e applicazioni simili, come:
– Cucine di negozi, uffici e altri am-
bienti di lavoro
– Fattorie
– Clienti di hotel, motel e altri am-
bienti residenziali
– Bed and breakfast.
AVVERTENZA!
Rischio di lesioni.
• Non apportare modifiche alle specifiche di questa apparecchiatura.
• Sistemare i coltelli e le posate appuntite nel cestello portaposate con
l’estremità rivolta verso il basso o in
posizione orizzontale.
• Non tenere la porta dell’apparecchiatura aperta senza supervisione per evitare di caderci.
• Non sedersi o salire sulla porta aperta.
• I detersivi per la lavastoviglie sono pericolosi. Osservare le istruzioni di sicu-
ITALIANO 19
rezza riportate sulla confezione del detersivo.
• Non bere o giocare con l’acqua all’interno dell’apparecchiatura.
• Non rimuovere i piatti dall'apparecchiatura fino al completamento del
programma. Potrebbe rimanere del
detersivo sulle stoviglie.
AVVERTENZA!
Rischio di scossa elettrica, incendio o ustioni.
• Non appoggiare o tenere liquidi o
materiali infiammabili, né oggetti facilmente incendiabili sull'apparecchiatura, al suo interno o nelle immediate vicinanze.
• Non usare acqua spray né vapore per
pulire l'apparecchiatura.
• L'apparecchiatura può rilasciare vapore caldo se si apre la porta durante lo
svolgimento del programma.
1.4 Smaltimento
AVVERTENZA!
Rischio di lesioni o soffocamento.
• Staccare la spina dall'alimentazione
elettrica.
• Tagliare il cavo di alimentazione e
smaltirlo.
• Rimuovere il blocco porta per evitare
che bambini e animali domestici rimangano chiusi all’interno dell’apparecchiatura.
Page 20

www.aeg.com
20
2. DESCRIZIONE DEL PRODOTTO
12
11
Mulinello sul cielo vasca
1
Mulinello superiore
2
Mulinello inferiore
3
Filtri
4
Targhetta dati
5
Contenitore del sale
6
10
1
7
8
9
6
7
8
9
10
11
12
4
5
Selettore della durezza dell'acqua
Contenitore del brillantante
Contenitore del detersivo
Cestello posate
Cestello inferiore
Cestello superiore
3
2
Page 21

3. PANNELLO DEI COMANDI
ITALIANO 21
1
Tasto on/off
1
Guida programma
2
Indice di riferimento dei programmi
3
Spie
4
Display
5
Spie Descrizione
Spia fasi di lavaggio.
Spia della fase di asciugatura.
2
Tasto Start
6
Tasto Delay
7
Tasto Multitab
8
Selettore dei programmi
9
3
4
5
8
9
7
6
4. PROGRAMMI
Program-
1)
ma
2)
Grado di
sporco
Tipo di carico
Tutto
Stoviglie miste, posate e
pentole
Spia del brillantante. La spia è spenta durante l'esecuzione del programma.
Spia del sale. La spia è spenta durante l'esecuzione del programma.
Spia Multitab .
Fasi del
programma
Prelavaggio
Durata
(min)
Energia
(kWh)
Acqua
(l)
90 - 160 0.9 - 1.7 8 - 15
Lavaggio 45°C o
70°C
Risciacqui
Asciugatura
Page 22

www.aeg.com
22
Program-
1)
ma
3)
Grado di
sporco
Tipo di carico
Sporco fresco
Stoviglie e
Fasi del
programma
Lavaggio 60°C
Risciacquo
Durata
(min)
Energia
(kWh)
30 0.9 9
Acqua
(l)
posate
4)
5)
Sporco normale
Stoviglie e
posate
Sporco intenso
Stoviglie miste, posate e
Prelavaggio
Lavaggio 50°C
Risciacqui
Asciugatura
Prelavaggio
Lavaggio 70°C
Risciacqui
Asciugatura
165 - 175 0.9 - 1.0 9 - 11
150 - 160 1.4 - 1.6 13 - 14
pentole
Tutto Prelavaggio 14 0.1 4
6)
1)
I valori di consumo e di durata possono variare a seconda della pressione e della
temperatura dell'acqua, delle variazioni dell'alimentazione elettrica, delle opzioni
selezionate e della quantità di stoviglie.
2)
L'apparecchiatura rileva il grado di sporco e la quantità di stoviglie presenti nei cestelli.
Regola automaticamente la temperatura e la quantità dell'acqua, il consumo di
elettricità e la durata del programma.
3)
Con questo programma è possibile lavare un carico di stoviglie con sporco fresco.
Garantisce buoni risultati di lavaggio in breve tempo.
4)
Questo programma consente un utilizzo più efficiente di acqua ed elettricità per lavare
stoviglie e posate con grado di sporco normale. (Programma standard per gli istituti di
prova).
5)
Questo programma prevede una fase di risciacquo ad alta temperatura per garantire
migliori risultati igienici. Durante la fase di risciacquo, la temperatura viene mantenuta a
70°C per 10 - 14 minuti.
6)
Utilizzare questo programma per un risciacquo veloce delle stoviglie. Ciò evita la
formazione di cattivi odori all'interno dell'apparecchiatura.
Non utilizzare il detersivo con questo programma.
Informazioni per gli istituti di prova
Per le informazioni necessarie, relative alle prestazioni inviare una mail a:
info.test@dishwasher-production.com
Riportare il numero del prodotto (PNC) che si trova sulla targhetta dei dati.
5. OPZIONI
5.1 Opzione Multitab
Attivare questa opzione solo se si utilizza
il detersivo in pastiglie multifunzione.
Questa opzione disattiva l'erogazione di
brillantante e sale. Le rispettive spie sono disattivate.
La durata del programma può aumentare.
Page 23

Attivazione dell'opzione
Multitab
Attivare o disattivare l'opzione
Multitab prima di avviare un programma. Non è possibile attivare
o disattivare questa opzione
mentre è in corso un programma.
1. Premere il tasto On/Off per accendere l’apparecchiatura. Verificare che
l'apparecchiatura sia in modalità impostazione. Fare riferimento al capitolo 'IMPOSTAZIONE ED AVVIO DI
UN PROGRAMMA'.
2. Premere Multitab, la spia Multitab si
accende.
L'opzione rimane attiva fino a
quando viene disattivata. Premere Multitab, la spia Multitab si
spegne.
Se si smette di utilizzare le pastiglie
combinate, prima di iniziare ad
utilizzare il detersivo, il brillantante e il
sale da lavastoviglie separatamente,
eseguire le seguenti operazioni:
1. Disattivare l'opzione Multitab.
2. Impostare il decalcificatore dell'ac-
qua sul livello più alto.
3. Assicurarsi che i contenitori del sale e
del brillantante siano pieni.
4. Avviare il programma più breve con
una fase di risciacquo, senza detersivo e senza piatti.
5. Regolare il decalcificatore dell’acqua
in base alla durezza dell'acqua locale.
6. Regolare la quantità di brillantante rilasciata.
6. PREPARAZIONE AL PRIMO UTILIZZO
ITALIANO 23
1. Accertarsi che il livello del decalcifi-
catore dell'acqua preimpostato dalla
fabbrica sia conforme alla durezza
dell'acqua locale. In caso contrario,
regolare il decalcificatore dell'acqua.
Contattare l'ente locale di erogazione idrica per conoscere la durezza locale dell'acqua.
2. Riempire il contenitore del sale.
3. Riempire il contenitore del brillantan-
te.
4. Aprire il rubinetto dell’acqua.
5. Potrebbero rimanere dei residui di la-
vorazione all'interno dell'apparecchiatura. Avviare un programma per
eliminarli. Non utilizzare il detersivo e
non caricare stoviglie.
6.1 Regolare il decalcificatore dell’acqua
Durezza dell'acqua
Tedesco
gradi
(°dH)
51 - 70 91 - 125 9.1 - 12.5 64 - 88
43 - 50 76 - 90 7.6 - 9.0 53 - 63
37 - 42 65 - 75 6.5 - 7.5 46 - 52
29 - 36 51 - 64 5.1 - 6.4 36 - 45
Francese
gradi
(°fH)
mmol/l Gradi
Se si utilizza del detersivo in pastiglie multifunzione, attivare
l'opzione Multitab.
Regolazione
del decalcificatore
dell'acqua
Manuale Elet-
Clarke
troni-
ca
1)
2
1)
2
1)
2
1)
2
10
9
8
7
Page 24

www.aeg.com
24
Durezza dell'acqua
del decalcificatore
dell'acqua
Regolazione
Tedesco
gradi
(°dH)
23 - 28 40 - 50 4.0 - 5.0 28 - 35
19 - 22 33 - 39 3.3 - 3.9 23 - 27
Francese
gradi
(°fH)
mmol/l Gradi
Clarke
Manuale Elet-
1)
2
1)
2
15 - 18 26 - 32 2.6 - 3.2 18 - 22 1 4
11 - 14 19 - 25 1.9 - 2.5 13 - 17 1 3
4 - 10 7 - 18 0.7 - 1.8 5 - 12 1 2
< 4 < 7 < 0.7 < 5
1)
Impostazione di fabbrica.
2)
Non utilizzare il sale a questo livello.
Il decalcificatore dell’acqua deve
essere regolato manualmente ed
elettronicamente.
2)
1
Impostazione manuale
Ruotare il selettore della durezza dell'acqua nella posizione 1 o 2.
troni-
ca
6
1)
5
2)
1
Impostazione elettronica
1. Premere il tasto On/Off per accendere l’apparecchiatura. Verificare che
l'apparecchiatura sia in modalità impostazione. Fare riferimento al capitolo "IMPOSTAZIONE ED AVVIO DI
UN PROGRAMMA".
2. Ruotare il selettore dei programmi fino a quando sul display compaiono
due barre di stato orizzontali.
3. Premere a lungo Multitab e Delay
contemporaneamente finché le spie
, , e lampeggiano.
4. Premere Multitab.
•
Le spie
•
La spia
• Il display visualizza l'impostazione
del decalcificatore dell’acqua; ad
es.
5. Premere ripetutamente il tasto Multitab per modificare l'impostazione.
6. Spegnere l'apparecchiatura per con-
fermare l'impostazione.
e si spengono.
continua a lampeggiare.
= livello 5.
Page 25

6.2 Riempire il contenitore del sale
1.
Ruotare il tappo in senso antiorario e
aprire il contenitore del sale.
2.
Versare 1 litro d’acqua nel contenitore del sale (solo la prima volta).
3.
Riempire il contenitore del sale.
4.
Togliere l'eventuale sale rimasto attorno all'apertura del contenitore.
5.
Riavvitare il tappo in senso orario
per chiudere il contenitore del sale.
ATTENZIONE
Acqua e sale potrebbero fuoriuscire dal contenitore del sale durante il riempimento. Rischio di
corrosione. Per evitarla, avviare
un programma dopo aver riempito il contenitore del sale.
6.3 Riempire il contenitore del brillantante
1.
A
B
A
X
M
2
1
3
4
+
-
C
D
Premere il pulsante di sgancio (D)
per aprire il coperchio (C).
2.
Riempire il contenitore del brillantante (A) non oltre il segno di
“max.”.
3.
Rimuovere l'eventuale brillantante
fuoriuscito con un panno assorbente, per evitare che si formi troppa
schiuma.
4.
Chiudere il coperchio. Assicurarsi
che il pulsante di sgancio si blocchi
in posizione.
È possibile ruotare il selettore
del dosaggio (B) tra la posizione
1 (quantità minima) e la posizione
4 (quantità massima).
ITALIANO 25
7. UTILIZZO QUOTIDIANO
1. Aprire il rubinetto dell’acqua.
2. Premere il tasto On/Off per accende-
re l’apparecchiatura. Verificare che
l'apparecchiatura sia in modalità impostazione, fare riferimento al capitolo 'IMPOSTAZIONE ED AVVIO DI UN
PROGRAMMA'.
• Se la spia del sale è accesa, riempi-
re il contenitore del sale.
• Se la spia del brillantante è accesa,
riempire il contenitore del brillantante.
3. Caricare i cestelli.
Page 26

M
A
X
1
2
3
4
+
-
www.aeg.com
26
4. Aggiungere il detersivo. 5. Impostare ed avviare il programma
corretto per il tipo di carico ed il grado di sporco.
7.1 Utilizzo del detersivo
1.
B
A
30
20
C
7.2 Impostazione ed avvio di
un programma
Modalità impostazione
L’apparecchiatura deve essere in modalità impostazione per accettare alcune
operazioni.
L'apparecchiatura è in modalità impostazione se, dopo l'attivazione, tutte le spie
della fase si accendono. Sul display lampeggia la durata dell'ultimo programma
selezionato.
Se il pannello dei comandi mostra condizioni diverse, premere a lungo Multitab
e Delay contemporaneamente fino a
quando l'apparecchiatura passa in modalità di impostazione.
Avvio del programma senza
partenza ritardata
1. Aprire il rubinetto dell’acqua.
2. Premere il tasto On/Off per accende-
re l’apparecchiatura. Verificare che
l'apparecchiatura sia in modalità impostazione.
3. Chiudere la porta dell'apparecchiatura.
4. Ruotare la manopola di selezione
programma fino a quando il segno
sulla manopola è allineato al programma che si vuole impostare.
• Sul display lampeggia la durata del
programma.
Premere il pulsante di sgancio (B)
per aprire il coperchio (C).
2.
Mettere il detersivo nel rispettivo
contenitore (A).
3.
Se il programma ha una fase di prelavaggio, mettere una piccola quantità di detersivo nella parte interna
della porta dell'apparecchiatura.
4.
Se si usa detersivo in pastiglie, mettere la pastiglia nel contenitore (A).
5.
Chiudere il coperchio. Assicurarsi
che il pulsante di sgancio si blocchi
in posizione.
• Le spie delle fasi del programma
specificato si accendono.
5. Premere Start. Il programma si avvia.
• Rimane accesa solo la spia della fase in corso.
• Il display indica la durata del programma che diminuisce ad intervalli di 1 minuto.
Avvio del programma con
partenza ritardata
1. Impostare il programma.
2. Continuare a premere Delay finché il
display indica l'intervallo desiderato
per la partenza ritardata (da 1 a 24
ore).
• Il tempo impostato lampeggia sul
display.
3. Premere Start. Il conto alla rovescia
si avvia.
• Il display mostra il conto alla rove-
scia che diminuisce ad intervalli di
1 ora.
• Le spie delle fasi del programma
specificato si spengono.
• Appena è completato il conto alla ro-
vescia, il programma si avvia.
– La spia della fase in corso si accen-
de.
Page 27

ITALIANO 27
Apertura della porta durante il
funzionamento
dell'apparecchiatura
Se si apre la porta, l'apparecchiatura si
blocca. Quando si chiude nuovamente la
porta, l'apparecchiatura riprende dal
punto in cui era stata interrotta.
Annullamento della partenza
ritardata mentre è in corso il
conto alla rovescia
1. Premere a lungo Multitab e Delay
contemporaneamente finché:
• Sul display lampeggia la durata del
programma.
• Le spie delle fasi del programma si
accendono.
2. Premere Start. Il programma si avvia.
Annullamento del programma
Premere a lungo Multitab e Delay contemporaneamente finché:
• Sul display lampeggia la durata del
programma.
• Le spie delle fasi del programma si ac-
cendono.
Verificare che vi sia del detersivo
nell'apposito contenitore prima
di avviare un nuovo programma.
Al termine del programma
Una volta terminato il programma, le
spie di fase si spengono e il display indica 0.
1. Premere il tasto On/Off per spegnere
l’apparecchiatura.
2. Chiudere il rubinetto dell'acqua.
Se non si preme il tasto on/off, il
dispositivo AUTO OFF spegne
automaticamente l'apparecchiatura dopo alcuni minuti. Ciò contribuisce a ridurre il consumo di
energia.
• Lasciare raffreddare le stoviglie
prima di estrarle dall'apparecchiatura. Le stoviglie calde
possono essere più facilmente
danneggiabili.
• Vuotare prima il cestello inferiore e quindi quello superiore.
• Sulle pareti laterali e sulla porta dell'apparecchiatura può
formarsi della condensa perché l'acciaio inox si raffredda
più velocemente della ceramica.
8. CONSIGLI E SUGGERIMENTI UTILI
8.1 Il decalcificatore
dell’acqua
L'acqua dura contiene un'elevata quantità di minerali che possono causare danni
all’apparecchiatura e risultati di lavaggio
scadenti. Il decalcificatore dell’acqua
neutralizza tali minerali.
Il sale per lavastoviglie mantiene il decalcificatore dell’acqua pulito e in buone
condizioni. Ѝ importante impostare il livello corretto del decalcificatore dell'acqua. Ciò assicura che il decalcificatore
dell’acqua utilizzi l’esatta quantità di sale
per lavastoviglie.
8.2 Caricare i cestelli
• Utilizzare l’apparecchiatura esclusivamente per lavare articoli idonei al lavaggio in lavastoviglie.
• Non introdurre nell’apparecchiatura
articoli di legno, osso, alluminio, peltro o rame.
• Non inserire nell'apparecchiatura oggetti che possano assorbire acqua
(spugne, panni).
Fare riferimento all'opuscolo in
dotazione per gli esempi su come caricare i cestelli.
Page 28

www.aeg.com
28
• Eliminare i residui di cibo dalle stoviglie.
• Per rimuovere senza fatica tracce di
bruciato, lasciare pentole e recipienti
a bagno nell'acqua prima di introdurli
nell'apparecchiatura.
• Disporre gli utensili cavi (tazze, bicchieri e padelle) con l’apertura rivolta
verso il basso.
• Assicurarsi che le posate e i piatti non
aderiscano tra loro. Mescolare i cucchiai con le altre posate.
• Verificare che i bicchieri non si tocchino l’un l’altro.
• Disporre gli oggetti piccoli nel cestello
portaposate.
• Sistemare gli oggetti leggeri nel cestello superiore in modo tale che non
possano muoversi.
• Prima di avviare un programma, assicurarsi che i mulinelli possano ruotare
liberamente.
8.3 Se si utilizzano sale,
brillantante e detersivo
• Utilizzare soltanto sale, brillantante e
detersivo specifici per lavastoviglie.
Altri prodotti possono danneggiare
l'apparecchiatura.
• Durante l’ultima fase di risciacquo, il
brillantante favorisce l'asciugatura delle stoviglie senza lasciare striature e
macchie.
• Le pastiglie multifunzione contengono
agenti che conglobano le funzioni di
detersivo, brillantante e sale. Verificare
che le pastiglie siano idonee per la
durezza dell’acqua locale. Consultare
le indicazioni riportate sulle confezioni
dei prodotti.
• Le pastiglie possono non sciogliersi
completamente nei cicli brevi. Per evitare residui di detersivo sulle stoviglie,
consigliamo di utilizzare il detersivo in
pastiglie con i programmi lunghi.
Non usare una dose di detersivo
superiore alla quantità raccomandata. Osservare le istruzioni riportate sulla confezione del detersivo.
8.4 Prima di avviare il
programma
Verificare che:
• I filtri siano puliti e installati correttamente.
• I fori sui mulinelli non siano ostruiti.
• Le stoviglie siano riposte correttamente nei cestelli.
• Il programma sia adatto al tipo di carico e al grado di sporco.
• Si utilizzi la quantità corretta di detersivo e additivi.
• Siano presenti il sale per lavastoviglie
e il brillantante (a meno che non si utilizzino le pastiglie multifunzione).
• Il tappo del contenitore del sale sia
serrato.
9. PULIZIA E CURA
AVVERTENZA!
Prima di eseguire qualunque intervento di manutenzione, spegnere l'apparecchiatura ed
estrarre la spina dalla presa.
Filtri sporchi e mulinelli ostruiti riducono i risultati di lavaggio.
Eseguire controlli periodici e pulirli, se necessario.
Page 29

9.1 Pulizia dei filtri
C
ITALIANO 29
1.
Ruotare il filtro (A) in senso antiorario e rimuoverlo.
C
B
A
A1
A2
9.2 Pulizia dei mulinelli
Non rimuovere i mulinelli.
Se i fori dei mulinelli sono ostruiti da residui di sporco, liberarli servendosi di un
oggetto a punta fine.
2.
Per smontare il filtro (A), estrarre
(A1) e (A2).
3.
Rimuovere il filtro (B).
4.
Sciacquare i filtri con acqua.
5.
Ricollocare il filtro (B) nella posizione iniziale. Verificare che sia montato correttamente sotto le due guide
(C).
6.
Montare il filtro (A) e posizionarlo all'interno del filtro (B). Ruotarlo in
senso orario finché non si blocca in
posizione.
Un’errata posizione dei filtri può
comportare scadenti risultati di
lavaggio e danni all’apparecchiatura.
Utilizzare solo detergenti neutri. Non
usare prodotti abrasivi, spugnette abrasive o solventi.
9.3 Pulizia esterna
Pulire l'apparecchiatura con un panno
inumidito e morbido.
10. RISOLUZIONE DEI PROBLEMI
L'apparecchiatura non si avvia o si blocca durante il funzionamento.
Prima di contattare il Centro di Assistenza, consultare le seguenti informazioni
Page 30

www.aeg.com
30
per tentare di trovare una soluzione al
problema.
Il display visualizza un codice allarme
in alcuni casi:
•
- L'apparecchiatura non carica
l'acqua.
•
- L'apparecchiatura non scarica
l'acqua.
•
- Il dispositivo antiallagamento è
attivo.
AVVERTENZA!
Spegnere l'apparecchiatura prima di eseguire i controlli.
Problema Possibile soluzione
Non è possibile accendere l'apparecchiatura.
Verificare che la spina sia collegata alla presa elettrica.
Assicurarsi che il fusibile all'interno del qua-
dro elettrico non sia danneggiato.
Il programma non si avvia. Controllare che la porta dell'apparecchiatu-
ra sia chiusa.
Premere Start.
Se è stata impostata la Partenza ritardata,
annullare l'impostazione o attendere il ter-
mine del conto alla rovescia.
L'apparecchiatura non carica ac-
qua.
Controllare che il rubinetto dell'acqua sia
aperto.
Controllare che la pressione dell'acqua di
alimentazione non sia troppo bassa. Per ot-
tenere informazioni a questo proposito, con-
tattare l’ente erogatore locale.
Controllare che il rubinetto dell'acqua non
sia ostruito.
Controllare che il filtro nel tubo di carico
non sia ostruito.
Verificare che il tubo di carico non sia attor-
cigliato o piegato.
L'apparecchiatura non scarica
l'acqua.
Controllare che lo scarico del lavello non sia
ostruito.
Verificare che il tubo di scarico non sia attor-
cigliato o piegato.
Il dispositivo antiallagamento è
attivo.
Una volta effettuati questi controlli, accendere l'apparecchiatura. Il programma
riprende dal punto in cui era stato interrotto.
In caso di ricomparsa dell'anomalia, contattare il Centro di Assistenza.
Se il display mostra altri codici di allarme, contattare il Centro di Assistenza.
Chiudere il rubinetto dell’acqua e contattare
il Centro di Assistenza.
10.1 Se i risultati di lavaggio e
di asciugatura non sono
soddisfacenti
Su bicchieri e stoviglie rimangono
delle striature biancastre o striature
bluastre
• La quantità di brillantante erogata è
eccessiva. Impostare il selettore del
brillantante nella posizione inferiore.
Page 31

• È stata utilizzata una dose eccessiva di
detersivo.
Macchie e tracce di gocce d'acqua su
bicchieri e stoviglie
• La quantità di brillantante erogata non
è insufficiente. Impostare il selettore
del brillantante nella posizione superiore.
• La causa potrebbe essere la qualità
del detersivo.
Le stoviglie sono bagnate
• Il programma non prevede la fase di
asciugatura o l'asciugatura viene eseguita a bassa temperatura.
• Il contenitore del brillantante è vuoto.
• La causa potrebbe essere la qualità
del brillantante.
• La causa potrebbe essere la qualità
del detersivo in pastiglie multifunzione. Provare un prodotto di una marca
diversa o attivare il contenitore del
brillantante e utilizzare il brillantante
insieme al detersivo in pastiglie multifunzione.
Fare riferimento alla sezione
"CONSIGLI E SUGGERIMENTI
UTILI" per trovare altre possibili
cause.
ITALIANO 31
l'apparecchiatura sia in modalità impostazione, fare riferimento al capitolo 'IMPOSTAZIONE ED AVVIO DI UN
PROGRAMMA'.
2. Ruotare il selettore dei programmi fino a quando sul display compaiono
due barre di stato orizzontali.
3. Premere e tenere premuti Multitab e
Delay contemporaneamente finché
le spie
4. Premere Delay.
•
•
• Il display visualizza l'impostazione
, , e lampeggiano.
Le spie
La spia
re.
del contenitore del brillantante.
e si spengono.
continua a lampeggia-
Off
On
5. Premere ripetutamente il tasto Delay
per modificare l'impostazione.
6. Spegnere l'apparecchiatura per confermare l'impostazione.
10.2 Attivazione del
contenitore del brillantante
con la funzione Multitab attiva
1. Premere il tasto On/Off per accendere l’apparecchiatura. Verificare che
11. DATI TECNICI
Dimensioni Larghezza x Altezza x Pro-
Collegamento elettrico Fare riferimento alla targhetta dati.
Tensione 220-240 V
Frequenza 50 Hz
Pressione dell’acqua di
alimentazione
fondità (mm)
596 / 818 - 898 / 575
Min./max. (bar/MPa) (0.5 / 0.05 ) / (8 / 0.8 )
Page 32

www.aeg.com
32
Collegamento dell'ac-
1)
qua
Acqua fredda o calda
Capacità Coperti 12
Assorbimento elettrico Modalità left-on 0.10 W
Modalità Off 0.10 W
1)
Collegare il tubo di carico dell'acqua a un rubinetto con filettatura 3/4".
2)
Consigliamo il collegamento all'acqua calda se prodotta mediante utilizzo di fonti di
energia alternativa (per es. pannelli solari, impianti eolici) per ridurre il consumo di
energia.
12. CONSIDERAZIONI AMBIENTALI
Riciclare i materiali con il simbolo .
Buttare l'imballaggio negli appositi
contenitori per il riciclaggio.
Aiutare a proteggere l’ambiente e la
salute umana e a riciclare rifiuti
derivanti da apparecchiature
elettriche ed elettroniche. Non
2)
smaltire le apparecchiature che
riportano il simbolo
normali rifiuti domestici. Portare il
prodotto al punto di riciclaggio più
vicino o contattare il comune di
residenza.
max. 60°C
insieme ai
Page 33

POLSKI 33
SPIS TREŚCI
1. WSKAZÓWKI DOTYCZĄCE BEZPIECZEŃSTWA . . . . . . . . . . . . . . . . . . . . . . . . . . . . . 34
2. OPIS URZĄDZENIA . . . . . . . . . . . . . . . . . . . . . . . . . . . . . . . . . . . . . . . . . . . . . . . . . . . . . 36
3. PANEL STEROWANIA . . . . . . . . . . . . . . . . . . . . . . . . . . . . . . . . . . . . . . . . . . . . . . . . . . 37
4. PROGRAMY . . . . . . . . . . . . . . . . . . . . . . . . . . . . . . . . . . . . . . . . . . . . . . . . . . . . . . . . . . 38
5. OPCJE . . . . . . . . . . . . . . . . . . . . . . . . . . . . . . . . . . . . . . . . . . . . . . . . . . . . . . . . . . . . . . . 39
6. PRZED PIERWSZYM UŻYCIEM . . . . . . . . . . . . . . . . . . . . . . . . . . . . . . . . . . . . . . . . . . . 39
7. CODZIENNA EKSPLOATACJA . . . . . . . . . . . . . . . . . . . . . . . . . . . . . . . . . . . . . . . . . . . . 42
8. WSKAZÓWKI I PORADY . . . . . . . . . . . . . . . . . . . . . . . . . . . . . . . . . . . . . . . . . . . . . . . . . 43
9. KONSERWACJA I CZYSZCZENIE . . . . . . . . . . . . . . . . . . . . . . . . . . . . . . . . . . . . . . . . . 44
10. ROZWIĄZYWANIE PROBLEMÓW . . . . . . . . . . . . . . . . . . . . . . . . . . . . . . . . . . . . . . . . . 45
11. DANE TECHNICZNE . . . . . . . . . . . . . . . . . . . . . . . . . . . . . . . . . . . . . . . . . . . . . . . . . . . . 47
12. OCHRONA ŚRODOWISKA . . . . . . . . . . . . . . . . . . . . . . . . . . . . . . . . . . . . . . . . . . . . . . . 48
Z MYŚLĄ O PERFEKCYJNYCH REZULTATACH
Dziękujemy za wybór tego produktu AEG. Zaprojektowaliśmy go z myślą o wieloletniej
bezawaryjnej pracy i wyposażyliśmy w innowacyjne technologie, które ułatwiają życie — nie
wszystkie te funkcje można znaleźć w zwykłych urządzeniach. Prosimy o poświęcenie kilku
minut na lekturę w celu zapewnienia najlepszego wykorzystania urządzenia.
Odwiedź naszą witrynę internetową, aby uzyskać:
Wskazówki dotyczące użytkowania, broszury, pomoc w rozwiązywaniu problemów
oraz informacje dotyczące serwisu:
www.aeg.com
Zarejestruj swój produkt, aby uprościć jego obsługę serwisową:
www.aeg.com/productregistration
Kupuj akcesoria, materiały eksploatacyjne i oryginalne części zamienne do swojego
urządzenia:
www.aeg.com/shop
OBSŁUGA KLIENTA
Zalecamy stosowanie oryginalnych części zamiennych.
Kontaktując się z serwisem, należy przygotować poniższe dane.
Informacje można znaleźć na tabliczce znamionowej. Model, numer produktu, numer seryjny.
Ostrzeżenie/przestroga – informacje dotyczące bezpieczeństwa.
Informacje i wskazówki ogólne
Informacje dot. ochrony środowiska
Producent zastrzega sobie możliwość wprowadzenia zmian bez wcześniejszego
powiadomienia.
Page 34

www.aeg.com
34
1.
WSKAZÓWKI DOTYCZĄCE BEZPIECZEŃSTWA
Przed instalacją i użyciem urządzenia
należy dokładnie przeczytać dostarczo‐
ne instrukcje. Producent nie odpowiada
za uszkodzenia i obrażenia ciała spowo‐
dowane nieprawidłową instalacją i eks‐
ploatacją. Należy zachować instrukcję
wraz z urządzeniem do wykorzystania w
przyszłości.
1.1 Bezpieczeństwo dzieci i
osób o ograniczonych
zdolnościach ruchowych,
sensorycznych lub umysłowych
OSTRZEŻENIE!
Występuje zagrożenie udusze‐
niem lub odniesieniem obrażeń
mogących skutkować trwałym
kalectwem.
• Nie wolno pozwalać obsługiwać tego
urządzenia osobom, w tym również
dzieciom, o ograniczonych zdolnoś‐
ciach ruchowych, sensorycznych lub
umysłowych albo osobom bez odpo‐
wiedniego doświadczenia lub wiedzy.
Osoby te mogą obsługiwać urządze‐
nie wyłącznie pod nadzorem lub po
odpowiednim poinstruowaniu przez
osobę odpowiedzialną za ich bezpie‐
czeństwo. Nie pozwalać, aby dzieci
bawiły się urządzeniem.
• Wszystkie opakowania należy prze‐
chowywać poza zasięgiem dzieci.
• Wszystkie detergenty należy przecho‐
wywać poza zasięgiem dzieci.
• Dzieci i zwierzęta domowe nie powin‐
ny znajdować się w pobliżu urządze‐
nia, gdy jego drzwi są otwarte.
• Należy zadbać o to, by struktury znaj‐
dujące się nad urządzeniem i w jego
pobliżu spełniały odpowiednie wymogi
bezpieczeństwa.
Podłączenie do sieci
wodociągowej
• Należy zwrócić uwagę, aby nie uszko‐
dzić węży wodnych.
• Przed podłączeniem urządzenia do
nowych rur lub do rur, które nie były
używane przez dłuższy czas, należy
puścić wodę i odczekać, aż pojawi się
czysta woda.
• Przy pierwszym uruchomieniu urzą‐
dzenia należy sprawdzić, czy nie ma
wycieków.
• Wąż dopływowy wyposażono w zawór
bezpieczeństwa i ścianki z wewnętrz‐
nym przewodem zasilającym.
OSTRZEŻENIE!
Niebezpieczne napięcie.
• W razie uszkodzenia węża dopływo‐
wego należy natychmiast wyjąć wtycz‐
kę z gniazda elektrycznego. Należy
skontaktować się z punktem serwiso‐
wym w celu wymiany węża dopływo‐
wego.
1.2 Instalacja
• Usunąć wszystkie elementy opakowa‐
nia.
• Nie instalować ani nie używać uszko‐
dzonego urządzenia.
• Nie instalować ani nie używać urzą‐
dzenia w miejscach, w których tempe‐
ratura jest niższa niż 0°C.
• Należy postępować zgodnie z instruk‐
cją instalacji dostarczoną wraz z urzą‐
dzeniem.
Podłączenie do sieci
elektrycznej
OSTRZEŻENIE!
Występuje zagrożenie pożarem i
porażeniem prądem elektrycz‐
nym.
• Urządzenie musi być uziemione.
• Należy upewnić się, że informacje o
podłączeniu elektrycznym podane na
Page 35

tabliczce znamionowej są zgodne z
parametrami instalacji zasilającej. W
przeciwnym razie należy skontakto‐
wać się z elektrykiem.
• Należy zawsze używać prawidłowo
zamontowanych gniazd elektrycznych
z uziemieniem.
• Nie stosować rozgałęźników ani
przedłużaczy.
• Należy uważać, aby nie uszkodzić
wtyczki ani przewodu zasilającego.
Wymianę uszkodzonego przewodu za‐
silającego należy zlecić przedstawicie‐
lowi serwisu lub wykwalifikowanemu
elektrykowi.
• Podłączyć wtyczkę do gniazda elek‐
trycznego dopiero po zakończeniu in‐
stalacji. Należy zadbać o to, aby po
zakończeniu instalacji urządzenia
wtyczka przewodu zasilającego była
łatwo dostępna.
• Przy odłączaniu urządzenia nie ciąg‐
nąć za przewód zasilający. Zawsze
ciągnąć za wtyczkę.
1.3 Zastosowanie
• To urządzenie jest przeznaczone do
użytku w gospodarstwie domowym
oraz do podobnych zastosowań, np.:
– Kuchnie w obiektach sklepowych,
biurowych oraz innych placówkach
pracowniczych
– Gospodarstwa rolne
– Klienci hoteli, moteli i innych obiek‐
tów mieszkalnych
– Obiekty noclegowe.
OSTRZEŻENIE!
Zagrożenie odniesieniem obra‐
żeń.
• Nie zmieniać parametrów technicz‐
nych urządzenia.
• Noże oraz inne ostre sztućce należy
wkładać do kosza na sztućce ostrzami
skierowanymi w dół lub poziomo.
POLSKI 35
• Nie pozostawiać otwartych drzwi urzą‐
dzenia bez nadzoru, aby nie dopuścić
do potknięcia się o drzwi.
• Nie siadać ani nie stawać na otwar‐
tych drzwiach urządzenia.
• Detergenty do zmywarki są niebez‐
pieczne. Należy przestrzegać instruk‐
cji bezpieczeństwa podanych na opa‐
kowaniu detergentu.
• Nie pić wody z urządzenia ani nie ba‐
wić się nią.
• Nie wyjmować naczyń z urządzenia
przed zakończeniem programu. Na
naczyniach może znajdować się deter‐
gent.
OSTRZEŻENIE!
Zagrożenie porażeniem prądem,
wystąpieniem pożaru lub oparze‐
niami.
• Nie umieszczać łatwopalnych produk‐
tów lub przedmiotów nasączonych łat‐
wopalnymi produktami w urządzeniu,
na nim lub w jego pobliżu.
• Do czyszczenia urządzenia nie wolno
używać wody pod ciśnieniem ani pary
wodnej.
• W przypadku otwarcia drzwi podczas
cyklu pracy może dojść do uwolnienia
gorącej pary.
1.4 Utylizacja
OSTRZEŻENIE!
Występuje zagrożenie udusze‐
niem lub odniesieniem obrażeń
ciała.
• Odłączyć urządzenie od źródła zasila‐
nia.
• Odciąć przewód zasilający i wyrzucić.
• Wymontować zatrzask drzwi, aby
uniemożliwić zamknięcie się dziecka
lub zwierzęcia w urządzeniu.
Page 36

www.aeg.com
36
2. OPIS URZĄDZENIA
12
11
10
Najwyżej położone ramię spryskują‐
1
ce
Górne ramię spryskujące
2
Dolne ramię spryskujące
3
Filtry
4
Tabliczka znamionowa
5
Zbiornik soli
6
1
7
8
9
6
7
8
9
10
11
12
4
5
Pokrętło ustawienia twardości wody
Dozownik płynu nabłyszczającego
Dozownik detergentu
Kosz na sztućce
Dolny kosz
Górny kosz
3
2
Page 37

3. PANEL STEROWANIA
POLSKI 37
1
Przycisk wł./wył.
1
Przewodnik po programach
2
Znacznik programu
3
Wskaźniki
4
Wyświetlacz
5
Wskaźniki Opis
Wskaźnik fazy zmywania.
Wskaźnik fazy suszenia.
2
Przycisk Start
6
Przycisk Delay
7
Przycisk Multitab
8
Pokrętło wyboru programów
9
3
4
5
8
9
7
6
Wskaźnik płynu nabłyszczającego. W trakcie
trwania programu wskaźnik jest wyłączony.
Wskaźnik soli. W trakcie trwania programu
wskaźnik jest wyłączony.
Wskaźnik Multitab.
Page 38

www.aeg.com
38
4. PROGRAMY
Program
2)
3)
1)
4)
5)
6)
Stopień za‐
brudzenia
Rodzaj zała‐
Fazy
programu
Czas
trwania
(min)
Zużycie
energii
(kWh)
dunku
Dowolne
Naczynia sto‐
łowe, sztućce,
garnki i patel‐
nie
Zmywanie wstęp‐
ne
Zmywanie w tem‐
peraturze 45°C
lub 70°C
90 - 160 0.9 - 1.7 8 - 15
Płukania
Suszenie
Świeże
Naczynia sto‐
łowe i sztućce
Średnie
Naczynia sto‐
łowe i sztućce
Zmywanie w tem‐
peraturze 60°C
Płukania
Zmywanie wstęp‐
ne
Zmywanie w tem‐
30 0.9 9
165 -
0.9 - 1.0 9 - 11
175
peraturze 50°C
Płukania
Suszenie
Duże
Naczynia sto‐
łowe, sztućce,
garnki i patel‐
nie
Zmywanie wstęp‐
ne
Zmywanie w tem‐
peraturze 70°C
Płukania
150 160
1.4 - 1.6 13 - 14
Suszenie
Dowolne Zmywanie wstęp‐ne14 0.1 4
Zużycie
wody
(l)
1)
Czas trwania programu i parametry eksploatacyjne mogą ulec zmianie w zależności od
ciśnienia i temperatury wody, zmian w napięciu zasilania, użytych opcji oraz ilości
naczyń.
2)
Urządzenie rozpoznaje stopień zabrudzenia oraz ilość naczyń znajdujących się w
koszach. Automatycznie reguluje temperaturę i ilość wody, a także zużycie energii oraz
czas trwania programu.
3)
Program ten umożliwia zmywanie świeżo zabrudzonych naczyń. Program pozwala w
krótkim czasie uzyskać dobre efekty zmywania.
4)
W tym programie uzyskuje się największą efektywność zużycia wody i energii
elektrycznej podczas zmywania średnio zabrudzonych naczyń i sztućców. (Jest to
standardowy program dla ośrodków przeprowadzających testy).
5)
Ten program obejmuje fazę płukania w wysokiej temperaturze, aby zapewnić większą
higienę zmywania naczyń. Podczas płukania temperatura pozostaje na poziomie 70°C
przez 10–14 minut.
6)
Ten program służy do szybkiego płukania naczyń. Zapobiega to zasychaniu resztek
jedzenia na naczyniach i powstawaniu przykrych zapachów.
W tym programie nie należy stosować detergentu.
Page 39

Informacje dla ośrodków przeprowadzających testy
Aby uzyskać więcej informacji na temat wyników testu, należy wysłać wiadomość email na adres:
info.test@dishwasher-production.com
Należy zapisać numer produktu (PNC) podany na tabliczce znamionowej.
5. OPCJE
POLSKI 39
5.1 Funkcja Multitab
Tę opcję można włączyć jedynie stosu‐
jąc wieloskładnikowe tabletki z detergen‐
tem.
Opcja ta zatrzymuje dopływ płynu nabły‐
szczającego i soli. Odpowiednie wskaź‐
niki są wyłączone.
Czas trwania programu może się wydłu‐
żyć.
Włączanie opcji Multitab
Opcję Multitab należy włączyć
lub wyłączyć przed rozpoczęciem
programu. Opcji Multitab nie
można włączyć ani wyłączyć
podczas trwania programu.
1. Nacisnąć przycisk wł./wył., aby włą‐
czyć urządzenie. Upewnić się, że
urządzenie znajduje się w trybie usta‐
wiania. Patrz „USTAWIANIE I URU‐
CHAMIANIE PROGRAMU”.
2. Nacisnąć Multitab – zaświeci się
wskaźnik Multitab.
Opcja pozostanie włączona do
chwili wyłączenia jej przez użyt‐
kownika. Nacisnąć Multitab –
wskaźnik Multitab zgaśnie.
W przypadku zaprzestania korzystania z
wieloskładnikowych tabletek z
detergentem przed rozpoczęciem
stosowania oddzielnie detergentu, płynu
nabłyszczającego i soli do zmywarek
należy wykonać poniższe czynności:
1. Wyłączyć opcję Multitab.
2. Ustawić najwyższy poziom zmiękcza‐
nia wody.
3. Upewnić się, że zbiornik soli oraz do‐
zownik płynu nabłyszczającego są
pełne.
4. Uruchomić najkrótszy program z fazą
płukania, bez detergentu i bez na‐
czyń.
5. Ustawić poziom zmiękczania wody
odpowiednio do twardości wody do‐
prowadzanej do urządzenia.
6. Wyregulować dozowanie płynu na‐
błyszczającego.
6. PRZED PIERWSZYM UŻYCIEM
1. Sprawdzić, czy ustawiony poziom
zmiękczania wody odpowiada twar‐
dości wody doprowadzanej do urzą‐
dzenia. Jeśli nie, należy ustawić po‐
ziom zmiękczania wody. Skontakto‐
wać się z miejscowym zakładem wo‐
dociągowym, aby ustalić stopień
twardości wody doprowadzanej do
urządzenia.
2. Napełnić zbiornik soli.
3. Napełnić dozownik płynu nabłyszcza‐
jącego.
4. Otworzyć zawór wody.
5. W urządzeniu mogą znajdować się
pozostałości z procesu produkcyjne‐
go. Aby je usunąć, należy uruchomić
program. Nie należy stosować deter‐
Page 40

www.aeg.com
40
gentu ani umieszczać naczyń w ko‐
szach.
Aby zastosować wieloskładniko‐
we tabletki z detergentem, nale‐
ży wybrać opcję Multitab.
6.1 Regulacja zmiękczania wody
Twardość wody
Stopnie
niemieckie
(°dH)
Stopnie
francuskie
(°fH)
mmol/l Stopnie
Clarke'a
51 - 70 91 - 125 9.1 - 12.5 64 - 88
43 - 50 76 - 90 7.6 - 9.0 53 - 63
37 - 42 65 - 75 6.5 - 7.5 46 - 52
29 - 36 51 - 64 5.1 - 6.4 36 - 45
23 - 28 40 - 50 4.0 - 5.0 28 - 35
19 - 22 33 - 39 3.3 - 3.9 23 - 27
15 - 18 26 - 32 2.6 - 3.2 18 - 22 1 4
11 - 14 19 - 25 1.9 - 2.5 13 - 17 1 3
4 - 10 7 - 18 0.7 - 1.8 5 - 12 1 2
< 4 < 7 < 0.7 < 5
1)
Ustawienie fabryczne.
2)
Przy tym poziomie nie stosować soli.
Poziom zmiękczania wody nale‐
ży ustawić ręcznie oraz elektro‐
nicznie.
Regulacja zmięk‐
ręczna elek‐
1)
2
1)
2
1)
2
1)
2
1)
2
1)
2
2)
1
czania
wody
tronicz‐
na
10
9
8
7
6
1)
5
2)
1
Regulacja ręczna
Ustawienie elektroniczne
1. Nacisnąć przycisk wł./wył., aby włą‐
czyć urządzenie. Upewnić się, że
urządzenie znajduje się w trybie usta‐
wiania. Patrz „USTAWIANIE I URU‐
CHAMIANIE PROGRAMU”.
Ustawić pokrętło ustawienia twardości
wody w pozycji 1 lub 2.
2. Obracać pokrętło wyboru programów,
aż na wyświetlaczu pojawią się dwa
poziome paski stanu.
3. Nacisnąć jednocześnie i przytrzymać
Multitab i Delay dopóki nie zaczną
migać wskaźniki programów
i .
4. Nacisnąć Multitab.
,
Page 41

•
Wskaźniki
•
Wskaźnik nadal będzie migał.
i wyłączą się.
• Na wyświetlaczu będzie widoczne
ustawienie zmiękczacza wody
(przykład:
= poziom 5).
6.2 Napełnianie zbiornika soli
POLSKI 41
5. Nacisnąć kilkakrotnie przycisk Multi‐
tab, aby zmienić ustawienie.
6. Wyłączyć urządzenie w celu potwier‐
dzenia ustawienia.
1.
Obrócić pokrywkę w lewo i otworzyć
zbiornik soli.
2.
Wlać 1 litr wody do zbiornika soli
(tylko za pierwszym razem).
3.
Napełnić zbiornik soli solą do zmy‐
warek.
4.
Usunąć sól rozsypaną wokół otworu
zbiornika soli.
5.
Obrócić pokrywkę w prawo, aby za‐
mknąć zbiornik soli.
UWAGA!
Podczas napełniania zbiornika
soli może się z niego wydosta‐
wać woda i sól. Zagrożenie wy‐
stąpieniem korozji. Aby tego
uniknąć, po napełnieniu zbiornika
soli należy uruchomić program.
6.3 Napełnianie dozownika płynu nabłyszczającego
1.
A
B
A
X
M
2
1
3
4
+
-
C
D
Nacisnąć przycisk zwalniający (D),
aby otworzyć pokrywę (C).
2.
Napełnić dozownik płynu nabły‐
szczającego (A) najwyżej do pozio‐
mu oznaczenia „max”.
3.
Rozlany płyn nabłyszczający należy
usunąć za pomocą chłonnej szmatki,
aby zapobiec powstaniu zbyt dużej
ilości piany.
4.
Zamknąć pokrywę. Upewnić się, że
przycisk zwalniający jest odpowied‐
nio zablokowany.
Dozowanie płynu nabłyszczają‐
cego można wyregulować za po‐
mocą pokrętła (B) pomiędzy po‐
zycją 1 (najmniejsza ilość) a po‐
zycją 4 (największa ilość).
Page 42

M
A
X
1
2
3
4
+
-
www.aeg.com
42
7. CODZIENNA EKSPLOATACJA
1. Otworzyć zawór wody.
2. Nacisnąć przycisk wł./wył., aby włą‐
czyć urządzenie. Należy upewnić się,
że urządzenie znajduje się w trybie
ustawiania — patrz: „Ustawianie i
uruchamianie programu”.
• Jeśli wskaźnik soli jest włączony,
należy napełnić zbiornik soli.
• Jeśli wskaźnik płynu nabłyszczają‐
cego jest włączony, napełnić do‐
zownik płynu nabłyszczającego.
7.1 Stosowanie detergentu
B
A
30
20
C
7.2 Ustawianie i uruchamianie
programu
Tryb ustawiania
Urządzenie musi być w trybie ustawia‐
nia, aby możliwe było wykonanie niektó‐
rych czynności.
Urządzenie jest w trybie ustawiania, jeśli
po jego włączeniu świecą się wszystkie
wskaźniki faz programu. Na wyświetla‐
czu miga czas trwania ostatnio ustawio‐
nego programu zmywania.
Jeśli na panelu sterowania pokazane są
inne ustawienia, należy jednocześnie
nacisnąć i przytrzymać Multitab i Delay,
aż urządzenie przełączy się do trybu us‐
tawiania.
Uruchamianie programu bez
opóźnienia
1. Otworzyć zawór wody.
3. Załadować kosze.
4. Dodać detergent.
5. Ustawić i uruchomić odpowiedni pro‐
gram dla określonego rodzaju naczyń
i poziomu zabrudzenia.
1.
Nacisnąć przycisk zwalniający (B),
aby otworzyć pokrywę (C).
2.
Umieścić detergent w przegródce
oznaczonej symbolem (A).
3.
Jeśli program przewiduje fazę zmy‐
wania wstępnego, umieścić niewiel‐
ką ilość detergentu na wewnętrznej
stronie drzwi urządzenia.
4.
W razie korzystania z tabletek do
zmywarek, włożyć tabletkę do prze‐
gródki (A).
5.
Zamknąć pokrywę. Upewnić się, że
przycisk zwalniający jest odpowied‐
nio zablokowany.
2. Nacisnąć przycisk wł./wył., aby włą‐
czyć urządzenie. Upewnić się, że
urządzenie znajduje się w trybie usta‐
wiania.
3. Zamknąć drzwi urządzenia.
4. Obrócić pokrętło wyboru programów,
aż znacznik na pokrętle znajdzie się
na równi z oznaczeniem wybranego
programu.
• Na wyświetlaczu zacznie migać
czas trwania programu.
• Zaświecą się wskaźniki faz usta‐
wionego programu.
5. Nacisnąć Start. Nastąpi uruchomie‐
nie programu.
• Włączony pozostanie tylko wskaź‐
nik aktualnie trwającej fazy progra‐
mu.
• Na wyświetlaczu pojawi się czas
trwania programu, który będzie ak‐
tualizowany co 1 minutę.
Page 43

Uruchamianie programu bez
opóźnienia
1. Ustawić program.
2. Nacisnąć kilkakrotnie przycisk Delay,
aż na wyświetlaczu pojawi się żąda‐
ny czas opóźnienia (od 1 do 24 go‐
dzin).
• Na wyświetlaczu zacznie migać
czas opóźnienia rozpoczęcia pro‐
gramu.
3. Nacisnąć Start. Rozpocznie się odli‐
czanie czasu.
• Wyświetlany czas opóźnienia roz‐
poczęcia programu jest odliczany
co 1 godzinę.
• Zgasną wskaźniki faz ustawionego
programu.
• Po zakończeniu odliczania program
rozpocznie się automatycznie.
– Zaświeci się wskaźnik aktualnie
trwającej fazy programu.
Otwieranie drzwi w trakcie
pracy urządzenia
Po otwarciu drzwi urządzenie przestaje
pracować. Po zamknięciu drzwi odlicza‐
nie jest kontynuowane od momentu
przerwania.
Anulowanie opóźnienia
rozpoczęcia programu w
trakcie odliczania
1. Jednocześnie nacisnąć i przytrzymać
przyciski Multitab i Delay, aż:
• Na wyświetlaczu zacznie migać
czas trwania programu.
• Zaświecą się wskaźniki faz progra‐
mu.
POLSKI 43
2. Nacisnąć Start. Nastąpi uruchomie‐
nie programu.
Anulowanie programu
Jednocześnie nacisnąć i przytrzymać
przyciski Multitab i Delay, aż:
• Na wyświetlaczu zacznie migać czas
trwania programu.
• Zaświecą się wskaźniki faz programu.
Przed uruchomieniem nowego
programu należy upewnić się, że
w dozowniku znajduje się deter‐
gent.
Po zakończeniu programu
Po zakończeniu programu zgasną
wskaźniki faz programu, a na wyświetla‐
czu pojawi się symbol 0.
1. Nacisnąć przycisk wł./wył., aby wyłą‐
czyć urządzenie.
2. Zakręcić zawór wody.
Jeśli przycisk wł./wył. nie zosta‐
nie naciśnięty, funkcja AUTO
OFF automatycznie wyłączy
urządzenie po kilku minutach.
Pozwala to zmniejszyć zużycie
energii.
• Przed wyjęciem naczyń z urzą‐
dzenia należy poczekać, aż
ostygną. Gorące naczynia łat‐
wo ulegają uszkodzeniu.
• Należy najpierw wyjmować na‐
czynia z dolnego, a następnie
z górnego kosza.
• Na ściankach i drzwiach urzą‐
dzenia może znajdować się
woda. Stal nierdzewna schła‐
dza się szybciej niż naczynia.
8. WSKAZÓWKI I PORADY
8.1 Zmiękczanie wody
Twarda woda zawiera dużo minerałów,
które mogą uszkodzić urządzenie oraz
sprawić, że efekty zmywania będą nieza‐
dowalające. Zmiękczacz wody neutrali‐
zuje te minerały.
Sól do zmywarek utrzymuje zmiękczacz
wody w czystości oraz w odpowiednim
stanie. Istotne jest ustawienie właściwe‐
go poziomu zmiękczania wody. Zapew‐
nia to stosowanie odpowiedniej ilości soli
do zmywarek i wody przez zmiękczacz
wody.
Page 44

www.aeg.com
44
8.2 Ładowanie koszy
Przykłady załadunku koszy
przedstawiono w dołączonej bro‐
szurze.
• W urządzeniu należy zmywać przed‐
mioty, które są przystosowane do
zmywania w zmywarkach.
• Nie wkładać do urządzenia elementów
wykonanych z drewna, rogu, alumi‐
nium, cynołowiu i miedzi.
• Nie wkładać do urządzenia przedmio‐
tów, które mogą pochłaniać wodę
(gąbki, ściereczki).
• Usunąć z naczyń resztki jedzenia.
• Aby ułatwić usuwanie pozostałości
przypalonych potraw, należy zamo‐
czyć naczynia w wodzie przed ich
umieszczeniem w urządzeniu.
• Wklęsłe elementy (kubki, szklanki i mi‐
ski) układać otworami w dół.
• Upewnić się, że naczynia i sztućce nie
przylegają do siebie. Wymieszać łyżki
z innymi sztućcami.
• Upewnić się, że szklanki nie stykają
się ze sobą
• Małe elementy umieścić w koszu na
sztućce.
• Lekkie elementy umieścić w koszu
górnym. Upewnić się, że nie będą się
one przemieszczać.
• Przed uruchomieniem programu
upewnić się, że ramiona spryskujące
mogą się swobodnie obracać.
8.3 Stosowanie soli, płynu
nabłyszczającego i detergentu
• Należy stosować wyłącznie sól, płyn
nabłyszczający i detergent do zmywa‐
rek. Inne produkty mogą uszkodzić
urządzenie.
• Płyn nabłyszczający jest dozowany
podczas ostatniej fazy płukania i zapo‐
biega powstawaniu smug i plam na
naczyniach podczas ich suszenia.
• Tabletki wieloskładnikowe zawierają
detergent, płyn nabłyszczający oraz
inne dodatki. Należy sprawdzić, czy te
tabletki można stosować przy danej
twardości wody. Należy zapoznać się
z instrukcją na opakowaniu produktu.
• Tabletki z detergentem nie rozpusz‐
czają się całkowicie w trakcie krótkich
programów. Zaleca się stosowanie
tabletek przy długich programach, aby
zapobiec osadzaniu się detergentu na
naczyniach.
Nie używać większej ilości deter‐
gentu niż zalecana. Postępować
zgodnie ze wskazówkami pod‐
anymi na opakowaniu detergen‐
tu.
8.4 Przed rozpoczęciem
programu
Upewnić się, że:
• filtry są czyste i prawidłowo założone;
• ramiona spryskujące nie są zatkane;
• ułożenie naczyń i przyborów kuchen‐
nych w koszach jest prawidłowe;
• program jest odpowiedni dla danego
rodzaju załadunku i stopnia zabrudze‐
nia;
• zastosowano prawidłową ilość deter‐
gentu;
• w zmywarce znajduje się sól do zmy‐
warek i płyn nabłyszczający (chyba że
stosowane są wieloskładnikowe tab‐
letki z detergentem);
• pokrywka zbiornika soli nie jest polu‐
zowana.
9. KONSERWACJA I CZYSZCZENIE
OSTRZEŻENIE!
Przed przeprowadzeniem kon‐
serwacji należy wyłączyć urzą‐
dzenie i wyjąć wtyczkę przewodu
zasilającego z gniazda elektrycz‐
nego.
Brudne filtry i zapchane ramiona
spryskujące pogarszają efekt
zmywania.
Należy je regularnie sprawdzać i
w razie potrzeby wyczyścić.
Page 45

9.1 Czyszczenie filtrów
C
POLSKI 45
1.
Obrócić filtr (A) przeciwnie do ruchu
wskazówek zegara i wyjąć go.
C
B
A
A1
A2
9.2 Czyszczenie ramion
spryskujących
Nie wolno wyjmować ramion spryskują‐
cych.
Jeżeli otwory w ramionach spryskują‐
cych są zatkane, zabrudzenia należy
usunąć przy pomocy cienkiego i za‐
ostrzonego przedmiotu.
2.
Aby rozebrać filtr (A), należy roz‐
dzielić części (A1) i (A2).
3.
Wyjąć filtr (B).
4.
Przepłukać filtry wodą.
5.
Umieścić filtr (B) w pierwotnym poło‐
żeniu. Sprawdzić, czy jest zamonto‐
wany prawidłowo pod dwoma za‐
czepami (C).
6.
Złożyć filtr (A) i umieścić go w pierw‐
otnym położeniu w filtrze (B). Obró‐
cić zgodnie z ruchem wskazówek
zegara, aż się zablokuje.
Nieprawidłowe położenie filtrów
może skutkować niezadowalają‐
cymi efektami zmywania i uszko‐
dzeniem urządzenia.
9.3 Czyszczenie obudowy
Wyczyścić urządzenie za pomocą wilgot‐
nej szmatki.
Stosować wyłącznie neutralne środki do
czyszczenia. Nie używać produktów
ściernych, myjek do szorowania ani roz‐
puszczalników.
10. ROZWIĄZYWANIE PROBLEMÓW
Zmywarka nie daje się uruchomić lub
przestaje działać podczas zmywania.
Przed skontaktowaniem się z serwisem
należy zapoznać się z poniższymi infor‐
macjami, które mogą być pomocne w
rozwiązaniu problemu.
Przy niektórych usterkach na wyświetla‐
czu pojawia się kod alarmowy:
Page 46

www.aeg.com
46
•
- Urządzenie nie napełnia się wo‐
dą.
•
- Urządzenie nie odpompowuje
wody.
•
- Włączyło się zabezpieczenie
przed zalaniem.
OSTRZEŻENIE!
Przed przystąpieniem do spraw‐
dzenia należy wyłączyć urządze‐
nie.
Problem Możliwe rozwiązanie
Urządzenie nie włącza się. Upewnić się, że wtyczka przewodu zasilają‐
cego jest włożona do gniazdka.
Upewnić się, że bezpiecznik w skrzynce
bezpieczników jest sprawny.
Program nie uruchamia się. Upewnić się, że drzwi urządzenia są za‐
mknięte.
Nacisnąć przycisk Start.
Jeśli wybrano opóźnienie rozpoczęcia pro‐
gramu, należy je anulować lub poczekać do
końca odliczania czasu.
Urządzenie nie napełnia się wo‐
Sprawdzić, czy zawór wody jest otwarty.
dą.
Upewnić się, że ciśnienie wody nie jest zbyt
niskie. W tym celu należy skontaktować się
z miejscowym zakładem wodociągowym.
Upewnić się, że zawór wody jest drożny.
Upewnić się, że filtr w wężu dopływowym
jest drożny.
Upewnić się, że wąż dopływowy nie jest za‐
gięty lub przygnieciony.
Urządzenie nie wypompowuje
wody.
Upewnić się, że syfon zlewozmywaka jest
drożny.
Upewnić się, że wąż spustowy nie jest za‐
gięty lub przygnieciony.
Włączyło się zabezpieczenie
przed zalaniem.
Po sprawdzeniu włączyć urządzenie.
Program zostanie wznowiony od mo‐
mentu, w którym został przerwany.
W razie ponownego wystąpienia proble‐
mu należy skontaktować się z punktem
serwisowym.
Jeśli na wyświetlaczu pojawią się inne
kody alarmowe, należy skontaktować się
z punktem serwisowym.
Zamknąć zawór wody i skontaktować się z
punktem serwisowym.
10.1 Efekty zmywania i
suszenia są niezadowalające
Białawe smugi lub niebieskawy nalot na
szklankach i naczyniach
• Zbyt duża dawka płynu nabłyszczają‐
cego. Obrócić pokrętło regulacji dozo‐
wania płynu nabłyszczającego, aby
zmniejszyć dozowanie.
• Użyto zbyt dużo detergentu.
Page 47

Plamy i ślady po odparowanych kroplach
wody na szklankach i naczyniach.
• Zbyt mała dawka płynu nabłyszczają‐
cego. Obrócić pokrętło regulacji dozo‐
wania płynu nabłyszczającego, aby
zwiększyć dozowanie.
• Przyczyną może być jakość detergen‐
tu.
Naczynia są mokre
• Program nie posiada fazy suszenia
lub temperatura w fazie suszenia jest
zbyt niska.
• Dozownik płynu nabłyszczającego jest
pusty.
• Przyczyną może być jakość płynu na‐
błyszczającego.
• Przyczyną może być jakość wielos‐
kładnikowych tabletek z detergentem.
Należy wypróbować inną markę lub
włączyć dozownik płynu nabłyszczają‐
cego i zastosować płyn nabłyszczają‐
cy wraz z wieloskładnikowymi tablet‐
kami z detergentem.
Patrz: „Porady i wskazówki”,
gdzie omówiono inne możliwe
przyczyny.
POLSKI 47
że urządzenie znajduje się w trybie
ustawiania — patrz: „Ustawianie i
uruchamianie programu”.
2. Obracać pokrętło wyboru programów,
aż na wyświetlaczu pojawią się dwa
poziome paski stanu.
3. Nacisnąć jednocześnie i przytrzymać
Multitab i Delay dopóki nie zaczną
migać wskaźniki programów
i .
4. Nacisnąć Delay.
•
Wskaźniki
•
Wskaźnik
• Wyświetlacz wskaże ustawienie
dozownika płynu nabłyszczające‐
go.
i wyłączą się.
nadal będzie migał.
,
Wyłączony
Włączony
5. Nacisnąć kilkakrotnie przycisk Delay,
aby zmienić ustawienie.
6. Wyłączyć urządzenie w celu potwier‐
dzenia ustawienia.
10.2 Włączanie dozownika
płynu nabłyszczającego przy
włączonej opcji Multitab
1. Nacisnąć przycisk wł./wył., aby włą‐
czyć urządzenie. Należy upewnić się,
11. DANE TECHNICZNE
Wymiary Wysokość/szerokość/głębo‐
Podłączenie do sieci
elektrycznej
Napięcie 220-240 V
Częstotliwość 50 Hz
Ciśnienie doprowadza‐
nej wody
Dopływ wody
1)
kość (mm)
Patrz tabliczka znamionowa.
Min./maks. (bar/MPa) (0.5 / 0.05 ) / (8 / 0.8 )
Zimna lub ciepła woda
596 / 818 - 898 / 575
2)
maks. 60°C
Page 48

www.aeg.com
48
Pojemność Liczba standardowych na‐
kryć
Pobór mocy Tryb włączenia 0.10 W
Tryb wyłączenia 0.10 W
1)
Podłączyć wąż dopływowy do zaworu z gwintem 3/4".
2)
Jeżeli ciepła woda pochodzi z alternatywnych źródeł energii (np. z kolektorów
słonecznych, elektrowni wiatrowych), można użyć jej do zasilania urządzenia, aby
zmniejszyć zużycie energii.
12. OCHRONA ŚRODOWISKA
Materiały oznaczone symbolem
należy poddać utylizacji.
Opakowanie urządzenia włożyć do
odpowiedniego pojemnika w celu
przeprowadzenia recyklingu.
Należy zadbać o ponowne
przetwarzanie odpadów urządzeń
elektrycznych i elektronicznych, aby
12
chronić środowisko naturalne oraz
ludzkie zdrowie. Nie wolno wyrzucać
urządzeń oznaczonych symbolem
razem z odpadami domowymi.
Należy zwrócić produkt do
miejscowego punktu ponownego
przetwarzania lub skontaktować się z
odpowiednimi władzami miejskimi.
Page 49

TÜRKÇE 49
İÇINDEKILER
1. GÜVENLIK TALIMATLARI . . . . . . . . . . . . . . . . . . . . . . . . . . . . . . . . . . . . . . . . . . . . . . . . 50
2. ÜRÜN TANIMI . . . . . . . . . . . . . . . . . . . . . . . . . . . . . . . . . . . . . . . . . . . . . . . . . . . . . . . . . 52
3. KONTROL PANELI . . . . . . . . . . . . . . . . . . . . . . . . . . . . . . . . . . . . . . . . . . . . . . . . . . . . . 53
4. PROGRAMLAR . . . . . . . . . . . . . . . . . . . . . . . . . . . . . . . . . . . . . . . . . . . . . . . . . . . . . . . . 53
5. SEÇENEKLER . . . . . . . . . . . . . . . . . . . . . . . . . . . . . . . . . . . . . . . . . . . . . . . . . . . . . . . . . 54
6. İLK KULLANIMDAN ÖNCE . . . . . . . . . . . . . . . . . . . . . . . . . . . . . . . . . . . . . . . . . . . . . . . 55
7. GÜNLÜK KULLANIM . . . . . . . . . . . . . . . . . . . . . . . . . . . . . . . . . . . . . . . . . . . . . . . . . . . . 57
8. İPUÇLARI VE YARARLI BILGILER . . . . . . . . . . . . . . . . . . . . . . . . . . . . . . . . . . . . . . . . . 59
9. BAKIM VE TEMIZLIK . . . . . . . . . . . . . . . . . . . . . . . . . . . . . . . . . . . . . . . . . . . . . . . . . . . . 60
10. SORUN GIDERME . . . . . . . . . . . . . . . . . . . . . . . . . . . . . . . . . . . . . . . . . . . . . . . . . . . . . 61
11. TEKNIK BILGILER . . . . . . . . . . . . . . . . . . . . . . . . . . . . . . . . . . . . . . . . . . . . . . . . . . . . . . 63
12. ÇEVREYLE ILGILI BILGILER . . . . . . . . . . . . . . . . . . . . . . . . . . . . . . . . . . . . . . . . . . . . . 63
MÜKEMMEL SONUÇLAR İÇİN
Bu AEG ürününü seçtiğiniz için teşekkür ederiz. Bu ürünü, sıradan cihazlarda bulamayacağınız
hayatı kolaylaştıran özellikler ve yenilikçi teknolojiler kullanarak, size uzun yıllar üstün
performans vermesi için tasarladır. Lütfen, cihazınızdan en iyi şekilde yararlanabilmek için
birkaç dakikanızı ayırarak bu belgeyi okuyun.
Web sitemizi aşağıdakiler için ziyaret edin:
Kullanım önerileri, broşürler, sorun giderme bilgileri, servis bilgileri alın:
www.aeg.com
Ürününüzü daha iyi servis için kaydedin:
www.aeg.com/productregistration
Cihazınız için Aksesuarlar, Sarf Malzemeleri ve Orijinal yedek parçalar satın alın:
www.aeg.com/shop
MÜŞTERİ HİZMETLERİ VE SERVİS
Orijinal yedek parça kullanılmasını tavsiye ederiz.
Servis ile iletişim sırasında, aşağıdaki verilerin bulunduğunu kontrol edin.
Bilgiler, bilgi etiketinde yazılıdır. Model, PNC, Seri Numarası.
Uyarı / Dikkat-Güvenlik bilgileri.
Genel bilgiler ve ipuçları
Çevresel bilgiler
Önceden haber verilmeksizin değişiklik yapma hakkı saklıdır.
Page 50

www.aeg.com
50
1.
GÜVENLİK TALİMATLARI
Cihazın montajından ve kullanımından
önce, verilen talimatları dikkatlice oku‐
yun. Üretici, yanlış bir montajın ve kulla‐
nımın hasara neden olması durumunda
sorumluluk kabul etmez. Kullanma kıla‐
vuzunu ileride kullanım için daima ciha‐
zın yakınında bulundurun.
1.1 Çocukların ve tehlikeye
açık kişilerin güvenliği
UYARI
Boğulma, yaralanma ya da kalıcı
sakatlık riski.
• Çocuklar dahil olmak üzere, fiziksel ve
mental kapasiteleri düşük veya cihazın
kullanımına yönelik deneyimi ve bilgisi
olmayan kişilerin cihazı kullanmalarına
izin vermeyin. Bu kişiler cihazı, güven‐
liklerinden sorumlu olan bir kişinin de‐
netimi altında veya cihazın kullanımı
hakkında bu kişi tarafından bilgilendi‐
rilmek kaydıyla kullanabilir. Bu cihaz,
çocukların oynayabileceği bir oyuncak
değildir.
• Tüm ambalaj malzemelerini çocuklar‐
dan uzak tutun.
• Tüm deterjanları çocuklardan uzak tu‐
tun.
• Cihaz kapağı açıkken, çocukları ve ev‐
cil hayvanları makineden uzak tutun.
1.2 Montaj
• Tüm ambalajları çıkarın.
• Hasarlı bir cihazı monte etmeyin ya da
kullanmayın.
• Cihazı, sıcaklığın 0°C'den daha az ol‐
duğu yerlere monte etmeyin ya da bu‐
ralarda kullanmayın.
• Cihazla birlikte verilen montaj talimatı‐
na uyun.
• Cihazı güvenli yapıların altına ve yanı‐
na monte edin.
Su bağlantısı
• Su hortumlarına zarar vermemeye
özen gösterin.
• Cihazı yeni borulara veya uzun süre
kullanılmamış olan borulara bağlama‐
dan önce, temiz gelene dek suyu akı‐
tın.
• Cihazı ilk kez kullanırken, kaçak olma‐
dığından emin olun.
• Su giriş hortumu bir emniyet valfine ve
içinden elektrik kablosunun geçtiği bir
kılıfa sahiptir.
UYARI
Tehlikeli voltaj.
• Eğer su giriş hortumu hasar görürse,
cihazın fişini derhal prizden çekin. Su
giriş hortumunu değiştirmek için servi‐
se başvurun.
Elektrik bağlantısı
UYARI
Yangın ve elektrik çarpması riski.
• Cihaz topraklanmalıdır.
• Bilgi etiketindeki elektriksel verilerin
elektrik beslemesine uygun olduğun‐
dan emin olun. Aksi durumda, bir elek‐
trikçiyi arayın.
• Her zaman doğru monte edilmiş, dar‐
belere dayanıklı bir priz kullanın.
• Priz çoğaltıcıları ve uzatma kabloları
kullanmayın.
• Elektrik fişine ve kablosuna zarar ver‐
memeye özen gösterin. Hasarlı bir
kabloyu değiştirmek için yetkili servise
ya da bir elektrikçiye başvurun.
• Fişi prize sadece montaj tamamlandık‐
tan sonra takın. Montajdan sonra elek‐
trik fişine erişilebildiğinden emin olun.
• Cihazın fişini prizden çıkarmak için
elektrik kablosunu çekmeyin. Her za‐
man fişten tutarak çekin.
Page 51

1.3 Kullanım amacı
• Bu cihaz aşağıdaki gibi evle ilgili ve
benzeri uygulamalarda kullanılmak
üzere tasarlanmıştır:
– Mağaza, ofis ve diğer çalışma orta‐
mlarındaki mutfak bölümleri.
– Çiftlik evleri.
– Otel, motel ve diğer konaklama tarzı
yerlerdeki müşteriler tarafından.
– Pansiyon tipi ortamlarda.
UYARI
Yaralanma riski.
• Bu cihazın teknik özelliklerini değiştir‐
meyin.
• Uçları aşağı ya da yatay konumda ola‐
cak şekilde bıçakları ve keskin uçlu
parçaları çatal-bıçak sepetine koyun.
• Üzerine düşülmesini önlemek için, ci‐
haz kapağını başında bulunmadığınız
zamanlarda açık bırakmayın.
• Açık kapak üzerine oturmayın veya
basmayın.
• Bulaşık makinesi deterjanları tehlikeli‐
dir. Deterjan ambalajının üzerindeki
güvenlik talimatlarına uyun.
• Cihazdaki suyu içmeyin ya da bu suyla
oynamayın.
• Program tamamlanana kadar cihaz‐
dan bulaşıkları çıkarmayın. Bulaşıklar‐
da deterjan olabilir.
UYARI
Elektrik çarpması, yangın ya da
yanık riski.
TÜRKÇE 51
• Cihazın içine, üzerine veya yakınına
yanıcı ürünler ya da yanıcı ürünlerle
ıslanmış eşyalar koymayın.
• Cihazı temizlemek için su spreyi veya
buhar kullanmayın.
• Bir program çalışırken kapağı açarsa‐
nız cihazdan sıcak buhar çıkışı olabilir.
1.4 Elden çıkarma
UYARI
Yaralanma ya da boğulma riski.
• Cihazın fişini prizden çekin.
• Elektrik kablosunu kesin ve atın.
• Çocukların ve hayvanların cihazda ka‐
palı kalmasını önlemek için kapı kilit
dilini çıkarın.
Üretici / İhracatçı :
ELECTROLUX HOME PRODUCTS
CORPORATION NV.
RAKETSTRAAT 40 / RUE DE LA
FUSEE 40
B-1130 BRUSSEL / BRUXELLES
BELGIUM
TEL: +32 2 716 26 00
FAX: +32 2 716 26 01
www.electrolux.com
Kullanım Ömrü Bilgisi :
Kullanım ömrü küçük ev aletlerinde 7 yıl,
diğer beyaz eşya ürünlerinde ise 10
yıldır. Kullanım ömrü, üretici ve/veya
ithalatçı firmanın cihazınızla ilgili yedek
parça temini ve bakım süresini ifade
eder.
Page 52

www.aeg.com
52
2. ÜRÜN TANIMI
Üst püskürtme kolu
1
Üst püskürtme kolu
2
Alt püskürtme kolu
3
Filtreler
4
Bilgi etiketi
5
Tuz haznesi
6
12
11
10
1
7
8
9
6
7
8
9
10
11
12
4
5
Su sertliği ayar düğmesi
Parlatıcı gözü
Deterjan gözü
Çatal-bıçak sepeti
Alt sepet
Üst sepet
3
2
Page 53

3. KONTROL PANELİ
TÜRKÇE 53
1
Açma/kapama tuşu
1
Program kılavuzu
2
Program işaretleyici
3
Göstergeler
4
Ekran
5
Göstergeler Açıklama
Yıkama aşaması göstergesi.
Kurutma aşaması göstergesi.
2
Start tuşu
6
Delay tuşu
7
Multitab tuşu
8
Program düğmesi
9
3
4
5
8
9
7
6
4. PROGRAMLAR
1)
Program
2)
Kirlilik derece‐
si
Bulaşık türü
Tümü
Tabaklar, ça‐
tal-bıçaklar,
tencereler ve
tavalar
Parlatıcı göstergesi. Program çalışırken bu gös‐
terge söner.
Tuz göstergesi. Program çalışırken bu gösterge
söner.
Multitab göstergesi.
Program
aşamaları
Ön yıkama
Süre
(dk.)
Enerji
(kWsaat)Su(l)
90 - 160 0.9 - 1.7 8 - 15
45 °C veya 70
°C'de yıkama
Durulamalar
Kurutma
Page 54

www.aeg.com
54
Program
Kirlilik derece‐
si
Program
aşamaları
Süre
(dk.)
Enerji
(kWsaat)Su(l)
1)
Bulaşık türü
Yeni kirli
3)
Tabaklar ve
60 °C'de yıkama
Durulama
30 0.9 9
çatal-bıçaklar
4)
Normal kirli
Tabaklar ve
çatal-bıçaklar
Ön yıkama
50 °C'de yıkama
Durulamalar
165 -
175
0.9 - 1.0 9 - 11
Kurutma
5)
Çok kirli
Tabaklar, ça‐
tal-bıçaklar,
tencereler ve
Ön yıkama
70 °C'de yıkama
Durulamalar
Kurutma
150 -
160
1.4 - 1.6 13 - 14
tavalar
Tümü Ön yıkama 14 0.1 4
6)
1)
Su basıncı ve sıcaklığı, elektrik beslemesindeki dalgalanmalar, seçenekler ve
bulaşıkların miktarı program süresi ve tüketim değerlerinde değişikliğe neden olabilir.
2)
Cihaz, kirliliğin derecesini ve sepetlerdeki bulaşıkların miktarını algılar. Suyun sıcaklığını
ve miktarını, enerji tüketimini ve program süresini otomatik olarak ayarlar.
3)
Bu programla yeni kirlenmiş bulaşıkları yıkayabilirsiniz. Kısa bir sürede iyi yıkama
sonuçları sağlar.
4)
Bu programla normal kirli tabaklar ve çatal-bıçaklar için en etkin su ve enerji kullanımına
sahip olursunuz. (Bu, test enstitüleri için standart programdır).
5)
Bu programda, daha iyi hijyen sonuçları için yüksek sıcaklıkta durulama aşaması vardır.
Durulama aşamasında, sıcaklık 10 ila 14 dakika boyunca 70°C'de kalır.
6)
Bulaşıkları hızlı şekilde durulamak için bu programı kullanın. Bu, kalan yiyeceklerin
tabaklara yapışmasını ve cihazdan kötü kokuların gelmesini önler.
Bu programda deterjan kullanmayın.
Test enstitüleri için bilgiler
Test performansı hakkında tüm gerekli bilgiler için şu adrese e-posta gönderin:
info.test@dishwasher-production.com
Bilgi etiketinde bulunan ürün numarasını (PNC) not edin.
5. SEÇENEKLER
5.1 Multitablet seçeneği
Kombi deterjan tabletlerini kullanırken bu
seçeneği etkinleştirin.
Bu seçenek, parlatıcı ve tuzun akışını
devre dışı bırakır. İlgili göstergeler kapa‐
lıdır.
Program süresi artabilir.
Multitab seçeneğinin
etkinleştirilmesi
Multitab seçeneğini bir programı
çalıştırmadan önce etkinleştirin
veya devre dışı bırakın. Bir prog‐
ram çalışırken bu seçeneği etkin‐
leştiremezsiniz veya devre dışı
bırakamazsınız.
1. Cihazı çalıştırmak için açma/kapama
tuşuna basın. Cihazın ayarlama mo‐
Page 55

dunda olduğundan emin olun. 'BİR
PROGRAMIN AYARLANMASI VE
BAŞLATILMASI' kısmına bakın.
2. Multitab tuşuna basın, Multitab gös‐
tergesi yanar.
Seçenek devre dışı bırakılana
dek açık kalır. Multitab tuşuna
basın, Multitab göstergesi söner.
Deterjan, parlatıcı ve bulaşık makinesi
tuzunu ayrı olarak kullanmaya
başlamadan önce kombi deterjan
tabletlerini kullanmayı keserseniz, bu
adımları gerçekleştirin:
1. Multitab seçeneğini devre dışı bıra‐
kın.
6. İLK KULLANIMDAN ÖNCE
TÜRKÇE 55
2. Su yumuşatıcıyı en yüksek seviyeye
ayarlayın.
3. Tuz haznesinin ve parlatıcı gözünün
dolu olduğundan emin olun.
4. Deterjan ve bulaşıklar olmadan bir
durulama aşaması olan en kısa prog‐
ramı başlatın.
5. Su yumuşatıcıyı bölgenizdeki su sert‐
liğine göre ayarlayın.
6. Verilen parlatıcı miktarını ayarlayın.
1. Ayarlanan su yumuşatıcı seviyesinin
bölgenizdeki su sertliği ile uyumlu
olup olmadığını kontrol edin. Uyumlu
değilse, su yumuşatıcıyı ayarlayın.
Bölgenizdeki su sertliği konusunda
bilgi almak için yerel su idarenize
başvurun.
2. Tuz haznesini doldurun.
3. Parlatıcı gözünü doldurun.
4. Su vanasını açın.
5. Cihazınızda imalat sonrası artıklar
kalabilir. Bunları temizlemek için bir
program başlatın. Deterjan kullanma‐
yın ve sepetlere bir şey yerleştirme‐
yin.
Kombi deterjan tabletlerini kulla‐
nıyorsanız, multitablet seçeneğini
çalıştırın.
6.1 Su yumuşatıcının ayarlanması
Su sertliği
Alman
dereceleri
(°dH)
Fransız
dereceleri
(°fH)
mmol/l Clarke
dereceleri
51 - 70 91 - 125 9.1 - 12.5 64 - 88
43 - 50 76 - 90 7.6 - 9.0 53 - 63
37 - 42 65 - 75 6.5 - 7.5 46 - 52
29 - 36 51 - 64 5.1 - 6.4 36 - 45
23 - 28 40 - 50 4.0 - 5.0 28 - 35
19 - 22 33 - 39 3.3 - 3.9 23 - 27
15 - 18 26 - 32 2.6 - 3.2 18 - 22 1 4
11 - 14 19 - 25 1.9 - 2.5 13 - 17 1 3
Su yumuşatıcı
Manuel Elek‐
1)
2
1)
2
1)
2
1)
2
1)
2
1)
2
ayarı
tronik
10
9
8
7
6
1)
5
Page 56

www.aeg.com
56
Su yumuşatıcı
Manuel Elek‐
Alman
dereceleri
(°dH)
Su sertliği
Fransız
dereceleri
(°fH)
mmol/l Clarke
dereceleri
4 - 10 7 - 18 0.7 - 1.8 5 - 12 1 2
< 4 < 7 < 0.7 < 5
1)
Fabrika konumu.
2)
Bu seviyede tuz kullanmayın.
Su yumuşatıcıyı manuel ve elek‐
tronik olarak ayarlamalısınız.
1
Manuel ayarlama
Su sertliği ayar düğmesini pozisyon 1 ve‐
ya 2'ye getirin.
Elektronik ayarlama
1. Cihazı çalıştırmak için açma/kapama
tuşuna basın. Cihazın ayarlama mo‐
dunda olduğundan emin olun. 'BİR
PROGRAMIN AYARLANMASI VE
BAŞLATILMASI' kısmına bakın.
2. Gösterge ekranında iki yatay durum
çubuğu gösterilene kadar program
düğmesini çevirin.
3.
Multitab ve Delay tuşunu
göstergeleri yanıp sönene kadar
aynı anda basılı tutun.
, ve
4. Multitab tuşuna basın.
•
ve göstergeleri söner.
•
göstergesi yanıp sönmeye de‐
vam eder.
• Gösterge ekranında su yumuşatıcı
ayarı görüntülenir, ör.
5.
5. Ayarı değiştirmek için Multitab tuşuna
arka arkaya basın.
6. Ayarı onaylamak için cihazı kapayın.
2)
ayarı
tronik
2)
1
= seviye
Page 57

6.2 Tuz haznesinin doldurulması
6.3 Parlatıcı gözünün doldurulması
A
B
A
X
M
2
1
3
4
+
-
C
D
TÜRKÇE 57
1.
Kapağı saatin tersi yönde çevirin ve
tuz haznesini açın.
2.
Tuz haznesine 1 litre su koyun (sa‐
dece ilk çalıştırmada).
3.
Tuz haznesini bulaşık makinesi tuzu
ile doldurun.
4.
Tuz haznesi deliğinin etrafındaki tuz‐
ları temizleyin.
5.
Tuz haznesini kapatmak için kapağı
saat yönünde çevirin.
DİKKAT
Doldururken, tuz haznesinden
tuz ve su taşabilir. Korozyon riski
vardır. Bunu önlemek için, tuz
haznesini doldurduktan sonra bir
program başlatın.
1.
Kapağı (C) açmak için, kilit açma tu‐
şuna (D) basın.
2.
Parlatıcı gözünü (A), 'max' işaretini
geçirmeden doldurun.
3.
Dökülen parlatıcıyı, aşırı köpük oluş‐
masını önlemek için emici bir bezle
silin.
4.
Kapağı kapatın. Açma tuşunun yeri‐
ne oturduğundan emin olun.
Bırakılan miktar seçicisini (B) ko‐
num 1 (en düşük miktar) ile ko‐
num 4 (en yüksek miktar) arasın‐
da ayarlayabilirsiniz.
7. GÜNLÜK KULLANIM
1. Su musluğunu açın.
2. Cihazı çalıştırmak için açma/kapama
tuşuna basın. 'BİR PROGRAMIN
AYARLANMASI VE BAŞLATILMASI'
kısmına bakarak, cihazın ayarlama
modunda olduğuna emin olun.
• Tuz göstergesi yanıyorsa, tuz haz‐
nesini doldurun.
• Parlatıcı göstergesi yanıyorsa, par‐
latıcı gözünü doldurun.
3. Bulaşıkları sepetlere yerleştirin.
4. Deterjanı ekleyin.
5. Bulaşığın tipine ve kirlilik derecesine
göre doğru yıkama programını ayar‐
layın ve başlatın.
Page 58

M
A
X
1
2
3
4
+
-
www.aeg.com
58
7.1 Deterjan kullanımı
B
A
30
20
1.
Kapağı (C) açmak için, açma tuşuna
(B) basın.
2.
Deterjanı, deterjan gözüne (A) ko‐
yun.
3.
Programın ön yıkama aşaması var‐
sa, cihaz kapağının iç kısmına az
miktarda deterjan koyun.
4.
Deterjan tabletleri kullanacaksanız,
C
tableti göze (A) koyun.
5.
Kapağı kapatın. Açma tuşunun yeri‐
ne oturduğundan emin olun.
7.2 Bir programın ayarlanması
ve başlatılması
Ayarlama modu
Bazı işlemleri kabul etmek için cihazın
ayarlama modunda olması gereklidir.
Cihaz, çalıştırıldıktan sonra tüm aşama
göstergeleri yanmaya başladığında,
ayarlama modundadır. Son ayarlanan
programın süresi gösterge ekranında ya‐
nıp söner.
Kontrol paneli başka durumları gösteri‐
yorsa, cihaz ayarlama moduna girene
dek aynı anda Multitab ve Delay tuşlarını
basılı tutun.
Gecikmeli başlatma olmadan
bir programın başlatılması
1. Su musluğunu açın.
2. Cihazı çalıştırmak için açma/kapama
tuşuna basın. Cihazın ayarlama mo‐
dunda olduğundan emin olun.
3. Cihazın kapağını kapatın.
4. Düğme üzerindeki işaretleyici ayarla‐
mak istediğiniz programla aynı hizaya
gelene kadar program düğmesini çe‐
virin.
• Gösterge ekranında programın sü‐
resi yanıp söner.
• Ayarlanan programın aşama gös‐
tergeleri yanar.
5. Start tuşuna basın. Program başlar.
• Sadece yapılmakta olan aşamaya
ait gösterge yanık kalır.
• Gösterge ekranında, 1 dakikalık
aşamalarla azalan program süresi
gösterilir.
Gecikmeli başlatma ile bir
programın başlatılması
1. Programı ayarlayın.
2. Gösterge ekranında ayarlamak iste‐
diğiniz gecikme süresi görünene dek
Delay tuşuna arka arkaya basın (1 ila
24 saat).
• Gecikme süresi gösterge ekranın‐
da yanıp söner.
3. Start tuşuna basın. Geri sayım baş‐
lar.
• Gösterge ekranında, gecikmeli
başlatma işleminin geri sayım süre‐
ci, 1 saatlik aşamalarla azalır.
• Ayarlanan programın aşama gös‐
tergeleri söner.
• Geri sayım işlemi sona erdiğinde,
program çalışmaya başlar.
– Gerçekleştirilmekte olan aşamaya
ait gösterge yanar.
Cihaz çalışırken kapağın
açılması
Kapağı açarsanız, cihaz durur. Kapağı
kapattığınızda, cihaz duraklatıldığı nok‐
tadan itibaren devam eder.
Geri sayım sırasında gecikmeli
başlatmanın iptal edilmesi
1. Aşağıdakiler olana kadar Multitab ve
Delay tuşlarını aynı anda basılı tutun:
Page 59

• Gösterge ekranında programın sü‐
resi yanıp söner.
• Aşama göstergeleri yanar.
2. Start tuşuna basın. Program başlar.
1. Cihazı devre dışı bırakmak için açma/
kapama tuşuna basın.
2. Su musluğunu kapatın.
Programın iptal edilmesi
Aşağıdakiler olana kadar Multitab ve De‐
lay tuşlarını aynı anda basılı tutun:
• Gösterge ekranında programın süresi
yanıp söner.
• Aşama göstergeleri yanar.
Yeni bir program başlatmadan
önce deterjan gözünde deterjan
bulunduğundan emin olun.
Programın sonunda
Program tamamlandığında, aşama gös‐
tergeleri söner ve gösterge ekranında 0
gösterilir.
8. İPUÇLARİ VE YARARLİ BİLGİLER
TÜRKÇE 59
Açma/kapama tuşuna basmazsa‐
nız, AUTO OFF aygıtı birkaç da‐
kika sonra cihazı otomatik olarak
devre dışı bırakır. Bu, enerji tüke‐
timini azaltmaya yardımcı olur.
• Bulaşıkları makineden çıkar‐
madan önce soğumalarını bek‐
leyin. Sıcak bulaşıklar kolayca
zarar görebilir.
• İlk olarak alt sepeti, daha son‐
ra üst sepeti boşaltın.
• Cihazın yan kısımlarında ve
kapağında su olabilir. Paslan‐
maz çelik, tabaklara göre daha
çabuk soğur.
8.1 Su yumuşatıcısı
Sert su, cihazda hasara ve kötü yıkama
sonucuna neden olabilen yüksek miktar‐
da mineral içerir. Su yumuşatıcı bu mine‐
ralleri nötr hale getirir.
Bulaşık makinesi tuzu, su yumuşatıcıyı
temizler ve iyi durumda tutar. Su yumu‐
şatıcısının doğru miktarda ayarlanması
önemlidir. Su yumuşatıcısının doğru mik‐
tarda bulaşık makinesi tuzunu ve suyu
kullanmasını sağlar.
8.2 Bulaşıkların sepetlere
yerleştirilmesi
Bulaşıkların sepetlere yerleştiril‐
mesine ilişkin örneklerin bulun‐
duğu, ürünle birlikte verilen kitap‐
çığa bakın.
• Bu cihazı, sadece bulaşık makinesin‐
de güvenli şekilde yıkanabilir olan bu‐
laşıkları yıkamak için kullanın.
• Ağaç, boynuz, alüminyum, kalay-kur‐
şun ve bakırdan yapılmış cisimleri ci‐
haza koymayın.
• Suyu emebilen nesneleri (süngerler,
toz bezleri) cihazın içine koymayın.
• Bulaşıklarda kalan yiyecekleri alın.
• Kalan yanmış yiyecekleri kolayca te‐
mizlemek için, cihaza koymadan önce
tencere ve tavaları su içinde bekletin.
• İçi boş bulaşıkları (fincanlar, bardaklar
ve tavalar) ağızları aşağı gelecek şe‐
kilde yerleştirin.
• Çatal-bıçakların ve tabakların birbirleri‐
ne yapışmamasını sağlayın. Kaşıkları
diğer çatal-bıçaklar ile karıştırın.
• Bardakların diğer bardaklara temas et‐
mediğinden emin olun.
• Küçük bulaşıkları çatal-bıçak sepetine
koyun.
• Hafif bulaşıkları üst sepete koyun.
Bunların hareket etmediğinden emin
olun.
• Bir programı başlatmadan önce, püs‐
kürtme kollarının rahatça hareket ede‐
bildiğinden emin olun.
8.3 Tuz, parlatıcı ve deterjan
kullanımı
• Sadece bulaşık makinesi tuzu, parlatı‐
cısı ve deterjanı kullanın. Diğer ürünler
cihazınıza zarar verebilir.
Page 60

www.aeg.com
60
• Parlatıcı, son durulama aşamasında
bulaşıkların çizilmeden ve lekelenme‐
den kurumasını sağlar.
• Kombi deterjan tabletleri, parlatıcı ve
ilave maddeleri barındırır. Bu tabletle‐
rin, bölgenizdeki su sertliği için uygun
olduğundan emin olun. Ürünlerin am‐
balajının üzerindeki talimatlara bakın.
• Deterjan tabletleri kısa programlarda
tamamen çözünmezler. Yemek takım‐
larının üzerinde deterjan artıklarının
kalmaması için, tabletleri uzun prog‐
ramlarla kullanmanızı öneririz.
Gereğinden fazla deterjan kullan‐
mayın. Deterjan paketindeki tali‐
matlara bakın.
8.4 Bir programa başlamadan
önce
Şunlardan emin olun:
9. BAKIM VE TEMİZLİK
• Filtreler temiz olmalı ve doğru şekilde
yerleştirilmelidir.
• Püskürtme kolları tıkanmamış olmalı‐
dır.
• Bulaşıklar sepete doğru yerleştirilmeli‐
dir.
• Program, bulaşık tipine ve kirlilik dere‐
cesine uygun olmalıdır.
• Doğru miktarda deterjan kullanılmalı‐
dır.
• (Kombi deterjan tabletleri kullanma‐
dığınız takdirde) bulaşık makinesi tuzu
ve parlatıcısı kullanılmalıdır.
• Tuz haznesinin kapağı sıkı olmalıdır.
UYARI
Bakım işleminden önce, cihazı
devre dışı bırakın ve elektrik fişini
prizden çekin.
9.1 Filtrelerin temizlenmesi
C
B
A1
A2
Kirli filtreler ve tıkalı püskürtme
kolları yıkamadan alınacak sonu‐
cu kötüleştirir.
Düzenli olarak kontrol yapın ve
gerekirse bunları temizleyin.
1.
Filtreyi (A) saatin tersi yönde çevirip
çıkarın.
C
A
2.
Filtreyi (A) sökmek için (A1) ve (A2)
parçalarını ayırın.
3.
Filtreyi (B) çıkarın.
4.
Filtreleri suyla yıkayın.
5.
Filtreyi (B) ilk konumuna yerleştirin.
İki kılavuzun (C) altına tam olarak
oturduğundan emin olun.
Page 61

TÜRKÇE 61
6.
Filtreyi (A) birleştirin ve filtre (B) için‐
deki konumuna yerleştirin. Kilitlene‐
ne kadar saat yönünde çevirin.
Filtrelerin yanlış konumlanması,
tatmin edici olmayan yıkama so‐
nuçlarına ve cihazın zarar gör‐
mesine neden olabilir.
9.2 Püskürtme kollarının
temizlenmesi
Püskürtme kollarını çıkarmayın.
Püskürtme kollarındaki delikler tıkanırsa,
kalan kir parçalarını ince sivri bir cisim ile
çıkarın.
10. SORUN GİDERME
Cihaz çalışmıyor veya çalışırken bir an‐
da duruyor.
Servis ile temasa geçmeden önce, soru‐
na bir çözüm sunan bilgilere bakın.
Bazı arızalarda, gösterge ekranında bir
alarm kodu gösterilir:
•
- Cihaz su almıyor.
Sorun Olası çözüm
Cihaz çalışmıyor. Elektrik fişinin prize takılı olduğundan emin
Sigorta kutusunda hasarlı bir sigorta bulun‐
Program başlamıyor. Cihazın kapağının kapalı olduğundan emin
Start tuşuna basın.
Gecikmeli başlatma ayarlanmış ise, ayarı ip‐
Cihaz suyla dolmuyor. Su musluğunun açık olduğundan emin olun.
Su besleme basıncının çok düşük olma‐
Su musluğunun tıkalı olmadığından emin
9.3 Dış temizlik
Cihazı yumuşak nemli bir bezle temizle‐
yin.
Sadece nötr deterjanlar kullanın. Aşındı‐
rıcı ürünleri, aşındırıcı temizleme bezleri‐
ni veya çözücüleri kullanmayın.
•
- Cihaz suyu boşaltmıyor.
•
- Taşma tespit aygıtı çalışıyor.
UYARI
Kontrolleri yapmadan önce cihazı
kapayın.
olun.
madığından emin olun.
olun.
tal edin ya da geri sayımın bitişini bekleyin.
dığından emin olun. Bu bilgi için, yerel su
idarenizi arayın.
olun.
Page 62

www.aeg.com
62
Sorun Olası çözüm
Giriş hortumundaki filtrenin tıkalı olmadığın‐
dan emin olun.
Giriş hortumunda bükülmeler olmadığından
emin olun.
Cihaz suyu boşaltmıyor. Lavabo giderinin tıkalı olmadığından emin
olun.
Tahliye hortumunda bükülmeler olmadığın‐
dan emin olun.
Taşma tespit aygıtı çalışıyor. Su musluğunu kapatın ve yetkili servisi ara‐
yın.
Kontroller sonrasında, cihazı çalıştırın.
Program duraklatıldığı noktadan itibaren
çalışmaya devam eder.
Sorun tekrarlanırsa, yetkili servisi arayın.
Gösterge ekranında başka alarm kodları
gösterilirse, yetkili servisi arayın.
10.1 Yıkama sonuçları ve
kurutma sonuçları tatmin edici
değilse
Bardak ve tabaklarda beyazımsı çizikler
ve lekeler ya da mavimsi katmanlar
varsa
• Verilen parlatıcı miktarı çok fazladır.
Parlatıcı miktarı seçicisini daha düşük
seviyeye ayarlayın.
• Çok fazla deterjan kullanılmıştır.
Bardak ve tabakların üzerinde lekeler ve
kurumuş su damlacıkları
• Verilen parlatıcı miktarı yeterli değildir.
Parlatıcı miktarı seçicisini daha yüksek
seviyeye ayarlayın.
• Sebebi deterjanın kalitesi olabilir.
Bulaşıklar ıslak
• Programda kurutma aşaması yoktur
veya düşük sıcaklıklı bir kurutma aşa‐
ması vardır.
• Parlatıcı gözü boştur.
• Bunun nedeni parlatıcı kalitesi olabilir.
• Bunun nedeni kombi deterjan tabletle‐
rinin kalitesi olabilir. Farklı bir marka
kullanın veya parlatıcı gözünü aktive
edin ve kombi deterjan tabletleriyle
parlatıcıyı birlikte kullanın.
Olası diğer sebepler için 'İPUÇ‐
LARI VE YARARLI BİLGİLER'
BÖLÜMÜNE BAŞVURUN.
10.2 Multitablet seçeneği etkin
durumdayken parlatıcı gözünün
etkinleştirilmesi
1. Cihazı çalıştırmak için açma/kapama
tuşuna basın. 'BİR PROGRAMIN
AYARLANMASI VE BAŞLATILMASI'
kısmına bakarak, cihazın ayarlama
modunda olduğuna emin olun.
2. Gösterge ekranında iki yatay durum
çubuğu gösterilene kadar program
düğmesini çevirin.
3.
Multitab ve Delay tuşlarını
ve göstergeleri yanıp sönmeye
başlayana kadar aynı anda basılı tu‐
tun.
4. Delay tuşuna basın.
•
ve göstergeleri söner.
•
göstergesi yanıp sönmeye de‐
vam eder.
• Gösterge ekranında parlatıcı gözü
ayarı gösterilir.
Kapama
Açma
5. Ayarı değiştirmek için Delay tuşuna
arka arkaya basın.
6. Ayarı onaylamak için cihazı kapayın.
,
Page 63

11. TEKNİK BİLGİLER
TÜRKÇE 63
Boyutlar Genişlik / Yükseklik / Derin‐
lik (mm)
Elektrik bağlantısı Bilgi etiketine bakın.
Gerilim 220-240 V
Frekans 50 Hz
Su besleme basıncı Min. / maks. (bar / MPa) (0.5 / 0.05 ) / (8 / 0.8 )
Su beslemesi
1)
Soğuk su veya sıcak su
Kapasite Yerleştirme ayarları 12
Enerji tüketimi Açık bırakma modu 0.10 W
Kapalı modu 0.10 W
1)
Su giriş hortumunu 3/4" vida dişli bir su musluğuna bağlayın.
2)
Sıcak su alternatif enerji kaynaklarından (ör. güneş panelleri, rüzgar) geliyorsa, enerji
tüketimini azaltmak için sıcak su kaynağını kullanın.
12. ÇEVREYLE İLGİLİ BİLGİLER
Şu sembole sahip malzemeler geri
dönüştürülebilir
dönüşüm için uygun konteynerlere
koyun.
Elektrikli ve elektronik cihaz
atıklarının geri dönüşümüne ve çevre
ve insan sağlığının korunmasına
. Ambalajı geri
596 / 818 - 898 / 575
2)
yardımcı olun. Ev atığı sembolü
bulunan cihazları atmayın. Ürünü
yerel geri dönüşüm tesislerinize
gönderin ya da belediye ile irtibata
geçin.
EEE Yönetmeliğine Uygundur.
maks. 60°C
Page 64

www.aeg.com/shop
117924181-A-232012
 Loading...