

Page 1

FAVORIT 55002 I
OPVASKEMASKINE BRUGSANVISNING 2
DA
DISHWASHER USER MANUAL 22
EN
LAVASTOVIGLIE ISTRUZIONI PER L’USO 42
IT
Page 2

2
FOR PERFEKTE RESULTATER
Tak fordi du valgte dette produkt fra AEG. Vi har skabt
det, så du kan nyde en ulastelig funktionsevne i mange
år med nyskabende teknologi, der gør livet lettere –
funktioner, som du ikke finder i almindelige apparater.
Brug et par minutter på at læse mere – så du kan få det
bedste ud af det.
TILBEHØR OG FORBRUGSVARER
I AEG's webbutik kan du finde alt, hvad du har brug for,
til at holde alle dine AEG-apparater flotte og perfekt
fungerende. Sammen med et stort udvalg af tilbehør,
der er designet og udviklet til de høje
kvalitetsstandarder, du ville forvente – fra
specialkogegrej og bestikkurve til flaskeholdere og fine
vaskeposer ...
Besøg webbutikken på
www.aeg-electrolux.com/shop
Page 3

INDHOLD
Indhold
4 Om sikkerhed
7 Produktbeskrivelse
8Betjeningspanel
10 Brug af apparatet
10 Indstilling af blødgøringsanlæg
12 Brug af filtersalt
12 Brug af vaske- og
afspændingsmiddel
13 Multitab-funktion
14 Placering af bestik og service
14 Tørreprogrammer
15 Valg og start af opvaskeprogram
17 Vedligeholdelse og rengøring
18 Hvis noget går galt
21 Tekniske data
21 Miljøhensyn
3
Der er anvendt følgende symboler i
denne brugervejledning:
Vigtige oplysninger om din egen
sikkerhed, samt oplysninger om,
hvordan du undgår skader på
apparatet.
Generelle oplysninger og tips
Miljøoplysninger
Ret til ændringer uden varsel
forbeholdes
Page 4

Om sikkerhed
4
OM SIKKERHED
Læs denne brugervejledning grundigt før installation og ibrugtagning af maskinen :
• Af hensyn til din og din ejendoms sikkerhed.
• Af hensyn til miljøet.
• For korrekt betjening og brug af opvaskemaskinen.
Opbevar altid brugervejledningen sammen med opvaskemaskinen, og lad den følge med,
hvis du flytter eller giver den til en anden.
Producenten kan ikke drages til ansvar, hvis apparatet installeres forkert og eller anvendelsen forårsager skade.
Sikkerhed for børn og andre udsatte personer
• Lad ikke personer, herunder børn, med nedsat fysisk mobilitet, nedsatte mentale evner
eller manglende erfaring og viden betjene apparatet. De skal være under opsyn af en
person, der har ansvaret for deres sikkerhed, eller instrueres i at bruge apparatet.
• Opbevar al emballage utilgængeligt for børn. Der er fare for kvælning eller personskade.
• Opbevar alle opvaskemidler et sikkert sted. Lad ikke børn røre opvaskemidlerne.
• Lad ikke børn og husdyr komme tæt på apparatet, mens døren er åben.
Generelt om sikkerhed
• Apparatets specifikationer må ikke ændres. Dette kan medføre risiko for personskade
samt beskadigelse af apparatet.
• Overhold sikkerhedsanvisningerne på pakken med opvaskemidlet for at undgå ætsning
af øjne, mund og hals.
• Drik ikke vandet fra opvaskemaskinen. Der kan være rester af opvaskemiddel i maskinen.
• Lad ikke lågen stå åben uden opsyn. Dette er for at forhindre personskade, eller at nogen falder over en åben låge.
• Undgå at sidde eller stå på den åbne låge.
Anvendelse
• Dette apparat er kun til husholdningsbrug. Undlad at bruge opvaskemaskinen til andre
formål for at forhindre eller skade på ejendom.
• Brug kun maskinen til tilbehør, der egner sig til maskinopvask.
• Undlad at bruge brændbare produkter eller genstande, der er fugtet med brændbare
produkter, i maskinen eller i nærheden af eller på denne. Der er fare for eksplosion
eller brand.
• Sæt knive og andre ting med skarpe spidser i bestikkurven med spidsen nedad. De kan
evt. også lægges vandret i den øverste kurv eller i kurven til knive (ikke alle modeller
har en kurv til knive).
• Brug kun foreskrevne produkter til opvaskemaskiner (opvaskemiddel, filtersalt, afspændingsmiddel).
• Blødgøringsanlægget kan tage skade af salttyper, der ikke er beregnet til opvaskemaskiner.
Page 5

Om sikkerhed
• Påfyld salt i maskinen, inden du starter et opvaskeprogram. Saltrester i opvaskemaskinen kan forårsage rust eller lave hul i bunden af maskinen.
• Fyld aldrig andre midler (afkalkningsmiddel til opvaskemaskine, flydende opvaskemiddel) i beholderen til afspændingsmiddel. Det kan skade maskinen.
• Sørg for, at spulearmene kan bevæge sig frit, før du starter et opvaskeprogram.
• Der kan komme meget varm damp ud af opvaskemaskinen, hvis du åbner lågen, mens
maskinen er i gang. Dette kan medføre skoldningsfare.
• Tag ikke opvasken ud af maskinen, før opvaskeprogrammet er slut.
Vedligeholdelse og rengøring
• Sluk for maskinen, og tag stikket ud af kontakten inden rengøring.
• Undlad at bruge brændbare produkter eller produkter, der kan forårsage rust.
• Brug ikke maskinen uden filtrene. Sørg for at sætte filtrene rigtigt i. En forkert isættelse resulterer i, at opvasken bliver utilfredsstillende, og maskinen tager skade.
• Undlad at bruge højtryksrenser eller damp til at rengøre maskinen. Der er risiko for
elektrisk stød og skader på apparatet.
Installation
• Kontrollér, at apparatet ikke er beskadiget. Du må ikke installere et tilslutte et beskadiget apparat. Kontakt forhandleren.
• Fjern al emballage, før opvaskemaskinen installeres og tages i brug.
• El- og blikkenslagerarbejde samt installation må kun udføres af en faguddannet person. Dermed forhindrer du materiel skade eller personskade.
• Sørg for, at elstikket er taget ud af stikkontakten under installationen.
• Undgå at bore huller i apparatets sider, så der opstår fare for at beskadige de hydrauliske og elektriske dele.
•
Vigtigt! Følg instruktionerne i skabelonen, som leveres sammen med apparatet:
– Installation af apparatet.
– Montering af dørpanel.
– Tilslutning til vandsyning og afløb.
• Sørg for, apparatet er installeret under og opad stabile køkkenelementer.
5
Forholdsregler mod frost
• Stil ikke maskinen et sted, hvor temperaturen kommer under 0 °C.
• Producenten påtager sig intet ansvar for frostskader.
Tilslutning, vand
• Brug nye slanger ved tilslutning af maskinen til vandforsyningen. Brug ikke brugte slanger.
• Tilslut ikke apparatet til nye rør eller rør, der ikke har været brugt i længere tid. Lad
vandet løbe i nogle minutter, og forbind så tilløbsslangen.
• Undgå at mase eller forårsage skade på vandslangerne, når apparatet installeres.
• Kontrollér, at samlingerne er tætte, så der ikke kan sive vand ud.
• Sørg for, at slangerne er tætte inden ibrugtagning af apparatet.
Page 6
Om sikkerhed
6
• Tilløbsslangen har en sikkerhedsventil og en dobbelt kappe med et indvendigt elkabel.
Der er kun tryk i indløbsslangen, når vandet løber. Hvis der er en lækage i tilløbsslangen, afbryder sikkerhedsventilen det løbende vand.
– Pas på, når du tilslutter tilløbsslangen:
– Undlad at lægge tilløbsslangen eller sikkerhedsventilen i vand.
– Tag straks stikket ud af stikkontakten, hvis tilløbsslangen eller sikkerhedsventilen
beskadiges.
– Tilløbsslangen med sikkerhedsventil må kun udskiftes af servicecentret.
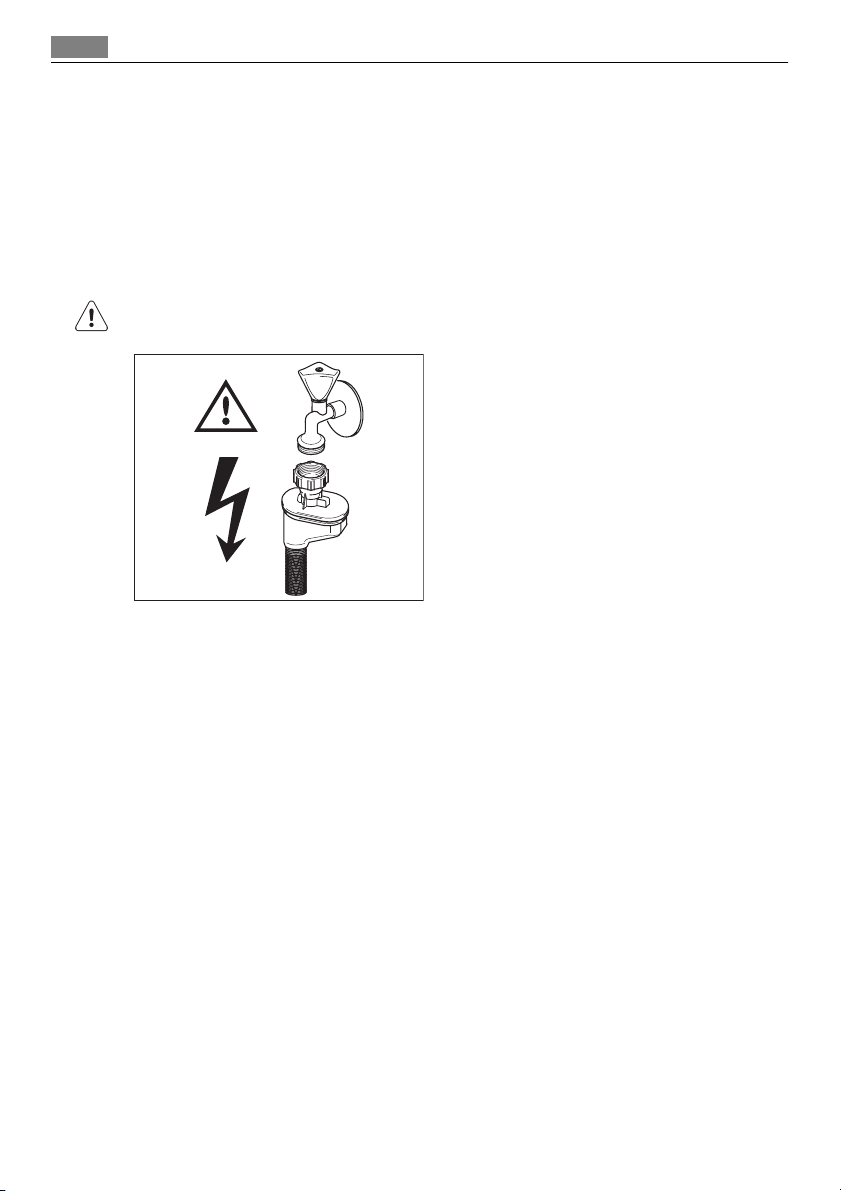
ADVARSEL
Højspænding.
Tilslutning, el
• Maskinen skal tilsluttes strøm m/jord, jvf. Stærkstrømsreglementet.
• Sørg for, at de elektriske data på typeskiltet svarer til strømforsyningen.
• Brug altid en korrekt monteret lovlig stikkontakt.
• Brug ikke multistik og forlængerledninger. Der er risiko for brand.
• Udskift ikke elledningen. Kontakt servicecentret.
• Undgå at mase eller forårsage skade på stikket og ledningen bag apparatet.
• Sørg for, at der er adgang til netstikket efter installationen.
• Undgå at slukke for maskinen ved at trække i ledningen. Tag altid selve netstikket ud
af kontakten.
Servicecenter
• Reparation eller arbejde på apparatet må kun udføres af en godkendt tekniker. Kontakt servicecentret.
• Brug kun originale reservedele.
Kassering af apparatet
• Sådan undgås risiko for personskade eller beskadigelse:
– Tag stikket ud af kontakten.
– Klip elledningen af, og kassér den.
Page 7
Produktbeskrivelse
– Fjern lugelåsen. Det forhindrer, at børn eller dyr kan smække sig inde i apparatet.
Der er fare for kvælning.
– Kassér apparatet på kommunens genbrugsstation.
ADVARSEL
Opvaskemidler er farlige og kan forårsage ætsning!
• Kontakt straks en læge, hvis der sker et uheld med disse opvaskemidler.
• Kontakt straks en læge, hvis opvaskemidlet kommer ind i munden.
• Kommer vaskemidlerne i øjnene, skylles straks grundigt med vand, og læge kontaktes.
• Opbevar opvaskemidlerne på et sikkert sted og utilgængeligt for børn.
• Lad ikke vaskemaskinens låge stå åben, når der er opvaskemiddel i beholderen til opvaskemiddel.
• Fyld først beholderen til opvaskemiddel op, lige inden du starter et opvaskeprogram.
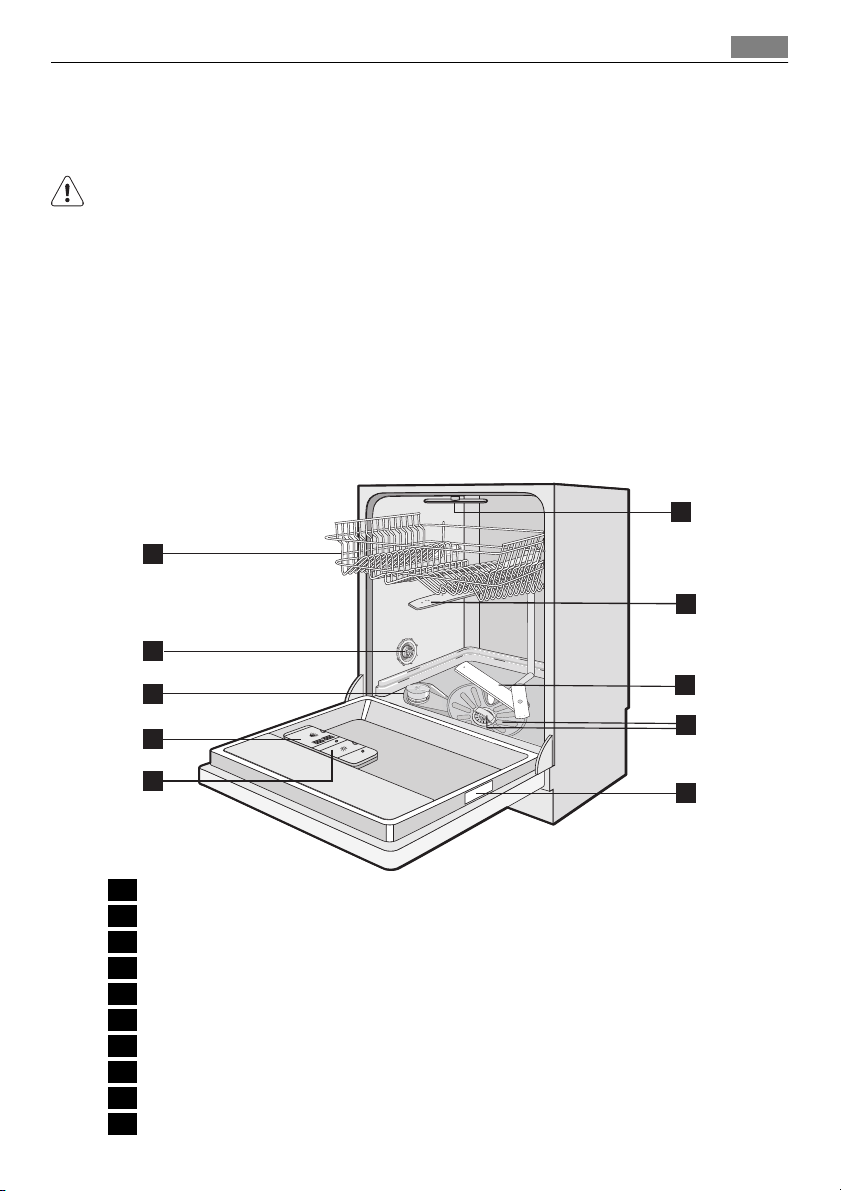
PRODUKTBESKRIVELSE
1
7
10
9
2
3
4
5
1 Den øverste kurv
2 Justering af vandets hårdhedsgrad
3 Saltbeholder
4 Beholder til opvaskemiddel
5 Beholder til afspændingsmiddel
6 Typeskilt
7 Filtre
8 Nederste spulearm
9 Mellemste spulearm
10 Øverste spulearm
8
7
6
Page 8

Betjeningspanel
8
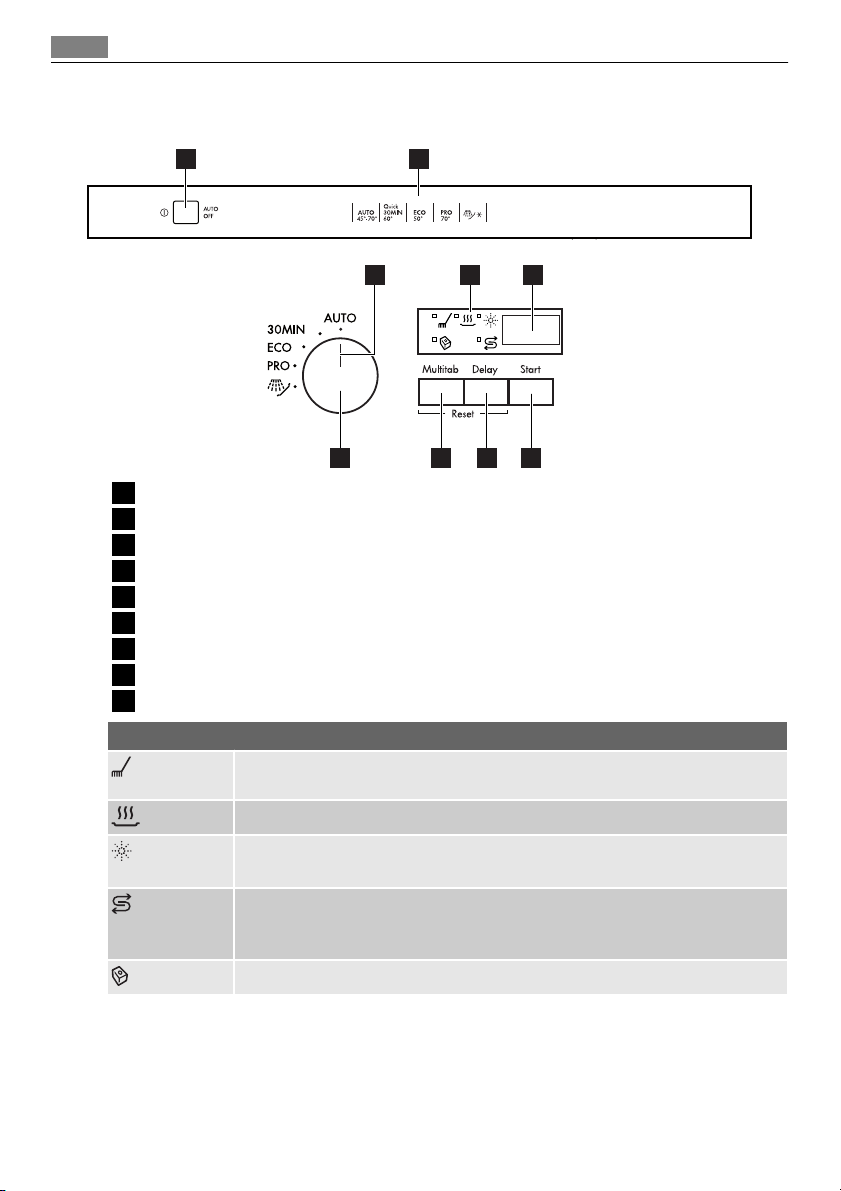
BETJENINGSPANEL
1
1 Tænd-/sluk-knap
2 Programvejledning
3 Programmærke
4 Kontrollamper
5 Display
6 Start-knap
7 Delay-knap
8 Multitab-knap
9 Programknap
Kontrollampe for opvaske- og skyllefase. Lyser, når opvaske- eller skyllefasen
er i gang.
Kontrollampe for tørrefase. Lyser, når tørrefasen er i gang.
9
2
3
Kontrollamper
4
8
5
7
6
Kontrollampe for afspændingsmiddel. Lampen tændes, når beholderen til afspændingsmiddel skal påfyldes.
Salt-lampe. Kontrollampen lyser, når der skal påfyldes salt i beholderen.
Når beholderen er fyldt, kan salt-lampen fortsætte med at lyse i nogle timer.
Det påvirker ikke apparatets funktion i øvrigt.
Kontrollampe for Multitab-funktion. Tændes, når Multitab-funktionen aktiveres.
1) Når beholderne til salt og/eller afspændingsmiddel er tomme, lyser de tilhørende kontrollamper ikke, hvis et
opvaskeprogram er i gang.
1)
Tænd-/sluk-knap
Tryk på denne knap for at tænde eller slukke for apparatet.
Ti minutter efter afslutningen af vaskeprogrammet slukker AUTO OFF-funktionen automatisk for maskinen. Dette hjælper med at reducere energiforbruget.
1)
Page 9
Betjeningspanel
Programvejledning
Denne guide hjælper dig med valget af opvaskeprogram.
Display
Displayet viser:
• Den elektroniske indstilling af blødgøringsanlægget
• Aktivering/deaktivering af afspændingsmiddel (kun når Multitab-funktionen er aktiveret)
• Tiden for opvaskeprogrammet
• Resttid, til opvaskeprogrammet er slut
• Afslutning af et opvaskeprogram (digitaldisplayet viser nul)
•Tid for udskudt start
•Alarmkoder
Start-knap
Tryk på denne knap for at starte:
• Opvaskeprogrammet
• Nedtællingen til Senere start.
Delay-knap
Tryk gentagne gange på denne knap for at udskyde starten af opvaskeprogrammet fra 1
til 24 timer.
9
Multitab-knap
Tryk på denne knap for at slå multitab-funktionen til eller fra (se 'Multitab-funktion').
Programknap
Vælg opvaskeprogram ved at dreje programknappen, så programmærket er ud for et opvaskeprogram. Se under "Opvaskeprogrammer".
Når der tændes for apparatet, står programknappen ud for det sidst valgte opvaskeprogram.
Indstillingsfunktion
Ved følgende operationer skal apparatet stå på indstillingsfunktion:
• Når der vælges opvaskeprogram.
• Når der vælges udskudt start.
• Ved elektronisk indstilling af niveauet for blødgøringsniveau.
• For at aktivere/deaktivere afspændingsmiddel (kun, når Multitab-funktionen er aktiveret).
Tænd for apparatet. Apparatet står i indstillingsfunktion, når:
• Tiden for det sidst valgte opvaskeprogram blinker i displayet.
• Kontrollamperne for opvaskeprogrammets trin tændes.
Page 10
Brug af apparatet
10
Tænd for apparatet. Apparatet står ikke i indstillingsfunktion, når:
• Tiden for opvaskeprogrammet eller den udskudte start blinker ikke i displayet.
• Kun én programlampe tændes.
– For at gå tilbage til indstillingsfunktion er det nødvendigt at afbryde programmet
eller afbryde den udskudte start. Se under "Valg og start af opvaskeprogram".
BRUG AF APPARATET
1. Kontrollér, om det indstillede niveau for blødgøringsanlægget passer til det lokale
vands hårdhedsgrad. Hvis ikke, skal blødgøringsanlægget indstilles.
2. Fyld saltbeholderen op med filtersalt.
3. Fyld beholderen til afspændingsmiddel op.
4. Sæt bestik og tallerkener i opvaskemaskinen.
5. Vælg det opvaskeprogram, der passer til opvaskens art og graden af snavs.
6. Fyld den rette mængde opvaskemiddel i beholderen til opvaskemiddel.
7. Start opvaskeprogrammet.
Brug multitab-funktionen, hvis du bruger Multitabs ("3 i 1", "4 i 1", "5 i 1" osv.) (Se "Multitabfunktion").
INDSTILLING AF BLØDGØRINGSANLÆG
Blødgøringsanlægget fjerner salte og mineraler fra ledningsvandet. Disse mineraler og salte kan skade maskinen.
Justér blødgøringsanlægget, hvis det ikke passer til det lokale vands hårdhed.
Kontakt det lokale vandværk angående det lokale vands hårdhed.
Vandets hårdhedsgrad
Tyske grader (°dH) Franske grader
(TH°)
51 - 70 91 - 125 9,1 - 12,5 64 - 88
43 - 50 76 - 90 7,6 - 9,0 53 - 63
37 - 42 65 - 75 6,5 - 7,5 46 - 52
29 - 36 51 - 64 5,1 - 6,4 36 - 45
23 - 28 40 - 50 4,0 - 5,0 28 - 35
19 - 22 33 - 39 3,3 - 3,9 23 - 27
15 - 18 26 - 32 2,6 - 3,2 18 - 22 1 4
11 - 14 19 - 25 1,9 - 2,5 13 - 17 1 3
4 - 10 7 - 18 0,7 - 1,8 5 - 12 1 2
mmol/l Clarke-gra-
der
Indstilling af vandets
hårdhed
manuelt elek-
1)
2
1)
2
1)
2
1)
2
1)
2
1)
2
tronisk
10
9
8
7
6
1)
5
Page 11
Indstilling af blødgøringsanlæg
11
Vandets hårdhedsgrad
Tyske grader (°dH) Franske grader
(TH°)
< 4 < 7 < 0,7 < 5
1) Fabriksindstilling.
2) Brug ikke salt på dette niveau.
mmol/l Clarke-gra-
der
Indstilling af vandets
manuelt elek-
1
Blødgøringsanlægget skal både indstilles manuelt og elektronisk.
Manuel indstilling
Sæt knappen til indstilling af hårdhedsgrad i position 1 eller 2 (se tabel).
Elektronisk indstilling
1. Tænd for ovnen.
2. Sørg for, at apparatet står på indstillingsfunktionen.
3. Drej programknappen med uret, indtil der vises to vandrette statusbjælker i displayet.
4. Tryk samtidigt på knappen Multitab og knappen Delay , og hold dem nede, indtil kon-
trollamperne
5. Giv slip på Multitab-knappen og Delay-knappen.
6. Tryk på Multitab-knappen.
•Kontrollamperne
•Kontrollampen
• Displayet viser indstillingen af blødgøringsmidlet (eksempel:
7. Tryk gentagne gange på Multitab-knappen for at ændre indstillingen.
8. Sluk apparatet for at bekræfte.
Hvis blødgøringsanlægget indstilles elektronisk til niveau 1, forbliver salt-lampen slukket.
, og blinker.
og slukkes.
bliver ved med at blinke.
= niveau 5).
hårdhed
2)
tronisk
2)
1
Page 12
20
30
M
A
X
1
2
3
4
+
-
Brug af filtersalt
12
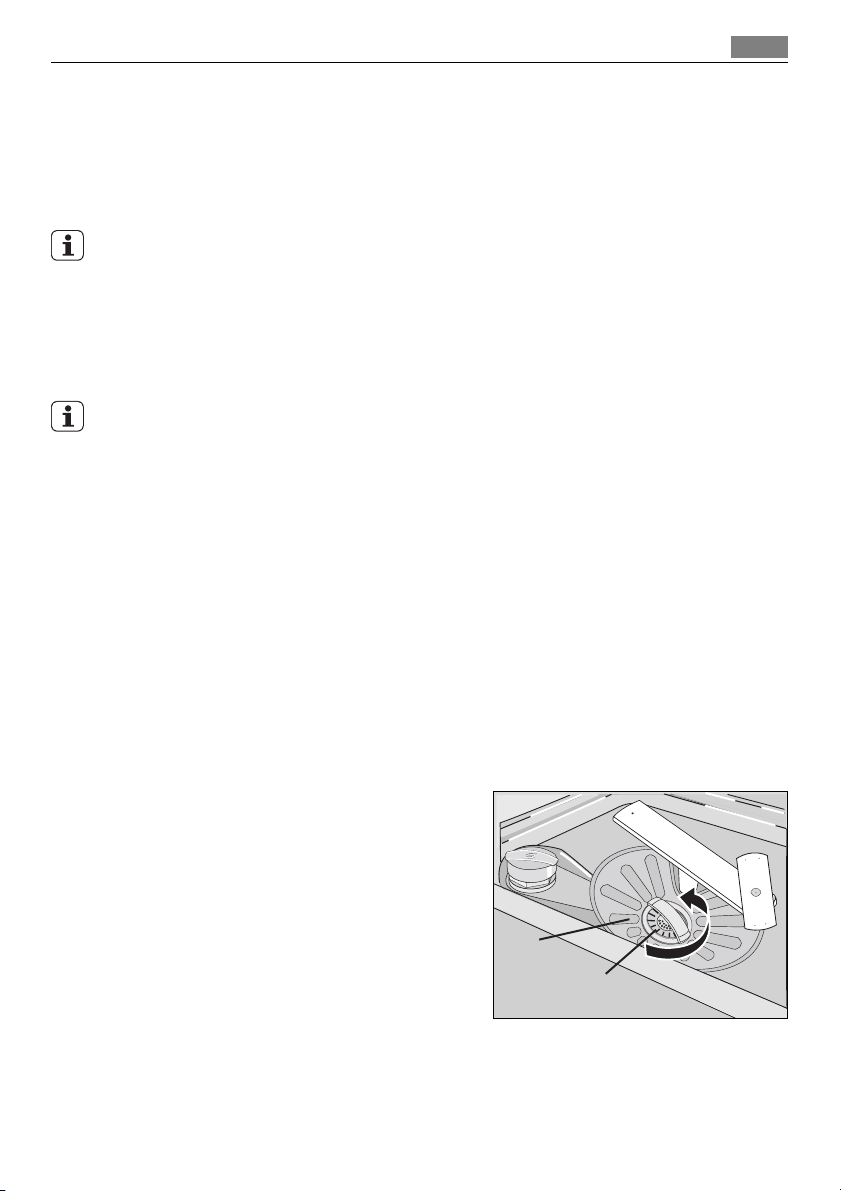
BRUG AF FILTERSALT
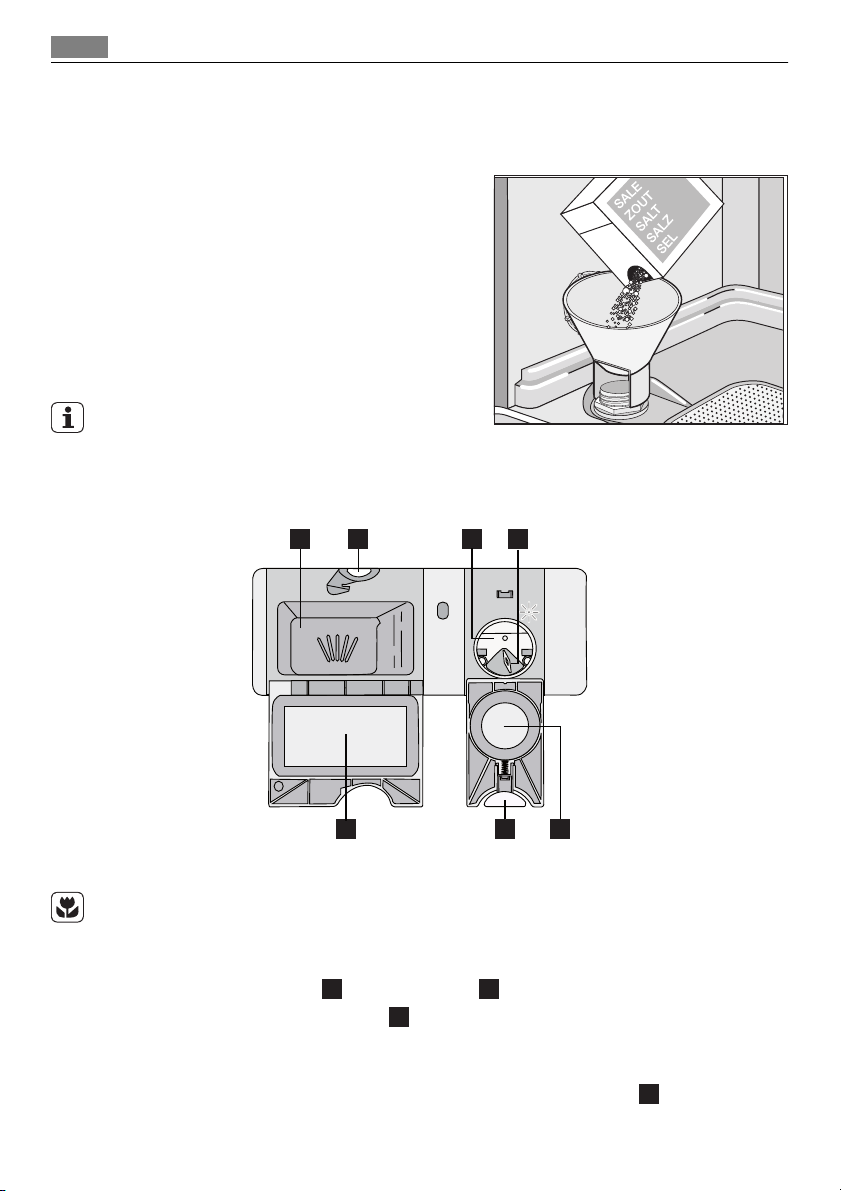
Hvordan du fylder saltbeholderen
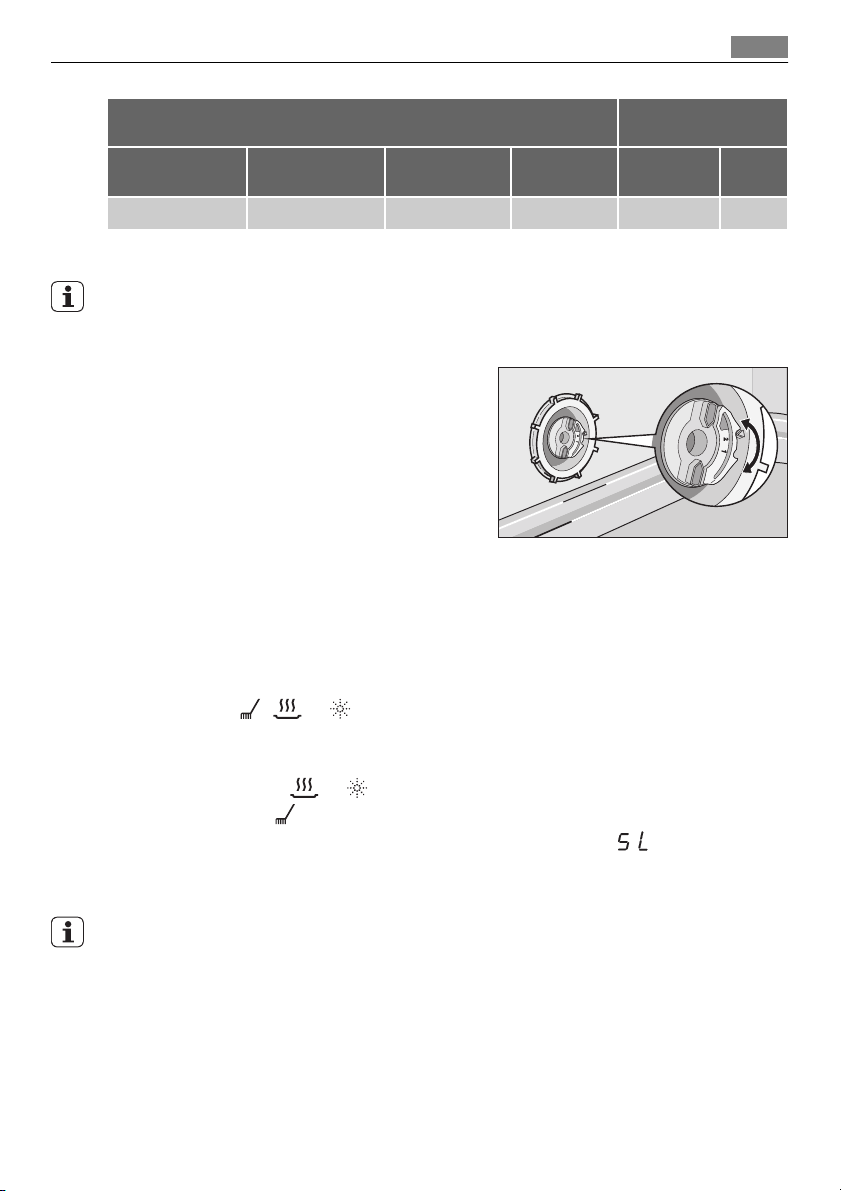
1. Drej hætten mod uret for at åbne saltbe-
holderen.
2. Hæld 1 liter vand i saltbeholderen (kun
første gang, du påfylder salt).
3. Brug tragten til at fylde salt i beholderen.
4. Fjern salt rundt om saltbeholderens åb-
ning.
5. Luk saltbeholderen ved at dreje hætten
med uret.
Det er normalt, at vandet i saltbeholderen løber over, når der påfyldes salt.
BRUG AF VASKE- OG AFSPÆNDINGSMIDDEL
1
2
7
3
4
6
5
Brug af opvaskemiddel
Brug ikke mere end den korrekte mængde opvaskemiddel af hensyn til miljøet.
Følg anbefalingerne fra producenten af opvaskemidlet på pakningen.
Sådan fyldes beholderen til opvaskemiddel:
1.
Tryk på udløserknappen
2.
Fyld opvaskemiddel i beholderen
3. Hvis opvaskeprogrammet har et trin med forvask, anbringes en lille mængde opvaske-
middel i hulningen udvendig på låget til opvaskemiddel.
4.
Læg tabletten i beholderen til opvaskemiddel, hvis du bruger tabs
5. Luk beholderen til opvaskemiddel. Tryk på låget, indtil det låses fast.
2
for at åbne låget 7 til beholderen til opvaskemiddel.
1
.
1
.
Page 13
Multitab-funktion
Brug lange opvaskeprogrammer, når du bruger opvaskemidler i tabletform (tabs). Disse
kan ikke blive helt opløst med korte opvaskeprogrammer og kan forringe opvaskeresultaterne.
Brug af afspændingsmiddel
Afspændingsmiddel gør det muligt at tørre tallerkener og fade, uden at de får pletter og
striber.
Beholderen til afspændingsmiddel tilfører automatisk afspændingsmiddel under det sidste skylletrin.
Fremgangsmåde for påfyldning af beholderen til afspændingsmiddel:
1.
Tryk på udløserknappen
2.
Fyld beholderen til afspændingsmiddel op
"Max"-mærket.
3. Tør spildt afspændingsmiddel op med en sugende klud, så der ikke dannes for meget
skum under det næste program.
4. Luk beholderen til afspændingsmiddel. Tryk på låget, indtil det låses fast.
6
for at åbne låget 5 til beholderen til afspændingsmiddel.
3
med afspændingsmiddel. Påfyld kun til
Indstil dosering af afspændingsmiddel
Fabriksindstilling: Position 3.
Doseringen af afspændingsmiddel kan indstilles fra position 1 (laveste dosering) til position 4 (højeste dosering).
Drej på vælgeren til afspændingsmiddel
4
for at øge eller reducere doseringen.
13
MULTITAB-FUNKTION
Multitab-funktionen er til kombinerede opvaskemidler i tabletform (tabs).
Disse tabletter indeholder vaskemiddel, afspændingsmiddel og opvaskesalt. Nogle typer
af tabletter kan indeholde andre midler.
Sørg for, at disse tabletter egner sig til vandets hårdhed i lokalområdet (se vejledningen
på pakken).
Multitab-funktionen stopper automatisk tilsætning af afspændingsmiddel og salt.
Multitab-funktionen deaktiverer kontrollamper for afspændingsmiddel og salt.
Programmets varighed kan blive forlænget, hvis du bruger Multitab-funktionen.
Slå Multitab-funktionen fra eller til, før opvaskeprogrammet starter. Du kan ikke slå Multitab-funktionen til eller fra, mens programmet kører.
Aktivering af Multitab-funktionen
• Tryk på knappen Multitab. Kontrollampen for Multitab-funktionen tændes. Funktionen
er aktiveret.
– Når Multitab-funktionen slås til, er den aktiveret, indtil du slår den fra.
Page 14
Placering af bestik og service
14
Deaktivering af Multitab-funktionen og den separate brug af opvaskemiddel, salt og
afspændingsmiddel
1. Tryk på knappen Multitab. Kontrollampen for Multitab-funktionen slukkes. Funktio-
nen er deaktiveret.
2. Fyld saltbeholderen og beholderen til afspændingsmiddel.
3. Indstil blødgøringsanlægget til højeste niveau.
4. Kør et opvaskeprogram med tom maskine.
5. Juster blødgøringsanlægget til det lokale vands hårdhedsgrad, når opvaskeprogram-
met er slut.
6. Juster doseringen af afspændingsmiddel.
PLACERING AF BESTIK OG SERVICE
Se folderen "Eksempler på ProClean påfyldninger".
Råd
• Anbring ikke andre ting i opvaskemaskinen, som kan opsuge vand (svampe, klude).
• Fjern tiloversbleven mad fra tingene.
• Blødgør tiloversbleven brændt mad på disse ting.
• Stil hule ting (f.eks. kopper, glas og gryder) med åbningen nedad.
• Sørg for, at vandet ikke samler sig i beholdere eller skåle.
• Sørg for, at bestik og tallerkener m.m. ikke ligger sammen.
• Sørg for, at glas ikke rører andre glas.
• Læg små ting i bestikkurven.
• Bland skeer med andet bestik, så de ikke sætter sig sammen.
• Sørg for, at vandet kan komme til alle overflader, når du stiller tingene i kurvene.
• Læg de lette ting i øverste kurv. Sørg for, at tingene ikke kan flytte sig.
• Vanddråber kan samle sig på ting i plast og på "slip-let"-pander og gryder.
TØRREPROGRAMMER
Program Graden af snavs Opvaskens type Beskrivelse af programmet
Alle Service, bestik, gry-
1)
Frisk snavset Service og bestik Vask 60 °C
2)
der og pander
Forvask
Vask 45 °C eller 70 °C
Skylninger
Tørring
Skylning
Page 15
Valg og start af opvaskeprogram
Program Graden af snavs Opvaskens type Beskrivelse af programmet
Normalt snavset Service og bestik Forvask
3)
Meget snavset Service, bestik, gry-
der og pander
Brug dette program til hurtig skylning af
opvasken. Det forhindrer, at madrester
sætter sig fast på tallerkenerne, og at
der trænger ubehagelig lugt ud fra opvaskemaskinen.
Brug ikke opvaskemiddel til dette program.
1) Apparatet registrerer typen af snavs og antallet af genstande i kurvene. Temperaturen, mængden af vand,
energiforbruget og programtiden justeres automatisk.
2) Med dette program kan du vaske en opvask med frisk snavs. Det giver gode opvaskeresultater i løbet af kort
tid.
3) Dette er standardprogrammet til prøveanstalter. Med dette program får du den mest effektive brug af vand
og energiforbrug til service og bestik med normalt snavs. Se den medfølgende folder med testoplysninger.
Vask 50 °C
Skylninger
Tørring
Forvask
Vask 70 °C
Skylninger
Tørring
Skylning
15
Forbrugsværdier
Program
1)
Energi (kWh) Vand (liter)
0,9 - 1,7 8 - 15
0,9 9
1,5 - 1,6 13 - 14
0,9 - 1,0 9 - 11
0,1 4
1) Displayet viser programmets varighed.
Forbrugsværdierne kan variere, alt efter vandtemperatur og -tryk, udsving i netspænding
og opvaskens størrelse.
VALG OG START AF OPVASKEPROGRAM
Start af opvaskeprogrammet uden udskudt start
1. Luk lågen til opvaskemaskinen.
2. Tænd for apparatet.
3. Sørg for, at apparatet står på indstillingsfunktionen.
4. Vælg et opvaskeprogram.
• Programmets varighed blinker i displayet.
Page 16
Valg og start af opvaskeprogram
16
• Kontrollamperne for det valgte opvaskeprogram tændes.
5. Tryk på knappen Start. Opvaskeprogrammet starter automatisk.
• Kontrollamperne for opvasketrin slukkes, men kontrollampen for det igangværende trin forbliver tændt.
Start af opvaskeprogrammet med udskudt start
1. Luk lågen til opvaskemaskinen.
2. Tænd for apparatet.
3. Sørg for, at apparatet står på indstillingsfunktionen.
4. Vælg et opvaskeprogram.
5. Tryk på knappen Delay en eller flere gange, indtil displayet viser den ønskede tid til
udskudt start.
• Tiden for den udskudte start blinker i displayet.
6. Tryk på knappen Start. Nedtællingen starter automatisk.
• Tiden til den udskudte start blinker ikke længere i displayet.
• Kontrollamperne for det valgte opvaskeprogram slukkes.
Når nedtællingen er slut, starter opvaskeprogrammet automatisk.
• Kontrollampen for det igangværende programtrin tændes.
Hvis lågen åbnes, standser nedtællingen. Når lågen lukkes igen, fortsætter nedtællingen
det sted, hvor den blev afbrudt.
Annullering af udskudt start
Nedtællingen er ikke i gang
1. Tryk på knappen Delay en eller flere gange, indtil:
• Displayet viser tiden for opvaskeprogrammet.
• Kontrollamperne for programtrin tændes.
2. Tryk på knappen Start for at starte opvaskeprogrammet.
Nedtællingen er i gang
1. Tryk på knappen Delay en eller flere gange, indtil:
• Displayet viser tiden for opvaskeprogrammet.
• Kontrollamperne for programtrin tændes.
• Opvaskeprogrammet starter automatisk.
Afslutning på opvaskeprogrammerne
•Åbn lågen.
– Opvaskeprogrammet stopper.
• Luk lågen til opvaskemaskinen.
– Programmet fortsætter det sted, hvor det blev afbrudt.
Annullering af opvaskeprogrammet
Hvis opvaskeprogrammet ikke er startet, kan du ændre programvalget.
Page 17
Vedligeholdelse og rengøring
Når opvaskeprogrammet er i gang, skal programmet annulleres, før du kan ændre valg af
program.
• Tryk samtidigt på knappen Multitab og knappen Delay, og hold dem nede, indtil:
– Tiden for opvaskeprogrammet blinker i displayet.
– Kontrollamperne for opvaskeprogrammets trin tændes.
Sørg for, at der er opvaskemiddel i beholderen til opvaskemiddel, inden der startes et nyt
opvaskeprogram.
Afslutning på opvaskeprogrammet
Når opvaskeprogrammet er slut, viser displayet et nul, og kontrollamperne for programtrin slukkes.
Sluk for apparatet og åbn lågen.
Lad lågen stå på klem i nogle minutter for at opnå bedre tørring.
Fjern tingene fra kurvene
• Lad opvasken køle af, før du tager den ud af maskinen. Tallerkener m.m. er skrøbelige,
når de er meget varme.
• Tøm først nederste kurv og derefter øverste kurv.
• Der kan være vand på maskinens sider og låge. Rustfrit stål køler hurtigere af end tal-
lerkener.
17
VEDLIGEHOLDELSE OG RENGØRING
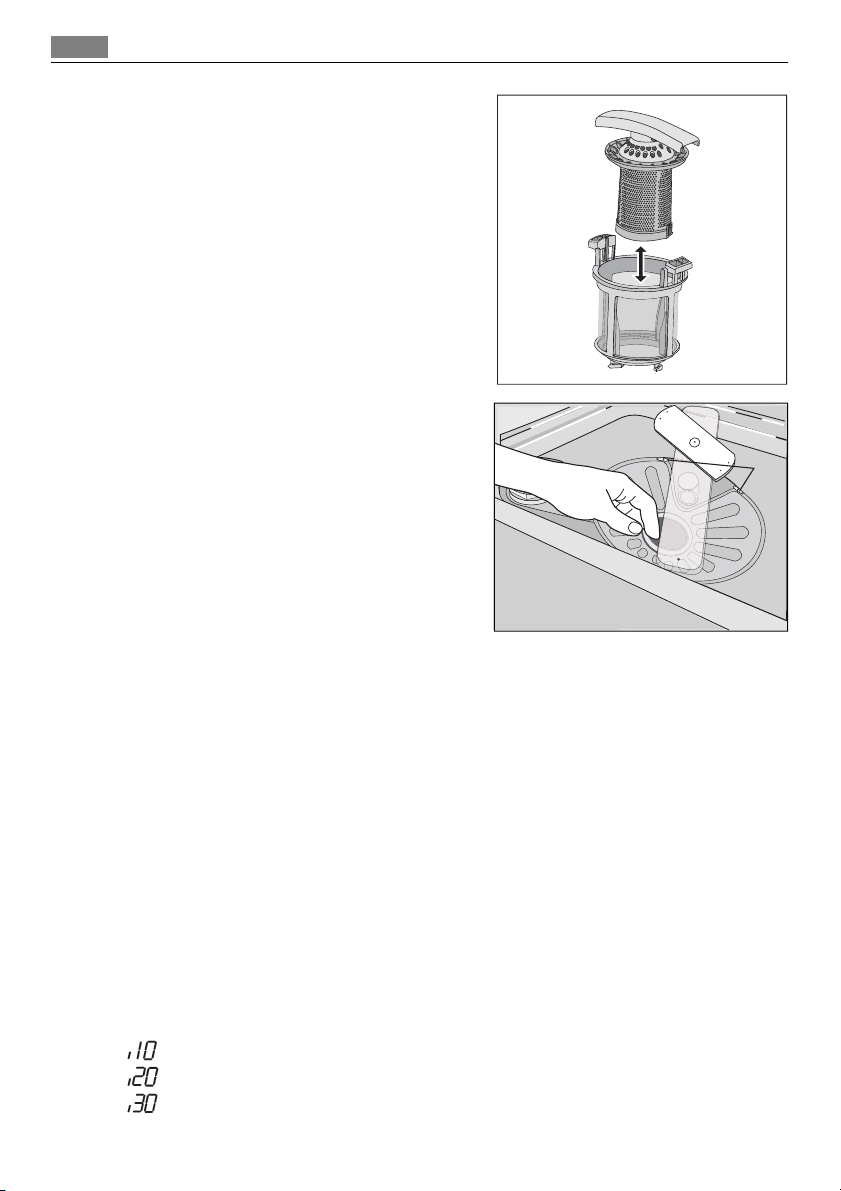
Sådan fjernes og renses filtre
Snavsede filtre forringer opvaskeresultatet.
Selvom vedligeholdelsen er meget begrænset med disse filtre, bør du jævnligt efterse maskinen og om nødvendigt rense filtrene.
1. Drej filteret (A) mod uret og fjern det fra
filteret (B).
B
A
Page 18
Hvis noget går galt
18
2. Filteret (A) består af to dele. Filteret adskilles ved at trække delene fra hinanden.
3. Rens delene grundigt med vand.
4. Sæt det todelte filter (A) sammen, og
pres. Sørg for, at delene samles korrekt.
5. Fjern filteret (B).
6. Rens filteret (B) grundigt med vand.
7. Sæt filteret (B) på plads igen. Sørg for, at
det samles korrekt i de to skinner (C).
8. Sæt filteret (A) på plads i filteret (B). Drej
filteret (A) med uret, indtil det låses fast.
C
Sådan rengøres spulearmene:
Fjern ikke spulearmene.
Hvis hullerne i spulearmene tilstoppes, kan det tiloversblevne snavs fjernes med en spids
genstand.
Sådan renses de ydre overflader:
Rengør opvaskemaskinens udvendige sider og betjeningspanelet med en blød, fugtig klud.
Brug kun et neutralt rengøringsmiddel.
Brug ikke slibende midler, skuresvampe eller opløsningsmidler (f.eks. acetone).
HVIS NOGET GÅR GALT
Maskinen starter ikke, eller den stopper midt i et program.
Forsøg først at finde en løsning på problemet (se tabel). Kontakt servicecentret, hvis dette
ikke hjælper.
Ved visse fejlfunktioner viser displayet en alarmkode:
- Maskinen tager ikke vand ind
•
- Maskinen tømmes ikke
•
- Overløbssikringen er tændt
•
Page 19
Hvis noget går galt
19
ADVARSEL
Sluk for maskinen, inden du udfører eftersynet.
Fejl Mulig årsag Mulig løsning
Maskinen tager ikke vand ind. Vandtilslutningen er blokeret
Vandtrykket er for lavt. Kontakt det lokale vandværk.
Der er lukket for vandet. Åbn for vandhanen.
Filteret i tilløbsslangen er stop-
Tilløbsslangen er ikke tilsluttet
Tilløbsslangen er beskadiget. Sørg for, at tilløbsslangen er in-
Maskinen tømmes ikke for
vand.
Afløbsslangen er ikke tilsluttet
Afløbsslangen er beskadiget. Sørg for, at afløbsslangen er in-
Overløbssikringen er blevet udløst.
Opvaskeprogrammet starter ikke.
Der blev ikke trykket på knap-
Stikket er ikke sat rigtigt i kon-
Sikringen på husets eltavle (sik-
Der er valgt udskudt start. • Annuller den udskudte start.
eller kalket til.
pet.
korrekt.
Køkkenvaskens vandlås er tilstoppet.
korrekt.
Luk for vandhanen, og kontakt
Lågen er åben. Luk lågen til opvaskemaskinen.
pen Start.
takten.
ringsboks) er gået.
Rengør vandtilslutningen.
Rens filteret.
Kontroller, at tilslutningen er i
orden.
takt.
Rens vandlåsen.
Kontroller, at tilslutningen er i
orden.
takt.
servicecentret.
Tryk på knappen Start.
Sæt stikket rigtigt i stikkontakten.
Udskift sikringen.
• Når nedtællingen er slut,
starter opvaskeprogrammet
automatisk.
Sæt programknappen på samme opvaskeprogram igen, som før fejlen opstod, når kontrollen er udført. Programmet fortsætter fra det punkt, hvor det blev afbrudt.
Kontakt det lokale servicecenter, hvis den samme fejl opstår igen.
Kontakt det lokale servicecenter, hvis displayet viser andre alarmkoder.
De nødvendige oplysninger til servicecentret er angivet på typeskiltet.
Notér følgende oplysninger:
– Model (MOD.) ........................................................
– Produktnummer (PNC) ..........................................
– Serienummer (S.N.) ...............................................
Page 20

Hvis noget går galt
20
Opvaske- og tørringsresultaterne er utilfredsstillende
Fejl Mulig årsag Mulig løsning
Opvasken er ikke ren. Opvaskeprogrammet passer ik-
Du lagde ikke gestandene kor-
Spulearmene kunne ikke dreje
Filtrene er snavsede eller mon-
Der er brugt for lidt eller intet
Der er kalkaflejringer på servicet.
Forkert hårdhedsgrad for blød-
Dækslet på saltbeholderen er
Der er striber, hvide pletter eller en blålig belægning på glas
og service.
Der er spor efter indtørrede
vanddråber på glas og service.
Det kan skyldes opvaskemidlet. Brug en anden type opvaske-
Opvasken er våd. Opvaskeprogrammet var uden
Opvasken er våd og mat. Beholderen til afspændings-
Multitab-funktionen er tændt
ke til opvaskens art og graden
af snavs.
rekt i kurvene, og vandet rørte
ikke ved alle overflader.
frit. Genstandene var lagt forkert i kurvene.
teret forkert.
opvaskemiddel.
Saltbeholderen er tom. Fyld saltbeholderen op med fil-
gøringsanlægget.
ikke lukket korrekt.
Der er brugt for meget afspæn-
dingsmiddel.
Der er brugt for lidt afspændingsmiddel.
en tørrefase eller med en nedsat tørrefase.
middel er tom.
(denne funktion slår automatisk beholderen til afspændingsmiddel fra).
Sørg for, det valgte opvaskeprogram passer til opvaskens
art og graden af snavs.
Læg gentandene korrekt i kurvene.
Kontroller, at en ukorrekt placering af genstandene ikke blokerer for spulearmene.
Sørg for, at filtrene er rene og
korrekt monteret.
Sørg for, der er tilstrækkeligt
med opvaskemiddel.
tersalt.
Justér blødgøringsanlægget
med det korrekte niveau.
Sørg for, at saltbeholderens
hætte er lukket korrekt.
Nedsæt mængden af afspæn-
dingsmiddel.
Øg mængden af afspændingsmiddel.
middel.
Lad lågen stå på klem i nogle
minutter for at opnå bedre tørring.
Fyld beholderen til afspændingsmiddel op.
Aktiver beholderen til afspændingsmiddel.
Aktivering af beholderen til afspændingsmiddel
1. Tænd for apparatet.
2. Sørg for, at apparatet står på indstillingsfunktionen.
3. Drej programknappen, indtil der vises to vandrette statusbjælker i displayet.
Page 21

Tekniske data
4. Tryk samtidigt på knappen Multitab og knappen Delay, og hold dem nede, indtil kontrollamperne
, og blinker.
5. Slip knappen Multitab og knappen Delay.
6. Tryk på knappen Delay.
–Kontrollamperne
–Kontrollampen
og slukkes.
bliver ved med at blinke.
– Displayet viser indstillingen for beholderen til afspændingsmiddel.
Beholderen til afspændingsmiddel er slået fra.
Beholderen til afspændingsmiddel er slået til.
7. Tryk på knappen Delay for at ændre indstillingen.
8. Sluk for apparatet for at bekræfte.
TEKNISKE DATA
Mål Bredde 596 mm
Højde 818 - 898 mm
Dybde 575 mm
Vandtilførslens tryk Minimum 0,5 bar (0,05 MPa)
Maksimum 8 bar (0,8 MPa)
Vandtilførsel
Kapacitet Antal kuverter 12
1) Forbind tilførselsslangen til en vandtilslutning/lukkeventil med et 3/4"-gevind.
1)
Typeskiltet på lågens indvendige kant på apparatet viser data for den elektriske forbindelse.
Koldt vand eller varmt vand Maksimalt 60 °C
21
Hvis det varme vand leveres af alternative energikilder (f.eks. solfangere, solceller eller vindenergi), bruges tilslutning til varmt vand for at spare på energien.
MILJØHENSYN
Symbolet på produktet eller på pakken angiver, at dette produkt ikke må behandles
som husholdningsaffald. Det skal i stedet overgives til en affaldsstation for behandling af
elektrisk og elektronisk udstyr. Ved at sørge for at dette produkt bliver bortskaffet på den
rette måde, hjælper du med til at forebygge eventuelle negative påvirkninger af miljøet
og af personers helbred, der ellers kunne forårsages af forkert bortskaffelse af dette
produkt. Kontakt det lokale kommunekontor, affaldsselskab eller den forretning, hvor
produktet er købt, for yderligere oplysninger om genanvendelse af dette produkt.
Genbrug materialer med symbolet
genbruge den.
. Anbring indpakningen i passende beholdere for at
Page 22

22
FOR PERFECT RESULTS
Thank you for choosing this AEG product. We have
created it to give you impeccable performance for many
years, with innovative technologies that help make life
simpler – features you might not find on ordinary
appliances. Please spend a few minutes reading to get
the very best from it.
ACCESSORIES AND CONSUMABLES
In the AEG webshop, you’ll find everything you need to
keep all your AEG appliances looking spotless and
working perfectly. Along with a wide range of
accessories designed and built to the high quality
standards you would expect, from specialist cookware
to cutlery baskets, from bottle holders to delicate
laundry bags…
Visit the webshop at:
www.aeg-electrolux.com/shop
Page 23

CONTENTS
Contents
24 Safety information
27 Product description
28 Control panel
30 Use of the appliance
30 Setting the water softener
32 Use of dishwasher salt
32 Use of detergent and rinse aid
33 Multitab function
34 Loading cutlery and dishes
34 Washing programmes
35 Select and start a washing
programme
37 Care and cleaning
38 What to do if…
41 Technical data
41 Environment concerns
23
The following symbols are used in this
user manual:
Important information concerning
your personal safety and information
on how to avoid damaging the
appliance.
General information and tips
Environmental information
Subject to change without notice
Page 24

Safety information
24
SAFETY INFORMATION
Before the installation and use, read this manual carefully:
• For your safety and the safety of your property.
• To help the environment.
• For the correct operation of the appliance.
Always keep these instructions with the appliance also if you move or give it to a different person.
The manufacturer is not responsible if an incorrect installation and use causes damage.
Children and vulnerable persons safety
• Do not let persons, children included, with reduced physical sensory, reduced mental
functions or lack of experience and knowledge to use the appliance. They must have
supervision or instruction for the operation of the appliance by a person who is responsible for their safety.
• Keep all packaging away from children. There is the risk of suffocation or injury.
• Keep all detergents in a safe area. Do not let the children touch the detergents.
• Keep children and pets away from the appliance when the door is open.
General safety
• Do not change the specifications of this appliance. There is the risk of injury and damage to the appliance.
• Obey the safety instructions from the detergent manufacturer to prevent burns to
eyes, mouth and throat.
• Do not drink the water from the appliance. Particles of detergent can stay in your appliance.
• Do not keep the appliance door open without supervision. This to prevent injury and
to fall on an open door.
• Do not sit or stand on the open door.
Use
• The appliance is only for domestic use. Do not use the appliance for other uses to prevent injury to persons and damage to property.
• Only use the appliance to clean accessories that are applicable for dishwashers.
• Do not put flammable products or items that are wet with flammable products in,
near or on the appliance. Risk of explosion or fire.
• Put the knives and all items with sharp points in the cutlery basket with their points
down. If not, put in a horizontal position in the upper basket or in the knife basket.
(Not all models have the knife basket).
• Use only specified products for dishwashers (detergent, salt, rinse aid).
• Types of salt that are not specified for dishwashers can cause damage to the water
softener.
• Fill the appliance with salt before you start a washing programme. Remaining salt in
the appliance can cause corrosion or make a hole in the bottom of the appliance.
Page 25

Safety information
• Do not fill the rinse aid dispenser with other products than the rinse aid, (dishwasher
cleaning agent, liquid detergent). This can cause damage to the appliance.
• Make sure that the spray arms can move freely before you start a washing programme.
• The appliance can release hot steam if you open the door while a washing programme
operates. There is a risk of skin burns.
• Do not remove the dishes from the appliance until the washing programme is completed.
Care and cleaning
• Before you clean the appliance, deactivate it and disconnect the mains plug from the
mains socket.
• Do not use flammable products or products that can cause corrosion.
• Do not use the appliance without the filters. Make sure that the installation of the
filters is correct. An incorrect installation causes unsatisfactory washing results and
damage to the appliance.
• Do not use spray water or steam to clean the appliance. Risk of electrical shock and
damage to the appliance.
Installation
• Make sure that the appliance is not damaged. Do not install or connect a damaged
appliance, contact the supplier.
• Remove all packaging before you install and use the appliance.
• Only a qualified person must do the electrical connection, the plumbing and the installation of the appliance. This to prevent the risks of structural damage or injury.
• Make sure that the mains plug is disconnected from the mains socket during installation.
• Do not drill into the sides of the appliance to prevent damage to hydraulic components and electrical components.
•
Important! Obey the instructions in the template supplied with the appliance:
– To install the appliance.
– To assemble the door panel.
– To connect to the water supply and drain.
• Make sure that the appliance is installed below and adjacent to safe structures.
25
Frost precautions
• Do not install the appliance where the temperature is less than 0 °C.
• The manufacturer is not responsible for frost damage.
Water connection
• Use new hoses to connect the appliance to the water supply. Do not use used hoses.
• Do not connect the appliance to new pipes or pipes not used for a long time. Let the
water flow for some minutes, then connect the inlet hose.
• Make sure not to squash or cause damage to the water hoses when you install the
appliance.
• Make sure that the water couplings are tight to prevent a water leakage.
• The first time you use the appliance, make sure that the hoses do not have water leaks.
Page 26

Safety information
26
• The water inlet hose has a safety valve and a double sheath with an inner mains cable.
There is pressure in the water inlet hose only when the water flows. If there is a leak in
the water inlet hose, the safety valve interrupts the flow of water.
– Be careful when you connect the water inlet hose:
– Do not put the water inlet hose or the safety valve in water.
– If the water inlet hose or the safety valve are damaged, immediately disconnect
the mains plug from the mains socket.
– Contact the service centre to replace the water inlet hose with safety valve.
WARNING!
Dangerous voltage.
Electrical connection
• The appliance must be earthed.
• Make sure that the electrical information on the rating plate agrees with the power
supply.
• Always use a correctly installed shockproof socket.
• Do not use multiple plugs and extension cables. There is a risk of fire.
• Do not replace or change the mains cable. Contact the service centre.
• Make sure not to squash or cause damage to the mains plug and cable behind the
appliance.
• Make sure that there is access to the mains plug after the installation.
• Do not pull the mains cable to disconnect the appliance. Always pull the mains plug.
Service centre
• Only a qualified person can repair or work on the appliance. Contact the service centre.
• Use only original spare parts.
To discard the appliance
• To prevent the risk of injury or damage:
– Disconnect the mains plug from the mains socket.
– Cut off the mains cable and discard it.
Page 27

Product description
– Remove the door catch. This prevents children or pets to be closed in the appliance.
There is a risk of suffocation.
– Discard the appliance at the local waste disposal centre.
WARNING!
The dishwasher detergents are dangerous and can cause corrosion !
• If an accident occurs with these detergents, contact immediately a physician.
• If the detergent gets into the mouth, contact immediately a physician.
• If the detergent gets into the eyes, contact immediately a physician and clean the eyes
with water.
• Keep dishwasher detergents in a safe area and out of children touch.
• Do not keep the appliance door open when there is detergent in the detergent dispenser.
• Fill the detergent dispenser only before you start a washing programme.
PRODUCT DESCRIPTION
1
27
10
9
2
3
4
5
1 Upper basket
2 Water hardness dial
3 Salt container
4 Detergent dispenser
5 Rinse aid dispenser
6 Rating plate
7 Filters
8 Lower spray arm
9 Upper spray arm
10 Top spray arm
8
7
6
Page 28
Control panel
28
CONTROL PANEL
1
1 On/off button
2 Programme guide
3 Programme marker
4 Indicators
5 Display
6 Start button
7 Delay button
8 Multitab button
9 Programme knob
Washing phase and rinsing phase indicator. It comes on when the washing
phase or the rinsing phases operate.
Drying phase indicator. It comes on when the drying phase operates.
2
3
9
8
Indicators
4
5
7
6
Rinse aid indicator. It comes on when it is necessary to fill the rinse aid dis-
1)
penser.
Salt indicator. It comes on when it is necessary to fill the salt container.
After you fill the container, the salt indicator can stay on for some hours. This
does not have an unwanted effect on the operation of the appliance.
Multitab indicator. It comes on when you activate the function.
1) When the salt container and/or the rinse aid dispenser are empty, the related indicators do not come on
while a washing programme operates.
On/off button
Press this button to activate or deactivate the appliance.
After ten minutes from the end of the washing programme, the AUTO OFF function automatically deactivates the appliance. This helps to decrease energy consumption.
1)
Page 29

Control panel
Programme guide
This guide helps you in the selection of the washing programme.
Display
The display shows:
• The electronic adjustment of the level of the water softener
• The activation and deactivation of the rinse aid dispenser (only with the multitab function on)
• The time of the washing programme
• The remaining time to the end of the washing programme
• The end of a washing programme (the display shows a zero)
• The time of the delay start
• The alarm codes.
Start button
Press this button to start:
• The washing programme
• The countdown of the delay start.
Delay button
Press this button again and again to delay the start of the washing programme from 1 to
24 hours.
29
Multitab button
Press this button to activate or deactivate the multitab function (refer to 'Multitab function').
Programme knob
To set a washing programme, align the programme marker that is on the knob with a
washing programme. Refer to 'Washing programmes'.
When you activate the appliance, the programme knob is aligned with the last set washing programme.
Setting mode
The appliance must be in setting mode for these operations:
• To set a washing programme.
• To set a delay start.
• To adjust electronically the level of the water softener.
• To activate or deactivate the rinse aid dispenser (only with the multitab function on).
Activate the appliance. The appliance is in setting mode when:
• The time of the last set washing programme flashes in the display.
• The indicators of the phases of the washing programme come on.
Page 30
Use of the appliance
30
Activate the appliance. The appliance is not in setting mode when:
• The time of the washing programme or of the delay start do not flash in the display.
• Only one phase indicator is on.
– It is necessary to cancel the programme or the delay start to go back to the setting
mode. Refer to 'Select and start a washing programme'.
USE OF THE APPLIANCE
1. Be sure that the set level of the water softener agrees with the water hardness in
your area. If not, adjust the water softener.
2. Fill the salt container with dishwasher salt.
3. Fill the rinse aid dispenser with rinse aid.
4. Load cutlery and dishes into the appliance.
5. Set the correct washing programme for the type of load and soil.
6. Fill the detergent dispenser with the correct quantity of detergent.
7. Start the washing programme.
If you use the combi detergent tablets ('3 in 1', '4 in 1', '5 in 1'), use the multitab function
(refer to 'Multitab function').
SETTING THE WATER SOFTENER
The water softener removes minerals and salts from the water supply. These minerals and
salts can cause damage to the appliance.
Adjust the level of the water softener if this does not agree with the water hardness in
your area.
Contact your local water authority to know the water hardness in your area.
Water hardness
German degrees
(°dH)
51 - 70 91 - 125 9,1 - 12,5 64 - 88
43 - 50 76 - 90 7,6 - 9,0 53 - 63
37 - 42 65 - 75 6,5 - 7,5 46 - 52
29 - 36 51 - 64 5,1 - 6,4 36 - 45
23 - 28 40 - 50 4,0 - 5,0 28 - 35
19 - 22 33 - 39 3,3 - 3,9 23 - 27
15 - 18 26 - 32 2,6 - 3,2 18 - 22 1 4
11 - 14 19 - 25 1,9 - 2,5 13 - 17 1 3
French degrees
(TH°)
mmol/l Clarke de-
grees
Water hardness ad-
justment
manually elec-
1)
2
1)
2
1)
2
1)
2
1)
2
1)
2
troni-
cally
10
9
8
7
6
1)
5
Page 31

Setting the water softener
31
Water hardness
German degrees
(°dH)
4 - 10 7 - 18 0,7 - 1,8 5 - 12 1 2
< 4 < 7 < 0,7 < 5
1) Factory position.
2) Do not use salt at this level.
French degrees
(TH°)
mmol/l Clarke de-
grees
Water hardness ad-
manually elec-
1
You must adjust the water softener manually and electronically.
Manual adjustment
Turn the water hardness dial to the position 1 or
2 (refer to the table).
Electronic adjustment
1. Activate the appliance.
2. Make sure that the appliance is in setting mode.
3. Turn the programme knob clockwise until the display shows two horizontal status bar.
4. Press and hold the Multitab button and the Delay button at the same time until the
indicators
5. Release the Multitab button and the Delay button .
6. Press the Multitab button,
•The indicators
•The indicator
• The display shows the setting of the water softener (example:
7. Press the Multitab button again and again to change the setting.
8. Deactivate the appliance to confirm.
If the water softener is set electronically to the level 1, the salt indicator stays off.
, and flash.
and go off.
continues to flash.
justment
2)
= level 5).
troni-
cally
2)
1
Page 32

20
30
M
A
X
1
2
3
4
+
-
Use of dishwasher salt
32
USE OF DISHWASHER SALT
How to fill the salt container
1. Turn the cap counterclockwise and open
the salt container.
2. Fill the salt container with 1 litre of wa-
ter (only for the first time you fill with
salt).
3. Use the funnel to fill the salt container
with salt.
4. Remove the salt around the opening of
the salt container.
5. Turn the cap clockwise to close the salt
container.
It is correct that water comes out from the salt container when you fill it with salt.
USE OF DETERGENT AND RINSE AID
1
2
7
3
4
6
5
Use of detergent
To help the environment, do not use more than the correct quantity of detergent.
Obey the instructions on the detergent packaging.
How to fill the detergent dispenser:
1.
Press the release button
2.
Put the detergent in the dispenser
3. If the washing programme has a prewash phase, put a small quantity of detergent
on the inner part of the appliance door.
4.
If you use the detergent tablets, put the tablet in the detergent dispenser
2
to open the lid 7 of the detergent dispenser.
1
.
1
.
Page 33

Multitab function
5. Close the detergent dispenser. Press the lid until it locks into position.
Use long washing programmes when you use the detergent tablets. These cannot fully
dissolve with short washing programmes and can decrease the washing results.
Use of rinse aid
Rinse aid makes it possible to dry the dishes without streaks and stains.
The rinse aid dispenser automatically adds rinse aid during the last rinsing phase.
Do these steps to fill the rinse aid dispenser:
1.
Press the release button
2.
Fill the rinse aid dispenser
3. Remove the spilled rinse aid with an absorbent cloth to prevent too much foam dur-
ing the washing programme.
4. Close the rinse aid dispenser. Press the lid until it locks into position.
6
to open the lid 5 of the rinse aid dispenser.
3
with rinse aid. The mark 'max' shows the maximum level.
Adjust the rinse aid dosage
Factory set: position 3.
You can set the rinse aid dosage between position 1 (lowest dosage) and position 4 (highest dosage).
Turn the rinse aid selector
4
to increase or decrease the dosage.
MULTITAB FUNCTION
33
The multitab function is for combi detergent tablets.
These tablets contain agents as detergent, rinse aid and dishwasher salt. Some types of
tablets can contain other agents.
Be sure that these tablets are applicable for the water hardness in your area (refer to the
instructions on the packaging of the products).
The multitab function deactivates the flow of rinse aid and salt.
The multitab function deactivates the indicators of salt and rinse aid.
The programme duration can increase if you use the multitab function.
Activate or deactivate the multitab function before the start of a washing programme.
You cannot activate or deactivate the function when a washing programme operates.
Activating the multitab function
• Press the Multitab button, the multitab indicator comes on. The function is activated.
– When you activate the multitab function, it stays on until you deactivate it.
Deactivating the multitab function and use separately detergent, salt and rinse aid
1. Press the Multitab button, the multitab indicator goes off. The function is deactivated.
2. Fill the salt container and the rinse aid dispenser.
3. Adjust the water hardness to the highest level.
4. Start a washing programme without dishes.
Page 34

Loading cutlery and dishes
34
5. When the washing programme is completed, adjust the water softener to the water
hardness in your area.
6. Adjust the quantity of rinse aid.
LOADING CUTLERY AND DISHES
Refer to the leaflet 'Examples of ProClean loads'.
Hints and tips
• Do not put in the appliance items that can absorb water (sponges, household cloths).
• Remove the remaining food from the items.
• Make soft the remaining burned food on the items.
• Put hollow items (cups, glasses and pans) with the opening down.
• Make sure that water does not collect in containers or in bowls.
• Make sure that cutlery and dishes do not bond together.
• Make sure that the glasses do not touch other glasses.
• Put small items in the cutlery basket.
• Mix the spoons with other cutlery to prevent them to bond together.
• When you put the items in the baskets, make sure that the water can touch all surfaces.
• Put light items in the upper basket. Make sure that the items do not move.
• Water droplets can collect on plastic items and non-stick pans.
WASHING PROGRAMMES
Programme Type of soil Type of load Programme description
All Crockery, cutlery,
1)
Fresh soil Crockery and cut-
2)
Normal soil Crockery and cut-
3)
Heavy soil Crockery, cutlery,
pots and pans
lery
lery
pots and pans
Prewash
Wash 45 °C or 70 °C
Rinses
Dry
Wash 60°C
Rinse
Prewash
Wash 50 °C
Rinses
Dry
Prewash
Wash 70 °C
Rinses
Dry
Page 35

Select and start a washing programme
Programme Type of soil Type of load Programme description
Use this programme to quickly rinse the
dishes. This prevents the remaining food
to bond on the dishes and bad odours to
come out from the appliance.
Do not use detergent with this programme.
1) The appliance senses the type of soil and the quantity of items in the baskets. It automatically adjusts the
temperature and quantity of the water, the energy consumption and the programme time.
2) With this programme you can wash a load with fresh soil. It gives good washing results in a short time.
3) This is the standard programme for test institutes. With this programme you have the most efficient use of
water and energy consumption for crockery and cutlery with normal soil. Refer to the supplied leaflet for
test information.
Rinse
35
Consumption values
Programme
1)
Energy (kWh) Water (litre)
0,9 - 1,7 8 - 15
0,9 9
1,5 - 1,6 13 - 14
0,9 - 1,0 9 - 11
0,1 4
1) The display shows the programme time.
The water pressure and temperature, the variations of the mains supply and the quantity
of dishes can change the consumption values.
SELECT AND START A WASHING PROGRAMME
Starting the washing programme without delay start
1. Close the appliance door.
2. Activate the appliance.
3. Make sure that the appliance is in setting mode.
4. Set the washing programme.
• The programme time flashes in the display.
• The phase indicators of the set washing programme come on.
5. Press the Start button, the washing programme starts automatically.
• The phase indicators go off but the indicator of the phase in operation stays on.
Starting the washing programme with delay start
1. Close the appliance door.
2. Activate the appliance.
3. Make sure that the appliance is in setting mode.
Page 36

Select and start a washing programme
36
4. Set the washing programme.
5. Press the Delay button again and again until the display shows the time of the delay
start.
• The time of the delay start flashes in the display.
6. Press the Start button, the countdown starts automatically.
• The delay start time flashes no more in the display.
• The phase indicators of the set washing programme go off.
When the countdown is completed, the washing programme starts automatically.
• The indicator of the phase in operation comes on.
The opening of the appliance door interrupts the countdown. When you close the door,
the countdown continues from the point of interruption.
Cancelling the delay start
The countdown is not operating
1. Press the Delay button again and again until:
• The display shows the time of the washing programme.
• The phase indicators come on.
2. Press the Start button to start the washing programme.
The countdown is operating
1. Press the Delay button again and again until:
• The display shows the time of the washing programme.
• The phase indicators come on.
• The washing programme starts automatically.
Interruption of a washing programme
• Open the appliance door.
– The washing programme stops.
• Close the appliance door.
– The washing programme continues from the point of interruption.
Cancelling the washing programme
If the washing programme has not started, you can change the selection.
To change the selection while the washing programme operates, it is necessary to cancel
the programme.
• At the same time press and hold the Multitab button and the Delay button until:
– The time of the washing programme flashes in the display.
– The indicators of the phases of the washing programme come on.
Make sure that there is detergent in the detergent dispenser before you start a new washing programme.
Page 37

Care and cleaning
End of the washing programme
When the washing programme is completed, the display shows a zero and the phase indicators go off.
Deactivate the appliance and open the door.
For better drying results, keep the appliance door ajar for some minutes.
Remove the items from the baskets
• Let the dishes become cold before you remove them from the appliance. Hot dishes
can be easily damaged.
• First remove the items from the lower basket, then from the upper basket.
• There can be water on the sides and on the door of the appliance. Stainless steel becomes cool more quickly than the dishes.
CARE AND CLEANING
To remove and clean the filters
Dirty filters decrease the washing results.
Although the maintenance is very low with these filters, make a check at intervals and if
necessary, clean them.
1. Turn the filter (A) counterclockwise and
remove it out from filter (B).
37
2. Filter (A) has two parts. To disassemble
the filter, pull them apart.
3. Fully clean the parts with water.
4. Put the two parts of the filter (A) togeth-
er and push. Make sure that they assemble correctly in each other.
5. Remove the filter (B).
6. Fully clean the filter (B) with water.
B
A
Page 38

What to do if…
38
7. Put the filter (B) to its initial position.
Make sure that it assembles correctly in
the two guides (C).
8. Put the filter (A) into position in filter
(B). Turn the filter (A) clockwise until it
locks.
To clean the spray arms
Do not remove the spray arms.
If the holes in the spray arms become clogged, remove remaining parts of soil with a
thin pointed object.
To clean the external surfaces
Clean the external surfaces of the appliance and control panel with a moist soft cloth.
Only use neutral detergents.
Do not use abrasive products, abrasive cleaning pads or solvents (acetone).
WHAT TO DO IF…
C
The start of the appliance does not occur or it stops during operation.
First try to find a solution to the problem (refer to the table). If not, contact the service
centre.
With some malfunctions, the display shows an alarm code:
- The appliance does not fill with water
•
- The appliance does not drain the water
•
- The anti-flood device is on.
•
WARNING!
Deactivate the appliance before you do the checks.
Malfunction Possible cause Possible solution
The appliance does not fill
with water.
The water pressure is too low. Contact your local water au-
The water tap is closed. Open the water tap.
The filter in the water inlet
The connection of the water in-
The water tap is blocked or
there is limescale on it.
hose is blocked.
let hose is not correct.
Clean the water tap.
thority.
Clean the filter.
Make sure that the connection
is correct.
Page 39

What to do if…
Malfunction Possible cause Possible solution
The water inlet hose is dam-
The appliance does not drain
the water.
The connection of the water
The water drain hose is dam-
The anti-flood device is on. Close the water tap and con-
The start of the washing programme does not occur.
You did not press the Start
The mains plug is not connec-
The fuse in the fuse box is dam-
The delay start is set. • Cancel the delay start.
aged.
There is a blockage in the sink
spigot.
drain hose is not correct.
aged.
The appliance door is open. Close the appliance door.
touchpad or button.
ted in the mains socket.
aged.
Make sure that the water inlet
hose has no damages.
Clean the sink spigot.
Make sure that the connection
is correct.
Make sure that the water
drain hose has no damages.
tact the service centre.
Press the Start touchpad or
button.
Connect the mains plug.
Replace the fuse.
• When the countdown is
completed, the washing programme starts automatically.
After the check, set the programme knob on the same washing programme before the
malfunction occurred. The programme continues from the point of interruption.
If the malfunction occurs again, contact the service centre.
If the display shows other alarm codes, contact the service centre.
The necessary information for the service centre is on the rating plate.
Record this information:
– Model (MOD.) ........................................................
– Product number (PNC) ..........................................
– Serial number (S.N.) ..............................................
39
The washing results and drying results are not satisfactory
Problem Possible cause Possible solution
The dishes are not clean. The washing programme was
not applicable for the type of
load and soil.
You did not put the items cor-
rectly in the baskets, water did
not touch all surfaces.
Make sure that the washing
programme is applicable for
the type of load and soil.
Put the items correctly in the
baskets.
Page 40

What to do if…
40
Problem Possible cause Possible solution
The spray arms could not turn
The filters are dirty or not as-
The quantity of detergent was
Limescale particles on the
dishes.
Incorrect level of the water
The salt container cap is not
There are streaks, whitish
stains, or a bluish layer on
glasses and dishes.
Dry water drop stains on
glasses and dishes.
The detergent can be the cause. Use a different brand of deter-
The dishes are wet. The washing programme was
The dishes are wet and matt. The rinse aid dispenser is emp-
The multitab function is on
freely. Incorrect position of
the items in the baskets.
sembled and installed correctly.
not sufficient or missing.
The salt container is empty. Fill the salt container with dish-
softener adjustment.
closed correctly.
The rinse aid quantity is too
high.
The rinse aid quantity is too
low.
without a drying phase or
with a decreased drying phase.
ty.
(this function automatically
deactivates the rinse aid dispenser).
Make sure that an incorrect position of the items do not
cause the blockage of the
spray arms.
Make sure that the filters are
clean and correctly assembled
and installed.
Make sure that the quantity of
detergent is sufficient.
washer salt.
Adjust the water softener with
the correct level.
Make sure that the salt con-
tainer cap is closed correctly.
Decrease the rinse aid quantity.
Increase the rinse aid quantity.
gent.
For better drying results, keep
the door ajar for some minutes.
Fill the rinse aid dispenser with
rinse aid.
Activate the rinse aid dispenser.
Activating the rinse aid dispenser
1. Activate the appliance.
2. Make sure that the appliance is in setting mode.
3. Turn the programme knob until the display shows two horizontal status bar.
4. Press and hold button Multitab and button Delay at the same time until the indica , and flash.
tors
5. Release button Multitab and button Delay.
6. Press button Delay.
–The indicators
–The indicator
and go off.
continues to flash.
Page 41

Technical data
– The display shows the setting of the rinse aid dispenser.
The rinse aid dispenser is off.
The rinse aid dispenser is on.
7. Press button Delay to change the setting.
8. Deactivate the appliance to confirm.
TECHNICAL DATA
Dimensions Width 596 mm
Height 818 - 898 mm
Depth 575 mm
Water supply pressure Minimum 0,5 bar (0,05 MPa)
Maximum 8 bar (0,8 MPa)
Water supply
Capacity Place settings 12
1) Connect the water inlet hose to a water tap with a 3/4'' thread.
1)
The rating plate on the inner edge of the appliance door shows the electrical connection
data.
Cold water or hot water maximum 60 °C
41
If the hot water comes from alternative sources of energy, (e.g. solar panels, photovoltaic
panels and aeolian), use a hot water supply to decrease energy consumption.
ENVIRONMENT CONCERNS
The symbol on the product or on its packaging indicates that this product may not
be treated as household waste. Instead it should be taken to the appropriate collection
point for the recycling of electrical and electronic equipment. By ensuring this product is
disposed of correctly, you will help prevent potential negative consequences for the
environment and human health, which could otherwise be caused by inappropriate
waste handling of this product. For more detailed information about recycling of this
product, please contact your local council, your household waste disposal service or the
shop where you purchased the product.
Recycle the materials with the symbol
recycle it.
. Put the packaging in applicable containers to
Page 42
42
PER RISULTATI PERFETTI
Grazie per aver scelto di acquistare questo prodotto
AEG. Lo abbiamo creato per fornirvi prestazioni
impeccabili per molti anni, grazie a tecnologie
innovative che vi semplificheranno la vita - funzioni che
non troverete sui normali elettrodomestici. Vi invitiamo
di dedicare qualche minuto alla lettura per sapere come
trarre il massimo dal vostro elettrodomestico.
ACCESSORI E PRODOTTI DI CONSUMO
All'interno del webshop AEG troverete tutto ciò che vi
serve per fare in modo che i vostri elettrodomestici AEG
siano sempre perfettamente puliti e funzionanti. Non
mancano inoltre una vasta gamma di accessori studiati
e realizzati conformemente agli elevati standard
qualitativi che vi aspettate: pentole, scolaposate,
portabottiglie e sacchi biancheria delicati...
Visitate il webshop su
www.aeg-electrolux.com/shop
Page 43

INDICE
Indice
44 Informazioni per la sicurezza
48 Descrizione del prodotto
49 Pannello dei comandi
51 Uso dell'apparecchiatura
51 Regolazione del decalcificatore
dell’acqua
53 Uso del sale per lavastoviglie
53 Uso del detersivo e del brillantante
54 Uso di pastiglie combinate
55 Sistemazione di posate e stoviglie
56 Programmi di lavaggio
57 Selezione e avvio di un
programma di lavaggio
58 Pulizia e cura
60 Cosa fare se…
63 Dati tecnici
63 Considerazioni ambientali
43
In questo manuale sono riportati i
seguenti simboli:
Informazioni importanti relative alla
prevenzione dei rischi per la salute
personale e dei danni alle
apparecchiature.
Informazioni e consigli generali
Informazioni in materia di sicurezza
ambientale
Con riserva di modifiche
Page 44

Informazioni per la sicurezza
44
INFORMAZIONI PER LA SICUREZZA
Leggere attentamente il presente libretto di istruzioni prima dell'installazione e dell'uso:
• Per la propria sicurezza e per la sicurezza dei propri oggetti.
• Per motivi ecologici.
• Per il buon funzionamento dell’apparecchiatura.
Conservare sempre queste istruzioni assieme all'apparecchio anche in caso di trasferimento o di vendita dell'apparecchio stesso.
Il costruttore non risponde di danni da ascrivere a un'installazione e uso non corretti.
Sicurezza dei bambini e delle persone con problemi
• Non permettere alle persone, compresi i bambini, con capacità fisiche, sensoriali o mentali ridotte, o con mancanza di esperienza e conoscenza di utilizzare l'apparecchio, a
meno che tale utilizzo non avvenga sotto la supervisione o la guida di una persona
responsabile della loro sicurezza.
• Tenere i materiali di imballaggio al di fuori della portata dei bambini. Sussiste il rischio
di soffocamento o lesioni.
• Conservare i detersivi in un luogo sicuro. Evitare che i bambini tocchino i detersivi.
• Tenere lontani i bambini e gli animali domestici dall'apparecchio quando la porta è aperta.
Norme di sicurezza generali
• Non apportare modifiche alle specifiche di questo prodotto. Vi è il rischio di ferirsi o
danneggiare l'apparecchio.
• Seguire le istruzioni di sicurezza del produttore di detersivo per evitare ustioni chimiche a occhi, bocca e gola.
• Non bere l’acqua dell'apparecchio. Potrebbe contenere particelle di detersivo.
• Non tenere la porta dell'apparecchio aperta senza supervisione. In questo modo si prevengono lesioni e la caduta su una porta aperta.
• Non sedersi o salire sullo sportello aperto.
Uso dell’apparecchiatura
• Questo apparecchio è destinato solo all'uso domestico. Non utilizzare l'apparecchio
per altri utilizzi per prevenire lesioni alle persone e danni alle cose.
• Utilizzare l'apparecchio solo per lavare accessori idonei alla lavastoviglie.
• Non appoggiare o tenere liquidi o materiali infiammabili, né oggetti facilmente incendiabili sull'apparecchio, al suo interno o nelle immediate vicinanze. Si può verificare
un'esplosione o un incendio.
• Mettere i coltelli e gli altri utensili appuntiti nel cestello delle posate con la punta rivolta verso il basso, altrimenti sistemarli orizzontalmente nel cestello superiore o nell'apposito cestello (non tutti i modelli hanno questo cestello).
• Usare solo prodotti specifici per lavastoviglie (detersivo, sale, brillantante).
• Altri tipi di sale possono danneggiare il decalcificatore.
• Riempire l'apparecchio di sale prima di avviare un programma di lavaggio. Il sale residuo nell'apparecchio può causare corrosione o creare un foro sul fondo dell'apparecchio.
Page 45

Informazioni per la sicurezza
• Non introdurre nel contenitore del brillantante altre sostanze (detergenti per lavastoviglie, detersivi liquidi). Ciò potrebbe danneggiare l'apparecchio.
• Prima di avviare un programma di lavaggio, assicurarsi che i mulinelli possano ruotare
liberamente.
• L'apparecchio può rilasciare vapore caldo se si apre lo sportello durante un programma di lavaggio. Vi è rischio di scottature.
• Non rimuovere i piatti dall'apparecchio fino al completamento del programma di lavaggio.
Pulizia e cura
• Prima di pulire l'apparecchio, spegnerlo ed estrarre la spina dalla presa.
• Non usare prodotti infiammabili o che possono causare corrosione.
• Non usare la lavastoviglie senza i filtri. Controllare che i filtri siano stati installati correttamente. Un'installazione non corretta dei filtri influisce negativamente sui risultati
del lavaggio e può danneggiare l'apparecchiatura.
• Non usare acqua spray né vapore per pulire l'apparecchio. Vi è il rischio di scosse elettriche o di danni all'apparecchio.
Installazione
• Controllare che l'apparecchiatura non sia danneggiata. Non installare né collegare
un'apparecchiatura danneggiata; se ciò dovesse verificarsi, contattare.
• Rimuovere tutti gli imballaggi prima di installare e usare l'apparecchiatura.
• I collegamenti elettrici, i collegamenti idraulici e l'installazione dell'apparecchiatura devono essere effettuati solo da personale qualificato. Questa misura ha lo scopo di evitare rischi legati a danni strutturali o lesioni fisiche.
• Verificare che la spina sia staccata dalla presa elettrica durante l’installazione.
• Non forare le pareti laterali dell'apparecchiatura per evitare di danneggiare i componenti idraulici ed elettrici.
•
Importante! Attenersi alle istruzioni riportate nel modello fornito insieme all'apparecchiatura:
– per installare l'apparecchiatura;
– per montare il pannello dello sportello;
– per collegare l’apparecchiatura all’alimentazione e allo scarico dell'acqua.
• Assicurarsi che l'apparecchio sia installato sotto e vicino a parti adeguatamente ancorate a una struttura fissa.
45
Precauzioni antigelo
• Non collocare l’apparecchio in un luogo in cui la temperatura possa scendere al di sotto di 0°C.
• Il produttore non è responsabile di eventuali danni dovuti al gelo.
Collegamento dell’acqua
• Utilizzare tubi nuovi per il collegamento dell'apparecchio all'alimentazione dell'acqua.
Non utilizzare tubi usati.
Page 46

Informazioni per la sicurezza
46
• Non collegare l'apparecchio a tubazioni nuove o rimaste inutilizzate per molto tempo.
Lasciar scorrere l’acqua per alcuni minuti prima di collegare il tubo di carico dell'acqua.
• Accertarsi di non schiacciare o danneggiare i tubi di carico e scarico dell'acqua quando
si installa l'apparecchio.
• Per evitare perdite, assicurarsi che gli accoppiamenti siano serrati a fondo.
• La prima volta che si usa la lavastoviglie, accertarsi che non vi siano perdite nei tubi.
• Il tubo di carico dell'acqua dispone di una valvola di sicurezza e una doppia guaina
con un cavo elettrico interno. Il tubo di carico è soggetto a pressione solo quando l'acqua scorre. In caso di una perdita nel tubo di carico dell'acqua, la valvola di sicurezza
interrompe il passaggio dell'acqua.
– Prestare attenzione quando si collega il tubo di carico dell'acqua:
– Non immergere nell'acqua il tubo di carico o la valvola di sicurezza.
– Se il tubo di carico o la valvola di sicurezza sono danneggiati, scollegare immedia-
tamente la spina dalla presa elettrica.
– Fare sostituire il tubo di carico dell'acqua con valvola di sicurezza solo da perso-
nale specializzato.
AVVERTENZA
Pericolo di tensione.
Collegamento elettrico
• L'apparecchio deve disporre di una messa a terra.
• Verificare che i dati elettrici riportati sulla targhetta del modello corrispondano a quelli dell'impianto.
• Utilizzare sempre una presa di corrente collegata a terra e correttamente installata.
• Non utilizzare prese multiple e prolunghe. Vi è il rischio di incendio.
• Non sostituire o modificare mai il cavo elettrico da soli. Contattare il centro assistenza.
• Evitare di schiacciare o danneggiare la presa e il cavo dietro il dispositivo.
• Verificare che la spina di alimentazione rimanga accessibile dopo l'installazione.
• Non tirare il cavo di alimentazione per scollegare l’apparecchio. Tirare solo la spina.
Page 47

Informazioni per la sicurezza
Centro assistenza
• Le riparazioni o i lavori all'apparecchio devono essere svolti esclusivamente da una persona qualificata. Contattare il centro assistenza.
• Devono essere utilizzati esclusivamente ricambi originali.
Per smaltire l'apparecchio
• Per evitare il rischio di danni o lesioni:
– Scollegare la spina dalla presa di corrente.
– Tagliare il cavo di rete e smaltirlo.
– Rimuovere il fermo della porta. Ciò evita che i bambini o gli animali domestici resti-
no chiusi nell'apparecchio. Vi è il rischio di soffocamento.
– Scartare l'apparecchio presso il locale centro di smaltimento dei rifiuti.
AVVERTENZA
I detersivi per lavastoviglie sono pericolosi e possono causare corrosione!
• Se durante l'utilizzo di questi detersivi dovesse verificarsi un incidente, richiedere l'immediato intervento di un medico.
• Se il detersivo dovesse penetrare nella bocca, richiedere l'immediato intervento di un
medico.
• In caso di contatto con gli occhi, contattare immediatamente un medico e lavare gli
occhi con acqua.
• Tenere tutti i detersivi per lavastoviglie in un luogo sicuro e fuori della portata dei bambini.
• Non lasciare lo sportello dell'apparecchio aperto quando è presente detersivo nell'apposito contenitore.
• Riempire il contenitore del detersivo solo prima di avviare un programma di lavaggio.
47
Page 48

Descrizione del prodotto
48
DESCRIZIONE DEL PRODOTTO
1
2
10
9
3
4
5
1 Cestello superiore
2 Selettore durezza dell'acqua
3 Contenitore del sale
4 Contenitore del detersivo
5 Contenitore del brillantante
6 Targhetta di identificazione
7 Filtri
8 Mulinello inferiore
9 Mulinello superiore
10 Mulinello sul cielo vasca
8
7
6
Page 49

PANNELLO DEI COMANDI
Pannello dei comandi
49
1
9
2
3
4
7
8
1 Tasto on/off
2 Guida programma
3 Indice di riferimento per la selezione dei programmi
4 Indicatori
5 Display
6 TastoStart
7 TastoDelay
8 TastoMultitab
9 Selettore dei programmi
Indicatori
Spia della fase di lavaggio e risciacquo. Si accende quando sono in corso le
fasi di lavaggio o risciacquo.
Spia della fase di asciugatura. Si accende quando è in corso la fase di asciugatura.
5
6
Spia del brillantante. Si accende quando è necessario riempire il contenitore
del brillantante.
Spia del sale. La spia si accende quando è necessario riempire il contenitore
del sale.
Dopo avere riempito il contenitore, la spia del sale potrebbe restare accesa ancora per qualche ora. Ciò non compromette il corretto funzionamento dell'apparecchiatura.
Spia della funzione Multitab. Si accende quando si attiva la funzione.
1) Quando il contenitore del sale e/o del brillantante sono vuoti, la spia corrispondente non si accende durante
l'esecuzione di un programma.
1)
1)
Tasto on/off
Premere questo tasto per attivare e disattivare l'apparecchiatura.
Page 50

Pannello dei comandi
50
Dopo dieci minuti dalla fine del programma, la funzione AUTO OFF disattiva automaticamente l'apparecchiatura. Ciò contribuisce a ridurre il consumo di energia.
Guida programma
Questa guida aiuta nella selezione del programma di lavaggio.
Display
Il display mostra:
• La regolazione elettronica del decalcificatore dell'acqua.
• L'attivazione e disattivazione del contenitore del brillantante (solo con la funzione Multitab attiva)
• Il tempo del programma di lavaggio
• Il tempo residuo al termine del programma di lavaggio
• La fine del programma di lavaggio (nel display viene visualizzato uno zero)
• Il conto alla rovescia della partenza ritardata
• I codici allarme.
Start tasto
Premere questo tasto per avviare:
• Il programma di lavaggio
• Il conto alla rovescia della partenza ritardata.
Delay tasto
Premere questo tasto ripetutamente per ritardare l'avvio del programma di lavaggio da 1
ora fino ad un massimo di 24 ore.
Tasto Multitab
Premere questo tasto per attivare o disattivare la funzione Multitab (fare riferimento al
capitolo "Funzione Multitab").
Selettore dei programmi
Per impostare un programma di lavaggio, allineare la tacca dei programmi sul selettore a
un programma di lavaggio. Consultare la tabella "Programmi di lavaggio".
Quando si attiva l'apparecchio, il selettore dei programmi è allineato con l'ultimo programma di lavaggio selezionato.
Modalità impostazione
L’apparecchiatura deve essere in modalità impostazione per eseguire le seguenti
operazioni:
• Impostare un programma di lavaggio.
• Impostare la partenza ritardata.
• Regolare elettronicamente il livello del decalcificatore dell'acqua.
• Attivare o disattivare l'erogazione del brillantante (solo con la funzione Multitab attiva).
Page 51

Uso dell'apparecchiatura
Attivare l'apparecchiatura. L’apparecchiatura è in modalità impostazione quando:
• Sul display lampeggia la durata dell'ultimo programma di lavaggio selezionato.
• Le spie delle fasi del programma specificato si accendono.
Attivare l'apparecchiatura. L’apparecchiatura non è in modalità impostazione quando:
• La durata del programma di lavaggio o il conto alla rovescia della partenza ritardata
non lampeggia sul display.
• È accesa solo una spia di fase.
– È necessario annullare il programma o la partenza ritardata per tornare alla modali-
tà di impostazione. Fare riferimento al capitolo "Selezione e avvio di un programma
di lavaggio".
USO DELL'APPARECCHIATURA
1. Accertarsi che il livello stabilito del decalcificatore dell'acqua sia conforme alla durez-
za dell'acqua locale. In caso contrario, regolare il decalcificatore dell'acqua.
2. Riempire il contenitore del sale.
3. Riempire il contenitore del brillantante.
4. Caricare le stoviglie nella lavastoviglie.
5. Impostare il programma corretto per il tipo di carico ed il grado di sporco.
6. Riempire il contenitore con un quantitativo corretto di detersivo.
7. Avviare il programma di lavaggio.
Se si utilizzano pastiglie combinate ("3 in 1", "4 in 1", "5 in 1"), usare la funzione MULTITAB (fare riferimento al capitolo "Funzione Multitab").
51
REGOLAZIONE DEL DECALCIFICATORE DELL’ACQUA
Il decalcificatore dell'acqua rimuove i sali e i minerali presenti nell'acqua della rete idrica.
Questi minerali e sali possono danneggiare l'apparecchiatura.
Regolare il livello del decalcificatore dell'acqua se non dovesse corrispondere alla durezza
dell'acqua locale.
Contattare l'ente locale di erogazione idrica per informarsi circa la durezza dell'acqua nella propria area.
Durezza dell'acqua
gradi tedeschi gradi francesi mmol/l gradi Clarke Manuale Elet-
51 - 70 91 - 125 9,1 - 12,5 64 - 88
43 - 50 76 - 90 7,6 - 9,0 53 - 63
37 - 42 65 - 75 6,5 - 7,5 46 - 52
29 - 36 51 - 64 5,1 - 6,4 36 - 45
Regolazione della du-
rezza dell'acqua
2
2
2
2
tronica
1)
1)
1)
1)
10
9
8
7
Page 52

Regolazione del decalcificatore dell’acqua
52
Durezza dell'acqua
gradi tedeschi gradi francesi mmol/l gradi Clarke Manuale Elet-
23 - 28 40 - 50 4,0 - 5,0 28 - 35
19 - 22 33 - 39 3,3 - 3,9 23 - 27
15 - 18 26 - 32 2,6 - 3,2 18 - 22 1 4
11 - 14 19 - 25 1,9 - 2,5 13 - 17 1 3
4 - 10 7 - 18 0,7 - 1,8 5 - 12 1 2
< 4 < 7 < 0,7 < 5
1) Impostazione di fabbrica.
2) Non utilizzare il sale a questo livello.
Il decalcificatore dell’acqua deve essere regolato manualmente ed elettronicamente.
Impostazione manuale
Ruotare la manopola per la durezza dell'acqua sulla posizione 1 o 2 (fare riferimento alla tabella).
Regolazione della du-
rezza dell'acqua
tronica
1)
2
1)
2
2)
1
6
1)
5
2)
1
Regolazione elettronica
1. Attivare l'elettrodomestico.
2. Verificare che l'apparecchiatura sia in modalità impostazione.
3. Ruotare il selettore dei programmi in senso orario fino a quando sul display compaio-
no due barre di stato orizzontali.
4. Premere e tenere premuti contemporaneamente il tasto Multitab e quello Delay fino
a quando le spie
5. Rilasciare il tasto Multitab ed il tasto Delay.
6. Premere il tasto Multitab .
• Le spie
•La spia
• Il display visualizza l'impostazione del decalcificatore dell'acqua (ad es.:
lo 5).
7. Premere ripetutamente il tasto Multitab per modificare l'impostazione.
8. Disattivare l'apparecchiatura per confermare.
, e lampeggiano.
e si spengono.
continua a lampeggiare.
= livel-
Page 53

20
30
M
A
X
1
2
3
4
+
-
Uso del sale per lavastoviglie
Se il decalcificatore dell'acqua viene impostato elettronicamente sul livello 1, la spia del
sale rimane spenta.
USO DEL SALE PER LAVASTOVIGLIE
Come riempire il contenitore del sale
1. Ruotare il tappo in senso antiorario e aprire il contenitore del sale.
2. Versare 1 litro di acqua all'interno del contenitore del sale (solo la prima volta che
lo si riempie di sale).
3. Riempire il contenitore con il sale servendosi dell'imbuto.
4. Togliere l'eventuale sale rimasto attorno
all'apertura del contenitore.
5. Ruotare il tappo in senso orario per chiudere il contenitore del sale.
È giusto che l’acqua fuoriesca dal contenitore quando si riempie con il sale.
USO DEL DETERSIVO E DEL BRILLANTANTE
53
1
2
7
Uso del detersivo
Per contribuire alla protezione dell’ambiente, non usare una dose di detersivo superiore
3
4
6
5
alla quantità raccomandata.
Attenersi alle raccomandazioni del produttore riportate sulla confezione del detersivo.
Come riempire il contenitore del detersivo:
1.
Premere il tasto di sgancio
2
per aprire il coperchio 7 del contenitore del detersivo.
Page 54

Uso di pastiglie combinate
54
2.
Mettere il detersivo nel contenitore
3. Se il programma prevede una fase di prelavaggio, mettere una piccola quantità di
detersivo nella parte interna dello sportello della lavastoviglie.
4.
Se si utilizzano tavolette combinate, inserire la tavoletta nel contenitore
5. Chiudere il contenitore. Premere il coperchio fino a che non si blocca.
Con le pastiglie di detersivo, utilizzare programmi di lavaggio lunghi. Le pastiglie non si
sciolgono completamente con i programmi di lavaggio brevi e possono ridurre la qualità
dei risultati di lavaggio.
1
.
Uso del brillantante
Il brillantante permette di asciugare le stoviglie senza strisce o macchie.
Il contenitore del brillantante aggiunge automaticamente il brillantante durante l'ultima
fase di risciacquo.
Riempire il contenitore del brillantante procedendo nel modo seguente:
1.
Premere il tasto di sgancio
2.
Riempire il contenitore del brillantante
il livello massimo.
3. Togliere l'eventuale brillantante fuoriuscito con un panno assorbente per evitare la
formazione di schiuma eccessiva durante il lavaggio.
4. Chiudere il contenitore del brillantante. Premere il coperchio fino a che non si blocca.
6
per aprire il coperchio 5 del contenitore del brillantante.
3
con il brillantante. Il simbolo "max" indica
Regolare il dosaggio del brillantante
Impostazione di fabbrica: posizione 3.
È possibile impostare il livello del brillantante da 1 (dosaggio minore) a 4 (dosaggio maggiore).
Ruotare il selettore del brillantante
4
per aumentare o diminuire il dosaggio.
1
.
USO DI PASTIGLIE COMBINATE
La funzione Multitab è specifica per l'utilizzo di detersivo in pastiglie.
Queste pastiglie contengono agenti quali detersivo, brillantante e sale. Alcuni tipi di pastiglie possono contenere altri agenti.
Accertarsi che le pastiglie siano adatte alla durezza dell'acqua locale (fare riferimento alle
istruzioni sulla confezione dei prodotti).
La funzione Multitab disattiva l’erogazione di brillantante e sale.
La funzione Multitab disattiva le spie del brillantante e del sale.
La durata del programma può aumentare se si usa la funzione Multitab a seguito dell'adattamento automatico dei tempi per garantire lo scioglimento della pastiglia.
Attivare o disattivare la funzione Multitab prima di avviare un programma di lavaggio.
Non è possibile attivare o disattivare la funzione Multitab quando un programma di lavaggio è in corso.
Page 55

Sistemazione di posate e stoviglie
Disattivazione della funzione Multitab.
• Premere il tasto Multitab . La spia della funzione Multitab si accende. La funzione è attiva.
– Una volta impostata, la funzione Multitab rimane attiva fino a quando non viene
disattivata.
Disattivazione della funzione Multitab e utilizzo separato del detersivo, sale e
brillantante
1. Premere il tasto Multitab . La spia della funzione Multitab si spegne. La funzione è
disattivata.
2. Riempire il contenitore del sale e il contenitore del brillantante.
3. Impostare il decalcificatore dell'acqua sul livello più alto.
4. Avviare un programma di lavaggio senza piatti.
5. Una volta completato il programma di lavaggio, regolare decalcificatore dell’acqua in
base alla durezza dell'acqua locale.
6. Regolare il dosaggio del brillantante.
SISTEMAZIONE DI POSATE E STOVIGLIE
Fare riferimento all'opuscolo "Esempi di carichi ProClean".
Suggerimenti
• Non inserire nell'apparecchiatura oggetti che possano assorbire acqua (spugne, panni).
• Eliminare i residui di cibo dalle stoviglie.
• Ammorbidire le tracce di bruciato nelle stoviglie.
• Disporre gli utensili cavi (tazze, bicchieri e padelle) con l’apertura rivolta verso il basso
• Assicurarsi che l’acqua non si depositi nei contenitori o nelle ciotole.
• Assicurarsi che le posate e i piatti non aderiscano tra loro.
• Verificare che i bicchieri non si tocchino l’un l’altro.
• Disporre gli oggetti piccoli nel cestello portaposate.
• Collocare i cucchiai insieme ad altri tipi di posate per evitare che aderiscano tra loro.
• Quando si inseriscono le stoviglie nei cestelli, assicurarsi che l'acqua raggiunga tutte le
superfici.
• Sistemare gli oggetti leggeri nel cestello superiore in modo tale che non possano muo-
versi.
• Le stoviglie in plastica e i tegami in materiale antiaderente tendono a trattenere le goc-
ce d'acqua.
55
Page 56

Programmi di lavaggio
56
PROGRAMMI DI LAVAGGIO
Programma Tipo di sporco Tipo di carico Descrizione programma
Tutti Stoviglie miste, po-
1)
Sporco fresco Stoviglie e posate Lavaggio 60°C
2)
sate e pentole
Ammollo
Lavaggio 45 °C o 70 °C
Risciacqui
Asciugatura
Risciacquo
Grado di sporco
3)
normale
Stoviglie e posate Ammollo
Lavaggio 50 °C
Risciacqui
Asciugatura
Sporco intenso Stoviglie miste, po-
sate e pentole
Ammollo
Lavaggio 70 °C
Risciacqui
Asciugatura
Utilizzare questo programma per risciac-
Risciacquo
quare rapidamente i piatti. Ciò evita che
i residui di cibo di attacchino ai piatti e
dall'elettrodomestico fuoriescano cattivi
odori.
Non utilizzare il detersivo con questo programma.
1) L'apparecchio rileva il tipo di sporco e la quantità di articoli presenti nei cestelli. Regola automaticamente la
temperatura e quantità dell'acqua, oltre che il consumo di elettricità e la durata del programma.
2) Con questo programma è possibile lavare un carico dallo sporco fresco. Offre buoni risultati di lavaggio in
breve tempo.
3) Il programma standard per gli istituti di prova. Questo programma offre l'utilizzo più efficiente dell'acqua ed
elettricità per lavare stoviglie e posate normalmente sporche. Fare riferimento all'opuscolo in dotazione per
le informazioni sulle condizioni di prova.
Valori di consumo
Programma
1)
Energia elettrica (kWh) Acqua (in litri)
0,9 - 1,7 8 - 15
0,9 9
1,5 - 1,6 13 - 14
0,9 - 1,0 9 - 11
0,1 4
1) Il display indica la durata del programma.
I valori di consumo possono variare a seconda della pressione e della temperatura dell’acqua, le variazioni dell’alimentazione elettrica e la quantità di stoviglie.
Page 57

Selezione e avvio di un programma di lavaggio
SELEZIONE E AVVIO DI UN PROGRAMMA DI LAVAGGIO
Avvio del programma di lavaggio senza partenza ritardata
1. Chiudere lo sportello dell'apparecchiatura.
2. Attivare l'apparecchiatura.
3. Verificare che l'apparecchiatura sia in modalità impostazione.
4. Impostare il programma di lavaggio.
• Sul display lampeggia la durata del programma.
• Le spie delle fasi del programma specificato si accendono.
5. Premere il tasto Start , il programma di lavaggio impostato parte automaticamente.
• Le spie delle fasi si spengono, mentre quella della fase di funzionamento resta accesa.
Avvio del programma di lavaggio con la partenza ritardata.
1. Chiudere lo sportello dell'apparecchiatura.
2. Attivare l'apparecchiatura.
3. Verificare che l'apparecchiatura sia in modalità impostazione.
4. Impostare il programma di lavaggio.
5. Premere ripetutamente il tasto Delay fino a quando il display visualizza il conto alla
rovescia della partenza ritardata.
• Il conto alla rovescia della partenza ritardata lampeggia sul display.
6. Premere il tasto Start ; il conto alla rovescia parte automaticamente.
• Il conto alla rovescia della partenza ritardata smette di lampeggiare sul display.
• Le spie delle fasi del programma specificato si spengono.
Al termine del conto alla rovescia il programma si avvia automaticamente.
• La spia della fase in corso si accende.
L'apertura dello sportello interrompe il conto alla rovescia. Quando si chiude nuovamente
lo sportello, il conto alla rovescia riprende dal punto in cui era stato interrotto.
57
Annullamento della partenza ritardata
Il conto alla rovescia non è attivo
1. Premere ripetutamente il tasto Delay fino a quando:
• Il display mostra la durata del programma di lavaggio.
• Le spie delle fasi del programma si accendono.
2. Premere il tasto Start per avviare il programma di lavaggio.
Il conto alla rovescia è attivo
1. Premere ripetutamente il tasto Delay fino a quando:
• Il display mostra la durata del programma di lavaggio.
• Le spie delle fasi del programma si accendono.
• Il programma di lavaggio si avvia automaticamente.
Page 58

Pulizia e cura
58
Interruzione del programma di lavaggio
• Aprire lo sportello della lavastoviglie.
– Il programma si interrompe.
• Chiudere lo sportello della lavastoviglie.
– Il programma riprende dal punto in cui era stato interrotto.
Annullamento del programma di lavaggio
Se il programma di lavaggio non è ancora iniziato, è possibile modificare la selezione.
Per modificare la selezione mentre il programma di lavaggio è in corso, è necessario annullare il programma.
• Premere e tenere premuti contemporaneamente il tasto Multitab e quello Delay fino a
quando:
– La durata del programma di lavaggio lampeggia sul display.
– Le spie delle fasi del programma specificato si accendono.
Verificare che vi sia del detersivo nell'apposito contenitore prima di avviare un nuovo programma di lavaggio.
Fine del programma di lavaggio
Una volta completato il programma di lavaggio, sul display è visualizzato uno zero e le
spie delle fasi si spengono.
Disattivare l'apparecchiatura e aprire lo sportello.
Per ottenere risultati di asciugatura migliori, lasciare lo sportello dell'apparecchiatura socchiuso per alcuni minuti.
Rimuovere tali elementi dai cestelli
• Lasciare raffreddare i piatti prima di estrarli dalla lavastoviglie. Le stoviglie calde posso-
no essere più facilmente danneggiabili.
• Vuotare prima il cestello inferiore e quindi quello superiore.
• Sulle pareti laterali e sulla porta della lavastoviglie può formarsi della condensa perché
l'acciaio inox si raffredda più velocemente della ceramica.
PULIZIA E CURA
Rimozione e pulizia dei filtri
I filtri sporchi riducono i risultati di lavaggio.
Nonostante richiedano poca manutenzione, controllarli con regolarità e, se necessario, pulirli.
Page 59

1. Ruotare il filtro (A) in senso antiorario ed
estrarlo dal filtro (B).
2. Il filtro (A) è composto da 2 parti. Staccar-
le per smontare il filtro.
3. Pulire accuratamente i componenti con
dell'acqua.
4. Assemblare i 2 componenti del filtro (A) e
spingere. Accertarsi che siano montati correttamente l'uno nell'altro.
5. Rimuovere il filtro (B).
6. Pulire accuratamente il filtro (B) con del-
l'acqua.
B
Pulizia e cura
A
59
7. Collocare il filtro (B) nella posizione ini-
ziale. Verificare che sia montato correttamente nelle due guide (C).
8. Inserire il filtro (A) in posizione nel filtro
(B). Ruotare il filtro (A) in senso orario fino a bloccarsi.
Pulire i mulinelli
Non rimuovere i mulinelli.
Se i fori dei mulinelli sono ostruiti da residui di sporco, liberarli servendosi di un oggetto
a punta fine.
Pulire le superfici esterne
Pulire le superfici esterne dell’apparecchiatura e il pannello dei comandi con un panno
morbido inumidito.
Utilizzare solo detergenti neutri.
Non usare prodotti abrasivi, spugnette abrasive o solventi (acetone).
C
Page 60

Cosa fare se…
60
COSA FARE SE…
L'apparecchio non si avvia o blocca durante il funzionamento.
Cercare dapprima di risolvere il problema (fare riferimento alla tabella). Se ciò non è possibile, contattare l’assistenza tecnica.
Il display visualizza un codice allarme in alcuni casi:
- La lavastoviglie non carica acqua
•
- L'apparecchiatura non scarica
•
- Il dispositivo antiallagamento è attivo.
•
AVVERTENZA
Disattivare l'apparecchiatura prima di eseguire i controlli.
Guasto Possibile causa Possibile soluzione
L'apparecchiatura non carica
acqua.
La pressione dell'acqua è trop-
Il rubinetto dell’acqua è chiuso. Aprire il rubinetto dell’acqua.
Il filtro del tubo di carico del-
Il tubo di carico dell'acqua
Il tubo di carico dell'acqua è
L'apparecchiatura non scarica
l'acqua.
Il tubo di scarico dell'acqua
Il tubo di scarico dell'acqua è
Il dispositivo antiallagamento
è attivo.
Il programma di lavaggio non
si avvia.
Non si ha premuto il touchpad
La spina non è inserita nella
Il rubinetto dell'acqua è ostruito o intasato dal calcare.
po bassa.
l'acqua è ostruito.
non è collegato correttamente.
danneggiato.
Lo scarico del lavello è ostruito. Pulire lo scarico del lavello.
non è collegato correttamente.
danneggiato.
Chiudere il rubinetto dell’ac-
Lo sportello dell'apparecchiatura è aperto.
o tasto Start .
presa di alimentazione.
Pulire il rubinetto dell’acqua.
Contattare l’ente erogatore locale.
Pulire il filtro.
Controllare che il collegamento sia corretto.
Verificare che il tubo di carico
dell'acqua non sia danneggiato.
Controllare che il collegamento sia corretto.
Accertarsi che il tubo di scarico dell'acqua non sia danneggiato.
qua e contattare il centro di assistenza.
Chiudere lo sportello dell'apparecchiatura.
Premere il touchpad o tasto
Start .
Inserire la spina nella presa.
Page 61

Cosa fare se…
Guasto Possibile causa Possibile soluzione
Il salvavita dell'impianto dome-
stico è danneggiato.
È stata impostata la partenza
ritardata.
Sostituire il fusibile.
• Annullare la partenza ritardata.
• Al termine del conto alla rovescia il programma si avvia
automaticamente.
Dopo il controllo, impostare il selettore dei programmi sullo stesso programma specificato prima del verificarsi dell'anomalia. Il programma riprende dal punto in cui era stato
interrotto.
In caso di ricomparsa dell'anomalia, contattare il centro di assistenza.
Se il display mostra altri codici di allarme, contattare il centro assistenza.
Le informazioni necessarie per il centro assistenza si trovano sulla targhetta dei dati.
Prendere nota delle seguenti informazioni:
– Modello (MOD.) ........................................................
– Numero di prodotto (PNC) ..........................................
– Numero di serie (S.N.) ..............................................
I risultati di lavaggio e di asciugatura non sono soddisfacenti.
Problema Possibile causa Possibile soluzione
Le stoviglie non sono pulite. Il programma di lavaggio non
Le stoviglie non sono state si-
I mulinelli non ruotavano libe-
I filtri sono sporchi o non sono
È stata utilizzata una dose in-
Ci sono depositi di calcare sulle stoviglie.
Regolazione errata del livello
era corretto per il tipo di carico ed il grado di sporco.
stemate correttamente nei cestelli, per cui l'acqua non ha
raggiunto tutte le superfici.
ramente. Sistemazione non
corretta delle stoviglie nei cestelli.
montati correttamente.
sufficiente di detersivo o addirittura mancava.
Il contenitore del sale è vuoto. Riempire il contenitore del sale.
del decalcificatore dell'acqua.
Accertarsi che il programma di
lavaggio selezionato sia corretto per il tipo di carico ed il grado di sporco.
Sistemare le stoviglie correttamente nei cestelli.
Accertarsi che una sistemazione non corretta delle stoviglie
non blocchi i mulinelli.
Controllare che i filtri siano puliti e montati correttamente.
Accertarsi che la quantità di detersivo sia sufficiente.
Regolare correttamente il decalcificatore dell'acqua.
61
Page 62

Cosa fare se…
62
Problema Possibile causa Possibile soluzione
Il tappo del contenitore del sa-
Bicchieri e stoviglie presentano striature, macchie biancastre o una patina bluastra.
Tracce di gocce d'acqua che si
sono asciugate su bicchieri e
stoviglie.
La causa potrebbe essere il de-
Le stoviglie sono bagnate. Il programma di lavaggio non
Le stoviglie sono bagnate ed
opache.
La funzione Multitab è attiva
le non è chiuso correttamente.
Il dosaggio del brillantante è
troppo alto.
Il dosaggio del brillantante è
troppo basso.
tersivo.
comprendeva la fase di asciugatura o aveva una fase di
asciugatura ridotta.
Il contenitore del brillantante
è vuoto.
(questa funzione disattiva automaticamente il contenitore
del brillantante).
Assicurarsi che il tappo del contenitore del sale sia chiuso correttamente.
Ridurre il dosaggio del brillantante.
Aumentare il dosaggio del brillantante.
Utilizzare un detersivo di marca diversa.
Per ottenere risultati di asciugatura migliori, lasciare lo sportello socchiuso per alcuni minuti.
Riempire il contenitore del brillantante.
Attivare l'erogatore del brillantante.
Attivazione del contenitore del brillantante
1. Attivare l'apparecchiatura.
2. Verificare che l'apparecchiatura sia in modalità impostazione.
3. Ruotare il selettore dei programmi fino a quando sul display compaiono due barre di
stato orizzontali.
4. Premere e tenere premuti contemporaneamente il tasto Multitab e quello Delay fino
a quando le spie
5. Rilasciare il tasto Multitab e Delay.
6. Premere il tasto Delay.
– Le spie
–La spia
– Il display visualizza l'impostazione del contenitore del brillantante.
7. Premere il tasto Delay per cambiare l'impostazione.
8. Disattivare l'apparecchiatura per confermare.
, e lampeggiano.
e si spengono.
continua a lampeggiare.
Il contenitore del brillantante è disattivo.
Il contenitore del brillantante è attivo.
Page 63

Dati tecnici
DATI TECNICI
Dimensioni Larghezza 596 mm
Altezza 818 - 898 mm
Profondità 575 mm
Pressione di carico dell'acqua Minima 0,5 bar (0,05 MPa)
Massima 8 bar (0,8 MPa)
1)
Collegamento dell'acqua
Capacità Coperti 12
1) Collegare il tubo di carico dell'acqua a un rubinetto con filettatura 3/4".
Acqua fredda o calda massimo 60 °C
La targhetta dei dati sul bordo interno dello sportello dell'apparecchio reca le informazioni sui collegamenti elettrici.
Se l'acqua calda proviene da una fonte di energia alternativa (ad es., pannelli solari, pannelli fotovoltaici ed impianti eolici), usare un'alimentazione di acqua calda per ridurre il
consumo di elettricità.
CONSIDERAZIONI AMBIENTALI
Il simbolo sul prodotto o sulla confezione indica che il prodotto non deve essere
considerato come un normale rifiuto domestico, ma deve essere portato nel punto di
raccolta appropriato per il riciclaggio di apparecchiature elettriche ed elettroniche.
Provvedendo a smaltire questo prodotto in modo appropriato, si contribuisce a evitare
potenziali conseguenze negative per l’ambiente e per la salute, che potrebbero derivare
da uno smaltimento inadeguato del prodotto. Per informazioni più dettagliate sul
riciclaggio di questo prodotto, contattare l’ufficio comunale, il servizio locale di
smaltimento rifiuti o il negozio in cui è stato acquistato il prodotto.
Riciclare i materiali con il simbolo
contenitori per il riciclaggio.
. Smaltire i materiali di imballaggio negli appositi
63
Page 64

www.aeg-electrolux.com/shop 117941920-B-272010
 Loading...