

Page 1

User manual
Инструкцияѝпоѝэксплуатации
Washing machine
Стиральнаяѝмашина
EWT 8120 W
Page 2

We were thinking of you
when we made this product
Page 3

Welcome to the world of Electrolux
Thank you for choosing a first class
product from Electrolux, which hopefully
will provide you with lots of pleasure in
the future. The Electrolux ambition is to
offer a wide variety of quality products
that make your life more comfortable.
You find some examples on the cover in
this manual. Please take a few minutes
to study this manual so that you can
take advantage of the benefits of your
new machine. We promise that it will
provide a superior User Experience
delivering Ease-of-Mind. Good luck !
Доброѝпожаловатьѝвѝмирѝ
Electrolux
Выѝвыбралиѝпервоклассный
продуктѝотѝ Electrolux,ѝкоторый,ѝмы
надеемся,ѝ доставитѝ Вамѝ много
радостиѝ вѝ будущем.ѝ Electrolux
стремитсяѝ предложитьѝ какѝ можно
болееѝ широкийѝ ассортимент
качественнойѝ продукции,ѝ который
сможетѝсделатьѝВашуѝжизньѝеще
болееѝудобной.ѝВыѝможетеѝувидеть
несколькоѝэкземпляровѝнаѝобложке
этойѝ инструкции.ѝ Внимательно
изучитеѝ данноеѝ руководство,
чтобыѝ правильноѝ использовать
Вашѝновыйѝприборѝиѝнаслаждаться
егоѝ преимуществами.ѝМы
гарантируем,ѝчтоѝонѝсделаетѝВашу
жизньѝ намногоѝ легчеѝ благодаря
легкостиѝвѝиспользовании.ѝУдачиѝ!
3
Page 4
4 contents
Contents
Warnings ........................................... 5
Description of the appliance ..............7
How to run a wash cycle ? ................8
Washing guide ................................ 12
Programmes table ........................... 14
Consumption .................................. 15
Care and cleaning ........................... 16
Operating problems ........................ 17
Technical specifications ................... 20
Installation ....................................... 20
Environment .................................... 23
The following symbols have been used
in this user guide :
Important information about concerning your safety and information on how to avoid damaging
the appliance.
General information.
Information concerning the environment.
Page 5

warnings 5
Warnings
These warnings are for the safety of
you and others around you.
Please read these points carefully
before installing and using your appliance. Thank you for your attention.
Keep this user manual with your appliance. If the appliance is sold or given to another person, please make
sure this user manual is included.
This way, the new user will have the
relevant operating instructions and
warnings.
General safety
• Do not modify or attempt to modify
this appliance. This would put yourself in danger.
• Ensure that all coins, safety pins,
brooches, screws etc have been
removed before starting a washing
programme. If left in washing, they
can seriously damage the appliance.
• Use the amount of detergent recommended in the paragraph “Using the
right amount of detergent”.
• Put small items together (socks, belts
etc.) in a small linen bag or pillow
case.
• Unplug and close inlet hose tap after
using appliance.
• Always disconnect the power supply
from the appliance before cleaning or
maintenance.
• Do not machine wash clothes with
ribbing, unfinished or torn material.
Installation
• Unpack or ask for the appliance to
be unpacked immediately upon arrival. Check the outside of the
appliance is not damaged in any way.
Put any complaints you may have in
writing on your copy of the delivery
receipt.
• The appliance must be untied before
connecting to power supply or using.
If all transit packaging is not completely removed, the appliance or surrounding furniture could be
damaged.
• Connection to the water supply must
be carried out by a qualified plumber.
• If your domestic electrical circuit
needs adapting to allow the
appliance to be plugged in, use a
qualified electrician.
• Ensure that, after installation, the
power cable is not trapped under the
appliance.
• If the appliance is installed on carpeted floor, ensure that the carpet does
not obstruct any ventilation ducts
located at the base of the appliance.
• The appliance must be equipped
with an earthed power plug which
conforms to regulations.
• Before connecting your appliance to
the power supply, carefully read the
instructions in the chapter entitled
“Electrical connection”.
• Replacing the power cable should
only be carried out by the After Sales
Service.
• The manufacturer cannot be held
responsible for any damage resulting
from incorrect installation.
Page 6

6 warnings
Precautions to be taken against
frost
If your appliance is exposed to temperatures below 0°C, the following precautions must be taken :
• Close the tap and disconnect the
inlet hose.
• Place the end of this hose and the
drain hose in a basin on the floor.
• Select the Drain programme let it run
until the end of the cycle.
• Disconnect the appliance from the
power supply by turning the program
selector to “Stop”.
• Unplug the appliance.
• Screw the inlet hose back on and
replace the drain hose.
This way, the water remaining in the hoses will be drained away, avoiding any
ice formation which would damage your
appliance.
Before turning your appliance on again,
ensure that it is installed in an area where the temperature will not fall below
freezing.
these items into the drum.
• Your appliance has been designed
for use by adults. Ensure children do
not touch the appliance or use it as a
toy.
Use
• Your appliance is intended for normal
domestic use. Do not use the
appliance for commercial or industrial
purposes or for any purpose other
than the one it was designed for :
washing, rinsing and spinning.
•Only wash items suitable for this
treatment. Refer to the instructions
on the label of each item.
• Do not put items into the washing
machine which have had stains
removed with petrol, alcohol, trichlorethylne etc. If such stain removers
have been used, wait until the product has evaporated before putting
Page 7
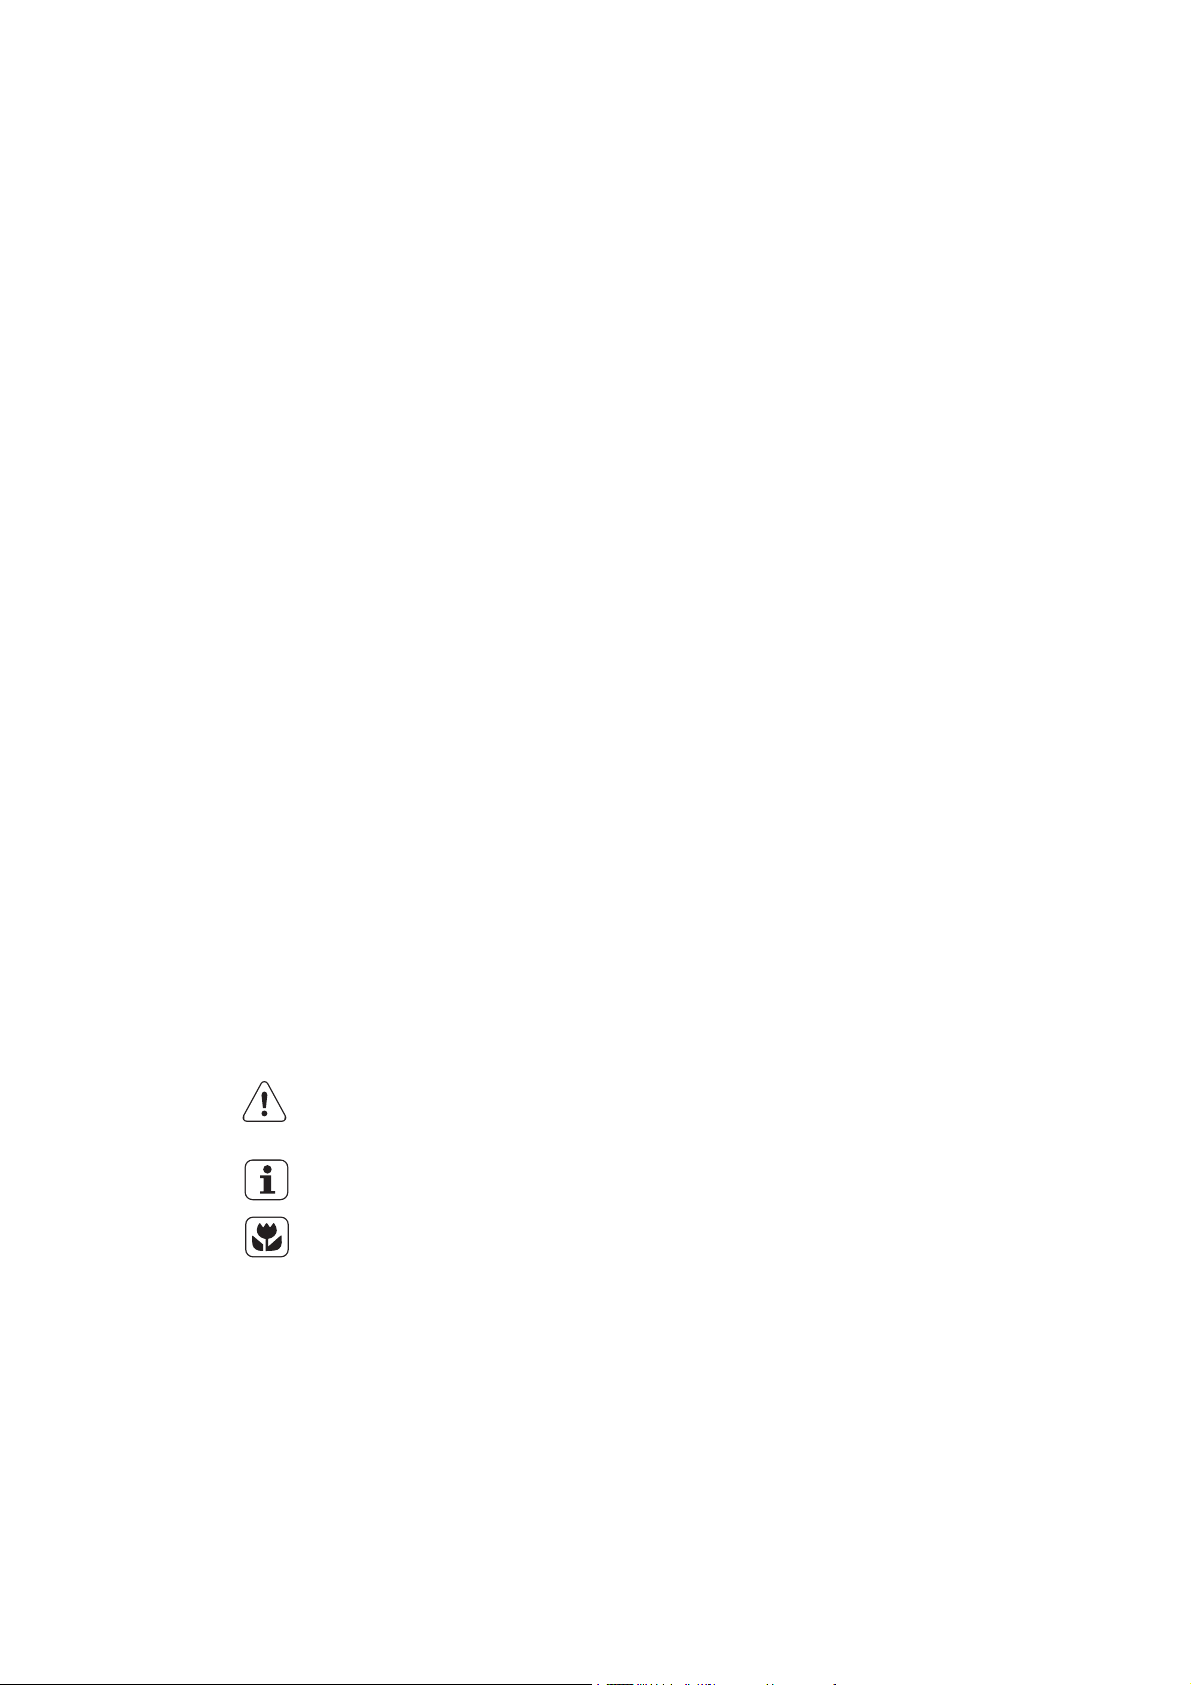
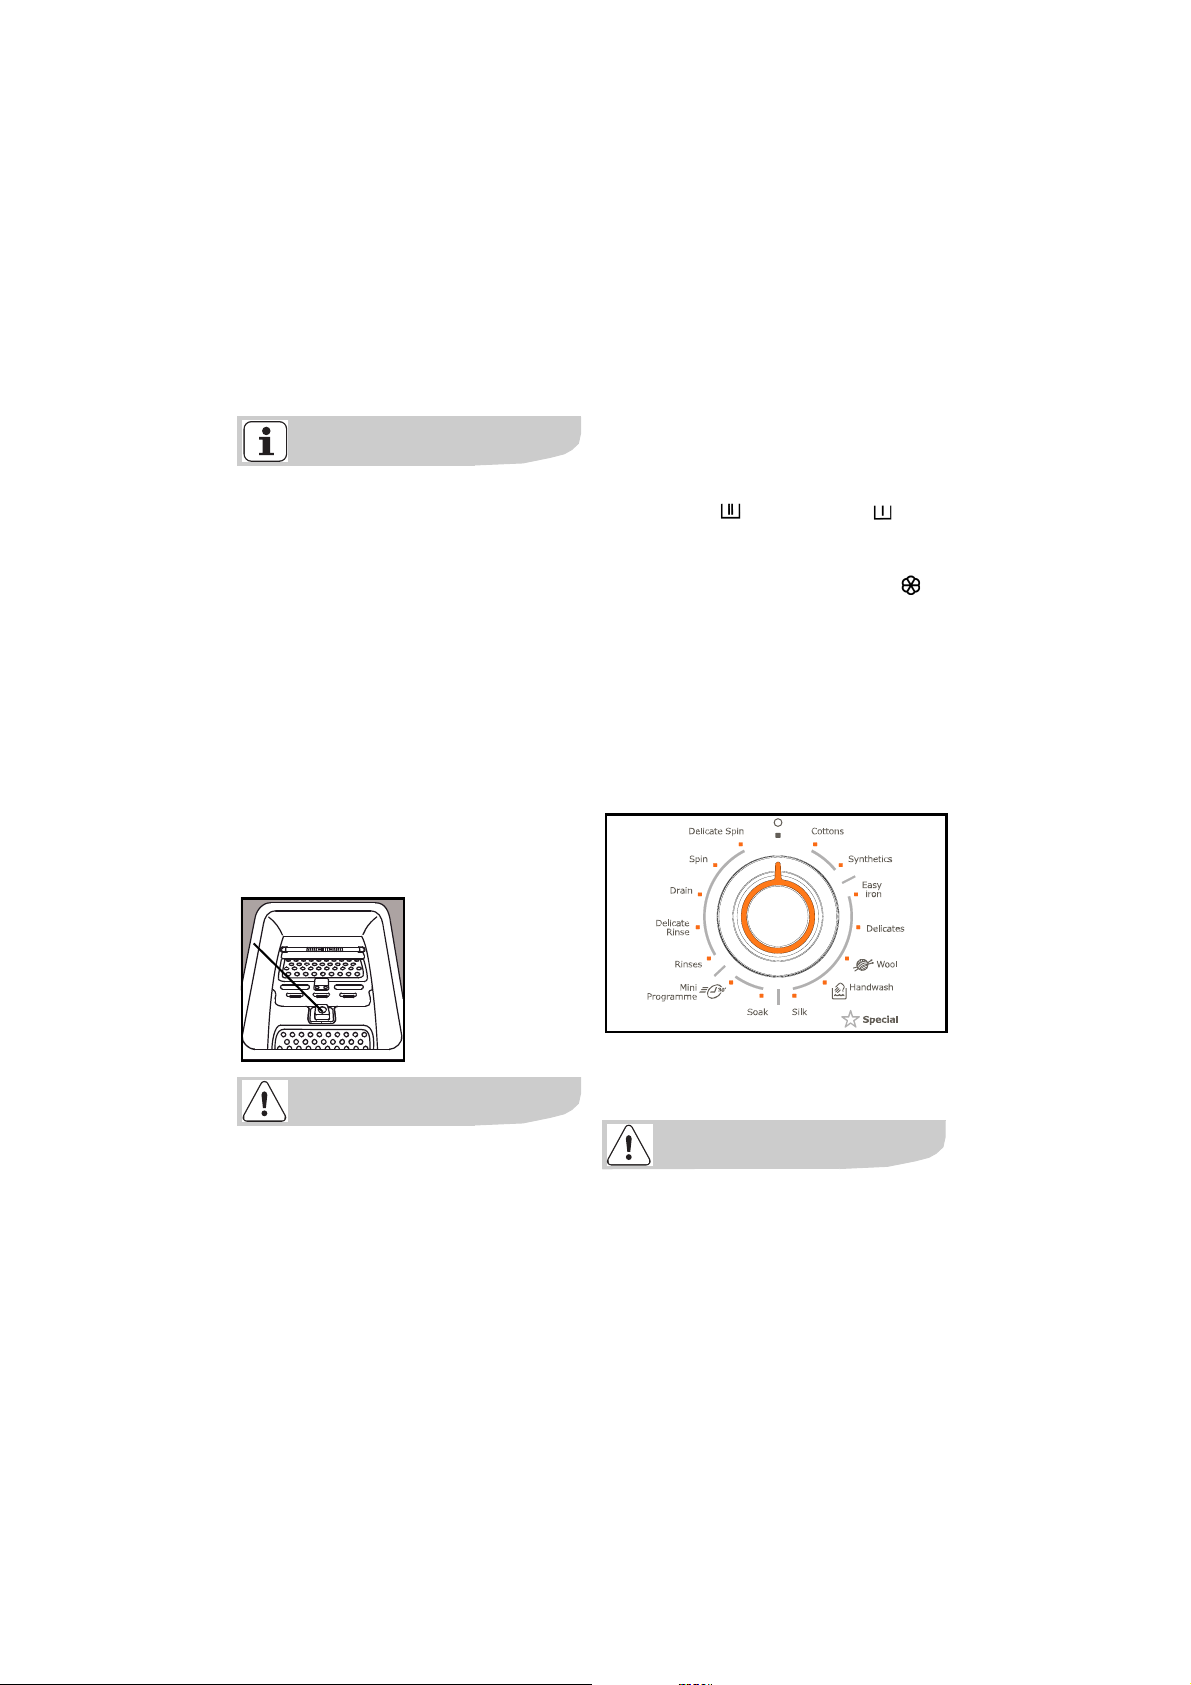
Description of the appliance
The control panel
1
Lid handle
2
Lever for moving the appliance
3
Adjustable levelling feet
4
Description of the appliance 7
1
2
3
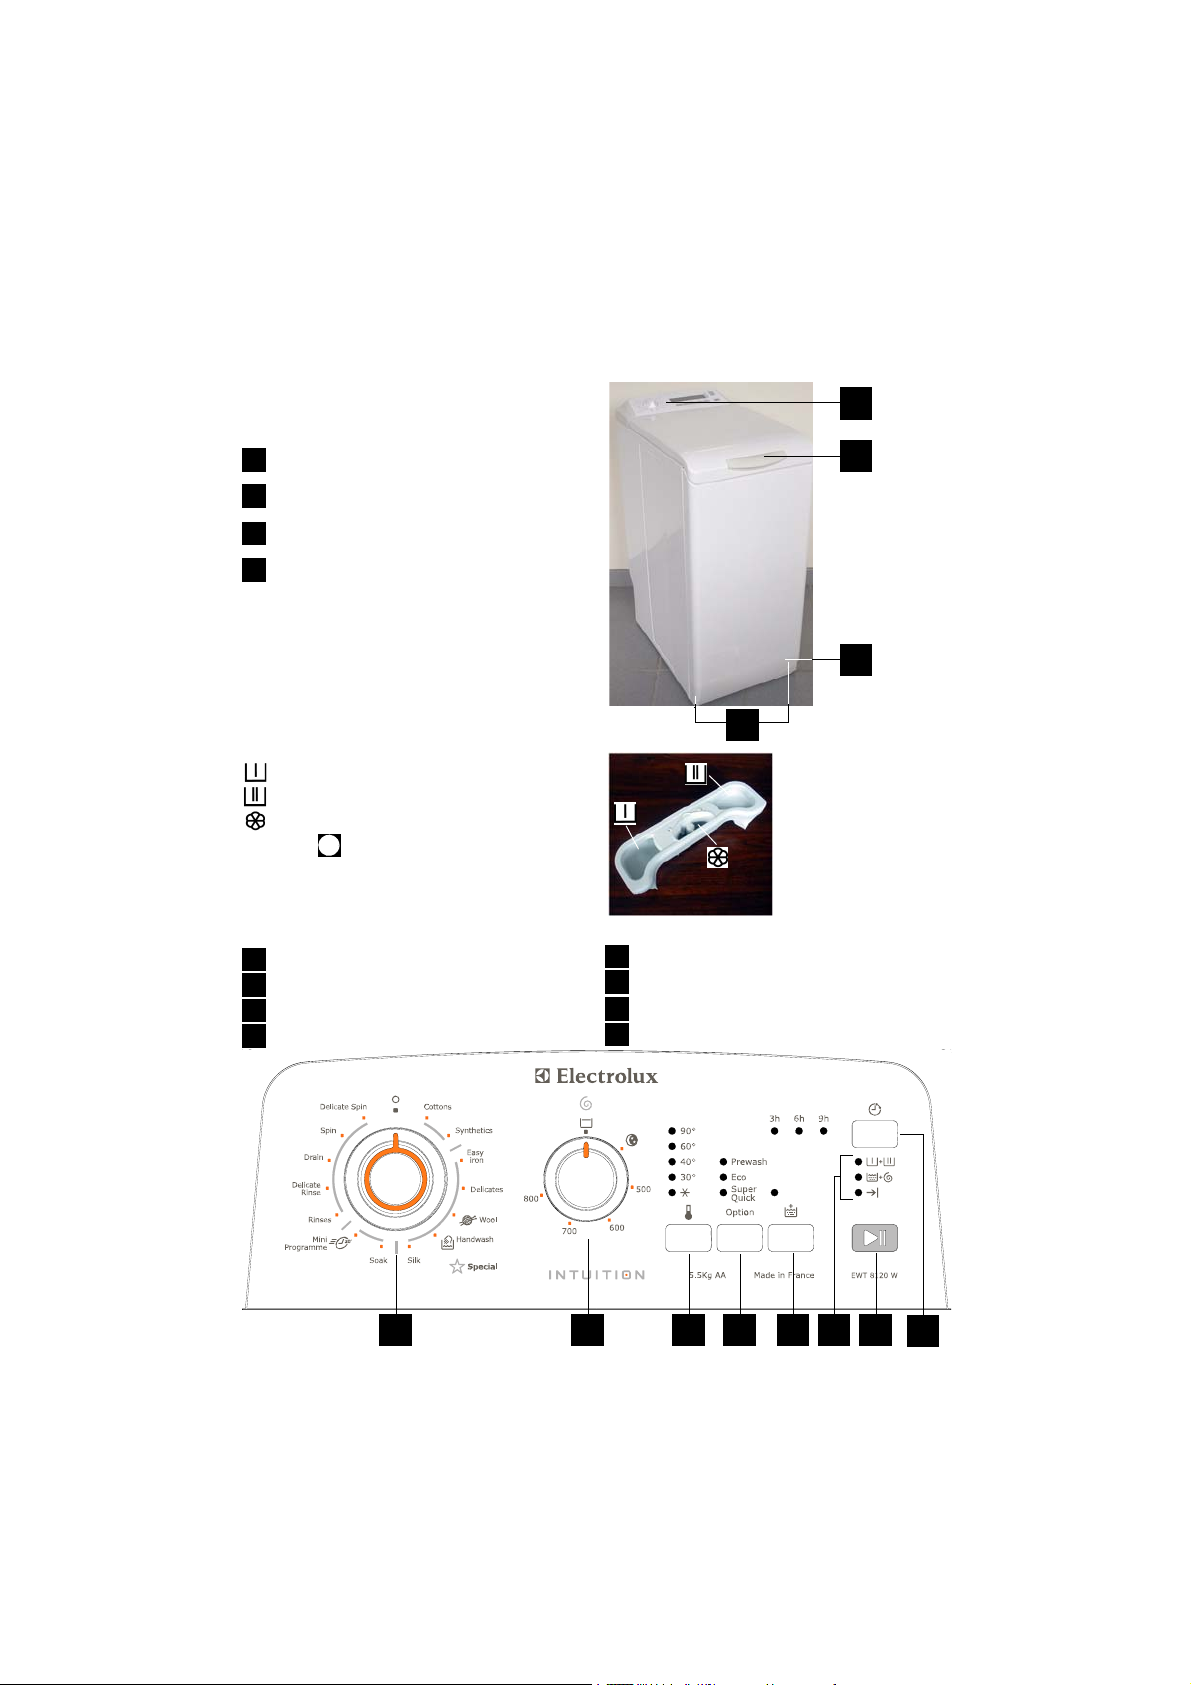
Dispenser box
Prewash
Wash
Softener (do not fill above the MAX
symbol )
The control panel
1
2
3
4
M
Programme selector
Spin speed selector
“Temperature” pushbutton
“Option” pushbutton
4
“Extra rinse” pushbutton
5
Lights of cycle progress
6
“Start/Pause” pushbutton
7
“Delay start” pushbutton
8
1
732 4 5 6
8
Page 8
8 How to run a wash cycle
How to run a wash cycle?
Using for the first time
• Ensure the electrical and water connections comply with the installation
instructions.
• Remove the polystyrene insert and
all other items inside the drum.
• Run an initial wash cycle at 90°C,
without any washing but with detergent to clean the water tank.
Daily use
Loading washing
• Open the lid of the appliance.
• Open the drum by depressing the loc-
king button A : The two shutters
unlock automatically.
• Load the washing, close the drum
and the lid of your washing machine.
Proportioning of detergents
Your washing machine has been designed to reduce your water and detergent consumption. You can therefore
reduce the amounts recommended by
detergent manufacturers.
Pour the amount of washing powder into
the washing and prewash compartments if you have selected the
“prewash” option. Pour fabric softener
into the compartment if necessary .
If you use another detergent type, refer
to the section “detergents and
additives” in the washing guide.
Selection of desired programme
You can find the right programme for
different types of washing in the
programme table (see “Programme
table”).
A
Before closing the lid of your appliance,
ensure that the drum is properly closed :
• When the two shutters are closed,
• locking button A released.
Turn the programme selector to the
required programme. The “Start/Pause”
pushbutton flashes green.
If you turn the programme selector to
another programme while a cycle is in
progress, the appliance will ignore the
new selected programme. The “Start/
Pause” pushbutton flashes red for a few
seconds.
Page 9
How to run a wash cycle 9
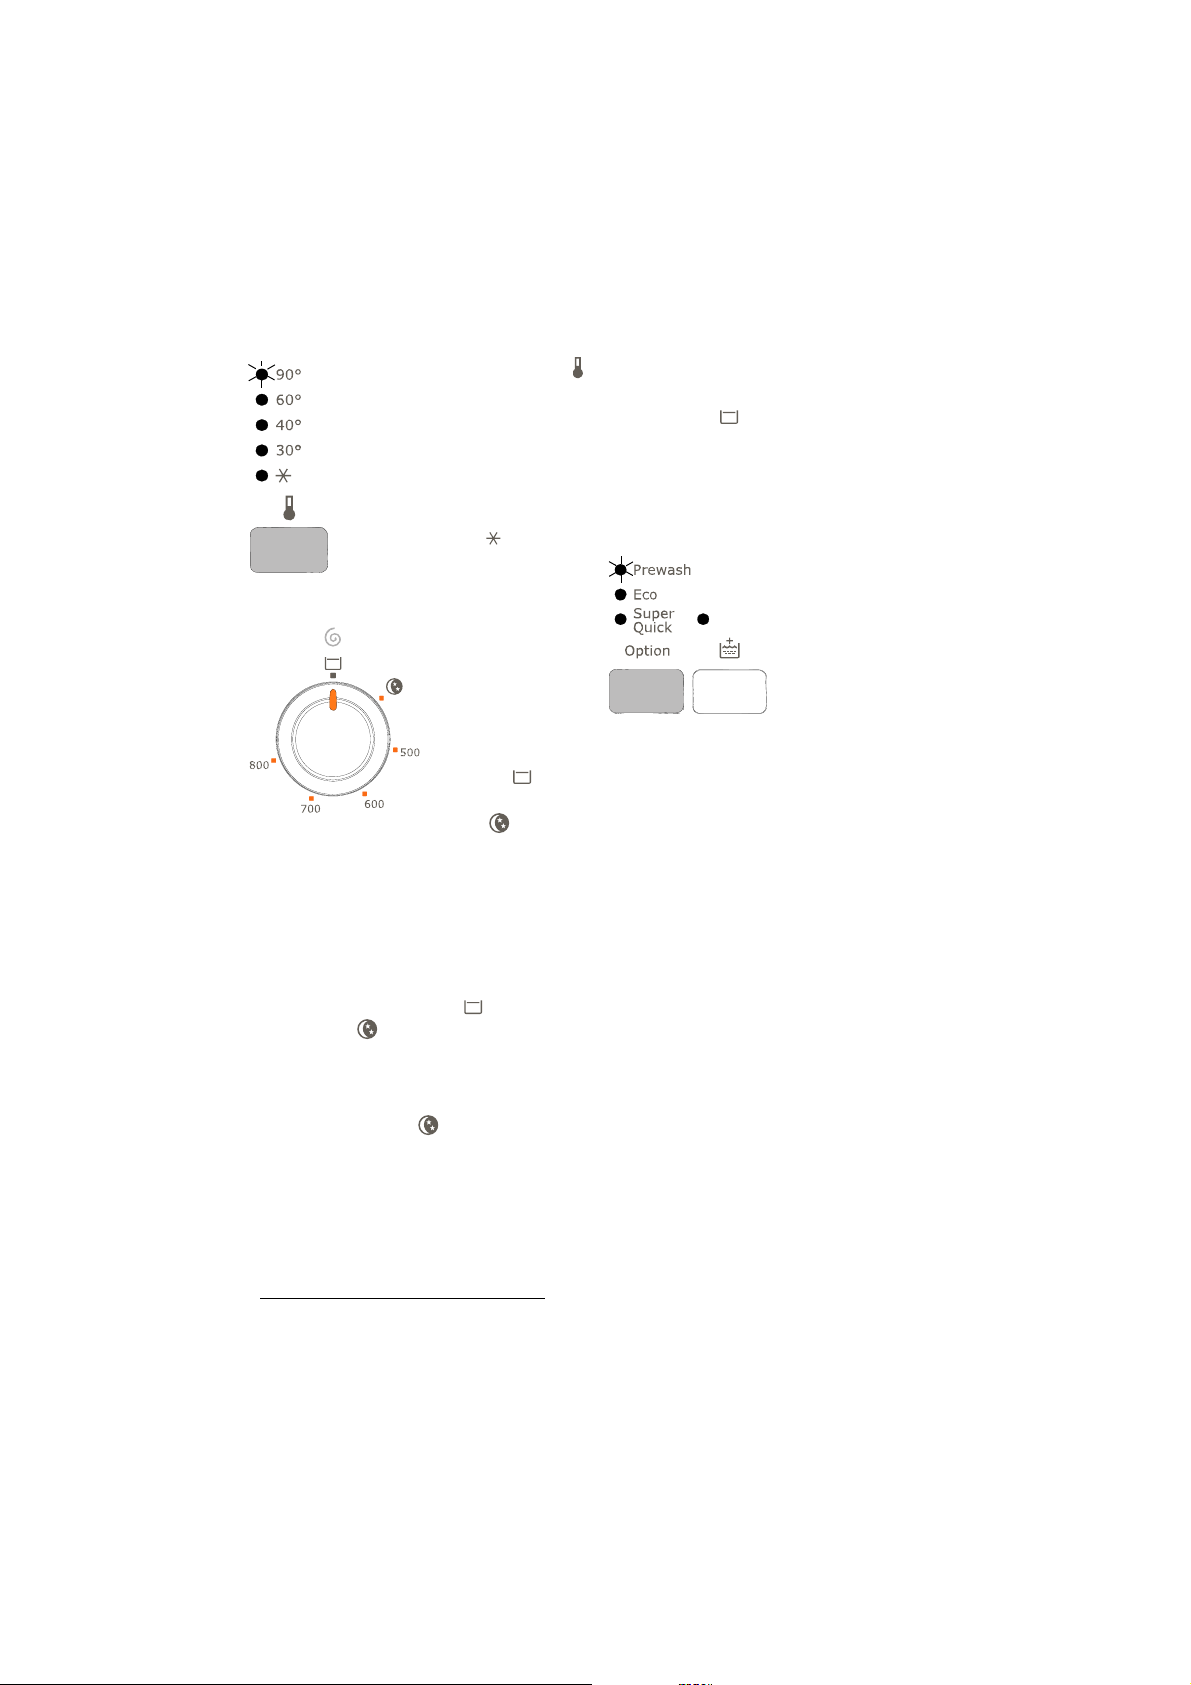
Selecting the temperature
Press the “Temperature”
pushbutton repeatedly to
increase or decrease the
temperature if you want
your washing to be washed
at a different temperature to
the one selected by the appliance. The symbol
means a cold wash.
Selecting the spin speed
Turn the spin
speed selector
on the desired
speed. You can
also select “No
spin”*, “Rinse
hold”
*
or
“Night silence
plus” *.
The maximum speeds are :
for Cottons, Synthetics, Easy iron, Wool,
Handwash : 800 rpm,
for Delicates, Silk, Mini programme : 700
rpm.
At the end of the programme, if you have
selected “Rinse hold” or “Night
silence plus” , you then need to select
a “Spin”, “Delicate Spin” or “Drain”
programme to finish the cycle.
“Night silence plus”
The washing machine does not empty
the water after the final rinse which prevents the washing from creasing. Because there are no spin cycles, the
washing programme is very quiet and
can be selected at night. In Cotton and
Synthetics programmes, the rinsing cycle uses more water.
“Rinse hold”
The washing machine will not drain the
water from the last rinse, so will not
crease the laundry.
Selecting options
You must select the
different options after selecting the
programme and
before pressing the
“Start/Pause” pushbutton (see “Pro-
gramme table”).
Press the desired button(s) ; the corresponding lights come on. If pressed
again, the lights go out. If one of the options is not compatible with the selected
programme, the “Start/Pause” pushbutton flashes red.
“Super Quick” option
The washing time will be reduced
depending on the programme selected.
“Eco” option
This option allows you to choose a lower
temperature programme which is as effective as a higher temperature wash
programme.
“Prewash” option
The appliance runs a prewash at 30°C
max. The prewash finishes with a short
spin cycle for cotton or synthetic
programmes, and with an empty cycle
for delicates programmes.
*depending on model
Page 10
10 How to run a wash cycle
“Extra rinse” option
The washing machine will add one or
more rinses during the cycle.
This option is recommended for people
with sensitive skin and in soft water
areas.
Tem p o r a r y :
Press the “Extra rinse” pushbutton.
The option is only active for the selected
programme.
Permanent :
Hold down the “Temperature” and
“Option” pushbuttons for a few seconds. The option is permanently activated, even if the appliance is switched
off. To deactivate it, repeat the process.
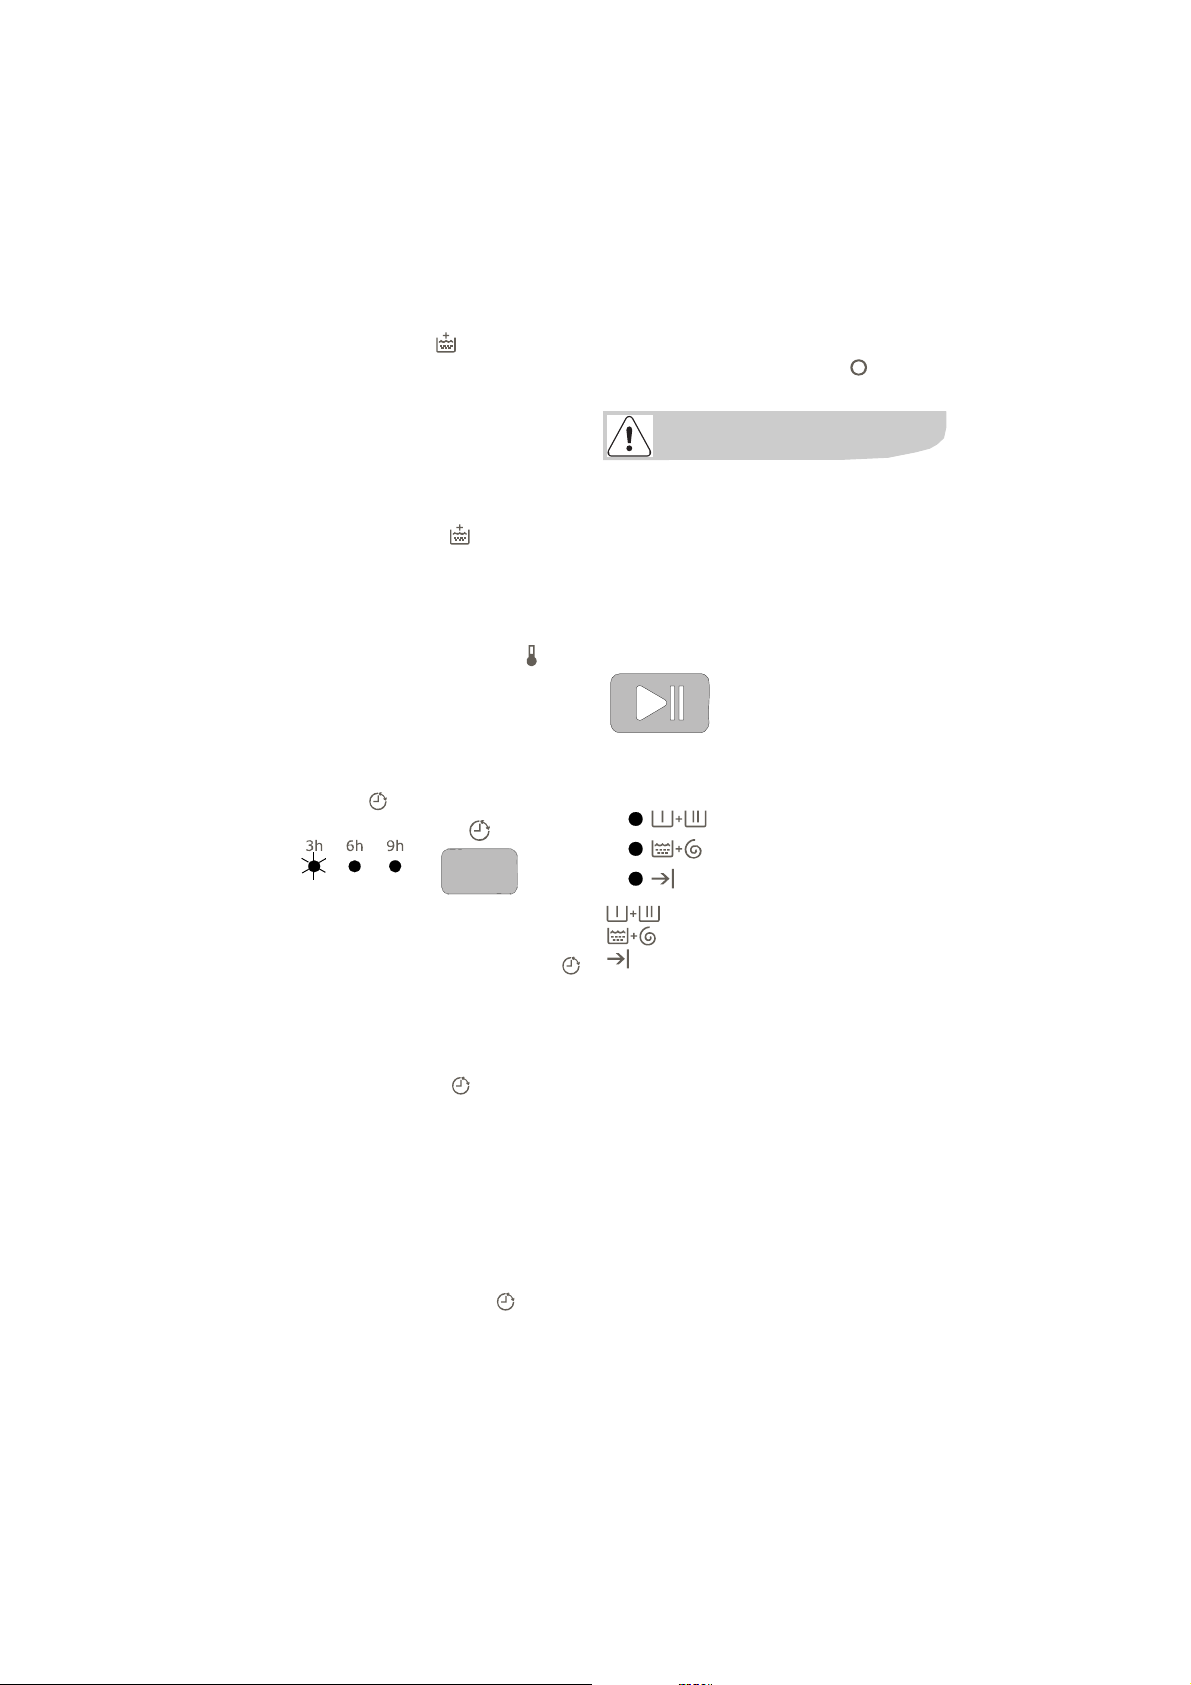
“Delay start”
This option allows you to delay the start
of a wash programme by 3, 6 or 9 hours
by pressing the “Delay start”
pushbutton.
You can change or cancel the delayed
start time at any time before you press
the “Start/Pause” pushbutton, by pressing the “Delay start” pushbutton
again (when all indicators are off, the
wash programme will start immediately).
If you have already pressed the “Start/
Pause” pushbutton and you want to
change or cancel the delayed start, proceed as follows :
• To cancel the delayed start and start
the cycle immediately, press “Start/Pause” and then “Delay start” . Press
“Start/Pause” to start the cycle.
• To change the timer delay period, you
must go through the “Off”
ѝ
position
and reprogram your cycle.
The lid will be locked during the delayed
start time. If you need to open it, you
must first pause the appliance by pressing the “Start/Pause” pushbutton. After
closing the lid again, press the “Start/
Pause” pushbutton.
Start of the programme
Press the “Start/Pause”
pushbutton to start the
cycle ; the corresponding
light will come on green.
It is normal for the programme selector
to remain stationary during the cycle.
The light corresponding
to the current cycle is illuminated.
: Prewash + Wash
: Rinse + Spin
: End of cycle
Interrupting a programme
Adding washing during the first 10
minutes
Press the “Start/Pause” pushbutton :
the corresponding light will flash green
while the appliance is paused. The lid
can only be opened around 2 minutes
after the washing machine has come to
a stop. Press the “Start/Pause” pushbutton again to continue the programme.
Page 11

How to run a wash cycle 11
Modifying the programme in progress
Before making any changes to the current programme, you need to pause the
washing machine by pressing the “Start/
Pause” pushbutton. If the modification is
not possible, the “Start/Pause” pushbutton flashes red for a few seconds. If
you still decide to change the programme, you must cancel the current programme (see below).
Cancelling the programme
If you want to cancel the programme,
turn the programme selector to the “Off”
position.
End of the programme
The washing machine stops
automatically ; the “Start/Pause”
pushbutton goes out and the light “End
of cycle” comes on. The lid can only be
opened around 2 minutes after the
washing machine has come to a stop.
To exit standby mode, simply press any
pushbutton or turn the programme
selector.
Turn the programme selector to the
“Off”
Remove washing
Unplug and close water inlet tap.
We recommend leaving the lid and drum
open after use to ventilate the water
tank.
ѝ
position.
Standby mode
If the appliance is on but no commands
are selected for 10 min before or after a
cycle, it goes into standby mode. All the
lights go out and “Start/Pause” flashes
slowly.
Page 12

12 washing guide
Washing guide
Sorting and preparing the washing
• Sort washing by type and care label
(refer to International symbols section
below) : normal wash for tough
fabrics which can withstand intense
washing and spinning cycles ; delicate wash for delicate fabrics which
need to be treated with care. For
mixed loads, loads with items of different types of material, choose a
programme and a temperature suitable for the most fragile material.
• Wash whites and colours separately :
Otherwise, whites will be coloured or
will turn grey.
• New coloured clothes often contain
excess dye. It is recommended to
wash such items separately the first
time. Follow care instructions “wash
separately” and “wash separately
several times”.
• Empty pockets and unfold items.
• Remove loose buttons, pins and fasteners. Close zip fasteners, tie ups
laces and straps.
• Turn multilayered fabrics (sleeping
bags, anoraks, etc.), coloured headwear, wool and material with printed
designs inside out.
• Wash small fragile items (socks,
tights, bras, etc) in a net bag.
• Take special care with curtains.
Remove hooks and place net curtains in a net or bag.
Wash loads depending on type of
materials
The amount of washing placed in the
drum must not exceed the maximum
capacity of the washing machine. This
capacity can vary depending on the type
of materials. Reduce the quantity if
washing is heavily soiled or made of absorbant material.
Not all textiles have the same volume in
the drum or the same water absorption
levels. In general, the drum must therefore be filled :
• to full capacity but avoiding excessive pressure on cotton, linen and
cotton/linen mixtures,
• to half capacity for processed cottons and synthetic fibres,
• to a third of its capacity for very fragile items such as net curtains and
woollens.
For mixed loads, fill drum depending on
most fragile materials.
Detergents and additives
Only use detergents and additives designed for use in a washing machine. Refer to manufacturer’s recommendations
and also Dispenser box and Using the right amount of detergent sections.
We do not recommend mixing different
types of detergents. This may spoil the
washing.
The amount of detergent to be used depends on the size of the load, the hardness of the water and how heavily soiled
the washing is.
If the water is soft, reduce the amount
slightly. If the water contains lime scale
(a descaler is recommended) or if the
washing is heavily soiled or stained, increase the amount slightly.
Page 13
washing guide 13
You can obtain information on the hardness level of water in your area by contacting your water company or other
competent source.
There are no restrictions on the use of
powder detergents.
Liquid detergents must not be used
when a prewash has been selected. For
cycles without prewash, they can be added either via means of a dosing ball, or
in the detergent compartment. In either
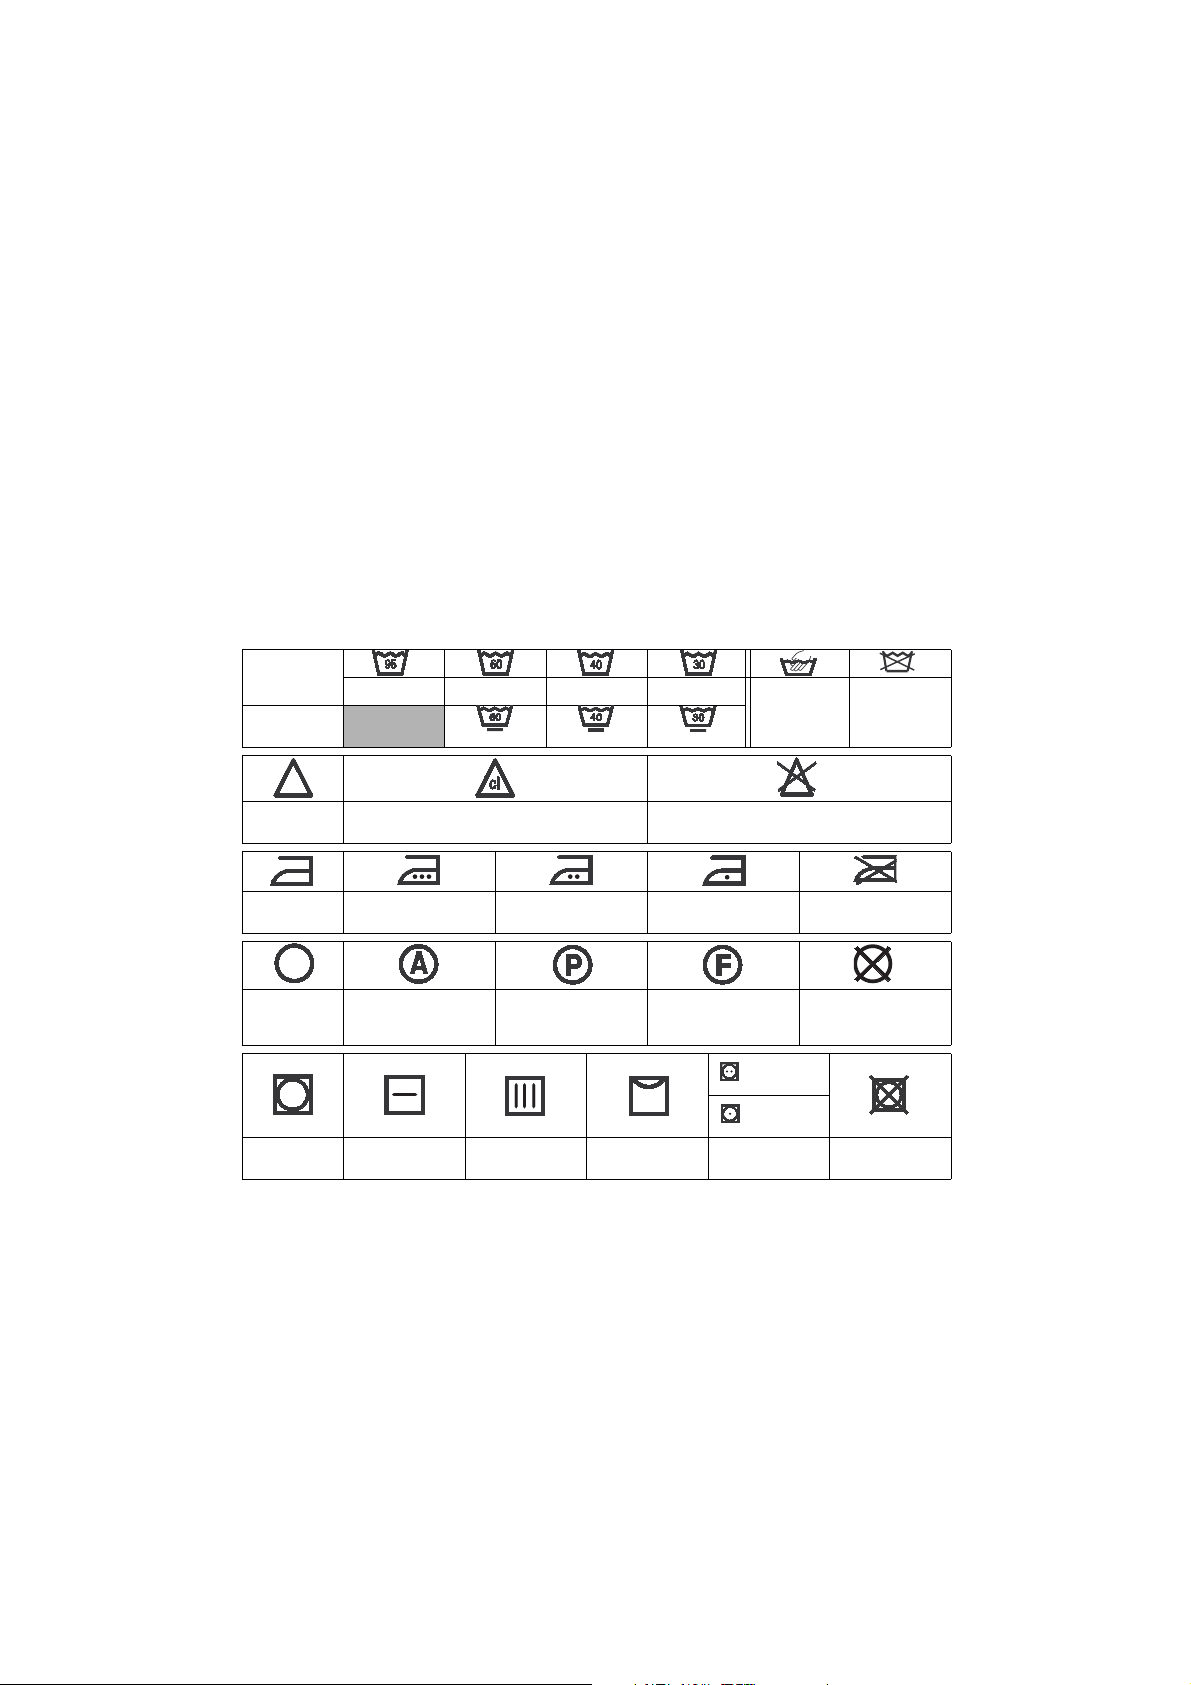
International symbols
NORMAL
WASH
DELICATE
WASH
BLEACHING Whitewashing (bleach) allowed (cold only and in dilu-
IRONING
Wash at 95°C Wash at 60°C Wash at 40°C Wash at 30°C
ted solution)
High temperature
(max 200°C)
Mid temperature
(max 150°C)
case, the wash cycle must be started
immediately.
Detergent tablets or doses must be placed in the detergent compartment of
your appliance’s dispenser box.
For stain removal before a wash cycle,
please refer to manufacturer’s recommended amounts and instructions. If
you use a detergent to remove stains,
the wash cycle must be started immediately.
Hand wash Do not wash
No whitewashing (bleach)
Low temperature
(max 100°C)
Do not iron
DRY
CLEANING
DRYING Dry flat Hang dry Dry on clothes
Dry cleaning
(all common solvents)
Dry cleaning
(all common solvents
except trichlorethylene
hanger
Dry cleaning
(only oil-based solvents
and R113)
High
temperature
Mid
temperature
Tumble drying
permitted
Do not dry clean
Do not tumble dry
Page 14

14 programmes table / consumption
Programmes table
Programme / Type of washing Load Possible options
Cottons* : White or colour, e.g., normally soiled work
clothes, bed linen, table linen, body linen, towels.
Synthetics : Synthetic fabrics, body linen, coloured fabrics, non-iron shirts, blouses.
Easy iron : Reduces creasing and makes ironing easier. 1,0 kg Prewash
Delicates : For all delicate materials, for example, cur-
tains.
Wool : Machine washable wool carrying the labels
“pure new wool, machine washable, does not shrink”.
Handwash : Very delicate items carrying the “wash
by hand” label.
Silk : Fabric machine washable at 30°C. 1,0 kg
5,5 kg Prewash
Eco**
2,5 kg
2,5 kg Prewash
1,0 kg
1,0 kg
Super quick
Extra rinse
Rinse hold
Night silence plus
Delay start
Extra rinse
Rinse hold
Delay start
Super quick
Extra rinse
Rinse hold
Night silence plus
Delay start
Rinse hold
Night silence plus
Delay start
Soak : Soaking for very dirty washing. The drum stops
full of water.
Mini programme : For lightly soiled fabrics except
for wool.
Rinses : Hand washed items can be rinsed in this program.
Delicate Rinse : Hand washed items can be rinsed in
this programme.
Drain : Runs an empty cycle after a Rinse hold or (Night
Silence Plus).
Spin : A spin cycle from 500 to 800 rpm after a Rinse
hold (or Night silence plus).
5,5 kg
2,5 kg Delay start
5,5 kg
2,5 kg
5,5 kg
5,5 kg Delay start
Delay start
Extra rinse
Rinse hold
Night silence plus
Delay start
Page 15

programmes table / consumption 15
Programme / Type of washing Load Possible options
Delicate spin : A delicate spin cycle after a Rinse hold
2,5 kg Delay start
(or Night silence plus).
* Reference programme for test conforming to CEI 456 standard (60° Cottons programme with Eco
option).
** Cannot be used with programmes lower than 40°C.
Consumption
Programme
Washing type
Cottons* cold - 90 67 2,20 140-150
Synthetics cold - 60 48 0,85
Easy iron cold - 60 55 0,65
Delicates cold - 40 53 0,55
Wool cold - 40 48 0,45 55-65
Handwash cold - 40 48 0,45 55-65
Silk 30 40 0,30 25-35
Soak 30 20 0,20 15-25
Mini programme 30 40 0,35 25-35
Temperatu-
res
Average
consumption**
°C Litres kWh Time
90-100
125-135
60-70
Rinses - 32 0,05 50-60
Delicate Rinse - 45 0,04 35-45
Drain - - 0,002 0-10
Spin - - 0,015 10-20
Delicate spin - - 0,015 5-15
* Reference programme for test conforming to CEI 456 standard (60° Cottons programme with Eco
option) : 49 L / 1,04 kWh / 140 min.
** Average figures which can vary depending on conditions of use.
Consumptions shown refer to the maximum temperature for each programme.
Page 16

16 care and cleaning
Care and cleaning
Unplug the appliance before cleaning.
Descaling the appliance
To descale the appliance, use an appropriate non-corrosive product designed
for washing machines. Read product label for recommended amounts and how
often descaling should be carried out.
The exterior
Use warm soapy water to clean the exterior of the appliance. Never use alcohol, solvents or similar products.
Dispenser box
To clean, proceed as follows :
1
2
Object trap
Regularly clean out the object trap
which is located at the bottom of the
drum :
1
3
5
2
4
6
Water inlet filters
3
5
4
6
To clean the 2 filters, proceed as follows :
1
2
Page 17

operating problems 17
Operating problems
Numerous checks were carried out on your appliance before it left the factory.
However, should you notice a malfunction, please refer to the sections below before
contacting the after-sales service.
Problems Causes
The washing machine
doesn’t start or doesn’t fill :
The appliance fills but
empties straight away :
The washing machine
doesn’t rinse or doesn’t
empty :
You have found water
around the washing
machine :
• the appliance isn’t plugged in correctly, the
electrical installation isn’t working,
• the lid of your appliance and the drum shutters
aren’t closed firmly,
• the programme start command hasn’t been
properly selected,
• there is a power failure,
• the water supply has been cut off,
• the water inlet tap is closed,
• the water inlet filters are dirty,
• a red tab appears on the water inlet hose.
• the drainage U-piece is fixed too low (see installation section).
• the drain hose is blocked or bent,
• the drainage filter is obstructed,
• the out of balance detector has been activated :
washing is unevenly distributed in the drum,
• the “Drain” programme or “Night Silence Plus”
or “Rinse hold” option have been selected,
• the height of the drainage U-piece is unsuitable.
• too much detergent has caused foam to overflow,
• the detergent is unsuitable for machine
washing,
• the drainage U-piece isn’t attached correctly,
• the water inlet hose is leaking.
Wash is unsatisfactory : • the detergent is unsuitable for machine
washing,
• there is too much washing in the drum,
• the wash cycle is unsuitable,
• there isn’t enough detergent.
Page 18

18 operating problems
Problems Causes
The appliance vibrates, is
noisy :
the wash cycle is much too
long :
The washing machine
stops during a wash cycle :
The lid doesn’t open at the
end of the cycle :
• the appliance hasn’t been untied properly (see
untying section),
• the appliance isn’t level and is unbalanced,
• the appliance is too close to the wall or furniture,
• washing is unevenly distributed in the drum,
• the load is too small.
• the water inlet filters are dirty,
• the power or water supply has been cut off,
• the motor overheating detector has been activated,
• the water inlet temperature is lower than usual,
• the foam detection security system has been
activated (too much detergent) and the washing
machine has begun draining the foam,
• the out of balance detector has been activated :
an extra phase has been added to distribute
washing more evenly in the drum.
• the water or electricity supply is defective
• a Rinse hold has been selected,
• the drum shutters are open.
• the “immediate opening”* light is not lit,
• the temperature inside the drum is too high,
• the lid unlocks 1 - 2 minutes after the end of the
cycle*.
The “Start/Pause”
pushbutton
**
flashes red
***
The “Start/Pause”
pushbutton** flashes
red***:
The “Start/Pause”
pushbutton** flashes
red***:
• the lid isn’t closed properly.
:
• the drainage filter is obstructed,
• the drain hose is blocked or bent,
• the drain hose is fixed too high (see “Installation” section).
• the drainage pump is blocked,
• the standpipe is blocked.
• the water inlet tap is closed,
• the water supply has been cut off.
Page 19

Problems Causes
operating problems 19
Softener runs directly into
• you have gone past the MAX indicator.
the drum when filling the
dispenser box :
* Depending on model.
**On some models, the audible signals can sound.
*** After solving any problems, press the ‘Start/Pause’ pushbutton to restart the
interrupted programme.
Page 20

20 technical specifications / installation
Technical specifications
DIMENSIONS Height
Width
Depth
LINE VOLTAGE / FREQUENCY
POWER CONSUMPTION
WATER PRESSURE
Connection to water supply
This appliance conforms to the CEE 89-336 directive concerning the limiting of radio-electric interference and the 2006/95/CE directive concerning electrical safety.
Minimum
Maximum
Installation
Remove all protective packaging for
transit before using for the first time.
Keep in case needed for future transit :
Transporting a non-secured appliance
may damage internal components and
cause leakages and malfunctions. The
appliance can also be damaged through
physical contact.
850 mm
400 mm
600 mm
230 V / 50 Hz
2300 W
0,05 MPa (0,5 bar)
0,8 MPa (8 bar)
Type 20x27
3
5
4
6
Unpacking
1
7
2
8
Page 21

technical specifications / installation 21
Untying
5
1
1
2
4
4
3
To install your washing machine at the
same level as surrounding furniture, pro-
2
ceed as follows :
5
Water supply
Install the supplied water inlet hose at
the rear of your washing machine by
proceeding as follows (Do not reuse an
old hose) :
1 2
3
3 4
Open the water inlet tap.
Check there are no leaks.
The water inlet hose can not be extended. If it is too short, please contact the
after-sales service.
Page 22

22 technical specifications / installation
Drainage
1
- The connector at
the end of the flexible hose can be attached to all
common types of
standpipe.
Attach the connec-
tor to the standpipe
with the hose clamp supplied with the
appliance
2
*
.
- Fit the U-piece on
the drainage hose.
Place everything in
a drainage point (or
in a sink) at a height
of between 70 and
100 cm. Ensure it is
positioned securely. Air must be able to enter the end of
the hose, to avoid any risk of siphoning.
The drain hose must never be stretched.
If it is too short, contact a tradesperson.
Positioning
Position the appliance on a flat and hard
surface in a ventilated location. Ensure
the appliance does not come into contact with the wall or other furniture.
To move the appliance, proceed as follows :
1
To move your appliance, place it on
its rollers by pulling
the lever located at
the base of the appliance hard from
right to left. Once
the appliance is in
the desired position, push the lever back
to its original position.
Accurate levelling avoids vibrations, noise and prevents the appliance from moving when running.
2
3
Electrical connection
This washing machine must only be
connected in single-phased 230 V.
Check the fuse size : 10 A for 230 V.
The appliance must not be connected
with an extension lead or multi-plug
adaptor.
Ensure that the plug is earthed and that
it is in accordance with current norms.
* depending on model
Page 23

environment 23
Environment
Disposing of the appliance
All materials carrying the symbol are
recyclable. Dispose of them at a waste
collection site (enquire at your local
council) for collection and recycling.
When disposing of your appliance, remove all parts which could be dangerous to others: cut off the power supply
cable at the base of the appliance.
The symbol on the product or on its
packaging indicates that this product
may not be treated as household waste.
Instead it shall be handed over to the applicable collection point for the recycling
of electrical and electronic equipment.
By ensuring this product is disposed of
correctly, you will help prevent potential
negative consequences for the environment and human health, which could
otherwise be caused by inappropriate
waste handling of this product. For more
detailed information about recycling of
this product, please contact your local
city office, your household waste disposal service or the shop where you purchased the product.
Protecting the environment
To save water and energy and therefore
help protect the environment, we recommend the following :
• Whenever possible, use the
appliance at full capacity and avoid
partial loads.
• Only use the prewash and soak programmes for heavily soiled items.
• Use an appropriate amount of detergent for the hardness of the water (cf.
section “Using the right amount of
detergent”), the size of the load and
how soiled the washing is.
Page 24

24 оглавление
Оглавление
Мерыѝпредосторожностиѝ ...........25
Описаниеѝприбораѝ .....................27
Какѝстиратьѝ?ѝ .............................28
Руководствоѝпоѝстиркеѝ...............33
Таблицаѝпрограммѝ 36
Потреблениеѝводыѝиѝэнергииѝ.....38
Уходѝиѝчисткаѝ ............................. 39
Вѝслучаеѝнеисправностиѝ ............41
Техническиеѝданныеѝ ..................45
Установкаѝ...................................45
Защитаѝокружающейѝсредыѝ .......49
Вѝ данномѝ руководстве
используютсяѝ следующие
обозначенияѝ:
Важнаяѝ информацияѝ по
личнойѝ безопасностиѝ и
сведенияѝ по
предотвращению
поврежденийѝприбора
Общиеѝсведения
Сведенияѝпоѝзащитеѝ
окружающейѝсреды
Page 25

Мерыѝпредосторожности 25
Мерыѝ
предосторожности
Описанныеѝ здесьѝ меры
предосторожностиѝ направлены
наѝобеспечениеѝвашейѝличной
безопасностиѝиѝбезопасности
другихѝлюдей.
Настоятельноѝ советуемѝ вам
внимательноѝ ознакомитьсяѝ с
этимиѝ указаниямиѝ доѝ того,ѝкак
приступатьѝ кѝ установкеѝ и
пользованиюѝ вашимѝ прибором.
Благодаримѝвасѝзаѝвнимание.
Хранитеѝэтиѝ инструкцииѝ вместе
сѝ вашимѝ прибором.ѝВѝслучае
передачиѝилиѝпродажиѝприбора
другомуѝ лицуѝ необходимо
приложитьѝ кѝ приборуѝ данные
инструкции.ѝ Такимѝ образом,
новыйѝ владелецѝ сможет
ознакомитьсяѝсѝпринципами
работыѝ стиральнойѝ машиныѝ и
необходимымиѝ мерами
предосторожности.
Общиеѝправилаѝтехникиѝ
безопасности
• Нельзяѝ изменятьѝ илиѝ пытаться
изменитьѝ характеристики
прибора.ѝЭтоѝпредставляет
опасностьѝдляѝвас.
• Передѝ каждойѝ стиркой
необходимоѝудалитьѝвозможные
монеты,ѝбулавки,ѝзначки,ѝвинтыѝи
т.п.ѝ Еслиѝ такиеѝ предметыѝ будут
оставленыѝ вѝ белье,ѝониѝмогут
статьѝпричинойѝпорчиѝизделий.
• Пользуйтесьѝмоющимѝсредством
вѝ техѝ дозах,ѝкоторыеѝуказаныѝв
разделеѝ “Дозировкаѝ моющих
средств”.
• Складывайтеѝ мелкиеѝ изделия,
например,ѝноски,ѝремниѝиѝт.п.ѝв
полотняныйѝмешочекѝилиѝв
наволочку.
• Поѝ окончанииѝ пользованием
приборомѝотключитеѝподачу
напряженияѝ наѝ розеткуѝ и
закройтеѝкранѝподачиѝводы.
• Передѝ выполнениемѝ уборкиѝ или
техобслуживанияѝ стиральной
машиныѝ необходимоѝ всегда
отключатьѝ ееѝ отѝ электрической
сети.
• Нельзяѝ стиратьѝ вѝ стиральной
машинеѝизделияѝсѝжестким
каркасом,ѝаѝтакже
неподрубленныеѝ илиѝ порванные
ткани.
Установка
• Приѝ полученииѝ прибора
необходимоѝ сразуѝ же
распаковатьѝ его.ѝ Проверьте
общееѝ состояниеѝ прибора.
Изложитеѝ возможныеѝ замечания
вѝ письменномѝ видеѝ вѝ талоне
доставки,ѝодинѝизѝэкземпляров
которогоѝостанетсяѝуѝвас.
• Передѝ подключениемѝ или
использованиемѝ наѝ приборе
должныѝ бытьѝ снятыѝ все
транспортировочныеѝ зажимыѝ и
т.п.ѝ Неполноеѝ устранение
защитныхѝ транспортировочных
приспособленийѝможетѝпривести
кѝ повреждениюѝ прибораѝ или
стоящейѝрядомѝмебели.
• Работыѝпоѝподключениюѝприбора
кѝсетиѝводоснабженияѝдолжны
выполнятьсяѝ только
квалифицированным
сантехником.
• Еслиѝдляѝподключенияѝприбора
необходимоѝ выполнить
модификацию
электрооборудованияѝ вѝ вашем
Page 26

26 Мерыѝпредосторожности
доме,ѝ необходимоѝ обратитьсяѝ к
квалифицированномуѝэлектрику.
• Послеѝ установкиѝ прибора
необходимоѝ удостоверитьсяѝ в
том,ѝчтоѝонѝнеѝопираетсяѝнаѝсвой
кабельѝпитания.
• Приѝ установкеѝ машиныѝ наѝ полѝ с
ковровымѝ покрытием
необходимоѝ проследитьѝ заѝ тем,
чтобыѝ этоѝ покрытиеѝ не
закрывалоѝ вентиляционные
отверстия,ѝ расположенныеѝ в
нижнейѝчастиѝмашины.
• Приборѝ долженѝ подключатьсяѝ к
розеткеѝ сѝ заземлением,
удовлетворяющим
положениеѝ“Выкл”.
• Отсоединитеѝ приборѝ от
электрическойѝсети.
• Прикрутитеѝсноваѝшлангѝподачи
водыѝиѝустановитеѝнаѝместо
сливнойѝшланг.
Такимѝобразом,ѝводаѝбудетѝудалена
изѝ шлангов,ѝчтоѝустраняет
опасностьѝ образованияѝ льдаѝ и
поврежденияѝ вѝ связиѝ сѝ этим
прибора.
Дляѝ тогоѝ чтобыѝ начатьѝ снова
пользоватьсяѝ прибором,
необходимоѝ проследитьѝ заѝ тем,
чтобыѝонѝнаходилсяѝвѝпомещенииѝс
температурамиѝвышеѝ0°C.
существующимѝнормам.
• Преждеѝ чемѝ подключатьѝ прибор
кѝ электросети,ѝвнимательно
прочтитеѝ инструкцииѝ вѝ разделе
“Подключениеѝ кѝ электрической
сети”.
• Заменаѝ кабеляѝ питанияѝ может
выполнятьсяѝ только
специалистамиѝ сервисного
центра.
• Изготовительѝ снимаетѝ сѝ себя
всякуюѝ ответственность,
связаннуюѝ сѝ ущербом,ѝкоторый
возникѝ вѝ результатеѝ установки,
неѝ соответствующей
требованиям.
Пользованиеѝприбором
• Данныйѝ приборѝ предназначен
дляѝ использованияѝ вѝ быту.
Нельзяѝ пользоватьсяѝ этим
приборомѝвѝкоммерческихѝили
промышленныхѝ целях;ѝприбор
долженѝ использоватьсяѝ только
дляѝ выполненияѝ следующих
операцийѝ:ѝстирка,ѝполосканиеѝи
отжим.
• Стирайтеѝвѝмашинеѝтолькоѝте
вещи,ѝ которыеѝ допускают
машиннуюѝ стирку.ѝДляѝсправки
см.ѝ содержимоеѝ этикеткиѝ по
уходуѝнаѝкаждомѝизделии.
• Нельзяѝ стиратьѝ вѝ машине
Мерыѝпредосторожностиѝпротивѝ
замерзания
• Закройтеѝ кранѝиѝотключитеѝшланг
подачиѝводы.
• Поместитеѝконецѝэтогоѝшланга,ѝа
такжеѝсливногоѝшлангаѝвѝемкость
наѝполу.
• Выберитеѝ программуѝ Сливѝ и
выполнитеѝ полныйѝ циклѝ этой
программы.
• Отключитеѝ подачуѝ питанияѝ на
прибор,ѝустановив
переключательѝ программѝ в
изделияѝсоѝследамиѝбензина,
спирта,ѝ трихлорэтиленаѝ иѝ т.п.
Еслиѝ выѝ пользовалисьѝ такого
родаѝ пятновыводителями,
необходимоѝ подождатьѝ доѝ тех
пор,ѝ покаѝ этиѝ средстваѝ не
испарятся,ѝиѝтолькоѝпослеѝэтого
кластьѝизделияѝвѝмашину.
• Данныйѝ приборѝ предназначен
дляѝ пользованияѝ взрослыми.
Следитеѝ заѝ тем,ѝчтобыѝдетиѝне
трогалиѝ приборѝ иѝ неѝ игралиѝ с
ним.
Page 27

Описаниеѝприбора
Панельѝуправления
1
Ручкаѝдляѝоткрыванияѝкрышки
2
Рычагѝдляѝперемещенияѝприбора
3
Регулируемыеѝпоѝвысотеѝножки
4
описаниеѝприбора 27
1
2
3
Отделениеѝдляѝмоющихѝсредств
ѝПредварительнаяѝстирка
ѝСтирка
ѝКондиционерѝдляѝтканиѝ(не
превышатьѝотметкуѝMAXѝ )
Панельѝуправления
Переключательѝпрограмм
1
Переключательѝскоростиѝотжима
2
Кнопкаѝ“Температура”
3
Кнопкаѝ“Опции”
4
M
4
Кнопкаѝ“Полосканиеѝплюс”
5
Индикаторыѝ ходаѝ выполнения
6
цикла
Кнопкаѝ“Старт/Пауза”
7
Кнопкаѝ“Задержкаѝпуска”
8
1
732 4 5 6
8
Page 28

28 какѝстирать
Какѝстиратьѝ?
• створкиѝзацепленыѝдругѝзаѝдруга,
• запирающаяѝ кнопкаѝ А
Первоеѝпользованиеѝ
прибором
• Проверьте,ѝчтобыѝвсе
подключенияѝ кѝ электросетиѝ иѝ к
сетиѝ водоснабжения
соответствовалиѝинструкциямѝпо
установке.
• Снимитеѝ полистироловую
прокладкуѝиѝвсеѝдругиеѝдеталиѝв
барабане.
• Выполнитеѝ предварительную
стиркуѝприѝ90°C,ѝбезѝбелья,ѝноѝс
добавлениемѝмоющегоѝсредства
дляѝтого,ѝчтобыѝпромытьѝбак.
Каждодневноеѝ
пользование
Загрузкаѝбелья
• Откройтеѝкрышкуѝмашины.
• Откройтеѝ барабан,ѝнажавѝна
запирающуюѝ кнопкуѝ А:
произойдетѝ автоматическое
открываниеѝдвухѝстворок.
• Загрузитеѝ белье,ѝзакройте
барабанѝиѝкрышкуѝмашины.
Дозировкаѝмоющихѝсредств
Стиральнаяѝ машина
сконструированаѝ такимѝ образом,
чтобыѝ сделатьѝ возможным
снижениеѝ потребленияѝ водыѝ и
моющихѝ средств,ѝпоэтому
уменьшитеѝдозы,ѝрекомендованные
производителямиѝмоющихѝсредств.
Насыпьтеѝ нужноеѝ количество
моющегоѝсредстваѝвѝ отсекиѝ стирки
еслиѝ выбранѝ режим
“Предварительнаяѝ стирка”.ѝЕсли
нужно,ѝ добавьтеѝ кондиционерѝ для
тканиѝвѝотсекѝ .
Вѝ случаеѝ использованияѝ моющего
средстваѝдругогоѝтипа,ѝобр атитесь ѝк
разделуѝ “Моющиеѝ средстваѝ и
добавки”ѝинструкцийѝпоѝстирке.
Выборѝнужнойѝпрограммы
Описаниеѝ программѝ дляѝ разных
типовѝ бельяѝ приведеноѝ вѝ таблице
программѝ (см.ѝ разделѝ сѝ таблицей
программ).
освобождена.
ѝиѝпредварительнойѝстиркиѝ ,
A
Преждеѝ чемѝ закрыватьѝ крышку
машины,ѝубедитесьѝвѝтом,ѝчто
барабанѝзакрытѝправильноѝ:
Установитеѝ переключатель
программѝ наѝ нужнуюѝ программу.
Индикаторѝ кнопкиѝ “Старт/Пауза”
начинаетѝмигатьѝзеленымѝцветом.
Page 29

Приѝ установкеѝ переключателя
программѝ наѝ другуюѝ программуѝ в
процессеѝ выполненияѝ цикла
машинаѝ игнорируетѝ новую
выбраннуюѝ программу.ѝкнопка
“Старт/Пауза”ѝ начинаетѝ мигать
краснымѝцветом.
Выборѝтемпературы
Нажимайте
последовательноѝ кнопку
ѝ
“Температура”
повыситьѝ илиѝ понизить
температуруѝ вѝ случае,
еслиѝ необходимо
стиратьѝ при
температуре,ѝотличной
отѝ той,ѝ котораяѝ была
выбранаѝ стиральной
машиной.ѝСимвол
стиркеѝвѝхолоднойѝводе.
ѝѝ
,ѝчтобы
соответствует
Выборѝскоростиѝотжима
Установите
переключатель
скорости
отжимаѝ на
нужную
скорость.
Можноѝ также
выбратьѝ один
изѝ следующих
вариантов:ѝ “Безѝ отжима”ѝ *,
“Остановкаѝсѝводойѝвѝбаке”ѝ
*
ѝили
“Ночнойѝрежимѝплюс”ѝ *.
Предусмотренныеѝ максимальные
скоростиѝ:
дляѝпрограммыѝХлопок,ѝСинтетика,
Легкоеѝ глаженье,ѝШерсть,ѝРучная
стиркаѝ:ѝ800ѝоб/мин,
*вѝзависимостиѝотѝмодели
какѝстирать 29
дляѝпрограммыѝ Деликатныеѝ ткани,
Шёлк,ѝМини-программаѝ :ѝ 700ѝоб/
мин.
Поѝ завершенииѝ программы,ѝв
случаеѝ еслиѝ выбранаѝ функция
“Остановкаѝ сѝ водойѝ вѝ баке”
“Ночнойѝрежимѝплюс”ѝ
необходимоѝдляѝполного
завершенияѝ циклаѝ выбрать
программуѝОтжим
ѝѝ
илиѝСлив
ѝѝ
или
ѝ .
,
“Ночнойѝрежимѝплюс”ѝ
Сливѝ водыѝ послеѝ последнего
полосканияѝнеѝпроизводится,ѝтаким
образом,ѝбельеѝнеѝсминается.
Посколькуѝвсеѝстадииѝотжимаѝбудут
отменены,ѝциклѝстиркиѝбудетѝпочти.
бесшумным,ѝиѝегоѝможноѝвыбирать
дляѝ стиркиѝ ночью.ѝ Вѝ программах
Хлопокѝ иѝ Синтетикаѝ полоскание
выполняетсяѝ сѝ использованием
большегоѝколичестваѝводы.
“Остановкаѝсѝводойѝвѝбаке”ѝ
Сливѝ водыѝ послеѝ последнего
полосканияѝнеѝпроизводится,ѝтаким
образом,ѝбельеѝнеѝсминается.
Выборѝдополнительнойѝ
функции
Дополнительные
функции
выбираются
послеѝ выбора
программы,ѝно
доѝ нажатия
кнопкиѝ “Старт/
Пауза”ѝ (см.
таблицуѝпрограмм).
Нажмитеѝоднуѝилиѝнесколько
нужныхѝкнопок;ѝприѝэтомѝзагорятся
соответствующиеѝиндикаторы.ѝПри
повторномѝ нажатииѝ индикаторы
гаснут.ѝЕслиѝкакаяѝлибоѝиз
Page 30

30 какѝстирать
дополнительныхѝ функций
несовместимаѝ сѝ выбранной
программой,ѝкнопкаѝ“Старт/Пауза”
начинаетѝмигатьѝкраснымѝцветом.
Функцияѝ“Супербыстраяѝ
“Функция”.ѝ Функцияѝ окажется
включеннойѝ постоянно,ѝдажеѝпри
отключенииѝ прибораѝ от
электросети.ѝ Дляѝ отключения
функцииѝ повторитеѝ туѝ же
процедуру.
стирка”ѝ(Superѝquick)
Вѝ зависимостиѝ отѝ выбранной
“Задержкаѝпуска”ѝ
программыѝ времяѝ стиркиѝ будет
сокращено.
Функцияѝ“Эко”ѝ(Eco)
Этаѝ функцияѝ позволяетѝ выбирать
программуѝ сѝ болееѝ низкой
температурой,ѝкотораяѝбудетѝстоль
жеѝэффективной,ѝкакѝиѝпрограмма
стиркиѝсѝвысокойѝтемпературой.
Функцияѝ“Предварительнаяѝ
стирка”ѝ(Prewash)
Предварительнаяѝ стирка
выполняетсяѝ приѝ температуреѝ не
болееѝ 30°C.ѝСтадия
предварительнойѝ стирки
завершаетсяѝ быстрымѝ отжимомѝ в
случаеѝпрограммѝдляѝстиркиѝхлопка
иѝ синтетикиѝ иѝ сливомѝ вѝ случае
программѝ стиркиѝ деликатных
тканей.
Функцияѝ“Полосканиеѝплюс”ѝ
Вѝпроцессеѝвыполненияѝциклаѝбудет
добавленоѝ одноѝ илиѝ несколько
полосканий.ѝЭтуѝфункциюѝудобно
использоватьѝвѝслучаеѝстиркиѝбелья
лицѝ сѝ чувствительнойѝ кожейѝ иѝ в
районахѝсѝоченьѝмягкойѝводой.
Однократныйѝвыборѝ:
Нажмитеѝкнопкуѝ“Полосканиеѝплюс”
.ѝФункцияѝокажетсяѝвключенной
толькоѝдляѝвыбраннойѝпрограммы.
Постоянноеѝвключениеѝ:
Нажимайтеѝ вѝ течениеѝ нескольких
секундѝ кнопкиѝ “Температура”ѝѝи
Даннаяѝфункцияѝобеспечивает
задержкуѝпускаѝ программыѝстирки
наѝ2,ѝ4ѝилиѝ6ѝчаса;ѝвыборѝвремени
выполняетсяѝ последовательным
нажатиемѝкнопкиѝ“Задержкаѝпуска”
.
Можноѝ вѝ любойѝ моментѝ изменить
времяѝзадержкиѝилиѝотменитьѝэтот
режимѝ совсем,ѝдляѝэтогоѝперед
нажатиемѝ кнопкиѝ “Старт/Пауза”
следуетѝ нажатьѝ сноваѝ кнопку
“Задержкаѝ пуска”ѝ
включенногоѝиндикатораѝуказывает
наѝнемедленныйѝпуск).
Еслиѝ жеѝ кнопкаѝ “Старт/Пауза”ѝуже
былаѝ нажатаѝ иѝ необходимо
изменитьѝ времяѝ задержкиѝ или
отменитьѝ задержкуѝ совсем,
выполнитеѝ описанныеѝ ниже
действия
•ѝ
немедленногоѝпускаѝциклаѝнажмите
кнопкуѝ “Старт/Пауза”,ѝаѝзатем
кнопкуѝ “Задержкаѝ пуска”
Нажмитеѝ кнопкуѝ “Старт/Пауза”ѝдля
пускаѝцикла.
•ѝ
Дляѝизмененияѝвремениѝзадержки
следуетѝ перейтиѝ вѝ положение
“Выкл”
перенастройкуѝцикла.
ѝ
(отсутствие
ѝ:
Дляѝ отменыѝ задержкиѝ и
ѝ .
ѝѝ
иѝ выполнить
Page 31

Вѝ течениеѝ периодаѝ задержки
крышкаѝбудетѝблокирована.ѝЕслиѝее
необходимоѝ открыть,ѝследует
перевестиѝ стиральнуюѝ машинуѝ в
режимѝпаузы,ѝнажавѝкнопкуѝ“Старт/
Пауза”.ѝ Закрывѝ крышку,ѝнажмите
кнопкуѝ“Старт/Пауза”.
Пускѝпрограммы
Дляѝ пускаѝ программы
нажмитеѝ кнопку
“Старт/Пауза”;
соответствующий
индикаторѝ загоритсяѝ зеленым
цветом.
Считаетсяѝ нормальнымѝ явлением
тотѝ факт,ѝ чтоѝ переключатель
программѝ неѝ поворачиваетсяѝ во
времяѝвыполненияѝцикла.
Индикаторѝ стадии
стирки,ѝвыполняемойѝв
даннойѝ момент,ѝбудет
включен.
ѝ :ѝ Предварительнаяѝ стиркаѝ +
стирка
ѝ:ѝПолосканиеѝ+ѝотжим
ѝ:ѝКонецѝцикла
Вмешательствоѝвѝходѝ
выполненияѝпрограммы
Добавлениеѝбельяѝвѝпервыеѝ 10
минут
Нажмитеѝ кнопкуѝ “Старт/Пауза”:ѝво
времяѝ паузыѝ соответствующий
индикаторѝмигаетѝзеленымѝцветом.
Крышкаѝможетѝбытьѝоткрытаѝтолько
поѝ прошествииѝ примерноѝ 2ѝминут
послеѝ остановкиѝ стиральной
машины.ѝѝНажмитеѝсноваѝнаѝэту
кнопкуѝ дляѝ возобновления
выполненияѝпрограммы.
какѝстирать 31
Изменениеѝвыполняемойѝ
программы
Преждеѝчемѝвыполнятьѝ какие-либо
измененияѝ вѝ выполняемой
программе,ѝнеобходимоѝперевести
стиральнуюѝ машинуѝ вѝ режим
паузы,ѝнажавѝкнопкуѝ“Старт/Пауза”.
Еслиѝ выбранноеѝ изменение
невозможноѝ осуществить,ѝ кнопка
“Старт/Пауза”ѝ мигаетѝ красным
цветомѝвѝтечениеѝнескольких
секунд.ѝ Еслиѝ всеѝ жеѝ необходимо
изменитьѝ программу,ѝследует
отменитьѝ выполнениеѝ текущей
программыѝ(см.ѝниже).
Отменаѝпрограммы
Еслиѝ необходимоѝ отменить
программу,ѝследуетѝповернуть
ручкуѝ переключателяѝ программѝ в
положениеѝ“Выкл”
ѝ .
Конецѝпрограммы
Стиральнаяѝ машина
останавливаетсяѝ автоматически;
кнопкаѝ “Старт/Пауза”ѝгаснет,ѝи
включаетсяѝиндикаторѝ .ѝКрышка
можетѝ бытьѝ открытаѝ толькоѝ по
прошествииѝ примерноѝ 2ѝминут
послеѝ остановкиѝ стиральной
машины.
Установитеѝ ручкуѝ переключателя
программѝвѝположениеѝ“Выкл”ѝ .
Выньтеѝ белье.ѝ Отключитеѝ подачу
напряженияѝ наѝ розеткуѝ иѝ закройте
кранѝподачиѝводы.
Рекомендуетсяѝ оставлятьѝ после
использованияѝкрышкуѝиѝбарабан
открытымиѝ сѝ цельюѝ проветривания
бака
.
Page 32

32 какѝстирать
Режимѝожидания
Еслиѝ наѝ приборе,ѝ наѝ который
подаетсяѝ напряжение,ѝне
выполнялосьѝ никакихѝ действийѝ в
течениеѝ 10ѝ минутѝ передѝ пуском
циклаѝ илиѝ послеѝ окончанияѝ цикла,
включаетсяѝ режимѝ ожидания.ѝВсе
индикаторыѝ погаснут,ѝаѝкнопка
“Старт/Пауза”ѝначнетѝмедленно
мигать.ѝ Дляѝ прекращенияѝ режима
ожиданияѝ достаточноѝ нажать
какую-либоѝ кнопкуѝ илиѝ повернуть
ручкуѝпереключателя.
Page 33

руководствоѝпоѝстирке 33
Руководствоѝпоѝстирке
Сортировкаѝиѝподготовкаѝбелья
• Рассортируйтеѝ бельеѝ поѝ типуѝ и
символуѝ обработкиѝ (см.ѝниже
разделѝ “Международные
символы”):ѝобычнаяѝстирка
подходитѝ дляѝ прочногоѝ белья,
котороеѝ допускаетѝ интенсивные
стиркуѝиѝотжим;ѝстиркаѝв
щадящемѝ режимеѝ подходитѝ для
тонкогоѝ бельяѝ изѝ деликатных
тканей,ѝ котороеѝ должно
обрабатыватьсяѝ с
осторожностью.ѝВѝслучае
смешаннойѝ загрузки,ѝзагрузки
изделийѝ изѝ разногоѝ типаѝ тканей
выбирайтеѝ программуѝ и
температуру,ѝсоответствующую
самымѝнепрочнымѝволокнам.
• Цветноеѝ иѝ белоеѝ бельеѝстирайте
отдельно.ѝВѝпротивномѝслучае
белоеѝ бельеѝ можетѝ окраситься
илиѝ приобрестиѝ сероватый
оттенок.
• Новыеѝ цветныеѝ изделияѝ могут
иметьѝизбытокѝкраски.ѝПоэтомуѝв
первыйѝ разѝ ихѝ следуетѝ стирать
отдельно.ѝСоблюдайтеѝуказания
“Стиратьѝ отдельно”ѝиѝ“Стирать
неоднократноѝотдельно”.
• Освободитеѝкарманыѝи
развернитеѝбелье.
• Удалитеѝ слабозакрепленные
пуговицы,ѝбулавки,ѝ пряжкиѝ иѝ т.п.
Застегнитеѝ застежкиѝ наѝ молнии,
свяжитеѝшнуркиѝиѝремешки.
• Вывернитеѝ наизнанку
многослойнуюѝодеждуѝизѝразных
видовѝ тканиѝ (спальныеѝ мешки,
• Мелкиеѝнепрочныеѝизделия
• Занавесиѝ следуетѝ стиратьѝ с
Загрузкаѝбельяѝсѝучетомѝтипаѝ
волокон
Количестваѝ загружаемогоѝ в
барабанѝ бельяѝ неѝ должно
превышатьѝ максимальную
вместимостьѝ стиральнойѝ машины.
Этаѝвместимостьѝзависитѝотѝотѝтипа
тканей.ѝ Необходимоѝ уменьшить
загрузкуѝвѝслучаеѝмахровых
изделийѝ илиѝ слишкомѝ грязного
белья.
Разныеѝтканиѝразличаютсяѝпо
занимаемомуѝ имиѝ объемуѝ и
способностиѝ удерживатьѝ воду.
Поэтому,ѝвѝобщемѝслучае,ѝбарабан
заполняетсяѝследующимѝобразомѝ:
• полностью,ѝноѝбезѝуплотнения,ѝв
• наполовинуѝ вѝ случаеѝ изделийѝ из
• примерноѝ наѝ третьѝ своего
Вѝ случаеѝ загрузкиѝ бельяѝ разного
типаѝ заполняйтеѝ барабанѝ сѝ учетом
самыхѝнепрочныхѝтканей.
аноракиѝ иѝ т.п.),ѝцветные
трикотажныеѝ изделия,ѝаѝтакже
изделияѝ изѝ шерстиѝ иѝ тканейѝ с
декоративнымиѝвставками.
(носки,ѝколготки
т.п.)ѝследуетѝстиратьѝвѝмешкесеткеѝдляѝбелья.
особойѝосторожностью.ѝСнимите
зажимыѝиѝположитеѝзанавескиѝв
сеткуѝилиѝмешок.
случаеѝ бельяѝ изѝ хлопка,ѝльна,
смешанныхѝволокон,
обработанногоѝ хлопкаѝ и
синтетическихѝволокон,
объемаѝ вѝ случаеѝ очень
непрочныхѝ изделий,ѝнапример,
занавесокѝ иѝ шерстяной/вязаной
одежды.
,ѝбюстгальтерыѝи
Page 34

34 руководствоѝпоѝстирке
Моющиеѝсредстваѝиѝдобавки
Пользуйтесьѝтолькоѝтемиѝмоющими
средствамиѝиѝдобавками,ѝ которые
предназначеныѝ дляѝ стиральных
машин.ѝ Следуйтеѝ инструкциям
производителяѝ сѝ учетомѝ указаний,
содержащихсяѝ вѝ разделах
“Отделениеѝдляѝмоющихѝсредств”ѝи
“Дозировкаѝмоющихѝсредств”.
Неѝ рекомендуетсяѝ пользоваться
одновременноѝ разнымиѝ моющими
средствами,ѝтакѝкакѝэтоѝможет
привестиѝкѝпорчеѝбелья.
Количествоѝ используемого
моющегоѝ средстваѝ зависитѝ от
загрузкиѝ белья,ѝ жесткостиѝ водыѝ и
степениѝзагрязненияѝбелья.
Еслиѝводаѝмягкая,ѝследуетѝнемного
уменьшитьѝ дозуѝ моющего
средства.ѝЕслиѝводаѝжесткая
(рекомендуетсяѝ пользоваться
средствамиѝдляѝудаления
известковогоѝ налета)ѝилиѝесли
бельеѝ оченьѝ грязноеѝ илиѝ наѝ нем
многоѝ пятен,ѝнемногоѝувеличьте
дозу.
Сведенияѝоѝжесткостиѝ водыѝ можно
получить,ѝобратившисьѝвѝслужбу
водоснабженияѝ илиѝ вѝ другую
компетентнуюѝорганизацию.
Cтиральныеѝ порошкиѝ могут
использоватьсяѝбезѝограничений.
Вѝ случаеѝ выбораѝ предварительной
стиркиѝнельзяѝиспользоватьѝжидкие
моющиеѝ средства.ѝПриѝостальных
циклахѝ безѝ предварительной
стиркиѝ такиеѝ средстваѝ могут
заливатьсяѝ вѝ шарик-дозатор,
помещаемыйѝ непосредственноѝ в
барабан,ѝилиѝвѝотделениеѝдля
моющихѝ средств.ѝВѝобоихѝслучаях
необходимоѝ сразуѝ жеѝ включать
циклѝстирки.
Моющиеѝсредстваѝвѝтаблеткахѝилиѝв
отдельныхѝ дозахѝ загружаются
толькоѝвѝотсекѝосновнойѝстирки
отделенияѝ дляѝ моющихѝ средств
стиральнойѝмашины.
Приѝобработкеѝпятенѝпередѝстиркой
следуйтеѝдозамѝиѝрекомендациям,
даннымѝ изготовителем.ѝЕслиѝдля
обработкиѝ пятенѝ используется
моющееѝ средство,ѝнеобходимо
сразуѝжеѝвключитьѝциклѝстирки.
Page 35

Международныеѝсимволы
ОБЫЧНАЯ
СТИРКА
ЩАДЯЩАЯ
СТИРКА
Стиркаѝприѝ
95°C
Стиркаѝприѝ
60°C
Стиркаѝприѝ
40°C
руководствоѝпоѝстирке 35
Стиркаѝприѝ
30°C
Щадящаяѝ
ручнаяѝстирка
Неѝстирать
ОБРАБОТКАѝ
ЖАВЕЛЕМ
ГЛАЖЕНЬЕ
ХИМИЧЕСКА
ЯѝЧИСТКА
СУШКА Сушитьѝнаѝ
Разрешеноѝотбеливаниеѝхлоромѝ(жавелем),ѝ
толькоѝвѝхолоднойѝводеѝиѝразбавленнымѝ
Высокиеѝтемпературыѝ
(макс.ѝ200°C)
Химическаяѝчисткаѝ
(всеѝобычныеѝ
растворители)
горизонтальнойѝ
поверхности
раствором
Средниеѝтемпературыѝ
(макс.ѝ150°C)
Химическаяѝчисткаѝ
(всеѝобычныеѝ
растворители,ѝкромеѝ
трихлорэтилена)
Сушитьѝвѝ
подвешенномѝ
состоянии
Запрещеноѝотбеливаниеѝхлоромѝ(жавелем)
Низкиеѝтемпературыѝ
(макс.ѝ100°C)
Химическаяѝчисткаѝ
(толькоѝ
углеводороднымиѝѝ
растворителямиѝиѝѝ
R113)
Высокаяѝ
температура
Средняя
температура
Сушитьѝнаѝ
плечиках
Разрешенаѝсушкаѝ
вѝбарабаннойѝ
сушилке
Неѝгладить
Химическаяѝчисткаѝ
запрещена
Запрещенаѝсушкаѝ
вѝбарабаннойѝ
сушилке
Page 36

36 таблицаѝпрограммѝ/ѝпотреблениеѝводыѝиѝэнергии
Таблицаѝпрограмм
Программа/Типѝбелья Загруз
Хлопок*ѝ (Cottons)ѝ :ѝ белоеѝ илиѝ цветноеѝ белье,
например,ѝ рабочаяѝ одеждаѝ обычнойѝ степени
загрязнения,ѝпостельноеѝбелье,ѝстоловоеѝбелье,
нательноеѝбелье,ѝсалфетки
Синтетикаѝ (Synthetics)ѝ :ѝ синтетическиеѝ ткани,
нательноеѝ белье,ѝцветныеѝткани,ѝрубашки,ѝне
требующиеѝглаженья,ѝблузки.
Легкоеѝ глаженьеѝ (Easyѝ iron)ѝ :ѝ меньшее
сминаниеѝбелья,ѝкотороеѝпоэтомуѝлегчеѝгладить.
Деликатныеѝтканиѝ(Delicates)ѝ:ѝдляѝнепрочных
тканей,ѝнапример,ѝзанавесок.
.
ка
5,5ѝкг
2,5ѝкг
1,0ѝкг
2,5ѝкг
Возможныеѝ
дополнительныеѝ
функции
Предварительнаяѝ
стирка
Эко**
Супербыстраяѝ
стирка
Полосканиеѝплюс
Остановкаѝсѝ
водойѝвѝбаке
Ночнойѝрежимѝ
плюс
Задержкаѝпуска
Предварительнаяѝ
стирка
Полосканиеѝплюс
Остановкаѝсѝ
водойѝвѝбаке
Задержкаѝпуска
Предварительнаяѝ
стирка
Супербыстраяѝ
стирка
Полосканиеѝплюс
Остановкаѝсѝ
водойѝвѝбаке
Ночнойѝрежимѝ
плюс
Задержкаѝпуска
Page 37

таблицаѝпрограммѝ/ѝпотреблениеѝводыѝиѝэнергии 37
Программа/Типѝбелья Загруз
ѝ Шерстьѝ (Wool)ѝ :ѝ Шерсть,ѝдопускающая
машиннуюѝ стирку,ѝсѝуказаниямиѝнаѝэтикетке
“чистаяѝ натуральнаяѝ шерсть,ѝ машиннаяѝ стирка,
неѝсадится”.
ѝРучнаяѝ стиркаѝ (Handwash)ѝ :ѝ тонкоеѝ белье,
требующееѝ бережнойѝ стирки,ѝсѝуказаниемѝна
этикеткеѝ“ручнаяѝстирка”.
Шёлкѝ (Silk)ѝ :ѝ ткани,ѝдопускающиеѝмашинную
стиркуѝприѝ30°C.
Замачиваниеѝ (Soak)ѝ :ѝзамачиваниеѝвѝслучае
оченьѝгрязногоѝбельяѝсѝостановкойѝсѝводойѝв
баке.
Мини-программаѝ(Miniѝ programme)ѝ :ѝДля
незначительноѝ загрязненныхѝ тканей,ѝкроме
шерсти.
Полосканиеѝ (Rinses)ѝ :ѝ белье,ѝ постиранное
вручную,ѝможноѝпрополоскать,ѝиспользуяѝэту
программу.
Деликатныеѝ полосканияѝ (Delicateѝ rinse)ѝ :
белье,ѝ постиранноеѝ вручную,ѝможно
прополоскать,ѝиспользуяѝэтуѝпрограмму.
ка
1,0ѝкг
1,0ѝкг
1,0ѝкг
5,5ѝкг
2,5ѝкг
5,5ѝкг
2,5ѝкг
Возможныеѝ
дополнительныеѝ
функции
Остановкаѝсѝ
водойѝвѝбаке
Ночнойѝрежимѝ
плюс
Задержкаѝпуска
Задержкаѝпуска
Задержкаѝпуска
Полосканиеѝплюс
Остановкаѝсѝ
водойѝвѝбаке
Ночнойѝрежимѝ
плюс
Задержкаѝпуска
Сливѝ(Drain)ѝ :ѝ сливѝпослеѝостановкиѝсѝводойѝв
бакеѝ(илиѝночногоѝрежимаѝплюс).
Отжимѝ (Spin)ѝ :ѝ отжимѝ приѝ скоростиѝ отѝ 500ѝдо
800ѝоб/минѝпослеѝостановкиѝсѝводойѝвѝбокеѝ(или
ночногоѝрежимаѝплюс).
Деликатныйѝ отжимѝ (Delicateѝ spin)ѝ :ѝПосле
остановкиѝсѝполнымѝѝбакомѝ(илиѝприѝвыполнении
ночногоѝ бесшумногоѝ цикла)ѝ осуществляет
деликатныйѝотжим.
*ѝКонтрольнаяѝпрограммыѝдляѝиспытанийѝсогласноѝнормеѝCEIѝ456ѝ(программаѝХлопокѝ
60°,ѝФункцияѝЭко).
**ѝЭтотѝрежимѝнедоступенѝприѝтемпературахѝнижеѝ 40°.
5,5ѝкг
5,5ѝкг
2,5ѝкг
Задержкаѝпуска
Задержкаѝпуска
Page 38

38 таблицаѝпрограммѝ/ѝпотреблениеѝводыѝиѝэнергии
Потреблениеѝводыѝиѝэнергии
Программа
Типѝбелья
Температура
°C
Хлопок* холоднаяѝ-ѝ90 67 2,20 140-150
Синтетика
Легкоеѝглаженье холоднаяѝ-ѝ60 55 0,65 125-135
Деликатныеѝткани холоднаяѝ-ѝ40 53 0,55 60-70
Шерсть холоднаяѝ-ѝ40 48 0,45 55-65
Ручнаяѝстирка холоднаяѝ-ѝ40 48 0,45 55-65
Шёлк 30 40 0,30 25-35
Замачивание 30 20 0,20 15-25
Мини-программа 30 40 0,35 25-35
Полоскание - 32 0,05 50-60
Деликатныеѝполоскания - 45 0,04 35-45
Слив - - 0,002 0-10
Отжим - - 0,015 10-20
Деликатныйѝотжим - - 0,015 5-15
*ѝКон т р о л ь н аяѝпрогр а м м ы ѝд л я ѝи спытани й ѝс о г л а с н о ѝнормеѝCEIѝ456ѝ(программаѝХлопокѝ60°,
ФункцияѝЭко)ѝ:ѝ49ѝлѝ/ѝ1,04ѝкВтѝ/ѝ140ѝмин
**ѝПриведенныеѝданныеѝимеютѝориентировочныйѝхарактерѝиѝмогутѝменятьсяѝвѝ
зависимостиѝотѝреальныхѝусловийѝпользования.ѝУказанныеѝзначенияѝпотребленияѝ
соответствуютѝмаксимальнойѝтемпературеѝдляѝкаждойѝпрограммы.
холоднаяѝ-ѝ60 48 0,85 90-100
Примерныеѝпоказатели
потребления**
литры кВт длит-сть
Page 39

уходѝиѝчистка 39
Уходѝиѝчистка
Передѝ чисткойѝ всегдаѝ отключайте
приборѝотѝэлектросети.
Удалениеѝизвестковыхѝ
отложенийѝвѝприборе
Дляѝ удаленияѝ известковых
отложенийѝ используйте
специальные,ѝ неѝ вызывающие
коррозииѝ средства,
предназначенныеѝ дляѝ стиральных
машин.ѝ Соблюдайтеѝ приведенные
наѝупаковкеѝуказанияѝ поѝ дозировке
иѝчастотеѝпользования.
Корпус
Чиститеѝ корпусѝ стиральной
машины,ѝиспользуяѝтеплуюѝводуѝс
мягкимѝмоющимѝсредством.ѝНельзя
пользоватьсяѝ спиртом,
растворителямиѝ илиѝ аналогичными
средствами.
Отделениеѝдляѝмоющихѝсредств
Дляѝчисткиѝэтогоѝотделения
выполнитеѝ действия,ѝ показанные
нижеѝ:
1
2
5
Бачокѝдляѝсбораѝпредмето
Выполняйтеѝ регулярнуюѝ очистку
бачкаѝ дляѝ сбораѝ предметов,
расположенныйѝ вѝ нижнейѝ части
барабанаѝ:
1
3
5
6
2
4
6
3
4
Page 40

40 уходѝиѝчистка
Фильтрыѝнаѝлинииѝподачиѝводы
Дляѝ чисткиѝ этихѝ фильтров
выполнитеѝ действия,ѝ показанные
нижеѝ:
1
2
Page 41

вѝслучаеѝнеисправности 41
Вѝслучаеѝнеисправности
Приѝ изготовленииѝ приборѝ прошелѝ множествоѝ проверок.ѝЕслиѝвсеѝже
имеетѝ местоѝ сбой/неисправность,ѝ ознакомьтесьѝ сѝ изложеннымиѝ ниже
сведениямиѝпрежде,ѝчемѝобращатьсяѝвѝсервисныйѝцентр.ѝ
Неисправность Причины
Стиральнаяѝ машинаѝ не
включаетсяѝ илиѝ не
заполняетсяѝводойѝ:
Стиральнаяѝ машина
заполняетсяѝ водойѝ и
сразуѝвыполняетѝсливѝ:
Стиральнаяѝ машинаѝ не
отжимаетѝ илиѝ не
выполняетѝсливѝ:
• приборѝ подключенѝ неправильноѝ к
электросети;ѝѝнеѝработает
электрооборудованиеѝвѝдоме,
• плохоѝ закрытаѝ крышкаѝ стиральной
машиныѝиѝстворкиѝбарабана,
• пускѝпрограммыѝнеѝбылѝв
действительностиѝосуществлен,
• сбойѝподачиѝэлектроэнергии,
• сбойѝподачиѝводы,
• закрытѝкранѝподачиѝводы,
• засореныѝфильтрыѝвѝлинииѝѝподачиѝводы,
• наѝшлангеѝподачиѝводыѝпоявилсяѝкрасный
знак.
• загнутыйѝ конецѝ наѝ сливеѝ подвешен
слишкомѝнизкоѝ(см.ѝразделѝпоѝустановке).
• закупоренѝилиѝперегнутѝсливнойѝшланг,
• засоренѝсливнойѝфильтр,
• сработалоѝ устройствоѝ предотвращения
дисбалансаѝ:ѝплохоѝраспределеноѝбельеѝв
барабане,
• выбранаѝ программаѝ “Слив”ѝилиѝфункция
“Ночнойѝрежимѝплюс”ѝилиѝ“Остановкаѝ с
водойѝвѝбаке”,
• неправильноѝ выбранаѝ высотаѝ загнутого
концаѝслива.
Page 42

42 вѝслучаеѝнеисправности
Неисправность Причины
Следыѝ водыѝ около
машиныѝ:
Неудовлетворительные
результатыѝстиркиѝ:
Машинаѝвибрируетѝи
издаетѝшумѝ:
• переливѝ пеныѝ из-заѝ избыточного
количестваѝмоющегоѝсредства,
• используемоеѝ моющееѝ средствоѝ не
подходитѝ дляѝ стиркиѝ вѝ стиральной
машине,
• неправильноѝ подвешенѝ загнутыйѝ конец
слива,
• шлангѝ подачиѝ водыѝ закреплен
негерметично.
• используемоеѝ моющееѝ средствоѝ не
подходитѝ дляѝ стиркиѝ вѝ стиральной
машине,
• вѝ барабанѝ загруженоѝ слишкомѝ много
белья,
• выбранаѝ неподходящаяѝ программа
стирки,
• недостаточноеѝ количествоѝ моющего
средства.
• неѝ снятыѝ всеѝ транспортировочные
приспособленияѝ (см.ѝразделѝпо
подготовкеѝмашиныѝкѝработе),
• приборѝ неѝ выставленѝ горизонтальноѝ и
стоитѝнедостаточноѝустойчиво,
• приборѝстоитѝслишкомѝблизкоѝкѝстенеѝили
кѝмебели,
• бельеѝ приѝ пускеѝ оказалосьѝ плохо
распределеннымѝвѝбарабане,
• недостаточнаяѝзагрузка.
Page 43

Неисправность Причины
вѝслучаеѝнеисправности 43
Слишком
продолжительныйѝ цикл
стиркиѝ:
Стиральнаяѝ машина
останавливаетсяѝ во
времяѝ выполнения
циклаѝстиркиѝ:
Неѝ открываетсяѝ крышка
поѝзавершенииѝциклаѝ:
Кнопкаѝ “Старт/Пауза”
мигаетѝ красным
цветом
***
ѝ:
• засореныѝфильтрыѝвѝлинииѝѝподачиѝводы,
• сбойѝподачиѝводы,
• сработалаѝ системаѝ термозащиты
двигателя,
• температураѝ подаваемойѝ водыѝ ниже
обычной,
• сработалаѝ защитнаяѝ система
обнаруженияѝ пеныѝ (слишкомѝ много
моющегоѝсредства),ѝиѝстиральнаяѝмашина
выполняетѝудалениеѝпены,
• сработалоѝ устройствоѝ предотвращения
дисбаланса:ѝдобавленаѝдополнительная
стадияѝсѝповторнымѝпускомѝприѝлучшем
распределенииѝбельяѝвѝбарабане.
• неисправностьѝ вѝ системеѝ подачиѝ воды
илиѝэлектроэнергии,
• выбранаѝ функцияѝ “Остановкаѝ сѝ водойѝ в
баке”,
• открытыѝстворкиѝбарабана.
• индикаторѝ готовностиѝ кѝ открыванию
выключен,
• слишкомѝвысокаяѝтемператураѝвѝбаке,
• крышкаѝ освобождаетсяѝпоѝпрошествииѝ 12ѝминутѝпослеѝзавершенияѝпрограммы*.
**
• неправильноѝзакрытаѝкрышка.
*
Кнопкаѝ “Старт/Пауза”**
мигаетѝ красным
цветом***ѝ:
Кнопкаѝ “Старт/Пауза”**
мигаетѝ красным
цветом***ѝ:
• засоренѝсливнойѝфильтр,
• закупоренѝилиѝперегнутѝсливнойѝшланг,
• слишкомѝ высокоѝ установленѝ сливной
шлангѝ(см.ѝразделѝ“Установка”),
• засоренѝсливнойѝнасос,
• засоренѝсифон.
• закрытѝкранѝподачиѝводы,
• сбойѝподачиѝводыѝвѝсетиѝводоснабжения.
Page 44

44 вѝслучаеѝнеисправности
Неисправность Причины
Кондиционерѝ дляѝ ткани
• превышенаѝотметкаѝMAX.
стекает
непосредственноѝ в
барабанѝ воѝ время
заполненияѝ отделения
дляѝмоющихѝсредствѝ:
*ѝВѝзависимостиѝотѝмодели.
**Вѝнекоторыхѝмодуляхѝможетѝвключатьсяѝзвуковойѝсигнал.
***ѝПослеѝустраненияѝвозможныхѝпричинѝнеисправностиѝнажмитеѝкнопку
“Старт/Пауза”ѝдляѝповторногоѝпускаѝпрерваннойѝпрограммы.
Page 45

Техническиеѝданные
техническиеѝданныеѝ/ѝустановка 45
ГАБАРИТЫѝ Высота
Ширина
Глубина
НАПРЯЖЕНИЕ/ЧАСТОТА
ОБЩАЯѝМОЩНОСТЬ
ДАВЛЕНИЕѝВОДЫ
Подсоединениеѝ кѝ сети
водоснабжения
Данныйѝприборѝ соответствуетѝ требованиямѝ директивыѝ CEEѝ 89-
336,ѝкасающимсяѝ ограниченийѝ радиопомех,ѝиѝдирективыѝ2006/
95/CE,ѝкасающимсяѝэлектробезопасности.
Минимум
Максимум
Установка
Обязательноѝудалитеѝпередѝпервым
включениемѝприбораѝвсеѝзащитные
детали,ѝ установленныеѝ для
транспортировки.ѝ Сохранитеѝ эти
деталиѝдляѝвозможныхѝперевозокѝв
будущем:ѝперевозкаѝприбораѝбез
соответствующихѝ фиксаторов
можетѝ привестиѝ кѝ повреждению
внутреннихѝ узлов/деталейѝ иѝ стать
причинойѝ утечекѝ иѝ сбоев,ѝаѝтакже
деформацийѝприѝударе.
Распаковка
1
2
850ѝмм
400ѝмм
600ѝмм
230ѝВѝ/ѝ50ѝГц
2300ѝВт
0,05ѝМПаѝ(0,5ѝбар)
0,8ѝМПаѝ(8ѝбар)
Типѝ20x27
3
5
7
4
6
8
Page 46

46 техническиеѝданныеѝ/ѝустановка
Подготовкаѝмашиныѝкѝработе
4
3
5
2
1
1
2
3
4
Еслиѝнужноѝсохранить
выравниваниеѝ машины
относительноѝ стоящейѝ рядом
мебели,ѝвыполнитеѝпоказанные
нижеѝдействияѝ:
5
Подачаѝводы
Закрепитеѝ шлангѝ подачиѝ воды,
поставляемыйѝвѝкомплектеѝс
прибором,ѝнаѝзаднейѝпанели
стиральнойѝ машины,ѝвыполнив
описанныеѝ нижеѝ действияѝ (Не
используйтеѝ повторноѝ старый
шланг)ѝ:
1 2
3 4
Page 47

техническиеѝданныеѝ/ѝустановка 47
Откройтеѝкранѝподачиѝводы.
Проверьтеѝнаѝотсутствиеѝутечек.
Шлангѝподачиѝводыѝнеѝможетѝбыть
удлинен.ѝ Еслиѝ егоѝ длинаѝ всеѝ же
недостаточна,ѝобратитесьѝв
сервисныйѝцентр.
Слив
1
зажимногоѝ хомута,ѝприлагаемогоѝк
прибору
*
.
2
вѝ раковину)ѝнаѝвысотеѝ70-100ѝсм.
Проследите,ѝчтобыѝшлангѝнеѝмог
упасть.ѝНеобходимоѝпредусмотреть
отверстиеѝдляѝпоступленияѝ воздуха
наѝ концеѝ сливногоѝ шлангаѝ сѝ целью
предотвращенияѝ эффекта
сифонирования.
Сливнойѝшлангѝнеѝможетѝможетѝниѝв
коемѝ случаеѝ удлинен.ѝЕслиѝего
длинаѝ всеѝ жеѝ недостаточна,
обратитесьѝ кѝ техническому
специалисту.
-ѝНаконечникѝна
шлангеѝ подходит
коѝвсемѝ обычным
типамѝсифонов.
Закрепите
наконечникѝ на
сифонеѝ с
помощью
-ѝУстановите
загнутыйѝ конец
наѝ сливной
шланг.
Поместитеѝ шланг
сѝ загнутым
концомѝвѝсливной
трубопроводѝ(или
Подключениеѝ кѝ электрической
сети
Даннаяѝ стиральнаяѝ машинаѝ может
подключатьсяѝтолькоѝ кѝоднофазной
сетиѝ230ѝВ.
Проверьтеѝ характеристики
линейногоѝ предохранителя:ѝ 10ѝ A
приѝ230ѝВ.
Нельзяѝ подключатьѝ приборѝ с
использованиемѝ удлинителейѝ или
многогнездовойѝрозетки.
Проверьте,ѝчтобыѝзаземление
соответствовалоѝ действующим
нормам.
Установкаѝприбораѝвѝнужноеѝ
место
Устанавливайтеѝприборѝнаѝровныйѝи
прочныйѝ полѝ вѝ хорошо
проветриваемомѝ помещении.
Проследитеѝ заѝ тем,ѝчтобыѝприбор
неѝ касалсяѝ стеныѝ илиѝ предметов
мебели.
Дляѝ перемещенияѝ прибора
необходимоѝвыполнитьѝследующие
действияѝ:
справаѝ налевоѝ рычаг,
предусмотренныйѝ вѝ нижнейѝ части
прибора.ѝПослеѝустановкиѝприбора
вѝнужноеѝместоѝприведитеѝрычагѝв
исходноеѝположение.
1
Для
перемещения
стиральной
машины
достаточно
установитьѝ ееѝ на
колесики,
вытянувѝдоѝупора
* Вѝзависимостиѝотѝмодели.
Page 48

48 техническиеѝданныеѝ/ѝустановка
Точноеѝвыставлениеѝприбораѝпо
уровнюѝ позволяетѝ предотвратить
вибрации,ѝшумѝиѝсмещение
прибораѝвоѝвремяѝработы.
2
3
Page 49

защитаѝокружающейѝсреды 49
Защитаѝокружающейѝ
среды
Удалениеѝвѝотходы
Всеѝ материалы,ѝимеющиеѝсимвол
,ѝдопускаютѝреутилизацию.
Доставьтеѝ этиѝ материалыѝ вѝ место
сбораѝ утиляѝ (оѝ местонахождении
этогоѝ местаѝ можноѝ узнатьѝ в
местныхѝ службах)ѝдляѝих
реутилизации.
Приѝ удаленииѝ прибораѝ наѝ слом
приведитеѝ егоѝ в
неработоспособноеѝ состояние:
полностьюѝ срежьтеѝ кабель
питания.
Символѝ ѝнаѝизделииѝилиѝнаѝего
упаковкеѝ указывает,ѝчтоѝоноѝне
подлежитѝ утилизацииѝ вѝ качестве
бытовыхѝотходов.ѝВместоѝэтогоѝего
следуетѝ сдатьѝ вѝ соответствующий
пунктѝ приемкиѝ электронногоѝ и
электрооборудованияѝ для
последующейѝутилизации.
Соблюдаяѝ правилаѝ утилизации
изделия,ѝ Выѝ поможете
предотвратитьѝ причинение
окружающейѝ средеѝ иѝ здоровью
людейѝ потенциальногоѝ ущерба,
которыйѝ возможен,ѝвѝпротивном
случае,ѝ вследствие
неподобающегоѝ обращенияѝ с
подобнымиѝ отходами.ѝ Заѝ более
подробнойѝ информациейѝ об
утилизацииѝэтогоѝизделияѝпросьба
обращатьсяѝ кѝ местнымѝ властям,ѝв
службуѝ поѝ вывозуѝ иѝ утилизации
отходовѝилиѝ вѝ магазин,ѝвѝкотором
Выѝприобрелиѝизделие.
Защитаѝокружающейѝсреды
Дляѝ экономногоѝ расходаѝ водыѝ и
энергии,ѝаѝтакжеѝдляѝзащиты
окружающейѝсредыѝрекомендуется
соблюдатьѝ приведенныеѝ ниже
правилаѝ:
• Пользуйтесьѝ приборомѝ при
максимальной,ѝаѝнеѝчастичной
загрузке.
• Пользуйтесьѝ функциями
“Предварительнаяѝ стирка”ѝи
“Замачивание”ѝ толькоѝ вѝ случае
оченьѝгрязногоѝбелья.
• Выбирайтеѝ дозуѝ моющего
средстваѝ вѝ соответствииѝ с
жесткостьюѝ водыѝ (см.ѝраздел
“Дозировкаѝ моющихѝ средств”),
аѝ такжеѝ сѝ учетомѝ загрузкиѝ и
степениѝзагрязненияѝбелья.
Page 50

www.electrolux.com
108 3587 00 - 11/07
 Loading...