

Page 1

User manual
Gebruiksaanwijzing
fridge-freezer
koelkast-vries
ERZ36700
Page 2

We were thinking of you
when we made this product
Page 3

Welcome to the world of Electrolux
Thank you for choosing a first class product from Electrolux, which hopefully will
provide you with lots of pleasure in the future. The Electrolux ambition is to offer
a wide variety of quality products that make your life more comfortable. You find
some examples on the cover in this manual. Please take a few minutes to study
this manual so that you can take advantage of the benefits of your new machine.
We promise that it will provide a superior User Experience delivering
Ease-of-Mind. Good luck!
3
Page 4
The following symbols are used in this manual:
T
Important information concerning your personal safety and
information on how to avoid damaging the appliance
General information and tips
Environmental information
Scrapping old appliances
he symbol on the product or on its packaging indicates that this product
may not be treated as household waste. Instead it should be taken to the
appropriate collection point for the recycling of electrical and electronic
equipment. By ensuring this product is disposed of correctly, you will help
prevent potential negative consequences for the environment and human
health, which could otherwise be caused by inappropriate waste handling of
this product. For more detailed information about recycling of this product,
please contact your local council, your household waste disposal service or the
shop where you purchased the product.
4
Page 5
Safety instructions
Your new fridge/freezer may have other
functions compared to your previous
one.
Carefully read these instructions
learn how the appliance works
how to care for it. Keep the
booklet. It will come in handy if
later sell the cabinet or give it
somebody else.
These warnings are provided in the
interests of your safety. Ensure that
you understand them all before
installing or using the appliance. Your
safety is of paramount importance. If
you are unsure about any of the
meanings or warnings contact the
Customer Care Department.
This appliance is not intended for use
by persons (including children) with
reduced physical, sensory or mental
capabilities, or lack of experience and
knowledge, unless they have been
given supervision or instruction
concerning use of the appliance by a
person responsible for their safety.
to
and
instruction
you
to
For the User
· The refrigerator is intended for the
storage of foodstuffs and for the
production of ice for normal household
consumption in accordance with these
instructions.
· Do not keep explosive gases or
liquids in the refrigerator or freezer
compartment. They may explode and
cause injury and material damage.
· Do not let sharp objects come into
contact with the refrigerating system
on the back of and inside the cabinet.
If the refrigerating system is punctured,
the cabinet will be damaged and
foodstuff inside may spoil.
· Do not keep carbonised drinks or
bottles in the freezer compartment.
The glass bottles may break.
· The cabinet is heavy. The edges
and projecting parts of the cabinet
may be sharp. Be careful when moving
the cabinet and always use gloves.
Child Safety
· Pay attention so that small children
do not gain access to the operating
controls or the inside of the cabinet.
WARNING
Keep ventilation openings, in the
appliance enclosure or in the built-in
structure, clear of obstruction.
WARNING
Do not use mechanical devices or
other means to accelerate the
defrosting process, other than those
recommended by the manufacturer.
WARNING
Do not damage the refrigerant circuit.
WARNING
Do not use electrical appliance inside
the food storage compartments of the
appliance, unless they are of the type
recommended by the manufacturer.
5
Page 6

Contents
Scrapping old cabinets 4...........
Safety instructions 5...............
Contents 6.......................
USE 6...........................
DISPLAY 7.......................
Switching off 8....................
Functions Menu 8.................
Setting the Clock 9................
Select /Switch off /Switch on
each compartment 9...........
Switch off of one compartment 9....
Ambient Temperature Function 9.....
Child Lock Function 9..............
Shopping Function 10..............
Eco mode Function 10.............
Drinks Chill Function 10............
Use of the fridge compartment 10....
Temperature regulation 10..........
The "Natura-fresh" zone 11.........
Holiday Function 11................
Use of the freezer compartment 12...
Temperature regulation 12..........
Freezing fresh food 12..............
Storage of frozen food 13...........
Excessive temperature alarm 13.....
Door open acoustic alarm 13........
Cabinet interior 14.................
HINT and TIPS 15.................
Saving energy 15..................
Food Storage 16..................
Protect the environment 16.........
MAINTENANCE and CLEANING 16.
Removing the ventilation grille 16....
Cleaning 16......................
Defrosting the freezer 17............
Defrosting the fridge 18.............
To change the lamp 18.............
Change of carbon filter 18..........
When the appliance is not in use 18..
SOMETHING NOT WORKING 19....
TECHNICAL SPECIFICATION 21....
INSTALLATION 22.................
Mains Cable 22...................
Unpacking 22.....................
Remove the transport supports 22...
Cleaning 22......................
Installation of carbon filter 23........
Installing the cabinet 23............
Door Reversal 24..................
Electrical connection 24............
6
Page 7
USE
p
Position and clean the cabinet as
explained in the section "Installation".
Check that the drain hose at the rear
of the cabinet discharges into the drip
tray.
Before inserting the power plug into the outlet and switching on the cabinet for
the first time, leave it standing upright for about 2 hours. Otherwise the
compressor may sustain damage. This time will allow the oil sufficient time to
return to the compressor.
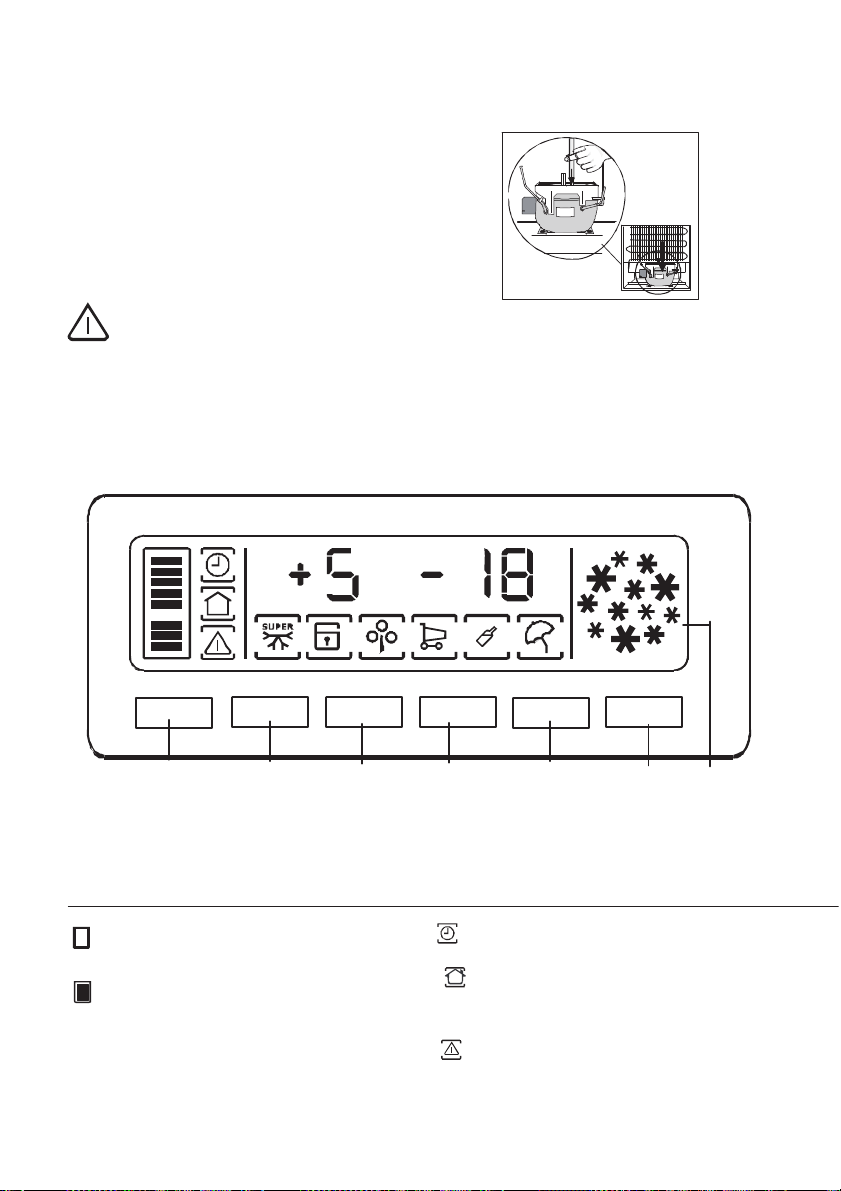
DISPLAY
On/Off Function
A
A - Appliance button ON/OFF
B - Function button
C - Temperature regulation button
If on the indicated compartment
is on;
If on the indicated temperature is
that of the relative com
Flashes the operations corresponds to the relative compartment
7
BCC
+
artment
-
D - MODE-button
E - Confirmation button
F - Temperature and function indicator
Mode Ok
D
If on the Clock function is on
If on the temperature indicated is
the ambient temperature
Excessive temperature alarm and
Door open acoustic alarm
Indicator (if foreseen)
E
F
Page 8
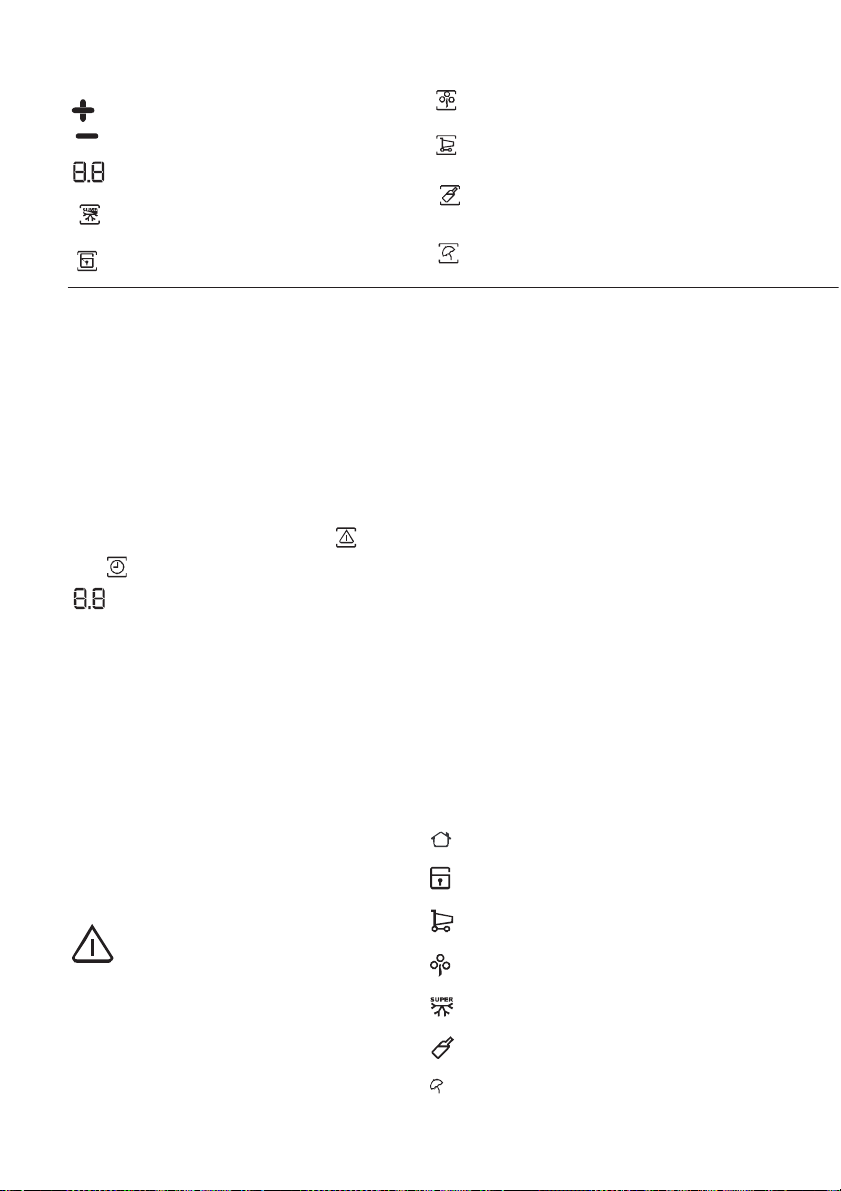
Positive
T
emperature indicator
If on the Eco Mode function is on
NegativeTemperature indicator
Temperature indicator
If on theAction Freeze function
is on
If on the Child Lock function is on
First switch on
After plugging the plug into the power
outlet, if the display is not illuminated,
press key (A), appliance on.
As soon as the appliance is turned on,
it is in alarm condition, the temperature
flashes and you will hear a buzzer.
Press key (E) and the buzzer will go off
(also see the section on "excessive
temperature alarm") the icons
and still flashes and on the indicator
will appear the warmest
temperature reached.
For a correct storage of the food select
the Eco mode function that guarantee
the following temperatures are set:
+5°C in the fridge
-18°C in the freezer
· Wait until the inside compartment
temperature reach -18°C, before introducing the goods in the freezer compartment.
· To select a different temperature
see "Temperature regulation".
Important
If the door remains ajar for some
minutes, the internal lighting will turn
off electronically; after this, the lighting
function will be reset by closing and
opening the door itself.
If on the Shopping function is on
If on the Quick Chill mode function
is on
If on the Holiday function is on
Switching off
The appliance is shut off by pressing
key (A) for more than 1 second. After
this, a countdown of the temperature
from -3 -2 -1 will be shown.
Functions Menu
By activating the key D the functions
menu is operating. Each function
could be confirmed by pressing button
E. If there is no confirmation after
some seconds the display will go out
from the menu and return in normal
condi-tion.
The following functions are indicated:
•Select/Switchoff/Switchonfridge
compartment
• Select/Switch off/Switch on freezer
compartment
Ambient Temperature
Child Lock function
Shopping function
Eco Mode function
Action Freeze function
Quick Chill function
Holiday function
8
Page 9
Setting the Clock
The Clock fu n ction is activated by
pressing key +/- (C/C). Set the hours'
first, confirm by pressing key E, then
the minutes, confirm by pressing key
E. Note! You must make new time
setting after power failure.
Select /Switch off /Switch on
each compartment
The temperature may be regulated by
pressing the key (B) to select the
compartment and than the key
(C/C) to set the desired temperature.
By pressing the key B the current temperature setting flashes on the indicator and by pressing the key B again it
is possible to change it.
Youconfirmthechoiceofthetemperature either by pressing the key E,
(you will hear the buzzer) or by waiting
for some seconds (you will not hear
the buzzer).
Then the indicator shows the inside
compartment temperature again.
The newly selected-temperature must
be reached after 24 hours.
It is not n ecessary to set the temperature again after long periods of non
use as the temperature remains
stored.
Attention!
During the stability period by the first
starting the temperature displayed
cannot correspond to the setting
temperature. During this time it is
possible that the temperature
displayed is different than the setting
temperature.
Switch off of one compartment
To switch off one compartment press
the key (D) until the compartment is
selected and then press the key (A),
the count down will follow.
Ambient Temperature Function
The ambient temperature function is
activated by pressing key D (several
times if necessary) until the corres-
ponding icon appears
In this condition the selected temperature is the ambient temperature.
You must confirm the choice by
pressing key E within a few seconds.
You will hear the buzzer and the icon
will remain lit.
It is possible to de-activate the function
atanytimebypressingkeyDuntilthe
corres po nding icon will flash and then
key E.
.
Child Lock Function
The Child Lock function is activated by
pressing key D (several times if necessary) until the corresponding icon
appears
You must confirm the choice by pres sing key E within a few seconds. You
will hear the buzzer and the icon will
remain lit.
In this condition any possible operation
through the keys does not cau se any
change as long as this fu n ction is
activated.
It is possible to de-activate the function
atanytimebypressingkeyDuntilthe
corresponding icon flashes and then
key E.
.
9
Page 10

Shopping Function
If you need to insert a large amount of
warm food, for example after doing the
grocery shopping, we suggest you
activate the Shopping function to chill
the products more rapidly and to avoid
warming the other food which is
already in the refrigerator.
The Shopping function is activated by
pressing key D (several times if necessary) until the corresponding icon
appears
choice by pressing key E within a few
seconds. You will hear the buzzer and
the icon will remain lit.
The Shopping function shuts off automatically after approximately 6 hours.
It is possible to de-activate the function
atanytimebypressingkeyDuntilthe
corresponding icon will flashes and
then key E.
You mu st con f irm th e
Eco mode Function
The Eco Mode function is activated by
pressing key D (several times if necessary) until the corresponding icon
appears
at +5°C and -18°C).
You must confirm the choice by pressing key E within a few seconds. You
will hear the buzzer and the icon will
remain lit.
In this condition the chosen temperatures are automatically set (+ 5°C and
- 18°C), in the best conditions for
storing food.
It is possible to de-activate the function
at any time by changing the selected
temperature in one of the compartments.
(or setting the temperature
Drinks Chill Function
The Quick Chill function permits the
rapid cooling of cans and bottles
taking forced cold air into them.
Put the drinks on the Quick Chill shelf
and open the air lever to the
maximum.
The Quick Chill function is activated by
pressing key D (several times if
necessary) until the corresponding icon
appears
When the cooling is finished de-activate the function by pressing key D
until the corresponding icon will flash,
then key E and reset the air lever to the
minimum .
.
Use of the fridge compartment
Temperature regulation
The temperature of this compartment
may be regulated between +3°C and
+8°C.
During normal functioning the indicator
shows the temperature inside the
fridge.
Attention!
Difference between the temperature
displayed and temperature setting is
normal. Especially when:
- a new setting has recently been
selected
- the door has been left open for a
long time
- warm food has been placed in the
compartment.
10
Page 11
The "Natura-fresh" zone
The temperature in the "Natura-fresh"
zone is constantly just above 0°C.
Adjustment by the user is not
necessary.
The "Natura-fresh" zone contains two
drawers separated by a cover.
The lower drawer has a higher
humidity of the air is suited for keeping
berries, fruits and vegetables.
Theupperdrawerissuitedformeat,
fish and poultry.
Foodstuffs not suitable to keep
in the "Natura-fresh" zone:
- Cold sensitive fruits like bananas,
papaya, passion fruits, avocado and
citrus fruits.
- Cold sensitive vegetables like
pimiento, cucumber courgette,
aubergine potatoes and tomatoes.
Fruit and vegetables not yet mellow,
like pears.
Pack up all foodstuffs before
keeping in the "Natura-fresh" zone. In
this way aroma, moisture and colour is
kept for a longer time.
Suitable packing materials:
Polyethylene airtight bags and wraps;
Plastic containers with lids;
Aluminium foil.
Regulation of air humidity
The two drawers are fitted with
adjustable air slots. The opening in the
air slots can be adjusted with sliders,
which allow the humidity inside the
drawers to be varied.
With the air slots open, the stronger air
circulation results in a lower air
moisture in the drawer.
A closed air slots keeps the natural air
moisture for longer.
Do not connect the refrigerator in
spaces where ambient temperature
can decrease to below freezing.
The refrigerator may only be
connected to drinking water supplies.
The refrigerator may only be
connected to cold water supplies.
Holiday Function
The holiday function sets the temperature at + 15°C.
This function allows you to keep the
refrigerator shut and empty during a
long holiday period ( e. g. the summer
holidays) without the formation of a
bad smell.
The Holiday Function may be regulated by pressing the key C. By pressing the key C the current temperature
setting flashes on the indicator. Press
thekeyCagain.Whenonthedisplay
appears the icon
of the temperature or by pressing the
key E, (you will hear the buzzer) or by
waiting for some seconds (you will not
hear the buzzer).
Now the refrigerator is in the Holiday
function in the energy saving mode
and the indicator shows the icon
It is possible to de-activate the function
at any time by changing the selected
temperature in the compartment.
confirm the choice
.
11
Page 12
Attention!
The fridge compartment must be
empty whilst the Holiday function is on.
Use of the freezer compartment
The freezer is provided with the symbol
whichmeansthatitis
suitable for freezing fresh food and for
long term storage of frozen and
deep-frozen food.
Temperature regulation
The temperature may be regulated
between -15°C and -24°C.
We suggest setting the internal temperature of approximately -18°C,
which guarantees proper freezing and
conservation of the frozen foods.
Attention!
During the stability period by the first
starting the temperature displayed
cannot correspond to the setting
temperature. During this time it is
possible that the temperature
displayed is different than the setting
temperature.
Attention!
Difference between the temperature
displayed and temperature setting is
normal. Especially when:
- a new setting has recently been
selected
- the door has been left open for a
long time
- warm food has been placed in the
compartment.
Difference until 5°C inside the
compartment are quite normal.
During normal functioning the indicator
shows the warmest temperature inside
the compartment.
Freezing fresh food
The freezer compartment is suitable for
long term storage of commercially
frozen and deep-frozen food, and for
freezing fresh food.
The maximum quantity of foods to
freezein24hoursisshownonthe
serial number plate.
To freeze the amount of food indicated
on the serial number plate, place the
food directly in touch with the cooling
surface (remove the drawer or basket).
In case the food is frozen inside the
drawers or baskets, the maximum
quantity is slightly reduced.
To freeze fresh foods, you will need to
activate the Action Freeze function.
Press key D (several times if necessary)
until the corresponding icon appears
.
You must confirm the choice by pressing key E within a few seconds. You
will hear the buzzer and on the display
will appear some animation with lines.
After a pre-cooling period of 24 hours,
place the foods in the freezer. Place
the food to be frozen in the
compart-ment, as this is the coldest
point.
The freezing process takes 24 hours.
During this period do not put other
foods in the freezer.
This function stops automatically after
52 hours.
It is possible to de-activate the function
atanytimebypressingkeyDuntilthe
corresponding icon flashes and then
key E.
12
Page 13
Storage of frozen food
When first starting-up or after a period
out of use, before putting the products
in the compartment let the appliance
run at least 12 hours. To obtain the
best performance from this appliance,
you should: if large quantities of food
aretobestored,removealldrawers
and baskets from appliance and place
food on cooling shelves.
Pay careful attention not to exceed
load limit stated on the side of the
upper section
Important
In the event of accidental defrosting,
for example due to a power failure, if
the power has been off for longer that
the value shown in the technical
characteristics chart under "rising
time", the defrosted food must be
consumed quickly or cooked
immediately and then refrozen (after
cooling).
(where applicable).
Excessive temperature alarm
An increase in the temperature in the
freezer compartment (for example due
to a power failure) is indicated by:
- flashing temperature;
- freezer compartment flashing
;
on indicator for some seconds. Then it
returns on the normal operation
showing the temperature of the
selected compartment.
During the alarm phase, the buzzer
can be switched off by pressing key E.
Door open acoustic alarm
An acoustic alarm will sound when the
door is left open for around 5 minutes
refrigerator, 1,5 minutes freezer.
The door open alarm conditions are
indicated by:
- flashing symbol
compartment
- flashing of the icon
- sounding of buzzer.
Press the key (E) to stop the acoustic
alarm.
When normal conditions are restored
(door closed):
- the acoustic alarm will stop.
Carbon filter's function:
The built-in carbon filter means that
strong smelling groceries can be
placed near other groceries without
affecting their taste or aroma.
of the relative
;
- flashing of the icon
- sounding of buzzer.
When normal conditions are restored:
- the acoustic signal shuts off;
- the temperature value continues to
flash;
When you press key "E" to de-activate
the alarm, the highest temperature
reached in the compartment appears
13
;
Page 14
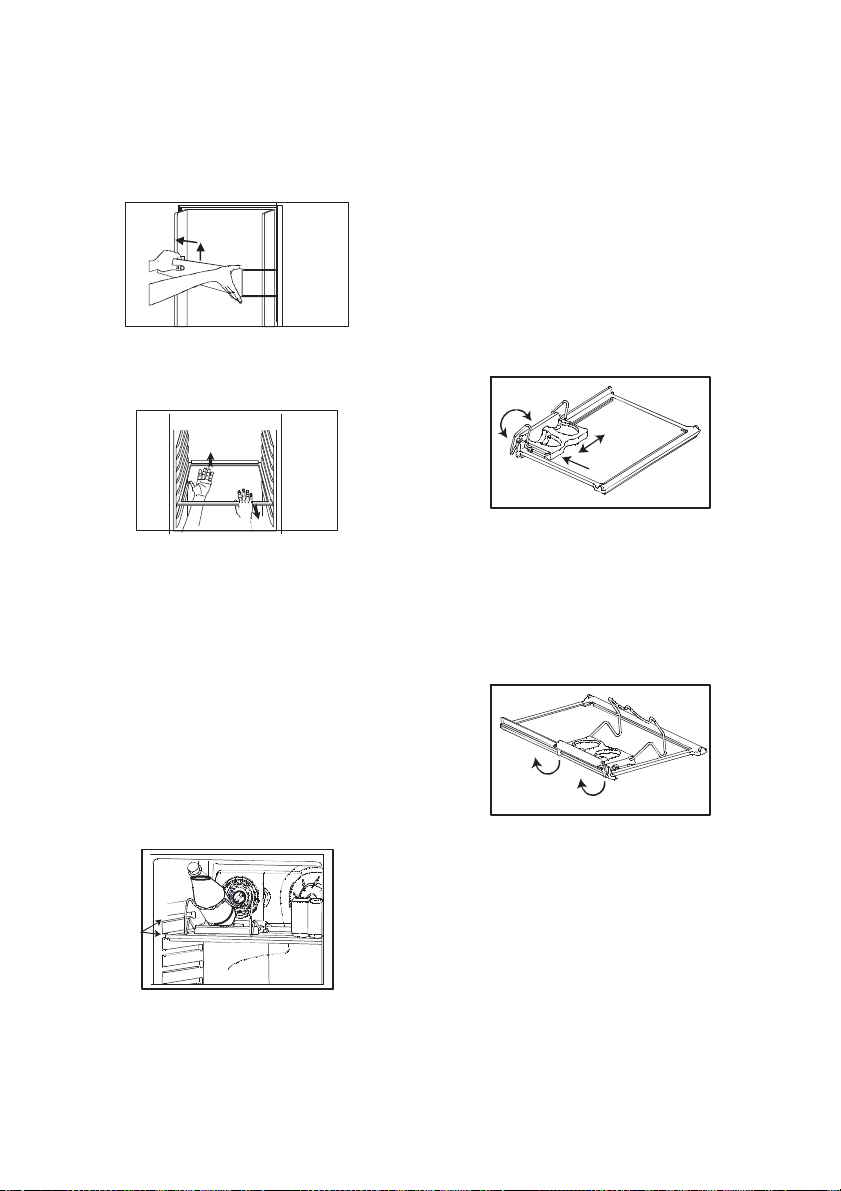
Cabinet interior
The shelves and door compartments
are removable and can easily be
re-arranged.
Certain shelves must be lifted up by
the rear edge to enable them to be
removed.
The bottom compartment in the door,
the divider and the cover over drawer
must not be moved as it has an impact
on the air circulation.
Shelves with a raised edge should be
placed with the raised edge facing the
rear wall of the cabinet.
Quick chill shelf:
The lower Quick chill shelf can be
placed in one of the upper grooves. To
maintain the best performance the
shelf should be placed in the second
groove from the top.
of the grid. To allow the holder to be
moved easier, when moving sideways,
press the shelf backwards.
During chilling of cans or bottles the
article should be centrally placed in
front of the grid to obtain the best
chilling effect.
The bottle support can be pulled out
when chilling larger bottles.
For a description of this functions start
and stop, see under heading Quick
Chill.
Dismantling of the bottle- and can
holder.
Take out the Quick Chill shelf with
holder from the cabinet.
To loosen the holder from the shelf,
bend the hooks/brackets that surround
the backside of the shelf.
Bottle- and can holder
Thesideofthebottleandcanholderis
moveable to enable a more flexible
placement of cans and bottles in front
14
Page 15

Freezer drawers
The freezer drawers ensure that it is
quick and easy to find the food
package you want. To gain space, the
drawers can be removed and the
products can be put directly on the
shelves. On all shelves, except the top
shelf, it is possible to place products
that protrude 20 mm from the front
edge. This allows maximum use of the
available space.
Do not remove the bottom drawer. It is
required to assure proper air
circulation.
Freezer tray
Use the freezer tray to freeze berries
and vegetables. After about 4 hours
the food will be thoroughly frozen and
can then be packaged normally. Food
that is frozen in this way will not stick
together, enabling you to use only the
amount required.
Ice cubes
Fill the ice tray to max. 3/4 since water
expands as it freezes. Release the ice
cubes by twisting the ice tray.
If ice cubes are kept for a long time,
they will dry out and the taste is
affected. Thus, throw away old ice
cubes and prepare new ones when
needed.
HINT and TIPS
Saving energy
· Pay careful attention to where the
cabinet is placed. See the section
"Installation". When installed correctly,
the cabinet will consume less energy.
· Try to avoid keeping the door open
for long periods, or opening the door
too frequently as warm air will enter the
cabinet, and cause the compressor to
switch on unnecessarily often.
· Ensure there are no obstructions
preventing the door from closing
properly.
· Thaw frozen food in the fridge. This
will ensure safer defrosting of foods
and reduce the work of the
refrigeration unit
· It is advisable to periodically clean the
refrigeration system at the back of the
appliance with a duster or vacuum
cleaner.
· Always leave warm food to cool
down to room temperature before
placing in the fridge.
· Food which is to be frozen (when
cool) should be placed in the fridge
before being transfered to the freezer.
· Avoid unnecessary frosting in the
cabinet by packing all foodstuffs into
airtight packages before placing them
in the freezer.
· Carefully follow the advice on freezing
products in the section "Using the
freezer". This will prevent wasting
energy.
· Make sure the door gasket is
complete and always clean.
15
Page 16
· Do not set the temperature too low in
the freezer. A suitable temperature is in
the range of -18°C to -20°C .
· Defrost the freezer when the frost
layer reaches a thickness of 3-5 mm.
Food Storage
· To obtain the best results from your
appliance, neither hot foods nor liquids
which may evaporate, should be
placed in the larder compartment.
· Avoid buying frozen food if you can
not store it straight away. The use of
an insulated container is advisable.
When you arrive home place the
frozen food in the freezer immediately.
· Ensure that food placed in the freezer
is dated and labelled and used in date
order to ensure that food is consumed
at its best. Remove suspect food from
you refrigerator and clean, refer to
cleaning and maintenance.
Protect the environment
· Hand over the cabinet packaging
and discarded fridges and freezers to a
recycling station. Contact your local
council or Environmental Health office
for more information.
· Keep foodstuff in re-usable
containers. Cut down on disposable
material as much as possible.
· When cleaning the cabinet, use a
mild washing-up detergent.
· Follow the advice in the section
"Saving energy"
· The door gasket and coolant used in
this cabinet will not harm the ozone
layer.
· All parts in the packaging can be
recycled.
· The cabinet has been designed for
easy dismantling and subsequent
recycling.
MAINTENANCE and
CLEANING
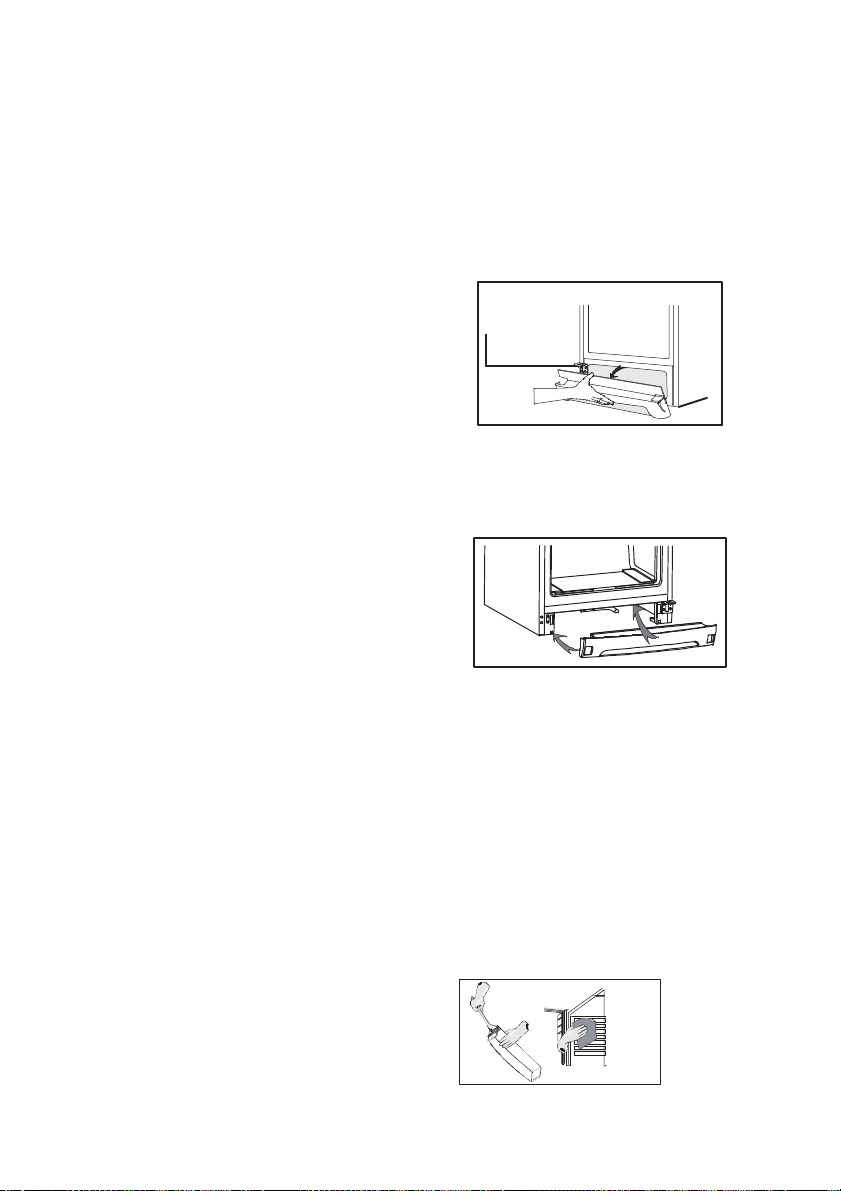
Removing the ventilation grille
The ventilation grille can be removed,
e.g. to wash the grille.
Unsnap the ventilation grille by pulling
it toward you.
When reassembling the ventilation
grid:
First hook at the hitches on the lower
edge, then press the grind in position.
2
1
Cleaning
Clean the cabinet at regular intervals.
Disconnect the appliance from
electricity supply.
Internal Cleaning
Clean the inside and accessories with
warm water and bicarbonate of soda
(5ml to 0,5 litre water) Rinse and dry
thoroughly.
Regularly check the door seals and
wipe clean to ensure they are clean
and free from debris.
16
Page 17

"Natura-fresh" drawer.
Pull out the drawer.
Lift it over the locks in back on the
sliding guides. Tip drawer downwards
and pull it out.
Pull out the dividing plater.
Clean whit soft detergent, and rinse
whit lukewarm water.
Assemble in reverse order.
External Cleaning
Use water/neutral soap emulsion for
cleaning the surface of stainless steel,
anti-finger-print coated. Do NOT use
abrasive paste.
Wash the outer cabinet with warm
soapy water. Remove the ventilation
grille (see the section "Removing the
ventilation grille") and vacuum-clean
under the cabinet. Once or twice a
year dust the condenser (black grille)
and the compressor at the back of the
appliance, with a brush or vacuum
cleaner, as an accumulation of dust
will affect the performance of the
appliance and cause excessive
electricity consumption.
When moving the cabinet, lift it by the
front edge to avoid scratching the floor.
Defrosting the freezer
A certain amount of frost will always
form on the freezer shelves and around
the top compartment. Defrost the
freezer when the frost layer reaches a
thickness of about 3-5 mm.
Remove the freezer drawers and place
them on top of each other by turning
every other drawer one half turn. Put
insulating material around the drawers,
e.g. blankets or newspapers.
The frozen products can also be
packed closely together and be kept in
a cold location, e.g. in the fridge.
Defrosting can be accelerated by
placing bowls with hot water (not
boiling) inside the freezer.
Loosen the drainage channel from its
resting position and push in according
to the illustration and place it in the
bottom freezer drawer where water
can collect.
Carefully scrape off the ice when it
starts to thaw. Use a wood or plastic
scraper. Do not use sharp objects as
these may damage the interior.
When all the ice has melted, clean and
wipe the cabinet dry, then put the
drainage channel back in place.
Switch on the cabinet and replace the
frozen foodstuff.
17
Page 18

Never use a hair drier or other heating
appliances to speed up defrosting.
Excessive heat may damage the
plastic interior, and humidity could
enter the electric appliance making it
live.
Defrosting the fridge
The fridge is defrosted automatically
every time the compressor stops. Frost
formation can be prevented by:
· not putting warm foodstuff inside
the cabinet.
· avoiding frequently opening the
door or keeping it open too long.
To change the lamp
The light is switched on automatically
when the door is opened. Before
replacing the light bulb, disconnect the
power plug from the outlet.
Disassemble the lamp by using a
screwdriver in the recess on the lamp
insert. To prise it out of its location.
Assemble a new lamp by guiding it
into a centred position and press until
it snaps into place.
Use a halogen bulb of the same type,
maximum rating of 20 W.
Change of carbon filter
To maintain the best performance the
carbon filter should be changed once
a year with normal usage.
New carbon filters can be purchased
from your local dealer. The filter is
placed behind the grill and can be
reached by opening the cover. The
cover can be opened by simultaneously pressing the lever on the right
of the grill (1) and turning the cover
outward (2). The carbon filter is then
pulled out of its slot (3).
The new carbon filter is placed in the
existing slot - The filter should be
handled carefully so fragments do not
loosen from the surface.
1
2
When the appliance is not in use
Disconnect the appliance from
electricity supply.
Empty all foods and clean the
appliance, leaving the doors ajar to
prevent unpleasant smells.
If the cabinet is to be kept on, ask
somebody to check it once in a while
to prevent the food inside from spoiling
in case of a power failure.
3
18
Page 19

SOMETHING NOT WORKING
Before contacting your local Service Force Centre check the following point:
Problem Possible cause / Remedy
”” is displayed in the
temperature display.
Audible alarm + flashing red
warning lamp. (It is too warm
inside the freezer.)
It is too warm inside the
refrigerator.
It is too cold inside the
refrigerator.
It is for cold in the "Naturafresh" zone.
Water comes out on the floor.
An error has occurred in measuring the
temperature. Call your service representative.
(The cooling system will continue to keep
food products cold, but temperature
adjustment will not be possible.)
Switch off the audible alarm by pressing the
alarm off button.
The audible alarm could have been triggered
by:
The cabinet having been recently switched
on and the temperature still being too high.
See the chapter "Switching on and setting
the temperature".
The door may have been open for so long
that the `door open' alarm was triggered.
Set a lower temperature.
Put food products in the right place inside the
refrigerator. See the chapter "Temperature
inside the refrigerator".
Distribute the food products to allow cold air
to circulate around them.
Make sure that the door is completely closed
and that the insulating strip is complete and
clean.
Set a warmer temperature.
Push the refrigerators "+" and the "Ok"
buttons simultaneously about 5 sec.
Place the drain hose at the back of the
cabinet above the drain bowl. See the
chapter "Before using the cabinet the first
time".
19
Page 20

It is too warm inside the
freezer.
It is too cold inside the freezer.
Too much frost and ice are
produced.
The compressor operates
continuously.
The cabinet does not operate
at all. Cooling or interior light
does not operate. No indicator
lamps light.
Power failure
Set a lower temperature.
Make sure that the door is completely closed
and that the insulating strip is complete and
clean.
If warm food products have been put inside
the freezer, wait for a couple of hours and
then check the temperature again.
Distribute the food products to allow cold air
to circulate around them.
Set a warmer temperature.
Action Freeze could have been switched on.
The temperature display shows the highest
temperature inside the cabinet. Thus a
difference between the temperature indicated
on the display and the (average) temperature
measured in another way is normal.
Make sure that the door is completely closed
and that the insulating strip is complete and
clean.
Set a warmer temperature.
Make sure that the door is completely closed
and that the insulating strip is complete and
clean.
The cabinet is not switched on.
Power does not reach the cabinet. (Try
connecting another electrical device to the
power outlet.)
The power plug is not properly connected.
Thefusehasblown.
Do not unnecessarily open the cabinet,
except when the power cut seems to be
long, in which case the food products should
be moved to another cabinet that works. If
the frozen products are still hard following the
power cut, they may be immediately refrozen.
If the food products have thawed but are still
fresh, they may be used, however they
should be prepared before re-freezing or
eating them.
20
Page 21

Sound level in cabinet is too
high.
The refrigerating system will always produce
some sounds. A pulsing sound is heard when
coolant is pumped inside the cooling pipes.
A ticking sound from the thermostat can be
heard when the compressor switches on and
off. The sound level varies depending on the
operation of the cabinet.
If you feel the sound level is incorrect:
Make sure the pipes at the back of the
cabinet do not touch each other. Carefully
bend them if they do.
If the cushion spacers (between the cabinet
wall and pipes) come loose, put them back in
place again.
Carefully follow the instructions in the chapter
"Installing the cabinet".
TECHNICAL SPECIFICATION
Model ERZ36700W8
ERZ36700X8
Net capacity Refrigerator l 160
Net capacity "Natura-fresh" zone 82
Net capacity Freezer l 87
Energy consumption kWh/y 315
Freezing capacity kg/24 h 14
Rising time h 20
Dimension mm
Height 2000
Width 595
Depth 600
21
Page 22

INSTALLATION
Mains Cable
Do not remove the power cord by
pulling on its lead, particulary when the
product is being pulled out of its niche.
· Damage to the cord may cause a
short-circuit, fire and/or electric shock.
· In the event of damage to the
appliance's main cable, only an
authorised service company
recommended by the manufacturer or
a similarly qualified person may adjust
it in order to avoid shock hazard for the
user.
Unpacking
Unpack the cabinet and check that it
is in good condition and free of any
transport damage. Notify the dealer
immediately of any damage. Hand the
packaging over for recycling. For more
information, contact your local council
or the dealer.
until the shelf tilts and the transport
support can be removed. Some
models are fitted with a silencing pad
under the cabinet. Do not remove this
pad.
Do not allow children to play with the
packaging. The plastic film can cause
suffocation.
Remove the transport supports
Removethetapeandthetransport
supports from
· the door sides
· inside the door hinges
·theshelves
Remove the transport support on the
glass shelf by pushing the support
forwardalongtheedgeoftheshelf
until it stops. Take hold of the rear
edge of the glass shelf and pull the
shelf and transport support forward
Installation of distance
Assemble the attached distance on
the back side of the panel according to
the illustration.
Cleaning
Wash the inside of the cabinet using
lukewarm water, a mild washing-up
detergentandasoftcloth.
22
Page 23

Installation of carbon filter
On delivery the carbon filter is placed
in a plastic bag to secure the length of
the carbon filter life. The filter should
be placed behind the grill before the
cabinet is turned on.
The cover can be opened by
simultaneously pressing the lever on
the right of the grill (1) and turning the
cover outward (2). The carbon filter is
then mounted in the slot found in the
back of the cover.
The filter should be handled carefully
so fragments do not loosen from the
surface.
1
2
Installing the cabinet
Make sure that the power plug is not
squashed or damaged by the back of
the product.
· A damaged power plug may
overheat and cause a fire.
Do not place heavy articles or the
product itself on the power cord.
· there is a risk of a short circuit and
fire.
If the power plug socket is loose, do not
insert the power plug.
· there is a risk of electric shock or fire.
3
To obtain the best performance from the
cabinet, ensure:
· the cabinet is placed in a dry, cool
place and is not exposed to direct
sunlight.
· the cabinet is not placed close to a
source of heat, e.g. a cooker or
dishwasher.
· the cabinet is level. The cabinet
should not lean against any wall. If
necessary adjust the feet using the
adjustment spanner supplied.
· there is good air circulation around
the cabinet and that the air channels
below and behind the cabinet are not
blocked. The ventilation space above
the cabinet must be at least 4 cm.
The ventilation space can either be
a) directly above the cabinet, or
b) behind and above the top cupboard.
In this case, the space behind the
cupboard must be at least 50 mm deep.
a)
b)
50mm
23
Page 24

Cabinet is placed at a location where
the ambient temperature corresponds
to the climate classification*, for which
the appliance is designed.
* See on the rating plate on the inside
of the appliance.
The following table shows which
ambient temperature is correct for
each climate classification.
Climate
classification
SN
for an ambient
temperature of
+10°C to +32°C
Electrical connection
Connect the cabinet to a grounded
electrical outlet.
Voltage: 230 V.
Fuse: 10 A.
Refer to the rating plate on the left
inside the cabinet.
N
ST
T
If the cabinet is placed in a corner and
the side with the hinges facing the
wall, the distance between the wall
and the cabinet must be at least 360
mm to allow the door to open enough
so that the shelves can be removed.
Check that the drain hose at the rear
of the cabinet discharges into the drip
tray.
The power plug must be accessible
after installation of the cabinet.
+16°C to +32°C
+18°C to +38°C
+18°C to +43°C
Door Reversal
Important! Reversing the door
The door hinges can be changed from
right (as supplied) to right if required to
suit the location where the appliance is
installed only by authorized engineers
(repairmen) If door reversing is needed,
call Your local Service Force Centre.
24
Page 25

Welkom in de wereld van Electrolux!
Gefeliciteerd, u hebt gekozen voor een eersteklas product van Electrolux. U zult
hier jarenlang plezier aan beleven. Het is de ambitie van Electrolux om het
huishouden voor u gemakkelijker te maken door middel van een breed
assortiment kwaliteitsapparatuur. U vindt enkele voorbeelden hiervan op de
voorzijde van deze gebruiksaanwijzing. Neem de tijd om deze gebruiksaanwijzing
te bestuderen zodat u kunt profiteren van de voordelen van uw nieuwe apparaat.
Wij beloven u een superieure gebruikerservaring en dus meer gemoedsrust.
Veel succes!
25
Page 26

Enkele paragrafen in deze handleidungen zi
j
volgende beeknis hebben:
Dit symbool vindt u bij belangrijke voor de gebruiksveiligheid van
uw machine. Het niet in acht nemen van deze informatie kan
schade veroorzaken.
Dit symbool geeft informatie over een juist gebruik van de
machine en vertelt u hoe u de beste prestaties van de machine
kunt verkrijgen.
Dit symbool geeft belangrijke information over milieubescherming
n voorzien van symbolen die
Als u uw oude toestel afdankt
Het symbool op het product of op de verpakking wijst erop dat dit
product niet als huishoudafval mag worden behandeld, maar moet worden
afgegeven bij een verzamelpunt waar elektrische en elektronische apparatuur
wordt gerecycled. Als u ervoor zorgt dat dit product op de juiste manier
wordt verwijderd, voorkomt u mogelijke negatieve gevolgen voor mens en
milieu die zich zouden kunnen voordoen in geval van verkeerde afvalverwerking. Voor gedetailleerdere informatie over het recyclen van dit product,
kunt u contact opnemen met de gemeente, de gemeentereiniging of de
winkel waar u het product hebt gekocht.
26
Page 27

Veiligheidsinformatie
Uw nieuwe koel-/vrieskast kan andere
functies hebben dan uw oude
Lees deze gebruiksaanwijzing met
informatie over het gebruik en het
onderhoud van de kast in zijn geheel
aandachtig door. Zorg ervoor, dat de
gebruiksaanwijzing bewaard blijft. Dit
kan nuttig zijn als u de kast later aan
iemand anders geeft of verkoopt.
Dit apparaat is niet bedoeld voor
gebruik door personen (waaronder
begrepen kinderen) met verminderde
fysieke, zintuiglijke gesteldheid of een
gebrek aan ervaring en kennis, tenzij
dit onder toezicht gebeurt van een
voor hun veiligheid verantwoordelijke
persoon of tenzij zij van een dergelijke
persoon instructie hebben ontvangen
over het gebruik van het apparaat.
Gebruik
· Zoals in deze gebruiksaanwijzing
wordt uitgelegd is dit apparaat
uitsluitend bedoeld om in een normaal
huishouden levensmiddelen te
bewaren.
· Bewaar geen explosieve stoffen in
het koel- of vriesvak. Dergelijke stoffen
kunnen exploderen en lichamelijk letsel
of materiële schade veroorzaken
· Voorkom dat het koelsysteem aan
de achterkant en aan de binnenkant
van de kast met scherpe voorwerpen
in aanraking komt. Als er lekkage in
het koelsysteem optreedt, kan het
apparaat onherstelbaar worden
beschadigd en kunnen de levensmiddelen bederven.
· Bewaar geen flessen met
koolzuurhoudende dranken in het
vriesvak. De glazen flessen kunnen
kapot gaan.
· Het apparaat is zwaar. De
onderkant van de kast heeft scherpe
randen. Wees voorzichtig bij het tillen
van de kast en draag hierbij altijd
handschoenen.
Kinderen
· Laat kinderen niet aan het apparaat
en de bedieningsorganen komen.
WAARSCHUWING!
Houd de ventilatie-openingen van de
apparaten en de behuizing waarin ze
zijn ingebouwd vrij.
WAARSCHUWING!
Gebruik geen mechanische apparaten
of andere hulpmiddelen om het
ontdooiproces te versnellen dan
degene die door de fabrikant zijn
aanbevolen.
WAARSCHUWING!
Beschadig niet het koelmiddelcircuit.
WAARSCHUWING!
Gebruik geen elektrisch apparaat in de
voedselopslagcompartimenten van het
apparaat , tenzij een type dat door de
fabrikant is aanbevolen
27
Page 28

Inhoud
Als u uw oude toestel afdankt 26....
Veiligheidsinformatie 27.............
Inhoud 28........................
HET GEBRUIK 29.................
Alvorens de kast in gebruik
te nemen 29..................
DISPLAY 29......................
Werking 30.......................
Het uitschakelen 30................
Functies Menu 30.................
De klok instellen 31................
Selecteer/Zet uit/Zet aan
Elk gedeelte 31................
Eén gedeelte uitschakelen 31.......
Omgevingstemperatuur Functie 31...
Child Lock Functie 32..............
Shopping Functie 32...............
Eco Mode Functie 32..............
Functie voor het snel koelen van
drankjes Drinks Chill 32.........
Het gebruik van het koelgedeelte 33..
Temperatuurselectie 33.............
De "Natura-Fresh"-zone 33.........
Holiday functie 34.................
Het gebruik van het vriesgedeelte 34.
Temperatuurselectie 34.............
Verse levensmiddelen invriezen 35...
Diepvriesproducten bewaren 35.....
Alarm voor te hoge temperatuur 36...
Geluidsalarm bij open deur 36.......
Het interieur van de kast 36.........
Verwijderen van flessen- en
blikjeshouder 37...............
Handige tips 38...................
Energiespaaradviezen 38...........
De kast en het milieu 38............
Denk aan het milieu 39.............
Onderhoud 39....................
Het ventilatierooster verwijderen 39...
Reinigen 39.......................
De koelkast ontdooien 40...........
De lamp vervangen 41.............
De vrieskast ontdooien 41..........
Vervangen van koolfilter 41..........
Alsdekastnietgebruiktwordt 42....
Technische gegevens 45...........
Installeren 45.....................
Aansluitsnoer 45..................
Uitpakken 45.....................
De transportsteunen verwijderen 45..
Reinigen 46.......................
Installatie van koolfilter 46...........
De kast installeren 46
ische aansluiting 48...........
r
Elekt
..............
28
Page 29

HET GEBRUIK
A
A
A
A
A
-
Alvorens de kast in gebruik te
nemen
Plaats en reinig de kast volgens de
aanwijzingen van "Installeren".
Controleer of de afvoerslang aan de
achterkant van de kast in de
opvangbak uitmondt.
Voordat u de stekker voor het eerst in het stopcontact steekt, dient u de
kast ongeveer 4 uur te laten staan. De compressor kan beschadigd worden als
deze wachttijd niet in acht wordt genomen. De olie heeft hiermee voldoende tijd
om naar de compressor te kunnen terugstromen.
DISPLAY
On/Off Function
A
A - Aan / uit toets van het apparaat
B - Starttoets voor de functies
C - Temperatuurregelaar
lshetbrandtwilditzeggendat
het betreffende gedeelte aan
staat.
lshetbrandtwilditzeggendat
het betreffende gedeelte de
aangegeven temperatuur heeften.
Als het brandt wil dit zeggen dat
de acties gelden voor het
betreffende gedeelte
29
BCC
+
-
D-MODE-toets
E - Bevestigingstoets
F - Temperatuur- en functiedisplay
Mode Ok
D
lshetbrandtwilditzeggendat
de Clock functie actief is
lshetbrandtwilditzeggenwat
de omgevingstemperatuur is
larm hoge temperatuur en alarm
indicator open deur
E
F
Page 30

A
anduiding van de negatieve
A
A
A
A
A
A
A
temperatuur
lshetbrandtwilditzeggendat
de Eco Mode functie actief is
anduiding van de positieve
temperatuur
Temperatuuraanduiding
lshetbrandtwilditzeggendat
de snelvriesfunctie actief is
lshetbrandtwilditzeggendat
de Child Lock actief is
Werking
Alshetdisplaynadestekkerinhet
stopcontact te hebben gedaan niet
brandt, dient u op toets (A) te drukken
die het apparaat inschakelt.
Zodra het apparaat ingeschakeld is
(het staat in alarmprogramma) knippert
de temperatuur en is er een geluid te
horen (zoemer).
Druk op toets (E) en het geluid houdt
op (zie ook de paragraaf "Alarm hoge
temperatuur"), het
knippert nog steeds en op de
indicator verschijnt de hoogst bereikte
temperatuur.
Voorhetopdejuistewijzeopslaanvan
levensmiddelen kiest u de Eco Mode
functie die garandeert dat de volgende
temperatuur wordt aangehouden:
+5°C in het koelgedeelte
-18°C in het vriesgedeelte.
· Aangeraden wordt de interne
temperatuur op ongeveer -18°C te
houden, dat garandeert dat de
levensmiddelen goed worden
ingevroren en bewaard.
of icoon
lshetbrandtwilditzeggendat
de Shopping functie actief is
lshetbrandtwilditzeggendat
de Chill mode functie actief is
lshetbrandtwilditzeggendat
de Holiday functie actief is
· Om een andere temperatuur in te
stellen zie ''Temperatuurregeling''.
Belangrijk
Als de deur langer dan 7 minuten
openblijft, gaat de binnenverlichting
elektronisch uit. Vervolgens wordt
de werking weer hersteld door het
openen en sluiten van de deur zelf.
Het uitschakelen
Het vriesgedeelte wordt uitgeschakeld
door toets (A) langer dan 1 seconde
ingedrukt te houden. Hierna wordt
aangegeven dat de temperatuur vanaf
-3 -2 -1 afgeteld wordt.
Functies Menu
Door toets D in te schakelen, is het
functies menu actief. Elke functie kan
bevestigd worden met toets E. Als er
niet binnen enkele seconden wordt
bevestigd, gaat het display uit het
menu en keert terug naar normale
functie.
30
Page 31

De volgende opties zijn ingesteld:
• Selecteer/Zet uit/ Zet aan
koelgedeelte
• Selecteer/Zet uit/Zet aan
vriesgedeelte
Omgevingstemperatuur functie
Child Lock functie
Shopping functie
Eco Mode functie
Action Freeze functie
Drink Chill functie
Holiday functie
De klok instellen
De klokfunctie wordt geactiveerd door
op toets +/- (C/C) te drukken. Eerst de
uren instellen, bevestigen door op
toets E te drukken, dan de minuten,
bevestigen door op toets E te drukken.
N.B.! Na een stroomstoring dient de
tijd opnieuw te worden ingesteld.
Selecteer/Zet uit/Zet aan
Elk gedeelte
De temperatuur wordt geregeld door
toets (D) in te drukken om het
gedeelte te selecteren en dan toets (B)
om de gewenste temperatuur in te
stellen.
Door toets (B) in te drukken, knippert
de huidige temperatuurinstelling op de
indicator. U bevestigt de keuze van de
temperatuur door op de toets E te
drukken (u hoort de zoemer) of door
enkele seconden te wachten (u hoort
geen zoemer).
Daarna geeft de indicator weer de
binnentemperatuur aan.
De nieuw gekozen temperatuur moet
bereikt worden binnen 24 uur.
Als u het apparaat lang in gebruik
heeft, is het niet nodig om de
temperatuur weer in te stellen omdat
die wordt opgeslagen.
Attentie!
Tijdens de stabilisatie na de eerste
start kan de aangegeven temperatuur
niet overeenkomen met de ingestelde
temperatuur. Gedurende deze tijd is
het mogelijk dat de aangegeven
temperatuur verschilt van de
ingestelde temperatuur.
Eén gedeelte uitschakelen
Om één gedeelte uit te schakelen
drukt u toets (D) in tot het gedeelte is
geselecteerd en dan drukt u op toets
(A).
Omgevingstemperatuur Functie
De functie omgevingstemperatuur
wordt ingeschakeld door op toets D
te drukken (indien nodig meerdere
keren) tot het bijbehorende icoon
verschijnt. Op deze stand is de
geselecteerde temperatuur de
omgevingstemperatuur.
U moet de keuze bevestigen door
binnen enkele seconden toets E in te
drukken. U hoort de zoemer en het
icoon blijft verlicht.
De functie kan op ieder moment
worden uitgeschakeld door op toets D
te drukken totdat het corresponde-
rende icoon
toets E in te drukken.
gaat knipperen en dan
31
Page 32
Child Lock Functie
De functie Child Lock wordt ingeschakeld door op toets D te drukken
(indien nodig meerdere keren) tot het
bijbehorende icoon
U moet de keuze bevestigen door
binnen enkele seconden toets E in te
drukken. U hoort de zoemer en het
icoon blijft verlicht.
Zolang deze functie geactiveerd is
kunnen de toetsen niet bediend
worden.
De functie kan op ieder moment
worden uitgeschakeld door op toets D
te drukken totdat het
corresponderende icoon gaat
knipperenendantoetsEinte
drukken.
verschijnt.
Shopping Functie
Indien u een grote hoeveelheid
levensmiddelen in het koelgedeelte
moet opbergen, bijvoorbeeld nadat u
boodschappen heeft gedaan, raden
wij u aan de Shoppingfunctie in te
schakelen om de levensmiddelen
snellertekoelenentevoorkomendat
de temperatuur van de levensmiddelen
die zich reeds in het koelgedeelte
bevinden verhoogd wordt.
De Shopping functie wordt ingeschakeld door op toets (D) te drukken
(indien nodig meerdere keren) tot het
bijbehorende icoon
U moet de keuze bevestigen door
binnen enkele seconden toets E in te
drukken. U hoort de zoemer en het
icoon blijft verlicht.
De Shoppingfunctie gaat na ongeveer
6 uur automatisch uit.
De functie kan op ieder moment
worden uitgeschakeld door op toets D
verschijnt.
te drukken totdat het corresponderende icoon gaat knipperen en dan
toets E in te drukken.
Eco Mode Functie
De functie Eco Mode wordt ingeschakeld door op toets E te drukken
(indien nodig meerdere keren) tot het
bijbehorende icoon
door de temperatuur Op + 5°C -18 °C
in te stellen).
U moet de keuze bevestigen door
binnen enkele seconden toets E in te
drukken. U hoort de zoemer en het
icoon blijft verlicht.
Op deze stand worden de gekozen
temperaturen automatisch (+ 5°C 18°C) ingesteld op de optimale
toestand om de levensmiddelen te
bewaren .
De functie kan op ieder moment
worden uitgeschakeld door de
geselecteerde temperatuur in één van
de gedeelten te wijzigen.
verschijnt (of
Drinks Chill Functie
Met de functie Quick Chill kunnen
blikjes en flessen snel worden gekoeld
door koude lucht in het vak te blazen.
Plaats de dranken op het Quick
Chill-rek en draai de luchthendel
helemaal open.
De functie Quick Chill wordt
geactiveerd door op toets D te
drukken (indien nodig enkele keren)
totdat het bijbehorende icoon
verschijnt.
Schakel de functie als de flessen zijn
gekoeld uit door op toets D te drukken
totdat het bijbehorende icoon begint te
knipperen; druk dan op toets E en
draai de luchthendel helemaal dicht.
32
Page 33

Als het koelen is voltooid, de functie
deactiveren door op toets D te
drukken totdat het corresponderende
pictogram gaat knipperen.
Bevestigen door toets E in te drukken
en de luchthendel op minimum te
plaatsen
Het gebruik van het
koelgedeelte
Temperatuurselectie
De temperatuur van het koelgedeelte
kan variëren tussen ongeveer +3°C en
+8°C.
Tijdens normaal gebruikt geeft de
indicatie de temperatuur binnenin het
koelgedeelte aan.
Belangrijk
Een verschil tussen de aangegeven
en de ingestelde temperatuur is
normaal. Vooral als:
- pas een nieuwe instelling is
gekozen
- de deur lange tijd open is geweest
- warme levensmiddelen in het
koelgedeelte zijn geplaatst.
De "Natura-Fresh"-zone
De temperatuur in de
"Natura-Fresh"-zone ligt net boven 0º
en moet niet worden afgesteld door de
gebruiker.
De "Natura-fresh"-zone bevat twee
schuiven die gescheiden zijn door een
deksel.
De onderste schuif heeft een hogere
vochtigheidsgraad en is geschikt voor
het bewaren van bessen, fruit en
groenten.
De bovenste schuif is geschikt voor
vlees, vis en gevogelte.
Voedingsmiddelen die niet in de
"Natura-fresh"-zone mogen bewaard
worden:
- Koudegevoelig fruit zoals bananen,
papaja, passievruchten, advocaat en
citrusvruchten.
- Koedegevoelige groenten zoals
paprika, komkommer, courgette,
aubergine, aardappelen en tomaten.
Onrijpe vruchten en groenten, zoals
peren.
Pak alle voedingsmiddelen in vooraleer
ze in de "Natura-fresh"-zone te
bewaren. Op die manier behouden de
aroma, het vocht en de kleur zich
langer.
Geschikte verpakkingsmaterialen:
Luchtdichte zakken en folies van
polyethyleen;
Plastic bakjes met deksels;
Aluminiumfolie.
33
Page 34

Regeling van de luchtvochtigheid
De twee schuiven zijn uitgerust met
regelbare luchtspleten. De opening van
deze luchtspleten kan geregeld
worden door middel van glijders
waarmee de vochtigheidsgraad in de
schuiven kan gewijzigd worden.
Wanneer de luchtspleten open zijn,
zorgt de grotere luchtcirculatie voor
een lagere vochtigheidsgraad in de
schuif.
Een gesloten luchtspleet behoudt de
natuurlijke vochtigheidsgraad langer.
Bij extreme vochtigheid dienen de
spleten volledig opengehouden te
worden.
Holiday functie
BijdeHolidayfunctieisde
temperatuur ingesteld op +15 °C.
Zodoende kunt u tijdens een lange
periode van afwezigheid (bijv. vakantie)
de deur van het lege koelgedeelte
dicht laten in plaats van deze open te
laten staan, zonder dat er
onaangename luchtjes ontstaan.
De Holiday functie kan worden ingeschakeld door op toets D te drukken
(indien nodig meerdere keren) tot het
bijbehorende icoon
Druk opnieuw op toets B. Als op het
display de icoon
bevestigt u de keuze van de
temperatuur door op toets E te
drukken (u hoort de zoemer) of door
enkele seconden te wachten (u hoort
geen zoemer). De koelkast staat nu in
de energiezuinige stand in de Holiday
functie. Het is te allen tijde mogelijk de
verschijnt.
verschijnt,
functie uit te schakelen door de
geselecteerde temperatuur in het vak
te wijzigen.
Belangrijk
Het vriesgedeelte moet, als de
Holiday functie is ingeschakeld, leeg
zijn.
Het gebruik van het
vriesgedeelte
Het vriesgedeelte is aangeduid met het
symbool
dat het geschikt is om verse levensmiddelen in te vriezen en gedurende
lange tijd diepvries- en diepgevroren
levensmiddelen te bewaren.
Temperatuurselectie
De temperatuur van het vriesgedeelte
kan variëren tussen ongeveer -15°C en
-24°C. Aangeraden wordt de interne
temperatuur op ongeveer -18°C te
houden, dat garandeert dat de
levensmiddelen goed worden
ingevroren en bewaard.
Attentie!
Tijdens de stabilisatie na de eerste
start kan de aangegeven
temperatuur niet overeenkomen met
de ingestelde temperatuur.
Gedurende deze tijd is het mogelijk
dat de aangegeven temperatuur
verschilt van de ingestelde
temperatuur.
. Dat wil zeggen
34
Page 35

Belangrijk
Eenverschiltussendeaangegevenen
de ingestelde temperatuur is normaal.
Vooral als:
- pas een nieuwe instelling is gekozen
- de deur lange tijd open is geweest
- warme levensmiddelen in het
koelgedeelte zijn geplaatst.
Een verschil van max. 5°C binnenin
het vriesgedeelte is normaal.
Tijdens de normale werking geeft de
indicatie de warmste temperatuur
binnenin het vriesgedeelte aan.
Verse levensmiddelen invriezen
Het vriesgedeelte is geschikt om verse
levensmiddelen in te vriezen en
gedurende lange tijd diepvries- en
diepgevroren levensmiddelen te
bewaren.
De maximum hoeveelheid levensmiddelen die in 24 uur ingevroren mag
worden, staat op het typeplaatje.
Om de op het "typeplaatje"
aangegeven hoeveelheid in te vriezen,
dient u de levensmiddelen rechtstreeks
in aanraking te brengen met de
koelende oppervlakken (de lade of het
rek wegnemen).
Bij invriezen in de laden of rekken
wordt de maximum hoeveelheid wat
minder.
Om verse levensmiddelen in te vriezen
dient de Action Freeze functie te
worden ingeschakeld.
Druk op toets D (indien nodig
meerdere keren) tot het bijbehorende
icoon
U moet de keuze bevestigen door
binnen enkele seconden toets E in te
drukken. U hoort de zoemer en het
verschijnt.
icoon blijft verlicht. U hoort de zoemer
en op het display verschijnen wat
beelden en lijnen.
Leg de levensmiddelen die ingevroren
moeten worden in het vak van het
vriesgedeelte, omdat dit de koudste
plek is.
Het invriesproces duurt 24 uur. Doe
gedurende deze periode geen andere
verse levensmiddelen in het
vriesgedeelte.
Deze functie stopt na 52 uur
automatisch.
De functie kan op ieder moment
worden uitgeschakeld door op toets D
te drukken totdat het
corresponderende icoon gaat
knipperenendantoetsEinte
drukken.
Diepvriesproducten bewaren
Het einde van de geselecteerde tijd
Wacht op het moment van de
inbedrijfstelling of na een periode
waarin het vriesgedeelte niet gebruikt
is minstens 12 uur alvorens de
levensmiddelen in het apparaat te
doen.
Aangeraden wordt de knop op de
tussenliggende stand te houden. Als er
grote hoeveelheden levensmiddelen in
het vriesgedeelte gedaan moeten
worden, kunnen alle laden of rekken
uit het apparaat gehaald worden en de
levensmiddelen rechtstreeks op de
koeloppervlakken gelegd worden.
Kijk uit dat de maximum hoeveelheid
die op de zijkant van het bovenste
vak staat (indien aanwezig), niet overschreden wordt.
35
Page 36

Belangrijk
Indien de temperatuur in het
vriesgedeelte per ongeluk abnormaal
stijgt, bijvoorbeeld bij stroomuitval, en
de duur van de stroomuitval langer is
dan de waarde die in de tabel met
technische gegevens staat onder "tijd
voor temperatuurtoename", dienen de
levensmiddelen binnen korte tijd te
worden geconsumeerd of meteen
bereid en weer ingevroren (als ze weer
afgekoeld zijn).
Alarm voor te hoge temperatuur
Een temperatuurstijging in het vriesgedeelte (bijv. bij stroomuitval) wordt
aangegeven door:
- het knipperen van de temperatuur;
- het knipperen van het
vriesgedeelte
- het knipperen van het icoon
- geluid van de zoemer.
Als de normale toestand hersteld is:
- gaat het geluidssignaal uit;
- blijft de temperatuurwaarde
knipperen;
Als u op toets E drukt om het alarm uit
te schakelen, verschijnt gedurende
enkele seconden de in het
vriesgedeelte hoogst behaalde
temperatuur op aanduiding .
Dan gaat het display terug naar
normale werking en wordt de
temperatuur van het geselecteerde
gedeelte aangegeven.
Tijdens de alarmfase kan het geluid
van de zoemer uitgezet worden door
op toets E te drukken.
;
;
Geluidsalarm bij open deur
Een geluidsalarm waarschuwt als de
deur langer dan 5 minuten koelkast /
1,5 minuten vries openblijft.
De open deur alarmsituatie wordt
aangeduid door:
-het knipperen van het symbool van
het betreffende gedeelte
- het knipperen van het icoon
- het geluidsalarm.
Om het geluidsalarm uit te schakelen,
dient u op toets (E) te drukken.
Als de normale omstandigheden weer
hersteld zijn (gesloten deur):
- gaat het geluidssignaal uit.
Functie van het koolfilter
Het ingebouwde koolfilter zorgt ervoor
dat u artikelen met een sterke geur
vlakbij andere artikelen kunt neerzetten
zonder dat ze die smaak en geur
aannemen.
Het interieur van de kast
De rekken en de deurvakken zijn
uitneembaar en kunnen eenvoudig van
plaats worden veranderd.
Sommige rekken moeten aan de
achterkant worden opgetild om ze te
kunnen verwijderen.
36
Page 37

Het onderste compartiment en de
glasplaat boven de groentebak mogen
niet worden verplaatst. Zij zorgen
mede voor goede luchtcirculatie in de
kast.
Rekken met verhoogde rand moeten
met de verhoogde rand naar achteren
in de kast worden gelegd.
Schap voor snel afkoelen
Het ondiepe schap voor snel afkoelen
kan in een van de bovenste gleuven
geplaatst worden. Voor de best
mogelijke werking moet de schap in
de tweede gleuf van boven worden
gezet.
Voor een beschrijving van het starten
en stoppen van de functie zie het
hoofdstuk Snelkoelen (Quick Chill).
Verwijderen van flessen- en
blikjeshouder
Haak de snelkoelplank met de houder
uit de kast.
Om de houder van de plank los te
maken moet u de haken die om de
achterkant van de plank zitten naar
buiten toe buigen.
Flessen- en blikjeshouder
De flessen- en blikjeshouder is
zijdelings verplaatsbaar zodat het
mogelijk is de blikjes en flessen flexibel
voor het rooster te plaatsen. Om de
zijdelingse verplaatsing van de houder
te vergemakkelijken, moet u de houder
naar achteren drukken.
Om een blik of fles af te koelen moet
het product midden voor het rooster
geplaatst zijn voor het beste koeleffect.
De flessensteun kunt u uitklappen
wanneer er een grote fles gekoeld
moet worden.
37
Invriesblad
Gebruik het invriesblad om fruit en
groenten in te vriezen. Na ongeveer 4
uur zijn de producten volledig
ingevroren en kunnen ze op de
gebruikelijke manier worden ingepakt.
Levensmiddelen die op deze wijze
worden ingevroren, vriezen niet aan
elkaar vast zodat u gemakkelijker
porties van de producten kunt maken.
Page 38

Vriesbakken
Dankzij de vriesbakken kunt u de
gewenste levensmiddelen snel en
gemakkelijk terugvinden. Om ruimte te
besparen kunnen de vriesbakken
worden verwijderd en de producten
direct op de rekken worden gelegd. De
producten mogen behalve bij het
bovenste rek 20 mm over de rand
uitsteken. Hierdoor kan de
beschikbare ruimte optimaal worden
benut.
Verwijder nooit de onderste vriesbak.
Deze bak draagt mede bij aan een
goede luchtcirculatie.
Ijsblokjes
Omdat water bij bevriezing uitzet hoeft
de ijsbak slechts voor ongeveer 3/4
gevuld te worden. Wring de ijsblokjes
los door de ijsbak iets te verbuigen.
Als ijsblokjes te lang worden bewaard,
drogen ze uit en neemt de smaak af.
Gooi oude ijsblokjes weg en maak
nieuwe aan wanneer dit nodig is.
· Voorkom dat de kast te vaak wordt
geopend en de deur te lang open blijft
staan.
· Controleer regelmatig of de deur
goed sluit.
· Dooi ingevroren levensmiddelen in
de koelkast af; de afgegeven koude
komt in de koelkast goed van pas.
· Reinig de compressor en het
koelsysteem aan de achterkant van de
koelkast ongeveer eenmaal per jaar
met een stofzuiger.
· Laat warme levensmiddelen
volledig afkoelen voordat u ze in de
koelkast zet.
· Koel levensmiddelen in de koelkast
af voordat u ze in de vrieskast zet.
· Bewaar levensmiddelen bij
voorkeur in luchtdichte verpakking om
onnodige ijsvorming te voorkomen.
· Volg de adviezen van "Zo gebruikt
u de vrieskast" op. Hiermee kunt u het
stroomverbruik reduceren.
· Stel de temperatuur van de
vrieskast niet te laag in. Een goede
temperatuur ligt tussen de -18_Cen
-20_C.
· Ontdooi de vrieskast als de
hoeveelheid ijs een dikte van 3-5 mm
bereikt.
· Controleer en reinig de afdichtring
regelmatig.
Handige tips
Energiespaaradviezen
· Kies de plaats van de kast met
zorg. Zie "Installatie". Het stroomverbruik van de kast kan aanzienlijk
afnemen als een goede plaats is
gekozen.
De kast en het milieu
· De in deze kast gebruikte afdichting
en het koelmiddel tasten de ozonlaag
niet aan.
· De verpakking kan volledig
hergebruikt worden.
· De kast is speciaal ontworpen om
gemakkelijk gedemonteerd en
hergebruikt te kunnen worden.
38
Page 39

Denk aan het milieu
· Uit het oogpunt van milieubescherming moeten afgedankte
koel- en vriestoestellen volgens de
plaatselijke regelingen op deskundige
wijze verwerkt worden. Informeer bij de
gemeente naar de mogeliijkheden in
uw woonplaats.
· Bewaar levensmiddelen bij
voorkeur in verpakkingsmateriaal dat
opnieuw gebruikt kan worden. Vermijd
het gebruik van wegwerpverpakking zo
veel mogelijk.
· Gebruik een neutraal reinigingsmiddelomdekasttereinigen.
· Volg de adviezen van
"Energiespaaradviezen" nauwgezet.
Reinigen
Reinig de kast regelmatig.
Schakel de kast uit en trek de stekker
uit het stopcontact. U kunt eventueel
ook de zekering verwijderen.
Reinigen binnenkant
Verwijder alle loszittende onderdelen
en was ze met de hand af. Reinig de
kast, het interieur en de afdichting.
Gebruik een zachte doek, bevochtigd
in een sopje van handwarm water en
een mild afwasmiddel. Sluit de deur
niet voordat de kast van binnen
helemaal droog is.
Onderhoud
Het ventilatierooster verwijderen
Het ventilatierooster kan voor het
reinigen worden verwijderd.
Trek het ventilatierooster naar voren
om het te openen.
Bij het terugplaatsen van het
ventilatierooster:
Eerst alle haken aan de onderrand
vasthaken en daarna het rooster op
zijn plaats duwen.
2
1
"Nature-fresh"-schuif.
Trek de groentebak naar buiten.
Hefzeoverderemmendiezich
achteraan op de rails bevinden. Kantel
de bak neerwaarts en trek haar naar
buiten.
Verwijder de scheidingsplaat.
Reinig met een zacht reinigingsmiddel
en spoel met lauw water af.
Monteer in omgekeerde volgorde.
39
Page 40

Reinigen buitenkant
Verwijder het ventilatierooster (zie "Het
ventilatierooster verwijderen") en
stofzuig onder de kast. Trek de kast
vandewandafenstofzuigde
achterkant van de kast, het
koelsysteem en de compressor.
Til bij het verplaatsen van de kast de
kast aan de voorkant op om te
voorkomen dat de vloer beschadigd
wordt.
De vrieskast ontdooien
Er vormt zich altijd een laag ijs op de
rekken en langs de bovenkant van de
vrieskast. Ontdooi de vrieskast als de
hoeveelheid ijs een dikte van 3-5 mm
bereikt.
Verwijder de vriesbakken en zet ze
boven op elkaar door ze telkens een
halveslag te draaien. Verpak de
bakkeninisolerendmateriaal,zoals
dekens of kranten.
De ingevroren producten kunnen ook
dicht tegen elkaar worden aangelegd
en op een koude plaats worden
bewaard, zoals in de koelkast.
Maak het afwateringsslangetje los uit
de ruststand en schuif het erin volgens
de afbeelding en zet het in de onderste
vriesbak waar het water opgevangen
kan worden.
Schraap het ijs voorzichtig los als het
begint te smelten.
Gebruik hiervoor een houten of plastic
krabber. Gebruik geen scherpe
voorwerpen die het interieur kunnen
beschadigen.
Maak de kast schoon en droog als al
het ijs gesmolten is en breng de
afwateringsslangetje op zijn plaats
terug.
Schakel de kast weer in en leg de
levensmiddelen terug.
Gebruik nooit haardrogers of andere
warmte-producerende apparaten om
het ontdooien te versnellen. Door de
warmte kan het plastic interieur
vervormen en vocht dat het apparaat
binnendringt kan kortsluiting
veroorzaken.
Het ontdooien kan worden versneld
door kommen met warm water (geen
kokend water) in de vrieskast te zetten.
40
Page 41

De koelkast ontdooien
De koelkast wordt elke keer dat de
compressor afslaat automatisch
ontdooid. IJsvorming kan worden
voorkomen door:
· geen warme levensmiddelen in de
kast te zetten.
· te voorkomen dat de deur te vaak
wordt geopend of te lang open blijft
staan.
De lamp vervangen
De verlichting in de kast gaat
automatisch branden wanneer de deur
geopend wordt. Trek de stekker uit het
stopcontact voordat u de lamp
verwisselt.
Demonteer de lamp en plaats h iervoor
een schroevendraaier in de uitsparing
van de ingang van de lamp.
Plaats een nieuwe lamp in de
middenpositie en druk deze aan tot u
een klik hoort.
Gebruik een halogeenlamp van
hetzelfde type; max. vermogen 20 W.
Vervangen van koolfilter
Voor de best mogelijke werking moet
het koolfilter bij normaal gebruik een
keer per jaar vervangen worden.
Nieuwe koolfilters zijn te koop bij uw
lokale dealer. Het filter zit achter het
rooster en is bereikbaar wanneer u het
klepje opent. Het rooster wordt
geopend door tegelijkertijd de hendel
rechts van het rooster (1) in te drukken
en de klep naar buiten te draaien (2).
Het koolfilter wordt vervolgens uit de
gleuf getrokken waar het koolfilter in
loopt (3).
Het nieuwe koolfilter wordt vervolgens
in dezelfde gleuf geplaatst. De filters
moeten zorgvuldig behandeld worden
zodat er geen schilfers van het
oppervlak loskomen.
1
2
3
Alsdekastnietgebruiktwordt
Schakel de kast uit en trek de stekker
uit het stopcontact. U kunt eventueel
ook de zekering verwijderen.
Reinig de kast zoals wordt u itgelegd in
"Reiniging". Sluit de deur van de kast
niet: hierdoor zou er een muffe geur in
de kast kunnen ontstaan.
Als de kast aan moet blijven staan,
verdient het aanbeveling om iemand
de kast regelmatig te laten controleren
om te voorkomen dat levensmiddelen
door een stroomstoring bederven.
41
Page 42

ALS DE KAST NIET NAAR BEHOREN
FUNCTIONEERT
Als de kast niet naar behoren functioneert, is het vaak mogelijk om dit zelf te
verhelpen. Lees onderstaande aanwijzingen aandachtig door om onnodige
onderhoudsbeurten te voorkomen.
Probleem Mogelijke oorzaak / Oplossing
De temperatuurdisplay geeft
““ aan.
Alarmsignaal + knipperende
rode waarschuwingslamp. (Het
is te warm in het vriesvak.)
Hetistewarmindekoelkast. Stel een lagere temperatuur in.
Hetistekoudindekoelkast. Stel een hogere temperatuur in.
Het is voor koude in de
"Nature-fresh"-zone.
Er ligt water op de vloer. Hang de afvoerslang aan de achterkant van
Er is een fout opgetreden bij de meting van
de temperatuur. Neem contact op met uw
leverancier. (Het koelsysteem werkt
voldoende om uw levensmiddelen gekoeld te
houden, maar de temperatuurinstelling kan
niet worden veranderd.)
Schakel het alarmsignaal uit door op de
alarmtoets te drukken.
Het alarmsignaal kan zijn afgegaan door:
De koelkast is onlangs ingeschakeld en de
temperatuur is nog te hoog. Zie het
hoofdstuk "De koelkast inschakelen en de
temperatuur instellen".
De deur kan zolang hebben opengestaan,
dat het `deuralarm' is afgegaan.
Leg de voedingsmiddelen op de juiste plaats
in de koelkast. Zie het hoofdstuk
"Temperaturenindekoelkast".
Verdeel de voedingsmiddelen gelijkmatig,
zodat de koude lucht om de producten kan
circuleren.
Controleer of de deur goed gesloten is en of
de isolatiestrip schoon en heel is.
Tryck in kylens "+" och "Ok" knappen
samtidigt ca 5 sekunder.
de koelkast boven de opvangbak. Zie het
hoofdstuk "Alvorens de koelkast in gebruik te
nemen".
42
Page 43

Hetistewarmindevriesvak.
Hetistekoudindevriesvak. Stel een hogere temperatuur in.
Stel een lagere temperatuur in.
Controleer of de deur goed gesloten is en of
de isolatiestrip schoon en heel is.
Als er levensmiddelen die nog warm zijn in de
vriesvak zijn gezet, wacht u enkele uren en
controleert u daarna de temperatuur
opnieuw.
Verdeel de voedingsmiddelen gelijkmatig,
zodat de koude lucht om de producten kan
circuleren.
De snelvriesfunctie kan zijn
ingeschakeld..
De temperatuurdisplay toont de hoogste
temperatuur in de kast. Het kan voorkomen,
dat er een verschil is tussen de temperatuur
die op de display wordt aangegeven en de
op een andere wijze gemeten (gemiddelde)
temperatuur.
Er treedt te veel ijsvorming op. Controleer of de deur goed gesloten is en of
de isolatiestrip schoon en heel is.
Stel een hogere temperatuur in.
De compressor is continu in
bedrijf.
De kast werkt niet. Er wordt
niet gekoeld of de kastlamp
brandt niet. Ook de indicators
branden niet.
Stel een hogere temperatuur in.
Controleer of de deur goed gesloten is en of
de isolatiestrip schoon en heel is.
De stekker zit niet goed in het stopcontact.
De zekering is doorgebrand.
De kast is niet ingeschakeld.
Er is geen stroomtoevoer naar de kast. (Sluit
als test een ander elektrisch apparaat op het
stopcontact aan.)
43
Page 44

De kast produceert te veel
geluid.
Stroomuitval Voorkom het onnodig openen van de
Het koelsysteem produceert altijd wat
bijgeluiden. Er is een stromend geluid
hoorbaar wanneer de koelvloeistof door het
koelsysteem wordt gepompt. Er is een
klikgeluid van de thermostaat hoorbaar
wanneer de compressor wordt in- of
uitgeschakeld. De geluidssterkte hangt af van
de bedrijfsstatus van de kast.
Als u denkt dat de geluidssterkte niet goed is:
Verbuig de leidingen aan de achterzijde van
de kast voorzichtig, zodat ze niet met elkaar
in aanraking komen.
Als de afstandskussens (tussen de kastwand
en de leidingen) losraken, zet u ze weer vast.
Voer de aanwijzingen van hoofdstuk "De
kast Installeren" zorgvuldig uit.
vrieskast, behalve als de stroomstoring
uitzonderlijk lang duurt; in dit geval dient u de
levensmiddelen op te slaan in een vrieskast
die wel functioneert. Als ingevroren
levensmiddelen nog hardbevroren zijn nadat
de stroomstoring is opgeheven, kunnen ze
onmiddellijk weer worden ingevroren. Als de
ingevroren levensmiddelen ontdooid zijn en
nog goed ruiken, moeten ze worden bereid
voordat ze worden geconsumeerd of
opnieuw ingevroren.
44
Page 45

TECHNISCHE GEGEVENS
Model ERZ367000W8
ERZ367000X8
Netto inhoud koel l 160
Netto inhoud "Natura-fresh" 82
Netto inhoud vries l 87
Stroomverbruik kWh/jaar 315 kWh
Invriescapaciteit uren 14
Tijd voor temperatuurtoename 20
Dimension
Hoogte 2000 mm
Breedte 595 mm
Diepte 623 mm
Installeren
Aansluitsnoer
Trek de stekker niet uit het stopcontact
door aan het snoer te trekken, vooral
niet als het apparaat uit de nis wordt
getrokken.
· Schala aan het snoer kan
kortsluiting, brand en/of een
elektrische schok veroorzaken.
· Als het aansluitsnoer van het
product beschadigd is, mag het alleen
vervangen worden door een door de
leverancier geautoriseerd servicebedrijf
of een deskundig persoon om gevaar
te voorkomen.
Uitpakken
Pak de kast uit en controleer of de
kast in goede staat is en tijdens het
transport niet beschadigd is. Licht
onmiddellijk uw leverancier in als de
kast tijdens transport beschadigd is.
Lever de verpakking in voor recycling.
Voor vragen hierover kunt u terecht bij
het gemeentehuis van uw gemeente of
bij uw leverancier.
Laat kinderen niet met de verpakking
spelen. Het plastic kan gevaar voor
verstikking opleveren.
De transportsteunen verwijderen
Verwijder het plakband en de
transportsteunen van
· de deurscharnieren
· de binnenkant van de
deurscharnieren
· de rekken
Verwijder de transportsteun van de
glasplaat door de steun langs de rand
van de plaat zo ver mogelijk naar voren
te drukken. Neem vervolgens de
glasplaat bij de achterste rand vast en
trek de glasplaat en de transportsteun
45
Page 46

naar voren, zodat de glasplaat kantelt
en de transportsteun verwijderd kan
worden. Bij sommige modellen zit aan
de onderkant van de kast een
geluiddempend kussen. Verwijder dit
kussen niet.
Installatie van koolfilter
Bij levering van het koolfilter zit het in
een plastic zakje om de levensduur
van het filter te garanderen. Het filter
moet achter het rooster worden
geplaatst voordat de koelkast aangezet
wordt.
Het rooster wordt geopend door
tegelijkertijd de hendel rechts van het
rooster (1) in te drukken en de klep
naar buiten te draaien (2). Het koolfilter
wordt daarna in de gleuf geplaatst die
aan de achterkant van de klep (3)
zitten.
De filters moeten zorgvuldig behandeld
worden zodat er geen schilfers van het
oppervlak loskomen.
1
Reinigen
Reinig de binnenkant van de kast met
behulp van een zachte doek,
bevochtigd in een sopje van
handwarm water en een mild
afwasmiddel.
Installatie van afstandshouders
Monteer de bijgeleverde
afstandshouders overeenkomstig de
afbeelding aan de achterkant van het
paneel.
2
De kast installeren
Wanneer twee kasten naast elkaar
opgesteld worden moeten de twee
afstandhouders die in de plastic zak
zijn meegeleverd tussen de kasten
vastgeplakt worden, zoals op de
afbeelding te zien is.
Zorg ervoor dat de aansluitsnoer en/of
stekker niet wordt platgedrukt of
beschadigd door de achterkant van
het apparaat.
· een beschadigde aansluitsnoer
en/of stekker kan oververhit raken en
3
46
Page 47

brand veroorzaken.
Plaats geen zware voorwerpen of het
apparaat zelf op het aansluitsnoer.
· daardoor bestaat kans op
kortsluiting en brand.
Als het stopcontact los zit, steek de
stekker er dan niet in.
· daardoor bestaat kans op een
elektrische schok of brand.
Voor een goede werking van de kast is
het van belang, dat:
· de kast op een droge, koele plaats
wordt neergezet en niet aan direct
zonlicht wordt blootgesteld.
· dekastnietindebuurtwordt
geplaatst van een warmtebron, zoals
een fornuis of een vaatwasmachine.
· de kast waterpas staat en op alle
vier de hoeken rust. De kast mag niet
tegen een muur leunen. Stel zonodig
de voetjes af m.b.v. de bijgeleverde
stelsleutel.
dient de open ruimte tenminste 50 mm
diep te zijn.
a)
b)
50mm
· de kast alleen op een plaats
neerzetten waarvan de
omgevingstemperatuur overrnkomt
met de klimaatcategorie* waarvoor het
apparaat is ontworpen.
* Zie typeplaatje het apparaat bevindt.
De volgende tabel geeft aan welke
omgevingstemperatuur bij welke
klimaatcatergorie behoort.
Klimaat-
categorie
SN
voor een
omgevings-
temperatuure van
+10°C tot +32°C
· er een goede luchtcirculatie
rondom de kast mogelijk is en de
luchtkanalen onder en achter de kast
niet geblokkeerd worden. De
ventilatieruimte boven de koelkast en
de eventueel erboven geplaatste
bovenkast /keukenkast dient
tenminste 4 cm te zijn. De
ventilatieruimte kan zijn aangebracht
a) direct boven de kast, of
b) achter en boven de bovenkast die
boven de kast is geplaatst. In dit geval
47
N
ST
T
+16°C tot +32°C
+18°C tot +38°C
+18°C tot +43°C
Als de kast in een hoek wordt
geplaatst en de scharnieren zich aan
de muurzijde bevinden, dient er tussen
de kast en de muur een afstand van
tenminste 360 mm bewaard te
worden, zodat de deur ver genoeg
geopend kan worden om de rekken uit
de kast te kunnen nemen.
Page 48

Controleer of de afvoerslang aan de
achterkant van de kast in de
opvangbak uitmondt.
De stekker moet ook na de installatie
van de kast bereikbaar zijn.
Draairichting van de deur wisselen
De draairichting van de deur kan
omgezet worden, als dat voor de
opstellingsplaats nodig is.
Attentie! De deurstuiter mag alleen
door een gekwalificeerde vakman
worden verwisseld. Neem indien nodig
contact op met onze service-afdeling
of uw vakhandel.
Elektrische aansluiting
Sluit de kast aan op een geaard
stopcontact.
Voltage: 230 V.
Zekering: 10 A.
Zie de kenplaat aan de linkerzijde in de
kast.
48
Page 49

495051
Page 50

Page 51

Page 52

www.electrolux.com
www.electrolux.co.uk
www.electrolux.nl
8184209-00/8 122007
 Loading...