

Page 1
user manual
käyttöohje
bruksanvisning
Refrigerator
Jääkaappi
Kylskåp
ERC37320W
Page 2
2 electrolux
Electrolux. Thinking of you.
Share more of our thinking at www.electrolux.com
CONTENTS
Safety information 2
Control panel 4
First use 4
Daily use 5
Helpful hints and tips 6
SAFETY INFORMATION
In the interest of your safety and to ensure
the correct use, before installing and first
using the appliance, read this user manual
carefully, including its hints and warnings.
To avoid unnecessary mistakes and accidents, it is important to ensure that all people using the appliance are thoroughly familiar with its operation and safety features.
Save these instructions and make sure that
they remain with the appliance if it is moved
or sold, so that everyone using it through its
life will be properly informed on appliance
use and safety.
For the safety of life and property keep the
precautions of these user's instructions as
the manufacturer is not responsible for
damages caused by omission.
Children and vulnerable people safety
• This appliance is not intended for use by
persons (including children) with reduced
physical, sensory or mental capabilities,
or lack of experience and knowledge, unless they have been given supervision or
instruction concerning use of the appliance by a person responsible for their
safety.
Children should be supervised to ensure
that they do not play with the appliance.
• Keep all packaging well away from children. There is risk of suffocation.
• If you are discarding the appliance pull
the plug out of the socket, cut the connection cable (as close to the appliance
as you can) and remove the door to prevent playing children to suffer electric
shock or to close themselves into it.
• If this appliance featuring magnetic door
seals is to replace an older appliance
having a spring lock (latch) on the door or
Care and cleaning 7
What to do if… 8
Technical data 10
Installation 10
Environmental concerns 13
Subject to change without notice
lid, be sure to make that spring lock unusable before you discard the old appliance. This will prevent it from becoming a
death trap for a child.
General safety
Warning!
Keep ventilation openings, in the appliance
enclosure or in the built-in structure, clear of
obstruction.
• The appliance is intended for keeping
foodstuff and/or beverages in a normal
household as explained in this instruction
booklet.
• Do not use a mechanical device or any
artificial means to speed up the thawing
process.
• Do not use other electrical appliances
(such as ice cream makers) inside of refrigerating appliances, unless they are approved for this purpose by the manufacturer.
• Do not damage the refrigerant circuit.
• The refrigerant isobutane (R600a) is contained within the refrigerant circuit of the
appliance, a natural gas with a high level
of environmental compatibility, which is
nevertheless flammable.
During transportation and installation of
the appliance, be certain that none of the
components of the refrigerant circuit become damaged.
If the refrigerant circuit should become
damaged:
– avoid open flames and sources of igni-
tion
– thoroughly ventilate the room in which
the appliance is situated
Page 3

electrolux 3
• It is dangerous to alter the specifications
or modify this product in any way. Any
damage to the cord may cause a shortcircuit, fire and/or electric shock.
Warning! Any electrical component
(power cord, plug, compressor) must
be replaced by a certified service agent
or qualified service personnel to avoid
hazard.
1. Power cord must not be lengthened.
2. Make sure that the power plug is not
squashed or damaged by the back
of the appliance. A squashed or
damaged power plug may overheat
and cause a fire.
3. Make sure that you can come to the
mains plug of the appliance.
4. Do not pull the mains cable.
5. If the power plug socket is loose, do
not insert the power plug. There is a
risk of electric shock or fire.
6. You must not operate the appliance
1)
without the lamp cover
of interior
lighting.
• This appliance is heavy. Care should be
taken when moving it.
• Do not remove nor touch items from the
freezer compartment if your hands are
damp/wet, as this could cause skin abrasions or frost/freezer burns.
• Avoid prolonged exposure of the appliance to direct sunlight.
•
Bulb lamps
2)
used in this appliance are
special purpose lamps selected for
household appliances use only. They are
not suitable for household room illumination.
Daily use
• Do not put hot pot on the plastic parts in
the appliance.
• Do not store flammable gas and liquid in
the appliance, because they may explode.
• Appliance's manufacturers storage recommendations should be strictly adhered
to. Refer to relevant instructions.
Care and cleaning
• Before maintenance, switch off the appliance and disconnect the mains plug from
the mains socket.
• Do not clean the appliance with metal
objects.
• Regularly examine the drain in the refrigerator for defrosted water. If necessary,
clean the drain. If the drain is blocked,
water will collect in the bottom of the appliance.
Installation
Important! For electrical connection
carefully follow the instructions given in
specific paragraphs.
• Unpack the appliance and check if there
are damages on it. Do not connect the
appliance if it is damaged. Report possible damages immediately to the place
you bought it. In that case retain packing.
• It is advisable to wait at least four hours
before connecting the appliance to allow
the oil to flow back in the compressor.
• Adequate air circulation should be
around the appliance, lacking this leads
to overheating. To achieve sufficient ventilation follow the instructions relevant to
installation.
• Wherever possible the back of the product should be against a wall to avoid
touching or catching warm parts (compressor, condenser) to prevent possible
burn.
• The appliance must not be located close
to radiators or cookers.
• Make sure that the mains plug is accessible after the installation of the appliance.
•
Connect to potable water supply only.
3)
Service
• Any electrical work required to do the
servicing of the appliance should be carried out by a qualified electrician or competent person.
• This product must be serviced by an authorized Service Centre, and only genuine spare parts must be used.
1) If the lamp cover is foreseen.
2) If the lamp is foreseen.
3) If a water connection is foreseen.
Page 4
4 electrolux
Environment Protection
This appliance does not contain gasses
which could damage the ozone layer,
in either its refrigerant circuit or insulation materials. The appliance shall not
be discarded together with the urban
refuse and rubbish. The insulation foam
contains flammable gases: the appli-
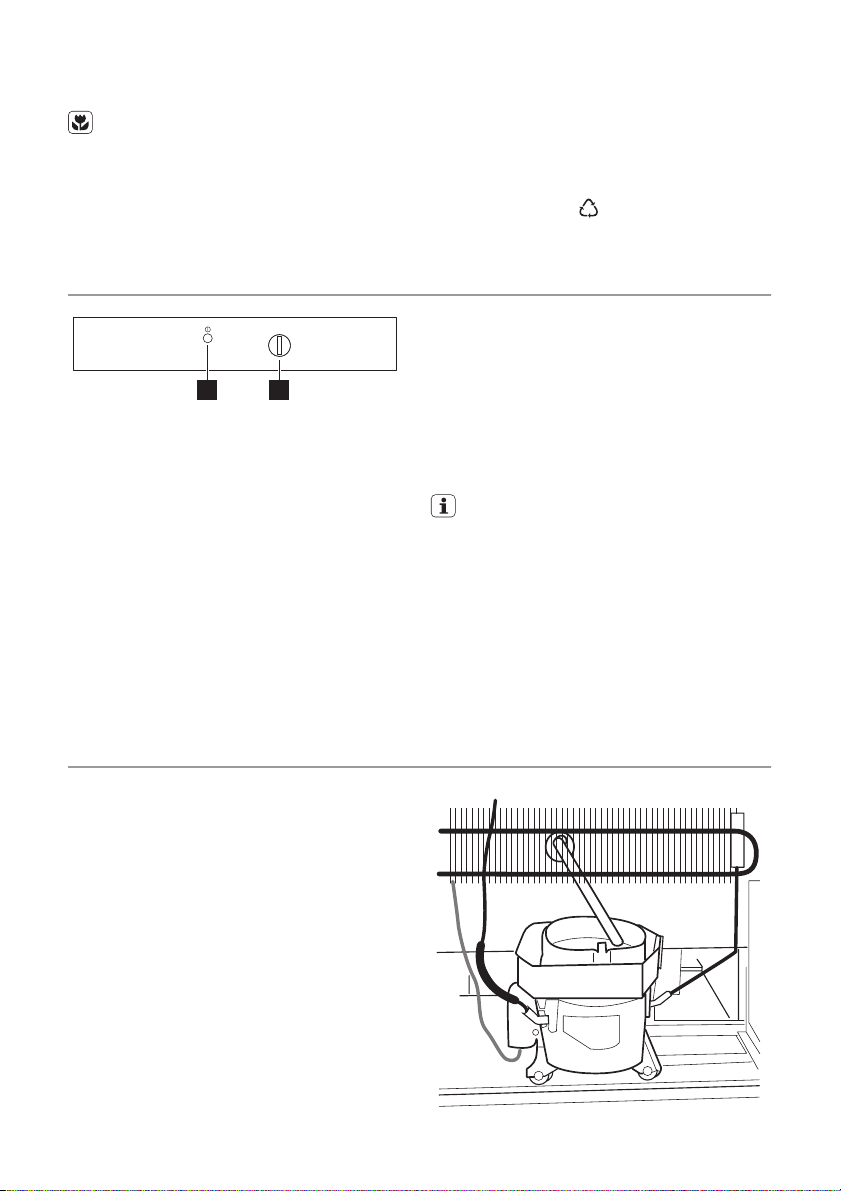
CONTROL PANEL
0
1
601
6
2345
2345
1 2
1. Pilot light
2. Temperature regulator
Switching on
Insert the plug into the wall socket.
The pilot light will light up.
Turn the Temperature regulator clockwise
to a medium setting.
Switching off
To turn off the appliance, turn the Temperature regulator to the "O" position.
Important! The Pilot light stay ON until the
appliance is disconnected from the power
socket.
ance shall be disposed according to
the applicable regulations to obtain
from your local authorities. Avoid damaging the cooling unit, especially at the
rear near the heat exchanger. The materials used on this appliance marked
by the symbol
are recyclable.
Temperature regulation
The temperature is automatically regulated.
To operate the appliance, proceed as follows:
• turn the Temperature regulator counter
clockwise to obtain warmer storage temperature.
• turn the Temperature regulator clockwise
to obtain colder storage temperature.
A medium setting is generally the most
suitable.
The exact setting should be chosen keeping in mind that the temperature inside the
appliance depends on:
• room temperature
• how often the door is opened
• the quantity of food stored
• the location of the appliance.
FIRST USE
Cleaning the interior
Before using the appliance for the first time,
wash the interior and all internal accessories with lukewarm water and some neutral
soap so as to remove the typical smell of a
brand-new product, then dry thoroughly.
Important! Do not use detergents or abrasive powders, as these will damage the finish.
Check that the drain hose at the rear of the
cabinet discharges into the drip tray.
Page 5
DAILY USE
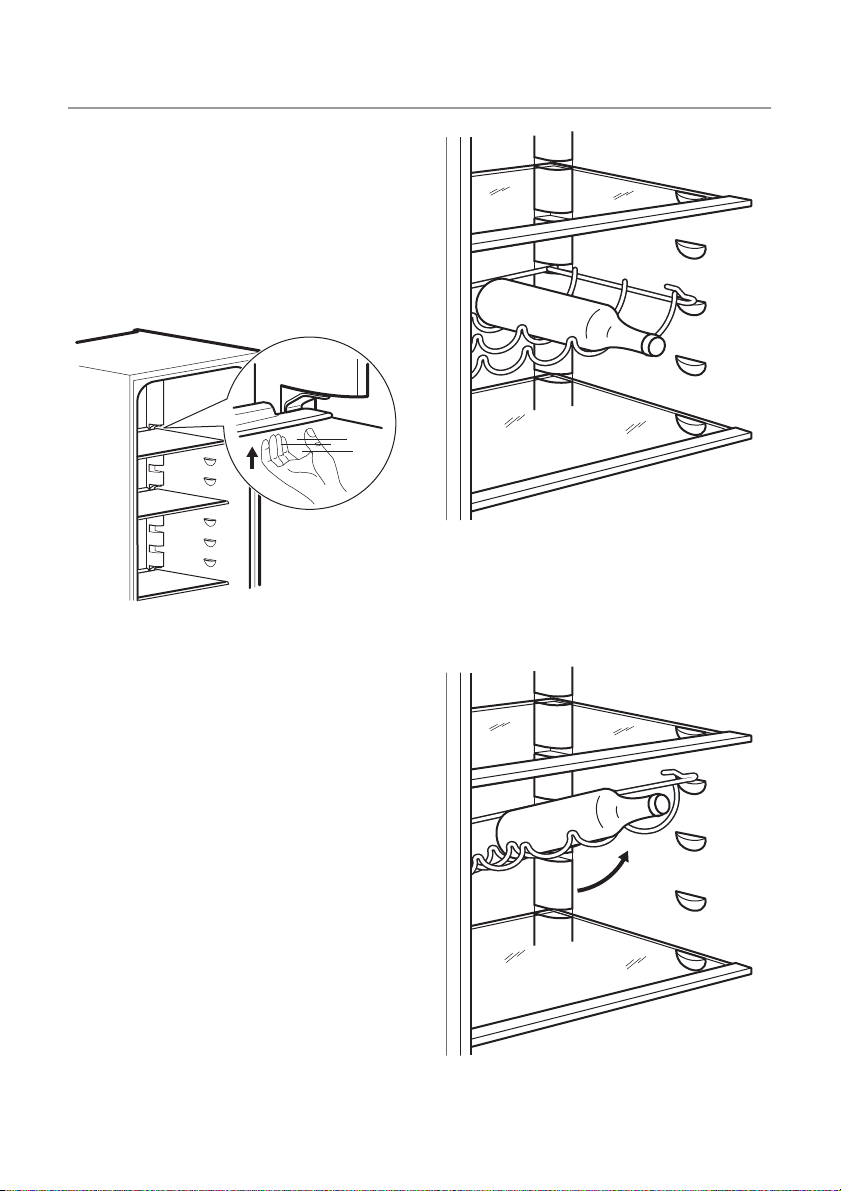
Movable shelves
The walls of the refrigerator are equipped
with a series of shelves support so that the
shelves can be positioned as desired.
Some shelves must be lifted up by the rear
edge to enable them to be removed.
Important! Do not move the glass shelf
above the vegetable drawer to ensure
correct air circulation.
Vegetable Drawer
The drawer is suitable for storing fruit and
vegetables.
Some models have a separator inside the
drawer that can be placed in different positions to allow for the subdivision best suited
to personal needs.
All parts inside the drawer can be removed
for cleaning purposes.
Bottle rack
Place the bottles (with the opening facing
front) in the pre-positioned shelf.
Important! If the shelf is positioned
horizontally, place only closed bottles.
electrolux 5
This bottle holder shelf can be tilted in order
to store previously opened bottles. To obtain this result, pull the shelf up so it can rotate upwards and be placed on the next
higher shelf support.
Page 6
6 electrolux
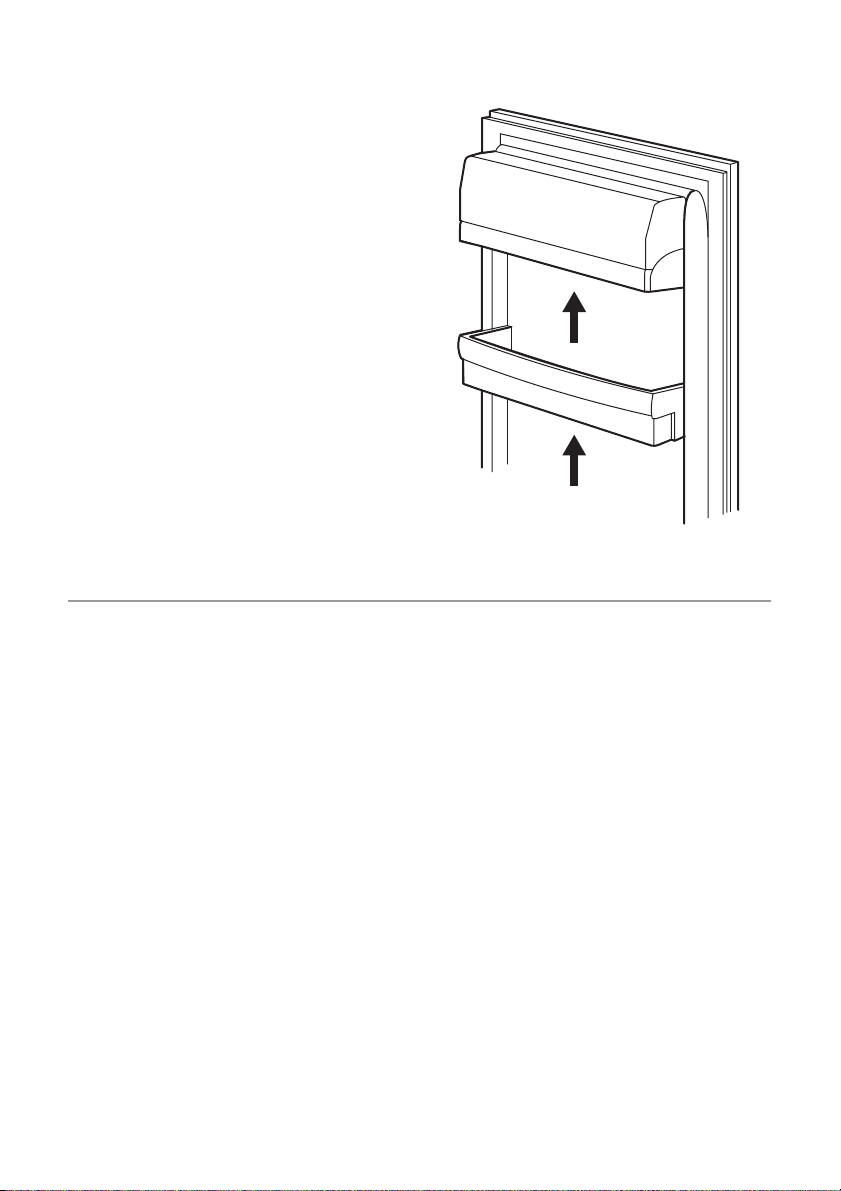
Positioning the door shelves
To permit storage of food packages of various sizes, the door shelves can be placed
at different heights.
To make these adjustments proceed as follows:
gradually pull the shelf in the direction of the
arrows until it comes free, then reposition
as required.
Important! Do not move the big lower door
shelf to ensure correct air circulation.
HELPFUL HINTS AND TIPS
Hints for energy saving
• Do not open the door frequently or leave
it open longer than absolutely necessary.
• If the ambient temperature is high and
the Temperature Regulator is set to low
temperature and the appliance is fully
loaded, the compressor may run continuously, causing frost or ice on the evaporator. If this happens, set the Temperature Regulator toward warmer settings to
allow automatic defrosting and so a saving in electricity consumption.
Hints for fresh food refrigeration
To obtain the best performance:
• do not store warm food or evaporating
liquids in the refrigerator
• do cover or wrap the food, particularly if it
has a strong flavour
•position food so that air can circulate
freely around it
Hints for refrigeration
Useful hints:
Meat (all types) : wrap in polythene bags
and place on the glass shelf above the vegetable drawer.
For safety, store in this way only one or two
days at the most.
Cooked foods, cold dishes, etc..: these
should be covered and may be placed on
any shelf.
Fruit and vegetables: these should be thoroughly cleaned and placed in the special
drawer(s) provided.
Butter and cheese: these should be placed
in special airtight containers or wrapped in
aluminium foil or polythene bags to exclude
as much air as possible.
Milk bottles: these should have a cap and
should be stored in the bottle rack on the
door.
Bananas, potatoes, onions and garlic, if not
packed, must not be kept in the refrigerator.
Hints for temperature inside the fridge
• A suitable temperature inside the fridge is
approx. +5° C. It is normal with higher
temperature in the top of the fridge and
lower temperature in the lower part. If the
temperature regulator is set to a cold
temperature, the ambient temperature is
high or if the fridge is fully loaded the
compressor will run for a longer time.
Page 7
This results in colder temperature in the
lower part of the fridge due to the cold air
that falls down. It may result in that food
with high water content start to freeze. If
too cold, change to a higher temperature
setting.
Important! Do not place any shelves
towards the water drain hole. This can
result in too cold temperatures.
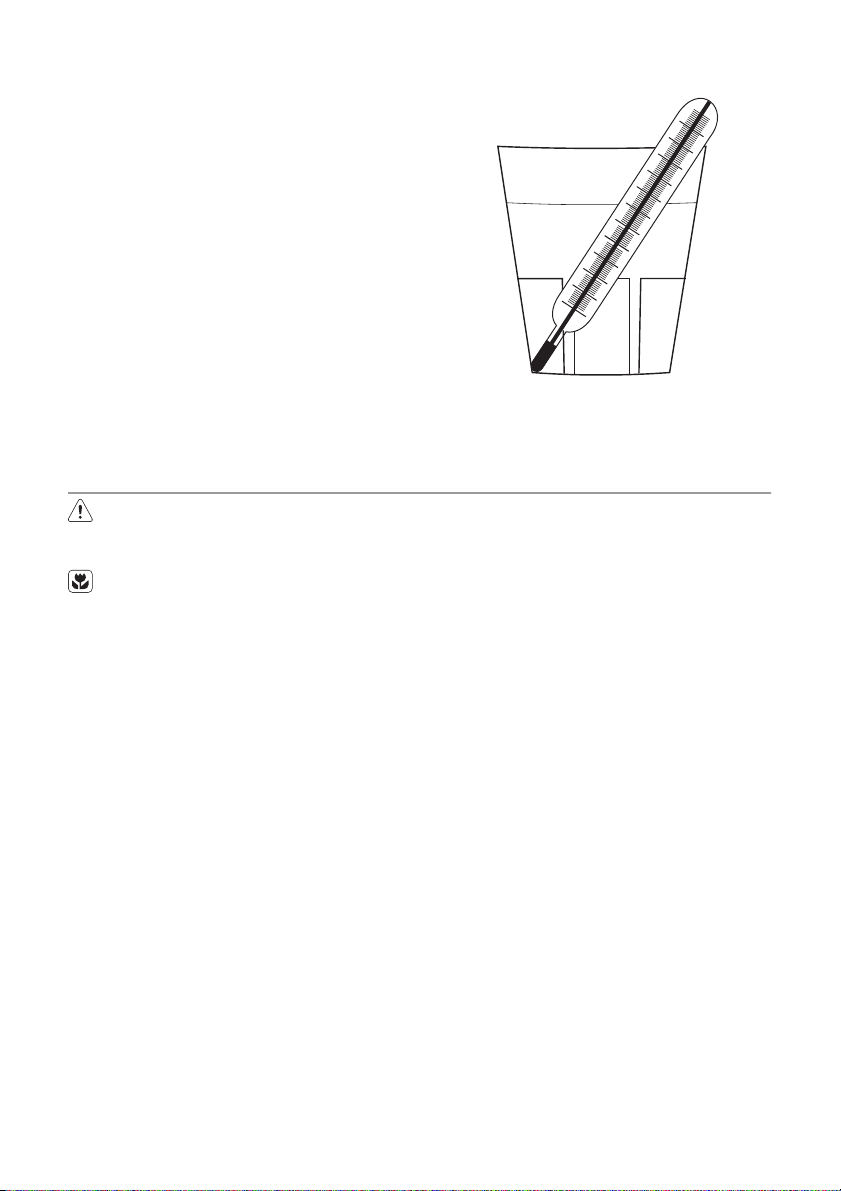
• If you want to check the temperature of
food stored in the refrigerator, place a
glass of water centrally in the cabinet,
and put a proper thermometer with an
accuracy of +/– 1 °C into it. After 6 hours
the temperature can be monitored. The
measuring shall be performed under
steady-stated conditions (without changing the load).
CARE AND CLEANING
Caution! Unplug the appliance before
carrying out any maintenance
operation.
This appliance contains hydrocarbons
in its cooling unit; maintenance and recharging must therefore only be carried
out by authorized technicians.
Periodic cleaning
The equipment has to be cleaned regularly:
• clean the inside and accessories with
lukewarm water and some neutral soap.
• regularly check the door seals and wipe
clean to ensure they are clean and free
from debris.
• rinse and dry thoroughly.
Important! Do not pull, move or damage
any pipes and/or cables inside the cabinet.
Never use detergents, abrasive powders,
highly perfumed cleaning products or wax
polishes to clean the interior as this will
damage the surface and leave a strong
odour.
Clean the condenser (black grill) and the
compressor at the back of the appliance
with a brush. This operation will improve the
performance of the appliance and save energy consumption.
Important! Take care of not to damage the
cooling system.
electrolux 7
Important! When moving the cabinet, lift it
by the front edge to avoid scratching the
floor.
Many proprietary kitchen surface cleaners
contain chemicals that can attack/damage
the plastics used in this appliance. For this
reason use a soft cloth rinsed in warm water and neutral soap emulsion for cleaning
external surfaces.
Important! Do not use detergents or
abrasive paste as these will damage the
paint, or stainless steel anti finger print
coating.
After cleaning, reconnect the equipment to
the mains supply.
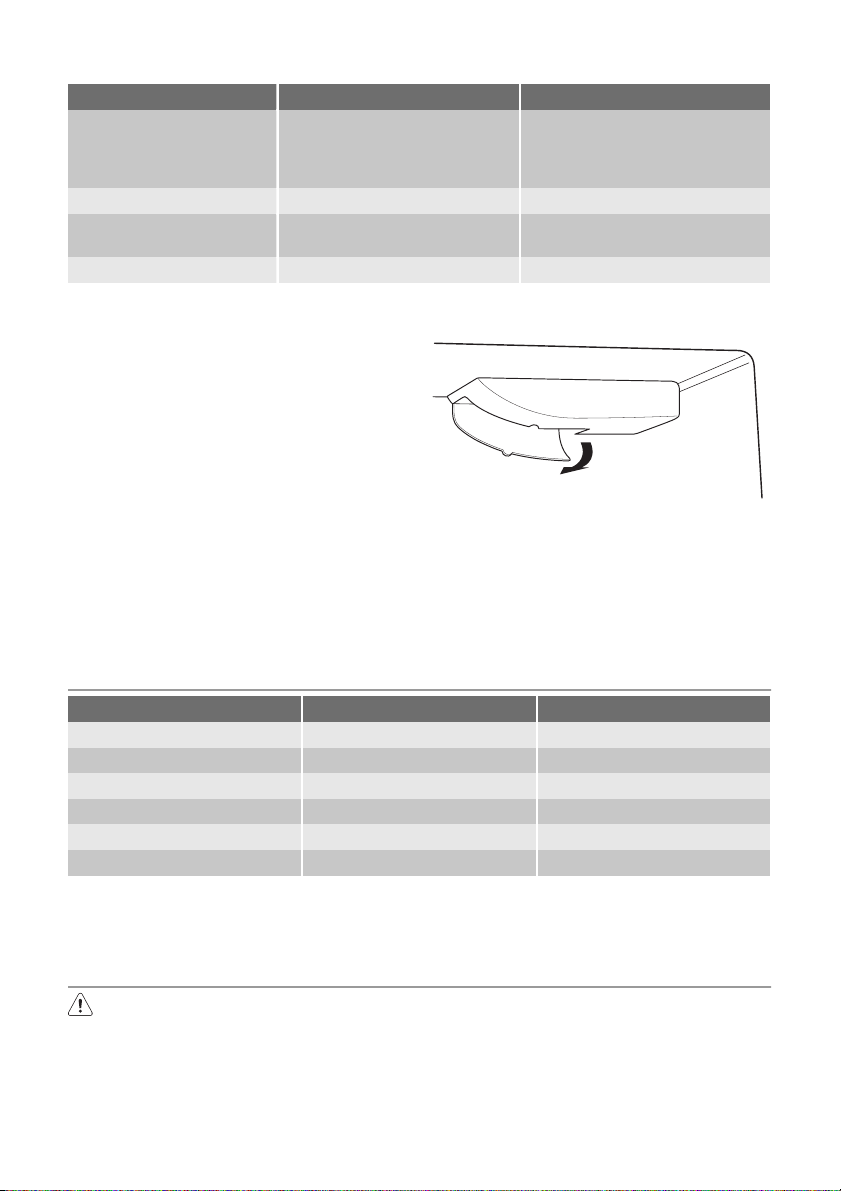
Cleaning the ventilation grille
The ventilation grille can be removed for
washing.
Make sure the door is open and then:
1. Loosen the upper edge of the grille by
pulling outward/downward.
2. Pull the grille straight out to completely
remove it.
3. Vacuum clean under the cabinet.
Page 8
8 electrolux
Defrosting the refrigerator
Frost is automatically eliminated from the
evaporator of the refrigerator compartment
every time the motor compressor stops,
during normal use. The defrost water drains
out through a drain hole into a special container at the back of the appliance, over the
motor compressor, where it evaporates.
It is important to periodically clean the defrost water drain hole in the middle of the
refrigerator compartment channel to prevent the water overflowing and dripping onto the food inside.
Periods of non-operation
When the appliance is not in use for long
periods, take the following precautions:
1. disconnect the appliance from electricity supply
2. remove all food
3. defrost and clean the appliance and all
accessories
4. leave the door/doors open to prevent
unpleasant smells.
Important! If the cabinet will be kept on,
ask somebody to check it once in a while to
prevent the food inside from spoiling in
case of a power failure.
WHAT TO DO IF…
During operation of the appliance some
smaller but annoying trouble can often occur, which does not require calling a technician out. In the following chart information is
given about them to avoid unnecessary
charges on service.
Important! The operation of the appliance
goes with certain sounds (compressor and
circulating sound). This not means a
trouble, but a normal operation.
Important! The appliance operates
discontinuously, so the stopping of
compressor does not mean being no
current. That is why you must not touch the
electrical parts of the appliance before
breaking the circuit.
Page 9
electrolux 9
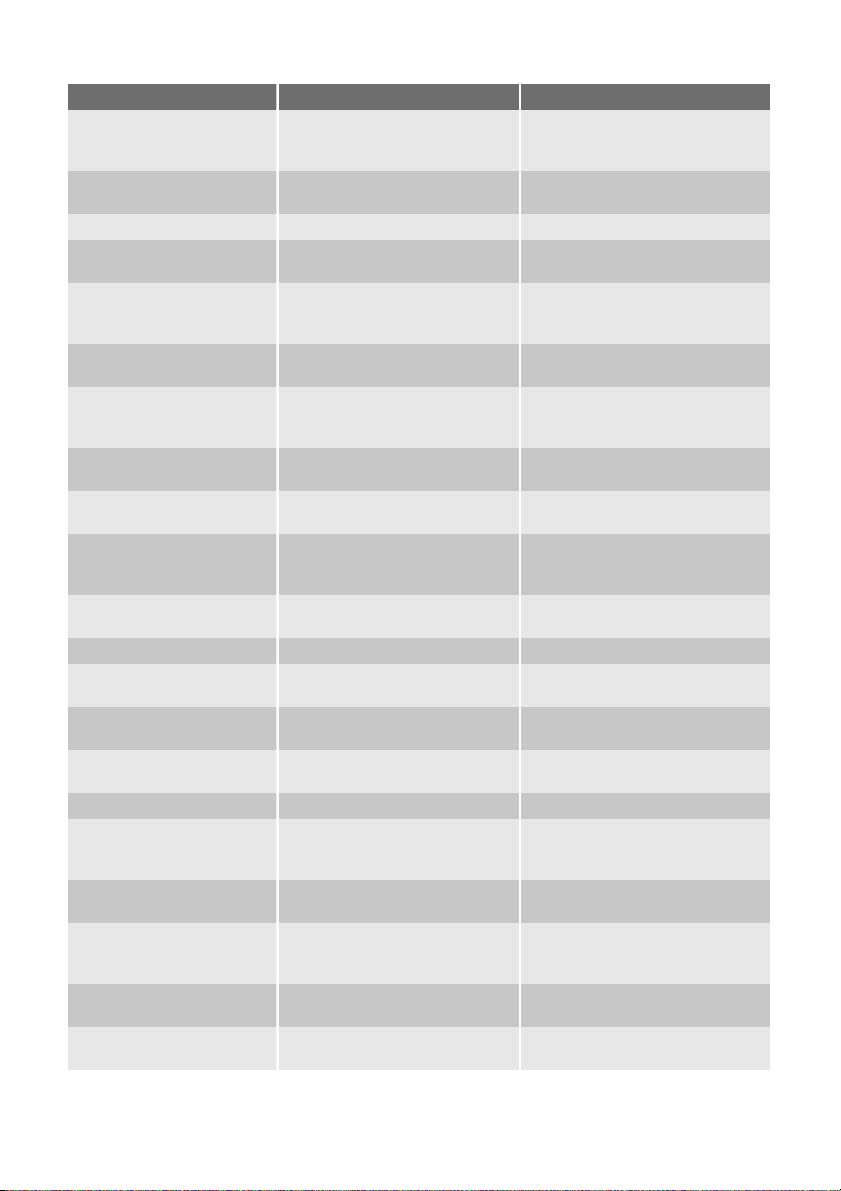
Problem Possible cause Solution
The appliance is noisy. The appliance is not supported
properly.
Check if the appliance stands stable (all feet and wheels should be
on the floor). Refer to "Levelling".
The compressor runs
continuously.
The Temperature regulator may
be set incorrectly.
Set a warmer temperature.
The door is not closed correctly. Refer to "Closing the door".
The door has been opened too
frequently.
The food temperature is too
high.
Do not keep the door open longer
than necessary.
Let the food temperature decrease to room temperature before storage.
The room temperature is too
Decrease the room temperature.
high.
Water flows on the rear
plate of the refrigerator.
During the automatic defrosting
process, frost defrosts on the
This is correct.
rear plate.
Water flows inside the
The water outlet is clogged. Clean the water outlet.
refrigerator.
Food prevent that water flows
into the water collector.
Water flows on the
ground.
The melting water outlet does
not flow in the evaporative tray
Make sure that food do not touch
the rear plate.
Attach the melting water outlet to
the evaporative tray.
above the compressor.
There is too much frost
Food are not wrapped properly. Wrap the food better.
and ice.
The door is not closed correctly. Refer to "Closing the door".
The Temperature regulator may
Set a warmer temperature.
be set incorrectly.
The temperature in the
appliance is too cold.
The temperature in the
appliance is too warm.
The Temperature regulator may
be set incorrectly.
The Temperature regulator may
be set incorrectly.
Set a warmer temperature.
Set a colder temperature.
The door is not closed correctly. Refer to "Closing the door".
The food temperature is too
warm.
Let the food temperature decrease to room temperature before storage.
The temperature in the
refrigeration is too warm.
Large quantities of food to be
There is no cold air circulation in
the appliance.
cooled were put in at the same
Make sure that there is cold air
circulation in the appliance.
Insert smaller quantities of food to
be cooled at the same time.
time.
The appliance does not
The appliance is switched off. Switch on the appliance.
operate.
The mains plug is not connected
to the mains socket correctly.
Connect the mains plug to the
mains socket correctly.
Page 10
10 electrolux
Problem Possible cause Solution
The appliance has no power.
The lamp does not work. The lamp is defective. Refer to "Replacing the lamp".
Door interferes with ven-
tilation grill.
Misaligned door.
There is no voltage in the mains
socket.
The appliance is not levelled. Refer to "Levelling".
The appliance is not levelled. Refer to "Levelling".
Connect a another electrical appliance to the mains socket.
Check fuse. Contact a qualified
electrician.
As much as the advice does not lead to result, call the nearest brand-mark service.
Replacing the lamp
1. Disconnect the appliance from the
power socket.
2. Fold the lamp cover backward by loosen the front edge.
3. Replace the bulb with one of the same
power and specifically designed for
household appliances (the maximum
power is shown on the light diffuser)
and with E14 socket type.
4. Reconnect the appliance.
Closing the door
1. Clean the door gaskets.
2. If necessary, adjust the door. Refer to
"Installation".
3. If necessary, replace the defective door
gaskets. Contact the Service Center.
TECHNICAL DATA
Dimension
Height 1800 mm
Width 595 mm
Depth 623 mm
Voltage 230 V
Frequency 50 Hz
The technical information are situated in the
rating plate on the internal left side of the
appliance and in the energy label.
INSTALLATION
Read the "Safety Information" carefully
for your safety and correct operation of
the appliance before installing the
appliance.
Positioning
Install this appliance at a location where the
ambient temperature corresponds to the
climate class indicated on the rating plate of
the appliance:
Page 11
electrolux 11
Climate
class
SN +10°C to + 32°C
N +16°C to + 32°C
ST +16°C to + 38°C
T +16°C to + 43°C
Ambient temperature
Location
To ensure best performance, if the appliance is positioned below an overhanging
wall unit, the minimum distance between
the top of the cabinet and the wall unit
must be at least 40 mm . Ideally, however,
the appliance should not be positioned below overhanging wall units.
The ventilation space can be:
• directly above the appliance
• behind and above the top cupboard.
In this case, the space behind the top
cupboard must be at least 50 mm deep.
50mm
The manufacturer declines all responsibility
if the above safety precautions are not observed.
This appliance complies with the E.E.C. Directives.
Removing the transport support
Your appliance is equipped with transport
support to secure the door during transportation.
To remove them do these steps:
1. Open the door.
2. Remove the transport support from the
door sides.
3. Remove the transport support from the
lower hinge (some models).
Important! Some models are fitted with a
silencing pad under the cabinet. Do not
remove this pad.
3
Electrical connection
Before plugging in, ensure that the voltage
and frequency shown on the rating plate
correspond to your domestic power supply.
The appliance must be earthed. The power
supply cable plug is provided with a contact
for this purpose. If the domestic power supply socket is not earthed, connect the appliance to a separate earth in compliance with
current regulations, consulting a qualified
electrician.
2
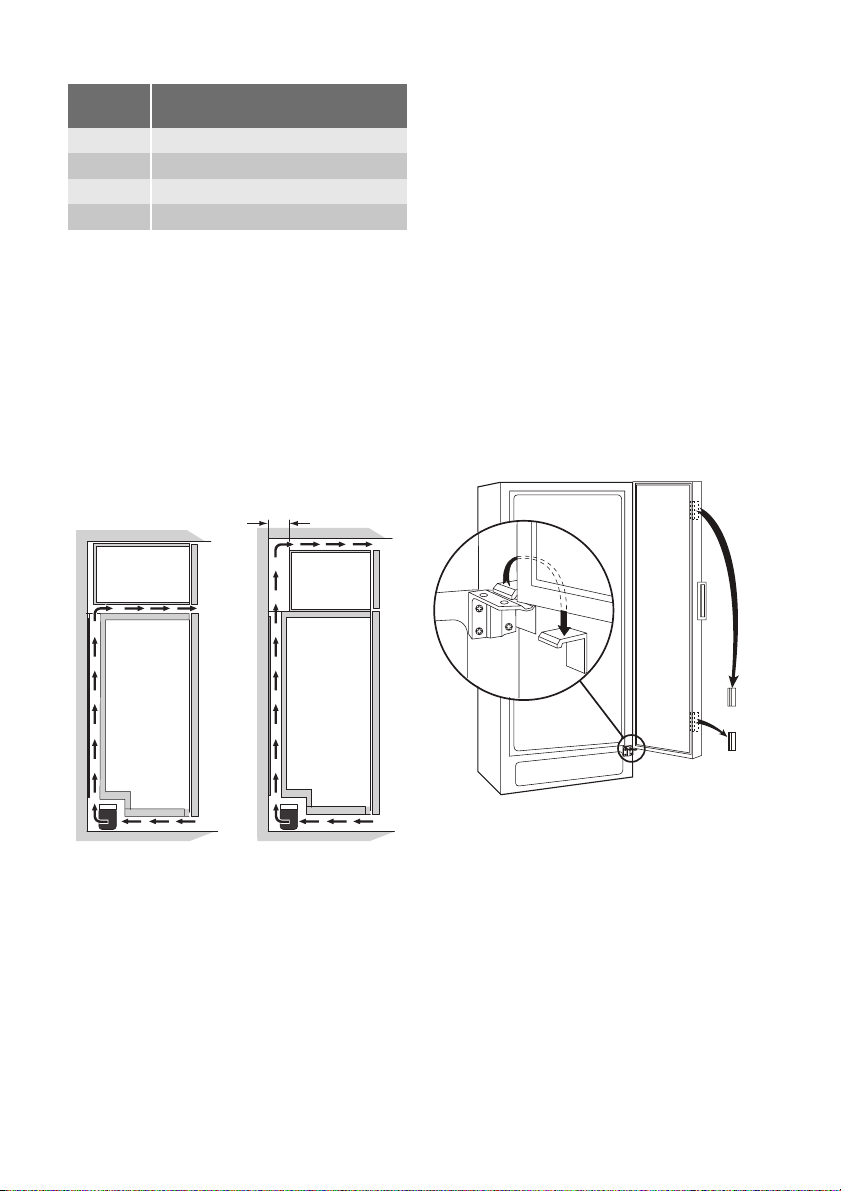
Removing the shelf holders
Your appliance is equipped with shelf retainers that make it possible to secure the
shelves during transportation.
To remove them proceed as follows:
1. Move the shelf holders in the direction
of the arrow (A).
2. Lift up the shelves in the rear edge (B)
and push it forward until it is freed (C).
3. Remove the retainers.
Page 12
12 electrolux
C
A
B
Rear spacers
Install the spacers provided within the accessory bag as shown in the figure.
Install the spacers on the back side of the
panel.
2. Remove the ventilation grille. Remove
the upper filling and install it on the opposite side of the grille.
Remove the pedal hole cover and install it on the opposite side.
3. Lay down the appliance back side
down on a wooden support.
4. Unscrew the hinge (B1) and remove the
cover plate (B2) and the support (B3).
Remove the cover (B4) on the opposite
side and install the support (B3) the
cover plate (B2) and the hinge (B1). Install the cover (B4) on the opposite
side.
B1
B2
B3 B4
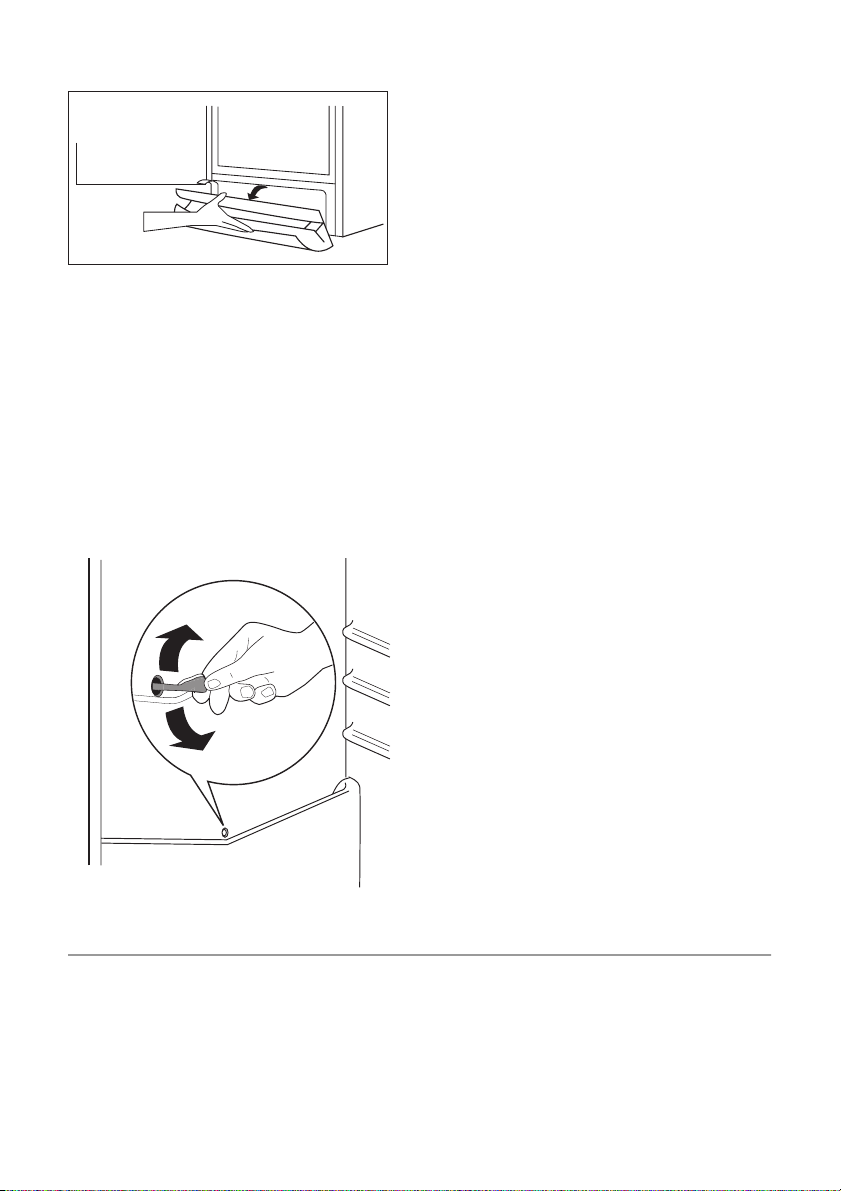
Levelling
When placing the appliance ensure that it
stands level. If necessary adjust the feet using the adjustment spanner supplied.
Door reversibility
To change the opening direction of the
door, do these steps:
1. Remove the plug from the power.
5. Unscrew the lower hinge (C1). Move
the pin to the opposite side (C2).
Unscrew and move the pedal to the
opposite side (C3).
Screw on the lower hinge on the opposite side.
C3
C2
C1
6. Tighten the pin with the adjustment
spanner supplied.
Page 13

electrolux 13
7. Unscrew the handle. On the opposite
side remove the hole covers by driving
a 3–4 mm drift or drill into them. Install
the handle. Install the hole covers provided within the accessory bag.
8. Raise the appliance and install the ventilation grille.
ENVIRONMENTAL CONCERNS
The symbol on the product or on its
packaging indicates that this product may
not be treated as household waste. Instead
it should be taken to the appropriate
collection point for the recycling of electrical
and electronic equipment. By ensuring this
product is disposed of correctly, you will
help prevent potential negative
9. Put the appliance in position.
Warning! Reposition, level the
appliance, wait for at least four hours
and then connect it to the power
socket.
Do a final check to make sure that:
• All screws are tightened.
• The magnetic seal adheres to the cabinet.
• The door opens and closes correctly.
If the ambient temperature is cold (i.e. in
Winter), the gasket may not fit perfectly to
the cabinet. In that case, wait for the natural
fitting of the gasket.
consequences for the environment and
human health, which could otherwise be
caused by inappropriate waste handling of
this product. For more detailed information
about recycling of this product, please
contact your local council, your household
waste disposal service or the shop where
you purchased the product.
Page 14

14 electrolux
Electrolux. Thinking of you.
Lue lisää osoitteessa www.electrolux.com
SISÄLLYS
Turvallisuusohjeet 14
Käyttöpaneeli 16
Ensimmäinen käyttökerta 16
Päivittäinen käyttö 17
Hyödyllisiä neuvoja ja vinkkejä 18
TURVALLISUUSOHJEET
Lue tämä käyttöohje ja sen sisältämät neuvot sekä varoitukset huolellisesti ennen laitteen asentamista ja ensimmäistä käyttöä,
jotta osaisit käyttää laitetta turvallisesti ja oikealla tavalla. Turhien virheiden ja onnettomuuksien välttämiseksi on tärkeää, että
kaikki laitteen käyttäjät perehtyvät huolellisesti sen toimintaan ja turvallisuusominaisuuksiin. Pidä tämä ohje tallessa ja varmista, että se kulkee aina laitteen mukana esimerkiksi asunnon vaihdon yhteydessä tai
luovutetaan mahdolliselle uudelle omistajalle. Näin kaikilla laitteen käyttäjillä on asianmukaiset ohjeet turvallista käyttöä varten.
Huomioi tarkasti käyttöohjeen sisältämät
varoitukset käyttäjien turvallisuuden varmistamiseksi ja omaisuusvahinkojen välttämiseksi. Valmistaja ei vastaa vahingoista, jotka
ovat aiheutuneet varoitusten ja turvallisuusohjeiden vastaisesta toiminnasta.
Lasten ja taitamattomien henkilöiden
turvallisuus
• Tämä laite ei ole tarkoitettu fyysisesti,
motorisesti tai henkisesti rajoitteisten tai
kokemattomien tai taitamattomien henkilöiden (eikä lasten) käyttöön, ellei heidän
turvallisuudestaan vastuussa oleva henkilö valvo ja opasta heitä laitteen käytössä.
Pikkulapsia on valvottava eikä heidän pidä antaa leikkiä laitteella.
• Pidä kaikki pakkausmateriaalit poissa lasten ulottuvilta. Ne voisivat aiheuttaa tukehtumisvaaran.
• Kun poistat laitteen käytöstä lopullisesti,
irrota pistoke pistorasiasta, leikkaa virtajohto irti (mahdollisimman läheltä laitteen
liitäntäkohtaa) ja irrota laitteen ovi. Tällä
tavoin voidaan välttää leikkiville lapsille ai-
Hoito ja puhdistus 19
Käyttöhäiriöt 20
Tekniset tiedot 22
Asennus 22
Ympäristönsuojelu 25
Oikeus muutoksiin pidätetään
heutuva sähköiskun tai loukkuunjäämisen
vaara.
• Tässä laitteessa on magneettiset oven tiivisteet. Jos entisen laitteesi ovessa on
jousilukitus (salpa), riko jousilukitus, ennen kuin poistat vanhan laitteen käytöstä
estääksesi lasten loukkuunjäämisen vaaran.
Yleiset turvallisuusohjeet
Varoitus!
Pidä kalusteen sisään asennetun laitteen
syvennyksen tai kalustekaapin ilmanvaihtoaukot vapaina.
• Laite on tarkoitettu elintarvikkeiden ja/tai
juomien säilyttämiseen kotitalouskäytössä
tämän käyttöohjeen kuvauksen mukaisesti.
• Älä yritä nopeuttaa sulatusta mekaanisten
laitteiden tai muun keinotekoisen sulatusvälineen avulla.
• Älä käytä muita sähkölaitteita (esim. jäätelökonetta) jäähdytyslaitteiden sisällä, elleivät ne ole valmistajan hyväksymiä tähän tarkoitukseen.
• Varo vahingoittamasta jäähdytysputkistoa.
• Laitteen jäähdytysputkisto sisältää isobutaania (R600a), joka on hyvin ympäristöystävällinen luonnonkaasu, mutta kuitenkin tulenarka.
Varmista, etteivät jäähdytyspiirin komponentit pääse vaurioitumaan laitteen kuljetuksen ja asennuksen aikana.
Jos jäähdytysputkisto vaurioituu:
– vältä avotulta ja muita syttymislähteitä
– tuuleta huolellisesti huone, johon laite
on sijoitettu
Page 15

electrolux 15
• Laitteen teknisten ominaisuuksien muuttaminen tai muiden muutosten tekeminen
laitteeseen on vaarallista. Vahingoittunut
virtajohto voi aiheuttaa oikosulun, tulipalon ja/tai sähköiskun.
Varoitus! Sähköosien (virtajohto, pistoke, kompressori) vaihdon saa suorittaa
vain valtuutettu huoltoliike vaaratilanteiden välttämiseksi.
1. Virtajohtoa ei saa jatkaa.
2. Varmista, että virtajohto ei joudu pu-
ristuksiin tai pääse vahingoittumaan
laitteen takana. Litistynyt tai vahingoittunut virtajohto voi ylikuumentua
ja aiheuttaa tulipalon.
3. Laitteen verkkovirtakytkennän on ol-
tava hyvin ulottuvilla siten, että pistoke on helppo irrottaa pistorasiasta.
4. Älä vedä virtajohdosta pistoketta ir-
rottaessasi.
5. Jos pistoke on löysästi kiinni virtajoh-
dossa, älä kiinnitä sitä pistorasiaan.
Tämä aiheuttaa sähköiskun tai tulipalon vaaran.
6. Laitetta ei saa käyttää, jos sisävalon
4)
lampun suojus
puuttuu.
• Laite on painava. Sen siirtämisessä on
noudatettava varovaisuutta.
• Älä koske pakastimessa oleviin tuotteisiin
kostein tai märin käsin. Koskettaminen
voi aiheuttaa ihon hankautumista tai kylmävammoja.
• Laite ei saa olla pitkään suorassa auringonvalossa.
•
Tämän laitteen hehkulamput
5)
ovat erityisiä lamppua, joita saa käyttää vain kodinkoneissa. Ne eivät sovi huoneiden valaistukseen.
Päivittäinen käyttö
• Älä laita kuumia kattiloita laitteen muoviosien päälle.
• Älä säilytä tulenarkoja kaasuja tai nesteitä
jääkaapissa, sillä ne voivat räjähtää.
• Noudata tarkasti laitteen valmistajan säilytysohjeita. Lue ohjeet.
Huolto ja puhdistus
• Ennen kuin aloitat huoltoa tai puhdistusta, kytke laite pois toiminnasta ja irrota
pistoke pistorasiasta.
• Älä käytä laitteen puhdistuksessa metalliesineitä.
• Tarkista säännöllisesti jääkaapin sulatusveden poistoaukko. Puhdista poistoaukko tarvittaessa. Jos poistoaukko on tukossa, vesi kerääntyy laitteen pohjalle.
Asennus
Tärkeää Noudata tarkasti sähköliitäntää
käsittelevissä kappaleissa annettuja ohjeita.
• Pura laite pakkauksestaan ja tarkista
mahdolliset kuljetusvauriot. Vaurioitunutta
laitetta ei saa kytkeä verkkovirtaan. Ilmoita mahdollisista vahingoista välittömästi
jälleenmyyjälle. Säilytä tässä tapauksessa
pakkausmateriaalit.
• Odota vähintään kaksi tuntia, ennen kuin
kytket laitteen verkkovirtaan, jotta öljy ehtii virrata kompressoriin.
• Laitteen ympärillä on oltava hyvä ilmankierto, jotta ylikuumenemisen vaaraa ei
ole. Noudata asennusohjeissa esitettyjä
ilmanvaihtomääräyksiä.
• Laite on mahdollisuuksien mukaan sijoitettava selkä seinää vasten, jotta palovammoja aiheuttaviin kuumiin osiin (kompressori, lauhdutin) ei voida koskea.
• Laitetta ei saa sijoittaa lämpöpatterin tai
lieden viereen.
• Varmista, että laitteen verkkovirtakytkentä
on hyvin ulottuvilla laitteen asennuksen
jälkeen.
• Laitteen saa kytkeä ainoastaan puhtaaseen vesijohtoverkkoon.
6)
Huoltopalvelu
• Kaikki laitteen asennukseen liittyvät sähkötyöt on annettava ammattitaitoisen
sähköasentajan tehtäväksi.
• Laitteen huoltotyöt saa suorittaa vain valtuutettu huoltoliike, ja ainoastaan alkuperäisten varaosien käyttäminen on sallittua.
4) Mikäli lampussa on suojus.
5) Mikäli laitteessa on lamppu.
6) Mikäli laitteessa on vesiliitäntä.
Page 16

16 electrolux
Ympäristönsuojelu
Tämä laite ei sisällä otsonikerrosta tuhoavia kaasuja jäähdytyspiirissä eikä
eristemateriaaleissa. Käytöstäpoistettua
laitetta ei saa toimittaa tavallisen yhdyskuntajätteen keräykseen. Eristevaahto
sisältää tulenarkoja kaasuja: laitteen
KÄYTTÖPANEELI
0
1
601
6
2345
2345
1 2
1. Merkkivalo
2. Lämpötilan säädin
Laitteen kytkeminen toimintaan
Kiinnitä pistoke pistorasiaan.
Merkkivalo syttyy.
Käännä lämpötilan säädintä myötäpäivään
keskiasentoon.
Laitteen kytkeminen pois toiminnasta
Laite kytketään pois toiminnasta kääntämällä lämpötilan säädin asentoon "O".
Tärkeää Merkkivalo palaa kunnes laite
kytketään irti sähköverkosta ON.
käytöstäpoistossa ja hävittämisessä tulee noudattaa paikallisia jätehuoltomääräyksiä. Vältä vahingoittamasta jäähdytysyksikköä, erityisesti lämmönvaihtimen läheltä. Tässä laitteessa käytetyt,
symbolilla
merkityt materiaalit ovat
kierrätettäviä.
Lämpötilan säätäminen
Lämpötila säätyy automaattisesti.
Laitetta käytetään seuraavasti:
• Lämpötilaa säädetään korkeammaksi
kääntämällä lämpötilan säädintä vastapäivään.
• Lämpötilaa säädetään kylmemmäksi
kääntämällä lämpötilan säädintä myötäpäivään.
Keskimääräinen asetus on yleensä sopivin.
Lämpötilan valinnassa tulee huomioida seuraavat sisälämpötilaan vaikuttavat asiat:
• huoneen lämpötila
• oven avaamistiheys
• säilytettävien elintarvikkeiden määrä
• laitteen sijaintipaikka.
ENSIMMÄINEN KÄYTTÖKERTA
Sisätilan puhdistaminen
Ennen kuin otat laitteen käyttöön, pese sisäosat ja kaikki kaapin sisään sijoitettavat
varusteet haalealla vedellä ja käsitiskiaineella poistaaksesi näin uudelle laitteelle tyypillisen hajun. Kuivaa pinnat ja varusteet lopuksi huolellisesti.
Tärkeää Älä käytä puhdistusaineita tai hankaavia jauheita, sillä ne vahingoittavat pintoja.
Tarkista, että laitteen takana oleva poistoputki tyhjentää veden kaukaloon.
Page 17

PÄIVITTÄINEN KÄYTTÖ
Siirrettävät hyllyt
Jääkaapin seinissä on kannattimia eri tasoilla, minkä ansiosta hyllyt voidaan sijoittaa
halutulle tasolle.
Joitakin hyllyjä täytyy nostaa takaa, jotta ne
voi irrottaa.
Tärkeää Älä siirrä vihanneslaatikon
yläpuolella olevaa lasihyllyä, jotta jääkaapin
ilmanvaihto toimii oikein.
Vihanneslaatikko
Laatikko sopii hedelmien ja vihannesten säilyttämiseen.
Joissakin malleissa laatikossa on välilevy,
jolla saadaan tarvittavan kokoiset lokerot
asettamalla levy haluttuun asentoon.
Kaikki laatikon osat voidaan irrottaa puhdistusta varten.
Pulloteline
Sijoita pullot (suu eteenpäin) valmiiksi asetettuun hyllyyn.
Tärkeää Jos hylly on vaakasuorassa, laita
siihen vain suljettuja pulloja.
electrolux 17
Pullotelinettä voidaan kallistaa, jotta siinä
voidaan säilyttää myös avattuja pulloja. Se
tehdään vetämällä sitä niin, että se voi
kääntyä ylöspäin ja kiinnittyä seuraavalle
hyllytasolle.
Page 18

18 electrolux
Ovilokeroiden sijoittaminen
Ovilokerot voidaan sijoittaa eri korkeuksille
siten, että erikokoiset pakkaukset mahtuvat
lokeroihin.
Ovilokeroiden korkeus säädetään seuraavasti:
Vedä lokeroa varovasti nuolen suuntaan,
kunnes se irtoaa kiinnikkeestään. Sijoita lokero sen jälkeen haluamallesi korkeudelle.
Tärkeää Oikean ilmanvaihdon takaamiseksi
älä poista suurta alempaa ovilokeroa.
HYÖDYLLISIÄ NEUVOJA JA VINKKEJÄ
Energiansäästövinkkejä
• Älä avaa ovea usein äläkä pidä ovea auki
pitempään kuin on tarpeen.
• Jos ympäristön lämpötila on korkea, ja
lämpötila on säädetty hyvin kylmäksi kaapin ollessa hyvin täynnä, kompressori voi
käydä jatkuvasti, jolloin haihduttimeen
muodostuu huurretta tai jäätä. Käännä
tässä tapauksessa lämpötilan säädin korkeampaan lämpötilaan automaattisen sulatuksen käynnistämiseksi, jolloin myös
energiankulutus vähenee.
Tuoreiden elintarvikkeiden säilytys
Noudata seuraavia ohjeita varmistaaksesi
elintarvikkeiden parhaan mahdollisen säilyvyyden:
• Alä laita jääkaappiin lämpimiä ruokia tai
haihtuvia nesteitä
• Peitä ruoka kannella tai kääri folioon tms.
erityisesti, kun ruoka on voimakastuoksuista
• Sijoita elintarvikkeet jääkaappiin siten, että ilma pääsee kiertämään vapaasti niiden
ympärillä
Säilytysohjeita
Vinkkejä:
Liha (kaikki lihalajit): pakkaa muovipusseihin
ja laita vihanneslaatikon päällä olevalle lasihyllylle.
Säilytä lihaa tällä tavoin korkeintaan muutama päivä.
Kypsennetty ruoka, kylmät ruoat jne: peitä
kannella ja laita mille hyllylle tahansa.
Hedelmät ja vihannekset: puhdista huolellisesti ja säilytä niille tarkoitetussa laatikossa/
laatikoissa.
Voi ja juusto: säilytä ilmatiiviissä rasioissa tai
pakattuna alumiinifolioon tai muovipussiin
mahdollisimman ilmatiiviisti.
Maitopullot: säilytä korkilla suljetut maitopullot oven pullotelineessä.
Banaaneita, perunoita, sipuleita ja valkosipuleita ei pidä säilyttää jääkaapissa pakkaamattomana.
Neuvoja jääkaapin sisälämpötilan
asettamista varten
• Jääkaapin sopiva sisälämpötila on noin
+5 °C. On normaalia, että jääkaapin yläosan lämpötila on korkeampi ja alaosan
lämpötila alhaisempi. Jos lämpötilan säädin on asetettu alhaiseen arvoon, ympäristölämpötila on korkea tai jos jääkaappi
on täytetty täyteen, kompressori toimii pi-
Page 19

demmän aikaa. Tällöin kylmä ilma kerääntyy jääkaapin alaosaan. ja runsaasti
vettä sisältävät elintarvikkeet voivat jäätyä. Jos jääkaappi on liian kylmä, säädä
lämpötila korkeammaksi.
Tärkeää Älä aseta ritilöitä veden
tyhjennysaukkoon päin. Tämä voi johtaa
liian alhaisiin lämpötiloihin.
• Jos haluat tarkistaa jääkaapissa olevien
elintarvikkeiden lämpötilan, aseta kaapin
keskiosaan lasi vettä ja siihen lämpömittari, jonka tarkkuus on +/– 1 °C. 6 tunnin
kuluttua voit tarkistaa lämpötilan. Mittaus
tulee suorittaa vakiona pysyvissä olosuhteissa (lisäämättä tai vähentämättä tuotteita jääkaapista).
HOITO JA PUHDISTUS
Huomio Kytke laite irti verkkovirrasta
ennen puhdistus- ja huoltotöiden
aloittamista.
Laitteen jäähdytysyksikkö sisältää hiilivetyä; Jäähdytysyksikön huollon ja täytön saa suorittaa ainoastaan valtuutettu
huoltoliike.
Säännöllinen puhdistus
Laite on puhdistettava säännöllisesti.
• Puhdista sisäosa ja varusteet lämpimällä
vedellä ja käsitiskiaineella.
• Tarkista oven tiivisteet säännöllisesti ja
pyyhi puhtaaksi.
• Huuhtele ja kuivaa huolellisesti.
Tärkeää Älä vedä, siirrä tai vahingoita
kaapin sisällä olevia putkia ja/tai kaapeleita.
Älä käytä puhdistusaineita, hankausjauhetta, voimakastuoksuisia puhdistustuotteita
tai kiillotusvahaa sisätilojen puhdistamisessa, sillä tällaiset tuotteet vahingoittavat pintoja ja jättävät voimakkaan tuoksun.
Puhdista laitteen takapuolella sijaitsevat
lauhdutin (musta ritilä) ja kompressori harjalla. Tämä toimenpide parantaa laitteen suorituskykyä ja säästää energiaa
Tärkeää Varo vahingoittamasta
jäähdytysjärjestelmää.
Tärkeää Kun siirrät laitetta, nosta sitä
etureunasta, jottet naarmuta lattiaa.
electrolux 19
Monet keittiön pintojen puhdistusaineet sisältävät kemikaaleja, jotka voivat vahingoittaa laitteen muoviosia. Puhdista siis ulkopinnat pehmeällä lämpimään veteen ja
neutraaliin pesunesteeseen kostutetulla liinalla.
Tärkeää Älä käytä puhdistusaineita tai
hankausjauhetta, sillä ne vahingoittavat
maalia tai ruostumattoman teräksen
pinnoitusta.
Kun laite on puhdistettu, kytke se takaisin
verkkovirtaan.
Ilmanvaihtosäleikön puhdistaminen
Ilmanvaihtosäleikkö voidaan irrottaa puhdistamista varten.
Varmista, että ovi on auki ja:
1. Irrota säleikön yläosa vetämällä sitä
ulos/alas.
2. Vedä säleikköä suoraan ulos, jotta se irtoaa kokonaan.
3. Imuroi laitteen alus.
Page 20

20 electrolux
Jääkaapin sulattaminen
Normaalikäytössä huurretta poistuu automaattisesti jääkaappiosaston haihduttimesta aina moottorin kompressorin pysähtyessä Sulatusvesi valuu laitteen takana tyhjennysaukosta, kompressorin yläpuolella sijaitsevaan kaukaloon, josta se haihtuu
Jääkaappiosaston kanavan keskellä oleva
sulatusveden tyhjennysaukko on tärkeää
puhdistaa säännöllisin väliajoin, jotta vettä ei
tulvi yli ja tipu ruokien päälle.
Jos laitetta ei käytetä pitkään aikaan
Jos laitetta ei ole tarkoitus käyttää pitkään
aikaan, suorita seuraavat toimenpiteet:
1. Kytke laite irti verkkovirrasta.
2. Ota kaikki ruoat pois.
3. Sulata ja puhdista laite sekä kaikki sen
varusteet.
4. Jätä ovi/ovet raolleen, jotta laitteen sisälle ei muodostu epämiellyttävää hajua.
Tärkeää Jos jätät laitteen toimintaan,
pyydä jotakin henkilöä tarkistamaan
kaappiin jätetyt elintarvikkeet aika ajoin,
jotta ne eivät pilaannu esimerkiksi
sähkökatkon sattuessa.
KÄYTTÖHÄIRIÖT
Käytön aikana voi usein esiintyä pieniä mutta harmittavia ongelmia, jotka eivät vaadi
huoltohenkilöstön kutsumista. Seuraavassa
taulukossa annetaan ohjeet, joita noudattamalla voidaan välttää huoltokustannuksia.
Tärkeää Laitteen toimintaan kuuluu tiettyjä
ääniä (kompressorin ja ilman kierrätyksen
Ongelma Mahdollinen syy Korjaustoimenpide
Laitteen käyntiääni on
kova.
Kompressori toimii jatkuvasti.
Ovi ei ole kunnolla kiinni. Lue ohjeet kohdasta "Oven sulke-
Ovea on avattu liian usein. Älä pidä ovea auki pitempään kuin
Laitetta ei ole tuettu kunnolla
paikalleen.
Lämpötilan säädin ei ehkä ole oikeassa asennossa.
ääni). Tämä ei merkitse vikaa, vaan se
kuuluu normaaliin toimintaan.
Tärkeää Laite toimii jaksoittain, joten
kompressorin pysähtyminen ei tarkoita
virran katkeamista. Sen vuoksi laitteen
sähköosiin ei saa koskea ennen virran
katkaisemista.
Tarkista, että laite on tukevasti
paikallaan (kaikki jalat koskevat
lattiaan). Katso kohta "Tasapainottaminen".
Säädä lämpötila korkeammaksi.
minen".
on tarpeen.
Page 21

electrolux 21
Ongelma Mahdollinen syy Korjaustoimenpide
Ruoat ovat liian lämpimiä. Anna lämpötilan laskea huoneen
lämpötilaan ennen kuin laitat ruoat
laitteeseen.
Huoneen lämpötila on liian kor-
Laske huoneen lämpötilaa.
kea.
Vettä valuu jääkaapin takaseinää pitkin.
Automaattisen sulatuksen aikana takaseinässä oleva huurre su-
Tämä on normaalia.
laa.
Vettä valuu jääkaapin sisälle.
Elintarvikkeet estävät veden va-
Vettä valuu lattialle.
Veden tyhjennysaukko on tukossa.
lumisen vedenkeruukaukaloon.
Sulatusvesi ei poistu kompres-
sorin yläpuolella olevaan haihdu-
Puhdista veden tyhjennysaukko.
Varmista, että elintarvikkeet eivät
kosketa takaseinää.
Kiinnitä sulatusveden poistoputki
haihdutusastiaan.
tusastiaan.
Laitteessa on liikaa huurretta ja jäätä.
Elintarvikkeita ei ole pakattu kunnolla.
Pakkaa ruoat oikein.
Ovi ei ole kunnolla kiinni. Lue ohjeet kohdasta "Oven sulke-
minen".
Lämpötilan säädin ei ehkä ole oi-
Säädä lämpötila korkeammaksi.
keassa asennossa.
Laitteen lämpötila on
liian alhainen.
Laitteen lämpötila on
liian korkea.
Lämpötilan säädin ei ehkä ole oikeassa asennossa.
Lämpötilan säädin ei ehkä ole oikeassa asennossa.
Säädä lämpötila korkeammaksi.
Säädä lämpötila alhaisemmaksi.
Ovi ei ole kunnolla kiinni. Lue ohjeet kohdasta "Oven sulke-
minen".
Ruoat ovat liian lämpimiä. Anna lämpötilan laskea huoneen
lämpötilaan ennen kuin laitat ruoat
laitteeseen.
Jääkaapin lämpötila on
liian korkea.
Jääkaappiin on laitettu samanai-
Laitteen kylmän ilman kierto ei
toimi.
kaisesti suuria määriä elintarvik-
Tarkista kylmän ilman kierto.
Sijoita jääkaappiin pienempiä ruokamääriä yhdellä kertaa.
keita.
Laite ei toimi lainkaan.
Pistoke ei ole kunnolla kiinni pis-
Laitteeseen ei tule virtaa. Pisto-
Virta on katkaistu laitteesta. Kytke laitteeseen virta.
Kiinnitä pistoke oikein pistorasi-
torasiassa.
aan.
Kokeile kytkemällä pistorasiaan
rasiaan ei tule jännitettä.
jokin toinen sähkölaite. Tarkista
sulake. Ota yhteys sähköasentajaan.
Valo ei syty. Lamppu on palanut. Lue ohjeet kohdasta "Lampun
vaihtaminen".
Ovi osuu ilmanvaihtosä-
Laite ei ole oikein tasapainotettu. Katso kohta "Tasapainottaminen".
leikköön.
Ovi ei ole kohdallaan. Laite ei ole oikein tasapainotettu. Katso kohta "Tasapainottaminen".
Page 22

22 electrolux
Jos nämä ohjeet eivät ratkaise ongelmaa, ota yhteys lähimpään valtuutettuun huoltoliikkeeseen.
Lampun vaihtaminen
1. Irrota pistoke pistorasiasta.
2. Käännä lampun suojusta taaksepäin
sen etureunasta.
3. Vaihda lampun tilalle uusi samantehoinen lamppu, joka on tarkoitettu erityisesti kodinkoneisiin (maksimiteho on
Oven sulkeminen
1. Puhdista oven tiivisteet.
2. Säädä ovea tarvittaessa. Lue ohjeet
kohdasta Asennus.
3. Vaihda tarvittaessa vaurioituneet oven
tiivisteet. Ota yhteys valtuutettuun huoltoliikkeeseen.
merkitty lampun suojukseen) ja jonka
kannan tyyppi on E14.
4. Kytke laite sähköverkkoon.
TEKNISET TIEDOT
Mitat
Korkeus 1800 mm
Leveys 595 mm
Syvyys 623 mm
Jännite 230 V
Taajuus 50 Hz
Tekniset tiedot on merkitty laitteen sisälle,
vasemmalle puolelle kiinnitettyyn arvokilpeen ja energiatarraan.
ASENNUS
Lue huolellisesti turvallisuusohjeet
oman turvallisuutesi ja laitteen
asianmukaisen toiminnan
varmistamiseksi, ennen kuin aloitat
laitteen asennuksen.
Sijoittaminen
Asenna laite paikkaan, jossa ympäristön
lämpötila vastaa laitteen arvokilvessä mainittua ilmastoluokkaa:
Ilmasto-
luokka
SN +10 °C - 32 °C
N +16 °C - 32 °C
ST +16 °C - 38 °C
T +16 °C - 43 °C
Ympäristön lämpötila
Sijainti
Jos laite sijoitetaan keittiökaapin alapuolelle,
laitteen yläreunan ja keittiökaapin välillä tulee olla vähintään 40 mm parhaan suorituskyvyn varmistamiseksi. Mahdollisuuksien
Page 23

electrolux 23
mukaan tulee kuitenkin välttää sijoittamasta
laitetta kalustekaapin alapuolelle.
Tila ilmanvaihtoa varten voi olla
• heti laitteen yläpuolella
• yläkalusteen takana ja yläpuolella.
Tällöin kalusteen takana on oltava vähintään 50 mm tilaa.
50mm
Sähköliitäntä
Ennen kuin kytket laitteen verkkovirtaan,
tarkista, että arvokilvessä mainittu jännite ja
taajuus vastaavat verkkovirran arvoja.
Laite on kytkettävä maadoitettuun pistorasiaan. Virtajohdon pistoke on varustettu maadoituskoskettimella. Jos pistorasia, johon
laite kytketään, ei ole maadoitettu, ota yhteys sähköasentajaan ja pyydä asentajaa
kytkemään laite erilliseen maadoitusliittimeen voimassa olevien määräysten mukaisesti.
Valmistaja ei vastaa millään tavalla vahingoista, mikäli edellä olevia turvallisuusohjeita
ei ole noudatettu.
Tämä laite vastaa Euroopan yhteisön. direktiivejä.
Kuljetustukien irrottaminen
Laitteessa on kuljetustuki, joka pitää oven
paikallaan kuljetuksen aikana.
Se irrotetaan seuraavalla tavalla:
1. Avaa ovi.
2. Poista kuljetustuki oven reunoilta.
3. Poista kuljetustuki alasaranasta (malli-
kohtainen).
Tärkeää Joissain malleissa laitteen alla on
vaimennustyyny. Älä poista sitä.
3
2
Hyllyjen kiinnikkeiden irrottaminen
Hyllyt on kiinnitetty kuljetuksen ajaksi kiinnikkeillä, jotka estävät niiden liikkumisen ja
vaurioitumisen.
Irrota kiinnikkeet seuraavasti:
1. Siirrä kiinnikkeitä nuolen (A) suuntaan.
2. Nosta hyllyä takaosasta (B) ja vedä
eteenpäin, kunnes se vapautuu (C).
3. Poista kiinnikkeet.
C
A
Takaosan välikappaleet
Kiinnitä varustepussista löytyvät välikappaleet kuvan mukaisesti.
Kiinnitä välikappaleet paneelin takapuolelle.
B
Page 24

24 electrolux
Tasapainottaminen
Kun sijoitat laitteen paikalleen, tarkista, että
se on vaakatasossa. Säädä jalkoja tarvittaessa toimitetulla ruuviavaimella.
4. Irrota sarana (B1) ja poista suojalevy
(B2) ja tukikappale (B3).
Poista suoja (B4) vastakkaiselta puolelta ja asenna tukikappale (B3), suojalevy
(B2) ja sarana (B1). Kiinnitä suojus (B4)
vastakkaiselle puolelle.
B1
B2
B3 B4
Oven kätisyyden vaihtaminen
Oven avautumissuunta vaihdetaan seuraavalla tavalla:
1. Irrota pistoke pistorasiasta.
2. Poista ilmanvaihtosäleikkö. Poista irrotettava yläosa ja asenna se säleikön
vastakkaiselle puolelle.
Irrota polkimen reiän suojus ja kiinnitä
se vastakkaiselle puolelle.
3. Kallista laite takaosansa varaan puisen
tuen päälle.
5. Ruuvaa irti alasarana (C1). Siirrä tappi
toiselle puolelle (C2).
Irrota poljin ja siirrä se toiselle puolelle
(C3).
Ruuvaa alasarana kiinni vastakkaiselle
puolelle.
C3
C2
C1
6. Kiristä tappi toimitetulla ruuviavaimella.
Page 25

electrolux 25
7. Ruuvaa kahva irti. Poista toiselta puolelta reikien tulpat 3-4 mm:n lävistimellä
tai poralla. Asenna kahva. Laita paikoilleen varustepussista löytyvät ruuvien
reikien tulpat.
8. Nosta laite ylös ja sijoita ilmanvaihtosäleikkö paikalleen.
YMPÄRISTÖNSUOJELU
Tuotteeseen tai sen pakkaukseen merkitty
symboli
saa laittaa sekajätteen joukkoon, vaan se
on toimitettava erilliseen sähkö- ja
elektroniikkajätteiden keräyspisteeseen.
Asianmukaisella jätehuollolla estetään
mahdolliset ympäristö- ja terveyshaitat.
Laitetta ei saa purkaa ennen jätehuoltoon
, osoittaa, että tätä tuotetta ei
9. Aseta laite paikalleen.
Varoitus! Sijoita laite paikalleen ja
tasapainota se. Odota vähintään neljä
tuntia ennen kuin kytket virtajohdon
pistorasiaan.
Tarkista lopuksi seuraavat seikat:
• Kaikki ruuvit on kiristetty.
• Magneettitiiviste on tarttunut tiukasti
kaappiin.
• Ovi avautuu ja sulkeutuu kunnolla.
Jos sijoituspaikan lämpötila on alhainen
(esim. talvella), tiiviste ei mahdollisesti tartu
hyvin. Odota tässä tapauksessa, että tiiviste
kiinnittyy itsestään.
luovuttamista eikä laitteen sisälle saa laittaa
muita jätteitä.
Tarkempia tietoja tämän tuotteen
kierrättämisestä saat kuntasi jäteasioita
hoitavalta viranomaiselta, liikkeestä josta
tuote on ostettu tai internet sivuiltamme
www.electrolux.fi.
Page 26

26 electrolux
Electrolux. Thinking of you.
Ta del av våra tankegångar på www.electrolux.com
INNEHÅLL
Säkerhetsinformation 26
Kontrollpanel 28
När maskinen används första gången 28
Daglig användning 29
Råd och tips 30
SÄKERHETSINFORMATION
För din egen säkerhet och för att du skall
kunna använda produkten på korrekt sätt är
det viktigt att du noggrant läser igenom
denna bruksanvisning, inklusive tips och
varningar, innan du installerar och använder
produkten första gången. För att undvika
onödiga misstag och olyckor är det viktigt
att alla som använder produkten har god
kännedom om dess skötsel och skyddsanordningar. Spara denna bruksanvisning
och se till att den följer med produkten om
den flyttas eller säljs, så att alla som använder produkten får korrekt säkerhetsinformation och information om hur den skall skötas.
För att minimera risken för skador på person och egendom är det viktigt att du läser
och följer säkerhetsföreskrifterna i denna
bruksanvisning. Tillverkaren ansvarar inte
för skador orsakade av att föreskrifterna
inte har följts.
Säkerhet för barn och handikappade
• Denna produkt är inte avsedd att användas av personer (även barn) med nedsatt
fysisk eller sensorisk förmåga, eller om de
har bristande erfarenhet och kunskap,
om de inte instrueras och övervakas av
en person som ansvarar för deras säkerhet.
Barn bör alltid övervakas när de använder
produkten för att säkerställa att de inte
leker med den.
• Håll allt förpackningsmaterial utom räckhåll för barn. Risk för kvävning kan föreligga.
• När du skall kassera produkten: koppla
loss den från eluttaget och klipp av nätkabeln (så nära produkten som möjligt)
och demontera dörrarna så att lekande
Underhåll och rengöring 31
Om maskinen inte fungerar 32
Tekniska data 34
Installation 34
Miljöskydd 37
Med reservation för ändringar
barn inte utsätts för elektriska stötar eller
löper risk att bli innestängda.
• Om denna produkt, som har magnetiska
dörrtätningar, skall ersätta en äldre produkt som har en fjäderbelastad spärr i
dörrarna, var noga med att göra fjäderspärren obrukbar innan du kasserar den
gamla produkten. Då finns det ingen risk
att produkten blir en dödsfälla för barn.
Allmän säkerhet
Varning
Se till att ventilationsöppningarna inte
blockeras i produktens hölje eller i inbyggnadsutrymmet.
• Produkten är avsedd för förvaring av
matvaror och/eller drycker i ett normalt
hushåll enligt beskrivning i denna bruksanvisning.
• Använd inga mekaniska eller artificiella
metoder för att påskynda upptiningsprocessen.
• Använd inga andra elektriska apparater
inne i produkten, (t.ex. en glassmaskin),
såvida de inte har godkänts för detta ändamål av tillverkaren.
• Var noga med att inte skada kylkretsen.
• I kylkretsen används isobutan (R600a)
som köldmedel. Det är en miljövänlig naturgas, men den är dock brandfarlig.
Se till att inga komponenter i kylkretsen
skadas under transport och installation
av produkten.
Om kylkretsen skadas:
– undvik att komma nära öppen eld och
antändande källor
– ventilera noga rummet där produkten
står
Page 27

electrolux 27
• Det är farligt att ändra specifikationerna
eller att försöka modifiera denna produkt
på något sätt. En skadad nätkabel kan
orsaka kortslutning, brand och/eller elektriska stötar.
Varning Elektriska delar (t.ex. nätkabel,
stickkontakt, kompressor) får endast
bytas ut av en certifierad serviceagent
eller annan kvalificerad servicepersonal
för att undvika fara.
1. Nätkabeln får inte förlängas.
2. Se till att stickkontakten inte kläms
eller skadas av produktens baksida.
En skadad stickkontakt kan överhettas och orsaka brand.
3. Se till att stickkontakten är åtkomlig
när produkten har installerats.
4. Dra inte i nätkabeln.
5. Sätt inte i stickkontakten om elutta-
get sitter löst. Risk för elektriska stötar eller brand föreligger.
6. Produkten får inte användas utan att
innerbelysningens lampskydd sitter
7)
på plats
över den inre belysningen.
• Denna produkt är tung. Var försiktig när
du flyttar den.
• Plocka inte ut matvaror från frysfacket,
och ta inte i dem, med våta eller fuktiga
händer eftersom detta kan leda till skador
på huden eller frost-/frysskador.
• Se till att produkten inte exponeras för direkt solsken under långa perioder.
•
Lamporna
8)
som används i den här produkten är speciallampor som endast är
avsedda för användning i produkten. De
lämpar sig inte som rumsbelysning.
Daglig användning
• Ställ inte heta kärl på produktens plastdelar.
• Förvara inte brandfarliga gaser eller vätskor i produkten eftersom de kan explodera.
• Följ rekommendationerna om förvaring
från produktens tillverkare noga. Se relevanta anvisningar.
Skötsel och rengöring
• Stäng av produkten och dra ut stickkontakten ur eluttaget före underhåll.
7) Om produkten har ett lampskydd.
8) Om produkten har en lampa.
9) Om produkten har en vattenanslutning.
• Rengör inte produkten med metallföremål.
• Kontrollera regelbundet kylens tömning
av avfrostat vatten. Rengör vid behov
tömningskanalen. Om tömningskanalen
täpps igen samlas vatten på produktens
botten.
Installation
Viktigt För den elektriska anslutningen, följ
noga anvisningarna i respektive avsnitt.
• Packa upp produkten och kontrollera att
den inte har några utvändiga skador. Anslut inte produkten om den är skadad på
något sätt. Rapportera omedelbart eventuella skador till din återförsäljare, och
spara i så fall förpackningsmaterialet.
• Vi rekommenderar att du väntar minst
fyra timmar innan du nätansluter produkten så att oljan kan rinna tillbaka i kompressorn.
• Tillräcklig luftcirkulation måste säkerställas runt produkten, annars överhettas
den. För att erhålla tillräcklig ventilation,
följ instruktionerna som är relevanta för
installationen.
• När så är möjligt bör produktens baksida
vara vänd mot en vägg för att undvika risken för brännskador genom kontakt med
produktens varma delar (kompressor,
kondensor).
• Produkten får inte placeras nära värmeelement eller spisar.
• Säkerställ att elkontakten är åtkomlig efter installation av produkten.
• Produkten får endast anslutas till ett
dricksvattenssystem.
9)
Service
• Allt arbete avseende elektricitet som
krävs för att utföra service på produkten
skall utföras av en behörig elektriker eller
annan kompetent person.
• Service på denna produkt får endast utföras av en auktoriserad serviceverkstad.
Endast originaldelar får användas.
Page 28

28 electrolux
Miljöskydd
Denna produkt innehåller inte, varken i
kylkretsen eller i isolationsmaterialen,
någon gas som kan skada ozonlagret.
Produkten får inte kasseras tillsammans med det vanliga hushållsavfallet.
Isolationsmaterialet innehåller brandfarliga gaser: Produkten skall därför kas-
KONTROLLPANEL
0
1
601
6
2345
2345
1 2
1. Nätindikator
2. Temperaturreglage
Sätta på produkten
Sätt i stickkontakten i eluttaget.
Nätindikatorn tänds.
Vrid temperaturreglaget medurs till en medelhög inställning.
Stänga av podukten
För att stänga av produkten, vrid temperaturreglaget till "O"-läget.
Viktigt Nätindikatorn lyser ON tills
produkten kopplas loss från eluttaget.
seras enligt tillämpliga bestämmelser
som kan erhållas från de lokala myndigheterna. Undvik att skada kylenheten, särskilt på baksidan nära kondensorn. Material i denna produkt som är
märkta med symbolen
kan återvin-
nas.
Temperaturreglering
Temperaturen regleras automatiskt.
Gör på följande sätt för att reglera produkten:
• vrid temperaturreglaget moturs för att erhålla en varmare förvaringstemperatur.
• vrid temperaturreglaget medurs för att erhålla en kallare förvaringstemperatur.
En medelhög inställning är i regel bäst.
Den exakta inställningen bör dock väljas
med hänsyn till att temperaturen inne i produkten beror på:
•rumstemperaturen
• hur ofta dörren öppnas
• mängden matvaror som förvaras
• produktens placering
NÄR MASKINEN ANVÄNDS FÖRSTA GÅNGEN
Invändig rengöring
Innan du använder produkten första gången, rengör dess insida och alla invändiga
tillbehör med ljummet vatten och en liten
mängd neutral såpa för att ta bort den typiska lukten hos nya produkter. Eftertorka
sedan noga.
Viktigt Använd inga starka rengöringsmedel eller skurpulver eftersom sådana produkter skadar ytfinishen.
Kontrollera att tömningsslangen på baksidan av produkten tömmer ut i uppsamlingsskålen.
Page 29

DAGLIG ANVÄNDNING
Flyttbara hyllor
Väggarna i kylskåpet är försedda med ett
antal hyllstöd så att hyllorna kan placeras
enligt önskemål.
Vissa hyllor måste lyftas upp i bakkanten för
att kunna avlägsnas.
Viktigt Flytta inte glashyllan ovanför
grönsakslådan detta för att säkerställa
korrekt luftcirkulation.
Grönsakslåda
Denna låda är lämplig för förvaring av frukter och grönsaker.
På vissa modeller finns det en avdelare i lådan som kan placeras i olika positioner så
att du kan dela in lådan enligt dina personliga behov.
Alla delar i lådan kan tas bort för rengöring.
Flaskhylla
Placera flaskorna (med öppningarna vända
utåt) i den redan installerade hyllan.
Viktigt Lägg endast in förslutna flaskor om
hyllan är placerad horisontellt.
electrolux 29
Flaskhyllan kan dock vinklas för att kunna
förvara öppnade flaskor. Du vinklar flaskhyllan genom att dra ut den så långt att framkanten kan flyttas upp och placeras på nästa högre hyllskena.
Page 30

30 electrolux
Placering av dörrhyllorna
För att kunna förvara olika stora matförpackningar kan dörrhyllorna placeras på olika nivåer.
Justera hyllorna på följande sätt:
Dra försiktigt hyllan i pilens riktning tills hyllan lossnar och placera den sedan i önskad
position.
Viktigt Flytta inte den stora nedre
dörrhyllan för att säkerställa korrekt
luftcirkulation.
RÅD OCH TIPS
Tips om energibesparing
• Öppna inte dörren för ofta och låt den
inte stå öppen längre tid än absolut nödvändigt.
• Om omgivningstemperatuen är hög, och
temperaturreglaget är inställt på en hög
temperatur och produkten är full med
matvaror, kan kompressorn arbeta kontinuerligt och medföra att frost eller is bildas på evaporatorn. Om detta inträffar,
ställ in temperaturreglaget på en lägre
temperatur för att möjliggöra automatisk
avfrostning och därigenom också sänka
energiförbrukningen.
Tips om kylning av färska livsmedel
För att erhålla bästa resultat:
• förvara inte varm mat eller avdunstande
vätskor i kylskåpet
• täck över eller förpacka maten, särskilt
om den har en stark smak
• placera mat så att luft kan cirkulera fritt
omkring den
Tips om kylning
Praktiska råd:
Kött (alla typer): lägg i plastpåsar och placera på glashyllan ovanför grönsakslådan.
Av säkerhetsskäl bör kött förvaras på detta
sätt i högst två dygn.
Tillagad mat och kalla rätter: dessa bör
täckas över och kan placeras på valfri hylla.
Frukt och grönsaker: skölj av och rengör
noga och lägg i den speciella grönsakslådan (eller lådorna i förekommande fall).
Smör och ost: dessa produkter bör läggas i
särskilda, lufttäta behållare eller förpackas i
aluminiumfolie eller plastpåsar för att evakuera så mycket luft som möjligt.
Mjölkflaskor: dessa bör ha kapsyl och förvaras lämpligen i dörrens flaskställ.
Bananer, potatis och lökar som inte är förpackade bör inte förvaras i kylskåpet.
Tips om temperaturen i kylskåpet
• En lämplig temperatur i kylen är cirka +5
°C. Det är normalt att temperaturen är
högre längst upp i kylen och lägre i den
nedre delen. Om temperaturreglaget är
inställt på en låg temperatur, och rumstemperaturen är hög eller kylen är full
med matvaror, kommer kompressorn att
arbeta under en längre period. Detta resulterar i en lägre temperatur i den nedre
delen av kylen på grund av kalluften som
sjunker nedåt. Detta kan i sin tur medföra
Page 31

att mat med hög vattenhalt börjar frysa.
Ställ in en högre temperatur om det blir
för kallt.
Viktigt Placera inte några hyllor mot
vattentömningshålet. Detta kan leda till för
låga temperaturer.
• Om du vill kontrollera temperaturen hos
livsmedel som förvaras i kylskåpet, placera ett glas vatten centralt i kylen och ställ
en lämplig termometer med en noggrannhet på +/– 1 °C i glaset. Efter 6 timmar kan temperaturen kontrolleras. Mätningen skall utföras under konstanta förhållanden (dvs. utan att ändra innehållet i
kylen).
UNDERHÅLL OCH RENGÖRING
Försiktighet Koppla loss produkten
från eluttaget innan du utför någon
form av underhåll.
Kylenheten i denna produkt innehåller
kolväten: underhåll och påfyllning får
därför endast utföras av en auktoriserad servicetekniker.
Regelbunden rengöring
Utrustningen måste rengöras med jämna
mellanrum:
• rengör produktens insida och alla tillbehör med ljummet vatten och en liten
mängd neutral såpa.
• inspektera regelbundet dörrtätningarna
och torka dem rena från eventuell smuts.
•skölj och torka noga.
Viktigt Dra inte i, flytta inte och undvik att
skada rörledningarna och kablarna inne i
produkten.
Använd aldrig skarpa rengöringsmedel,
skurpulver, parfymerade rengöringsprodukter eller vaxpolermedel för att rengöra produkten invändigt eftersom sådana produkter skadar ytfinishen och efterlämnar en
stark lukt.
Rengör kondensorn (svart galler) och kompressorn på produktens baksida med en
borste. Detta förbättrar produktens prestanda och bidrar till en lägre energiförbrukning
electrolux 31
Viktigt Var försiktig så att du inte skadar
kylsystemet.
Viktigt När du flyttar produkten, lyft upp
den i framkanten för att inte repa golvet.
Många produkter för rengöring av köksytor
innehåller kemikalier som kan skada plastkomponenterna i produkten. Använd därför
en mjuk trasa indränkt med varmt vatten
och en neutral tvållösning för att rengöra
produkten utvändigt.
Viktigt Använd inga skarpa
rengöringsmedel eller skurpulver eftersom
sådana produkter skadar färgen. Använd
inte heller produkter som används för att ge
ytor av rostfritt stål en beläggning som
motverkar fingeravtryck.
Anslut produkten till eluttaget igen efter rengöringen.
Rengöring av ventilationsgallret
Ventilationsgallret kan avlägsnas så att det
kan tvättas.
Öppna dörren när du skall avlägsna ventilationsgallret.
1. Lossa gallrets övre kant genom att dra
det utåt/nedåt.
2. Dra gallret rakt ut för att avlägsna det
helt.
3. Dammsug under produkten.
Page 32

32 electrolux
Avfrostning av kylskåpet
Frost avlägsnas automatiskt från evaporatorn i kylutrymmet varje gång kompressorn
stannar under normal användning. Det avfrostade vattnet töms ut via en ränna i en
särskild behållare som sitter ovanför kompressorn på produktens baksida, där vattnet avdunstar.
Det är viktigt att regelbundet rengöra avfrostningsvattnets tömningshål i mitten av
kylskåpsutrymmet för att undvika att vattnet
rinner över och droppar ned på matvarorna.
Långa uppehåll
Följ nedanstående anvisningar om produkten inte skall användas under en längre tidsperiod:
1. Koppla loss produkten från eluttaget.
2. Plocka ur alla matvaror.
3. Avfrosta och rengör produkten och alla
tillbehör.
4. Låt dörren/dörrarna stå på glänt så att
inte dålig lukt bildas.
Viktigt Om produkten lämnas påslagen, be
någon titta till den då och då så att inte
matvarorna i den förstörs i händelse av
strömavbrott.
OM MASKINEN INTE FUNGERAR
Under drift kan ibland små, men irriterande,
problem uppstå som du själv kan lösa utan
att tillkalla en servicetekniker. Följande tabell
ger råd som hjälper dig att lösa sådana problem för att undvika onödiga serviceavgifter.
Viktigt Produkten avger vissa ljud under
drift (kompressor och cirkulation). Detta är
normalt och innebär inte att något är fel.
Viktigt Produkten arbetar hela tiden, så när
kompressorn stannar innebär inte detta att
produkten är utan ström. Det är därför du
inte får ta i de elektriska delarna utan att
först koppla bort produkten från eluttaget.
Page 33

electrolux 33
Problem Möjlig orsak Åtgärd
Produkten bullrar. Produkten står ostadigt. Kontrollera att produkten står sta-
digt (alla fötter och hjul ska ha
kontakt med golvet). Se avsnittet
”Avvägning”.
Kompressorn arbetar
hela tiden.
Temperaturreglaget kan vara felaktigt inställt.
Ställ in en varmare temperatur.
Dörren är inte ordentligt stängd. Se avsnittet ”Stängning av dör-
ren”.
Dörren har öppnats för ofta. Låt inte dörren stå öppen längre
än nödvändigt.
Matvarornas temperatur är för
hög.
Låt matvarornas temperatur sjunka till rumstemperatur innan du
lägger in dem.
Rumstemperaturen är för hög. Sänk rumstemperaturen.
Vatten rinner på bakre
väggen i kylskåpet.
Vatten rinner inne i kyl-
Under den automatiska avfrost-
Detta är normalt.
ningen tinar frost på bakväggen.
Vattenutloppet är igentäppt. Rengör vattenutloppet.
skåpet.
Matvaror hindrar vattnet från att
rinna till vattenuppsamlaren.
Vatten rinner på golvet.
Smältvattnet rinner inte genom
utloppet till avdunstningsbrickan
Kontrollera att inga matvaror har
kontakt med den bakre väggen.
Anslut smältvattenutloppet till avdunstningsbrickan.
ovanför kompressorn.
Det har bildats för mycket frost och is.
Matvaror är inte ordentligt förpackade.
Förpacka maten bättre.
Dörren är inte ordentligt stängd. Se avsnittet ”Stängning av dör-
ren”.
Temperaturreglaget kan vara fel-
Ställ in en varmare temperatur.
aktigt inställt.
Temperaturen i produkten är för låg.
Temperaturen i produkten är för hög.
Temperaturreglaget kan vara felaktigt inställt.
Temperaturreglaget kan vara felaktigt inställt.
Ställ in en varmare temperatur.
Ställ in en lägre temperatur.
Dörren är inte ordentligt stängd. Se avsnittet ”Stängning av dör-
ren”.
Matvarorna är för varma. Låt matvarornas temperatur sjun-
ka till rumstemperatur innan du
lägger in dem.
Temperaturen i kylskåpet
är för hög.
Stora mängder mat har lagts in
Kalluft cirkulerar inte i produkten. Se till att kalluft kan cirkulera i pro-
dukten.
Lägg in mindre mängder mat för
för kylning på en gång.
kylning samtidigt.
Produkten fungerar inte. Produkten har stängts av. Sätt på produkten.
Stickkontakten sitter inte ordent-
ligt i eluttaget.
Sätt i stickkontakten ordentligt i
eluttaget.
Page 34

34 electrolux
Problem Möjlig orsak Åtgärd
Produkten får ingen ström. Elut-
Belysningen fungerar
inte.
Dörren blockerar ventilationsgallret.
Dörren är felinriktad.
taget är strömlöst.
Lampan är trasig. Se avsnittet ”Byte av lampan”.
Produkten står inte i våg. Se avsnittet ”Avvägning”.
Produkten står inte i våg. Se avsnittet ”Avvägning”.
Anslut en annan elektrisk apparat
till eluttaget. Kontrollera säkringen. Kontakta en behörig elektriker.
Kontakta vår lokala serviceverkstad om dessa råd inte löser problemet.
Byte av glödlampan
1. Koppla loss produkten från eluttaget.
2. Vik lampglaset bakåt genom att lossa
den främre kanten.
3. Byt ut den gamla glödlampan mot en
ny lampa med samma effekt och som
Stängning av dörren
1. Rengör dörrtätningarna.
2. Justera dörren vid behov. Se avsnittet
"Installation".
3. Byt vid behov ut defekta dörrtätningar.
Kontakta vår lokala serviceavdelning.
är speciellt avsedd för produkten (max.
effekt anges på lampglaset) och med
sockeltyp E14.
4. Anslut produkten till eluttaget igen.
TEKNISKA DATA
Mått
Höjd 1800 mm
Bredd 595 mm
Djup 623 mm
Nätspänning 230 V
Frekvens 50 Hz
Den tekniska informationen anges på typskylten som sitter till vänster inne i produkten
samt på energietiketten.
INSTALLATION
För din egen säkerhet och för att du
skall kunna använda produkten på
korrekt sätt, läs noga igenom avsnittet
"Säkerhetsinformation" innan du
installerar produkten.
Page 35

electrolux 35
Placering
Installera produkten på en plats där omgivningstemperaturen motsvarar den klimatklass som anges på typskylten:
Klimat-
klass
SN +10 till +32 °C
N +16 till +32 °C
ST +16 till +38 °C
T +16 till +43 °C
Omgivningstemperatur
Plats
För bästa effekt: om produkten placeras
under en överhängande väggenhet skall det
finnas minst 40 mm fritt utrymme mellan
produktens översida och väggenheten.
Produkten bör dock helst inte placeras under överhängande väggenheter
Utrymmet för ventilation kan vara
• direkt ovanför produkten
• bakom och ovanför överskåpet.
I detta fall måste utrymmet bakom överskåpet vara minst 50 mm djupt.
50mm
för att ansluta produkten till en separat jord
enligt gällande bestämmelser.
Tillverkaren ansvarar inte för skador orsakade av att ovanstående säkerhetsåtgärder
inte har följts.
Denna produkt uppfyller kraven enligt EGdirektiven för CE-märkning.
Avlägsna transportstöden
Din produkt är utrustad med transportstöd
för att säkra dörren under transport.
Avlägsna dessa stöd på följande sätt:
1. Öppna dörren.
2. Avlägsna transportstöden från dörrsidorna.
3. Ta bort transportstödet från nedre
gångjärnet (vissa modeller).
Viktigt Vissa modeller har en
ljuddämpande dyna undertill. Ta inte bort
denna dyna.
Elektrisk anslutning
Kontrollera före anslutning till ett eluttag att
nätspänningen och nätfrekvensen överensstämmer med de värden som anges på
typskylten.
Produkten måste jordas. Nätkabelns stickkontakt är försedd med en kontakt för detta
ändamål. Om nätspänningsmatningen inte
är jordad, kontakta en kvalificerad elektriker
3
2
Borttagning av hyllspärrarna
Kylskåpet har hyllspärrar för att låsa hyllorna
under transport.
Ta bort dem enligt följande:
1. Flytta hyllspärrarna i pilens riktning (A).
2. Lyft hyllorna baktill (B) och tryck dem
försiktigt framåt tills de lossnar (C).
3. Ta bort spärrarna.
Page 36

36 electrolux
C
A
B
Bakre distanshållare
Montera distanshållarna som medföljer i tillbehörspåsen såsom figuren visar.
Montera distanshållarna på panelens baksida.
2. Avlägsna ventilationsgallret. Avlägsna
den övre fyllningen och placera den på
motsatta sidan av gallret.
Avlägsna skyddet till pedalhålet och
montera det på motsatta sidan.
3. Lägg ned produkten med baksidan vilande på ett trästöd.
4. Skruva loss gångjärnet (B1) och avlägsna kåpan (B2) och stödet (B3).
Avlägsna skyddet (B4) på motsatta sidan och installera stödet (B3), kåpan
(B2) och gångjärnet (B1). Sätt fast kåpan (B4) på motsatta sidan.
B1
B2
B3 B4
Avvägning
Se till att produkten står i våg där den installeras. Justera vid behov fötterna med
medföljande skruvnyckel.
Omhängning av dörrar
Gör på följande sätt för att ändra dörrens
öppningsriktning:
1. Koppla loss produkten från eluttaget.
5. Skruva loss det nedre gångjärnet (C1).
Flytta sprinten till andra sidan (C2).
Skruva bort och flytta pedalen till motsatta sidan (C3).
Skruva fast det nedre gångjärnet på
andra sidan.
C3
C2
C1
6. Dra åt sprinten med medföljande skruvnyckel.
Page 37

electrolux 37
7. Skruva loss handtaget. Avlägsna täckpropparna på motsatta sidan genom
att sätta ett 3–4 mm dorn eller borr i
dem. Montera handtaget. Sätt fast
täckpropparna som finns i tillbehörspåsen.
8. Ställ produkten upprätt och sätt ventilationsgallret på plats.
MILJÖSKYDD
Symbolen på produkten eller emballaget
anger att produkten inte får hanteras som
hushållsavfall. Den skall i stället lämnas in
på uppsamlingsplats för återvinning av eloch elektronikkomponenter. Genom att
säkerställa att produkten hanteras på rätt
sätt bidrar du till att förebygga eventuellt
9. Ställ produkten på plats.
Varning Ställ tillbaka produkten på
plats, justera in den i våg och vänta
sedan minst fyra timmar innan du
ansluter den till eluttaget.
Kontrollera slutligen följande:
• Alla skruvar är åtdragna.
• Magnettätningen suger fast ordentligt
mot skåpet.
• Dörren öppnas och stängs ordentligt.
Om rumstemperaturen är låg (t.ex. på vintern) kanske tätningen inte fäster ordentligt.
Vänta i så fall tills tätningen har anpassat sig
på naturlig väg.
negativa miljö- och hälsoeffekter som kan
uppstå om produkten kasseras som vanligt
avfall. För ytterligare upplysningar om
återvinning bör du kontakta lokala
myndigheter eller sophämtningstjänst eller
affären där du köpte varan.
Page 38

38 electrolux
Page 39

electrolux 39
Page 40

www.electrolux.com/shop
855817000-B-082011
 Loading...