

Page 1
ERA 39391 X8
Fridge
Frigorífico
Kjøleseskap
UUsseerr MMaannuuaall
MMaannuuaall ddee iinnssttrruuççõõeess
BBrruukkssaannvviissnniinngg
Page 2

Page 3

electrolux
3
Welcome to the world of Electrolux
You’ve chosen a first class product from Electrolux, which hopefully will provide
you with lots of pleasure in the future. Electrolux ambition is to offer a wide variety
of quality products that would make your life even more comfortable. You can look
at some examples on the cover in this manual. But now it’s time to study this
manual and start using and enjoying the benefits from your new machine. We
promise that it’ll make your life a little easier. Good luck!
Page 4
4
electrolux
The following symbols are used in this manual:
Important information concerning your personal safety and information on
how to avoid damaging the appliance.
General information and tips
Environmental information
The symbol on the product or on its packaging indicates that this product
may not be treated as household waste. Instead it shall be handed over to the
applicable collection point for the recycling of electrical and electronic equipment.
By ensuring this product is disposed of correctly, you will help prevent potential
negative consequences for the environment and human health, which could
otherwise be caused by inappropriate waste handling of this product. For more
detailed information about recycling of this product, please contact your local city
office, your household waste disposal service or the shop where you purchased
the product.
Page 5

electrolux
5
CONTENTS
Safety IInformation 6
Use 99
Cleaning the interior 9
Control panel 9
Display 10
First switch on 10
Switching off 10
Temperature regulation 10
Functions Menu 11
Use of the fridge compartment 12
Holiday Function 12
Fresh food refrigeration 12
Movable shelves 13
Bottle rack 13
Positioning the door shelves 13
Air recycling 14
Hints 14
Hints for refrigeration 14
Maintenance 114
Periodic cleaning 15
Periods of non-operation 15
Interior light 15
Defrosting 15
Technical iinformation 16
Customer sservice aand sspare pparts 116
Installation 17
Location 17
Electrical connection 17
Shelf holders 18
Rear spacers 18
Door reversibility 18
European GGuarantee 20
www.electrolux.com 21
Page 6
6
electrolux
SAFETY INFORMATION
It iis mmost iimportant tthat tthis
instruction bbook sshould bbe rretained
with tthe aappliance ffor ffuture rreference.
Should tthe aappliance bbe ssold oor
transferred tto aanother oowner, oor
should yyou mmove hhouse aand lleave tthe
appliance, aalways eensure tthat tthe
book iis ssupplied wwith tthe aappliance iin
order tthat tthe nnew oowner ccan bbe
acquainted wwith tthe ffunctioning oof tthe
appliance aand tthe rrelevant wwarnings.
If tthis aappliance ffeaturing mmagnetic
door sseals iis tto rreplace aan oolder
appliance hhaving aa sspring llock ((latch)
on tthe ddoor oor llid, bbe ssure tto mmake
that sspring llock uunusable bbefore yyou
discard tthe oold aappliance. TThis wwill
prevent iit ffrom bbecoming aa ddeath-ttrap
for aa cchild.
These wwarnings aare pprovided iin tthe
interest oof ssafety. YYou mmust rread tthem
carefully bbefore iinstalling oor uusing tthe
appliance.
General Safety
• This appliance is not intended for
use by persons (including children)
with reduced physical, sensory or
mental capabilities, or lack of
experience and knowledge, unless
they have been given supervision
or instruction concerning use of the
appliance by a person responsible
for their safety.
Children should be supervised to
ensure that they do not play with
the appliance.
• It is dangerous to alter the
specifications or modify this
product in any way.
• Before any cleaning or
maintenance work is carried out,
be sure to switch off and unplug
the appliance.
• This appliance is heavy. Care
should be taken when moving it
• Ice lollies can cause frost burns if
consumed straight from the
appliance.
•• Take uutmost ccare wwhen hhandling
your aappliance sso aas nnot tto ccause
any ddamages tto tthe ccooling uunit
with cconsequent ppossible ffluid
leakages.
• The aappliance mmust nnot bbe llocated
close tto rradiators oor ggas ccookers.
• Avoid pprolonged eexposure oof tthe
appliance tto ddirect ssunlight.
• There mmust bbe aadequate vventilation
round tthe bback oof tthe aappliance
and aany ddamage tto tthe rrefrigerant
circuit mmust bbe aavoided.
• For ffreezers oonly ((except bbuilt-iin
models): aan iideal llocation iis tthe
cellar oor bbasement.
• Do nnot uuse oother eelectrical
appliances ((such aas iice ccream
makers) iinside oof rrefrigerating
appliances.
Service/Repair
• Any electrical work required to
install this appliance should be
carried out by a qualified electrician
or competent person
• This product should be serviced by
an authorized Service Centre, and
only genuine spare parts should be
used.
Page 7

electrolux
7
• Under no circumstances should
you attempt to repair the appliance
yourself. Repairs carried out by
inexperienced persons may cause
injury or more serious
malfunctioning. Refer to your local
Service Centre, and always insist
on genuine spare parts.
• This appliance contains
hydrocarbons in its cooling unit;
maintenance and recharging must
therefore only be carried out by
authorized technicians.
Use
• The domestic refrigerators and
freezers are designed to be used
specifically for the storage of edible
foodstuffs only.
• Best performance is obtained with
ambient temperature between
+18°C and +43°C (class T); +18°C
and +38°C (class ST); +16°C and
+32°C (class N); +10°C and +32°C
(class SN). The class of your
appliance is shown on its rating
plate.
Warning:
when the ambient
temperature is not included within
the range indicated for the class of
this appliance, the following
instructions must be observed:
when the ambient temperature
drops below the minimum level, the
storage temperature in the freezer
compartment cannot be
guaranteed; therefore it is advisable
to use the food stored as soon as
possible.
• Frozen food must not be re-frozen
once it has been thawed out.
• Manufacturers’ storage
recommendations should be strictly
adhered to. Refer to relevant
instructions.
• The inner lining of the appliance
consists of channels through which
the refrigerant passes. If these
should be punctured this would
damage the appliance beyond
repair and cause food loss. DO
NOT USE SHARP INSTRUMENTS
to scrape off frost or ice. Frost may
be removed by using the scraper
provided. Under no circumstances
should solid ice be forced off the
liner. Solid ice should be allowed to
thaw when defrosting the
appliance.
• Do not place carbonated or fizzy
drinks in the freezer as it creates
pressure on the container, which
may cause it to explode, resulting
in damage to the appliance.Do not
use a mechanical device or any
artificial means to speed up the
thawing process other than those
recommended by the
manufacturer. Never use metal
objects for cleaning your appliance
as it may get damaged.
Installation
• During normal operation, the
condenser and compressor at the
back of the appliance heat up
considerably. For safety reasons,
minimum ventilation must be as
shown in the instructions.
Page 8

8
electrolux
Attention: kkeep vventilation oopenings
clear oof oobstruction.
• Care must be taken to ensure that
the appliance does not stand on
the electrical supply cable.
Important:
if the supply cord is
damaged, it must be replaced by a
special cord or assembly availa-ble
from the manufacturer or its service
agent.
• If the appliance is transported
horizontally, it is possible that the
oil contained in the compressor
flows in the refrigerant circuit. It is
advisable to wait at least two hours
before connecting the appliance to
allow the oil to flow back in the
compressor.
• There are working parts in this
product which heat up. Always
ensure that there is adequate
ventilation as a failure to do this will
result in component failure and
possible food loss. See installation
instructions.
• Parts which heat up should not be
exposed. Wherever possible the
back of the product should be
against a wall.
Environment
Protection
This aappliance ddoes nnot ccontain
gasses wwhich ccould ddamage tthe oozone
layer, iin eeither iits rrefrigerant ccircuit oor
insulation mmaterials. TThe aappliance
shall nnot bbe ddiscarded ttogether wwith
the uurban rrefuse aand rrubbish. AAvoid
damaging tthe ccooling uunit, eespecially
at tthe rrear nnear tthe hheat eexchanger.
Information oon yyour llocal ddisposal ssites
may bbe oobtained ffrom mmunicipal
authorities. TThe mmaterials uused oon tthis
appliance mmarked bby tthe ssymbol
are rrecyclable.
Page 9

electrolux
9
USE
Cleaning the interior
Before using the appliance for the first
time, wash the interior and all internal
accessories with luke-warm water and
some neutral soap so as to remove
the typical smell of a brand-new
product, then dry thoroughly.
Do nnot uuse ddetergents oor
abrasive ppowders, aas tthese wwill
damage tthe ffinish.
Control panel
A - Appliance button ON/OFF
B - Temperature regulation button
C - Temperature and function indicator
D - Function button
E - Confirmation button
A
B
C
D
E
Page 10
10
electrolux
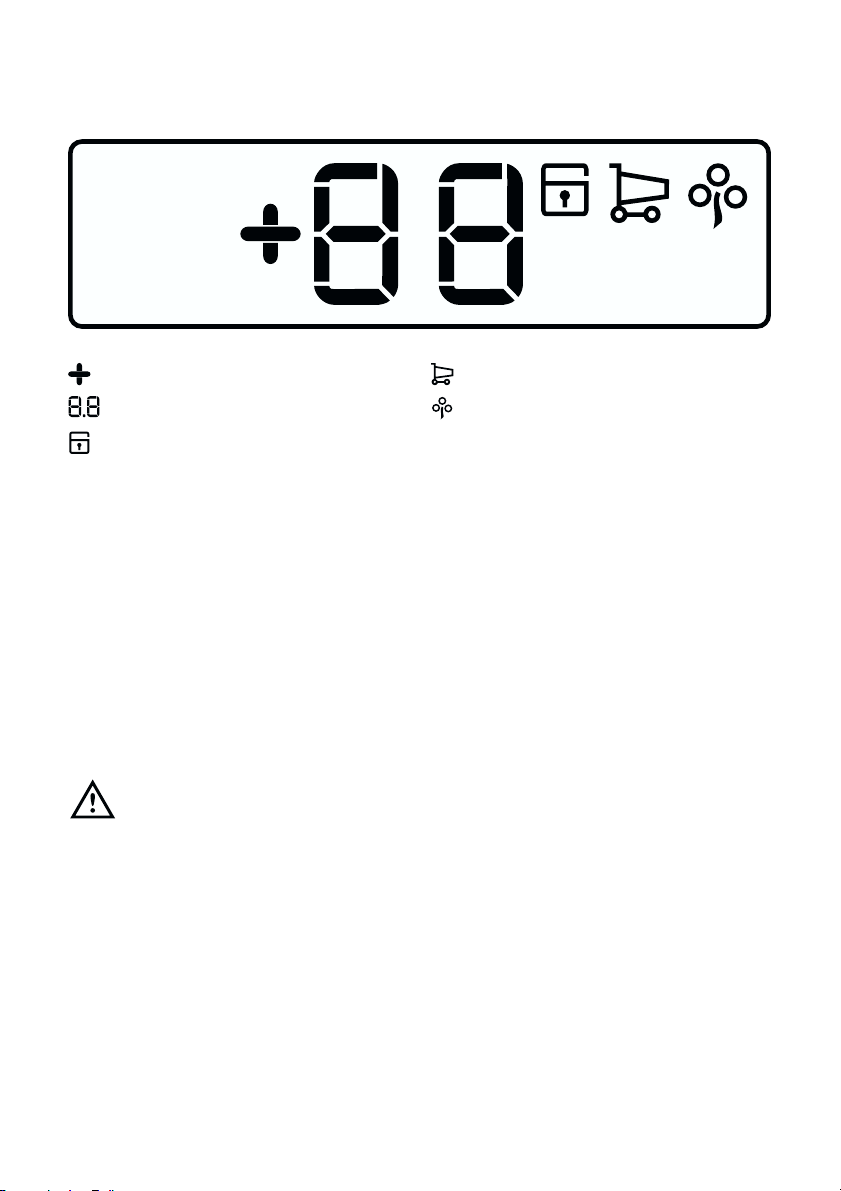
Display
Positive Temperature indicator
Temperature indicator
If on the Child Lock function is on
If on the Shopping function is on
If on the Eco Mode function is on
First switch on
After plugging the plug into the power
outlet, if the display is not illuminated,
press key (A), appliance on.
For a correct storage of the food select
the Eco Mode function that guarantee
the following temperature is set:
+5°C in the fridge
• To select a different temperature
see "Temperature regulation".
Important
If the door remains ajar for some
minutes, the internal
lighting will turn off electronically; after
this, the lighting function will be reset
by closing and opening the door itself.
Switching off
The appliance is shut off by pressing
key (A) for more than 1 second. During
this, a countdown of the temperature
from -3 -2 -1 will be shown.
Temperature regulation
The temperature may be regulated by
pressing the key B.
By pressing the key B the current
temperature setting flashes on the
indicator and by pressing the key B
again it is possible to change it.
You confirm the choice of the
temperature either by pressing the key
E, (you will hear the buzzer) or by
waiting for some seconds (you will not
hear the buzzer).
Then the indicator shows again the
inside compartment temperature.
The newly selected-temperature must
be reached after 24 hours.
After a long period out of use it is not
necessary to set again the temperature
because it remains stored.
Page 11
electrolux
11
Attention!
During the stability period by the first
starting the temperature displayed can
not correspond to the setting
temperature. During this time it is
possible that the temperature
displayed is different than the setting
temperature.
Functions Menu
By activating the key D the functions
menu is operating.
Each function could be confirmed by
pressing button E. If there is no
confirmation after some seconds the
display will go out from the menu and
return in normal condition.
The following functions are indicated:
Child Lock function
Shopping function
Eco Mode function
Child Lock Function
The Child Lock function is activated by
pressing key D (several times if
necessary) until the corresponding icon
appears .
You must confirm the choice by
pressing key E within few seconds.
You will hear the buzzer and the icon
remains lighted.
In this condition any possible operation
through the keys does not cause any
change as long as this function is
activated.
It is possible to de-activate the
function at any time by pressing key D
until the corresponding icon will flash
and then key E.
Shopping Function
If you need to insert a large amount of
warm food, for example after doing the
grocery shopping, we suggest
activating the Shopping function to
chill the products more rapidly and to
avoid warming the other food which is
already in the refrigerator.
The Shopping function is activated by
pressing key D (several times if
necessary) until the corresponding icon
appears .
You must confirm the choise by
pressing key E within few seconds.
You will hear the buzzer and the icon
remains lighted.
The Shopping function shuts off
automatically after approximately 6
hours.
It is possible to de-activate the
function at any time by pressing key D
until the corresponding icon will flash
and then key E.
Eco Mode Function
The Eco Mode function is activated by
pressing key D (several times if
necessary) until the corresponding icon
appears (or setting the temperature
at +5°C).
You must confirm the choice by
pressing key E within few seconds.
You will hear the buzzer and the icon
remains lighted.
In this condition the chosen
temperatures are automatically set (+
5°C), in the best conditions for storing
food.
It is possible to de-activate the
function at any time by changing the
selected temperature in the
compartment.
Page 12

12
electrolux
Now the refrigerator is in the Holiday
function in the energy- saving mode
and the indicator shows the letter H.
It is possible to de-activate the function
at any time by changing the selected
temperature in the compartment.
Attention!
The fridge compartment must be
empty with Holiday function on.
Fresh food refrigeration
To obtain the best performance:
• do not store warm food or
evaporating liquids in the
refrigerator;
• do cover or wrap the food,
particularly if it has a strong flavour.
• Position food so that air can
circulate freely round it.
Use of the fridge
compartment
The temperature of this compartment
may be regulated between +2°C and
+8°C.
During normal functioning the indicator
shows the temperature inside the
fridge.
Attention!
Difference between the temperature
displayed and temperature setting is
normal. Especially when:
• a new setting has recently been
selected
• the door has been left open for a
long time
• warm food has been placed in the
compartment.
Holiday Function “H”
The Holiday function sets the
temperature at + 15°C.
This function allows you to keep the
refrigerator shut and empty during a
long holiday period ( e. g. the summer
holidays) without the formation of a
bad smell.
The Holiday Function H may be
regulated by pressing the key B. By
pressing the key B the current
temperature setting flashes on the
indicator. Press the key B again. When
on the display appears the letter H
confirm the choice of the temperature
or by pressing the key E, (you will hear
the buzzer) or by waiting for some
seconds (you will not hear the buzzer).
Page 13

electrolux
13
Movable shelves
The walls of the refrigerator are
equipped with a series of runners so
that the shelves can be positioned as
desired.
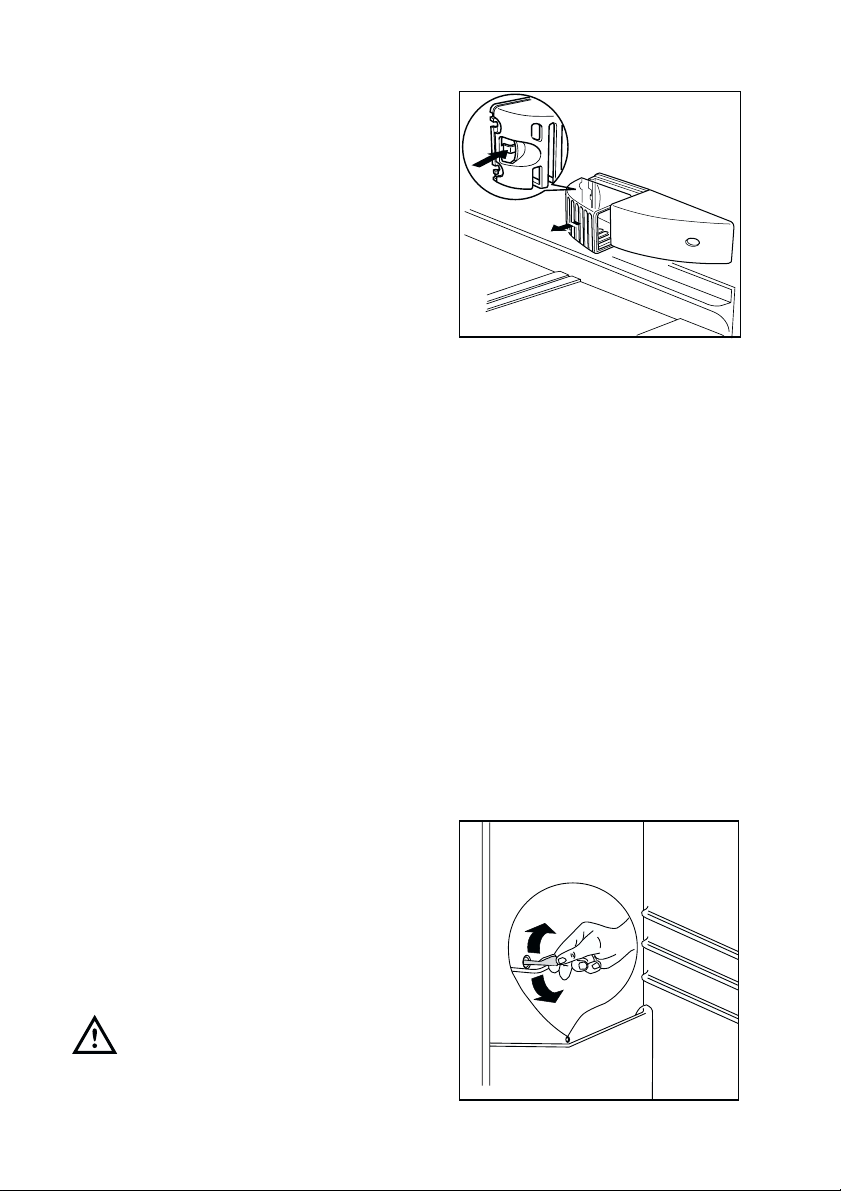
Bottle rack
Place bottles in the rack with the
bottleneck to the front.
Important: Only store unopened
bottles horizontally.
The bottle rack can be tilted for storing
opened bottles.
To do this pull the bottle rack forward
until it can be tilted upwards, then
slide the front support into the next
level up.
Positioning the door
shelves
To permit storage of food packages of
various sizes, the door shelves can be
placed at different heights.
To make these adjustments proceed
as follows: Gradually pull the shelf in
the direction of the arrows until it
comes free, then reposition as
required.
D338
Page 14
14
electrolux
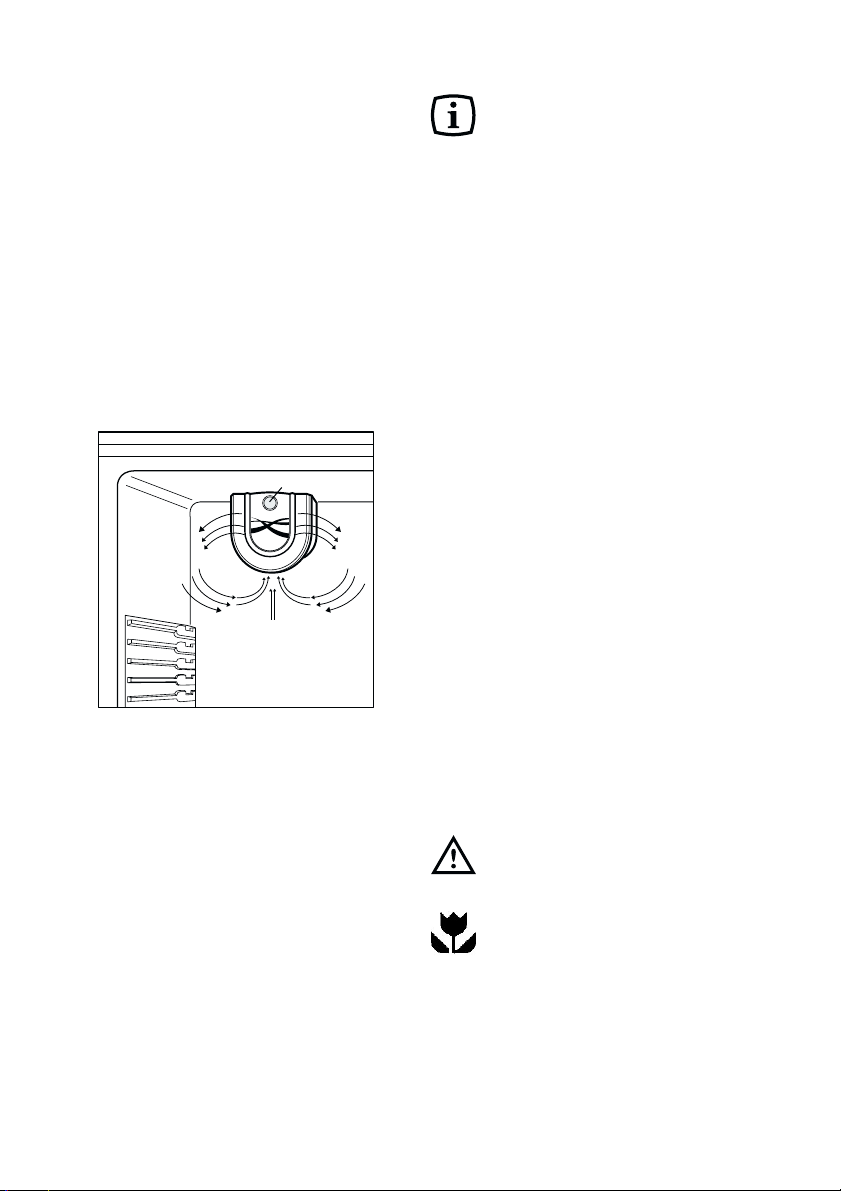
Air recycling
The refrigerator compartment is
equipped with a device which can be
turned on with the switch (A-see fig.).
The green light, when on, means that
the fan is working.
It is suggested that the device be
used when the ambient temperature
exceeds 25°C .
This device allows for rapid cooling of
foods and a more uniform temperature
in the compartment.
HINTS
Hints for refrigeration
Useful hints:
Meat ((all ttypes):
wrap in polythene
bags and place on the glass shelf
above the vegetable drawer.
For ssafety, sstore iin tthis wway oonly oone
or ttwo ddays aat tthe mmost.
Cooked ffoods, ccold ddishes, eetc..:
these should be covered and may be
placed on any shelf.
Fruit aand vvegetables:
these should be
thoroughly cleaned and placed in the
special drawer(s) provided.
Butter aand ccheese:
these should be
placed in special airtight containers or
wrapped in aluminium foil or polythene
bags to exclude as much air as
possible.
Milk bbottles:
these should have a cap
and should be stored in the bottle rack
on the door.
Bananas, ppotatoes, oonions aand ggarlic,
if nnot ppacked, mmust nnot bbe kkept iin tthe
refrigerator.
MAINTENANCE
Unplug tthe aappliance bbefore
carrying oout aany mmaintenance
operation.
Warning
This aappliance ccontains
hydrocarbons iin iits ccooling uunit;
maintenance aand rrecharging mmust
therefore oonly bbe ccarried oout bby
authorized ttechnicians.
A
Page 15
electrolux
15
Periodic cleaning
Many pproprietary kkitchen ssurface
cleaners ccontain cchemicals tthat ccan
attack/damage tthe pplastics uused iin
this aappliance. FFor tthis rreason iit iis
recommended tthat tthe oouter ccasing oof
this aappliance iis oonly ccleaned wwith
warm wwater wwith aa llittle wwashing-uup
liquid aadded.
Clean the inside with warm water and
bicarbonate of soda.
Rinse and dry thoroughly.
Clean the condenser (black grill) and
the compressor at the back of the
appliance with a brush or a vacuum
cleaner. This operation will improve the
performance of the appliance and
save electricity consumption.
Periods of non-operation
When the appliance is not in use for
long periods, take the following
precautions:
• remove the plug from the wall socket;
• remove all food;
• defrost and clean the interior and
all accessories;
• leave the door ajar to allow air to
circulate to prevent unpleasant smells.
Interior light
If it becomes necessary to replace the
lamp, press on the rear hook and at the
same time slide the cover in the
direction indicated by the arrow.
Attention
Replace the lamp with one of the
same power (the maximum power is
shown on the light diffuser).
Defrosting
Frost is automatically eliminated from
the evaporator of the refrigerator
compartment every time the motor
compressor stops, during normal use.
The defrost water drains out through a
trough into a special container at the
back of the appliance, over the motor
compressor, where it evaporates.
It iis iimportant tto pperiodically cclean tthe
defrost wwater ddrain hhole iin tthe mmiddle
of tthe rrefrigerator ccompartment
channel tto pprevent tthe wwater
overflowing aand ddripping oonto tthe ffood
inside. UUse tthe sspecial ccleaner
provided, wwhich yyou wwill ffind aalready
inserted iinto tthe ddrain hhole.
D037
Page 16
16
electrolux
CUSTOMER SERVICE
AND SPARE PARTS
If the appliance is not functioning
properly, check that:
• the plug is firmly in the wall socket
and the mains power switch is on;
• there is an electricity supply (find
out by plugging in another
appliance);
• If there are water drops on the
bottom of the cabinet, check that
the defrost water drain opening is
not obstructed (see “Defrosting”
section).
• If your appliance is still not working
properly after making the above
checks, contact the nearest service
centre.
To oobtain ffast sservice, iit iis eessential
that wwhen yyou aapply ffor iit yyou sspecify
the mmodel aand sserial nnumber oof yyour
appliance wwhich ccan bbe ffound oon tthe
guarantee ccertificate oor oon tthe rrating
plate llocated iinside tthe aappliance, oon
the bbottom lleft-hhand sside.
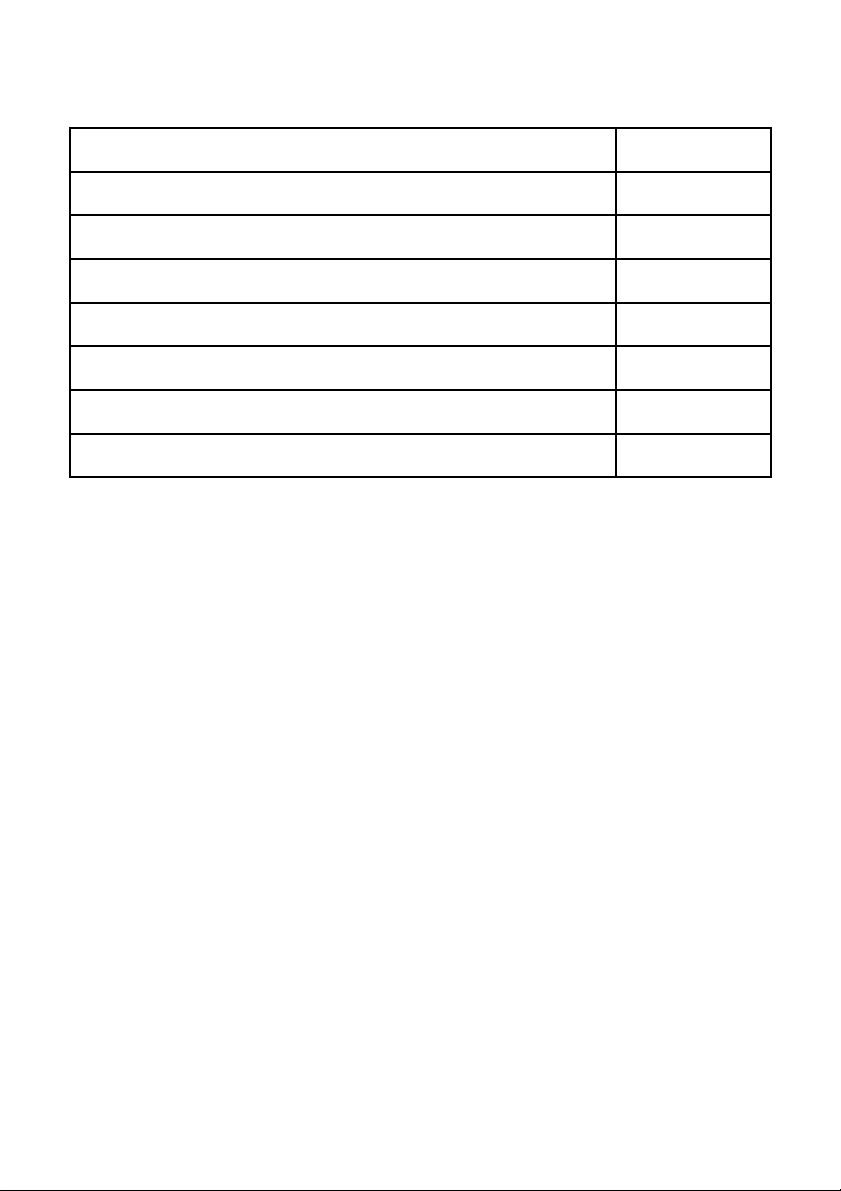
TECHNICAL INFORMATION
378
0,403
147
1800
600
645
Net Fridge Capacity lt.
Energy Consumption kWh/year
Dimensions mm
High
Energy Consumption kWh/24h
Width
Depth
The technical infomation are situated in the rating plate on the internal left side of
the appliance.
Page 17

electrolux
17
INSTALLATION
Location
The appliance should be installed well
away from sources of heat such as
radiators, boilers, direct sunlight etc.
Ensure that air can circulate freely
around the back of the cabinet. To
ensure best performance, if the
appliance is positioned below an
overhanging wall unit, the minimum
distance between the top of the
cabinet and the wall unit must be at
least 100 mm . Ideally, however, the
appliance should not be positioned
below overhanging wall units. Accurate
levelling is ensured by one or more
adjustable feet at the base of the
cabinet.
Attention
It must be possible to disconnect the
appliance from the mains power
supply; the plug must therefore be
easily accessible after installation.
Electrical connection
Before plugging in, ensure that the
voltage and frequency shown on the
serial number plate correspond to your
domestic power supply. Voltage can
vary by ±6% of the rated voltage.
For operation with different voltages, a
suitably sized auto-transformer must
be used.
The aappliance mmust bbe eearthed.
The power supply cable plug is provided
with a contact for this purpose.
If the domestic power supply socket is
not earthed, connect the appliance to
a separate earth in compliance with
current regulations, consulting a
specialist technician.
The MManufacturer ddeclines aall
responsibility iif tthe aabove ssafety
precautions aare nnot oobserved.
This appliance complies with
the following E.E.C. Directives:
•
87/308 EEEC
of 2/6/87 relative to
radio interference suppression.
•
73/23 EEEC
of 19.2.73 (Low Voltage
Directive) and subsequent
modifications;
•
89/336 EEEC
of 3.5.89
(Electromagnetic Compatibility
Directive) and subsequent
modifications.
100 mm10 mm
10 mm
NP00
Page 18

18
electrolux
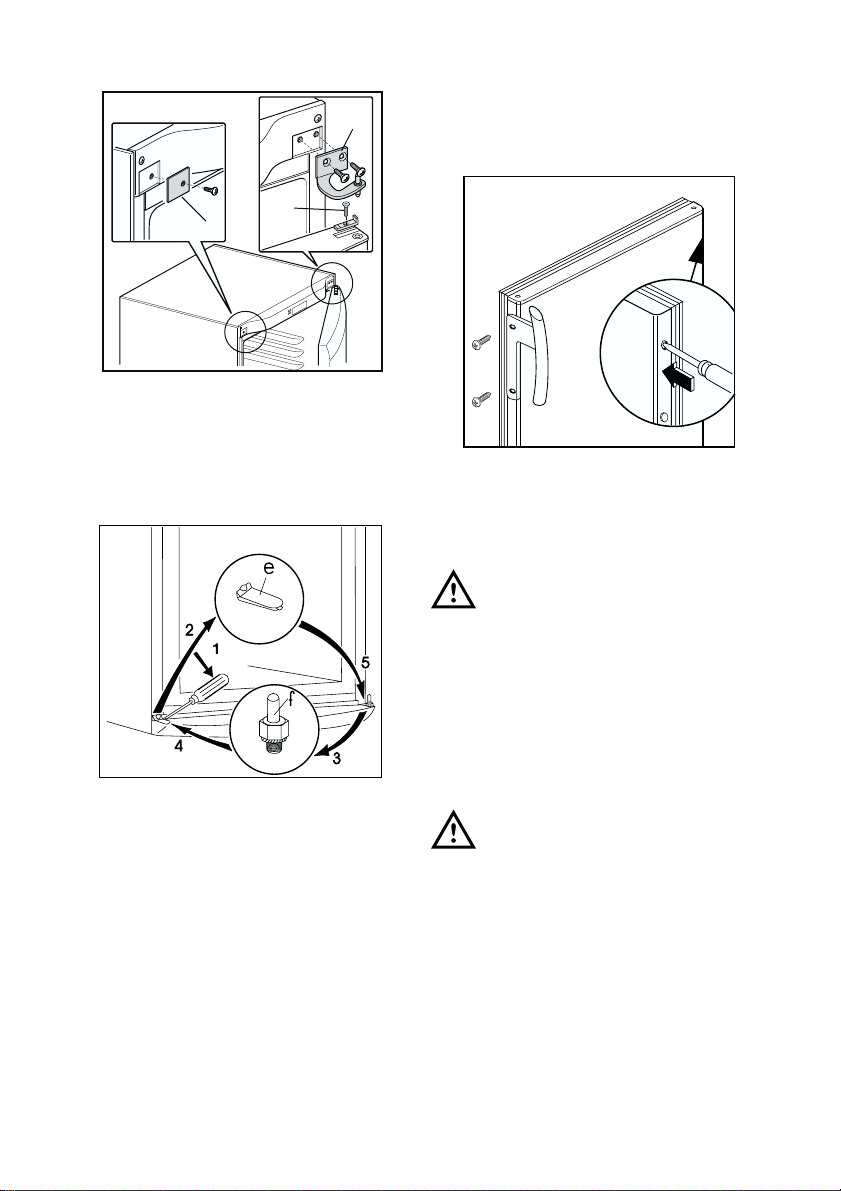
Door reversibility
Before carrying out any operations,
remove the plug from the power socket.
To change the opening direction of the
door, proceed as follows:
• To carry out the following operations,
we suggest that this be made with
another person that will keep a firm
hold on the door of the appliance
during the operations.
• Open the door with the appliance in
the upright position. Unscrew the
screws and remove the upper door
plastic trim.
• Remove the little plastic cover from
the door plastic trim and refit on the
opposite side (d).
• Lay down the appliance back side
down.
• Remove the screw of the hinge cover
plug (a).
• Unscrew the upper hinge and remove
it (b).
• Unscrew the screw and remove the
door stopper (c).
• Remove the door.
Shelf holders
Your appliance is equipped with shelf
retainers that make it possible to
secure the shelves during
transportation.
To remove them proceed as follows:
Move the shelf holders in the direction
of the arrow, raise the shelf from the
rear and push it forward until it is freed
and remove the retainers.
Rear spacers
In tthe aappliance, tthere aare ttwo sspacers
which mmust bbe ffitted aas sshown iin tthe
figure ..
Slacken the screws and insert the
spacer under the screw head, then retighten the screws.
A
B
C
Page 19
electrolux
19
• Remove using a tool the cover (e)
unscrew the lower hinge pivot (f)
and place it on the opposite side.
• Reinsert the cover (e) on the
opposite side.
• Reinsert the door .
• Pay attention that the front board of
the door is parallel to the front
board of the top.
• Fix the door stopper on the
opposite side.
• Position and fix the upper hinge (that
can be found in the instruction for use
bag) on the opposite side .
• Fix the screw of the new cover hinge
(that can be found in the instruction for
use bag).
a
b
c
• Lift up the appliance to vertical position.
• Open the door and reposition the
upper door plastic trim with screws.
• Fix the handle on the opposite side,
insert the plastic plugs into the holes
left open that can be found in the
instruction for use bag.
Reposition, level the appliance,
wait for at least two hours and
then connect it to the power socket.
In case you do not want to carry out
the above mentioned operations,
contact the nearest After Sales Service
Force. The After Sales Service
specialist will carry out the reversibility
of the doors at your cost.
Warning
After hhaving rreversed tthe
opening ddirection oof tthe ddoor check
that aall tthe sscrews aare pproperly
tightened aand tthat tthe mmagnetic sseal
adheres tto tthe ccabinet.
If tthe aambient ttemperature iis ccold ((i.e.
in WWinter), tthe ggasket mmay nnot ffit
perfectly tto tthe ccabinet. IIn tthat ccase,
wait ffor tthe nnatural ffitting oof tthe ggasket
or aaccelerate tthis pprocess bby hheating
up tthe ppart iinvolved wwith aa nnormal
hairdrier. LLay ddown tthe aappliance bback
side ddown
.
Page 20

20
electrolux
EUROPEAN GUARANTEE
This appliance is guaranteed by Electrolux in each of the countries listed at the
back of this user manual, for the period specified in the appliance guarantee or
otherwise by law. If you move from one of these countries to another of the
countries listed, the appliance guarantee will move with you subject to the
following qualifications:
• The appliance guarantee starts from the date you first purchased the appliance
which will be evidenced by production of a valid purchase document issued by
the seller of the appliance.
• The appliance guarantee is for the same period and to the same extent for
labour and parts as exists in your new country of residence for this particular
model or range of appliances.
• The appliance guarantee is personal to the original purchaser of the appliance
and cannot be transferred to another user.
• The appliance is installed and used in accordance with instructions issued by
Electrolux and is only used within the home, i.e. is not used for commercial
purposes.
• The appliance is installed in accordance with all relevant regulations in force
within your new country of residence.
The provisions of this European Guarantee do not affect any of the rights granted
to you by law.
Page 21

electrolux
21
Suomi
www.electrolux.fi
Sverige
+46 (0)771 76 76 76
Electrolux Service, S:t Göransgatan 143, S-105 45 Stockholm
Türkiye
+90 21 22 93 10 25
Tarlaba caddesi no : 35 Taksim stanbul
+7 095 937 7837
Albania
+35 5 4 261 450
Rr. Pjeter Bogdani Nr. 7 Tirane
Belgique/België/Belgien
+32 2 363 04 44
Bergensesteenweg 719, 1502 Lembeek
Danmark
+45 70 11 74 00
Sjællandsgade 2, 7000 Fredericia
eská republika
+420 2 61 12 61 12
Bud jovická 3, Praha 4, 140 21
Deutschland
+49 180 32 26 622
Muggenhofer Str. 135, 90429 Nürnberg
Eesti
+37 2 66 50 030
Mustamäe tee 24, 10621 Tallinn
España
+34 902 11 63 88
Carretera M-300,Km.29,900 Alcalá de Henares Madrid
France
Great Britain
+44 8705 929 929
Addington Way, Luton, Bedfordshire LU4 9QQ
Hellas
+30 23 10 56 19 70
4, Limnou Str., 54627 Thessaloniki
Hrvatska
+385 1 63 23 338
Slavonska avenija 3, 10000 Zagreb
Ireland
+353 1 40 90 753
Long Mile Road Dublin 12
Italia
+39 (0) 434 558500
C.so Lino Zanussi, 26 - 33080 Porcia (PN)
Latvija
+37 17 84 59 34
Kr. Barona iela 130/2, LV-1012, Riga
Lietuva
+370 5 2780609
Verki 29, LT-09108 Vilnius
Luxembourg
+35 2 42 43 13 01
Rue de Bitbourg, 7, L-1273 Hamm
Magyarország
+36 1 252 1773
H-1142 Budapest XIV, Erzsébet királyné útja 87
Nederland
+31 17 24 68 300
Vennootsweg 1, 2404 CG - Alphen aan den Rijn
Norge
+47 81 5 30 222
Risløkkvn. 2 , 0508 Oslo
Österreich
+43 18 66 400
Herziggasse 9, 1230 Wien
Polska
+48 22 43 47 300
ul. Kolejowa 5/7, Warsaw
Portugal
+35 12 14 40 39 39
Quinta da Fonte-Edificio Gonçalves Zarco-Q 35-2774-518 Paço de Arcos
Romania
+40 21 451 20 30
Str. Garii Progresului 2, S4, 040671 RO
Schweiz-Suisse-Svizzera
+41 62 88 99 111
Industriestrasse 10, CH-5506 Mägenwil
Slovenija
+38 61 24 25 731
Electrolux Ljubljana d.o.o., Gerbi eva 98, 1000 Ljubljana
Slovensko
+421 2 43 33 43 22
Electrolux Slovakia s.r.o., Electrolux Domáce spotrebi e SK, Seberíniho 1, 821 03 Bratislava
www.electrolux.com
ě
á
ŏ
ŝ
www.electrolux.fr
È
129090 Москва, Олимпийский проспект, 16, БЦ "Олимпик"
ģ
ě
Россия
Page 22

222
electrolux
Bem-vindo ao mundo Electrolux
Obrigado por ter escolhido adquirir um produto de primeira classe da Electrolux,
que esperamos lhe traga muito prazer no futuro. A ambição da Electrolux é
oferecer uma vasta variedade de produtos de qualidade que tornem a sua vida
ainda mais confortável. Pode encontrar alguns exemplos na capa deste manual.
Tire alguns minutos para estudar este manual para que possa começar a tirar
partido dos benefícios do seu novo aparelho. Nós prometemos que lhe irá
proporcionar uma experiência superior e confortante como utilizador. Boa sorte!
Page 23

electrolux
23
Os símbolos que se seguem são utilizados neste manual
Informações importantes relativas à segurança pessoal e como evitar
danos no aparelho
Informações gerais e sugestões
Informações ambientais
O símbolo no produto ou na embalagem indica que este produto não pode
ser tratado como lixo doméstico. Em vez disso, deve ser entregue ao centro de
recolha selectiva para a reciclagem de equipamento eléctrico e electrónico.
Ao garantir uma eliminação adequada deste produto, irá ajudar a evitar eventuais
consequências negativas para o
meio ambiente e para a saúde pública, que, de outra forma, poderiam ser
provocadas por um tratamento incorrecto do produto.
Para obter informações mais pormenorizadas sobre a reciclagem deste produto,
contacte os serviços municipalizados locais, o centro de recolha selectiva da sua
área de residência ou o estabelecimento onde adquiriu o produto.
Page 24

24
electrolux
ÍNDICES
Advertências ee cconselhos
importantes 25
Uso ee ffuncionamiento 28
Limpeza das partes internas 28
Painel de comandos 28
Display 28
Primeira Utilização do Aparelho 29
Desligar o Aparelho 29
Regulação de Temperatura 29
Funções do Menu 29
Utilização do compartimento
frigorífico 31
Função Holiday 31
Refrigeração dos alimentos 31
Prateleiras amovíveis 32
Prateleira para garrafas 32
Colocação das preteleiras da porta 32
Recirculação de ar 33
Conselhos 33
Conselhos para a refrigeração 33
Manutenção 33
Limpeza periódica 33
Paragem prolongada 34
Lâmpada de iluminação 34
Descongelação 34
Dados TTécnicos 35
Assistência ttécnica ee ppeças dde
substsuição 35
Instalação 36
Colocação 36
Ligação eléctrica 36
Fixadores para prateleiras 37
Espaçadores posteriores 37
Reversibilidade da porta 37
Garantia/Assistência ttécnica 39
Garantia EEuropeia 41
www.electrolux.com 42
Page 25

electrolux
25
ADVERTÊNCIAS E
CONSELHOS
IMPORTANTES
É mmuito iimportante qque eeste mmanual
de uutilização aacompanhe oo aaparelho
para ggarantir uuma ffutura uutilização
correcta. SSe oo aaparelho ffor vvendido oou
emprestado aa uuma ooutra ppessoa, oo
manual dde uutilização ddeve, ccomo
acima sse ffaz nnotar, aacompanhá-llo, dde
maneira qque oo uutilizador ppossa sser
informado ddo sseu ffuncionamento, ddas
advertências ee cconselhos. SSe eeste
aparelho, mmunido dde ffecho mmagnético,
veio ssubstituir uum ooutro qque ttinha
portas ccom ffecho dde mmola,
aconselhamos aa iinutilizar eeste ffecho,
antes ddo aaparelho sser pposto
definitivamente dde llado. EEsta
precaução pprocura eevitar qque
crianças, bbrincando, sse ppossam ffechar
no aaparelho oo qque sseria aaltamente
perigoso.
Essas aadvertências ttêm ppor ffim
garantir aa ssegurança ddos uutilizadores.
Agradecemos, pportanto, qque lleia oo
manual aatentamente, aantes dde iinstalar
e uutilizar oo aaparelho.
Segurança
• Este aparelho não se destina a ser
utilizado por pessoas (incluindo
crianças) com capacidades mentais,
sensoriais e físicas reduzidas, ou com
falta de experiência e conhecimento, a
não ser que sejam supervisionadas ou
recebam instruções relativamente à
utilização do aparelho, por parte de
uma pessoa responsável pela sua
segurança.
As crianças devem ser
supervisionadas para garantir que não
brincam com o electrodoméstico.
• É perigoso modificar ou tentar
modificar as características deste
aparelho.
• Este aparelho é pesado. Tenha o
maior cuidado quando o deslocar
• Não consuma certos produtos, tais
como gelados, imediatamente
após terem saído do aparelho; a
temperatura muito baixa a que se
encontram pode provocar
queimaduras.
• Este aaparelho ccontém
hidrocarbonetos nno ccircuito
refrigerante; pportanto, aa
manutenção ee aa rrecarga ddevem
ser eefectuadas eexclusivamente ppor
pessoal aautorizado ppelo pprodutor.
• Preste aa mmáxima aatenção aao
deslocar oo aaparelho, ppara nnão
danificar aas ppartes ddo ccircuito
refrigerante, eevitando aassim
possíveis ssaídas dde ffluido.
• O aaparelho nnão ddeve sser iinstalado
perto dde eelementos dde
aquecimento oou ffogões dde ggás.
• Evite aa eexposição pprolongada ddo
aparelho aaos rraios ddo ssol.
• A pparte dde ttrás ddo aaparelho ddeve
receber uuma ssuficiente vventilação ee
deve sser eevitado qqualquer ddano aao
circuito rrefrigerante.
• Somente ppara oos ccongeladores
(excepto oos dde eencaixe): aa mmelhor
colocação éé nna ccave.
Assistência
• Se uma eventual modificação da
instalação eléctrica, na casa do
Page 26

26
electrolux
utilizador, tiver de ser feita para tornar
possível a instalação do aparelho,
deve, esta, ser efectuada por pessoal
qualificado.
• Este aparelho deve ser assistido
por um Centro de Assistência
autorizado, sendo apenas
aplicadas peças de origem.
• Em caso de avaria, não tente você
mesmo, reparar o aparelho. As
reparações executadas por
pessoas inexperientes, podem
causar danos físicos e mate-riais
(aumentando as avarias a serem
reparadas). Faça apelo ao seu
Centro de Assistência mais
próximo e insista em peças
genuínas.
Utilização
• Os frigoríficos e/ou congeladores
domésticos destinam-se,
unicamente, à conservação e/ou
congelação de alimentos.
• Os melhores rendimentos são
conseguidos com temperaturas
ambiente incluídas entre +18°C e
+43°C (Classe T); +18°C e +38°C
(Classe ST); +16°C e +32°C
(Classe N); +10°C e +32°C (Classe
SN); a classe a que pertence o
aparelho é indicada na placa de
matrícula (posta na cela ao lado do
compartimento dos legumes).
Atenção: com temperaturas
ambiente não incluídas nas
indicadas para a classe climática a
que pertence o produto, é preciso
cumprir as indicações seguintes:
quando a temperatura ambiente
descer abaixo do valor mínimo,
pode não ser garantida a
temperatura de conservação no
compartimento congelador;
portanto, aconselha-se a
consumar rapidamente os
alimentos nele contidos.
• Um produto descongelado não
deve, em nenhum caso, voltar a
ser congelado.
• Siga as indicações do fabricante
para a conservação e/ou
congelação dos alimentos.
• O revestimento interior do aparelho
em composto de pequenos tubos
por onde passa o refrigerante. Se
estes tubos forem danificados o
aparelho ficará irremediavelmente
avariado, provocando a perda dos
alimentos no seu interior. NÃO
UTILIZE OBJECTOS
PONTEAGUDOS para raspar o gelo
acumulado. Esse gelo pode ser
raspado utilizando a espátula que é
fornecida com o aparelho. Para
eliminar grandes quantidades de gelo
acumulado, é aconselhável deixá-lo
derreter. Veja as instruções para a
descongelação.
• Não coloque no
compartimento/congelador a baixa
temperatura, garrafas ou latas com
bebidas gaseificadas dado que se
cria uma pressão elevada no interior
da garrafa e/ou lata havendo o perigo
de este explodir. Desta explosão
resultariam danos graves para o
aparelho.
Page 27

electrolux
27
Instalação
• Durante o normal funcionamento o
condensador e o compressor,
colocados na parte de trás do
aparelho, aquecem sensivelmente.
Por razões de segurança a
ventilação deve ser como indicado
na respectiva Figura.
Atenção: mmantenha aas aaberturas
para aa vventilação llivres dde qqualquer
obstrução.
• O aparelho aquece, sensivelmente,
ao nível do con-densador e do
compressor. Certifique-se que o ar
circula, livremente, à volta do
aparelho. Uma ventila-ção
insuficiente ocasionaria um mau
funcionamen-to, danos para o
aparelho e perda dos alimentos no
seu interior. Siga as instruções
para a correcta instalação do
aparelho.
• Assegure-se, quando instalar o
aparelho, que este não repousa
sobre o cabo de alimentação
eléctrica.
Importante:
se o cabo de
alimentação se danificar, deverá ser
substituído por um cabo especial ou
por um conjunto, disponíveis junto do
construtor ou do serviço de
assistência técnica.
• Os componentes do aparelho que
aquecem devido ao seu
funcionamento não devem estar
expostos. Sempre que possível as
costas do aparelho devem ficar
encostadas a uma parede
• Desligue sempre a tomada de
corrente antes de proceder à limpeza
ou qualquer operação de
manutenção do aparelho.
• Ao transportar o aparelho na
horizontal, pode acontecer que o óleo
contido no compressor escorra para
o circuito refrigerante. É portanto
aconselhável esperar pelo menos
duas horas antes de ligar o aparelho
à corrente.
Protecão do
ambiente
Este aaparelho nnão ccontem, nno sseu
circuito rrefrigerante ee nnas ssuas
matérias iisolantes, ggases nnocivos àà
camada dde oozono.Mesmo aassim eeste
aparelho ddeve, qquando ffor
destruido,receber oos ccuidados
convenientes, dde aacordo ccom aas
disposições eem vvigor ppara aa pprotecção
do mmelo aambiente. OOs mmateriais
utilizados nneste aaparelho, mmarcados
com oo ssimbolo ssão rreciclàveis.
Page 28

28
electrolux
USO E
FUNCIONAMIENTO
Limpeza das partes
internas
Estando o aparelho convenientemente
instalado, antes de o utilizar,
aconselhamos a sua limpeza
cuidadosa com água tépida e sabão
neutro para retirar o cheiro
característico do “novo”.
Não uutilize ddetergentes oou ppós
abrasivos, qque ppodem ddanificar
os aacabamentos. EEnxague ee
seque ccuidadosamente.
Painel de comandos
A
B
C
D
E
Display
Indicador de temperatura positiva
Indicador da temperatura (dígitos)
Se ligado, indica que está activa
a função Child Lock
Se ligado, indica que está activa a
função Shopping
Se ligado, indica que está activa a
função Eco Mode
A - Tecla para ligar/desligar o aparelho
B - Tecla de regulação de temperatura
C - Display de exibição temperaturas
e funções
D - Tecla de activação das funções
E - Tecla de confirmação
Page 29

electrolux
29
Primeira Utilização
do Aparelho
Após ter introduzido a ficha na tomada
de corrente, se o écrã não se iluminar
carregue na tecla (A).
Para um correcto armazenamento dos
alimentos seleccione a Função Eco
Mode que garante a seguinte
temperatura:
cerca de +5°C no frigorífico.
• Para seleccionar uma temperatura
diferente veja a secção "Regulação
de Temperatura".
Importante
Se a porta permanecer entreaberta por
mais de 7 minutos, a luz interna
desligar-se-á utomaticamente.
A função de luz interna será restaurada
abrindo e fechando a porta do frigorífico.
Desligar o Aparelho
Para desligar o aparelho prima a tecla
(A) durante mais de 1 segundo.
Será iniciada uma contagem decrescente
da temperatura de -3 -2 -1 .
Regulação de
Temperatura
A temperatura pode ser regulada
pressionando a tecla (B).
Pressionando a tecla (B), a
temperatura configurada aparece a
piscar no display.
Para confirmar a temperatura
pretendida, pressione a tecla (E),
(ouvirá o sinal sonoro) ou aguarde
durante alguns segundos (não ouvirá o
sinal sonoro).
Depois o display volta a indicar a
temperatura interna do compartimento.
A temperatura programada será
atingida em 24h.
Após um longo período sem utilização
não será necessário ajustar novamente
a temperatura pois esta fica em
memória.
Atenção!
Durante o período de estabilização na
primeira colocação em função, a
temperatura visualizada pode não
corresponder à temperatura
configurada. Durante este período é
possível que a temperatura visualizada
seja diferente da temperatura
configurada.
Funções do Menu
Pressionando a tecla (D) acciona as
funções do Menu. Cada função pode
ser confirmada pressionando a tecla (E).
Se não carregar na tecla (E), após
alguns segundos, o display volta ao
ecrã/informação anterior
As seguintes funções são indicadas:
Função Child Lock
Função Shopping
Função Eco Mode
Page 30

30
electrolux
Função Child Lock
A função Child Lock é activada
carregando na tecla (D) até aparecer o
símbolo correspondente .
Deverá confirmar a sua escolha
pressionando a tecla (E) por alguns
segundos.
Irá ouvir um sinal sonoro e o símbolo
permanece ligado.
Com esta função activada não será
possível fazer alterações nas
definições programadas anteriormente.
É possível desactivar a função a
qualquer momento carregando a tecla
(D) até o símbolo começar a piscar
e depois pressionando a tecla (E).
Função Shopping
Se necessitar de colocar uma grande
quantidade de alimentos
quentes/mornos, por exemplo, depois
de estes terem sido comprados,
sugerimos que active a função
Shopping para refrigerar mais
rapidamente evitando assim que os
alimentos que acabou de colocar
dentro do seu aparelho aqueçam os
que já lá estavam anteriormente frescos.
A função Shopping é activada
carregando na tecla (D) até aparecer o
símbolo correspondente .
Deverá confirmar a sua escolha
pressionando a tecla (E) por alguns
segundos.
Irá ouvir um sinal sonoro e o símbolo
permanece ligado.
Esta função desliga-se
automaticamente após 6 horas.
É possível desactivar a função a
qualquer momento carregando a tecla
(D) até o símbolo começar a piscar
e depois pressionando a tecla (E).
Função Eco Mode
A função Eco Mode é activada
carregando na tecla (D) até aparecer o
símbolo correspondente (or
ajustando a temperatura para +5°C).
Deverá confirmar a sua escolha
pressionando a tecla (E) por alguns
segundos.
Irá ouvir um sinal sonoro e o símbolo
permanece ligado.
Nesta função as temperatures são
definidas automaticamente (+ 5°C),
mantendo as melhores condições de
conservação dos alimentos.
É possível desactivar a função a qualquer
momento alterando a temperatura
seleccionada no compartimento.
Utilização do
compartimento frigorífico
A temperatura do frigorífico pode ser
configurada entre +2°C e +8°C.
Durante o funcionamento normal é
visualizada a temperatura do
compartimento frigorífico.
Atenção!
É normal ter uma diferença entre a
temperatura visualizada e aquela
configurada. Sobretudo quando:
• foi recentemente alterada a
temperatura configurada
• a porta foi mantida aberta por
muito tempo
• foram introduzidos alimentos
quentes.
Page 31

electrolux
31
Refrigeração dos
alimentos
Para obter um melhor rendimento do
seu aparelho:
• reparta as provisões de maneira a
que o ar possa circular, facilmente,
à volta delas;
• não introduza, na caixa, alimentos
ainda quentes ou líquidos em
evaporação;
• cubra os alimentos, de especial
modo se são aromáticos.
Função Holiday “H”
No regime de férias, a temperatura
TEÓRICA do frigorífico é regulada para
+ 15 °C. Este regime
permite- lhe deixar o frigorífico vazio
fechado, em vez de aberto, - sem que
se verifique uma formação de cheiros
ou de bolor - durante uma ausência
mais prolongada ( p. ex. férias) .
Vantagem: a porta não poderá, assim,
fechar- se acidentalmente ou ser
fechada, por descuido, por pessoas
que tenham eventualmente acesso à
casa, durante a sua ausência. Sem o
regime de férias, isso daria origem à
formação de cheiros e de bolor.
A função Holiday H pode ser ajustada
premindo a tecla B. Ao premir a tecla
B, a actual definição de temperatura
pisca no indicador. Prima novamente a
tecla B. Quando no visor for
apresentada a letra H, confirme a
escolha da temperatura premindo a
tecla E (ouvirá o aviso sonoro) ou
aguarde alguns segundos (não ouvirá
o aviso sonoro).
O frigorífico está agora na função
Holiday no modo de poupança de
energia e o indicador apresenta a letra
H.
É possível desactivar a função a
qualquer altura mudando a
temperatura seleccionada no
compartimento.
Atenção!
Não coloque produtos no frigorífico
enquanto ele estiver a funcionar no
regime de férias.
Page 32

32
electrolux
Prateleiras amovíveis
Nas paredes do compartimento há
calhas que permitem colocar as
prateleiras a diferentes alturas.
Prateleira para garrafas
Colocar as garrafas da prateleira com
a boca para frente.
Atenção: Só guardar deitadas garrafas
que ainda não tenham sido abertas.
Para guardar garrafas já abertas, a
prateleira para garrafas pode ser
colocada na posição inclinada.
Para tal, puxe a prateleira para
garrafas para frente, até que seja
possível levantá-la. Em seguida,
colocar a prateleira da frente em um
nível mais alto.
Colocação das
prateleiras da porta
Pode modificar a posição das
prateleiras da porta. Para isso
proceda da seguinte forma:
Empurre gradualmente a prateleira no
sentido que indica a seta até
desencaixa-la. Depois monte-a no
lugar desejado fazendo a operação
inversa.
D338
Page 33

electrolux
33
Frutas ee llegumes:
nas caixas de
legumes depois de lavados.
Bananas, bbatatas, ccebola ee aalho, sse
não fforem ppreparados, nnão sse
conservam nno rrefrigerador.
MANUTENÇÃO
Antes dde qqualquer iintervenção
no aaparelho, aaconselhamos qque
se ddesligue aa ttomada dde ccorrente.
Aviso
Este eelectrodoméstico ccontém
hidrocarbonetos nno ssistema dde
refrigeração; aa mmanutenção ee aa
recarga ddeve sser, pportanto,
executada aapenas ppor ttécnicos
autorizados.
Limpeza periódica
Muitos ddetergentes eespecíficos ppara
as ssuperfícies dda ccozinha ccontêm
agentes qquímicos qque ppodem
corromper/danificar aas ppartes eem
plástico ppresentes nneste aaparelho.
Aconselha-sse, ppor iisso, dde llimpar oo
revestimento eexterno ddeste aaparelho
só ccom áágua qquente jjuntamente ccom
uma ppequena qquantidade dde
detergente llíquido ppara aa llouça.
Lave as paredes e acessórios com
água tépida e bicarbonato de soda.
Enxague e seque cuidadosamente;
limpe o condensador e o
motocompressor com uma escova ou
um aspirador. Esta operação vai
melhorar o funcionamento com
conseguinte poupança de energia.
Recirculação de ar
O compartimento geladeira é dotado
de uma ventoinha especial que é
ativada agindo no interruptor (A-ver
fig.), o sinal luminoso aceso significa
que a ventoinha está funcionando.
Aconselha-se o uso da ventoinha
quando a temperatura ambiente
ultrapassa os 25°C.
Este dispositivo permite um
arrefecimento rápido dos alimentos e
uma uniformidade melhor da
temperatura dentro do
compartimento.
CONSELHOS
Conselhos para a
refrigeração
Carne ((de qqualquer ttipo):
envolva
esses alimentos em sacos plásticos e
coloque-as na divisão imediatamente
acima das caixas para legumes.
O pperíodo dde cconservação éé dde 11 aa 22
dias, nno mmáximo.
Alimentos ccozidos, ppratos ffrios, eetc:
coloque-os, bem cobertos, numa
prateleira qualquer.
A
Page 34

34
electrolux
Paragem prolongada
No caso de se ausentar por um
período prolongado, desligue a
tomada de corrente, esvazie, degele e
limpe o aparelho.
Mantenha as portas entre-abertas
durante toda a não utilização, para
facilitar a circulação do ar no interior e
evitar a formação de cheiros
desagradáveis.
Lâmpada de iluminação
Para a eventual substituição da
lâmpada apertar o engate traseiro e
simultaneamente desenfiar a tampa no
sentido das setas.
Atenção
Substituir a lâmpada com uma
de potência igual (a potência
máxima está contida no difusor
de luz).
Descongelação
A descongelação do refrigerador dáse automaticamente durante cada
período de paragem do compressor.
A água proveniente do descongelação
é evacuada para um recipiente situado
na parte detrás do aparelho, por cima
do compressor, e onde ela se
evapora.
Não sse eesqueça dde llimpar
periodicamente oo oorifício dde
escoamento dde áágua ddo
descongelação qque sse eencontra nno
centro dda ggoteira ddo ccompartimento
refrigerador ppara eevitar qque aa áágua
possa ttransbordar ee ccair ssobre oos
alimentos. UUtilize ppara eesse eefeito aa
pequena bbarra qque sse eencontra nno
orifício.
D037
Page 35

electrolux
35
ASSISTÊNCIA
TÉCNICA E PEÇAS
DE SUBSTITUIÇÃO
Se o aparelho não funcionar verifique:
• Se a ficha está bem introduzida na
tomada e se há corrente na rede.
• Se o botão do termóstato está na
posição correcta.
• No caso de haver vibrações ou
ruídos verifique se o aparelho está
em contacto com moveis que
podem transmitir ou ampliar ruídos
e vibrações.
• Verifique também se as tubagens
do sistema refrigerante não vibram.
Se houver restos de água no interior
do frigorifico verifique se o orifício de
descarga não está obstruído.
Se depois de todas estas verificações
o problema persistir dirija-se ao seu
vendedor ou o serviço de assistência
mais perto da sua residência.
Para oobter uuma aassistência mmais
rápida iindique oos ddados dda pplace dde
identificac,ão ddo aaparelho qque sse
encontra nno iinterior ddo
electrodoméstico nna pparede ddo ffundo
no llado eesquerdo, ee ttambém oo mmodelo
número dde sserie ee ccertificado dde
garantia.
DADOS TECNICOS
378
0,403
147
1800
600
645
Capacidade lìquida em litros do frigorìfico
Consumo energético en kWh/ano
Consumo energético en kWh/24h
Dimensões em mm
Altura
Largura
Profundidade
Os dados técnicos são indicados na placa de matrícula que se encontra no lado
esquerdo interno do apareho.
Page 36

36
electrolux
INSTALAÇÃO
Colocação
Coloque o aparelho longe de qualquer
fonte de calor (aquecimento, fogões,
ou raios solares demasiado
intensos).Verifique que nas parses
posterior, superior e inferior o ar pode
circular livremente. Para um melhor
funcionamento verifique que a parse
superior têm pelo menos 100 mm de
distancia de algum móvel suspenso
por cima do aparelho . A solução
preferível é indicada na (sem móvel).
Um ou vários pés niveladores situados
na base têm a função de nivelar o
aparelho correctamente.
Importante
O aparelho deve
poder ser desligado
da rede; uma vez realizada a
instalação, portanto, é necessário que
a ficha fique acessível.
100 mm10 mm
10 mm
NP00
Ligação eléctrica
Verifique, antes de ligar o aparelho, se
a voltagem e a frequência indicadas na
placa sinalética correspondem às da
sua rede. Tolerância admitida na
voltagem nominal: ±6%. Para a
adaptação do aparelho a voltagens
diferentes, é indispensável a adjunção
de um auto-transformador de uma
potência adequada.
Verifique sse aa ttomada dde ccorrente dda
parede eestá eem bbom eestado ee aapta aa
receber aa fficha ddo ffio dde aalimentação
do aaparelho.
Esta última está conforme às normas
em vigor e possui uma entrada para a
ligação à terra. Essa ficha pode ser
ligada a qualquer tomada de corrente
desde que esta tenha uma ponta de
ligação à terra. No caso em que a
tomada não tenha a ligação à terra,
ligar o aparelho a uma instalação de
ligação à terra separada, conforme as
normas em vigor, consultando para
isso um técnico especializado.
A CCasa CConstrutora ddeclina ttoda ee
qualquer rresponsabilidade nno ccaso dde
esta nnorma ccontra oos aacidentes nnão
ser ccumprida ee sse vverificarem
acidentes ooriginados ppor ddeficiente
ligação àà tterra, oou ffalta ddela.
Este aparelho está conforme as
seguintes Directrizes
Comunitárias:
•
87/308
de 2/6/87 respeitante à
supressão das interferências radioeléctricas.
•
73/23 CCEE
19/02/73 (Baixa Tensão)
e sucessivas modificações;
•
89/336 CCEE
03/05/89
(Compatibilidade Electromagnética)
e sucessivas modificações.
Page 37

electrolux
37
Fixadores para prateleiras
O seu aparelho é equipado com
fixadores para prateleiras que
permitem de bloquear as prateleiras
durante o transporte.
Para removê-los executar quanto segue:
mexer os fixadores de prateleiras no
sentido da seta, levantar o vidro na
parte traseira e empurrá-lo para a
frente até liberá-lo e remover os
fixadores.
Espaçadores posteriores
No interior do aparelho encontram se
dois espaçadores que hão de ser
montados nos figuras.
Desapertar oos pparafusos, iinserir oo
espaçador ddebaixo dda ccabeça ddo
parafuso ee vvoltar aa aapertar.
Reversibilidade da porta
Antes de levar a cabo qualquer
operação, remova a ficha da tomada.
Para mudar a direcção de abertura da
porta proceda do seguinte modo:
• Para levar a cabo as seguintes
operações, nós sugerimos que o
faça com outra pessoa que possa
segurar firmemente a porta do
aparelho durante as operações.
• Abra a porta com o aparelho na
posição vertical. Desaperte os
parafusose e remova a parte
superior de plástico da porta.
• Remova a bucha e reposicione no
lado contrário (d).
• Deite o aparelho com a parte
traseira para baixo.
• Remova o parafuso da cobertura
da dobradiça (a)
• Desaparafuse a dobradiça superior
e remova-a (b)
• Desaparafuse e retire o travão da
porta (c)
• Remova a porta.
• Remova usando uma ferramenta a
capa (e) , desaparafuse o pino no
eixo da dobradiça inferior (f) e
reaparafuse no lado oposto.
A
B
C
Page 38

38
electrolux
• Reinsira a cobertura (e) no lado
oposto.
• Reinsira a porta.
• Preste atenção à parte da frente da
porta, que é paralela à parte
superior.
• Coloque o travão da porta no lado
oposto.
• Posicione e fixe a dobradiça
superior (que pode ser encontrada
no saco das instruções de
utilização) no lado oposto.
• Fixe o parafuso da nova cobertura
da dobradiça (que pode ser
encontrada no saco das instruções
de utilização).
• Eleve o aparelho para a posição
vertical.
a
b
c
• Abra a porta e reposicione a parte
superior de plástico da porta com
parafusos.
• Fixe a pega no lado oposto, insira
as fichas de plástico nos buracos
livres que podem ser encontrados
nas instruções, num saco.
Reposicione, eleve o aparelho,
espere pelo menos duas horas
antes de ligue na ficha de alimentação.
Em qualquer caso, se não desejar
levar a cabo as operações acima
descritas, contacte o Concessionário
de Assitência Técnica mais próximo. O
Concessionário, especialista no
serviço pós venda levará a cabo a
reversibilidade das portas.
Aviso
Depois dde rreverter aa ddirecção dde
abertura dda pporta, vverifique qque ttodos
os pparafusos eestão ccorrectamente
apertados ee qque oo sselo mmagnético
adere aao aaparelho.
Se aa ttemperatura aambiente éé ffria, ((ex.
no IInverno), aa bborracha ppode nnão
aderir pperfeitamenteao aaparelho. EEm
qualquer ccaso, eespere ppelo nnatural
ajustamento dda bborracha, oou aacelere
este pprocesso aaquecendo aa pparte nnão
aderente ccom uum ssecador dde ccabelo.
Page 39

electrolux
39
GARANTIA/ASSISTÊNCIA TÉCNICA
Estimado Cliente:
Queremos felicitá-lo pela sua compra e agradecer a confiança depositada na
nossa empresa.
O seu electrodoméstico dispõe de uma garantia de 24 meses para mão-de-obra
e peças.
Se durante o período de garantia o seu electrodoméstico tiver uma avaria,
contacte o Serviço Técnico Oficial.
ASSISTÊNCIA TTÉCNICA OOFICIAL
21 4440 339 339
SERVIÇO DDE AAPOIO AAO CCLIENTE
21 4440 339 000
(de 2a a 6a feira. das 10H-13H e das 14H-17H)
CONDIÇÕES DE GARANTIA
1. O aparelho que acaba de adquirir possui uma garantia de dois anos a partir
da data de aquisição. Os pedidos de assistência na garantia são gratuitos,
mediante apresentação do respectivo certificado juntamente com a factura
de compra.
2. A presente garantia do fabricante (2 anos) cobre a substituição de peças,
mão de obra e deslocação.
3. Em caso de imobilização do seu aparelho por período superior a 15 dias, a
garantia será prolongada adicionando o tempo de imobilização à data de
entrega nos nossos serviços.
4. Nos pedidos de assistência na garantia de Pequenos Electrodomésticos, os
aparelhos a reparar deverão ser entregues directamente no ponto de
assistência.
EXCLUSÕES DE GARANTIA
Substituições de peças danificadas por mau manuseamento, instalação
incorrecta, danos de transporte e danos provocados por condições atmosféricas
adversas; Intervenções por pessoal técnico não autorizado pelo
ELECTROLUX
SERVICE
; substituições de lâmpadas, filtros, juntas de borracha, vidros, botões,
puxadores e acessórios de aspiradores; Todos os serviços de manutenção
provocados pelo desgaste ou pela utilização do aparelho; Pedidos de
demonstração de montagem e explicações de funcionamento; Danos no esmalte
e/ou na pintura provocados por cortes ou pancadas; Uso intensivo em locais
Page 40

40
electrolux
públicos ou profissionais, a menos que se trate de um produto adequado para o
efeito; Desobstrução de bombas de limpeza e filtros.
•
MANIPULAÇÃO
nos dados da placa de Matrícula do presente aparelho ou
deste certificado.
•
INSTALAÇÃO IINCORRECTA EE NNÃO RREGULAMENTAR
(tensão, pressão de
gás ou de água, ligações eléctricas ou hidráulicas não adequadas).
Assistência TTécnica - EELECTROLUX SSERVICE - QQuinta dda FFonte, EEdifício
Gonçalves ZZarco - QQ 335, 22774-5518 PPaço dde AArcos.
NOTA 11: DDeve cconservar aa ffactura dde ccompra jjunto ddeste CCertificado dde GGarantia
NOTA 22: PPara aa vvalidade ddesta ggarantia, nno mmomento dda iintervenção ttécnica éé
absolutamente iimprescindível aapresentar aao ppessoal aautorizado oo
presente ccertificado jjunto dda ffactura llegal dde ccompra ddo aaparelho
devidamente ppreenchida.
Page 41

electrolux
41
GARANTIA EUROPEIA
Este aparelho possui garantia da Electrolux em cada um dos países listados na
parte de trás deste manual, para o período especificado na garantia do seu
aparelho ou, caso contrário, pela lei. Se mudar de um destes países para outro
dos países listados em baixo, a garantia do aparelho mudará também, estando
sujeita aos seguintes requisitos:
• A garantia do seu aparelho tem inicio na data em que adquiriu o aparelho, a
qual terá como prova o documento válido de compra emitido pelo vendedor
do aparelho.
• A garantia do aparelho é válida para o mesmo período de tempo e para o
mesmo tipo de trabalho e peças existente no seu novo país de residência para
este modelo em particular ou gama de aparelhos.
• A garantia do aparelho é pessoal, para o comprador original, e não pode ser
transferida para outro utilizador.
• O aparelho é instalado e usado de acordo com as instruções emitidas pela
Electrolux e destina-se apenas ao uso doméstico, ou seja, não é usado para
fins comerciais.
• O aparelho é instalado de acordo com todas as normas relevantes em vigor no
seu novo país de residência.
As condições desta Garantia Europeia não afecta nenhum dos seus direitos
concedidos por lei.
Page 42

42
electrolux
Suomi
www.electrolux.fi
Sverige
+46 (0)771 76 76 76
Electrolux Service, S:t Göransgatan 143, S-105 45 Stockholm
Türkiye
+90 21 22 93 10 25
Tarlaba caddesi no : 35 Taksim stanbul
+7 095 937 7837
Albania
+35 5 4 261 450
Rr. Pjeter Bogdani Nr. 7 Tirane
Belgique/België/Belgien
+32 2 363 04 44
Bergensesteenweg 719, 1502 Lembeek
Danmark
+45 70 11 74 00
Sjællandsgade 2, 7000 Fredericia
eská republika
+420 2 61 12 61 12
Bud jovická 3, Praha 4, 140 21
Deutschland
+49 180 32 26 622
Muggenhofer Str. 135, 90429 Nürnberg
Eesti
+37 2 66 50 030
Mustamäe tee 24, 10621 Tallinn
España
+34 902 11 63 88
Carretera M-300,Km.29,900 Alcalá de Henares Madrid
France
Great Britain
+44 8705 929 929
Addington Way, Luton, Bedfordshire LU4 9QQ
Hellas
+30 23 10 56 19 70
4, Limnou Str., 54627 Thessaloniki
Hrvatska
+385 1 63 23 338
Slavonska avenija 3, 10000 Zagreb
Ireland
+353 1 40 90 753
Long Mile Road Dublin 12
Italia
+39 (0) 434 558500
C.so Lino Zanussi, 26 - 33080 Porcia (PN)
Latvija
+37 17 84 59 34
Kr. Barona iela 130/2, LV-1012, Riga
Lietuva
+370 5 2780609
Verki 29, LT-09108 Vilnius
Luxembourg
+35 2 42 43 13 01
Rue de Bitbourg, 7, L-1273 Hamm
Magyarország
+36 1 252 1773
H-1142 Budapest XIV, Erzsébet királyné útja 87
Nederland
+31 17 24 68 300
Vennootsweg 1, 2404 CG - Alphen aan den Rijn
Norge
+47 81 5 30 222
Risløkkvn. 2 , 0508 Oslo
Österreich
+43 18 66 400
Herziggasse 9, 1230 Wien
Polska
+48 22 43 47 300
ul. Kolejowa 5/7, Warsaw
Portugal
+35 12 14 40 39 39
Quinta da Fonte-Edificio Gonçalves Zarco-Q 35-2774-518 Paço de Arcos
Romania
+40 21 451 20 30
Str. Garii Progresului 2, S4, 040671 RO
Schweiz-Suisse-Svizzera
+41 62 88 99 111
Industriestrasse 10, CH-5506 Mägenwil
Slovenija
+38 61 24 25 731
Electrolux Ljubljana d.o.o., Gerbi eva 98, 1000 Ljubljana
Slovensko
+421 2 43 33 43 22
Electrolux Slovakia s.r.o., Electrolux Domáce spotrebi e SK, Seberíniho 1, 821 03 Bratislava
www.electrolux.com
ě
á
ŏ
ŝ
www.electrolux.fr
È
129090 Москва, Олимпийский проспект, 16, БЦ "Олимпик"
ģ
ě
Россия
Page 43

electrolux
43
Velkommen til Electrolux verden
Takk for at du valgte et kvalitetsprodukt fra Electrolux. Vi håper det vil gi deg mye
glede i årene som kommer. Electrolux ambisjon er å tilby et bredt og variert
utvalg av kvalitetsprodukter som gjør livet mer behagelig. På forsiden av denne
bruksanvisningen finner du noen eksempler på hva du kan velge i. Ta deg noen
minutter til å lese gjennom innholdet i denne bruksanvisningen, slik at du kan dra
nytte av alle fordelene med den nye maskinen din. Vi lover at den vil gi deg en
enestående brukeropplevelse og gjøre hverdagen din litt enklere. Lykke til!
Page 44

44
electrolux
Følgende symboler er brukt i denne bruksanvisningen
Viktig informasjon som gjelder din personlige sikkerhet og informasjoner om
hvordan du kan unngå skader på apparatet
Generelle informasjoner og tips
Miljøinformasjoner
Symbolet på produktet eller på emballasjen viser at dette produktet ikke må
behandles som husholdningsavfall. Det skal derimot bringes til et mottak for
resirkulering av elektrisk og elektronisk utstyr.Ved å sørge for korrekt avhending av
apparatet, vil du bidra til å forebygge de negative konsekvenser for miljø og helse
som gal håndtering kan medføre. For nærmere informasjon om resirkulering av
dette produktet, vennligst kontakt kommunen, renovasjonsselskapet eller
forretningen der du anskaffet det.
Page 45

electrolux
45
INNHOLD
Advarsel oog oopplysninger 46
Bruk 49
Innvendig rengjøring 49
Betjeningspanel 49
Display 49
Første gangs start 50
Slå av 50
Regulere temperaturen 50
Funksjonsmeny 50
Bruke kjøleseksjonen 51
Holiday-funksjon 52
Kjøling av matvarer 52
Hyllene kan justeres i høyden 53
Kjølehylle for drikkevarer 53
Plassering av hyllene og
leskedrikkautomatene i døren 53
Luftsirkulasjon 54
Råd 554
Råd for kjøling 54
Vedlikehold 54
Periodisk rengjøring 55
Avstenging 55
Innvendig belysning 55
Avriming 55
Tekniske ddata 56
Driftsforstyrrelser 56
Installering 57
Plassering 57
Elektrisk tilkopling 57
Hyllesperrer 58
Bakre avstandsstykker 58
Omhengsling av døren 58
Garanti/kundeservice 60
Europeisk ggaranti 61
www.electrolux.com 62
Page 46

46
electrolux
ADVARSEL OG
VIKTIGE
OPPLYSNINGER
Det eer mmeget vviktig aat ddenne
instruksjonsboken ooppbevares
sammen mmed sskapet til ssenere bbruk.
Dersom sskapet selges eeller ooverdras ttil
andre, eeller hhvis ddu fflytter oog eetterlater
skapet, mmå ddu ssørge ffor aat
instruksjonsboken vvedlegges sskapet
slik aat dden nnye eeieren kkan ggjøre sseg
kjent mmed hhvordan ddet vvirker oog
advarslene ii iinstruksjonsboken.
Om ddette sskapet mmed mmagnetlist ppå
døren sskal eerstatte eet ggammelt sskap
med ddørlås mmå ddenne llåsen ffullstendig
ødelegges ffør sskapet kkastes. DDette ffor
å hhindre aat ddet ggamle sskapet bblir een
dødsfelle ffor bbarn.
Disse aadvarslene ggis aav hhensyn ttil
sikkerheten. LLes ddem nnøye ffør ddu
installerer aapparatet eeller ttar ddet ii bbruk.
Generell sikkerhet
• Dette apparatet er ikke beregnet på
å bli brukt av personer (inkludert
barn) med reduserte fysiske,
åndelige eller mentale evner eller
som mangler erfaring og
kunnskaper om bruken, dersom de
ikke holdes under oppsikt eller har
fått opplæring i bruken av en
person som er ansvarlig for deres
sikkerhet.
Barn må holdes under oppsikt for å
sikre at de ikke leker med
apparatet.
• Det er farlig å foreta tekniske
inngrep i skapet.
• Slå av strømmen og trekk støpselet
ut av stikkontakten før rengjøring og
vedlikehold av skapet.
• Dette skapet er tungt. Pass på når
skapet skal flyttes.
• Ispinner kan gi frostskader hvis de
spises direkte fra fryseren.
• Vær fforsiktig nnår ddu hhåndterer
skapet slik aat ddet iikke ooppstår
skader ppå kkjølesystemet oog ddermed
mulighet ffor vvæskelekkasje.
• Skapet må iikke pplasseres nnær
radiatorer eeller ggasskomfyrer.
• Sørg ffor aat sskapet ikke uutsettes ffor
direkte ssollys ii llengre pperioder.
• Det mmå vvære ttilstrekkelig vventilasjon
på bbaksiden aav sskapet, oog sskader
på kkjølekretsløpet mmå aabsolutt
unngås.
• Det bbeste sstedet åå pplassere
fryseskapet er ii kkjelleren ((gjelder
ikke iinnbyggingsmodeller).
• Bruk iikke aandre eelektriske aapparater
(som ff.eks. iiskremmaskiner).
Service / reparasjon
• Alt elektrisk arbeid i forbindelse
med installasjonen av dette skapet
må bare utføres av en autorisert
elektroinstallatør eller annen
kompetent person.
• La bare et autorisert servicesenter
utføre service på skapet og sørg for
at det bare brukes originale
reservedeler eller deler som leveres
av servicesenteret.
• Du må under ingen omstendigheter
Page 47

electrolux
47
forsøke å foreta reparasjoner på
dette skapet selv.
• Reparasjoner som er utført av
ukyndige personer, kan medføre
skader eller alvorlige funksjonsfeil.
Ta kontakt med ditt lokale
servicesenter.
• Dette skapet inneholder
hydrokarboner i kjølesystemet;
vedlikehold og påfylling må derfor
bare utføres av autorisert personell.
• Bruk ikke metallredskaper når du
rengjør skapet, da det kan medføre
skader.
Bruk
• Kjøleskap og frysere til bruk i
vanlige husholdninger er bare
beregnet til lagring av matvarer.
• De beste ytelsene oppnås med en
omgivelses-temperatur mellom
+18°C og +43°C (Klasse T); +18°C
og +38°C (Klasse ST); +16°C og
+32°C (Klasse N); +10°C og +32°C
(Klasse SN); klassen produktet
hører til er oppført på merkeskiltet.
Advarsel: For andre
omgivelsestemperaturer enn de
som er oppgitte i produktets
tilhørende klima-klasse, må
følgende anvisninger overholdes:
når omgivelsestemperaturen synker
under minimumsverdien kan ikke
oppbevaringstemperaturen i
fryseren garanteres, og det
anbefales at matvarene
konsumeres så raskt som mulig.
• Frosne matvarer som har tint, må
ikke fryses ned igjen.
• Produsentens anbefalinger for
lagring og nedfrysing bør
overholdes nøye. Se opplysningene
på emballasjen.
• Skapets innermantel består av
kanaler som kjølemiddelet ledes
igjennom. Hvis det kommer hull på
disse, er skapet ødelagt for alltid,
og matvarene vil gå tapt. BRUK
DERFOR IKKE SKARPE
GJENSTANDER til å skrape bort
rim eller is. Rim fjernes best med
den skrapen som følger med.
Under ingen omstendigheter må
rimlaget fjernes fra den indre
kledningen med makt. Isklumper
må få lov til å smelte når skapet
avrimes. Se avrimingsveiledningen.
• Ikke legg kullsyreholdige eller
musserende drikkevarer i fryseren,
da det frembringer et trykk i flasken
som gjør at den kan bli sprengt i
stykker og dermed skade
apparatet.
• Bruk ikke andre mekaniske
redskaper eller kunstige midler for å
fremskynde avrimingen enn de som
anbefales av produsenten.
Installasjon
• Under normal bruk vil
kondensatoren og kompressoren
på baksiden av skapet bli svært
varme. Av sikkerhetsgrunner må de
minimumsmålene for ventilasjon
som er vist på figuren, overholdes.
Merk: VVentilasjonsåpningene mmå
ikke ttilstoppes.
• Sørg for at apparatet ikke står på
den elektriske ledningen.
Viktig:
dersom nettkabelen
Page 48

48
electrolux
ødelegges, må den skiftes ut med
en spesialkabel eller et sett som
kan fåes ved henvendelse til
produsenten eller kundeservice.
• Visse deler i dette skapet blir svært
varme. Sørg derfor alltid for at det
er tilstrekkelig ventilasjon. Hvis du
unnlater å gjøre dette, kan du
risikere at komponenter bryter
sammen, og at matvarer blir
ødelagt. Se
installasjonsveiledningen.
• Deler som blir varme, bør være
tildekket. Om mulig bør baksiden av
apparatet stå opp mot en vegg.
• Hvis skapet har vært transportert
liggende, kan det forekomme at
oljen i kompressoren renner ut i
kjølekretsløpet. Det er derfor best å
vente minst to timer før skapet
tilkobles slik at oljen kan renne
tilbake i kompressoren.
Miljøvern
Dette sskapet inneholder iikke ggasser
som kkan sskade oozonlaget, vverken ii
kjølesystemet eeller ii
isoleringsmaterialet. SSkapet må iikke
skrotes ssammen mmed
husholdningsavfall. UUnngå åå sskade
kjølesystemet, sspesielt ppå bbaksiden
nær vvarmeveksleren. TTa eeventuelt
kontakt mmed kkommunen ffor åå ffå
opplysninger oom llokale
mottaksstasjoner ffor sspesialavfall. AAlle
materialer ppå sskapet som eer mmerket
med ssymbolet kkan rresirkuleres.
Page 49

electrolux
49
BRUK
Innvendig rengjøring
Før skapet tas i bruk, vaskes det
innvendig med lunkent vann og en
nøytral såpe for å fjerne den spesielle
lukten av «nytt produkt», og tørkes
godt.
IKKE bbruk ssyntetisk vvaskemiddel
eller ppulver ssom kkan rripe oog øødelegge
overflaten.
Betjeningspanel
A - Apparatets PÅ/AV-knapp
B - Temperaturvelger
C - Temperatur- og funksjonsdisplay
D - Funksjonsknapp
E - Bekreftelse-knapp
Display
Positivt temperaturdisplay
Temperaturdisplay
hvis på, er funksjonen Child Lock
aktivert
hvis på, er funksjonen Shopping
aktivert
Hvis på, er funksjonen Eco Mode
aktivert
A
B
C
D
E
Page 50

50
electrolux
Første gangs start
Når støpselet er satt inn i stikkontakten,
trykk på tasten (A) for å slå apparatet
på, hvis displayet ikke er tent.
For å oppbevare maten best mulig,
velg Eco Mode-funksjonen, som
garanterer at følgende temperatur er
innstilt:
+5°C i kjøleskapet
• For å velge en annen temperatur,
se "Regulere temperaturen".
Viktig
Hvis døren blir stående på gløtt noen
minutter, vil den innvendige
belysningen slå seg av elektronisk;
deretter kan lampefunksjonen nullstilles
ved at selve døren lukkes og åpnes.
Slå av
Apparatet slås av ved at tasten (A)
trykkes inn i mer enn 1 sekund. I løpet
av denne prosessen vises en nedtelling
av temperaturen fra -3 -2 -1.
Regulere temperaturen
Temperaturen kan reguleres ved å
trykke på tasten B.
Når du trykker på tasten B, blinker den
aktuelt innstilte temperaturen i
displayet, og når du trykker på tasten
B en gang til, kan du endre den.
Du kan endre valg av temperatur enten
ved å trykke på tasten E (det høres et
lydsignal) eller ved å vente et par
sekunder (det høres ikke et lydsignal).
Deretter viser displayet temperaturen
inni seksjonen igjen.
Den siste innstilte temperaturen må
oppnås etter 24 timer.
Selv om apparatet ikke brukes over en
lengre periode, må du likevel ikke stille inn
temperaturen igjen, fordi den er lagret.
OBS!
I løpet av stabilitetsperioden ved første
gangs igangsetting kan ikke den viste
temperaturen samsvare med
innstillingstemperaturen. I løpet av
denne tiden er det mulig at
temperaturen som vises er forskjellig
fra innstillingstemperaturen).
Funksjonsmeny
Når du trykker på tasten D, aktiveres
funksjonsmenyen.
Hver funksjon kan bekreftes ved å
trykke på knapp E. Hvis det ikke
bekreftes etter
et par sekunder, vil displayet forlate
menyen og gå tilbake til normal drift.
Følgende funksjoner vises:
Child Lock-funksjon
Shopping-funksjon
Eco Mode-funksjon
Child Lock-funksjon
Barnesikringsfunksjonen aktiveres ved
å trykke på tasten D (flere ganger om
nødvendig) til
tilsvarende ikon kommer til syne.
Du må bekrefte valget ved å trykke på
tasten E innen få sekunder. Det høres
et lydsignal, og ikonet forblir tent.
Så lenge denne funksjonen er aktivert,
er det ikke mulig å foreta noen
innstillinger med tastene.
Du kan deaktivere funksjonen når du vil
Page 51

electrolux
51
ved å trykke på tasten D til tilsvarende
ikon blinker. Trykk så på tast E.
Shopping-funksjon
Hvis du skal legge inn en større
mengde romtemperert mat, for
eksempel etter at du har handlet,
foreslår vi at du aktiverer Shoppingfunksjonen, så avkjøles matvarene
raskere, og du unngår at de matvarene
som allerede befinner seg i
kjøleskapet, blir oppvarmet.
Shopping-funksjonen aktiveres ved å
trykke på tasten D (flere ganger om
nødvendig) til tilsvarende ikon
kommer til syne.
Du må bekrefte valget ved å trykke på
tasten E innen få sekunder. Det høres
et lydsignal, og ikonet forblir tent.
Shopping-funksjonen slår seg av
automatisk etter omlag seks timer.
Du kan deaktivere funksjonen når du vil
ved å trykke på tasten D til tilsvarende
ikon blinker. Trykk så på tast E.
Eco Mode-funksjon
Eco Mode-funksjonen aktiveres ved å
trykke på tasten D (flere ganger om
nødvendig) til
tilsvarende ikon kommer til syne
(eller til temperaturen stilles inn på
+5°C).
Du må bekrefte valget ved å trykke på
tasten E innen få sekunder. Det høres
et lydsignal, og ikonet forblir tent.
Nå er de valgte temperaturene
automatisk innstilt (+ 5°C), som er den
beste
betingelsen for å oppbevare matvarer.
Det er mulig å deaktivere funksjonen
når du vil ved å endre den valgte
temperaturen i seksjonen.
Bruke kjøleseksjonen
Temperaturen i denne seksjonen kan
reguleres mellom +2°C og +8°C.
Ved normal drift viser displayet
temperaturen inni kjøleskapet.
OBS!
Det er normalt at det er en forskjell
mellom den temperaturen som vises
og temperaturinnstillingen. Særlig
dersom:
• du nettopp har valgt en ny
innstilling
• døren har stått åpen en stund
• du har lagt romtemperert mat inn i
seksjonen.
Holiday-funksjon “H”
Holiday-funksjonen stiller inn
temperaturen på +15°C.
Denne funksjonen gjør at du kan holde
kjøleskapet lukket og tomt mens du er
borte lenge ( f.eks. sommerferie) uten
at det danner seg dårlig lukt.
Holiday-funksjonen H kan reguleres
ved å trykke på tasten B. Når du
trykker på tasten B, blinker aktuell
temperaturinnstilling i displayet. Trykk
på tasten B en gang til. Når bokstaven
H kommer til syne i displayet, kan du
bekrefte valg av temperatur enten ved
å trykke på tasten E, (det høres et
lydsignal) eller ved å vente et par
sekunder (det høres ikke et lydsignal).
Nå er kjøleskapet innstilt på feriefunksjon i energisparende modus, og
displayet viser bokstaven H.
Page 52

52
electrolux
Det er mulig å deaktivere funksjonen
når du vil ved å endre den valgte
temperaturen i seksjonen.
OBS!
Kjøleseksjonen må være tom når
Holiday-funksjonen er aktivert.
Kjøling av matvarer
Kjøleskapet er beregnet til drikker og
dagligvarer.
Sett ikke varme retter eller dampende
drikker direkte inn i kjøleskapet. Det
reeuserer kjøleskapets kjøleevne.
Matvarer med sterk lukt må pakkes
godt inn.
Page 53

electrolux
53
Hyllene kan justeres i
høyden
Avstanden mellom de forskjellige
hyllene kan endres etter ønske. Ta ut
hyllene og sett dem inn igjen i ønsket
høyde.
Kjølehylle for drikkevarer
For å oppnå maksimal kjøling på
kjølehyllen må du
ta hensyn til følgende:
• Plasser hyllen rett under
dråpekanalen.
• Kontroller at hyllen er avkjølt før du
setter inn de flaskene og boksene
du vil avkjøle på den.
• Sett store bokser og flasker i de
store innskjæringene i midten av
hyllen.
• Sett små bokser og flasker i de
små innskjæringene nærmest
skapveggen.
Plassering av hyllene og
leskedrikkautomatene i
døren
For lagring av pakker i forskjellige
størrelser med mat, kan hyllene og
leskedrikkautomatene i døren justeres
etter ønske dette gjøres på følgende
måte:
Trekk hyllen forsiktig i pilens retning
inntil den er ute, deretter settes den på
plass igjen i ønsket høyde.
D338
Page 54

54
electrolux
Luftsirkulasjon
Kjøleseksjonen er utstyrt med en
innretning som du kan slå på med
bryteren (A-se fig.). Når det grønne
lyset er tent, betyr dette at viften er
aktivert.
Vi foreslår at du aktiverer innretningen
når omgivelsestemperaturen er over
25°C .
Denne innretningen gjør at matvarene
nedkjøles raskere og gir en jevnere
temperatur i seksjonen.
RÅD
Råd for kjøling
Frukt oog ggrønnsaker:
Rengjøres
omhyggelig og oppbevares i
grønnsaksskuffen i bunnen av
kjøleskapet.
Smør oog oost:
Bør oppbevares i lufttette
beholdere eller innpakkes i folie eller
plastposer for å unngå luft så mye som
mulig.
Melkekartonger:
Oppbevares lukket i
hyllen i kjøleskapets dør.
Rått kkjøtt ((okse-ssvin-oog llammekjøtt
samt vvilt):
Legges i plastposer og
anbringes på hyllen i bunnen av
kjøleskapet eller over grønnsaksskuffen
som er det kaldeste stedet i
kjøleskapet.
N.B.: KKjøtt kkan kkun ooppbevares ssikkert
på ddenne mmåten ii 11-22 ddøgn.
VEDLIKEHOLD
Trekk fførst sstøpselet uut aav
stikkontakten.
Viktig
Dette aapparatet iinneholder
hydrokarboner ii kkjøleenheten.
Derfor mmå vvedlikehold oog
A
Page 55

electrolux
55
etterfylling bbare uutføres aav
autoriserte fforhandlere.
Periodisk rengjøring
Mange vvaskemidler ffor kkjøkken
inneholder kkjemiske sstoffer ssom kkan
skade ddelene ii pplast ssom ffinnes ii ddette
skapet. DDet aanbefales dderfor åå rrengjøre
skapet uutvendig mmed vvarmt vvann ttilsatt
mild ssåpe.
Vask skapet innvendig med lunkent
vann og mild såpe.
Det samme gjelder for de store
utvendige flatene. Kondensatoren og
kompressoren bør rengjøres med
børste eller støvsuger. Dette vil bidra til
at skapet beholder sine gode
driftsegenskaper og sparer energi.
Avstenging
Dersom skapet ikke skal brukes i
lengre tid (f.eks. under en ferie), skal
det stenges av:
• trekk støpselet ut av stikkontakten;
• ta alle matvarene ut av kjøleskapet;
• vask skapet godt innvendig;
• la døren stå åpen for å få god
luftsirkulasjon slik at det ikke danner
seg dårlig lukt.
Innvendig belysning
For å skifte ut lyspæren trykk på den
bakre hekten og trekk samtidig ut
dekselet i retningen som angis av pilene.
Advarsel
Skift ut lyspæren med en med samme
styrke (maksimal effekt står oppgitt på
lysdiffusøren).
Avriming
Rimen fjernes automatisk fra
kjøleelementet i kjøleavdelingen hver
gang kompressoren stanser.
Avrimingsvannet renner ut gjennom en
kanal til en spesiell beholderpå
baksiden av kjøleskapet, hvor det
fordamper. Åpningen til
avrimingsvannets avløp som befinner
sea midt på den spesielle skinner i
kjøleskapet bør jevnlig renses, sånn at
avrimingsvannet ikke flyter over og
drypper ned på matvarene som
oppbevares i kjøleskapet. For dette
arbeidet brukes rensepinnen som
allerede befinner sea i avløpshullet.
D037
Page 56

56
electrolux
Vann i bbunnen aav sskapet
Er avløpet for smeltevannet tettet til?
Når du tilkaller service, ber vi deg om å
oppgi modell og produktnummer, som
du finner på typeskiltet (nederst til
venstre på innsiden av skapet). Det
gjør det lettere for oss å reparere
skapet ditt raskt.
TEKNISKE DATA
378
0,403
147
1800
600
645
Kjøleskapets nettokapasitet i liter
Strømforbruk i kWh/årlig (Kwh)
Dimensjoner i mm
høyde
Strømforbruk i kWh/24 t (Kwh)
bredde
dybde
De tekniske dataene er oppført på dataskiltet som finnes på venstre side inne i
skapet.
DRIFTSFORSTYRRELSER
Dersom det i årenes løp skulle oppstå
en feil ved skapet, bør det først
undersøkes om du ikke kan fjerne
feilen selv.
Lampen ii sskapet Iyser iikke nnår ddøren
åpnes
Får skapet strøm? Sjekk sikringene.
Dersom skapet får strøm, er Iyspæren
gått og må sk¦ftes.
Ingen kkjøling
Får skapet strøm?
Page 57

electrolux
57
INSTALLERING
Plassering
Skapet må ikke plasseres nær en
varmekilde, som radiator, ovn, direkte
sol el.
Av sikkerhetsgrunner må
minimumsmålene for ventilasjon som
er vist på figuren, overholdes.
For at skapet skal kunne virke på
beste måte må avstanden fra toppen
av skapet og til overskap eller
lignende, minst være 100 mm.
Likevel, den beste løsningen ville være
om det ikke var overskap over skapet.
Merk
Ventilasjonsåpningene mmå iikke
tildekkes
Med de to justerbare benene vatres
skapet nøyaktig
Elektrisk tilkopling
Skapet tilsluttes strømnettet ved å
sette støpselet i en forskriftsmessig
jordet stikkontakt. Kontroller
at den spenningen og frekvensen som
er oppgitt på skapets typeskilt,
stemmer med strømnettets spenning
og frekvens. Et avvik på ±6% fra
nominell spenning er tillatt.
Det er viktig at skapet er
forskriftsmessig jordet. Derfor er
strørnkabelen forsynt med en spesiell
jordingskontakt. Hvis stikkontaktene i
boligens elektriske system ikke er
jordet, må skapet tilkobles en separat
jordledning av en faglært elektriker i
samsvar med gjeldende
sikkerhetsforskrifter.
Produsenten ffrasier sseg eethvert aansvar
dersom ddenne ssikkerhetsbestemmelsen
ikke bblir ffulgt.
Dette skapet overholder
følgende EFdirektiver:
•
87/308 aav 22.6.87
om demping av
radiostøy.
•
73/23 EEØF aav 119.2.73
(direktiv om
lavspenning) med senere endringer;
•
89/336 EEØF aav 33.5.89
(direktiv om
elektromagnetisk kompatibilitet)
med senere endringer.
Viktig
Skapet må kunne koples fra nettet, og
støpslet må derfor være tilgjengelig
etter at installasjonen er utført.
100 mm10 mm
NP00
10 mm
Page 58

58
electrolux
Hyllesperrer
Skapet er utstyrt med hyllesperrer som
holder hyllene festet under transporten.
Gå frem på følgende måte for å fjerne
dem:
Flytt hyllesperrene i pilretningen, løft
opp glasshyllen bak og skyv den
fremover helt til den løsner og ta av
sperrene.
Bakre avstandsstykker
Inne i apparatet finner du to
avstandsstykker som må monteres
som vist i figuren.
Skru ut skruene, sett avstandsstykkene
på skruene og skru til slutt skruene i igjen.
Omhengsling av døren
Før du begynner, må du trekke ut
støpselet fra stikkontakten.
Gå frem som følger for å hengsle om
døren:
• Vi foreslår at dette arbeidet utføres
av to personer.
• Åpne døren når skapet står. Skru ut
skruene og fjern plastlisten øverst
på døren.
• Fjern det lille plastdekselet fra
dørens plastlist og sett det inn på
motsatt side (d).
• Legg skapet ned på ryggen.
A
B
C
b
c
a
Page 59

electrolux
59
• Fjern skruen på hengseldekselets
plugg (a).
• Skru av det øvre hengselet og fjern
det (b).
• Skru ut skruen og fjern
dørstopperen (c).
• Ta av døren.
• Fjern dekselet (e) med et verktøy,
skru av det nedre hengselet (f) og
sett det på igjen på motsatt side.
• Sett dekselet (e) på igjen på
motsatt side.
• Sett døren på igjen.
• Pass på at frontplaten på døren er
parallelle til frontplaten på toppen.
• Fest dørstopperen på motsatt side.
• Juster posisjonen og fest det øvre
hengselet (som du finner i posen
med bruksanvisningen) på motsatt
side.
• Fest skruene til det nye
hengseldekselet (som du finner i
posen med bruksanvisningen).
• Reis skapet opp i stående stilling
igjen.
• Åpne døren og fest den øvre
plastlisten med skruer igjen.
• Fest håndtaket på motsatt side,
sett plastproppene som du finner i
posen med bruksanvisningen inn i
de hullene som fremdeles er åpne.
Juster og sett skapet i vater,
vent i minst to timer før du setter
støpselet inn i stikkontakten.
Dersom du ikke selv vil gjennomføre
arbeidet som beskrives over, kan du ta
kontakt med nærmeste servicesenter.
Mot regning vil en tekniker ved
servicesenteret hengsle om døren på
skapet.
Advarsel
Når ddu hhar hhengslet oom ddøren,
kontroller aat aalle sskruene eer sstrammet
godt oog aat dden mmagnetiske ppakningen
sitter ggodt iinntil kkabinettet.
Hvis oomgivelsestemperaturen eer llav
(f.eks. oom vvinteren) kkan ddet hhende aat
pakningen iikke ppasser ssom dden sskal
mot kkabinettet. II sså ffall mmå ddu vvente ttil
dette jjusterer sseg aav sseg sselv eeller ffå
fortgang ii ddenne pprosessen vved åå
varme oopp listen mmed een vvanlig
hårføner.
Page 60

60
electrolux
GARANTI/KUNDESERVICE
Service
Ved behov for service på ditt produkt, bør du kontakte din lokale forhandler for å
få opplysninger om vår lokale reparatør.
Du kan også besøke vår internettadresse www.electrolux.no der du finner frem til
din nærmeste reparatør eller ringe 815 30 222 for opplysninger vedrørende dette.
Service oog rreservedeler
Husk alltid å oppgi modellbetegnelse, produktnummer, serienummer og kjøpsdato
ved bestilling av service eller reservedeler. Dette finner du på dataskiltet på
produktet og som kan være lurt og skrive opp nedenfor. Husk at kjøpsbevis må
fremvises til servicemann ved en eventuell reklamasjon.
Reservedeler
Som forbruker kan du bestille deler hos E-Service Oslo AS på:
Telefon: 22 72 58 30
Fax: 22 72 58 80
Internett: post@e-serviceoslo.no
Leveringsbetingelser
Produkter solgt til forbruker i Norge, er underlagt Lov om forbrukerkjøp.
Dersom det inntreffer feil eller mangler som omfattes av loven innen lovens frister,
utbedres dette uten omkostninger for deg. Feil eller skader som oppstår, som er
brukerbetinget eller ligger utenfor leverandørens kontroll, omfattes ikke av loven.
En reparasjon vil da normalt belastes bruker.
All service/reparasjon skal utføres av serviceverksteder godkjent av leverandør.
Inngrep/reparasjoner skal kun utføres av fagperson og i henhold til gjeldende
forskrifter.
Ved næringskjøp mellom to profesjonelle parter gjelder egne bestemmelser i hht.
NEL's leveringsbetingelser og Lov om kjøp.
Leverandør:
Electrolux Home Products Norway A/S
Risløkkveien 2
0508 Oslo
Tlf. 81530222
E-mail: eha@electrolux.no
Internett: www.electrolux.no
..........................................
..........................................
..........................................
..........................................
Modell betegnelse
Produktnummer
Serienummer
Kjøpsdato
Page 61

electrolux
61
EUROPEISK GARANTI
Dette apparatet er dekket av garantien fra Electrolux i alle de landene som er
oppført på baksiden av denne håndboken for den tidsperioden som er spesifisert
i apparatets garanti eller ellers gjennom kjøpsloven.Hvis du flytter fra et av disse
landene til et annet land som er oppført på listen nedenfor, vil apparatets garanti
flytte sammen med deg, forutsatt at følgende betingelser overholdes:
• Apparatets garanti starter fra den dato du først kjøpte apparatet, som bekreftes
ved fremleggelse av gyldig kjøpsdokument, som utstedes av den som solgte
deg apparatet.
• Apparatets garanti gjelder for samme periode og i samme utstrekning for arbeid
og deler for denne spesifikke modellen eller typen apparat, som er i handelen i
det nye landet du bor i.
• Apparatets garanti gjelder personlig for den som opprinnelig kjøpte apparatet
og kan ikke overdras til annen bruker.
• Apparatet installeres og brukes i overensstemmelse med instruksjonene som er
utstedt av Electrolux og må kun brukes i vanlig husholdning, dvs. må ikke
brukes til kommersielle formal.
• Apparatet installeres i overensstemmelse med alle relevante forskrifter som
gjelder i det nye landet du bor i.
Bestemmelsene i denne europeiske garantien har ingen innflytelse på de
rettighetene du innrømmes gjennom loven.
Page 62

62
electrolux
Suomi
www.electrolux.fi
Sverige
+46 (0)771 76 76 76
Electrolux Service, S:t Göransgatan 143, S-105 45 Stockholm
Türkiye
+90 21 22 93 10 25
Tarlaba caddesi no : 35 Taksim stanbul
+7 095 937 7837
Albania
+35 5 4 261 450
Rr. Pjeter Bogdani Nr. 7 Tirane
Belgique/België/Belgien
+32 2 363 04 44
Bergensesteenweg 719, 1502 Lembeek
Danmark
+45 70 11 74 00
Sjællandsgade 2, 7000 Fredericia
eská republika
+420 2 61 12 61 12
Bud jovická 3, Praha 4, 140 21
Deutschland
+49 180 32 26 622
Muggenhofer Str. 135, 90429 Nürnberg
Eesti
+37 2 66 50 030
Mustamäe tee 24, 10621 Tallinn
España
+34 902 11 63 88
Carretera M-300,Km.29,900 Alcalá de Henares Madrid
France
Great Britain
+44 8705 929 929
Addington Way, Luton, Bedfordshire LU4 9QQ
Hellas
+30 23 10 56 19 70
4, Limnou Str., 54627 Thessaloniki
Hrvatska
+385 1 63 23 338
Slavonska avenija 3, 10000 Zagreb
Ireland
+353 1 40 90 753
Long Mile Road Dublin 12
Italia
+39 (0) 434 558500
C.so Lino Zanussi, 26 - 33080 Porcia (PN)
Latvija
+37 17 84 59 34
Kr. Barona iela 130/2, LV-1012, Riga
Lietuva
+370 5 2780609
Verki 29, LT-09108 Vilnius
Luxembourg
+35 2 42 43 13 01
Rue de Bitbourg, 7, L-1273 Hamm
Magyarország
+36 1 252 1773
H-1142 Budapest XIV, Erzsébet királyné útja 87
Nederland
+31 17 24 68 300
Vennootsweg 1, 2404 CG - Alphen aan den Rijn
Norge
+47 81 5 30 222
Risløkkvn. 2 , 0508 Oslo
Österreich
+43 18 66 400
Herziggasse 9, 1230 Wien
Polska
+48 22 43 47 300
ul. Kolejowa 5/7, Warsaw
Portugal
+35 12 14 40 39 39
Quinta da Fonte-Edificio Gonçalves Zarco-Q 35-2774-518 Paço de Arcos
Romania
+40 21 451 20 30
Str. Garii Progresului 2, S4, 040671 RO
Schweiz-Suisse-Svizzera
+41 62 88 99 111
Industriestrasse 10, CH-5506 Mägenwil
Slovenija
+38 61 24 25 731
Electrolux Ljubljana d.o.o., Gerbi eva 98, 1000 Ljubljana
Slovensko
+421 2 43 33 43 22
Electrolux Slovakia s.r.o., Electrolux Domáce spotrebi e SK, Seberíniho 1, 821 03 Bratislava
www.electrolux.com
ě
á
ŏ
ŝ
www.electrolux.fr
È
129090 Москва, Олимпийский проспект, 16, БЦ "Олимпик"
ģ
ě
Россия
Page 63

Page 64

2223 417-14-00 20052008
wwwwww..eelleeccttrroolluuxx..ccoomm
www.electrolux.pt
www.electrolux.no
 Loading...