

Page 1
user manual
Қолдану туралы
нұсқаулары
informaţii pentru utilizator
Інструкція
Fridge-Freezer
Тоңазытқыш-мұздатқыш
Frigider cu congelator
Холодильник-морозильник
ERA36633W
ERA40633W
Page 2
2 electrolux
Electrolux. Thinking of you.
Share more of our thinking at www.electrolux.com
CONTENTS
Safety information 2
Control panel 4
First use 7
Daily use 7
Helpful hints and tips 9
SAFETY INFORMATION
In the interest of your safety and to ensure
the correct use, before installing and first
using the appliance, read this user manual
carefully, including its hints and warnings.
To avoid unnecessary mistakes and accidents, it is important to ensure that all people using the appliance are thoroughly familiar with its operation and safety features.
Save these instructions and make sure that
they remain with the appliance if it is moved
or sold, so that everyone using it through its
life will be properly informed on appliance
use and safety.
For the safety of life and property keep the
precautions of these user's instructions as
the manufacturer is not responsible for
damages caused by omission.
Children and vulnerable people safety
• This appliance is not intended for use by
persons (including children) with reduced
physical, sensory or mental capabilities,
or lack of experience and knowledge, unless they have been given supervision or
instruction concerning use of the appliance by a person responsible for their
safety.
Children should be supervised to ensure
that they do not play with the appliance.
• Keep all packaging well away from children. There is risk of suffocation.
• If you are discarding the appliance pull
the plug out of the socket, cut the connection cable (as close to the appliance
as you can) and remove the door to prevent playing children to suffer electric
shock or to close themselves into it.
• If this appliance featuring magnetic door
seals is to replace an older appliance
having a spring lock (latch) on the door or
Care and cleaning 10
What to do if… 11
Technical data 13
Installation 13
Environmental concerns 17
Subject to change without notice
lid, be sure to make that spring lock unusable before you discard the old appliance. This will prevent it from becoming a
death trap for a child.
General safety
Warning!
Keep ventilation openings, in the appliance
enclosure or in the built-in structure, clear of
obstruction.
• The appliance is intended for keeping
foodstuff and/or beverages in a normal
household as explained in this instruction
booklet.
• Do not use a mechanical device or any
artificial means to speed up the thawing
process.
• Do not use other electrical appliances
(such as ice cream makers) inside of refrigerating appliances, unless they are approved for this purpose by the manufacturer.
• Do not damage the refrigerant circuit.
• The refrigerant isobutane (R600a) is contained within the refrigerant circuit of the
appliance, a natural gas with a high level
of environmental compatibility, which is
nevertheless flammable.
During transportation and installation of
the appliance, be certain that none of the
components of the refrigerant circuit become damaged.
If the refrigerant circuit should become
damaged:
– avoid open flames and sources of igni-
tion
– thoroughly ventilate the room in which
the appliance is situated
Page 3
electrolux 3
• It is dangerous to alter the specifications
or modify this product in any way. Any
damage to the cord may cause a shortcircuit, fire and/or electric shock.
Warning! Any electrical component
(power cord, plug, compressor) must
be replaced by a certified service agent
or qualified service personnel to avoid
hazard.
1. Power cord must not be lengthened.
2. Make sure that the power plug is not
squashed or damaged by the back of
the appliance. A squashed or damaged power plug may overheat and
cause a fire.
3. Make sure that you can come to the
mains plug of the appliance.
4. Do not pull the mains cable.
5. If the power plug socket is loose, do
not insert the power plug. There is a
risk of electric shock or fire.
6. You must not operate the appliance
1)
without the lamp cover
of interior
lighting.
• This appliance is heavy. Care should be
taken when moving it.
• Do not remove nor touch items from the
freezer compartment if your hands are
damp/wet, as this could cause skin abrasions or frost/freezer burns.
• Avoid prolonged exposure of the appliance to direct sunlight.
•
Bulb lamps
2)
used in this appliance are
special purpose lamps selected for
household appliances use only. They are
not suitable for household room illumination.
Daily Use
• Do not put hot pot on the plastic parts in
the appliance.
• Do not store flammable gas and liquid in
the appliance, because they may explode.
• Do not place food products directly
against the air outlet on the rear wall.
3)
• Frozen food must not be re-frozen once
it has been thawed out.
1) If the lamp cover is foreseen.
2) If the lamp is foreseen.
3) If the appliance is Frost Free.
• Store pre-packed frozen food in accordance with the frozen food manufacturer's
instructions.
• Appliance's manufacturers storage recommendations should be strictly adhered
to. Refer to relevant instructions.
• Do not place carbonated or fizzy drinks in
the freezer compartment as it creates
pressure on the container, which may
cause it to explode, resulting in damage
to the appliance.
• Ice lollies can cause frost burns if consumed straight from the appliance.
Care and cleaning
• Before maintenance, switch off the appliance and disconnect the mains plug from
the mains socket.
• Do not clean the appliance with metal
objects.
• Do not use sharp objects to remove frost
from the appliance. Use a plastic scraper.
• Regularly examine the drain in the refrigerator for defrosted water. If necessary,
clean the drain. If the drain is blocked,
water will collect in the bottom of the appliance.
Installation
Important! For electrical connection
carefully follow the instructions given in
specific paragraphs.
• Unpack the appliance and check if there
are damages on it. Do not connect the
appliance if it is damaged. Report possible damages immediately to the place
you bought it. In that case retain packing.
• It is advisable to wait at least four hours
before connecting the appliance to allow
the oil to flow back in the compressor.
• Adequate air circulation should be
around the appliance, lacking this leads
to overheating. To achieve sufficient ventilation follow the instructions relevant to
installation.
• Wherever possible the back of the product should be against a wall to avoid
touching or catching warm parts (compressor, condenser) to prevent possible
burn.
Page 4
4 electrolux
• The appliance must not be located close
to radiators or cookers.
• Make sure that the mains plug is accessible after the installation of the appliance.
•
Connect to potable water supply only.
4)
Service
• Any electrical work required to do the
servicing of the appliance should be carried out by a qualified electrician or competent person.
• This product must be serviced by an authorized Service Centre, and only genu-
in either its refrigerant circuit or insulation materials. The appliance shall not
be discarded together with the urban
refuse and rubbish. The insulation foam
contains flammable gases: the appliance shall be disposed according to
the applicable regulations to obtain
from your local authorities. Avoid damaging the cooling unit, especially at the
rear near the heat exchanger. The materials used on this appliance marked
by the symbol
ine spare parts must be used.
Environment Protection
This appliance does not contain gasses
which could damage the ozone layer,
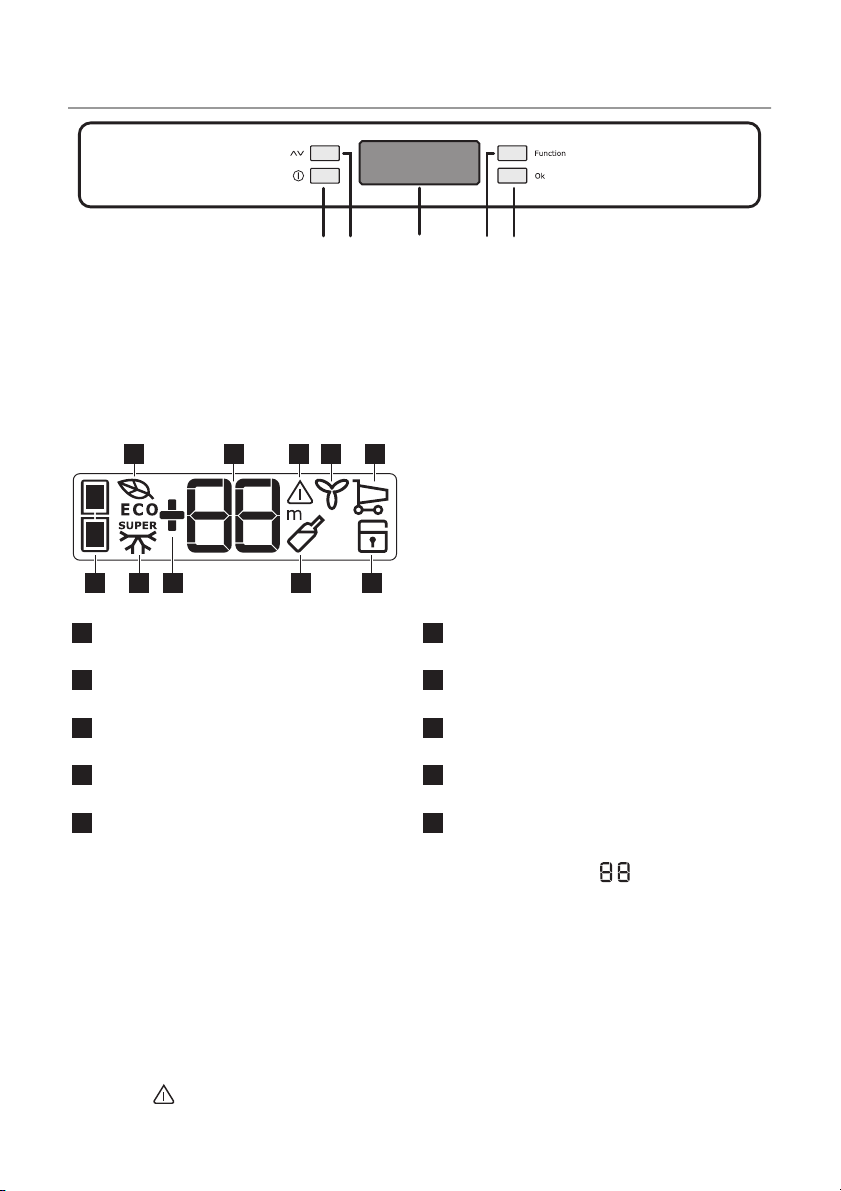
CONTROL PANEL
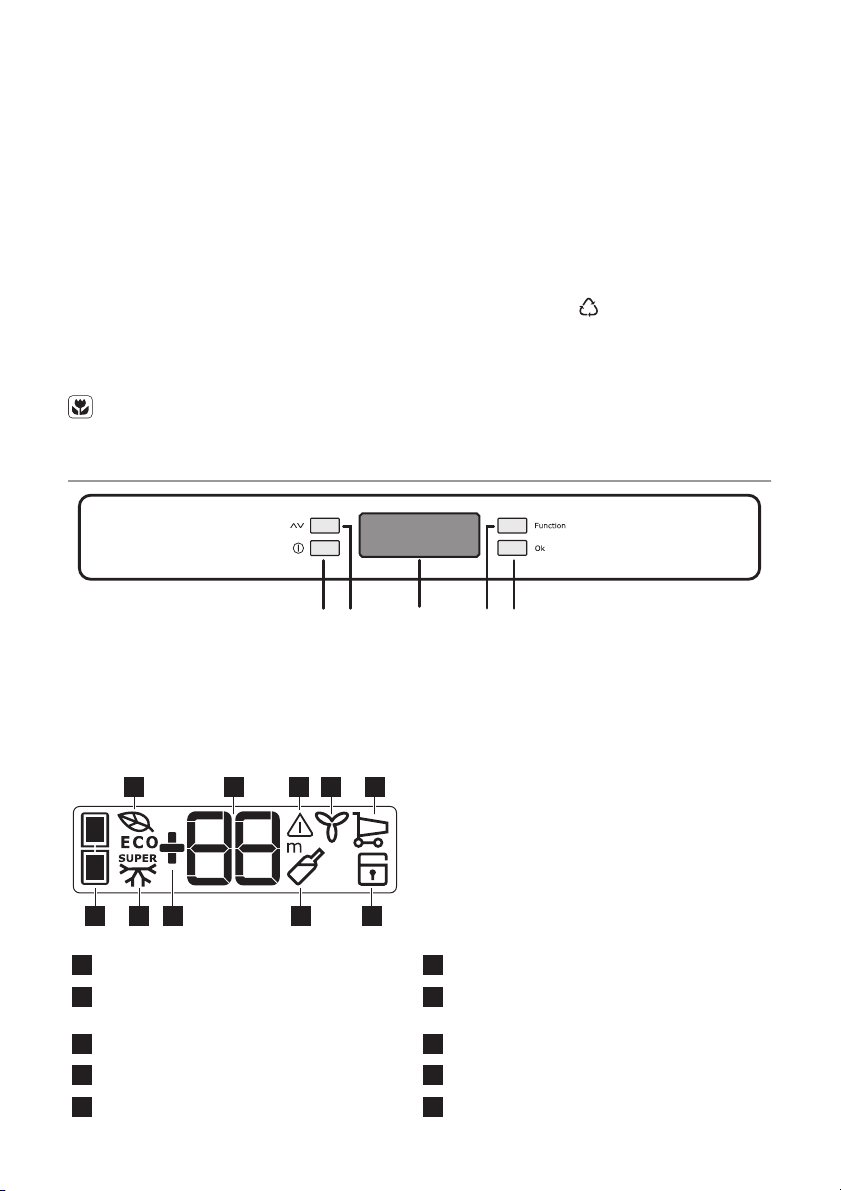
B
A - Appliance button ON/OFF D - Function button
B - Temperature regulation button E - Confirmation button
C - Temperature and function indicator
Display
DEAC
are recyclable.
10 1 2 3 4
Temperature indicator.
1
Excessive temperature alarm.
2
FreeStore funcion indicator.
3
Shopping function indicator.
4
Child Lock function indicator.
5
4) If a water connection is foreseen.
56789
Timer function indicator.
6
Positive or negative temperature indi-
7
cator.
Action Freeze function indicator.
8
Compartment indicator.
9
Eco Mode function indicator.
10
Page 5
electrolux 5
First switch on
After plugging the plug into the power outlet, if the display is not illuminated, press
key (A), appliance on.
As soon as the appliance is turned on, it is
in alarm condition, the temperature flashes
and you will hear a buzzer.
Press key (E) and the buzzer will go off (also
see the section on "excessive temperature
alarm" ) the icon
indicator
still flashes and on the
will appear the warmest temperature reached.
For a correct storage of the food select the
Eco mode function that guarantee the following temperatures are set:
+5°C in the fridge
-18°C in the freezer
• Wait until the inside compartment tem-
perature reach -18°C, before introducing
the goods in the freezer compartment.
• To select a different temperature see
"Temperature regulation".
Switching off
The appliance is shut off by pressing key (A)
for more than 1 second.
During this, a countdown of the temperature from -3 -2 -1 will be shown.
Functions Menu
By activating the key (D) the functions menu
is operating. Each function could be confirmed by pressing button (E). If there is no
confirmation after some seconds the display will go out from the menu and return in
normal condition.
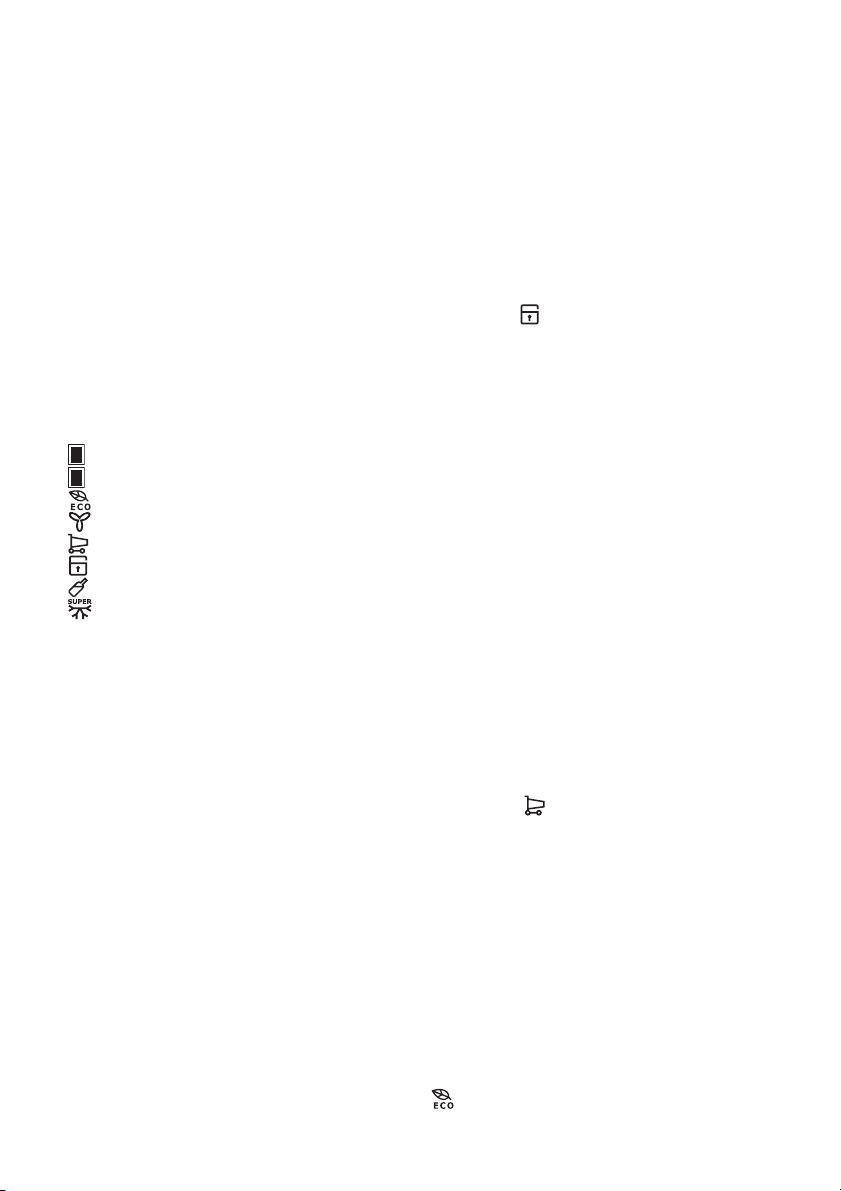
The following functions are indicated:
Select the fridge compartment
Select the freezer compartment
Eco Mode function
FreeStore function
Shopping function
Child Lock function
Drinks Chill function
Action Freeze function
Temperature regulation
Press the key (D) to select the compartment
and than the key (B) to set the necessary
temperature.
Press the key (E) to confirm the selection.
The temperature indicator shows the set
temperature. The set temperature will be
reached within 24 hours.
Holiday Function "H"
The holiday function sets the temperature
at + 15°C.
This function allows you to keep the refrigerator shut and empty during a long holiday
period ( e. g. the summer holidays) without
the formation of a bad smell.
To turn on the holiday function operate as
per modift the selected temperature. The
temperature indicator can modify the displayed temperature up to + 8 °C, 1 °at a
tim. + 2 °C will be followed by the letter "H
". Press key E to confirm.
Now the refrigerator is in the "holiday "function in the energy- saving mode.
Important! The fridge compartment must
be empty with holiday function on.
Child Lock Function
The Child Lock function is activated by
pressing key (D) (several times if necessary)
until the corresponding icon appears
.
You must confirm the choice by pressing
key (E) within few seconds. You will hear
the buzzer and the icon remains lighted. In
this condition any possible operation
through the keys does not cause any
change as long as this function is activated.
It is possible to de-activate the function at
any time by pressing key (D) until the corresponding icon will flash and then key (E).
Shopping Function
If you need to insert a large amount of
warm food, for example after doing the grocery shopping, we suggest activating the
Shopping function to chill the products
more rapidly and to avoid warming the other food which is already in the refrigerator.
The Shopping function is activated by
pressing key (D) (several times if necessary)
until the corresponding icon appears
.
You must confirm the choise by pressing
key (E) within few seconds. You will hear
the buzzer and the icon remains lighted.
The Shopping function shuts off automatically after approximately 6 hours. It is possible to de-activate the function at any time
Page 6
6 electrolux
by pressing key (D) until the corresponding
icon will flash and then key (E).
Eco Mode Function
Press the key (D) (several times if necessary) until the corresponding icon appears
.
Press the key (E) to confirm the selection.
You will hear the buzzer and the icon remains lighted.
In this condition the temperatures are automatically set (+ 5°C and - 18°C), in the best
conditions for storing food.
Set a different temperature in one of the
compartment to switch off the function.
FreeStore Function
Press the key (D) (several times if necessary) until the corresponding icon appears
Press the key (E) to confirm the selection.
You will hear the buzzer and the icon remains lighted.
Important! If the function is activated
automatically the FreeStore icon is not
shown (refer to "Daily use").
The activation of the FreeStore function increase the energy consumption.
Action Freeze Function
The freezer compartment is suitable for
long term storage of commercially frozen
and deep-frozen food, and for freezing
fresh food.
The maximum quantity of foods to freeze in
24 hours is shown on the rating plate.
To freeze the amount of food indicated on
the rating plate, place the food directly in
touch with the cooling surface (remove the
drawer or basket). In case the food is frozen
inside the drawers or baskets, the maximum quantity is slightly reduced.
To freeze fresh foods, you will need to activate the Action Freeze function. Press key
(D) (several times if necessary) until
indicator appears.
You must confirm the choice by pressing
key (E) within few seconds. You will hear
the buzzer and on the display will appear
some animation with lines.
After a pre-cooling period of 24 hours,
place the foods in the freezer.
Place the food to be frozen in the
com-
partment, as this is the coldest point.
The freezing process takes 24 hours. During this period do not put other foods in the
freezer.
This function stops automatically after 52
hours.
It is possible to deactivate the function at
any time by pressing key (D) until
indica-
tor will flash and then press key (E).
Drinks Chill Function
The Drinks Chill function is to be used as a
safety warning when placing bottles in the
freezer compartment. It is activated by
pressing key (D) (several times if necessary)
until the corresponding icon appears
.
You must confirm the choice by pressing
key (E) within few seconds. You will hear
the buzzer and the icon remains lighted.
In this condition it operates a timer with a
default value of 30 min. and it could change
from 1 to 90 min., by pressing key (B) you
select the minutes needed.
At the end of the selected time there are
the following indications:
•
on the indicator
the symbol flash-
ing
•
the icon
•
the icon
flashing
flashing
• sounding of an acoustic alarm until key
(E) is pressed
At this point bear in mind to remove the
drinks contained in the freezer compartment.
It is possible to deactivate the function at
any time by pressing key (D) until the corresponding icon will flash and then key (E).
Excessive temperature alarm
An increase in the temperature in a compartment (for example due to an power failure) is indicated by:
• flashing temperature
•
freezer compartment
•
flashing of the icon
flashing
• sounding of buzzer
When normal conditions are restored:
• the acoustic signal shuts off
• the temperature value continues to flash
When you press key (E) to de-activate the
alarm, the highest temperature reached in
the compartment appears on indicator
for some seconds.
Page 7
electrolux 7
Then it returns on the normal operation
showing the temperature of the selected
compartment.
FIRST USE
Cleaning the interior
Before using the appliance for the first time,
wash the interior and all internal accessories with lukewarm water and some neutral
soap so as to remove the typical smell of a
brand-new product, then dry thoroughly.
DAILY USE
Storage of frozen food
When first starting-up or after a period out
of use, before putting the products in the
compartment let the appliance run at least
2 hours on the higher settings.
Important! In the event of accidental
defrosting, for example due to a power
failure, if the power has been off for longer
than the value shown in the technical
characteristics chart under "rising time", the
defrosted food must be consumed quickly
or cooked immediately and then re-frozen
(after cooling).
Thawing
Deep-frozen or frozen food, prior to being
used, can be thawed in the refrigerator
compartment or at room temperature, depending on the time available for this operation.
Small pieces may even be cooked still frozen, directly from the freezer: in this case,
cooking will take longer.
FreeStore
The refrigerator compartment is equipped
with a device that allows for rapid cooling of
foods and more uniform temperature in the
compartment.
During the alarm phase, the buzzer can be
switched off by pressing key (E).
Important! Do not use detergents or abrasive powders, as these will damage the finish.
This device activates by itself when needed,
for example for a quick temperature recovering after door opening or when the ambient temperature is high.
Allows you to switch on the device manually
when needed (refer to "FreeStore Function").
Important! The FreeStore device stops
when the door is open and restarts
immediately after the door closing.
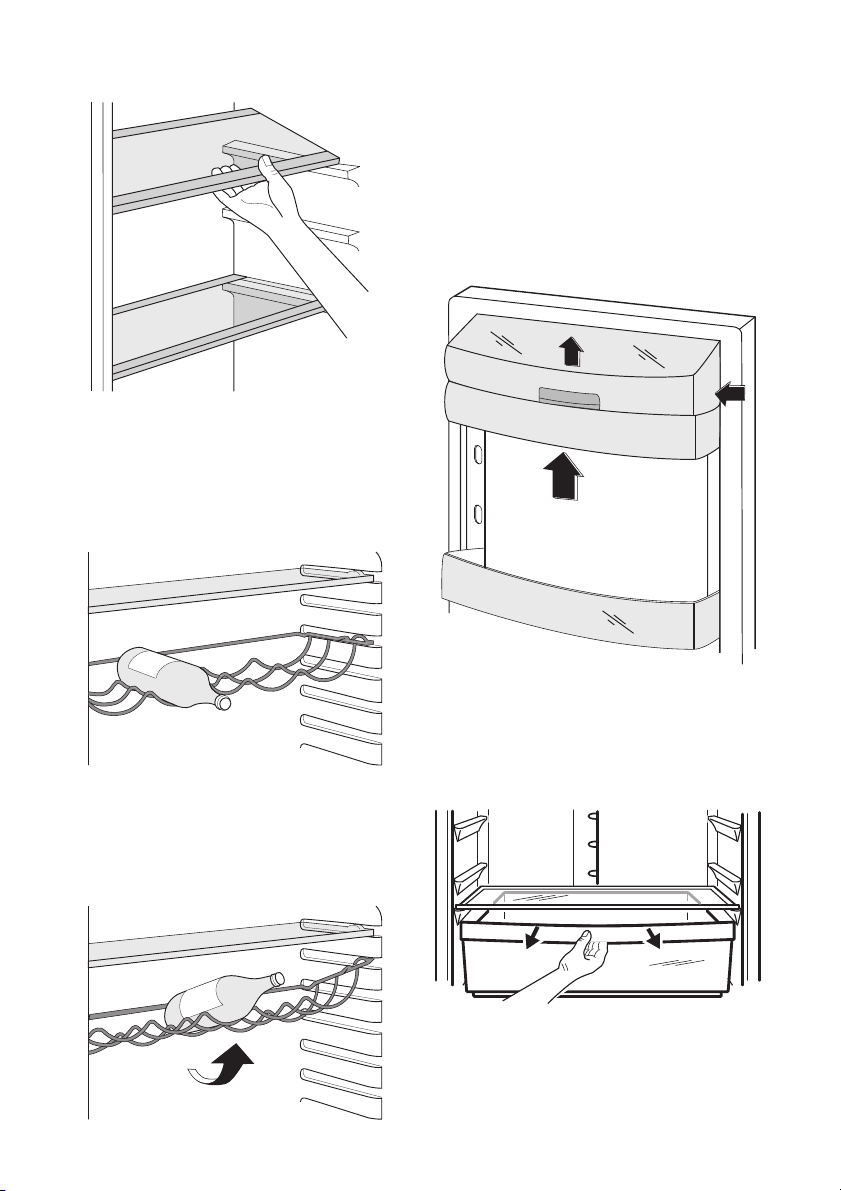
Movable shelves
The walls of the refrigerator are equipped
with a series of runners so that the shelves
can be positioned as desired.
Page 8
8 electrolux
Bottle rack
Place the bottles (with the opening facing
front) in the pre-positioned shelf.
Important! If the shelf is positioned
horizontally, place only closed bottles.
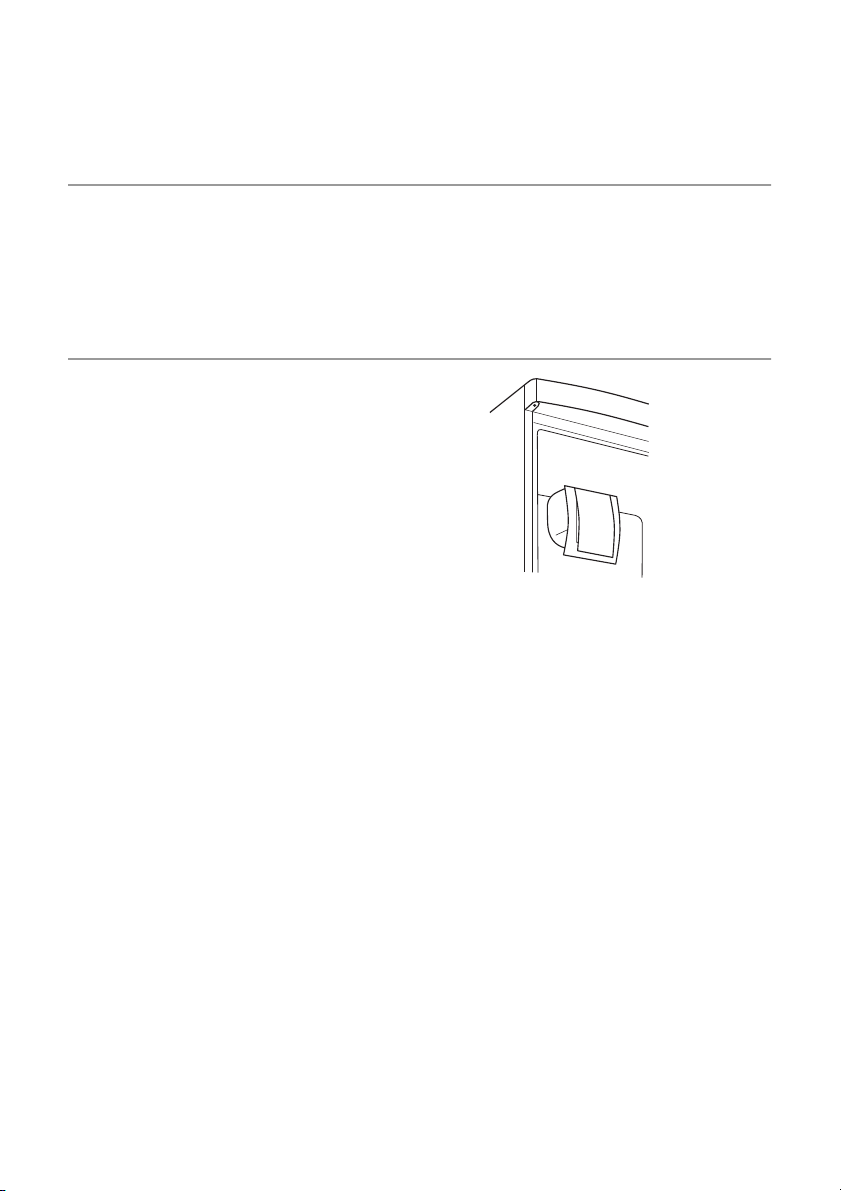
Positioning the door shelves
To permit storage of food packages of various sizes, the door shelves can be placed
at different heights.
To make these adjustments proceed as follows:
gradually pull the shelf in the direction of the
arrows until it comes free, then reposition
as required.
This bottle holder shelf can be tilted in order
to store previously opened bottles. To obtain this result, pull the shelf up so it can rotate upwards and be placed on the next
higher level.
FreshZone drawer
TheFreshZonedrawer is suitable for storing
fresh food like fish, meat, seafood, because
the temperature is lower here than in the
rest of the fridge.
Removal of freezing baskets from the
freezer
The freezing baskets have a limit stop to
prevent their accidental removal or falling
out. At the time of its removal from the
freezer, pull the basket towards yourself
Page 9
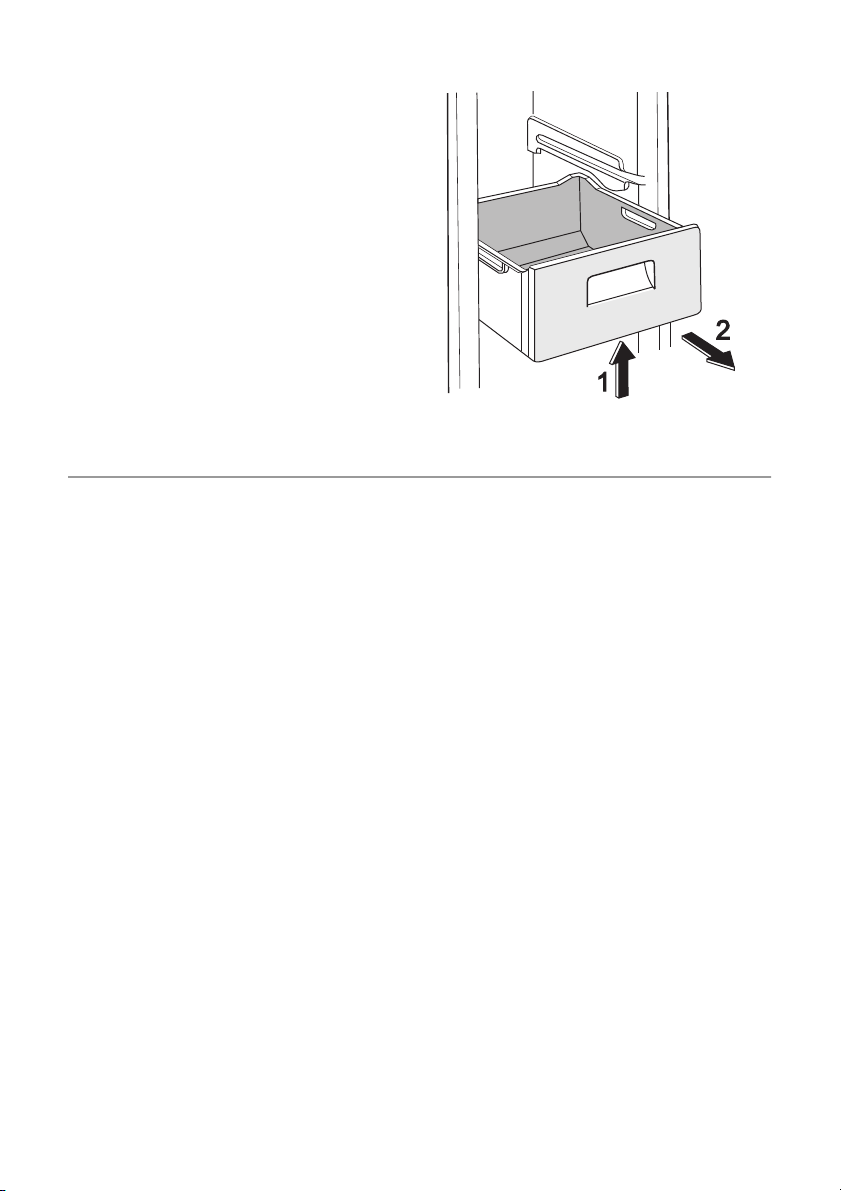
and, upon reaching the end point, remove
the basket by tilting its front upwards.
At the time of putting it back, slightly lift the
front of the basket to insert it into the freezer. Once you are over the end points, push
the baskets back in their position.
HELPFUL HINTS AND TIPS
Normal Operating Sounds
• You may hear a faint gurgling and a bubbling sound when the refrigerant is pumped through the coils or tubing. This is
correct.
• When the compressor is on, the refrigerant is being pumped around and you will
hear a whirring sound and a pulsating
noise from the compressor. This is correct.
• The thermic dilatation might cause a sudden cracking noise. It is natural, not dangerous physical phenomenon. This is
correct.
Hints for energy saving
• Do not open the door frequently or leave
it open longer than absolutely necessary.
• If the ambient temperature is high and
the Temperature Regulator is set to low
temperature and the appliance is fully
loaded, the compressor may run continuously, causing frost or ice on the evaporator. If this happens, set the Temperature Regulator toward warmer settings to
allow automatic defrosting and so a saving in electricity consumption.
Hints for fresh food refrigeration
To obtain the best performance:
• do not store warm food or evaporating
liquids in the refrigerator
electrolux 9
• do cover or wrap the food, particularly if it
has a strong flavour
• position food so that air can circulate
freely around it
Hints for refrigeration
Useful hints:
Meat (all types) : wrap in polythene bags
and place on the glass shelf above the vegetable drawer.
For safety, store in this way only one or two
days at the most.
Cooked foods, cold dishes, etc..: these
should be covered and may be placed on
any shelf.
Fruit and vegetables: these should be thoroughly cleaned and placed in the special
drawer(s) provided.
Butter and cheese: these should be placed
in special airtight containers or wrapped in
aluminium foil or polythene bags to exclude
as much air as possible.
Milk bottles: these should have a cap and
should be stored in the bottle rack on the
door.
Bananas, potatoes, onions and garlic, if not
packed, must not be kept in the refrigerator.
Hints for freezing
To help you make the most of the freezing
process, here are some important hints:
Page 10
10 electrolux
• the maximum quantity of food which can
be frozen in 24 hrs. is shown on the rating plate;
• the freezing process takes 24 hours. No
further food to be frozen should be added during this period;
• only freeze top quality, fresh and thoroughly cleaned, foodstuffs;
• prepare food in small portions to enable it
to be rapidly and completely frozen and
to make it possible subsequently to thaw
only the quantity required;
• wrap up the food in aluminium foil or polythene and make sure that the packages
are airtight;
• do not allow fresh, unfrozen food to
touch food which is already frozen, thus
avoiding a rise in temperature of the latter;
• lean foods store better and longer than
fatty ones; salt reduces the storage life of
food;
• water ices, if consumed immediately after
removal from the freezer compartment,
CARE AND CLEANING
Caution! Unplug the appliance before
carrying out any maintenance
operation.
This appliance contains hydrocarbons
in its cooling unit; maintenance and recharging must therefore only be carried
out by authorized technicians.
Periodic cleaning
The equipment has to be cleaned regularly:
• clean the inside and accessories with
lukewarm water and some neutral soap.
• regularly check the door seals and wipe
clean to ensure they are clean and free
from debris.
• rinse and dry thoroughly.
Important! Do not pull, move or damage
any pipes and/or cables inside the cabinet.
Never use detergents, abrasive powders,
highly perfumed cleaning products or wax
polishes to clean the interior as this will
damage the surface and leave a strong
odour.
Clean the condenser (black grill) and the
compressor at the back of the appliance
with a brush. This operation will improve the
can possibly cause the skin to be freeze
burnt;
• it is advisable to show the freezing in date
on each individual pack to enable you to
keep tab of the storage time.
Hints for storage of frozen food
To obtain the best performance from this
appliance, you should:
• make sure that the commercially frozen
foodstuffs were adequately stored by the
retailer;
• be sure that frozen foodstuffs are transferred from the foodstore to the freezer in
the shortest possible time;
• not open the door frequently or leave it
open longer than absolutely necessary.
• Once defrosted, food deteriorates rapidly
and cannot be refrozen.
• Do not exceed the storage period indicated by the food manufacturer.
performance of the appliance and save
electricity consumption.
Important! Take care of not to damage the
cooling system.
Many proprietary kitchen surface cleaners
contain chemicals that can attack/damage
the plastics used in this appliance. For this
reason it is recommended that the outer
casing of this appliance is only cleaned with
warm water with a little washing-up liquid
added.
After cleaning, reconnect the equipment to
the mains supply.
Defrosting of the refrigerator
Frost is automatically eliminated from the
evaporator of the refrigerator compartment
every time the motor compressor stops,
during normal use. The defrost water drains
out through a trough into a special container at the back of the appliance, over the
motor compressor, where it evaporates.
It is important to periodically clean the defrost water drain hole in the middle of the
refrigerator compartment channel to prevent the water overflowing and dripping on-
Page 11
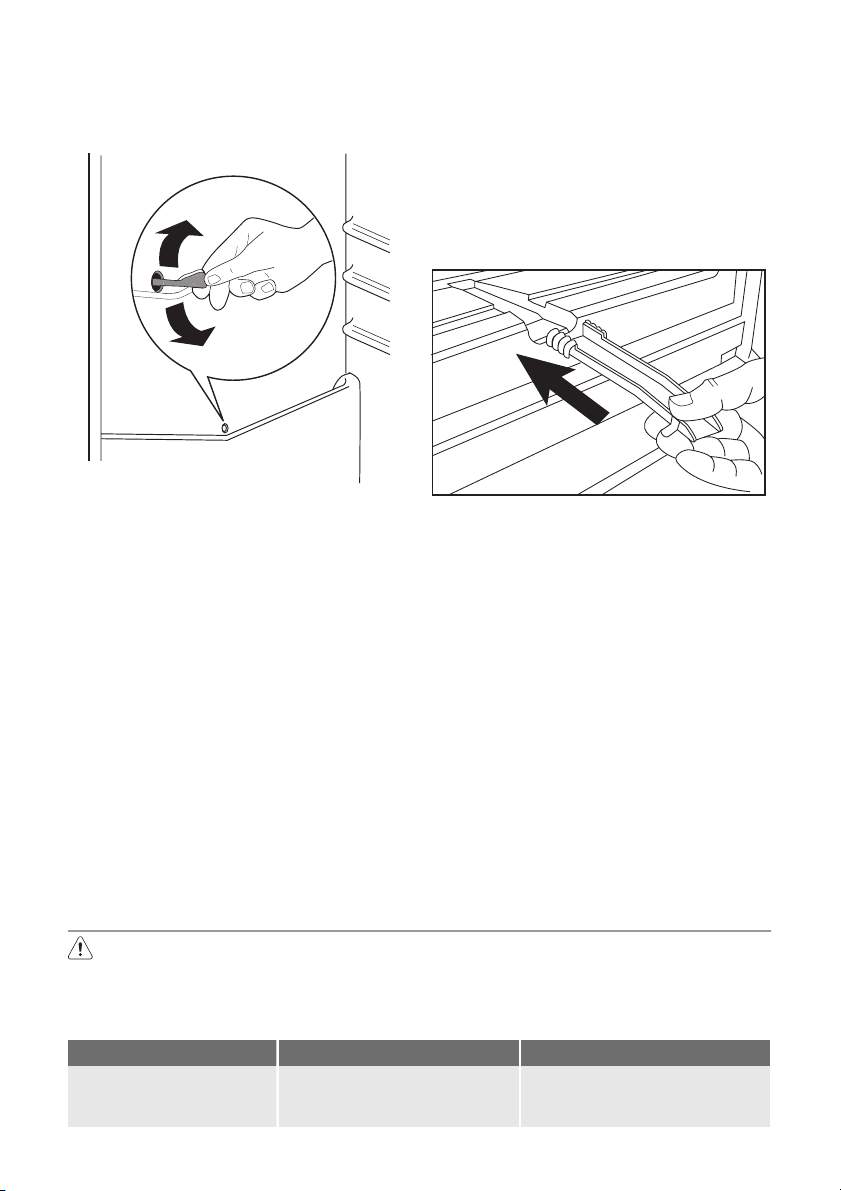
electrolux 11
to the food inside. Use the special cleaner
provided, which you will find already inserted into the drain hole.
Defrosting the freezer
A certain amount of frost will always form
on the freezer shelves and around the top
compartment.
Defrost the freezer when the frost layer reaches a thickness of about 3-5 mm.
To remove the frost, follow the instructions
below:
• pull out the plug from the wall socket or
switch off the appliance
• remove any stored food, wrap it in several layers of newspaper and put it in a cool
place
• remove the freezer drawers
• put insulating material around the drawers, e.g. blankets or newspapers.
Defrosting can be accelerated by placing
bowls with hot water (not boiling) inside the
freezer.
• Loosen the drainage channel from its
resting position, push it in according to
the illustration and place it in the bottom
freezer drawer where water can collect
• carefully scrape off the ice when it starts
to thaw. Use a wood or a plastic scraper
• when all the ice has melted, clean and
wipe the cabinet dry, then put the drainage channel back in place.
• switch on the cabinet and replace the
frozen foodstuff.
It is recommended to operate the appliance at the highest position of the
thermostatic control for some hours so
that it can reach the sufficient storing
temperature as soon as possible.
Important! Never use sharp metal tools to
scrape off frost from the evaporator as you
could damage it. Do not use a mechanical
device or any artificial means to speed up
the thawing process other than those
recommended by the manufacturer. A
temperature rise of the frozen food packs,
during defrosting, may shorten their safe
storage life.
WHAT TO DO IF…
Caution! Before troubleshooting,
disconnect the power supply.
Only a qualified electrician or competent person must do the troubleshooting that is not in this manual.
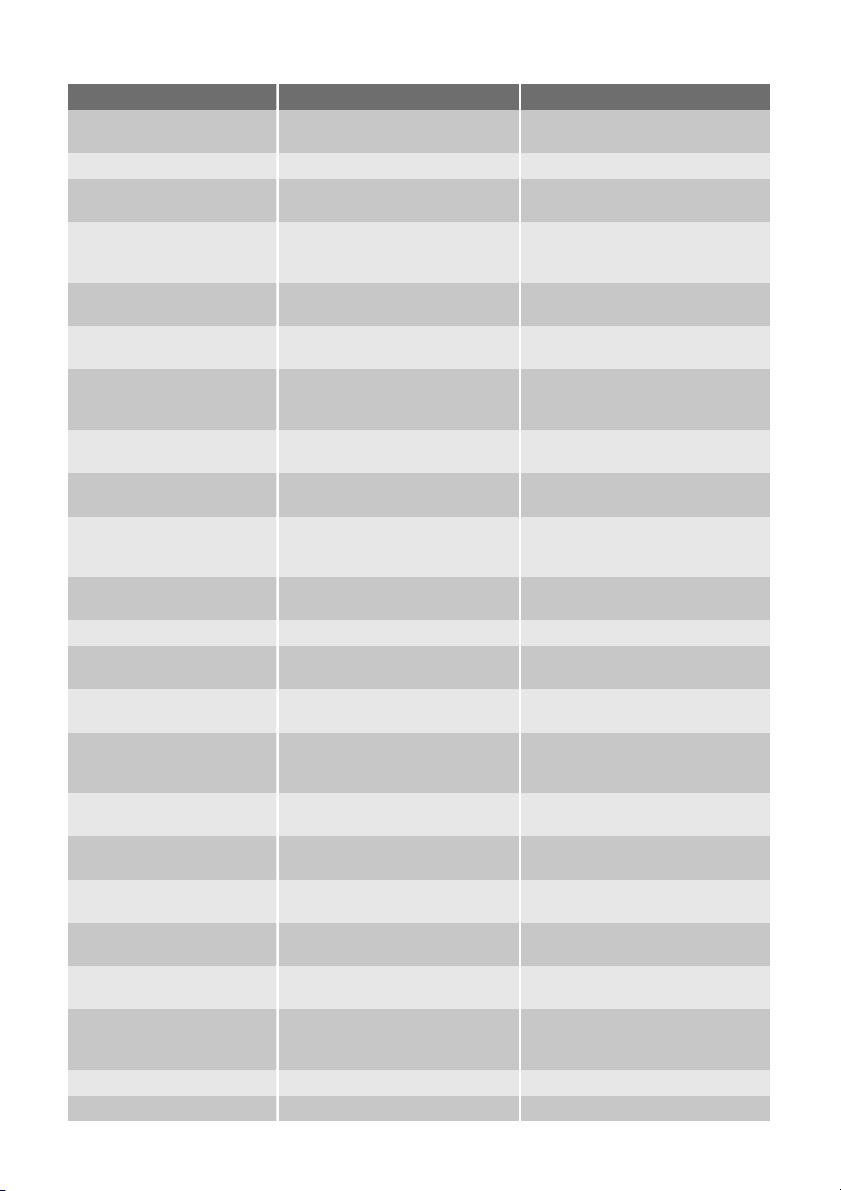
Problem Possible cause Solution
The appliance is noisy. The appliance is not supported
properly.
Important! There are some sounds during
normal use (compressor, refrigerant
circulation).
Check if the appliance stands stable (all the four feet should be on
the floor).
Page 12
12 electrolux
Problem Possible cause Solution
The compressor operates continually.
The Temperature regulator may
be set incorrectly.
Set a warmer temperature.
The door is not closed correctly. Refer to "Closing the door".
The door has been opened too
frequently.
The product temperature is too
high.
Do not keep the door open longer
than necessary.
Let the product temperature decrease to room temperature before storage.
The room temperature is too
Decrease the room temperature.
high.
The Action Freeze function is
Refer to "Action Freeze function".
switched on.
Water flows on the rear
plate of the refrigerator.
During the automatic defrosting
process, frost defrosts on the
This is correct.
rear plate.
Water flows into the re-
The water outlet is clogged. Clean the water outlet.
frigerator.
Products prevent that water
flows into the water collector.
Water flows on the
ground.
The melting water outlet does
not flow in the evaporative tray
Make sure that products do not
touch the rear plate.
Attach the melting water outlet to
the evaporative tray.
above the compressor.
There is too much frost
and ice.
Products are not wrapped properly.
Wrap the products better.
The door is not closed correctly. Refer to "Closing the door".
The Temperature regulator may
Set a higher temperature.
be set incorrectly.
The temperature in the
The door is not closed correctly. Refer to "Closing the door".
appliance is too high.
The product temperature is too
high.
Let the product temperature decrease to room temperature before storage.
Many products are stored at the
same time.
The temperature in the
refrigeration is too high.
The temperature in the
freezer is too high.
The appliance does not
There is no cold air circulation in
the appliance.
Products are too near to each
other.
The appliance is switched off. Switch on the appliance.
Store less products at the same
time.
Make sure that there is cold air
circulation in the appliance.
Store products so that there is
cold air circulation.
operate.
The mains plug is not connected
to the mains socket correctly.
The appliance has no power.
There is no voltage in the mains
socket.
Connect the mains plug to the
mains socket correctly.
Connect a different electrical appliance to the mains socket. Contact a qualified electrician.
The lamp does not work. The lamp is in stand-by. Close and open the door.
The lamp is defective. Refer to "Replacing the lamp".
Page 13
electrolux 13
As much as the advice does not lead to result, call the nearest brand-mark service.
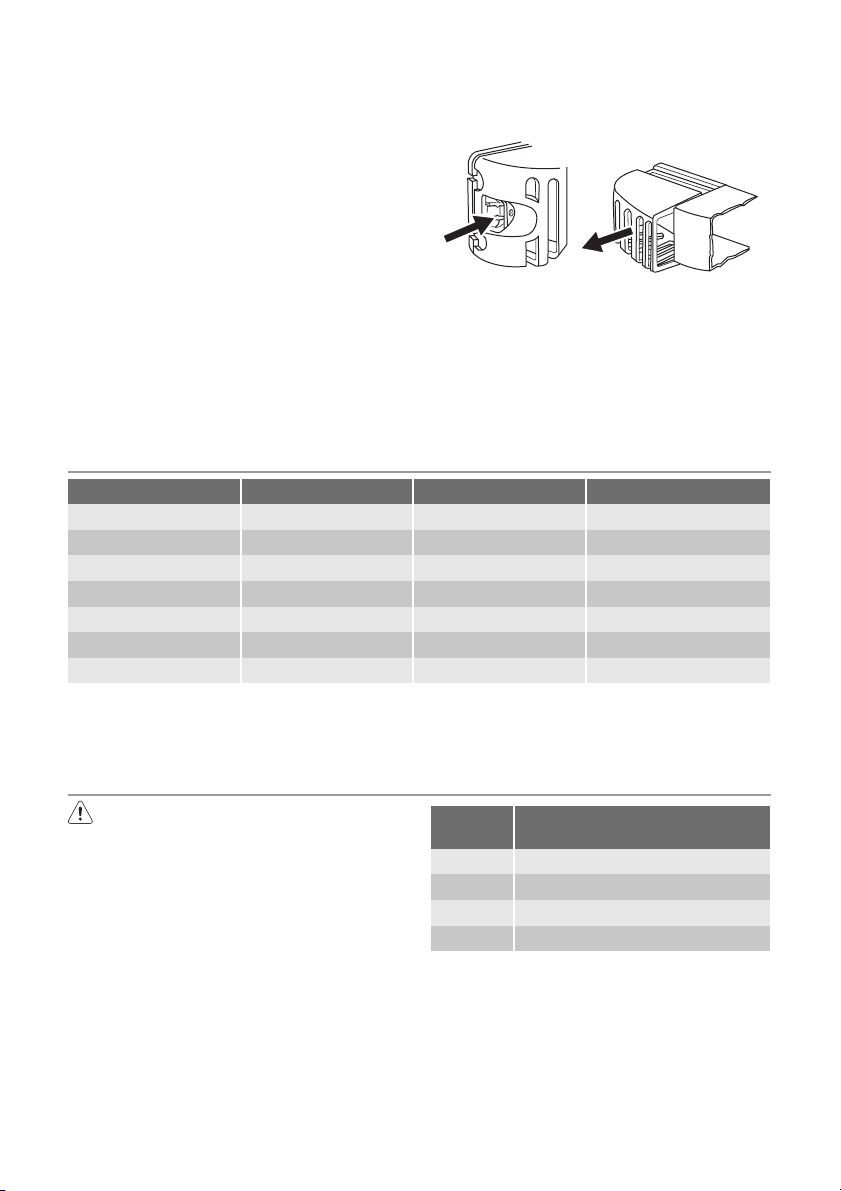
Replacing the lamp
1. Disconnect the appliance.
2. Push the movable part to unhook the
lamp cover (1).
3. Remove the lamp cover (2).
4. Replace the lamp with one of the same
1
2
power and specifically designed for domestic appliances only.
5. Install the lamp cover.
6. Connect the appliance.
7. Open the door. Make sure that the lamp
comes on.
Closing the door
1. Clean the door gaskets.
2. If necessary, adjust the door. Refer to
"Installation".
3. If necessary, replace the defective door
gaskets. Contact the Service Center.
TECHNICAL DATA
ERA36633W ERA40633W
Dimension
Height 1850 mm 2010 mm
Width 595 mm 595 mm
Depth 658 mm 658 mm
Rising Time 20 h 20 h
Voltage 230 - 240 V 230 - 240 V
Frequency 50 Hz 50 Hz
The technical information are situated in the
rating plate on the internal left side of the
appliance and in the energy label.
INSTALLATION
Read the "Safety Information" carefully
for your safety and correct operation of
the appliance before installing the
appliance.
Positioning
Install this appliance at a location where the
ambient temperature corresponds to the
climate class indicated on the rating plate of
the appliance:
Climate
class
SN +10°C to + 32°C
N +16°C to + 32°C
ST +16°C to + 38°C
T +16°C to + 43°C
Ambient temperature
Location
The appliance should be installed well away
from sources of heat such as radiators,
boilers, direct sunlight etc. Ensure that air
can circulate freely around the back of the
cabinet. To ensure best performance, if the
appliance is positioned below an overhanging wall unit, the minimum distance be-
Page 14
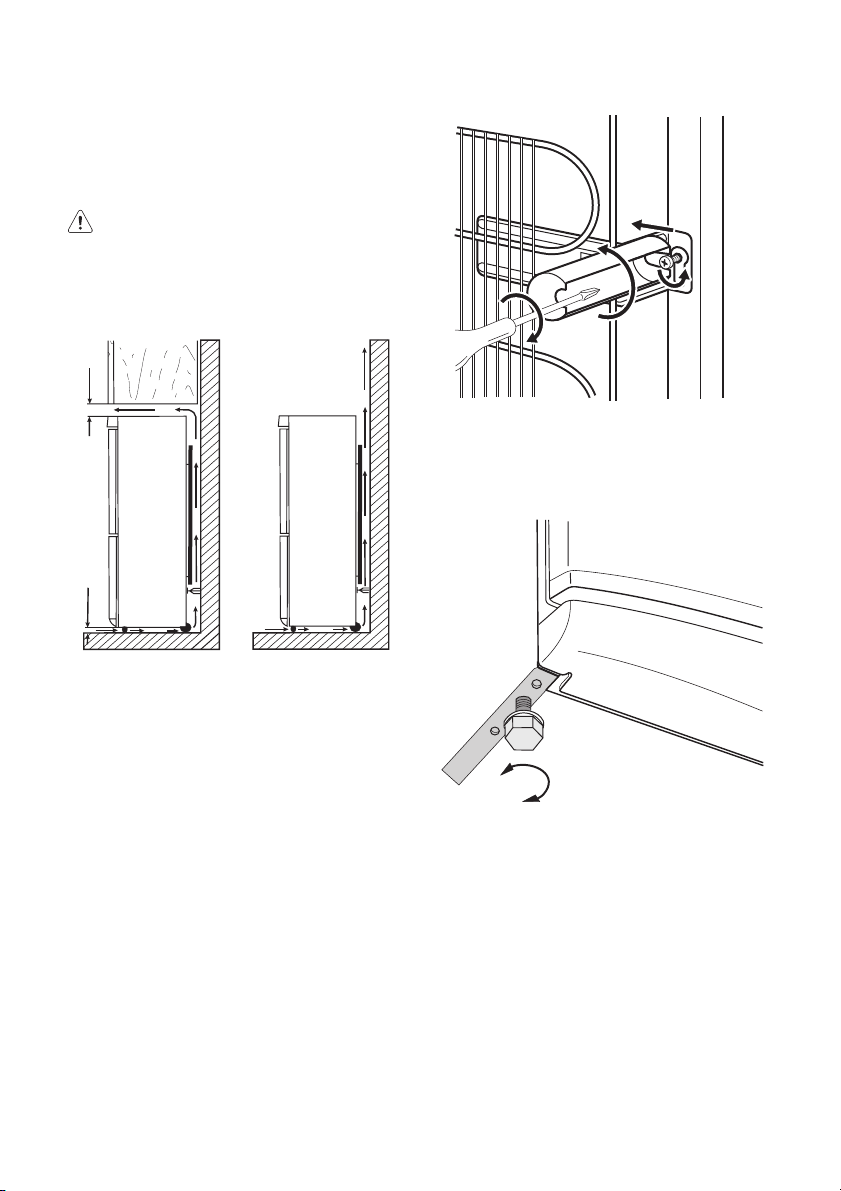
14 electrolux
tween the top of the cabinet and the wall
unit must be at least 100 mm . Ideally, however, the appliance should not be positioned below overhanging wall units. Accurate levelling is ensured by one or more adjustable feet at the base of the cabinet.
Warning! It must be possible to
disconnect the appliance from the
mains power supply; the plug must
therefore be easily accessible after
installation.
mm
min
100
A
mm
20
B
4. Tighten again the screws.
2
1
4
Levelling
When placing the appliance ensure that it
stands level. This can be achieved by two
adjustable feet at the bottom in front.
3
Electrical connection
Before plugging in, ensure that the voltage
and frequency shown on the rating plate
correspond to your domestic power supply.
The appliance must be earthed. The power
supply cable plug is provided with a contact
for this purpose. If the domestic power supply socket is not earthed, connect the appliance to a separate earth in compliance with
current regulations, consulting a qualified
electrician.
The manufacturer declines all responsibility
if the above safety precautions are not observed.
This appliance complies with the E.E.C. Directives.
Rear spacers
You can find the two spacers in the bag
with documentation.
Do these steps to install the spacers:
1. Release the screw.
2. Engage the spacer below the screw.
3. Turn the spacer to the right position.
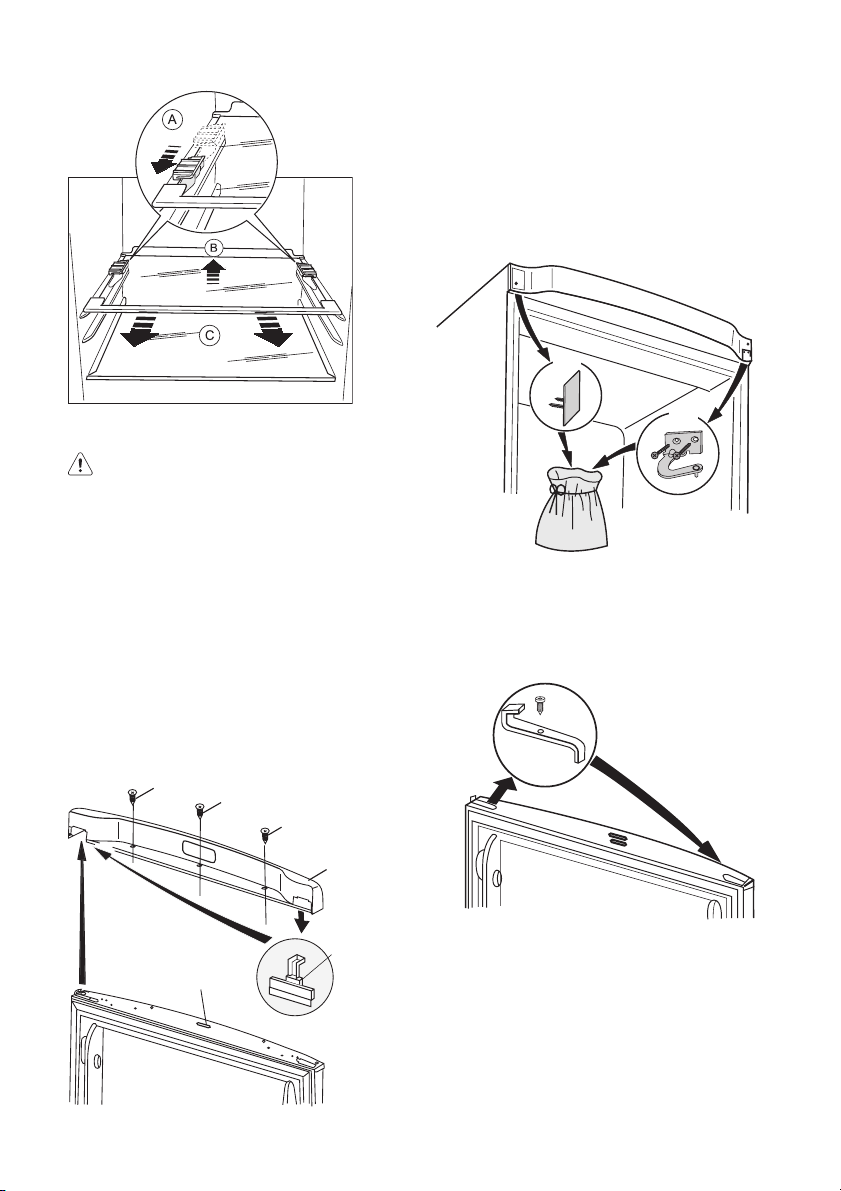
Removing the shelf holders
Your appliance is equipped with shelf retainers that make it possible to secure the
shelves during transportation.
To remove them proceed as follows:
1. Move the shelf holders in the direction of
the arrow (A).
2. Raise the shelf from the rear and push it
forward until it is freed (B).
3. Remove the retainers (C).
Page 15
electrolux 15
2. Remove the little plastic cover from the
door plastic trim and refit on the opposite side (t3).
3. Remove the panel (t4). If it is necessary
use a screwdriver very carefully. Unscrew the screw on the other side. Remove the upper door mount (t5). Place
them in an empty plastic bag.
t4
Door reversibility
Warning! Before carrying out any
operations, remove the plug from the
power socket.
Important! To carry out the following
operations, we suggest that this be made
with another person that will keep a firm
hold on the doors of the appliance during
the operations.
To change the opening direction of the
door, do these steps:
1. Open the door with the appliance in the
upright position. Unscrew the screws
(t1) and remove the upper door plastic
trim (t2). Close the door.
t1
t1
t1
t2
t3
d7
t5
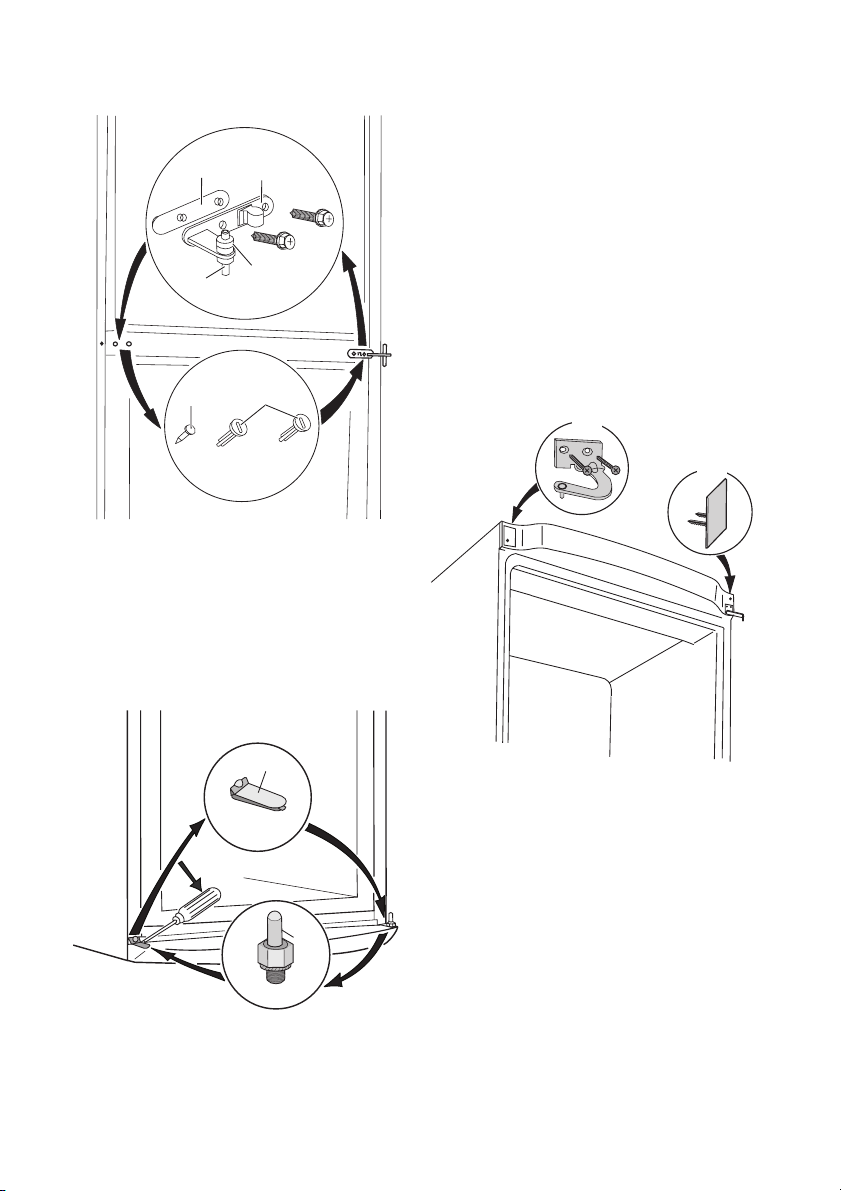
4. Remove the upper door.
5. Unscrew the screw and remove the
door stopper (d1). Attach it reversed on
the other side.
d1
6. Unscrew the middle hinge (m2). Remove the plastic spacer (m1).
Page 16
16 electrolux
7. Remove the lower door.
m1
m5
m3
8. Remove the spacer (m6) and move to
the other side of the hinge pivot (m5).
9. Remove using a tool the cover (b1).
Unscrew the lower hinge pivot (b2) and
the spacer (b3) and place them on the
opposite side.
10. Re-insert the cover (b1) on the opposite
side.
m2
m6
m4
13. Fit the pin of the middle hinge (m5) into
the left-hand hole of the lower door.
14. Re-insert the lower door on the pivot
pin (b2).
15. Re-screw the middle hinge (m1) on the
opposite side . Do not forget the plastic
spacer (m2) inserted under the middle
hinge.
16. Re-insert the upper door on the middle
hinge (m5).
Make sure that the edges of the doors
run parallel to the side edge of the appliance.
17. Position and fix the upper hinge (you
can find them in the instruction for use
bag) on the opposite side (t6).
t6
t7
b1
b2
b3
11. Remove the stoppers (d1) and move to
the other side of the doors.
12. Remove the left-hand cover pin of the
middle hinge (m3,m4) and move to the
other side.
18. Insert the panel (t7) (that can be found
in the instruction for use bag).
19. Open the upper door, attach the top
cover (t2) using screws (t1). Insert the
magnet (d7). Close the door.
20. Reposition, level the appliance, wait for
at least four hours and then connect it
to the power socket.
Do a final check to make sure that:
• All screws are tightened.
• The magnetic seal adheres to the cabi-
net.
• The door opens and closes correctly.
If the ambient temperature is cold (i.e. in
Winter), the gasket may not fit perfectly to
the cabinet. In that case, wait for the natural
fitting of the gasket.
In case you do not want to carry out the
above mentioned operations, contact the
Page 17
nearest After Sales Service Force. The After
Sales Service specialist will carry out the reversibility of the doors at your cost.
ENVIRONMENTAL CONCERNS
The symbol on the product or on its
packaging indicates that this product may
not be treated as household waste. Instead
it should be taken to the appropriate
collection point for the recycling of electrical
and electronic equipment. By ensuring this
product is disposed of correctly, you will
help prevent potential negative
electrolux 17
consequences for the environment and
human health, which could otherwise be
caused by inappropriate waste handling of
this product. For more detailed information
about recycling of this product, please
contact your local council, your household
waste disposal service or the shop where
you purchased the product.
Page 18
18 electrolux
Electrolux. Thinking of you.
Біздің басқа идеяларымызбен www.electrolux.com веб-
сайтынан танысыңыз.
МАЗМҰНЫ
Қауіпсіздік туралы мағлұматтар 18
Басқару панелі 21
Бірінші қолдану 24
Əркүндік қолдану 24
Пайдалы нұсқаулар менен кеңестер
Күту менен тазалау 27
Не істерсіңіз, егер... 29
Техникалық сиппатама 31
Орнату 31
Қоршаған орта мəселелері 35
26
Өндіруші ескертусіз өзгеріс енгізу құқығына ие.
ҚАУІПСІЗДІК ТУРАЛЫ МАҒЛҰМАТТАР
Құрылғыны орнатып, ең алғаш
пайдаланбас бұрын, өз қауіпсіздігіңіз
бен құрылғыны дұрыс қолдану
мақсатында, пайдаланушыға арналған
бұл нұсқаулықты, оның ішінде кеңестері
мен ескертулеріне назар салып оқып
шығыңыз. Осы құрылғыны
пайдаланатын адамдардың барлығы,
қажетсіз ақаулықтар мен тұрмыстық
апаттардың алдын алу үшін,оны
пайдалану тəсілдерімен жəне
қауіпсіздікті қамтамасыз ететін
функцияларымен жете таныс болуы
керек. Осы қолдану туралы
нұсқаулықты сақтап қойыңыз
тоңазытқышты басқа адамдарға
бергеніңізде немесе сатқаныңызда, оны
пайдаланатын əрбір адамның
бұйымның қолданыс мерзімі
аяқталғанға дейін оған қатысты
пайдалану жəне қауіпсіздік
шараларынан хабардар болуы үшін
нұсқаулықты да қоса беруді ұмытпаңыз.
Адам өмірі мен құрылғының қауіпсіздігін
қамтамасыз ету үшін осы пайдаланушы
нұсқаулығындағы ескертулерді
орындаңыз, себебі қадағалаудың
жеткіліксіздігінен туған ақаулық үшін
өндіруші жауапкершілік көтермейді.
Балалар мен əлсіз адамдардың
қауіпсіздігі
құрылғыны физиологиялық,
• Бұл
сезімдік не болмаса ақыл-ой
деңгейіне байланысты не пеш
жұмысына қатысты тəжрибиесі мен
білімінің аздығына байланысты
пайдалана алмайтын адамдар
жəне
(балаларды қоса алғанда), пешті
пайдалану туралы ерекше
нұсқауларды алмайынша не олардың
қауіпсіздігіне ие адамның
қадағалауынсыз пайдаланбауға тиіс.
Балалар құрылғымен ойнамас үшін
оларды қадағалап отыру қажет.
• Машинаның орауыштары мен
қорабын балалардың қолы жетпейтін
жерде сақтаңыз.
бар.
• Егер құрылғыны тастасаңыз, оның
ашасын розеткадан суырыңыз да,
қорек сымын қиып(құрылғыға
барынша тақата)балалар ішіне кіріп
қамалып не электр тогының қатерлі
əсеріне ұшырамас үшін есігін ағытып
алып тастаңыз.
• Егер есігі магнитті тығыздағышпен
жабдықталған бұл құрылғыны,
есігінде не қақпағында серіппелі
құлыбы бар ескі құрылғының орнына
қоймақ болсаңыз, ескі құрылғыны ең
алдымен
жарамсыз етіп барып тастаңыз. Бұл
құрылғыны бала ішіне қамалып
қалатын қауіп көзіне айналудан
сақтайды.
Жалпы қауіпсіздік туралы
мағлұматтар
Назарыңызда болсын!
Желдету тесіктерін ашық ұстаңыз.
• Осы нұсқаулықта айтылғандай, бұл
құрылғы əдеттегі үй жағдайларында
Тұншығып кету қаупі
оның серіппелі құлыбын
Page 19
electrolux 19
тамақты жəне/немесе сусындарды
сақтау үшін арналған.
• Жібіту үдерісін жылдамдату
мақсатында ешқандай механикалық
немесе кез келген басқа жасанды
құралды пайдаланушы болмаңыз.
• Өндіруші рұқсат бермеген болса,
тоңазытқыш құрылғылардың ішіне
басқа электр құрылғыларды
(балмұздақ жасайтын құрылғы
сияқты) салып қолданушы болмаңыз.
• Салқындатқыш зат ағатын жүйеге
зақым келтірмеңіз.
• Құрылғының салқындатқыш зат
ағатын жүйесінде изобутан (R600a)
жəне қоршаған ортамен
сыйысымдылығы жоғары, бірақ сонда
да жанғыш зат болып табылатын,
табиғи газ болады.
Құрылғының тасымалдау жəне орнату
кезінде салқындатқыш зат жүйесіне
зақым келтірілмейтініне көз жеткізіңіз.
Салқындатқыш зат жүйесі
зақымдалса:
– жалын от пен тұтату көздері
болмауы тиіс
– құрылғы орналасқан бөлмені
жақсылап желдетіңіз
• Осы өнімді немесе оның сипаттарын
өзгерту қауіпті. Кабельге зақым келсе
қысқа тұйықталу, өрт шығу
жəне/
немесе тоқ соғу қаупі төнеді.
Назарыңызда болсын! Кез келген
электрлік бөлшектерін (қуат сымы,
аша, компрессор), қатерлі жағдай
орын алмас үшін, куəлігі бар қызмет
көрсетуші маманы немесе білікті
техник маман ауыстыруға тиіс.
1. Қуат кабелін ұзартуға болмайды.
2. Қуат кабелі құрылғының артқы
жағында мыжылып немесе
зақымдалып қалмағанына көз
жеткізіңіз. Мыжылған немесе
зақымдалған қуат кабелі тым
қызып кетіп, өрт шығуына əкелуі
мүмкін.
3. Құрылғының
айыры қол жетерлік
жерде орналасқанына көз
жеткізіңіз.
5) Егер шамның қақпағы бар болса.
6) Егер шам бар болса.
7) Егер құрылғыға мұз қатпайтын болса.
4. Айырды қуат кабелін ұстап
тартпаңыз.
5. Розетка босап кеткен болса,
айырды оған қоспаңыз. Тоқ соғу
немесе өрт шығу қаупі бар.
6. Құрылғыны ішкі жарықтама
5)
шамының
қалпағынсыз
қоспаңыз.
• Бұл құрылғы ауыр. Оны жылжытқан
кезде абай болу керек.
• Қолыңыз сулы болса, мұздатқыш
бөліктен заттарды алмаңыз жəне
оларға тимеңіз, себебі қолыңыздың
терісі сыдырылып кетуі немесе
қарылып қалуы мүмкін.
• Құрылғыны ұзақ уақытқа тікелей күн
сəулелерінің астына қоймаңыз.
•
Осы құрылғыдағы шамдар
6)
— тек үй
құрылғылары үшін пайдаланылуға
арналған арнайы шамдар. Оларды
үйді жарықтандыру үшін қолдануға
болмайды.
Күнделікті пайдалану
• Ыстық ыдысты құрылғы ішіндегі
пластик жерлерге қоймаңыз.
• Құрылғы ішіне тұтанғыш газ бен
сұйықты қоймаңыз, себебі олар
жарылып кетуі мүмкін.
• Тағамды пештің артқы
қабырғасындағы ауа шығатын
саңылауға тура қарама-қарсы жерге
қоймаңыз.
7)
• Мұздатылған тағамды жібітіп алған
соң оны қайта мұздатуға болмайды.
• Алдын ала оралған тағамды
мұздатылған тағам өндірушінің
нұқсауларына сай сақтаңыз.
• Құрылғы өндірушінің тағам сақтауға
қатысты ұсыныстарын қатаң орындау
керек. Тиісті нұсқауларға қараңыз.
• Көмірқышқылдандырылған не
көпіршитін сусындарды тоңазытқыш
камераға қоймаңыз, себебі ыдысқа
түскен қысым оның жарып,
нəтижесінде құрылғыға нұқсан келуі
мүмкін.
• Мұздақтарды тоңазытқыштан алған
пайдаланғанда аяз қарып
бетте
жіберуі мүмкін.
Page 20
20 electrolux
Күтім жəне тазалау
• Құрылғыға қызмет көрсетуді бастамас
бұрын құрылғыны өшіріп, ашаны
электр желісіндегі розеткадан суырып
алыңыз. Егер желідегі розеткаға
қолыңыз жетпесе, ток желісін өшіріп
қойыңыз.
• Құрылғыны металл заттармен
тазаламаңыз.
• Құрылғы қырауын тазалау үшін өткір
заттарды пайдаланбаңыз. Пластик
қырғышты пайдаланыңыз.
• Еріген суды жинайтын табақшаны
мезгіл-мезгіл тексеріп отырыңыз.
Қажет болса, табақшаны тазалап
отырыңыз. Табақша толып
қалған
жағдайда су құрылғының астыңғы
жағына жиналады.
Орнату
Өте маңызды! Электр желісіне
қосарда, арнайы бөлімдерде берілген
нұсқауларды мұқият орындаңыз.
• Құрылғы орамын ашып, оның еш
жерінің бүлінбегенін тексеріп алыңыз.
Құрылғының бір жері бүлініп қалса
қоспаңыз. Қандай да бір бүлінушілік
орын алғанда, құрылғыны сатып
алған жерге дереу хабарлаңыз.
Бұндай жағдайда қорабын сақтап
қойыңыз.
• Құрылғыны қоспас бұрын
оның майы
компрессорға ағып құйылу үшін кем
дегенде екі сағат күтіңіз.
• Құрылғы айналасында ауа жеткілікті
түрде айналуға тиіс, ауа айналымы
жеткіліксіз болса құрылғы қызып
кетеді. Желдету жеткілікті болу үшін
орнатуға қатысты нұсқауларды
орындаңыз.
• Мүмкін болса, құрылғының жылы
тұратын бөлшектерін (компрессор,
конденсатор) ұстап қалып не оларға
қол тигізіп алып күйіп қалмас үшін
тоңазытқыштың арт жағын əрқашан
қабырғаға қаратып қойыңыз.
• Құрылғыны радиатор не пештердің
қасына жақын орналастыруға
болмайды.
• Құрылғыны орнатқан соң оның
ашасының қол оңай жететін жерде
болуын қамтамасыз етіңіз.
• Тек ауыз суы жүйесіне ғана жалғаңыз.
8)
Қызмет
• Құрылғыны жөндеу үшін қажет электр
жұмыстарын электр маманы не білікті
адам жүзеге асыруға тиіс.
• Бұл өнімге қызмет көрсетуді тек
уəкілетті қызмет көрсету орындары
жүзеге асыру керек жəне құрылғының
нағыз өз бөлшектері ғана
пайдаланылуға тиіс.
Қоршаған ортаны қорғау
Бұл құрылғының салқындатқыш
сұйығының құрамында да, изоляция
материалдарында да озон
қабатына зиян келтіретін газдар
жоқ. Бұл құрылғыны тұрмыстық
қалдық пен қоқыстар тасталатын
жерге тастауға болмайды. Оның
изоляция қабаттамасында
тұтанғыш газдар бар: құрылғыны
жергілікті құзырлы мекемелерден
алынатын жарамды ережелерге сай
тастау қажет. Салқындатқыш
құралға, əсіресе оның қызу
алмастырғышқа жақын артқы
бөлігіне зиян келтірмеңіз.
Құрылғыда пайдаланылған
белгішесімен белгіленген
материалдар қайта өңдеуден
өткізуге жарайды.
8) Егер суға қосу қажет болса.
Page 21
БАСҚАРУ ПАНЕЛІ
AC
BDE
electrolux 21
A - Құрылғының ON/OFF (қосу/ажырату)
D - Функция түймешігі
түймешігі
B - Температураны реттеу түймешігі E - Құптау түймешігі
C - Температура мен функция
индикаторы
Бейнебет
10 1 2 3 4
56789
Температура индикаторы.
1
Таймер функциясының
6
индикаторы.
Асқын температура туралы
2
ескерту.
FreeStore функциясының
3
индикаторы.
Шопинг функциясының
4
Оң немесе теріс температура
7
индикаторы.
Мұздату функциясының
8
индикаторы.
Камера индикаторы.
9
индикаторы.
Балалар құлпы функциясының
5
индикаторы.
Алғаш рет Іске қосу
Ашаны розеткаға сұққаннан кейін, егер
бейнебет жанбаса, (A) пернесін
басыңыз, сонда құрылғы іске қосылады.
Құрылғы іске қосылғаннан кейін ол
ескерту күйінде болады, температура
жыпылықтап, ызылдаған дыбыс
естіледі.
(E) пернесін басыңыз, сонда ызыл
тоқтайды да (сондай-ақ "асқын
температура туралы ескерту" бөлімін
қараңыз),
белгішесі əлі жыпылықтап
Эко режимі функциясының
10
индикаторы.
жеткенін көрсететін
пайда болады.
Тағамды сақтау үшін эко режимі
функциясын таңдаңыз, ол мына
температуралардың орнатылуын
қамтамасыз етеді:
тоңазытқышта +5°C
мұздатқышта -18°C
• Мұздатқыш камераға тағамды салмас
бұрын ішкі камераның температурасы
-18°C мəніне жеткенше күтіңіз.
тұрады, жəне ең жылы температураға
индикаторы
Page 22
22 electrolux
• Басқа температураны таңдау үшін
"Температураны реттеу" тарауын
қараңыз.
Өшіру
Құрылғы (A) пернесін 1 секундтан астам
басу арқылы өшіріледі.
Осы кезде температураның -3 -2 -1-ден
басталатын кері санағы көрсетіледі.
Функциялар мəзірі
(D) пернесін іске қосу арқылы
функциялар мəзірі жұмыс істейді. Əр
функцияны (E) түймешігін басу арқылы
құптауға болады. Егер бірнеше
секундтан кейін құптау берілмесе,
бейнебет мəзірден шығады да, қалыпты
күйге оралады.
Төмендегі
функциялар көрсетіледі:
Тоңызытқыш бөлікті таңдау
Мұздатқыш бөлікті таңдау
Эко режимі функциясы
FreeStore функциясы
Шопинг функциясы
Балалар құлпы функциясы
Сусын салқындату функциясы
Мұздату функциясы
Температураны реттеу
Камераны таңдау үшін (D) пернесін
басыңыз да, қажетті температураны
орнату үшін (B) пернесін басыңыз.
Таңдауыңызды растау үшін (E) пернесін
басыңыз.
Температура индикаторы орнатылған
температураны көрсетеді. Таңдалған
температура 24 сағат ішінде орнайды.
"H" демалыс функциясы
Демалыс функциясы температураны +
15 °C мəніне орнатады.
Бұл функция ұзақ демалыста (мысалы,
жазғы демалыс) болған кезде,
жағымсыз иіс пайда болмастан
тоңазытқышты жабық əрі
бос ұстауға
мүмкіндік береді.
Демалыс функциясын іске қосу үшін
таңдалған температураны өзгерткен
сияқты əрекет етіңіз. Температура
индикаторы бейнебеттегі
температураны + 8 °C мəніне дейін, əр
кез 1 ° градустан өзгерте алады. + 2 °C
мəнінен кейін "H" əрпі шығады. Растау
үшін E пернесін басыңыз.
Енді тоңазытқыш "демалыс"
функциясында, қуат үнемдеу режимінде
тұрады.
Өте маңызды! Демалыс функциясы
іске қосулы тұрғанда, тоңазытқыш
камерасы бос болуға тиіс.
Балалар
құлпы функциясы
Балалар құлпы функциясы (D) пернесін
тиісті белгіше пайда болғанша басу
арқылы (қажет болса бірнеше рет) іске
қосылады
.
Таңдауыңызды бірнеше секунд ішінде
(E) пернесін басу арқылы құптау керек.
ызылдаған дыбыс естіледі де, белгіше
жанып тұра береді. Осы күйде
пернелер арқылы жасалған кез келген
əрекет ешқандай өзгеріс тудырмайды,
себебі осы функция іске қосулы.
Бұл функцияны кез келген уақытта (D)
пернесін тиісті белгіше
жыпылықтағанша басып, содан кейін
(E) пернесін басу арқылы ажыратуға
болады.
Шопинг функциясы
тағамды көп мөлшерде, мысалы,
Жылы
азық-түлік дүкенінен келген бетте
салғыңыз келсе, тағамдарды неғұрлым
тез тоңазыту үшін, əрі тоңазытқыштағы
басқа тағамдар жібіп кетпес үшін
Шопинг функциясын іске қосуды
ұсынамыз.
Шопинг функциясы(D) пернесін тиісті
белгіше пайда болғанша басу арқылы
(қажет болса бірнеше рет) іске
қосылады.
. Таңдауыңызды бірнеше
секунд ішінде (E) пернесін басу арқылы
құптау керек. ызылдаған дыбыс естіледі
де, белгіше жанып тұра береді.
Шопинг функциясы шамамен 6 сағат
уақыт өткенде автоматты түрде өшеді.
Бұл функцияны кез келген уақытта (D)
пернесін тиісті белгіше
жыпылықтағанша басып, содан кейін
(E) пернесін басу арқылы ажыратуға
болады.
Эко режимі функциясы
(D) (қажет болса бірнеше рет) пернесін
тиісті белгіше көрсетілгенше
басыңыз
.
Page 23

electrolux 23
Таңдауыңызды растау үшін (E) пернесін
басыңыз. Ызылдаған дыбыс естіледі
де, белгіше жанып тұра береді.
Бұл күйде температуралар автоматты
түрде (+ 5°C жəне - 18°C) тағам
сақтауға ең жақсы қалыпта
орнатылады.
Функцияны ажырату камералардың
біріне басқа температураны орнатыңыз.
FreeStore функциясы
(D) (қажет болса бірнеше рет) пернесін
тиісті белгіше көрсетілгенше басыңыз
Таңдауыңызды растау үшін (E) пернесін
басыңыз. Ызылдаған дыбыс естіледі
де, белгіше жанып тұра береді.
Өте маңызды! Егер функция
автоматты түрде іске қосылса,
FreeStore белгішесі көрсетілмейді
("Күнделікті пайдалану" тарауын
қараңыз).
FreeStore функциясы іске қосылғанда
қуат тұтыну көлемі артады.
Мұздату функциясы
Мұздатқыш камера сату үшін
мұздатылған жəне терең мұздатылған
тағамды ұзақ мерзімге сақтау үшін жəне
жас тағамды мұздату үшін
қолайлы.
24 сағаттан кейін мұздайтын тағамның
ең үлкен мөлшері ақпарат
тақтайшасында көрсетілген.
Ақпарат тақтайшасында көрсетілген
тағам мөлшерін мұздату үшін тағамды
тікелей суытқыш қабатқа (суырманы
немесе себетті алып тастаңыз)
қойыңыз. Тағам суырмалардың не
себеттердің ішінде мұздатылған
жағдайда, ең үлкен көлемі сəл азаяды.
Жас тағамдарды мұздату үшін Мұздату
функциясын іске қосу керек. (D)
пернесін (қажет болса бірнеше рет
)
индикаторы пайда болғанша басыңыз.
Таңдауыңызды бірнеше секунд ішінде
(E) пернесін басу арқылы құптау керек.
ызылдаған дыбыс естіледі де,
бейнебетте сызықтары бар қимыл
көрсетіледі.
24 сағаттық алдын ала суыту кезеңінен
кейін тағамды мұздатқышқа салыңыз.
Мұздатылуға тиіс тағамды
бөлікке
салыңыз, себебі ол ең суық жер.
Мұздату үдерісі 24 сағатқа созылады.
Осы уақыт ішінде мұздатқышқа басқа
тағам салмаңыз.
Бұл функция 52 сағат өткенде
автоматты түрде тоқтайды.
Функцияны кез келген уақытта (D)
пернесін
индикаторы
жыпылықтағанша басып, содан кейін
(E) пернесін басу арқылы ажыратуға
болады.
Сусын салқындату функциясы
Сусын салқындату функциясы
шөлмектерді мұздатқыш камераға
қойғанда қауіпсіздік құралы ретінде
қолданылады. Бұл функция (D)
пернесін тиісті белгіше пайда болғанша
басқанда (қажет болса бірнеше рет)
іске қосылады
.
Таңдауыңызды бірнеше секунд ішінде
(E) пернесін басу арқылы құптау керек.
Ызылдаған дыбыс естіледі де, белгіше
жанып тұра береді.
Осы күйде бұл таймерді 30 минуттық
бастапқы мəні бойынша іске қосады
жəне оны 1 минуттан 90 минутқа дейін
өзгертуге болады, (B) пернесін басу
арқылы қажетті минут санын таңдайсыз.
Таңдалған уақыт аяқталған кезде келесі
белгілер көрсетіледі:
•
индикаторында белгішесі
жыпылықтайды
•
белгішесі жыпылықтайды
•
белгішесі жыпылықтайды
•(E) пернесі басылғанша дыбыстық
сигнал естіледі
Осы кезде мұздатқыш камерадағы
сусындарды алуды ұмытпаңыз.
Бұл функцияны кез келген уақытта (D)
пернесін тиісті белгіше
жыпылықтағанша басып, содан кейін
(E) пернесін басу арқылы ажыратуға
болады.
Асқын температура туралы ескерту
Камерадағы температураның артуы
(мысалы, электр қуаты үзіліп қалуы
себепті) төмендегілер арқылы
көрсетіледі:
• жыпылықтаған температура
•
мұздатқыш камера
жыпылықтайды
Page 24

24 electrolux
•
жыпылықтаған белгіше:
• ызылдаған дыбыс естілуі
Қалыпты жағдайлар қалпына келгенде:
• дыбыстық сигнал тоқтайды
• температура мəндері жыпылықтай
береді
ескерту сигналын ажырату үшін (E)
пернесін басқанда, камерадағы ең
жоғары температура
БІРІНШІ ҚОЛДАНУ
Ішін тазалау
Құрылғыны ең алғаш пайдаланбас
бұрын, жаңа бұйымға тəн иісті арылту
үшін оның іші мен ішкі керекжарақтарын сəл нейтрал сабын
салынған жылы сумен жуып, содан соң
мұқият құрғатыңыз.
ƏРКҮНДІК ҚОЛДАНУ
Мұздатылған тағамды сақтайтын
камера
Құрылғыны ең алғаш қолданғанда не
ұзақ уақыт пайдаланбағаннан кейін
қосқан кезде, камераға тамақ салмас
бұрын құрылғыны ең кем дегенде 2
сағат ең жоғарғы параметрлерге қойып
жұмыс істетіп алыңыз.
Өте маңызды! Кездейсоқ еріп кету,
мысалы электр қуаты өшіп, ток
техникалық сипаттамалар
кестесіндедегі "көтеру уақыты"
бөлімінде берілген мəндерден де ұзақ
уақыт бойы қосылмай тұрса
тағамды жылдам пайдаланып не дереу
пісіріп алып барып қайта тоңазыту
(салқындатқан соң) қажет.
Жібіту
Мұздатылған не тоңазытылған тағамды
қажетке жаратпас бұрын, осы жұмысқа
арналған уақыттың шамасына қарай
отырып, оны тоңазытқыш ішінде не
бөлме температурасында жылытуға
болады.
Тағамның кіші кесектерін
тоңазытқыштан алған бетте мұздаған
қалпы пісіре беруге болады. бұндай
жағдайда пісіру уақыты ұзағырақ
болады.
, еріп кеткен
индикаторында бірнеше секундқа пайда
болады.
Содан кейін таңдалған камераның
температурасын көрсетіп, қалыпты
жұмыс күйіне оралады.
Ескерту сатысында ызылдаған
дыбысты (E) пернесін басу арқылы
ажыратуға болады.
Өте маңызды! Жуғыш зат не жеміргіш
ұнтақтарды пайдаланбаңыз, бұл
құрылғының сыртқы қабатына зиян
келтіреді.
FreeStore
Тоңазытқыш
жылдам суытып, камера ішіндегі
температураны барынша біркелкі
ұстауға көмектесетін құралмен
жабдықталған.
Бұл құрал қажетті болғанда өздігінен
іске қосылады, мысалы есік
ашылғаннан кейін немесе бөлме
температурасы жоғары болған кезде
температураны жылдам қалпына
келтіреді.
Қажет болғанда құралды қолмен қосуға
мүмкіндік береді ("FreeStore
функциясы" тарауын қараңыз).
Өте маңызды! FreeStore құралы есік
ашық кезде тоқтайды да, есік
жабылғаннан кейін дереу іске
қосылады.
камера тағамдарды
Page 25

Жылжымалы сөрелер
Тоңазытқыштың қабырғасында
сөрелерді қажетті қатарға
орналастыруға арналған бірнеше
бағыттағыш жолдар бар.
Бөтелке сөресі
Бөтелкелерді (ауызын алға қаратып)
алдын ала орналастырылған сөреге
қойыңыз.
Өте маңызды! Сөре көлденең
орналастырылған болса, тек жабық
бөтелкелерді ғана қойыңыз.
electrolux 25
Есіктің сөрелерін орналастыру
Əр түрлі көлемде оралған тағамдарды
орналастыру үшін, есіктегі сөрелерді əр
түрлі биіктікке қоюға болады.
Бұл істеу үшін төмендегі əрекеттерді
орындаңыз:
сөрелерді көрсеткі бағыты бойынша
орнынан шыққанша ақырын тартыңыз
да, содан соң қажетті орынға қойыңыз.
Ашылған бөтелкелерді сақтау үшін осы
бөтелке сөресін еңкейтіп қоюға болады.
Бұл нəтижеге қол жеткізу үшін сөрені
жоғары қарай бұрып, келесі жоғарғы
деңгейге көтеріп қоюға болады.
FreshZone тартпа
Тартпа FreshZoneбалық, ет, теңіз
өнімдері сияқты жас тағамдарды
сақтауға қолайлы, себебі бұл жердің
температурасы, тоңазытқыштың басқа
жеріндегі температурадан төмен.
Page 26

26 electrolux
мұздатқышқа салыңыз. Шеткі жақтарын
келтіріп салғаннан кейін, себеттерді өз
орындарына қарай итеріңіз.
Мұздатқыш себеттерді
мұздатқыштан алу
Мұздатқыш себеттер, кездейсоқ
алынып қалуға немесе құлап кетуге жол
бермейтін тіреуішпен жабдықталған.
Оны мұздатқыштан алу үшін, себетті
өзіңізге қарай тартыңыз да, шегіне
жеткен кезде себеттің алдыңғы жағын
жоғары көтеріп қалыңыз.
Қайта орнына қою үшін, себеттің
алдыңғы жағын ақырын ғана көтеріп
ПАЙДАЛЫ НҰСҚАУЛАР МЕНЕН КЕҢЕСТЕР
Қалыпты жұмыс шуылы
• Тоңазытқыш сұйық түтікшелер
арқылы аққан кезде, сылдыраған
немесе көпіршіген тəрізді əлсіз шуыл
естілуі мүмкін. Бұл дұрыс.
• Компрессор қосылып тұрған кезде,
тоңазытқыш сұйық жан-жаққа
таралады да, компрессордан
сылдырлаған, сондай-ақ дірілдеген
дыбыс естисіз. Бұл дұрыс.
• Жылу əсерінен кеңею кезінде кенет
тырс-тырс еткен шуыл естілуі мүмкін.
Бұл қалыпты жағдай, қауіпті
физикалық
Қуатты үнемдеуге қатысты ақылкеңес
• Есікті жиі-жиі ашпаңыз не қажетті
уақыттан артық уақыт ашып
тұрмаңыз.
• Орта температурасы жоғары болса,
температура регуляторы ең жоғарғы
параметрге қойылса жəне
тоңазытқыш ішіне тамақ толтырылса
салынса, компрессор буландырғыш
құралдың үстіне мұз қатырып, үздіксіз
жұмыс жасауы мүмкін. Бұндай жағдай
орын алса, температура регуляторын
құбылыс емес. Бұл дұрыс.
құрылғы электр
отырып өздігінен жібу үшін төменгі
көрсеткішке қойыңыз.
Жаңа тағамды тоңазытуға қатысты
ақыл-кеңес
Ең жақсы нəтижеге жету үшін:
• жылы не буы бұрқырап тұрған сұйық
заттарды тоңазытқышқа қоймаңыз
• тағамның бетін жабыңыз не оны орап
салыңыз, əсіресе ол өткір иісті болса
• тағамды ауа оның айналасында еркін
айнала алатындай етіп
орналастырыңыз
Тоңазытуға қатысты ақыл-кеңес
Пайдалы
Ет (барлық түрлері) : полиэтилен
қалтаға орап көкөніс суырмасының
үстіңгі жағындағы шыны сөреге
қойыңыз.
Сақтық мақсатында тағамды осылайша
тек бір, көп дегенде екі күн ғана сақтау
керек.
Пісірілген тағамдар, суық тағамдар т.б.:
бұлардың бетін жауып кез келген
сөреге қоюға болады.
кеңестер:
қуатын үнемдей
Page 27

electrolux 27
Жемістер мен көкөністер: бұларды
мұқият тазалап арнайы сөреге (лер)
салу қажет.
Сарымай мен ірімшік: бұларды арнайы
ауа өткізбейтін сауыттарға салып не
алюминий қағазға не полиэтилен
қалтаға орап, мүмкіндігінше ауа
өткізбеуге тырысу қажет.
Сүт бөтелкелері: бұлардың тығындарын
жауып, есіктегі бөтелке қойылатын
қатарға қою қажет.
Оралмаған банан, картоп, пияз бен
сарымсақты тоңазытқышта ұстауға
болмайды.
Тоңазыту туралы кеңес
Төменде
тиімді жүзеге асыру үшін бірнеше
маңызды кеңестер берілген:
•24 сағат ішінде тоңазытуға болатын
• мұздату үрдісі 24 сағатқа созылады.
• тек аса жоғары сапалы, жаңа жəне
• тағамды жылдам əрі
• тағамды алюминий қағазға не
тоңазыту үрдісін барынша
ең көп тағам мөлшері техникалық
ақпарат тақтайшасында берілген;
Осы уақыт аралығында тоңазытылуға
тиіс ешбір қосымша тағамды қосып
салуға болмайды;
мұқият тазаланған тағамдарды ғана
тоңазытыңыз;
толықтай
мұздатып, қажетті кезде оның тек
қажетті мөлшерін ғана жібіту үшін
кішкене бөлшектерге бөліп
дайындаңыз;
полиэтилен қалтаға орап, орамының
ауа өткізбейтіндігіне көз жеткізіп
алыңыз;
• жаңа, мұздамаған тағамды
əлдеқашан мұздаған тағамға, оның
температурасы көтеріле бастамас
үшін тигізбеңіз;
• майы аз тағамдар майлы тағамдарға
қарағанда жақсы əрі ұзақ сақталады;
тұз тағамның сақталу уақытын
азайтады;
• мұз текшелерін мұздатқыш
камерадан алған бетте тура
пайдаланса, аяз теріні қарып кетуі
мүмкін;
• Тағамдарды сақтау уақытының
кестесін жасау үшін, тағамның əрбір
жеке орамасына оның тоңазытылған
ай-күнін жазып қою ұсынылады;
Тоңазытылған тағамдарды сақтауға
қатысты ақыл-кеңес
Құрылғыны аса тиімді пайдалану үшін:
• сатылып алынатын тағамдардың
бөлшек сауда орнында тиісті түрде
сақталғанын тексеріп алыңыз;
• мұздатылған тағамдардың
дүкенінен тоңазытқышқа
мүмкіндігінше қысқа уақыт ішінде
жеткізілуін қадағалаңыз;
• есікті жиі-жиі ашып не қажетті
уақыттан артық ашып қалдырмаңыз.
• Тағамды бірден жібітіп алған соң
оның сапасы төмендей бастайды
жəне қайта тоңазытуға келмейді.
• Тағам өндірушісі көрсеткен уақыттан
артық уақыт сақтамаңыз.
тағам
КҮТУ МЕНЕН ТАЗАЛАУ
Сақтандыру туралы ескерту!
Жөндеу жұмысын жүргізбес бұрын
құрылғыны электр желісінен
ағытыңыз.
Бұл құрылғының салқындатқыш
құралында сутегілі көміртек бар;
сондықтан да, жөндеу жұмыстары
мен оны қайта толтыруды тек
уəкілетті маман ғана жүзеге
асыруға тиіс.
Мезгілімен тазалап отыру
Құрылғыны мезгіл-мезгіл тазалап отыру
қажет:
• іші мен керек-жарақтарын аздап
нейтрал сабын салынған жылы сумен
тазалаңыз.
• есік тығыздағышын мезгіл-мезгіл
тазалап, кір тұрып қалмас үшін сүртіп
алып отырыңыз.
шайып мұқият құрғатыңыз.
•
Page 28

28 electrolux
Өте маңызды! Құрылғы ішіндегі
түтікшелер жəне/не сымдардың
ешқайсысын тартпаңыз, жылжытып не
бүлдірмеңіз.
Құрылғының ішін тазалау үшін жуғыш
заттарды, жеміргіш ұнтақтар мен аса
хош иістендірілген тазалағыш заттарды
не балауыз жылтыратқыштарды
пайдаланбаңыз, себебі бұндай заттар
құрылғының беткі қабатын бүлдіріп,
онда ерекше иіс қалдырады.
Құрылғының артында орналасқан
конденсат құрылғысы (қара гриль) мен
компрессорды шөткемен тазалаңыз.
Желдеткіш торды
бұлай тазалау
құрылғының жұмысын жақсартып,
электр қуатын тұтынуды азайтуға
көмектеседі.
Өте маңызды! Салқындатқыш жүйеге
еш нұқсан келтірмеуге тырысыңыз.
Ас үй құрылғыларының бетін тазалауға
арналған көпшілік заттардың
құрамында осы құрылғы үшін
пайдаланылған пластиктерге зиянды
əсер ететін химикаттар бар. Сондықтан
да осы құрылғы корпусының сыртын,
тек аздаған жуғыш зат салынған жылы
сумен тазалау ұсынылады.
Тазалап болған соң
құрылғыны электр
желісіне қайта қосыңыз.
Тоңазытқыш қырауын еріту
Құрылғыны қалыпты пайдалану кезінде
тоңазытқыш камерасының
буландырғышындағы қырау, мотор
компрессоры тоқтаған сайын автоматты
түрде жойылып отырады. Еріген су
құрылғының артындағы, мотор
компрессорының үстіндегі арнайы
контейнердегі түтікше арқылы
жиналады да, осы жерде буға
айналады.
Су тасып төгіліп тамақтардың үстіне
ақпас үшін тоңазытқыш ортасындағы
каналдағы еріген суды ағызатын тесікті
мезгіл-мезгіл
тазалап отырған дұрыс.
Арнайы берілген тазалағышты
пайдаланыңыз, оны су ағызатын
тесіктен таба аласыз.
Мұздатқыш камераның мұзын еріту
Мұздатқыш сөрелері мен үстіңгі
камераның айналасына белгілі бір
мөлшерде қырау əрқашан жиналады.
Мұздатқыш камераның қырауының
қалыңдығы шамамен 3-5 мм болған
кезде, оны жібітіңіз.
Қырауды кетіру үшін төмендегі
нұсқауларды орындаңыз:
• электр ашасын жардағы розеткадан
суырыңыз немесе құрылғыны
сөндіріңіз
• ішінде тағам тұрса, оны алып,
бірнеше қабат газетке ораңыз да,
салқын жерге қойыңыз
• мұздартқыштың
тартпаларын алыңыз
• тартпалардың айналасына жылу
өткізбейтін материал қойыңыз,
мысалы, жамылғылар немесе
газеттер.
Мұздатқыштың мұзын ерітуді ішіне
ыстық су (қайнап тұрмаған) құйылған
тостағандарды қою арқылы
жылдамдатуға болады.
• Ағызу арнасын бекітілген күйінен
босатыңыз, оны суретте
көрсетілгендей басыңыз жəне оған су
жиналуы үшін мұздатқыштың төменгі
тартпасына салыңыз
• ери бастаған кезде мұзды ақырын
қырып тастаңыз. Ағаш немесе
пластмасса қырғышты пайдаланыңыз
• барлық мұз еріген кезде, камераны
тазалаңыз жəне құрғата сүртіңіз,
Page 29

electrolux 29
содан кейін ағызу арнасын өз орнына
қойыңыз.
термостатты бақылау тетігін бірнеше
сағатқа ең жоғарғы күйге қойып
пайдалану ұсынылады.
Өте маңызды! Буландырғыштағы
қырауды ешқашан өткір металл
қырғышпен қырмаңыз, оны бүлдіріп
алуыңыз мүмкін. Мұзды жылдам еріту
үшін өндіруші ұсынған құралдардан өзге
механикалық немесе басқа жасанды
заттарды ешқашан қолданбаңыз.
Құрылғының
мұзын еріту кезінде,
оралып мұздатылған тағамдардың
температурасының жоғарылауы
олардың қауіпсіз сақталу мерзімін
• камераны қосыңыз жəне мұздатылған
қысқартуы мүмкін.
тағамдарды қайта салыңыз.
Жеткілікті сақтау температурасына
тез арада жетуі үшін құрылғыны
НЕ ІСТЕРСІҢІЗ, ЕГЕР...
Сақтандыру туралы ескерту!
Ақаулықтың себептерін анықтамас
бұрын құрылғыны тоқтан ағытыңыз.
Осы нұсқаулықта көрсетілмеген
ақаулықты тек электрші маман
немесе білікті адам ғана анықтауға
тиіс.
Ақаулық Ықтимал себебі Шешімі
Құрылғыдан шуыл
шығады.
Компрессор үздіксіз
жұмыс істейді.
Есік дұрыс жабылмаған. "Есікті жабу" тарауын қараңыз.
Есік тым жиі ашылған. Есікті қажет кезде ғана
Тағамның температурасы
Бөлме температурасы тым
Мұздату функциясы қосулы. "Мұздату функциясы" тарауын
Су тоңазытқыштың
артқы тақтасына қарай
ағады.
Құрылғы дұрыс орнықпаған. Құрылғының орнықты тұрған-
Температура тетігі дұрыс
орнатылмаған болуы мүмкін.
тым жоғары.
жоғары.
Мұзды автоматты түрде еріту
барысында еріген су артқы
тақтаға ағады.
Өте маңызды! Құрылғы қалыпты
жұмыс істеп тұрған кезде шуыл естіледі
(компрессор, салқындатқыш
сұйықтықтың айналуы).
тұрмағанын тексеріңіз (төрт
аяғы да еденге тиіп тұруға
тиіс).
Жылырақ температураға
қойыңыз.
ашыңыз, ұзақ ашып қоймаңыз.
Тағамды сақтардың алдында
температурасын бөлме
температурасына дейін
азайтыңыз.
Бөлменің температурасын
азайтыңыз.
қараңыз.
Бұл дұрыс.
Page 30

30 electrolux
Ақаулық Ықтимал себебі Шешімі
Су тоңазытқыштың
ішіне ағады.
Тағамдар судың су жинағыш
Су жерге ағады. Еріген су ағатын түтікше
Қырау, мұз тым көп
қатқан.
Есік дұрыс жабылмаған. "Есікті жабу" тарауын қараңыз.
Температура тетігі дұрыс
Құрылғының ішіндегі
температура тым
жоғары.
Тағамның температурасы
Бір мезгілде тым көп тағам
Тоңазытқыштың
ішіндегі температура
тым жоғары.
Мұздатқыштың ішіндегі
температура тым
жоғары.
Құрылғы жұмыс
істемей тұр.
Қуат ашасы розеткаға дұрыс
Құрылғыға электр қуаты
Шам жанбайды. Шам күту режимінде тұр. Есікті жауып, қайта ашыңыз.
Шамның ақауы бар. "Шамды ауыстыру" тарауын
Су ағатын түтікше бітеліп
қалған.
науаға құйылуына кедергі
жасайды.
арқылы аққан су,
компрессордың үстіндегі
буландырғыш науаға
ақпайды.
Тағамдар дұрыс оралмаған. Тағамдарды жақсылап ораңыз.
орнатылмаған болуы мүмкін.
Есік дұрыс жабылмаған. "Есікті жабу" тарауын қараңыз.
тым жоғары.
сақтауға қойылған.
Құрылғының ішінде суық ауа
айналымы жоқ.
Тағамдар бір-біріне өте
жақын қойылған.
Құрылғы сөндірулі. Құрылғыны қосыңыз.
сұғылмаған.
келмей тұр. Розеткада тоқ
жоқ.
Су ағатын түтікшені тазалаңыз.
Тағамдарды артқы тақтаға
тигізбей орналастырыңыз.
Еріген су ағатын түтікшені
буландырғыш науаға
жалғаңыз.
Жоғарырақ температураға
қойыңыз.
Тағамды сақтардың алдында
температурасын бөлме
температурасына дейін
азайтыңыз.
Бір мезгілде сақталатын тағам
мөлшерін азайтыңыз.
Құрылғы ішінде суық ауаның
айналуын қамтамасыз етіңіз.
Тағамдарды суық ауа айнала
алатындай етіп сақтаңыз.
Ашаны розеткаға дұрыстап
сұғыңыз.
Розеткаға басқа электр
құрылғысын қосып көріңіз.
Электрші маманға
хабарласыңыз.
қараңыз.
Берілген ақыл-кеңес ақаулықты түзетуге көмектеспесе, жақын жердегі қызмет
көрсету орталығына хабарласыңыз.
Шамды ауыстыру
1. Құрылғыны ажыратыңыз.
2. Шамның қалпағын ағыту үшін
жылжымалы бөлігін басыңыз (1).
3. Шамның қалпағын алыңыз (2).
4. Шамның орнына тұрмыстық
құрылғыларға арналған, қуат
параметрі дəл сондай шамдардың
бірін салыңыз.
5. Шамның қалпағын орнына қойыңыз.
6. Құрылғыны іске қосыңыз.
Page 31

electrolux 31
7. Есікті ашыңыз. Шамның
жанатындығын тексеріңіз.
Есікті жабыңыз
1. Есік тығыздағыштарын тазалаңыз.
2. Қажет болса, есікті лайықтаңыз.
"Орнату" тарауын қараңыз.
3. Қажет болса, есіктің нұқсан келген
тығыздағыштарын айырбастаңыз.
1
2
Қызмет көрсету орталығына
хабарласыңыз.
ТЕХНИКАЛЫҚ СИППАТАМА
ERA36633W ERA40633W
Өлшемдері
Биіктігі 1850 мм 2010 мм
Ені 595 мм 595 мм
Тереңдігі 658 мм 658 мм
Көтерілу уақыты 20 сағ. 20 сағ.
Кернеу 230 - 240 В 230 - 240 В
Жиілік 50 Гц 50 Гц
Техникалық ақпарат құрылғының сол
жақ ішкі қабырғасындағы техникалық
ақпарат тақтайшасында жəне электр
қуатының жапсырмасында көрсетілген.
ОРНАТУ
Құрылғыны орнатпай тұрып
"Қауіпсіздік туралы ақпаратты" жеке
басыңыздың қауіпсіздігін
қамтамасыз ету үшін жəне
құрылғыны дұрыс пайдалану үшін
мұқият оқып шығыңыз.
Орналастыру
Бұл құрылғыны температурасы
құрылғының техникалық ақпараттар
тақтайшасында көрсетілген климат
санатына сай келетін жерге
орналастыру қажет:
Климат
санаты
SN +10°C бастап + 32°C дейін
N +16°C бастап + 32°C дейін
ST +16°C бастап + 38°C дейін
T +16°C бастап + 43°C дейін
Қоршаған орта
температурасы
Орналасуы
Құрылғыны радиаторлар, бойлерлер,
тура түскен күн жарығы сияқты жылу
көздерінен мүмкіндігінше алыс орнату
қажет. Құрылғының артқы жағында
ауаның еркін айналып тұруын
қамтамасыз етіңіз. Құрылғы жақсы
жұмыс істеуі үшін, егер құрылғы
қабырғаға ілулі заттың астына қойылса,
құрылғының үсті мен қабырғаға ілулі
заттың арасында кем дегенде 100 мм
орын қалуға тиіс. Дегенмен, ең
жақсысы, құрылғыны қабырғаға ілінетін
заттың
астына қоймаған дұрыс.
Құрылғы корпусының астындағы бір
немесе бірнеше аяғын реттеу арқылы
оны бір деңгейлеп орнатуға болады.
Назарыңызда болсын! Құрылғыны
электр желісінен ағытатындай етіп
орналастыру керек; сондықтан оны
орнатқаннан кейін оның ашасы қол
оңай жететін жерде тұруға тиіс.
Page 32

32 electrolux
mm
min
100
2
A
mm
20
B
Электр желісіне жалғау
Электр желісіне қоспас бұрын
техникалық ақпарат тақтайшасында
көрсетілген кернеу мен жиіліктің үйдегі
электр желісінің қуатына сай
келетіндігін тексеріп алыңыз.
Құрылғы жерге қосылуға тиіс. Осы
мақсатта қорек сымы контактпен қатар
жеткізілген. Егер үйдегі розетка жерге
қосылмаған болса, білікті электр
маманынан ақыл-кеңес ала отырып,
құрылғыны қолданыстағы ережелерге
сай жерге жекелей қосыңыз.
Жоғарыда айтылып өткен
ережелер
сақталмаса, өндіруші қандай да бір
жауапкершілікті өз мойнына алудан бас
тартады.
Бұл құрылғы E.E.C. ережелеріне сай
келеді.
Артқы тығыздағыштар
Құжаттар салынған қалтадан екі
тығыздағышты таба аласыз.
Тығыздағыштарды орнату үшін мына
қадамдарды орындаңыз:
1. Бұранданы босатыңыз.
2. Тығыздағышты бұранданың астына
салыңыз.
3. Тығыздағышты дұрыс жаққа
бұраңыз.
4. Бұрандаларды қатайтыңыз.
1
4
Деңгейлеу
Құрылғыны орналастырған кезде
орнықты болуын қадағалаңыз. Оны
алдының төменгі жағындағы реттемелі
екі аяғының көмегімен орнықты етуге
болады.
Сөре тіреуіштерін алу
Құрылғы тасымал кезінде сөрелерді
орнынан жылжыптай ұстауға арналған
тіреуіштермен жабдықталған.
Тіреуіштерді алу үшін мына əрекеттерді
орындаңыз:
1. Сөре тіреуіштерін көрсеткі(A)
бағытымен жылжытыңыз.
2. Сөрені артқы жағынан көтеріңіз де,
əбден босағанша алға итеріңіз (B).
3. Тіреуіштерді алыңыз(C).
3
Page 33

electrolux 33
1. Есікті құрылғымен бірге тігінен
ашып қойыңыз. Бұрандаларды (t1)
ағытып алыңыз да, үстіңгі есіктің
пластмасса жақтауын (t2) алыңыз.
Есікті жабыңыз.
Есіктің ашылатын жағын өзгерту
Назарыңызда болсын! Қандай да
бір жұмысты іске асырмас бұрын
ашаны электр розеткасынан
суырыңыз.
Өте маңызды! Төмендегі əрекеттерді
жүзеге асыру үшін біз тағы бір адамның
болуын ұсынамыз, ол жұмыс
барысында құрылғының есіктерін
мықтап ұстап тұрады.
Есіктің ашылатын бағытын өзгерту үшін
мына қадамдарды жасаңыз:
t1
t1
t1
t2
t3
d7
2. Есіктің пластмасса жақтауының
кішкене пластмасса қақпағын
алыңыз да, қарсы жағына
орналастырыңыз (t3).
3. Панельді (t4) алыңыз. Қажет болса,
өте абайлап бұрағышты
пайдаланыңыз. Екінші жақтағы
бұранданы босатып алыңыз. Үстіңгі
есіктің бекітпесін (t5) алыңыз.
Оларды бос пластик қапшыққа
салыңыз.
t4
t5
4. Үстіңгі есікті ағытып алыңыз.
Page 34

34 electrolux
5. Бұранданы ағытып алып, есіктің
тығырығын (d1) алыңыз. Оны қарсы
жағына бекітіңіз.
d1
6. Ортаңғы топсаны (m2) бұрап
алыңыз. Пластмасса аралық
шектегішті (m1) алыңыз.
7. Астыңғы есікті ағытып алыңыз.
m1
m5
m3
m2
m6
m4
10. Қақпақты (b1) қарама-қарсы жаққа
орнатыңыз.
b1
b2
b3
11. Тығырықтарды (d1) алыңыз да,
есіктің екінші жағына ауыстырыңыз.
12. Ортаңғы топсаның (m3,m4) сол жақ
қақпақ істікшесін алыңыз да, екінші
жағына ауыстырыңыз.
13. Ортаңғы топсаның істікшесін (m5)
астыңғы есіктің сол жақ тесігіне
салыңыз.
14. Астыңғы есікті бұрылмалы істікшеге
(b2) қайта орнатыңыз.
15. Ортаңғы топсаны (m1) қарама-
қарсы жаққа орнатыңыз. Ортаңғы
топсаның астына салынған
пластмасса шектегішті (m2)
ұмытпаңыз.
16. Үстіңгі есікті ортаңғы топсаға (m5)
қайта орнатыңыз.
Есіктердің жиектерінің құрылғының
бүйір жиегімен қатарлас келетіндігін
тексеріңіз.
8. Аралық шектегішті (m6) алыңыз да,
топса өзегінің (m5) екінші жағына
ауыстырыңыз.
9. Сайманның көмегімен қақпақты (b1)
алыңыз. Астыңғы топса өзегін (b2)
жəне аралық шектегішті (b3) бұрап
алыңыз да, қарсы жағына салыңыз.
Page 35

electrolux 35
17. Үстіңгі топсаны қарама-қарсы жаққа
салып, бекітіңіз (t6) (оларды
пайдаланушы нұсқаулығы салынған
қапшықтан таба аласыз).
t6
t7
18. Панельді (t7) салыңыз (оны
пайдаланушы нұсқаулығы салынған
қапшықтан таба аласыз).
ҚОРШАҒАН ОРТА МƏСЕЛЕЛЕРІ
Бұйымдағы немесе бұйым
қорапшасындағы
кəдімгі үй қалдығы емес екенін көрсетіп
білдіреді. Сондықтан оны ескі электр
жəне электроникалық бұйымдарды
жинап утилизация үшін арнайы
контейнерлерге салуыңыз керек. Осы
бұйымды дұрыс түрде утилизация
арқылы Сіз қоршаған орта менен адам
денсаулығына түсіп пайда бола алатын
белгісі осы бұйым
19. Үстіңгі есікті ашыңыз да, үстіңгі
қақпақты (t2) бұрандалардың (t1)
көмегімен бекітіңіз. Магнитті (d7)
салыңыз. Есікті жабыңыз.
20. Құрылғыны орнына қойыңыз,
деңгейін реттеңіз, кем дегенде төрт
сағат уақыт өткеннен кейін электр
желісіне жалғаңыз.
Төмендегілерді тексеріңіз:
• барлық бұрандалардың қатайтып
бұралғанын.
• Магнитті тығыздауыштың қаптамаға
жабысқанын.
• Есіктің дұрыс ашылып-жабылатынын.
Егер бөлме температурасы салқын
болса (мысалы, қыста), тығыздағыш
қаптамаға дұрыс келмеуі мүмкін.
Мұндай жағдайда тығыздағыш өздігінен
дəл келгенше күтіңіз.
Егер жоғарыда аталған жұмысты
атқарғыңыз келмесе, жақын жерде
орналасқан қызмет көрсету орталығына
хабарласыңыз. Қызмет көрсету
орталығының маманы есіктің орнын
төлемақыға ауыстырып береді.
зиянын болдыртпауын үшін үлес қоса
аласыз; осы зиян бұл бұйымды дұрыс
емес қолданғанда пайда болуы мүмкін
Осы бұйымның утилизациясы туралы
көбірек білуіңіз үшін жергілікті
əкімшілігіңізбен, қалдықтарды жинап
əкететін мекемеңізбен немесе осы
бұйымды Өзіңізге сатқан дүкенімен
хабарласыңыз.
.
Page 36

36 electrolux
Electrolux. Thinking of you.
Pentru a vedea cum gândim, vizitaţi www.electrolux.com
CUPRINS
Informaţii privind siguranţa 36
Panoul de comandă 38
Prima utilizare 41
Utilizarea zilnică 41
Sfaturi utile 44
Ne rezervãm dreptul asupra efectuãrii de modificãri
INFORMAŢII PRIVIND SIGURANŢA
Pentru siguranţa dv. şi pentru a asigura utilizarea corectă a aparatului, înainte de instalare şi de prima utilizare, citiţi cu atenţie
acest manual de utilizare, inclusiv recomandările şi avertismentele cuprinse în el.
Pentru a evita erorile inutile şi accidentele,
este important să vă asiguraţi că toate persoanele care vor folosi aparatul cunosc
foarte bine modul său de funcţionare şi caracteristicile de siguranţă. Păstraţi aceste
instrucţiuni şi asiguraţi-vă că ele vor însoţi
aparatul în cazul în care este mutat sau
vândut, astfel încât toţi utilizatorii, pe întreaga durată de viaţă a aparatului, să fie corect
informaţi cu privire la utilizarea şi siguranţa
sa.
Pentru siguranţa persoanelor şi a bunurilor,
respectaţi măsurile de precauţie din aceste
instrucţiuni de utilizare, deoarece producătorul nu este responsabil de daunele
cauzate prin nerespectarea acestor cerinţe.
Siguranţa copiilor şi a persoanelor
vulnerabile
• Acest aparat nu trebuie folosit de persoane (inclusiv copii) cu capacităţi fizice, senzoriale şi mentale reduse, sau lipsiţi de
experienţă şi cunoştinţe, cu excepţia cazului în care sunt supravegheaţi sau li sau dat instrucţiuni în legătură cu folosirea
aparatului, de către o persoană
răspunzătoare pentru siguranţa lor.
Copiii trebuie supravegheaţi ca să nu se
joace cu aparatul.
•Nu lăsaţi ambalajele la îndemâna copiilor.
Există riscul de sufocare.
• Când aruncaţi aparatul, scoateţi ştecherul
din priză, tăiati cablul de alimentare (cât
mai aproape de aparat) şi înlăturaţi uşa,
astfel încât copiii care se joacă să nu se
Îngrijirea şi curăţarea 45
Ce trebuie făcut dacă... 46
Date tehnice 48
Instalarea 48
Informaţii privind mediul 52
poată electrocuta şi să nu se poată închi-
untru.
de înă
•Dacă acest aparat, care are garnituri
magnetice la uşă, înlocuieşte un aparat
mai vechi care are un sistem de închidere
cu arc (zăvor cu resort), faceţi inutilizabil
sistemul de închidere înainte de a arunca
aparatul vechi. În acest mod nu va putea
deveni o capcană mortală pentru un copil.
Aspecte generale referitoare la
siguranţă
Avertizare
Menţineţi libere deschiderile de ventilare din
carcasa aparatului sau din structura în care
este încorporat.
• Acest aparat este destinat pentru conservarea alimentelor şi/sau a băuturilor în locuinţele normale, aşa cum se arată în
acest manual de instrucţiuni.
• Nu utilizaţi dispozitive mecanice sau alte
mijloace artificiale pentru a accelera procesul de dezgheţare.
• Nu utilizaţi alte aparate electrice (de ex.
aparate de îngheţată) în interiorul aparatelor de răcire, decât dacă sunt aprobate
în mod special de producător în acest
scop.
•Nu deterioraţi circuitul de răcire.
• Circuitul de răcire al aparatului conţine
izobutan ca agent de răcire (R600a), un
gaz natural cu un nivel ridicat de compatibilitate cu mediul înconjurător, dar care
este inflamabil.
În timpul transportului şi instalării aparatu-
lui, procedaţi cu atenţie pentru a nu dete-
Page 37

electrolux 37
riora niciuna dintre componentele circuitului de răcire.
Dacă circuitul de răcire este deteriorat:
–evitaţi flăcările deschise şi sursele de
foc
– aerisiţi foarte bine camera în care este
amplasat aparatul
• Este periculos să modificaţi specificaţiile
sau să modificaţi acest produs, în orice
fel. Deteriorarea cablului de alimentare
poate produce un scurt-circuit, un incendiu şi/sau electrocutarea.
Avertizare Pentru evitarea oricărui pe-
ricol, componentele electrice (cablu de
alimentare, ştecher, compresor etc.)
trebuie înlocuite numai de către un tehnician de service autorizat şi calificat,
cu respectarea normelor de siguranţă
în vigoare.
1. Cablul de alimentare nu trebuie să fie
prelungit.
2. Asiguraţi-vă ca ştecherul nu este stri-
vit sau deteriorat de partea din spate
a aparatului. Un cablu de alimentare
strivit sau deteriorat se poate supraîncălzi şi poate produce un incendiu.
3. Trebuie să puteţi accesa uşor şteche-
rul aparatului.
4. Nu trageţi de cablu.
5. Dacă priza nu este fixă, nu introduceţi
ştecherul în priză. Există riscul de
electrocutare sau de incendiu.
6. Nu trebuie să utilizaţi aparatul fără ca-
9)
pacul becului
din interior.
• Acest aparat este greu. Trebuie să procedaţi cu atenţie când îl deplasaţi.
•Nu scoateţi şi nu atingeţi alimentele din
compartimentul congelator dacă aveţi
mâinile umede sau ude, deoarece în
acest mod pielea se poate zgâria sau
poate suferi degerături.
•Evitaţi expunerea îndelungată a aparatului
la lumină solară directă.
•
Becurile
10)
utilizate pentru acest aparat
sunt special selecţionate pentru utilizarea
exclusivă în aparate electrocasnice.
Acestea nu sunt compatibile cu iluminatul
locuinţei.
9) În cazul în care capacul becului este prevăzut.
10) Dacă lampa este prevăzută din fabricaţie.
11) Dacă aparatul este Frost Free (fără dezgheţare)
Utilizarea zilnică
•Nu puneţi oale fierbinţi pe piesele din
plastic ale aparatului.
•Nu păstraţi gaze şi lichide inflamabile în
interiorul aparatului, deoarece ar putea
exploda.
•Nu puneţi alimentele în contact cu des-
chiderile de aerisire de pe peretele din
11)
spate.
• Alimentele congelate nu trebuie să mai fie
congelate din nou după ce s-au dezgheţat.
•Păstraţi alimentele congelate ambalate în
conformitate cu instrucţiunile producăto-
rului alimentelor congelate.
• Recomandările producătorului aparatului
privind conservarea trebuie respectate cu
stricteţe. Consultaţi instrucţiunile respective.
•Nu puneţi băuturi gazoase sau carbona-
tate în compartimentul congelator, deoarece se creează presiune asupra recipientului, iar acesta ar putea exploda, deteriorând aparatul.
• Îngheţata pe băţ poate cauza degerături
dacă e consumată imediat după scoaterea din aparat.
Întreţinerea şi curăţarea
• Înainte de a efectua operaţiile de întreţi-
nere, opriţi aparatul şi scoateţi ştecărul
din priză.
•Nu curăţaţi aparatul cu obiecte din metal.
•Nu folosiţi obiecte ascuţite pentru a în-
depărta gheaţa din aparat. Folosiţi o
răzuitoare din plastic.
•Examinaţi periodic scurgerea din frigider
pentru a vedea dacă există apă rezultată
din dezgheţare. Dacă este necesar,
curăţaţi scurgerea. Dacă scurgerea este
blocată, apa se va acumula în partea de
jos a aparatului.
Instalarea
Important Pentru racordarea la electricitate
respectaţi cu atenţie instrucţiunile din
paragrafele specifice.
• Despachetaţi aparatul şi verificaţi să nu
fie deteriorat. Nu conectaţi aparatul dacă
este deteriorat. Comunicaţi imediat even-
Page 38

38 electrolux
tualele defecte magazinului de unde l-aţi
cumpărat. În acest caz, păstraţi ambalajul.
• Se recomandă să aşteptaţi cel puţin
două ore înainte de a conecta aparatul,
pentru a permite uleiului să curgă înapoi
în compresor.
•Trebuie să se asigure o circulaţie adec-
vată a aerului în jurul aparatului, în lipsa
acesteia se poate supraîncălzi. Pentru a
obţine o ventilare suficientă, urmaţi instrucţiunile referitoare la instalare.
• Pe cât posibil, spatele aparatului trebuie
să se afle lângă un perete, pentru a evita
atingerea părţilor calde şi a evita riscul de
arsuri.
• Aparatul nu trebuie amplasat în apropierea caloriferului sau a aragazului.
•Asiguraţi-vă că după instalarea aparatului
priza rămâne accesibilă.
• Conectaţi numai la o sursă de apă pota-
12)
bilă.
Serviciul de Asistenţă Tehnică
•Toate lucrările electrice necesare pentru
instalarea acestui aparat trebuie efectua-
PANOUL DE COMANDĂ
te de către un electrician calificat sau de
o persoană competentă.
• Acest produs trebuie reparat numai centru de service autorizat şi trebuie să se
folosească numai piese de schimb origi-
nale.
Protecţia mediului înconjurător
Acest aparat nu conţine gaze care pot
deteriora stratul de ozon, nici în circuitul
de răcire şi nici în materialele de izolare.
Aparatul nu poate fi aruncat împreună
cu deşeurile urbane şi cu gunoiul. Spuma izolatoare conţine gaze inflamabile:
aparatul trebuie eliminat conform reglementărilor aplicabile ale autorităţilor locale. Evitaţi deteriorarea unităţii de răci-
re, mai ales în spate, lângă schimbăto-
rul de căldură. Materialele folosite pentru acest aparat marcate cu simbolul
sunt reciclabile.
AC
BDE
A - Butonul aparatului ON/OFF (Aprins/
Stins)
B - Buton pentru reglarea temperaturii E - Buton de confirmare
C - Afişaj pentru temperatură şi pentru
funcţii
12) Dacă este prevăzută conectarea la apă
D - Buton pentru funcţii
Page 39

Afişaj
10 1 2 3 4
electrolux 39
56789
Indicator pentru temperatură
1
Alarmă temperatură excesivă
2
Indicator funcţie FreeStore.
3
Indicator pentru funcţia Cumpărături
4
Indicator pentru funcţia Siguranţă co-
5
pii.
Prima aprindere
După ce aţi introdus ştecherul în priză, dacă
afişajul nu se luminează, apăsaţi pe tasta
(A), aparatului porneşte.
Imediat după pornire, aparatul e în starea
de "alarmă", temperatura clipeşte intermitent şi se va auzi o sonerie.
Apăsaţi pe tasta (E), iar soneria se va stinge
(vezi şi secţiunea despre "Alarmă tempera-
tură excesivă"), simbolul
te intermitent, iar pe afişajul
încă mai clipeş-
va apărea
temperatura cea mai ridicată la care s-a
ajuns.
Pentru o conservare corectă a alimentelor
alegeţi funcţia "modul Eco", care garantează reglarea următoarelor temperaturi:
+5°C în frigider
-18°C în congelator
•Aşteptaţi până când temperatura din in-
teriorul compartimentului ajunge la -18°C,
înainte de a introduce alimentele în compartimentul congelator.
• Pentru a selecta o temperatură diferită,
vezi "Reglarea temperaturii".
Oprirea
Aparatul se stinge apăsând pe tasta (A) mai
mult de 1 secundă.
În acest timp, se afişează o numărătoare inversă a temperaturii de la -3 -2 -1.
Indicator pentru funcţia Timer
6
Indicator pentru temperatură pozitivă
7
sau negativă
Indicator funcţie Congelare rapidă
8
Indicator compartiment.
9
Indicator pentru funcţia Mod Eco.
10
Meniul cu funcţiile
Activând tasta (D), meniul cu funcţiile este
activat Fiecare funcţie poate fi confirmată
apăsând pe tasta (E) Dacă nu există o confirmare după câteva secunde, afişajul va ieşi
din modul Meniu şi va reveni la starea normală.
Sunt indicate următoarele funcţii:
Selectaţi compartimentul frigiderului
Selectaţi compartimentul congelatorului
Funcţia Mod Eco
Funcţia FreeStore
Funcţia Cumpărături
Funcţia Siguranţă copii
Funcţia Răcirea băuturilor
Funcţia Congelare rapidă
Reglarea temperaturii
Apăsaţi tasta (D) pentru a selecta compartimentul şi apoi tasta (B) pentru a seta temperatura necesară.
Apăsaţi tasta (E) pentru a confirma selecţia.
Indicatorul de temperatură afişează temperatura aleasă. Temperatura aleasă va fi
atinsă în 24 de ore.
Funcţia Vacanţă "H"
Funcţia "Vacanţă" reglează temperatura la
+ 15°C.
Această funcţie vă permite să ţineţi frigiderul
închis şi gol pe durata unei vacanţe lungi
Page 40

40 electrolux
(de ex. vacanţa de vară) fără să se formeze
mirosuri neplăcute.
Pentru a activa funcţia "Vacanţă" procedaţi
la fel ca pentru modificarea temperaturii selectate. Afişajul pentru temperatură poate
modifica temperatura afişată cu până la + 8
°C, câte 1 °pe rând. + 2 °C va fi urmat de
litera "H". Apăsaţi pe tasta E pentru a confirma.
Acum frigiderul este în modul "Vacanţă",
care este un mod cu consum redus de
energie.
Important Compartimentul frigider trebuie
să fie gol când e activată funcţia "Vacanţă".
Funcţia "Blocare pentru copii"
Funcţia "Blocare pentru copii" se activează
apăsând pe tasta D (de mai multe ori, dacă
este nevoie), până când apare simbolul co-
respunzător
.
Trebuie să confirmaţi alegerea apăsând pe
tasta (E) într-un interval de câteva secunde.
Veţi auzi soneria, iar simbolul rămâne
aprins. Cu această setare, orice activare
prin intermediul tastelor nu produce nicio
modificare, cât timp această funcţie este
activată.
E posibil să dezactivaţi funcţia oricând,
apăsând pe tasta (D), până când simbolul
corespunzător clipeşte intermitent, apoi pe
tasta (E).
Funcţia "Cumpărături"
Dacă e nevoie să introduceţi o cantitate
mare de alimente calde, de exemplu după
ce aţi făcut cumpărături, vă recomandăm
să activaţi funcţia "Cumpărături" pentru a
răci produsele mai rapid şi pentru a evita
încălzirea alimentelor care se află deja în frigider.
Funcţia "Cumpărături" se activeaz
ă
apăsând pe tasta (D) (de mai multe ori,
dacă este nevoie), până când apare simbo-
lul corespunzător
. Trebuie să confirmaţi
alegerea apăsând pe tasta (E) într-un interval de câteva secunde. Veţi auzi soneria, iar
simbolul rămâne aprins.
Funcţia "Cumpărături" se va dezactiva automat după aproximativ 6 ore. E posibil să
dezactivaţi funcţia oricând, apăsând pe tasta (D), până când simbolul corespunzător
clipeşte intermitent, apoi pe tasta (E).
Funcţia Mod Eco
Apăsaţi pe tasta (D) (de mai multe ori, dacă
e nevoie), până când apare simbolul cores-
punzător
.
Apăsaţi tasta (E) pentru a confirma selecţia.
Veţi auzi soneria, iar simbolul rămâne
aprins.
Cu această setare, temperaturile sunt configurate automat (+ 5 °C şi - 18 °C), realizându-se condiţiile optime pentru conservarea
alimentelor.
Setaţi o temperatură diferită într-unul dintre
compartimente pentru a opri funcţia.
Funcţia FreeStore
Apăsaţi pe tasta (D) (de mai multe ori, dacă
e nevoie), până când apare simbolul cores-
punzător
Apăsaţi tasta (E) pentru a confirma selecţia.
Veţi auzi soneria, iar simbolul rămâne
aprins.
Important Dacă funcţia este activată
automat, pictograma FreeStore nu este
afişată (consultaţi "Utilizarea zilnică").
Activarea funcţiei FreeStore creşte consumul de energie.
Funcţia "Congelare rapidă"
Compartimentul congelator este adecvat
pentru conservarea pe termen lung a alimentelor congelate comercial şi pentru
congelarea alimentelor proaspete.
Cantitatea maximă de alimente care poate fi
congelată într-o perioadă de 24 de ore e indicată pe plăcuţa cu datele tehnice.
Pentru a congela cantitatea de alimente indicată pe plăcuţa cu datele tehnice, puneţi
alimentele în contact direct cu suprafaţa de
răcire (scoateţi sertarul sau coşul). Dacă alimentele sunt congelate în interiorul sertarelor sau al coşurilor, cantitatea maximă e puţin mai mică.
Pentru a congela alimente proaspete, trebuie să activaţ
i funcţia Congelare rapidă.
Apăsaţi pe tasta (D) (de mai multe ori, dacă
este nevoie), până când apare indicatorul
.
Trebuie să confirmaţi alegerea apăsând pe
tasta (E) într-un interval de câteva secunde.
Veţi auzi soneria, iar pe afişaj va apărea o
animaţie cu liniuţe.
După o perioadă de răcire preliminară de
24 de ore, puneţi alimentele în congelator.
Page 41

electrolux 41
Puneţi alimentele ce urmează a fi congelate
în compartimentul
zona cea mai rece.
Procesul de congelare durează 24 ore. În
acest răstimp nu puneţi alte alimente în
congelator.
Această funcţie se opreşte automat după
52 ore.
E posibil să dezactivaţi funcţia oricând,
apăsând pe tasta (D) până când indicatorul
clipeşte intermitent, apoi apăsaţi pe tas-
ta (E).
Funcţia Răcirea băuturilor
Funcţia Răcirea băuturilor se utilizează ca
avertizare de siguranţă când se pun sticle în
compartimentul congelator. Se activează
apăsând pe tasta (D) (de mai multe ori,
dacă este nevoie), până când apare simbo-
lul corespunzător
Trebuie să confirmaţi alegerea apăsând pe
tasta (E) într-un interval de câteva secunde.
Veţi auzi soneria, iar simbolul rămâne
aprins.
Cu această setare, se activează un timer cu
o valoare implicită de 30 min., care poate fi
modificat de la 1 la 90 min., apăsând pe
tasta (B) selectaţi minutele necesare.
La terminarea duratei fixate apar următoa-
rele indicaţii:
•
pe afişajul
mitent
•
simbolul
, deoarece aceasta e
.
simbolul clipeşte inter-
clipeşte intermitent
•
simbolul
•sună o alarmă acustică până când se
apasă pe tasta (E)
Reţineţi că în acest moment trebuie să
scoateţi băuturile din compartimentul congelator.
E posibil să dezactivaţi funcţia oricând,
apăsând pe tasta (D) până când simbolul
corespunzător clipeşte intermitent, apoi pe
tasta (E).
Alarmă temperatură excesivă
O creştere a temperaturii în compartiment
(de exemplu din cauza unei întreruperi a curentului) este indicată de:
• temperatura care clipeşte intermitent
•
compartimentul congelator
peşte intermitent
•
clipeşte intermitent simbolul
•sună o sonerie
Când se restabilesc condiţiile normale:
• semnalul acustic încetează
• valoarea temperaturii continuă să cli-
pească intermitent
Când apăsaţi pe tasta (E) pentru a dezacti-
va alarma, pe afişajul
dicată temperatură la care s-a ajuns în
compartiment, timp de câteva secunde.
După aceea revine la modul de funcţionare
normal, indicând temperatura compartimentului selectat.
În timpul fazei de alarmă, soneria poate fi
dezactivată apăsând pe tasta (E).
clipeşte intermitent
care cli-
apare cea mai ri-
PRIMA UTILIZARE
Curăţarea interiorului
Înainte de a folosi aparatul pentru prima
oară, spălaţi interiorul şi toate acesoriile interne cu apă călduţă şi cu detergent neutru,
pentru a înlătura mirosul specific de produs
nou, apoi uscaţi-le bine.
UTILIZAREA ZILNICĂ
Conservarea alimentelor congelate
La prima pornire sau după o perioadă de
neutilizare, înainte de a introduce alimentele
în compartiment, lăsaţi aparatul să funcţio-
neze timp de cel puţin 2 ore la setările cele
mai mari.
Important Nu folosiţi detergenţi sau prafuri
abrazive, deoarece vor deteriora suprafaţa.
Important În cazul dezgheţării accidentale,
de exemplu din cauza unei întreruperi a
curentului, dacă curentul a fost întrerupt
mai mult timp decât valoarea indicată în
tabelul cu caracteristicile tehnice din
paragraful "Timpul de atingere a condiţiilor
normale de funcţionare", alimentele
decongelate trebuie consumate rapid sau
Page 42

42 electrolux
trebuie gătite imediat şi apoi recongelate
(după ce s-au răcit).
Dezgheţarea
Alimentele congelate, înainte de a fi utilizate,
pot fi dezgheţate în compartimentul frigider
sau la temperatura camerei, în funcţie de
timpul de care dispuneţi pentru această
operaţiune.
Bucăţile mici pot fi gătite congelate, direct
din congelator: în acest caz, durata de coacere va fi mai mare.
FreeStore
Compartimentul frigiderului este echipat cu
un dispozitiv care permite răcirea rapidă a
alimentelor şi o temperatură mai uniformă în
compartiment.
Suportul pentru sticle
Puneţi sticlele (cu gura îndreptată înainte) în
raftul poziţionat anterior.
Important Dacă raftul este poziţionat
orizontal, puneţi numai sticle închise.
Dacă este necesar, dispozitivul se dezacti-
vează automat, de exemplu pentru o recuperare rapidă a temperaturii după deschiderea uşii sau când temperatura ambiantă
este ridicată.
Vă permite să porniţi manual dispozitivul
când este necesar (consultaţi " Funcţia
FreeStore").
Important Dispozitivul FreeStore se
opreşte când uşa este deschisă şi
reporneşte imediat după închiderea uşii.
Rafturile detaşabile
Pe pereţii frigiderului se află o serie de ghidaje, astfel încât rafturile să poată fi poziţio-
nate după dorinţă.
Acest suport pentru sticle poate fi înclinat
pentru a stoca sticle deschise anterior.
Pentru a obţine acest rezultat, trageţi raftul
în sus astfel încât să se poată roti în sus şi
să fie pus pe următorul nivel mai înalt.
Page 43

electrolux 43
Poziţionarea rafturilor de pe uşă
Pentru a permite conservarea pachetelor cu
alimente de diferite dimensiuni, rafturile de
pe uşă pot fi poziţionate la înălţimi diferite.
Pentru a efectua aceste reglări, procedaţi
după cum urmează:
Trageţi treptat raftul în direcţia săgeţilor
până când se eliberează, apoi re-poziţionaţi-l conform necesităţilor.
Scoaterea coşurilor de congelare din
congelator
Coşurile de congelare au un limitator de
cursă pentru a preveni scoaterea lor accidentală sau căderea afară. În momentul
scoaterii din congelator, trageţi coşul înspre
dvs. şi, până la atingerea punctului de
capăt, scoateţi coşul prin înclinarea sa în
sus înainte.
În momentul punerii sale înapoi, ridicaţi uşor
partea din faţă a coşului pentru a-l introduce în congelator. Odată ce vă aflaţi deasupra punctelor de capăt, apăsaţi coşurile
înapoi în poziţia lor.
Sertar FreshZone
Sertarul FreshZoneeste adecvat pentru
păstrarea alimentelor proaspete precum
peşte, carne, fructe de mare, deoarece aici
temperatura este mai mică decât în restul
frigiderului.
Page 44

44 electrolux
SFATURI UTILE
Sunete normale în timpul funcţionării
•Puteţi auzi sunete slabe, ca nişte gâlgâi-
turi sau ca nişte bule, când agentul de
răcire este pompat prin serpentine sau
prin tuburi. Acest lucru e normal.
• Când compresorul funcţionează, agentul
de răcire este pompat prin circuit, iar de
la compresor se aude un sunet ca un
sfârâit sau un zgomot ca de pulsaţie.
Acest lucru e normal.
• Dilatarea termică poate produce zgomote
bruşte, asemănătoare cu nişte crăpături.
Este un fenomen fizic natural, nu este periculos. Acest lucru e normal.
Recomandări pentru economisirea
energiei
• Nu deschideţi uşa prea des şi nu o lăsaţi
deschisă mai mult decât e absolut necesar.
•Dacă temperatura camerei este ridicată şi
Butonul de reglare a temperaturii este setat pe temperatură redusă, iar aparatul
este complet încărcat, compresorul poate funcţiona în mod continuu, iar pe evaporator se poate produce brumă sau
gheaţă. Dacă se întâmplă acest lucru, setaţi butonul de reglare a temperaturii pe o
setare mai cald
gheţarea automată, economisindu-se
astfel energia.
Recomandări pentru conservarea
alimentelor proaspete
Pentru a obţine cele mai bune rezultate:
• nu puneţi alimente calde şi nu păstraţi lichide care se evaporă în frigider
• acoperiţi sau înveliţi alimentele, mai ales
dacă au un miros puternic
•poziţionaţi alimentele astfel încât aerul să
poată circula liber în jurul lor
Recomandări privind păstrarea în
frigider
Recomandări utile:
Carne (toate tipurile) : ambalaţi-o în pungi
de polietilenă şi puneţi-o pe raftul de sticlă,
deasupra sertarului pentru legume.
Carnea poate fi conservată în siguranţă în
acest mod pentru una sau două zile maximum.
ă pentru a permite dez-
Alimente gătite, gustări reci etc.: acestea
trebuie acoperite şi pot fi păstrate pe orice
raft.
Legume şi fructe: acestea trebuie să fie bine curăţate şi puse în sertarul special (sertarele speciale) din dotare.
Unt şi brânză
piente ermetice sau învelite în folie de aluminiu sau în pungi de polietilenă pentru a exclude aerul cât mai bine posibil.
Sticle de lapte: acestea trebuie să aibă dop
şi să fie păstrate în raftul pentru sticle de pe
uşă.
Bananele, cartofii, ceapa şi usturoiul, dacă
nu sunt ambalate, nu trebuie păstrate în frigider.
Recomandări privind păstrarea în
congelator
Pentru a obţine o congelare eficientă, iată
câteva recomandări importante:
• cantitatea maximă de alimente care poate fi congelată într-o perioadă de 24 de
ore este indicată pe plăcuţa cu datele
tehnice;
• procesul de congelare durează 24 ore. În
acest interval de timp nu mai pot fi
adăugate alte alimente de congelat;
• congelaţi numai alimente de calitate superioară, proaspete şi bine curăţate;
• faceţi porţii mici de alimente, care să se
poată congela rapid şi complet, iar apoi
să puteţi dezgheţa numai cantitatea necesară;
•înfăşuraţi alimentele în folie de aluminiu
sau de polietilenă şi verificaţi ca pachetele
să fie etanşe;
•aveţi grijă ca alimentele proaspete, ne-
congelate, să nu vină în contact cu cele
deja congelate, evitând astfel creşterea
temperaturii celor din urmă;
• alimentele fără grăsime se păstrează mai
bine şi pe o perioadă mai îndelungată decât cele grase; sarea reduce perioada de
păstrare a alimentelor;
• îngheţatele pe bază de sucuri, dacă sunt
consumate imediat după scoaterea din
congelator, pot produce degerături ale
pielii;
• se recomandă să notaţi data congelării
pe fiecare pachet, pentru a putea ţine
evidenţa perioadei de conservare.
: acestea trebuie puse în reci-
Page 45

electrolux 45
Recomandări pentru conservarea
alimentelor congelate
Pentru a obţine cele mai bune rezultate de
la acest aparat, procedaţi astfel:
•controlaţi ca alimentele congelate comer-
cial să fi fost păstrate în mod corespunzător în magazin;
•aveţi grijă ca alimentele congelate să fie
transferate din magazin în congelator cât
mai repede posibil;
ÎNGRIJIREA ŞI CURĂŢAREA
Atenţie Scoateţi ştecherul din priză
înainte de a efectua orice operaţie de
întreţinere.
Acest aparat conţine hidrocarburi în
unitatea de răcire; prin urmare, întreţi-
nerea şi reîncărcarea trebuie efectuate
numai de tehnicieni autorizaţi.
Curăţarea periodică
Aparatul trebuie să fie curăţat regulat:
•curăţaţi interiorul şi accesoriile cu apă
caldă şi cu detergent neutru.
• verificaţi regulat garniturile uşii şi ştergeţile, pentru a vă asigura că sunt curate.
•clătiţi şi uscaţi bine.
Important Nu trageţi, nu deplasaţi şi nu
deterioraţi tuburile şi/sau cablurile din
interiorul carcasei.
Nu folosiţi niciodată detergenţi, prafuri abrazive, produse de curăţare foarte parfumate
sau ceară de lustruit pentru a curăţa interiorul, deoarece acestea vor deteriora suprafaţa şi vor lăsa un miros puternic.
i condensatorul (grila neagră) şi
Curăţaţ
compresorul din spatele frigiderului cu o perie. Această operaţiune va îmbunătăţi performanţele aparatului şi va duce la economia de energie.
Important Aveţi grijă să nu deterioraţi
sistemul de răcire.
Multe substanţe speciale de curăţat suprafeţele din bucătărie conţin substanţe chimice care pot ataca/deteriora materialul plastic utilizat în acest aparat. Din acest motiv,
se recomandă să curăţaţi carcasa exte-
rioară a aparatului numai cu apă caldă în
care s-a adăugat puţin detergent.
• nu deschideţi uşa prea des şi nu o lăsaţi
deschisă mai mult decât e absolut nece-
sar.
•După dezgheţare, alimentele se deterio-
rează rapid şi nu mai pot fi congelate din
nou.
•Nu depăşiţi perioada de păstrare indicată
de producătorul alimentelor.
După curăţare, conectaţi din nou aparatul la
reţea.
Dezgheţarea frigiderului
Gheaţa este eliminată automat din evaporatorul din compartimentul frigider de fiecare
dată când se opreşte compresorul motorului, în timpul utilizării normale. Apa rezultată
din dezgheţ
într-un recipient special situat în spatele
aparatului, deasupra compresorului motorului, de unde se evaporă.
Este necesar să curăţaţi periodic orificiul de
drenare a apei rezultate din dezgheţare, din
mijlocul canalului din compartimentul frigider, pentru ca apa să nu dea pe dinafară şi
să nu se scurgă peste alimente. Folosiţi dispozitivul special de curăţare din dotare, pe
care-l veţi găsi deja introdus în orificiul de
drenare.
are se scurge printr-un canal
Page 46

46 electrolux
Dezgheţarea congelatorului
O anumită cantitate de gheaţă se va forma
întotdeauna pe rafturile congelatorului şi în
jurul compartimentului superior.
Dezgheţaţi congelatorul când stratul de
gheaţă atinge o grosime de circa 3-5 mm.
Pentru a înlătura gheaţa, respectaţi instrucţiunile de mai jos:
• scoateţi ştecherul din priza de perete sau
opriţi aparatul
• scoateţi toate alimentele depozitate, înveliţi-le în câteva straturi de ziar şi puneţi-le
într-un loc rece
• scoateţi sertarele congelatorului
• puneţi material izolator în jurul sertarelor,
de exemplu pături sau ziare.
Dezgheţarea poate fi accelerată prin punerea de vase cu apă caldă (nu fiartă) în interiorul congelatorului.
• Desfaceţi canalul de evacuare din poziţia
sa de repaus, apăsaţi-l în conformitate cu
ilustraţia şi puneţi-l în sertarul inferior al
congelatorului unde se poate colecta apa
•răzuiţi cu grijă gheaţa când începe să se
dezgheţ
sau plastic
• când toată gheaţa s-a topit, curăţaţi şi
ştergeţi aparatul, apoi puneţi canalul de
evacuare înapoi la loc.
e. Utilizaţi o răzuitoare din lemn
•porniţi aparatul şi puneţi la loc alimentele
congelate.
Se recomandă să setaţi aparatul pe poziţia cea mai ridicată a butonului termostatului timp de câteva ore, pentru a
atinge temperatura adecvată de conservare cât mai rapid.
Important Nu utilizaţi niciodată unelte
metalice ascuţite pentru a răzui gheaţa de
pe evaporator, pentru că îl puteţi deteriora.
Nu utilizaţi un dispozitiv mecanic sau orice
alt mijloc artificial pentru a grăbi procesul de
dezgheţare, altele decât cele recomandate
de producător. O creştere a temperaturii
pachetelor de alimente congelate, pe
durata dezgheţării, le poate scurta durata
de păstrare în siguranţă.
CE TREBUIE FĂCUT DACĂ...
Atenţie Înainte de a remedia
defecţiunile scoateţi ştecherul din priză.
Numai un electrician calificat sau o persoană competentă trebuie să remedieze defecţiunile care nu apar în acest
manual.
Important În timpul utilizării normale se aud
unele sunete (compresorul, circulaţia
agentului de răcire).
Page 47

electrolux 47
Problemă Cauză posibilă Soluţie
Aparatul face zgomot. Aparatul nu este sprijinit corect. Verificaţi dacă aparatul este stabil
(toate cele patru picioruşe trebuie
să fie pe podea).
Compresorul funcţio-
nează în mod continuu.
Butonul de reglare a temperaturii
poate fi setat incorect.
Setaţi o temperatură mai ridicată.
Uşa nu este închisă corect. Consultaţi paragraful "Închiderea
uşii".
Uşa a fost deschisă prea des. Nu ţineţi uşa deschisă mai mult
decât este necesar.
Temperatura alimentelor este
prea ridicată.
Lăsaţi temperatura alimentelor să
scadă până la temperatura camerei înainte de conservare.
Temperatura camerei este prea
Reduceţi temperatura camerei.
mare.
Funcţia "Congelare rapidă" este
activată.
Pe peretele posterior al
frigiderului curge apă.
În timpul procesului de dezgheţare automată, gheaţa de pe pe-
Consultaţi paragraful "Funcţia
Congelare rapidă".
Acest lucru este normal.
retele posterior se topeşte.
Se scurge apă în frigider. Orificiul pentru evacuarea apei
este înfundat.
Alimentele pot împiedica scurge-
rea apei în colector.
Se scurge apă pe jos. Apa rezultată din dezgheţare nu
se scurge în tăviţa de evaporare
situată pe compresor.
Există prea multă gheaţă.
Produsele nu sunt ambalate co-
Curăţaţi orificiul pentru evacuarea
apei.
Asiguraţi-vă că alimentele nu ating
peretele din spate.
Puneţi canalul de evacuare a apei
rezultate din dezgheţare în tăviţa
de evaporare.
Ambalaţi produsele mai bine.
rect.
Uşa nu este închisă corect. Consultaţi paragraful "Închiderea
uşii".
Butonul de reglare a temperaturii
Setaţi o temperatură mai ridicată.
poate fi setat incorect.
Temperatura din aparat
este prea mare.
Temperatura alimentelor este
Uşa nu este închisă corect. Consultaţi paragraful "Închiderea
uşii".
Lăsaţi temperatura alimentelor să
prea ridicată.
scadă până la temperatura camerei înainte de conservare.
Sunt conservate prea multe ali-
mente în acelaşi timp.
Temperatura din frigider
Aerul rece nu circulă în aparat. Verificaţi ca aerul rece să circule
este prea mare.
Temperatura din conge-
lator este prea mare.
Aparatul nu funcţio-
Produsele sunt puse prea
aproape unele de altele.
Aparatul este oprit. Porniţi aparatul.
Introduceţi mai puţine alimente în
acelaşi timp.
în aparat.
Puneţi produsele astfel încât aerul
rece să poată circula printre ele.
nează.
Ştecherul nu este introdus co-
rect în priză.
Introduceţi ştecherul corect în
priză.
Page 48

48 electrolux
Problemă Cauză posibilă Soluţie
Aparatul nu este alimentat cu
Becul nu funcţionează.
Becul este defect. Consultaţi paragraful "Înlocuirea
electricitate. La priză nu există
tensiune.
Becul este în stand-by. Închideţi şi deschideţi uşa.
Conectaţi alt aparat electric la
priză. Contactaţi un electrician calificat.
becului".
Dacă soluţia indicată nu duce la niciun rezultat, contactaţi cel mai apropiat centru de
asistenţă autorizat al firmei.
Înlocuirea becului
1. Deconectaţi aparatul de la sursa de alimentare electrică.
2. Împingeţi partea mobilă pentru a desprinde capacul becului (1).
3. Scoateţi capacul becului (2).
1
2
4. Înlocuiţi becul cu unul de aceeaşi putere
şi care a fost conceput special pentru
utilizarea doar în aparatele electrocasnice.
5. Puneţi la loc capacul becului.
6. Conectaţi aparatul la sursa de alimentare electrică.
7. Deschideţi uşa. Asiguraţi-vă că becul se
aprinde.
Închiderea uşii
1. Curăţaţi garniturile uşii.
2. Dacă este nevoie, reglaţi uşa. Consultaţi
paragraful "Instalarea".
3. Dacă este nevoie, înlocuiţi garniturile defecte ale uşii. Contactaţi Centrul de
Asistenţă.
DATE TEHNICE
ERA36633W ERA40633W
Dimensiuni
Înălţime 1850 mm 2010 mm
Lăţime 595 mm 595 mm
Adâncime 658 mm 658 mm
Timp de atingere a
condiţiilor normale de
funcţionare
Tensiune 230 - 240 V 230 - 240 V
Frecvenţă 50 Hz 50 Hz
Informaţiile tehnice sunt specificate pe
plăcuţa cu datele tehnice de pe partea in-
20 h 20 h
ternă din stânga a aparatului şi pe eticheta
referitoare la energie.
INSTALAREA
Citiţi cu atenţie "Informaţiile privind
siguranţa", pentru siguranţa dv. şi
pentru a asigura utilizarea corectă a
aparatului, înainte de instalarea
acestuia.
Amplasarea
Instalaţi aparatul într-un loc în care temperatura ambientului să corespundă cu clasa
climatică indicată pe plăcuţa cu datele tehnice ale aparatului:
Page 49

electrolux 49
Clasa
clima-
tică
SN +10°C până la +32°C
N +16°C până la +32°C
ST +16°C până la +38°C
T +16°C până la +43°C
Temperatura camerei
Amplasarea
Aparatul trebuie instalat la distanţă de surse
de căldură cum ar fi radiatoare, boilere, lumina directă a soarelui etc. Aveţi grijă ca
aerul să poată circula liber în jurul părţii din
spate a dulapului. Pentru a asigura cele mai
bune performanţe, dacă aparatul este amplasat dedesubtul unui perete ieşit în afară,
distanţa minimă între partea de sus a carcasei şi perete trebuie să fie de cel puţin
100 mm . În orice caz, în mod ideal, aparatul nu trebuie amplasat dedesubtul pereţilor
ieşiţi în afară. Aşezarea uniformă corespunzătoare este asigurată prin unul sau mai
multe picioruşe reglabile la baza carcasei
aparatului.
Avertizare Trebuie să poată fi posibilă
deconectarea aparatului de la priză;
prin urmare, ştecherul trebuie să fie
uşor accesibil după instalare.
ţa cu datele tehnice corespund cu sursa de
alimentare a locuinţei dv.
Aparatul trebuie să fie legat la pământ. Şte-
cherul cablului electric este prevăzut cu un
contact în acest scop. Dacă priza din locuinţă nu este legată la pământ, conectaţi
aparatul la o împământare separată, în conformitate cu reglementările în vigoare, după
ce aţi consultat un electrician calificat.
Producătorul nu-şi asumă nicio responsabilitate dacă aceste măsuri de siguranţă nu
sunt respectate.
Acest aparat este conform cu Directivele
C.E.E.
Distanţierele posterioare
Puteţi găsi cele două distanţatoare în punga
cu documentaţia.
Efectuaţi aceşti paşi pentru a monta distanţatoarele:
1. Desfaceţi şurubul.
2. Puneţi distanţatorul sub şurub.
3. Puneţi distanţatorul în poziţia corectă.
4. Strângeţi din nou şuruburile.
2
mm
min
100
A
mm
20
B
Conexiunea electrică
Înainte de a conecta aparatul, asiguraţi-vă
că tensiunea şi frecvenţa indicate pe plăcu-
1
4
Nivelarea
Când amplasaţi aparatul, aveţi grijă să fie
aşezat uniform. Acest lucru poate fi obţinut
cu ajutorul a două picioruşe reglabile din
partea de jos, în faţă.
3
Page 50

50 electrolux
Pentru a schimba direcţia de deschidere a
uşii, efectuaţi aceste operaţii:
1. Deschideţi uşa cu aparatul în poziţie
verticală. Desfaceţi şuruburile (t1) şi
scoateţi ornamentul de plastic din partea de sus a uşii (t2). Închideţi uşa.
Scoaterea opritoarelor rafturilor
Aparatul dv. este echipat cu opritoare pentru rafturi, care asigură blocarea rafturilor în
timpul transportului.
Pentru a le scoate, procedaţi după cum urmează:
1. Mutaţi opritoarele rafturilor în direcţia
săgeţii (A).
2. Ridicaţi raftul din partea din spate şi împingeţi-l înainte, până când se eliberează (B).
3. Scoateţi opritoarele (C).
t1
t1
t1
t2
t3
d7
2. Scoateţi căpăcelul de plastic de pe ornamentul de plastic al uşii şi montaţi-l
pe partea opusă (t3).
3. Scoateţi panoul (t4). Dacă este nevoie,
folosiţi o şurubelniţă, cu foarte mare
atenţie. Deşurubaţi şurubul de pe cealaltă parte. Scoateţi balamaua de sus a
uşii (t5). Puneţi-le într-o pungă de plastic.
Reversibilitatea uşii
Avertizare Înainte de a face orice
operaţie, scoateţi ştecherul din priză.
Important Pentru a efectua operaţiile
următoare, vă recomandăm să le faceţi
împreună cu încă o persoană care să ţină
bine uşile aparatului în cursul operaţiilor.
t4
t5
4. Scoateţi uşa de sus.
Page 51

electrolux 51
5. Desfaceţi şurubul şi scoateţi opritorul
uşii (d1). Montaţi-l invers pe cealaltă
parte.
d1
6. Deşurubaţi balamaua din mijloc (m2).
Scoateţi distanţierul de plastic (m1).
7. Scoateţi uşa de jos.
m1
m5
m3
m2
m6
m4
10. Reintroduceţi capacul (b1) pe partea
opusă.
b1
b2
b3
11. Scoateţi opritoarele (d1) şi mutaţi-le pe
partea cealaltă a uşilor.
12. Îndepărtaţi bolţul de acoperire al balamalei din mijloc din stânga (m3, m4) şi
mutaţi-l pe partea cealaltă.
13. Potriviţi bolţul balamalei din mijloc (m5)
în orificiul din stânga al uşii de jos.
14. Introduceţi din nou uşa de jos pe pivotul (b2).
15. Înşurubaţi din nou balamaua din mijloc
(m1) pe partea opusă . Nu uitaţi distanţierul de plastic (m2) care trebuie introdus sub balamaua din mijloc.
16. Introduceţi din nou uşa de sus pe balamaua din mijloc (m5).
Verificaţi ca muchiile uşilor să fie paralele cu muchia laterală a aparatului.
8. Scoateţi distanţierul (m6) şi mutaţi-l pe
partea opusă a pivotului balamalei (m5).
9. Scoateţi capacul (b1) cu ajutorul unei
unelte. Deşurubaţi pivotul balamalei de
jos (b2) şi distanţierul (b3) şi montaţi-le
pe partea opusă.
Page 52

52 electrolux
17. Poziţionaţi şi fixaţi balamaua superioară
(o puteţi găsi în punga cu instrucţiunile
de folosire) pe partea opusă (t6).
t6
t7
18. Introduceţi panoul (t7) (care se găseşte
în punga cu instrucţiunile de folosire).
19. Deschideţi uşa de sus, montaţi garnitura de plastic de acoperire de sus (t2) cu
şuruburile (t1). Introduceţi magnetul
(d7). Închideţi uşa.
INFORMAŢII PRIVIND MEDIUL
Simbolul e pe produs sau de pe ambalaj
indică faptul că produsul nu trebuie aruncat
împreună cu gunoiul menajer. Trebuie
predat la punctul de colectare
corespunzător pentru reciclarea
echipamentelor electrice şi electronice.
Asigurându-vă că aţi eliminat în mod corect
produsul, ajutaţi la evitarea potenţialelor
consecinţe negative pentru mediul
20. Puneţi la loc aparatul, reglaţi-i poziţia
orizontală, aşteptaţi cel puţin patru ore,
apoi conectaţi-l la priză.
Efectuaţi o verificare finală pentru a vă asigura că:
• Toate şuruburile sunt bine strânse.
• Dispozitivul magnetic de etanşare se li-
peşte de carcasă.
•Uşa se deschide şi se închide corect.
Dacă temperatura ambiantă este scăzută
(de ex. iarna), este posibil ca garnitura să nu
se potrivească perfect la aparat. În acest
caz, aşteptaţi până când garnitura se potriveşte în mod natural.
nu doriţi să realizaţi singur operaţiile
Dacă
de mai sus, vă rugăm adresaţi-vă celui mai
apropiat centru service de asistenţă post
vânzare. Specialistul centrului service de
asistenţă post vânzare va va efectua schimbarea direcţiei de deschidere a uşilor pe
cheltuiala dvs.
înconjurător şi pentru sănătatea
persoanelor, consecinţe care ar putea
deriva din aruncarea necorespunzătoare a
acestui produs. Pentru mai multe informaţii
detaliate despre reciclarea acestui produs,
vă rugăm să contactaţi biroul local, serviciul
pentru eliminarea deşeurilor sau magazinul
de la care l-aţi achiziţionat.
Page 53

Electrolux. Thinking of you.
Дізнайтеся більше про нас на сайті www.electrolux.com
ЗМІСТ
Інформація з техніки безпеки 53
Панель керування 55
Перше користування 58
Щоденне користування 58
Корисні поради 61
Догляд та чистка 62
Що робити, коли ... 63
Технічні дані 65
Установка 66
Екологічні міркування 69
ІНФОРМАЦІЯ З ТЕХНІКИ БЕЗПЕКИ
В інтересах вашої безпеки та для належного використання приладу уважно
прочитайте цю інструкцію, включаючи
підказки та застереження, перш ніж
встановлювати його і розпочинати ним
користуватися. Аби уникнути помилкових дій і нещасних випадків необхідно,
щоб усі, хто користується приладом, ретельно ознайомилися з правилами експлуатації і техніки безпеки. Збережіть
цю інструкцію
дачі приладу іншим особам обов'язково
передайте її разом із приладом, щоб усі
користувачі змогли в будь-який час ознайомитися з правилами експлуатації і
технікою безпеки.
Задля безпеки життя та майна дотримуйтеся викладених у цій інструкції рекомендацій з техніки безпеки, оскільки
компанія-виробник не
ності за шкоду, що сталася через недотримання цих рекомендацій.
Безпека дітей і вразливих осіб
• Прилад не призначений для користування ним людьми (в т.ч. дітьми) з обмеженими фізичними, сенсорними чи
розумовими здібностями чи недостатнім досвідом та знаннями, якщо їм не
було проведено відповідного інструктажу
бою, відповідальною за їх безпеку.
Щоб діти не гралися з приладом, вони
мають користуватися ним під наглядом дорослих.
• Не дозволяйте дітям гратися з пакувальними матеріалами. Порушення
і в разі продажу або пере-
несе відповідаль-
з користування приладом осо-
• Перш ніж утилізувати прилад, вийміть
• Якщо цей прилад, оснащений магніт-
Загальні правила безпеки
Вентиляційні отвори в корпусі приладу
та в конструкції, що вбудовується, мають бути відкритими.
• Цей прилад призначений для збері-
• Не застосовуйте механічні пристрої
• Не використовуйте інші електричні
• Не пошкодьте холодильний контур
electrolux 53
Може змінитися без оповіщення
цієї вимоги може призвести до того,
що вони можуть задихнутися.
вилку з розетки, відріжте
місці, яке знаходиться якомога ближче до корпусу) і зніміть дверцята, щоб
запобігти випадкам, коли діти, граючись, отримають електрошок або замкнуться всередині.
ним замком, має замінити старий прилад із замком на пружині (клямкою),
подбайте про те, щоб вивести з ладу
пружину, перш
прилад. У такий спосіб ви попередите
ситуацію, коли він може стати смертельною пасткою для дитини.
Попередження!
гання харчових продуктів і напоїв у
звичайному домогосподарстві, як пояснюється в цій інструкції.
чи інші штучні засоби для прискорення процесу розморожування.
пристрої (наприклад, прилад для виготовлення морозива) всередині холодильника, якщо це не передбачено
виробником.
приладу.
ніж утилізувати старий
кабель (у
Page 54

54 electrolux
• У холодильному контурі міститься холодоагент ізобутан (R600a) — природний газ, що майже не шкідливий
для довкілля, проте займистий.
Подбайте, щоб під час транспортування і встановлення приладу жоден
з компонентів холодильного контуру
не був пошкоджений.
У разі пошкодження холодильного
контуру:
– уникайте контакту з відкритим во-
гнем або джерелами займання;
– ретельно провітріть
приміщення, де
знаходиться прилад.
• З міркувань безпеки не слід змінювати технічні характеристики приладу
чи якимось чином його модифікувати.
Будь-яке пошкодження кабелю може
викликати коротке замикання, пожежу
й ураження електричним струмом.
Попередження! Щоб уникнути нещасних випадків, заміну всіх електричних компонентів (кабель живлення, вилка, компресор) має виконувати сертифікований майстер
або спеціаліст сервісного центру.
1. Забороняється подовжувати ка-
бель живлення.
2. Подбайте про те, щоб вилка кабе-
лю живлення не була роздавлена
чи пошкоджена задньою частиною
приладу. Роздавлена чи пошкоджена вилка
кабелю живлення може перегрітися і спричинити пожежу.
3. Подбайте про наявність доступу
до вилки кабелю живлення.
4. Не тягніть за кабель живлення.
5. Не вставляйте вилку в розетку,
яка хитається. Існує ризик електричного удару чи займання.
6. Не можна користуватися прила-
13)
дом, якщо знято плафон
з лам-
пи.
• Прилад важкий. Будьте обережні при
його переміщенні.
• Не беріть речі в морозильному відді-
ленні та не торкайтеся до них вологими чи мокрими руками, бо це може
призвести до поранення або холодового опіку.
• Не слід надовго залишати прилад під
прямими сонячними променями.
Лампи
14)
в цьому приладі призначені
•
виключно для використання в побутових приладах. Вони не придатні для
освітлення житлових приміщень.
Щоденне використання
• Не ставте гарячий посуд на пластикові частини приладу.
• Не зберігайте в приладі займистий
газ або рідини, бо вони можуть вибухнути.
• Не кладіть харчові продукти безпосередньо проти отворів для
задній стінці приладу.
повітря в
15)
• Заморожені продукти після розморо-
жування не можна заморожувати знову.
• Фасовані заморожені продукти зберігайте у відповідності з інструкціями
виробника.
• Необхідно чітко дотримуватися рекомендацій виробника приладу щодо
зберігання продуктів. Зверніться до
відповідних інструкцій.
• Не розміщуйте газовані або шипучі
напої в морозильному відділенні, бо
через підвищення тиску на пляшку во-
можуть вибухнути, що пошкодить
ни
прилад.
• Морозиво на паличці спроможне викликати холодові опіки, якщо його їсти
прямо з морозильника.
Догляд і чищення
• Перш ніж виконувати технічне обслуговування, вимкніть прилад і вийміть
вилку з розетки.
• При чищенні не можна користуватися
металевими предметами.
• Не використовуйте гострі предметидля чищення приладу від льоду.
Кори-
стуйтеся пластиковим шкребком.
• Регулярно перевіряйте злив води з
холодильника. За потреби прочищайте його. Якщо злив буде заблокований, вода збиратиметься на дні приладу.
13) Якщо плафон передбачений.
14) Якщо лампа передбачена.
15) Якщо прилад Frost Free (без намерзання)
Page 55

electrolux 55
Установка
Важливо! Під час підключення до
електромережі ретельно дотримуйтеся
інструкцій, наведених у відповідних
параграфах.
• Розпакуйте прилад і огляньте на
предмет пошкоджень. Не користуйтеся приладом, якщо він пошкоджений.
У разі виявлення пошкоджень негайно повідомте про це торговельний заклад, де ви придбали прилад. У цьому разі збережіть пакування.
• Рекомендується зачекати
ше дві години, перш ніж вмикати прилад, з тим щоб масло повернулося до
компресора.
• Повітря має нормально циркулювати
довкола приладу; недотримання цієї
рекомендації призводить до перегрівання. Щоб досягти достатньої вентиляції, дотримуйтеся відповідних інструкцій щодо встановлення.
• По можливості, встановлюйте прилад
так, щоб його задня стінка була повернута до стіни. Це дозволить уникнути торкання гарячих частин (компресора, конденсора) і відповідно опіків.
• Прилад не можна ставити біля батареї опалення або плити.
• Подбайте про те, щоб до розетки був
доступ після встановлення приладу.
щонаймен-
• Під'єднуйте лише до джерела питної
Технічне обслуговування
• Електричні роботи, необхідні для об-
• Технічне обслуговування цього при-
Захист довкілля
16)
води.
слуговування приладу, мають виконуватися кваліфікованим електриком
або компетентною особою.
ладу має здійснюватися лише кваліфікованим персоналом. Для ремонту
необхідно використовувати лише оригінальні запасні частини.
Ні в охолоджувальній системі, ні в
ізоляційних матеріалах цього приладу не міститься газів, які могли б
нанести шкоду озоновому шару.
Прилад не можна утилізувати разом
з міськими відходами та сміттям.
Ізоляційна піна містить займисті гази: прилад необхідно утилізувати
згідно з відповідними нормативними
актами, виданими місцевими органами влади. Уникайте пошкодження
холодильного агрегату
задній частині, поблизу теплообмінника. Матеріали, позначені симво-
, підлягають вторинній пере-
лом
робці.
, особливо в
ПАНЕЛЬ КЕРУВАННЯ
AC
BDE
А — кнопка увімкнення/вимкнення приладу
В — кнопка регулювання температури Е — кнопка підтвердження
С — індикатор температури й функцій
16) Якщо передбачене під'єднання до джерела водопостачання
D — кнопка функцій
Page 56

56 electrolux
Дисплей
10 1 2 3 4
56789
Індикатор температури.
1
Сигнал надмірної температури.
2
Індикатор функції FreeStore.
3
Індикатор функції «Після відвідан-
4
ня магазину».
Індикатор функції захисту від до-
5
ступу дітей
Перше увімкнення приладу
Якщо після вставки вилки в розетку
дисплей не засвітився, натисніть кнопку
(А), щоб увімкнути прилад.
В момент увімкнення прилад перебуває
в режимі сигналізації: індикатор температури блимає, лунає звуковий сигнал.
Натисніть кнопку (E), і звуковий сигнал
вимкнеться (також див. розділ «Сигнал
надмірної температури»). Значок
продовжуватиме блимати, а на індикаторі
відобразиться найвища досягнута температура.
В екологічному режимі правильне зберігання продуктів забезпечується шляхом
встановлення наступних температур:
+5°C у холодильнику,
–18°C у морозильнику.
• Перед тим як завантажувати продукти
в морозильне відділення, зачекайте,
доки всередині відділення не встановиться температура –18°C.
• Інформацію про вибір іншої темпера-
тури див. у розділі «Регулювання температури».
Вимкнення
Для вимкнення приладу натисніть і утримуйте кнопку (А) довше 1 секунди.
При цьому відобразиться зворотній відлік значень температури «-3 -2 -1».
Індикатор функції таймера.
6
Індикатор плюсової чи мінусової
7
температури.
Індикатор функції Action Freeze.
8
Індикатор відділення.
9
Індикатор екологічного режиму.
10
Меню функцій
Керувати меню функцій можна за допомогою кнопки (D). Для підтвердження
функції необхідно натиснути кнопку (E).
Якщо не підтвердити функцію впродовж
декількох секунд, меню зникне і дисплей перейде у звичайний стан.
Підтримувані
функції
Вибір холодильного відділення
Вибір морозильного відділення
Екологічний режим
Функція FreeStore
Функція «Після відвідання магазину»
Функція захисту від доступу дітей
Функція охолодження напоїв
Функція Action Freeze
Регулювання температури
Натисніть кнопку (D) для вибору відділення, а потім встановіть бажану температуру за допомогою кнопки (В).
Натисніть кнопку (E), щоб підтвердити
вибір.
На індикаторі температури відобразиться встановлена температура. Ця температура буде досягнута протягом 24 годин.
Функція «Відпустка» (Н)
Для функції «Відпустка» встановлюється температура 15°C.
Page 57

electrolux 57
Завдяки цій функції холодильник можна
залишити закритим і порожнім на період
тривалої відсутності (наприклад, під час
літньої відпустки) і не боятися, що всередині утвориться неприємний запах.
Щоб встановити функцію «Відпустка»,
скористайтеся процедурою регулювання температури. Значення на індикаторі
температури змінюються при кожному
натисканні на 1°C аж до + 8°C. Після +
2°C відобразиться буква «H». Натисніть
кнопку E для
підтвердження.
Функція «Відпустка» увімкнена, і холодильник перебуває у режимі енергозбереження.
Важливо! При виборі функції
«Відпустка» холодильне відділення має
бути порожнім.
Функція захисту від доступу дітей
Функція захисту від доступу дітей активується повторним натисканням кнопки
(D) до появи значка
.
Щоб підтвердити вибір, необхідно на
протязі декількох секунд натиснути
кнопку (E). Пролунає звуковий сигнал, а
значок залишиться на дисплеї. У цьому
стані натискання кнопок не призводить
до зміни настройок.
Щоб вимкнути функцію, натискайте
кнопку (D), поки не почне блимати відповідний значок, а потім натисніть кнопку (Е).
Функція «Після відвідання магазину»
При завантаженні великої
кількості теплих продуктів (наприклад, після відвідання магазину) радимо увімкнути
функцію «Після відвідання магазину»,
щоб швидше охолодити нові продукти й
уникнути нагрівання продуктів, що вже
зберігаються у холодильнику.
Функція «Після відвідання магазину» активується повторним натисканням кнопки (D) до появи значка
. Щоб підтвердити вибір, необхідно на протязі декількох секунд натиснути кнопку (E). Пролунає звуковий сигнал, а значок залишиться на дисплеї.
Функція «Після відвідання магазину»
автоматично вимикається приблизно
через 6 годин. Щоб вимкнути функцію,
натискайте кнопку (D), поки не почне
блимати відповідний значок, а потім натисніть кнопку (Е).
Екологічний режим
Натискайте кнопку
ся відповідний значок
(D), поки не з’явить-
.
Натисніть кнопку (E), щоб підтвердити
вибір. Пролунає звуковий сигнал, а значок залишиться на дисплеї.
В цьому режимі автоматично встановлюється оптимальна температура зберігання продуктів (+ 5°C і –18°C).
Щоб вимкнути функцію, встановіть в одному з відділень іншу температуру.
Функція FreeStore
Натискайте кнопку (D), поки не з’явиться відповідний значок
Натисніть кнопку (E), щоб підтвердити
вибір. Пролунає звуковий сигнал, а значок залишиться на дисплеї.
Важливо! Якщо функція вмикається
автоматично, то значок FreeStore не
відображається (див. розділ «Щоденне
користування»).
При увімкненні функції FreeStore споживання електроенергії збільшується.
Функція Action Freeze
Морозильне відділення призначене для
тривалого зберігання заморожених продуктів і продуктів глибокої заморозки, а
також для заморожування свіжих
продуктів.
Максимальна кількість продуктів, яку
можна заморозити за 24 години, вказана на табличці з технічними даними.
Щоб заморозити таку кількість продуктів, викладайте їх безпосередньо на
охолоджувальну поверхню, вийнявши
шухляду чи кошик. При заморожуванні
продуктів у шухлядах чи кошиках максимальна кількість продуктів трохи зменшується.
Для заморожування свіжих продуктів
слід активувати
функцію Action Freeze.
Повторно натискайте кнопку (D), доки
не з’явиться значок
.
Щоб підтвердити вибір, необхідно на
протязі декількох секунд натиснути
кнопку (E). Пролунає звуковий сигнал, а
на дисплеї відтвориться рухоме зображення, що складається з ліній.
Page 58

58 electrolux
Після попереднього охолодження, яке
триває 24 години, завантажте продукти
в морозильне відділення.
Кладіть продукти, які необхідно заморозити, у відділення
температура найнижча.
Процес заморожування триває 24 години. Впродовж цього часу не завантажуйте у морозильник інші продукти.
Функція автоматично вимикається через 52 години.
Щоб вимкнути функцію, натискайте
кнопку (D), доки не почне блимати інди-
катор
Функція охолодження напоїв
Функція охолодження напоїв вмикається з міркувань безпеки при завантаженні пляшок у морозильне відділення. Для
її активації повторно натискайте кнопку
(D) до появи значка
Щоб підтвердити вибір, необхідно на
протязі декількох секунд натиснути
кнопку (E). Пролунає звуковий сигнал, а
значок залишиться на дисплеї.
Вмикається таймер, для якого за замовчуванням встановлено значення 30 хвилин. Цей час можна змінювати в діапазоні від 1 до 90 хвилин за допомогою
кнопки (B).
Після спливання встановленого часу:
•
•
•
, а потім натисніть кнопку (E).
на індикаторі
значок
блимає значок
блимає значок
;
, оскільки в ньому
.
починає блимати
;
;
• лунає звуковий сигнал, який можна
вимкнути кнопкою (Е).
Вийміть напої з морозильного відділення.
Щоб вимкнути функцію, натискайте
кнопку (D), поки не почне блимати відповідний значок, а потім натисніть кнопку (Е).
Сигнал надмірної температури
Про підвищення температури у відділенні (наприклад, через перебої в постачанні електроенергії) свідчить наступне:
• блимає значення температури;
• блимає значок морозильного відді-
лення
•
блимає значок
• лунає звуковий сигнал.
Після відновлення звичайного стану:
• звуковий сигнал вимикається;
• значення температури продовжує
блимати.
При вимкненні сигналу за допомогою
кнопки (Е) протягом декількох секунд на
дисплеї
температура, що була досягнута у відділенні.
Потім прилад повертається у звичайний
режим і відображається температура у
вибраному відділенні.
Під час сигнальної фази звуковий сигнал можна вимкнути, натиснувши кнопку (E).
;
відображається найвища
ПЕРШЕ КОРИСТУВАННЯ
Миття камери
Перш ніж почати користуватися приладом, помийте його камеру і всі внутрішні
аксесуари за допомогою теплої води з
нейтральним милом, щоб усунути типовий запах нового приладу, а потім ретельно витріть його.
ЩОДЕННЕ КОРИСТУВАННЯ
Зберігання заморожених продуктів
При вмиканні після тривалого періоду
простою (коли прилад не використовувався), перш ніж ставити продукти у відділення, дайте йому попрацювати що-
Важливо! Не застосовуйте детергенти
або абразивні порошки, бо вони можуть
пошкодити поверхню.
найменше впродовж 2 годин при налаштуванні на більш високу температуру.
Page 59

electrolux 59
Важливо! У разі випадкового
розморожування, наприклад, через
перебої в постачанні електроенергії,
якщо електропостачання переривалося
на довший час, ніж зазначено на
табличці технічних характеристик у
графі "тривалість виходу в робочий
режим ", продукти, що розморозилися,
необхідно якнайшвидше спожити або
негайно приготувати, а потім знову
заморозити (попередньо охолодивши).
Розморожування
Перш ніж споживати продукти глибокої
заморозки, їх можна розморозити
у холодильному відділенні або при кімнатній температурі, залежно від того, скільки часу у вас є на це.
Невеликі шматки можна готувати навіть
замороженими, прямо з морозильника:
У цьому випадку на готування піде більше часу.
FreeStore
Холодильне відділення оснащене пристроєм, який забезпечує швидке охолодження продуктів і підтримує
рівно-
мірну температуру.
Зйомні полички
Стінки холодильника
мають значну кількість напрямних, тому висоту поличок
можна змінювати за бажанням.
Підставка для пляшок
Покладіть пляшки (отворами наперед)
на полицю вигнутої форми.
Важливо! Якщо полиця розташована
горизонтально, кладіть на неї лише
закриті пляшки.
За потреби цей пристрій вмикається автоматично, наприклад, щоб швидко відновити температуру у відділенні після
відкривання дверцят чи в умовах високої температури навколишнього середовища.
Також пристрій можна вмикати вручну
(див. розділ «Функція FreeStore»).
Важливо! Пристрій FreeStore
зупиняється при відкриванні дверцят і
знову починає працювати після їх
закривання.
Цю полицю для пляшок можна нахиляти, щоб зберігати на ній відкриті раніше
пляшки. Для цього потягніть полицю
вгору, щоб її можна було повернути догори і поставити на наступний вищий рівень.
Page 60

60 electrolux
Установлення поличок на дверцятах
Щоб уможливити зберігання упаковок з
продуктами різного розміру, полички на
дверцятах можна встановити на різній
висоті.
Щоб здійснити такі пристосування, зробіть так:
поступово потягніть поличку у напрямку, вказаному стрілками, доки вона не
вивільниться, а потім знову встановіть
поличку у потрібному місці.
морепродуктів і т.і.), оскільки температура в ній нижча, ніж в інших відділеннях холодильника.
Виймання кошиків для
заморожування з морозильної
камери
Кошики морозильної камери обладнано
граничними обмежувачами для запобігання їх випадкового висування або випадіння. Щоб вийняти кошик з морозильної камери, потягніть його на себе
до упору, а потім вийміть кошик, дещо
піднявши його передній край вгору.
Щоб встановити кошик на місце, злегка
підніміть передню частину
кошика і
вставте його в морозильну камеру. Розмістивши поличку за точками упору,
просуньте її на місце.
Шухляда FreshZone
Шухляда FreshZone підходить для зберігання свіжих продуктів (риби, м’яса,
Page 61

КОРИСНІ ПОРАДИ
Нормальні звуки при роботі приладу
• Ви можете чути тихий звук дзюрчання
або булькання, коли холодильний
агент перекачується через батарею
охолодження або труби. Це нормальне явище.
• Коли компресор працює, холодильний агент перекачується по контуру, і
ви чутимете дзижчання та пульсуючий шум компресора. Це нормальне
явище.
• Термічне розширення може спричи-
Поради про те, як заощаджувати
електроенергію
• Не відкривати часто дверцята і не за-
• Коли температура навколишнього по-
Рекомендації щодо зберігання в
холодильнику необроблених
продуктів
Щоб отримати найкращі результати:
• не зберігайте в холодильнику страви,
• накривайте або загортайте продукти,
• розміщуйте продукти так, щоб повітря
Рекомендації щодо заморожування
Корисні поради:
М'ясо (будь-якого типу): покладіть у поліетиленові кульки і поставте на скляну
поличку над шухлядою для овочів.
звук клацання. Це є природним і
няти
безпечним фізичним явищем. Це нормальне явище.
лишати їх відкритими довше, ніж це
абсолютно необхідно.
вітря висока, регулятор температури
встановлений на більшу потужність, а
прилад повністю завантажений, компресор може
но, що призводить до появи інею або
льоду на випарнику. Якщо це трапляється, поверніть регулятор температури вбік нижчого значення, щоб
унеможливити автоматичне розмерзання і, таким чином, заощадити
електроенергію.
коли вони теплі; не
що випаровуються
особливо ті, що сильно пахнуть
могло вільно циркулювати довкола
них
працювати безперерв-
зберігайте рідини,
electrolux 61
Задля безпеки зберігайте продукт таким
не довше ніж один або два дні.
чином
Готові страви, холодні страви тощо..:
необхідно накривати і можна ставити на
будь-яку поличку.
Фрукти та овочі: слід ретельно помити і
покласти і спеціальну шухляду, яка входить у комплект постачання.
Масло і сир: слід покласти у спеціальні
герметичні контейнери або загорнути в
алюмінієву фольгу чи
ленові кульки, щоб максимально захистити від обвітрювання.
Пляшки з молоком: слід закрити кришками і зберігати в підставці для пляшок на дверцятах.
Банани, картопля, цибуля та часник (якщо вони не упаковані): не слід зберігати
в холодильнику.
Поради щодо заморожування
Ось кілька важливих підказок, які допоможуть
тати заморожування:
• максимальна кількість продуктів, яку
• процес заморожування триває 24 го-
• заморожуйте лише продукти найви-
• готуйте продукти невеликими партія
• загортайте продукти в алюмінієву
• не давайте незамороженим продук-
• пласкі продукти зберігаються краще і
• шматочки льоду, якщо їх проковтнути
вам одержати найкращі резуль-
можна заморозити за 24 год. вказана
на табличці з технічними даними;
дини. Упродовж цього періоду не
можна додавати продукти до тих, які
вже заморожуються;
щої якості, свіжі і ретельно вимиті;
ми, щоб можна було їх швидко і повною мірою заморозити, а потім розморозити стільки, скільки потрібно;
фольгу або складайте в поліетиленові кульки; пакування має бути герметичним;
там контактувати з уже замороженими; в іншому разі температура оста-
підвищиться;
нніх
довше, ніж товсті; сіль зменшує термін зберігання продуктів;
відразу після того, як продукт був вий-
покласти поліети-
-
Page 62

62 electrolux
нятий з морозильника, можуть викликати холодовий опік;
• рекомендується вказувати на кожній
окремій упаковці дату заморожування, щоб не перевищувати тривалість
зберігання;
Поради щодо зберігання
заморожених продуктів
Щоб отримати найкращі результати, необхідно:
• переконатися, що продукти, які продаються замороженими, адекватно
зберігалися в магазині;
ДОГЛЯД ТА ЧИСТКА
Обережно! Перш ніж виконувати
операції з технічного
обслуговування, завжди виймайте
вилку з розетки.
У холодильному агрегаті цього приладу містяться вуглеводні; тому
технічне обслуговування та перезарядку його має виконувати лише
кваліфікований майстер.
Періодичне миття
Прилад необхідно регулярно мити:
• камеру та аксесуари мийте теплою
водою з нейтральним милом.
• регулярно перевіряйте ізоляцію
дверцят, щоб переконатися, що вона
чиста і на ній немає решток продуктів.
• протріть чистою
витріть.
Важливо! Не тягніть, не пересувайте і
не пошкоджуйте трубки та/або кабелі
всередині камери.
Ніколи не застосовуйте детергенти,
абразивні порошки, чистильні засоби з
сильним запахом або поліролі, щоб почистити камеру зсередини, бо вони можуть пошкодити поверхню або залишити сильний запах.
Конденсатор (чорну решітку) і компресор у задній частині приладу необхідно
чистити за допомогою щітки. Це покращить роботу приладу і дозволить заощадити електроенергію.
Важливо! Дбайте про те, щоб не
пошкодити систему охолодження.
водою і ретельно
• подбати про те, щоб заморожені продукти якнайшвидше
з продуктового магазину до морозильника;
• не відкривати часто дверцята і не залишати їх відкритими довше, ніж це
абсолютно необхідно.
• Після розморожування продукти
швидко псуються, і їх не можна заморожувати знову.
• Не можна зберігати продукти довше,
ніж вказано компанією-виробником
продуктів.
Багато комерційних засобів для чищення поверхонь містять хімікати, які можуть пошкодити пластик у цьому приладі. Тому рекомендується мити корпус
виключно теплою водою з дода-
ззовні
ванням невеликої кількості рідкого миючого засобу.
Завершивши миття, знову підключіть
прилад до електромережі.
Розморожування холодильника
Крига автоматично усувається з випарювача холодильного відділення щоразу, коли припиняється робота компресора під час звичайної експлуатації. Тала
вода витікає через жолоб у спеціальний
контейнер в задній частині приладу,
двигуном компресора, де вона випаровується.
Важливо періодично чистити зливний
отвір для талої води по центру холодильного відділення, щоб запобігти переливанню води через край та осіданню
її на продуктах усередині холодильника.
Користуйтеся спеціальним очищувачем,
що входить у комплект поставки. Ви
знайдете його вже вставленим у зливний отвір.
були перенесені
над
Page 63

electrolux 63
Розморожування морозильника
На поличках морозильника та навколо
верхнього відділення завжди формується певна кількість інею.
Коли товщина шару інею досягає приблизно 3-5 мм, розморожуйте морозильник.
Щоб прибрати іній, виконайте наступні
дії.
• Витягніть вилку з розетки або вимкніть прилад.
• Вийміть продукти, загорніть їх у декілька газет та покладіть у
не місце.
• Витягніть шухляди з морозильника.
• Для ізоляції загорніть шухляди, на-
приклад, у ковдру чи декілька газет.
Прискорити розморожування можна, поклавши у морозильник пляшки з гарячою (не киплячою) водою.
• Зніміть зливний канал, вставте його,
як показано на малюнку, і розташуйте
прохолод-
у нижній шухляді морозильника, де
буде збиратися
• Коли лід почне розтавати, обережно
зішкребіть його. Користуйтеся дерев’яним або пластиковим шкребком.
• Коли весь лід розтане, помийте і ретельно витріть відділення, а потім поверніть зливний канал у вихідне положення.
• Увімкніть прилад і завантажте заморожені продукти.
Залиште прилад працювати впродовж кількох годин з ручкою термостата у найвищому положенні, щоб
всередині якнайшвидше встановилася достатня для зберігання продуктів
температура.
Важливо! Щоб не пошкодити випарник,
не використовуйте металеві предмети
для видалення інею. Для прискорення
процесу розморожування не
застосовуйте механічні пристрої чи
засоби, окрім рекомендованих
виробником. Підвищення температури
заморожених продуктів під час
розморожування може скоротити термін
їх придатності.
вода.
інші
ЩО РОБИТИ, КОЛИ ...
Обережно! Перш ніж намагатися
ліквідувати несправність, відключіть
прилад від електроживлення.
Усунення несправностей, які не вказані у цій інструкції, повинно здійснюватися кваліфікованим електриком або іншою компетентною особою.
Важливо! Під час нормальної роботи
приладу чути певні звуки (спричинені
компресором або циркуляцією
холодоагенту).
Page 64

64 electrolux
Проблема Можлива причина Спосіб усунення
Прилад шумить під час
роботи.
Прилад встановлено нестійко.
Перевірте, чи стійко стоїть прилад (усі чотири ніжки мають
спиратися на підлогу).
Компресор працює без
зупинок.
Дверцята не зачинено належ-
Дверцята відчинялися надто
Температура продуктів надто
Неправильне налаштування
регулятора температури.
ним чином.
часто.
висока.
Встановіть вищу температуру.
Див. розділ «Зачинення дверцят».
Не тримайте дверцята відчиненими довше, ніж необхідно.
Дайте продуктам охолонути до
кімнатної температури, перш
ніж розміщувати їх у приладі.
Температура у приміщенні
надто висока.
Увімкнено функцію «Action
Freeze».
По задній стінці холодильника тече вода.
Під час автоматичного розморожування на задній стінці та-
Зменшіть кімнатну температуру.
Див. розділ «Функція Action
Freeze».
Це цілком нормально.
не іній.
Вода затікає всередину
холодильника.
Продукти заважають воді сті-
Вода тече на підлогу. Злив для талої води не спря-
Закупорився отвір для зливу
води.
кати в колектор.
мовано у піддон для випаровування, який розташований
Прочистіть отвір.
Подбайте про те, щоб продукти не торкалися задньої стінки.
Приєднайте злив для талої води до піддону для випаровування.
над компресором.
Утворюється забагато
льоду та інею.
Дверцята не зачинено належ-
Неправильне налаштування
Продукти не були загорнуті
належним чином.
ним чином.
Правильно упаковуйте продукти.
Див. розділ «Зачинення дверцят».
Встановіть вищу температуру.
регулятора температури.
Температура всередині
приладу надто висока.
Температура продуктів надто
Дверцята не зачинено належним чином.
висока.
Див. розділ «Зачинення дверцят».
Дайте продуктам охолонути до
кімнатної температури, перш
ніж розміщувати їх у приладі.
У приладі одночасно знахо-
диться надто багато продук-
Не тримайте у приладі багато
продуктів одночасно.
тів.
Температура в холодильнику надто висока.
Температура в морозильнику надто висока.
Всередині приладу не відбувається циркуляція холодного
повітря.
Продукти розташовані надто
близько один до одного.
Подбайте про те, щоб повітря
могло вільно циркулювати всередині приладу.
Зберігайте продукти так, щоб
холодне повітря могло циркулювати.
Прилад не працює. Прилад вимкнено. Увімкніть прилад.
Page 65

electrolux 65
Проблема Можлива причина Спосіб усунення
Кабель живлення не підклю-
чено належним чином до
електромережі.
До приладу не подається
електроживлення. Відсутній
струм у розетці.
Лампочка не світиться. Лампочка знаходиться у ре-
жимі очікування.
Лампочка несправна. Див. розділ «Заміна лампоч-
Правильно вставте вилку кабелю живлення у розетку.
Підключіть до розетки інший
електроприлад. Зверніться до
кваліфікованого електрика.
Зачиніть, а потім відчиніть
дверцята.
ки».
Якщо ці поради не дали результатів, зверніться до найближчого авторизованого
сервісного центру.
Заміна лампочки
1. Відключіть прилад від електромережі.
2. Натисніть на рухому частину, щоб
від’єднати плафон (1).
3. Зніміть плафон (2).
4. Замініть лампочку на нову такої са-
мої потужності і спеціально призначену лише для побутових приладів.
Закривання дверцят
1. Прочистіть прокладки дверцят.
2. У разі потреби відкоригуйте дверця-
та. Зверніться до розділу "Установка".
3. У разі потреби замініть прокладки
дверцят, що вийшли з ладу.
Зв'яжіться з Центром технічного обслуговування.
5. Встановіть плафон.
6. Підключіть прилад.
7. Відкрийте дверцята. Переконайтеся,
що лампочка горить.
1
2
ТЕХНІЧНІ ДАНІ
ERA36633W ERA40633W
Габарити
Висота 1850 мм 2010 мм
Ширина 595 мм 595 мм
Глибина 658 мм 658 мм
Час виходу в робочий режим
Напруга 230 - 240 В 230 - 240 В
Частота струму 50 Гц 50 Гц
20 год. 20 год.
Page 66

66 electrolux
Технічна інформація міститься на табличці, розташованій на внутрішньому
УСТАНОВКА
Перед встановленням приладу
уважно прочитайте розділ
"Інформація з техніки безпеки", щоб
ознайомитися з правилами безпеки
і правильної експлуатації.
Встановлення
Встановіть прилад у місці, де температура навколишнього середовища відповідає кліматичному класу, вказаному на
табличці з технічними даними приладу:
Кліма-
тичний
клас
SN +10°C - + 32°C
N +16°C - + 32°C
ST +16°C - + 38°C
T +16°C - + 43°C
Розташування
Прилад слід встановлювати подалі від
джерел тепла, таких, як батареї, бойлери, пряме сонячне світло і т. д. Повітря
повинне вільно циркулювати довкола
задньої панелі приладу. Якщо прилад
встановлюється під навісною шафою,
то для забезпечення найвищої ефективності мінімальна відстань від
верхнього краю приладу до навісної шафи має становити не менше 100 мм
Проте в ідеальному випадку прилад
краще не ставити під навісними шафами. Точне вирівнювання виконується за
допомогою однієї або кількох регульованих ніжок внизу на корпусі приладу.
Температура навколишнього
середовища
.
Попередження! Щоб мати
можливість від’єднувати прилад від
електромережі, забезпечте вільний
доступ до розетки після установки.
лівому боці приладу, та на ярлику енергоспоживання.
mm
min
100
A
mm
20
B
Підключення до електромережі
Перш ніж підключати прилад до електромережі, переконайтеся, що показники напруги і частоти, вказані на табличці
з паспортними даними, відповідають показникам мережі у вашому регіоні.
Прилад має бути заземлений. З цією
меторю вилка приладу оснащена спеціальним контактом. Якщо у розетці заземлення немає, заземліть прилад окремо у відповідності до чинних нормативних вимог, проконсультувавшись із
кваліфікованим електриком.
Виробник не несе відповідальності у
разі недотримання цих правил техніки
безпеки.
Цей прилад відповідає Директивам ЄС .
Задні розпірки
У сумці з документацією є дві розпірки,
які потрібно встановити так, як показано
на малюнку.
Ослабте гвинти і вставте розпірки під
голівки гвинтів, після
чого затягніть
гвинти.
1. Відкрутіть гвинт.
2. Зачепіть розпірку за гвинт нижче
гвинта.
3. Оберніть розпірку у правильне положення.
4. Затягніть гвинти.
Page 67

electrolux 67
2
1
4
3
Вирівнювання
Встановлюючи прилад, подбайте про
те, щоб він стояв рівно. Цього можна
досягти за допомогою двох регульованих ніжок, що розташовані внизу спереду.
Знімання фіксаторів поличок
Фіксатори поличок не дозволяють поличкам рухатися під час транспортування
приладу.
Щоб їх зняти, виконайте наступні дії.
1. Зсуньте фіксатори поличок у вказаному стрілкою напрямку (A).
2. Підніміть задню частину полички і
звільніть її, натиснувши вперед (B).
3. Зніміть фіксатори (C).
Встановлення дверцят на інший бік
Попередження! Перед виконанням
будь-яких операцій витягніть вилку
з електричної розетки.
Важливо! Для виконання наступної
процедури вам знадобиться помічник,
який буде міцно тримати дверцята
приладу.
Щоб змінити напрямок відкривання
дверцят, виконайте такі дії.
1. Встановіть прилад вертикально і
відкрийте дверцята. Відкрутіть гвинти (t1) і зніміть верхнє пластикове
оздоблення дверцят (t2). Закрийте
дверцята.
t1
t1
t1
t2
t3
d7
Page 68

68 electrolux
2. Зніміть з оздоблення дверцят невелику пластикову кришку і встановіть
її з протилежного боку (t3).
3. Зніміть панель (t4). Будьте обережні, користуючись викруткою. Відкрутіть гвинт на протилежному боці.
Зніміть верхнє кріплення дверцят
(t5). Покладіть деталі у порожній
пластиковий пакет.
t4
t5
4. Зніміть верхні дверцята.
5. Відкрутіть гвинт і зніміть обмежувач
дверцят (d1). Переверніть його і
встановіть з протилежного боку.
7. Зніміть нижні дверцята.
m1
m3
m5
m2
m6
m4
8. Зніміть розпірку (m6) і встановіть її з
іншого боку шарніра завіси (m5).
9. За допомогою викрутки зніміть
кришку (b1). Відкрутіть шарнір
нижньої завіси (b2) і розпірку (b3), а
потім встановіть їх з протилежного
боку.
10. Встановіть кришку (b1) з протилежного боку.
d1
6. Відкрутіть середню завісу (m2). Витягніть пластикову розпірку (m1).
b1
b2
b3
11. Зніміть обмежувачі (d1) і переставте
їх на інший бік дверцят.
12. Вийміть лівий шплінт середньої завіси (m3, m4) і встановіть його з протилежного боку.
Page 69

electrolux 69
13. Вставте шплінт середньої завіси
(m5) у лівий отвір на нижніх дверця-
тах.
14. Встановіть нижні дверцята на шарнірний шплінт (b2).
15. Пригвинтіть середню завісу (m1) з
протилежного боку. Не забудьте
підставити під середню завісу пластикову розпірку (m2).
16. Встановіть верхні дверцята на середню завісу (m5).
Пильнуйте, щоб краї дверцят розташовувалися паралельно до бокової
приладу.
стінки
17. Встановіть і зафіксуйте верхню завісу (зберігається у пластиковому пакеті) з протилежного боку (t6).
t6
t7
18. Встановіть панель (t7) (зберігається
у пластиковому пакеті).
19. Відкрийте верхні дверцята і зафіксуйте верхню кришку (t2) за допомогою гвинтів (t1). Вставте магніт (d7).
Закрийте дверцята.
20. Поставте прилад на місце, вирівняйте його, зачекайте щонайменше
чотири години, а потім вставте вилку в розетку.
Проведіть остаточну перевірку, щоб переконатися в тому, що:
гвинти міцно загвинчені;
• всі
• магнітний ущільнювач прилягає до
корпусу;
• дверцята правильно відкриваються і
закриваються.
Якщо температура навколишнього середовища низька (наприклад, узимку),
ущільнювач може не повністю прилягати до корпуса. В такому разі зачекайте,
поки ущільнювач природним чином займе належне місце.
Якщо ви не хочете самостійно виконувати вищенаведені операції,
до найближчого сервісного центру. Спеціаліст сервісного центру перестановить дверцята на інший бік за ваш рахунок.
зверніться
ЕКОЛОГІЧНІ МІРКУВАННЯ
Цей символ на виробі або на його
упаковці позначає, що з ним не можна
поводитися, як із побутовим сміттям.
Замість цього його необхідно повернути
до відповідного пункту збору для
переробки електричного та
електронного обладнання.
Забезпечуючи належну переробку
цього виробу, Ви допомагаєте
попередити потенційні негативні
наслідки для навколишнього
середовища та здоров’я людини, які
могли би виникнути
неналежного позбавлення від цього
виробу. Щоб отримати детальнішу
інформацію стосовно переробки цього
виробу, зверніться до свого місцевого
офісу, Вашої служби утилізації або до
магазина, де Ви придбали цей виріб.
за умов
Page 70

70 electrolux
Page 71

electrolux 71
Page 72

www.electrolux.com/shop
210621854-A-052011
 Loading...