

AEG-Electrolux EOC6620X User Manual

Built-In Electric Oven
Operating Instructions
822 947 948-B-260503-05
EOC 6620
g

Dear customer,
Please read these operating instructions carefully.
Pay particular attention to the section “Safety information” on the first few pages. Please retain these
operating instructions for later reference. Pass them
on to possible new owners of the appliance.
The following symbols are used in the
text:
1 Safety instructions
Warning: Information concerning your personal safety.
Important: Information on how to avoid damaging the appliance.
3 Information and practical tips
2 Environmental information
1. These numbers indicate step by step how to use
the appliance.
2. …
3. …
These operating instructions contain information on
steps you can take yourself to rectify a possible malfunction. Refer to the section “What to do if...”.
2

Contents
Safety . . . . . . . . . . . . . . . . . . . . . . . . . . . . . . . . . . . . . . . . . . . . . . . . . . . . . . . . . . . . . . . . . . . . . . . . . . . . . . . 4
Disposal . . . . . . . . . . . . . . . . . . . . . . . . . . . . . . . . . . . . . . . . . . . . . . . . . . . . . . . . . . . . . . . . . . . . . . . . . . . . . 4
Description of the Appliance . . . . . . . . . . . . . . . . . . . . . . . . . . . . . . . . . . . . . . . . . . . . . . . . . . . . . . . . . . . . 5
General Overview . . . . . . . . . . . . . . . . . . . . . . . . . . . . . . . . . . . . . . . . . . . . . . . . . . . . . . . . . . . . . . . . . . . . . . 5
Control Panel . . . . . . . . . . . . . . . . . . . . . . . . . . . . . . . . . . . . . . . . . . . . . . . . . . . . . . . . . . . . . . . . . . . . . . . . . 6
Oven Features. . . . . . . . . . . . . . . . . . . . . . . . . . . . . . . . . . . . . . . . . . . . . . . . . . . . . . . . . . . . . . . . . . . . . . . . . 6
Oven accessories . . . . . . . . . . . . . . . . . . . . . . . . . . . . . . . . . . . . . . . . . . . . . . . . . . . . . . . . . . . . . . . . . . . . . . 7
Before Using for the First Time . . . . . . . . . . . . . . . . . . . . . . . . . . . . . . . . . . . . . . . . . . . . . . . . . . . . . . . . . . 8
Initial Cleaning. . . . . . . . . . . . . . . . . . . . . . . . . . . . . . . . . . . . . . . . . . . . . . . . . . . . . . . . . . . . . . . . . . . . . . . . . 8
Using the Oven . . . . . . . . . . . . . . . . . . . . . . . . . . . . . . . . . . . . . . . . . . . . . . . . . . . . . . . . . . . . . . . . . . . . . . . 9
Switching the Oven On and Off . . . . . . . . . . . . . . . . . . . . . . . . . . . . . . . . . . . . . . . . . . . . . . . . . . . . . . . . . . . 9
Oven Functions. . . . . . . . . . . . . . . . . . . . . . . . . . . . . . . . . . . . . . . . . . . . . . . . . . . . . . . . . . . . . . . . . . . . . . . . 10
Inserting the general purpose pan, grill, and tray . . . . . . . . . . . . . . . . . . . . . . . . . . . . . . . . . . . . . . . . . . . . . . 11
Inserting/Removing the Fat Filter . . . . . . . . . . . . . . . . . . . . . . . . . . . . . . . . . . . . . . . . . . . . . . . . . . . . . . . . . . 11
Additional functions . . . . . . . . . . . . . . . . . . . . . . . . . . . . . . . . . . . . . . . . . . . . . . . . . . . . . . . . . . . . . . . . . . . . 12
Timer . . . . . . . . . . . . . . . . . . . . . . . . . . . . . . . . . . . . . . . . . . . . . . . . . . . . . . . . . . . . . . . . . . . . . . . . . . . . . 13
Meat cooking rod. . . . . . . . . . . . . . . . . . . . . . . . . . . . . . . . . . . . . . . . . . . . . . . . . . . . . . . . . . . . . . . . . . . . 14
Mechanical Door Lock . . . . . . . . . . . . . . . . . . . . . . . . . . . . . . . . . . . . . . . . . . . . . . . . . . . . . . . . . . . . . . . . . . 16
Uses, Tables and Tips . . . . . . . . . . . . . . . . . . . . . . . . . . . . . . . . . . . . . . . . . . . . . . . . . . . . . . . . . . . . . . . . . . 17
Baking . . . . . . . . . . . . . . . . . . . . . . . . . . . . . . . . . . . . . . . . . . . . . . . . . . . . . . . . . . . . . . . . . . . . . . . . . . . . . . . 17
Baking Table . . . . . . . . . . . . . . . . . . . . . . . . . . . . . . . . . . . . . . . . . . . . . . . . . . . . . . . . . . . . . . . . . . . . . . . 19
Roasting . . . . . . . . . . . . . . . . . . . . . . . . . . . . . . . . . . . . . . . . . . . . . . . . . . . . . . . . . . . . . . . . . . . . . . . . . . . . . 22
Roasting Table . . . . . . . . . . . . . . . . . . . . . . . . . . . . . . . . . . . . . . . . . . . . . . . . . . . . . . . . . . . . . . . . . . . . . . 23
Meat Probe Table . . . . . . . . . . . . . . . . . . . . . . . . . . . . . . . . . . . . . . . . . . . . . . . . . . . . . . . . . . . . . . . . . . . . . . 24
Grilling . . . . . . . . . . . . . . . . . . . . . . . . . . . . . . . . . . . . . . . . . . . . . . . . . . . . . . . . . . . . . . . . . . . . . . . . . . . . . . . 25
Infrared Grilling. . . . . . . . . . . . . . . . . . . . . . . . . . . . . . . . . . . . . . . . . . . . . . . . . . . . . . . . . . . . . . . . . . . . . . 25
Turbo grilling . . . . . . . . . . . . . . . . . . . . . . . . . . . . . . . . . . . . . . . . . . . . . . . . . . . . . . . . . . . . . . . . . . . . . . . 26
Preserving . . . . . . . . . . . . . . . . . . . . . . . . . . . . . . . . . . . . . . . . . . . . . . . . . . . . . . . . . . . . . . . . . . . . . . . . . . . . 27
Drying with Hot Air . . . . . . . . . . . . . . . . . . . . . . . . . . . . . . . . . . . . . . . . . . . . . . . . . . . . . . . . . . . . . . . . . . . . . 28
Cleaning and Care . . . . . . . . . . . . . . . . . . . . . . . . . . . . . . . . . . . . . . . . . . . . . . . . . . . . . . . . . . . . . . . . . . . . 29
Exterior of the Appliance. . . . . . . . . . . . . . . . . . . . . . . . . . . . . . . . . . . . . . . . . . . . . . . . . . . . . . . . . . . . . . . . . 29
Oven Interior . . . . . . . . . . . . . . . . . . . . . . . . . . . . . . . . . . . . . . . . . . . . . . . . . . . . . . . . . . . . . . . . . . . . . . . . . . 29
Accessories. . . . . . . . . . . . . . . . . . . . . . . . . . . . . . . . . . . . . . . . . . . . . . . . . . . . . . . . . . . . . . . . . . . . . . . . . . . 29
Fat Filter . . . . . . . . . . . . . . . . . . . . . . . . . . . . . . . . . . . . . . . . . . . . . . . . . . . . . . . . . . . . . . . . . . . . . . . . . . . . . 29
Shelf Support Rails . . . . . . . . . . . . . . . . . . . . . . . . . . . . . . . . . . . . . . . . . . . . . . . . . . . . . . . . . . . . . . . . . . . . . 30
Pyrolytic cleaning . . . . . . . . . . . . . . . . . . . . . . . . . . . . . . . . . . . . . . . . . . . . . . . . . . . . . . . . . . . . . . . . . . . . . . 31
Oven Lighting . . . . . . . . . . . . . . . . . . . . . . . . . . . . . . . . . . . . . . . . . . . . . . . . . . . . . . . . . . . . . . . . . . . . . . . . . 32
Oven Door. . . . . . . . . . . . . . . . . . . . . . . . . . . . . . . . . . . . . . . . . . . . . . . . . . . . . . . . . . . . . . . . . . . . . . . . . . . . 33
Oven door glass . . . . . . . . . . . . . . . . . . . . . . . . . . . . . . . . . . . . . . . . . . . . . . . . . . . . . . . . . . . . . . . . . . . . . . . 34
What to do if … . . . . . . . . . . . . . . . . . . . . . . . . . . . . . . . . . . . . . . . . . . . . . . . . . . . . . . . . . . . . . . . . . . . . . . . 36
Technical Data . . . . . . . . . . . . . . . . . . . . . . . . . . . . . . . . . . . . . . . . . . . . . . . . . . . . . . . . . . . . . . . . . . . . . . . . 37
Oven Interior Dimensions . . . . . . . . . . . . . . . . . . . . . . . . . . . . . . . . . . . . . . . . . . . . . . . . . . . . . . . . . . . . . . . . 37
Regulations, Standards, Directives . . . . . . . . . . . . . . . . . . . . . . . . . . . . . . . . . . . . . . . . . . . . . . . . . . . . . . . . . 37
Index. . . . . . . . . . . . . . . . . . . . . . . . . . . . . . . . . . . . . . . . . . . . . . . . . . . . . . . . . . . . . . . . . . . . . . . . . . . . . . . . 38
Service . . . . . . . . . . . . . . . . . . . . . . . . . . . . . . . . . . . . . . . . . . . . . . . . . . . . . . . . . . . . . . . . . . . . . . . . . . . . . . 39
3

1 Safety
Electrical Safety
• The appliance may only be connected by a regis-
tered specialist.
• In the event of any faults or damage to the appli-
ance: remove fuses or switch off.
• It is not permissible to clean the appliance with a
steam or high pressure cleaner for safety reasons!
• Repairs to the appliance may only be carried out
by specialists. Repairs carried out by inexperi-
enced persons may cause injury or serious malfunctioning. If your appliance needs repairing,
please contact your local AEG Service Force Centre or your specialist dealer.
Child Safety
• Never leave children unsupervised when the appli-
ance is in use.
Safety whilst Using
• This appliance is intended to be used for cooking,
frying and baking food in the home.
• Take care when connecting electric appliances to
sockets nearby. Do not allow connecting leads to
come into contact with hot rings or to catch beneath the hot oven door.
• Warning: Risk of burns! The interior of the oven
becomes hot during use.
• Using ingredients containing alcohol in the oven
may create an alcohol-air mixture that is easily ignited. In this case, open the door carefully. Do not
have embers, sparks or naked flames in the vicinity
when opening the door.
To Avoid Damaging Your Appliance
• Do not line your oven with aluminium foil and do
not place a baking tray or dish on the oven floor,
otherwise the oven enamel will be damaged by the
resulting build up of heat.
• Juice from fruit that drips from baking trays will
leave marks that cannot be removed. For very
moist cakes, use the universal baking tray.
• Do not put any weight on the oven door when it is
open.
• Never pour water directly into the hot oven. The
enamel may be damaged.
• Using force, especially on the edges of the front
glass panel, may break the glass.
• Do not store inflammable objects in the oven. They
may ignite when the oven is switched on.
• Do not store moist food in the oven. The enamel
may be damaged.
2 Disposal
Disposing of the packaging
material
All materials used can be fully recycled.
Plastics are marked as follows:
• >PE< for polyethylene, as used for the outer wrapping and the bags inside.
• >PS< for polystyrene foam, e.g., as used for the
padding materials. They are completely free of
CFCs.
Disposal of old appliances
1 Warning: Before disposing of old appliances
please make them inoperable so that they
cannot be the source of danger.
To do this, disconnect the appliance from
the mains supply and remove the mains
lead.
To protect the environment, it is important that worn
out appliances are disposed of in the correct manner.
• The appliance must not be disposed of with
household rubbish.
• You can obtain information about collection dates
or public refuse disposal sites from your local
refuse department or council.
4
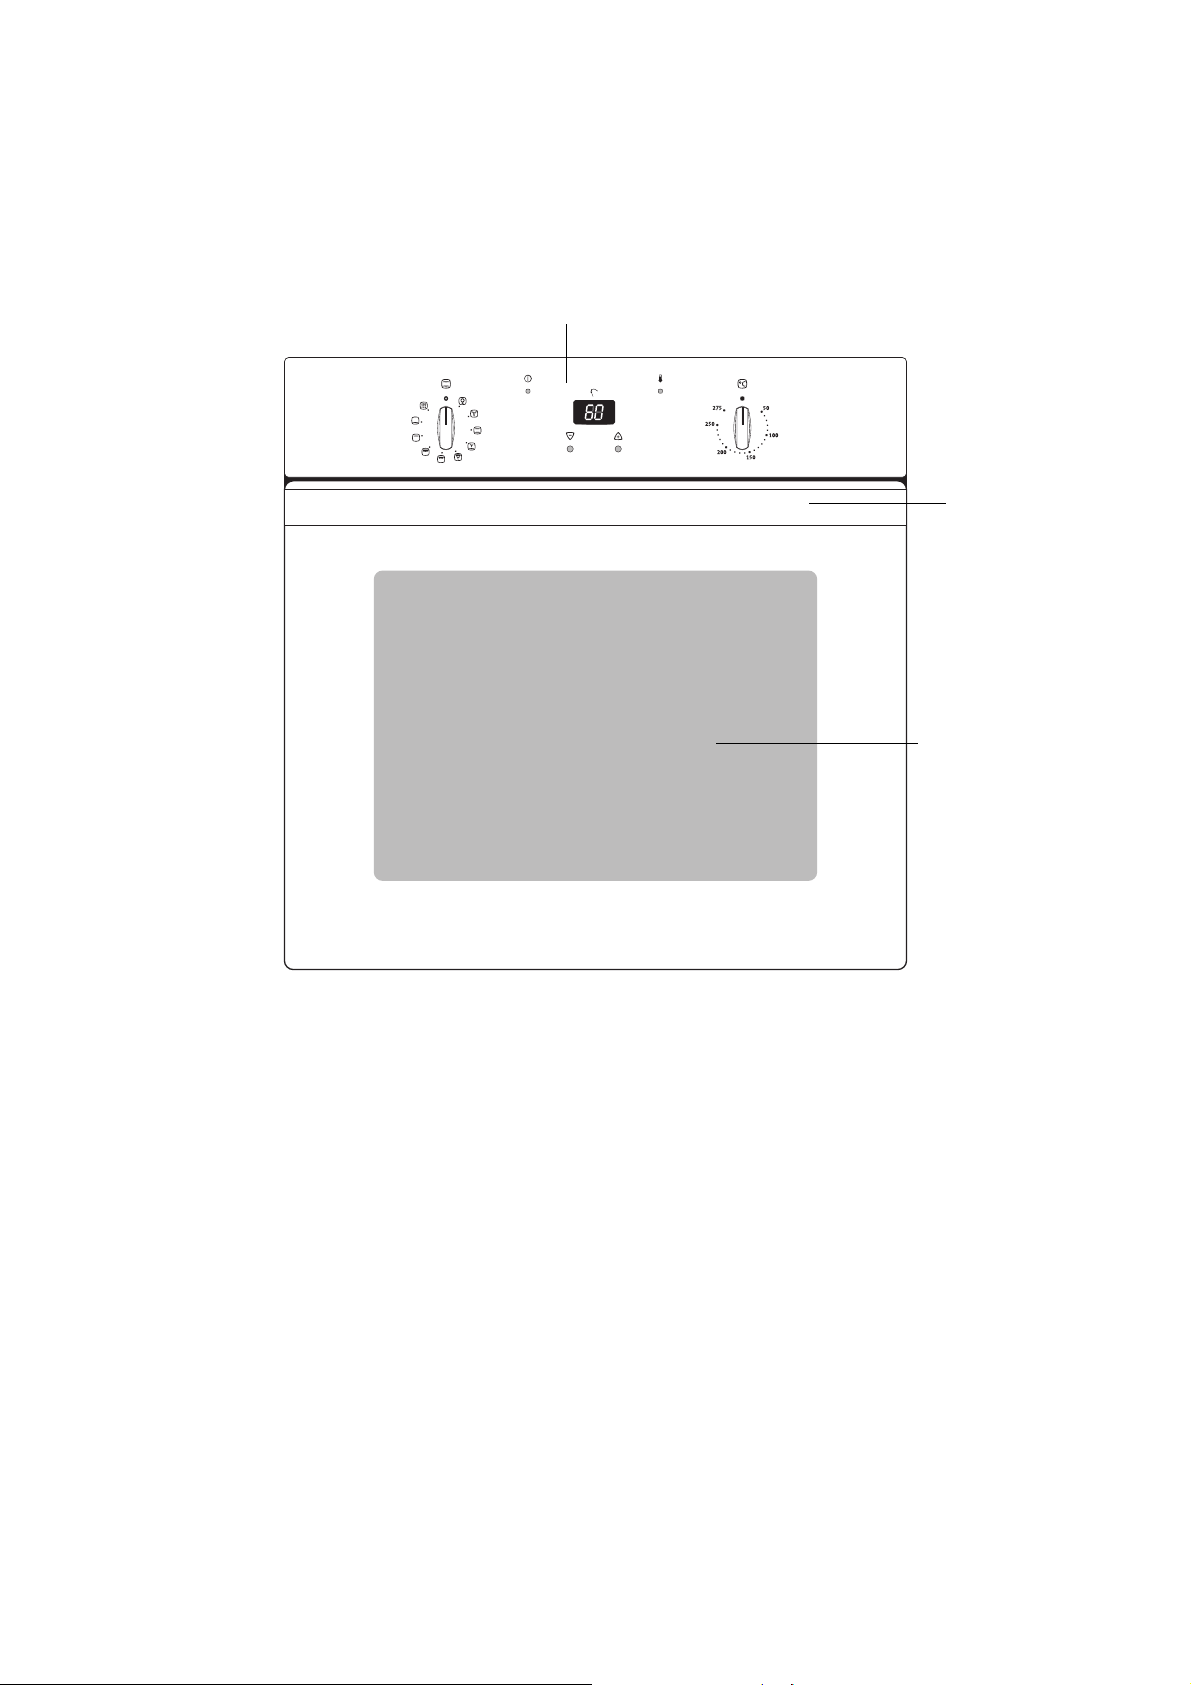
Description of the Appliance
General Overview
Control panel
Door handle
Full glass door
5
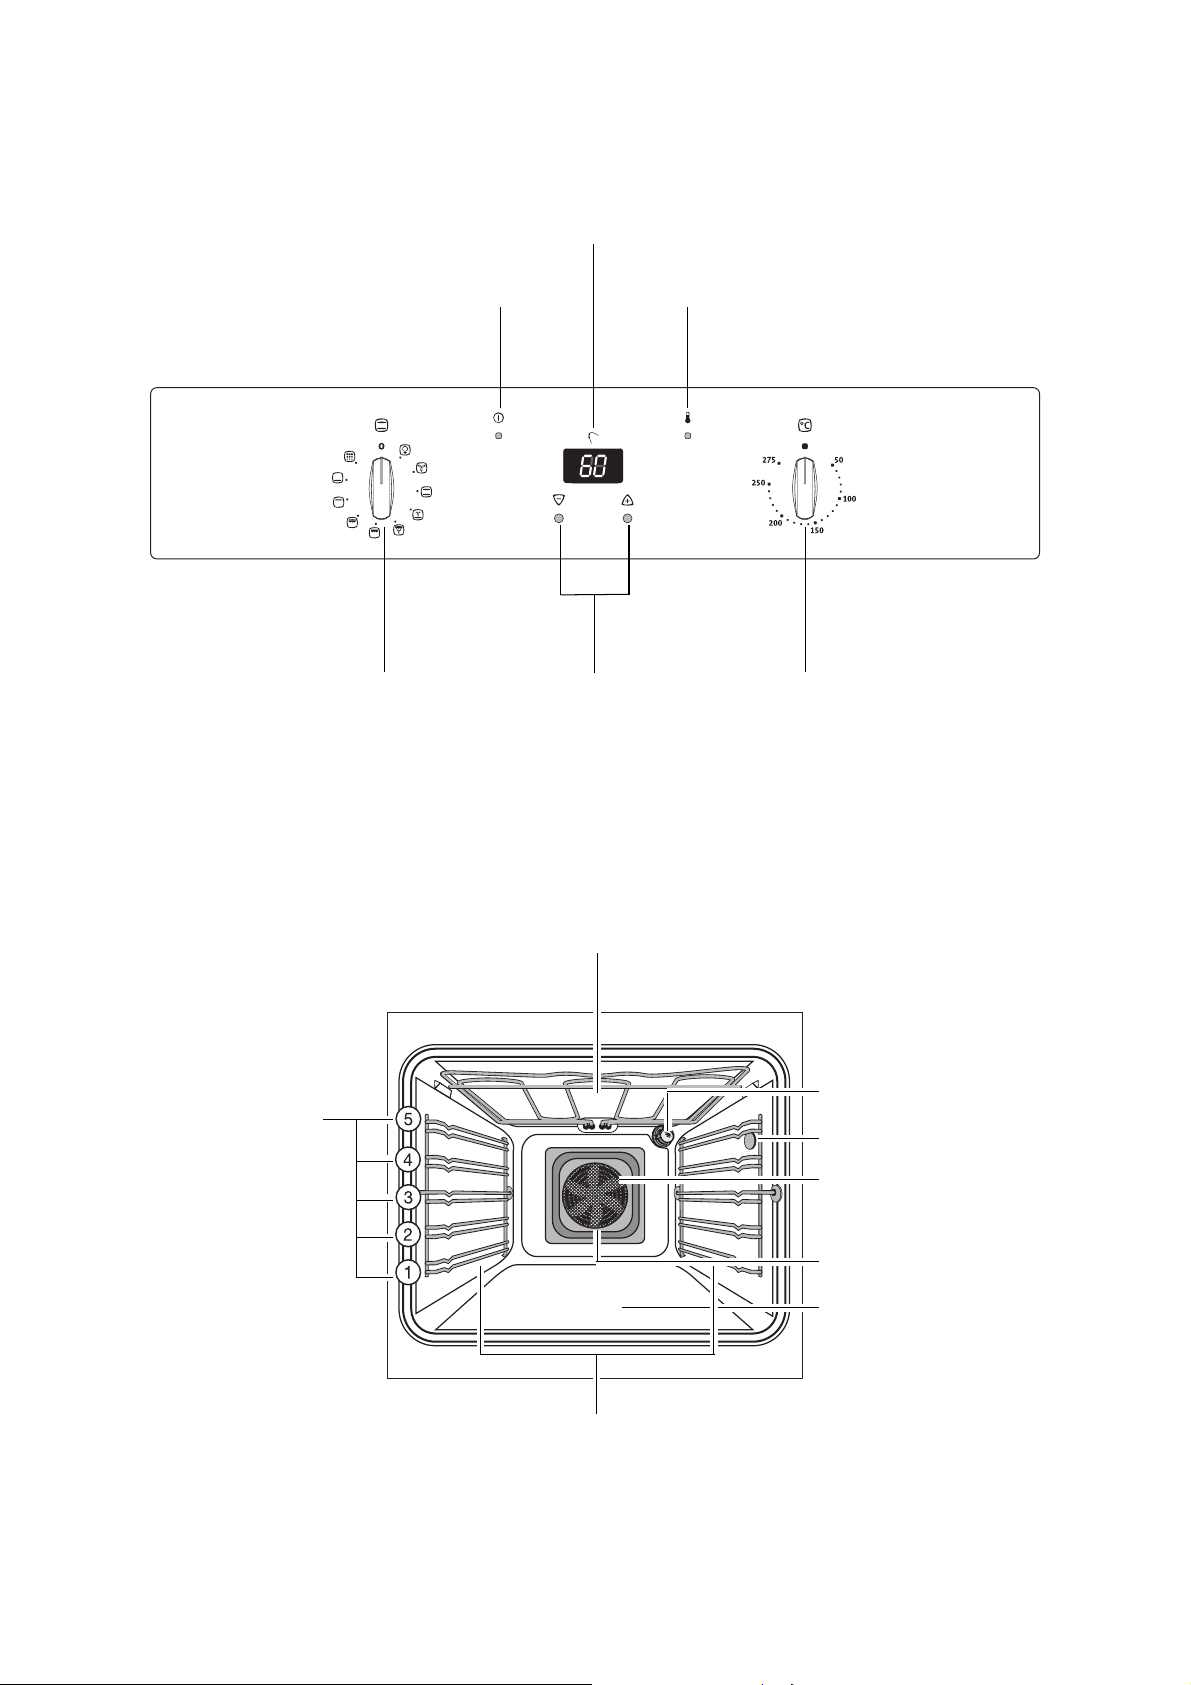
Control Panel
Temperature / Time Display
Temperature Pilot LightOven Power Indicator
Oven Functions
Oven Features
Shelf positions
Settings buttons
Top heat and heating elements
Temperature selector
Oven lighting
Meat probe socket
Fat Filter
Rear wall heating element
Bottom Heat
Oven shelf runners, removable
6
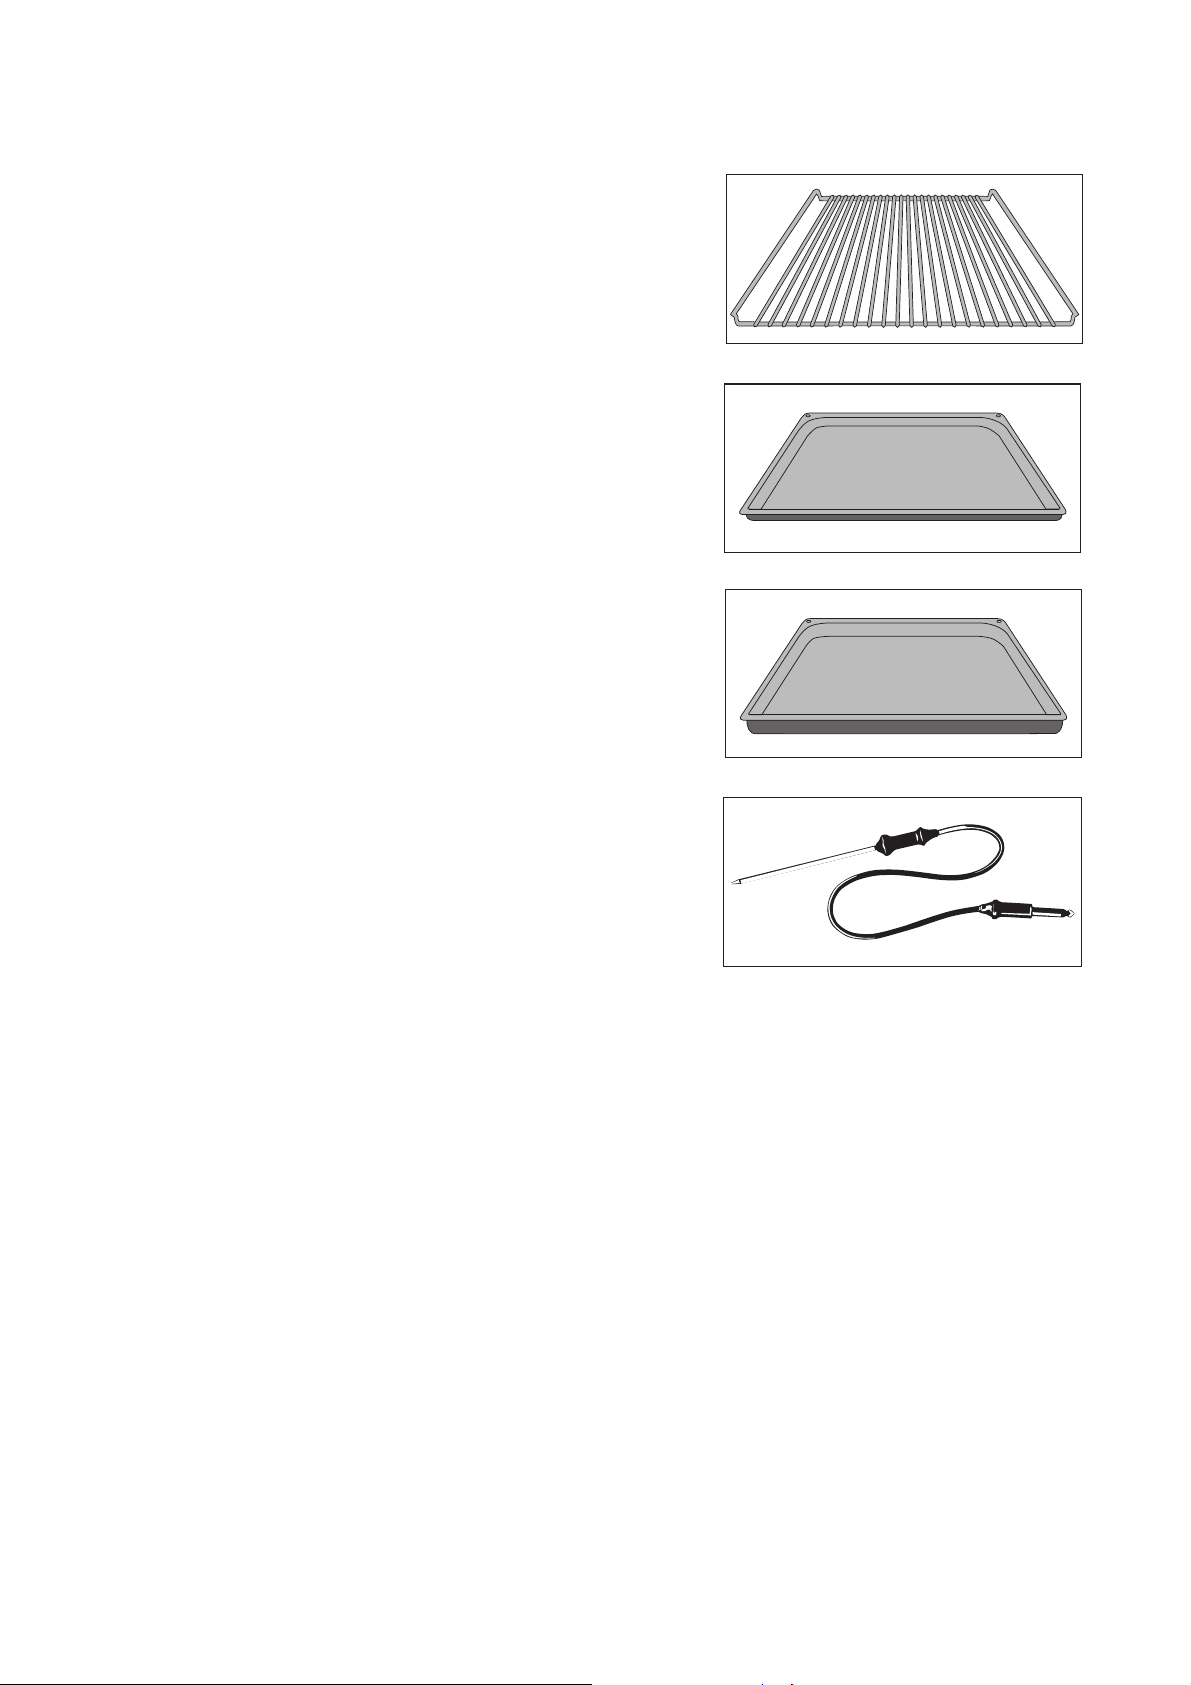
Oven accessories
Combination shelf
For dishes, cake tins, items for roasting and grilling.
Baking tray
For cakes and biscuits.
General purpose pan
For roasting, or as a receptacle for grease.
Meat probe
For determining exactly how far joints of meat are
cooked.
7

Before Using for the First Time
Initial Cleaning
Before using the oven for the first time you should
clean it thoroughly.
1 Caution: Do not use any caustic, abrasive
cleaners! The surface could be damaged.
3 To clean metal fronts use commercially availa-
ble cleaning agents.
1. Turn the oven function switch to oven lighting L.
2. Remove all accessories and the shelf support rails
and wash them with warm water and washing up
liquid.
3. Then wash out the oven with warm water and
washing-up liquid, and dry.
4. Wipe the front of the appliance with a damp cloth.
8
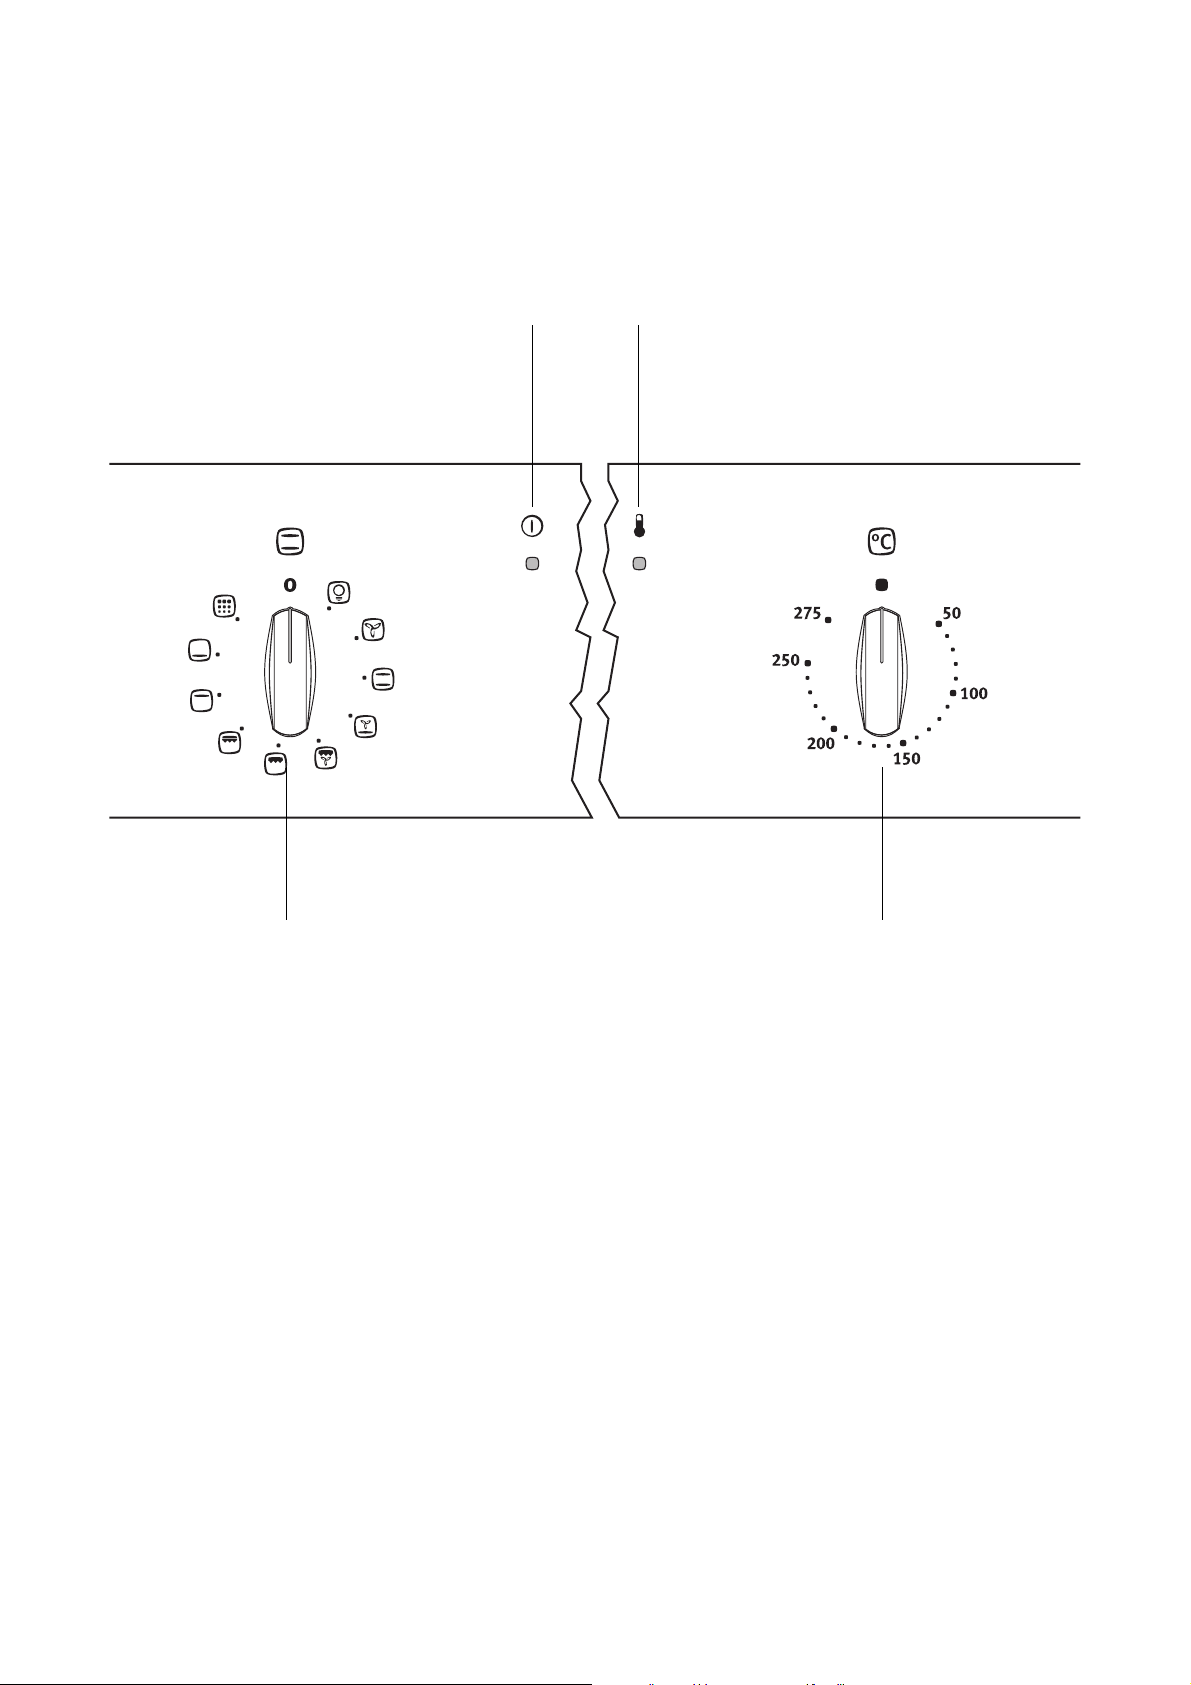
Using the Oven
Switching the Oven On and Off
Oven Power Indicator
Temperature Pilot Light
Oven Functions
1. Turn the oven functions switch to the required
function.
2. Turn the temperature selection switch to the re-
quired temperature.
The red oven power indicator is illuminated while
the oven is in use.
The red temperature pilot light is illuminated while
the oven is heating up.
3. To switch off the oven, turn the oven functions
switch and the temperature selection switch to the
zero position.
3 Cooling fan
When the oven is switched on, the fan comes
on automatically to keep the surfaces the appliance cool. When the oven is switched off,
the fan continues to operate to cool the appliance down, then switches itself off.
Temperature Selection
9

Oven Functions
The oven has the following functions:
L Oven lighting
With this function you can illuminate the oven interior, e.g., for cleaning.
The heating element is not in use.
¥ Hot Air
For roasting and baking on up to three levels simultaneously.
Set oven temperatures 20-40 °C lower than when
using conventional.
The rear wall heating element is used and in addition
the fan is switched on.
¡ Conventional
For baking or roasting on one level.
The conventional heating elements are in use.
¦ Pizza Setting
For baking pizza, fruit flans, quiches and flat sweet
or savoury pies.
The rear wall heating element and bottom heat are
used and in addition the fan is switched on.
¼ Turbo All-Round Grill
For roasting larger joints of meat or poultry on one
level. The function is also suitable for gratinating
and browning.
The grill heater elements and the ventilator operate
simultaneously.
¸ Infrared Grill
For grilling flat foods that are arranged in the middle
of the shelf such as steaks, escalopes, fish or for
toasting.
The grill heating element is in use.
º Infrared Wide-Area Grill
For grilling flat foods in larger quantities, such as
steaks, escalopes, fish or for toasting.
Top heat and the grill element are used.
O Top Heat
For browning foods topped with breadcrumbs
and foods cooked au gratin.
The top heating element is in use.
U Bottom Heat
For crisping cakes that require a crisp base.
The bottom heating element is in use.
P Pyroluxe
For pyrolytic self-cleaning.
During this process splashes and deposits are
burned in the oven and can be washed off once the
oven has cooled.
The oven is heated to approx. 500 °C.
10
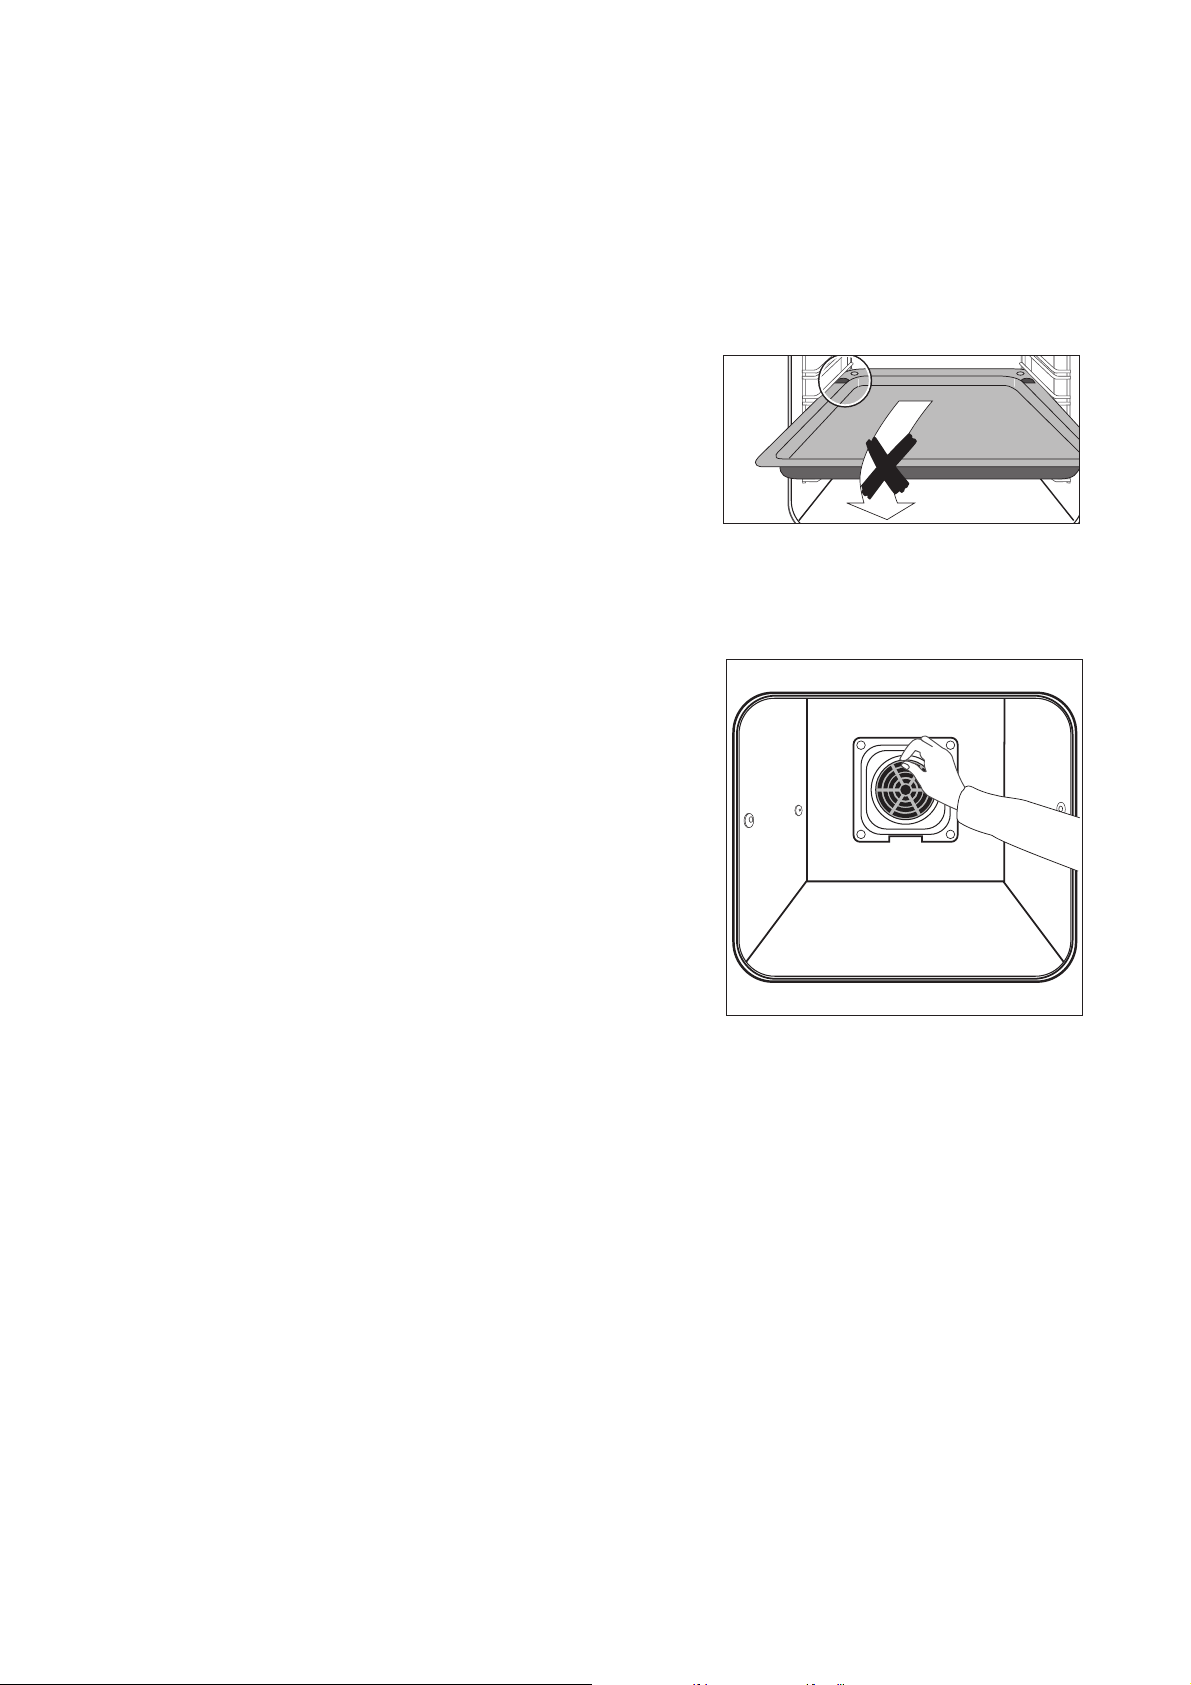
Inserting the general purpose pan, grill, and tray
Inserting the general purpose pan and
tray:
The trays have a little bulge on the left and right edges. These are provided as positioning guides and
must always be located towards the rear when inserting the tray.
For grills:
Insert the tray at the desired position.
Inserting/Removing the Fat Filter
The fat filter protects the rear wall heating element
against splashes of fat when roasting.
Inserting the fat filter
Holding the fat filter by the tab, insert the two retainers into the opening on the rear wall of the oven
(fan opening) from the top downwards.
Removing the fat filter
Take hold of the tab on the fat filter and remove by
pulling upwards.
11
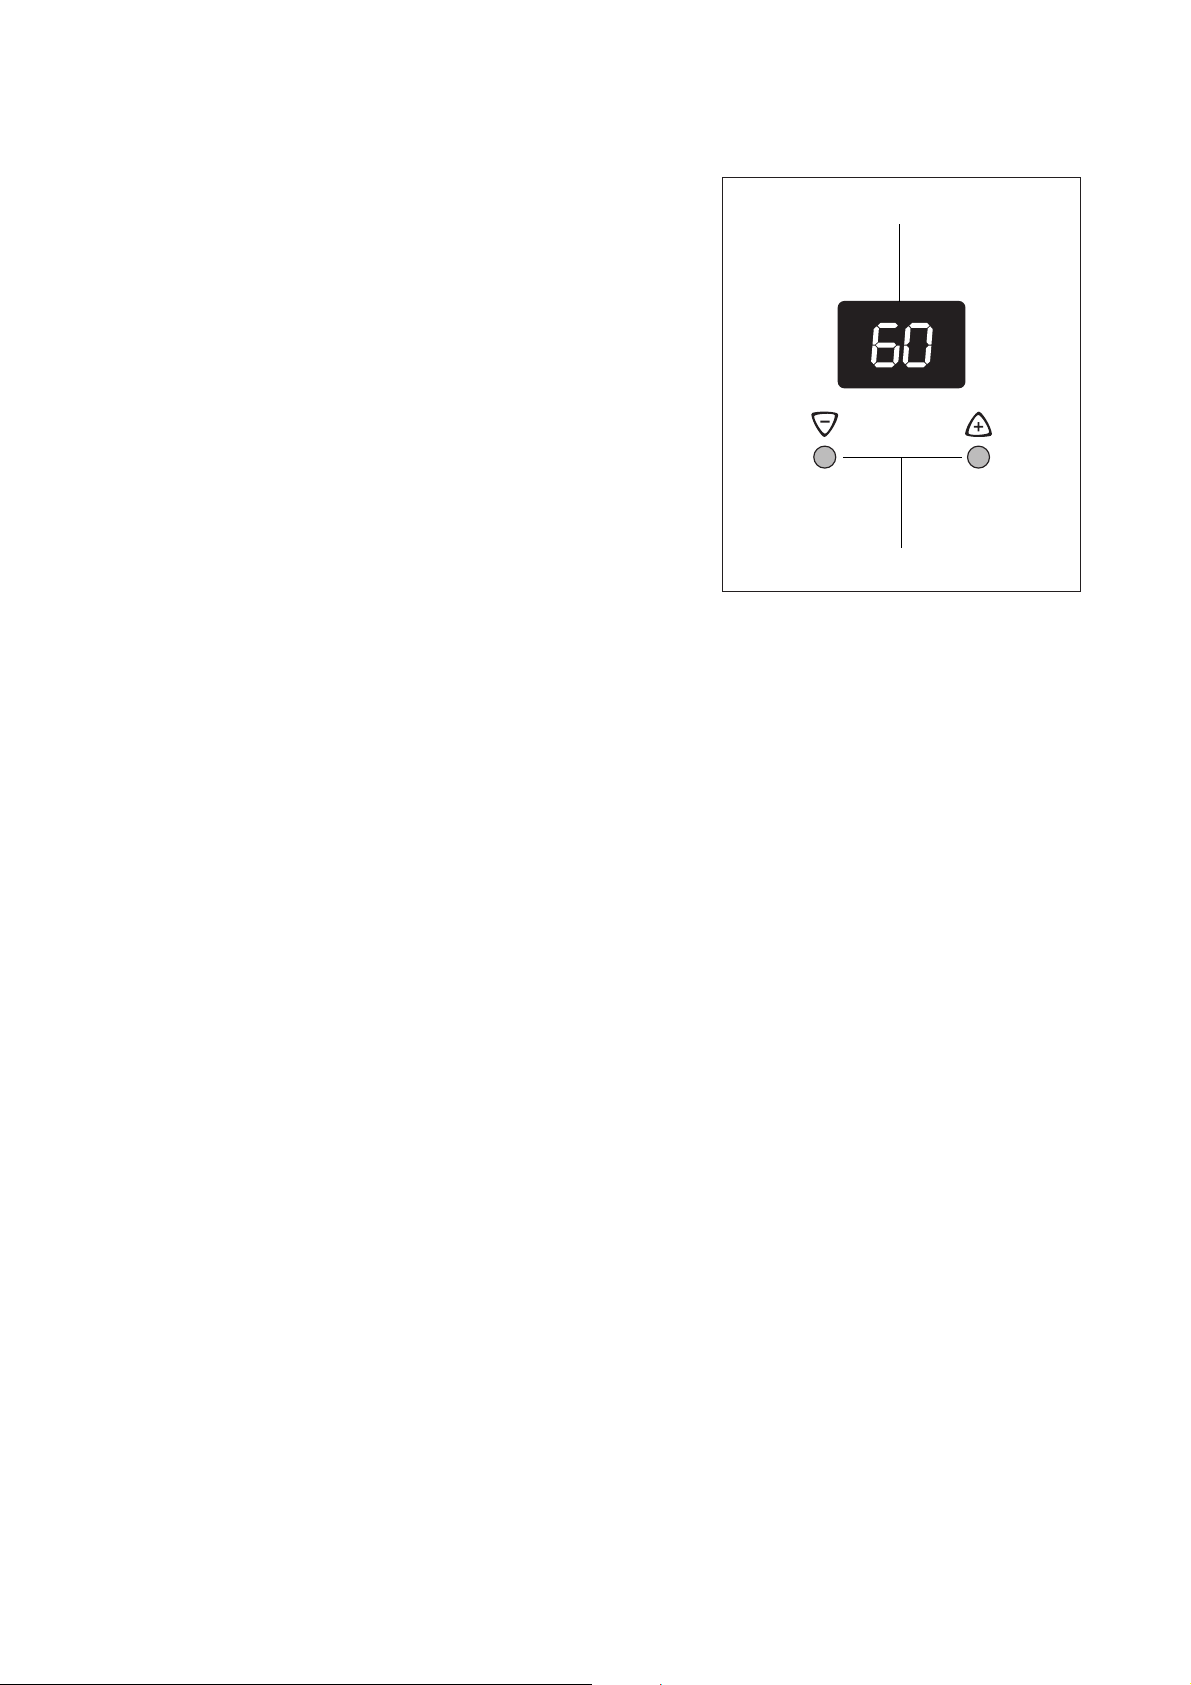
Additional functions
Either the timer or the meat cooking rod can be set.
Timer
Setting the timer.
Meat Cooking Rod
Setting the core temperature.
3 General Hints
• After a function has been selected, the display
flashes for about 5 seconds. While it flashes, the
desired time can be set using the + or - buttons.
• When the desired time has been set, the display
flashes for another 5 seconds. The set time begins
to run.
• Press any of the buttons to stop the signal.
• The desired oven function and temperature can be
selected before or after setting the clock functions.
• When cooking is finished, turn the oven and temperature selectors back to zero.
Temperature / Time Display
Settings buttons
12
 Loading...