

Page 1

VITRAMIC 725 K
Build-in Hotplate Unit
Einbau-Kochmulde
AEG
Instructions for Installation and Use
Montage- und Gebrauchsanweisung
Page 2

It is essential to read these instructions and keep
them in a safe place
Contents
Illustrations
Equipment and description
For the user Installation instructions
Safety instructions 6
Using the hotplates 7/8 For the kitchen furniture installer
Operation of the hotplates 8/9
Page
3-5 Care and cleaning of the hotplates 9/10
Heavy soiling and stains 10
6
For the installer 11
Gebrauchsanweisung unbedingt lesen und aufbewahren!
Inhaltsverzeichnis
Bildseiten
Ausstattung 14 Typschild
Sicherheitsbestim m ungen 14/15
Bedienung der Kochstellen 15-17
Seite
3-5 Einbauhinweise 17/18
Reinigung und Pflege 19
Page
12/13
Seite
18
Printed on recycled paper. AEG - putting words into action.
Gedruckt auf Umweltschutzpapier - Wer ökologisch denkt, handelt auch so...
Page 3
Page 4

Page 5

Page 6

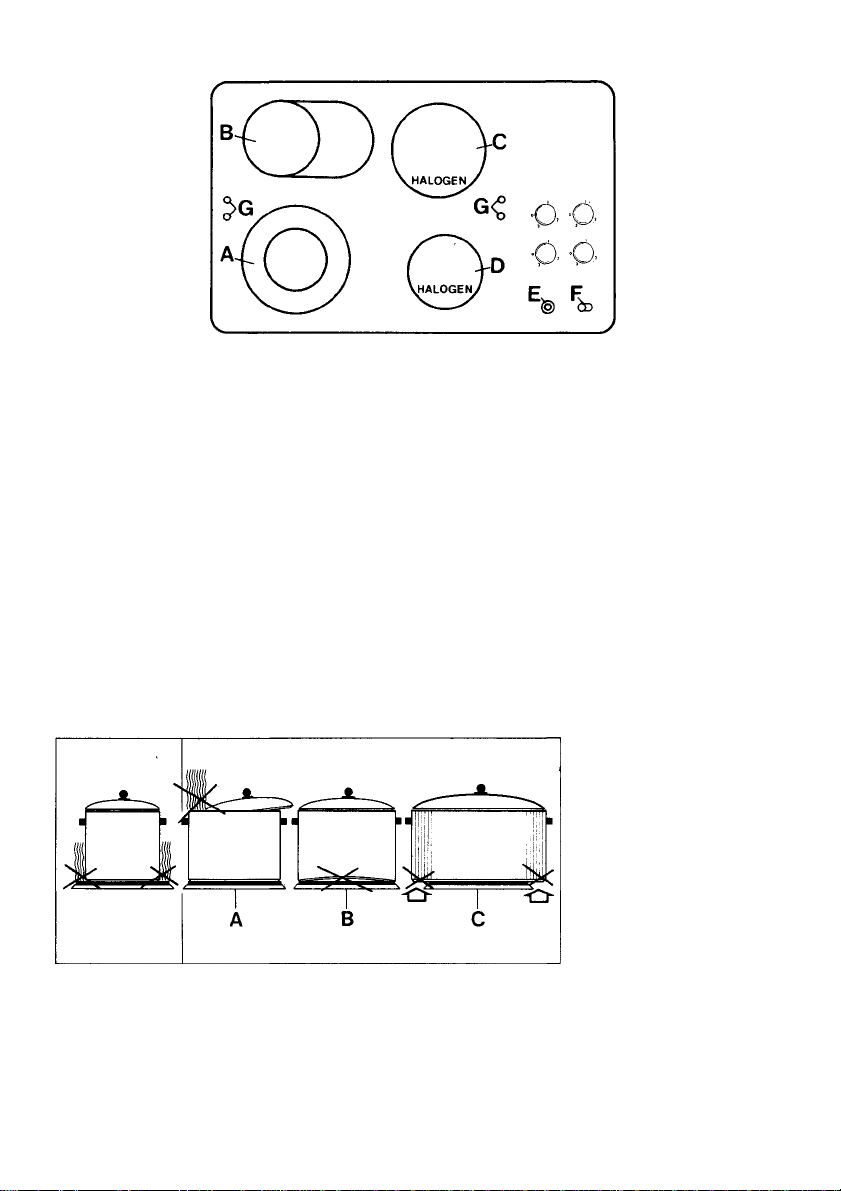
Equipment and description
Figure 1
A Dual circuit hotplate 12 cm and 21 cm 0
with corresponding switch
B Roaster piate 14.5 cm x 25 cm with
corresponding switch
C Hotplate 18 cm 0 with corresponding switch
D Hotpiate 14.5 cm 0 with corresponding
switch
E Touch control for dual zone
F Touch control for roaster plate
G Residual heat indicator
For the user
Safety instructions
To comply with safety regulations we must draw your attention
to the following instructions:
■ Oniy an approved eiectrical instaiier shouid
connect your appiiance. This ensures that
the iegai requirements and the connection
reguiations of your electricity supply author
ity applicabie in your iocaiity are compiied
with.
■ To maintain the safety of your appliance
you should only have repairs, especially on
live parts, carried out by a trained electri
cian. In the event of a fault, you should
therefore approach your retailer or our
AEG Service Department direct.
■ During cooking, the hotplates become hot.
You should therefore keep small children
well away.
■ Overheated fats and oils rapidly ignite on
hot hobs! Preparation of dishes with fats
and oils (eg chipped potatoes) must always
be supervised.
■ Please make sure that the connection leads
of other appliances (eg small appliances)
do not come into contact with the hot
hotplates.
important
Never use this appliance for heating purposes!
This appliance must never be operated
without supervision!
Page 7

Using the. hotplates
The correct utensils
Always use pans with a flat base. Uneven pots
and pans do not absorb the heat from the
cooking zone properly, thus prolonging cook
ing times and causing permanent discoloura
tion of the hob. For the same reason you
should not use pans which are too small, but
ones which are the same size as the cooking
zone.
Always make sure the pan is placed on top of
the cooking zone marks.
This is the correct pan. It has a thick, flat base
which efficiently absorbs heat from the cooking
zone and therefore protects it from overheating.
It is larger than the cooking zone and protects
it, like an umbreiia, from spiliage.
Do not put wet pans or steaming lids on cook
ing zones that are not in use. Water and steam
inevitably produce calcareous deposits.
The more suitable the utensil the more satis
factory the resuits wiil be. It is faise economy to
buy cheap utensiis. Good quaiity utensils save
power as they permit lower settings.
The important consideration in the quality of
the pan in relation to hotpiates is the pan base
Additional information concerning the
Halogen hotplates
When using the Halogen plates avoid pans
with shiny bases as they reflect the heat. This
wili resuit in the plate cycling on and off fairiy
frequently, extending cooking times.
This pan is too small and wastes heat.
Moreover, any spillage burns on the hob
surface and is then very difficuit to remove.
Never use pans with a thin, distorted base.
They cause the cooking zone to overheat.
The ideal pans have thick, fiat bottomed bases.
and not - as is frequently assumed - the
material from which the pan is made. The pan
base should be as thick and as flat as
possible. Ideal are sandwich bases (tripie
layer) which conduct the heat best.
Hints for cooking on the hotplates
■ The ceramic glass is extremeiy resistant
and strong, capable of withstanding iight or
moderate impacts without damage - but not
unbreakabie. Pointed and hard objects
faiiing on the cooking area may damage it.
Page 8

Using the hotplates
Important
If the surface is cracked or fractured, the hob
must not be used. The hob should be
switched off at the mains supply and AEG
Service Department called immediately.
■ After switching on the hob you will hear a
faint hum. Do not be concerned. This noise
is simply a feature of the radiant heating
system and does not effect the operation of
the hob.
■ Your hob has four heat residual warning
lights - these remain “lit” even when the
cooking zone has been switched off, so
long as the temperature of the ceramic
surface is still dangerously high. The light
goes out only when the temperature has
.fallen to a safe level.
Operation of the hotplates
General
The hotplate is OFF when the “0” is next to the
dot.
The output can be varied by turning the control
knobs clockwise or anticlockwise.
Do not leave articles standing on the hob.
Do not prepare dishes in aluminium foil or
plastic containers on heated cooking zones.
Keep the hotplates clean at all times - dirty
plates waste energy and could result in
permanent discolouration of the glass.
Take advantage of the residual heat: turn
the hotplates off 5-10 minutes before the
end of the cooking time.
Simmering and frying on the hotplates
Simmering
To heat up, select setting 3 and turn back to 1
for simmering; use the higher or lower setting
as required.
Control knob
Setting
3
2-3
Suitable for:
Rapid heating of fat and water
Fast frying of meat, fish
Frying
Heat the frying pan on setting 3, then add the
food to be fried and turn back to setting 2; use
higher or lower settings as required.
2 Slow frying, making a roux
1-2 Boiling large quantities of food, stews and soups
1 Simmering potatoes, soups
0-1 Simmering vegetables, fish in its own juice
0 Residual heat and OFF position
«
Page 9

Operation of the hotplates
Roaster plate
Switch on the small diameter hotplate (14.5 cm)
as described under “Simmering and frying”.
The roaster plate is activated by means of
touch control CX> (figure 4/F). The symbol CD
glows with a red control light.
The small diameter hotplates are switched off
as normal.
Should you wish to use both the dual circuit
Dual circuit hotplate
The small diameter hotplate (12 cm) is switched
on as described under “Simmering and frying".
The dual circuit is activated by means of touch
control ® (figure 4/E). The symbol ® glows
with a red control light.
and roaster plates together - follow instruc
tions above but press 4/E and 4/F one after
the other, not together.
Care and cleaning of the ceramic hob
Care
■ Use only pans with smooth, flat bases
intended for use on electric cookers.
Never use pans with a rough base, eg
cast iron, or enamel pots with an electro
graphite base - these will scratch the
cooking area.
■ Always dry the pan base before placing it
on the cooking area - scale deposits will
damage the cooking area.
■ Always select the correct pan size for the
hotplate.
■ Place the pan in the centre of the hotplate.
Do not use the ceramic hob as a chopping
board - dirt and food residues (especially
those containing sugar) will burn in whilst
cooking is in progress and damage the
cooking area. Grains of sand will leave
scratches on the cooking area.
Take care not to scratch the surface of the
ceramic glass with sharp edged jewellery
(eg diamond ring).
Do not scatter sugar or allow sugar solu
tions Cam, jelly, etc) to boil over onto the hot
surface, as permanent damage may occur.
Cleaning .
Clean the hob thoroughly before using it for
the first time and at regular intervals afterwards.
Generai ruies
■ You should not clean the hob until it has
cooled to the point where it is safe to touch.
It is easier to clean when cold, or just warm,
and there is no risk of burning yourself.
■ After EVERY cleaning, wipe over the
surface with a damp cioth, then poiish dry.
Do not use sponges or washing up cloths
which have been used for other purposes.
■ Make sure that all traces of cleaning
products are moistened and thoroughly
wiped off - if not, they could have a corro
sive effect when the surface is reheated.
Never use pan cleaners or scouring
powders, soap impregnated steel wool or
sponges with a rough, abrasive surface,
chemical cream cleaners, bleaching agents,
rust and stain removers; all these have a
corrosive effect and can damage the glass
surface.
Page 10

Care and cleaning of the ceramic hob
Cleaning procedure
1. Clean the ceramic hob after every use with
a clean, damp cloth and a little washing up
liquid. Then wipe the cooking area dry with
a clean cloth. No detergent residues should
remain on the surface.
2. For light to normal soilage, clean the entire
hob with Stahl-fix*or Sidol Edelstahlglanz*.
Then rinse the entire cooking area
thoroughly with clean water and wipe dry
with a clean cloth. No detergent residues
should remain on the surface.
3. For normal use, the hob should be condi
tioned once a week. We recommend the
use of “Collo profi” * or “Cera-fix” * which
have been developed especially for this
purpose. Collo profi and Cera-fix clean and
protect the hob by creating a siiicon film
which acts as a water and dirt repellant.
Use of the conditioning products will ensure
that the hob is easy to clean and offers
protection against damage from sugar and
highly sweetened food stuffs.
*AII these cleaning products are available
Heavy soiling and stains
from AEG Spare Parts Department.
Clean spillages off the hob after every use
Mineral deposits, present in hard water and
food, may cause discolouration in the form
of grey, mother of pearl stains which appear
to be on the surface. Clean such discolourations while the cooking area is still warm
(not hot). Then clean the cooking area as
described under 2. and 3.
If the calcareous deposits have turned
brown, they are already quite severe and
the only way of removing them is intensive
cleaning, which may have to be repeated
several times.
Boiled over food should first be wiped with
a damp cloth and dirt residues finally re
moved with a glass or razor blade scraper *.
Then clean as described under 2.
Burnt on sugar or molten plastic should be
imrhediately removed when still hot - with a
glass scraper. Clean the cooking area as
described under 2.
10
Do not allow spillages to become burnt into
the surface by repeated heating.
* Available via AEG Spare Parts Dapartment.
Page 11

Installation instructions
For the installer
Safety instructions
- According to the technical connection
conditions of the electricity board serving
your area, the appliance may only be
connected to the mains supply by an
approved electrical installer.
- in the fixed connection, a device allowing
the appliance to be isolated on all poles
from the mains supply with a contact open
ing width of at least 3 mm must be provid
ed. Suitable isolating devices are Cooker
Control Units.
- In respect of fire protection, the appliance
conforms to type Y (lEC 335-2-6). Only
appliances of this type may be installed
on one side of adjacent upright kitchen
housings or walls.
Electricai connection of appiiance
Local and national electrical regulations must
be observed.
All instructions given by the Electricity Board
must be followed carefully when connecting
the oven to the mains supply.
The appliance Is rated for 240 volts single
phase and must be permanently connected.
The hob must be installed in such a way that it
can be easily disconnected from the mains
supply before servicing, eg by an adjacent
cooker control unit.
Sufficient cable should be left to enable the
hob to be removed from the work surface
whilst still connected to the mains supply
(approximately 1.5 metres or 5 ft).
When pushing the hob into the cutout of the
furniture housing, make sure that the mains
cable is neither kinked nor trapped under the
appliance.
Access protection must be ensured by
installation.
The distance between the hob and vapour
extractor hood must be of the extent indi
cated in the instaliation instructions of the
vapour extractor hood.
Warning - This appliance must be earthed!
Voitage and Current
Please ensure that the voltage and current
indicated on the rating plate agrees with the
voltage of your electricity supply.
220/240 volts (ie 220/240 V a.c.).
After installation there must be no access to
live parts.
11
Page 12

For the kitchen furniture installer
Safety instructions
Please note that veneers and plastic coatings
on the unit housings must be treated with heatresistant adhesive (100°C). Uniess the plastic
coatings and adhesives are heat-resistant, the
coating may deform or come loose.
The use of solid wood wali upstands behind
the hob is allowable so long as the minimum
distances indicated in the hob diagrams are
complied with.
Surface discoiourations of the wali upstand are
not due to temperature effects of the appiiance.
For temperature reasons, cut out any upper
panels of base units below the hob.
Owing to the risk of fire, ensure that no flam
mable or thermally deformable objects are
placed directly below the hob.
Do not install a drawer below build-in hobs.
An intermediate panel must be fitted, that can
only be detached with tools, at least 50 mm
beneath the hob for safety (contact protec
tion) reasons.
Hob Cutout
Use the template supplied for your “Soft Line”
ceramic hob.
Figure 5
Hobs with a width of 77 cm should be fitted
over only two 60 cm base units (rather than
three) to avoid the loss of the third drawer
space. Please make sure that the cutout is
accurately made. You should therefore use
only a good, straight fretsaw blade or else
a routing cutter.
There should be no cross-strips below the
worktop cutout. They should be sawn back at
least as far as the worktop cutout size.
The minimum distances of hob cutouts to the
rear are indicated in the installation diagrams
(figure 5).
During installation beside an upright kitchen
housing, a safety distance of at least 50' mm
must be ensured. The side surface of the
upright kitchen housing should be lined with
heat-resistant material.
For reasons of good working practice, the
distance laterally to upright kitchen units
should be at least 300 mm.
The distance between the hob and vapour
extractor hood must be of the extent indi
cated in the installation instructions of the
vapour extractor hood.
The cutting surfaces must be sealed.
The range of the clamping brackets extends
from 30 mm to 40 mm. With thicker worktops
recesses should be provided in the worktop
at suitable points.
The clamping brackets are fastened according
to figure 6/1,2.
Hob Instaliation
1. Take the mean according to figure 8.
2. Attach fixing bracket to figure 9.
3. Cut off top half fixing brackets (figure 10)
with a knife.
4. Insert hob according to (figure 7) and place
it horizontally, level in the worktop.
5. The two clamps firmly fitted on both sides
will grip under the fixing brackets (figure 11)
and retain the hob. For removing it proceed
in reverse order.
12
Important
Under no circumstances should drawers be
fitted in either of the base units straddled by
the hob.
Page 13

For the kitchen furniture installer
Rating plate
Please state the product number (E. No.) and
the serial number (F. No.) of the hob; these will
be found on the information sheet accompany
ing this hob.
The data given shouid be quoted for the
purpose of servicing and when ordering spare
parts.
Please enter this data on the back of these
instructions.
indication of these numbers enables the
Service Department to make precise identifica
tion of the required spare parts so that your
hob can be repaired on the engineer’s first
visit.
This appiiance meets the radio interference
suppression requirements of EC Directive
82/499 EC and the standards concerning
the effects of electricai appiiances on power
systems EN 60 555 Parts 1-3/DiN VDE 0838
Parts 1-3, June 1987.
13
 Loading...