

Page 1
ISTRUZIONI PER L’USO
INSTRUCTION MANUAL
Gefrierschrank /freezer / congélateur /
F
UK
D
I
congelatore -
SV/E/UC/70. (09.)
UG 0880-10N
Page 2
2 Stampato su carta tollerabile per lÕambiente
Sicherheitshinweise
Bevor Sie Ihr neues KŠltegerŠt in Betrieb
nehmen, lesen Sie bitte diese
Gebrauchsanweisung aufmerksam durch.
Diese sind Sicherheitshinweise. Wir ersuchen Sie
daher, die folgenden Punkte vor der Installation
des GerŠtes und seiner Inbetriebnahme
aufmerksam durchzulesen.
Es wird empfohlen, diese Gebrauchsanweisung gut
aufzubewahren und bei einem eventuellen Verkauf
des GerŠtes dem neuen Besitzer auszuhŠndigen.
Benutzung im Haushalt
¥ Die KŸhl- und/oder GefrierschrŠnke sind zur
Einlagerung und/oder zum Einfrieren von
Lebensmitteln bestimmt.
¥ Vor der Installation sicherstellen, dass das GerŠt
nicht beschŠdigt ist. Mšgliche TransportschŠden
sind dem HŠndler unverzŸglich mitzuteilen.
¥
Das GerŠt ist schwer. Scharfe Metallkanten am
GerŠt hinten und unten stellen ein Verletzungsrisiko
dar. Beim Aufstellen oder Verschieben sind
Schutzhandschuhe zu tragen.
¥ Sollte die Installation des GerŠtes eine €nderung
der elektrischen Hausinstallation verlangen, so darf
diese nur von Elektro-FachkrŠften durchgefŸhrt
werden.
¥ Bitte prŸfen, dass das Netzkabel nicht von der
GerŠterŸckseite eingeklemmt und beschŠdigt wird.
Ein beschŠdigtes Netzkabel kann Ÿberhitzen und
einen Brand verursachen.
¥ Keine schweren GegenstŠnde bzw. das GerŠt
selbst auf das Netzkabel stellen. Kurzschluss- und
Brandgefahr!
¥ Den Netzstecker nie am Kabel aus der Steckdose
ziehen, besonders wenn das GerŠt aus der Nische
gezogen wurde. Eine BeschŠdigung des
Netzkabels kann Kurzschluss, Feuer und/oder
Stromschlag verursachen.
¥ Keine ElektrogerŠte (z.B. Eismaschinen) in das
GerŠt stellen.
¥ Es sollten keine kohlensŠurehaltigen GetrŠnke in
das Gefrier- bzw. Frosterfach eingestellt werden,
sie kšnnten platzen.
¥ Speiseeis und EiswŸrfel nicht unmittelbar aus dem
Gefrierfach in den Mund nehmen. Sehr kaltes Eis
kann an Lippen oder Zunge festfrieren und
Verletzungen verursachen.
¥ TiefkŸhlgut nicht mit nassen HŠnden berŸhren. Die
HŠnde kšnnten daran festfrieren.
¥ Tritt eine Stšrung oder ein Defekt ein, versuchen
Sie nicht, das GerŠt selbst zu reparieren.
ElektrogerŠte dŸrfen nur von Elektro-FachkrŠften
repariert werden, da durch unsachgemŠsse
Reparaturen erhebliche FolgeschŠden entstehen
kšnnen. Sich an die nŠchstgelegene
Kundendienststelle wenden und nur OriginalErsatzteile anfordern.
Sicherheit fŸr Kinder
¥ Die Teile des Verpackungsmaterials (z.B.
KunststoffhŸllen, Polystyrol) kšnnen fŸr Kinder
gefŠhrlich werden. Erstickungsgefahr!
¥ Im Falle der Entsorgung des GerŠtes ist das
Anschlusskabel durchzutrennen und der
TŸrverschluss unbrauchbar zu machen, damit sich
spielende Kinder nicht im GerŠt einschlie§en
kšnnen.
Umweltnormen
¥ Das GerŠt darf nicht mit dem HausmŸll oder
SperrmŸll entsorgt werden. Auskunft Ÿber
Abholtermine oder SammelplŠtze gibt die šrtliche
Gemeindeverwaltung an.
Hinweise zur Benutzung der Gebrauchsanweisung
Die folgenden Symbole erleichtern das Lesen der Gebrauchanweisung:
Sicherheitshinweise bezŸglich der Benutzung des GerŠtes
RatschlŠge fŸr den korrekten Gebrauch und die optimale Ausnutzung des GerŠtes.
Informationen zum Umweltschutz
D
Page 3
3
Sicherheitshinweise . . . . . . . . . . . . . . . . . . . . . . . . . . . . . . . . . . . . . . . . . . . . . . . . . . . . . . . . . . . . . . . . . . . . . .2
Entsorgung . . . . . . . . . . . . . . . . . . . . . . . . . . . . . . . . . . . . . . . . . . . . . . . . . . . . . . . . . . . . . . . . . . . . . . . . . . . . .3
Gebrauch . . . . . . . . . . . . . . . . . . . . . . . . . . . . . . . . . . . . . . . . . . . . . . . . . . . . . . . . . . . . . . . . . . . . . . . . . . . . . .3
Vor Inbetriebnahme / Bedienungsblende / Inbetriebnhame / Temperatureinstellung . . . . . . . . . . . . . . . . . . . .4
Schnellgefriervorgang / Alarmlampe . . . . . . . . . . . . . . . . . . . . . . . . . . . . . . . . . . . . . . . . . . . . . . . . . . . . . . . . .4
Temperaturalarm / Gefrierkalender / Gefrierabteilausstattung / Tipps . . . . . . . . . . . . . . . . . . . . . . . . . . . . . . .5
Wartung Abtauen / Reinigung . . . . . . . . . . . . . . . . . . . . . . . . . . . . . . . . . . . . . . . . . . . . . . . . . . . . . . . . . . . . . .6
Wenn etwas nicht funktioniert / Kundendienst und Ersatzteile . . . . . . . . . . . . . . . . . . . . . . . . . . . . . . . . . .7
Technische Angabe . . . . . . . . . . . . . . . . . . . . . . . . . . . . . . . . . . . . . . . . . . . . . . . . . . . . . . . . . . . . . . . . . . . . . .8
Installation
Aufstellung . . . . . . . . . . . . . . . . . . . . . . . . . . . . . . . . . . . . . . . . . . . . . . . . . . . . . . . . . . . . . . . . . . .8
Elektrischer Anschluss . . . . . . . . . . . . . . . . . . . . . . . . . . . . . . . . . . . . . . . . . . . . . . . . . . . . . . . . . . . . . . . . . . . .9
Installation . . . . . . . . . . . . . . . . . . . . . . . . . . . . . . . . . . . . . . . . . . . . . . . . . . . . . . . . . . . . . . . . . . . . . . . . . . . . .9
Inhalt
Gebrauch
Dieses GerŠt ist mit dem ÇViersterne-È Symbol versehen, was bedeutet, dass darin sowohl frische
Lebensmittel eingefroren als auch TiefkŸhlkost langfristig gelagert werden kšnnen.
Oben auf dem Gerät abgelegte gefrorene Ware kann dazu führen, dass sich durch die Kälte im
Hohlraum der Ablageplatte Kondenswasser bildet. In diesem Hohlraum sind elektronische Bauteile
untergebracht. Falls Kondenswasser auf diese Bauteile tropft, kann ein Kurzschluss das Gerät
beschädigen. Legen Sie deshalb keine gefrorene Ware oben auf das Gerät.
Entsorgung
Verpackungsmaterialien
¥ Die mit dem Symbol gekennzeichneten Materialien sind recyclingfŠhig.
>PE<=PolyŠthylen
>PS<=Polystyrol
>PP<=Polypropylen
SŠmtliche Verpackungsmaterialien sind recyclingfŠhig.
In Deutschland kšnnen Sie die Verpackung an den HŠndler zurŸckgeben, bei dem Sie das GerŠt gekauft
haben.
Entsorgung von AltgerŠten
Das Symbol auf dem Produkt oder seiner Verpackung weist darauf hin, dass dieses Produkt nicht als
normaler Haushaltsabfall zu behandeln ist, sondern an einem Sammelpunkt fŸr das Recycling von elektrischen
und elektronischen GerŠten abgegeben werden muss.
Durch Ihren Beitrag zum korrekten Entsorgen dieses Produkts schŸtzen Sie die Umwelt und die Gesundheit
Ihrer Mitmenschen. Umwelt und Gesundheit werden durch falsches Entsorgen gefŠhrdet. Weitere
Informationen Ÿber das Recycling dieses Produkts erhalten Sie von Ihrem Rathaus, Ihrer MŸllabfuhr oder dem
GeschŠft, in dem Sie das Produkt gekauft haben.
Page 4
4
➀
➁
➂
➃
➄
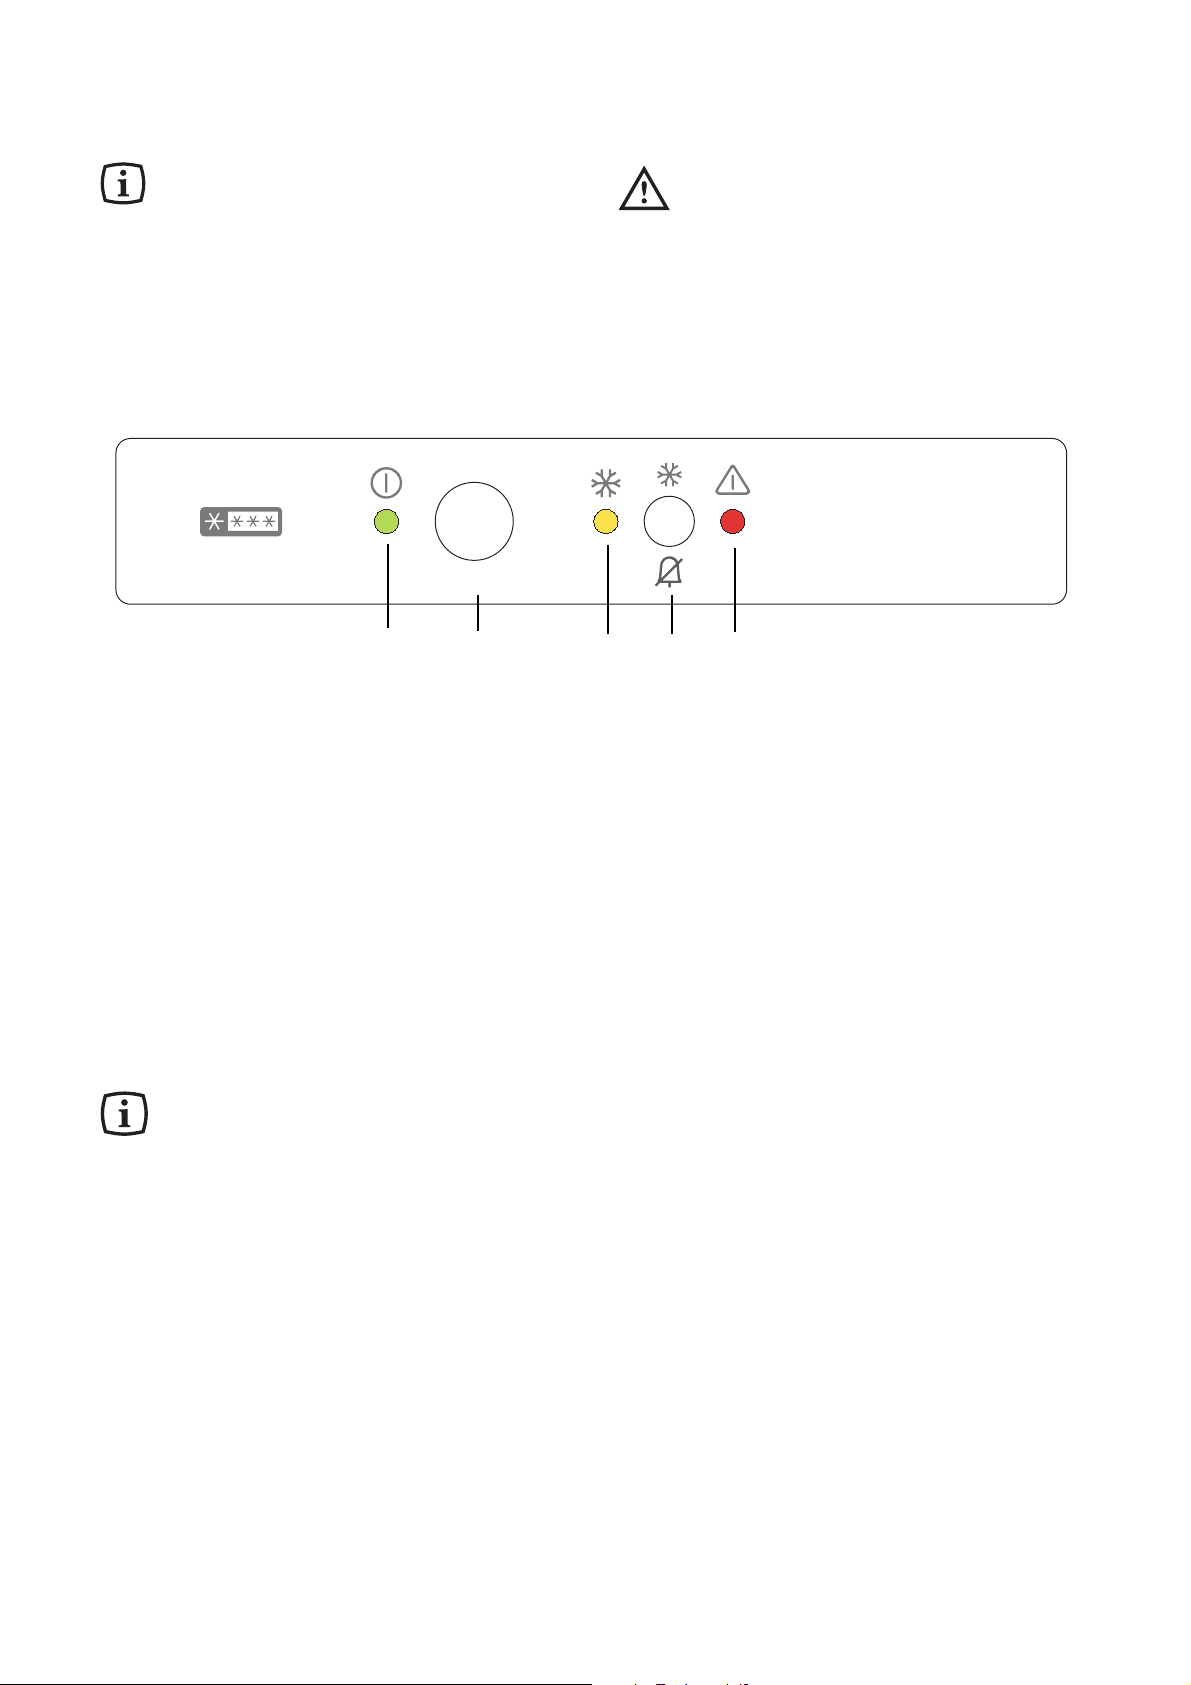
Schnellgefriervorgang
Schalter (4) ca. 1 Sekunde gedrŸckt halten, um auf
Position SUPER zu stellen. Die Kontrollampe (3)
leuchtet auf. Die Elektronic des GerŠtes schaltet die
Schnellgefrier-Funktion nach 48 Stunden
automatisch ab.
Sie kšnnen den Schnellgefriervorgang jederzeit
manuell beenden, indem Sie die Taste (4) erneut
drŸcken.
Alarmlampe
Die Alarmlampe (5) leuchtet auf, wenn die
Temperatur im GerŠteinneren steigt, und dadurch die
richtige Lagertemperatur nicht mehr gewŠhrleistet
Temperatureinstellung
¥ Durch Drehen des Thermostatknopfes (2) auf die
hšheren Zahlen erhŠlt man kŠltere Temperaturen,
durch Drehen auf die niedrigeren Zahlen erhŠlt
man wŠrmere Temperaturen.
¥ FŸr eine gute Lagerung der eingefrorenen bzw.
tiefgefrorenen Lebensmittel, muss die Temperatur
im Gefrierschrank unter oder gleich -18¡C sein.
¥ Die richtige Einstellung erhŠlt man, unter
BerŸcksichtigung folgender, die Innentemperatur
beeinflussender Faktoren:
¥ Raumtemperatur
¥ HŠufigkeit des TŸršffnens
¥ Menge der eingelagerten Lebensmittel,
¥ Aufstellung des GerŠtes.
¥ Die Temperatur wird automatisch geregelt.
¥ Stellung ã-16Ò = wŠrmste Innentemperatur
¥ Stellung ã-24Ò = kŠlteste Innentemperatur
¥ Stellung ã•Ò = KŸhlung aus
Wir empfehlen, den Thermostatknopf (2) auf die
Ò-18¡CÓ Stellung zu drehen. Die
Temperaturregelung zur optimalen Aufbewahrung
der Lebensmittel erfolgt automatisch.
Inbetriebnahme
¥ Den Stecker in die Steckdose einsetzen.
Thermostatknopf von der Stellung Ç•È (STOP) aus
im Uhrzeigersinn Ÿber die Stellung Ò-16¡CÓ drehen.
Der Thermostatknopf (2) ist in der Arbeitsplatte.
¥ Die Aufleuchten der Kontrollampe (1), der
Schnellgefrier-Kontrolleuchte (3) und der
Alarmlampe (5) zeigen an. Das GerŠt ist
eingeschaltet.
Die Elektronic des GerŠtes schaltet die
Schnellgefrier-Funktion bei Inbetriebnahme
nach 5 Stunden automatisch ab.
Den Stillstand des GerŠtes erhŠlt man durch
Drehen des Thermostatknopfes auf das Symbol
Ç•È.
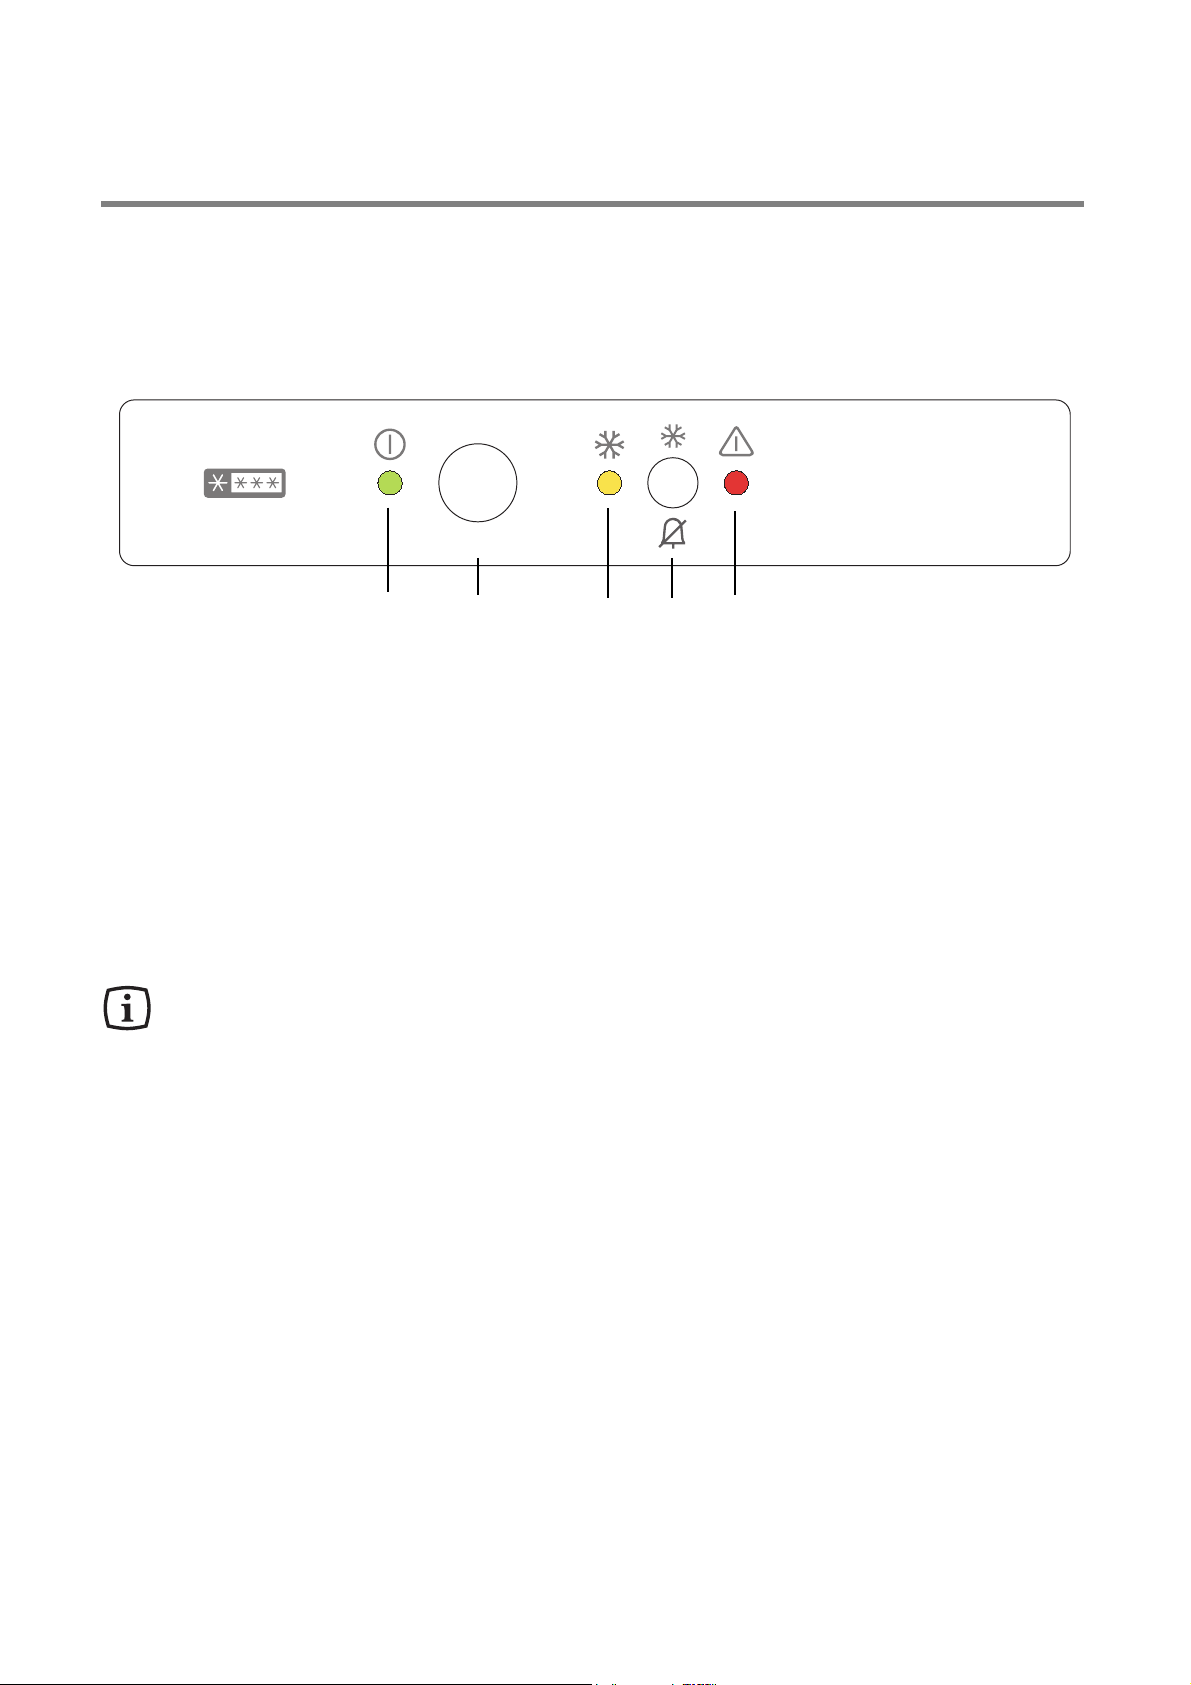
1
Netzkontrolleuchte grŸn
2
Thermostat
3
Schnellgefrier-Kontrolleuchte gelb
4
Schalter zum Schnellgefrieren
5
Alarmkontrolleuchte rot
Vor Inbetriebnahme
Man sollte mindestens 2 Std. warten, bevor
das Gerät in Betrieb genommen wird, damit
das Kältemittel zurückströmen kann.
¥ Bevor Sie das GerŠt in Betrieb nehmen, beseitigen
Sie den typischen ÇNeugeruchÈ am besten durch
Auswaschen der Innenteile mit lauwarmem Wasser
und einem neutralen Reinigungsmittel. SorgfŠltig
nachtrocknen.
Bitte keine Reinigungs- bzw. Scheuermittel
verwenden, die das GerŠt beschŠdigen
kšnnten.
Das GerŠt sowie Teile der Innenausstattung sind fŸr
den Transport geschŸtzt.
Alle KlebebŠnder sowie Polsterteile aus dem
GerŠteinnenraum entfernen.
Bedienungsblende
0
1
2
3
4
Frost Free
6
5
Page 5
5
Gefrierabteilausstattung
EiswŸrfelbereitung
Das GerŠt hat EiswŸrfelschalen, welche mit Wasser
aufgefŸllt in das Gefrierfach gestellt werden. Die
EiswŸrfel kšnnen herausgenommen werden, indem
die EiswŸrfelschale kurz unter Leitungswasser
gehalten wird.
Bitte zur Entnahme der EiswŸrfelschalen
keine MetallgegenstŠnde benutzen!
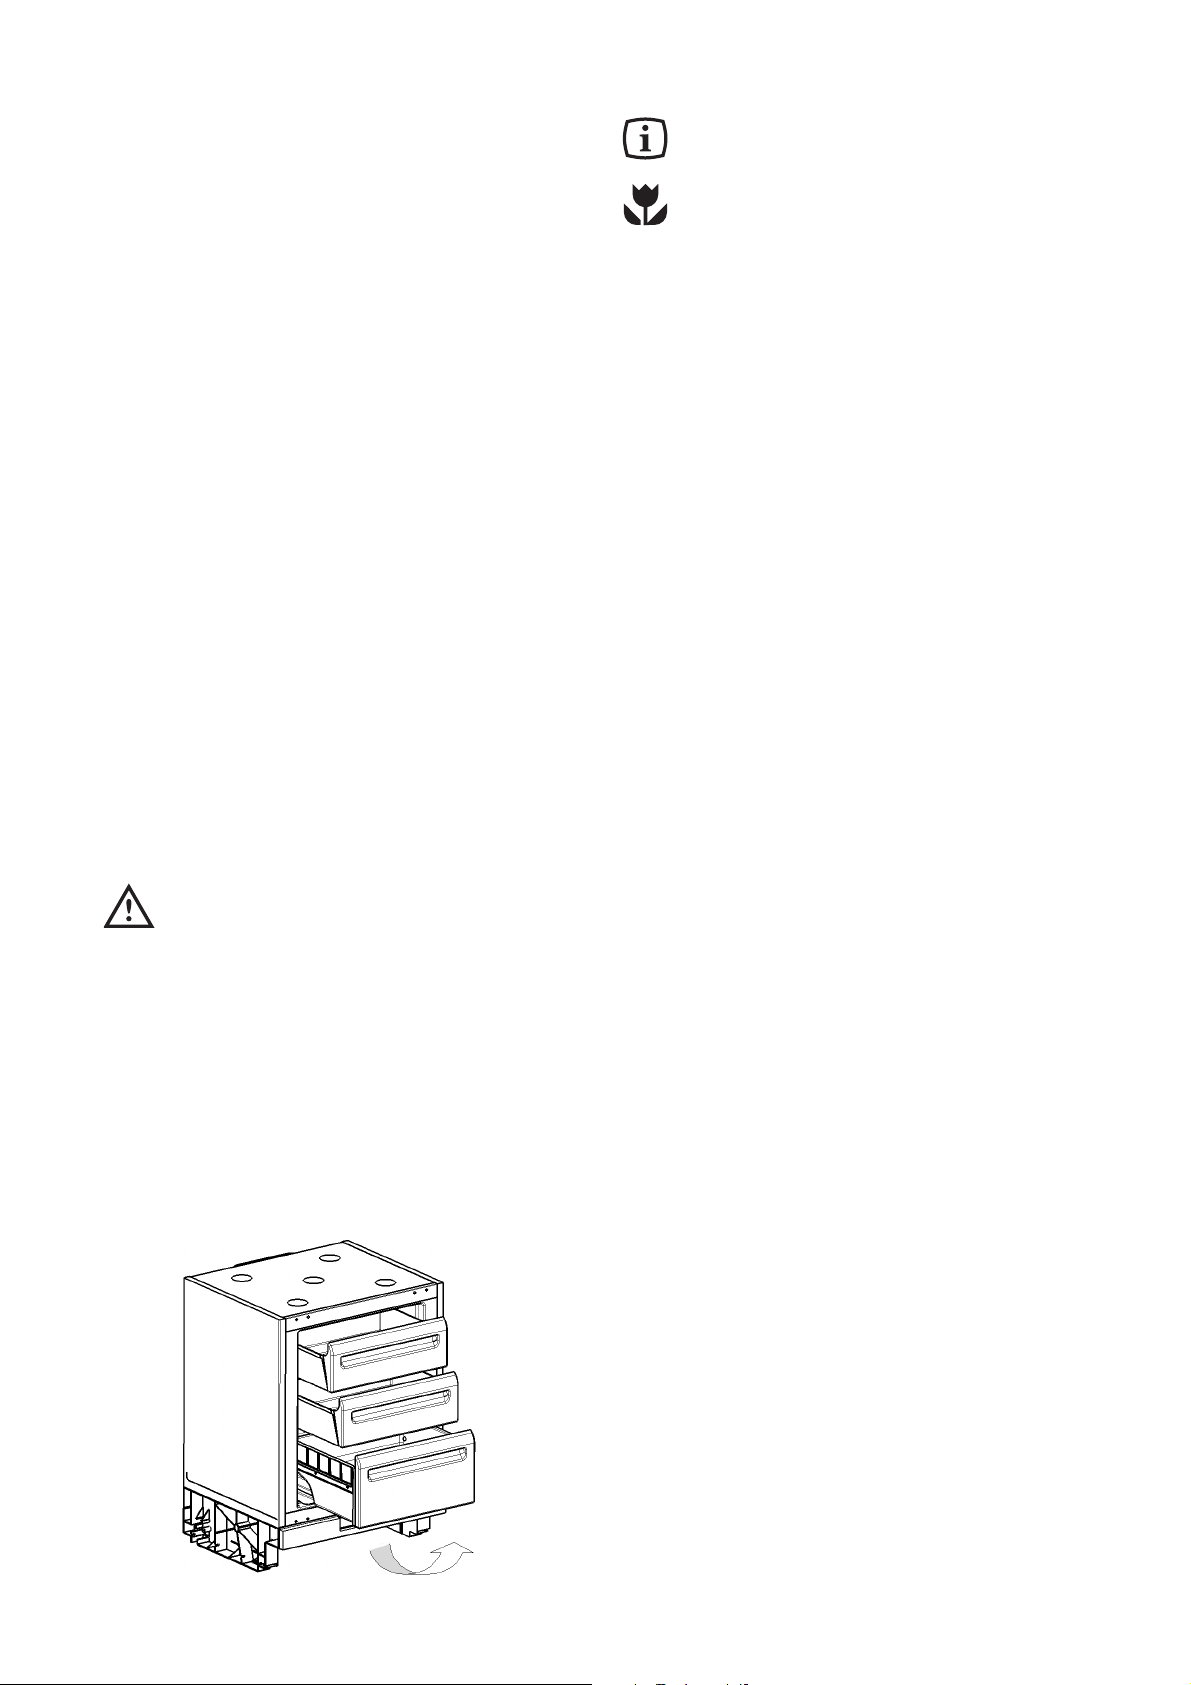
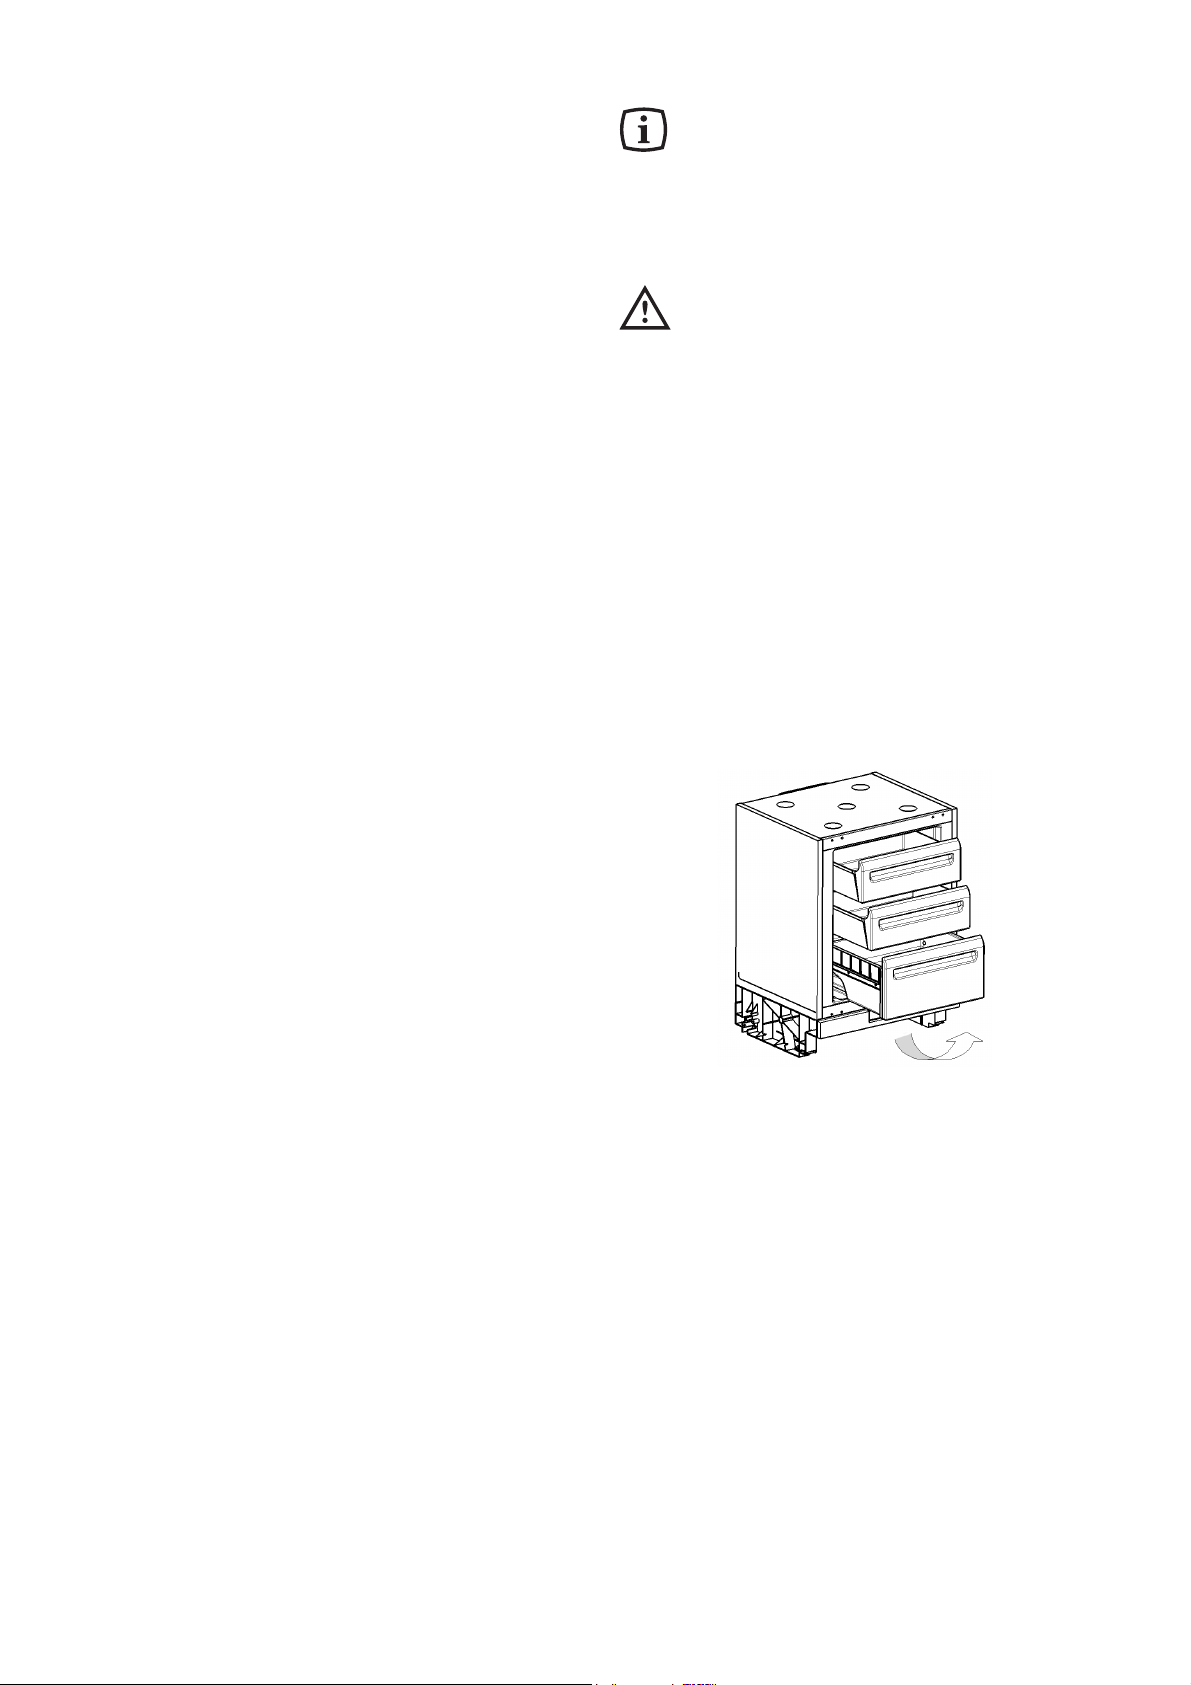
Schublade
Die stabilen KŠlteschubladen sind kippgesichert und
in Endstellung arretiert. Dies gewŠhrleistet sicheres
und bequemes Einlagern und Entnehmen des
Gefrierguts.
Zum Herausnehmen ziehen Sie die Schubladen bis
zur Arretierung heraus, kippen sie nach oben und
ziehen sie nach vorn heraus (siehe Abb.)
Tipps
Energie-Einsparung
¥ Das GerŠt nicht in der NŠhe von Herden,
Heizkšrpern oder anderen WŠrmequellen
aufstellen. Bei hoher Umgebungstemperatur lŠuft
der Kompressor hŠufiger und lŠnger. Bitte im
Abschnitt ÒAufstellungÓ nachsehen.
¥ TŸr nur so lange wie nštig gešffnet lassen.
¥ Keine warmen Speisen in das GerŠt stellen.
Warme Speisen erst abkŸhlen lassen.
¥ Die Temperatur nicht kŠlter als nštig einstellen.
¥ TiefkŸhlgut zum Auftauen in den KŸhlraum legen.
Die KŠlte im TiefkŸhlgut wird so zur KŸhlung im
KŸhlraum genutzt.
¥ Den VerflŸssiger, das Metallgitter an der
GerŠterŸckseite, mit einem Staubsauger oder einer
BŸrste immer sauber halten.
Einfrieren und TiefkŸhllagern
¥ Um den Schnellgefriervorgang durchzufŸhren,
muss das GerŠt, falls es nicht in Betrieb ist,
wenigstens drei Stunden vor der Einlagerung der
einzufrierenden Lebensmittel auf
Schnellgefriervorgang gestellt werden. LŠuft jedoch
das GerŠt bereits, wird empfohlen, den
Schnellgefriervorgang mindestens 24 Stunden vor
der Einlagerung der einzufrierenden Lebensmittel
einzuschalten.
¥ Nach der Einlagerung der Lebensmittel, rechnet
man 24 Stunden, bis der Gefriervorgang beendet
ist. Nach dieser Zeit den ÇAufbewahrungs-
BetriebÈ wieder einstellen.
¥ Nach einem lŠngeren Stillstand des GerŠtes muss
dieses vor der Einlagerung der Lebensmittel, durch
Einstellung des Schalters auf
Schnellgefriervorgang (SUPER), wenigstens 2
Stunden in Betrieb gesetzt werden; danach wieder
den normalen Betrieb einstellen.
¥
Die einzufrierenden Lebensmittel in das untere
Gefrierfach einlegen.
¥ Das Gefriervermšgen in 24 Stunden finden Sie
auf dem ÇTypschildÈ links unten im GerŠtes.
¥ Da das Einfrieren mit Hilfe der no_frost-Technik
schneller geht, behŠlt das Gefriergut auch nach
dem Auftauen sein ursprŸngliches Aussehen,
seinen NŠhrwert und seinen Geschmack.
¥ Die Lebensmittel in kleine Portionen einteilen,
damit der Gefriervorgang beschleunigt wird; dies
ermšglicht das spŠtere Auftauen von kleineren
Portionen.
¥ TŸr so wenig wie mšglich šffnen oder offen lassen.
¥ Die Lebensmittel in Alu- oder PolyŠthylenfolien
luftdicht verpacken.
wird (wŠrmer als -12¡C). Sie leuchtet jedoch auch
dann auf, wenn das GerŠt gerade eingeschaltet
worden ist und bleibt solange eingeschaltet, bis die
richtige Lagertemperatur erreicht ist.
ãOffene TŸrÒ Warnung
Ein Tonwarner ertšnt, wenn die TŸr lŠnger als 60
Sekunden gešffnet bleibt.
Der Tonwarner kann durch Schlie§en der TŸr
abgestellt werden.
Gefrierkalender
Die Symbole auf den Schubladen zeigen
unterschiedliche Arten von TiefkŸhlgut.
Die Zahlen geben fŸr die jeweilige Art von TiefkŸhlgut
die Lagerzeit in Monaten an. Ob der obere oder der
untere Wert der angegebenen Lagerzeiten gŸltig ist,
hŠngt von der QualitŠt der Lebensmittel und deren
Vorbehandlung vor dem Einfrieren ab.
Page 6

¥ Die einzufrierenden Lebensmittel sollen mit den
TiefkŸhlkosten nicht in BerŸhrung kommen, um ein
Temperaturanstieg an diese zu verhindern.
¥ Speiseeis, das direkt aus dem Gefrierfach
genommen wird, kann KŠlte-Brandwunden
verursachen.
¥ Es ist empfehlenswert, auf der Verpackung das
Einfrierdatum zu notieren, damit die
Aufbewahrungszeit eingehalten werden kann.
¥ Um die beste Leistung des GerŠtes zu erreichen
empfehlen wir, fŸr die Lagerung des Gefriergutes
alle FŠcher gleichmŠ§ig zu nutzen.
¥ Der Transport vom VerkŠufer zum Verbraucher
Wartung
Vor jeder Reinigungsarbeit immer den
Netzstecker aus der Steckdose ziehen.
Dieses GerŠt erhŠlt im Kaltekreislauf
Kohlenwasserstoff. Aus diesem Grund darf
die Wartung und das NachfŸllen
ausschlie§lich von autorisierten
Fachpersonal durchgefŸhrt werden.
Automatisches Abtauen
Ihr GerŠt wurde so konzipiert, dass sich im
Gefrierraum kein Eis bildet. Dies bedeutet, dass es
nicht manuell abgetaut werden muss. Das
erforderliche Abtauen des KŠlteaggregates erfolgt
automatisch.
muss in kurzer Zeit erfolgen.
¥ Es sollten keine kohlensŠurehaltigen GetrŠnke
in das Gefrierschrank eingestellt werden, da
sie explodieren kšnnen.
¥ Einmal aufgetaute Lebensmittel verderben schnell
und kšnnen kein ein zweites Mal eingefroren
werden.
Um ein einwandfreies Funktionieren des
GerŠtes sicherzustellen, darf kein
Gefriergut direkten Kontakt mit der
Ventilatorabdeckung bzw. dem Ventilator in
der GerŠterŸckwand, haben.
Stillstandszeiten
Bei lŠngerem Stillstand des GerŠtes, mŸssen Sie
folgenderma§en vorgehen:
¥ den Stecker aus der Steckdose ziehen;
¥ alle Lebensmittel herausnehmen;
¥ GerŠt abtauen, Innenraum und Zubehšrteile
reinigen;
¥ die TŸr offen lassen, um im Inneren eine gute
Luftzirkulation zu gewŠhrleisten und somit
Geruchsbildung zu vermeiden.
RegelmŠ§ige Reinigung
Benutzen Sie nie MetallgegenstŠnde um
das GerŠt zu reinigen, da es beschŠdigt
werden kšnnte.
Den Innenraum mit lauwarmem Wasser und einem
neutralen Reinigungsmittel reinigen.
Gut nachwaschen und sorgfŠltig trocknen.
Der Aufbau des GerŠtes erlaubt auch die Reinigung
der GerŠterŸckseite mit Hilfe eines Staubsaugers,
um einen sicheren und stromsparenden Betrieb des
GerŠtes zu gewŠhrleisten
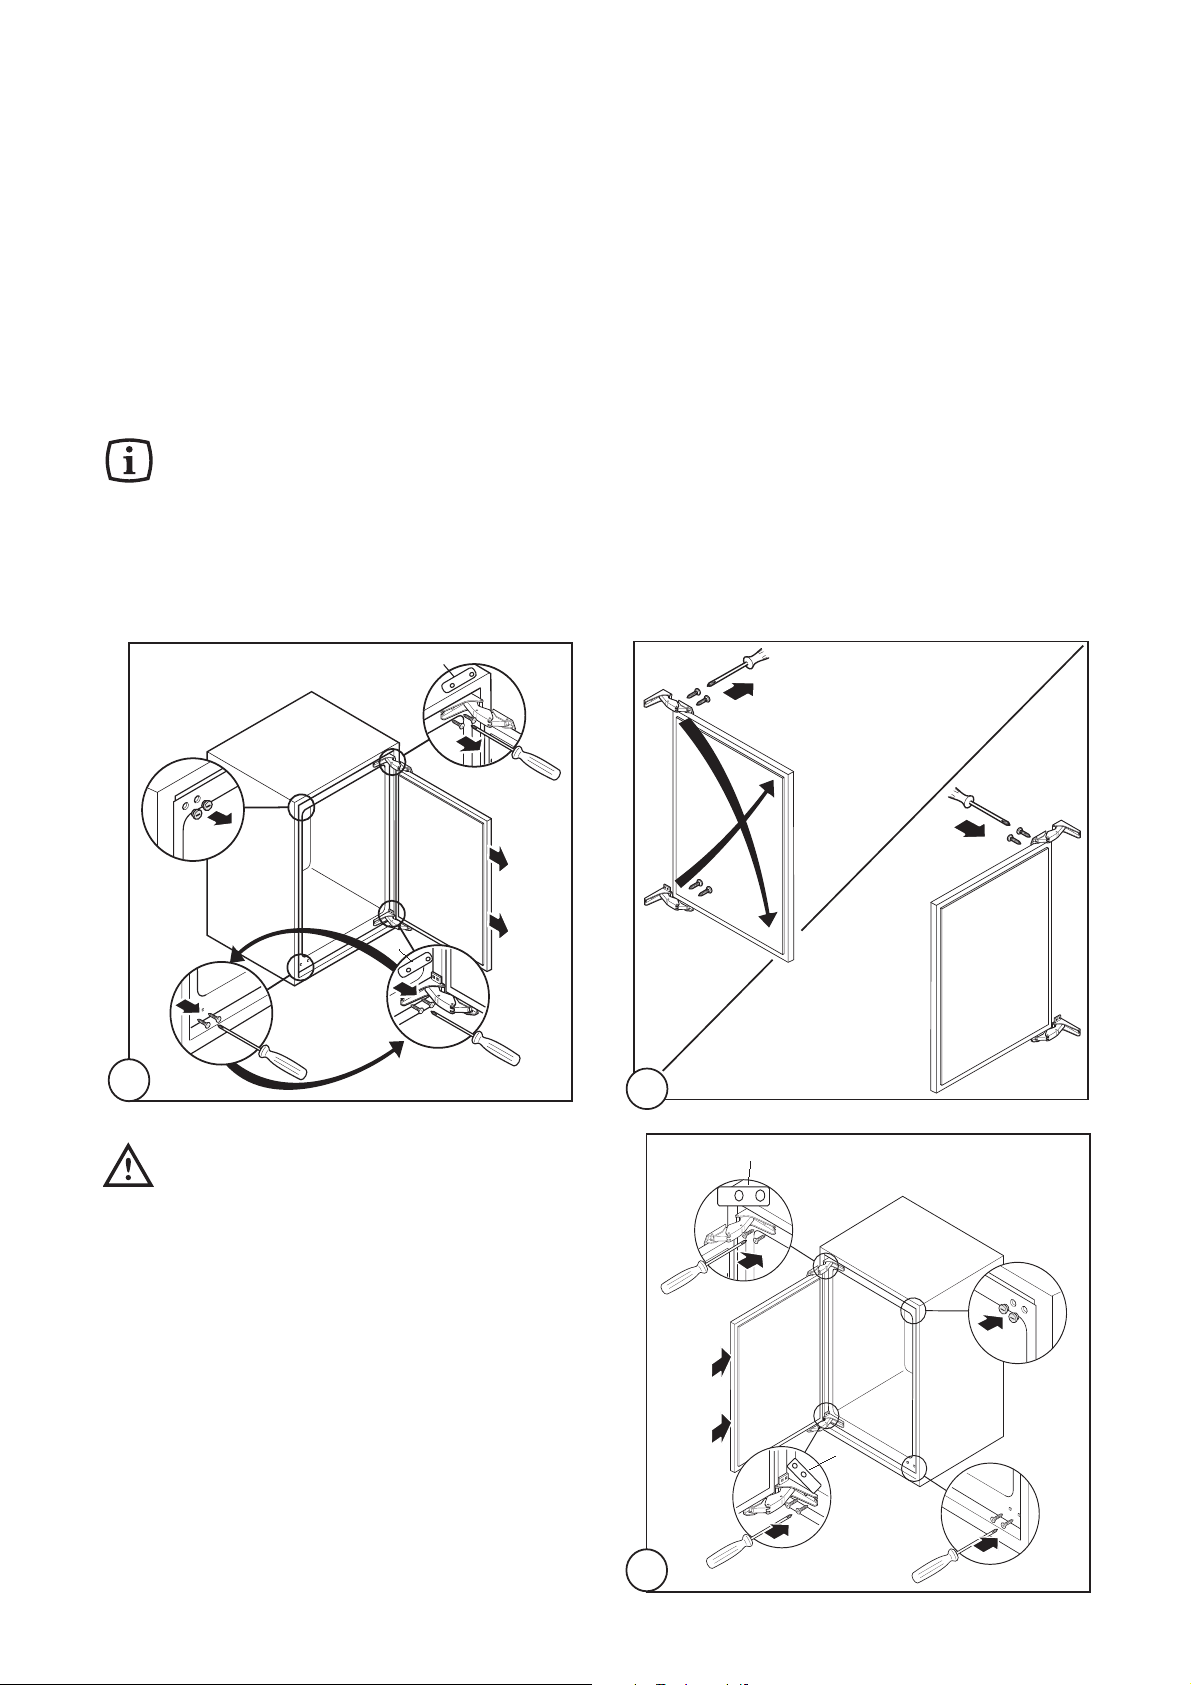
1. Nehmen Sie die KŸchenmšbelsockelblende (1)
ab;
2. demontieren Sie die BelŸftungsblende (2);
3. ziehen Sie vorsichtig die Verdunsterschale (3)
heraus.
6
21
3
S.I.013
Page 7
7
Wenn etwas nicht funktioniert
Falls das GerŠt Stšrungen aufweisen sollte, bevor Sie den Kundendienst verstŠndigen, ŸberprŸfen Sie
zuerst folgendes:
Störung Abhilfe
Im GerŠt wird es nicht kalt genug
GerŠt kŸhlt zu stark.
Der Kompressor lŠuft stŠndig
GerŠusche
VorŸbergehend kŠltere Temperatureinstellung wŠhlen.
Die Lebensmittel mŸssen so eingelagert werden, dass die KŠlte um sie frei zirkulieren
kann.
TŸr richtig schlie§en.
Die Umgebungstemperatur ist zu warm.
VorŸbergehend wŠrmere Temperatureinstellung wŠhlen.
VorŸbergehend wŠrmere Temperatureinstellung wŠhlen.
Die Umgebungstemperatur ist zu warm.
Achten Sie darauf, dass diese …ffnungen nicht durch Sockelblenden oder Geschirr
abgedeckt werden.
Innerhalb der letzen 24 Std. wurden grš§ere Mengen warmer Lebensmittel eingelagert.
TŸr nur so lange wie nštig gešffnet lassen.
Manchmal sind sie charakterstisch fŸr KŠltegerŠte.
Wenn KŠltemittel in dŸnne Rohre einstršmt, kšnnen Sie ein blubberndes oder
plŠtscherndes GerŠusch hšren.
Immer wenn der Kompressor ein- oder ausschaltet, ist ein Klicken zu hšren.
GerŠusche kšnnen durch das Instand setzen der Mšbelstruktur entstehen.
Funktionsstšrungen
Hat die Elektronik des GerŠtes einen technischen Defekt erkannt, der verhindert, da§ die IST-Temperatur erfa§t
werden kann, blinkt die rote Alarmkontrolleuchte. Das GerŠt arbeitet mit einem Notprogramm, bis der
Kundendienst die Reparatur durchgefŸhrt hat.
Diese Angaben finden Sie auf dem Typschild links an
der Innenseite des GerŠtes. Damit Sie die Daten
schnell bei der Hand haben, empfehlen wir, sie hier
einzutragen.
Kundendienst und Ersatzteile
Sollten Sie nach o.e. PrŸfungen zu keinem Resultat
kommen, so wenden Sie sich bitte an unseren
nŠchsten Kundendienst.
Um ein rasches Beheben des Schadens zu
ermšglichen, ist es beim Anruf an den Kundendienst
notwendig anzugeben:
¥ Modellbezeichnung
¥ Erzeugnis-Nummer (PNC)
¥ Fertigungs-Nummer (S-No.)
Page 8
8
Kundendienst und Ersatzteile
Falls das GerŠt Stšrungen aufweisen sollte,
ŸberprŸfen Sie zuerst folgendes:
¥ Steckt der Netzstecker in der Steckdose?
¥ Befindet sich der Hauptschalter der elektrischen
Anlage in der richtigen Stellung?
¥ Ist die Stromzufuhr unterbrochen?
¥ Befindet sich der Thermostatknopf in richtiger
Stellung?
Sollten Sie nach o.e. PrŸfungen zu keinem Resultat
kommen, so wenden Sie sich bitte an unseren
nŠchsten Kundendienst.
Um ein rasches Beheben des Schadens zu
ermšglichen, ist es beim Anruf an den
Kundendienst notwendig, die Modell- und
Serienummer anzugeben, die Sie dem
Garantieschein oder dem Typschild (- linke Seite
- unten) entnehmen kšnnen.
Technische Angabe
Die technischen Angaben sind auf dem Typschild genannt, das auf der linken inneren Seite der Anlage liegt.
TŸranschlagwechsel
Achtung!
Bei einer niedrigen Raumtemperatur (z.B. im
Winter) kann es vorkommen, dass die
Dichtung nicht perfekt am Schrank haftet. Die
Wiederherstellung der Dichtung erfolgt
automatisch nach gewisser Zeit. Wollen Sie
aber diesen Prozess beschleunigen, so
genŸgt es die Dichtung mit einem Fšn zu
erwŠrmen.
6
4
1
6
2
1
6
3
7
8
5
2
6
10
13
9
6
12
11
3
Page 9
9
Installation
Elektrischer Anschluss
Bevor Sie den Stecker in die Steckdose einstecken,
ŸberprŸfen Sie bitte, dass die auf dem Typschild des
GerŠtes angegebene Spannung sowie Frequenz mit
dem Anschluss wert des Hauses Ÿbereinstimmen.
Eine Abweichung von ±6% von der
Nominalspannung ist zulŠssig.
FŸr die Anpassung des GerŠtes an andere
Spannungen muss ein Spartransformator
angemessener Leistung vorgeschaltet werden.
Wichtig
Das GerŠt muss unbedingt
vorschriftsmŠ§ig geerdet werden.
Zu diesem Zweck ist der Stecker des
Anschlu§kabels mit dem dafŸr vorgesehenen
Kontakt versehen.
Sollte die Netzleitung im Haus nicht mit einer
Erdleitung versehen sein, so mu§ das GerŠt
an eine getrennte Erdleitung vorschriftsmŠ§ig
und unter Hinzuziehung eines Fachmanns
angeschlossen werden.
Die Erzeugerfirma lehnt jede
Verantwortung ab, falls diese
UnfallverhŸtungsvorschrift nicht beachtet
wird.
Wichtig
Es mu§ mšglich sein, das GerŠt vom Netz zu
trennen; nach der Installation mu§ die
Steckdose daher zugŠnglich bleiben.
Dieses GerŠt entspricht der folgende EWG Richtlinie:
- 73/23 EWG vom 19.2.73 (Niederspannung)
und folgende €nderungen;
- 87/308 EWG vom 2.6.87 (Funkentstšrung);
- 89/336 EWG vom 03/05/89 (Elektromagnetische VertrŠglichkeit) und folgende
€nderungen.
Aufstellung
Das GerŠt sollte nicht in der NŠhe von
WŠrmequellen wie Heizkšrpern oder …fen aufgestellt
und vor direkter Sonneneinstrahlung geschŸtzt
werden.
Die beste Leistung erzielt man erfahrungsgemŠ§ bei
Raumtemperaturen von +18¡C bis +43¡C (Klasse T);
+18¡C bis +38¡C (Klasse ST); +16¡C bis +32¡C
(Klasse N); +10¡C bis +32¡C (Klasse SN).
Die GerŠteklasse ist auf dem Typschild
angegeben.
FŸr den Einbau und ev. TŸranschlagwechsel lesen
Sie bitte den entsprechenden Abschnitt durch.
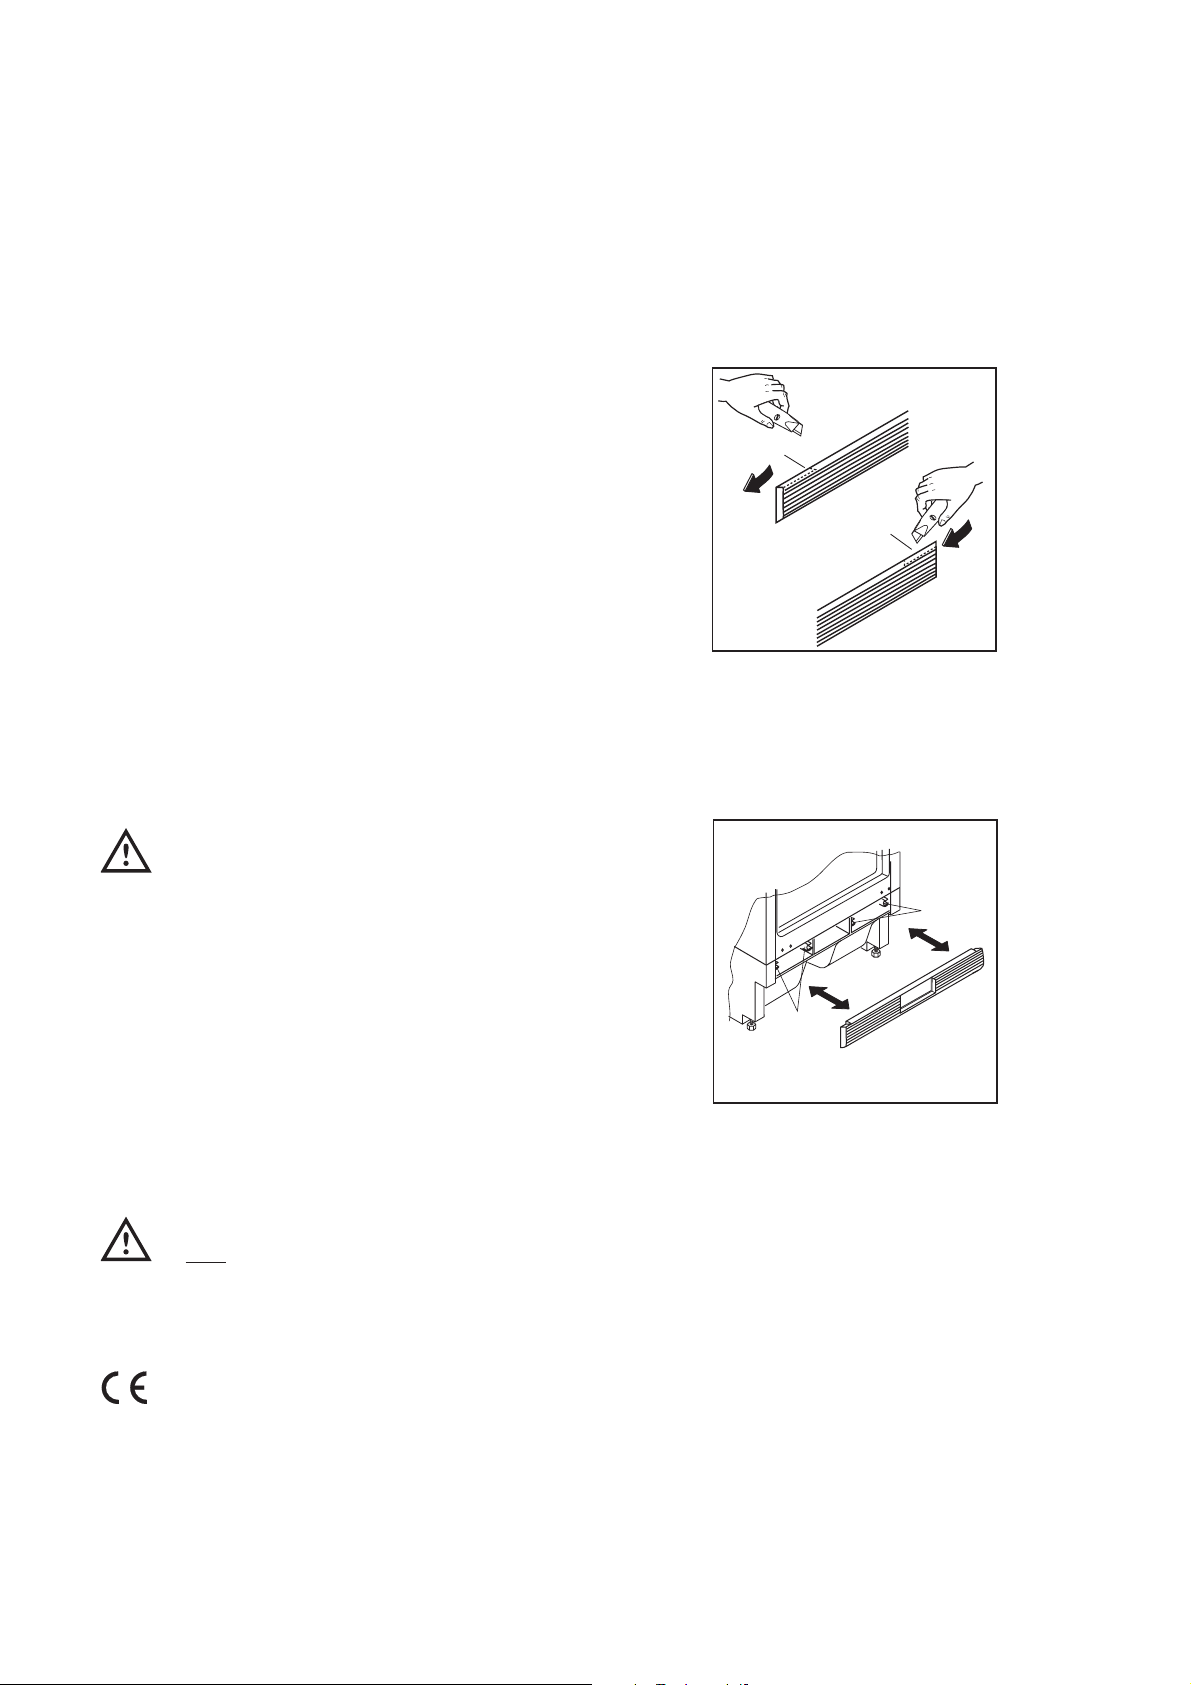
Vorbereitung des LŸftungsgitters
Nehmen Sie das Gitter aus der unteren
Verpackungsschale.
TŸr …ffnung links:
- entfernen Sie die linke TŸrlagerblende (A) vom
Gitter durch einen Schnitt von hinten.
TŸr …ffnung rechts:
- entfernen Sie die rechte TŸrlagerblende (B) vom
Gitter durch einen Schnitt von hinten.
FŸr die Positionierung des Gitters am GerŠt drŸcken
Sie das Gitter auf die Haken (a) bis diese einrasten.
Das GerŠt mit den Montagewinkeln in der Nische
befestigen, danach das Gitter montieren.
A
B
DO002/2
a
a
DO001
Page 10
10
Lato sinistro Lato destro
2
Einbau unter eine Arbeitsplatte
Nischenma§e
Die Ma§e der Nische mŸssen den angegebenen
Werten entsprechen.
Mitgelieferte Montageteile
1. Winkel rechts und links wie abgebildet befestigen.
2. GerŠt in die Nische einschieben. Die zum
Anschluss des GerŠtes nštige SchutzkontaktSteckdose sollte so positioniert sein, dass sich sie
nicht vom GerŠt verdeckt wird.
3. Das GerŠt ist mit regulierbaren FŸssen
ausgestattet, um es der gewŸnschten Hšhe (max
870 mm) anzupassen; diese befinden sich an den
vier unteren Ecken des GerŠtes.
2
1
2
4. Um die Positionierung in der Nische zu erleichtern,
sind zwei Gleitbacken mitgeliefert, die unter den
beiden hinteren FŸssen angebracht werden
mŸssen.
Falls notwendig, kann die Grš§e der Gleitbacken
durch Abbrechen lŠngs der markierte Linie
angepasst werden.
600
550
min.
600
DO013
1xB
2xC
1xA
1xK
2xG
2xL
2xF
2xD
18xI
1
596
555
max
+
-
-
+
3
Page 11
11
5. Fugenabdeckprofil am GerŠt ankleben, wie in der
Abbildung gezeigt.
6. GerŠt festschrauben
5
7. MšbeltŸr montieren
10
2
1
a
C
4
2
1
3
B
b
6
3
115°
4
7
ab
C
clic
C
clic
c
8
Page 12
12
OBERER TEIL DER K†CHEM…BELVERKLEIDUNG
UNTERES TEIL DER K†CHEM…BELVERKLEIDUNG
8. Abdeckung (A) anbringen.
1
a
=
=
2
9
b
1
=
2
10
=
12
8 mm
I
10
F
I
27,5 cm
45°
27,5 cm
1
55 cm
2
F
G
13
K
A
3
11
13
Page 13
13
90°
115°
L
L
15
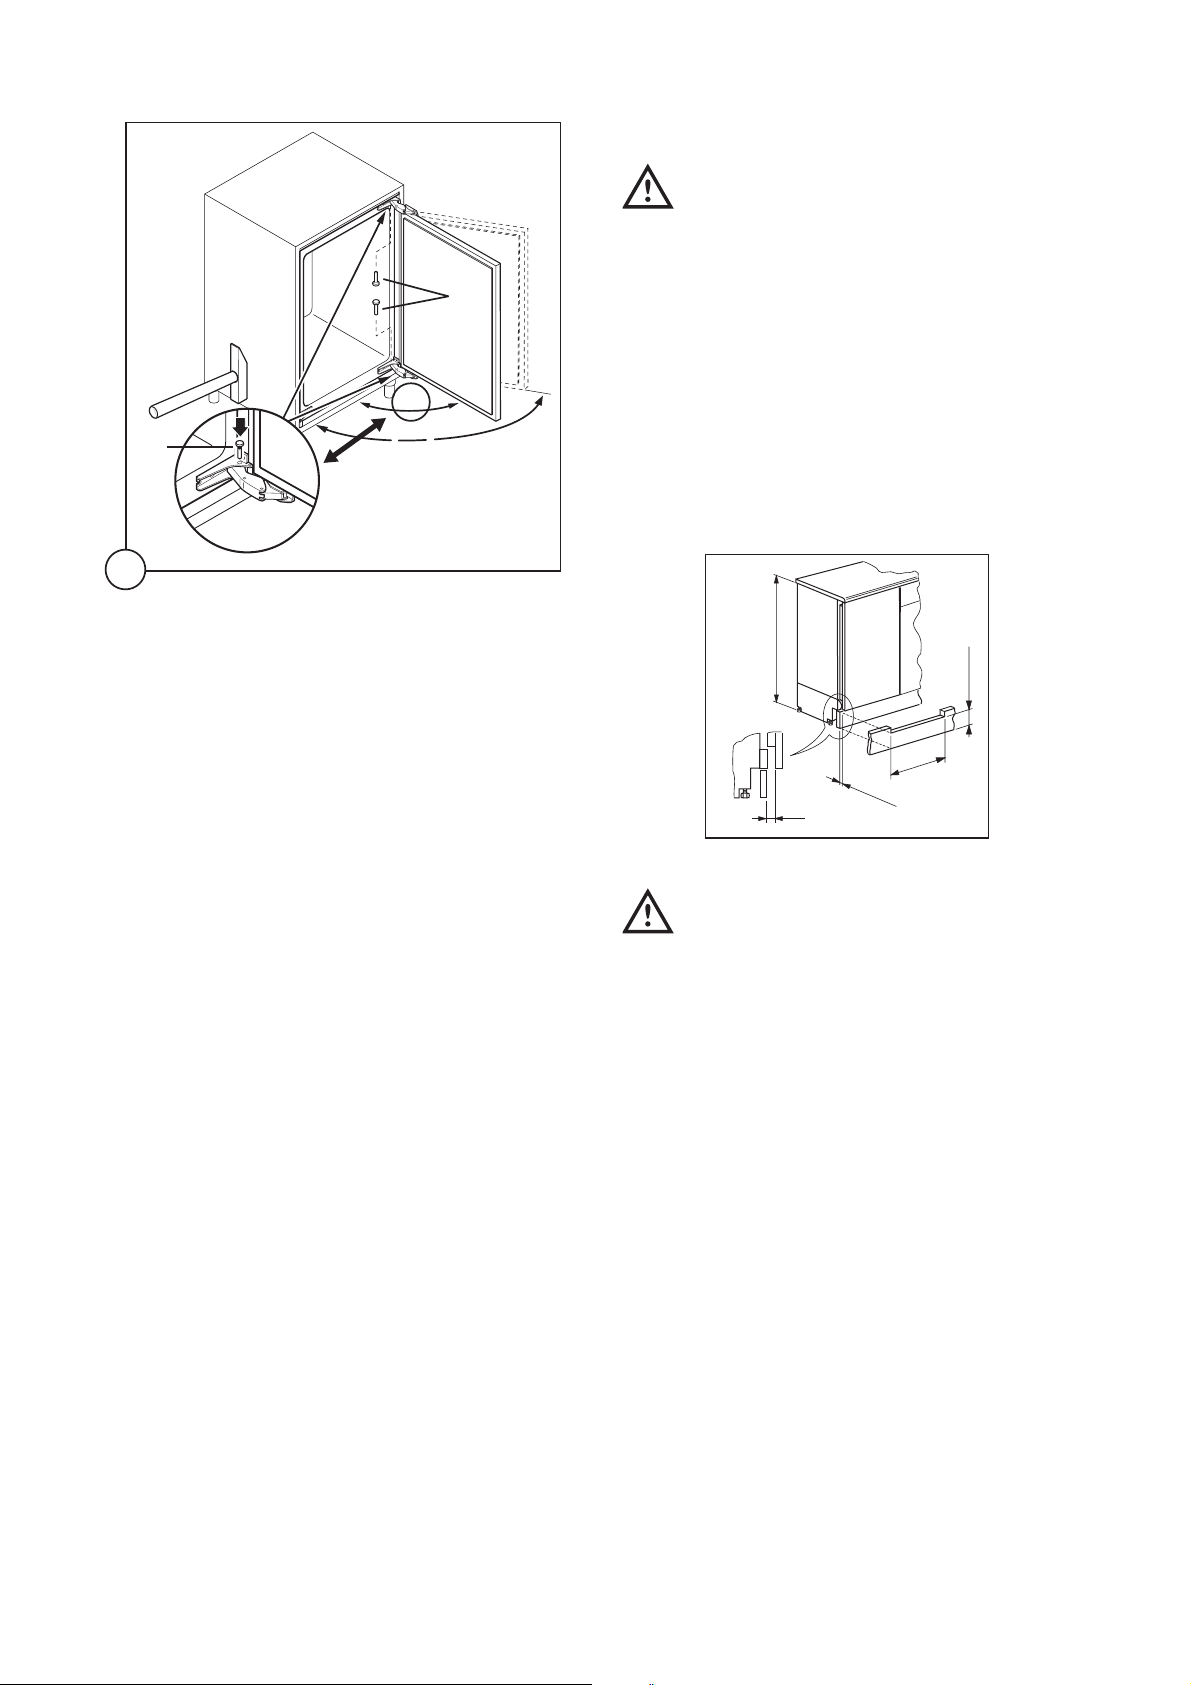
Montage der Sockelblende
Achtung
Um die FunktionalitŠt des GerŠtes nicht zu
beeintrŠchtigen ist es notwendig das
Original-LŸftungsgitter zu benutzen.
¥ Bei einer lichten Einbauhöhe Maß A=820 mm und
einer Sockelblendenhöhe Maß a=100 mm kann die
Sockelblende unverändert montiert werden.
Ebenso bei einer lichten Einbauhöhe Maß
B=870 mm und einer Sockelblendenhöhe Maß
b=150 mm.
¥ Bei Sockelblendenhöhen größer als a=100 mm,
b=150 mm, ist die Sockelblende mittig 580 mm
breit auf eine verbleibende Resthöhe von a=100
mm, b=150 mm auszuschneiden.
¥ Sockelblende an der Küchenzeile befestigen.
Wichtig
Die Sockelblende muss mit mindestens
25 mm Abstand von der TŸr montiert
werden.
A = 820
B = 870
a = 100
b = 150
580
25 - 80
DO008
25
Page 14
14
¥ If the refrigerant circuit should become damaged:
- avoid open flames and sources of ignition.
- thoroughly ventilate the room in which the
appliance is situated.
Child Safety
¥ Do not allow children to tamper with the controls or
play with the product.
¥ There is a risk of suffocation! Keep packaging
material away from children!
General Safety
¥ This appliance contains hydrocarbons in its
cooling unit; maintenance and recharging must
therefore only be carried out by authorised
technicians.
¥ Take utmost care when handling your
appliance so as not to cause any damages to
the cooling unit with consequent possible fluid
leakages.
¥ The appliance must not be located close to
radiators or boilers.
¥ Avoid prolonged exposure of the appliance to
direct sunlight.
¥ Do not use other electrical appliances (such as
ice cream makers) inside of refrigerating
appliances.
During Use
¥ This appliance is designed for domestic use only,
specifically for the storage of edible foodstuffs. It is
not intended for commercial or industrial use.
¥ Containers with flammable gases or liquids can
leak at low temperatures. Do not store any
containers with flammable materials, such as spray
cans, fire extinguisher refill cartridges etc. in the
freezer.
Prior to Installation
¥ Check the appliance for transport damage. Under
no circumstance should a damaged appliance be
installed. In the event of damage please contact
your retailer.
Installation
¥ This appliance is heavy. Care should be taken
when moving it.
¥ It is dangerous to alter the specifications or attempt
to modify this product in any way.
¥ Ensure that the appliance does not stand on the
electrical supply cable.
Important: if the supply cable is damaged, it must
be replaced by a cable available from the
manufacturer or your local Service Force Centre.
¥ Any electrical work required to install this appliance
should be carried out by a qualified electrician or
competent person.
¥ Parts which heat up should not be exposed.
Whenever possible, the back of the appliance
should be close to a wall, but leaving the required
distance for ventilation, as stated in the installation
instructions.
¥ The appliance should be left for 2 hours after
installation before it is turned on, in order to allow
the refrigerant to settle.
Refrigerant
¥ The refrigerant isobutane (R600a) is contained
within the refrigerant circuit of the appliance, a
natural gas with a high level of environmental
compatibility, which is nevertheless flammable.
¥ During transportation and installation of the
appliance, be certain that none of the components
of the refrigerant circuit become damaged.
These warnings are provided in the interests of your safety. Ensure that you understand them all before
installing or using this appliance. Your safety is of paramount importance. If you are unsure about any
of the meanings of these warnings contact the Customer Care Department.
Important Safety Instructions
Instructions for the use of the instructions booklet
Notes which are important for your safety or for the proper functioning of the appliance
Supplementary information regarding operation and practical applications of the appliance.
Tips and notes concerning economical and environmentally sound use of the appliance
t
Page 15

15
¥ Frozen food should not be refrozen once it has
thawed out.
¥ Do not place carbonated or fizzy drinks in the
freezer compartment.
¥ Ice lollies can cause Ôfrost/freezer burnsÕ if
consumed straight from the freezer.
¥ Do not remove items from the freezer
compartment if your hands are damp/wet, as this
could cause skin abrasions or frost/freezer burns.
¥ Placing frozen goods on the top of the appliance
can lead to the accumulation of condensation in
the cavity of the storage tray through contact with
the cold. Electronic components are housed within
this cavity. If condensation should drip onto these
components, the appliance could be damaged by
a short circuit. For this reason do not place frozen
goods on top of the appliance.
¥ Bottles and cans must not be placed in the freezer
as they can burst when the contents freeze.
¥ ManufacturersÕ recommended storage times
should be adhered to. Refer to relevant
instructions.
Maintenance and Cleaning
¥ Before cleaning, always switch off the appliance
and disconnect from the electrical supply.
¥ When unplugging always pull the plug from the
mains socket, do not pull on the cable.
Servicing
¥ This product should be serviced by an authorised
engineer and only genuine spare parts should be
used.
¥ Under no circumstances should you attempt to
repair the appliance yourself. Repairs carried out
by inexperienced persons may cause injury or
serious malfunctioning. Contact your local Service
Force Centre.
At the end of the Appliance Life
¥ When disposing of your appliance use an
authorised disposal site.
The symbol on the product or on its
packaging indicates that this product may not be
treated as household waste. Instead it shall be
handed over to the applicable collection point for
the recycling of electrical and electronic
equipment. By ensuring this product is disposed of
correctly, you will help prevent potential negative
consequences for the environment and human
health, which could otherwise be caused by
inappropriate waste handling of this product. For
more detailed information about recycling of this
product, please contact your local city office, your
household waste disposal service or the shop
where you purchased the product.
¥ Remove the plug and ensure that any locks or
catches are removed, to prevent young children
being trapped inside.
Contents
Instructions for the User
Important Safety Instructions . . . . . . . . . . . . . . .14
Operation . . . . . . . . . . . . . . . . . . . . . . . . . . . . . . . .16
Before use . . . . . . . . . . . . . . . . . . . . . . . . . . . . . .16
Freezer controls . . . . . . . . . . . . . . . . . . . . . . . . . .16
Starting your appliance . . . . . . . . . . . . . . . . . . . .16
Temperature control . . . . . . . . . . . . . . . . . . . . . . .16
Warning light (red) . . . . . . . . . . . . . . . . . . . . . . . .16
Freezing fresh food . . . . . . . . . . . . . . . . . . . . . . .17
Frozen food storage . . . . . . . . . . . . . . . . . . . . . . .17
Freezing calendar . . . . . . . . . . . . . . . . . . . . . . . .17
Thawing . . . . . . . . . . . . . . . . . . . . . . . . . . . . . . . .17
Making ice cubes . . . . . . . . . . . . . . . . . . . . . . . . .18
Normal operating sounds . . . . . . . . . . . . . . . . . . .18
Automatic defrost . . . . . . . . . . . . . . . . . . . . . . . . .18
Instructions for the Installer
Installation . . . . . . . . . . . . . . . . . . . . . . . . . . . . . . .24
Positioning . . . . . . . . . . . . . . . . . . . . . . . . . . . . . . .24
Electrical Connection . . . . . . . . . . . . . . . . . . . . . . .25
Door Reversal . . . . . . . . . . . . . . . . . . . . . . . . . . . .26
Building-in instruction . . . . . . . . . . . . . . . . . . . . .28
Health and Safety Guidelines . . . . . . . . . . . . . . .19
Maintenance and Cleaning . . . . . . . . . . . . . . . . .20
Internal cleaning . . . . . . . . . . . . . . . . . . . . . . . . . .20
When the appliance is not in use . . . . . . . . . . . . .20
Something Not Working? . . . . . . . . . . . . . . . . . . .21
Service and Spare Parts . . . . . . . . . . . . . . . . . . .22
Customer Care Department . . . . . . . . . . . . . . . . .22
Guarantee Conditions . . . . . . . . . . . . . . . . . . . . .23
Page 16
16
Your appliance is frost free, which means there is no need to manually defrost your appliance as this
will be carried out automatically.
Operation
Before use
Remove all securing tapes. Wash inside the
appliance with lukewarm water and bicarbonate of
soda (5 ml to 0.5 litre of water). Do not use soap or
detergent as the smell may linger. Dry thoroughly.
1 Pilot light (green)
2 Thermostat control knob
3 Fast-freezing indicator light (yellow)
4 Push button for fast-freezing and for stopping
the audible signal (warning light on)
5 Warning light (red)
Starting your appliance
Insert the plug into the wall socket. The appliance
can be activated by turning the thermostat knob (2)
beyond the Ò-16¡CÓ position. When the pilot light (1)
is illuminated this shows that the appliance is on.
The freezer is switched off by turning knob (2) to
position Ç 0 È.
When first switching on the appliance, the
fast freeze function will automatically
switch on. It will remain on for 5 hours and
automatically switch off at the end of this
time. This function can manually be
switched off at any time by pressing the
fast freeze button (4).
position.
An intermediate position (-18¡C) is usually the most
suitable, although the temperature will be affected
by:
¥
Room temperature
¥ How often the door is opened
¥ How much food is stored
¥ Position of the appliance
In determining the correct temperature control setting
all these factors have to be considered and some
experimentation may be necessary.
To obtain a lower temperature, turn the thermostat
control knob to the higher numbers; to obtain a
higher temperature turn the control knob to the lower
numbers.
When altering the temperature setting, allow 24
hours for the temperature to stabilise before making
further changes.
➀
➁
➂
➃
➄
Temperature acoustic alarm
This appliance incorporates an alarm which gives off
an audible signal whenever the warning light comes
on. This signal can be temporarily stopped by
depressing the push button for fast-freezing (1).
The fast-freezing push button can be released as
soon as the warning light is off.
Open door acoustic alarm
This appliance also incorporates an alarm which
sounds if the door is left open for more than 60
seconds. The signal will be stopped when the door is
closed again.
Warning light (red)
If the temperature warning light (5) lights up, it
indicates that the temperature within the freezer has
reached a level where safe food storage is no longer
ensured (warmer than -12¡C).
When the freezer is first switched on, the warning
light will stay on until the temperature has dropped to
a safe level for the storage of frozen food.
Temperature control
The temperature inside the freezer is regulated by a
thermostat with 5 temperature positions and one
ÇOFFÈ ( 0 ) position.
Position 1 Ç-16¡CÈ = minimum cold
Position 6 Ç-24¡CÈ = maximum cold
Turn the thermostat control knob to the required
0
1
1
2
2
3
3
4
4
Frost Free
6
6
5
5
A
B
C
D
E
Page 17
Freezing fresh food
In any 24 hour period you can freeze up to 9 kg of
fresh food.
Activate fast freeze by depressing the fast-freeze
button (4) - for more than one second - 24 hours
before you want to freeze your fresh food, the yellow
light (3) illuminates. This time can be shortened,
depending on the quantity of food to be frozen.
After the time has elapsed place the food to be
frozen in the bottom drawer of the freezer as this is
the coldest part.
You should never freeze more than 13 Kg. of
fresh food at anyone time.
Once the food is completely frozen (which could take
up to 24 hours) the fast freeze function can be ended
manually by depressing the button (4) again for more
than one second. The yellow light goes out. If the fast
freeze function is not ended manually, the appliance
electronics switch off the fast freeze function after 48
hours. The yellow light (3) goes out.
Distribute the frozen food packages in the other
compartments, so that the bottom drawer can be
used for a further freezing operation.
Only freeze top quality, fresh and thoroughly cleaned
foodstuffs.
Do not allow fresh food to touch food which is
already frozen.
During the freezing process, ensure that the freezer
door remains closed.
Because freezing is faster with frost free technology,
once food is defrosted, it retains all of its original
texture, vitamins and taste.
Frozen food storage
When you first start the freezer or if the freezer has
been out of use for some time, we advise you to run
your appliance for at least two hours in the Çfast
freezeÈ mode before storing frozen food.
To obtain the best performance from this appliance,
we suggest that all of the internal drawers are
utilized.
Moreover, we strongly recommend that you make
sure that the commercially frozen foodstuffs were
adequately stored by the retailer and, furthermore,
be sure that these frozen foodstuffs are transferred
from the foodstore to the consumer in the shortest
possible time (a temperature increase of the frozen
food could shorten its storage period).
It is also advisable not to exceed the storage period
indicated by the producer of the food.
To ensure the correct functioning of the appliance, no
foodstuffs should be stored directly against the fan
blade.
Finally, do not open the door frequently or leave it
open longer than is absolutely necessary.
In the event of a power failure the
appliance automatically starts again in fast
freeze mode. If the fast freeze function is
not ended manually, the appliance
electronics switch off the fast freeze
function after 5 hours. The yellow light (3)
goes out.
Thawing
Frozen food, prior to being used, can be thawed in
the fridge or at room temperature depending on the
time available. Small food items may even be cooked
from frozen; in this case cooking will take longer. Any
frozen food which is allowed to thaw accidentally
should either be eaten as soon as possible or thrown
away. Alternatively, if the food is uncooked and has
not been completely defrosted it can be cooked and
then refrozen.
Defrosted cooked food must never be refrozen.
Freezing calendar
The symbols on the drawers show different types of
frozen goods.
The numbers indicate storage times in months for
the appropriate types of frozen goods. Whether the
upper or lower value of the indicated storage time is
valid depends on the quality of the foods and pretreating before freezing.
Important
Do not put carbonated liquids, (fizzy drinks
etc.), in the freezer compartment.
Ice lollies, if consumed immediately after
removal from the freezer, can possibly result in
a low temperature skin burn.
Do not remove items from the freezer if your
hands are damp/wet, as this could cause skin
abrasions or "frost/freezer burns".
If there is a power failure during the storage of
frozen food, do not open the door during the
whole time of the power failure. If the freezer is
fully loaded, the frozen food will not be
affected if the power cut is of short duration;
otherwise, it is recommended to consume the
food within a very short time.
To remove the drawers, proceed as follows: pull the
drawer out until it comes to a stop, then tilt it upwards
(see figure).
17
Page 18

18
Automatic defrost
Your appliance has been designed to be frost free.
This means there is no need to manually defrost your
appliance as this will be carried out automatically.
Making ice cubes
The appliance is provided with a plastic ice cube tray.
Fill the tray 3/4 full to allow the ice to expand and
place it in the freezer. To turn out the ice cubes
simply give the tray a slight twist to release the
cubes.
Never tray to free an ice tray that is frozen to the
freezer using a sharp or pointed object.
Normal operating sounds
The advanced design of todayÕs frost free appliances
mean you hear unfamiliar noises during everyday
operation. The diagrams below describe some of the
noises you may hear. These are quite normal and
mean your appliance is operating correctly.
COOLING FAN
You may hear the cooling air being
blown inside the cabinet by the fan.
The flow of liquids and gases
through the cooler may create a
bubbling or gurgling sound.
During normal operations movement
caused by temperature change may
cause sudden sharp sounds.
MOTOR
Modern, high efficiency motors
operate much faster than older
models. The motor may have a high
pitched hum or pulsating sound.
Page 19

19
Because of consumer demand, preservatives have been removed from many pre-prepared foods. This
together with the changes in shopping habits to a once-a-week shop, mean that safe handling and
storage of food is even more important than ever.
The following tips should help you to ensure that the food in your home is in as perfect condition as
possible.
Health and Safety Guidelines
¥ Keep the freezer door closed as much as possible.
¥ Do not push food together too much, try to allow air
to circulate around each item.
¥ Cool cooked food as quickly as possible but do
NOT place in the freezer until cool. (Leave food in
a place as cool as possible in order that it can then
be placed in the refrigerator as soon as possible).
¥ Do not store food uncovered.
¥ The best way to defrost food is to put it in the
refrigerator to thaw slowly.
¥ Ensure that food placed in the freezer is dated and
labelled and used in date order to ensure that food
is consumed at its best.
¥ It is important that food is used before its Òbest
beforeÓ date.
¥ Always wash your hands with soapy water and dry
them with a clean towel before handling food.
¥ Keep work surfaces clean and avoid cross
contamination by not using the same work surface
or knife, without washing them thoroughly in
between.
¥ The foods to be frozen must be fresh and of the
best quality.
¥ The size of each pack should be small enough to
ensure that it is used in one go. Small packs freeze
more quickly and uniformly and give better results.
¥ Frozen food, once thawed, must not be refrozen.
Lean food keeps better and longer than fatty food,
salt reduces the storage time.
¥ Wrap the food in polythene or aluminium freezing
bags or foil so that they adhere to the food and
provide an airtight seal.
¥ Packaging which is swollen or has traces of
refrozen water droplets on the pack could indicate
that the product has not been kept at a suitable
temperature and that it may have lost its original
quality. Partially thawed food must not be refrozen,
it must be consumed within 24 hours. Never
exceed the storage time indicated.
¥ Never place hot food, bottles or cans of fizzy drink
in the freezer as they may explode. Containers with
a lid must not be filled to the brim.
¥ Do not open the door or place extra fresh food in
the freezer next to food which is already frozen as
this could cause the temperature of the frozen food
to rise and its quality and storage life to reduce.
Important
In the event of a power failure causing the temperature within your freezer to rise, do not re-
freeze the food without checking its condition. The following guidelines should assist you:
Ice-cream:
once thawed should be discarded.
Fruits & Vegetables: if soft should be cooked and used up.
Breads & Cakes: can be re-frozen without danger.
Shellfish: should be refrigerated and used up quickly.
Cooked Dishes: i.e. casseroles should be refrigerated and used up.
Large Pieces of Meat: can be re-frozen providing there are still ice crystals remaining within them.
Small Joints: should be cooked and can then be re-frozen as cooked dishes.
Chicken: should also be cooked and re-frozen as a cooked dish.
Page 20

Maintenance and Cleaning
Internal cleaning
Clean the inside and accessories with warm water
and bicarbonate of soda (5ml to 0.5 litre of water).
Rinse and dry thoroughly.
NEVER USE DETERGENTS, ABRASIVE
POWDERS, HIGHLY PERFUMED CLEANING
PRODUCTS OR WAX POLISHES, TO CLEAN THE
INTERIOR AS THESE WILL DAMAGE THE
SURFACE AND LEAVE A STRONG SMELL.
Important
Do not use abrasive products.
Warning
Before any maintenance or cleaning work
is carried out, DISCONNECT the appliance
from the ELECTRICITY supply.
Important
This appliance contains hydrocarbons in
its cooling unit maintenance and
recharging must therefore only be carried
out by authorised technicians.
Periods of non-operation
When the appliance is not in use for long periods,
take the following precautions:
¥ remove the plug from the wall socket;
¥ remove all food:
¥ defrost and clean the interior and all accessories;
¥ leave the door ajar to allow air to circulate to
prevent unpleasant smells.
Customer service and spare parts
If the appliance is not functioning properly, check
that:
¥ the plug is firmly in the wall socket and the mains
power switch is on;
¥ there is an electricity supply (find out by plugging in
another appliance);
¥ the thermostat knob is in the correct position.
If your appliance is still not working properly after
making the above checks, contact the nearest
service centre.
To obtain fast service, it is essential that when
you apply for it you specify the model and serial
number of your appliance which can be found on
the guarantee certificate or on the rating plate
located inside the appliance, on the bottom lefthand side.
Periodic cleaning
Never use metal objects for clearing your
appliance as it may get damaged.
Clean the inside with warm water and bicarbonate of
soda. Rinse and dry thoroughly.
The appliance is equipped with a ventilation grid.
Keep clean to guarantee good ventilation and good
working order of the appliance.
An accumulation of dust will affect the performance
of the appliance and cause excessive electricity
consumption.
The structure of the appliance permits cleaning of the
rear zone close to the wall, using a vacuum cleaner.
1. Remove the plinth (1), then the ventilation grid (2);
2. Carefully pull the air deflector out (3).
20
S.I.013
3
21
Page 21

21
Something not Working?
Before contacting your local Service Force Centre check the following points.
IMPORTANT: If you call out an engineer to a fault listed below, or to repair a fault caused by incorrect use or
installation, a charge will be made even if the appliance is under guarantee.
Symptom Solution
No power to appliance
The temperature in the freezer is too high
The freezer door will not open
The compressor runs continuously
Excessive frost and ice has built up.
Noise
- Check there is power at the socket.
- Check there is not a power cut by checking the house
hold lights.
- Check the fuse has not blown.
- Check the thermostat control knob is turned to the
correct setting relative to ambient conditions.
- Check the ambient temperature is within the appliances
operating limits of 10¡C to 32¡C.
Relocate the appliance if necessary.
- Has the door just been opened?
If so leave for a few minutes to allow the air pressure to
equalise.
- Adjust the thermostat control knob to give correct tem-
perature control. See page 5.
- Check that the door is closed.
- Large quantities of food have recently been placed in
the cabinet and/or door is frequently opened.
- Check that air ventilation is not obstructed.
- Ensure the door is not left open.
- Check that nothing is preventing the door from closing.
Is the door gasket intact and clean?
- Has advised periodic defrosting been carried out?
- Refer to normal operating sounds.
If after the above checks, there is still a fault, call your local Service Force Centre.
In-guarantee customers should ensure that the above checks have been made as the engineer will make a
charge if the fault is not a mechanical or electrical breakdown.
Please note that proof of purchase is required for any in-guarantee service calls.
Page 22

22
Service and Spare Parts
In the event of your appliance requiring service, or if
you wish to purchase spare parts, please contact
your local Service Force Centre by telephoning:-
08705 929929
Your telephone call will be automatically routed to the
Service Force Centre covering your post code area.
For the address of your local Service Force Centre
and further information about Service Force, please
visit the website at www.serviceforce.co.uk
Before calling out an engineer, please ensure you
have read the details under the heading ÒSomething
Not Working.Ó
When you contact the Service Force Centre you will
need to give the following details:
1. Your name, address and post code
2. Your telephone number
3. Clear and concise details of the fault
4. The model and serial number of the appliance
(found on the rating plate)
5. The purchase date
Please note that a valid purchase receipt or
guarantee documentation is required for inguarantee service calls.
For Customer Service in Ireland please contact us at
the address below:
Electrolux Group (Irl) Ltd
Long Mile Road
Dublin 12
Republic of Ireland
Tel: + 353 1 4090753
Email: service.eid@electrolux.ie
Customer Care Department
For general enquiries concerning your Electrolux
appliance or for further information on Electrolux
products, please contact our Customer Care
Department by letter or telephone at the address
below or visit our website at www.electrolux.co.uk
Customer Care Department
Electrolux
55-77 High Street
Slough
Berkshire
SL1 1DZ
08705 950 950 (*)
* calls to this number may be recorded for training
purposes.
Page 23

23
Standard guarantee conditions
We, Electrolux, undertake that if within 12 months of the date of purchase this Electrolux appliance or any part
thereof is proved to be defective by reason only of faulty workmanship or materials, we will, at our option repair
or replace the same FREE OF CHARGE for labour, materials or carriage on condition that:
¥ The appliance has been correctly installed and used only on the electricity supply stated on the rating plate.
¥ The appliance has been used for normal domestic purposes only, and in accordance with the manufactuer's
instructions.
¥ The appliance has not been serviced, maintained repaired, taken apart or tampered with by any person not
authoried by us.
¥ All service work under this guarantee must be undertaken by a Service Force Centre.
¥ Any appliance or defective part replaced shall become the Company's property.
¥ This guarantee is in addition to your statutory and other legal rights.
Home visits are made between
8.30am and 5.30pm Monday to Friday. Visits may be available outside these
hours in which case a premium will be charged.
Exclusions
This guarantee does not cover:
¥ Damage or calls resulting from transportation, improper use or neglect, the replacement of any light bulbs or
removable parts of glass or plastic.
¥ Costs incurred for calls to put right an appliance which is improperly installed or calls to appliances outside
the United Kingdom.
¥ Appliances found to be in use within a commercial environment, plus those which are subject to rental
agreements.
¥ Products of Electrolux manufacture which are not marketed by Electrolux.
European Guarantee
If you should move to another country within Europe then your guarantee moves with you to your new home
subject to the following qualifications:
¥ The guarantee starts from the date you first purchased your product.
¥ The guarantee is for the same period and to the same extent for labour and parts as exists in the new country
of use for this brand or range of products.
¥ This guarantee relates to you and cannot be transferred to another user.
¥ Your new home is within European Community (EC) or European Free Trade Area.
¥ The product is installed and used in accordance with our instructions and is only used domestically, i.e. a
normal household.
¥ The product is installed taking into account regulations in your new country.
Before you move please contact your nearest Customer Care centre, listed below, to give them details of your
new home. They will then ensure that the local Service Organisation is aware of your move and able to look
after you and your appliance.
France Senlis +33 (0) 3 44 62 20 13
Germany NŸrnberg +49 (0) 800 234 7378
Italy Pordenone +39 (0) 800 117 511
Sweden Stockholm +46 (0) 20 78 77 50
UK Slough +44 (0) 1753 219898
Ireland Dublin +353 (0) 1 4090753
Guarantee Conditions
Page 24

24
Warning
IF YOU ARE DISCARDING AN OLD
APPLIANCE THAT HAS A LOCK OR CATCH
ON THE DOOR, YOU MUST ENSURE THAT
IT IS MADE UNUSABLE TO PREVENT
YOUNG CHILDREN BEING TRAPPED
INSIDE.
Depending upon the position which you choose for
your appliance, you may wish to reverse the way in
which the door opens. To do this, refer to instructions
under ÒDoor reversalÓ.
Positioning
The appliance should only be installed at a location
where the ambient temperature corresponds to the
climate classification indicated on the rating plate,
which is located on the inside right of the appliance.
The following table shows which ambient
temperature is correct for each climate classification.
SN +10¡C to +32¡C
ST +18¡C to +38¡C
The appliance should be located in a dry
atmosphere, out of direct sunlight and away from
continuous heat and extreme temperature, e.g. not
next to a boiler or radiator or in a very cold room e.g.
an outhouse. If these temperatures are exceeded i.e.
warmer or colder, then the appliance may not
operate correctly.
Installation
For building-in and door reversal instructions please
refer to the relevant instructions on the following
pages.
Important
It must be possible to disconnect the appliance
from the mains power supply; the plug must
therefore be easily accessible after installation.
Page 25

25
Electrical Connection
Before plugging in, ensure that the voltage and
frequency shown on the serial number plate
correspond to your domestic power supply.
Voltage can vary by ±6% of the rated voltage.
For operation with different voltages, a suitably sized
auto-transformer must be used.
Important
The appliance must be earthed.
The power supply cable plug is provided with a
contact for this purpose.
If the domestic power supply socket is not
earthed. connect the appliance to a separate
earth in compliance with current regulations,
consulting a specialist technician.
The Manufacturer declines all responsibility if the
above safety precautions are not observed.
Attention!
It must be possible to disconnect the appliance
from the mains power supply; the plug must
therefore be easily accessible after installation.
This appliance complies with the following
E.E.C. Directives:
- 87/308 EEC of 2/6/87 relative to radio interference
suppression.
- 73/23 EEC of 19.2.73 (Low Voltage Directive) and
subsequent modifications;
- 89/336 EEC of 3.5.89 (Electromagnetic
Compatibility Directive) and subsequent
modifications.
Page 26

26
Door reversal
To reverse the opening direction of the door, proceed
as shown in the figures:
Attention
After completion of the door reversing
operation, check that the door gasket adheres
to the cabinet. If the ambient temperature is
cold (i.e. in Winter), the gasket may not fit
perfectly to the cabinet. In that case, wait for the
natural fitting of the gasket or accelerate this
process by heating up the part involved with a
normal hairdryer on a low setting.
1
6
6
4
1
7
8
5
2
6
3
2
6
10
13
3
9
6
12
11
Page 27

27
Building-in instructions
Before carrying out any work, remove the plug from
the power socket.
Grid preparation
Left door opening:
Remove the left side (A) of the grid cutting it from the
rear (see figure).
Right door opening:
Remove the right side (B) of the grid cutting it from
the rear (see figure).
To position the grid on the appliance proceed as
follows:
Apply the grid to the base of the appliance by
pushing on to the clasps (a) until they click.
Building in the appliance under a
worktop
The dimensions of the recessed installation area
must correspond with those indicated in the figure.
Installation kit
1. Two cabinet securing brackets are supplied with
the installation pack. They need to be assembled
onto the cabinet prior to cabinet being pushed into
the Kitchen aperture.
- To fit these brackets remove the two screws at the
top left and right hand front corners of the cabinet.
- Position the two brackets as shown in the figure
and replace the two securing screws.
Left hand bracket Right hand bracket
2
A
B
DO002/2
600
550
min.
600
DO013
1xB
1xA
1xK
2xG
2xL
2xC
18xI
DO001
2xF
2xD
a
1
a
Page 28

28
2. Push the appliance into place. The plug socket
necessary for connection of the appliance to the
electricity supply should be positioned, so that the
plug is not placed in the recess.
3. To adjust the height proceed as follows:
- Loosen or tighten the two front feet.
- The rear feet are adjusted by turning the screw in
the front kick plate to the left or right.
4. The joint cover (B) is to be assembled after having
installed the appliance in the recess.
6. To mount the furniture door proceed as shown in
the figures:
5. Screw appliance into place and retain the cabinet
with screws (I) through the securing brackets into
the worktop or adjacent woodwork as necessary.
596
555
max
+
3
-
-
+
2
1
10
a
C
4
3
b
6
1
B
4
I
7
5
Page 29

29
ab
Upper part of kitchen
furniture panel
1
45°
C
click
3
click
2
8
Möbeltür Innenseite
c
11
a
I
=
1
=
=
c
2
10
=
9
b
12
10
F
I
27,5 cm
27,5 cm
55 cm
13
8 mm
F
G
I
K
Page 30

30
Fitting the plinth
Important
For the efficient operation of the appliance, it is
important that the original ventilation grid is
used.
¥ For an opening height dimension A=820 mm and a
plinth height dimension a=100 mm, the plinth may
be fitted without adjustments. The same applies to
an opening height dimension B=890 mm and a
plinth height dimension b=170 mm.
¥ For plinth heights greater than a=100 mm,
b=170 mm, a cut should be made in the plinth,
580 mm wide, in the centre of the appliance
position, leaving a remaining height of a=100 mm,
b=170 mm.
¥ Attach plinth to the kitchen units.
Important
The plinth must be positioned at a minimun
distance of 25 mm from the door.
7. Refit the covering strip (A).
14
A
A = 820
B = 890
a = 100
b = 170
15
L
90°
115°
L
580
25 - 80
DO008b
25
Page 31

31
Comment lire votre notice dÕemploi
Les symboles ci-dessous vous guideront au long de la lecture de votre notice:
Instructions liées à la sécurité lors de l’utilisation de l’appareil.
Conseils pour une utilisation correcte de l’appareil afin d’obtenir les meilleures performances.
Informations liées à la protection de l’environnement.
Protection de lÕenvironnement
Le circuit rŽfrigŽrant et lÕisolation de cet appareil ne
contiennent pas de gaz rŽfrigŽrant nocif pour lÕozone.
LÕappareil ne doit •tre ni jetŽ avec les ordures
mŽnag•res ni mis ˆ la casse. Il faudra Žviter
dÕendommager le circuit rŽfrigŽrant, notamment ˆ
lÕarri•re, ˆ proximitŽ du condensateur grillagŽ.
SÕadresser aux services de la commune pour avoir
les renseignements nŽcessaires sur les dŽchetteries.
Avertissements importants
Usage domestique
¥ Les rŽfrigŽrateurs/congŽlateurs domestiques sont
destinŽs uniquement ˆ la conservation et/ou ˆ la
congŽlation des aliments.
¥ Contr™ler, avant dÕinstaller lÕappareil, sÕil nÕest pas
endommagŽ. Dans le cas contraire, sÕadresser au
revendeur.
¥ Cet appareil est lourd. Faites attention lors de son
dŽplacement.
¥ Une Žventuelle modification ˆ lÕinstallation
Žlectrique de votre maison qui devrait •tre
nŽcessaire pour lÕinstallation de lÕappareil ne devra
•tre effectuŽe que par du personnel qualifiŽ.
¥ Assurez-vous que la prise n'est pas ŽcrasŽe ou
endommagŽe par l'arri•re de l'appareil. Une prise
de courant endommagŽe peut s'Žchauffer et
causer un incendie.
¥ Ne placez pas d'objets lourds ou l'appareil sur le
c‰ble d'alimentation (risque de court circuit et
incendie).
¥ Ne dŽbranchez pas l'appareil en tirant sur le c‰ble,
particuli•rement lorsque l'appareil est tirŽ de son
emplacement. Si le c‰ble d'alimentation est
endommagŽ ou ŽcrasŽ peut causer un court
circuit, un incendie et/ou une Žlectrocution.
¥ Ne pas mettre dÕinstruments Žlectriques ˆ
lÕintŽrieur de lÕappareil (sorbeti•re, par exemple).
¥ Ne placez ni bouteilles ni bo”tes de boissons
gazeuses dans le congŽlateur/compartiment ˆ
basse tempŽrature, elles pourraient Žclater.
¥ Ne touchez pas les aliments surgelŽs avec des
mains humides. Les mains pourraient y rester
collŽes.
¥ Ne dŽcollez jamais les bacs ˆ glace avec un
couteau ou tout autre objet tranchant.
¥ Ne jamais essayer de rŽparer lÕappareil vous-
m•me. Les rŽparations effectuŽes par des
incompŽtents peuvent endommager lÕappareil.
SÕadresser au consumer services le plus proche et
nÕexiger que des pi•ces de rechange dÕorigine.
SŽcuritŽ enfants
¥ Les ŽlŽments de lÕemballage (par ex. sacs,
pellicules, polystyr•ne) peuvent •tre dangereux
pour les enfants. Ils peuvent sÕŽtouffer!
¥ En cas dÕŽlimination de lÕappareil, couper le c‰ble
dÕalimentation et neutraliser le dispositif de
fermeture de la porte de mani•re ˆ ce que les
enfants ne puissent pas rester enfermŽs ˆ
lÕintŽrieur de lÕappareil.
Ce sont des avertissements de sŽcuritŽ. Nous
vous prions donc de les lire attentivement avant
dÕinstaller et dÕutiliser votre appareil.
Nous recommandons de conserver cette notice afin
de pouvoir la consulter au besoin et de la remettre, le
cas ŽchŽant, au nouveau propriŽtaire de lÕappareil.
F
Page 32

32
Sommaire
Avertissements importants . . . . . . . . . . . . . . . . . . . . . . . . . . . . . . . . . . . . . . . . . . . . . . . . . . . . . . . . . . . . . . .31
Elimination . . . . . . . . . . . . . . . . . . . . . . . . . . . . . . . . . . . . . . . . . . . . . . . . . . . . . . . . . . . . . . . . . . . . . . . . . . . .32
Utilisation . . . . . . . . . . . . . . . . . . . . . . . . . . . . . . . . . . . . . . . . . . . . . . . . . . . . . . . . . . . . . . . . . . . . . . . . . . . . .32
Avant la mise en service / Tableau de commande / Mise en service . . . . . . . . . . . . . . . . . . . . . . . . . . . . . . .33
RŽglage de la tempŽrature / CongŽlation rapide . . . . . . . . . . . . . . . . . . . . . . . . . . . . . . . . . . . . . . . . . . . . . .33
Voyant dÕalarme / Dispositif dÕalarm de la tempŽrature . . . . . . . . . . . . . . . . . . . . . . . . . . . . . . . . . . . . . . . . . .34
Calendrier de congŽlation / Equipement intŽrieur / Conseils . . . . . . . . . . . . . . . . . . . . . . . . . . . . . . . . . . . . .34
Entretien DŽgivrage automatique / Nettoyage . . . . . . . . . . . . . . . . . . . . . . . . . . . . . . . . . . . . . . . . . . . . . . . . .35
Si quelque chose ne va pas ... / Service apr•s-vente et pi•ces de rechange . . . . . . . . . . . . . . . . . . . . . .36
CaractŽristiques Techniques . . . . . . . . . . . . . . . . . . . . . . . . . . . . . . . . . . . . . . . . . . . . . . . . . . . . . . . . . . . . .37
Installation
Emplacement . . . . . . . . . . . . . . . . . . . . . . . . . . . . . . . . . . . . . . . . . . . . . . . . . . . . . . . . . . . . . . . .37
Branchement Žlectrique . . . . . . . . . . . . . . . . . . . . . . . . . . . . . . . . . . . . . . . . . . . . . . . . . . . . . . . . . . . . . . . . .38
RŽversibilitŽ de la porte . . . . . . . . . . . . . . . . . . . . . . . . . . . . . . . . . . . . . . . . . . . . . . . . . . . . . . . . . . . . . . . . . .38
Utilisation
Cet appareil est repŽrŽ par le symbole ce qui signifie qu'il est apte ˆ la congŽlation de denrŽes
fra”ches, au stockage de produits surgelŽs et ˆ la fabrication de cubes de glace.
Si des produits congelŽs sont placŽs sur le dessus de lÕappareil, le froid peut provoquer de la
condensation dans lÕespace creux de la plaque. Cet espace creux renferme des composants
Žlectroniques. Si de lÕeau de condensation goutte sur ces composants, un court-circuit peut se produire.
Par consŽquent, ne pas dŽposer de marchandises congelŽes sur le dessus de lÕappareil.
Elimination
MatŽriaux de lÕemballage
¥ Les matŽriaux marquŽs du symbole sont recyclables.
>PE<=polyŽthyl•ne
>PS<=polystyr•ne
>PP<=polypropyl•ne
Tous les matŽriaux de lÕemballage sont recyclables.
Mise au rebut des anciens appareils
Le symbole sur le produit ou son emballage indique que ce produit ne peut •tre traitŽ comme dŽchet
mŽnager. Il doit •tre remis au point de collecte dŽdiŽ ˆ cet effet (collecte et recyclage du matŽriel Žlectrique et
Žlectronique). En procŽdant ˆ la mise ˆ la casse rŽglementaire de l'appareil, nous prŽservons l'environnement
et notre sŽcuritŽ, s'assurant ainsi que le dŽchets seront traitŽs dans des conditions appropriŽes. Pour obtenir
plus de dŽtails sur le recyclage de ce produit, veuillez prendre contact avec les services de votre commune ou
le magasin o• vous avez effectuŽ lÕachat.
Page 33

33
CongŽlation rapide
Appuyez sur l'interrupteur (4) pendant une seconde.
Le voyant (3) s'allume. Si lÕon rŽappuye sur la touche
(4), la fonction de congŽlation rapide peut •tre ™tŽe
manuellement autant quÕon veut. Le voyant jaune (3)
sÕŽteint.
Si la fonction de congŽlation rapide nÕest pas ™tŽe
manuellement, lÕappareillage Žlectronique lÕŽteint
automatiquement apr•s 48 heures. Le voyant jaune
(3) sÕŽteint.
Avant la mise en service
A cause du syst•me de transport, IÕhuile
contenue dans le compresseur pourrait
sÕŽcouler dans le circuit rŽfrigŽrant. Attendez 2
heures au moins avant de brancher lÕappareil
pour permettre ˆ lÕhuile de refluer dans le
compresseur.
¥ L'appareil Žtant convenablement installŽ, nous
vous conseillons de le nettoyer soigneusement
avec de l'eau ti•de savonneuse, pour enlever
l'odeur caractŽristique de ÇneufÈ.
N'utilisez pas de produits abrasifs, poudre
ˆ rŽcurer, Žponge mŽtallique.
LÕappareil et certaines parties de lÕŽquipement
intŽrieur sont protŽgŽs pour le transport.
Enlevez les bandes autocollantes ˆ gauche et ˆ
droite ˆ lÕextŽrieur de la porte et toutes les bandes
autocollantes et rembourrages ˆ lÕintŽrieur de
lÕappareil (sauf la plaque signalŽtique).
Tableau de commande
1
Voyant de contr™le secteur vert
2
Thermostat
3
Voyant de contr™le jaune pour la
congŽlation rapide
4
Interrupteur pour la congŽlation rapide
5
Voyant de contr™le alarme rouge
➀
➁
➂
➃
➄
Mise en service
¥ Branchez la prise de courant. Tournez le bouton du
thermostat (2) dans le sens des aiguilles d'une
montre au-delˆ de la position Ò-16¡CÓ.
Le bouton du thermostat se trouve dans le plan de
travail du congŽlateur.
¥ L'appareil est ainsi en Žtat de fonctionnement. Les
voyants (1), (3) et (5) s'allument.
A la mise en service lÕappareillage
Žlectronique Žteint la fonction de congŽlation
rapide (voyant jaune) automatiquement apr•s
5 heures.
Pour arr•ter l'appareil tournez le bouton du
thermostat sur la position Ç•È.
RŽglage de la tempŽrature
¥ Les diffŽrentes positions comprises entre Ò-16¡CÓ
et Ò-24¡CÓ indiquent des tempŽratures toujours plus
froides.
¥ Pour une bonne conservation des produits
surgelŽs et congelŽs la tempŽrature ˆ l'intŽrieur
doit •tre infŽrieure ou Žgale ˆ -18¡C. Attendez que
la lampe (5) s'Žteigne. Cela signifie que la
tempŽrature optimale a ŽtŽ atteinte.
¥ Les positions du thermostat sont susceptibles
d'•tre modifiŽes en considŽrant que la tempŽrature
interne dŽpend des facteurs suivants:
¥ tempŽrature ambiante;
¥ frŽquence d'ouverture des portes;
¥ quantitŽ d'aliments conservŽs;
¥ emplacement de l'appareil.
¥
Nous vous conseillons, lors de la mise en
service de l'appareil, d'effectuer un premier
rŽglage sur la position Ò-18¡CÓ.
Dispositif d'alarme de la
tempŽrature
Votre congŽlateur est ŽquipŽ d'un dispositif sonore
d'alarme qui signale que la tempŽrature ˆ l'intŽrieur
du congŽlateur est remontŽe ˆ un niveau qui ne
garantit plus la bonne conservation des aliments
(plus chaud que -12¡C).
Le signal sonore est Žmis jusqu'ˆ ce que le voyant
rouge de contr™le de la tempŽrature s'Žteigne ou
jusqu'ˆ ce que l'interrupteur de congŽlation rapide
soit activŽ.
0
1
6
Frost Free
5
2
3
4
Page 34

34
Voyant d'alarme
Le voyant d'alarme (5) s'allume lorsque la
tempŽrature ˆ l'intŽrieur du congŽlateur remonte
au-dessus d'une certaine valeur qui est prŽjudiciable
ˆ une conservation de longue durŽe (plus chaud que
-12¡C). Il est normal que le voyant d'alarme reste
momentanŽment allumŽ lors de la mise en marche
de l'appareil, c'est-ˆ-dire jusqu'ˆ ce que la
tempŽrature ˆ l'intŽrieur atteigne la valeur convenant
le mieux ˆ la conservation des aliments.
Calendrier de congŽlation
Les symboles qui figurent sur les tiroirs
correspondent ˆ diffŽrents types de produits
congelŽs.
Les chiffres indiquent la durŽe de conservation en
mois du type correspondant de produit. La durŽe de
conservation supŽrieure ou infŽrieure est valable en
fonction de la qualitŽ des aliments et du traitement
quÕils ont subi avant la congŽlation.
Conseils
ƒconomie dÕŽnergie
¥ NÕinstallez pas lÕappareil ˆ proximitŽ de cuisini•res,
radiateurs ou autres sources de chaleur. Si la
tempŽrature ambiante est ŽlevŽe, le compresseur
fonctionne plus frŽquemment et plus longtemps
(voir chapitre ÒInstallationÓ).
¥ NÕouvrez pas la porte plus longtemps que
nŽcessaire.
¥ Ne placez pas dÕaliments chauds dans lÕappareil.
Attendez que les aliments refroidissent.
¥ Ne rŽglez pas la tempŽrature plus bas que
nŽcessaire.
¥ Placez les aliments surgelŽs dans le rŽfrigŽrateur
pour les dŽgeler. Le froid des aliments surgelŽs est
ainsi utilisŽ pour le refroidissement du
rŽfrigŽrateur.
¥ De temps en temps, dŽpoussiŽrez le condenseur
situŽ ˆ lÕarri•re de lÕappareil, ˆ lÕaide dÕun
aspirateur ou dÕune brosse souple.
CongŽlation et surgŽlation
¥ Appuyez sur la touche super congŽlation 3 heures
avant dÕintroduire les denrŽes fra”ches si lÕappareil
est vide (mise en service ou apr•s dŽgivrage par
exemple).
Passez ensuite au régime de
conservation. Cela n'est pas nécessaire si le
congélateur est déjà en fonction.
¥ 24 heures avant dÕintroduire les denrŽes fra”ches si
lÕappareil est dŽjˆ en rŽgime de conservation, et si
vous utilisez la capacitŽ maximale de congŽlation.
¥ Maintenez le rŽgime de congŽlation pendant 24
heures apr•s avoir introduit les produits ˆ congeler.
¥
Placez les aliments ˆ congeler dans le
compartiment infŽrieur de l'appareil de fa•on ˆ
dans la position extr•me. Ceci garantit un stockage
sžr et commode et facilite lÕacc•s aux aliments
congelŽs.
Pour les sortir, tirez-les jusquÕˆ la butŽe, remontezles et enlevez-les par lÕavant (voir fig.).
Alarme porte ouverte
LÕappareil est ŽquipŽ dÕune alarme porte ouverte. Le
signal accoustique se fait entendre lorsque la porte
de lÕappareil reste ouverte pendant plus dÕune
minute.
Pour lÕarr•ter, fermez la porte.
Calendrier de congŽlation
Les symboles qui figurent sur le tiroir supŽrieur
correspondent ˆ diffŽrents types de produits
congelŽs.
Les chiffres indiquent la durŽe de conservation en
mois du type correspondant de produit. La durŽe de
conservation supŽrieure ou infŽrieure est valable en
fonction de la qualitŽ des aliments et du traitement
quÕils ont subi avant la congŽlation.
Equipement intŽrieur
Fabrication de cubes de glace
Notre appareil est ŽquipŽ d'un ou plusieurs bacs ˆ
glace en mati•re plastique qui vous donneront
satisfaction dans l'utilisation mŽnag•re courante.
Remplissez d'eau les bacs ˆ glace jusqu'aux trois
quarts de leur hauteur.
Placez les bacs dans le compartiment congŽlateur.
N'employez pas d'objet mŽtallique pour
dŽcoller les bacs ˆ glace.
Le dŽmoulage des bacs en mati•re plastique
s'obtient par simple torsion.
Tiroirs
Les tiroirs stables sont antibasculants et bloquŽs
L'interrupteur de congŽlation rapide peut •tre
dŽsactivŽ d•s que le voyant rouge de contr™le de la
tempŽrature s'est Žteint.
Page 35

35
Žviter qu'ils puissent entrer en contact avec des
produits dŽjˆ congelŽs, ce qui en Žl•verait la
tempŽrature.
¥
La quantitŽ maximum d'aliments pouvant •tre
congelŽs en 24 h est indiquŽe sur la plaque
signalŽtique situŽe ˆ l'intŽrieur de l'appareil.
¥ A cause de la technologie NO FROST le procŽss
de congŽlation est plus rapide; d•s lors que les
aliments ont decongelŽs ils conservent toutes les
vitamines et les propriŽtŽs originales ainsi que le
gožt.
¥ Des paquets de petites dimensions permettent
d'obtenir une congŽlation rapide et uniforme. Ne
perdez jamais de vue qu'une fois dŽcongelŽs, les
aliments congelŽs se dŽtŽriorent rapidement.
¥ Evitez d'ouvrir trop souvent la porte et ne la laissez
ouverte que le temps nŽcessaire.
¥ Pour lÕemballage des aliments ˆ congeler, utilisez
des sacs et films de congŽlation en polyŽthyl•ne et
du papier aluminium extra fort.
¥ Evitez de placer les produits frais en contact avec
les produits dŽjˆ congelŽs.
Entretien
DŽbranchez lÕappareil avant toute
opŽration.
Attention
Cet appareil contient des hydrocarbures
dans son circuit rŽfrigŽrant; lÕentretien et la
recharge ne doivent donc •tre effectuŽs
que par du personnel qualifiŽ.
¥ Ne consommez pas certains produits tels que les
b‰tonnets glacŽs d•s leur sortie de lÕappareil; la
tempŽrature tr•s basse ˆ laquelle ils se trouvent
peut provoquer des bržlures.
¥ A fin dÕobtenir la meuilleure performance de cet
appareil il faut utiliser tous les compartiments du
congŽlateur.
¥ Indiquez sur chaque paquet la date de
congŽlation, afin de pouvoir contr™ler le temps
d'entreposage.
¥ PrŽvoyez un temps rŽduit au minimum pour leur
transport du magasin dÕalimentation ˆ votre
domicile.
¥
Ne placez ni bouteilles ni bo”tes de boissons
gazeuses dans le congŽlateur, elles pourraient
Žclater.
¥ Les aliments dŽgelŽs, m•me partiellement, ne
peuvent •tre recongelŽs.
A fin dÕassurer le bon fonctionnement du
congŽlateur ne stockez pas les paquets
directement contre le ventilateur situŽ sur la
paroi postŽrieure de lÕappareil.
Nettoyage pŽriodique
La structure de lÕappareil permet dÕeffectuer un
nettoyage de la partie arri•re situŽe pr•s du mur en
utilisant Žgalement un aspirateur.
Pour effectuer cette opŽration, procŽdez comme
suit:
1. Enlevez la plinthe (1);
2. dŽmontez la grille dÕaŽration (2);
3. sortez le cache (3) avec prŽcaution.
DŽgivrage automatique
Cet appareil a ŽtŽ con•u pour •tre libre de givre.
Cela signifie quÕil nÕest pas necessaire de procŽder
au dŽgivrage manuellement lorsque le dŽgivrage a
lieu automatiquement.
Nettoyage
N'utilisez jamais d'objets mŽtalliques pour
nettoyer l'appareil; vous risquez de
l'endommager.
Nettoyez pŽriodiquement l'intŽrieur de votre appareil
avec de l'eau ti•de et du bicarbonate de soude.
Rincez et sŽchez soigneusement.
LÕappareil est ŽquipŽ dÕune grille dÕaŽration; elle
doive toujours •tre nettoyŽe afin de garantir une
bonne ventilation en partie arri•re et un
fonctionnement optimal de lÕappareil.
Arr•t prolongŽ
Lorsque l'appareil doit rester ˆ l'arr•t pendant un
certain temps, prenez les prŽcautions suivantes:
¥ dŽbranchez la prise de courant;
¥ videz l'appareil;
¥ dŽgivrez-le et nettoyez-le ˆ fond;
¥ laissez la porte entrouverte pour faire circuler
de l'air, de fa•on ˆ Žviter les mauvaises
odeurs.
21
3
S.I.013
Page 36

36
Si quelque chose ne va pas ...
Si l'appareil marche mal, il faut contr™ler:
Dérangement Remède
La tempŽrature ˆ lÕintŽrieur de lÕappareil est
trop chaude.
LÕappareil refroidit trop.
Le compresseur fonctionne sans interruption
Bruits
La tempŽrature est mal rŽglŽe. Veuillez consulter la partie "RŽglage de la tempŽrature".
Placez les denrŽes de fa•on ˆ ce que l'air puisse circuler tout autour.
VŽrifiez que la porte soit bien fermŽe.
La tempŽrature ambiante du local est trop elevŽe.
RŽguler la tempŽrature sur une tempŽrature plus ŽlevŽe.
RŽguler la tempŽrature sur une tempŽrature plus basse.
La tempŽrature ambiante du local est trop chaude.
VŽrifier si lÕaŽration de lÕappareil est suffisante et si aucun obstacle nÕemp•che son
acheminement.
De trop grandes quantitŽs dÕaliments ont ŽtŽ entreposŽes au cours des derni•res 24
heures.
NÕouvrez pas la porte plus longtemps que nŽcessaire.
Les bruits sont typiques des appareils frigorifiques.
Il nÕest pas anormal dÕentendre le bruit de circulation du fluide frigorig•ne selon son Žtat
liquide, gazeux ou vaporeux.
D•s que le compresseur se met en marche, vous lÕentendrez bourdonner ou claquer.
Certaines sources de bruit sont dž ˆ la mise en place de la structure du meuble.
Service apr•s-vente et pi•ces de rechange
Une fois que tous ces contr™les ont ŽtŽ effectuŽs, si
l'anomalie de fonctionnement persiste, adressezvous au Service Apr•s-Vente le plus proche.
Pour que l'intervention soit plus rapide, au moment
de l'appel, il vaut mieux indiquer:
¥ le mod•le
¥ le numŽro de produit (PNC)
¥ le numŽro de sŽrie (S-No)
Ces indications figurent sur le certificat de garantie
ou sur la plaque signalŽtique situŽe ˆ l'intŽrieur de
l'appareil, ˆ gauche et en bas.
Nous vous conseillons de noter ces indications ici
afin de les avoir rapidement ˆ portŽe de la main.
Mauvais fonctionnement de lÕappareillage
Si le syst•me de contr™le Žlectronique de lÕappareillage dŽtecte une panne technique qui emp•che que la
tempŽrature ACTUELLE soit atteinte, le voyant de contr™le alarme rouge clignote. LÕappareillage fonctionne
gr‰ce ˆ un programme dÕurgence jusquÕau moment o• le technicien du service apr•s vente aura effectuŽ les
rŽparations nŽcessaires.
Page 37

Installation
Emplacement
Placez de prŽfŽrence votre appareil loin d'une source
de chaleur (chauffage, cuisson ou rayons solaires
trop intenses).
Pour le bon fonctionnement de votre appareil, la
tempŽrature ambiante du local doit •tre comprise
entre +18¡C et +43¡C (classe T); +18¡C et +38¡C
(classe ST); +16¡C et +32¡C (classe N); +10¡C et
+32¡C (classe SN).
La classe d'appartenance est
indiquŽe sur la plaque signalŽtique.
Pour lÕencastrement et lÕŽventuel changement du
sens dÕouverture de la porte rapportez-vous aux
instructions relatives ci-jointes.
RŽversibilitŽ de la porte
Pour l'inversion opŽrer comme suit:
Attention!
La rŽversibilitŽ de la porte une fois effectuŽe,
contr™lez ensuite que le joint magnŽtique
adh•re ˆ la carrosserie. Si la tempŽrature ˆ
l'intŽrieur de la pi•ce est trop basse (en hiver,
p.ex.), il se peut que le joint n'adh•re pas
parfaitement. Dans ce cas, si on ne veut pas
attendre que le joint reprenne ses dimensions
naturelles apr•s un certain temps, on pourra
accŽlŽrer ce processus en chauffant la partie
intŽressŽe ˆ l'aide d'un s•che-cheveux.
37
6
4
1
2
1
6
3
6
7
8
5
2
6
10
13
9
6
12
11
3
Page 38

38
Branchement Žlectrique
Contr™lez, avant de brancher l'appareil, si le voltage
et la frŽquence indiquŽs sur la plaque signalŽtique
correspondent ˆ ceux de votre rŽseau. TolŽrance
admise: ±6%.
Pour l'adaptation de l'appareil ˆ des voltages
diffŽrents, l'adjonction d'un autotransformateur d'une
puissance adŽquate est indispensable.
Important
Il faut absolument brancher lÕappareil ˆ une
prise de terre qui marche.
CÕest pour cela que la prise du c‰ble
dÕalimentation est munie dÕun contact prŽvu
exprŽs. Si la prise de courant de rŽseau
domestique nÕest pas branchŽe ˆ la terre,
branchez lÕappareil ˆ une prise de terre ˆ part,
conformŽment aux normes en vigueur, en
vous adressant ˆ un tŽchnicien spŽcialisŽ.
Le fabricant dŽcline toute responsabilitŽ
pour tout incident ou accident provoquŽ
par une mise ˆ la terre inexistante ou
dŽfectueuse.
Cet appareil est conforme aux Directives
Communautaires suivantes:
- 73/23 CEE 19/02/73 (Basse Tension) et
modifications successives;
- 87/308 du 2.6.87 concernant la suppression
des interfŽrences radio-Žlectriques.
- 89/336 CEE 03/05/89 (CompatibilitŽ
ElectromagnŽtique) et modifications
successives.
Important
LÕappareil doit pouvoir •tre dŽbranchŽ du
secteur; il est donc nŽcessaire que la fiche
reste accessible une fois que lÕinstallation est
terminŽe.
PrŽparation de la grille
Ouverture de la porte ˆ gauche:
- enlevez le c™tŽ gauche (A) de la grille en le
coupant de l'arri•re.
Ouverture porte ˆ droite:
- enlevez le c™tŽ droit (B) de la grille en le coupant
de l'arri•re.
ProcŽdez ensuite comme suit pour remettre la grille
sur l'appareil:
- glissez la grille ˆ la base de l'appareil puis appuyer
sur les crochets (a) jusqu'au dŽclic.
Encastrement sous un plan de travail
Dimensions de la niche
Les dimensions de la niche doivent correspondre ˆ
celles indiquŽes dans la figure.
Pi•ces de montage fournies avec lÕappareil.
A
B
DO002/2
a
DO001
600
550
min.
600
DO013
1xB
1xB
1xA
1xA
2xG
2
2xF
2
1
1
a
2xC
2xC
1
2xL
1
2xD
1xK
12
18xI
2
Page 39

39
1. Fixez ˆ lÕappareil les Žquerres livrŽes ˆ cet effet
(fig.).
2. Mettre en place l’appareil. La prise murale doit se
trouver impérativement hors de la niche
d’encastrement de l’appareil.
2
1
2
3. LÕappareil est ŽquipŽ de pieds rŽgables; pour
rŽgler lÕappareil ˆ la hauteur souhaitŽe (890 mm
max.), il est nŽcessaire dÕagir sur les 4 pieds
rŽglables.
5. Appliquez les joints ˆ pression ˆ lÕappareil (fig.).
4. Pour faciliter le glissement de lÕappareil dans la
niche dÕencastrement, appliquez les coussinets
fournis sous les deux pieds postŽrieurs.
Si nŽcessaire, vous pouvez rŽduire les dimensions
des coussinets en les coupant comme lÕindique la
figure.
Left hand bracket Right hand bracket
2
596
555
max
2
1
B
3
115°
+
-
max. 890 mm
3
-
+
4
Page 40

40
6. Vissez lÕappareil.
7. Montez la porte du meuble.
5
PARTIE SUPERIEURE DE LA PORTE DU MEUBLE
PARTIE INFƒRIEURE DE LA PORTE DU MEUBLE
ab
C
2
1
10
3
clic
C
clic
c
8
a
1
a
=
C
4
=
2
b
6
9
I
F
27,5 cm
27,5 cm
7
10
55 cm
b
Page 41

41
Posez le couvre-joint (A).
45°
A
1
2
3
11
14
1
L
=
2
10
L
90°
115°
=
12
15
13
8 mm
F
G
I
K
Page 42

42
Montage de la plinthe
Attention!
Pour ne pas compromettre le bon
fonctionnement de lÕappareil, il est
nŽcessaire dÕutiliser la grille dÕaŽration
dÕorigine.
¥ Si la niche dÕencastrement de lÕappareil a une
hauteur de A=820 mm et une hauteur de plinthe
a=100 mm, la plinthe peut •tre montŽe sans
modification. Il en est de m•me pour une hauteur
dÕencastrement de B=870 mm et une hauteur de
plinthe b=150 mm.
¥ Si la hauteur de la plinthe est supŽrieure ˆ
a=100 mm, b=150 mm, celle-ci doit •tre dŽcoupŽe
afin dÕobtenir une hauteur de a=100 mm et
b=150 mm et une largeur a=580 mm.
¥ Fixez la plinthe au bloc cuisine.
Important
La plinthe doit •tre positionnŽe ˆ une
distance minimum de 25 mm de la porte.
A = 820
B = 870
a = 100
b = 150
580
25 - 80
DO008
25
Page 43

Guida allÕuso del libretto istruzioni
I seguenti simboli guideranno nella lettura del libretto:
Informazioni legate alla sicurezza nellÕuso dellÕapparecchiatura
Consigli per lÕuso corretto dellÕapparecchiatura e per ottenerne le migliori prestazioni
Informazioni legate alla protezione dellÕambiente
Sicurezza
I
Vi preghiamo di leggere attentamente queste
istruzioni prima dÕinstallare e utilizzare
lÕapparecchiatura.
Queste avvertenze sono state redatte per la
Vostra sicurezza e per quella degli altri. é molto
importante che questo libretto istruzioni sia
conservato assieme allÕapparecchiatura per
qualsiasi futura consultazione.
Uso domestico
I frigoriferi e/o congelatori domestici sono destinati
¥
unicamente alla conservazione e/o congelazione
degli alimenti.
¥Controllare prima dell’installazione che
l’apparecchiatura non sia danneggiata. In caso di
danno chiamare il rivenditore.
¥LÕapparecchiatura • pesante e alcune parti del
mobile potrebbero essere taglienti. Prestare la
massima attenzione nel maneggiare
lÕapparecchiatura e comunque utilizzare sempre
dei guanti di protezione.
¥Ogni eventuale modifica che si rendesse
necessaria allÕimpianto elettrico domestico, per
poter installare lÕapparecchiatura, dovrˆ essere
eseguita solo da personale abilitato.
¥Assicurarsi che la spina non venga schiacciata o
danneggiata dal fianco posteriore del
frigorifero/congelatore. Una spina danneggiata
potrebbe surriscaldarsi e causare un incendio.
¥Non collocare oggetti pesanti o il
frigorifero/congelatore stesso sopra il cavo di
alimentazione. Esiste il rischio di corto circuito e
incendio.
¥Non rimuovere il cavo di alimentazione premendo
sulla sua sommitˆ, specialmente quando il
frigorifero/congelatore Ž stato tolto dalla sua sede.
Un danno al cavo elettrico potrebbe causare un
corto circuito, un incendio e/o uno shock elettrico.
Non introdurre apparecchi elettrici all’interno
¥
dell’apparecchiatura.
¥Non mettere mai nello scomparto congelatore
bibite gassate: possono esplodere.
¥Non mettere in bocca i cubetti di ghiaccio appena
estratti dallo scomparto conservatore. Il ghiaccio
pu˜ causare gravi lesioni.
¥é pericoloso modificare o tentare di modificare le
caratteristiche di questÕapparecchiatura.
Mai riparare l’apparecchiatura da soli. Le
¥
riparazioni effettuate da persone non competenti
possono provocare dei danni. Contattare il Centro
di Assistenza più vicino ed esigere solo ricambi
originali
.
Sicurezza bambini
¥QuestÕapparecchiatura • stata progettata per
essere utilizzata da persone adulte. Pericolo di
soffocamento! Tenere il materiale di imballaggio
lontano dalla portata dei bambini!
¥Prima di rottamare vecchi frigoriferi non pi• in uso,
si raccomanda di renderli inservibili togliendone la
spina e il cavo di alimentazione ed eventualmente
rimuovendone o distruggendone la serratura a
scatto o i lucchetti. In tal modo si eviterˆ che i
bambini possano restare imprigionati allÕinterno
dellÕapparecchio.
Protezione dellÕambiente
¥Questa apparecchiatura non contiene, nel circuito
refrigerante e nellÕisolamento, gas refrigeranti
nocivi per lÕozono. LÕapparecchiatura non deve
essere smaltita con rifiuti urbani e rottami. Deve
essere evitato il danneggiamento del circuito
refrigerante, soprattutto nella parte posteriore
vicino al condensatore grigliato. Informazioni sui
centri di raccolta vengono forniti dallÕautoritˆ
comunale.
43 Stampato su carta tollerabile per lÕambiente
Page 44

Indice
44
Sicurezza . . . . . . . . . . . . . . . . . . . . . . . . . . . . . . . . . . . . . . . . . . . . . . . . . . . . . . . . . . . . . . . . . . . . . . . . . . . . . . .43
Smaltimento . . . . . . . . . . . . . . . . . . . . . . . . . . . . . . . . . . . . . . . . . . . . . . . . . . . . . . . . . . . . . . . . . . . . . . . . . . . .44
Uso . . . . . . . . . . . . . . . . . . . . . . . . . . . . . . . . . . . . . . . . . . . . . . . . . . . . . . . . . . . . . . . . . . . . . . . . . . . . . . . . . . .44
Prima della messa in funzione / Pannello comandi / Messa in funzione . . . . . . . . . . . . . . . . . . . . . . . . . . . . .45
Regolazione della temperatura / Congelazione rapida . . . . . . . . . . . . . . . . . . . . . . . . . . . . . . . . . . . . . . . . . . .45
Lampada spia di allarme / Dispositivo di allarme della temperatura . . . . . . . . . . . . . . . . . . . . . . . . . . . . . . . . .46
Calendario di congelamento / Equipaggiamento interno / Consigli . . . . . . . . . . . . . . . . . . . . . . . . . . . . . . . . .46
Manutenzione Sbrinamento automatico / Pulizia . . . . . . . . . . . . . . . . . . . . . . . . . . . . . . . . . . . . . . . . . . . . . . .47
Se qualcosa non funziona / Assistenza tecnica e ricambi . . . . . . . . . . . . . . . . . . . . . . . . . . . . . . . . . . . . . . .48
Preparazione griglia . . . . . . . . . . . . . . . . . . . . . . . . . . . . . . . . . . . . . . . . . . . . . . . . . . . . . . . . . . . . . . . . . . . . . .49
Reversibilitˆ della porta . . . . . . . . . . . . . . . . . . . . . . . . . . . . . . . . . . . . . . . . . . . . . . . . . . . . . . . . . . . . . . . . . .49
Installazione Posizionamento / Collegamento elettrico . . . . . . . . . . . . . . . . . . . . . . . . . . . . . . . . . . . . . . . . . . 50
Istruzioni per lÕincasso . . . . . . . . . . . . . . . . . . . . . . . . . . . . . . . . . . . . . . . . . . . . . . . . . . . . . . . . . . . . . . . . . . 52
Montaggio del battiscopa . . . . . . . . . . . . . . . . . . . . . . . . . . . . . . . . . . . . . . . . . . . . . . . . . . . . . . . . . . . . . . . . . 55
Servizio dopo Vendita . . . . . . . . . . . . . . . . . . . . . . . . . . . . . . . . . . . . . . . . . . . . . . . . . . . . . . . . . . . . . . . . . . . 55
Smaltimento
Informazione sullÕimballaggio dellÕapparecchio
¥I materiali usati in questa apparecchiatura contrassegnati dal simbolo sono riciclabili.
>PE<=polietilene >PS<=polistirolo schiumoso >PP<=polipropilene
Tutti i materiali di produzione impiegati sono tollerabili per lÕambiente!
Smaltimento di apparecchi vecchi
Il simbolo sul prodotto o sulla confezione indica che il prodotto non deve essere considerato come un
normale rifiuto domestico, ma deve essere portato nel punto di raccolta appropriato per il riciclaggio di
apparecchiature elettriche ed elettroniche. Provvedendo a smaltire questo prodotto in modo appropriato, si
contribuisce a evitare potenziali conseguenze negative per lÕambiente e per la salute, che potrebbero derivare
da uno smaltimento inadeguato del prodotto. Per informazioni pi• dettagliate sul riciclaggio di questo prodotto,
contattare lÕufficio comunale, il servizio locale di smaltimento rifiuti o il negozio in cui • stato acquistato il
prodotto.
Uso
Il congelatore • contraddistinto dal simbolo , il quale indica che esso • adatto alla congelazione di cibi
freschi e alla conservazione, a lungo termine, di cibi congelati e surgelati.
I prodotti congelati posti sul piano di lavoro dellÕapparecchiatura a causa del freddo possono provocare la
formazione di condensa nel piano di lavoro stesso. Questo vano contiene dei componenti elettronici. Se
lÕacqua di condensa dovesse bagnare questi componenti lÕapparecchiatura potrebbe essere danneggiata
da un corto circuito. Per questo motivo non porre alimenti congelati sul piano di lavoro
dellÕapparecchiatura.
Page 45

Prima della messa in funzione
Lasciare lÕapparecchiatura in posizione
verticale almeno 2 ore prima di metterla in
funzione per dar modo allÕolio di refluire nel
compressore.
¥Prima dell'uso e del collegamento elettrico pulire
tutte le parti interne con acqua tiepida e sapone
neutro allo scopo di togliere il caratteristico odore
di nuovo, indi asciugare accuratamente.
Pannello comandi
0
1
6
Frost Free
➀
Spia di funzionamento verde
1
Termostato
2
Spia di controllo gialla per la congelazione rapida
3
5
➁
2
3
4
Non usare detersivi n• polveri abrasive che
sono dannose alle finiture.
¥Togliere nastri adesivi e distanziatori utilizzati per il
trasporto.
➂
➃
Interruttore per la congelazione rapida
4
Spia di controllo allarme rossa
5
➄
Messa in funzione
¥Inserire la spina nella presa di corrente e ruotare in
senso orario la manopola del termostato (2) oltre la
posizione 1 dove abbiamo la temperatura minima
Ç-16¡CÈ fino al massimo con la posizione 6
Ç-24¡CÈ.
La manopola termostato si trova nel piano di lavoro
del congelatore.
¥Le spie (1), (3) e (5) si accendono.
Alla messa in funzione lÕelettronica
dellÕapparecchio disinserisce dopo 5 orela
funzione di congelazione rapida (spia gialla)
automaticamente.
L'arresto del funzionamento si ottiene con la
manopola
sulla posizione .Ç 0 È
(2)
Regolazione della temperatura
¥La temperatura del congelatore • regolata
automaticamente per una buona conservazione
degli alimenti.
¥Ruotare la manopola di regolazione (2) verso le
posizioni pi• alte per ottenere temperature pi•
fredde oppure verso quelle pi• basse per ottenere
temperature meno fredde.
¥Selezionare la posizione del termostato in funzione
del freddo desiderato.
¥Per la buona conservazione degli alimenti
surgelati, la temperatura del congelatore deve
essere uguale o inferiore a -18¡C.
45
Si consiglia, pertanto, di ruotare la manopola (2)
sulla posizione Ç¥ 3È.
¥La posizione corretta, comunque, va individuata
tenendo conto che la temperatura interna dipende
da questi fattori:
¥ la temperatura ambiente
¥ la frequenza di apertura della porta
¥ la quantitˆ di alimenti conservati
¥ la collocazione dell'apparecchio.
Congelazione rapida
Premere per circa 1 sec. lÕinterruttore (4). La spia (3)
si accende (funzione SUPER inserita). La funzione
SUPER o congelazione rapida pu˜ essere disinserita
in qualsiasi momento premendo nuovamente sul
tasto (4). La spia gialla (3) si spenge.
Se la funzione SUPER non viene disinserita
manualmente lÕelettronica dellÕapparecchiatura la
disattiva automaticamente dopo 48 ore.
Lampada spia di allarme
La lampada spia di allarme (5) ha lo scopo di
segnalare che la temperatura all'interno del vano
congelatore • risalita ad un livello tale da non
garantire una buona conservazione degli alimenti
(pi• calda di -12¡C).
Quando l'apparecchio viene messo in funzione
oppure inizialmente quando vengono introdotti gli
alimenti da congelare, questa spia rimane accesa
sino a che la temperatura non ha raggiunto il valore
per la sicura conservazione degli alimenti stessi.
Page 46

Allarme sonoro
LÕapparecchiatura Ž dotata di unÕallarme sonoro.
Quando la temperatura interna Ž troppo elevata si
sente lÕallarme sonoro e la lampada spia rossa
lampeggia. LÕallarme sonoro rimane in funzione fino
a quando non si preme lÕinterruttore della
congelazione rapida. (4)
Allarme porta aperta
Quando la porta rimane aperta per pi• di 60 secondi
si sente lÕallarme sonoro. LÕallarme sonoro rimane in
funzione fino a quando non si chiude la porta l
Calendario di congelamento
I simboli sui cassetti/sportelliindicano diversi tipi di
prodotti da congelare.
Le cifre indicano il periodo di immagazzinaggio in
mesi per ciascun tipo di prodotto da congelare. Se •
valido il valore superiore oppure quello inferiore del
periodo di immagazzinaggio indicato, dipende dalla
qualitˆ dei prodotti alimentari e dal proprio
pretrattamento prima del congelamento.
Cassetti
I cassetti di conservazione sono assicurati contro
ribaltamento e in posizione Þnale bloccati.
Ci˜ permette sia la conservazione che l'estrazione
sicura e comoda di prodotti congelati.
Per l'estrazione dei cassetti procedere come segue:
estrarre il cassetto fino al punto di battuta, quindi
ruotarlo verso l'alto (vedi figura).
Consigli
Masse eutettiche
LÕapparecchio Ž munito di due accumulatori termici
da posizionare nel cassetto superiore.Questi
permettono di aumentare la durata di conservazione
degli alimenti in caso di arresto dellÕapparecchiatura.
In questo caso dovranno essere posizionati sopra gli
alimenti per non ridurre la durata di stoccaggio degli
stessi.
Equipaggiamento interno
Cubetti di ghiaccio
LÕapparecchiatura• equipaggiatacon una o pi•
vaschette per la formazione dei cubetti di ghiaccio.
Dette vaschette vanno riempite di acqua potabile e
riposte nel vanocongelatore.
Si raccomanda di non usare utensili
metallici per staccare le vaschette.
Risparmio di energia
¥Non installare lÕapparecchio in prossimitˆ di cucine,
termosifoni o altre fonti di calore. Se la temperatura
ambiente • elevata, il compressore si inserisce pi•
spesso e pi• a lungo. Vedi capitolo ÒInstallazioneÓ.
¥Tenere aperta la porta soltanto per il tempo
strettamente necessario.
¥Non introdurre mai vivande ancora calde
nellÕapparecchio, bens“ lasciare che prima si
raffreddino.
¥Per scongelare i cibi surgelati, collocarli nel
frigorifero. In questo modo, il freddo dei cibi
surgelati viene sfruttato per il raffreddamento del
frigoriferostesso.
¥Pulire il condensatore e il motocompressore situati
sulla parete posteriore dellÕapparecchiatura con
una spazzola o un aspirapolvere.
Congelazione e conservazione
¥Per eseguire la congelazione rapida dei cibi,
qualora l'apparecchio non sia in funzione, •
necessario metterlo in funzione e predisporlo al
funzionamento di congelazione rapida almeno tre
ore prima di introdurre nel congelatore gli alimenti.
¥Nel caso, invece, I'apparecchio sia giˆ in funzione,
predisporlo per la congelazione rapida almeno 24
ore prima di introdurre gli alimenti da congelare.
¥Una volta inseriti gli alimenti, la congelazione pu˜
essere considerata ultimata dopo 24 ore dal suo
inizio.
46
Page 47

Dopo questo periodo • necessario ripristinare il
funzionamento di ÇconservazioneÈ.
¥Porre i cibi da congelare nello scomparto
inferiore dell'apparecchiatura.
¥La quantitˆ massima di alimenti che possono
essere congelati in 24 h • riportata sulla
Çtarghetta matricolaÈ.
¥Con la tecnologia NO FROSTil processo di
congelazione Ž pi• rapido; questo consente ai cibi
scongelati di mantenere intatte tutte le
caratteristiche originali, le vitamine nonchŽ il gusto
dei cibi.
¥Dividere tutto in piccole parti, in modo da favorire la
rapiditˆ della congelazione e consentire lo
scongelamento solo della quantitˆ necessaria.
¥Avvolgere gli alimenti in fogli di alluminio o
politene. Gli stessi devono essere bene aderenti ai
cibi e ben chiusi.
¥Non congelare in una sola volta alimenti in quantitˆ
superiore a quella indicata sulla targhetta matricola
dell'apparecchiatura.
¥Durante la congelazione non introdurre nuovi cibi
da congelare e non aprire la porta.
¥Evitare di mettere i prodotti da congelare a contatto
di quelli giˆ congelati; ci˜ eviterˆ l'innalzamento
della temperatura di questi ultimi.
¥Un innalzamento della temperatura dei surgelati
durante lo sbrinamento potrebbe ridurne il tempo di
conservazione.
¥Non consumare immediatamente i ghiaccioli
prelevati dallo scomparto congelatore: possono
provocare scottature da freddo.
¥é consigliabile indicare sulla confezione la data di
inizio della congelazione al fine di poter controllare
il tempo di conservazione.
Non mettere nel vanocongelatore bevande
¥
gassate: possono esplodere.
Per ottenere i migliori risultati da questa
¥
apparecchiatura • necessario utilizzare tutti gli
scomparti.
¥Assicurarsi che il trasporto, dall'acquisto dei
prodotti congelati alla sistemazione nello
scomparto, sia breve.
¥Non aprire troppo frequentemente la porta del vano
congelatoree non lasciarla aperta pi• del
necessario.
¥Una volta scongelati, gli alimenti si deteriorano in
breve tempo e non possono venir ricongelati.
Per assicurare il corretto funzionamento
dellÕapparecchiatura non porre surgelati
direttamente contro il ventilatore che si trova
sulla parete posteriore del congelatore.
Manutenzione
Staccare la spina dalla presa di corrente
prima di eseguire qualsiasi operazione.
Attenzione
Questa apparecchiatura contiene idrocarburi
nel circuito refrigerante; pertanto la
manutenzione e la ricarica devono essere
effettuate esclusivamente da personale
autorizzato dall’azienda.
Sbrinamento automatico
Questa apparecchiatura • stata concepita per essere
NO FROST, cio• libero da brina. Ci˜ significa che
non • necessario procedere allo sbrinamento
manuale dal momento che lo sbrinamento ha luogo
automaticamente.
Pulizia
Si raccomanda di non impiegare utensili
metallici per pulire onde evitare gravi danni
all'apparecchio.
Non impiegare mai delle sostanze
detergenti graffianti. Non utilizzare prodotti
spray per lo sbrinamento, poichŽ possono
nuocere alla salute e/o contenere sostanze
dannose per i materiali plastici.
¥Pulire l'interno con acqua tiepida e bicarbonato di
soda. Risciacquare e asciugare accuratamente.
Quando lÕapparecchiatura non • in funzione
Staccare la spina dalla presa di corrente. Togliere
tutti gli alimentie pulirelÕapparecchiatura lasciando
la porta socchiusa per evitare la formazione di odori
sgradevoli.
47
Page 48

Se qualcosa non funziona
Qualora l'apparecchiatura presentasse qualche disfunzione, è bene controllare:
DISTURBO RIMEDIO
Le derrate sono troppo calde.
LÕapparecchiatura raffredda eccessivamente.
Il compressore lavora continuamente.
Rumori di servizio
Temperatura non correttamente regolata; consultare il paragrafo ÒRegolazione della
temperatura.
LÕapparecchiatura • installata accanto ad una fonte di calore; consultare il paragrafo
ÒInstallazioneÓ.
La porta • rimasta aperta a lungo; tenere aperta la porta soltanto per il tempo
strettamente necessario.
NellÕarco delle ultime 24 ore sono state introdotte grandi quantitˆ di vivande calde;
regolare temporaneamente la temperaturasu una posizione pi• fredda.
Regolare la temperaturasu una posizione pi• calda.
Regolare la temperaturasu una posizione pi• calda.
Controllare che ci sia unÕadeguata aereazione e che le aperture per la ventilazione siano
libere da ogni ostruzione.
La causa potrebbe essere lÕintroduzione di grandi quantitˆ di vivande e/o frequenti
aperture/chiusure della porta.
Avolte ci˜ • normale. Ogni volta che il compressore si inserisce e disinserisce, si
sentono degli scatti.
Quando la sostanza refrigerante fluisce negli stretti tubi, si possono dei rumori di
gorgogliamento. Anche dopo il disinserimento del compressore • udibile per breve
tempo questo rumore.
Non appena il compressore incomincia a lavorare, si sente il relativo ronzio.
Cattivo funzionamento dellÕapparecchio
Se il sistema di controllo elettronico dellÕapparecchiatura individua una disfunzione tecnica che impedisce di
raggiungere la temperatura impostata, la spia di controllo allarme rossa lampeggia. LÕapparecchio continuerˆ a
funzionare grazie ad un programma di emergenza fino a che il servizio di assistenza tecnica non abbia
effettuato la riparazione necessaria.
Assistenza tecnica e ricambi
Dopo le verifiche di cui sopra, se la disfunzione
dovesse permanere, • bene consultare la Vostra
cartolina di garanzia e chiamare il Centro di
Assistenza Tecnica pi• vicino.
Per un sollecito intervento • importante, all'atto della
chiamata, indicare il tipo di difetto e provvedere
sempre le seguenti informazioni relative
allÕapparecchiatura:
¥ Modello
¥ Prod. No. (PNC)
¥ Ser. No. (S-No.)
Queste indicazioni sono riportate sulla targa
matricola situata nellÕinterno dellÕapparecchio.
Allo scopo di aver rapidamente a portata di mano
tutti i dati, si consiglia di annotarli qui.
48
Page 49

Preparazione griglia
Apertura porta a sinistra:
-asportare il lato sinistro (A) della griglia incidendolo
dal retro (v. fig.).
A
B
DO002/2
Apertura porta a destra:
-asportare il lato destro (B) della griglia incidendolo
dal retro (v. fig.).
Successivamente, per riposizionare la griglia
sull'apparecchiatura procedere come segue:
-accostare la griglia alla base dell'apparecchiatura,
quindi premere sui ganci (a) fino allo scatto.
a
a
DO001
N.B. Montare la griglia dopo aver fissato, con le
staffe, I'apparecchiaturanel vano.
Reversibilitˆ della porta
Per l'inversione operare come indicato nelle figure
successive:
6
4
1
5
2
1
6
3
6
7
8
2
49
Page 50

6
10
13
Ultimata la reversibilitˆ della porta, controllare
che la guarnizione magnetica sia aderente al
mobile. Se la temperatura ambiente • fredda
(ad es. in inverno), pu˜ succedere che la
guarnizione non aderisca perfettamente al
mobile. In tal caso attendere il naturale
rinvenimento della guarnizione stessa oppure
accelerare tale processo riscaldando la parte
interessata con un normale asciugacapelli.
9
3
11
6
12
50
Page 51

Installazione
Osservare durante il trasporto e lÕinstallazione
dellÕapparecchio che non venga danneggiato
alcun elemento della circolazione della
sostanza refrigerante.
Durante il normale funzionamento il condensatore
¥
ed il compressore, che sono posti sul retro
dellÕapparecchiatura, si riscaldano sensibilmente.
Assicurarsi quindi che lÕinstallazione venga
eseguita come da istruzioni riportate sul libretto.
UnÕaerazione insufficiente comporterˆ sicuramente
un cattivo funzionamento e dei danni
allÕapparecchiatura.
¥
Importante:se il cavo di alimentazione si
danneggiasse, dovrˆ essere sostituito da uno
speciale cavo o assieme disponibili presso il
costruttore o il servizio di assistenza.
Posizionamento
¥Sballare lÕapparecchiatura e controllare che sia in
buone condizioni e priva di danni provocati dal
trasporto.
¥Collocare l'apparecchiatura lontana da fonti di
calore, quali: termosifoni, stufe da riscaldamento,
esposizione diretta ai raggi solari ecc.
¥Per l’incasso nei mobili componibili é necessario
attenersi alle istruzioni specifiche relative alla
incassabilità.
La classificazione climatica • riportata sulla targa
matricola situata a destranellÕinterno della cella
dellÕapparecchio.
La tabella successiva mostra quali temperature
ambientali sono state assegnate alla classificazione
climatica:
Classificazione
climatica
per temperature ambientali di
Collegamento elettrico
Assicurarsi prima di inserire la spina nella presa di
corrente, che la tensione e la frequenza riportate
sulla targhetta matricola corrispondano a quelle
dell'impianto domestico
é ammessa una oscillazione di ±6% sulla tensione
nominale.
Per il funzionamento a tensioni diverse si dovrˆ
utilizzare un autotrasformatore di potenza adeguata.
Importante
é indispensabile che l'apparecchiatura sia
collegata ad una efficiente presa di terra.
Atale scopo la spina del cavo di alimentazione
• dotata dell'apposito contatto.
Qualora la presa di corrente dell'impianto
domestico non sia collegata a terra, allacciare
l'apparecchiatura ad un impianto di terra a
parte, conformemente alle norme in vigore,
consultando in proposito un tecnico
specializzato.
La Casa Costruttrice declina ogni
responsabilitˆ qualora questa norma
antinfortunistica non fosse rispettata.
Questa apparecchiatura • conforme alle seguenti
Direttive Comunitarie:
-73/23/CEEdel 19/02/73 (Bassa Tensione) e
successive modificazioni;
-87/308/CEEdel 2/6/87 (Soppressione dei
disturbi radio).
-89/336/ CEEdel 03/05/89 (Compatibilitˆ
Elettromagnetica) e successive
modificazioni.
Importante
LÕapparecchio deve poter essere scollegato
dalla rete; • quindi necessario che la spina
rimanga accessibile ad installazione avvenuta.
SN da +10 fino a +32¡C
N
ST
T
Quando la temperatura ambiente non rientra
nelle fasce indicate per le classi
dellÕapparecchiatura, la temperatura di
conservazione allÕinterno dellÕapparecchiatura
stessa non • garantita. Pertanto si consiglia di
consumare il cibo conservato prima possibile.
51
da +16 fino a +32¡C
da +18 fino a +38¡C
da +18 fino a +43¡C
Page 52

Istruzioni per l'incasso
Dimensioni del vano
Le dimensioni del vano devono corrispondere a
quelle indicate in figura.
600
550
min.
600
596
555
max
+
-
-
+
DO013
1xA
2xG
2xF
1
1.Kit di installazione
1xB
2xL
2xD
1xK
2xC
3
3.Inserire lÕapparecchiatura nel vano. La presa con
contatto di terra necessaria per il collegamento
dell'apparecchiatura deve essere installata in
modo che la spina non sia situata nel vano di
installazione dell'apparecchiatura.
L'apparecchiatura • dotata di piedini regolabili;
pertanto per adattare l'apparecchiatura all'altezza
desiderata (max. 870 mm) • necessario agire sui
piedini posti ai quattro angoli inferiori.
18xI
2
Lato sinistro Lato destro
2.Fissate allÕapparecchio le cerniere (D)fornite a
questo scopo (fig.).
52
Page 53

1
B
4
4.Applicare a pressione il coprifuga (B) tra
apparecchiatura e mobile dopo aver inserito
lÕapparecchiatura nel vano di alloggiamento.
7
I
5
5.Fissare lÕapparecchiatura al piano lavoro del
mobile.
6.Per montare la porta del mobile procedere come
mostrato nelle figure successive.
2
1
10
a
C
4
ab
C
click
click
8
Parte superiore del pannello
del mobile
Möbeltür Innenseite
c
a
I
=
=
53
3
c
b
b
6
9
Page 54

F
I
27,5 cm
27,5 cm
55 cm
8 mm
F
I
K
10
11
45°
3
1
2
G
13
A
14
7.Applicare il listello di copertura (A).
1
=
2
12
10
=
L
15
L
90°
115°
54
Page 55

Montaggio del battiscopa
Importante
Per non compromettere la funzionalitˆ
dell'apparecchio • necessario utilizzare la
griglia di ventilazione originale.
¥Nel caso di luce massima di misura A=820 mm e di
altezza del battiscopa di misura a=100 mm, il
battiscopa pu˜ essere montato cos“ com'•, senza
modifiche. Lo stesso dicasi nel caso di luce
massima in altezza di misura B=890 mm e di
altezza del battiscopa di misura b=170 mm.
¥Se l'altezza del battiscopa • superiore a
a=100 mm, b=170 mm il battiscopa va tagliato fino
a metˆ della zona coperta dall'apparecchio, a
580 mm di larghezza su un'altezza residua di
a=100 mm, b=170 mm.
A = 820
B = 890
a = 100
b = 170
580
25 - 80
DO008b
25
¥Fissare il battiscopa al blocco cucina.
Importante
Il battiscopa deve essere posizionato a una
distanza minima di 25 mm dalla porta.
55
Page 56

933 026 007 - 00 - 211620017
www.electrolux.com
www.electrolux.ch
 Loading...