

AEG S7388KG, S7380KG User Manual

SANTO 7380KG
Fridge Freezer
Operating and Installation Instructions
SANTO 7388KG

Congratulations on the purchase of your new refrigerator. With proper care, it will provide you with many years of dependable operation.
Please read this Use and Care manual completely before operating your refrigerator. It contains the necessary information to ensure safe,
efficient operation. Please note the model number and serial number located on the inside of your refrigerator. If a problem arises, both of
these numbers will be required to obtain service.
2

Electrical
Safety
WARNING -For your own safety, read
the following instructions before operating
your refrigerator. Failure to follow these
instructions may result in personal injury.
Destroy or recycle the carton, staples and
any plastic packing materials after the
refrigerator is unpacked. Cartons and
plastics are potential safety hazards to
small children.
• Remove the door from your old
refrigerator before disposing of it.
• Never disconnect the refrigerator by
pulling on the service cord. Firmly grip
plug at electrical outlet and pull.
• To avoid electrical shock, disconnect the
refrigerator prior to cleaning or changing
a light bulb, or removing rear access
cover. Turning the interior control to “0”
will NOT disconnect the power supply.
• Do not store flammable liquids near any
appliance. Do not operate the refrigerator in the presence of explosive fumes.
• If your refrigerator has an automatic ice
maker, avoid contact with moving parts.
Information
WARNING: Failure to follow these
warnings may result in electric shock or
injury. Check serial plate for voltage and
cycle information.
220 - 240 Volt, 50/60 Hz
WARNING: If this does not match your
electrical requirements, contact your dealer
immediately. Operating a refrigerator on an
incorrect power supply can damage the
compressor. Be sure the refrigerator is
properly grounded. The service cord of the
refrigerator is equipped with a grounding
terminal. It must be plugged directly into a
properly grounded receptacle. If you do not
have a properly grounded receptacle, it
must be replaced in accordance with local
codes and ordinances. The work must be
done by a qualified electrician.
WALL CIRCUIT BREAKER RATING:
220 - 240 V, 50/60 Hz = 7.5 A
CAUTION:
If the service cord is damaged, it must
be replaced by a special cord or
assembly available from your
authorized dealer.
• Do not use an adaptor.
• Do not use an extension cord.
• Do not remove or cut grounding prong.
• Do not pinch, knot, or bend the power
cord.
CAUTION
Performance may be affected if the
voltage varies by 10% or more.
Operating the refrigerator with
insufficient power can damage the
compressor. Such damage is not
covered under your warranty.
Do not plug the unit into an outlet
controlled by a wall switch or pull cord
to prevent the refrigerator from being
turned off accidentally.
3

Installation
The refrigerator should be located away
from direct sunlight and heat sources such
as registers, radiators or any cooking
products.
In accordance with ISO standards, your
refrigerator is performance rated at Class N,
16°C to 32°C (61°F to 90°F) or at Class ST,
18°C to 38°C (65°F to 100°F). Internal
temperatures may be affected by such
factors as its location, ambient temperature,
and the frequency of door openings.
Allow space around the unit for good air
circulation. Allow a 25mm (1 inch) space
behind and a 10mm (3/8 inch) space above
the refrigerator for adequate ventilation.
In a recessed installation, allow an extra
10 - 15 mm (½ inch) on each side for ease
of installation. If the side of the unit will be
placed against a wall, allow 13 mm
(½ inch) space for proper door opening.
TIPS:
• Proper air circulation and leveling will
assure efficient operation of yourrefrigerator.
Installation
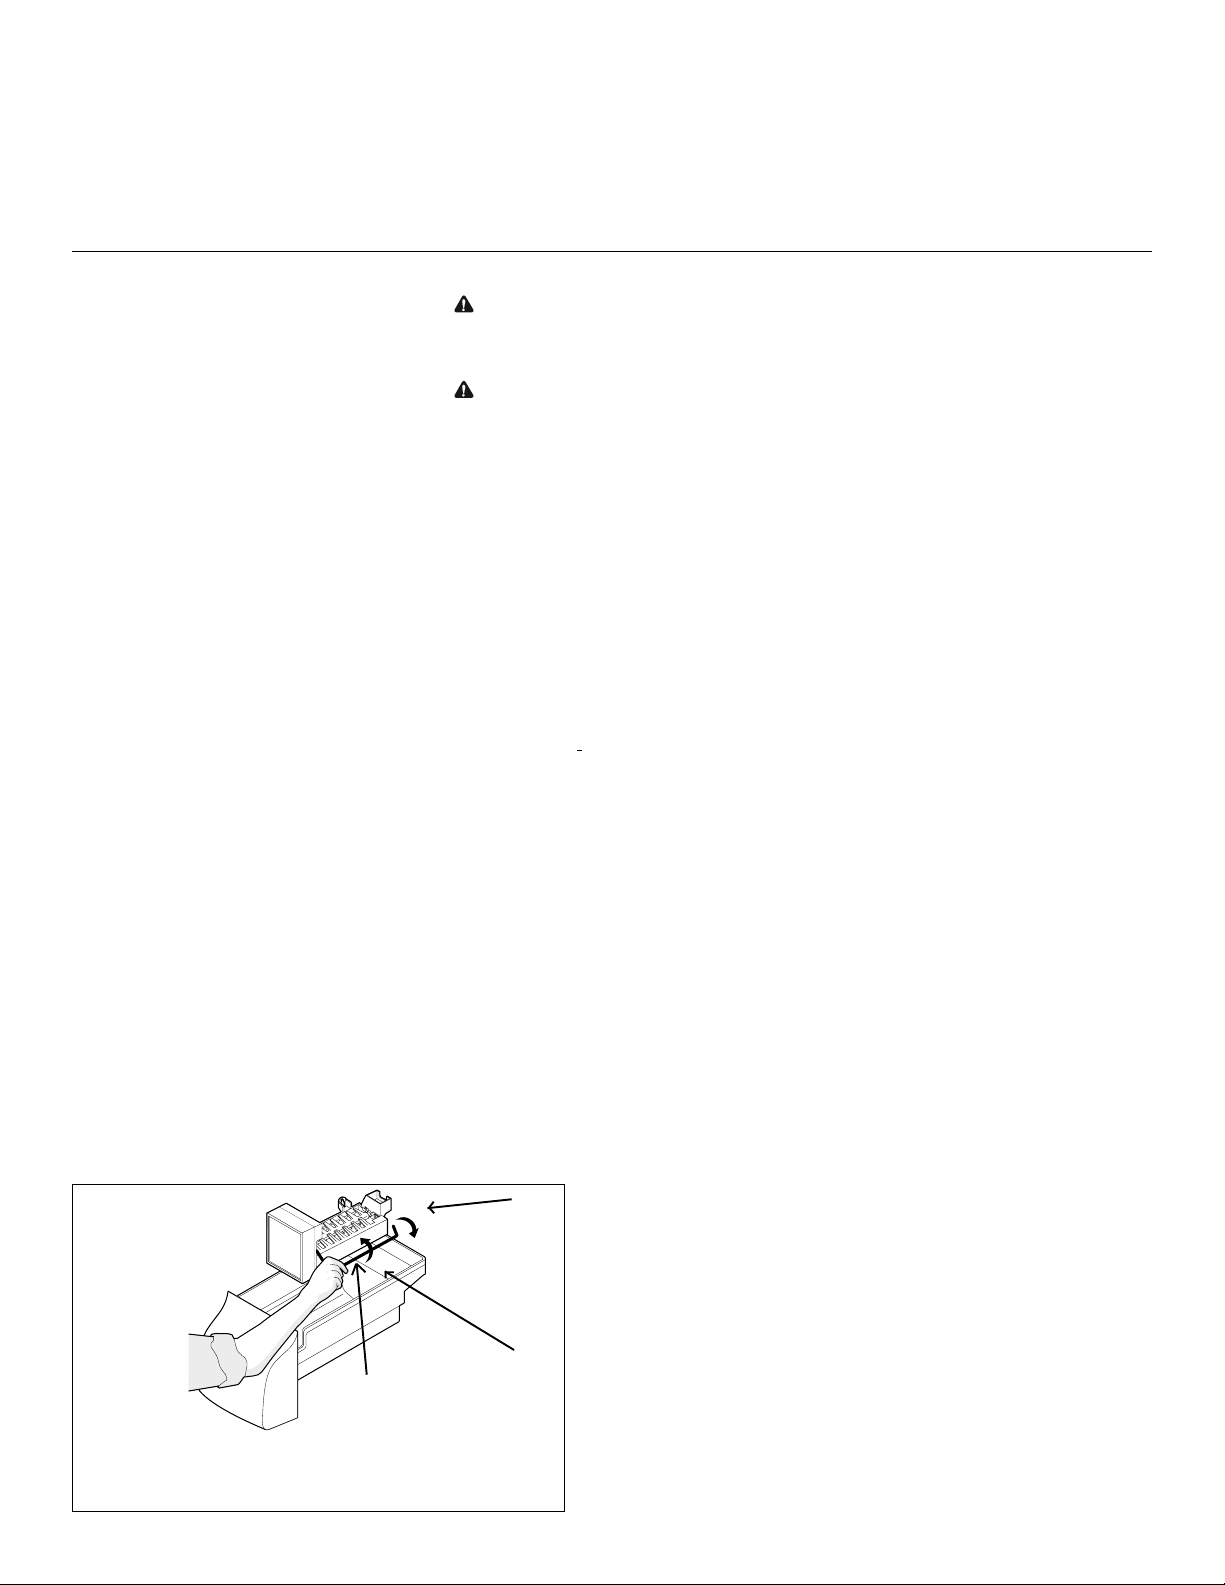
TO ADJUST THE FRONT ROLLERS
1. Open both doors.
2. Remove the toe grille by pulling it
straight out.
3. Adjust the rollers by turning each roller
adjusting bolt with a wrench until the
refrigerator is level and stable. The rear
rollers are not adjustable.
4. Check both doors to ensure that the
seals touch the cabinet on all sides.
5. Replace the toe grille by lining up the
retainers with the holes and pushing the
grille straight on.
TIPS:
• If the freezer door is higher than the
refrigerator door, raise the right corner
and/or lower the left corner until the
doors align across the top of the cabinet.
• If the refrigerator door is higher than
the freezer door, raise the left corner
and/or lower the right corner until doors
align across the top of the cabinet.
• Do not use an extension cord.
• If refrigerator has an ice maker, locate it
near a water supply.
• Remove all packing materials and tape.
• Wash interior with a mild soap and
warm water .
• Do not use a razor blade or knife to
remove tape.
4

Temperature
Operation
Before starting the refrigerator, follow these
important steps:
• Insert the power cord into a properly
grounded electrical receptacle. DO NOT
use an extension cord or an adaptor .
• If your refrigerator is equipped with an
automatic ice maker , see section “AUTO-
MA TIC ICE MAKER” for starting
procedure.
• Set the controls at midpoint at start up.
See section “TEMPERATURE CONTROLS” if
adjustments are desired.
• To ensure safe food storage, allow the
refrigerator to operate with doors closed
for at least 8 hours before loading with
food.
• To maintain temperatures, a fan circulates
air in the refrigerator and freezer compartments. Do not block air vents with food
items.
When taking the refrigerator out of service for
a period of time:
• Remove all food and ice. T urn the controls
to the “O” position and disconnect the
service cord.
Operation
• Clean the interior thoroughly.
• Leave both doors open to prevent odor
and mold build-up.
Controls
REFRIGERA TOR CONTROLS
The refrigerator controls should be set at
midpoint of the dial for a period of 24
hours. After 24 hours, adjust the control if
needed. To obtain a COLDER temperature,
turn the knob clockwise to a higher
number. To obtain a WARMER temperature,
turn the knob counterclockwise to a lower
number. Note that storage temperatures
may be affected by room temperature.
FREEZER CONTROLS
The freezer controls are located inside the
freezer compartment. The freezer should be
set at midpoint for a period of 24 hours.
After 24 hours, adjust the control if
needed.To obtain a COLDER temperature,
turn the knob clockwise to a higher
number. To obtain a WARMER temperature,
turn the knob counterclockwise to a lower
number.
IMPORTANT TIPS
• Turning the freezer control to “0” will
shut down cooling in BOTH the
refrigerator and the freezer compartments.
• If equipped with an ice maker , raise the
signal arm to its locked position (see Figure
1) and turn off the water supply at its valve.
NOTE: When placing the refrigerator back into
service, leave ice maker off until water supply is
turned on.
Figure 1
Figura 1
Figure 1
Abbildung 1
УчЮмб 1
1 á¼
Wire Signal Arm
Señal de Alarma
Bras de coupure
Signalhebel
ВсбчЯпнбтУЮмбфпт
|f£îZ oZfe
• When first setting the controls or when
changing a setting, wait 24 hours for
the temperature to stabilize before
making more changes.
• A change in the control setting in the
freezer compartment will affect the
temperature in BOTH the freezer and the
refrigerator compartment.
On
Encendido
Marche
Ein
Бнпйкфь
áø²¥Z Úz
Off
Apagado
Arrêt
Aus
Клейуфь
v£¹îZ Úz
5
Ice & Water
Ice & Water
Dispenser
AUTOMATIC ICE & WATER
DISPENSER (some models)
The ice and water dispenser on the freezer
door conveniently dispenses chilled water
and ice. To operate the dispenser, select the
ice option desired using the touch pad, and
press a glass against the dispensing arm. To
stop dispensing, pull glass away from
dispensing arm. When dispensing ice,
release dispensing arm before the glass is
full. Allow ice chute to clear or water to stop
before removing glass.
A drip tray located beneath the dispenser
catches and evaporates small spills. This
drip tray is removable and dishwasher safe.
It is NOT a drain, DO NOT pour water
directly into this area.
LOCK OUT FEATURE (some models)
The Ice & Water Dispensing System can be
locked out to prevent unwanted use.
T o Lock Out - Press the “Padlock” pad for 3-5
seconds. A RED light will appear above the
Padlock.
To Unlock - Press the “Padlock” pad for 3-5
seconds until the RED light above the Padlock goes out.
ICE MAKER OPERATION
The ice maker is located behind the baffle in
the top of the freezer. The wire signal arm
may be raised up and locked in the “OFF”
position to stop ice maker operation (see
Figure 2). When the freezer temperature is
cold, the ice maker can be started by
lowering the wire signal arm to its “ON”
position.
Dispenser
WATER CONNECTION:
CAUTION: Ensure that the ice maker
water supply tube is connected to a safe
(potable) water pipe only.
CAUTION: Water supply must have a
minimum pressure of 1.4 bars (20 psi) and a
maximum pressure of 6.9 bars (100 psi).
DISPENSER LIGHT (SOME MODELS)
The light can be turned on and off by
pressing the light touchpad. The light will
illuminate the entire dispenser area. The
light also turns on automatically when the
ice and/or water is dispensed. If bulb
replacement is necessary, use an E14, 7 watt
appliance bulb.
OPERATION OF WATER DISPENSER
A water tank is located at the back of the
refrigerator compartment and holds about
0.7 liters (24 oz.) of water. As the water is
dispensed, the tank is automatically refilled.
When first installing the refrigerator, draw
and discard one glass of water. This action
will fill the tank and should take about 1½
minutes. Continue to draw and discard 7
more glasses of water to ensure that all
plumbing connections have been rinsed of
any impurities.
To ensure fresh tasting water, it is suggested that the water dispenser be used
every day. If water supply is not used for
more than one week, flush the tank as
specified above.
NOTE: The water delivery system has a
built-in shutoff device that will stop
thewater flow after 3 minutes of continuous use. To RESET the dispensing mechanism, release the acuator button.
Figure 2
Figura 2
Figure 2
Abbildung 2
УчЮмб 2
2 á¼
6
Wire Signal Arm
Señal de Alarma
Bras de coupure
Signalhebel
ВсбчЯпнбтУЮмбфпт
|f£îZ oZfe
On
Encendido
Marche
Ein
Бнпйкфь
áø²¥Z Úz
Off
Apagado
Arrêt
Aus
Клейуфь
v£¹îZ Úz
 Loading...