

Page 1
LAVAMAT 74850 M
User Manual
Upute za uporabu
Washing Machine
Perilica rublja
Page 2

2
Dear Customer
Thank you for choosing one of our high-quality products.
With this appliance you will experience the perfect combination of functional
design and cutting edge technology.
Convince yourself that our appliances are engineered to deliver the best
performance and control - indeed we are setting the highest standards of
excellence.
In addition to this you find environmental and energy saving aspects as an
integral part of our products.
To ensure optimal and regular performance of your appliance please read this
instruction manual carefully. It will enable you to navigate all processes perfectly
and most efficiently. To refer to this manual any time you need to, we
recommend you to keep it in a safe place. And please pass it to any future owner
of the appliance.
We wish you much joy with your new appliance.
The following symbols are used in this manual:
Important information concerning your personal safety and information on how to
avoid damaging the appliance
General information and tips
Environmental information
Page 3

Contents
Contents
Instruction booklet 6
Safety information 6-7
Product Description 10
Control panel 11
Display 11
First use 12
Personalization 12
Acoustic signal 12
Child safety lock 12
Daily use 13
Load the laundry 13
Measure out the detergent and the fabric softener 14
Select the required programme 15
Select the temperature 15
Select the spin speed, Rinse Hold or Night Cycle option 15
Programm option buttons 15
Select the Prewash option 16
Select the Stain option 16
Select the Sensitive option 17
Select an additional rinse 17
Select the Time saving option 17
Display 18
Select the Start/Pause 19
Select the Delay Start 19
Programme progress display 20
Altering an option or a running programme 20
3
Page 4

Contents
4
Interrupting a programme 21
Cancelling a programme 21
Opening the door after the programme has started 21
At the end of the programme 21
Washing programmes 22-25
Programme informations 26-27
Washing hints 28-32
Sorting the laundry 28
Temperatures 28
Before loading the laundry 28
Maximum loads 29
Laundry weights 29
Removing stains 30
Detergents and additives 30
Quantity of detergent to be used 30
Degrees of water hardness 31
International wash code symbols 33
Care and cleaning 34
Descaling 34
After each wash 34
External cleaning 34
Detergent dispenser drawer 34
Drain pump 35
Water inlet filter 36
Frost precautions 37
Emergency emptying out 37
Something not working 38-41
Page 5

Contents
Technical Data 42
Consumption value 43
Installation 44
Unpacking 44
Positioning and levelling 46
Water inlet 46-47
Acqua-stop device 47
Water drainage 47-48
Electrical connection 48
Enviroment concerns 49
Packaging materials 49
Old machine 49
Ecological hints 49
Guarantee 50
5
Customer service centres 51
Page 6

Safety information
6
Instruction booklet
Safety information
Prior to using for the first time
• The safety of AEG/ELECTROLUX appliances complies with the industry
standards and with legal requirements on the safety of appliances. However,
as manufacturers, we feel it is our duty to provide the following safety notes.
You MUST read them carefully before installing or using the appliance.
• It is most important that this instruction book should be retained with the
appliance for future reference. Should the appliance be sold or transferred to
another owner, or should you move house and leave the appliance, always
ensure that the book is supplied with the appliance in order that the new
owner can get to know the functioning of the appliance and the relevant
warnings.
• You MUST read them carefully before installing or using the appliance.
• Before first starting up, check the machine for any damage incurred during
transport. Never connect up a damaged machine. If parts are damaged,
contact your supplier.
• If the appliance is delivered in the winter months when there are minus
temperatures: Store the washing machine at room temperature for 24 hours
before using for the first time.
General safety
It is dangerous to alter the specifications or attempt to modify this product in
any way.
During high temperature wash programmes the door glass may get hot. Do
not touch it!
Make sure that small pets do not climb into the drum. To avoid this, please
check into the drum before using.
Any objects such as coins, safety pins, nails, screws, stones or any other hard,
sharp material can cause extensive damage and must not be placed into the
machine.
Only use the advised quantities of fabric softener and detergent. Damage to
the fabric can ensue if you over-fill. Refer to the manufacturer’s
recommendations of quantities.
Page 7

Wash small items such as socks, laces, washable belts etc in a washing bag or
pillow case as it is possible for such items to slip down between the tub and
the inner drum.
Do not use your washing machine to wash articles with whalebones, material
without hems or torn material.
Always unplug the appliance and turn off the water supply after use, clean
and maintenance.
This appliance is provided with a white drum light. It is class 1, in accordance
with IEC 60825-1:1993 + A1:1997 + A2:2001 standard. Should the appliance
drum light need to be replaced, this must be carried out by a Service Centre.
Under no circumstances should you attempt to repair the machine yourself.
Repairs carried out by inexperienced persons may cause injury or serious
malfunctioning. Contact your local Service Centre. Always insist on genuine
spare parts.
Installation
This appliance is designed for domestic use. It must not be used for purposes
other than those for which it was designed.
When unpacking the appliance, check that it is not damaged. If in doubt, do
not use it and contact the Service Centre.
All packing and transit bolts must be removed before use. Serious damage can
occur to the product and to property if this is not adhered to. See relevant
section in the user manual.
After having installed the appliance, check that it is not pressing or standing on
its electrical supply cable, inlet hose and drain hose.
If the machine is situated on a carpeted floor, please adjust the feet in order to
allow air to circulate freely
Always be sure, that there is no water leakage from hoses and their connections
after the installation.
If the appliance is installed in a location subject to frost, please read the
ddaannggeerrss ooff ffrreeeezziinngg
“
Any plumbing work required to install this appliance should be carried out by a
qualified plumber or competent person.
Any electrical work required to install this appliance should be carried out by a
qualified electrician or competent person.
” chapter.
Safety information
7
Page 8

8
Use
Safety information
This appliance is designed for domestic use. It must not be used for purposes
other than those for which it was designed.
Only wash fabrics which are designed to be machine washed. Follow the
instructions on each garment label.
Do not overload the appliance. See the relevant section in the user manual.
Before washing, ensure that all pockets are empty and buttons and zips are
fastened. Avoid washing frayed or torn articles and treat stains such as paint,
ink, rust, and grass before washing. Underwired bras must NOT be machine
washed.
Garments which have been in contact with volatile petroleum products should
not be machine washed. If volatile cleaning fluids are used, care should be
taken to ensure that the fluid is removed from the garment before placing in
the machine.
Never pull the power supply cable to remove the plug from the socket; always
take hold of the plug itself.
Never use the washing machine if the power supply cable, the control panel,
the working surface or the base are damaged so that the inside of the washing
machine is accessible.
Child Safety
This appliance is not intended for use by person (including children) with
reduced physical sensory or mental capabilities or lack of experience and
knowledge unless they have been given supervision or instruction concerning
use of the appliance by a person responsible for their safety.
This washing machine is not intended for use by young children or infirm
persons without supervision.
Young children should be supervised to ensure that they do not play with the
appliance.
The packaging components (e.g. plastic film, polystyrene) can be dangerous to
children - danger of suffocation! Keep them out of children’s reach.
Keep all detergents in a safe place out of children’s reach.
Page 9
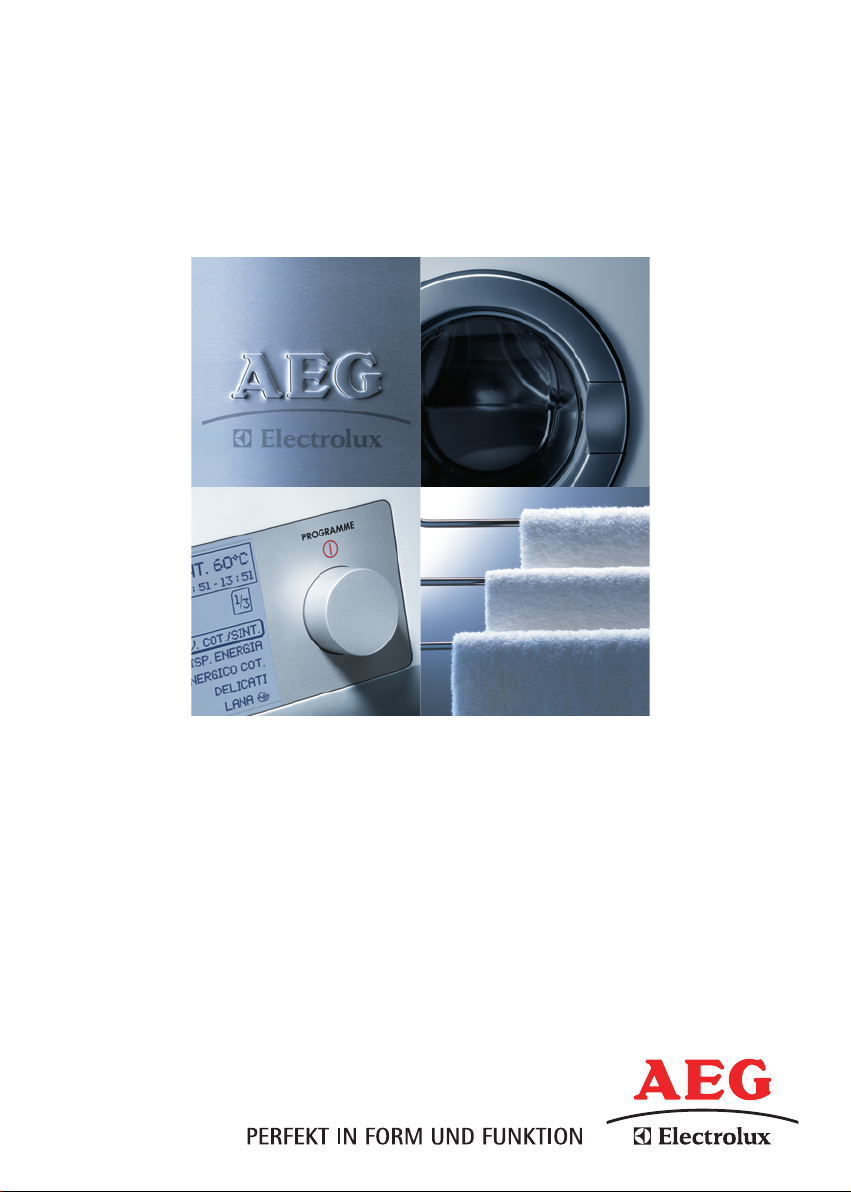
Make sure that children or pets do not
climb into the drum. To avoid this the
machine incorporates special feature. To
activate this device, rotate the button
(without pressing it) inside the door
clockwise until the groove is horizontal.
If necessary use a coin. To disable this
device and restore the possibility of
closing the door, rotate the button anticlockwise until the groove is vertical.
Safety information
9
Page 10
Product description
10
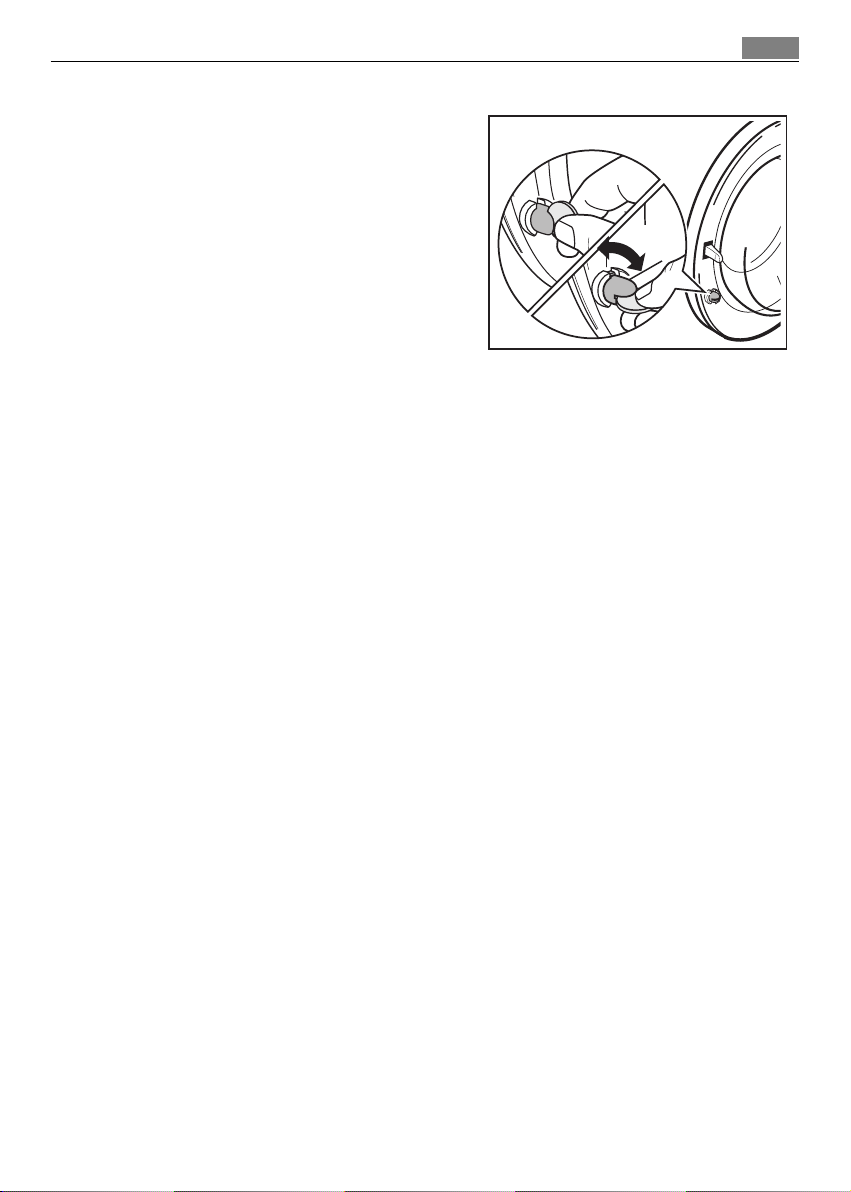
Product description
Your new appliance meets all modern requirements for effective treatment of
laundry with low water, energy and detergent consumption.
Detergent dispenser drawer
1
Control panel
2
Drum light
3
4
Door opening handle
Detergent dispenser drawer
Compartment for detergent used for prewash.
Compartment for powder or liquid detergent used for main wash.
Compartment for liquid additives (fabric softener, starch).
Compartment for stain remover used for main wash with STAIN -
option.
Rating plate
5
Drain pump
6
Three adjustable feet; The rear
7
foot on the left-hand side is
automatic
Page 11
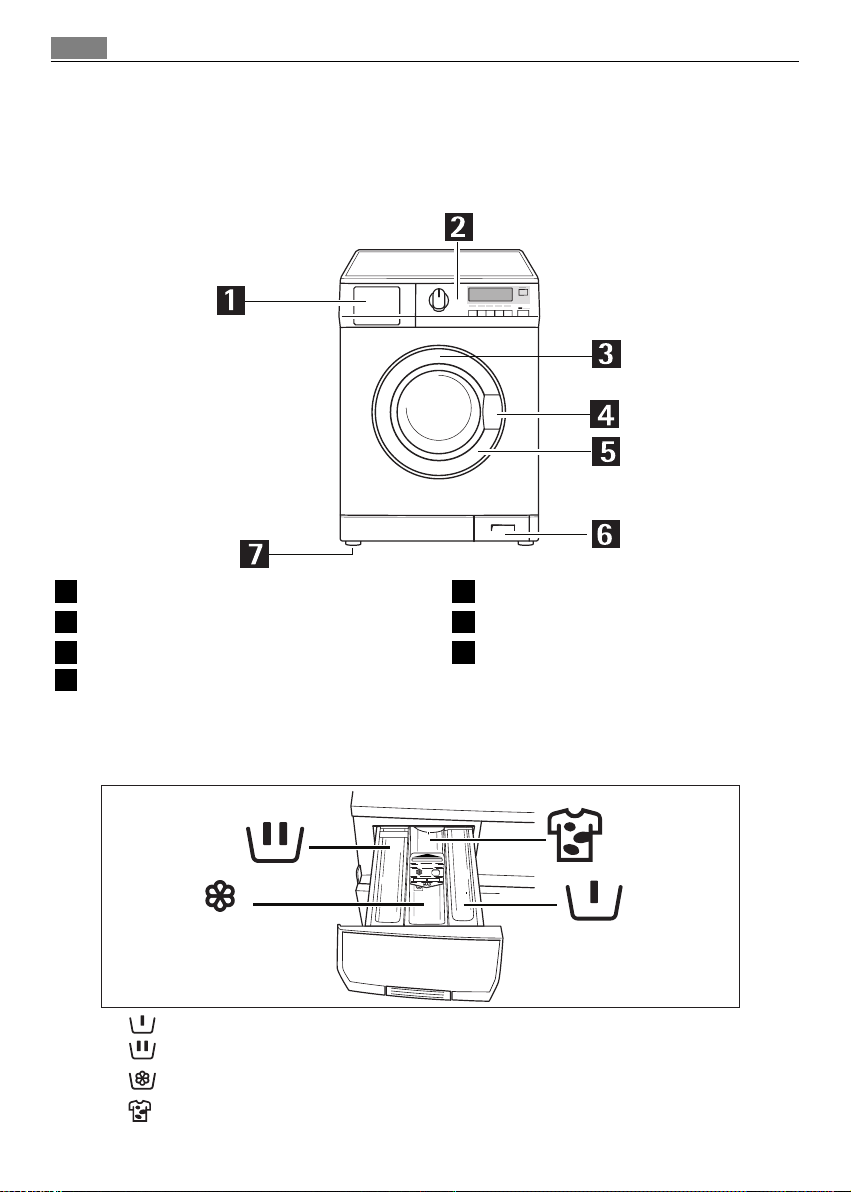
Control panel
ECO
- 3KG
40-60 MIX
bandeau de commande
OK
11
SILENT SYSTEM PLUS
1
Programme selector dial
2
«Temperature» button
3
«Spin reduction» button
4
«Option» button
5
«OK» button
Display
74850M
1 2 3 4 5 6 7 8 9
6
«Time saving» button
7
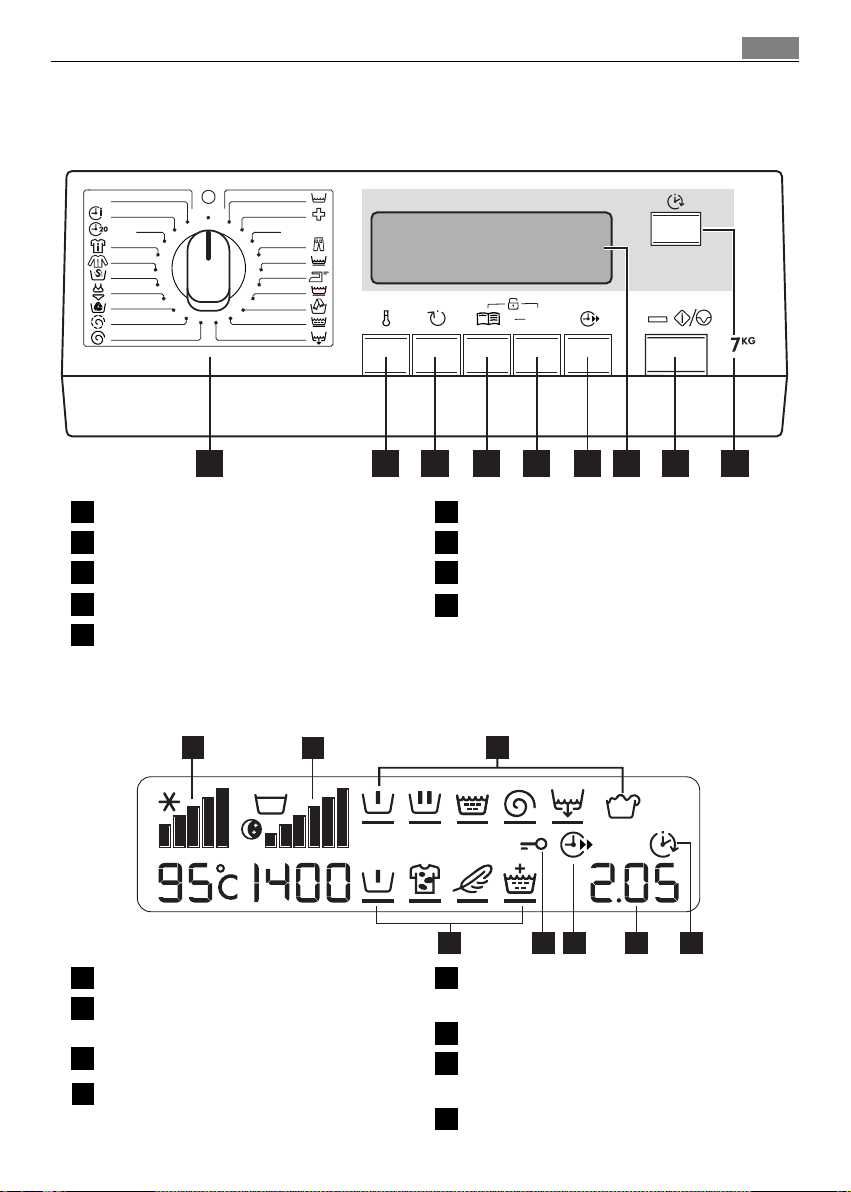
Display
8
«Start/Pause» button
9
«Delay start» button
1
2
3
1
Temperature - symbol
2
Spin Speed, Rinse Hold, Night Cycle symbol
3
Programme phase - symbols
4
Options
4 5 6 7 8
5
Door - symbol (door locked)
6
«Quick» - option symbol
7
Washing programme duration or
delayed start
8
Delay start - symbol
Page 12
Use
12
First Use
Ensure that the electrical and water connections comply with the installation
instructions.
Remove the polystyrene block and any material from the drum.
Personalization
Acoustic signals
The machine is provided with the acoustic device, which sounds in the following
cases:
● at the end of the cycle
● in the event of operating problems
By pressing the
««SSPPIINN»»
6 seconds, the acoustic signal is deactivated (except for the events of operating
problems).
By pressing these 2 buttons again, the acoustic signal is reactivated.
and
««OOPPTTIIOONN»»
buttons simultaneously for about
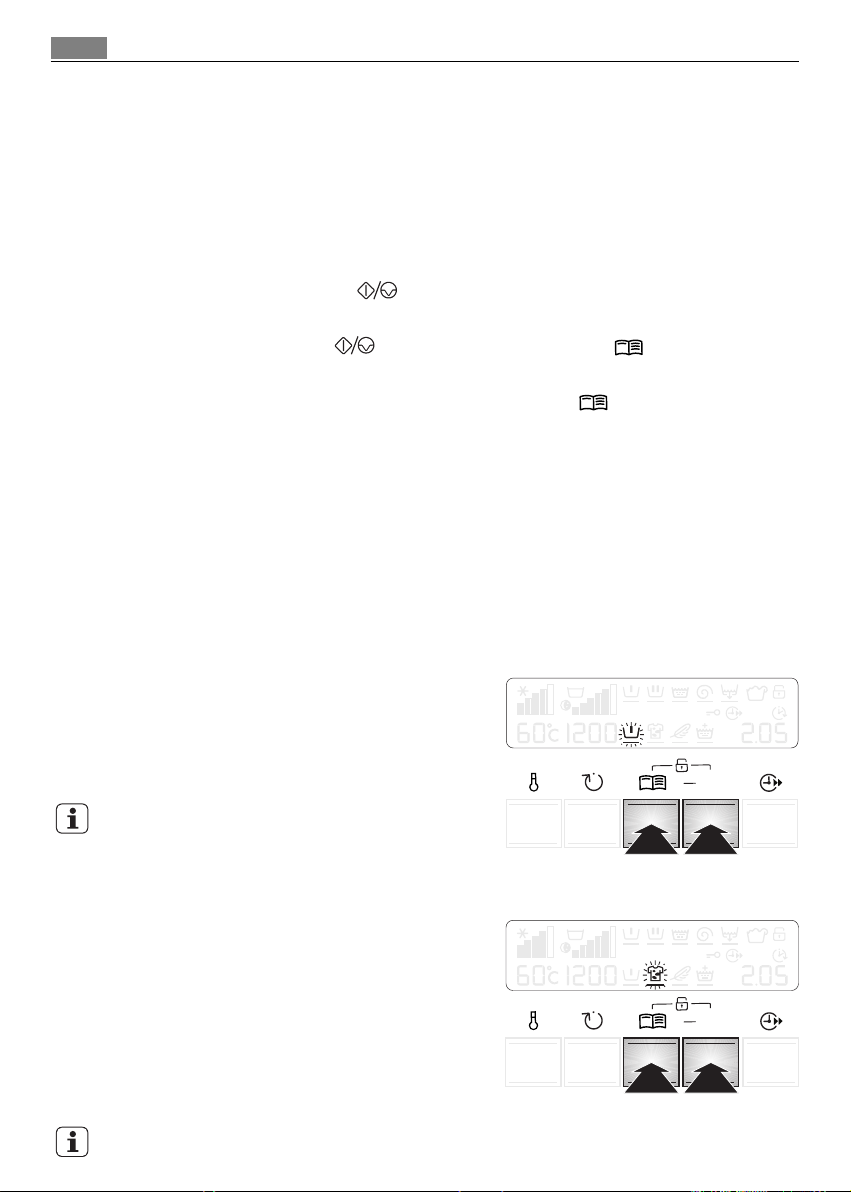
Child safety lock
This device permits you to leave the appliance unsupervised without having the
worry that children might be injured by or cause damage to the appliance.
This function remains able also when the washer-dryer is not working.
There are two different ways to set this option:
● before pressing the «Start/Pause»: it will be impossible to start the machine.
● after pressing the «Start/Pause» it will be impossible to change any other
programme or option.
To enable (disable) this option press simoultaneously for about 6 seconds
««OOPPTTIIOONN»»
the display.
and «OK» buttons until the icon appears (disappears) on (from)
Page 13
Daily Use
Load the laundry
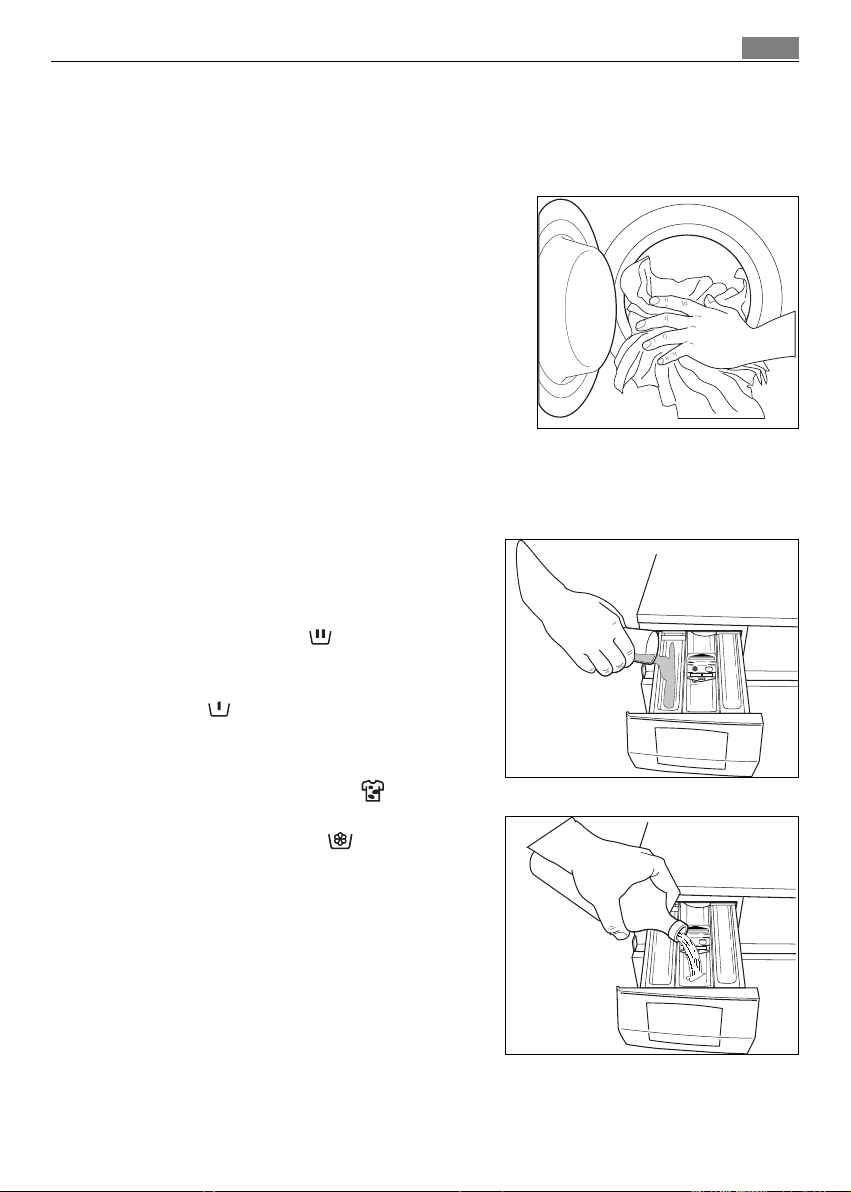
1. Open the door by carefully pulling the door
handle outwards. Place the laundry in the drum,
one item at a time, shaking them out as much
as possible.
2. Close firmly the door. You must hear a click
during closing.
Attention! Do not embed the laundry
between the door and the rubber joint.
Measure out the detergent and the fabric softener
Your new appliance was designed to reduce water, energy and detergent
consumption.
1. Pull out the dispenser drawer until it
stops. Measure out the amount of
detergent required, pour it into the main
wash compartment and, if you wish
to carry out the prewash phase, pour
the detergent into the compartment
marked .
If you wish to perform the stain
function, pour the stain remover into
the compartment marked .
2. If required, pour fabric softener into the
compartment marked (the amount
used must not exceed the MAX mark in
the drawer).
Close the drawer gently.
Use
13
Page 14
Use
14
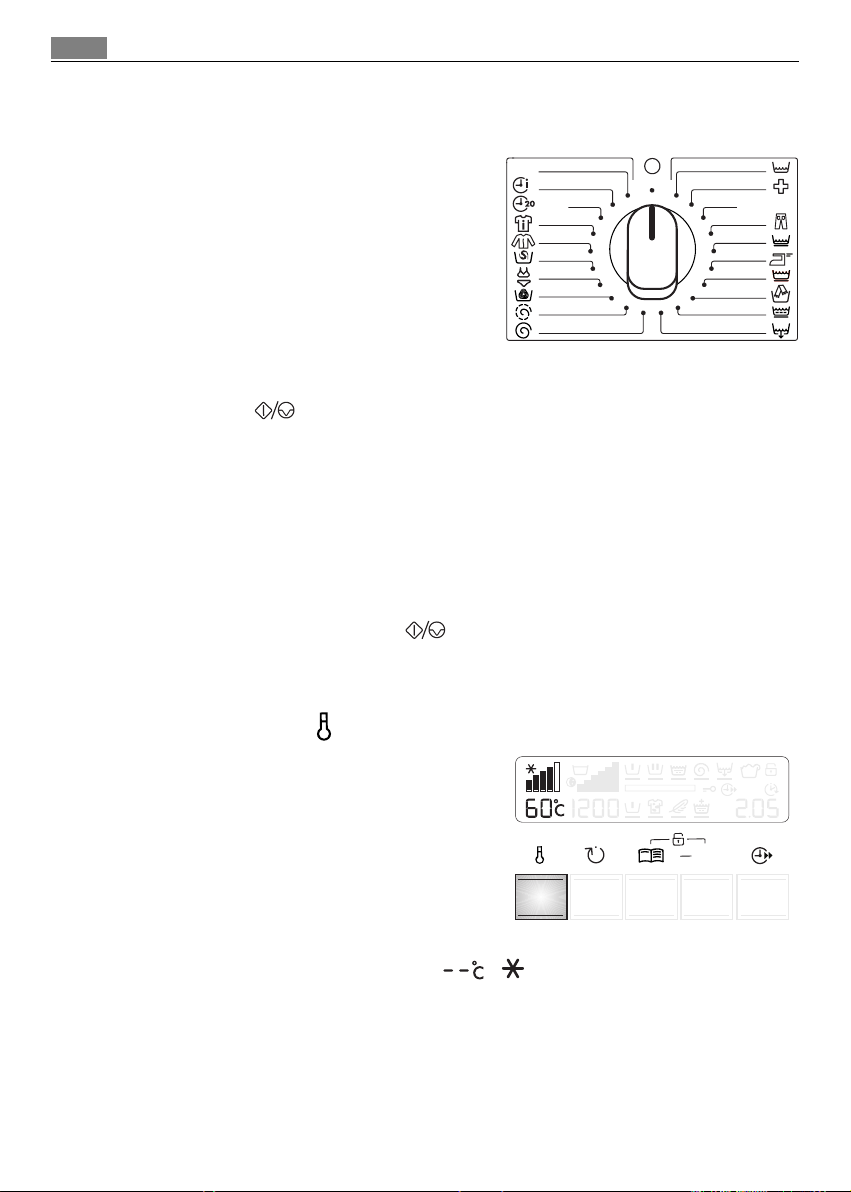
Select the required programme
You can choose the right programme for any
type of laundry following the descriptions on
the washing programme tables (see Washing
Programmes).
Turn the programme selector dial to the
required programme. The programme selector
determines the type of washing cycle (e.g.
water level, drum movement, number of rinses)
and the washing temperature according to the
type of laundry.
The Start/Pause light starts to flash and the Display shows the duration of
the selected programme.
The selector dial can be turned either clockwise or anticlockwise. Position
programme/Switching OFF of the machine.
At the end of the programme the selector dial must be turned to position
O, to switch the machine off.
Attention!
If you turn the programme selector dial to another programme when the machine
is working, the Yellow Start/Pause pilot light will flash 3 times and the
message Err is displayed on the display to indicate a wrong selection. The machine
will not perform the new selected programme.
ECO
- 3KG
40-60 MIX
O to Reset
Select the temperature
Press this button repeatedly to increase or
decrease the temperature, if you want your
laundry to be washed at a temperature
different from the one proposed by the
washing machine.
The maximum temperatures for each washing
programme can be checked in the paragraph
«Washing programmes».
The symbol of cold wash corresponds to ().
OK
Page 15
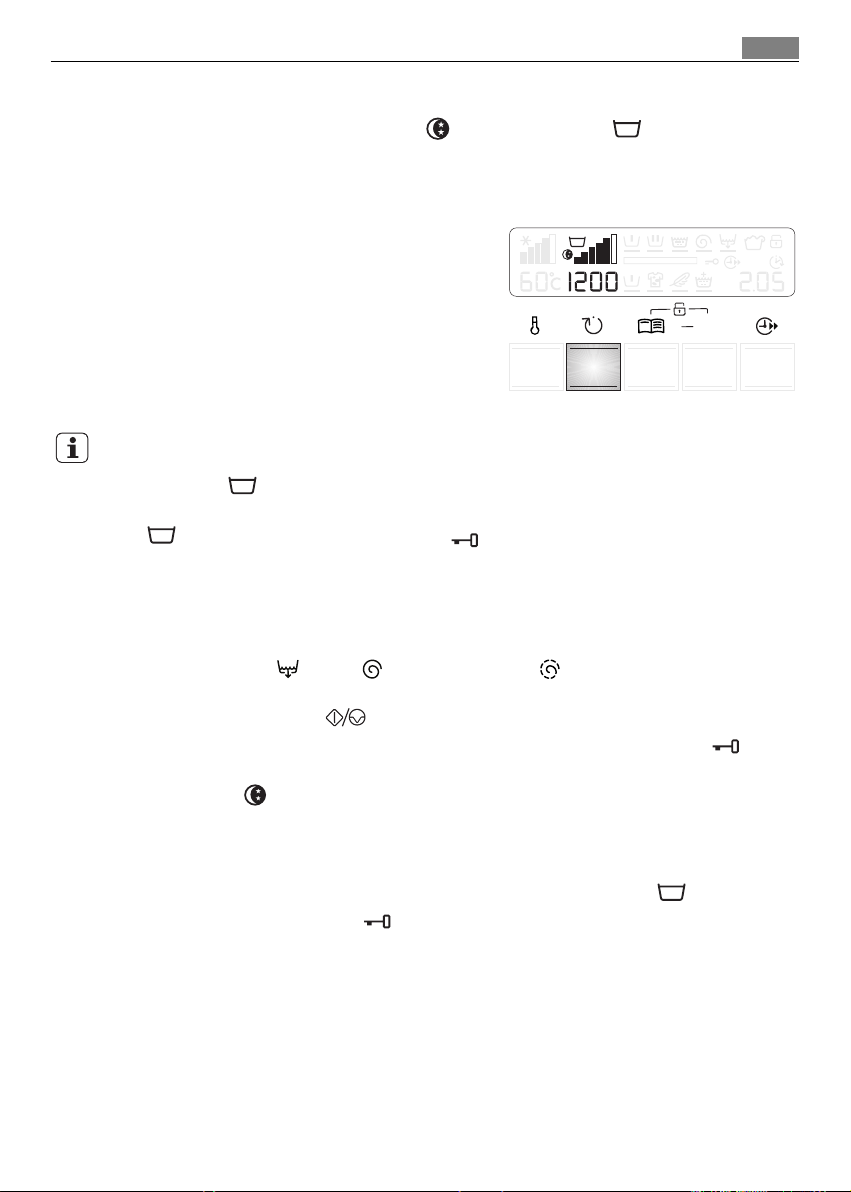
Select the spin speed, Night cycle or Rinse hold option
Press this button repeatedly to change the spin speed, if you want your laundry to
be spun at a speed different from the one proposed by the washing machine.
Maximum speeds are:
● for COTTOINS, HYGIÈNE, 40-60 MIX,
ECONOMY: 1400 rpm;
● for JEANS, SYNTHETICS, EASY IRON,
DELICATES, VISCOSE, WOOL, LINGERIE, SILK,
SPORT INTENSIVE, 20 MIN.-3 KG, QUICK
INTENSIVE: 1200 rpm ;
● for SPORT JACKETS: 800 rpm;
For the compatibility between options and washing programmes consult the
chapter
«Washing programmes».
«Rinse hold» : by selecting this option the water of the last rinse is not
emptied out to prevent the fabrics from creasing. At the end of the programme,
and -symbol will flash on the display, - symbol (door locked) remains lit, the
Start/Pause pilot light goes off and the door is blocked to indicate that the water
must be emptied out.
To empty the water out:
● turn the programme selector dial to O
● select the Drain , Spin or Delicate Spin programme
● reduce the spin speed if needed, by means of the relevant button
● press the Start/Pause button
● when the programme has finished the display shows a flashing 0. the
symbol Door goes off and the door can be opened.
«Night cycle» : by selecting this option, the machine will not drain the water
of the last rinse, so as not to wrinkle the laundry. As all spinning phases are
suppressed, this washing cycle is very noiseless and it can be selected at night or in
times with a more economical power rate
performed with more water. At the end of the programme, 0 and -symbol will
. On some programmes the rinses will be
flash on the display, the door -symbol (door locked) remains lit, the
Start/Pause pilot light goes off and the door is blocked to indicate that the water
must be emptied out.
TToo eemmppttyy oouutt tthhee wwaatteerr,, pplleeaassee rreeaadd tthhee pprreevviioouuss ooppttiioonn cchhaapptteerr..
OK
Use
15
0
-
Page 16
use
16
Programme option buttons
Depending on the programme, different functions can be combined.
Attention: Not all the options are compatible between themselves. The symbols
of the incompatible options disappear.
Anyway, if an option, which is not compatible with the set washing programme
or any other option, is selected, the Err message is displayed for few seconds
and the yellow
You must select the options after you have selected the programme but before
pressing the
option symbols appear on the display.
To scroll all the available options, depress the
corresponding symbol appear on the display and starts flashing.
Depress the OK button to activate and confirm your choice. A black dash appears
under the selected symbol to indicate that this option has been set. Depress the same
button to deactivate the option.
After selecting the options, wait about 10 seconds untill the display gets back to the
default status. The selected options appear on the display.
««SSttaarrtt//PPaauussee»»
««SSttaarrtt//PPaauussee»»
pilot light starts flashing.
button. Press the
««OOPPTTIIOONN»»
««OOPPTTIIOONN»»
button: All the
button. The
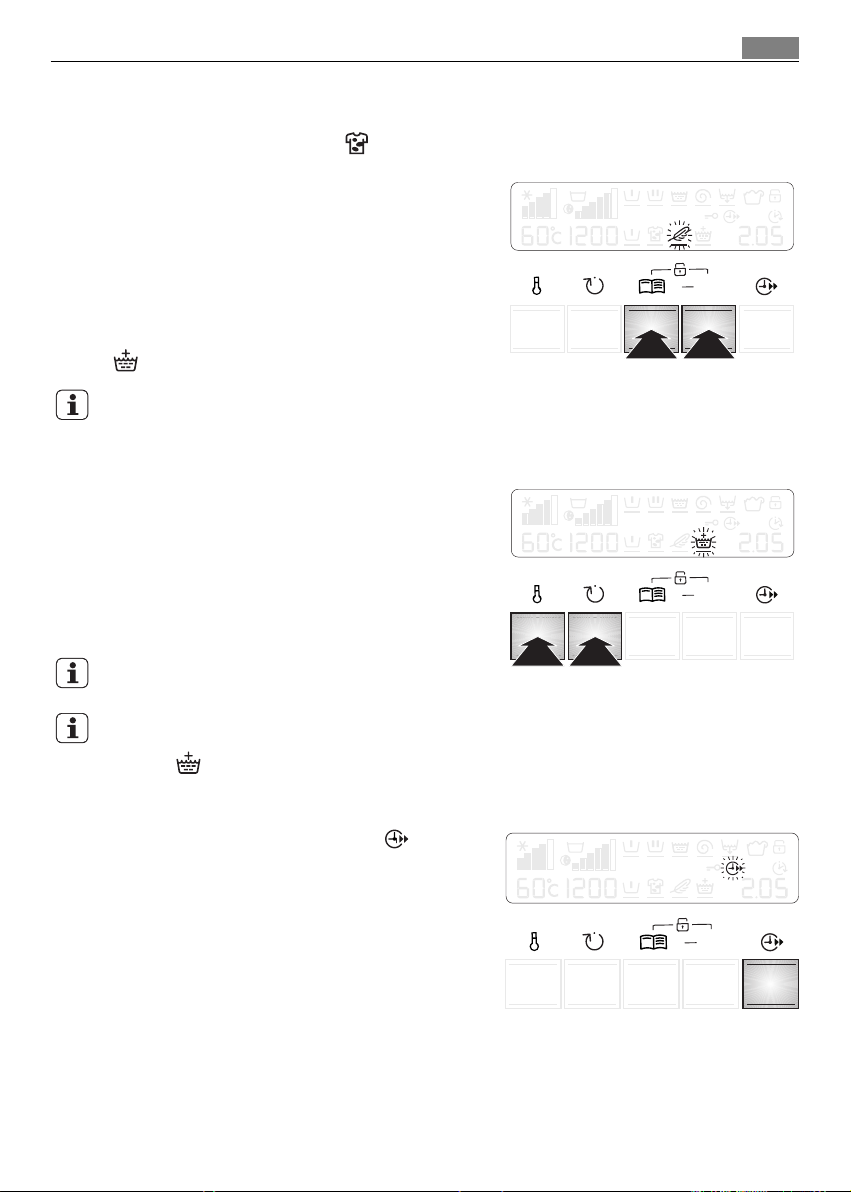
Select the Prewash option
Select this option if you wish your laundry to be prewashed at 30°C before the
main wash.
The Prewash ends with a short spin in
programmes for cotton and synthetic fabrics,
whereas in the programmes for delicate
fabrics the water is only drained.
For the compatibility between this option and
washing programmes consult the chapter
«Washing programmes».
The relevant symbol will appear on the display.
1
OK
2
Select the Stain option
Select this option to treat heavily soiled or
stained laundry with stain remover (extended
main wash with time optimised stain action
phase).
This option is not available with a
temperature lower than 40°C.
For the compatibility between this option and all washing programmes consult the
chapter «Washing programmes».
1
OK
2
Page 17
Attention! If you wish to perform a programme with the stain option, pour stain
remover into compartment .
Select the Sensitive option
By depressing this button the washing
intensity will be reduced. The machine adds
one rinse in the programmes for COTTONS,
40°-60° MIX and SYNTHETICS.
This option is non compatible with Extra Rinse
option.
1
For the compatibility between this option and washing programmes consult the
chapter
«Washing programmes».
This option is recommended for non fast coloureds items.
Select an additional rinse
This appliance is designed for saving water.
However, for people with a very delicate skin
(allergic to detergents) it may be necessary to
rinse the laundry using an extra quantity of
water (extra rinse).
1
For the compatibility between this option and
washing programmes consult the chapter
«Washing programmes».
If you wish to ativate this option permanently for every washing cycle, depress
simoultaneously TEMPERATURE and SPIN buttons for about 6 seconds: the
symbol illuminates on the display. This option remains active permanently.
If you wish to cancel it depress the same buttons untill the symbol desappears.
2
use
17
OK
2
OK
Select the Time Saving option
The washing machine proposes by default the
washing cycle for «Normally soiled laundry». The
washing cycle can be shorted by means of the
«Time saving» button.
This option can be selected with the washing
programmes for COTTONS, SYNTHETICS and
DELICATES.
By pressing this button once, the corresponding symbol appears on the display
and you will be able to short the washing duration for «Daily soiled laundry».
The display will show the shorted washing time. To be used for daily soiled
laundry. The maximum load size is 7 kg for cotton and 3.5 kg for synthetics and
delicates.
OK
Page 18
use
18
By pressing this button twice, the corresponding symbol remains alight on the
display and you will be able to short the washing duration for «lightly soiled
laundry». The display will show the shorted washing time.
The display will show the shorted washing time. To be used for very lightly soiled
laundry only. The maximum load size is 3.5 kg for cotton and 2 kg for synthetics
and delicates.
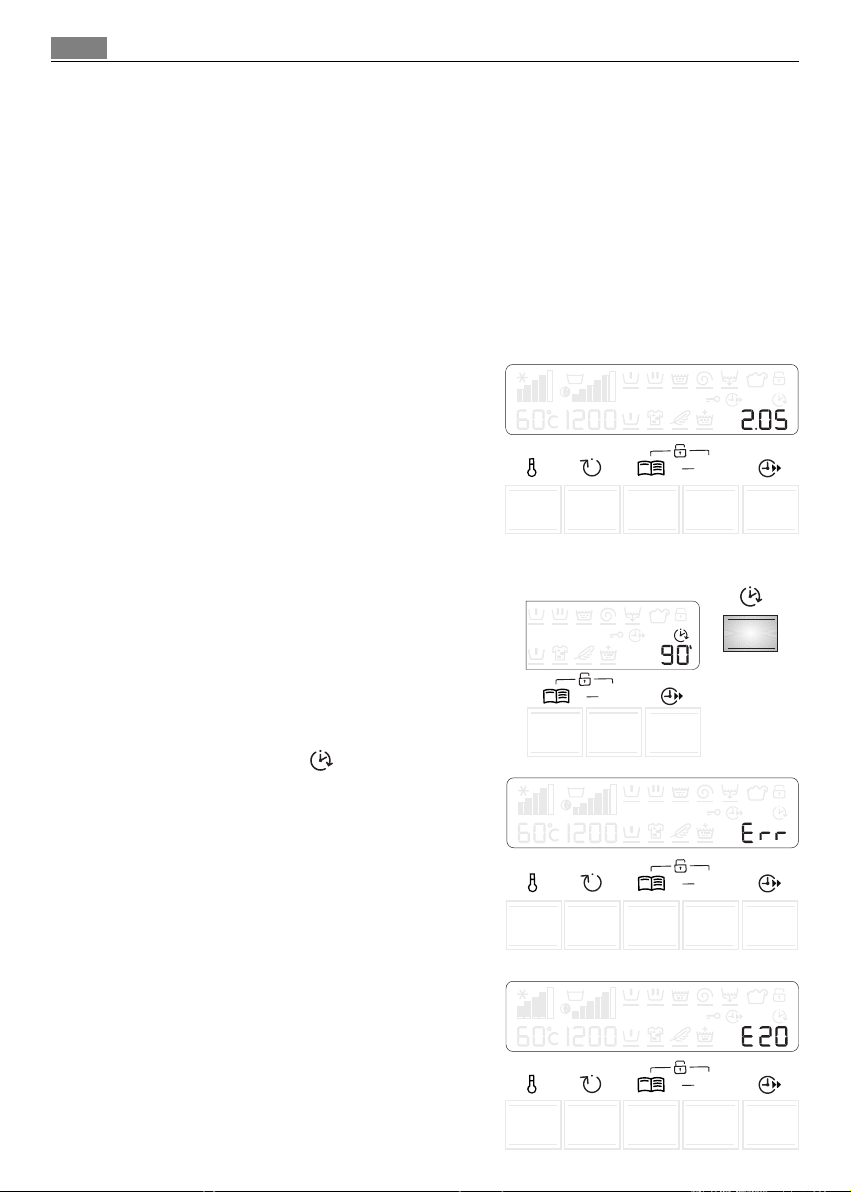
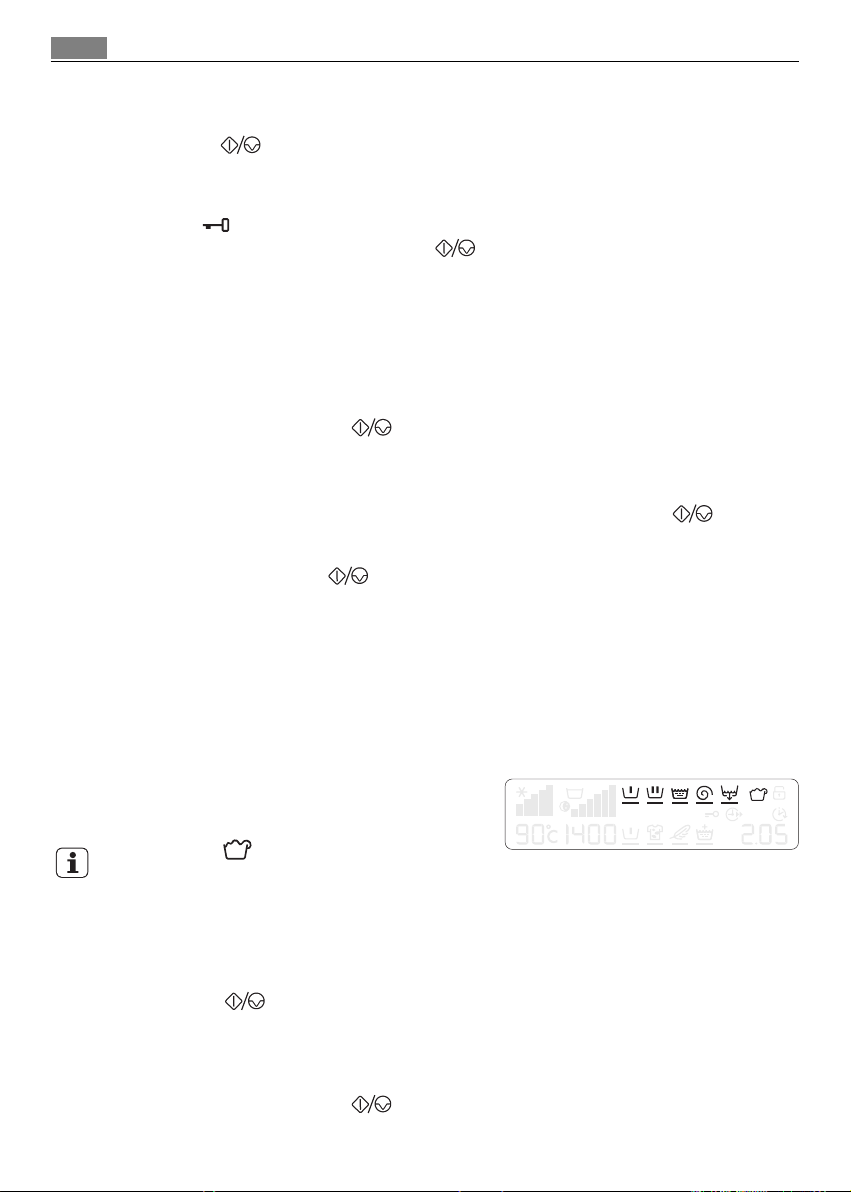
Display
The display shows the following information:
Duration of the selected programme
After selecting a programme, the duration is
displayed in hours and minutes (for example
2.05). The duration is calculated automatically
on the basis of the maximum recommended
load for each type of fabric.
After the programme has started, the time
remaining is updated every minute.
Delay start
The selected delay (20 hours max) set by
means of the relevant button appears on the
display for about 3 seconds, then the duration
of the previously selected programme is
displayed.
The Delay Start symbol will appear on the
display.
The delay time value decreases by one unit
every hour and then, when remains 1 hour,
the time decreases every minute.
OK
OK
OK
Incorrect option selection
If an option which is not compatible with the
set wash programme is selected, the message
Err is displayed for about 2 seconds and the
yellow Start/Pause light start flashing.
Alarm codes
In the event of operating problems, some
alarm codes can be displayed, for example
E20 (see paragraph «Something not working»).
OK
Page 19
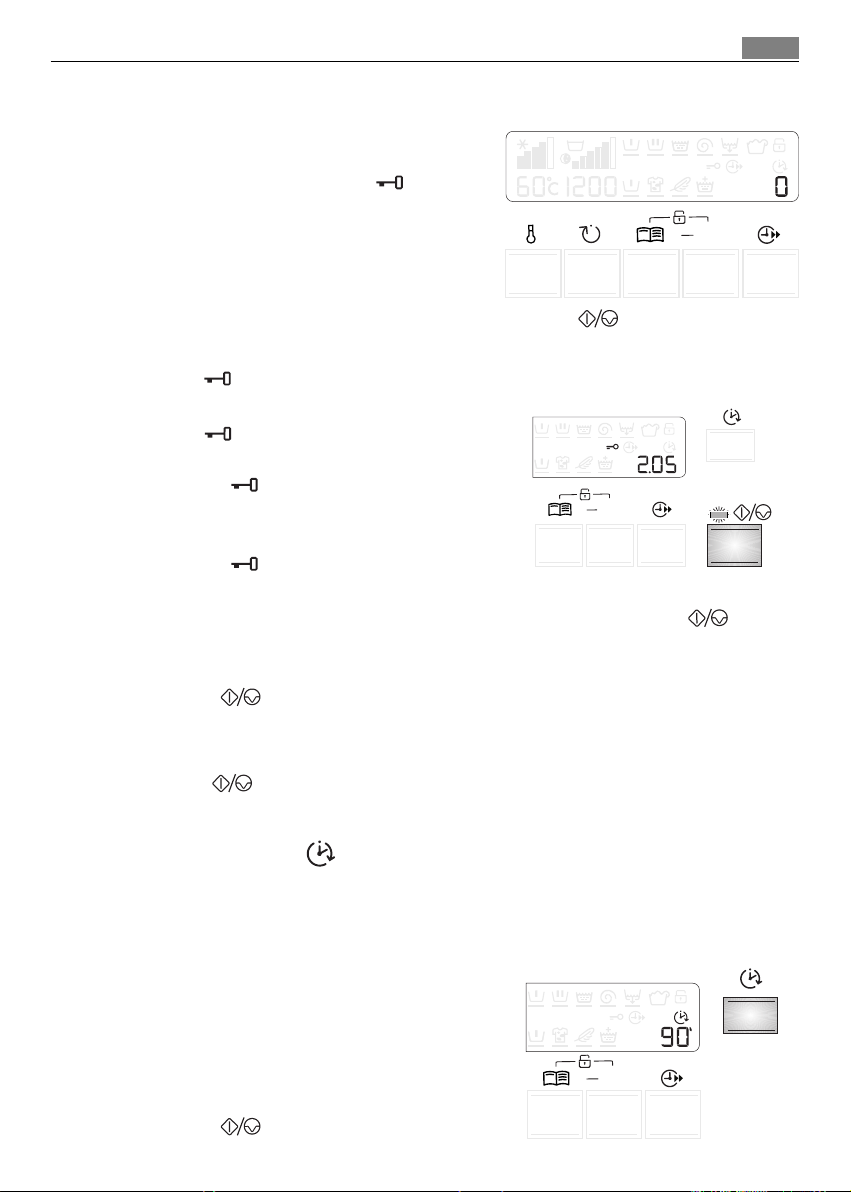
End of the programme
When the programme has finished a flashing
0 is displayed, the «Door»
zero (
symbol
-
disappears and the door can be opened.
Select the «Start/Pause»
To start the selected programme, press the Start/Pause button; the
corresponding red pilot light stops flashing.
The «Door» symbol appears on the display to indicate that the appliance has
started operating and the door is locked.
The «Door» symbol indicates if the door
can be opened:
● the «Door» symbol is on: the door
cannot be opened. The appliance is
performing a washing programme.
● the «Door» symbol is off: the door can
be opened. The washing programme is finished.
To interrupt a programme which is running, depress the Start/Pause button:
the corresponding red pilot light starts to flash.
To restart the programme from the point at which it was interrupted, press the
Start/Pause button again.
If you have chosen a delayed start, the machine will begin the countdown.
If an incorrect option is selected, the integrated yellow pilot light of the
Start/Pause button flashes for 3 times, the message Err is displayed for
about 2 seconds.
OK
use
19
OK
Select the Delay Start
Before you start the programme, if you wish to delay the start, press the Delay
Start button repeatedly, to select the desired delay.
The corresponding symbol will appear on the display
The selected delay time value (up to 20 hours)
will appear on the display for about 3
seconds, then the duration of the programme
will appear again.
You must select this option after you have set
the programme and before you press the
Start/Pause button.
OK
Page 20
use
20
You can modify or cancel the delay time at any moment, before you press the
Start/Pause button.
If you wish to add laundry in the machine during the delay time, press
Start/Pause button to put the machine in pause. Then wait for some minutes, until
the «Door» symbol stops flashing before opening the door. After you have
closed the door, press the Start/Pause button again.
The washing programme can be delayed from 30 min - 60 min - 90 min, 2 hours
and then by 1 hour up to a maximum of 20 hours by means of this button.
Selecting the delayed start:
● Select the programme and the required options;
● Select the delay start;
● Depress the Start/Pause button: the machine starts its hourly
countdown. The programme will start after the selected delay has expired.
Cancelling the delayed start:
● set the washing machine to PAUSE by pressing the Start/Pause button;
● press the Delay Start button until the symbol 0’ is displayed;
● press the Start/Pause button again to start the programme.
The Delay Start option can not be selected with Drain programme
.
Programme progress display
The programme progress display shows the washing phases of the selected
programme.
During the washing, a black line flashes under the washing phase symbole of the
running programme. At the end of each
washing phase , the line under the
corresponding symbol becomes fixed.
If the symbol «Overdosage» lights up at the
end of the programme, it indicates that too much detergent has been used.
Altering an option or a running programme
It is possible to change any option before the programme carries it out. Before
you make any change, you must pause the washing machine by pressing the
Start/Pause button.
Changing a running programme is possible only by resetting it. Turn the
programme selector dial to O and then to the new programme position. The
washing water in the tub will be not emptied out. Start the new programme by
depressing the Start/Pause button again.
Page 21
Interrupting a programme
Depress the Start/Pause button to interrupt a programme which is
running, the corresponding light starts to flash. Depress the button again to
restart the programme.
Cancelling a programme
Turn the selector dial to O to cancel a programme which is running. Now you
can select a new programme.
Opening the door after the programme has started
First set the machine to pause by pressing the Start/Pause button.
● if the «Door» symbol disappears, the door can be opened.
● if the «Door» symbol doesn’t go off, it means that the machine is already
heating, that the water level is above the bottom edge of the door. In this
case the door can not be opened.
● If you cannot open the door but you need to open it, you have to switch the
machine off by turning the selector dial to O. After about 3 minutes the door
can be opened (pay attention to the water level and temperature!).
use
21
At the end of the programme
The machine stops automatically, the Start/Pause button pilot light goes
off, a flashing
minutes.
If the Rinse Hold or Night Cycle option has been selected, the «Door»
symbol is still on and the door remains locked to indicate that the water
must be emptied out before opening the door.
To empty out the water please read the steps on the Rinse Hold option
paragraph.
Turn the programme selector dial to O to switch the machine off. Remove the
laundry from the drum and carefully check that the drum is empty.
If you do not intend to carry out another wash, close the water tap. Leave the
door open to prevent the formation of mildew and unpleasant smells.
0 appears on the display and the acoustic signal sounds for 2
Page 22

Washing programmes
22
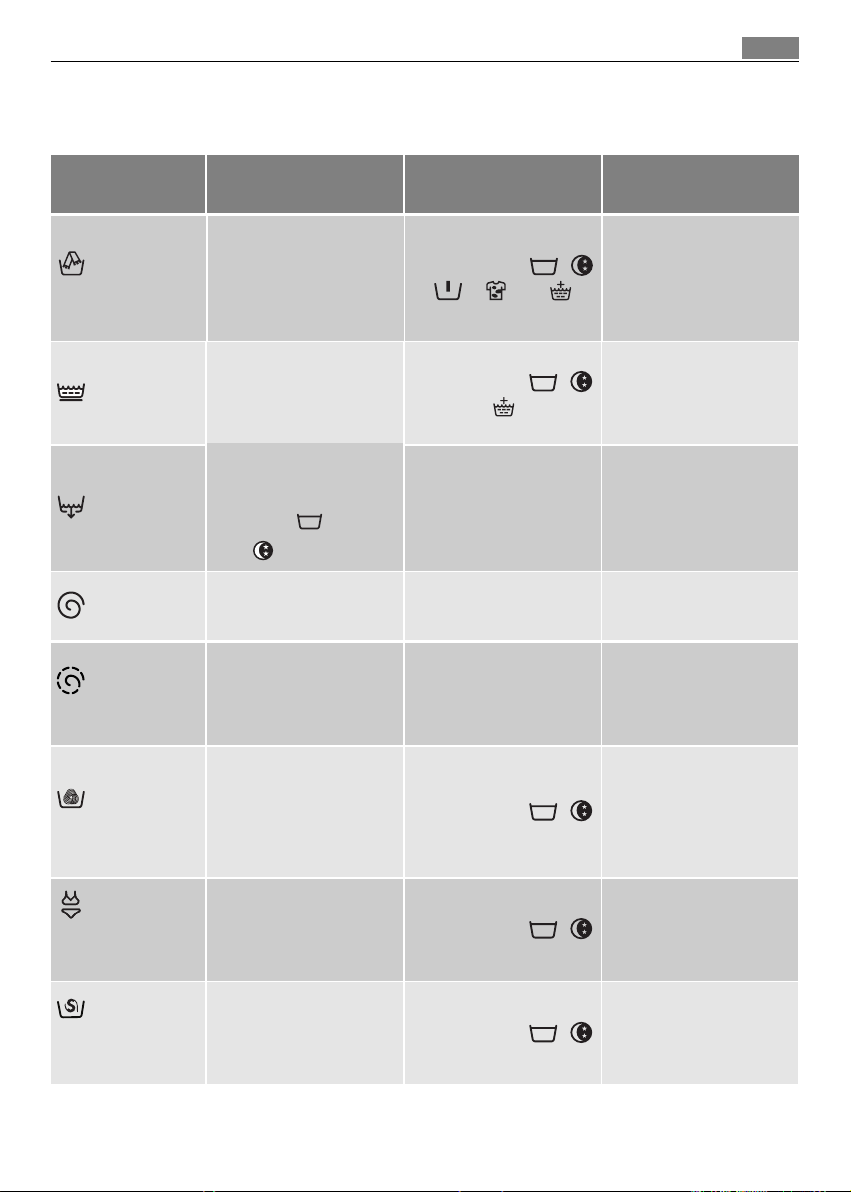
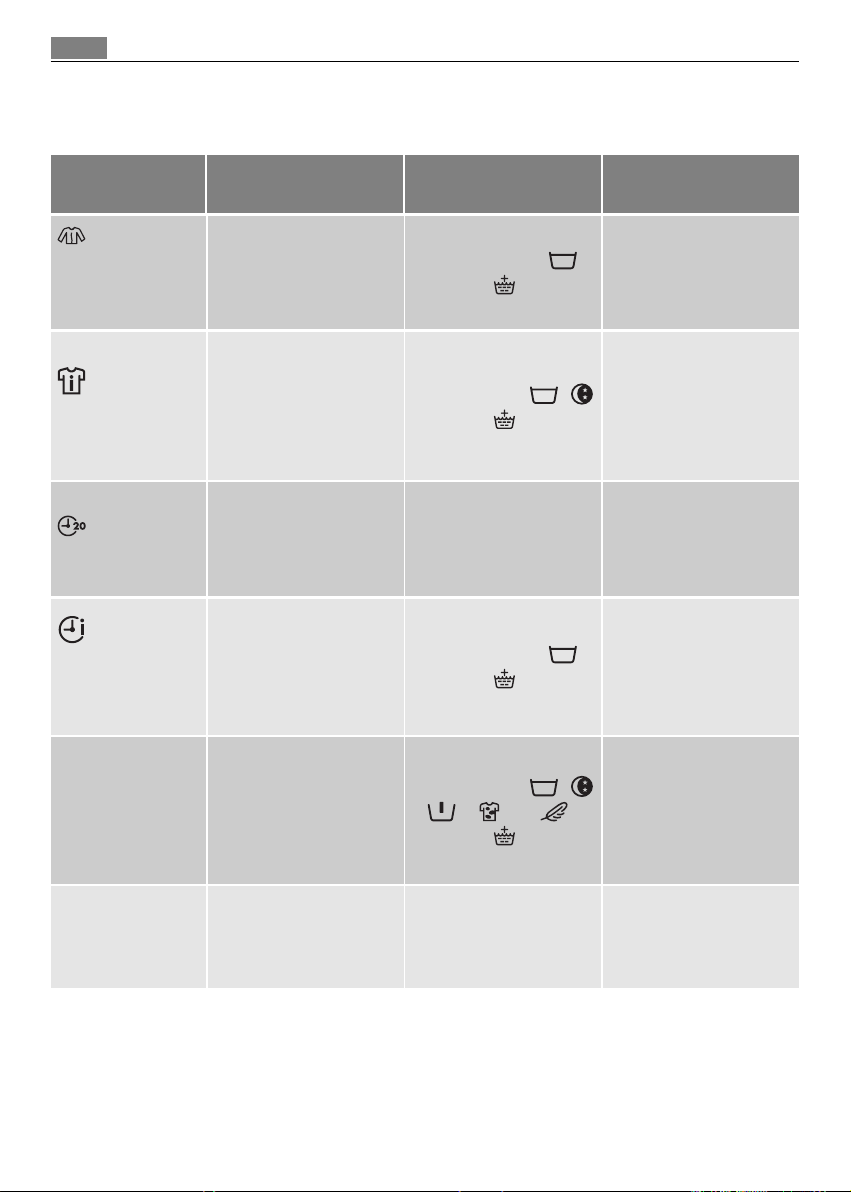
Washing programmes
Programme/
Temperature
WHITE
COTTONS
95°-60°
COLOURED
COTTONS
60°-50°-40°-30°cold
40-60 MIX
HYGIENE
60°
JEANS
60°-50°-40°-30°cold
Max.load 3,5 kg
SYNTHETICS
40°-30°-cold
TTyyppee ooff llaauunnddrryy
White cotton:
tablecloths, household
linen.
Coloured cotton and
linen: work garments,
sheets, household linen,
underwear, towels.
Special programme for
white cottons
Special programme for
the items like pants,
shirts or jackets in jeans
Synthetic or mixed
fabrics: underwear,
coloured garments, nonshrink shirts, blouses.
e.g. sheets,
Options
Spin reduction/
/
- (*) - -
-
Spin reduction/
/
- (*) - -
- (not possible with 40-60
MIX)
Spin reduction/
- (*)
Spin reduction/
/
Spin reduction/ /
- (*) - -
-
Description of the
programme
Main wash from 95°C to
60°C
3 rinses
Long spin
Main wash from 60°C to
cold
3 rinses
Long spin
Main wash at 60°C
Long spin
Main wash from 60°C to
cold
5 rinsees
Long spin at 1200 rpm
Main wash from 60°C to
cold
3 rinses
Short spin
EASY IRON
60°-50°-40°-30°cold
Max. load 1,5 kg
DELICATES
40°-30°-cold
Synthetic or mixed
fabrics: underwear,
coloured garments, nonshrink shirts, blouses.
Delicate fabrics: for
example curtains
Spin reduction/
-
Spin reduction/ /
- (*) - -
Main wash from 60°C to
cold
4 rinsees
Short spin at 1200 rpm
Main wash from 40°C to
cold
3 rinses
Short spin
Page 23
Washing programmes
Washing programmes
23
Programme/
Temperature
VISCOSE
Max. load 3,5 kg
RINSES
DRAIN
SPIN
DELICATE
SPIN
TTyyppee ooff llaauunnddrryy
Viscose items
Separate rinse cycle for
hand washed items.
For emptying out the last
rinse water in
programmes with the
Rinse Hold and Night
cycle option.
Separate spin for cottons
Separate spin for
synthetic and delicate
fabrics.
Options
Spin reduction/ /
- (*) -
Spin reduction/ /
Spin reduction Drain and long spin
Spin reduction Drain and short spin
Description of the
programme
Main wash from 40°C to
cold
3 rinses
Short spin
Long spin
Drain
WOOL
40°-30°-cold
LINGERIE
40°-30°-cold
Max. load 1 kg
SILK
30°-cold
Max. load 1 kg
Garments bearing the
“Pure new wool, nonshrink, machine
washable” or
“Handwash” label
Special programme for
extremly delicate
handwashed garments
Silk items to be gentle
washed and spun.
Spin reduction/ /
Spin reduction/ /
Spin reduction/ /
Main wash from 40°C to
cold
3 rinses
Short spin
Main wash from 40°C to
cold
3 rinses
Short spin
Main wash from 30°C to
cold
3 rinses
Short spin
Page 24
Washing programmes
24
Washing programmes
Programme/
Temperature
SPORT
JACKETS
40°-30°-COLD
Max. load 2 kg
SPORT
INTENSIVE
Max. load. 2,5 kg
- 3 KG
30°
QUICK
INTENSIVE
60°-50°-40°
Max. load. 5 kg
TTyyppee ooff llaauunnddrryy
Special programme for
sport clothes
Special programme for
heavily soiled sportwear
items
For slightly soiled
fabrics, except wool
To use for cotton or
mixed fabrics, slightly
soiled or worn only once
Options
Spin reduction/
Spin reduction/ /
Spin reduction
Spin reduction/
DDeessccrriippttiioonn ooff tthhee
pprrooggrraammmmee
Main wash from 40°C to
cold
3 rinses
Short spin
Prewash at 30°
Main wash from 40°C to
cold
3 rinses
Short spin at 1200 rpm
Main wash at 30°
2 rinses
Short spin at 1200 rpm
Main was from 60° to
40°C
3 rinses
Short spin at 1200 rpm
ECONOMY
60°
O
White and coloured
cotton - economy,
lightly-normally soiled
items, shirts, underwear.
For cancelling the programme which is running or to switch the
machine off.
Spin reduction/ /
- (*) - -
Main wash at 60°C
2 rinses
Long spin
* Stain option can be selected only at the temperature of 40°C or higher.
Page 25

Washing programmes
Washing programmes
Type of fabric Max. Load
COTTONS 7 kg
25
SYNTHETICS,
JEANS 3,5 kg
EASY IRON 1,5 kg
WOOL (HANDWASH) 2 kg
LINGERIE and SILK 1 kg
SPORT JACKETS 2.5 kg
DELICATES and VISCOSE
3,5 kg
20 MIN. - 3 KG 3 kg
SPORT INTENSIVE 2.5 kg
ECONOMIY 7 kg
QUICK INTENSIVE 5 kg
Page 26
Programme information
26
Programme information
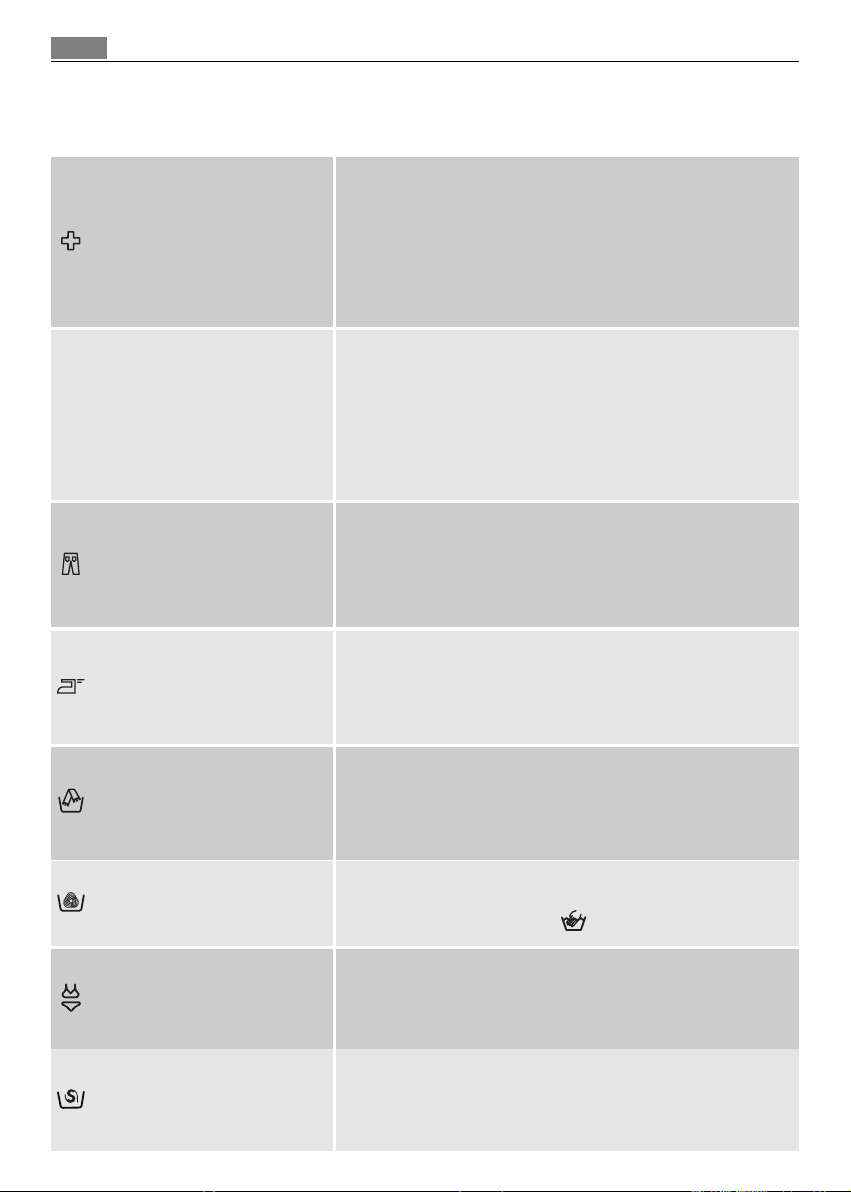
The washing program for white cottons. This program
eliminates the micro-organisms thanks to the washing by 60°C
HYGIENE
40-60 MIX
JEANS
and an additional rinse. So that this action is more effective,
place into the compartment "Stains" a special additive
"Hygiene" and select the option "Stains". Recommended
maximum spin speed: 1400 rpm
Special programme for white and coloured cotton suitable
for different washing temperatures. This programme can be
used for laundry, which should be washed at 40°C or 60°C
separately. So, you can put into the drum the maximum
load capacity in order to save energy and water. You will
obtain the same good washing result as a normal
programme at 60°C.
With this programme it is possible to wash items like pants,
shirts or jackets in Jeans and also jersey realized with hi-tech
materials. (The Extra Rinse option will be activated
automatically). The maximum spin speed is 1200 rpm.
EASY IRON
VISCOSE
WOOL/HANDWASH
LINGERIE
SILK
Selecting this programme the laundry is gently washed
and spun to avoid any creasing. In this way ironing is
easier. Furthermore the machine will perform additional
rinses.
Special programme for fabrics such a viskose, cupro, lyocell,
which will be washed with a more gently machine action
than in the Delicats programme and with a more intensive
cleaning action than the «Handwash» programme.
Washing programme for machine washable wool as well as
for hand washable woollens and delicate fabrics with the
“hand washing” care symbol .
This programme is suitable for very delicate items, as lingerie,
bras and underwear etc. The maximum washing temperature
is 40°C. The maximum spin speed is automatically reduced
to 1200 rpm.
Delicate washing programme suitable for silk and mixed
synthetic items. Washing temperature is 30°C.
The maximum spin speed is automatically reduced to 1200
rpm.
Page 27
Programme informations
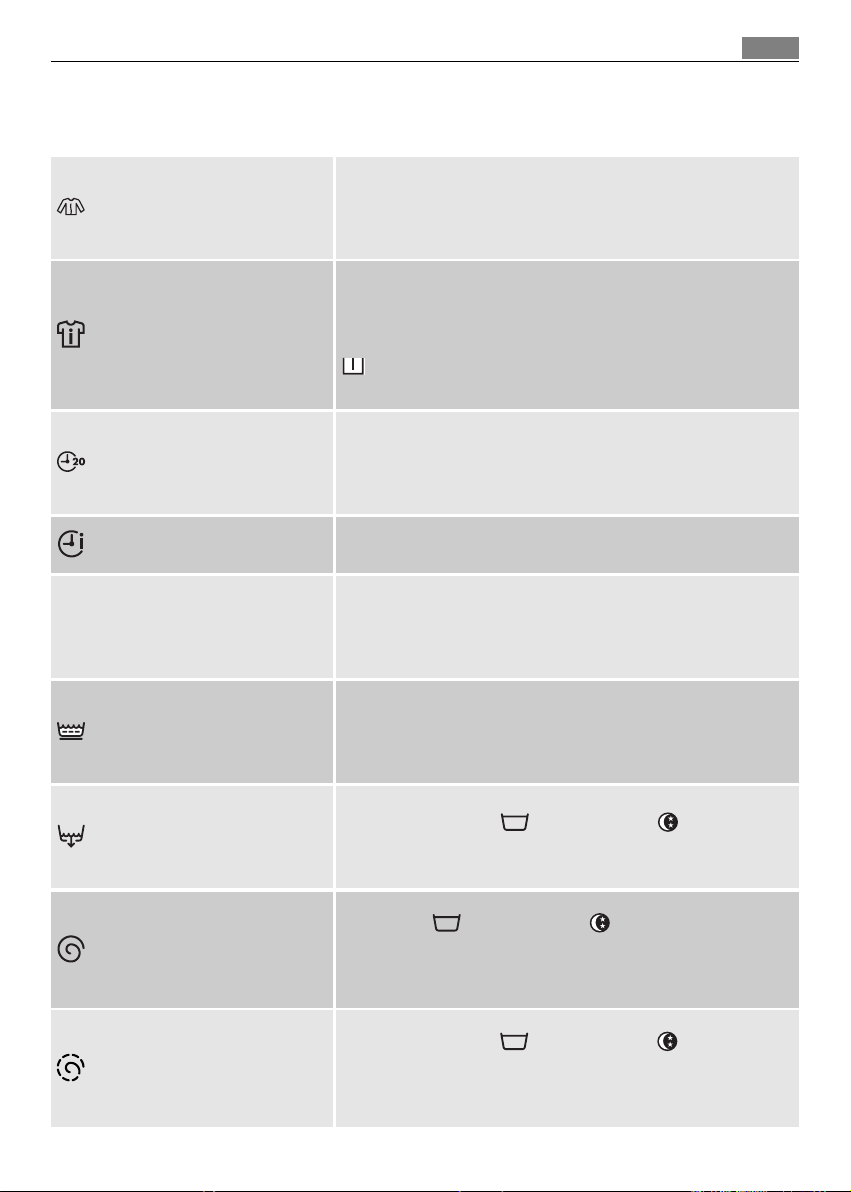
Special program for sport clothes washing. The maximum
SPORT JACKETS
SPORT INTENSIVE
- 3 KG
QUICK INTENSIVE
ECONOMY
temperature is 40°C. The maximum spin speed is 800 rpm. By
selecting this program, do not add any additives.
This programme is suitable for washing heavily soiled sport
items. The machine will add automatically a prewash phase
before the main wash to eliminate mud stains. We
recommend you
of the detergent drawer. Washing temperature is 40°C.
The maximum spin speed is 1200 rpm.
Special program at 30°C, duration - approx. 20 minutes, ideal
for laundry to be refreshed: e.g. a sport jacket worn only once
or slightly soiled or new garments.
Quick washing programme, to be used for lightly soiled
white/fast coloured cottons and mixed fabrics.
This programme can be selected for slightly or normally
soiled cotton items. The temperature will decrease and the
washing time will be extended. This allows to obtain a good
washing efficiency by saving energy.
Programme information
nnoott
to put the detergent into the compartent
27
RINSES
DRAIN
SPIN
DELICATE SPIN
With this programme it is possible to rinse and spin cotton
garments which have been washed by hand. The machine
performs 3 rinses, followed by a final long spin. The spin
speed can be reduced by depressing the
For emptying out the water of the last rinse in programmes
with the Rinse Hold and Night Cycle option.
Turn first the programme selector dial to O, then select
programme
Separate spin for cottons and after programmes with the
Rinse Hold and Night Cycle option. Before selecting
this programme the selector dial must be turned to O. You
can choose the speed by means of the relevant button to
adapt it to the fabrics to be spun.
Separate spin for synthetics, delicates and after programmes
with the Rinse Hold and Night Cycle option. Before
selecting this programme the selector dial must be turned to
O. You can choose the speed by means of the relevant
button to adapt it to the fabrics to be spun.
DDrraaiinn
and depress the Start/Pause button.
SSppiinn SSppeeeedd
button.
Page 28

Preparing the wash cycle
28
Preparing the wash cycle
Sorting out the laundry
Follow the wash code symbols on each garment label and the manufacturer’s
washing instructions. Sort the laundry as follows: whites, coloureds, synthetics,
delicates, woollens.
Temperatures
95° or 90°
60°/50°
40°-30°- Cold
for normally soiled white cottons and linen (e.g. tea cloths,
towels, tablecloths, sheets...).
for normally soiled, colour fast garments (e.g. shirts, night
dresses, pyjamas....) in linen, cotton or synthetic fibres and
for lightly soiled white cotton (e.g. underwear).
for delicate items (e.g. net curtains), mixed laundry including
synthetic fibres and woollens bearing the label «pure new
wool, machine washable, non-shrink».
Before loading the laundry
Never wash whites and coloureds together. Whites may lose their “whiteness” in
the wash.
New coloured items may run in the first wash; they should therefore be washed
separately the first time.
Make sure that no metal objects are left in the laundry (e.g. hair clips,
safety pins, pins).
Button up pillowcases, close zip fasteners, hooks and poppers. Tie any belts or
long tapes.
Remove persistent stains before washing.
Rub particularly soiled areas with a special detergent or detergent paste.
Treat curtains with special care. Remove hooks or tie them up in a bag or net.
Page 29

Preparing the wash cycle
Maximum loads
Recommended loads are indicated in the washing programme charts.
General rules:
Cotton, linen: drum full but not too tightly packed;
Synthetics: drum no more than half full
;
Delicate fabrics and woollens: drum no more than one third full.
Washing a maximum load makes the most efficient use of water and energy.
For heavily soiled laundry, reduce the load size.
Washing a maximum load makes the most efficient use of water and energy. For
heavily soiled laundry, reduce the load size.
Laundry weights
The following weights are indicative:
29
bathrobe
1200 g
100 gnapkin
700 gquilt cover
500 gsheet
200 gpillow case
250 gtablecloth
200 gtowelling towel
100 gtea cloth
200 gnight dress
100 gladies’ briefs
600 gman’s work shirt
200 gman’s shirt
500 gman’s pyjamas
100 gblouse
100 gmen’s underpants
Page 30

Preparing the wash cycle
30
Removing stains
Stubborn stains may not be removed by just water and detergent. It is therefore
advisable to treat them prior to washing.
Blood: treat fresh stains with cold water. For dried stains, soak overnight in
water with a special detergent then rub in the soap and water.
Oil based paint::moisten with benzine stain remover, lay the garment on a soft
cloth and dab the stain; treat several times.
Dried grease stains: moisten with turpentine, lay the garment on a soft
surface and dab the stain with the fingertips and a cotton cloth.
Rust: oxalic acid dissolved in hot water or a rust removing product used cold. Be
careful with rust stains which are not recent since the cellulose structure will
already have been damaged and the fabric tends to hole.
Mould stains: treat with bleach, rinse well (whites and fast coloureds only).
Grass: soap lightly and treat with bleach (whites and fast coloureds only).
Ball point pen and glue: moisten with acetone (*), lay the garment on a soft
cloth and dab the stain.
Lipstick: moisten with acetone as above, then treat stains with methylated
spirits. Treat any residual marks with bleach.
Red wine: soak in water and detergent, rinse and treat with acetic or citric acid,
then rinse. Treat any residual marks with bleach.
Ink: depending on the type of ink, moisten the fabric first with acetone (*), then
with acetic acid; treat any residual marks on white fabrics with bleach and then
rinse thoroughly.
Tar stains: first treat with stain remover, methylated spirits or benzine, then rub
with detergent paste.
(*) do not use acetone on artificial silk.
Detergents and additives
Good washing results also depend on the choice of detergent and use of the
correct quantities to avoid waste and protect the environment.
Although biodegradable, detergents contain substances which, in large
quantities, can upset the delicate balance of nature.
The choice of detergent will depend on the type of fabric (delicates, woollens,
cottons, etc.), the colour, washing temperature and degree of soiling.
Page 31

Preparing the wash cycle
All commonly available washing machine detergents may be used in this
appliance:
powder detergents for all types of fabric,
powder detergents for delicate fabrics (60°C max) and woollens,
liquid detergents, preferably for low temperature wash programmes (60°C
max) for all types of fabric, or special for woollens only.
The detergent and any additives must be placed in the appropriate
compartments of the dispenser drawer before starting the wash programme.
If using concentrated powder or liquid detergents, a programme without
prewash must be selected.
The washing machine incorporates a recirculation system which allows an
optimal use of the concentrated detergent.
Pour liquid detergent into the dispenser drawer compartment marked just
before starting the programme.
Any fabric softener or starching additives must be poured into the compartment
marked before starting the wash programme.
Follow the product manufacturer’s recommendations on quantities to use and do
not exceed the «MAX» mark in the detergent dispenser drawer.
Quantity of detergent to be used
The type and quantity of detergent will depend on the type of fabric, load size,
degree of soiling and hardness of the water used.
Follow the product manufacturers’ instructions on quantities to use.
Use less detergent if:
• you are washing a small load,
• the laundry is lightly soiled,
• large amounts of foam form during washing.Pour le traitement des taches
avant le cycle de lavage, conformez-vous aux doses et aux instructions
préconisées par le fabricant du produit. Si vous utilisez du produit de lavage
pour traiter les taches, vous devez démarrer immédiatement le cycle de
lavage.
31
Degrees of water hardness
Water hardness is classified in so-called “degrees” of hardness. Information on
hardness of the water in your area can be obtained from the relevant water
supply company, or from your local authority.
Page 32

Preparing the wash cycle
32
Note: A water softener must be added when water has a medium-high degree
of hardness (from degree of hardness II). Follow the manufacturer’s instructions.
The quantity of detergent can then always be adjusted to degree of hardness I (=
soft).
DDeeggrreeeess ooff wwaatteerr hhaarrddnneessss
LLeevveell
1
2 medium
3 hard
4 very hard
Characteristic
soft
GGeerrmmaann
°°ddHH
0-7 0-15
8-14 16-25
15-21 26-37
> 21 > 37
FFrreenncchh
°°TT..HH..
Page 33

International wash code symbols
95
60
60
40
40
40
30
30
33
International wash code symbols
These symbols appear on fabric labels, in order to help you choose the best way to treat your laundry.
Energetic wash
Max. wash
temperature
95°C
Delicate wash
Bleaching Bleach in cold water Do not bleach
Ironing Hot iron
max 200°C
Max. wash
temperature
60°C
Max. wash
temperature
40°C
Warm iron
max 150°C
Max. wash
temperature
30°C
Lukewarm iron
max 110°C
Hand wash Do not
wash
at all
Do not iron
Dry cleaning Dry cleaning
Drying Flat On the line On clothes
in all solvents
Dry cleaning in
perchlorethylene,
petrol, pure alcohol,
R 111 & R 113
hanger
Dry cleaning
in petrol,
pure alcohol
and R 113
Tumble dry
high
temperature
low
temperature
Do not
dry clean
Do not
tumble dry
Page 34

Care and cleaning
34
Care and cleaning
You must DISCONNECT the appliance from the electricity supply, before you can
carry out any cleaning or maintenance work.
Descaling
The water we use normally contains lime. It is a good idea to periodically use a
water softening powder in the machine. Do this separately from any laundry
washing, and according to the softening powder manufacturer's instructions.
This will help to prevent the formation of lime deposits.
After each wash
Leave the door open for a while. This helps to prevent mould and stagnant smells
forming inside the appliance. Keeping the door open after a wash will also help
to preserve the door seal.
Maintenance wash
With the use of low temperature washes it is possible to get a build up of
residues inside the drum.
We recommend that a maintenance wash be performed on a regular basis.
To run a maintenance wash:
• The drum should be empty of laundry.
• Select the hottest cotton wash programme.
• Use a normal measure of detergent, must be a powder with biological
properties
.
External cleaning
Clean the exterior cabinet of the appliance with soap and water only, and then
dry thoroughly.
Important: do not use methylated spirits, solvents or similar products to clean
the cabinet.
Detergent dispenser drawer
The detergent dispenser drawer should be
cleaned regularly.
1. Remove the detergent dispenser drawer
by pulling it firmly.
Page 35

Care and cleaning
2. Remove the conditioner insert from the middle compartment.
3. Clean all parts with water.
4. Put the conditioner insert in as far as it
will go, so that it is firmly in place.
5. Clean all parts of the washing machine, especially the nozzles in the top
of the washing-in chamber, with a
brush.
6. Insert the detergent dispenser drawer in the guide rails and push it in.
Drain pump
The pump should be inspected regularly and particularly if
• the machine does not empty and/or spin
• the machine makes an unusual noise during draining due to objects such as
safety pins, coins etc. blocking the pump.
Proceed as follows:
1. Disconnect the appliance.
2. If necessary wait until the water has
cooled down.
3. Open the pump door.
4. Place a container close to the pump to
collect any spillage.
5. Release the emergency emptying hose,
place it in the container and remove its
cap.
35
Page 36

Care and cleaning
36
6. When no more water comes out,
unscrew the pump and remove it.
Always keep a rag nearby to dry up
spillage of water when removing the
pump.
7. Remove any objects from the pump
impeller by rotating it.
8. Put the cap back on the emergency
emptying hose and place the latter
back in its seat.
9. Screw the pump fully in.
10. Close the pump door.
Warning!
When the appliance is in use and
depending on the programme selected
there can be hot water in the pump. Never
remove the pump cover during a wash
cycle, always wait until the appliance has
finished the cycle, and is empty. When
replacing the cover, ensure it is securely
retightened so as to stop leaks and young
children being able to remove it.
Water inlet filter
If you notice that the machine is taking longer to fill, check that the filter in
the water inlet hose is not blocked.
1. Turn off the water tap.
2. Unscrew the hose from the tap.
3. Clean the filter in the hose with a stiff
brush.
4. Screw the hose back onto the tap.
Page 37

Care and cleaning
Frost precautions
If the machine is installed in a place where the temperature could drop below
0°C, proceed as follows:
1. Close the water tap and unscrew the water inlet hose from the tap.
2. Place the end of the emergency emptying hose and that of the inlet hose in a
bowl placed on the floor and let water drain out.
3. Screw the water inlet hose back on and reposition the emergency emptying
hose after having put the cap on again
By doing this, any water remaining in the machine is removed, avoiding ice
forming and consequently damage to the appliance.
When you use the machine again, make sure that the ambient temperature is
above 0°C.
.
Emergency emptying out
If the water is not discharged, proceed as follows to empty out the machine:
1. pull out the plug from the power socket;
2. close the water tap;
3. if necessary, wait until the water has cooled down;
4. open the the pump door;
5. place a bowl on the floor and place the end of the emergency emptying hose
into the bowl. Remove its cap. The water should drain by gravity into the
bowl. Whe the bowl is full, put the cap back on the hose. Empty the bowl.
Repeat the procedure until water stops flowing out;
6. clean the pump if necessary as previously described;
7. replace the emergency emptying hose in its seat after having plugged it;
8. screw the pump again and close the door.
37
Page 38

Something not working
38
Something not working
Certain problems are due to lack of simple maintenance or oversights, which can be
solved easily without calling out an engineer. Before contacting your local Service Centre,
please carry out the checks listed below.
During machine operation it is possible that the
the following alarm codes appears on the display and at the same some acoustic signals
sound every 20 seconds to indicate that the machine is not working:
• E10 : problem with the water supply
• E20 : problem with the water draining
• E40 : door open.
• EF0 : Anti-flooding system has activated
Once the problem has been eliminated, press the
programme. If after all checks, the problem persists, contact your local Service Centre.
Problem Possible cause/Solution
The door has not been closed. E40
• Close firmly the door.
The plug is not properly inserted in the power socket.
• Insert the plug into the power socket.
There is no power at the socket.
• Please check your domestic electrical installation.
The washing machine does not
start:
The main fuse has blown.
• Replace the fuse.
The selector dial is not correctly positioned and the
Start/Pause button has not been depressed.
• Please turn the selector dial and press the
Start/Pause button again.
The delay start has been selected.
• If the laundry are to be washed immediately, cancel
the delay start.
yyeellllooww
Start/Pause pilot light flashes, one of
SSttaarrtt//PPaauussee
button to restart the
Page 39

Problem Possible cause/Solution
The machine does not fill:
Something not working
The water tap is closed. E10
• Open the water tap.
The inlet hose is squashed or kinked.
• Check the inlet hose connection.
The filter in the inlet hose is blocked.
• Clean the water inlet hose filter.
The door is not properly closed.
• Close firmly the door.
E40
39
E10
E10
The machine fills then empties
immediately:
The machine does not empty
and/or does not spin:
There is water on the floor:
The end of the drain hose is too low.
• Refer to relevant paragraph in «water drainage»
section.
The drain hose is squashed or kinked. E20
• Check the drain hose connection.
The drain pump is clogged.
• Clean the drain pump.
The option or Night Cycle has been selected.
• Disable the or Night Cycle option .
The laundry is not evenly distributed in the drum.
• Redistribute the laundry.
Too much detergent or unsuitable detergent (creates
too much foam) has been used.
• Reduce the detergent quantity or use another one.
Check whether there are any leaks from one of the
inlet hose fittings. It is not always easy to see this as
the water runs down the hose; check to see if it is
damp.
• Check the water inlet hose connection.
The drain hose is damaged.
• Change it with a new one.
The cap on the emergency emptying hose has not
been replaced after cleaning the pump.
• Put the cap back on the emergency emptying and
place the latter back in its seat.
E20
Page 40

Something not working
40
Problem Cause possible/Solution
Unsatisfactory washing results:
The door will not open:
Too little detergent or unsuitable detergent has been
used.
• Increase the detergent quantity or use another one.
Stubborn stains have not been treated prior to
washing.
• Use commercial products to treat the stubborn
stains
.
The correct temperature was not selected.
• Check if you have selected the correct temperature.
Excessive laundry load.
• Introduce into the drum less laundry.
The programme is still running.
• Wait the end of washing cycle.
The door lock has not been released.
• Wait some minutes.
There is water in the drum.
• Select drain or spin programme to empty out the
water.
The machine vibrates or is noisy:
Spinning starts late or the machine
does not spin:
The transit bolts and packing have not been removed.
• Check the correct installation of the appliance.
The support feet have not been adjusted
• Check the correct levelling of the appliance.
The laundry is not evenly distributed in the drum.
• Redistribute the laundry.
Maybe there is very little laundry in the drum.
• Load more laundry.
The electronic unbalance detection device has cut in
because the laundry is not evenly distributed in the
drum. The laundry is redistributed by reverse rotation
of the drum. This may happen several times before
the unbalance disappears and normal spinning can
resume. If, after some minutes, the laundry is still not
evenly distributed in the drum, the machine will not
spin.
• Redistribute the laundry.
Page 41

Problem Cause possible/Solution
Mod. ..........
Prod. No. ...........
Ser. No. .........
Mod. ..........
Prod. No. ...........
Ser. No. .........
P0042 BD
The machine makes an unusual
noise
No water is visible in the drum:
Something not working
41
The machine is fitted with a type of motor which
makes an unusual noise compared with other
traditional motors. This new motor ensures a softer
start and more even distribution of the laundry in the
drum when spinning, as well as increased stability of
the machine.
Machines based on modern technology operate very
economically using very little water without affecting
performance.
The display shows the alarm code:
EF0
Anti-flooding system has activated.
• Disconnect the appliance and contact the Service
Force Centre
The drum light doesn’t work: Please contact your local Service Centre.
If you are unable to identify or solve the problem,
contact our service centre. Before telephoning,
make a note of the model, serial number and
purchase date of your machine: the Service Centre
will require this information.
Page 42

Technical data
42
Technical Data
Dimensions
Electrical connection Voltage Overall power - Fuse
Water supply pressure
Maximum Load
Spin Speed
Width
Height
Depth
(door included)
Information on the electrical connection is given on the rating
plate on the inner edge of the appliance door
Minimum
Maximum
Cottons
Synthetics, Delicates and Viscose
Jeans
Blanket, Wool (handwash)
Sport Jackets
Sport intensive
Easy iron
Lingerie and Silk
Quick Intensive
Maximum 1400 rpm
60 cm
85 cm
63 cm
0,05 MPa
0,80 MPa
7,0 kg
3,5 kg
3,5 kg
2,0 kg
2,5 kg
2,5 kg
1,5 kg
1,0 kg
5,0 kg
Page 43

Consumption value
Consumption value
43
Programme
Cottons 95° 62 2,1
Hygiene 60° 68 1,7
40-60 MIX 40° 45 1,3
Jeans 60° 55 0,9
Synthetics 40° 54 0,9
Easy iron 40° 63 0,45
Delicates 40° 63 0,55
Viscose 40° 63 0,55
Rinses 46 0,1
Drain - -
Spin - -
Delicate spin - -
Wool 40° 62 0,4
Lingerie 40° 60 0,35
Silk 30° 50 0,25
Water consumption
(in litres)
Energy consumption
(in kWh)
Programme duration
(in minutes)
control panel.
Sport Jackets 40° 70 0,5
Sport Intensive 60° 70 0,65
20 MIN.- 3 Kg 30° 38 0,2
Quick Intensive 60° 48 1,05
(*) Economy 60° 45 1,19
The consumption data shown on this chart is to be considered purely indicative, as
it may vary depending on the quantity and type of laundry, on the inlet water
temperature and on the ambient temperature. It refers to the highest temperature
for each wash programme.
(*) “Economy 60°C”with a load of 7 kg is the reference programme for the data
entered in the energy label, in compliance with EEC 92/75 standards.
For the duration of the programmes, please refer to the display on the
Page 44

Installation
HEC0008
A
HEC00022
HEC0001
44
IInstallation
Unpacking
All transit bolts and packing must be removed before using the appliance.
You are advised to keep all transit devices so that they can be refitted if the
machine ever has to be transported again.
1. After removing all the packaging, carefully lay
machine on it’s back to remove the
polystyrene base from the bottom.
2. Remove the power supply cable and the
draining hose from the hose holders on the rear of the
appliance.
With a suitable spanner unscrew and remove the
3.
central rear bolt A.
Page 45

4. Unscrew and remove the two large rear bolts B
C
C
B
D
HEC0003
B
C
C
HEC0023
E
HEC0010
HEC0005
and the six smaller bolts C.
5. Remove the bracket D and tighten up the six
smaller bolts C. Slide out the relevant plastic
spacer E.
6. Open the porthole, take out the inlet hose from the
drum and remove the polystyrene block fitted with the
adhesive tape on the door seal.
Installation
45
7. Fill the smaller upper hole and the two large ones with
the corresponding plastic plug caps supplied in the bag
containing the instruction booklet.
8. Connect the water inlet hose as described under the
paragraph «Water inlet».
All the different plug caps are supplied with the appliance in
the plastic bag containing the instruction booklet.
Page 46

Installation
HEC007S
HEC0006
46
Positioning and levelling
Install the machine on a flat hard floor.
Make sure that air circulation around the machine is
not impeded by carpets, rugs etc.
Before placing it on small tiles, apply a rubber
coating.
Never try to correct any unevenness in the floor by
putting pieces of wood, cardboard or similar
materials under the machine.
If it is impossible to avoid positioning the machine next to a gas cooker or coalburning stove, an insulating panel covered with aluminium foil on the side facing
the cooker or stove, must be inserted between the two appliances.
The machine must not be installed in rooms where the temperature can drop
below 0.
The water inlet hose and the drain hose must not be kinked.
Please ensure that when the appliance is installed, it is easily accessible for the
engineer in the event of a breakdown.
Carefully level by screwing the adjustable feet in or out. Never place cardboard,
wood or similar materials under the machine to compensate for any unevenness
in the floor.
Automatic foot: The rear foot on the left-hand
side of your washing machine is built as a shock
absorbing foot, which is why the appliance gives in
the back left-hand corner if put under load. The
automatic foot guarantees that the appliance does
not move even at high spin speeds. Basically the
automatic foot does not need to be set.
Water inlet
An inlet hose is supplied and can be found inside the machine drum.
Do not use the hose from your previous
machine to connect to the water supply.
This appliance must be connected to a cold
water supply.
1. Open the porthole and extract the inlet hose.
2. Connect the hose with the angled connection to
the machine.
Page 47

Installation
A
352
Do not place the inlet hose downwards. Angle the hose to the left or
right depending on the position of your water tap.
loosening the ring nut.
After positioning the inlet hose, be sure to tighten the ring nut again to prevent leaks.
3. Set the hose correctly by
4. Connect the hose to a tap with a 3/4” thread. Always use the hose supplied with
the appliance.
The inlet hose must not be lengthened. If it is too short and you do not wish to
move the tap, you will have to purchase a new, longer hose specially designed
for this type of use.
Water-stop device
The inlet hose is provided with a water stop device,
which protects against damage caused by water leaks in
the hose which could develop due to natural ageing of
the hose. This fault is shown by a red sector in the
window “AA”. Should this occur, turn the water tap off
and refer to your Service Centre to replace the hose.
Water drainage
The end of the drain hose can be positioned in three ways:
Hooked over the edge of a sink using the
plastic hose guide supplied with the machine.
In this case, make sure the end cannot come
unhooked when the machine is emptying.
This could be done by tying it to the tap with a piece
of string or attaching it to the wall.
In a sink drain pipe branch. This branch must be
above the trap so that the bend is at least 60 cm above
the ground.
Directly into a drain pipe at a height of not less than 60 cm and not more
than 90 cm.
The end of the drain hose must always be ventilated, i.e. the inside diameter of
the drain pipe must be larger than the outside diameter of the drain hose.
The drain hose must not be kinked.
47
Page 48

Installation
P1118
48
Important!
The drain hose may be extended to a maximum of 4 metres. An additional drain hose and
joining piece is available from your local Service Centre.
Electrical connection
This machine is designed to operate on a 220-230 V, single-phase,
50 Hz supply.
Check that your domestic electrical installation can take the maximum load
required (2.2 kW), also taking into account any other appliances in use.
Connect the machine to an earthed socket.
The manufacturer does not accept any responsibility for damage or
injury through failure to comply with the above safety precaution.
Permanent connection
In the case of a permanent connection it is necessary that you install a double pole
switch between the appliance and the electricity supply (mains), with a minimum
gap of 3 mm between the switch contacts and of a type suitable for the required
load in compliance with the current electrical regulations.
The switch must not break the yellow and green earth cable at any point.
This operation must be performed by a qualified electrician.
The power supply cable must be easily accessible after installing the
machine.
Should the appliance power supply cable need to be replaced, this must
be carried out by a Service Centre.
Page 49

Environment concerns
Enviroment concerns
Packaging materials
The materials marked with the symbol are recyclable.
>PE<=polyethylene
>PS<=polystyrene
>PP<=polypropylene
This means that they can be recycled by disposing of them properly in
appropriate collection containers.
Old machine
Use authorised disposal sites for your old appliance. Help to keep your country tidy!
The symbol on the product or on its packaging indicates that this product may
not be treated as household waste. Instead it shall be handed over to the applicable
collection point for the recycling of electrical and electronic equipment. By ensuring
this product is disposed of correctly, you will help prevent potential negative
consequences for the environment and human health, which could otherwise be
caused by inappropriate waste handling of this product. For more detailed
information about recycling of this product, please contact your local city office,
your household waste disposal service or the shop where you purchased the
product.
49
Ecological hints
To save water, energy and to help protect the environment, we recommend that
you follow these tips:
• Normally soiled laundry may be washed without prewashing in order to save
detergent, water and time (the environment is protected too!).
• The machine works more economically if it is fully loaded.
• With adequate pre-treatment, stains and limited soiling can be removed; the
laundry can then be washed at a lower temperature.
• Measure out detergent according to the water hardness, the degree of soiling
and the quantity of laundry being washed.
Page 50

European guarantee
50
European Guarantee
This appliance is guaranteed by Electrolux in each of the countries listed at the
back of this user manual, for the period specified in the appliance guarantee
orotherwise by law. If you move from one of these countries to another of the
countries listed, the appliance guarantee will move with you subject to the
following qualifications:
• The appliance guarantee starts from the date you first purchased the appliance
which will be evidenced by production of a valid purchase document issued by
the seller of the appliance.
• The appliance guarantee is for the same period and to the same extent for
labour and parts as exists in your new country of residence for this particular
model or range of appliances.
• The appliance guarantee is personal to the original purchaser of the appliance
and cannot be transferred to another user.
• The appliance is installed and used in accordance with instructions issued by
Electrolux and is only used within the home, i.e. is not used for commercial
purposes.
• The appliance is installed in accordance with all relevant regulations in force
within your new country of residence.
The provisions of this European Guarantee do not affect any of the rights
granted to you by law.
Page 51

www.electrolux.com
Customer service centres
51
à
Albania
Belgique/België/Belgien
Česká republika
Danmark
Deutschland
Eesti
España
France
Great Britain
Hellas
Hrvatska
Ireland
Italia
Latvija
Lituania
Luxembourg
Magyarország
Nederland
Norge
Österreich
Polska
Portugal
Romania
Schweiz-Suisse-Svizzera
Slovenija
Slovensko
Suomi
Sverige
Türkiye
Россия
+35 5 4 261 450
+32 2 363 04 44
+420 2 61 12 61 12
+45 70 11 74 00
+49 180 32 26 622
+37 2 66 50 030
+34 902 11 63 88
www.electrolux.fr
+44 8705 929 929
+30 23 10 56 19 70
+38 51 63 23 338
+353 1 40 90 753
+39 (0) 434 558500
+37 17 84 59 34
+370 5 27 80 609
+35 2 42 43 13 01
+36 1 252 1773
+31 17 24 68 300
+47 81 5 30 222
+43 18 66 400
+48 22 43 47 300
+35 12 14 40 39 39
+40 21 451 20 30
+41 62 88 99 111
+38 61 24 25 731
+421 2 43 33 43 22
www.electrolux.fi
+46 (0)771 76 76 76
+90 21 22 93 10 25
+7 095 937 7837
Rr. Pjeter Bogdani Nr. 7 Tirane
Bergensesteenweg 719, 1502 Lembeek
Budějovická 3, Praha 4, 140 21
Sjællandsgade 2, 7000 Fredericia
Muggenhofer Str. 135, 90429 Nürnberg
Pärnu mnt. 153, 11624 - Tallinn
Carretera M-300, Km. 29,900 Alcalá de Henares Madrid
Addington Way, Luton, Bedfordshire LU4 9QQ
4, Limnou Str., 54627 Thessaloniki
Slavonska avenija 3, 10000 Zagreb
Longmile Road Dublin 12
C.so Lino Zanussi, 26 - 33080 Porcia (PN)
Kr. Barona iela 130/2, LV-1012, Riga
Verkiu, 2 9, 09108 Vilnius, Lithuania
Rue de Bitbourg, 7, L-1273 Hamm
H-1142 Budapest XIV, Erzsébet királyné útja 87
Vennootsweg 1, 2404 CG - Alphen aan den Rijn
Risløkkvn. 2 , 0508 Oslo
Herziggasse 9, 1230 Wien
ul. Kolejowa 5/7, Warsaw
Quinta da Fonte - Edificio Gonçalves Zarco - Q35 -2774-518 Paço de Arcos
Str. Garii Progresului 2, S4, 040671 RO
Industriestrasse 10, CH-5506 Mägenwil
Tr aška 132, 1000 Ljubljana
Electrolux Slovakia s.r.o., Electrolux Domáce spotrebiče SK, Seberíniho 1, 821 03 Bratislava
Electrolux Service, S:t Göransgatan 143, S-105 45 Stockholm
Tarlabași caddesi no : 35 Taksim Istanbul
129090 Москва, Олимпийский проспект, 16, БЦ «Олимпик»
Page 52

52
Poštovani,
Zahvaljujemo se na povjerenju i odabiru ovog vrhunskog proizvoda. Milijuni
vijernih kupaca diljem svijeta najbolji su pokazatelj kvalitete naših proizvoda.
Ergonomičnost, funkcionalnost, vrhunski dizajn, preciznost izrade, inovacija,
upotreba najkvalitetnijih materijala i tehnologija pri izradi svakog proizvoda,
te ekološka osviještenost i konstantna briga za zaštitu okoliša i uštedu
energije, samo su neka od obilježja naših proizvoda.
Kako bi maksimalo i kvalitetno iskoristili sve funkcije i mogućnosti ovog
proizvoda, molimo Vas da prije stavljanja u funkciju ovog proizvoda pročitate
priloženo uputstvo za upotrebu. Preporučujemo da uputstvo za upotrebu
sačuvate kako bi ga mogli koristiti svaki put kada se pojavi potreba.
Želimo Vam mnogo ugodnih trenutaka uz vaš novi uređaj!
U ovim se uputama koriste sljedeći simboli:
Važne informacije o vašoj osobnoj sigurnosti i informacije o načinu kako izbjeći
štete na uređaju
Opće informacije i savjeti
Informacije za zaštitu okoliša
Page 53

Sadržaj
53
Sadržaj
Upute za uporabu 56
Informacije o sigurnosti 56-57
Opis proizvoda 60
Upravljačka ploča 61
Zaslon 61
Prva uporaba 62
Personalizacija 62
Zvučni signal 62
Zaključavanje radi sigurnosti djece 62
Svakodnevna uporaba 63
Napunite perilicu rubljem 63
Izmjerite količinu deterdženta i omekšivača 64
Odaberite željeni program 65
Odaberite temperaturu 65
Odaberite brzinu centrifuge ili Zadržavanje vode ili opciju Noćni ciklus 65
Tipke opcija programa 65
Odaberite opciju Pretpranje 66
Odaberite opciju Mrlje 66
Odaberite opciju Osjetljivo 67
Odaberite Dodatno ispiranje 67
Odaberite opciju Uštede vremena 67
Zaslon 68
Odaberite Start/Pauza 69
Odaberite Odgodu starta 69
Prikaz tijeka programa 70
Izmjena opcije ili programa u tijeku 70
Page 54

Sadržaj
54
Prekidanje programa 71
Poništavanje programa 71
Otvaranje vrata nakon početka programa 71
Na kraju programa 71
Programi pranja 77-75
Informacije o programu 76-77
Savjeti za pranje 78-82
Razvrstavanje rublja 28
Temperature 28
Prije punjenja perilice 28
Maksimalne količine rublja 29
Težine rublja 29
Uklanjanje mrlja 80
Deterdženti i aditivi 80
Potrebna količina deterdženta 80
Stupnjevi tvrdoće vode 81
Međunarodni simboli za pranje 88
Održavanje i čišćenje 84
Čišćenje vodenog kamenca 84
Nakon svakog pranja 84
Vanjsko čišćenje 84
Spremnik deterdženta 84
Odvodna crpka 85
Filtar na dovodu vode 86
Zaštita od zaleđivanja 87
Pražnjenje u hitnim slučajevima 87
Nešto ne radi 88-91
Page 55

Sadržaj
55
Tehnički podaci 92
Potrošnja 93
Postavljanje 94
Uklanjanje ambalaže 94
Pozicioniranje i niveliranje 96
Dovod vode 96-97
Naprava za zaustavljanje vode 97
Odvod vode 97-98
Električni priključak 98
Briga za okoliš 99
Ambalaža 99
Stara perilica 99
Ekološki savjeti 99
Jamstvo 100
Servisni centri 105
Page 56

Informacije o sigurnosti
56
Upute za uporabu
Informacije o sigurnosti
Prije prve uporabe uređaja
• Sigurnost uređaja AEG/ELECTROLUX u skladu je sa standardima
industrije i sa zakonskim zahtjevima u pogledu sigurnosti uređaja.
Međutim, kao proizvođači, osjećamo da su sljedeće sigurnosne
napomene naša dužnost. MORATE ih pažljivo pročitati prije postavljanja
ili korištenja uređaja.
• Od najveće je važnosti da sačuvate ove upute uz uređaj radi budućeg
konzultiranja. Ako uređaj prodate ili predate drugom vlasniku, ili ako se
preselite i ostavite za sobom uređaj, uvijek se osigurajte da knjižica
ostane uz uređaj kako bi se novi vlasnik upoznao s radom uređaja i
odgovarajućim upozorenjima.
• MORATE ih pažljivo pročitati prije postavljanja ili korištenja uređaja.
• Prije prvog pokretanja provjerite da se stroj nije oštetio tijekom
transporta. Nikada nemojte spajati oštećeni stroj. Ako su neki dijelovi
oštećeni, kontaktirajte vašeg dobavljača.
• Ako je uređaj isporučen tijekom zimskih mjeseci kada su temperature
ispod nule: skladištite perilicu na sobnoj temperaturi 24 sata prije prvog
korištenja.
Opća sigurnost
• Opasna je izmjena specifikacija ili pokušaj izmjene ovog proizvoda na
bilo koji način.
• Tijekom programa pranja na velikim temperaturama, staklo na vratima
može postati vruće. Nemojte ga dirati!
• Nemojte dopustiti malim kućnim ljubimcima da se popnu u bubanj. Kako
biste to spriječili, molimo pogledajte u bubanj prije uporabe.
• Predmeti kao što su kovanice, sigurnosne igle, pribadače, vijci, kamenje i
ostali tvrdi, oštri materijali mogu uzrokovati veliku štetu i ne smiju se
stavljati u uređaj.
• Upotrebljavajte samo preporučene količine omekšivača i deterdženta.
Prevelika količina može oštetiti tkanine. Provjerite količine koje
preporučuje proizvođač.
Page 57

• Perite sitno rublje poput čarapa, vrpca, perivih pojaseva i sl. u maloj
vrećici za pranje ili jastučnici, jer ti predmeti mogu skliznuti između
unutrašnjosti perilice i bubnja.
• Nemojte upotrebljavati vašu perilicu za pranje komada rublja s kitovom
kosti, neporubljenih ili potrganih tkanina.
• Nakon uporabe, čišćenja i održavanja, obvezno isključite uređaj iz struje i
zatvorite dovod vode.
• Ovaj je uređaj opremljen bijelim svjetlom u bubnju. Prve je klase, u
skladu sa standardom IEC 60825-1:1993 + A1:1997 + A2:2001. Ako je
potrebno zamijeniti svjetlo u bubnju uređaja, to mora izvršiti servisni
centar.
• Ni u kom slučaju nemojte pokušavati sami popravljati uređaj. Popravci
koje izvrše osobe bez potrebnog iskustva mogu prouzrokovati ozljede ili
teška oštećenja. Kontaktirajte ovlašteni servisni centar. Uvijek zatražite
originalne rezervne dijelove.
Postavljanje
• Ovaj je uređaj namijenjen uporabi u domaćinstvu. Nemojte ga
upotrebljavati u druge svrhe.
• Kada vadite uređaj iz ambalaže, provjerite da nema oštećenja. Ako postoje
sumnje, nemojte upotrebljavati uređaj i kontaktirajte servisni centar.
• Potrebno je ukloniti svu ambalažu i transportne vijke prije uporabe.
Nepoštivanje toga može prouzročiti teška oštećenja na proizvodu i na
imovini. Pročitajte odgovarajući dio u ovom priručniku.
• Nakon instaliranja perilice, provjerite da ne stoji na svojem električnom
kabelu, niti na cijevi za dovod ili za odvod vode.
• Ako se uređaj nalazi na podu prekrivenom sagom, molimo namjestite
nožice kako biste omogućili slobodno kruženje zraka.
• Uvijek provjerite da cijevi i njihovi spojevi ne propuštaju vodu nakon
postavljanja.
• Ako je perilica postavljena na mjestu koje je podložno zamrzavanju,
molimo pročitajte poglavlje “opasnosti od zamrzavanja”.
• Sve vodoinstalaterske radove potrebne za postavljanje ovog uređaja mora
izvršiti kvalificirani vodoinstalater ili kompetentna osoba.
• Sve električarske radove potrebne za postavljanje ovog uređaja mora
izvršiti kvalificirani električar ili kompetentna osoba.
Informacije o sigurnosti
57
Page 58

Informacije o sigurnosti
58
Uporaba
• Ovaj je uređaj namijenjen za uporabu u domaćinstvu. Nemojte ga
upotrebljavati u druge svrhe.
• Perite samo tkanine koje su namijenjene pranju u perilici. Slijedite upute na
svakoj etiketi na rublju.
• Nemojte prenapuniti uređaj. Pročitajte odgovarajući dio u ovom priručniku.
• Prije pranja provjerite da su svi džepovi prazni, sva dugmad zakopčana i
zatvarači povučeni. Nemojte prati izlizane ili poderane komade rublja i
tretirajte mrlje od boje, tinte, hrđe i trave prije pranja. Grudnjaci s metalnim
žicama NE smiju se prati u perilici.
• Rublje koje je bilo u dodiru s hlapljivim naftnim proizvodima ne smije se
prati u perilici. Ako koristite hlapljive tekućine za čišćenje, potrebno je paziti
da je tekućina uklonjena s rublja prije njegovog stavljanja u uređaj.
• Nikada nemojte povlačiti za električni kabel kada vadite utikač iz utičnice;
uvijek primite za utikač.
• Nikada nemojte koristiti perilicu ako su električni kabel, upravljačka ploča,
radna površina ili podnožje oštećeni na način da se može doći do
unutrašnjosti perilice.
Sigurnost djece
• Ovaj uređaj nije namijenjen korištenju osoba (uključujući djecu) koje imaju
smanjene fizičke ili senzorne sposobnosti, ili su bez iskustva ili znanja,
osim ako su nadgledane ili ako su dobile upute vezane uz korištenje
uređaja od osobe koja je odgovorna za njihovu sigurnost.
• Ova perilica nije namijenjena uporabi od strane male djece ili nemoćnih
osoba bez nadzora.
• Malu djecu treba nadzirati kako biste se osigurali da se ne igraju s
uređajem.
• Sastavni dijelovi pakovanja (npr. plastični omot, polistirol) mogu biti opasni
za djecu - opasnost od gušenja! Držite ih daleko od dohvata djece.
• Držite deterdžente na sigurnom mjestu izvan dohvata djece.
Page 59

Osigurajte se da se djeca ili kućni
ljubimci ne popnu u bubanj. Kako bi
se to spriječilo, uređaj je opremljen
posebnom napravom. Za aktivaciju te
naprave, okrenite dugme (bez da ga
pritisnete) unutar vrata u smjeru
kazaljke na satu dok utor ne bude
vodoravan. Ako je potrebno, koristite
kovanicu. Za deaktiviranje ove
naprave tako da ponovo bude
moguće zatvaranje vrata, okrenite
dugme u smjeru suprotnom kazaljki
na satu dok utor ne bude okomit.
Informacije o sigurnosti
59
Page 60

Opis proizvoda
60
Opis proizvoda
Vaš novi uređaj zadovoljava sve moderne zahtjeve učinkovitog pranja rublja uz
nisku potrošnju vode, struje i deterdženta.
1
Spremnik deterdženta
2
Upravljačka ploča
3
Svjetlo u bubnju
4
Ručka za otvaranje vrata
Spremnik deterdženta
Pretinac za deterdžent korišten za pretpranje.
Pretinac za praškasti ili tekući deterdžent korišten za glavno pranje.
Pretinac za tekuće aditive (omekšivač tkanina, štirak).
Pretinac za odstranjivač mrlja korišten za glavno pranje s opcijom
MRLJE.
5
Natpisna ploča
6
Odvodna crpka
7
Tri podesive nožice; s
nožica na lijevoj strani je
automatska
tražnja
Page 61

Upravljačka ploča
40-60 MIX
ECO
- 3KG
1 2 3 4 5 6 7 8 9
OK
SILENT SYSTEM PLUS
74850M
1
2
3
4 5 6 7 8
bandeau de commande
61
1
Programator
2
Tipka «Temperature» (temperatura)
3
Tipka «Spin reduction»
(smanjena centrifuga)
4
Tipka «Option» (opcije)
5
Tipka «OK»
Zaslon
1
Simbol temperature
2
Simbol brzine centrifuge,
zadržavanje vode, noćnog ciklusa
3
Simboli faze programa
4
Opcije
6
Tipka «Time saving» (ušteda vremena)
7
Zaslon
8
Tipka «Start/Pause» (start/pauza)
9
Tipka «Delay start» (odgoda starta)
5
Simbol vrata (zaključana vrata)
Simbol opcije «Brzo»
6
7
Trajanje programa pranja ili
odgođen start
8
Simbol odgode starta
Page 62

Uporaba
62
Prva uporaba
Provjerite da su spojevi struje i vode u skladu s uputama za postavljanje.
Skinite komad polistirola i sav eventualni ostali materijal iz bubnja.
Personalizacija
Zvučni signali
Uređaj je opremljen zvučnim uređajem, koji se oglašava u sljedećim
slučajevima:
● na kraju ciklusa
● u slučaju nepravilnog rada
Istovremenim pritiskom na
otprilike 6 sekundi, zvučni signal se
rada).
Ponovnim pritiskom na ove 2 tipke, ponovo se aktivira zvučni signal.
tipke «SPIN» i «OPTION» u trajanju od
deaktivira (osim u slučajevima nepravilnog
Zaključavanje radi sigurnosti djece
Zahvaljujući ovoj napravi ne morate nadgledati uređaj u brizi da bi se djeca
mogla povrijediti ili izazvati štetu na njemu.
Ova funkcija ostaje uključena i kad perilica-sušilica ne radi.
Opciju možete postaviti na dva različita načina:
● prije pritiska na «Start/Pauza»: da bi se onemogućilo pokretanje stroja.
● poslije pritiska na «Start/Pauza» da bi se onemogućilo mijenjanje programa ili
opcije.
Za aktiviranje (isključenje) ove opcije istovremeno pritisnite otprilike 6 sekundi
tipke «OPTION»
zaslona.
i «Ok» dok se simbol ne pojavi (nestane) na (sa)
Page 63

Svakodnevna uporaba
Napunite perilicu rubljem
1. Otvorite vrata tako da pažljivo povučete ručku
na vratima prema van. Stavite rublje u
bubanj, komad po komad, stresajući ga što je
više moguće.
2. Dobro zatvorite vrata. Morate čuti klik tijekom
zatvaranja.
Važno! Nemojte stavljati rublje između vrata i
gumenog spoja.
Izmjerite količinu deterdženta i omekšivača
Vaš je novi uređaj zamišljen za uštedu vode, struje i deterdženta.
1. Izvucite spremnik deterdženta dok se
ne zaustavi. Izmjerite količinu
potrebnog deterdženta, uspite je u
pretinac glavnog pranja i, ako želite
izvršiti program s fazom pretpranja,
uspite deterdžent u pretinac označen s
.
Ako želite koristiti funkciju mrlje, uspite
odstranjivač mrlja u pretinac označen s
.
2. Ako je potrebno, ulijte omekšivač
u pretinac označen s (korištena
količina ne smije prijeći oznaku MAX u
spremniku).
Nježno zatvorite spremnik.
Uporaba
63
Page 64

Uporaba
64
Odaberite željeni program
Možete odabrati ispravan program za svaku
vrstu rublja sljedeći opise u tablicama
programa pranja (vidi Programi pranja).
Okrenite programator na željeni program.
Programator određuje vrstu ciklusa pranja
(npr. razina vode, pokreti bubnja, broj
ispiranja) i temperaturu pranja prema vrsti
rublja.
Indikatorsko svjetlo Start/Pauza
počinje treptati i zaslon prikazuje trajanje odabranog programa.
Programator možete okrenuti u smjeru kazaljki na satu ili u suprotnom smjeru.
Stavite na
O za ponovno postavljanje programa i za isključivanje uređaja.
Na kraju programa, za isključivanje perilice, programator mora biti u
položaju O.
Važno!
Ako okrenete programator na drugi program dok uređaj radi, žuto indikatorsko
svjetlo Start/Pauza zatreptat će 3 puta i na zaslonu će se prikazati
poruka Err koja označava krivi odabir. Perilica neće izvršiti novi odabrani
program.
ECO
- 3KG
40-60 MIX
Odaberite temperaturu
Pritisnite više puta ovu tipku za povećavanje ili smanjivanje temperature, ako
želite da se vaše rublje pere na različitoj temperaturi od one koju predlaže
perilica.
Najviše temperature za svaki program pranja
mogu se provjeriti u stavku «Programi
pranja».
Simbol hladnog pranja odgovara
().
OK
Page 65

Uporaba
65
Odaberite brzinu centrifuge, Noćni ciklus ili opciju
Zadržavanje vode .
Pritisnite više puta ovu tipku za izmjenu brzine centrifuge, ako želite da se vaše
rublje centrifugira na različitoj brzini od one
koju predlaže perilica.
Maksimalne brzine su:
● za PAMUK, HIGIJENSKO, 40-60 MIX,
EKONOMIČNO: 1400 o/min;
● za JEANS, SINTETIKU, LAKO
GLAČANJE, OSJETLJIVO, VISKOZU,
VUNU, LINGERIE, SVILU, SPORT INTENZIVNO, 20 MIN.-3 KG, BRZO
INTENZIVNO: 1200 o/min;
● za SPORTSKE JAKNE: 800 o/min;
Za kompatibilnost između opcija i programa pranja pogledajte poglavlje
«Programi pranja».
«Zadržavanje vode» : kada se odabere ova opcija, voda posljednjeg
ispiranja se ne prazni, što sprječava gužvanje tkanina. Na kraju programa, 0 i
simbol treptat će na zaslonu, - simbol (zaključana vrata) ostaje
upaljen, indikatorsko svjetlo Start/Pauza se gasi i vrata su blokirana što
označava da se voda mora izbaciti.
Za izbacivanje vode:
● okrenite programator na O
● odaberite program Izbacivanje vode , Centrifuga ili Lagano
centrifugiranje
● smanjite brzinu centrifuge ako je potrebno, pomoću odgovarajuće tipke
● pritisnite tipku Start/Pause
● kad program završi, na zaslonu trepće 0. gasi se simbol Vrata i vrata se
mogu otvoriti.
«Noćni ciklus» : odabirom ove opcije, perilica neće izbaciti vodu
posljednjeg ispiranja, tako da se rublje neće gužvati. Budući da su preskočene
sve faze centrifugiranja, ovaj ciklus pranja je vrlo tihi pa se može odabrati noću
ili kada je struja ekonomičnija. U nekim programima ispiranja će se izvršiti s
više vode. Na kraju programa, 0 i simbol će treptati na zaslonu, simbol
vrata (zaključana vrata) ostaje upaljen, gasi se indikatorsko svjetlo
Start/Pauza i vrata su blokirana što označava da je potrebno izbaciti vodu.
Za izbacivanje vode, molimo pročitajte poglavlje prethodne opcije.
OK
Page 66

uporaba
66
Tipke opcija programa
Ovisno o programu, mogu se kombinirati različite funkcije.
Važno: Nisu sve opcije međusobno kompatibilne. Simboli nekompatibilnih
opcija nestaju.
U svakom slučaju, ako odaberete opciju koja se ne može kombinirati s
odabranim programom pranja, ili s bilo kojom drugom opcijom, nekoliko
sekundi se prikazuje poruka Err i žuto indikatorsko svjetlo «Start/Pauza»
počinje treptati.
Morate odabrati opcije nakon što ste odabrali program, ali prije pritska na tipku
«Start/Pause» . Pritisnite tipku
pojave na zaslonu.
Za pregled svih dostupnih opcija pritisnite tipku
pojavljuje odgovarajući simbol i počinje treptati.
Pritisnite tipku OK za aktiviranje i potvrđivanje vašeg odabira. Crna crta
pojavljuje se ispod odabranog simbola što označava da je postavljena ta
opcija. Pritisnite istu tipku za deaktiviranje opcije.
Nakon odabira opcija, pričekajte otprilike 10 sekundi dok se zaslon ne vrati u
početno stanje. Na zaslonu se pojavljuju odabrane opcije.
«OPTION» : Ako se simboli opcija
«OPTION» . Na zaslonu se
Odaberite opciju Pretpranje
Odaberite ovu opciju ako želite uključiti pretpranje na 30°C prije glavnog
pranja.
Pretpranje završava kratkom centrifugom u
programima za pamučne i sintetičke tkanine,
dok se u programu za osjetljive tkanine samo
izbacuje voda.
Za kompatibilnost između te opcije i
programa pranja pogledajte poglavlje
«Programi pranja».
Na zaslonu će se prikazati odgovarajući simbol.
1
OK
2
Odaberite opciju Mrlje
Odaberite ovu opciju za tretiranje vrlo
zaprljanog ili zamrljanog rublja s
odstranjivačem mrlja (produženo glavno
pranje s vremenski optimiziranom fazom
akcije protiv mrlja).
Ova opcija nije dostupna s temperaturom
nižom od 40°C.
Za kompatibilnost između te opcije i programa pranja pogledajte poglavlje
«Programi pranja».
OK
1
2
Page 67

Važno! Ako želite izvršiti program s opcijom za uklanjanje mrlja, uspite
odstranjivač mrlja u pretinac .
Odaberite opciju Nježno
Pritiskom na tu tipku smanjuje se intenzitet
pranja. Uređaj dodaje jedno ispiranje u
programima za PAMUK, 40°-60° MIX i
SINTETIKU.
Ova opcija nije kompatibilna s opcijom
Dodatno ispiranje .
Za kompatibilnost između te opcije i programa pranja pogledajte poglavlje
«Programi pranja».
Ova se opcija preporučuje za neotporne boje.
Odaberite dodatno ispiranje
Ovaj je uređaj predviđen za uštedu vode.
Međutim, za osobe s vrlo osjetljivom kožom
(alergične na deterdžente) može biti
potrebno isprati rublje korištenjem dodatne
količine vode (Dodatno ispiranje).
Za kompatibilnost između te opcije i
programa pranja pogledajte poglavlje
«Programi pranja».
Ako želite aktivirati tu opciju za stalno, za svaki ciklus pranja, pritisnite
istovremeno tipke
TEMPERATURE i SPIN otprilike 6 sekundi: simbol
osvjetljava se na zaslonu.Ta opcija ostaje stalno aktivna.
Ako je želite poništiti pritisnite iste tipke dok ne nestane simbol.
1
2
uporaba
1
67
OK
2
OK
Odaberite opciju Ušteda vremena
Perilica predlaže kao početnu postavku
ciklus pranja za «Normalno prljavo rublje».
Ciklus pranja može se skratiti tipkom “Time
saving”.
Ta se opcija može odabrati s programima
pranja za PAMUK, SINTETIKU i
OSJETLJIVO.
Jednim pritiskom na tu tipku, odgovarajući simbol pojavljuje se na zaslonu i
moći ćete skratiti trajanje pranja za «Dnevno prljavo rublje».
Zaslon će prikazati skraćeno vrijeme pranja. Koristiti za dnevno zaprljano
rublje. Maksimalna količina rublja je 7 kg za pamuk i 3.5 kg za sintetiku i
osjetljivo.
OK
Page 68

uporaba
68
Pritiskom dva puta na tu tipku, odgovarajući simbol ostaje osvijetljen na
zaslonu i moći ćete skratiti trajanje pranja za «malo prljavo rublje». Zaslon će
pokazivati
skraćeno vrijeme pranja.
Zaslon će prikazati skraćeno vrijeme pranja. Koristi se samo za
zaprljano rublje. Maksimalna količina rublja je 3.5 kg za pamuk i 2 kg za
sintetiku i osjetljivo.
Zaslon
Na zaslonu se prikazuju sljedeće informacije:
Trajanje odabranog programa
Kada odaberete program, njegovo se
trajanje prikazuje u satima i minutama (na
primjer
izračunava na osnovi maksimalno pune
perilice za svaku vrstu tkanine.
Nakon što je program započeo, preostalo
vrijeme se obnavlja svake min
Odgoda starta
Odgoda (20 sati max) koju ste odabrali
pomoću odgovarajuće tipke prikazuje se na
zaslonu u trajanju od otprilike 3 sekundi,
zatim se prikazuje trajanje prethodno
odabranog programa.
Simbol Odgode starta pojavit će se na
zaslonu.
Vrijednost vremena odgode smanjuje se za
jednu jedinicu svaki sat i zatim, kada
preostane 1 sat, vrijeme se smanjuje svake
minute.
Krivi odabir opcije
Ako odaberete opciju koja nije kompatibilna s
odabranim programom pranja, prikazuje se
poruka Err otprilike 2 sekunde i žuto
indikatorsko svjetlo tipke Start/Pause počinje
treptati.
2.05). Trajanje se automatski
ute.
OK
vrlo malo
OK
OK
Šifre alarma
U slučaju nepravilnog rada, mogu se
prikazati šifre alarma, na primjer
stavak «Nešto ne radi»).
OK
E20 (vidi
Page 69

Kraj programa
Kad program završi, prikazuje se nula koja
trepće (
0je prikazana, simbol «Vrata»
nestaje i vrata se mogu otvoriti).
Odaberite «Start/Pause»
Za pokretanje odabranog programa, pritisnite
tipku Start/Pause ; odgovarajuće
crveno indikatorsko svjetlo prestaje treptati.
Simbol «Vrata» pojavljuje se na zaslonu što označava da je uređaj počeo
raditi i da su vrata zaključana.
Simbol «Vrata» označava da se vrata
mogu otvoriti:
● osvijetljen je simbol «Vrata» : vrata se
ne mogu otvoriti. Uređaj obavlja program
pranja.
● ugašen je simbol «Vrata» : vrata se
mogu otvoriti. Program pranja je gotov.
Za prekidanje programa u tijeku, pritisnite tipku Start/Pause : počinje
treptati odgovarajuće crveno indikatorsko svjetlo.
Za nastavak programa iz točke gdje je bio prekinut, pritisnite tipku
Start/Pause još jednom.
Ako ste odabrali odgođeni start, perilica će početi odbrojavanje.
Ako ste odabrali pogrešnu opciju, integrirano žuto indikatorsko svjetlo tipke
Start/Pause trepće 3 puta i prikazuje se poruka Err u trajanju od otprilike
2 sekunde.
OK
uporaba
OK
69
Odaberite Odgodu starta
Prije nego pokrenete program, ako želite odgoditi početak, pritisnite više
puta tipku Odgode starta, kako biste odabrali željenu odgodu.
Odgovarajući simbol pojavit će se na zaslonu
Odbrana vrijednost odgode starta (do 20
sati) prikazuje se na zaslonu u trajanju od
otprilike 3 sekunde, zatim se ponovo
prikazuje trajanje programa.
Morate odabrati tu opciju nakon što ste
postavili program i prije pritiska na tipku
Start/Pause .
OK
Page 70

uporaba
70
Možete izmijeniti ili poništiti vrijeme odgode u bilo kojem trenutku, dok ne
pritisnete tipku Start/Pause .
Ako želite dodati rublja u perilicu za vrijeme odgode, morate pritisnuti tipku
Start/Pause da uređaj uđe u pauzu. Zatim pričekajte nekoliko minuta prije nego
simbol «Vrata» prestane treptati prije nego što otvorite vrata. Nakon što ste
zatvorili vrata ponovo pritisnite tipku Start/Pause .
Pomoću ove tipke, program pranja može se odgoditi od 30 min - 60 min - 90
min, 2 sata i zatim u koracima od 1 sata do najviše 20 sati.
Odabir odgode starta:
● Odaberite program i željene opcije;
● Odaberite odgodu starta;
● Pritisnite tipku Start/Pause tipka: perilica počinje s odbrojavanjem
sati. Program će se pokrenuti kada istekne odabrana odgoda.
Poništavanje odgode starta:
● stavite perilicu u PAUZU pritiskom na tipku Start/Pause ;
● pritisnite tipku Odgođen start dok se ne prikaže simbol 0’;
● ponovo pritisnite tipku Start/Pause za pokretanje programa.
Nije moguće odabrati Odgodu starta s programom Izbacivanja vode
.
Prikaz tijeka programa
Na prikazu tijeka programa prikazane su faze pranja odabranog programa.
Tijekom pranja crna crta trepće ispod simbola faze programa za program u
tijeku. Na kraju svake faze pranja, crta ispod odgovarajućeg simbola stalno
svijetli.
Ako se simbol «Prekomjerno
doziranje» osvjetljava na kraju programa,
pokazuje da je korišteno previše
deterdženta.
Izmjena opcije ili programa u tijeku
Moguće je izmijeniti bilo koju opciju prije nego je program izvršen. Prije bilo
koje izmjene, morate staviti perilicu u pauzu pritiskom na tipku Start/Pause
.
Izmjena programa u tijeku moguća je samo ponovnim postavljanjem
(resetom). Okrenite programator na O i zatim na položaj novog programa.
Voda od pranja neće biti izbačena iz unutrašnjosti perilice. Pokrenite novi
program ponovnim pritiskom na tipku Start/Pause .
Page 71

Prekidanje programa
Pritisnite tipku Start/Pause za prekid programa u tijeku, počinje treptati
odgovarajuće indikatorsko svjetlo. Ponovo pritisnite tipku za nastavak
programa.
Poništavanje programa
Okrenite programator na O za poništavanje programa u tijeku. Sada možete
odabrati novi program.
Otvaranje vrata nakon početka programa
Prvo stavite perilicu u pauzu pritiskom na tipku Start/Pause .
● ako simbol «Vrata» nestane, vrata se mogu otvoriti.
● ako se simbol «Vrata» ne ugasi, to znači da se uređaj već zagrijava, da
je razina vode iznad donjeg ruba vrata. U tom slučaju vrata se ne mogu
otvoriti.
● Ako ne možete otvoriti vrata, a potrebno je da ih otvorite, morate isključiti
perilicu tako da okrenete programator u položaj O. Nakon otprilike 3 minute
vrata se mogu otvoriti (pazite na razinu i temperaturu vode!).
uporaba
71
Na kraju programa
Uređaj se automatski zaustavlja, indikatorsko svjetlo tipke Start/Pause
se gasi, trepćuća
trajanju od 2 minute.
Ako je odabrana opcija Zadržavanje vode ili Noćni ciklus , simbol
«Vrata» je još osvijetljen i vrata ostaju zaključana što označava da je
potrebno isprazniti vodu prije otvaranja vrata.
Za pražnjenje vode molimo vas pročitajte postupak u stavku opcije
Zadržavanje vode.
Okrenite programator na O za isključivanje perilice. Izvadite rublje iz bubnja i
pažljivo provjerite je li bubanj prazan.
Ako ne namjeravate izvršiti još jedno pranje, zatvorite slavinu za vodu. Ostavite
vrata pritvorena kako biste spriječili stvaranje plijesni i neugodnih
mirisa.
0 pojavljuje se na zaslonu i zvučni signal se oglašava u
Page 72

Programi pranja
72
Programi pranja
Program/
Temperatura
BIJELI
PAMUK
95°-60°
OBOJEN
PAMUK
60°-50°-40°-30°hladno
40-60 MIX
HIGIJENSKO
60°
JEANS
60°-50°-40°-30°hladno
Max punjenje
3,5 kg
SINTETIKA
40°-30°-hladno
Vrsta rublja
Bijeli pamuk:
posteljina, stolnjaci,
ručnici.
Obojen pamuk i lan:
radna odjeća, plahte,
stolno rublje, donje
rublje, ručnici.
Specijalni program za
bijeli pamuk
Specijalni program za
komade rublja kao što
su hlače, košulje ili
jakne od jeansa
Sintetičke ili miješane
tkanine: donje rublje,
šareno rublje, košulje
koje se ne skupljaju,
bluze.
npr.
Opcije Opis programa
Smanjena centrifuga/
/
- (*) - -
-
Smanjena centrifuga/
/
- (*) - -
(nije moguće sa
40-60 MIX)
Smanjena
centrifuga/
/
- (*)
Smanjena centrifuga/
/
Smanjena
centrifuga
//
- (*) - -
-
Glavno pranje od 95°C
do 60°C
3 ispiranja
Dugo centrifugiranje
Glavno pranje od 60°C
do hladno
3 ispiranja
Dugo centrifugiranje
Glavno pranje na 60°C
Dugo centrifugiranje
Glavno pranje od 60°C
do hladno
5 ispiranja
Dugo centrifugiranje na
1200 o/min
Glavno pranje od 60°C
do hladno
3 ispiranja
Kratko centrifugiranje
LAKO
GLAČANJE
60°-50°-40°-30°hladno
Maks. količina
rublja 1,5 kg
OSJETLJIVO
40°-30°-hladno
Sintetičke ili miješane
tkanine: donje rublje,
šareno rublje, košulje
koje se ne skupljaju,
bluze.
Osjetljive tkanine: na
primjer zavjese
Smanjena
centrifuga
Smanjena
centrifuga
- (*) - -
/
-
//
Glavno pranje od 60°C
do hladno
4 ispiranja
Kratko centrifugiranje
na 1200 o/min
Glavno pranje od 40°C
do hladno
3 ispiranja
Kratko centrifugiranje
Page 73

Programi pranja
Programi pranja
73
Program/
Temperatura
VISKOZA
Maks. količina
rublja 3,5 kg
ISPIRANJE
IZBACIVANJE
VODE
CENTRIFUGA
LAGANO
CENTRIFUGIRANJE
Vrsta rublja
Rublje od viskoze
Odvojen ciklus
centrifugiranja za
pamuk koji se pere
ručno.
Za pražnjenje vode
posljednjeg ispiranja u
programima sa
Zadržavanjem vode
ili s opcijom Noćnog
ciklusa
Odvojeno
centrifugiranje za
pamučne tkanine
Odvojeno
centrifugiranje za
sintetičke i osjetljive
tkanine.
.
Opcije Opis programa
Smanjena
centrifuga
//
- (*) -
Smanjena
centrifuga
Smanjena centrifuga
Smanjena centrifuga
//
Glavno pranje od 40°C
do hladno
3 ispiranja
Kratko centrifugiranje
Dugo centrifugiranje
Izbacivanje vode
Izbacivanje vode i
dugo centrifugiranje
Izbacivanje vode i
kratko centrifugiranje
VUNA
40°-30°-hladno
LINGERIE
40°-30°-hladno
Maks. količina
rublja 1 kg
SVILA
30°-hladno
Maks. količina
rublja 1 kg
Rublje s etiketom
“Čista nova vuna, ne
skuplja se, periva u
perilici” ili s etiketom
“Ručno pranje”
Specijalni program za
izuzetno osjetljivo
rublje koje se pere na
ruke
Svileno rublje koje se
treba nježno prati i
centrifugirati.
Smanjena
centrifuga
Smanjena
centrifuga
Smanjena
centrifuga
//
//
//
Glavno pranje od 40°C
do hladno
3 ispiranja
Kratko centrifugiranje
Glavno pranje od 40°C
do hladno
3 ispiranja
Kratko centrifugiranje
Glavno pranje od 30°C
do hladno
3 ispiranja
Kratko centrifugiranje
Page 74

Programi pranja
74
Programi pranja
Program/
Temperatura
SPORTSKE
JAKNE
40°-30°-hladno
Maks. količina
rublja 2 kg
SPORT
INTENZIVNO
Maks. količina
rublja 2,5 kg
- 3 KG
30°
BRZO
INTENZIVNO
60°-50°-40°
Maks. količina
rublja. 5 kg
Vrsta rublja
Specijalni program za
sportsko rublje
Specijalni program za
vrlo zaprljano sportsko
rublje
Za malo zaprljano
rublje, izuzev vune
Za pamuk ili miješane
tkanine, malo prljave ili
nošene samo jednom
Opcije
Smanjena
centrifuga
Smanjena
centrifuga
Smanjena centrifuga
Smanjena
centrifuga
/
//
/
Opis programa
Glavno pranje od 40°C
do hladno
3 ispiranja
Kratko centrifugiranje
Pretpranje na 30°
Glavno pranje od 40°C
do hladno
3 ispiranja
Kratko centrifugiranje
na 1200 o/min
Glavno pranje na 30°
2 ispiranja
Kratko centrifugiranje
na 1200 o/min
Glavno pranje od 60°
do 40°C
3 ispiranja
Kratko centrifugiranje
na 1200 o/min
EKONOMIČNO
60°
O
Bijeli i šareni pamuk
ekonomično,
malo-uobičajeno prljavo
rublje, košulje, donje
rublje.
Za poništavanje
programa u tijeku ili za
isključivanje perilice.
Smanjena
centrifuga
- (*) - -
//
Glavno pranje na 60°C
2 ispiranja
Dugo centrifugiranje
* Opciju za uklanjanje mrlja možete odabrati samo na temperaturi od 40°C ili više.
Page 75

Programi pranja
Programi pranja
Vrsta tkanine Maks. količine rublja
PAMUK 7 kg
SINTETIKA, OSJETLJIVO i VISKOZA 3,5 kg
JEANS 3,5 kg
LAKO GLAČANJE 1,5 kg
VUNA (RUČNO PRANJE) 2 kg
75
LINGERIE i
SPORTSKE JAKNE 2.5 kg
20 MIN
SPORT INTENZIVNO 2.5 kg
EKONOMIČNO 7 kg
BRZO INTENZIVNO 5 kg
SVILA
. - 3 KG
1 kg
3 kg
Page 76

Informacije o programu
76
Informacije o programu
Program pranja za bijeli pamuk.Taj program uklanja
mikroorganizme zahvaljujući pranju na 60°C i jednom
Higijensko
40-60 MIX
Jeans
dodatnom ispiranju. Kako bi to djelovanje bilo učinkovitije,
stavite u pretinac “Mrlje” specijalni aditiv “Higijensko” i
odaberite opciju “Mrlje”. Preporučena maksimalna brzina
centrifuge: 1400 o/min
Specijalni program za bijeli i šareni pamuk prikladan za
različite temperature pranja. Ovaj se program može
koristiti za rublje koje se treba prati na 40°C ili 60°C
odvojeno.Tako da možete staviti u bubanj maksimalnu
količinu kako biste uštedjeli struju i vodu. Postići ćete iste
dobre rezultate pranja kao i na uobičajenom programu na
60°C.
S ovim je programom moguće oprati rublje kao što su hlače,
košulje ili jakne od jeansa, kao i od džerseja izrađenog od
visoko tehnoloških materijala. (Opcija Dodatnog ispiranja
može se aktivirati automatski). Maksimalna brzina centrifuge
je 1200 o/min.
Lako glačanje
Viskoza
Vuna/Ručno pranje
Lingerie
Svila
Odabirom ovog programa, rublje se lagano pere i
centrifugira kako se ne bi izgužvalo. Na taj je način
glačanje jednostavnije. Osim toga, perilica će izvršiti
dodatna ispiranja.
Specijalni program za tkanine kao što su viskoza, cupro,
lyocell, koje će biti oprane nježnijim pokretima stroja nego
u programu Osjetljivo, a istovremeno s jačim čišćenjem
nego u programu «Ručno pranje».
Program pranja za vunu koja se može prati u perilici te za
vunu koja se može prati na ruke i za osjetljive tkanine sa
simbolom održavanja “ručno pranje” .
Ovaj je program prikladan za vrlo osjetljive predmete, kao
što su lingerie, grudnjaci, donje rublje i sl. Maksimalna
temperatura pranja je 40°C. Maksimalna brzina centrifuge
automatski se smanjuje na 1200 o/min.
Nježni program pranja koji je namijenjen svili i miješanoj
sintetici. Temperatura pranja je 30°C.
Maksimalna brzina centrifuge automatski se smanjuje na
1200 o/min.
Page 77

Informacije o programu
Specijalni program za pranje sportske odjeće. Maksimalna
Sportske jakne
Sport intenzivno
- 3 KG
temperatura je 40°C. Maksimalna brzina centrifuge je 800
o/min. Kada odaberete ovaj program nemojte dodati aditive.
Ovaj je program prikladan za pranje vrlo prljavih sportskih
predmeta. Uređaj će automatski dodati fazu pretpranja
prije glavnog pranja kako bi se uklonile mrlje od blata.
Preporučujemo da ne stavljate deterdžent u pretinac u
spremniku za deterdžent.Temperatura pranja j
Maksimalna brzina centrifuge je 1200 o/min.
Specijalni program na 30°C, trajanje - otprilike 20 minuta,
idealno za rublje koje je potrebno osvježiti: npr. sportska
jakna nošena samo jednom ili malo prljava ili novo rublje.
Informacije o programu
e 40°C.
77
Brzo intenzivno
Ekonomično
Ispiranje
Izbacivanje vode
Centrifuga
Lagano centrifugiranje
Program brzog pranja, koristiti za malo prljavi bijeli pamuk i
pamuk otpornih boja te miješane tkanine.
Ovaj program ne možete odabrati za malo ili uobičajeno
prljavo pamučno rublje.Temperatura će se smanjiti i
vrijeme pranja produžiti. To omogućuje postizanje dobre
učinkovitosti pranja uz uštedu struje.
S ovim je programom moguće ispirati i centrifugirati
pamučno rublje koje je oprano ručno.Uređaj vrši 3 ispiranja,
nakon toga slijedi završno dugo centrifugiranje. Brzina
centrifuge može se smanjiti pritiskom na tipku Spin Speed.
Za pražnjenje vode posljednjeg ispiranja u programima sa
Zadržavanjem vode ili s opcijom Noćnog ciklusa
Prvo okrenite programator na O, zatim odaberite program
Izbacivanje vode i pritisnite tipku Start/Pauza.
Odvojeno centrifugiranje za pamuk i nakon programa sa
Zadržavanjem vode i opcijom Noćnog ciklusa . Prije
odabira ovog programa, programator morate okrenuti na O.
Možete odabrati brzinu pomoću odgovarajuće tipke kako
biste je prilagodili tkaninama koje želite centrifugirati.
Odvojeno centrifugiranje za sintetiku, osjetljive tkanine i
nakon programa sa Zadržavanjem vode i opcijom
Noćnog ciklusa . Prije odabira ovog
programa, programator morate okrenuti na O.Možete
odabrati brzinu pomoću odgovarajuće tipke kako biste je
prilagodili tkaninama koje želite centrifugirati.
Page 78

Priprema ciklusa pranja
78
Priprema ciklusa pranja
Razvrstavanje rublja
Slijedite simbole pranja na etiketi rublja te upute za pranje proizvođača.
Razvrstajte rublje kako slijedi: bijelo, obojeno, sintetičko, osjetljivo, vuna.
Temperature
95° ili 90°
60°/50°
40°-30°- Hladno
za normalno prljavi bijeli pamuk i lan (npr. stolnjaci, ručnici,
posteljina...).
za normalno prljavo rublje otpornih boja (npr. košulje i bluze,
spavaćice, pidžame...) od lana, pamuka ili sintetičkih vlakana i
za malo prljavi bijeli pamuk (npr.donje rublje).
za osjetljivo rublje (npr. mrežaste zavjese), miješano rublje
uključujući sintetična vlakna i vune s etiketom «čista nova
vuna, periva u perilici, ne skuplja se».
Prije punjenja perilice
Nikada nemojte zajedno prati bijelo i šareno rublje. Bijelo rublje može
izgubiti “bjelinu” tijekom pranja.
Novo šareno rublje može pustiti boju u prvome pranju; zato ga morate prati
odvojeno prvi put.
Uvjerite se da u rublju nisu ostali metalni predmeti (npr. kopče za kosu,
sigurnosne igle, pribadače).
Zakopčajte jastučnice, povucite zatvarače, zatvorite kukice i dugmad.
Zavežite u čvor pojaseve i duge vrpce.
Uklonite tvrdokorne mrlje prije pranja.
Trljajte naročito prljava područja specijalnim deterdžentom ili deterdžentom
u pasti.
Posebnom pažnjom rukujte sa zavjesama. Skinite kukice ili ih svežite i
stavite u vrećicu ili mrežicu.
Page 79

Priprema ciklusa pranja
Maksimalne količine rublja
Preporučene količine rublja navedene su u tablicama programa.
Opća pravila:
Pamuk, lan: pun bubanj ali ne previše gusto raspoređeno rublje;
Sintetika: bubanj napunjen najviše do pola
;
Osjetljive tkanine i vuna: bubanj napunjen najviše do trećine.
Pranje maksimalne količine rublja omogućuje najučinkovitiju uporabu vode i
struje.
Kod vrlo prljavog rublja, smanjite količinu u perilici.
Pranje maksimalne količine rublja omogućuje najučinkovitiju uporabu vode i
struje. Kod vrlo prljavog rublja, smanjite količinu u perilici.
Težine rublja
Sljedeće su težine približne:
79
ogrtač za kupanje
1200 g
100 gubrus
700 gpokrivač
500 gplahta
200 gjastučnica
250 gstolnjak
200 gručnik
100 gstolnjak za čaj
200 gspavaćica
100 ggrudnjaci
600 gmuška radna bluza
200 gkošulja
500 gmuška pidžama
100 gbluza
100 gmuško donje rublje
Page 80

Priprema ciklusa pranja
80
Uklanjanje mrlja
Tvrdokorne mrlje ponekad se ne mogu ukloniti samo vodom i deterdžentom.
Stoga je uputno njihovo tretiranje prije pranja.
Krv: svježe mrlje operite hladnom vodom. Kod osušenih mrlja, namočite
preko noći u vodi sa specijalnim deterdžentom, zatim trljajte vodom i
sapunom.
Uljne boje: navlažite s odstranjivačem mrlja na bazi benzina, položite rublje
na mekanu krpu i tapkajte mrlju; ponovite više puta.
Osušene masne mrlje: navlažite s terpentinom, položite rublje na mekanu
površinu i tapkajte mrlju vrhovima prstiju i pamučnom tkaninom.
Hrđa: oksalna kiselina rastvorena u vreloj vodi ili proizvod za uklanjanje
hrđe korišten hladan. Pazite s mrljama od hrđe koje nisu svježe jer je
celulozna struktura već oštećena i tkanina ima tendenciju da se stvaraju
rupe.
Mrlje od plijesni: tretirajte izbjeljivačem, dobro isperite (samo bijelo i
šareno rublje otpornih boja).
Trava: lagano nasapunajte i tretirajte izbjeljivačem (samo bijelo i šareno
rublje otpornih boja).
Kemijske i ljepilo: navlažite acetonom (*), stavite rublje na mekanu krpu i
tapkajte mrlju.
Ruž za usne: navlažite acetonom kao što je gore opisano, zatim tretirajte
mrlje metiliranim alkoholom. Tretirajte eventualne preostale znakove
izbjeljivačem.
Crno vino: namočite u vodi i deterdžentu, isperite i tretirajte octenom ili
limunskom kiselinom, zatim isperite. Tretirajte eventualne preostale znakove
izbjeljivačem.
Tinta: ovisno o vrsti tinte, navlažite tkaninu prije acetonom (*), zatim
octenom kiselinom; tretirajte eventualne tragove na bijelom rublju
izbjeljivačem i zatim dobro isperite.
Mrlje od katrana: prvo tretirajte odstranjivačem mrlja, metiliranim alkoholom
ili benzinom, zatim trljajte deterdžentom u pasti.
(*) nemojte upotrebljavati aceton na umjetnoj svili.
Deterdženti i aditivi
Dobri rezultati pranja ovise i o izboru deterdženta i o ispravnoj količini kako
bi se spriječilo nepotrebno trošenje i zaštitio okoliš.
Iako biološki razgradivi, deterdženti sadrže tvari koje, ako su u velikim
količinama, mogu narušiti osjetljivu ravnotežu prirode.
Izbor deterdženta ovisit će o vrsti tkanine (osjetljivo, vuna, pamuk, itd.), o
boji, o temperaturi pranja i o stupnju zaprljanosti.
Page 81

Priprema ciklusa pranja
S ovim se uređajem mogu upotrebljavati svi uobičajeni deterdženti:
• deterdženti u prahu za sve vrste tkanina,
• deterdženti u prahu za osjetljive tkanine (maks. 60°C) i vunu,
• tekući deterdženti, po mogućnosti za programe pranja na niskim
temperaturama (maks. 60°C) za sve vrste tkanina, ili specijalni samo za
vunu.
Deterdžent i svi aditivi moraju biti stavljeni u odgovarajuće pretince u
spremniku deterdženta prije pokretanja programa pranja.
Ako upotrebljavate koncentrirane deterdžente u prahu, ili koncentrirane
tekuće deterdžente, potrebno je odabrati program bez pretpranja.
Perilica rublja ima ugrađeni sustav ponovnog kruženja koji omogućuje
optimalnu uporabu koncentriranog deterdženta.
Ulijte tekući deterdžent u pretinac spremnika označen s neposredno
prije pokretanja programa.
Sve eventualne omekšivače ili škrobne aditive morate uliti u spremnik
označen s prije pokretanja programa pranja.
Slijedite preporuke proizvođača proizvoda što se tiče količina koje trebate
koristiti i nemojte prelaziti oznaku «MAX» u spremniku deterdženta.
Potrebna količina deterdženta
Vrsta i količina deterdženta ovisit će o vrsti tkanine, količini rublja, stupnju
zaprljanosti i tvrdoći korištene vode.
Slijedite preporuke proizvođača što se tiče količina koje trebate koristiti.
Upotrijebite manje deterdženta ako:
• perete malu količinu rublja,
• rublje je samo malo prljavo,
• stvara se mnogo pjene tijekom pranja.*
81
Stupnjevi tvrdoće vode
Tvrdoća vode je klasificirana na takozvane “stupnjeve” tvrdoće. Informacije o
tvrdoći vode u vašem području možete dobiti od vodovodnog poduzeća ili
općine.
Page 82

Priprema ciklusa pranja
82
Opaska: Potrebno je dodati omekšivač vode kada je stupanj tvrdoće
srednje-visok (od stupnja tvrdoće II). Slijedite preporuke proizvođača.
Količina deterdženta se zatim može uvijek podesiti prema stupnju tvrdoće I
(= mekano).
Stupnjevi tvrdoće vode
Razina
1 mekana
2 srednja 8-14 16-25
3 tvrda 15-21 26-37
4 vrlo tvrda > 21 > 37
Svojstva
Njemački
°dH
0-7 0-15
Francuski
°T.H.
Page 83

Međunarodni simboli za pranje
83
Page 84

Održavanje i čišćenje
84
Održavanje i čišćenje
Morate ISKOPČATI uređaj iz dovoda električne energije prije bilo kakvog
čišćenja ili održavanja.
Čišćenje vodenog kamenca
Voda koju obično koristimo sadrži kamenac. Preporučuje se redovito
korištenje praška za omekšavanje vode u perilici. Učinite to odvojeno od bilo
kojeg pranja rublja i u skladu s uputama proizvođača omekšivača vode.
To će pomoći u sprječavanju stvaranja naslaga kamenca.
Nakon svakog pranja
Ostavite vrata neko vrijeme otvorena. To pomaže u sprječavanju stvaranja
plijesni i ustajalih mirisa u uređaju. Ostavite li vrata otvorena nakon pranja,
to će i produžiti vijek brtvi na vratima.
Pranje radi održavanja
Korištenjem niske temperature za pranje moguće su nakupine ostataka
unutar bubnja.
Preporučujemo da redovito provedete pranje radi održavanja.
Za pranje radi održavanja:
• Bubanj mora biti prazan.
• Odaberite najtopliji program pranja pamuka.
• Koristite normalnu količinu deterdženta, a to mora biti prašak s biološkim
svojstvima
.
Vanjsko čišćenje
Očistite vanjsko kućište perilice isključivo sapunom i vodom, zatim temeljito
osušite.
Važno: nemojte upotrebljavati metilirani alkohol, razrjeđivače ili slične
proizvode za čišćenje kućišta.
Spremnik deterdženta
Potrebno je redovito čistiti spremnik
deterdženta.
1. Izvadite spremnik deterdženta tako
da ga odlučno povučete.
Page 85

Održavanje i čišćenje
2. Izvadite umetak za balzam iz srednjeg pretinca.
3. Očistite sve dijelove vodom.
4. Stavite unutra umetak za balzam sve
dok ide, tako da čvrsto sjedne u
mjestu.
5. Očistite četkom sve dijelove perilice,
naročito brizgalice na vrhu komore
za pranje.
6. Stavite spremnik za deterdžent u vodilice i zatim ga gurnite prema
unutra.
Odvodna crpka
Crpku je potrebno redovito pregledavati, i to naročito ako
• perilica ne izbacuje vodu i/ili ne centrifugira
• perilica proizvodi neobičan zvuk za vrijeme izbacivanje vode zbog
predmeta kao što su sigurnosne igle,
kovanice itd. koje blokiraju crpku.
Postupite na sljedeći način:
1. Iskopčajte perilicu.
2. Ako je potrebno, pričekajte dok se
voda nije ohladila.
3. Otvorite vrata crpke.
4. Stavite spremnik blizu crpke kako bi
sakupili eventualna prolijevanja.
5. Oslobodite cijev za pražnjenje u
hitnim slučajevima, stavite je u
spremnik i skinite s nje čep.
85
Page 86

Održavanje i čišćenje
86
6. Kada iz nje ne izlazi više voda,
odvijte crpku i skinite je. Uvijek držite
krpu u blizini kako bi osušili vodu
koja se eventualno prolije dok
skidate crpku.
7. Ako u rotoru crpke ima predmeta,
okrenite ga da biste ih izvadili.
8. Stavite čep nazad na cijev za
pražnjenje u hitnim slučajevima i
vratite je u svoje sjedište.
9. Potpuno zavijte crpku.
10. Zatvorite vrata crpke.
Upozorenje!
Kada je perilica uključena i ovisno o
odabranom programu, crpka može
sadržati vruću vodu. Nikada nemojte
skidati poklopac crpke tijekom ciklusa
pranja, uvijek pričekajte da uređaj
završi ciklus, i da je prazan. Kada
vraćate na mjesto poklopac, provjerite
da je čvrsto ponovo zategnut tako da
zaustavi propuštanja i da ga mala
djeca ne mogu skinuti.
Filtar na dovodu vode
Ako primijetite da perilici treba više vremena da se puni, provjerite da filtar
na ulaznoj cijevi nije blokiran.
1. Zatvorite slavinu za dovod vode.
2. Odvijte cijev sa slavine.
3. Očistite filtar u cijevi čvrstom četkom.
4. Zavijte cijev natrag na slavinu.
Page 87

Održavanje i čišćenje
Zaštita od zaleđivanja
Ako je perilica instalirana na mjestu gdje se temperature mogu spustiti ispod
0°C, postupite na sljedeći način:
1. Zatvorite slavinu za dovod vode i odvijte dovodnu cijev sa slavine.
2. Stavite kraj cijevi za pražnjenje u hitnim slučajevima i kraj cijevi dovodne
vode u posudu na podu te pričekajte da se voda isprazni.
3. Zavijte cijev za dovod vode i vratite cijev za pražnjenje u hitnim
slučajevima nakon što ste ponovo vratili čep na mjesto
Na taj se način uklanja sva voda koja je eventualno još prisutna u uređaju,
sprječavajući stvaranje leda koji bi mogao oštetiti uređaj.
Kada ponovo koristite perilicu, provjerite da je temperatura u prostoriji iznad
0°C.
.
Pražnjenje u hitnim slučajevima
Ako se voda ne prazni, postupite na sljedeći način da je izbacite iz perilice:
1. izvucite električni utikač iz utičnice;
2. zatvorite slavinu za dovod vode;
3. ako je potrebno, pričekajte dok se voda nije ohladila;
4. otvorite vrata crpke;
5. stavite posudu na pod i stavite kraj cijevi za pražnjenje u hitnim
slučajevima u zdjelu. Skinite njezin čep. Voda bi se trebala prazniti silom
teže u posudu. Kada se zdjela napuni, vratite čep na cijev. Ispraznite
posudu. Ponovite postupak dok voda ne prestane izlaziti;
6. očistite crpku, ako je potrebno, kao što je gore opisano;
7. vratite cijev za pražnjenje u hitnim slučajevima u svoje sjedište nakon što
ste vratili čep;
8. ponovo zavijte crpku i zatvorite vrata.
87
Page 88

Nešto ne radi
88
Nešto ne radi
Određeni problemi koji se javljaju kao rezultat zanemarivanja ili neodržavanja
uređaja mogu se riješiti jednostavno, bez pozivanja servisera. Prije nego što stupite
u kontakt s najbližim ovlaštenim servisnim centrom, molimo vas izvršite sljedeće
provjere.
Tijekom rada perilice može se dogoditi da žuto indikatorsko svjetlo Start/Pauza trepće,
da se na zaslonu pojavi jedna od sljedećih šifri alarma i da se istovremeno oglasi zvučni
signal svakih 20 sekundi, što označuje da perilica ne radi:
• E10 : problem s dovodom vode
• E20 : problem s pražnjenjem vode
• E40 : vrata otvorena.
• EF0 : aktiviran je sustav protiv poplave
Nakon što je problem uklonjen, pritisnite tipku
Ako nakon svih provjera postoji i dalje problem, kontaktirajte najbliži ovlašteni servis.
Problem Mogući uzrok/Rješenje
Vrata nisu zatvorena. E40
• Dobro zatvorite vrata.
Utikač nije dobro utaknut u utičnicu.
• Utaknite utikač u utičnicu.
U utičnici nema struje.
• Molimo provjerite vašu kućnu električnu
instalaciju.
Perilica se ne uključuje:
Izgorio je glavni osigurač.
• Zamijenite osigurač.
Programator nije ispravno postavljen i tipka
Start/Pause nije pritisnuta.
• Molimo okrenite programator i ponovo pritisnite
tipku Start/Pause.
Odabrana je odgoda starta.
• Ako rublje želite oprati odmah, poništite
odgođeni start.
Start/Pause za nastavak programa.
Page 89

Problem Mogući uzrok/Rješenje
Uređaj se ne puni:
Perilica se puni i odmah prazni:
Perilica ne izbacuje vodu i/ili ne
centrifugira:
Nešto ne radi
Zatvorena je slavina za vodu. E10
• Otvorite slavinu za vodu.
Dovodna cijev je prignječena ili savijena.
• Provjerite spoj cijevi za dovod vode.
Filtar na dovodnoj cijevi je začepljen.
• Očistite filtar na cijevi za dovod vode.
Vrata nisu dobro zatvorena.
• Dobro zatvorite vrata.
Kraj odvodne cijevi nalazi se prenisko.
• Vidjeti odgovarajući stavak u dijelu “Izbacivanje
vode”.
Odvodna cijev je presavijena ili prignječena. E20
• Provjerite priključak odvodne cijevi.
Odvodna crpka je začepljena.
• Očistite odvodnu crpku.
Odabrana je opcija ili Noćni ciklus .
• Deaktivirajte opciju ili Noćni ciklus .
Rublje nije ravnomjerno raspoređeno u bubnju.
• Ponovo rasporedite rublje.
E40
E10
E20
89
E10
Voda je na podu:
Upotrijebljeno je previše deterdženta ili
neodgovarajući deterdžent (stvara se previše
pjene).
• Smanjite količinu deterdženta ili koristite drukčiju
.
marku
Provjerite pušta li jedan od spojeva dovodne cijevi.
To ponekad nije lako vidjeti jer voda curi niz cijev;
provjerite je li vlažna.
• Provjerite spoj cijevi za dovod vode.
Odvodna cijev je oštećena.
• Zamijenite je s novom.
Čep na cijevi za pražnjenje u hitnim slučajevima
nije ponovno vraćen na mjesto nakon čišćenja
crpke.
• Stavite čep nazad na cijev za pražnjenje u hitnim
slučajevima i vratite je u svoje sjedište.
Page 90

Nešto ne radi
90
Problem Mogući uzrok/Rješenje
Nezadovoljavajući ishod pranja:
Vrata se ne otvaraju:
Upotrijebljeno je premalo deterdženta ili
neodgovarajući deterdžent.
• Povećajte količinu deterdženta ili koristite drugu
marku.
Tvrdokorne mrlje nisu bile tretirane prije pranja.
• Koristite komercijalne proizvode za tretman
tvrdokornih mrlja
.
Nije odabrana ispravna temperatura.
• Provjerite jeste li odabrali ispravnu temperaturu.
Perilica je previše puna rublja.
• Stavite manje rublja u bubanj.
Program je još u tijeku.
• Pričekajte kraj ciklusa pranja.
Brava na vratima se još nije otključala.
• Pričekajte nekoliko minuta.
Voda je u bubnju.
• Odaberite program za izbacivanje vode ili
centrifugiranje da se perilica isprazni.
Perilica vibrira ili je bučna:
Centrifugiranje počinje kasno ili
perilica ne centrifugira:
Transportni vijci i ambalaža nisu uklonjeni.
• Provjerite je li perilica ispravno postavljena.
Nožice perilice nisu podešene
• Provjerite je li uređaj ispravno niveliran.
Rublje nije ravnomjerno raspoređeno u bubnju.
• Ponovo rasporedite rublje.
Možda je vrlo malo rublja u bubnju.
• Stavite više rublja.
Uključio se elektronski uređaj za otkrivanje
uravnoteženosti jer rublje nije ravnomjerno
raspoređeno u bubnju. Rublje se ponovo
raspoređuje s obrnutim okretanjem bubnja. To se
može dogoditi više puta prije nego nestane
uravnoteženost i prije nego se nastavi normalno
centrifugiranje. Ako nakon nekoliko minuta rublje
još nije ravnomjerno raspoređeno u bubnju, uređaj
neće centrifugirati.
• Ponovo rasporedite rublje.
Page 91

Problem Mogući problem/Rješenje
Mod. ..........
Prod. No. ...........
Ser. No. .........
M
o
d
.
....
......
P
r
o
d
. N
o
. .
..
..
..
....
S
e
r
. N
o
.
..
....
...
P0042 BD
Perilica proizvodi neobičan zvuk
Ne vidi se voda u perilici:
Nešto ne radi
91
Uređaj je opremljen vrstom motora koji proizvodi
neobičan zvuk u odnosu na ostale klasične motore.
Taj novi motor osigurava nježniji početak i
ravnomjernije raspoređivanje rublja u bubnju
tijekom centrifugiranja, kao i povećanu stabilnost
perilice.
Uređaji moderne tehnologije rade vrlo ekonomično
koristeći vrlo malo vode bez da to utječe na
izvedbu.
Na zaslonu se prikazuje šifra
alarma:
EF0
Uključen je sustav protiv poplave.
• Otpojite uređaj i kontaktirajte ovlašteni servis
Svjetlo u bubnju ne radi: Molimo kontaktirajte vaš najbliži ovlašteni servis.
Ako ne možete ustanoviti ili riješiti problem,
kontaktirajte našu ovlaštenu servisnu službu.
Prije nego telefonirate, zabilježite model, serijski
broj i datum kupovine vaše perilice: ti su podaci
potrebni servisnom centru.
Page 92

Tehnički podaci
92
Tehnički podaci
Dimenzije
Električni priključak Napon Ukupna snaga - Osigurač
Pritisak dovoda vode
Maksimalna napunjenost
Brzina centrifuge
Širina
Visina
Dubina
(s vratima)
Podaci o električnom spajanju nalaze se na natpisnoj
pločici na rubu vrata perilice
Minimalni
Maksimalna
Pamuk
Sintetika, Osjetljivo i Viskoza
Jeans
Deke, Vuna (ručno pranje)
Sportske jakne
Sport intenzivno
Lako glačanje
Lingerie i Svila
Brzo Intenzivno
Maksimalna 1400 o/min
60 cm
85 cm
63 cm
0,05 MPa
0,80 MPa
7,0 kg
3,5 kg
3,5 kg
2,0 kg
2,5 kg
2,5 kg
1,5 kg
1,0 kg
5,0 kg
Page 93

Potrošnja
Potrošnja
93
Program
Pamuk 95° 62 2,1
Higijensko 60° 68 1,7
40-60 MIX 40° 45 1,3
Jeans 60° 55 0,9
Sintetika 40° 54 0,9
Lako glačanje 40° 63 0,45
Osjetljivo 40° 63 0,55
Viskoza 40° 63 0,55
Ispiranje 46 0,1
Izbacivanje vode - -
Centrifuga - -
Lagano centrifugiranje - -
Vuna 40° 62 0,4
Lingerie 40° 60 0,35
Svila 30° 50 0,25
Potrošnja vode
(litre)
Potrošnja struje (u
kWh)
Trajanje programa
(u minutama)
Sportske jakne 40° 70 0,5
Sport intenzivno 60° 70 0,65
20 MIN.- 3 Kg 30° 38 0,2
Brzo Intenzivno 60° 48 1,05
(*) Ekonomično 60° 45 1,19
Podaci potrošnje prikazani u ovoj tablici samo su indikativni, jer mogu varirati
ovisno o količini i vrsti rublja, o temperaturi dovodne vode i o temperaturi
okoline. Odnosi se na najvišu temperaturu u svakom programu pranja.
(*) “Ekonomično 60°C” s količinom od 7 kg rublja je referentni program za
podatke navedene na energetskoj pločici, u skladu sa standardima EEZ 92/75.
Za trajanje programa, upućujemo vas na zaslon upravljačke ploče.
Page 94

Postavljanje
HEC0008
A
HEC00022
HEC0001
94
Postavljanje
Uklanjanje ambalaže
Prije korištenja uređaja morate skinuti sve transportne vijke i ambalažu iz
unutrašnjosti.
Savjetujemo vam da sačuvate svu transportnu zaštitu jer će vam možda
zatrebati pri budućem transportu.
1. Nakon što ste uklonili svu ambalažu,
pažljivo položite perilicu na stražnji dio
kako biste uklonili podnožje od polistirola
s dna.
2. Izvadite električni kabel i odvodnu cijev iz držača
cijevi na stražnjem dijelu uređaja.
3. Odgovarajućim ključem odvijte i uklonite
središnji stražnji vijak A.
Page 95

4. Odvijte i skinite dva velika stražnja vijka B
C
C
B
D
HEC0003
B
C
C
HEC0023
E
HEC0010
HEC0005
i šest manjih vijaka C.
5. Skinite okvir D i pričvrstite šest manjih
vijaka C. Izvucite odgovarajući plastični
odstojnik E.
Postavljanje
95
6. Otvorite vrata, izvadite dovodnu cijev iz bubnja i
uklonite komad polistirola koji je pričvršćen
ljepljivom vrpcom za brtvu na vratima.
7. Napunite manji gornji otvor i dva velika otvora
odgovarajućim plastičnim čepovima koji se
nalaze u vrećici s uputama za uporabu.
8. Spojite cijev za dovod vode kao što je opisano u
stavku «Dovod vode».
Svi razni poklopci isporučeni su uz uređaj u
plastičnoj vrećici koja sadrži upute za uporabu.
Page 96

Postavljanje
HEC007S
HEC0006
96
Pozicioniranje i niveliranje
Postavite perilicu na ravan i tvrdi pod.
Uvjerite se da zrak slobodno kruži oko uređaja i da
ga u tome ne ometa sag, itd.
Prije nego je stavite na male pločice namjestite
plastičnu zaštitu.
Nikada nemojte pokušavati ispraviti eventualne
neravnine poda tako da stavite komade drva,
kartona ili sličnih materijala ispod uređaja.
Ako je nemoguće izbjeći pozicioniranje uređaja pored plinskog štednjaka ili
peći na ugljen, potrebno je umetnuti između ta dva uređaja izolacijsku ploču
prekrivenu aluminijskom folijom na strani koja je okrenuta prema štednjaku
ili peći.
Uređaj ne smije biti postavljen u prostorijama gdje temperatura može pasti
ispod 0.
Cijevi za dovod i odvod vode ne smiju biti presavijene.
Jednom kada je uređaj instaliran, kabel električnog napajanja mora biti lako
dostupan serviserima u slučaju kvara.
Pažljivo nivelirajte pomoću podesivih nožica. Nikada nemojte stavljati karton,
drvo ili slične materijale ispod perilice da biste kompenzirali neravnomjernost
poda.
Automatska nožica: Stražnja nožica na lijevoj
strani vaše perilice izgrađena je kao
amortizirajuća nožica, zato je uređaj fleksibilan u
stražnjem lijevom uglu kada je pod opterećenjem.
Automatska nožica osigurava da se uređaj ne
pomiče čak ni za vrijeme centrifugiranja na
visokim brzinama. U principu, automatsku nožicu
nije potrebno podešavati.
Dovod vode
Uređaj je opremljen dovodnom cijevi koja se nalazi
u bubnju perilice.
Nemojte koristiti cijev vaše prethodne perilice
za spajanje na dovod vode.
Ovaj uređaj mora biti spojen na dovod hladne
vode.
1. Otvorite vrata i izvucite dovodnu cijev.
2. Spojite cijev s kutnim priključkom na perilicu.
Page 97

Postavljanje
A
352
Nemojte staviti dovodnu cijev prema dole. Stavite cijev lijevo ili desno
ovisno o položaju slavine za vodu.
3. Namjestite ispravno cijev tako da olabavite prstenastu maticu.
Nakon što ste postavili dovodnu cijev, dobro pričvrstite prstenastu maticu
da spriječite propuštanja.
4. Spojite cijev na slavinu s navojem 3/4. Uvijek koristite cijev priloženu uz
perilicu.
Dovodna cijev ne smije se produžavati. Ako je prekratka, a ne želite
pomaknuti slavinu, morat ćete kupiti novu, dužu cijev koja je specijalno
projektirana za ovu vrstu korištenja.
Naprava za zaustavljanje vode
Dovodna cijev opremljena je napravom za
zaustavljanje vode, koja štiti od oštećenja
prouzročenih propuštanjem cijevi do kojih može doći
uslijed prirodnog starenja cijevi. Ta je neispravnost
prikazana crvenom linijom u prozorčiću «A». Ukoliko
se to dogodi, zatvorite slavinu za vodu i obratite se
ovlaštenom servisu za zamjenu cijevi.
97
Odvod vode
Kraj odvodne cijevi može se postaviti na tri načina:
Preko ruba slivnika pomoću isporučenog
plastičnog držača.
U tom slučaju, provjerite da se kraj ne može
otkačiti tijekom izbacivanja vode iz perilice.
To se može učiniti tako da se pričvrsti trakom za
slavinu, ili za zid.
U granu na odvodu slivnika. Ta se cijev mora nalaziti iznad sifona tako da se
zakrivljenje nalazi barem 60 cm iznad tla.
Neposredno u odvodni kanal na visini od najmanje 60 cm i najviše 90 cm.
Kraj odvodne cijevi mora uvijek biti prozračivan, tj. unutarnji promjer
odvodnog kanala mora biti širi od vanjskog promjera odvodne cijevi.
Odvodna cijev ne smije biti savijena.
Page 98

Postavljanje
P1118
98
Važno!
Odvodna cijev se može produžiti najviše do 4 metara. Dodatna odvodna cijev i
spojnica dostupni su u ovlaštenom servisnom centru.
Električni priključak
Ovaj je uređaj projektiran za rad s napajanjem od 220-230 V, jednofazni,
50 Hz.
Provjerite da vaša kućna električna instalacija može podnijeti maksimalno
potrebno opterećenje (2.2 kW), vodeći računa i o ostalim uređajima u uporabi.
Spojite uređaj na uzemljenu utičnicu.
Proizvođač ne prihvaća nikakvu odgovornost za štete na stvarima ili
povrede na osobama nastale uslijed nepoštivanja gornjih sigurnosnih
mjera opreza.
Stalni spoj
U slučaju stalnog spoja potrebno je postaviti dvopolni prekidač između
uređaja i električnog napajanja (mreže), s minimalnim razmakom od 3 mm
između kontakata prekidača i vrste koja odgovara opterećenju u skladu s
važećim propisima.
Prekidač nigdje ne smije prekidati žuti i zeleni kabel uzemljenja.
Tu radnju mora izvršiti kvalificirani električar.
Kabel električnog napajanja mora biti lako dostupan nakon postavljanja
uređaja.
Ako je potrebno zamijeniti električni kabel, to mora izvršiti ovlašteni
servis
Page 99

Briga za okoliš
Briga za okoliš
Ambalaža
Materijali označeni simbolom mogu se reciklirati.
>PE<=polietilen
>PS<=polistirol
>PP<=polipropilen
To znači da mogu biti reciklirani ako ih se pravilno odloži u za to namijenjene
sabirne kontejnere.
Stara perilica
Rashodujte vaš stari uređaj odlaganjem u ovlašteni deponij. Pomognite
održati vašu zemlju čistom!
Simbol na proizvodu ili na njegovoj ambalaži označava da se ovaj
proizvod ne može smatrati otpadom iz domaćinstva. Umjesto toga, predaje se
odgovarajućoj sabirnoj točki za reciklažu električnih i elektronskih uređaja.
Propisnim zbrinjavanjem ovog proizvoda pomoći ćete u sprječavanju
potencijalnih negativnih posljedica za okoliš i zdravlje ljudi, koje bi inače mogle
biti prouzročene neodgovarajućim rukovanjem otpada ovoga proizvoda. Za
detaljnije informacije o recikliranju ovog proizvoda, molimo kontaktirajte Vaš
mjesni ured, odlagalište otpada iz domaćinstva ili trgovinu u kojoj ste kupili
proizvod.
99
Ekološki savjeti
Kako biste ostvarili uštedu vode i struje te pomogli u zaštiti okoliša,
preporučujemo vam da slijedite ove naputke:
•
Kod normalno prljavog rublja ne morate uključiti pretpranje, na taj način ćete
uštedjeti deterdžent, vodu i vrijeme (na taj način štitite i okoliš!).
• Perilica vam omogućuje uštedu energije ako je potpuno napunjena.
• S odgovarajućom pripremom prije pranja, mrlje i ograničene dijelove
prljavštine moguće je ukloniti; rublje se zatim može oprati na nižoj temperaturi.
•
Izmjerite deterdžent ovisno o tvrdoći vode, stupnju prljavosti i količini rublja.
Page 100

Garancija/servis
100
Garancija/servis
Jamčevna izjava
Izjavljujemo da su proizvodi ispravni i da su ispunili sve uvjete etapne i završne
kontrole te da će ovaj proizvod raditi ispravno ukoliko se priključuje i koristi prema
priloženim uputama o rukovanju. Ukoliko, unatoč kvaliteti našeg proizvoda dođe do
tehničkih problema za vrijeme jamčevnog roka, jamčimo da ćemo besplatno odstraniti
sve nedostatke i kvarove u proizvodu. Jamčevina vrijedi 24 mjeseca za sve kućanske
aparate od dana prodaje uz sljedeće protokolarne uvjete:
1 Jamčevni list mora biti u cijelosti, ispravno i čitko ispunjen, ovjeren od prodavatelja
i sa upisanim danom prodaje.
2 Ovlaštene servisne radionice neće prihvatiti ovaj proizvod na besplatan popravak
u jamčevnom roku bez predočenja ovog jamčevnog lista i original računa.
3 Ukoliko se popravak ne izvrši u roku od 45 dana, obvezujemo se, proizvod
zamijeniti novim ili izvršiti povrat novca. Jamčevni rok se produžuje za onoliko
dana koliko je trajao popravak, ako je popravak duži od 10 dana.
4 Eventualne troškove prijevoza, prethodno pismeno odobrene od strane
Electroluxa, u svezi sa reklamacijom na ovaj proizvod, a koji nastaju pri popravku
proizvoda odnosno pri njegovoj zamjeni novim proizvodom snosimo mi, s time da
je prijevoz obavljen javnim prijevoznim sredstvom, a po poštanskom, željezničkom
ili brodskom cjeniku.
Proizvod mora biti zapakiran u original ambalaži uz odgovarajuću mehaničku
izolaciju. Moguća oštećenja koja bi nastala pri prijevozu idu na rizik i trošak kupca.
5 Jamčevina ne obuhvaća:
– kvarove ili oštećenja nastala zbog nepravilne uporabe ili pogrešnog priključenja
– mehanička oštećenja nastala uslijed uporabe sile i pada
– oštećenja koja je prouzrokovala nestručna osoba to jest neovlašteni servis ili da
su ugrađeni neoriginalni dijelovi
– ako je proizvod pustila u rad neovlaštena osoba (plinski bojler)
6 Servis, potrošni materijal i rezervne dijelove osiguravamo najmanje 7 godina po
prestanku proizvodnje.
Electrolux pridržava pravo izmjena tijekom proizvodnje, a u cilju poboljšanja
proizvoda ili izmjene dizajna i/ili tehničkih specifikacija, bez prethodne najave.
ELECTROLUX d.o.o.
10000 Zagreb, Slavonska avenija 3
Tel: +385 1 6323 333
Fax: +385 1 6323 300
 Loading...