

Page 1
LC-13/15/20SH1E
SHARP CORPORATION
B517WJN3
OPERATION MANUAL BEDIENUNGSANLEITUNG MODE D’EMPLOI
MANUALE DI ISTRUZIONI MANUAL DE MANEJO GEBRUIKSAANWIJZING
LC-13SH1E
LC-15SH1E
LC-20SH1E
LCD COLOUR TELEVISION
LCD-FARBFERNSEHGERÄT
TÉLÉVISION COULEUR À ÉCRAN
À CRISTAUX LIQUIDES (LCD)
TELEVISORE A COLORI LCD
TELEVISIÓN EN COLOR LCD
LCD-KLEURENTELEVISIE
ENGLISH
DEUTSCH
FRANÇAIS
ITALIANO
ESPAÑOL
NEDERLANDS
LC13SH1E
LC15SH1E
LC20SH1E
LC-13_15_20SH1E_E_Hyo1-4.p65 05.1.27, 11:07 AM1
Printed on environmentally friendly paper
Auf ökologischem Papier gedruckt
Imprimé sur papier écologique
Stampato su carta ecologica
Impreso en papel ecológico
Afgedrukt op ecologisch papier
Printed in Spain
Gedruckt in Spanien
Imprimé en Espagne
Stampato in Spagna
Impreso en España
Gedrukt in Spanje
TINS-B517WJN3
10-2004
OPERATION MANUAL
BEDIENUNGSANLEITUNG
MODE D’EMPLOI
MANUALE DI ISTRUZIONI
MANUAL DE MANEJO
GEBRUIKSAANWIJZING
1
Page 2
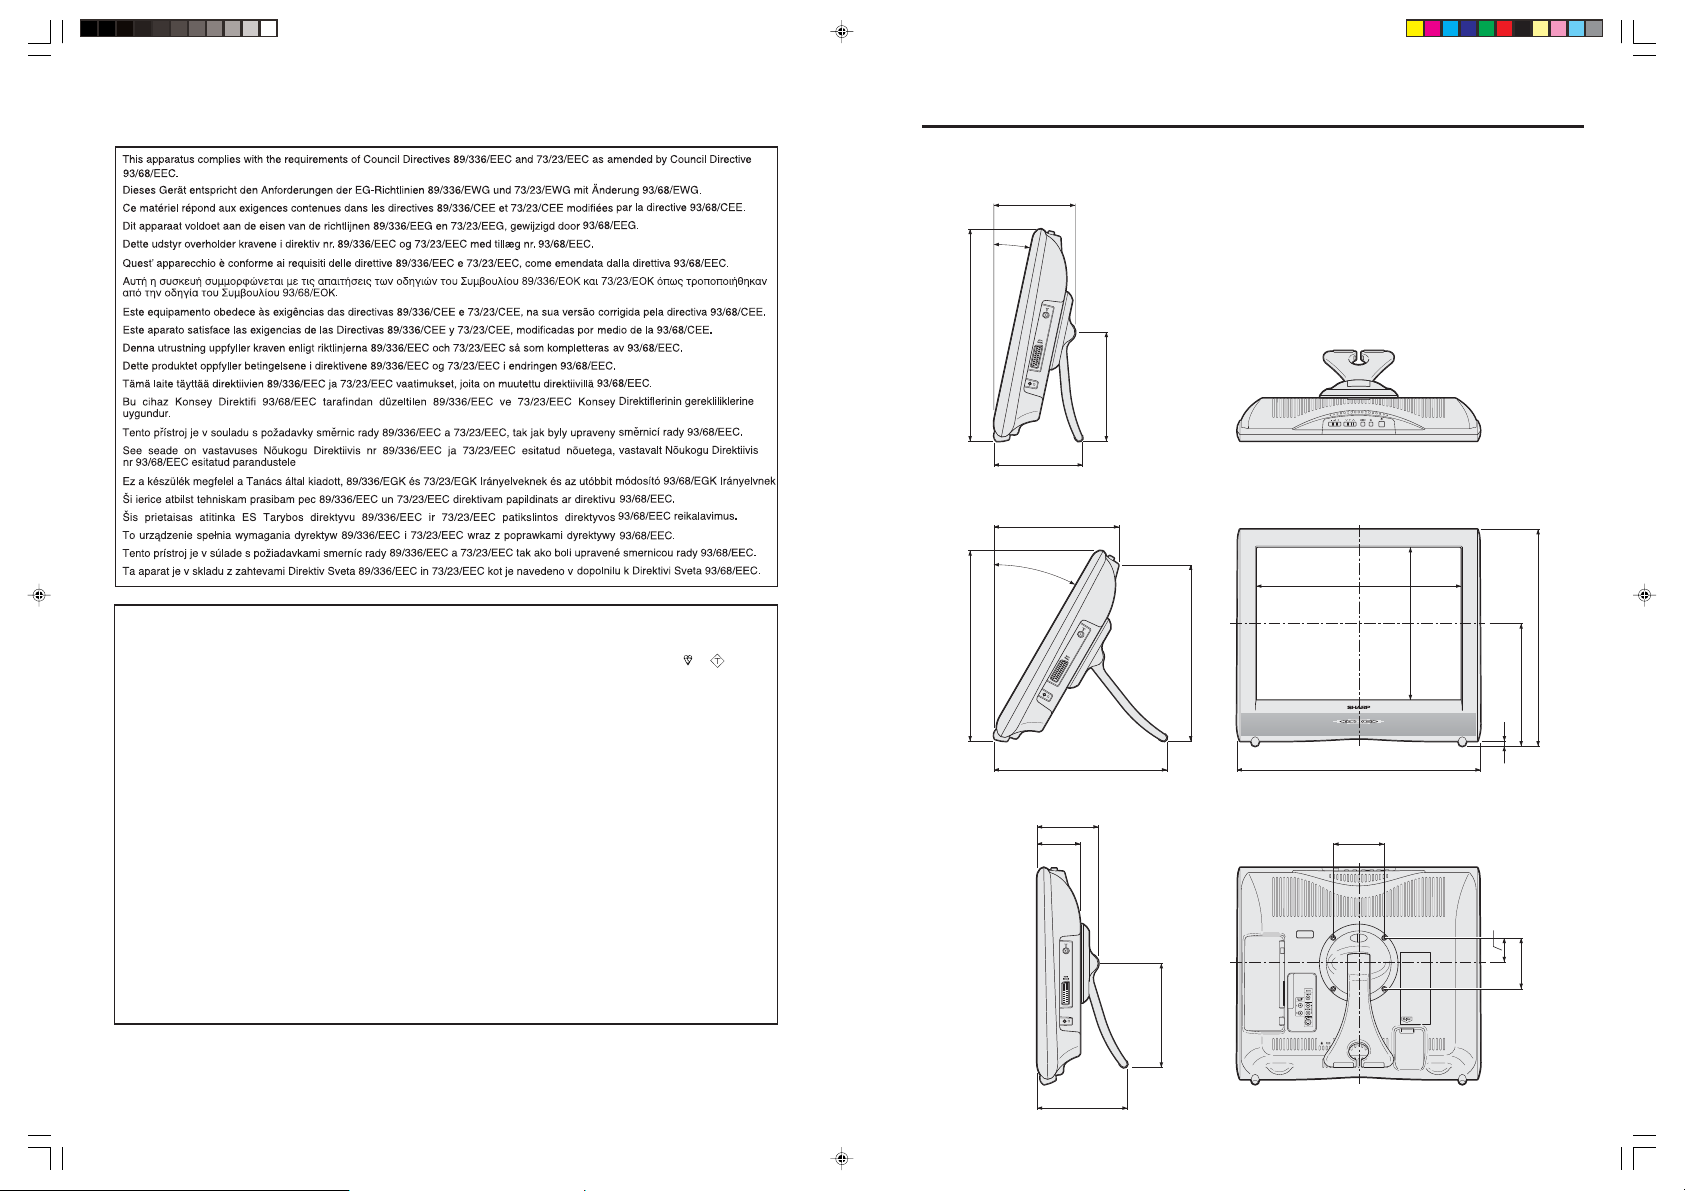
Dimensional Drawings
LC-13SH1E/LC-15SH1E/LC-20SH1E
143/145/161
12°
312/344/418
163/167/215
153/155/175
196/205/246
Unit: mm
The mains lead of this product is fitted with a non-rewireable (moulded) plug incorporating a 3A (LC-20SH1E/LC-15SH1E)/
SPECIAL NOTE FOR USERS IN THE U.K.
ASA
or
13A (LC-13SH1E) fuse. Should the fuse need to be replaced, a BSI or ASTA approved BS 1362 fuse marked
and of
the same rating as above, which is also indicated on the pin face of the plug, must be used.
Always refit the fuse cover after replacing the fuse. Never use the plug without the fuse cover fitted.
In the unlikely event of the socket outlet in your home not being compatible with the plug supplied, cut off the mains plug and
fit an appropriate type.
DANGER: The fuse from the cut-off plug should be removed and the cut-off plug destroyed immediately and disposed of in a
safe manner.
Under no circumstances should the cut-off plug be inserted elsewhere into a 13A socket outlet, as a serious
electric shock may occur.
To fit an appropriate plug to the mains lead, follow the instructions below:
IMPORTANT: The wires in the mains lead are coloured in accordance with the following code:
Blue : Neutral Brown : Live
As the colours of the wires in the mains lead of this product may not correspond with the coloured markings identifying the
terminals in your plug, proceed as follows;
• The wire which is coloured blue must be connected to the plug terminal which is marked N or coloured black.
• The wire which is coloured brown must be connected to the plug terminal which is marked L or coloured red.
Ensure that neither the brown nor the blue wire is connected to the earth terminal in your three-pin plug.
Before replacing the plug cover make sure that:
• If the new fitted plug contains a fuse, its value is the same as that removed from the cut-off plug.
• The cord grip is clamped over the sheath of the mains lead, and not simply over the lead wires.
IF YOU HAVE ANY DOUBT, CONSULT A QUALIFIED ELECTRICIAN.
282/311/375
30°
277/281/342
115/115/121
79/79/85
157/158/178
259/282/346
152/158/205
267/307/403.3
319/351/427
200.9/231/300.8
181/201/242
10
341/384/480
100
52.3/37.4/47
100
LC-13_15_20SH1E_E_Hyo1-4.p65 05.1.27, 11:07 AM2
Page 3

LC-13SH1E
LC-15SH1E
LC-20SH1E
LCD COLOUR TELEVISION
ENGLISH
OPERATION MANUAL
Contents
Dear SHARP Customer .................................................... 2
Important Safety Precautions ......................................... 2
Supplied Accessories ...................................................... 4
Preparation ....................................................................... 4
Installing Batteries in the Remote Control ................... 4
Using the Remote Control ........................................... 4
Power Connection ....................................................... 5
Antenna Connection ................................................... 5
Listening with Headphones.........................................5
First Installation ........................................................... 6
Part Names of the Main Unit ........................................... 7
How to Fix the Cables ................................................. 8
How to Prevent the LCD TV Set from Falling Over ...... 8
Part Names of the Remote Control................................. 9
Basic Operation.............................................................. 10
Turning On and Off the Main Power .......................... 10
STANDBY/ON ............................................................ 10
Switching the Input Mode (EXT1/EXT2/TV) ............... 10
Sound Volume ........................................................... 11
Changing Channels .................................................. 11
Selecting Menu Items................................................ 12
Useful Features .............................................................. 14
Picture Adjustments .................................................. 14
Sound Adjustments ................................................... 14
Sound Mode Settings ................................................ 15
Programmes .............................................................. 16
Using the Programme Table ...................................... 18
Rotate ........................................................................18
EXT Connections ....................................................... 19
Clock Setup ............................................................... 20
Language ..................................................................20
Teletext Language ..................................................... 20
Backlight ................................................................... 21
Sleep Timer ............................................................... 21
Auto Power Off .......................................................... 21
On-Screen Display ....................................................22
Child Lock ................................................................. 22
NICAM Broadcast Selection ..................................... 24
A2 Stereo Broadcast Selection ................................. 24
Teletext ............................................................................ 25
Connecting External Devices........................................ 27
Example of external devices that can be connected
Connecting to the EXT1/EXT2 Terminals ................... 28
Troubleshooting ............................................................. 29
LCD TV set ................................................................ 29
Antenna .....................................................................30
Specifications ................................................................. 30
.... 27
ENGLISH
LC-13_15_20SH1E_E_P01-09.p65 04.10.8, 4:32 PM1
Dimensional Drawings
• The dimensional drawings for each model are shown on the
inside back cover.
Page 4
Dear SHARP Customer
Thank you for your purchase of the SHARP LCD colour TV product. To ensure safety and many years of trouble-free
operation of your product, please read the Important Safety Precautions carefully before using this product.
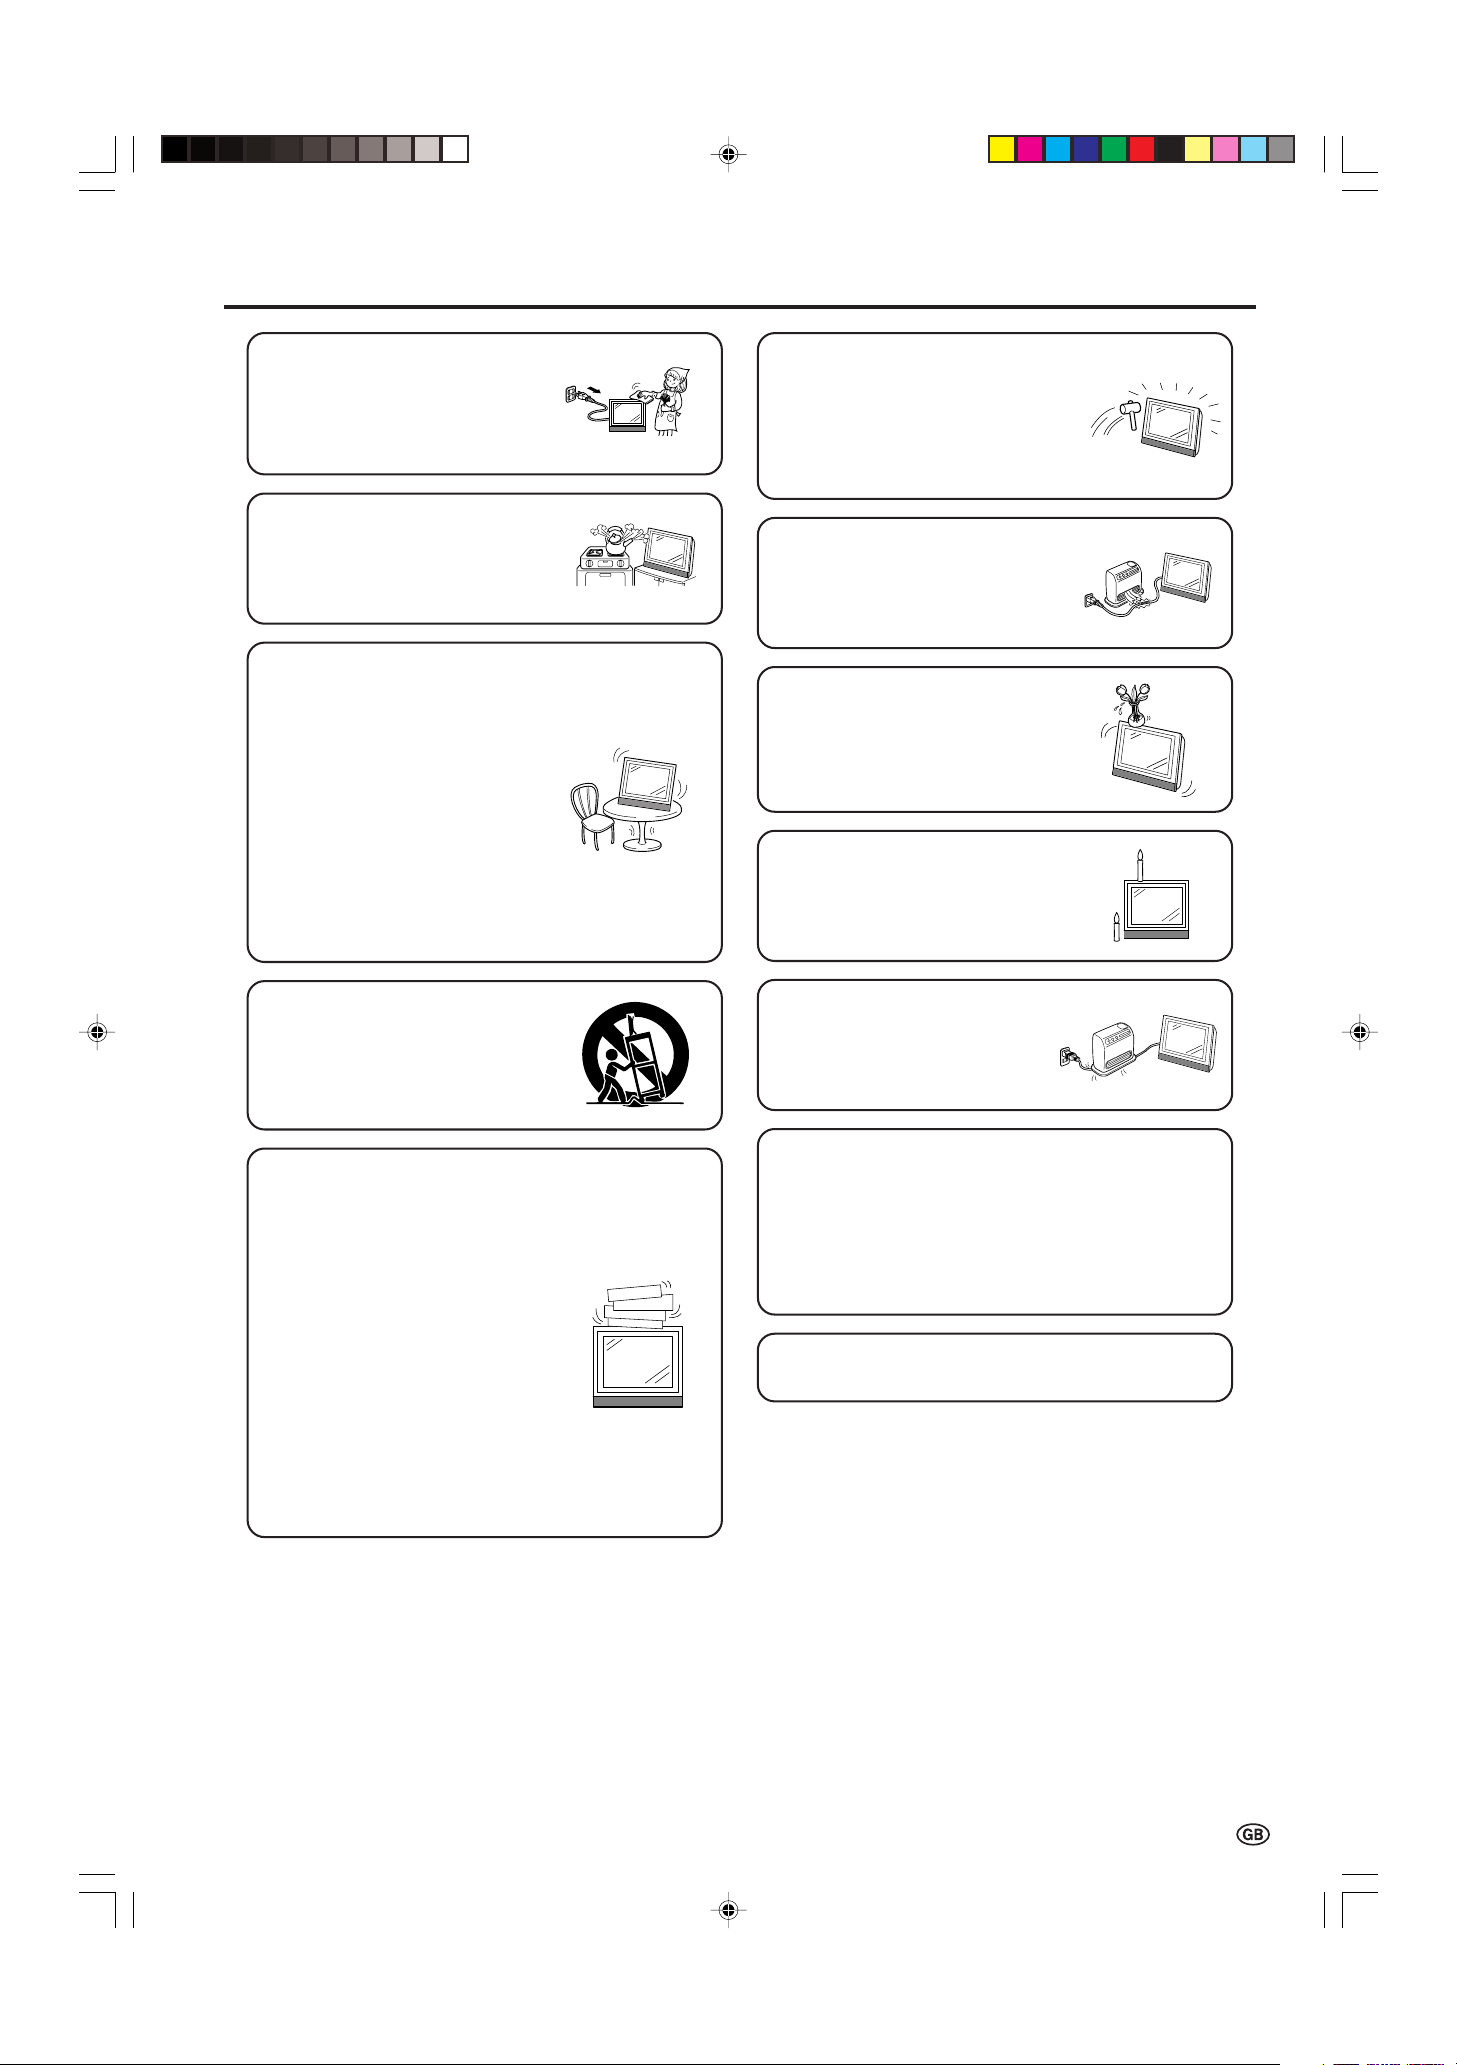
Important Safety Precautions
Electricity is used to perform many useful functions, but it can also cause personal injuries and property damage
if improperly handled. This product has been engineered and manufactured with the highest priority on safety.
However, improper use can result in electric shock and/or fire. In order to prevent potential danger, please
observe the following instructions when installing, operating and cleaning the product. To ensure your safety
and prolong the service life of your LCD colour TV product, please read the following precautions carefully
before using the product.
1. Read instructions—All operating instructions must be read and understood before the product is operated.
2. Keep this manual in a safe place—These safety and operating instructions must be kept in a safe place for future
reference.
3. Observe warnings—All warnings on the product and in the instructions must be observed closely.
4. Follow instructions—All operating instructions must be followed.
5. Attachments—Do not use attachments not recommended by the manufacturer. Use of inadequate attachments can
result in accidents.
6. Power source—This product must operate on a power source specified on the specification label. If you are not sure
of the type of power supply used in your home, consult your dealer or local power company.
7. AC cord protection—The AC cords must be routed properly to prevent people from stepping on them or objects
from resting on them. Check the cords at the plugs and product.
8. Overloading—Do not overload AC outlets or extension cords. Overloading can cause fire or electric shock.
9. Entering of objects and liquids—Never insert an object into the product through vents or openings. High voltage
flows in the product, and inserting an object can cause electric shock and/or short internal parts. For the same
reason, do not spill water or liquid on the product.
10. Servicing—Do not attempt to service the product yourself. Removing covers can expose you to high voltage and
other dangerous conditions. Request a qualified service person to perform servicing.
11. Repair—If any of the following conditions occurs, unplug the AC cord from the AC outlet, and request a qualified
service person to perform repairs.
a. When the AC cord or plug is damaged.
b. When a liquid was spilled on the product or when objects have fallen into the product.
c. When the product has been exposed to rain or water.
d. When the product does not operate properly as described in the operating instructions.
Do not touch the controls other than those described in the operating instructions. Improper adjustment of
controls not described in the instructions can cause damage, which often requires extensive adjustment work
by a qualified technician.
e. When the product has been dropped or damaged.
f. When the product displays an abnormal condition. Any noticeable abnormality in the product indicates that
the product needs servicing.
12. Replacement parts—In case the product needs replacement parts, make sure that the service person uses
replacement parts specified by the manufacturer, or those with the same characteristics and performance as the
original parts. Use of unauthorised parts can result in fire, electric shock and/or other danger.
13. Safety checks—Upon completion of service or repair work, request the service technician to perform safety checks
to ensure that the product is in proper operating condition.
14. Wall or ceiling mounting—When mounting the product on a wall or ceiling, be sure to install the product according
to the method recommended by the manufacturer.
2
LC-13_15_20SH1E_E_P01-09.p65 04.10.4, 3:29 PM2
Page 5
Important Safety Precautions (Continued)
• Cleaning—Unplug the AC cord
from the AC outlet before cleaning
the product. Use a damp cloth to
clean the product. Do not use
liquid cleaners or aerosol
cleaners.
•Water and moisture—Do not use
the product near water, such as
bathtub, washbasin, kitchen sink,
laundry tub, swimming pool and in
a wet basement.
• Stand—Do not place the product
on an unstable cart, stand, tripod
or table. Doing so can cause the
product to fall, resulting in serious
personal injuries as well as
damage to the product. Use only
a cart, stand, tripod, bracket or
table recommended by the
manufacturer or sold with the
product. When mounting the
product on a wall, be sure to
follow the manufacturer’s
instructions. Use only the
mounting hardware recommended
by the manufacturer.
• The LCD panel used in this
product is made of glass.
Therefore, it can break when the
product is dropped or applied
with impact. Be careful not to be
injured by broken glass pieces in
case the LCD panel breaks.
• Heat sources—Keep the product
away from heat sources such as
radiators, heaters, stoves and
other heat-generating products
(including amplifiers).
• Do not place vases or any other
water-filled containers on this
product. The water may spill onto
the product causing fire or electric
shock.
•To prevent fire, never place any
type of candle or naked flames on
the top or near the TV set.
• When relocating the product
placed on a cart, it must be
moved with utmost care. Sudden
stops, excessive force and
uneven floor surface can cause
the product to fall from the cart.
•Ventilation—The vents and other
openings in the cabinet are
designed for ventilation. Do not
cover or block these vents and
openings since insufficient
ventilation can cause overheating
and/or shorten the life of the
product. Do not place the product
on a bed, sofa, rug or other similar
surface, since they can block
ventilation openings. This product
is not designed for built-in
installation; do not place the
product in an enclosed place
such as a bookcase or rack,
unless proper ventilation is
provided or the manufacturer’s
instructions are followed.
•To prevent fire or shock hazard,
do not place the AC power cord
under the TV set or other heavy
items.
The LCD panel is a very high technology product with
921,600 thin film transistors, giving you fine picture
details.
Due to the very large number of pixels, a few
non-active pixels may occasionally appear on the screen
as a fixed point of blue, green or red.
This is within product specifications and does not
constitute a fault.
Do not display a still picture for a long time, as this could
cause an afterimage to remain.
LC-13_15_20SH1E_E_P01-09.p65 04.10.4, 3:29 PM3
3
Page 6
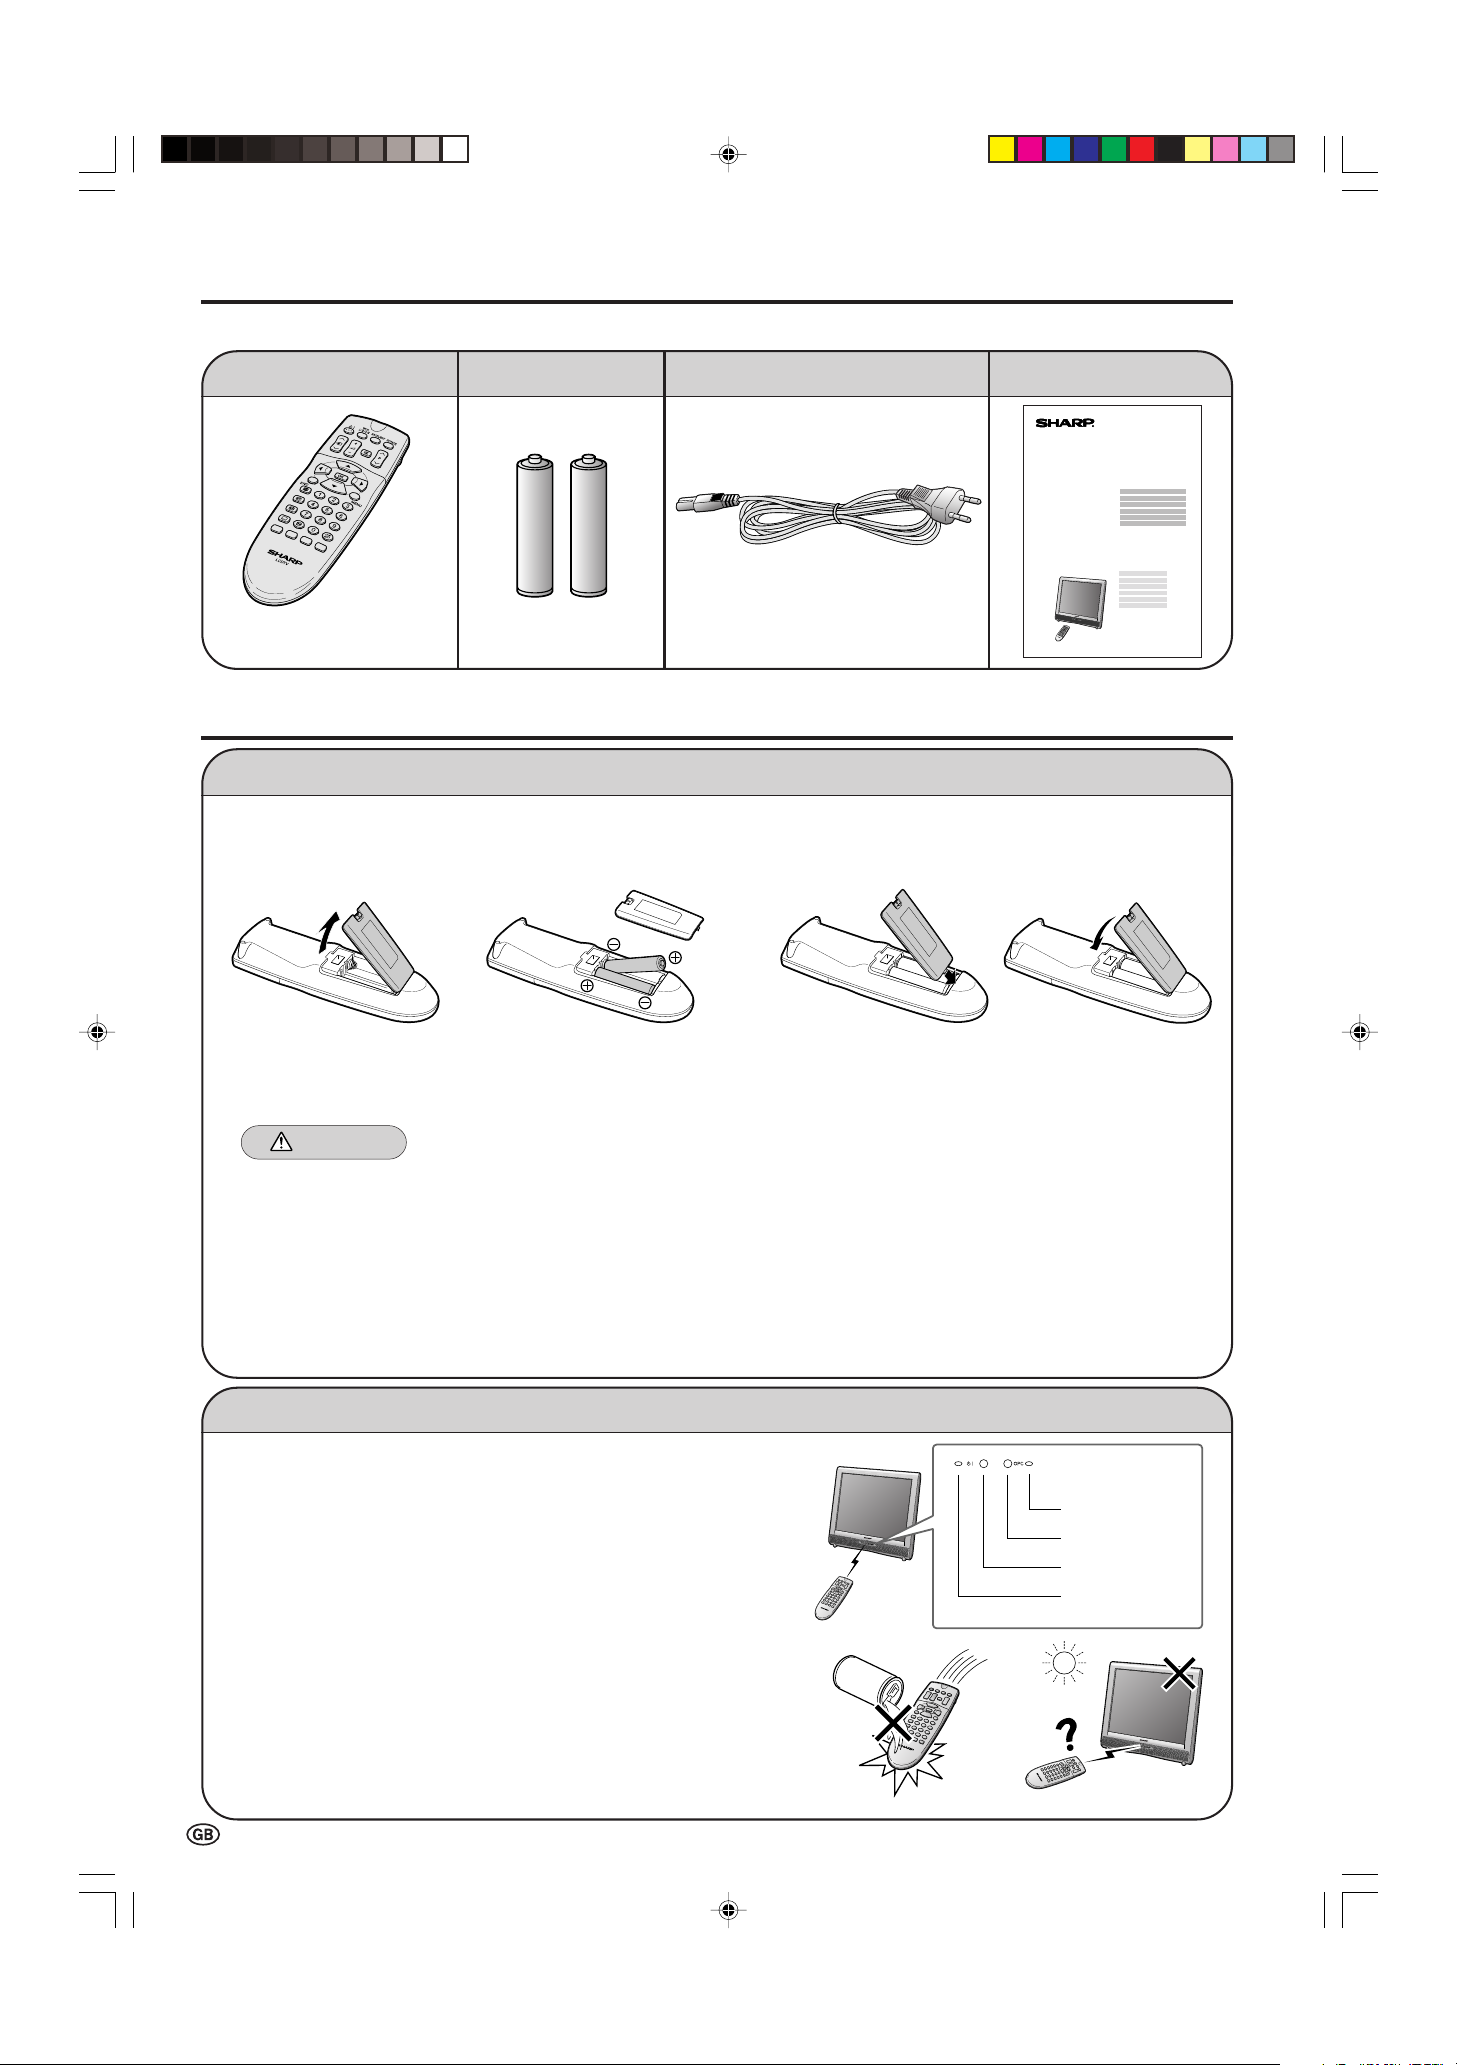
Supplied Accessories
STANDBY/ON
indicator
OPC indicator
Remote sensor
OPC sensor
LC-13SH1E
LC-15SH1E
LC-20SH1E
Make sure the following accessories are provided with the LCD TV set.
Wireless remote control
pages 4 and 9 page 4
“AA” size batteries (×2)
AC cord
*Product shape may vary
from country to country.
page 5
Operation manual
Preparation
Installing Batteries in the Remote Control
Before using the LCD TV set for the first time, install the two “AA” size batteries (supplied) in the remote control. When the
batteries become depleted and the remote control fails to operate, replace the batteries with new “AA” size batteries.
1 Open the battery cover. 2 Insert two “AA” size batteries. 3 Close the battery cover.
1
2
• Detach the cover
while pressing the
(") part.
•Place batteries with their
terminals corresponding
to the (+) and (–)
indications in the battery
compartment.
•Align the tab on the battery cover (1) and place
it while pressing the tab (2) to close it.
Caution!
Precautions regarding batteries
Improper use of batteries can result in a leakage of chemicals and/or explosion. Be sure to follow the instructions below.
•Place batteries with their terminals corresponding to the (+) and (–) indications.
•Different types of batteries have different characteristics. Do not mix batteries of different types.
• Do not mix old and new batteries. Mixing old and new batteries can shorten the life of new batteries and/or cause old
batteries to leak chemicals.
• Remove batteries as soon as they are depleted. Chemicals that leak from batteries can cause a rash. If chemical
leakage is found, wipe it off with a cloth.
• The batteries supplied with the LCD TV set may have a shorter operating time due to storage conditions.
• If the remote control is not to be used for an extended period of time, remove the batteries from the remote control.
Using the Remote Control
Use the remote control by pointing it towards the remote sensor
window of the main unit. Objects between the remote control and
sensor window may prevent proper operation.
Cautions regarding use of the remote control
• Do not apply shock to the remote control. In addition, do not
expose the remote control to liquids, and do not place it in an area
with high humidity.
• Do not install or place the remote control under direct sunlight. The
heat may cause deformation of the unit.
• The remote control may not work properly if the remote sensor
window is under direct sunlight or strong lighting. In such a case,
change the angle of the lighting or main unit, or operate the remote
control closer to the remote sensor window.
4
LC-13_15_20SH1E_E_P01-09.p65 04.10.4, 3:29 PM4
Page 7
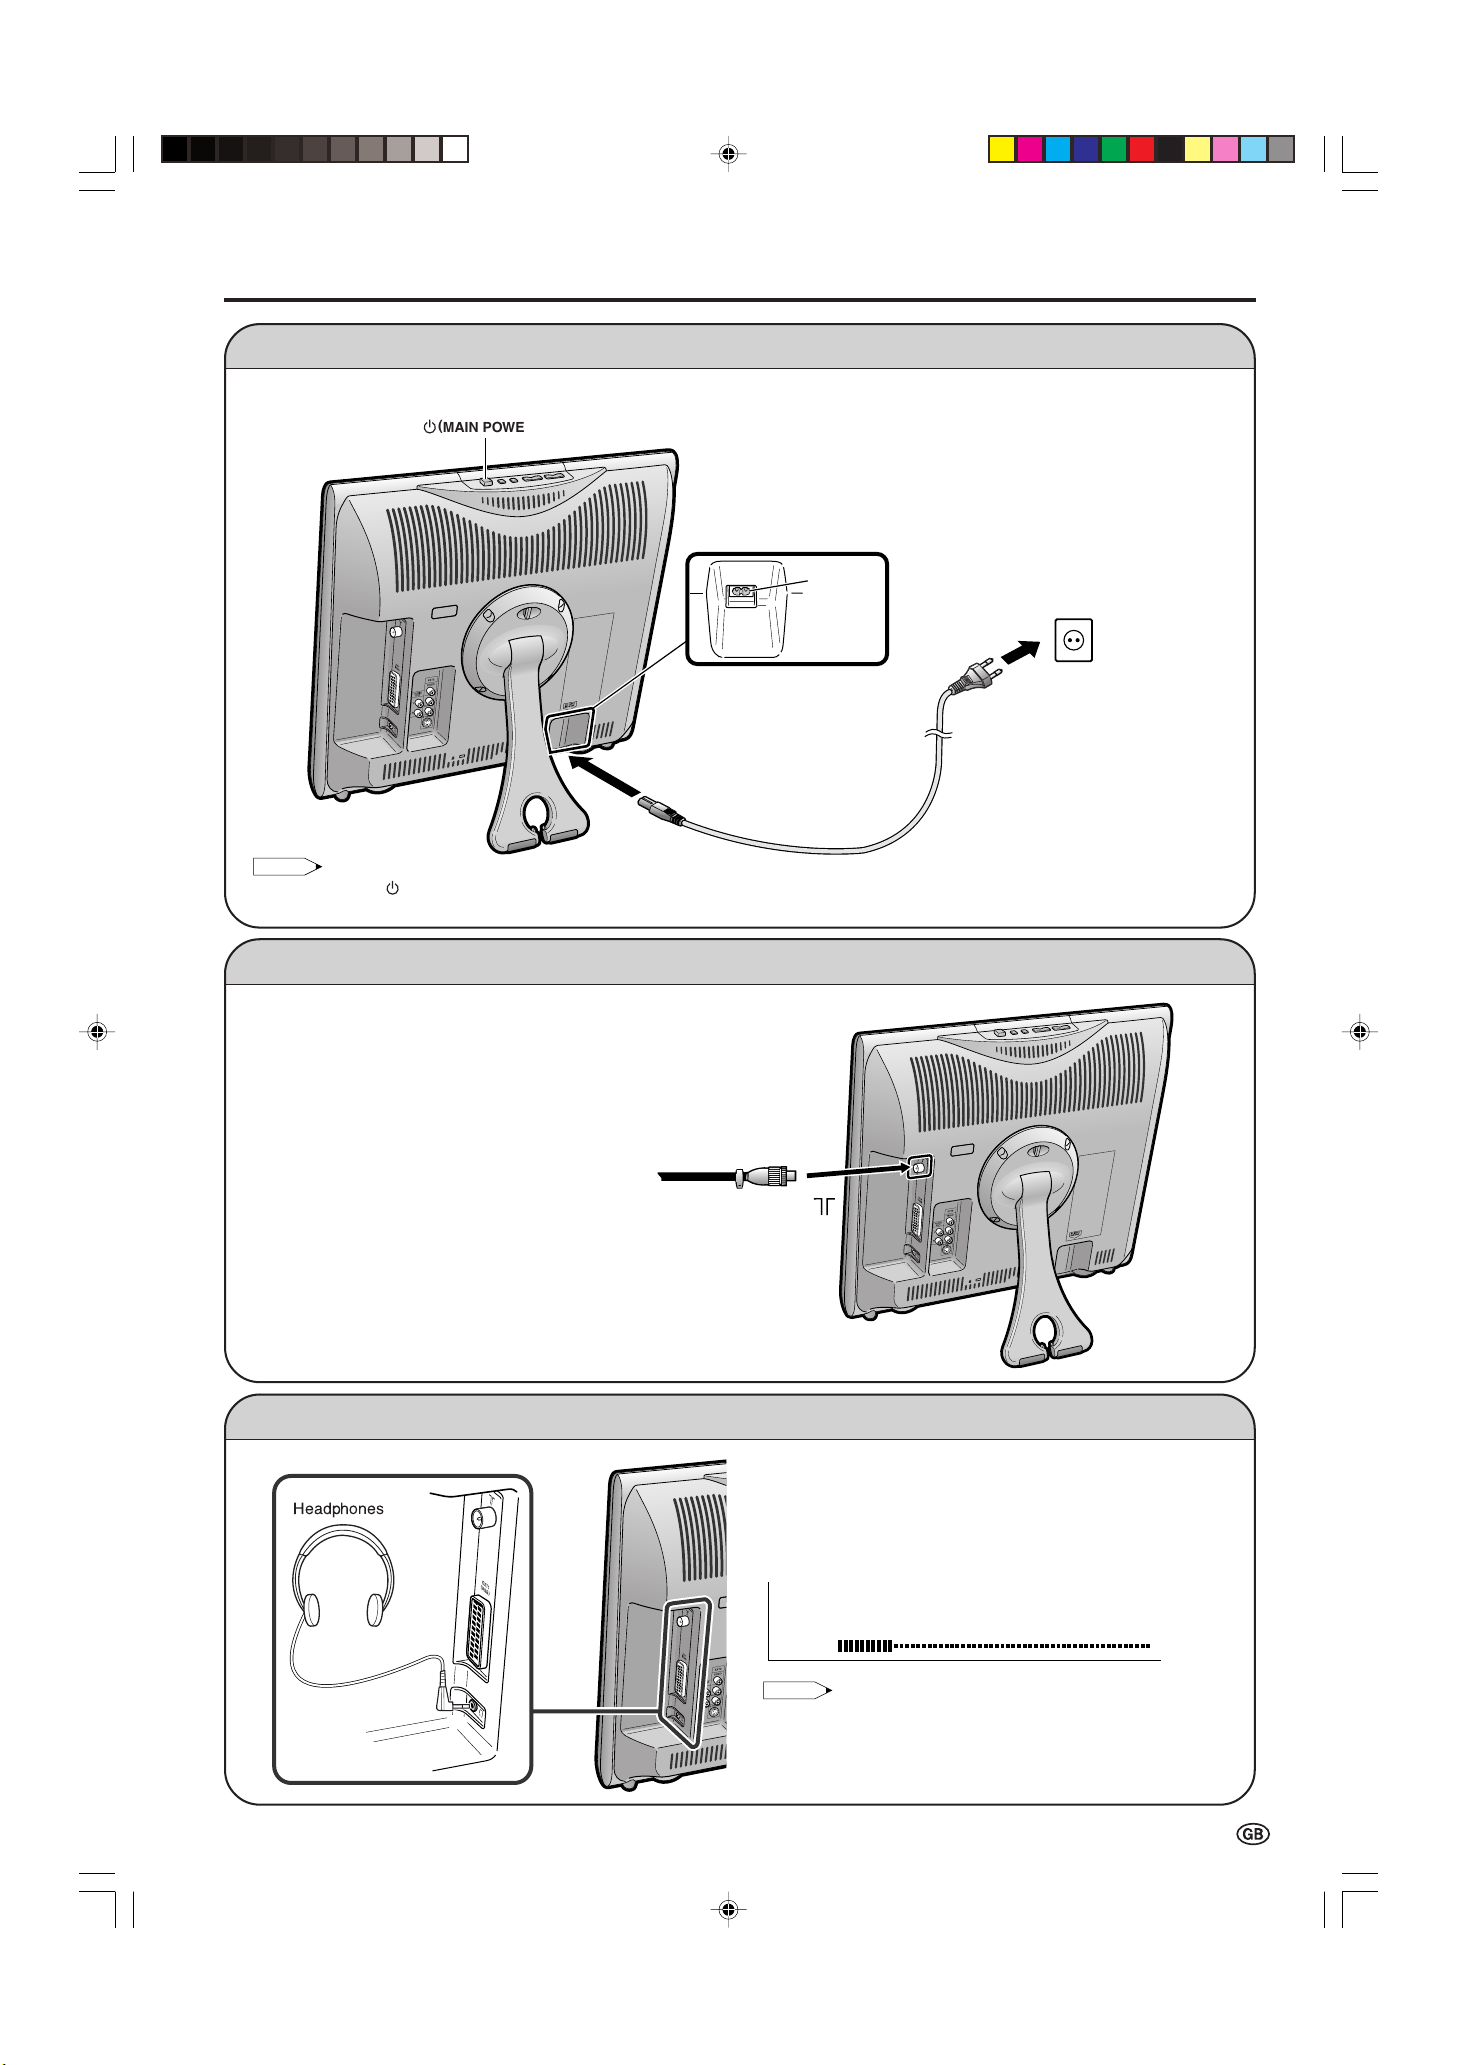
Power Connection
NOTE
Headphones
(
MAIN POWER
)
AC INPUT
terminal
(220-240V)
TV Volume
10
NOTE
Connect to the AC input terminal of the LCD TV set using the AC cord (supplied).
To AC INPUT terminal
Preparation (Continued)
Household
power outlet
Plug into an AC outlet.
AC cord*
* Product shape may vary
from country to country.
• Always turn the (MAIN POWER) switch of the LCD TV set to OFF when connecting the AC cord.
• Unplug the AC cord from the LCD TV set and power outlet when the LCD TV set is not to be used for a long period of time.
Antenna Connection
■ Using a TV antenna cable
To enjoy a clearer picture, we recommend that
you use an outdoor antenna. The following is a
brief explanation of the type of connection that
is used for coaxial cable:
• Please ensure your 75-ohm coaxial cable is
fitted with a DIN 45325 (IEC169-2) coaxial
plug and plug it into the antenna terminal at
the side of the LCD TV set (antenna cable
not supplied).
75-ohm coaxial cable
(round cable)
To antenna terminal ( )
Listening with Headphones
LC-13_15_20SH1E_E_P01-09.p65 04.10.13, 1:46 PM5
Plug the headphone mini-plug into the headphone jack
located on the side of the LCD TV set.
Adjust the sound volume using i (–)/(+) on the remote
control.
On-screen display
• Headphones are not included in the supplied accessories.
• No sound is heard from the main unit speakers when a
headphone mini-plug is connected into the headphone jack.
• Do not set the volume at a high level. Hearing experts
advise against extended listening at high volume levels.
5
Page 8
Country UK
Colour system PAL
Sound system I
Start search
8 16
1 E- 2 9 17
2 E- 4 1 18
3 U- 2 11 19
4 12 2
5 13 21
6 14 22
7 15 23
0
0
0
NOTE
NOTE
English Russian
Españ ol Portuguê s
Deutsch Tü rkç e
Franç ais Greek
Italiano Suomi
Svenska Polski
Nederlands
Country UK
Colour system PAL
Sound system I
Start search
Preparation (Continued)
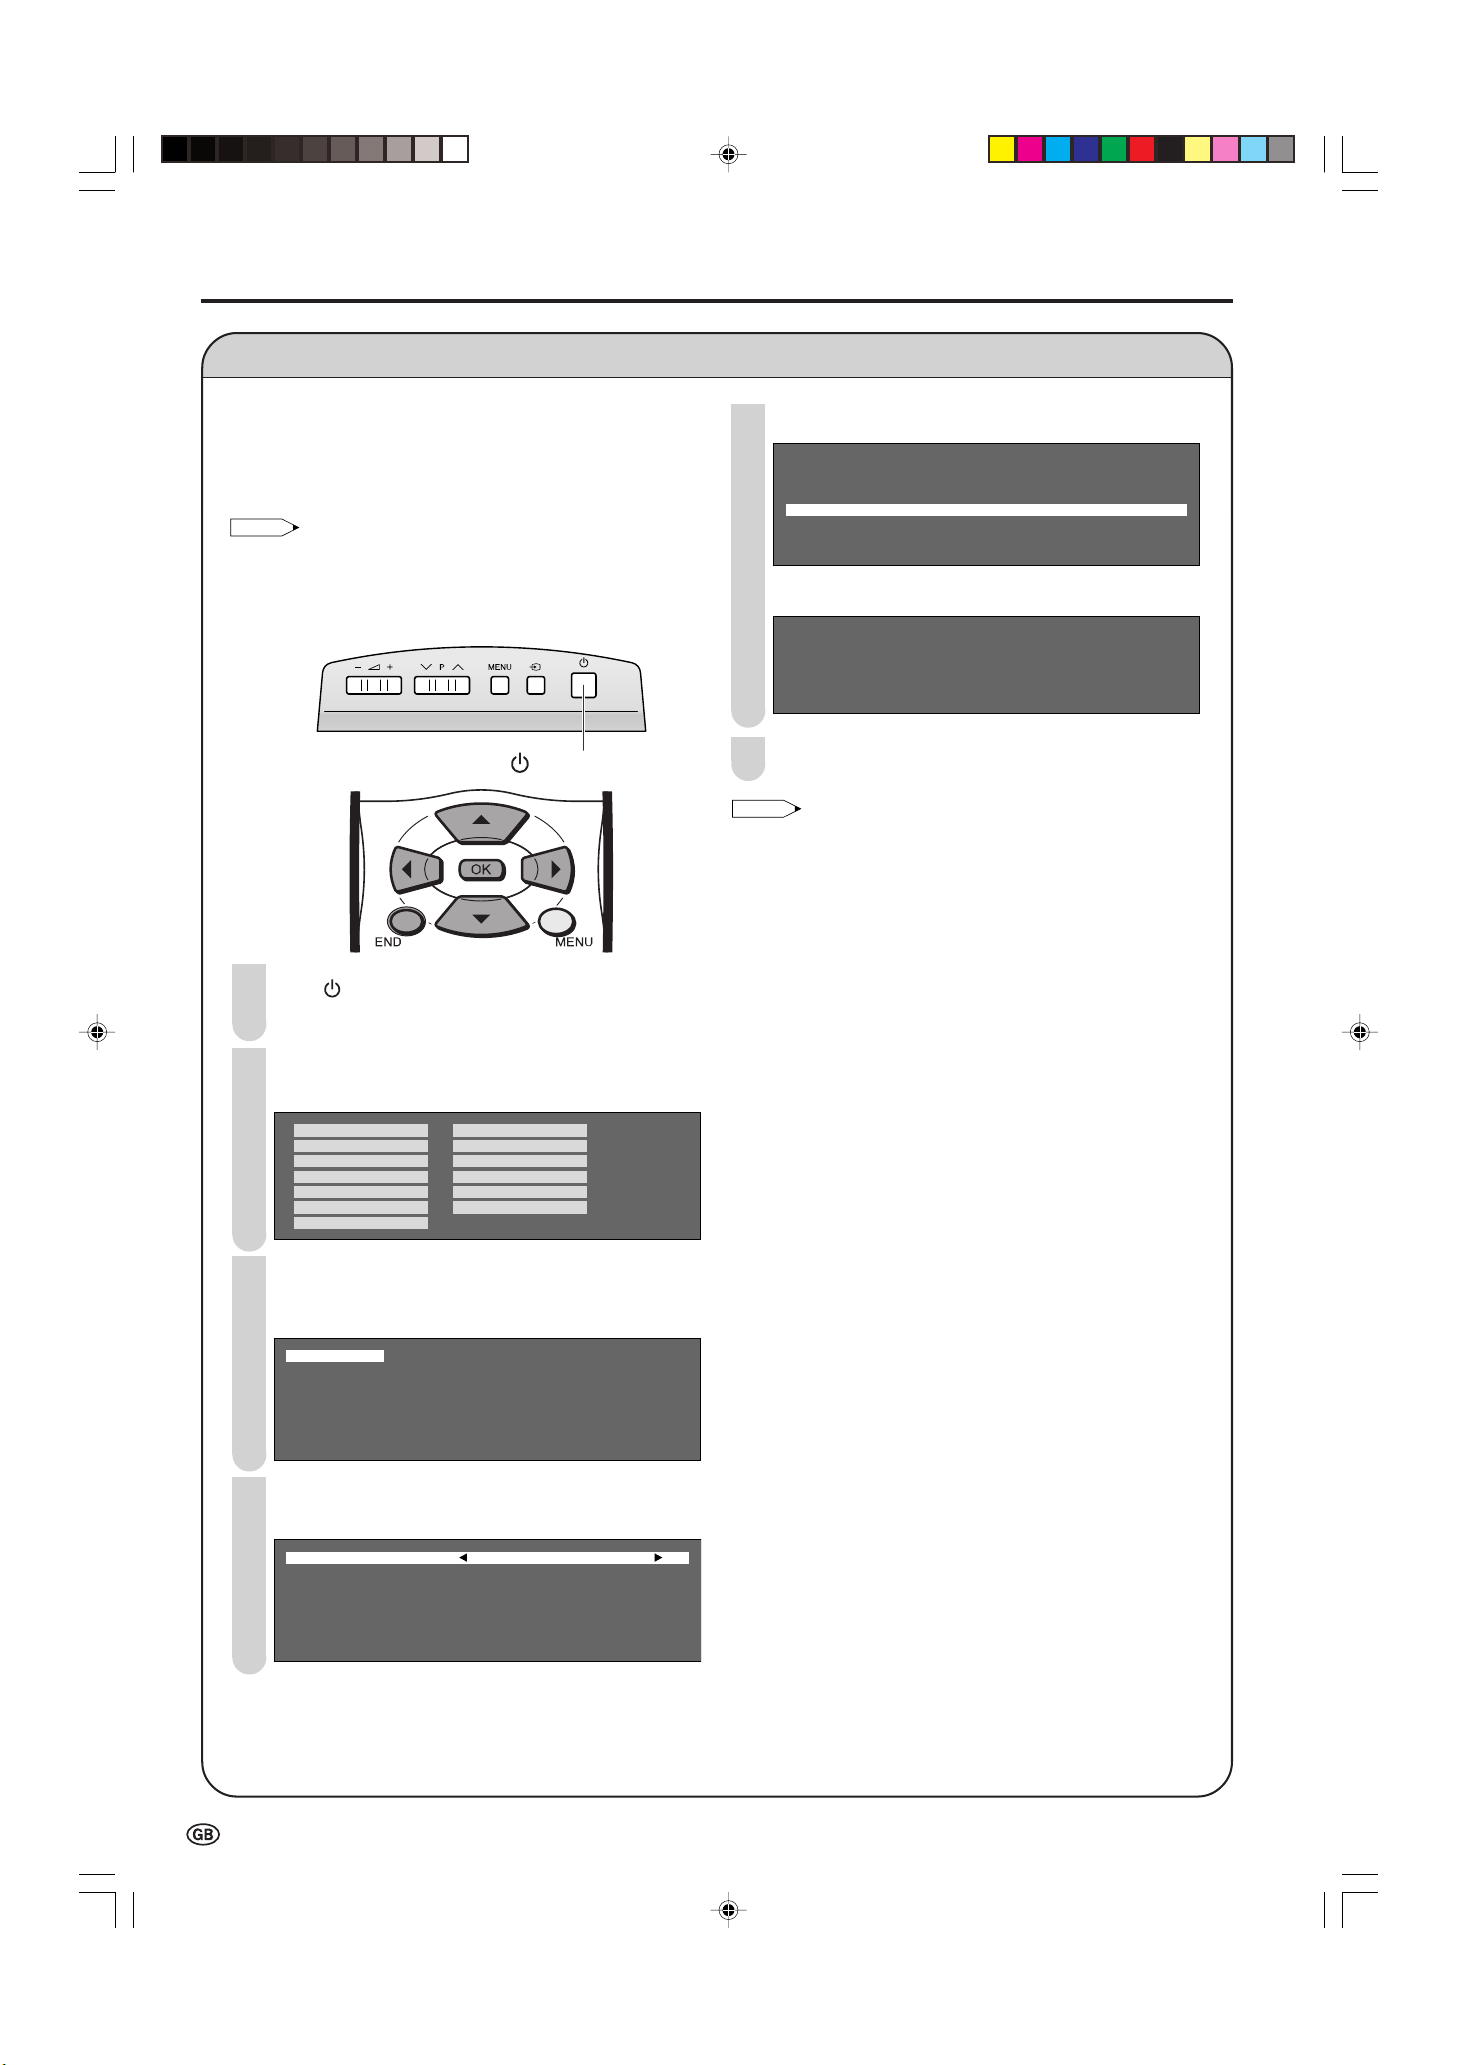
First Installation
When you turn on the LCD TV set for the first time, the
First Installation routine, which makes installation easier,
is activated. Using this routine, you can select the onscreen display language, clock setup and automatically
search for and store all the receivable TV channels.
• You can also execute the First Installation routine by
selecting “First installation” on the Setup Menu screen.
For selecting the menu items, see pages 12 and 13.
Control panel of the main unit
(MAIN POWER)
Press (MAIN POWER) on the LCD TV set.
1
• The “First installation” screen with a list of the languages
for the on-screen display is displayed.
5
Press '/" to select “Start search”, and press OK.
• The automatic programme search begins.
Press END to exit.
6
• After the First installation routine, you can change the settings
of “Language” (page 20) and “Clock setup” (page 20), and
perform “Automatic search” (page 16) again.
2
Press '/"/\/| to select the desired language, and
press OK.
3
Press '/" to set the time, and press OK.
• The time you set is automatically updated via Teletext
time information.
0 0 0 0 0 0
: :
Press '/" to select the desired item, and press
4
\/| to make the setting.
6
LC-13_15_20SH1E_E_P01-09.p65 2004.10.22, 10:07 AM6
Page 9
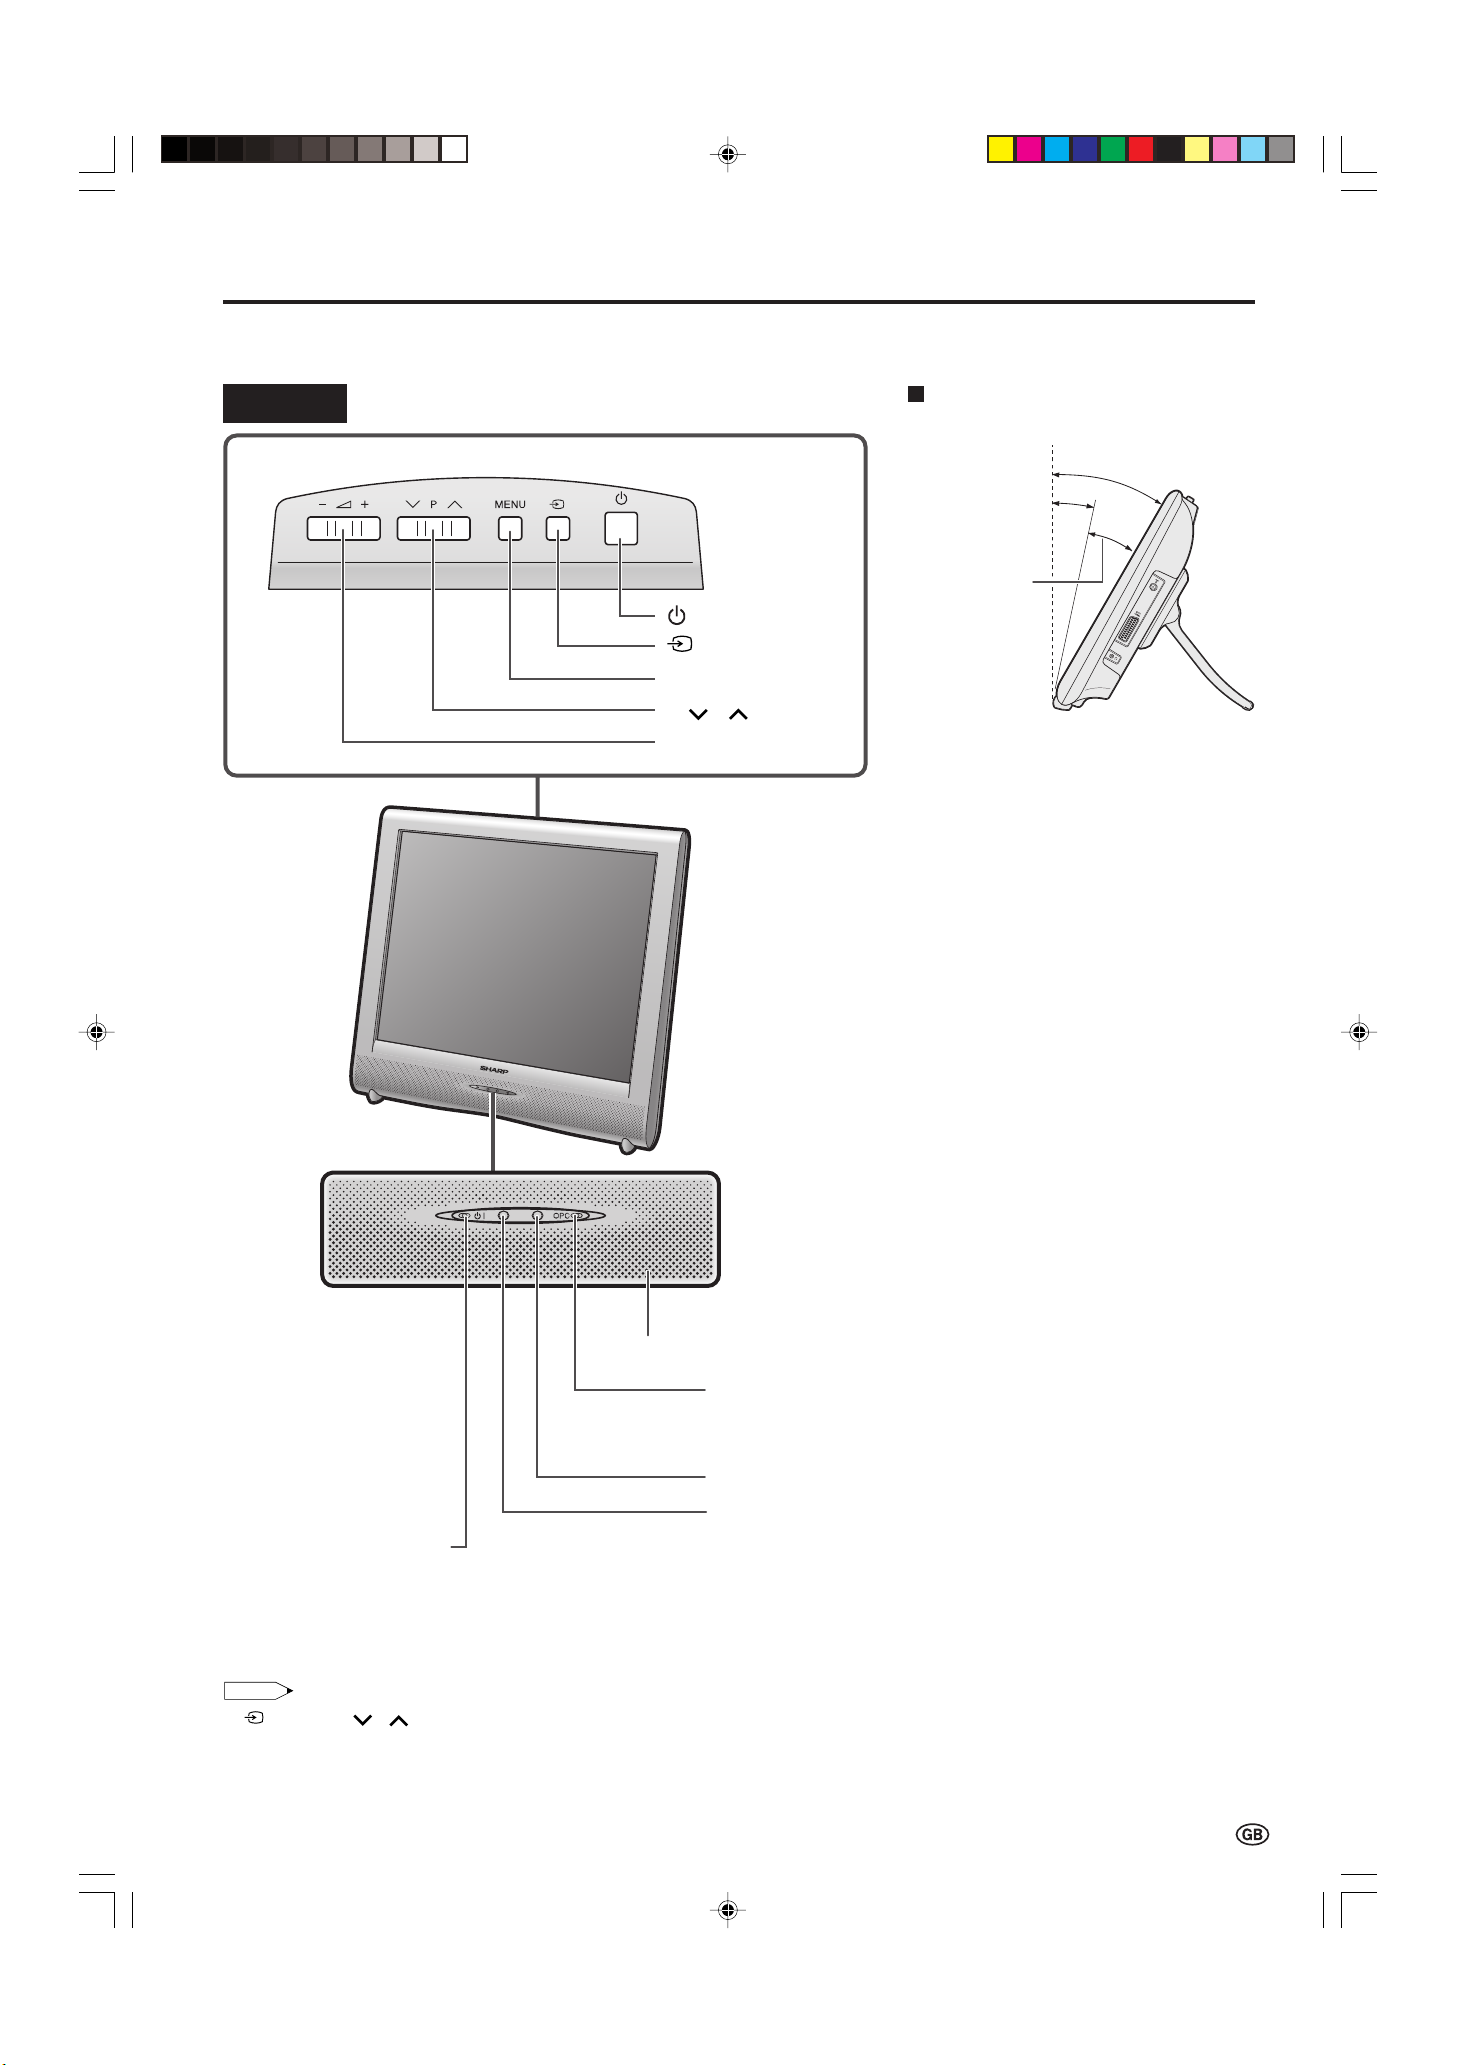
Part Names of the Main Unit
NOTE
The examples used throughout this manual are based on the LC-20SH1E model.
Controls
Upper control panel
(MAIN POWER)
(Input)
MENU
P ( )/( ) (Channel)
i (–)/(+) (Volume)
How to adjust the angle
30°
12°
Adjustable range
The screen angle can be tilted backwards
between 12 and 30 degrees. (It cannot be
set to vertical.) When changing the angle,
make sure to hold the stand and adjust the
screen to the best viewable angle.
STANDBY/ON indicator
STANDBY/ON indicator lights up green when the power is on, and red when in
the standby mode (the indicator will not light when the main power is off).
• (Input), P ( )/( )(Channel), i (–)/(+) (Volume) and MENU on the control panel of the main unit have the same functions as
the same buttons on the remote control (see page 12). Fundamentally, this operation manual provides a description based on operation
using the remote control.
LC-13_15_20SH1E_E_P01-09.p65 04.10.8, 4:32 PM7
Speaker
OPC (Optical Picture Control) indicator
The OPC indicator lights up green when the “Backlight” is set
to “Auto (OPC)”. (See page 21.)
Remote sensor
OPC sensor
7
Page 10
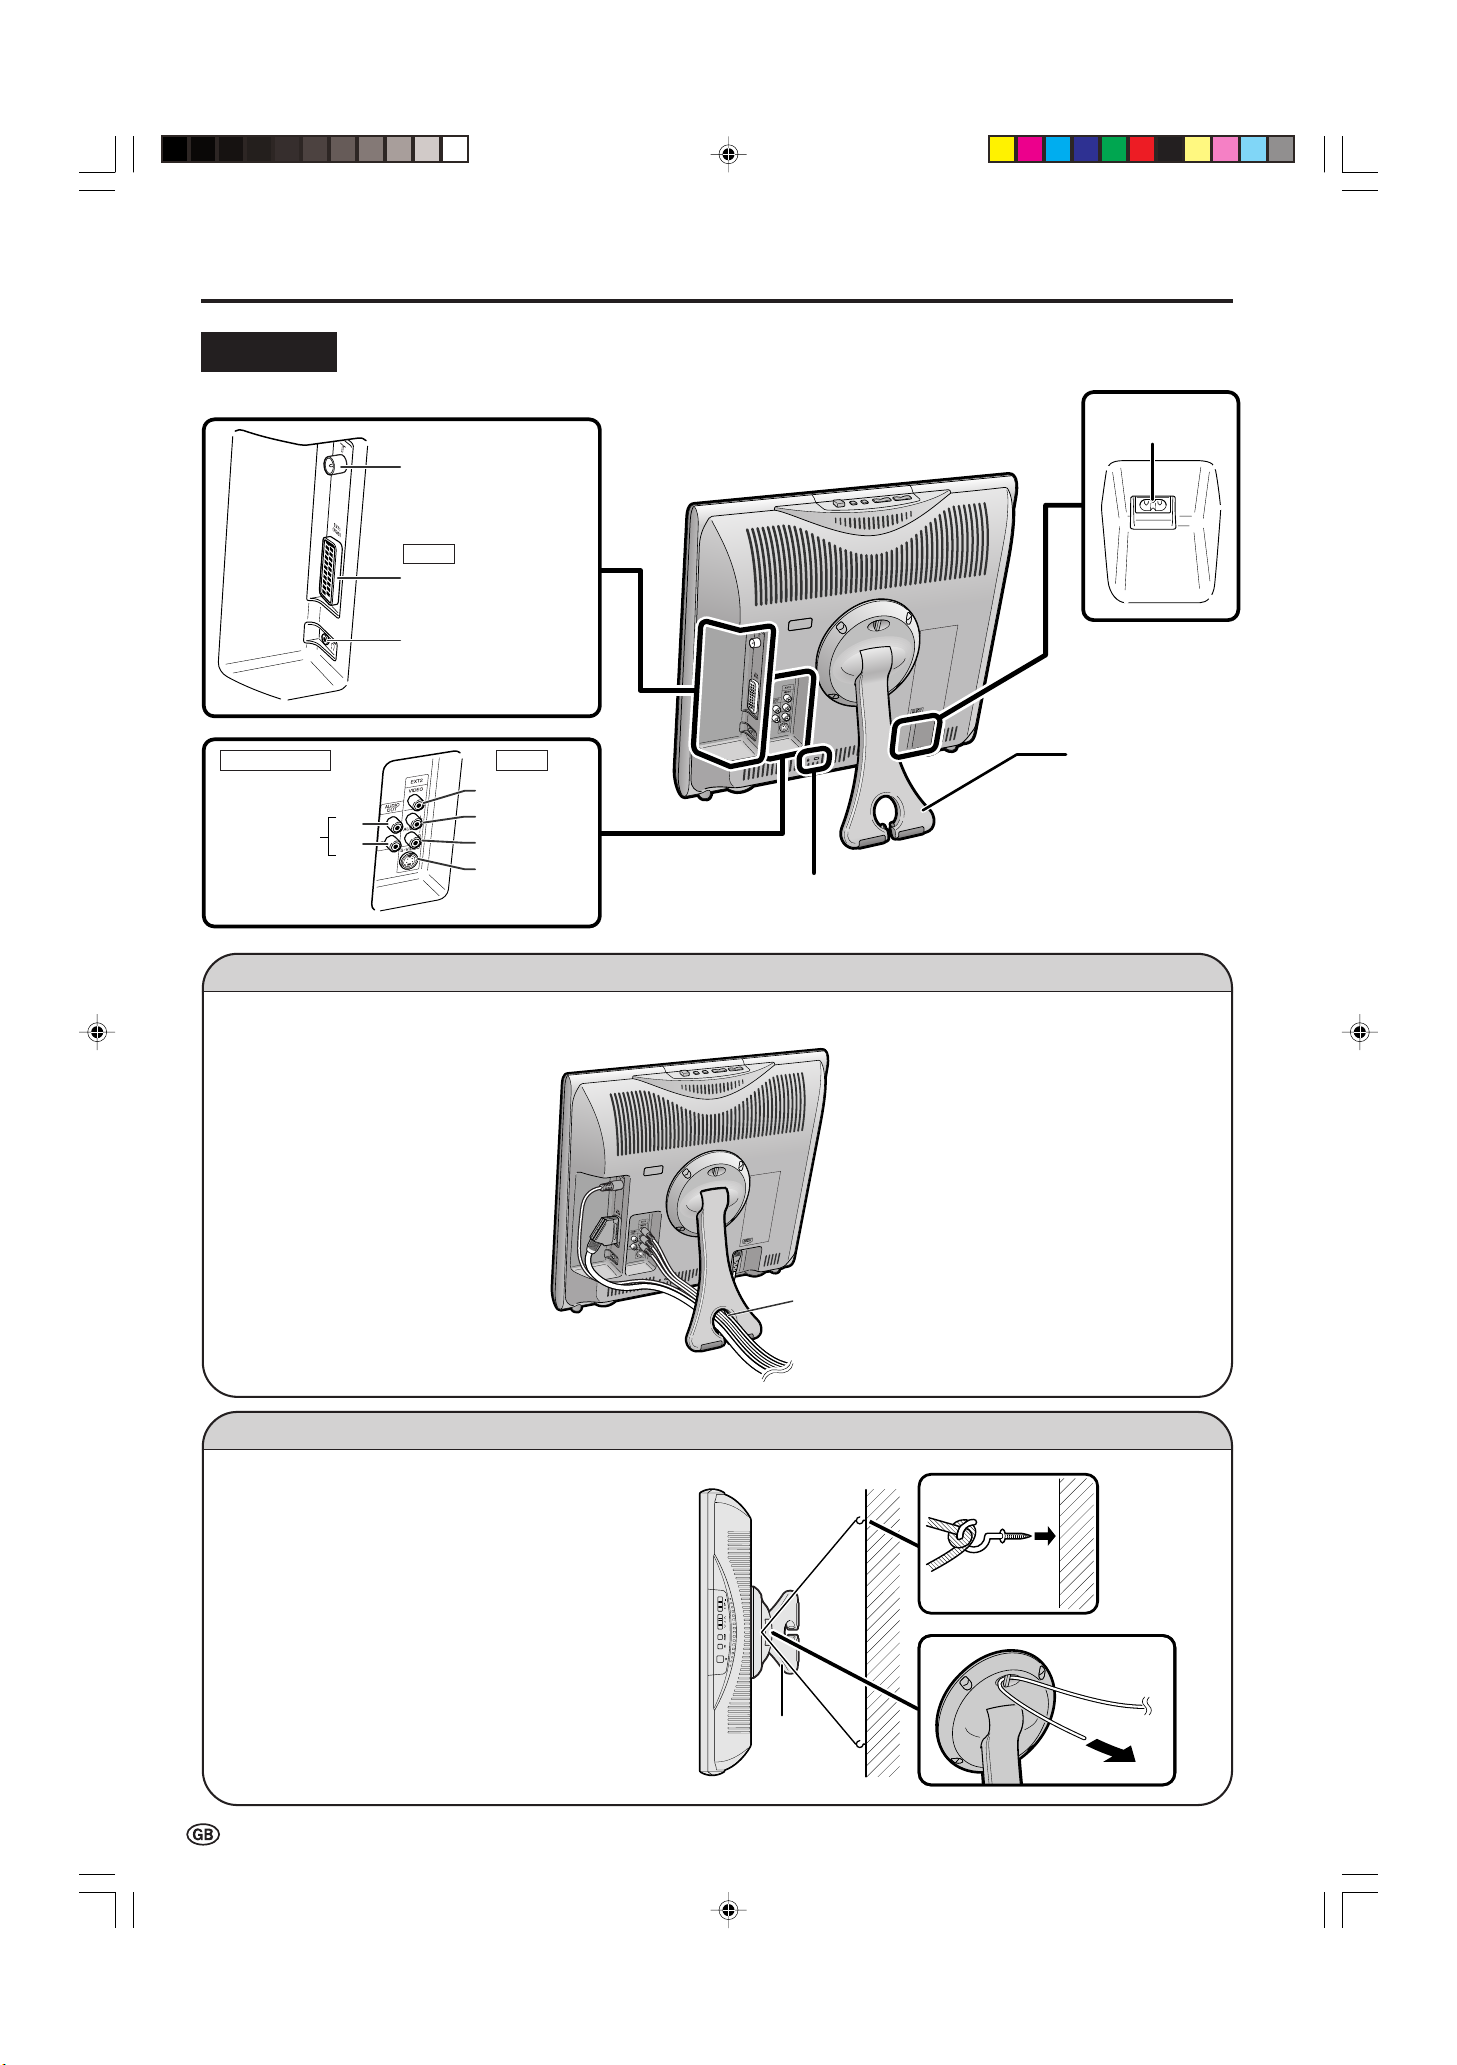
Part Names of the Main Unit (Continued)
Stand
AC INPUT
terminal
Round lock for Kensington
Security Standard slot
Rear View
Antenna terminal
EXT1
Headphone jack
RGB
(21-pin Euro-SCART)
AUDIO OUT
AUDIO OUT EXT2
(L)
(R)
VIDEO
AUDIO (L)
AUDIO (R)
S-VIDEO
Terminals
How to Fix the Cables
Pull the cables connected to each terminal. Insert the cables into the stand hole and fix the cables.
Stand hole
How to Prevent the LCD TV Set from Falling Over
To prevent the LCD TV set from falling over in case
of earthquakes and so on, strap it onto the wall by
threading one end of the string through the loop of
the stand (1) and fastening the LCD TV set with
the string attached to the hook on the wall or the
post, etc. (2).
(An example of strapping the LCD TV set onto the
wall is shown on the right.)
• The string and hook are commercially available.
2
1
8
LC-13_15_20SH1E_E_P01-09.p65 04.10.4, 3:29 PM8
Stand
Page 11

Part Names of the Remote Control
(Sound)
Switches to the sound mode.
(P. 24)
BACKLIGHT
Selects the brightness and
OPC of the display. (P. 21)
ROTATE
Rotates the display in every
direction. (P. 18)
Upwards/Downwards
Selection, Zoom display
function (Teletext mode)
(P. 6, 26)
(Mute)
Switches the sound on and off.
(P. 11)
(Power)
(P. 10)
MENU
Displays the menu.
Returns to the previous screen.
(P. 12)
(Flashback)
Returns to the previous channel.
(P. 11)
Channel Select
(P. 11)
Blue, Status Display
Turns on the status display
when the menu is not displayed.
(P. 22, 25)
Yellow (P. 25)
(+)/(-) (Volume
)
(P. 11)
( )/( ) (Input)
Switches the input source
between EXT1, EXT2
and TV modes. (P. 10)
OK, Programme Table
(P. 6, 18)
END
Returns to normal screen.
(P. 6)
Right/Left Selection
(P. 6)
(Teletext)
Displays the Teletext mode
screen. (P. 25)
(Reveal)
Displays hidden information
such as solutions to riddles
and puzzles. (P. 26)
(Hold)
Temporarily holds the
current Teletext page.
(P. 26)
(Subtitle)
Displays the Teletext
Subtitle directly.
(P. 26)
(Subpage)
Displays the Teletext
Subpage directly.
(P. 26)
Red, Picture Menu
(P. 14, 25)
Green, Sound Menu
(P. 14, 25)
P ( )/( ) (Channel)
(P. 11)
LC-13_15_20SH1E_E_P01-09.p65 04.10.4, 3:29 PM9
9
Page 12

1 S- 6
Basic Operation
NOTE
EXT2
EXT1
1 S- 6
Turning On and Off the Main Power
(MAIN POWER)
STANDBY/ON indicator
● Press (MAIN POWER).
• The STANDBY/ON indicator instantly changes from red to
green and the LCD TV set is turned on.
• The on-screen display appears for a few seconds after turning
on the main power.
On-screen display
Switching the Input Mode (EXT1/EXT2/TV)
Turn on the power of the connected devices.
1
Press
2
input source.
• The screen changes in order of EXT1, EXT2 and TV mode
each time ( )/( ) (Input) is pressed.
( )/( ) (Input) to select the applicable
EXT1 mode
EXT2 mode
TV mode
● To turn off the main power, press (MAIN POWER)
again.
STANDBY/ON
To turn off the LCD TV
BB
Press
B (Power).
BB
• The STANDBY/ON indicator will turn red.
To turn the LCD TV back on
BB
Press
B (Power) again.
BB
• The STANDBY/ON indicator will turn green.
• EXT1: Select this mode when viewing the signals from the video
equipment connected to the EXT1 (21-pin Euro-SCART
(RGB)) terminal.
• EXT2: Select this mode when viewing the signals from the video
equipment connected to the EXT2 terminals using the
VIDEO or S-VIDEO terminal for video input.
If both VIDEO and S-VIDEO terminals are connected with
cables, the S-VIDEO input terminal is selected as the high
priority.
10
LC-13_15_20SH1E_E_P10-14.p65 04.10.8, 4:33 PM10
Page 13

Basic Operation (Continued)
NOTE
5
1
15
NOTE
1
TV Volume
50
TV Volume
10
Sound off
Sound on
NOTE
Sound Volume
To adjust the volume
● Press i (+) to increase the sound volume.
• The bar indicator shifts right.
● Press i (–) to decrease the sound volume.
• The bar indicator shifts left.
To mute the sound
● Press
ee
e (Mute) to temporarily turn off the sound.
ee
• “Sound off” is displayed.
Changing Channels
You can select channels using Channel Select or
P ( )/( ) (Channel).
• To handle the increasing number of channels available, this LCD
TV set allows you to select up to 200 channels (0 to 199).
■ Using Channel Select
When selecting the channel using Channel Select, finish
inputting the channel number by holding down the button for
the last digit for a moment.
To select a one-digit channel (e.g. Channel 5)
● Hold down the
button.
● Press
• When i (+)/(–) is pressed in the Mute mode, the sound turns
on, and the volume indicator is displayed.
• The Mute function is cancelled when
ee
e (Mute) again to turn off the Mute function.
ee
• “Sound on” is displayed.
BB
B is pressed.
BB
To select a two/three-digit channel (e.g. Channel 15)
Press the
1
Hold down the
2
■ Using P ( )/( ) (Channel)
● Press P ( ) to change the channels in the following order:
1 → 2 → 3 → . . . → 198 → 199 → 0 → 1 → 2 → 3 → . . .
● Press P ( ) to change the channels in the following order:
3 → 2 → 1 → 0 → 199 → 198 → . . . → 3 → 2 → 1 → . . .
• Channel “0” is reserved for RF output of VCR.
• Channels not set with “Automatic search” or via “Setup” are set to
be skipped and therefore cannot be displayed using P ( )/( )
(Channel).
button.
button.
LC-13_15_20SH1E_E_P10-14.p65 04.10.4, 3:30 PM11
■ Using
● Press
AA
A (Flashback)
AA
AA
A to switch the currently tuned channel to the
AA
previously tuned channel.
● Press
AA
A again to switch back to the currently tuned
AA
channel.
11
Page 14

Basic Operation (Continued)
Contrast [ 5 ]-]-
Brightness [ ]-]-
Colour [ ]-]-
Tint [ ]]
Sharpness [
NOTE
Contrast [ 5Contrast [ 5 ]-]- +
Brightness [ Brightness [ ]-]- +
Colour [ Colour [ ]-]- +
Tint [ Tint [ ]]
Sharpness [ Sharpness [ ]- +
Reset
Picture Sound Setup Features
0
0
0
0
0
Selecting Menu Items
The menus can be used to adjust the various settings of your
LCD TV set. Select the desired menu item by following the
steps below.
See the next page for each Menu screen.
• Settings most recently adjusted will be saved in memory.
■ Using the remote control
Press MENU to display the Menu screen.
1
Press \/| to select the desired menu item.
2
• The cursor moves left or right.
• The cursor indicates the selected menu item.
3
Press '/" to select the desired item, and press \/|
to adjust the selected item.
• For some items (e.g. “Programmes” on the “Setup” Menu
screen), press OK to display the setting screen.
4
Press MENU to return to the previous screen or END to
return to the normal screen.
■ Using the control panel of the main unit
(Input)
ii
i (–)/(+)
ii
Press MENU to display the Menu screen.
1
2
Press i (–)/(+) to select the desired menu item.
• The cursor moves left or right.
• The cursor indicates the selected menu item.
3
Press P ( )/( ) to select the desired item, and press
i (–)/(+) to adjust the selected item.
• For some items (e.g. “Programmes” on the “Setup” Menu
screen), press (Input) to display the setting screen.
Picture Sound Setup Features
Contrast [ 5
Brightness [
Colour [
Tint [
Sharpness [
Reset
Press MENU to return to the previous screen.
4
• Each time MENU is pressed, you will return to the screen
previously shown.
MENU
P ( )/( )
0
0
0
0
0
]- +
+
+
+
12
LC-13_15_20SH1E_E_P10-14.p65 04.10.4, 3:30 PM12
Page 15

Basic Operation (Continued)
NOTE
0
0
0
0
Menu[Sound]
Picture Sound Setup Features
Sound via [TV]
Treble [ ]- +
Bass [ ]- +
Balance [ ]L R
Loudsp. sound
AV audio sig.
Sound wide
Reset
Menu[Setup]
Picture Sound Setup Features
Programmes
First installation
Rotate
EXT connections
Clock setup
Language
Teletext language
Menu[Features]
Picture Sound Setup Features
Backlight
Sleep timer
Auto power off
On screen disp.
Child lock
Menu[Picture
]
Contrast [ 5Contrast [ 5 ]- ]- +
Brightness [ Brightness [ ]-]- +
Colour [ Colour [ ]-]- +
Tint [ Tint [ ]]
Sharpness [ Sharpness [ ]- +
Reset
Picture Sound Setup Features
0
0
0
0
0
:: Select
MENU
:Back
END
:Exit
■ Menu setting screens
For details on setting each menu item, refer to the page number indicated below.
• The illustrations and on-screen displays in this manual are for explanation purposes and may vary slightly from the actual
appearance.
• “Programmes” or “First installation” cannot be set when the EXT1 or EXT2 mode is selected as an input mode.
Picture
Sound
Page
Contrast .......................................................... 14
Brightness ....................................................... 14
Colour ............................................................. 14
Tint .................................................................. 14
Sharpness ....................................................... 14
Reset ............................................................... 14
The bar above is an operational guide for the remote control.
The bar will change in accordance with each menu setting
screen.
Page
Sound via ........................................................ 15
Treble .............................................................. 14
Bass ................................................................ 14
Balance ........................................................... 14
Loudsp. sound ................................................ 15
AV audio sig. .................................................. 15
Sound wide ..................................................... 15
Reset ............................................................... 14
Setup
Features
Page
Programmes ............................................. 16, 17
First installation................................................. 6
Rotate ............................................................. 18
EXT connections ............................................ 19
Clock setup ..................................................... 20
Language ........................................................ 20
Teletext language ........................................... 20
Page
Backlight ......................................................... 21
Sleep timer...................................................... 21
Auto power off ................................................ 21
On screen disp. .............................................. 22
Child lock .................................................. 22, 23
LC-13_15_20SH1E_E_P10-14.p65 2004.10.22, 2:08 PM13
13
Page 16

Useful Features
Contrast [ 5 ]-]-
Brightness [ ]-]-
Colour [ ]-]-
Tint [ ]]
Sharpness [
NOTE
0
0
0
Sound Setup Features
Sound via [TV]
Treble [ ]- +
Bass [ ]- +
Balance [ ]L R
Loudsp. sound
AV audio sig.
Sound wide
Reset
NOTE
Picture Adjustments
Adjust the picture to suit your preference. See the table
below for the adjustment items.
Press MENU to display the Menu screen.
1
• The Picture Menu screen can be displayed directly by
pressing the Red button.
Press \/| to select “Picture”.
2
3
Press '/" to select a specific adjustment item.
Picture Sound Setup Features
Contrast [ 5
Brightness [
Colour [
Tint [
Sharpness [
Reset
0
0
0
0
0
]- +
+
+
+
Sound Adjustments
Adjust the sound quality and volume to suit your preference.
See the table below for the adjustment items.
1
Press MENU to display the Menu screen.
• The Sound Menu screen can be displayed directly by
pressing the Green button.
Press \/| to select “Sound”.
2
Press '/" to select a specific adjustment item.
3
Press \/| to adjust the item to your desired position.
4
5
Press END to exit.
Selected item
Contrast
Brightness
Colour
Tint
Sharpness
• When resetting all adjustment items to factory preset values,
perform the following procedure.
1 Press '/" to select “Reset”, and press OK.
2 Press '/" to select “Yes”, and press OK.
\\
\ button
\\
For less contrast
For less brightness
For less colour
intensity
Skin tones become
purplish.
For less sharpness
||
| button
||
For more contrast
For more brightness
For more colour
intensity
Skin tones become
greenish.
For more sharpness
Press \/| to adjust the item to your desired position.
4
Press END to exit.
5
Selected item
Treble*
Bass*
Balance*
* These items cannot be adjusted when “Sound via” is set to “Hi-fi”.
• When resetting all adjustment items to factory preset values,
perform the following procedure.
1 Press '/" to select “Reset”, and press OK.
2 Press '/" to select “Yes”, and press OK.
\\
\ button
\\
For weaker treble
For weaker bass
Increase the volume of
the speaker on the left
side.
||
| button
||
For stronger treble
For stronger bass
Increase the volume of
the speaker on the
right side.
14
LC-13_15_20SH1E_E_P10-14.p65 04.10.13, 1:46 PM14
Page 17

Useful Features (Continued)
NOTE
Hi-fi Volume
20
Sound Mode Settings
You can make various sound mode settings.
Perform steps 1 and 2 in Sound Adjustments to
1
display the Sound Menu screen.
2
Press '/" to select the desired item, and press OK.
3
Press '/" to select the sound mode, and press OK.
4
Press END to exit.
Selected item
Sound via
Loudsp. sound
AV audio sig.
Sound wide
TV Hi-fi
Stereo Mono
Sound 1 Sound 2 Sound 1+2 Mono
Sound 1 Sound 2 Sound 1+2
On (For increasing the spread of the sound) Off
Choice
For the “Sound via” setting
• When setting “Sound via” to “Hi-fi” in the Sound Menu screen, the
sound from the built-in speakers will be turned off. To exit this
mode, switch “Sound via” from “Hi-fi” to “TV” in the Sound Menu
screen.
• Pressing i (+)/(–) will display the volume indicator shown
below. You can adjust the volume by pressing i (+)/(–).
For the “Loudsp. sound” setting
• The sound output modes differ depending on whether or not a
NICAM or A2 stereo signal is received. See page 24.
For the “AV audio sig.” setting
• Select “Sound 1” or “Sound 2” when playing back the video from
mono-video recorders and “Sound 1+2” when playing back from
stereo-video recorders.
15
LC-13_15_20SH1E_E_P15-18.p65 2004.10.15, 2:57 PM15
Page 18

Useful Features (Continued)
Automatic search
Manual adjustment
Sort
Erase programme range
Enter / Change name
Channel 199
Frequency 224.25MHz
Name E- 12
Colour system PAL
Sound system I
Skip Off
NOTE
Automatic search
Manual adjustment
Sort
Erase programme range
Enter / Change name
Country UK
Colour system PAL
Sound system I
Store prog. from
Start search
NOTE
8 E- 9 16 E- 54
1 S- 6 9 E- 1 17 E- 56
2 S- 8 1 E- 11 18 E- 57
3 S- 1 11 E- 36 19
4 S- 11 12 E- 37 2
5 E- 3 13 E- 38 21
6 E- 5 14 E- 5 22
7 E- 6 15 E- 53 23
0
0
0
0
0
0
NOTE
Programmes
[1] Automatic Search
Perform the procedure below to search for and store new
TV programmes after the First Installation routine.
Press MENU to display the Menu screen.
1
Press \/| to select “Setup”.
2
Press '/" to select “Programmes”, and press OK.
3
Press '/" to select “Automatic search”, and press OK.
4
Press '/" to select “Start search”, and press OK to
8
begin the automatic programme search.
Country UK
Colour system PAL
Sound system I
Store prog. from
Start search
“Search is completed” is displayed, and press END to
9
exit.
[2] Manual Adjustment
Individual settings of programmes can be adjusted.
1
Perform steps 1 to 3 in [1] Automatic Search to
display the “Programmes” screen.
5
Press '/" to select the desired item, and press \/|
to make the setting.
• You can change “Colour system” and “Sound system” only when
“Other count.” is selected in “Country”.
Press '/" to select “Store prog. from”, and press OK
6
to display the “Store prog. from” screen.
7
Press '/"/\/| to select the programme position from
which the programmes are to be stored, and press OK
to return to the automatic search setting screen.
8 E- 9 16 E- 54
0
1 S- 6 9 E- 1 17 E- 56
2 S- 8 1 E- 11 18 E- 57
3 S- 1 11 E- 36 19
4 S- 11 12 E- 37 2
5 E- 3 13 E- 38 21
6 E- 5 14 E- 5 22
7 E- 6 15 E- 53 23
0
0
• See page 6 for details on the search process.
0
0
0
2
Press '/" to select “Manual adjustment”, and press
OK.
Press '/" to select the desired item, and press \/|
3
to make the setting.
Press END to exit.
4
Selected item
Channel
Frequency
Name
Colour system
Sound system
Skip
Choice/Value range
0–199
The channel changes to the
higher or lower channel.
044 – 859 (MHz)
Receivable frequencies depending on
TV norm, installation site, and range.
Alphabets,
numerical
Programme name
(up to 5 characters).
values and
symbols
(e.g. !, t, etc.)
Auto, PAL,
Colour norm
SECAM
B/G, I, D/K,
TV norm
L/L’, Auto
On Off
Channel numbers with a
“(♦) (RED)” mark on the left are
set to Skip.
Description
16
LC-13_15_20SH1E_E_P15-18.p65 2004.10.22, 10:07 AM16
• Depending on the settings in the colour system of the channels,
switching between channels may be slow. If you want to speed up
channel switching, switch “Auto” in “Colour system” to the current
reception system (PAL or SECAM).
Page 19

Useful Features (Continued)
8 E- 9 16 E- 54
1 S- 6 9 E- 1 17 E- 56
2 S- 8 1 E- 11 18 E- 57
3 S- 1 11 E- 36 19
4 S- 11 12 E- 37 2
5 E- 3 13 E- 38 21
6 E- 5 14 E- 5 22
7 E- 6 15 E- 53 23
0
0
0
0
0
0
Automatic search
Manual adjustment
Sort
Erase programme range
Enter / Change name
8 E- 9 16 E- 54
1 - 6 9 E- 1 17 E- 56
2 S- 8 1 E- 11 18 E- 57
3 S- 1 11 E- 36 19
4 S- 11 12 E- 37 2
5 E- 3 13 E- 38 21
6 E- 5 14 E- 5 22
7 E- 6 15 E- 53 23
0
0
0
0
0
0
8 E- 9 16 E- 54
1 A- 6 9 E- 1 17 E- 56
2 S- 8 1 E- 11 18 E- 57
3 S- 1 11 E- 36 19
4 S- 11 12 E- 37 2
5 E- 3 13 E- 38 21
6 E- 5 14 E- 5 22
7 E- 6 15 E- 53 23
0
0
0
0
0
0
Automatic search
Manual adjustment
Sort
Erase programme range
Enter / Change name
8 E- 9 16 E- 54
1 S- 6 9 E- 1 17 E- 56
2 S- 8 1 E- 11 18 E- 57
3 S- 1 11 E- 36 19
4 S- 11 12 E- 37 2
5 E- 3 13 E- 38 21
6 E- 5 14 E- 5 22
7 E- 6 15 E- 53 23
0
0
0
0
0
0
Automatic search
Manual adjustment
Sort
Erase programme range
Enter / Change name
8 E- 9 16 E- 54
1 S- 6 9 E- 1 17 E- 56
2 S- 8 1 E- 11 18 E- 57
3 S- 1 11 E- 36 19
4 S- 11 12 E- 37 2
5 E- 3 13 E- 38 21
6 E- 5 14 E- 5 22
7 E- 6 15 E- 53 23
0
0
0
0
0
0
[3] Sort
The programme positions for individual programmes can
be changed freely.
Perform steps 1 to 3 in [1] Automatic Search to
1
display the “Programmes” screen.
2
Press '/" to select “Sort”, and press OK.
3
Press '/"/\/| to select the desired programme, and
press OK to sort.
• When OK is pressed, the Move mode is activated. Press
'/" to move the currently marked programme to the
desired programme position. When the channel has moved
to the desired position, all the preceding/subsequent channel
position will go up/down. Press OK to exit the Move mode.
4
If you are erasing programmes in a connected range,
press '/"/\/| to select the programme at the end of
the range.
Press OK to erase the selected programme(s). All the
5
subsequent programmes move up.
6
Press END to exit.
[5] Enter/Change Name
The name of an individual programme can be entered or
changed.
Perform steps 1 to 3 in [1] Automatic Search to
1
display the “Programmes” screen.
Press '/" to select “Enter/Change name”, and press
2
OK.
4
Press END to exit.
[4] Erase Programme Range
The individual programme or programmes in a connected
range can be erased.
1
Perform steps 1 to 3 in [1] Automatic Search to
display the “Programmes” screen.
2
Press '/" to select “Erase programme range”, and
press OK.
3
Press '/"/\/| to select the programme to be erased,
and press OK.
• If you want to erase programmes in a connected range,
select the programme at the beginning of the desired range.
Press '/"/\/| to select the desired programme, and
3
press OK.
4
Press \/| to select the input position, and press '/"
to select the desired character.
5
Press OK to accept the name entered, and press END
to exit.
LC-13_15_20SH1E_E_P15-18.p65 2004.10.15, 2:57 PM17
17
Page 20

Useful Features (Continued)
Normal
Mirror
Rotate
Upside down
NOTE
Rotate: Upside down
Rotate: Normal
Rotate: Mirror
Rotate: Rotate
8 E- 9 16 E- 54
1 S- 6 9 E- 1 17 E- 56
2 S- 8 1 E- 11 18 E- 57
3 S- 1 11 E- 36 19
4 S- 11 12 E- 37 2
5 E- 3 13 E- 38 21
6 E- 5 14 E- 5 22
7 E- 6 15 E- 53 23
0
0
0
0
0
0
Using the Programme Table
The Programme table shows a list of all receivable programmes. They are located in channels 0 to 199.
To select the desired programme
Press OK to display the Programme table.
1
Press '/"/\/| to select the desired programme.
2
• To display the next or previous list of the Programme table,
press '/" when the cursor is at a programme in the lowerright or upper-left position, or press \/| when the cursor is
at a programme in the right or left column.
Rotate
You can set the orientation of the picture.
1
Press MENU to display the Menu screen.
Press \/| to select “Setup”.
2
Press '/" to select “Rotate”, and press OK.
3
Press '/" to select the desired mode, and press OK.
4
3
Press OK to display the selected programme.
Press END to exit.
4
5
Press END to exit.
■ Directly setting the Rotate
Press ROTATE to select the desired mode.
• Each time you press ROTATE, the mode changes as follows.
• “Rotate” is set to “Normal” at the factory setting.
[Normal]: Normal image
orientation.
[Upside down]: To display upside
down images for special uses.
[Mirror]: To display mirror
images for special uses.
[Rotate]: To display rotated
images for special uses.
18
LC-13_15_20SH1E_E_P15-18.p65 04.10.25, 11:06 AM18
Page 21

Useful Features (Continued)
EXT1
EXT2(Y/C)
EXT2(CVBS)
AFC Mode 1
Colour system Auto
Signal type CVBS
NOTE
EXT Connections
It is possible to manually adjust various settings for connections with external devices on the “EXT connections” screen.
■ EXT1/EXT2
Select the appropriate signal type and colour standard for
the signals from the video equipment connected to the
EXT1 or EXT2 terminal.
1
Perform steps 1 and 2 in Rotate to display the Setup
Menu screen.
Press '/" to select “EXT connections”, and press OK.
2
3
Press '/" to select “EXT1”, “EXT2 (Y/C)”, or
“EXT2 (CVBS)”, and press OK.
•
If no (colour) image is displayed, try to change to a different signal
type.
• Depending on the compatibility with the various types of equipment, the picture may become skewed. In this case, select the
“AFC” (Automatic Frequency Control) mode that will improve the
picture.
• Switching between AV input signals may be slow, depending on
the settings in “Colour system”. If you want to speed up signal
switching, select “Auto” in “Colour system” to the current reception
colour system.
Press '/" to select the desired item, and press \/|
4
to make the setting. (See the table below for details.)
Press END to exit.
5
Selected item
Signal type*
AFC
Colour system
This item is visible only when “EXT1” is selected for the “EXT
*
connections” setting.
Choice
Auto, CVBS,
RGB
Mode 1, Mode 2
Auto, PAL,
SECAM, N358
(NTSC 3.58),
N443 (NTSC
4.43), PAL-M,
PAL-N, PAL60
To select the signal type of
external equipment.
To select frequency control
modes. Mode 1 is suitable for
DVD players or decoders, and
Mode 2 is suitable for VCRs or
Camcorders.
Colour norm
Description
LC-13_15_20SH1E_E_P19-24.p65 04.10.8, 5:56 PM19
19
Page 22

Useful Features (Continued)
NOTE
English Russian
Españ ol Portuguê s
Deutsch Tü rkç e
Franç ais Greek
Italiano Suomi
Svenska Polski
Nederlands
Clock Setup
The Sleep timer that turns power off at the specified time
does not work unless the clock has been adjusted. Be sure
to adjust the clock first.
1
Press MENU to display the Menu screen.
2
Press \/| to select “Setup”.
3
Press '/" to select “Clock setup”, and press OK.
4
Press '/" to set the time, and press OK.
12: :
0000
Language
The language for the on-screen display can be selected from
English, Spanish, German, French, Italian, Swedish, Dutch,
Russian, Portuguese, Turkish, Greek, Finnish and Polish.
Perform steps 1 and 2 in Clock Setup to display the
1
Setup Menu screen.
Press '/" to select “Language”, and press OK.
2
3
Press '/"/\/| to select the desired language, and
press OK.
Press END to exit.
4
Teletext Language
5
Press END to exit.
• The time is automatically set/corrected via the Teletext broadcast
when available.
The language for the Teletext can be selected.
1
Perform steps 1 and 2 in Clock Setup to display the
Setup Menu screen.
Press '/" to select “Teletext language”, and press OK.
2
3
Press '/" to select the desired language, and press
OK.
West europe
East europe
Turkish/Greek
Cyrillic
4
Press END to exit.
20
LC-13_15_20SH1E_E_P19-24.p65 04.10.19, 11:23 AM20
Page 23

Useful Features (Continued)
Backlight:Bright
Backlight:Medium
Backlight:Auto(OPC)
Backlight:Dark
NOTE
HH:MM On
: :
0 0 0 0 0 0
NOTE
On
Off
NOTE
Backlight
You can make the setting for the brightness of the screen.
Press MENU to display the Menu screen.
1
Press \/| to select “Features”.
2
Press '/" to select “Backlight”, and press OK.
3
Press '/" to select the desired mode, and press OK.
4
Press END to exit.
5
Selected item
Backlight*
* The Backlight setting can be switched with one touch using the remote
control (see below).
Factory setting
[Bright] Maximum
brightness
[Medium] Suitable for viewing in
[Dark]
[Auto (OPC)] Screen brightness is
■ Directly setting the Backlight
You can change the setting of Backlight directly.
Press BACKLIGHT to select the desired mode.
• Each time you press BACKLIGHT, the mode changes as follows.
Choice
well-lit areas. Saves
energy.
Sufficiently bright when
viewing in dim areas.
adjusted according to the
ambient light of the room.
Sleep Timer
You can set “Sleep timer” to automatically turn off the LCD
TV set.
1
Perform steps 1 and 2 in Backlight to display the
Features Menu screen.
2
Press '/" to select “Sleep timer”, and press OK.
Press Channel Select or
3
4
Selected item
1
Sleep timer
• Be sure to adjust the clock with “Clock setup” in the Setup Menu
before setting “Sleep timer”.
• The time is automatically set/corrected via the Teletext broadcast
when available.
• When not using the LCD TV set for a long period of time, turn off
the main power.
\/|
press
Press END to exit.
. Press
Input value/Choice
HH:MM
Off On
'/"
'/"
to select the time, and
to set “On”.
Current Time
Description
The LCD TV set automatically
turns off.
Auto Power Off
• See the table above for details of the each brightness setting.
• When set to “Auto (OPC)”, make sure that no object obstructs the
OPC sensor, which could affect its ability to sense surrounding light.
You can set the power to automatically turn off if there is no
signal for 5 minutes.
Perform steps 1 and 2 in Backlight to display the
1
Features Menu screen.
Press '/" to select “Auto power off”, and press OK.
2
Press '/" to select “On”, and press OK.
3
Press END to exit.
4
• “Off” is factory preset value.
21
LC-13_15_20SH1E_E_P19-24.p65 04.10.25, 11:06 AM21
Page 24

Useful Features (Continued)
Position Bottom
Sound info. Yes
Time No
Sleep time No
NOTE
Please define your PIN
1 2 3 4
NOTE
On-Screen Display
You can adjust various settings for on-screen displays.
Press MENU to display the Menu screen.
1
Press \/| to select “Features”.
2
Press '/" to select “On screen disp.”, and press OK.
3
Press '/" to select the desired item.
4
Press \/| to make the setting.
5
Press END to exit.
6
Child Lock
Important:
•
Please refer to page 31 for “IMPORTANT NOTE ON DISENGAGING
ADVANCED CHILD LOCK”.
The Child lock function blocks the viewing of any channels.
To use this function, you need to define your PIN (Personal
Identification Number) first.
[1] Defining a PIN
Press MENU to display the Menu screen.
1
2
Press \/| to select “Features”.
3
Press '/" to select “Child lock”, and press OK to
display the PIN input screen.
Input the desired four-digit PIN (e.g. 1234) with
4
Channel Select, and press OK.
Selected item
Position
Sound info.
Time
Sleep time
• The status display appears by pressing the Blue button.
Choice
Bottom Top
No Yes
No Yes
No Yes
To select the position of the onscreen display.
To select whether or not sound
info is to be displayed, when a
channel has been selected.
To select information to be
displayed on the on-screen display.
Description
• Be sure to make a note of your PIN before pressing OK.
• The PIN will not be set if MENU or END is pressed before the
fourth digit has been input.
Press OK to accept the input PIN.
5
[2] Setting a Child Lock
• There are two different ways of activating a Child lock:
1. General child lock for all programmes immediately
2. Programme-position-related child lock without time
limit
To set a Child Lock for all programmes with a time limit
Perform steps 1 to 3 in [1] Defining a PIN to display
1
the PIN input screen.
Input your four-digit PIN (e.g. 1234) with Channel
2
Select.
Please input your PIN
? ? ? ?
22
LC-13_15_20SH1E_E_P19-24.p65 2004.10.22, 2:08 PM22
• When the PIN is correctly input, the “Child lock” screen is
displayed.
Page 25

Useful Features (Continued)
For all programmes
For individual prog. only
Change PIN
Cancel PIN
For all programmes
For individual prog. only
Change PIN
Cancel PIN
NOTE
For all programmes
For individual prog. only
Change PIN
Cancel PIN
Please define your PIN
5 6 7 8
Please input your PIN
? ? ? ?
Press '/" to select “For all programmes”, and press
3
OK.
4
Press '/" to select “Yes”, and press OK.
•The lock remains effective until “No” is selected.
Yes
No
5
Press END to exit.
To set a Child Lock for individual programmes without
time limit
1
Perform steps 1 and 2 in [2] Setting a Child Lock to
display the “Child lock” screen.
2
In step 3 above, press '/" to select “For individual
prog. only”, and press OK .
[3] Changing/Cancelling a PIN
To change a PIN
Perform steps 1 and 2 in [2] Setting a Child Lock to
1
display the “Child lock” screen.
Press '/" to select “Change PIN”, and press OK.
2
•The currently defined PIN is displayed.
3
Input the new four-digit PIN (e.g. 5678) with Channel
Select, and press OK.
4
Press END to exit.
To cancel a PIN
Press '/"/\/| to select the desired programme.
3
Press OK to lock the programme.
4
• The locked programme is displayed in red.
• To unlock the programme, select the programme, and press OK.
• The Child lock remains effective until it is cancelled.
Press END to exit.
5
1
In step 2 above, press '/" to select “Cancel PIN”, and
press OK.
2
Press '/" to select “Yes”, and press OK.
Yes
No
[4] Temporarily cancelling the Child Lock setting
You can view a programme for which a Child lock has
been set by temporarily cancelling the Child lock setting.
Perform the procedure below to input your PIN and
cancel the Child lock if you are prompted to do so.
When the PIN input screen is displayed, input your PIN
with Channel Select.
• The normal screen appears when the PIN is correctly
input.
LC-13_15_20SH1E_E_P19-24.p65 2004.10.15, 2:56 PM23
23
Page 26

Useful Features (Continued)
Stereo
Mono
Mono
Sound 1
Sound 1+2
Sound 2
NOTE
Stereo
Mono
Mono
Sound 1
Sound 1+2
Sound 2
NOTE
NICAM Broadcast Selection
This enables the selection of the reception mode when
receiving a NICAM-I or NICAM-B/G signal. To let you enjoy
NICAM broadcasting, this LCD TV set receives NICAM
stereo system and bilingual broadcasts.
Stereo
The LCD TV set is receiving a stereo broadcast.
•Each time you press
between “Stereo” and “Mono”.
•When “Mono” is selected, the TV sound is output monaurally.
Bilingual
The LCD TV set is receiving a bilingual broadcast.
• Each time you press
follows:
(Sound), the mode changes
(Sound), the mode changes as
A2 Stereo Broadcast Selection
This enables the selection of the reception mode when
receiving an A2 stereo signal. To let you enjoy A2 stereo
broadcasting, this LCD TV set receives A2 stereo system
and bilingual broadcasts.
Stereo
The LCD TV set is receiving a stereo broadcast.
• Each time you press
between “Stereo” and “Mono”.
• When “Mono” is selected, the TV sound is output monaurally.
Bilingual
The LCD TV set is receiving a bilingual broadcast.
• Each time you press
follows:
(Sound), the mode changes
(Sound), the mode changes as
• If the button is not pressed for a few seconds, the mode setting is
automatically terminated and the LCD TV set returns to the normal
mode.
• If the button is not pressed for a few seconds, the mode setting is
automatically terminated and the LCD TV set returns to normal
mode.
24
LC-13_15_20SH1E_E_P19-24.p65 04.10.25, 3:11 PM24
Page 27

TELETEXT
Red Green Yellow
Blue
100
NOTE
TELETEXT
Red Green Yellow
Blue
100
Teletext
■ What is Teletext?
Teletext is an information service organised like a
magazine, which is provided by some TV stations in
addition to regular television broadcasting. Your LCD TV
set receives special Teletext signals broadcast by a TV
station, processes the information and displays it
graphically on the screen. News, weather and sports
information, stock exchange prices, programme reviews
and closed captioning for people hard of hearing are
among the many services available through Teletext.
■ Teletext mode
Teletext is activated with
control and is also closed with it. The LCD TV set can be
controlled in Teletext mode directly by inputting commands with the remote control and indirectly through the
on-screen display (menu system).
(Teletext) on the remote
[1] Turning on and off Teletext mode
Select a TV channel that is broadcasting the Teletext
1
programme.
Press (Teletext) to display Teletext screen.
2
• To turn off the Teletext mode, press (Teletext)
again.
■ Operating instructions in Teletext mode
• The FLOF system for Teletext is transmitted in the UK
currently.
• The TOP system for Teletext is transmitted in Germany
currently.
• If TOP Teletext is broadcast, a control line and TOP line
can be displayed on the screen. The TOP line involves
the operating instructions associated with all of the
Coloured buttons if TOP text is transmitted.
• For selecting the language for the Teletext screen, see
“Teletext Language” on page 20.
[2] Using the TOP line
When TOP Teletext is being broadcast, you can display
the TOP line, which contains the operating instructions on
the screen.
Press the Coloured buttons to operate the Teletext screen.
• Press Red to display the previous page and Green to display the
next page. Yellow and Blue are as indicated on the TOP line.
LC-13_15_20SH1E_E_P25-26.p65 04.10.19, 11:23 AM25
25
Page 28

Teletext (Continued)
TELETEXT
S
ABC
DEF
ABC DEF
[3] Changing subpages
If a page has been selected from among several subpages,
you can display a control line which contains the subpage
numbers.
1
Press (Subpage).
2
Press Channel Select to select the desired subpage
number.
Press
3
[4] Useful Features for Teletext
● (Hold) on the remote control can be used to hold the
current teletext page.
Press the button again to cancel the Hold mode.
● '/" can be used to zoom the current Teletext page as
shown below.
• The screen is displayed in each mode each time '/" is
pressed.
● (Subtitle) can be used to quickly activate subtitles.
• Press
(Subpage) to turn off the control line.
(Teletext) to deactivate subtitles.
● (Reveal) can be used to display hidden information
such as solutions to riddles and puzzles.
Press the button again to hide the information.
26
LC-13_15_20SH1E_E_P25-26.p65 04.10.13, 2:33 PM26
Page 29

NOTE
<Example>
• Audio amplifier
To AUDIO OUT terminal
To EXT2 terminal
<Example>
• Camcorder
• Home video game system
• VCR
* If your external device has an S-VIDEO terminal,
S-VIDEO connection is recommended.
• Decoder
To EXT1 terminal
Connecting External Devices
You can enjoy picture and sound by connecting devices, such as a VCR or home video game system, to the terminals located
on the rear of the LCD TV set.
When connecting an external device, turn off the power of the LCD TV set first to prevent any possible damage.
Example of external devices that can be connected
• For the cable, use a commercially available audio/video cable.
• Only connect audio/video signals to EXT1 and 2 terminals. Connecting other signals may result in a malfunction.
• The VIDEO input terminal and the S-VIDEO input terminal on the EXT2 are shared connections with priority given to the S-VIDEO
• For more information about external device connections, see the operation manuals of your external devices.
Note:
terminal. If both terminals are connected, the video signals from the S-VIDEO input terminal are selected for the EXT2 input.
When viewing video from the VIDEO input terminal, do not connect anything to the S-VIDEO input terminal.
LC-13_15_20SH1E_E_P27-28.p65 04.10.4, 3:32 PM27
27
Page 30

NOTE
Camcorder
VCR
2
4
6
8
10
12
14
16
18
20
1
3
5
7
9
11
13
15
17
19
21
Decoder
Audio/Video cable
(commercially available)
S-Video cable
(commercially available)
21-pin Euro-SCART connector
(commercially available)
Video
Audio (L)
Audio (R)
S-Video
Connecting External Devices (Continued)
Connecting to the EXT1/EXT2 Terminals
21-pin Euro-SCART (RGB)
1. Audio right output
2. Audio right input
3. Audio left output
4. Common earth for audio
5. Earth for blue
6. Audio left input
7. BLUE input
8. Audio-video control
9. Earth for green
10. Not used
• If your VCR (or other external devices) has an S-Video terminal, S-VIDEO connection is recommended. (Use an S-Video cable.)
Note:
• When you connect external devices to both S-VIDEO and VIDEO terminals (and if you select EXT2), you can only view pictures from the
S-VIDEO terminal.
• You cannot view multiple or synthesised pictures by connecting two or more external devices. When connecting an external device, make
sure to connect the video and audio cables to the corresponding terminals.
11. GREEN input
12. Not used
13. Earth for red
14. Earth
15. RED input
16. RED/GREEN/BLUE control
17. Earth for video
18.
Earth for RED/GREEN/BLUE control
19. Video output
20. Video input (PAL/SECAM/NTSC)
21. Plug shield
28
LC-13_15_20SH1E_E_P27-28.p65 2004.10.22, 2:09 PM28
Page 31

Troubleshooting
Before calling for repair services, make the following checks for possible remedies to the symptoms encountered.
LCD TV set
Sound
Problem Check item
• Reception other than that of broadcasting stations could be the
Picture
Picture
There is no
picture or sound.
There is no
picture.
There is no
picture from
EXT2 .
There is no
sound.
There is no
picture or sound,
just noise.
problem.
• Make sure the input mode is set to TV.
• Make sure the main power switch of the LCD TV set is on.
• Make sure the Picture adjustment is properly adjusted.
•The fluorescent lamp may have reached the end of its service
life.
• Make sure the S-VIDEO terminal has nothing connected.
• Make sure the volume is not set to minimum.
• Make sure the sound is not set to mute.
• Make sure the antenna cable is properly connected.
•Bad reception could be the problem.
Reference
page
–
10
10
14
–
8, 28
11
11
5
–
The picture is
not clear.
The picture is
too light or
improperly
tinted.
The picture is
too dark.
Remote control does not work.
Unit cannot be operated.
• Make sure the antenna cable is properly connected.
•Bad reception could be the problem.
• Check the colour adjustment.
•Check if “Backlight” is set to “Dark”.
•Check “Contrast”.
•The fluorescent lamp may have reached the end of its service
life.
•Check if batteries in the remote control have sufficient power.
• Make sure the remote sensor window is not under strong
lighting.
• External influences such as lightning, static electricity, etc., may
cause improper operation. In this case, operate the unit after
turning the power off, or unplugging the AC cord and replugging it in 1 or 2 minutes.
5
–
14
21
14
–
4
4
–
■ Cautions regarding use in high and low temperature environments
•
When the unit is used in a low temperature space (e.g. room, office), the picture may leave trails or appear slightly delayed.
This is not a malfunction, and the unit will recover when the temperature returns to normal.
• Do not leave the unit in a hot or cold location. Also, do not leave the unit in a location exposed to direct sunlight or near a
heater, as this may cause the cabinet to deform and the LCD panel to malfunction.
(Storage temperature: –20°C to +60°C (–4°F to +140°F))
LC-13_15_20SH1E_E_P29-33.p65 04.10.4, 3:32 PM29
29
Page 32

Troubleshooting (Continued)
Antenna
Problem Check item
•The reception may be weak.
The picture is not sharp.
The picture shakes.
The picture has ghosts.
The picture is spotted.
There are stripes on the screen or
colours fade.
•The quality of the broadcast may also be bad.
•Make sure the antenna is facing the correct direction.
•Make sure the outside antenna has not been disconnected.
•Make sure the antenna is facing the correct direction.
•Broadcast waves may be reflected from adjacent mountains or buildings.
•There may be interference from automobiles, trains, high-voltage lines, neon lights, etc.
• There may be interference between the antenna cable and power cable. Try positioning
them further apart.
• Is the unit receiving interference from other devices?
Transmission antennas of radio broadcasting stations and transmission antennas of
amateur radios and mobile phones may also cause interference.
• Use the unit as far apart as possible from devices that may cause possible interference.
Specifications
Items
LCD panel
Number of dots 921,600 dots
Video colour system PAL/SECAM/NTSC
TV TV-Standard (CCIR) B/G, I, D/K, L/L’
TV-Tuning System Auto preset 200 ch.
STEREO/BILINGUAL NICAM, A2 stereo
AUTO PRESET YES
CATV ~Hyper Band
Brightness 430 cd/m
Lamp life 60,000 hours*
Viewing angles H: 170° V: 170°
Audio amplifier 2.1 W × 2
Speakers 7.5 cm × 3 cm 2 pcs. 11 cm × 4 cm 2 pcs.
Terminals EXT1 21-pin Euro-SCART
EXT2 S-VIDEO, VIDEO, AUDIO
OUT AUDIO
Antenna DIN
Headphones 3.5 mm ø jack (side)
OSD language English/Spanish/German/French/Italian/Swedish/Dutch/Russian/Portuguese/
Power requirement AC 220 V–240 V, 50/60 Hz
Power consumption 55 W (1.0 W Standby) 59 W (1.0 W Standby) 74 W (1.0 W Standby)
Weight (approx.) 3.5 kg, w/o accessories 4.1 kg, w/o accessories 6.3 kg, w/o accessories
* The typical period of time after which the lamp’s power output will have decreased by about half, given that the LCD TV set is used continu-
ously in a 25°C/77°F room under standard lighting and brightness conditions.
Dimensional Drawings
• The dimensional drawings for each model are shown on the inside back cover.
Model
LC-13SH1E LC-15SH1E LC-20SH1E
13" Advanced Super View 15" Advanced Super View 20" Advanced Super View
& BLACK TFT LCD & BLACK TFT LCD & BLACK TFT LCD
2
Turkish/Greek/Finnish/Polish
AC 220 V–240 V AC 220 V–240 V AC 220 V–240 V
■ As a part of policy of continuous improvement, SHARP reserves the right to make design and specification changes for the LCD TV set
improvement without prior notice. The performance specification figures indicated are nominal values of production units. There may be
some deviations from these values in individual units.
30
LC-13_15_20SH1E_E_P29-32.p65 04.10.25, 4:12 PM30
Page 33

Information for Customers
on environmentally friendly disposal of this SHARP product
If this product cannot be used any more, it should be disposed of in a legally correct and environmentally sound way.
DO NOT DISPOSE OF THIS PRODUCT WITH YOUR HOUSEHOLD WASTE
OR MIXED WITH OTHER WASTES! YOU MIGHT ENDANGER THE ENVIRONMENT!
Sharp Corporation is committed to protecting the environment and conserving energy. Our goal is to minimize the
environmental impact of our products by continually implementing and improving product technologies, designs, and
customer information aimed at environmental conservation.
(1) For our customers in Belgium,The Netherlands, Sweden, and Switzerland
SHARP takes part in the respective national recycling systems for electronic equipment, which have been founded on the
basis of the environmental laws in these countries.
Please see here details on the respective countries.
Country
Recycling Information for that Country
Sweden
The Netherlands
Belgium
Switzerland
Please use the Swedish electronics recycling system called “ELRETUR”,
and see the website at http://www.el-kretsen.se
Please use the Dutch electronics recycling system called “ICT-Milieu”,
and see the website at http://www.nederlandict.nl/index.php
Please use the Belgian electronics recycling system called “Recupel”,
and see the website at http://www.recupel.be
Please use the Swiss electronics recycling system called “SWICO”,
and see the website at http://www.swico.ch
(2) For our customers in United Kingdom, Germany, France, and Italy
Please contact your local authorities for collection and recycling facilities, or contact a recycling service company, which is
licensed for the recycling of electronic equipment.
IMPORTANT NOTE ON DISENGAGING ADVANCED CHILD LOCK
We suggest that you remove the following instruction from the operation manual to prevent children from reading it. As this operation
manual is multilingual, we also suggest the same with each language. Keep it in a safe space for future reference.
If you have forgotten your personal code number and cannot disengage ADVANCED CHILD LOCK, follow the procedure below.
1. Press MENU to display the Menu screen.
2. Press \/| to select “Features”.
3. Press '/" to select “Child lock”, and press OK.
4. The PIN input menu is displayed.
5. Input “3001” with Channel Select.
The Child lock setting menu is displayed.
ADVANCED CHILD LOCK will now be disengaged.
LC-13_15_20SH1E_E_P29-32.p65 04.10.8, 5:46 PM31
31
Page 34

32
LC-13_15_20SH1E_E_P29-32.p65 04.10.8, 4:34 PM32
 Loading...