

Page 1
KME768080M
KMF768080M
KMK768080B
KMK768080M
KMK768080T
USER
MANUAL
EN User Manual
Microwave combi-oven
Page 2
FOR PERFECT RESULTS
Thank you for choosing this AEG product. We have created it to give you impeccable
performance for many years, with innovative technologies that help make life simpler – features
you might not find on ordinary appliances. Please spend a few minutes reading to get the very
best from it.
Visit our website to:
Get usage advice, brochures, trouble shooter, service and repair information:
www.aeg.com/support
Register your product for better service:
www.registeraeg.com
Buy Accessories, Consumables and Original spare parts for your appliance:
www.aeg.com/shop
CUSTOMER CARE AND SERVICE
Always use original spare parts.
When contacting our Authorised Service Centre, ensure that you have the following data
available: Model, PNC, Serial Number.
The information can be found on the rating plate.
Warning / Caution-Safety information
General information and tips
Environmental information
CONTENTS
1. SAFETY INFORMATION............................. 3
1.1 Children and vulnerable people
safety..................................................... 3
1.2 General Safety.................................4
2. SAFETY INSTRUCTIONS........................... 6
2.1 Installation........................................6
2.2 Electrical connection........................7
2.3 Use.................................................. 8
2.4 Care and cleaning............................9
2.5 Glassware use................................. 9
2.6 Internal lighting................................ 9
2.7 Service...........................................10
2.8 Disposal......................................... 10
3. PRODUCT DESCRIPTION........................ 10
3.1 General overview...........................10
3.2 Accessories................................... 10
4. HOW TO TURN APPLIANCE ON AND
OFF................................................................ 11
4.1 Control panel................................. 11
2/40
4.2 Display........................................... 12
5. BEFORE FIRST USE.................................13
5.1 Initial Cleaning .............................. 13
5.2 First connection............................. 13
5.3 Wireless connection
5.4 Software licences...........................15
6. DAILY USE................................................ 15
6.1 How to set: Heating functions........ 15
6.2 How to set: Microwave functions... 15
6.3 How to use: Microwave quick start 16
6.4 How to set: Assisted Cooking........ 17
6.5 Heating functions........................... 17
7. CLOCK FUNCTIONS.................................20
7.1 Clock functions description............ 20
7.2 How to set: Clock functions........... 21
8. HOW TO USE: ACCESSORIES................ 22
8.1 Inserting accessories..................... 22
................. 14
Page 3

SAFETY INFORMATION
9. ADDITIONAL FUNCTIONS....................... 24
9.1 How to save: Favourites................ 24
9.2 Function lock..................................24
9.3 Automatic switch-off.......................24
9.4 Cooling fan.....................................25
10. HINTS AND TIPS..................................... 25
10.1 Cooking recommendations.......... 25
10.2 Microwave recommendations ..... 25
10.3 Microwave suitable cookware and
materials ............................................. 26
10.4 Recommended power settings for
different kinds of food.......................... 27
10.5 Cooking tables for test institutes..28
11. CARE AND CLEANING...........................29
11.1 Notes on cleaning........................ 29
11.2 How to remove: Shelf supports ...30
11.3 How to replace: Lamp..................30
Subject to change without notice.
SAFETY INFORMATION
1.
12. TROUBLESHOOTING............................. 31
12.1 What to do if.................................31
12.2 How to manage: Error codes....... 32
12.3 Service data.................................33
13. ENERGY EFFICIENCY............................ 33
13.1 Energy saving.............................. 33
14. MENU STRUCTURE................................34
14.1 Menu............................................34
14.2 Submenu for: Options..................34
14.3 Submenu for: Connections.......... 35
14.4 Submenu for: Setup.....................35
14.5 Submenu for: Service.................. 36
15. IT'S EASY!............................................... 36
16. TAKE A SHORTCUT!.............................. 37
17. ENVIRONMENTAL CONCERNS.............38
Before the installation and use of the appliance, carefully read
the supplied instructions. The manufacturer is not responsible
for any injuries or damage that are the result of incorrect
installation or usage. Always keep the instructions in a safe
and accessible location for future reference.
1.1 Children and vulnerable people safety
• This appliance can be used by children aged from 8 years
and above and persons with reduced physical, sensory or
mental capabilities or lack of experience and knowledge if
they have been given supervision or instruction concerning
the use of the appliance in a safe way and understand the
hazards involved. Children of less than 8 years of age and
persons with very extensive and complex disabilities shall
be kept away from the appliance unless continuously
supervised.
3/40
Page 4

SAFETY INFORMATION
• Children should be supervised to ensure that they do not
play with the appliance and mobile devices with My AEG
Kitchen .
• Keep all packaging away from children and dispose of it
appropriately.
• WARNING: The appliance and its accessible parts become
hot during use. Keep children and pets away from the
appliance when in use and when cooling down.
• If the appliance has a child safety device, it should be
activated.
• Children shall not carry out cleaning and user maintenance
of the appliance without supervision.
1.2 General Safety
• This appliance is for cooking purposes only.
• This appliance is designed for single household domestic
use in an indoor environment.
• This appliance may be used in, offices, hotel guest rooms,
bed & breakfast guest rooms, farm guest houses and other
similar accommodation where such use does not exceed
(average) domestic usage levels.
• Only a qualified person must install this appliance and
replace the cable.
• Do not use the appliance before installing it in the built-in
structure.
• Disconnect the appliance from the power supply before
carrying out any maintenance.
• If the mains power supply cable is damaged, it must be
replaced by the manufacturer, its Authorised Service Centre
or similarly qualified persons to avoid an electrical hazard.
• WARNING: Ensure that the appliance is switched off before
replacing the lamp to avoid the possibility of electric shock.
4/40
Page 5

SAFETY INFORMATION
• WARNING: The appliance and its accessible parts become
hot during use. Care should be taken to avoid touching
heating elements or the surface of the appliance cavity.
• Always use oven gloves to remove or insert accessories or
ovenware.
• Do not activate the microwave function when the appliance
is empty. Metal parts inside the cavity can create electric
arcing.
• Metallic containers for food and beverages are not allowed
during microwave cooking. This requirement is not
applicable if the manufacturer specifies size and shape of
metallic containers suitable for microwave cooking.
• WARNING: If the door or door seals are damaged, the
appliance must not be operated until it has been repaired by
a qualified person.
• WARNING: Only a qualified person can carry out any
service or repair operation that involves the removal of a
cover which gives protection against exposure to microwave
energy.
• WARNING: Do not heat liquids and other foods in sealed
containers. They are liable to explode.
• Use only utensils that are suitable for use in microwave
ovens.
• When heating food in plastic or paper containers, observe
the appliance due to the possibility of ignition.
• The appliance is intended for heating food and beverages.
Drying of food or clothing and heating of warming pads,
slippers, sponges, damp cloth and similar may lead to risk of
injury, ignition or fire.
• If smoke is emitted, switch off or unplug the appliance and
keep the door closed in order to stifle any flames.
• Microwave heating of beverages can result in delayed
eruptive boiling. Care must be taken when handling the
container.
5/40
Page 6
SAFETY INSTRUCTIONS
• The contents of feeding bottles and baby food jars shall be
stirred or shaken and the temperature checked before
consumption, in order to avoid burns.
• Eggs in their shell and whole hard-boiled eggs should not be
heated in the appliance since they may explode, even after
microwave heating has ended.
• To remove the shelf supports first pull the front of the shelf
support and then the rear end away from the side walls.
Install the shelf supports in the opposite sequence.
• The appliance should be cleaned regularly and any food
deposits removed.
• Do not use a steam cleaner to clean the appliance.
• Do not use harsh abrasive cleaners or sharp metal scrapers
to clean the glass door since they can scratch the surface,
which may result in shattering of the glass.
• Failure to maintain the appliance in a clean condition could
lead to deterioration of the surface that could adversely
affect the life of the appliance and possibly result in a
hazardous situation.
2. SAFETY INSTRUCTIONS
2.1 Installation
WARNING!
Only a qualified person must install this appliance.
• Remove all the packaging.
• Do not install or use a damaged appliance.
• Follow the installation instructions supplied with the appliance.
• Always take care when moving the appliance as it is heavy. Always use safety gloves and
enclosed footwear.
• Do not pull the appliance by the handle.
• Install the appliance in a safe and suitable place that meets installation requirements.
• Keep the minimum distance from other appliances and units.
• Before mounting the appliance, check if the appliance door opens without restraint.
• The appliance is equipped with an electric cooling system. It must be operated with the
electric power supply.
• The built-in unit must meet the stability requirements of DIN 68930.
6/40
Page 7
SAFETY INSTRUCTIONS
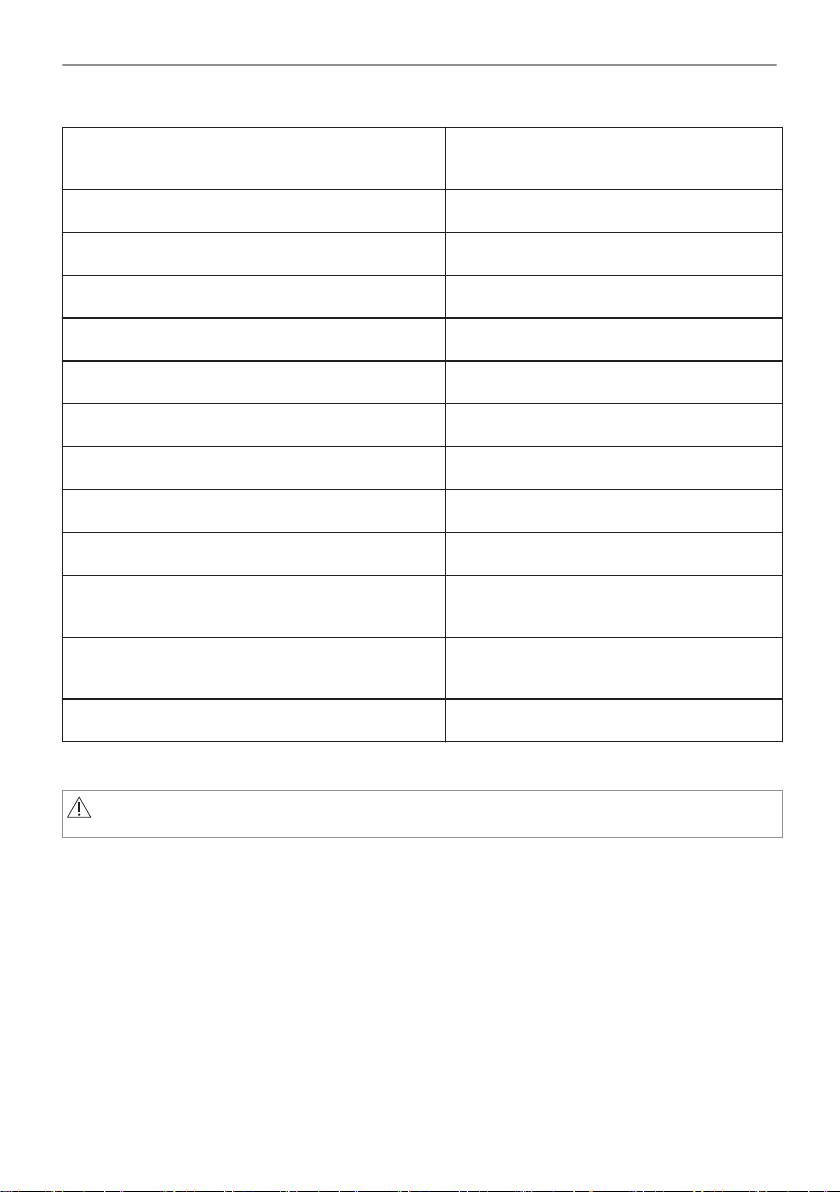
Cabinet minimum height (Cabinet under the work‐
top minimum height)
Cabinet width 560 mm
Cabinet depth 550 (550) mm
Height of the front of the appliance 455 mm
Height of the back of the appliance 440 mm
Width of the front of the appliance 595 mm
Width of the back of the appliance 559 mm
Depth of the appliance 567 mm
Built in depth of the appliance 546 mm
Depth with open door 882 mm
Ventilation opening minimum size. Opening placed
on the bottom rear side
Mains supply cable length. Cable is placed in the
right corner of the back side
Mounting screws 3.5x25 mm
444 (460) mm
560x20 mm
1500 mm
2.2 Electrical connection
WARNING!
Risk of fire and electric shock.
• All electrical connections should be made by a qualified electrician.
• The appliance must be earthed.
• Make sure that the parameters on the rating plate are compatible with the electrical ratings
of the mains power supply.
• Always use a correctly installed shockproof socket.
• Do not use multi-plug adapters and extension cables.
• Make sure not to cause damage to the mains plug and to the mains cable. Should the mains
cable need to be replaced, this must be carried out by our Authorised Service Centre.
• Do not let mains cables touch or come near the appliance door or the niche below the
appliance, especially when it operates or the door is hot.
• The shock protection of live and insulated parts must be fastened in such a way that it
cannot be removed without tools.
7/40
Page 8
SAFETY INSTRUCTIONS
• Connect the mains plug to the mains socket only at the end of the installation. Make sure
that there is access to the mains plug after the installation.
• If the mains socket is loose, do not connect the mains plug.
• Do not pull the mains cable to disconnect the appliance. Always pull the mains plug.
• Use only correct isolation devices: line protecting cut-outs, fuses (screw type fuses removed
from the holder), earth leakage trips and contactors.
• The electrical installation must have an isolation device which lets you disconnect the
appliance from the mains at all poles. The isolation device must have a contact opening
width of minimum 3 mm.
• This appliance is supplied with a main plug and a main cable.
2.3 Use
WARNING!
Risk of injury, burns and electric shock or explosion.
• Do not change the specification of this appliance.
• Make sure that the ventilation openings are not blocked.
• Do not let the appliance stay unattended during operation.
• Deactivate the appliance after each use.
• Be careful when you open the appliance door while the appliance is in operation. Hot air can
release.
• Do not operate the appliance with wet hands or when it has contact with water.
• Do not apply pressure on the open door.
• Do not use the appliance as a work surface or as a storage surface.
• Open the appliance door carefully. The use of ingredients with alcohol can cause a mixture
of alcohol and air.
• Do not let sparks or open flames to come in contact with the appliance when you open the
door.
• Do not put flammable products or items that are wet with flammable products in, near or on
the appliance.
• Do not share your Wi-Fi password.
• Do not use microwave function to preheat the appliance.
WARNING!
Risk of damage to the appliance.
• To prevent damage or discoloration to the enamel:
– do not put aluminium foil directly on the bottom of cavity of the appliance.
– do not put water directly into the hot appliance.
– do not keep moist dishes and food in the appliance after you finish the cooking.
– be careful when you remove or install the accessories.
• Discoloration of the enamel or stainless steel has no effect on the performance of the
appliance.
• Use a deep pan for moist cakes. Fruit juices cause stains that can be permanent.
• Always cook with the appliance door closed.
• If the appliance is installed behind a furniture panel (e.g. a door) make sure the door is never
closed when the appliance operates. Heat and moisture can build up behind a closed
furniture panel and cause subsequent damage to the appliance, the housing unit or the floor.
Do not close the furniture panel until the appliance has cooled down completely after use.
8/40
Page 9
SAFETY INSTRUCTIONS
2.4 Care and cleaning
WARNING!
Risk of injury, fire, or damage to the appliance.
• Before maintenance, deactivate the appliance and disconnect the mains plug from the mains
socket.
• Make sure the appliance is cold. There is the risk that the glass panels can break.
• Replace immediately the door glass panels when they are damaged. Contact the Authorised
Service Centre.
• Be careful when you remove the door from the appliance. The door is heavy!
• Make sure the cavity and the door are wiped dry after each use. Steam produced during the
operation of the appliance condensates on cavity walls and can cause corrosion.
• Clean regularly the appliance to prevent the deterioration of the surface material.
• Fat and food remaining in the appliance can cause fire and electric arcing when the
microwave function operates.
• Clean the appliance with a moist soft cloth. Use only neutral detergents. Do not use abrasive
products, abrasive cleaning pads, solvents or metal objects.
• If you use an oven spray, follow the safety instructions on its packaging.
2.5 Glassware use
Handling your glassware without an appropriate degree of care could result in breakage,
chipping, cracking or severe scratching:
• Do not spill cold water or other liquids on the glassware because a sudden temperature drop
may cause immediate breakage of the glass. Broken glass pieces may be extremely sharp
and difficult to locate.
• Do not place hot glassware on a wet or cool surface, directly on countertop or metal surface,
or in sink; or handle hot glassware with wet cloth.
• Do not use or repair any glassware that is chipped, cracked or severely scratched.
• Do not drop or hit glassware against a hard object or strike utensils against it.
• Do not heat empty or nearly empty glassware in microwave, or overheat oil or butter in
microwave (use minimum amount of cooking time).
Allow hot glassware to cool on a cooling rack, a potholder or a dry cloth. Make sure that the
glassware is cool enough before washing, refrigerating or freezing.
Avoid handling hot glassware (including ware with silicone gripping surfaces) without dry
potholders.
Avoid microwave misuse (i.e. running the oven without any load or small load).
2.6 Internal lighting
WARNING!
Risk of electric shock.
• Concerning the lamp(s) inside this product and spare part lamps sold separately: These
lamps are intended to withstand extreme physical conditions in household appliances, such
as temperature, vibration, humidity, or are intended to signal information about the
operational status of the appliance. They are not intended to be used in other applications
and are not suitable for household room illumination.
• This product contains a light source of energy efficiency class G.
• Use only lamps with the same specifications.
9/40
Page 10
1 2
8
4
3
1
2
3
6
4
5
7
PRODUCT DESCRIPTION
2.7 Service
• To repair the appliance contact the Authorised Service Centre.
• Use original spare parts only.
2.8 Disposal
WARNING!
Risk of injury or suffocation.
• Contact your municipal authority for information on how to dispose of the appliance.
• Disconnect the appliance from the mains supply.
• Cut off the mains electrical cable close to the appliance and dispose of it.
• Remove the door catch to prevent children or pets from becoming trapped in the appliance.
3. PRODUCT DESCRIPTION
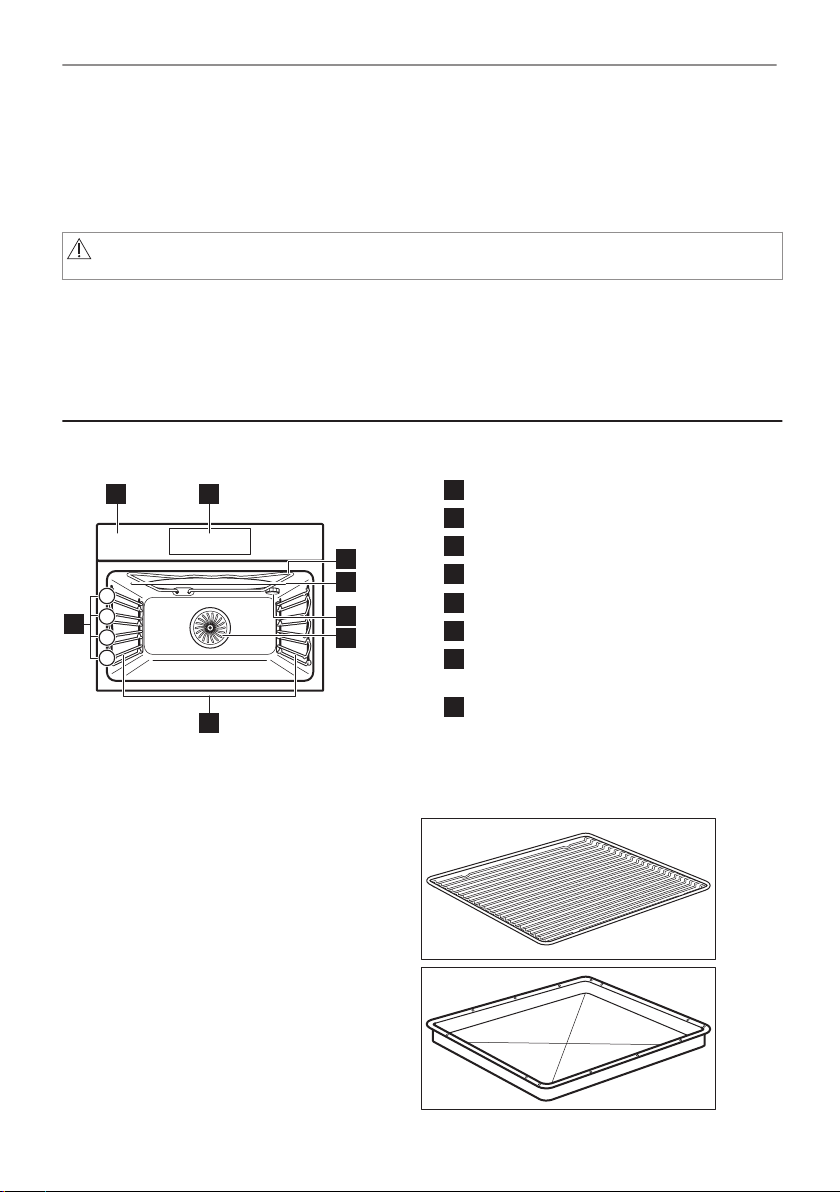
3.1 General overview
Control panel
Display
Heating element
Microwave generator
Lamp
Fan
Shelf support, removable
3.2 Accessories
Wire shelf
For cookware, cake tins, roasts.
Baking tray
For cakes and biscuits.
10/40
Shelf positions
Page 11
1 2 3 4
5 6 7
HOW TO TURN APPLIANCE ON AND OFF
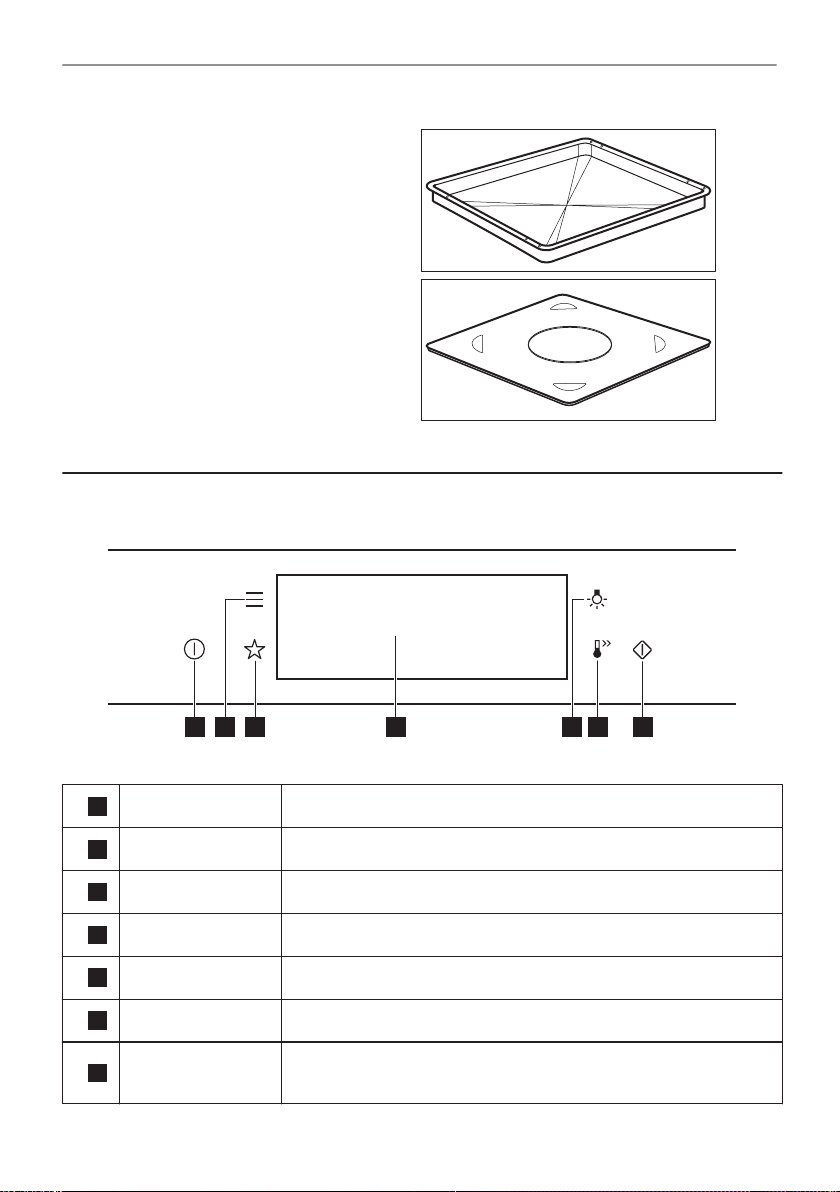
Grill- / Roasting pan
To bake and roast or as a pan to collect fat.
Microwave bottom glass plate
To prepare food in microwave mode.
4. HOW TO TURN APPLIANCE ON AND OFF
4.1 Control panel
ON / OFF Press and hold to turn the appliance on and off.
1
Menu Lists the appliance functions.
2
Favourites Lists the favourite settings.
3
Display Shows the current settings of the appliance.
4
Lamp switch To turn the lamp on and off.
5
Fast Heat Up To turn on and off the function: Fast Heat Up.
6
Microwave quick
7
start
To turn on microwave function (1000 W and 30 seconds).
11/40
Page 12
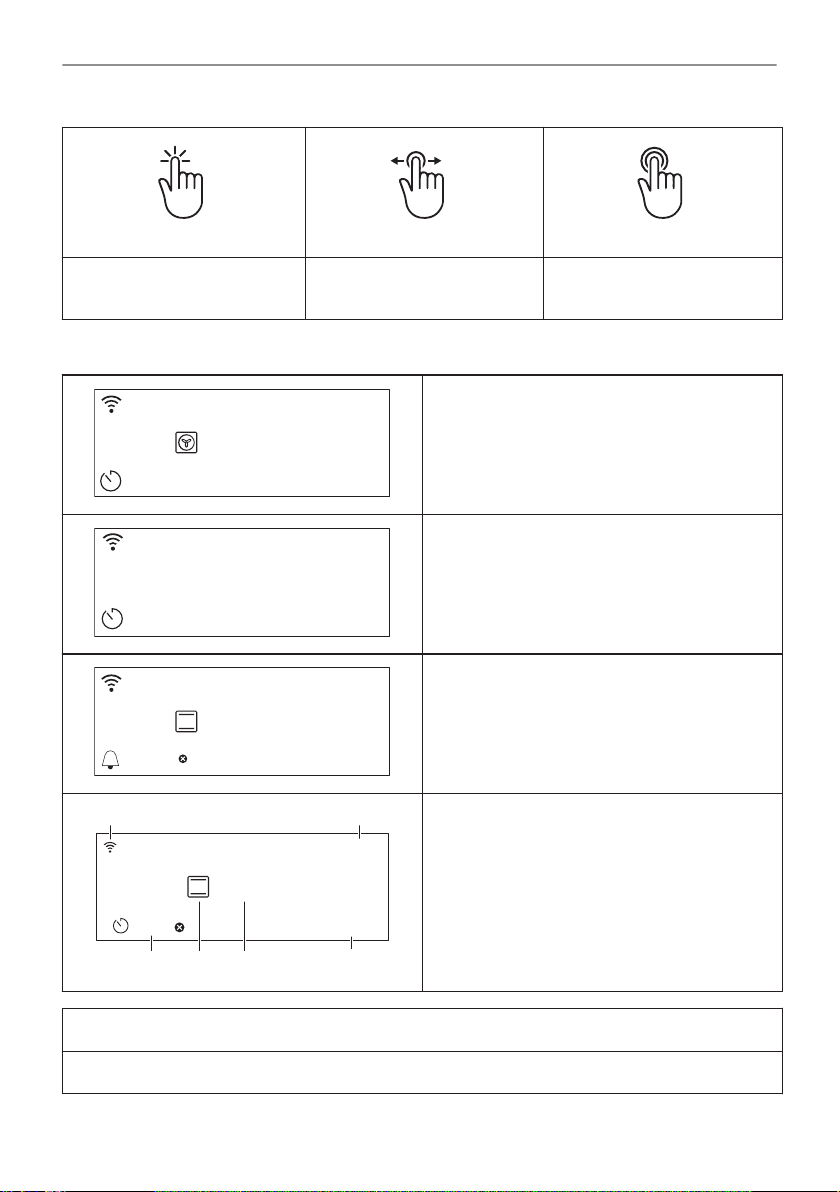
3s
STARTSTART
12:3012:30
150°C
12:34
11min
12:3012:30
150°C
STOP
150°C
12:30
15min
START
F DE
C
A B
HOW TO TURN APPLIANCE ON AND OFF
Press Move
Touch the surface with finger‐
tip.
4.2 Display
Slide fingertip over the sur‐
face.
After turning on, the display shows the main
screen with the heating function and the default
temperature.
If you do not use the appliance for 2 minutes,
the display switches to standby.
When you cook, the display shows the set
functions and other available options.
Display with key functions set.
A. Wi-Fi
B. Time of day
C. START/STOP
D. Temperature / Microwave timer
E. Heating functions
F. Timer
Press and hold
Touch the surface for 3 sec‐
onds.
Display indicators
Basic indicators - to navigate on the display.
12/40
Page 13
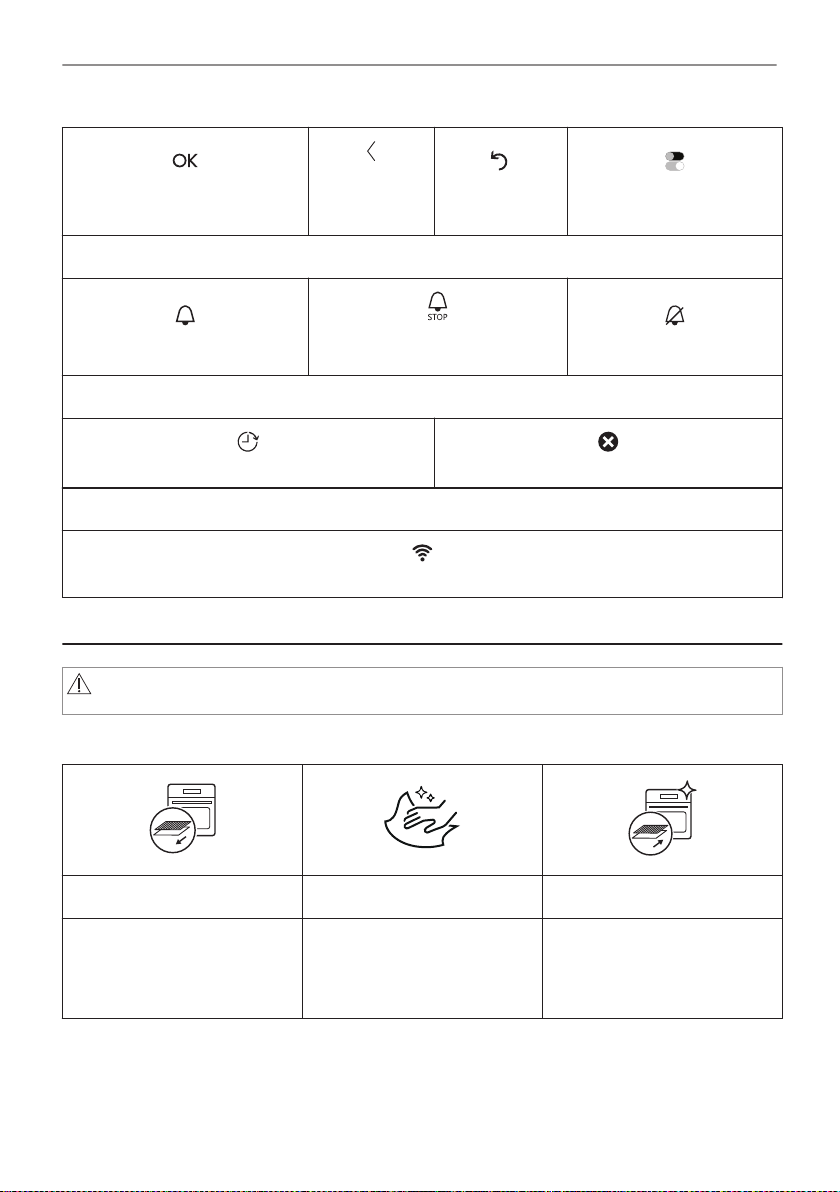
BEFORE FIRST USE
To confirm the selection / set‐
ting.
Sound alarm function indicators - when the set time of cooking ends, the signal sounds.
The function is on.
Timer indicators
To set the function: Delayed start.
Wi-Fi indicator - the appliance can be connected to Wi-Fi.
To go one
level back in
the menu.
The function is on.
Cooking stops automatically.
Wi-Fi connection is turned on.
To undo the
last action.
To turn the options on and
off.
Sound alarm is off.
To cancel the setting.
5. BEFORE FIRST USE
WARNING!
Refer to Safety chapters.
5.1 Initial Cleaning
Step 1 Step 2 Step 3
Remove all accessories and
removable shelf supports from
the appliance.
Clean the appliance and the
accessories only with a micro‐
fibre cloth, warm water and a
mild detergent.
Place the accessories and the
removable shelf supports in
the appliance.
5.2 First connection
The display shows welcome message after the first connection.
You have to set: Language, Display brightness, Key tones, Buzzer volume, Time of day.
13/40
Page 14
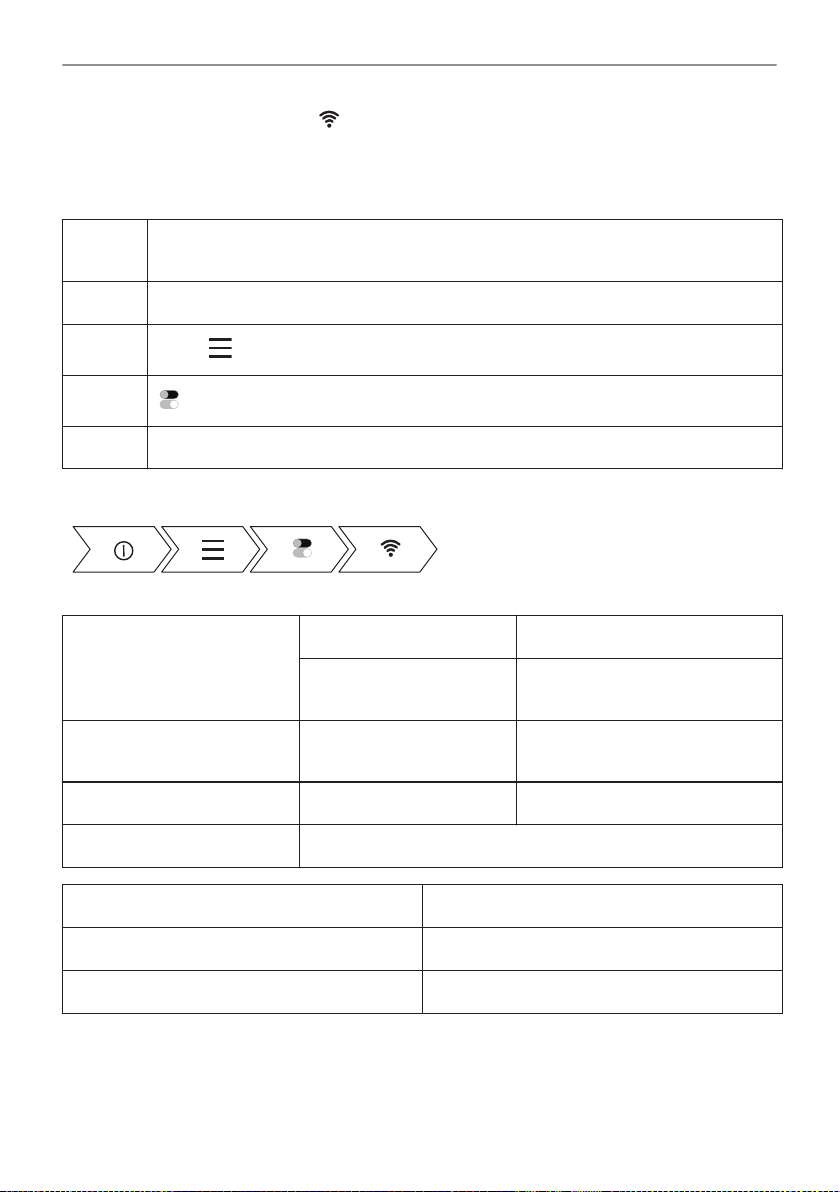
BEFORE FIRST USE
5.3 Wireless connection
To connect the appliance you need:
• Wireless network with the Internet connection.
• Mobile device connected to your wireless network.
Step 1 Download the mobile app My AEG Kitchen and follow the instructions for the next
Step 2 Turn on the appliance.
Step 3
Step 4
Step 5 The appliance wireless module starts within 90 sec.
steps.
Press:
. Select: Settings / Connections.
- slide or press to turn on: Wi-Fi.
Take a shortcut!
Frequency 2.4 GHz WLAN 5 GHz WLAN
2400 - 2483.5 MHz 5150 - 5350 MHz
Protocol IEEE 802.11b DSSS,
802.11g/n OFDM
Max Power EIRP < 20 dBm (100 mW) EIRP < 23 dBm (200 mW)
5470 - 5725 MHz
IEEE 802.11 a/n OFDM
Wi-Fi module NIU5-50
Frequency Bluetooth 2400 - 2483.5 MHz
Protocol LE: DSSS
Max Power EIRP < 4 dBm (2.5 mW)
Countries covered by the provision of Directive 2014/53/EU: Belgium, Bulgaria, Czech
Republic, Denmark, Germany, Estonia, Ireland, Greece, Spain, France, Croatia, Italy, Cyprus,
Latvia, Lithuania, Luxembourg, Hungary, Malta, Netherlands, Northern Ireland, Austria, Poland,
Portugal, Romania, Slovenia, Slovakia, Finland, Sweden, Norway, Iceland, Liechtenstein,
Switzerland, Turkey.
14/40
Page 15
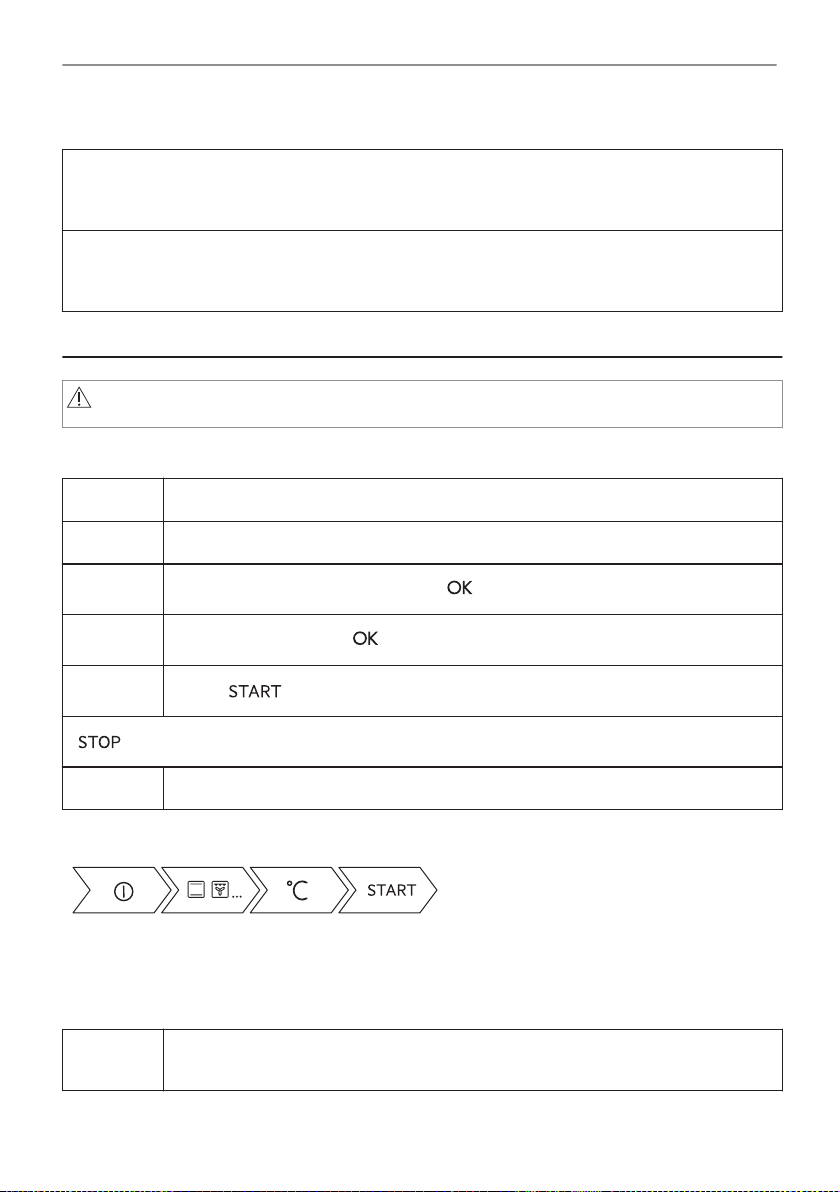
DAILY USE
5.4 Software licences
The software in this product contains components that are based on free and open source soft‐
ware. AEG gratefully acknowledges the contributions of the open software and robotics communi‐
ties to the development project.
To access the source code of these free and open source software components whose license
conditions require publishing, and to see their full copyright information and applicable license
terms, please visit: http://aeg.opensoftwarerepository.com (folder NIU5).
6. DAILY USE
WARNING!
Refer to Safety chapters.
6.1 How to set: Heating functions
Step 1 Turn on the oven. The display shows the default heating function.
Step 2 Press the symbol of the heating function to enter the submenu.
Step 3
Step 4
Step 5
Step 6 Turn off the oven.
Take a shortcut!
Select the heating function and press:
Set: temperature. Press:
Press:
- press to turn off the heating function.
.
.
. The display shows: temperature.
6.2 How to set: Microwave functions
Step 1 Remove all accessories and turn on the appliance.
Insert microwave bottom glass plate.
15/40
Page 16
DAILY USE
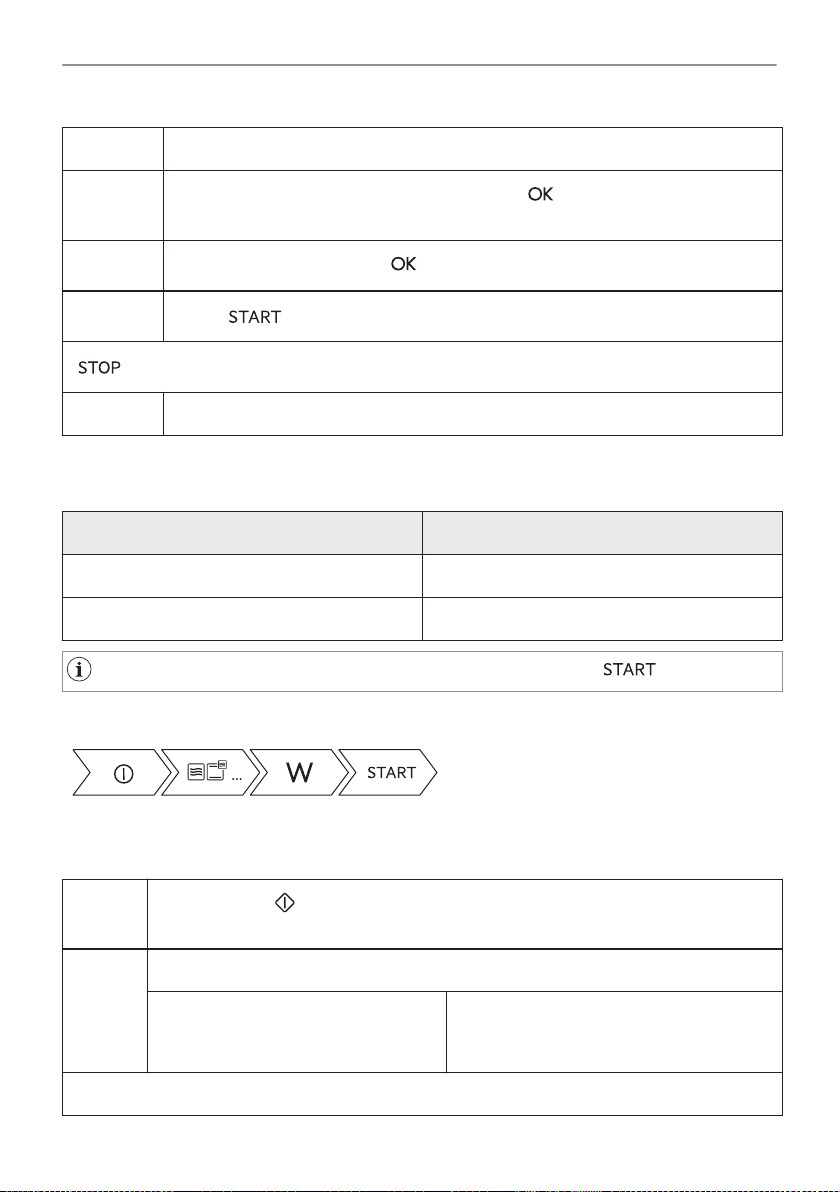
Step 2 Press the symbol of the heating function to enter the submenu.
Step 3
Step 4
Step 5
Step 6 Turn off the appliance.
Select the microwave heating function and press:
wave power.
Set: microwave power. Press:
Press:
- press to turn off the function.
.
.
. The display shows: micro‐
The maximum time of microwave functions depends on microwave power you
set:
MICROWAVE POWER MAXIMUM TIME
100 - 600 W 59 minutes
More than 600 W 7 minutes
If you open the door, the function stops. To start it again, press .
Take a shortcut!
6.3 How to use: Microwave quick start
Step 1
Step 2 To extend the cooking time:
The microwave can be switched on at any time with: Microwave quick start.
16/40
Press and hold:
The microwave runs for 30 s.
Press on the running time value to go
to the time settings. Set the cooking
time.
.
Press +30 s.
Page 17
DAILY USE
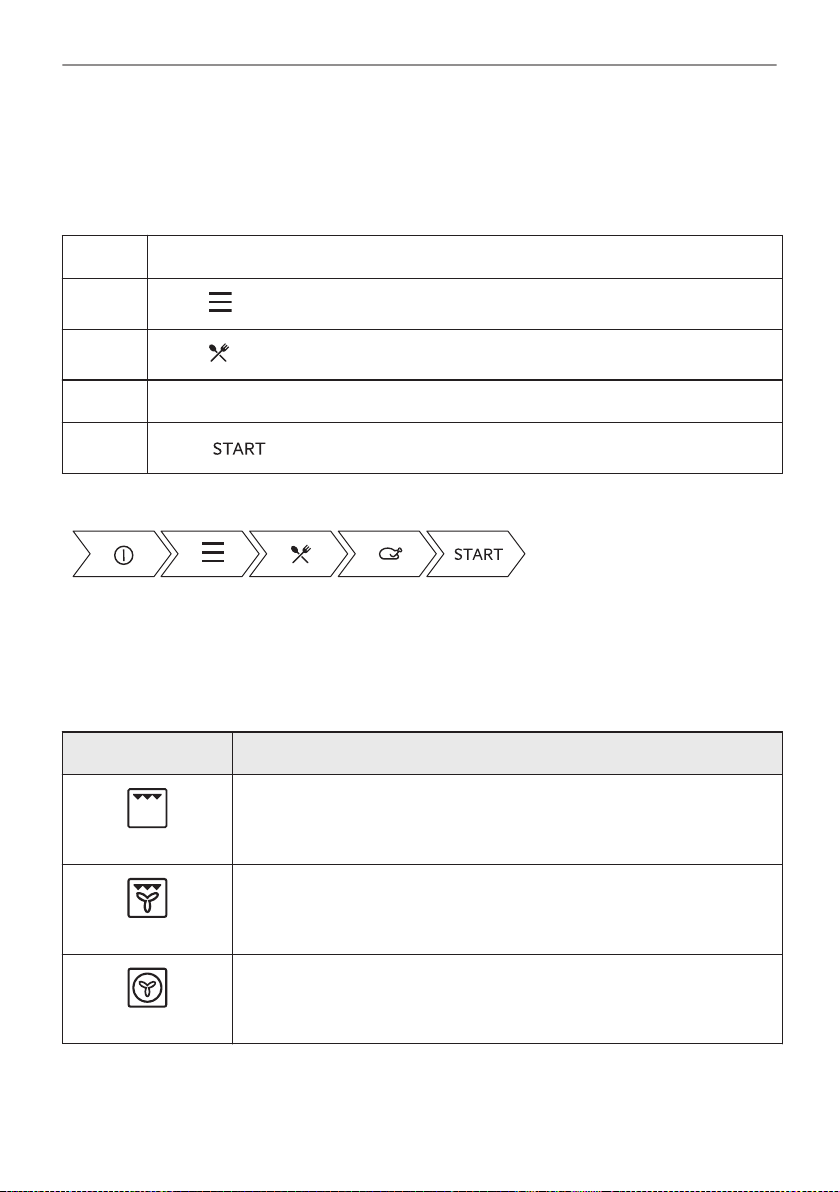
6.4 How to set: Assisted Cooking
Every dish in this submenu has a recommended function and temperature. You can adjust the
time and the temperature.
For some of the dishes you can also cook with:
• Weight Automatic
Step 1 Turn on the oven.
Step 2
Step 3
Step 4 Choose a dish or a food type.
Step 5
Take a shortcut!
Press:
Press:
Press:
.
. Enter: Assisted Cooking.
.
6.5 Heating functions
STANDARD
Heating function Application
To grill thin pieces of food and to toast bread.
Grill
Turbo Grilling
True Fan Cooking
To roast large meat joints or poultry with bones on one shelf position. To
make gratins and to brown.
To bake on up to two shelf positions at the same time and to dry food. Set
the temperature 20 - 40 °C lower than for Conventional Cooking.
17/40
Page 18
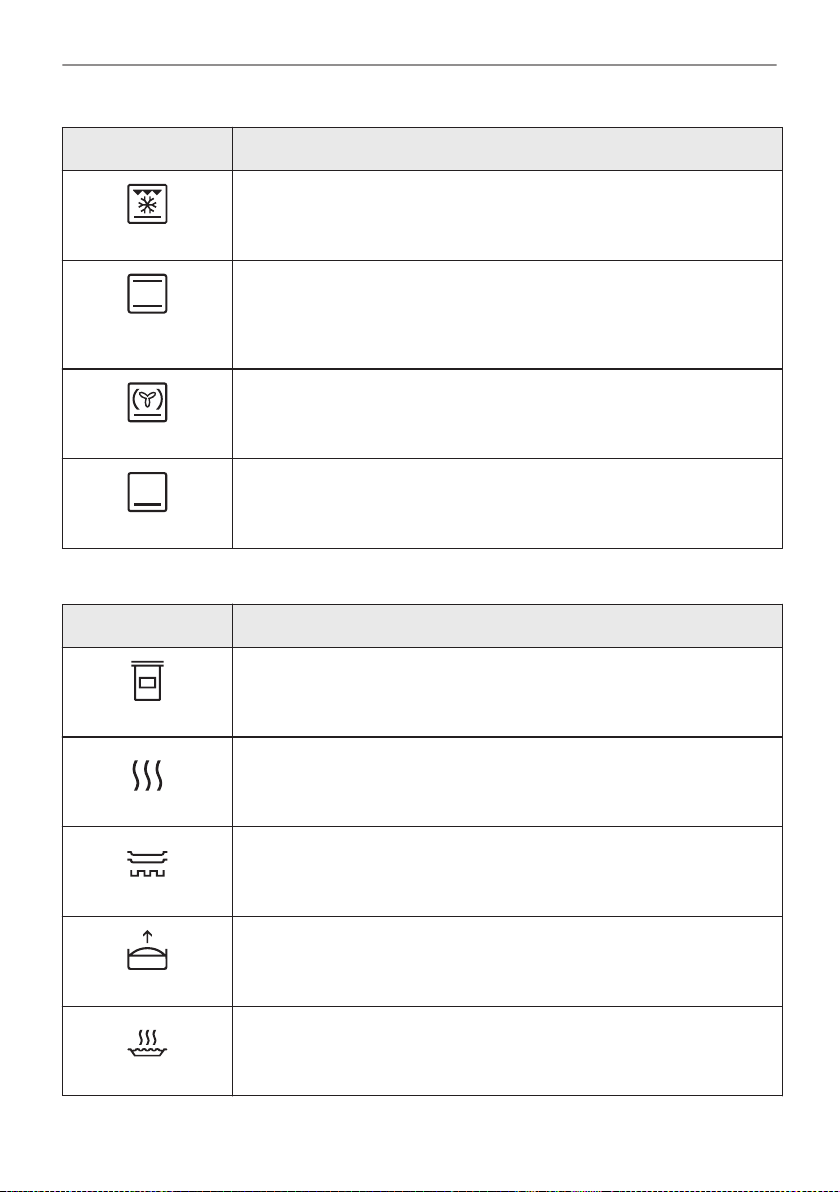
DAILY USE
Heating function Application
To make convenience food (e.g., french fries, potato wedges or spring
rolls) crispy.
Frozen Foods
To bake and roast food on one shelf position.
Conventional
Cooking
To bake pizza. To make intensive browning and a crispy bottom.
Pizza Function
To bake cakes with crispy bottom and to preserve food.
Bottom Heat
SPECIALS
Heating function Application
Preserving
Dehydrating
Plate Warming
Dough Proving
Au Gratin
18/40
To preserve vegetables (e.g., pickles).
To dry sliced fruit, vegetables and mushrooms.
To preheat plates for serving.
To speed up the rising of the yeast dough. It prevents dough surface from
drying and keeps the dough elastic.
For dishes such as lasagna or potato gratin. To make gratins and to
brown.
Page 19
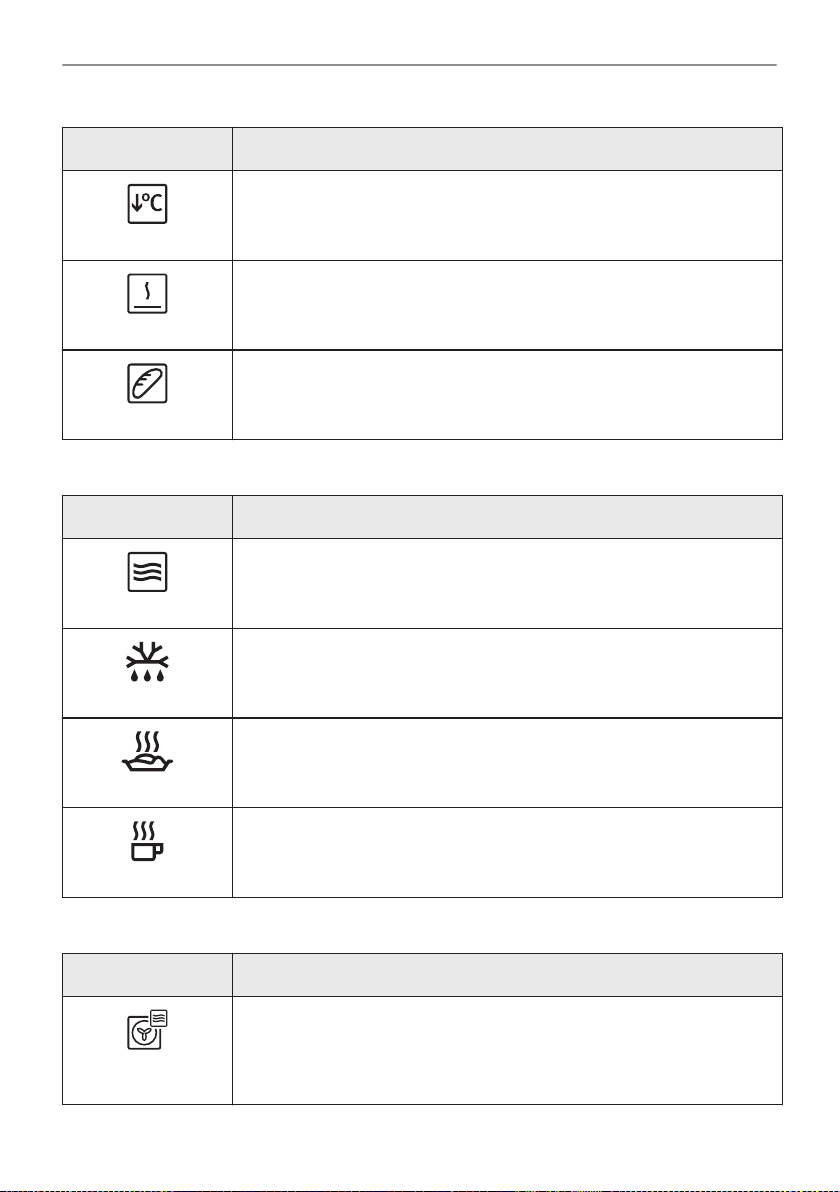
Heating function Application
To prepare tender, succulent roasts.
Slow Cooking
To keep food warm.
Keep Warm
Use this function to prepare bread and bread rolls with a very good pro‐
fessional-like result in terms of crispiness, colour and crust gloss.
Bread Baking
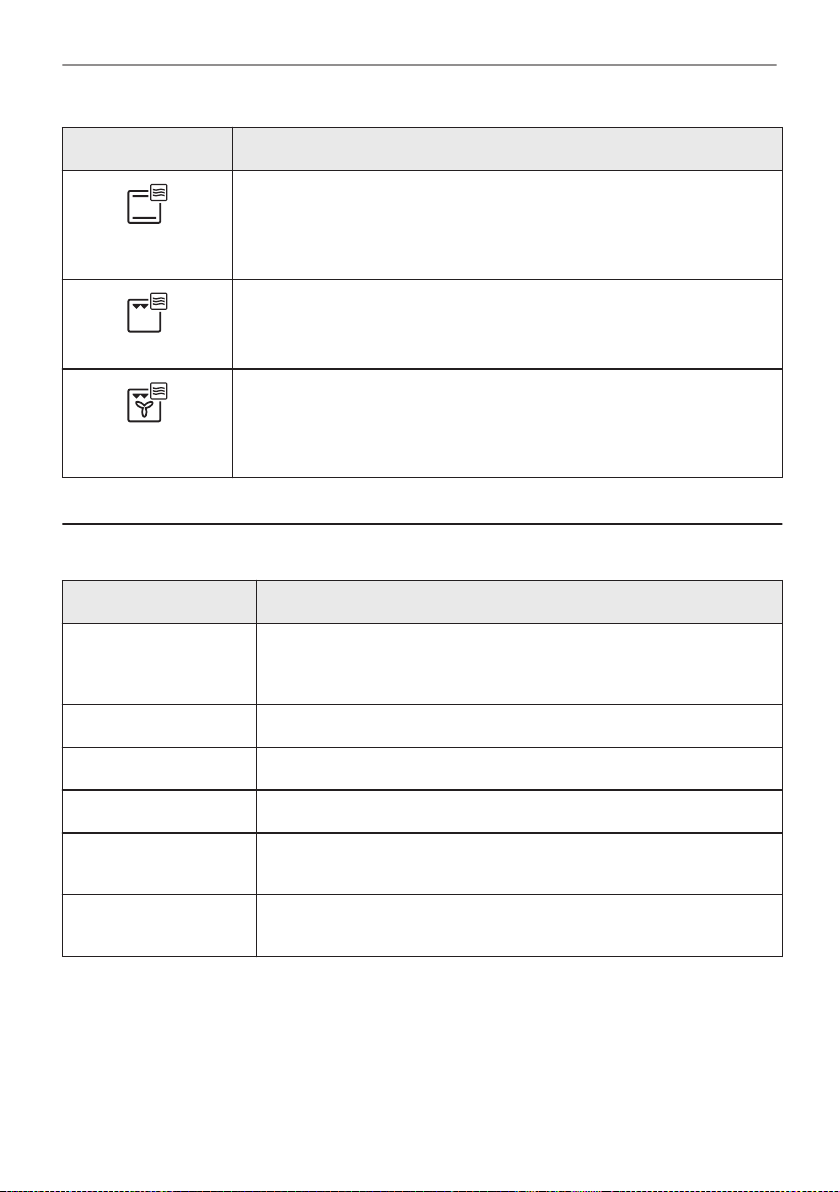
MICROWAVE
Heating function Application
Heating up, cooking, power range: 100 - 1000 W
Microwave
DAILY USE
Defrosting meat, fish, cakes, power range: 100 - 200 W
Defrost
Heating up pre-prepared meals and delicate food, power range: 300 - 700
W
Reheat
Heating up drinks and soups, power range: 800 - 1000 W
Liquid
MICROWAVE COMBINATION
Heating function Application
Baking on one shelf position. The function with MW boost.
True Fan Cooking
+ MW
19/40
Page 20
CLOCK FUNCTIONS
Heating function Application
Baking and roasting food on one shelf position. The function with MW
boost.
Conventional
Cooking + MW
To cook food in a short time and to brown it. The function with MW boost.
Grill + MW
To roast large pieces of meat on one level. To make gratins and to brown.
The function with MW boost.
Turbo Grilling +
MW
7. CLOCK FUNCTIONS
7.1 Clock functions description
Clock function Application
Cooking time To set the length of cooking. Maximum is 23 h 59 min.
End action To set what happens when the timer ends counting.
Delayed start To postpone the start and / or end of cooking.
Time extension To extend cooking time.
Reminder To set a countdown. Maximum is 23 h 59 min. This function has no ef‐
Uptimer Monitors how long the function operates. Uptimer - you can turn it on
End action and Delayed start are not available for microwave functions.
20/40
Maximum for combined functions (microwave + standard) is: 23 h 59
min.
fect on the operation of the appliance.
and off.
Page 21
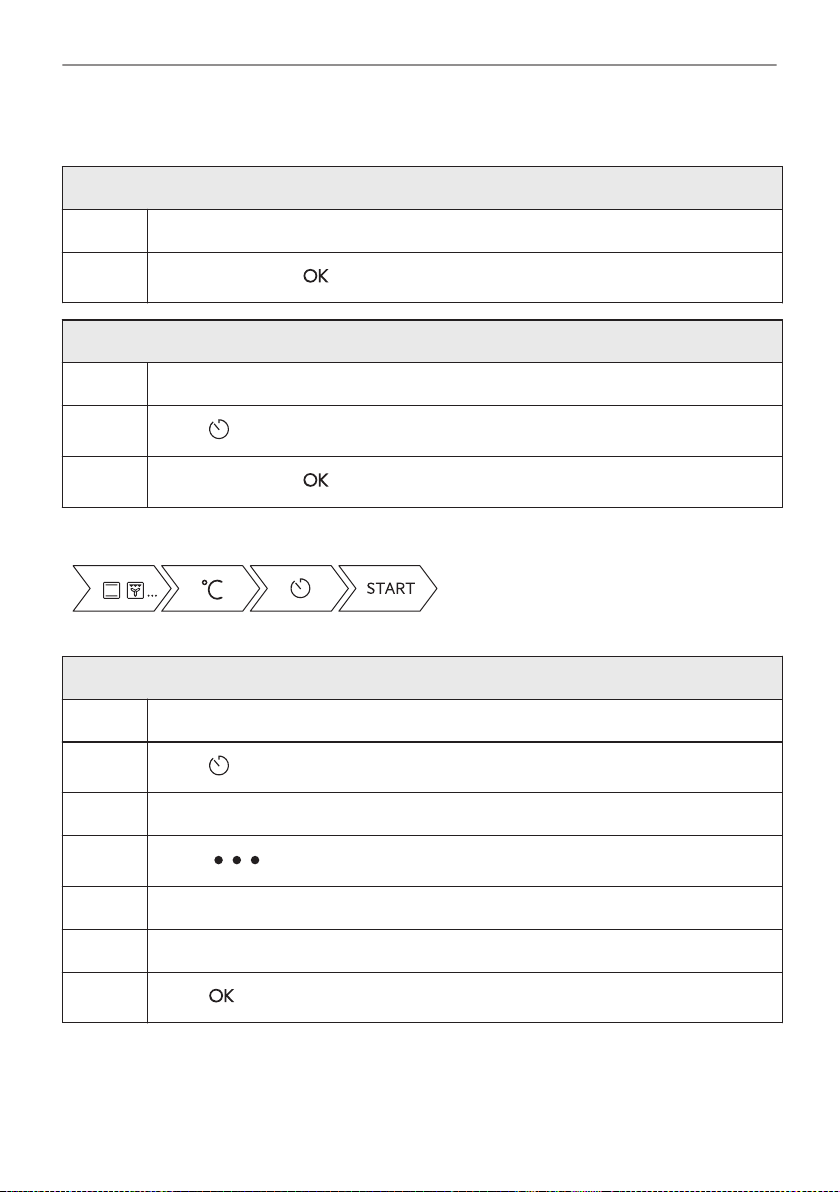
7.2 How to set: Clock functions
How to set the clock
Step 1 Press: Time of day.
CLOCK FUNCTIONS
Step 2
How to set cooking time
Step 1 Choose the heating function and set the temperature.
Step 2
Step 3
Set the time. Press:
Press:
Set the time. Press:
.
.
.
Take a shortcut!
How to choose end option
Step 1 Choose the heating function and set the temperature.
Step 2
Step 3 Set the cooking time.
Press:
.
Step 4
Step 5 Press: End action.
Step 6 Choose the preferred: End action.
Step 7
Press:
Press:
.
. Repeat the action until the display shows the main screen.
21/40
Page 22
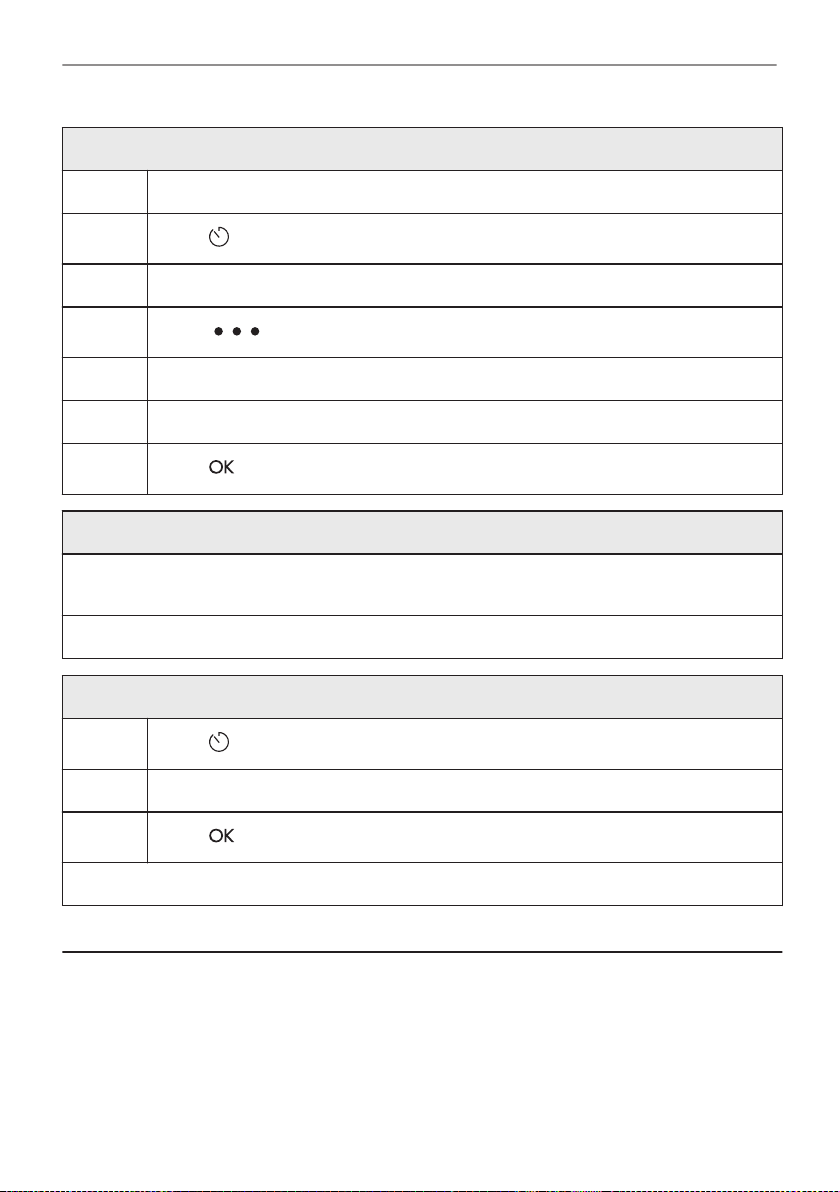
HOW TO USE: ACCESSORIES
How to delay start of cooking
Step 1 Set the heating function and the temperature.
Step 2
Step 3 Set the cooking time.
Step 4
Step 5 Press: Delayed start.
Step 6 Choose the value.
Step 7
How to extend cooking time
When 10% of cooking time is left and the food seems not to be ready, you can extend cooking
time. You can also change the heating function.
Press +1min to extend the cooking time.
How to change timer settings
Step 1
Step 2 Set the timer value.
Press:
Press:
Press:
Press:
.
.
. Repeat the action until the display shows the main screen.
.
Step 3
You can change the set time during cooking at any time.
Press:
.
8. HOW TO USE: ACCESSORIES
8.1 Inserting accessories
Use only suitable cookware and material. Refer to "Hints and tips" chapter, Microwave suitable
cookware and materials.
A small indentation at the top increases safety. The indentations are also anti-tip devices. The
high rim around the shelf prevents cookware from slipping of the shelf.
22/40
Page 23
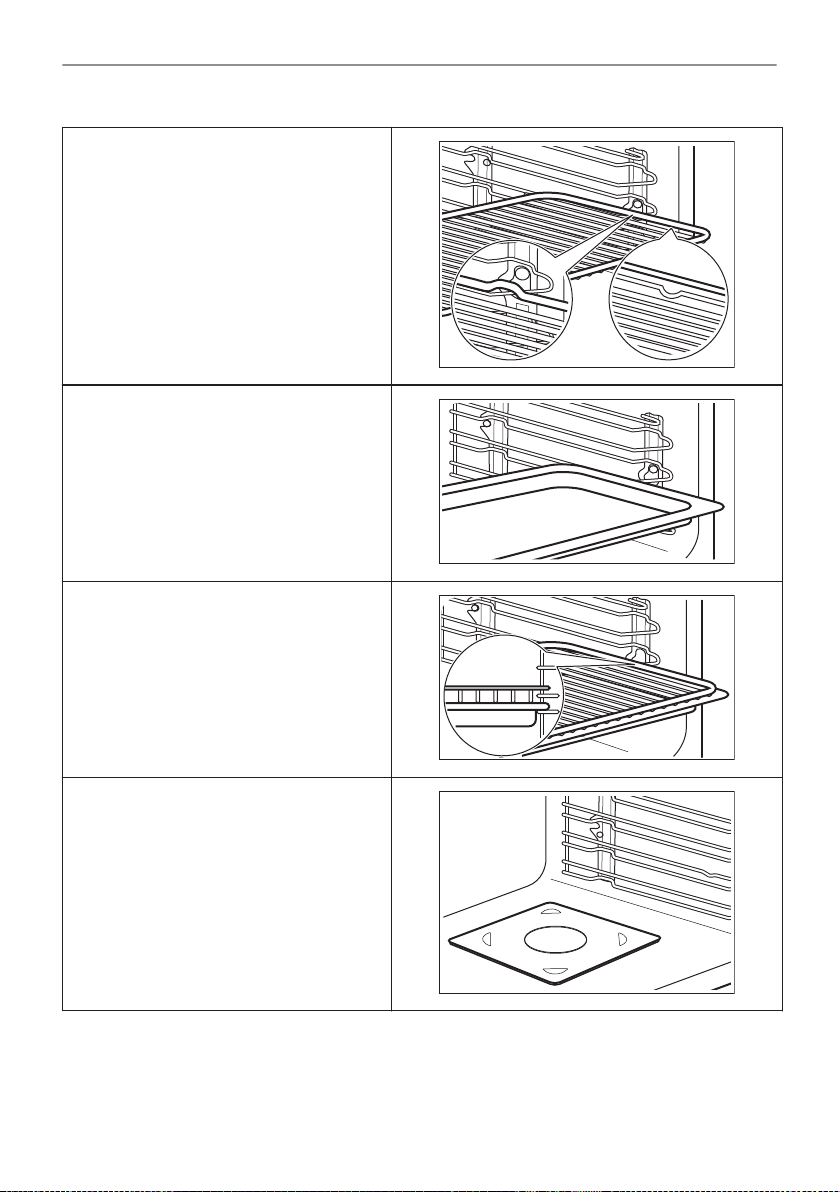
Wire shelf:
Push the shelf between the guide bars of
the shelf support and make sure that the
feet point down.
Baking tray / Deep pan:
Push the tray between the guide bars of
the shelf support.
Wire shelf, Baking tray / Deep pan:
Push the tray between the guide bars of
the shelf support and the wire shelf on the
guide bars above.
HOW TO USE: ACCESSORIES
Microwave bottom glass plate:
Use the microwave bottom glass plate only
with microwave function. It is not suitable
for combined microwave function (e.g. mi‐
crowave grilling).
Put the accessory on the bottom of the
cavity.
You can put the food directly on the micro‐
wave bottom glass plate.
23/40
Page 24
ADDITIONAL FUNCTIONS
9. ADDITIONAL FUNCTIONS
9.1 How to save: Favourites
You can save your favourite settings, such as the heating function, the cooking time, the
temperature or the cleaning function. You can save 3 favourite settings.
Step 1 Turn on the appliance.
Step 2 Select the preferred setting.
Step 3
Step 4 Select: Save current settings.
Step 5
- press to reset the setting.
- press to cancel the setting.
Press:
Press + to add the setting to the list of: Favourites. Press
. Select: Favourites.
.
9.2 Function lock
This function prevents an accidental change of the heating function.
Step 1 Turn on the appliance.
Step 2 Set a heating function.
Step 3
To turn off the function repeat step 3.
, - press at the same time to turn on the function.
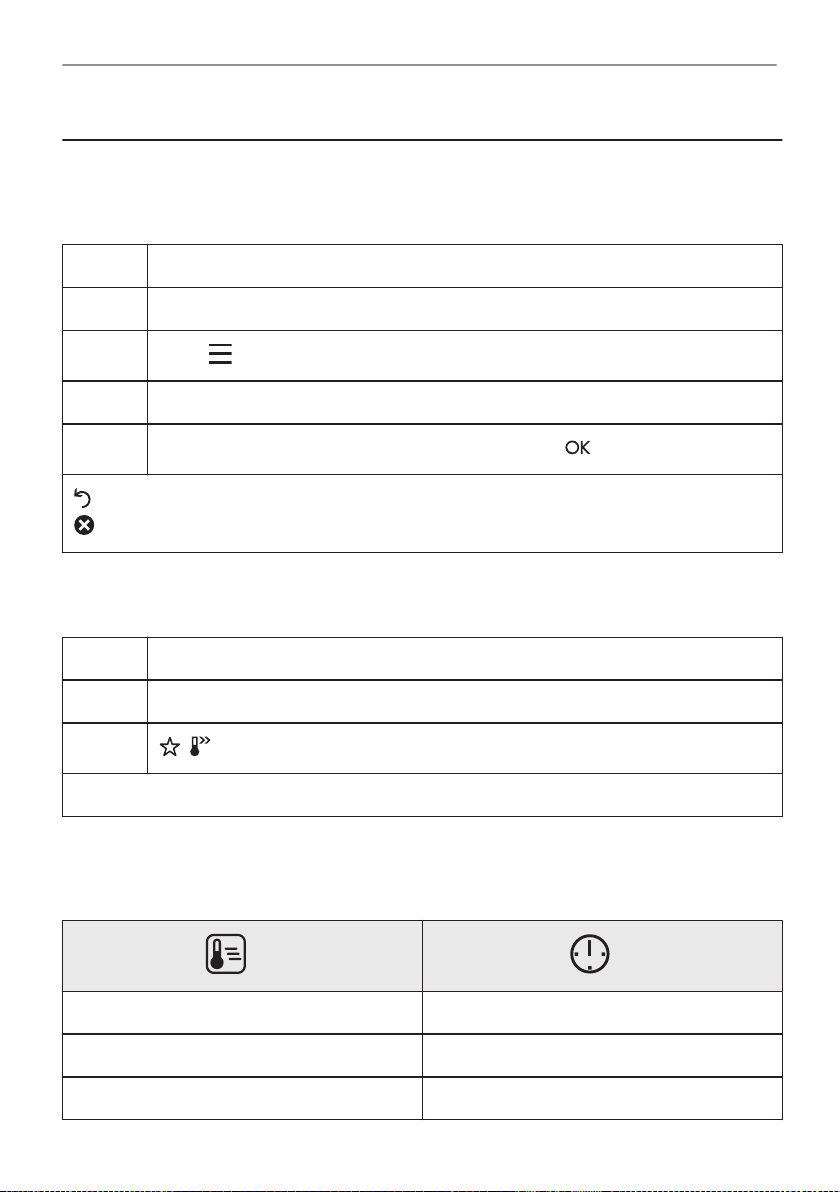
9.3 Automatic switch-off
For safety reasons the oven turns off after some time, if a heating function works and you do
not change any settings.
24/40
(°C) (h)
30 - 115 12.5
120 - 195 8.5
200 - 230 5.5
Page 25
HINTS AND TIPS
The Automatic switch-off does not work with the functions: Light, End time, Slow Cooking.
9.4 Cooling fan
When the appliance operates, the cooling fan turns on automatically to keep the surfaces of the
appliance cool. If you turn off the appliance, the cooling fan can continue to operate until the
appliance cools down.
10. HINTS AND TIPS
10.1 Cooking recommendations
The temperature and cooking times in the tables are guidelines only. They depend on the recipes
and the quality and quantity of the ingredients used.
Your appliance may bake or roast differently to the appliance you had before. The hints below
show recommended settings for temperature, cooking time and shelf position for specific types of
the food.
If you cannot find the settings for a special recipe, look for the similar one.
For more cooking recommendations refer to cooking tables on our website. To find the Cooking
Hints check the PNC number on the rating plate on the front frame of the appliance cavity.
10.2 Microwave recommendations
Let's cook!
Place the food on the microwave bottom glass plate on the bottom of the cavity.
Place the food on a plate on the bottom of the cavity.
Turn or stir the food halfway through the defrosting and cooking time.
Stir liquid dishes from time to time.
Stir the food before serving.
Cover the food for cooking and reheating.
Put the spoon to the bottle or glass when heating drinks to ensure better heat distribution.
Put the food into the appliance without packaging. The packaged ready meals can be put into
the appliance only when the packaging is microwave safe (check information on the
packaging).
Microwave cooking
Cook food covered. If you want to keep a crust cook food without a cover.
Do not overcook the dishes by setting the power and time too high. The food can dry out, burn
or cause fire.
Do not use the appliance to cook eggs or snails in their shells, because they can burst. Pierce
the yolk of fried egg before reheating it.
Pierce food with skin or peel several times before cooking.
Cut vegetables into similar-sized pieces.
After you turn off the appliance, take the food out and let it stand for a few minutes to allow the
heat distribute evenly.
Microwave defrosting
Put the frozen, unwrapped food on a small upturned plate with a container below it, or on a
defrosting rack or plastic sieve so that the defrosting liquid can leak out.
Remove defrosted pieces subsequently.
25/40
Page 26
HINTS AND TIPS
To cook fruit and vegetables without defrosting them first, you can use a higher microwave
power.
10.3 Microwave suitable cookware and materials
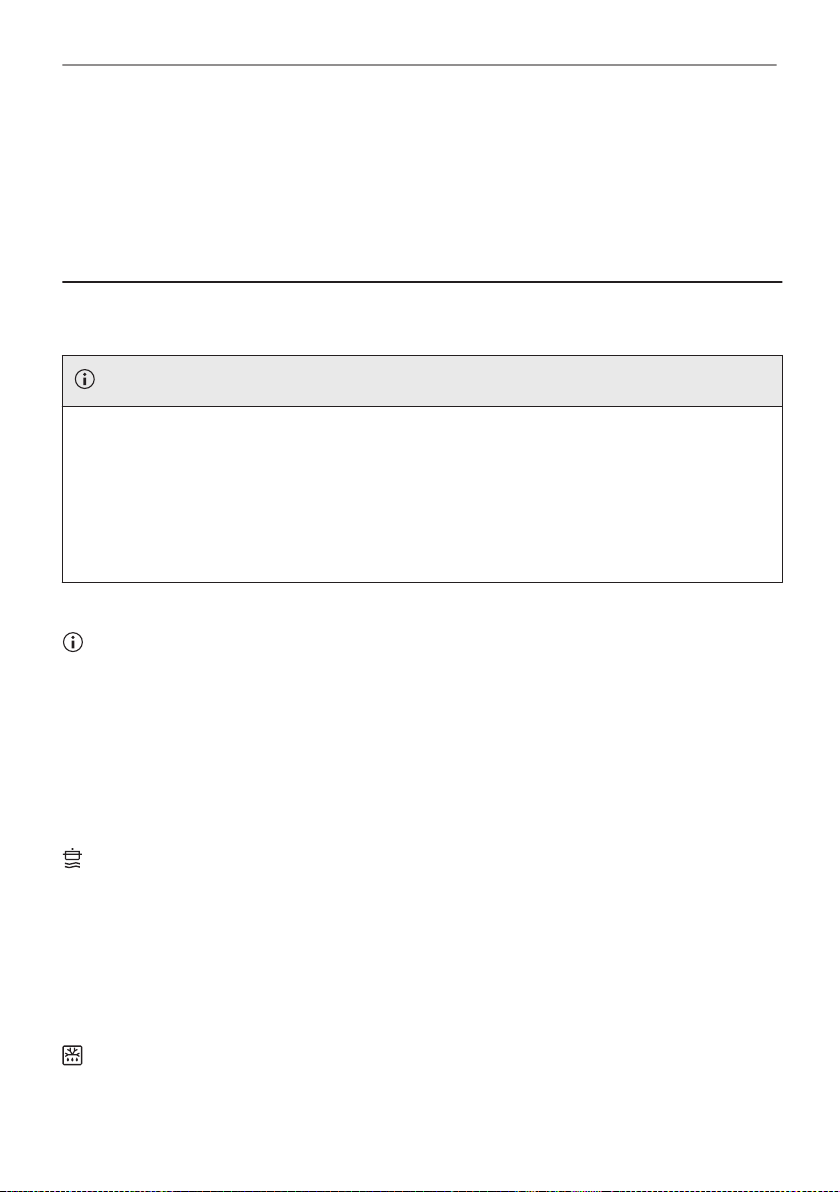
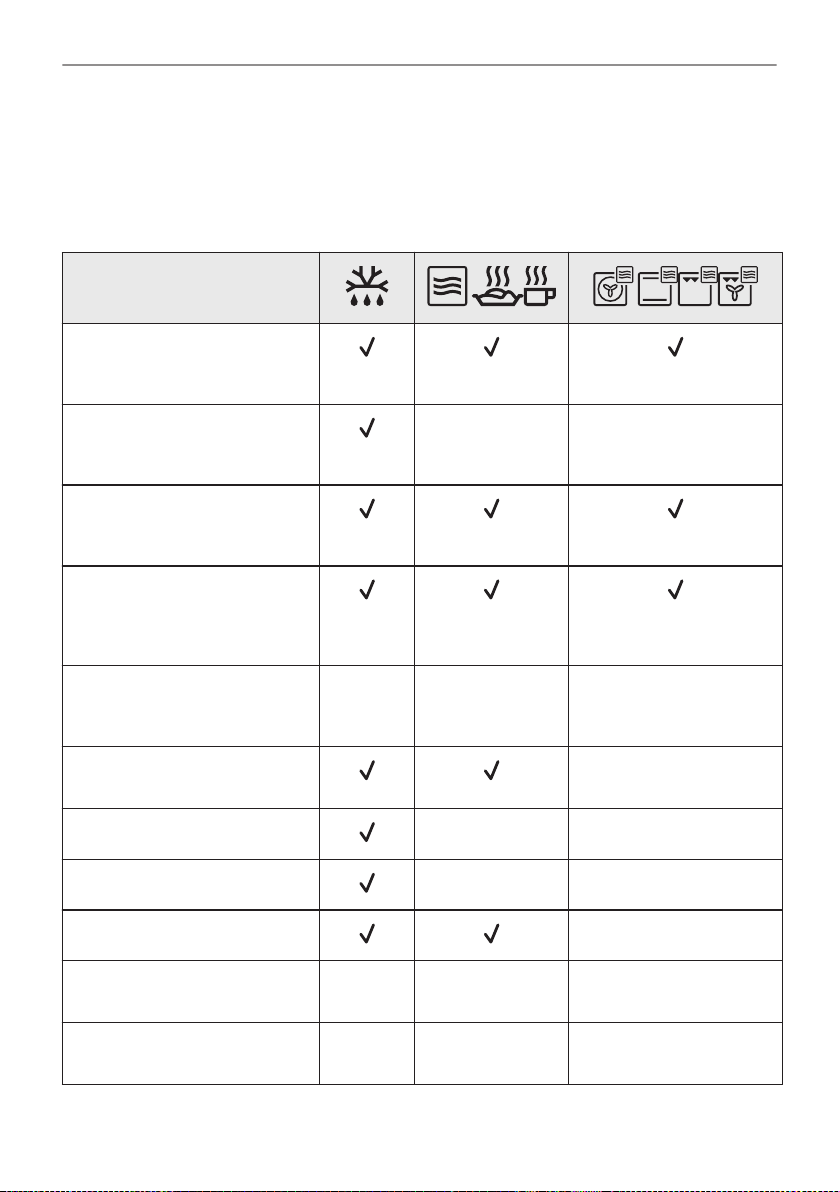
For the microwave use only suitable cookware and materials. Use below table as a reference.
Check the cookware / material specification before use.
Cookware / Material
Ovenproof glass and porcelain
with no metal components, e.g.
heat-proof glass
Non-ovenproof glass and porce‐
lain without any silver, gold, plat‐
inum or other metal decorations
Glass and glass ceramic made
of ovenproof / frost-proof materi‐
al
Ovenproof ceramic and earthen‐
ware without any quartz or metal
components and glazes which
contain metal
Ceramic, porcelain and earthen‐
ware with unglazed bottom or
with small holes, e.g. on handles
Heat-resistant plastic up to
200 °C
Cardboard, paper
Clingfilm
Microwave clingfilm
Roasting dishes made of metal,
e.g. enamel, cast iron
X X
X X X
X
X X
X X
X
X X X
Baking tins, black lacquer or sili‐
con-coated
26/40
X X X
Page 27
HINTS AND TIPS
Cookware / Material
Baking tray X X X
Wire shelf X X
Microwave glass bottom plate X
Cookware for microwave use,
e.g. crisp pan
X
X
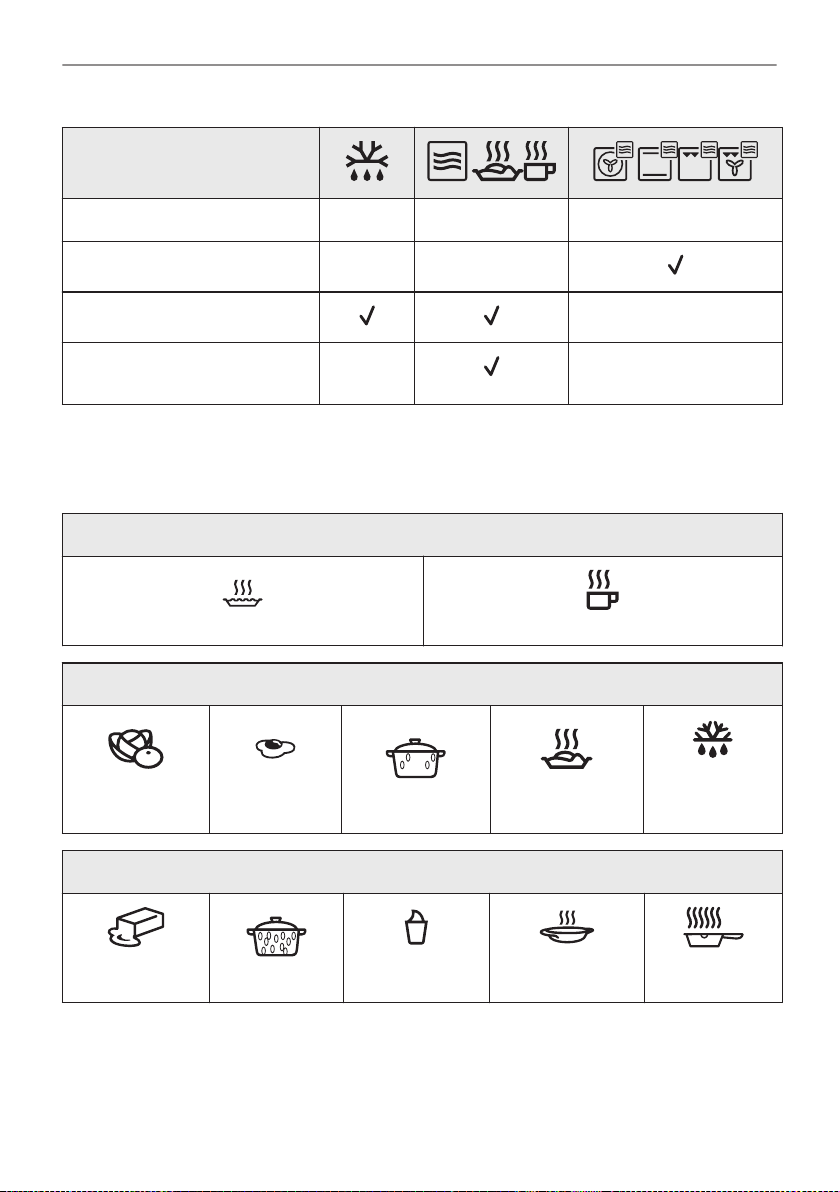
10.4 Recommended power settings for different kinds of food
The data in the table is for guidance only.
700 - 1000 W
Searing at the start of the cooking process Heating liquids
500 - 600 W
Cooking vegeta‐
bles
Cooking egg
dishes
Simmering stews
300 - 400 W
Heating one-plate
meals
Defrosting and
heating frozen
meals
Melting cheese,
chocolate, butter
Simmering rice
Heating baby
food
Cooking / Heating
delicate food
Continuing
cooking
27/40
Page 28
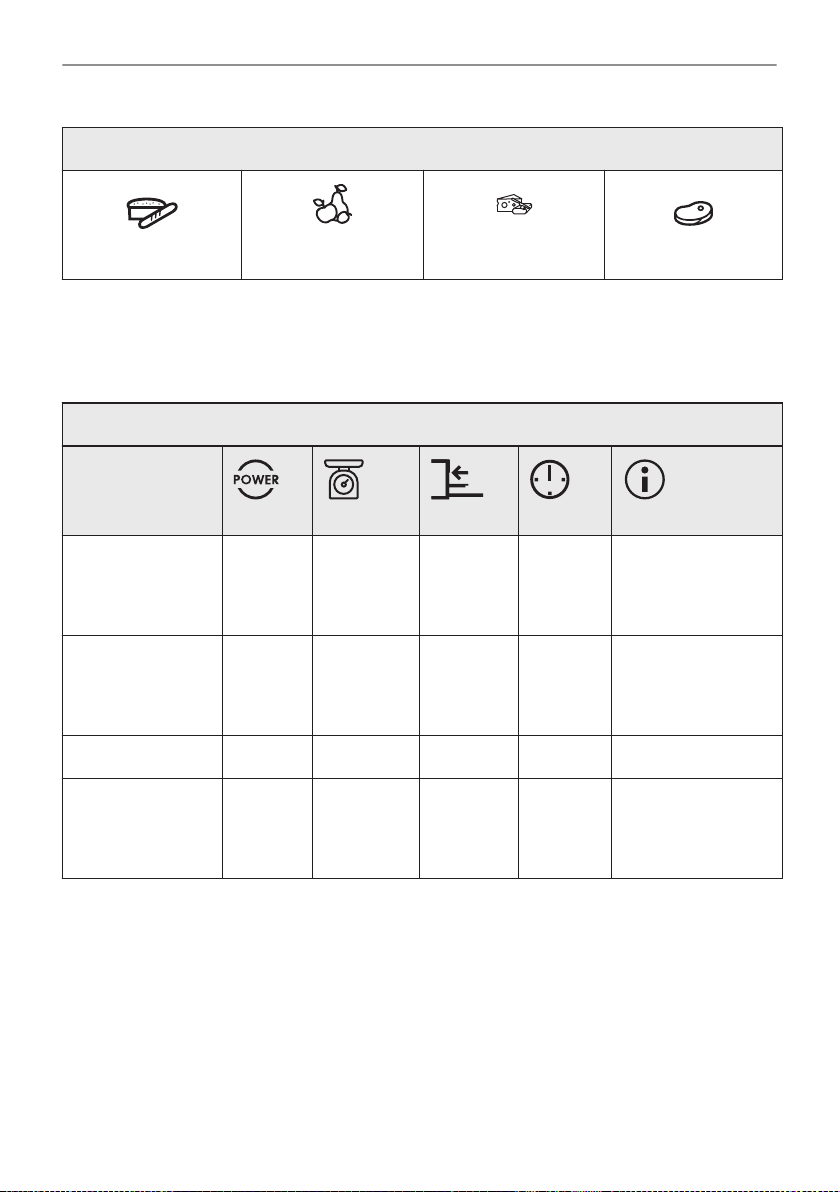
HINTS AND TIPS
100 - 200 W
Defrosting bread
Defrosting fruit and
cakes
Defrosting cheese,
cream, butter
Defrosting meat, fish
10.5 Cooking tables for test institutes
Information for test institutes
Tests according to IEC 60705.
Use wire shelf unless otherwise specified.
MICROWAVE
FUNCTION
(W)
Sponge cake 600 0.475 Bottom 7 - 9 Turn container
Meatloaf 400 0.9 2 25 - 32 Turn container
Egg custard 500 1 Bottom 18 -
Meat defrosting 200 0.5 Bottom 7 - 8 Turn the meat up‐
(kg)
(min)
around by 1/4, half‐
way through the
cooking time.
around by 1/4, half‐
way through the
cooking time.
side down halfway
through the cooking
time.
28/40
Page 29
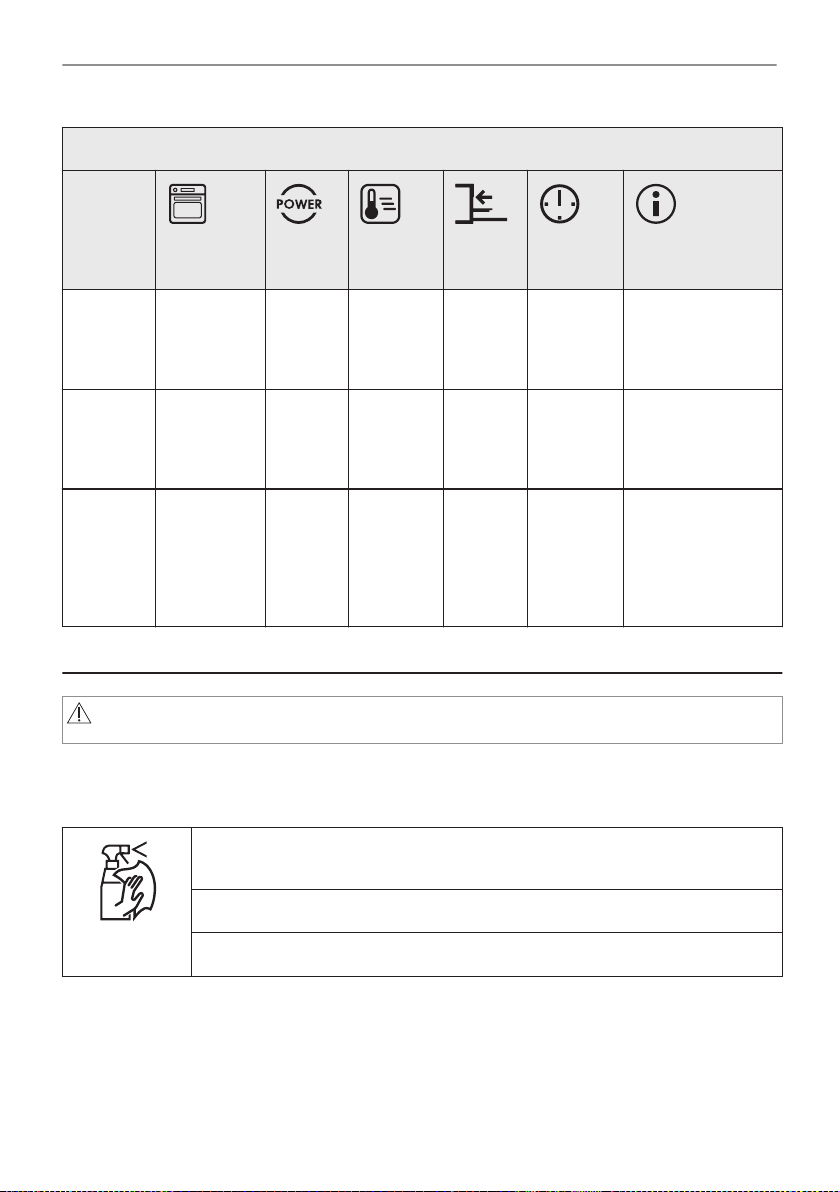
Use the wire shelf.
MICRO‐
WAVE
COMBI
FUNC‐
TION
CARE AND CLEANING
(W) (°C) (min)
Cake, 0.7kgConven‐
Potato
gratin,
1.1 kg
Chicken,
1.1 kg
tional Cook‐
ing + MW
True Fan
Cooking +
MW
Turbo Grill‐
ing + MW
100 200 2 23 - 27 Turn container
300 180 2 38 - 42 Turn container
400 230 1 35 - 40 Put the meat in
11. CARE AND CLEANING
WARNING!
Refer to Safety chapters.
11.1 Notes on cleaning
Clean the front of the appliance only with a microfibre cloth with warm water and
a mild detergent.
around by 1/4,
halfway through
the cooking time.
around by 1/4,
halfway through
the cooking time.
round glass con‐
tainer and turn it
upside down half‐
way through the
cooking time.
Cleaning
Agents
Use a cleaning solution to clean metal surfaces.
Clean stains with a mild detergent.
29/40
Page 30
2
3
1
CARE AND CLEANING
Clean the cavity after each use. Fat accumulation or other residue may cause
fire.
Clean the appliance ceiling carefully from residue and fat.
Everyday Use
Accessories
Do not store the food in the appliance for longer than 20 minutes. Dry the cavity
only with a microfibre cloth after each use.
Clean all accessories after each use and let them dry. Use only a microfibre
cloth with warm water and a mild detergent. Do not clean the accessories in a
dishwasher.
Do not clean the non-stick accessories using abrasive cleaner or sharp-edged
objects.
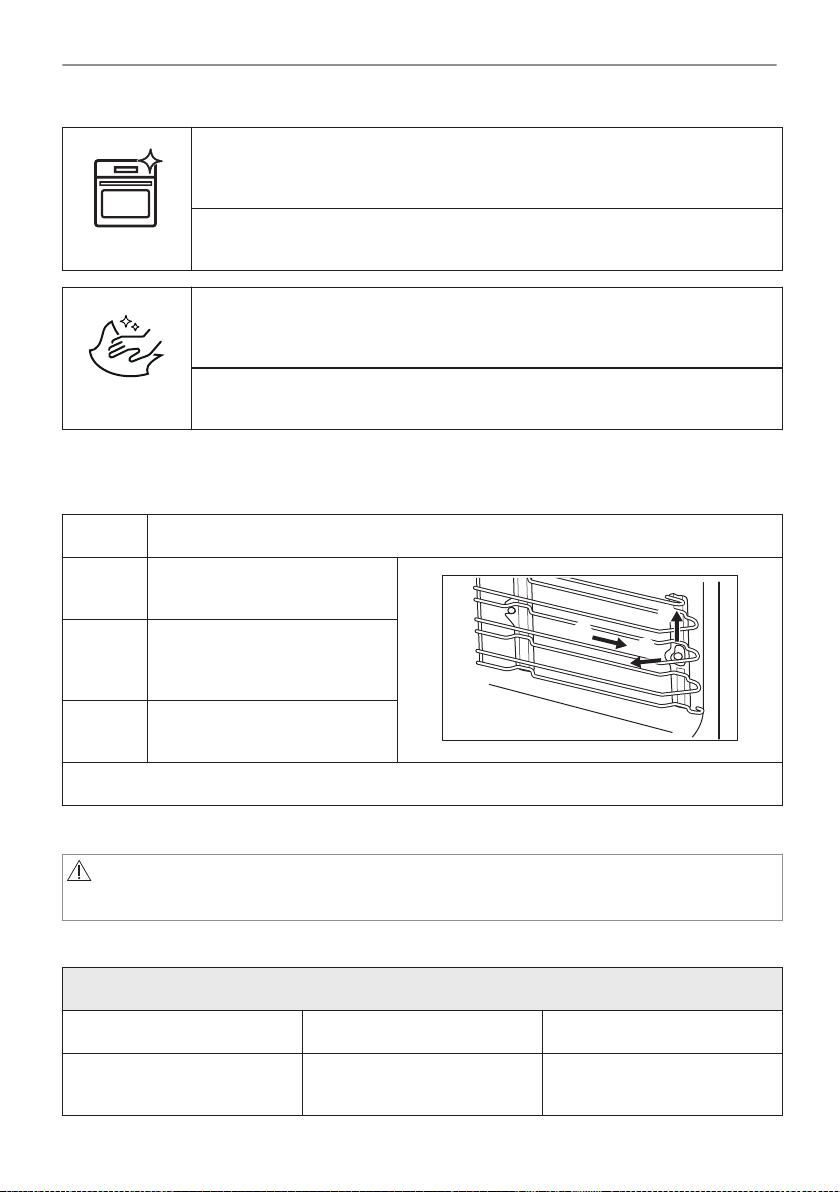
11.2 How to remove: Shelf supports
Remove the shelf supports to clean the oven.
Step 1 Turn off the oven and wait until it is cold.
Step 2 Carefully pull the shelf supports
Step 3 Pull the front end of the shelf
Step 4 Pull the supports out of the rear
Install the shelf supports in the opposite sequence.
up and out of the front catch.
support away from the side
wall.
catch.
11.3 How to replace: Lamp
WARNING!
Risk of electric shock.
The lamp can be hot.
Always hold the halogen lamp with a cloth to prevent grease residue from burning on the lamp.
Before you replace the lamp:
Step 1 Step 2 Step 3
Turn off the oven. Wait until
the oven is cold.
30/40
Disconnect the oven from the
mains.
Put a cloth on the bottom of
the cavity.
Page 31
TROUBLESHOOTING
Top lamp
Step 1 Turn the glass cover to remove it.
Step 2 Clean the glass cover.
Step 3 Replace the lamp with a suitable 300 °C heat-resistant lamp.
Step 4 Install the glass cover.
12. TROUBLESHOOTING
WARNING!
Refer to Safety chapters.
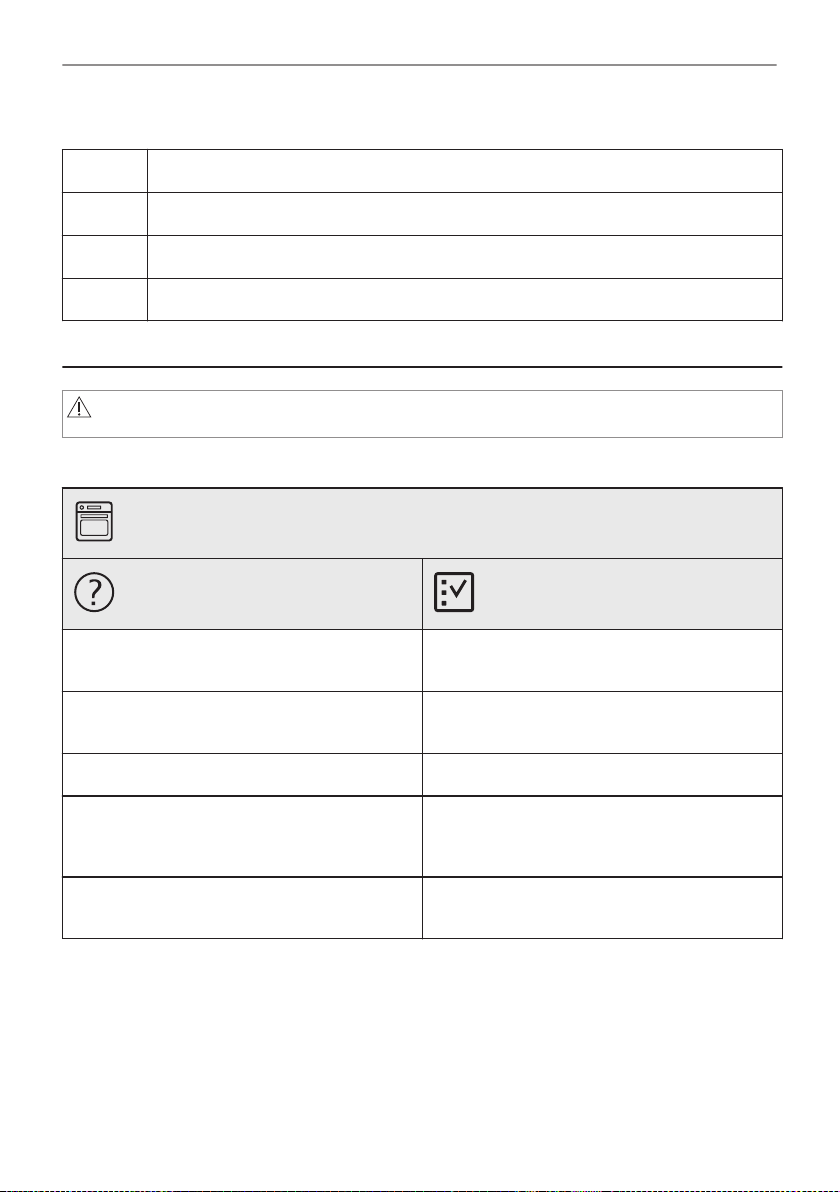
12.1 What to do if...
The appliance does not turn on or does not heat up
Possible cause Remedy
The appliance is not connected to an electrical
supply or it is connected incorrectly.
The clock is not set. Set the clock, for details refer to Clock func‐
The door is not closed correctly. Fully close the door.
The fuse is blown. Make sure the fuse is the cause of the prob‐
The appliance Child Lock is on. Refer to "Menu" chapter, Submenu for: Op‐
Check if the appliance is correctly connected to
the electrical supply.
tions chapter, How to set: Clock functions.
lem. If the problem recurs, contact a qualified
electrician.
tions.
31/40
Page 32
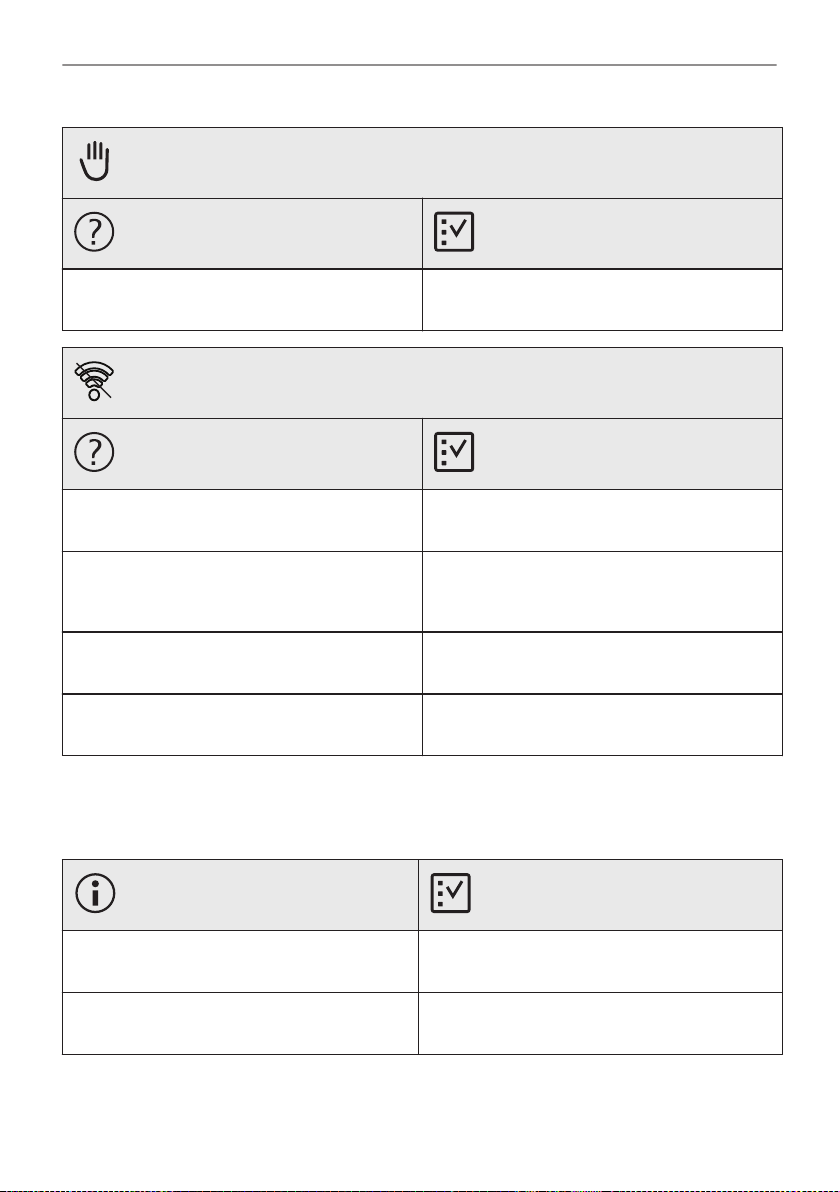
TROUBLESHOOTING
Components
Description Remedy
The lamp is burnt out. Replace the lamp, for details refer to "Care and
Problems with Wi-Fi signal
Possible cause Remedy
Trouble with wireless network signal. Check your wireless network and router.
New router installed or router configuration
changed.
The wireless network signal is weak. Move router as close to the appliance as possi‐
The wireless signal is disrupted by another mi‐
crowave oven placed near the appliance.
Cleaning" chapter, How to replace: Lamp.
Restart the router.
To configure appliance and mobile device
again, refer to "Before first use" chapter, Wire‐
less connection.
ble.
Turn off the microwave oven.
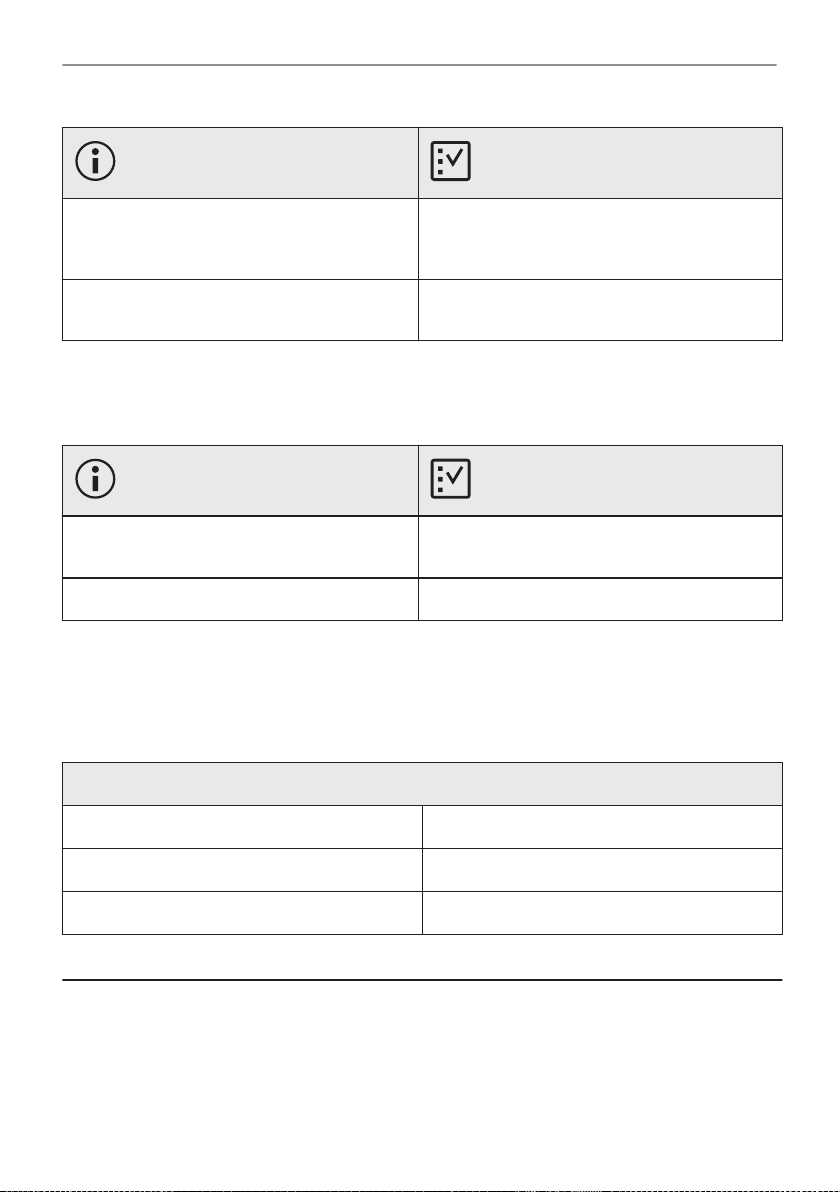
12.2 How to manage: Error codes
When the software error occurs, the display shows error message.
In this section, you will find the list of the problems that you can handle on your own.
Code and description Remedy
F240, F439 - the touch fields on the display do
not work properly.
F601 - there is a problem with Wi-Fi signal. Check your network connection. Refer to "Be‐
32/40
Clean the surface of the display. Make sure
there is no dirt on the touch fields.
fore first use" chapter, Wireless connection.
Page 33
ENERGY EFFICIENCY
Code and description Remedy
F604 - the first connection to Wi-Fi failed. Turn the appliance off and on and try again. Re‐
F908 - the appliance system cannot connect
with the control panel.
When one of these error messages continues to appear on the display, it means a faulty
subsystem may have been disabled. In such a case contact your dealer or an Authorized
Service Centre. If one of these errors occurs, the rest of the appliance functions will continue to
work as usually.
Code and description Remedy
F131 - the temperature of magnetron sensor is
too high.
F602, F603 - Wi-Fi is not available. Turn the appliance off and on.
fer to "Before first use" chapter, Wireless con‐
nection.
Turn the appliance off and on.
Turn the appliance off and wait until it cools
down. Turn the appliance on again.
12.3 Service data
If you cannot find a solution to the problem yourself, contact your dealer or an Authorised
Service Centre.
The necessary data for the service centre is on the rating plate. The rating plate is on the front
frame of the appliance cavity. Do not remove the rating plate from the appliance cavity.
We recommend that you write the data here:
Model (MOD.) .........................................
Product number (PNC) .........................................
Serial number (S.N.) .........................................
13. ENERGY EFFICIENCY
13.1 Energy saving
Make sure that the appliance door is closed when the appliance operates. Do not open the
appliance door too often during cooking. Keep the door gasket clean and make sure it is well
fixed in its position.
Use metal cookware to improve energy saving (only when you use a non-microwave function).
When possible, do not preheat the appliance before cooking.
33/40
Page 34
MENU STRUCTURE
Keep breaks between baking as short as possible when you prepare a few dishes at one time.
Cooking with fan
When possible, use the cooking functions with fan to save energy.
Residual heat
If a programme with Duration is activated and the cooking time is longer than 30 min, the
heating elements automatically turn off earlier in some appliance functions.
The fan and lamp continue to operate. When you turn off the appliance, the display shows the
residual heat. You can use that heat to keep the food warm.
When the cooking duration is longer than 30 min, reduce the appliance temperature to
minimum 3 - 10 min before the end of cooking. The residual heat inside the appliance will
continue to cook.
Use the residual heat to warm up other dishes.
Keep food warm
Choose the lowest possible temperature setting to use residual heat and keep a meal warm.
The residual heat indicator or temperature appears on the display.
Cooking with the lamp off
Turn off the lamp during cooking. Turn it on only when you need it.
14. MENU STRUCTURE
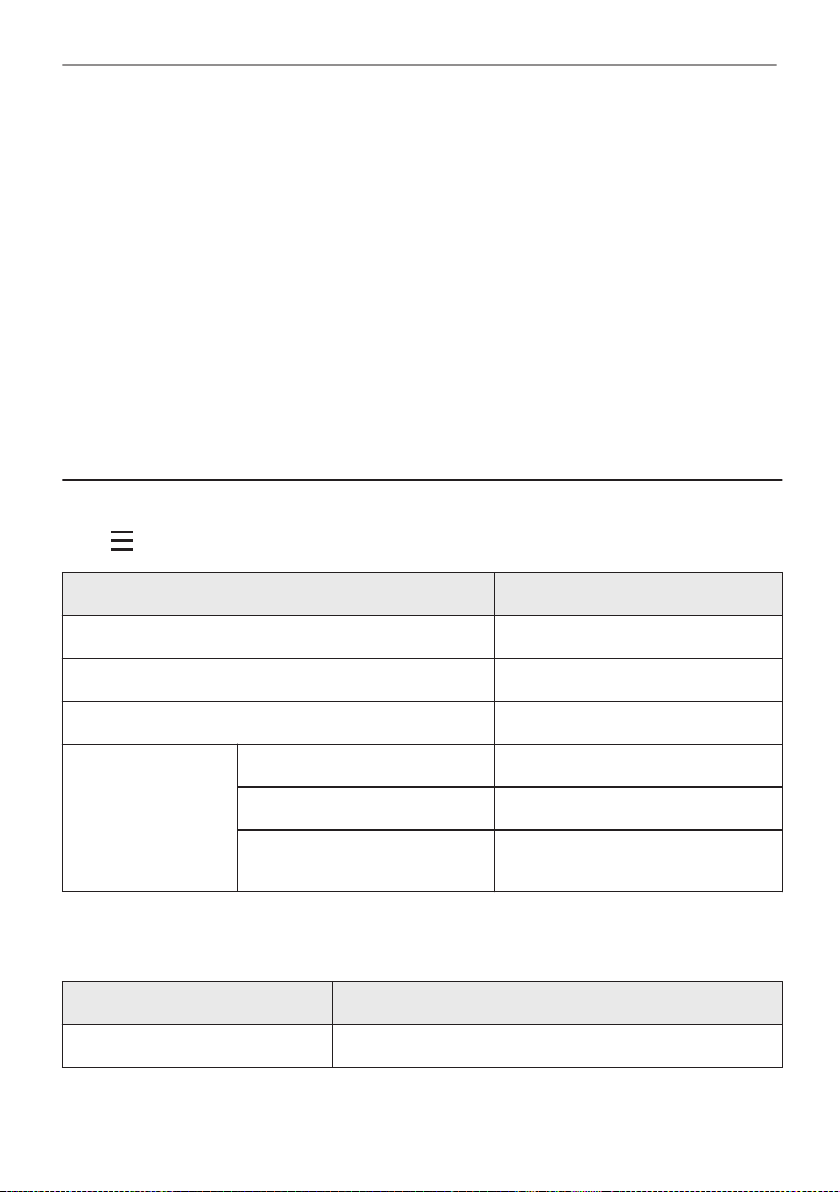
14.1 Menu
Press
to open Menu.
Menu item Application
Assisted Cooking Lists automatic programmes.
Favourites Lists the favourite settings.
Options To set the appliance configuration.
Settings Connections To set the network configuration.
Setup To set the appliance configuration.
Service Shows the software version and con‐
figuration.
14.2 Submenu for: Options
Submenu Application
Light Turns the lamp on and off.
34/40
Page 35
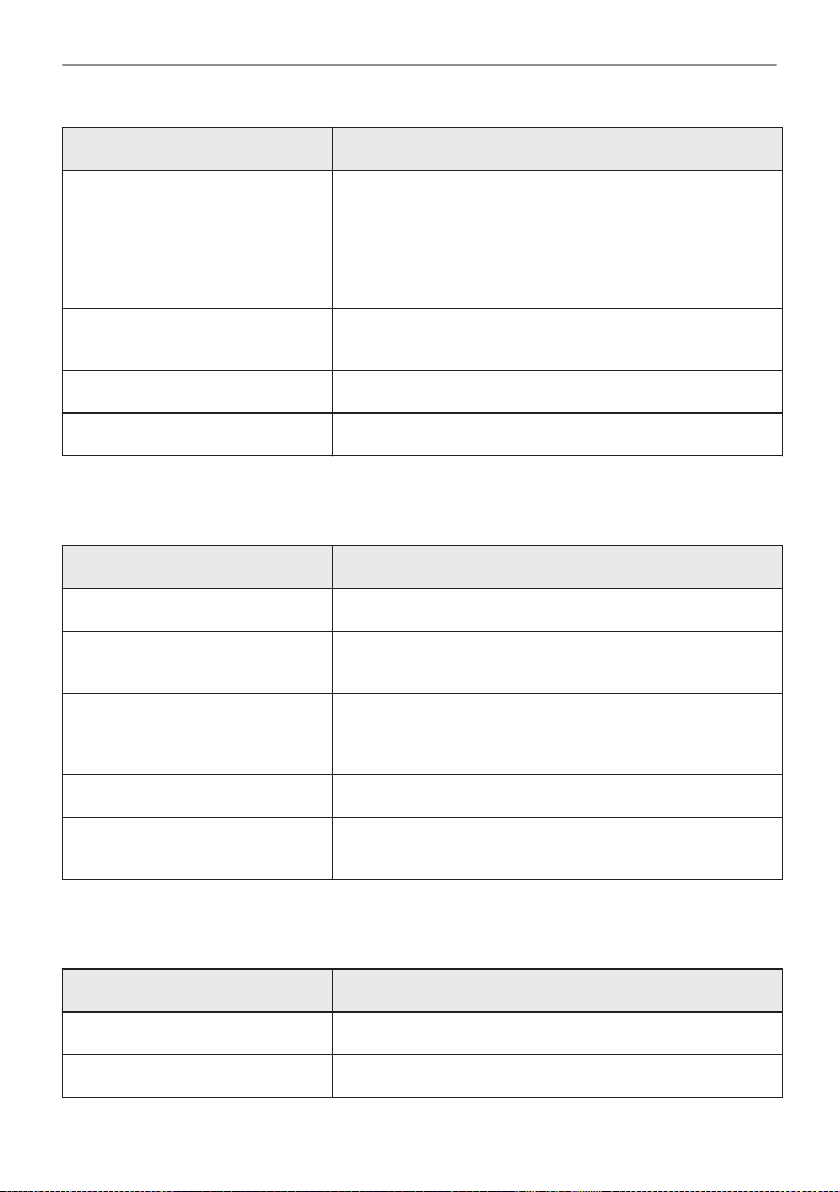
Submenu Application
MENU STRUCTURE
Child Lock Prevents accidental activation of the appliance. When the
Fast Heat Up Shortens heat up time. It is available only for some of the
Time indication Turns the clock on and off.
Digital clock style Changes the format of the displayed time indication.
option is on, the text Child Lock appears in the display when
you turn on the appliance. To enable the appliance use,
choose the code letters in the alphabetical order. Access to
the timer, the remote operation and the lamp is available
with the option on.
appliance functions.
14.3 Submenu for: Connections
Submenu Description
Wi-Fi To enable and disable: Wi-Fi.
Remote operation To enable and disable remote control.
Auto remote operation To start remote operation automatically after pressing
Option visible only after you turn on: Wi-Fi.
START.
Option visible only after you turn on: Wi-Fi.
Network To check network status and the signal power of: Wi-Fi.
Forget network To disable current network from auto connection with the
appliance.
14.4 Submenu for: Setup
Submenu Description
Language Sets the appliance language.
Display brightness Sets the display brightness.
35/40
Page 36
IT'S EASY!
Submenu Description
Key tones Turns the tone of the touch fields on and off. It is not possi‐
ble to mute the tone for:
Buzzer volume Sets the volume of key tones and signals.
Time of day Sets the current time and date.
.
14.5 Submenu for: Service
Submenu Description
Demo mode Activation / deactivation code: 2468
Software version Information about software version.
Reset all settings Restores factory settings.
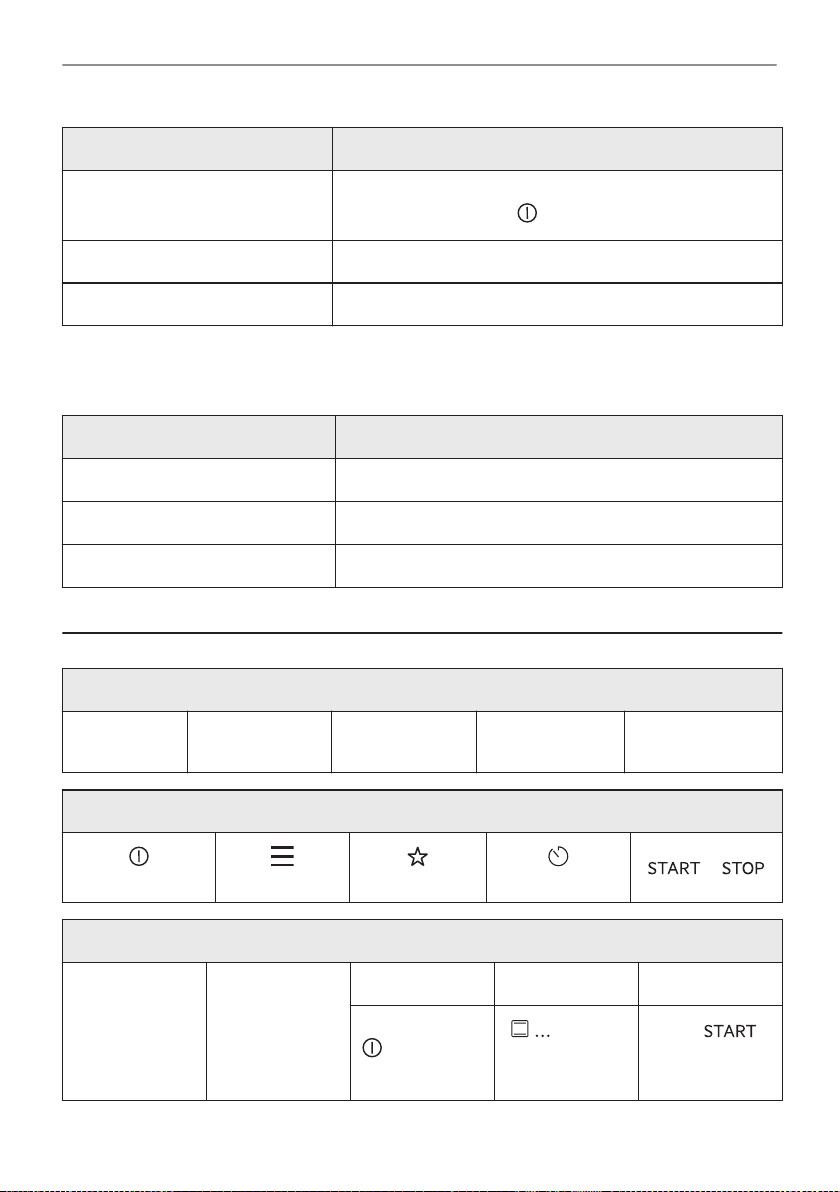
15. IT'S EASY!
Before first use you have to set:
Language
Familiarize yourself with the basic icons on the control panel and the display:
ON / OFF Menu Favourites
Start using the appliance
Quick start Turn on the ap‐
36/40
Display bright‐
ness
pliance and start
cooking with the
default tempera‐
ture and time of
the function.
Key tones Buzzer volume Time of day
Timer
Step 1 Step 2 Step 3
Press and hold:
.
- select
the preferred
function.
/
Press: .
Page 37
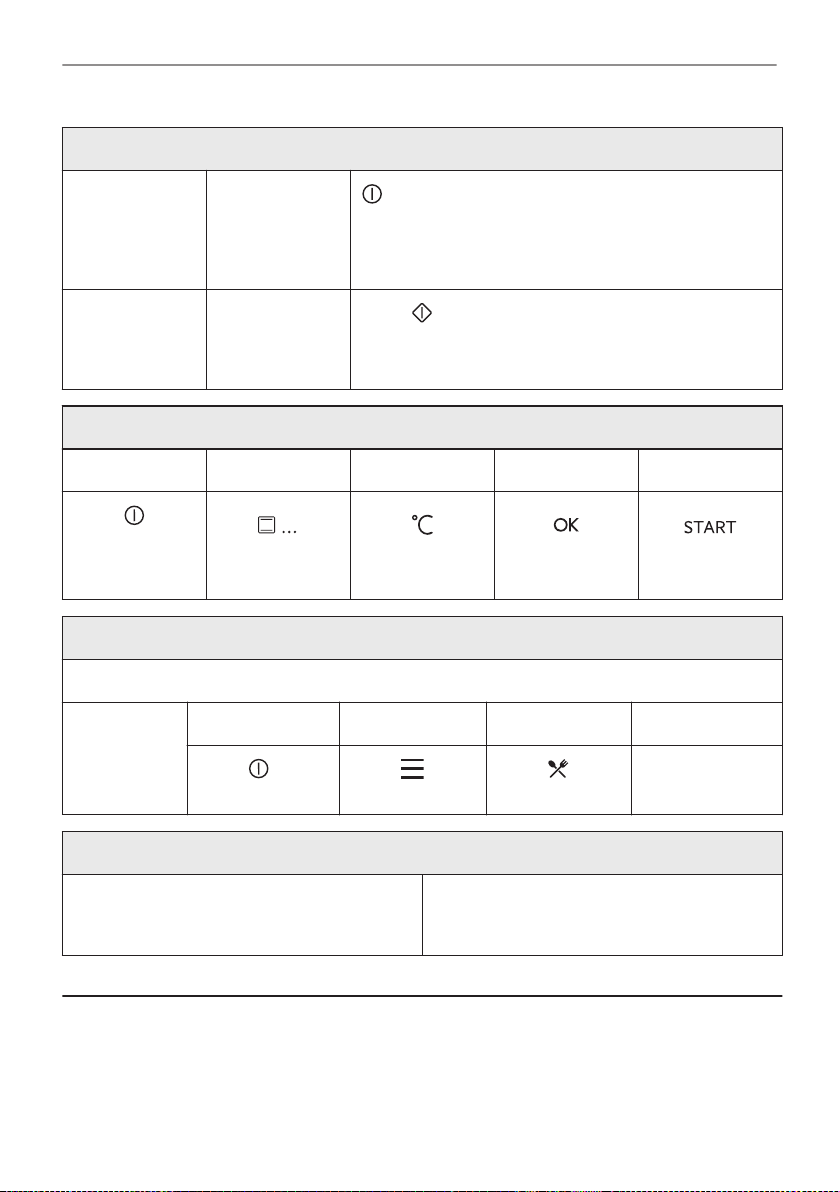
Start using the appliance
IT'S EASY!
Quick Off Turn off the ap‐
MW quick start Start Microwave
Start cooking
Step 1 Step 2 Step 3 Step 4 Step 5
- press to turn
on the appli‐
ance.
Get to know how to cook quickly
Use the automatic programmes to prepare a dish quickly with the default settings:
Assisted
Cooking
pliance, any
screen or mes‐
sage at any
time.
at any time with
default settings:
30 sec / 1000W.
- select the heat‐
ing function.
Step 1 Step 2 Step 3 Step 4
Press:
. Press: . Press: Assis‐
- press and hold until the appliance turns off.
Press:
- set the temper‐
ature.
.
- press to con‐
firm.
Choose the dish.
ted Cooking.
- press to start
cooking.
Use quick functions to set the cooking time
10% Finish assist
Use 10% Finish assist to add extra time when
10% of the cooking time is left.
To extend the cooking time press +1min.
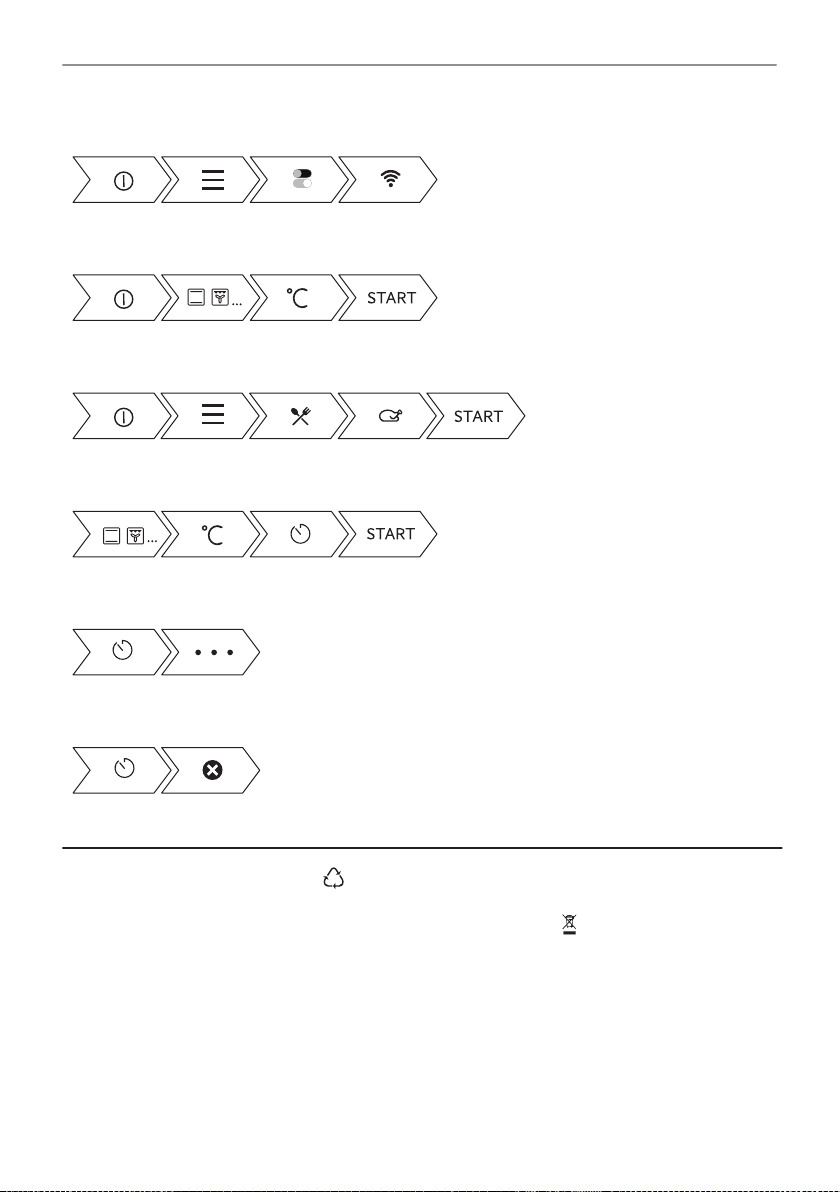
16. TAKE A SHORTCUT!
Here you can see all the useful shortcuts. You can also find them in the dedicated chapters in
the user manual.
37/40
Page 38
TAKE A SHORTCUT!
Wireless connection
How to set: Heating functions
How to set: Assisted cooking
How to set: Cooking time
How to delay: Start and end of cooking
How to cancel: Set Timer
17. ENVIRONMENTAL CONCERNS
Recycle materials with the symbol . Put the packaging in relevant containers to recycle it.
Help protect the environment and human health by recycling waste of electrical and electronic
appliances. Do not dispose of appliances marked with the symbol
Return the product to your local recycling facility or contact your municipal office.
38/40
*
with the household waste.
Page 39

39/40
Page 40
www.aeg.com/shop
867353974-G-322022
 Loading...