

Page 1

HK764400PB
INDUCTION HOB USER MANUAL
EN
調理ホブ ユーザーマニュアル
JA
18
2
Page 2

2
FOR PERFECT RESULTS
Thank you for choosing this AEG product. We have
created it to give you impeccable performance for many
years, with innovative technologies that help make life
simpler – features you might not find on ordinary
appliances. Please spend a few minutes reading to get the
very best from it.
ACCESSORIES AND CONSUMABLES
In the AEG webshop, you’ll find everything you need to
keep all your AEG appliances looking spotless and
working perfectly. Along with a wide range of accessories
designed and built to the high quality standards you
would expect, from specialist cookware to cutlery baskets,
from bottle holders to delicate laundry bags…
Visit the webshop at:
www.aeg.com/shop
Page 3

CONTENTS
4 Safety information
5 Installation instructions
7 Product description
9 Operating instructions
13 Helpful hints and tips
15 Care and cleaning
15 What to do if…
17 Environment concerns
Contents
3
The following symbols are used in this user
manual:
Important information concerning your
personal safety and information on how to
avoid damaging the appliance.
General information and tips
Environmental information
Subject to change without notice
Page 4

4 Safety information
SAFETY INFORMATION
For your safety and correct operation of the appliance, read this manual carefully before
the installation and use. Always keep these instructions with the appliance also if you move
or sell it. The users must fully know the operation and safety functions of the appliance.
Children and vulnerable people safety
WARNING!
Do not let persons, children included, with reduced physical sensory, reduced mental functions or lack of experience and knowledge to use the appliance. They must have supervision
or instruction for the operation of the appliance by a person who is responsible for their
safety.
• Keep all packaging away from children. There is the risk of suffocation or injury.
• Keep the children away from the appliance during and after the operation, until the appliance is cold.
WARNING!
Activate the child safety device to prevent small children and pets from an accidental activation of the appliance.
Safety during operation
• Remove all packaging, stickers and layers from the appliance before the first use.
• Set the cooking zones to "off" after each use.
• The risk of burns! Do not put the objects made of metal, for example cutlery or saucepan
lids, on the surface that you cook. They can become hot.
• The Users with an implanted pacemaker must keep their upper body minimum 30 cm
from induction cooking zones that are activated.
WARNING!
Fire risk! Too hot fats and oils can occur with ignition very quickly.
Correct operation
• Always monitor the appliance during operation.
• The appliance is only for domestic use!
• Do not use the appliance as a work or a storage surface.
• Do not put or keep very flammable liquids and materials, easy fusible objects (made of
plastic or aluminium) on or near the appliance.
• Be careful when you connect the appliance to the near sockets. Do not let the electricity
bonds touch the appliance or hot cookware. Do not let the electricity bonds to tangle.
How to prevent a damage to the appliance.
• If the objects or cookware fall on the glass, the surface can be damaged.
• Cookware made of cast iron, cast aluminium or with damaged bottoms can cause
scratch of the glass. Do not move them on the surface.
Page 5

Installation instructions
• Do not let cookware boil dry to prevent the damage to cookware and glass .
• Do not use the cooking zones with empty cookware or without cookware.
• Do not put the aluminium foil on the appliance.
• Make sure that the airflow space of 5 mm between the worktop and front of the unit
below it stays opened.
WARNING!
If there is a crack on the surface, disconnect power supply to prevent the electrical
shock.
INSTALLATION INSTRUCTIONS
Before the installation, note down the serial number (Ser. Nr.) from the rating plate.The
rating plate of the appliance is on its lower casing.
HK764400PB
58 GDD D6 WG
AEG
200 V 50-60-Hz
The Safety Instructions
WARNING!
You must read these!
• Make sure that the appliance is not damaged because of transportation. Do not connect
a damaged appliance. If it is necessary, speak to the supplier.
• Only an authorized servicing technician can install, connect or repair this appliance. Use
only original spare parts.
• Only use the built-in appliances after you assemble the appliance into correct built-in
units and work surfaces that align to the standards.
• Do not change the specifications or change this product. Risk of injury and damage to
the appliance.
• Fully obey the laws, ordinances, directives and standards in force in the country where
you use the appliance (safety regulations, recycling regulations, electrical safety rules
etc.)!
• Keep the minimum distances to other appliances and units!
• Install shock protection, for example install the drawers only with a protective floor directly below the appliance!
• Keep safe the cut surfaces of the worktop from moisture with a correct sealant!
• Seal the appliance to the work top with no space between with a correct sealant!
• Keep safe the bottom of the appliance from steam and moisture, e.g. from a dishwasher
or oven!
• Do not install the appliance adjacent to doors and below windows! If not, when you
open the doors or windows they can push off hot cookware from the appliance.
949 595 097
Induction 6,0 kW
6,0 kW
5
Page 6

6 Installation instructions
WARNING!
Risk of injury from electrical current. Carefully obey the instructions for electrical connections.
• The electrical mains terminal is live.
• Make electrical mains terminal free of voltage.
• Install correctly to give shock protection.
• Loose and incorrect plug and socket connections can make the terminal become too hot.
• A qualified electrician must install the connections in the clamps correctly.
• Use a strain relief clamp on cable.
• Use the correct mains cable of type H05BB-F Tmax 90°C (or higher) for a single phase or
two phase connection.
• Replace the damaged mains cable with a special cable (type H05BB-F Tmax 90°C; or
higher). Speak to your local Service Centre.
The appliance must have the electrical installation which lets you disconnect the appliance
from the mains at all poles with a contact opening width of minimum 3 mm.
You must have correct devices to isolate: line protecting cut-outs, fuses (screw type fuses
removed from the holder), earth leakage trips and contactors.
Assembly
min.
min.
50mm
R 5mm
=
490
+1
mm
=
680
600mm
+1
mm
500mm
min.
50mm
min.
5mm
Page 7

Product description 7
min.
25 mm
min.
min.
20 mm
If you use a protection box (the additional accessory), the front airflow space of 5 mm and protective floor directly below the appliance are not
necessary.
5 mm
PRODUCT DESCRIPTION
Cooking surface layout
1 2
6
5
4
min.
38 mm
min.
5 mm
1 Induction cooking zone 1900 W with
power function 2400 W
2 Induction cooking zone 1900 W with
power function 2400 W
3 Control panel
3
4 Induction cooking zone 1900 W with
power function 2400 W
5 Induction cooking zone 1900 W with
power function 2400 W
6 Control panel
Page 8

8 Product description
Control panel layout
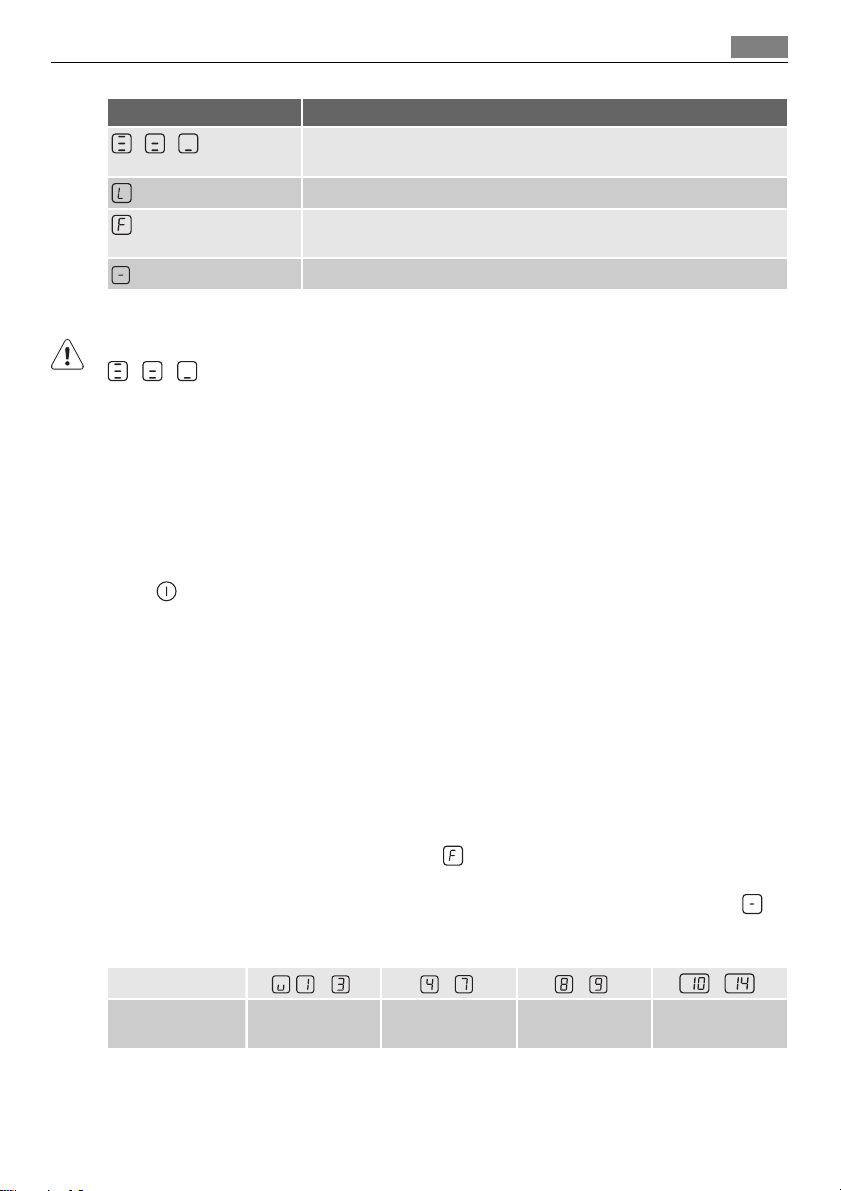
9
8
7
6
5
4
Use the sensor fields to operate the appliance. The displays, indicators and sounds tell which
functions operate.
sensor field function
1
A heat setting display It shows the heat setting.
2
3
A control bar To set the heat setting.
4
5
6
7
8
9
10
/
The timer display It shows the time in minutes.
Cooking zones' indicators of timer It shows for which cooking zone you set the time.
10
1
2
3
It activates and deactivates the appliance.
It activates the Power function.
It increases or decreases the time.
It sets the cooking zone.
It locks/unlocks the control panel.
It activates and deactivates the STOP+GO function.
Heat setting displays
Display Description
-
+ digit
The cooking zone is deactivated.
The cooking zone operates.
The function operates.
The Automatic Heat Up function operates.
Power function operates.
There is a malfunction.
Page 9
Operating instructions 9
Display Description
/ /
OptiHeat Control (3 step Residual heat indicator) : continue cook /
stay warm / residual heat.
Lock/The Child Safety functions operates.
Not correct cookware or too small or no cookware on the cooking
zone.
The Automatic Switch Off function operates.
OptiHeat Control (3 step Residual heat indicator)
WARNING!
\ \ The risk of burns from residual heat!
OptiHeat Control shows the level of the residual heat. The induction cooking zones make
the heat necessary for cooking directly in the bottom of the cookware. The glass ceramic is
hot from the heat of the cookware.
OPERATING INSTRUCTIONS
Activation and deactivation
Touch for 1 second to activate or deactivate the appliance.
Automatic Switch Off
The function stops the hob automatically if:
• All cooking zones are deactivated.
• You do not set the heat setting after you activate the appliance.
• You spill something or put something on the control panel for more than 10 seconds, (a
pan, a cloth, etc.). The sound operates some time and the appliance deactivates. Remove
the object or clean the control panel.
• The appliance become too hot (e.g. when, a saucepan boils dry). Before you use the hob
again, the cooking zone must be cool.
• You use not correct cookware. The symbol
vates automatically after 2 minutes.
• You do not deactivate a cooking zone or change the heat setting. After some time,
comes on and the appliance deactivates. See the table.
The times of Automatic Switch Off
Heat setting
The cooking zone
deactivates after
- - -
6 hours 5 hours 4 hours 1.5 hours
comes on and the cooking zone deacti-
-
Page 10
10 Operating instructions
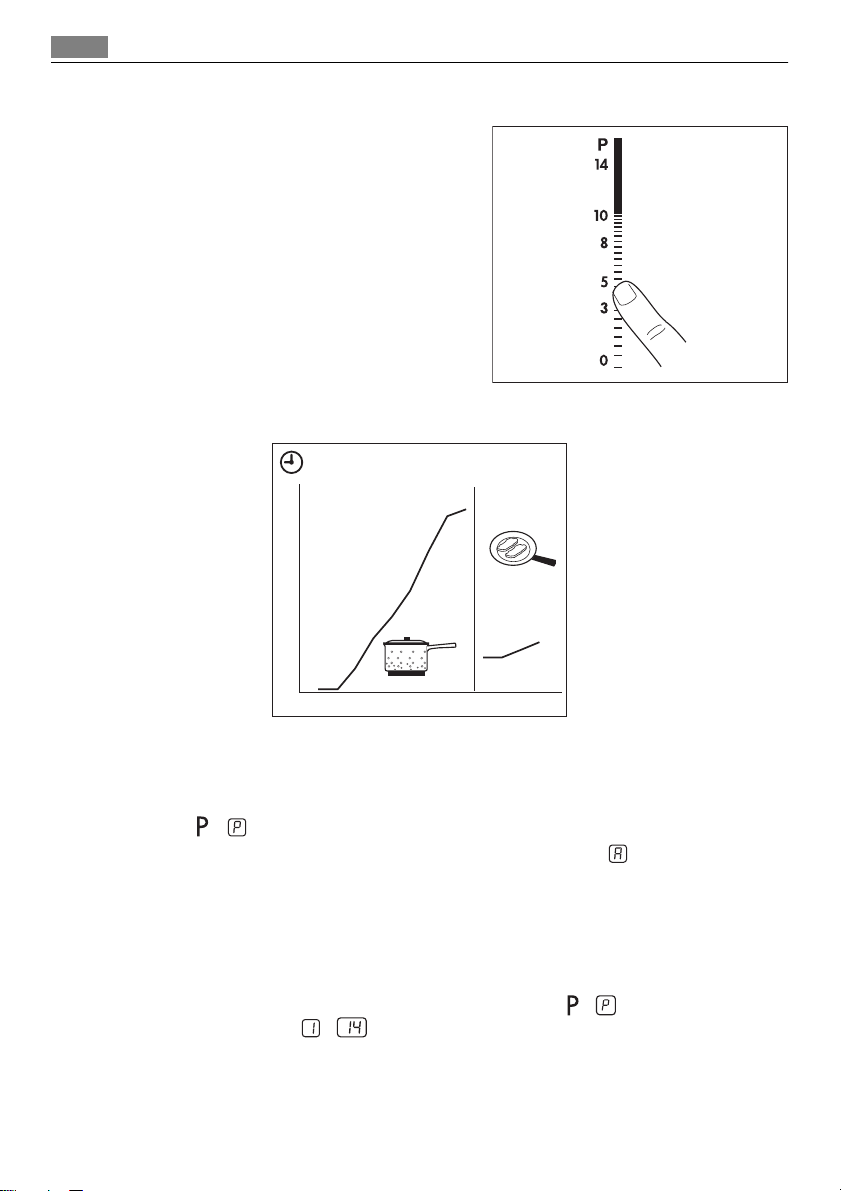
The heat setting
Touch the control bar at the heat setting. Change
up or down, if it is necessary. Do not release before you have a correct heat setting.
Automatic Heat Up
12
11
10
9
8
7
6
5
4
3
2
1
0
1234567891011121314
You can get a necessary heat setting in a shorter time if you activate the Automatic Heat
Up function. This function sets the highest heat setting for some time (see the illustration),
and then decreases to the necessary heat setting.
To start the Automatic Heat Up function for a cooking zone:
1. Touch
2. Immediately touch the necessary heat setting. After 3 seconds
play.
To stop the function change the heat setting.
( comes on in the display).
comes on in the dis-
Power function
The Power function makes more power available to the induction cooking zones. The Power
function is activated for 10 minutes at most. After, that the induction cooking zone automatically sets back to highest heat setting. To activate, touch
vate, touch a heat setting
- .
, comes on. To deacti-
Page 11
99
Operating instructions 11
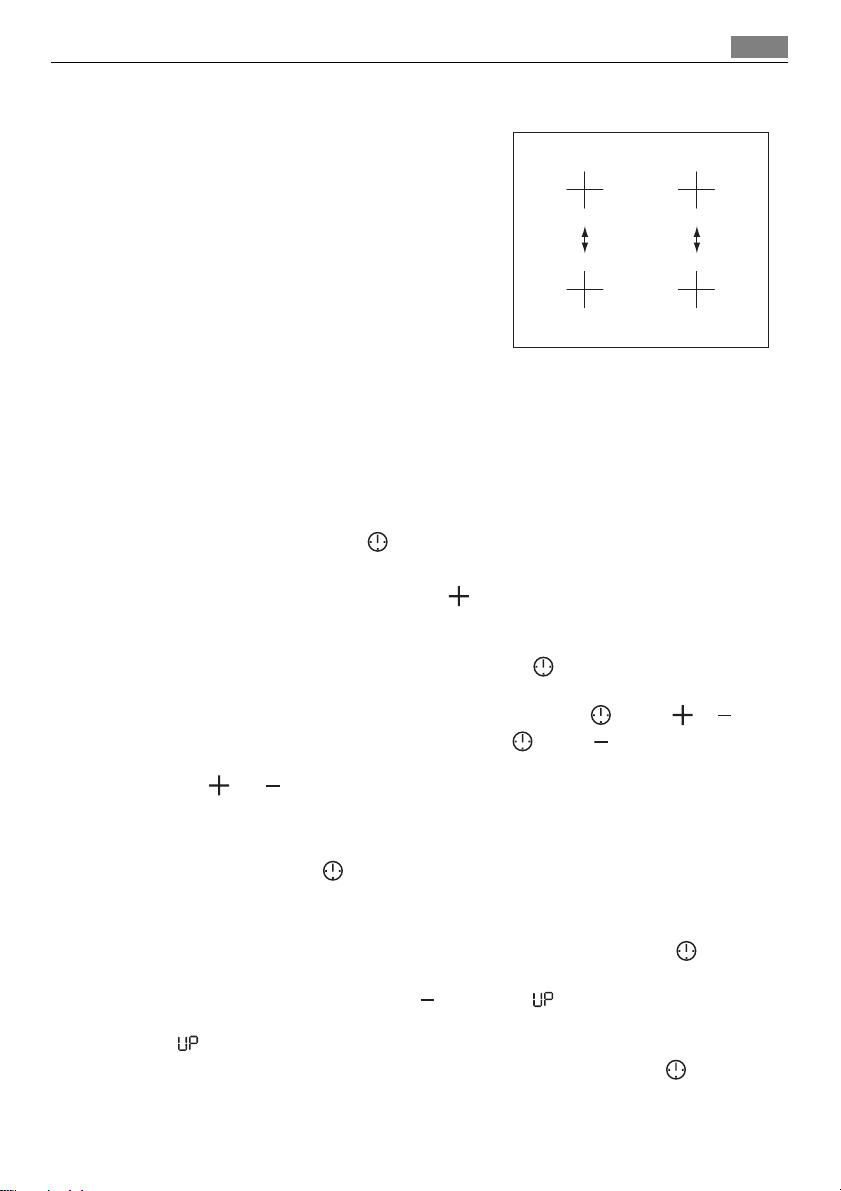
Power management
The power management divides the power between two cooking zones in a pair (see the illustration). The power function increases the power
to the maximum level for one cooking zone in the
pair. Automatically decreases the power in the
second cooking zone to a lower level. The display
for the reduced zone change between two levels.
Timer
Count Down Timer
Use the Count Down Timer to set how long the cooking zone operates for only this one
time.
Set the Count Down Timer after the selection of the cooking zone.
You can set the heat setting before or after you set the timer.
• To set the cooking zone: touch
cooking zone comes on.
• To activate the Count Down Timer: touch
minutes). When the indicator of the cooking zone start to flash slow, the time counts
down.
• To see the remaining time: set the cooking zone with
zone starts to flash quickly. The display shows the remaining time.
• To change the Count Down Timer: set the cooking zone with
• To deactivate the timer: set the cooking zone with
counts back to
also touch
When the countdown comes to an end, the sound operates and
zone deactivates.
• To stop the sound: touch
CountUp Timer ( The count up timer)
Use the CountUp Timer to monitor how long the cooking zone operates.
• To set the cooking zone (if more than 1 cooking zone operate ) : touch
again until the indicator of a necessary cooking zone comes on.
• To activate the CountUp Timer: touch
of the cooking zone starts to flash slow, the time counts up. The display switches between
• To see how long the cooking zone operates: set the cooking zone with
tor of the cooking zone starts to flash quickly. The display shows the time that the cooking zone operates.
and counted time (minutes).
. The indicator of the cooking zone goes out. To deactivate you can
00
and at the same time.
again and again until the indicator of a necessary
of the timer to set the time ( 00 -
. The indicator of the cooking
. Touch or .
. Touch . The remaining time
flashes. The cooking
00
of the timer comes on. When the indicator
again and
. The indica-
Page 12

12 Operating instructions
• To deactivate the CountUp Timer: set the cooking zone with and touch or to
deactivate the timer. The indicator of the cooking zone goes out.
Minute Minder
You can use the timer as a Minute Minder while the cooking zones do not operate. Touch
. Touch or of the timer to set the time. When the time comes to an end, the sound
operates and
• To stop the sound: touch
00
flashes.
STOP+GO
The function sets all cooking zones that operate to the lowest heat setting ( ).
When
The
• To activate this function touch
• To deactivate this function touch
operates, you cannot change the heat setting.
function does not stop the timer function.
. The symbol comes on.
. The heat setting that you set before comes on.
Lock
When the cooking zones operate, you can lock the control panel, but not . It prevents an
accidental change of the heat setting.
First set the heat setting.
To start this function touch
The Timer stays on.
To stop this function touch
When you stop the appliance, you also stop this function.
. The symbol comes on for 4 seconds.
. The heat setting that you set before comes on.
The child safety device
This function prevents an accidental operation of the appliance.
To activate the child safety device
• Activate the appliance with
• Touch
• Deactivate the appliance with
To deactivate the child safety device
• Activate the appliance with
The symbol
• Deactivate the appliance with
To override the child safety device for only one cooking time
• Activate the appliance with
• Touch
ance.
• When you deactivate the appliance with
for 4 seconds. The symbol comes on.
comes on.
for 4 seconds. Set the heat setting in 10 seconds. You can operate the appli-
. Do not set the heat settings.
.
. Do not set the heat settings. Touch for 4 seconds.
.
. The symbol comes on.
, the child safety device operates again.
OffSound Control (Deactivation and activation of the sounds)
Deactivation of the sounds
Deactivate the appliance.
Page 13

Helpful hints and tips
Touch for 3 seconds. The displays come on and go out. Touch for 3 seconds.
comes on, the sound is on. Touch , comes on, the sound is off.
When this function operates, you can hear the sounds only when:
• you touch
• the Minute Minder comes down
• the Count Down Timer comes down
• you put something on the control panel.
Activation of the sounds
Deactivate the appliance.
Touch
comes on, because the sound is off. Touch , comes on. The sound is on.
for 3 seconds. The displays come on and go out. Touch for 3 seconds.
HELPFUL HINTS AND TIPS
Use the induction cooking zones with correct cookware.
Put the cookware on the cross which is on the surface that you cook. Cover the cross fully.
The magnetic part of the bottom of the cookware must be 125mm minimum. Induction
cooking zones adapt to the dimension of the bottom of the cookware automatically. You
can cook with the large cookware on two cooking zones at the same time.
13
Cookware for induction cooking zones
For induction cooking zones a strong electro-magnetic field creates the heat in the cookware very quickly.
Cookware material
• Correct: cast iron, steel, enamelled steel, stainless steel, the bottom made of multi-layer
(with correct mark from a manufacturer).
• Not correct: aluminium, copper, brass, glass, ceramic, porcelain.
Cookware is correct for an induction hob if …
• ... some water boils very quickly on a zone set to the highest heat setting.
• ... a magnet pulls on to the bottom of the cookware.
The bottom of the cookware must be as thick and flat as possible.
The noises during operation
If you can hear
• crack noise: cookware is made of different materials (Sandwich construction).
• whistle sound: you use one or more cooking zones with high power levels and the cookware is made of different materials (Sandwich construction).
• humming: you use high power levels.
• clicking: electric switching occurs.
Page 14
14 Helpful hints and tips
• hissing, buzzing: the fan operates.
The noises are normal and do not refer to appliance malfunction.
Energy saving
• If it is possible, always put the lids on the cookware.
• Put cookware on a cooking zone before you start it.
Öko Timer (Eco Timer)
To save the energy, the heater of the cooking zone deactivates before the count down timer
signal. The difference in the operation time is depends of the heat setting level and the time
you cook.
The examples of cooking applications
The data in the table is for guidance only.
Heat
setting
Keep cooked foods warm as nec-
1
1-3 Hollandaise sauce, melt: butter, choco-
1-3 Solidify: fluffy omelettes, baked eggs 10-40
3-5 Simmer rice and milkbased dishes, heat-
5-7 Steam vegetables, fish, meat 20-45
7-9 Steam potatoes 20-60
7-9 Cook larger quantities of food, stews
9-12 Gentle fry: escalope, veal cordon bleu,
12-13 Heavy fry, hash browns, loin steaks,
14 Boil large quantities of water, cook pasta, sear meat (goulash, pot roast), deep fry chips.
late, gelatine
ing up ready-cooked meals
and soups
cutlets, rissoles, sausages, liver, roux,
eggs, pancakes, doughnuts
steaks
The Power function is best to heat up large quantities of water.
Use to: Time Hints
essary
5-25
min
min
25-50
min
min
min
60-150
min
as necessary
5-15
min
Put a lid on a cookware.
Mix from time to time.
Cook with a lid on.
Add the minimum two times as
much liquid as rice, mix milk dishes
at some point of the procedure
through.
Add some tablespoons of liquid.
Use max. ¼ l water for 750 g of potatoes.
Up to 3 l liquid plus ingredients.
Turn halfway through.
Turn halfway through.
Page 15

Care and cleaning 15
Information on acrylamides
Important! According to the newest scientific knowledge, if you brown food (specially the
one which contains starch), acrylamides can pose a health risk. Thus, we recommend that
you cook at the lowest temperatures and do not brown food too much.
CARE AND CLEANING
Clean the appliance after each use.
Always use cookware with clean bottom.
WARNING!
The sharp objects and abrasive cleaning agents can cause damage to the appliance.
For your safety, do not clean the appliance with steam cleaners or high-pressure cleaners.
Scratches or dark stains on the glass-ceramic cause no effect on how the appliance operates.
To remove the dirt:
1. – Remove immediately:melted plastic, plastic foil, and food with sugar. If not, the dirt
can cause damage to the appliance. Use a special scraper for the glass . Put the
scraper on the glass surface at an acute angle and move the blade on the surface .
– Remove after the appliance is sufficiently cool:limescale rings , water rings, fat
stains, shiny metallic discolorations. Use a special cleaning agent for glass ceramic
or stainless steel.
2. Clean the appliance with a moist cloth and some detergent.
3. At the end rub the appliance dry with a clean cloth.
WHAT TO DO IF…
Problem Possible cause and remedy
You cannot activate the appliance or operate it.
A Sound operates and the appliance deactivates.
A sound operates when the appliance is deactivated.
The appliance deactivates.
• Activate the appliance again and set the heat setting in 10
seconds.
• You touched 2 or more sensor fields at the same time. Only
touch one sensor field.
• The Child Safety Device or the Lock or Stop+Go operates. See
the chapter Operating instructions.
• There is water or fat stains on the control panel. Clean the
control panel.
You put something on one or more sensor fields. Remove the object from the sensor fields.
You put something on the . Remove the object from the sensor field.
Page 16

16 What to do if…
Problem Possible cause and remedy
The residual heat indicator does
not comes on.
The Automatic Heat Up function does not operate.
The heat setting changes between two levels.
The sensor fields become hot. The cookware is too large or you out it too near to the controls.
There is no signal when you
touch the panel sensor fields.
comes on
comes on
and number comes on.
comes on
The cooking zone is not hot because it operated only for a short
time. If the cooking zone should be hot, speak to the service centre.
• There is still residual heat on the cooking zone. Let the cooking
zone become sufficiently cool.
• The highest heat setting is set. The highest heat setting has the
same power as the Automatic Heat Up function.
The Power management is activated. See the section Power management.
Put large cookware on the rear cooking zones if it is necessary.
The signals are deactivated. Activate the signals (see OffSound
Control).
The Automatic Switch Off operates. Deactivate the appliance and
activate it again.
• No cookware on the cooking zone. Put cookware on the cooking zone.
• Not correct cookware. Use the correct cookware.
• The diameter of the bottom of the cookware is too small for
the cooking zone. Use cookware with correct dimensions.
• The cookware do not cover the cross. Cover the cross fully.
There is an error in the appliance.
Disconnect the appliance from the electrical supply for some
time. Disconnect the fuse from the electrical system of the house.
Connect again. If
There is an error in the appliance, because a cookware boils dry.
The protection against become too hot for the cooking zone operates. The Automatic Switch Off operates.
Deactivate the appliance. Remove the hot cookware. After, approximately 30 seconds activate the cooking zone again.
should go out of the display, residual heat indicator can stay. Let
the cookware become sufficiently cool and check it with the section Cookware for the induction cooking zone.
comes on again, speak to the service centre.
If you tried the above solutions and cannot repair the problem, speak to your dealer or the
customer service. Give the data from the rating plate, three digit letter code for the glass
ceramic (it is in the corner of the glass surface) and an error message that comes on.
Make sure, you operated the appliance correctly. If not the servicing by a customer service
technician or dealer will not be free of charge, also during the warranty period. The instructions about the customer service and conditions of guarantee are in the guarantee booklet.
Page 17

Environment concerns
ENVIRONMENT CONCERNS
The symbol on the product or on its packaging indicates that this product may not be
treated as household waste. Instead it should be taken to the appropriate collection point
for the recycling of electrical and electronic equipment. By ensuring this product is
disposed of correctly, you will help prevent potential negative consequences for the
environment and human health, which could otherwise be caused by inappropriate waste
handling of this product. For more detailed information about recycling of this product,
please contact your local council, your household waste disposal service or the shop where
you purchased the product.
Packaging material
The packaging materials are friendly to the environment and can be recycled. The plastic
components are identified by marking: >PE<,>PS<, etc. Discard the packaging materials as
household waste at the waste disposal facilities in your municipality.
17
Page 18

18
最大限にご活用いただくために
AEG 製品をお買い上げいただきありがとうございます。
この製品は長期間に渡って優れた性能を発揮するように、
通常の製品には見られない、消費者皆様の生活をよりシン
プルにする革新的なテクノロジーを用いて製造されてい
ます。 製品を最大限に活用するために少し時間を取って
お読みください。
アクセサリと消耗品
AEG ウェブショップでは、製品を汚れも故障もなく使い
続けていただくために必要なものをすべて取り揃えてお
ります。 専門調理具、刃物バスケット、ボトルホルダか
らデリケートな洗濯物バッグまで、考えられる限りの高い
品質基準で設計・製造された様々なアクセサリがございま
す。
ウェブショップはこちら
www.aeg.com/shop
Page 19

コンテンツ
コンテンツ
20 安全についての情報
21 取り付け指示
23 製品説明
24 操作指示
29 お役立ちヒントや一口メモ
30 ケアと清掃
31 トラブルシューティング
32 環境保護
19
次のシンボルがこの取扱説明書の中で使われ
ています:
あなた自身の安全に関する重要な情報と、ど
のように機器の損傷を防ぐことができるかに
ついての情報。
般的な情報と助言
環境に関する情報
予告なしに仕様を変更することがあります。
Page 20
安全についての情報
20
安全についての情報
本製品を安全に正しくお使いいただくため、取り付け、ご使用になる前にこのマニュアルを
よくお読みください。本製品を移動または販売する際にもマニュアルを機器に必ず添付し
てください。本製品の使い方と安全機能について十分に理解してください。
お子様と体が弱い人の安全
警告
お子様も含め、身体感覚が弱い方、精神的機能が低下している方、または経験や知識が浅い
方には本機を使用させないでください。上記のような方は、、かならず安全面で責任を負え
る方の監督または指示の下で使用してください。
• 梱包材はお子様の手の届かない場所に置いてください。窒息または怪我の恐れがありま
す。
• 使用中、または使用後本製品が冷めるまで、お子様を本製品に近づけないでください。
警告
幼児やペットが誤って本製品を作動させないように、子供用安全装置をご使用ください。
使用時の安全事項
• 初めてご使用になる前に、梱包材、ステッカー、レイヤーを本製品からすべて取り除いて
ください。
• クッキングゾーンを使用した後は、必ずスイッチを「オフ」にしてください。
• やけどの危険があります!金属製のもの、たとえばナイフやフォーク、鍋のふたなどを調
理を行う面におかないでください。熱くなります。
• 埋め込み式ペースメーカーをご使用の方は、電源が入っている IH クッキングゾーンから
30 センチ以上離れてください。
警告
火災の危険! 温度が上がりすぎた油脂は非常に早く引火します。
正しい使い方
• 使用中は本製品から離れないでください。
• 本製品は一般家庭用です。
• 本製品を作業台または保管場所として使用しないでください。
• 可燃性液体や可燃物または可溶性のもの(プラスチック製やアルミニウム製のもの)を本
製品の上または近くに置かないでください。
• 本製品をコンセントに接続する際には注意してください。電源コードが本製品または熱
い調理器具に触れないようにしてください。電源コードが絡まらないようにしてくださ
い。
本製品の破損を防ぐために
• 物や調理器具をガラスセラミックに落とすと、表面が破損することがあります。
• 鋳鉄、アルミキャスト製の調理器具または底が破損した調理器具はガラス表面を傷つける
場合があります。それらの調理器具をガラス面上で動かさないでください。
Page 21

取り付け指示
• 調理器具とガラスセラミックの破損を防ぐため、調理器具を空焚きしないでください。
• 空の調理器具、または調理器具なしでクッキングゾーンを使用しないでください。
• 本製品の上にアルミホイルを置かないでください。
• 調理台とその下のユニット前面との間にある 5mm の換気スペースを塞がないように気
を付けてください。
警告
表面に割れ目がある場合は、感電防止のために電源を切ってください。
取り付け指示
据え付けの前に、銘板からシリアル番号 (Ser. Nr.) をメモしておいてください。本製品の銘
板は下部ケーシングにあります。
HK764400PB
58 GDD D6 WG
AEG
200 V 50-60-Hz
安全上のご注意
警告
「安全上のご注意」を必ずお読みください。
• 運搬中に本製品が破損していないか確認してください。本製品が破損している場合は、接
続しないでください。必要な場合は、代理店にお問い合わせください。
• 資格のある保守技術者のみが本製品を取り付け、接続、または修理することができます。
純正スペア部品だけをお使いください。
• 本製品を、基準どおりに適切なビルトインユニットおよび調理台に組み立てたら、そのま
までご利用ください。
• 仕様や、本製品の改造をしないでください。怪我や、本製品破損のおそれがあります。
• 本製品を使用する国の法律、条例、指示、および基準をすべて遵守してください(安全規
則、リサイクル規則、電気に関する安全規則など)。
• 別の器具やユニットとの間隔には、最小限の間を空けてください。
• 衝撃保護を施してください。たとえば、引き出しを取り付けるのは、本製品真下の床に衝
撃保護を施してある場合のみなど。
• 適切なシーリング材を使用して、調理台の断面を湿気から保護してください。
• 適切なシーリング材を使用して、本製品を調理台に隙間なく取り付けます。
• 食器洗い機やオーブンなどの蒸気や湿気から、本製品の底部を保護してください。
• ドアの横または窓の下に本製品を取り付けないでください。ドアまたは窓を開けた時に、
熱い調理器具を本製品の上から突き落してしまうかもしれません。
警告
電流による怪我の危険があります。電気配線に関する指示に慎重に従ってください。
949 595 097
Induction 6,0 kW
6,0 kW
21
• 電源接続端子には電圧がかかっています。
• 電源接続端子を電源から外してください。
• 衝撃保護のため、正しく据え付けてください。
Page 22

取り付け指示
22
• 緩みのある差し込み接続または不適切な差込み接続が原因で、端子が過熱することがあり
ます。
• 有資格電気技術者だけが圧着接続を適切に取り付けることができます。
• ストレインリリーフクランプを使用してください。
• 単相または二相接続には、タイプ H05BB-F Tmax 90°C 以上の適切な電源コードを使用し
てください。
• 破損した電源コード、専用ケーブル(タイプ H05BB-F Tmax 90°C 以上)と交換してくだ
さい。お近くのサービスセンターまでお問い合わせください。
全ての極の開極幅が 3mm 以上となるようにして、壁のコンセントから本製品の電源を抜け
る状態で本線の電気配線を行ってください。
次のものに対し適切な絶縁装置をご使用ください。ヒューズ(ホルダーから外すスクリュー
タイプのヒューズ)、漏電遮断器、および接触機など。
組立て
min.
min.
500mm
50mm
min.
50mm
min.
5mm
R 5mm
=
490
+1
mm
=
min.
20 mm
680
600mm
+1
mm
min.
25 mm
min.
5 mm
min.
38 mm
min.
5 mm
Page 23

保護ボックス(追加アクセサリー)を使用している
場合は、5 ミリの換気スペースと本製品の真下の保
護フロアは必要ありません。
製品説明
調理面のレイアウト
製品説明
23
1 2
6
5
4
コントロールパネルのレイアウト
7
6
5
4
1 IH クッキングゾーン 1900W(パワー機
能は 2400W)
2 IH クッキングゾーン 1900W(パワー機
能は 2400W)
3 コントロールパネル
3
4 IH クッキングゾーン 1900W(パワー機
能は 2400W)
5 IH クッキングゾーン 1900W(パワー機
能は 2400W)
6 コントロールパネル
9
8
10
1
2
3
センサーパネルを使用して本製品を操作してください。ディスプレイ、表示灯、およびアラーム音に
より、どの機能が作動しているのかがわかります。
センサーパネル 機能
1
調理段階の表示 加熱レベル設定を表示します。
2
本製品の電源のオン・オフを行います。
Page 24

24
操作指示
センサーパネル 機能
3
コントロールバー 過熱レベルの設定
4
5
6
7
8
/
タイマー表示 分単位で時間を示します。
クッキングゾーンのタイマーの表示灯時間を設定したゾーンを示します。
パワー機能を有効にします。
時間を増減します。
クッキングゾーンの選択
9
10
加熱レベル設定の表示
ディスプレイ 説明
クッキングゾーンがオフになっています。
-
+ 数字
/ /
クッキングゾーンが作動しています。
機能が作動しています。
自動過熱機能が作動しています。
パワー機能が作動しています。
不具合が発生しています。
OptiHeat Control(3 ステップ余熱表示灯)調理中/保温/余熱。
ロック/子供用安全機能が作動しています。
調 r 器具が適切でない、または小さすぎる、あるいはクッキングゾーン
の上に調理器具が置かれていない。
自動スイッチオフ機能が作動しています。
OptiHeat Control(3 ステップ余熱表示灯)
警告
\ \ 余熱によるやけどの危険あり!
コントロールパネルをロックおよびロック解除し
ます。
本製品の STOP+GO 機能を有効化/停止します。
OptiHeat Control 余熱のレベルを示します。クッキングゾーンは、調理器具の底へ直接、調
理に必要な熱を加えます。ガラスセラミックは調理器具の熱で熱くなっています。
操作指示
有効化および無効化
に 1 秒間タッチして本製品のオンとオフを切り替えます。
Page 25

操作指示
自動スイッチオフ
次の場合にクッキングヒーターを自動的にオフにします。
• すべてのクッキングゾーンがオフになっている。
• クッキングヒーターをオンにした後で、加熱レベル設定を行っていない場合。
• コントロールパネルに何かをこぼしたかまたはなにか(鍋、布など)を置いた場合。しば
らくアラーム音が鳴り、その後本製品が停止します。パネルの上のものを除けるか、コン
トロールパネルを掃除してください。
• 本製品が熱くなり過ぎた場合(例:鍋を空焚きした場合など)。クッキングゾーンが冷め
てから、クッキングヒーターの使用を再開してください。
• 不適切な調理器具をした場合。
のマークが点灯し、2 分後にクッキングゾーンが自動
的に停止します。
• クッキングゾーンをオフにしていないか、加熱レベル設定を変更していません。しばらく
してから
自動スイッチオフが作動するまでの時間
加熱レベル設定
クッキングゾーン
がオフになるまで
の時間
が点灯表示され本製品がオフになります。表をご覧ください。
- - - -
6 時間 5 時間 4 時間 1.5 時間
加熱レベル設定
加熱レベル設定の部分のコントロールバーにタッ
チします。必要に応じて、上または下に変更しま
す。加熱レベル設定を適切に行ったら、手を離し
ます。
25
Page 26

操作指示
26
自動加熱
12
11
10
9
8
7
6
5
4
3
2
1
0
1234567891011121314
自動加熱機能をオンにすると、短時間で必要な加熱設定の温度にすることができます。この
機能は、しばらくの間 (グラフ参照) 最高レベルに設定し、その後必要な加熱レベルまで下が
ります。
クッキングゾーンの自動加熱機能を開始するには、次の手順を行います。
にタッチする ( が点灯します)。
1.
2. すぐに必要な過熱レベルにタッチします。3 秒後に
のマークが点灯します。
この機能を停止するには、過熱レベル設定を変更します。
パワー機能
パワー機能を使用すると、クッキングゾーンで使用できる電力を増やすことができます。パ
ワー機能は最長 10 分間作動します。その後、クッキングゾーンは自動的に最も高い加熱レ
ベルに自動的に戻ります。この機能を有効にするには、
ークが点灯します。機能を解除するには、
- の加熱レベル設定にタッチします。
にタッチします。すると マ
パワー管理
パワー管理は、対になっている 2 つのクッキング
ゾーンで電力を分割します(図参照)。パワー機能
は対のクッキングゾーンの片方に最大レベルの電
力を供給します。自動的にもう片方のクッキング
ゾーンへの電力供給を最低レベルに下げます。電
力が減少したほうのクッキングゾーンの表示は 2
段階で表示されます。
タイマー
カウントダウンタイマー
カウントダウンタイマーを使用すると、その時一度だけに対するクッキングゾーンの作動時
間を設定できます。
クッキングゾーンを選んだ後で、カウントダウンタイマーを設定します。
加熱レベル設定はタイマー設定後または設定前に行うことができます。
Page 27

00
操作指示
• クッキングゾーンの選択使用したいクッキングゾーンが表示されるまで繰り返し に
タッチします。
• カウントダウンタイマーの始動:タイマーの
分間)。クッキングゾーンの表示灯がゆっくり点滅して、時間がカウントダウンされ
99
ます。
• 残り時間の表示:クッキングゾーンを
く点滅します。ディスプレイに残り時間が表示されます。
• カウントダウンタイマーの変更:クッキングゾーンを
タッチします。
• タイマー解除:クッキングゾーンを
に戻ります。クッキングゾーンの表示灯が消えます。別の方法として と を同
00
時にタッチして解除することもできます。
残り時間が無くなるとアラームが鳴り
ります。
• アラームの停止: 次のマークにタッチします。
CountUp Timer(カウントアップタイマー)
クッキングゾーン作動時間の監視には、CountUp Timer を使用します。
• クッキングゾーンの設定 (複数のクッキングゾーンを操作する場合):使用したいクッキン
グゾーンが表示されるまで繰り返し
• CountUp Timer の有効化:タイマーの
ゾーンの表示灯がゆっくり点滅して、時間がカウントアップされます。ディスプレイには
とカウントされている時間 (分) が交互に表示されます。
• クッキングゾーンの作動時間監視:クッキングゾーンを
ーンの表示灯が速く点滅します。ディスプレイにクッキングゾーン作動時間が表示され
ます。
• CountUp Timer の解除:クッキングゾーンの設定を
タイマーを解除します。クッキングゾーンの表示灯が消えます。
お知らせタイマー
クッキングゾーンをお使いでない時は、タイマーをお知らせタイマーとしてご利用いただけ
ます。
が無くなるとアラームが鳴り
• アラームの停止: タッチするマークは
にタッチします。 か にタッチしてご希望の時間を設定します。残り時間
が点滅します。
で設定します。 にタッチします。残り時間が
00
にタッチします。
をタッチすると が表示されます。クッキング
にタッチして時間を設定します ( 00 -
で設定します。クッキングゾーンの表示灯が速
で設定します。 または に
が点滅します。クッキングゾーンがオフにな
で設定します。クッキングゾ
で行い または にタッチして
27
STOP+GO
機能がすべての作動中のクッキングゾーンを一番低い過熱レベルに設定します ( )。
が作動しているときは過熱レベルを変更できません。
は、タイマー機能を停止しません。
• この機能を有効にするには
• この機能を解除にするには
ンになります。
にタッチします。 のマークが表示されます。
にタッチします。前に設定していた加熱レベル設定がオ
Page 28

操作指示
28
ロック
クッキングゾーン作動中は、コントロールパネルをロックできますが はロックされませ
ん。この機能は、うっかり過熱レベル設定を変更することを防止します。
最初に過熱レベルを設定します。
この機能を開始するには
タイマーはついたままです。
この機能を停止するには
す。
本製品をオフにすると、この機能もオフになります。
にタッチします。 のマークが 4 秒間点灯します。
にタッチします。前に設定した加熱レベル設定が表示されま
子供用安全装置
この機能は、本製品を誤って作動させるのを防止します。
子供用安全装置の作動
• 本製品を
に 4 秒間タッチします。 のマークが表示されます。
•
• 本製品を
子供用安全装置の解除
• 本製品を
ッチします。
• 本製品を
1 度きりの調理時間だけ子供用安全装置を解除するには
• 本製品を
に 4 秒間タッチします。加熱レベルを 10 秒以内に設定します。これで、本製品を使
•
用できるようになります。
で本製品をオフにした時点で、子供用安全装置が作動します。
•
でオンにします。加熱レベル設定は行わないでください。
でオフにします。
でオンにします。加熱レベル設定は行わないでください。 に 4 秒間タ
のマークが表示されます。
でオフにします。
でオンにします。 のマークが表示されます。
OffSound Control (アラーム音の停止/開始)
アラームの停止
本機をの電源を切ります。
に 3 秒間タッチします。ディスプレイがオンになって消えます。 に 3 秒間タッチし
ます。
ラームがオフになります。
この機能が作動中は、以下の時のみ音が鳴ります。
•
• お知らせタイマー終了時
• カウントダウンタイマー終了時
• コントロールパネルの上に何か物を置いたとき
アラームの開始
本機をの電源を切ります。
ます。
す。アラーム音がオンになります。
が表示されアラームがオンになります。 にタッチしすると が点灯して、ア
にタッチしたとき
に 3 秒間タッチします。ディスプレイがオンになって消えます。 に 3 秒間タッチし
が表示されアラームがオフになります。 にタッチすると、 がオンになりま
Page 29

お役立ちヒントや一口メモ
お役立ちヒントや一口メモ
クッキングゾーンには適切な調理器具を使用してください。
調理を行う面の十字のマークの上に調理器具を載せます。十字のマークを完全に覆うよう
に載せてください。調理器具の底の磁気部分は、125 ミリ以上である必要があります。クッ
キングゾーンは、調理器具の底の寸法に自動的に調整されます。同時に 2 つのクッキングゾ
ーンで大型調理器具を用いて調理することができます。
クッキングゾーンに適した調理器具
IH クッキングゾーンでは強力な電磁場が調理器具の中で瞬間的に熱を発生させます。
調理器具の材質
• ○:鋳鉄、スチール、ホーロー、ステンレススチール、多層底鍋(メーカーにより適正表
示されているもの)
• ×:アルミニウム、銅、真鍮、ガラス、セラミック、磁器
次の場合、調理器具はクッキングヒーターに適しています。
• ... 最も高い温度に設定されたクッキングゾーンで、水がすぐに沸く
• ... 磁石が調理器具の底にくっつく
調理器具は底部にできるだけ厚みがあり、平らなものを使用してください。
29
作動音について
次の音がした場合
• 割けれるような音:調理器具が複合的な材質でできています(サンドイッチ構造)
• 笛のような音:1 つまたは複数のクッキングゾーンを高いパワーレベルで使っていて、しか
も調理器具が複合的な材質でできています(サンドイッチ構造)。
• ブーンという音:高いパワーレベルを使用しています。
• カチっという音:スイッチが切り替わる音です。
• シューという音、ブンブンいう音:ファンが作動しています。
これらの音は正常なものであり、不具合を示すものではありません。
省エネ
• できる限り、調理器具は蓋をしてご使用ください。
• クッキングゾーンをオンにする前に、調理器具を載せてください。
Öko Timer(エコタイマー)
省エネのため、クッキングゾーンは、カウントダウンタイマーのアラーム音が鳴るよりも早
く停止します。作動時間は、過熱レベル設定および調理時間によって異なります。
Page 30

ケアと清掃
30
調理のための応用例
表のデータはあくまでも参考です。
加熱レ
ベル設
定
調理した食べ物を保温する 必要に
1
1-3 ホランデーズソースの保温、バター、チ
1-3 凝固させるふんわりしたオムレツ、目玉焼き10~40分蓋をして調理する
ョコレート、ゼラチンを溶かす
用途: 時間 ヒント
調理器具にふたをします。
応じて
5~25分時々かき混ぜる
3-5 米や牛乳をベースにした料理を煮込む、
調理済みの食べ物を加熱する
5-7 野菜、魚、肉の蒸し料理 20~45分大さじ 1 杯の水を加える
7-9 ジャガイモを蒸す 20~60分ジャガイモ 750 グラムに対して水
7-9 大量の料理の調理、煮込み料理やスープ 60~150分材料に最大 3 リットルの液体を加
9-12 軽い炒め物薄きり肉、コルドン・ブル
ー、カツレツ、フリカデル、焼きソーセ
ージ、レバー、卵、パンケーキ、ドーナ
ッツ
12-13 大量の揚げ物、ハッシュブラウン、腰肉
のステーキ、ステーキ
14 大量の湯を沸かす、パスタ料理、肉を焼く(グーラッシュ、ポットロースト)、フライドポ
テト
25~50分最低 2 倍の量の水を米に加える、牛
必要に
応じて
5~15分時間が半分経過した時点で裏返す。
乳料理は途中でかき混ぜる
を最大 1/4 リットル使う。
える。
時間が半分経過した時点で裏返す。
パワー機能は、大量の湯を沸かすのに適しています。
アクリルアミドについて
重要事项! 最新の科学知識によると、食べ物(特にでんぷんを含むもの)を焦がし過ぎると、
アクリルアミドによって健康被害が生じる可能性があります。 そのため、調理はできるだけ
低温で行って、食べ物を焦がし過ぎないことをお勧めします。
ケアと清掃
使用後は毎回、必ず掃除してください。
必ず、底部に汚れのない調理器具を使用してください。
警告
とがったものや研磨剤は本製品を傷つける場合があります。
安全のため、本製品にはスチーム洗浄機または高圧洗浄機を使用しないでください。
Page 31

トラブルシューティング
ガラスセラミック上の引っかき傷や濃い染みが本製品の作動に影響することはありません。
汚れを取り除く
1. – 即除去する:溶けたプラスチック、プラスチックホイル、砂糖を含んだ食べ物。ス
フに取り除かない場合、本製品破損の原因になることがあります。専用のガラスス
クレイパーをご使用ください。ガラススクレーパーをガラス面に対して斜めに立て
て、ブレードを滑らせます。
– 本製品が十分に冷めてから取り除く:リング状の石灰かすや水垢、油脂の飛沫、光
沢のある金属の変色。ガラスセラミックス用、またはステンレス用洗剤を使います。
2. 濡らした布巾と洗剤で掃除してください。
3. お手入れの終わりに清潔な布で本製品をから拭きしてください。
トラブルシューティング
問題 考えられる原因と対処法
本製品を始動または作動できない。• 再び本製品の電源を入れてから加熱レベルを 10 秒間以内にに
アラームが鳴り本製品がオフに
なる。
本製品をオフにするときにアラ
ーム音が鳴る。
本製品が自動的に停止する。
余熱表示灯が点灯しない。 短時間しか使わなかったため、クッキングゾーンが熱くなってい
自動過熱機能が作動しない。 • クッキングゾーンに余熱が残っている。クッキングゾーンを
過熱レベルが 2 段階の間で設定
される。
センサーパネルが熱くなる。 調理器具が大きすぎるか、コントロールパネルに近すぎるところ
設定する。
• 同時に複数のセンサーパネルにタッチした。1つのセンサー
パネルだけにタッチする。
• 子供用安全装置かロック、または Stop+Go が作動している。
「操作指示」の章を参照。
• コントロールパネルに水垢または脂染みが付着している。コ
ントロールパネルを掃除する。
1 つまたは複数のセンサーパネルが何かに覆われている。センサ
ーパネルを覆っている物を除ける。
の上に何かを置いた。センサーパネルを覆っている物を除け
る。
ない。クッキングゾーンが熱くなるはずなのに、そうならない場
合は、サービスセンターにお問い合わせください。
十分に冷ましてください。
• 最も高い加熱レベルが設定されている。最も高い加熱レベル
設定のパワーは、自動過熱機能と同じです。
パワー機能が作動している。「パワー管理」の項目を参照する。
に置いている。必要に応じて、大きい調理器具を後ろのクッキン
グゾーンに置く。
31
Page 32

環境保護
32
問題 考えられる原因と対処法
センサーパネルのキーにタッチ
したときにシグナルが鳴らな
い。
がオンになる。
がオンになる。
がオンになり、数字が表示さ
れる。
がオンになる。
シグナルがオフになっている。シグナルをゆうこうにする (「オフ
サウンド・コントロール」参照)。
自動スイッチオフ機能が作動している。本製品を停止してから、
再びオンにする。
• 調理器具がクッキングゾーンの上に置かれていない。調理器
具をクッキングゾーンの上に置く。
• 調理器具が適切でない。適切な調理器具を使用する。
• 調理器具の底の直径が、クッキングゾーンに対して小さすぎ
る。適切な寸法の調理器具を使用する。
• 調理器具が十字マークを覆っていない。十字のマークを完全
に覆うように載せてください。
本製品に不具合がある。
しばらくの間本製品の電源コードをコンセントから抜く。家の配
線系統からヒューズを外す。再び接続する。再び
った場合は、サービスセンターにお問い合わせください。
調理器具を空焚きしたことで本製品にエラーが発生した。クッキ
ングゾーン作動中は熱くなりすぎると過熱防止機能が作動しま
す。自動スイッチオフ機能が作動している。
本機をの電源を切ります。熱い調理器具を取り除く。およそ 30
秒後にクッキングゾーンを再度オンにする。
イから消える。余熱表示灯は点灯されたままでも良い。調理器具
を十分に冷まして、「クッキングゾーンのに適した調理器具」の項
目を確認する。
がオンにな
がディスプレ
上記の対処法を行っても、問題が解決されなかった場合は、販売代理店またはカスタマーサ
ービスまでお問い合わせください。銘板のデータ、ガラスセラミックの 3 桁の文字コード
(ガラス面のコーナーに記載)、および表示されたエラーメッセージをお伝えください。
必ず本製品を正しく操作するようご注意ください。保証期間中でも、操作ミスによる故障の
場合は、カスタマーサービスの技術者または代理店の保守費用が発生します。カスタマーサ
ービスおよび保証条件に関する指示は、保証ブックレットに記載されています。
環境保護
製品またはパッケージ上の マークは、製品を 家庭廃棄物として処理できない場合がある
ことを示し ています。このマークが付いた製品は、電気電子機器 リサイクル業者にて、回
収処分してもらってください。 製品の不正な廃棄処理は、環境や人体に害を及ぼす原 因と
なりますので、製品の処分は正しく行ってくださ い。 製品リサイクルの詳細については、
市町村役所、家庭 廃棄物サービス事業者、または製品購入店にお問い合 わせください
梱包材
梱包材は環境に配慮しており、リサイクルが可能です。プラスチック材は、次の表示によっ
て識別されています - >PE<、>PS<など。梱包材は適切な容器に入れて、地域の廃棄物処理
施設で廃棄してください。
Page 33

333435
Page 34

Page 35

Page 36

www.aeg.com/shop 892934417-A-112011
 Loading...