

Page 1
FSS62800P
USER
MANUAL
EN User Manual 2
Dishwasher
DE Benutzerinformation 26
Geschirrspüler
Page 2

www.aeg.com2
CONTENTS
1. SAFETY INFORMATION.............................................................................................2
2. SAFETY INSTRUCTIONS.............................................................................................4
3. PRODUCT DESCRIPTION...........................................................................................6
4. CONTROL PANEL....................................................................................................... 7
5. PROGRAMMES............................................................................................................7
6. SETTINGS.....................................................................................................................9
7. OPTIONS....................................................................................................................12
8. BEFORE FIRST USE................................................................................................... 13
9. DAILY USE..................................................................................................................14
10. HINTS AND TIPS..................................................................................................... 17
11. CARE AND CLEANING.......................................................................................... 18
12. TROUBLESHOOTING.............................................................................................20
13. PRODUCT INFORMATION SHEET .......................................................................24
14. ADDITIONAL TECHNICAL INFORMATION.........................................................24
FOR PERFECT RESULTS
Thank you for choosing this AEG product. We have created it to give you
impeccable performance for many years, with innovative technologies that help
make life simpler features you might not find on ordinary appliances. Please
spend a few minutes reading to get the very best from it.
Visit our website for:
Get usage advice, brochures, trouble shooter, service information:
www.aeg.com/webselfservice
Register your product for better service:
www.registeraeg.com
Buy Accessories, Consumables and Original spare parts for your appliance:
www.aeg.com/shop
CUSTOMER CARE AND SERVICE
Always use original spare parts.
When contacting our Authorised Service Centre, ensure that you have the
following data available: Model, PNC, Serial Number.
The information can be found on the rating plate.
Warning / Caution-Safety information
General information and tips
Environmental information
Subject to change without notice.
1.
SAFETY INFORMATION
Before the installation and use of the appliance,
carefully read the supplied instructions. The
Page 3

ENGLISH 3
manufacturer is not responsible for any injuries or
damages that are the result of incorrect installation or
usage. Always keep the instructions in a safe and
accessible location for future reference.
1.1 Children and vulnerable people safety
• This appliance can be used by children aged from 8
years and above and persons with reduced physical,
sensory or mental capabilities or lack of experience
and knowledge if they have been given supervision or
instruction concerning the use of the appliance in a
safe way and understand the hazards involved.
• Children between 3 and 8 years of age and persons
with very extensive and complex disabilities shall be
kept away from the appliance unless continuously
supervised.
• Children of less than 3 years of age should be kept
away from the appliance unless continuously
supervised.
• Do not let children play with the appliance.
• Keep detergents away from children.
• Keep children and pets away from the appliance when
the door is open.
• Children shall not carry out cleaning and user
maintenance of the appliance without supervision.
1.2 General Safety
• This appliance is intended to be used in household
and similar applications such as:
– farm houses; staff kitchen areas in shops, offices
and other working environments;
– by clients in hotels, motels, bed & breakfast and
other residential type environments.
• Do not change the specification of this appliance.
• The operating water pressure (minimum and
maximum) must be between 0.5 (0.05) / 8 (0.8) bar
(MPa)
• Obey the maximum number of 13 place settings.
Page 4

www.aeg.com4
• If the supply cord is damaged, it must be replaced by
the manufacturer, its Authorised Service Centre or
similarly qualified persons in order to avoid a hazard.
• Put the cutlery in the cutlery basket with the sharp
ends pointing down or put them in the cutlery drawer
in a horizontal position with the sharp edges down.
• Do not leave the appliance with the open door
unattended to avoid stepping accidentally onto it.
• Before any maintenance operation, deactivate the
appliance and disconnect the mains plug from the
socket.
• Do not use high pressure water sprays and/or steam
to clean the appliance.
• If the appliance has ventilation openings in the base,
they must not be covered e.g. by a carpet.
• The appliance is to be connected to the water mains
using the new supplied hose-sets. Old hose sets must
not be reused.
2. SAFETY INSTRUCTIONS
2.1 Installation
WARNING!
Only a qualified person must
install this appliance.
• Remove all the packaging.
• Do not install or use a damaged
appliance.
• Do not use the appliance before
installing it in the built-in structure
due to safety manner.
• Follow the installation instructions
supplied with the appliance.
• Always take care when moving the
appliance as it is heavy. Always use
safety gloves and enclosed footwear.
• Do not install or use the appliance
where the temperature is less than 0
°C.
• Install the appliance in a safe and
suitable place that meets installation
requirements.
2.2 Electrical connection
WARNING!
Risk of fire and electric
shock.
• The appliance must be earthed.
• Make sure that the parameters on the
rating plate are compatible with the
electrical ratings of the mains power
supply.
• Always use a correctly installed
shockproof socket.
• Do not use multi-plug adapters and
extension cables.
• Make sure not to cause damage to
the mains plug and to the mains
cable. Should the mains cable need
to be replaced, this must be carried
out by our Authorised Service Centre.
• Connect the mains plug to the mains
socket only at the end of the
installation. Make sure that there is
access to the mains plug after the
installation.
Page 5
ENGLISH 5
• Do not pull the mains cable to
disconnect the appliance. Always pull
the mains plug.
• This appliance complies with the
E.E.C. Directives.
• This appliance is fitted with a 13 A
mains plug. If it is necessary to
change the mains plug fuse, use only
a 13 A ASTA (BS 1362) fuse (UK and
Ireland only).
2.3 Water connection
• Do not cause damage to the water
hoses.
• Before connection to new pipes,
pipes not used for a long time, where
repair work has been carried out or
new devices fitted (water meters,
etc.), let the water flow until it is clean
and clear.
• Ensure that there are no visible water
leaks during and after the first use of
the appliance.
• The water inlet hose has a safety valve
and a sheath with an inner mains
cable.
disconnect the mains plug from the
mains socket. Contact the Authorised
Service Centre to replace the water
inlet hose.
2.4 Use
• Do not put flammable products or
items that are wet with flammable
products in, near or on the appliance.
• Dishwasher detergents are
dangerous. Follow the safety
instructions on the detergent
packaging.
• Do not drink and play with the water
in the appliance.
• Do not remove the dishes from the
appliance until the programme is
complete. Some detergent may
remain on the dishes.
• Do not sit or stand on the open door
of the appliance.
• The appliance can release hot steam
if you open the door while a
programme operates.
2.5 Service
• To repair the appliance contact the
Authorised Service Centre.
• Use original spare parts only.
WARNING!
Dangerous voltage.
• If the water inlet hose is damaged,
immediately close the water tap and
2.6 Disposal
WARNING!
Risk of injury or suffocation.
• Disconnect the appliance from the
mains supply.
• Cut off the mains cable and discard it.
• Remove the door catch to prevent
children and pets to get closed in the
appliance.
Page 6
5
4
9
67
13
12
11
10
14
2
3
1
8
www.aeg.com6
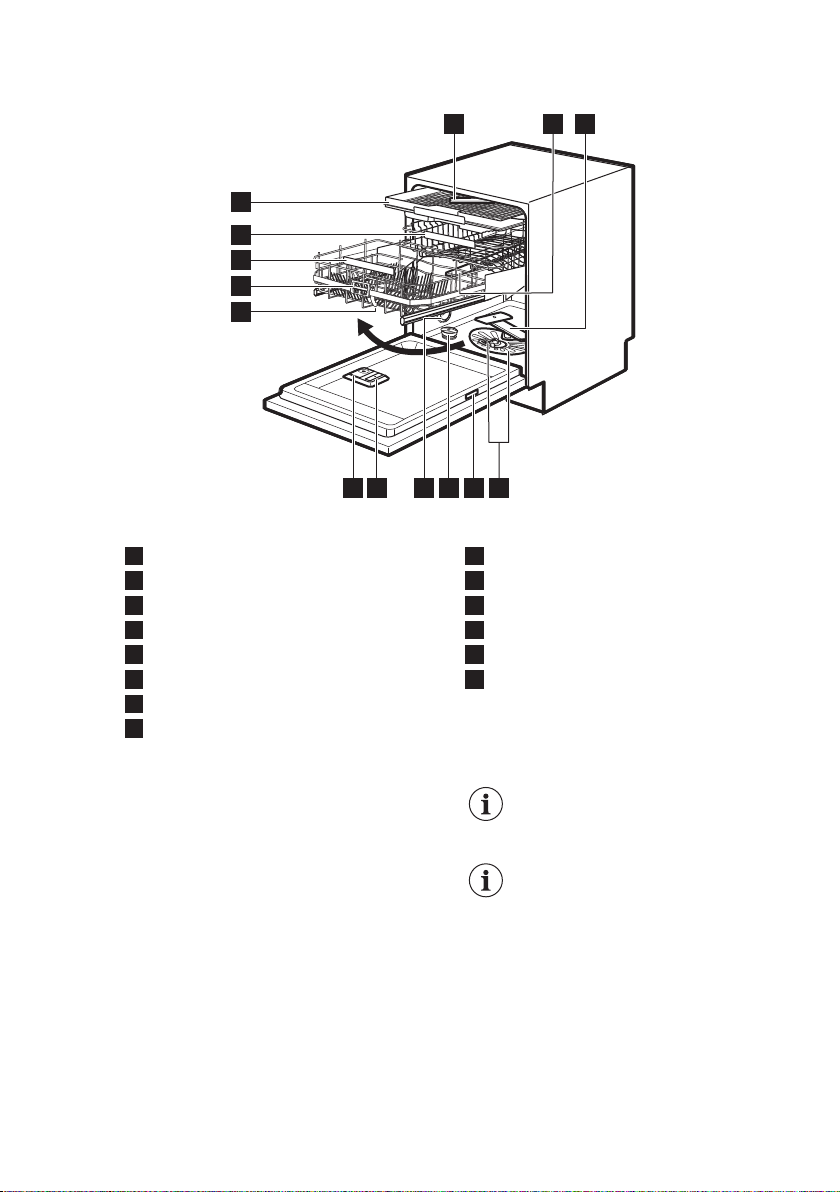
3. PRODUCT DESCRIPTION
Top spray arm
1
Upper spray arm
2
Lower spray arm
3
Filters
4
Rating plate
5
Salt container
6
Air vent
7
Rinse aid dispenser
8
3.1 Beam-on-Floor
The Beam-on-Floor is a light that is
displayed on the floor below the
appliance door.
• When the programme starts, a red
light comes on and stays on for the
duration of the programme.
• When the programme is completed, a
green light comes on.
• When the appliance has a
malfunction, the red light flashes.
Detergent dispenser
9
Comfort Lift basket
10
Trigger handle
11
Lower basket handle
12
Upper basket
13
Cutlery drawer
14
The Beam-on-Floor is off
when the appliance is
deactivated.
When AirDry is activated
during the drying phase, the
projection on the floor may
not be completely visible. To
see if the cycle has ended,
check the control panel.
Page 7
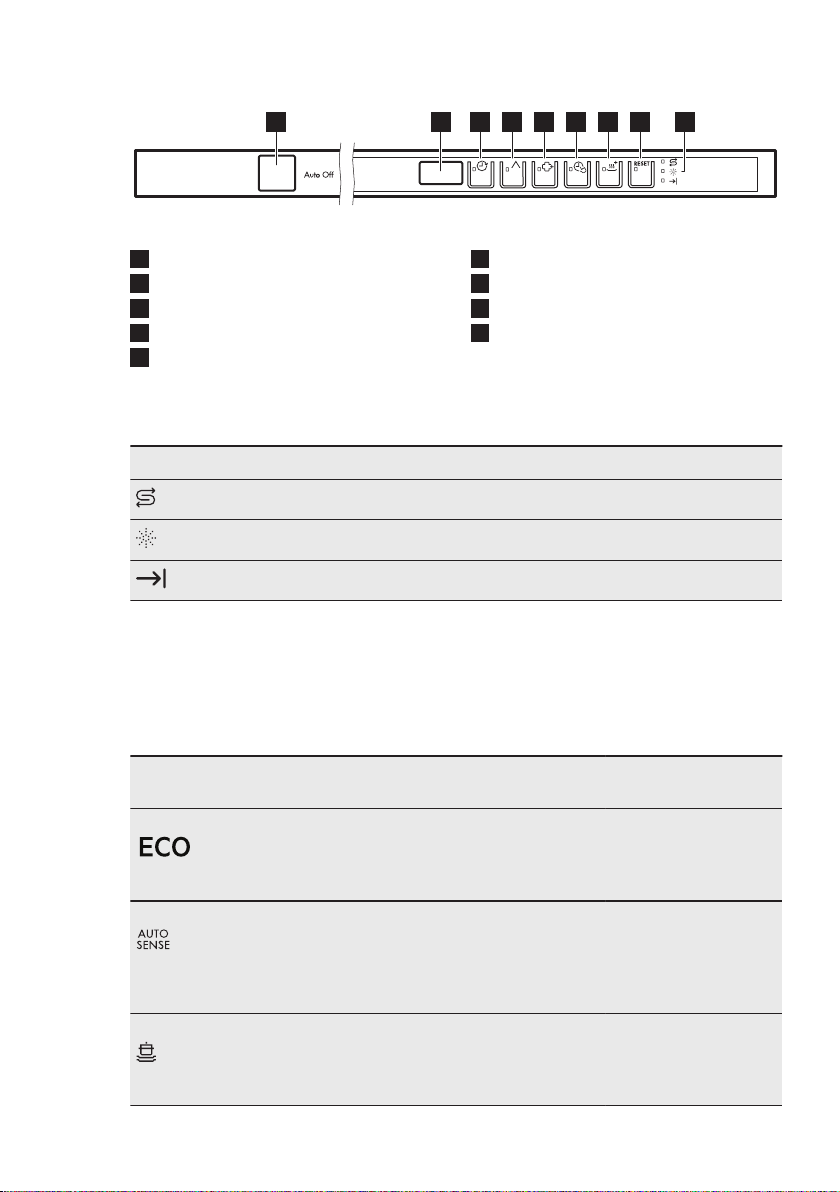
4. CONTROL PANEL
1
2
3 4 5 6 7 8
9
ENGLISH 7
On/off button
1
Display
2
Delay button
3
Program button
4
ExtraHygiene button
5
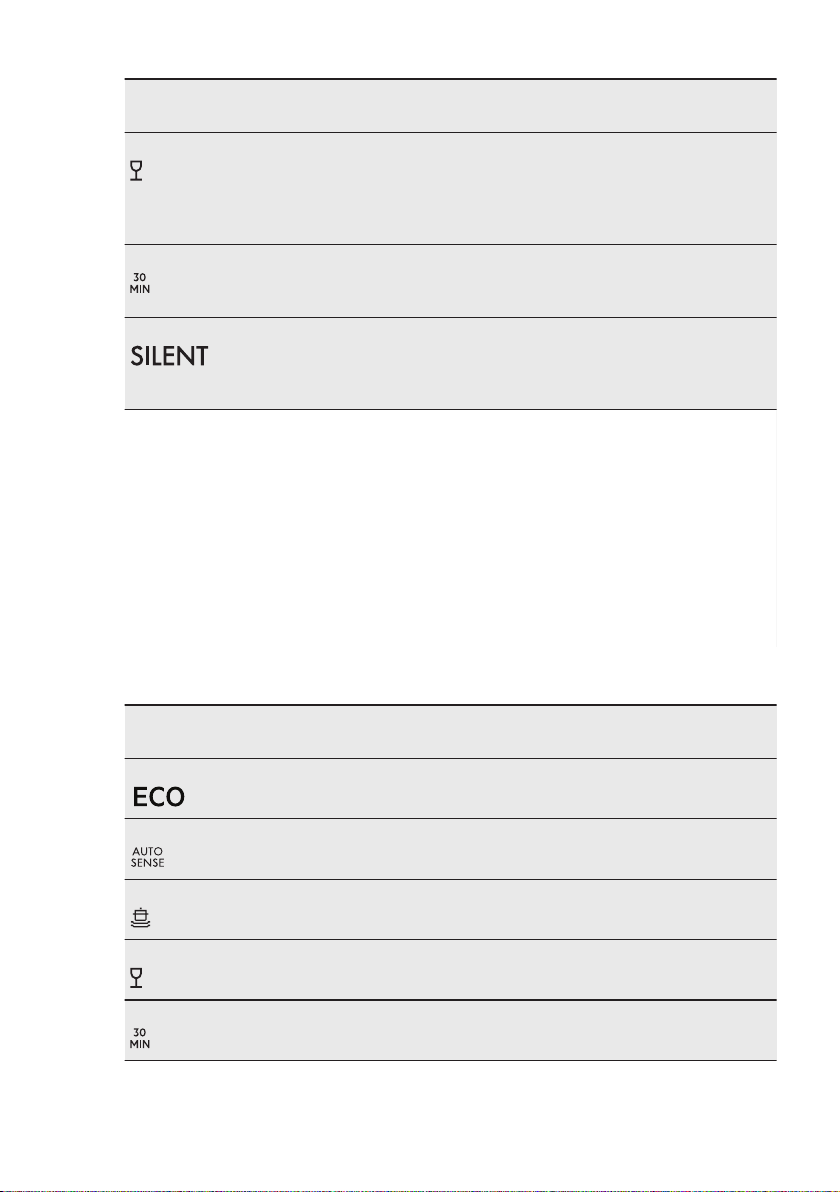
4.1 Indicators
Indicator Description
Salt indicator. It is on when the salt container needs refilling.
Rinse aid indicator. It is on when the rinse aid dispenser needs refilling.
End indicator. It is on when the programme is completed.
5. PROGRAMMES
The numbering of the programmes in
the table (P1, P2, etc.) reflects their
sequence on the control panel.
Programme Degree of soil
Type of load
P1
1)
P2
2)
P3
3)
• Normal soil
• Crockery and
• All
• Crockery, cut-
• Heavy soil
• Crockery, cut-
cutlery
lery, pots and
pans
lery, pots and
pans
TimeSaver button
6
XtraDry button
7
Reset button
8
Indicators
9
The order of the programmes in the
table may not reflect their sequence on
the control panel.
Programme phases Options
• Prewash
• Wash 50 °C
• Rinses
• Dry
• Prewash
• Wash from 45 °C to 70
°C
• Rinses
• Dry
• Prewash
• Wash 70 °C
• Rinses
• Dry
• ExtraHygiene
• XtraDry
• ExtraHygiene
• XtraDry
• ExtraHygiene
• TimeSaver
• XtraDry
Page 8
www.aeg.com8
Programme Degree of soil
Programme phases Options
Type of load
P5
• Normal or light
4)
soil
• Delicate crock-
• Wash 45 °C
• Rinses
• Dry
• XtraDry
ery and glassware
P4
5)
• Fresh soil
• Crockery and
• Wash 60 °C
• Rinses
• ExtraHygiene
• XtraDry
cutlery
P6
• Normal soil
• Crockery and
6)
cutlery
• Prewash
• Wash 50 °C
• Rinses
• XtraDry
• Dry
1)
This programme offers the most efficient use of water and energy consumption for crockery and cut-
lery with normal soil. This is the standard programme for test institutes.
2)
The appliance senses the degree of soil and the quantity of items in the baskets. It automatically ad-
justs the temperature and quantity of water as well as the wash duration.
3)
This programme is designed to wash heavily soiled items with high water pressure and at a high tem-
perature.
4)
This programme controls the temperature of the water to provide special care for delicate items,
glassware in particular.
5)
This programme is suitable for washing a load or a half load with fresh or light soil in a short time.
6)
This is the most silent programme. The wash pump works at a very low speed to reduce the noise
generated by the appliance. Due to the low speed, the programme duration is long.
5.1 Consumption values
Programme
P1
P2
P3
P5
P4
1)
Water
12.5 - 14.5 1.4 - 1.7 170 - 190
12 - 14 0.8 - 1.0 82 - 92
Energy
(l)
(kWh)
Duration
(min)
11 0.921 235
8 - 15 0.7 - 1.7 46 - 170
10 0.9 30
Page 9

ENGLISH 9
Programme
P6
1)
The pressure and the temperature of the water, the variations of the mains supply, the options and the
quantity of dishes can change the values.
5.2 Information for test institutes
To receive the necessary information for
conducting performance tests (e.g.
according to EN60436), send an email to:
info.test@dishwasher-production.com
6. SETTINGS
6.1 Programme selection
mode and user mode
When the appliance is in programme
selection mode it is possible to set a
programme and to enter user mode.
Settings available in the user mode:
• The level of water softener according
to the water hardness.
• Activation or deactivation of the rinse
aid empty notification.
• The level of rinse aid according to the
required dosage.
• Activation or deactivation of the
acoustic signal for the end of a
programme.
• Activation or deactivation of the
AirDry.
As the appliance stores the saved
settings, there is no need to configure
it before every cycle.
How to set the programme selection mode
The appliance is in programme selection
mode when the display shows the
programme number P1.
After activation, the appliance is in
programme selection mode by default. If
not, set the programme selection mode
the following way:
1)
Water
(l)
12 - 13 1.1 - 1.3 230 - 250
Energy
(kWh)
In your request please include the
product number code (PNC) found on
the rating plate.
For any other questions regarding your
dishwasher please refer to the service
book provided with your appliance.
Press and hold Reset until the appliance
is in programme selection mode.
Duration
(min)
How to enter user mode
Make sure the appliance is in
programme selection mode.
To enter the user mode, press and hold
simultaneously and until the
indicators
and the display is blank.
, , , and flash
6.2 The water softener
The water softener removes minerals
from the water supply, which would have
a negative effect on the washing results
and on the appliance.
The higher the content of these minerals,
the harder your water is. Water hardness
is measured in equivalent scales.
The water softener should be adjusted
according to the hardness of the water in
your area. Your local water authority can
advise you on the hardness of the water
in your area. It is important to set the
right level of the water softener to assure
good washing results.
Page 10
www.aeg.com10
Softening hard water
increases the consumption
of water and energy as well
as the programme duration.
The higher the level of water
softener, the higher the
consumption and the longer
the duration.
Water hardness
German de-
grees (°dH)
47 - 50 84 - 90 8.4 - 9.0 58 - 63 10
43 - 46 76 - 83 7.6 - 8.3 53 - 57 9
37 - 42 65 - 75 6.5 - 7.5 46 - 52 8
29 - 36 51 - 64 5.1 - 6.4 36 - 45 7
23 - 28 40 - 50 4.0 - 5.0 28 - 35 6
19 - 22 33 - 39 3.3 - 3.9 23 - 27
15 - 18 26 - 32 2.6 - 3.2 18 - 22 4
11 - 14 19 - 25 1.9 - 2.5 13 - 17 3
4 - 10 7 - 18 0.7 - 1.8 5 - 12 2
<4 <7 <0.7 < 5
1)
Factory setting.
2)
Do not use salt at this level.
French degrees
(°fH)
mmol / l Clarke de-
grees
Water softener lev-
el
1)
5
2)
1
Regardless of the type of detergent
used, set the proper water hardness
level to keep the salt refill indicator
active.
Multi-tabs containing salt
are not effective enough to
soften hard water.
How to set the water softener level
Make sure the appliance is in user mode.
1. Press
• The indicators , , and
• The indicator still flashes.
.
are off.
• The display shows the current
setting: e.g.
2. Press
repeatedly to change the
= level 5.
setting.
3. Press on/off to confirm the setting.
6.3 The rinse aid empty
notification
The rinse aid helps to dry the dishes
without streaks and stains. It is
automatically released during the hot
rinse phase.
When the rinse aid chamber is empty,
the rinse aid indicator is turned on
notifying to refill rinse aid. If the drying
results are satisfactory while using multitablets only, it is possible to deactivate
the notification for refilling rinse aid.
Page 11
ENGLISH 11
However, for best drying performance,
always use rinse aid.
If standard detergent or multi-tablets
without rinse aid are used, activate the
notification to keep the rinse aid refill
indicator active.
How to deactivate the rinse aid empty notification
Make sure the appliance is in user mode.
1. Press
• The indicators
• The indicator
• The display shows the current
2. Press
3. Press on/off to confirm the setting.
.
are off.
setting.
– = the rinse aid empty
notification is deactivated.
= the rinse aid empty
–
notification is activated.
to change the setting.
, , and
still flashes.
6.4 The rinse aid level
It is possible to set the released quantity
of rinse aid between level 1 (minimum
quantity) and level 6 (maximum quantity).
Level 0 deactivates the rinse aid
dispenser and no rinse aid is released.
Factory setting: level 4.
How to set the rinse aid level
Make sure the appliance is in user mode.
6.5 Acoustic signals
Acoustic signals sound when a
malfunction of the appliance occurs. It is
not possible to deactivate these acoustic
signals.
There is also an acoustic signal that
sounds when the programme is
completed. By default this acoustic
signal is deactivated but it is possible to
activate it.
How to activate the acoustic signal for the end of programme
Make sure the appliance is in user mode.
1. Press
• The indicators
• The indicator
• The display shows the current
2. Press
3. Press on/off to confirm the setting.
.
are off.
setting.
= the acoustic signal is
–
deactivated.
–
= the acoustic signal is
activated.
to change the setting.
, , and
still flashes.
6.6 AirDry
AirDry improves the drying results with
less energy consumption.
1. Press
• The indicators
• The indicator
• The display shows the current
2. Press
setting.
3. Press on/off to confirm the setting.
.
are off.
flash.
setting: e.g.
– The levels of rinse aid range
from 0A to 6A where level 0A
means rinse aid is not used.
repeatedly to change the
, , and
continues to
= level 4.
During the drying phase, the
door opens automatically
and remains ajar.
Page 12
www.aeg.com12
CAUTION!
Do not try to close the
appliance door within 2
minutes after automatic
opening. This can cause
damage to the appliance.
If, afterwards, the door is
closed for another 3
minutes, the running
programme ends.
AirDry is automatically activated with all
programmes excluding
applicable).
To improve the drying performance refer
to the XtraDry option or activate AirDry.
CAUTION!
If children have access to the
appliance, it is advised to
deactivate AirDry as opening
the door may pose a danger.
7. OPTIONS
Desired options must be
activated every time before
you start a programme.
It is not possible to activate
or deactivate options while a
programme is running.
Not all options are
compatible with each other.
If you select non compatible
options, the appliance
automatically deactivates
one or more of them. Only
the indicators of the still
active options are on.
If an option is not applicable
to a programme, the related
indicator is off or it flashes
quickly for a few seconds
and then goes out.
Activating options can affect
the water and energy
consumption as well as the
programme duration.
(if
How to deactivate AirDry
Make sure the appliance is in user mode.
1. Press .
• The indicators
are off.
• The indicator
• The display shows the current
setting.
–
= AirDry is deactivated.
– = AirDry is activated.
2. Press
3. Press on/off to confirm the setting.
to change the setting.
, , and
still flashes.
7.1 XtraDry
Activate this option to boost the drying
performance.
XtraDry is a permanent option for all
programmes other than
automatically activated in next cycles.
This configuration can be changed at any
time.
Every time is
activated, XtraDry is off and
needs to be chosen
manually.
Activating XtraDry deactivates TimeSaver
and vice versa.
. It is
How to activate XtraDry
Press
The related indicator is on.
The display shows the updated
programme duration.
.
Page 13
ENGLISH 13
7.2 TimeSaver
The TimeSaver allows to reduce the
duration of a selected programme by
approximately 50%.
The washing results are the same as with
the normal programme duration. The
drying results can decrease.
This option increases the pressure and
the temperature of the water. The
washing and the drying phases are
shorter.
By default, TimeSaver is off, but it is
possible to activate it manually. This
option cannot be combined with
XtraDry.
How to activate TimeSaver
Press
.
8. BEFORE FIRST USE
1. Make sure that the current level of
the water softener agrees with the
hardness of the water supply. If
not, adjust the level of the water
softener.
2. Fill the salt container.
3. Fill the rinse aid dispenser.
4. Open the water tap.
5. Start a programme to remove any
processing residuals that can still be
inside the appliance. Do not use
detergent and do not put dishes in
the baskets.
After starting the programme, the
appliance recharges the resin in the
water softener for up to 5 minutes. The
washing phase starts only after this
procedure is complete. The procedure is
repeated periodically.
8.1 The salt container
The related indicator is on.
The display shows the updated
programme duration.
7.3 ExtraHygiene
This option provides better hygiene
results by keeping the temperature at 70
°C for at least 10 minutes during the last
rinsing phase.
How to activate ExtraHygiene
Press
The related indicator is on.
The display shows the updated
programme duration.
.
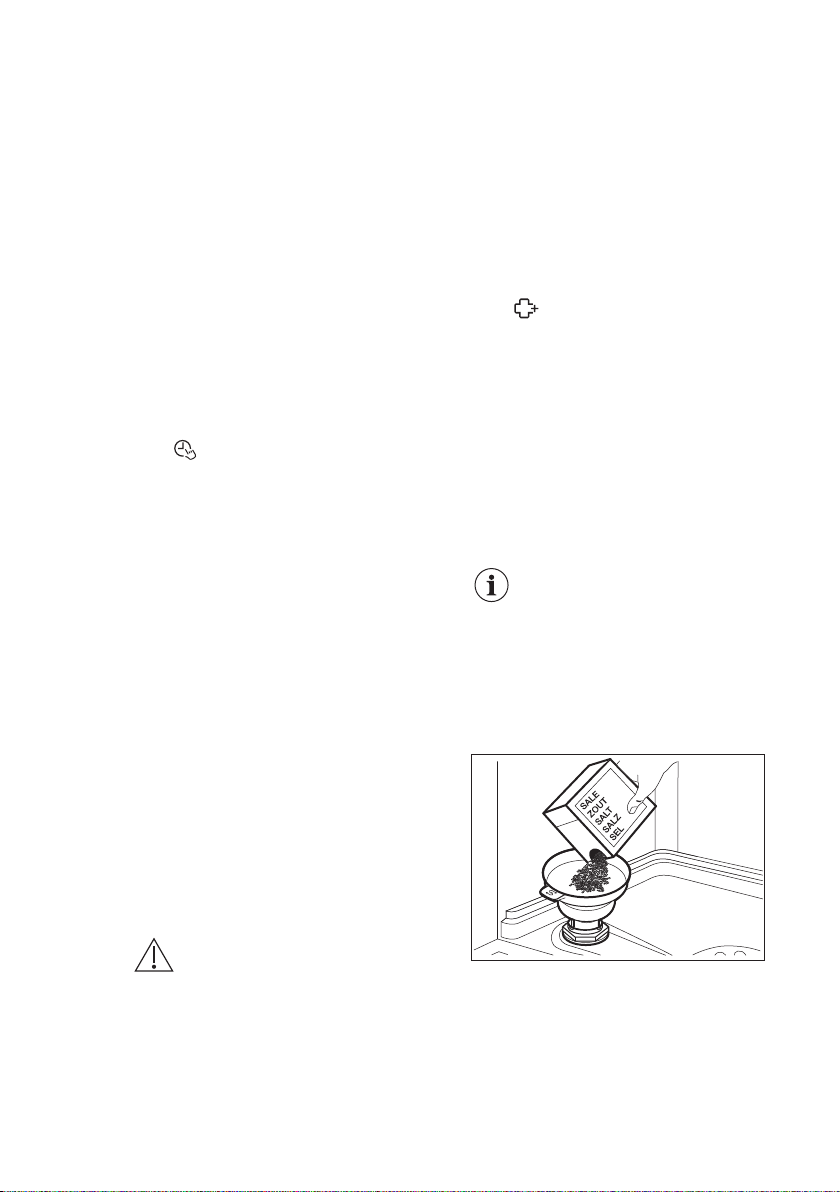
How to fill the salt container
Make sure that the Comfort
Lift basket is empty and
locked in the raised position.
1. Turn the cap of the salt container
counterclockwise and remove it.
2. Put 1 litre of water in the salt
container (only for the first time).
3. Fill the salt container with dishwasher
salt (until it is full).
CAUTION!
Use rough salt designed for
dishwashers only. Fine salt
increases the risk of
corrosion.
The salt is used to recharge the resin in
the water softener and to assure good
washing results in daily use.
4. Carefully shake the funnel by its
handle to get the last granules
inside.
5. Remove the salt around the opening
of the salt container.
Page 14
A
B
C
www.aeg.com14
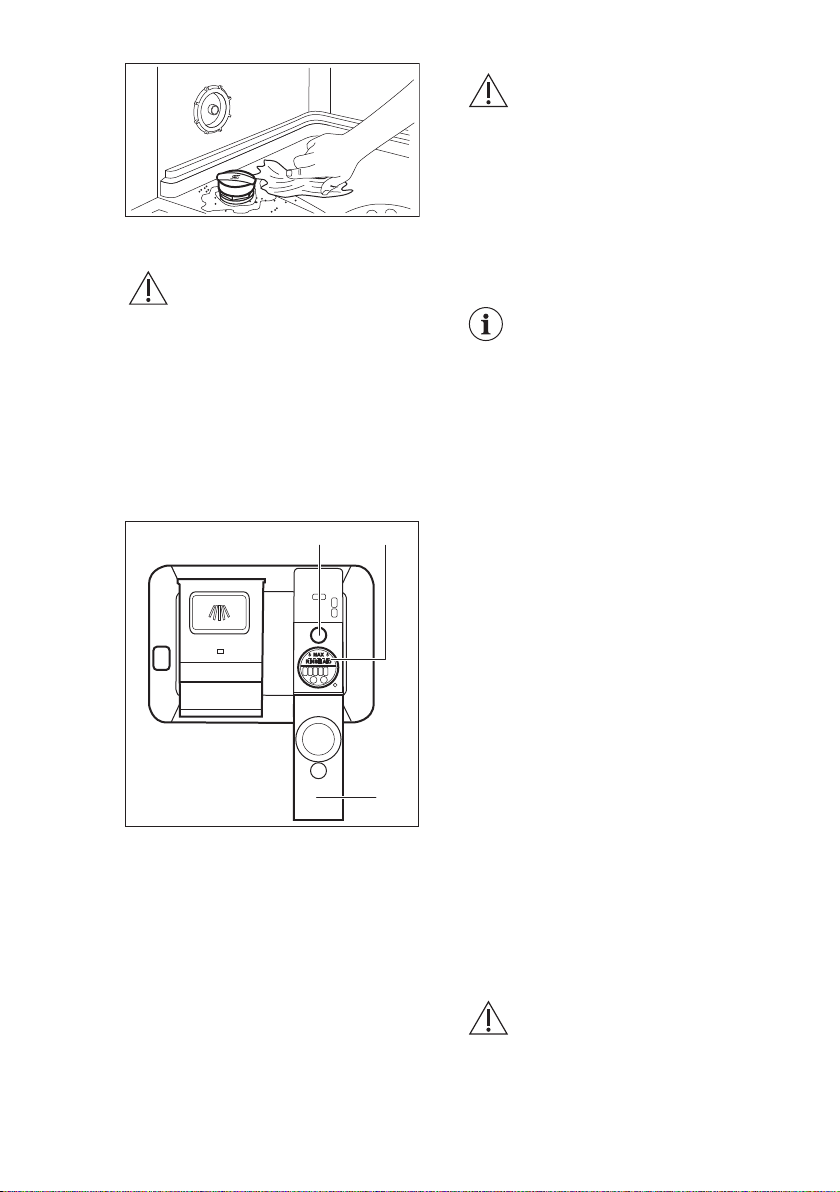
6. Turn the cap of the salt container
clockwise to close the salt container.
CAUTION!
Water and salt can come out
of the salt container when
you fill it. After you fill the
salt container, immediately
start the shortest
programme to prevent
corrosion. Do not put dishes
in the baskets.
8.2 How to fill the rinse aid dispenser
CAUTION!
Only use rinse aid designed
specifically for dishwashers.
1. Open the lid (C).
2. Fill the dispenser (B) until the rinse
aid reaches the marking ''MAX''.
3. Remove the spilled rinse aid with an
absorbent cloth to prevent excessive
foam formation.
4. Close the lid. Make sure that the lid
locks into position.
Fill the rinse aid dispenser
when the indicator (A) is
clear.
9. DAILY USE
1. Open the water tap.
2. Press the on/off button to activate
Make sure that the appliance is in
programme selection mode.
3. Load the baskets.
4. Add the detergent.
the appliance.
• If the salt indicator is on, fill the
salt container.
• If the rinse aid indicator is on, fill
the rinse aid dispenser.
5. Set and start a programme suitable
for the type of load and the degree
of soil.
9.1 Comfort Lift
CAUTION!
Do not sit on the rack or put
excessive pressure on the
locked basket.
Page 15
A
B
C
ENGLISH 15
CAUTION!
Do not exceed the max load
capacity of 18 kg.
CAUTION!
Make sure that items do not
stick out of the basket frame
as it can cause damage to
the items and the Comfort
Lift mechanism.
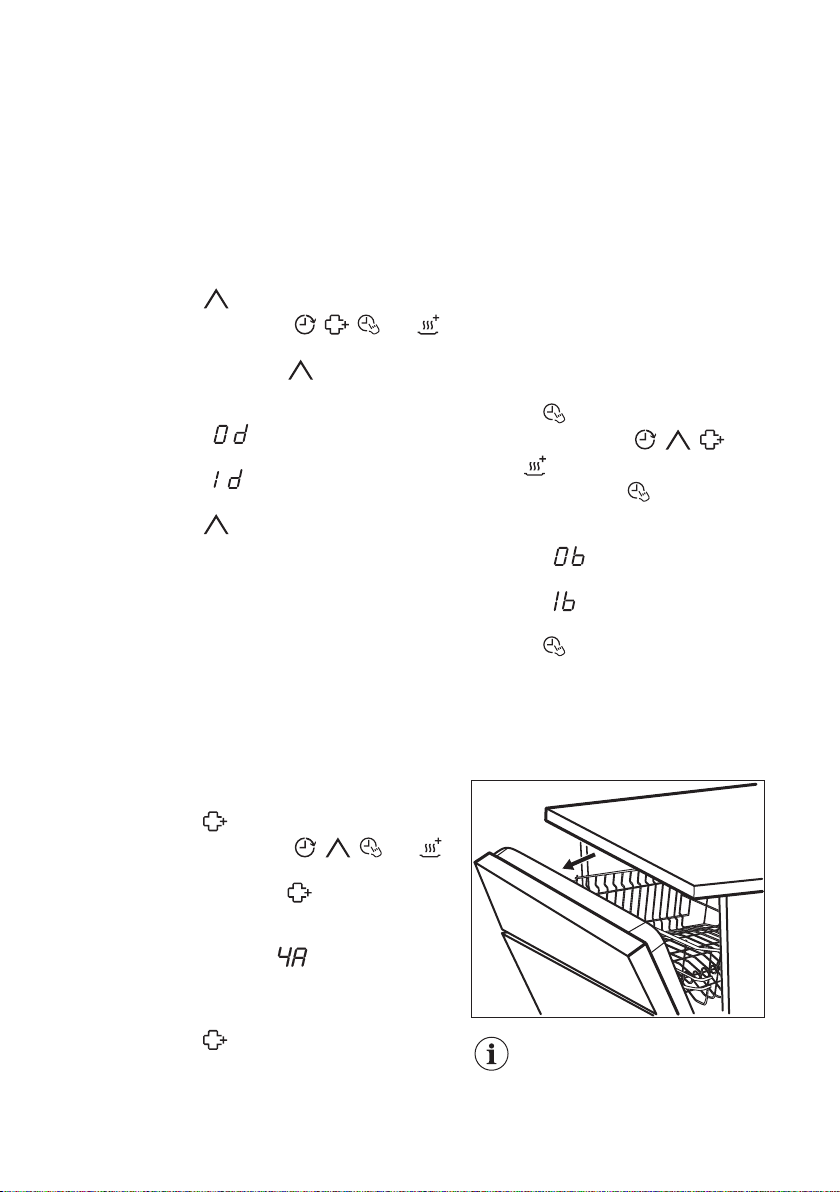
The Comfort Lift mechanism allows to lift
the lower rack up (to the second rack
level) and put it down to load and unload
dishes easily.
To load or unload the lower basket:
1. Lift the basket by pulling the rack out
of the dishwasher by the basket
handle. The trigger handle should
not be used.
the rack down. The mechanism
returns to its default position on the
lower level.
There are two ways of lowering the
basket depending on the loading:
• If there is a full load of plates,
slightly push the basket down.
• If the basket is empty or halfloaded, press the basket down.
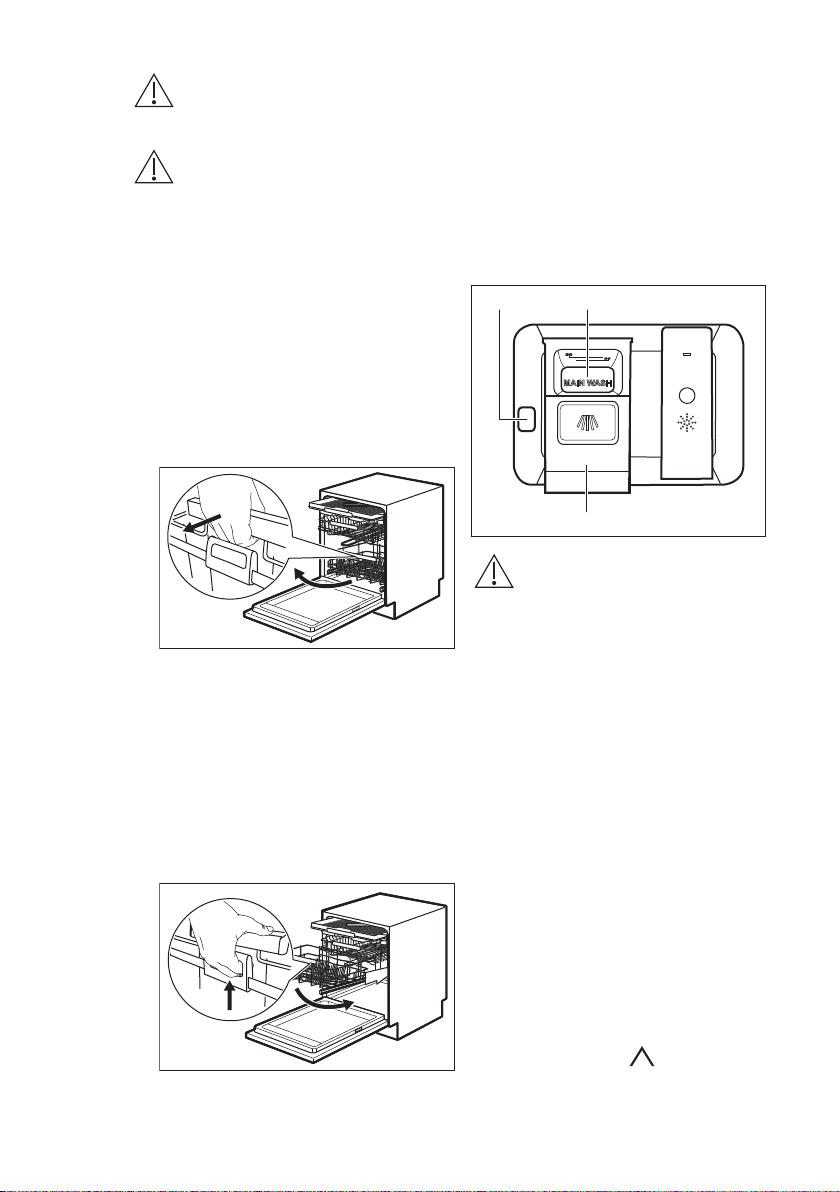
9.2 Using the detergent
CAUTION!
Only use detergent
specifically designed for
dishwashers.
1. Press the release button (A) to open
The basket is automatically locked on the
upper level.
2. Carefully place items in the basket or
remove them (refer to Basket
loading leaflet).
3. Lower the basket by connecting the
trigger handle with the basket frame
as shown below. Lift the trigger
handle completely and the basket
handle slightly until the basket is
disengaged on both sides.
the lid (C).
2. Put the detergent, in powder or
tablets, in the compartment (B).
3. If the programme has a prewash
phase, put a small quantity of
detergent on the inner part of the
appliance door.
4. Close the lid. Make sure that the lid
locks into position.
9.3 Setting and starting a
programme
Starting a programme
Once the basket is unlocked, push
1. Keep the appliance door ajar.
2. Press the on/off button to activate
the appliance. Make sure that the
appliance is in programme selection
mode.
3. Press repeatedly
shows the number of the chosen
until the display
Page 16

www.aeg.com16
programme. The display shows the
programme number for
approximately 3 seconds and then
shows the programme duration.
4. Set the applicable options.
5. Close the appliance door to start the
programme.
Starting a programme with delay start
1. Set a programme.
2. Press
shows the desired delay time (from 1
to 24 hours).
The indicator
3. Close the appliance door to start the
countdown.
During the countdown, it is possible to
increase the delay time but not to
change the programme and options.
When the countdown is completed, the
programme starts.
repeatedly until the display
is on.
Opening the door while the appliance operates
Opening the door while a programme is
running stops the appliance. It may affect
the energy consumption and the
programme duration. After closing the
door, the appliance continues from the
point of interruption.
If the door is opened for
more than 30 seconds
during the drying phase, the
running programme ends. It
does not happen if the door
is opened by AirDry
function.
Press and hold Reset until the appliance
is in programme selection mode.
Cancelling the programme
Press and hold Reset until the appliance
is in programme selection mode.
Make sure that there is detergent in the
detergent dispenser before you start a
new programme.
End of the programme
When the programme is complete, the
display shows 0:00. The indicator
on.
All buttons are inactive except for the
on/off button.
1. Press the on/off button or wait for
the Auto Off function to
automatically deactivate the
appliance.
If you open the door before the
activation of Auto Off, the appliance
is automatically deactivated.
2. Close the water tap.
is
The Auto Off function
This function decreases energy
consumption by deactivating
automatically the appliance when it is not
operating.
The function comes into operation:
• 5 minutes after the completion of the
programme.
• After 5 minutes if the programme has
not started.
Cancelling the delay start while the countdown operates
When you cancel the delay start you
have to set the programme and options
again.
Page 17

10. HINTS AND TIPS
ENGLISH 17
10.1 General
Follow the hints below to ensure optimal
cleaning and drying results in daily use
and to help you protect the environment.
• Remove larger residues of food from
the dishes into the waste bin.
• Do not pre-rinse dishes by hand.
When needed, select a programme
with a prewash phase.
• Always use the whole space of the
baskets.
• Make sure that items in the baskets
do not touch or cover each other.
Only then can the water completely
reach and wash the dishes.
• You can use dishwasher detergent,
rinse aid and salt separately or you
can use the multi-tablets (e.g. ''All in
1''). Follow the instructions on the
packaging.
• Select a programme according to the
type of load and the degree of soil.
offers the most efficient use of
water and energy consumption.
10.2 Using salt, rinse aid and
detergent
• Only use salt, rinse aid and detergent
for dishwasher. Other products can
cause damage to the appliance.
• In areas with hard and very hard water
we recommend to use plain
dishwasher detergent (powder, gel,
tablets containing no additional
agents), rinse aid and salt separately
for optimal cleaning and drying
results.
• At least once a month run the
appliance with the use of appliance
cleaner which is particularly suitable
for this purpose.
• Detergent tablets do not fully dissolve
with short programmes. To prevent
detergent residues on the tableware,
we recommend that you use the
tablets with long programmes.
• Do not use more than the correct
quantity of detergent. Refer to the
instructions on the detergent
packaging.
10.3 What to do if you want to stop using multi-tablets
Before you start to use separately
detergent, salt and rinse aid, complete
the following steps:
1. Set the highest level of the water
softener.
2. Make sure that the salt and rinse aid
containers are full.
3. Start the shortest programme with a
rinsing phase. Do not add detergent
and do not load the baskets.
4. When the programme is completed,
adjust the water softener according
to the water hardness in your area.
5. Adjust the released quantity of rinse
aid.
6. Activate the rinse aid empty
notification.
10.4 Loading the baskets
• Use the appliance to wash
dishwasher-safe items only.
• Do not wash in the appliance items
made of wood, horn, aluminium,
pewter and copper.
• Do not wash in the appliance items
that can absorb water (sponges,
household cloths).
• Remove large food residues from
dishes.
• Soak cookware with burnt-on food
before washing it in the appliance.
• Put hollow items (cups, glasses and
pans) with the opening facing
downwards.
• Make sure that glasses do not touch
each other.
• Put light items in the upper basket.
Make sure that the items do not move
freely.
• Put cutlery and small items in the
cutlery drawer.
• Make sure that the spray arms can
move freely before you start a
programme.
Page 18

C
B
A
www.aeg.com18
10.5 Before starting a
programme
Before you start the selected
programme, make sure that:
• The filters are clean and correctly
installed.
• The cap of the salt container is tight.
• The spray arms are not clogged.
• There is enough salt and rinse aid
(unless you use multi-tablets).
• The arrangement of the items in the
baskets is correct.
• The programme is suitable to the
type of load and the degree of soil.
11. CARE AND CLEANING
WARNING!
Before maintenance,
deactivate the appliance and
disconnect the mains plug
from the main socket.
Make sure that the Comfort
Lift basket is empty and
locked in the raised position.
Dirty filters and clogged
spray arms negatively affect
the washing results. Check
these elements regularly
and, if necessary, clean
them.
11.1 Cleaning the filters
The filter system is made of 3 parts.
• The correct quantity of detergent is
used.
10.6 Unloading the baskets
1. Let the tableware cool down before
you remove it from the appliance.
Hot items can be easily damaged.
2. First remove items from the lower
basket, then from the upper basket.
After the programme is
completed, water can still
remain on the inside
surfaces of the appliance.
1. Turn the filter (B) counterclockwise
and remove it.
2. Remove the filter (C) out of filter (B).
Page 19

3. Remove the flat filter (A).
4. Wash the filters.
5. Make sure that there are no residues
of food or soil in or around the edge
of the sump.
6. Put back in place the flat filter (A).
Make sure that it is correctly
positioned under the 2 guides.
ENGLISH 19
CAUTION!
An incorrect position of the
filters can cause bad
washing results and damage
to the appliance.
11.2 Cleaning the upper spray arm
We recommend to clean the upper spray
arm regularly to prevent soil from
clogging the holes.
Clogged holes can cause unsatisfactory
washing results.
1. Pull out the upper basket.
2. To detach the spray arm from the
basket, press the spray arm upwards
and simultaneously turn it clockwise.
7. Reassemble the filters (B) and (C).
8. Put back the filter (B) in the flat filter
(A). Turn it clockwise until it locks.
3. Wash the spray arm under running
water. Use a thin pointed tool, e.g. a
toothpick, to remove particles of soil
from the holes.
Page 20

www.aeg.com20
4. To install the spray arm back, press
the spray arm upwards and
simultaneously turn it
counterclockwise until it locks into
place.
11.3 External cleaning
• Clean the appliance with a moist soft
cloth.
• Only use neutral detergents.
• Do not use abrasive products,
abrasive cleaning pads or solvents.
11.4 Internal cleaning
• Carefully clean the appliance,
including the rubber gasket of the
door, with a soft damp cloth.
• To maintain the performance of your
appliance, use a cleaning product
designed specifically for dishwashers
at least once a month. Carefully follow
the instructions on the packaging of
the product.
• Do not use abrasive products,
abrasive cleaning pads, sharp tools,
strong chemicals, scourer or solvents.
• Using short-duration programmes
regularly can cause grease and
limescale buildup inside the
appliance. Run long-duration
programmes at least twice a month to
prevent the buildup.
12. TROUBLESHOOTING
WARNING!
Improper repair of the
appliance may pose a
danger to the safety of the
user. Any repairs must be
performed by qualified
personnel.
The majority of problems that may
occur can be solved without the need
Problem and alarm code Possible cause and solution
You cannot activate the appliance.
• Make sure that the mains plug is connected to the
• Make sure that there is no damaged fuse in the fuse
to contact an Authorised Service
Centre.
Refer to the below table for information
on possible problems.
With some problems, the display shows
an alarm code.
mains socket.
box.
Page 21

Problem and alarm code Possible cause and solution
The programme does not
start.
• Make sure that the appliance door is closed.
• If the delay start is set, cancel the setting or wait for the
end of the countdown.
• The appliance recharges the resin inside the water softener. The duration of the procedure is approximately 5
minutes.
The appliance does not fill
with water.
The display shows
.
• Make sure that the water tap is open.
• Make sure that the pressure of the water supply is not
or
too low. For this information, contact your local water
authority.
• Make sure that the water tap is not clogged.
• Make sure that the filter in the inlet hose is not clogged.
• Make sure that the inlet hose has no kinks or bends.
The appliance does not
drain the water.
The display shows
• Make sure that the sink spigot is not clogged.
• Make sure that the filter in the outlet hose is not clog-
.
ged.
• Make sure that the interior filter system is not clogged.
• Make sure that the drain hose has no kinks or bends.
The anti-flood device is on.
The display shows
The appliance stops and
starts more times during op-
• Close the water tap and contact an Authorised Service
.
Centre.
• It is normal. It provides optimal cleaning results and energy savings.
eration.
The programme lasts too
long.
• If the delay start option is set, cancel the delay setting or
wait for the end of the countdown.
• Activate the TimeSaver option to reduce the programme duration.
• Activating options can increase the programme duration.
The remaining time in the
• This is not a defect. The appliance is working correctly.
display increases and skips
nearly to the end of the programme duration.
Small leak from the appliance door.
• The appliance is not levelled. Loosen or tighten the adjustable feet (if applicable).
• The appliance door is not centred on the tub. Adjust the
rear foot (if applicable).
The appliance door is difficult to close.
• The appliance is not levelled. Loosen or tighten the adjustable feet (if applicable).
• Parts of the tableware are protruding from the baskets.
Rattling or knocking sounds
from the inside of the appliance.
• The tableware is not properly arranged in the baskets.
Refer to basket loading leaflet.
• Make sure that the spray arms can rotate freely.
ENGLISH 21
Page 22

www.aeg.com22
Problem and alarm code Possible cause and solution
The appliance trips the circuit-beaker.
• The amperage is insufficient to supply simultaneously all
the appliances in use. Check the socket amperage and
the capacity of the meter or turn off one of the appliances in use.
• Internal electrical fault of the appliance. Contact an Authorised Service Centre.
Refer to "Before first use",
"Daily use", or "Hints and
tips" for other possible
causes.
the problem occurs again, contact an
Authorised Service Centre.
For alarm codes not described in the
table, contact an Authorised Service
Centre.
Once you have checked the appliance,
deactivate and activate the appliance. If
12.1 The washing and drying results are not satisfactory
Problem Possible cause and solution
Poor washing results. • Refer to "Daily use", "Hints and tips" and the basket
loading leaflet.
• Use more intensive washing programmes.
• Clean spray arm jets and the filter. Refer to "Care and
Cleaning".
Poor drying results. • Tableware has been left for too long inside the closed
appliance.
• There is no rinse aid or the dosage of rinse aid is not
sufficient. Adjust the rinse aid level to a higher level.
• Plastic items may need to be towel dried.
• For the best drying performance, activate XtraDry and
AirDry.
• We recommend to always use rinse aid, even in combination with multi-tablets.
There are whitish streaks or
bluish layers on glasses and
dishes.
There are stains and dry water
drops on glasses and dishes.
• The released quantity of rinse aid is too high. Adjust
the rinse aid level to a lower level.
• The quantity of detergent is too high.
• The released quantity of rinse aid is not sufficient. Adjust the rinse aid level to a higher level.
• The quality of the rinse aid can be the cause.
Page 23

ENGLISH 23
Problem Possible cause and solution
The dishes are wet. • For the best drying performance, activate XtraDry and
AirDry .
• The programme does not have a drying phase or has
a drying phase with low temperature.
• The rinse aid dispenser is empty.
• The quality of the rinse aid can be the cause.
• The quality of the multi-tablets can be the cause. Try a
different brand or activate the rinse aid dispenser and
use rinse aid and multi-tablets together.
The interior of the appliance is
wet.
• This is not a defect of the appliance. Humid air condensates on the appliance walls.
Unusual foam during washing. • Use the detergent designed specifically for dishwash-
ers.
• There is a leak in the rinse aid dispenser. Contact an
Authorised Service Centre.
Traces of rust on cutlery. • There is too much salt in the water used for washing.
Refer to "The water softener".
• Silver and stainless steel cutlery were placed together.
Avoid putting silver and stainless steel items close together.
There are residues of detergent in the dispenser at the
end of the programme.
• The detergent tablet got stuck in the dispenser and
was not completely washed away by water.
• Water cannot wash away the detergent from the dispenser. Make sure that the spray arm is not blocked or
clogged.
• Make sure that items in the baskets do not impede the
lid of the detergent dispenser from opening.
Odours inside the appliance. • Refer to "Internal cleaning".
Limescale deposits on the tableware, on the tub and on
the inside of the door.
• The level of salt is low. Check the salt indicator.
• The cap of the salt container is loose.
• Your tap water is hard. Refer to "The water softener".
• Use salt and set regeneration of the water softener
even when multi-functional tablets are used. Refer to
"The water softener".
• If lime scale deposits still remain, clean the appliance
with appliance cleaners which are particularly suitable
for this purpose.
• Try a different detergent.
• Contact the detergent manufacturer.
Dull, discoloured or chipped
tableware.
• Make sure that only dishwasher-safe items are washed
in the appliance.
• Load and unload the basket carefully. Refer to basket
loading leaflet.
• Place delicate items in the upper basket.
• For washing delicate items and glassware, select the
dedicated programme. Refer to "Programmes".
Page 24

www.aeg.com24
Refer to "Before first use",
"Daily use" or "Hints and
tips" for other possible
causes.
13. PRODUCT INFORMATION SHEET
Trade Mark AEG
Model FSS62800P 911434450
Rated capacity (standard place settings) 13
Energy efficiency class A++
Energy consumption in kWh per year, based on 280
standard cleaning cycles using cold water fill and the
consumption of the low power modes. The actual energy consumption will depend on how the appliance is
used.
Energy consumption of standard cleaning cycle (kWh) 0.921
Power consumption in off mode (W) 0.50
Power consumption in left-on mode (W) 5.0
Water consumption in litres per year, based on 280
standard cleaning cycles. The actual water consumption
will depend on how the appliance is used
Drying efficiency class on a scale from G (least efficient)
to A (most efficient)
The ‘standard programme’ is the standard cleaning cycle to which the information in the label and the fiche
relates. This programme is suitable to clean normally
soiled tableware and is the most efficient programme in
terms of combined energy and water consumption. It is
indicated as "Eco" programme.
Programme time of standard cleaning cycle (min) 235
Duration of the left-on mode (min) 5
Sound power level (db(A) re 1pW) 44
Built in appliance Y/N Yes
262
3080
A
14. ADDITIONAL TECHNICAL INFORMATION
Dimensions Width / height / depth (mm) 596 / 818 - 898 / 550
Electrical connection
1)
Voltage (V) 220 - 240
Frequency (Hz) 50
Page 25

Water supply pressure bar (minimum and maximum) 0.5 - 8
MPa (minimum and maximum) 0.05 - 0.8
Water supply
1)
Refer to the rating plate for other values.
2)
If the hot water comes from alternative source of energy (e.g. solar panels), use the hot water supply to
decrease energy consumption.
Cold water or hot water
15. ENVIRONMENTAL CONCERNS
ENGLISH 25
2)
max 60 °C
Recycle materials with the symbol
.
Put the packaging in relevant containers
to recycle it. Help protect the
environment and human health by
recycling waste of electrical and
electronic appliances. Do not dispose of
appliances marked with the symbol
with the household waste. Return the
product to your local recycling facility or
contact your municipal office.
Page 26

www.aeg.com26
INHALTSVERZEICHNIS
1. SICHERHEITSHINWEISE...........................................................................................27
2. SICHERHEITSANWEISUNGEN.................................................................................29
3. PRODUKTBESCHREIBUNG......................................................................................30
4. BEDIENFELD..............................................................................................................31
5. PROGRAMME............................................................................................................32
6. EINSTELLUNGEN......................................................................................................34
7. OPTIONEN.................................................................................................................37
8. VOR DER ERSTEN INBETRIEBNAHME................................................................... 38
9. TÄGLICHER GEBRAUCH.......................................................................................... 40
10. TIPPS UND HINWEISE............................................................................................ 42
11. REINIGUNG UND PFLEGE.....................................................................................44
12. FEHLERSUCHE........................................................................................................ 46
13. PRODUKTDATENBLATT........................................................................................ 50
14. ZUSÄTZLICHE TECHNISCHE DATEN...................................................................51
FÜR PERFEKTE ERGEBNISSE
Danke, dass Sie sich für dieses AEG Produkt entschieden haben. Wir haben es
geschaffen, damit Sie viele Jahre von seiner ausgezeichneten Leistung und den
innovativen Technologien, die Ihnen das Leben erleichtern, profitieren können.
Es ist mit Funktionen ausgestattet, die in gewöhnlichen Geräten nicht vorhanden
sind. Nehmen Sie sich ein paar Minuten Zeit zum Lesen, um seine Vorzüge
kennen zu lernen.
Besuchen Sie uns auf unserer Website, um:
Sich Anwendungshinweise, Prospekte, Fehlerbehebungs- und ServiceInformationen zu holen:
www.aeg.com/webselfservice
Ihr Produkt für einen besseren Service zu registrieren:
www.registeraeg.com
Zubehör, Verbrauchsmaterial und Original-Ersatzteile für Ihr Gerät zu kaufen:
www.aeg.com/shop
REPARATUR- UND KUNDENDIENST
Bitte verwenden Sie ausschließlich Original-Ersatzteile für Ihre Produkte.
Halten Sie folgende Angaben bereit, wenn Sie sich an den Kundendienst
wenden: Modell, Produktnummer (PNC), Seriennummer.
Diese Informationen finden Sie auf dem Typenschild.
Warnungs-/Sicherheitshinweise
Allgemeine Informationen und Empfehlungen
Informationen zum Umweltschutz
Änderungen vorbehalten.
Page 27

1. SICHERHEITSHINWEISE
Lesen Sie vor der Montage und dem Gebrauch des
Geräts zuerst die Gebrauchsanleitung. Bei Verletzungen
oder Schäden infolge nicht ordnungsgemäßer Montage
oder Verwendung des Geräts übernimmt der Hersteller
keine Haftung. Bewahren Sie die Anleitung immer an
einem sicheren und zugänglichen Ort zum späteren
Nachschlagen auf.
1.1 Sicherheit von Kindern und schutzbedürftigen Personen
• Das Gerät kann von Kindern ab 8 Jahren und
Personen mit eingeschränkten physischen,
sensorischen oder geistigen Fähigkeiten oder mit
mangelnder Erfahrung und/oder mangelndem Wissen
nur dann verwendet werden, wenn sie durch eine für
ihre Sicherheit zuständige Person beaufsichtigt
werden oder in die sichere Verwendung des Geräts
eingewiesen wurden und die mit dem Gerät
verbundenen Gefahren verstanden haben.
• Kinder zwischen 3 und 8 Jahren und Personen mit
schweren Behinderungen oder Mehrfachbehinderung
müssen vom Gerät ferngehalten werden, wenn sie
nicht ständig beaufsichtigt werden.
• Halten Sie Kinder unter 3 Jahren vom Gerät fern,
wenn sie nicht ständig beaufsichtigt werden.
• Kinder dürfen nicht mit dem Gerät spielen.
• Halten Sie alle Wasch- und Reinigungsmittel von
Kindern fern.
• Halten Sie Kinder und Haustiere vom geöffneten
Gerät fern.
• Kinder dürfen keine Reinigung und Wartung ohne
Beaufsichtigung durchführen.
DEUTSCH 27
1.2 Allgemeine Sicherheit
• Dieses Gerät ist für die Verwendung im Haushalt und
ähnliche Zwecke vorgesehen, wie z. B.
Page 28

www.aeg.com28
– Bauernhöfe, Personalküchenbereiche in
Geschäften, Büros und anderen Arbeitsumfeldern.
– Für Gäste in Hotels, Motels, Pensionen und
anderen wohnungsähnlichen Räumlichkeiten.
• Nehmen Sie keine technischen Änderungen am Gerät
vor.
• Der Betriebswasserdruck (Mindest- und Höchstdruck)
muss zwischen 0.5 (0.05) / 8 (0.8) bar (MPa) liegen
• Beachten Sie, dass die Höchstzahl an Maßgedecken
13 beträgt.
• Wenn das Netzkabel beschädigt ist, muss es vom
Hersteller, seinem autorisierten Kundenservice oder
einer gleichermaßen qualifizierten Person
ausgetauscht werden, um Gefahrenquellen zu
vermeiden.
• Stellen Sie Besteck mit scharfen Spitzen mit der Spitze
nach unten in den Besteckkorb oder legen Sie es in
die Besteckschublade mit den scharfen Kanten nach
unten.
• Lassen Sie das Gerät bei geöffneter Tür nicht
unbeaufsichtigt, damit sie nicht versehentlich auf sie
treten.
• Schalten Sie das Gerät immer aus und ziehen Sie den
Netzstecker aus der Steckdose, bevor
Reinigungsarbeiten durchgeführt werden.
• Reinigen Sie das Gerät nicht mit einem Wasser- und/
oder Dampfstrahl.
• Besitzt das Gerät Lüftungsschlitze im Boden, dürfen
diese zum Beispiel nicht von einem Bodenbelag
blockiert werden.
• Das Gerät muss mit den mitgelieferten neuen
Schläuchen an die Wasserversorgung angeschlossen
werden. Alte Schläuche dürfen nicht wieder
verwendet werden.
Page 29

2. SICHERHEITSANWEISUNGEN
DEUTSCH 29
2.1 Montage
WARNUNG!
Die Montage des Geräts
darf nur von einer
qualifizierten Fachkraft
durchgeführt werden.
• Entfernen Sie das gesamte
Verpackungsmaterial.
• Montieren Sie ein beschädigtes Gerät
nicht und benutzen Sie es nicht.
• Verwenden Sie das Gerät aus
Sicherheitsgründen nicht, bevor es in
den Einbauschrank gesetzt wird.
• Halten Sie sich an die mitgelieferte
Montageanleitung.
• Seien Sie beim Umsetzen des Gerätes
vorsichtig, da es sehr schwer ist.
Tragen Sie stets
Sicherheitshandschuhe und festes
Schuhwerk.
• Stellen Sie das Gerät nicht an einem
Ort auf, an dem die Temperatur unter
0 °C absinken kann, und benutzen Sie
das Gerät nicht, wenn die Temperatur
unter 0 °C absinkt.
• Montieren Sie das Gerät an einem
sicheren und geeigneten Ort, der den
Montageanforderungen entspricht.
2.2 Elektrischer Anschluss
WARNUNG!
Brand- und
Stromschlaggefahr.
• Das Gerät muss geerdet sein.
• Stellen Sie sicher, dass die Daten auf
dem Typenschild mit den elektrischen
Nennwerten der Netzspannung
übereinstimmen.
• Schließen Sie das Gerät nur an eine
ordnungsgemäß installierte
Schutzkontaktsteckdose an.
• Verwenden Sie keine
Mehrfachsteckdosen oder
Verlängerungskabel.
• Achten Sie darauf, Netzstecker und
Netzkabel nicht zu beschädigen. Falls
das Netzkabel des Geräts ersetzt
werden muss, lassen Sie diese Arbeit
durch unseren autorisierten
Kundendienst durchführen.
• Stecken Sie den Netzstecker erst nach
Abschluss der Montage in die
Steckdose. Stellen Sie sicher, dass der
Netzstecker nach der Montage noch
zugänglich ist.
• Ziehen Sie nicht am Netzkabel, wenn
Sie das Gerät von der
Stromversorgung trennen möchten.
Ziehen Sie stets am Netzstecker.
• Das Gerät entspricht den ECRichtlinien.
• Dieses Gerät ist mit einem 13 ANetzstecker ausgestattet. Muss die
Sicherung im Netzstecker
ausgetauscht werden, setzen Sie
immer eine 13 A-Sicherung des Typs
ASTA (BS 1362) ein (nur GB und
Irland).
2.3 Wasseranschluss
• Achten Sie darauf, die
Wasserschläuche nicht zu
beschädigen.
• Bevor Sie neue oder lange Zeit nicht
benutzte Schläuche, an denen
Reparaturarbeiten ausgeführt wurden
oder neue Geräte (Wasserzähler usw.)
an das Gerät anschließen, lassen Sie
Wasser durch die Schläuche fließen,
bis es sauber austritt.
• Stellen Sie sicher, dass es keine
sichtbaren Wasserlecks während und
nach dem ersten Gebrauch des
Gerätes gibt.
• Der Wasserzulaufschlauch verfügt
über ein Sicherheitsventil und eine
Ummantelung mit einem
innenliegenden Netzkabel.
WARNUNG!
Gefährliche Spannung.
Page 30

5
4
9
67
13
12
11
10
14
2
3
1
8
www.aeg.com30
• Drehen Sie sofort den Wasserhahn zu
und ziehen Sie den Netzstecker aus
der Steckdose, wenn der
Wasserzulaufschlauch beschädigt ist.
Wenden Sie sich für den Austausch
des Wasserzulaufschlauchs an den
autorisierten Kundendienst.
2.4 Gebrauch
• Laden Sie keine entflammbaren
Produkte oder Gegenstände, die mit
entflammbaren Produkten benetzt
sind, in das Gerät und stellen Sie
solche nicht in die Nähe oder auf das
Gerät.
• Geschirrspüler-Reinigungsmittel sind
gefährlich. Beachten Sie die
Sicherheitsanweisungen auf der
Reinigungsmittelverpackung.
• Trinken Sie nicht das Wasser aus dem
Gerät und verwenden Sie es nicht
zum Spielen.
• Nehmen Sie kein Geschirr aus dem
Gerät, bevor das Programm beendet
ist. Auf dem Geschirr kann noch etwas
Reinigungsmittel haften.
3. PRODUKTBESCHREIBUNG
• Setzen oder stellen Sie sich niemals
auf die geöffnete Gerätetür.
• Es kann heißer Dampf aus dem Gerät
austreten, wenn Sie die Tür während
des Ablaufs eines Programms öffnen.
2.5 Service
• Wenden Sie sich zur Reparatur des
Geräts an den autorisierten
Kundendienst.
• Verwenden Sie ausschließlich
Originalersatzteile.
2.6 Entsorgung
WARNUNG!
Verletzungs- und
Erstickungsgefahr.
• Trennen Sie das Gerät von der
Stromversorgung.
• Schneiden Sie das Netzkabel ab, und
entsorgen Sie es.
• Entfernen Sie das Türschloss, um zu
verhindern, dass sich Kinder oder
Haustiere in dem Gerät einschließen.
Oberen Sprüharm
1
Oberer Sprüharm
2
Unterer Sprüharm
3
Siebe
4
Page 31

1
2
3 4 5 6 7 8
9
DEUTSCH 31
Typenschild
5
Salzbehälter
6
Entlüftung
7
Klarspülmittel-Dosierer
8
Reinigungsmittelfach
9
Comfort Lift Korb
10
3.1 Beam-on-Floor
Der Beam-on-Floor ist ein Lichtstrahl, der
unterhalb der Gerätetür auf den Boden
projiziert wird.
• Nach dem Start des Programms
leuchtet der rote Lichtstrahl auf und
bleibt während der gesamten
Programmdauer eingeschaltet.
• Nach Ende des Programms leuchtet
der Lichtstrahl grün.
• Bei einer Störung des Geräts blinkt
der rote Lichtstrahl.
4. BEDIENFELD
Auslösegriff
11
Griff des Unterkorbs
12
Oberkorb
13
Besteckschublade
14
Nach dem Abschalten des
Gerätes erlischt der Beamon-Floor.
Wird AirDry während der
Trockenphase eingeschaltet,
ist die Projektion auf dem
Boden möglicherweise nicht
vollständig sichtbar. Sie
können dann auf dem
Bedienfeld sehen, ob das
Programm beendet wurde.
Taste „Ein/Aus“
1
Display
2
Delay Taste
3
Program Taste
4
ExtraHygiene Taste
5
4.1 Kontrolllampen
Kontrolllam-peBeschreibung
Kontrolllampe Salz. Leuchtet, wenn der Salzbehälter nachgefüllt werden
muss.
Kontrolllampe Klarspülmittel. Leuchtet, wenn der Klarspülmittel-Dosierer
nachgefüllt werden muss.
6
7
8
9
TimeSaver Taste
XtraDry Taste
Reset Taste
Kontrolllampen
Page 32

www.aeg.com32
Kontrolllam-peBeschreibung
Kontrolllampe Programmende. Leuchtet nach dem Ende des Spülprogramms.
5. PROGRAMME
Die Nummerierung der Programme in
der Tabelle (P1, P2 usw.) entspricht ihrer
Reihenfolge auf dem Bedienfeld.
Programm Verschmutzungs-
grad
Beladung
P1
1)
P2
2)
P3
3)
P5
4)
P4
5)
• Normaler Verschmutzungsgrad
• Geschirr und Besteck
• Alle
• Geschirr, Besteck, Töpfe und
Pfannen
• Stark verschmutzt
• Geschirr, Besteck, Töpfe und
Pfannen
• Normaler oder
leichter Verschmutzungsgrad
• Empfindliches
Geschirr und
Gläser
• Vor kurzem benutztes Geschirr
• Geschirr und Besteck
Programmphasen Optionen
• Vorspülen
• Hauptspülgang 50 °C
• Spülen
• Trocknen
• Vorspülen
• Hauptspülgang von 45
• Spülen
• Trocknen
• Vorspülen
• Hauptspülgang 70 °C
• Spülen
• Trocknen
• Hauptspülgang 45 °C
• Spülen
• Trocknen
• Hauptspülgang 60 °C
• Spülen
Die Reihenfolge der Programme in der
Tabelle entspricht möglicherweise nicht
ihrer Reihenfolge auf dem Bedienfeld.
• ExtraHygiene
• XtraDry
• ExtraHygiene
• XtraDry
°C bis 70 °C
• ExtraHygiene
• TimeSaver
• XtraDry
• XtraDry
• ExtraHygiene
• XtraDry
Page 33

DEUTSCH 33
Programm Verschmutzungs-
Programmphasen Optionen
grad
Beladung
P6
• Normaler Ver-
6)
schmutzungsgrad
• Geschirr und Be-
• Vorspülen
• Hauptspülgang 50 °C
• Spülen
• Trocknen
• XtraDry
steck
1)
Dieses Programm gewährleistet den wirtschaftlichsten Wasser- und Energieverbrauch für normal ver-
schmutztes Geschirr und Besteck. Dies ist das Standardprogramm für Prüfinstitute.
2)
Das Gerät erkennt den Verschmutzungsgrad und die Anzahl der Geschirrteile in den Körben. Es stellt
dann automatisch die Wassertemperatur und -menge sowie die Programmdauer ein.
3)
Dieses Programm dient zum Spülen von stark verschmutztem Geschirr mit einem hohen Wasserdruck
und einer hohen Temperatur.
4)
Das Programm regelt die Wassertemperatur, um empfindliche Gegenstände und insbesondere Glas
schonend zu spülen.
5)
Dieses Programm eignet sich zum schnellen Spülen eines Geräts, das voll oder halb voll mit vor kurz-
em benutzten oder leicht verschmutzten Geschirr beladen ist.
6)
Dies ist das leiseste Programm. Die Pumpe arbeitet mit einer sehr niedrigen Drehzahl, um die Geräuschentwicklung des Geräts zu verringern. Aufgrund der niedrigen Drehzahl verlängert sich die Programmdauer.
5.1 Verbrauchswerte
Programm
P1
1)
Wasserverbrauch
(l)
11 0.921 235
Energieverbrauch
(kWh)
Dauer
(Min.)
P2
P3
P5
P4
8 - 15 0.7 - 1.7 46 - 170
12.5 - 14.5 1.4 - 1.7 170 - 190
12 - 14 0.8 - 1.0 82 - 92
10 0.9 30
P6 12 - 13 1.1 - 1.3 230 - 250
1)
Druck und Temperatur des Wassers, die Schwankungen in der Stromversorgung, die ausgewählten
Optionen und die Geschirrmenge können die Werte verändern.
Page 34

www.aeg.com34
5.2 Informationen für
Prüfinstitute
Wenn Sie Informationen zur
Durchführung von Leistungsprüfungen
(z.B. gemäß EN60436) benötigen,
schicken Sie eine E-Mail an:
info.test@dishwasher-production.com
6. EINSTELLUNGEN
6.1 Programmwahlmodus und
Benutzermodus
Wenn sich das Gerät im
Programmwahlmodus befindet, kann ein
Programm eingestellt und der
Benutzermodus aufgerufen werden.
Einstellungen, die im Benutzermodus
verfügbar sind:
• Die Stufe des Wasserenthärters
gemäß der Wasserhärte.
• Ein- und Ausschalten der
Klarspülmittelnachfüllanzeige.
• Klarspülmittelstufe gemäß der
erforderlichen Dosierung.
• Ein- und Ausschalten des Signaltons
für das Programmende.
• Ein- und Ausschalten von AirDry.
Da das Gerät die Einstellungen
speichert, müssen sie nicht vor jedem
Programmstart erneut konfiguriert
werden.
Einstellen des Programmwahlmodus
Das Gerät befindet sich im
Programmwahlmodus, wenn im Display
die Programmnummer P1 angezeigt
wird.
Nach dem Einschalten befindet sich das
Gerät standardmäßig im
Programmwahlmodus. Anderenfalls
stellen Sie den Programmwahlmodus
folgendermaßen ein:
Halten Sie Reset gedrückt, bis sich das
Gerät im Programmwahlmodus befindet.
Geben Sie in Ihrer Anfrage den
Produktnummerncode (PNC) an, den Sie
auf dem Typenschild finden.
Bezüglich anderer Fragen zu Ihrem
Geschirrspüler siehe die mit dem Gerät
gelieferte Bedienungsanleitung.
Halten Sie zum Aufrufen des
Benutzermodus gleichzeitig
gedrückt, bis die Kontrolllampen ,
, , und blinken und das
Display nichts anzeigt.
und
6.2 Wasserenthärter
Der Wasserenthärter entfernt Mineralien
aus dem Spülwasser, die sich nachteilig
auf die Spülergebnisse und das Gerät
auswirken könnten.
Je höher der Mineralgehalt ist, um so
härter ist Ihr Wasser. Die Wasserhärte
wird in gleichwertigen Einheiten
gemessen.
Der Enthärter muss entsprechend der
Wasserhärte Ihres Gebietes eingestellt
werden. Ihr lokales Wasserwerk kann Sie
über die Wasserhärte in Ihrem Gebiet
informieren. Der Wasserenthärter muss
unbedingt auf die richtige Stufe
eingestellt werden, um gute
Spülergebnisse zu garantieren.
Durch die Enthärtung von
hartem Wasser erhöht sich
der Wasser- und
Energieverbrauch und
verlängert sich die
Programmdauer. Ja höher
die Stufe des
Wasserenthärters eingestellt
ist, desto höher ist der
Verbrauch und desto länger
die Programmdauer.
Aufrufen des Benutzermodus
Stellen Sie sicher, dass sich das Gerät im
Programmwahlmodus befindet.
Page 35

Wasserhärte
Deutsche Was-
serhärtegrade
(°dH)
47 - 50 84 - 90 8.4 - 9.0 58 - 63 10
43 - 46 76 - 83 7.6 - 8.3 53 - 57 9
37 - 42 65 - 75 6.5 - 7.5 46 - 52 8
29 - 36 51 - 64 5.1 - 6.4 36 - 45 7
23 - 28 40 - 50 4.0 - 5.0 28 - 35 6
19 - 22 33 - 39 3.3 - 3.9 23 - 27
15 - 18 26 - 32 2.6 - 3.2 18 - 22 4
11 - 14 19 - 25 1.9 - 2.5 13 - 17 3
4 - 10 7 - 18 0.7 - 1.8 5 - 12 2
<4 <7 <0.7 < 5
1)
Werkseitige Einstellung.
2)
Verwenden Sie kein Salz bei diesen Werten.
Französische
Wasserhärte-
grade (°fH)
mmol / l Clarke Was-
serhärtegra-
de
DEUTSCH 35
Einstellung des
Wasserenthärters
1)
5
2)
1
Stellen Sie unabhängig vom
verwendeten Reinigungsmittel den
richtigen Wasserhärtegrad ein, damit
die Salznachfüllanzeige eingeschaltet
bleibt.
Multi-Reinigungstabletten
eignen sich nicht zum
Enthärten von hartem
Wasser.
Einstellen des Wasserenthärters
Stellen Sie sicher, dass sich das Gerät im
Benutzermodus befindet.
1. Drücken Sie
• Die Kontrolllampen
und erlöschen.
• Die Kontrolllampe
weiterhin.
• Im Display wird die aktuelle
Einstellung angezeigt: z. B.
Stufe 5.
2. Drücken Sie
Ändern der Einstellung.
.
, ,
blinkt
wiederholt zum
3. Drücken Sie Ein/Aus zum Bestätigen
der Einstellung.
6.3
Klarspülmittelnachfüllanzeige
Das Klarspülmittel ermöglicht das
Trocknen des Geschirrs ohne Streifen
und Flecken. Es wird automatisch
während der heißen Spülphasen
abgegeben.
Ist das Klarspülmittelfach leer, wird die
Klarspülmittelnachfüllanzeige
eingeschaltet und weist darauf hin, dass
Klarspülmittel nachgefüllt werden sollte.
Wenn Sie Multi-Reinigungstabletten
verwenden, und die
Reinigungsergebnisse zufriedenstellend
sind, können Sie die
Klarspülmittelnachfüllanzeige
ausschalten. Für eine bessere
Trocknungsleistung empfehlen wir
jedoch stets Klarspülmittel zu
verwenden.
=
Verwenden Sie die üblichen
Reinigungsmittel oder MultiReinigungstabletten ohne Klarspülmittel,
schalten Sie die
Klarspülmittelnachfüllanzeige ein.
Page 36

www.aeg.com36
Ausschalten der Klarspülmittelnachfüllanzeige
Stellen Sie sicher, dass sich das Gerät im
Benutzermodus befindet.
1. Drücken Sie .
• Die Kontrolllampen
und erlöschen.
• Die Kontrolllampe
weiterhin.
• Im Display wird die aktuelle
Einstellung angezeigt.
– = die
Klarspülmittelnachfüllanzeige
ist ausgeschaltet.
= die
–
Klarspülmittelnachfüllanzeige
ist eingeschaltet.
2. Drücken Sie
Einstellung.
3. Drücken Sie Ein/Aus zum Bestätigen
der Einstellung.
zum Ändern der
, ,
blinkt
6.4 Klarspülmittelmenge
Die Zugabemenge für das Klarspülmittel
kann zwischen Stufe 1 (Mindestmenge)
und Stufe 6 (Höchstmenge) eingestellt
werden. Bei Stufe 0 wird der
Klarspülmittel-Dosierer ausgeschaltet
und es wird kein Klarspülmittel
zugegeben.
Werkseitige Einstellung: Stufe 4.
Einstellen der Klarspülmittelstufe
Stellen Sie sicher, dass sich das Gerät im
Benutzermodus befindet.
1. Drücken Sie .
• Die Kontrolllampen
und erlöschen.
• Die Kontrolllampe
weiter.
• Im Display wird die aktuelle
Einstellung angezeigt: z. B.
Stufe 4.
– Die Klarspülmittelstufen
reichen von 0A bis 6A, wobei
, ,
blinkt
bei Stufe 0A kein
Klarspülmittel zugegeben
wird.
2. Drücken Sie
Ändern der Einstellung.
3. Drücken Sie Ein/Aus zum Bestätigen
der Einstellung.
wiederholt zum
6.5 Signaltöne
Bei einer Störung des Geräts ertönen
akustische Signale. Es ist nicht möglich,
diese Signaltöne auszuschalten.
Es ertönt auch ein Signalton, wenn das
Programm beendet ist. Standardmäßig
ist dieser Signalton ausgeschaltet, es ist
jedoch möglich, ihn einzuschalten.
So schalten Sie den Signalton für das Programmende ein
Stellen Sie sicher, dass sich das Gerät im
Benutzermodus befindet.
1. Drücken Sie
• Die Kontrolllampen
und erlöschen.
• Die Kontrolllampe
weiterhin.
• Im Display wird die aktuelle
Einstellung angezeigt.
–
ist ausgeschaltet.
–
eingeschaltet.
2. Drücken Sie
Einstellung.
3. Drücken Sie Ein/Aus zum Bestätigen
der Einstellung.
.
= das akustische Signal
= das akustische Signal ist
zum Ändern der
6.6 AirDry
AirDry verbessert die Trockenergebnisse
bei einem geringeren Energieverbrauch.
=
, ,
blinkt
Page 37

Während der Trockenphase
wird die Tür automatisch
geöffnet und bleibt einen
Spaltbreit offen.
VORSICHT!
Versuchen Sie nicht, die
Gerätetür innerhalb der
ersten 2 Minuten nach der
automatischen Öffnung zu
schließen. Andernfalls kann
das Gerät beschädigt
werden.
Wird die Tür danach für
weitere 3 Minuten
geschlossen, wird das
laufende Programm
beendet.
AirDry wird bei allen Programmen mit
Ausnahme von
automatisch eingeschaltet.
(falls vorhanden)
DEUTSCH 37
Zur Verbesserung der
Trocknungsleistung beachten Sie die
XtraDry-Option oder schalten Sie AirDry
ein.
VORSICHT!
Haben Kinder Zugang zum
Gerät, wird empfohlen
AirDry auszuschalten, da das
Öffnen der Tür eine Gefahr
darstellen könnte.
Ausschalten von AirDry
Stellen Sie sicher, dass sich das Gerät im
Benutzermodus befindet.
1. Drücken Sie
• Die Kontrolllampen
und erlöschen.
• Die Kontrolllampe
weiterhin.
• Im Display wird die aktuelle
Einstellung angezeigt.
– = AirDry ist
ausgeschaltet.
– = AirDry ist eingeschaltet.
2. Drücken Sie
Einstellung.
3. Drücken Sie Ein/Aus zum Bestätigen
der Einstellung.
.
, ,
blinkt
zum Ändern der
7. OPTIONEN
Sie müssen die gewünschten
Optionen vor dem
Programmstart einschalten.
Es ist nicht möglich,
Optionen während eines
laufenden Programms einoder auszuschalten.
Nicht alle Optionen lassen
sich miteinander
kombinieren. Wenn Sie
Optionen eingeschaltet
haben, die nicht miteinander
kombinierbar sind, schaltet
das Gerät automatisch eine
oder mehrere von ihnen aus.
Es leuchten dann nur die
Kontrolllampen der noch
eingeschalteten Optionen.
Page 38

www.aeg.com38
Ist die Option nicht mit
einem Programm
kombinierbar, leuchtet die
entsprechende
Kontrolllampe nicht oder sie
blinkt ein paar Sekunden
schnell und erlischt dann.
Die eingeschalteten
Optionen können sich auf
den Wasser- und
Energieverbrauch sowie die
Programmdauer auswirken.
7.1 XtraDry
Schalten Sie diese Option ein, um die
Trocknungsleistung zu erhöhen.
Die Option XtraDry bleibt permanent für
alle Programme mit Ausnahme von
eingeschaltet. Sie wird
automatisch in den nächsten
Spülprogrammen eingeschaltet. Sie
können diese Konfiguration jederzeit
ändern.
Jedes Mal, wenn
eingeschaltet wird, wird die
Option XtraDry
ausgeschaltet und muss
manuell ausgewählt werden.
Durch das Einschalten von XtraDry wird
TimeSaver ausgeschaltet und
umgekehrt.
7.2 TimeSaver
Mit dem TimeSaver können Sie die
Dauer des gewählten Programms um
etwa 50% verkürzen.
Die Spülergebnisse entsprechen denen
einer normalen Programmdauer. Die
Trockenergebnisse können
beeinträchtigt werden.
Wenn diese Option eingeschaltet ist,
erhöht sich der Wasserdruck und die
Wassertemperatur. Die Spül- und
Trockenphasen verkürzen sich.
Standardmäßig ist der TimeSaver
ausgeschaltet, es ist jedoch möglich, ihn
manuell einzuschalten. Die Option kann
nicht mit XtraDry kombiniert werden.
So schalten Sie TimeSaver ein
Drücken Sie .
Die zugehörige Kontrolllampe leuchtet.
Das Display zeigt die aktualisierte
Programmdauer an.
7.3 ExtraHygiene
Diese Option bietet bessere
Hygieneergebnisse, indem die
Temperatur im letzten Spülgang für
mindestens 10 Minuten auf 70 °C
gehalten wird.
So schalten Sie ExtraHygiene ein
So schalten Sie XtraDry ein
Drücken Sie
Die zugehörige Kontrolllampe leuchtet.
Das Display zeigt die aktualisierte
Programmdauer an.
.
Drücken Sie .
Die zugehörige Kontrolllampe leuchtet.
Das Display zeigt die aktualisierte
Programmdauer an.
8. VOR DER ERSTEN INBETRIEBNAHME
1. Prüfen Sie, ob die Einstellung des
Wasserenthärters der Wasserhärte
in Ihrem Gebiet entspricht. Wenn
nicht, stellen Sie die
Wasserenthärterstufe ein.
2. Füllen Sie den Salzbehälter.
3. Füllen Sie den Klarspülmittel-
Dosierer.
4. Öffnen Sie den Wasserzulaufhahn.
5. Starten Sie ein Programm, um
Fertigungsrückstände, die sich
möglicherweise noch im Gerät
befinden können, zu beseitigen.
Verwenden Sie kein Reinigungsmittel
und beladen Sie die Körbe nicht.
Nach dem Programmstart regeneriert
das Gerät bis zu 5 Minuten lang das Harz
Page 39

im Wasserenthärter. Die Spülphase
A
B
C
startet erst nach Abschluss dieses
Vorgangs. Dieser Vorgang wird
regelmäßig wiederholt.
8.1 Salzbehälter
VORSICHT!
Verwenden Sie
ausschließlich speziell für
Geschirrspüler bestimmtes
grobkörniges Salz. Mit
feinem Salz besteht erhöhte
Korrosionsgefahr.
Das Salz wird für die Regenerierung des
Filterharzes im Wasserenthärter und zur
Erzielung guter Spülergebnisse im
täglichen Gebrauch benötigt.
So füllen Sie den Salzbehälter
Achten Sie darauf, dass der
Comfort Lift Korb leer und in
angehobener Stellung
verriegelt ist.
1. Drehen Sie den Deckel des
Salzbehälters gegen den
Uhrzeigersinn und entfernen Sie ihn.
2. Füllen Sie 1 Liter Wasser in den
Salzbehälter (nur beim ersten Mal).
3. Füllen Sie Salz für Geschirrspüler in
den Salzbehälter, bis er voll ist.
DEUTSCH 39
6. Drehen Sie den Deckel des
Salzbehälters im Uhrzeigersinn, um
den Salzbehälter zu schließen.
VORSICHT!
Beim Befüllen des
Salzbehälters können
Wasser und Salz austreten.
Starten Sie nach dem Füllen
des Salzbehälters umgehend
das kürzeste Programm, um
Korrosion zu verhindern.
Ordnen Sie kein Geschirr in
die Körbe ein.
8.2 Füllen des KlarspülmittelDosierers
4. Schütteln Sie den Trichter leicht am
Griff, damit auch die verbleibenden
Körner in den Behälter gelangen.
5. Entfernen Sie das Salz, das sich um
die Öffnung des Salzbehälters herum
angesammelt hat.
VORSICHT!
Verwenden Sie
ausschließlich Klarspülmittel
für Geschirrspüler.
1. Öffnen Sie den Deckel (C).
2. Füllen Sie den Dosierer (B) mit
Klarspülmittel bis zur Marke „MAX„.
3. Wischen Sie verschüttetes
Klarspülmittel mit einem saugfähigen
Tuch auf, um eine übermäßige
Schaumbildung zu vermeiden.
Page 40

www.aeg.com40
4. Schließen Sie den Deckel. Achten Sie
darauf, dass der Deckel einrastet.
9. TÄGLICHER GEBRAUCH
1. Öffnen Sie den Wasserhahn.
2. Drücken Sie die Taste Ein/Aus, um
das Gerät einzuschalten.
Stellen Sie sicher, dass sich das Gerät im
Programmwahlmodus befindet.
• Füllen Sie den Salzbehälter auf,
wenn die Kontrolllampe Salz
leuchtet.
• Leuchtet die Kontrolllampe
Klarspülmittel, füllen Sie den
Klarspülmittel-Dosierer.
3. Beladen Sie die Körbe.
4. Füllen Sie Reinigungsmittel ein.
5. Stellen Sie je nach Beladung und
Verschmutzungsgrad das passende
Programm ein.
9.1 Comfort Lift
VORSICHT!
Setzen Sie sich nicht auf den
Korb und üben Sie keinen
übermäßigen Druck auf den
verriegelten Korb aus.
VORSICHT!
Überschreiten Sie das
maximale
Fassungsvermögen von 18
kg nicht.
Füllen Sie den
Klarspülmittel-Dosierer,
wenn das Schauglas (A) klar
ist.
1. Zum Anheben des Korbs ziehen Sie
den Korb am Griff aus dem
Geschirrspüler. Verwenden Sie nicht
den Auslösegriff.
Der Korb wird automatisch auf der
oberen Ebene verriegelt.
2. Be- und entladen Sie den Korb
vorsichtig (siehe Broschüre zum
Beladen der Körbe).
3. Zum Absenken des Korbs verbinden
Sie den Auslösegriff wie unten
abgebildet mit dem Korbrahmen.
Heben Sie den Auslösegriff
vollständig und den Korbgriff leicht
an, bis der Korb auf beiden Seiten
entriegelt ist.
VORSICHT!
Achten Sie darauf, dass
keine Utensilien aus dem
Korbrahmen ragen, da diese
Gegenstände sowie den
Comfort Lift Mechanismus
beschädigen können.
Der Comfort Lift Mechanismus
ermöglicht ein Anheben des unteren
Korbs (auf die zweite Ebene) und ein
Absenken, um das Be- und Entladen von
Geschirr zu vereinfachen.
Be- und Entladen des unteres Korbs:
Drücken Sie nach dem Entriegeln
den Korb nach unten. Der
Mechanismus kehrt in die
Standardposition auf der unteren
Ebene zurück.
Je nach Beladung gibt es zwei
Möglichkeiten zum Absenken des
Korbs:
Page 41

A
B
C
DEUTSCH 41
• Bei voll beladenem Korb drücken
Sie den Korb leicht nach unten.
• Bei leerem oder halbvollem Korb
drücken Sie den Korb nach unten.
9.2 Verwenden des Reinigungsmittels
wird. Die Programmnummer wird
etwa 3 Sekunden lang im Display
angezeigt, anschließend erscheint
die Programmdauer.
4. Stellen Sie die verfügbaren Optionen
ein.
5. Schließen Sie die Gerätetür, um das
Programm zu starten.
Starten eines Programms mit Zeitvorwahl
1. Wählen Sie ein Programm.
2. Drücken Sie wiederholt, bis im
Display die gewünschte Zeitvorwahl
angezeigt wird (zwischen 1 und 24
Stunden).
Die Kontrolllampe
3. Schließen Sie die Gerätetür, um den
Countdown zu starten.
Während des Countdowns kann die
VORSICHT!
Verwenden Sie nur
Reinigungsmittel für
Geschirrspüler.
1. Drücken Sie die Entriegelungstaste
(A), um den Deckel (C) zu öffnen.
2. Füllen Sie das Reinigungsmittel ein
oder legen Sie eine
Reinigungstablette in den Behälter
(B).
3. Wenn das Programm einen
Vorspülgang hat, schütten Sie eine
kleine Menge Reinigungsmittel auf
die Innenseite der Gerätetür.
4. Schließen Sie den Deckel. Achten Sie
darauf, dass der Deckel einrastet.
9.3 Einstellen und Starten
eines Programms
Starten eines Programms
1. Lassen Sie die Gerätetür einen
Spaltbreit offen.
2. Drücken Sie die Taste Ein/Aus, um
das Gerät einzuschalten. Stellen Sie
sicher, dass sich das Gerät im
Programmwahlmodus befindet.
3. Drücken Sie wiederholt die Taste
, bis im Display die Nummer des
gewünschten Programm angezeigt
Zeitvorwahl weiter verlängert werden, es
ist jedoch nicht möglich, das Programm
und die Optionen zu ändern.
Nach Ablauf der Zeitvorwahl wird das
Programm gestartet.
Öffnen der Tür während eines laufenden Programms
Wenn Sie die Tür während eines
laufenden Programms öffnen, stoppt das
Gerät. Dies kann sich auf den
Energieverbrauch und die
Programmdauer auswirken. Wenn Sie die
Tür wieder schließen, setzt das Gerät
den Betrieb ab dem Zeitpunkt der
Unterbrechung fort.
Wird die Tür länger als 30
Sekunden während der
Trockenphase geöffnet, wird
das laufende Programm
beendet. Dies geschieht
nicht, wenn die Tür durch
die Funktion AirDry geöffnet
wird.
leuchtet.
Page 42

www.aeg.com42
Abbrechen einer eingestellten Zeitvorwahl während des Countdowns
Wenn Sie die eingestellte Zeitvorwahl
abbrechen, müssen das Programm und
die Optionen erneut eingestellt werden.
Halten Sie Reset gedrückt, bis sich das
Gerät im Programmwahlmodus befindet.
Beenden des Programms
Halten Sie Reset gedrückt, bis sich das
Gerät im Programmwahlmodus befindet.
Bevor Sie ein neues Programm starten,
stellen Sie sicher, dass der
Reinigungsmittelbehälter gefüllt ist.
Programmende
Wenn das Programm beendet ist, wird
im Display 0:00 angezeigt. Die
Kontrolllampe leuchtet.
10. TIPPS UND HINWEISE
10.1 Allgemeines
Beachten Sie die folgenden Hinweise,
um optimale Reinigungs- und
Trocknungsergebnisse im täglichen
Gebrauch sicherzustellen. Sie tragen
auch zum Umweltschutz bei.
• Schütten Sie größere
Lebensmittelreste auf dem Geschirr in
den Abfallbehälter.
• Spülen Sie das Geschirr nicht von
Hand vor. Wählen Sie bei Bedarf ein
Programm mit Vorspülphase.
• Nutzen Sie die Körbe immer ganz aus.
• Achten Sie darauf, dass das Geschirr
in den Körben sich weder berührt
noch von anderem Geschirr verdeckt
wird. Nur so erreicht das Spülwasser
das ganze Geschirr.
• Sie können Geschirrspülreiniger,
Klarspülmittel und Salz separat oder
Kombi-Reinigungstabletten (z.B. „Allin-1“) verwenden. Beachten Sie die
auf der Verpackung angegebenen
Hinweise.
• Wählen Sie ein Programm, das für die
Beladung und den
Verschmutzungsgrad geeignet ist.
Alle Tasten außer der Taste Ein/Aus sind
inaktiv.
1. Drücken Sie die Taste Ein/Aus oder
warten Sie, bis das Gerät über die
Funktion Auto Off automatisch
ausgeschaltet wird.
Wenn Sie die Tür öffnen, bevor die
Funktion Auto Off eingeschaltet wird,
wird das Gerät automatisch
ausgeschaltet.
2. Schließen Sie den Wasserhahn.
Funktion Auto Off
Mit dieser Funktion wird der
Energieverbrauch gesenkt, da sich das
Gerät automatisch ausschaltet, wenn es
nicht in Betrieb ist.
Die Funktion schaltet sich in folgenden
Fällen ein:
• 5 Minuten nach Programmende.
• Nach 5 Minuten, wenn das Programm
nicht gestartet wurde.
bietet den effizientesten
Wasser- und Energieverbrauch.
10.2 Gebrauch von Salz,
Klarspül- und Reinigungsmittel
• Verwenden Sie nur Salz, Klarspülmittel
und Reinigungsmittel für
Geschirrspüler. Andere Produkte
können das Gerät beschädigen.
• Wir empfehlen in Bereichen mit
hartem und sehr hartem Wasser
Reinigungsmittel ohne Zusätze
(Pulver, Gel oder Tabs ohne Zusätze),
Klarspülmittel und Salz getrennt zu
verwenden, um optimale Reinigungsund Trocknungsergebnisse zu
erzielen.
• Schalten Sie das Gerät mindestens
einmal im Monat mit einem
Geschirrspülerreinigungsmittel, das
speziell für diesen Zweck vorgesehen
ist, ein.
• Geschirrspüler-Tabs lösen sich bei
kurzen Programmen nicht vollständig
auf. Wir empfehlen, die Tabletten nur
mit langen Programmen zu
verwenden, damit keine
Page 43

DEUTSCH 43
Reinigungsmittel-Rückstände auf dem
Geschirr zurückbleiben.
• Verwenden Sie nicht mehr als die
angegebene Reinigungsmittelmenge.
Siehe hierzu die Angaben auf der
Reinigungsmittelverpackung.
10.3 Was tun, wenn Sie keine
Multi-Reinigungstabletten
mehr verwenden möchten
Vorgehensweise, um zurück zur
separaten Verwendung von
Reinigungsmittel, Salz und Klarspülmittel
zu kehren:
1. Stellen Sie die höchste
Wasserenthärterstufe ein.
2. Stellen Sie sicher, dass der
Salzbehälter und der KlarspülmittelDosierer gefüllt sind.
3. Starten Sie das kürzeste Programm
mit einer Spülphase. Verwenden Sie
kein Reinigungsmittel und beladen
Sie die Körbe nicht.
4. Stellen Sie den Wasserenthärter nach
Ablauf des Programms auf die
Wasserhärte in Ihrer Region ein.
5. Stellen Sie die Menge des
Klarspülmittels ein.
6. Schalten Sie die
Klarspülmittelnachfüllanzeige ein.
10.4 Beladen der Körbe
• Verwenden Sie das Gerät
ausschließlich zum Spülen
spülmaschinenfester Teile.
• Spülen Sie im Gerät keine
Geschirrteile aus Holz, Horn,
Aluminium, Zinn oder Kupfer.
• Spülen Sie in diesem Gerät keine
Gegenstände, die Wasser aufnehmen
können (Schwämme, Geschirrtücher
usw.).
• Entfernen Sie größere
Lebensmittelrückstände vom
Geschirr.
• Weichen Sie Kochgeschirr mit
eingebrannten Speiseresten vor dem
Spülen im Gerät ein.
• Ordnen Sie hohle Gefäße (z. B.
Tassen, Gläser, Pfannen) mit der
Öffnung nach unten ein.
• Achten Sie darauf, dass Gläser
einander nicht berühren.
• Ordnen Sie leichte Gegenstände im
Oberkorb an. Achten Sie darauf, dass
diese sich nicht frei bewegen können.
• Ordnen Sie Besteck und kleine
Gegenstände in die
Besteckschublade ein.
• Vergewissern Sie sich, dass sich die
Sprüharme ungehindert bewegen
können, bevor Sie ein Programm
starten.
10.5 Vor dem Starten eines
Programms
Stellen Sie vor dem Start des Programms
sicher, dass:
• Die Siebe sauber und
ordnungsgemäß eingesetzt sind.
• Der Deckel des Salzbehälters fest
geschlossen ist.
• Die Sprüharme nicht verstopft sind.
• Geschirrspülsalz und Klarspülmittel
vorhanden sind (außer Sie verwenden
Multi-Reinigungstabletten).
• Die Geschirrteile richtig in den
Körben angeordnet sind.
• Das Programm sich für die Beladung
und den Verschmutzungsgrad eignet.
• Die Reinigungsmittelmenge stimmt.
10.6 Entladen der Körbe
1. Lassen Sie das Geschirr abkühlen,
bevor Sie es aus dem Gerät nehmen.
Heißes Geschirr ist stoßempfindlich.
2. Entladen Sie zuerst den Unter- und
dann den Oberkorb.
Nach Abschluss des
Programms kann sich noch
Wasser an den Innenseiten
des Geräts befinden.
Page 44

C
B
A
www.aeg.com44
11. REINIGUNG UND PFLEGE
WARNUNG!
Schalten Sie das Gerät
immer aus und ziehen Sie
den Netzstecker aus der
Steckdose, bevor
Reinigungsarbeiten
durchgeführt werden.
Achten Sie darauf, dass der
Comfort Lift Korb leer und in
angehobener Stellung
verriegelt ist.
Verschmutzte Siebe und
verstopfte Sprüharme wirken
sich negativ auf das
Spülergebnis aus. Prüfen Sie
diese Teile regelmäßig und
reinigen Sie sie, falls nötig.
11.1 Reinigen der Filter
Das Filtersystem besteht aus 3 Teilen.
1. Drehen Sie den Filter (B) nach links
und nehmen Sie ihn heraus.
2. Nehmen Sie den Filter (C) aus dem
Filter (B).
3. Entfernen Sie den flachen Filter (A).
4. Reinigen Sie die Filter.
5. Achten Sie darauf, dass sich keine
Lebensmittelreste oder
Verschmutzungen in oder um den
Rand der Wanne befinden.
6. Setzen Sie den flachen Filter (A)
wieder ein. Stellen Sie sicher, dass er
korrekt unter den beiden Führungen
eingesetzt wurde.
Page 45

7. Bauen Sie die Filter (B) und (C)
wieder zusammen.
8. Setzen Sie den Filter (B) in den
flachen Filter (A) ein. Drehen Sie ihn
nach rechts, bis er einrastet.
DEUTSCH 45
3. Reinigen Sie den Sprüharm unter
fließendem Wasser. Entfernen Sie
Verunreinigungen aus den
Öffnungen des Sprüharms mit einem
spitzen Gegenstand, z.B. einem
Zahnstocher.
VORSICHT!
Eine falsche Anordnung der
Filter führt zu schlechten
Spülergebnissen und kann
das Gerät beschädigen.
11.2 Reinigen des oberer
Sprüharms
Wir empfehlen den oberer Sprüharm
regelmäßig zu reinigen, um zu
verhindern, dass Verunreinigungen die
Löcher verstopfen.
Verstopfte Löcher können die Ursache
für nicht zufriedenstellende
Spülergebnisse sein.
1. Ziehen Sie den Oberkorb bis zum
Anschlag heraus.
2. Drücken Sie den Sprüharm nach
oben und drehen Sie ihn gleichzeitig
im Uhrzeigersinn, um ihn vom Korb
zu lösen.
4. Drücken Sie zum Einsetzen des
Sprüharms diesen nach oben und
drehen Sie ihn gleichzeitig gegen
den Uhrzeigersinn, bis er einrastet.
11.3 Reinigen der Außenseiten
• Reinigen Sie das Gerät mit einem
weichen, feuchten Tuch.
• Verwenden Sie ausschließlich
Neutralreiniger.
Page 46

www.aeg.com46
• Benutzen Sie keine Scheuermittel,
scheuernde Reinigungsschwämmchen
oder Lösungsmittel.
11.4 Reinigung des
Geräteinnenraums
• Reinigen Sie das Gerät und die
Gummidichtung der Tür sorgfältig mit
einem weichen, feuchten Tuch.
• Verwenden Sie einmal im Monat ein
spezielles Reinigungsmittel für
Geschirrspüler, um die
Leistungsfähigkeit des Geräts zu
erhalten. Befolgen Sie sorgfältig die
12. FEHLERSUCHE
WARNUNG!
Eine unsachgemäße
Reparatur des Geräts kann
eine Gefahr für die
Sicherheit des Benutzers
darstellen. Die
Reparaturarbeiten dürfen
nur von qualifiziertem
Personal durchgeführt
werden.
Anweisungen auf der
Reinigungsmittelverpackung.
• Benutzen Sie keine Scheuermittel,
scheuernden
Reinigungsschwämmchen, scharfen
Gegenstände, starken Chemikalien,
Schaber oder Lösungsmittel.
• Wenn Sie regelmäßig
Kurzprogramme verwenden, können
diese zu Fett- und Kalkablagerungen
im Gerät führen. Schalten Sie
mindestens zweimal im Monat ein
langes Programm ein, um die
Ablagerungen zu verhindern.
Die meisten Störungen, die auftreten,
können behoben werden, ohne dass
der autorisierte Kundendienst gerufen
werden muss.
Informationen zu möglichen Störungen
finden Sie in der nachfolgenden Tabelle.
Bei einigen Störungen zeigt das Display
einen Alarmcode an.
Störung und Alarmcode Mögliche Ursache und Abhilfe
Das Gerät lässt sich nicht
einschalten.
Das Programm startet nicht. • Achten Sie darauf, dass die Gerätetür geschlossen ist.
• Vergewissern Sie sich, dass der Netzstecker in die Netzsteckdose eingesteckt ist.
• Vergewissern Sie sich, dass im Sicherungskasten keine
Sicherung ausgelöst hat.
• Wenn die Zeitvorwahl eingestellt ist, brechen Sie diese
ab, oder warten Sie, bis sie abgelaufen ist.
• Das Gerät regeneriert das Harz im Wasserenthärter. Dieser Vorgang dauert ca. 5 Minuten.
Page 47

Störung und Alarmcode Mögliche Ursache und Abhilfe
Es läuft kein Wasser in das
Gerät.
Im Display erscheint
oder .
• Stellen Sie sicher, dass der Wasserzulaufhahn geöffnet
ist.
• Vergewissern Sie sich, dass der Wasserdruck der Wasserversorgung nicht zu niedrig ist. Diese Informationen
erhalten Sie von Ihrem lokalen Wasserversorger.
• Stellen Sie sicher, dass der Wasserzulaufhahn nicht verstopft ist.
• Vergewissern Sie sich, dass das Sieb im Zulaufschlauch
nicht verstopft ist.
• Vergewissern Sie sich, dass der Zulaufschlauch nicht geknickt oder zu stark gekrümmt ist.
Das Gerät pumpt das Wasser nicht ab.
Im Display erscheint
• Stellen Sie sicher, dass der Siphon nicht verstopft ist.
• Vergewissern Sie sich, dass das Sieb im Ablaufschlauch
.
nicht verstopft ist.
• Vergewissern Sie sich, dass das interne Siebsystem nicht
verstopft ist.
• Vergewissern Sie sich, dass der Ablaufschlauch nicht geknickt oder zu stark gekrümmt ist.
Das Überlaufschutzsystem
ist eingeschaltet.
Im Display erscheint
Während des Betriebs
stoppt und startet das Gerät
• Drehen Sie den Wasserhahn zu und wenden Sie sich an
einen autorisierten Kundendienst.
.
• Das ist normal. So werden optimale Reinigungsergebnisse erzielt und Strom gespart.
mehrmals.
Das Programm dauert zu
lang.
• Wenn die Zeitvorwahl eingestellt ist, brechen Sie die
Zeitvorwahl ab, oder warten Sie, bis sie abgelaufen ist.
• Schalten Sie die Option TimeSaver ein, um die Programmdauer zu verkürzen.
• Eingeschaltete Optionen können die Programmdauer
verlängern.
Die verbleibende Zeit im
Display erhöht sich und
• Dies ist keine Störung. Das Gerät arbeitet ordnungsgemäß.
springt bis kurz vor das Ende
der Programmdauer.
Aus der Gerätetür tritt ein
wenig Wasser aus.
• Das Gerät ist nicht ausgerichtet. Schrauben Sie die
Schraubfüße weiter hinein oder weiter heraus (falls vorhanden).
• Die Gerätetür ist nicht mittig zur Wanne positioniert.
Stellen Sie den hinteren Fuß ein (sofern vorhanden).
Die Gerätetür ist schwer zu
schließen.
• Das Gerät ist nicht ausgerichtet. Schrauben Sie die
Schraubfüße weiter hinein oder weiter heraus (falls vorhanden).
• Teile des Geschirrs ragen aus den Körben heraus.
DEUTSCH 47
Page 48

www.aeg.com48
Störung und Alarmcode Mögliche Ursache und Abhilfe
Klappernde oder schlagende Geräusche aus dem Geräteinneren.
Das Gerät löst die Sicherung
aus.
• Das Geschirr ist nicht richtig in den Körben eingeordnet.
Siehe Broschüre zum Beladen der Körbe.
• Achten Sie darauf, dass sich die Sprüharme frei drehen
können.
• Die abgesicherte Stromstärke reicht nicht für den gleichzeitigen Betrieb aller eingeschalteten Geräte. Überprüfen Sie, für welche Stromstärke die Steckdose bzw. der
Stromzähler zugelassen ist, und schalten Sie eines der
eingeschalteten Geräte aus.
• Ein Fehler in der Elektrik des Geräts. Wenden Sie sich an
den autorisierten Kundendienst.
Siehe „Vor der ersten
Inbetriebnahme“,
„Täglicher Gebrauch“ oder
„Tipps und Hinweise“
bezüglich anderer möglicher
Ursachen.
Problem erneut auf, wenden Sie sich an
einen autorisierten Kundendienst.
Wenden Sie sich an einen autorisierten
Kundendienst, wenn Alarmcodes
angezeigt werden, die nicht in der
Tabelle angegeben sind.
Schalten Sie nach der Überprüfung das
Gerät aus und wieder ein. Tritt das
12.1 Die Spül- und Trocknungsergebnisse sind nicht zufriedenstellend
Störung Mögliche Ursache und Abhilfe
Nicht zufriedenstellende Spülergebnisse.
Nicht zufriedenstellende
Trocknungsergebnisse.
Weiße Streifen oder blau
schimmernder Belag auf Gläsern und Geschirr.
• Siehe „Täglicher Gebrauch“, „Tipps und Hinweise“
sowie die Broschüre zum Beladen der Körbe.
• Nutzen Sie intensivere Spülprogramme.
• Reinigen Sie die Austrittsdüsen der Sprüharme und
das Sieb. Siehe „Reinigung und Pflege“.
• Das Geschirr stand zu lange im geschlossenen Gerät.
• Es ist kein Klarspülmittel vorhanden oder die Klarspülmittelmenge ist nicht ausreichend. Stellen Sie eine höhere Klarspülmittelmenge ein.
• Kunststoffteile müssen eventuell mit einem Tuch abgetrocknet werden.
• Schalten Sie XtraDry und AirDry ein, um die beste
Trocknungsleistung zu erzielen.
• Wir empfehlen Ihnen stets Klarspülmittel zu verwenden, auch wenn Sie Multi-Reinigungstabletten benutzen.
• Die zugegebene Klarspülmittelmenge ist zu hoch.
Stellen Sie eine geringere Klarspülmittelmenge ein.
• Die Reinigungsmittelmenge ist zu hoch.
Page 49

DEUTSCH 49
Störung Mögliche Ursache und Abhilfe
Wasserflecken und andere
Flecken auf Gläsern und Geschirr.
• Die zugegebene Klarspülmittelmenge ist zu niedrig.
Stellen Sie eine höhere Klarspülmittelmenge ein.
• Die Ursache kann in der Qualität des Klarspülmittels
liegen.
Das Geschirr ist nass. • Schalten Sie XtraDry und AirDry ein, um die beste
Trocknungsleistung zu erzielen.
• Das Programm enthält keine Trocknungsphase oder
eine Trocknungsphase mit niedriger Temperatur.
• Der Klarspülmittel-Dosierer ist leer.
• Die Ursache kann in der Qualität des Klarspülmittels
liegen.
• Die Ursache kann in der Qualität der Multi-Reinigungstabletten liegen. Probieren Sie eine andere Marke aus oder schalten Sie den Klarspülmittel-Dosierer
ein und verwenden Sie ihn zusammen mit den MultiReinigungstabletten.
Der Geräteinnenraum ist nass. • Dies ist keine Störung des Geräts. Feuchte Luft kon-
densiert an den Wänden des Geräts.
Ungewöhnliche Schaumbildung während des Spülgangs.
• Verwenden Sie nur Reinigungsmittel für Geschirrspüler.
• Der Klarspülmittel-Dosierer hat ein Leck. Wenden Sie
sich an den autorisierten Kundendienst.
Rostspuren am Besteck. • Das Spülwasser enthält zu viel Salz. Siehe „Wasseren-
thärter“.
• Silber- und Edelstahlbesteck wurden zusammen eingeordnet. Ordnen Sie nicht Silber- und Edelstahlbesteck zusammen ein.
Am Ende des Programms befinden sich Reinigungsmittelreste im Behälter.
• Das Reinigungsmittel-Tab blieb im Behälter stecken
und wurde daher nicht vollständig vom Wasser mitgenommen.
• Das Wasser kann das Reinigungsmittel nicht aus dem
Behälter ausspülen. Achten Sie darauf, dass der
Sprüharm nicht blockiert oder verstopft ist.
• Stellen Sie sicher, dass die im Korb eingeordneten Gegenstände ein Öffnen des Reinigungsmittelbehälters
nicht verhindern.
Gerüche im Gerät. • Siehe „Reinigen des Geräteinnenraums“.
Page 50

www.aeg.com50
Störung Mögliche Ursache und Abhilfe
Kalkablagerungen auf dem
Geschirr, im Innenraum und
auf der Türinnenseite.
Das Geschirr ist glanzlos, verfärbt sich oder ist angeschlagen.
• Die Salzmenge ist nicht ausreichend. Überprüfen Sie
die Salzkontrolllampe.
• Der Deckel des Salzbehälters ist locker.
• Ihr Leitungswasser ist hart. Siehe „Wasserenthärter“.
• Verwenden Sie Salz und schalten Sie die Regenerierung des Wasserenthärters ein, selbst wenn Sie MultiReinigungstabletten verwenden. Siehe „Wasseren-
thärter“.
• Sind noch Kalkrückstände vorhanden, reinigen Sie das
Gerät mit Pflegemitteln, die speziell für diesen Zweck
vorgesehen sind.
• Probieren Sie ein anderes Reinigungsmittel aus.
• Wenden Sie sich an den Reinigungsmittelhersteller.
• Achten Sie darauf, dass nur spülmaschinenfestes Geschirr im Gerät gespült wird.
• Laden und entladen Sie den Korb vorsichtig. Siehe
Broschüre zum Beladen der Körbe.
• Ordnen Sie empfindliche Gegenstände im Oberkorb
an.
• Wählen Sie für empfindliches Geschirr und Gläser das
Spezialprogramm. Siehe „Programme“.
Siehe „Vor der ersten
Inbetriebnahme“,
„Täglicher Gebrauch“ oder
„Tipps und Hinweise“
bezüglich anderer möglicher
Ursachen.
13. PRODUKTDATENBLATT
Warenzeichen AEG
Modellkennung FSS62800P 911434450
Nennleistung (Standard-Einstellungen) 13
Energieeffizienzklasse A++
Energieverbrauch in kWh pro Jahr, basierend auf 280
Stanard-Reinigungszyklen bei Verwendung von kaltem
Wasser und der Modi mit wenig Energiebedarf. Der tatsächliche Verbrauch hängt davon ab, wie das Gerät verwendet wird.
Energieverbrauch des Standard-Reinigungs-Zyklus in
kWh
Energieverbrauch im OFF-Modus in W 0.50
262
0.921
Page 51

Energieverbauch im nicht-ausgeschalteten Zustand inW5.0
DEUTSCH 51
Wasserverbrauch in Liter/Jahr, auf der Grundlage von
280 Standardreinigungszyklen. Der tatsächliche Wasserverbrauch hängt von der Art der Nutzung des Geräts
ab
Trocknungseffizienzklasse auf einer Skala von G (geringste Effizienz) bis A (höchste Effizienz)
Das „Standardprogramm“ ist der Reinigungszyklus, auf
den sich die Informationen auf dem Etikett und im Datenblatt beziehen, dass dieses Programm zur Reinigung
normal verschmutzten Geschirrs geeignet und in Bezug
auf den kombinierten Energie- und Wasserverbrauch
am effizientesten ist. wird angegeben als “Eco“-Programm.
Programmdauer des Standardreinigungszyklus in Minuten
Dauer des unausgeschalteten Zustands in Minuten 5
Luftschallemissionen in dB(A) re 1 pW 44
Einbaugerät J/N Ja
3080
A
235
14. ZUSÄTZLICHE TECHNISCHE DATEN
Abmessungen Breite/Höhe/Tiefe (mm) 596 / 818 - 898 / 550
Elektrischer Anschluss
Wasserversorgungsdruck bar (Mindest- und Höchstwert) 0.5 - 8
Wasserversorgung
1)
Weitere Werte finden Sie auf dem Typenschild.
2)
Wenn Sie Warmwasser mit alternativen Energiequellen (z. B. Solaranlagen) aufbereiten, können Sie
durch den Anschluss des Geräts an die Warmwasserversorgung den Energieverbrauch reduzieren.
1)
Spannung (V) 220 - 240
Frequenz (Hz) 50
MPa (Mindest- und Höchstwert) 0.05 - 0.8
Kalt- oder Warmwasser
2)
max. 60 °C
15. UMWELTTIPPS
Recyceln Sie Materialien mit dem Symbol
. Entsorgen Sie die Verpackung in den
entsprechenden Recyclingbehältern.
Recyceln Sie zum Umwelt- und
Gesundheitsschutz elektrische und
elektronische Geräte. Entsorgen Sie
Geräte mit diesem Symbol nicht mit
dem Hausmüll. Bringen Sie das Gerät zu
Ihrer örtlichen Sammelstelle oder
wenden Sie sich an Ihr Gemeindeamt.
*
Page 52

www.aeg.com/shop
117883254-A-072019
 Loading...