

Page 1

Dishwasher
FAVORIT 665/665 i
Operating instructions
AEG
Page 2

Please read the instructions for use and keep them in a safe place!
Your dishwasher should only be installed
by a qualified tradesman. Our special
installation instructions are given on
pages 19—21.
These instructions for use wiil heip you take
fuii advantage of aii the features offered
by thisHTiachine. In return for this minor
effort, your favorì! wiii reward you with
fauitiess service. You wiil also save yourself
unnecessary maintenance costs!
Contents
Illustration pages (please unfold)
Machine description
Important hints to help you use
your dishwasher correctly
How to operate your machine:
• Filling with rinse aid —
Setting the rinse aid quantity
to be dosed
• Add dishwashing detergent —
before each washing programme
Loading the dishwasher correctly
Starting and stopping —
taking out the dishes
3— 5 Washing programmes
(programme chart)
6—8
Cleaning and care
8 If you think your dishwasher
is not working properly
After-sales service
Notes on installation
10
(Installation —
water and electrical connection
-| I water protection system)
12 Technical data
Arrangement examples
13
14—15
16
16—17
18
19—21
22
23
Page 3
Page 4
Page 5
Page 6

Machine description
Please unfold illustration pages 3, 4, 5 before reading on!
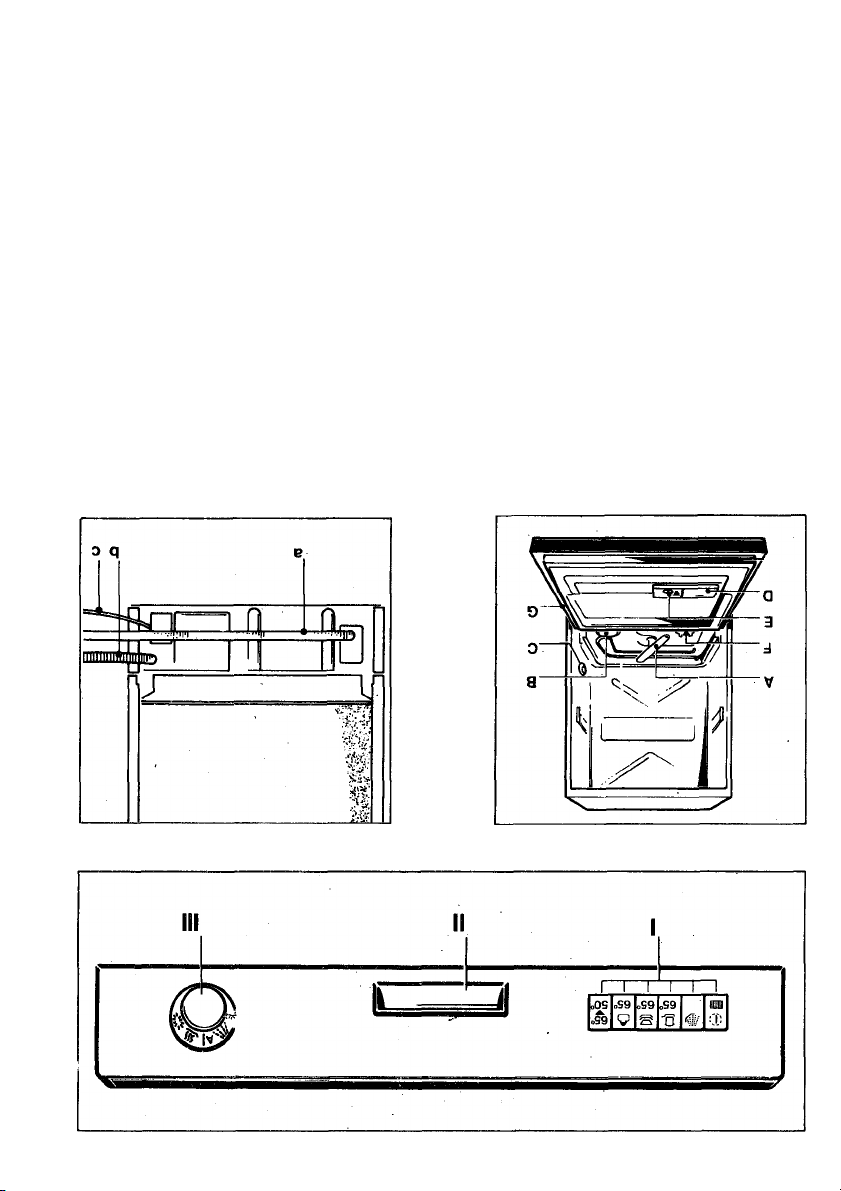
Control panol
Fig. 1
I Start/stop and pro
gramme selector buttons
II Door release handle
III Programme switch and
programme cycle
Indicator
Inside view
without crockery baskets
Fig. 2
A Lower spray arm
B No function
C No function
D Detergent dispenser
E Rinse aid dispenser
F Strainers
G Rating piate (with E- and
F-number)
Start/stop and programme selector buttons (Fig. 1/1)
Start/stop button with operating indicator
Rear view
Fig. 3
a) Supply hose
b) Drain hose
c) Electrical supply lead
Extra pre-wash
Intensive 65° C (temperature cannot be reduced to 50° C)
65° C normal programme
(can be combined with temperature reduction to 50° C)
Page 7

Machine description
65°
65° C economy programme
(can be combined with temperature reduction to 50° C)
65°
50°
Temperature reduction to 50° C
Programme cycle indicator (Fig. 1/III)
/!i\\
* !
IHT
Washing with detergent
Pre-wash
//l\\
//lt\
//It' Intermediate rinse
K ■ /
••• •••
* ! •
Final rinse with rinse aid
Drying with hot air
Page 8

Machine description
Crockery baskets
To ensure protection of the crockery baskets
during transport, we have packed them with
poiystyrene foam parts. Piease remove aii
poiystyrene foam parts before operating
your dishwasher.
important hints to heip you use your dishwasher correctiy
• Operate your dishwasher economically
and with regard for the environment:
Collect your dirty dishes, stack them in
the dishwasher, and only wash them when
both baskets are full. Always select the
programme corresponding to the degree
of soiling of your crockery (according
to the chart on pages 34/35).
• Certain types of decoration which have
been painted over the glaze may fade after
frequent machine washing. Please ensure
that earthenware dishes are marked
“dishwasher-proof”!
• Parts of aluminium utensils or saucepans
also tend to discolour during washing.
Some types of glass further become
cloudy after many washing cycles.
• Silver crockery and cutlery should always
be cleaned of food residues if they are not
washed immediately after a meal (since
many food residues, such as egg white,
egg yolk, or mustard cause discolorations
or staining).
• The following are unsuitable for machine
washing:
Wooden boards, plastic parts sensitive to
hot water, tin crockery, glued crockery
parts, and crockery parts with hairline
cracks. Also older types of cutlery with
temperature-sensitive adhesive as well as
rust-sensitive steel knives, and cutlery with
wooden, horn, porcelain, and mother-of-
pearl handles.
• When you buy new crockery, ensure that
its shape is suitable for loading in dish
washers; items should have straight and
even surfaces, large openings, flat shallow
bases, dishwasher-safe decoration.
Glasses and cutlery should also be
dishwasher-safe.
Page 9

Page 10

How to operate your machine
Filling with rinse aid
The rinse aid ensures that the iast rinse water
flows off, leaving no drops, and gives your
crockery its final sparkle. The rinse aid is
dispensed automatically from the dispenser.
Important!
Use only a branded rinse aid for domestic
dishwashers, since other agents, e.g.
vinegar, may damage your machine and
not produce the intended effect.
Never use conventional washing-up liquids,,
since they contain agents causing heavy
frothing and are unsuitable for dishwashers.
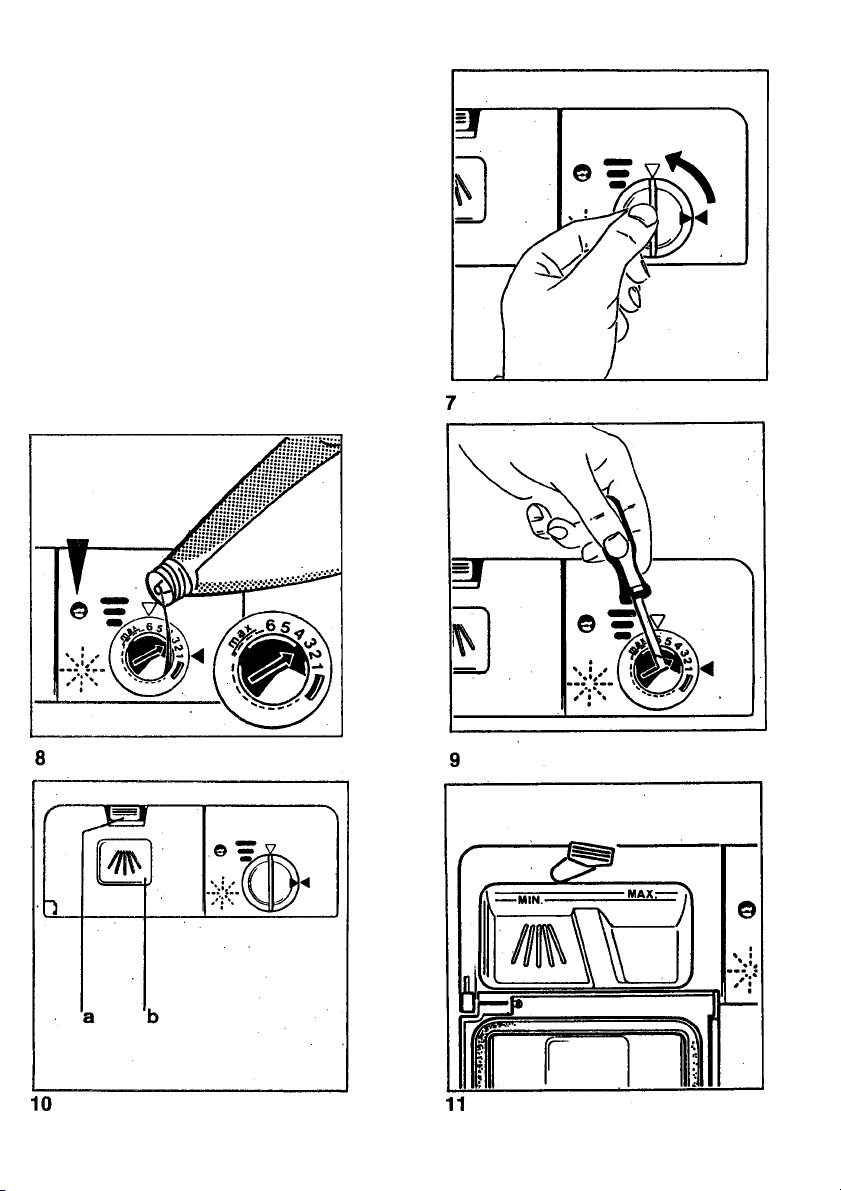
The dispenser is located on the inside of the
door (Fig. 2/E). Open the dispenser by
twisting the cap Vi revolution to the left
(Fig. 7/arrow) and fill the rinse aid into the
filling opening max. up to the dotted line
(Fig. 8).
Then close the cap again by twisting it to the
right.
Filling quantity is around 150 cm^ (sufficient
for around 50 washing programmes).
Wipe off any spilled rinse aid with a cloth,
otherwise too much foam will be produced
during washing.
Rinse aid replenishment indicator
You must replenish with rinse aid when a
dark spot surrounded by a bright ring { )
appears in the display window on the dosage
combination (Fig. 8/arrow). When the rinse aid
dispenser is full, the display window appears
uniformly dark.
10
Page 11

How to operate your machine
Setting the rinse aid quantity to be dosed
The dispensing unit is iocated inside the
filling opening (Fig. 9). You can use it to
reguiate the rinse aid quantity on a scale
of 1—6 corresponding to 1—6 cm^ rinse aid
addition.
For this purpose, set the arrow with a coin
or screwdriver to the required scale position.
The rinse aid dosage is factory-set to
a quantity of 3 cm^ rinse aid (arrow
points to “3”) per washing programme.
In individual cases, more or less rinse aid can
be dispensed, but you should do this only if
you discover imperfect crockery results after
washing (see page 17 under “If you think your
dishwasher is not working properly”).
Add dishwashing detergent — before each washing programme
Before starting a washing programme (except
“Extra pre-wash”), you must fill the detergent
dispenser with dishwasher detergent powder
(Fig. 2/D).
If the lid is closed, press the locking lever
(Fig. 10/a), and the lid will spring open.
The quantity of detergent used depends
on the degree of soiling of the dishes.
For normal soiling, around 20 g (for heavy
soiling, especially with starch and fat, up to
max. 30 g) should be added. The two marking
lines in the detergent dispenser are intended
to help you achieve the correct dosage.
The lower “Min” mark corresponds to around
20 g and the upper “Max” mark to around
30 g detergent when filled level (Fig. 11).
Then press the lid shut. The catch must
engage.
The detergent is dispensed automatically into
the machine during the washing programme.
During programmes with pre-wash, we
additionally recommend you to put around
5 g detergent in the dispenser cap recess
(Fig. 10/b)
Since the effectiveness of different detergents
may vary, please also note the dosage recom
mendations of the detergent manufacturer
concerned.
(recess filled level).
Important note;
The detergent dosage indicated as “Min” and
“Max” applies to the full load which we
recommend as being the most economic
and environmentally acceptable method of
machine dishwashing.
You may of course also wash smaller quanti
ties of dishes — with correspondingly smaller
detergent dosage. E.g. for half-load, you
should add only max. 15 g detergent to
achieve satisfactory dishwashing results.
Important!
• Use only branded dishwasher detergent
for domestic dishwashers; Never use
conventional washing-up liquids (they
cause heavy frothing, and the dishes will
not be cleaned).
• Always store the detergent in a dry place
in a sealed container (lumpy detergent will
not clean dishes).
• To ensure good economy and as a contri
bution to environmental protection, never
add too much dishwashing detergent.
If you add too little detergent, starch
residues remain on the dishes and can
only be rubbed off by hand.
11
Page 12

Loading the dishwasher correctly
Before loading the machine with dishes,
remove larger food residues that are not
soluble in water, e.g. fishbones and other
bones, etc. Pans with burnt-on food residues
should be pre-soaked in water.
The easiest way to load the basket is from
back to front.
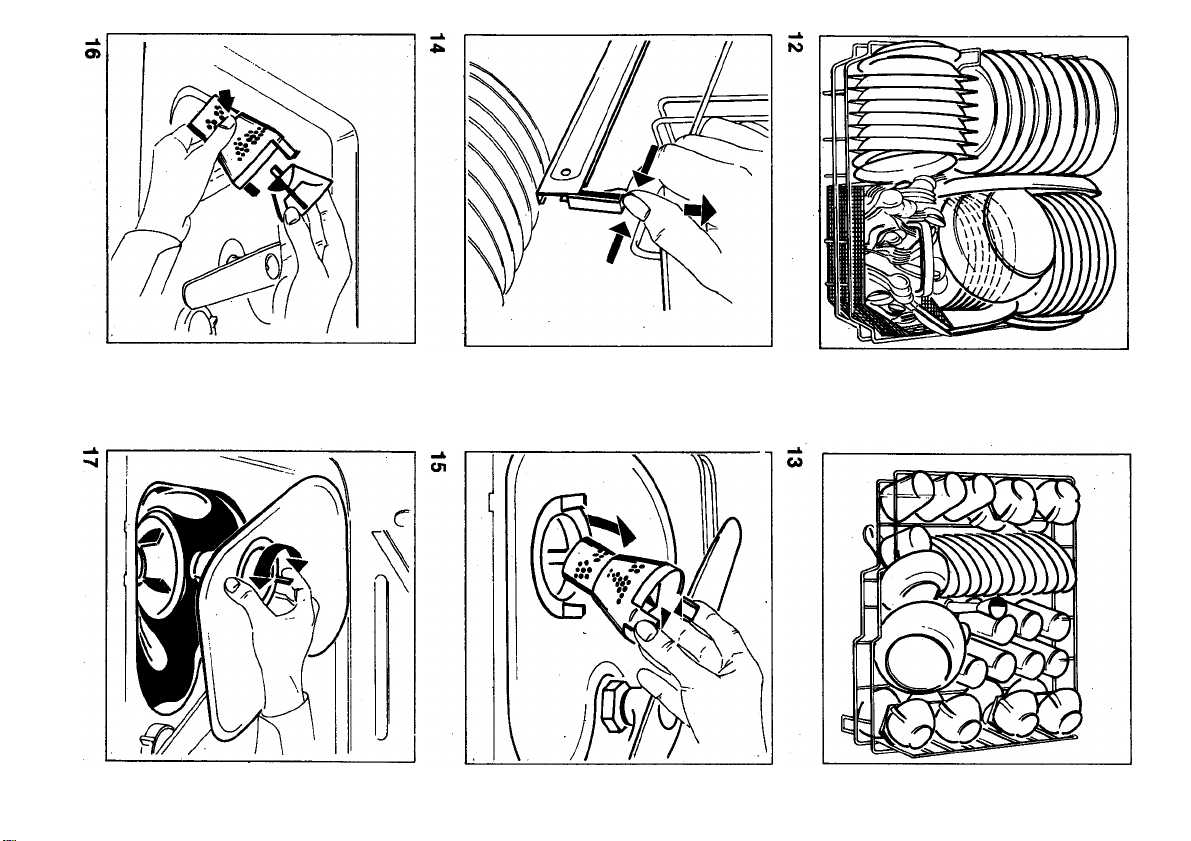
Lower basket (Fig. 12)
Large, heavily soiled dishes are best cleaned
in the lower basket. Draw out the lower
basket to its fuiiest extent and place dishes,
bowls, plates, and pots according to our
illustrated example.
Cutlery basket
Cutlery should be arranged in the basket
as follows;
• Arrange cutlery loosely and distribute
It in all compartments so that each .
individual article has good contact with
the washing water.
• Place knives, forks, and spoons with the
handle pointing downwards.
• Do not nest spoons and forks inside
each other.
• Do not arrange spoons and forks with
their dirty side In contact with each other.
For coffee- and teaspoons, you can use
the special spoon rack on the LH side.
• Exceptionally long cutlery pieces, such as
e.g. soup ladles or the like, can be placed
in the upper basket (since the upper rotor
arm may otherwise be obstructed).
Upper basket (Fig. 13)
Smaller, more fragile dishes are given
a gentle wash In the upper basket. Draw out
the upper basket to its fullest extent and
insert the smaller crockery items, such as
saucers, cups, glasses, and small cans accor
ding to our Illustrated example. For this
purpose, also use the hinged cup holders.
important!
Proper arrangement ensures perfect washing
resuits.
• Arrange all containers, such as cups,
glasses, saucepans, etc., with the open
downwards so that the yvater can run out
freely. Make sure that no water can collect
In the recesses.
• Extremely curved dishes or other items
should be placed in holders with wide
spacings on the LH side at the back of
the lower basket so that the sprayed
water has good access to all surfaces.
• Dishes, pots, and pans are best placed
upside down over the short angled holders
in the lower basket.,
• Arrange glasses so that they are not In
contact with each other (this prevents
marks which may be produced during
drying and also prevents glass damage).
• Hinged cup holders; arrange cups in
staggered formation to ensure thorough
cleaning action from all sides.
Upper basket adjustment
The upper basket is height-adjustable.
The upper position of the upper basket allows
a setting height of 20 cm In the upper basket
and 29 cm in the lower basket, whereas the
lower position of the upper basket allows a
setting height of 25 cm In the upper basket
and 24 cm in the lower basket.
The upper position of the upper basket has
been factory-set. To adjust the height of the
upper basket, proceed as follows;
1. Draw out the upper basket to its fullest
extent.
2. Remove the catches (Fig. 14) at the front
end of the basket rails.
3. Pull the upper basket fully out of the
basket rails.
4. Thread the upper or lower roller set
(upper roller set = lower position of
upper basket, lower roller set =
upper position of upper basket)
of the upper basket In the basket rails.
5. Clip the catches back on to the basket
raiis.
12
Page 13

starting and stopping — taking out the dishes
Programme start
(Turn to next page for programme chart)
1. Fully open water tap.
Note: Should you ever forget to open the
water tap when the dishwasher has
already been started, switch off the
appliance, open the water tap, and restart
the programme from the beginning.
2. Turn programme switch (Fig. 1/III) clock
wise to symbol A or B.
3. Press start/stop and programme selector
button and possibly also press 50° button
(Fig. 1/i). Programme starts.
Programme correction
If you have set the wrong programme by
mistake, you can immediately correct this by
pressing the programme button or turning the
programme switch clockwise to the correct
position.
Programme cycle indicator
(Fig. 1/III)
After starting, the washing programme runs
automatically.
During the programme cycle, the programme
switch rotates stepwise and thereby indicates
the respective status of the washing
programme.
During heating for washing with detergent
and final rinsing with rinse aid, the
programme cycle indicator remains stationary
until the required temperature Is attained.
Important!
On radio Interference grounds, operate
programme switch only when the machine
is switched off. Otherwise this could also
result In unintentional detergent dosage.
Programme stop
When the programme has ended:
• Press the start/stop button.
The operating indicator goes out.
Release any pressed 50° button.
• Then open the door (there will be some
escape of steam) and leave it sligthly ajar.
The drying stage is accelerated by warm
air and steam escapes. After around
15 minutes, you can take out the dishes.
Important note:
If your machine is Installed under a
continuous worktop, please note the
instructions on worktop protection given
on page 19.
First take out the dishes from the
lower basket and then from the upper
basket so that np water from the recesses
in the crockery above can drip on
to articles In the lower basket.
Check the condition of the strainers after
every washing programme. If they are
choked, clean them. Turn to page 16 for
cleaning instructions.
13
Page 14

Washing
programmes
Suitable for
Set programme:
Turn pro- Press start/stop button
gramme and programme selector
buttonswitch to
symbol
Extra
pre-wash
Intensive 65 °C
Normal 65 °C Normally soiled tableware
Normal 50 °C Normally soiled tableware
Used crockery collected
In the dishwasher and
Intended for washing
at a later time
Heavily soiled tableware
and cookware with heavily
drIed-on food residues,
especially egg-white and
starch
and cookware with heavily
dried-on food residues
with temperature-sensitive
items (e.g. glass, plastic)
' I '
V I !
\\j
BBS
' T'
\ 1 !
Q
65°
N--/
65°
65°
65°
^°
Economy 65 °C
Economy/
short 50 °C
14
Normally to slightly soiled
tableware and cookware
Short programme for
normally to slightly soiled
coffee and dessert crockery
as well as sensitive glasses
B
B
(T)
iii
' T'
V I ;
65°
65°
65°
^°
Page 15

Programme cycle
Programme
duration in minutes
for coid water
cdnnection
Energy
consumption (kWh)
for coid water
connection
Water
consumption
in litres
Pre-wash
Pre-wash,
washing with detergent,
2 X intermediate rinse,
finai rinse
with rinse aid,
drying with hot air
Pre-wash,
washing with detergent,
intermediate rinse,
finai rinse
with rinse aid,
drying with hot air
Pre-wash,
washing with detergent,
intermediate rinse,
finai rinse
with rinse aid,
drying with hot air
Washing with detergent,
intermediate rinse,
final rinse
with rinse aid,
drying with hot air
11
0.1 6
90 1.7
87
70
77
1.6
1.0 20
1.6 15
25
20
Washing with detergent,
intermediate rinse,
final rinse
with rinse aid,
drying with hot air
59
0.9 15
15
Page 16

Cleaning the strainers
Coarse filter
Fig. 15
Remove the coarse strainer and clean it
under running water with a brush.
If food residues have become stuck,
take out the insert (Fig. 16) and remove
the food residues.
Then replace the insert firmly in the coarse
strainer and place it in the fine strainer.
Fine filter
Fig. 17
If necessary, also clean the fine strainer
and microfilter.
Twist it to the left and clean the upper
and lower sides.
Unscrew it anticlockwise and clean the top
and the underside of the strainer.
Then replace it so that the outside edge
rests correctly on the floor of the
machine (i.e. forms a tight fit). Then screw
on tight in a clockwise direction.
Never carry out a washing programme
without a strainer.
Care instructions
Never clean the screens and controls of your
appliance with commercially available
furniture cleaners and aggressive detergents.
If cleaning is necessary, use only lukewarm
water.
If you think your dishwasher is not working properly
Before calling our service centre, please check whether you can rectify the fault yourself
by following the instructions given below.
What should I check if....?
... the program will not start?
• Are the fuses in order?
• Have you closed the door properly?
... no water flows in?
• Have you turned on the water tap?
• Check the water supply hose
(it must not be kinked).
... the programme switch stops at the start
of cleaning (symbol inr ) or rinsing with
rinse aid (symbol )?
• Have you fully opened the water tap
(see page 13)?
• Check the strainer at the screwed
connection of the supply hose
(please clean if dirty).
• Is a minimum water pressure of around
1 bar available (see page 20)?
16
the crockery is not clean?
Did you select the correct programme?
Remember to use a programme suitable
for the nature and degree of soiling
of your crockery.
Did you arrange the crockery in
accordance with the instructions given
in this manual? The sprayed water must
have access to all surfaces, both internal
and external. The baskets must not be
overfilled!
Have the spray arms been obstructed by
a piece of crockery or cutlery?
Please tpake sure that, for better drainage
of residual water at the programme end,
the upper spray arm obliquely tilts when
it comes to rest. When operational,
it automatically runs in the horizontal
position.
Page 17

If you think your dishwasher is not working properly
• Are the strainers clean? Did you replace
the strainers properly after cleaning them?
• Have you used sufficient detergent?
• Check the drain hose (it must be run
according to the instructions given on
pages 20/21).
• In the event of a hot-water connection
(up to max. 60°C) — to ensure good
economy, only recommended if a cheap
supply of hot water is available — use
no 50° programmes so that the detergent
has a sufficiently long time to act.
the dishes do not dry and haVe
no sparkle?
• Have you used a branded rinse aid?
Is there enough rinse aid in the
dispenser? (check rinse aid indicator
on dosage combination).
Was the correct dosage selected?
In case of an overdosage:
If streaks, stripes, and milky shapeless
marks (also blue-coloured blooms) form on
the crockery, too much rinse aid is being
added. Therefore decrease the dose!
rust marks can be seen inside
the machine?
The machine interior, filters, and door
interior are made of stainless steel and
will not rust. If rust is found on these
parts, this must be from another source
(rust in water, rust particles from water
pipes, saucepans, and cutlery).
Remove the marks with a commercially
available stainless steel cleaner.
the drain pump runs continuously
(even when the machine is stopped)?
The water protection system (see page 21)
has responded.
First close the water tap and then unplug
the machine.
In this case, the service centre should
always be called for fault-finding.
In case of an underdosage:
If dried water droplets (also greyish white
drop edges) form, especially on glasses,
too little rinse aid is being added.
Therefore increase the dose!
17
Page 18

After-sales service
On page 16/17, we have listed the most
important faults which you can remedy your
self.
• If you nevertheless wish to call in our
service engineer to eliminate one of the
above faults or a fault resulting from
incorrect operation, we should like to draw
your attention to the fact that repairs are
not carried out free of charge even during
the warranty period.
• You are therefore strongly advised
to adhere to the instructions given in this
manual and also to follow our additional
tips and recommendations.
• If you find that this Instruction manual
cannot help you in detecting and elimi
nating a particular fault, then please call
the senrice centre.
Our electrical appliances comply with the
valid safety requirements. Repairs to electri
cal appliances should only be performed by
a trained electrician. Improper repairs may
place the user at serious risk.
When calling the service centre, please state
the
E-number
(product number)
and the
F-number
(serial number)
which are given on the rating plate (Fig. 2/G).
Your indication of these numbers enables the
after-sales service to make precise identifi
cation of the required spare parts so that
your dishwasher can be repaired at the
engineer’s first visit.
You will thus save yourself additional costs
due to any possible repeated trips by the
service engineer.
18
Page 19

Notes on installation
Installation
Your dishwasher can be installed on any
level and stable floor. It is important that your
dishwasher should stand firmly and horizon
tally on the floor. Uneven floor conditions can
be compensated by adjustment of the feet.
If you want to integrate your free-standing
appliance below a worktop, you can remove
the worktop (cover from the dishwasher).
In this case, please make sure that, before
the appliance is inserted, the worktop is
covered below and on its front edge by an
aluminium foil (to be ordered from
the service centre).
The fitting instructions are given on the back
of this foil.
Only in this manner will your worktop be
protected from damage by the steam
emerging from the machine when the door
is opened.
Water supply
This dishwasher is equipped with a safety
valve (solenoid valve) directly at the water tap
(see also page 21); To assure the function of
the safety device, the double-skinned supply
hose must be connected to the outlet valve
(water tap) in a specific installation position.
Please therefore take special note of the
separate “Water Tap Safety Valve”
connection instructions.
Your dishwasher has been built in accordance
with regulations governing water-consuming
appliances and is equipped with safety
devices which prevent used water from
flowing back into the drinking water mains.
Your dishwasher can be connected to either
a cold or hot water supply of max. 60°C,
but not to open hot water appliances and
through-flow heaters.
Important note
(applies only to freestanding machines
with worktop)
If, for reasons of space, there is no alternative
to installing your dryer directly next to a gas
or electric cooker or coal range, you must
interpose a thermally insulated panel
(measuring 85 x 57.5 cm) between cooker and
dishwasher. This panel should be coated with
aluminium foil on the side facing the cooker.
If you have build-under appliance, please
follow the notes on installation given in the
installation and connection instructions
supplied as well as the separate fitting
instructions.
The supply hose is fitted with a screwed
hose connection (to DIN 259) and can be
connected to an outlet valve (water tap)
with male thread (%”).
Suitable washers are supplied with the
machine. Do not use any washers other than
these! The plastic nut of the screwed hose
connections can be tightened by hand.
If you require a supply hose which is longer
than the one supplied, use only a complete
hose kit continuously and to adequate length.
Never lengthen existing hoses.
19
Page 20

Notes on installation
Water supply
Important note:
On appliances with a safety valve at the
water tap, the extension can also be made
with a permanently installed copper pipeline
(8—10 mm dia.).
Minimum water pressure:
around 1 bar (1 atm overpressure, 1 kp/cm^,
10 N/cm*). If your water pressure is under
1 bar, please ask our service centre for
advice.
Maximum allowable water pressure:
around 10 bar. For water pressure over 10 bar,
a pressure reducing valve (obtainable from
your dealer) must be fitted upstream.
Water drainage
The drain hose Is fastened at the back
of the machine by a plastic tape.
Remove the piastic tape and piace the drain
hose in the plinth recess (see Fig. 3/b).
The hose connection (19 mm dja.) supplied
with the dishwasher wili fit all commonly
available makes of sink trap. Secure
the hose with the supplied hose clip.
If you suspended the drain hose on a free
standing appliance in a sink, you should then
use the supplied attachable bend
(see illustration opposite).
If you draw a string through the hole
(see arrow), you can also mount the bend on
a wall and thus prevent it from slipping off
(e.g. if the^ink edges are too wide).
20
Page 21

Notes on installation
Water drainage
Your dishwasher is equipped with a pump
which serves to pump out the used washing
water and is controiied by the programme,
it pumps the used washing water through
the drain hose up to a height of 1 m,
hose extension max. 3 m, iaid horizontaiiy,
up to max. 85 cm above fioor levei
(see iiiustration).
Water protection system
To protect your dishwasher from water
damage, it is equipped with a water
protection system.
Apart from an overflow protection, which
prevents uncontrolled rising of water in the
appliance, it also features an outlet protection
(float switch in the floor tray). This responds
in the event of any untightness in the
machine.
The double-skinned supply hose is monitored
by the safety valve directly at the
water tap.
Use oniy originai extension hoses. They are
obtainabie in iengths of 2.70 m and 4 m from
our sen/ice centre.
The inside diameter of these extension hoses
must be 19 mm so that appiiance operation is
not impaired.
The drain hose is run from the rear of your
dishwasher, it can be iaid in the piinth recess
either to the right or ieft of the machine.
Caution! The hose must not be kinked,
squashed or twisted. Piease aiso note:
The iniet height must be at ieast 30 cm above
the bottom edge of the machine.
If the hose is connected directiy to a sink
trap, the inside diameter of the sink trap
connection may not be iess than 15 mm.
In all cases of malfunction, the water supply
is immediately interrupted and the drain
pump switched on.
The pump also operates
even if the machine is switched off.
This prevents water from either flowing out
or overflowing. Any residual water in the
appliance is automatically pumped away.
A fault is recognizable by the fact that
a pump noise is heard when the machine
is switched off.
If a fault occurs, first cióse the water tap.
Then fully isolate the machine from the mains
supply by unplugging it.
Eiectricai connection
Details of the electrical connection are given
on the rating plate. This is located on the
RH inner edge of the door. If the machine can
be changed over, the changeover diagram
directions given in the machine must also be
observed.
Comply with the specifications when
connecting the machine and also where
necessary with the local regulations of
the electricity authority.
During appliance connection, it is essential
to ensure that the nominal voltage specified
on the rating piate is the same as the mains
voitage at the place of installation.
To disconnect the automatic dishwasher from
the mains supply, pull out the plug. Should
the appliance have a ’’fixed wiring connec
tion” with the mains supply, it must be
disconnected by appropriate measures on the
fixed wiring side (fuses, automatic cutout,
spurious current protection switch, or the like
which have a contact opening width
> than 3 mm).
21
Page 22

Notes on installation
Important note
The supplied package contains 2 plastic
clamping springs and 2 metal pins which can
be used for additional fixing of the decor
panels In the frame.
Technical data
When the decor panel has been fitted, the
clamping spring is to be engaged in the
available recess between door decor frame
and control panel frame and pressed in to its
fullest extent. Then insert the filling pin and
pinch off projecting end (see illustration).
In the event of any possible decor panel
change, the foregoing mounting is to be
removed by prizing off with a screwdriver,
care being taken to prevent damage to the
decor frame. The used parts are to be
replaced by new ones during re-instaiiation.
The individuai parts can be ordered from the
service centre under the foiiowing part
numbers:
Ciamping spring Part No. 646 054 470
Fiiiing pin Part No. 646 056 660
Capacity as per I EC Publ. 436
12 Standard place settings
inciuding serving utensils
Water pressure: 1 to 10 bar
This appiiance meets the radio interference
suppression requirements of EC Directive
82/499. EC and the standards concerning the
effects of eiectricai appiiances on power
systems EN 60 555 Parts 1—3 / DIN VDE 0838
Parts 1—3, June 1987.
22
The consumption data stated in this manuai
refer to the comparison programme
“Normai 65 °C”.
Detergent dosage:
5 g in pre-wash sequence
20 g in wash sequence
Decor panel dimensions:
Free-standing appiiance:
H 590 X B 580 mm
Ciamping thickness: max. 4 mm
Page 23

Examples of crockery arrangement for 12 standard place settings including serving utensils to lEC Publ. 436
Figs. 12 and 13
12 place settings:
12 soup plates of around 24 cm dia.
12 dinner plates of around 24 cm dia.
12 dessert plates of around 19 cm dia.
12 teacups of around 9 cm dia.
12 saucers of around 14.5 cm dia.
12 drinking glasses of around 7 cm dia.
and around Vi i capacity
12 knives
12 forks
12 spoons
12 teaspoons
12 dessert spoons
Serving utensils:
oval platter of around 37.5 x 26 cm
round bowl of around 21.5 cm dia.
and around 10 cm depth
round bowl of around 17 cm dia.
and around 7.8 cm depth
dish of around 15 cm dia.
serving fork
serving spoons
gravy ladle
23
Page 24

H 246 245 540 — 06881./31 —
Subject to change without notice
AEG
 Loading...