

Page 1
DA Brugsanvisning 2
Opvaskemaskine
EN User Manual 26
Dishwasher
IT Istruzioni per l’uso 49
Lavastoviglie
F88725VI1P
Page 2

www.aeg.com
2
INDHOLDSFORTEGNELSE
1. OPLYSNINGER OM SIKKERHED............................................................................. 3
2. SIKKERHEDSANVISNINGER.................................................................................... 4
3. PRODUKTBESKRIVELSE AF APPARATET............................................................... 6
4. BETJENINGSPANEL.................................................................................................7
5. PROGRAMMER......................................................................................................... 7
6. INDSTILLINGER.........................................................................................................9
7. TILVALGSFUNKTIONER......................................................................................... 13
8. FØR IBRUGTAGNING............................................................................................ 14
9. DAGLIG BRUG.........................................................................................................15
10. RÅD OG TIP...........................................................................................................17
11. VEDLIGEHOLDELSE OG RENGØRING..............................................................18
12. FEJLFINDING........................................................................................................20
13. TEKNISK INFORMATION.....................................................................................24
FOR PERFEKTE RESULTATER
Tak fordi du valgte dette produkt fra AEG. Vi har skabt det, så du kan nyde en
uovertruffen funktionsevne i mange år med nyskabende teknologi, der gør livet
lettere – funktioner, som du ikke finder i almindelige apparater. Brug et par
minutter på at læse mere – så du kan få det bedste ud af det.
Besøg vores websted for at:
Få rådgivning, brochurer, fejlfinding, serviceinformation:
www.aeg.com/webselfservice
Registrere dit produkt for bedre service:
www.registeraeg.com
Købe tilbehør, forbrugsvarer og originale reservedele til dit apparat:
www.aeg.com/shop
KUNDEPLEJE OG SERVICE
Brug altid originale reservedele.
Sørg for at have følgende data tilgængelig, når du kontakter vores autoriserede
servicecenter: Model, PNC, serienummer.
Du finder oplysningerne på maskinens typeskilt.
Advarsel/Forsigtig-Sikkerhedsanvisninger
Generelle oplysninger og gode råd
Miljøoplysninger
Ret til ændringer uden varsel forbeholdes.
Page 3

1. OPLYSNINGER OM SIKKERHED
Læs brugsanvisningen grundigt, før apparatet installeres
og tages i brug. Producenten påtager sig intet ansvar
for eventuelle skader, der er resultatet af forkert
installation eller brug. Opbevar altid brugsanvisningen
på et sikkert og tilgængeligt sted til senere opslag.
1.1 Sikkerhed for børn og andre udsatte personer
• Apparatet kan bruges af børn fra 8 år og opefter samt
af personer med nedsat fysisk, sensorisk eller psykisk
funktionsevne, eller som mangler den nødvendige
erfaring eller viden, hvis de er under opsyn eller er
blevet instrueret i at bruge apparatet på en sikker
måde samt forstår de medfølgende farer.
• Børn må ikke lege med apparatet.
• Opbevar vaskemidler utilgængeligt for børn.
• Lad ikke børn og husdyr komme tæt på apparatet,
mens lugen er åben.
• Børn må ikke udføre rengøring og vedligholdelse på
apparatet uden opsyn.
DANSK
3
1.2
Generelt om sikkerhed
•
Dette apparat er beregnet til husholdningsbrug eller
lignende anvendelse, som f.eks.:
– stuehuse, kantineområder i butikker, på kontorer
og i andre arbejdsmiljøer.
– af kunder på hoteller, moteller, bed & breakfast og
andre miljøer af indkvarteringstypen.
• Apparatets specifikationer må ikke ændres.
• Driftsvandtrykket (minimum og maksimum) skal være
mellem 0.5 (0.05) / 8 (0.8) bar (MPa)
• Overhold det maksimale antal af 15 kuverter.
• Hvis netledningen er beskadiget, skal den af
sikkerhedsgrunde udskiftes af producenten, et
autoriseret servicecenter eller en tekniker med
tilsvarende kvalifikationer.
Page 4

www.aeg.com
4
• Læg knive og bestik med skarpe spidser i bestikkurven
med spidserne vendt nedad eller læg dem vandret.
• Lad ikke apparatets låge stå åben uden opsyn for at
undgå, at nogen falder over den.
• Sluk for apparatet, og tag netstikket ud af kontakten
inden nogen som helst form for vedligeholdelse.
• Undlad at bruge højtryksrenser og/eller damp til at
rengøre apparatet.
• Ventilationsåbningerne i bunden (hvis relevant) må
ikke tildækkes af et gulvtæppe.
• Apparatet skal sluttes til vandledningsnettet ved hjælp
af de nye medfølgende slangesæt. Gamle slangesæt
må ikke genbruges.
2. SIKKERHEDSANVISNINGER
2.1 Installation
• Fjern al emballagen.
• Undlad at installere eller bruge et
beskadiget apparat.
• Stil eller brug ikke apparatet et sted,
hvor temperaturen kommer under 0
°C.
• Følg installationsvejledningen, der
følger med apparatet.
• Sørg for, at apparatet er installeret
under og opad stabile
køkkenelementer.
2.2 Tilslutning, el
ADVARSEL!
Risiko for brand og elektrisk
stød.
• Apparatet skal tilsluttes strøm m/jord,
jvf. Stærkstrømsreglementet.
• Sørg for, at de elektriske data på
typeskiltet svarer til strømforsyningen.
Hvis det ikke er tilfældet, skal du
kontakte en elektriker.
• Brug altid en korrekt monteret lovlig
stikkontakt.
• Brug ikke multistik-adaptere og
forlængerledninger.
• Pas på, du ikke beskadiger netstikket
og netledningen. Hvis der bliver
behov for at udskifte netledningen,
skal det udføres af vores autoriserede
servicecenter.
• Sæt først netstikket i stikkontakten
ved installationens afslutning. Sørg
for, at der er adgang til netstikket
efter installationen.
• Undgå at slukke for apparatet ved at
trække i netledningen. Tag altid selve
netstikket ud af kontakten.
• Dette apparat opfylder gældende
EØF-direktiver.
• Kun for Storbritannien og Irland.
Apparatet har et 13 A-netstik. Hvis det
er nødvendigt at udskifte sikringen i
netstikket, brug sikring: 13 amp ASTA
(BS 1362).
2.3 Tilslutning, vand
• Beskadig ikke vandslangerne.
• Før du slutter til nye rør, rør, der ikke
har været brugt i lang tid, hvor der er
udført reparationsarbejde eller
monteret nye enheder (vandmålere
osv.), skal du lade vandet løbe, indtil
det er klart og rent.
• Sørg for, at der ikke er synlige
vandlækager under og efter første
brug af apparatet.
• Tilløbsslangen har en sikkerhedsventil
og en kappe med et indvendigt
elkabel.
Page 5
DANSK
• Undlad at bruge brændbare
produkter eller ting, der er fugtet
med brændbare produkter, i
apparatet eller i nærheden af eller på
dette.
2.5 Indvendigt lys
ADVARSEL!
Fare for personskade.
5
ADVARSEL!
Højspænding.
• Hvis tilløbsslangen beskadiges, skal
vandhanen straks lukkes, og stikket
tages ud af stikkontakten. Kontakt det
autoriserede servicecenter for at få
udskiftet tilløbsslangen.
2.4 Brug
• Undgå at sidde eller stå på den åbne
låge.
• Opvaskemidler er farlige. Følg
sikkerhedsanvisningen på
opvaskemidlets emballage.
• Drik og leg ikke med vandet i
apparatet.
• Tag ikke opvasken ud af apparatet,
før opvaskeprogrammet er slut. Der
kan være opvaskemiddel på servicet.
• Der kan komme meget varm damp ud
af apparatet, hvis du åbner lågen,
mens programmet er i gang.
• Dette apparat er udstyret med
indvendig belysning, der tænder, når
lågen åbnes, og slukker, når lågen
lukkes.
• Lampen i dette apparatet er ikke
egnet til oplysning i almindelige rum.
• Kontakt servicecenteret for at få
udskiftet pæren.
2.6 Bortskaffelse
ADVARSEL!
Risiko for personskade eller
kvælning.
• Tag stikket ud af kontakten.
• Klip elledningen af, og kassér den.
• Fjern lågens lås, så børn og kæledyr
ikke kan blive lukket inde i apparatet.
Page 6
5
4
10
9
67
11
12
2
3
1
8
www.aeg.com6
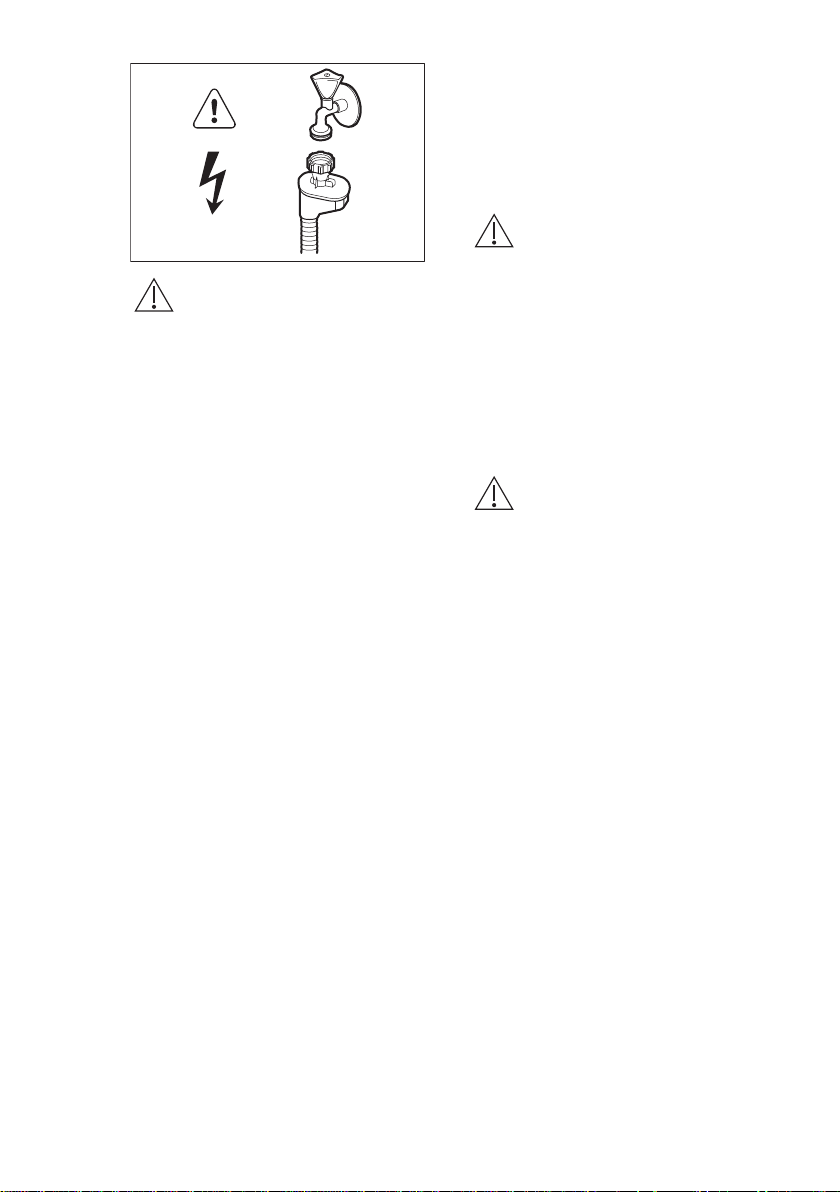
3. PRODUKTBESKRIVELSE AF APPARATET
Øverste spulearm
1
Mellemste spulearm
2
Nederste spulearm
3
Filtre
4
Mærkeplade
5
Saltbeholder
6
Udluftning
7
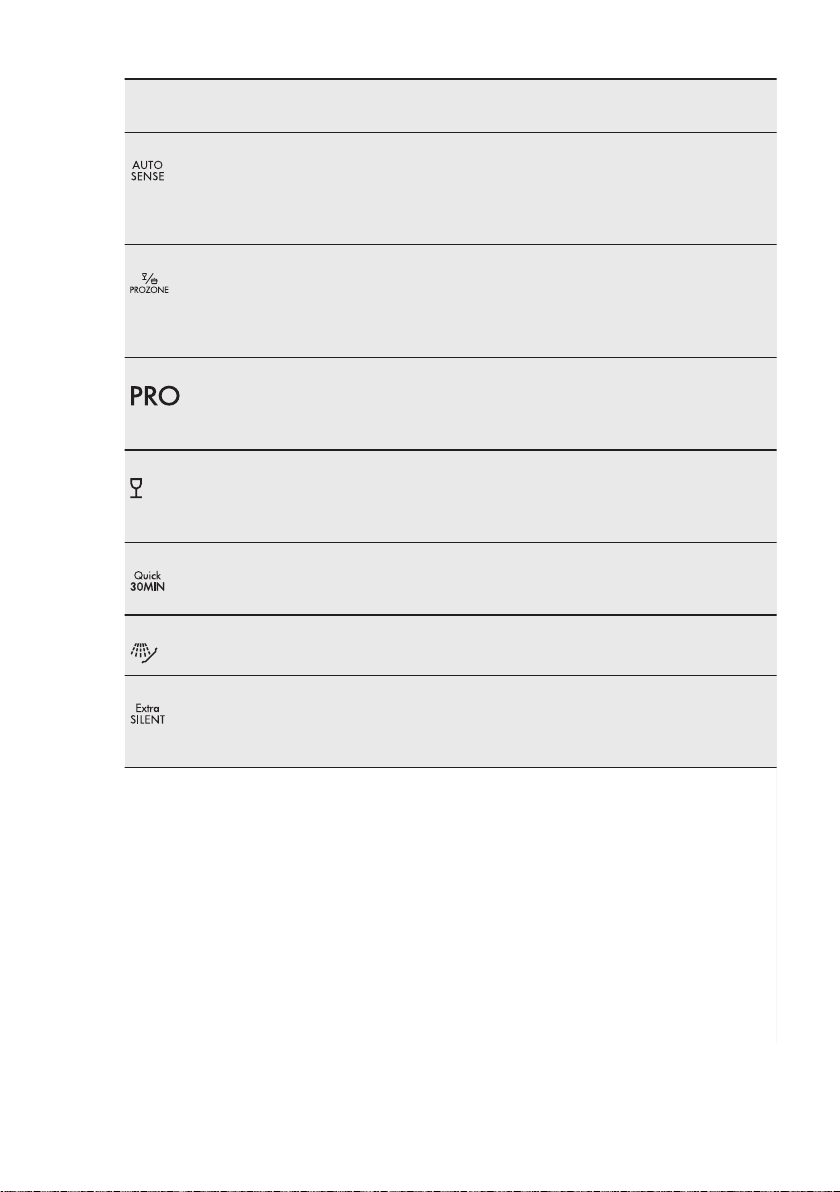
3.1 TimeBeam
TimeBeam er et display, som vises på
gulvet under apparatets låge.
• Når programmet starter, vises
programmets varighed.
• Når programmet er afsluttet, lyser
0:00 og CLEAN.
• Når den udskudte start starter, lyser
nedtællingstiden og DELAY.
• Hvis der er en fejl i apparatet, vises
der en alarmkode.
Beholder til afspændingsmiddel
8
Beholder til vaskemiddel
9
Nederste kurv
10
Øverste kurv
11
Bestikskuffe
12
Page 7

Når AirDry aktiveres under
1 2
83 4 5 6 7
9
tørringsfasen, er
projektionen på gulvet
muligvis ikke helt synlig. Se
på betjeningspanelets
display for at kontrollere den
resterende tid af det
igangværende program.
4. BETJENINGSPANEL
DANSK 7
Til-/fra-knap
1
Display
2
Delay-knap
3
Program-knap
4
Sanitize-knap
5
4.1 Lamper
Lampe Beskrivelse
Slut-lampe.
Kontrollampe for skyllemiddel. Er altid slukket, når programmet er i gang.
Kontrollampe for salt. Er altid slukket, når programmet er i gang.
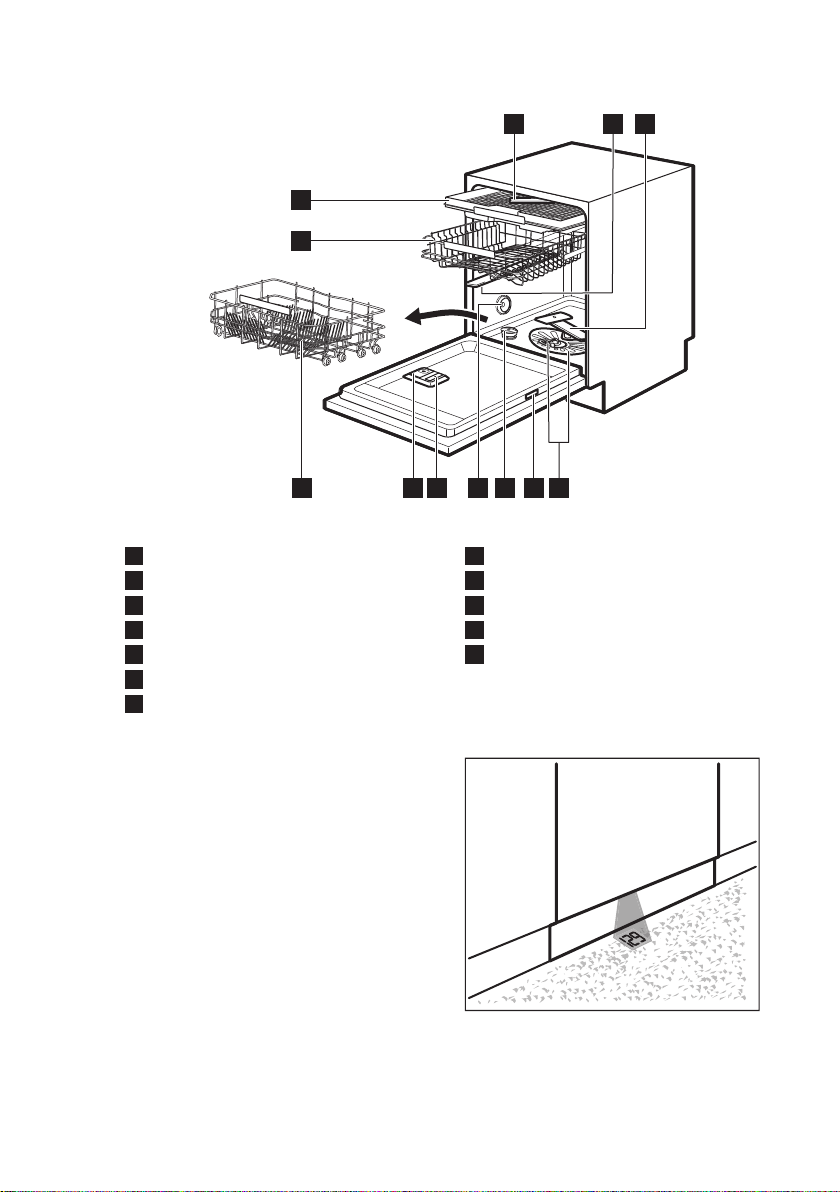
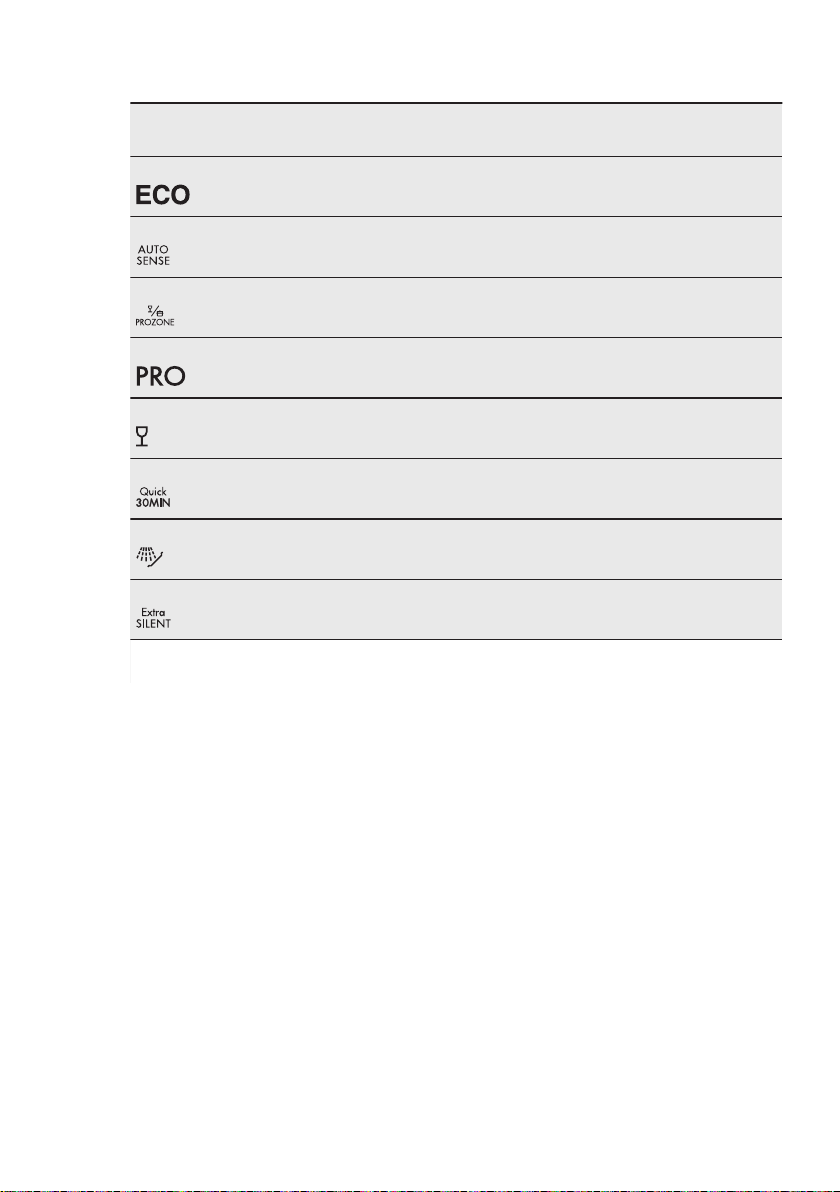
5. PROGRAMMER
Program Grad af snavs
Fyldningens art
P1
1)
• Normalt snavset
• Service og bestik
TimeSaver-knap
6
XtraDry-knap
7
Reset-knap
8
Lamper
9
Programtrin Tilvalg
• Forskyl
• Opvask 50 °C
• Skylning
• Tørring
• Sanitize
• TimeSaver
• XtraDry
Page 8
8
www.aeg.com
Program Grad af snavs
Programtrin Tilvalg
Fyldningens art
P2
2)
• Alt
• Service, bestik,
kogegrej
• Forskyl
• Opvask fra 45 °C til
70 °C
• Sanitize
• XtraDry
• Skylning
• Tørring
P3
3)
• Blandet snavs
• Service, bestik,
kogegrej
• Forskyl
• Opvask 50 °C og 65
°C
• TimeSaver
• XtraDry
• Skylning
• Tørring
P4 • Meget snavset
• Service, bestik,
kogegrej
• Forskyl
• Opvask 70 °C
• Skylning
• Sanitize
• XtraDry
• TimeSaver
• Tørring
P5 • Normalt eller let
snavset
• Finere porcelæn
• Opvask 45 °C
• Skylning
• Tørring
• XtraDry
og glas
P6
P7
P8
4)
5)
6)
• Frisk snavset
• Service og be-
• Opvask 60 °C
• Skylning
stik
• Alt • Forskyl
• Normalt snavset
• Service og bestik
• Forskyl
• Opvask 50 °C
• Skylning
• Sanitize
• XtraDry
• XtraDry
• Tørring
1)
Med dette program får du den mest effektive brug af vand og energiforbrug til service og bestik med
normalt snavs. (Dette er standardprogrammet til testgennemførsler).
2)
Apparatet registrerer graden af snavs og mængden af genstande i kurvene. Temperaturen, mængden
af vand, energiforbruget og programtiden justeres automatisk.
3)
Med dette program kan du vaske en opvask med forskellig grad af tilsmudsning. Meget snavsede
genstande i den nederste kurv og normalt snavsede i den øverste kurv. Vandtrykket og -temperaturen i
den nederste kurv er højere end i den øverste kurv.
4)
Med dette program kan du vaske en opvask med frisk snavs. Det giver gode opvaskeresultater på kort
tid.
5)
Med dette program kan du hurtigt skylle service for at forhindre, at madrester sætter sig godt fast på
det, og at der dannes lugte i apparatet. Brug ikke opvaskemiddel til dette program.
6)
Dette er det mest lydsvage program. Pumpen arbejder ved meget lav hastighed for at nedsætte støjniveauet. Programtiden er lang på grund af den lave hastighed.
Page 9
5.1 Forbrugsværdier
DANSK 9
Program
P1 11 0.857 225
P2 7 - 14 0.6 - 1.6 40 - 154
P3 14 - 16 1.2 - 1.5 140 - 156
P4 12.5 - 14.5 1.4 - 1.7 160 - 170
P5 12 - 14 0.7 - 0.9 84 - 94
P6 10 0.9 30
P7 4 0.1 14
P8 9 - 10 1.1 - 1.3 219 - 229
1)
opvaskens størrelse.
1)
Forbrugsværdierne kan variere alt efter vandtemperatur og -tryk, udsving i netspænding, tilvalg og
Vand
(l)
Energi
(kWt)
Varighed
(min)
5.2 Oplysninger til
testinstitutter
For alle nødvendige oplysninger til test,
send en e-mail til:
6. INDSTILLINGER
6.1 Tilstand for programvalg
og brugertilstand
Når et apparat står i tilstanden for
programvalg, er det muligt at indstille et
program og at åbne brugertilstanden.
I brugertilstanden kan følgende
indstillinger ændres:
• Niveauet af blødgøringsanlægget i
henhold til vandets hårdhed.
• Aktiveringen eller deaktiveringen af
lydsignalet for programslut.
• Valget af farven for TimeBeam.
info.test@dishwasher-production.com
Skriv produktnummeret (PNC) ned, som
findes på mærkepladen.
• Aktiveringen eller deaktiveringen af
meddelelse om tom beholder til
afspændingsmiddel.
• Niveauet af afspændingsmiddel i
henhold til den påkrævede dosis.
• Aktiveringen eller deaktiveringen af
tilvalget AirDry.
Disse indstillinger gemmes, indtil du
ændrer dem igen.
Page 10
www.aeg.com10
Sådan indstiller du tilstanden for programvalg
Apparatet er i tilstanden for valg af
program, når displayet viser
programnummeret P1.
Når du aktiverer programmet, står det
normalt i tilstanden for programvalg.
Hvis dette dog ikke skulle være tilfældet,
kan du indstille tilstanden for
programvalg på følgende måde:
Tryk på Reset og hold den nede, indtil
apparatet er i tilstanden for programvalg.
en skadelig virkning på
opvaskeresultaterne og på apparatet.
Jo højere indholdet af disse mineraler er,
desto hårdere er vandet. Vandets
hårdhedsgrad måles i modsvarende
skalaer.
Blødgøringsanlægget skal indstilles efter
det lokale vands hårdhedsgrad.
Oplysning om vandets hårdhedsgrad fås
hos det lokale vandværk. Det er vigtigt at
vælge det rette niveau for
blødgøringsanlægget for at sikre gode
vaskeresultater.
6.2 Blødgøringsanlæg
Blødgøringsanlægget fjerner mineraler
fra vandforsyningen, som ellers kan have
Vandets hårdhed
Tyske grader
(°dH)
47 - 50 84 - 90 8.4 - 9.0 58 - 63 10
43 - 46 76 - 83 7.6 - 8.3 53 - 57 9
37 - 42 65 - 75 6.5 - 7.5 46 - 52 8
29 - 36 51 - 64 5.1 - 6.4 36 - 45 7
23 - 28 40 - 50 4.0 - 5.0 28 - 35 6
19 - 22 33 - 39 3.3 - 3.9 23 - 27
15 - 18 26 - 32 2.6 - 3.2 18 - 22 4
11 - 14 19 - 25 1.9 - 2.5 13 - 17 3
4 - 10 7 - 18 0.7 - 1.8 5 - 12 2
<4 <7 <0.7 < 5
1)
Fabriksindstilling.
2)
Brug ikke salt på dette niveau.
Franske grader
(°fH)
mmol/l Clarke-gra-
der
Blødgøringsanlæg-
gets niveau
1)
5
2)
1
Uanset om du bruger almindeligt
opvaskemiddel eller multitabs (med
eller uden salt), bør du indstille den
rette vandhårdhedsgrad for at holde
saltpåfyldningslampen aktiv.
Multitabs med salt er ikke
tilstrækkeligt effektive til at
blødgøre hårdt vand.
Sådan indstilles blødgøringsanlægget
Apparatet skal være i
programvalgstilstand.
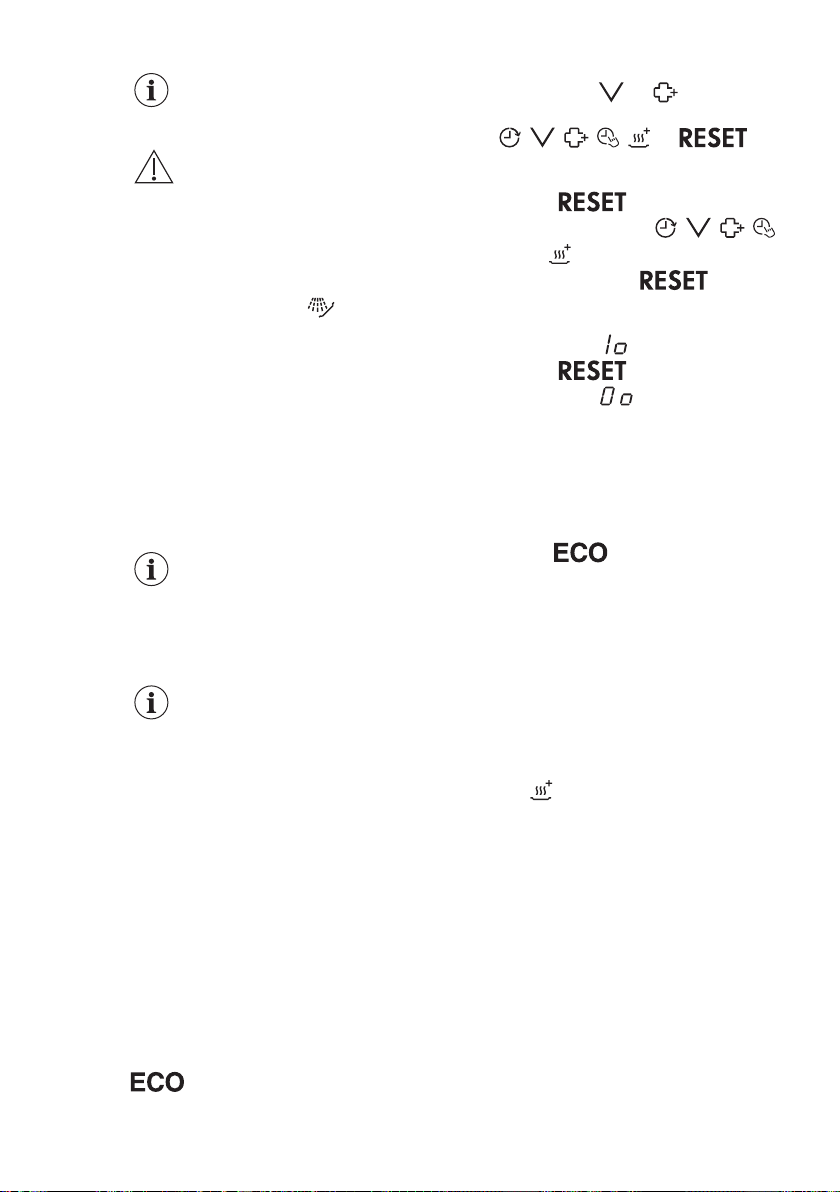
1. Indstil brugertilstanden ved at trykke
samtidigt på og , og hold
dem nede, indtil kontrollamperne
, , , , og
Page 11
DANSK
11
begynder at blinke, og displayet er
tomt.
2. Tryk på .
• Kontrollamperne , , ,
og slukkes.
• Kontrollampen
at blinke.
• Displayet viser den aktuelle
indstilling: f.eks. = niveau 5.
3. Tryk på gentagne gange for at
ændre indstillingen.
4. Tryk på tænd-/sluk-knappen for at
bekræfte indstillingen.
bliver ved med
6.3 Beholderen til afspændingsmiddel
Afspændingsmiddel hjælper med at
tørre tallerkener og fade, uden at de får
pletter og striber.
Der frigøres automatisk
afspændingsmiddel under den varme
skyllefase.
Du kan indstille den frigjorte mængde
afspændingsmiddel mellem niveau 1
(min. mængde) og niveau 6 (maks.
mængde). Niveau 0 deaktiverer
beholderen til afspændingsmiddel, og
der frigøres intet afspændingsmiddel.
Fabriksindstilling: niveau 4.
Sådan indstilles niveauet af afspændingsmiddel
Apparatet skal være i
programvalgstilstand.
1. Indstil brugertilstanden ved at trykke
samtidigt på og , og hold
dem nede, indtil kontrollamperne
, , , , og
begynder at blinke, og displayet er
tomt.
2. Tryk på .
• Kontrollamperne
og slukkes.
• Kontrollampen
at blinke.
, , ,
bliver ved med
• Displayet viser den aktuelle
indstilling: f.eks.
– Niveauet af
afspændingsmiddel går fra 0A
til 6A.
– Niveau 0 = der frigøres intet
afspændingsmiddel.
3. Tryk på gentagne gange for at
ændre indstillingen.
4. Tryk på tænd-/sluk-knappen for at
bekræfte indstillingen.
= niveau 4.
6.4 Meddelelse om manglende afspændingsmiddel
Afspændingsmiddel hjælper med at
tørre tallerkener og fade, uden at de får
pletter og striber.
Der frigøres automatisk
afspændingsmiddel under den varme
skyllefase.
Når afspændingsmiddelbeholderen er
tom, tændes indikatoren for
afspændingsmiddel for at meddele, at
der skal påfyldes afspændingsmiddel.
Hvis du bruger multitabs, som
indeholder afspændingsmiddel, og du er
tilfreds med tørreresultatet, kan du
frakoble meddelelsen om opfyldning af
afspændingsmiddel. Det anbefales dog,
at du altid bruger afspændingsmiddel for
at få det bedste tørreresultat.
Hvis du bruger standardopvaskemiddel
eller multitabs uden afspændingsmiddel,
skal du aktivere meddelelsen for at holde
indikatoren for påfyldning af
afspændingsmiddel aktiv.
Sådan deaktiveres meddelelsen om manglende afspændingsmiddel
Apparatet skal være i
programvalgstilstand.
1. Indstil brugertilstanden ved at trykke
samtidigt på og , og hold
dem nede, indtil kontrollamperne
, , , , og
begynder at blinke, og displayet er
tomt.
2. Tryk på .
Page 12
12
www.aeg.com
• Kontrollamperne , , ,
og slukkes.
• Kontrollampen bliver ved
med at blinke.
• Displayet viser den aktuelle
indstilling: = meddelelse om
ingen afspændingsmiddel
aktiveres (fabriksindstilling).
3. Tryk på
= meddelelse om tom beholder til
afspændingsmiddel deaktiveres.
4. Tryk på tænd-/sluk-knappen for at
bekræfte indstillingen.
for at ændre indstilling.
6.5 Akustiske signaler
Der udsendes lydsignaler, når der opstår
en fejl i apparatet. Lydsignalerne kan ikke
slås fra.
Der lyder også et lydsignal, når
programmet er slut. Dette lydsignal er
deaktiveret som standard, men det kan
aktiveres.
Sådan aktiveres lydsignalet for programslut
Apparatet skal være i
programvalgstilstand.
1. Indstil brugertilstanden ved at trykke
samtidigt på og , og hold
dem nede, indtil kontrollamperne
, , , , og
begynder at blinke, og displayet er
tomt.
2. Tryk på
• Kontrollamperne , , ,
og slukkes.
• Kontrollampen bliver ved med
at blinke.
• Displayet viser den aktuelle
indstilling: = Akustisk signal
slukket.
3. Tryk på
= Akustisk signal tændt.
4. Tryk på tænd-/sluk-knappen for at
bekræfte indstillingen.
for at ændre indstillingen.
6.6 Sådan indstiller du farven på TimeBeam
Du kan skifte farven på TimeBeam, så
farven matcher til dit køkkengulv. Der er
flere tilgængelige farver. TimeBeam kan
også deaktiveres.
Apparatet skal være i
programvalgstilstand.
1. Indstil brugertilstanden ved at trykke
samtidigt på
dem nede, indtil kontrollamperne
, , , , og
begynder at blinke, og displayet er
tomt.
2. Tryk på
• Kontrollamperne , , ,
og slukkes.
• Kontrollampen bliver ved med
at blinke.
• Displayet viser et tal og bogstavet
C. Hvert tal henviser til en
forskellig farve.
–
3. Tryk på gentagne gange for at
ændre farven.
• Du kan se de forskellige farver på
køkkengulvet.
4. Tryk på tænd-/sluk-knappen for at
bekræfte indstillingen.
og , og hold
.
= TimeBeam deaktiveret.
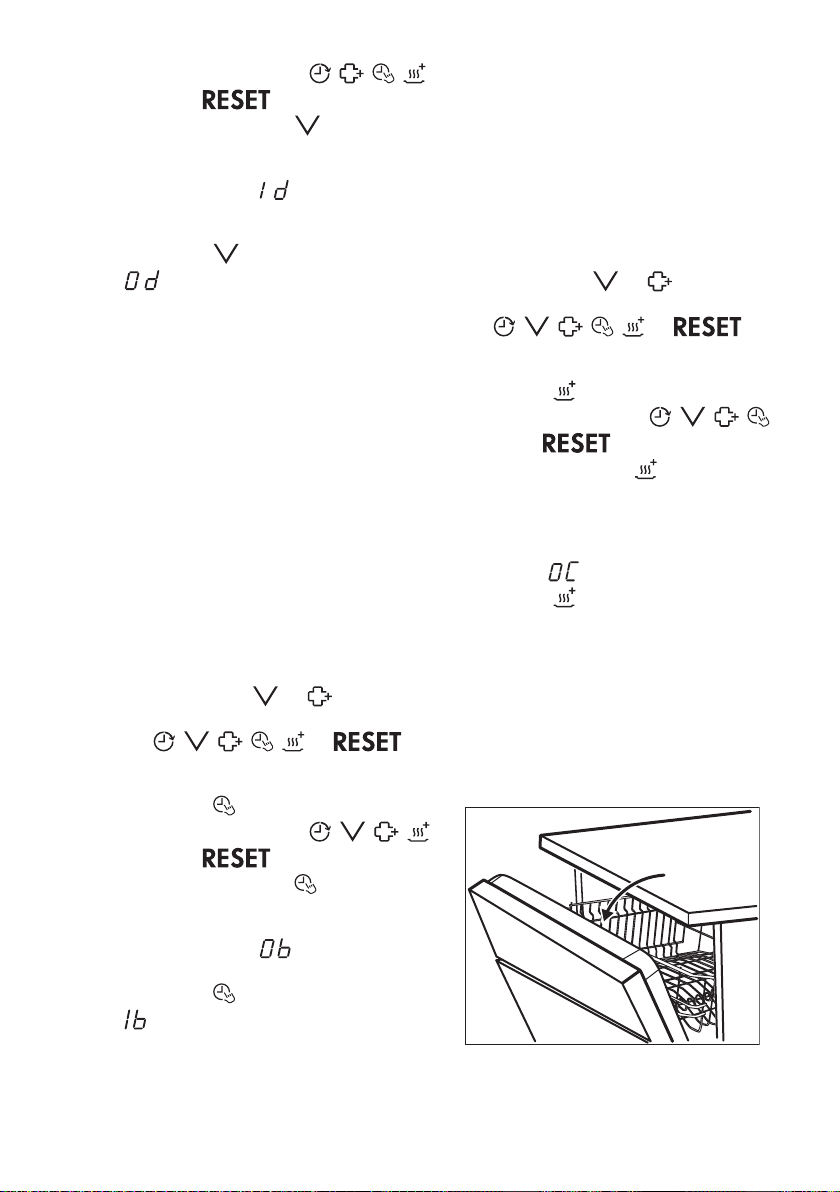
6.7 AirDry
AirDry forbedrer tørreresultaterne med
mindre energiforbrug.
Page 13
DANSK
13
Mens tørrefasen er i gang,
åbner en enhed apparatets
låge. Lågen står på klem.
FORSIGTIG!
Forsøg ikke at lukke
apparatets låge inden for 2
minutter efter automatisk
åbning. Det kan skade
apparatet.
AirDry aktiveres automatisk med alle
programmer undtagen .
Der henvises til funktionen XtraDry eller
at aktivere AirDry for at forbedre
tørreevnen.
Sådan deaktiveres AirDry
Apparatet skal være i
programvalgstilstand.
7. TILVALGSFUNKTIONER
De ønskede tilvalg skal slås
til hver gang, inden du
starter et program.
Dette tilvalg kan ikke slås til
eller fra, mens et program er
i gang.
Ikke alle tilvalg er
kompatible med hinanden.
Hvis du har valgt tilvalg, som
ikke er kompatible,
deaktiverer apparatet
automatisk et eller flere af
dem. Det er kun lamperne
for de tilvalg, der stadigvæk
er aktive, som forbliver
tændt.
7.1 XtraDry
Aktivér denne funktion, når du ønsker at
forbedre tørringen. Når denne funktion
anvendes, kan varigheden af visse
programmer, vandforbruget og den
sidste skylletemperatur påvirkes.
Funktionen XtraDry er en permanent
funktion til alle andre programmer end
og er ikke nødvendig at vælge
ved hvert program.
1. Indstil brugertilstanden ved at trykke
samtidigt på
dem nede, indtil kontrollamperne
, , , , og
begynder at blinke, og displayet er
tomt.
2. Tryk på
• Kontrollamperne , , ,
og slukkes.
• Kontrollampen bliver
ved med at blinke.
• Displayet viser den aktuelle
indstilling: = AirDry aktiveret.
3. Tryk på for at ændre
indstillingen:
deaktiveret.
4. Tryk på tænd-/sluk-knappen for at
bekræfte indstillingen.
Hver gang aktiveres, slukkes
funktionenXtraDry og er ikke nødvendig
at vælge manuelt. I andre programmer er
indstillingen af XtraDry permanent og
anvendes automatisk i de næste
programmer. Konfigurationen kan
ændres når som helst.
Aktivering af XtraDry-funktionen
deaktivererTimeSaver.
og , og hold
.
= AirDry
Sådan aktiveres XtraDry
Tryk på . Den tilhørende lampe
tændes.
Hvis funktionen ikke gælder for
programmet, vises den relaterede
kontrollampe ikke, eller den blinker
hurtigt nogle få sekunder og slukkes
derefter.
Displayet viser den opdaterede
programvarighed.
7.2 TimeSaver
TimeSaver gør det muligt at reducere
det valgte programs tid.
Den samlede programvarighed mindskes
med ca. 50 %.
Page 14
14
www.aeg.com
Vaskeresultaterne er de samme som for
den normale programvarighed.
Tørreresultaterne forringes muligvis.
Dette tilvalg øger trykket og
vandtemperaturen. Vaske- og
tørrefaserne er kortere.
TimeSaver er frakoblet som standard,
men det kan aktiveres manuelt. Denne
funktion kan ikke kombineres med
XtraDry samtidigt.
Sådan aktiveres TimeSaver
Tryk på , den tilknyttede lampe
tændes.
Hvis tilvalget ikke gælder for
programmet, tændes den relaterede
lampe ikke, eller den blinker hurtigt
nogle få sekunder og slukkes derefter.
8. FØR IBRUGTAGNING
1. Sørg for, at blødgøringsanlæggets
aktuelle niveau svarer til
vandforsyningens hårdhed. Hvis
ikke, bør du justere niveauet for
blødgøringsanlægget.
2. Fyld saltbeholderen.
3. Fyld beholderen til
afspændingsmiddel.
4. Åbn vandhanen.
5. Start et program for at fjerne evt.
rester fra fabrikationen, der
stadigvæk kan befinde sig i
apparatet. Brug ikke opvaskemiddel,
og fyld ikke noget i kurvene.
Når du starter et program, kan det tage
op til 5 minutter før
blødgøringsanlægget er klar til drift. Det
ser ud til, at maskinen ikke virker.
Vaskefasen starter først, når denne
procedure er afsluttet. Proceduren
gentages regelmæssigt.
8.1 Saltbeholderen
Displayet viser den opdaterede
programvarighed.
7.3 Sanitize
Denne funktion giver bedre
hygiejneresultater, fordi det holder
temperaturen på 70 °C i mindst 10
minutter under den sidste skylning.
Sådan aktiveres Sanitize
Tryk på , den tilknyttede lampe
tændes
Hvis tilvalget ikke gælder for
programmet, tændes den relaterede
lampe ikke, eller den blinker hurtigt
nogle få sekunder og slukkes derefter.
Displayet viser den opdaterede
programvarighed.
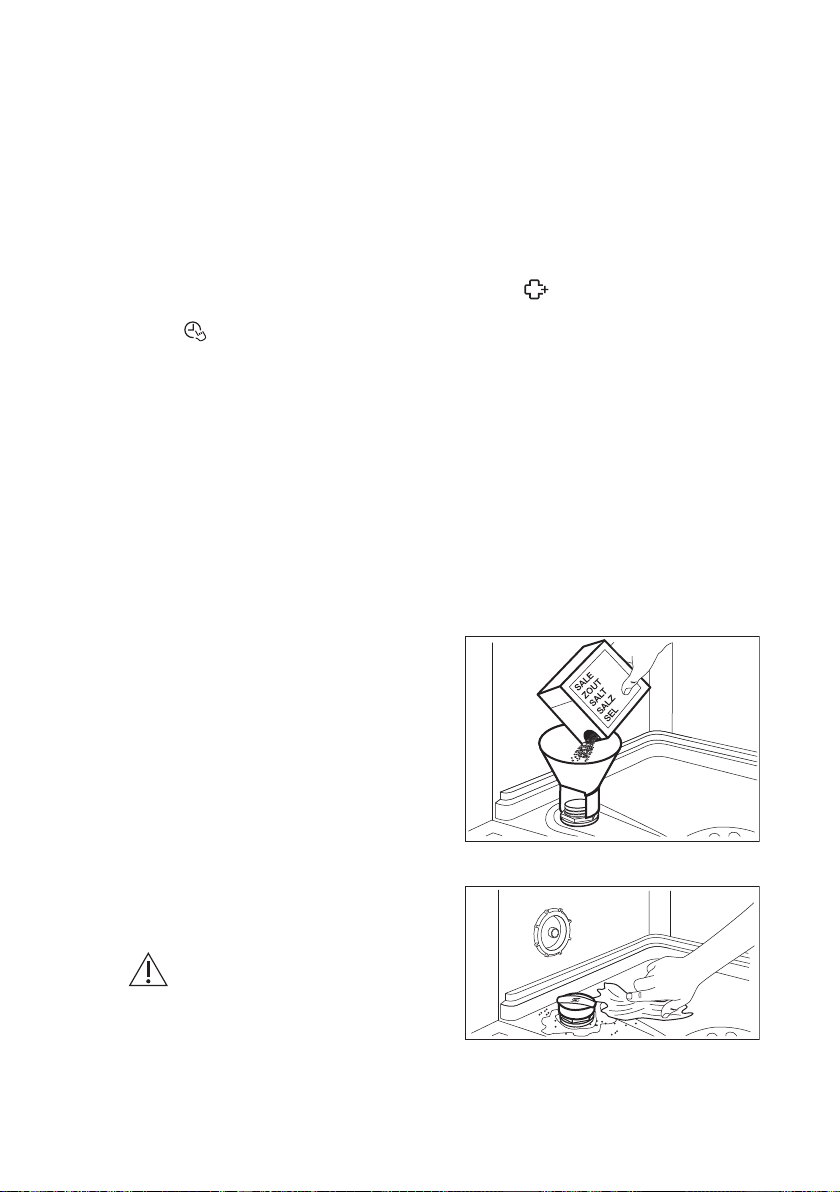
Sådan fyldes saltbeholderen
1. Drej hætten på saltbeholderen mod
uret, og fjern den.
2. Hæld en liter vand i saltbeholderen
(kun første gang).
3. Fyld saltbeholderen op med filtersalt.
4. Fjern saltet rundt om saltbeholderens
åbning.
FORSIGTIG!
Brug kun salt beregnet til
opvaskemaskiner.
Saltet bruges til at gøre
blødgøringsanlægget klar til drift og til at
sikre gode opvaskeresultater i den
daglige brug.
5. Drej hætten på saltbeholderen med
uret for at lukke saltbeholderen.
Page 15
A
B
C
A
B
C
DANSK 15
FORSIGTIG!
Der kan løbe vand og salt ud
af saltbeholderen, når du
fylder den. Start øjeblikkeligt
et program, efter du har
fyldt saltbeholderen, for at
forhindre korrosion.
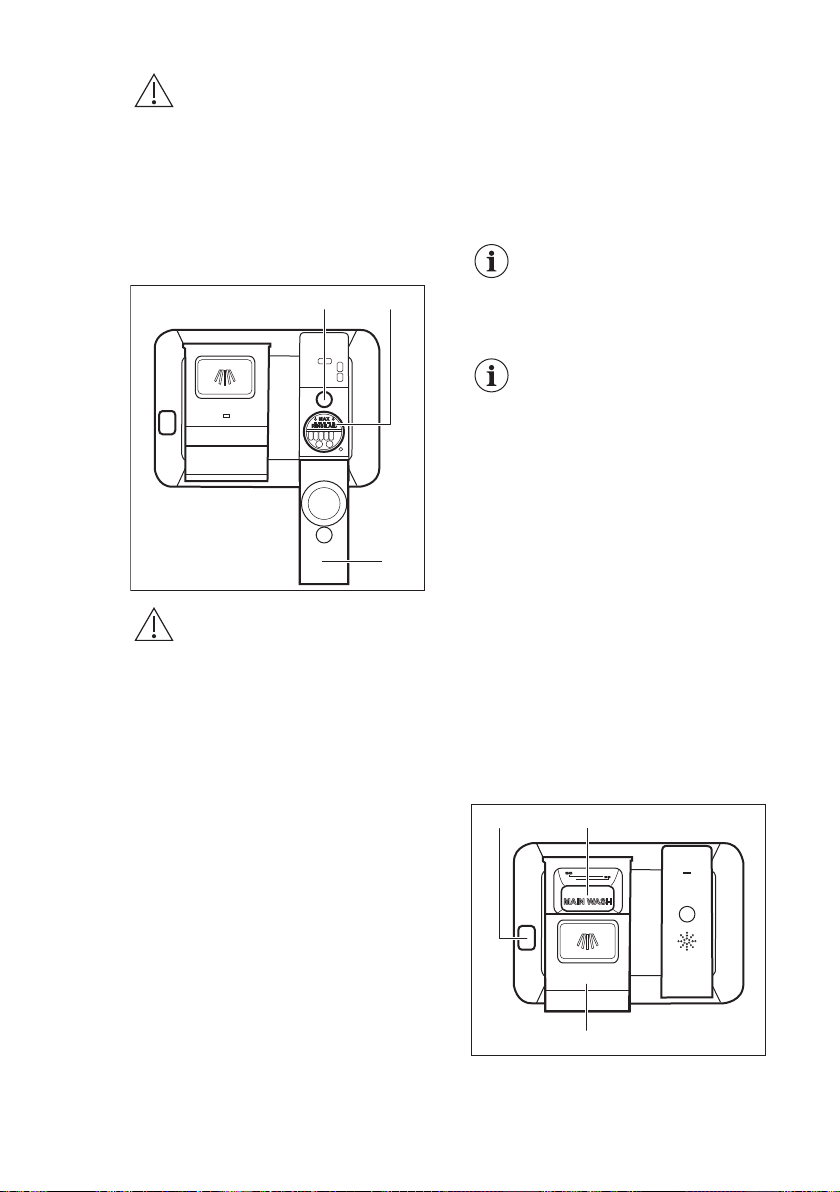
8.2 Sådan fyldes beholderen til afspændingsmiddel
FORSIGTIG!
Brug kun
afspændingsmiddel
beregnet til
opvaskemaskiner.
1. Åbn låget (C).
2. Fyld beholderen (B), indtil
afspændingsmidlet når mærket
"MAX".
3. Tør spildt afspændingsmiddel op
med en sugende klud, så der ikke
dannes for meget skum.
4. Luk lågen. Sørg for, at låget låses på
plads.
Påfyld afspændingsmiddel i
beholderen til
afspændingsmiddel, når
indikatorvinduet (A) bliver
gennemsigtigt.
Hvis du bruger multitabs, og
tørringen er tilfredsstillende,
kan angivelsen af påfyldning
af afspændingsmiddel
frakobles.
Vi anbefaler altid at bruge
afspændingsmiddel for at få
en bedre tørring, også
kombineret med multitabs,
der indeholder
afspændingsmiddel.
9. DAGLIG BRUG
1. Åbn vandhanen.
2. Tryk på tænd-/sluk-knappen for at
aktivere apparatet.
Se efter, at apparatet står i tilstanden for
programvalg.
• Påfyld saltbeholderen, hvis
lampen for salt er tændt.
• Fyld beholderen til
afspændingsmiddel, hvis lampen
for afspændingsmiddel lyser.
3. Fyld kurvene.
4. Påfyld opvaskemiddel.
5. Vælg og start det rette program til
opvaskens art og graden af snavs.
9.1 Brug af opvaskemiddel
Page 16
16
www.aeg.com
FORSIGTIG!
Brug kun opvaskemiddel
beregnet til
opvaskemaskiner.
1. Tryk på udløserknappen (A) for at
åbne låget (C).
2. Fyld opvaskemiddel i form af pulver
eller tabletter i rummet til
opvaskemiddel (B).
3. Hvis opvaskeprogrammet har et trin
med forvask, anbringes en lille
mængde opvaskemiddel på den
inderste del af apparatets låge.
4. Luk lågen. Sørg for, at låget låses på
plads.
9.2 Indstilling og start af et
program
Auto Off-funktionen
Denne funktion mindsker
energiforbruget ved automatisk at slukke
for apparatet, når det ikke er i drift.
Funktion går i gang:
• 5 minutter efter programmets
afslutning.
• Efter 5 minutter, hvis programmet
ikke er gået i gang.
Starte et program
1. Hold apparatets låge på klem.
2. Tryk på tænd-/sluk-knappen for at
aktivere apparatet. Se efter, at
apparatet står i tilstanden for
programvalg.
3. Tryk gentagne gange på
displayet viser nummeret på det
program, du ønsker at starte.
Displayet viser programnummeret i
ca. 3 sekunder og viser derefter
programmets varighed.
4. Indstil de relevante tilvalg.
5. Luk apparatets låge for at starte
programmet.
, indtil
Start af et program med senere start
1. Indstil et program.
2. Tryk på en eller flere gange, indtil
displayet viser den ønskede
udskydelse (fra 1-24 timer).
Lampen for senere start begynder at
lyse.
3. Luk apparatets låge for at starte
nedtællingen.
Mens en nedtælling er i gang, kan den
udskudte tid øges, men valget af
program og tilvalg kan ikke ændres.
Når nedtællingen er slut, starter
programmet.
Åbning af lågen, mens apparatet er i gang
Hvis du åbner lågen, mens et program er
i gang, stopper apparatet. Det kan
påvirke energiforbruget og programmets
varighed. Når lågen lukkes igen,
fortsætter apparatet fra det sted, hvor
det blev afbrudt.
Hvis lågen er åben i mere
end 30 sekunder under
tørrefasen, afsluttes det
igangværende program.
Dette sker ikke, hvis lågen
åbnes af AirDry.
FORSIGTIG!
Forsøg ikke at lukke
apparatets låge inden for 2
minutter, efter AirDry åbner
den automatisk, da dette
kan forårsage skader på
apparatet. Hvis lågen
bagefter lukkes i yderligere 3
minutter, afsluttes det
igangværende program.
Annullering af den senere start, mens nedtællingen er i gang
Når du annullerer udskudt start, skal du
indstille programmet og tilvalgene igen.
1. Åbn lågen til apparatet.
2. Tryk på tænd-/sluk-knappen for at
deaktivere apparatet.
3. Lad apparatet være frakoblet i ca. 30
sekunder.
4. Tryk på tænd-/sluk-knappen igen for
at aktivere apparatet.
Page 17

DANSK
17
5. Tryk på Reset og hold den nede,
indtil apparatet er i tilstanden for
programvalg.
Annullering af program
1. Åbn lågen til apparatet.
2. Tryk på tænd-/sluk-knappen for at
deaktivere apparatet.
3. Lad apparatet være frakoblet i ca. 30
sekunder.
4. Tryk på tænd-/sluk-knappen igen for
at aktivere apparatet.
10. RÅD OG TIP
10.1 Generel
Følgende tips vil sikre optimale
rengørings- og tørreresultater i den
daglige brug samt hjælpe med at
beskytte miljøet.
• Bortskaf madrester fra servicet
sammen med køkkenaffaldet.
• Forskyl ikke service i hånden. Når det
er nødvendigt, kan du bruge
programmet til forskyl (hvis
tilgængeligt) eller vælge et program
med en forskylningsfase.
• Brug altid hele kurveområdet.
• Når du fylder apparatet, skal du sikre
dig, at alt servicet kan nås
fuldstændigt og vaskes af det vand,
der kommer ud af spulearmdyserne.
Sørg for, at genstandene ikke rører
eller dækker hinanden.
• Du kan bruge opvaskemiddel,
afspændingsmiddel og salt separat,
eller du kan bruge multitabs (f.eks. ''3i-1'', ''4-i-1'', ''Alt-i-1''). Følg
vejledningen på pakken.
• Vælg programmet alt efter typen af
opvask og graden af snavs. Med
programmet ECO får du den mest
effektive brug af vand og
energiforbrug til service og bestik
med normalt snavs.
10.2 Brug af salt,
afspændingsmiddel og
opvaskemiddel
• Brug kun salt, afspændingsmiddel og
opvaskemiddel til opvaskemaskine.
5. Tryk på Reset og hold den nede,
indtil apparatet er i tilstanden for
programvalg.
Sørg for, at der er opvaskemiddel i
beholderen til opvaskemiddel, inden der
startes et nyt program.
Program slut
Når programmet er afsluttet, og du
åbner lågen, slukkes apparatet
automatisk.
Luk for vandhanen.
Andre produkter kan beskadige
apparatet.
• I områder med hårdt og meget hårdt
vand anbefaler vi at bruge almindeligt
opvaskemiddel (pulver, gelé, tabletter
uden ekstra midler),
afspændingsmiddel og salt separat
for at opnå optimale rengørings- og
tørreresultater.
• Kør apparatet mindst én gang om
måneden med brug af det
rengøringsmiddel, der er beregnet
specifikt til dette formål.
• Opvasketabletter opløses ikke helt
ved korte programmer. Det
anbefales, at du benytter
opvasketabletterne til lange
programmer for at undgå rester af
opvaskemidler på bordservicet.
• Brug ikke mere end den angivne
mængde opvaskemiddel. Se
anvisningerne på opvaskemidlets
emballage.
10.3 Gør følgende, hvis du ønsker at holde op med at bruge multitabletter
Gør følgende, inden du starter med at
bruge separat opvaskemiddel, salt og
afspændingsmiddel.
1. Indstil det højeste niveau for
blødgøringsanlæg.
2. Sørg for, at saltbeholderen og
beholderen til afspændingsmiddel er
fuld.
3. Start det korteste program med en
skyllefase. Tilsæt ikke
Page 18

C
B
A
18
www.aeg.com
opvaskemiddel, og fyld ikke noget i
kurvene.
4. Justér blødgøringsanlægget til det
lokale vands hårdhedsgrad, når
programmet er slut.
5. Justér doseringen af
afspændingsmiddel.
6. Aktivér meddelelse om tom beholder
til afspændingsmiddel.
10.4 Fyldning af kurvene
• Brug kun apparatet til at vaske
genstande, som kan vaskes i
opvaskemaskine.
• Kom ikke genstande af træ, horn,
aluminium, tin og kobber i
opvaskemaskinen.
• Anbring ikke ting i opvaskemaskinen,
som kan opsuge vand (svampe,
klude).
• Bortskaf madrester fra servicet
sammen med køkkenaffaldet.
• Blødgør tiloversbleven brændt mad
på disse ting.
• Stil hule ting (f.eks. kopper, glas og
gryder) med åbningen nedad.
• Sørg for, at glas ikke rører andre glas.
• Læg bestik og små ting i
bestikskuffen.
• Læg de lette ting i øverste kurv. Sørg
for, at tingene ikke kan flytte sig.
• Sørg for, at spulearmene kan bevæge
sig frit, før du starter et
opvaskeprogram.
10.5 Før programmet startes
Kontroller, at:
• Filtrene er rene og korrekt sat i.
• Hætten til saltbeholderen er spændt.
• Spulearmene ikke er tilstoppet.
• Der er filtersalt og
afspændingsmiddel (medmindre du
bruger multitabletter).
• Genstandene er lagt korrekt i
kurvene.
• Det valgte program passer til
opvaskens art og graden af snavs.
• Der anvendes den rette mængde
opvaskemiddel.
10.6 Tømning af kurvene
1. Lad servicet køle af, før du tager det
ud af maskinen. Varme genstande
beskadiges nemt.
2. Tøm først nederste kurv og derefter
øverste kurv.
Ved programslut kan der
stadigvæk være vand tilbage
på siderne af apparatet og
på lågen.
11. VEDLIGEHOLDELSE OG RENGØRING
ADVARSEL!
Sluk for apparatet, og tag
stikket ud af kontakten inden
vedligeholdelse.
Tilsmudsede filtre og
tilstoppede spulearme
forringer vaskeresultaterne.
Kontrollér dem jævnligt og
rengør dem, om
11.1 Rengøring af filtre
Filtersystemet består af 3 dele.
nødvendigt.
1. Drej filteret (B) mod uret, og tag det
ud.
Page 19
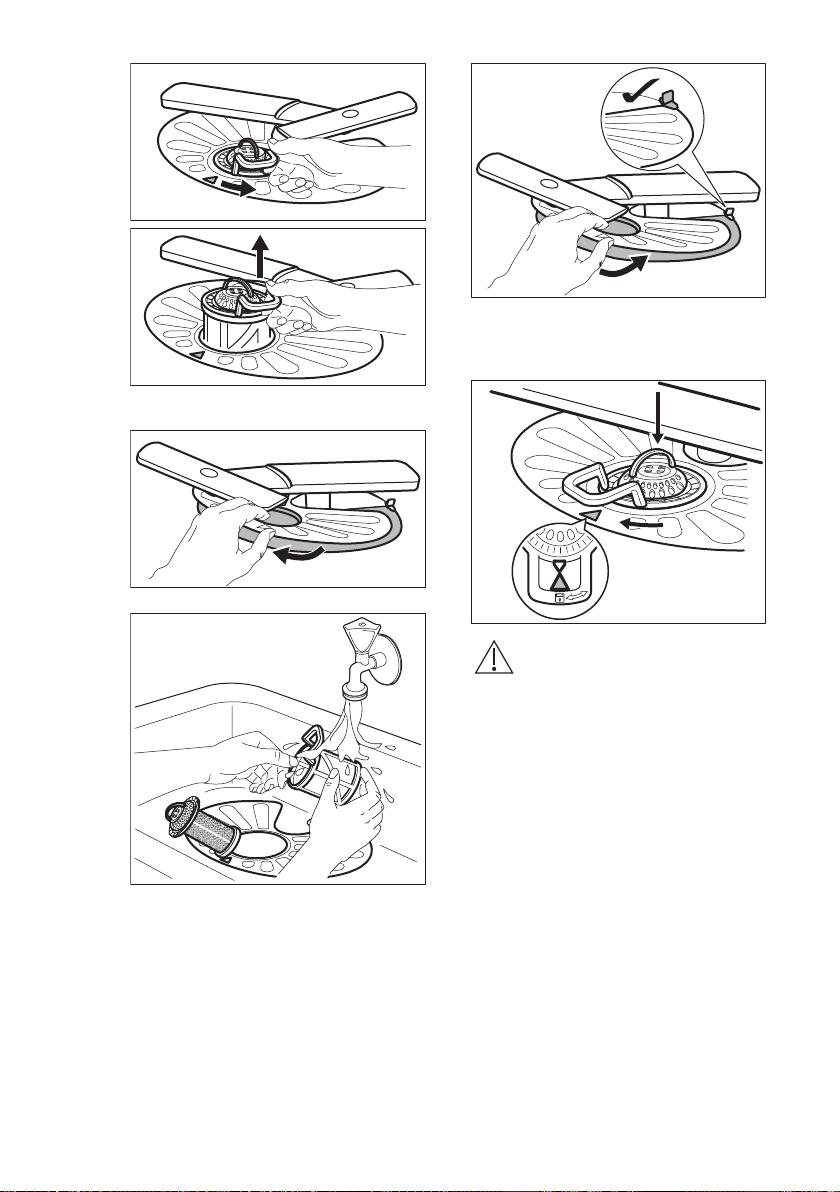
2. Tag filteret (C) ud af filteret (B).
3. Tag det flade filter (A) ud.
4. Skyl filtrene.
DANSK
7. Saml filtrene (B) og (C).
8. Sæt filteret (B) på plads i det flade
filter (A). Drej det med uret, indtil det
klikker på plads.
19
5. Sørg for, at der ikke er madrester
eller snavs i eller omkring
bundkarrets kant.
6. Sæt det flade filter (A) på plads. Sørg
for, at det sidder korrekt fast under
de 2 skinner.
FORSIGTIG!
Hvis filtrene sidder forkert,
kan det give dårlige
opvaskeresultater og
beskadige apparatet.
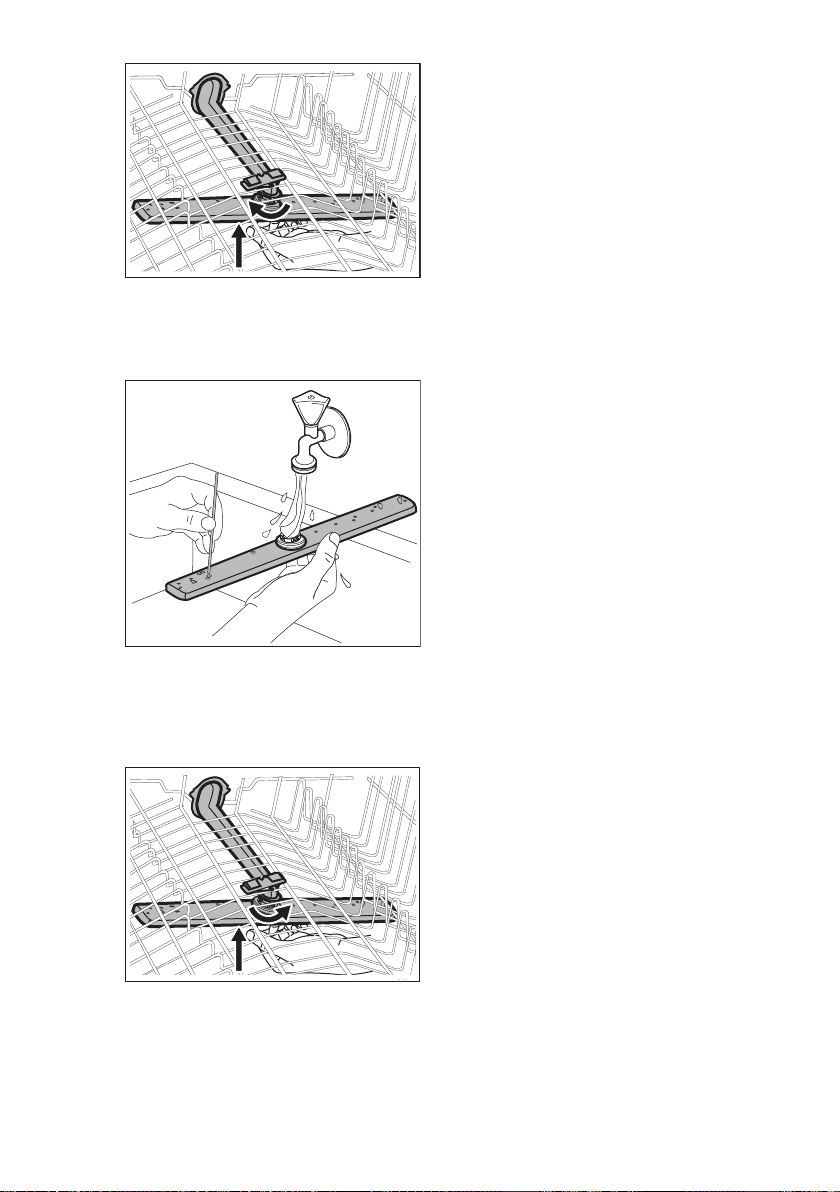
11.2 Rengøring af den øverste spulearm
Vi anbefaler, at du regelmæssigt rengør
den øverste spulearm for at undgå, at
snavs stopper hullerne til.
Tilstoppede huller kan resultere i
utilfredsstillende opvaskeresultater.
1. Træk den øverste kurv ud.
2. For at koble spulearmen fra kurven
skal du trykke spulearmen opad i den
retning, som angives af den nederste
pil, og samtidigt dreje den med uret.
Page 20
www.aeg.com20
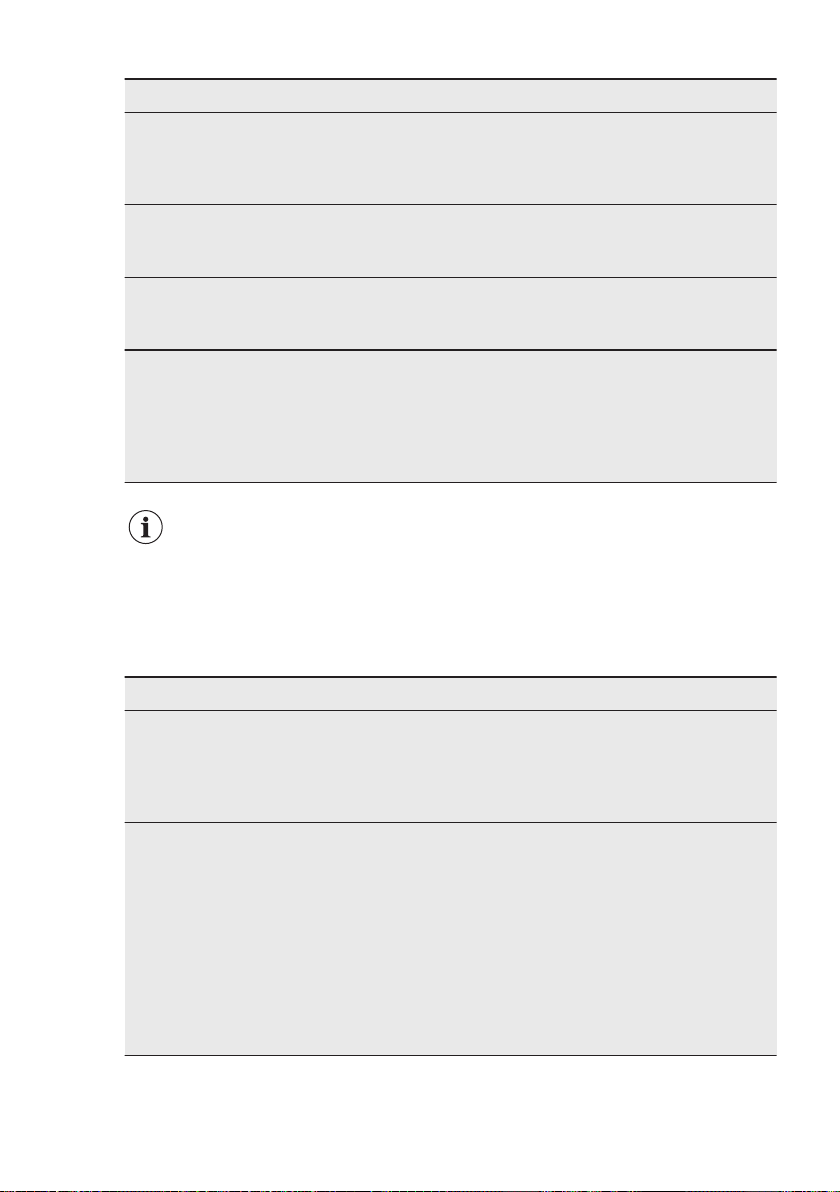
3. Skyl spulearmen under rindende
vand. Brug et tyndt og spidst
redskab, som f.eks. en tandstikker, til
at fjerne partikler af snavs fra
hullerne.
11.3 Udvendig rengøring
• Rengør apparatet med en fugtig, blød
klud.
• Brug kun et neutralt
rengøringsmiddel.
• Brug ikke slibende midler,
skuresvampe eller opløsningsmidler.
11.4 Indvendig rengøring
• Rengør apparatet omhyggeligt,
herunder lågens gummipakning, med
en blød og fugtig klud.
• Hvis du regelmæssigt bruger
programmer af kort varighed, kan
disse efterlade ophobninger af fedt
og kalk i apparatet. For at forhindre
dette anbefaler vi, at du kører
programmer af lang varighed mindst
2 gange om måneden.
• For at bevare dit apparats ydeevne
bedst muligt anbefaler vi at bruge et
rengøringsprodukt, der er beregnet til
opvaskemaskiner (mindst én gang om
måneden). Følg anvisningerne på
produktets emballage omhyggeligt.
4. For at koble spulearmen tilbage på
kurven skal du trykke spulearmen
opad i den retning, som angives af
den nederste pil, og samtidigt dreje
den mod uret, indtil den klikker på
plads.
12. FEJLFINDING
Hvis apparatet ikke starter eller stopper
under drift. Inden du kontakter et
autoriseret servicecenter, bør du
kontrollere, om du kan løse problemet
selv ved hjælp af informationen i
tabellen.
Page 21
DANSK 21
ADVARSEL!
Reparationer, der ikke
udføres korrekt, kan
resultere i alvorlig risiko for
brugerens sikkerhed.
Eventuelle reparationer skal
Ved visse fejlfunktioner viser displayet
en alarmkode.
Størstedelen af de problemer, der kan
opstå, kan løses, uden at det er
nødvendigt at kontakte et autoriseret
servicecenter.
udføres af kvalificeret
personale.
Problem og alarmkode Mulig årsag og løsning
Du kan ikke tænde for apparatet.
Programmet starter ikke. • Kontrollér, at apparatets låge er lukket.
Apparatet fyldes ikke med
vand.
Displayet viser .
Apparatet tømmes ikke for
vand.
Displayet viser .
Overløbssikringen er blevet
udløst.
Displayet viser .
Apparatet stopper og starter
flere gange under drift.
Programmet varer for længe.
Den resterende tid på displayet øges og springer næsten hen til slutningen af
programtiden.
• Kontrollér, at netstikket er sat rigtigt i stikkontakten.
• Kontrollér, at der ikke er sprunget en sikring i sikringsdåsen.
• Hvis der er indstillet senere start, skal du annullere indstillingen og vente til nedtællingen er slut.
• Apparatet er ved at gøre blødgøringsanlægget klar til
drift. Det kan tage ca. 5 minutter.
• Kontrollér, at der åbnet for vandhanen.
• Kontrollér, at vandtrykket ikke er for lavt. Kontakt dit lokale vandværk for at få disse oplysninger.
• Kontrollér, at vandhanen ikke er tilstoppet.
• Sørg for, at filteret i tilløbsslangen ikke er tilstoppet.
• Kontrollér, at der ikke er knæk eller bøjninger på tilløbsslangen.
• Kontrollér, at vandlåsen ikke er tilstoppet.
• Sørg for, at filteret i afløbsslangen ikke er tilstoppet.
• Kontrollér, at det indvendige filtersystem ikke er tilstoppet.
• Kontrollér, at der ikke er knæk eller bøjninger på afløbsslangen.
• Luk for vandhanen, og kontakt et autoriseret servicecenter.
• Det er normalt. Det giver optimale rengøringsresultater
og energibesparelser.
• Vælg funktionen TimeSaver for at afkorte programtiden.
• Hvis funktionen for udskudt start er indstillet, kan du annullere indstillingen for udskydelse eller vente på, at
nedtællingen er færdig.
• Dette er ikke en fejl. Apparatet fungerer korrekt.
Page 22
www.aeg.com22
Problem og alarmkode Mulig årsag og løsning
Lille lækage fra apparatets
låge.
Apparatets låge er svær at
lukke.
Raslende/bankende lyde
indvendigt fra apparatet.
Apparatet udløser afbryderen.
• Apparatet er ikke i vater. Løsn eller stram de justerbare
ben (hvis relevant).
• Apparatets låge står ikke centralt på karret. Indstil det
bageste ben (hvis relevant).
• Apparatet er ikke i vater. Løsn eller stram de justerbare
ben (hvis relevant).
• Dele af bordservicet stikker ud fra kurvene.
• Bordservicet ligger ikke ordentligt i kurvene. Se brochuren til fyldning af kurve.
• Sørg for, at spulearmene kan rotere frit.
• Strømstyrken er utilstrækkelig til at forsyne alle anvendte
apparater samtidigt. Kontrollér kontaktstrømstyrken og
målerens kapacitet eller sluk for et af de anvendte apparater.
• Intern elektrisk fejl i apparatet. Kontakt et autoriseret
servicecenter.
Se "Før ibrugtagning",
"Daglig brug" eller "Råd"
for andre mulige årsager.
et autoriseret servicecenter, hvis
problemet opstår igen.
Kontakt et autoriseret servicecenter i
forbindelse med alarmkoder, der ikke er
Når du har kontrolleret apparatet, skal du
beskrevet i tabellen.
slukke og tænde for apparatet. Kontakt
12.1 Opvaske- og tørringsresultaterne er utilfredsstillende
Problemer Mulig årsag og løsning
Dårlig opvask. • Se "Daglig brug", "Nyttige råd" og brochuren til
fyldning af kurv.
• Brug mere intensive opvaskeprogrammer.
• Rengør spulearmens dyser og filter. Se "Vedligehol-
delse og rengøring"..
Dårlig tørring. • Bordservice har været efterladt for længe i et lukket
apparat.
• Der er intet afspændingsmiddel, eller der er ikke blevet doseret nok afspændingsmiddel. Indstil beholderen til afspændingsmiddel til et højere niveau.
• Det kan være nødvendigt at tørre plastikgenstande
med et viskestykke.
• Aktivér tilvalget XtraDry og indstil AirDry for at opnå
den bedste tørring.
• Vi anbefaler altid at bruge afspændingsmiddel, selv
sammen med multitabletter.
Page 23

DANSK 23
Problemer Mulig årsag og løsning
Der er hvidlige striber eller en
blålig belægning på glas og
service.
Der er pletter og tørre vanddråber på glas og tallerkener.
• Der er for meget afspændingsmiddel. Sæt afspændingsmiddelniveauet til et lavere niveau.
• Der er for meget opvaskemiddel.
• Der er for lidt afspændingsmiddel. Sæt afspændingsmiddelniveauet til et højere niveau.
• Det kan skyldes kvaliteten af afspændingsmidlet.
Tallerkenerne er våde. • Aktivér tilvalget XtraDry og indstil AirDry for at opnå
den bedste tørring.
• Programmet har ikke en tørrefase eller har en tørrefase med lav temperatur.
• Beholderen til afspændingsmiddel er tom.
• Det kan skyldes kvaliteten af afspændingsmidlet.
• Det kan skyldes kvaliteten af multitabletterne. Prøv et
andet mærke eller aktiver beholderen til afspændingsmidlet og brug afspændingsmidlet sammen med multitabletterne.
Apparatets inderside er våd. • Dette er ikke en fejl i apparatet. Det forårsages af fug-
ten i luften, som kondenserer på væggene.
Usædvanlig skum under opvask.
• Brug kun opvaskemidlet til opvaskemaskiner.
• Der er en lækage i beholderen til afspændingsmiddel.
Kontakt et autoriseret servicecenter.
Spor af rust på bestik. • Der er for meget salt i det vand, der bruges til opvask.
Se "Blødgøringsanlægget".
• Bestik af sølv og rustfrit stål blev anbragt sammen.
Undgå at placere genstande af sølv og rustfrit stål i
nærheden af hinanden.
Der er rester af opvaskemiddel i beholderen i slutningen
af programmet.
• Opvasketabsen sad fast i beholderen og blev derfor
ikke vasket helt væk af vand.
• Vand kan ikke vaske opvaskemiddel væk fra beholderen. Sørg for, at spulearmen ikke er blokeret eller tilstoppet.
• Sørg for, at genstandene i kurvene ikke forhindrer låget på beholderen til opvaskemiddel i at blive åbnet.
Lugte i apparatet. • Se "Indvendig rengøring".
Page 24

www.aeg.com24
Problemer Mulig årsag og løsning
Kalkaflejringer på bordservice,
på karret og på lågens inderside.
Mat, affarvet eller krakeleret
bordservice.
• Saltniveauet er lavt, kontroller påfyldningslampen.
• Hætten til saltbeholderen er løs.
• Vandet fra hanen er hårdt. Se "Blødgøringsanlæg-
get".
• Selv hvis du bruger multitabs, bør du bruge salt og
indstille regeneration af blødgøringsanlægget. Se
"Blødgøringsanlægget".
• Hvis der stadigvæk er kalkaflejringer, bør du rengøre
apparatet med rengøringsmidler, der er beregnet
specifikt til dette formål.
• Prøv et andet opvaskemiddel.
• Kontakt producenten af opvaskemidlet.
• Sørg for, at det kun er genstande, som kan komme i
opvaskemaskine, der bliver vasket i apparatet.
• Fyld og tøm kurven forsigtigt. Se brochuren til fyldning
af kurve.
• Læg de sarte ting i øverste kurv.
Se "Før ibrugtagning",
"Daglig brug" eller
"Nyttige råd" for andre
mulige årsager.
13. TEKNISK INFORMATION
Mål Bredde/højde/dybde (mm) 596 / 818-898 / 550
Tilslutning, el
Vandforsyningens tryk bar (minimum og maksimum) 0.5 - 8
Vandtilførsel
Kapacitet Antal kuverter 15
Strømforbrug Tændt funktion (W) 5.0
Strømforbrug Slukket funktion (W) 0.10
1)
Se typeskiltet for andre værdier.
2)
Hvis det varme vand leveres af alternativ energikilde (f.eks. solfangere, vindenergi), bruges tilslutning
til varmt vand for at spare på energien.
1)
Spænding (V) 200 - 240
Frekvens (Hz) 50 / 60
MPa (minimum og maksimum) 0.05 - 0.8
Koldt vand eller varmt vand
2)
maks. 60 °C
Page 25

14. MILJØHENSYN
DANSK 25
Genbrug materialer med symbolet .
Anbring emballagematerialet i passende
beholdere til genbrug. Hjælp med at
beskytte miljøet og menneskelig
sundhed samt at genbruge affald af
elektriske og elektroniske apparater.
Kasser ikke apparater, der er mærket
med symbolet , sammen med
husholdningsaffaldet. Lever produktet
tilbage til din lokale genbrugsplads eller
kontakt din kommune.
Page 26

www.aeg.com
26
CONTENTS
1. SAFETY INFORMATION.........................................................................................27
2. SAFETY INSTRUCTIONS........................................................................................ 28
3. PRODUCT DESCRIPTION...................................................................................... 30
4. CONTROL PANEL...................................................................................................31
5. PROGRAMMES....................................................................................................... 31
6. SETTINGS................................................................................................................ 33
7. OPTIONS................................................................................................................. 37
8. BEFORE FIRST USE.................................................................................................38
9. DAILY USE................................................................................................................39
10. HINTS AND TIPS...................................................................................................41
11. CARE AND CLEANING........................................................................................ 42
12. TROUBLESHOOTING...........................................................................................44
13. TECHNICAL INFORMATION...............................................................................48
FOR PERFECT RESULTS
Thank you for choosing this AEG product. We have created it to give you
impeccable performance for many years, with innovative technologies that help
make life simpler features you might not find on ordinary appliances. Please
spend a few minutes reading to get the very best from it.
Visit our website for:
Get usage advice, brochures, trouble shooter, service information:
www.aeg.com/webselfservice
Register your product for better service:
www.registeraeg.com
Buy Accessories, Consumables and Original spare parts for your appliance:
www.aeg.com/shop
CUSTOMER CARE AND SERVICE
Always use original spare parts.
When contacting our Authorised Service Centre, ensure that you have the
following data available: Model, PNC, Serial Number.
The information can be found on the rating plate.
Warning / Caution-Safety information
General information and tips
Environmental information
Subject to change without notice.
Page 27

1. SAFETY INFORMATION
Before the installation and use of the appliance,
carefully read the supplied instructions. The
manufacturer is not responsible for any injuries or
damages that are the result of incorrect installation or
usage. Always keep the instructions in a safe and
accessible location for future reference.
1.1 Children and vulnerable people safety
• This appliance can be used by children aged from 8
years and above and persons with reduced physical,
sensory or mental capabilities or lack of experience
and knowledge if they have been given supervision or
instruction concerning the use of the appliance in a
safe way and understand the hazards involved.
• Do not let children play with the appliance.
• Keep detergents away from children.
Keep children and pets away from the appliance door
•
when it is open.
• Children shall not carry out cleaning and user
maintenance of the appliance without supervision.
ENGLISH
27
1.2
General Safety
•
This appliance is intended to be used in household
and similar applications such as:
– farm houses; staff kitchen areas in shops, offices
and other working environments;
– by clients in hotels, motels, bed & breakfast and
other residential type environments.
• Do not change the specification of this appliance.
• The operating water pressure (minimum and
maximum) must be between 0.5 (0.05) / 8 (0.8) bar
(MPa)
• Obey the maximum number of 15 place settings.
• If the supply cord is damaged, it must be replaced by
the manufacturer, its Authorised Service Centre or
similarly qualified persons in order to avoid a hazard.
Page 28

www.aeg.com
28
• Put knives and cutlery with sharp points in the cutlery
basket with the points down or in a horizontal
position.
• Do not keep the appliance door open without
supervision to prevent to fall on it.
• Before any maintenance operation, deactivate the
appliance and disconnect the mains plug from the
socket.
• Do not use high pressure water sprays and/or steam
to clean the appliance.
• The ventilation openings in the base (if applicable)
must not be obstructed by a carpet.
• The appliance is to be connected to the water mains
using the new supplied hose-sets. Old hose sets must
not be reused.
2. SAFETY INSTRUCTIONS
2.1 Installation
• Remove all the packaging.
• Do not install or use a damaged
appliance.
• Do not install or use the appliance
where the temperature is less than 0
°C.
• Follow the installation instruction
supplied with the appliance.
• Make sure that the appliance is
installed below and adjacent to safe
structures.
2.2 Electrical connection
WARNING!
Risk of fire and electrical
shock.
• The appliance must be earthed.
• Make sure that the electrical
information on the rating plate agrees
with the power supply. If not, contact
an electrician.
• Always use a correctly installed
shockproof socket.
• Do not use multi-plug adapters and
extension cables.
• Make sure not to cause damage to
the mains plug and to the mains
cable. Should the mains cable need
to be replaced, this must be carried
out by our Authorised Service Centre.
• Connect the mains plug to the mains
socket only at the end of the
installation. Make sure that there is
access to the mains plug after the
installation.
• Do not pull the mains cable to
disconnect the appliance. Always pull
the mains plug.
• This appliance complies with the
E.E.C. Directives.
• Only for UK and Ireland. The
appliance has a 13 amp mains plug. If
it is necessary to change the fuse in
the mains plug, use fuse: 13 amp
ASTA (BS 1362).
2.3 Water connection
• Do not cause damage to the water
hoses.
• Before connection to new pipes,
pipes not used for a long time, where
repair work has been carried out or
new devices fitted (water meters,
etc.), let the water flow until it is clean
and clear.
Page 29

ENGLISH
29
• Ensure that there are no visible water
leaks during and after the first use of
the appliance.
• The water inlet hose has a safety valve
and a sheath with an inner mains
cable.
WARNING!
Dangerous voltage.
• If the water inlet hose is damaged,
immediately close the water tap and
disconnect the mains plug from the
mains socket. Contact the Authorised
Service Centre to replace the water
inlet hose.
2.4 Use
• Do not sit or stand on the open door.
• Dishwasher detergents are
dangerous. Obey the safety
instructions on the detergent
packaging.
• Do not drink and play with the water
in the appliance.
• Do not remove the dishes from the
appliance until the programme is
completed. There can be detergent
on the dishes.
• The appliance can release hot steam
if you open the door while a
programme operates.
• Do not put flammable products or
items that are wet with flammable
products in, near or on the appliance.
2.5 Internal light
WARNING!
Risk of injury.
• This appliance has an internal lamp
that comes on when you open the
door and goes off when the door is
closed.
• The lamp in this appliance is not
suitable for household room
illumination.
• To replace the lamp, contact the
Service.
2.6 Disposal
WARNING!
Risk of injury or suffocation.
• Disconnect the appliance from the
mains supply.
• Cut off the mains cable and discard it.
• Remove the door catch to prevent
children and pets to get closed in the
appliance.
Page 30

5
4
10
9
67
11
12
2
3
1
8
www.aeg.com30
3. PRODUCT DESCRIPTION
Top spray arm
1
Upper spray arm
2
Lower spray arm
3
Filters
4
Rating plate
5
Salt container
6
Air vent
7
3.1 TimeBeam
The TimeBeam is a display that is shown
on the floor below the appliance door.
• When the programme starts, the
programme duration comes on.
• When the programme is completed,
0:00 and CLEAN come on.
• When the delay start starts, the
countdown duration and DELAY
come on.
• When the appliance has a
malfunction, an alarm code appears.
Rinse aid dispenser
8
Detergent dispenser
9
Lower basket
10
Upper basket
11
Cutlery drawer
12
Page 31

When AirDry is activated
1 2
83 4 5 6 7
9
during the drying phase, the
projection on the floor may
not be completely visible. To
check the remaining time of
the running programme,
look at the control panel
display.
4. CONTROL PANEL
ENGLISH 31
On/off button
1
Display
2
Delay button
3
Program button
4
Sanitize button
5
4.1 Indicators
Indicator Description
End indicator.
Rinse aid indicator. It is always off while the programme operates.
Salt indicator. It is always off while the programme operates.
5. PROGRAMMES
Programme Degree of soil
Type of load
P1
1)
• Normal soil
• Crockery and
cutlery
TimeSaver button
6
XtraDry button
7
Reset button
8
Indicators
9
Programme phases Options
• Prewash
• Wash 50 °C
• Rinse
• Dry
• Sanitize
• TimeSaver
• XtraDry
Page 32

www.aeg.com32
Programme Degree of soil
Programme phases Options
Type of load
P2
2)
• All
• Crockery, cutlery, pots and
pans
• Prewash
• Wash from 45 °C to
70 °C
• Rinse
• Sanitize
• XtraDry
• Dry
P3
3)
• Mixed soil
• Crockery, cutlery, pots and
pans
• Prewash
• Wash 50 °C and 65
°C
• Rinse
• TimeSaver
• XtraDry
• Dry
P4 • Heavy soil
• Crockery, cutlery, pots and
pans
P5 • Normal or light
soil
• Delicate crock-
• Prewash
• Wash 70 °C
• Rinse
• Dry
• Wash 45 °C
• Rinse
• Dry
• Sanitize
• XtraDry
• TimeSaver
• XtraDry
ery and glassware
P6
P7
P8
4)
5)
6)
• Fresh soil
• Crockery and
• Wash 60 °C
• Rinse
cutlery
• All • Prewash
• Normal soil
• Crockery and
cutlery
• Prewash
• Wash 50 °C
• Rinse
• Sanitize
• XtraDry
• XtraDry
• Dry
1)
With this programme you have the most efficient use of water and energy consumption for crockery
and cutlery with normal soil. (This is the standard programme for test institutes).
2)
The appliance senses the degree of soil and the quantity of items in the baskets . It automatically ad-
justs the temperature and the quantity of water, the energy consumption and the programme duration.
3)
With this programme you can wash a load with mixed soil. Very heavy soil in the lower basket and
normal soil in the upper basket. The pressure and the temperature of the water in the lower basket are
higher than in the upper basket.
4)
With this programme you can wash a load with fresh soil. It gives good washing results in a short time.
5)
With this programme you can quickly rinse dishes to prevent remains of food to bond on dishes and
odours to form in the appliance. Do not use detergent with this programme.
6)
This is the most silent programme. The pump works at a very low speed to decrease the level of noise.
Because of the low speed, the programme duration is long.
Page 33

5.1 Consumption values
ENGLISH 33
Programme
P1 11 0.857 225
P2 7 - 14 0.6 - 1.6 40 - 154
P3 14 - 16 1.2 - 1.5 140 - 156
P4 12.5 - 14.5 1.4 - 1.7 160 - 170
P5 12 - 14 0.7 - 0.9 84 - 94
P6 10 0.9 30
P7 4 0.1 14
P8 9 - 10 1.1 - 1.3 219 - 229
1)
The pressure and the temperature of the water, the variations of the mains supply, the options and the
quantity of dishes can change the values.
1)
Water
(l)
Energy
(kWh)
Duration
(min)
5.2 Information for test
institutes
For all the necessary information for test
performance, send an email to:
6. SETTINGS
6.1 Programme selection
mode and user mode
When the appliance is in programme
selection mode it is possible to set a
programme and to enter the user mode.
In user mode, the following settings
can be changed:
• The level of the water softener
according to the water hardness.
• The activation or the deactivation of
the acoustic signal for end of
programme.
info.test@dishwasher-production.com
Write down the product number (PNC)
that is on the rating plate.
• The selection of the colour for
TimeBeam.
• The activation or deactivation of the
rinse aid empty notification.
• The level of rinse aid according to the
required dosage.
• The activation or the deactivation of
the option AirDry.
These settings will be saved until you
change them again.
Page 34

www.aeg.com34
How to set the programme selection mode
The appliance is in programme selection
mode when the display shows the
programme number P1.
When you activate the appliance, usually
it is in programme selection mode.
However, if this does not happen, you
can set the programme selection mode
in the following way:
Press and hold Reset until the appliance
a detrimental effect on the washing
results and on the appliance.
The higher the content of these minerals,
the harder your water is. Water hardness
is measured in equivalent scales.
The water softener should be adjusted
according to the hardness of the water in
your area. Your local water authority can
advise you on the hardness of the water
in your area. It is important to set the
right level of the water softener to assure
good washing results.
is in programme selection mode.
6.2 The water softener
The water softener removes minerals
from the water supply, which would have
Water hardness
German de-
grees (°dH)
47 - 50 84 - 90 8.4 - 9.0 58 - 63 10
43 - 46 76 - 83 7.6 - 8.3 53 - 57 9
37 - 42 65 - 75 6.5 - 7.5 46 - 52 8
29 - 36 51 - 64 5.1 - 6.4 36 - 45 7
23 - 28 40 - 50 4.0 - 5.0 28 - 35 6
19 - 22 33 - 39 3.3 - 3.9 23 - 27
15 - 18 26 - 32 2.6 - 3.2 18 - 22 4
11 - 14 19 - 25 1.9 - 2.5 13 - 17 3
4 - 10 7 - 18 0.7 - 1.8 5 - 12 2
<4 <7 <0.7 < 5
1)
Factory setting.
2)
Do not use salt at this level.
French degrees
(°fH)
mmol/l Clarke de-
grees
Water softener lev-
el
1)
5
2)
1
Whether you use a standard detergent
or multi-tabs (with or without salt), set
the proper water hardness level to
keep the salt refill indicator active.
Multi-tabs containing salt
are not effective enough to
soften hard water.
How to set the water softener level
The appliance must be in programme
selection mode.
1. To enter the user mode, press and
hold simultaneously and until
the indicators , , , ,
Page 35

ENGLISH
35
and start to flash and the
display is blank.
2. Press .
• The indicators , , ,
and go off.
• The indicator continues to
flash.
• The display shows the current
setting: e.g. = level 5.
3. Press
the setting.
4. Press the on/off button to confirm
the setting.
again and again to change
6.3 The rinse aid dispenser
The rinse aid helps to dry the dishes
without streaks and stains.
The rinse aid is automatically released
during the hot rinse phase.
You can set the released quantity of rinse
aid between level 1 (minimum quantity)
and level 6 (maximum quantity). Level 0
will deactivate the rinse aid dispenser
and no rinse aid will be released.
Factory setting: level 4.
How to set the rinse aid level
The appliance must be in programme
selection mode.
1. To enter the user mode, press and
hold simultaneously and until
the indicators , , , ,
and start to flash and the
display is blank.
2. Press .
• The indicators
and go off.
• The indicator
flash.
• The display shows the current
setting: e.g. = level 4.
– The levels of rinse aid are
from 0A to 6A.
– Level 0 = no rinse aid is
released.
, , ,
continues to
3. Press again and again to change
the setting.
4. Press the on/off button to confirm
the setting.
6.4 The rinse aid empty notification
The rinse aid helps to dry the dishes
without streaks and stains.
The rinse aid is automatically released
during the hot rinse phase.
When rinse aid chamber is empty, the
rinse aid indicator is turned on notifying
to refill rinse aid. If you are using multitabs containing rinse aid and you are
satisfied with the drying result, you can
deactivate the notification for refilling
rinse aid. However, we recommend that
you always use rinse aid for best drying
performance.
If you use standard detergent or multitablets without rinse aid, activate the
notification to keep the rinse aid refill
indicator active.
How to deactivate the rinse aid empty notification
The appliance must be in programme
selection mode.
1. To enter the user mode, press and
hold simultaneously and until
the indicators , , , ,
and start to flash and the
display is blank.
2. Press .
• The indicators
and go off.
• The indicator
flash.
• The display shows the current
setting: = the rinse aid empty
notification is activated (factory
setting).
3. Press to change the setting.
= the rinse aid empty notification is
deactivated.
4. Press the on/off button to confirm
the setting.
, , ,
continues to
Page 36

36
www.aeg.com
6.5 Acoustic signals
Acoustic signals sound when a
malfunction of the appliance occurs. It is
not possible to deactivate these acoustic
signals.
There is also an acoustic signal that
sounds when the programme is
completed. By default this acoustic
signal is deactivated but it is possible to
activate it.
How to activate the acoustic signal for the end of programme
The appliance must be in programme
selection mode.
1. To enter the user mode, press and
hold simultaneously
the indicators , , , ,
and start to flash and the
display is blank.
2. Press
• The indicators , , ,
and go off.
• The indicator
flash.
• The display shows the current
setting: = Acoustic signal off.
3. Press
= Acoustic signal on.
4. Press the on/off button to confirm
the setting.
to change the setting.
and until
continues to
6.6 How to set the colour of the TimeBeam
It is possible to change the colour of the
TimeBeam to match the colour of the
kitchen floor. There are several colours
available. The TimeBeam can also be
deactivated.
The appliance must be in programme
selection mode.
1. To enter the user mode, press and
hold simultaneously
the indicators
and until
, , , ,
and start to flash and the
display is blank.
2. Press .
• The indicators , , ,
and go off.
• The indicator continues to
flash.
• The display shows a number and
the letter C. Each number refers
to a different colour.
= TimeBeam
–
deactivated.
3. Press again and again to change
the colour.
• You can see the different colours
on the kitchen floor.
4. Press the on/off button to confirm
the setting.
6.7 AirDry
AirDry improves the drying results with
less energy consumption.
While the drying phase
operates, a device opens the
appliance door. The door is
then kept ajar.
CAUTION!
Do not try to close the
appliance door within 2
minutes after automatic
open. This can cause
damage to the appliance.
AirDry is automatically activated with all
programmes excluding .
To improve the drying performance refer
to the XtraDry option or activate AirDry.
Page 37

ENGLISH
37
How to deactivate AirDry
The appliance must be in programme
selection mode.
1. To enter the user mode, press and
hold simultaneously and until
the indicators
and start to flash and the
display is blank.
2. Press .
• The indicators , , ,
and go off.
7. OPTIONS
Desired options must be
activated every time before
you start a programme.
It is not possible to activate
or deactivate options while a
programme is running.
Not all options are
compatible with each other.
If you have selected non
compatible options, the
appliance will automatically
deactivate one or more of
them. Only the indicators of
the options still active will
stay on.
7.1 XtraDry
Activate this option when you want to
boost the drying performance. With use
of this option, the duration of some
programmes, water consumption and
the last rinse temperature can be
affected.
The XtraDry option is a permanent
option for all programmes other than
and need not to be selected at
every cycle.
Every time is activated, XtraDry
option is off and needs to be chosen
manually. In other programmes, the
setting of XtraDry is permanent and it is
automatically used in next cycles. This
configuration can be changed at any
time.
, , , ,
• The indicator continues
to flash.
• The display shows the current
setting: = AirDry activated.
3. Press to change the setting:
= AirDry deactivated.
4. Press the on/off button to confirm
the setting.
Activating XtraDry option deactivates
TimeSaver.
How to activate XtraDry
Press . The related indicator comes
on.
If the option is not applicable to the
programme, the related indicator does
not appear or it flashes quickly for a few
seconds and then goes off.
The display shows the updated
programme duration.
7.2 TimeSaver
The TimeSaver allows to reduce the time
of the selected programme.
The total programme duration decreases
by approximately 50%.
The washing results are the same as with
the normal programme duration. The
drying results can decrease.
This option increases the pressure and
the temperature of the water. The
washing and the drying phases are
shorter.
By default, TimeSaver is off, but it is
possible to activate it manually. This
option cannot be combined with XtraDry
at the same time.
How to activate TimeSaver
Press , the related indicator comes on.
Page 38

www.aeg.com38
If the option is not applicable to the
programme, the related indicator does
not come on or it flashes quickly for a
few seconds and then goes off.
The display shows the updated
programme duration.
7.3 Sanitize
This option provides better hygiene
results by keeping the temperature at 70
°C for at least 10 minutes during the last
rinsing phase.
8. BEFORE FIRST USE
1. Make sure that the current level of
the water softener agrees with the
hardness of the water supply. If
not, adjust the level of the water
softener.
2. Fill the salt container.
3. Fill the rinse aid dispenser.
4. Open the water tap.
5. Start a programme to remove any
processing residuals that can still be
inside the appliance. Do not use
detergent and do not load the
baskets.
When you start a programme, the
appliance can take up to 5 minutes to
recharge the resin in the water softener.
It seems that the appliance is not
working. The washing phase starts only
after this procedure is completed. The
procedure will be repeated periodically.
8.1 The salt container
CAUTION!
Only use salt specifically
designed for dishwashers.
The salt is used to recharge the resin in
the water softener and to assure good
washing results in the daily use.
How to fill the salt container
1. Turn the cap of the salt container
counterclockwise and remove it.
2. Put 1 litre of water in the salt
container (Only for the first time).
3. Fill the salt container with dishwasher
salt.
How to activate Sanitize
Press , the related indicator comes on
If the option is not applicable to the
programme, the related indicator does
not come on or it flashes quickly for a
few seconds and then goes off.
The display shows the updated
programme duration.
4. Remove the salt around the opening
of the salt container.
5. Turn the cap of the salt container
clockwise to close the salt container.
CAUTION!
Water and salt can come out
of the salt container when
you fill it. After you fill the
salt container, immediately
start a programme to
prevent corrosion.
Page 39

A
B
C
A
B
C
ENGLISH
39
8.2 How to fill the rinse aid
dispenser
CAUTION!
Only use rinse aid
specifically designed for
dishwashers.
9. DAILY USE
1. Open the water tap.
2. Press the on/off button to activate
the appliance.
Make sure that the appliance is in
programme selection mode.
• If the salt indicator is on, fill the
salt container.
• If the rinse aid indicator is on, fill
the rinse aid dispenser.
3. Load the baskets.
4. Add the detergent.
5. Set and start the correct programme
for the type of load and the degree
of soil.
1. Open the lid (C).
2. Fill the dispenser (B) until the rinse
aid reaches the marking ''MAX''.
3. Remove the spilled rinse aid with an
absorbent cloth to prevent too much
foam.
4. Close the lid. Make sure that the lid
locks into position.
Fill the rinse aid dispenser
when the indicator (A)
becomes clear.
If you use multi-tablets and
the drying performance is
satisfactory, the rinse aid
refill indication can be
disabled.
We recommend to always
use rinse aid for better
drying performance, also in
combination with multitablets containing rinsing
agent.
9.1 Using the detergent
1.
2. Put the detergent, in powder or
3. If the programme has a prewash
CAUTION!
Only use detergent
specifically designed for
dishwashers.
Press the release button (A) to open
the lid (C).
tablets, in the compartment (B).
phase, put a small quantity of
Page 40

40
www.aeg.com
detergent on the inner part of the
appliance door.
4. Close the lid. Make sure that the lid
locks into position.
9.2 Setting and starting a programme
The Auto Off function
This function decreases energy
consumption by deactivating
automatically the appliance when it is not
operating.
The function comes into operation:
• 5 minutes after the completion of the
programme.
• After 5 minutes if the programme has
not started.
Starting a programme
1. Keep the appliance door ajar.
2. Press the on/off button to activate
the appliance. Make sure that the
appliance is in programme selection
mode.
3. Press repeatedly
shows the number of the programme
you want to start. The display will
show the programme number for
approximately 3 seconds and then
show the programme duration.
4. Set the applicable options.
5. Close the appliance door to start the
programme.
until the display
Starting a programme with delay start
1. Set a programme.
2. Press again and again until the
display shows the delay time you
want to set (from 1 to 24 hours).
The delay indicator comes on.
3. Close the appliance door to start the
countdown.
While a countdown is running it is
possible to increase the delay time but
not to change the selection of the
programme and options.
When the countdown is completed, the
programme starts.
Opening the door while the appliance operates
If you open the door while a programme
is running, the appliance stops. It may
affect the energy consumption and the
programme duration. When you close
the door, the appliance continues from
the point of interruption.
If the door is opened for
more than 30 seconds
during the drying phase, the
running programme will end.
This will not happen if the
door is opened by AirDry.
CAUTION!
Do not try to close the
appliance door within 2
minutes after AirDry
automatically opens it, as
this may cause damage to
the appliance. If, afterwards,
the door is closed for
another 3 minutes, the
running programme ends.
Cancelling the delay start while the countdown operates
When you cancel the delay start you
have to set the programme and options
again.
1. Open the appliance door.
2. Press the on/off button to deactivate
the appliance.
3. Keep the appliance deactivated for
approximately 30 seconds.
4. Press again the on/off button to
activate the appliance.
5. Press and hold Reset until the
appliance is in programme selection
mode.
Cancelling the programme
1. Open the appliance door.
2. Press the on/off button to deactivate
the appliance.
3. Keep the appliance deactivated for
approximately 30 seconds.
4. Press again the on/off button to
activate the appliance.
Page 41

ENGLISH
41
5. Press and hold Reset until the
appliance is in programme selection
mode.
Make sure that there is detergent in the
detergent dispenser before you start a
new programme.
10. HINTS AND TIPS
10.1 General
The following hints will ensure optimal
cleaning and drying results in daily use
and also help to protect the
environment.
• Remove larger residues of food from
the dishes into the waste bin.
• Do not pre-rinse dishes by hand.
When needed, use the prewash
programme (if available) or select a
programme with a prewash phase.
• Always use the whole space of the
baskets.
• When loading the appliance, make
sure that the dishes can be
completely reached and washed by
the water released from the spray arm
nozzles. Make sure that items do not
touch or cover each other.
• You can use dishwasher detergent,
rinse aid and salt separately or you
can use the multi-tablets (e.g. ''3in1'',
''4in1'', ''All in 1''). Follow the
instructions written on the packaging.
• Select the programme according to
the type of load and degree of soil.
With the ECO programme you have
the most efficient use of water and
energy consumption for crockery and
cutlery with normal soil.
10.2 Using salt, rinse aid and detergent
• Only use salt, rinse aid and detergent
for dishwasher. Other products can
cause damage to the appliance.
• In areas with hard and very hard water
we recommend to use plain
dishwasher detergent (powder, gel,
tablets containing no additional
agents), rinse aid and salt separately
for optimal cleaning and drying
results.
End of programme
When the programme is completed and
you open the door, the appliance is
automatically deactivated.
Close the water tap.
• At least once a month run the
appliance with the use of appliance
cleaner which is particularly suitable
for this purpose.
• Detergent tablets do not fully dissolve
with short programmes. To prevent
detergent residues on the tableware,
we recommend that you use the
tablets with long programmes.
• Do not use more than the correct
quantity of detergent. Refer to the
instructions on the detergent
packaging.
10.3 What to do if you want to
stop using multi-tablets
Before you start to use separately
detergent, salt and rinse aid do the
following procedure.
1. Set the highest level of the water
softener.
2. Make sure that the salt and rinse aid
containers are full.
3. Start the shortest programme with a
rinsing phase. Do not add detergent
and do not load the baskets.
4. When the programme is completed,
adjust the water softener according
to the water hardness in your area.
5. Adjust the released quantity of rinse
aid.
6. Activate the rinse aid empty
notification.
10.4 Loading the baskets
• Only use the appliance to wash items
that are dishwasher-safe.
• Do not put in the appliance items
made of wood, horn, aluminium,
pewter and copper.
• Do not put in the appliance items that
can absorb water (sponges,
household cloths).
Page 42

C
B
A
42
www.aeg.com
• Remove larger residues of food from
the dishes into the waste bin.
• Make soft the remaining burned food
on the items.
• Put hollow items (cups, glasses and
pans) with the opening down.
• Make sure that glasses do not touch
other glasses.
• Put cutlery and small items in the
cutlery drawer.
• Put light items in the upper basket.
Make sure that the items do not
move.
• Make sure that the spray arms can
move freely before you start a
programme.
10.5 Before starting a
programme
Make sure that:
• The filters are clean and correctly
installed.
11. CARE AND CLEANING
WARNING!
Before maintenance,
deactivate the appliance and
disconnect the mains plug
from the main socket.
• The cap of the salt container is tight.
• The spray arms are not clogged.
• There is dishwasher salt and rinse aid
(unless you use multi- tablets).
• The position of the items in the
baskets is correct.
• The programme is applicable for the
type of load and for the degree of
soil.
• The correct quantity of detergent is
used.
10.6 Unloading the baskets
1. Let the tableware cool down before
you remove it from the appliance.
Hot items can be easily damaged.
2. First remove items from the lower
basket, then from the upper basket.
At the end of the program
water can still remain on the
sides and on the door of the
appliance.
Dirty filters and clogged
spray arms decrease the
washing results. Make a
check regularly and, if
necessary, clean them.
11.1 Cleaning the filters
The filter system is made of 3 parts.
1. Turn the filter (B) counterclockwise
and remove it.
Page 43

2. Remove the filter (C) out of filter (B).
3. Remove the flat filter (A).
4. Wash the filters.
5. Make sure that there are no residues
of food or soil in or around the edge
of the sump.
6. Put back in place the flat filter (A).
Make sure that it is correctly
positioned under the 2 guides.
ENGLISH
8. Put back the filter (B) in the flat filter
(A). Turn it clockwise until it locks.
CAUTION!
An incorrect position of the
filters can cause bad
washing results and damage
to the appliance.
11.2 Cleaning the upper spray
arm
We recommend to clean regularly the
upper spray arm to avoid soil to clog the
holes.
Clogged holes can cause unsatisfactory
washing results.
1. Pull out the upper basket.
2. To disengage the spray arm from the
basket, press the spray arm upwards
in the direction indicated by the
lower arrow and simultaneously turn
it clockwise.
43
7. Reassemble the filters (B) and (C).
3. Wash the spray arm under running
water. Use a thin pointed tool, e.g.
toothpick, to remove particles of soil
from the holes.
Page 44

www.aeg.com44
4. To engage again the spray arm to
the basket, press the spray arm
upwards in the direction indicated by
the lower arrow and simultaneously
turn it counterclockwise until it locks
into place.
11.3 External cleaning
• Clean the appliance with a moist soft
cloth.
• Only use neutral detergents.
• Do not use abrasive products,
abrasive cleaning pads or solvents.
11.4 Internal cleaning
• Carefully clean the appliance,
including the rubber gasket of the
door, with a soft damp cloth.
• If you use short duration programmes
regularly, these can leave deposits of
grease and limescale inside the
appliance. To prevent this, we
recommend running long duration
programmes at least twice a month.
• To maintain the performance of your
appliance at its best, we recommend
using a specific cleaning product for
dishwashers (at least once a month).
Follow carefully the instructions on
the packaging of the product.
12. TROUBLESHOOTING
If the appliance does not start or it stops
during operation. Before you contact an
Authorised Service Centre, check if you
can solve the problem by yourself with
the help of the information in the table.
WARNING!
Repairs not properly done
may result in serious risk to
the safety of the user. Any
repairs must be performed
by qualified personnel.
With some problems, the display
shows an alarm code.
The majority of problems that can
occur can be solved without the need
to contact an Authorised Service
Centre.
Page 45

ENGLISH 45
Problem and alarm code Possible cause and solution
You cannot activate the appliance.
• Make sure that the mains plug is connected to the
mains socket.
• Make sure that there is no damaged fuse in the fuse
box.
The program does not start. • Make sure that the appliance door is closed.
• If the delay start is set, cancel the setting or wait for the
end of the countdown.
• The appliance has started the procedure to recharge
the resin inside the water softener. The duration of the
procedure is approximately 5 minutes.
The appliance does not fill
with water.
The display shows .
• Make sure that the water tap is open.
• Make sure that the pressure of the water supply is not
too low. For this information, contact your local water
authority.
• Make sure that the water tap is not clogged.
• Make sure that the filter in the inlet hose is not clogged.
• Make sure that the inlet hose has no kinks or bends.
The appliance does not
drain the water.
The display shows .
• Make sure that the sink spigot is not clogged.
• Make sure that the filter in the outlet hose is not clogged.
• Make sure that the interior filter system is not clogged.
• Make sure that the drain hose has no kinks or bends.
The anti-flood device is on.
The display shows .
The appliance stops and
starts more times during op-
• Close the water tap and contact an Authorised Service
Centre.
• It is normal. It provides optimal cleaning results and energy savings.
eration.
The program lasts too long. • Select the TimeSaver option to shorten the program
time.
• If the delayed start option is set, cancel the delay setting
or wait for the end of the countdown.
The remaining time in the
• This is not a defect. The appliance is working correctly.
display increases and skips
nearly to the end of program
time.
Small leak from the appliance door.
• The appliance is not levelled. Loosen or tighten the adjustable feet (if applicable).
• The appliance door is not centred on the tub. Adjust the
rear foot (if applicable).
The appliance door is difficult to close.
• The appliance is not levelled. Loosen or tighten the adjustable feet (if applicable).
• Parts of the tableware are protruding from the baskets.
Page 46

www.aeg.com46
Problem and alarm code Possible cause and solution
Rattling/knocking sounds
from inside the appliance.
The appliance trips the circuit-beaker.
• The tableware is not properly arranged in the baskets.
Refer to basket loading leaflet.
• Make sure that the spray arms can rotate freely.
• The amperage is insufficient to supply simultaneously all
the appliances in use. Check the socket amperage and
the capacity of the meter or turn off one of the appliances in use.
• Internal electrical fault of the appliance. Contact an Authorised Service Centre.
Refer to "Before first use",
"Daily use", or "Hints and
tips" for other possible
causes.
the problem occurs again, contact an
Authorised Service Centre.
For alarm codes not described in the
table, contact an Authorised Service
Centre.
Once you have checked the appliance,
deactivate and activate the appliance. If
12.1 The washing and drying results are not satisfactory
Problem Possible cause and solution
Poor washing results. • Refer to "Daily use", "Hints and tips" and basket
loading leaflet.
• Use more intensive washing programmes.
• Clean spray arm jets and filter. Refer to "Care and
Cleaning".
Poor drying results. • Tableware has been left for too long inside a closed
appliance.
• There is no rinse aid or the dosage of rinse aid is not
enough. Set the rinse aid dispenser to a higher level.
• Plastic items may need to be towel dried.
• For the best drying performance activate the option
XtraDry and set AirDry.
• We recommend to always use rinse aid, even in combination with multi-tablets.
There are whitish streaks or
bluish layers on glasses and
dishes.
There are stains and dry water
drops on glasses and dishes.
• The release quantity of rinse aid is too much. Adjust
the rinse aid level to a lower level.
• The quantity of detergent is too much.
• The released quantity of rinse aid is not sufficient. Adjust the rinse aid level to a higher level.
• The quality of the rinse aid can be the cause.
Page 47

ENGLISH 47
Problem Possible cause and solution
The dishes are wet. • For the best drying performance activate the option
XtraDry and set AirDry .
• The programme does not have a drying phase or has
a drying phase with low temperature.
• The rinse aid dispenser is empty.
• The quality of the rinse aid can be the cause.
• The quality of the multi-tablets can be the cause. Try a
different brand or activate the rinse aid dispenser and
use rinse aid and multi-tablets together.
The interior of the appliance is
wet.
• This is not a defect of the appliance. it is caused by
the humidity in the air that condenses on the walls.
Unusual foam during washing. • Use the detergent for dishwashers only.
• There is a leak in the rinse aid dispenser. Contact an
Authorised Service Centre.
Traces of rust on cutlery. • There is too much salt in the water used for washing.
Refer to "The water softener".
• Silver and stainless steel cutlery were placed together.
Avoid to put silver and stainless steel items close together.
There are residues of detergent in the dispenser at the
end of the programme.
• The detergent tablet got stuck in the dispenser and
therefore was not completely washed away by water.
• Water cannot wash away the detergent from the dispenser. Make sure that the spray arm is not blocked or
clogged.
• Make sure that items in the baskets do not impede the
lid of the detergent dispenser from opening.
Odours inside the appliance. • Refer to "Internal cleaning".
Limescale deposits on the tableware, on the tub and on
the inside of the door.
• The level of salt is low, check the refill indicator.
• The cap of the salt container is loose.
• Your tap water is hard. Refer to "The water softener".
• Even using multi-functional tabs use salt and set regeneration of the water softener. Refer to "The water
softener".
• If lime scale deposits still remain, clean the appliance
with appliance cleaners which are particularly suitable
for this purpose.
• Try different detergent.
• Contact the detergent manufacturer.
Dull, discoloured or chipped
tableware.
• Make sure that only dishwasher-safe items are washed
in the appliance.
• Load and unload the basket carefully. Refer to basket
loading leaflet.
• Place delicate items in the upper basket.
Page 48

www.aeg.com48
Refer to "Before first use",
"Daily use" or "Hints and
tips" for other possible
causes.
13. TECHNICAL INFORMATION
Dimensions Width / height / depth (mm) 596 / 818-898 / 550
Electrical connection
Water supply pressure bar (minimum and maximum) 0.5 - 8
Water supply
Capacity Place settings 15
Power consumption Left-on mode (W) 5.0
Power consumption Off-mode (W) 0.10
1)
Refer to the rating plate for other values.
2)
If the hot water comes from alternative source of energy, (e.g. solar panels, aeolian energy), use the
hot water supply to decrease energy consumption.
1)
Voltage (V) 200 - 240
Frequency (Hz) 50 / 60
MPa (minimum and maximum) 0.05 - 0.8
Cold water or hot water
2)
max 60 °C
14. ENVIRONMENTAL CONCERNS
Recycle the materials with the symbol .
Put the packaging in applicable
containers to recycle it. Help protect the
environment and human health and to
recycle waste of electrical and electronic
appliances. Do not dispose appliances
marked with the symbol with the
household waste. Return the product to
your local recycling facility or contact
your municipal office.
Page 49

INDICE
1. INFORMAZIONI PER LA SICUREZZA....................................................................50
2. ISTRUZIONI DI SICUREZZA....................................................................................51
3. DESCRIZIONE DEL PRODOTTO...........................................................................53
4. PANNELLO DEI COMANDI................................................................................... 54
5. PROGRAMMI...........................................................................................................54
6. IMPOSTAZIONI....................................................................................................... 56
7. OPZIONI...................................................................................................................60
8. PREPARAZIONE AL PRIMO UTILIZZO.................................................................. 61
9. UTILIZZO QUOTIDIANO........................................................................................ 63
10. CONSIGLI E SUGGERIMENTI UTILI....................................................................64
11. PULIZIA E CURA....................................................................................................66
12. RISOLUZIONE DEI PROBLEMI............................................................................ 68
13. DATI TECNICI....................................................................................................... 72
PER RISULTATI PERFETTI
Grazie per aver scelto di acquistare questo prodotto AEG. Lo abbiamo creato per
fornirvi prestazioni impeccabili per molti anni, grazie a tecnologie innovative che
vi semplificheranno la vita - funzioni che non troverete sulle normali
apparecchiature. Vi invitiamo a dedicare qualche minuto alla lettura del presente
manuale, per conoscere come trarre il massimo vantaggio dall'utilizzo della vostra
apparecchiatura.
Visitate il nostro sito web per:
Ricevere consigli, scaricare i nostri opuscoli, eliminare eventuali anomalie,
ottenere informazioni sull'assistenza:
www.aeg.com/webselfservice
Registrare il vostro prodotto e ricevere un servizio migliore:
www.registeraeg.com
ITALIANO
49
Acquistare accessori, materiali di consumo e ricambi originali per la vostra
apparecchiatura:
www.aeg.com/shop
SERVIZIO CLIENTI E MANUTENZIONE
Consigliamo sempre l’impiego di ricambi originali.
Quando si contatta il Centro di Assistenza autorizzato, accertarsi di disporre dei
seguenti dati: Modello, PNC, numero di serie.
Le informazioni si trovano sulla targhetta dei dati.
Avvertenza/Attenzione - Importanti Informazioni per la sicurezza
Informazioni e suggerimenti generali
Informazioni sull'ambiente
Con riserva di modifiche.
Page 50

www.aeg.com
50
1. INFORMAZIONI PER LA SICUREZZA
Leggere attentamente le istruzioni fornite prima di
installare e utilizzare l'apparecchiatura. I produttori non
sono responsabili di eventuali lesioni o danni derivanti
da un'installazione o un uso scorretti. Conservare
sempre le istruzioni in un luogo sicuro e accessibile per
poterle consultare in futuro.
1.1 Sicurezza dei bambini e delle persone vulnerabili
• Questa apparecchiatura può essere usata da bambini
a partire dagli 8 anni e da adulti con limitate capacità
fisiche, sensoriali o mentali o con scarsa esperienza o
conoscenza sull'uso dell'apparecchiatura, solamente
se sorvegliati o se istruiti relativamente all'uso
dell'apparecchiatura e se hanno compreso i rischi
coinvolti.
Non consentire ai bambini di giocare con
•
l'apparecchio.
• Tenere i detersivi al di fuori della portata dei bambini.
• Tenere i bambini e gli animali domestici lontano
dal'oblò dell'apparecchiatura quando è aperto.
• I bambini non devono eseguire interventi di pulizia e
manutenzione sull'apparecchiatura senza essere
supervisionati.
1.2
Avvertenze di sicurezza generali
•
Questo elettrodomestico è destinato ad un uso
domestico e applicazioni simili, quali:
– case di campagna; cucine di negozi, uffici e altri
ambienti di lavoro;
– clienti di hotel, motel, bed and breakfast e altri
ambienti residenziali.
• Non modificare le specifiche tecniche
dell'apparecchiatura.
Page 51

ITALIANO
• La pressione di esercizio dell'acqua (minima e
massima) deve essere compresa tra 0.5 (0.05) / 8 (0.8)
bar (MPa)
• Rispettare il numero massimo di 15 coperti.
• Se il cavo di alimentazione è danneggiato, deve
essere sostituito dal produttore, dal Centro di
Assistenza Autorizzato o da una persona qualificata
per evitare situazioni di pericolo.
• Sistemare i coltelli e le posate appuntite nel cestello
portaposate con l’estremità rivolta verso il basso o in
posizione orizzontale.
• Non tenere la porta dell’apparecchiatura aperta senza
supervisione per evitare di caderci.
• Prima di eseguire qualunque intervento di
manutenzione, spegnere l'apparecchiatura ed estrarre
la spina dalla presa.
• Non usare acqua spray ad alta pressione né vapore
per pulire l'apparecchio.
• Le aperture di ventilazione alla base (ove previste) non
devono essere ostruite da un tappeto.
• L'apparecchiatura deve essere collegata
correttamente all'impianto idrico con i tubi nuovi
forniti. I tubi usati non devono essere riutilizzati.
51
2.
ISTRUZIONI DI SICUREZZA
2.1 Installazione
• Rimuovere tutti i materiali di
imballaggio.
• Non installare o utilizzare
l'apparecchiatura se è danneggiata.
• Non collocare o usare
l’apparecchiatura in un luogo in cui la
temperatura possa scendere al di
sotto di 0°C.
• Attenersi alle istruzioni fornite insieme
all'apparecchiatura.
• Assicurarsi che l'apparecchiatura sia
installata sotto e vicino a parti
adeguatamente ancorate a una
struttura fissa.
2.2 Collegamento elettrico
AVVERTENZA!
Rischio di incendio e scossa
elettrica.
• L'apparecchiatura deve disporre di
una messa a terra.
• Verificare che i dati elettrici riportati
sulla targhetta dei dati corrispondano
a quelli dell'impianto. In caso
contrario, contattare un elettricista.
• Utilizzare sempre una presa elettrica
con contatto di protezione
correttamente installata.
• Non utilizzare prese multiple e
prolunghe.
• Accertarsi di non danneggiare la
spina e il cavo. Qualora il cavo
Page 52

52
www.aeg.com
elettrico debba essere sostituito,
l’intervento dovrà essere effettuato
dal nostro Centro di Assistenza
autorizzato.
• Inserire la spina di alimentazione nella
presa solo al termine
dell'installazione. Verificare che la
spina di alimentazione rimanga
accessibile dopo l'installazione.
• Non tirare il cavo di alimentazione per
scollegare l’apparecchiatura. Tirare
solo la spina.
• Questa apparecchiatura è conforme
alle direttive CEE.
• Solo per il Regno Unito e l'Irlanda.
L'apparecchiatura è dotata di spina di
alimentazione da 13 amp. Nel caso si
rendesse necessario sostituire il
fusibile nella spina di alimentazione,
utilizzare il fusibile: 13 amp ASTA (BS
1362).
2.3 Collegamento dell’acqua
• Non danneggiare i tubi dell'acqua.
• Prima di eseguire il collegamento a
tubi nuovi, tubi non usati a lungo,
dove sono stati eseguiti interventi di
riparazione o sono stati inseriti nuovi
dispositivi (misuratori dell'acqua,
ecc.), lasciar uscire acqua fino a che
non sarà trasparente e limpida.
• Verificare che non vi siano perdite
visibili durante e dopo il primo uso
dell'apparecchiatura.
• Il tubo di carico dell'acqua dispone di
una valvola di sicurezza e una guaina
con un cavo elettrico interno.
Centro di Assistenza autorizzato per
sostituire il tubo di carico dell’acqua.
2.4 Utilizzo
• Non sedersi o salire sulla porta
aperta.
• I detersivi per la lavastoviglie sono
pericolosi. Osservare le istruzioni di
sicurezza riportate sulla confezione
del detersivo.
• Non bere o giocare con l’acqua
all’interno dell’apparecchiatura.
• Non rimuovere i piatti
dall'apparecchiatura fino al
completamento del programma.
Potrebbe rimanere del detersivo sulle
stoviglie.
• L'apparecchiatura può rilasciare
vapore caldo se si apre la porta
durante lo svolgimento del
programma.
• Non appoggiare o tenere liquidi o
materiali infiammabili, né oggetti
facilmente incendiabili
sull'apparecchiatura, al suo interno o
nelle immediate vicinanze.
2.5 Luce interna
AVVERTENZA!
Rischio di lesioni.
• Questa apparecchiatura dispone di
una lampadina interna che si accende
e si spegne, rispettivamente, quando
si apre e si chiude la porta.
• Le lampadine utilizzate per questa
apparecchiatura non possono essere
utilizzate per l'illuminazione
domestica.
• Per sostituire la lampadina, contattare
il Centro di Assistenza.
AVVERTENZA!
Tensione pericolosa.
• Se il tubo di carico è danneggiato,
chiudere immediatamente il rubinetto
e scollegare immediatamente la spina
dalla presa elettrica. Contattare il
2.6 Smaltimento
AVVERTENZA!
Rischio di lesioni o
soffocamento.
• Staccare la spina dall'alimentazione
elettrica.
• Tagliare il cavo di rete e smaltirlo.
• Rimuovere il blocco porta per evitare
che bambini e animali domestici
rimangano chiusi all'interno
dell'apparecchiatura.
Page 53

3. DESCRIZIONE DEL PRODOTTO
5
4
10
9
67
11
12
2
3
1
8
ITALIANO
53
Mulinello su cielo vasca
1
Mulinello superiore
2
Mulinello inferiore
3
Filtri
4
Targhetta dei dati
5
Contenitore del sale
6
Apertura di ventilazione
7
3.1 TimeBeam
Il TimeBeam è un display proiettato sul
pavimento al di sotto della porta
dell'apparecchiatura.
• Quando si avvia il programma, appare
la durata dello stesso.
• Al termine del programma, il display
indica 0:00 e CLEAN.
• Quando inizia la partenza ritardata,
appaiono il conto alla rovescia e
DELAY.
• In caso di malfunzionamento
dell'apparecchiatura, il display mostra
un codice di allarme.
Contenitore del brillantante
8
Contenitore del detersivo
9
Cestello inferiore
10
Cestello superiore
11
Cassetto portaposate
12
Page 54

1 2
83 4 5 6 7
9
www.aeg.com54
Quando viene attivato
AirDry durante la fase di
asciugatura, la proiezione sul
pavimento potrebbe non
essere completamente
visibile. Per controllare il
tempo restante del
programma, guardare il
display del pannello di
controllo.
4. PANNELLO DEI COMANDI
Tasto On/Off
1
Display
2
Tasto Delay
3
Tasto Program
4
Tasto Sanitize
5
4.1 Spie
Spia Descrizione
Spia di fine.
Spia del brillantante. La spia è spenta durante l'esecuzione del programma.
Spia del sale. La spia è spenta durante l'esecuzione del programma.
5. PROGRAMMI
Programma Grado di sporco
P1
1)
Tipo di carico
• Grado di sporco
normale
• Stoviglie e posate
Tasto TimeSaver
6
Tasto XtraDry
7
Tasto Reset
8
Spie
9
Fasi del programma Opzioni
• Ammollo
• Lavaggio a 50°C
• Risciacquo
• Deumidificazione
• Sanitize
• TimeSaver
• XtraDry
Page 55

ITALIANO
55
Programma Grado di sporco
Fasi del programma Opzioni
Tipo di carico
P2
2)
• Tutto
• Stoviglie miste,
posate e pentole
• Ammollo
• Lavaggio da 45°C a
70°C
• Risciacquo
• Sanitize
• XtraDry
• Deumidificazione
P3
3)
• Sporco misto
• Stoviglie miste,
posate e pentole
• Ammollo
• Lavaggio a 50 °C e
65 °C
• Risciacquo
• TimeSaver
• XtraDry
• Deumidificazione
P4 • Grado di sporco
intenso
• Stoviglie miste,
posate e pento-
• Ammollo
• Lavaggio a 70 °C
• Risciacquo
• Deumidificazione
• Sanitize
• XtraDry
• TimeSaver
le
P5 • Grado di sporco
normale o leggero
• Lavaggio a 45 °C
• Risciacquo
• Deumidificazione
• XtraDry
• Stoviglie e bicchieri delicati
P6
4)
P7
5)
P8
6)
1)
Questo programma consente un utilizzo più efficiente di acqua ed elettricità per lavare stoviglie e po-
sate con grado di sporco normale. (Programma standard per gli istituti di prova).
2)
L'apparecchiatura rileva il grado di sporco e la quantità di stoviglie presenti nei cestelli. Regola auto-
maticamente la temperatura e la quantità dell'acqua, il consumo di elettricità e la durata del programma.
3)
Con questo programma è possibile lavare un carico con sporco misto. Caricare le stoviglie con sporco
molto intenso nel cestello inferiore e sporco normale nel cestello superiore. I valori di pressione e temperatura dell'acqua nel cestello inferiore sono maggiori rispetto al cestello superiore.
4)
Con questo programma è possibile lavare un carico di stoviglie con sporco fresco. Garantisce buoni
risultati di lavaggio in breve tempo.
5)
Con questo programma è possibile risciacquare velocemente le stoviglie per evitare residui di cibo sui
piatti e la formazione di odori all'interno dell'apparecchiatura. Non utilizzare il detersivo con questo programma.
6)
Questo è il programma più silenzioso. La pompa funziona a velocità ridotta per diminuire il livello di
rumore. Data la bassa velocità, il programma viene allungato.
• Sporco fresco
• Stoviglie e posa-
• Lavaggio a 60 °C
• Risciacquo
te
• Tutto • Ammollo
• Grado di sporco
normale
• Stoviglie e posate
• Ammollo
• Lavaggio a 50°C
• Risciacquo
• Deumidificazione
• Sanitize
• XtraDry
• XtraDry
Page 56

www.aeg.com56
5.1 Valori di consumo
Programma
P1 11 0.857 225
P2 7 - 14 0.6 - 1.6 40 - 154
P3 14 - 16 1.2 - 1.5 140 - 156
P4 12.5 - 14.5 1.4 - 1.7 160 - 170
P5 12 - 14 0.7 - 0.9 84 - 94
P6 10 0.9 30
P7 4 0.1 14
P8 9 - 10 1.1 - 1.3 219 - 229
1)
I valori possono variare a seconda della pressione e della temperatura dell'acqua, delle variazioni del-
l'alimentazione elettrica, delle opzioni selezionate e della quantità di stoviglie.
1)
Acqua
(l)
Energia
(kWh)
Durata
(min)
5.2 Informazioni per gli istituti
di prova
Per le informazioni necessarie, relative
alle prestazioni inviare una mail a:
6. IMPOSTAZIONI
6.1 Modalità di selezione
programma e modalità utente
Quando l'apparecchiatura si trova in
modalità di selezione programma, è
possibile impostare un programma ed
accedere alla modalità utente.
In modalità utente è possibile
modificare le seguenti impostazioni:
• Il livello del decalcificatore dell'acqua
in base alla durezza dell'acqua.
info.test@dishwasher-production.com
Riportare il numero del prodotto (PNC)
che si trova sulla targhetta dei dati.
• L'attivazione o disattivazione del
segnale acustico al termine del
programma.
• La scelta del colore del TimeBeam.
• Attivazione/disattivazione della
notifica contenitore del brillantante
vuoto.
• Il livello di brillantante in base al
dosaggio richiesto.
• L'attivazione o disattivazione
dell'opzione AirDry.
Page 57

ITALIANO 57
Tali impostazioni vengono
memorizzate fino alla successiva
modifica.
Come impostare la modalità di selezione programma
L’apparecchiatura si trova in modalità di
selezione programma quando il display
mostra il numero del programma P1.
Quando si attiva l’apparecchiatura,
generalmente si trova in modalità di
selezione programma. Tuttavia, se ciò
non accade, è possibile impostare la
modalità di selezione programma come
segue:
Tenere premuto Reset finché
l’apparecchiatura entra in modalità di
6.2 Decalcificatore dell’acqua
Il decalcificatore rimuove dall'acqua i
minerali che avrebbero effetti negativi
sui risultati di lavaggio e
sull'apparecchiatura.
La durezza dell'acqua dipende dal
contenuto di questi minerali. La durezza
dell'acqua è misurata in scale
equivalenti.
Il decalcificatore dell'acqua deve essere
regolato in base alla durezza dell’acqua
locale. Per informazioni sulla durezza
dell’acqua nella propria zona è possibile
rivolgersi all’ente erogatore locale. È
importante impostare il livello corretto
del decalcificatore dell'acqua per
garantire buoni risultati di lavaggio.
selezione programma.
Durezza dell'acqua
Gradi tedeschi
(°dH)
47 - 50 84 - 90 8.4 - 9.0 58 - 63 10
43 - 46 76 - 83 7.6 - 8.3 53 - 57 9
37 - 42 65 - 75 6.5 - 7.5 46 - 52 8
29 - 36 51 - 64 5.1 - 6.4 36 - 45 7
23 - 28 40 - 50 4.0 - 5.0 28 - 35 6
19 - 22 33 - 39 3.3 - 3.9 23 - 27
15 - 18 26 - 32 2.6 - 3.2 18 - 22 4
11 - 14 19 - 25 1.9 - 2.5 13 - 17 3
4 - 10 7 - 18 0.7 - 1.8 5 - 12 2
<4 <7 <0.7 < 5
1)
Impostazioni di fabbrica.
2)
Non utilizzare il sale a questo livello.
Gradi francesi
(°fH)
mmol/l Gradi Clar-keLivello del decalci-
ficatore dell’acqua
1)
5
2)
1
Quando si utilizza un detersivo
normale o pastiglie multifunzione (con
o senza sale), impostare il corretto
livello di durezza dell'acqua per
mantenere la spia di riempimento del
sale attiva.
Le multi-pastiglie contenenti
sale non sono
sufficientemente efficaci per
ammorbidire l'acqua dura.
Page 58

58
www.aeg.com
Come impostare il livello del decalcificatore
L'apparecchiatura deve essere in
modalità di selezione programma.
1. Per accedere alla modalità utente,
tenere premuti
contemporaneamente e
finché le spie , , , , e
display è vuoto.
2.
Premere .
• Le spie , , , e
• La spia continua a
• Il display mostra l'impostazione
3. Premere ripetutamente il tasto
per modificare l'impostazione.
4. Premere il tasto On/Off per
confermare l'impostazione.
iniziano a lampeggiare e il
si spengono.
lampeggiare.
corrente: ad es. = livello 5.
6.3 Contenitore del brillantante
Il brillantante permette di asciugare le
stoviglie senza strisce o macchie.
Il brillantante viene erogato
automaticamente durante la fase di
risciacquo con acqua calda.
È possibile impostare la quantità di
brillantante rilasciata tra il livello 1
(quantità minima) e il livello 6 (quantità
massima). Il livello 0 disattiva il
contenitore del brillantante che di
conseguenza non viene rilasciato.
Impostazione di fabbrica: livello 4.
display è vuoto.
iniziano a lampeggiare e il
2. Premere .
• Le spie , , , e
si spengono.
• La spia continua a
lampeggiare.
• Il display mostra l'impostazione
corrente: ad es. = livello 4.
– I livelli di brillantante vanno
da 0A a 6A.
– Livello 0 = nessuna
erogazione di brillantante.
3. Premere ripetutamente il tasto
per modificare l'impostazione.
4. Premere il tasto On/Off per
confermare l'impostazione.
6.4 Indicazione assenza brillantante
Il brillantante permette di asciugare le
stoviglie senza strisce o macchie.
Il brillantante viene erogato
automaticamente durante la fase di
risciacquo con acqua calda.
Quando la vaschetta del brillantante è
vuota, la spia corrispondente è attiva per
indicare di aggiungere altro brillantante.
Se si utilizzando pastiglie multifunzione
contenenti brillantante e si è soddisfatti
dei risultati di asciugatura, è possibile
disattivare la spia di riempimento.
Tuttavia, si consiglia di usare sempre il
brillantante per ottenere le migliori
prestazioni di asciugatura.
Se si utilizza un detersivo standard o
pastiglie multifunzione senza brillantante,
attivare la spia di riempimento.
Come impostare il livello del brillantante
L'apparecchiatura deve essere in
modalità di selezione programma.
1. Per accedere alla modalità utente,
tenere premuti
contemporaneamente
finché le spie , , , , e
e
Come disattivare la notifica contenitore del brillantante vuoto
L'apparecchiatura deve essere in
modalità selezione programma.
1. Per accedere alla modalità utente,
tenere premuti
contemporaneamente e
finché le spie , , , , e
Page 59

ITALIANO
59
display è vuoto.
2. Premere .
• Le spie , , , e
• L'indicatore continua a
• Il display mostra l'impostazione
3. Premere per cambiare
l'impostazione.
= la notifica contenitore del
brillantante vuoto è disattivata.
4. Premere il tasto On/Off per
confermare l'impostazione.
iniziano a lampeggiare e il
si spengono.
lampeggiare.
attuale:
contenitore del brillantante vuoto
è attiva (impostazione di fabbrica).
= la notifica
6.5 Segnali acustici
I segnali acustici vengono emessi in caso
di malfunzionamento
dell'apparecchiatura. Non è possibile
disattivare questi segnali acustici.
C'è inoltre un segnale acustico che viene
emesso al termine del programma. Per
impostazione predefinita, questo
segnale acustico è disattivato ma è
possibile attivarlo.
Come attivare il segnale acustico che indica il termine del programma
L'apparecchiatura deve essere in
modalità di selezione programma.
1. Per accedere alla modalità utente,
tenere premuti
contemporaneamente e
finché le spie , , , , e
display è vuoto.
2. Premere
• Le spie , , , e
• La spia
iniziano a lampeggiare e il
si spengono.
continua a
lampeggiare.
• Il display mostra l'impostazione
corrente:
non attivo.
3. Premere per cambiare
l'impostazione.
= Segnale acustico attivo.
4. Premere il tasto On/Off per
confermare l'impostazione.
= Segnale acustico
6.6 Come impostare il colore del TimeBeam
È possibile cambiare il colore del
TimeBeam per fare in modo che sia
uguale a quello del pavimento della
cucina. Sono disponibili diversi colori. Il
TimeBeam può anche essere disattivato.
L'apparecchiatura deve essere in
modalità di selezione programma.
1. Per accedere alla modalità utente,
tenere premuti
contemporaneamente e
finché le spie , , , , e
display è vuoto.
2. Premere
• Le spie , , , e
• La spia continua a
• Il display mostra un numero e la
3. Premere ripetutamente il tasto
per modificare il colore.
• È possibile visualizzare i diversi
4. Premere il tasto On/Off per
confermare l'impostazione.
iniziano a lampeggiare e il
.
si spengono.
lampeggiare.
lettera C. Ciascun numero fa
riferimento ad un colore diverso.
– = TimeBeam disattivato.
colori sul pavimento della cucina.
6.7 AirDry
AirDry migliora i risultati di asciugatura
con consumi elettrici ridotti.
Page 60

60
www.aeg.com
Mentre la fase di asciugatura
è in funzione, un dispositivo
apre la porta
dell'apparecchiatura. La
porta viene tenuta
socchiusa.
ATTENZIONE!
Non cercare di chiudere
l'apparecchiatura 2 minuti
dopo l'apertura automatica.
Ciò potrebbe danneggiare
l'apparecchio.
AirDry viene attivata automaticamente
con tutti i programmi, escluso .
Per migliorare le prestazioni di
asciugatura, fare riferimento all'opzione
XtraDry o attivare nuovamente AirDry.
Come disattivare l'opzione AirDry
L'apparecchiatura deve essere in
modalità di selezione programma.
1. Per accedere alla modalità utente,
tenere premuti
contemporaneamente e
finché le spie , , , , e
display è vuoto.
2.
Premere .
• Le spie , , , e si
• La spia
• Il display mostra l'impostazione
3. Premere per cambiare
l'impostazione:
disattivato.
4. Premere il tasto On/Off per
confermare l'impostazione.
iniziano a lampeggiare e il
spengono.
lampeggiare.
corrente:
continua a
= AirDry attivato.
= AirDry
7. OPZIONI
Le opzioni desiderate
devono essere attivate ogni
volta prima dell'avvio di un
programma.
Non è possibile attivare o
disattivare le opzioni
durante l'esecuzione di un
programma.
Non tutte le opzioni sono
compatibili tra loro. Se sono
state selezione delle opzioni
non compatibili,
l'apparecchiatura ne
disattiva automaticamente
una o diverse. Solo le spie
delle opzioni ancora attive
rimangono accese.
7.1 XtraDry
Attivare questa opzione se si desidera
migliorare le prestazioni di asciugatura.
Utilizzando questa opzione, la durata di
alcuni programmi, il consumo d'acqua e
la temperatura dell'ultimo risciacquo
potrebbero subire delle variazioni.
L'opzione XtraDry è un'opzione
permanente per tutti i programmi che
non siano , e non deve essere
selezionata a ogni ciclo.
Ogni volta che viene attivato ,
XtraDry l'opzione è spenta e deve essere
scelta manualmente. Negli altri
programmi, l'impostazione XtraDry è
fissa e viene usata automaticamente nei
Page 61

ITALIANO 61
cicli successivi. Questa configurazione
può essere modificata in qualsiasi
momento.
L'attivazione dell'opzione XtraDry
disattiva TimeSaver.
Come attivare XtraDry
Premere . La spia corrispondente si
accende.
Se l'opzione non è prevista con il
programma selezionato, la spia
corrispondente non si accende o
lampeggia velocemente per alcuni
secondi, quindi si spegne.
Il display indica la durata aggiornata del
programma.
7.2 TimeSaver
La TimeSaver consente di ridurre il
tempo del programma selezionato.
La durata complessiva del programma si
riduce di circa il 50%.
I risultati di lavaggio sono gli stessi che si
ottengono con la normale durata del
programma. I risultati di asciugatura
possono ridursi.
L'opzione aumenta la pressione e la
temperatura dell'acqua. Le fasi di
lavaggio e di asciugatura sono più brevi.
Per impostazione predefinita, TimeSaver
è spento ma è possibile attivarlo
manualmente. Non è possibile
combinare questa opzione con XtraDry
contemporaneamente.
Come attivare TimeSaver
Premere , la spia corrispondente si
accende.
Se l'opzione non è prevista con il
programma selezionato, la spia
corrispondente non si accende o
lampeggia velocemente per alcuni
secondi, quindi si spegne.
Il display indica la durata aggiornata del
programma.
7.3 Sanitize
Questa opzione offre migliori risultati a
livello di igiene con una temperatura di
70°C per almeno 10 minuti durante la
fase di risciacquo.
Come attivare Sanitize
Premere , la spia corrispondente si
accende.
Se l'opzione non è prevista con il
programma selezionato, la spia
corrispondente non si accende o
lampeggia velocemente per alcuni
secondi, quindi si spegne.
Il display indica la durata aggiornata del
programma.
8.
PREPARAZIONE AL PRIMO UTILIZZO
1. Accertarsi che il livello del
decalcificatore dell'acqua attuale
sia conforme alla durezza
dell'acqua. In caso contrario,
regolare il livello del
decalcificatore dell'acqua.
2. Riempire il contenitore del sale.
3. Riempire il contenitore del
brillantante.
4. Aprire il rubinetto dell’acqua.
5. Avviare un programma per rimuovere
possibili residui di lavorazione
presenti all’interno
dell’apparecchiatura. Non utilizzare il
detersivo e non caricare stoviglie.
Quando si avvia un programma,
l'apparecchiatura può impiegare fino a 5
minuti per rigenerare la resina nel
decalcificatore. Può sembrare che
l'apparecchiatura non funzioni
correttamente. La fase di lavaggio si
avvia soltanto al termine di tale
procedura. La procedura viene ripetuta
periodicamente.
8.1 Contenitore del sale
ATTENZIONE!
Utilizzare solo sale specifico
per lavastoviglie.
Page 62

A
B
C
www.aeg.com62
Il sale viene utilizzato per rigenerare la
resina nel decalcificatore e per assicurare
buoni risultati di lavaggio nell'uso
quotidiano.
Come riempire il contenitore del sale
1. Ruotare il tappo del contenitore del
sale in senso antiorario e aprirlo.
2. Versare 1 litro d’acqua nel
contenitore del sale (solo la prima
volta).
3. Riempire il contenitore del sale.
4. Togliere l'eventuale sale rimasto
attorno all'apertura del contenitore.
5. Ruotare il tappo del contenitore del
sale in senso orario per chiuderlo.
ATTENZIONE!
Acqua e sale potrebbero
fuoriuscire dal contenitore
del sale durante il
riempimento. Dopo aver
riempito il contenitore del
sale, avviare
immediatamente un
programma volto ad evitare
la corrosione.
8.2 Come riempire il contenitore del brillantante
ATTENZIONE!
Utilizzare solo prodotti
brillantanti specifici per
lavastoviglie.
1.
Aprire il coperchio (C).
2. Riempire il contenitore (B) finché il
brillantante non raggiunge
l'indicazione di "MAX".
3. Rimuovere l'eventuale brillantante
fuoriuscito con un panno assorbente,
per evitare che si formi troppa
schiuma.
4. Chiudere il coperchio. Assicurarsi che
il coperchio si blocchi in posizione.
Riempire il contenitore del
brillantante quando la spia
(A) diventa trasparente.
Se si utilizzano pastiglie
multifunzione e le
prestazioni di asciugatura
sono soddisfacenti, la spia di
riempimento del brillantante
può essere disattivata.
Si consiglia di utilizzare
sempre il brillantante per
migliori prestazioni di
asciugatura, anche in
combinazione con pastiglie
multifunzione contenenti un
agente di risciacquo.
Page 63

9. UTILIZZO QUOTIDIANO
A
B
C
ITALIANO
63
1. Aprire il rubinetto dell’acqua.
2. Premere il tasto On/Off per
accendere l’apparecchiatura.
Verificare che l'apparecchiatura sia in
modalità di selezione programma.
• Se la spia del sale è accesa,
riempire il contenitore del sale.
• Se la spia del brillantante è
accesa, riempire il contenitore del
brillantante.
3. Caricare i cestelli.
4. Aggiungere il detersivo.
5. Impostare ed avviare il programma
corretto per il tipo di carico ed il
grado di sporco.
9.1 Utilizzo del detersivo
ATTENZIONE!
Utilizzare solo detersivo
specifico per lavastoviglie.
1. Premere il tasto di sgancio (A) per
aprire il coperchio (C).
2. Mettere il detersivo in polvere o in
pastiglie nell'apposito contenitore
(B).
3. Se il programma ha una fase di
prelavaggio, mettere una piccola
quantità di detersivo nella parte
interna della porta
dell'apparecchiatura.
4. Chiudere il coperchio. Assicurarsi che
il coperchio si blocchi in posizione.
9.2 Impostazione ed avvio di un programma
Funzione Auto Off
Questa funzione permette di ridurre il
consumo di energia disattivando
automaticamente l'apparecchiatura
quando non è in funzione.
La funzione si attiva:
• Dopo 5 minuti dal termine del
programma.
• Dopo 5 minuti se il programma non è
stato avviato.
Avvio di un programma
Tenere la porta dell'apparecchiatura
1.
socchiusa.
2. Premere il tasto On/Off per
accendere l’apparecchiatura.
Verificare che l'apparecchiatura sia in
modalità di selezione programma.
3. Premere ripetutamente fino a
quando il display mostra il numero
del programma che si desidera
avviare. Il display mostrerà il numero
del programma per circa 3 secondi,
seguito dalla durata del programma.
4. Impostare le opzioni disponibili.
5. Chiudere la porta
dell'apparecchiatura per avviare il
programma.
Avvio del programma con partenza ritardata
1. Impostare un programma.
2. Premere ripetutamente finché il
display indica l'intervallo desiderato
per la partenza ritardata (da 1 a 24
ore).
Si accende la spia Partenza ritardata.
3. Chiudere la porta
dell'apparecchiatura per avviare il
conto alla rovescia.
Una volta avviato il conto alla rovescia, è
possibile aumentare il ritardo ma non
modificare il programma e le opzioni.
Appena è completato il conto alla
rovescia, il programma si avvia.
Page 64

www.aeg.com64
Apertura della porta durante il funzionamento dell'apparecchiatura
Se si apre la porta mentre è in corso un
programma, l’apparecchiatura si arresta.
Ciò può influenzare il consumo di
energia e la durata del programma.
Quando si chiude nuovamente la porta,
l'apparecchiatura riprende dal punto in
cui era stata interrotta.
Se la porta rimane aperta
per più di 30 secondi
durante la fase di
asciugatura, il programma in
corso termina. Ciò non
avviene se la porta viene
aperta da AirDry.
ATTENZIONE!
Non provare a chiudere la
porta dell'apparecchiatura
entro 2 minuti dopo che
AirDry la apre
automaticamente, dato che
ciò potrebbe causare danni
all'apparecchiatura. Qualora
successivamente la porta
venga chiusa per altri 3
minuti, si conclude la
modalità in funzione.
Annullamento della partenza ritardata mentre è in corso il conto alla rovescia
Quando si annulla la partenza ritardata, è
necessario impostare nuovamente il
programma e le opzioni.
1. Aprire l'oblò dell'apparecchiatura.
2. Premere il tasto On/Off per spegnere
l’apparecchiatura.
3. Mantenere l'apparecchiatura spenta
per circa 30 secondi.
4. Premere nuovamente il tasto On/Off
per accendere l’apparecchiatura.
5. Tenere premuto Reset finché
l’apparecchiatura entra in modalità di
selezione programma.
Annullamento del programma
1. Aprire l'oblò dell'apparecchiatura.
2. Premere il tasto On/Off per spegnere
l’apparecchiatura.
3. Mantenere l'apparecchiatura spenta
per circa 30 secondi.
4. Premere nuovamente il tasto On/Off
per accendere l’apparecchiatura.
5. Tenere premuto Reset finché
l’apparecchiatura entra in modalità di
selezione programma.
Verificare che vi sia del detersivo
nell'apposito contenitore prima di
avviare un nuovo programma.
Fine programma
Quando al termine del programma si
apre la porta, l'apparecchiatura si
disattiva automaticamente.
Chiudere il rubinetto dell'acqua.
CONSIGLI E SUGGERIMENTI UTILI
10.
10.1 Informazioni generali
I seguenti suggerimenti garantiranno una
pulizia e risultati di asciugatura
quotidiani ottimali ed aiuteranno a
salvaguardare l'ambiente.
• Gettare i residui di cibo più grandi
nella spazzatura.
• Non prelavare le stoviglie a mano. Se
necessario, utilizzare il programma
prelavaggio (se disponibile) o
selezionare un programma con fase di
prelavaggio.
• Utilizzare sempre tutto lo spazio
presente nei cestelli.
• Quando si carica l'apparecchiatura,
assicurarsi che le stoviglie vengano
raggiunte interamente e lavate
dall'acqua rilasciata dagli ugelli del
mulinello. Verificare che gli oggetti
non si tocchino o coprano.
• È possibile utilizzare il detersivo per
lavastoviglie, il brillantante e il sale
Page 65

ITALIANO
65
separatamente o le pastiglie
multifunzione (ad es. "3 in 1", "4 in
1", "Tutto in uno"). Seguire le
istruzioni riportate sulla confezione.
• Impostare il programma corretto per
il tipo di carico ed il grado di sporco.
Il programma ECO consente un
utilizzo più efficiente di acqua ed
elettricità per lavare stoviglie e posate
con grado di sporco normale.
10.2 Se si utilizzano sale,
brillantante e detersivo
• Utilizzare soltanto sale, brillantante e
detersivo specifici per lavastoviglie.
Altri prodotti possono danneggiare
l'apparecchiatura.
• In zone con acqua dura e molto dura
si consiglia di utilizzare solo detersivo
(in polvere, gel, pastiglie senza
funzioni aggiuntive), brillantante e
sale separatamente per risultati di
pulizia e asciugatura ottimali.
• Almeno una volta al mese, far
funzionare l'apparecchiatura con un
detergente adatto a tal fine.
• Le pastiglie possono non sciogliersi
completamente nei cicli brevi. Per
evitare residui di detersivo sulle
stoviglie, consigliamo di utilizzare il
detersivo in pastiglie con i programmi
lunghi.
• Non usare una dose di detersivo
superiore alla quantità raccomandata.
Osservare le istruzioni riportate sulla
confezione del detersivo.
10.3 Cosa fare se non si
desidera utilizzare più il
detersivo in pastiglie
multifunzione
Prima di iniziare ad usare separatamente
detersivo, sale e brillantante attenersi
alla procedura seguente:
1. Impostare il livello più alto del
decalcificatore dell'acqua.
2. Assicurarsi che i contenitori del sale e
del brillantante siano pieni.
3. Avviare il programma più breve con
una fase di risciacquo. Non
aggiungere il detersivo e non
caricare i cestelli.
4. Una volta completato il programma,
regolare il decalcificatore dell'acqua
in base alla durezza dell'acqua locale.
5. Regolare la quantità di brillantante
rilasciata.
6. Attivare l'indicazione assenza
brillantante.
10.4 Caricare i cestelli
• Utilizzare l’apparecchiatura
esclusivamente per lavare articoli
idonei al lavaggio in lavastoviglie.
• Non introdurre nell’apparecchiatura
articoli di legno, osso, alluminio,
peltro o rame.
• Non inserire nell'apparecchiatura
oggetti che possano assorbire acqua
(spugne, panni per la pulizia).
• Gettare i residui di cibo più grandi
nella spazzatura.
• Ammorbidire le tracce di bruciato
sulle stoviglie.
• Disporre gli utensili cavi (tazze,
bicchieri e padelle) con l’apertura
rivolta verso il basso.
• Verificare che i bicchieri non si
tocchino l’un l’altro.
• Sistemare le posate e i piccoli oggetti
nel cassetto portaposate.
• Sistemare gli oggetti leggeri nel
cestello superiore. In modo tale che
non possano muoversi.
• Prima di avviare un programma,
assicurarsi che i mulinelli possano
ruotare liberamente.
10.5 Prima di avviare il
programma
Verificare che:
• I filtri siano puliti e installati
correttamente.
• Il tappo del contenitore del sale sia
serrato.
• I fori sui mulinelli non siano ostruiti.
• Siano presenti il sale per lavastoviglie
e il brillantante (a meno che non si
utilizzino le pastiglie combinate).
• Le stoviglie siano riposte
correttamente nei cestelli.
• Il programma sia adatto al tipo di
carico e al grado di sporco.
• Si utilizzi la quantità corretta di
detersivo e additivi.
Page 66

C
B
A
66
www.aeg.com
10.6 Scaricare i cestelli
1. Lasciare raffreddare i piatti prima di
estrarli dall'apparecchiatura. Le
stoviglie calde possono essere più
facilmente danneggiabili.
2. Vuotare prima il cestello inferiore e
quindi quello superiore.
11. PULIZIA E CURA
AVVERTENZA!
Prima di eseguire qualunque
intervento di manutenzione,
spegnere l'apparecchiatura
ed estrarre la spina dalla
presa.
Filtri sporchi e mulinelli
ostruiti riducono i risultati di
lavaggio. Eseguire controlli
periodici e pulirli, se
necessario.
11.1 Pulizia dei filtri
Il sistema del filtro si compone di 3 parti.
Al termine del programma,
dell'acqua potrebbe
rimanere sulle pareti e sulla
porta dell'apparecchiatura.
2. Estrarre il filtro (C) dal filtro (B).
3. Rimuovere il filtro piatto (A).
4. Lavare i filtri.
1. Ruotare il filtro (B) in senso antiorario
e rimuoverlo.
5. Assicurarsi che non vi siano residui di
cibo o di sporco all'interno o attorno
al bordo della vasca di raccolta.
6. Posizionare nuovamente il filtro
piatto (A). Assicurarsi che sia
posizionato correttamente al di sotto
delle due guide.
Page 67

7. Rimontare i filtri (B) e (C).
8. Posizionare nuovamente il filtro (B)
nel filtro piatto (A). Ruotarlo in senso
orario finché non si blocca in
posizione.
ITALIANO
3.
Lavare il mulinello sotto l'acqua
corrente. Utilizzare un oggetto sottile
appuntito, ad es. uno stuzzicadenti,
per rimuovere i residui di sporco dai
fori.
67
ATTENZIONE!
Un’errata posizione dei filtri
può comportare scadenti
risultati di lavaggio e danni
all’apparecchiatura.
11.2 Pulizia del mulinello superiore
Si consiglia di pulire regolarmente il
mulinello superiore per evitare che lo
sporco ostruisca i fori.
Fori ostruiti possono causare risultati di
lavaggio insoddisfacenti.
1. Estrarre il cestello superiore.
2. Per sganciare il mulinello dal cestello,
premerlo verso l'alto nella direzione
indicata dalla freccia inferiore e
contemporaneamente ruotarlo in
senso orario.
4. Per riagganciare il mulinello al
cestello, premerlo nella direzione
indicata dalla freccia inferiore e
contemporaneamente ruotarlo in
senso antiorario finché non si blocca
in posizione.
11.3 Pulizia esterna
• Pulire l'apparecchiatura con un panno
inumidito e morbido.
• Utilizzare solo detergenti neutri.
• Non usare prodotti abrasivi,
spugnette abrasive o solventi.
Page 68

www.aeg.com68
11.4 Pulizia interna
• Pulire accuratamente
l'apparecchiatura, inclusa la
guarnizione in gomma della porta,
con un panno morbido umido.
• Se si usano regolarmente programmi
di breve durata, è possibile
riscontrare depositi di grasso e
calcare all'interno
dell'apparecchiatura. Al fine di evitare
ciò, consigliamo di eseguire
• Per mantenere al meglio le
12. RISOLUZIONE DEI PROBLEMI
L'apparecchiatura non si avvia o si blocca
durante il funzionamento. Prima di
contattare il Centro di Assistenza
Autorizzato, tentare di risolvere il
problema da soli con l'aiuto delle
informazioni riportate in tabella.
AVVERTENZA!
Riparazioni non eseguite in
modo accurato possono
comportare gravi rischi per
la sicurezza dell'utente.
Qualsiasi tipo di riparazione
deve essere eseguita da
personale qualificato.
In alcuni casi il display visualizza un
codice allarme.
La maggior parte dei possibili
problemi possono essere risolti senza
il bisogno di contattare il Centro di
Assistenza Autorizzato.
programmi di lunga durata almeno
due volte al mese.
prestazioni dell'apparecchiatura, si
consiglia di utilizzare un prodotto
specifico per la pulizia per
lavastoviglie (almeno una volta al
mese). Seguire attentamente le
indicazioni riportate sulle confezioni
dei prodotti.
Problema e codice allarme Possibile causa e soluzione
Non è possibile accendere
l'apparecchiatura.
Il programma non si avvia. • Controllare che la porta sia chiusa.
L'apparecchiatura non carica
acqua.
Il display visualizza .
• Verificare che la spina sia collegata alla presa elettrica.
• Assicurarsi che il fusibile all'interno del quadro elettrico
non sia danneggiato.
• Se è stato impostato il ritardo, annullare l'impostazione
o attendere il termine del conto alla rovescia.
• L'apparecchiatura ha avviato la procedura di rigenerazione della resina all'interno del decalcificatore. La procedura dura all'incirca 5 minuti.
• Controllare che il rubinetto dell'acqua sia aperto.
• Controllare che la pressione dell'acqua di alimentazione
non sia troppo bassa. Per ottenere informazioni a questo proposito, contattare l'ente erogatore locale.
• Controllare che il rubinetto dell'acqua non sia ostruito.
• Controllare che il filtro nel tubo di carico non sia ostruito.
• Verificare che il tubo di carico non sia attorcigliato o piegato.
Page 69

ITALIANO 69
Problema e codice allarme Possibile causa e soluzione
L'apparecchiatura non scarica l'acqua.
Il display visualizza .
• Controllare che lo scarico del lavello non sia ostruito.
• Controllare che il filtro nel tubo di scarico non sia ostruito.
• Controllare che il sistema del filtro interno non sia
ostruito.
• Verificare che il tubo di scarico non sia attorcigliato o
piegato.
Il dispositivo antiallagamento è attivo.
• Chiudere il rubinetto dell’acqua e contattare il Centro di
Assistenza Autorizzato.
Il display visualizza .
L'apparecchiatura si arresta
e riparte più volte durante il
• È normale. Permette di ottenere risultati di pulizia ottimali e risparmiare energia.
funzionamento.
Il programma dura troppo. • Selezionare l'opzione TimeSaver per ridurre la durata
del programma.
• Se è stata impostata la partenza ritardata, annullare l'impostazione o attendere il termine del conto alla rovescia.
Il tempo residuo sul display
aumenta e raggiunge quasi
• Non si tratta di un'anomalia. L'apparecchiatura funziona
correttamente.
il termine del programma.
Leggera perdita dalla porta
dell'apparecchiatura.
• L'apparecchiatura non è correttamente livellata. Allentare o stringere i piedini regolabili (ove previsti).
• La porta dell'apparecchiatura non è centrata rispetto alla vasca. Regolare il piedino posteriore (ove previsto).
La porta dell'apparecchiatura si chiude con difficoltà.
• L'apparecchiatura non è correttamente livellata. Allentare o stringere i piedini regolabili (ove previsti).
• Alcune parti di pentole e stoviglie sporgono dai cestelli.
Tintinnio/colpi dall'interno
dell'apparecchiatura.
• Le pentole e le stoviglie non sono state sistemate adeguatamente nei cestelli. Fare riferimento al libretto contenente le indicazioni per caricare il cestello.
• Accertarsi che i mulinelli possano girare liberamente.
L'apparecchiatura fa scattare
l'interruttore principale.
• L'amperaggio è insufficiente per sopportare l'uso di più
apparecchiature contemporaneamente. Verificare l'amperaggio della presa e la capacità del contatore o spegnere una delle apparecchiature in uso.
• Guasto elettrico interno all'apparecchiatura. Contattare
un Centro di Assistenza Autorizzato.
Page 70

www.aeg.com70
Fare riferimento a
"Preparazione al primo
utilizzo", "Utilizzo
quotidiano" o "Consigli e
suggerimenti" per altre
ricomparsa dell'anomalia, contattare il
Centro di Assistenza Autorizzato.
Per i codici allarme non presenti in
tabella, contattare un Centro di
Assistenza Autorizzato.
possibili cause.
Una volta controllata l'apparecchiatura,
spegnerla e riaccenderla. In caso di
12.1 I risultati di lavaggio e di asciugatura non sono soddisfacenti
Problema Possibile causa e soluzione
Risultati di lavaggio insoddisfacenti.
Risultati di asciugatura insoddisfacenti.
Su bicchieri e stoviglie rimangono delle striature biancastre
o striature bluastre.
Macchie e tracce di gocce
d'acqua su bicchieri e stoviglie.
• Fare riferimento a "Utilizzo quotidiano", "Consigli e
suggerimenti" e al libretto contenente le indicazioni
per caricare il cestello.
• Usare programmi di lavaggio più intensi.
• Pulire i mulinelli ed il filtro. Vedere il capitolo "Pulizia
e cura".
• Pentole e stoviglie sono state lasciate troppo tempo
all'interno dell'apparecchiatura chiusa.
• Brillantante assente o quantità di brillantante insufficiente. Impostare il contenitore del brillantante su un
livello superiore.
• Gli oggetti di plastica devono essere asciugati con un
panno.
• Per ottenere le migliori prestazioni di asciugatura, attivare l'opzione XtraDry e impostare AirDry.
• Si consiglia di utilizzare sempre il brillantante, anche in
combinazione con pastiglie multifunzione.
• La quantità di brillantante erogata è eccessiva. Regolare il livello del brillantante su una posizione inferiore.
• È stata utilizzata una dose eccessiva di detersivo.
• La quantità di brillantante erogata non è sufficiente.
Regolare il livello del brillantante su una posizione superiore.
• La causa potrebbe essere la qualità del brillantante.
Page 71

ITALIANO 71
Problema Possibile causa e soluzione
Le stoviglie sono bagnate. • Per ottenere le migliori prestazioni di asciugatura, atti-
vare l'opzione XtraDry e impostare AirDry.
• Il programma non dispone di una fase di asciugatura
oppure questa fase viene eseguita a bassa temperatura.
• Il contenitore del brillantante è vuoto.
• La causa potrebbe essere la qualità del brillantante.
• La causa potrebbe essere la qualità del detersivo in
pastiglie multifunzione. Provare un prodotto di una
marca diversa o attivare il contenitore del brillantante
e utilizzare il brillantante insieme al detersivo in pastiglie multifunzione.
L'interno dell'apparecchiatura
è bagnato.
Insolita produzione di schiuma
durante il lavaggio.
• Non si tratta di un'anomalia ma dell'umidità presente
nell'aria che si condensa sulle pareti.
• Utilizzare solo detersivi per lavastoviglie.
• Perdita dal contenitore del brillantante. Contattare un
Centro di Assistenza Autorizzato.
Tracce di ruggine sulle posate. • È presente troppo sale nell'acqua utilizzata per il la-
vaggio. Fare riferimento a "Decalcificatore dell'ac-
qua".
• Sono state sistemate insieme posate d'argento e acciaio inossidabile. Evitare di sistemare oggetti d'argento e acciaio inossidabile uno accanto all'altro.
Sono presenti residui di detersivo all'interno del contenitore
al termine del programma.
• La pastiglia del detersivo si è incollata all'interno del
contenitore e l'acqua non è riuscita ad eliminarla completamente.
• L'acqua non è in grado di eliminare il detersivo dal
contenitore. Assicurarsi che il mulinello non sia bloccato o ostruito.
• Assicurarsi che gli oggetti nei cestelli non impediscano l'apertura del coperchio del contenitore del detersivo.
Odori all'interno dell'apparec-
• Fare riferimento a "Pulizia interna".
chiatura.
Page 72

www.aeg.com72
Problema Possibile causa e soluzione
Il calcare può depositarsi su
pentole e stoviglie, nella vasca
o all'interno della porta.
Pentole e stoviglie opache,
scolorite o incrinate.
• Il livello di sale è basso, controllare l'indicatore di
riempimento.
• Il tappo del contenitore del sale è lento.
• L'acqua di rubinetto è dura. Fare riferimento a "Decal-
cificatore dell'acqua".
• Anche le pastiglie multi-funzione usano il sale e impostano la rigenerazione dell'ammorbidente dell'acqua.
Fare riferimento a "Decalcificatore dell'acqua".
• Qualora i depositi di calcare rimangano, pulire l'apparecchiatura con detergenti particolarmente adatti a tal
fine.
• Provare un detergente diverso.
• Contattare il produttore del detergente.
• Assicurarsi di introdurre nell'apparecchiatura solo oggetti lavabili in lavastoviglie.
• Caricare e scaricare il cestello delicatamente. Fare riferimento al libretto contenente le indicazioni per caricare il cestello.
• Sistemare gli oggetti delicati nel cestello superiore.
Fare riferimento a
"Preparazione al primo
utilizzo", "Utilizzo
quotidiano" o "Consigli e
suggerimenti" per altre
possibili cause.
13. DATI TECNICI
Dimensioni Larghezza/Altezza/Profondità
Collegamento elettrico
Pressione dell’acqua di alimentazione
Collegamento dell'acqua
Capacità Coperti 15
Consumo di energia Modalità Acceso (W) 5.0
Consumo di energia Modalità Spento (W) 0.10
1)
Per altri valori, fare riferimento alla targhetta dei dati.
2)
Consigliamo il collegamento all'acqua calda se prodotta mediante utilizzo di fonti di energia alternati-
va (per es. pannelli solari, impianti eolici) per ridurre il consumo di energia.
(mm)
Tensione (V) 200 - 240
1)
Frequenza (Hz) 50 / 60
bar (minima e massima) 0.5 - 8
MPa (minima e massima) 0.05 - 0.8
Acqua fredda o calda
2)
596 / 818-898 / 550
max. 60°C
Page 73

14. CONSIDERAZIONI SULL'AMBIENTE
ITALIANO
73
Riciclare i materiali con il simbolo .
Buttare l'imballaggio negli appositi
contenitori per il riciclaggio. Aiutare a
proteggere l’ambiente e la salute umana
e a riciclare rifiuti derivanti da
apparecchiature elettriche ed
elettroniche. Non smaltire le
apparecchiature che riportano il simbolo
insieme ai normali rifiuti domestici.
Portare il prodotto al punto di riciclaggio
più vicino o contattare il comune di
residenza.
*
Page 74

www.aeg.com74
Page 75

ITALIANO 75
Page 76

www.aeg.com/shop
117889390-A-182016
 Loading...