

Page 1
X56223MT10
ADU6250AM
DUB2620M
USER
MANUAL
EN USER MANUAL 2
DE GEBRAUCHSANLEITUNG 6
FR MANUEL D’UTILISATION 11
NL GEBRUIKSAANWIJZING 16
ES MANUAL DE USO 21
PT LIVRO DE INSTRUÇÕES PARA
UTILIZAÇÃO. 26
IT LIBRETTO DI USO 31
SV ANVÄNDNINGSHANDBOK 35
NO BRUKSVEILEDNING 39
FI KÄYTTÖOHJEET 43
DA BRUGSVEJLEDNING 47
RU
РУКОВОДСТВО ПО ЭКСПЛУАТАЦИИ
51
ET KASUTUSJUHEND 56
LV LIETOŠANAS PAMĀCĪBA 60
LT NAUDOTOJO VADOVAS 64
UK ІНСТРУКЦІЯ З ЕКСПЛУАТАЦІЇ 68
HU HASZNÁLATI ÚTMUTATÓ 73
CS NÁVOD K POUŽITÍ 77
SK NÁVOD NA POUŽÍVANIE 81
RO MANUAL DE FOLOSIRE 85
PL INSTRUKCJA UŻYTKOWANIA 89
HR KNJIŽICA S UPUTAMA 94
SL NAVODILO ZA UPORABO 98
EL ΟΔΗΓΊΕΣ ΧΡΉΣΗΣ 102
TR KULLANIM KITAPÇIĞI 107
BG
РЪКОВОДСТВО
НА ПОТРЕБИТЕЛЯ 112
KK ПАЙДАЛАНУШЫ НҰСҚАУЛЫҒЫ 117
MK УПАТСТВО ЗА КОРИСНИК 122
SQ UDHËZUES PËR PËRDORIMIN 127
SR КОРИСНИЧКО УПУТСТВО 131
139 AR
Page 2
EN USER MANUAL
2
www.aeg.com
FOR PERFECT RESULTS
Thank you for choosing this AEG product. We have created it to give you impeccable
performance for many years, with innovative technologies that help make life simpler
– features you might not find on ordinary appliances. Please spend a few minutes reading to
get the very best from it.
Visit our website to:
Get usage advice, brochures, trouble shooter, service information:
www.aeg.com
Register your product for better service:
www.aeg.com/productregistration
Buy Accessories, Consumables and Original spare parts for your appliance:
www.aeg.com/shop
ENVIRONMENT CONCERNS
Recycle the materials with the symbol . Put the packaging in applicable containers to
recycle it. Help protect the environment and human health and to recycle waste of electrical
and electronic appliances. Do not dispose appliances marked with the symbol with the
household waste. Return the product to your local recycling facility or contact your municipal
office department for household waste or the shop where you purchased this product.
CUSTOMER CARE AND SERVICE
We recommend the use of original spare parts.
When contacting Service, ensure that you have the following data available.
The information can be found on the rating plate. Model, PNC, Serial Number.
Warning / Caution-Safety information.
General information and tips
Environmental information.
Subject to change without notice.
Page 3
ENGLISH
3
1. SAFETY INSTRUCTIONS
Caution! Closely follow the instructions
set out in this manual. All responsibility,
for any eventual inconveniences,
damages or fires caused by not
complying with the instructions in this
manual, is declined. The extractor hood
has been designed exclusively for
domestic use.
Caution! Do not connect the appliance
to the mains until the installation is fully
complete.
Before any cleaning or maintenance
operation, disconnect hood from
the mains by removing the plug or
disconnecting the mains electrical
supply.
Always wear work gloves for all installation
and maintenance operations. The
appliance is not intended for use by
children or persons with impaired physical,
sensorial or mental faculties, or if lacking
in experience or knowledge, unless they
are under supervision or have been
trained in the use of the appliance by a
person responsible for their safety. This
appliance is designed to be operated
by adults, children should be monitored
to ensure that they do not play with the
appliance. This appliance is designed to
be operated by adults. Children should not
be allowed to tamper with the controls or
play with the appliance. Never use the hood
without effectively mounted grating! The
hood must NEVER be used as a support
surface unless specifically indicated. The
premises where the appliance is nstalled
must be sufficiently ventilated, when the
kitchen hood is used together with other
gas combustion devices or other fuels. The
ducting system for this appliance must not
be connected to any existing ventilation
system which is being used for any other
purpose such as discharging exhaust
fumes from appliances burning gas or other
fuels. The flaming of foods beneath the
hood itself is severely prohibited. The use
of exposed flames is detrimental to the
filters and may cause a fire risk, and must
therefore be avoided in all circumstances.
Any frying must be done with care in order
to make sure that the oil does not overheat
and ignite.
Caution! Accessible parts of the hood
may became hot when used with
cooking appliance.
With regards to the technical and safety
measures to be adopted for fume
discharging it is important to closely follow
the regulations provided by the local
authorities. The hood must be regularly
cleaned on both the inside and outside (AT
LEAST ONCE A MONTH).
This must be completed in accordance
with the maintenance instructions provided
in this manual). Failure to follow the
instructions provided in this user guide
regarding the cleaning of the hood and
filters will lead to the risk of fires. Do not
use or leave the hood without the lamp
correctly mounted due to the possible risk
of electric shocks. We will not accept any
responsibility for any faults, damage or fires
caused to the appliance as a result of the
non-observance of the instructions included
in this manual.
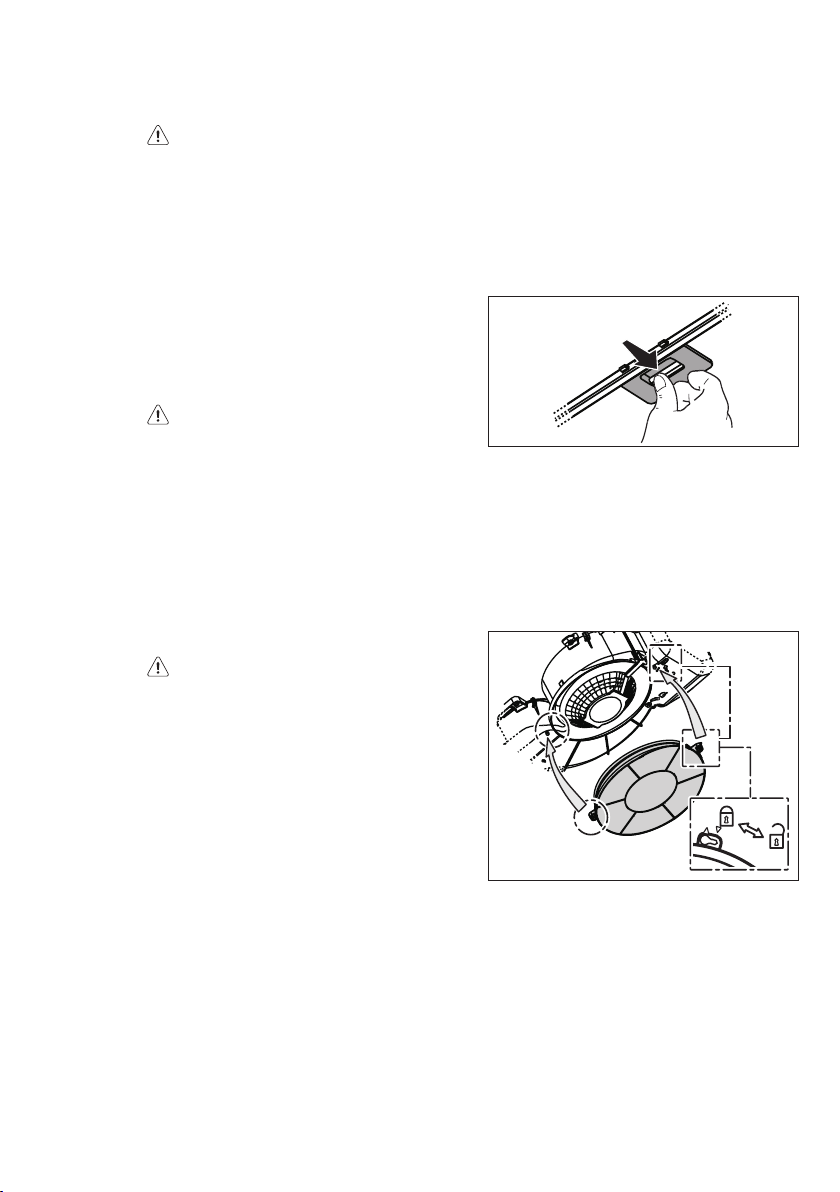
Warning! Failure to install the screws
or fixing device in accordance with
these instructions may result in
electrical hazards.
2. USE
The hood serves to aspirate the fumes and
vapors resulting from cooking.
The attached installation manual indicates
the version to be used depending on the
model you have, the suction version with
external evacuation or filtering with
internal recirculation .
3. INSTALLATION
The mains power supply must correspond
to the rating indicated on the plate situated
inside the hood. If provided with a plug
connect the hood to a socket in compliance
with current regulations and positioned in
an accessible area, after installation. If it not
fitted with a plug (direct mains connection)
or if the plug is not located in an accessible
area, after installation, apply a double
pole switch in accordance with standards
which assures the complete disconnection
of the mains under conditions relating to
over-current category III in accordance with
installation instructions.
Warning! Before re-connecting the
hood circuit to the mains supply and
checking the efficient function, always
check that the mains cable is correctly
assembled.
Page 4

4
www.aeg.com
Warning! Power cable replacement
must be undertaken by the authorised
service assistance centre or similar
qualified person.
The minimum distance between the
supporting surface for the cooking
equipment on the hob and the lowest part
of the range hood must be not less than
50cm from electric cookers and 65cm from
gas or mixed cookers. If the instructions for
installation for the gas hob specify a greater
distance, this must be adhered to.
4. MAINTENANCE
ATTENTION! Before performing any
maintenance operation, isolate the
hood from the electrical supply by
switching off at the connector and
removing the connector fuse.
Or if the appliance has been connected
through a plug and socket, then the plug
must be removed from the socket.
The cooker hood should be cleaned
regularly (at least with the same frequency
with which you carry out maintenance of the
fat filters) internally and externally. Clean
using the cloth dampened with neutral liquid
detergent. Do not use abrasive products.
DO NOT USE ALCOHOL!
Warning! Failure to carry out the basic
cleaning recommendations of the
cooker hood and replacement of the
filters may cause fire risks. Therefore,
we recommend observing these
instructions.
The manufacturer declines all responsibility
for any damage to the motor or any
fire damage linked to inappropriate
maintenance or failure to observe the above
safety recommendations.
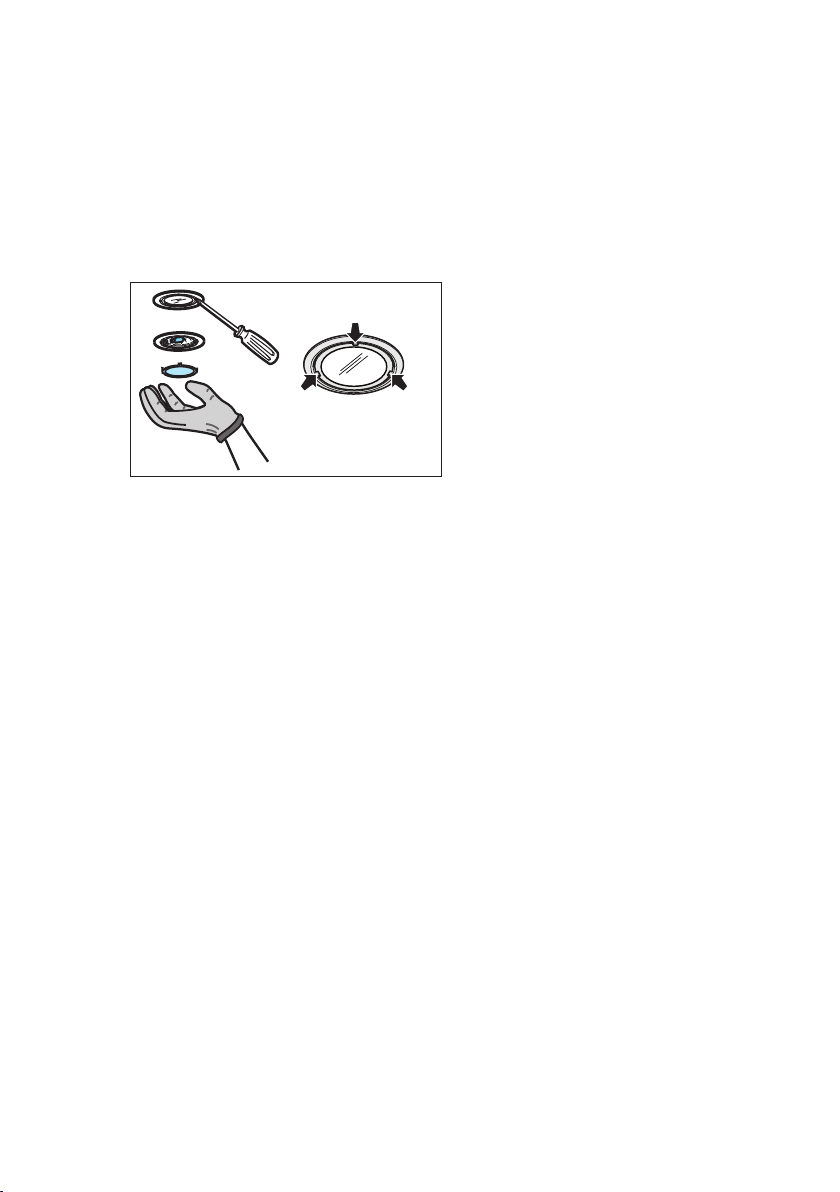
4.1 Grease filter - The grease filter
must be cleaned once a month using non
aggressive detergents, either by hand or
in the dishwasher, which must be set to a
low temperature and a short cycle. When
washed in a dishwasher, the grease filter
may discolour slightly, but this does not
affect its filtering capacity.
4.2 Charcoal filter - Washable activated
charcoal filter - The saturation of the
charcoal filter occurs after more or less
prolonged use, depending on the type of
cooking and the regularity of cleaning of the
grease filter.
In any case it is necessary to replace the
cartridge at least every four mounths.
The charcoal filter may NOT be washed or
regenerated.
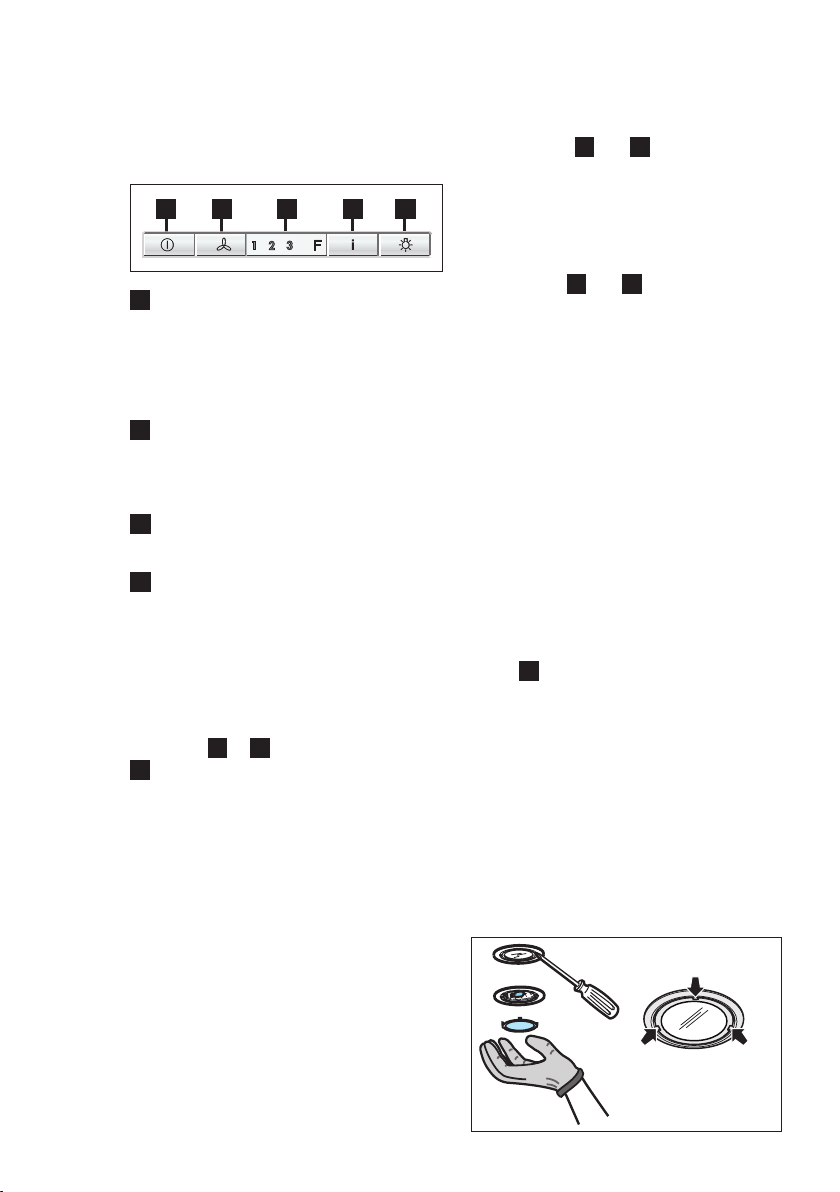
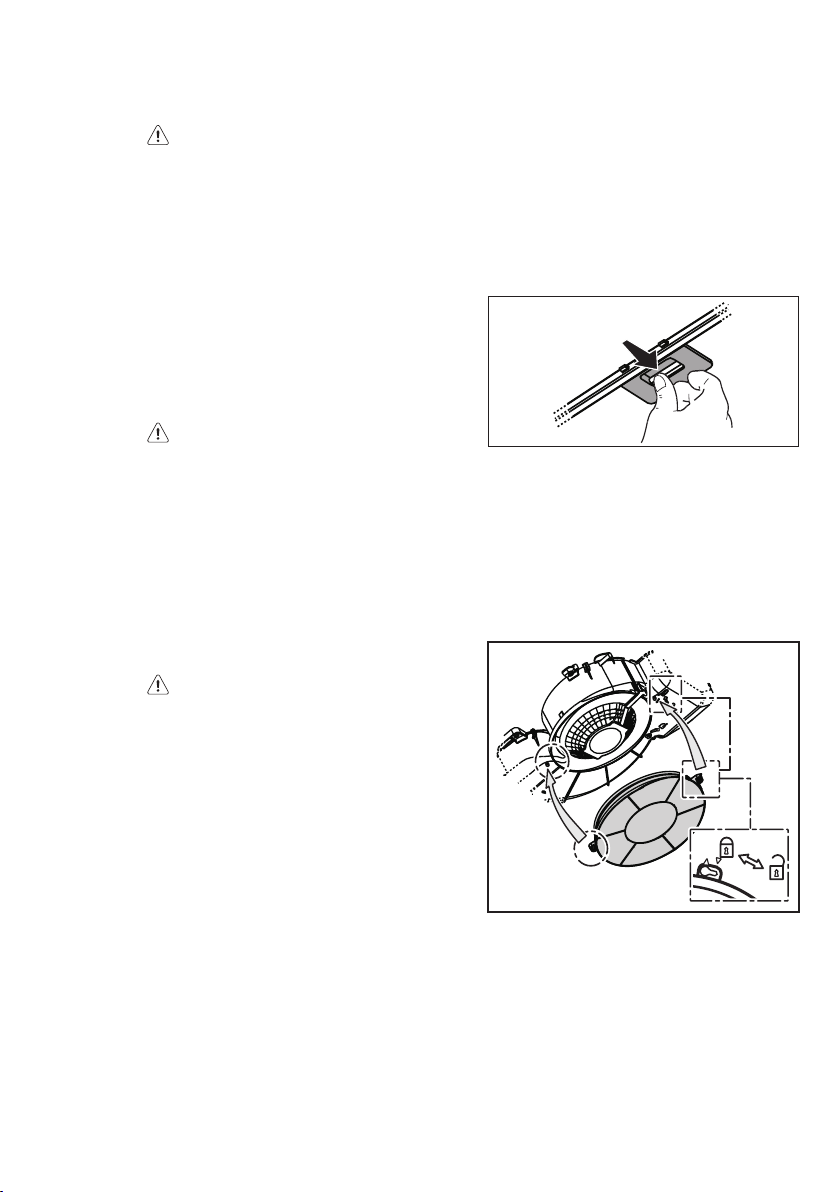
5. CONTROLS
The hood is fitted with a control panel with
aspiration speed selection control and a
light switch to control cooking area lights.
Use the high suction speed in cases
of concentrated kitchen vapours. It is
recommended that the cooker hood suction
is switched on for 5 minutes prior to cooking
and to leave in operation during cooking
and for another 15 minutes approximately
Page 5
ENGLISH
5
after terminating cooking.
The control switches are located on the
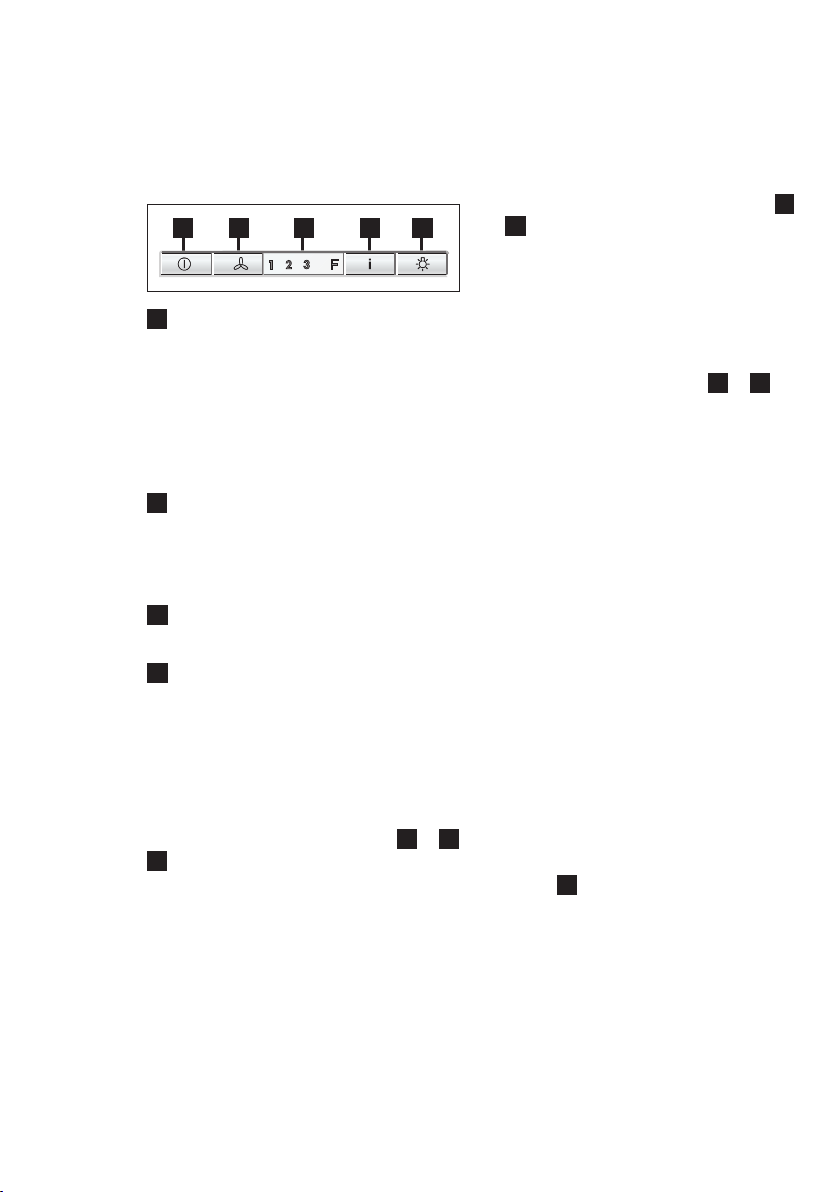
hood’s front panel:
A
B
A OFF – ON push button
Press once or more to obtain the
function desired:
ON: the hood switches on to the last
speed selected.
OFF: all the functions are switched off
except the illumination.
B Speed selection push button (extraction
power).
Press this push button once or more
to select the most suitable extraction
speed (power) (1-2-3).
C The display shows the extraction power
selected, signalling the saturation of the
filters F.
D Intensive speed on/off. The Intensive
speed runs for 5 minutes:
If the hood is on when the Intensive
speed is activated, the hood reverts to
previous speed after 5 minutes.
If the hood is off when the Intensive
speed is activated, the hood will be
turned off after 5 minutes.
To interrupt the Intensive speed, press
button A or B .
E Light ON/OFF
Should the hood or the controls fail to
operate: disconnect the power supply for at
least 5 seconds, then turn the hood back
on again.
Grease and charcoal filter maintenance
indicator
This hood is fitted with a device that
indicates when it is necessary to clean the
grease filter or the charcoal filter (if the
hood is used in the recirculation version
with a charcoal filter).
On delivery, the hood is not supplied with
a charcoal filter, so the saturation indicator
will be disabled.
If the hood is to be used with a charcoal
filter, the saturation
indicator light must be enabled as follows:
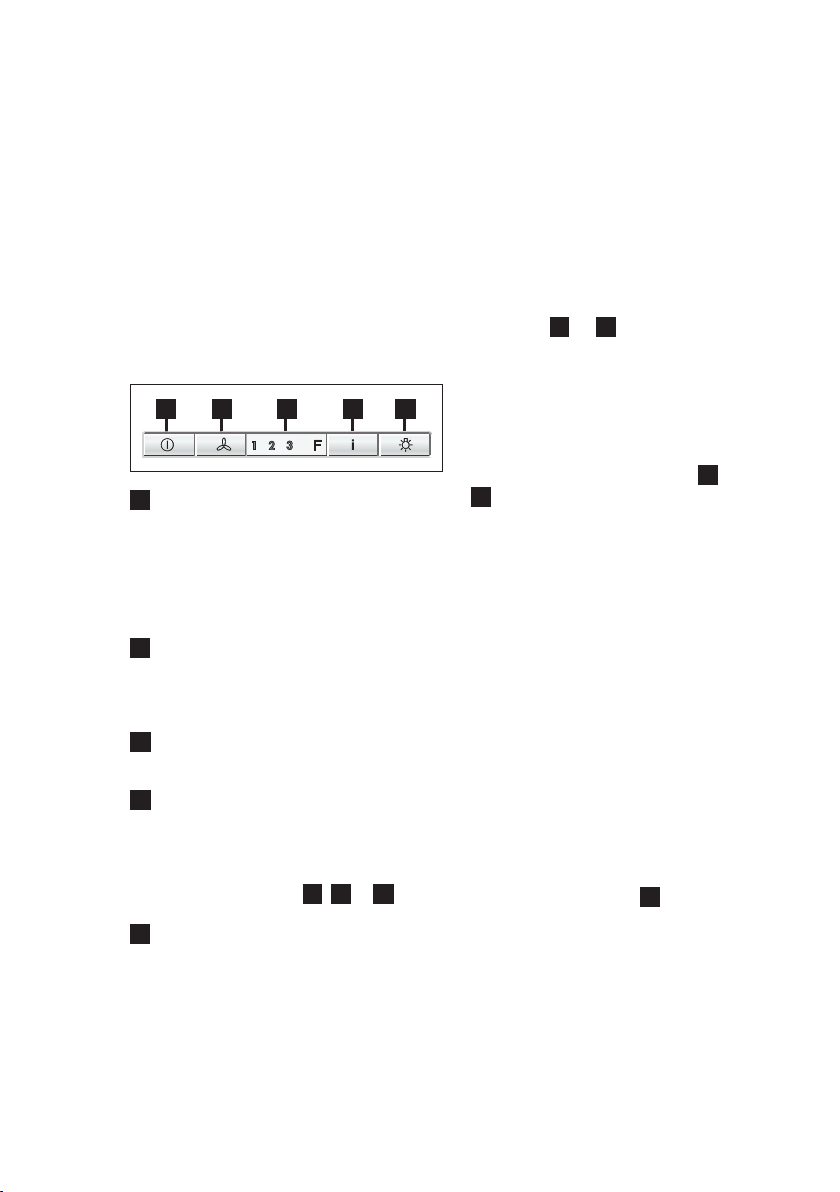
C
D
E
Set the hood in “OFF”.
Pressing keys B and D simultaneously
for three seconds, LED F lights up and
begins to flash the 1st speed led. After 1
second the 2nd speed led also flashes and
the system emits a sound signal (-Beep-) to
indicate setting taking place.
To remove the charcoal filter signal press
push buttons
3 seconds. LED F lights up and begins to
flash the 1st speed led (grease filter) and
the 2nd speed led. After 1 second, only
the 1st speed led continues to flash. The
system emits a sound signal (-Beep-) to
indicate setting taking place.
Grease filter LED
The 1st speed led (+ led F) flashes, when it
is time to clean the grease filter.
Always comply with the maintenance
instructions for the grease filter.
Charcoal filter LED
The 2nd speed led (+ led F) flashes,
when the charcoal filter needs to be
cleaned or replaced.
Resetting the saturation indicator
After cleaning or replacing the filters, press
button A for 3 seconds until the 1st speed
led or the second speed led stops flashing.
The F LED also turns off.
B and D simultaneously for
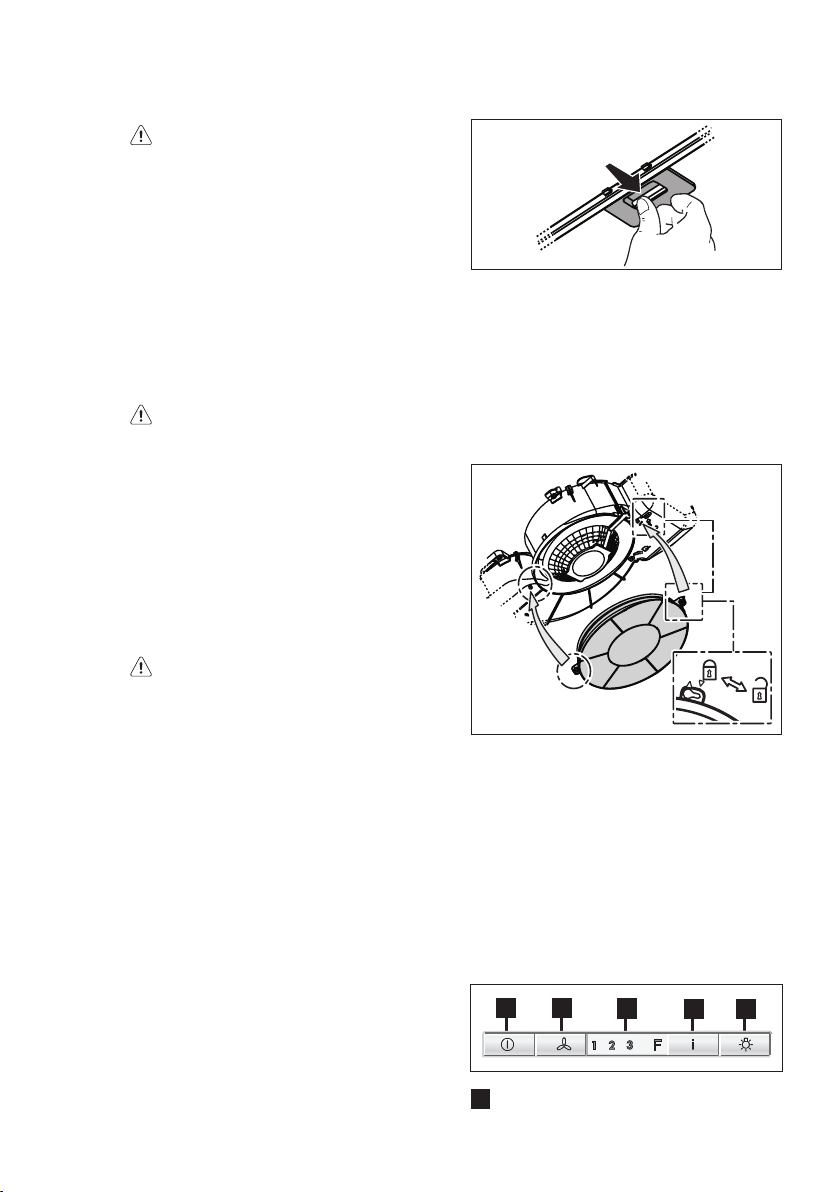
6. LIGHTING
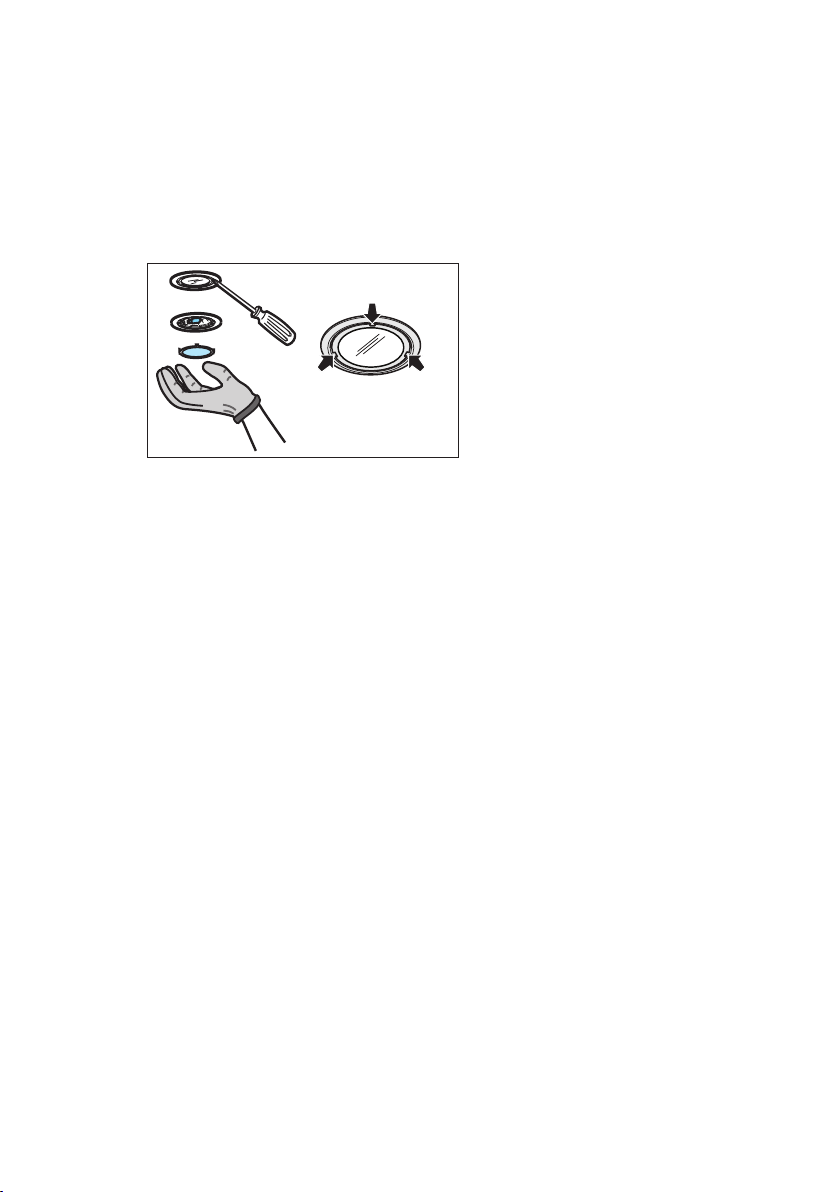
Disconnect the hood from the electricity.
Warning! Prior to touching the light bulbs
ensure they are cooled down.Replace with
a new 12 Volt, 20 Watt (Maximum) halogen
light made for a G-4 base SUITABLE FOR
USE IN OPEN LUMINAIRES. Follow
package directions and do not touch new
light with bare hands.
Page 6
DE GEBRAUCHSANLEITUNG
6
www.aeg.com
FÜR PERFEKTE ERGEBNISSE
Danke, dass Sie sich für dieses AEG Produkt entschieden haben. Wir haben es geschaffen,
damit Sie viele Jahre von seiner ausgezeichneten Leistung und den innovativen
Technologien, die Ihnen das Leben erleichtern, profitieren können. Es ist mit Funktionen
ausgestattet, die in gewöhnlichen Geräten nicht vorhanden sind. Nehmen Sie sich ein paar
Minuten Zeit zum Lesen, um seine Vorzüge kennen zu lernen.
Besuchen Sie uns auf unserer Website, um:
Anwendungshinweise, Prospekte, Fehlerbehebungs- und Service-Informationen zu
erhalten:
www.aeg.com
Ihr erworbenes Produkt zu registrieren, um den besten Service dafür zu
gewährleisten:
www.aeg.com/productregistration
Zubehör, Verbrauchsmaterial und Original-Ersatzteile für Ihr Gerät zu erwerben:
www.aeg.com/shop
UMWELTTIPPS
Recyclen Sie Materialien mit dem Symbol . Entsorgen Sie die Verpackung in den
entsprechenden Recyclingbehältern.
Recyclen Sie zum Umwelt- und Gesundheitsschutz elektrische und elektronische Geräte.
Entsorgen Sie Geräte mit diesem Symbol nicht mit dem Hausmüll. Bringen Sie das
Gerät zu Ihrer örtlichen Sammelstelle oder wenden Sie sich an Ihr Gemeindeamt.
REPARATUR- UND KUNDENDIENST
Bitte verwenden Sie ausschließlich Original-Ersatzteile für Ihre Produkte.
Halten Sie folgende Angaben bereit, wenn Sie sich an den Kundendienst wenden
(diese Informationen finden Sie auf dem Typenschild): Modell, Produktnummer (PNC),
Seriennummer.
Warnungs-/ Sicherheitshinweise.
Allgemeine Informationen und Empfehlungen.
Informationen zum Umweltschutz.
Änderungen vorbehalten.
Page 7
DEUTSCH
7
1. SICHERHEITSHINWEISE
Vorsicht! Die Instruktionen, die in
diesem Handbuch gegeben werden,
müssen strikt eingehalten werden. Es
wird keinerlei Haftung übernommen
für mögliche Mängel, Schäden oder
Brände der Dunstabzugshaube, die auf
die Nichtbeachtung der Vorschriften
in diesem Handbuch zurückzuführen
sind. Die Dunstabzugshaube ist
ausschliesslich zum Einsatz im privaten
Haushalt vorgesehen.
Achtung! Das Gerät nicht an das
Stromnetz anschließen, solange die
Installation noch nicht abgeschlossen
ist. Vor Beginn sämtlicher Reinigungsoder Wartungsarbeiten muss das
Gerät durch Ziehen des Steckers oder
Betätigen des Hauptschalters der
Wohnung vom Stromnetz getrennt
werden.
Bei allen Installations- und
Instandhaltungsarbeiten immer
Schutzhandschuhe tragen.
Kinder nicht mit dem Gerät spielen lassen.
Erwachsene und Kinder dürfen nie
unbeaufsichtigt das Gerät betreiben,
– wenn sie körperlich oder geistig dazu
nicht in der Lage sind,
– oder wenn ihnen Wissen und Erfahrung
fehlen, das Gerät richtig und sicher zu
bedienen. Die Dunstabzugshaube niemals
ohne korrekt montiertes Gitter in Betrieb
setzen! Die Dunstabzugshaube darf
NIEMALS als Abstellfläche verwendet
werden, sofern dies nicht ausdrücklich
angegeben wird. Der Raum muss über
eine hinreichende Belüftung verfügen,
wenn die Dunstabzugshaube mit
anderen gas- oder brennstoffbetriebenen
Geräten gleichzeitig verwendet
wird. Bei gleichzeitigem Betrieb der
Dunstabzugshaube im Abluftbetrieb und
Feuerstätten darf im Aufstellraum der
Feuerstätte der Unterdruck nicht größer als
4 Pa (4 x 10⁻⁵ bar) sein. Die angesaugte
Luft darf nicht in Rohre geleitet werden, die
für die Ableitung der Abgase von gas- oder
brennstoffbetriebenen Geräten genutzt
werden. Es ist strengstens verboten, unter
der Haube mit offener Flamme zu kochen.
Eine offene Flamme beschädigt die Filter
und kann Brände verursachen, daher ist
dies in jedem Fall zu vermeiden. Das
Frittieren muss unter Aufsicht erfolgen, um
zu vermeiden, dass das überhitzte Öl Feuer
fängt.
Vorsicht! Zugängliche Teile können
beim Gebrauch mit Kochgeräten heiss
werden.
In Bezug auf technische und
Sicherheitsmaßnahmen für die Ableitung
der Abluft sind die Vorschriften der
zuständigen örtlichen Behörden
strengstens einzuhalten. Die Haube muss
regelmäßig innen und außen gereinigt
werden (MINDESTENS EINMAL IM
MONAT, diesbezüglich sind in jedem
Fall die ausdrücklichen Angaben in der
Wartungsanleitung dieses Handbuchs
zu beachten). Eine Nichtbeachtung der
Vorschriften zur Reinigung der Haube
sowie zur Auswechselung und Reinigung
der Filter führt zu Brandgefahr. Um
das Risiko eines Stromschlages zu
vermeiden, darf die Dunstabzugshaube
ohne richtig eingesetzte Lampen nicht
betrieben werden. Es wird keinerlei
Haftung übernommen für Fehler, Schäden
oder Brände des Gerätes, die durch
Nichteinhaltung der in diesem Handbuch
aufgeführten Anweisungen verschuldet
wurden.
Warnung! Erfolgt die Installation
der Schrauben oder Befestigungsvo
rrichtungen nicht entsprechend den
vorliegenden Anweisungen, führt dies
zu Gefahr durch Stromschlag.
2. BEDIENUNG
Der Dunstabzug dient zum Absaugen der
beim Kochen entstehenden Dämpfe.
In dem mitgelieferten Montagehandbuch ist
angegeben, ob Sie Ihre Haube als Abluft-
oder Umluftversion betreiben.
3. BEFESTIGUNG
Die Netzspannung muss der
Spannung entsprechen, die auf dem
Betriebsdatenschild im Innern der Haube
angegeben ist. Sofern die Haube einen
Netzstecker hat, ist dieser an zugänglicher
Stelle an eine den geltenden Vorschriften
entsprechende Steckdose auch nach der
Montage anzuschließen. Bei einer Haube
ohne Stecker (direkter Netzanschluss) oder
falls der Stecker nicht zugänglich ist, ist ein
normgerechter zweipoliger Schalter auch
nach der Montage anzubringen, der unter
Umständen der Überspannung Kategorie
III entsprechend den Installationsregeln ein
vollständiges Trennen vom Netz garantiert.
Hinweis! Vor der Inbetriebnahme
muss sichergestellt sein, dass
die Netzversorgung (Steckdose)
ordnungsgemäß montiert wurde.
Page 8

8
www.aeg.com
Hinweis! Zur Vermeidung von
Gefahren darf die Auswechselung des
Stromkabels nur vom autorisierten
Kundendienst vorgenommen werden.
Der Abstand zwischen der Abstellfläche
auf dem Kochfeld und der Unterseite
der Dunstabzugshaube darf 60cm im
Fall von elektrischen Kochfeldern und
65cm im Fall von Gas- oder kombinierten
Herden nicht unterschreiten.Wenn
die Installationsanweisungen des
Gaskochgeräts einen größeren Abstand
vorgeben, ist dieser zu berücksichtigen.
4. WARTUNG
Hinweis! Vor jeder Reinigung und
Pflege ist die Dunstabzugshaube
durch Ziehen des Netzsteckers oder
Ausschalten der Sicherung stromlos zu
machen.
Die Dunstabzugshaube muss sowohl innen
als auch außen häufig gereinigt werden
(etwa in denselben Intervallen, wie die
Wartung der Fettfilter). Zur Reinigung ein
mit flüssigem Neutralreiniger getränktes
Tuch verwenden. Keine Produkte
verwenden, die Scheuermittel enthalten.
KEINEN ALKOHOL VERWENDEN!
Hinweis! Nichtbeachtung dieser
Anweisungen zur Reinigung des
Gerätes und zum Wechsel bzw. zur
Reinigung der Filter kann zum Brand
führen. Diese Anweisungen sind
unbedingt zu beachten!
Der Hersteller übernimmt keine Haftung
für irgendwelche Schäden am Motor oder
Brandschäden, die auf eine unsachgemäße
Wartung oder Nichteinhaltung der oben
angeführten Sicherheitsvorschriften
zurückzuführen sind.
4.1 Fettfilter - Der Metallfettfilter muss
einmal monatlich gewaschen werden.
Das kann mit einem milden Waschmittel
von Hand, oder in der Spülmaschine bei
niedriger Temperatur und Kurzspülgang
erfolgen. Der Metallfettfilter kann bei der
Reinigung in der Spülmaschine abfärben,
was seine Filtermerkmale jedoch in keiner
Weise beeinträchtigt.
4.2 Aktivkohlefilter - Der waschbare Aktivkohlefilter - Je nach der
Benetzungsdauer des Herdes und der
Häufigkeit der Reinigung des Fettfilters
tritt nach einer mehr oder weniger langen
Benutzungsdauer die Sättigung des
Aktivkohlefilters auf. Auf jeden Fall muß
der Filtereinsatz mindestens alle 4 Monate
ausgewechselt werden. Er kann NICHT
gereinigt oder erneut aktiviert werden.
5. BEDIENELEMENTE
Die Dunstabzugshaube ist mit einer
Bedienungsblende ausgestattet, die mit
einer Steuerung für die Ansaugstärke bzw.
-geschwindigkeit, sowie einer Steuerung
zur Einstellung der Arbeitsplatzbeleuchtung
versehen ist.
Bei starker Dampfentwicklung die
höchste Betriebsstufe einschalten. Es
wird empfohlen, die Dunstabzugshaube
schon fünf Minuten vor Beginn des
Kochvorganges einzuschalten und sie nach
dessen Beendigung noch ungefähr 15
Page 9

DEUTSCH
9
Minuten weiterlaufen zu lassen.
Auf der Vorderseite des Gerätes befinden
sich die Schalter:
A
B
A Taste OFF (Taste ausgeschaltet) - ON
(Taste eingeschaltet)
Ein- oder mehrmals drücken, um die
gewünschte Funktion zu erhalten:
ON (Taste eingeschaltet): die
Haube stellt die zuletzt ausgewählte
Geschwindigkeitsstufe ein.
OFF (Taste ausgeschaltet): sämtliche
Funktionen gesperrt außer der
Beleuchtung.
B Auswahltaste für Gebläsestufe
(Saugleistung)
Diese Taste ein- oder mehrmals
drücken, um die angemessene
Gebläsestufe (Saugleistung) (1 - 2 - 3
anzuwählen).
C Display: zeigt die ausgewählte
Saugleistung an (1-2-3), meldet die
Sättigung der Filter (F).
D Einschalter Intensivstufe:
Nach 5 Minuten schaltet die
Intensivstufe in die vorher eingestellte
Stufe zurück bzw. schaltet aus, wenn
keine Stufe eingestellt ist. Um die
Intensivstufe vor Ablauf von 5 Minuten
zu beenden, muss Knopf A , B oder
D gedrückt werden.
E Ausschalter/Einschalter Beleuchtung.
Falls die Dunstabzugshaube oder die
Bedienungselemente nicht funktionieren:
Für mindestens 5 Sekunden die
Stromversorgung der Dunstabzugshaube
unterbrechen und dann die Haube erneut
einschalten.
C
D
E
Wird die Haube jedoch mit Aktivkohlefilter
in Betrieb genommen, so ist diese
Sättigungsanzeige wie folgt einzuschalten:
Die Haube muss auf „AUS“ eingestellt sein.
Gleichzeitig drei Sekunden lang die
Tasten
B und D drücken, die LED
F schaltet sich ein und die LED der 1.
Geschwindigkeitsstufe beginnt zu blinken,
nach 1 Sekunde blinkt auch die LED der 2.
Stufe und das System gibt ein Tonsignal
ab (-Beep-) um die erfolgte Einstellung
anzuzeigen.
Um die Kohlefiltermeldung zu entfernen,
gleichzeitig drei Sekunden lang die Tasten
B und D drücken, die LED F schaltet
sich ein und die LED der 1. Stufe (Fettfilter)
beginnt zu blinken sowie die LED der 2.
Stufe, nach 1 Sekunde blinkt nur die LED
der 1. Stufe, das System gibt ein Tonsignal
(-Beep-) ab, um die erfolgte Einstellung
anzuzeigen.
LED-Anzeige Fettfilter
Die LED der 1. (+ LED F). Stufe blinkt,
wenn der Fettfilter gereinigt werden muss.
Die Wartungsvorschriften der Fettfilter sind
zu beachten.
LED-Anzeige Aktivkohlefilter
Die LED der 2. (+ LED F) Stufe blinkt, wenn
der Aktivkohlefilter regeneriert werden
muss.
Zurückstellen der Sättigungsanzeige
Nach Reinigung oder Austausch des
Fettfilters die Taste A für 3 Sekunden
gedrückt halten bis die LED der 1. Stufe
oder die LED der 2. Stufe nicht mehr blinkt.
Auch die LED F schaltet sich aus.
Kontrollvorrichtung für Fett- und
Aktivkohlefilter
Diese Dunstabzugshaube verfügt über eine
Vorrichtung, die anzeigt, wenn der Fettfilter
beziehungsweise der Aktivkohlefilter
zu reinigen ist (bei Umluftbetrieb mit
Aktivkohlefilter).
Diese Haube wird vom Werk aus ohne
Aktivkohlefilter geliefert, deshalb ist ihre
Sättigungsanzeige ausgeschaltet.
Page 10

10
www.aeg.com
6. BELEUCHTUNG
Das gerät vom stromnetz nehmen.
Hinweis! Vor berühren der lampen sich
vergewissern, dass sie abgekühlt sind.
Ausschließlich Halogenlampen zu m12V
-20W max - G4 verwenden und darauf
achten, diese nicht mit den Händen zu
berühren.
Page 11
FR MANUEL D’UTILISATION
FRANÇAIS
POUR DES RÉSULTATS PARFAITS
Merci d’avoir choisi ce produit AEG. Nous l’avons conçu pour qu’il vous offre des
performances irréprochables pour longtemps, en intégrant des technologies innovantes qui
vous simplifient la vie grâce à des caractéristiques que vous ne trouverez pas forcément
sur des appareils ordinaires. Veuillez prendre quelques instants pour lire cette notice afin
d’utiliser au mieux votre appareil.
Visitez notre site Internet pour :
Obtenir des conseils d’utilisation, des brochures, de l’aide, des informations :
www.aeg.com
Enregistrer votre produit pour obtenir un meilleur service :
www.aeg.com/productregistration
Acheter des accessoires, consommables et pièces de rechange d’origine pour
votre appareil :
www.aeg.com/shop
EN MATIÈRE DE PROTECTION DE L’ENVIRONNEMENT
11
Recyclez les matériaux portant le symbole . Déposez les emballages dans les
conteneurs prévus à cet effet. Contribuez à la protection de l’environnement et à votre
sécurité, recyclez vos produits électriques et électroniques. Ne jetez pas les appareils
portant le symbole avec les ordures ménagères. Emmenez un tel produit dans votre
centre local de recyclage ou contactez vos services municipaux.
SERVICE APRÈS-VENTE
N’utilisez que des pièces de rechange d’origine.
Avant de contacter le service, assurez-vous de disposer des informations suivantes :
Vous trouverez ces informations sur la plaque signalétique. Modèle, PNC, numéro de série.
Avertissement/Attention : consignes de sécurité.
Informations générales et conseils.
Informations en matière de protection de l’environnement.
Sous réserve de modifications.
Page 12

12
www.aeg.com
1. CONSIGNES DE SÉCURITÉ
Attention! Suivre impérativement
les instructions de cette notice. Le
constructeur décline toute responsabilité
pour tous les inconvénients, dommages
ou incendies provoqués à l’appareil
et dûs à la non observation des
instructions de la présente notice. La
hotte a été conçue exclusivement pour
l’usage domestique.
Avertissement! Ne pas raccorder
l’appareil au circuit électrique avant
que le montage ne soit complètement
terminé. Avant toute opération de
nettoyage ou d’entretien, débrancher
la hotte du circuit électrique en retirant
la prise ou en coupant l’interrupteur
général de l’habitation.
Munissez-vous de gants de travail avant
d’effectuer toute opération d’installation
et d’entretien. L’appareil n’est pas destiné
à une utilisation par des enfants ou
des personnes à capacités physiques,
sensorielles ou mentales réduites et sans
expérience et connaissance à moins qu’ils
ne soient sous la supervision ou formés sur
l’utilisation de l’appareil par une personne
responsable de leur sécurité.
Les enfants doivent être surveillés afin qu’ils
ne jouent pas avec l’appareil. Ne jamais
utiliser la hotte sans que la grille ne soit
montée correctement!
La hotte ne doit JAMAIS être utilisée comme
plan pour déposer quelque chose sauf si
cela est expressément indiqué. Quand
la hotte est utilisée en même temps que
d’autres appareils à combustion de gaz ou
d’autres combustibles, le local doit disposer
d’une ventilation suffisante.
L’air aspiré ne doit jamais être envoyé
dans un conduit utilisé pour l’évacuation
des fumées produites par des appareils
à combustion de gaz ou d’autres
combustibles. Il est formellement interdit
de faire flamber les aliments sous la hotte.
L’utilisation de flammes libres peut entraîner
des dégâts aux filtres et peut donner lieu
à des incendies, il faut donc les éviter à
tout prix. La friture d’aliments doit être
réalisée sous contrôle pour éviter que l’huile
surchauffée ne prenne feu.
Attention! Les pièces accessibles
peuvent se réchauffer de façon
importante quand elles sont utilisées
avec des appareils pour la cuisson.
En ce qui concerne les mesures techniques
et de sécurité à adopter pour l’évacuation
des fumées, s’en tenir strictement à ce
qui est prévu dans les règlements des
autorités locales compétentes. La hotte
doit être régulièrement nettoyée, aussi bien
à l’intérieur qu’à l’extérieur (AU MOINS UNE
FOIS PAR MOIS, respecter néanmoins les
instructions relatives à l’entretien fournies
dans ce manuel). La non observation de
ces normes de nettoyage de la hotte et
du changement et nettoyage des filtres
comporte des risques d’incendie. Ne pas
utiliser ou laisser la hotte sans que les
ampoules soient correctement placées
pour éviter tout risque de choc électrique.
La société décline toute responsabilité
pour d’éventuels inconvénients, dégâts
ou incendies provoqués par l’appareil
et dérivés de la non observation des
instructions reprises dans ce manuel.
Attention! Ne pas installer les vis et
les éléments de fixation conformément
à ces instructions peut entraîner des
risques électriques.
2. UTILISATION
La hotte est utilisée pour aspirer les fumées
et les vapeurs causés par la cuisine.
Le manuel d’installation attaché indique la
version d’utiliser pour votre modèle, soit
la version avec aspiration et évacuation
externe
recirculation interne
ou la version avec filtration et
.
3. INSTALLATION
La tension électrique doit correspondre à la
tension reportée sur la plaque signalétique
située à l’intérieur de la hotte. Si une prise
est présente, branchez la hotte dans une
prise murale conforme aux normes en
vigueur et placée dans une zone accessible
également après l’installation. Si aucune
prise n’est présente (raccordement direct au
circuit électrique), ou si la prise ne se trouve
pas dans une zone accessible également
après l’installation, appliquez un disjoncteur
normalisé pour assurer de débrancher
complètement la hotte du circuit électrique
en conditions de catégorie surtension III,
conformément aux règlementations de
montage.
Attention! Avant de rebrancher le circuit
de la hotte à l’alimentation électrique
et d’en vérifier le fonctionnement
correct, contrôlez toujours que le câble
d’alimentation soit monté correctement.
Page 13
FRANÇAIS
13
Attention! La substitution du câble
d’alimentation doit être effectuée par le
service d’assistance technique autorisé
de façon à prévenir tout risque.
La distance minimum entre la superficie
de support des récipients sur le dispositif
de cuisson et la partie la plus basse de la
hotte de cuisine ne doit pas être inférieure à
50cm dans le cas de cuisinières électriques
et de 65cm dans le cas de cuisinières à gaz
ou mixtes.
Si les instructions d’installation du dispositif
de cuisson au gaz spécifient une plus
grande distance, il faut en tenir compte.
4. ENTRETIEN
Attention! Avant toute opération de
nettoyage ou d’entretien, débrancher la
hotte du circuit électrique en enlevant
la prise ou en coupant l’interrupteur
général de l’habitation.
La hotte doit être régulièrement nettoyée
à l’intérieur et à l’extérieur (au moins à la
même fréquence que pour l’entretien des
filtres à graisse). Pour le nettoyage, utiliser
un chiffon humidifié avec un détergent
liquide neutre. Ne pas utiliser de produit
contenant des abrasifs. NE PAS UTILISER
D’ALCOOL!
Attention! Il y a risque d’incendie si
vous ne respectez pas les instructions
concernant le nettoyage de l’appareil
et le remplacement ou le nettoyage du
filtre.
La responsabilité du constructeur ne
peut en aucun cas être engagée dans le
cas d’un endommagement du moteur ou
d’incendie liés à un entretien négligé ou
au non respect des consignes de sécurité
précédemment mentionnées.
4.1 Filtre anti-graisse - Le filtre antigraisse métallique doit être nettoyé une
fois par mois avec des détergents non
agressifs, à la main ou dans le lavevaisselle à faibles températures et cycle
rapide. Le lavage du filtre anti-graisse
métallique au lave-vaisselle peut en
provoquer la décoloration. Toutefois, les
caractéristiques de filtrage ne seront en
aucun cas modifiées.
4.2 Filtre à charbon actif - Filtre à
charbon actif lavable - La saturation du
charbon actif se constate aprés un emploi
plus ou mois long, selon la fréquence
d’utilisation et la régularité du nettoyage
du filtre à graisses. En tout cas, il est
nécessaire de changer le filtre aprés, au
maximum, quatre mois.
IL NE PEUT PAS être nettoyé ou régénéré.
5. COMMANDES
La hotte est équipée d’un panneau de
contrôle doté d’une commande de vitesse
d’aspiration et d’une commande d’éclairage
du plan de cuisson.
Utiliser la puissance d’aspiration maximum
en cas de concentration très importante
des vapeurs de cuisson. Nous conseillons
d’allumer la hotte 5 minutes avant de
commencer la cuisson et de la faire
Page 14
14
www.aeg.com
fonctionner encore pendant 15 minutes
environ après avoir terminé la cuisson.
Le bandeau de commandes de la hotte se
trouve sur l’avant de l’appareil.
A
B
A Touche ARRET(touche éteinte)
– MARCHE (touche allumée)
Appuyez une ou plusieurs fois pour
obtenir la fonction souhaitée:
MARCHE (touche allumée) : la hotte
fonctionne à la dernière vitesse
sélectionnée.
ARRET (touche éteinte) : toutes les
fonctions sont désactivées à l’exception
de l’éclairage.
B Touche de sélection de la vitesse
(puissance d’aspiration).
Appuyez sur cette touche une ou
plusieurs fois pour choisir la vitesse
(puissance) d’aspiration la plus
appropriée (1-2-3).
C Afficheur: visualise la puissance
d’aspiration sélectionnée (1-2-3),
signale la saturation des filtres (F).
D Touche de vitesse intensive : En
appuyant sur cette touche, la hotte
fonctionne pendant 5 minutes environ
à la vitesse intensive. A l’issue de cette
durée, la hotte fonctionne à la vitesse
initialement sélectionnée ou s’arrête
si aucune vitesse n’est réglée. Pour
mettre à l’arrêt la hotte en vitesse
intensive avant l’écoulement des 5
minutes, appuyez sur la touche A ou B
E Touche Marche / Arrêt d’éclairage
Coupez l’alimentation de la hotte pendant
au moins 5 secondes puis remettez la hotte
en fonctionnement.
Dispositif de contrôle de saturation du
filtre à graisse et du filtre à charbon actif
Cette hotte est équipée d’un dispositif
qui signale lorsque le filtre à graisse et
éventuellement le filtre à charbon actif
doivent être nettoyés.
La hotte est fournie sans filtre à charbon
actif; c’est pourquoi le dispositif signalant
la saturation du filtre à charbon actif est
C
D
E
déconnecté.
Si l’on désire installer un filtre à charbon
actif, il faut alors activer le dispositif:
La hotte doit être mise à l’ARRET.
Appuyez simultanément sur les touches
et D pendant trois secondes, l’indicateur
F s’allume et l’indicateur de la 1ère
vitesse commence à clignoter, après 1
seconde l’indicateur de la 2ème vitesse
clignote également et le système émet
un signal sonore (-Beep-) qui indique que
l’activation a été effectuée. Pour enlever la
signalisation du filtre à charbon, appuyez
simultanément sur les touches B et D
pendant trois secondes, l’indicateur F
s’allume et l’indicateur de la 1ère vitesse
(filtre à graisse) commence à clignoter et
également l’indicateur de la 2ème vitesse,
après 1 seconde, seulement l’indicateur de
la 1ère vitesse clignotera, le système émet
un signal sonore (-Beep -) qui indique que
désactivation a été effectuée.
Voyant de saturation du filtre à graisse
L’indicateur de la 1ère (+ l’indicateur F)
vitesse clignote lorsque le filtre à graisse
doit être nettoyé. Lisez attentivement les
conseils pour l’entretien du filtre à graisse.
Voyant de saturation du filtre à charbon
L’indicateur de la 2ème (+ l’indicateur F)
vitesse clignote, lorsque le filtre à charbon
doit être nettoyé.
Lisez attentivement les conseils sur le
nettoyage du filtre à charbon actif.
Rétablissement de la signalisation de
saturation du filtre à graisse et du filtre
à charbon
Après avoir nettoyé le filtre, appuyez sur
la touche A pendant 3 secondes environ
jusqu’à ce que l’indicateur de la 1ère
vitesse ou l’indicateur de la 2ème vitesse
arrête de clignoter. L’indicateur F s’éteint
également.
B
Page 15
6. ÉCLAIRAGE
Débrancher l’appareil du réseau électrique
Attention! Avant de toucher les lampes,
assurez-vous qu’elles soient froides.
Utiliser uniquement des lampes halogènes
12V -20W max - G4 (Adaptée à un système
d’éclairage ouvert), en ayant soin de ne pas
les toucher avec les mains.
FRANÇAIS
15
Page 16
www.aeg.com16
NL GEBRUIKSAANWIJZING
VOOR PERFECTE RESULTATEN
Bedankt dat u voor dit AEG product heeft gekozen. Dit apparaat is ontworpen om vele jaren
uitstekend te presteren, met innovatieve technologieën die het leven gemakkelijker helpen
maken – functies die gewone apparaten wellicht niet hebben. Neem een paar minuten de
tijd om het door te lezen zodat u er optimaal van kunt profiteren.
Ga naar onze website voor:
Advies over gebruik, brochures, het oplossen van problemen en
onderhoudsinformatie:
www.aeg.com
Registreer uw product voor een betere service:
www.aeg.com/productregistration
Koop accessoires, verbruiksartikelen en originele reserveonderdelen voor uw
apparaat:
www.aeg.com/shop
MILIEUBESCHERMING
Recycle de materialen met het symbool . Gooi de verpakking in een geschikte
verzamelcontainer om het te recyclen. Help om het milieu en de volksgezondheid te
beschermen en recycle het afval van elektrische en elektronische apparaten. Gooi
apparaten gemarkeerd met het symbool niet weg met het huishoudelijk afval. Breng het
product naar het milieustation bij u in de buurt of neem contact op met de gemeente.
KLANTENSERVICE
Wij raden altijd het gebruik van originele onderdelen aan.
Zorg er als u contact opneemt met de klantenservice voor dat u de volgende gegevens bij
de hand hebt.
De informatie staat op het typeplaatje. Model, productnummer, serienummer.
Waarschuwing - Belangrijke veiligheidsinformatie.
Algemene informatie en tips
Milieu-informatie.
Wijzigingen voorbehouden.
Page 17
NEDERLANDS
17
1. VEILIGHEIDSVOOR-
SCHRIFTEN
Let op! Zich strikt aan de aanwijzingen
uit deze tekst houden. Iedere
aansprakelijkheid voor eventuele
schade of brand aan het apparaat
veroorzaakt door het niet in acht
nemen van de aanwijzingen in deze
handleiding weergegeven wordt
afgewezen. De wasemkap is uitsluitend
ontworpen voor huishoudelijk gebruik.
Waarschuwing! Het apparaat niet aan
het stroomnet aansluiten voordat de
installatie voltooid is. Koppel, voor ieder
onderhoud, eerst de wasemkap van het
elektriciteitsnet af door de stekker weg
te trekken of door de hoofdschakelaar
van de woning uit te schakelen.
Draag bij alle installatie- en
onderhoudswerkzaamheden
werkhandschoenen. Dit apparaat mag
niet worden gebruikt door kinderen of
door personen met beperkte sensorische
of geestelijke capaciteiten of met weinig
ervaring en onvoldoende kennis, tenzij dit
niet geschiedt onder het toezicht of volgens
de gebruiksaanwijzingen van een persoon
die verantwoordelijk is voor hun veiligheid.
De kinderen moeten altijd gecontroleerd
worden zodat zij niet met het apparaat
spelen. De wasemkap nooit gebruiken als
het rooster niet goed gemonteerd is! De
wasemkap NOOIT als steunvlak gebruiken
tenzij dit niet uitdrukkelijk is aangegeven.
Altijd voor een goede ventilatie van de
ruimte zorgen als de wasemkap tegelijkertijd
wordt gebruikt met andere apparaten die
gas en andere brandstoffen toepassen. De
gezogen lucht mag niet afgevoerd worden
in een leiding die gebruikt wordt voor de
afvoer van rook van apparaten die gas of
andere brandstoffen toepassen.
Het is streng verboden met open vlammen
onder de wasemkap te koken.
Het gebruik van open vlammen is schadelijk
voor de filters en kan brand veroorzaken,
daarom moet het absoluut vermeden
worden. Het frituren moet geschieden
onder voortdurend toezicht om te
voorkomen dat verhit vet in brand raakt.
Let op! De bereikbare onderdelen
kunnen bijzonder warm worden als
deze tegelijkertijd met kookapparaten
gebruikt worden.
Wat betreft technische- en
veiligheidsmaatregelen voor de rookafvoer
zich strikt houden aan de regelingen
voorzien door de plaatselijke bevoegde
autoriteiten. De wasemkap moet
regelmatig schoongemaakt worden, zowel
binnen als buiten (MINSTENS EENMAAL
PER MAAND, neem in ieder geval hetgeen
in deze handleiding is aangegeven in acht).
Het niet in acht nemen van de
reinigingsnormen van de wasemkap en van
de vervanging en reiniging van de filters
kan brandgevaar veroorzaken.
Zorg altijd dat de lampjes in de kap
aanwezig en goed gemonteerd zijn om
het gevaar voor elektrische schokken te
voorkomen. Iedere aansprakelijkheid
voor eventuele schade aan het apparaat
of brand veroorzaakt door het niet in acht
nemen van de aanwijzingen uit deze
handleiding wordt afgewezen.
Opgelet! Indien de schroeven
en bevestigingssystemen niet in
overeenstemming met deze instructies
gemonteerd zijn kan dit leiden tot
elektrische gevaren.
2. GEBRUIK
De kap is ontwikkeld om rook en
kookdampen af te zuigen. In het bijgesloten
montageboekje is aangegeven welke
uitvoering mogelijk is voor het model in Uw
bezit: in de afzuigversie met afvoer naar
buiten
luchtcirculatie
of in de filtrerende versie met
.
3. HET INSTALLEREN
De netspanning moet corresponderen met
de spanning die vermeld wordt op het etiket
met eigenschappen, aan de binnenkant
van de wasemkap. Als de wasemkap
een stekker heeft, moet deze in een
stopcontact worden gestoken dat voldoet
aan de geldende voorschriften op een, ook
na de installatie, goed bereikbare plaats.
Heeft de kap geen stekker (rechtstreekse
verbinding met het net) of is deze, ook na
de installatie, niet goed te bereiken, dan
moet er een tweepolige schakelaar worden
geplaatst die de volledige ontkoppeling
van het net garandeert in het geval
van een overspanning van klasse III,
in overeenstemming met de installatie
normen.
Attentie! Alvorens de wasemkap weer
aan het voedingsnet aan te sluiten
controleer of deze goed functioneert,
controleer altijd of de voedingskabel
goed gemonteerd is.
Page 18
18
www.aeg.com
Attentie! De voedingskabel moet door
de bevoegde technische assistentie
dienst worden vervangen om ieder
risico te voorkomen.
De minimum afstand tussen het kookvlak
van het fornuis en het laagste deel van de
afzuigkap mag niet onder de 50cm liggen,
in geval van een elektrisch fornuis en 65cm,
in geval van een gas- of gemengd fornuis.
Indien in de installatie-aanwijzing van
het gaskooktoestel een grotere afstand
wordt aangegeven moet hiermee rekening
worden gehouden.
4. ONDERHOUD
Attentie! Koppel, voor ieder
onderhoud, eerst de wasemkap van het
elektriciteitsnet af door de stekker weg
te trekken of door de hoofdschakelaar
van de woning uit te schakelen.
De kap moet regelmatig schoon gemaakt
worden, zowel binnen als buiten (tenminste
met dezelfde regelmaat waarmee de
vetfilters gereinigd worden). Gebruik
voor het reinigen een doek die u vochtig
maakt met een beetje neutraal vloeibaar
reinigingsmiddel. Gebruik geen producten
die schuurmiddelen bevatten.
GEEN ALCOHOL GEBRUIKEN!
Attentie! Als u deze aanwijzingen
m.b.t. reiniging van het apparaat en
vervanging resp. reiniging van de filters
niet opvolgt, kan dat tot brand leiden.
Deze aanwijzingen beslist opvolgen!
De fabrikant is niet aansprakelijk voor
schade aan de motor of schade t.g.v.
brand die het gevolg zijn van ondeskundig
onderhoud of niet opvolgen van de
bovengenoemde veiligheidsvoorschriften.
4.1 Vetfilter - Het metalen vetfilter moet
eenmaal per maand worden gereinigd
met neutrale reinigingsmiddelen, met de
hand of in de vaatwasmachine op lage
temperaturen en met een kort programma.
Door hem in de vaatwasmachine te wassen
kan het metalen vetfilter ontkleuren, maar
dit is niet van invloed op de eigenschappen,
die beslist niet veranderen.
4.2 Wasbaar koolstoffilter - De
verzadiging van de koolstoffilter vindt
plaats na een min of meer geprolongeerd
gebruik en hangt af van het soort koken en
de regelmaat waarmee de vetfilter wordt
gewassen. In ieder geval moet de filter
minstens om de 4 maanden vervangen
worden. Het kan NIET gewassen of
opnieuw gebruikt worden
Page 19
NEDERLANDS
19
5. BEDIENINGSELEMENTEN
De kap is voorzien van een
bedieningspaneel met een schakelaar
voor de snelheid van afzuiging en een
schakelaar voor de verlichting van het
fornuis.
In geval van een sterkere dampconcentratie
een hogere zuigkracht gebruiken.
We raden aan de afzuigkap 5 minuten
voordat men begint te koken aan te doen
en deze nog voor ongeveer 15 minuten
nadat men beëindigt heeft aan te laten.
De schakelaars bevinden zich aan de
voorkant van de kap:
A
B
A toets OFF (toets uitgeschakeld) - toets
ON (toets ingeschakeld) Druk op de
toets om de gewenste functie te kiezen:
ON (toets ingeschakeld): de kap stelt
de laatst gekozen stand in
OFF (toets uitgeschakeld): alle
functies zijn uitgeschakeld behalve de
verlichting.
B toets voor kiezen van de stand
(zuigkracht)
Druk op deze toets totdat de gewenste
stand (vermogen) geselecteerd is (1 - 2
- 3).
C display: geeft de gekozen zuigkracht
(1-2-3) en geeft de filterverzadiging aan
(F).
D inschakelen intensief-stand:na 5
minuten intensief-stand schakelt de
kap op de eerder ingestelde stand
terug resp. uit, als geen stand is
ingesteld. Om de intensief-stand eerder
te beëindigen, toets A , B of D
indrukken.
E in-/uitschakelen verlichting
Als het apparaat of de bedieningselementen
niet functioneren: minstens 5 seconden de
stroomverzorging naar de kap onderbreken
en dan opnieuw inschakelen.
C
D
E
gebruik als recirculatiekap met koolfilter).
Deze kap wordt door de fabriek zonder
koolfilter geleverd, daarom is de
verzadigingsindicatie voor het koolfilter
uitgeschakeld.
Als de kap echter met koolfilter in gebruik
wordt genomen, dan moet
deze verzadigingsindicatie als volgt worden
ingeschakeld:
De kap moet op “UIT” ingesteld zijn.
Druk tegelijkertijd, 3 seconden lang, op
de toetsen
en de LED van de 1ste stand begint te
knipperen, na 1 seconden begint ook de
LED van de 2de stand te knipperen en een
geluidssignaal (pieptoon) geeft aan dat de
instelling plaats heeft gehad.
Om de verzadigingsindicatie van het
koolfilter te verwijderen drukt u tegelijkertijd,
3 seconden lang, op de toetsen B en
D , de LED F gaat aan en de LED van
de 1ste stand (vetfilter) en de LED van de
2de stand beginnen te knipperen, na een
seconde knippert alleen de LED van de
1ste stand, een geluidssignaal (pieptoon)
geeft aan dat de instelling plaats heeft
gehad.
LED-indicatie vetfilters
De LED van de 1ste stand (+ LED F)
knippert als de vetfilters moeten worden
gereinigd. Zie hoofdstuk “Onderhoud Metalen vetfilters”.
LED-indicatie koolfilter
De LED van de 2de stand (+ LED F)
knippert als het koolfilter moet worden
gereinigd of vervangen. Zie hoofdstuk
“Onderhoud - Koolfilter”.
Reset verzadigingsindicatie
Na reinigen of vervangen van de vetfilters
resp. het koolfilter toets A 3
seconden ingedrukt houden tot de LED van
de 1ste stand of die van de
2de stand niet meer knippert. Ook de LED
F gaat uit.
B en D , de LED F gaat aan
Controle-inrichting voor vet- en
koolfilters
Deze afzuigkap beschikt over een inrichting
die aangeeft wanneer de vetfilters resp.
het koolfilter gereinigd moeten worden (bij
Page 20
20
www.aeg.com
6. VERLICHTING
Sluit de stroom af.
Attentie! Alvorens de lampjes aan te raken
controleer eerst of ze koud zijn.
Gebruik alleen halogeenlampjes van 12V
-20W max - G4, en zorg ervoor dat u hen
niet met de blote hand aanraakt.
Page 21

ES MANUAL DE USO
PARA OBTENER RESULTADOS PERFECTOS
Gracias por escoger este producto AEG. Lo hemos creado para ofrecerle un rendimiento
impecable durante muchos años, con tecnologías innovadoras que le facilitarán la vida:
características que probablemente no encontrará en electrodomésticos corrientes.
Lea durante algunos minutos este documento para aprovechar al máximo este
electrodoméstico.
Visite nuestro sitio web para:
Obtener consejos, folletos, soluciones a problemas e información de servicio:
www.aeg.com
Registrar su producto para recibir un mejor servicio:
www.aeg.com/productregistration
Adquirir accesorios, artículos de consumo y recambios originales para su aparato:
www.aeg.com/shop
ASPECTOS MEDIOAMBIENTALES
Recicle los materiales con el símbolo . Coloque el material de embalaje en los
contenedores adecuados para su reciclaje.Ayude a proteger el medio ambiente y la salud
pública, así como a reciclar residuos de aparatos eléctricos y electrónicos. No deseche los
aparatos marcados con el símbolo junto con los residuos domésticos. Lleve el producto
a su centro de reciclaje local o póngase en contacto con su oficina municipal.
ESPAÑOL
21
ATENCIÓN Y SERVICIO AL CLIENTE
Le recomendamos que utilice recambios originales.
Al contactar con el Servicio, cerciórese de tener la siguiente información a mano.
La información se puede encontrar en la placa de características. Modelo, PNC, Número de
serie.
Advertencia - Precaución-Información sobre seguridad.
Información general y consejos
Información medioambiental.
Sujeto a cambios sin previo aviso.
Page 22
22
www.aeg.com
1. INSTRUCCIONES DE
SEGURIDAD
Precaución! Aténgase estrictamente a
las instrucciones del presente manual.
Se declina cada responsabilidad por
eventuales inconvenientes, daños
o incendios provocados al aparato
originados por la inobservancia de
las instrucciones colocadas en este
manual. La campana ha sido concebida
exclusivamente para un uso doméstico.
Advertencia! No conectar el aparato a
la red eléctrica hasta que la instalación
fue completada.
Antes de cualquier operación de limpieza
o mantenimento, desenchufar la
campana o el interruptor general de la
casa.
Todas las operaciones de instalación y
mantenimiento se deben realizar utilizando
guantes de trabajo.
El aparato no está destinado para el
uso por parte de los niños o personas
con problemas fisicos o mentales y sin
experiencia y conocientos a menos que no
sea bajo la supervisión de profesionales
,o por una persona responsable de
su seguridad. Los niños deben ser
controlados para evitar que jueguen con el
aparato. Nunca utilizar la campana sin la
parrilla correctamente montada!
La campana no debe ser nunca
utilizada como plano de apoyo solo si es
expresamente indicado.
El ambiente debe poseer suficiente
ventilación, cuando la campana de cocina
es utilizada conjuntamente con otros
aparatos a gas u otros combustibles.
El aire aspirado no debe ser mezclado
en un conducto para descarga de humo
producidos por aparatos a gas u otros
combustibles.
Es prohibido cocinar alimentos con llama
alta por debajo de la campana.
El uso de las llamas libres puede provocar
daños a los filtros y dar lugar a incendios,
por lo tanto evitar en cada caso.
Las frituras deben ser cocinadas bajo
control para evitar que el aceite recalentado
prenda fuego.
Precaución! Las partes accessibles
pueden calentarse cuando se usan
junto a aparatos para la cocción.
En cuanto a las medidas técnicas y de
seguridad adoptar para la descarga de
humo atenerse estrictamente a las reglas
de las autoridades locales.
La campana se debe limpiar siempre
internamente y externamente (COMO
MINIMO UNA VEZ AL MES, respetando las
reglas indicadas en este manual)
No efectuar los consejos de limpieza
de la campana y el cambio de los filtros
puede provocar incendios. No utilice
o deje la campana sin las lámparas
correctamente montadas, debido a riesgos
de cortocircuito. Se declina todo tipo de
responsabilidades, daños o incendios
provocados por no leer atentamente las
instrucciones indicadas en este manual.
Advertencia! La falta de instalación
de tornillos y elementos de fijación
de acuerdo con estas instrucciones
podría comportar riesgos de naturaleza
eléctrica.
2. USO
La campana sirve para aspirar los humos y
vapores derivantes de la cocción. .
En el folleto de instalación adjunto viene
indicada cuál versión es posible utilizar
para el modelo en vuestra posesión entre
la versión aspirante a evacuación externa
o filtrante a recírculo interno .
3. INSTALACIÓN
La tensión de red debe corresponder con
tensión indicada en la etiqueta colocada en
el interior de la campana.Si es suministrada
con un enchufe, conectar la campana a
un enchufe conforme a las normas en
vigor y colocarlo en una zona accesible,
aun después de la instalación. Si no es
suministrada con enchufe (conexión directa
a la red) o clavija y no es posible situarla
en un lugar accesible, aun después de la
instalación, colocar un interruptor bipolar
de acuerdo con las normativas, para
asegurarse la desconexión completa a
la red en el caso de la categoria de alta
tensión III, conforme con las reglas de
instalación.
Antes de reconectar el circuito de
la campana a la red y de verificar el
correcto funcionamiento, controlar
siempre que el cable de red fue
montado correctamente.
Page 23
Atención! La sustitución del cable
de alimentación debe ser efectuado
por el servicio de asistencia técnica
autorizado de manera de evitar todo
tipo de riesgo.
La distancia mínima entre la superficie de
cocción y la parte más baja de la campana
no debe ser inferior a 50cm en el caso de
cocinas electricas y de 65cm en el caso de
cocinas a gas o mixtas. Si las instrucciones
para la instalación del dispositivo para
cocinar con gas especifican una distancia
mayor, hay que tenerlo en consideración.
4. MANTENIMIENTO
¡Atención! Antes de cualquier
operación de limpieza o mantenimiento,
retire la campana de la red eléctrica
desconectando el enchufe o
desconectando el interruptor general de
la casa.
La campana debe ser limpiada con
frecuencia tanto externamente como
internamente (con la misma frecuencia con
la que se realiza el mantenimiento de los
filtros de grasa). Para la limpieza, utilice
un paño impregnado de detergente líquido
neutro. No utilice productos que contengan
abrasivos. ¡NO UTILICE ALCOHOL!
¡Atención! De no observarse las
instrucciones dadas para limpiar el
aparato y sustituir el filtro, puede
producirse un incendio. El fabricante
recomienda leerlas y respetarlas
atentamente.
El fabricante no se hace responsable
por los daños al motor o los incendios
provocados en el aparato debido a
intervenciones de mantenimiento
incorrectas o al incumplimiento de las
normas de seguridad proporcionadas.
4.1 Filtro antigrasa - El filtro antigrasa
metálico debe limpiarse una vez al mes con
detergentes no agresivos, manualmente o
bien en lavavajillas a bajas temperaturas
y con ciclo breve. Con el lavado en el
lavavajilla el filtro antigrasa metálico puede
desteñirse pero sus características de
filtrado no cambian absolutamente.
ESPAÑOL
4.2 Filtro al carbón activo - Filtro al
carbón activo lavable - La saturaciòn
del carbòn activado ocurre despuès da
mas o menos tiempo de uso prolongado,
dependiendo del tipo de cocina y de la
regularidad de limpieza del filtro de grasa.
En cualquier caso es necesario sustituir
el cartucho al menos cada 4 meses. NO
puede lavarse o reciclarse.
5. MANDOS
La campana está dotada de un panel de
mandos con control de las velocidades de
aspiración y control de encendido de la luz
para la iluminación del plano de cocción.
Usar la potencia de aspiraciòn mayor
en caso de particular concentraciòn de
vapores de cocina. Aconcejamos de
encender la aspiraciòn 5 minutos antes de
iniciar a cocinar y dejarla en funciòn por
otros 15 minutos aproximadamente.
Los mandos en el lado frontal del aparato:
A
B
C
D
E
23
A Tecla OFF (tecla apagado) ON (Tecla
encendido)
Apretar una o más veces para obtener
Page 24

24
www.aeg.com
la función deseada:
ON (tecla encendido ): la campana
imposta la ultima velocidad
seleccionada.
OFF (tecla apagado ): todas las
funciones deshabilitadas ,excepto la
iluminación
B Tecla de selección de la velocidad
(potencia de aspiración).Apretar esta
tecla una o más veces para elegir la
velocidad (potencia) de aspiración más
adecuada (1 - 2 - 3 ).
C Pantalla: visualiza la potencia de
aspiración seleccionada (1-2-3), señala
la saturación de los filtros (F).
D Tecla insertado velocidad intensiva.
Una vez insertada,la velocidad
intensiva permanecerá en función por
aproximadamente 5 minutos , luego de
que la campana volverá a la velocidad
precedentemente seleccionada
(de 1 a 3) o inclusive se apaga si
precedentemente no había sido
seleccionada ninguna velocidad. Para
desinsertar el intensivo antes de que
hayan pasado los 5 minutos, apretar la
tecla A o la tecla B .
E Tecla ON/OFF luz.
En caso en que la campana o los mandos
no funcionen, se aconseja interrumpir la
alimentación por al menos 5 segundos
y luego reencender. Esperar luego 15
segundos y verificar si la campana funciona
correctamente.
Apretar contemporáneamente las teclas
B y D por tres segundos, el LED F se
enciende e inicia a destellar el led de la 1°
velocidad, después de 1 segundo también
destella el led de las 2° velocidad y el
sistema emite una señal sonora (- Beep -)
para indicar la ejecutada impostación.
Para remover la señal del filtro carbón
apretar contemporáneamente las teclas
B y D por tres segundos, el LED F se
enciende e inicia a destellar el led de la
1° velocidad (filtro grasas) y el led de la
2° velocidad, después de 1 segundo sólo
destellará el led de la 1° velocidad, el
sistema emite una señal sonora (- Beep -)
para indicar la ejecutada impostación.
LED( 1) señal de saturación filtro
grasas.
El destello del led de la velocidad 1 advierte
al operador que los filtros grasas tienen que
ser lavados.
Leer cuidadosamente las instrucciones
relativas a la manutención de los filtros
grasas para la limpieza de los mismos.
Led (2) señal de saturación filtro a
carbones activos
El destello del led de la velocidad 2 advierte
al operador que el filtro carbón tiene que
ser lavado o reemplazado.
Leer cuidadosamente las instrucciones
relativas al lavado o sustitución del filtro
carbón.
Dispositivo para el control del filtro
grasas y al carbón activo.
Este tipo de campana viene predispuesta
con un dispositivo que señala cuando
el filtro grasas o el filtro al carbón activo
necesita ser limpiado (vendido con el filtro
al carbón activo por la empresa productora
especializada en aparatos de aspiración).
Este tipo de campana viene provista por
el fabricante sin el filtro al carbón activo ,
por lo tanto la señal de saturación viene
desactivada.
En el caso se quiera utilizar la campana
con filtro al carbón, entonces activar la
señal de saturación del filtro al carbón
como sigue:
La campana debe ser programada en
“OFF.”
Restablecimiento del indicador de
saturación
Después de haber ejecutado la
manutención de los filtros, tener apretada la
tecla A . por 3 segundos hasta que el LED
1 o 2 dejen de destellar.
Page 25

6. ILUMINACIÓN
Desconecte el aparato de la red elèctrica.
¡Atención! Antes de tocar las lámparas
asegúrese de que esten frías.
Utilizar sólo lámparas halógenas de 12V
-20W max - G4 (Adecuada para su uso en
luminaria abierta) prestando atención en no
tocarlas con las manos.
ESPAÑOL
25
Page 26

PT LIVRO DE INSTRUÇÕES PARA UTILIZAÇÃO.
www.aeg.com26
PARA RESULTADOS PERFEITOS
Obrigado por escolher este produto AEG. Criámo-lo para lhe oferecer um desempenho
impecável durante vários anos, com tecnologias inovadoras que tornam a sua vida mais
fácil – funcionalidades que poderá não encontrar em aparelhos comuns. Continue a ler
durante alguns minutos para tirar o máximo partido do produto.
Visite o nosso website para:
Resolver problemas e obter conselhos de utilização, catálogos e informações
sobre serviços:
www.aeg.com
Registar o seu produto para beneficiar de um serviço melhor:
www.aeg.com/productregistration
Adquirir acessórios, consumíveis e peças de substituição originais para o seu
aparelho:
www.aeg.com/shop
PREOCUPAÇÕES AMBIENTAIS
Recicle os materiais que apresentem o símbolo . Coloque a embalagem nos
contentores indicados para reciclagem.
Ajude a proteger o ambiente e a saúde pública através da reciclagem de aparelhos
eléctricos e electrónicos. Não elimine os aparelhos que tenham o símbolo juntamente
com os resíduos domésticos. Coloque o produto num ponto de recolha para reciclagem
local ou contacte as suas autoridades municipais.
APOIO AO CLIENTE E ASSISTÊNCIA
Recomendamos a utilização de peças de substituição originais.
Quando contactar a Assistência, certifique-se de que tem os seguintes dados disponíveis.
A informação encontra-se na placa de características. Modelo, PNC, Número de Série.
Aviso / Cuidado - Informações de segurança.
Informações gerais e sugestões
Informações ambientais.
Sujeito a alterações sem aviso prévio.
Page 27

PORTUGUÊS
27
1. INSTRUÇÕES DE SEGURANÇA
Cuidado! Siga especificamente as
instruções indicadas neste manual.
Declina-se qualquer responsabilidade
por eventuais inconvenientes, danos
ou incêndios provocados ao aparelho,
derivantes da inobservância das
instruções indicadas neste manual.
O exaustor foi projectado para ser
utilizado exclusivamente em ambientes
domésticos.
Advertência! Não conectar o aparelho à
rede elétrica enquanto a instalação não
tiver sido totalmente completada.
Antes de qualquer limpeza ou
manutenção, desligar a coifa da rede
elétrica tirando o pluge da tomada
ou desligando o interruptor geral da
alimentação elétrica.
Para todas as operações de instalação
e manutenção, utilize luvas adequadas
para este tipo de atividade. O aparelho
não é destinado para uso de crianças ou
pessoas com alguma incapacidade fisica,
motoras, ou mentais reduzidas, e também
à às pessoas sem experiência ou sem
conhecimentos suficientes. Devem ser de
ser auxiliadas por alguém que tenha com
conhecimento e capacidade competência
para utilizar o aparelho. As crianças devem
ser controladas de maneira que não
brinquem com o aparelho. Nunca utilizar
a coifa sem a grelha esteja corretamente
montada! A coifa NUNCA deve ser
utilizada como plano de apoio. Quando
a coifa é utilizada ao mesmo tempo com
outros aparelhos a combustão de gás ou
outros combustíveis o local deve dispor
de suficiente ventilação. O ar aspirado
não deve ser transportado por meio de
ductos usados para a descarga dos fumos
produzidos por aparelhos a combustão
de gás ou de outros combustíveis. É
severamente proibido cozinhar alimentos
diretamente na chama sob a coifa. O
emprego de chama livre é danoso para
os filtros e pode dar lugar a incêndios,
portanto, deve ser absolutamente evitado.
A fritura deve ser feita sob controlo de
modo a evitar que o óleo superaquecido se
incendeie.
Cuidado! As partes externas podem
aquecer-se notávelmente quando forem
usadas com os aparelhos de cocção.
No que diz respeito às medidas técnicas e
de segurança a serem adoptadas para a
descarga dos fumos, ater-se estritamente
a quanto previsto pelos regulamentos das
autoridades competentes locais.
A coifa deve ser limpa frequentemente
tanto interna quanto externamente (AO
MENOS UMA VEZ POR MÊS, respeitando
as instruções de manutenção indicadas
neste manual).
O não atendimento às normas de limpeza
da coifa e de substituição e limpeza dos
filtros pode provocar riscos de incêndio.
A coifa não de ser utilizada sem lâmpadas
ou com sua montagem incorreta, pois isto
pode provocar risco de choque elétrico.
Não nos responsabilizamos por eventuais
inconvenientes, danos ou incêndios
provocados ao aparelho, caso as
instruções indicadas neste manual não
sejam seguidas corretamente.
Atenção! A não instalação dos
parafusos e elementos de fixação,
conforme estas instruções, pode
resultar em riscos elétricos.
2. USO
O exaustor serve para sugar a fumaça e
vapores da cozinha.
No manual de instalação que acompanha
o aparelho, vem indicado qual versão é
possível utilizar para o modelo no seu
poder entre a versão aspirante com
evacuação ao exterior ou a filtragem
com recirculação interna .
3. INSTALAÇÃO
A voltagem da rede elétrica deve
corresponder à voltagem indicada na
etiqueta das características situada no
interior da coifa. Se dotada de ficha,
conectar a coifa a uma tomada em
conformidade com as normas vigentes
posta em zona acessível,mesmo depois
da instalação. Se não dotada de ficha
(conexão direta à rede) ou a tomada não
se encontra em zona acessível,mesmo
depois da instalação, aplicar um interruptor
bipolar em conformidade com a norma que
assegure a desconexão completa da rede
nas condições da categoria de sobretensão
III, conformemente às regras de instalação.
Atenção! Antes de conectar novamente
o circuito da coifa com a alimentação
elétrica, verificar seu funcionamento,
atentar sempre para que o cabo de
rede esteja montado corretamente.
Page 28
28
www.aeg.com
Atenção! A substituição do cabo
de alimentação deve ser efetuada
pelo serviço de assistência técnica
autorizado de modo a prevenir qualquer
risco.
A distância mínima entre a superfície de
suporte dos recipientes sobre o fogão
e a parte mais baixa da coifa não deve
ser inferior a 50cm no caso de fogões
elétricos e 65cm no caso de fogões a
gás ou combinados. Se as instruções de
instalação do fogão a gás especificarem
uma distância maior, deve-se levar em
conta esta indicação.
4. MANUTENÇÃO
Atenção! Antes de qualquer
operação de limpeza ou manutenção,
desconectar a coifa da rede elétrica
tirando o pluge da tomada ou
desligando o interruptor geral da
alimentação elétrica.
O exaustor deve ser limpo frequentemente,
interna e externamente (pelo menos com a
mesma frequência com a qual se efectua a
manutenção dos filtros antigorduras).
Para a limpeza use um pano umedecido
com detergentes líquidos neutros. Evite o
uso de produtos contendo abrasivos. NÃO
UTILIZE ÁLCOOL!
Atenção! O não cumprimento das
instruções fornecidas para a limpeza
do aparelho e para a limpeza ou
substituição do filtro pode provocar
riscos de incêndio.
O fabricante não se responsabiliza por
danos causados ao motor ou decorrentes
de incêndio, provocados por uma
manutenção inadequada ou pelo não
cumprimento das indicações de segurança
citadas neste manual.
4.1 Filtro de gordura - O Filtro de gordura
deve ser limpo uma vez por mês com
detergentes não agressivos. O filtro pode
ser lavado manualmente ou em máquina
de lavar louça a baixas temperaturas e com
ciclo breve. O filtro metálico para a gordura
pode perde cor com as lavagens na
máquina da louça, mas suas características
de filtração não se alteram.
4.2 - Filtro de carvão acrivolavável
A saturação do filtro de carvão activado
se verifica após um uso mais ou menos
prolongado em função do tipo de cozinha
e da regularidade da limpeza do filtro de
gorduras. Em todo caso, é necessário
substituir o cartucho no máximo cada 4
meses.
NÃO pode ser lavado ou regenerado.
5. COMANDOS
O exaustor é dotado de um painel de
comandos com um controlo de velocidade
de aspiração e um controlo para acender a
luz de iluminação do plano de cozedura.
Usar a potência de aspiração no caso
de uma maior concentração de vapor
de cozimento. Aconselhamos ligar a
aspiração 5 minutos antes de iniciar a
cozinhar e de deixá-la em funcionamento
por aproximadamente 15 minutos após o
Page 29

PORTUGUÊS
29
término do cozimento.
Os comandos frontais do aparelho:
A
B
A Tecla OFF ( botão desligado) – ON
(botão ligado)
Pressionar uma ou mais vezes para
obter a função desejada:
ON (botão ligado): A coifa define a
ultima velocidade selecionada.
OFF (botão desligado): todas as
funções desativadas exceto a
iluminação.
B Tecla de seleção de velocidade
(potência de aspiração) pressione-a de
novo e então novamente para escolher
a velocidade (potência) de aspiração
adequada ( 1-2-3 ).
C Display : Visualiza a potência de
aspiração selecionada ( 1-2-3 ), indica
a saturação dos filtros ( F ).
D Tecla seleção de velocidade intensiva.
Quando selecionada, a velocidade
intensiva terá uma duração de cerca
de 5 minutos, após o processo a coifa
volta a velocidade anteriormente
selecionada ( de 1 a 3) ou então é
desligada se precedentemente não foi
escolhida nenhuma velocidade. Para
desativar a velocidade intensiva antes
que sejam passados os 5 minutos
pressione a tecla A ou a tecla B .
E Tecla ON/OFF Luz
Se a coifa ou os comandos não funcionam,
aconselha-se de interromper a alimentação
na rede elétrica pelo menos 5 segundos e
então religar.. Após o termine esperar 15
segundos e verificar se a coifa funciona
corretamente.
Dispositivo para o controle de filtro de
gordura e para o carvão ativo.
Este tipo de coifa é projetado com um
dispositivo que indica quando o filtro
de gordura ou o filtro de carvão ativo
necessitam ser limpo (vendida com o filtro
de carvão ativo pela empresa especializada
e produtora em aparelhos de aspiração).
Este tipo de coifa vem fornecido do
C
D
E
fabricante sem o filtro de carvão ativo,
portanto a função de saturação é
desativada.
Se deseje usar a coifa com o filtro de
carvão, então ativar a função de saturação
do filtro de carvão seguinte:
A coifa deve estar em “OFF”.
Pressione contemporaneamente as teclas
B e D por três segundos, o LED F se
acenderá e iniciará a lampejar o LED da 1°
velocidade, após um segundo lampejará
também o LED velocidade 2 e o sistema
emite um sinal sonoro ( -Beep- ) indicando
assim a configuração bem sucedida.
Para remover a sinalização do filtro de
carvão pressionar ao mesmo tempo as
teclas B e D por três segundos, o LED
F se acenderá e iniciará a piscar o LED da
1° velocidade (filtro de gordura) e o LED da
2° velocidade, ao termine de um segundo
lampejará só o LED da velocidade 1, o
sistema emite um sinal sonoro ( -Beep- )
para indicar a conclusão bem sucedida.
Led ( 1 ) sinalização da saturação de
filtro de gordura
Quando picar o LED da velocidade 1 é
uma sinal para o operador que os filtros de
gordura devem ser lavados.
Leia atentamente as instruções relativas
às manutenções e limpeza dos filtros de
gordura.
Led ( 2 ) sinalização de saturação filtro
ao carvão ativo.
O piscar do LED da velocidade 2 adverte
ao operador que o filtro de carvão deve ser
limpo ou substituído.
Leia atentamente as instruções de limpeza
ou substituição dos filtros de carvão.
Restauração do indicador de saturação
Depois de haver concluído a manutenção
dos filtros, manter pressionado a tecla
A por 3 segundos até que o LED 1 ou 2
parem de piscar.
Page 30
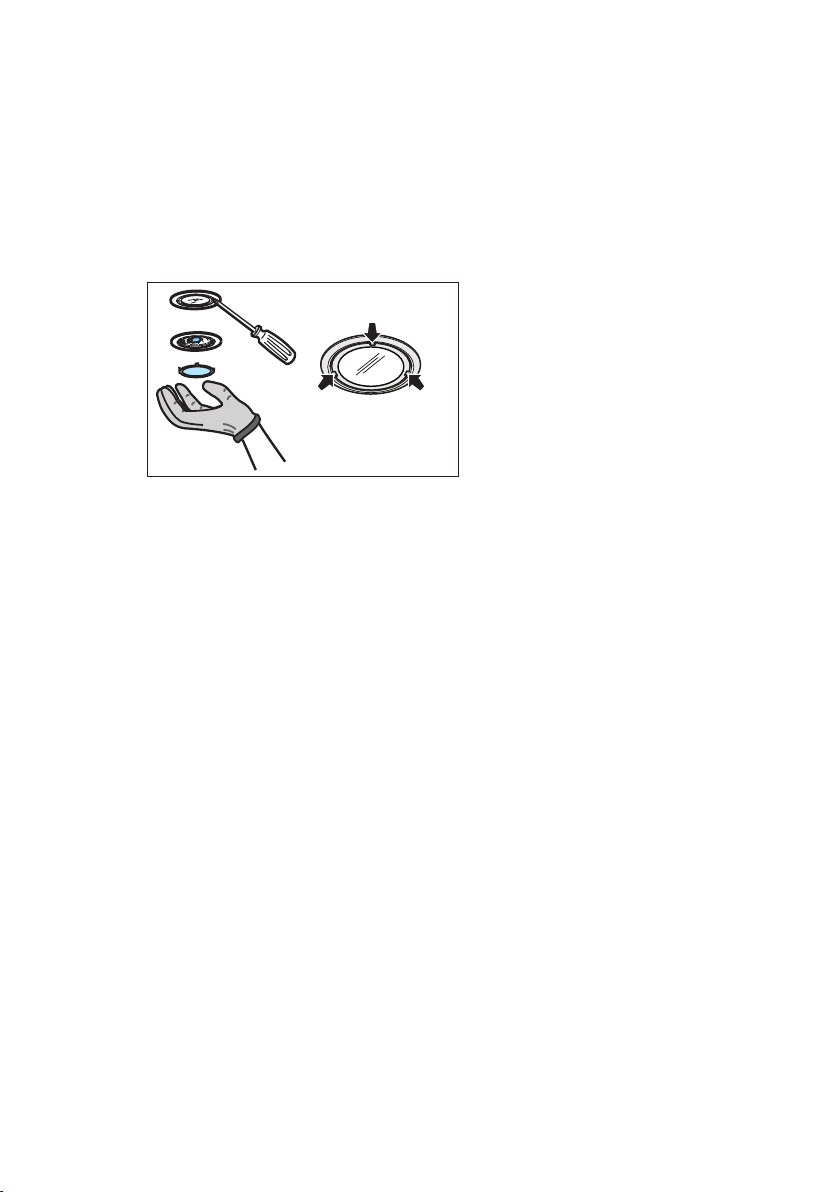
30
www.aeg.com
6. ILUMINAÇÃO
Desligar o aparelho da rede elétrica;
Atenção! Antes de tocar as lâmpadas,
certificar-se que estejam frias.
Utilize exclusivamente lâmpadas de
halogéneo de 12V - 20W max - G4,
tomando o cuidado para não as tocar com
as mãos.
Page 31

IT LIBRETTO DI USO
PER RISULTATI PERFETTI
Grazie per aver scelto di acquistare questo prodotto AEG. Lo abbiamo creato per fornirvi
prestazioni impeccabili per molti anni, grazie a tecnologie innovative che vi semplificheranno
la vita - funzioni che non troverete sulle normali apparecchiature. Vi invitiamo a dedicare
qualche minuto alla lettura del presente manuale, per conoscere come trarre il massimo
vantaggio dall’utilizzo della vostra apparecchiatura.
Visitate il nostro sito web per:
ricevere consigli, scaricare i nostri opuscoli, eliminare eventuali anomalie, ottenere
informazioni sull’assistenza:
www.aeg.com
registrare il vostro prodotto e ricevere un servizio migliore:
www.aeg.com/productregistration
acquistare accessori, materiali di consumo e ricambi originali per la vostra
apparecchiatura:
www.aeg.com/shop
CONSIDERAZIONI AMBIENTALI
ITALIANO
31
Riciclare i materiali con il simbolo . Buttare l’imballaggio negli appositi contenitori per il
riciclaggio.
Aiutare a proteggere l’ambiente e la salute umana e a riciclare rifiuti derivanti da
apparecchiature elettriche ed elettroniche. Non smaltire le apparecchiature che riportano il
simbolo insieme ai normali rifiuti domestici. Portare il prodotto al punto di riciclaggio più
vicino o contattare il comune di residenza.
SERVIZIO CLIENTI E MANUTENZIONE
Consigliamo sempre l’impiego di ricambi originali.
Quando si contatta l’Assistenza, accertarsi di disporre dei seguenti dati.
Le informazioni si trovano sulla targhetta di identificazione. Modello, numero
dell’apparecchio (PNC), numero di serie.
Avvertenza / Attenzione - Importanti Informazioni di Sicurezza
Informazioni e suggerimenti generali
Informazioni sull’ambiente.
Con riserva di modifiche
Page 32

32
www.aeg.com
1. ISTRUZIONI DI SICUREZZA
Avvertenza! Attenersi strettamente alle
istruzioni riportate in questo manuale. Si
declina ogni responsabilità per eventuali
inconvenienti, danni o incendi provocati
alla cappa derivati dall’inosservanza
delle istruzioni riportate in questo
manuale. La cappa è stata progettata
esclusivamente per uso domestico.
Attenzione! Non collegare
l’apparecchio alla rete elettrica finche
l’installazione non è totalmente
completata. Prima di qualsiasi
operazione di pulizia o manutenzione,
disinserire la cappa dalla rete elettrica
togliendo la spina o staccando
l’interruttore generale dell’abitazione.
Per tutte le operazioni di installazione e
manutenzione utilizzare guanti da lavoro
L’apparecchio non è destinato all’utilizzo
da parte di bambini o persone con ridotte
capacità fisiche sensoriali o mentali e con
mancata esperienza e conoscenza a meno
che essi non siano sotto la supervisione o
istruiti nell’uso dell’apparecchiatura da una
persona responsabile per la loro sicurezza.
I bambini devono essere controllati
affinché non giochino con l’apparecchio.
Mai utilizzare la cappa senza griglia
correttamente montata! La cappa non va
MAI utilizzata come piano di appoggio a
meno che non sia espressamente indicato.
Il locale deve disporre di sufficiente
ventilazione, quando la cappa da cucina
viene utilizzata contemporaneamente ad
altri apparecchi a combustione di gas o
altri combustibili. L’aria aspirata non deve
essere convogliata in un condotto usato per
lo scarico dei fumi prodotti da apparecchi
a combustione di gas o di altri combustibili.
E’ severamente vietato fare cibi alla fiamma
sotto la cappa. L’impiego di fiamma libera è
dannoso ai filtri e può dar luogo ad incendi,
pertanto deve essere evitato in ogni caso.
La frittura deve essere fatta sotto controllo
onde evitare che l’olio surriscaldato prenda
fuoco.
Avvertenza! Quando il piano di cottura
è in funzione le parti accessibili della
cappa possono diventare calde.
Per quanto riguarda le misure tecniche e di
sicurezza da adottare per lo scarico dei fumi
attenersi strettamente a quanto previsto dai
regolamenti delle autorità locali competenti.
La cappa va frequentemente pulita sia
internamente che esternamente (ALMENO
UNA VOLTA AL MESE, rispettare
comunque quanto espressamente indicato
nelle istruzioni di manutenzione riportate
in questo manuale). L’inosservanza
delle norme di pulizia della cappa e della
sostituzione e pulizia dei filtri comporta
rischi di incendi.
Non utilizzare o lasciare la cappa priva
di lampade correttamente montate per
possibile rischio di scossa elettrica.
Si declina ogni responsabilità per eventuali
inconvenienti, danni o incendi provocati
all’apparecchio derivati dall’inosservanza
delle istruzioni riportate in questo manuale.
Attenzione! La mancata installazione
di viti e dispositivi di fissaggio in
conformità di queste istruzioni può
comportare rischi di natura elettrica.
2. USO
La cappa serve per aspirare i fumi e vapori
derivanti dalla cottura.
Nel libretto di installazione allegato è
indicata quale versione è possibile utilizzare
per il modello in Vs. possesso tra la
versione aspirante ad evacuazione esterna
o filtrante a ricircolo interno .
3. INSTALLAZIONE
La tensione di rete deve corrispondere
alla tensione riportata sull’etichetta
caratteristiche situata all’interno della
cappa. Se provvista di spina allacciare
la cappa ad una presa conforme alle
norme vigenti posta in zona accessibile
anche dopo l’installazione. Se sprovvista
di spina (collegamento diretto alla rete) o
la spina non è posta in zona accessibile,
anche dopo installazione, applicare un
interruttore bipolare a norma che assicuri
la disconnessione completa della rete nelle
condizioni della categoria di sovratensione
III, conformemente alle regole di
installazione.
Attenzione! Prima di ricollegare il
circuito della cappa all’alimentazione
di rete e di verificarne il corretto
funzionamento, controllare sempre
che il cavo di rete sia stato montato
correttamente.
Page 33

Attenzione! La sostituzione del cavo
di alimentazione deve essere effettuata
dal servizio assistenza tecnica
autorizzato o da persona con qualifica
similare.
La distanza minima fra la superficie di
supporto dei recipienti sul dispositivo di
cottura e la parte più bassa della cappa da
cucina deve essere non inferiore a 50cm in
caso di cucine elettriche e di 65cm in caso
di cucine a gas o miste.
Se le istruzioni di installazione del
dispositivo di cottura a gas specificano una
distanza maggiore, bisogna tenerne conto.
4. MANUTENZIONE
Attenzione! Prima di qualsiasi
operazione di pulizia o manutenzione,
disinserire la cappa dalla rete elettrica
togliendo la spina o staccando
l’interruttore generale dell’abitazione.
La cappa va frequentemente pulita
(almeno con la stessa frequenza con cui
si esegue la manutenzione dei filtri grassi),
sia internamente che esternamente. Per
la pulizia usare un panno inumidito con
detersivi liquidi neutri.
Evitare l’uso di prodotti contenenti abrasivi.
NON UTILIZZARE ALCOOL!
Attenzione! L’inosservanza delle
norme di pulizia dell’apparecchio e
della sostituzione dei filtri comporta
rischi di incendi. Si raccomanda quindi
di attenersi alle istruzioni suggerite.
Si declina ogni responsabilità per
eventuali danni al motore, incendi
provocati da un’impropria manutenzione
o dall’inosservanza delle suddette
avvertenze.
4.1 Filtro antigrasso - Il filtro antigrasso
metallico deve essere pulito una volta
al mese con detergenti non aggressivi,
manualmente oppure in lavastoviglie a
basse temperature ed a ciclo breve. Con il
lavaggio in lavastoviglie il filtro antigrasso
metallico può scolorirsi ma le sue
caratteristiche di filtraggio non cambiano
assolutamente.
ITALIANO
4.2 - Filtro ai carboni attivi lavabile
La saturazione del filtro carbone si verifica
dopo un uso più o meno prolungato a
seconda del tipo di cucina e della regolarità
della pulizia del filtro grassi. In ogni caso
è necessario sostituire la cartuccia al
massimo ogni quattro mesi.
NON può essere lavato o rigenerato
5. COMANDI
La cappa è fornita di un pannello
comandi con un controllo delle velocità di
aspirazione ed un controllo di accensione
della luce per l’illuminazione del piano di
cottura.
Usare la velocità maggiore in caso di
particolare concentrazione di vapori
di cucina. Consigliamo di accendere
l’aspirazione 5 minuti prima di iniziare a
cucinare e di lasciarla in funzione a cottura
terminata per altri 15 minuti circa.
I comandi sul lato frontale dell’apparecchio:
A
B
C
D
E
33
A Tasto OFF (tasto spento) - ON (tasto
acceso)
Premere una o più volte per ottenere la
Page 34

34
www.aeg.com
funzione desiderata:
ON (tasto acceso): la cappa imposta
l’ultima velocità selezionata.
OFF (tasto spento): tutte le funzioni
disabilitate eccetto l’illuminazione.
B Tasto di selezione della velocità
(potenza di aspirazione)
Premere questo tasto una o più volte
per scegliere la velocità (potenza) di
aspirazione più adatta (1 - 2 - 3 ).
C Display: visualizza la potenza di
aspirazione selezionata (1-2-3),
segnala la saturazione dei filtri (F).
D Tasto inserimento velocità intensiva.
Una volta inserita, la velocità intensiva
rimarrà in funzione per 5 minuti circa,
dopodiché la cappa ritornerà alla
velocità precedentemente selezionata
(da 1 a 3) o addirittura si spegne
se precedentemente non era stata
selezionata nessuna velocità. Per
disinserire l’intensivo prima che siano
passati i 5 minuti premere il tasto A o
il tasto B .
E Tasto ON/OFF luce
Nel caso la cappa o i comandi non
funzionino si consiglia di interrompere
l’alimentazione per almeno 5 secondi e
quindi di riaccendere.. Attendere poi 15
secondi e verificare se la cappa funziona
correttamente.
Dispositivo per il controllo del filtro
grassi e al carbone attivo
Questo tipo di cappa è predisposta per
un dispositivo che segnala quando il filtro
grassi o il filtro al carbone attivo necessita
di essere pulito (venduto con il filtro al
carbone attivo dalla ditta produttrice
specializzata in apparecchi di aspirazione).
Questo tipo di cappa viene fornita dal
fabbricante senza il filtro al carbone attivo
pertanto la spia di saturazione è disattivata.
Nel caso si voglia utilizzare la cappa con
filtro al carbone, allora attivare la spia di
saturazione del filtro al carbone come
segue:
La cappa deve essere impostata su “OFF”.
Premere contemporaneamente i tasti B e
D per tre secondi, il LED F si accende ed
inizia a lampeggerà il led della 1^ velocità
, dopo 1 secondo lampeggia anche il il
led della 2^ velocità ed il sistema emette
un segnale sonoro (-Beep-) ad indicare
l’avvenuta impostazione.
Per rimuovere la segnalazione del filtro
carbone premere contemporaneamente i
tasti B e D per tre secondi, il LED F si
accende ed inizia a lampeggiare il led della
1^ velocità (filtro grassi) e il led della 2^
velocità, dopo 1 secondo lampeggerà solo
il led della 1^ velocità, il sistema emette
un segnale sonoro (-Beep-) ad indicare
l’avvenuta impostazione.
Led (1) di segnalazione saturazione filtro
grassi
Il lampeggio del led della velocità 1 avverte
l’operatore che i filtri grassi devono essere
lavati.
Leggere attentamente le istruzioni relative
alla manutenzione dei filtri grassi per la loro
pulizia.
Led (2) di segnalazione saturazione filtro
ai carboni attivi
Il lampeggio del led della velocità 2 avverte
l’operatore che il filtro carbone deve essere
lavato o sostituito.
Leggere attentamente le istruzioni relative
al lavaggio o sostituzione del filtro carbone.
Ripristino dell’indicatore di saturazione
Dopo aver eseguito la manutenzione
dei filtri, tenere premuto il tasto
A per 3
secondi fino a che il LED 1 o 2 smettono
di lampeggiare.
6. ILLUMINAZIONE
Disinserire l’apparecchio dalla rete elettrica.
Attenzione! Prima di toccare le lampade
sincerarsi che siano fredde.
Utilizzare solo lampade alogene da 12V 20W max - G4, avendo cura di non toccarle
con le mani.
Page 35

SV ANVÄNDNINGSHANDBOK
FÖR PERFEKT RESULTAT
Tack för att du valt denna produkt från AEG. Vi har skapat den så att du ska kunna få felfritt
resultat i många år, med innovativa tekniker som gör livet enklare – funktioner som du inte
skulle hitta hos vanliga produkter. Varsågod att ägna några minuter åt att läsa detta för att
få ut så mycket som möjligt av produkten.
Besök vår webbplats för att:
Få tips om användning, broschyrer, felsökare, serviceinformation:
www.aeg.com
Registrera din produkt för bättre service:
www.aeg.com/productregistration
Köp tillbehör, förbrukningsvaror och originalreservdelar till din produkt:
www.aeg.com/shop
MILJÖSKYDD
Återvinn material med symbolen . Återvinn förpackningen genom att placera den i
lämpligt kärl.
Bidra till att skydda vår miljö och vår hälsa genom att återvinna avfall från elektriska
och elektroniska produkter. Släng inte produkter märkta med symbolen med
hushållsavfallet. Lämna in produkten på närmaste återvinningsstation eller kontakta
kommunkontoret.
SVENSKA
35
KUNDTJÄNST OCH SERVICE
Vi rekommenderar att originalreservdelar används.
Ha följande uppgifter till hands när du kontaktar serviceavdelningen.
Informationen finns på typskylten. Modell, PNC, serienummer.
Varnings-/viktig säkerhetsinformation.
Allmän information och tips
Miljöinformation.
Vi förbehåller oss rätten till ändringar utan föregående meddelande.
Page 36

36
www.aeg.com
1. SÄKERHETSFÖRESKRIF-
TER
Försiktighet! Följ noga instruktionerna
i denna manual. Tillverkaren
frånsäger sig allt ansvar för eventuella
funktionsfel, skador eller bränder som
uppstår på apparaten på grund av att
instruktionerna i denna manual inte har
respekterats. Denna köksfläkt är endast
ämnad för privat bruk i hemmet.
Varning! Anslut inte apparaten till
elnätet förrän installationen är helt
slutförd.
Gör alltid fläkten strömlös innan någon
typ av underhållsarbete eller rengöring
inleds genom att dra ur kontakten eller
slå av bostadens huvudströmbrytare.
Använd alltid skyddshandskar vid
installation och underhåll.
Apparaten får inte användas av barn eller
personer med reducerad rörelseförmåga
eller mental kapacitet, eller personer som
saknar erfarenhet och kännedom om
apparaten, såtillvida inte användandet
övervakas eller instruktioner ges av erfaren
person som ansvarar för säkerheten. Barn
får inte lämnas utan uppsikt för att förhindra
att de leker med apparaten.
Fläkten får alridg användas utan att gallret
är korrekt monterat!
Fläkten får ALDRIG användas som
avställningsyta om inte detta är uttryckligen
angivet.
Lokalen skall vara ordentligt ventilerad
när köksfläkten används tillsammans med
andra apparater vilka matas med gas och
andra typer av bränsle.
Utblåsningsluften får inte ledas in i rökkanal
som används för avledning av rökångor
som kommer från apparater vilka matas
med gas eller andra typer av bränsle.
Det är strängt förbjudet att flambera mat
under fläkten.
Öppna lågor skadar filtren och kan orsaka
brand och skall därför undvikas i alla lägen.
Frityrkokning skall ske under uppsikt för att
undvika att överhettad olja fattar eld.
Försiktighet! Vid användning
tillsammans med spisar och
matlagningsutrustning kan tillgängliga
delar hettas upp avsevärt.
Vad beträffar de tekniska och
säkerhetsåtgärder som skall vidtas för
avledning av utblåsningsluften, skall
de föreskrifter som utfärdats av lokala
myndigheter noga efterlevas.
Rengör fläkten ofta, såväl utvändigt som
invändigt, (MINST EN GÅNG I MÅNADEN,
och respektera under alla händelser
samtliga underhållsinstruktioner i denna
manual).
Bristande rengöring av fläkten och filtren
samt ett uteblivet byte av filtren medför
brandfara.
Använd eller lämna aldrig fläkten utan
korrekt imonterade lampor för att undvika
risken för elektriska stötar.
Tillverkaren frånsäger sig allt ansvar för
eventuella problem eller bränder som
orsakats av att instruktionerna i denna
manual inte efterlevts.
Varning! En utebliven installation
av de fixeringsskruvar och
fixeringsanordningar som dessa
anvisningar föreskriver kan medföra
elektriska risker.
2. ANVÄNDNING INSTALLATION
Fläkten används för att suga ut matos och
ånga. I den bifogade installationshandboken
indikeras de av de två versionerna som är
disponibla på den modell ni är Ägare till.
De disponibla versionerna är de följande:
utsugningsversion med utvändig evakuering
eller filterversion med invändig
återcirkulation .
3. INSTALLATION
Nätspänningen skall motsvara spänningen
som anges på märkplåten som sitter
inne i fläkten. Om fläkten är utrustad
med stickkontakt skall denna anslutas till
ett uttag som är lättillgängligt även efter
installationen och som uppfyller gällande
föreskrifter. I det fall fläkten saknar
stickkontakt (direktanslutning till nätet), eller
om uttaget är placerat på en svåråtkomlig
plats skall en godkänd tvåpolig strömbrytare
installeras som garanterar en fullkomlig
frånkoppling från nätet i samband med
överspänningsklass III, i enlighet med
installationsbestämmelserna.
Varning! kontrollera innan fläktens
krets ansluts med nätspänningen att
den fungerar korrekt och är korrekt
monterad.
Page 37

SVENSKA
37
Varning! byte av elektrisk kabel skall
utföras av auktoriserad servicetekniker i
syftet att undvika all typer av risker.
Minsta tillåtna avstånd mellan kokkärlens
stödyta på spishällen och köksfläktes
underkant är 50cm om det är frågan om en
elektrisk spis och 65cm om det är frågan
om gasspis eller kombinerad gashäll.
Om spishällens instruktioner anger ett
större avstånd skall detta respekteras.
4. UNDERHÅLL
Varning! Gör alltid fläkten strömlös
innan någon typ av underhållsarbete
eller rengöring inleds genom att slå
ifrån bostadens huvudströmbrytare.
Fläkten skall rengöras ofta, såväl invändigt
som utvändigt (åtminstone med samma
underhållsintervall som för fettfiltren).
Använd en trasa fuktad med neutrala
rengöringsmedel vid rengöring.
Undvik produkter som innehåller slipmedel.
ANVÄND INTE ALKOHOL!
Varning! Observera att en bristande
rengöring av apparaten och icke utförda
filterbyten kan medföra brandrisk. Följ
därför ovanstående instruktioner noga.
Tillverkaren frånsäger sig allt ansvar
för eventuella motorskador, eldsvådor
beroende på ett bristande underhåll eller att
dessa instruktioner inte respekterats.
Observera att en bristande rengöring
av apparaten och filtren kan medföra
brandrisk. Följ därför ovanstående
instruktioner noga.
4.1 Fettfilter - Filtret skall rengöras en gång
i månaden, med ett milt rengöringsmedel,
för hand eller i diskmaskin, med låg
temperatur och kort program.
Vi tvätt i diskmaskin kan fettfiltret av metall
missfärgas utan att detta på något sätt
påverkar filtrets uppsugningsförmåga.
4.2 Kolfilter - Aktivt kolfilter som
kan rengöras - Kolfiltret mättas efter
en mer eller mindre lång tidsperiod
beroende på i vilken utsträckning fläkten
används, på typen av matlagning och
hur regelbundet fettfiltren rengörs. Det är
under alla händelser nödvändigt att ersätta
kolfilterpatronen minst var 4 månad.
Filtret kan INTE rengöras eller
återanvändas.
5. KOMMANDON
Fläkten är utrustad med en manöverpanel
med en hastighetskontroll och en
strömbrytare för spishällens belysning.
Använd en högre hastighet om matoset är
mycket koncentrerat. Vi rekommenderar
att starta luftevakueringen 5 minuter innan
matlagningen inleds och låta den fungera i
cirka 15 minuter efter avslutad matlagning.
Manövertangenterna på apparatens front:
A
B
A OFF-tangent (släckt tangent) - ON (tänd
tangent)
Tryck en elller flera gånger för att
erhålla önskad funktion:
ON (tänd tangent): fläkten väljer
senaste inställda hastighet.
OFF (släckt tangent): samtliga
funktioner är avaktiverade med
undantag för belysningen.
B Tangent för val av hastighet
(utsugningseffekt)
Tryck på denna tangent en eller
C
D
E
Page 38

38
www.aeg.com
flera gånger för att välja lämplig
utsugningshastighet (effekt) (1 - 2 - 3 ).
C Display: visualiserar den valda
utsugningseffekten (1-2-3), signalerar
filtrens mättning (F).
D Tangent för start av intensivhastighet.
Efter starten fungerar
intensivhastigheten i cirka 5 minuter
varefter fläkten återgår till den tidigare
valda hastigheten (från 1 till 3) eller
stängs av om ingen hastighet var
inställd. I det fall man önskar avbryta
intensivhastigheten innan 5 minuter
förflutit trycker man på tangenten A
eller tangenten B .
E ON/OFF-tangent för belysning
I det fall fläkten eller manövertangenterna
inte fungerar rekommenderar vi att bryta
strömtillförseln under minst 5 sekunder
och därefter slå på fläkten igen. Vänta i
15 sekunder för att kontrollera att fläkten
fungerar korrekt.
Lysdiod (1) signalerar fetttiltrets
mättning
När lysdioden för hastighet 1 blinkar
indikerar detta att operatören måste utföra
en rengöring av fettfilren.
Läs noga instruktionerna beträffande
underhåll av fettfiltren och hur dessa
rengörs.
Lysdiod (2) signalerar de aktiva
kolfiltrets mättning
När lysdioden för hastighet 2 blinkar
indikerar detta att operatören måste utföra
en rengöring eller ett byte av koltiltret.
Läs noga instruktionerna beträffande
rengöring och byte av kollfiltret.
Återställning av signalen för mättning
Efter att underhållet av filtren slutförs skall
tangenten
A hållas nedtryckt under 3
sekunder till Lysdioden 1 eller 2 upphör
att blinka.
Kontrollanordning för fettfilter och
kolfilter
Denna typ av fläkt är förberedd för en
anordning som signalerar när fettfiltret eller
kolfiltret kräver rengöring (anordningen
säljs tillsammans med med kolfiltret av
ett specialiserat företag som producerar
utsugningsapparater).
Denna typ av fläkt säljs av tilverkaren utan
kolfilter och därför är signalen för mättning
avaktiverad.
I det fall fläkten skall användas med kolfilter
skall signalen för kolfiltret aktiveras på
följande sätt: Fläkten skall vara inställd på
“OFF”. Tryck samtidigt på tangenterna B
och D under tre sekunder, Lysdioden F
tänds samtidigt som lysdioden för hastighet
1 börjar blinka, efter 1 sekund börjar
även lysdioden för hastighet 2 blinka och
systemet avger en ljudsignal (-Beep-) vilket
indikerar att inställningen är slutförd.
För att eliminera fettfiltrets signal, tryck
samtidigt på tangenterna B och D under
tre sekunder, Lysdioden F tänds samtidigt
som lysdioden för hastighet 1 börjar blinka
(fettfiltret) tillsammans med lysdioden för
hastighet 2, efter 1 sekund blinkar endast
lysdioden för hastighet 1, systemet avger
en ljudsignal (-Beep-) vilket indikerar att
inställningen är slutförd.
6. BELYSNING
Koppla ur apparaten från elnätet.
Varning! Kontrollera att lamporna har
svalnat innan ni vidrör dem.
Använd endast halogenlampor 12V -20W
max - G4, och var noga med att inte vidröra
lamporna.
Page 39

NO BRUKSVEILEDNING
FOR PERFEKTE RESULTATER
Takk for at du har valgt dette AEG-produktet. Vi har konstruert det for å gi deg perfekt ytelse
i mange år, med innovativ teknologi som bidrar til å gjøre livet enklere - egenskaper som du
kanskje ikke finner i ordinære produkter. Vi vil be deg bruke noen øyeblikk til å lese denne,
for å få mest mulig ut av produktet.
Gå inn på nettstedet vårt for å:
Få råd om bruk, finne brosjyrer, feilsøking, serviceinformasjon:
www.aeg.com
Registrere produktet ditt for å få bedre service:
www.aeg.com/productregistration
Kjøpe tilbehør, forbruksvarer og originale reservedeler til produktet ditt:
www.aeg.com/shop
MILJØVERN
Resirkuler materialer som er merket med symbolet . Legg emballasjen i riktige
beholdere for å resirkulere det.
Bidrar til å beskytte miljøet, menneskers helse og for å resirkulere avfall av elektriske og
elektroniske produkter. Ikke kast produkter som er merket med symbolet sammen med
husholdningsavfallet. Produktet kan leveres der hvor tilsvarende produkt selges eller på
miljøstasjonen i kommunen. Kontakt kommunen for nærmere opplysninger.
NORSK
39
KUNDESTØTTE OG SERVICE
Vi anbefaler at du bruker originale reservedeler.
Når du kontakter serviceavdelingen, må du sørge for å ha følgende data for hånden.
Informasjonen finner du på typeskiltet. Modell, PNC (produktnummer), serienummer.
Advarsel/Forsiktig - Sikkerhetsinformasjon.
Generell informasjon og tips
Miljøinformasjon.
Med forbehold om endringer.
Page 40

40
www.aeg.com
1. SIKKERHETSANVISNINGER
Obs! Instruksjonene i denne
håndboken må følges nøye.
Produsenten fraskriver seg ethvert
ansvar for eventuelle uhell, skader eller
brann på apparatet som skyldes at
bruksanvisningen i denne håndboken
ikke har blitt overholdt. Denne
ventilatoren er kun til husholdningsbruk.
Advarsel! Ikke koble apparatet til
strømnettet før installasjonen er helt
fullført.
Før rengjøring eller vedlikehold av
apparatet må ventilatoren kobles fra
strømnettet ved å trekke ut støpselet
eller skru ut sikringen i husets
sikringsskap.
Ved alle installasjonsprosedyrer og alt
vedlikehold av ventilatoren må man bruke
arbeidshansker. Ventilatoren er ikke egnet
til å brukes av barn eller personer med
nedsatte fysiske, mentale eller sensoriske
funksjoner, eller med manglende erfaring
og kjennskap, med mindre disse ikke blir
overvåket eller gitt instruksjoner om bruk av
apparatet av en person som står ansvarlig
for deres sikkerhet. Barn må overvåkes for
å kontrollere at de ikke leker med apparatet.
Ventilatoren må aldri brukes uten at gitteret
er korrekt montert!
Ventilatoren må ALDRI brukes som
anleggsflate, med mindre det er uttrykkelig
angitt.
Rommet må være godt ventilert når
ventilatoren brukes samtidig med andre
apparater som bruker gassforbrenning eller
andre brennstoffer.
Luften som suges opp må ikke føres ut i en
avtrekkskanal for røyk som produseres av
apparater som bruker gassforbrenning eller
andre brennstoffer.
Det er strengt forbudt å lage mat på åpen
ild under ventilatorhetten.
Bruk av åpen ild skader filtrene og kan
fremkalle brann, derfor må det absolutt
unngås.
Steking må foregå under kontroll for å
unngå at den overopphetede oljen tar fyr.
Obs! De berørbare delene kan bli
meget varme når de brukes sammen
med kokeapparater.
Når det gjelder de tekniske sikkerhetsforans
taltningene som må anvendes for røykutløp,
må man forholde seg strengt til gjeldende
lokale regelverk. Ventilatoren må rengjøres
ofte både innvendig og utvendig (MINST
EN GANG I MÅNEDEN; uansett må man
følge instruksjonene som er uttrykkelig
angitt i vedlikeholdsanvisningene i denne
håndboken).
Hvis man ikke overholder normene for
rengjøring av ventilatoren og utskiftning
og rengjøring av filtrene, vil dette medføre
risiko for brann.
Ventilatoren må alltid ha korrekt monterte
lyspærer, både under bruk og i stand by, for
å unngå risikoen for elektrisk støt.
Produsenten fraskriver seg ethvert ansvar
for eventuelle uhell, skader eller brann på
apparatet som skyldes at bruksanvisningen
i denne håndboken ikke har blitt overholdt.
Advarsel! Manglende installering av
skruer og festeanordninger i samsvar
med disse instruksjonene kan medføre
elektrisk fare.
2. BRUK
Kjøkkenhetten brukes til avtrekk av røyk
og damp fra matlaging. I den vedlagte
installasjonsanvisningen er det angitt
hvilken versjon som kan anvendes på
modellen du eier; versjonen med direkte
avtrekk ut i friluft , eller versjonen med
resirkulering av luften .
3. INSTALLASJON
Nettspenningen må være i samsvar med
den elektriske spenningen som angis på
typeskiltet inne i ventilatoren. Hvis det
følger med støpsel, kobles ventilatoren
til en lett tilgjengelig stikkontakt som er
godkjent i henhold til gjeldende normer.
Stikkontakten må være lett tilgjengelig
også etter installasjonen. Hvis det ikke
følger med støpsel (direkte kobling til
strømnettet), eller stikkontakten selv etter
installasjonen ikke er lett tilgjengelig, må
man sette på en godkjent topolet bryter
som garanterer fullstendig frakobling fra
strømnettet i situasjonene som oppstår i
kategorien overspenning III, i henhold til
installasjonsreglene.
Advarsel! Før man kobler ventilatorens
strømkrets til strømnettet og fastslår
at alt fungerer korrekt, må man alltid
kontrollere at strømledningen er korrekt
montert.
Page 41

NORSK
41
Advarsel! Strømledningen må skiftes
ut av autorisert teknisk service eller av
en elektriker.
Minimumsavstanden mellom koketoppen
og undersiden av kjøkkenventilatoren
må ikke være på mindre enn 50cm når
det gjelder elektriske kokeplater og 65cm
når det gjelder gassbluss og kombinerte
koketopper.
Dersom bruksanvisningen for et
gasskokeapparat opererer med en større
avstand, må denne overholdes.
4. VEDLIKEHOLD
Advarsel! Før enhver form for
rengjøring eller vedlikehold må
ventilatorhetten frakobles strømnettet
ved å dra ut ledningen eller slå av
husets hovedstrømbryter.
Ventilatoren må rengjøres jevnlig, både
innvendig og utvendig (minst så ofte som
man utfører vedlikehold av fettfiltrene). Til
rengjøring benyttes en klut fuktet med et
nøytralt rengjøringsmiddel.
Unngå bruk av slipende eller etsende
produkter.
Advarsel! Hvis ikke reglene for
rengjøring og utskifting av filtrene
følges, kan det føre til brann. Det er
derfor meget viktig å følge denne
bruksanvisningen nøye.
Produsenten fraskriver seg ethvert ansvar
for eventuelle skader på motoren, brann
som skyldes manglende vedlikehold eller
andre skader som skyldes at instruksene
over ikke er blitt fulgt.
4.2 - Vaskbart aktivt kullfilter
Kullfilteret må skiftes ut hver 4. måned ved
middels bruk av ventilatoren, og oftere hvis
ventilatoren brukes mye.
Det kan IKKE vaskes eller benyttes om
igjen.
5. KONTROLLER
Viften er utstyrt med et kontrollpanel med
viftehastighetsvalg og en lysbryter for å
kontrollere kokeområdets lys.
Bruk største hastighet ved høy
dampkonsentrasjon på kjøkkenet. Vi
anbefaler å slå på viften 5 minutter før du
begynner å lage mat, og la den fortsette
å virke i enda cirka 15 minutter etter du er
ferdig med matlagingen.
Kommandoknappene på forsiden av
apparatet:
A
B
C
D
E
4.1 Fettfilteret - Fettfilteret må rengjøres en
gang i måneden uten bruk av aggressive
rengjøringsmidler, for hånd eller i
oppvaskmaskin ved lav temperatur og med
kort syklus.
Ved vask i oppvaskmaskin kan
fettfilteret i metall miste fargen, men dets
filterkarakteristikker endres absolutt ikke.
A OFF-knapp (avknapp) - ON (påknapp)
Trykk en eller flere ganger for ønsket
funksjon:
ON (påknapp): ventilatoren aktiveres på
siste innstilte hastighet.
OFF (avknapp): alle funksjoner er
deaktivert, med unntak av belysningen.
B Knapp for valg av hastighet
(sugestyrke).
Trykk en eller flere ganger på denne
knappen for å velge den mest egnede
sugehastigheten (-styrken) (1 - 2 - 3 ).
C Skjerm: viser den valgte sugestyrken
(1-2-3), og gir signal om at filtrene er
Page 42

42
www.aeg.com
mettet (F).
D Knapp for innstilling av intensiv
hastighet.
Når man har innstilt intensiv hastighet,
vil denne vare i cirka 5 minutter; når
denne tiden er ute, vil ventilatoren gå
tilbake til forrige valgte hastighet (fra
1 til 3), eller slår seg til og med av
hvis det tidligere ikke var valgt noen
hastighet. Trykk på knapp
A eller B
for å koble fra den intensive hastigheten
før de 5 minuttene har gått.
E ON/OFF-knapp for belysning.
Dersom ventilatoren eller
kommandoknappene ikke skulle virke,
anbefaler vi å koble fra strømforsyningen
i minst 5 sekunder og deretter slå på
ventilatoren igjen. Vent så i 15 sekunder og
kontroller om ventilatoren fungerer korrekt.
Anordning for kontroll av fettfilteret og
kullfilteret
Denne type ventilator er tilpasset til
å ha en anordning som gir signal om
når fettfilteret eller kullfilteret trenger å
rengjøres (anordningen selges sammen
med kullfilteret hos fabrikanten som er
spesialisert på avtrekksvifter).
Denne type ventilator leveres uten kullfilter,
derfor er varsellampen for mettet filter
deaktivert.
Dersom man vil bruke ventilatoren med
kullfilter, må man aktivere varsellampen for
mettet kullfilter på følgende måte:
Ventilatoren må stå på “OFF”.
Hold knappene B og D inntrykt samtidig
i tre sekunder; LED-lyset F slås på, og ledlyset som tilsvarer 1. hastighet begynner å
blinke. Etter 1 sekund begynner også ledlyset som tilsvarer 2. hastighet å blinke, og
systemet avgir et lydsignal (-Bip-) for å angi
at innstillingen er utført.
For å deaktivere signalet for kullfilteret, skal
man holde knappene B og D inntrykt
samtidig i tre sekunder, da vil LED-lyset
F slås på, og led-lysene som tilsvarer
1. hastighet (fettfilteret) og 2. hastighet
begynner å blinke. Etter 1 sekund blinker
kun led-lyset som tilsvarer 1. hastighet, og
systemet avgir et lydsignal (-Bip-) for å angi
at innstillingen er utført.
Led-lys (1) for signal om mettet fettfilter
Når led-lyset som tilsvarer hastighet
1 blinker, varsler det brukeren om at
fettfiltrene må vaskes.
Les nøye instruksjonene om vedlikehold av
fettfiltrene for å holde dem rene.
Led-lys (2) for signal om mettet kullfilter
Når led-lyset som tilsvarer hastighet
2 blinker, varsler det brukeren om at
kullfilteret må vaskes eller skiftes ut.
Les nøye instruksjonene om vasking eller
utskifting av kullfilteret.
Tilbakestilling av indikatoren for mettet
filter
Etter å ha utført vedlikehold av filtrene, skal
man holde knappen
A inntrykt i 3 sekunder
helt til LED-lys 1 eller 2 slutter å blinke.
6. BELYSNING
Koble ventilatoren fra strømnettet.
Advarsel! Forsikre deg om at lyspæren er
kald før du tar i den.
Bruk bare halogene lyspærer på maks 12V
-20W - G4, og pass på å ikke røre dem
med hendene.
Page 43

FI KÄYTTÖOHJEET
TÄYDELLISTEN TULOSTEN SAAVUTTAMISEKSI
Kiitämme teitä tämän AEG-tuotteen valitsemisesta. Olemme kehittäneet tämän tuotteen
tarjotaksemme teille huipputason suorituskyvyn moneksi vuodeksi. Laitteen innovatiiviset
teknologiat tekevät elämästänne yksinkertaisempaa – kyseisiä ominaisuuksia ei välttämättä
löydy tavallisista laitteista. Käyttäkää muutama minuutti lukemiseen, jotta voitte hyödyntää
laitteen ominaisuudet parhaalla mahdollisella tavalla.
Vieraile verkkosivullamme:
Saadaksesi käyttöön liittyviä neuvoja, esitteitä, vianmääritysohjeita ja huoltoohjeita:
www.aeg.com
Tuotteen rekisteröimiseksi parempaa huoltoa varten:
www.aeg.com/productregistration
Ostaaksesi laitteesi lisävarusteita, kulutusosia ja alkuperäisiä varaosia:
www.aeg.com/shop
YMPÄRISTÖNSUOJELU
SUOMI
43
Kierrätä materiaalit, jotka on merkitty merkillä . Kierrätä pakkaus laittamalla se
asianmukaiseen kierrätysastiaan.
Suojele ympäristöä ja ihmisten terveyttä kierrättämällä sähkö- ja elektroniikkaromut.
Älä hävitä merkillä merkittyjä kodinkoneita kotitalousjätteen mukana. Palauta tuote
paikalliseen kierrätyskeskukseen tai ota yhteyttä paikalliseen viranomaiseen.
ASIAKASPALVELU JA HUOLTO
Suosittelemme alkuperäisten varaosien käyttöä.
Pidä seuraavat tiedot saatavilla ottaessasi yhteyttä valtuutettuun huoltoliikkeeseen.
Kyseiset tiedot löytyvät laitteen arvokilvestä. Malli, tuotenumero, sarjanumero.
Varoitukset/huomautukset ja turvallisuusohjeet.
Yleisohjeet ja vinkit
Ympäristönsuojeluohjeita.
Oikeus muutoksiin pidätetään ilman erillistä ilmoitusta.
Page 44

44
www.aeg.com
1. TURVALLISUUSOHJEET
Huomio! Noudata käyttöohjetta
huolellisesti. Valmistaja ei vastaa
käyttöohjeen noudattamattajättämisestä
aiheutuneista haitoista, vahingoista tai
tulipaloista. Tuuletin on suunniteltu
ainoastaan kotitalouskäyttöön.
Varoitus! Älä yhdistä laitetta
sähköverkkoon ennenkuin asennus on
täysin valmis.
Irrota laite sähköverkosta aina ennen
puhdistus- tai huoltotoimenpiteitä
, ottamalla töpseli irti seinästä tai
katkaisemalla virta huoneiston
pääkytkimestä.
Käytä asennus- ja huoltotöissä
suojakäsineitä.
Tätä laitetta ei ole tarkoitettu sellaisten
henkilöiden käyttöön (mukaan lukien
lapset), joiden fyysiset, sensoriset tai
henkiset ominaisuudet ovat heikentyneet
eikä sellaisten henkilöiden käyttöön,
joilta puuttuu laitteen käyttökokemus ja
tieto, jollei henkilöiden turvallisuudesta
vastuullinen henkilö anna heille ohjausta tai
ohjeita laitteen käytöstä.
Älä anna lasten leikkiä laitteella.
Älä koskaan käytä laitetta, jos sen ritilää ei
ole asennettu oikealla tavalla!
Tuuletinta ei saa KOSKAAN käyttää
tukipintana, jollei niin ole erikseen mainittu.
Jos liesituuletinta käytetään samaan
aikaan kaasulieden kanssa, huoneeseen on
tultava niin paljon korvausilmaa, ettei synny
alipainetta, joka voi sammuttaa kaasuliekin.
Poistoilmaa ei saa johtaa kaasulla tai
muilla polttoaineilla toimivien laitteiden
savunpoistohormiin.
Tuulettimen alla liekittäminen on
ehdottomasti kielletty.
Avotulen käyttö vahingoittaa suodattimia ja
voi aiheuttaa tulipalon.
Huomio! Kosketuspinnat voivat
kuumentua huomattavasti ruoanlaiton
yhteydessä.
Paistettaessa on valvottava paistoastiaa
jatkuvasti. Ylikuumentunut öljy saattaa olla
palovaarallinen.
Noudata huolellisesti paikallisten
viranomaisten antamia savunpoiston
teknisiä ja turvatoimenpiteitä koskevia
määräyksiä.
Tuuletin on puhdistettava huolellisesti
sekä sisä- että ulkopuolelta (VÄHINTÄÄN
KERRAN KUUKAUDESSA, noudata
kuitenkin tämän käyttöohjeen neuvoja).
Tuulettimen puhdistusta ja suodattimien
vaihtoa ja puhdistusta koskevien
määräysten noudattamattajättäminen voi
aiheuttaa tulipalovaaran.
Älä käytä tuuletinta, jos lamppuja ei
ole asennettu oikein. Siitä voi aiheutua
sähköiskun vaara. Valmistaja ei vastaa
käyttöohjeen noudattamatta jättämisestä
aiheutuneista haitoista, vahingoista tai
tulipaloista.
Huomio! Kiinnitysruuvien ja -laitteiden
ohjeiden vastainen asennus voi
vaikuttaa sähköturvallisuuteen.
2. KÄYTTÖ
Tuuletinta käytetään ruoanlaitosta
aiheutuneen savun ja höyryn poistamiseen.
Laitteen mukana tulevasta asennusohjeesta
käy ilmi käytetäänkö hankkimaanne mallia
imukupuversiona ulkoiseen poistoon
vai suodatinversiona sisäiseen kiertoon
.
3. ASENNUS
Verkon jännitteen on oltava sama
kuin tuulettimen sisäpuolella olevassa
tyyppikilvessä ilmoitettu jännite. Jos
laitteessa on pistoke, liitä tuuletin
voimassaolevien normien mukaiseen
pistorasiaan, joka sijaitsee sellaisessa
paikassa, että siihen pääsee käsiksi myös
asennuksen jälkeen. Jos laitteessa ei ole
pistoketta (suora liitos verkkoon) tai pistoke
ei ole sellaisessa paikassa että siihen
pääsee käsiksi myös asennuksen jälkeen,
käytä normien mukaista kaksinapaista
katkaisijaa, jolla varmistetaan että laite
saadaan kokonaan irti sähköverkosta, jos
ylijännite kategoria on III, asennussääntöjen
mukaisesti.
Huomio! Tarkista aina, että
verkkokaapeli on asennettu oikealla
tavalla ennen kuin yhdistät tuulettimen
sähköverkkoon ja tarkistat että se toimii
oikein.
Page 45

SUOMI
45
Huomio! Riskien välttämiseksi
virransyöttöjohdon voi vaihtaa
ainoastaan valtuutettu tekninen tuki.
Lieden keittotason tukipinnan ja
keittiötuulettimen alimman osan välinen
minimietäisyys on oltava vähintään 50cm
sähköliesien osalta ja 65cm kaasu- ja
sekaliesien osalta.
Jos kaasulieden käyttöohjeissa vaaditaan
suurempi etäisyys, on se otettava
huomioon.
4. HUOLTO
Huomio! Irroita laite aina
virtalähteestä ennen puhdistus- tai
huoltotoimenpiteitä, irrota virtajohdon
pistoke verkkovirtapistorasiasta tai
katkaise virta kodin sähköverkosta.
Tuuletin on puhdistettava usein sekä
sisä- etttä ulkopuolelta (vähintään yhtä
usein kuin rasvasuodattimien huolto). Käytä
puhdistukseen neutraalissa nestemäisessä
pesuaineessa kostutettua kangasta.
Vältä hankaavia pesuaineita.
ÄLÄ KÄYTÄ ALKOHOLIPITOISIA
PUHDISTUSAINEITA!
Huomio! Laitteen puhdistusta ja
suodattimien vaihtoa koskevien
määräysten noudattamattajättäminen
voi aiheuttaa tulipalovaaran. On siis
suositeltavaa noudattaa määräyksiä.
Valmistaja ei vastaa mahdollisista vääristä
huoltotoimenpiteistä tai yllämainittujen
normien noudattamattajättämisestä
aiheutuvista moottorivioista tai tulipaloista.
4.2 Hiilisuodatin - Pestävä aktiivihi-
ilisuodatin - Hiilisuodattimen kyllästys
tapahtuu pidemmän käytön jälkeen
riippuen keittiötyypistä ja rasvasuodattimen
puhdistustiheydestä. Joka tapauksessa
suodatin on vaihdettava vähintään neljän
kuukauden välein.
Sitä EI voi pestä eikä käyttää uudestaan
5. OHJAIMET
Liesituuletin on varustettu ohjauspaneelilla,
josta voidaan säätää imun nopeuksia ja
kytkeä valo, joka valaisee keittotasoa.
Käytä maksiminopeutta jos keittiössä on
erityisen paljon höyryä. On suositeltavaa
käynnistää tuuletus 5 minuuttia ennen
ruoanlaiton aloittamista ja antaa sen
toimia noin 15 minuuttia ruoanlaiton
lopettamisesta.
Laitteen etuosassa olevat ohjaimet:
4.1 Rasvasuodatin - Rasvasuodatin on
puhdistettava kerran kuukaudessa miedolla
pesuaineella, käsin tai astianpesukoneessa
alhaisella lämpötilalla ja lyhyellä
pesuohjelmalla.
Metallinen rasvasuodatin voi haalistua
astianpesukoneessa, mutta tämä ei vaikuta
sen suodatustehoon millään tavallla.
A
B
A OFF näppäin (näppäin sammutettu)-
ON (näppäimen valo palaa)
Paina yksi tai kaksi kertaa halutun
toiminnon käynnistämiseksi:
ON (näppäimen valo palaa): tuuletin
käynnistää viimeksi valitun nopeuden.
OFF (näppäin sammutettu): kaikki
toiminnot katkaistu, paitsi valaistus.
B Imunopeuden (imutehon) valitsin Paina
näppäintä kerran tai useammin ja
valitse sopivin imunopeus (teho) (1-2-
3).
C Näyttö: näyttää valitun imunopeuden
C
D
E
Page 46

46
www.aeg.com
(1-2-3), ilmoittaa suodattimien
kyllästyksestä (F).
D Intensiivisen nopeuden valitsin.
Kun intensiivinen nopeus on valittu,
se toimii noin 5 minuuttia, minkä
jälkeen tuuletin palaa aiemmin valitulle
nopeudelle (1-3) tai se jopa sammuu,
jos aiemmin ei ole valittu mitään
nopeutta. Ennen kuin 5 minuuttia
on kulunut, intensiivinen nopeus
sammutetaan painamalla näppäintä
A
tai näppäintä B .
E ON/OFF valonäppäin
Jos tuuletin tai näppäimet eivät toimi, on
suositeltavaa katkaista virta vähintään
5 sekunnin ajaksi ja käynnistää se
uudestaan.. Odota 15 sekuntia ja tarkista
toimiiko tuuletin oikein.
Rasvasuodattimen ja
aktiivihiilisuodattimen ohjauslaite
Tämä tuuletinmalli on varustettu laitteella,
joka ilmoittaa kun rasvasuodatin tai
aktiivihiilisuodatin on puhdistettava (
imulaitteisiin erikoistunut valmistaja myy
laitteen aktiivihiilisuodattimella).
Valmistaja myy tuulettimen ilman
aktiivihiilisuodatinta, siksi kyllästyksen
merkkivaloa ei ole aktivoitu.
Jos tuuletinta halutaan käyttää
hiilisuodattimella, aktivoi hiilisuodattimen
kyllästyksen merkkivalo seuraavalla tavalla:
Tuuletin on säädettävä “OFF” asentoon.
Paina yhtäaikaisesti näppäimiä B ja
D kolme sekuntia, LED F syttyy ja 1.
nopeuden led alkaa vilkkua, 1 sekunnin
kuluttua vilkkuu myös 2. nopeuden led ja
järjestelmä ilmoittaa tehdystä säädöstä
äänimerkillä (-PIIP).
Hiilisuodattimen merkkivalo poistetaan
painamalla yhtäaikaisesti näppäimiä
B ja D kolme sekuntia, LED F syttyy
ja 1. nopeuden led (rasvasuodatin) ja
2.nopeuden led alkavat vilkkua, sekunnin
kuluttua vilkkuu ainoastaan 1. nopeuden
led, järjestelmä ilmoittaa tehdystä säädöstä
äänimerkillä (-PIIP-)
Lue huolellisesti rasvasuodattimien
puhdistuksesta annetut huolto-ohjeet.
Led (2) aktiivihiilisuodattimen
kyllästyksen merkkivalo
Nopeuden 2. vilkkuva led ilmoittaa
käyttäjälle, että hiilisuodatin on pestävä ja
vaihdettava.
Lue huolellisesti hiilisuodattimen
puhdistuksesta annetut huolto-ohjeet.
Kyllästyksen merkkivalon palautus
Kun suodattimet on huollettu, pidä
näppäintä
A alaspainettuna 3 sekuntia
kunnes LED 1 tai 2 lakkaavat vilkkumasta.
6. VALAISTUS
Irrota laite sähköverkosta.
Huomio! Tarkista että lamput eivät ole
kuumia ennen kuin kosket niihin.
Käytä ainoastaan max 12V -20W – G4
halogeenilamppuja ja varo koskemasta niitä
käsin.
Led (1) rasvasuodattimen merkkivalo
Nopeuden 1. vilkkuva led ilmoittaa
käyttäjälle, että rasvasuodattimet on
pestävä.
Page 47

DA BRUGSVEJLEDNING
FOR PERFEKTE RESULTATER
Tak fordi du valgte dette produkt fra AEG. Vi har skabt det, så du kan nyde en ulastelig
funktionsevne i mange år med nyskabende teknologi, der gør livet lettere – funktioner, som
du ikke finder i almindelige apparater. Brug et par minutter på at læse mere – så du kan få
det bedste ud af det.
Besøg vores websted for at:
Få rådgivning, brochurer, fejlfinding, serviceinformation:
www.aeg.com
Registrere dit produkt for bedre service:
www.aeg.com/productregistration
Købe tilbehør, forbrugsvarer og originale reservedele til dit apparat:
www.aeg.com/shop
MILJØHENSYN
DANSK
47
Genbrug materialer med symbolet . Anbring emballagematerialet i passende beholdere
til genbrug.
Hjælp med at beskytte miljøet og menneskelig sundhed samt at genbruge affald af
elektriske og elektroniske apparater. Kasser ikke apparater, der er mærket med symbolet
, sammen med husholdningsaffaldet. Lever produktet tilbage til din lokale genbrugsplads
eller kontakt din kommune.
PLEJE OG SERVICE
Vi anbefaler brugen af originale reservedele.
Sørg for at have følgende data tilgængelig, når du kontakter service.
Du finder oplysningerne på maskinens typeskilt. Model, PNC, Serienummer.
Advarsel /Forsigtig-Sikkerhedsanvisninger.
Generelle oplysninger og gode råd
Miljøoplysninger.
Ret til ændringer uden varsel forbeholdes.
Page 48

48
www.aeg.com
1. SIKKERHEDSANVISNINGER
Bemærk! Overhold venligst alle
instruktioner i denne vejledning.
Fabrikanten frasiger sig ethvert
ansvar for eventuelle fejl, skader eller
brande forårsaget af apparatet, men
afledt af manglende overholdelse af
instruktionerne i denne vejledning.
Emhætten er udelukkende udviklet til
brug i almindelige hjem.
Advarsel! Apparatet må ikke tilsluttes
elnettet før installeringen er helt
tilendebragt.
Før der udføres nogen form for
rengøring eller vedligeholdelse, skal
emhætten afbrydes fra elnettet ved at
trække stikket ud, eller ved at afbryde
hovedafbryderen i hjemmet.
Ved alle installations- og
vedligeholdelsesindgreb skal der bæres
arbejdshandsker.
Apparatet må ikke benyttes af børn, eller
af personer med nedsatte sanseevner
eller mentale færdigheder, eller uden den
nødvendige erfaring og kendskab, med
mindre brugen sker under opsyn eller
vejledning fra en person der har ansvaret
for deres sikkerhed. Børn skal holdes
under opsyn, så de ikke får mulighed for at
lege med emhætten. Emhætten må aldrig
benyttes uden korrekt monteret rist!
Emhætten må ALDRIG benyttes som
støtteoverflade, med mindre dette
er udtrykkeligt tilladt. Lokalet skal
have tilstrækkelig ventilation, når
køkkenemhætten anvendes samtidigt
med andre apparater der forbrænder
gas eller andre brændstoffer. Den
opsugede luft må ikke ledes ind i rør, der
anvendes til udledning af røg fra apparater
med forbrænding af gas eller af andre
brændstoffer.
Det er strengt forbudt at flambere under
emhætten. Brug af åben ild er farligt for
filtrene og kan medføre brand, og skal
derfor altid undgås. Friturestegning skal
ske under opsyn for at forhindre, at den
overopvarmede olie bryder i brand.
Bemærk! De tilgængelige dele kan
blive meget varme, når de benyttes
sammen med apparater til madlavning.
Hvad angår de nødvendige tekniske
forholdsregler og sikkerhedskrav for
udledning af røg, skal alle reglementer fra
de lokale myndigheder overholdes uden
undtagelse. Emhætten skal rengøres ofte,
både indvendigt og udvendigt (MINDST
EN GANG OM MÅNEDEN; overhold under
alle omstændigheder angivelserne i kapitlet
om vedligeholdelse i denne vejledning).
Manglende overholdelse af kravene for
rengøring af emhætten, og for udskiftning
og rengøring af filtrene, medfører brandfare.
Emhætten må hverken benyttes eller
efterlades uden korrekt indsatte lyspærer
pga. fare for elektrisk stød. Fabrikanten
fralægger sig ethvert ansvar for eventuelle
fejl, skader eller brand forårsaget af
apparatet, men afledt af manglende
overholdelse af instruktionerne i denne
vejledning.
Pas på! Manglende montering af
skruer og fastgøringsanordninger
i overensstemmelse med disse
instruktioner, kan medføre elektrisk
fare.
2. ANVENDELSE
Emhætten har til opgave at udsuge røg og
damp fra madlavningen. I den medfølgende
vejledning til installering er det anført,
om den købte model kan benyttes i den
sugende udgave med udledning udenfor
eller i den filtrerende udgave med
intern recirkulation .
3. INSTALLERING
Netspændingen skal svare til spændingen
vist på typeskiltet internt i emhætten.
Hvis emhætten er udstyret med et stik,
skal emhætten tilsluttes en let tilgængelig
stikkontakt, der er i overensstemmelse med
de gældende standarder. Stikkontakten
skal også være let tilgængelig efter
installeringen. Hvis emhætten ikke er
udstyret med et stik (direkte tilslutning
til elnettet), eller hvis stikket ikke findes
i et område, der også er let tilgængeligt
efter installeringen, skal der monteres en
topolet afbryderkontakt i overensstemmelse
med standarderne, der sørger for fuld
afbrydelse fra elnettet i tilfælde af
forhold i overspændingskategori III, og
i overensstemmelse med reglerne for
elektriske installationer.
Obs! Undersøg altid, at netkablet er
blevet monteret rigtigt, før emhættens
kredsløb tilsluttes forsyningsnettet og
der udføres kontrol af korrekt funktion.
Page 49

Obs! forsyningsledningen må
udelukkende udskiftes af den
autoriserede tekniske service, så alle
risici kan undgås.
Minimumsafstanden mellem kogegrejets
støtteoverflade på komfuret og den
nederste del af emhætten må ikke være
under 50cm ved elektriske kogeplader,
og ikke under 65cm ved gasblus eller
komfurer med både gasblus og elektriske
kogeplader.
Hvis gaskomfurets vejledning angiver en
større afstand, skal dette overholdes.
4. VEDLIGEHOLDELSE
Obs! Inden der udføres nogen form
for rengøring eller vedligeholdelse skal
emhætten afbrydes fra elnettet ved at
fjerne stikket fra stikkontakten, eller ved
at afbryde hjemmets hovedafbryder.
Emhætten skal rengøres jævnligt både på
ydersiden og på indersiden (mindst med
samme frekvens som for vedligeholdelse
af fedtfiltrene). Ved rengøring skal man
anvende en klud fugtet med neutrale, milde
rengøringsmidler i flydende form.
Undgå brug af produkter indeholdende
slibemidler BENYT ALDRIG SPRIT!
Pas på! Manglende overholdelse af
vejledningen til rengøring af apparatet
og udskiftning af filtrene medfører
brandfare.
Der henstilles således til, at instruktionerne
følges. Fabrikanten frasiger sig ethvert
ansvar for eventuel beskadigelse af
motoren, brande forårsaget af utilstrækkelig
vedligeholdelse af apparatet eller
manglende overholdelse af ovenstående
instruktioner.
4.1 Fedtfilter - Fedtfilteret skal rengøres
én gang om måneden med milde
rengøringsmidler; filteret kan også vaskes i
opvaskemaskine ved lav temperatur og på
et kort opvaskeprogram.
Ved vask i opvaskemaskinen kan metalfedtfilteret blive misfarvet, men dette vil ikke
have negativ indflydelse på dets filtrerende
egenskaber.
DANSK
4.2 - Filter med aktivt kul der kan vaskes
- Kulfilteret skal udskiftes hver 4. Måned,
hvis emhætten ikke benyttes intensivt, eller
oftere.
Kulfilteret kan IKKE vaskes eller
genanvendes.
5. BETJENING
Emhætten er udstyret med et
betjeningspanel med mulighed for
regulering af sugestyrken og lys til
oplysning af kogeområdet.
Benyt den højeste hastighed ved stor
dampkoncentration i køkkenet. Det
anbefales, at man tænder udsugningen 5
minutter før påbegyndelse af madlavning,
og at udsugningen efterlades tændt i
yderligere cirka 15 minutter efter afslutning
af madlavningen.
Betjeningsanordninger på apparatets
forside:
A
B
C
D
E
49
A Tasten OFF (slukket tast) - ON (tændt
tast)
Tryk en eller flere gange for at få den
Page 50

50
www.aeg.com
ønskede funktion:
ON (tændt tast): emhætten indstiller
den sidst valgte hastighed.
OFF (slukket tast): alle funktioner er
afbrudt, undtagen belysningen.
B Tast til valg af hastigheden
(udsugningseffekt)
Tryk på denne tast en eller flere
gange for at vælge det mest egnede
udsugningshastighed (effekt) (1 - 2 - 3).
C Display: viser effekten fra den valgte
udsugning (1-2-3), viser mætning af
filtrene (F).
D Tast til tilslutning af den intensive
hastighed.
Når den intensive hastighed er blevet
tilsluttet, vil den være i funktion i cirka
5 minutter, hvorefter emhætten vender
tilbage til hastigheden valgt tidligere
(fra 1 til 3), eller emhætten slukker, hvis
der ikke er blevet foretaget noget valg
af hastigheden tidligere. Tryk på tast A
eller tast B for at afbryde den intensive
hastighed før de 5 minutter er udløbet.
E Tast til ON/OFF lys
Hvis emhætten eller
betjeningsanordningerne ikke fungerer,
anbefales det at afbryde strømforsyningen i
mindst 5 sekunder, og derefter tænde igen.
Vent herefter 15 sekunder, og kontrollér at
emhætten fungerer korrekt.
Anordning til kontrol af fedtfilteret og
filteret med aktivt kul
Denne type emhætte er forberedt til
installering af en anordning der viser, når
fedtfilteret eller filteret med aktivt kul har
behov for rengøring (sælges af fabrikanten
specialiseret i udsugningsapparater
sammen med det aktive kulfilter).
Denne type emhætte leveres af fabrikanten
uden aktivt kulfilter, og kontrollampen for
mætning er således afbrudt.
Hvis man ønsker at anvende emhætten
med et kulfilter, skal mætningskontrollampen for kulfilteret aktiveres på
følgende måde:
Emhætten skal være indstillet på “OFF”.
Tryk samtidigt på tasterne B og D i
tre sekunder; lysdioden F tændes, og
lysdioden for 1. hastighed begynder at
blinke; efter 1 sekund blinker lysdioden for
2. hastighed også, og systemet udsender
et lydsignal (-Bip-) der tilkendegiver, at
indstillingen er blevet udført.
For at fjerne signaler fra kulfilteret, skal man
trykke samtidigt på tasterne B og
D i tre sekunder; lysdioden F tændes,
og lysdioden for 1. hastighed (fedtfilter)
og lysdioden for 2. hastighed begynder at
blinke; efter 1 sekund blinker kun lysdioden
for 1. hastighed, og systemet udsender
et lydsignal (-Bip-) der tilkendegiver, at
indstillingen er blevet udført.
Lysdiode (1) til signalering af mættet
fedtfilter
Blink af lysdioden for 1. hastighed gør
brugeren opmærksom på, at fedtfiltrene
skal vaskes.
Læs omhyggeligt vejledningen til
vedligeholdelse af fedtfiltrene for
oplysninger om deres rengøring.
Lysdiode (2) til signalering af mættet
filter med aktivt kul
Blink af lysdioden for 2. hastighed gør
brugeren opmærksom på, at fedtfilteret med
aktivt kul skal vaskes eller udskiftes.
Læs omhyggeligt vejledningen til vask eller
udskiftning af filteret med aktivt kul.
Tilbagestilling af mætningsviseren
Efter at have udført vedligeholdelse af
filtrene, skal tasten A holdes trykket i 3
sekunder, indtil lysdioden 1 eller 2 holder
op med at blinke.
6. BELYSNING
Afbryd apparatet fra el-nettet.
Pas på! Sørg for at pærerne er kolde før de
berøres.
Benyt kun halogenpærer på 12V -20W max
- G4, og sørg for ikke at røre ved dem med
hænderne.
Page 51

RU
РУКОВОДСТВО ПО ЭКСПЛУАТАЦИИ
ДЛЯ ИДЕАЛЬНЫХ РЕЗУЛЬТАТОВ
Благодарим вас за выбор данного изделия AEG. Оно будет безупречно служить Вам
долгие годы – ведь мы создали его, призвав на помощь инновационные технологии,
которые помогают облегчить жизнь и реализуют функции, которых не найдешь в
обычных приборах. Потратьте несколько минут на чтение, чтобы получить от своей
покупки максимум пользы.
На нашем веб-сайте
Найти рекомендации по использованию изделий, руководства по
эксплуатации, мастер устранения неисправностей, информацию о
техническом обслуживании:
www.aeg.com
Зарегистрировать свое изделия для улучшения обслуживания:
www.aeg.com/productregistration
Приобрести дополнительные принадлежности, расходные материалы и
фирменные запасные части для своего прибора:
www.aeg.com/shop
Вы сможете:
ОХРАНА ОКРУЖАЮЩЕЙ СРЕДЫ
Материалы с символом следует сдавать на переработку. Положите упаковку в
соответствующие контейнеры для сбора вторичного сырья.
Принимая участие в переработке старого электробытового оборудования, Вы
помогаете защитить окружающую среду и здоровье человека. Не выбрасывайте
вместе с бытовыми отходами бытовую технику, помеченную символом . Доставьте
изделие на местное предприятие по переработке вторичного сырья или обратитесь в
свое муниципальное управление.
PYCCĸИЙ
51
ПОДДЕРЖКА ПОТРЕБИТЕЛЕЙ И СЕРВИСНОЕ
ОБСЛУЖИВАНИЕ
Мы рекомендуем использовать оригинальные запчасти. При обращении в сервисцентр следует иметь под рукой следующую информацию. Данная информация
находится на табличке с техническими данными. Модель, код изделия (PNC),
серийный номер.
Внимание / Важные сведения по технике безопасности.
Общая информация и рекомендации
Информация по охране окружающей среды.
Право на изменения сохраняется.
Page 52

52
www.aeg.com
1. УКАЗАНИЯ ПО
БЕЗОПАСНОСТИ
Внимание! Производитель снимает
с себя всякую ответственность
за неполадки, ущерб или пожар,
которые возникли при использовании
прибора вследствие несоблюдения
инструкций, приведенных в данном
руководстве. Вытяжка предназначена
исключительно для домашнего
использования.
Предупреждение! Не подключайте
прибор к электрической сети, пока
операции по установке полностью не
завершены. Прежде чем приступить
к операциям по очистке или уходу
отсоедините вытяжку от сети,
вынув вилку или выключив общий
выключатель электрической сети.
Для выполнения всех операций по
установке и уходу используйте рабочие
перчатки. Дети или взрослые не
пользоваться вытяжкой, если по
своему физическому или психическому
состоянию не в состоянии этого делать,
или если они не обладают знаниями и
опытом необходимыми для правильного и
безопасного управления прибором.
Не оставляйте детей без присмотра,
чтобы они не играли с прибором.
Не используйте вытяжку, если решетка
неправильно установлена! Категорически
запрещается использовать
качестве опорной плоскости, если это
специально не оговорено. Обеспечьте
надлежащий воздухообмен помещения,
когда Вы используете вытяжку в кухне
одновременно с другими приборами
на газу или на другом горючем.
Вытягиваемый воздух не должен
выбрасываться наружу через воздуховод,
используемый для выброса дымов от
приборов с газовым сжиганием или с
питанием
Категорически запрещается готовить
блюда над пламенем, поскольку
свободное пламя может повредить
фильтры и стать причиной пожара;
поэтому, воздерживайтесь от этого в
любом случае. Жаренье в большом
количестве масла должно производиться
под постоянным контролем, имея в
виду, что перегретое масло может
воспламеняться.
Что касается технических мер и условий
по технике безопасности при отводе
дымов, то придерживайтесь строго
правил, предусмотренных регламентом
другими горючими.
Внимание! При использовании
вместе с прочими аппаратами для
варки, открытые части прибора могут
сильно нагреваться.
должны
вытяжку в
местных компетентных властей.
Производите периодическую очистку
вытяжки как внутри, так и снаружи
(ПО КРАЙНЕЙ МЕРЕ, РАЗ В
с соблюдением условий, которые
специально предусмотрены в инструкциях
по обслуживанию данного прибора).
Несоблюдение инструкций по чистке
вытяжки и по замене и чистке фильтров
может стать причиной пожара.
Не используйте и не оставляйте вытяжку
без правильно установленных лампочек
в связи с возможным риском удара
электрическим током. Мы снимаем с себя
всякую ответственность за неполадки,
ущерб или сгорание прибора вследствие
несоблюдения инструкций, приведенных в
данном руководстве.
Внимание! Отсутствие установки
винтов и устройств крепления в
соответствии с этими инструкциями
может повлечь за собой риски
электрического характера.
МЕСЯЦ
2. ЭКСПЛУАТАЦИЯ
Вытяжка служит для всасывания
дымов и пара, образовывающихся
во время приготовления еды. В
прилагаемой инструкции указывается в
каком исполнении можно использовать
вашу модель – как вытяжку с выводом
наружу
рециркуляцией воздуха
, или вытяжку с внутренней
.
3. УСТАНОВКА
Напряжение сети должно соответствовать
напряжению, указанному на табличке
технических данных, которая
размещена внутри прибора. Если
вытяжка снабжена вилкой, подключите
вытяжку к штепсельному разъему,
отвечающему действующим правилам,
который должен быть расположен
в легкодоступном месте, что можно
сделать и после установки. Если же
вытяжка не снабжена вилкой (прямое
подключения к сети), или штепсельный
разъем не расположен в доступном
месте, также и после установки, то
используйте надлежащий двухполюсный
выключатель, обеспечивающий полное
размыкание сети при возникновении
условий перенапряжения 3-ей категории,
в соответствии с инструкциями по
установке.
Внимание! прежде чем подключить к
сети питания электрическую систему
вытяжки и проверить исправное
функционирование ее убедитесь в
том, что кабель питания правильно
смонтирован.
Page 53

PYCCĸИЙ
53
Внимание! Во избежание всяких
рисков, операция по замене кабеля
питания должна быть произведена
персоналом компетентной службы
техобслуживанияa.
Расстояние нижней грани вытяжки
над опорной плоскостью под сосуды
на кухонной плите должно быть не
менее 50cm – для электрических
плит, и не менее 65cm для газовых
или комбинированных плит. Если в
инструкциях по установке газовой
оговорено большее расстояние, то
учтите это.
плиты
4. УХОД
Внимание! Прежде чем выполнить
любую операцию по чистке или
техническому обслуживанию,
отсоедините вытяжку от электросети,
отсоединяя вилку или главный
выключатель помещения.
Вытяжка должна подвергаться частой
очистке как внутри, так и снаружи (по
крайней мере с той же периодичностью,
что и уход за фильтрами для задержки
жира). Для чистки используйте
специальную тряпку, смоченную
нейтральным жидким моющим
средством. Не применяйте средства,
содержащие абразивные материалы. НЕ
ПРИМЕНЯЙТЕ СПИРТ!
Внимание! Не соблюдение
правил чистки прибора и замены
фильтров может привести к
риску возникновения пожара.
Поэтому рекомендуем соблюдать
приведенные инструкции.
Снимается любая ответственность в
связи с возможными повреждениями
двигателя и с пожарами, возникшими
вследствие неправильного ремонта
или несоблюдения вышеописанных
предупреждений.
4.1 Фильтры задержки жира
Фильтр следует зачищать ежемесячно
неагрессивными моющими средствами,
вручную или в посудомоечной
машине при низкой температуре и
экономичном цикле мытья. При мытье
в посудомоечной машине может иметь
место некоторое обесцвечивание
фильтра задержки жира, но его
фильтрующая характеристика остается
абсолютно неизменной.
4.2 - Моющий угольный фильтр
- Насыщение угольного фильтра
происходит по истечении более
или менее длительного периода
эксплуатации, предопределяемого типом
кухни и периодичностью задержки жира.
В любом случае, заменяйте патрон по
крайней мере через каждые 4 месяца.
Угольный фильтр НЕ подлежит мойке
или регенерации.
5. ОРГАНЫ УПРАВЛЕНИЯ
Вытяжка оснащена щитом управления
для контроля скорости вытяжного
вентилятора и зажигания света для
освещения рабочей поверхности плиты.
Пользуйтесь интенсивным режимом
работы вытяжки в случае особо высокой
концентрации кухонных испарений.
Мы рекомендуем включить вытяжку
за 5 минут до начала процесса
приготовления пищи и оставить ее
включенной в течение 15 минут по
Page 54

54
www.aeg.com
окончании процесса.
Команды на фронтальной стороне
устройства:
A
B
A Кнопка OFF (кнопка не горит) – ON
(кнопка горит)
Нажать один или несколько раз для
того, чтобы получить желаемую
функцию:
ON (кнопка горит): Вытяжка
устанавливает последнюю
выбранную скорость.
OFF (кнопка выключено): все
функции отключены кроме
освещения.
B Кнопка выбора скорости (мощности
всасывания)
Нажать на эту кнопку один или
несколько раз для выбора наиболее
подходящей скорости (мощности)
всасывания (1 – 2 – 3).
C Дисплей: отображает выбранную
мощность всасывания ( 1 – 2
– 3), сигнализирует о насыщении
фильтров (F).
D Кнопка подключения интенсивной
скорости.
После подключения, интенсивная
скорость остается включенной
на протяжении около 5 минут,
после чего вытяжка возвращается
на предварительно выбранную
скорость ( от 1 до 3), или сразу
же отключается, если перед
этим не было установлено одной
из скоростей всасывания. Для
отключения интенсивной скорости
раньше 5 минут нажать на кнопку A
или B .
E Кнопка ON/OFF свет
Если вытяжка или команды не работают,
советуем отключить питание хотя
бы на 5 секунд и потом снова его
подключить. Подождать еще 15 секунд
и затем проверить правильность работы
вытяжки.
C
D
E
Устройство контроля металлического
и угольного фильтров.
Этот тип вытяжки оборудован
устройством, которое сигнализирует,
когда металлический фильтр или
фильтр на активированном угле должен
быть очищен (продается с угольным
фильтром заводом изготовителем
специализированным на вытяжных
устройствах).
Данный вид вытяжки поставляется
изготовителем без угольного фильтра,
поэтому индикатор насыщенности
отключен.
Если вы желаете использовать вытяжку
с угольным фильтром в этом случае
подключите индикатор насыщенности
угольного фильтра следующим образом:
Вытяжка должна быть установлена на
“OFF”.
Одновременно нажимать кнопки B и D
на протяжении трех секунд, светодиод
LED F включится и начнет мигать
светодиод 1-ой скорости, по истечению
1 секунды начнет мигать также и
светодиод 2-ой скорости и система
издаст звуковой сигнал (- Зуммер-)
указывая, что установка выполнена.
Для отключения сигнализации угольного
фильтра -одновременно нажимать
кнопки B и D на протяжении трех
секунд, светодиод LED F включится и
начнет мигать светодиод 1-ой скорости
(металлический фильтр) и светодиод
2-ой скорости, по истечении 1 секунды
будет мигать только светодиод 1-ой
скорости, система издаст звуковой
сигнал (- Зуммер-) указывая, что
установка выполнена.
Светодиод (1) сигнализации
насыщенности металлического фильтра
Если светодиод 1 скорости мигает это
означает, что жировые фильтры надо
помыть.
Внимательно изучить инструкции по
обслуживанию жировых металлических
фильтров в части, что касается их
чистки.
Светодиод (2) сигнализации
насыщенности угольного фильтра
Если светодиод 2 скорости мигает это
означает, что угольный фильтр надо
помыть или заменить.
Внимательно изучить инструкции по
Page 55

обслуживанию угольного фильтра в
части, что касается его чистки или
замены.
Сброс индикатора насыщенности.
После проведения обслуживания
фильтров держать нажатой кнопку
A
на протяжении 3 секунд пока светодиод
LED 1 или 2 перестанут мигать.
6. ОСВЕЩЕНИЕ
Отключите прибор от электросети.
Внимание! Прежде чем прикасаться к
лампам убедитесь в том, что они остыли.
Используйте для этого лишь галогенные
дампы на 12V - 20W макс - G4, не
прикасаясь к ним руками.
PYCCĸИЙ
55
Page 56

ET KASUTUSJUHEND
www.aeg.com56
PARIMATE TULEMUSTE SAAVUTAMISEKS
Täname teid selle AEG toote valimise eest. Lõime toote, mis võimaldab teil aastaid nautida
laitmatuid tulemusi ning lisasime elu lihtsamaks ja kergemaks muutvaid innovaatilisi
tehnoloogiaid – omadusi, mida te tavaliste seadmete juures ei pruugi leida. Leidke mõni
minut aega ning lugege, kuidas seadmega parimaid tulemusi saavutada.
Külastage meie veebisaiti:
Leiate nõuandeid, brošüüre, veaotsingu, teavet teeninduse kohta:
www.aeg.com
Võite registreerida oma toote parema teeninduse saamiseks:
www.aeg.com/productregistration
Saate osta lisaseadmeid, tarvikuid ja originaalvaruosi:
www.aeg.com/shop
JÄÄTMEKÄITLUS
Sümboliga tähistatud materjalid võib ringlusse suunata. Selleks viige pakendid
vastavatesse konteineritesse.
Aidake hoida keskkonda ja inimeste tervist ja suunake elektri- ja elektroonilised jäätmed
ringlusse. Ärge visake sümboliga tähistatud seadmeid muude majapidamisjäätmete
hulka. Viige seade kohalikku ringluspunkti või pöörduge abi saamiseks kohalikku
omavalitsusse.
KLIENDITEENINDUS
Soovitame alati kasutada originaalvaruosi.
Teenindusse pöördumisel peaksid teil olema varuks järgmised andmed.
Andmed leiate andmesildilt. Mudel, tootenumber (PNC), seerianumber.
Hoiatus / oluline ohutusinfo.
Üldine informatsioon ja nõuanded
Keskkonnateave.
Jäetakse õigus teha muutusi.
Page 57

EESTI
57
1. OHUTUSJUHISED
Ettevaatust! Järgige täpselt käesolevas
juhendis antud juhiseid. Seadme
valmistaja keeldub igasugusest
vastutusest seadmega seotud võimalike
ebameeldivuste, rikete või tulekahjude
eest, mis tulenevad selles juhendis
antud juhiste eiramisest. Õhupuhasti
on projekteeritud ainult koduseks
kasutamiseks.
Hoiatus! Ärge lülitage seadet
elektrivõrku enne, kui paigaldamine on
täiesti lõpetatud.
Enne puhastus- või hooldustööd
lülitage õhupuhasti vooluvõrgust välja,
tõmmates selleks pistiku seinakontaktist
või lülitades voolu pealülitist välja.
Kasutage paigaldus- ja hooldustöödel
kaitsekindaid.
Lapsed, füüsilise, vaimse või meelepuudega
inimesed ja isikud, kellel ei ole seadme
kasutamise kogemust, võivad seadet
kasutada ainult järelevalve all või siis, kui
nende turvalisuse eest vastutav inimene on
õpetanud neid seadet kasutama.
Lastel ei tohi lubada seadmega mängida.
Ärge kasutage õhupuhastit ilma õigesti
paigaldatud võreta.
Õhupuhasti peale ei tohi KUNAGI midagi
toetada, kui seda ei ole eraldi märgitud.
Kui õhupuhastit kasutatakse samaaegselt
teiste, gaasil või muul kütusel töötavate
seadmetega, peab ruum olema piisavalt
ventileeritud. Seadme torustikku ei tohi
ühendada ventilatsioonisüsteemiga,
mida kasutatakse muul otstarbel, näiteks
suitsugaaside eemaldamiseks seadmetest,
milles kasutatakse majapidamisgaasi või
muid kütuseid.
Lahtise tulega toiduvalmistamine
õhupuhasti all on rangelt keelatud.
Lahtine tuli kahjustab filtreid ja võib
põhjustada tulekahju ning seega tuleb seda
igati vältida.
Toidu praadimisel peab olema hoolikas, et
vältida õli ülekuumenemist ja süttimist.
Ettevaatust! Köögiseadmete
kasutamisel võivad õhupuhasti
kokkupuutepinnad märkimisväärselt
soojeneda.
Tuleb järgida eeskirju, mida ametiasutused
on suitsuärastuse tehniliste ja
ohutusmeetmete kohta kehtestanud.
Õhupuhastit peab seest ja väljast
regulaarselt (VÄHEMALT ÜKS
KORD KUUS) puhastama, pidades
kinni käesolevas juhendis toodud
hooldusnõuetest.
Kui käesolevas juhendis õhupuhasti ja
filtrite puhastamise kohta sätestatud
nõudeid ei täideta, võib tekkida tulekahju
oht.
Ärge kasutage õhupuhastit ega jätke
seda seisma ilma korralikult paigaldatud
lampideta, sest see põhjustab elektrilöögi
ohu.
Me ei võta vastutust seadme vigastuste ja
kahjustuste eest, mis tekivad käesolevas
juhendis sätestatud nõuete eriramise
tagajärjel.
Ettevaatust! Käesolevaid juhiseid
täpselt järgimata ja seetõttu valesti
paigaldatud kruvid ja kinnitusseadmed
võivad põhjustada elektriohtu.
2. KASUTAMINE
Õhupuhasti eesmärk on eemaldada ruumist
toiduvalmistamisel tekkiv suits ja aur.
Seadme juurde kuuluvas juhendis on
ära näidatud, millist varianti teie mudeli
juures kasutada saab (õhu väljaviiguga
tõmbeversioon
filtreeriv versioon ).
või õhuringlusega
3. PAIGALDAMINE
Võrgupinge peab vastama õhupuhasti
sees asuval andmesildil toodud pingele.
Kui õhupuhastil on pistik, ühendage
see kehtivatele eeskirjadele vastavasse
pistikupessa, mis asub ka pärast
õhupuhasti paigaldamist ligipääsetavas
kohas. Kui õhupuhastil pistikut ei ole
(puhasti on otse võrku ühendatud) või kui
pistik ei asu kohas, mis jääks ka pärast
õhupuhasti paigaldamist ligipääsetavaks,
paigaldage nõuetekohane kahepooluseline
lüliti, mis kindlustaks vastavalt
paigalduseeskirjadele III kategooria
liigpinge korral täieliku eraldamise
vooluvõrgust.
Tähelepanu! Enne kui lülitate
õhupuhasti uuesti elektrivõrku ja
kontrollite, kas see töötab korralikult,
kontrollige alati, kas võrgukaabel on
korralikult monteeritud.
Page 58

58
www.aeg.com
ähelepanu! Riski vältimiseks peab
elektrijuhtme asendamine läbi viidud
olema selleks autoriseeritud inimeste
poolt.
Minimaalne vahekaugus pliidi pinna ja
köögi õhupuhasti alumise ääre vahel ei tohi
elektripliidi puhul olla väiksem kui 50cm
ning gaasi- või kombineeritud pliidi puhul
väiksem kui 65cm.
Kui gaasipliidi paigaldusjuhendis nõutakse
suuremat vahekaugust, tuleb seda arvesse
võtta.
4. HOOLDUS
Enne hooldustöid võtke õhupuhasti
vooluvõrgust välja.
Õhupuhastit tuleb sageli (vähemalt
sama tihti, kui hooldatakse rasvafiltreid)
nii seest kui ka väljast puhastada.
Puhastamiseks kasutage neutraalse vedela
puhastusvahendiga niisutatud lappi.
Vältige abrasiivseid aineid sisaldavaid
vahendeid.
ÄRGE KASUTAGE PUHASTAMISEKS
ALKOHOLI!
Tähelepanu! Seadme puhastamise
ja filtrite vahetamise eeskirjade
mittejärgimisega kaasneb tulekahju oht.
Seepärast on soovitatav järgida antud
juhiseid.
Me ei võta endale mingit vastutust
ebaõigest käsitsemisest või eespool toodud
ettevaatusabinõude eiramisest tingitud
võimalike mootorikahjustuste ja tulekahjude
eest.
4.1 Rasvafilter - Seda tuleb kord kuus
mittesööbivate puhastusvahenditega
puhastada kas käsitsi või
nõudepesumasinas madala temperatuuri ja
lühikese tsükliga.
Nõudepesumasinas pesemisel võib
metallist rasvafilter värvi muuta, aga tema
filtreerimisomadusi ei muuda see vähimalgi
määral.
4.2 - Pestav aktiivsöefilter
Söefilter küllastub kas lühema või pikema
kasutamise järel olenevalt pliidist ja sellest,
kui korrapäraselt rasvafiltrit puhastatakse.
Igal juhul tuleb kassett välja vahetada
vähemalt iga nelja kuu tagant.
Seda EI TOHI pesta ega taasaktiveerida
5. JUHIKUD
Tulede ja tõmbemootori sisselülitamiseks
kasutada õhupuhasti eesküljel olevaid
lüliteid.
Kui auru kontsentratsioon köögis on eriti
suur, kasutage kõige suuremat kiirust.
Soovitame väljatõmbe sisse lülitada 5
minutit enne söögitegemise algust ning jätta
see pärast söögivalmistamise lõppu veel
umbes 15 minutiks tööle.
Seadme esiküljel olevad juhtseadmed:
A
B
A Sisse- ja väljalülitusnupp (ON-OFF)
Vajutage soovitud funktsiooni
saamiseks üks või mitu korda:
ON („sisse”): õhupuhasti paneb tööle
viimati valitud tõmbekiiruse.
OFF („välja”): kõik funktsioonid on
desaktiveeritud, välja arvatud valgus.
B Kiiruse (tõmbevõimsuse) valiku nupp
Vajutage seda nuppu sobiva
tõmbekiiruse (-võimsuse) valimiseks
üks või mitu korda (1-2-3).
C Kuvar: näitab valitud tõmbevõimsust
(1-2-3), annab märku, kui filtrid (F) on
küllastunud.
C
D
E
Page 59

EESTI
59
D Intensiivse tõmbekiiruse käivitamise
nupp.
Kui intensiivne kiirus on sisse lülitatud,
jääb õhupuhasti tööle umbes 5
minutiks. Pärast seda hakkab seade
jälle tööle eelnevalt valitud kiirusel
(1–3) või lülitub välja, kui mingit kiirust
ei olnud valitud. Kui soovite intensiivse
kiiruse enne 5 minuti möödmist välja
lülitada, vajutage nuppu
A või nuppu
B .
E Valguse lüliti.
Kui õhupuhasti või selle juhtseadmed ei
tööta, on soovitatav toide vähemalt viieks
sekundiks välja ja siis uuesti sisse lülitada.
Oodake seejärel 15 sekundit ja kontrollige,
kas õhupuhasti töötab korralikult.
Aktiivsöega rasvafiltri ja aktiivsöega filtri
kontrollseade
Seda tüüpi õhupuhastid on varustatud
seadmega, mis annab märku, kui rasvafilter
või aktiivsöefilter vajab puhastamist
(tõmbeseadmetele spetsialiseerunud
tootjafirma müüb seadet koos
aktiivsöefiltriga).
Tootja tarnib õhupuhastid ilma
aktiivsöefiltrita, seega on filtri küllastumise
märgutuli desaktiveeritud.
Kui õhupuhastit tahetakse kasutada
aktiivsöefiltriga, tuleb filtri küllastumise
märgutuli aktiveerida järgmiselt.
Õhupuhasti lüliti peab olema asendis
„OFF”.
Vajutage kolme sekundi jooksul korraga
nuppe B ja D , süttib LED F ning 1. kiiruse
märgutuli hakkab vilkuma, ühe sekundi
möödudes hakkab vilkumaka 2. kiiruse
tuli ja süsteem annab helisignaali, mis
tähendab, et süsteem on seadistatud.
Aktiivsöefiltri signalisatsiooni
mahavõtmiseks vajutage kolme sekundi
jooksul korraga nuppe B ja D , süttib LED
F ning 1. kiiruse (rasvafilter) ja 2. kiiruse
märgutuled hakkavad vilkuma, ühe sekundi
möödudes jääb vilkuma ainult 1. kiiruse tuli,
süsteem annab helisignaali, mis tähendab,
et süsteem on seadistatud.
Rasvafiltrite puhastamiseks lugege
tähelepanelikult nende hooldusjuhiseid.
Aktiivsöefiltri küllastumise märgutuli (2)
2. kiiruse märgutule vilkumine hoiatab
töötajat, et söefiltrit tuleb pesta või
vahetada.
Lugege tähelepanelikult söefiltri pesemise
või vahetamise juhiseid.
Küllastumisindikaatori lähtestamine
Filtrite hooldustööde järel hoidke
kolme sekundi vältel all nuppu
A , kuni
valgusdiood 1 või 2 lakkab vilkumast.
6. VALGUSTUS
Võtke aparaat vooluvõrgust välja.
Tähelepanu! Enne pirnide puudutamist
veenduge, kas need on jahtunud.
Kasutage üksnes 20-vatise võimsusega
(12 V) G4-pirne ning ärge neid käega
puudutage.
Rasvafiltri küllastumise märgutuli (1)
1. kiiruse märgutule vilkumine hoiatab
töötajat, et rasvafiltreid tuleb pesta.
Page 60

LV LIETOŠANAS PAMĀCĪBA
www.aeg.com60
LABĀKIEM REZULTĀTIEM
Pateicamies, ka izvēlējāties AEG produktu. Esam to izveidojuši, lai ilgstoši nodrošinātu
nevainojamu veiktspēju, izmantojot novatoriskas tehnoloģijas, kas palīdz vienkāršot dzīvi,
– iespējas, ko neatradīsit parastās ierīcēs. Lūdzu, veltiet dažas minūtes, lai izlasītu šo
tekstu un gūtu labākus rezultātus.
Apmeklējiet mūsu mājaslapu:
Atradīsiet lietošanas padomus, brošūras, informāciju par traucējumu novēršanu un
apkopi:
www.aeg.com
Reģistrējiet savu produktu, lai uzlabotu pakalpojumu:
www.aeg.com/productregistration
Iegādājieties ierīcei oriģinālās rezerves daļas, materiālus un piederumus:
www.aeg.com/shop
APLINKOSAUGA
Nododiet otrreizējai pārstrādei materiālus ar simbol . Ievietojiet iepakojuma materiālus
atbilstošos konteineros to otrreizējai pārstrādei.
Palīdziet aizsargāt apkārtējo vidi un cilvēku veselību, atkārtoti pārstrādājot elektrisko un
elektronisko iekārtu atkritumus. Neizmetiet ierīces, kas apzīmētas ar šo simbolu , kopā ar
mājsaimniecības atkritumiem. Nododiet izstrādājumu vietējā otrreizējās pārstrādes punktā
vai sazinieties ar vietējo pašvaldību.
KLIENTU APKALPOŠANA UN PAKALPOJUMI
Iesakām izmantot oriģinālās rezerves daļas.
Sazinoties ar apkalpes dienestu, pārliecinieties, vai jums ir šādi dati.
Šo informāciju var atrast tehnisko datu plāksnītē. Modelis, izstrādājuma Nr., sērijas numurs.
Drošības informācija brīdinājumam un piesardzībai.
Vispārēja informācija un padomi
Informācija par apkārtējo vidi.
Izmaiņu tiesības rezervētas.
Page 61

LATVIEŠU
61
1.
DROŠĪBAS NORĀDĪJUMI
Uzmanību! Stingri sekot instrukcijām,
kas atrodas šajā rokasgrāmatā.
Netiek uzņemta jebkāda atbildība par
iespējamām grūtībām, kaitējumiem
vai ugunsgrēkiem, kas var notikt
ierīcei šīs rokasgrāmatas instrukciju
neievērošanas gadījumā. Gaisa
nosūcējs tika projektēts tikai
izmantošanai mājās.
Brīdinājums! Nepieslēgt ierīci pie
elektriskā tīkla, līdz ko ierīkošana nav
pilnīgi pabeigta.
Pirms jebkuras tīrīšanas vai tehniskās
apkalpošanas operācijas, atslēgt gaisa
nosūcēju no elektriskā tīkla, izņemot
kontaktdakšu vai atslēdzot mājokļa
kopējo slēdzi.
Ierīce nav domāta, lai to izmantotu bērni
vai cilvēki ar nepietiekamām fiziskām,
sensoriālām vai mentālām spējām, vai ar
nepietiekošām zināšanām un pieredzi,
izņemot gadījumus, kad tos pieskata vai
ierīces izmantošanu apmāca cilvēks, kurš ir
atbildīgs par viņu drošību.
Bērniem ir jābūt pieskatītiem, lai tie
nespēlētos ar ierīci.
Nekad neizmantot gaisa nosūcēju, ja režģis
nav pareizi ierīkots!
Gaisa nosūcējs nekad netiek izmantots,
kā atbalsta konstrukcija, ja nu tikai tas ir
skaidri norādīts. Telpā ir jābūt pietiekamai
ventilācijai, kad gaisa nosūcējs tiek
vienlaicīgi izmantots ar citām ierīcēm, kuras
darbojas ar gāzi vai citām degvielām.
Iesūktam gaisam nav jābūt vērstam
caurulē, kura tiek izmantota gāzes vai citu
degvielu ierīču dūmu izvadīšanai.
Ir stingri aizliegts pagatavot ēdienus
“flambē” veidā zem gaisa nosūcēja.
Atlkātās uguns izmantošana ir kaitīga
filtriem un var provocēt ugunsgrēkus, tādēļ
no tās jebkurā gadījumā ir jāizvairās.
Cepšana ir jāveic to uzraugot, lai izvairītos
no pārkarsušās eļļas degšanas.
Uzmanību! Pieejamās daļas var
ievērojami sasildīties, kad tiek
izmantotas kopā ar ierīcēm ēdiena
gatavošanai.
Kas attiecas uz tehniskiem un drošības
noteikumiem, lai izvadītu dūmus, tad ir
nepieciešams stingri pieturēties pie vietējo
kompetento autoritāšu noteikumiem.
Gaisa nosūcējs ir bieži jātīr, gan no
ārpuses, gan no iekšpuses (VISMAZ
VIENU REIZI MĒNESĪ,jebkurā
gadījumā,ņemot vērā to, kas ir skaidri
rakstīts šīs rokasgrāmatas tehniskās
apkalpošanas instrukcijās).
Gaisa nosūcēja tīrīšanas, filtru
nomainīšanas un tīrīšanas normu
neieverošana provocē ugunsgrē
Neizmantot vai neatstāt gaisa nosūcēju
bez pareizi ierīkotām spuldzēm iespējamā
elektriskā trieciena riska dēļ.
Tiek noraidīta jebkura atbildība par
iespējamiem kaitējumiem, neērtībām
vai ugunsgrekiem, kurus provocēja
ierīce, gadījumā kad netika ievērotas šīs
rokasgrāmatas instrukcijas.
Uzmanību! Gadījumā, ja netiek
instalētas skrūves vai fiksācijas ierīces,
kā to paredz šīs instrukcijas, tas var
izraisīt elektriskās dabas riskus.
ka risku.
2. NAUDOJIMAS
Gaisa nosūcējs ir domāts, lai iesūktu
dūmus un tvaikus, kurus izraisa ēdiena
pagatavošana.
Līdzi sniegtajā instalācijas grāmatiņā ir
uzrādīts kuru versiju ir iespējams izmantot
Jūsu modelim – starp iesūkšanas versiju ar
izvadīšanu uz ārpusi vai versiju ar filtru
ar iekšējo apstrādi .
3. IERĪKOŠANA
Tīkla spriegumam ir jāatbilst spriegumam,
kurš ir atzīmēts uz īpašas etiķetes, kura
atrodas gaisa nosūcēja iekšpusē. Ja
nosūcējam ir kontaktdakša, pievienot to
rozetei, kura atbilst pastāvošiem likumiem
un atrodas pieejamā zonā arī pēc
installēšanas.
Ja gaisa nosūcējam nav kontaktdakšas
(tieša pieslēgšana pie elektriskās sistēmas)
vai arī kontaktdakša neatrodas pieejamā
zonā, arī pēc installēšanas, pielietot
normām atbilstošu bipolāru slēdzi, kurš
nodrošina pilnu atslēgšanu no tīkla
sprieguma, pārslodzes kategorijas III
nosacījumos, saskaņā ar ierīkošanas
likumiem.
Uzmanību! pirms pieslēgt gaisa
nosūcējau pie tīkla barošanas un pirms
pārbaudīt tā pareizu darbošanos,
vienmēr pārbaudīt ka tīkla kabelis ir
ierīkots pareizi.
Page 62

62
www.aeg.com
Uzmanību! Barošanas vada
nomainīšanu ir jāveic tehniskās
apkalpošanas dienestam, lai novērstu
jebkuru risku.
Minimālam attālumam starp plīts virsmu,
kur tiek novietoti tilpumi un viszemākās
gaisa nosūcēja daļas nav jābūt mazākam
par 50cm elektriskās plīts gadījumā un
65cm gāzes un kombinētas virtuves
gadījumā. Gadījumā, ja ierīkošanas
instrukcijās gāzes ierīcei tiek precizēts
lielāks attālums, ir nepieciešams to ievērot.
4. APKOPE
Pirms jebkura veida tehniskās apkalošanas
darba, atslēgt gaisa nosūcēju no elektrības.
Gaisa nosūcējs ir bieži jātīra (vismaz
tikpat bieži, cik bieži tiek veikta tauku filtru
tehniskā apkalpošana) gan no ārpuses, gan
no iekšpuses. Tīrīšanai ir jāizmanto mitrs
audums, kurš ir samitrināts ar neitrāliem
šķidriem mazgāšanas līdzekļiem.
Neizmantot jebkuru abrazīvus saturošu
produktu.
NEIZMANTOT ALKOHOLU!
Uzmanību! Ierīces tīrīšanas un filtru
nomainīšanas normu neievērošana
var vest pie ugunsgrēka riskiem. Tātad
ir ietecams pieturēties pie ieteiktām
instrukcijām.
Tiek noraidīta jebukra atbildība par
iespējamiem dzinēja bojajumiem,
ugunsgrēkiem, kas tika provocēti
neatbistošas tehniskās apkalpošanas vai
augstāk minēto brīdinājumu neievērošanas
dēļ.
4.1 Prettauku filtrs - Prettauku filtram ir
jābūt tīrītam katru mēnesi, ar neagresīviem
līdzekļiem, manuāli vai trauku mazgājamā
mašīnā, pie zemas temperatūras un
izmantojot īso ciklu. Ja tas tiek mazgāts
trauku mazgā
metāla detaļas var kļūt nespodras, bet
jebkurā gadījumā to spējas nemainās
jamā mašīnā, prettauku filtra
4.2 - Aktīvo ogļu filtrs ir mazgājams
Ogles filtra piesātināšana notiek pēc
vairāk vai mazāk ilgas izmantošanas,
atkarībā no virtuves veida un tauku filtru
tīrīšanas biežuma. Jebkurā gadījumā, ir
nepieciešams nomainīt kartridžu katru
ceturto mēnesi.
NEVAR būt mazgāts vai atjaunots.
5. VADĪBAS ELEMENTI
izmantot taustus, kuri atrodas uz nosūcēja
priekšdaļas lai ieslēgtu gaismas un
iesūkšanas motoru.
Izmantot augstāku ātrumu īpašas virtuves
dūmu koncentrācijas gadījumā. Iesakām
ieslēgt iesūkšanu 5 minūtes pirms ēdiena
gatavošanas sākšanas un neslēgt to ārā
vēl 15 minūtes pēc ēdiena gatavošanas
pabeigšanas.
Komandas uz ierīces priekšējās daļas:
A
B
A Tausts OFF (izslēgts tausts) - ON
(ieslēgts tausts)
Piespiest vienu vai vairākas reizes, lai
iegūtu vēlamo funkciju:
ON (tausts ieslēgts): gaisa nosūcējs
uzstāda pēdējo izvēlēto ātrumu.
OFF (izslēgts tausts): visas funkcijas ir
atslēgtas, izņemot apgaismojumu.
B Ātruma izvēles tausts (iesūkšanas
jauda)
Piestpiest šo taustu vienu vai vairākas
reizes, lai izvēlētos vispiemērotāku
iesūkšanas ātrumu (jaudu) (1 - 2 - 3 ).
C
D
E
Page 63

LATVIEŠU
63
C Displejs: uzrāda izvēlēto iesūkšanas
jaudu (1-2-3), paziņo par filtru
aizsprostojumu (F).
D Intensīvā ātruma ieslēgšanas tausts.
Kad tas ir ieslēgts, instensīvais ātrums
paliks darbībā aptuveni 5 minūtes,
pēc kā, gaisa nosūcējs atgriezīsies uz
agrāk izvelēto ātrumu (no 1 uz 3) vai
arī izslēdzas, ja agrāk netika izvēlēts
neviens ātrums. Lai atslēgtu intensīvo
pirms ir pagājušas 5 minūtes, piespiest
taustu
A vai taustu B .
E Tausts ON/OFF gaisma
Gadījumā, ja gaisa nosūcējs vai komandas
nedarbojas, tiek ieteikts pārtraukt padevi uz
aptuveni 5 sekundēm un pēc tam ieslēgt
no jauna. Pēc tam, uzgaidīt 15 sekundes
un pārbaudīt, vai gaisa nosūcējs pareizi
darbojas.
Ierīce tauku un aktīvo ogļu filtra
pārbaudei
Šis gaisa nosūcēja veids ir iepriekšnosacīts
ierīcei, kas paziņo, kad tauku filtriem vai
aktīvo ogļu filtriem ir jābūt tīrītiem (pārdeva
ar aktīvo ogļu filtru uzņēmums-ražotājs,
kura specializācija ir iesūkšanas ierīces).
Šo gaisa nosūcēja veidu sniedz
ražotājs bez aktīvo ogļu filtra, un tātad
aizsprostojuma indikatorlampiņa nav
aktivēta.
Gadījumā, ja ir vēlēšanās izmantot gaisa
nosūcēju ar ogļu filtru, ir jāiedarbina ogļu
filtra aizsprostošanas indikatorlampiņa, kā
tas ir uzrādīts tālāk:
Gaisa nosūcējam ir jābūt uzstādītam uz
“OFF”.
Vienlaicīgi piespiest taustus B un D uz
trim sekundēm, LED F ieslēdzas un sāk
mirguļot 1.ātruma led, pēc 1 sekundes
murguļos arī 2.ātruma led un sistēma
izdod skaņas signālu (-Beep-), kas uzrāda
notikušo uzstādījumu.
Lai noņemtu ogļu filtra paziņojumu,
vienlaicīgi piespiest taustus B un D uz
trim sekundēm, LED F ieslēdzas un sāk
mirguļot 1.ātruma led (tausku filtrs) un
2.ātruma led; pēc 1 sekundes mirguļos tikai
1.ātruma led, sistēma izdod skaņas signālu
(-Beep-), kas uzrāda notikušo uzstādījumu.
Tauku filtra aizsprostošanas paziņojuma
led (1)
1.ātruma led mirguļošana brīdina operatoru,
ka tauku filtriem ir jābūt mazgātiem.
Uzmanīgi izlasīt instrukcijas, kas attiecas uz
tauku filtru tehnisko apkopi to tīrīšanai.
Aktīvo ogļu aizsprostošanas paziņojuma
led (2)
2.ātruma led mirguļošana brīdina operatoru,
ka ogļu filtram ir jābūt mazgātam vai
nomainītam.
Uzmanīgi izlasīt instrukcijas, kas attiecas uz
ogļu filtra mazgāšanu vai nomainīšanu.
Aizsprostojuma indikatora atiestatīšana
Pēc filtru tehniskās apkopes veikšanas,
turēt piespiestu taustu
A 3 sekundes līdz
ko LED 1 vai 2 nepārtrauc mirguļot.
6. APGAISMOJUMS
Atvienot ierīci no elektriskās sistēmas.
Uzmanību! Pirms pieskarties spuldzēm,
pārliecināties, ka tās ir aukstas.
Izmantot tikai 12V -20W max - G4 halogēna
spuldzes, uzmanoties lai neaiztiktu tās ar
rokām.
Page 64

LT NAUDOTOJO VADOVAS
www.aeg.com64
PUIKIEMS REZULTATAMS PASIEKTI
Ačiū, kad pasirinkite šį AEG gaminį. Mes sukūrėme jį taip, kad jis nepriekaištingai veiktų
daugelį metų – pasižymintis pažangiomis technologijomis, kurios padeda palengvinti
gyvenimą, jis turi funkcijų, kurių galite nerasti įprastuose buitiniuose prietaisuose. Skirkite
kelias minutes perskaityti insktrukciją, kad galėtumėte jį maksimaliai panaudoti.
Apsilankykite mūsų interneto svetainėje, kad:
gautumėte naudojimo patarimų, brošiūrų, trikčių šalinimo, aptarnavimo informacijos:
www.aeg.com
užregistruotumėte savo gaminį geresniam aptarnavimui:
www.aeg.com/productregistration
įsigytumėte priedų, vartojamųjų prekių ir originalių atsarginių dalių savo prietaisui:
www.aeg.com/shop
APLINKOS APSAUGA
Atiduokite perdirbti medžiagas, pažymėtas šiuo ženklu . Išmeskite pakuotę į atitinkamą
atliekų surinkimo konteinerį, kad ji būtų perdirbta.
Padėkite saugoti aplinką bei žmonių sveikatą ir surinkti bei perdirbti elektros ir elektronikos
prietaisų atliekas. Neišmeskite šiuo ženklu pažymėtų prietaisų kartu su kitomis
buitinėmis atliekomis. Atiduokite šį gaminį į vietos atliekų surinkimo punktą arba susisiekite
su vietnos savivaldybe dėl papildomos informacijos.
KLIENTŲ PRIEŽIŪRA IR APTARNAVIMAS
Rekomenduojame naudoti tik originalias atsargines dalis.
Kreipdamiesi į aptarnavimo centrą, būtinai pateikite šią informaciją.
Informacija yra nurodyta techninių duomenų plokštelėje. Modelis, PNC, serijos numeris.
Įspėjimas / atsargumo ir saugos informacija.
Bendroji informacija ir patarimai
Aplinkosaugos informacija.
Galimi pakeitimai be įspėjimo.
Page 65

LIETUVIŠKAI
65
1. SAUGOS INSTRUKCIJA
Atsargiai! Griežtai laikykitės
naudojimosi instrukcijų. Gamintojas
neprisiima jokios atsakomybės, jei
montuojant prietaisą buvo nesilaikoma
naudojimosi instrukcijoje nurodytų
taisyklių ir tokiu būdu prietaisas
sugedo, buvo pažeistas ar užsidegė.
Gaubtas buvo sukurtas naudoti tik
namuose.
Įspėjimas! Nejunkite aparato į elektros
tinklą tol, kol įdiegimas nėra visiškai
užbaigtas.
Prieš bet kokį priežiūros ar valymo
veiksmą, reikia išjungti gaubtą iš
elektros srovės šaltinio, ištraukiant
kištuką iš rozetės arba išjungiant
jungiklį.
Įrenginiu nepatariama naudotis vaikams,
žmonėms su fizine arba protine negalia be
už juos atsakingo asmens priežiūros arba
specialių nurodymų.
Vaikams neturi būti leidžiama žaisti su
įrenginiu. Nenaudokite gaubto, jei grotelės
sumontuotos netaisyklingai.
Gaubto niekada nenaudokite kaip atramos,
nebent toks jo naudojimo būdas yra
nurodytas kaip galimas.
Patalpa turi būti gerai vėdinama, kai
virtuvės gaubtas yra naudojamas kartu su
kitais dujinių įrenginiais.
Įsiurbiamas oras neturi būti nukreiptas į
dūmtraukį, įtraukiantį garus, išeinančius iš
dujinių bei kitų įrenginių.
Griežtai draudžiama gaminti maistą ant
ugnies po gaubtu.
Atvira ugnis pažeidžia filtrus ir gali sukelti
gaisrą, todėl jos reikia griežtai vengti.
Kepant reikia prižiūrėti, kad įkaitęs aliejus
neužsidegtų.
Atsargiai! Naudojant kartu su maisto
gaminimo įranga kai kurios detalės gali
stipriai įkaisti.
Būtina laikytis vietos valdžios nustatytų
dūmtraukio techninių bei saugos taisyklių.
Gaubtą reikia valyti tiek iš išorės, tiek iš
vidaus (bent vieną kartą per mėnesį arba
taip, kaip nurodyta naudojimo instrukcijų
knygelėje).
Gaubto bei filtrų valymo ir keitimo instrukcijų
nesilaikymas didina gaisro pavojaus riziką.
Jei lempos neteisingai įmontuotos ar
jų nėra, nenaudokite gaubto, gali įvykti
elektros iškrova.
Įmonė neatsako už įvairius nepatogumus,
žalą arba gaisrą, kilusį nesilaikant įrenginio
naudojimo instrukcijų, nurodytų šioje
knygelėje.
Dėmesio! Šiose instrukcijose nurodytų
varžtų ir jungiamųjų įtaisų trūkumas gali
sukelti elektrinio pobūdžio pavojų.
2. IZMANTOŠANA
Gaubtas ištraukia dūmus ir garus,
susidarančius gaminant maistą.
Pridedamoje montavimo instrukcijų
knygelėje nurodyta, kuri gaubto versija gali
būti naudojama Jūsų turimame modelyje,
tai gali būti išorinio dūmų ištraukimo ir
pašalinimo į išorę įrenginys arba dūmų
filtravimo ir vidinės recirkuliacijos įrenginys
.
3. ĮRENGIMAS
Įtampa elektros tinkle turi atitikti įtampą,
nurodytą etiketėje, priklijuotoje gaubto
viduje. Jei yra kištukas, reikia įjungti
gaubtą į rozetę, atitinkančią galiojančius
nuostatus ir esančią prieinamoje vietoje
net ir po gaubto įdiegimo. Jeigu kištuko
(yra numatytas tiesioginis prijungimas
prie elektros srovės) arba nėra rozetės
prieinamoje vietoje net ir po gaubto
įdiegimo, yra naudojamas dvipolis jungiklis,
pagal visas įdiegimo taisykles užtikrinantis
visišką atsijungimą nuo elektros tinklo per
aukštos įtampos atveju.
Dėmesio! Prieš vėl prijungdami
gaubtą prie elektros maitinimo tinklo
ir patikrindami, ar jis tinkamai veikia,
visada įsitikinkite, ar tinklo kabelis
tinkamai įmontuotas.
Page 66

66
www.aeg.com
Dėmesio! Siekiant išvengti rizikos,
maitinimo laido pakeitimą turėtų atlikti
įgalioti techninės pagalbos specialistai.
Jei viryklė elektrinė, mažiausias atstumas
tarp viryklės kaitlentės paviršiaus ir
žemiausios virtuvinio gaubto dalies turi būti
50cm, o jei viryklė dujinė ar kombinuota
– 65cmo jei viryklė dujinė ar kombinuota.
Jei dujinės viryklės įrengimo instrukcijoje
nurodomas didesnis atstumas, būtina į tai
atsižvelgti.
4. PRIEŽIŪRA
Dėmesio! Prieš valydami prietaisą, išjunkite
jį iš elektros tinklo. Ištraukite kištuką iš
rozetės arba išjunkite pagrindinį namų
elektros jungiklį.
Gaubtą reikia nuolat valyti (bent jau taip pat
dažnai kaip ir prižiūrint riebalų filtrus), tiek
iš vidaus, tiek ir iš išorės. Valymui naudoti
šluostę, suvilgytą skystu neutraliu valikliu.
Nenaudokite abrazyvinių valymo priemonių.
NENAUDOKITE SPIRITO!
Dėmesio! Netinkamai valant prietaisą
bei nesilaikant filtrų keitimo normų
gali kilti gaisro pavojus. Todėl
rekomenduojama laikytis pateiktų
nurodymų.
Gamintojas neprisiima jokios atsakomybės
už gaisrą bei galimus variklio gedimus,
kilusius dėl netinkamos priežiūros arba dėl
šių nurodymų nesilaikymo.
4.1 Nuo riebalų saugantis filtras
Turi būti valomas vieną kartą per mėnesį
švelniais valikliais, rankiniu būdu ar
indaplovėje atitinkamoje temperatūroje ir
trumpuoju ciklu.
Plaunant metalinį nuo riebalų saugantį filtrą
indaplovėje, jis gali prarasti spalvą, bet jo
filtravimo savybės išliks nepakitusios
4.2 - Plaunamas aktyviosios anglies
filtras - Anglies filtras prisipildo naudojant
jį ilgą laiką, priklausomai nuo virtuvės tipo ir
riebalų filtro valymo reguliarumo. Bet kokiu
atveju, kapsulę reikia keisti mažiausiai kas
keturis mėnesius.
NEGALIMA plauti ar regeneruoti.
5. VALDYMAS
Gaubte yra valdymo skydelis su ištraukimo
greičio parinkimu ir šviesos jungikliu, kuriuo
galima valdyti kepimo ploto šviesas.
Virtuvėje susikaupus dideliam garų kiekiui,
naudokite didžiausią greitį. Patartina įjungti
ištraukimą prieš 5 minutes pradedant
gaminti, o baigus gaminti palikti veikti dar
apie 15 minučių.
Valdymo komandos priekinėje prietaiso
dalyje:
A
B
A Mygtukas OFF (išjungimo mygtukas)
- ON (įjungimo mygtukas)
Paspauskite vieną ar kelis kartus, kol
pasirinksite norimą funkciją:
ON (įjungimo mygtukas): gaubte
nustatomas paskutinis pasirinktas
greitis.
OFF (išjungimo mygtukas): visos
funkcijos išjungiamos, išskyrus
apšvietimą.
B Greičio pasirinkimo mygtukas (įtraukimo
galingumas).
Norėdami pasirinkti tinkamą įtraukimo
greitį (galingumą)(1 - 2 - 3 ),
paspauskite šį mygtuką vieną ar kelis
C
D
E
Page 67

LIETUVIŠKAI
67
kartus.
C Ekranas: rodo pasirinktą įtraukimo
galingumą (1-2-3), taip pat rodo filtrų
persipildymą (F).
D Intensyvaus greičio nustatymo
mygtukas.
Nustačius intensyvų greitį, jis veiks
maždaug 5 minutes, po to gaubtas
vėl ims veikti anksčiau nustatytu
greičiu (nuo 1 iki 3) arba išsijungs,
jei prieš tai nebuvote pasirinkę jokio
greičio. Norėdami išjungti intensyvų
greitį anksčiau, nei praeis 5 minutės,
paspauskite mygtuką A arba mygtuką
B .
E Šviesos įjungimo/išjungimo (ON/OFF)
mygtukas
Jei gaubtas ar valdymo komandos
neveikia, rekomenduojama išjungti gaubtą
iš maitinimo tinklo bent 5 sekundėms,
tuomet vėl įjungti. Palaukite 15 sekundžių ir
patikrinkite, ar gaubtas tinkamai veikia.
Riebalų filtro ir aktyviosios anglies filtro
kontrolės prietaisas
Šio tipo gaubtas yra pritaikytas naudoti
su prietaisu, rodančiu, kada reikia išvalyti
riebalų filtrą ar aktyviosios anglies filtrą
(šį prietaisą kartu su aktyviosios anglies
filtru parduoda įtraukiamųjų prietaisų
gamintojas).
Šio tipo prietaisą gamintojas parduoda
be aktyviosios anglies filtro, todėl filtro
perpildymo lemputė jame būna išjungta.
Norint naudoti gaubtą su anglies filtru, reikia
aktyvuoti filtro perpildymo lemputę toliau
aprašyta tvarka:
Gaubte turi būti nustatyta OFF funkcija.
Tuo pačiu metu spauskite mygtukus B ir
D tris sekundes, tuomet įsijungs šviesos
diodas F, taip pat įsijungs ir pradės mirksėti
1^ greičio šviesos diodas, po 1 sekundės
pradės mirksėti ir 2^ greičio šviesos diodas,
o sistemoje pasigirs pyptelėjimas, rodantis,
kad nustatyta teisingai.
Norėdami išjungti anglies filtro signalą, tuo
pačiu metu spauskite mygtukus B ir D tris
sekundes, tuomet įsijungs šviesos diodas
F, taip pat įsijungs ir pradės mirksėti 1^
greičio mygtukas (riebalų filtro) ir 2^ greičio
mygtukas, po 1 sekundės liks mirksėti tik
1^ greičio mygtukas, o sistemoje pasigirs
pyptelėjimas, rodantis, kad nustatėte
teisingai.
Riebalų filtro perpildymą rodantis
šviesos diodas (1)
Kai 1 greičio šviesos diodas ima mirksėti,
reiškia, kad reikia išvalyti riebalų filtrus.
Norėdami išvalyti filtrus, Įdėmiai
perskaitykite riebalų filtro priežiūros
instrukcijas.
Aktyviosios anglies filtro perpildymą
rodantis šviesos diodas (2)
Kai 2 greičio šviesos diodas ima mirksėti,
reiškia, kad reikia išvalyti aktyviosios
anglies filtrus.
Įdėmiai perskaitykite anglies filtro valymo ar
keitimo instrukcijas.
Perpildymo signalo atstatymas
Atlikę filtrų priežiūros darbus, laikykite
nuspaudę mygtuką
A 3 sekundes, kol 1 ar
2 šviesos diodas nustos mirksėti.
6. APŠVIETIMAS
Išjunkite prietaisą iš elektros tinklo.
Dėmesio! Prieš liesdami lempas,
įsitikinkite, kad jos atvėsusios.
Naudokite tik halogenines 12V -20W
(daugiausia) lempas G4, saugokitės, kad
nepaliestumėte jų rankomis.
Page 68

UK ІНСТРУКЦІЯ З ЕКСПЛУАТАЦІЇ
www.aeg.com68
ДЛЯ ВІДМІННОГО РЕЗУЛЬТАТУ
Дякуємо, що обрали цей прилад AEG. Ми створили його для бездоганної роботи
протягом багатьох років, за інноваційними технологіями, які допомагають робити
життя простішим - ці властивості, які можна й не знайти в звичайних приладах. Будь
ласка, приділіть декілька хвилин, аби прочитати, як отримати найкраще від цього
приладу.
Звертайтеся на наш веб-сайт:
Поради
з використання, брошури, інструкції з усунення несправностей,
сервісна інформація:
www.aeg.com
Зареєструйте виріб, щоб отримати покращене обслуговування:
www.aeg.com/productregistration
Придбання приладдя, витратних матеріалів та оригінальних запчастин для
вашого приладу:
www.aeg.com/shop
ОХОРОНА ДОВКІЛЛЯ
Здавайте на повторну переробку матеріали, позначені відповідним символом .
Викидайте упаковку у відповідні контейнери для вторинної сировини.
Допоможіть захистити навколишнє середовище та здоров’я інших людей і забезпечити
вторинну переробку електричних і електронних приладів. Не викидайте прилади,
позначені відповідним символом , разом з іншим домашнім сміттям. Поверніть
продукт до заводу із вторинної переробки у вашій місцевості або зверніться до
місцевих муніципальних органів влади.
РОБОТА З КЛІЄНТАМИ ТА СЕРВІСНЕ
ОБСЛУГОВУВАННЯ
Рекомендується використовувати оригінальні запчастини.
При звертанні до сервісного центру необхідно мати наступну інформацію.
Її можна знайти на табличці з технічними даними. Модель, номер виробу, серійний
номер.
Увага! Важлива інформація з техніки безпеки.
Загальна інформація й рекомендації
Інформація щодо захисту навколишнього середовища.
Дані можуть бути змінені без попередження.
Page 69

УКРАЇНСЬКА
69
1. ІНФОРМАЦІЯ З
ТЕХНІКИ БЕЗПЕКИ
Обережно! Чітко дотримуватися
приведених в даному керівництві
інструкцій. Виробник знімає з себе
всяку відповідальність за неполадки,
збитки або пожар, що може мати місце
при використанні прибору внаслідок
невиконання інструкцій, приведених
в даному керівництві. Витяжка
призначена виключно для побутового
використання.
Попередження! Не під’єднувати
пристрій до електромережі поки
установка повністю не завершена.
Перед виконанням будь-якої операції
по чистці або ремонту, відключити
ковпак від електромережі, виймаючи
вилку або відключаючи основний
вимикач приміщення.
Обладнання не призначено для
використання з боку дітей або людей з
обмеженими фізичними можливостями
сприйняття або розумовими і
досвіду і знань, за винятком випадків
коли вони знаходяться під наглядом або
навчені використовувати обладнання
людиною, що відповідає за їх безпеку.
Не допускайте дітей до приладу без
нагляду обладнання.
Не використовуйте витяжку, якщо решітка
неправильно змонтована витяжний ковпак
без правильно вмонтованої решітки!
Витяжка не повина використовуватись
як опорна
коли ясно про це сказано. В випадку
використання витяжки разом з іншими
пристроями на газі або інших горючих,
приміщення має мати достатню
вентиляцію. Повітря, що всмоктується не
має бути направлено в витяжний канал,
який використовується для викиду димів
від роботи пристроїв на газі або інших
горючих. Суворо
удалить їжу під вогнем. Використання
вільного вогню є шкідливим для фільтрів
і може викликати пожежу, отже необхідно
уникати його використання у будь-якому
випадку.
Смаження має відбуватися під контролем,
щоб уникнути займання розігрітої олії.
Що ж стосується використання технічних
правил та правил безпеки для викиду
димів, то необхідно чітко дотримуватись
нормативів, передбачених місцевими
інстанціями. Чищення витяжки має
поверхня, лише у випадках
забороняється готувати
Обережно! Відкриті частини
можуть сильно нагріватися коли
використовуються разом з приладами
для варіння.
з відсутністю
регулярно проводитися, як всередині,
так і назовні (НЕ МЕНШЕ ОДНОГО
РАЗУ НА МІСЯЦЬ, в
виконувати всі інструкції, що описані в
цьому керівництві).
Недотримання норм очищення витяжки
та заміни і очищення фільтрів може
викликати ризик пожежі.
не використовуйте і не залишайте без
вірно вмонтованих ламп у зв’язку з
можливим ризиком удару електричним
струмом.
Не несеться жодної відповідальності
за несправності, ушкодження та пожежі
нанесені пристрою, що є наслідком
недотримання порад, поданих в даній
інструкції.
Увага! Відсутність установлення
гвинтів та деталей кріплення у
відповідності до цих інструкцій може
призвести до ризику електричного
характеру.
будь-якому випадку
2. ВИКОРИСТАННЯ
Витяжка служить для всмоктування
кіптяви та пару, що утворюються під час
приготування їжі.
В інструкції, що додається вказується, в
якому виконанні можна використовувати
вашу модель - як витяжку з виведенням
назовні
внутрішньою рециркуляцією повітря
, або як витяжку з
.
3. ІНСТАЛЯЦІЯ
Напруга в електромережі має відповідати
вказаним характеристикам на етикетці,
яка знаходиться всередині витяжки. Якщо
в комплект входить вилка під’єднання
в електромережу, то слід під’єднати
витяжку до розетки, що відповідає
існуючим нормам та знаходиться в
доступному місці, що можна виконати
й після інсталяції. Якщо ж вилка не
входить в комплект
в електромережу), або розетка не
знаходиться в доступному місці, також
і після інсталяції, то слід вмонтувати
належний двох-полюсний вимикач, який
забезпечить повне відключення від мережі
в умовах перенапруги III категорії, в повній
відповідності з правилами інсталяції.
Увага! перед тим як знову підключити
витяжку до електромережі і
перевірити правильність роботи,
завжди контролюйте щоб шнур
мережі був змонтований вірно.
(пряме під’єднання
Page 70

70
www.aeg.com
Увага! Заміна електрошнура має
здійснюватись авторизованими
службами технічного обслуговування.
Відстань нижньої відчастини витяжки
до посуду на кухонній плиті має бути
не менше 50cm, у випадку електричних
плит, та 65cm, у випадку газових та
комбінованих плит.
Необхідно приймати до уваги відстані,
якщо вказуються в інструкції з інсталяції
газової плити.
4. ОБСЛУГОВУВАННЯ
Увага! Перед будь-якою операцією
чистки чи обслуговування,
від’єднайте витяжку від
електромережі, витягуючи вилку
або відключаючи головний вимикач
житла.
Витяжка має чиститись часто і як зовні
так і в середині (по крайній мірі з такою ж
періодичністю як і догляд за фільтрами
для затримання жирів). Для чистки
використовуйте спеціальну серветку,
намочену нейтральним рідким миючим
засобом. Не використовуйте засоби що
мають абразивні матеріали.
НЕ ВИКОРИСТОВУЙТЕ СПИРТ!
Увага! Не виконання правил чищення
і заміни фільтрів може привести до
ризику виникнення пожежі. Тому
рекомендуємо дотримуватись
приведених інструкцій.
Знімається всяка відповідальність в
зв’язку з можливими ушкодженнями
двигуна і пожежами, що виникли
внаслідок невірного ремонту або не
виконання вищеописаних попереджень.
4.1 Фільтр затримки жирів
Повинен чиститись один раз на місяць
не сильнодіючими миючими засобами,
вручну або в посудомийній машині при
низькій температурі і з коротким циклом.
При митті в посудомийній машині
металевий фільтр затримки жиру може
втратити колір, але його характеристики
з фільтрування жодним чином не
зміняться.
4.2 - Вугільний фільтр, підлягає
миттю - Перевірка вугільного фільтру
на насичення проводиться після більш
менш довгого періоду використання в
залежності від типу кухні і регулярності
очистки фільтру жирів. У будь-якому
випадку необхідно заміняти патрон
максимум кожні чотири місяці.
НЕ підлягає миттю чи поновленню.
5. ЕЛЕМЕНТИ КЕРУВАННЯ
Витяжка обладнана панеллю команд
з контролем швидкості витягування
та контролем світла для освітлення
варильної поверхні.
Використовуйте інтенсивну швидкість у
випадку особливо високої концентрації
кухонних парів. Рекомендуємо включити
витяжку за 5 хвилин до початку
готування їжі і залишити його включеним
на протязі 15 хвилин після закінчення
Page 71

УКРАЇНСЬКА
71
готування їжі.
Команди на фронтальній стороні
пристрою:
A
B
A Кнопка OFF (кнопка не світиться)
– ON (кнопка світиться)
Натиснути один чи декілька разів для
отримання бажаної функції:
ON (кнопка світиться): Витяжний
ковпак встановлює останню вибрану
швидкість.
OFF (кнопка не світиться): всі функції
відключені за винятком освітлення.
B Кнопка вибору швидкості (потужності
всмоктування)
Натиснути на цю кнопку один чи
декілька разів щоб вибрати швидкість
(потужність) всмоктування, що
найбільш підходить (1 - 2 - 3).
C Дисплей: відображає обрану
потужність всмоктування (1 - 2 - 3),
сигналізує про насичення фільтрів
(F).
D Кнопка підключення інтенсивної
швидкості.
Після підключення, інтенсивна
швидкість залишається включеної
протягом близько 5 хвилин, після
чого витяжка повертається на
попередньо обрану швидкість (від 1
до 3), або відразу ж відключається,
якщо перед цим не було встановлено
однієї зі швидкостей всмоктування.
Для відключення інтенсивної
швидкості раніше 5 хвилин натиснути
на кнопку A або B .
E Кнопка ON/OFF світла
Якщо витяжний ковпак, або команди не
працюють, радимо вимкнути живлення
хоча б на 5 секунд і потім знову його
підключити. Почекати ще 15 секунд і
потім перевірити правильність роботи
витяжного ковпака.
Пристрій контролю металевого та
вугільного фільтрів.
Цей тип витяжного ковпака обладнаний
пристроєм, який сигналізує, коли
C
D
E
металевий фільтр або фільтр на
активованому вугіллі повинен бути
очищений (продається з вугільним
фільтром з заводу виробника,
спеціалізованого на витяжних
пристроях). Даний вид витяжного ковпака
постачається без вугільного фільтру,
тому індикатор насиченості відключений.
Якщо ви бажаєте використовувати
ковпак з вугільним фільтром, то в цьому
випадку підключіть індикатор насиченості
вугільного фільтра наступним
Ковпак повинен бути встановлений на
“OFF”.
Одночасно натискати кнопки B і D
протягом трьох секунд, світлодіод LED F
включиться і почне блимати світлодіод
першої швидкості, по закінченню 1
секунди почне блимати також і світлодіод
другої швидкості і система видасть
звуковий сигнал (- Зумер -), вказуючи, що
установка виконана.
Для відключення сигналізації вугільного
фільтра одночасно натискати кнопки B
і D протягом трьох секунд, світлодіод
LED F включиться і почне блимати
світлодіод 1-ої швидкості (металевий
фільтр) і світлодіод 2-ої швидкості, після
закінчення 1 секунди буде блимати
тільки світлодіод 1 - ої швидкості,
система видасть звуковий сигнал
(- Зумер-) вказуючи, що установка
виконана..
Світлодіод (1) сигналізації насиченості
металевого фільтра
Якщо світлодіод швидкості 1 блимає, це
означає, що жирові металеві фільтри
треба помити.
Уважно вивчити інструкції з
обслуговування жирових металевих
фільтрів в частині, що стосується їх
чищення.
Світлодіод (2) сигналізації насиченості
вугільного фільтра
Якщо світлодіод швидкості 2 блимає,
це означає, що фільтр на активованому
вугіллі треба помити або замінити.
Уважно вивчити інструкції з
обслуговування вугільного фільтра в
частині, що стосується його чищення або
.
заміни
чином:
Page 72

72
www.aeg.com
Встановлення на нуль індикатора
насиченості.
Після проведення обслуговування
фільтрів тримати натиснутою кнопку A
протягом 3 секунд поки світлодіод LED 1
або 2 перестануть блимати.
6. ОСВІТЛЮВАЛЬНИЙ
ПРИЛАД
Відключити прилад від електромережі.
Увага! Перш ніж торкати лампи
необхідно впевнитися що вони охололи.
Використовуйте для цього лише
галогенні лампи на 12V -20W макс - G4,
не доторкуючись до них руками.
Page 73

HU HASZNÁLATI ÚTMUTATÓ
AZ ÖN ELÉGEDETTSÉGE ÉRDEKÉBEN
Köszönjük, hogy megvásárolta ezt az AEG készüléket. Termékünk készítésekor egy olyan
beredezést kívántunk létrehozni az Ön számára, amely kifogástalan teljesítményt nyújt
hosszú éveken keresztül, köszönhetően az alkalmazott innovatív technológiáknak, amelyek
az életét jelentősen megkönnyítik – és amelyeket más készülékeken nem talál meg. Kérjük,
szánjon néhány percet az útmutató végigolvasására, hogy a maximumot hozhassa ki
készülékéből.
Látogassa meg a weboldalunkat:
Kezelési tanácsok, kiadványok, hibaelhárító, szerviz információk:
www.aeg.com
További előnyökért regisztrálja készülékét:
www.aeg.com/productregistration
Kiegészítők, segédanyagok és eredeti alkatrészek vásárlása a készülékhez:
www.aeg.com/shop
KÖRNYEZETVÉDELMI TUDNIVALÓK
MAGYAR
73
A következő jelzéssel ellátott anyagokat hasznosítsa újra: . Újrahasznosításhoz tegye a
megfelelő konténerekbe a csomagolást.
Járuljon hozzá környezetünk és egészségünk védelméhez, és hasznosítsa újra az
elektromos és elektronikus hulladékot. A tiltó szimbólummal ellátott készüléket ne dobja
a háztartási hulladék közé. Juttassa el a készüléket a helyi újrahasznosító telepre, vagy
lépjen kapcsolatba a hulladékkezelésért felelős hivatallal.
VÁSÁRLÓI TÁMOGATÁS ÉS SZERVIZ
Kizárólag eredeti alkatrészek használatát javasoljuk.
Ha készülékével a szervizhez fordul, legyenek kéznél az alábbi adatok.
Ezek az információk az adattáblán olvashatók. Típus, Termékszám, Sorozatszám.
Figyelmeztetés - Biztonsági információk
Általános információk és hasznos tanácsok
Környezetvédelmi információk.
A változtatások jogát fenntartjuk.
Page 74

74
www.aeg.com
1. BIZTONSÁGI
ELŐÍRÁSOK
Figyelem! Ezen kézikönyv utasításait
szigorúan be kell tartani. Az itt
feltüntetett utasítások be nem
tartásából származó bármilyen hiba, kár
vagy tűzesettel kapcsolatban a gyártó
felelősséget nem vállal. Az elszívó
kizárólag háztartási felhasználásra
készült.
Vigyázat! A készüléket mindaddig ne
kösse be az elektromos hálózatba,
amíg a beszerelést teljesen be nem
fejezte.
Takarítás vagy karbantartás előtt
minden esetben kösse ki az elszívót
az elektromos hálózatból a villásdugó
kihúzása vagy a lakás fő biztosítékának
lecsapása révén.
Valamennyi üzembe helyezési és
karbantartási művelethez használjon
védőkesztyűt.
A készülék nem arra készült, hogy
gyermekek, vagy csökkent fizikai vagy
értelmi képességekkel rendelkező,
tapasztalatok és ismeretek híján levő
emberek használják, hacsak nem a
biztonságukért felelős személy felügyelete
alatt, vagy ha ez a személy a készülék
használatát megtanította.
Ügyeljenek a kisgyermekekre, nehogy a
készülékkel játszanak.
Az elszívót a fém zsírszűrő (rács) nélkül
soha ne használja!
A konyhai páraelszívót SOHA nem szabad
lerakó felületnek használni, kivéve, ha
kifejezetten fel van tüntetve ez a lehetőség.
A helyiségnek elegendő szellőzéssel
kell rendelkeznie, amennyiben a konyhai
elszívót gáz és más tüzelőanyaggal
működtetett készülékekkel egyidőben
használják.
Az elszívott levegőt nem szabad olyan
kéménybe, füstcsőbe vezetni, amelyet gáz
vagy más tüzelőanyagok égéstermékeinek
elvezetésére használnak.
Az elszívó alatt szigorúan tilos flambírozott
ételeket készíteni. A nyílt láng használata
károsítja a filtereket, tűzveszélyt okozhat,
ezért minden esetben kerülni kell.
Bő zsiradékban sütni csak ellenőrzés
mellett szabad, nehogy a túlhevült olaj vagy
zsír meggyulladjon.
Figyelem! Főzés közben a felszálló
forró levegő a készülékházat
felmelegítheti!
A füstelvezetésre vonatkozó műszaki
és biztonsági intézkedések tekintetében
szigorúan be kell tartani a helyi illetékes
hatóságok előírásait.
Az elszívót gyakran kell tisztogatni,
mind belülről, mind kívülről. (LEGALÁBB
HAVONTA EGYSZER, minden esetben
betartva ezen kézikönyvben kifejezetten
előírt karbantartási utasításokat.)
Az elszívó tisztántartására, valamint a
filterek cseréjére és tisztítására vonatkozó
előírások be nem tartása tűzveszélyt okoz.
A páraelszívót ne használja szabályosan
beszerelt izzólámpa nélkül, mert áramütés
veszélye léphet fel.
A kézikönyvben szereplő utasítások be nem
tartásából következő kellemetlenségekért,
károkért vagy tűzesetekért a gyártó nem
vállal felelősséget.
Figyelem! A csavarok és rögzítő
eszközök nem előírás szerinti
behelyezése áramütést okozhat.
2. HASZNÁLAT
A páraelszívó a főzés közben keletkező füst
és pára elszívására szolgál.
A mellékelt beszerelési útmutatóban fel van
tüntetve, hogy a külső kivezetésű,
a szűrt, belső környezetbe visszaforgatott
változat közül melyik használható az Ön
készülékéhez
.
vagy
3. FELSZERELÉS
A hálózati feszültségnek azonosnak kell
lennie a konyhai páraelszívó belsejében
elhelyezett műszaki adattáblán feltüntetett
feszültséggel. Ha az elszívó rendelkezik
villásdugóval, csatlakoztassa egy
hozzáférhető helyen elhelyezett, az
érvényben lévő szabványoknak megfelelő
dugaszoló aljzathoz, akár a beszerelést
követően is. Ha nem rendelkezik
csatlakozódugóval (közvetlen csatlakozás
a hálózathoz) vagy a dugaszoló aljzat nem
hozzáférhető, szereljen fel egy szabványos,
kétpólusú megszakítót akár a beszerelést
követően is, amely III. túláram-kategória
esetén biztosítja a hálózatról való teljes
leválasztását, a telepítési szabályoknak
megfelelően.
Figyelem! mielőtt az elszívó áramkörét
visszaköti a hálózatba és ellenőrzi,
hogy az elszívó helyesen működike, mindig ellenőrizze azt is, hogy
a hálózati vezeték beszerelése
szabályos-e.
Page 75

MAGYAR
75
Figyelem! A kockázatok megelőzése
érdekében a tápkábel cseréjét csak
az engedéllyel rendelkező műszaki
szervizszolgálat végezheti!
A főzőkészülék felülete és a konyhai
szagelszívó legalsó része közötti minimális
távolság nem lehet kisebb, mint 50cm
elektromos főzőlap, és 65cm gáz vagy
vegyes tüzelésű főzőlap esetén.
Ha a gázfőzőlap beszerelési utasításában
ennél nagyobb távolság szerepel, azt
kellfigyelembe venni.
4. KARBANTARTÁS
Figyelem! Takarítás vagy karbantartás
előtt minden esetben kösse ki az
elszívót az elektromos hálózatból a
villásdugó kihúzása vagy a lakás fő
biztosítékának lecsapása révén.
Az elszívót gyakran kell tisztítani, mind
belülről, mind kívülről (legalább olyan
gyakran, mint a zsírszűrő filterek tisztítását).
A tisztításhoz használjon semleges
folyékony mosószerrel átitatott nedves
ruhát. Kerülje a súrolószert tartalmazó
mosószerek használatát.
NE HASZNÁLJON ALKOHOLT!
Figyelem! Az elszívó tisztán tartására,
valamint a filterek cseréjére vonatkozó
előírások be nem tartása tűzveszélyt
okoz. Ezért felhívjuk figyelmét, hogy
tartsa be az utasításokat.
A helytelen karbantartás, vagy a fent
említett utasítások be nem tartása miatt a
motorban esetleg bekövetkező károk vagy
tűzesetek miatt semmiféle felelősséget nem
vállalunk.
4.1 Zsírszűrő filter - Havonta egyszer
nem agresszív tisztítószerrel, kézzel vagy
mosogatógépben, alacsony hőfokon és
rövid ciklussal el kell mosogatni.
Mosogatógépben történő mosogatás a
zsírszűrő elszíneződését okozhatja, de ez
nem változtat hatékonyságán.
4.2 - Mosható aktív szénfilter.
A szénfilter telítődése többé vagy kevésbé
hosszú idő alatt történik meg, a tűzhely
típusától és a zsírszűrő tisztogatásának
rendszerességétől függően. Mindenképpen
cserélni kell a betétet legalább
négyhavonként.
NEM lehet kimosni vagy regenerálni
5. KEZELŐSZERVEK
Az elszívó szíváserősség-szabályozóval
és főzőlapvilágítás-kapcsolóval ellátott
kezelőpanellel rendelkezik.
Amikor a konyhában különösen nagy a
párakoncentráció, használja a nagyobb
sebességet. Javasoljuk, hogy főzés előtt 5
perccel kapcsolja be az elszívót, és a főzés
befejezése után 15 percig működtesse
tovább.
A front panel vezérlőgombjai:
A
B
A OFF gomb (gomb kikapcsolva) - ON
(gomb világít)
A kívánt funkció beállításához nyomja
meg egyszer vagy többször:
ON (gomb világít): laz elszívó a
legutolsó kiválasztott fokozatot állítja
be.
OFF gomb kikapcsolva): minden
funkció kikapcsolva a világítást kivéve.
B Sebességválasztó gomb (elszívási
erősség)
A megfelelő (1 - 2 - 3 ) elszívó
sebesség (teljesítmény)
C
D
E
Page 76

76
www.aeg.com
kiválasztásához nyomja meg egyszer,
vagy többször.
C Kijelző: a kiválasztott elszívó
teljesítményt (1-2-3), valamint a szűrők
telítettségi állapotát (F) jelzi.
D Intenzív sebesség gomb.
Az első beállításnál az intenzív
sebesség cca 5 percig marad
beállítva, melynek végeztével az
elszívó visszatér az előzőleg választott
sebességre (1 - 3) vagy akár le is
áll, amennyiben előzőleg nem volt
sebesség kiválasztva. Az intenzív
fokozat 5 perces idejének lejárta előtti
leállításához nyomja meg az A vagy
B gombokat.
E Világítás ON/OFF gomb
Amennyiben az elszívó, vagy a
vezérlőgombok nem működnének,
ajánlatos a készüléket legalább 5
másodpercig lekapcsolni, majd újraindítani.
Várjon ezután 15 másodpercet, majd
ellenőrizze, hogy megfelelően működik-e
az elszívó.
Zsírfilter és aktív szénszűrő ellenőrző
kijelző
Ez az elszívó típus rendelkezik egy olyan
eszközzel, mely kijelzi, ha a zsírfilter
vagy az aktív szénszűrő tisztítása
szükséges (megvásárolható az elszívó
berendezésekre szakosodott aktív
szénszűrőt gyártó cégeknél).
Ez az elszívó típus gyárilag aktív szénszűrő
nélkül kerül forgalomba, emiatt a telítettség
kijelző lámpa deaktiválva van.
Amennyiben szénszűrővel szeretné
használni az elszívót, akkor aktiválja a
szénszűrő telítettség kijelző érzékelőt, az
alábbiak szerint:
Az elszívót állítsa “OFF” állapotba.
Nyomja meg és tartsa egyszerre lenyomva
a B és D gombokat, az F LED kigyullad
és villogni kesz az 1^ sebesség, majd 1
másodperc múlva a 2^ sebességet jelző
LED is és a rendszer hangjelzéssel (-Beep) nyugtázza az új beállítást.
A szénszűrő kijelzés deaktiválásához
nyomja meg egyszerre és tartsa lenyomva
3 másodpercig a B és D gombokat, az
F LED ekkor felgyullad és villogni kezd
az 1^ sebesség kijelző (zsírfilter) és a
2^ sebességé, majd 1 másodperc múlva
csak az 1^ sebességkijelző, a rendszer
hangjelzéssel (-Beep-) nyugtázza a
beállítás megtörténtét.
Led (1) zsírfilter telítettség kijelzései
Az 1. sebességi fokozatjelző villogása
figyelmeztet a zsírfilter tisztítás
szükségességére.
Olvassa el figyelmesen a zsírfilter
karbantartási és tisztításii útmutatást.
Led (2) aktív szénfilter telítettség
kijelzései
Az 2. sebességi fokozatjelző villogása
figyelmeztet a szénszűrő mosásának vagy
cseréjének szükségességére.
Olvassa el figyelmesen a szénmzűrő
karbantartási és tisztításii útmutatást.
Telítettség kijelzés visszaállítása
A filterek karbantartási munkálatainak
végeztével tartsa lenyomva 3 másodpercig
az
A gombot, míg az 1-es vagy 2-es LED
villágása meg nem szűnik.
6. VILÁGÍTÁS
Bármilyen karbantartási munka
megkezdése előtt szüntesse meg az
elszívó áramellátását, kösse ki a hálózatból.
Figyelem! Mielőtt a lámpákhoz érne,
győződjön meg róla, hidegek-e.
Csak 12V - 20W max - G4 halogén égőket
használjon, vigyázzon arra, hogy kézzel ne
érjen hozzájuk.
Page 77

CS NÁVOD K POUŽITÍ
ČEŠTINA
PRO DOKONALÉ VÝSLEDKY
Děkujeme vám, že jste si zvolili výrobek značky AEG. Aby vám bezchybně sloužil mnoho
let, vyrobili jsme jej s pomocí inovativních technologií, které usnadňují život, a vybavili jsme
jej funkcemi, které u obyčejných spotřebičů nenajdete. Stačí věnovat pár minut čtení a
zjistíte, jak z něho získat co nejvíce.
Navštivte naše stránky ohledně:
Rady ohledně používání, brožury, poradce při potížích, servisních informací:
www.aeg.com
Registrace vašeho spotřebiče, kterou získáte lepší servis:
www.aeg.com/productregistration
Nákupu příslušenství, spotřebního materiálu a originálních náhradních dílů pro váš
spotřebič:
www.aeg.com/shop
POZNÁMKY K OCHRANĚ ŽIVOTNÍHO PROSTŘEDÍ
77
Recyklujte materiály označené symbolem . Obaly vyhoďte do příslušných odpadních
kontejnerů k recyklaci.
Pomáhejte chránit životní prostředí a lidské zdraví a recyklovat elektrické a elektronické
spotřebiče určené k likvidaci. Spotřebiče označené příslušným symbolem nelikvidujte
spolu s domovním odpadem. Spotřebič odevzdejte v místním sběrném dvoře nebo
kontaktujte místní úřad.
PÉČE O ZÁKAZNÍKY A SERVIS
Doporučujeme používat originální náhradní díly.
Při kontaktu se servisním střediskem se ujistěte, že máte k dispozici následující údaje.
Tyto informace jsou uvedeny na typovém štítku. Model, výrobní číslo (PNC), sériové číslo.
Upozornění / Důležité bezpečnostní informace.
Všeobecné informace a rady
Poznámky k ochraně životního prostředí.
Změny vyhrazeny.
Page 78

78
www.aeg.com
1.
BEZPEČNOSTNÍ POKYNY
Pozor! Výrobce odmítá převzít
jakoukoliv odpovědnost za případné
závady, škody nebo vznícení digestoře,
které byly způsobeny nedodržením
těchto předpisů. Digestoř byla
projektována k výlučně domácímu
použití.
Upozornění! Nenapojujte přístroj na
elektrickou síť, dokud nebyla zcela
dokončena jeho instalace.
Před provedením jakéhokoliv úkonu
čištění nebo údržby, je třeba odpojit
kryt od elektrické sítě tak, že se odpojí
od zásuvky nebo vypnutím hlavního
vypínače obytné jednotky.
Při všech instalačních a údržbových pracích
používejte pracovní rukavice.
Přístroj není určen k používání pro děti
nebo pro osoby se sníženými fyzickými,
smyslovými nebo mentálními schopnostmi,
které s ním nemají zkušenost a neznají
ho. Tyto osoby můžou s přístrojem
zacházet pouze tehdy, kdy jsou pod
dohledem odborného personálu nebo jsou
speciálně vyškoleny k jeho použití osobou
odpovědnou za jejich bezpečnost.
Děti musí být pod dohledem, aby si s
přístrojem nehrály.
Nikdy nepoužívejte kryt bez správně
namontované mříže!
Kryt nesmí být NIKDY používán jako
odkládací plocha. Může se tak stát pouze
ve specificky uvedených případech.
Místnost musí být vybavena dostatečnou
ventilací, v případě, že je kuchyňský kryt
používán současně s jinými přístroji s
plynovým spalováním nebo spalováním
jinými palivy.
Odsávaný vzduch nesmí být odváděn do
odvodu používaného pro odpad kouřů
z přístrojů na plynové spalování nebo
spalování jiných paliv.
Je přísně zakázáno vařit jídla s volným
plamenem pod krytem.
Použití otevřeného plamene je škodlivé pro
filtry a může se stát příčinou požárů, je tedy
třeba se mu vyhnout v každém případě.
Smažení je třeba provádět pouze za stálé
kontroly, aby nenastala situace, kdy se olej
přehřeje a dojde k jeho vznícení.
Pozor! Přístupné části se mohou
značně rozpálit, pokud jsou používány
současně s varným zařízením.
Pokud se týká technických a
bezpečnostních opatření, která je třeba
zaujmout při odvádění kouře, je třeba úzce
dodržovat normy místních odpovědných
orgánů.
Kryt je třeba často čistit jak vnitřně, tak z
vnějšku (ALESPOŇ JEDNOU ZA MĚSÍC),
je třeba v každém případě dodržovat
vše, co je uvedeno v návodu k údržbě
popsaném v tomto manuálu).
Nedodržování norem čištění krytu a výměny
a čištění filtrů se může stát příčinou požárů.
Nepoužívejte či nenechávejte digestoř bez
řádně nastavených svíditel a nevystavujte
se tak nebezpe
Výrobce se zříká jakékoliv odpovědnosti
za eventuální nepříjemnosti, škody nebo
požáry způsobené na přístroji, které
jsou následkem nedodržování pokynů
uvedených v tomto manuálu.
Pozor! Pokud instalace šroubů a
úchytných zařízení není provedena
v souladu s tímto návodem, hrozí
nebezpečí úrazu elektrickým proudem.
čí elektrického výboje.
2. POUŽITÍ
Digestoř slouží k odsávání dýmů a par při
vaření.
V přiložené příručce je vyznačeno, v jaké
verzi je možné používat Vám vlastněný
model, tj. buď v odsávací verzi s vývodem
navenek anebo filtrující s vnitřní
recykláží vzduchu .
3. INSTALACE
Síťové napětí musí odpovídat napětí
uvedenému na štítku s charakteristikamii
umístěnému uvnitř krytu. Pokud je kryt
vybaven přípojkou, stačí jej zapojit do
zásuvky odpovídající stávajícím normám,
která se nachází ve snadno dosažitelném
prostoru i po provedené montáži. Pokud
kryt není vybaven přípojkami (přímé
připojení k síti) nebo se zásuvka nenachází
ve snadno dosažitelném prostoru i po
provedené montáži , je třeba použít
dvojpólový vypínač odpovídající normám,
který zaručí úplné odpojení od sítě v
podmínkách kategorie přepětí III, v souladu
s pravidly instalace.
Pozor! Dříve než opět napojíte obvod
digestoře na síťové napájení a ověříte
správné fungování, zkontrolujte si
vždy, že síťový kabel byl správně
namontován.
Page 79

ČEŠTINA
79
Pozor! Výměna napájecího kabelu
musí být provedena pouze odborným
technickým personálem určeným
k tomuto druhu úkonů za účelem
vyvarovat se jakémukoliv riziku.
Minimální vzdálenost mezi podporou
nádoby na varné ploše a nejnižší částí
digestoře nesmí být menší než 50cm
v případě elektrických sporáků 65cm v
případě plynových či smíšených sporáků.
Pokud návod na instalaci varného zařízení
na plyn doporučují větší vzdálenost, je třeba
se tímto pokynem řídit.
4. ÚDRŽBA
Pozor! Před jakoukoliv operací čištění
či údržby odpojte digestoř od elektrické
sítě, vyjměte zátrčku anebo vypněte
hlavní spínač bytu.
Digestoř musí být často čištěna, jak uvnitř
tak zevně (alespoň stejně často jako je
prováděna údržba filtrů proti mastnotám).
Pro čištění je třeba použít látku navlhčenou
denaturovaným líhem anebo neutrálními
tekutými čistícími prostředky. Nepouživejte
prostředky obsahující brusné látky.
NEPOUŽÍVEJTE ALKOHOL!
Pozor! Nedodržení norem čištění
přístroje a vyměňování filtrů by mohlo
vést k požárům. Doporučujeme tedy
dodržovat návod k použití.
Výrobce odmítá jakoukoliv zodpovědnost
za škody na motoru, požáry způsobené
nesprávnou údržbou či nedodržením výše
uvedeného upozornění.
4.2 - Umyvatelný filtr s aktivními uhlíky
- Saturace filtru s uhlíkem nastane po více
či méně dlouhém užití, tj. závisí na typu
kuchyně a pravidelném čištění filtru proti
mastnotám. V každém případě je nutné
nahradit patronu maximálně jednou za 4
měsíce.
NEMŮŽE být umýván či regenerován.
5. PŘÍKAZY
Odsavač je vybaven ovládacím panelem s
ovládáním rychlosti odsávání a zapínáním
osvětlení pracovní plochy.
V případě velmi intenzivní koncentrace
kuchyňských par použijte maximální sací
výkon. Doporučuje se zapnout digestoř 5
minut před zahájením vaření a vypnout ji
cca 15 minut po ukončení vaření.
Ovladače na čelní straně přístroje:
4.1 Tukový filtr - Tukový filtr se musí 1 x
do měsíce vyčistit .
Je možné jej čistit ručně jemným mycím
prostředkem nebo v kuchyňské myčce při
nejnižší teplotě a kratším programu.
A
B
A Tlačítko OFF (tlačítko nesvítí) - ON
(tlačítko svítí)
Stiskněte jednou či vícekrát, abyste
dosáhli zvolené funkce:
ON (tlačítko svítí): digestoř nastaví
poslední zvolenou rychlost.
OFF (tlačítko nesvítí): všechny funkce
jsou odstaveny s výjimkou osvětlení.
B Tlačítko volby rychlosti (síla odsávání).
Stiskněte toto tlačítko jednou či vícekrát
ke zvolení nejvhodnější rychlosti (síly)
odsávání (1 - 2 - 3 ).
C Displej: zobrazuje sílu zvoleného
C
D
E
Page 80

80
www.aeg.com
odsávání (1-2-3), hlásí saturování filtrů
(F).
D Tlačítko nastavení intenzívní rychlosti.
Po nastavení intenzívní rchlost bude
fungovat po dobu přibližně 5 minut
a poté se digestoř vrátí do dříve
nastavené rychlosti (od 1 do 3) anebo
se dokonce vypne pokud předtím
nebyla zvolena žádná rychlost. K
odstavení intenzivní rychlosti dříve než
uplyne 5 minut stiskněte
A anebo
tlačítko B .
E Tlačítko ON/OFF svítidlo
V případě, že digestoř anebo ovladače
nefungují se doporučuje přerušení napájení
proudem po dobu alespoň 5 vteřin a pak
opět napojit. Vyčkejte pak 15 vteřin a ověřte
si zda digestoř funguje správně.
Zařízení ke kontrole filtru proti
mastnotám a filtru a s aktivním uhlíkem
Tento typ digestoře je projektován pro
zařízení signalizující v případě, že filtr
proti mastnotám anebo filtr s aktivním
uhlíkem musí být vyčištěn (prodávaný
s filtrem s aktivním uhlíkem od výrobce
specializovaného na odsávací přístroje)..
Tento typ digestoře je dodáván výrobcem
bez filtru s aktivním uhlíkem a proto je
kontrolní žárovka saturace odstavena.
V případě, že chceme použít diogestoř
s filtrem s aktivním uhlíkiem, je třeba
aktivovat kontrolní žárovku saturování
filtru s aktivním uhlíkem, následujícím
způsobem.:
Digestoř musí být nastavena do pozice
“OFF”.
Stiskněte současně tlačítka B a D po
dobu tří vteřin, DIODA F se rozsvítí a
začne blikat dioda 1^ rychlosti , po 1
vteřině bliká i dioda 2^ rychlosti a systém
vydá zvukový signál (-Beep-, který vyznačí,
že došlo k nastavení.
K odstranění signalizace filtru s uhlíkem
stiskněte současně tlačítka B a D po
dobu tří vteřin, DIODA F se rozsvítí a
začne blikat dioda 1^ rychlosti (filtr proti
mastnotám) a dioda 2^ rychlosti, po
1 vteřině bude blikat pouze dioda 1^
rychlosti, systém vydá zvukový signál (Beep-), který vyznačí, že došlo k nastavení.
Dioda (1) signalizující saturaci filtru proti
mastnotám
Blikání diody rychlosti 1 upozorňuje
operátora, že filtry proti mastnotám musejí
být umyty.
Přečtěte si pozorně návod týkající se
údržby a čištění filtrů proti mastnotám.
Led (2) signalizující saturaci filtru s
aktivním uhlíkem
Blikání dioody rychlosti 2 upozorňuje
operátora, že filtr s uhlíkem musí být umyt
či vyměněn.
Přečtěte si pozorně návod týkající se umytí
či výměny filtru s uhlíkem.
Opětné nastavení ukazovatele
saturování
Po provedení údržby filtrů, stiskněte tlačítko
A po dobu 3 vteřin až do okamžiku kdy
DIODY 1 nebo 2 přestanou blikat.
6. OSVĚTLENÍ
Odpojte přístroj z elektrické sítě.
Pozor! Dříve než se doktnete svítidel si
ověřte že vychladla.
Používejte pouze halogenová svítidla o
výkonu 12V - 20W max - G4 a dávejte
pozor, abyste se jich nedotýkali rukama.
Page 81

SK NÁVOD NA POUŽÍVANIE
DOSIAHNITE TIE NAJLEPŠIE VÝSLEDKY
Ďakujeme, že ste si vybrali tento výrobok značky AEG. Vyrobili sme ho tak, aby vám
poskytoval dokonalý výkon mnoho rokov, a s inovatívnymi technológiami, ktoré vám uľahčia
život – to sú vlastnosti, ktoré pri bežných spotrebičoch často nenájdete. Venujte, prosím,
niekoľko minút prečítaniu si tohto návodu, aby ste svoj spotrebič využili čo najlepšie.
Navštívte našu stránku, kde nájdete:
Tipy na používanie, brožúry, riešenie problémov a informácie o údržbe:
www.aeg.com
Zaregistrujte si produkt a využite tak ešte lepší servis:
www.aeg.com/productregistration
Do spotrebiča si môžete zakúpiť príslušenstvo, spotrebný materiál a originálne
náhradné diely:
www.aeg.com/shop
OCHRANA ZIVOTNEHO PROSTREDIA
SLOVENČINA
81
Materiály označené symbolom odovzdajte na recykláciu. Obal hoďte do príslušných
kontajnerov na recykláciu.
Chráňte životné prostredie a zdravie ľudí a recyklujte odpad z elektrických a elektronických
spotrebičov. Nelikvidujte spotrebiče označené symbolom spolu s odpadom z
domácnosti. Výrobok odovzdajte v miestnom recyklačnom zariadení alebo sa obráťte na
obecný alebo mestský úrad.
STAROSTLIVOSŤ A SLUŽBY ZÁKAZNÍKOM
Odporúčame, aby ste používali originálne náhradné diely.
Keď budete kontaktovať servis, nezabudnite si pripraviť nasledujúce údaje.
Tieto informácie nájdete na výrobnom štítku. Model, číslo výrobku, sériové číslo.
Varovanie/upozornenie – Bezpečnostné pokyny.
Všeobecné informácie a tipy
Ochrana životného prostredia.
Vyhradzujeme si právo na zmeny bez predchádzajúceho upozornenia.
Page 82

82
www.aeg.com
1.
BEZPEČNOSTNÉ POKYNY
Pozor! Prísne sa dodržiavať návodom
uvedenými v tejto príručke. Vyhýba
sa každej zodpovednosti za prípadne
nespôsoblivosti, škody alebo nehody
spôsobenè nedodržiavaním návodov
uvedených v tejto príručke. Odsávač
pary bol projektovaný výnimočne pre
používanie v domácnosti.
Varovanie! Nenapojiť zariadenie na
elektrickú sieť skôr ako inštalácia nie je
celkovo ukončená.
Skôr ako sa začne akákoľvek činnosť
čistenia alebo údržby, odpojiť odsávač
pary od elektrickej siete odpojením
zástrčky alebo vypnutím hlavného
vypínača bytu.
Pri všetkých inštalačných a údržbárskych
prácach používajte ochranné pracovné
rukavice. Spotrebič nie je určený na
používanie osobami (vrátane detí) so
zníženými fyzickými, zmyslovými alebo
mentálnymi schopnosťami alebo s
nedostatkom skúseností a vedomostí,
pokiaľ im osoba zodpovedná za ich
bezpečnosť neposkytuje dohľad alebo ich
nepoučila o používaní spotrebiča.
Deti musia byť pod dohľadom, aby sa
nehrali so zariadením.
Nepoužívať NIKDY odsávač pary bez
správne namontovanej mriežky!
Odsávač pary sa nesmie NIKDY používať
ako oporná plocha, iba za predpokladu,
že je to výslovne určené. V prípade, že
sa kuchynský odsávač používa súčastne
s inými zariadeniami, ktoré sú v styku s
plynom alebo inými horľavinami, miestnosť
musí byť zariadená vhodnou ventiláciou.
Odsávací vzduch nesmie byť odvádzaný
do toho istého odvodu, ktorý sa používa
na odvod dymov, ktoré vylučujú zariadenia
spaľujúce plyny alebo iné horľaviny.
Je prísne zakázané pod odsávačom pary
pripravovať jedlá na plameni.
Použitie voľného plameňa poškodzuje filtry,
čo može byť príčinou vyvolania požiaru,
preto sa ho v každom prípade treba
vyvarovať. Vyprážanie potravín sa musí
vykonávať pod kontrolou a treba sa vyhnúť
tomu, aby prepálený olej začal horieť.
Pozor! Pri použití spolu s varnými
spotrebičmi, prístupové časti sa môžu
značne zohriať.
Čo sa týka technických a bezpečnostných
opatrení schválených pre odvod dymov, je
potrebné dodržiavať sa presne predpismi
stanovenými príslušnými miestnými úradmi.
Odsávač pary je potrebné pravidelne čistiť
vnútorne aj zvonku (ASPOŇ JEDENKRÁT
ZA MESIAC, akokoľvek rešpektovať ako je
vyslovene určené v poučeniach o údržbe
uvedených v tejto príručke).
Nedodržiavanie pravidiel týkajúcich sa
čistenia odsávača pary a výmeny a čistenia
filtrov, vyvoláva nebezpečenstvo vzniku
požiaru. Nepoužívať alebo nenechať
odsávač pary bez správne namontovaných
žiaroviek kôli možnému nebezpečenstvu
elektrického otrasu. Neberú sa do úvahy
žiadne zodpovednosti za prípadné
neprimerannosti, škody a požiare vyvolané
zariadením, pochádzajúce z nedodržiavania
sa návodov uvádzaných v tejto príručke.
Pozor! Chýbajúca inštalácia skrutiek
a upevňovacích zariadení v súlade
s týmito pokynmi môže mať za
následok ohrozenie elektrickým
prúdom.
2. POUŽÍVANIE
Odsávač pary slúži pre odsávanie dymov a
pár pochádzajúce z varenia.
V priloženej príručke pre inštaláciu je
uvedené, ktorú verziu je možné používať
pre Váš model medzi odsávacou verziou s
vonkajšou evakuáciou alebo filtračnou
s vnútornou recirkuláciou .
3. MONTÁŽ
Napätie siete musí zodpovedať s napätím
udaným na etikete charakteristiky
umiestnené vo vnútri odsávača pary. Ak
je predložená zástrčka, zapojiť odsávač
pary do rozvodu zhodného so stanovenými
právnymi predpismi na prístupnom území
aj po inštalácii. Ak nie je predložená
zástrčka (priamy spoj so sieťou), alebo
zástrčka nie je umiestnená na prístupnom
území, aj po inštalácii, pripojiť dvojpólový
vypínač zhodný s predpismi, ktoré zaručujú
kompletné odpojenie sa zo siete podľa
podmienok kategórie nadmierného napätia
III, v zhode s pravidlami inštalácie.
Upozornenie! Pred napojením okruhu
odsávača pary do prívodovej elektrickej
siete a pred kontrolou jeho správnej
činnosti, skontrolovať stále, aby kábel
siete bol správne namontovaný.
Page 83

Upozornenie! Výmena napájacieho
kábla musí byť prevedená príslušnou
schválenou technickou službou.
Minimálna vzdialenosť medzi povrchom
podstavca pre nádoby na kuchynskom
sporáku a najspodnejšej časti kuchynského
odsávača pary nesmie byť kratšia ako
50cm v prípade elektrického sporáka a
ako 65cm v prípade plynového alebo
kombinovaného sporáka.
Ak návody kuchynského plynového aparátu
uvádzajú väčšiu vzdialenosť, je ptrebné s
tým počítať.
4. ÚDRŽBA
Skôr ako začína ktorákoľvek údržba,
odpojiť odsávač pary z elektrického
vedenia.
Odsávač pary sa pravidelne čistí zvonku
aj zvnútra (aspoň rovnako častým
opakovaním ako sa vykonáva údržba filtrov
tuku).
Na čistenie používať vlhké plátno
s neutrálnymi tekutými čistiacími
prostriedkami.
Vyhnúť sa používania prostriedkov
obsahujúcich škrabacie látky.
NEPOUŽÍVAŤ ALKOHOL!
Upozornenie! Nedodržanie noriem
na čistenie zariadenia a výmenu filtrov
predstavuje riziko požiaru. Odporúča sa
preto dodržiavať uvedené pokyny.
Odmieta sa akákoľvek zodpovednosť
za prípadné škody na motore, požiare
vyvolané nesprávnou údržbou alebo
nedodržaním vyššie uvedených
upozornení.
4.1 Protitukový filter - Musí byť čistený
jedenkrát za mesiac s nedráždivými
čistiacími prostriedkami, ručne alebo v
umývačke riadu s nízkou teplotou a s
krátkym umývacím cyklom.
Umývaním v umývačke riadu, protitukový
kovový filter môže vyblednúť, ale jeho
filtračné vlastnosti sa tým vôbec nezmenia.
SLOVENČINA
4.2 - Aktívno uhlíkový filter umývateľný
- Nasýteľnosť uhoľného filtru sa odhaľuje
iba po viac-menej predľženom použití,
na základe typu kuchyne a pravidelnosti
čistenia filtra tukov. V každom prípade je
nevyhnutné vymeniť zásobník maximálne
každé štyri mesiace.
NEMÔŽE byť umývaný alebo
regenerovaný.
5. OVLÁDAČE
Odsávač pary je vybavený ovládacím
panelom s kontrolou odsávacej rýchlosti a s
kontrolou zapínania svietidla na osvetlenie
varnej pracovnej plochy.
V prípade mimoriadného zhromaždenia sa
pary v kuchyni, používať väčšiu rýchlosť.
Odporúčame zapnúť odsávanie 5 minút
pred začatím varenia a nechať ho v chode
ešte približne ďalších 15 minút po ukončení
varenia.
Ovládacie prvky na čelnej strane prístroja.
A
B
C
D
E
83
A Tlačidlo OFF (tlačidlo vypnuté) - ON
(tlačidlo zapnuté)
Page 84

84
www.aeg.com
Stlačiť jeden alebo viac krát pre
dosiahnutie požadovanej funkcie:
ON (tlačidlo zapnuté): odstávač pary
nastaví rýchlosť, ktorá bola naposledy
zvolená.
OFF (tlačidlo vypnuté): všetky
deaktivované funkcie s výnimkou
osvetlenia.
B Tlačidlo výberu rýchlosti (odsávací
výkon)
Stlačením tohto tlačidla jeden alebo
viac krát, sa zvolí najvhodnejšia
odsávacia rýchlosť (výkon) (1 - 2 - 3 ).
C Displej: zobrazuje vybraný odsávací
výkon (1-2-3), signalizuje nasýteľnosť
filtrov (F).
D Tlačidlo zapojenia intenzívnej rýchlosti..
Po zapojení, intenzívna rýchlosť
ostane funkčná po dobu asi 5 minút,
počom odsávač pary sa vráti do
predtým zvolenej rýchlosti (od 1 do 3)
alebo dokonca sa vypne, ak predtým
nebola zvolená žiadna rýchlosť. Pre
deaktiváciu intenzívnej rýchlosti skôr
ako prejde 5 minút, stlačiť tlačidlo
A alebo tlačidlo B .
E Tlačidlo ON/OFF osvetlenie
V prípade, ak odsávač pary alebo ovládacie
prvky nefungujú, odporúča sa prerušiť
napájanie aspoň na 5 sekúnd a potom ho
znovu zapnúť. Počkať potom 15 sekúnd
a overiť, či odsávač pary funguje správne.
Zariadenie pre kontrolu tukového filtra
a filtra s aktívnym uhlím
Tento typ odsávača pary je určený
pre zariadenie, ktoré signalizuje kedy
je potrebné čistiť tukový filter a filter
s aktívnym uhlím (predaný je s filtrom
s aktívnym uhlím od výrobcu, ktorý je
špecializovaný na odsávacie zariadenia).
Tento typ odsávača pary je dodaný od
výrobcu bez filtra s aktívnym uhlím, takže
kontrolný svetelný ukazovateľ nasýteľnosti
je deaktívny.
V prípade, že chcete používať odsávač
pary s uholným filtrom, aktivujte kontrolný
svetelný ukazovateľ nasýteľnosti uholného
filtra nasledovne:
Odsávač pary musí byť nastavený na
“OFF”.
Stlačiť súčasne tlačidla B a D po dobu
troch sekúnd, zasvieti sa kontrolka LED F
a začne blikať kontolka led prvej rýchlosti,
po jednej sekunde bude blikať aj kontrolka
led druhej rýchlosti a systém vydá zvukový
signál (-Beep) oznamujúc uskutočnenie
nastavenia.
Pre odstránenie signalizácie uholného
filtra, stlačiť súčasne tlačidlá
B a D po
dobu troch sekúnd, zasvieti sa kontrolka
LED F a začne blikať kontrolka led prvej
rýchlosti (tukový filter) a kontrolka led
druhej rýchlosti, po 1 sekunde začne blikať
len kontrolka led prvej rýchlosti, systém
vydá zvukový signál (-Beep-) oznamujúc
uskutočnenie nastavenia.
KontrolkaLed (1) signalizácie
nasýteľnosti tukového filtra
Blikanie kontrolky led rýchlosti 1 upozorní
operátora, že tukové filtre sa musia umyť.
Pozorne si prečítať pokyny prislúhajúce
údržbe tukových filtrov a jeho umývaniu.
Kontrolka Led (2) signalizácie
nasýteľnosti filtrov s aktívnym uhlím
Blikanie kontrolky led rýchlosti 2 upozorní
operátora, že uhoľný fiter sa musí umyť
alebo vymeniť.
Pozorne si prečítať pokyny prislúhajúce
umývaniu a výmene uhoľných filtrov.
Opätovná aktivácia ukazovateľa
nasýteľnosti
Po vykonaní údržby filtra, stlačiť tlačidlo
A po dobu 3 sekúnd, až kým kontrolka
LED 1 a 2 neprestanú blikať .
6. OSVETLENIE
Vypnite odsávač z elektrickej siete.
Upozornenie! Skôr ako sa dotknete
žiaroviek, presvedčte sa, že sú chladné.
Používajte len halogénové žiarovky 12V
- 20W, max. - G4, a dbajte pritom, aby ste
sa ich nedotkli rukami.
Page 85

RO MANUAL DE FOLOSIRE
PENTRU REZULTATE PERFECTE
Vă mulţumim că aţi ales acest produs AEG. Am creat acest produs pentru a vă oferi
performanţe impecabile, pentru mulţi ani, cu tehnologii inovative care fac viaţa mai simplă
- funcţii pe care s-ar putea să nu le găsiţi la aparatele obişnuite. Vă rugăm să alocaţi câteva
minute cititului pentru a obţine ce este mai bun din acest aparat.
Vizitaţi website-ul la:
Aici găsiţi sfaturi privind utilizarea, broşuri, informaţii care vă ajută la rezolvarea
unor probleme apărute şi informaţii despre service:
www.aeg.com
Înregistraţi-vă produsul pentru a beneficia de servicii mai bune:
www.aeg.com/productregistration
Cumpăraţi accesorii, consumabile şi piese de schimb originale pentru aparatul
dvs.:
www.aeg.com/shop
PROTEJAREA MEDIULUI INCONJURATOR
Reciclaţi materialele marcate cu simbolul . Pentru a recicla ambalajele, acestea trebuie
puse în containerele corespunzătoare.
Ajutaţi la protejarea mediului şi a sănătăţii umane şi la reciclarea deşeurilor din aparatele
electrice şi electrocasnice. Nu aruncaţi aparatele marcate cu acest simbol împreună
cu deşeurile menajere. Returnaţi produsul la centrul local de reciclare sau contactaţi
administraţia oraşului dvs.
ROMÂNĂ
85
SERVICIUL DE RELAŢII CU CLIENŢII ŞI SERVICE
Vă recomandăm utilizarea pieselor de schimb originale.
Atunci când contactaţi unitatea de Service, asiguraţi-vă că aveţi disponibile următoarele
informaţii.
Informaţiile pot fi găsite pe plăcuţa cu datele tehnice. Model, PNC, Număr de serie.
Avertisment / Atenţie-Informaţii privind siguranţa.
Informaţii generale şi recomandări
Informaţii privind mediul înconjurător.
Ne rezervăm dreptul asupra efectuării de modificări fără preaviz.
Page 86

86
www.aeg.com
1. INSTRUCŢIUNI PRIVIND
SIGURANŢA
Atenţie! Urmăriţi îndeaproape
instrucţiunile conţinute în acest
manual. Producătorul îşi declină orice
responsabilitate în cazul daunelor
sau incendiilor provocate aparatului şi
derivate dintr-o utilizare incorectă şi din
nerespectarea instrucţiunilor conţinute
în acest manual. Hota a fost proiectată
excluziv pentru uz casnic.
Avertizare! Nu conectaţi aparatul la
reţeaua electrică până când nu aţi
terminat de montat toată instalaţia.
Înainte de orice intervenţie de curăţenie
şi întreţinere, deconectaţi hota de la
reţeaua electrică, scoţând ştecherul sau
deconectând întrerupătorul general al
locuinţei.
Pentru toate operaţiile de instalare şi
întreţinere utilizaţi mănuşi de protecţie.
Aparatul nu este destinat pentru a fi folosit
de către copii sau persoane cu capacităţi
fizice senzoriale şi mentale reduse sau care
nu au experienţa şi cunoştinţa adecvată,
numai în cazul în care acestea sunt sub
supraveghere sau le sunt date instrucţiunile
de folosire a aparaturii de către o persoană
responsabilă cu siguranţa acestora.
Copiii trebuie să fie supravegheaţi pentru a
fi siguri că nu se joacă cu aparatura.
Nu folosiţi niciodată hota fără montajul
corect al grilei!
Hota nu trebuie folosită NICIODATĂ ca
suprafaţă de aşezare numai în cazul în care
este indicat în mod specific.
Localul trebuie să fie destul de ventilat,
când hota de bucătărie se foloseşte
împreună cu alte aparate cu combustie de
gaz sau alţi combustibili. Aerul aspirat nu
trebuie să treacă printr-o conductă folosită
pentru eliminarea fumul produs de aparatele
cu combustie de gaz sau alţi combustibili.
Este absolut interzis pregătirea sub hotă
a mâncărurilor cu flamă. Folosirea flăcării
libere poate dăuna filtrele şi poate crea
incendii, aşadar trebuie evitată în orice caz.
Friptura trebuie făcută sub control pentru a
evita ca uleiul prea încălzit să se aprindă.
Atenţie! Părţile componente cu care
am putea intra in contact se pot încălzi
considerabil în momentul în care se
folosesc împreună cu aparatura pentru
pregătit mâncarea.
În ceea ce privesc măsurile tehnice şi de
siguranţă care trebuie să fie adoptate pentru
evacuarea fumurilor este strict necesar
să respectaţi regulamentele în vigoare
şi să apelaţi la autorităţile competente
locale. Hota trebuie să fie curăţată tot
des atât în interior cât şi în exterior (CEL
PUŢIN ODATĂ PE LUNĂ, respectând în
mod expresiv toate indicaţiile redate în
instrucţiunile de întreţinere reproduse în
acest manual) Nerespectarea normelor de
curăţare a hotei precum şi neînlocuirea sau
necurăţarea filtrelor poate crea la riscuri
de incendii. Nu folosiţi niciodată hota fără
montajul corect al becurilor pentru a nu crea
riscuri de scurtcircuit. Firma îşi declină orice
responsabilitate pentru eventualele pagube,
daune sau incendii provocate de aparatură
ce provin din nerespectarea instrucţiunilor
redate în acest manual.
Atenţie! Neinstalarea şuruburilor sau
dispozitivelor de fixare în conformitate
cu aceste instrucţiuni poate comporta
riscuri de natura electrică.
2. UTILIZARE
Hota serveşte la aspirarea gazelor şi
vaporilor rezultaţi din gătit.
În manualul de instalare ataşat se indică
versiunea care se poate utiliza pentru
modelul achiziţionat de Dumneavoastră, fie
versiunea cu aspiraţie şi evacuare externă
fie versiunea filtrantă cu reciculare
internă .
3. INSTALAREA
Tensiunea din reţea trebuie să corespundă
cu tensiunea la care se referă eticheta
situată în interiorul hotei. Dacă este
prevăzută cu ştecher conectaţi hota la
o priză conform cu normele în vigoare,
poziţionată într-o zona accesibilă şi după
instalare. Dacă nu este prevăzută cu
ştecher (conexiunea este direct la reţea)
sau ştecherul nu este poziţionat într-o
zonă accesibilă şi după instalare, aplicaţi
un întrerupător bipolar la normă care să
asigure deconectarea completă de la reţea
în condiţiile categoriei de supratensiune III,
conform regulilor de instalare.
Atenţie! înainte de a efectua
conectarea circuitului hotei la
alimentaţia din reţea şi de a verifica
funcţionarea corectă, controlaţi
totdeauna dacă cablul a fost montat în
mod corect.
Page 87

Atenţie! înlocuirea cablului de
alimentare trebuie să fie efectuată
numai de către serviciul de asistenţă
tehnică autorizat în aşa fel încât să
poată preveni orice risc.
Distanţa minimă între suprafaţa suportului
recipientelor pe dispozitivul de gătit şi
partea de jos a hotei nu trebuie să fie mai
mică de 50cm în cazul maşinilor de gătit
electrice, şi de 65cm în cazul maşinilor de
gătit cu gaz sau mixte.
Dacă instrucţiiunile dispozitivului de gătit
cu gaz specifică o distanţă mai mare, este
necesar să ţineţi cont de aceasta.
4. ÎNTREŢINERE
Atenţie! Înainte de orice intervenţie
de curăţenie şi întreţinere, deconectaţi
hota de la reţeaua electrică,
scoţând ştecherul sau deconectând
întrerupătorul general al locuinţei.
Hota trebuie curăţată frecvent (cel puţin
cu aceeaşi frecvenţă cu care se curăţă
filtrele anti-grăsime), fie în interior cât şi în
exterior. Pentru curăţare folosiţi un material
îmbibat cu detergenţi lichizi neutri. Evitaţi
folosirea produselor pe bază de abrazivi
NU FOLOSIŢI ALCOOL!
Atenţie! Nerespectarea normelor de
curăţare a hotei şi de înlocuire a filtrelor
conduce la potenţiale riscuri de incendii.
Vă sfătuim să respectaţi îndeaproape
instrucţiunile prezente în acest manual.
Producătorul îşi declină orice
responsabilitate în cazul daunelor la motor
sau incendiilor provocate aparatului şi
derivate dintr-o utilizare sau întreţinere
incorectă precum şi din nerespectarea
instrucţiunilor conţinute în acest manual.
4.1 Filtru anti-grăsimi - Trebuie curăţat
o dată pe lună cu detergenţi neabrazivi,
manual sau utilizând maşina de spălat
vase, la temperaturi scăzute şi folosind un
program scurt.
Filtrul metalic anti-grăsimi, spălat cu maşina
de spălat vase se poate decolora, dar nu-şi
va pierde caracteristicile de filtrare.
ROMÂNĂ
4.2 - Filtru cu carbon activ lavabil
- Saturaţia filtrului de cărbune depinde de
folosirea mai mult sau mai puţin prelungită
a tipului de maşina de gătit precum şi de
curăţarea regulară a filtrului pentru grăsime.
În orice caz, cartuşul filtrului trebuie înlocuit
cel mult la fiecare patru luni.
NU-l spălaţi sau refolosiţi
5. COMENZI
Hota este dotată cu un panou de comandă,
de la care se modifică viteza de aspiraţie şi
se declanşează aprinderea becurilor pentru
iluminarea blatului de aragaz.
Se recomandă o viteza crescută, în special
în cazul unei concentraţii mari de vapori în
bucătărie. Vă sfătuim să o lăsaţi să aspire
5 minute înainte de a demara procesul
de coacere şi de a o lăsa în funcţiune, la
închiderea procesului de coacere, pentru
încă 15 minute (aproximativ).
Comenzile pe latura frontală a aparatului:
A
B
C
D
E
87
A Tasta OFF (tasta stinsă) - ON (tasta
aprinsă)
Apăsaţi o dată sau de mai multe ori
Page 88

88
www.aeg.com
pentru a obţine funcţia dorită:
ON (tasta aprinsă): hota configurează
ultima viteză selectată.
OFF (tasta stinsă): toate funcţiile
dezactivate cu excepţia iluminării.
B Tasta de selectare a vitezei (putere de
aspirare)
Apăsaţi această tastă o dată sau
de mai multe ori pentru a alege
viteza (puterea) de aspirare mai
corespunzătoare (1 - 2 - 3 ).
C Display: vizualizează putere de aspirare
selectată (1-2-3), semnalizează
saturaţia filtrelor (F).
D Tasta introducere viteză intensivă.
După introducere, viteza intensivă va
rămâne în funcţie timp de aproximativ
5 minute, după care hota va reveni la
viteza anterior selectată (de la 1 la 3)
sau se chiar stinge dacă în prealabil nu
fusese selectată nicio viteză. Pentru a
dezactiva viteza intensivă înainte de a
fi trecut cele 5 minute apăsaţi tasta A
sau tasta B .
E Tasta ON/OFF lumină
În cazul în care hota sau comenzile nu
funcţionează se recomandă întreruperea
alimentării timp de cel puţin 5 secunde şi
apoi reporniţi.. Apoi aşteptaţi 15 secunde şi
verificaţi dacă hota funcţionează corect.
Dispozitiv pentru controlul filtrului
grăsimi şi filtrului cu carbon activ
Acest tip de hotă este prevăzut pentru un
dispozitiv care semnalizează când filtrul
de grăsimi sau filtrul cu carbon trebuie să
fie curăţat (vândut cu filtrul cu carbon activ
de către firma producătoare specializată în
aparate de aspirat).
Acest tip de hotă este livrat de fabricant
fără filtrul cu carbon activ aşadar ledul de
saturaţie este dezactivat.
În cazul în care se doreşte utilizarea hotei
cu filtru cu carbon, atunci activaţi ledul de
saturaţie a filtrului cu carbon după cum
urmează:
Hota trebuie configurată pe “OFF”.
Apăsaţi simultan tastele B şi D timp de
trei secunde, LEDUL F se aprinde şi începe
să pâlpâie ledul vitezei 1, după o secundă
pâlpâie şi ledul vitezei 2 iar sistemul emite
un semnal sonor (-Beep-) pentru a indica
configurarea stabilită.
Pentru a elimina semnalizarea filtrului cu
carbon apăsaţi simultan tastele B şi D
timp de trei secunde, LEDUL F se porneşte
şi începe să pâlpâie ledul vitezei 1 (filtru de
grăsimi), şi ledul vitezei 2, după o secundă
va pâlpâi doar ledul vitezei 1, sistemul
emite un semnal sonor (-Beep-) pentru a
indica configurarea stabilită.
Led (1) de semnalizare saturaţie filtru de
grăsimi
Aprinderea intermitentă a ledului vitezei 1
avertizează operatorul că filtrele de grăsimi
trebuie să fie spălate.
Citiţi cu atenţie instrucţiunile privind
întreţinerea filtrelor grăsimi pentru curăţarea
acestora.
Led (2) de semnalizare saturaţie filtru cu
carbon activ
Aprinderea intermitentă a ledului vitezei 2
avertizează operatorul că filtrul carbon
trebui spălat sau înlocuit.
Citiţi cu atenţie instrucţiunile privind
spălarea sau înlocuirea filtrului cu carbon.
Refacerea indicatorului de saturaţie
După executarea întreţinerii filtrelor, ţineţi
apăsată tasta
A timp de 3 secunde până
când LEDUL 1 sau 2 încetează să mai
pâlpâie.
6. ILUMINAT
Deconectaţi hota de la reţeaua electrică.
Atenţie! Înainte de a atinge becurile,
asiguraţi-vă că nu au o temperatură
ridicată.
Folosiţi doar becuri halogene de 12V -20W
max - G4, având grijă să nu le atingeţi cu
mâna.
Page 89

PL INSTRUKCJA UŻYTKOWANIA
Z MYŚLĄ O PERFEKCYJNYCH REZULTATACH
Dziękujemy za wybór tego produktu AEG. Zaprojektowaliśmy go z myślą o wieloletniej
bezawaryjnej pracy i wyposażyliśmy w innowacyjne technologie, które ułatwiają życie — nie
wszystkie te funkcje można znaleźć w zwykłych urządzeniach. Prosimy o poświęcenie
kilku minut i przeczytanie tej dokumentacji w celu zapewnienia najlepszego wykorzystania
urządzenia.
Odwiedź naszą witrynę internetową, aby uzyskać:
Wskazówki dotyczące użytkowania, broszury, pomoc w rozwiązywaniu problemów
oraz informacje dotyczące serwisu:
www.aeg.com
Zarejestruj swój produkt, aby uprościć jego obsługę serwisową:
www.aeg.com/productregistration
Kupuj akcesoria, materiały eksploatacyjne i oryginalne części zamienne do
swojego urządzenia:
www.aeg.com/shop
OCHRONA ŚRODOWISKA
POLSKI
89
Materiały oznaczone symbolem należy poddać utylizacji. Opakowanie urządzenia
włożyć do odpowiedniego pojemnika w celu przeprowadzenia recyklingu.
Należy zadbać o ponowne przetwarzanie odpadów urządzeń elektrycznych i
elektronicznych, aby chronić środowisko naturalne oraz ludzkie zdrowie. Nie wolno
wyrzucać urządzeń oznaczonych symbolem razem z odpadami domowymi. Należy
zwrócić produkt do miejscowego punktu ponownego przetwarzania lub skontaktować się z
odpowiednimi władzami miejskimi.
OBSŁUGA KLIENTA
Zalecamy stosowanie oryginalnych części zamiennych.
Kontaktując się z serwisem, należy przygotować poniższe dane.
Informacje można znaleźć na tabliczce znamionowej. Model, numer produktu, numer
seryjny.
Ostrzeżenie/przestroga – informacje dotyczące bezpieczeństwa.
Ogólne informacje i wskazówki
Informacje dotyczące środowiska naturalnego.
Może ulec zmianie bez powiadomienia.
Page 90

90
www.aeg.com
1.
WSKAZÓWKI
DOTYCZĄCE
BEZPIECZEŃSTWA
Uwaga! Przy przeprowadzaniu
instalacji urządzenia należy postępować
według wskazówek podanych w niniejszej
instrukcji. Producent uchyla się od wszelkiej
odpowiedzialności za uszkodzenia
wynikłe na skutek instalacji niezgodnej
z informacjami podanymi w niniejszej
instrukcji. Okap został zaprojektowany
wyłącznie do użytku domowego.
Ostrzeżenie! Nie podłączać urządzenia
do sieci elektrycznej przed ukończeniem
montażu. Przed wykonaniem jakiejkolwiek
czynności czyszczenia lub konserwacji
należy odłączyć okap od zasilania, wyjmując
wtyczkę z gniazdka lub wyłączając główny
wyłącznik zasilania. Wszelkie czynności
montażowe i konserwacyjne wykonywać
w rękawicach ochronnych. Niniejsze
urządzenie nie jest przeznaczone do użytku
przez osoby (w tym dzieci) o ograniczonych
zdolnościach fizycznych, sensorycznych czy
umysłowych, a także nieposiadające wiedzy
lub doświadczenia w użytkowaniu tego typu
urządzeń, chyba, że będą one nadzorowane
lub zostaną poinstruowane na temat
korzystania z tego urządzenia przez osobę
odpowiedzialną za ich bezpieczeństwo.
Dzieci należy pilnować, aby mieć
że nie bawią się urządzeniem. Nie należy
nigdy używać okapu bez prawidłowo
zamontowanych filtrów! Okap nie powinien
być NIGDY używany jako płaszczyzna
oparcia chyba, że taka możliwość została
wyraźnie wskazana. Pomieszczenie, w
którym okap jest używany łącznie z innymi
urządzeniami spalającymi gaz lub inne
paliwo powinno posiadać odpowiednią
wentylację. Zasysane powietrze nie
powinno być odprowadzane do kanału
wykorzystywanego do odprowadzania spalin
wytwarzanych przez urządzenia gazowe
lub na inne paliwo. Surowo zabrania się
przygotowywania pod okapem potraw z
użyciem otwartego ognia (flambirowanie).
Użycie otwartego ognia jest groźne dla
filtrów i stwarza ryzyko pożaru, a zatem nie
wolno tego robić pod żadnym pozorem.
Podczas smażenia należy zachować
ostrożność, aby nie dopuścić do przegrzania
oleju, aby nie uleg
Uwaga! Dostępne części mogą ulec
znacznemu nagrzaniu, jeżeli będą używane
razem z urządzeniami przeznaczonymi
do gotowania. W zakresie koniecznych
ł samozapaleniu.
pewność,
do zastosowania środków technicznych i
bezpieczeństwa dotyczących odprowadzania
spalin należy ściśle przestrzegać przepisów
wydanych przez kompetentne władze
lokalne. Okap powinien być często
czyszczony zarówno na zewnątrz jak i
od wewnątrz (PRZYNAJMNIEJ RAZ W
MIESIĄCU, z zachowaniem wskazówek
dotyczących konserwacji podanych w
niniejszej instrukcji). Nieprzestrzeganie
zasad dotyczących czyszczenia okapu oraz
wymiany i czyszczenia filtrów powoduje
powstanie zagrożenia pożarem.
Celem uniknięcia porażenia prądem nie
należy używać lub pozostawiać okapu bez
prawidłowo zamontowanych żarówek.
Producent nie ponosi żadnej
odpowiedzialności za ewentualne szkody
lub pożary spowodowane przez urządzenie
a wynikające z nieprzestrzegania zalece
podanych w niniejszej instrukcji.
Uwaga! Nie dokręcenie śrub oraz
urządzeń mocujących zgodnie z niniejszymi
instrukcjami może spowodować zagrożenia
natury elektrycznej.
ń
2. UŻYTKOWANIE
Okap służy do wchłaniania oparów
pochodzących z gotowania.
W załączonej instrukcji instalacyjnej zostało
zaznaczone, którą wersję można używać
dla posiadanego przez Was modelu; wersję
wchłaniająca z wydalaniem zewnętrznym
lub wersję filtrującą o recyrkulacji
wewnętrznej
.
3. INSTALACJA OKAPU
Napięcie sieciowe musi odpowiadać napięciu
wskazanemu na tabliczce umieszczonej
w wewnętrznej części okapu. Jeśli okap
jest wyposażony we wtyczkę, należy
ją podłączyć do gniazdka zgodnego z
obowiązującymi normami i umieszczonego
w łatwo dostępnym miejscu, również po
zakończonej instalacji.
Jeśli okap nie jest wyposażony we wtyczkę
(bezpośrednie podłączenie do sieci) lub
wtyczka nie znajduje się w łatwo dostępnym
miejscu, również po zakończonej instalacji,
należy zastosować znormalizowany
wyłącznik dwubiegunowy, który umożliwi
całkowite odcięcie od sieci elektrycznej
w warunkach nadprądowych kategorii III,
zgodnie z zasadami instalacji.
Uwaga! Przed ponownym podłączeniem
obwodu okapu do zasilania i sprawdzeniem
poprawności jego działania należy się
zawsze upewnić, czy przewód zasilający jest
prawidłowo zamontowany.
Page 91

POLSKI
91
Uwaga! Jeżeli przewód zasilający
nieodłączalny ulegnie uszkodzeniu,
to powinien on być wymieniony u
wytwórcy lub w specjalistycznym
zakładzie naprawczym albo przez
wykwalifikowaną osobę w celu
uniknięcia zagrożenia.
Minimalna odległość między powierzchnią,
na której znajdują się naczynia na
urządzeniu grzejnym a najniższą częścią
okapu kuchennego powinna wynosić nie
mniej niż 50cm w przypadku kuchenek
elektrycznych i nie mniej niż 65cm w
przypadku kuchenek gazowych lub typu
mieszanego.
Jeżeli w instrukcji zainstalowania kuchni
gazowej podana jest większa odległość,
należy dostosować się do takich wskazań.
4. KONSERWACJA
Uwaga! Przed wykonaniem
jakiejkolwiek czynności czyszczenia lub
konserwacji należy odłączyć okap od
zasilania wyjmując wtyczkę z gniazdka
lub wyłączając główny wyłącznik
zasilania.
Okap należy często czyścić, tak wewnątrz
jak i na zewnątrz (przynajmniej z tą samą
częstotliwością, z którą wykonuje się
czyszczenie filtrów tłuszczowych) przy
użyciu szmatki nawilżonej łagodnymi
środkami. Nie należy używać środków
ściernych. NIE STOSOWAĆ ALKOHOLU!
Uwaga! Nieprzestrzeganie przepisów
dotyczących czyszczenia urządzenia
i wymiany filtrów powoduje powstanie
zagrożenia pożarem. Zaleca się zatem
przestrzeganie podanych wskazówek.
Producent nie ponosi żadnej
odpowiedzialności za ewentualne
uszkodzenia silnika lub pożary wynikające
z nieprzestrzegania zasad konserwacji oraz
wzmiankowanych wyżej instrukcji.
4.1 Filtr przeciwtłuszczowy
Musi być czyszczony co najmniej raz w
miesiącu, za pomocą środka czyszczącego
nie żrącego, ręcznie lub w zmywarce w
niskiej temperaturze i krótkim cyklu mycia.
Mycie w zmywarce metalowego filtra
tłuszczowego może spowodować jego
nieznaczne odbarwienie, to jednak nie
pogarsza parametrów jego pracy.
4.2 Filtr na węgiel ( tylko dla wersji
filtrującej) - Filtr węglowy nadający się
do mycia
Nasycenie filtra następuje po krótszym lub
dłuższym okresie użytkowania w zależności
od rodzaju kuchni i od regularności z
jaką jest wykonywane czyszczenie filtra
tłuszczowego. Wkład filtra powinien być w
każdym razie wymieniony po upływie nie
więcej niż czterech miesięcy.
NIE wolno myć lub regenerować filtra.
5. STEROWANIE
Okap jest wyposażony w panel sterowania
z regulacją prędkości turbiny zasysającej
oraz włącznikiem oświetlenia przestrzeni
roboczej pod okapem.
W przypadku, gdy powietrze w
pomieszczeniu kuchennym jest szczególnie
zanieczyszczone, należy używać okapu
ustawionego na najwyższą prędkość.
Zaleca się uruchomienie okapu 5 minut
przed przystąpieniem do gotowania
jakichkolwiek potraw i pozostawienie go
Page 92

92
www.aeg.com
włączonym jeszcze przez ok. 15 minut po
zakończeniu gotowania.
Przyciski sterowania znajdują się na
przednim panelu urządzenia:
A
B
A Przycisk OFF (przycisk wyłączony)
– ON (przycisk włączony)
Nacisnąć raz lub kilka razy, aby
uzyskać właściwą funkcję:
ON (przycisk włączony): okap nastawia
ostatnio wybraną prędkość.
OFF (przycisk wyłączony): wszystkie
funkcje nieaktywne, z wyjątkiem
oświetlenia.
B Przycisk wyboru prędkości (mocy
zasysania)
Nacisnąć ten przycisk raz lub kilka razy,
aby wybrać najbardziej odpowiednią
prędkość (moc) zasysania (1Ę-Ę2ĘĘ3).
C Wyświetlacz: pokazuje wybraną
moc zasysania (1-2-3), sygnalizuje
nasycenie filtrów (F).
D Przycisk włączający prędkość
intensywną.
Po naciśnięciu tego przycisku okap
będzie pracował z prędkością
intensywną przez około 5 minut, po
czym powróci do uprzednio wybranej
prędkości (od 1 do 3) lub wręcz
wyłączy się, jeśli nie wybrano wcześniej
żadnej prędkości. Aby wyjść z trybu
intensywnego przed upływem 5 minut,
nacisnąć przycisk A lub przycisk B .
E Przycisk ON/OFF oświetlenia
W przypadku gdy okap lub komendy nie
działają, zaleca się przerwanie zasilania na
co najmniej 5 sekund i ponowne włączenie.
Następnie należy odczekać 15 sekund i
sprawdzić, czy okap działa prawidłowo.
Urządzenie do kontroli filtra
tłuszczowego i filtra z aktywnym
węglem.
Ten typ okapu wyposażony jest w
urządzenie sygnalizujące konieczność
wymiany filtra tłuszczowego lub filtra z
aktywnym węglem (sprzedany z filtrem z
aktywnym węglem przez firmę produkcyjną
C
D
E
wyspecjalizowaną w urządzeniach
ssących).
Ten typ okapu dostarczany jest, przez
producenta, bez filtra z aktywnym węglem,
dlatego też kontrolka nasycania jest
wyłączona.
W przypadku, kiedy chce się używać okap
z filtrem węglowym należy aktywować
kontrolkę nasycania filtra węglowego w
następujący sposób:
Okap musi być ustawiony w pozycji “OFF”.
Wcisnąć jednocześnie przyciski
przez trzy sekundy, LED F zapala się i
zaczyna świecić się LED szybkości 1, po
upływie 1 sekundy zaczyna świecić się
również LED szybkości 2 a system emituje
sygnał akustyczny (-Beep-) wskazujący
wykonanie ustawienia.
Aby usunąć sygnalizację filtra węglowego
wcisnąć jednocześnie przyciski B i D
przez trzy sekundy, LED F zapala się i
zaczyna świecić się LED szybkości 1 (filtr
tłuszczowy) oraz LED szybkości 2, po
upływie 1 sekundy będzie świecić się tylko
LED szybkości 1, system emituje sygnał
akustyczny (-Beep-) wskazujący wykonanie
ustawienia.
LED (1) sygnalizacji nasycenia filtra
tłuszczowego.
Świecenie się LED szybkości 1 ostrzega
operatora, że filtry tłuszczowe muszą być
umyte.
Należy zapoznać się z instrukcjami
dotyczącymi konserwacji filtrów
tłuszczowych odnośnie ich czyszczenia.
LED (2) sygnalizacji nasycenia filtra z
aktywnym węglem.
Świecenie się LED szybkości 2 ostrzega
operatora, że filtr węglowy musi być umyty
lub wymieniony.
Należy zapoznać się z instrukcjami
dotyczącymi mycia lub wymiany filtra
węglowego.
Resetowanie wskaźnika nasycenia.
Po wykonaniu konserwacji filtrów, wcisnąć
klawisz A przez 3 sekundy aż do chwili,
kiedy LED 1 lub 2 zaprzestaną świecić się.
B i D
Page 93

6. OŚWIETLENIE
Przed przystąpieniem do jakichkolwiek
operacji związanych z konserwacją
urządzenia, należy odłączyć okap od
zasilania energią elektryczną.
Uwaga! Nie dotykać żarówek dopóki są
gorące.
Należy stosować wyłącznie żarówki halogenowe o maksymalnej mocy 20 W - 12 V
- G4. Nie należy dotykać żarówek rękami.
POLSKI
93
Page 94

HR KNJIŽICA S UPUTAMA
94
www.aeg.com
ZA SAVRŠENE REZULTATE
Zahvaljujemo vam što ste odabrali ovaj AEG proizvod. Proizveli smo ga kako bi vam pružio
godine besprijekornog rada, s inovativnim tehnologijama koje život čine jednostavnijim
- svojstva koja ne možete pronaći kod običnih uređaja. Molimo vas da odvojite nekoliko
minuta na čitanje kako biste dobili ono najbolje od njega.
Posjetite našu internetsku stranicu za:
Dobivanje savjeta o korištenju, prospekata, rješavanju problema, servisnim
informacija:
www.aeg.com
Registriranje vašeg proizvoda za bolji servis:
www.aeg.com/productregistration
Kupovinu dodatne opreme, potrošnog materijala i originalnih rezervnih dijelova za
vaš uređaj:
www.aeg.com/shop
BRIGA ZA OKOLIŠ
Reciklirajte materijale sa simbolom . Ambalažu za recikliranje odložite u prikladne
spremnike.
Pomozite u zaštiti okoliša i ljudskog zdravlja, kao i u recikliranju otpada od električnih
i elektroničkih uređaja. Uređaje označene simbolom ne bacajte zajedno s kućnim
otpadom. Proizvod odnesite na lokalno reciklažno mjesto ili kontaktiraje nadležnu službu.
BRIGA O KUPCIMA I SERVIS
Preporučujemo uporabu originalnih rezervnih dijelova.
Kada se obraćate servisu, provjerite da su Vam dostupni sljedeći podaci.
Informacije možete pronaći na nazivnoj pločici. Model, PNC, serijski broj.
Upozorenje / Oprez - sigurnosne informacije.
Opće informacije i savjeti
Informacije za zaštitu okoliša.
Zadržava se pravo na izmjene bez prethodne najave.
Page 95

HRVATSKI
95
1. SIGURNOSNE UPUTE
Pozor! Strogo se pridržavajte uputstava
koje donosi ovaj priručnik. Otklanjamo
bilo kakvu odgovornost za eventualne
nezgode,smetnje ili požar na aparatu
koji proizlaze iz nepoštivanja uputstava
koje donosi ovaj priručnik. Kuhinjska
napa je projektirana isključivo za
kućansku uporabu.
Upozorenje! Ne priključujte aparat
na električnu mrežu sve dok niste
kompletno završili sa instaliranjem.
Prije bilo kakvog čišćenja ili održavanja,
iskopčajte kuhinjsku napu s električne
mreže vadeći utikač ili isključujući opći
kućni prekidač/sklopku.
Ovaj aparat nije namijenjen uporabi od
strane djece ili osoba koje imaju smanjene
fizičke,mentale ili osjetne sposobnosti, i
kojima nedostaje iskustva i saznanja osim
ako oni nisu nadgledani i obučeni kako
upotrebljavati aparat od osoba koje su
odgovorne za njihovu sigurnost.
Trebate paziti na djecu da se ne igraju
s aparatom . Na upotrebljavajte nikada
kuhinjsku napu bez da je pregrada ili
mrežica pravilno montirana!
Ne upotrebljavajte NIKADA napu kao
podlogu na koju ćete polagati predmete
ukoliko to nije jasno naglašeno.
Prostorija treba imati dovoljno
provjetravanje, kada je kuhinjska napa
upotrebljavana istovremeno s drugim
aparatima na plinski pogon ili na drugo
gorivo. Zrak koji se usisava ne smije
biti proveden u cijev koja se koristi za
izbacivanje dimova koje proizvode ostali
aparati na plinski pogon ili drugo gorivo.
Strogo se zabranjuje pripremanje hrane na
plamenu ispod nape.
Korištenje nekontroliranog plamena je
štetno za filtre te može izazvati požar ,u
svakom slučaju bi ga trebalo izbjegavati.
Držite pod kontrolom postupak pri prženju
kako biste izbjeglii da se pregrijano ulje
zapali.
Pozor! Neki dijelovi se mogu znatno
zagrijati kada se koriste zajedno sa
aparatima za kuhanje.
Što se tiče tehničkih mjera kojih se treba
pridržavati s obzirom na dimove, strogo se
pridržavajte pravilnika nadležnih lokalnih
vlasti .
Kuhinjska napa se treba često čistiti i prati
i izvana i iznutra (BAREM JEDANPUT
NA MJESEC, poštivajte sve ono što je
navedeno u uputstvima za održavanje
koje donosi ovaj priručnik). Ne poštivanje
propisa o čišćenju nape i zamjene i čišćenja
filtra povećava opasnost od požara.
Ne upotrebljavajte niti ostavljajte kuhinjsku
napu bez da ste pravilno montirali lampe jer
postoji rizik od električnog udara.
Otklanjamo bilo kakvu odgovornost radi
eventualnih neprilika,štete ili požara koje
bi mogao izazvati aparat a koje proizlaze
iz nepoštivanja uputstava koje donosi ovaj
priručnik.
Upozorenje! Neinstaliranja vijaka i
zakovica u skladu s ovim uputama
može stvoriti rizik od električne
opasnosti.
2. KORIŠTENJE
Kuhinjska napa služi usisu dima i pare koji
su posljedica kuhanja.
U priloženoj knjižici o instalaciji se navodi
koju verziju možete koristiti za model koji
imate i to birajući između usisne verzije sa
izbacivanjem vani ili filtracijske verzije
s unutrašnjim kruženjem .
3. POSTAVLJANJE
Napon mreže treba odgovarati naponu
koji je naveden na etiketi karakteristika koji
se nalazi u unutrašnjosti kuhinjske nape.
Ukoliko ima utikač, povežite kuhinjsku
napu s jednim utikačem koja je u skladu
s propisima na snazi i koji je postavljen
na pristupačnom mjestu čak i nakon
instalacije. Ako nije opremljen utikačem
(direktno povezivanje s mrežom) ili utikač
nije postavljen na pristupačnom mjestu,
čak i nakon instalacije postavite dvopolan
prekidač koji je u skladu s propisima i koji
osigurava kompletno iskopčavanje s mreže
u uvjetima kategorije br.3 o previsokom
naponu , u skladu s pravilima o instalaciji.
Upozorenje! Prije nego što ponovno
povežete kružni put kuhinjske nape
s napajanjem mreže te provjerite
pravilno funkcioniranje , uvijek dobro
kontrolirajte je li kabl mreže bio pravilno
montiran.
Page 96

96
www.aeg.com
Upozorenje! Zamjena kabla za
napajanje se treba obaviti od strane
autorizirane servisne tehničke
službe ili od strane osobe sa sličnom
kvalifikacijom.
Minimalna udaljenost između podloge za
posude na uređaju za kuhanje i najnižeg
dijela kuhinjske nape ne smije biti niža od
50cmkada se radi o električnim štednjacima
,a 65cmu slučaju plinskih štednjaka ili
mješovitih.
Ukoliko uputstva za instalaciju aparata na
plin govore da je potrebno održavati veću
udaljenost, trebate ih se pridržavati.
4. ODRŽAVANJE
Upozorenje! Prije bilo kakvog postupka
čišćenja ili održavanja, iskopčajte
kuhinjsku napu od napajanja strujom
na način da izvadite utičnicu ili isključite
opći prekidač kuće.
Kuhinjska napa se treba često čistiti
( barem isto tako često kao i filtri za
uklanjanje masnoće), u unutrašnjosti i
izvana. Koristite ovlaženu krpu s neutralnim
deterdžentima u tekućem stanju.
Izbjegavajte uporabu proizvoda koji bi mogli
grebati.
NE KORISTITE ALKOHOL!
Pozor: Nepoštivanje pravila o čišćenju
aparata i pravila o zamjeni filtara
povećava rizik od požara. Stoga se
preporučuje poštivanje sugeriranih
uputstava.
Otklanjamo bilo kakvu odgovornost za
eventualne kvarove na motoru, požar
izazvan neodgovarajućim održavanjem ili
nepoštivanjem navedenih upozorenja.
4.1 Filtar za masnoću - Taj filtar morate
čistiti jednom mjesečno, upotrijebivši
neagresivne deterdžente, bilo ručno ili u
stroju za pranje posuđa, u kojem slučaju
morate izabrati program pranja s kratkim
ciklusom i na niskoj temperaturi.
Ako ga perete u stroju za posuđe, možda
ćete opaziti manju promjenu ili gubitak
boje, što ni u kom slučaju ne utječe na
učinkovitost filtra.
4.2 - Aktivni karbonski filtar koji se
može oprati - Zasićenje karbonskog filtra
se pojavljuje poslije manje-više produljene
uporabe s obzirom na tip kuhinje i na
urednost u čišćenju filtera za uklanjanje
masnoće. U svakom slučaju je potrebno
zamijeniti kartušu barem svaka četiri
mjeseca.
NE može se niti oprati, niti obnoviti.
5. NAREDBI
Napa ima upravljačku ploču s kontrolom
brzine isisivanja i kontrolom paljenja svjetla
za osvjetljenje površine za kuhanje.
Upotrebljavajte veću brzinu u slučaju
velikog prisustva pare u kuhinji.
Savjetujemo da uključite usisavanje 5
minuta prije nego što počnete s kuhanjem i
da ostavite da djeluje nakon što ste završili
s kuhanjem za još otprilike 15 minuti.
Komande na prednjem dijelu aparata:
A
B
A Tipka OFF (tipka isključena) - ON (tipka
uključena)
Pritisnite jedan ili više puta da biste
postigli željenu funkciju:
ON (tipka uključena): kuhinjska napa
C
D
E
Page 97

HRVATSKI
97
namješta zadnju odabranu brzinu.
OFF (tipka isključena): sve su funkcije
onesposobljene osim rasvjete.
B Tipka za odabir brzine (jačina
usisavanja)
Pritisnite ovu tipku jedan ili više puta
da biste odabrali najprikladniju brzinu
(jačinu) usisavanja (1 - 2 - 3 ).
C Display: vizualizira jačinu odabranog
usisavanja (1-2-3), signalizira zasićenje
filtara (F).
D Tipka za pokretanje intenzivne brzine.
Jedan put kada se pokrene, intenzivna
brzina će ostati u funkciji u trajanju od
otprilike 5 minuta, nakon čega će se
kuhinjska napa vratiti na prethodno
odabranu brzinu (od 1 do 3) ili će se
čak isključiti ako prethodno nije bila
odabrana nijedna brzina. Da biste
isključili intenzivnu brzinu prije nego
što prođe 5 minuta pritisnite tipku A ili
tipku B .
E Tipka ON/OFF svjetlo
U slučaju da kuhinjska napa ili komande
ne funkcioniraju savjetuje se da prekinete
napajanje u trajanju od barem 5 sekundi
i potom ponovno pustite napajanje.
Pričekajte potom 15 sekundi i kontrolirajte
da li kuhinjska napa funkcionira pravilno.
Uređaj za kontrolu filtra za odstranjivanje
masnoće i aktivnog karbonskog filtra
Ova vrsta kuhinjske nape je prethodno
pripremljena za uređaj koji signalizira
kada filtar za odstranjivanje masnoće i
aktivni karbonski filtar imaju potrebu da se
očiste( prodaje se sa aktivnim karbonskim
filtrom koji proizvodi poduzeće proizvođač
specijalizirano u proizvodnji usisnih
aparata). Ova vrsta kuhinjske nape se
prilaže od strane proizvođača bez aktivnog
karbonskog filtra i zato je kontrolno svjetlo o
zasićenju filtra deaktivirano.
U slučaju da se želi koristiti kuhinjska
napa sa karbonskim filtrom tada aktivirajte
kontrolno svjetlo o zasićenju karbonskog
filtra na slijedeći način:
Kuhinjska napa treba biti namještena na
“OFF”.
Pritisnite istovremeno tipke B i D u
trajanju od tri sekunde, IND.SVJETLO F
se uključuje i počinje bliještiti ind.svjetlo
1^ brzine , poslije 1 sekunde bliješti i ind.
svjetlo 2^ brzine te sustav ispušta zvuk(Beep-) kako bi signalizirao da je došlo do
namještanja.
Da biste isključili signalizaciju karbonskog
filtra pritisnite istovremeno tipke
B i D u
trajanju od tri sekunde, IND.SVJETLO F
se uključuje i počinje bliještiti ind.svjetlo
1^ brzine(filtar za odstranjivanje masnoće)
, poslije 1 sekunde bliješti i ind.svjetlo 2^
brzine te sustav ispušta zvuk(-Beep-) kako
bi signalizirao da je došlo do namještanja.
Ind.svjetlo (1) koje signalizira zasićenje
filtra za odstranjivanje masnoće
Kada bliješti ind.svjetlo brzine 1 upozorava
operatera da se filtri za odstranjivanje
masnoće trebaju oprati.
Pažljivo pročitajte upute koje se odnose
na održavanje filtara za odstranjivanje
masnoće u svezi sa njihovim pranjem.
Ind.svjetlo (2) koje signalizira zasićenje
aktivnog karbonskog filtra
Kada bliješti ind.svjetlo brzine 2 upozorava
operatera da se karbonski filtar treba oprati
ili zamijeniti.
Pažljivo pročitajte upute koje se odnose na
zamjenu ili pranje karbonskog filtra.
Vraćanje u prethodno stanje indikatora
zasićenja
Nakon što ste obavili održavanje filtara,
držite pritisnutom tipku A u trajanju od 3
sekunde sve dok IND.SVJETLA 1 ili 2 ne
prestanu bliještiti.
6. RASVJETA
Iskopčajte aparat s električne mreže.
Pozor! Prije nego što dodirnete lampe
provjerite jesu li se ohladile.
Koristite samo halogene lampe od 12V
-20W maks - G4, i pripazite da ih ne dirate
rukama.
Page 98

SL NAVODILO ZA UPORABO
98
www.aeg.com
ZA ODLIČNE REZULTATE
Hvala, ker ste izbrali izdelek AEG. Ustvarili smo ga z namenom, da bi vam brezhibno služil
vrsto let, inovativna tehnologija pa vam bo olajšala življenje – funkcije, ki jih morda ne boste
našli pri običajnih aparatih. Prosimo, vzemite si nekaj minut časa za branje, da boste izdelek
čim bolje izkoristili.
Obiščite našo spletno stran za:
nasvete glede uporabe, brošure, odpravljanje motenj, servisne informacije:
www.aeg.com
Registrirajte vaš izdelek za boljši servis:
www.aeg.com/productregistration
Kupite dodatke, potrošni material in originalne nadomestne dele za vaš aparat:
www.aeg.com/shop
SKRB ZA VARSTVO OKOLJA
Reciklirajte materiale, ki jih označuje simbol . Embalažo odložite v ustrezne zabojnike za
reciklažo.
Pomagajte zaščititi okolje in zdravje ljudi ter reciklirati odpadke električnih in elektronskih
naprav. Naprav, označenih s simbolom , ne odstranjujte z gospodinjskimi odpadki.
Izdelek vrnite na krajevno zbirališče za recikliranje ali se obrnite na občinski urad.
POMOČ STRANKAM IN SERVIS
Priporočamo uporabo originalnih nadomestnih delov.
Ko kličete servis, imejte pri roki naslednje podatke.
Podatke najdete na ploščici s tehničnimi podatki. Model, PNC, serijska številka.
Opozorilo / Pozor - varnostne informacije.
Splošne informacije in nasveti
Okoljske informacije.
Pridržujemo si pravice do sprememb brez predhodnega obvestila.
Page 99

SLOVENŠČINA
99
1. VARNOSTNA NAVODILA
Previdnost! Strogo se držite navodil iz
tega priročnika. Zavračamo vsakršno
odgovornost za morebitne neprilike,
škodo ali požare na napravi, ki bi
izvirali iz neupoštevanja navodil iz tega
priročnika. Napa je bila zasnovana
izključno za domačo uporabo.
Opozorilo! Ne priključujte naprave na
električno omrežje, dokler inštalacija ni
v celoti zaključena.
Pred vsakršnim čiščenjem ali
vzdrževanjem, izključite napo iz
električnega omrežja, tako da vtič
izvlečete iz vtičnice ali izključite glavno
vklopno stikalo.
Naprave naj ne uporabljajo otroci ali osebe
z nižjimi fizičnimi, senzoričnimi ali umskimi
sposobnostmi in osebe brez ustreznih
izkušenj in znanja, razen pod nadzorom ali
ob pomoči odgovorne osebe, ki poskrbi za
njihovo varnost.
Otroke je treba imeti pod nadzorom, da se
ne bi igrali z napravo.
Nape nikoli ne uporabljajte, če rešetka ni
pravilno nameščena!
Nape NIKOLI ne uporabljajte kot odlagalne
površine, razen če je to izrecno dovoljeno.
Ko se kuhinjsko napo uporablja istočasno
z drugimi napravami, ki delujejo na plin
ali druga goriva, mora biti prostor dovolj
prezračen.
Vsesani zrak se ne sme usmerjati v
cevovod, ki služi kot odvod za pline, katere
proizvajajo naprave, ki delujejo na plin ali
druga goriva.
Pod napo je strogo prepovedana priprava
flambiranih jedi.
Uporaba odprtega ognja je škodljiva za
filtre in lahko povzroči požare, zato je
treba uporabo slednjega v vsakem primeru
prepovedati.
Cvrtje zahteva stalen nadzor, da se
pregreto olje ne bi vnelo.
Previdnost! Ob istočasni uporabi
pečice, se lahko dostopni deli močno
segrejejo.
Kar zadeva tehnične in varnostne ukrepe
za odvod dimov, se morate strogo držati
predpisov pristojnih lokalnih oblasti.
Napo pogosto čistite tako zunaj kot znotraj
(VSAJ ENKRAT MESEČNO, v vsakem
primeru upoštevajte, kar izrecno narekujejo
navodila za vzdrževanje v tem priročniku).
Neupoštevanje pravil čiščenja nape ter
zamenjave in čiščenja filtrov predstavlja
tveganje požarov.
Nape ne uporabljajte oziroma je ne puščajte
z nepravilno nameščenimi žarnicami, saj
obstaja tveganje električnega udara.
Zavračamo vsakršno odgovornost za
morebitne neprilike, škodo ali požare na
napravi, ki bi izvirali iz neupoštevanja
navodil iz tega priročnika.
Pozor! Če pri nameščanju vijakov
in pritrdil ne upoštevate teh navodil,
obstaja nevarnost poškodbe z
električnim tokom.
2. UPORABA
Napa odsesava dimne pline in pare, ki
nastajajo med kuhanjem.
V priloženem priročniku z navodili za
namestitev je navedeno, katero različico
lahko uporabite pri vašem modelu nape:
odzračevalno ali obtočno .
3. INŠTALACIJA
Omrežna napetost mora ustrezati
napetosti, navedeni na nalepki z lastnostmi,
nameščeni v notranjosti nape. Če ima
napa vtič, slednjega vstavite v vtičnico,
ki je skladna z veljavnimi predpisi in se
nahaja na takem mestu, ki bo dostopno tudi
po vgradnji naprave. Če napa nima vtiča
(neposredna povezava na omrežje) ali se
vtič nahaja na takem mestu, ki po vgradnji
naprave ne bi bilo dostopno, namestite
dvopolno stikalo, skladno s predpisi,
ki zagotavlja popoln izklop iz omrežja
v pogojih prenapetostnega razreda III,
skladno s predpisi o inštalaciji.
Pozor! pred ponovnim priklopom
tokokroga nape na omrežno napajanje
in kontrolo pravilnega delovanja, vselej
preverite, ali je omrežni kabel pravilno
nameščen.
Page 100

100
www.aeg.com
Pozor! Zamenjavo napajalnega kabla
mora izvesti pooblaščena servisna
služba, tako da se prepreči vsakršno
tveganje.
Minimalna razdalja med podporno površino
posod na kuhalni površini in spodnjim
delom nape za kuhinjske prostore ne
sme biti manjša od 50cm pri električnih
štedilnikih in 65cm pri plinskih ali mešanih
štedilnikih.
Če je v navodilih za instalacijo plinskega
kuhalnika napisana večja razdalja, jo je
treba tudi upoštevati.
4. VZDRŽEVANJE
Pozor! Pred vsakršnim čiščenjem
ali vzdrževanjem izključite električno
napajanje nape, tako da vtič izvlečete iz
vtičnice ali izklopite glavno stikalo.
Napa zahteva pogosto čiščenje, tako zunaj
kot znotraj.
Za čiščenje uporabljajte krpo, navlaženo s
tekočimi nevtralnimi detergenti.
Izogibajte se uporabi izdelkov, ki vsebujejo
abrazivne snovi. NE UPOBLJAJTE
ALKOHOLA!
Pozor! Neupoštevanje pravil za
čiščenje naprave in zamenjavo filtrov
predstavlja tveganje požarov. Zato vam
svetujemo, da sledite priporočenim
navodilom.
Zavračamo vsakršno odgovornost za
morebitno škodo na motorju in požare, ki bi
bili posledica neprimernega vzdrževanja ali
neupoštevanja zgornjih opozoril.
4.2 - Pralni filter z aktivnim ogljem
Ogleni filter je potrebno zamenjati po
daljši uporabi, glede na tip kuhe ter redno
čiščenje maščobnega filtra. Vsekakor je
potrebno zamenjati vložek najmanj vsake
štiri mesece.
Filter ni niti pralen niti obnovljiv.
5. UPRAVLJALNI GUMBI
Napa je opremljena s komandno ploščo
z nastavitvijo hitrosti izsesavanja in
nastavitvijo jakosti svetlobe za osvetljevanje
kuhalne plošče.
V primeru posebno visoke koncentracije
dimov v kuhinji uporabite najvišjo hitrost.
Priporočamo vam, da prezračevanje
vključite 5 minut pred pričetkom kuhanja in
ga pustite delovati še približno 15 minut po
končanem kuhanju.
Upravljalni gumbi na prednji strani naprave:
4.1 Maščobni filter - Očistiti ga je treba
enkrat mesečno z ne agresivnimi čistilnimi
sredstvi, ročno ali v pomivalnem stroju pri
nizki temperaturi in kratkim ciklom pranja.
S pranjem v pomivalnem stroju se
maščobni filter lahko razbarva, toda
njegove filtrirne značilnosti ostanejo
nespremenjene.
A
B
A Gumb OFF (gumb izključen) - ON
(gumb vključen)
Pritisnite enkrat ali večkrat, da izberete
želeno funkcijo.
ON (gumb vključen): napa se nastavi
na zadnjo izbrano hitrost delovanja.
OFF (gumb izključen): vse funkcije so
onemogočene, razen luči.
B Gumb za izbiro hitrosti (moči) delovanja
Enkrat ali večkrat pritisnite to tipko, da
izberete najprimernejšo hitrost (moč)
delovanja (1 - 2 - 3 ).
C Prikazovalnik: prikazuje izbrano
C
D
E
 Loading...