

Page 1
Page 2

Page 3

Deutsch
2–10
English
2–10
. . . . . . . . . . . . . . . . . . . . . . . . . . . . . . . . . . . . .
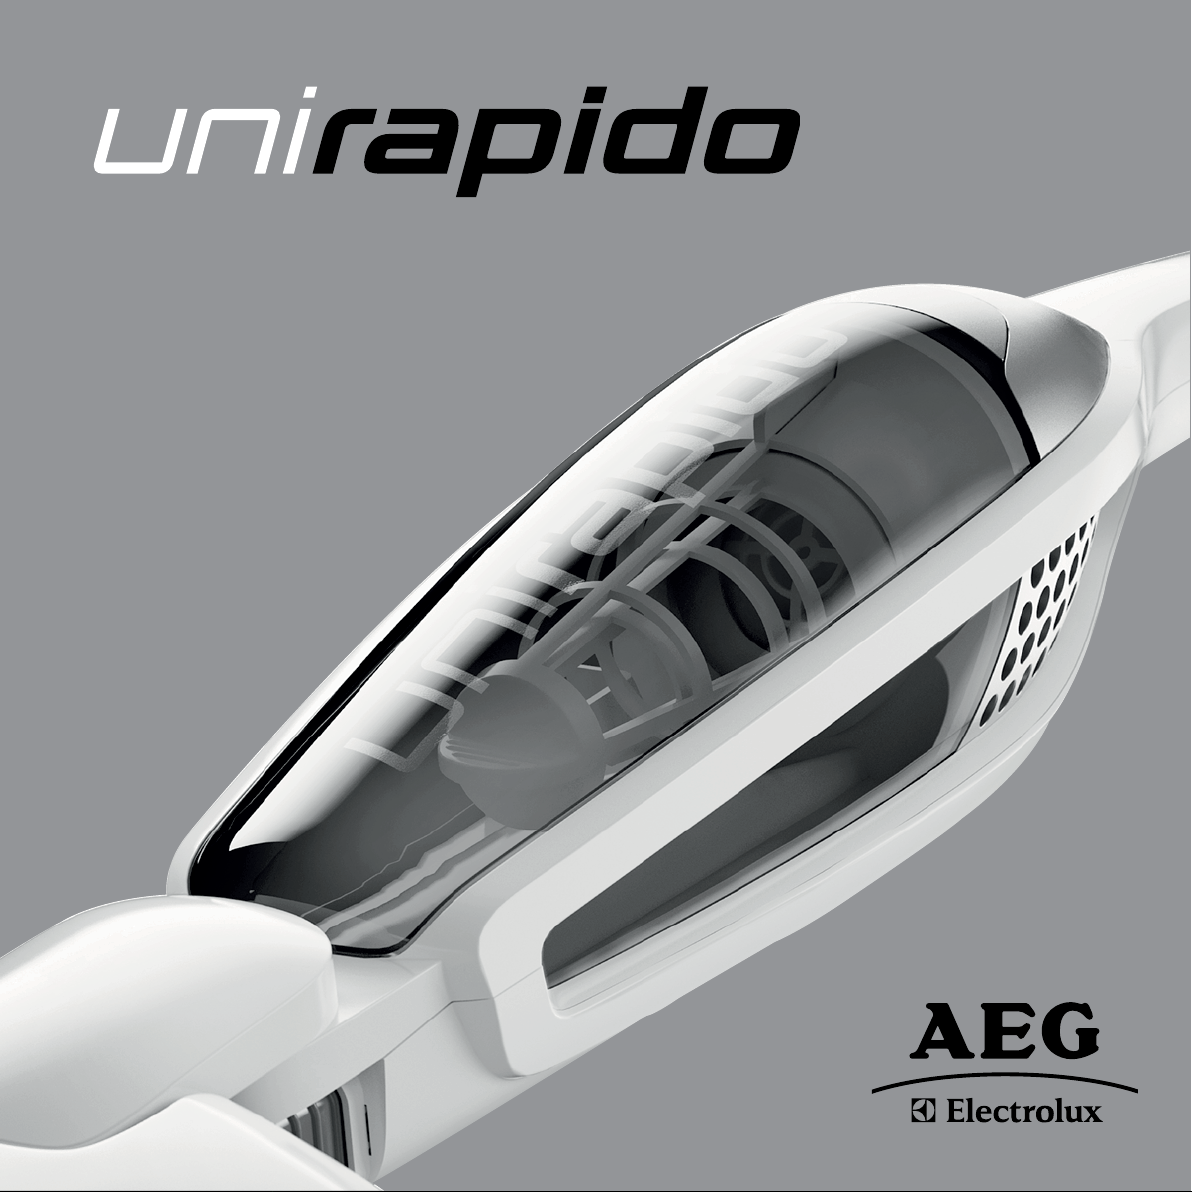
Wir freuen uns, dass Sie sich für den Electrolux
UniRapido-Staubsauger entschieden haben. UniRapido
ist ein Akku-Handstaubsauger für leichte und trockene
Schmutzteilchen im Haushalt. Um bestmögliche
Ergebnisse zu erzielen, sollten Sie ausschließlich das
Original-Electrolux-Zubehör verwenden, das speziell
für Ihren Staubsauger entwickelt wurde.
. . . . . . . . . . . . . . . . . . . . . . . . . . . . . . . . . . . . . . .
Thank you for choosing an Electrolux UniRapido vacuum
cleaner. UniRapido is a rechargeable stick vacuum cleaner
intended for use on light dry household debris. In order
to ensure the best results, always use original Electrolux
accessories. They have been designed especially for your
vacuum cleaner.
Français . . . . . . . . . . . . . . . . . . . . . . . . . . . . . . . . . . . 12–20
Merci d’avoir choisi un aspirateur Electrolux UniRapido.
UniRapido est un aspirateur balai rechargeable conçu
pour aspirer les poussières sèches et légères de votre
intérieur. Afin d’obtenir des performances optimales,
toujours utiliser des accessoires originaux Electrolux.
Ils ont été spécialement conçus pour votre aspirateur.
Nederlands . . . . . . . . . . . . . . . . . . . . . . . . . . . . . . 12–20
Gefeliciteerd met uw keuze van een Electrolux UniRapido
stofzuiger. UniRapido is een oplaadbare steelstofzuiger,
bedoeld voor licht en droog huishoudelijk vuil. Gebruik voor
de beste resultaten altijd originele Electrolux-accessoires.
Deze zijn speciaal ontworpen voor uw stofzuiger.
Page 4
2
Front Back
Vorderseite Rückseite
1
2
6
7
3
4
5
11
9
8
13a 13b12
10
14
Page 5
Content / Inhalt 3
English
Before starting
• Unpack all details and check that the package includes all accessories relating to
your UniRapido.
• Read the Instructions for Use carefully.
• Pay special attention to Safety advice chapter.
Enjoy your Electrolux UniRapido!
Table of contents
Unpacking and charging
Cleaning the filters and dustcontainer
Cleaning brush roll, wheels and bellows
Removing the batteries and disposal
Safety precuations
Consumer information
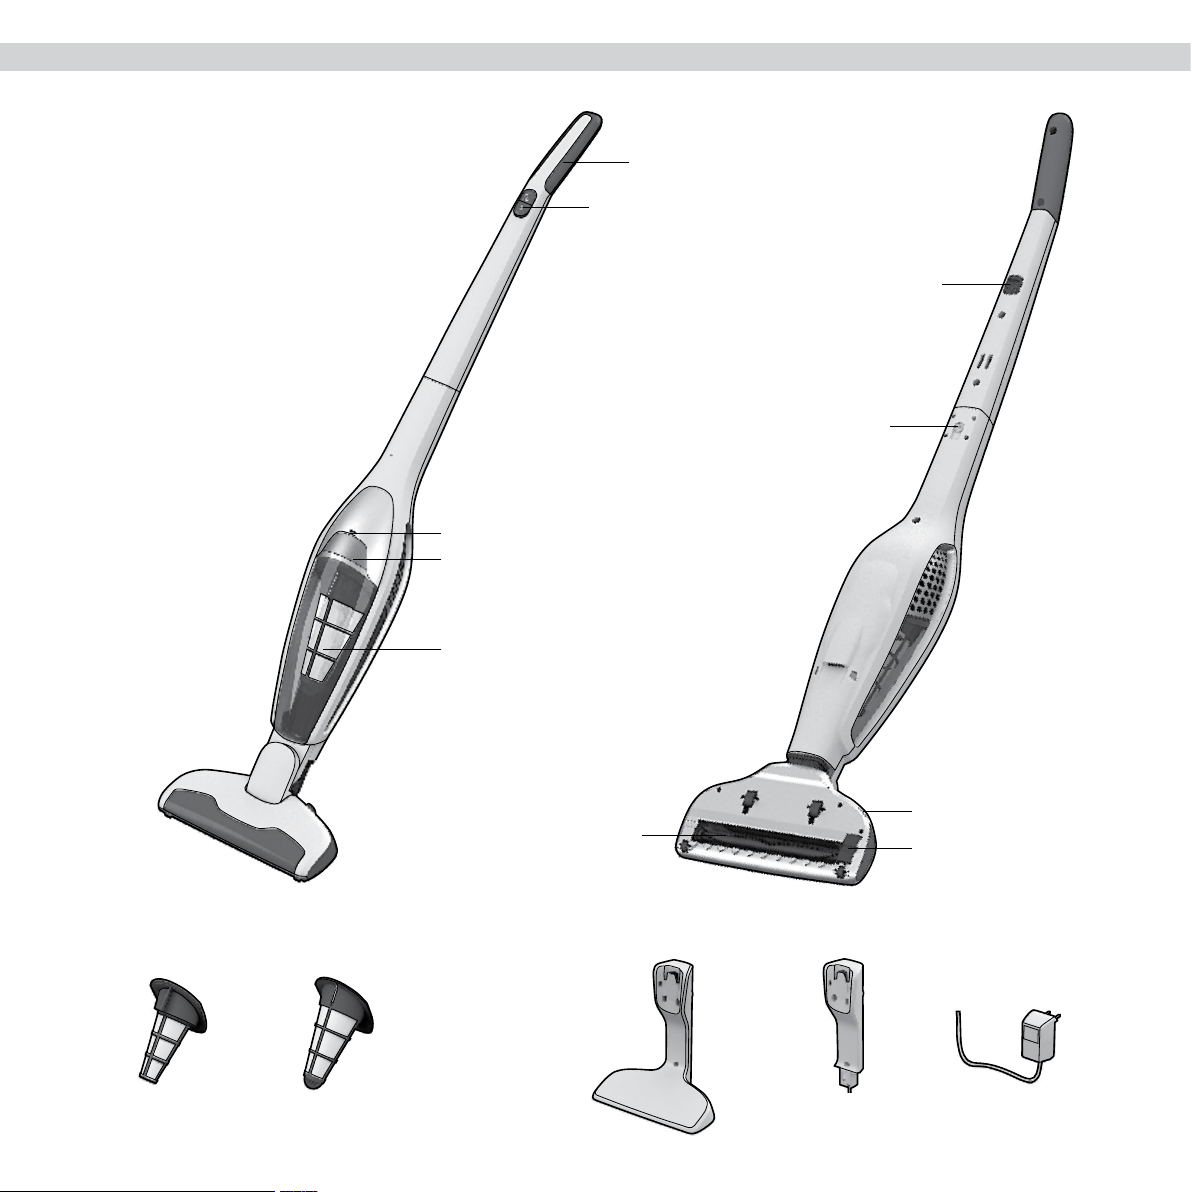
Description of your UniRapido
1 Soft touch handle
2 On/off button
3 Charging/running indicator light
4 Container release button
5 Dust container
6 Parking rubber knob
7 Locking screw
8 Brush roll
9 Brush roll release button
10 Hatch cover for brush roll
11 Fine filter (inner filter)
12 Pre filter (outer filter)
13a Charging station, floor unit
13b Charging station, wall unit
14 Adaptor
. . . . . . . . . . . . . . . . . . . . . . . . . . . . . . . . . . . . . . . . . . 4-5
. . . . . . . . . . . . . . . . . . . . . . . . . . . . . .
. . . . . . . . . . . . . . . . . . . . . . . . . . . 7
. . . . . . . . . . . . . . . . . . . . . . . . . . . . . . 8
. . . . . . . . . . . . . . . . . . . . . . . . . . . . . . . . . . . . . . . . . . . . . . . . . . . 9
. . . . . . . . . . . . . . . . . . . . . . . . . . . . . . . . . . . . . . . . . . . . . 10
6
Deutsch
Vorbereitungen
• Packen Sie alle Teile aus und prüfen Sie, ob das enthaltene Zubehör für Ihren
UniRapido vollständig ist.
• Lesen Sie die Bedienungsanleitung sorgfältig durch.
• Beachten Sie dabei besonders das Kapitel mit den Sicherheitshinweisen.
Wir wünschen Ihnen viel Freude mit Ihrem Electrolux UniRapido!
Inhaltsverzeichnis:
Auspacken und Laden
Reinigen von Filtern und Staubbehälter
Reinigen von Bürstenrolle, Rädern und Faltenbalg
Entnahme und Entsorgung der Batterien
Sicherheitsvorkehrungen
Verbraucher-Information
Beschreibung Ihres UniRapido
1 Soft-Touch-Griff
2 Ein/Aus-Schalter
3 Lade- und Betriebsanzeige
4 Behälter-Entriegelungsknopf
5 Staubbehälter
6 Gummi-Parkpuffer
7 Feststellschraube
8 Bürstenrolle
9 Freigabeknopf für Bürstenrolle
10 Lagerabdeckung für Bürstenrolle
11 Feinfilter (innerer Filter)
12 Vorfilter (äußerer Filter)
13a Aufstellbare Ladestation
13b Ladestation für Wandmontage
14 Steckernetzteil
. . . . . . . . . . . . . . . . . . . . . . . . . . . . . . . . . . . . . . . . . . . . 4-5
. . . . . . . . . . . . . . . . . . . . . . . . . . . .
. . . . . . . . . . . . . . . . 7
. . . . . . . . . . . . . . . . . . . . . . . . . . 8
. . . . . . . . . . . . . . . . . . . . . . . . . . . . . . . . . . . . . . . . . . . . 9
. . . . . . . . . . . . . . . . . . . . . . . . . . . . . . . . . . . . . . . . . . . 10
6
GB
DE
FR
NL
Page 6
4
Unpacking and assembly / Auspacken und Zusammenbau
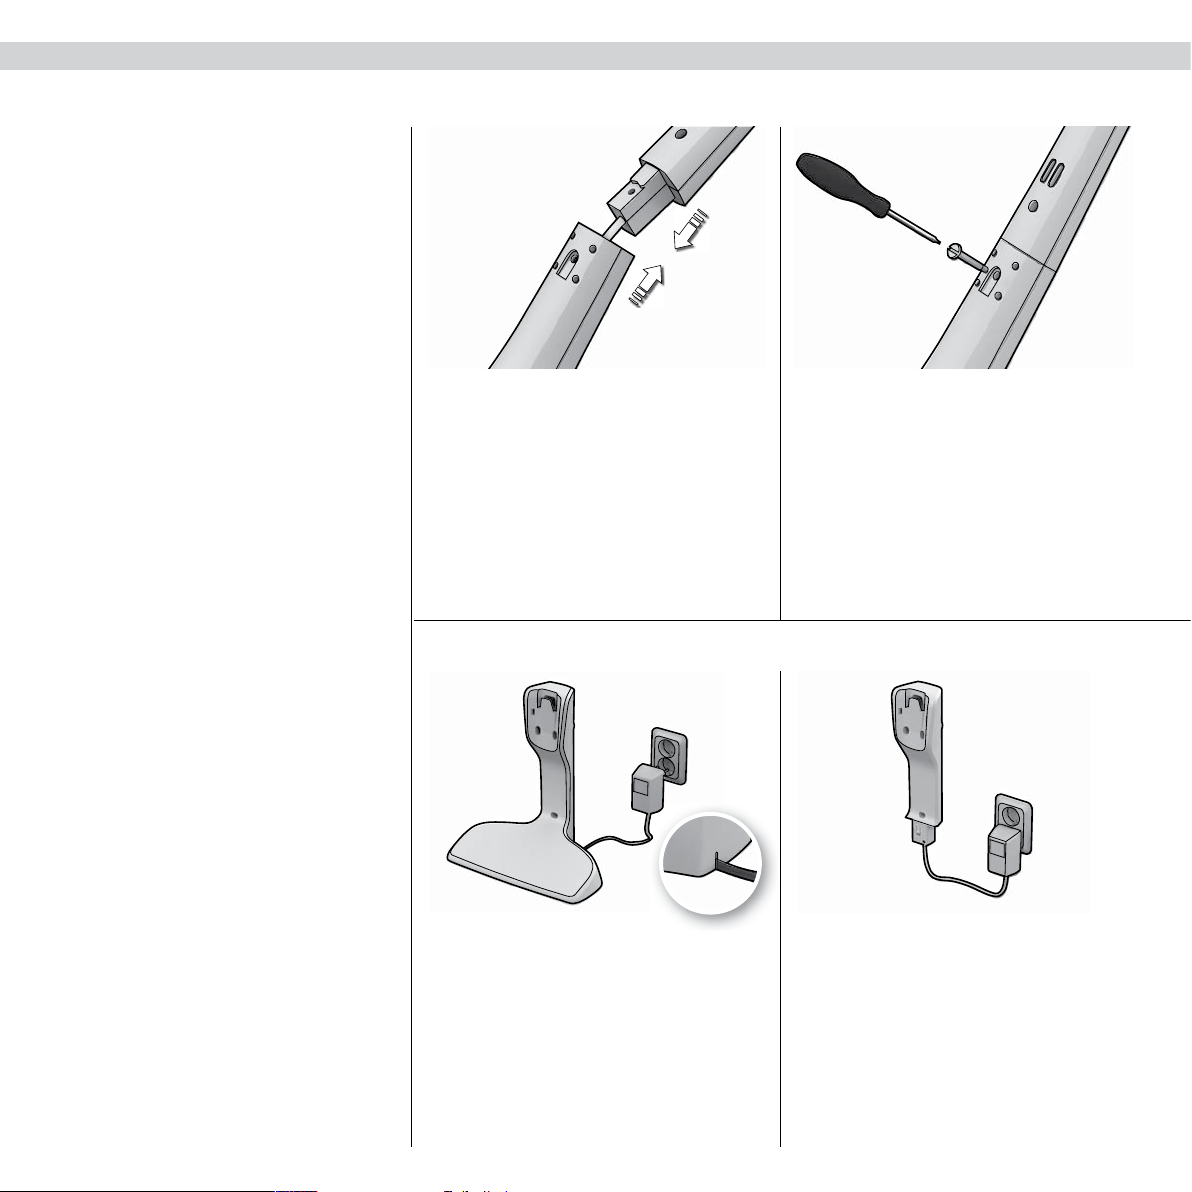
1. Fit the handle by carefully inserting it into the
lower main body. Make sure that the cable does
not jam.
1. Griff durch vorsichtiges Einführen in das GeräteUnterteil montieren. Darauf achten, dass das
Kabel nicht eingeklemmt wird.
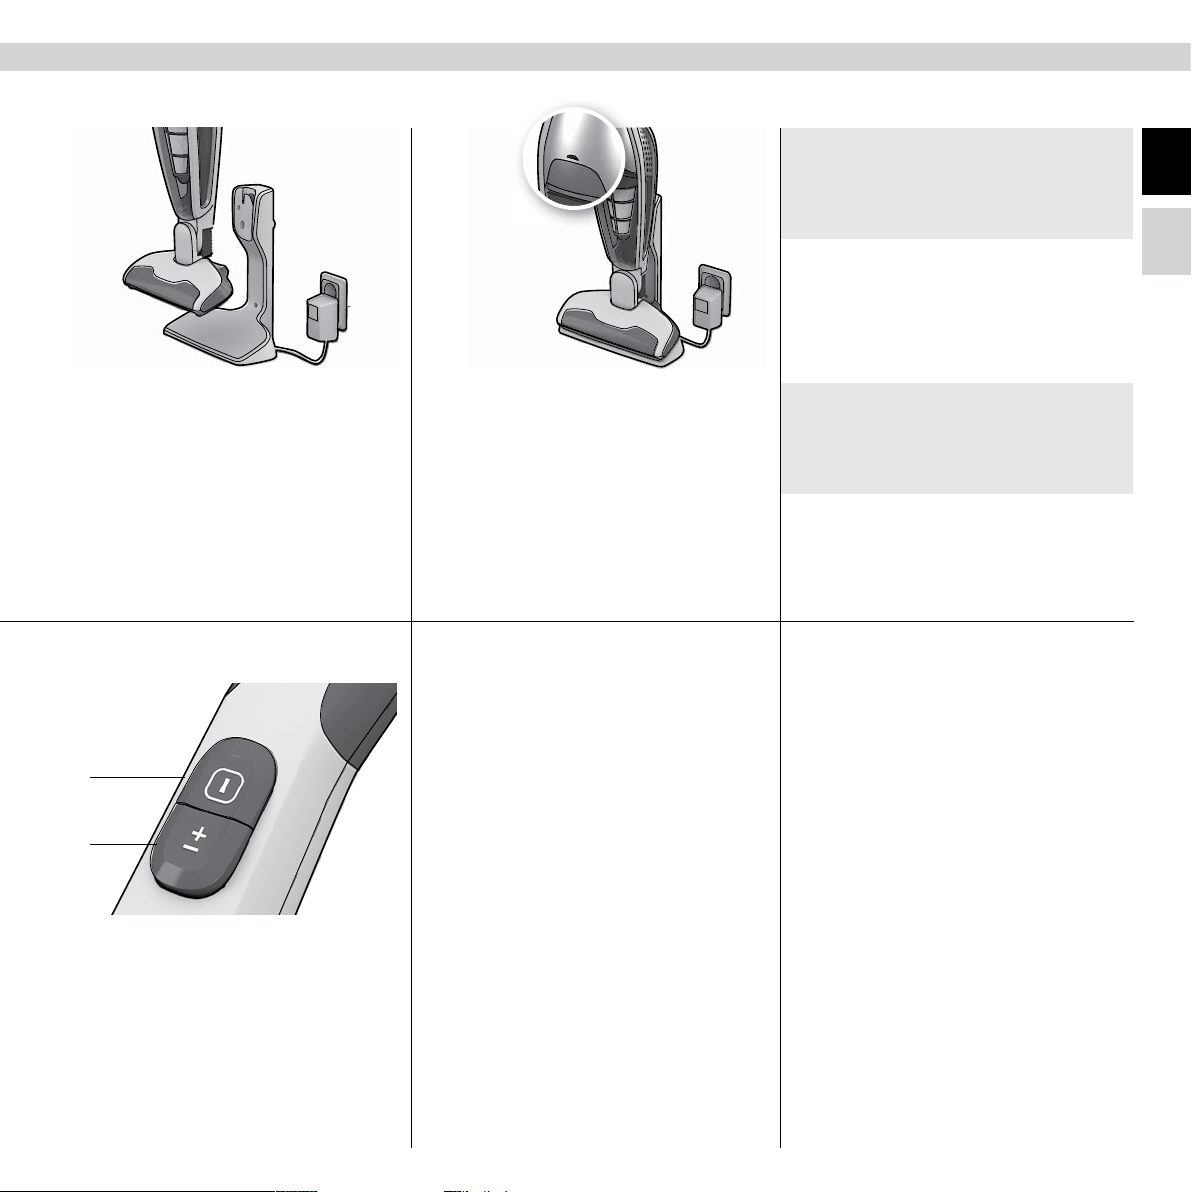
Charging station / Ladestation
1. Position the charging station close to a mains
(well away from heat sources, direct sunlight or wet
places). Insert the adaptor into the mains socket
and connect it to the charging station.
2. Secure the handle by tightening the locking screw
supplied. Use a screwdriver or a coin.
2. Griff durch Anziehen der mitgelieferten
Feststellschraube sichern. Schraubendreher oder
Münze verwenden.
2. The wall unit can also be mounted on a wall.
Always ensure that the wall can bear the weight of
UniRapido.
1. Ladestation in Steckdosennähe positionieren
(von Hitzequellen, direkter Sonnenstrahlung
oder Feuchtzonen fernhalten). Steckernetzteil an
Netzsteckdose und Ladestation anschließen.
2. Die Ladestation kann auch an der Wand montiert
werden. Achten Sie stets darauf, dass der
UniRapido für die Fläche, an der die Halterung
angebracht werden soll, nicht zu schwer ist.
Page 7
Charging / Aufladen
Unpacking and charging / Auspacken und Laden 5
1. Place UniRapido in the charging station. Always
make sure that UniRapido is turned off when
placed in the charging station.
1. UniRapido in die Ladestation einsetzen. Immer
sicherstellen, dass der UniRapido beim
Einsetzen in die Ladestation ausgeschaltet ist.
Start/Stop / Ein- und Ausschalten
2. Charging!
2. Aufl aden!
Vacuuming floors and carpets
Avoid scratching sensitive areas by checking that
nozzle wheels and brush roll are clean.
First use: up to 24 hours charging.
Fully discharged: 16 - 24 hours
charging.
Leave UniRapido on charge when not in use. Warm
adaptor is normal.
Erstmalige Verwendung: bis zu 24
Stunden laden.
Vollständig entladen: 16 - 24
Stunden laden.
UniRapido bei Nichtbenutzung in der Ladestation
lassen. Erwärmung des Steckernetzteils ist normal.
Saugen von Böden und Teppichen
Um Verkratzen empfi ndlicher Flächen zu
verhindern, Düsenräder und Bürstenrolle auf
Sauberkeit prüfen.
GB
DE
FR
NL
A
B
1. Start UniRapido by pushing the on/off button.
A. Press for start/stop (Start on maximum
cleaning power)
B. Press for intermediate power
1. UniRapido durch Drücken des Ein-/Ausschalters
einschalten.
A. Drücken zum Ein-/Ausschalten (Starten mit
maximaler Reinigungsleistung)
B. Drücken für mittlere Leistung
Page 8
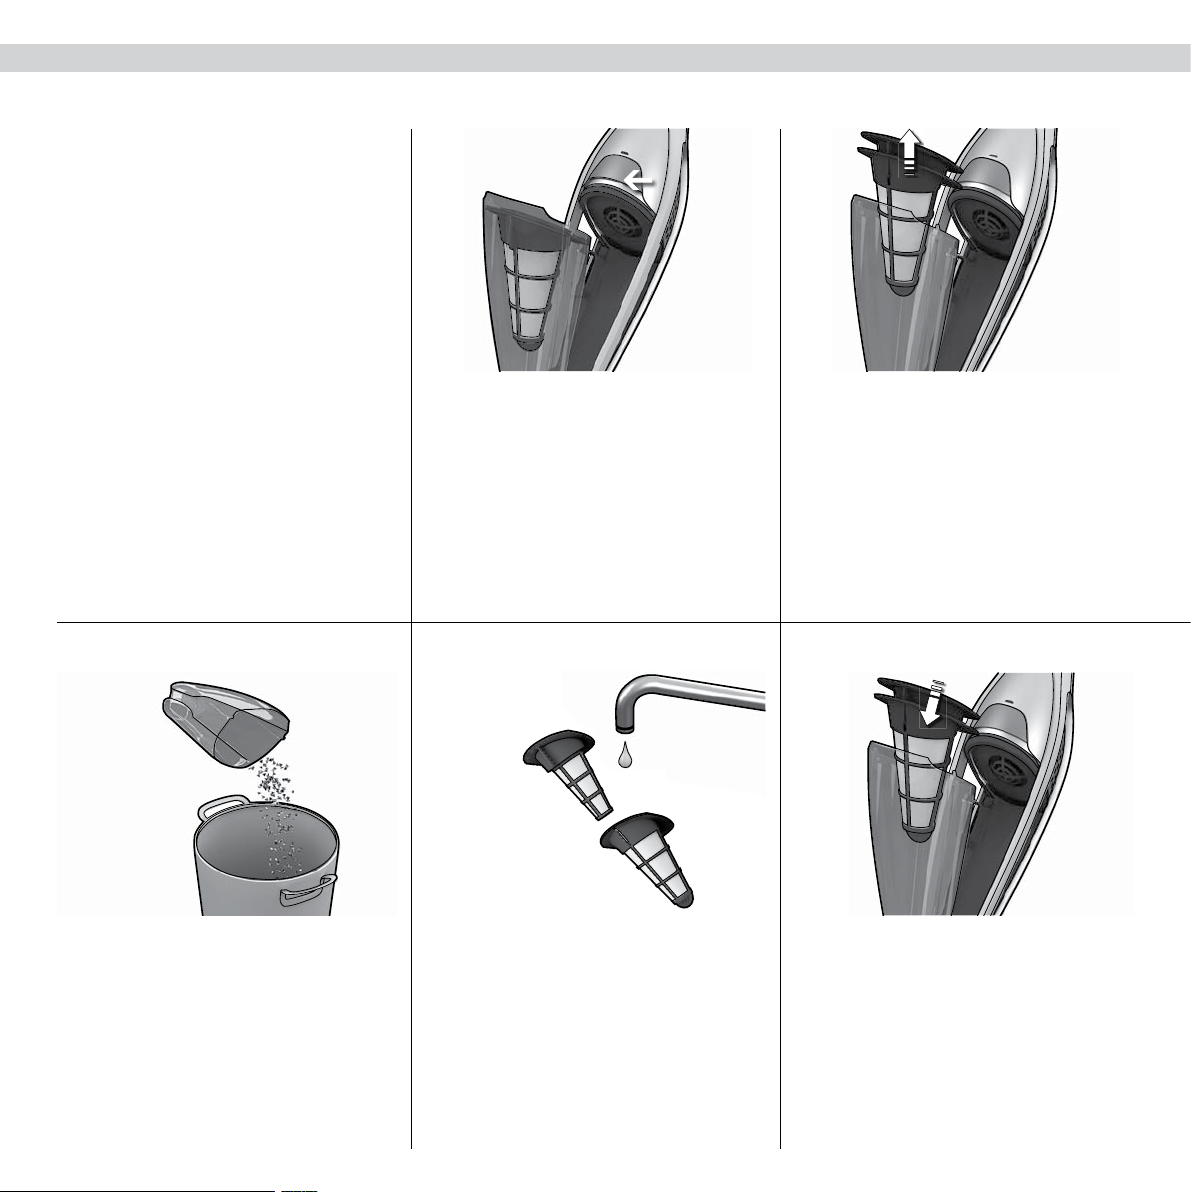
6 Cleaning the filters and dustcontainer / Reinigen von Filtern und Staubbehälter
UniRapido’s dust container must be emptied
regularly, plus dust container and fi lters need to
be cleaned to maintain a high suction power.
Clean the fi lters every third emptying or when
UniRapido has low suction power. Make sure parts
are dry before reassembling.
Den Staubbehälter des UniRapido regelmäßig
entleeren sowie Staubbehälter und Filter regelmäßig
reinigen, um eine hohe Saugleistung zu erhalten.
Filter bei jedem dritten Entleeren oder bei
nachlassender Saugleistung reinigen. Teile müssen
trocken sein, bevor sie zusammengesetzt werden.
3. Empty the content into a wastepaper basket. 4. Separate fi lters. Shake them clean or rinse
1. Release the whole dust container by pushing the
release button.
1. Staubbehälter abnehmen. Dazu den
Freigabeknopf drücken.
separately using warm water. Make sure fi lters are
dry before reassembling in reverse order.
2. Take out both fi lters.
2. Beide Filter herausnehmen.
Click!
5. Put the fi lters back and press back the dust
container in reverse order.
3. Den Inhalt in einen Papierkorb oder Mülleimer
entleeren.
4. Filter trennen. Durch Rütteln oder Abspülen
mit warmem Wasser reinigen. Vor dem
Zusammensetzen in umgekehrter Reihenfolge den
Filter vollständig trocknen lassen.
5. Filter wieder einsetzen und Staubbehälter
hineindrücken. Dabei in umgekehrter Reihenfolge
vorgehen.
Page 9

Cleaning the brush roll / Reinigung der Bürstenrolle
If the brush roll becomes blocked or jammed, a
protection circuit will block the power supply to the
motor. Then clean the brush.
Cleaning brush roll and wheels / Reinigen von Bürstenrolle und Rädern 7
GB
DE
FR
NL
Bei blockierter oder schwergängiger Bürstenrolle
wird die Stromversorgung des Motors durch einen
Schutzschaltung getrennt. Bürste danach reinigen.
1. Push the brush roll release button. The hatch cover
1. Freigabeknopf der Bürstenrolle drücken. Die
Cleaning the wheels / Reinigen der Rollen
1. If the wheels needs to be cleaned, remove them
carefully by using a small screwdriver.
2. Remove objects that have become jammed in the
will come slightly free and the brush roll can now
be removed.
Lagerabdeckung löst sich etwas, sodass sich die
Bürstenrolle herausnehmen lässt.
wheel shafts. Reassemble the wheels by pressing
them back into their tracks.
2. Carefully use a sharp object to remove hair or
threads. Replace the brush roll and make sure that
it fi ts into its guiding tracks, and that it can spin
freely. Replace the hatch cover.
2. Haare oder Fäden vorsichtig mit einem scharfen
Gegenstand entfernen.. Bürstenrolle wieder
anbringen. Dabei sicherstellen, dass sie in ihre
Führungen einrastet und sich frei drehen lässt.
Lagerabdeckung wieder anbringen.
Cleaning the bellows /
Reinigung des Faltenbalgs
1. Occasionally objects can get stuck in the bellows,
and this can affect suction power. Clean the
bellows after removing the dust cup.
1. Falls die Räder gereinigt werden müssen, diese
vorsichtig mit einem kleinen Schraubendreher
abnehmen.
2. Gegenstände, die in die Radwellen eingeklemmt
wurden, beseitigen. Räder durch Hineindrücken in
ihre Führungen wieder zusammenbauen.
1. Gelegentlich kann die Saugleistung durch
Gegenstände beeinträchtigt werden, die sich
im Faltenbalg verklemmen. Faltenbalg nach
Abnehmen der Staubabdeckung reinigen.
Page 10
8 Disposal / Entsorgung
Removing batteries / Entnahme der Akkus
Only remove batteries if product is to be scrapped. / Batterien nur herausnehmen, wenn Gerät entsorgt werden soll.
1. Run batteries fl at and disconnect UniRapido
from the charging station. Undo the 11 screws
(2 of them hidden under the release button).
1. Batterien entladen und UniRapido aus der
Ladestation nehmen. Die 11 Schrauben lösen
(2 davon verdeckt unter dem Freigabeknopf).
3b. Unclip the connecting cables and lift out the
batteries. Batteries should be removed from the
appliance before it is scrapped.
2. Release the button and carefully lift the hood.
2. Knopf freigeben und Abdeckung vorsichtig
anheben.
Used batteries should always be taken to a recycling
station.
3a. Unclip the connecting cables and lift out the
batteries. Batteries should be removed from the
appliance before it is scrapped.
3a. Die Anschlusskabel lösen und Batterien
herausheben. Batterien sollten vor dem Entsorgen
des Geräts entfernt werden.
3b. Die Anschlusskabel lösen und Batterien
herausheben. Batterien vor dem Entsorgen des
Geräts herausnehmen.
Verbrauchte Batterien müssen an einer Annahmestelle
zurückgegeben werden.
Page 11

Safety precuations / Sicherheitsvorkehrungen 9
UniRapido should only be used by adults and only for normal vacuuming in a
domestic environment. Make sure the vacuum cleaner is stored in a dry place. All
servicing and repairs must be carried out by an authorized Electrolux service centre.
This appliance is not intended for use by persons (including children) with
reduced physical, sensory or mental capabilities, or lack of experience and
knowledge, unless they have been given supervision or instruction concerning use
of the appliance by a person responsible for their safety.
Please remove the plug from the socket outlet before cleaning or maintaining the
appliance.
Children should be supervised to ensure that they do not play with the appliance.
Each vacuum cleaner is designed for a specific voltage. Check that your supply
voltage is the same as that stated on the rating plate. Use only the original charging
adaptor designed for this model.
Never use the vacuum cleaner
• In wet areas.
• Close to flammable gases, etc.
• When housing shows visible signs of damage.
• On sharp objects or fluids.
• On hot or cold cinders, lighted cigarette butts, etc.
• On fine dust, for instance from plaster, concrete, flour, hot or cold ashes.
• Do not leave the vacuum cleaner in direct sunlight.
• Avoid exposing the vacuum cleaner or battery to strong heat.
• The battery must not be dismantled, shortcircuited, placed against a metal
surface or exposed to strong heat.
• Without filter.
Using the vacuum cleaner in the above circumstances may cause serious damage
to the product. Such damage is not covered by the warranty.
Servicing or repairs
In cases of breakdown or faults, your UniRapido must be taken to an authorized
Electrolux service centre. If the supply cord is damaged, it must be replaced by
Electrolux or its service agent or a similarly qualified person in order to avoid a
hazard.
Der UniRapido darf nur von Erwachsenen und nur für normales Staubsaugen
im Haushalt verwendet werden. Staubsauger immer an einem trockenen Ort
aufbewahren. Alle Wartungs- und Reparaturarbeiten dürfen nur vom autorisierten
Electrolux-Kundendienst durchgeführt werden.
Personen (einschließlich Kindern) mit eingeschränkten körperlichen, sensorischen
oder geistigen Fähigkeiten oder mit fehlender Erfahrung und Kenntnissen dürfen
dieses Gerät nur unter Aufsicht oder nach Anleitung durch eine für ihre Sicherheit
verantwortliche Person benutzen.
Vor dem Reinigen oder Warten des Geräts den Netzstecker aus der Steckdose
ziehen.
Kinder müssen beaufsichtigt werden, um zu gewährleisten, dass diese mit dem
Gerät nicht spielen.
Jeder Staubsauger ist für eine bestimmte Netzspannung ausgelegt. Die
Netzspannung muss mit dem Typenschild übereinstimmen. Ausschließlich
originales Ladegerät für dieses Modell verwenden.
Benutzen Sie den Staubsauger niemals
• In nassen Bereichen.
• In der Nähe von brennbaren Gasen etc.
• Wenn das Gehäuse sichtbare Schäden aufweist.
• Für Flüssigkeiten oder scharfkantige und spitze Gegenstände.
• Für heiße oder kalte Asche, brennende Zigarettenkippen etc.
• Für feinen Staub (z. B. von Gips, Beton, Mehl, heißer oder kalter Asche).
• Niemals den Staubsauger in direktem Sonnenlicht stehen lassen.
• Staubsauger und Batterien vor starker Hitze schützen.
• Batterie niemals zerlegen, kurzschließen, gegen leitende Flächen halten oder
starker Hitze aussetzen.
• Ohne Filter.
Der Einsatz des Staubsaugers unter den genannten Bedingungen kann das Produkt
ernsthaft beschädigen. Ein solcher Schaden ist nicht durch die Garantie abgedeckt.
Wartung und Reparatur
Bei einem Ausfall oder einer Störung des Geräts autorisierten ElektroluxKundendienst aufsuchen. Wenn das Netzkabel beschädigt ist, muss es durch
Electrolux, den Kundendienst oder eine entsprechend qualifizierte Person
ausgetauscht werden.
GB
DE
FR
NL
Page 12
10 Consumer information / Verbraucher-Information
Electrolux decline all responsibility for all damages arising from any improper use of
the appliance or in cases of tampering with the appliance.
If the supply cord is damaged, it must be replaced by the manufacturer, its service
agent or similarly qualified person in order to avoid a hazard.
This product is designed with the environment in mind. All plastic parts are
marked for recycling purposes. For details see our web site: www.electrolux.com
If you have any comments on the cleaner or the Instructions for Use booklet
please e-mail us at: floorcare@electrolux.com
If you can´t find accessories to your Electrolux vacuum cleaner, please visit our
website at www.electrolux.co.uk or call 08706 055 055.
We declare that this battery-operated vacuum cleaner, intended for domestic use,
conforms to the EMC Directive 2004/108/EC, Low Voltage Directive 2006/95/EC
and the CE marking Directive 93/68/EEC. All conformity testing has been done by
an independent third party testing body.
Für Schäden, die durch unsachgemäße Handhabung bzw. durch unbefugtes
Öffnen des Gerätes entstanden sind, kann keine Haftung übernommen werden.
Überprüfungen aufgrund von verstopften Filtern können wir nicht kostenfrei
durchführen. Bitte überprüfen Sie bei Fehlerbildern, wie z.B. nachlassende
Saugleistung, alle im Gerät befindlichen Filter und reinigen Sie diese ggf. bzw.
tauschen Sie diese aus.
Dieses Produkt wurde mit Rücksicht auf die Umwelt hergestellt. Alle Plastikteile
sind für Recyclingzwecke markiert. Einzelheiten darüber finden Sie auf unserer
Website: www.electrolux.com
Benötigen Sie Zubehör wie Spezialdüse, Filter oder Staubbeutel oder haben Sie
Fragen zu Ihrem Gerät, in unserer Kundenbetreuung stehen wir Ihnen gerne zur
Verfügung, Sie erreichen uns montags bis freitags von 8 bis 18.00 Uhr.
Serviceline Deutschland: 01805-30 60 80
Aus dem Festnetz der Deutschen Telekom Euro 0,12/Min.
Kundendienst Österreich und Schweiz:
Serviceline Österreich: 0810-955 200
Aus dem Festnetz der Telecom Austria Euro 0,10/Min.
Service Schweiz:
Electrolux AG Staubsauger/Kleingeräte
Industriestrasse 10
5506 Mägenwil
Tel. Kundendienst: 0848 / 899 300
Fax. 062 / 889 93 10
www.electrolux.ch
Wir erklären, dass dieser für die Nutzung im Haushalt konstruierte Akkustaubsauger
der EMV-Richtlinie 2004/108/EC, der Niederspannungsrichtlinie 2006/95/EC sowie
der CE-Kennzeichnungsrichtlinie 93/68/EG entspricht. Alle Konformitätstests
wurden von einer unabhängigen Prüfstelle durchgeführt.
Page 13

11
GB
DE
FR
NL
Page 14

12
Devant
Voorkant
3
4
5
1
Achterkant
2
6
7
Arrière
11
9
8
13a 13b12
10
14
Page 15

Contenu / Contenuto 13
Français
Avant de commencer
• Déballer le et vérifier que tous les accessoires sont inclus avec votre UniRapido
• Lire attentivement les instructions d’utilisation.
• Le chapitre «Consignes de sécurité» doit être lu avec une attention particulière.
Electrolux UniRapido pour le nettoyage d’appoint des sols !
Table des matières
Déballage et mise en charge
Nettoyage des filtres et du bac à poussière
Nettoyage de la brosse rotative, des roues et des soufflets
Comment enlever les batteries et leur mise au rebut
Précautions de sécurité
Informations consommateur
Description de votre UniRapido
1 Poignée souple au toucher
2 Interrupteur marche/arrêt
3 Voyant de charge/marche
4 Bouton de déverrouillage du bac à poussière
5 Bac à poussière
6 Boutée caoutchoutée pour pouvoir le poser contre unte table par exemple
7 Vis de blocage
8 Brosse rotative
9 Bouton de déverrouillage de la brosse rotative
10 Trappe d’accès à la brosse rotative
11 Filtre fin (filtre interne)
12 Préfiltre (filtre extérieur)
13a Support de charge, en version à poser sur le sol
13b Support de charge, en version à fixer au mur
14 Chargeur
. . . . . . . . . . . . . . . . . . . . . . . . . . . . . . . . . . . 14-15
.. . . . . . . . . . . . . . . . . . . . . . . . . . . . . . . . . . . . . . . . . . . 19
. . . . . . . . . . . . . . . . . . . . . . . . . . . . . . . . . . . . . . .
.. . . . . . . . . . . . . . . . . . . . . 16
.. . . .
. . . . . . . . . . . . . 18
17
20
Nederlands
Voordat u begint
• Pak alles uit en controleer of het pakket alle benodigde onderdelen van de
UniRapido bevat.
• Lees de handleiding zorgvuldig door.
• Geef vooral aandacht aan de veiligheidsinstructies.
Veel plezier met uw Electrolux UniRapido!
Inhoud
Uitpakken en opladen
Filters en stofreservoir reinigen
Rolborstel, wielen en blaasbalg schoonmaken
De batterijen verwijderen
Veiligheidsinstructies
Klanteninformatie
Beschrijving van de UniRapido
1 Zachte handgreep
2 Aan/Uit-knop
3 Indicatielampje voor opladen/werken
4 Ontgrendelknop van reservoir
5 Stofreservoir
6 Rubberdop voor parkeerstand
7 Borgschroef
8 Rolborstel
9 Ontgrendelknop voor rolborstel
10 Borstelkap voor rolborstel
11 Fijn filter (binnenste filter)
12 Pre-filter (buitenste filter)
13a Staand oplaadstation
13b Hangend oplaadstation
14 Adapter
. . . . . . . . . . . . . . . . . . . . . . . . . . . . . . . . . . . . . . . 124-125
.. . . . . . . . . . . . . . . . . . . . . . . . . . . . . . . . . .126
. . . . . . . . . . . . . . . . . . . . . . . . . . . . . . . . . . . . . . . . .128
.. . . . . . . . . . . . . . . . . . . . . . . . . . . . . . . . . . . . . . . . . . . . .129
. . . . . . . . . . . . . . . . . . . . . . . . . . . . . . . . . . . . . . . . . . . . . . . . . .130
. . . . . . . . . . . . . . . . . . . .
. . . . . . . . . . . . . . . . . .127
14-15
. 17
. 18
.
. 20
16
18
GB
DE
FR
NL
Page 16

14
Déballage et assemblage / Uitpakken en in elkaar zetten
1. Fixer le manche en l’insérant avec précaution
dans le corps inférieur de l’aspirateur. Vérifi er
que le câble n’est pas emmêlé.
1. Bevestig de greep door deze voorzichtig in het
hoofdonderdeel te schuiven. Zorg ervoor dat de
kabel niet klem komt te zitten
Oplaadstation / Caricabatterie
1. Positionner le support de charge à proximité
d’une prise secteur (à bonne distance de toute
source de chaleur, des endroits humides ou d’une
exposition directe au soleil). Brancher l’adaptateur
au secteur puis le connecter au support charge.
2. Ajuster le manche en serrant la vis de blocage
fournie. Utiliser un tournevis ou une pièce de
monnaie.
2. Bevestig de handgreep door de meegeleverde
borgschroef vast te draaien. Gebruik een
schroevendraaier of een munt.
2. Le support de charge peut également être fi xé
sur un mur. Toujours s’assurer que le mur peut
supporter le poids de l’UniRapido.
1. Plaats het oplaadstation in de buurt van een
stopcontact (ver verwijderd van warmtebronnen,
rechtstreeks zonlicht of natte gedeelten). Steek de
adapter in het stopcontact en sluit deze aan op het
oplaadstation
2. Het hangende oplaadstation kan ook aan een
muur worden bevestigd. Controleer of de muur het
gewicht van de UniRapido kan dragen.
Page 17

Mise en charge / Opladen
Déballage et mise en charge / Uitpakken en opladen 15
1. Placer UniRapido sur le support de charge.
Toujours s’assurer qu’UniRapido est arrêté
lorsque vous le placez sur le support de charge.
Plaats de UniRapido in het oplaadstation.
1.
de UniRapido is uitgeschakeld als u deze in het
oplaadstation plaatst.
Marche/Arrêt /
Aan/Uit
2. Pendant la mise en charge !
Bezig met opladen...
2.
tapis et moquettes
Pour éviter de rayer les surfaces délicates, nous
vous conseillons de vérifi er que les roues et la
brosse rotative sont propres.
Avant la première utilisation:
jusqu’à 24 heures de charge sont
nécessaires.
Lorsqu’Unirapido est complètement
déchargé : entre 16 et 24 heures de
charge sont nécessaires.
Lorsque UniRapido n’est pas utilisé, le laisser en
charge. L’adaptateur peut chauffer durant la mise en
charge. Ceci est normal.
Bij eerste gebruik: tot 24 uur
opladen.
Helemaal leeg: 16 - 24 uur opladen.
Als u de UniRapido niet gebruikt, kunt u deze het
beste in het oplaadstation laten. Een warme adapter
is normaal.
Vloeren en tapijt stofzuigenNettoyage des sols lisses et des
Voorkom krassen op kwetsbare oppervlakken:
controleer regelmatig of de wieltjes van het
mondstuk en de rolborstel schoon zijn.
GB
DE
FR
NL
A
B
1. Démarrer Unirapido en appuyant sur le bouton
marche/arrêt.
A. Appuyer pour démarrer ou arrêter (le
démarrage se fait sur la puissance max).
B. Appuyer pour obtenir la puissance
intermédiaire.
Druk op de aan/uit-knop om UniRapido te starten.
1.
A. Start/stop (voor maximale zuigkracht)
B. Verlaagd vermogen
Page 18

16 Nettoyage des filtres et du bac à poussière / Filters en stofreservoir reinigen
Le bac à poussière d’UniRapido doit être vidé
régulièrement ; ce bac ainsi que les fi ltres doivent
être nettoyés pour que la puissance d’aspiration reste
optimale.
Nettoyer les fi ltres tous les trois vidages du bac ou
lorsque la puissance d’aspiration d’UniRapido devient
faible. S’assurer que les différents éléments soientt
secs avant de les remettre en place.
Het stofreservoir van de UniRapido moet regelmatig
worden leeggemaakt en het stofreservoir en de
fi lters moeten af en toe worden schoongemaakt. Zo
behoudt u een goede zuigkracht.
Maak de fi lters schoon elke derde keer dat u het
stofreservoir leegmaakt of wanneer de zuigkracht
vermindert. Zorg dat alle onderdelen droog zijn
voordat u ze terugplaatst.
3. Vider son contenu dans une poubelle. 4. Séparer les fi ltres. Pour les nettoyer, les secouer
1. Déverrouiller complètement le bac à poussière
en appuyant sur le bouton de déverrouillage.
1. 2.
Ontgrendel het stofreservoir door op de
ontgrendelknop te drukken.
ou les rincer séparément à l’eau tiède du robinet.
S’assurer que les fi ltres soient secs avant de les
remettre en place.
2. Retirer les deux fi ltres.
Verwijder de beide fi lters.
Click!
5. Remettre les fi ltres et le bac à poussière en place
dans l’ordre inverse du démontage.
3. 4. 5.
Leeg de inhoud in een afvalbak. Haal de fi lters uit elkaar. Schud ze uit of spoel
ze apart uit met warm water. Zorg dat de fi lters
droog zijn voordat u ze in de omgekeerde volgorde
terugplaatst.
Plaats de fi lters terug en plaats daarna het
stofreservoir terug (omgekeerde volgorde).
Page 19

Nettoyage de la brosse rotative et des roues / Rolborstel en wieltjes schoonmaken 17
Nettoyage de la brosse rotative / De rolborstel reinigen
En cas de blocage ou d’obstruction de la brosse
rotative, une sécurité stoppe l’alimentation du moteur.
Il faudra alors nettoyer alors la brosse rotative.
GB
DE
FR
NL
Als de rolborstel verstopt raakt of vastloopt, wordt de
stroomtoevoer naar de motor geblokkeerd door een
beveiligingscircuit. Maak dan de borstel schoon.
1. Appuyer sur le bouton de déverrouillage de la
brosse rotative. La trappe d’accès est partiellement
libérée et la brosse rotative peut être alors retirée.
Druk op de ontgrendelknop van de rolborstel.
1.
De borstelkap komt nu zachtjes los zodat u de
rolborstel kunt verwijderen.
Nettoyage des roues / De wieltjes reinigen
1. Si un nettoyage des roues s’avère nécessaire, les
retirer avec précaution à l’aide d’un petit tournevis.
2. Retirer les objets qui pourraient être coincés dans
les axes de roues. Remettre les roues en place en
les insérant sur leurs rails.
2. Retirer les cheveux et les fi ls à l’aide d’une
paire de ciseaux manipulée avec précaution.
Remonter la brosse rotative et s’assurer qu’elle est
bien en place dans ses rails de guidage, et qu’elle
peut tourner librement. Refermer la trappe d’accès.
Haal haartjes, draadjes en pluisjes voorzichtig
2.
weg met een scherp voorwerp.. Plaats de
rolborstel terug en controleer of deze goed in
de geleiderails zit en vrij kan ronddraaien. Zet
vervolgens de borstelkap weer vast.
Nettoyage des soufflets du flexible
d’aspiration / De blaasbalgen reinigen
1. Des objets peuvent parfois se coincer dans les
souffl ets et ainsi diminuer la puissance d’aspiration.
Nettoyer les souffl ets après avoir retiré le bac à
poussière.
Als u de wieltjes wilt schoonmaken, verwijdert
1. 2. 1.
u deze voorzichtig met behulp van een kleine
schroevendraaier.
Verwijder alles wat in de wielassen verstrikt is
geraakt. Druk de wielen weer op hun plaats.
Soms raken voorwerpen verstrikt in de blaasbalg,
waardoor de zuigkracht afneemt. Haal de klep weg
en maak de blaasbalg schoon.
Page 20

18 Traitement des batteries usagées / De batterijen verwijderen
Comment enlever les batteries / Batterijen verwijderen
Retirer les batteries uniquement avant la mise au rebut de l’appareil. / Verwijder de batterijen alleen als u het product wegdoet.
1. Mettre en marche Unirapido pour décharger
complètement les batteries et enlever l’UniRapido
du support de charge. Dévisser les 11 vis (2 d’entre
elles sont situées sous le bouton de déverrouillage
du bac).
Maak de batterijen leeg en haal de UniRapido
1. 2. 3a.
van het oplaadstation. Draai de elf schroeven los
(onder de ontgrendelknop zitten twee schroeven
verborgen).
3b. Débrancher les câbles de connexion et retirer les
batteries. Les batteries doivent être retirées avant
que l’appareil ne soit mis au rebut.
2. Retirer le bouton et soulever le capot avec
précaution.
Ontgrendel de knop en haal de klep voorzichtig
weg.
Les batteries usagées doivent être jetées dans un
conteneur de recyclage.
3a. Débrancher les câbles de connexion et retirer les
batteries. Les batteries doivent être retirées avant
que l’appareil ne soit mis au rebut.
Klik de verbindingskabels los en haal de
batterijen uit het apparaat. De batterijen dienen
te worden verwijderd voordat het apparaat wordt
afgedankt.
Klik de verbindingskabels los en haal de
3b.
batterijen uit het apparaat. De batterijen dienen
te worden verwijderd voordat het apparaat wordt
afgedankt.
Gebruikte batterijen moeten worden ingeleverd bij
speciaal daarvoor bestemde afgiftepunten.
Page 21

Précautions de sécurité / Veiligheidsinstructies 19
L’aspirateur UniRapido ne doit être utilisé que par des adultes pour aspirer dans
un environnement domestique normal. S’assurer que l’aspirateur est rangé dans
un endroit sec. Toutes les révisions et réparations doivent être effectuées dans un
Centre Service Agréé Electrolux.
Cet appareil n’est pas destiné à être utilisé par des personnes (y compris des
enfants) dont les capacités physiques, sensorielles ou mentales sont diminuées, ou
qui ne disposent pas des connaissances ou de l’expérience nécessaires, à moins
qu’elles n’aient été formées ou encadrées pour l’utilisation de cet appareil par une
personne responsable de leur sécurité.
Débrancher la fiche de la prise secteur avant toute opération de nettoyage ou
d’entretien de votre aspirateur.
Les enfants doivent être surveillés pour éviter qu’ils ne jouent avec cet appareil.
Chaque aspirateur est conçu pour une tension spécifique. Vérifier que la tension
d’alimentation est la même que celle indiquée sur la plaque signalétique. Utiliser
uniquement le chargeur d’origine conçu pour ce modèle.
Ne jamais utiliser l’aspirateur :
• Dans les endroits humides ;
• À proximité de gaz inflammables, etc. ;
• Lorsque le corps de l’aspirateur est visiblement endommagé ;
• Sur des objets pointus ou tranchants, des liquides ;
• Sur des cendres chaudes ou refroidies, des mégots de cigarettes incandescents,
etc. ;
• Sur des particules de poussière très fines issues entre autres du plâtre, du béton,
de la farine ou de cendres chaudes ou refroidies.
• Ne jamais laisser l’aspirateur en plein soleil.
• Éviter d’exposer l’aspirateur ou la batterie à une forte chaleur.
• La batterie ne doit pas être démontée, court-circuitée, placée contre une surface
métallique ou exposée à une forte chaleur.
• Sans filtre.
• Les produits en bombe aérosol peuvent être inflammables. Ne pas vaporiser de
tels produits à proximité ou sur l’aspirateur.
L’utilisation de l’aspirateur dans les circonstances mentionnées ci-dessus peut
provoquer de graves dommages à l’appareil. La garantie ne prend pas en charge ce
type de dommages.
Maintenance ou réparation
En cas de panne ou de dysfonctionnement, ramener votre UniRapido à un Centre
Service Agréé Electolux. Si le cordon d’alimentation du chargeur est endommagé,
il doit être remplacé par Electrolux, l’un de ses réparateurs ou toute autre personne
dûment qualifiée afin d’éviter tout danger.
De UniRapido mag alleen door volwassenen worden gebruikt en is alleen bedoeld
voor huishoudelijk gebruik. Zorg dat de stofzuiger altijd op een droge plaats wordt
opgeborgen. Alle servicebeurten en reparaties moeten worden uitgevoerd door een
erkend Electrolux Service Centre.
Dit apparaat mag niet worden gebruikt door personen (met inbegrip van kinderen)
met beperkte lichamelijke, zintuiglijke of geestelijke vermogens, of personen
zonder ervaring of kennis, tenzij zij worden begeleid bij of zijn geïnstrueerd over het
gebruik van het apparaat door iemand die de verantwoordelijkheid draagt voor hun
veiligheid.
Haal de stekker uit het stopcontact voordat u het apparaat gaat reinigen of
onderhouden.
Let op dat kinderen niet met het apparaat spelen.
Elke stofzuiger is ontworpen voor een specifieke spanning. Controleer of de
voedingsspanning gelijk is aan de spanning die op het naamplaatje wordt vermeld.
Gebruik alleen de originele oplaadadapter die ontworpen is voor dit model.
Gebruik de stofzuiger nooit
• In natte ruimten.
• In de buurt van ontvlambare gassen, enz.
• Als de behuizing zichtbare tekenen van schade vertoont.
• Bij scherpe voorwerpen of vloeistoffen.
• Voor hete of koude as, brandende sigarettenpeuken, enz.
• Voor fijn stof van bijvoorbeeld gips, beton, bloem of as.
• Laat de stofzuiger nooit in direct zonlicht staan.
• Stel de stofzuiger of de batterij niet aan grote hitte bloot.
• De batterij mag nooit uit elkaar worden gehaald, worden kortgesloten, in contact
komen met een metalen oppervlak of worden blootgesteld aan grote hitte.
• Zonder filter.
Het gebruik van de stofzuiger in de bovengenoemde situaties kan schade aan het
product veroorzaken. Dergelijke schade valt niet onder de garantie.
Onderhoud of reparaties
Als uw UniRapido niet goed of helemaal niet meer werkt, brengt u de stofzuiger
naar een erkend Electrolux Service Centre. Als de voedingskabel is beschadigd,
moet deze worden vervangen door Electrolux, een servicevertegenwoordiger of
een vergelijkbare, gekwalificeerde persoon. Zo kunnen gevaarlijke situaties worden
voorkomen.
GB
DE
FR
NL
Page 22
20 Informations consommateur / Klanteninformatie
Electrolux décline toute responsabilité concernant tous les dommages découlant
d’une mauvaise utilisation de l’appareil ou en cas de modification de l’appareil.
Ce produit est conçu dans le plein respect de l’environnement. Toutes les pièces en
plastique sont marquées pour faciliter leur recyclage. Pour plus de détails, visiter
notre site internet.
Si vous avez des commentaires ou des remarques à propos de votre aspirateur,
si vous rencontrez des difficultés pour l’achat des consommables ou accessoires,
ou si vous souhaitez connaître l’adresse du Centre Service Agréé le plus proche de
votre domicile, n’hésitez pas à nous contacter.
Si vous ne trouvez pas les accessoires de votre aspirateur Electrolux, contactez
notre service Consommateurs :
Pour la France :
Service Conseil Consommateurs Electrolux LDA
B.P. 63 02140 VERVINS
Fax: 03 23 91 03 07
E-mail : Serviceconsommateurs.electrolux@electrolux.fr
tél : 0820 900 109 (0,118
Pour la Belgique :
E-mail : consumer.services@electrolux.be
tél : 0902/88 488 (0.75
Pour le Luxembourg :
ELECTROLUX s.ar.l
7, rue de Bitbourg
L-1273 Luxembourg/Hamm
Call Center; +352 42 431-1
E-mail : consumer-service.luxembourg@electrolux.lu
www.electrolux.lu
Pour la Suisse :
Electrolux AG, Kleingeräte, Industriestrasse 10, 5506 Mägenwil
Tel. 0848 899 300
Fax 062 889 93 10
E-Mail : info@electrolux.ch
www.electrolux.ch
Dans le souci d’une constante amélioration de nos produits, nous nous réservons
le droit d’apporter à leurs caractéristiques toutes modifications liées à l’évolution
technique (Décret du 24/03/78).
€ TTC la minute depuis un poste fixe)
€ /min)
Electrolux wijst alle verantwoordelijkheid af voor eventuele schade die voortkomt uit
het ondeskundig of oneigenlijk gebruik van het apparaat.
Dit product is ontwikkeld rekeninghoudend met het milieu. Alle plastic onderdelen
kunnen worden hergebruikt. Bezoekt u onze website www.electrolux.nl voor meer
informatie.
Indien u suggesties heeft met betrekking tot verbetering van dit product of de
meegeleverde gebruiksaanwijzing, neemt u dan s.v.p. contact met ons op via:
consumenten.belangen@electrolux.nl
Wij verklaren dat deze oplaadbare stofzuiger voor huishoudelijk gebruik voldoet
aan EMC-richtlijn 2004/108/EC, Laagspanningsrichtlijn 2006/95/EC en CEmarkeringsrichtlijn 93/68/EEC. Alle vereiste testen zijn uitgevoerd door een
onafhankelijke testinstantie.
Nous garantissons que cet aspirateur fonctionnant sur batterie, destiné à un usage
domestique, est conforme à la directive CEM 2004/108/CE, à la directive basse
tension 2006/95/CE et à la directive de marquage CE 93/68/CEE. Tous les tests de
conformité ont été réalisés par un organisme de test tiers indépendant.
Page 23

21
GB
DE
FR
NL
Page 24

Share more of our thinking at www.electrolux.com
AEG AG805-1-rev2
 Loading...