

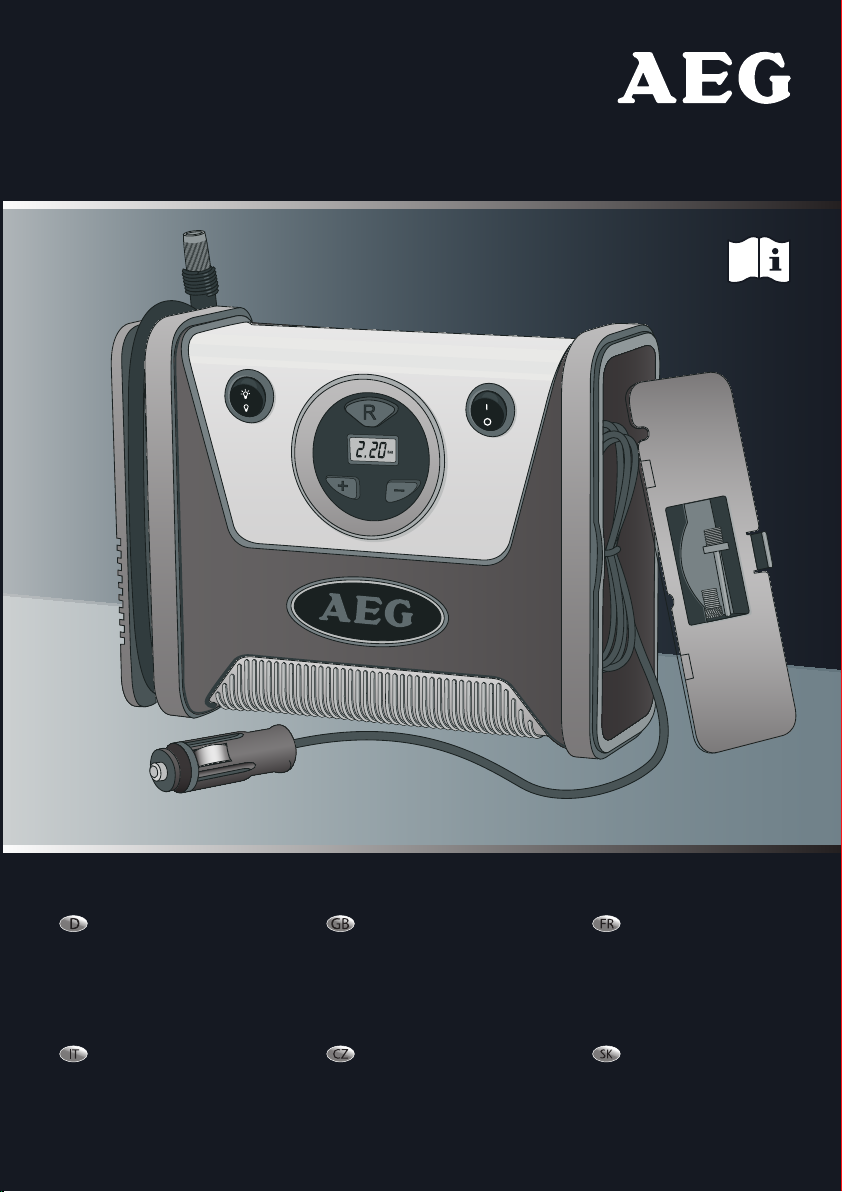
Kompressor
KD 7.0
Kompressor
Bedienungs- und
Sicherheitshinweise
Compressore
Indicazioni per l’uso e
per la sicurezza
Compressor
Operation and Safety
Notes
Kompresor
Pokyny pro obsluhu a
bezpečnostní pokyny
97136
Compresseur
Instructions d‘utilisation
et consignes de sécurité
Kompresor
Pokyny pre obsluhu a
bezpečnostné pokyny
Klappen Sie vor dem Lesen die Seite mit den Abbildungen aus und machen Sie sich
anschließend mit allen Funktionen des Gerätes vertraut.
Before reading, unfold the page containing the illustrations and familiarise yourself with all
functions of the device.
Avant de lire le mode d‘emploi, ouvrez la page contenant les illustrations et familiarisezvous ensuite avec toutes les fonctions de l‘appareil.
Prima di leggere aprire la pagina con le immagini e prendere confidenza con le diverse
funzioni dell’apparecchio.
Před čtením si otevřete stranu s obrázky a potom se seznamte se všemi funkcemi přístroje.
Pred čítaním si odklopte stranu s obrázkami a potom sa oboznámte so všetkými funkciami
prístroja.
D Bedienungs- und Sicherheitshinweise Seite 5
GB Operation and Safety Notes Page 11
FR Instructions d‘utilisation et consignes de sécurité Page 17
IT Indicazioni per l’uso e per la sicurezza Pagina 23
CZ Pokyny pro obsluhu a bezpečnostní pokyny Strana 29
SK Pokyny pre obsluhu a bezpečnostné pokyny Strana 35
1
1615
5
14
13
101112
2
3
4
6
78
9
A B
14

Inhaltsverzeichnis
Einleitung
Bestimmungsgemäßer Gebrauch ................................................................................................................Seite 6
Lieferumfang .....................................................................................................................................................Seite 6
Teilebeschreibung ............................................................................................................................................ Seite 6
Technische Daten ............................................................................................................................................. Seite 6
Sicherheit
Allgemeine Sicherheitshinweise ..................................................................................................................Seite 7
Spezielle Hinweise ........................................................................................................................................... Seite 7
Bedienung
Kompressor ein / ausschalten ........................................................................................................................ Seite 8
Licht ein / ausschalten ..................................................................................................................................... Seite 8
Druckeinheit (PSI, Bar oder kPa) einstellen ............................................................................................. Seite 8
Reifendruck prüfen ......................................................................................................................................... Seite 8
Reifendruck erhöhen / vermindern ............................................................................................................. Seite 8
Mitgelieferte Ventile verwenden ................................................................................................................ Seite 9
Sicherung am 12 V KFZ-Anschluss auswechseln .................................................................................... Seite 9
Fehlersuche ......................................................................................................................................................Seite 9
Wartung und Pflege ................................................................................................................................ Seite 9
Service ..................................................................................................................................................................Seite 10
Garantie ..............................................................................................................................................................Seite 10
Entsorgung .......................................................................................................................................................Seite 10
5 D
Einleitung
In dieser Bedienungsanleitung / am Gerät werden folgende Piktogramme verwendet:
Bedienungsanleitung lesen!
Warn- und Sicherheitshinweise
beachten!
Kompressor KD 7.0
Einleitung
Machen Sie sich vor der ersten Inbe-
triebnahme mit allen Funktionen des
Gerätes vertraut und informieren Sie
sich über den richtigen Umgang mit dem Gerät.
Lesen Sie hierzu die nachfolgende Bedienungsanleitung sorgfältig. Bewahren Sie diese Anleitung
gut auf. Händigen Sie alle Unterlagen bei Weitergabe des Gerätes an Dritte ebenfalls aus.
Bestimmungsgemäßer Gebrauch
Das Gerät ist zum Aufpumpen von intakten PKWZweirad-, Spielzeugreifen und -schläuchen sowie
aufblasbaren Spiel-, Sport- und Freizeitartikeln
geeignet. Es ist ausschließlich für den privaten
Gebrauch zugelassen. Jede andere Verwendung
oder Veränderung des Gerätes gilt als nicht bestimmungsgemäß und birgt erhebliche Gefahren.
Für Schäden, die aus bestimmungswidriger
Verwendung entstanden sind, übernimmt der
Hersteller keine Haftung.
Lieferumfang
Kontrollieren Sie unmittelbar nach dem Auspacken
den Lieferumfang. Prüfen Sie das Gerät sowie
alle Teile auf Beschädigungen. Nehmen Sie ein
defektes Gerät oder Teile nicht in Betrieb.
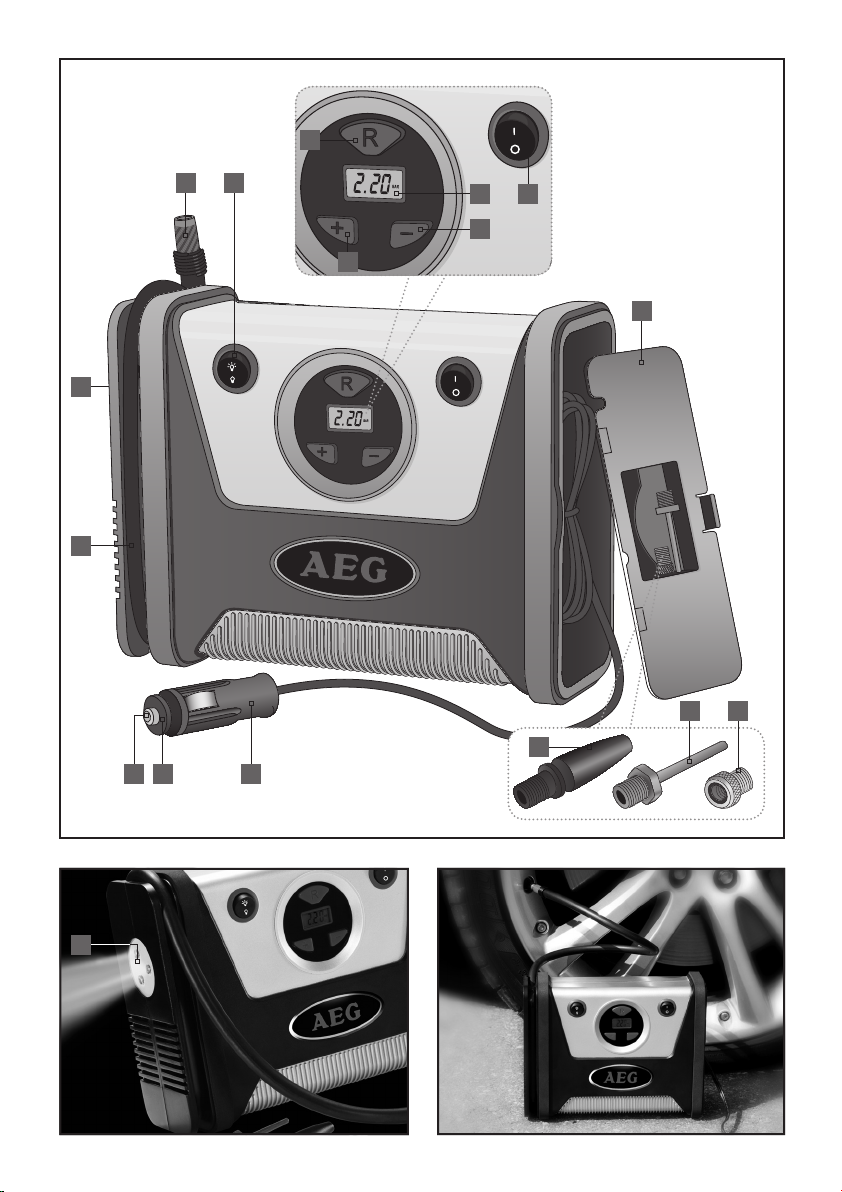
1 Kompressor KD 7.0
1 Rennrad-Ventil (Presta-Ventil)
1 Ventil für Sportbälle
Lebens- und Unfallgefahr für
Kleinkinder und Kinder!
Entsorgen Sie Verpackung und
Gerät umweltgerecht!
1 Ventil für aufblasbares Spielzeug
1 Bedienungsanleitung
Teilebeschreibung
1
Taste Druckeinheit „R“ (PSI, Bar oder kPa) wählen
2
Manometer-Anzeige (Digital Display)
3
EIN-/AUS-Schalter Kompressor
4
Taste Voreinstellung „–“
5
Taste Voreinstellung „+“
6
Staufachdeckel
7
Rennrad-Ventil (Presta-Ventil)
8
Ventil für Sportbälle
9
Ventil für aufblasbares Spielzeug
10
Netzkabel mit 12 V KFZ-Anschluss
und POWER-LED
11
Rändelring (12 V KFZ-Anschluss)
12
Sicherung
13
Hochdruckschlauch
14
Licht (3 LED)
15
Ventil-Anschluss
16
EIN-/AUS-Schalter Licht
Technische Daten
Artikel-Nr.: 97136
Betriebsspannung: 12 V
Leistung: max. 7 bar / 100 PSI
Genauigkeit: 0,1 bar bei < 3,4 bar
Betriebsart: periodischer Aussetzbetrieb,
15 min. (manuell)
Licht: 3 x LED, können nicht
ausgetauscht werden
Gewicht: 1 kg
Maße: ca. 21,5 x 16,5 x 7 cm (B x H x T)
Schalldruck: 000 dB (A)
Vibration: 0,0 m/s
2
6 D
Sicherheit
Sicherheit
Allgemeine
Sicherheitshinweise
WARNUNG!
weise und Anweisungen. Versäumnisse bei der
Einhaltung der Sicherheitshinweise und Anweisungen können elektrischen Schlag, Brand und /
oder schwere Verletzungen verursachen.
Bewahren Sie alle Sicherheitshinweise und
Anweisungen für die Zukunft auf.
J
unbeaufsichtigt mit dem Verpackungsmaterial.
Es besteht Erstickungsgefahr.
J Dieses Gerät ist nicht dafür bestimmt, durch
Personen (einschließlich Kinder) mit eingeschränkten physischen, sensorischen oder
geistigen Fähigkeiten oder mangels Erfahrung
und / oder mangels Wissen benutzt zu werden,
es sei denn, sie werden durch eine für ihre
Sicherheit zuständige Person beaufsichtigt
oder erhielten von ihr Anweisungen, wie das
Gerät zu benutzen ist. Kinder sollten beaufsichtigt werden, um sicherzustellen, dass sie
nicht mit dem Gerät spielen.
J Es darf keine Flüssigkeit, gleich welcher Art,
in das Gerät eindringen. Andernfalls besteht
Lebensgefahr durch elektrischen Schlag und
Gefahr der Sachbeschädigung.
J Lassen Sie den Kompressor bei der Benut-
zung nicht unbeobachtet.
J ACHTUNG VERBRENNUNGSGEFAHR! Der
Hochdruckschlauch
triebs heiß. Lassen Sie ihn daher abkühlen
bevor Sie ihn anfassen und wieder aufwickeln.
J Der Kompressor darf mittels des KFZ-Adapters
nur am Bordnetz eines stehenden Fahrzeugs
mit abgestelltem Motor betrieben werden.
Der Betrieb während der Fahrt ist unzulässig.
J Kontrollieren Sie gegebenenfalls den Luft-
druck mit Hilfe eines Luftdruckmessers nach.
Lesen Sie alle Sicherheitshin-
LEBENS- UND UNFALLGEFAHR
FÜR KLEINKINDER UND KINDER! Lassen Sie Kinder niemals
13
wird während des Be-
J Setzen Sie das Gerät keinen hohen Tempera-
turen, starken Vibrationen oder hoher
Feuchtigkeit aus.
J Beschädigte Geräte dürfen nicht mehr be-
nutzt werden. Lassen Sie sie von einer Fachkraft reparieren.
J Benutzen Sie den Kompressor nicht länger
als 15 Minuten. Lassen Sie ihn danach ca.
15 Minuten abkühlen. Andernfalls kann es
zu Überhitzung und zu bleibenden Beschädigungen kommen.
J Der Kompressor ist nicht zum Aufpumpen
von LKW, Traktorreifen, großen PKW-Reifen
(Reifenbreite >225 mm) oder anderer großvolumiger Gegenstände, wie Schlauchboote
etc., vorgesehen.
Spezielle Hinweise
J Pumpen Sie Gegenstände nicht über den
vorgesehenen bzw. angegebenen Druck auf.
J Pumpen Sie niemals größere Gegenstände
wie etwa LKW-, Traktorreifen, Luftmatratzen
oder Schlauchboote auf. Dies überschreitet
die Pumpleistung und somit die Laufzeit des
Kompressors.
J Die Druckangaben des Manometers sind An-
haltswerte. Kontrollieren Sie den Druck mit
Hilfe eines geeichten Luftdruckmessers nach.
J Der max. Druck von 100 PSI (7 bar) wird nur
erreicht, wenn das Pumpvolumen nicht
größer als 0,5 l ist.
Unverbindliche Druckangaben (Richtwerte)
Autoreifen 1,65 - 2,5 Bar
Fahrradreifen 2,4 - 2,8 Bar
Fußball 0,9 Bar
Basketball 0,6 Bar
Volleyball 0,34 Bar
7 D
Bedienung
Bedienung
Kompressor ein / ausschalten
j Öffnen Sie das Staufach mit Staufachdeckel
6
und entnehmen Sie das Netzkabel mit
12 V KFZ-Anschluss
10
.
j Wickeln Sie das Netzkabel mit 12 V KFZ-
Anschluss
j Stecken Sie den 12 V KFZ-Anschluss
10
vollständig ab.
10
in
die 12 V-Buchse des Fahrzeugs.
j Warten Sie einige Sekunden, bis die Mano-
meter-Anzeige
2
0.0 anzeigt.
j Führen Sie die gewünschten Arbeitsschritte
wie in nachfolgenden Kapiteln beschrieben
durch.
j Schalten Sie den Kompressor ein, indem Sie den
EIN-/AUS-Schalter
3
in die Position drü-
cken.
j Schalten Sie den Kompressor aus, indem Sie
den EIN-/AUS-Schalter
3
in die Position
drücken.
j Ziehen Sie den 12 V KFZ-Anschluss
10
aus
der 12 V-Buchse des Fahrzeugs.
Licht ein / ausschalten
Die Lichtquelle des Kompressors ist vorgesehen,
um die Arbeitsstelle (Ventil) besser auszuleuchten.
j Drücken Sie den EIN-/AUS-Schalter Licht
in die Position
, um die 3 LED 14 einzu-
16
schalten.
auszu-
16
j Drücken Sie den EIN-/AUS-Schalter Licht
in die Position
, um die 3 LED
14
schalten.
Druckeinheit (PSI, Bar oder kPa)
einstellen
j Drücken Sie die Taste Druckeinheit
oft, bis die gewünschte Druckeinheit in der
Manometer-Anzeige
2
erscheint.
„R“
1 so
Reifendruck prüfen
j Wickeln Sie den Hochdruckschlauch 13 voll-
ständig ab.
Hinweis: Achten Sie darauf, dass die POWERLED am 12 V KFZ-Anschluss
Manometer-Anzeige
10
leuchtet. Die
2
muss vor Beginn der
Messung 0.0 anzeigen.
j Fixieren Sie den Ventil-Anschluss
15
dem Ventil des Fahrzeugs.
Ist der Ventil-Anschluss
15
korrekt mit dem
Fahrzeug-Ventil verbunden, zeigt die Manometer-Anzeige
2
den aktuellen Reifendruck
an.
j Entspricht dieser Wert dem für das Fahrzeug
empfohlenen Reifendruck, können Sie den
Ventil-Anschluss
Reifendruck erhöhen / vermindern
15
wieder entfernen.
Liegt der angezeigte Wert unter oder über dem
empfohlenen Reifendruck für das Fahrzeug, gehen Sie zur Anpassung wie folgt vor:
j Drücken Sie die Taste Voreinstellung „+“
bzw. Taste Voreinstellung „–“
4
bis der vor-
eingestellten Wert der Manometer-Anzeige
2
dem richtigen Reifendruck entspricht.
j Schalten Sie den Kompressor ein, indem Sie
den EIN-/AUS-Schalter
drücken. Das Gerät erhöht bzw. vermindert
3
in die Position
den Reifendruck entsprechend dem voreingestellten Wert und schaltet automatisch ab.
j Entfernen Sie den Ventil-Anschluss
sichtig.
Wichtig:
j Drücken Sie während des Pumpvorgangs kei-
ne der Tasten
4
oder
5
.
j Wenn Sie das Gerät an der 12 V-Versorgung
eines Fahrzeugs angeschlossen haben aber
keinen Pumpvorgang starten, schaltet die
Manometer-Anzeige
2
nach einigen Minuten ab. Sie aktivieren sie wieder, indem Sie
die Taste Druckeinheit
„R“
1 drücken.
auf
15
vor-
5
8 D
Bedienung / Fehlersuche / Wartung und Pflege
Mitgelieferte Ventile verwenden
Im Staufachdeckel 6 des Kompressors befinden
sich 3 gängige Ventiladapter.
Beachten Sie unbedingt immer die Anleitung des
aufzublasenden Objekts.
· Rennrad-Ventil (Presta-Ventil)
· Ventil für Sportbälle
8
· Ventil für aufblasbares Spielzeug
j Schrauben Sie das gewünschte Ventil auf
den Ventil-Anschluss
15
entsprechenden Maximaldruck des aufzublasenden Objektes und lesen Sie die betreffende Bedienungsanleitung.
Sicherung am 12 V KFZ-Anschluss
auswechseln
j Lösen (und entfernen) Sie den Rändelring 11,
indem Sie ihn gegen den Uhrzeigersinn drehen.
j Entfernen Sie die defekte Sicherung und
ersetzen Sie sie gegen eine neue, max.
10 Ampere Sicherung.
j Schrauben Sie den Rändelring
fest, indem Sie ihn im Uhrzeigersinn drehen.
7
9
. Beachten Sie den
11
wieder
Trotz eingeschaltetem EIN- / AUS-Sch al-
3
ter
(in Position ) startet das Gerät
nicht den Pumpvorgang.
Bringen Sie den Zündschlüssel / Zündung in
die erste Position (nicht den Motor starten).
Das Gerät beendet den voreingestellten
Pumpvorgang nicht automatisch.
Stellen Sie sicher, dass Sie die Bedienhinweise
korrekt befolgt haben.
Stellen Sie sicher, dass Sie den korrekten
Wert voreingestellt haben.
Das Netzkabel und / oder der 12 V
KFZ-Anschluss werden heiß.
Kurzschlussgefahr - Trennen Sie das Gerät
sofort vom Bordnetz.
Die Manometer-Anzeige 2 zeigt Wert
falsch oder unlesbar an.
Stellen Sie sicher, dass das Gerät zunächst
Ihren aktuellen Reifendruck gemessen hat‚
(siehe Kapitel „Reifendruck prüfen“).
Ziehen Sie den 12 V KFZ-Anschluss 10 für
mindestens 5 Sekunden aus der 12 V-Buchse
des Fahrzeugs und entfernen Sie den VentilAnschluss
die Manometer-Anzeige
15
vom Fahrzeug. Warten Sie, bis
2
wieder 0.0 an-
zeigt. Starten Sie den Vorgang erneut.
Fehlersuche
Die Manometer-Anzeige 2 leuchtet
nicht.
Überprüfen Sie, ob der 12 V KFZ-Anschluss 10
vollständig und korrekt eingesteckt ist und
Spannung anliegt. (POWER-LED am 12 V
KFZ-Anschluss
10
leuchtet).
Überprüfen Sie, ob die POWER-LED am 12 V
KFZ-Anschluss
10
leuchtet. Falls nicht, überprüfen Sie sowohl die Sicherung des 12 V
KFZ-Anschlusses
10
als auch die Sicherung
der 12 V-Buchse des Fahrzeugs.
Der Pumpvorgang des Gerätes läuft, aber
der Reifen pumpt sich nicht auf.
Stellen Sie sicher, dass der Ventil-Anschluss
15
korrekt auf dem Ventil des Fahrzeugs
fixiert ist.
Stellen Sie sicher, dass der Reifen nicht
undicht ist.
Wartung und Pflege
Das Gerät ist wartungsfrei.
WARNUNG!
Trennen Sie elektrische Geräte
immer vom Netzstrom, bevor Sie Arbeiten zur
Pflege etc. durchführen.
9 D

Wartung und Pflege / Service / Garantie / Entsorgung / Konformität
j Schalten Sie das Gerät aus.
j Ziehen Sie den 12 V KFZ-Anschluss
der 12 V-Buchse Ihres Fahrzeugs.
j Reinigen Sie das Gerät mit einem trockenen
Tuch. Verwenden Sie keinesfalls Lösungsmittel oder andere aggressive Reiniger.
Service
WARNUNG!
von qualifiziertem Fachpersonal reparie-
ren. Damit wird die Sicherheit des Gerätes
sichergestellt und bleibt erhalten.
WARNUNG!
des Steckers oder der Anschlussleitung
immer von qualifiziertem Fachpersonal
ausführen. Damit wird die Sicherheit des
Gerätes sichergestellt und bleibt erhalten.
Garantie
Die allgemeinen Garantiebedingungen beziehen
sich auf Produktions- und Materialdefekte.
Falls das Gerät fehlerhaft ist, bringen Sie es
zu Ihrem Fachhändler bzw. der betreffenden
Verkaufsstelle zurück. Um die Garantie- und
Reparaturarbeiten am Gerät zu beschleunigen,
brauchen Sie Folgendes:
Lassen Sie das Gerät nur
Lassen Sie den Austausch
10
aus
Gemäß Europäischer Richtlinie 2002 / 96 / EC
über Elektro- und Elektronik-Altgeräte und Umsetzung in nationales Recht müssen verbrauchte
Elektrogeräte getrennt gesammelt und einer
umweltgerechten Wiederverwertung zugeführt
werden.
Über Entsorgungsmöglichkeiten für ausgediente
Elektrogeräte informieren Sie sich bitte bei Ihrer
Gemeinde- oder Stadtverwaltung.
- Eine Kopie des Kassenzettels (Lieferschein,
Kassenbon) mit dem Erwerbsdatum.
- Grund für die Beschwerde oder Beschreibung des Fehlers.
Entsorgung
Die Verpackung besteht aus umweltfreundlichen
Materialien, die Sie über d
stellen entsorge
10 D
n können.
Werfen Sie Elektrogeräte nicht in
den Hausmüll!
ie örtlichen Recycling-
Abbildungen können geringfügig vom Produkt
abweichen. Änderungen, die dem technischen
Fortschritt dienen, vorbehalten. Dekoration nicht
enthalten.

Table of Contents
Introduction
Intended use ......................................................................................................................................................Page 12
Scope of delivery ............................................................................................................................................. Page 12
Part description ................................................................................................................................................ Page 12
Technical data ................................................................................................................................................... Page 12
Security
General safety guidelines .............................................................................................................................. Page 13
Special Instructions .........................................................................................................................................Page 13
Operation
Compressor Switch ON/OFF ..........................................................................................................................Page 13
Light switch ON / OFF ...................................................................................................................................... Page 14
Set the unit of pressure (psi, bar or kPa) ................................................................................................. Page 14
Tire pressure check .......................................................................................................................................... Page 14
Tire pressure increase / decrease ................................................................................................................. Page 14
Use delivered valves ........................................................................................................................................ Page 14
Exchange fuse on the 12 V vehicle-connection ..................................................................................... Page 15
Error tracing ................................................................................................................................................... Page 15
Maintenance and care ...........................................................................................................................Page 15
Service ..................................................................................................................................................................Page 15
Warranty ............................................................................................................................................................Page 15
Disposal ............................................................................................................................................................... Page 16
11 GB
Introduction
In this operating manual / this device the following pictogram’s are used:
Read operating manual!
Observe warning- and safety
guidelines!
Compressor KD 7.0
Introduction
Make yourself familiar with all func-
tions before first start-up of the equip-
ment and gain inform you about correct
handling the device. Read for this the following
operating manual carefully. Store this manual
carefully. Pass on all documents also when passing on the device to third parties.
Intended use
The device is suitable for inflating intact passenger vehicles, bicycles, toy tires and – inner tubes
as well as inflatable play, sport and leisure articles. It is exclusively certified for the private use.
All other use or change to the device is considered
as not intended and bears substantial dangers.
The manufacturer does not take over any liability
for damages arising from unintended use.
Scope of delivery
After unpacking immediately check the scope of
delivery. Examine the device and all parts for
damages. Do not take a defective device or part
into operation.
1 compressor KD 7.0
1 racing cycle valve (Presta valve)
1 valve for sport balls
1 valve for inflatable toy
1 operating manual
Danger to life and danger of
accident for children!
Dispose the packaging
environmentally friendly!
Part description
Button to select unit of pressure „R“
1
(psi, bar or kPa)
Manometer display (digital display)
2
ON-/ OFF switch compressor
3
Button pre-setting „-“
4
Button pre-setting „+“
5
Stowage box cover
6
Racing cycle valve (Presta valve)
7
Valve for sport balls
8
Valve for inflatable toy
9
Power cable with 12 V vehicle connection
10
and power LED
Knurled ring (12 V vehicle connection)
11
Fuse
12
High-pressure hose
13
Light (3 LED)
14
Valve connection
15
ON-/ OFF switch light
16
Technical data
Article no.: 97136
Operating voltage: 12 V
Capacity: max. 7 bars / 100 psi
Accuracy: 0,1 bar with < 3.4 bar
Mode of operation: periodic intermittent opera-
tion, 15 min. (manual)
Light: 3 x LED, cannot be
exchanged
Weight: 1 kg
Dimension: approx. 21.5 x 16.5 x 7 cm
(W x H x D)
Sound pressure: 000 dB (A)
Vibration: 0.0 m/s
2
12 GB
Security / Operation
Security
General safety
guidelines
WARNING!
instructions. Omissions regarding the compliance
to safety guidelines and instructions can cause
electrical shock, fire and/or serious injuries.
Keep all safety guidelines and instructions for
future reference.
J
with the packing material. There is danger of
suffocation.
J This device is not intended for use by persons
(including children) with reduced physical,
sensory or mental abilities or lack of experience and/or lack of knowledge unless they
are supervised by a person responsible for
their security or received instructions from
this person, how the equipment is to be
used. Children should be supervised, in order
to guarantee that they do not play with the
device.
J Liquid of any kind shall never penetrate the
device. Mortal danger exists by electrical
shock otherwise and danger of the damage.
J Never leave the compressor unobserved
when in use.
J ATTENTION DANGER OF BURNS! The
high-pressure hose
the operation. Let it cool before you touch
and roll it up again.
J The compressor may be operated by means
of the vehicle adapter only in the electrical
system of a standing vehicle with turned off
engine. The operation while driving is not
allowed.
J Control the air pressure after with the help
of an air pressure gauge if necessary.
J Do not expose the device to high tempera-
tures, strong vibrations or high humidity.
J Damaged devices may not be used. Let a
specialist do the repair.
Read all safety guidelines and
DANGER OF ACCIDENT AND LIFE
FOR INFANTS AND CHILDREN!
Never leave children unsupervised
becomes hot during
13
J Do not use the compressor longer than
15 minutes. Leave it to cool for approx.
15 minutes. Otherwise it can lead to overheating and to lasting damages.
J The compressor is not intended for inflating
truck, tractor tires, large passenger car tyre
(tyre width >225 mm) or other large volume
articles, like life boats etc.
Special Instructions
J Do not pump up articles above the intended
and/or indicated pressure.
J Never pump up larger articles like truck,
tractor tires, air beds or inflatable rafts. This
exceeds the pumping capacity and thus the
lifetime time of the compressor.
J The pressure indications of the manometer
are reference values. Check the pressure with
the help of a calibrated air pressure gauge.
J The max. pressure of 100 psi (7 bar) is
reached only if the pumping volume is not
higher than 0.5 l
Noncommittal pressure indications
(approximate values)
Motor-car tire 1.65 - 2.5 bar
Bicycle tire 2.4 - 2.8 bar
Football 0.9 bar
Basketball 0.6 bar
Volleyball 0.34 bar
Operation
Compressor Switch ON/OFF
j Open the stowage box with stowage box
cover
vehicle connection
and take the power cable with 12 V
6
.
10
j Unwind the power cable with 12 V vehicle
connection
j Place the 12 V vehicle connection
completely.
10
10
into
the 12 V-socket of the vehicle.
j Wait a few seconds until the manometer
display
indicates 0,0.
2
13 GB

Operation
j Carry out the desired work procedures as
described in following chapters.
j Switch on the compressor by pressing the
ON-/ OFF switch
into the position .
3
j Switch off the compressor by pressing the
ON-/ OFF switch
j Pull the 12 V vehicle connection
into the position .
3
10
from the
12 V-socket of the vehicle.
Light switch ON / OFF
The light source on the compressor is intended
to better illuminate the working area (valve)
j Press the ON-/OFF –switch Light
position
, to switch on the 3 LED 14.
j Press the ON-/OFF –switch Light
position
Set the unit of pressure
, to switch off the 3 LED 14.
16
16
into
into
(psi, bar or kPa)
j Press the button Pressure unit „R“ 1 until
the desired pressure unit is shown on the
manometer display
.
2
Tire pressure increase / decrease
If the indicated value lies under or over the recommended tire pressure for the vehicle, proceed
for adjustment as follows:
j Press the button pre-setting „+ “
tively the button pre-setting „- “
pre-set value of the manometer display
respec-
5
until the
4
2
corresponds to the correct tire pressure.
j Switch on the compressor by pressing the
ON- /OFF- switch into position
. The device
increases respectively decreases the tire
pressure according to the pre-set value and
switches off automatically.
j Remove the valve connection
carefully.
15
Important:
j During the pumping procedure do not press
the buttons
or 5.
4
j If you connect the device to the 12 V-supply
of a vehicle but do not start the pumping
procedure, the manometer display
2
switches off after some minutes. You activate it again, by pressing the button unit of
pressure „R “
.
1
Tire pressure check
j Unwind the high-pressure hose 13 com-
pletely.
Note: Make sure that the power LED at the
12 V vehicle connection
manometer display
lights up. The
10
must indicate 0,0
2
before beginning of the measurement.
j Fix the valve connection
on the valve of
15
the vehicle.
If the valve connection
is correctly connect-
15
ed with the vehicle valve, the manometer
display
shows the current tire pressure.
2
j If this value corresponds to the recommend-
ed tire pressure for the vehicle, you can
remove the valve connection
14 GB
15
again.
Use delivered valves
In the stowage box cover 6 of the compressor
there are 3 typical valve adapters.
Always consider the manual of the object which
is to be pumped up.
· Racing cycle valve (Presta valve)
· Valve for sport balls
· Valve for inflatable toy
8
9
7
j Screw the desired valve on the valve con-
nection
. Consider the corresponding
15
maximum pressure of the object which is to
be pumped up and read the respective
operating manual.

Operation / Error tracing / Maintenance and care / Service / Warranty
Exchange fuse on the 12 V
vehicle-connection
j Release (and remove) the knurled ring 11, by
turning it against the clockwise direction.
j Remove the defective fuse and replace it
with a new one, max. 10 amps.
j Screws the knurled ring
turning it in the clockwise direction
Error tracing
again firmly, by
11
Pull off the 12 V vehicle- connection 10 for
at least 5 seconds from the 12 V-socket of the
vehicle and remove the valve connection
15
from the vehicle. Wait until the manometerdisplay
shows 0,0 again. Re-start the
2
procedure again.
The pump procedure is running, but the
tyre does not inflate.
Ensure that the valve-connection 15 is fixed
correctly on the valve of the vehicle.
Ensure that the tyre does not have a puncture.
The manometer display 2 does not shine.
Check, if the12 V vehicle- connection 10 is
inserted completely and correct and voltage
is on. (POWER-LED on 12 V vehicle-connection
shines).
10
Check, if the POWER-LED on 12 V vehicle-
connection
of the 12 V vehicle-connection
shines. If not, check the fuse
10
as well as
10
the fuse on the 12 V-socket of the vehicle.
Despite switched on ON- / OFF-switch 3
(in position
) the device does not start
the pumping procedure.
Turn the ignition key / ignition into the first
position (do not start the engine)
The device does not finish the pre-set
pump procedure automatically.
Ensure that you have followed the operating
instructions correctly.
Ensure that you have pre-set the correct
value.
The power cable and / or the 12 V vehicle-
connection gets hot.
Danger of short circuit - Disconnect the
device immediately from the circuit.
Maintenance and care
The device is maintenance-free.
WARNING!
Always separate electrical devices from the power supply, before you carry
out service etc.
j Switch off the device .
j Pull of the 12 V vehicle connection
10
from
the 12 V-socket of your vehicle.
j Clean the device with a dry cloth. Do not use
solvents or other aggressive detergents
under any circumstances.
Service
WARNING!
Leave the repair of the
device to qualified technical personnel to
repair. Thus the safety of the device is guaran-
teed and maintained.
WARNING!
Leave the exchange of the
plug or the connecting cable always to qualified technical personnel. Thus the security of
the equipment is guaranteed and maintained.
The manometer-display 2 shows the
wrong value or is not readable.
Ensure that the device has measured the ac-
tual tyre pressure, (see chapter „Tyre pressure
check“).
Warranty
The general guarantee conditions refer to
production and material defects.
15 GB

Warranty / Disposal
If the device is faulty, bring it to your specialist
dealer respectively back to the sales office. In
order to accelerate the warranty and repair work
on the device, you need the following:
- A copy of the receipt (delivery note, bill)
with the acquisition date.
- Reason for the complaint or description of
the error.
Disposal
The packing consists of pollution free materials,
which can dispose of you over the local recycling stations.
Do not throw electrical appliances
into the domestic waste!
In accordance with European guideline
2002 / 96 / EC for electrical and old electronic
devices and conversion to national law, used
electrical appliances must be collected separately and brought to a environmental fair recycling.
For disposal possibilities for retired electrical
appliances please inform yourself at your
community or city administration.
16 GB
Illustrations may vary slightly from the product
itself. We reserve the right to administer changes due to technical progress. Decoration not
included.

Table des matières
Introduction
Utilisation selon les prescriptions ...............................................................................................................Page 18
Volume de livraison .........................................................................................................................................Page 18
Description des pièces .................................................................................................................................... Page 18
Fiche technique ................................................................................................................................................ Page 18
Sécurité
Instructions générales de sécurité ..............................................................................................................Page 19
Indications spéciales ....................................................................................................................................... Page 19
Utilisation
Commuter / décommuter le compresseur ................................................................................................. Page 20
Commuter / décommuter la lumière .......................................................................................................... Page 20
Régler l’unité de pression (PSL, Bar ou kPa) ............................................................................................Page 20
Vérifier la pression des pneus ...................................................................................................................... Page 20
Augmenter / Diminuer la pression des pneus .......................................................................................... Page 20
Utilisez les valves livrées avec. .....................................................................................................................Page 21
Remplacer le fusible dans le connecteur de 12 V pour voiture ......................................................... Page 21
Recherche d’erreurs ................................................................................................................................. Page 21
Entretien et soins ....................................................................................................................................... Page 22
Service ..................................................................................................................................................................Page 22
Garantie ..............................................................................................................................................................Page 22
Élimination .......................................................................................................................................................Page 22
17 FR

Introduction
Dans ce manuel d’utilisation / dans l’appareil on utilise les pictogrammes suivants :
Lire le manuel d’utilisation !
Respectez les instructions d’alerte
et de sécurité !
Compresseur KD 7.0
Introduction
Familiarisez-vous avec toutes les fonc-
tions de l‘appareil avant la première
mise en marche et renseignez-vous
sur la manipulation correcte de l‘appareil. Lisez
pour cela soigneusement le guide d‘utilisation
suivant. Gardez ce manuel dans un lieu sûr.
Remettez tous les documents lors du transfert
de l‘appareil à un nouveau propriétaire.
Utilisation selon les prescriptions
L‘appareil est adapté pour le pompage de pneus
et tuyaux de voitures, motocycles et jouets, ainsi
que des articles gonflables de jeu, de sport et de
loisir. Il est homologué uniquement pour l‘utilisation dans le domaine privé. Toute utilisation ou
modification de l‘appareil doit être considérée
comme non conforme et entraînerait de graves
dangers. Pour les dommages qui ont surgi en raison d‘une utilisation non conforme, le fabricant
n‘assumera aucune responsabilité.
Danger de mort de d’accident pour
les tous petits et les enfants !
Éliminez l’emballage et l’appareil
de manière respectueuse de
l’environnement !
1 compresseur KD 7.0
1 valve de vélo de course (valve Presta)
1 valve pour des ballons de sport
1 valve pour un jouet gonflable
1 manuel d‘utilisation
Description des pièces
Touche de l‘unité de pression „R“
1
(sélectionner PSI, Bar ou kPa)
Affichage du manomètre (display digital)
2
Commutateur ON/OFF du compresseur
3
Touche de préréglage „–“
4
Touche de préréglage „+“
5
Couvercle du tiroir de rangement
6
Valve de vélo de course (valve Presta)
7
Valve pour des ballons de sport
8
Valve pour un jouet gonflable
9
Câble du réseau avec un connecteur de 12 V
10
de voiture et POWER-LED
Bagues rainurée (connexion de 12 V pour
11
voiture)
Fusible
12
Tuyau de haute pression
13
Luminaire (3 LED)
14
Raccordement valve
15
Commutateur ON/OFF de la lumière
16
Volume de livraison
Contrôlez immédiatement après le déballage le
volume de livraison. Vérifiez si l’appareil et ses
composants présentent des dommages. Ne réalisez
pas la mise en marche d‘un appareil défectueux
ou avec des parties défectueuses.
18 FR
Fiche technique
No. article : 97136
Tension de service : 12 V
Puissance : max. 7 bar / 100 PSI
Précision : 0,1 bar avec < 3,4 bar

Introduction / Sécurité
Mode de
fonctionnement : Fonctionnement de dé-
clenchement périodique,
15 min (manuel)
Lumière : 3 x LED, ne peuvent pas
être remplacés
Poids : 1 kg
Dimensions : env. 21,5 x 16,5 x 2,5 cm
(L x H x P)
Pression acoustique
(niveau de bruit) : 000 dB (A)
Vibration : 0,0 m/s
Sécurité
2
Instructions générales
de sécurité
AVERTISSEMENT
de sécurité et instructions. Les manquements
dans le respect des indications de sécurité et instructions peuvent provoquer un choc électrique,
des brulures et/ou des blessures graves.
Conservez toutes les indications de sécurité et
instructions pour une utilisation future.
J
jamais les enfants sans surveillance avec le
J Cet appareil n’est pas destiné à être utilisé
J Aucun liquide, de n’importe quelle nature,
DANGER DE MORT DE D’ACCI-
DENT POUR LES TOUS PETITS
ET LES ENFANTS ! Ne laissez
matériel d’emballage. Il y a danger d’asphyxie.
par des personnes (incluant des enfants)
avec des capacités physiques, sensorielles ou
psychiques limitées ou avec un manque
d’expérience et/ou un manque de savoir-faire,
à moins qu’elles soient surveillées par une
personne responsable de leur sécurité ou
qu’elles reçoivent des instructions sur comment utiliser cet appareil. Les enfants devront
être surveillés, afin de vérifier qu’ils ne
jouent pas avec l’appareil.
ne devra pénétrer dans l’appareil. En cas
contraire il y aura danger de mort par choc
électrique et danger de dommages matériels.
Lisez toutes les indications
J Ne laisser pas le compresseur lors de son
utilisation sans surveillance.
J ATTENTION ! DANGER DE BRULURE ! Le
tuyau de haute pression
dant leur fonctionnement. Laissez-le refroidir
donc avant de le toucher et/ou emballer.
J Le compresseur pourra être utilisé avec un
adaptateur pour la voiture uniquement dans
le réseau de bord d’une voiture arrêtée avec
un moteur éteint. Le fonctionnement pendant
le déplacement de la voiture est interdit.
J Contrôlez éventuellement la pression de l’air
à l’aide d’un dispositif de mesure de la pression de l’air.
J Ne soumettez pas l’appareil à des hautes
températures, à des vibrations fortes ou à
une humidité élevée.
J Les appareils endommagés ne doivent pas
être utilisés. Faites les réparer par des professionnels spécialisés.
J N’utilisez pas le compresseur plus de 15 mi-
nutes. Laisser le refroidir après pendant
environ 15 minutes. En cas contraire vous
pourriez provoquer une surchauffe et des
dommages permanents.
J Le compresseur n’est pas prévu pour le gon-
flage de pneus de camion, de grands pneus
de voitures (largeur des pneus >225 mm) ou
d’autres objets de grand volume, comme des
bateaux gonflables, etc.
Indications spéciales
J Ne gonflez pas des objets au-dessus de la
pression prévue ou indiquée.
J Ne gonflez jamais des objets plus volumineux
tels que des pneus de camion, tracteur, des
matelas gonflables ou des bateaux gonflables.
Cela dépasse la puissance de pompage et, en
conséquence, le temps d’utilisation du compresseur.
J Les données sur la pression du manomètre
sont des valeurs de référence.
J Contrôlez éventuellement la pression de
l’air à l’aide d’un dispositif de mesure de la
pression de l’air calibré.
sera chaud pen-
13
19 FR

Sécurité / Utilisation
J La pression max. de 100 PSI (7 bar) sera at-
teint uniquement si le volume de pompage
n’est pas supérieur à 0,5 l.
Indications sans engagement sur la pression
(valeurs orientatives)
Pneus de voitures 1,65 - 2,5 Bar
Pneus de vélos 2,4 - 2,8 Bar
Football 0,9 Bar
Basketball 0,6 Bar
Volleyball 0,34 Bar
Utilisation
Commuter / décommuter
le compresseur
j Ouvrez le compartiment de rangement avec
couvercle
avec connecteur de 12 V pour voiture
j Déroulez complètement le câble de réseau
avec connecteur de 12 V pour voiture
j Introduisez le connecteur de 12 V pour voiture
dans la prise femelle de 12 V du véhicule.
10
j Attendez quelques secondes jusqu’à ce que
l’affichage du manomètre
j Réalisez les étapes de travail souhaitées comme
on le décrit dans les chapitres suivants.
j Commutez le compresseur en appuyant sur le
commutateur ON/OFF
j Décommutez le compresseur en appuyant
sur le commutateur ON/OFF
position
j Tirez du connecteur de 12 V pour voiture
en le sortant de la prise femelle de 12 V du
véhicule.
Commuter / décommuter la lumière
La source lumineuse du compresseur est prévue
afin de mieux éclairer la zone de travail (valve).
j Appuyez sur le commutateur ON-/OFF de la
lumière
3 LEDs
et retirez le câble de réseau
6
affiche 0.0.
2
dans sa position .
3
dans sa
3
.
dans la position , afin que les
16
soit commutées.
14
10
10
.
.
10
j Appuyez sur le commutateur ON-/OFF de la
lumière
3 LEDs
Régler l’unité de pression
dans la position , afin que les
16
soit décommutées.
14
(PSL, Bar ou kPa)
j Appuyez sur la touche de l’unité de pression
„R“
jusqu’à ce que l’unité de pression
1
souhaitée apparaisse dans l’affichage du
manomètre
Vérifier la pression des pneus
.
2
j Déroulez complètement le tuyau de haute
pression
13
.
Note : Observez que le LED de POWER dans
le connecteur de 12 V pour voiture
L’affichage du manomètre
doit afficher
2
avant de commencer avec la mesure la
valeur 0.0.
j Fixez le raccord de la valve
avec la valve
15
du véhicule.
S le raccord de la valve
est bien raccordé
15
à la valve du véhicule, l’affichage du manomètre
montrera la pression des pneus
2
actuelle.
j Si cette valeur correspond à la pression de
pneu recommandée, vous pourrez enlever le
raccord de la valve
Augmenter / Diminuer la
à nouveau.
15
pression des pneus
Si la valeur affichée est située au-dessous ou
au-dessus de la pression des pneus recommandé,
procédez comme suit :
j Appuyez sur la touche de préréglage „+“
ou sur la touche de préréglage „–“
jusqu’à ce que la valeur préréglée de l’affichage du manomètre
pression correcte du pneu.
j Commutez le compresseur en appuyant sur le
commutateur ON/OFF
corresponde à la
2
dans sa position .
3
10
4
brille.
5
20 FR

Utilisation / Recherche d’erreurs
L’appareil augmente ou bien diminue la
pression du pneu selon la valeur préréglée et
décommute automatiquement.
j Enlevez avec soin le raccord de la valve
15
.
Important :
j N’appuyez, pendant le processus de pom-
page, sur aucune des touches
ou 5.
4
j Si vous avez commuté l’appareil à l’alimen-
tation de 12 V d’un véhicule, mais vous ne
démarrez aucun processus de pompage, l’affichage du manomètre
s’éteindra au bout
2
de quelques minutes. Vous l’activerez à nouveau en appuyant sur la touche d’unité de
pression «R»
Utilisez les valves livrées avec
.
1
Dans le couvercle 6 du compartiment du compresseur vous trouverez 3 adaptateurs courants.
Observez toujours les instructions du manuel de
l’objet à gonfler.
· Valve de vélo de course (valve Presta)
· Valve pour des ballons de sport
· Valve pour un jouet gonflable
7
8
9
j Vissez la valve souhaitée sur le raccord de
la valve
. Tenez en compte la pression
15
maximale correspondante à l’objet qu’on
veut gonfler et lisez le manuel d’utilisation
correspondant.
Remplacer le fusible dans le
connecteur de 12 V pour voiture
j Desserrez (et retirez) la bague de fixation 11
en tournant la rainure dans le sens antihoraire.
j Enlevez le fusible défectueux et remplacez-le
par un nouveau fusible de maximum 10 ampères.
j Vissez à nouveau la bague en la tournant
dans le sens horaire.
Recherche d’erreurs
L’affichage du manomètre 2 ne brille pas.
Vérifiez si le connecteur de 12 V pour voiture
est complet et correctement raccordé et
10
s’il y a de la tension électrique. (POWER-LED
dans le connecteur de 12 V pour voiture
10
brille).
Vérifiez si le témoin LED de POWER dans le
connecteur de 12 V pour voiture
brille. En
10
cas négatif, vérifiez, tant le fusible du raccordement de 12 V pour voiture
, comme le
10
fusible de la prise femelle de 12 V du véhicule.
Malgré l’interrupteur ON - / O FF 3
commuté (en position
) l’appareil ne dé-
marre pas le processus de pompage.
Mettez la clé d’allumage/contact dans sa
première position (ne pas démarrer le moteur).
L’appareil ne met pas fin automatique-
ment au processus de pompage.
Vérifiez si vous avez suivi correctement les
instructions d’utilisation.
Vérifiez si vous avez préréglé correctement
la valeur de pression.
Le câble de réseau et / ou le connecteur
de 12 V pour voiture réchauffe.
Danger de court-circuit- Séparez l’appareil
immédiatement du réseau de bord.
L’affichage du manomètre 2 affiche une
valeur fausse ou illisible.
Assurez-vous que l’appareil mesure d’abord
la pression des pneus (voir chapitre «vérifier
la pression des pneus“).
Débranchez le connecteur de 12 V pour voi-
ture
pendant au moins 5 secondes de la
10
prise femelle de 12 V du véhicule et enlevez
e raccord de la valve
jusqu’à ce que l’affichage du manomètre
du véhicule. Attendez
15
2
affiche à nouveau 0.0. Recommencez avec le
processus.
21 FR

Recherche d’erreurs / Entretien et soins / Service / Garantie / Élimination
Le processus de pompage fonctionne,
mais le pneu ne gonfle pas.
Vérifiez que le raccord de la valve 15 soit
correctement fixée au véhicule.
Vérifier que les pneus n’ait pas de fuites.
Entretien et soins
L’appareil ne nécessite aucun entretien.
AVERTISSEMENT
électriques toujours du courant électrique avant
de réaliser les travaux d’entretien, etc.
j Décommutez l’appareil.
j Tirez du connecteur de 12 V pour voiture
en le sortant de la prise femelle de 12 V de
votre véhicule.
j Nettoyez l’appareil avec un chiffon sec.
N’utilisez en aucun cas des solvants ou
autres produits nettoyants agressifs.
Service
AVERTISSEMENT
reil uniquement par du personnel qualifié.
De cette manière vous assurez et conservez la
sécurité de l’appareil.
AVERTISSEMENT
connecteur ou le câble de connexion toujours
par du personnel qualifié spécialisé. De cette
manière vous assurez et conservez la sécurité de
l’appareil.
Débranchez les appareils
10
Faites réparer l’appa-
Faites remplacer le
- Une copie de la pièce de vente (bon de
livraison, facture de caisse) avec la date
d’achat.
- Motifs pour la réclamation ou descriptions
de la défaillance.
Élimination
L’emballage est composé de matériaux respectueux de l’environnement que vous pourrez
éliminer dans les points de recyclages locaux
qu’y sont prévus.
Ne jetez pas les appareils électriques
dans votre poubelle domestique !
Selon la directive européenne 2002 / 96 / EC
concernant les vieux appareils électriques et
électroniques et son application dans le droit
national, vous devez collecter les appareils séparément et les éliminer de manière respectueuse
de l’environnement utilisant les postes de recyclage spéciaux.
Vous pouvez vous renseigner sur les possibilités
d’élimination pour les appareils électriques aussi
dans votre commune ou administration locale.
Garantie
Les conditions générales de garantie font référence
à des défauts de fabrication et des matériaux.
Si l’appareil est défaillant, portez-le à votre distributeur spécialisé ou bien au poste de vente
correspondant. Afin d’accélérer les travaux de
garantie et de réparation dans l’appareil, vous
aurez besoin des éléments suivants :
22 FR
Les images peuvent différer légèrement du produit.
On se réserve des changements dans l’intérêt du
progrès technique. Décoration pas incluse.

Indice
Introduzione
Utilizzo secondo la destinazione d’uso .................................................................................................Pagina 24
Contenuto ......................................................................................................................................................Pagina 24
Descrizione dei pezzi ...................................................................................................................................Pagina 24
Dati tecnici .....................................................................................................................................................Pagina 24
Sicurezza
Indicazioni di sicurezza generali .............................................................................................................Pagina 25
Indicazioni speciali ......................................................................................................................................Pagina 25
Funzionamento
Accendere / spegnere il compressore ........................................................................................................ Pagina 26
Accendere / spegnere la luce .....................................................................................................................Pagina 26
Regolare l’unità di pressione (PSI, Bar o kPa) .....................................................................................Pagina 26
Verificare la pressione delle ruote ..........................................................................................................Pagina 26
Aumentare / ridurre la pressione delle ruote .......................................................................................Pagina 26
Utilizzo delle valvole fornite ....................................................................................................................Pagina 27
Sostituzione del fusibile del cavo da 12 V del veicolo......................................................................Pagina 27
Risoluzione dei problemi ..................................................................................................................Pagina 27
Manutenzione e cura ..........................................................................................................................Pagina 27
Assistenza ......................................................................................................................................................Pagina 28
Garanzia .........................................................................................................................................................Pagina 28
Smaltimento ...............................................................................................................................................Pagina 28
23 IT

Introduzione
In queste istruzioni per l‘uso / sull’apparecchio vengono utilizzati i seguenti pittogrammi
Leggere le istruzioni per l‘uso
Osservare le avvertenze e le indicazioni
di sicurezza
Compressore KD 7.0
Introduzione
Familiarizzate con tutte le funzioni
dell’apparecchio prima del primo
utilizzo ed informatevi sulla gestione
dell’apparecchio. Leggete attentamente le seguenti
istruzioni per l’uso. Conservate bene queste
istruzioni. Recapitate tutto il kit nel caso della
cessione dell’attrezzo a terzi.
Utilizzo secondo la
destinazione d’uso
L’apparecchio è adatto per gonfiare ruote e camere d’aria intatte di autovetture, veicoli a due
ruote nonché giocattoli, articoli sportivi e per il
tempo libero gonfiabili. E’ omologato esclusivamente per l’uso privato. Ogni altro utilizzo o
modifica dell’apparecchio non è conforme alla
destinazione d’uso e presenta pericoli rilevanti.
Per quanto riguarda danneggiamenti che derivino
da un utilizzo diverso dalla sua destinazione, il
produttore non si assume responsabilità.
Pericolo di morte e di incidenti
per i bambini
Smaltite la confezione e l’apparecchio in modo ecocompatibile
1 Valvola per giocattoli gonfiabili
1 Istruzioni per l‘uso
Descrizione dei pezzi
Scegliere il tasto per l’unità di pressione “R“
1
(PSI, Bar oppure kPa)
Indicatore del manometro (display digitale)
2
Interruttore ON/OFF del compressore
3
Tasto preimpostazione “–“
4
Tasto preimpostazione “+“
5
Coperchio del vano capote
6
Valvola per ruota da bicicletta (valvola Presta)
7
Valvola per palloni sportivi
8
Valvola per giocattoli gonfiabili
9
Cavo di rete con collegamento da 12 V
10
per automobile e POWER LED
Anello zigrinato (collegamento da 12 V
11
per automobile)
Protezione
12
Fusibile ad alta pressione
13
Luce (3 LED)
14
Collegamento per valvola
15
Luce interruttore ON/OFF
16
Dati tecnici
Contenuto
Controllate il contenuto subito dopo aver aperto
la confezione. Provate l’apparecchio e tutti i
pezzi per verificare danni. Non mettete in funzionare apparecchi o pezzi difettosi.
1 Compressore KD 7.0
1 Valvola per ruota da corsa (valvola Presta)
1 Valvola per palloni sportivi
24 IT
Nr. articolo.: 97136
Tensione: 12 V
Potenza: max. 7 bar / 100 PSI
Precisione: 0,1 bar per < 3,4 bar
Tipo di funzionamento: funzionamento alternato
periodico, 15 min.
(manuale)
Luce: 3 x LED, non possono
essere sostituiti
Peso: 1 kg

Introduzione / Sicurezza
Dimensioni: ca. 21,5 x 16,5 x 7 cm
(L x A x P)
Pressione acustica: 000 dB (A)
Vibrazione: 0,0 m/s
Sicurezza
2
Indicazioni di
sicurezza generali
AVVISO!
curezza e le istruzioni. Omissioni nell’osservanza
delle indicazioni di sicurezza e delle istruzioni
possono provocare scosse elettriche, ustioni e/o
forti lesioni.
Conservate per il futuro tutte le indicazioni di
sicurezza e le istruzioni.
J
stoditi con il materiale contenuto nella confe-
zione. Ciò comporta pericolo di soffocamento.
J Questo dispositivo non è destinato ad essere
utilizzato da persone (compresi i bambini)
con capacità fisiche, psichiche, sensoriali e intellettuali limitate, oppure senza esperienza
e/o senza conoscenze adeguate, a meno che
essi non siano sotto il controllo di una persona
competente oppure ricevano da essa indicazioni su come utilizzare il dispositivo. I bambini dovrebbero essere sorvegliati per essere
sicuri che non giochino con il dispositivo.
J Non deve essere introdotto alcun liquido nel
dispositivo. Altrimenti sussiste pericolo di
morte tramite scossa elettrica e pericolo di
danneggiamento.
J Non lasciate il compressore incustodito in
caso di non utilizzo.
J ATTENZIONE, PERICOLO DI USTIONI! Il
flessibile ad alta pressione
lente durante il funzionamento. Farlo quindi
raffreddare prima di afferrarlo e riavvolgerlo.
J Il compressore deve essere azionato per
mezzo dell’adattatore per auto solo alla rete
di bordo di un veicolo fermo con motore
Leggete tutte le indicazioni di si-
PERICOLO DI VITA E DI INCI-
DENTI PER I BAMBINI PICCOLI!
Non lasciate mai i bambini incu-
diventa bol-
13
spento. Non è ammesso il funzionamento
durante la guida.
J Controllate la pressione dell’aria con l’aiuto
di un misuratore di pressione d’aria.
J Non esponete il dispositivo ad elevate tem-
perature, forti vibrazioni o elevata umidità.
J I dispositivi danneggiati non devono essere
più utilizzati. Fateli riparare da uno specialista.
J Non utilizzate il compressore per più di 15 mi-
nuti. Fatelo poi raffreddare per ca. 15 minuti.
Altrimenti può surriscaldarsi e riportare
danni duraturi.
J Il compressore non è destinato per gonfiare
ruote di camion, trattori, autovetture grandi
(larghezza delle ruote >225 mm) o altri oggetti molto voluminosi come canotti, ecc.
Indicazioni speciali
J Non gonfiate oggetti al di sopra della
pressione prevista o riportata.
J Non gonfiate mai grandi oggetti come ruote
di camion, trattori, materassi ad aria o canotti. Ciò eccede le prestazioni della pompa
e il tempo di utilizzo del compressore.
J Le indicazioni di pressione del manometro
sono valori di riferimento. Controllate la
pressione con l’aiuto di un misuratore per la
pressione d’aria tarato.
J La pressione max. di 100 PSI (7 bar) viene
raggiunta solo se i volumi di pompaggio non
superano 0,5 l.
Indicazioni di pressione consigliati
(valori indicativi)
Ruote per auto 1,65 - 2,5 Bar
Ruote per bicicletta 2,4 - 2,8 Bar
Palloni da calcio 0,9 Bar
Palloni da basket 0,6 Bar
Pallone da pallavolo 0,34 Bar
25 IT

Funzionamento
Funzionamento
Accendere / spegnere il compressore
j Aprite lo scomparto con il coperchio 6 e
prelevate il cavo di rete con il collegamento
da 12 V per auto
10
.
j Srotolate completamente il cavo di rete con
il collegamento da 12 V per auto
j Infilate il collegamento da 12 V per auto
10
.
10
nella presa da 12 V del veicolo.
j Aspettate qualche secondo, finché l’indica-
tore del manometro
indica 0.0.
2
j Eseguite le fasi di lavoro desiderate, secondo
la descrizione del seguente capitolo.
j Accendete il compressore premendo il
pulsante ON/OFF
in posizione .
3
j Spegnete il compressore premendo il
pulsante ON/OFF
j Estraete il collegamento da 12 V per auto
in posizione .
3
10
dalla presa da 12 V del veicolo.
Accendere / spegnere la luce
La fonte di luce del compressore è destinata ad
illuminare meglio il luogo di lavoro (valvola).
j Premete il pulsante ON/OFF della luce
alla posizione
, per accendere i 3 LED 14.
j Premete il pulsante ON/OFF della luce
alla posizione
Regolare l’unità di pressione
, per spegnere i 3 LED 14.
16
16
(PSI, Bar o kPa)
j Premete il tasto per l’unità di pressione “R“ 1
tante volte, fino a quando appare l’unità di
pressione desiderata sull’indicatore del
manometro.
Verificare la pressione delle ruote
Indicazione: Fate attenzione che si accenda
il LED POWER sul collegamento da 12 V per
auto
. L’indicatore del manometro 2
10
deve indicare 0.0 prima dell’inizio della
misurazione.
j Fissate il collegamento per la valvola
sulla valvola dell‘auto.
Se il collegamento per la valvola
15
tato correttamente con la valvola dell’auto,
l’indicatore del manometro
segna l’attuale
2
pressione delle ruote.
j Se questo valor corrisponde alla pressione
della ruota consigliata per il veicolo, potete
rimuovere nuovamente il collegamento per
la valvola
Aumentare / ridurre la
15
.
pressione delle ruote
Nel caso in cui il valore mostrato sia superiore o
inferiore alla pressione delle gomme raccomandata per il veicolo, seguire le seguenti istruzioni:
j Premete il tasto impostazioni “+“
fino a quando il valore mostrato sull’indicatore del manometro
sia uguale a quello
2
della pressione delle ruote.
j Accendete il compressore, posizionando l’in-
terruttore ON-/OFF-
su . Il dispositivo
3
alza e/o abbassa la pressione delle ruote a
seconda del valore inserito e si spegne automaticamente.
j Staccate il cavo della valvola
attenzione.
Importante:
j Durante il pompaggio non premete alcun
tasto
4
o 5.
j Nel caso in cui il dispositivo sia collegato alla
presa da 12 V del veicolo ma il pompaggio non
parta, spegnete l’indicatore del manometro
dopo qualche minuto. Riaccendetelo premendo il tasto per l’unità di pressione “R“
5
con molta
15
15
è mon-
o “–“ 4
.
1
2
j Srotolate il fusibile ad alta pressione 13
completamente.
26 IT

Funzionamento / Risoluzione dei problemi / Manutenzione e cura
Utilizzo delle valvole fornite
Nello scomparto del compressore si trovano
3 adattatori per valvola di uso comune.
Rispettate sempre le indicazioni relative all’oggetto da gonfiare.
Il dispositivo non termina automatica-
mente il programma di pompaggio.
Assicuratevi che le istruzioni per l’uso siano
state seguite correttamente.
Assicuratevi che sia stato inserito il valore
corretto.
· Valvola per ruota da bicicletta (valvola
Presta)
7
· Valvola per palloni sportivi
· Valvola per giocattoli gonfiabili
8
9
j Avvitate la valvola desiderata sul cavo della
valvola
. Tenete presente la pressione
15
massima dell’oggetto da gonfiare e le relative
istruzioni d’uso.
Sostituzione del fusibile del
cavo da 12 V del veicolo
j Svitate (e staccare) l’anello zigrinato 11
ruotando in senso antiorario.
j Togliete il fusibile danneggiato e sostituitelo
con uno nuovo di max. 10 Ampere.
j Riavvitate fermamente l’anello zigrinato
ruotando in senso orario.
Risoluzione dei problemi
L’indicatore del manometro 2 non si
accende.
Assicuratevi che il cavo da 12 V del veicolo 10
sia inserito correttamente e ci sia passaggio
di corrente (il LED POWER del cavo da 12 V
del veicolo
è illuminato).
10
Assicuratevi che il LED POWER del cavo a
12 V del veicolo
sia illuminato. In caso
10
contrario, controllate sia il fusibile del cavo a
12 V del veicolo
, sia il fusibile della presa
10
del veicolo.
Nonostante l’interruttore ON- / OFF 3
sia acceso (in posizione
), il dispositivo
non inizia a pompare.
Accendete il quadro (senza mettere in moto).
11
Il cavo di rete e/o la presa a 12 V si
surriscaldano.
Pericolo di corto circuito – Staccate imme-
diatamente il dispositivo dalla rete.
L’indicatore del manometro 2 mostra
valori sbagliati o illegibili.
Assicuratevi che il dispositivo abbia misurato
la pressione effettiva delle ruote (cfr. Il capitolo “controllo della pressione delle ruote“).
Staccate il cavo da 12 V 10 per almeno 5 se-
condi dalla presa da 12 V del veicolo e allontanate il cavo della valvola
dal veicolo.
15
Attendete che l’indicatore del manometro
mostri di nuovo 0.0. Ricominciate con la
procedura.
Il dispositivo pompa, ma la ruota non si
,
gonfia.
Assicuratevi che il cavo della valvola 15 sia
fissato correttamente sulla valvola del veicolo.
Assicuratevi che la ruota non sia sgonfia.
Manutenzione e cura
Il dispositivo non necessita di alcuna manutenzione.
AVVISO!
Staccate la corrente dai dispositivi
elettrici prima di effettuare la pulizia.
j Spegnete il dispositivo.
j Staccate il cavo da 12 V dalla presa a 12 V
del veicolo.
j Pulite il dispositivo con un panno asciutto.
Non utilizzate soluzioni pulenti o altri
detergenti aggressivi.
2
27 IT

Assistenza / Garanzia / Smaltimento
Assistenza
AVVISO!
da personale qualificato, in modo da man-
tenere integra la sicurezza del dispositivo.
AVVISO!
cavo di collegamento solo da personale
qualificato, in modo da mantenere integra
la sicurezza del dispositivo.
Garanzia
Le condizioni di garanzia si riferiscono ai difetti
legati alla produzione e ai materiali. In caso di
apparecchio difettato, riportatelo al rivenditore
specializzato, o al punto vendita dove è stato
acquistato. Per usufruire della garanzia e delle
riparazioni sono necessari:
- Una copia dello scontrino (ricevuta di conse-
gna o ricevuta d’acquisto) con la data di
consegna.
- Motivo del reclamo o descrizione del guasto.
Smaltimento
la confezione è composta da materiali a basso
impatto ambientale, riciclabili negli appositi siti
di raccolta.
Fate riparare il dispositivo solo
Fate sostituire la spina o il
Non buttate i dispositivi elettrici
nei rifiuti domestici!
Secondo la direttiva europea 2002 / 96 / EC sui
vecchi apparecchi elettrici ed elettronici e la
recezione nel diritto nazionale, gli apparecchi
elettrici usati devono essere raccolti separatamente per provvedere al riciclaggio in modo
ecologico.
Per informazioni sullo smaltimento degli
apparecchi elettrici usati, consultate l’amministrazione cittadina.
28 IT
Le illustrazioni possono leggermente differire dal
prodotto. Ci si riserva il diritto a modifiche che
siano funzionali al miglioramento tecnico.
Decorazione non compresa.

Seznam obsahu
Úvod
Používání k určenému účelu ....................................................................................................................Strana 30
Obsah dodávky .............................................................................................................................................Strana 30
Popis kompresoru a dílů ............................................................................................................................Strana 30
Technické údaje ............................................................................................................................................Strana 30
Bezpečnost
Všeobecná bezpečnostní upozornění ....................................................................................................Strana 31
Zvláštní pokyny.............................................................................................................................................Strana 31
Obsluha
Zapnutí a vypnutí kompresoru ................................................................................................................Strana 31
Zapnutí a vypnutí světla ............................................................................................................................Strana 32
Nastavení jednotky tlaku (PSI, bar nebo kPa) .....................................................................................Strana 32
Zkoušení tlaku v pneumatikách ..............................................................................................................Strana 32
Zvýšení nebo snížení tlaku v pneumatikách .......................................................................................Strana 32
Použití dodaných ventilů ..........................................................................................................................Strana 32
Výměna pojistky na zástrčce kompresoru ............................................................................................Strana 33
Hledání závad ............................................................................................................................................Strana 33
Údržba a ošetřování .............................................................................................................................Strana 33
Servis .................................................................................................................................................................Strana 33
Záruka ..............................................................................................................................................................Strana 33
Odstranění do odpadu .......................................................................................................................Strana 34
29 CZ

Úvod
V tomto návodu k obsluze a na přístroji budou použité následující piktogramy:
Přečíst návod k obsluze!
Dbát na varovná a bezpečnostní
upozornění!
Kompresor KD 7.0
Úvod
Před uvedením do provozu se seznamte
s funkcemi přístroje a informujte se o
správném zacházení . K tomu si přečtěte
důkladně následující návod k obsluze. Tento
návod si dobře uschovejte. Předávejte tyto podklady spolu s přístrojem.
Používání k určenému účelu
Přístroj je vhodný k napumpování pneumatik a
duší osobních vozidel, kol, motocyklů, hraček a
sportovních artiklů. Je připuštěný jen k privátnímu
použití. Každé jiné použití nebo pozměnění přístroje platí jako používání k jinému, než určenému
účelu a přináší sebou značná nebezpečí. Výrobce
neručí za škody vzniklé použitím k jinému než k
určenému účelu.
Nebezpečí zranění a ohrožení
života dětí!
Přístroj a obalový materiál
odstraňujte do odpadu ekologicky!
Popis kompresoru a dílů
Tlačítko „R“ na volení jednotky tlaku (PSI,
1
Bar nebo kPa)
Displej manometru (Digital Display)
2
Vypínač kompresoru (ON/OFF)
3
Tlačítko pro přednastavení „–“
4
Tlačítko pro přednastavení „+“
5
Víko přihrádky
6
Závodní ventilek (ventil Presta)
7
Ventilek pro nafukování sportovních míčů
8
Ventilek pro nafukovací hračky
9
Kabel se zástrčkou pro připojení na 12 V a
10
kontrolka POWER-LED
Ozubený kroužek (přípoj na 12 V v autě)
11
Pojistka
12
Vysokotlaká hadička
13
Světlo (3 LED)
14
Koncovka pro připojení na ventil
15
Vypínač světla ON/OFF
16
Technické údaje
Obsah dodávky
Zkontrolujte ihned po vybalení obsah dodávky.
Zkontrolujte, jestli není přístroj poškozený. Neuvádějte vadný přístroj nebo jeho díly do provozu.
1 kompresor KD 7.0
1 závodní ventilek (ventil Presta)
1 ventilek pro nafukování sportovních míčů
1 ventilek pro nafukování hraček
1 návod k obsluze
30 CZ
Artikl č.: 97136
Provozní napětí: 12 V
Výkon: maximálně 7 bar / 100 PSI
Přesnost: 0,1 bar při < 3,4 bar
Druh provozu: periodický, přerušovaný
provoz, 15 minut (manuálně)
Světlo: 3 x LED, výměna není možná
Váha: 1 kg
Rozměry: cca 21,5 x 16,5 x 7 cm
(Š x V x H)
Hladina zvuku: 000 dB (A)
Vibrace: 0,0 m/s
2

Bezpečnost / Obsluha
Bezpečnost
Všeobecná bezpečnostní
upozornění
VAROVÁNÍ
upozornění a pokyny. Nedbání na bezpečnostních
upozornění a pokyny může vést k zásahu elektrickým proudem, požáru nebo k těžkým zraněním.
Uschovejte si všechna bezpečnostní upozornění
a pokyny pro budoucí použití.
J
hledu s obalovým materiálem. Hrozí nebez-
pečí udušení.
J Přístroj nemají obsluhovat osoby (včetně
dětí) s omezenými fyzickými, senzorickými
nebo duševními schopnostmi nebo bez zkušeností, ledaže jsou poučené o používání přístroje v zájmu vlastní bezpečnosti a pod dozorem příslušné osoby. Děti mají zůstat pod
dohledem, aby si nehráli s přístrojem.
J Do přístroje nesmí vniknout žádná tekutina.
V opačném případě hrozí nebezpečí věcných
škod, zásahu elektrickým proudem a ohrožení života.
J Nenechávejte kompresor při používání bez
dohledu.
J POZOR NEBEZPEČÍ POPÁLENÍ! Vysokotlaká
hadička
nechte nejdříve vychladnout, než se jí před
navíjením znovu dotknete.
J Kompresor se smí používat, připojený a na-
pájený napětím 12 V jen u stojícího vozidla a
s vypnutým motorem. Používání během jízdy
není dovolené.
J V případě potřeby ještě kontrolujte tlak
vzduchu pomocí manometru.
J Nevystavujte přístroj vysokým teplotám,
silným vibracím nebo vysoké vlhkosti.
J Poškozené přístroje se nesmí dále používat.
Nechte je opravit odborníkem.
J Nepoužívejte kompresor déle než 15 minut.
Potom ho nechte cca 15 minut vychladnout.
Přečtěte si všechna bezpečnostní
NEBEZPEČÍ ZRANĚNÍ A OHRO-
ŽENÍ ŽIVOTA MALÝCH DĚTÍ!
Nenechávejte děti nikdy bez do-
je za provozu horká. Proto ji
13
V opačném případě může dojít k přehřátí a
trvalému poškození.
J Kompresor není určený k pumpování pneu-
matik nákladních vozů, traktorů, velkých
pneumatik osobních vozů (šířka pneumatiky
>225 mm) nebo velkoobjemových předmětů,
jako jsou nafukovací čluny, atd..
Zvláštní pokyny
J Nepumpujte předměty na větší tlak než je
předepsáno.
J Nepumpujte nikdy velké předměty jako jsou
třeba pneumatiky nákladních vozů, traktorů,
nafukovací matrace nebo čluny Toto přesahuje výkon přístroje a zároveň jeho schopnost
provozu spolu s životností.
J Údaje tlaku na displeji přístroje jsou orien-
tační hodnoty. Kontrolujte tlak kalibrovaným
manometrem.
J Maximální tlak 100 PSI (7 bar) je možné
dosáhnout jen při pumpovaném objemu do
0,5 litru.
Nezávazné údaje pro tlaky (orientační
hodnoty)
Automobilové pneumatiky 1,65 - 2,5 bar
Pneumatiky jízdních kol 2,4 - 2,8 bar
Fotbalový míč 0,9 bar
Basketbalový míč 0,6 bar
Volejbalový míč 0,34 bar
Obsluha
Zapnutí a vypnutí kompresoru
j Otevřete víko 6 přihrádky a vyjměte kabel
se zástrčkou
12 V v autě.
j Rozviňte úplně připojovací kabel pro 12 V.
j Zastrčte zástrčku kabelu
autě s napětím 12 V.
j Vyčkejte několik vteřin, až ukáže manometr
hodnotu 0.0.
pro napájení přes přípojku
10
do zásuvky v
10
2
31 CZ

Obsluha
j Proveďte požadované úkony, jak je popsáno
v následujících kapitolách.
j Zapněte kompresor stisknutím tlačítka
(ON/OFF) do polohy
.
j Vypněte kompresor stisknutím tlačítka
(ON/OFF) do polohy
j Vytáhněte zástrčku
.
ze zásuvky s napětím
10
3
3
12 V v autě.
Zapnutí a vypnutí světla
Světlo je určené na lepší osvětlení pracoviště
(ventilu).
j Zapněte světlo se 3 LED
tlačítka ON/OFF
16
j Vypněte světlo se 3 LED
tlačítka ON/OFF
Nastavení jednotky tlaku
16
stisknutím
14
do polohy .
stisknutím
14
do polohy .
(PSI, bar nebo kPa)
j Stiskněte tlačítko „R“ 1 na volbu jednotky
tlaku tolikrát, až se objeví žádaná jednotka
tlaku na manometru.
Zvýšení nebo snížení tlaku
v pneumatikách
Jestliže je naměřený tlak vyšší nebo nižší než
doporučený tlak, pak postupjte nasledujícím
způsobem:
j Stiskněte tlačítko přednastavení „+“
tlačítko přednastavení „–“
tolikrát až na-
4
stavíte na manometru hodnotu odpovídající
doporučenému tlaku pro pneumatiku.
j Zapněte kompresor stisknutím tlačítka ON/
OFF
do polohy . Přístroj nyní zvýší resp.
3
sníží tlak v pneumatice na přednastavenou
hodnoty a automaticky se vypne.
j Sejměte opatrně koncovku
15
.
Důležité:
j Během pumpování nepoužívejte tlačítka
nebo
.
5
j Jestliže jste připojili kompresor na napětí 12 V
ve vozidle a nezapnuli pumpování, vypíná se
po několika minutách automaticky ukazatel
manometru
vést tlačítkem „R“
. Novou aktivaci můžete pro-
2
pro nastavení jednotky
1
tlaku.
5
resp.
4
Zkoušení tlaku v pneumatikách
j Rozviňte úplně vysokotlakou hadičku 13.
Upozornění: Dbejte na to, aby svítila kontrolka POWER-LED na zástrčce
čátkem měření musí manometr
. Před za-
10
ukazovat
2
hodnotu 0.0.
j Zafixujte koncovku hadice
Při správném připojení koncovky
vozidla ukazuje manometr
na ventil vozidla.
15
na ventil
15
aktuální tlak v
2
pneumatice.
j Jestliže odpovídá tato hodnota doporučenému
tlaku pro pneumatiku, můžete koncovku
15
zase sejmout.
32 CZ
Použití dodaných ventilů
Ve víku 6 přihrádky kompresoru se nachází
3 běžné ventilové adaptéry.
Dbejte vždy na doporučení v návodu pro předmět, který nafukujete.
· Závodní ventil (ventil Presta)
· Ventil pro sportovní míče
· Ventil pro nafukování hraček
7
8
9
j Našroubujte potřebný ventil na koncovku 15.
Dodržujte doporučený maximální tlak pro
nafukovaný předmět a čtěte návod k jeho
obsluze.

Obsluha / Hledání závad / Údržba a ošetřování / Servis / Záruka
Výměna pojistky na
zástrčce kompresoru
manometr 2 zase hodnotu 0.0. Opakujte
postup od začátku.
j Povolte a sejměte kroužek 11 otáčením proti
směru otáčení hodinových ručiček.
j Vyměňte poškozenou pojistku za novou,
maximálně s 10 A.
j Našroubujte znovu kroužek
zpět otáčením
11
ve směru otáčení hodinových ručiček.
Hledání závad
Ukazatel manometru 2 nesvítí.
Přezkoušejte zástrčku 10 pro 12 V, jestli je
správně zastrčená a pod napětím.
Zkontrolujte, jestli svítí kontrolka POWER-LED
na zástrčce pro 12 V
ka nesvítí zkontrolujte pojistku v zástrčce
. V případě, že kontrol-
10
10
a také pojistku pro zásuvku na 12 V ve vozidle.
Přístroj nestartuje pumpování, přestože
je vypínač
v poloze .
3
Otočte klíček zapalování do první polohy –
bez nastartování motoru.
Kompresor neukončí automaticky před-
nastavené pumpování.
Kontrolujte, jestli jste postupovali podle
pokynů k obsluze.
Kontrolujte, jestli jste přednastavili správnou
hodnotu doporučeného tlaku.
Přívodní kabel nebo zástrčka kompresoru
pro 12 V jsou horké.
Nebezpečí zkratu –odpojte ihned kompresor
od napájení z vozidla.
Kompresor běží, ale pneumatika se neplní
vzduchem.
Zkontrolujte jestli je správně zafixovaná
koncovka
na ventilu vozidla.
15
Kontrolujte, jestli není pneumatika netěsná.
Údržba a ošetřování
Přístroj nevyžaduje žádnou údržbu.
VAROVÁNÍ
Před ošetřováním odpojte elek-
trické přístroje od přívodu elektrického proudu.
j Vypněte přístroj.
j Vytáhněte zástrčku
ze zásuvky pro 12 V
10
ve Vašem vozidle.
j Čistěte přístroj suchým hadrem. Nepoužívej-
te na čistění v žádném případě rozpouštědla
nebo agresivní čistící prostředky.
Servis
VAROVÁNÍ
Nechávejte přístroj opravovat
jen kvalifikovanými pracovníky. Tím zůstane
zajištěná bezpečnost přístroje.
VAROVÁNÍ
Výměnu zástrčka nebo
přívodního kabel nechávejte provádět jen
kvalifikovaným odborníkem. Tím zůstane
zajištěná bezpečnost přístroje.
Záruka
Manometr 2 ukazuje nesprávnou nebo
nečitelnou hodnotu.
Zajistěte, aby přístroj změřil nejdříve aktuální
tlak v pneumatice (viz. kapitola „Měření
tlaku v pneumatikách“).
Vytáhněte na nejméně 15 vteřin zástrčku 10
ze zásuvky na 12 V ve vozidle a sejměte
koncovku
z ventilu. Počkejte až ukáže
15
Všeobecné podmínky záruky se vztahují jen na
vady materiálu nebo chyby při výrobě.
Závadný přístroj odevzdejte u Vašeho odborného
prodejce. V zájmu urychlení záručních a opravářských prací potřebujeme následující doklady:
- Kopii pokladní poukázky (dodací list,
účtenku) s datem zakoupení.
- Důvod reklamace nebo popis závady.
33 CZ

Odstranění do odpadu
Odstranění do odpadu
Balení je vyrobené z ekologických materiálů,
které můžete odstranit do odpadu u místních
sběren recyklovatelných materiálů.
Neodhazujte elektrické přístroje do
domácího odpadu!
Podle evropské směrnice 2002/96/EC, týkající se
starých elektrických a elektronických přístrojů a
realizace národního práva, se musí nepotřebné
elektrické přístroje sbírat odděleně a odevzdávat
k ekologickému, opětovnému zhodnocení.
Informujte se o možnostech odstranění elektrických přístrojů do odpadu u Vaší obce nebo
správy města.
34 CZ
Zobrazení se mohou nepatrne lišit od vzhledu
výrobku. Zmeny v popisu provedené z duvodu
technického vývoje výrobku jsou vyhrazeny.
Dekorace není v obsahu.

Obsah
Úvod
Použitie podľa predpisov ...........................................................................................................................Strana 36
Obsah ...............................................................................................................................................................Strana 36
Popis častí ......................................................................................................................................................Strana 36
Technické údaje ............................................................................................................................................Strana 36
Bezpečnosť
Všeobecné bezpečnostné predpisy .........................................................................................................Strana 37
Špeciálne pokyny .........................................................................................................................................Strana 37
Obsluha
Zapnutie / vypnutie kompresora ..............................................................................................................Strana 38
Zapnutie / vypnutie svetla..........................................................................................................................Strana 38
Nastavenie jednotky tlaku (PSI, bar alebo kPa)..................................................................................Strana 38
Kontrola tlaku v pneumatike ...................................................................................................................Strana 38
Zvýšenie / zníženie tlaku v pneumatike .................................................................................................Strana 38
Použitie ďalších ventilov ............................................................................................................................Strana 38
Výmena poistky na 12 V automobilovej prípojke ...............................................................................Strana 39
Vyhľadávanie chýb .................................................................................................................................Strana 39
Údržba a ošetrovanie ..........................................................................................................................Strana 39
Servis .................................................................................................................................................................Strana 39
Záruka ..............................................................................................................................................................Strana 40
Likvidácia .......................................................................................................................................................Strana 40
35 SK

Úvod
Vtomto návode na obsluhu / na prístroji sú použité nasledovné piktogramy:
Prečítajte si návod na obsluhu!
Rešpektujte výstražné abezpečnostné
pokyny!
Kompresor KD 7.0
Úvod
Pred prvým uvedením prístroja do
činnosti sa oboznámte so všetkými
funkciami prístroja azabezpečte si
informácie ohľadom správneho používania prístroja. Dôsledne si prečítajte nasledujúci návod
na obsluhu. Tento návod si odložte. Ak prístroj
odovzdáte tretej osobe, taktiež jej priložte všetky
podklady.
Použitie podľa predpisov
Prístroj je vhodný na hustenie neporušených
pneumatík pre osobné motorové vozidlá, dvojkolesové dopravné prostriedky, detských dopravných
prostriedkov aduší, ako aj na hustenie nafukovacích hračiek, športových artiklov aartiklov na
voľný čas. Prístroj je určený výlučne na súkromné
použitie. Ak sa prístroj použije na akýkoľvek iný
účel, alebo sa na ňom vykonajú zmeny, takéto
použitie sa nepovažuje za štandardné askrýva
vsebe značné riziká. Výrobca neručí za škody
vzniknuté vdôsledku nesprávneho používania
prístroja.
Nebezpečenstvo ohrozenia života
azranenia malých detí adetí!
Obal aprístroj zlikvidujte
ekologickým spôsobom!
1 kompresor KD 7.0
1 galuskový ventil (ventil Presta)
1 ventil na lopty
1 ventil na nafukovacie hračky
1 návod na obsluhu
Popis častí
Tlačidlo voľby jednotky tlaku „R“ (PSI, bar
1
alebo kPa)
Displej manometra (digitálny displej)
2
Vypínač kompresora ZAP/VYP
3
Tlačidlo pre nastavenie „–“
4
Tlačidlo pre nastavenie „+“
5
Uzáver príručnej skrinky
6
Galuskový ventil (ventil Presta)
7
Ventil na lopty
8
Ventil na nafukovacie hračky
9
Sieťový kábel s 12 V automobilovou prípojkou
10
avýkonná LED dióda
Ryhovaný krúžok (12 Vautomobilová prípojka)
11
Poistka
12
Vysokotlaková hadica
13
Osvetlenie (3 LED diódy)
14
Prípojka ventilu
15
Vypínač svetla ZAP/VYP
16
Technické údaje
Obsah
Po vybalení prístroja ihneď skontrolujte obsah
balenia. Prístroj avšetky ostatné diely skontrolujte, či nie sú poškodené. Poškodený prístroj
alebo iné diely nepoužite.
36 SK
Číslo artikla: 97136
Prevádzkové napätie: 12 V
Výkon: max. 7 barov / 100 PSI
Presnosť: 0,1 baru pri < 3,4 baru
Pracovný režim: periodický prerušovaný
režim, 15 min. (manuálny)
Osvetlenie: 3 x LED diódy, nie sú
vymeniteľné

Úvod / Bezpečnosť
Hmotnosť: 1 kg
Rozmery: cca 21,5 x 16,5 x 7 cm
(Š x V x H)
Akustický tlak: 000 dB (A)
Vibrácie: 0,0 m/s
Bezpečnosť
2
Všeobecné bezpečnostné
predpisy
VAROVANIE! Prečítajte si bezpečnostné
pokyny a poučenie. Nerešpektovaním bezpečnostných pokynov apoučení sa vystavujete nebezpečenstvu zasiahnutia elektrickým prúdom,
vzniku požiaru a / alebo ťažkým zraneniam.
Všetky bezpečnostné pokyny apoučenia si odložte.
J
nikdy bez dozoru vblízkosti obalového
J Tento prístroj nesmú používať osoby (vrátane
J Do prístroja sa nesmie dostať žiadna kvapalina.
J Kompresor nenechávajte počas používania
J POZOR NEBEZPEČENSTVO POPÁLENIA!
J Kompresor sa smie pomocou automobilového
NEBEZPEČENSTVO OHROZENIA
ŽIVOTA AZRANENIA MALÝCH
DETÍ A DETÍ! Deti nenechajte
materiálu. Hrozí nebezpečenstvo ohrozenia
života udusením.
detí) sobmedzenými fyzickými, senzorickými
alebo duševnými schopnosťami, alebo osoby
snedostatkom skúseností a / alebo vedomostí,
iba ak by mali zabezpečený osobný dozor
aboli poučení oobsluhe prístroja. Deti by
mali mať zabezpečený dozor, aby sa sprístrojom nehrali.
Vopačnom prípade hrozí nebezpečenstvo
ohrozenia života zasiahnutím elektrického
prúdu ariziko vzniku vecných škôd.
bez dozoru.
Vysokotlaková hadica
zohreje. Hadice sa nedotýkajte, ani ju nenavíjajte, pokiaľ nevychladne.
adaptéra pripojiť (spustiť) len na palubnú
sieť stojaceho vozidla svypnutým motorom.
sa počas prevádzky
13
Je neprípustné kompresor používať počas jazdy.
J Tlak vzduchu eventuálne ešte skontrolujte
pomocou manometra.
J Prístroj nevystavujte vysokým teplotám,
silným vibráciam ani vysokej vlhkosti.
J Poškodený prístroj vžiadnom prípade nepou-
žite. Zabezpečte jeho opravu odborníkom.
J Kompresor nepoužívajte dlhšie ako 15 minút,
potom ho nechajte na cca 15 minút vychladnúť. Kompresor sa môže vopačnom prípade
prehriať atrvale poškodiť.
J Kompresor nie je dimenzovaný na hustenie
pneumatík pre nákladné automobily, traktory,
veľkých pneumatík pre osobné automobily
(šírka pneumatiky >225 mm) alebo iných
objemných predmetov, ako sú nafukovacie
člny atď.
Špeciálne pokyny
J Pri hustení predmetov neprekročte predpo-
kladaný príp. udaný tlak.
J Nikdy nehustite väčšie predmety ako sú pri-
bližne pneumatiky nákladných automobilov
alebo traktorov, nafukovacie matrace alebo
nafukovacie člny. Takto by bol prekročený
výkon kompresora ajeho doba chodu.
J Údaje otlaku indikované manometrom sú len
orientačné, tlak ešte skontrolujte pomocou
kalibrovaného manometra.
J Maximálny tlak 100 PSI (7 barov) sa dosiahne
len vtedy, keď čerpací objem nepresiahne 0,5 l.
Nezáväzné údaje o tlakoch (smerné hodnoty)
Automobilové pneumatiky 1,65 - 2,5 baru
Bicyklové pneumatiky 2,4 - 2,8 baru
Lopta 0,9 baru
Basketbalová lopta 0,6 baru
Volejbalová lopta 0,34 baru
37 SK

Obsluha
Obsluha
Zapnutie / vypnutie kompresora
j Otvorte uzáver príručnej skrinky 6 avyberte
sieťový kábel s 12 V automobilovou prípojkou
.
10
j Sieťový kábel s 12 V automobilovou prípoj-
kou
úplne odviňte.
10
j Sieťový kábel s 12 V automobilovou prípoj-
kou
vsuňte do 12 V automobilovej zásuvky.
10
j Počkajte niekoľko sekúnd, pokiaľ sa na disp-
leji manometra
nezobrazí 0.0.
2
j Postupujte podľa pokynov uvedených
vnasledovných kapitolách.
j Kompresor zapnite stlačením vypínača
ZAP/VYP
do polohy .
3
j Kompresor vypnite stlačením vypínača
ZAP/VYP
j 12 V automobilovú prípojku
do polohy .
3
vytiahnite z
10
12 V automobilovej zásuvky.
Zapnutie / vypnutie svetla
Svetlo kompresora slúži na osvetlenie manipulačnej zóny (ventil).
j Vypínač svetla ZAP/VYP
polohy
, tým zapnete 3 LED diódy 14.
j Vypínač svetla ZAP/VYP
polohy
Nastavenie jednotky tlaku
, tým vypnete 3 LED diódy 14.
prepnite do
16
prepnite do
16
(PSI, bar alebo kPa)
j Tlačidlo voľby jednotky tlaku „R“ 1 stláčajte
dovtedy, pokiaľ sa na displeji manometra
neobjaví želaná jednotka tlaku.
2
prípojke
metra
musí svietiť. Na displeji mano-
10
sa musí pred začiatkom merania
2
zobraziť 0.0.
j Prípojku ventilu
Ak je prípojka ventilu
upevnite na ventil vozidla.
15
na ventile automo-
15
bilu upevnená korektne, na displeji manometra
sa zobrazí aktuálny tlak v pneumatike.
2
j Ak tento tlak zodpovedá odporučenému tla-
ku pre daný typ vozidla, prípojku ventilu
môžete odstrániť.
Zvýšenie / zníženie tlaku
v pneumatike
Ak je nameraná hodnota tlaku vyššia alebo nižšia
ako je odporučená hodnota tlaku vpneumatike
pre daný typ vozidla, túto hodnotu prispôsobte
nasledovne:
j Stlačte tlačidlo pre nastavenie „+“
„–“
aprednastavenú hodnotu tlaku na
4
displeji manometra
mu tlaku.
j Stlačením vypínača ZAP/VYP
zapnite kompresor. Prístroj tlak vpneumatike zvýši príp. zníži vzávislosti od prednastavenej hodnoty aautomaticky sa vypne.
j Prípojku ventilu
Dôležité upozornenie:
j Počas hustenia pneumatiky nestlačte žiadne
ztlačidiel
alebo 5.
4
j Keď po pripojení prístroja do12 V automobi-
lovej prípojky nezapnete kompresor, displej
manometra
2
vypne. Displej môžete znova aktivovať stlačením tlačidla pre jednotku tlaku „R“
Použitie ďalších ventilov
prispôsobte správne-
2
do polohy
3
opatrne odstráňte.
15
sa po niekoľkých minútach
5
príp.
.
1
15
Kontrola tlaku v pneumatike
j Vysokotlakovú hadicu 13 úplne odviňte.
Poznámka: LED dióda na 12 V automobilovej
38 SK
Vuzávere príručnej skrinky 6 kompresora sa
nachádzajú 3 bežné ventilové adaptéry.
Vždy rešpektujte pokyny uvedené vnávode pre
objekt, ktorý budete nafukovať.

Obsluha / Vyhľadávanie chýb / Údržba a ošetrovanie / Servis
· Galuskový ventil (ventil Presta)
· Ventil na lopty
8
· Ventil na nafukovacie hračky
7
9
j Želaný ventil naskrutkujte na koncovku
ventilu
. Dodržte stanovený maximálny
15
tlak objektu, ktorý nafukujete aprečítajte si
príslušný návod na obsluhu.
Výmena poistky na 12 V
automobilovej prípojke
j Uvoľnite (a odstráňte) ryhovaný krúžok 11,
krúžok vyskrutkujte otáčaním proti smeru
pohybu hodinových ručičiek.
j Znehodnotenú poistku vyberte anahraďte ju
novou, max. 10 Apoistkou.
j Ryhovaný krúžok
ním otáčajte vsmere pohybu hodinových
ručičiek.
Vyhľadávanie chýb
Displej manometra 2 nesvieti.
Skontrolujte, či je 12 Vautomobilová prípoj-
ka
úplne akorektne zasunutá ači je
10
vytvorený kontakt (LED dióda 12 V automobilovej prípojky
Skontrolujte, či LED dióda 12 V automobilo-
vej prípojky
lujte poistku 12 V automobilovej prípojky
atiež poistku 12 V zásuvky v automobile.
Prístroj aj napriek zapnutému vypínaču
ZAP / V YP
3
Kľúč zapaľovania / zapaľovanie prepnite do
prvej polohy (motor neštartujte).
opäť priskrutkujte, teraz
11
svieti).
10
svieti. Ak nesvieti, skontro-
10
(v polohe ) nefunguje.
10
Sieťov ý kábel a / alebo 12 Vautomobilová
prípojka sa zohrievajú.
Nebezpečenstvo vzniku skratu – prístroj
okamžite odpojte od elektrickej siete vozidla.
Displej manometra 2 zobrazuje hodnotu
nesprávne alebo nečitateľne.
Presvedčte sa, či prístroj najskôr zmeral Váš
aktuálny tlak v pneumatike (pozri kapitolu
„Kontrola tlaku v pneumatike“).
12 V automobilovú prípojku 10 vytiahnite
aspoň na 5 sekúnd z 12 V zásuvky automobilu azvozidla odstráňte prípojku ventilu
Počkajte, pokiaľ sa na displeji manometra
opäť neobjaví 0.0. Postup zopakujte.
Prístroj je v činnosti, tlak vpneumatike
sa však nezvyšuje.
Presvedčte sa, či je prípojka ventilu 15
korektne upevnená ne ventile vozidla.
Skontrolujte tesnosť pneumatiky.
Údržba a ošetrovanie
Prístroj si nevyžaduje údržbu.
VAROVANIE! Elektrické prístroje musia byť
počas ich ošetrovania odpojené zo siete.
j Prístroj vypnite.
j Vytiahnite 12 V automobilovú prípojku
12 V zásuvky Vášho vozidla.
j Prístroj vyčistite suchou handričkou. Vžiad-
nom prípade nepoužívajte rozpúšťadlá alebo
iné agresívne čistiace prostriedky.
Servis
10
15
z
.
2
Prístroj nevypína automaticky.
Presvedčte sa, či ste obsluhu zvládli korektne.
Presvedčte sa, či ste nastavili korektnú
hodnotu.
VAROVANIE! Opravu prístroja zverte len
kvalifikovanému odborníkovi. Tak bude garan-
tovaná stála bezpečnosť prístroja.
VAROVANIE! Konektor akábel smie vy-
meniť len kvalifikovaný odborník. Tak bude
garantovaná stála bezpečnosť prístroja.
39 SK

Záruka / Likvidácia
Záruka
Všeobecné záručné podmienky sa vzťahujú na
výrobné amateriálové chyby.
Ak je prístroj chybný, vráťte ho vpríslušnej
predajni. Na rýchle vybavenie záručných plnení
aopráv budete potrebovať nasledovné doklady:
- Kópiu pokladničného lístka (dodací list,
pokladničný lístok) sdátumom kúpy.
- Dôvod reklamácie alebo popis chyby.
Likvidácia
Obal je zložený zekologických materiálov, tento
môžete zlikvidovať prostredníctvom miestnych
recyklačných zberní.
Elektrospotrebiče nelikvidujte
spolu sdomácim odpadom!
Na základe Európskej smernice 2002 / 96 / EC
oelektrických aelektronických použitých spotrebičoch arealizácii do národného práva musia
byť elektrospotrebiče zhromažďované separátne
adodávané do zariadení na ekologickú recykláciu.
Omožnostiach likvidácie použitých elektrospotrebičov sa informujte na správe Vašej obce alebo
mesta.
40 SK
Obrázky nemusia celkom korešpondovat s originálnym produktom. Zmeny súvisiace s technickým rozvojom vyhradené. Dekorácia nie je
súcastou dodávky.

SystemPartnerAutoteile GmbH & Co. KG
Greschbachstr. 1 76229 Karlsruhe
SystemPartnerAutoteile GmbH & CO.
Industrie Str. 31 CH-8112 Otelfingen
SPA Systems s.r.o. Pod Visnovkou 1661/37
140 00 Praha 4 - Krc - CZ
www.aeg-automotive.com
AEG is a registered trademark used under license from AB Electrolux (publ)
Stand der Informationen: 11 / 2010 • Ident.-No.: 97136112010
 Loading...