

Page 1
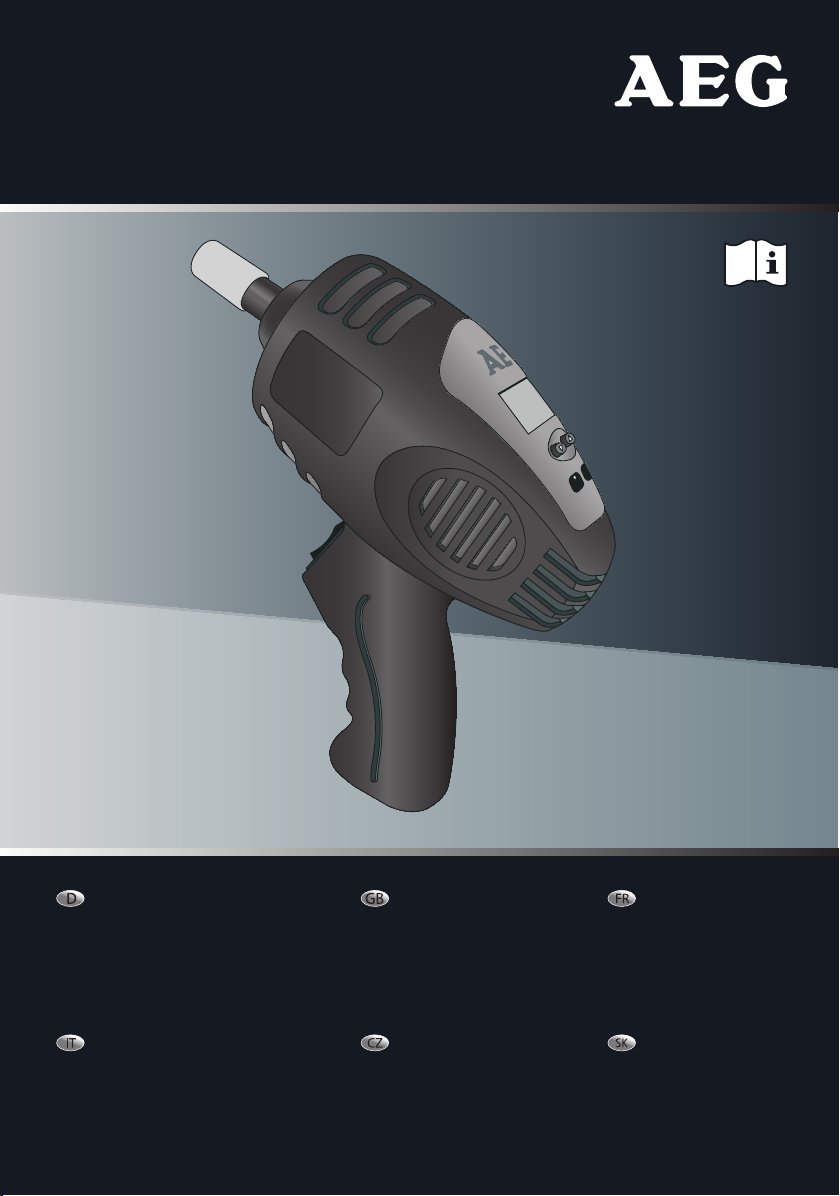
Schlagschrauber
SD 340
Schlagschrauber
Bedienungs- und
Sicherheitshinweise
Trapano avvitatore
a percussione
Indicazioni per l’uso e
per la sicurezza
Impact wrench
Operation and Safety
Notes
Nárazový
utahovák
Pokyny pro obsluhu a
bezpečnostní pokyny
97135
Visseuse à
percussion
Instructions d‘utilisation
et consignes de sécurité
Impulzový
skrutkovač
Pokyny pre obsluhu a
bezpečnostné pokyny
Page 2

Klappen Sie vor dem Lesen die Seite mit den Abbildungen aus und machen Sie sich
anschließend mit allen Funktionen des Gerätes vertraut.
Before reading, unfold the page containing the illustrations and familiarise yourself with all
functions of the device.
Avant de lire le mode d‘emploi, ouvrez la page contenant les illustrations et familiarisezvous ensuite avec toutes les fonctions de l‘appareil.
Prima di leggere aprire la pagina con le immagini e prendere confidenza con le diverse
funzioni dell’apparecchio.
Před čtením si otevřete stranu s obrázky a potom se seznamte se všemi funkcemi přístroje.
Pred čítaním si odklopte stranu s obrázkami a potom sa oboznámte so všetkými funkciami
prístroja.
D Bedienungs- und Sicherheitshinweise Seite 5
GB Operation and Safety Notes Page 13
FR Instructions d‘utilisation et consignes de sécurité Page 21
IT Indicazioni per l’uso e per la sicurezza Pagina 29
CZ Pokyny pro obsluhu a bezpečnostní pokyny Strana 37
SK Pokyny pre obsluhu a bezpečnostné pokyny Strana 45
Page 3
11
10
1 2 3
4
5
8
9
6
7
12 13
14 1716
15
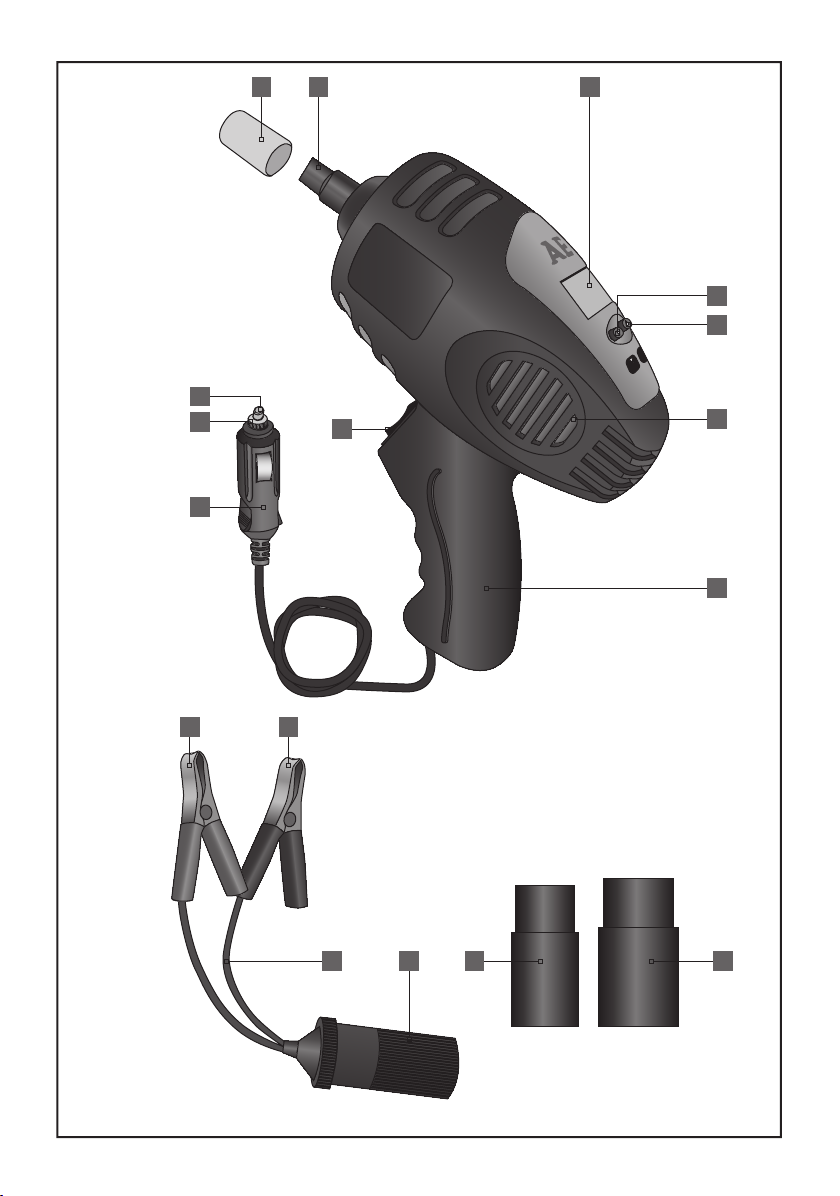
17 mm /
19 mm
21 mm /
23 mm
Page 4

Inhaltsverzeichnis
Einleitung
Bestimmungsgemäßer Gebrauch ................................................................................................................Seite 6
Lieferumfang .....................................................................................................................................................Seite 6
Teilebeschreibung ............................................................................................................................................ Seite 6
Technische Daten ............................................................................................................................................. Seite 7
Sicherheit
Allgemeine Sicherheitshinweise für Elektrowerkzeuge ......................................................................... Seite 7
1) Arbeitsplatz...................................................................................................................................................Seite 7
2) Elektrische Sicherheit ................................................................................................................................ Seite 7
3) Sicherheit von Personen ...........................................................................................................................Seite 8
4) Sorgfältiger Umgang und Gebrauch von Elektrowerkzeugen ..................................................... Seite 8
5) Wartung .........................................................................................................................................................Seite 9
Spezielle Sicherheitshinweise für Schlagschrauber .............................................................................. Seite 9
Bedienung
Anschluss an 12 V-Steckdose ....................................................................................................................... Seite 9
Anschluss an Batterie ..................................................................................................................................... Seite 9
Radmuttern lösen / anziehen ........................................................................................................................ Seite 10
Drehmoment einstellen ................................................................................................................................. Seite 10
Sicherung am 12 V-Stecker auswechseln ................................................................................................. Seite 10
Wartung und Pflege ................................................................................................................................ Seite 11
Service ..................................................................................................................................................................Seite 11
Garantie ..............................................................................................................................................................Seite 11
Entsorgung .......................................................................................................................................................Seite 11
5 D
Page 5
Einleitung
Einleitung / Sicherheit
In dieser Bedienungsanleitung / am Gerät werden folgende Piktogramme verwendet:
Bedienungsanleitung lesen!
Warn- und Sicherheitshinweise
beachten!
Schlagschrauber SD 340
Lieferumfang
Lebens- und Unfallgefahr für
Kleinkinder und Kinder!
Entsorgen Sie Verpackung und
Gerät umweltgerecht!
Kontrollieren Sie unmittelbar nach dem Auspacken
Einleitung
den Lieferumfang. Prüfen Sie das Gerät sowie
alle Teile auf Beschädigungen. Nehmen Sie ein
Machen Sie sich vor der ersten Inbe-
defektes Gerät oder Teile nicht in Betrieb.
triebnahme mit allen Funktionen des
Gerätes vertraut und informieren Sie
sich über den richtigen Umgang mit dem Gerät.
Lesen Sie hierzu die nachfolgende Bedienungsanleitung sorgfältig. Bewahren Sie diese Anleitung
gut auf. Händigen Sie alle Unterlagen bei Weitergabe des Gerätes an Dritte ebenfalls aus.
1 Schlagschrauber SD 340
1 Stecknuss 17 / 19 mm
1 Stecknuss 21 / 23 mm
1 Anschlusskabel mit Klemmen und Anschluss-
kabel für 12 V-Steckdose oder Buchse
1 Aufbewahrungskoffer
1 Bedienungsanleitung
Bestimmungsgemäßer Gebrauch
Der Schlagschrauber ist zum Lösen von
den Schrauben und Muttern sowie passender Bolzen
und Nüsse, insbesondere Radmuttern vorgesehen.
Die digitale Drehmomentkontrolle ermöglicht
die stufenweise Einstellung des Drehmoment
von 80 bis 340 Nm – mit der entsprechenden Voreinstellung wird die festzudrehende Schraube automatisch entsprechend angezogen. Das Gerät arbeitet mit 12 V-Gleichspannung. Es kann an die
12 V-Steckdose eines Fahrzeugs oder direkt an
eine Autobatterie angeschlossen werden. Es ist
ausschließlich für den privaten Gebrauch in trockenen Räumen zugelassen. Jede andere Verwendung oder Veränderung des Gerätes gilt als
nicht bestimmungsgemäß und birgt erhebliche
Gefahren. Für Schäden, die aus bestimmungswidriger Verwendung entstanden sind, übernimmt der Hersteller keine Haftung.
festsitzen-
Teilebeschreibung
1
Schutzkappe
2
½“ Antriebsvierkant / Aufnahme für
Stecknuss
3
Display
4
Taste (H), Drehmomentvorwahl –
5
Taste (G), Drehmomentvorwahl +
6
Lüftungsschlitze
7
Handgriff
8
Wipptaster Rechts- / Linkslauf
9
Netzkabel mit Stecker
10
Rändelring (12 V-Stecker)
11
Sicherung
12
Klemme rot (positiv)
13
Klemme schwarz (negativ)
14
Batterie-Adapterkabel
15
12 V-Buchse
16
Stecknuss 17 / 19 mm
17
Stecknuss 21 / 23 mm
Technische Daten
Artikel-Nr. 97135
Nennspannung: 12 V
Sicherung: 15 A
Leistung: 70 W
Drehmoment max.: 340 Nm
Werkzeugaufnahme: 12,5 mm (1/2“)
Kabellänge: 3,5 m
Sicherheit
Allgemeine Sicherheitshinweise
für Elektrowerkzeuge
WARNUNG!
leitung sorgfältig durch. Fehler bei der Einhaltung
der nachstehend aufgeführten Anweisungen und
Sicherheitshinweise können zu Schäden an Eigentum, Verletzungen oder Tod führen. Bewahren Sie diese Anleitung zum Nachschlagen auf.
J
aufsichtigt mit dem Verpackungsmaterial. Es
besteht Erstickungsgefahr.
J Dieses Gerät ist nicht dafür bestimmt, durch
Personen (einschließlich Kinder) mit eingeschränkten physischen, sensorischen oder
geistigen Fähigkeiten oder mangels Erfahrung und / oder mangels Wissen benutzt zu
werden, es sei denn, sie werden durch eine
für ihre Sicherheit zuständige Person beaufsichtigt oder erhielten von ihr Anweisungen,
wie das Gerät zu benutzen ist. Kinder sollten
beaufsichtigt werden, um sicherzustellen,
dass sie nicht mit dem Gerät spielen.
J Der Hersteller übernimmt keine Haftung für
Schäden, verursacht durch:
- Verbindungs- und / oder Betriebsfehler.
- Gewalteinwirkung, Beschädigung des
Gerätes und / oder Beschädigung der
Gerätekomponenten durch mechanische
Einwirkung oder Überlastung.
- Jede Art von Veränderungen am Gerät.
Lesen Sie diese Gebrauchsan-
LEBENS- UND UNFALLGEFAHR
FÜR KLEINKINDER UND KINDER!
Lassen Sie Kinder niemals unbe-
- Benutzungen des Gerätes für Anwendungen,
die nicht in der Bedienungsanleitung beschrieben sind.
- Folgeschäden durch nicht bestimmungsgemäßen und / oder falschen Gebrauch
- fehlerhafte Batterien.
- Einwirkung von Feuchtigkeit und / oder
unzureichende Belüftung.
- Unerlaubtes Öffnen des Gerätes.
Dieses führt zu einem Erlöschen der Garantie.
1) Arbeitsplatz
a) Halten Sie Ihren Arbeitsbereich sauber und
aufgeräumt. Unordnung und unbeleuchtete
Arbeitsbereiche können zu Unfällen führen.
b) Arbeiten Sie mit diesem Gerät nicht in explo-
sionsgefährdeter Umgebung, in der sich brennbare Flüssigkeiten, Gase oder Stäube befinden.
Elektrowerkzeuge erzeugen Funken, die den
Staub oder die Dämpfe entzünden können.
c) Halten Sie Kinder und andere Personen wäh-
rend der Benutzung des Elektrowerkzeuges
fern. Bei Ablenkung können Sie die Kontrolle
über das Gerät verlieren.
2) Elektrische Sicherheit
a) Der Anschlussstecker des Gerätes muss in die
Steckdose passen. Der Stecker darf in keiner
Weise verändert werden. Verwenden Sie keine
Adapterstecker gemeinsam mit schutzgeerdeten Geräten. Unveränderte Stecker und
passende Steckdosen verringern das Risiko
eines elektrischen Schlags.
b) Vermeiden Sie Körperkontakt mit geerdeten
Oberflächen, wie Rohren, Heizungen, Herden
und Kühlschränken. Es besteht ein erhöhtes
Risiko durch elektrischen Schlag, wenn Ihr
Körper geerdet ist.
c) Halten Sie das Gerät von Regen oder Nässe
fern. Das Eindringen von Wasser in ein Elektrogerät erhöht das Risiko eines elektrischen
Schlags.
6 D 7 D
Page 6
Sicherheit
Sicherheit / Bedienung
d) Zweckentfremden Sie das Kabel nicht, um
das Gerät zu tragen, aufzuhängen oder um
den Stecker aus der Steckdose zu ziehen.
Halten Sie das Kabel fern von Hitze, Öl,
scharfen Kanten oder sich bewegenden
Geräteteilen. Beschädigte oder verwickelte
Kabel erhöhen das Risiko eines elektrischen
Schlags.
e) Verwenden Sie keine Verlängerungskabel mit
diesem Elektrowerkzeug. Benutzen Sie nur
das mitgelieferte Adapterkabel.
3) Sicherheit von Personen
a) Seien Sie aufmerksam, achten Sie darauf, was
Sie tun und gehen Sie mit Vernunft an die
Arbeit mit einem Elektrowerkzeug. Benutzen
Sie das Gerät nicht, wenn Sie müde sind
oder unter dem Einfluss von Drogen, Alkohol
oder Medikamenten stehen. Ein Moment der
Unachtsamkeit beim Gebrauch des Elektrogerätes kann zu ernsthaften Verletzungen
führen.
b) Tragen Sie persönliche Schutzausrüstung und
immer eine Schutzbrille. Das Tragen persönlicher Schutzausrüstung, wie Staubmaske,
rutschfeste Sicherheitsschuhe, Schutzhelm
oder Gehörschutz, je nach Art und Einsatz
des Elektrowerkzeuges, verringert das Risiko
von Verletzungen.
c) Vermeiden Sie eine unbeabsichtigte Inbe-
triebnahme. Vergewissern Sie sich, dass der
Wipptaster
den Stecker in die Steckdose stecken. Wenn
Sie beim Tragen des Gerätes den Finger am
Schalter haben oder das Gerät eingeschaltet
an die Stromversorgung anschließen, kann
dies zu Unfällen führen.
d) Beugen Sie sich nicht über. Sorgen Sie für ei-
nen sicheren Stand und halten Sie jederzeit
das Gleichgewicht. Dadurch können Sie das
Gerät in unerwarteten Situationen besser
kontrollieren.
e) Tragen Sie geeignete Kleidung. Tragen Sie
keine weite Kleidung oder Schmuck. Halten
Sie Haare, Kleidung und Handschuhe fern
8
nicht betätigt ist, bevor Sie
von sich bewegenden Teilen. Lockere Kleidung, Schmuck oder lange Haare können
von sich bewegenden Teilen erfasst werden.
4) Sorgfältiger Umgang und Gebrauch
von Elektrowerkzeugen
a) Überlasten Sie das Gerät nicht. Verwenden Sie
für Ihre Arbeit das dafür bestimmte Elektrowerkzeug. Mit dem passenden Elektrowerkzeug arbeiten Sie besser und sicherer im
angegebenen Leistungsbereich.
b) Benutzen Sie kein Elektrowerkzeug, dessen
Schalter defekt ist. Ein Elektrowerkzeug, das
sich nicht mehr ein- oder ausschalten lässt,
ist gefährlich und muss repariert werden.
c) Sollte ein Auswechseln des Anschlusskabels
notwendig sein, muss dieses von qualifiziertem
Fachpersonal ersetzt werden, um Sicherheitsrisiken zu vermeiden.
d) Ziehen Sie den Stecker aus der Steckdose,
bevor Sie Zubehörteile wechseln oder das
Gerät weglegen. Diese Vorsichtsmaßnahme
verhindert den unbeabsichtigten Start des
Gerätes.
e) Bewahren Sie unbenutzte Elektrowerkzeuge
außerhalb der Reichweite von Kindern auf.
Lassen Sie Personen das Gerät nicht benutzen,
die mit diesem Gerät nicht vertraut sind oder
diese Anweisungen nicht gelesen haben.
Elektrowerkzeuge sind gefährlich, wenn sie
von unerfahrenen Personen benutzt werden.
f) Pflegen Sie das Gerät mit Sorgfalt. Kontrol-
lieren Sie, ob bewegliche Teile einwandfrei
funktionieren und nicht klemmen, ob Teile
gebrochen oder so beschädigt sind, dass die
Funktion des Gerätes beeinträchtigt ist. Lassen Sie beschädigte Teile vor dem Einsatz des
Gerätes reparieren. Viele Unfälle haben ihre
Ursache in schlecht gewarteten Elektrowerkzeugen.
g) Verwenden Sie Elektrowerkzeug, Zubehör,
Einsatzwerkzeuge usw. entsprechend diesen
Anweisungen und so, wie es für diesen speziellen Gerätetyp vorgeschrieben ist. Berücksichtigen Sie dabei die Arbeitsbedingungen
und die auszuführende Tätigkeit. Der Gebrauch
von Elektrowerkzeugen für andere als die
vorgesehenen Anwendungen kann zu gefährlichen Situationen führen.
5) Wartung
a) Lassen Sie das Elektrowerkzeug nur von
Fachpersonal reparieren. Es dürfen nur identische Ersatzteile verwendet werden. So bleibt
die Sicherheit des Gerätes gewährleistet.
Spezielle Sicherheitshinweise
für Schlagschrauber
J Verwenden Sie den Schlagschrauber nur mit
12 V-Gleichspannung. Versuchen Sie niemals
ihn an andere Energiequellen anzuschließen.
J Benutzen Sie den Schlagschrauber im Dau-
erbetrieb nicht länger als 8 Minuten, um
eine Überhitzung des Werkzeugmotors zu
vermeiden.
J Stellen Sie sicher, dass Sie die Anleitung und
alle Sicherheitsanweisungen, die mit dem
Fahrzeug mitgeliefert wurden, gelesen und
verstanden haben, bevor Sie mit Reparaturen
oder Wartungsarbeiten an dem Fahrzeug
beginnen.
J Stellen Sie sicher, dass die Zigarettenanzün-
derbuchse / 12 V-Buchse des Fahrzeugs mit
einer Sicherung von mindestens 15 A geschützt ist. Lesen Sie das Fahrzeughandbuch
oder fragen Sie bei Zweifeln den Hersteller.
J Achten Sie darauf, dass die Zündung des
Fahrzeugs, an dem der Schlagschrauber
benutzt wird auf AUS steht.
J Stellen Sie sicher, dass das Fahrzeug, an dem
der Schlagschrauber verwendet wird gesichert
ist und nicht wegrollen kann. Achten Sie
darauf, dass die Handbremse angezogen ist.
J Entfernen Sie den Schlagschrauber von der
Zigarettenanzünderbuchse / 12 V-Buchse und
von den Radmuttern, bevor Sie versuchen
mit dem Fahrzeug zu fahren.
J Trennen Sie bei längerem Nichtgebrauch den
Schlagschrauber von der Buchse. Einige
Fahrzeugmodelle versorgen die Zigarettenanzünderbuchse / 12 V-Buchse weiterhin mit
Strom, auch wenn die Zündung ausgeschaltet
wurde, die Fahrzeugbatterie kann dann entladen werden.
J Vermeiden Sie jeglichen Kontakt mit Batte-
riesäure, diese ist ätzend. Sollte Ihr Gesicht
mit Batteriesäure in Kontakt kommen, waschen Sie es ausgiebig unter fließendem
Wasser und kontaktieren Sie Ihren Arzt. Sollte
Batteriesäure mit Ihren Augen in Kontakt
kommen, spülen Sie diese für mindestens
10 Minuten mit fließendem Wasser und
kontaktieren Sie Ihren Arzt.
J Achten Sie auf korrekte Polarität. Vermeiden
Sie Kurzschlüsse.
Bedienung
Anschluss an 12 V-Steckdose
WARNUNG!
derbuchse / 12 V-Buchse anschließen, wenn diese
mit einer Sicherung von mehr als 15 A geschützt
ist. Sollte die Zigarettenanzünderbuchse / 12 VBuchse mit weniger als 15 A gesichert sein,
schließen Sie den Schlagschrauber direkt an die
Batterie an.
j Entfernen Sie den Zigarettenanzünder von
der Zigarettenanzünderbuchse bzw. die
Blende etc. von der 12 V-Buchse des Fahrzeugs.
j Schließen Sie den 12 V-Stecker
Zigarettenanzünderbuchse / 12 V-Buchse des
Fahrzeugs an.
Anschluss an Batterie
WARNUNG!
der Klemmen
nicht berühren und keine elektrische Verbindung
durch leitende Materialien zwischen beiden
Klemmen entsteht.
Nur an eine Zigarettenanzün-
9
Achten Sie beim Anschließen
12
13
darauf, dass diese sich
und
an die
8 D 9 D
Page 7
Wartung und Pflege / Service / Garantie / EntsorgungBedienung
Der Schlagschrauber kann über das mitgelieferte
Batterie-Adapterkabel
14
direkt an eine Auto-
batterie angeschlossen werden.
j Verbinden Sie die Klemme rot (positiv)
des Batterie-Adapterkabels
14
an den
12
positiven (+) Anschluss der Autobatterie.
j Verbinden Sie die die Klemme schwarz (ne-
gativ)
13
des Batterie-Adapterkabels
14
an
den negativen (-) Anschluss der Autobatterie.
j Verbinden Sie den 12 V-Stecker
12 V-Buchse
Radmuttern lösen / anziehen
15
.
9
mit der
j Verbinden Sie den Schlagschrauber mit einer
12 V-Stromquelle wie zuvor beschrieben.
j Wählen Sie die passende Stecknuss
17
und stecken ihn auf den Antriebsvierkant
2
des Schlagschraubers.
16
oder
j Entfernen Sie ggf. Zierabdeckungen von den
Radmuttern und setzen Sie die Stecknuss fest
auf die Radmutter oder den Radbolzen.
j Betätigen Sie den Wipptaster Rechts- / Links-
8
lauf
, indem Sie ihn auf seiner oberen
Seite herunterdrücken (Symbol g = Lösen /
Linkslauf). Am Motorgeräusch können Sie erkennen, dass der Schlagschrauber zunächst
Drehmoment aufbaut und dann mit einem
„Schlag“ an die Schraube abgibt. Durch steigendes Drehmoment mit jedem Schlag wird
die Schraube gelöst. Sie können sie nun von
Hand entfernen.
j Verfahren Sie in gleicher Weise mit allen Rad-
muttern, bis Sie das Rad abnehmen können.
j Setzen Sie das andere / neue Rad auf. Achten
Sie darauf, dass die Löcher in der Felge mit
den Bohrungen des Radträgers übereinstimmen.
j Drehen Sie alle Radmuttern zunächst per
Hand fest.
j Setzen Sie die Stecknuss auf die Radmutter
und betätigen Sie den Wipptaster Rechts- /
Linkslauf
8
, indem Sie ihn auf seiner
unteren Seite herunterdrücken (Symbol h =
Festziehen / Rechtslauf).
j Nach Anzeige des blinkenden Symbols
„>->->“ sind die Radmuttern ausreichend
festgezogen.
j Überprüfen Sie bei Verwendung des Ersatz-
rades umgehend dessen Reifendruck.
j Zur Montage von Aluminium-Felgen sollte
der Schlagschrauber mit Vorsicht eingesetzt
werden. Stellen Sie das Drehmoment zuvor
laut Angabe des Felgenherstellers ein.
Drehmoment einstellen
Die Elektronik des Schlagschraubers ermöglicht
eine Drehmomentvorwahl von 80 bis 340 Nm.
Das eingestellte Drehmoment wird im 3-stelligen
Display
3
dargestellt.
Nachdem das zuvor eingestellte Drehmoment
erreicht ist, erscheint im Display
j Drücken Sie die Taste
3
: „>>>“.
5
(G) zum Erhöhen
des Drehmoments. Das Drehmoment erhöht
sich mit jeder Betätigung um 10 Nm.
j Drücken Sie die Taste
4
(H) zum Herabsetzen des Drehmoments. Das Drehmoment
verringert sich mit jeder Betätigung um
10 Nm.
j Um das Drehmoment auf 0 zurückzusetzen
drücken Sie die Tasten
5
(G) und
4
(H)
gleichzeitig (Reset).
Hinweis: Es sind folgende Anzeigen möglich:
000 -> 080 -> 090 …
Die Anzeige wird in 10er- Schritten erhöht
und reicht bis 340 Nm.
Sicherung am 12 V-Stecker
auswechseln
j Lösen (und entfernen) Sie den Rändelring 10,
indem Sie ihn gegen den Uhrzeigersinn
drehen.
10
wieder
11
und
j Entfernen Sie die defekte Sicherung
ersetzen Sie sie gegen eine neue, max. 15 A
Sicherung.
j Schrauben Sie den Rändelring
fest, indem Sie ihn im Uhrzeigersinn drehen.
Wartung und Pflege
Das Gerät ist wartungsfrei.
WARNUNG!
Trennen Sie elektrische Geräte
immer vom Netzstrom, bevor Sie Arbeiten zur
Pflege etc. durchführen.
j Trennen Sie das Gerät von der 12 V-Strom-
quelle.
j Reinigen Sie das Gerät mit einem trockenen
Tuch. Verwenden Sie keinesfalls Lösungsmittel
oder andere aggressive Reiniger.
Service
WARNUNG!
Lassen Sie das Gerät nur
von qualifiziertem Fachpersonal reparie-
ren. Damit wird die Sicherheit des Gerätes
sichergestellt und bleibt erhalten.
WARNUNG!
Lassen Sie den Austausch
des Steckers oder der Anschlussleitung
immer von qualifiziertem Fachpersonal
ausführen. Damit wird die Sicherheit des
Gerätes sichergestellt und bleibt erhalten.
Garantie
Die allgemeinen Garantiebedingungen beziehen
sich auf Produktions- und Materialdefekte.
Falls das Gerät fehlerhaft ist, bringen Sie es
zu Ihrem Fachhändler bzw. der betreffenden
Verkaufsstelle zurück. Um die Garantie- und
Reparaturarbeiten am Gerät zu beschleunigen,
brauchen Sie Folgendes:
- Eine Kopie des Kassenzettels (Lieferschein,
Kassenbon) mit dem Erwerbsdatum.
- Grund für die Beschwerde oder Beschrei-
bung des Fehlers.
Entsorgung
Die Verpackung besteht aus umweltfreundlichen
Materialien, die Sie über die örtlichen Recyclingstellen entsorgen können.
Werfen Sie Elektrogeräte nicht in
den Hausmüll!
Gemäß Europäischer Richtlinie 2002 / 96 / EC
über Elektro- und Elektronik-Altgeräte und Umsetzung in nationales Recht müssen verbrauchte
Elektrogeräte getrennt gesammelt und einer
umweltgerechten Wiederverwertung zugeführt
werden.
Über Entsorgungsmöglichkeiten für ausgediente
Elektrogeräte informieren Sie sich bitte bei Ihrer
Gemeinde- oder Stadtverwaltung.
Abbildungen können geringfügig vom Produkt
abweichen. Änderungen, die dem technischen
Fortschritt dienen, vorbehalten. Dekoration nicht
enthalten.
10 D 11 D
Page 8
Table of Contents
Introduction
Intended use ......................................................................................................................................................Page 14
Scope of delivery ............................................................................................................................................. Page 14
Part description ................................................................................................................................................ Page 14
Technical data ................................................................................................................................................... Page 14
Security
General safety notices for electrical tools ............................................................................................... Page 15
1) Workplace ..................................................................................................................................................... Page 15
2) Electrical safety ........................................................................................................................................... Page 15
3) Personal safety ............................................................................................................................................ Page 15
4) Careful handling of electrical tools ...................................................................................................... Page 16
5) Service ............................................................................................................................................................ Page 16
Special safety notices for impact wrenches ............................................................................................Page 16
Operation
Connection to 12 V-socket / bushing .................................................................................................................Page 17
Connecting to the battery ............................................................................................................................ Page 17
Loosen / tighten wheel nuts .......................................................................................................................... Page 17
Setting the torque ........................................................................................................................................... Page 18
Replacing the fuse on the 12 V-plug ......................................................................................................... Page 18
Maintenance and care ...........................................................................................................................Page 18
Service ..................................................................................................................................................................Page 18
Warranty ............................................................................................................................................................Page 18
Disposal ............................................................................................................................................................... Page 18
12 13 GB
Page 9
Introduction
Introduction / Security
In this operating manual / this device the following pictogram’s are used:
Read operating manual!
Observe warning- and safety
guidelines!
Impact wrench SD 340
1 Impact wench SD 340
Danger to life and danger of
accident for children!
Dispose the packaging
environmentally friendly!
1 Socket 17 / 19 mm
1 Socket 21 / 23 mm
Introduction
1 Connecting cable with clamps and connecting
cable for 12 V-socket or bushing
Make yourself familiar with all func-
tions before first start-up of the equip-
1 Carrying case
1 Instruction manual
ment and gain inform you about correct
handling the device. Read for this the following
operating manual carefully. Store this manual
Part description
carefully. Pass on all documents also when passing on the device to third parties.
Intended use
The impact wrench is intended for loosening
tight screws and screw-nuts and matching bolts
and nuts, especially wheel nuts. The digital
torque control enables step-by-step setting of
the torque from 80 to 340 Nm – the screw is
automatically tightened with the corresponding
pre-setting. The device operates with 12 V-direct
current. It can be connected to the 12 V-socket
of a vehicle or directly to a car battery. It is exclusively authorized for private use in dry rooms.
All other use or change to the device is considered
as not intended and bears substantial dangers.
The manufacturer does not take over any liability
Protective cap
1
½“ square drive / intake for socket
2
Display
3
Button (H), torque selection –
4
Taste (G), torque pre-selection +
5
Ventilation slots
6
Handle
7
Flip switch clockwise- / counter clockwise
8
rotation
Power cable with plug
9
Knurled ring (12 V-plug)
10
Fuse
11
Clamp red (positive)
12
Clamp black (negative)
13
Battery-adapter cable
14
12 V-bushing
15
Socket 17 / 19 mm
16
Socket 21 / 23 mm
17
for damages arising from unintended use.
Scope of delivery
Technical data
Article No. 97135
After unpacking immediately check the scope of
delivery. Examine the device and all parts for
damages. Do not take a defective device or part
into operation.
Nominal voltage: 12 V
Fuse: 15 A
Output: 70 W
Torque max.: 340 Nm
Tool holder: 12.5 mm (1/2“)
Cable length: 3.5 m
Security
General safety notices
for electrical tools
Read these operating instructions
WARNING!
carefully. Negligence to adhere to the following
instructions may lead to damages of property,
injuries or death. Keep these instructions for
later reference.
J
pervised with the packing material. There is
danger of suffocation.
J This device is not intended for use by persons
(including children) with reduced physical,
sensory or mental abilities or lack of experience and/or lack of knowledge unless they
are supervised by a person responsible for
their security or received instructions from
this person, how the equipment is to be
used. Children should be supervised, in order
to guarantee that they do not play with the
device.
J The manufacturer assumes no liability for
damages caused by:
- Connecting and / or operating errors.
- Force, damage of the device and / or damage of the device components through
mechanical impacts or overload.
- Any type of modification of the device.
- Utilization of the device for applications
that are not listed in the instruction manual.
- Consequential damages due to non-intended and / or false usage
- Defective batteries.
- Effect of moisture and / or insufficient
ventilation.
- Unauthorized opening of the device.
In this case, the guarantee expires immedi-
ately.
DANGER OF ACCIDENT AND
LIFE FOR INFANTS AND CHILDREN! Never leave children unsu-
1) Workplace
a)
Keep your workplace clean and orderly. Disorder
and dark workplaces may lead to accidents.
b) Do not work in explosive hazard environments
that contain inflammable liquids, gases or dusts
with this device. Electrical tools generate
sparks that may ignite the dust or vapours.
c) Keep children and other persons away from
the electrical device while in use. You could
loose control of the device if your attention
is drawn somewhere else.
2) Electrical safety
a) The connecting plug of the device must fit
in the socket. The plug may not be modified
in any way. Do not use an adapter plug together with protectively grounded devices.
Unmodified plugs and matching sockets
lower the risk of an electrical shock.
b) Avoid physical contact with grounded sur-
faces like pipes, heaters and refrigerators.
There is an increased risk of electrical shock
if your body is grounded.
c) Keep the device away from rain or moisture.
The penetration of water in an electrical device increases the risk of an electrical shock.
d) Do not use the cable for any other purpose,
for carrying the device, hanging it up, or to
pull the cable from the socket. Keep the cable away from heat, oil, sharp edges or moving parts of the device. Damaged or tangled
cables increase the risk of electrical shock.
e) Do not use extension chords with this elec-
trical device. Only use the supplied adapter
cable.
3) Personal safety
a) Pay attention to what you do and be sensible
when using an electrical tool. Do not use the
device if you are tired or under the influence
of drugs, alcohol or medicine. One moment
of distracted attention when using the
14 GB 15 GB
Page 10

Security
Security / Operation
electrical device can lead to serious injuries.
b) Wear personal protective gear and always
wear protective glasses. Wearing personal
protective gear like a dust mask, slip-proof
safety shoes, protective helmet and hearing
protection, depending on the type and usage
of the electrical tool reduces the risk of injuries.
c) Avoid unintentional start-up. Ensure your-
self that the flip switch
is not on before
8
plugging in the power cable. Having your
finger on the switch when carrying it or
connecting it to the power when it is already on can lead to accidents.
d) Do not bend over. Ensure a secure stand and
keep your balance at all times. This way you
are better able to control the device in unexpected situations.
e) Wear adequate clothing. Do not wear loose
clothing or jewellery. Keep hair, clothing and
gloves away from moving parts. Loose clothing, jewellery or long hair can be caught in
moving parts.
4) Careful handling of electrical tools
a) Do not subject the device to overload. Use
the intended electrical tool for your work.
Using the right electrical tool makes your
work faster and safer in the stated work area.
b) Do not use an electrical tool with a broken
power switch. An electrical tool that cannot
be switched on or off is dangerous and
needs to be repaired.
c) Should replacement of the connecting cable
be necessary, this must be done by the manufacturer or his representative to prevent
safety risks.
d) Pull the plug from the socket before chang-
ing the accessory parts or put the device
away. This measure prevents unintentional
start-up of the device
e) Keep electrical tools not in use out of the
reach of children. Do not let people use the
device that are not familiar with the device
or did not read these instructions. Electrical
tools are hazardous if they are used by inex-
perienced people.
f) Take care of the device. Check whether
moveable parts work faultlessly and do not
get stuck, whether parts are broken or damaged such that the function of the device is
impeded. Have damaged parts repaired prior
to using the device. Many accidents are
caused by poorly serviced electrical tools.
g) Use electrical tools, accessories etc. accord-
ing to these instructions and in the way it is
prescribed for this special type of device.
Consider the working conditions and the
task to be done. Using electrical tools for
purposes other than those intended may
lead to dangerous situations.
5) Service
a) Only have electrical tools repaired by spe-
cialists. Only identical spare parts may be
used. This way, the safety of the device is
guaranteed.
Special safety notices for
impact wrenches
J Only use the impact wrench with 12 V-direct
current. Never try to connect it to other
sources of power.
J Do not use the impact wrench for more than
8 minutes without interruptions in order to
prevent the tool motor from overheating.
J Ensure that you have read and understood
the instructions and all safety instructions
that were supplied with the vehicle before
starting on the repairs or service work on
the vehicle.
J Ensure that the cigarette lighter bush-
ing / 12 V-bushing of the vehicle is protected
with a fuse of at least 15 A. Read the vehicle
manual or ask the manufacturer in case of
doubt.
J Pay attention that the ignition of the vehicle
on which the impact wrench is used is set to
OFF.
J Ensure that the vehicle on which the impact
wrench is used is secured and cannot roll
away. Pay attention that the handbrake is
tightened.
J Remove the impact wrench from the ciga-
rette lighter bushing / 12 V-bushing and from
the wheel nuts before trying to drive the vehicle.
J For longer periods of non-use, remove the
impact wrench from the bushing. Some vehicle models continue to supply the cigarette lighter bushing / 12 V-bushing with
power, even if the ignition was turned off,
this means that the car battery may loose
power then.
J Avoid all contact with battery acid, it is
caustic. Should your face come into contact
with battery acid, rinse it thoroughly with
running water and contact your physician.
Should battery acid come into contact with
your eyes, rinse them with running water for
at least 10 minutes and contact your physician.
J Pay attention to correct polarity. Avoid short
circuits.
Operation
Connection to 12 V-socket / bushing
WARNING!
Only connect it to a cigarette
lighter bushing / 12 V-bushing if it is protected
with a fuse of more than 15 A. Should the cigarette lighter bushing / 12 V-bushing be secured
with less than 15 A, connect the impact wrench
directly to the battery.
j Remove the cigarette lighter from the ciga-
rette lighter bushing resp. the cover etc.
from the 12 V-bushing of the vehicle.
j Connect the 12 V-plug
to the cigarette
9
lighter bushing / 12 V-bushing of the vehicle.
Connecting to the battery
WARNING!
the clamps
Pay attention when connecting
and 13 that no electrical connec-
12
tion is created by conducting material between
the two clamps.
The impact wrench can be connected directly to
car battery using the included battery adapter
cable
j Connect the clamp red (positive)
.
14
battery adapter cable
of the
12
to the positive (+)
14
connection of the care battery.
j Connect the clamp black (negative)
the battery adapter cable
to the negative
14
13
of
(-) connection to the car battery.
j Connect the 12 V-plug
ing
.
15
Loosen / tighten wheel nuts
to the 12 V-bush-
9
j Connect the impact wrench to a 12 V-power
source like described before.
j Select the matching socket
connect it to the square drive
or 17 and
16
of the
2
impact wrench.
j If applicable, remove covers of the wheel
nuts and place the socket tightly onto the
wheel nut or the wheel bolt.
j Activate the flip switch to clockwise- / or
counter clockwise rotation
, by pushing
8
down on it on the upper side (symbol g =
Loosen /counter clockwise). You can tell by
the engine sound that the impact wrench
builds up torque first and then transfers to
the screw with one „impact”. Due to the increasing torque with every impact, the screw
is loosened. You can now remove it by hand.
j Proceed the same with all wheel nuts, until
you can remove the wheel.
j Place the other / new wheel in position. Pay
attention that the holes in the rim match
the drillings of the wheel carrier.
j First, tighten all wheel nuts by hand.
j Place the socket onto the wheel nut and
activate the flip switch clockwise / counter
16 GB 17 GB
Page 11

Operation / Maintenance and care / Service / Warranty / Disposal
Disposal
clockwise rotation 8 by pressing down on the
lower side (symbol h = tighten / clockwise).
j After display of the blinking symbol „>->->“
the wheel nuts are sufficiently tightened.
j When using a spare tire, check the air pres-
sure promptly.
j When assembling aluminium rims, the impact
wrench should be used with care. Before, set
the torque according to the specifications of
the rim manufacturer.
Setting the torque
The electronics of the impact wrench allow a
torque selection of 80 to 340 Nm. The set torque
is shown in the 3-digit display
.
3
When the previously set torque is reached, the
display will show
j Press the button
: „>>>“.
3
(G) to increase the
5
torque. The torque increases by 10 Nm with
every activation.
j Press the button
(H) to lower the torque.
4
The torque is reduced by 10 Nm with every
activation.
j To set the torque back to 0, press the but-
tons
(G) and 4 (H) at the same time
5
(reset).
Notice: The following displays are possible:
000 -> 080 -> 090 …
The display is increased in steps of 10 and
goes to 340 Nm.
Replacing the fuse on the
12 V-plug
j Loosen (and remove) the knurled ring 10 by
turning it counter clockwise.
j Remove the defective fuse
with a new, max. 15 A fuse.
j Tighten the knurled ring
it clockwise.
and replace it
11
again by turning
10
Maintenance and care
The device is maintenance-free.
WARNING!
Always separate electrical
devices from the power supply, before you carry
out service etc.
j Disconnect the device from the 12 V-power
source.
j Clean the device with a dry cloth. Do not use
solvents or other aggressive detergents
under any circumstances.
Service
WARNING!
Leave the repair of the device
to qualified technical personnel to repair. Thus
the safety of the device is guaranteed and
maintained.
WARNING!
Leave the exchange of the plug
or the connecting cable always to qualified
technical personnel. Thus the security of the
equipment is guaranteed and maintained.
Warranty
The general guarantee conditions refer to
production and material defects.
If the device is faulty, bring it to your specialist
dealer respectively back to the sales office. In
order to accelerate the warranty and repair work
on the device, you need the following:
- A copy of the receipt (delivery note, bill)
with the acquisition date.
- Reason for the complaint or description of
the error.
Disposal
The packing consists of pollution free materials,
which can dispose of you over the local recycling stations.
Do not throw electrical appliances
into the domestic waste!
In accordance with European guideline
2002 / 96 / EC for electrical and old electronic
devices and conversion to national law, used
electrical appliances must be collected separately and brought to a environmental fair recycling.
For disposal possibilities for retired electrical
appliances please inform yourself at your
community or city administration.
Illustrations may vary slightly from the product
itself. We reserve the right to administer changes due to technical progress. Decoration not
included.
18 GB 19 GB
Page 12

Table des matières
Introduction
Utilisation selon les prescriptions ...............................................................................................................Page 22
Volume de livraison .........................................................................................................................................Page 22
Description des pièces .................................................................................................................................... Page 22
Fiche technique ................................................................................................................................................ Page 23
Sécurité
Indications de sécurité générales pour les outils électriques ............................................................ Page 23
1) Poste de travail ............................................................................................................................................Page 23
2) Sécurité électrique ..................................................................................................................................... Page 23
3) Sécurité de personnes ............................................................................................................................... Page 24
4) Utilisation soigneuse des outils électriques ....................................................................................... Page 24
5) Maintenance ................................................................................................................................................ Page 24
Indications de sécurité spéciales pour la visseuse à percussion........................................................Page 25
Maniement
Raccord à une prise de courant de 12 V/prise ........................................................................................ Page 25
Raccordement à la batterie .......................................................................................................................... Page 25
Dévisser l‘écrou hexagonal / le visser ......................................................................................................... Page 26
Réglage du tour de rotation.........................................................................................................................Page 26
Échanger le fusible à la prise de 12 V ........................................................................................................ Page 26
Entretien et soins ....................................................................................................................................... Page 26
Service ..................................................................................................................................................................Page 27
Garantie ..............................................................................................................................................................Page 27
Élimination .......................................................................................................................................................Page 27
20 21 FR
Page 13

Introduction
Introduction / Sécurité
Dans ce manuel d’utilisation / dans l’appareil on utilise les pictogrammes suivants :
Lire le manuel d’utilisation !
Respectez les instructions d’alerte
et de sécurité !
Visseuse à percussion SD 340
Volume de livraison
Danger de mort de d’accident pour
les tous petits et les enfants !
Éliminez l’emballage et l’appareil
de manière respectueuse de
l’environnement !
Contrôlez immédiatement après le déballage le
Introduction
volume de livraison. Vérifiez si l’appareil et ses
composants présentent des dommages. Ne réalisez
Familiarisez-vous avec toutes les fonc-
tions de l‘appareil avant la première
pas la mise en marche d‘un appareil défectueux
ou avec des parties défectueuses.
mise en marche et renseignez-vous
sur la manipulation correcte de l‘appareil. Lisez
pour cela soigneusement le guide d‘utilisation
suivant. Gardez ce manuel dans un lieu sûr.
Remettez tous les documents lors du transfert
de l‘appareil à un nouveau propriétaire.
1 visseuse SD 340
1 écrou à oeillet 17 / 19 mm
1 écrou à oeillet 21 / 23 mm
1 câble de raccordement avec pinces et câble de
raccordement pour prise de courant de 12 V ou
douille
1 coffre de transport
Utilisation selon les prescriptions
1 mode d‘emploi
La visseuse à percussion est adaptée à dévisser
les vis et écrous bloqués, ainsi que les boulons et
Description des pièces
écrous flottants, mais tout particulièrement les
écrous hexagonaux. Le contrôle numérique du
couple de rotation permet un réglage graduel de
80 à 340 Nm – le préréglage correspondant permet de visser automatiquement la vis. L’appareil
fonctionne avec une tension continue de 12 V. Il
peut être connecté à une prise de courant de
12 V d’un véhicule ou directement à la batterie
du véhicule. L’appareil est uniquement autorisé à
un usage privé dans des pièces sèches. Toute utilisation ou modification de l‘appareil doit être
considérée comme non conforme et entraînerait
de graves dangers. Pour les dommages qui ont
surgi en raison d‘une utilisation non conforme,
le fabricant n‘assumera aucune responsabilité.
Capuchon de protection
1
½“ Carré entraîneur / entrée pour écrou à
2
oeillet
Écran
3
Touche (H), nombre de tours de rotation –
4
Touche (G), nombre de tours de rotation +
5
Fentes d’aération
6
Poignée
7
Touche marche à droite/à gauche
8
Câble de réseau avec prise
9
Anneau moleté (prise 12 V)
10
Sécurité
11
Pince rouge (positive)
12
Pince noire (négative)
13
Câble d’adaptation de la batterie
14
Douille 12 V
15
Écrou à oeillet 17 / 19 mm
16
Écrou à oeillet 21 / 23 mm
17
Fiche technique
Nr. de référence : 97135
Tension nominale : 12 V
Sécurité : 15 A
Puissance : 70 W
Tour de rotation max. : 340 Nm
Werkzeugaufnahme: 12,5 mm (1/2“)
Longueur du câble : 3,5 m
Sécurité
Indications de sécurité générales
pour les outils électriques
AVERTISSEMENT
ment le mode d’emploi. Les erreurs causées par
le non-respect des instructions citées ci-dessous
peuvent provoquer des dommages, blessures ou
présentent un risque pour la vie. Conservez ce
mode d’emploi pour une relecture ultérieure.
J
DANGER DE MORT DE D’ACCI-
DENT POUR LES TOUS PETITS
ET LES ENFANTS ! Ne laissez
jamais les enfants sans surveillance avec le
matériel d’emballage. Il y a danger d’asphyxie.
J Cet appareil n’est pas destiné à être utilisé
par des personnes (incluant des enfants)
avec des capacités physiques, sensorielles ou
psychiques limitées ou avec un manque
d’expérience et / ou un manque de savoirfaire, à moins qu’elles soient surveillées par
une personne responsable de leur sécurité ou
qu’elles reçoivent des instructions sur comment utiliser cet appareil. Les enfants devront
être surveillés, afin de vérifier qu’ils ne
jouent pas avec l’appareil.
J Le fabricant n’est pas responsable des dom-
mages causés par :
- une erreur de raccordement et / ou de
fonctionnement,
- une trace de violence, endommagement de
l’appareil et / ou endommagement des
composants de l’appareil par action mécanique ou surcharge,
Veuillez lire soigneuse-
- tout type de modifications à l’appareil,
- l’utilisation de l’appareil pour des applications non décrites dans ce mode d’emploi,
- les dommages consécutifs causés par une
utilisation non conforme et / ou fausse,
- des piles défectueuses,
- la pénétration de l’humidité et / ou par une
aération insuffisante,
- une ouverture non autorisée de l’appareil.
Ceci mène à la suppression de la garantie.
1) Poste de travail
a) Tenez le poste de travail propre et rangé. Le
désordre et une zone de travail non éclairée
peuvent être à l‘origine des accidents.
b) Ne travaillez pas avec cet appareil dans un
environnement explosif contenant des liquides
combustibles, des gaz ou des poussières. Les
outils électriques produisent des étincelles,
lesquelles peuvent être formées par la poussière ou les vapeurs.
c) Tenez les enfants et autres personnes loin de
l‘appareil électrique durant son utilisation.
Une distraction pourrait vous faire perdre le
contrôle de l‘apppareil.
2) Sécurité électrique
a) La prise de raccordement de l‘appareil doit
être adaptée à la prise de courant. La prise
ne doit en aucun cas être modifiée. N‘utilisez
pas de prise d‘adaptation avec des appareils
mis à terre de protection. Des prises non
modifiées et des prises de courant correspondantes réduisent le risque d‘un choc
électrique.
b) Contrecarrez tout contact corporel avec des
surfaces mises à la terre, telles que tuyaux,
chauffages, fours et frigidaires. Risque de
choc électrique.
c) Tenez l‘appareil loin de la pluie ou de l‘humi-
dité. La pénétration d‘eau dans un appareil
électrique augmente le risque d‘un choc
électrique.
22 FR 23 FR
Page 14

Sécurité
Sécurité / Maniement
d) Ne désaffectez pas le câble afin de porter ou
accrocher l‘appareil, ou pour tirer la prise de
la prise de courant. Tenez le câble loin de la
chaleur, de l‘huile, de bords tranchants ou de
pièces mobiles. Des câbles endommagés ou
enroulés augmentent le risque d‘un choc
électrique.
e) N‘utilisez pas de rallonges avec cet outil
électrique. Utilisez uniquement le câble
d‘adaptation livré avec l‘appareil.
3) Sécurité de personnes
a) Soyez attentif et veillez à ce que vous faîtes,
soyez judicieux lors du maniement d‘un appareil électrique. N‘utilisez pas l‘appareil
quand vous êtes fatigué ou sous l‘influence
de drogues, alcool ou médicaments. Un moment de distraction peut causer de graves
blessures.
b) Portez un équipement de protection personnel
et toujours des lunettes de protection. Le
port d‘un équipement de protection personnel, comme p.ex. masque antipoussière,
chaussures de sécurité antidérapantes,
casque de protection ou coquille antibruit
réduisent le risque de blessures.
c) Contrecarrez une mise en service non sur-
veillée. Assurez-vous que la touche
soit pas actionnée avant de brancher la prise
à la prise de courant. Des accidents peuvent
se produire quand vous avez le doigt sur l‘interrupteur de l‘appareil en portant ce dernier
ou quand vous connectez l‘appareil à l‘alimentation électrique.
d) Ne vous penchez pas. Assurez une position
sûre et garder votre équilibre en tout temps.
Cela vous permet de contrôler au mieux
l‘outil dans des situations inattendues.
e) Portez des vêtements appropriés. Ne portez
pas de vêtements amples ou des bijoux.
Conservez les cheveux, vêtements et gants
éloignés des pièces mobiles. Les vêtements
amples, bijoux ou les cheveux longs peuvent
être saisis par des pièces mobiles.
ne
8
4) Utilisation soigneuse des
outils électriques
a) Ne pas surcharger l‘appareil. Utilisez l‘outil
approprié à votre travail. Un outil de bonne
puissance fera un meilleur travail mieux tout
en conservant la sécurité nécessaire.
b) Ne pas utiliser d‘outil électrique dont l‘inter-
rupteur est défectueux. Un outil qui ne peut
pas être commandé par son interrupteur est
dangereux et doit être réparé.
c) Si un remplacement du câble de raccordement
peut être nécessaire, il doit être remplacé
par le fabricant ou son mandataire, afin de
contrecarrer les risques de sécurité.
d) Retirez la fiche de la prise avant de changer
les accessoires ou de les ranger. Cette précaution évite le déclenchement intempestif
de l‘unité.
e) Rangez les outils électriques hors de portée
des enfants. Ne laissez pas des personnes utiliser l‘appareil, lesquelles ne sont pas familières
à celui-ci ou n‘ont pas lu les instructions. Les
outils sont dangereux lorsqu‘ils sont utilisés
par des personnes inexpérimentées.
f) Entretenez les outils électriques. Vérifiez si
les pièces mobiles fonctionnent correctement
et ne collent pas, si des pièces sont cassées
ou endommagées de sorte que le fonctionnement de l‘appareil ne soit pas compromis.
Laissez réparer les pièces endommagées avant
d‘utiliser l‘appareil. De nombreux accidents
sont causés par des outils mal entretenus.
g) Utilisez les outils électriques, les accessoires
et les outils à monter etc, conformément à
ces instructions et selon le type de dispositif
particulier. Prenez en compte les conditions
de travail et la tâche à effectuer. L‘utilisation
d‘outils autres que celles prévues peut
entraîner des situations dangereuses.
5) Maintenance
a) La réparation des outils électrique ne peut
être effectuée que par un personnel qualifié.
Utilisez uniquement des pièces de rechange
identiques. Cela permet de maintenir la
sécurité de l‘appareil.
Indications de sécurité spéciales
pour la visseuse à percussion
J Utilisez la visseuse à percussion uniquement
avec une tension continue de 12 / V DC. Ne
jamais essayer de la connecter à d‘autres
sources d‘énergie.
J Utilisez la visseuse à percussion en fonction-
nement continu de plus de 8 minutes pour
éviter une surchauffe du moteur de l‘outil.
J Consultez le mode d‘emploi et toutes les in-
dications de sécurité fournies avec le véhicule
avant de procéder à des réparations ou à
l‘entretien du véhicule.
J Assurez-vous que la prise de l‘allume-cigare /
prise de 12 / V de votre voiture soit protégée
avec un fusible d‘au moins 15 A. Lisez le
mode d‘emploi du fabricant en cas de doute.
J Assurez-vous que l‘allumage du véhicule où
la visseuse à percussion soit en en position
ARRÊT.
J Assurez-vous que le véhicule sur lequel la
visseuse à percussion est utilisée soit sécurisé
et ne peut rouler. Assurez-vous que le frein à
main soit tiré.
J Retirez la visseuse à percussion de l‘allume-
cigare / prise 12 / V et les écrous avant de
mettre le véhicule en marche.
J Débranchez la visseuse à percussion en cas
de non-utilisation de longue durée. Certains
modèles de véhicule continuent d‘approvisionner la prise de l‘allume-cigare / prise
12 / V en courant, ceci même lorsque le
contact est interrompu, la batterie du véhicule peut ainsi être déchargée.
J Contrecarrez tout contact avec les acides
sulfuriques de la batterie. En cas de contact
du visage avec de l‘acide de la batterie, il est
impératif de vous laver soigneusement sous
l‘eau courant et de consulter un médecin. En
cas de contact des yeux avec l‘acide de la
batterie, il est impératif de les rincer durant
au moins 10 minutes sous l‘eau courante et
de consulter un médecin.
J Veillez à une polarité correcte. Contrecarrez
les court-circuits.
Maniement
Raccord à une prise de
courant de 12 V/prise
AVERTISSEMENT
À ne raccorder qu‘à la prise de l‘allume-cigare de
12 / V, quand celle-ci est protégée par un
fusible de plus de 15 A. Si la prise de l‘allumecigare de 12 / V ne devait être protégée
avec moins de 15 A, il vous faut brancher la visseuse à percussion directement à la batterie.
j Retirez l‘allume-cigare de la prise ou du
cache de la prise de 12 / V du véhicule.
j Branchez la prise de 12 V
l‘allume-cigare de 12 V du véhicule.
Raccordement à la batterie
AVERTISSEMENT
Veillez lors de la connexion des pinces
qu‘aucun raccord électrique ne soit
produit à travers les matériaux conducteurs.
La visseuse à percussion peut être raccordée
directement à la batterie de la voiture avec
le câble d‘adaptation
j Raccordez la pince rouge (positive)
câble d‘adaptation de la batterie
cord positif (+) de la batterie du véhicule.
j Raccordez la pince noire (négative)
câble d‘adaptation de la batterie
cord négatif (-) de la batterie du véhicule.
j Raccordez la prise de 12 V
de 12 V
15
.
à la prise de
9
livré avec l‘appareil.
14
14
14
avec la prise
9
et 13
12
du
12
au rac-
du
13
au rac-
24 FR 25 FR
Page 15

Maniement / Entretien et soins
Entretien et soins / Service / Garantie / Élimination
Dévisser l‘écrou hexagonal /
le visser
j Raccordez la visseuse à percussion à une
source de courant de 12 / V comme décrit
ci-dessus.
j Sélectionnez l‘écrou à oeillet
correspondant et enfichez-le sur le carré
entraîneur
de la visseuse à percussion.
2
j Retirez le capuchon de décoration de l‘écrou
hexagonal et appliquez fermement l‘écrou à
oeillet sur l‘écrou hexagonal ou sur le goujon de roue.
j Actionnez la touche de marche à droite / à
gauche
en la poussant vers le haut (sym-
8
bole g = dévisser/marche à gauche). Au
bruit du moteur, vous pouvez reconnaître
que la visseuse à percussion développe tout
d‘abord un tour de rotation et donne d‘un
coup la vis. La vis est dévissée avec chaque
tour de rotation. Vous pouvez dès à présent
la retirer avec la main.
j Procédez de la même manière avec tous les
boulons, jusqu‘à ce que vous puissiez retirer
la roue.
j Montez maintenant la nouvelle route. Veillez
à la concordance des trous des jantes avec
les trous du support de la roue.
j Vissez tout d‘abord fermement tous les
écrous hexagonaux à la main.
j Posez l‘écrou à oeillet sur l‘écrou hexagonal
et actionnez la touche de marche à
droite / gauche
, en appuyant vers le bas
8
(symbole h = serrage/marche à droite).
j Les écrous des roues sont assez serrés après
affichage du symbole clignotant « >->-> ».
j Contrôlez la pression du pneu de rechange
en cas d‘utilisation de celui-ci.
j La visseuse à percussion doit être utilisée
prudemment pour le montage de jantes en
aluminium. Réglez le couple de rotation
selon les directives du fabricant.
ou 17
16
Réglage du tour de rotation
L‘électronique de la visseuse à percussion permet
un nombre de tours de rotation de 80 à 340 Nm.
Le couple de rotation réglé est indiqué sur
l‘écran à 3 chiffres
.
3
Après avoir atteint le couple de rotation préalablement réglé, l‘écran
affiche le message :
3
« >>> ».
j Appuyez sur la touche
(G) pour augmen-
5
ter le couple de rotation. Le couple de rotation
augmente de 10 Nm avec chaque actionnement.
j Appuyez sur la touche
(H) pour réduire
4
le couple de rotation. Le couple de rotation
diminie de 10 Nm avec chaque actionnement.
j Pour remettre le couple de rotation sur 0,
appuyez simultanément sur les touches
(G) et
(H) (Reset).
4
5
Indication : les affichages suivants sont
possibles : 000 -> 080 -> 090 …
L‘affichage est augmenté par étape de 10 et
atteint jusqu‘à 340 Nm.
Échanger le fusible à la prise de 12 V
j Dévissez (et retirez) l‘anneau moleté 10 en le
tournant contre le sens des aiguilles d‘une
montre.
j Retirez le fusible défectueux
et placez un
11
nouveau fusible de max. 15 A.
j Revissez à nouveau fermement l‘anneau
moleté
en le tournant dans le sens des
10
aiguilles d‘une montre.
Entretien et soins
L’appareil ne nécessite aucun entretien.
AVERTISSEMENT
Débranchez les appareils
électriques toujours du courant électrique avant
de réaliser les travaux d’entretien, etc.
j Séparez l‘appareil de la source de courant
de 12 V.
j Nettoyez l’appareil avec un chiffon sec.
N’utilisez en aucun cas des solvants ou
autres produits nettoyants agressifs.
Service
AVERTISSEMENT
Faites réparer l’appa-
reil uniquement par du personnel qualifié.
De cette manière vous assurez et conservez la
sécurité de l’appareil.
AVERTISSEMENT
Faites remplacer le
connecteur ou le câble de connexion toujours
par du personnel qualifié spécialisé. De cette
manière vous assurez et conservez la sécurité de
l’appareil.
Garantie
Les conditions générales de garantie font référence
à des défauts de fabrication et des matériaux.
Si l’appareil est défaillant, portez-le à votre distributeur spécialisé ou bien au poste de vente
correspondant. Afin d’accélérer les travaux de
garantie et de réparation dans l’appareil, vous
aurez besoin des éléments suivants :
- Une copie de la pièce de vente (bon de
livraison, facture de caisse) avec la date
d’achat.
- Motifs pour la réclamation ou descriptions
de la défaillance.
Élimination
L’emballage est composé de matériaux respectueux de l’environnement que vous pourrez
éliminer dans les points de recyclages locaux
qu’y sont prévus.
Ne jetez pas les appareils électriques
dans votre poubelle domestique !
Selon la directive européenne 2002 / 96 / EC
concernant les vieux appareils électriques et
électroniques et son application dans le droit
national, vous devez collecter les appareils séparément et les éliminer de manière respectueuse
de l’environnement utilisant les postes de recyclage spéciaux.
Vous pouvez vous renseigner sur les possibilités
d’élimination pour les appareils électriques aussi
dans votre commune ou administration locale.
Les images peuvent différer légèrement du produit.
On se réserve des changements dans l’intérêt du
progrès technique. Décoration pas incluse.
26 FR 27 FR
Page 16

Indice
Introduzione
Utilizzo secondo la destinazione d’uso .................................................................................................Pagina 30
Contenuto ......................................................................................................................................................Pagina 30
Descrizione dei pezzi ...................................................................................................................................Pagina 30
Dati tecnici .....................................................................................................................................................Pagina 31
Sicurezza
Avvisi di sicurezza generali per utensili elettrici ...............................................................................Pagina 31
1) Luogo di lavoro........................................................................................................................................Pagina 31
2) Sicurezza elettrica ..................................................................................................................................Pagina 31
3) Sicurezza delle persone.........................................................................................................................Pagina 32
4) Gestione particolare ed utilizzo di apparecchi elettrici .............................................................Pagina 32
5) Manutenzione ..........................................................................................................................................Pagina 32
Indicazioni di sicurezza speciali per i trapani avvitatori .................................................................Pagina 33
Funzionamento
Collegamento ad una presa da 12 V ......................................................................................................Pagina 33
Collegamento alla batteria .......................................................................................................................Pagina 33
Allentamento / serraggio dei dadi ruota ...............................................................................................Pagina 33
Inserimento della coppia ..........................................................................................................................Pagina 34
Cambiare il fusibile sulla spina da 12 V.................................................................................................Pagina 34
Manutenzione e cura ........................................................................................................................Pagina 34
Assistenza ......................................................................................................................................................Pagina 35
Garanzia .........................................................................................................................................................Pagina 35
Smaltimento ...............................................................................................................................................Pagina 35
28 29 IT
Page 17

Introduzione
Introduzione / Sicurezza
In queste istruzioni per l‘uso / sull’apparecchio vengono utilizzati i seguenti pittogrammi
Leggere le istruzioni per l‘uso
Osservare le avvertenze e le indicazioni
di sicurezza
Trapano avvitatore a percussione
Contenuto
Pericolo di morte e di incidenti
per i bambini
Smaltite la confezione e l’apparecchio in modo ecocompatibile
SD 340
Controllate il contenuto subito dopo aver aperto
Introduzione
Familiarizzate con tutte le funzioni
dell’apparecchio prima del primo
utilizzo ed informatevi sulla gestione
dell’apparecchio. Leggete attentamente le seguenti
istruzioni per l’uso. Conservate bene queste
istruzioni. Recapitate tutto il kit nel caso della
cessione dell’attrezzo a terzi.
Utilizzo secondo la
destinazione d’uso
Il trapano avvitatore a percussione è destinato a
svitare viti e madri ben fissate, così come i corrispondenti bulloni e dadi, in particolare dadi ruota.
Il controllo digitale della coppia di serraggio
rende possibile l’impostazione del momento di
rotazione graduale da 80 a 340 Nm- con le
preimpostazioni corrispondenti la vite da fissare
viene serrata automaticamente. Il dispositivo
lavora con un tensione continua di 12 / V. Può
essere collegato ad una presa da 12 / V di un veicolo oppure direttamente alla batteria dell’auto.
E’ consentito esclusivamente l’uso privato in
luoghi asciutti. Ogni altro utilizzo o modifica
dell’apparecchio non è conforme alla destinazione d’uso e presenta pericoli rilevanti. Per quanto
riguarda danneggiamenti che derivino da un utilizzo diverso dalla sua destinazione, il produttore
non si assume responsabilità.
la confezione. Provate l’apparecchio e tutti i
pezzi per verificare danni. Non mettete in funzionare apparecchi o pezzi difettosi.
1 trapano avvitatore a percussione SD 340
1 bussola 17 / 19 mm
1 bussola 21 / 23 mm
1 cavo di collegamento con morsetti e cavo di
collegamento per una presa di corrente da 12 V
1 borsa di trasporto
1 manuale d’uso
Descrizione dei pezzi
Cappuccio di protezione
1
½“ attacco quadro / ingresso per bussola
2
Display
3
Tasto (H), preselezione della coppia –
4
Taste (G), preselezione della coppia +
5
Aperture di aerazione
6
Manico
7
Regolatore a tasto verso destra/sinistra
8
Cavo di rete con spina
9
Anello zigrinato (spina da 12 V)
10
Fusibile
11
Morsetto rosso (positivo)
12
Morsetto nero (negativo)
13
Cavo di adattamento della batteria
14
Presa da12 V
15
Bussola 17 / 19 mm
16
Bussola 21 / 23 mm
17
Dati tecnici
Articolo nr. 97135
Tensione nominale: 12 V
Fusibile: 15 A
Potenza: 70 W
Coppia max.: 340 Nm
Portautensili: 12,5 mm (1/2“)
Lunghezza del cavo: 3,5 m
Sicurezza
Avvisi di sicurezza generali
per utensili elettrici
AVVISO!
manuale d’uso. Gli errori nell’osservanza delle
seguenti istruzioni possono portare danni a beni,
ferite o morte. Conservate questo manuale per
consultarlo successivamente.
J
stoditi con il materiale contenuto nella confe-
zione. Ciò comporta pericolo di soffocamento.
J Questo dispositivo non è destinato ad essere
utilizzato da persone (compresi i bambini)
con capacità fisiche, psichiche, sensoriali e intellettuali limitate, oppure senza esperienza
e / o senza conoscenze adeguate, a meno che
essi non siano sotto il controllo di una persona
competente oppure ricevano da essa indicazioni su come utilizzare il dispositivo. I bambini dovrebbero essere sorvegliati per essere
sicuri che non giochino con il dispositivo.
J Il produttore non si assume responsabilità
per danneggiamenti causati da:
- Errori nel collegamento e / o funzionamento.
- Azioni violente, danneggiamenti del dispositivo e / o delle sue componenti causati da
azioni meccaniche o sovraccarico.
- Ogni tipo di modifica all’apparecchio.
- Utilizzo dell’apparecchio per impieghi che
non sono descritti nel manuale utente.
Leggete attentamente questo
PERICOLO DI VITA E DI INCI-
DENTI PER I BAMBINI PICCOLI!
Non lasciate mai i bambini incu-
- Danneggiamenti causati da un utilizzo non
conforme e / o scorretto.
- Batterie difettose.
- Effetti causati dall’umidità e / o dall’aerazione insufficiente.
- Apertura non consentita del dispositivo.
Ciò porta al decadimento della garanzia.
1) Luogo di lavoro
a) Tenete il vostro luogo di lavoro pulito ed
ordinato. Il disordine o i luoghi di lavoro non
illuminati possono causare incidenti.
b) Non lavorate con questo dispositivo in
ambienti con pericolo di esplosione, in cui si
trovano liquidi infiammabili, gas o polveri.
Gli apparecchi elettrici provocano scintille
che possono infiammare la polvere o i vapori.
c) Tenete i bambini e le altre persone lontani
dagli apparecchi elettrici durante il loro utilizzo. In caso di distrazione potete perdere il
controllo del dispositivo.
2) Sicurezza elettrica
a) La spina di collegamento del dispositivo deve
essere adatta alla presa. La spina non deve
essere modificata in alcun modo. Non utilizzate adattatori insieme a dispositivi collegati
a terra. Le spine non modificate e le prese
adatte diminuiscono il rischio di una scossa
elettrica.
b) Evitate il contatto del corpo con superfici
collegate a terra, come tubi, termosifoni, fornelli e frigoriferi. Sussiste un elevato rischio
di scossa elettrica, se il vostro corpo è collegato a terra.
c) Tenete il dispositivo lontano dalla pioggia e
dal bagnato. L’infiltrazione di acqua in un
apparecchio elettrico aumenta il rischio di
una scossa elettrica.
d) Non usate il cavo per tirare il dispositivo, per
appenderlo o per tirare la spina dalla presa.
Tenete il cavo lontano da calore, olio, punte
affilate o parti dell’apparecchio in movimento.
30 IT 31 IT
Page 18

Sicurezza
Sicurezza / Funzionamento
I cavi danneggiati o incastrati aumentano il
rischio di una scossa elettrica.
e) Non utilizzate cavi di prolunga con questo
apparecchio elettrico. Utilizzate solo il cavo
di adattamento fornito.
3) Sicurezza delle persone
a) Siate prudenti, fate attenzione a ciò che fate
e lavorate con ragionevolezza se utilizzate
un apparecchio elettrico. Non utilizzate il
dispositivo se siete stanchi o sotto l’influenza
di droghe, alcool o medicine. Un momento di
disattenzione durante l’uso di un apparecchio elettrico può portare a serie lesioni.
b) Indossate sempre un equipaggiamento di
protezione personale e occhiali di protezione.
Indossare un equipaggiamento di protezione
personale come mascherina, scarpe antinfortunistiche antiscivolo, casco di protezione o
cuffie protettive durante l’impiego di un apparecchio elettrico limita il rischio di lesioni.
c) Evitate la messa in azione involontaria. Ac-
certatevi che il regolatore a tasto
in funzione prima di inserire la spina nella
presa. Se avete le dita sull’interruttore mentre trasportate il dispositivo o collegate il
dispositivo acceso alla corrente elettrica,
possono verificarsi incidenti.
d) Non piegatevi in avanti. Mantenete una
posizione sicura e sempre in equilibrio. Così
potete controllare meglio il dispositivo in
situazioni inaspettate.
e) Indossate un abbigliamento adeguato. Non
indossate abiti larghi o gioielli. Tenete lontani
i capelli, gli abiti larghi e i guanti dalle parti
in movimento. I gioielli o i capelli lunghi
possono essere afferrati dai pezzi in movimento.
non sia
8
4) Gestione particolare ed utilizzo
di apparecchi elettrici
a) Non sovraccaricate il dispositivo. Per il vostro
lavoro utilizzate l‘utensile elettrico adeguato.
Con l‘utensile adatto lavorate meglio e in
modo più sicuro nella gamma di potenza
indicata.
b) Non utilizzate un utensile elettrico il cui
interruttore è difettoso. Un apparecchio
elettrico che non si riesce ad accendere o
spegnere è pericoloso e deve essere riparato.
c) Se dovesse essere necessario sostituire un
cavo di collegamento, bisogna rivolgersi al
produttore o ad un suo incaricato, per evitare rischi di sicurezza.
d) Estraete la spina dalla presa prima di cam-
biare le parti degli accessori o di mettere via
il dispositivo. Queste misure di sicurezza evitano l’accensione involontaria del dispositivo.
e) Conservate gli utensili elettrici non utilizzati
lontano dalla portata dei bambini. Non fate
usare il dispositivo da persone che non hanno familiarità con questo dispositivo o che
non hanno letto queste indicazioni. Gli
utensili elettrici sono pericolosi se vengono
usati da persone senza esperienza.
f) Custodite il dispositivo con cura. Controllate
che le parti mobili funzionino perfettamente
e non si inceppino, che non ci siano parti rotte
o danneggiate, che le funzioni del dispositivo
non siano pregiudicate. Fate riparare le parti
danneggiate prima dell’utilizzo del dispositivo.
Molti incidenti hanno origine negli utensili
elettrici conservati male.
g) Utilizzate utensili elettrici, accessori, attrezzi
ecc in conformità con le presenti istruzioni e
secondo quanto previsto per questo tipo
specifico di apparecchio. Osservate le condizioni di lavoro ed il lavoro da eseguirsi durante l’impiego. L’uso di utensili elettrici per
impieghi diversi da quelli consentiti potrà
dar luogo a situazioni di pericolo.
5) Manutenzione
a) Fate riparare l‘utensile elettrico solo da per-
sonale specializzato. Devono essere utilizzati
solo pezzi di ricambio identici. Così viene
assicurata la sicurezza del dispositivo.
Indicazioni di sicurezza speciali per i trapani avvitatori
J Utilizzate il trapano avvitatore a percussione
solo con una tensione continua da 12 / V.
Non cercate mai di collegarlo ad altre fonti
di energia.
J Utilizzate il trapano avvitatore a percussione
in funzionamento continuo per non più di 8
minuti, per evitare un surriscaldamento del
motore dell’utensile.
J Assicuratevi di aver letto e compreso le indi-
cazioni e le istruzioni di sicurezza fornite
con il veicolo prima di iniziare riparazioni o
lavori di manutenzione del veicolo.
J Assicuratevi che la presa per accendisigari da
12 / V del veicolo sia protetta con un fusibile
di almeno 15 A. Leggete il libretto di istruzioni del veicolo oppure chiedetelo al produttore in caso di dubbio.
J Fate attenzione che il sistema di accensione
del veicolo su cui viene usato il trapano avvitatore a percussione sia posizionato su OFF.
J Assicuratevi che il veicolo su cui viene usato
il trapano avvitatore a percussione sia bloccato e non possa ruotare via. Verificate che
sia stato tirato il freno a mano.
J Allontanate il trapano avvitatore a percus-
sione dalla presa dell’accendisigari da 12 / V e
dai dadi ruota prima di cercare di spostarsi
con il veicolo.
J Separate il trapano avvitatore a percussione
dalla presa in caso di un mancato utilizzo
prolungato. Alcuni modelli di veicoli continuano a rilasciare corrente attraverso la presa
dell’accendisigari da 12 / V anche quando
non sono accesi, scaricando la batteria del
veicolo stesso.
J Evitate ogni contatto con gli acidi della
batteria, che sono corrosivi. Se il vostro viso
dovesse venire in contatto con gli acidi della
batteria, lavatelo ripetutamente sotto l’acqua corrente e contattate il vostro medico.
Se gli acidi della batteria dovessero venire in
contatto con i vostri occhi, puliteli per minimo 10 minuti con acqua corrente e contattate il vostro medico.
J Fate attenzione alla corretta polarità. Evitate
corti circuiti.
Funzionamento
Collegamento ad una presa da 12 V
AVVISO!
accendisigari da 12 / V se essa è protetta da un
fusibile da più di 15 A. Se l’accendisigari dovesse
riportare meno di 15 A, collegate il trapano
direttamente alla batteria.
j Allontanate l‘accendisigari, la sua protezione
ecc. dalla presa da 12 V del veicolo.
j Collegate la spina da 12 V
dell’accendisigari da 12 V del veicolo.
Collegamento alla batteria
AVVISO!
fate attenzione che non ci siano collegamenti
elettrici attraverso materiali conduttori tra i due
morsetti. Il trapano avvitatore può essere collegato direttamente alla batteria dell’auto attraverso il cavo di adattamento della batteria
fornito.
j Collegate il morsetto rosso (positivo)
cavo di adattamento della batteria
collegamento positivo (+) della batteria
dell’auto.
j Collegate il morsetto nero (negativo)
cavo di adattamento della batteria
collegamento negativo (-) della batteria
dell’auto.
j Collegate la spina da 12 V
12 V
Allentamento / serraggio dei
Collegare solo ad una presa di
alla presa
9
Nel collegare i morsetti 12 e 13,
con la presa da
9
.
15
14
14
12
13
al
al
14
del
del
dadi ruota
j Collegate il trapano avvitatore a percussione
con una fonte di corrente da 12 / V come
32 IT 33 IT
Page 19

Funzionamento / Manutenzione e cura
descritto precedentemente.
j Scegliete la bussola adatta
all’attacco quadro
2
a percussione.
j Rimuovete quindi la copertura dei dadi ruota
e fissate la bussola in modo fisso sul dado
ruota o sui bulloni a ruota .
j Attivate il regolatore a tasto verso destra /
sinistra 8, premendolo sulla sua parte superiore (simbolo g = allentare / gira a sinistra).
Dal rumore del motore potere riconoscere
che il trapano avvitatore a percussione
costruisce la coppia e poi con un “colpo”
rilascia la vite. Attraverso il momento di rotazione crescente, con ogni colpo viene allentata la vite. Potete quindi rimuoverla con
la mano.
j Comportatevi nello stesso modo con tutti i
dadi ruota, finché non potete rimuovere la
ruota.
j Inserite l’altra ruota o quella nuova. Fate at-
tenzione che i fori nel cerchione coincidano
con le perforazioni del montante della ruota.
j Avvitate in modo fermo tutti i dadi ruota a
mano.
j Posizionate la bussola sul dado ruota e pre-
mete il regolatore a tasto verso destra / sinistra
, premendolo sulla sua parte inferiore
8
(simbolo h = serrare / gira a destra).
j Con l’indicazione dei simboli lampeggianti
“>->->” i dadi ruota sono sufficientemente
serrati.
j Verificate la pressione delle ruote in caso di
utilizzo di una ruota di scorta.
j Per il montaggio di cerchioni in alluminio, il
trapano avvitatore a percussione dovrebbe
essere usato con cautela. Inserite prima la
coppia, secondo le indicazioni del produttore
del cerchione.
Inserimento della coppia
L’elettronica del trapano avvitatore a percussione
rende possibile una preselezione del momento di
rotazione da 80 fino a 340 Nm. La coppia inserita viene indicata nel display a 3 cifre
o 17 e fissatela
16
del trapano avvitatore
.
3
Dopo aver raggiunto la coppia inserita, appare
sul display 3: “>>>”.
j Premete il tasto
(G) per aumentare la
5
coppia. Essa aumenta di 10 Nm con ogni
azionamento.
j Premete il tasto
(H) per ridurre la coppia.
4
Essa diminuisce di 10 Nm con ogni azionamento.
j Per riposizionare la coppia a 0 premete i
tasti
(G) e 4 (H) contemporaneamente
5
(reset).
Indicazione: Sono possibili le seguenti segnalazioni: 000 -> 080 -> 090 …
L’indicazione aumenta in passi da 10 fino a
raggiungere 340 Nm.
Cambiare il fusibile sulla
spina da 12 V
j Svitate (e rimuovete) l’anello zigrinato 10,
girandolo in senso antiorario.
j Rimuovete il fusibile difettoso
telo con uno nuovo da max. 15 A.
j Riavvitate in modo fermo l’anello zigrinato
girandolo in senso orario.
Manutenzione e cura
Il dispositivo non necessita di alcuna manutenzione.
AVVISO!
Staccate la corrente dai dispositivi
elettrici prima di effettuare la pulizia.
j Separate il dispositivo dalla fonte di corrente
da 12 V.
j Pulite il dispositivo con un panno asciutto.
Non utilizzate soluzioni pulenti o altri
detergenti aggressivi.
e sostitui-
11
10
Assistenza / Garanzia / Smaltimento
Assistenza
AVVISO!
da personale qualificato, in modo da man-
tenere integra la sicurezza del dispositivo.
AVVISO!
cavo di collegamento solo da personale
qualificato, in modo da mantenere integra
la sicurezza del dispositivo.
Garanzia
Le condizioni di garanzia si riferiscono ai difetti
legati alla produzione e ai materiali. In caso di
apparecchio difettato, riportatelo al rivenditore
specializzato, o al punto vendita dove è stato
acquistato. Per usufruire della garanzia e delle
riparazioni sono necessari:
- Una copia dello scontrino (ricevuta di consegna o ricevuta d’acquisto) con la data di
consegna.
- Motivo del reclamo o descrizione del guasto.
,
Smaltimento
la confezione è composta da materiali a basso
impatto ambientale, riciclabili negli appositi siti
di raccolta.
Secondo la direttiva europea 2002 / 96 / EC sui
vecchi apparecchi elettrici ed elettronici e la
recezione nel diritto nazionale, gli apparecchi
elettrici usati devono essere raccolti separatamente per provvedere al riciclaggio in modo
ecologico.
Per informazioni sullo smaltimento degli
apparecchi elettrici usati, consultate l’amministrazione cittadina.
Fate riparare il dispositivo solo
Fate sostituire la spina o il
Non buttate i dispositivi elettrici
nei rifiuti domestici!
Le illustrazioni possono leggermente differire dal
prodotto. Ci si riserva il diritto a modifiche che
siano funzionali al miglioramento tecnico.
Decorazione non compresa.
34 IT 35 IT
Page 20

Seznam obsahu
Úvod
Používání k určenému účelu ....................................................................................................................Strana 38
Obsah dodávky .............................................................................................................................................Strana 38
Popis kompresoru a dílů ............................................................................................................................Strana 38
Technické údaje ............................................................................................................................................Strana 38
Bezpečnost
Všeobecná bezpečnostní upozornění pro elektrické nářadí ...........................................................Strana 39
1) Pracoviště ..................................................................................................................................................Strana 39
2) Bezpečnost elektrických dílů ...............................................................................................................Strana 39
3) Bezpečnost osob .....................................................................................................................................Strana 39
4) Pečlivé zacházení s elektrickým nářadím ........................................................................................Strana 40
5) Údržba ........................................................................................................................................................Strana 40
Speciální bezpečnostní předpisy pro úderové utahováky ...............................................................Strana 40
Obsluha
Připojení na zásuvku s napětím 12 V nebo zdířku .............................................................................Strana 41
Připojení na baterii vozidla .......................................................................................................................Strana 41
Povolování a utahování šroubů kol .......................................................................................................Strana 41
Nastavení kroutícího momentu ..............................................................................................................Strana 42
Výměna pojistky na zástrčce pro 12 V ...................................................................................................Strana 42
Údržba a ošetřování .............................................................................................................................Strana 42
Servis .................................................................................................................................................................Strana 42
Záruka ..............................................................................................................................................................Strana 42
Odstranění do odpadu .......................................................................................................................Strana 42
36 37 CZ
Page 21

Úvod
Bezpečnost
V tomto návodu k obsluze a na přístroji budou použité následující piktogramy:
Přečíst návod k obsluze!
Dbát na varovná a bezpečnostní
upozornění!
Nárazový utahovák SD 340
1 Ořech 21 / 23 mm
Nebezpečí zranění a ohrožení
života dětí!
Přístroj a obalový materiál
odstraňujte do odpadu ekologicky!
1 Připojovací kabel se svěrkami a zdířkou a
připojovací kabel na zásuvku s napětím 12 V
Úvod
1 Kufřík
1 Návod k obsluze
Před uvedením do provozu se seznamte
s funkcemi přístroje a informujte se o
správném zacházení . K tomu si přečtěte
Popis kompresoru a dílů
důkladně následující návod k obsluze. Tento
návod si dobře uschovejte. Předávejte tyto podklady spolu s přístrojem.
Krytka
1
Čtverhranný profil náhonu ½“ / spojení pro
2
ořech
Displej
Používání k určenému účelu
Nárazový utahovák je určený pro utahování a
povolování šroubů, matek, čepů a obzvlášť šroubů
kol motorových vozidel. Digitální kontrola kroutícího momentu umožňuje stupňovité nastavení
kroutícího momentu od 80 do 340 Nm pro utažení
šroubu. Utahovák je napájený stejnosměrným
proudem o napětí 12 V. Může se připojit na zásuvku s napětím 12 V ve vozidle nebo přímo na
baterii vozidla. Je určený jen pro privátní použití
a provoz v suchém prostředí. Každé jiné použití
nebo pozměnění přístroje platí jako používání k
jinému, než určenému účelu a přináší sebou znač-
3
Tlačítko (H),, předvolba momentu –
4
Tlačítko (G), předvolba momentu +
5
Větrací otvory
6
Rukojeť
7
Kolébkový vypínač běh vpravo nebo vlevo
8
Připojovací kabel se zástrčkou
9
Jistící kroužek (zástrčky pro 12 V)
10
Pojistka
11
Svěrka červená (kladný pól)
12
Svěrka černá (záporný pól)
13
Kabel adaptéru pro baterii
14
Zdířka 12 V
15
Ořech 17 / 19 mm
16
Ořech 21 / 23 mm
17
ná nebezpečí. Výrobce neručí za škody vzniklé
použitím k jinému než k určenému účelu.
Technické údaje
Obsah dodávky
Artikl č.: 97135
Jmenovité napětí: 12 V
Zkontrolujte ihned po vybalení obsah dodávky.
Zkontrolujte, jestli není přístroj poškozený. Neuvádějte vadný přístroj nebo jeho díly do provozu.
Pojistka: 15 A
Příkon: 70 W
Maximální kroutící moment: 340 Nm
Spojení pro nástavce: 12,5 mm (1/2“)
1 Nárazový utahovák SD 340
Délka kabelu: 3,5 m
1 Ořech 17 / 19 mm
Bezpečnost
Všeobecná bezpečnostní upozornění pro elektrické nářadí
VAROVÁNÍ
vod k použití. Chyby a odchylky od uvedených
pokynů mohou zapříčinit při používání nářadí
věcné škody nebo ohrožení života. Uschovejte si
tento návod pro pozdější nahlédnutí.
J
hledu s obalovým materiálem. Hrozí nebez-
pečí udušení.
J Přístroj nemají obsluhovat osoby (včetně
dětí) s omezenými fyzickými, senzorickými
nebo duševními schopnostmi nebo bez zkušeností, ledaže jsou poučené o používání přístroje v zájmu vlastní bezpečnosti a pod dozorem příslušné osoby. Děti mají zůstat pod
dohledem, aby si nehráli s přístrojem.
J Výrobce neručí za škody způsobené:
- chybami spojení nebo chybným provozem.
- násilím, předchozím poškození přístroje,
jeho dílů, mechanickým zatížením nebo
přetížením.
- jakoukoliv předcházející změnou konstrukce přístroje.
- použitím přístroje, které není popsáno v
návodu k obsluze.
- jako následující z používání k jinému, než
popsanému účelu nebo chybným použitím.
- vadnými bateriemi.
- působením vlhkosti nebo nedostatečným
větráním.
- po nedovoleném otevření přístroje.
Tyto případy vedou k zániku záruky.
Přečtěte si důkladně tento ná-
NEBEZPEČÍ ZRANĚNÍ A OHRO-
ŽENÍ ŽIVOTA MALÝCH DĚTÍ!
Nenechávejte děti nikdy bez do-
1) Pracoviště
a) Udržujte Vaše pracoviště čisté a uklizené.
Nepořádek a špatně osvětlené pracoviště
mohou zapříčinit úrazy.
b) Nepoužívejte přístroj ve výbušném prostředí,
ve kterém se nacházejí hořlaviny, plyny nebo
vznětlivý prach. Elektrická nářadí produkují
jiskry, které mohou zapálit prach nebo výpary.
c) Při používání elektrického nářadí držte děti a
jiné osoby v dostatečném odstupu. Při odvrácení pozornosti můžete ztratit kontrolu
nad přístrojem.
2) Bezpečnost elektrických dílů
a) Zástrčka přístroje musí být vhodná pro
vyhlédnutou zásuvku. Zástrčka se nesmí
žádným způsobem upravovat nebo měnit.
Nepoužívejte žádné adaptéry společně s
uzemněnými přístroji. Nezměněné zástrčky a
vhodné zásuvky snižují riziko zásahu elektrickým proudem.
b) Vyhýbejte se dotyku Vašeho těla s uzemně-
nými povrchy předmětů, jako jsou trubky,
topení, sporáky a ledničky. V případě uzemnění Vašeho těla hrozí zvýšené riziko zásahu
elektrickým proudem.
c) Nevystavujte přístroj dešti nebo vlhkosti.
Voda v elektrické přístroji zvyšuje riziko
zásahu elektrickým proudem.
d) Nepoužívejte kabel přístroje na nošení, zavě-
šování přístroje nebo na odpojování ze zásuvky
tahem. Chraňte kabel před žárem, olejem,
ostrými hranami nebo pohyblivými díly jiných přístrojů. Poškozený nebo zauzlovaný
kabel zvyšuje riziko zásahu elektrickým
proudem.
e) Nepoužívejte pro toto elektrické nářadí
prodlužovací kabel. Používejte jen dodaný
adaptační kabel.
3) Bezpečnost osob
a) Buďte pozorní, dbejte na to co právě děláte,
pracujte s tímto elektrickým nářadím rozumě
a rozvážně. Nepoužívejte nářadí, jestliže jste
unavení nebo pod vlivem drog, alkoholu
nebo léků. Okamžik nepozornosti může zapříčinit při používání elektrického přístroje
38 CZ 39 CZ
Page 22

Bezpečnost
Bezpečnost / Obsluha
závažná zranění.
b) Noste osobní ochranné pomůcky a vždy
vhodné ochranné brýle. Nošení osobních
ochranných pomůcek jako masky, neklouzavých pracovních bot, helmy nebo ochrany
sluchu, podle použití elektrického nářadí,
snižuje riziko zranění.
c) Zabraňujte nechtěnému, nežádoucímu za-
pnutí přístroje. Kontrolujte před zastrčením
zástrčky do zásuvky, jestli je vypnutý kolébkový vypínač
přístroje nebo vypínačem zapnutý přístroj
může způsobit zranění po připojení na přívod elektrického proudu.
d) Při práci se nepředklánějte. Zajistěte si pro
práci bezpečnou polohu a v každém případě
dostatečnou rovnováhu. Potom můžete přístroj lépe kontrolovat i při neočekávaných
situacích.
e) Noste vhodné oblečení. Nenoste při práci
volné, široké oblečení nebo šperky. Udržujte
Vaše vlasy, oblečení a rukavice v dostatečném
odstupu od pohyblivých dílů. Volné oblečení,
šperky nebo dlouhé vlasy mohou být zachycené pohyblivými díly.
. Prst na vypínači při nošení
8
4) Pečlivé zacházení s
elektrickým nářadím
a) Přístroj nepřetěžujte. Používejte pro Vaší
práci jen vhodné elektrické nářadí. S vhodným elektrickým nářadím můžete nejen lépe,
bezpečně pracovat ale i dosáhnout požadovaný výkon.
b) Nepožívejte elektrické nářadí s vadným vypí-
načem. Elektrické nářadí, které se nedá zapnout
nebo vypnout vypínačem je nebezpečné a
musí se nechat opravit.
c) Jestliže se musí vyměnit přívodní kabel, po-
věřte výměnou výrobce nebo pověřeného
pracovníka, aby jste zabránili rizikům.
d) Vytahujete vždy zástrčku ze zásuvky před
výměnou dílů nebo příslušenství na přístroji
a i po odložení nářadí. Toto opatření zabrání
nechtěnému zapnutí přístroje.
e) Udržujte nepoužívané elektrické nářadí
mimo dosah dětí. Nedovolujte používání přístroje osobám, které s ním nejsou seznámené
nebo které nečetly tyto pokyny. Elektrické
nářadí je nebezpečné, jestliže je používané
nezkušenými osobami.
f) Přístroj pečlivě ošetřujte. Kontrolujte jestli
fungují bezvadně pohyblivé díly, jestli nejsou
blokované, zlomené nebo poškozené a jestli
neovlivňují negativně funkci přístroje. Nechte opravit poškozené díly ještě před použitím
přístroje. Mnohé nehody a zranění jsou zapříčiněné špatně udržovaným elektrickým
nářadím.
g) Používejte elektrické nářadí, příslušenství,
atd. způsobem odpovídajícím těmto pokynům a tak jak je to předepsané pro speciální
typ přístroje. Berte přitom ohled i na pracovní podmínky a prováděnou práci. Použití
elektrického nářadí pro jiné účely může
zapříčinit nebezpečné situace.
5) Údržba
a) Elektrické nářadí nechte opravovat jen u od-
borníka. Při opravách se smějí používat jen
originální náhradní díly. Jen tak může být
zachovaná bezpečnost přístroje.
Speciální bezpečnostní předpisy pro úderové utahováky
J Pro tento úderový utahovák používejte jen
stejnosměrné napětí 12 V. Nepřipojujte ho
nikdy na jiné zdroje proudu.
J Nepoužívejte úderový utahovák déle než 8
minut v nepřetržitém provozu, při delším
provozu může dojít k přehřátí jeho motoru.
J Přečtěte si před údržbou nebo opravou vozi-
dla dodaný návod a všechny související bezpečnostní předpisy týkající se vozidla.
J Zkontrolujte, jestli je zásuvka cigaretového
zapalovače s napětím 12 V jištěná pojistkou
s nejméně 15 A. V případě pochyb si vezměte
na pomoc příručku vozidla nebo konzultujte
výrobce.
J Při používání elektrického úderového utaho-
váku na vozidle dbejte na to, aby bylo vypnuté jeho zapalování.
J Zajistěte vozidlo, aby nemohlo pojíždět. Za-
tahujte vždy ruční brzdu.
J Před jízdou s vozidlem vytáhněte vždy nej-
dříve zástrčku úderového utahováku ze zásuvky 12 V ve vozidle.
J Při nepoužívání vytáhněte vždy zástrčku pří-
stroje ze zásuvky ve vozidle. Některé typy
vozidel drží zásuvku cigaretového zapalovače pod napětím i při vypnutém zapalování,
při zasunuté zástrčce do zásuvky ve vozidle
může dojít k vybití jeho baterie.
J Vyhýbejte se kontaktu s kyselinou z baterie,
která je žíravá. Při kontaktu s obličejem
omyjte postižená místa pod tekoucí vodou a
vyhledejte lékařskou pomoc. Postižené oči
vymývejte nejméně 10 minut tekoucí vodou
a vyhledejte rovněž lékařskou pomoc.
J Dbejte na správnou polaritu. Zabraňujte
zkratům.
Obsluha
Připojení na zásuvku s napětím
12 V nebo zdířku
VAROVÁNÍ
na zásuvku s napětím 12 V chráněnou pojistkou
15 A. Jestliže je zásuvka chráněná pojistkou s
méně než 15 A, použijte připojení přímo na
baterii vozidla.
j Vytáhněte cigaretový zapalovač ze zásuvky
nebo odstraňte kryt zásuvky.
j Připojte zástrčku na 12 V
napětím 12 V ve vozidle.
Připojení na baterii vozidla
VAROVÁNÍ
a
na to, aby nedošlo k jejich elektrickému
13
propojení jinými vodivými materiály. Úderový
Připojujte přívod přístroje jen
do zásuvky s
9
Dbejte při připojování svěrek
12
utahovák je možné připojit i pomocí dodaného
adaptačního kabelu
j Spojte červenou svěrku (kladný pól)
adaptačního kabelu
baterie.
j Spojte černou svěrku (záporný pól)
tačního kabelu
baterie.
j Zasuňte zástrčku na 12 V
zdířky
Povolování a utahování šroubů kol
j Připojte úderový utahovák na napětí 12 V jak
bylo výše popsáno.
j Zvolte vhodný ořech
ho na čtyřhranný profil
hováku.
j V případě potřeby sejměte ozdobný kryt kola
zakrývající šrouby a nasaďte ořech na šroub.
j Zvolte kolébkovým vypínačem
jeho stisknutím na horním konci (Symbol g =
povolování / chod vlevo). Podle zvuku motoru
rozeznáte jak utahovák zvyšuje kroutící moment a potom vyšle „úder“. Šroub se
povolí stoupajícím kroutícím momentem a
následujícími údery. Nyní můžete vyšroubovat šroub rukou.
j Postupujte stejným způsobem i u ostatních
šroubů.
j Nasaďte nové kolo. Utáhněte nejdříve všech-
ny šrouby rukou.
j Nasaďte ořech na šroub a zvolte kolébkovým
vypínačem
na spodním konci (Symbol h = utahování /
chod vpravo).
j Blikající symbol: „>->->“ znamená, že je
šroub dostatečně utažený.
j Při použití náhradního kola přezkoušejte
ihned tlak v pneumatice.
j Při montáži hliníkových ráfků je třeba za-
cházet s utahovákem opatrně. Nastavujte
kroutící moment podle údajů výrobce ráfků.
na kabelech 14.
15
přímo na baterii.
14
s kladným pólem (+)
14
13
se záporným pólem (-)
14
přístroje do
9
nebo 17 a nasuňte
16
úderového uta-
2
chod vlevo
8
chod vpravo jeho stisknutím
8
12
adap-
40 CZ 41 CZ
Page 23

Obsluha / Údržba a ošetřování / Servis / Záruka / Odstranění do odpadu
Nastavení kroutícího momentu
Elektronika úderového utahováku umožňuje
nastavení kroutícího momentu od 80 do 340 Nm.
Nastavený kroutící moment se zobrazí na
třímístném displeji
.
3
Po dosažení nastaveného kroutícího momentu se
objeví na displeji
symbol: „>>>“.
3
j Pro zvýšení kroutícího momentu stiskněte
tlačítko
(G) Kroutící moment se jedním
5
stisknutím zvýší o 10 Nm.
j Pro snížení kroutícího momentu stiskněte
tlačítko
(H). Kroutící moment se jedním
4
stisknutím sníží o 10 Nm.
j Pro vrácení hodnoty kroutícího momentu na
0 (nulu) stiskněte současně obě tlačítka
(H) a
(G) (reset).
5
4
Upozornění: následující zobrazení jsou
možná: 000 -> 080 -> 090 …
Zobrazení se zvyšuje po 10 Nm a může dosáhnout hodnoty až 340 Nm.
Výměna pojistky na zástrčce
pro 12 V
j Povolte a sundejte jistící kroužek 10 otáče-
ním proti směru otáčení hodinových ručiček.
j Vyjměte vadnou pojistku
novou, maximálně s 15 A.
j Zašroubujte znovu zpátky jistící kroužek.
a vyměňte ji za
11
Servis
VAROVÁNÍ
Nechávejte přístroj opravovat
jen kvalifikovanými pracovníky. Tím zůstane
zajištěná bezpečnost přístroje.
VAROVÁNÍ
Výměnu zástrčka nebo
přívodního kabel nechávejte provádět jen
kvalifikovaným odborníkem. Tím zůstane
zajištěná bezpečnost přístroje.
Záruka
Všeobecné podmínky záruky se vztahují jen na
vady materiálu nebo chyby při výrobě.
Závadný přístroj odevzdejte u Vašeho odborného
prodejce. V zájmu urychlení záručních a opravářských prací potřebujeme následující doklady:
- Kopii pokladní poukázky (dodací list,
účtenku) s datem zakoupení.
- Důvod reklamace nebo popis závady.
Odstranění do odpadu
Balení je vyrobené z ekologických materiálů,
které můžete odstranit do odpadu u místních
sběren recyklovatelných materiálů.
Neodhazujte elektrické přístroje do
domácího odpadu!
Údržba a ošetřování
starých elektrických a elektronických přístrojů a
realizace národního práva, se musí nepotřebné
Podle evropské směrnice 2002/96/EC, týkající se
Přístroj nevyžaduje žádnou údržbu.
elektrické přístroje sbírat odděleně a odevzdávat
k ekologickému, opětovnému zhodnocení.
VAROVÁNÍ
trické přístroje od přívodu elektrického proudu.
Před ošetřováním odpojte elek-
Informujte se o možnostech odstranění elektrických přístrojů do odpadu u Vaší obce nebo
j Odpojte přístroje od zdroje napětí 12 V.
správy města.
j Čistěte přístroj suchým hadrem. Nepoužívej-
te na čistění v žádném případě rozpouštědla
nebo agresivní čistící prostředky.
Zobrazení se mohou nepatrne lišit od vzhledu
výrobku. Zmeny v popisu provedené z duvodu
technického vývoje výrobku jsou vyhrazeny.
Dekorace není v obsahu.
42 CZ 43 CZ
Page 24

Obsah
Úvod
Použitie podľa predpisov ...........................................................................................................................Strana 46
Obsah ...............................................................................................................................................................Strana 46
Popis častí ......................................................................................................................................................Strana 46
Technické údaje ............................................................................................................................................Strana 47
Bezpečnosť
Všeobecné bezpečnostné pokyny pre elektrické nástroje ...............................................................Strana 47
1) Pracovisko .................................................................................................................................................Strana 47
2) Elektrická bezpečnosť ............................................................................................................................Strana 47
3) Bezpečnosť osôb .....................................................................................................................................Strana 48
4) Starostlivá manipulácia apoužívanie elektrického nástroja ....................................................Strana 48
5) Údržba ........................................................................................................................................................Strana 48
Špeciálne bezpečnostné pokyny pre impulzový skrutkovač ............................................................Strana 49
Obsluha
Pripojenie do 12 Vzásuvky / puzdra .......................................................................................................Strana 49
Pripojenie batérie.........................................................................................................................................Strana 49
Uvoľnenie / pritiahnutie matíc kolesa ...........................................................................................................Strana 49
Nastavenie krútiaceho momentu ...........................................................................................................Strana 50
Výmena poistky v12 Vzástrčke .............................................................................................................Strana 50
Údržba a ošetrovanie ..........................................................................................................................Strana 50
Servis .................................................................................................................................................................Strana 50
Záruka ..............................................................................................................................................................Strana 50
Likvidácia .......................................................................................................................................................Strana 51
44 45 SK
Page 25

Úvod
Úvod / Bezpečnosť
Vtomto návode na obsluhu / na prístroji sú použité nasledovné piktogramy:
Prečítajte si návod na obsluhu!
Rešpektujte výstražné abezpečnostné
pokyny!
Impulzový skrutkovač SD 340
Obsah
Nebezpečenstvo ohrozenia života
azranenia malých detí adetí!
Obal aprístroj zlikvidujte
ekologickým spôsobom!
Po vybalení prístroja ihneď skontrolujte obsah
Úvod
balenia. Prístroj avšetky ostatné diely skontrolujte, či nie sú poškodené. Poškodený prístroj
Pred prvým uvedením prístroja do
alebo iné diely nepoužite.
činnosti sa oboznámte so všetkými
funkciami prístroja azabezpečte si
informácie ohľadom správneho používania prístroja. Dôsledne si prečítajte nasledujúci návod
na obsluhu. Tento návod si odložte. Ak prístroj
odovzdáte tretej osobe, taktiež jej priložte všetky
podklady.
1 impulzový skrutkovač SD 340
1 nasúvací pastorok 17 / 19 mm
1 nasúvací pastorok 21 / 23 mm
1 pripájací kábel so svorkami apripájací kábel
pre 12 Vzásuvku alebo puzdro
1 kufrík
1 návod na obsluhu
Použitie podľa predpisov
Popis častí
Impulzový skrutkovač je určený na uvoľnenie
pevne dotiahnutých skrutiek amatíc azávrtných
skrutiek apastorkov, najmä kolesových matíc.
Digitálna kontrola krútiaceho momentu umožňuje
postupné nastavenie krútiaceho momentu od
80 do 340 Nm – uťahujúca skrutka je automaticky primerane utiahnutá na základe príslušného
nastavenia. Prístroj pracuje s12 Vjednosmerným
napätím. Prístroj môže byť pripojený do 12 Vzásuvky automobilu alebo priamo na autobatériu.
Prístroj je určený výlučne na súkromné použitie
vsuchých priestoroch. Ak sa prístroj použije na
akýkoľvek iný účel, alebo sa na ňom vykonajú
zmeny, takéto použitie sa nepovažuje za štandardné askrýva vsebe značné riziká. Výrobca neručí
za škody vzniknuté vdôsledku nesprávneho
používania prístroja.
Ochranný kryt
1
½“ hnací štvorhran / upínací mechanizmus
2
na upnutie nasúvacieho pastorka
Displej
3
Tlačidlo (H), predvoľba krútiaceho momentu –
4
Tlačidlo (G), predvoľba krútiaceho momentu +
5
Vetrací otvor
6
Rukoväť
7
Kyvné tlačidlo pre pravotočivý / ľavotočivý chod
8
Sieťový kábel so zástrčkou
9
Ryhovaný krúžok (12 V zástrčka)
10
Poistka
11
Svorka červená (plus)
12
Svorka čierna (mínus)
13
Kábel sadaptérom na autobatériu
14
12 V zásuvka
15
Nasúvací pastorok 17 / 19 mm
16
Nasúvací pastorok 21 / 23 mm
17
Technické údaje
Číslo artikla: 97135
Menovité napätie: 12 V
Poistka: 15 A
Výkon: 70 W
Krútiaci moment max.: 340 Nm
Upínací mechanizmus: 12,5 mm (1/2“)
Dĺžka kábla: 3,5 m
Bezpečnosť
Všeobecné bezpečnostné pokyny pre elektrické nástroje
VAROVANIE! Návod na používanie si sta-
rostlivo prečítajte. Nedodržaním ďalej uvedených
pokynov môžu vzniknúť škody na majetku, môžu
sa zraniť osoby, alebo môže byť ohrozený ich
život. Tento návod si odložte.
J
nikdy bez dozoru vblízkosti obalového
J Tento prístroj nesmú používať osoby (vrátane
J Výrobca neručí za škody spôsobené následkom:
- násilných vplyvov, poškodenia prístroja
- vykonania akýchkoľvek zmien na prístroji.
- použitia prístroja na účely, ktoré nie sú
- neštandardného a / alebo nesprávneho po-
NEBEZPEČENSTVO OHROZENIA
ŽIVOTA AZRANENIA MALÝCH
DETÍ A DETÍ! Deti nenechajte
materiálu. Hrozí nebezpečenstvo ohrozenia
života udusením.
detí) sobmedzenými fyzickými, senzorickými
alebo duševnými schopnosťami, alebo osoby
snedostatkom skúseností a / alebo vedomostí,
iba ak by mali zabezpečený osobný dozor
aboli poučení oobsluhe prístroja. Deti by
mali mať zabezpečený dozor, aby sa sprístrojom nehrali.
- nesprávneho spojenia a / alebo chýb vzniknutých počas prevádzky.
a / alebo poškodenia častí prístroja. mechanickým pôsobením alebo preťažením.
uvedené vnávode na obsluhu.
užitia prístroja vdôsledku ktorého vznikli
ďalšie škody.
- chybných batérií.
- pôsobenia vlhkosti a / alebo nedostatočným
vetraním.
- neoprávneného otvorenia prístroja.
Nárok na záruku vtakýchto prípadoch zaniká.
1) Pracovisko
a) Vaše pracovisko musí byť čisté a upratané.
Vdôsledku neporiadku anedostatočného
osvetlenia môže vzniknúť úraz.
b) Stýmto prístrojom nepracujte vpriestoroch
ohrozených explóziou, vktorých sa nachádzajú zápalné kvapaliny, plyny alebo prach.
Pri práci selektrospotrebičmi vznikajú iskry,
ktoré môžu zapáliť prach alebo výpary.
c) Pri práci simpulzovým skrutkovačom sa vo
Vašej blízkosti nesmú zdržiavať deti alebo
iné osoby. Tie by mohli rušiť Vašu pozornosť
anad prístrojom by ste mohli stratiť kontrolu.
2) Elektrická bezpečnosť
a) Zástrčka prístroja musí byť kompatibilná so
zásuvkou elektrického zdroja. Zástrčka nesmie byť nijako zmenená. Vprípade použitia
prístrojov sochranným uzemnením nepoužívajte zástrčkový adaptér. Originálne zástrčky
avhodné elektrické zásuvky minimalizujú riziko zasiahnutia elektrickým prúdom.
b) Uzemnených povrchov ako sú rúry, vykuro-
vacie telesá, pece achladničky sa nedotýkajte. Vtýchto prípadoch hrozí zvýšené riziko
zasiahnutia elektrickým prúdom, keď je Vaše
telo uzemnené.
c) Prístroj nevystavujte dažďu alebo vlhkosti.
Vniknutím vody do elektrospotrebiča sa zvyšuje riziko zasiahnutia elektrickým prúdom.
d) Kábel nepoužívajte na prenášanie, zavesenie
prístroja, alebo na vytiahnutie zástrčky
zelektrickej zásuvky. Kábel nevystavujte vysokej teplote, zabráňte jeho kontaktu solejom, nepribližujte sa sním kostrým hranám
46 SK 47 SK
Page 26

Bezpečnosť
Bezpečnosť / Obsluha
alebo pohyblivým častiam prístroja. Poškodené alebo zamotané káble zvyšujú riziko
zasiahnutia elektrickým prúdom.
e) Vspojení stýmto prístrojom nepoužívajte
žiadne predlžovacie káble. Používajte len priložený kábel sadaptérom.
3) Bezpečnosť osôb
a) Pri práci selektrospotrebičom postupujte
pozorne, sústreďte sa arozmýšľajte. Prístroj
nepoužívajte vstave únavy, pôsobenia účinkov drog, alkoholu alebo liekov. Chvíľková
nepozornosť pri používaní elektrického prístroja môže zapríčiniť vážne zranenia.
b) Noste osobnú ochrannú výbavu avždy ochran-
né okuliare. Nosením osobnej ochrannej
výbavy, ako je maska proti prachu, protišmyková bezpečnostná obuv, ochranná prilba
alebo ochrana sluchu vzávislosti od druhu
apoužitia elektrického prístroja minimalizuje riziko vzniku úrazu.
c) Pozor na náhodné zapnutie prístroja. Skôr
než zapnete zástrčku do elektrickej zásuvky
sa ubezpečte, či nie je kyvné tlačidlo
zapnuté. Úraz môže vzniknúť pri prenose
prístroja sprstom položeným na vypínači,
alebo pri pripájaní zapnutého prístroja do
elektrickej zásuvky.
d) Nenakláňajte sa. Stojte vždy bezpečne asta-
bilne, aby ste mohli prístroj vnečakaných
situáciach lepšie zvládnuť.
e) Noste vhodný odev. Nenoste široký odev ale-
bo ozdoby. Vlasy, odev arukavice udržiavajte
vdostatočnej vzdialenosti od pohyblivých
častí. Voľný odev, ozdoby alebo dlhé vlasy
môžu byť zachytené pohybujúcimi sa časťami.
8
4) Starostlivá manipulácia
apoužívanie elektrického nástroja
a) Prístroj nepreťažujte. Pri práci používajte
elektrický nástroj určený pre daný druh práce.
Svhodným elektrickým nástrojom sa Vám
bude pracovať lepšie abezpečnejšie, keď
budete pracovať vrámci udaných parametrov výkonu.
b) Ak je na elektrickom nástroji poškodený
vypínač, nástroj nepoužite. Elektrický nástroj,
ktorý sa nedá zapnúť alebo vypnúť, je nebezpečný atreba ho opraviť.
c) Ak je potrebné vymeniť pripájací kábel, tento
musí vymeniť výrobca alebo ním poverený
subjekt, tým bude zaručená bezpečnosť pri
používaní prístroja.
d) Keď prístroj odložíte, alebo meníte príslušen-
stvo, zástrčku vytiahnite zo siete. Týmto preventívnym opatrením zabránite náhodnému
zapnutiu prístroja.
e) Keď elektrické nástroje nepoužívate, odložte
ich mimo dosahu detí. Prístroj nesmú používať
osoby ktoré neboli sjeho obsluhou oboznámené, alebo nečítali tento návod. Elektrické
nástroje sú nebezpečné, pokiaľ ich obsluhujú
neskúsené osoby.
f) Prístroj starostlivo udržujte. Kontrolujte, či
pohyblivé časti fungujú bezchybne ači sa
nezasekávajú, či nie sú zlomené, alebo poškodené tak, že by sa tým zhoršila funkcia
prístroja. Opravu poškodených častí zabezpečte skôr, než prístroj použijete. Mnohé
úrazy boli zapríčinené vdôsledku nesprávne
udržiavaných elektrických nástrojov.
g) Elektrický nástroj, príslušenstvo, aplikačné
nástroje atď. používajte vsúlade spokynmi
uvedenými vtomto návode apredpismi
určenými pre tento špeciálny typ prístroja.
Pritom zohľadnite pracovné podmienky avykonávanú činnosť. Ak sú elektrické nástroje
použité na iné účely, takéto použitie môže
byť nebezpečné.
5) Údržba
a) Opravu prístroja zverte len odborníkovi. Pou-
žiť sa smú len identické náhradné diely. Tak
zostane zachovaná bezpečnosť prístroja.
Špeciálne bezpečnostné pokyny
pre impulzový skrutkovač
J Impulzový skrutkovač pripojte len na zdroj
s12 Vjednosmerným napätím. Nikdy sa ho
nepokúšajte pripojiť na iné zdroje energie.
J Impulzový skrutkovač nepoužívajte nepretr-
žite dlhšie ako 8 minút, vopačnom prípade
by sa mohol prehriať motor.
J Skôr než začnete sopravou alebo údržbou
vozidla, si prečítajte návod avšetky bezpečnostné pokyny, ktoré patria kdanému vozidlu. Pokiaľ im neporozumiete, do opravy alebo
údržby sa nepúšťajte.
J Zapaľovač cigariet vo vozidle / 12 Vzásuvka
vo vozidle musia byť chránené minimálne
15 A poistkou. Toto si skontrolujte. Prečítajte
si príručku kvozidlu, vprípade pochybností
sa spojte svýrobcom vozidla.
J Zapaľovanie vozidla, na ktorom je impulzový
skrutkovač pripojený musí byť vpolohe VYP.
J Vozidlo na ktoré je impulzový skrutkovač
pripojený, musí byť zabezpečené proti samovoľnému pohybu. Ručná brzda musí byť zatiahnutá.
J Impulzový skrutkovač odpojte zo zapaľovača
cigariet / 12 Vzásuvky aod matíc kolesa skôr,
než vozidlo uvediete do pohybu.
J Ak nebudete impulzový skrutkovač dlhšiu
dobu používať, odpojte ho zo zásuvky. Vniektorých modeloch vozidiel je vzásuvke zapaľovača cigariet / 12 Vzásuvke prúd aj po
vypnutí zapaľovania, batéria vo vozidle sa
môže takto vybiť.
J Vyhnite sa akémukoľvek kontaktu skyseli-
nou nachádzajúcou sa vbatérii, je to žieravina. Ak sa kyselina zbatérie dostane na Vašu
tvár, tvár si výdatne opláchnite pod tečúcou
vodou aspojte sa sVašim lekárom. Ak Vám
vnikne kyselina do očí, oči si vypláchnite
tečúcou vodu minimálne po dobu 10 minút
aspojte sa s lekárom.
J Dbajte na správnu polaritu. Pozor na skraty.
Obsluha
Pripojenie do 12 Vzásuvky / puzdra
VAROVANIE! Pripojte len do zásuvky zapa-
ľovača cigariet / 12 V puzdra, pokiaľ sú tieto chránené viac než 15 A poistkou. Ak je zásuvka zapaľovača cigariet / 12 Vpuzdro chránené poistkou s
nižším stupňom ochrany ako 15 A, impulzový
skrutkovač pripojte priamo na batériu vozidla.
j Zapaľovač cigariet vytiahnite zo zásuvky,
príp. clonu atď. z12 Vzásuvky vozidla.
j Do zásuvky zapaľovača cigariet / 12 Vzásuvky
vozidla vsuňte 12 Vzástrčku
Pripojenie batérie
VAROVANIE! Pri pripájaní svoriek 12 a 13
dbajte na to, aby medzi obidvomi svorkami
nevzniklo žiadne elektrické spojenie vodivým
materiálom.
Impulzový skrutkovač je možné pomocou priloženého kábla sadaptérom na autobatériu
pripojiť priamo na autobatériu.
j Červenú svorku (kladná)
rom na autobatériu
pól (+) autobatérie.
j Čiernu svorku (záporná)
rom na autobatériu
pól (-) autobatérie.
j 12 V zástrčku
Uvoľnenie / pritiahnutie matíc kolesa
j Impulzový skrutkovač zapojte do 12 Vzdroja
prúdu podľa vyššie uvedených pokynov.
j Vyberte si vhodný nasúvací pastorok
bo
anasuňte ho na hnací štvorhran 2
17
impulzového skrutkovača.
j Zmatíc kolesa eventuálne odstráňte ozdob-
né kryty anasúvací pastorok pevne nasaďte
na maticu kolesa alebo na upevňovaciu
skrutku kolesa.
pripojte na kladný
14
pripojte na záporný
14
zapojte do 12 V zásuvky 15.
9
.
9
kábla sadapté-
12
kábla sadapté-
13
16
14
ale-
48 SK 49 SK
Page 27

Obsluha / Údržba a ošetrovanie / Servis / Záruka
Záruka / Likvidácia
j Stlačte kyvné tlačidlo pre pravotočivý / ľavo-
točivý chod
tak, že stlačíte jeho hornú
8
časť (symbol g = uvoľniť/ľavotočivý chod ).
Podľa zvuku motora môžete pozorovať, že
impulzový skrutkovač najskôr vytvára krútiaci moment, apotom ho jedným „impulzom“
prenesie na skrutku. Skrutka sa uvoľní jedným záberom zenergie vytvorenej narastajúcim krútiacim momentom. Skrutku môžete
teraz vyskrutkovať rukou.
j Rovnakým spôsobom vyskrutkujte všetky
matice kolesa, akoleso odstráňte.
j Nasaďte iné / nové koleso. Otvory vdisku ko-
lesa musia súhlasiť sotvormi na upevňovacom kruhu.
j Všetky matice dotiahnite najskôr rukou.
j Na maticu kolesa nasaďte nasúvací pastorok
astlačte kyvné tlačidlo pre pravotočivý /
ľavotočivý chod
, teraz stlačte spodnú
8
stranu tlačidla (symbol h = dotiahnutie /
pravotočivý chod).
j Blikajúci symbol „>->->“ oznámi, že matice
kolies sú dotiahnuté dostatočne.
j Vprípade použitia rezervného kolesa, skon-
trolujte hneď aj tlak vpneumatike.
j Pri montáži hliníkových diskov postupujte
opatrne. Krútiaci moment najskôr nastavte
podľa údajov výrobcu diskov.
Poznámka: Môžu sa zobraziť tieto údaje:
000 -> 080 -> 090 …
Údaj sa zvyšuje v10-intervalových krokoch
až po 340 Nm.
Výmena poistky v12 Vzástrčke
j Uvoľnite (a odstráňte) ryhovaný krúžok 10,
krúžok vyskrutkujte otáčaním proti smeru
pohybu hodinových ručičiek.
j Odstráňte poškodenú poistku
anahraďte
11
ju novou, max. 15 A poistkou.
j Ryhovaný krúžok
opäť pevne priskrutkujte,
10
krúžok priskrutkujte otáčaním v smeru pohybu hodinových ručičiek.
Údržba a ošetrovanie
Prístroj si nevyžaduje údržbu.
VAROVANIE! Elektrické prístroje musia byť
počas ich ošetrovania odpojené zo siete.
j Prístroj odpojte z12 Vzdroja prúdu.
j Prístroj vyčistite suchou handričkou. Vžiad-
nom prípade nepoužívajte rozpúšťadlá alebo
iné agresívne čistiace prostriedky.
predajni. Na rýchle vybavenie záručných plnení
aopráv budete potrebovať nasledovné doklady:
- Kópiu pokladničného lístka (dodací list,
pokladničný lístok) sdátumom kúpy.
- Dôvod reklamácie alebo popis chyby.
Likvidácia
Obal je zložený zekologických materiálov, tento
môžete zlikvidovať prostredníctvom miestnych
recyklačných zberní.
Elektrospotrebiče nelikvidujte
spolu sdomácim odpadom!
Na základe Európskej smernice 2002 / 96 / EC
oelektrických aelektronických použitých spotrebičoch arealizácii do národného práva musia
byť elektrospotrebiče zhromažďované separátne
adodávané do zariadení na ekologickú recykláciu.
Omožnostiach likvidácie použitých elektrospotrebičov sa informujte na správe Vašej obce alebo
mesta.
Nastavenie krútiaceho momentu
Servis
Elektronika impulzového skrutkovača umožňuje
nastavenie krútiaceho momentu od 80 do
340 Nm. Nastavený krútiaci moment sa zobrazí
na 3-miestnom displeji
.
3
Keď je dosiahnutý vopred nastavený krútiaci
moment, na displeji
sa zobrazí: „>>>“.
3
VAROVANIE! Opravu prístroja zverte len
kvalifikovanému odborníkovi. Tak bude garan-
tovaná stála bezpečnosť prístroja.
VAROVANIE! Konektor akábel smie vy-
meniť len kvalifikovaný odborník. Tak bude
garantovaná stála bezpečnosť prístroja.
j Stlačte tlačidlo
(G) krútiaci moment tak
5
zvýšite. Krútiaci moment sa každým stlačením zvýši o 10 Nm.
j Stlačte tlačidlo
(H) krútiaci moment tak
4
znížite. Krútiaci moment sa každým stlačením zníži o 10 Nm.
j Stlačením tlačidla
(G) a 4 (H) krútiaci
5
moment vynulujete, súčasný (reset).
50 SK 51 SK
Záruka
Všeobecné záručné podmienky sa vzťahujú na
výrobné amateriálové chyby.
Ak je prístroj chybný, vráťte ho vpríslušnej
Obrázky nemusia celkom korešpondovat s originálnym produktom. Zmeny súvisiace s technickým rozvojom vyhradené. Dekorácia nie je
súcastou dodávky.
Page 28

SystemPartnerAutoteile GmbH & Co. KG
Greschbachstr. 1 76229 Karlsruhe
SystemPartnerAutoteile GmbH & CO.
Industrie Str. 31 CH-8112 Otelfingen
SPA Systems s.r.o. Pod Visnovkou 1661/37
140 00 Praha 4 - Krc - CZ
www.aeg-automotive.com
AEG is a registered trademark used under license from AB Electrolux (publ)
Stand der Informationen: 11 / 2010 • Ident.-No.: 97135112010
 Loading...