

Page 1

GB INSTRUCTION MANUAL
DE BEDIENUNGSANLEITUNG
AEG 63Z
SEWING MACHINE
NÄHMASCHINE
Page 2

Page 3

Manual for Model 63Z
Important safety instructions
When using an electrical appliance, basic safety should always be
followed, including the following:
Read all instructions before using this sewing machine.
DANGER -
1. An appliance should never be left unattended when plugged in.
2. Always unplug this appliance from the electric outlet immediately
after using and before cleaning.
WARNING -
or injury to persons:
1. Read the instruction carefully before using the machine.
2. Keep the instructions at a suitable place close to the machine and
hand it over if you give the machine to a third party.
3. Use the machine only in dry locations.
4. Never leave the machine unattended with children or elderly
people due to the fact that they may not be able to estimate the
risk.
5. This appliance can be used by children aged from 14 years and
above and persons with reduced physical, sensory or mental
capabilities or lack of experience and knowledge if they have
been given supervision or instructions concerning the use of the
appliance in a safe way and understand therefore the hazards
involved.
To reduce the risk of electric shock:
To reduce the risk of burns, fire, electric shock,
6. Children shall not play with the appliance.
1
Page 4

Manual for Model 63Z
7. Cleaning and user maintenance shall not be made by children
without supervision.
8. Always switch o the machine if you carry out preparation for
work (change the needle, feed the yarn through the machine,
change the foot, etc.).
9. Always unplug the machine if you carry out maintenance (oiling,
cleaning).
10. Always unplug the machine if you leave it unattended.
11. Don't use the machine in a humid environment.
12. Do not remove the plug by tugging the power cable: always use
the plug itself.
13. If the LED lamp is damaged or broken it must be replaced by the
manufacturer or its service agent in order to avoid hazards.
14. Never place anything on the pedal.
15. Never use the machine if the air vents are blocked. Keep the air
vents of the machine and the foot controller free from dust, fusel
and leftovers.
16. The machine must only be used with foot controller type C-8000.
17. The power cord of the foot controller can not be replaced. If the
power cord is damaged the foot controller must be disposed.
18. The sound pressure level at normal operation is less than 75dB(A).
19. Do not dispose of electrical appliances as unsorted municipal
waste, use separate collection facilities.
20. Contact your local government for information regarding the
collection systems available.
2
Page 5

Manual for Model 63Z
21. If electrical appliances are disposed of in landfills or dumps,
hazardous substances can leak into the groundwater and get into
the food chain, damaging your health and well-being.
22. When replacing old appliances with new ones, the retailer is
legally obligated to take back your old appliance for free of charge
disposal.
SAVE THESE INSTRUCTIONS
This sewing machine is intended for household use only.
3
Page 6

Manual for Model 63Z
Contents
Principal parts of the machine ......................................................................................................... 6
Accessories ..............................................................................................................................................7
Connecting the machine .................................................................................................................... 8
Sewing table .......................................................................................................................................... 9
Free-arm ...................................................................................................................................................................................................... 9
Winding the bobbin ...................................................................................................................... 10-12
Inserting the bobbin...........................................................................................................................13
Threading the upper thread ...................................................................................................... 14-16
Using the needle threader ..............................................................................................................17
Replacing the needle ..........................................................................................................................18
Matching needle/ fabric/ thread ....................................................................................................19
Two-step presser foot lifter ............................................................................................................ 20
Changing the presser foot ...............................................................................................................21
To raise or drop the feed dog ......................................................................................................... 22
Thread tension ..............................................................................................................................23-24
Stitch chart ........................................................................................................................................... 25
Operation buttons ........................................................................................................................26-31
Useful skills .................................................................................................................................... 32-34
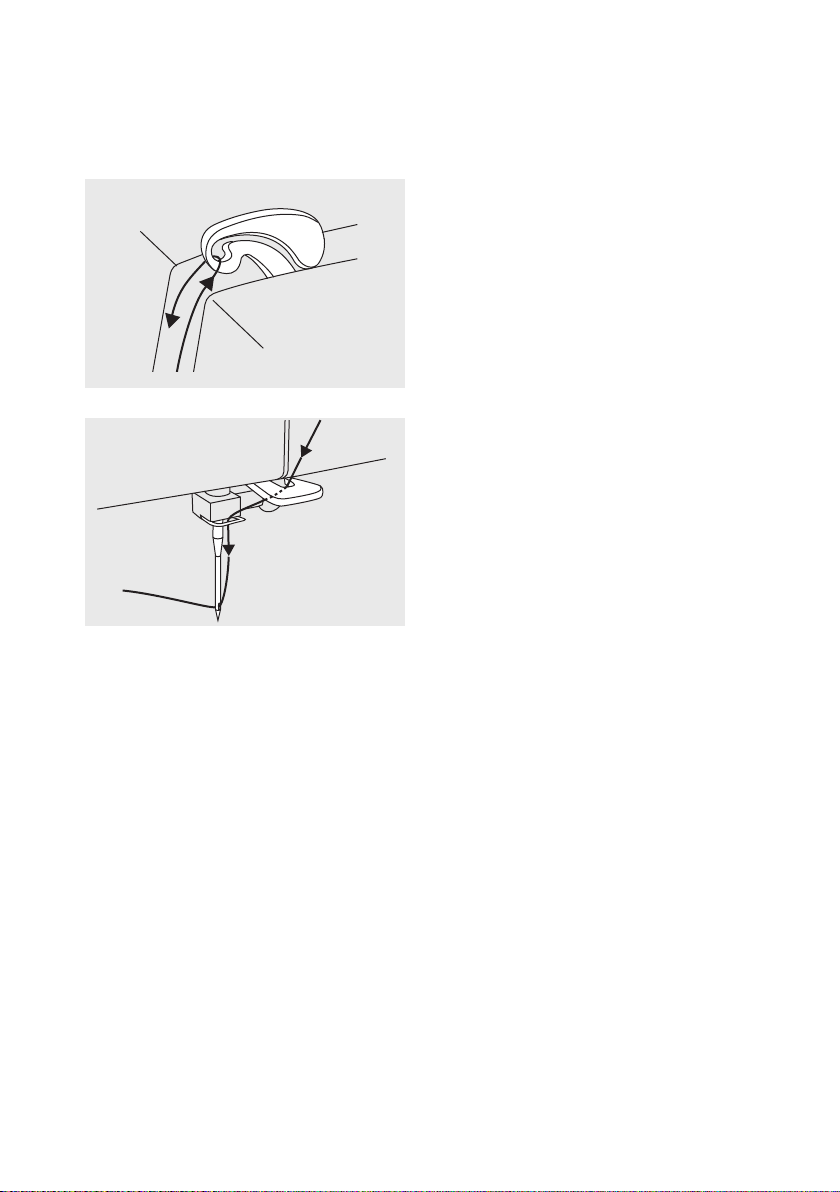
Sewing corners ....................................................................................................................................................................................32
Sewing curves.......................................................................................................................................................................................32
Cutting the thread ............................................................................................................................................................................33
Sewing thin fabrics ...........................................................................................................................................................................33
Sewing stretch fabrics ...................................................................................................................................................................33
Sewing on the heavy fabric .....................................................................................................................................................33
Straight stitches ................................................................................................................................. 35
Changing the needle position ........................................................................................................ 36
Zig-zag stitches .................................................................................................................................. 37
Stretch stitch ....................................................................................................................................... 38
Straight stretch stitch ................................................................................................................................................................... 38
Zig-zag........................................................................................................................................................................................................38
Sewing stretch fabrics and elastic tape ...................................................................................... 39
Overcasting stitches ........................................................................................................................ 40
Using the overcasting foot ..................................................................................................................................................... 40
Using the all purpose foot ...................................................................................................................................................... 40
4
Page 7

Manual for Model 63Z
Contents
Blind hem ...............................................................................................................................................41
Buttonhole stitch..........................................................................................................................42-45
Making a buttonhole on stretch fabrics ..................................................................................................................... 45
Button sewing ..................................................................................................................................... 46
Darning stitch ................................................................................................................................47-48
Zipper insertion ............................................................................................................................ 49-51
Inserting a centered zipper ....................................................................................................................................................49
Inserting a side zipper .................................................................................................................................................................50
Satin stitch sewing ............................................................................................................................. 52
Gathering .............................................................................................................................................. 53
Smocking ..............................................................................................................................................54
Free motion darning, embroidery and monogramming...................................................55-58
Darning .......................................................................................................................................................................................................55
Preparation for embroidering and monogramming ....................................................................................... 56
Embroidery ..............................................................................................................................................................................................57
Monogramming ................................................................................................................................................................................. 58
Quilting ........................................................................................................................................... 59-61
Attaching the edge/ quilting guide.................................................................................................................................59
Joining pieces of fabric ...............................................................................................................................................................60
Patchwork stitching ........................................................................................................................................................................60
Applique ..................................................................................................................................................................................................... 61
Fagoting ................................................................................................................................................ 62
Scalloping ............................................................................................................................................. 63
Scallop edging .....................................................................................................................................................................................63
Warning function ................................................................................................................................64
Maintenance.................................................................................................................................. 65-66
Trouble shooting guide .............................................................................................................. 67-69
5
Page 8
Manual for Model 63Z
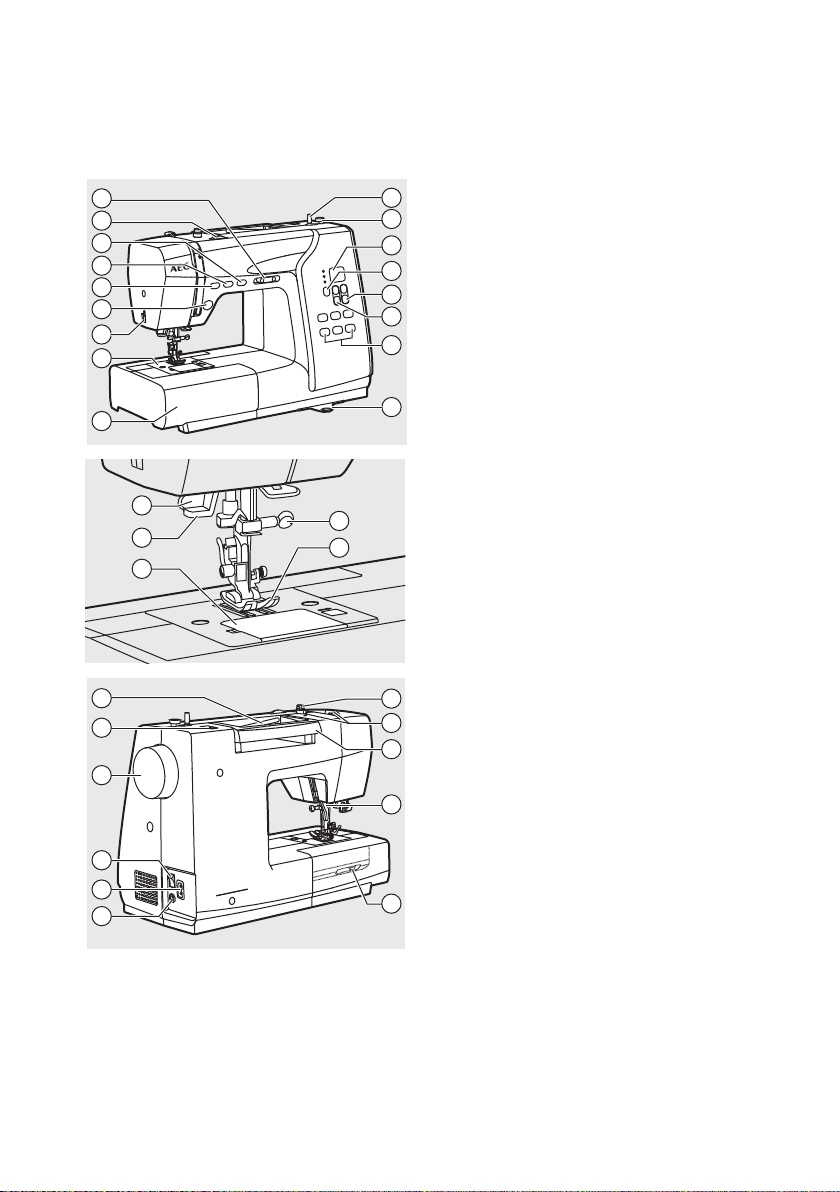
Principal parts of the machine
1. Speed limiting adjustment lever
1
2
3
4
5
6
7
8
9
20
21
22
23
24
25
26
27
28
10
2. Tension dial
11
3. Needle up/down position button
12
4. Auto-lock button
13
5. Reverse button
14
6. Start/stop button
15
7. Thread cutter
16
8. Needle plate
9. Sewing table and accessory box
17
10. Bobbin winder spindle
11. Bobbin winder stopper
12. Number display
13. Mode selection button
18
19
14. Stitch width adjustment buttons
15. Stitch length adjustment buttons
16. Direct stitch selection buttons
17. Stitch pattern plate
18. Needle clamp screw
19. Presser foot
20. Buttonhole lever
21. Needle threader
29
22. Bobbin cover plate
30
23. Horizontal spool pin
31
24. Hole for second spool pin
25. Handwheel
32
26. Main power switch
27. Power cord
28. Foot controller connector
29. Bobbin thread guide
33
30. Upper thread guide
31. Handle
32. Presser foot lifter
33. Drop feed lever
66
Page 9

Manual for Model 63Z
Accessories
1 2 3
5
10 11
14
17
18 19 20
23 24 25
6
12 13
15 16
7 8 9
21 22
26
4
Standard
1. All purpose foot
2. Zipper foot
3. Buttonhole foot
4. Satin stitch foot
5. Blind hem foot
6. Overcasting foot
7. Button sewing foot
8. Bobbin (3x)
9. Spool holder
10. Spool pin felt
11. L-screwdriver
12. Screwdriver (S)
13. Edge/ quilting guide
14. Seam ripper/ brush
15. Second spool pin
16. Pack of needles
17. Soft cover
Optional*
18. Hemmer foot
19. Cording foot
20. Quilting foot
21. Darning/ Embroidery foot
22. Gathering foot
23. Walking foot
24. Twin needle
25. Hard case
26. Extension table
Please Note:
-Accessories are stored inside the accessory box.
-*Optional accessories are not supplied with this machine; they are however available as
special accessories from your local dealer.
7
Page 10

Manual for Model 63Z
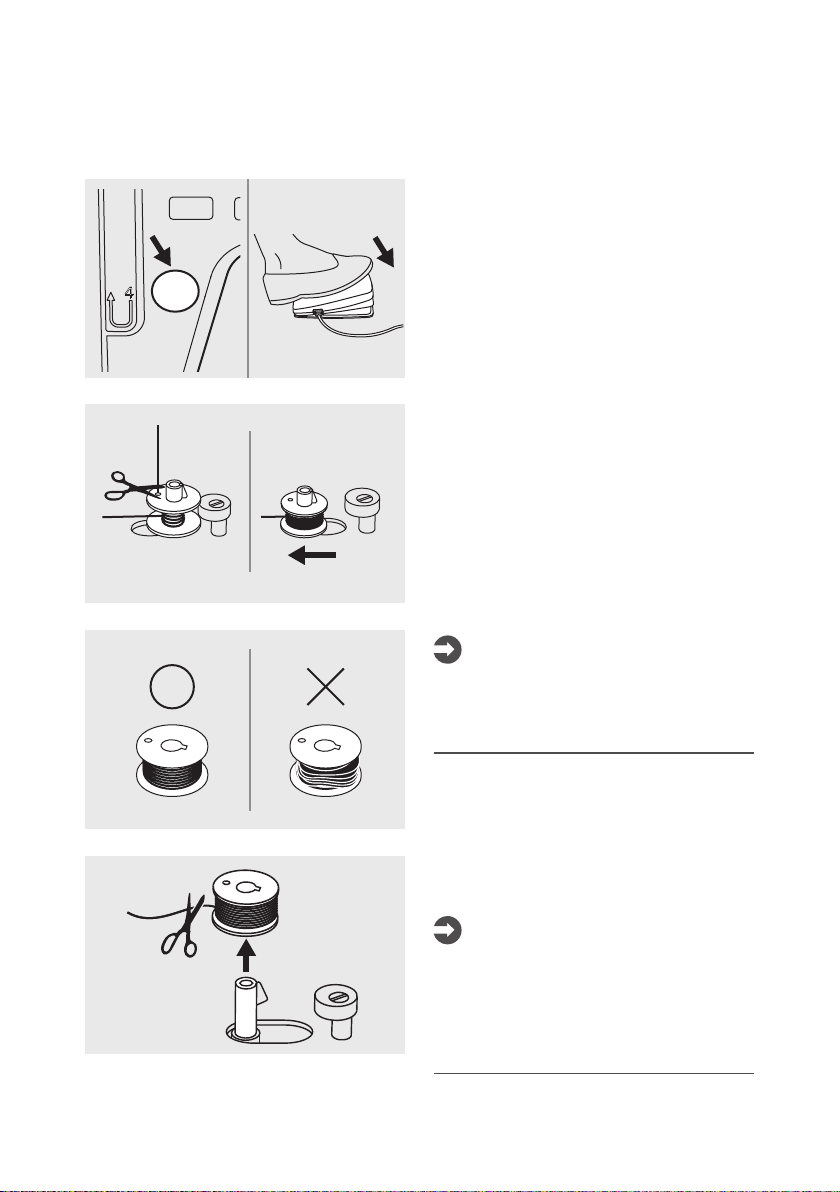
Connecting the machine
Always make sure that the machine is
unplugged from power source and the
main switch is on ("O") when the machine is
not in use and before inserting or removing
parts.
Before connecting the power supply, make
sure that the voltage and the frequency
shown on the rating plate conform to
your mains power. Place the machine on a
stable table.
1. Connect the machine to a power
ON
2. Turn on the power switch.
3. The sewing lamp will light up when the
OFF
Foot control
With the sewing machine turned o, insert
the foot control plug into its connector on
the sewing machine.
Turn on the sewing machine and then slowly
depress the foot control to start sewing.
Release the foot control to stop the sewing
machine.
Attention:
source as illustrated.
switch is turned on.
Note:
Consult a qualified electrician if in doubt
about how to connect the machine to the
power source.
8
Page 11
Manual for Model 63Z
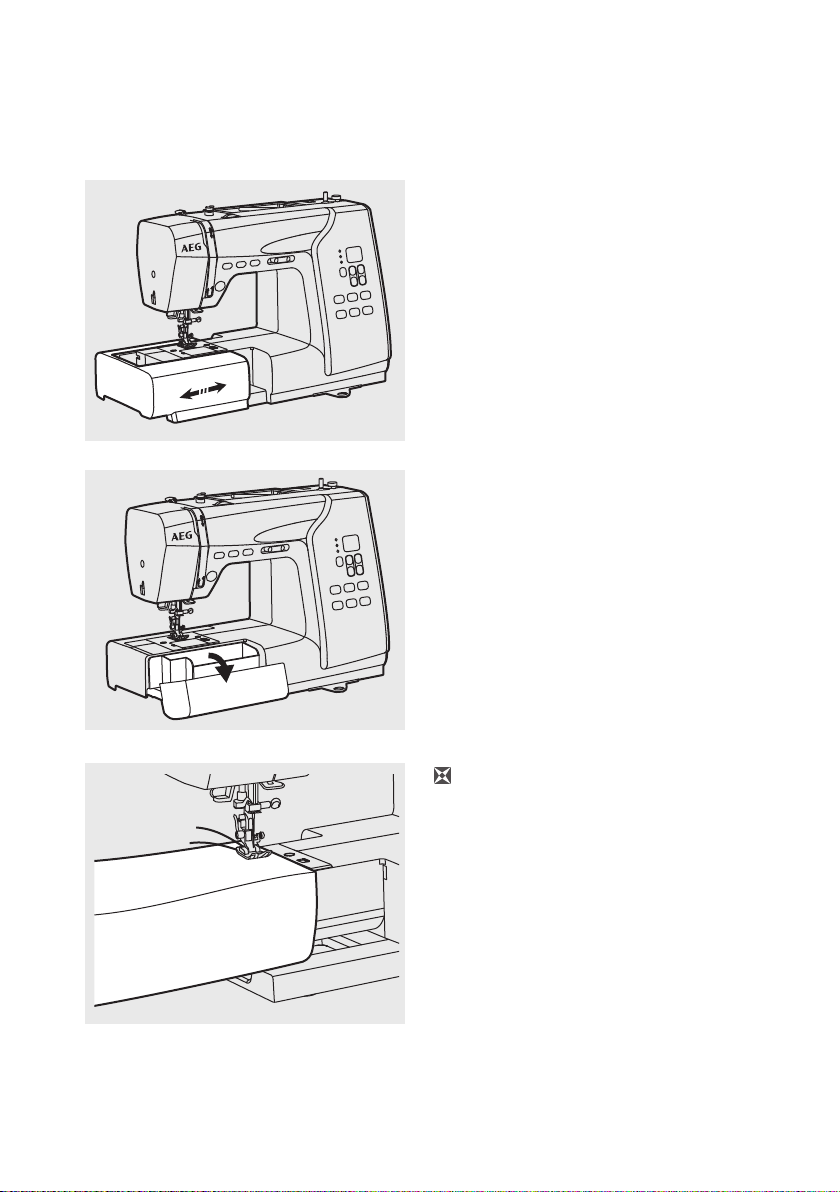
Sewing table
Keep the sewing table horizontal, and pull
it in the direction of the arrow.
The inside of the sewing table is used as
an accessory box.
Free-arm
Free-arm sewing is convenient for sewing
tubular areas such as pant hems and cus.
9
Page 12
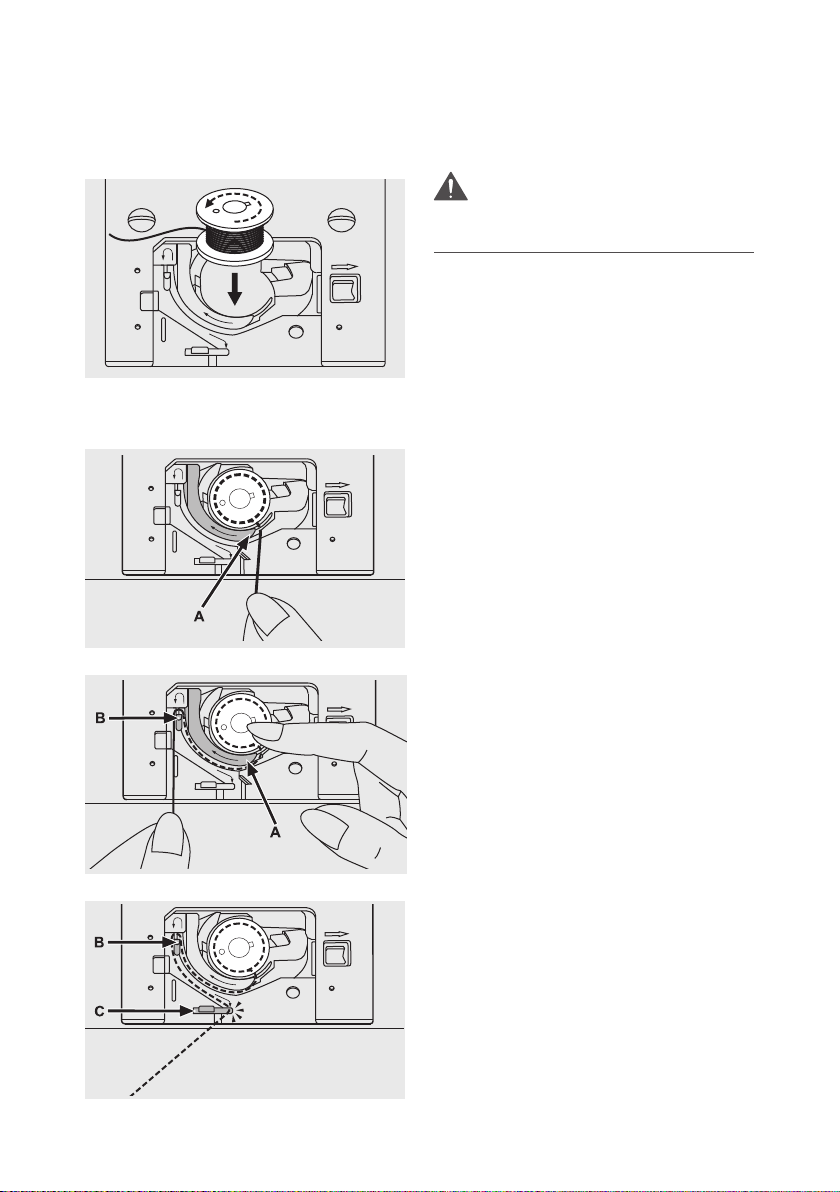
Manual for Model 63Z
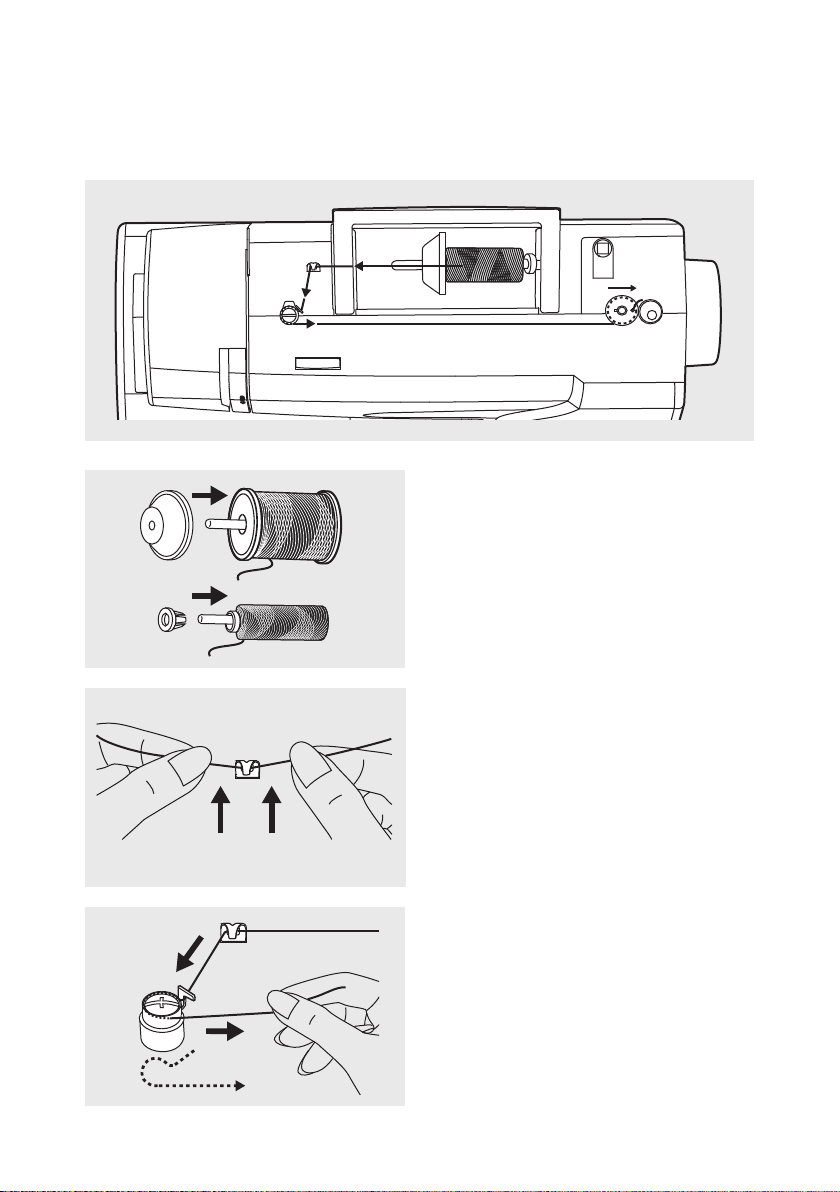
Winding the bobbin
2
3
1
4-10
1. Place thread and spool holder onto
the spool pin.
For smaller spools of thread, place the
spool holder with the small side next
to the spool or use the small spool
holder.
2. Draw the thread from the spool
through the upper thread guide.
3. Wind the thread counter-clockwise
around the bobbin winder tension
discs.
10
Page 13
Manual for Model 63Z
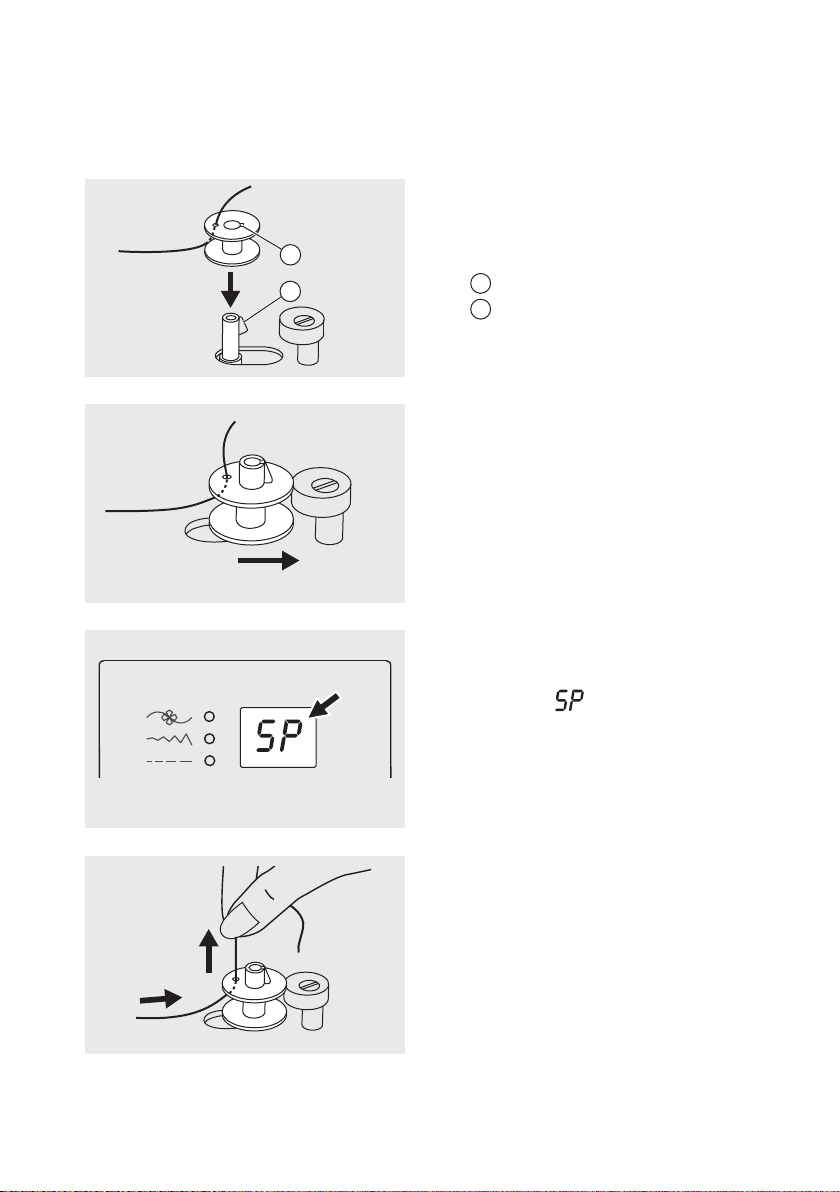
Winding the bobbin
1
2
4. Place the thread end through one of
the inner holes as illustrated and place
the empty bobbin on the spindle.
1
Notch
2
Bobbin winder shaft spring
5. Push the bobbin to the right.
6. When the bobbin winder shaft is
pushed to the right, the number
display will blink on and o while
displaying "
7. Hold the thread tail securely in one
hand.
11
".
Page 14
Manual for Model 63Z
Winding the bobbin
8. Press on the foot control to start
winding the bobbin.
9. After the desired amount of thread is
wound, stop the machine and cut the
thread near the hole of the bobbin.
Continue filling the bobbin until it is
full. Once the spool is full, it rotates
slowly. Release the pedal or stop the
machine. Push the bobbin winder
spindle to the left.
Note:
Use a bobbin that has been correctly
wound with thread, otherwise the needle
may break or the thread tension will be
incorrect.
10. Cut the thread and then remove the
bobbin.
Note:
When the bobbin winder spindle is placed
on the right, "bobbin winding position", the
machine will not sew and the handwheel
will not turn. To start sewing, push the
bobbin winder spindle to the left "sewing
position".
12
Page 15
Manual for Model 63Z
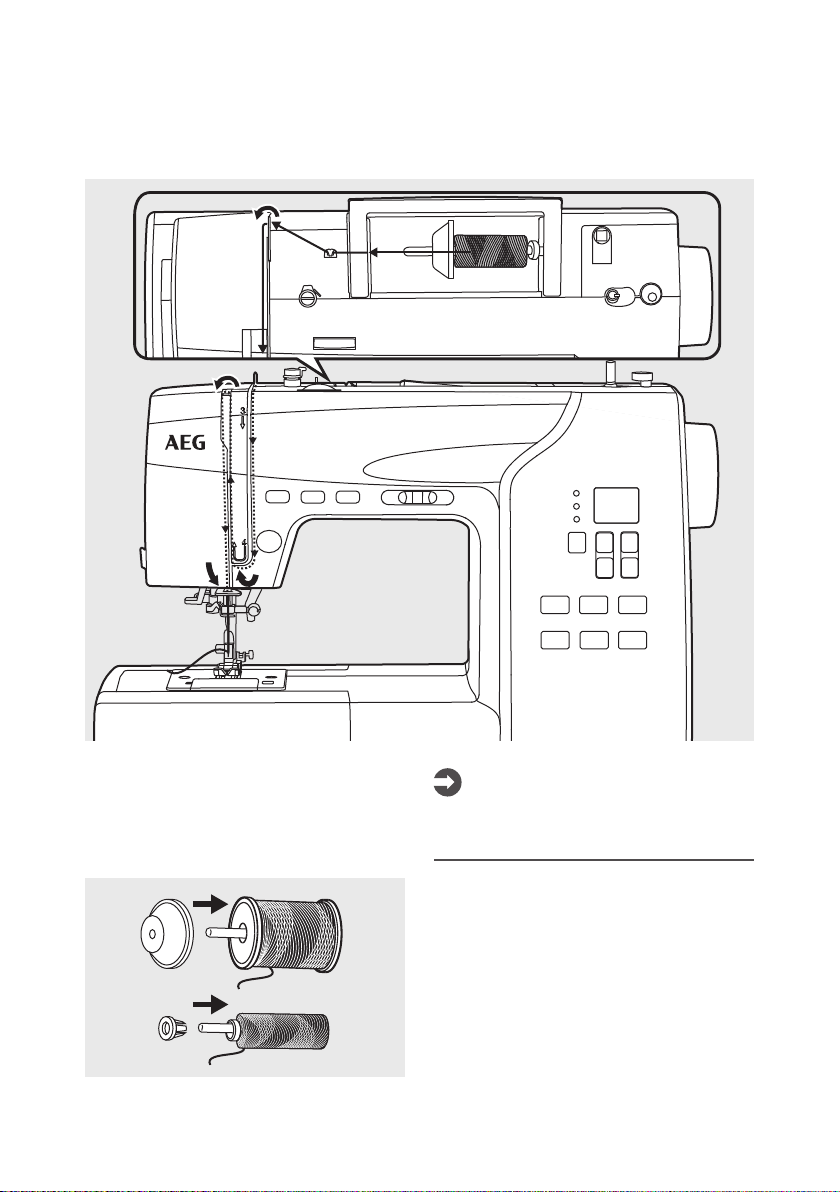
Inserting the bobbin
Attention:
Turn the power switch to o ("O") before
inserting or removing the bobbin.
When inserting or removing the bobbin,
the needle must be fully raised.
Open the needle plate cover.
Insert the bobbin in the bobbin case with
the thread running in a counterclockwise
direction (arrow).
Pull the thread through the slit (A).
Held gently on top of the bobbin with a
finger.
Draw the thread at the arrow markings into
the stitch plate thread guide from (A) to
(B).
Pull the thread at the arrow markings into
the stitch plate thread guide from (B) to (C).
To cut o excess thread pull thread back
over the cutting o blade at point (C).
Close the needle plate cover.
13
Page 16
Manual for Model 63Z
1
2
4
3
Threading the upper thread
6
5
7
8
Please Note:
It is important to carry out the threading
correctly otherwise sewing problems may
result.
1. Place thread and spool holder onto
the spool pin.
For smaller spools of thread, place the
spool holder with the small side next
to the spool or use the small spool
holder.
14
Page 17
Manual for Model 63Z
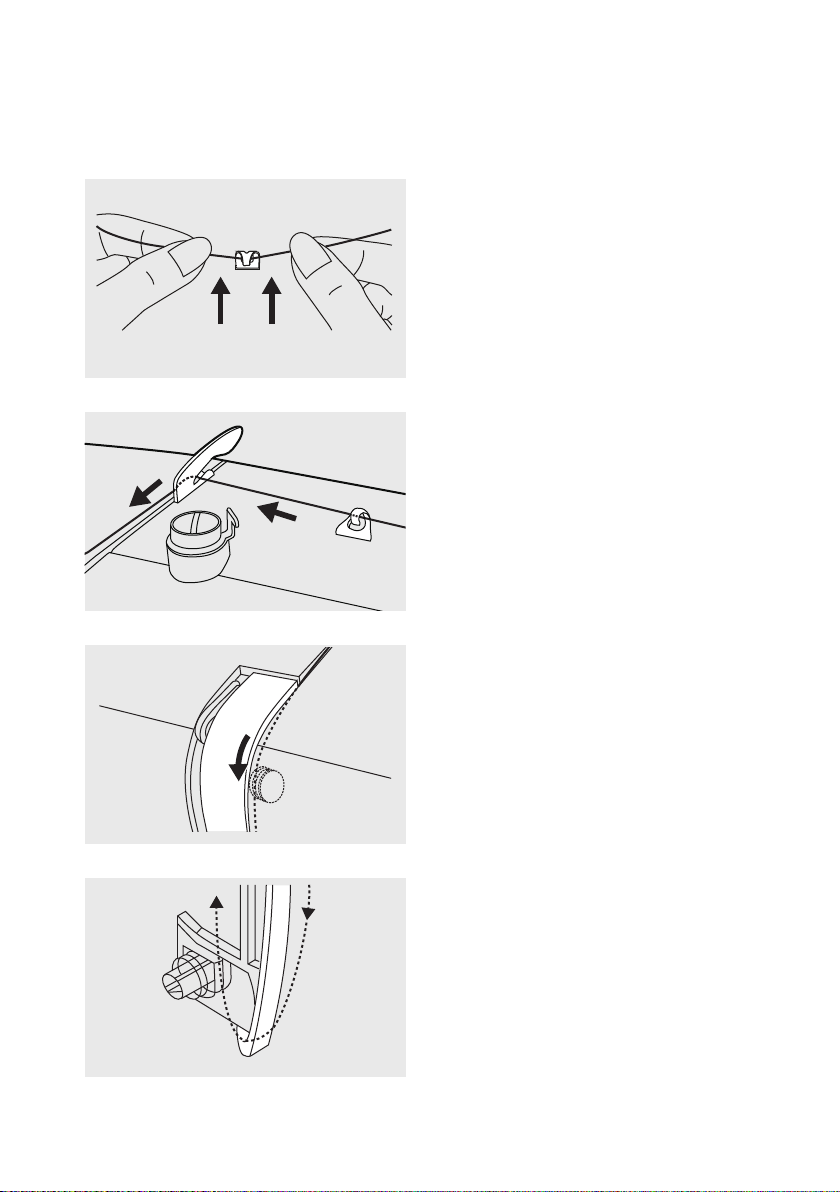
Threading the upper thread
2. Draw the thread from the spool
through the upper thread guide.
3. Guide the thread around the thread
guide pulling the thread through the
pre-tension spring as illustrated.
4. Thread the tension module by passing
the thread between the silver discs.
5. Then, down and around the check
spring holder.
15
Page 18
Manual for Model 63Z
Threading the upper thread
6. At the top of this movement pass the
thread from right to left through the
slotted eye of the take-up lever and
then downwards again.
7. Now pass the thread behind the thin
wire needle clamp guide.
8. Pull the end of the thread through the
needle from front to rear and pull out
about 10 cm of thread. Use the needle
threader to thread the needle.
16
Page 19
Manual for Model 63Z
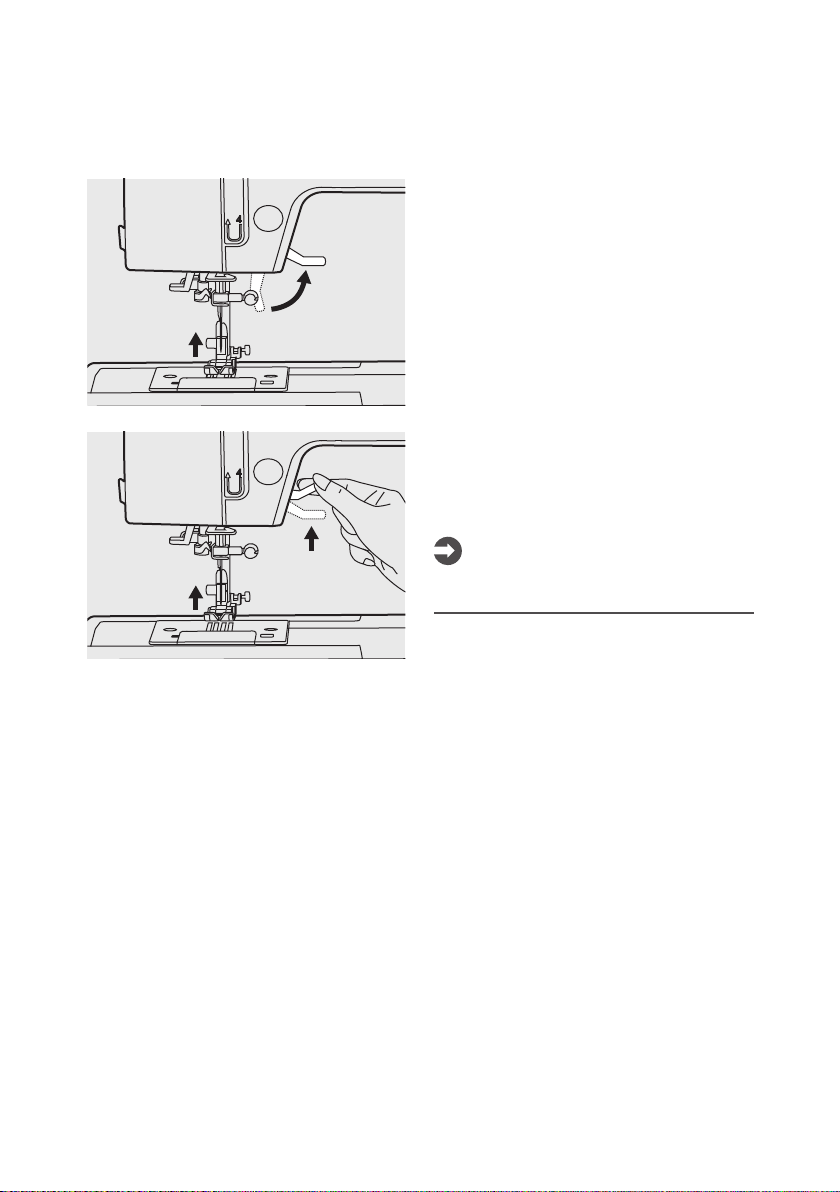
Using the needle threader
Attention:
Turn the power switch to the o position
("O").
Raise the needle to its highest position and
lower the presser foot.
Pass the thread around the thread guide.
1
1
1
2
Thread guide
Press the lever down as far as it goes.
The needle threader turns automatically
to the threading position and the hook pin
passes through the needle eye.
1
Needle
Hook
2
Take the thread in front of the needle.
Hold the thread loosely and release the
lever slowly. The hook turns and passes
the thread through the needle eye forming
a loop.
Pull the thread through the needle eye.
17
Page 20
Manual for Model 63Z
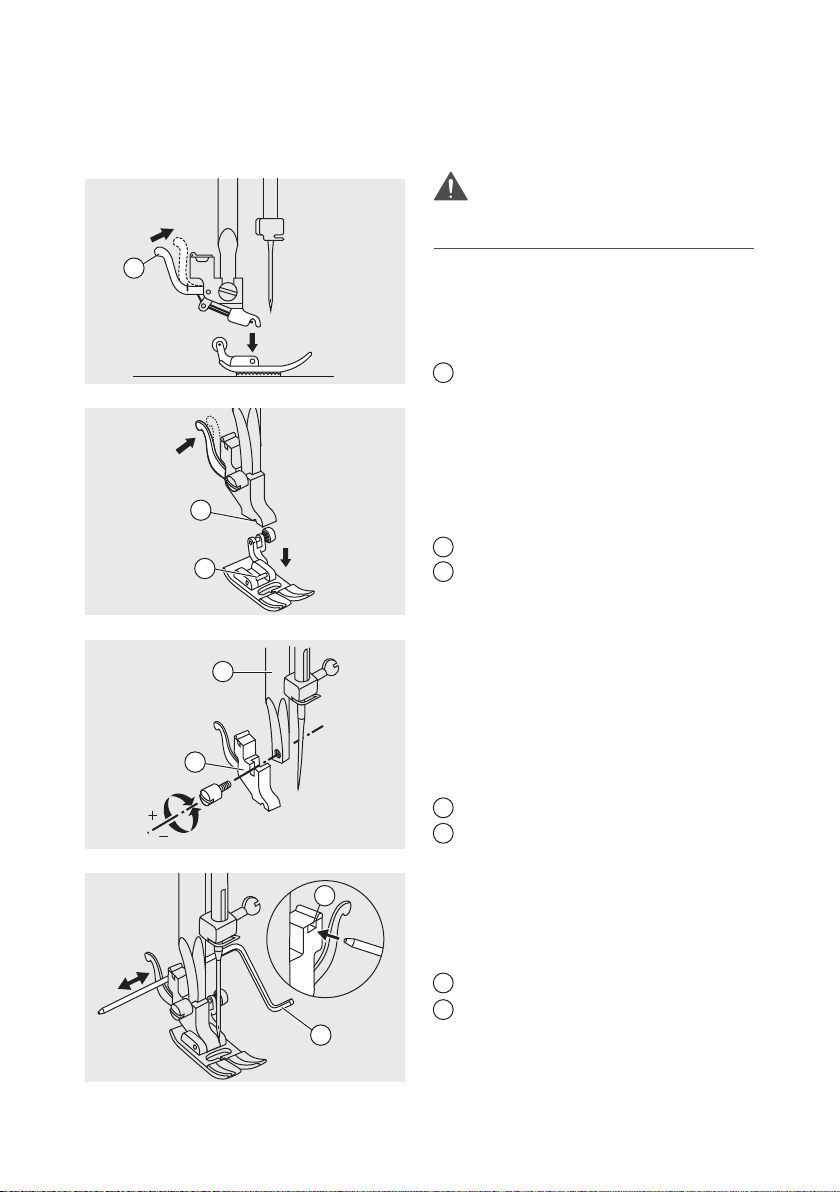
Replacing the needle
2
Turn the power switch to o ("O") when
carrying out any of the above operations!
Attention:
1
Change the needle regularly, especially
when it shows signs of wear or if it causes
problems.
Insert the needle following the illustrated
instructions.
1. Turn the handwheel towards you
(counterclockwise) lowering, then
raising the needle. Turn the needle
clamp screw counterclockwise to
remove the needle. The flat side of the
shaft should be positioned towards
the back.
2. Insert the needle up as far as it goes.
Then tighten the needle clamp.
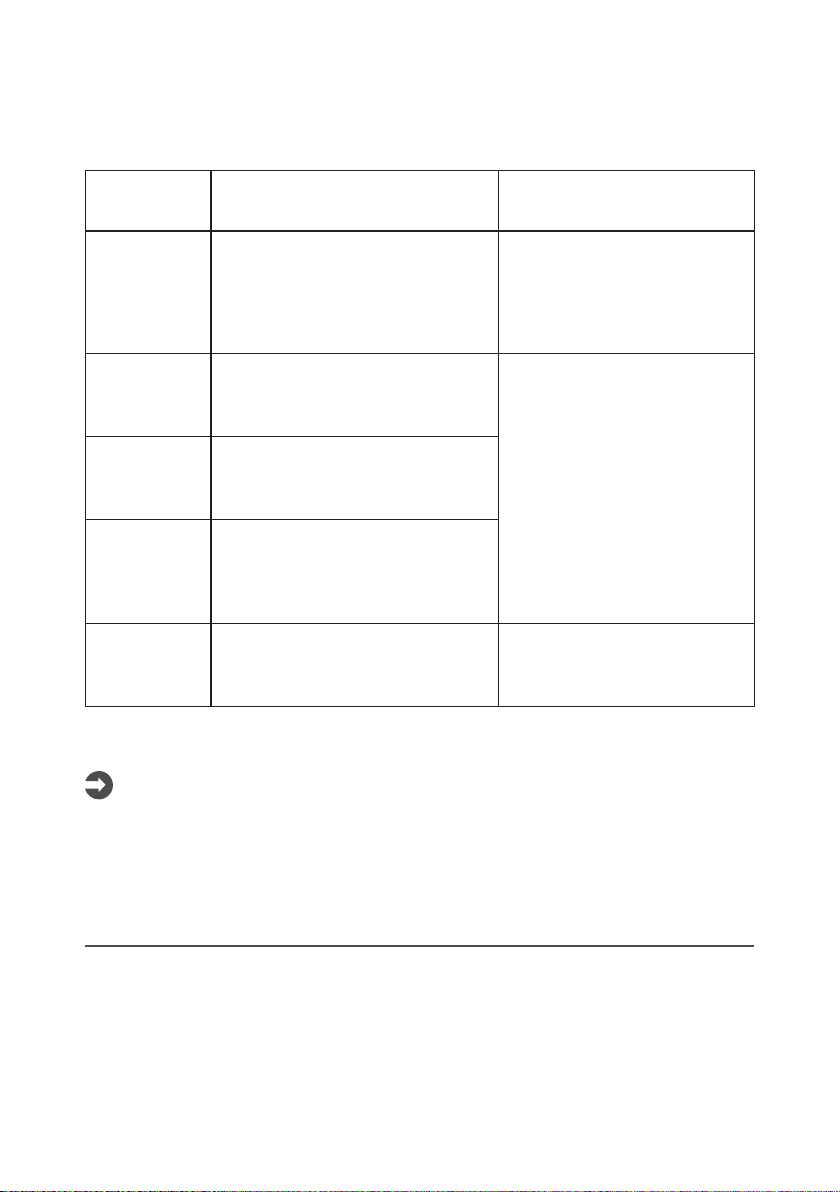
Needles must be in perfect condition.
Problems can occur with:
1
2
3
1
Bent needles
2
Blunt needles
3
Damaged points
18
Page 21
Manual for Model 63Z
Matching needle/ fabric/ thread
NEEDLE SIZE FABRICS THREAD
9-11 (70-80) Lightweight fabrics-thin cottons,
voile, serge, silk, muslin, qiana,
interlocks, cotton knits, tricot,
jerseys, crepes, woven polyester,
shirt & blouse fabrics.
11-14 (80 -90) Medium weight fabrics-cotton,
satin, kettleclote, sailcloth, double
knits, lightweight woollens.
14 (90) Medium weight fabrics-cotton duck,
woolen, heavier knits, terrycloth,
denims.
16 (100) Heavyweight fabrics-canvas,
woolens, outdoor tent and quilted
fabrics, denims, upholstery material
(light to medium).
18 (110) Heavy woollens, overcoat fabrics,
upholstery fabrics, some leathers
and vinyls.
Please Note:
-In general, fine threads and needles are used for sewing fine fabrics, and thicker threads
and needles are used for sewing heavy fabrics.
-Always test the thread and the needle size on a small piece of fabric which will be used
for sewing.
-Use the same thread for needle and bobbin.
-Use a backing for fine or stretchy fabrics.
Light-duty thread in cotton,
nylon, polyester or cotton
wrapped polyester.
Most threads sold are medium
size and suitable for these
fabrics and needle sizes.
Use polyester threads on
synthetic materials and cotton
on natural woven fabrics for
best results.
Always use the same thread on
top and bottom.
Heavy duty thread, carpet
thread.
19
Page 22
Manual for Model 63Z
Two-step presser foot lifter
The presser foot lifter raises and lowers
the presser foot.
When sewing several layers or thick fabrics,
the presser foot can be raised a second
stage for easy positioning of the work.
Note:
The needle must always be at the highest
position.
20
Page 23
Manual for Model 63Z
1
Changing the presser foot
Turn the power switch to o ("O") when
carrying out any of the below operations!
1
1
2
Removing the presser foot
Raise the presser foot.
Press the lever and the foot disengages.
1
Lever
Attaching the presser foot
Lower the presser foot holder until the cutout is directly above the pin.
Press the lever.
The presser foot engages automatically.
1
Cut-out
2
Pin
Attention:
Removing and inserting the presser foot
1
holder
Raise the presser foot bar. Align the
presser foot holder with the lower left side
of the presser bar. Hold the presser foot
2
holder, then tighten the screw using the
screwdriver.
1
Presser foot bar
2
Presser foot holder
Inserting the edge/ quilting guide
Insert the edge/ quilting guide in the slot
as illustrated. Adjust according to need for
hems, pleats, etc.
1
Slot
Edge/quilting guide
2
2
21
Page 24
Manual for Model 63Z
To raise or drop the feed dog
The feed dog adjustment lever can be seen
on the base at the rear side of the sewing
machine when the sewing table is opened.
Raise the presser foot lever, and then slide
the feed dog position lever, located at the
1
2
3
rear of the machine on the base, to left or
right (to the right as seen from the front of
the machine).
1
Feed dog position lever (as seen from
the rear of the machine)
2
Raised position
3
Lowered position
Please Note:
When you finish the work, (ex. button
sewing, free motion darning, embroidery
and monogramming) move the drop feed
control to raise the feed dogs.
22
Page 25
Manual for Model 63Z
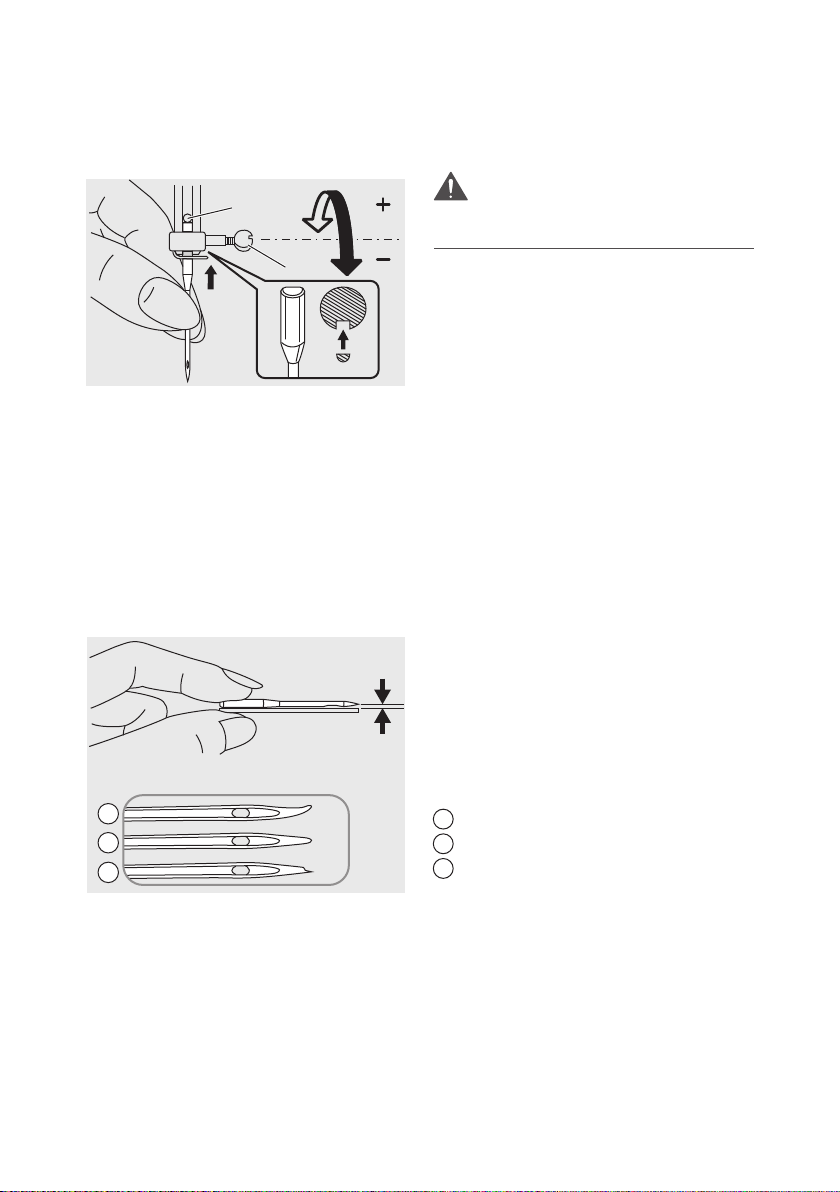
Thread tension
-Basic thread tension setting: "4"
-To increase the tension, turn the dial
up to the next number. To reduce the
tension, turn the dial down to the next
number.
-Proper setting of tension is important
for good sewing.
-For all decorative sewing you will
always obtain a nicer stitch and less
fabric puckering when the upper thread
appears on the bottom side of your
fabric.
-There is no single tension setting
appropriate for all the stitch functions
and fabrics.
1
2
Normal thread tension for straight stitch
sewing.
1
Surface
2
Reverse side
3
Upper thread
4
Bobbin thread
3
4
Thread tension is too loose for straight
stitch sewing. Turn the dial to the higher
number.
23
Page 26
Manual for Model 63Z
Thread tension
Thread tension is too tight for straight
stitch sewing. Turn the dial to the lower
number.
Normal thread tension for zig-zag and
decorative sewing.
Correct thread tension is when a small
number of the upper thread appears on
the bottom side of the fabric.
24
Page 27
Manual for Model 63Z
Stitch chart
The portions marked in grey (on the chart below) show the single unit of each stitch.
A. Direction patterns
B. Patterns
15
16
40
65
17
41
42
66
67
20
19
44
69
21
22
24
23
48
49
47
45
46
74
73
72
70
71
18
43
68
01
26
51
76
04
06
08
09
05
30
55
80
07
33
31
32
58
56
57
03
02
28
27
29
53
52
54
78
77
79
11
10
34
35
36
59
61
60
14
13
12
38
37
39
63
62
64
25
50
75
25
Page 28
Manual for Model 63Z
Operation buttons
4
3
2
65
7
1
1. Start/stop button
The machine will start running when the
start/stop button is pressed and it will
stop when this button is pressed a second
time. The machine rotates slowly at the
beginning of the sewing.
The sewing speed can be controlled by
the speed limiting adjustment lever.
This way you may operate the machine
without foot control.
8
9
26
Page 29
Manual for Model 63Z
Operation buttons
2. Reverse button
When the stitches 01-06 are selected,
the machine will sew reverse at a low
speed if the reverse button is pressed.
The machine will sew forward after the
button is released. When the stitches 2480 are selected, the machine will sew a
reinforcement stitch immediately if the
reverse button is pressed. The machine
stops sewing after the button is released.
3. Auto-lock button
If the button is pushed before sewing the
machine will immediately sew 3 locking
stitches. While sewing the stitches 01-06,
the machine will immediately sew 3 locking
stitches when the Auto-lock button is
pressed, then automatically stops.
While sewing the stitches 07-19, 24-80
are selected, press the Auto-lock button,
the machine will sew 3 locking stitches
at the end of the current pattern and
automatically stops. The function will be
cancelled if you press the button once
again or select another stitch.
4. Needle up/ down position button
With the needle up/ down position button,
you decide whether the needle stops in the
highest or lowest position (in the fabric)
when you stop sewing.
Please Note:
During sewing, the function of the button
is not activated.
27
Page 30

Manual for Model 63Z
Operation buttons
5. Speed adjustment lever
The speed limiting adjustment lever can
control the sewing speed. To increase
the speed, slide the lever to the right. To
decrease the sewing speed, slide the lever
to the left.
6. Mode selection button
The LED light will be set at stitch mode
"
" when the machine is turned on.
The light runs according to the sequence
of stitches, stitch width, and stitch length
mode.
Utility and decorative stitch mode
There are 80 stitches for selection.
To select the desired stitch (01~80)
use the stitch width and length
adjustment buttons.
Stitch width mode
Adjust the width of the stitch using
the stitch width adjustment buttons.
Stitch length mode
Adjust the length of the stitch
using the stitch length adjustment
buttons.
28
Page 31

Manual for Model 63Z
Operation buttons
7. Stitch length adjustment button
When you select a stitch the machine will
automatically set the recommended stitch
length (auto-position).
If the pre-set stitch length needs to be
adjusted once the stitch is selected, push
mode button "
length position.
To shorten the stitch length, press the "–"
button. For a longer stitch length, press
the "+" button. The stitch length can
be adjusted between "0.0-4.5". Certain
stitches have a limited length.
When the setting is set at auto position,
the number in the display will blink 3 times.
Selecting stitches
When MODE is set on pattern, press stitch
length adjustment buttons "+" or "–" for
decade digit between 0~8.
" to move to the stitch
29
Page 32

Manual for Model 63Z
Operation buttons
8. Stitch width adjustment button
When you select a stitch the machine will
automatically set the recommended stitch
width (auto position).
If the pre-set stitch width needs adjusting
once the pattern is selected, push mode
button "
position.
For a narrower stitch, press the "–" button.
For a wider stitch, press the "+" button. The
stitch width can be adjusted between "0.0-
7.0". Certain stitches have a limited stitch
width.
When the setting is at the auto position,
the number display will blink 3 times.
Selecting stitches
When MODE is set on stitch selection,
press stitch width adjustment buttons "+"
or "–" for unit position between 0~9.
" to move to the stitch width
30
Page 33

Manual for Model 63Z
Operation buttons
9. Direct pattern selection buttons
Frequently used patterns are available by
direct pattern selection buttons.
Direct selection buttons can be operated
in any mode.
Sound button
Buzzer turn o: Press the sound button for
2 seconds and when you hear the machine
delivering a short beep, the sound will be
turned o.
Buzzer turn on: When machine is in silent
mode, press the button for 2 seconds and
it will deliver two short beeps to remind
you that the sound is turned on now.
31
Page 34

Manual for Model 63Z
Useful skills
Various ways to achieve better results for your sewing projects are described below. Refer
to these tips when sewing your project.
A trial piece of fabric should be sewn because, depending on the type of fabric and
stitching being sewn, the desired results may not be achieved.
For the trial sewing, use a piece of fabric and thread that are like those used for your
project and check the thread tension and stitch length and width.
Since the results dier depending on the type of stitching and the number of layers of
fabric sewn, perform the trial sewing under the same conditions that will be used with
your project.
Sewing corners
1. Stop the sewing machine when you
reach a corner.
2. Lower the needle into the fabric.
3. Raise the presser foot.
4. Use the needle as a pivot and turn the
fabric.
5. Lower the presser foot and resume
sewing.
Sewing curves
Slightly change the sewing direction to sew
around the curve.
When sewing along a curve while using a
zig-zag stitch, select a shorter stitch length
in order to obtain a finer stitch.
32
Page 35

Manual for Model 63Z
Useful skills
1
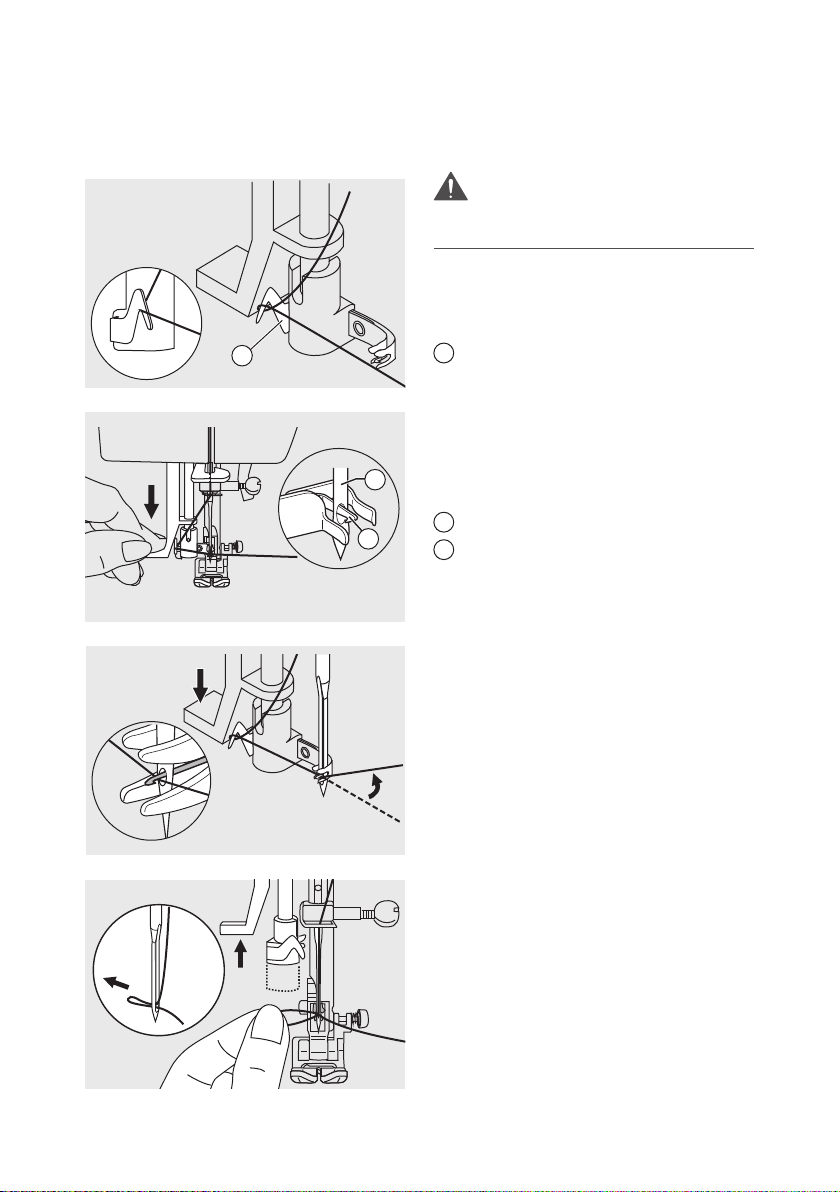
Cutting the thread
Bring the thread take up lever to its
highest position, raise the presser foot and
remove the fabric.
Guide both threads to the side of the face
plate and into the thread cutter. Pull the
threads down to cut them.
1
Thread cutter
Sewing thin fabrics
When sewing thin fabrics, the stitching
may become misaligned or the fabric may
not feed correctly. If this occurs, place
1
thin paper or stabilizer material under the
fabric and sew it together with the fabric.
When you have finished sewing, tear o
any paper in excess.
1
Stabilizer material or paper
Sewing stretch fabrics
Baste the pieces of fabric together and
then sew without stretching the fabric.
1
Basting
1
Sewing on the heavy fabric
The black button on the right side of the
presser foot will lock the presser foot in a
horizontal position if you push it in before
lowering the presser foot. This ensures
even feeding at the beginning of a seam
and helps when sewing multiple layers of
fabric.
33
Page 36

Manual for Model 63Z
Useful skills
When you reach the point of an increased
thickness, lower the needle and raise the
presser foot. Press the toe of the foot and
push in the black button, then lower the
foot and continue sewing.
The black button releases automatically
after sewing few stitches.
You can also place another piece of fabric
with the same thickness at the back of the
seam or support the presser foot while
feeding by hand and sewing toward the
folded side.
1
1
Cardboard or thick fabric
34
Page 37

Manual for Model 63Z
Straight stitches
01 02 03 04 05
Adjusting the stitch length
To shorten the stitch length, press the
" –" stitch length adjustment button. For
a longer stitch length, press the "+" stitch
length adjustment button.
Generally speaking, the thicker the fabric,
thread and needle, the longer the stitch
should be.
To begin sewing, set the machine for
straight stitch.
Place the fabric under the presser foot with
the fabric edge lined up with the desired
seam guide line on the needle plate.
Lower the presser foot lifter and then step
on the foot controller to start sewing.
35
Page 38

Manual for Model 63Z
Changing the needle position
01 02 03 04 05
Set the pattern as shown in figure.
The stitch width button is the control for
the straight stitch infinite needle position.
The pre-set position is "3.5", center position.
When you press the " –" stitch width
adjustment button, the needle position will
move to the left. When you press the "+"
stitch width adjustment button, the needle
position will move to the right.
36
Page 39

Manual for Model 63Z
Zig-zag stitches
06 07 08 08
Adjusting the stitch width
The width increases as you press the "+"
stitch width adjustment button from "0.0-
7.0".
The width can be reduced on any pattern.
Adjusting the stitch length
The density of zig-zag stitches increases
as the setting of stitch length approaches
"0.3".
Neat zig-zag stitches are usually achieved
at "2.5" or below.
Very tight zig-zag stitches are referred to
as a satin stitch.
37
Page 40

Manual for Model 63Z
Stretch stitch
03 04
1
2
Use this stitch with knitted tricot or other
stretchy fabrics. The stitch enables your
seam to stretch without breaking the
thread.
Good for easy to ravel and knit fabrics.
Good for joining durable fabric such as
denims.
These stitches can also be used as a
decorative top stitches.
1
Straight stretch stitch
2
Straight stitch
Straight stretch stitch
Straight stretch stitch is used to add triple
reinforcement to stretch and hardwearing
seams.
08
Zig-zag
Triple zig-zag stretch stitch is suitable for
firm fabrics like denim, poplin, duck, etc.
38
Page 41

Manual for Model 63Z
Sewing stretch fabrics and elastic tape
When elastic tape is attached to the cu or waist of a piece of clothing, the resulting
dimensions are those of the stretched elastic tape. Therefore it is necessary that a suitable
length of the elastic tape is used.
2.0~3.0072.5~5.0
Pin the elastic tape to the fabric in few
points to make sure that the tape is
uniformly positioned on the fabric.
1
2
1
Elastic tape
2
Pin
Sew the elastic tape to the fabric while
stretching the tape in order it has the same
length of the fabric.
While pulling the fabric behind the presser
foot with your left hand, pull the fabric at
the pin nearest the front of the presser
foot with your right hand.
Please Note:
When sewing, be sure that the needle does
not touch any pin, otherwise the needle
may bend or break.
39
Page 42

Manual for Model 63Z
Overcasting stitches
Sewing overcasting stitches along the edge of fabric prevent it from fraying.
06 09
07 11
1.0~2.0 2.5~4.0
2
2.0~3.0
2.5~4.5
Using the overcasting foot
Change the presser foot to the overcasting
foot (E).
1
Sew the fabric with the fabric edge against
the guide of the overcasting foot.
1
Needle drop point
2
Guide
Using the all purpose foot
Change the presser foot to the all purpose
foot.
1
Sewing the overcasting along the edge of
the fabric so that the needle drops over
the edge of the fabric on the right side.
1
Needle drop point
40
Page 43

Manual for Model 63Z
Blind hem
Secure the bottom of skirts and pants with a blind hem, this stitch sews without stitches
showed on the right side of the fabric.
13 15
2 23
1.0~2.0
1 1
3
2
2.5~4.0
13: Blind hem/lingerie for firm fabrics.
15: Blind hem for stretch fabrics.
Fold the fabric as illustrated with the
reverse side up.
First carry out an overcasting stitch as
shown in left picture.
Please Note:
It takes practice to sew blind hem. Always
make a sewing test first.
1
5mm
Reverse side
2
3
Overcasting stitch
Place the fabric under the foot. Turn the
handwheel forwards until the needle
swings fully to the left. It should just pierce
1
the fold of the fabric. If it does not, adjust
the stitch width accordingly.Adjust the
guide by turning the knob so that the
guide just rests against the fold.
1
2
Knob
Guide
Needle drop point
3
Sew slowly, guiding the fabric carefully
along the edge of the guide.
Turn over the fabric.
1
41
Reverse side
2
Right side
2
1
Page 44

Manual for Model 63Z
Buttonhole stitch
Buttonholes can be adapted to the size of the button.
For stretch fabric or thin fabric, it is recommended to use a stabilizer for a better buttonhole
finish.
20
0.3~1.0
21
2.5~7.0
20: For thin or medium fabric
21: For thin or medium fabric
22: For suits or overcoats
0.3~1.0
2.5~5.5
Please Note:
22
0.3~1.0
5.5~7.0
Before sewing a buttonhole on your
project, practice on a scrap piece of the
same type of fabric.
Mark the positions of the buttonhole on
the fabric.
The maximum buttonhole length is 3cm (1
3/16 inch). (Total of diameter + thickness of
button.)
Attach the buttonhole foot, then pull out the
button holder plate and insert the button.
The size of the buttonhole is determined by
the button inserted in the button plate.
The thread should be passed through the
hole in the presser foot, then be placed under
the foot.
Select the buttonhole stitch.
Adjust the stitch width and the stitch
length to the desired width and density.
Position the fabric under the presser
foot with the front end of the buttonhole
mark aligned with the center line on the
1
buttonhole foot.
1
Starting point
42
Page 45

Manual for Model 63Z
Buttonhole stitch
Pull the buttonhole lever all the way down
and position it behind the bracket on the
buttonhole foot.
Slightly hold the end of the upper thread
and start sewing.
Please Note:
Gently feed the fabric by hand.
Before stopping, the machine will
automatically sew a reinforcement stitch
after the buttonhole is sewn.
* Buttonholes are sewn from the front of the presser foot to the back, as shown.
20
21
22
43
Page 46

Manual for Model 63Z
Buttonhole stitch
Raise the presser foot and cut the thread.
To sew over the same buttonhole, raise
the presser foot (it will return to its original
position).
After sewing the buttonhole stitch, raise
the buttonhole lever until it stops.
Cut the center of the buttonhole being
careful not to cut any stitches on either side.
Use a pin as a stopper at the bar tack so you
do not cut too much.
Please Note:
When cutting the buttonhole with the
seam ripper, do not place your hands in the
cutting direction, otherwise injuries may
result.
44
Page 47

Manual for Model 63Z
Buttonhole stitch
Making a buttonhole on
stretch fabrics
When sewing buttonholes on stretch
fabric, hook heavy thread or cord under
the buttonhole foot.
Attach the buttonhole foot and hook the
gimp thread onto the back of the presser
foot.
Bring the two gimp thread ends to the
front of the foot and insert them into the
grooves, then tie them there temporarily.
Lower the presser foot and start sewing.
Set the stitch width to match the diameter
of the gimp thread.
Once sewing is completed, pull the gimp
thread gently to remove any slack, then
trim o any excess.
Please Note:
It is suggested that you use interfacing on
the backside of the fabric.
45
Page 48

Manual for Model 63Z
Button sewing
06
2.5~4.5
1
Change the presser foot with the button
sewing foot.
Move the drop feed control to lower the feed
dogs.
1
Lowered position
Position the work under the foot. Place the
button in the desired position, lower the foot.
Select zig-zag pattern. Adjust the stitch
width to "2.5-4.5" according to the distance
between the two holes of the button.
Turn the handwheel to check that the needle
goes cleanly into the left and right holes of
the button.
If a shank is required, place a darning
needle on top of the button and sew.
Pull end of the upper thread to the reverse
side of the fabric, then tie it with the
bobbin thread.
For buttons with 4 holes, sew through the
front two holes first, push the work forward
and then sew through the back two holes.
Please Note:
When you finish the work, move the drop
feed control to raise the feed dogs.
1
1
46
Raised position
Page 49

Manual for Model 63Z
Darning stitch
Darning a small hole or a tear before it becomes larger can save a garment. Choose a fine
thread in a color as close as possible to your garment.
1.0~2.0233.5~7.0
Baste the upper fabric and the under fabric
1
together.
Select the needle position. Lower the
presser foot over the center of the tear.
1
Basting stitching
Pull the button holder to rear.
Set the button guide plate on buttonhole
foot to the desired length.
The size of one darn cycle is variable.
However, the maximum stitch length is
2.6cm (1 inch) and the maximum stitch
width is 7mm (9/32 inch).
1
2
1
The length of sewing
2
The width of sewing
47
Page 50

Manual for Model 63Z
Darning stitch
1
Position the fabric so that the needle is
2mm (1/16 inch) in front of the area to be
darned and then lower the presser foot
lever.
Before lowering down the presser foot,
please hold the front tip of the BH presser
foot to keep it straight by left hand; then
lowering the presser foot lever by right
hand so as to get a perfect evenly finish.
Pass the upper thread down through the
hole in the presser foot.
Pull down the buttonhole lever.
The buttonhole lever is positioned behind
the bracket on the buttonhole foot.
Gently hold the end of the upper thread in
your left hand and then start sewing.
Darning stitches are sewn from the front of
the presser foot to the back, as illustrated.
Please Note:
If the fabric does not feed because it is too
thick, increase the stitch length.
If the sewing range is too big to sew we
suggest to sew several times (or cross sew)
to get a better sewing result.
48
Page 51

Manual for Model 63Z
1
Zipper insertion
This foot can be set to sew on each side of the zipper, the edge of the foot guides the
zipper to ensure straight placement.
01
1.0~3.0
3
4
5 5
2
Attention:
Zipper foot should be used for sewing
3.5
straight stitches only. It is possible that the
needle hits the presser foot and breaks
when sewing other patterns.
Inserting a centered zipper
-Place the right sides of the fabric
together. Sew a bottom seam 2cm from
the right edge of the zipper bottom stop
4
position. Sew a few stitches in reverse
to lock. Increase the stitch length to
maximum, set the tension below 2 and
baste the remaining length of the fabric.
-Press open the seam allowance. Place
the zipper face down on the seam
allowance with the teeth against the
seam line. Baste the zipper tape.
2cm
1
2
5mm
3
Reverse stitches
4
Basting stitching
5
Reverse side
-Attach the zipper foot. Attach the right
side of the presser foot pin to the holder
when sewing the left side of the zipper.
-Attach the left side of the presser foot
pin to the presser foot holder when
sewing the right side of the zipper.
49
Page 52

Manual for Model 63Z
Zipper insertion
-Stitching around the zipper
Please Note:
When sewing, be sure that the needle does
not touch the zipper, otherwise the needle
may bend or break.
-Remove the basting and press.
4
2
Inserting a side zipper
-Place the right sides of the fabric
together. Sew a bottom seam 2cm from
the right edge of the zipper bottom
5
stop position. Sew a few stitches in
reverse lock. Increase the stitch length to
maximum, set the tension below 2 and
6
1
3
baste the remaining length of the fabric.
-Fold back to the left the seam allowance.
Turn under the right the seam allowance
to form a 3mm fold.
2cm
1
5mm
2
3
3mm
4
Reverse stitches
5
Basting stitching
6
Reverse side
50
Page 53

Manual for Model 63Z
Zipper insertion
-Attach the zipper foot. Attach the right
side of the presser foot pin to the holder
when sewing the left side of the zipper.
Attach the left side of the presser foot
pin to the presser foot holder when
sewing the right side of the zipper.
-Sew the zipper to the piece of fabric with
the extra 3 mm (1/8"), starting from the
base of the zipper. When you are about
5 cm (2") from the end of the zipper,
stop the sewing machine with the needle
lowered (in the fabric), raise the presser
foot lever, and then open the zipper and
continue sewing.
-Turn the fabric right side out, stitch
across the lower end and the right side
of the zipper.
-Stop about 5cm (2") from the top of the
zipper. Remove the basting and open
the zipper. Stitch the remaining of the
seam.
51
Page 54

Manual for Model 63Z
Satin stitch sewing
33
32
0.3~1.0
243423
2.5~7.0
28
38
31302636253527372906
Use the satin stitch foot for satin stitching
and sewing decorative stitches. This foot
has a full indentation on the underside to
allow easy sewing over the thickness of
the stitches form by closely spaced zig-zag
stitches and even feeding of the fabric.
To tailor the satin or decorative stitch
pattern you may adjust the length and
width of the pattern by pressing the stitch
length and width adjustment buttons.
Experiment with fabric scraps until you get
the desired length and width.
Please Note:
When sewing very thin fabrics, it is
suggested that you use interfacing on the
backside of the fabric.
52
Page 55

Manual for Model 63Z
Gathering
The gathering foot is used for gathering fabrics. Ideal for clothing as well as home decor. It
works best on thin to medium weight fabrics.
01
4.5
3.5
-Set the pattern selection dial to straight
stitch.
-Loosen the tension of the upper thread
so that the lower thread lies on the
underside of the material.
-Sew a single row (or many rows) of
straight stitches.
-Pull the lower threads to gather the
material.
53
Page 56

Manual for Model 63Z
Smocking
The decorative stitch created by stitching or embroidering over gathers is called "smocking".
It is used to decorate the front of blouses or cus. The smocking stitch adds texture and
elasticity to the fabric.
18 19
1
the tension below 2. Use the all purpose
foot to sew basting lines 1cm (3/8") across
the area to be smocked.
Increase the stitch length to maximum, set
1
2
1cm (3/8")
2
Basting
Knot the threads along one edge.
Pull the bobbin threads and distribute the
gathers evenly. Secure the threads at the
1
other end.
1
Bobbin thread
Reduce the tension if necessary and sew
decorative pattern stitches between the
straight seams.
Pull out the basting.
54
Page 57

Manual for Model 63Z
Free motion darning, embroidery and
monogramming
01
2.0~4.0
3.5
1
Darning
Move the drop feed control to lower the
feed dogs.
1
Lowered position
-Set the stitch length adjustment button
to the desired length.
-Set the pattern to straight stitch, center
the needle position.
-Position the fabric to be darned under
the presser foot together with the under
laying fabric to be used.
-Lower the presser foot and sew
alternately forward and reverse using
the lever.
-Repeat this motion until the area to be
darned is filled with rows of stitches.
For reverse sewing instructions, see page
27.
Please Note:
When you finish the work, move the drop
feed control to raise the feed dogs.
1
1
Raised position
55
Page 58

Manual for Model 63Z
Free motion darning, embroidery and
monogramming
01 06
3.5
Preparation for embroidering
and monogramming
Move the drop feed control to lower the feed
dogs.
1
Lowered position
1
* Embroider hoop is not included with the
machine.
-Remove the presser foot and the presser
foot holder.
-Draw the desired lettering or design on
the right side of the fabric.
-Stretch the fabric between the
embroidery hoop as firmly as possible.
-Place the fabric under the needle. Make
sure the presser foot bar is down to its
lowest position.
-Turn the balance wheel towards you to
bring up the lower thread through the
fabric. Sew a few securing stitches at the
starting point.
-Hold the hoop with thumb and
forefinger of both hands while pressing
the material with the middle and third
finger and supporting the outside of the
hoop with your small finger.
Please Note:
Keep fingers away from moving parts,
especially needles.
When you finish the work, move the drop
1
feed control to raise the feed dogs.
1
Raised position
56
Page 59

Manual for Model 63Z
Free motion darning, embroidery and
monogramming
Embroidery
Move the drop feed control to lower the
feed dogs.
Lowered position
1
1
Stitch along the outline of the design
moving the embroidery hoop. Make sure to
maintain a constant speed.
Fill in the design working from the outline
towards the inside. Keep the stitches close
together.
You get longer stitches by moving the
hoop faster and shorter stitches by moving
the hoop slower.
Secure with reinforcement stitches at the
end of the design.
Please Note:
When you finish the work, move the drop
feed control to raise the feed dogs.
1
1
Raised position
57
Page 60

Manual for Model 63Z
Free motion darning, embroidery and
monogramming
Monogramming
Move the drop feed control to lower the
feed dogs.
1
Lowered position
1
Sew at constant speed, moving the
embroidery hoop slowly along the
lettering.
When the letter is finished secure with
reinforcement stitches at the end of the
design.
Please Note:
Keep fingers away from moving parts,
especially needles.
When you finish the work, move the drop
1
feed control to raise the feed dogs.
1
Raised position
58
Page 61

Manual for Model 63Z
Quilting
Sandwiching batting between the top and bottom layers of fabric is call "Quilting".
The top layer is usually formed by multiple geometrically shaped pieces of materials
joined together.
01 03
1.0~3.0
Attaching the edge/ quilting
guide
3.5
Insert the edge/quilting guide in the
presser foot holder as illustrated and set
the space as you desire.
Sew the first row and move over the fabric
to sew successive rows with the guide
riding along the previous row of stitches.
59
Page 62

Manual for Model 63Z
Quilting
01
2.5
1/4"
17 18 19 42
Joining pieces of fabric
3.5
Place the two pieces of fabric with the right
side together and sew with the straight
stitch.
Join the pieces of fabric with a seam
allowance of 1/4".
Sew with the side of the presser foot
aligned with the edge of the fabric.
Patchwork stitching
Place the two pieces of fabric with the right
side together and sew with the straight
stitch.
Open the seam allowances and press it flat.
Place the center of the presser foot on the
seam line of the joined pieces of fabric and
sew over the seam.
60
Page 63

Manual for Model 63Z
Quilting
1.0~3.0063.5~5.0
Applique
1
Cut out the applique design and baste it
on the fabric.
Sew slowly around the edge of the design.
1
Basting
Trim the excess material outside the
stitching. Make sure not to cut any stitches.
Remove the basting thread.
61
Page 64

Manual for Model 63Z
Fagoting
Stitching across an open seam is called "fagoting". It is used on blouses and children's
clothing. This stitch is more decorative when thicker thread is used.
17
1
2
3
-Separate the folded edges of the fabric
pieces with a gap of 4mm (3/16") and
baste them onto a piece of thin paper or
water-soluble stabilizer sheet.
1
4mm (3/16")
2
Thin paper or water-soluble stabilizer
3
Basting stitching
-Align the center of the presser foot with
the center of the two pieces of fabric
and begin sewing.
-After sewing, remove the paper.
62
Page 65

Manual for Model 63Z
Scalloping
The wave-shaped repeating pattern, that looks like shells, is called "scalloping". It is used
to decorate the collar of blouses and the edge of knitting projects.
53 26
Scallop edging
Stitch along the edge of the fabric making
sure not to sew directly on the edge of the
fabric.
For better results, apply spray starch onto
the fabric and press with a hot iron before
sewing.
Trim along the stitches, being careful not
to cut the stitches.
63
Page 66

Manual for Model 63Z
Warning function
Warning beeping sound
-When operating correctly: 1 beep.
-When operating incorrectly: 3-short beeps.
-When the sewing machine is in trouble and can't sew: 3-short beeps.
It means that the thread is twisted or jammed and the hand wheel axle can't move. Please
look through the "Trouble shooting guide" to find the solution. When the problem is
solved the machine will continue sewing.
Return bobbin winder spindle to left
If you press any button on the machine
when the bobbin is full or the bobbin
winder spindle is in the right position the
machine will beep 3 times as a warning.
Return the bobbin winder spindle to the
left position.
The sewing machine is in trouble
The animation message means that the
thread is twisted or jammed and the hand
wheel axle cannot move. Please look
through the "Trouble shooting guide" to
find the solution. When the problem is
solved the machine will continue sewing.
Please Note:
If the problem is still not solved, please contact your local dealer.
Attention:
During the sewing, if the thread get jammed inside the hook, stopping the needle from
moving, and you continue pressing the foot control, the security switch will stop the
machine completely. In order to restart the sewing machine, you have to turn the on/o
switch to the OFF position and then ON again.
64
Page 67

Manual for Model 63Z
Maintenance
Attention:
Disconnect the power cord from the wall socket before cleaning the screen and sewing
machine surface, otherwise injury or electrical shock may result.
Cleaning the screen
If the front panel is dirty, wipe it gently with
a soft, dry cloth.
Do not use any organic solvent or detergent.
Cleaning the sewing machine surface
If the surface of the sewing machine is dirty, lightly soak a cloth in mild detergent, squeeze
it out firmly and then wipe the surface. After cleaning it once in this way, wipe the surface
again with a dry cloth.
Attention:
This machine is equipped with a 100mW LED lamp. If lamp replacement is needed, please
contact the nearest authorized retailer.
65
Page 68

Manual for Model 63Z
Maintenance
Cleaning the hook
If lint and bits of thread accumulate in the hook, this will interfere with the smooth
operation of the machine. Check regularly and clean the stitching mechanism when
necessary.
Attention:
Disconnect the machine from the wall outlet before carrying out any maintenance.
Remove the bobbin cover plate and
bobbin.
Remove the needle, presser foot and
presser foot holder.
Remove the screws holding the stitch plate
and remove the stitch plate.
Clean the feed dog and bobbin case with a
brush or use a soft dry cloth.
66
Page 69

Manual for Model 63Z
Trouble shooting guide
Before calling for service, check the following items. If the problem still persists, contact
the place of purchase or your nearest authorized dealer.
Problem Cause Correction
Upper
thread
breaks
Lower
thread
breaks
Skipped
stitches
Needle
breaks
1. The machine is not threaded
correctly.
2. The thread tension is too tight.
3. The thread is too thick for the
needle.
4. The needle is not inserted
correctly.
5. The thread is wound around the
spool holder pin.
6. The needle is damaged.
1. The bobbin case is not inserted
correctly.
2. The bobbin case is threaded
wrong.
1. The needle is not inserted
correctly.
2. The needle is damaged.
3. The wrong size needle has been
used.
4. The foot is not attached correctly.
5. The machine is not threaded
correctly.
1. The needle is damaged.
2. The needle is not correctly
inserted.
3. Wrong needle size for the fabric.
4. The wrong foot is attached.
5. The needle clamp screw is loose.
6. The presser foot that is used is
not appropriate for the type of
stitch that you wish to sew.
1. Rethread the machine.
2. Reduce the thread tension (lower
number).
3. Select a larger needle.
4. Remove and reinsert the
needle (flat side towards the
back).
5. Remove the reel and wind up
the thread onto the reel.
6. Replace the needle.
1. Remove and reinsert the
bobbin case and pull on the
thread. The thread should
run easily.
2. Check both bobbin and
bobbin case.
1. Remove and reinsert the
needle (flat side towards the
back).
2. Insert a new needle.
3. Choose a needle to suit the
thread.
4. Check and attach it correctly.
5. Rethread the machine.
1. Insert a new needle.
2. Insert the needle correctly
(flat side towards the back).
3. Choose a needle to suit the
thread and fabric.
4. Select the correct foot.
5. Use the screwdriver to tighten
the screw.
6. Attach the presser foot that
is appropriate for the type of
stitch that you wish to sew.
Reference
14
23
19
18
14
18
13
13
18
18
19
21
14
18
18
19
-
18
-
67
Page 70

Manual for Model 63Z
Trouble shooting guide
Problem Cause Correction Reference
Needle
breaks
Loose
stitches
Seam gather
or pucker
Seam
puckering
Patterns are
distorted
The
machine
jams
The
machine is
noisy
7. The upper thread tension is too
tight.
1. The machine is not correctly
threaded.
2. The bobbin case is not threaded
correctly.
3. Needle/ fabric/ thread
combination is wrong.
4. The thread tension is wrong.
1. The needle is too thick for the
fabric.
2. The stitch length is wrong.
3. The thread tension is too tight.
1. The needle thread tension is too
tight.
2. The needle thread is not
threaded correctly.
3. The needle is too heavy for the
fabric being sewn.
4. The stitch length is too long for
the fabric.
5. If you are sewing on thin fabric.
1. The correct presser foot is not
used.
2. The needle thread tension is too
tight.
1. Thread is caught in the hook.
2. The feed dogs are packed with
lint.
1. Flu or oil have collected on the
hook or needle bar.
2. The needle is damaged.
3. Slight humming sound coming
from internal motor.
4. Thread is caught in the hook.
5. The feed dogs are packed with
lint.
7. Loosen the upper thread
tension.
1. Check the threading.
2. Thread the bobbin case as
illustrated.
3. The needle size must suit the
fabric and thread.
4. Correct the thread tension.
1. Select a finer needle.
2. Readjust the stitch length.
3. Loosen the thread tension.
1. Loosen the thread tension.
2. Rethread the machine.
3. Choose a needle to suit the
thread and fabric.
4. Make the stitch length shorter.
5. Sew with a stabiliser material
under the fabric.
1. Select the correct foot.
2. Loosen the thread tension.
Remove the upper thread and
bobbin case, turn the handwheel
backwards and forwards and
remove the thread remnants.
1. Clean the hook and feed dog.
2. Replace the needle.
3. Normal.
Remove the upper thread and
bobbin case, turn the handwheel
backwards and forwards and
remove the thread remands.
23
14
13
19
23
19
29
23
23
14
19
29
33
-
23
66
66
18
-
66
68
Page 71

Manual for Model 63Z
Trouble shooting guide
Problem Cause Correction Reference
Uneven
stitches,
uneven feed
The sewing
machine
doesn't
operate
1. Poor quality thread.
2. The bobbin case is threaded
wrong.
3. Fabric has been pulled on.
1. The machine is not turned on.
2. The presser foot lifter is raised.
3. The machine is not plugged in.
1. Select a better quality thread.
2. Remove the bobbin case and
the thread and reinsert them
correctly.
3. Do not pull on the fabric while
sewing, let it be taken up by
the machine.
1. Turn on the machine.
2. Lower the presser foot lifter.
3. Connect the power line plug
to the electric outlet.
19
13
-
8
20
8
69
Page 72

Page 73

Bedienungsanleitung für Modell AEG 63Z
WICHTIGE SICHERHEITSVORSCHRIFTEN
Wenn Sie ein elektrisches Gerät benutzen, sollten Sie immer die
grundlegenden Sicherheitshinweise beachten.
Lesen Sie die Bedienungsanleitung bevor Sie die Nähmaschine
benutzen.
Gefahr -
1. Die Nähmaschine sollte nie unbeaufsichtigt eingeschaltet sein.
2. Bitte ziehen Sie den Netzstecker immer sofort nach der Benutzung
aus der Steckdose. Dies gilt auch vor dem Reinigen und anderen
Wartungsvorgängen.
Achtung -
einer Verletzung verringert wird:
1. Lesen Sie die Bedienungsanleitung sorgfältig durch, bevor Sie die
Nähmaschine benutzen.
2. Bewahren Sie die Gebrauchsanweisung an einem geeigneten
Ort in der Nähe des Gerätes auf. Händigen Sie die
Gebrauchsanleitung bei der Weitergabe des Gerätes an Dritte
ebenfalls mit aus.
3. Verwenden Sie die Maschine immer nur in trockenen Räumen.
4. Lassen Sie Kinder, gebrechliche oder behinderte Personen nicht
unbeaufsichtigt mit der Maschine umgehen, da diese mögliche
Gefahren nicht immer richtig einschätzen können.
wie das Risiko eines Stromschlages reduziert wird:
wie das Risiko eines Brandes, eines Feuers oder
5. Dieses Gerät kann von Kindern ab 14 Jahren und darüber sowie von
Personen mit verringerten physischen, sensorischen oder mentalen
Fähigkeiten oder Mangel an Erfahrung und Wissen benutzt werden,
wenn sie beaufsichtigt oder bezüglich des sicheren Gebrauchs des
1
Page 74

Bedienungsanleitung für Modell AEG 63Z
Gerätes unterwiesen wurden und die daraus resultierenden Gefahren
verstehen.
6. Kinder dürfen nicht mit dem Gerät spielen.
7. Reinigung und Benutzer-Wartung dürfen nicht von Kindern ohne
Beaufsichtigung durchgeführt werden.
8. Schalten Sie die Maschine immer aus, wenn Sie Einstellungen
oder Arbeiten im Bereich der Nadel durchführen, wie Nadel
einfädeln oder wechseln, Spule einfädeln oder wechseln, Nähfuß
wechseln und so weiter.
9. Ziehen Sie immer den Stecker aus der Steckdose, wenn Sie
Wartungsarbeiten wie Ölen oder Reinigen und dergleichen
durchführen.
10. Ziehen Sie immer den Stecker aus der Steckdose, wenn Sie
die Maschine unbeaufsichtigt lassen um Verletzungen durch
versehentliches Einschalten zu vermeiden.
11. Benutzen Sie die Maschine nicht in feuchtem Zustand oder
feuchter Umgebung.
12. Ziehen Sie den Netzstecker nicht am Kabel aus der Steckdose.
Greifen Sie beim Herausziehen den Stecker und nicht das Kabel.
13. Wenn die LED-Beleuchtung beschädigt oder defekt ist, muss sie
durch den Hersteller oder seinen Kundendienst ersetzt werden,
um Gefährdungen zu vermeiden.
14. Stellen Sie niemals etwas auf das Fußpedal.
15. Betreiben Sie die Maschine niemals mit blockierten
Belüftungsönungen. Halten Sie die Belüftungsönungen
der Maschine sowie das Fußpedal frei von Fusseln, Staub und
Stoabfällen.
16. Die Nähmaschine darf nur mit dem Fußpedal vom Typ
C-8000
benutzt werden.
2
Page 75

Bedienungsanleitung für Modell AEG 63Z
17. Die Anschlussleitung des Fußpedals kann nicht ersetzt werden.
Bei Beschädigung der Leitung ist das Fußpedal zu verschrotten.
18. Der Schalldruckpegel unter normalen Bedingungen ist kleiner als
75dB(A).
19. Entsorgen Sie elektrische Geräte nicht im Hausmüll, nutzen Sie
die Sammelstellen der Gemeinde.
20. Fragen Sie ihre Gemeindeverwaltung nach den Standorten der
Sammelstellen.
21. Wenn elektrische Geräte unkontrolliert entsorgt werden, können
während der Verwitterung gefährliche Stoe ins Grundwasser
und damit in die Nahrungskette gelangen, oder die Flora und
Fauna auf Jahre vergiftet werden.
22. Wenn Sie das Gerät durch ein neues ersetzen, ist der Verkäufer
gesetzlich verpflichtet, das alte mindestens kostenlos zur
Entsorgung entgegenzunehmen.
Verwahren Sie diese Bedienungsanleitung
Diese Nähmaschine ist nur für den Haushalt gedacht.
3
Page 76

Bedienungsanleitung für Modell AEG 63Z
Inhaltsverzeichnis
Übersicht der wichtigsten Teile der Nähmaschine ................................................................... 6
Zubehör ....................................................................................................................................................7
Nähmaschine ans Stromnetz anschliessen .................................................................................. 8
Anschiebetisch ...................................................................................................................................... 9
Freiarm .......................................................................................................................................................................................................... 9
Greiferspule füllen ........................................................................................................................ 10-12
Greiferspule einsetzen .......................................................................................................................13
Oberfaden einfädeln ....................................................................................................................14-16
Einfädler .................................................................................................................................................17
Nadel wechseln ....................................................................................................................................18
Passende Nadel, Faden und Sto wählen ...................................................................................19
2-Stufen-Nähfussanhebung............................................................................................................20
Nähfuss auswechseln .........................................................................................................................21
Transporteur heben und senken ................................................................................................... 22
Fadenspannung ............................................................................................................................23-24
Stichübersicht ..................................................................................................................................... 25
Bedienknöpfe .................................................................................................................................26-31
Nützliche Anwendungen ............................................................................................................ 32-34
Ecken nähen ...........................................................................................................................................................................................32
Nähen von Kurven ...........................................................................................................................................................................32
Faden abschneiden .........................................................................................................................................................................33
Nähen von dünnen Stoen ......................................................................................................................................................33
Sewing stretch fabrics ...................................................................................................................................................................33
Auf dicken Stoen nähen ......................................................................................................................................................... 34
Geradstiche .......................................................................................................................................... 35
Nadelposition ändern .......................................................................................................................36
Zickzackstiche ..................................................................................................................................... 37
Stretchstich .......................................................................................................................................... 38
Stretchgeradstich ............................................................................................................................................................................. 38
Dreifachzickzackstretch ............................................................................................................................................................. 38
4
Page 77

Bedienungsanleitung für Modell AEG 63Z
Inhaltsverzeichnis
Nähen von Strechstoen und Gummibändern ......................................................................... 39
Overlockstiche ................................................................................................................................... 40
Overlockfuß .......................................................................................................................................................................................... 40
Benutzung des Universal-Fußes ...................................................................................................................................... 40
Blindsaum .............................................................................................................................................. 41
Knopflöcher nähen ......................................................................................................................42-45
Knopflöcher auf elastischen Stoen .............................................................................................................................. 45
Button sewing ..................................................................................................................................... 46
Stopfen ............................................................................................................................................47-48
Reissverschluss einnähen .......................................................................................................... 49-51
Beidseitig verdeckt eingesetzter Reissverschluss ............................................................................................ 49
Einseitig verdeckt eingesetzter Reissverschluss ...............................................................................................50
Raupennähte........................................................................................................................................ 52
Kräuseln ................................................................................................................................................ 53
Smoken ..................................................................................................................................................54
Freihandstopfen, -sticken und -monogramme ...................................................................55-58
Stopfen ........................................................................................................................................................................................................55
Vorbereitungen zur Erstellung eines Zeichens oder einer Stickerei ............................................... 56
Sticken ..........................................................................................................................................................................................................57
Monogramme ...................................................................................................................................................................................... 58
Quilten ............................................................................................................................................. 59-61
Anbringen der Rand-/Quiltführung ............................................................................................................................... 59
Stoe zusammennähen .............................................................................................................................................................60
Patchworkstich ...................................................................................................................................................................................60
Applikation .............................................................................................................................................................................................. 61
Hohlsaum .............................................................................................................................................. 62
Muschelstich ........................................................................................................................................ 63
Muschelstich ......................................................................................................................................................................................... 63
Warnfunktionen ..................................................................................................................................64
Instandhaltung ............................................................................................................................. 65-66
Beheben von Störungen ............................................................................................................67-69
5
Page 78

Bedienungsanleitung für Modell AEG 63Z
Übersicht der wichtigsten Teile der
Nähmaschine
1. Geschwindigkeitsregler
1
2
3
4
5
6
7
8
9
20
21
22
23
24
25
26
27
28
10
2. Fadenspanndrehknopf
11
3. Nadelstopp oben/unten
12
4. Automatisches Vernähen
13
5. Automatisches Vernähen
14
6. Ein/Aus Knopf
15
7. Fadenabschneider
16
8. Stichplatte
9. Anschiebetisch und Zubehörbox
17
10. Greiferspulvorrichtung
11. Greiferspulenstopper
12. Stichnummeranzeige
13. Auswahltaste Mode
18
19
14. Einstelltaste für die Stichbreite
15. Einstelltaste für die Stichlange
16. Direkte Stichanwahltasten
17. Ausziehbare Kurzanleitung
18. Nadelklemmschraube
19. Nahfüße
20. Knopflochhebel
21. Automatischer Nadeleinfädler
29
22. Spulenabdeckung
30
23. Horizontaler Garnrollenhalter
31
24. Önung für zweiten Garnrollenstift
25. Handrad
32
26. Hauptschalter
27. Netzkabel
28. Anschluss für Fussanlasser
29. Unterfadenspulführung
33
30. Oberfadenführung
31. Gri
32. Nähfusslifter
33. Transporteur
6
Page 79

Bedienungsanleitung für Modell AEG 63Z
Zubehör
1 2 3
5
10 11
14
17
18 19 20
23 24 25
6
12 13
15 16
7 8 9
21 22
26
4
Standardzubehör
1. Allzweck-Nähfuß
2. Reissverschlussfuß
3. Kopflochfuß
4. Stickfuß
5. Blindsaumfuß
6. Overlockfuß
7. Knopfannähfuß
8. Spulen (3x)
9. Garnrollenkappe
10. Spulenfilz
11. Schraubendreher
12. Schraubenzieher (S)
13. Kantenlineal
14. Bürste/ Trennmesser
15. Garnrollenstift
16. Nadeln
17. Schutzhaube
Extra Zubehör
18. Säumerfuß
19. Kordelfuß
20. Quiltfuß
21. Stopuß
22. Kräuselfuß
23. Obertransportfuß
24. Zwillingsnadel
25. Koer
26. Tischverlängerung
Hinweise:
-Zubehör ist in der Zubehörbox verstaut.
-Optionales Zubehör ist nicht im Lieferumfang der Maschine enthalten; dieses kann
jedoch als zusätzliches Zubehör bei ihrem Händler vor Ort bezogen werden.
7
Page 80

Bedienungsanleitung für Modell AEG 63Z
Nähmaschine ans Stromnetz anschliessen
Achtung:
Immer sicherstellen, dass die Maschine vom
Stromnetz getrennt und der Hauptschalter
auf ("O") ist, wenn sie nicht im Gebrauch
ist und bevor Sie Einzelteile einlegen oder
entfernen.
Vor Anschluss der Nähmaschine ans
Stromnetz, bitte zuerst sicherstellen,
dass Spannung (Volt) und Frequenz mit
Spannung und Frequenz des Stromnetzes
übereinstimmen. Nähmaschine auf stabilen
Tisch stellen.
ON
OFF
1. Schliessen Sie die Nähmaschine an das
Stromnetz an, wie abgebildet.
2. Ein/Ausschalter betätigen.
3. Die Lampe leuchtet auf, wenn das Gerät
eingeschaltet ist.
Fussanlasser
Fussanlasser bei ausgeschalteter
Nähmaschine anschliessen.
Stecker in die dafür vorgesehene
Anschlussbuchse an der Nähmaschine
einstecken.
Nähmaschine einschalten, dann langsam auf
Fussanlasser drücken, um mit dem Nähenzu
beginnen. Fussanlasser loslassen, damit die
Nähmaschine anhält.
Achtung:
Falls Unsicherheiten bestehen betreend
Anschluss der Nähmaschine ans Stromnetz,
bitte qualifizierten Elektriker fragen.
8
Page 81

Bedienungsanleitung für Modell AEG 63Z
Anschiebetisch
Halten Sie den Anschiebetisch waagerecht
und ziehen Sie in die Richtung der
Pfeilmarkierung.
Das Innere des Anschiebetisches kann als
Zubehörbox verwendet werden.
Freiarm
Freiarmnähen ist praktisch beim Nähen
von Röhrenware wie Hosensäume und
Ärmel.
9
Page 82

Bedienungsanleitung für Modell AEG 63Z
Greiferspule füllen
2
3
1
4-10
1. Faden und Fadenspulenhalter auf
Garnrollenstift setzen. Bei kleinen
Fadenspulen, den Spulenhalter mit der
schmalen Seite gegen die Fadenspule
setzen oder den kleinen Spulenhalter
nehmen.
2. Faden in Fadenführung einklinken.
3. Führen Sie den Faden im
Gegen-Uhrzeigersinn um die
Fadenspannungsführung.
10
Page 83

Bedienungsanleitung für Modell AEG 63Z
Greiferspule füllen
1
2
4. Faden wie illustriert in die Garnrolle
einfädeln und auf der Spindel
platzieren.
1
Kerbe
2
Spulenwickler
5. Garnrolle nach rechts drücken.
6. Spule nach rechts drücken. In dieser
Position blinkt im Display die Anzeige
"
".
7. Halten Sie das Fadenende mit der
Hand fest.
11
Page 84

Bedienungsanleitung für Modell AEG 63Z
Greiferspule füllen
8. Auf den Fußanlasser drücken.
9. Sobald die Garnrolle nach einigen
Umdrehungen gewickelt worden
ist, halten Sie die Maschine an und
schneiden den Faden in der Nähe
von dem Loch der Garnrolle ab.
Stellen dann die Geschwindigkeit
auf maximalen Wert ein, Wickeln die
Garnrolle weiter bis sie voll ist. Der
Motor stoppt automatisch sobald die
Garnrolle voll ist.
Hinweis:
Verwenden Sie eine richtig gewickelte
Spule, da andernfalls die Nadel abbrechen
oder die Fadenspannung falsch sein kann.
10. Stoppen Sie die Maschine und
Schneiden den Faden ab dann die
Garnrolle entfernen.
Bitte beachten:
Solange der Schalter des Garnrollenspulers
auf linker Position steht "Garnrolle
Wickelposition" näht die Maschine nicht und
dreht das Handrad auch nicht. Um nähen zu
können, muß der Schalter dann auf die linke
Position also "Nähposition" gestellt werden.
12
Page 85

Bedienungsanleitung für Modell AEG 63Z
Greiferspule einsetzen
Achtung:
Nähmaschine vor dem Einsetzen
oder Herausnehmen der Greiferspule
ausschalten (Hauptschalter auf OFF bzw.
"O" stellen).
Zum Einsetzen oder Herausnehmen der
Greiferspule muss die Nadel ganz oben sein.
Önen Sie die Spulenabdeckung.
Spule so in Spulenkapsel einsetzen, dass
sich die Spule im Gegenuhrzeigersinn
dreht (Pfeilrichtung).
Faden durch Schlitz (A) ziehen.
Die Spule mit einer Hand leicht festhalten
und mit der anderen Hand den Faden
entlang der Pfeilmarkierungen von (A)
nach (B) führen.
Ziehen Sie dann den Faden entlang der
Pfeilmarkierungen von (B) nach (C). Um
das Reststück des Fadens abzutrennen,
ziehen Sie den Faden bei (C) über die
Klinge. Abdeckung wieder einsetzen.
Schliessen Sie die Spulenabdeckung.
13
Page 86

Bedienungsanleitung für Modell AEG 63Z
1
2
4
3
Oberfaden einfädeln
6
5
7
8
Bitte beachten:
Es ist wichtig, richtig einzufädeln, sodass
keine Probleme bei der Näharbeit auftreten
könnten.
1. Faden und Fadenspulenhalter auf
Garnrollenstift setzen. Bei kleinen
Fadenspulen, den Spulenhalter mit der
schmalen Seite gegen die Fadenspule
setzen oder den kleinen Spulenhalter
nehmen.
14
Page 87

Bedienungsanleitung für Modell AEG 63Z
Oberfaden einfädeln
2. Faden ab Garnrolle durch die obere
Fadenführung ziehen.
3. Faden um die Fadenführung legen
und durch die Vorspannfeder ziehen,
wie abgebildet.
4. Faden weiter durch die Fadenspannung
zwischen den silberfarbenen Scheiben
durchführen.
5. Dann nach unten und um den
Kontrollfedernhalter.
15
Page 88

Bedienungsanleitung für Modell AEG 63Z
Oberfaden einfädeln
6. Oben angelangt, Faden von rechts
nach links durchs Führungsöhr am
Fadenhebel und wieder nach unten
führen.
7. Nun führen Sie den Faden hinter die
dünne Nadelklemmenführung.
8. Fadenende durch die Nadel von vorne
nach hinten ziehen, und ca. 10 cm
von Faden ausziehen um einzufädeln,
Einfädler benutzen.
16
Page 89

Bedienungsanleitung für Modell AEG 63Z
Einfädler
1
1
2
Achtung:
Hauptschalter auf ("O") stellen.
Nadel ganz hochstellen. Nähfuss senken.
Führen Sie den Faden um die Fadenführung.
1
Fadenführung
Drücken Sie den Hebel so weit es geht
nach unten.
Der Einfädler dreht sich automatisch in
Einfädelposition und das Häkchen fährt
durchs Nadelöhr.
1
Nadel
2
Haken
Faden vor die Nadel holen.
Faden locker halten und Hebel langsam
loslassen. Das Häkchen dreht sich, zieht
den Faden durchs Nadelöhr und formt
dabei eine Schlinge.
Faden ganz durchs Öhr ziehen.
17
Page 90

Bedienungsanleitung für Modell AEG 63Z
Nadel wechseln
2
1
Achtung:
Hauptschalter ausschalten (auf OFF
bzw. "O" stellen) vor dem Ausführen der
folgenden Arbeiten.
Nadel regelmässig wechseln, vor allem
wenn sie abgenutzt ist und Probleme
verursacht.
Nadel wie auf den folgenden Abbildungen
gezeigt einsetzen.
1. Drehen Sie das Einstellrad in Ihre
Richtung (gegen den Uhrzeigersinn)
um die Nadel zu senken und
dann zu erhöhen. Drehen Sie die
Nadelklemmschraube gegen den
Uhrzeigersinn um die Nadel zu
entfernen. Die flache Kolbenseite
kommt nach hinten.
2. Nadel so weit wie möglich nach oben
schieben. Danach schließen Sie die
Nadelklemme.
Nur einwandfreie Nadeln benutzen.
Probleme können auftreten bei der
Verwendung von:
1
2
3
Krummen Nadeln
1
Stumpfen Nadeln
2
3
Beschädigten Spitzen
18
Page 91

Bedienungsanleitung für Modell AEG 63Z
Passende Nadel, Faden und Sto wählen
Nadelstärke Sto Faden
9-11 (70-80) Feine Stoe dünne Baumwollstoe,
Voile, Serge, Seide, Mousseline,
Qiana, Baumwollstrick, Tricot,
Jersey, Crepe, Polyesterwebstoe,
Hemden-und Blusenstoe.
11-14 (80 -90) Mittelschwere Stoe Baumwolle,
Satin, Nessel, Segeltuch,
Doppelstrick, leichte Wollstoe.
14 (90) Mittelschwere Stoe
Baumwollsegeltuch, Wollstoe,
dickerere Strickstoe, Frotté, Jeans.
16 (100) Schwere Stoe: Canvas, Wollstoe,
Zeltstoe und Quilts, Jeans,
Polstermaterial (leicht bis
mittelschwer).
18 (110) Dicke Wollstoe, Mantelstoe,
Polsterstoe, einige Leder- und
Vinylarten.
Bitte beachten:
-Generall gilt:dünne Fäden und Nadeln für dünne Gewebe und dicke Fäden und Nadeln
für dicke Gewebe.
-Immer Faden und Nadel auf einem kleinen Stück Gewebe probieren bzw. testen, das
beim Nähen gebraucht wird.
-Verwenden Sie eine Stabilisierung für feine und dehnbare Stoe.
Dünner Baumwollfaden, Nylon,
Polyester- oder BaumwollFaden mit Polyesterkern.
Die meist verkauften Fäden
sind von mittlerer Stärke
und für diese Stoe und
Nadelstärken geeignet.
Polyesterfaden für
synthetische und
Mischmaterialien.
Baumwollfaden für natürliche
Gewebe.
Als Ober- und Unterfaden
generell den gleichen Faden
nehmen.
Starker Faden, Teppichfaden.
19
Page 92

Bedienungsanleitung für Modell AEG 63Z
2-Stufen-Nähfussanhebung
Mit dem Nähfusslifter wird der Nähfuss
gesenkt und hochgestellt.
Beim Nähen von dicken Lagen kann der
Nähfuss um eine Stufe höher gestellt werden
und erleichtert damit das Positionieren des
Nähguts.
Bitte beachten:
Die Nadel muss immer auf der höchsten
Position sein.
20
Page 93

Bedienungsanleitung für Modell AEG 63Z
1
Nähfuss auswechseln
1
1
2
Achtung:
Schalten Sie den Hauptschalter auf Aus
("O") sobald Sie eine der unten genannten
Operationen durchführen!
Lösen des Nähfusses
Heben Sie den Nähfuss an.
Drücken Sie den schwarzen Hebel und der
Nähfuss löst sich.
Hebel
1
Anbringen des Nähfusses
Senken Sie die Nähfussstange bis sich
der Ausschnitt direkt über dem Steg des
Füsschens befindet.
Drücken Sie den Hebel.
Der Nähfuß wird automatisch eingesetzt.
1
Ausschnitt
2
Stift
Lösen und Anbringen der
1
Nähfusshalterung
Heben Sie den Nähfuß. Richten Sie den
Nähfußhalter auf die linke Seite der
Nähfußstange. Halten Sie den Nähfußhalter,
2
dann ziehen Sie die Schraube mit dem
Schraubendreher fest.
1
Nähfuß-Stange
2
Nähfuß-Halter
Anbringen der Rand-/ Quiltführung
Bringen Sie die Rand- / Quiltführung in die
Spalte, wie dargestellt.
1
Spalte
2
Rand-/ Quiltführung
2
21
Page 94

Bedienungsanleitung für Modell AEG 63Z
Transporteur heben und senken
Die Einstellung des Transporteurs ist unten
auf der Rückseite der Nähmaschine zu
sehen, wenn der Nähtisch oen ist.
Heben Sie den Nähfusshebel an und
schieben dann den Transporteur
1
2
3
Einstellhebel auf der Rücksiete der
Maschine nach rechts oder links. (von der
Vorderseite der Maschine aus gesehen
nach rechts).
Transporteur-Einstellhebel (von der
1
Rückseite der Maschine gesehen)
Angehobene Position
2
Abgesenkte Position
3
Bitte beachten:
Wenn Sie die Arbeit beendet haben(z.B.
Knöpfe annähen, Freihand-Stopfen oder
-Sticken, Monogramme ) den Einstellhebel
betätigen, um den Transporteur wieder
anzuheben.
22
Page 95

Bedienungsanleitung für Modell AEG 63Z
Fadenspannung
-Grundeinstellung Fadenspannung: "4"
-Um die Spannung zu erhöhen, Rad auf
die nächst höhere Zahl drehen.
-Um die Spannung zu reduzieren, Rad
auf die nächst tiefere Zahl drehen. Es ist
wichtig, beim Nähen mit der richtigen
Fadenspannung zu arbeiten.
-Die Spannung muss je nach Stichart,
Faden und Sto angepasst werden.
-90% aller Näharbeiten kann mit
einer Spannung von zwischen "3"
und "5" ausgeführt werden ("4" ist die
Grundeinstellung).
-Bei allen dekorativen Näharbeiten wird
das Stichbild schöner und der Sto fältelt
weniger, wenn der Oberfaden leicht auf
die linke Stoseite gezogen wird.
-Es gibt keine Einstellung für
die Fadenspannung, die für alle
Nähprogramme und Stoe passend ist.
1
2
Normale Fadenspannung zum
Geradstichnähen.
1
Stovorderseite
2
Storückseite
3
Oberfaden
4
Unterfaden
23
3
4
Page 96

Bedienungsanleitung für Modell AEG 63Z
Fadenspannung
Zu lockere Fadenspannung zum
Geradstichnähen. Rad auf höhere Zahl
stellen.
Zu starke Fadenspannung zum
Geradstichnähen. Rad auf tiefere Zahl
stellen.
Normale Fadenspannung für Zickzack und
Dekorstiche.
Die Fadenspannung ist korrekt, wenn ein
Stück des Oberfadens an der unteren Seite
des Stoes erscheint.
24
Page 97

Bedienungsanleitung für Modell AEG 63Z
Stichübersicht
Der in grau markierte Bereich (in der unteren Auflistung) stellt jeweils eine Einheit eines
Stiches dar.
A. Direkt-Muster
B. Muster
15
16
40
65
17
41
42
66
67
20
19
44
69
21
22
47
45
46
72
70
71
18
43
68
23
48
73
25
24
50
49
75
74
01
26
51
76
04
06
08
09
05
30
55
80
07
33
31
32
58
56
57
03
02
28
27
29
53
52
54
78
77
79
11
10
34
35
36
59
61
60
14
13
12
38
37
39
63
62
64
25
Page 98

Bedienungsanleitung für Modell AEG 63Z
Bedienknöpfe
4
3
2
65
7
1
1. Start/Stopp-Taste
Die Maschine beginnt zu laufen, wenn
die Start/Stopp-Taste gedrückt ist und sie
stoppt, wenn die Taste noch mal gedrückt
wird.
Die Maschine läuft langsam am Anfang
des Nähens.
Die Nähgeschwindigkeit kann mit dem
Hebel vom Geschwindigkeitsregler
eingestellt werden.
8
9
26
Page 99

Bedienungsanleitung für Modell AEG 63Z
Bedienknöpfe
2. Rücktransportknopf
Wenn die Stiche 01-06, gewahlt sind, näht
die Maschine entgegengesetzt wenn der
Rücktran- sportknopf betätigt ist. Sie näht
wieder vorwärts sobald der Knopf gelöst
worden ist.
Wenn die Stiche 24-80 gewählt sind, näht
die Maschine einen Vernähstich sobald
der Rückwärtsknopf gedrückt wird. Die
Maschine hört auf zu nähen sobald der
Knopf nicht mehr gedrückt wird.
3. Automatisches Vernähen
Wenn die Stiche 01-06 gewählt sind, näht
die Maschine sofort 3 Lockingstiche falls
der Knopf Auto-Lock gedrückt wird, dann
stoppt sie automatisch.
Wenn die Stiche 07-19, 24-80 gewählt sind
und Sie den Knopf Auto-Lock drücken,
näht die Maschine 3 Lockingstiche am
Ende des momentanen Stiches und stoppt
automatisch.
Diese Funktion wird gelöscht, sobald Sie
den Knopf erneut drücken oder einen
anderen Stich auswählen.
4. Nadelstopp oben / unten
Mit der Nadelstopp oben / unten Taste
können Sie bestimmen, ob die Nadel in der
oberen Position oder im Sto stoppt, wenn
Sie das Nähen beenden.
Bitte beachten:
Während des Nähens ist diese Taste
auser Funktion. Nadel hoch / runter
Positionstaste stoppt nur die Maschine.
27
Page 100

Bedienungsanleitung für Modell AEG 63Z
Bedienknöpfe
5. Nähgeschwindigkeit einstellen
Der Geschwindigkeitseinstellhebel kann
die Nähgeschwindigkeit regulieren.
Um die Geschwindigkeit zu erhöhen,
schieben Sie den Hebel nach rechts, sie zu
bremsen, dann nach links.
6. Auswahltaste MODE
Mit der Taste MODE können "
Anwendungsbereiche Muster, Stichweite
und Stichlänge wählen. Die LED zeigt
jeweils die gewählte Einstellung an.
Modus für Nutz- und Dekorstiche
Es gibt 80 Stiche, die per Anwahl
von 01-80 per Stichlängentasten
und Stichbreitentasten angewählt
werden können.
" Sie die
Stichweiten-Modus
Verstellen Sie die Breite eines
Stiches, in dem Sie dies über die
Stichbreitentasten einstellen.
Stichlangen-Modus
Verstellen sie die Länge eines
Stiches, in dem sie dies über die
Stichlängentasten einstellen.
28
 Loading...