


ÓKO-FAVORIT
Lavavajíllas
Dishwasher
Máquina de iavar ioiga
AEG
4159
instrucciones para ei uso
Operating instructions
instrugóes de manejo

Dear customer!
Before you operate your dishwasher, please read through these operating
instructions carefully. They contain important information for your safety as well
as operation and maintenance of your machine.
For this small trouble, your dishwasher will reward you with faultless performance.
Should your dishwasher ever have a fault, please look it up in the section on "If
you think your dishwasher is not working properly”. In many cases, you can rectify
minor faults yourself and thus save yourself unnecessary service costs.
Keep the operating instructions in a safe place for future reference, and give them
to any future owners of your dishwasher.
42
Printed on recycled paper.
AEG - putting words into action.

Saf^ instructions 44/45
Disposai
Disposing of the packaging 46
Disposing of your oid machine 46
important hints to heip you use your dishwasher correctiy
Operating your dishwasher economicaiiy
and with regard for the environment 47
Unsuitabie crockery 47
Crockery that may be suitabie for your dishwasher 47
Machine description
Machine appearance 48/49
Control panel 50/51
Programme chart 52/53
Using your dishwasher for the first time
Before using your dishwasher for the first time 54
Setting the water softening system 54/55
Filling with special dishwasher salt 56/57
Filling with rinse aid 58
Setting the rinse aid quantity to be dosed 59
Filling with detergent 59/60
BIO dishwashing programmes and low-alkaline compact powders 61.
Loading your dishwasher correctly 62
Lower basket 62
Cutlery basket 63
Upper basket 63/64
Switching on/off
Setting the dishwashing programme 65
Switching off/unloading your dishwasher 66
Cieaning and care
Caring for your dishwasher 67
Cleaning the strainers 67/68
If you think your dishwasher is not working properly 69/70
Customer service 71
Hints for test centres 72
Technical data 73
Installation
Installing your dishwasher 74/75
Connection 76/77
Water protection system 78
Electrical connection 79,
Connection technology 80/81
43

The safety of AEG electrical appliances conforms to accepted rules of techno
logy and the Appliance Safety Act. We as manufacturers, however, see ourselves
as being obliged to femiiiarise you with the foliowing safety instructions.
Using your dishwasher for Its intended purpose
□ Only use your dishwasher for machine washing of househoid crockery. If your
machine is misused or used for any purposes other than that for which it is
intended, the manufacturer cannot be held liable for any damage caused.
□ For safety reasons, you should not convert or modify your dishwasher in any
vyay.
Before using your dishwasher for the first time
□ Check your dishwasher for any transport damage. Never connect a damaged
machine. If your dishwasher is damaged, you shouid contact your supplier.
□ Your dishwasha' must be correctiy instaiied and connected. Piease read the
section on "Installation'’ to make sure you know all about this.
□ Before using your dishwasher for the first time, do not forget that the nominal
voltage and current type indicated on the rating plate of your machine must be
the same as the nominal voltage and current type at the installation site. The
necessary electrical fusing is also given on the rating plate.
Child safety
□ Packaging parts (e.g. foils, styrene foam) may be dangerous for children, as it
could lead to suffbcationi You should therefore keep all packaging well away
from children.
n Children may not recognise the dangers of improper use of electrical appli
ances. You should therefore ensure proper supervision during operation and
not allow your children to play with your dishwasher.
□ Detergents may have a caustic effect on eyes, mouth, and throat and may even
cause suffbcationi Keep alt detergents in a safe place out of children's reach.
n The water in your dishwasher should not be used for drinking. Detergent
residues may still be present in your machine. Make sure you do not splash
these caustic residues onto your skin or suffocate yourselfl Keep children well
away from your dishwasher when its door is open.
44
O

iittiil-iil: tlNfi-M-P
Your dishwater in day-to-day use
□ The water protection system ensures reliable protection against water damage,
though this implies the fbllovwng conditions being iutfilled:
- The mains connection must be retained even when your dishwasher is switched
off.
- Your dishwasher must be properly installed.
- Always turn off the water tap if your dishwasher is left unattended for any length
of time,
□ Never operate your dishwasher if the electrical supply lead, supply or drain
hose, control panel, worktop, or plinth are damaged.
□ In case of a fault, first turn off the water tap. Then switch off your machine and
pull the plug out of the plug socket. Jf there is a fixed connection, switch offer
unscrew the fuse(s).
□ Never pull the plug out of the plug socket by the supply lead, biit by the plug
itself.
□ Dishwasher repairs should only be performed by trained personnel, improper
repairs may seriously endanger the user, if your dishwasher needs to be
repaired, you should contact our service centre or your retailer.
□ If the connection lead of your dishwasher is damaged, it must be replaced by
the special lead through your AEG-authorised service centre.
□ Never place any solvents in your dishwasher, or you may cause an explosion!
□ Do not rest or sit on the open door, or you machine could tilt.
□ The heating elements on the floor of the dishwasher remain hot for some time
after machine washing. Take care you do not scald yourself! Do not touch the
heating elements.
□ Before using special dishwasher salt, detergent, and rinse aid, make sure that
the manufacturer of these products expressly specifies their Use in domestic
dishwashers.
□ The high temperature in the immediate vicinity of the heating element may
deform or even melt plastic parts. Do not arrange any plastic parts in the lower
basket above the heating element.
□ Always turn off the water tap when your dishwasher is left unattended for any
length of time, e.g. when you are away on holiday.
□ The dishwasher should only be transported upright. Any tilting during trans
port may lead to salt water flowing into the dishwasher, which could result in
rusting.
O
S
45

Disposing of the packaging
Our dishwashers require effective protective packaging in transit, though we
always confine ourseives here to what is absoiuteiy necessary.
Aii used packaging materials are environmentaliy ffiendiy and reusabie.
The cardboard parts are produced from recycied paper, and the wood parts are
untreated.
The piastics are marked as foliows:
>PE< for poiyethyiehe, e.g. packaging fbiis
>PS< for poiystyrene, e.g. padding (basicaiiy CFC-free)
>POM< for poiyoxymethyiene, e.g. plastic ciamps
By recycling and reuse of the packaging, raw materials can be saved and the
volume of refuse reduced. -
Give the packaging for reuse to your local recycling centre. Your municipal or local
authority will give you its address.
Disposing of your old machine
When your machine needs replacing and you withdraw it from service, you should
render it unserviceable before having it disposed of.
Marking of plastic parts for graded recycling:
All plastic parts in your machine are marked with internationally standardised
abbreviations (e.g. >PS< for polystyrene). When your machine is disposed of, this
enables plastic waste to be sorted into individual types for. environmentally
conscious recycling.
Take your decommissioned machine to your local recycling centre or dealer, who
will take it back from you for a small handling charge.
46
a
I

operating your dishwasher economicaliy and with regard
for the environment
Connect your dishwasher to the hot water supply if you have a modern hot water
system. For electrically heated installations, you are recommended te connect
your dishwasher to the cold water supply.
Do not pre-rinse your dishes under running water.
Collect your dirty dishes, stack them in the dishwasher, and only wash them when
both baskets are liiil, making sure that the latter are never overloaded. Only then
can you be sure that you are machine-washing economically and with regard for
the environment.
Always select the programme corresponding to the type of crockery and degree
of soiling (see “Programme chart“).
Never overdose detergent, special salt, and rinse aid. Follow the dosage recom
mendations in these operating instructions as well as the instructions given by
manufacturers of these products.
Make sure that the water softener is correctly set.
Unsuitable crockery
Sponges, household cloths, and all objects which can become saturated with
water should not be cleaned in your dishwasher.
The following are unsuitable for machine washing:
- wooden boards or platters
- non-heat-resistant plastic parts
- lead crystal glass
- tin or copper items
- glued crockery or cutlery
- older types of cutlery with temperature-sensitive adhesive
- steel knives that are liable to rust
- cutlery with wood, horn, porcelain, and mother-of-pearl handles.
Crockery that may be suitable for your dishwasher
The following items have certain machine washing limitations;
- Only wash earthenware crockery in your dishwasher if the manufacturer has
expressly indicated it as being suitable for that purpose.
- Some types of decoration which have been painted over the glaze may fede
after frequent machine washing.
- Silver and aluminium parts tend to discolour during machine washing.
- Many food residues, such as egg white, egg yolk, mustard, often cause
discolouratfons or staining on silver. Silver crockery and cutlery should there
fore always be cleaned free from food residues if they are not washed imme
diately after a meal. ’
- Some types of glass may become cloudy after many washing cycles. You should
therefore continue to hand-wash especially valuable glassware.
When buying new crockery and cutlery, confirm that they are dishwasher-safe.
47
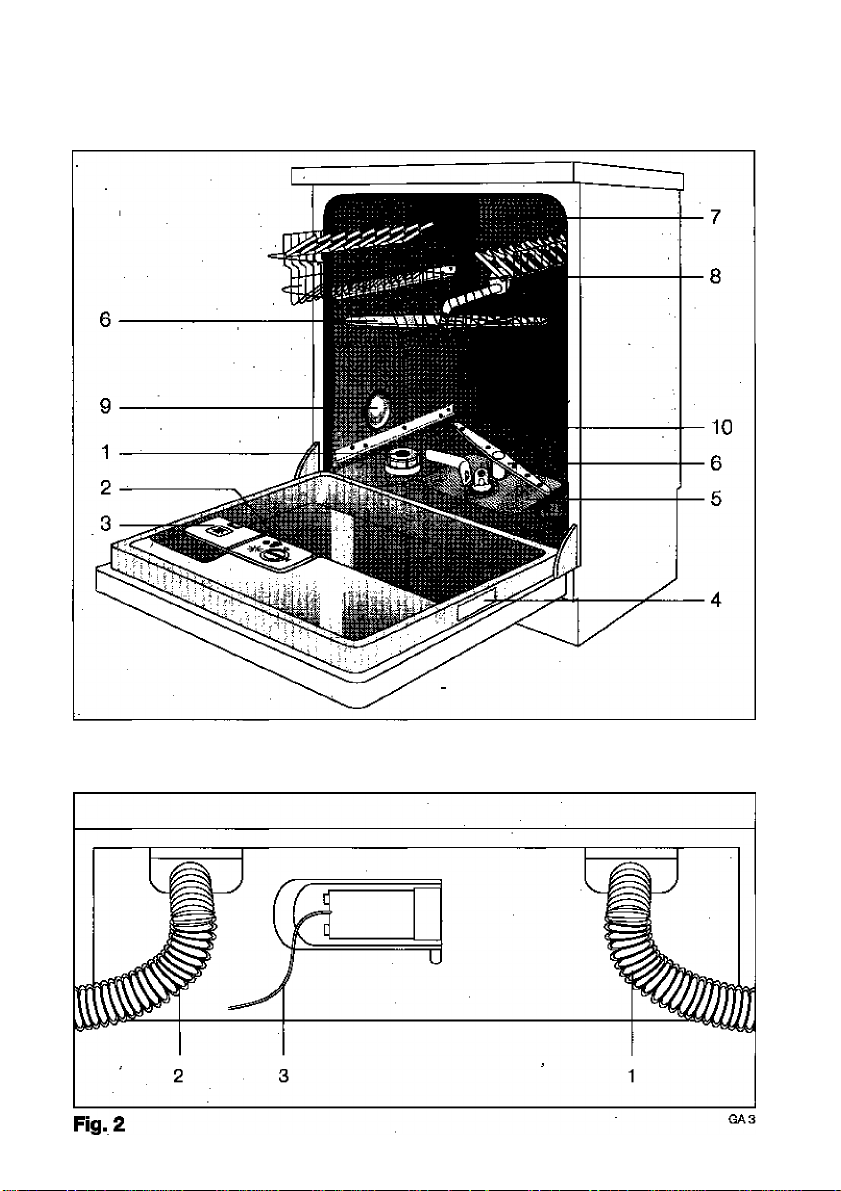
Machine appearance
48
ng. 1
GA5(1)
i

■ >,■■■■ ■ ■ ; ■ ■ ;■";■'■ ' U' ' :•■'•?'>i'-*‘jjj
; vf'ii i Ef ;rì-ì№t'i-
Inside view
1 Dishwasher salt container
2 Rinse aid dispenser
3 Detergent dispenser
4 Rating piate
5 Strainers
6 Spray arms
7 Ceiiing spray
8 Rubber seai for connection of water suppiy to upper spray arm
9 Hardness range switch
10 Heating eiement
Rear view
1 Suppiy hose
2 Drain hose
3 Eiectricai suppiy iead
49

Control panel
o
■ r^S^Oo--'
^b-
Rg.3
1 Button block
© ON/OFF button with operating indicator
Programme buttons
50 “C Normai BiO
Clip 50 °C Economy BiO
©65“ 65 °C Normai
E)iira pre-rinse
The seiected programme is indicated in red in the round dispiay window beside
the button.
2 Signal indicator
^ Replenish with dishwasher salt
50
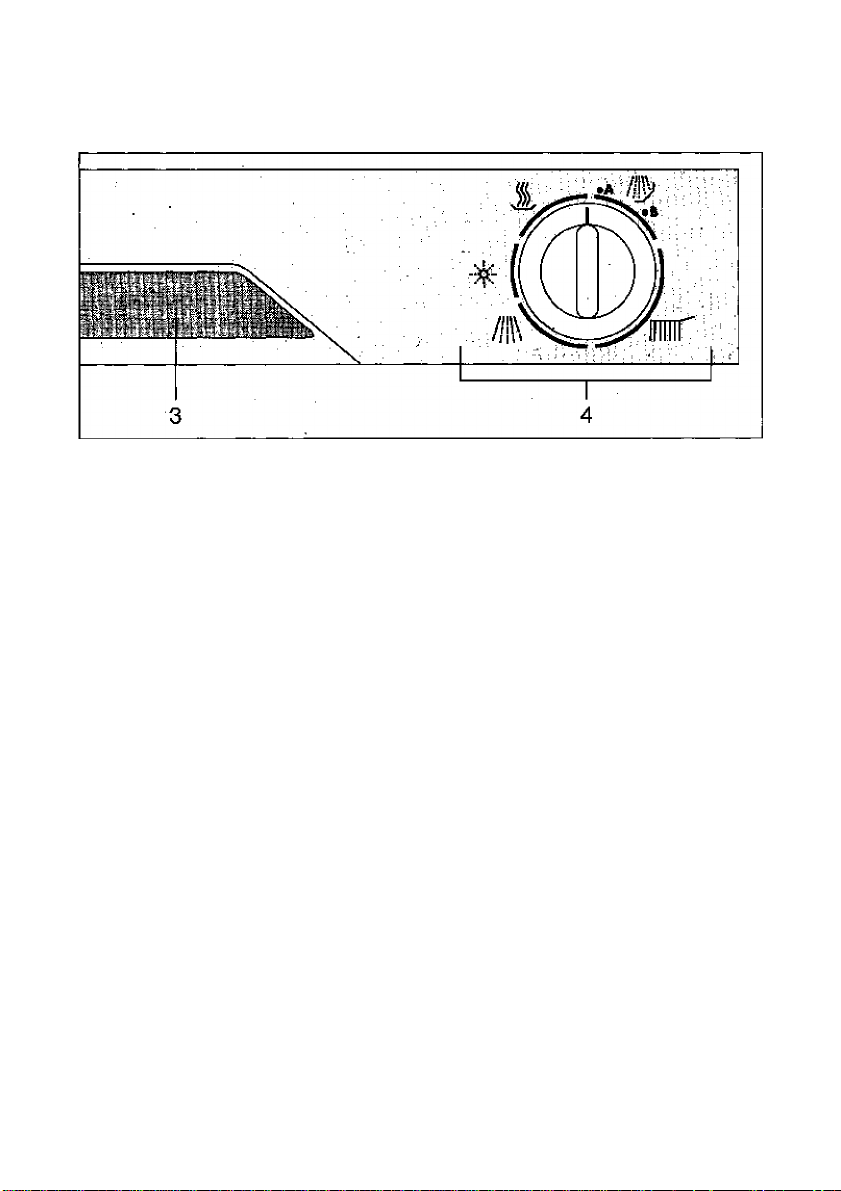
Fig.3
3 Door release handle with flap
4 Programme switch and programme cycle indicator
Pragramme switch: For setting programme starting point A or B
(see aiso “Programme chart").
Programme cycie indicator: Whiie the programme is running, the programme
switch cycies forward, indicating the status of the programme in each step.
//1^ Pre-rinse
irniT
.yi.
Washing with detergent
intermediate rinse
Rinsing with rinse aid
Drying
(D
?
03
ta 51

Jil
^: 41 Ц.ill“ -1|ii-H
Washing
programmes
50 “C Normai BIO Normally soiled tableware and .cookware
50 “C Economy BIONormally to slightly soiled fable, coffee, or
65 ‘’C Normal Normally soiled tableware and cookware
Extra pre-wash Used crockery coliected in the dishwasher
Suitable fon Setting the programme:
Tlim Press
programme programme
switch to button
with fragile parts (e.g. glass, plastic).
Specially desigrt^ for using low-alkaline
compact powders as well as for crockery
. with dried-on food residues.
dessert crockery and frag lie glassware. Spe
cially designed for using low-alkallne com
pact powders.
with dried-on food residues.
for washing at a-later time.
A Sg»
B ¿big?
A
A #
52

• f ; i ^ ^ i ‘ ? U iT' •;
Programme cycle
Pre-wash
Washing with detergent
Intermediate rinse
Rnai rinse with rinse aid
Drying with hot air
Washing with detergent
Intermediate rinse
Rnai rinse with rinse aid
Drying with hot air
Pre-wash
Washing with detergent
intermediate rinse
Final rinse with rinse aid
Drying with hot air
Pre-wash
* Values have been determined under normal conditions. Deviations are possible ixider praotioai conditions.
Average programme
duration^' in minutes
for cold water '
connection
65
55
69 1.5
10 0.1 6
Average energy
consumption^' in kWti
for cold water
connection
1.4 19
1.4 15
Average water
consumption^
In litres
19
53

Before using your dishwasher for the first time
To ensure protection of the crockery baskets during transport, we have packed
them with damps. Please remove aii clamps before operating your dishwasher.
When your new dishwasher is correctly set up and installed, you must first make
it ready for use.
Before using your dishw/asher for the first time, proceed as follows:
- set the water softener;
- fill the special salt ccntainer with special salt;
- fill the rinse aid dispenser with rinse aid.
The following sections give you more detailed information on the individual points.
Setting №e water softening system
Soft (low-lime) water is necessary for machine washing to avoid lime deposits on
crockery and in your dishwasher. Tap water with a hardness above 4 “d^ (German
degree) must therefore be softened for machine washing.
Forthis purpose, your dishwasher is fitted with a water softener. The water softener
is treated (regenerated) automatically and at regular intervals with salt solution.
The salt consumption needed for regeneration thus depends on the local water
hardness. Your competent water company will provide you with information about
water hardness in your locality.
To ensure optimum regeneration of the water softener:
- the water softening system must be set to the local water hardness;
- the dishwasher salt, container must always be filled with special salt.
54
Ì3
S
d]
CÙ
5

To ensure minimum sail consumption with optimum washing results, your
dishwasher is fitted with an electronic hardness range setting with six possible
stages.
Fig. 4
Hardness range Water hardness
IV 51-70
III 15-21
l/ll
1 below 4
WHB [1).
in °d^)
in mmol/l^)
9.1-12.5 6
36-50
29-35
6.4-9.0 5
5.1-6.3
22-28 3.9-5.0
2.6-3.8 2* .
4-14 0.7-2.5
below 0.7 1
Stage
setting
4
3
1
no salt necessary
1 [°d] German degree, measure of water hardness
^ [mmdi/l] Millimol per litre, international water hardness unit
*) Factory setting
□ Open the door, and take out the lower basket.
□ Set the hardness range switch, e.g. with a coin, as shown in the table to the
relevant water hardness in your locality. The arrow must then point to the
corresponding figure.
55

Filling with special dishwasher salt
Important:
!f the water hardness in your locality is below 4 “d, you need not fill your dish
washer with special salt.
Important note:
Use only special dishwasher salt. Other types of salt (e.g. cooking salt) often
contain water-insoiuble components which choke the water softener and may
render it unsen/iceable.
Salt and detergent packs often look very much alike. Detergent inadvertently
poured into the salt container will damage the water softener. Each time you fill it
with special salt, make sure you are really holding a salt pack in your hand.
□ Open the door, and take out the lower basket.
□ Unscrew the cap of the salt container by turning it anticlockwise.
Only when using your dishwasher for the first time: Rll the salt container
with around 0.5 litre of water.
□ Fill the salt container with special salt. The container holds around 1.0-1.5 kg
depending on the salt grain size. Do not overfill the container.
56
Fig. 5
SAE1 (1)

□ Clean the container opening so that no salt residues exist.
□ Screw the cap back on clockwise. The cap must be tightly closed, since s£üt
will otherwise find its way into the rinse water and may make your glasses
cloudy.
n If you do not wash your crockery immediately after filling with salt, run the
PRE-WASH programme to rinse away any salt water and salt grains that have
been spilt.
Salt replenishment indicator
You must replenish special salt when the control panel shows the illuminated
message SALT. Depending on the grain size of the salt, it may be some hours
before the message SALT goes out again.
Important:
At water hardnesses below 4 “d, you need not fill your dishw^her with special
salt. In this case, the control panel continuously shows the illuminated message
SALT. This implies no loss of machine function.
157

Filling with rinse aid
The nnse aid ensures that the last rinse water flows off, leaving no drops, and
gives your crockery its final sparkle. During a washing programme, rinse aid is
automatically dispensed from the dispenser.
Important note:
Use only a branded rinse aid for domestic dishwashers. Other agents, e.g. vinegar
essence, may damage your machine and do not produce the desired effect.
Detergent (also liquid detergent) inadvertently poured into the dispenser will
damage your machine.
The rinse aid dispenser is located inside the door.
□ Open the door.
□ Open the dispenser by twisting the cap V4 revolution anticlockwise.
□ Rll with rinse aid max. up to the dotted line. The maximum capacity is around
150 ml.
Fig. 6
KLE1 (1)
Fig. 7
n Then close the cap again by twisting it clockwise.
□ Wipe off any spilt rinse aid with a cloth, otherwise too much foam wiil be
produced during washing.
Rinse ajd replenishment Indicator
You must replenish rinse aid when the display window on the rinse aid dispenser
(Fig. 7/arrow) shows a dark spot surrounded by a bright ring @. When the rinse
aid dispenser is full, the display window appears uniformly dark.
58
KLE20
w
Id
s:!

; ■ Ét ; i : ' j.i i ; ! ; i [■ t:.; : !.!■ =
Setting the rinse aid quantity to be dosed
The dispensing unit is iocated inside the liiiing opening of the rinse aid dispenser.
You can use it to set the rinse aid quantity on a scaie of 1-6 corresponding to a
1-6 cm® rinse aid addition. The rinse aid dosage is factory-set to “4", At this
setting, there is sufficient rinse aid in the fuii dispenser for around 40 washing pro
grammes.
You shouid adjust the amount dispensed if you discover imperfect crockery re
sults (see the section on "if you think your dishwasher is not working properly").
□ To set the dose, open the dispenser by twisting the cap ’A revolution
anticiockwise (Rg. 6).
□ Set the dose seiector to the required position with a screwdriver.
Fig. 8
□ Then ciose the cap again by twisting it clockwise.
□ Wipe off any spilt rinse aid^with a cioth.
KLD1 (2)
Filling with detergent
Important) Never use conventionai washing-up iiquids. The latter cause heavy
frothing, may even imply a loss of machine function, and the dishes will not be
cleaned. Use only branded dishwasher detergent for domestic dishwashers.
Always store the detergent in a dry place in a sealed container. Lumpy detergent
will not clean dishes.
Before starting a washing programme (except "Pre-wash"), you must fill the
detergent dispenser with dishwasher detergent powder. The detergent is auto
matically dispensed during the programme.
59
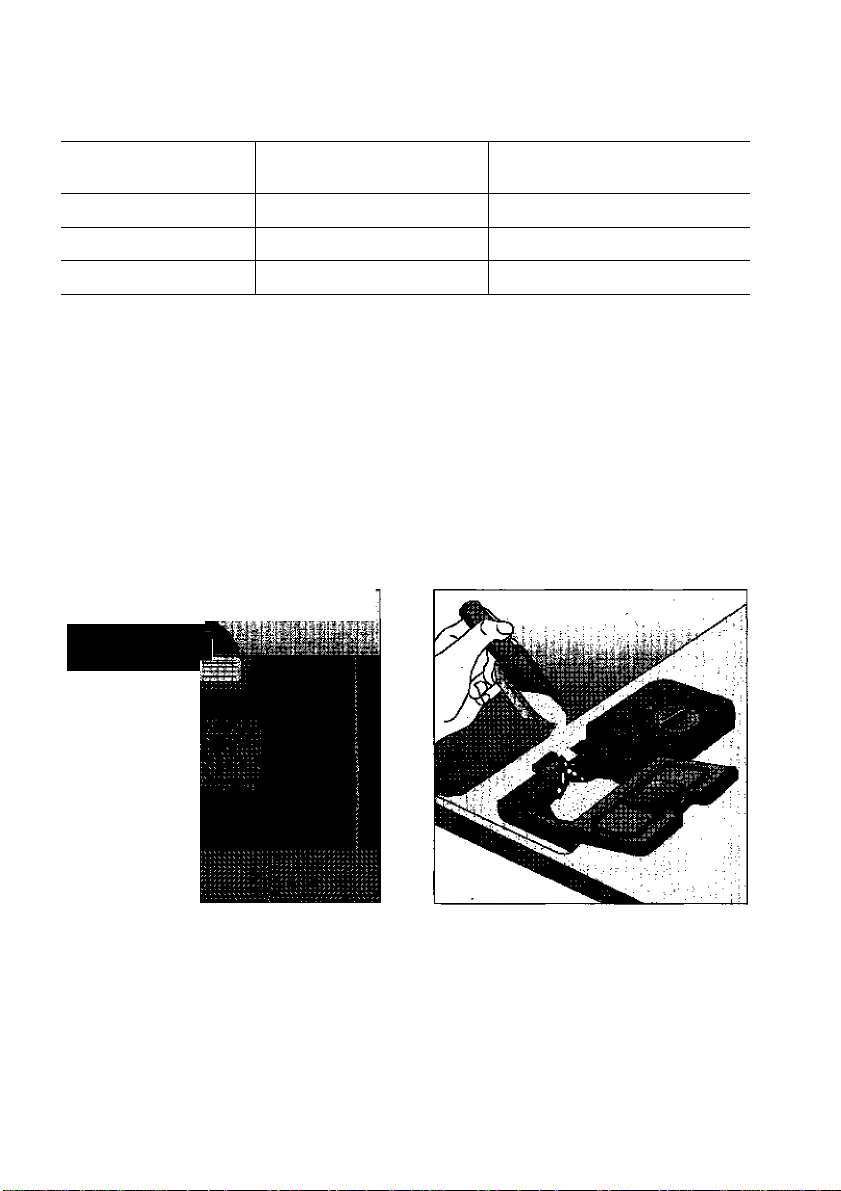
Recommended dose lor fully loaded baskets:.
Normally soiled Heavily soiled, especially
with starch and fat
Dishwashing powder
around 20 ml
around 30 ml
Dishwashing liquid around 30 ml around 40 ml
Tablets 1 1
When washing smaller crockery loads, you should dose correspondingly less
detergent.
Detergents may. vary in terms of their effectiveness. You should therefore
follow the dosage recommendations of each detergent manufacturer.
The detergent dispenser is located Inside the door. If the tid Is closed:
□ Press the cap lever forwards (Fig. 9/1). The lid will spring open.
□ Fill the detergent dispenser with detergent.
The marking lines are intended to help you achieve the correct dosage.
"MIN” corresponds to around 30 ml and “MAX" to around 40 ml detergent,
when filled level. -
■
Fig. 9
RME 1 ¡1)
Rg. 10
□ Press the lid shut until the cap engages.
When washing heavily soiled crockery, you have the option of putting additional
detergent in the cap dispenser (Fig. 9/2). Fill the cap level. This detergent will be
already effective during Pre-wash.
60
RMEE[1)

BIO dishwashing programmes and low-aikaiine compact
powders
On the basis of their chemicaJ composition, dishwasher detergents can be
ciassified into two basic groups;
- conventional, alkaiine detergents with caustic components:
- iow-aikaiine compact powders with naturai enzymes.
The enzymes in iow-aikaiine compact powders have a dirt-dissoiving effect and
are aiso more readiiy biodegradable. These enzymes depioy their fuil dirt dissoMng power within a temperature range of 40-55 °C. In BiO washing pro
grammes, the temperature range and duration of the heating phases are preciseiy
matched to the dirt-dissoiving properties of the enzymes.
In combination with iow-aikaiine compact powders, BiO washing programmes,
at a temperature as iow as 50 “C, therefore achieve the same cieaning results
that would otherwise be achievabie oniy with 65 “C programmes.
On BiO programmes, the wash water is briefly heated to 60 ”0 to activate the
active oxygen.
The iack of any caustic components in iow-aikaiine oompact powders and the
lower cleaning temperature of BIO washing programmes not only relieve the
environment, but also care for your crockery.
Detergent tablets
Detergent tablets of different manufacturers dissolve so slowly that they do not
release their full dishwashing power in short programrhes (without pre-wash).
When using detergent tablets, you should therefore set normal programmes with
pre-wash wherever possible.
61

Before loading your machine with dishes:
- remove larger food residues that are not soluble in water, such as e.g. fish
bones, other bones, etc.;
- pans with burnt-on food residues should be pre-soaked in water.
Proper arrangement ensures perfect washing results.
Arrange all hollow containers, such ^ cups, glasses, saucepans, etc., with the
opening facing downwards.
Make sure that no water can collect in the recesses.
Basicaiiy arrange crockery and cutlery so that they do not lie inside each other
and each item has good contact with the washing water.
Glasses should not touch each other so that glass damage is avoided and no
stains are retained during drying.
Make sure that small items cannot fail through. You are recommended to place
small objects {e-g- lids) in the cutlery basket.
The easiest way to load the baskets is from back to front.
Important! Tall crockery or cutlery or that which projects downwards out of the
baskets may obstruct thespray arms. This will seriously impairthe washing results.
Before starting a washing prograrnme, check that the spray arms freely rotate.
Arrange the crockery around them as appropriate.
Lower basket
Large, heavily soiled dishes are best cleaned in the lovirer basket.
Important note! The high temperature in the immediate vicinity of the heating
element may deform or even melt plastic parts. Therefore arrange plastic parts
in the upper basket.
n Draw out the lower basket to its fullest extent.
□ Arrange large and heavy dishes, such as plates, bowls, pans, etc., in the lower
basket.
62
Fig. 11
UK1 [1)
St
ÌD
o
IIJ
C5

• •.rr.f.’T-i :c;3
Cutlery basket
Place knives, forks, and spoons in the cutlery basket with their handles pointing
downwards. Also do not arrange spoons and forks with their dirty side in contact
with each other.
To prevent cutlery from falling on to each other, you can place the grid insert on
the cutlery basket. Then arrange the cutlery in the grid.
Important! Exceptionally long cutlery, such as soup ladles, kitchen knives, or the
like, may obstruct the upper spray arm. Such cutlery can be placed in the upper
basket.
The spoon strip on the LH side of the cutlery basket should be used for coffee
spoons and teaspoons. To unload, you can take the cutlery basket out of the
lower basket.
Fig. 12
BK2
Fig. 13
BK4
83

Upper basket
Smaller^ more fragile dishes are given a gentle wash in the upper basket.
'□ Draw out the upper basket to its fullest extent.
□ Arrange smedl crockery items, such as saucers, cups, glasses, and fragile plastic
parts, in the upper basket.
Arrange items inserted on and under the hinged cup holders in staggered
formation to ensure a thorough cleaning action on all sides. To insert tall items,
the hinged cup holders can be folded up. You can incline or suspend wine,
champagne, and brandy glasses in the recesses of the hinged cup holders. Both
rows of glass-holding prongs on the left are also suitable for inclination of glasses,
beakers, etc.
Fig. 15
□ After loading, re-insert the upper basket to its fullest extent.
34
k
O

Setting the dishwashing programme
□ Close the door.
□ Fully turn on the water tap, If It Is off.
Important! If a washing programme has been started despite the water tap being
turhed off, switch off your machine, turn on the water tap, and reset the washing
programme.
Setting the dishwashing programme
□ Press the programme button for the programme you require {see “Programme
chart"). The display beside the pressed button appears red.
During the programme cycle, the programme cycle indicator cycles fonward,
indicating the status of the machine washing programme In each step. During
heating In the washing and rinse aid cycles, the programme switch remains
stationary unti! the necessary temperature is attained.
□ Turn the programme switch clockwise to position A or B as shown In the pro
gramme chart.
n Press the ON/OFF button. The operating Indicator lights up. The programme
starts.
Programme correction
□ You can correct any washing programme you have Inadvertently set wrongly
by first switching off your machine with the ON/OFF button.
important! For reasons of radio interference suppression, you should operate
the programme switch only when your machine is switched off. Automatic
detergent addition could also be tripped.
□ Reset the washing programme you require,
interrupting the programme
□ A running washing programme is interrupted if you open the door.
□ Reclose the door. The washing programme restarts from the position where it
was interrupted.
□ You should open the door during the programme cycle only, when absolutely
necessary. When you reclose the appliance, the penetrating air is strongly
heated and expands. This may lead to programme cycle irregularities requiring
service centre attention.
65

Switching off/unloading your dishwasher
Switching off
When the programme has ended:
□ Press the ON/OFF button. The operating indicator goes out.
When the programme has ended, the dishes shouid be ieft in the closed
dishwasher for a lurther 15 minutes for compiete drying and cooling. You can
accelerate the drying and cooling phase by fully opening the door momentarily
when the programme has ^ded and then leaving it ajar.
However, please note that if your machine is installed under a kitchen worktop,
escaping steam may. damage the worktop. Its underside must be protected
against rising steam with aluminium foil as prescribed.
Unloading your dishwasher
Important note! Hot crockery is sensitive to shocks. You shouid therefore let
your dishes cool before taking them out.
□ First take out the dishes from the lower basket and then from the upper basket
so that no water from the recesses in the crockery above can drip on to articles
below and leave stains.
66

Appliance care
Clean the screen and controls of your dishwasher where necessary with a soft
cloth and lukewarm water.
Important note! Never use commercially available ^rniture cleaners or aggres
sive detergents.
The spray arms do not need to be cleaned.
The tank lining, door seal and water inlet should be checked occasionally for
pollution and when necessary cleaned.
Cleaning the strainers
The strainers on the floor of your dishwasher are to a major extent self-cleaning.
You are nonetheless recommended to check the strainers from time to time and
to clean them where necessary. Soiled strainers impair washing results.
□ Open the door, and take out the lower basket.
□ The strainer system of your dishwasher consists of 4 parts (coarse strainer, fine
strainer, microfilter, and strainer panel}. The system can be unlocked and
removed using the handle of the microfilter.
□ Turn the handle about 'A revolution anticlockwise and remove.
s
01
a
Fig. 16
HS1 t1)
67

G Hold the coarse strainer (1) by the lug and withdraw it together with the tine
strainer (2) frorin the microfilter (3).
□ Detach the fine strainer (2) from the coarse strainer {1}.
Fig. 17
HS2
□ Thoroughly clean all strainers under running water.
□ Remove the strainer panel (4} from the floor of your dishwasher and thoroughly
clean it on both sides.
Fig. 18
RS3(1)
□ Re-insert the strainer panel in the dishwasher floor.
□ Insert the-coarse and fine strainers in the microfitter and put together.
□ Insert and lock the strainer combination by turning the handle clockwise. Make
sure that the outer edge of the strainer panel rests correctly on the dishwasher
floor.
Important note! Never carry out a washing prograrhme without a strainer.
66

Before calling our service centre, please check whether you can rectify the fauft
yourself by following the instructions given below. Should this.information be of
no assistance to you in a specific case, please contact our service centre.
□ The drain pump runs continuously - even when your machine is
switched off.
- The water protection system has responded. Firstturnoffthe water tap. Then
pull out the mains plug. If you have a fixed connection: switch off the fuse(s) or
unscrew the screw-in fuse(s). Call our service centre to determine the fault.
G The programme wiil not start.
- Are the fuses in the fixed wiring in order? Is your machine connected to the
electricity supply?
- Have you closed the door properly? Press the door shut.
G No water ffows in.
- Have you turned on the water tap?
- is the strainer in the hose screw connection on the water tap choked? Clean
the strainer if necessary.
- Is the water supply hose kinked? Check hose running (seethe section on "Water
supply”).
G The programme cycie indicator sticks at the beginning of washing with
detergent
- Have you turned on the water tap?
- Is the strainer in the hose screw connection on the water tap choked? Clean
the strainer if necessary.
- Is the minimum water pressure of 1 bar available? (see the section on "Water
supply”).
G The water is not pumped away.
- Is the drain hose kinked, squashed or twisted? Please ensure correct running.
(See section on “Water drainage”.)
- Is the sink trap obstructed? Check the sink trap.
G The crockery is not clean.
- Have you selected a programme that is suitable for the type and degree of
soiling of your crockery? (see "Programme chart”).
- Have you arranged the crockery so that the sprayed water has access to all
surfaces, both interns^ and external? The crockery baskets must not be over
filled (see the section on “Arranging the crockeryi.
- Have the spray arms been qbstructed by crockery or cutlery? Please note that,
for better drainage of residual water at the programme end. the upper spray
arm obliquely tilts when it comes to rest. When operational, it automatically
runs in the horizontal position.
- Are all strainers on the floor of your dishwasher clean? Are the strainers
inserted properly (see the section on “Cleaning the strainers”).
- Have you used sufficient detergent? (see the section on “Filling with detergent”).
- Have you used branded detergent?
- Is the drain hose correctly run? (see the section on “Water drainage").

- Is there still special salt in the salt container? Without special salt, the water will
not be softened. At water hardnesses above 4 “d, lime deposits will form on
your dishes (see the section on "Filling with special dishwasher, salt").
- Have you set the water softener to the local water hardness? {see the section
on “Setting the water softening Si^em").
Cl The dishes do not dry and have no sparkle.
- Have you used a branded rinse aid?
- Is there sufRcient rinse ad in the dispenser? (see the section on “Riling with
rinse aid").
□ Glasses and dishes have streaks, stripes, milky blotches, or blue-
coloured blooms.
- The rinse aid is being overdosed. Set a lower rinse aid dosage (see the section,
■ on “Setting the rinse aid quantity to be dosed“).
Cl Glasses and dishes.have dried-on water drops.
- The rinse aid is being underdosed. Set a higher rinse aid dosage (seethe section
on “Setting the rinse aid quantity to be dosed").
- The detSfgent may be the cause. Contact your detergent manufacturer's con
sumer services manager.
□ Rusi marks can be seen inside your machine.
- The dishwasher interior is made of stainless steel. If rust is found inside your
dishwasher, this must be from another source (rust in water, from sauc^ans,
cutlery, etc.). Remove such marks with a commercially available stainless steel
cleaner.
- Have you dosed the detergent correctty? (see the section on “Filling with
detergent”).
- Is the lid of the salt container closed properly? (see the section on “Filling with
special dishwasher satT).
Have you set the water softener correctly? (see the section on “Setting the
water softening system”).
70

In the section on "It you think your dishwgsher Is not working properly", we have
listed the most important faults which you can rectify yourself.
Should you still wish to call our service centre for any of the specified faults or
because the appliance Is being wrongly operated, the service engineer^ visit
cannot be made free of charge even during the guarantee period.
Should you find no reference to a fault In the operating Instructions, you should
call our servflce centre.
When making your call, quote the E-No. (product number) and F-No. (serial
number) indicated on the rating plate. It is located on the RH Inside edge of the
door.
AEG Okofavoritwxyz
E-Nr.911.000000 F-Nr.000000000
Fjg. 19
To keep these numbers handy, we recommend you enter them here.
E-No
...................:...... .
..............................
F-No.
You specifying these details enables the service centre to make a precise identi
fication of the spare part required so that the appliance can be repaired at the
sen/ice engineer’s first visit without you having to pay extra costs for repeated
journeys by the sen/ice engineer.
O
71

Test standard: lEC 436/DIN 44990 (prENSO 242)
Reference programme: 65 “C Normal (Detergent type A)
50 “C Normal BIO detergent type B)
Detergent dosage (Type A): 5 g In lid dispenser
25 g in detergent dispenser
Detergent dosage (Type B): 30 g In detergent dispenser
Capacity: 12 standard place settings Including serving utensils
Arrangement example:
Upper basket
Upper basket
Lxrwer basket
Fig. 22
72
HFP3ra
7
E:

Capacity
12 standard place settings including serving utensils
Allowable water pressure
1 -10 bar (= 1 CM 00 N/cm" = 0.1-1.0 MPa)
Electrical connection
Details of the electrical connection are given on the rating plate. It is located on
the RH inside edge of the door.
Dimensions
- Free-standing appliance: 85 x 60 x 60 (H x B x D in cm)
- Build-in appliances: see enclosed Installation Instructions.
C€ This appliance complies with the following EC Directives:
- 73/23^EC of 19. 02.1973 - Low-Voltage Directive;
- 89/336/EEC of 03. 05.1989
(including Amendment Directive 92/31/EEC) - EMV Directive.
CD
73

Installing your dishwasher
Your dishwasher must be installed stably and horizontally (align with a spirit level)
on a firm floor. The adjustable feet can be unscrewed with the spanner supplied
to equalise floor irregularities and to adjust the machine height to other pieces of
furniture.
If your dishwasher is instedled under a continuous worktop, please note the
following:
- The drain hose, supply hose, and mains lead must retain free mobility when run
inside the plinth cavity. This is to prevent the hoses and lead from being kinked
or squashed.
- When integrating build-under Appliances able to be fitted with a decorative trim
are being installed, it must be additionally ensured that the machine is firmly
screwed to the continuous worktop or to the adjacent furniture. It is imperative
to take this measure to guarantee the necessary tilt safety as per VDE specifi
cations.
Depending on model, the dishwashers should be installed as follows:
Integrating machines (l-models)
To install, see the installation template supplied.
Important:
The appliance door can be lined with a vyood panel/furniture panel of the follow
ing dimensions:
Width: .. 591 mm-594 mm
Thickness: 16 mm-24 mm ^
Height: depending on
- recess height
- plinth height
- matchup to the joint runs of adjacent furniture (e. g. drawer), though
max. 600 mm.
Important note! Should the furniture panel be longer than 600 mm, the appli
ance door cannot be fully opened (the furniture panel bumps against the plinth).
In this case, the plinth must be cut out (see installation template) or overiength
door hinge kit BLT 60 used. You can obtain this under E-No. 911 239 008.
Build-under machines (U-models) and build-in machines (E-models)
To install, see the installation instructions supplied.
Free-standing machines can be installed free-standing without additional fixing.
Important note: (applies only to free-standing machines with original worktop)
If, for reasons of space, there is no alternative to installing your dishwasher directly
next to a gas or electric cooker or coal range, you must interpose a thermally
insulated, non-flammable panel (with a depth of 57.5 cm) between cooker and
dishwasher. This panel should be coated with aluminium foil on the side facing
the cooker.
74

The original worktops of free-standing machines are around 2 cm depth-ad
justable. This enables the worktop to be adjusted to adjacent applicances or
furniture.
□ To make an adjustmoit, unscrew both screws from the worktop on the machine
back.
n Slide the worktop forwards or backwards as required,
n Re-insert and tighten both screws.
FrM-standIng machines can be Installed under a continuous worktop if
the original worktop of the machine is removed.
Installing free-standing machines under a continuous worktop
□ To do this, unscrew both screws securing the worktop to the machine back.
□ Push the worktop back with a slight jerk and detach.
Important: The plinth of free-standing machines is not adjustable.
To match the dishwasher to the kitchen decor, free-standing machines can be
provided with a decor panel.
Decor panels matching the kitchen decor must be ordered from the kitchen
manufacturers. A decor frame is needed for installation. If your free-standing
machine is not serially fitted with a decor frame, you can order this as a special
accessory from your specialist retailer.
Decor panel dimensions: H 590 x B 581 mm
Clamping thickness: max. 4 mm
1 Decor panel
2 Doorframe
3 Decor frame
To make sure that thin decor panels do not sag or warp, you should fix them to
the machine, door with double-sided adhesive tape.
75

Connection
Water supply
Your dishwasher has been built in accordance with the valid regulations govern
ing water-consuming appliances and is equipped with safety devices which
prevent used water from flowing back into the cjrinking water mains. Your dish
washer c:an be connected to either a cold or hot water supply of max. 60 “C.
Never ccnnecrt your dishwasher to open hot water appliances and continuous
flow heaters! '
The supply hose is fitted with a screwed hose connection (to DIN 259) and can
be connected to an outlet valve (water tap) w'lth male thread f^A").
Suitable washers are supplied with the machine. Do not use any washers other
than these!
The nut of the screwed hose connection can be tightened by hand. If you require
a supply hose which is longer than the one supplied, use only the VDE-approved
complete hose kit (obtainable from our service centre) continuously and to
adequate length.
Never lengthen existing hoses.
Important note! The supply hose must not be kinked, squashed, or twisted.
Please ensure careful running.
To avoid reductions in water supply to the kitchen, we recommend you to install
a separate tap. Failing this, fit a branch piece to the existing water tap.
Additional installation expenditure (on the building side) can be reduced by use
of conventional sink mixers with a connection and shutoff valve.
Minimum water pressure:
1 bar(10N/cm=, tOOkPa).
If your water pressure is under 1 bar, please ask our service centre for advice.
Maximum allowabie water pressure;
10 bar (100 N/cm®, 1 MPa).
For a water pressure over 10 bar, a pressure-reducing valve (obtainable from your
speciaiist retailer) must be fitted upstream.
S
c
76

Water drainage
Drain hose connection:
maximum allowable height: 1 metre;
minimum necessary height of 30 cm over lower edge of machine.
For extension hoses, which may be laid horizontally to max. 3 m length, the
maximum allovyable height of the drain hose connection is 85 cm.
Cmportant notel Thedrain hose must not be kinked, squashed, or twisted. Please
ensure careful running.
Sink trap connection
The hose connection (19 mm dia.) supplied with the dishwasher will fit all
commonly available makes of sink trap.
The unobstructed width of the sink trap connection should not be less than '
15 mm.
The drain hose must be fastened to the sink trap connection with the hose clip
supplied.
Water drainage into a sink
if you want to run the drain hose on a free-standing machine into a sink, you
should use an attachable hose bend. You can obtain this hose bend from your
AEG service centre under spare part number ET 646 069 190. Fit the bend to
the drain hose.
Important notel Make sure that the drain hose does not slip off the edge of the.
sink.
If you draw a string through the hole, you can also mount the bend on a wall £«nd
thus prevent it from slipping off.
Extension hoses
Suitable extension hoses can be ordered from your specialist retailer and original
hoses from our service centre. The inside diameter of these extension hoses must
be 19 mm to prevent any loss of machine function.
77

Water protection system
To protect your dishwasher from water damage, it is equipped with a water pro
tection system,
Apart from an overflow protection, which prevents uncontrolled rising of water in
the appliance, it also features an outlet protection (float switch in the floor tray).
This responds in the event of any untightness in the machine.
In all cases of malfunction, the water supply is immediately interrupted and the
drain pump switched on. This prevents water from either flowing out or over
flowing, Any residual water in the appliance is automatically pumped away. The
pump also operates even if the machine is switched off and should not be dis
connected from the electricity supply.
A fault is recognised by the fact that a pump noise can be heard - even when the
machine is switched off.
□ If a fault occurs, first turn off the water tap. Then pull the plug out of the plug
socket. If there is a fixed connection, switch off or unscrew the fuse(s}.
78

Electrical connection
According to the technical connection conditions of the eiectricity companies, a
fixed connection to the mains suppiy may oniy be made by an approved eiectricai instailer.
Compiy with the VDE specifications when connecting the machine and aiso where
necessary with the additional reguiations of the iocal eiectricity companies. After
instaliation, iive parts and insuiated iines shouid not be accessibie with the test
finger to EN 60335/DIN VDE 0700.
Detaiis of the eiectricai connection are given on the rating piate. This is located
on the RH inside edge of the door, if the machine is convertible, the changeover
diagram directions given on the mains junction box must aiso be observed.
During appiiance connection, it is essentiai to ensure that the nominai voitage and
current type specified on the rating piate are the same as the mains voitage and
current type at the instaliation site. The necessary eiectricai fusing is also indi
cated on the rating plate.
To disconnect the dishwasher from the mains supply, pull out the plug. Should
the appliance have a fixed wiring connection with the mains supply, it must be
disconnected by appropriate measures on the fixed wiring side (fuses, auto
matic cutout, spurious current protection switch, or the like which have a
contact opening width > 3 mm).
79

Connection technology
Water supply, water drainage, and power supply connections must always be
planned from the side of the dishwasher. There is no room for them behind the
machine.
The following illustrations give typical examples of how the sanitary and electri
cal installation can be performed under different circumstances.
These examples can only be recommendations, since the definitive factors are
the Circumstances at the instailation site, existing connections, and any iocai
connection specifications or regulations of the power supply or water compa
nies.
A
Water drainage
B
Watersuppiy
Shutoff valve (UP)
c
Cl
Two-way valve
Electrical supply line
D
Electrical connection
E
45° or straight union of 19 mm o.d. and 30 mm length
F
2 45° or straight unions of 19 mm o.d.'and 30 mm length
Fi
Shutoff valve, e.g. integrated in fitting .
G
80
Fig. 25
AT 1(1)

Fig. 26
AT 2(1)
81
 Loading...