

Page 1

Page 2
Page 3
Chapter 5
Chapter 6
Chapter 7
Chapter 8
Contents
Preparations for operation
1. Confirmation inside granulator ----------------------------------------19
2. Confirmation of each unit condition ----------------------------------20
Operation ---------------------------------------------------------------------- 21
Maintenance and Check
1. Daily maintenance and check -----------------------------------------23
2. Every three months maintenance and check ---------------------25
3. Every six months maintenance and check ------------------------26
4. Exchange of grease -----------------------------------------------------26
5. Exchange point of the granulator cutters ----------------------------27
Troubleshooting ---------------------------------------------------------31
Chapter 9
Parts list
1. Equipment parts list ----------------------------------------------------- 34
2. Electric parts list --------------------------------------------------------- 35
Chapter 10 Specifications ---------------------------------------------------------------- 36
The attached drawing
[WO-3531;ET 2]
- Ⅱ -
Page 4
Page 5

Introduction
6. Improper or wrong maintenance, service, or handling; and
7. Your own transportation, repositioning, or reinstallation of our
products.
2)-C. Following is excluded from the warranty.
1. Any insufficient convey capacity, convey defect, weighing failure
resulting from property degeneration of the raw material.
2. Any clogging in pipe, convey defect, weighing failure resulting
from caking or cohesion of the raw material.
3. Lifetime of abrasion material such as hose or pipe is not
guaranteed.
4. Crystallization degree or moisture ratio (except for moisture ratio
for the resin tested and pre-confirmed and mutually recognized is
guaranteed.) is not guaranteed.
5. Failure/defect resulting from deformation and cohesion of resin.
6. Failure/defect resulting from any volatile additive yielded from
resin.
7. Failure/defect resulting from any condition that is not stated in
the
quotation.
3) Maintenance
Following inspection and maintenance must be performed in user’s
responsibility and expense.
This warranty does not cover any product faulty due to omitting the
specified maintenance.
3)-A. Inspection for operation.
3)-B. Periodical inspection designated in the instruction manual or in the
catalogue.
3)-C. Periodical replacement of parts designated in the instruction
manual or in the catalogue.
3)-D. Replace consumable parts when expire.
3)-E. Inspect, supplement, replace, clean following items.
○ Oil, filter, sealing material, grease, bearing
○ Ventilation duct, Freon gas
○ Oil filter of air apparatus
○ Sedimentary deposits
○ Other related items
3)-F. Adjust following items
○ V belt
○ Chain
○ Temperature control apparatus
○ Valve for water supply or drain, etc.
○ Pneumatic apparatus for pressurized air
○ Over heating protection equipment, etc.
[WO-3531;ET 4]
- Ⅳ -
Page 6
Chapter 1 For safe use
This chapter describes precautions for operation, maintenance
inspection and repair, identification of headings of precautions and
labels affixed to the product for using this product correctly and safely.
WARNING
When performing operation and maintenance inspection of this product,
be sure to follow the safety precautions described in this manual.
We shall assume no liability for any injury or accident caused by failing
to follow these precautions.
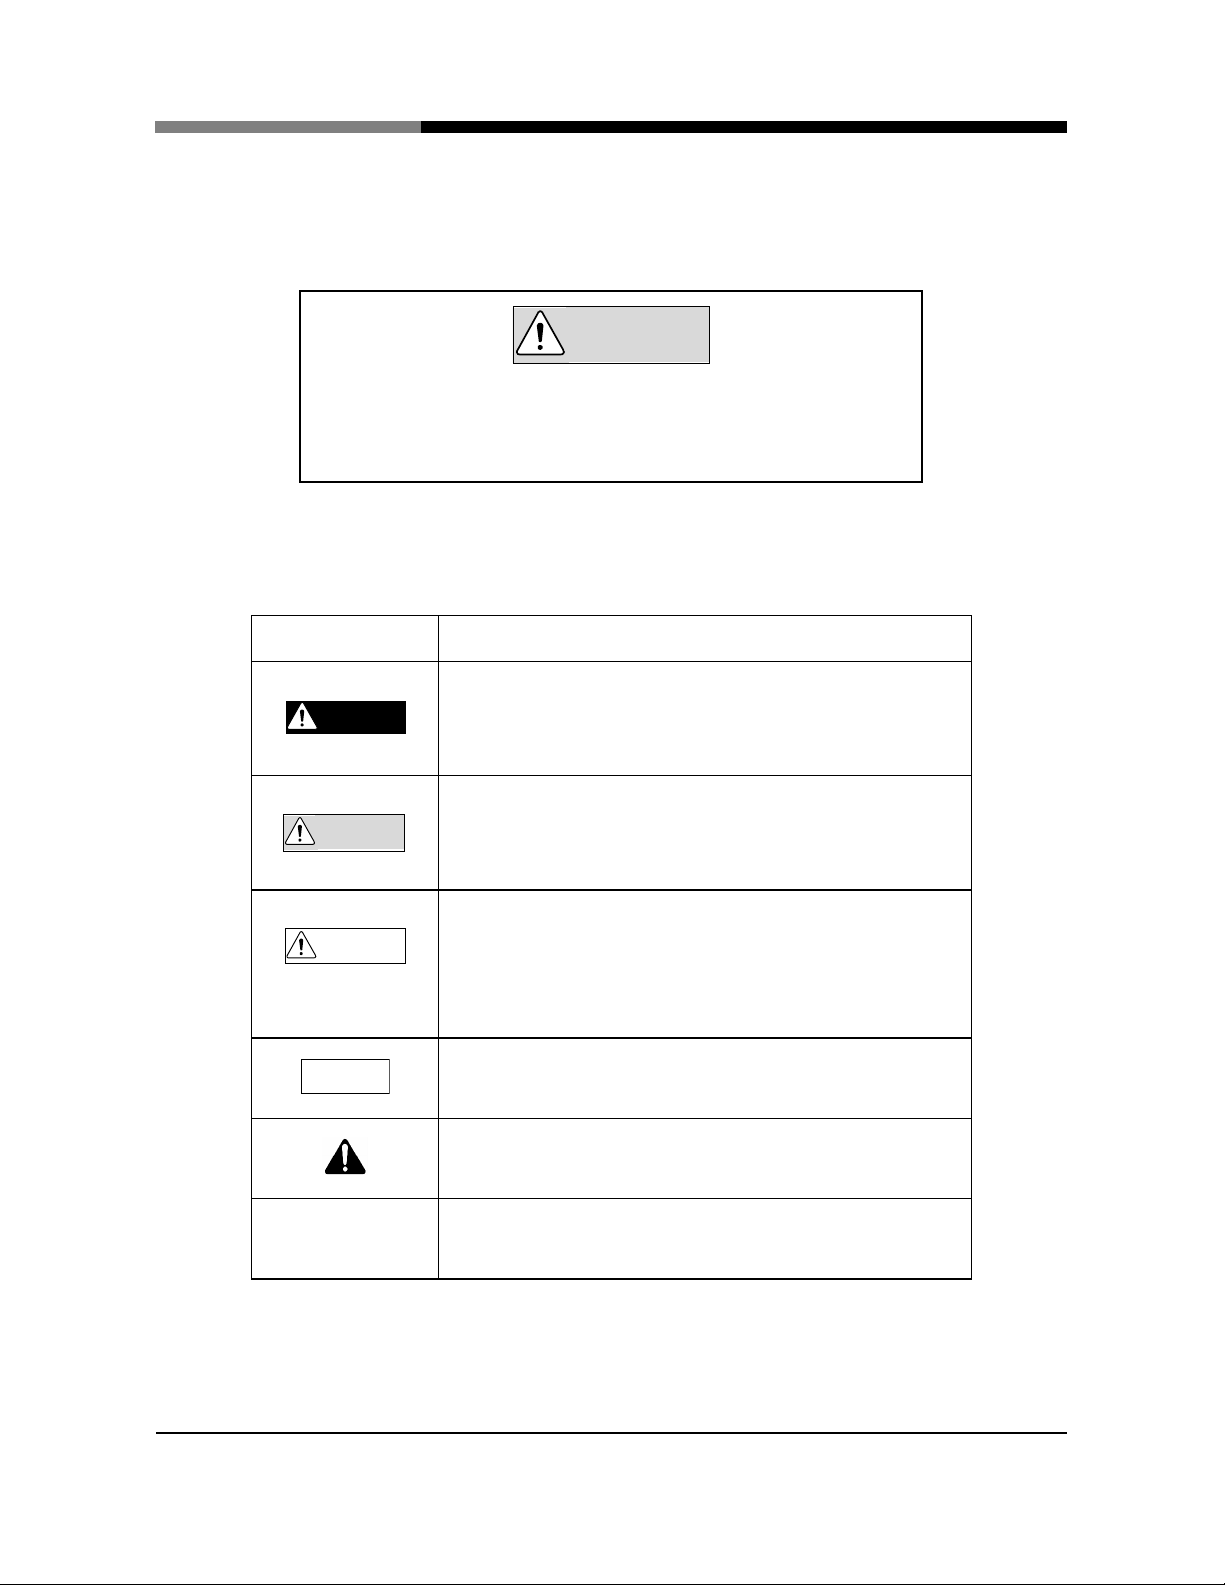
1. Precaution headings and their meanings
In this manual, indications are classified according to the degree of
danger as follows:
Heading Meaning
DANGER
WARNING
CAUTION
NOTE
※
This heading is used for cases where there is a possibility that
mishandling will lead to the user's death, and precautions to avoid
any such occurrence are described below the heading.
This heading is used for cases where there is a possibility that
mishandling will lead to the user serious injury, and precautions
to avoid any such occurrence are described below the heading.
This heading is used for cases where there is a possibility that
mishandling will lead to the user slight injury or damage to the
product, and precautions to avoid any such occurrence are
described below the heading.
Operating procedures and explanations requiring special attention
and emphasized information are described below this heading.
This mark is used for handling procedures requiring special
attention.
This mark is used for exceptional conditions and notes in figures
and tables.
[WO-3531;ET 1]
- 1 -
Page 7

WARNIN
G
2. Keeping items for safety operation
This is a general attention items to use this product safety.
1) Electric power
Do not check or exchange without our service division or the employee
in your company who has a good knowledge about the electricity,
because the operation includes the failure or the danger.
2) Never use in the gas
Never use this product in the combustible, explosive gas or vapor.
It is dangerous very much.
3) Prohibition of reconstruction
Never perform the reconstruction or modification without our
recognition. We do not responsible for the trouble by the
reconstruction.
Chapter 1 For safe use
4) Maintenance check and parts exchange
Before Checking and exchange, make sure to stop operation and put
“OFF“ the primary power supply.
5) Maintenance
Do not check or exchanges except the employee who has a good
knowledge about the product, because the operation includes the
failure or the danger. Please contact to the nearest our service division
(refer to the back cover), when you need the maintenance or repair.
- 2 -
[WO-3531;ET 2]
Page 8

1) Power sypply
2) Routine check
1) Wiping
Chapter 1 For safe use
CAUTION
Please use under the exact power supply voltage and frequency
according to the specifications, and establish a ground certainly.
The equipment system and parts have life expectancy.
Check the system and parts especially that the material contact at
regular year intervals, if the parts are needed to replace, request to our
service division.
NOTE
Do not use petroleum solvent. Wiping with the benzene, thinner,
polishing powder will seam the surface. If the labels become dirty, wipe
with the soft cloth that was soaked in water or hot water under 40℃ and
wring well.
[WO-3531;ET 3]
- 3 -
Page 9
it is
Support the feed hopper firmly, and open it
slowly when you open the openning cutting
When moving guranulator, watch for crevices,
stairs, or grades on the floor to prevent
3. About labels
Maintenance of the labels
●Keep the labels legible until you dispose of this unit.
●If the labels become dirty, wipe with the soft cloth that was soaked in water or hot water
under 40℃ and wring well. Do not use petroleum solvent and thinner in any case.
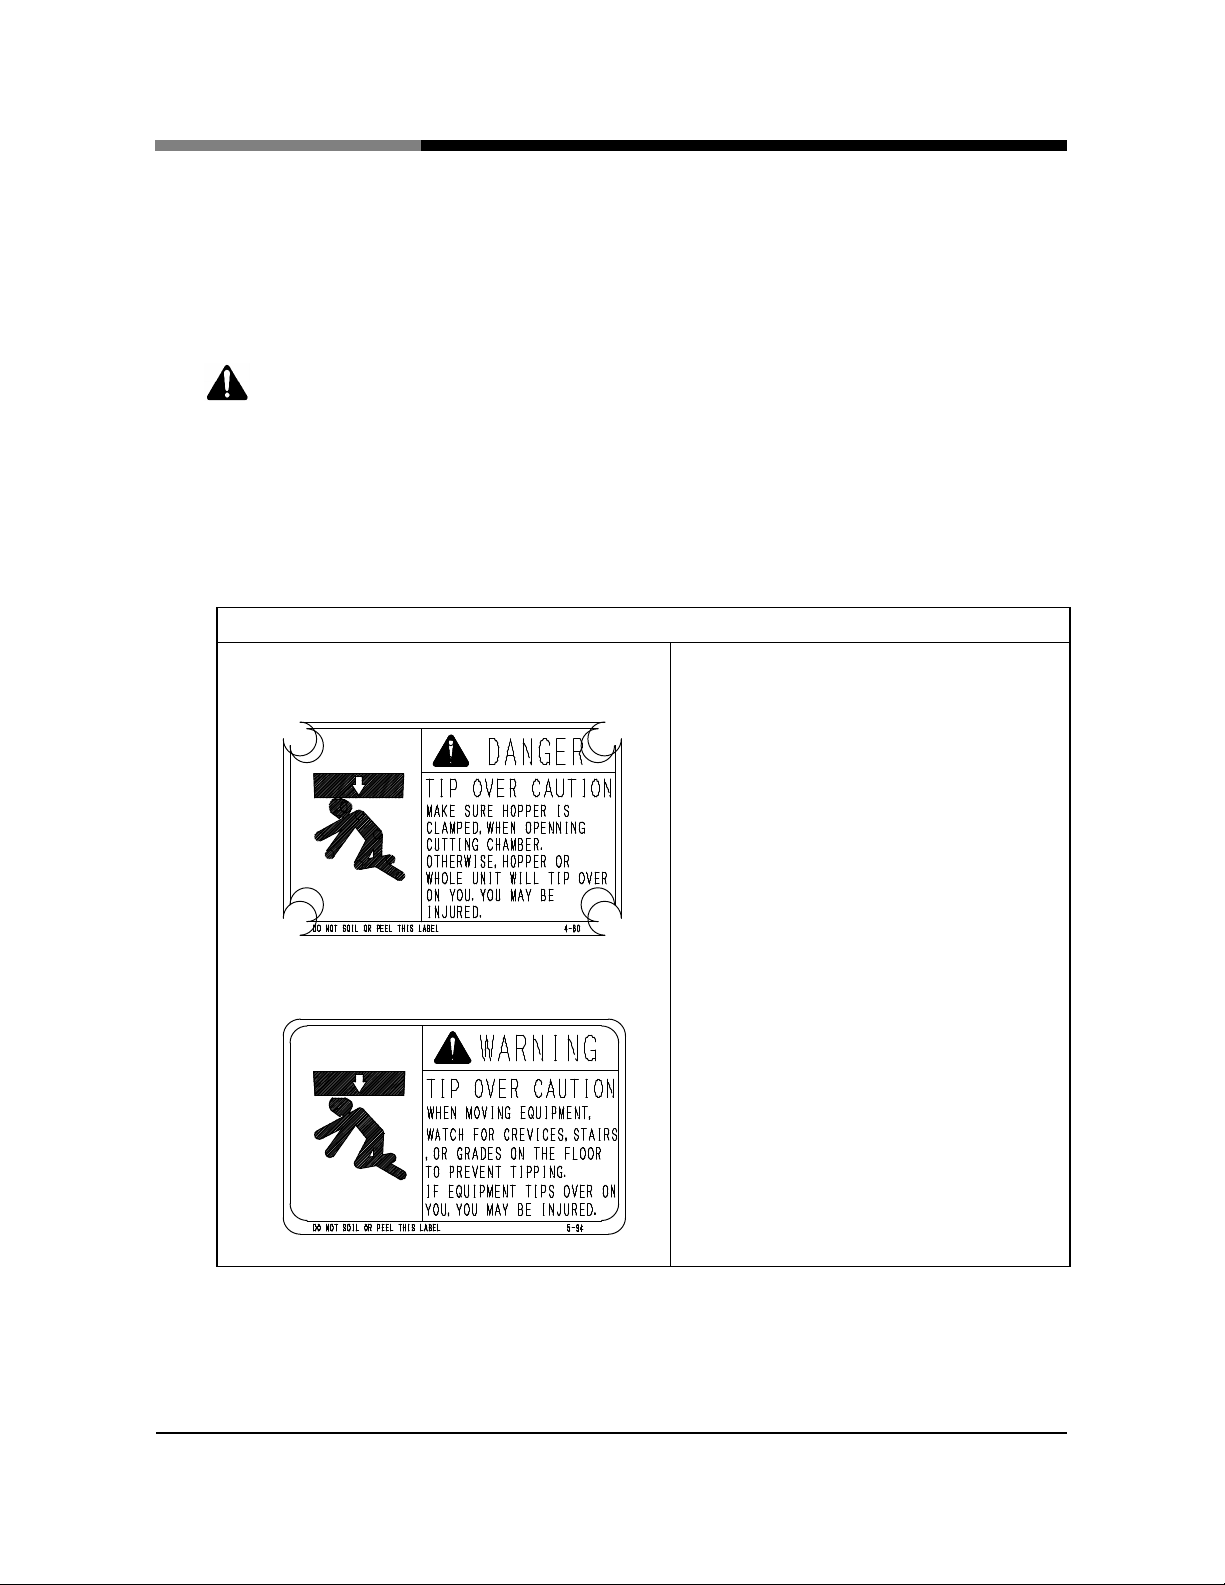
3-1. Contents of the labels
1. Caution of openning the cutting chamber of
guranulator.
Chapter 1 For safe use
Labels are attached to this product at position where particular
attention is required by degree of danger. Before starting the operation
be sure to fully understand the instructions with the WARNINGs and
CAUTIONs.
Caution of tip over
Don't tip over granulator for heavy weight.
Damage such as a fracture is suffered when
caught under the equipment.
◇
chamber of guranulator.
◇
tipping. Then, be fully careful.
2. Coution of the transfer and movement.
[WO-3531;ET 4]
- 4 -
Page 10
at high
d hopper
and the lower part of granulator during the
The rotating cutters are made sharply. Don't
Don't peep into the inside of feed hopper during
is
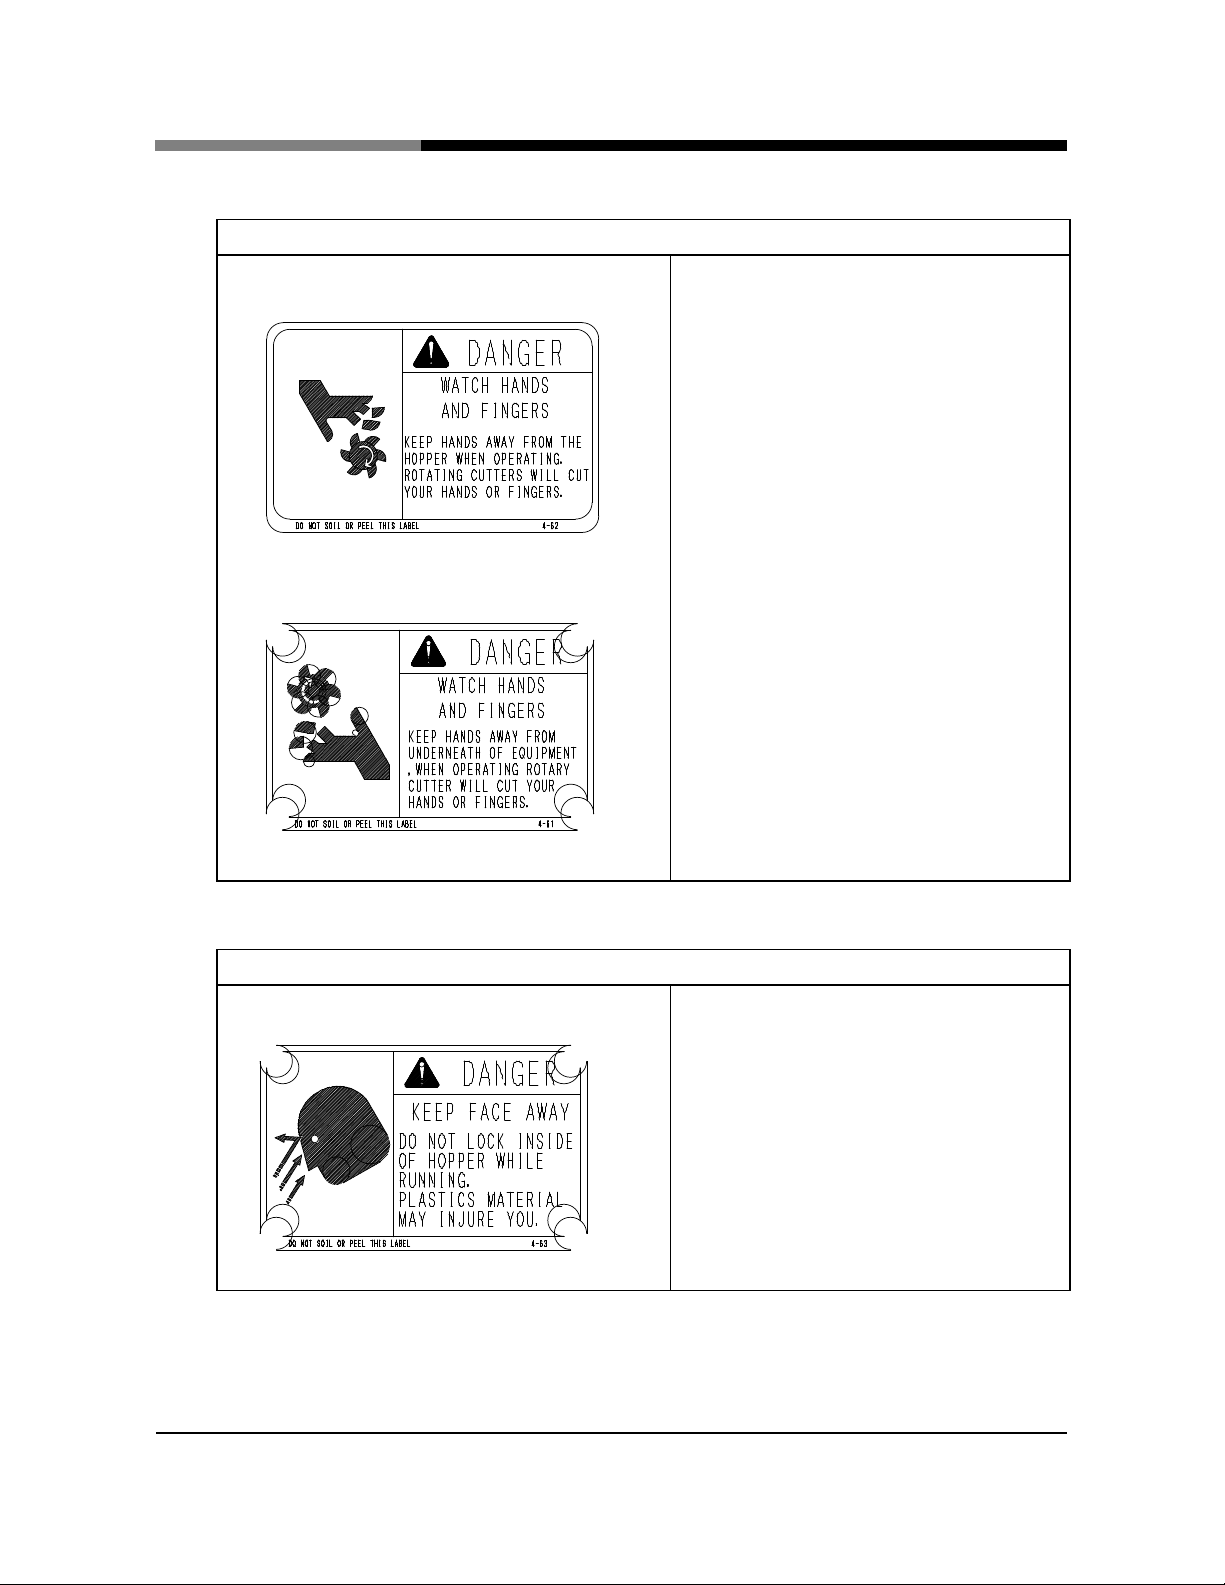
1. Caution of the part of feed hopper during operation
2. Caution of the lower part of granulator during the
operation.
Chapter 1 For safe use
Caution of hands and fingers cutting
The rotating cutters of guranulator rotate
speed.
Don't insert a hand to the inside of fee
operation.
touch it during the stop as well.
Caution of keep face away
- 5 -
the operation.
Plastic material scatters, and has danger that
hit to the face.
[WO-3531;ET 5]
Page 11
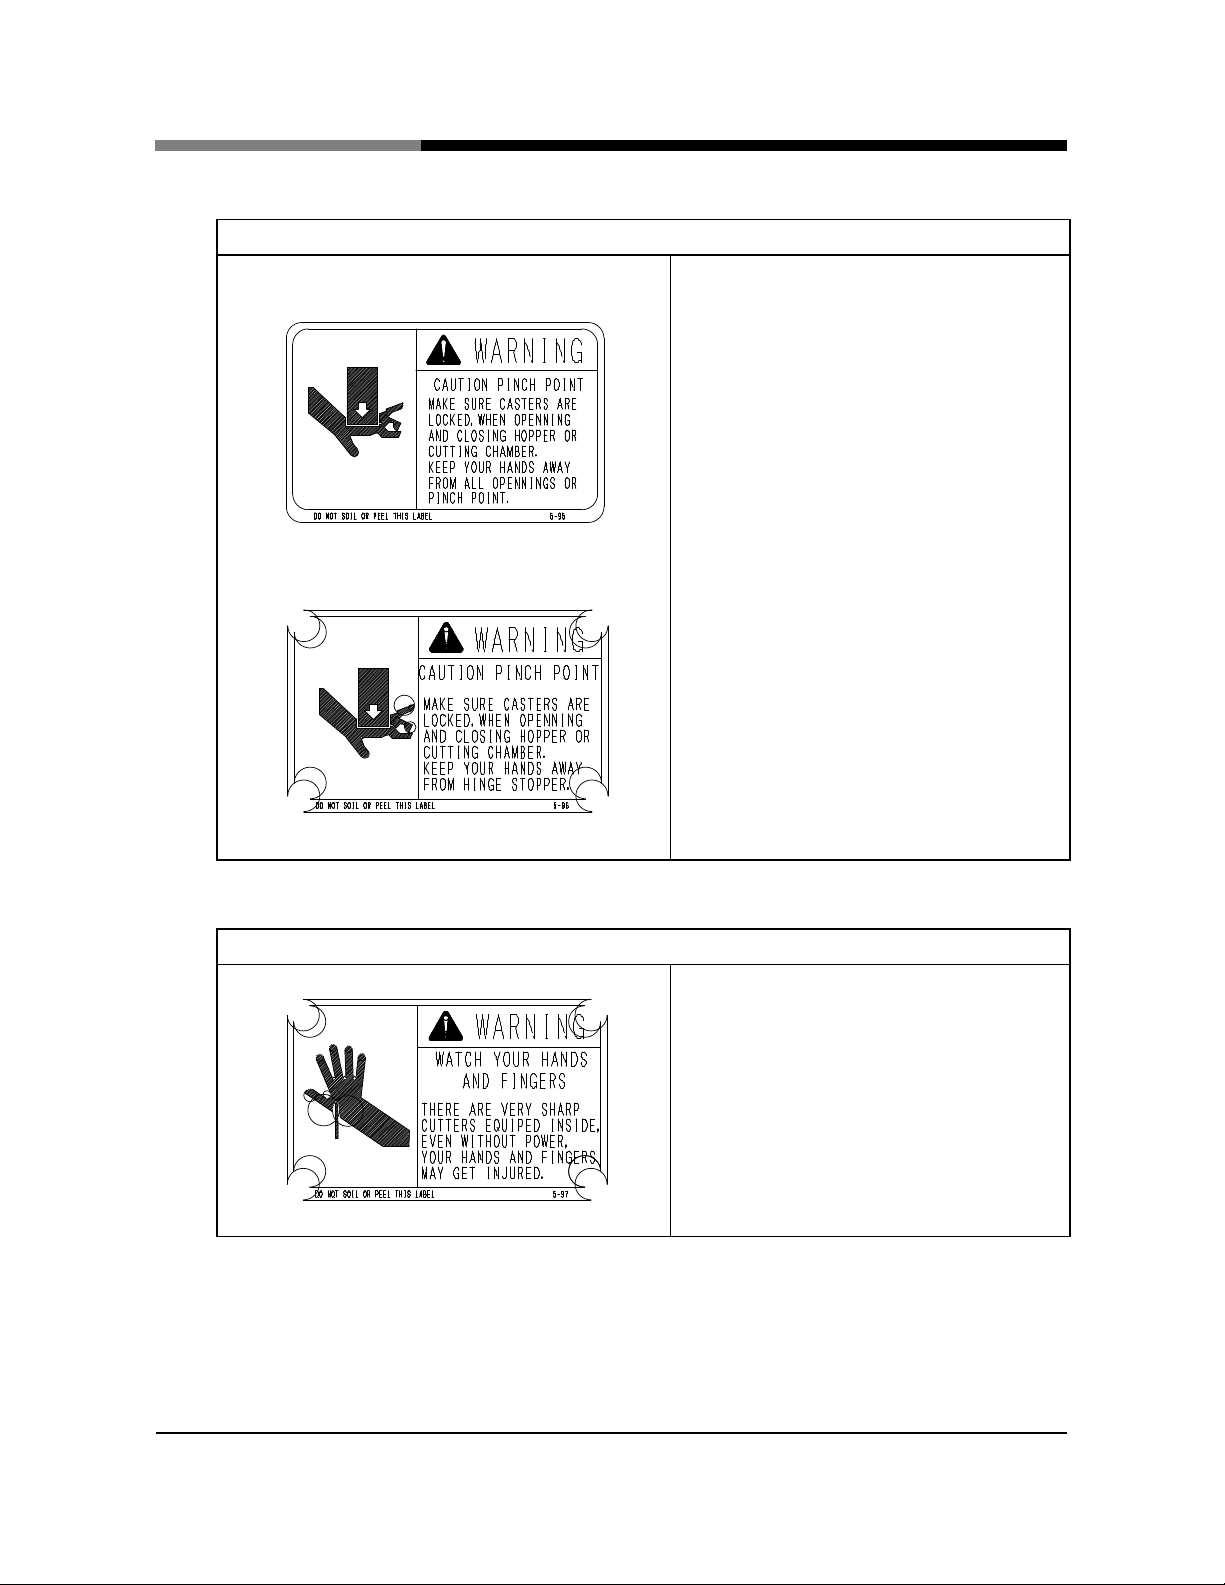
1. Caution of closing the feed hopper and cutting
2) for the
movement when feed hopper, cutting chamber
Lift feed hopper slowly, and don't insert a hand,
a finger into pinch point imprudently when you
Don't insert a hand into stopper of the hinge of
When hand and fingers are inserted into pinch
point, you suffer the damage of lacerations and
equiped
without power, your hands and
Caution which hands and fingers are pinch
chember
2. Caution of opening the feed hopper and cutting
chember
Chapter 1 For safe use
Be sure to lock wheels (caster ×
opens and closes.
close it.
feed hopper and granulator when you open it.
fracture.
Caut ion of hands and fingers may get injured
- 6 -
Don't touch the cutter carelessly.
There are very sharp rotating cutter
inside, even
fingers may get injured.
[WO-3531;ET 6]
Page 12
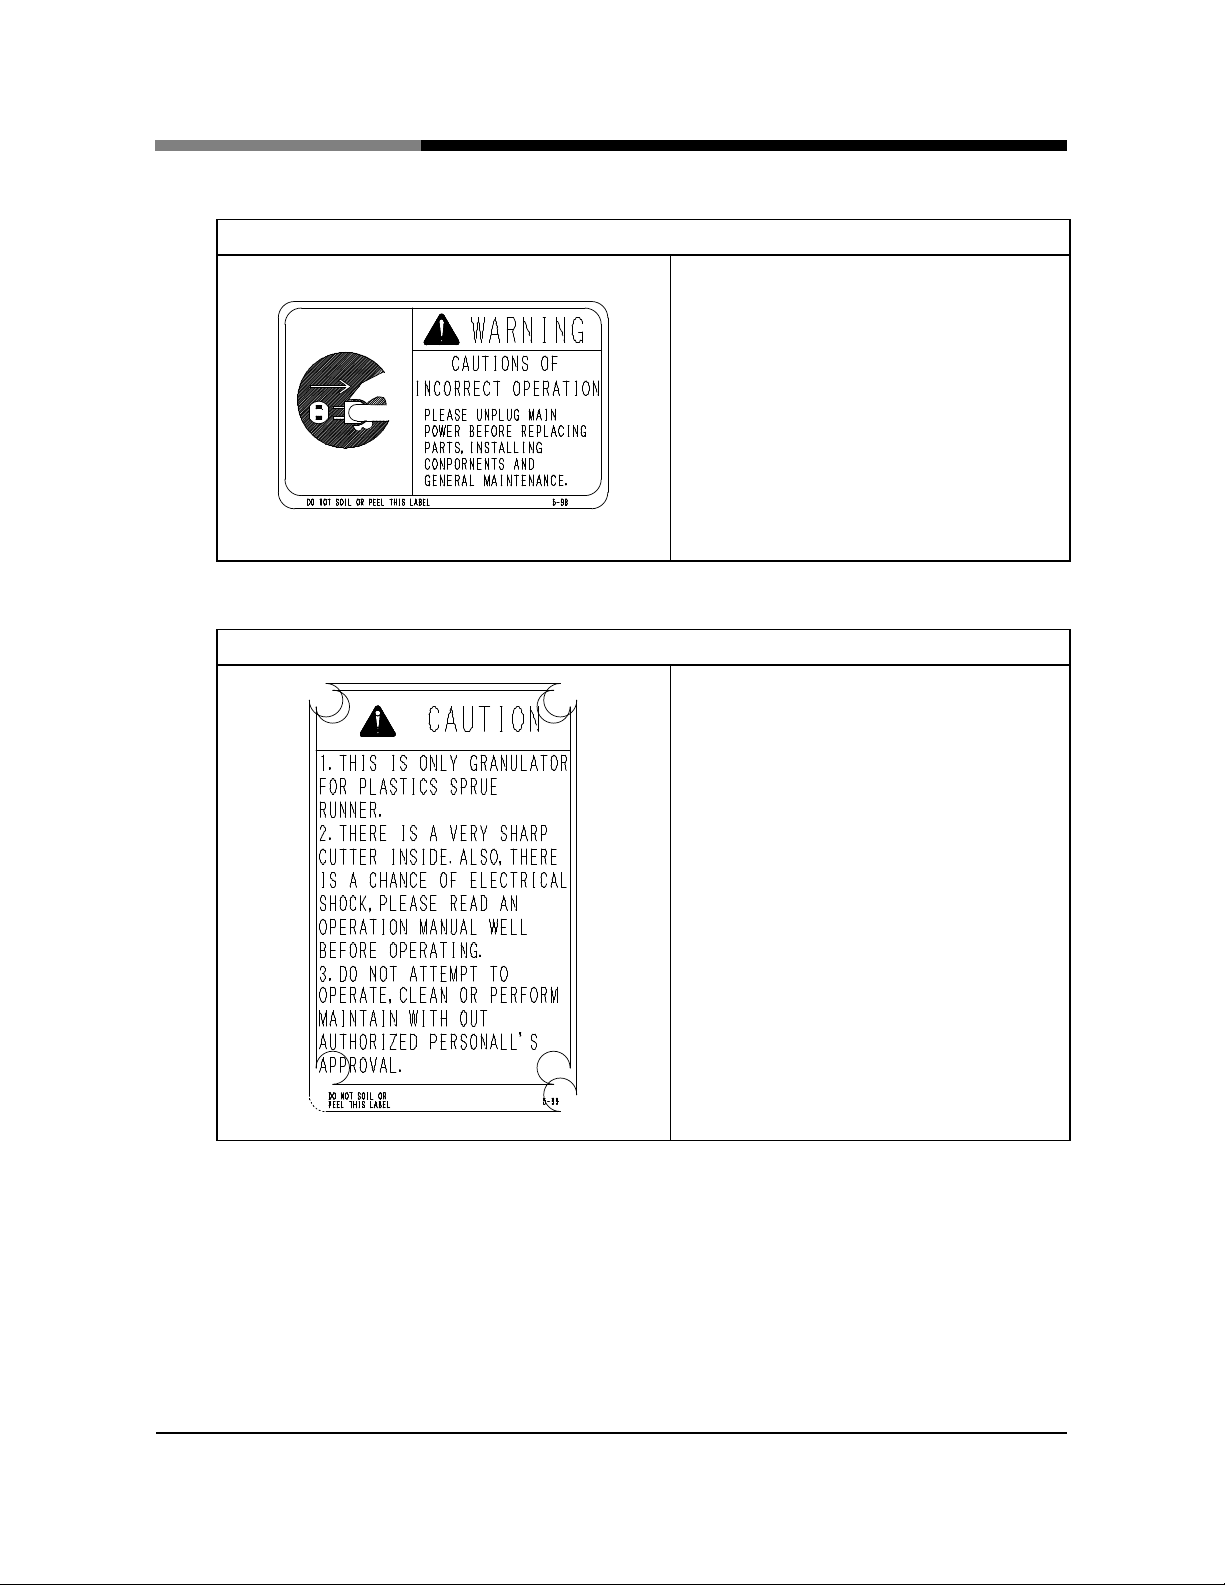
Before maintenance checking and exchange,
the
Don't granulate material except for plastics
Don't touch carelessness because sharp
Be sure to put off primary power supply
t use it except for the authorized
Chapter 1 For safe use
Cauti ons of incorrect operation
make sure to stop operation and put “OFF“
primary power supply.
Cautions for use
◇
sprue and runner.
◇
rotating cutters is being used.
◇
because it has the danger of electrical shock.
◇ Don'
personall's approval.
[WO-3531;ET 7]
- 7 -
Page 13

Before operation, confirm that the earth is
Be fully careful of what the tip over of the
equipment and pinch of the hand and the
close feed
Be sure to do two locks of caster except that you
Cautions to the authorized personall's approval
Chapter 1 For safe use
Cautions of electrical shock.
◇Don't open control box except for the check.
◇
provided perfectly.
◇There are ANTI-RUST AGENTS (AGR)
installed. Please wipe with a day cloth before
using.
◇Insert a single runner only.
◇
finger do when you open and
hopper and cutting chamber.
[WO-3531;ET 8]
Cation of casters locked
move granulator.
- 8 -
Page 14

Chapter 2 Precautions for use
This chapter explains precautions specific to the product.
To orevent the occurrence of danger, precautions are described with
headings (Refer to Chapter 1, section 1) from the most important items.
1. Precautions for the operator
Heading Item Precautions
WARNING
WARNING
About the use material
Operator and wear in
the operation
This equipment is only granulator for plastic sprue and runner.
Causes an accident occurrence, trouble and damaging because it
doesn't fit for other materials (Product granulation, wood chip,
iron, nonferrous metals, etc.).
Be careful because it can't be warranty about trouble that other
material was used for.
Don't do overhaul, wiping and operating except for the
authorized personall's approval.
Don't wear the clothes, which is often entangled in the
equipment.
Then, wear gloves so that you may avoid damage.
2. Precaution of movement and installation
Heading Item Precautions
Transfer, Movement Don't tip over granulator for heavy weight.
WARNING
Earth Before operation, confirm that the earth is provided perfectly.
WARNING
Damage such as a fracture is suffered when it is caught under
the equipment.
When moving guranulator, watch for crevices, stairs, or grades
on the floor to prevent tipping. Then, be fully careful.
Without it, there are fears that electric shocks take place.
- 9 -
[WO-3531;ET 9]
Page 15

3. Precautions of preparations for operation
Heading Item Precautions
WARNING
CAUTION
CAUTION
ANTI-RUST AGENTS
(AGR)
Caster Be sure to do two locks of caster except that you move
Reusing crushed
material
Only in delivery, after glove wears, wipes up AGR (Oil) that is
applied inside the unit by drying cloth after confirming the
blocking-off of your primary power.
※Be sure to wears a glove so as not to cut a hand with cutter.
granulator.
When using the crushed material after delivery in first, there is
possibility that the foreign material of AGR (oil) and the fine
particle, etc. is mixing.
As for the crushed material in initial and in set changes, surely,
reuses after check if AGR (oil) and the foreign material are
mixing in the crushed material.
Chapter 2 Precautions for use
4. Precations for operating
Heading Item Precautions
Don't insert a hand to the inside of feed hopper and the
lower part of granulator during the operation.
The rotating cutters are made sharply. Don't touch it during the
stop as well.
Don't peep into the inside of feed hopper during the operation.
Plastic material scatters, and has danger that is hit to the face.
Insert a single runner only.
It causes cutter damaging and trouble when many runners are
inserted.
It has the danger of electric shock, and causes trouble and
accident.
Then, don't add a strong shock, and don't shower water.
These acts become the cause of trouble and fire.
DANGER
DANGER
WARNING
WARNING
Feed hopper
lower part of granulator
Feed hopper
Feed runner
Control box Don't open control box except for the necessity.
- 10 -
[WO-3531;ET 10]
Page 16

Chapter 2 Precautions for use
5. Precautions for maintenance check and parts exchange
Heading Item Precautions
DANGER
WARNING
WARNING
WARNING
Cutting chamber of
guranulator
Feed hopper, cutting
chamber opens and
closes
Put off the power
supply.
Rotating cutter Don't touch the cutter carelessly.
Support the feed hopper firmly, and open it slowly when you
open the open cutting chamber of guranulator.
Don't tip over granulator for heavy weight.
Damage such as a fracture is suffered when it is caught under
the equipment.
Be sure to lock wheels (caster×2) for the movement when feed
hopper, cutting chamber opens and closes.
Do not open the feed hopper and the cutting chamber of
granulator at same time.
In opened condition, don't touch a hand and lean on the feed
hopper.
Lift feed hopper slowly, and don't insert a hand, a finger into
pinch point imprudently when you close it.
Don't insert a hand into stopper of the hinge of feed hopper and
granulator when you open it.
When hand and fingers are inserted into pinch point, you suffer
the damage of lacerations and fracture.
Before maintenance checking and exchange, make sure to stop
operation and put “OFF“the primary power supply.
Then, avoid danger by incorrect operation.
There are very sharp rotating cutter equiped inside, even without
power, your hands and fingers may get injured.
- 11 -
[WO-3531;ET 11]
Page 17

Page 18

Page 19

Page 20

Page 21

Chapter 4 Installation
Damage such as a fracture is suffered when it is caught under the
This chapter describes the method of installing the product step by
step.
Step
Installation of the
1
equipment
Cas t ers l oc ked
2
Preparation for the
3
primary power supply
Item Description
Install the equipment on a stable level floor.
Secure an installation place for maintenance to be made in consideration of the
space where feed hopper can be opened.
DANGER
Don't tip over granulator for heavy weight.
equipment.
When moving equipment, watch for crevices, stairs, or grades on the
floor to prevent tipping, then, be fully careful.
And, do the disposal of set up an iron plate when there are ditch and
hole in the movement passage.
Be sure to do two locks of caster as shown in Fig.4-1.
Figure 4-1
CAUTION
Be sure to do two locks of caster except that you move equipment.
Confirm a use standard voltage to indicate in nameplate of the equipment.
Then, prepare an outlet for the standard voltage or power supply box.
- 16 -
[WO-3531;ET 16]
Page 22

Connect the power cord of equipment with the primary power supply after you
confirm whether the switch of control box changes on the "STOP
Step 4 working is dangerous. Therefore, perform to work with full-time
person.
Step
Confirmation of the
4
Item Description
Remove feed hopper clamp, and open feed hopper.
rotating cutter condition
Confirm whether there is looseness in each fixed bolts of fixed cutter and guide
plate.
Remove axis cover on the reverse side of the motor.
Then, take the part of the width of 2 area of keeper plate with spanner or
monkey wrench, and confirm whether a shaft rotates smoothly.
Adjust the installation position of fixed cutter and guide plate when rotation
isn't smooth. (Refer to Chapter 7. Maintenance and check
point of the granulating cutters)
◎It is pushed down slowly with keep feed hopper from the down side
when feed hopper is opened.
Don't insert a hand and a finger into stopper.
When feed hopper is closed, it is lifted slowly.
At that time, be careful to insert a hand and a finger into pinch point.
When a hand and a finger are inserted into pinch point, it has the
danger of lacerations and fracture.
Chapter 4 Installation
DANGER
, 7-5 Exchange
WARNING
Connection of the
5
power supply
◎Don't touch granulating cutter imprudently. Sharp granulating cutter
has the danger that a hand and a finger have lacerations.
Put off the primary power supply.
position"("0"indicated) side.
◇When the primary power supply is an outlet ;
Insert the power supply plug of equipment in the outlet.
Continue to the next page.
- 17 -
[WO-3531;ET 17]
Page 23

to the direction of
hase
condition when it look into the hole of shaft cover of the motor and shaft
change 2
phase (R phase, T phase) on the secondary side of control box or power supply
, confirm whether the direction of
Step
Connection of the
5
Item Description
power supply
Check of positive
6
phase or negative
phase
Chapter 4 Installation
◇When electric supply panel is a switchboard, ;
Connect the power supply cord of equipment with electric supply panel.
R phase … Red
Power supply cord … S phase … White … Primary power supply
T phase … Black
E phase … Green …… For earth
CAUTION
◎Be sure to change switch of control box on the "STOP
position"("0"indicated) side before you connect power supply cord.
◎Fasten it securely so that looseness may not be shown in the
connection part.
When connction part has looseness, it becomes an abnormal cause
such as the operation of single phase.
◎Be sure to connect the earth
Put “ON” the primary power supply.
Turn the emergency stop push button on operation box
arrow. Then, reset the emergency stop.
Press the operation push button on operation box and starts granulator.
.
[WO-3531;ET 18]
The connection of power supply is completion because it is positive p
rotates in clockwise direction.
It is negative phase when shaft turns in the reverse direction of clockwise.
Primary power supply is put "OFF "in such a case. Then, connect and
panel.
Again, put "ON" primary power supply. Then
the rotation is positive phase.
- 18 -
Page 24

Chapter 5 Preparations for operation
This chapter describes preparatpry operations necessary for starting
the equipment.
WARNING
When confirmation work is started, primary power supply is surely put
off first, and you must avoid danger by incorrect operation.
1. Confirmation inside granulator
Step
Lock confirmation of
1
caster
Open feed hopper
2
Confirmation inside
3
granulator
Close feed hopper
4
Item Description
Confirm whether caster with lock×2 of the installation base is locked
securely.
CAUTION
Be sure to do two locks of caster except that you move granulator.
Remove feed hopper clamp, and open feed hopper.
WARNING
It is pushed down slowly with keep feed hopper from the down side
when feed hopper is opened.
Don't insert a hand and a finger into stopper.
When a hand and a finger are inserted into pinch point, it has the
danger of lacerations and fracture.
◇Confirm whether there is a mixing of the different material inside the
equipment.
◇Confirm whether there is looseness in each fixed bolts of fixed cutter and
guide plate.
Strangle a clamp securely, and fix it after you close feed hopper.
WARNING
When feed hopper is closed, it is lifted slowly.
At that time, be careful to insert a hand and a finger into pinch point.
When a hand and a finger are inserted into pinch point, it has the
danger of lacerations and fracture.
- 19 -
[WO-3531;ET 19]
Page 25
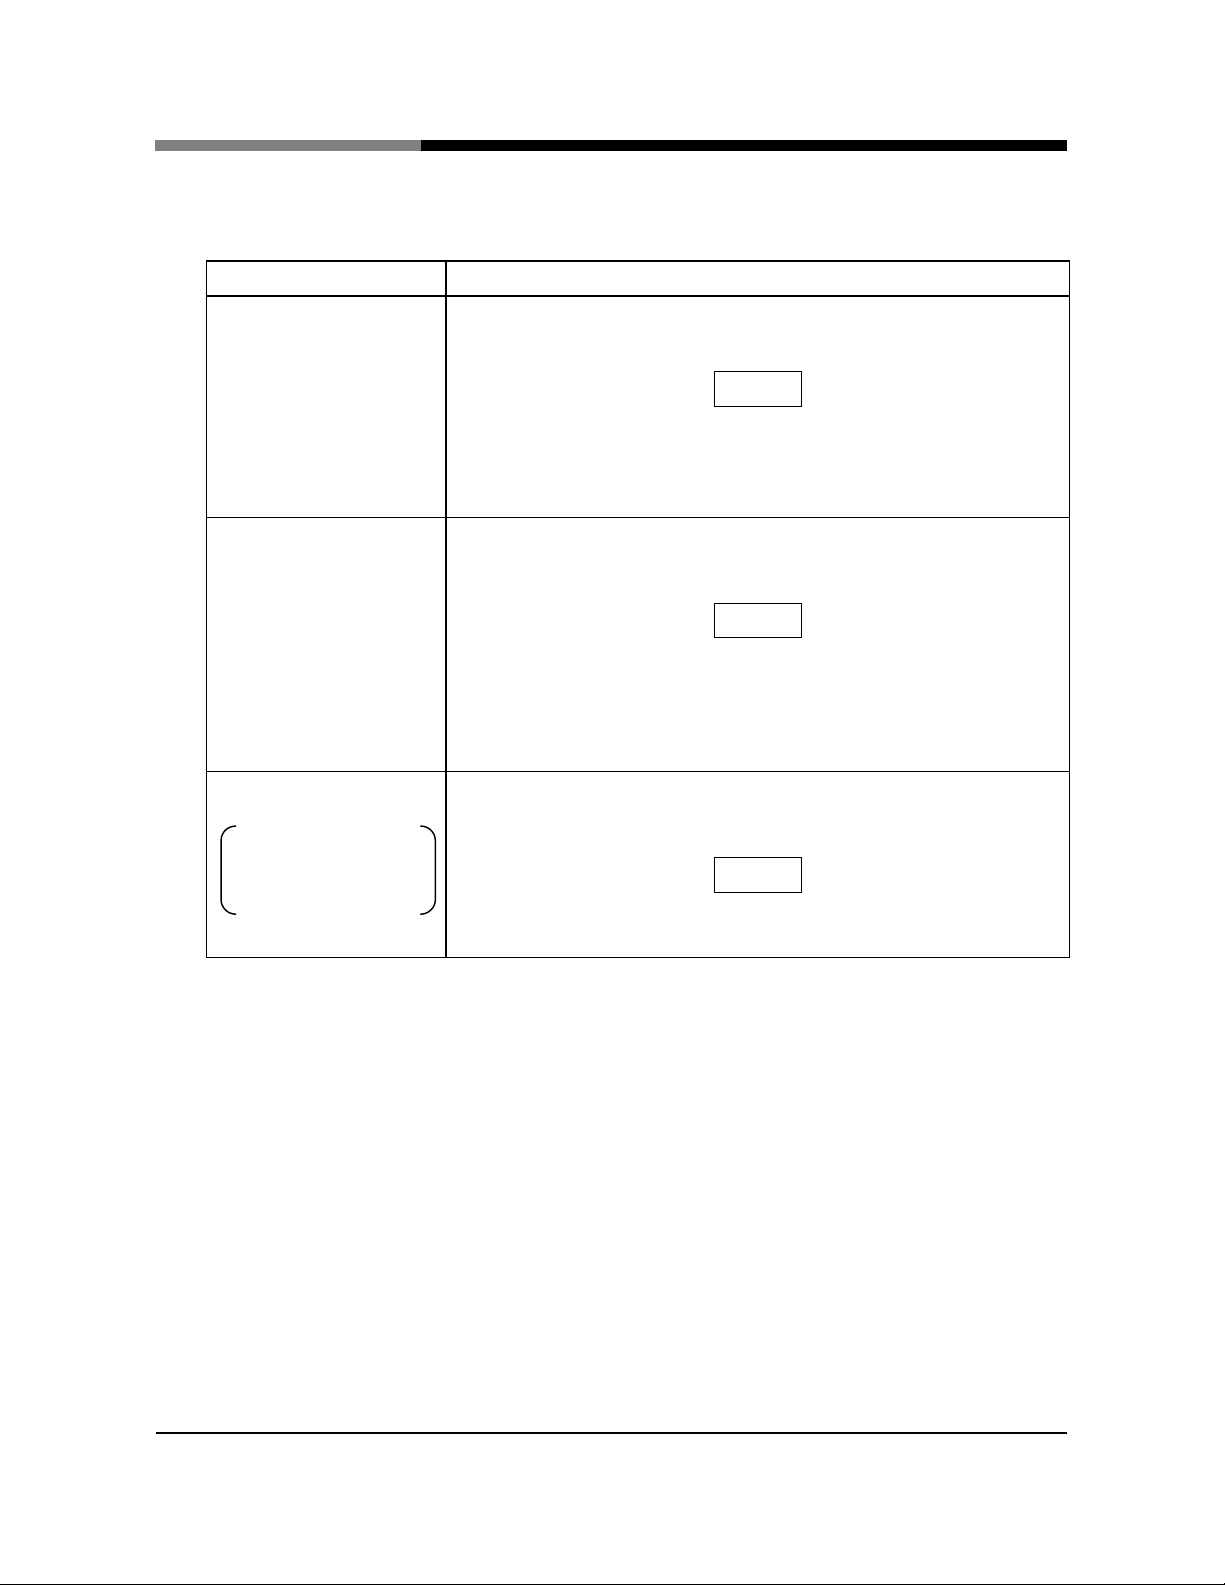
2. Confirmation of each unit condition
Confirmation unit Contents of confirmation
Feed hopper
Cutting chamber of the
granulator
Suction box (KKB)
or suction box (SKB)
or
receive box
Confirm whether feed hopper is closed securely.
(Confirm the fastening condition of the feed hopper clamp)
When feed hopper is open and when it isn't securely close.
The granulator can't start when either of two limit switch for the
closing confirmation is off.
Confirm whether cutting chamber of the granulator is closed securely.
(Confirm the fastening condition of the cutting chamber clamp)
When cutting chamber of the granulator is open and when it isn't
securely close.
The granulator can't start when either of two limit switch for the
closing confirmation is off.
Confirm whether suction box (KKB)(or suction box (SKB) or receive box)
is being installed in discharge port of granulator lower part.
Confirm whether the hinge bolt for the fixation is fastened.
Chapter 5 Preparations for operation
NOTE
NOTE
NOTE
[WO-3531;ET 20]
- 20 -
Page 26

Chapter 6 Operation
Turn the emergency stop push button on operation box to the
ion
Don't insert a hand and fingers to the inside of feed
hopper and the lower part of granulator during the
ated with the
Don't peep into the inside of feed hopper during the
is hit to the
When the cutting chamber of granulator or the feed
, a equipment doesn't
clamp of
, the equipment
doesn't start when it is in a limit switch for the close
a
tion
This chapter explains about operation of equipment and stop operation
in order.
NOTE
Before operation starts, do the mentioned work of Chapter 5.
Preparations for operation.
Step
1
Operation
Operation Contents of operation
direction of arrow. Then, reset the emergency stop.
Press the operation push button on operation box.
The granulator starts at the same time when the operat
indication (Green indicated) of the operation box is turn on.
◎
operation.
A hand and a finger are likely to be amput
sharp rotation cutter.
◎
operation.
Plastic material scatters, and has danger that
face.
Insert a single runner only.
It causes a trouble when many runners are inserted.
DANGER
CAUTION
[WO-3531;ET 21]
NOTE
◎
hopper isn't completely close. And
start when a limit switch for the close confirmation off.
◎ When fastening of the cutting chamber
granulator or feed hopper are loose. And
confirmation closing.
Then, the equipment stops as soon as possible when
limit switch for the close confirmation off by the vibra
in the start.
- 21 -
Page 27

The granulator stops at the same time when the operation
When pushing the emergency stop push button (In case of
cy stop), even if it pushes the operation push button, the
The equipment is stopping, don't insert a hand and a finger
into the feed hopper and the lower part of granulator
are likely to have lacerations with the
Step
2
Stop operation
Operation Contents of operation
Chapter 6 Operation
Press the emergency stop push button on operation box.
indication (Green indicated) of the operation box is put off.
※
emergen
unit doesn't start up. (Impossible to operate)
WARNING
imprudently.
A hand and a finger
sharp cutter.
[WO-3531;ET 22]
- 22 -
Page 28

Chapter 7 Maintenance and check
d the cause of the
If abnormal vibration is identified, stop operation immediately and fine the
temperature,stop operation immediately and find
Measure the load current value under the operation, and make sure that it is in
Exchange the new splash prevent curtain when you injure the deterioration
This chapter describes maintenance and check items and how to
perform it to maintain the unit in good condition per frequency.
WARNING
Performs to check with a full-time person of this unit.
1. Daily maintenance and check
Inspection items Contents of work
Geared motor
Check the noise (particularly metallic noise) occurring when operatong.
※If noise is identified, stop operation immediately and fin
nise.
CAUTION
Do not operate granulator when noise is identified.
Check the abnormal vibration ocuurring when operating.
※
cause of the vibration.
CAUTION
Do not operate granulator when vibration is identified.
Check the unit body and motor have abnormal hightemperature.
※If they get abnormally high-
the cause of the high heat
CAUTION
Do not operate granulator when they have high heat.
the rated value range.
The rated value is noted on the nameplate of the motor.
Splash prevent curtain inside
the feed hopper
[WO-3531;ET 23]
Check the deterioration conditions of the splash prevent curtain.
※
condition of the curtain firmly and cruel.
- 23 -
Page 29

gun or air
3. Remove the clamp of feed hopper, turns round the side the hopper is fallen,
the upper part of granulator, get rid of dust by the air
6. Remove the clamp of cutter chamber, turns round the side the feed hopper is
the upper hole of the axis of
10.As for the ditch of lower part of granulator and return cover (rotating part of
gun is to use a mask, because dust scatters in the
Inspection items Contents of work
Wiping and check inside the
feed hopper and granulator
Do the wiping and check in the following working order.
1. Put off the primary power supply.
2. Get rid of dust from the upper part of feed hopper with the aircleaner.
and opens slowly.
4. As for cleaning of
cleaner.
And, check the edge of blade condition of fixed cutter.
5.Close the feed hopper, and fixed with the clamp.
fallen, and opens slowly.
7. Get rid the dust that sticks to the inside of the granulator (rotating cutter)
with the air cleaner and the brush.
8. Insert an attached metal rod (with knob) into
rotating cutter, and, rotate the rotating cutter.
9. Check edge of blade condition with rotating the rotation cutter.
Chapter 7 Maintenance and check
large cutter), get rid of dust by air-gun.
11.If wiping is end, lift the feed hopperslowly, and close.
Then, fix the cutter chamber of granulator by the clamp.
WARNING
◎It is pushed down slowly with keep feed hopper from the down side
when feed hopper and cutting chamber is opened.
Don't insert a hand and a finger into stopper.
When feed hopper and cutting chamber is closed, feed hopper lifted
slowly.
At that time, be careful to insert a hand and a finger into pinch point.
When a hand and a finger are inserted into pinch point, it has the
danger of lacerations and fracture.
◎Don't touch the guranulator cutter imprudently. Because the cutter is
sharp, it has the danger that injures a hand and a finger.
NOTE
The wiping by the airair.
- 24 -
[WO-3531;ET 24]
Page 30

e switch of control box is changed to "OPERATION position"
("1"indicated) side under the condition that feed hopper is opened, and
When the granulator starts, the limit switch is a trouble, at once, do the
A hand and a finger are likely to be amputated by the sharp rotation
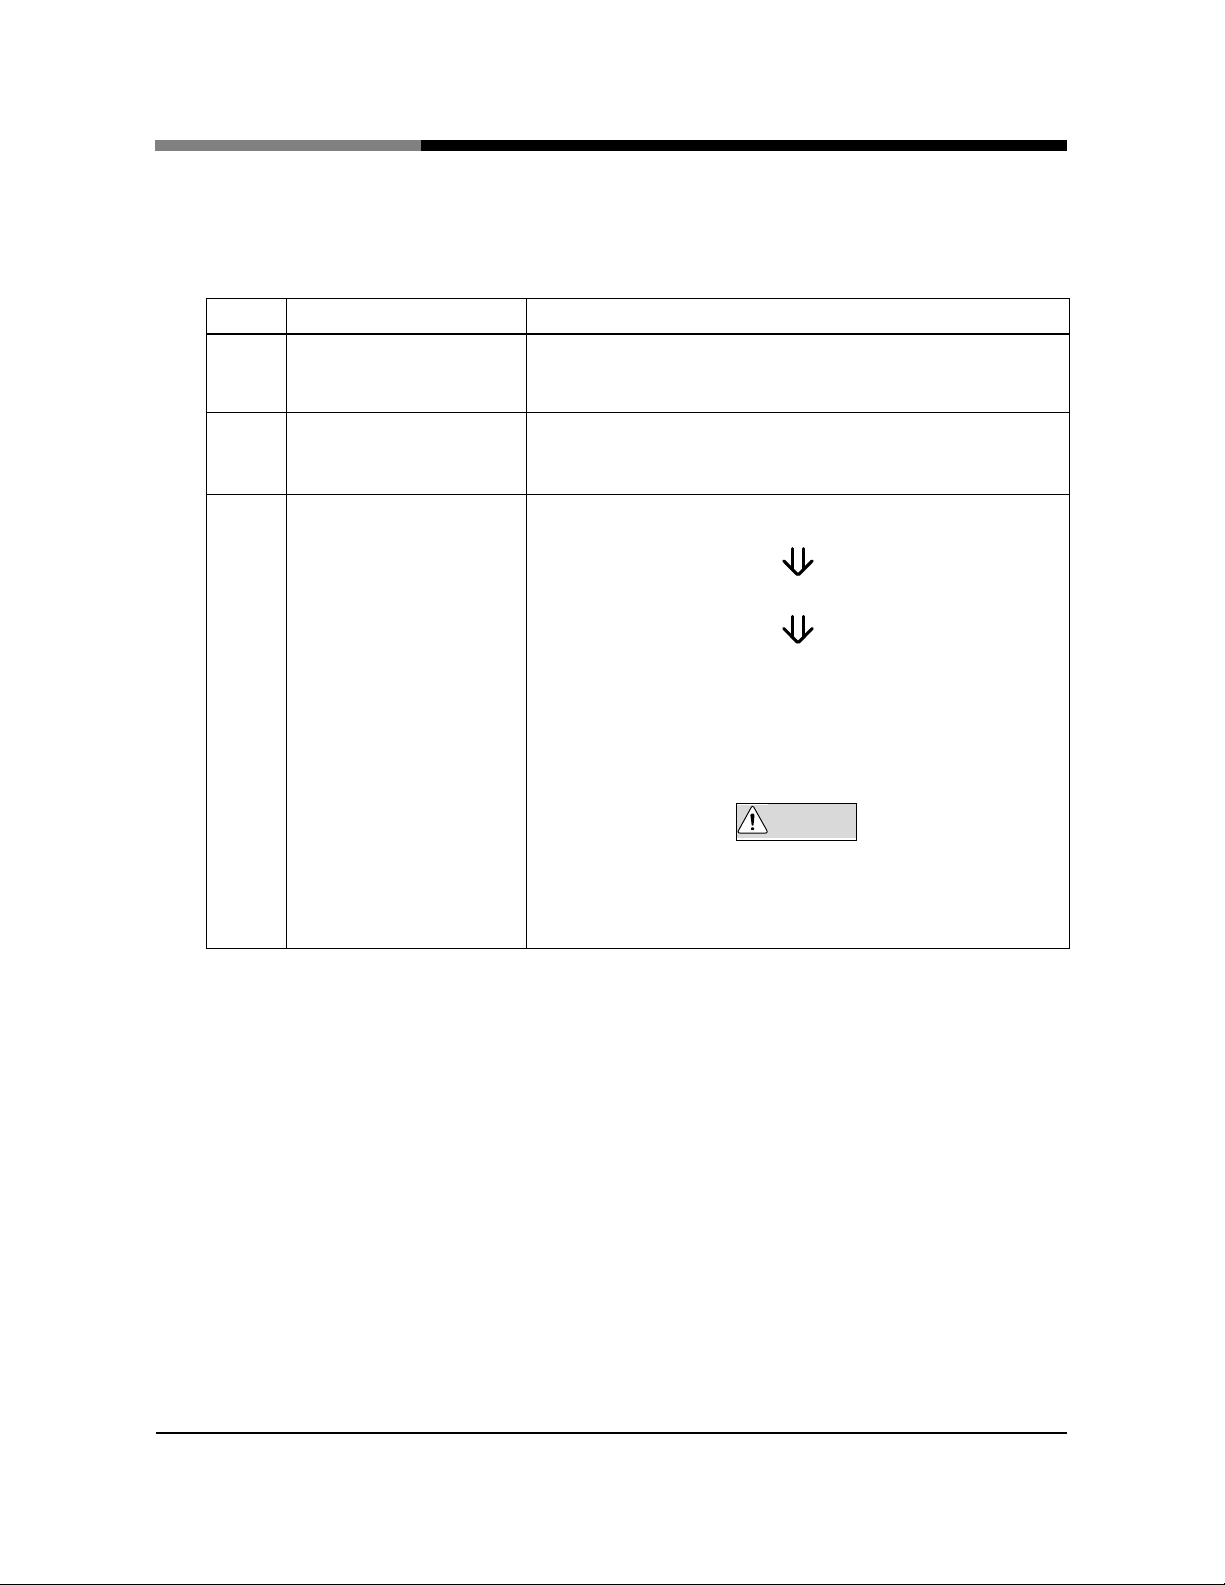
2. Every three months maintenance and check
Do the function check of each safety limit switch.
If, when the function doesn't operate normally, stop the operation, and
contact to the nearest our service division. (refer to the back cover)
DANGER
When the safety limit switch operates under the trouble condition,
because they become the cause of trouble and accident, never do it.
Inspection items Contents of work
Feed hopper and limit switch
×2 for closing confirmation of
cutting chamber
Th
confirms that the gaunulator doesn't start.
※
repair or exchange.
Chapter 7 Maintenance and check
DANGER
Don't insert a hand and fingers to the inside of granulator.
cutter.
- 25 -
[WO-3531;ET 25]
Page 31

ut
It is not necessary to exchange or add the grease. However, for more long life it
Chapter 7 Maintenance and check
3. Every six months maintenance and check
Inspection items Contents of work
Bolts and nuts of each part Check if there is any looseness of bolts and nuts.
Fasten them, if necessary.
4. Exchange of grease
Inspection items Contents of work
Bearing The oilless type is used. Therefore the exchange is not necessary for abo
30.000 hours operation.
Geared motor
(Hypoid motor)
is recommended to exchange after 20.000 hours operation.
[Recommended grease]
◇ Nihon Grease K.K.: Nigutait LYS NO.000
◇ Showa Shell K.K. : Albania EP grease R000
◇ Nihon Sekiyu K.K.: Buyknock Universal 000
※Face mount type Hollow shaft type
Motor output 0.75kW 1.5kW 2.2kW
Reduction ratio
Volume of grease 1.15kg 1.05kg 2.5kg
1/60~1/200 1/40~1/80 1/60~1/80
- 26 -
[WO-3531;ET 26]
Page 32

Remove the clamp of feed hopper, turns round the side the hopper
The fixed cutters and guide plate is removed and exchanged for the
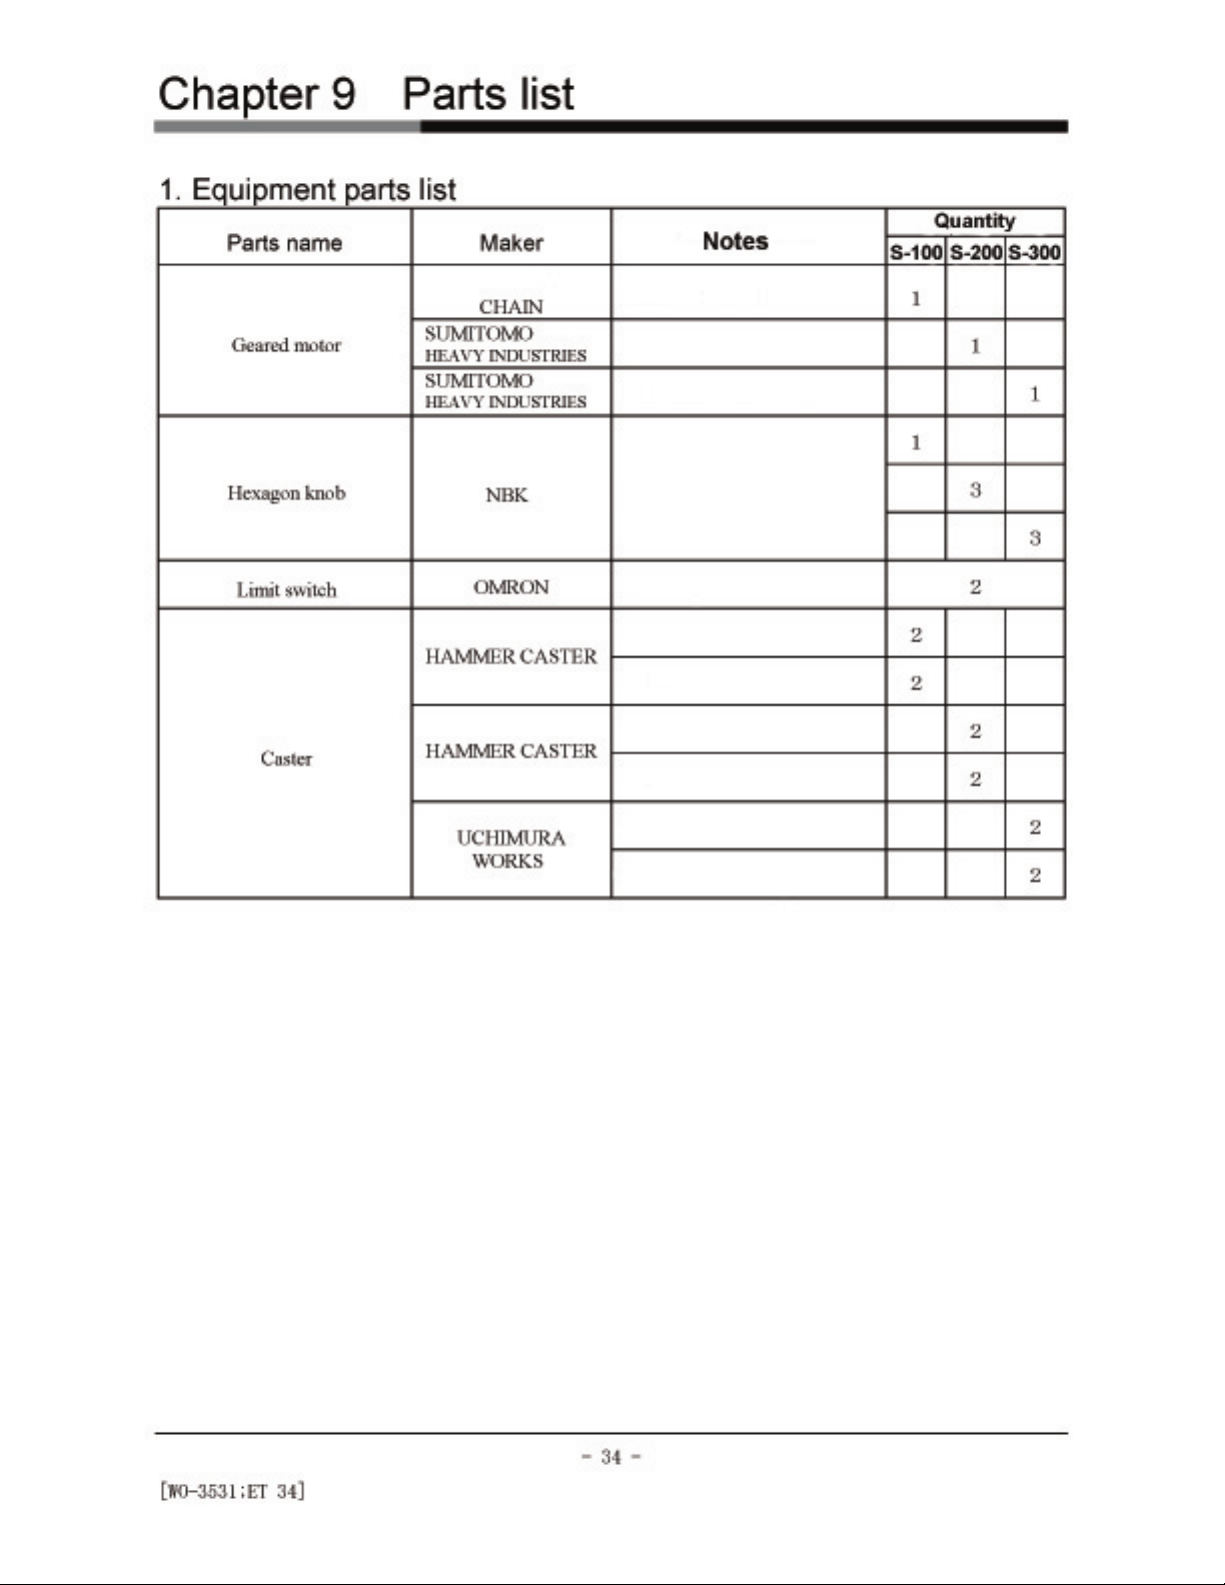
5. Exchange point of the granulator cutters
Explains about the exchange work point of fixed cutter, guide plate and
rotating cutters (large and small) in order.
WARNING
Before exchange work, make sure to stop operation and put “OFF“ the
primary power supply.
Then, avoid danger by incorrect operation.
5-1. Exchage of the fixed cutters and guide plate
Hopper is opened, and the exchange work is done.
Step
1
2
Openning the feed
hopper
Exchang of the fixed
cutters and guide plate
Item Description
is fallen, and opens slowly.
It is pushed down slowly with keep feed hopper from the
down side when feed hopper is opened.
Don't insert a hand and a finger into stopper.
When feed hopper is closed, feed hopper lifted slowly.
At that time, be careful to insert a hand and a finger into
pinch point.
When a hand and a finger are inserted into pinch point, it
has the danger of lacerations and fracture.
new part. (refer to Fig. 7-1)
※Refer to 5-3 how to gap adjust of rotating cutters and fixed
cutters of this chapter for the adjustment of the installation
position.
Work carefully with wear the gloves, when touched the fixed
cutters and the guide plate.
For the sharp cutters, it has the danger that the hand and
the finger have the lacerations.
Chapter 7 Maintenance and check
WARNING
WARNING
[WO-3531;ET 27]
- 27 -
Page 33
Pullout the clamp and hinge bilts of feed hopper, and remove the
The cutting chamber of granulator is lifted slowly, and released,
Loosen fixed nuts of the bearings at both ends of rotating axis, and
5-2. Exchange of rotating cutters (large and small)
Feed Hopper is removed, and the exchange work is done.
Step
1
2
3
The removal of feed
hopper
The removal of geared
motor
Each part of overhaul
and exchange
Item Description
feed hopper.
and the geared motor is removed.
remove bolts.
With each rotating axis, pull up and remove the rotating cutters.
Stop ring⇒Collar⇒Bearing cover⇒Bearing⇒Side plate
(Labyrinth)⇒Small cutters⇒Large cutters
Pull out in order and exchange.
After exchange, assemble part reversely in order.
The exchange work is doing carefully with wear the gloves.
For the sharp cutters, it has the danger that the hand and
the finger have the lacerations.
Chapter 7 Maintenance and check
WARNING
[WO-3531;ET 28]
- 28 -
Page 34

Remove the clamp of feed hopper, turns round the side the hopper
The clamp is to do the part of upper and lower the cutting chamber
Hold and turned the width of 2 area of keeper plate with spanner or
using the thickness gauge (the gap) does the adjustment of
en the fixed cutters on a
5-3. How to gap adjust of rotating cutters and fixed cutters
Adjust the gap between the rotating cutters and fixed cutters to 0.2mm.
Step
1
2
3
Opening the feed hopper
Clamp of cutting
chamber
Adjustment of the gap
Item Description
is fallen, and opens slowly.
It is pushed down slowly with keep feed hopper from the
down side when feed hopper is opened.
Don't insert a hand and a finger into stopper.
When feed hopper is closed, feed hopper lifted slowly.
At that time, be careful to insert a hand and a finger into
pinch point.
When a hand and a finger are inserted into pinch point, it
has the danger of lacerations and fracture.
of granulator without gap.
(Tighten the clamp of citting chamber completely)
The removed bolts of fixed cutters are tightened temporarily.
Chapter 7 Maintenance and check
WARNING
monkey wrench.
Then,
interval.
Completing adjustment of the gap, tight
full scale.
The work is doing carefully with wear the gloves.
For the sharp cutters, it has the danger that the hand and
the finger have the lacerations.
WARNING
[WO-3531;ET 29]
- 29 -
Page 35

Ca p
End p lat e
Stop rin g
Moto r
Motor suppor t
& bearing cover
Side plate
Bearin g
Large cutter s
Small cutter s
Chapter 7 Maintenance and check
Fixed cutter s
Guide plat e
Side plate
※ Insert hole of
metal rod with kno b
Bearin g
Keeper plate
Ca p
[WO-3531;ET 30]
Figure 7-1
- 30 -
Page 36

Chapter 8 Troubleshooting
The cause of the failure in the equipment and how to manage the trouble
are explained in theis chapter.
WARNING
Stop the operation and put off the primary power supply before checking
woek.
The abnormal sound on the operation comes out.
Power down of granulating ability.
Check point Remedy Precaution
Check whether the feed hopper
and cutting chamber of
granulator are doing the clamp
securely.
Check mixing of the different
material in the feed hopper and
granulator.
Check whether the adjustment of
interval for rotating cutting and
fixed cutters is correct.
Check whether the edge of fixed
cutters and rotating cutters is
exhausted or it isn't lack.
Tighten the clamp of each part
securely.
Remove the different material.
Then, exchange it when there is a
damage part.
Adjust the interval of rotating
cutters and fixed cutters to
0.2mm.
Exchange the fixed cutters or
rotating cutters.
Do the work after the primary power
supply put off.
To purchase the parts or exchange, please
contact our service division.
Do the work after the primary power
supply put off.
Refer to Chapter 7. Maintenance and
check, 5-3 How to gap adjust of rotating
cutters and fixed cutters.
Refer to Chapter 7. Maintenance and
check, -1. Daily maintenance and check
item of Wiping and check inside the feed
hopper and granulator.
Refer to Chapter 7. Maintenance and
check, -5. Exchange point of the
granulator cutters.
[WO-3531;ET 31]
- 31 -
Page 37

the clamp of cutting
Check point Remedy Precaution
Check whether the feed hopper is
securely close.
And, check whether the different
material in the clamp part of feed
hopper isn't caught.
Check whether the cutting
chamber is securely close.
And, check whether the different
material in the clamp part of
cutting chamber isn't caught.
Check whether the two each limit
switch is functioning normally.
The granulator doesn't start.
Remove the different material.
And, tighten the clamp of feed
hopper securely.
Remove the different material.
And, tighten
chamber securely.
Do the repair of the switch or the
exchange.
The granulator doesn't start under the
"OFF" condition of the limit switch for
closing confirmation.
The granulator doesn't start under the
"OFF" condition of the limit switch for
closing confirmation.
Refer to Chapter 7. Maintenance and
check, -2. Every three maintenance and
check.
To repair or exchange the limit switch,
please contact our service division.
Chapter 8 Troubleshooting
- 32 -
[WO-3531;ET 32]
Page 38

Overload operation is given, motor breaker trips
Check point Remedy Precaution
Check whether many runners
aren't being inserted in the feed
hopper.
Check mixing of the different
material in the feed hopper and
granulator.
Check whether the granulating
ability doesn't down.
Check whether the bearing of
driving part is not over heating
condition.
Check whether the driving motor
starts normally.
Check whether the power supply
code of driving motor isn’t out.
Check whether there is looseness
in the connection part.
Chapter 8 Troubleshooting
Remove the runners inside the
feed hopper.
Do the work after the primary power
supply put off.
Insert a single runner only.
Remove the different material.
Then, exchange it when there is a
damage part.
Do the work after the primary power
supply put off.
To purchase the parts or exchange, please
contact our service division.
Repair the down cause of the
granulating ability.
Refer to this chapter. “The abnormal
sound on the operation comes out,
Power down of granulating ability.”
Exchange the bearing. Do the work after the primary power
supply put off.
To purchase the bearing or exchange,
please contact our service division.
Repair or exchange the driving
motor (geared motor).
To purchase the geared motor or exchange,
please contact our service division.
○Tighten the connection part of
the power supply.
○Exchange the power supply
Do the work after the primary power
supply put off.
code.
[WO-3531;ET 33]
- 33 -
Page 39
Page 40

Page 41

Page 42

Page 43

 Loading...