

Page 1
USB
USB
USB
USB
USB
USB
USB Instant DVD
User’s Guide Rev. 3
USB
USB
USB
USB
USB
USBAV700Cover.p65 6/4/2002, 12:20 PM44
www.adstech.com
Technical Support: 562.926.4338
Technical Support Hours: M-F 8am-5pm, PST
Page 2

USB
USB
USB
USB
USB
USB
ADS Technologies
North America Office
12627 Hidden Creek Way
Cerritos, CA, 90703
Phone: 562.926.1928
Technical Support: 562.926.4338
Technical Support Hours: M-F 8am-5pm PST
Fax: 562.926.0518
European Office
Shannon Industrial Estate
Shannon Co. Clare, Ireland
Phone: +353.61.702042
www.adstech.com
USBAV700Cover.p65 6/4/2002, 12:20 PM45
USB
USB
USB
USB
USB
Page 3

USB Instant DVD User’s Guide
Table of Contents .....................................................................................................................................................................................................................................
Copyright Notice ..................................................................................................................................................................................................................................... 1
Instant DVD Overview ........................................................................................................................................................................................................................ 4
Three Ways to Capture Video .........................................................................................................................5
Burn a VCD or DVD movie to disk....................................................................................................................6
Create Video and Send Back to Tape ..............................................................................................................7
Single Step Capture &
Burn a CD or DVD disk.....................................................................................................................................8
Create VCD or DVD Slideshow .......................................................................................................................8
USB Instant DVD Installation Guide ............................................................................................................................................................................................ 9
System Requirements ........................................................................................................................................................................................................................ 9
Getting Started ....................................................................................................................................................................................................................................... 9
1. Check USB Instant DVD Contents ................................................................................................................9
2. Wire It Up!...................................................................................................................................................10
3. Plug It In & Install Device Drivers and Software.........................................................................................13
4. Optimize System For Best Performance....................................................................................................14
5. Verify Hardware Installation ......................................................................................................................15
6. Windows Audio Mixer Settings ..................................................................................................................16
7. Installation Summary ..................................................................................................................................17
8. Start Making DVD Movies ...........................................................................................................................17
USB Instant DVD Capture Wizard ................................................................................................................................................................................................ 18
Using Capture Wizard Video Capture/Playback tool for the first time:............................................................................................................. 22
Menu Options ....................................................................................................................................................................................................................................... 24
Menu Options: Options ...................................................................................................................................26
Menu Options: Advanced...............................................................................................................................27
Menu Options: Advanced
.......................................................................................................................................................................28
Menu Options: Help ........................................................................................................................................29
USB Instant DVD Wizard Features ............................................................................................................................................................................................. 30
Service and Warranty: .................................................................................................................................................................................................................... 32
Ulead VideoStudio 6 Quick Start .............................................................................................................................................................................................. 34
Copyright Notice
The USB Instant DVD is an innovative, hassle-free device that is designed to let you edit and
archive your home movies easily. ADS Technologies respects the rights of copyright owners and
asks that you do the same. The Copy Right Act gives owners of copyrights the exclusive right to
reproduce and prepare derivative works as well as to publicly perform, display and distribute their
works. This means that you must obtain permission to engage in any of these activities when using
works that are copyrighted by another person.
© 2002 ADS Technologies. All Rights Reserved
Third Edition: Revision 3.0 May 2002
Microsoft, Windows, & Windows 98 are registered trademarks of Microsoft Corporation. IBM is a registered trademark of the
International Business Machines, Inc.
ADS is a registered trademark of ADS Technologies Inc. ADS Technologies (ADS) makes no warranty of any kind with regard to
this material, including but not limited to, the implied warranties of merchantability and fitness for a particular purpose. The
information furnished within this written document is for information purposes only and is subject to change without notice. ADS
Technologies assumes no responsibility or liability for any errors or inaccuracies that may appear herein. ADS makes no
commitment to update or to keep current information contained within this document.
OverView.p65 6/4/2002, 12:21 PM1
Page 4

USB INSTANT DVD USER GUIDE
Ulead VIdeoSudio 6: The big picture ..................................................................................................................................................................................... 38
An introduction to
digital video ....................................................................................................................................................38
An introduction to MPEG ................................................................................................................................39
MPEG-1 ..............................................................................................................................................39
MPEG-2 ..............................................................................................................................................39
How VideoStudio works ................................................................................................................................40
Installing and running VideoStudio ....................................................................................................................................................................................... 41
Configuring VideoStudio .............................................................................................................................................................................................................. 42
.......................................................................................................................................................................42
Instant DVD Setup..........................................................................................................................................42
Getting around VideoStudio ....................................................................................................................................................................................................... 43
The Library.....................................................................................................................................................47
Steps to create your movie ......................................................................................................................................................................................................... 48
Start................................................................................................................................................................50
Creating a new project......................................................................................................................50
Selecting a template...........................................................................................................................52
Capture ..........................................................................................................................................................53
Checklist for successful video capture.............................................................................................53
Direct capturing MPEG video .............................................................................................................54
Capturing still images .........................................................................................................................55
Storyboard .....................................................................................................................................................56
Storyboard Mode ...............................................................................................................................56
Timeline Mode ....................................................................................................................................57
The Options Panel..............................................................................................................................58
SmartRender and Play Project button ................................................................................................59
Preview Files Manager ......................................................................................................................60
Inserting a clip into the Timeline .........................................................................................................60
Trimming a clip ...................................................................................................................................61
Working with clips .............................................................................................................................62
Capturing still images in the Storyboard Step.....................................................................................63
Using color clips ................................................................................................................................63
Effect .............................................................................................................................................................64
Creating effects .................................................................................................................................64
Customizing effects ...........................................................................................................................65
Overlay ..........................................................................................................................................................66
Inserting video/image in the Overlay track.........................................................................................66
Customizing overlays ........................................................................................................................67
Title.................................................................................................................................................................68
Creating text titles ..............................................................................................................................69
Rolling & scrolling...............................................................................................................................71
Fading in & out ...................................................................................................................................72
Putting it all together...........................................................................................................................72
Audio..............................................................................................................................................................73
Finish..............................................................................................................................................................75
Creating and saving a video file ........................................................................................................75
Video Save Options ...........................................................................................................................77
Creating a DVD / VCD / SVCD Title....................................................................................................80
Project Playback ................................................................................................................................80
Creating an audio file .........................................................................................................................80
2
OverView.p65 6/4/2002, 12:21 PM2
Page 5

USB INSTANT DVD USER GUIDE
Exporting your movie ...................................................................................................................................................................................................................... 81
Burning DVD/VCD/SVCD ...............................................................................................................................81
Recording back to a camcorder or VCR ........................................................................................................83
Shortcuts ................................................................................................................................................................................................................................................. 84
Need more help? ............................................................................................................................................................................................................................... 85
Glossary ................................................................................................................................................................................................................................................... 86
MyDVD User’s Guide .......................................................................................................................................................................................................................... 88
MyDVD: Get Started .......................................................................................................................................89
Video Capture from Instant DVD....................................................................................................................90
Single Step Capture and Burn a CD or DVD disk ...........................................................................................91
USB Instant DVD Helpful Hints: .................................................................................................................................................................................................... 92
OverView.p65 6/4/2002, 12:21 PM3
3
Page 6
USB INSTANT DVD USER GUIDE
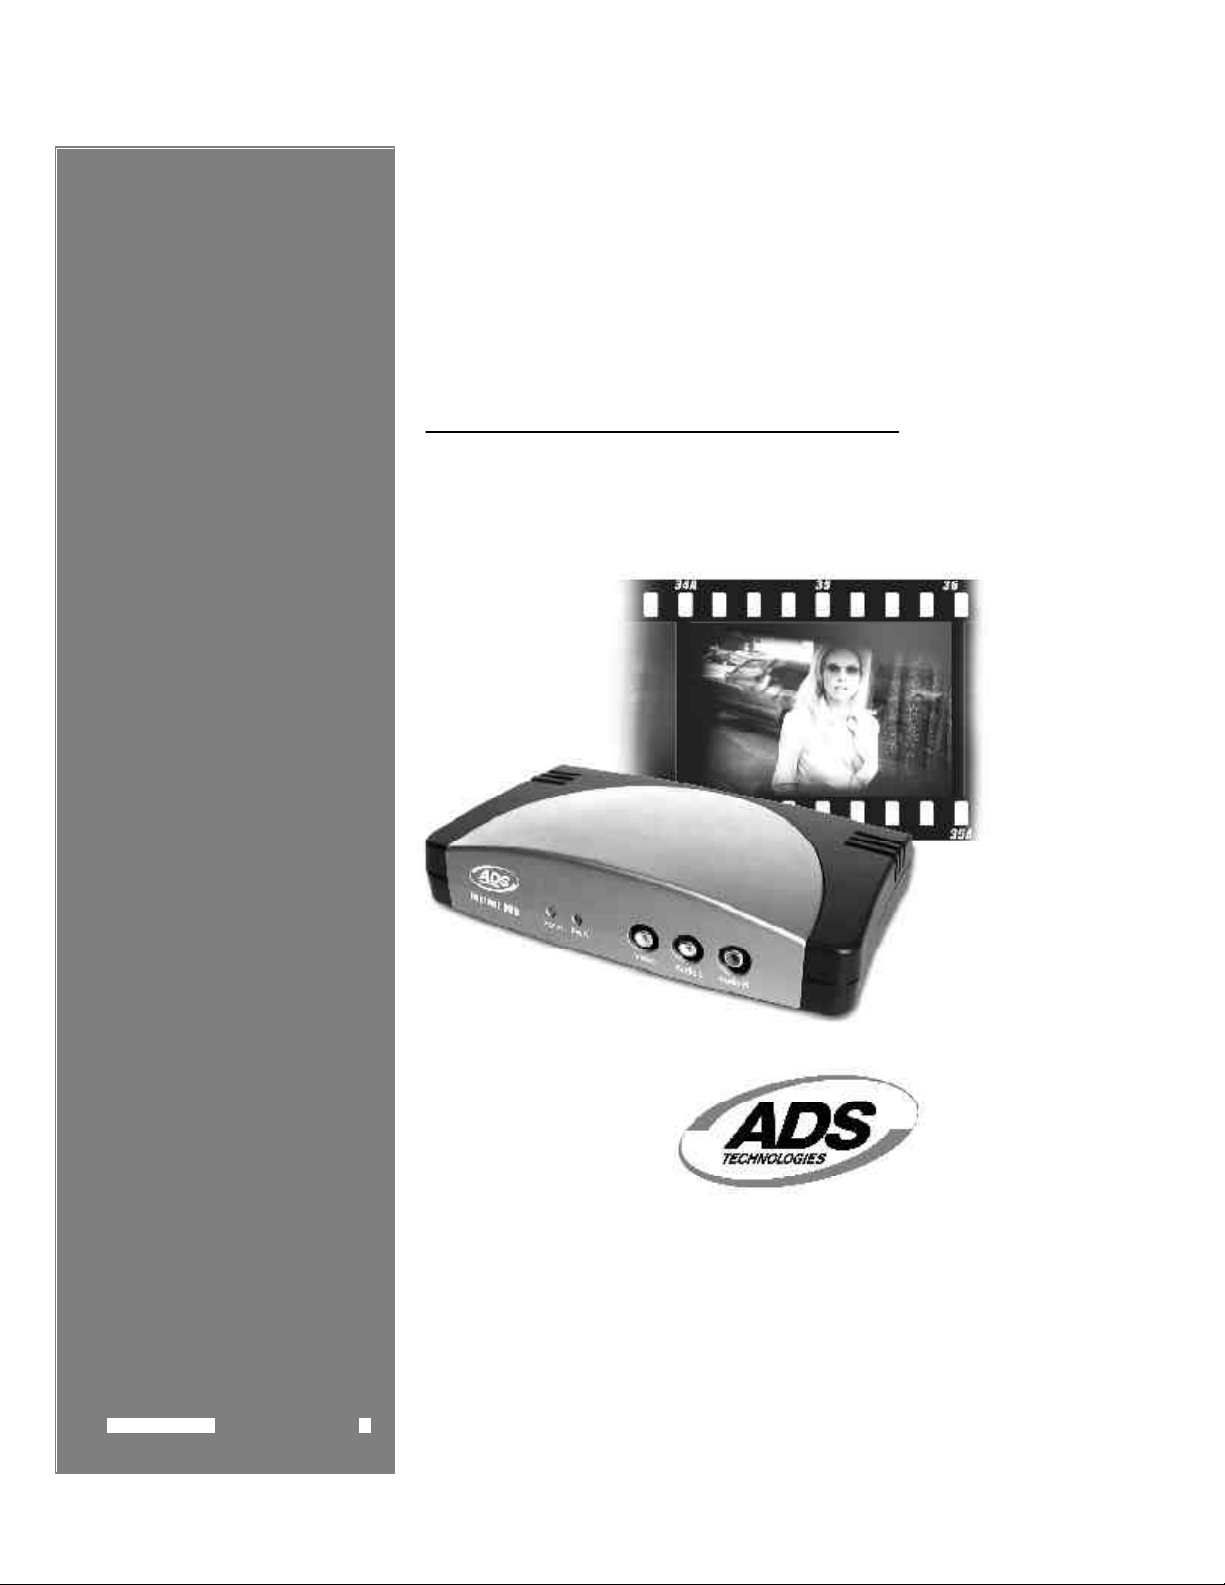
Instant DVD Overview
Instant DVD is a fun and easy way to get DVD,
SVCD and VCD video into your Windows PC so
you can edit or archive your home movies.
Instant DVD then lets you publish the video to
CD or DVD disk or publish to the Internet or
send the video back to a VCR or camcorder for
distribution on Tape.
All the video compression takes place in the Instant DVD device so when the video comes
through the USB port it is already compressed in the format you desire such as MPEG-1 for
VCD (Video on CD) or MPEG-2 for DVD (Digital Versatile Disc).
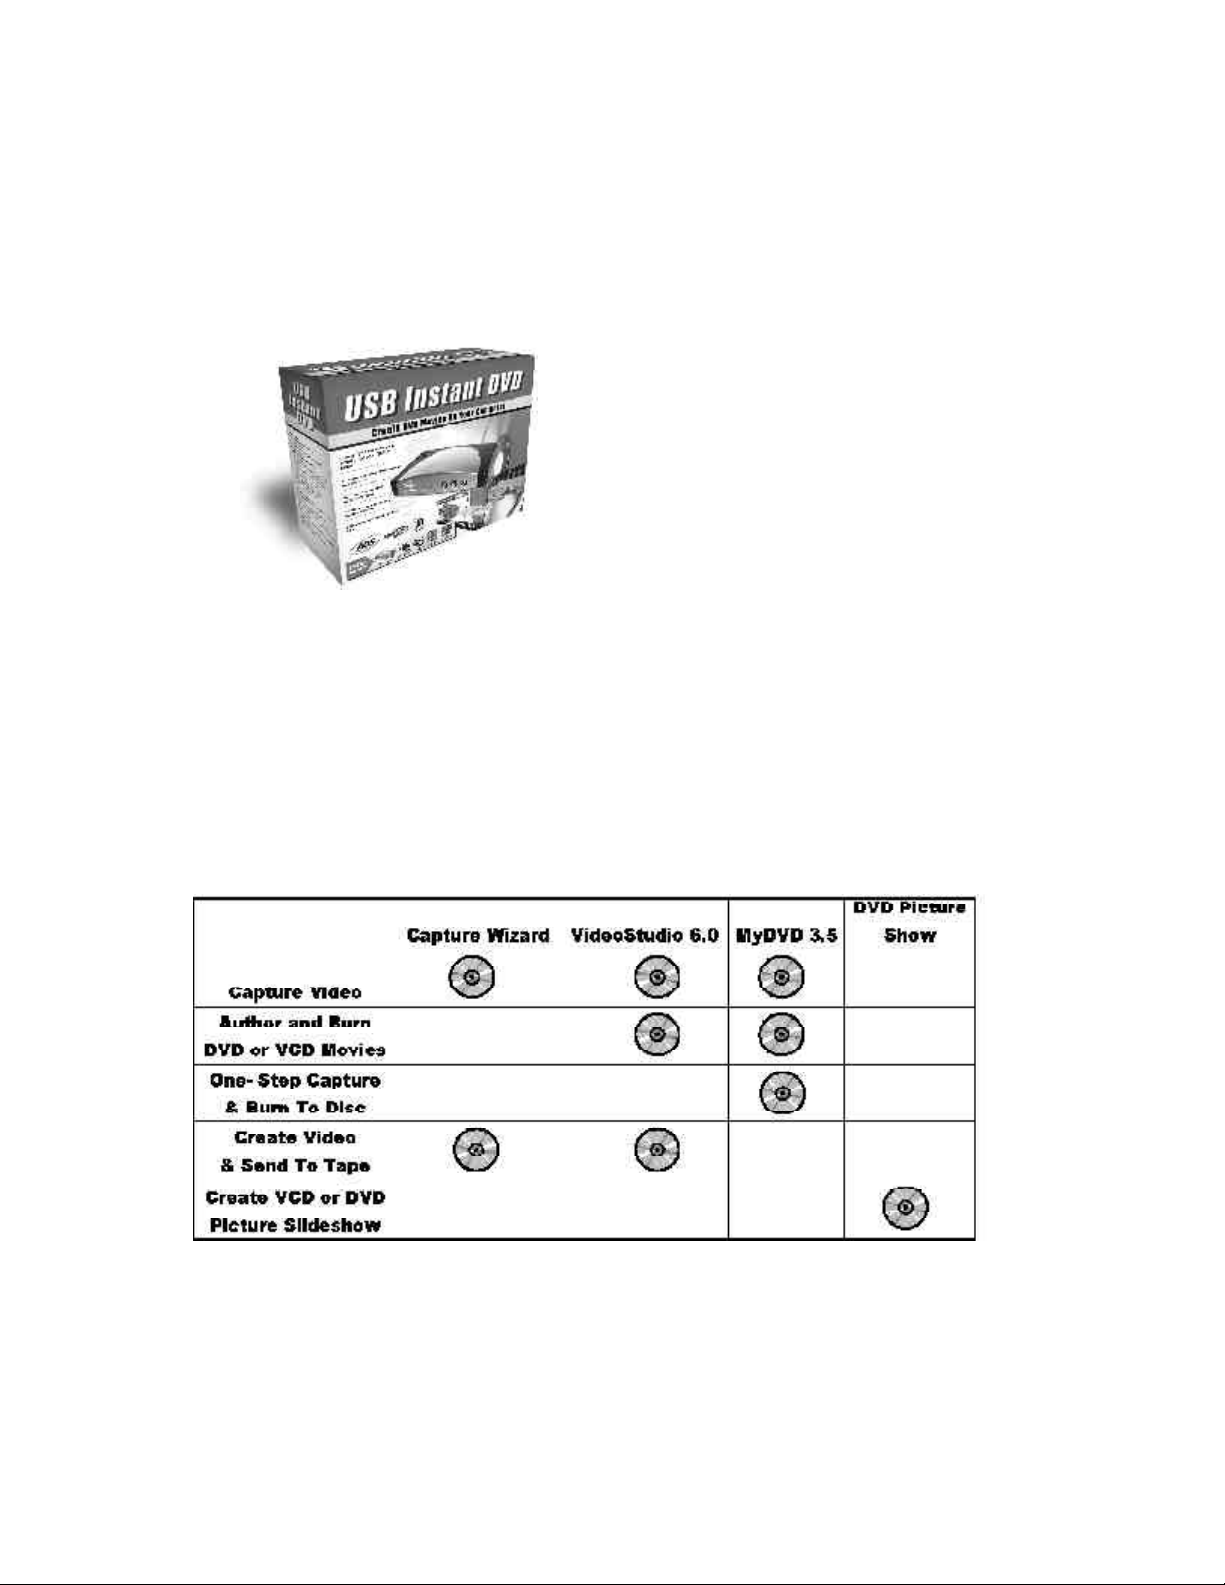
USB Instant DVD includes several flexible and dynamic software tools for
your video projects:
4
OverView.p65 6/4/2002, 12:21 PM4
Page 7
USB INSTANT DVD USER GUIDE
Three Ways to Capture Video
CAPWIZ: BASIC VIDEO CAPTURE & PLAYBACK
This is fastest and easiest way to capture MPEG-1
(VCD) or MPEG-2 (SVCD, DVD) video on your PC.
Use the Wizard screens to verify your video
connections and video and audio format.
Use CapWiz to quickly capture video or send MPEG
video back to a VCR for recording or a TV for
viewing. CapWiz also allows you to set up timed
recordings and delayed recordings, set audio
recording formats for various DVD authoring
software and easily select video capture bit rates
for good (3 Mb/sec.), Better (4 Mb/sec.) or Best (5
Mb/sec.) DVD video quality.
VIDEOSTUDIO: FULL VIDEO CAPTURE & EDITING
Video Studio steps you through the movie making
process. Key steps are START, CAPTURE,
STORYBOARD, EFFECTS, OVERLAY, TITLE, AUDIO
and FINISH.
OverView.p65 6/4/2002, 12:21 PM5
Use Video Studio if you want to edit video, add
effects or video filters, titles, back ground music or
voice overs to create a unique video production.
MYDVD: DIRECT PUBLISHING TO CD OR DVD DISKS
WITHOUT EDITING THE VIDEO
Use MyDVD to capture video in VCD or DVD format
for the purposes of authoring a VCD or DVD disk.
MyDVD allows you to capture video directly from
Instant DVD into the MyDVD application.
5
Page 8
USB INSTANT DVD USER GUIDE
Burn a VCD or DVD movie to disk
VIDEO STUDIO: DVD-WIZARD AT THE FINISH STEP
To use the DVD-Wizard you first save your
movie into VCD, SVCD or DVD format and
then the DVD-Plug-in will appear and allow
you to quickly and easily author and burn
your movie to disk.
If all you want to do is capture and burn you
can skip all the other video editing features
and jump to the Finish step after you have
captured your video.
VCD and SVCD movies can be burned on a CD-ROM
disk. DVD movies can also be burned on a CD-ROM
disk, but you are limited to about 20 minutes of DVD
quality video on a CD. If you have a DVD recorder,
you can get about 2 hours of DVD quality video on a
4.7 GB DVD disk.
Video Studio also supports publishing SVCD (MPEG-2
at 2.4 megabits/sec.) to a CD-ROM. SVCD is playable
in many home DVD players. You can fit about 35-40
minutes of SVCD content on a 700 MB CD disk.
MYDVD: CAPTURE AND BURN EITHER VCD (CD-ROM)
OR DVD (CD-ROM OR DVD DISK) MOVIES
You select the type of video you wish to
publish, select the background template and
either import video or capture video from
Instant DVD. Once you have updated the
template and button text to customize your
movie, click “Make Disk” and you will step
through the process to burn your movie to
disk.
When capturing video, MyDVD will check for a CD or
DVD burner installed on your system and it will
determine how many minutes of VCD or DVD video
(depending upon your selection) will fit on the disk.
If you want to make a DVD on a CD disk (sometimes
called “mini-DVD”), a software DVD player will
automatically be burned to the disk so you can
distribute to any Windows PC with a CD player. The
DVD player will automatically load so the DVD movie
can be played. This is a great way to distribute high
quality DVD video to people who may not have a DVDROM on their PC.
If you have a DVD recorder (burner) you can produce
DVD videos that will play in many home DVD players.
6
OverView.p65 6/4/2002, 12:21 PM6
With a CD burner you can produce a VCD (MPEG-1)
movie that will play in many home DVD players.
Page 9

USB INSTANT DVD USER GUIDE
Create Video and Send Back to Tape
While Instant DVD was created to allow you to easily publish your home movies to CD or
DVD disk, we did not forget the fact that many users would still like to record finished movies
on video tape or preview on a TV before publishing to disk. Instant DVD includes two
applications that allow you to send MPEG video from your computer and back through Instant
DVD to be displayed on TV or recorded on a VCR.
NOTE: When preparing to display captured video on a TV or recording to video tape, be sure that you have
connected a video cable from the Instant DVD to the video input of your TV or VCR and that you have
connected the audio out cable from your sound card to the audio inputs on your TV or VCR.
CAPWIZ: SELECT ANY MPEG-1 (VCD) OR MPEG-2
(SVCD OR DVD) VIDEO FILE AND PLAY IT BACK ON A TV
OR RECORD TO VCD
Simply select the file from the file library or
Browse to the directory where you saved the
video file. Once the file is selected, click
Play back on “TV or VCR” and click the
Play button. If you have a TV attached to
the RCA or S-VHS out connectors you will
see the video displayed on the TV. If you
connect to a VCR, click Record on the VCR
just before clicking Play on the CapWiz
application.
VIDEO STUDIO: EXPORT MPEG VIDEO THROUGH THE
INSTANT DVD UNIT SO YOU CAN DISPLAY EDITED
VIDEO ON TV OR RECORD TO TAPE
Although Video Studio allows you to save
video in various formats such as .avi, .rm,
.asf, .mov, only .mpg (MPEG) files can be
exported out through USB Instant DVD.
To export a video, go to the FINISH step, drag
a .mpg movie to the preview window and the
export button on the left of the interface will
be enabled. Click the Export button and
select “USB Instant DVD”. A small dialog
box as shown below will appear. Click Play
to begin playback of the video file. The video
will be displayed on your TV. If you wish to
record to video tape, click Record on your
VCR a few seconds before clicking Play USB
Instant DVD dialog box. Click Stop to stop
playback.
OverView.p65 6/4/2002, 12:21 PM7
7
Page 10

USB INSTANT DVD USER GUIDE
Create VCD or DVD SlideshowSingle Step Capture &
Burn a CD or DVD disk
MYDVD: DIRECT TO DISC
The Direct to Disk capability in MyDVD
allows you to easily set up a one step
capture and burn sequence. This is the
simplest way to archive your video tape
collection to CD or DVD.
Select Direct to Disk when the MyDVD
application is started. You must have a CD
or DVD recorder attached to your PC at the
beginning of this procedure and a new blank
disk inserted. Follow the steps and you will
be brought to a video capture dialog screen.
Select the hours and minutes you want to
record to the disk
Select how often you want chapters to be
automatically created in minutes or seconds;
i.e. set chapter every 5 minutes.
Select video quality (for DVD only) to Good,
Better or Best. VCD is a set quality
standard.
Click Play on your video device. You will see
video playing in the preview window, then
Click the “RED” record button below the video
preview area to start recording.
Video will temporarily be stored on your hard
drive. At the end of the capture sequence,
the video will automatically be sequenced
into chapters and burned to the disk.
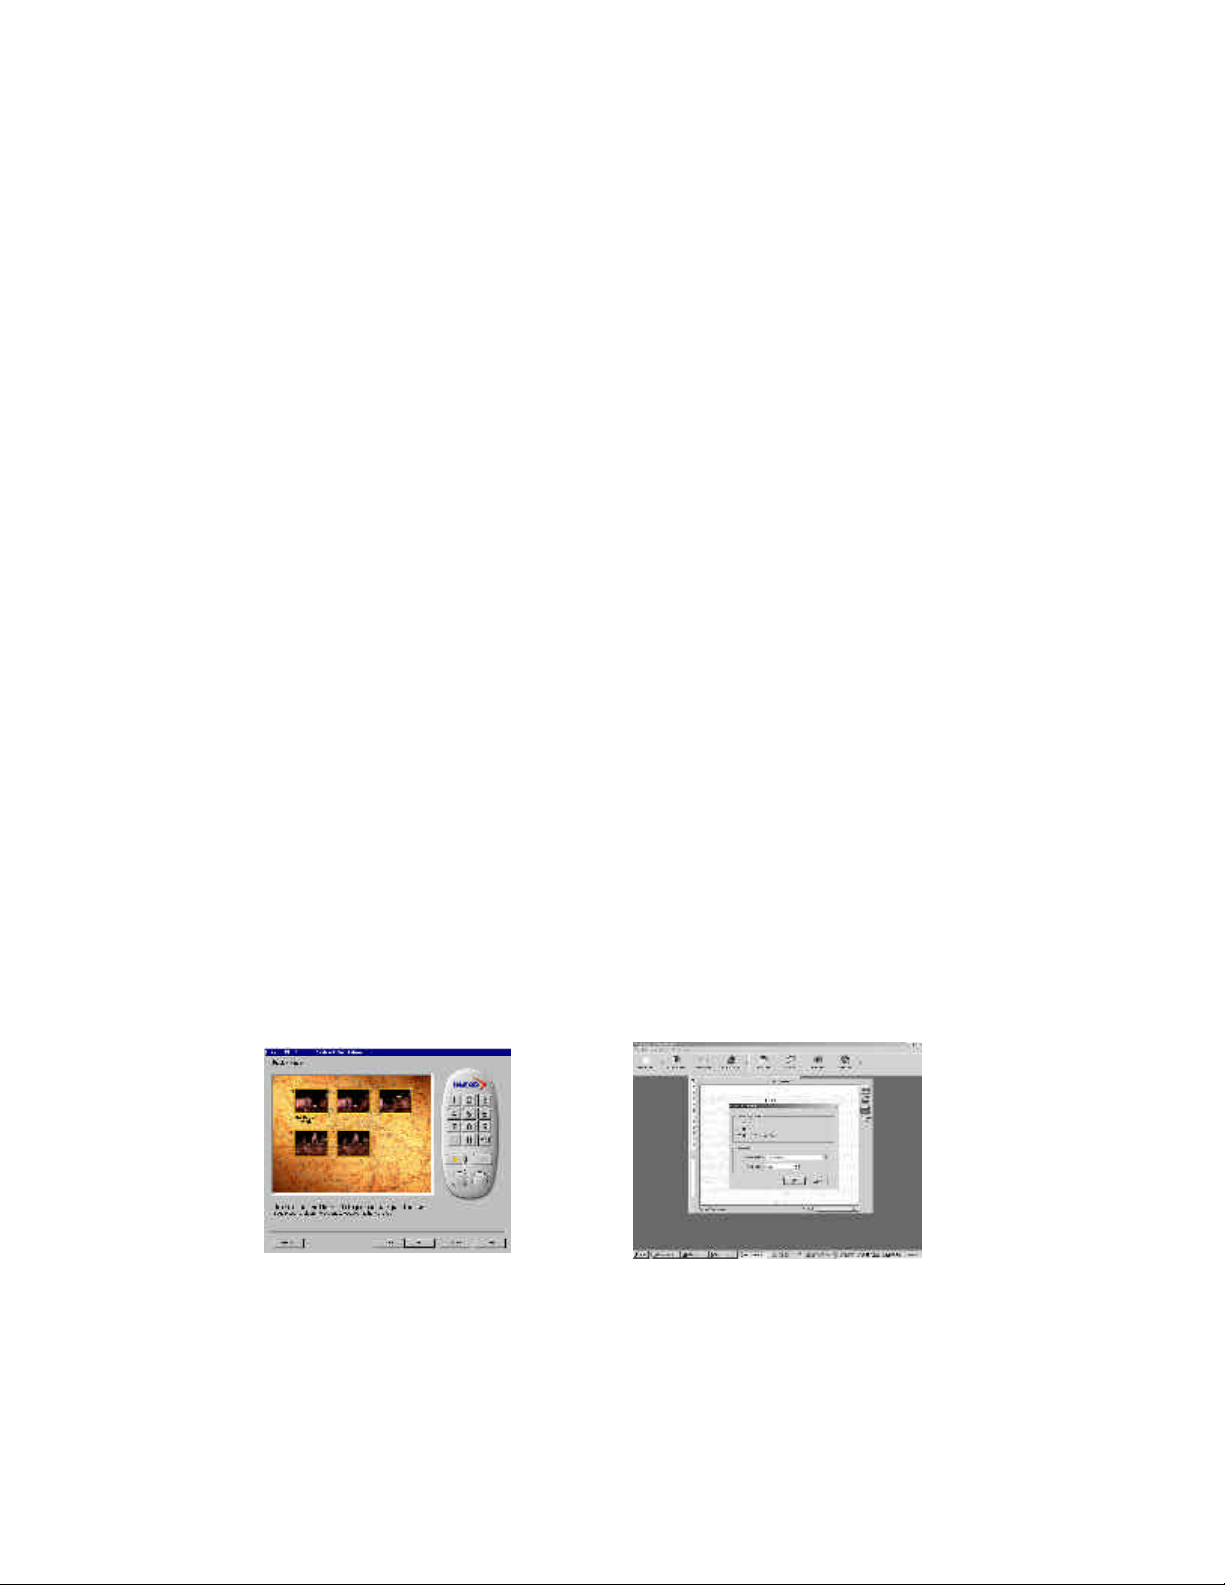
DVD PICTURE SHOW: CREATE CUSTOM
PHOTO SLIDESHOWS ON CD OR DVD
You can create custom backgrounds and
menus allowing you to put multiple
slideshows on a single disk. You can even
add music to your slideshows to create a
multimedia experience.
DVD Picture Show is totally wizard driven so
it is very easy to use, simply choose VCD
2.0 or DVD format, select the still images for
your slideshow, add background music,
select a menu background and record to CD
or DVD disk. Then you can play your slide
show in most any DVD player so the entire
family can enjoy the show!
Images can be captured in .jpg or .bmp format from
within the Video Studio 6 application.
A still image can be captured in the Storyboard Step
by selecting a specific frame in the Timeline and
saving it as an image file. In this manner, possible
distortions are avoided since the image is not acquired
from a running video.
To capture still images in Video Studio:
1. Select a clip in your project.
2. Drag the Preview Bar to the frame you want to
capture.
3. Switch to an image folder in the Library. The folder
can be the default Image folder, or the one created by
yourself.
4. Click Save Still Image in the Options Panel. The
new image file is saved to the hard disk and is
represented as a thumbnail in the image folder you
assigned.
The finished disk is automatically ejected
when sequence is complete.
8
OverView.p65 6/4/2002, 12:21 PM8
Page 11
USB INSTANT DVD INST ALLATION
USB Instant DVD Installation Guide
Getting Started
The basic steps are:
1. Check USB Instant DVD
package contents
2. Wire it Up!- audio and video connectors
3. Plug it In!- Power and USB connection
Install Device Drivers & Application
software
4. Optimize System For Best Performance
5. Verify Hardware Installation
6. Set Windows Audio Mixer
7. Installation Summary & Diagram
Optimize System For Best Performance
8. Start Making DVD Movies!
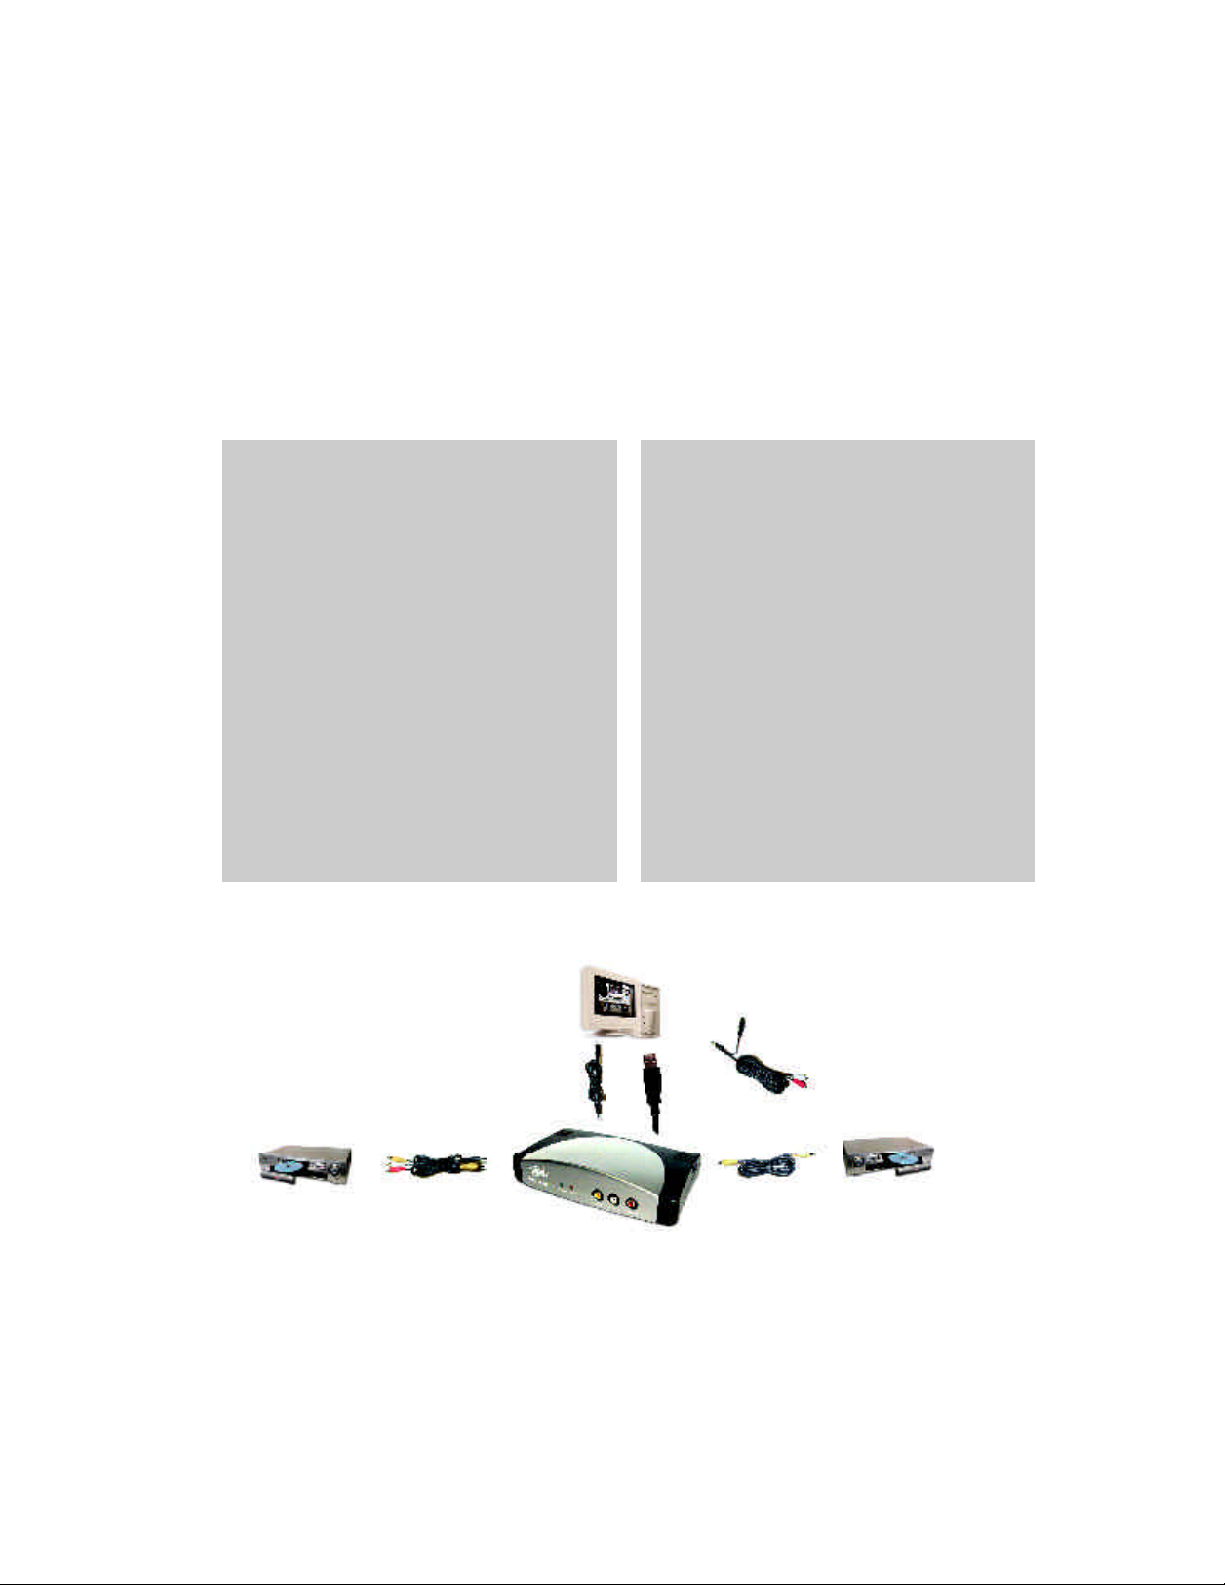
1. Check USB Instant DVD Contents
Hardware:
(A) USB Instant DVD device
(B) 5 VDC Power supply
(C) 6 ft. USB Cable
(D) 6 ft. A/V In cable (RCA video and Audio to
RCA video and 3.5 mm stereo)
(E) 6 ft. 3.5 mm male to 3.5 mm male stereo
audio cable
(F) 9 ft. Audio out to TV/VCR cable (3.5 mm
stereo w/female 3.5mm Y to R+L RCA audio)
(G) 9 ft. RCA Video cable
System Requirements
- Intel Celeron 500 MHz or AMD Athlon 600 MHZ or better
- Windows 98, Win98SE, WinME, Win2000 or WinXP
- 128 MB recommended
- Full duplex sound card
- 16 MB AGP video card
- CD-ROM Drive
- 150 MB hard disk space for capture/editing
applications
- Disk space for video captures; Video captured at
4 Mb/sec will use 1.8 GB per hour
- CD Recordable Drive & software required for saving
movie files onto a CD
- DVD Recordable Drive & software required for
recording DVD movies.
Instant DVD CD containing:
- Capture Wizard Capture & Export utility
- USB Instant DVD device drivers
- Ulead VideoStudio 6 – Special full version
customized for Instant DVD
- Sonic MyDVD 3.5
- Cyberlink PowerDVD 4.0
- Neptune MediaShare 3.0
- Ulead DVD PictureShow
- Quick Time player
CapWiz manual.p65 6/4/2002, 12:21 PM9
9
Page 12
USB INSTANT DVD INST ALLATION
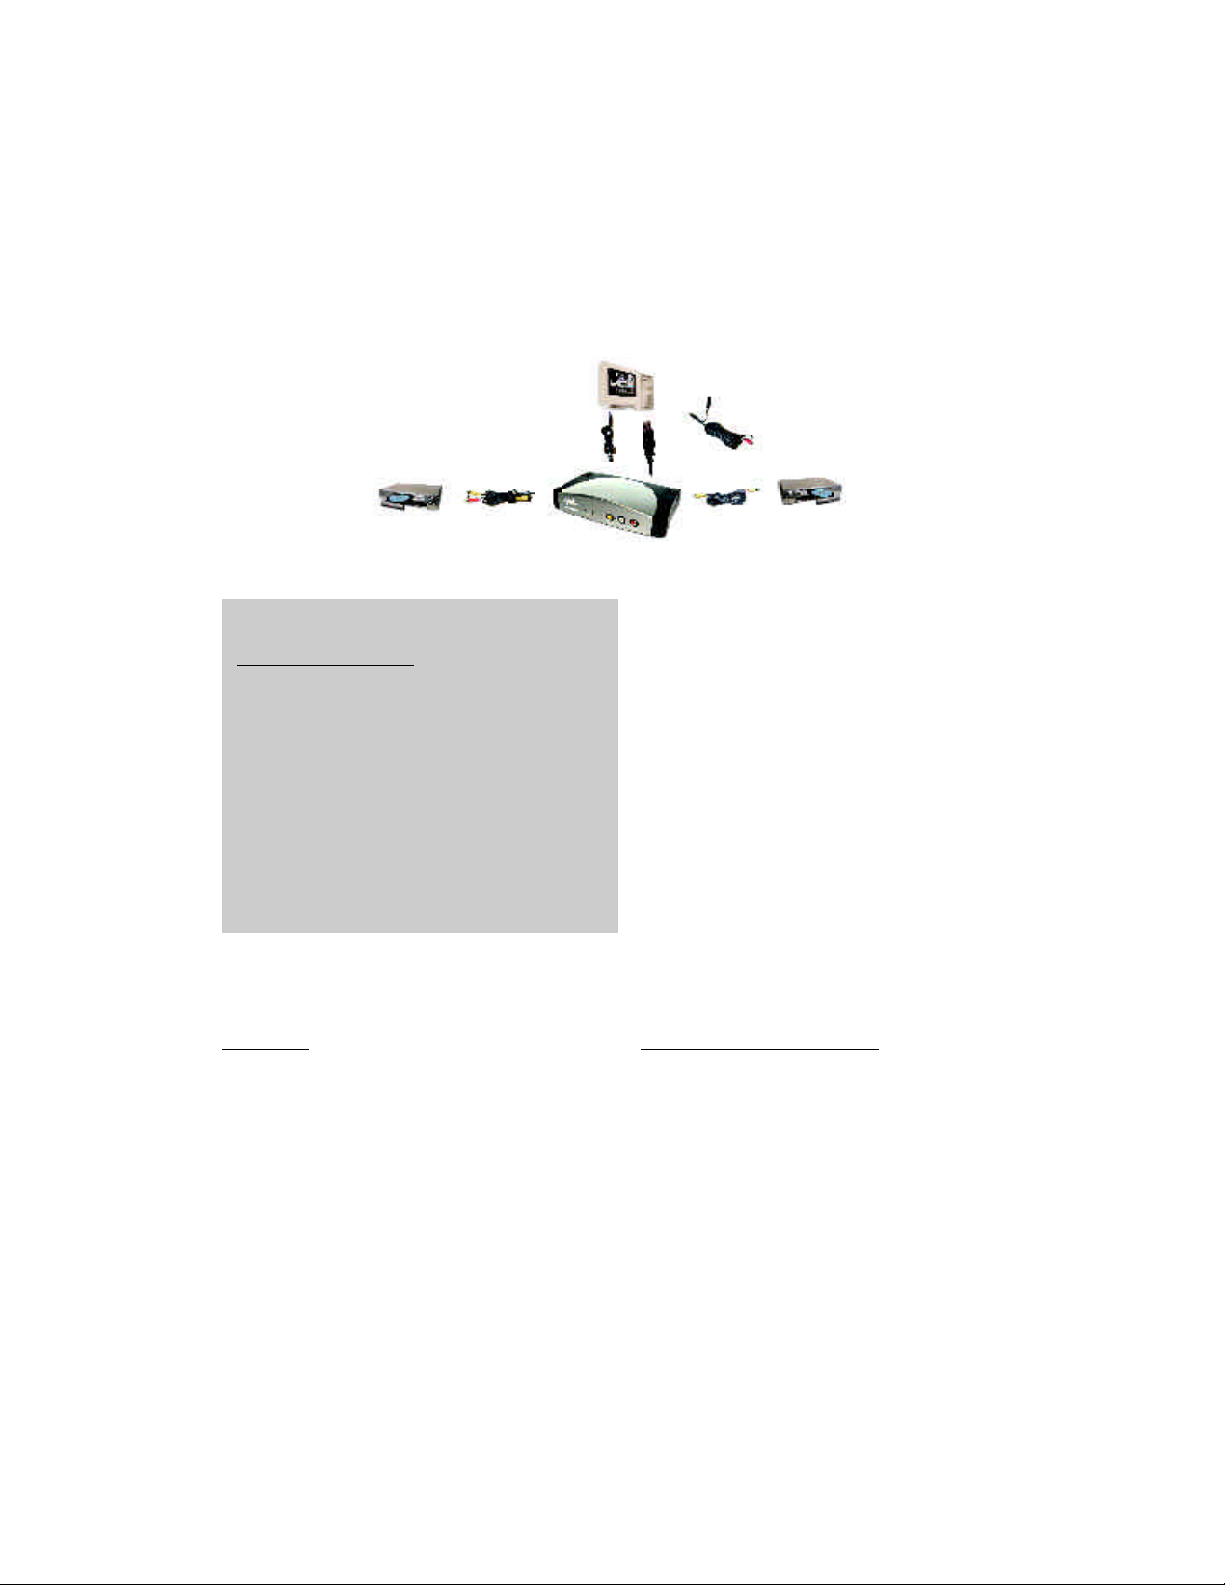
Check Contents - Wire it Up! - Plug It In! - Install Optimize System- - Verify Installation - Set Audio Mixer - Installation Summary
2. Wire It Up!
In this section we will connect all audio
and video cables that you will use to
capture audio and video and then send
audio and video back to a TV or VCR for
viewing or recording.
1. Connect your video source (VHS,
DVD, Laser Disc Player, TV. etc.) to
your USB Instant DVD.
Connect your (D) 6 ft. A/V In cable to
the 3 RCA jacks to your analog audio/
video source RCA Line Out.
The other end connects to the “RCA
Video In” jack and “Audio In” jack on the
back of your USB Instant DVD.
10
CapWiz manual.p65 6/4/2002, 12:21 PM10
A/V Source
USB Instant DVD
Page 13
USB INSTANT DVD INST ALLATION
Check Contents - Wire it Up! - Plug it In! - Install Optimize System- - Verify Installation - Set Audio Mixer - Installation Summary
2. Wire It Up! (cont’d)
2. Connect your USB Instant DVD
Audio to the Sound Card on your PC.
This will send Audio from your USB
Instant DVD to your PC.
Connect one end of your (E) 6 ft.
male to male stereo audio cable
to the Audio Out jack at the back of
your USB Instant DVD.
Connect the other end to the Line In
jack on your sound card of your PC.
Check your diagram of connectors on
your Sound Card
If you want to send captured or edited video
back to your TV or VCR for viewing or recording,
continue steps 3 & 4. If you only want to preview
& capture the video on your PC, skip to the Plug
It In section on page 6.
3. Connect your USB Instant DVD to
your TV or VCR. This will send captured or edited video back to your TV
or VCR for viewing or recording.
USB Instant DVD
PC Sound Card
USB Instant DVD
Connect (G) RCA cable to “Video
Out” on Instant DVD
Connect other end to Video IN on your
TV or VCR.
CapWiz manual.p65 6/4/2002, 12:21 PM11
A/V Source
11
Page 14
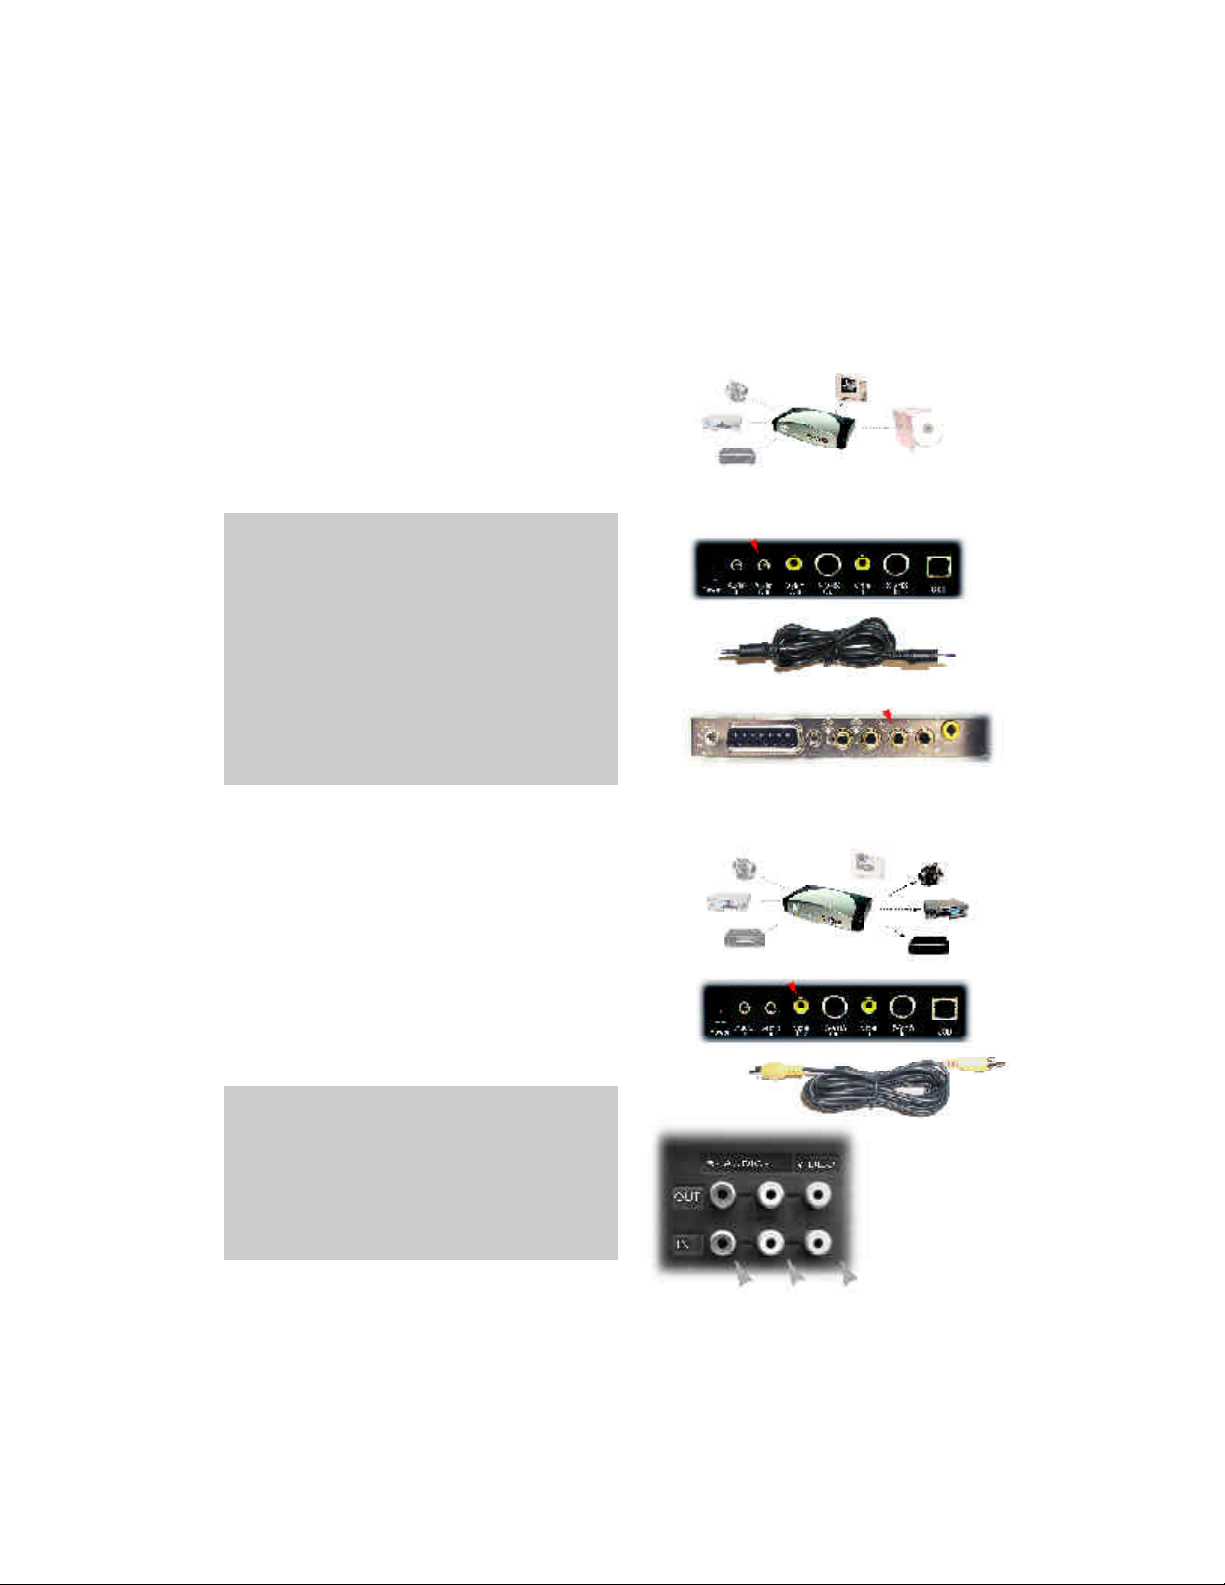
USB INSTANT DVD INST ALLATION
Check Contents - Wire it Up! - Plug It In! - Install Software - Verify Installation - Set Audio Mixer - Installation Summary
2. Wire It Up! (cont’d)
4. Connect the Audio Out of your PC to the
Audio In on your TV or VCR. This will send
recorded audio from your PC out for recording
or listening on your TV or VCR.
Connect the Right and Left RCA jacks of
the (F) 9 ft. Audio out to TV/VCR
cable to the Audio Inputs on your TV or
VCR.
Connect the 3.5mm stereo jack to the
Line Out or Speaker jack on your sound
card.
A/V Source
If you do not have a “Line Out” jack you can
connect this cable to your “Speaker Jack”.
Then you can plug your speakers into the “Y”
female 3.5mm jack
Sound Card Color Coded Connectors:
Audio Line-In = Light Blue
Audio Line-Out = Lime Green
Microphone = Pink
Speaker Out/Subwoofer = Orange
Right to Left Speaker = Brown
*Sound Card Connector color codes according
to PC-99 spec.
12
PC Sound Card
CapWiz manual.p65 6/4/2002, 12:21 PM12
Page 15
USB INSTANT DVD INST ALLATION
Check Contents - Wire it Up! - Plug It In! - Install Software - Verify Installation - Set Audio Mixer - Installation Summary
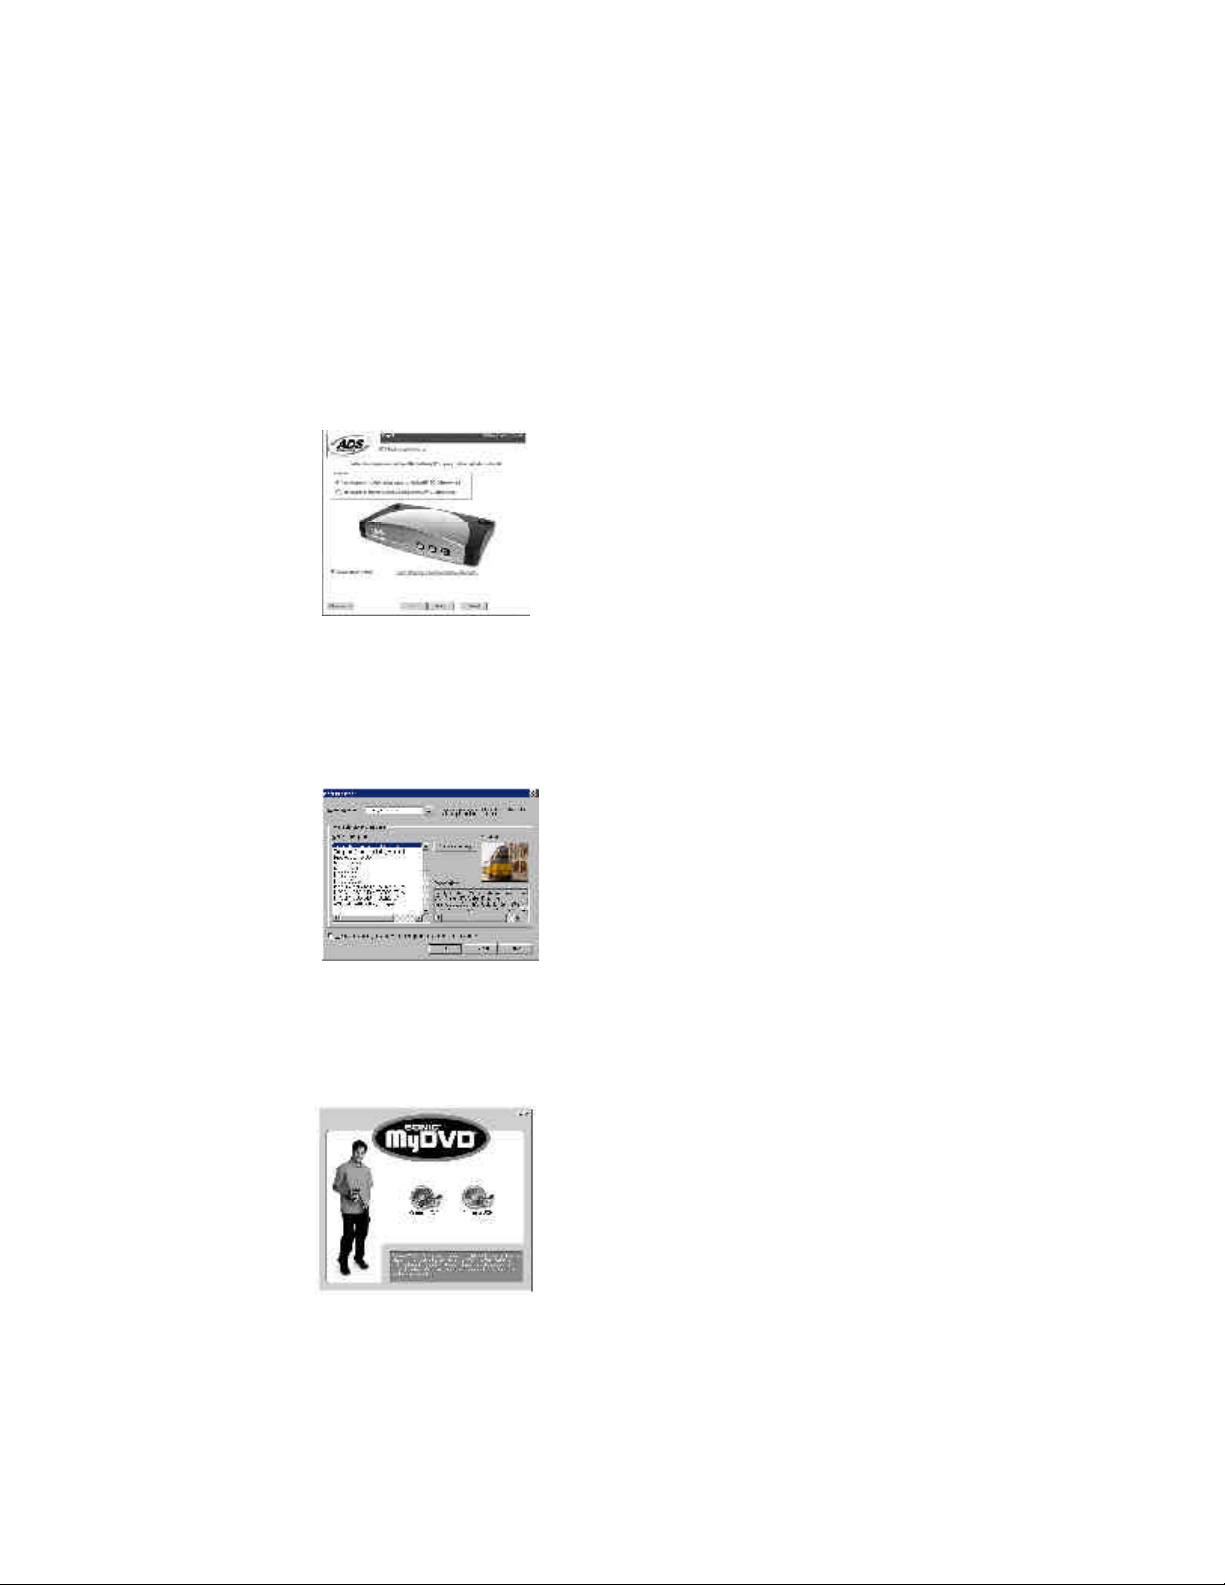
3. Plug It In & Install Device Drivers and Software
In this section you will Connect USB Instant DVD to your PC and Install Software Drivers. Please
read through this section first, then go back and follow these step by step instructions to connect
your USB Instant DVD and install device drivers and software applications:
1. Insert USB Instant DVD CD -
(Apple Quick time is required for our installers
to run. If you don’t have Quicktime Installed, it
will install automatically. Click Next on every
screen. No user name, registration or serial
number is required)
2. Once you see the Instant DVD installation
screen, Plug the power cable into your USB
Instant DVD, then plug it into a power source.
Now, plug your USB cable into USB Instant
DVD and your PC . Windows will recognize the
device and ask you for the drivers. Let
Windows conduct an automatic search for the
drivers. The drivers are located in the root
directory of your USB Instant DVD CD. Windows will install the drivers.
For WINDOWS XP users:
Click Continue at this
dialog box.
3. Now that you have installed the device, Click
the Capture Wizard button to install the key
software components that make Instant DVD
work as well as the CapWiz capture and
playback application.
a.) If you do not have Microsoft’s DirectX 8.1
installed, it will install automatically. DirectX
8.1 is required for proper operation of your
Instant DVD. Installation of DirectX 8.1 requires a re-start of your computer.
b.) If your computer restarted, Click “My
Computer” on your desktop. Double click the
CD Drive icon to bring back the Instant DVD
Installation screen.
c.) Continue installing the key bundled
software on to your system; Video Studio 6 and
MyDVD. We recommend installing MyDVD last
because it also requests you to restart your
system when the installation is complete.
CapWiz manual.p65 6/4/2002, 12:21 PM13
13
Page 16

USB INSTANT DVD INST ALLATION
Check Contents - Wire it Up! - Plug It In! - Install Optimize System- Verify Installation - Set Audio Mixer - Installation Summary
4. Optimize System For Best Performance
Optimize System For Best Performance
Set your VGA Resolution
1024 X 768 is the optimal resolution for
viewing video at full resolution. DVD video is
captured at
704 x 480 (704 x 576) PAL. If your resolution is
not high enough you will not be able to view the
video at full resolution.
1. Right click on your desktop
2. Click Properties
3, Click on Settings Tab
4. Adjust screen area to 1024 X 768 & 16 Bit
Color
Enable DMA to optimize video capture:
For Windows 98SE: Enable DMA on your IDE
hard drive for optimal video capture (Note: Not
all hardware supports DMA acess).
1. Right click on My Computer
2. Click Properties
3, Click on Device Manager
4. Double click Disk Drives
5. Double click Hard Disk (labeled Generic IDE
type XXX)
6. Click the settings tab
7. Enable DMA by checking the DMA box.
8. Click OK
9. Click OK
Your computer will reboot with DMA enabled.
14
CapWiz manual.p65 6/4/2002, 12:21 PM14
Page 17
CAPTURE WIZARD STEP-BY-STEP
Check Contents - Wire it Up! - Plug It In! -Install Optimize System- Verify Installation - Set Audio Mixer - Installation Summary
5. Verify Hardware Installation
Check Device Manager to verify that the
USB Instant DVD hardware is recognized by
Windows and is properly installed.
Win98, Win98SE, WinME:
1.) Click Start, Settings, Control Panel.
2.) In Control Panel, click System.
3.) Click Device Manager tab.
4.) Double click the Imaging Device heading.
5.) USB Instant DVD should be listed.
WinXP, Win2000:
1.) Click Start, Settings, Control Panel.
2.) In Control Panel, click System.
3.) Click on the Hardware Tab.
3.) Click Device Manager Button.
4.) Double click the Imaging Device
heading.
5.) USB Instant DVD should be listed.
If USB Instant DVD is listed under the
Imaging Device heading, then the device is
properly installed.
CapWiz manual.p65 6/4/2002, 12:21 PM15
15
Page 18

CAPTURE WIZARD STEP-BY-STEP
Check Contents - Wire it Up! - Plug It In! - Install Software - Verify Installation - Set Audio Mixer - Installation Summary
6. Windows Audio Mixer Settings
Windows Audio Mixer Settings
USB Instant DVD uses your computer sound
card to record and playback the audio portion
of your video recordings. You need to set up
your audio mixers to properly capture the
audio.
Volume/ Play Control Mixer
1.) Click “Mute” on the Line-In Mixer. If
Line-In is not present click “Options” and
select Line-In as one of the mixer options
that should appear in the Volume/Play
Control mixer.
Don’t worry, you’ll still hear the audio when you
preview or record your video. You should have a
full duplex sound card. This means that it
records and play’s back at the same time so you
will hear the playback through the sound card
while previewing and recording video. If you hear
and echo while recording video, check your mixer
and be sure Line-In is muted or check your sound
card to be certain that it supports full duplex.
Record Mixer
1.) Make the Record Mixer appear by
Clicking Options on the Volume/Play
Control Mixer & click the “Recording”
option.
2.) When switching to Recording, be sure
that the Line-In option is selected.
3.) Click OK and the Record Control mixer
is displayed.
4.) Select Line-In on the Record Control
Mixer.
5.) You can control audio record levels with
this mixer.
16
CapWiz manual.p65 6/4/2002, 12:21 PM16
Page 19
CAPTURE WIZARD STEP-BY-STEP
Check Contents - Wire it Up! - Plug It In! - Install Software - Verify Installation - Set Audio Mixer - Installation Summary
7. Installation Summary 8. Start Making DVD Movies
By now you should have completed the
following:
1.) Made all of the Audio and Video
connections between Instant DVD and
your Audio/Video equipment.
2.) Connected Instant DVD to the Power
Supply and USB Port on your PC.
3.) Installed USB drivers and verified the
device is properly installed
4.) Installed all necessary software
applications required for proper operation.
5.) Now you are ready to Start Making
DVD Movies.
USB Instant DVD Capture/Playback
Now you are ready to start capturing video.
We have created the Capture Wizard
application to allow you to quickly capture
and export video on your PC without
starting a video editor or DVD Authoring
program. Use the Capture Wizard application to test video capture and playback of
video before moving on to Video Studio 6 or
MyDVD.
We have created a simple getting started
Wizard that allows you to verify your
connections and make the proper setup
choices before capturing video.
CapWiz manual.p65 6/4/2002, 12:22 PM17
17
Page 20
CAPTURE WIZARD STEP-BY-STEP
USB Instant DVD Capture Wizard
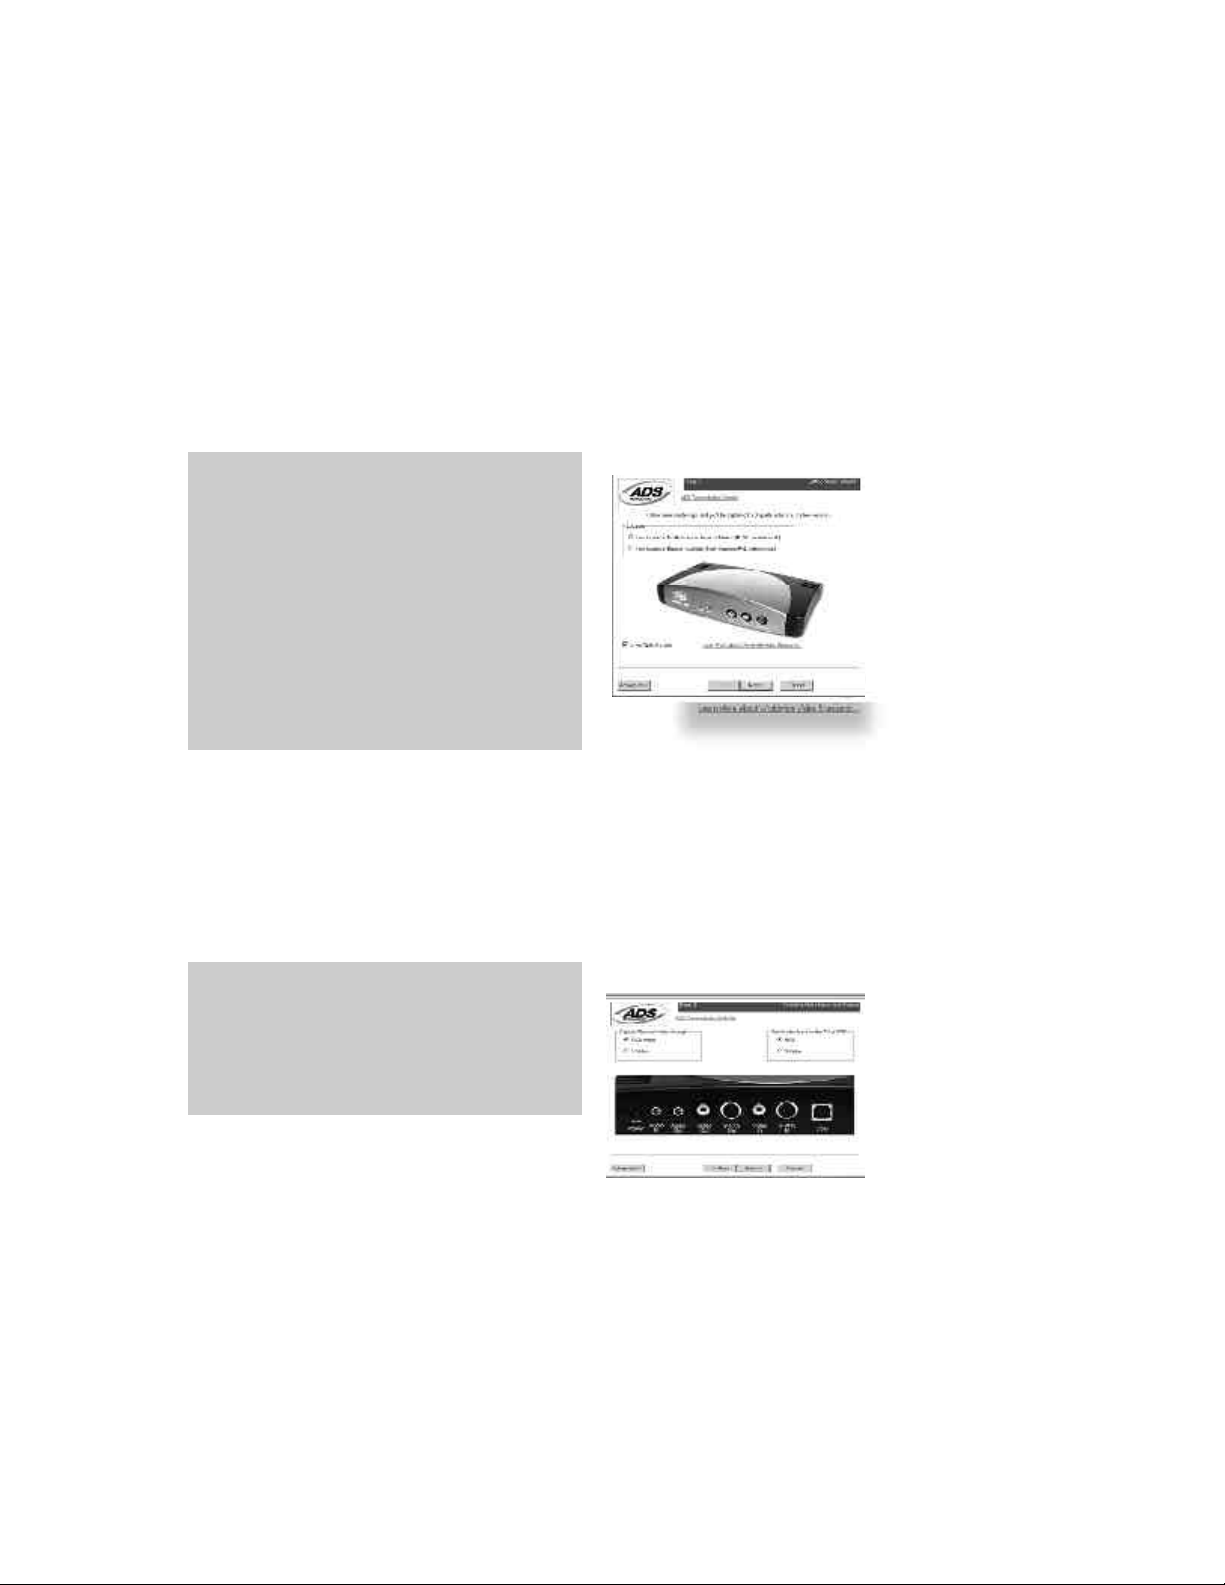
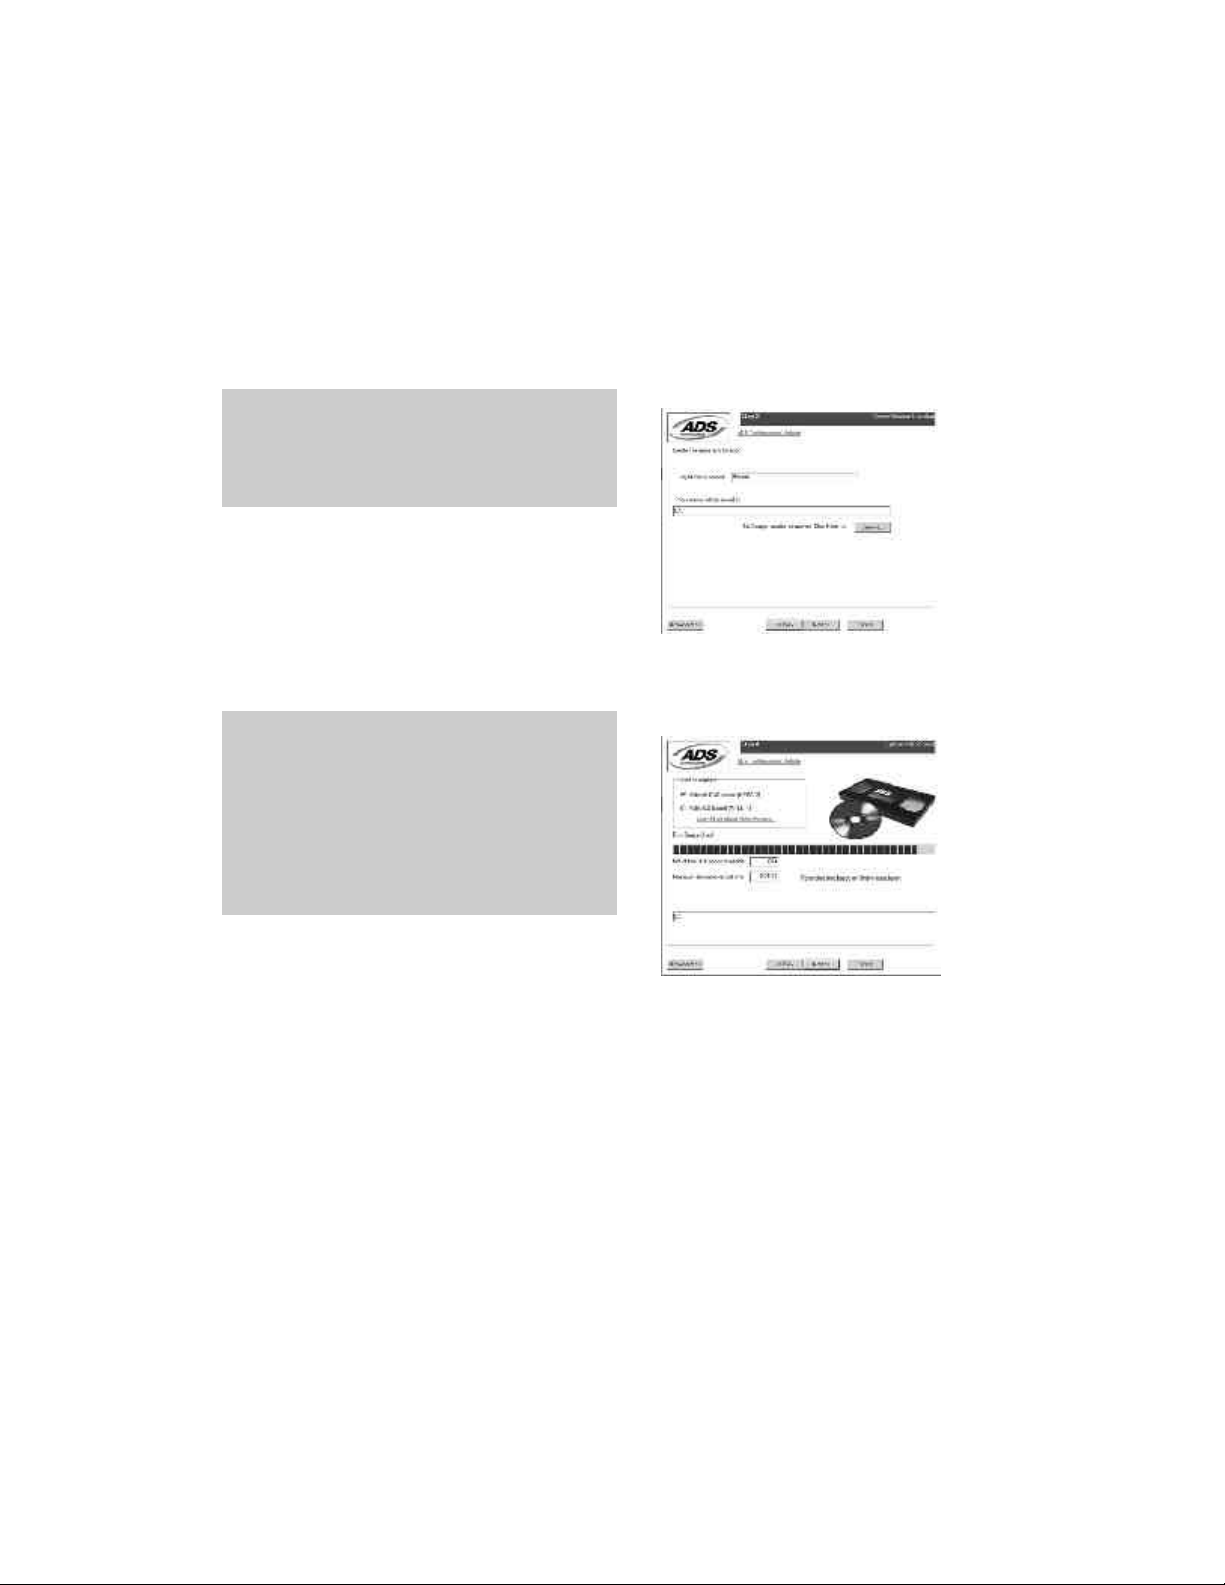
Step One : Open Cap Wiz.
Click the Cap Wiz icon on your Desktop
Or Click “Start” -> “Programs” -> “ADS Tech Instant
DVD” and click on “Capwiz”
Choose worldwide video standard based on
country
For more information on these standards,
click on “Learn more about worldwide video
standards”
Step Two: Select Video Inputs &Outputs
Choose RCA or S-Video based on your
video source
18
CapWiz manual.p65 6/4/2002, 12:22 PM18
Page 21
CAPTURE WIZARD STEP-BY-STEP
USB Instant DVD Capture Wizard (cont’d)
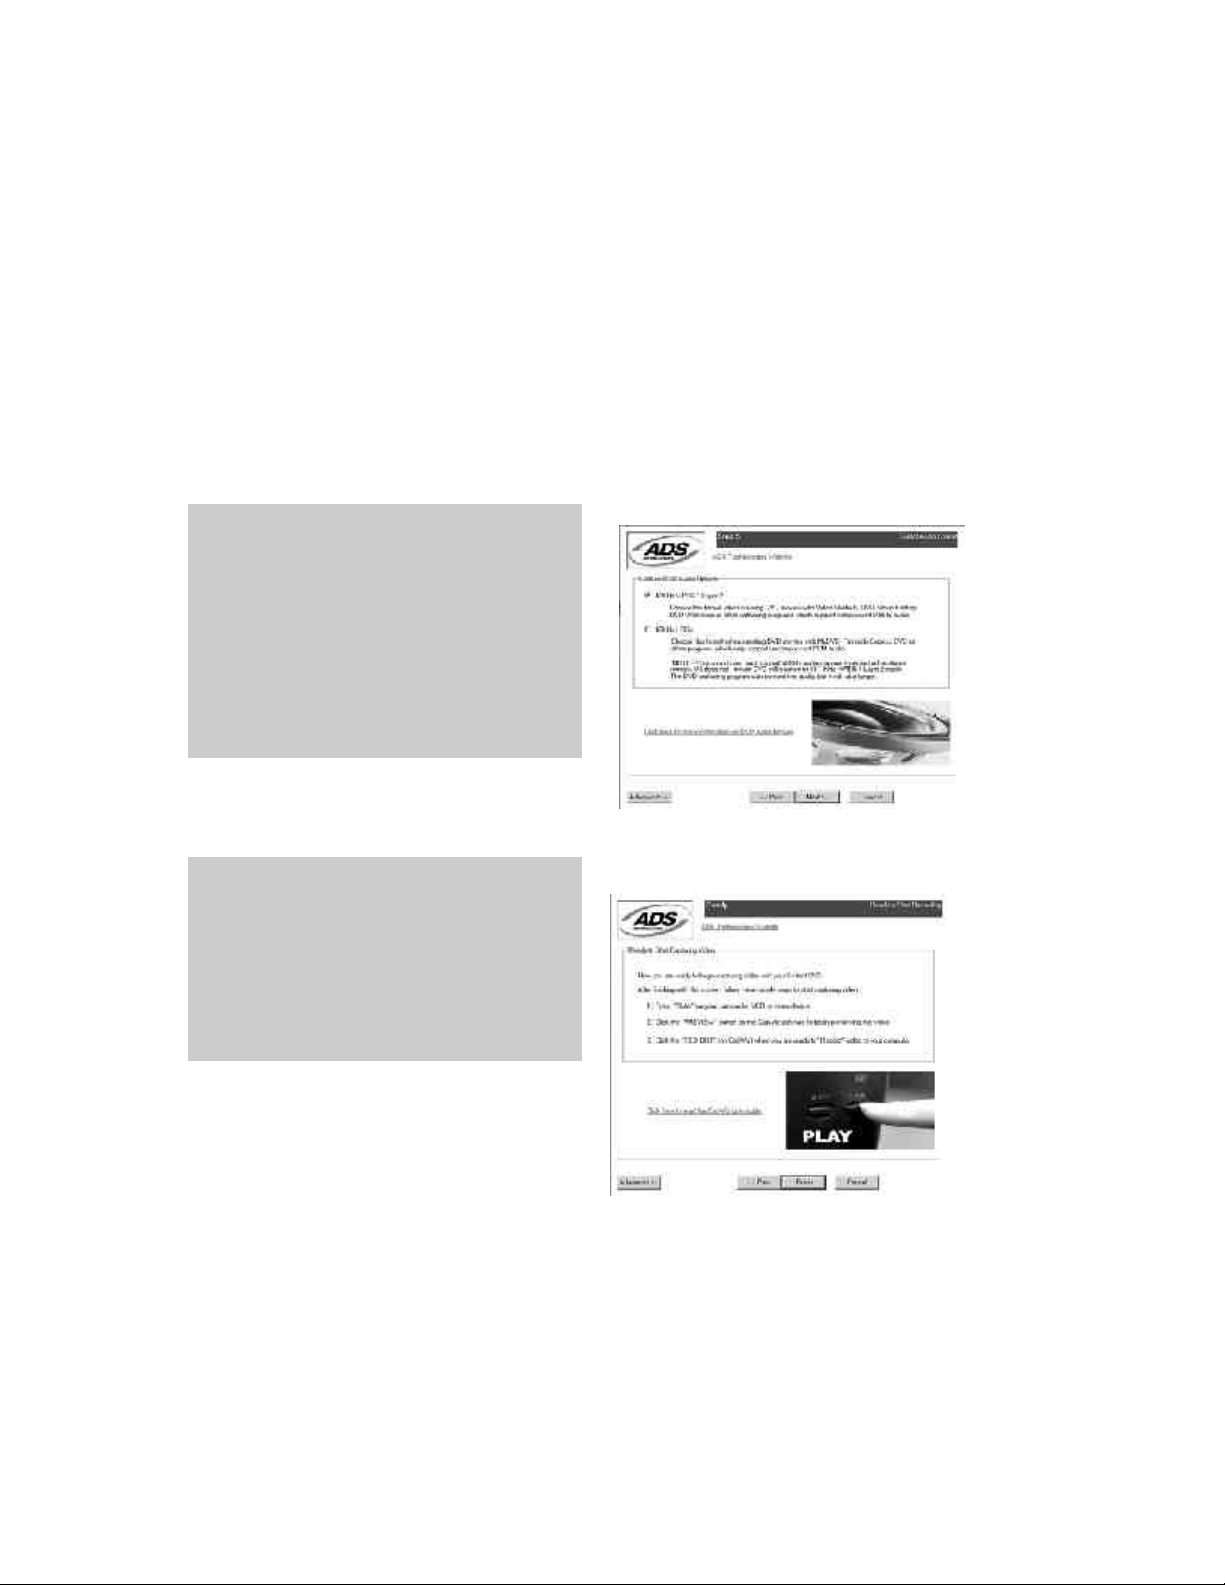
Step Three: Create file name and
select file location
Step Four: Choose video format and
click Finish.
For more information on these MPEG, click on
“Learn more about video formats”
CapWiz manual.p65 6/4/2002, 12:22 PM19
19
Page 22
CAPTURE WIZARD STEP-BY-STEP
USB Instant DVD Capture Wizard (cont’d)
Step 5: If you chose MPEG-2 format you will see
Step 5. Here you choose the MPEG-2 audio
format you wish to capture. Choose MPEG-1
Layer 2 if you want to create a file comaptible
with Video Studio, DVD Movie Factory or DVD
WorkShop from Ulead.
Choose LPCM if you plan to create a DVD disk
using MyDVD.
Ready: Now you are ready to start viewing and
capturing video. You will need to start your
camcorder or VCR playing. Click Finish to close
the Wizard screen.
20
CapWiz manual.p65 6/4/2002, 12:22 PM20
Page 23
CAPTURE WIZARD STEP-BY-STEP
USB Instant DVD Capture Wizard (cont’d)
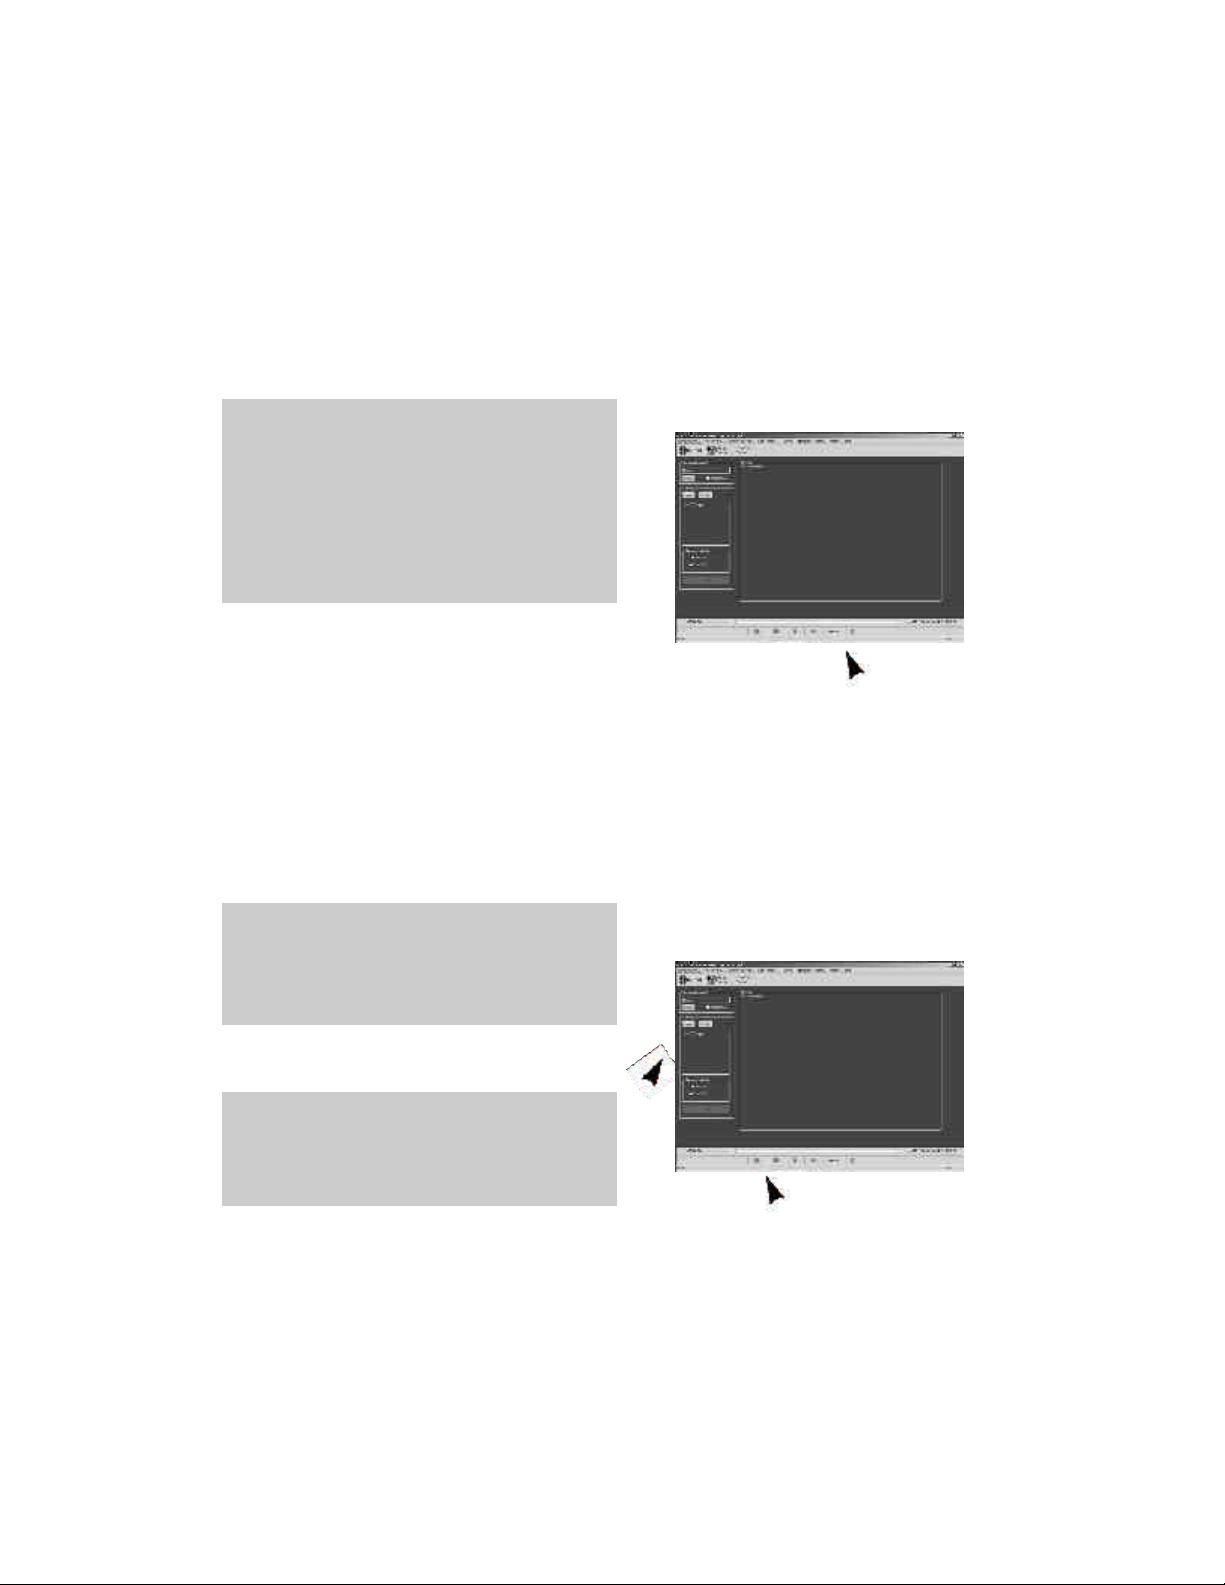
Step Six: Press Play on your video source
(VCR, DVD player, etc.).
Then in Cap Wiz, click the Preview button.
After a 2 second delay, you will see your video
in the preview window.
Step Seven : Click Record button to begin
capturing video to your PC. Click Stop to stop
recording. The filename will appear in the
Playback Library.
You can review your clip by selecting the file
from the cap wiz library and clicking on Play.
CapWiz manual.p65 6/4/2002, 12:22 PM21
21
Page 24

CAPTURE WIZARD STEP-BY-STEP
Using Capture Wizard Video Capture/Playback tool for the first time:
You have just completed the Wizard screens to ensure that you have connected your video cables,
selected your video format and now you are ready to capture video.
Application Icons
The icons at the top of the CapWiz screen allow you to easily jump from CapWiz to the bundled applications that came
with your Instant DVD. You can quickly jump to Video Studio 6, MyDVD or review the Capture Wizard screens anytime
video is not playing in the preview area. When you click on an application icon, CapWiz will automatically close.
You can repeat the Wizard steps by clicking the Capture Wizard icon at the top of the application anytime video is not
playing. The Wizard will run every time you start CapWiz. You can disable this by clicking Options at the top of the
application.
1.) Click or uncheck - Show Splash Screen
2.) Click or uncheck - Show Wizard
You can re-enable these features at anytime by re-selecting the options.
Ready to Preview and Capture Video
1. Be sure your VCR, camcorder or other video source is turned on.
2. Press play on your video source
3. Press Preview on the CapWiz interface. After a 2 second delay, you will see your video in the preview
window.
4. To Stop Preview, Click the Stop button.
Naming Files:
Before Recording check the Recording Filename box in the upper left hand corner of the application. The
file name you selected in the Wizard Screen is listed here.
1. Keep this file name if you wish or type in a new file name.
2. Check the Auto Naming box and CapWiz will automatically name each captured file in sequential order; i
I.e. if your video file is “My Video”, the first file captured will be named “My Video-000”, the second “My
Video-001” and so on.
3. You can also click the “Unique” button and CapWiz will give your next vide a unique file name.
4. Every time you stop a capture, the new file name will be displayed in Playback List box.
5. If don’t give each capture a new name, or use Auto Naming and capture several clips, you will actually
keep writing over the same file each time because each file will have the same file name. This is actually
handy if you want to do some simple test captures.
Begin Recording:
1. You can start recording from the Stop or idle setting in CapWiz or while you are previewing video.
2. Click the red record button to begin recording.
3. To Stop recording, Click the Stop “? “ button.
4. The video will be displayed in the resolution you selected for the video capture:
a. VCD 352 x 240 NTSC / 352 x 288 PAL
b. SVCD 480 x 480 NTSC / 480 x 576 PAL
c. DVD 704 x 480 NTSC / 704 x 576 PAL
22
CapWiz manual.p65 6/4/2002, 12:22 PM22
Page 25

CAPTURE WIZARD STEP-BY-STEP
Using Capture Wizard Video Capture/Playback tool for the first time:
Playback Captured Video
Playback on the computer screen:
This is the default setting. Video will be played
back at the resolution it was captured in.
1.) Click on the file name in the Playback List Box.
2.) Click the ? button to begin playback.
3.) To Stop Playback, Click the Stop button
Playback to TV or VCR:
If you wish to send the video you have captured
back to a TV for viewing or record to a VCR;
1.) Click TV/VCR in the Playback Video on box.
2.) Select the file you would like to play
3.) Click the PLAY button to begin playback.
4.) To Stop Playback, Click the STOP button
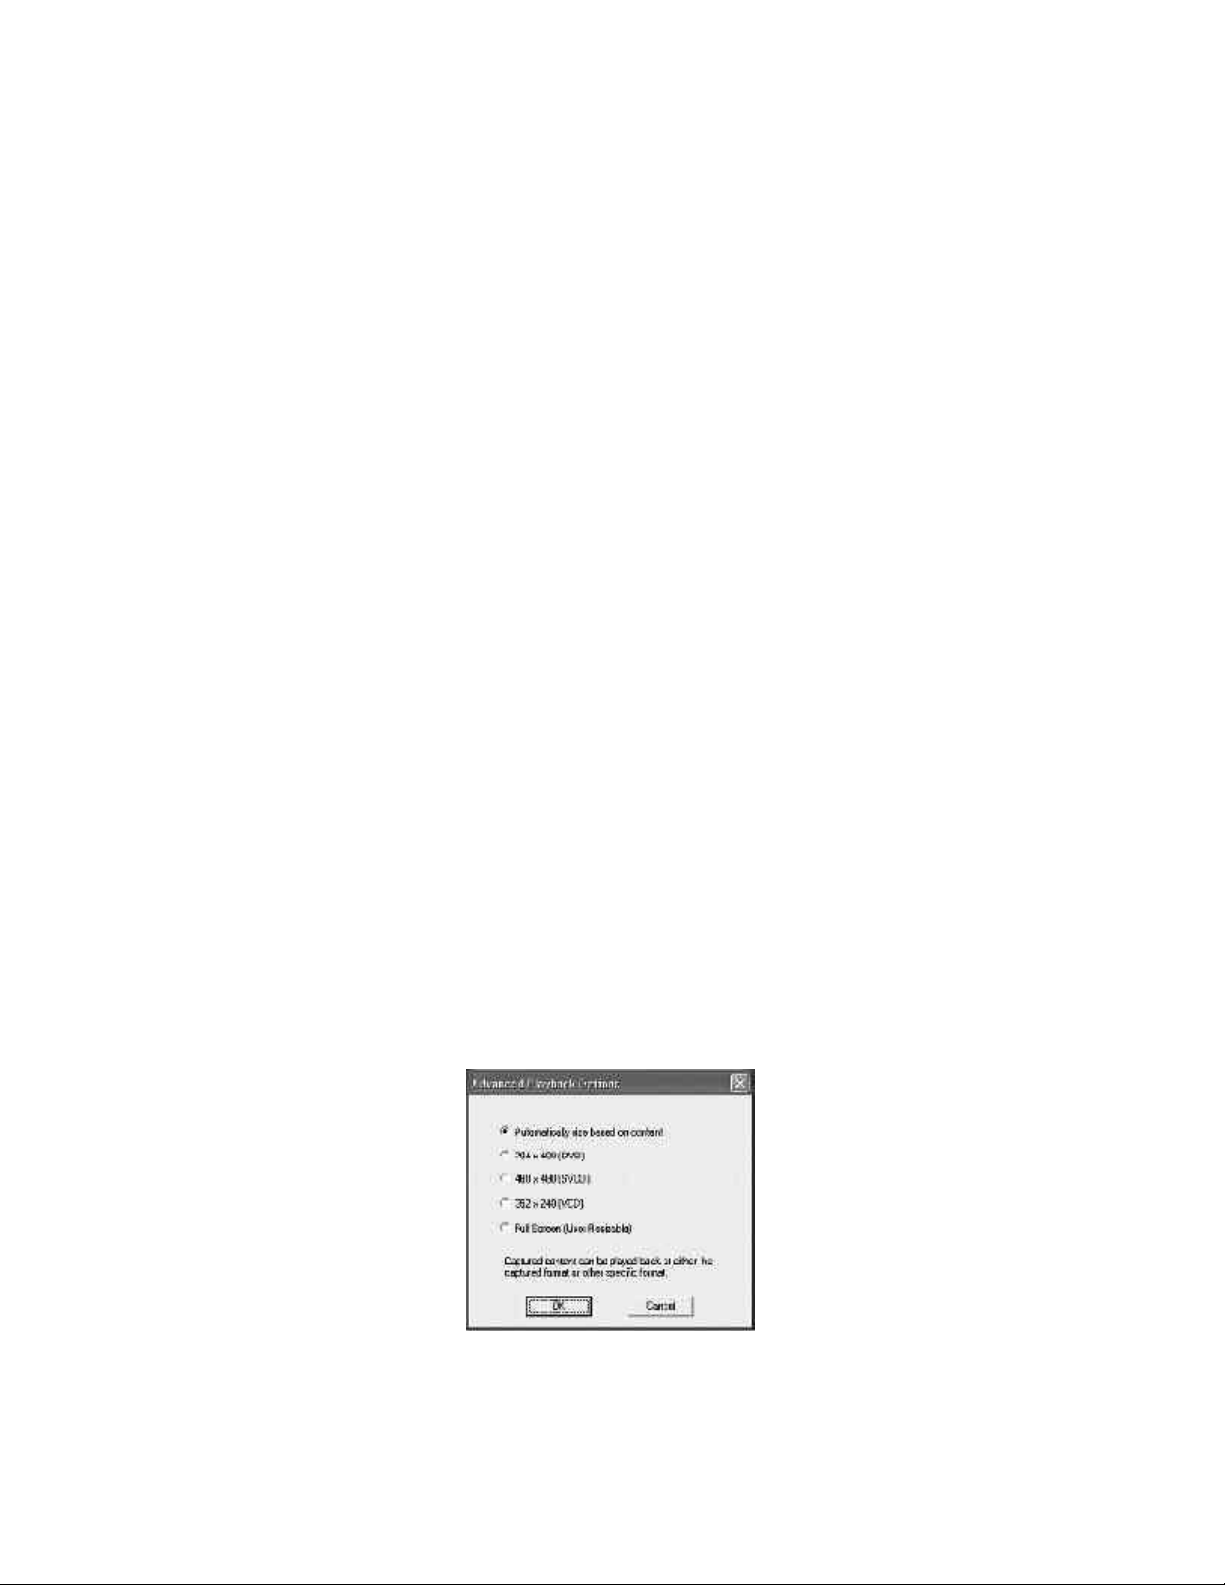
Playback Options:
This will allow you to playback captured video at
any standard playback resolution regardless of
the capture resolution:
1.) Click Options at the top of the screen.
2.) Click Advanced
3.) Click Playback Options
4.) Select the desired playback resolution.
5.) if you select Full Screen, then you can
manually drag the playback window to any size.
Playback List Box
The Playback list box shows all of your video
captures. This list will match the directory
location you selected in the Capture Wizard
screens. If you are unsure of the location you
selected, run the Wizard again.
Browse: The Browse button will allow you to
browse to other file directories or hard drives.
If you select another directory, any MPEG video
files located there will appear in the Playback
list box.
Details: The Details button will allow you
examine the details of the files in the Playback
List box.
Click on the Details Button and a dialog box will
open showing detailed information about each
file such as: Date, File Size, File Name and
location on your system
Click on any file in this dialog box and then click
Details again and you will see more details
about this individual files such as:
1.) Video bit rate
2.) Audio sampling rate
3.) Audio bit rate
4.) Frame rate
Deleting a File:
From the detailed information box you can
delete a file by clicking the “Remove” button.
CapWiz will ask you if you are sure, click OK and
the file is deleted from your system.
23
CapWiz manual.p65 6/4/2002, 12:22 PM23
Page 26
CAPTURE WIZARD STEP-BY-STEP
Menu Options
This section will describe all settings and
choices for all of the menu options along the top
of the CapWiz Interface.
Video Inputs/Outputs:
This dialog box allows you to quickly change
your video input and output choices. These
settings can also be changed by running the
Capture Wizard Screens.
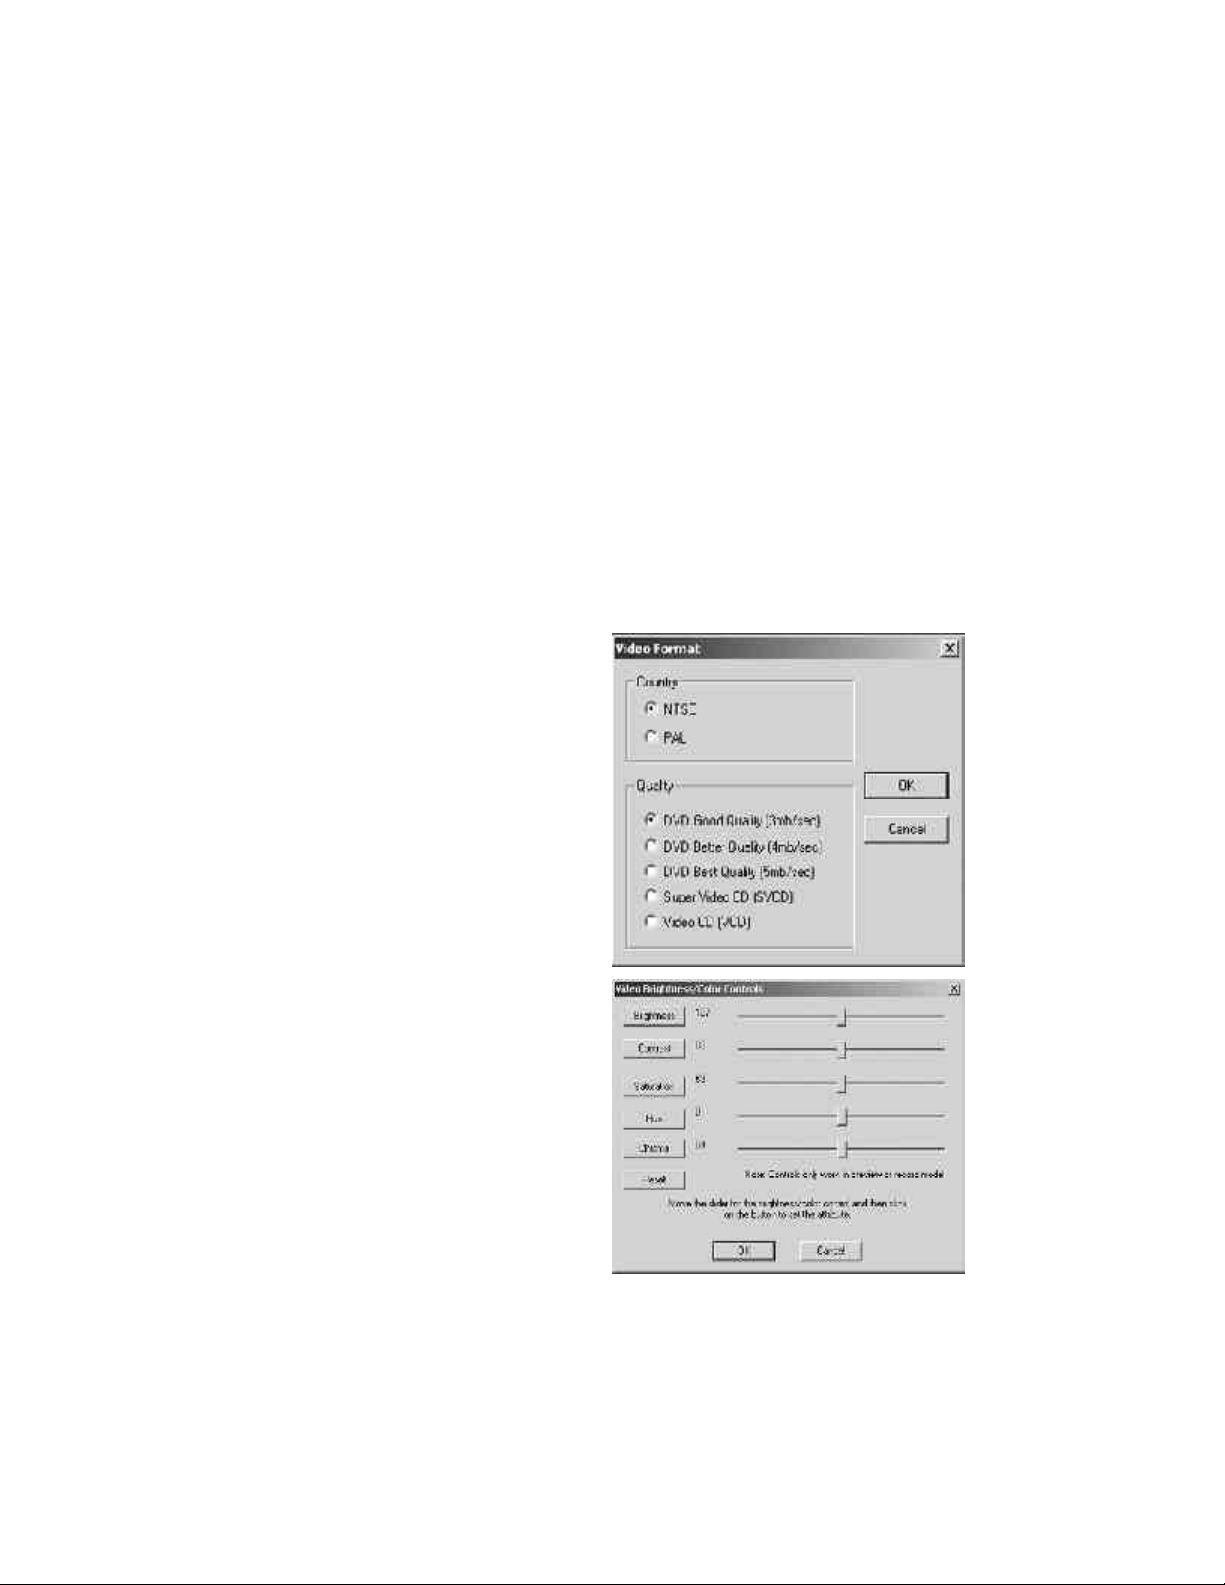
Video Format:
The Video format dialog box allows you to
quickly change your video format for NTSC or
PAL. If you are not sure of the correct selection,
run the Capture Wizard and read the document
called “Learn more about worldwide Video
Standards”
The Video format box also allows you to quickly
set your video resolution and quality setting.
You can choose:
a. DVD at Good, Better or Best Quality
b. Super Video CD (SVCD)
c. VCD
Brightness/Color
Here you can make changes to Brightness,
Color, Saturation, Hue and Chroma.
1. Move the slider
2. Click the associated button to “SET” your
adjustment; i.e. Slide the Brightness slider then
Click the Brightness button to set.
3. You will see the change in about 2 seconds.
The setting has to be communicated to Instant
DVD and set in the Instant DVD box.
4. If you mess up, Click Reset to restore factory
default settings.
5. Click OK to close the box.
There are no quality settings for SVCD or VCD
as these formats have standard video bit rates.
DVD Settings - 3, 4 or 5 Megabits per second
(Mb/sec.)
SVCD - MPEG-2 video at 2.4 Mb/sec.
VCD - MPEG-1 video at 1.15 Mb/sec.
The Video format and bit rate (3,4 or 5 Mb/sec)
for DVD video will be displayed in a status area
of the CapWiz interface you will always know
what video format and bit rate you are recording.
24
CapWiz manual.p65 6/4/2002, 12:22 PM24
Page 27

Menu Options
CAPTURE WIZARD STEP-BY-STEP
Audio/Video Delay Parameters
We have worked hard to ensure that audio and
video are in synch, but it is hard to predict
everyone’s system configuration and timing.
If the audio and video are not in synch you can
adjust the timing here.
Note:
1. Make adjustments with No Video Playing
2. Make small adjustments.
3 Change only one setting at a time; only audio
or only video.
4. Make small adjustments.
5. Watch the video carefully during capture and
playback so you can properly determine if audio
is ahead of the video or if the video is ahead of
the audio.
6. Watch both the preview and the captured
video. Often times the preview may be slightly
off, but the recorded file is fine.
7. Most corrections can be made by changing
ONLY the Audio timing.
8. During long captures you may see the lip
synch drift off a bit and then return to normal a
few minutes later. This will most likely not affect
your recording.
9. If you mess up, click the Reset button to
return to factory default settings.
Video Capture Timing:
Making an adjustment here will control audio
and video timing during preview and capture.
1. Slide Audio or Video delay slider.
2. Click the Audio or Video button to set.
3. Click OK.
4 Click Preview to see the change.
5. Repeat steps 1-4 until you have perfect lip
synch.
Video Playback Timing:
Making an adjustment here will control audio
and video timing during preview and capture.
1.) Slide Audio or Video delay slider.
2.) Click the Audio or Video button to set.
3.) Click OK.
4.) Click Preview to see the change.
5.) Repeat steps 1-4 until you have perfect lip
synch.
Control
The Control menu gives you another way to
control video recording and playback:
The selections are: Preview, Record, Stop,
Pause Play
Applications
The Applications menu gives you another way to
jump to bundled applications and you can also
change the path of these applications if you
happened to install them on a different drive.
1. Click the Applications menu button
2. Click on MyDVD or Video Studio to Jump to
the selected application. Capture Wizard will
automatically close when you do this.
3. Click the Edit button. This will show the
default or standard directory path the applications are normally installed.
4. To change the directory path click the box with
the “…” and you can browse to the directory path
you installed the application.
CapWiz manual.p65 6/4/2002, 12:22 PM25
25
Page 28
CAPTURE WIZARD STEP-BY-STEP
Menu Options: Options
The Options menus provide the widest variety
of selections in customizing your use of the
Capture Wizard application:
Click the Options button at the top of the
interface to view the Options drop down
menu.
Show Splash - If there is a check mark next to
this an “ADS” splash screen will appear on your
screen when you start Capture Wizard. To
disable, click on “Show Splash” and the check
mark will disappear.
Show Wizard - If there is a check mark next to
this, the “Capture Wizard” screens will appear
on your screen when you start Capture Wizard.
To disable, click on “Show Wizard” and the
check mark will disappear.
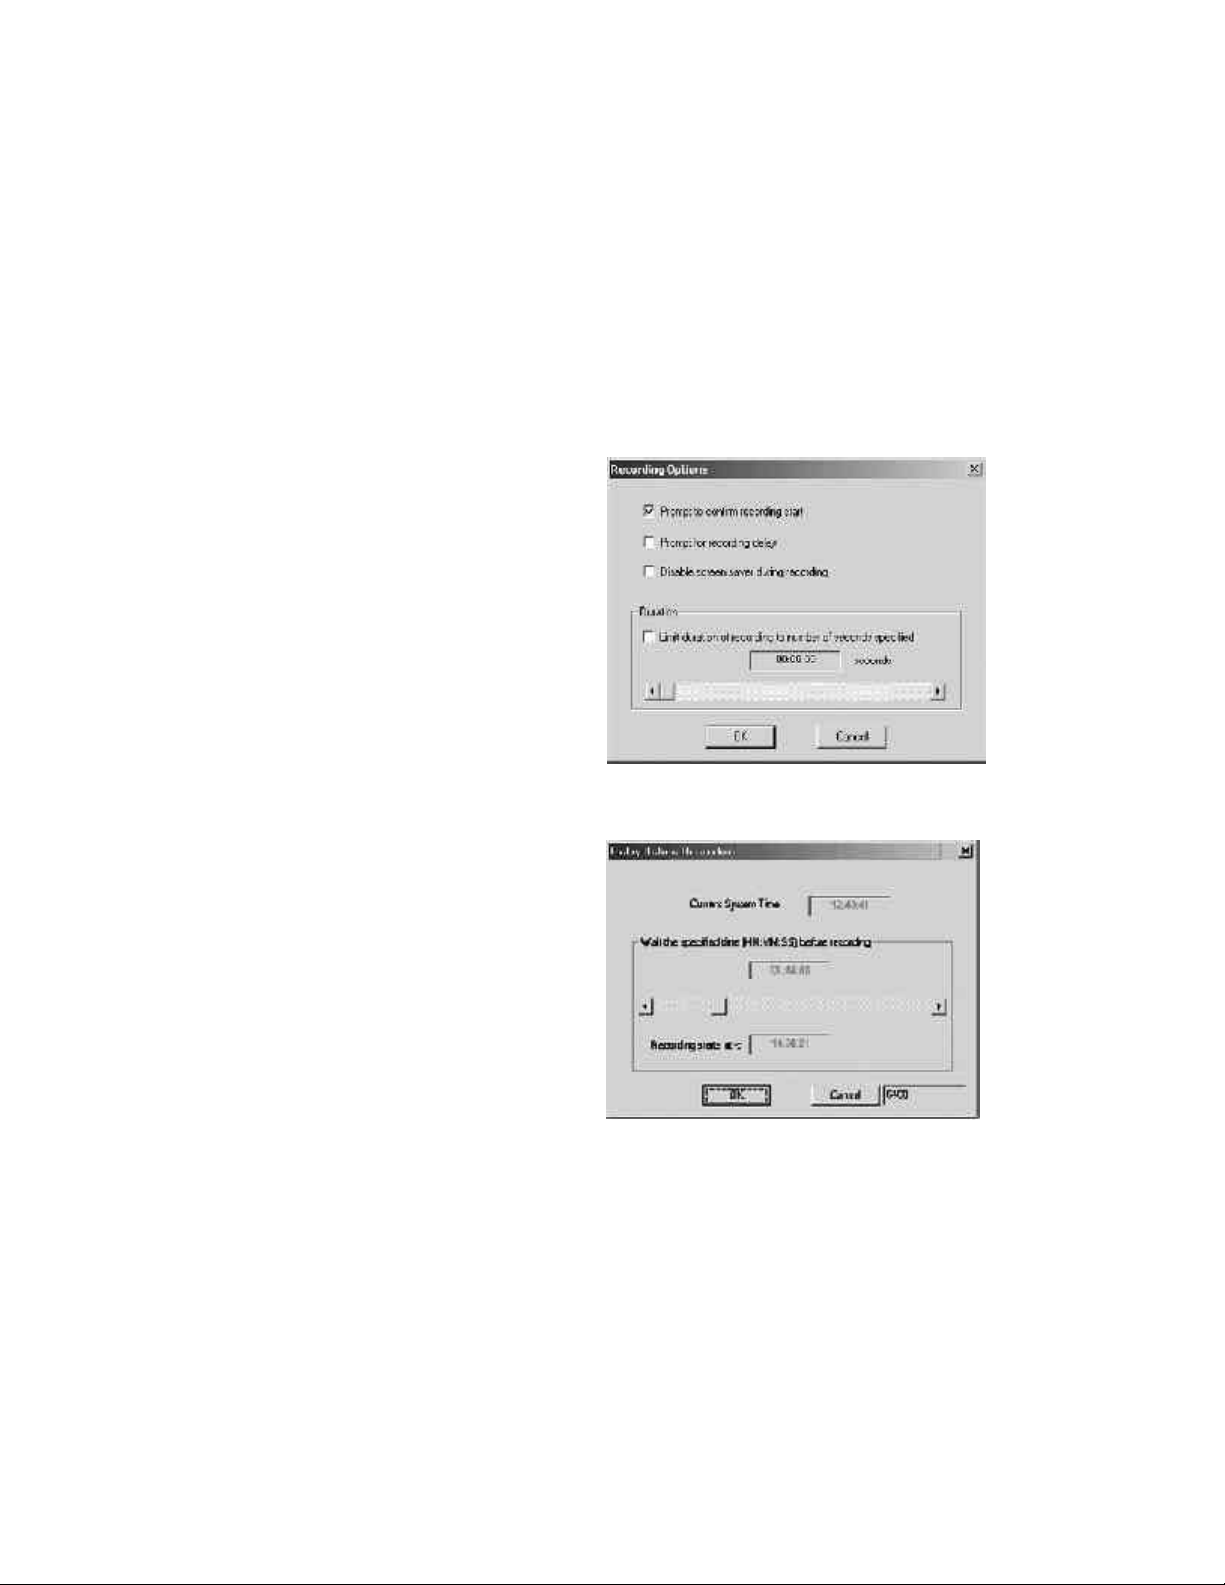
Prompt Record - If this has a check mark next to
it, you will see a “OK to begin Recording”
confirmation every time you click on the record
button. To disable, click on “Prompt Record”
and the check mark will disappear.
Prompt Delay Record - Enabling this feature
will cause the “Recording Options” box to
appear when you click the Record Button. Click
“Prompt” Delay Record” again to disable. More
on this below.
Recording Options Prompt to Confirm Recording - This will be
checked if you enabled the feature as described
above. This will prompt you to confirm you want
to record. You can use this to time a recording
sequence.
26
CapWiz manual.p65 6/4/2002, 12:22 PM26
Page 29
CAPTURE WIZARD STEP-BY-STEP
Menu Options: Advanced
There are several advanced features accessible through this menu.
Audio - In the Wizard screens, if you selected MPEG-2 for the video capture format, you were given
the opportunity to select 48 KHz MPEG-1 Layer 2 or 48 KHz LPCM audio format.
The Advanced Audio Options allows you to confirm your settings and make any changes.
Enable 48 KHZ Capture - MPEG-1 Layer 2:
Check this box if you wish to capture at 48 KHz audio. This is required to create a DVD compliant
video file.
Use 48KHz, but Capture in PCM format Check this box additionally to capture audio in the PCM
format. To capture 48KHz PCM audio, both boxes must be checked.
The CapWiz interface will display the audio setting during capture and preview as 48 KHz for 48 KHz
MPEG-1 Layer 2 and 48 KHz PCM for PCM audio capture.
SVCD and VCD video use 44.1 KHz MPEG-1 layer 2 audio format automatically.
Encoding Bitrate - You can select the audio encoding bitrate for MPEG-1 Layer 2 audio. The audio
bitrate for PCM audio is always 1,536 kbps or approximately 11.52 MB/minute.
Select the audio bit rate you desire for VCD, SVCD or DVD video. These bit rates are measured in
kilo bits per second (kbps) The standard for VCD and SVCD is 224 kbps, but you can select a range
from 64 kbps to 384 kbps.
Playback
This will allow you to playback captured video at any standard playback resolution regardless of the
capture resolution:
1.) Click Options at the top of the screen.
2.) Click Advanced
3.) Click Playback Options
4.) Select the desired playback resolution.
5.) If you select Full Screen, then you can manually drag the playback window to any size.
CapWiz manual.p65 6/4/2002, 12:22 PM27
27
Page 30

CAPTURE WIZARD STEP-BY-STEP
Menu Options: Advanced
Split Stream Audio
Some DVD authoring programs require the
audio and video to be separate elementary
streams.
Click the box to enable this feature. When you
capture video two (2) separate files will be
created.
Audio file will have the .mpa extension
Video file will have the .mpv extension
Click OK to set and close dialog box.
This setting will be in effect until you close
CapWiz. The next time you use CapWiz you will
automatically return to the default setting of a
single video file with audio and video contained
in the single file.
Audio Devices
This box shows the audio devices you have
installed on your system. If you have more than
one sound card, you can select the device you
wish to use for capturing audio with CapWiz and
Instant DVD.
Disk space
You can set up to be warned if you don’t have
enough disk space available when you begin
recording. Check this box to enable the feature
and set the slider to the amount of disk space
you feel comfortable as a warning level.
28
CapWiz manual.p65 6/4/2002, 12:22 PM28
Page 31

CAPTURE WIZARD STEP-BY-STEP
Menu Options: Help
About
The About box so you can check the version
number you are running and it will also display
the amount of disk space available on your C:
drive.
Help Using CapWiz
This will bring up an Adobe Acrobat file that will
display this CapWiz manual.
System Info
This will bring up a dialog box with all of your
system information. You can click the copy
button and paste this information in an e-mail
and send to the ADS tech support person if he/
she requests it.
CapWiz manual.p65 6/4/2002, 12:22 PM29
29
Page 32

CAPTURE WIZARD FEATURES
USB Instant DVD Wizard Features
Video Inputs/Outputs:
Video Format:
Television standards
Video Brightness/Color Control
Audio Parameters
Advanced Options
Video Compression Formats
My Goal is: Video format choice:
-Copy an hour of video on to a CD-R/RW disk VCD (Video CD format/MPEG-1)
-Capture video for video e-mail or publish on Internet VCD (MPEG-1)
-Copy 30-40 minutes of Better quality video to CD SVCD(Super Video CD)
-Copy DVD on CD (20 minutes) play back on PC (MPEG-2)
-Capture, edit and record back to videotape DVD (MPEG-2)
-Capture and copy DVD quality movie to DVD diskDVD (MPEG-2)
Select RCA or S-Video based on your video source
Select NTSC or PAL based on country (See Television standards below)
Select Video Quality (see Video Compression Formats below)
Brightness: To adjust brightness, slide control bar and click Brightness button
Contrast: To adjust contrast, slide on control bar and click Contrast button
Saturation: To adjust saturation, slide on control bar and click Saturation button
Hue: To adjust hue, slide on control bar and click Hue button
Chroma: To adjust chroma, slide on control bar and click Chroma button
Click OK to close dialog box.
Only use this feature if your captured video and audio are out of synch in
playback. In some cases, audio synch may appear off during preview.
Do not adjust these settings until you have reviewed your captured file.
To reset default settings, click Reset button and click OK to close dialog box.
Playback: Set playback format and resolution
Split Stream: Enable separate video (.mpv) and audio (.mpa) capture
Before selecting a Video compression format for recording your video
with Instant DVD, think about your final goal for the captured video? If
you wish to capture, edit and record back to videotape you will choose a
different format than if you want to put an hour of video on a CD-ROM.
Choosing a video format that matches your output goal will save you time
and assure the best video quality.
Read the description of each video capture format to be sure that it not
only matches your output goal, but also matches your playback goal.
Some formats will only playback on a Windows PC and others will play
back in home DVD players.
30
CapWiz manual.p65 6/4/2002, 12:22 PM30
Page 33

CAPTURE WIZARD FEATURES
USB Instant DVD Wizard Features (cont’d)
Television standards
Different countries use different television standards. The United
States, Japan and a few other countries use the NTSC (National
Television Standards Committee) standard; the rest of the world uses
PAL (or SECAM, which is very similar to PAL).
NTSC countries
Antigua and Barbuda, Aruba, Bahamas, Barbados, Belize, Bermuda, Bolivia, Brazil*, British Indian Ocean
Territory, Canada, Cayman Islands, Chile, Colombia, Costa Rica,Cuba, Dominica, Dominican Republic, Ecuador, El
Salvador, Greenland*, Grenada, Guam,Guatemala, Guyana, Haiti, Honduras, Jamaica, Japan, Korea (South),
Laos*, Marshall
Islands, Mexico, Micronesia, Myanmar (Burma), Netherlands Antilles, Nicaragua,Northern Mariana Islands, Palau,
Panama, Peru, Philippines, Puerto Rico, Samoa (American), St. Kitts and Nevis, St. Lucia, St. Vincent and the
Grenadines, Suriname, Taiwan, Tonga, Trinidad and Tobago, Turks and Caicos Islands, United States,
Venezuela,Virgin Islands (American and British).
PAL countries
Afghanistan, Albania, Algeria, Andorra, Angola, Anguilla?*, Argentina, Armenia,Australia, Austria, Azerbaijan,
Bahrain, Bangladesh, Belarus, Belgium, Benin, Bhutan,Bosnia, Botswana, Brunei, Bulgaria, Burkina Faso,
Burundi, Cambodia, Cameroon, Cape Verde, Central African Republic, Chad, China, Comoros, Congo, Republic
of, Cook Islands, Croatia, Cyprus, Czech Republic, Denmark, Djibouti, East Timor, Egypt, Equatorial Guinea,
Eritrea, Estonia, Ethiopia, Falkland Islands (Malvinas), Faroe Islands, Fiji, Finland, France, France
(Metropolitan),Gabon, Gambia, Georgia, Germany, Ghana, Gibraltar, Greece, Greenland*, Guadeloupe,
Guiana (French), Guinea, Guinea-Bissau, Hong Kong, Hungary, Iceland, India, Indonesia, Iran, Iraq, Ireland, Israel,
Italy, Ivory Coast (Côte d’Ivoire), Jordan, Kazakhstan, Kenya, Korea (North), Kuwait, Kyrgyzstan, Latvia,
Lebanon, Lesotho, Liberia, Libya, Liechtenstein, Luxembourg, Macau, Macedonia, Madagasgar, Malawi,
Malaysia, Maldives, Mali, Malta, Martinique, Mauritania, Mauritius, Mayotte, Moldova, Monaco,
Mongolia, Montserrat, Morocco, Mozambique, Namibia, Nauru?*, Nepal, Netherlands (Holland), New Caledonia,
New Zealand, Niger, Nigeria, Niue, Norway, Oman, Pakistan, Papua New Guinea, Paraguay, Poland, Polynesia
(French), Portugal, Qatar, Réunion, Romania, Russia, Rwanda, Samoa (Western), San Marino, São Tomé and
Principe, Saudi Arabia, Senegal, Seychelles, Sierra Leone, Singapore, Slovakia, Slovenia, Solomon Islands,
Somalia, South Africa, South Georgia and the South Sandwich Islands*, Spain, Sri Lanka, St. Helena?*, St. Pierre
and Miquelon, Sudan, Svalbard (Spitzbergen), Swaziland, Sweden, Switzerland, Syria, Tajikistan, Tanzania,
Thailand, Togo, Tunisia, Turkey, Turkmenistan,
Tuvalu?*, Uganda, Ukraine, United Arab Emirates, United Kingdom, Uruguay, Uzbekistan, Vanuatu, Vietnam,
Wallis and Futuna Islands, Western Sahara, Yemen, Yugoslavia (Serbia, Montenegro, Kosovo), Zambia,
Zimbabwe.
CapWiz manual.p65 6/4/2002, 12:22 PM31
31
Page 34

SERVICE AND WARRANTY
Service and Warranty:
Service:
If you require assistance with the installation, operation, or application of your ADS Technologies, Inc. product
there are several options available to you as described in the technical support section of this manual.
The ADS Technologies technical support and customer service staff can aid in solving many problems. Our
technical support department is available to repair any ADS Technologies product. You or your dealer must return
products to our factory for repair or warranty replacement.
Return/Replacement:
Each individual computer store or dealer sets product returns policies for their customers. ADS Technologies, Inc.
cannot be responsible for the actions or policies set by our dealers. If you desire to return the product for a
refund, you must get the refund from the dealer or store you purchased the product from. If you purchased the
product directly from ADS please see the “Terms and Conditions of Sale” on the reverse side of your sales invoice.
Returns to ADS Technologies, Inc. are for repair or warranty replacement only. If you need to return product to
ADS Technologies, Inc. for repair or replacement you must follow these steps:
1. Call our Technical Support department at (562) 926-4338 to obtain a Return Merchandise Authorization (RMA)
number.
2. The RMA number is valid for 30 days.
3. Ship the product to the ADS factory with the RMA number marked on the inside and outside of the package. If
there is no RMA number on the package or the RMA number has expired, the shipment will be refused. ADS will not
be liable for lost or mis-shipped products.
4. Replacement product cannot be shipped to you until the defective product has been
received by ADS.
5. Once the product is received at the factory it will be tested and then repaired or replaced.
6. Turn around time is approximately one week. A repaired or replacement product will be shipped back to you.
32
CapWiz manual.p65 6/4/2002, 12:22 PM32
Page 35

SERVICE AND WARRANTY
Warranty:
This ADS Technologies, Inc. product comes with a One (1) year hardware warranty. ADS Technologies, Inc.
(ADS) warrants this product against defects in material and workmanship for a period of One (1) year from
the date of original purchase from ADS or an authorized ADS dealer. This warranty applies only to the original
purchase of the product and is not transferable. This warranty does not cover any incompatibilities due to the
user’s computer, hardware, software or other related system configuration in which the product interfaces.
Proof of
purchase will be required before any warranty consideration by ADS occurs.
This warranty does not cover any damage caused by negligence, non-authorized modifications, or parts
installed without prior written permission from ADS.
This warranty does not apply if the product has been damaged by accident, abuse, or misapplication, nor as a
result of service to the product by anyone other than ADS.
If your ADS product is not in working order, your only recourse is repair or warranty replacement, as
described above. UNDER NO CIRCUMSTANCES will ADS Technologies, Inc. be liable for consequential
damages, including but not limited to any lost savings, lost profits, or any other damages, caused by the use of
any ADS Technologies, Inc. product or inability to use the product, even if the dealer or ADS Technologies, Inc.
has been advised of such liability or other claims. This includes damage to property and, to the extent
permitted by law, damages for personal injury. This warranty is in lieu of all other warranties including implied
warranties of merchantability and fitness for a particular purpose.
FCC Information
Federal communications Commission Radio Frequency Interference Statement
Note: This equipment has been tested and found to comply with the limits for a class B digital device, pursuant
to Part 15 of the FCC Rules. These limits are designed to provide reasonable protection against harmful
interference when the equipment is operated in a residential installation. This equipment generates, uses and
can radiate radio frequency energy and if not installed and used in accordance with the instruction manual
may cause harmful interference to radio communications. However, there is no guarantee that interference
will not occur in a particular installation. If this equipment does cause harmful interference to radio or television
reception, which can be determined by turning the equipment off and on, the user is encouraged to try to
correct the interference by one or more of the following measures:
* Reorient or relocate the receiving antenna
.
* Increase the separation between the equipment and receiver.
* Connect the equipment into an outlet on a circuit different from that to which the receiver is connected.
* Consult the dealer or an experienced radio TV technician for help.
Notice:
(1) The changes or modifications not expressly approved by the party responsible for compliance could void
the user’s authority to operate the equipment.
(2) Shielded interface cables and AC power cord, if any, must be used in order comply with the emission
limits.
33
CapWiz manual.p65 6/4/2002, 12:22 PM33
Page 36

34 VIDEOSTUDIO USER GUIDE
Ulead VideoStudio 6 Quick Start
Start Capturing Video with Video Studio in 5 Easy Steps
Before Starting with Video Studio 6 we trust that you have already used the Capture Wizard
and captured some video so you know that you have Instant DVD connected properly and
that you can capture video
1. Start Video Studio 6
2. Click the Tool Box button & select
“Change Capture Plug-in - USB Instant
DVD Capture Plug-in MUST be selected.
Click OK to Set or Cancel if USB Instant
DVD is already selected.
3. From the START page in Video Studio,
Click the New Project Button and the New
Project Template box will appear.
Select the Template that matches your
project goal. With Instant DVD you can
select templates for DVD, SVCD or VCD
ONLY.
Selecting the Template will automatically
select the resolution and video capture bit
rate for the video being captured.
4. If you have Instant DVD connected and
the Instant DVD capture Plug-in Selected
you will automatically be taken to the
Capture Mode . You can confirm that you
are capturing from Instant DVD by noting the
display at right.
5. Click the Capture Video Button
to begin capturing video. Click this button a
second time or click the “esc” key on your
keyboard to stop the capture. The file will
be displayed in the timeline below.
VS6-A.p65 6/4/2002, 12:22 PM34
Page 37

Abridged USB Instant DVD edition for Ulead VideoStudio version 6.0, May 2002
© 1992-2002 Ulead Systems, Inc.
All rights reserved. No part of this publication may be reproduced or transmitted in any form or by any means,
electronic or mechanical, including photocopying, recording or storing in a retrieval system, or translated into
any language in any form without the express written permission of Ulead Systems, Inc.
Software license
The software described in this document is furnished under a License Agreement, which is included with the
product. This Agreement specifies the permitted and prohibited uses of the product.
Licenses and trademarks
ICI Library © 1991–1992 C-Cube Microsystems.
Ulead Systems, Inc., Ulead, the Ulead logo, and Ulead VideoStudio are trademarks of Ulead Systems, Inc. All
other product names and any registered and unregistered trademarks mentioned in this
manual are used for identification purposes only and remain the exclusive property of their respective owners.
Sample files
Files provided as samples on the program CD can be used for personal demonstrations, productions and
presentations. No rights are granted for commercial reproduction or redistribution of any sample files.
North & South America: International:
Ulead Systems Inc. Ulead Systems, Inc.
http://www.ulead.com http://www.ulead.com
E-mail: info@ulead.com http://www.asiapac.ulead.com
http://www.ulead.com.tw
E-mail: info@ulead.com.tw
Europe: Japan:
Ulead Systems GmbH Ulead Systems, Inc.
http://www.ulead.de http://www.ulead.co.jp
E-mail: info@ulead.de E-mail: info@ulead.co.jp
VS6-A.p65 6/4/2002, 12:22 PM35
Page 38

Table of Contents
Ulead VideoStudio6 Quick Start .......................................................................... 34
The big picture ....................................................................................................... 38
An introduction to
digital video.......................................................................................................... 38
An introduction to MPEG ...................................................................................... 39
MPEG-1 ........................................................................................................................................... 39
MPEG-2 ........................................................................................................................................... 39
How VideoStudio works ........................................................................................ 40
Installing and running VideoStudio....................................................................... 41
Configuring VideoStudio....................................................................................... 42
........................................................................................................................... 42
Instant DVD Setup ............................................................................................... 42
Getting around VideoStudio ................................................................................. 43
The Library .......................................................................................................... 47
Steps to create your movie ................................................................................... 48
Start .................................................................................................................... 50
Creating a new project ................................................................................................................ 50
Selecting a template .................................................................................................................... 52
Capture ............................................................................................................... 53
Checklist for successful video capture.................................................................................... 53
Direct capturing MPEG video...................................................................................................... 54
Capturing still images ................................................................................................................. 55
Storyboard ........................................................................................................... 56
Storyboard Mode ........................................................................................................................... 56
Timeline Mode............................................................................................................................... 57
The Options Panel ....................................................................................................................... 58
SmartRender and Play Project button...................................................................................... 59
Preview Files Manager ................................................................................................................ 60
Inserting a clip into the Timeline ............................................................................................... 60
Trimming a clip ............................................................................................................................. 61
Working with clips ........................................................................................................................ 62
Capturing still images in the Storyboard Step ........................................................................ 63
Using color clips ........................................................................................................................... 63
VS6-A.p65 6/4/2002, 12:22 PM36
Page 39

Effect .................................................................................................................. 64
Creating effects ............................................................................................................................. 64
Customizing effects ..................................................................................................................... 65
Overlay ................................................................................................................ 66
Inserting video/image in the Overlay track .............................................................................. 66
Customizing overlays .................................................................................................................. 67
Title..................................................................................................................... 68
Creating text titles ......................................................................................................................... 69
Rolling & scrolling ........................................................................................................................ 71
Fading in & out .............................................................................................................................. 72
Putting it all together .................................................................................................................... 72
Audio .................................................................................................................. 73
Finish.................................................................................................................. 75
Creating and saving a video file ................................................................................................ 75
Video Save Options ...................................................................................................................... 77
Creating a DVD / VCD / SVCD Title........................................................................................... 80
Project Playback............................................................................................................................ 80
Creating an audio file .................................................................................................................. 80
Exporting your movie............................................................................................. 81
Burning DVD/VCD/SVCD ...................................................................................... 81
Recording back to a camcorder or VCR ................................................................. 83
Shortcuts................................................................................................................. 84
Need more help? ................................................................................................... 85
Glossary.................................................................................................................. 86
VS6-A.p65 6/4/2002, 12:22 PM37
Page 40

38 VIDEOSTUDIO USER GUIDE
The big picture
Digital video editing used to be dominated only by professionals . Advances in technology,
however, made it possible for almost anyone to create desktop video productions even at
home. As personal computers become increasingly powerful, video editing software also
become smarter.
Ulead VideoStudio puts you at the cutting edge of video technology by providing a complete
set of tools to cut, mix, run titles, add special effects, and do almost anything digitally possible
with your work. Even novices achieve professional results as VideoStudio turns the complex
process of video editing into a simple and fun affair.
An introduction to
digital video
Tens of millions of camcorders and personal
computers have been sold around the world
and video capture cards serve as the connection between the two. These cards allow the
transfer of video data from the camcorder to
the computer hard disk.
DV camcorders are
compact and simple
to operate
The introduction of the IEEE 1394 interface
technology also known as FireWire or i.Link
and the emergence of a generation of entirely
digital camcorders and a new format to
emerged - digital video (DV).
VideoStudio fully supports digital video (DV)
editing and puts all the advantages of working
with this format in your hands.
VS6-A.p65 6/4/2002, 12:22 PM38
VideoStudio lets you output
your video projects in a wide
range of storage media
Page 41

An introduction to MPEG
The Moving Picture Experts Group (MPEG)
defined a series of standards for compressing
or reducing the file size of video to make it
easier for computers to handle.
VideoStudio allows you to work with both
MPEG-1 and MPEG-2 formats to create VCD
and DVD movies with amazing frameaccurate technology.
MPEG-1
Also known as the White Book standard,
MPEG-1 gives you VHS quality video which
you can burn to a CD and play back using a
regular CD player. Popularly known as the
VCD format, MPEG-1 enables more than 70
minutes of good quality video and audio to be
stored on a single CD-ROM disc.
THE BIG PICTURE 39
MPEG-2
A standard for coding video at higher data
rates and in an interlaced format, MPEG-2
allows multi-channel sound recording and
enables a resolution four times greater than
MPEG-1. It is optimized for higher-end
applications such as satellite broadcast and
DVD.
Note:MPEG-4, a more recent development, allows video
and sound recorded by cameras and microphones to
work smoothly with their computer-generated
counterparts.
VS6-A.p65 6/4/2002, 12:22 PM39
Page 42

40 VIDEOSTUDIO USER GUIDE
How VideoStudio works
VideoStudio follows a step-by-step paradigm
so that editing tasks remain uncomplicated
from start to finish. VideoStudio also offers
more than a hundred transition effects,
professional titling capabilities and simple
soundtrack creation tools. Learn in seconds,
create in minutes.
VideoStudio breaks up your movie into
separate tracks, giving you broad creative
freedom. Changes to one track do not affect
others.
After transferring footage from your
camcorder, you can arrange scenes, apply
special effects, overlay images, add animated
titles, sync in a voiceover narration, and use
background music from your favorite CDs in
formats such as WAV and MP3. All these can
be done using drag-and-drop, cut-and-paste,
or select-and-apply operations.
Footage can be captured
from your camcorder and
digitized for editing in
your PC
All the tracks in your movie are then organized into a video project file (*.VSP), which
contains all the video and audio information
on how your movie is put together.
When everything is all set to go, your
computer collects all information needed to
create your final movie file. This process is
called rendering.
You can then output and distribute your
movie as a DVD/VCD/SVCD title, streaming
Web page video, or an e-mail attachment.
You can also record your movie back to your
camcorder or VCR.
VS6-A.p65 6/4/2002, 12:22 PM40
The VideoStudio workspace
Components of a finished project as displayed in
Timeline Mode
Page 43

CONFIGURING VIDEOSTUDIO 41
Installing and running VideoStudio
To install VideoStudio:
1. Place the Instant DVD CD into your CD-ROM
drive. Click on the Video Studio icon to load
the Video Studio Installation screen.
2. When the Setup screen appears, follow the
instructions to install VideoStudio onto your
computer.
Note: If the Setup screen does not appear after
loading the CD, then you can manually start it by
double-clicking the My Computer icon on your
desktop, then double-clicking the icon for the CDROM drive. When the CD-ROM window opens,
double-click the Setup icon.
Please install also the following applications,
because they are very important in making digital video work well on your computer. The
installation program will walk you through installing:
VideoStudio installation screen
• QuickTime
• Windows Media Format
• RealPlayer
• Acrobat Reader
Note:Skip this step if you already have newer versions
of the above supporting applications installed in
your PC.
To run VideoStudio:
• Double-click the VideoStudio icon on your
Windows desktop.
OR
• Select the VideoStudio icon from the
VideoStudio program group on the Windows
Start menu.
Running VideoStudio from Windows Start menu
VS6-A.p65 6/4/2002, 12:22 PM41
Page 44

42 VIDEOSTUDIO USER GUIDE
Configuring VideoStudio
Camcorders, VCRs, and VCD/DVD players are common sources of video footage. To ensure
a smooth interaction between these video sources and your computer, make sure that the
settings of VideoStudio are configured properly depending on the capture device you are using.
Instant DVD Setup
To check the setup of VideoStudio for analog
interface:
1. Connect your camcorder, VCR, or other video
source device to your analog capture card.
2. Insert your videotape into the capture device
and switch it on. Make sure it is in the
playback mode (usually named VTR or
VCR). See your machine’s manual for
specific instructions.
3. The Instant DVD Capture plug-in will be
detected automatically.
4. Click Capture Step at the top of Video Studio
software and check if your device is displayed in the Options Panel under Driver.
5. To change video source (RCA or S-VHS),
NTSC or PAL, brightness and color controls,
click the Options button (Gear icon). Select
Video Properties
and click Video Capture Pin. Make your
changes and click OK to close the dialog
box.
Check that your device is listed under Driver
Note: Instant DVD supports
multiple video sources.
The Video Properties dialog box
allows you to select your desired
video source such as Composite or S-Video. You can also
make changes to color and
brightness settings to video
being captured via Instant DVD.
VS6-A.p65 6/4/2002, 12:22 PM42
Page 45

GETTING AROUND VIDEOSTUDIO 43
Getting around VideoStudio
The VideoStudio interface has been designed to make the sometimes complicated task of
editing movies on your PC intuitive and enjoyable. The illustration on this page shows an
overview of the entire program, while the next few pages detail more specific features.
Track buttons
Each activates a track to edit.
Click a button to change the
Preview Window and available
options accordingly.
Options Panel
Contains controls,
buttons, and other
information.
Preview Window
Shows the current clip,
video filter, effect, or
title.
Folder button
Click to switch between
various library folders.
Load media button
Click to add video or
audio files to the
Library.
Library
Stores and organizes all
of your media clips.
Trim Bar
Used for trimming,
editing, and cropping
video clips.
Timeline
Represents the period
of time that a clip
appears in your movie.
The Options Panel
The Options Panel changes depending on the
program’s mode and the step or track you are
working on. The Options Panel may contain
one or two tabs. Information in each tab vary
depending on the selected clip .
VS6-A.p65 6/4/2002, 12:22 PM43
Options Panel in
Storyboard Step
Page 46

44 VIDEOSTUDIO USER GUIDE
Zoom controls
Increase or decrease the
number of frames
displayed in the
Timeline.
Storyboard and Timeline
Click tabs to switch between
Storyboard Mode and
Timeline Mode.
Selected range
These color bars represent the
trimmed or selected part of a clip
or project.
Insert media files
Displays a menu allowing you
to place video, audio or image
clips directly on the project.
Preview Bar
Click and drag these
controls to scroll
through a clip. The
position is shown in
the Preview Window’s
content.
Trim handle
Click and drag to trim
a clip.
Time units
Represents the timing
of clips in hours :
minutes, seconds, and
milliseconds
Project scroll
controls
Use the left and right
buttons or grab the
Scroll Bar to move
around your project.
VS6-A.p65 6/4/2002, 12:22 PM44
ToolTips
Place the mouse over a button or object to display a
balloon which identifies the item.
Page 47

Navigator buttons
These can be used to move around a
project or a selected clip. See page 22.
GETTING AROUND VIDEOSTUDIO 45
Save Project
Displays the Save As
dialog box to save the
VSP file in a folder of
your choice.
Trash Can
Drag and drop clips
here to delete them
from the project. You
can also select a clip
and press the Delete
key on your keyboard.
Settings and Commands
pop-up menu
VS6-A.p65 6/4/2002, 12:22 PM45
Settings and Commands
This button pops up a menu that
contains many useful tools such as
online Help and Preferences. You
can also setup Device control and
Capture plug-in from here.
Context Sensitive Help
This button activates the Context
sensitive help feature. After you
click on it, your cursor changes to a
question mark. Move over an object
in the program and click again.
Undo and Redo
Any changes you make that you
don’t like can be instantly fixed or
undone by clicking the left button.
And if you change your mind,
simply click Redo.
Page 48

46 VIDEOSTUDIO USER GUIDE
Next
Moves to the point right after the
present point of a project, clip, or
selected area.
Previous
Moves to the preceding point of
a project, clip, or selected area.
Home
Returns to the starting point of a
project, clip, or selected area.
Mark in / out
Use these buttons to mark the point
where you want a clip to start and end.
Play Project
Provides options to select between Instant
Preview or High Quality Preview. Choose
Instant Preview for a quick preview
without rendering. To render your project,
choose High Quality Preview.
Play Clip
Click to play a video or audio clip. Hold down
the [Shift] to play only the selected duration
(between Mark in and Mark out) on the Trim
Bar. During playback, click the button again to
stop.
End
Moves to the ending point
of a project, clip, or selected
area.
Repeat
Plays a project, clip, or
selected area continually.
System Volume
Click and drag the slider to
adjust the volume of a clip’s
audio output or music. This
adjusts the volume of your
speakers at the same time.
VS6-A.p65 6/4/2002, 12:22 PM46
Page 49

GETTING AROUND VIDEOSTUDIO 47
The Library
The Library is a storage depot for everything you need to create a movie: video clips, video
filters, audio clips, still images, transition effects, music files, titles and color clips. These are
collectively known as media clips.
To add media clips to the Library:
1. Click Load media to open a dialog box for
locating the media clip to insert in the
Library.
2. Select the desired file.
3. Click Open when you are finished.
Note:You can also drag and drop files from Windows
Explorer straight to the Library.
The type of clip you can insert depends on
which step you are working on (such as Title
or Audio). Use your mouse to drag and drop
single or multiple clips from the Library to its
destination.
Load media allows
you to locate the
clip you want to add
to the Library.
In the Storyboard Step, you can drag and
drop clips simultaneously from the Library to
the Timeline whether you are in Timeline
Mode or Storyboard Mode.
Please note: If you add a non-MPEG file
such as an .avi file or .mov file to your
project and want to create a VCD or DVD
(MPEG) movie, the inserted file will be
rendered or converted into the MPEG format
when you save the movie in the Finish step.
Video Studio allows you to save your project in
many video file formats. Please keep in mind that
if you wish to send video out through Instant
DVD to view your movie on a TV or record to
video tape, only MPEG-1 or MPEG-2 files can be
exported out through Instant DVD.
Right-click a clip in the
Library to view the clip’s
properties as well as copy,
delete, or split by scene.
Hold [Ctrl] or [Shift] to
select multiple clips.
VS6-A.p65 6/4/2002, 12:22 PM47
Page 50

48 VIDEOSTUDIO USER GUIDE
Steps to create your movie
VideoStudio is laid out in a step-by-step format, following the items on the Menu Bar at the top
of the program, from left to right. Click a step on the Menu Bar to move directly to it. The
step you are currently in is highlighted in yellow.
It is not necessary to work through every step every time, but these steps can serve as a guide
to creating a complete movie. These steps do not necessarily need to be followed in the order
that they are presented.
Your work is saved in a small project file (*.VSP) that organizes all of your media files
together. A project file is NOT the same as a movie and changes made to it do not affect your
media clips. It is possible to have a number of different projects using the same clips.
The Start Step is for creating a new project file or opening an existing one. This is
the very first and required step whenever you want to work in VideoStudio.
Once a project is opened in VideoStudio, video can be recorded directly to your
computer’s hard disk in the Capture Step. Footage from a videotape can be captured
as a single file or automatically divided into multiple files. This step allows you to
record video files and still images.
The Storyboard Step and the Timeline are the heart of VideoStudio. This is where
you arrange, edit, and trim your video clips. Video filters can also be applied to your
video clips in this step.
Transition effects between scenes are fun and easy. Thumbnail animations and dragand-drop operations put dozens of cool effects at your fingertips.
VS6-B.p65 6/4/2002, 12:23 PM48
Page 51

START 49
This feature allows you to superimpose one clip over another as an added effect to
your movie. On top of what you can do using Effects, you can use Overlay feature
to add a professional touch to your work.
No movie would be complete without opening and closing titles. You can design and
animate your text title in any Windows True Type font, color and size, or choose
from various presets in the Library.
Background music sets the mood of your movie. VideoStudio lets you select and
record music files from one or several CD-ROM drives attached to your computer.
You can also dub over your video in this step.
The final cuts have been made and the music has been synchronized with care. Now
it’s time to put it all together and make a master copy of your newest movie.
Note:
• When moving between steps, VideoStudio Guide - a real-time online Help - is displayed to
give you quick reference and tips. You can enable or disable it in the Preferences dialog
box which you can access by clicking Settings and Commands : Preferences or by
pressing [F6].
• Since video rendering usually requires large hard disk space, use the Preview Tab in the
Preferences dialog box to assign proper space and folders in your hard disk(s). This should
be done before opening a project in VideoStudio to ensure enough there is space for
rendering and previewing.
VS6-B.p65 6/4/2002, 12:23 PM49
Page 52

50 VIDEOSTUDIO USER GUIDE
Start
The Start Step is where you create a new project file (*.VSP), or open an existing project. A
project file is a small file used by VideoStudio to store all of the information about your movie
such as clips used, trimming information, duration of movie, size of frames, and type of movie
to make. A project file is not the finished movie and can only be opened in VideoStudio. The
actual process of creating a movie from a project file is performed in the Finish Step.
Creating a new project
When you run VideoStudio, it automatically
opens a new project and lets you start
composing your video production. If this is
your first time to use VideoStudio, the new
project uses VideoStudio’s initial default
settings. Otherwise, the new project reuses
the project settings which you have last used.
To check what these settings are, click
Settings and Commands and select Project
Properties.
Project settings determine how your video
project is rendered when you preview the
project. Rendering is the process by which
VideoStudio converts raw video, titles,
sounds, and effects into a continuous stream
of data which can be played back in your
computer. You can modify the project
settings in the Project Properties dialog box.
When you capture or insert your first video
clip into the project, VideoStudio automatically checks the properties of the clip and
your project. If properties such as file
format, frame size, etc. are not identical,
VideoStudio displays a message and gives you
the option to have the project settings automatically adjusted to match the clip’s properties. Changing the project settings allows
VideoStudio to perform the SmartRender
function.
VS6-B.p65 6/4/2002, 12:23 PM50
Page 53

You can also begin by creating an empty
project file using New Project .
START 51
To create a new project using New Project:
1. Click New Project in the Options Panel or the
Start menu arrow and select New Project .
2. Click Browse to select a working folder where
all your captured/project files will be located.
You can also click Settings and Commands:
Preferences . Enter a folder name to create a
subfolder in this location.
3. Choose a template from Available project
templates which includes all templates you
created previously.
Select the one that most closely matches the
type of movie you want to create. Customized templates have been created for Instant
DVD so you can easily select the format
based on your desired video project type; i.e.
VCD, SVCD or DVD. For DVD movies you
can select the capture bit rate of 3, 4 or 5 Mb/
sec. (Megabit). The project template you
choose will automatically select the video
resolution, video format (MPEG-1 or MPEG-
2) and capture data rate for the video that
you will capture for your video project.
4. Click OK.
OR
To open an existing project:
1. Click Open Project or the Start menu arrow
and select Open Project .
2. Select the project file (*.VSP) you want to
open. If you are not sure where the file is,
use Browse and then click Scan. This finds
all *.VSP files under your assigned folder or
drive.
3. Click Open.
Note:A faster way to open an existing project is to click it
in the Recent file list. VideoStudio, however,
cannot open a project that has been moved or
removed.
VS6-B.p65 6/4/2002, 12:23 PM51
Page 54

52 VIDEOSTUDIO USER GUIDE
Selecting a template
Templates provide settings that can get you started as quickly as possible. When choosing a
template, first know the attributes of the sources you are going to use in the project. Video
sources can be already existing video files in your hard drive or still to be captured scenes
from your capturing device. Templates displayed have been customized to work with Instant
DVD. Choose the VCD, SVCD or DVD template that matches your video project goal.
To get the best quality and rendering time,
choose a project template for your project,
capture and edit your video and then in the
finish step, select the same video format so
you will only render the changes you made to
the video; i.e. titles, transistion effect and
video filters you have added..
Video is displayed on NTSC or PAL devices,
the most common of which is the television.
Although many devices now work with both,
it is helpful to select the standard that suits
your specific need.
Select from Available project templates depending on
the settings required by your project
• NTSC is predominant in North America and
many Asian countries.
• PAL is the standard in Europe and South
Pacific.
If you select your country when installing
VideoStudio, the appropriate TV standard is
selected by default.
The output video file format determines the
media type by which your project can be
distributed.
• MPEG-1 lets you output in VCD.
• MPEG-2 lets you output in SVCD or DVD.
• The widely-used Microsoft AVI is ideal for
videos intended for viewing on most PCs.
• Streaming formats such as MOV, RM, and
WMV are used in creating video for sharing
over the Internet.
VS6-B.p65 6/4/2002, 12:23 PM52
Select a video file as a template dialog box is
displayed upon selecting Template from an
existing video file
Page 55

CAPTURE 53
Capture
The process of transferring video from your camcorder or other video sources to your
computer is called capturing. When everything is ready to go, the video feed from your source
device should be visible in the Preview Window. If your card supports a television monitor,
you should also be able to watch your video on it.
Checklist for successful video capture
Capturing video is one of the most demanding tasks you will ever ask of your computer. It
involves high data rates and requires huge amounts of disk space. Here are a few things you
can do to ensure success:
• Shut down ALL other programs that are running except Windows Explorer and VideoStudio. Disable
the Screen Saver to avoid possible interruption.
• Best results can be achieved by using a dedicated video hard disk, preferably with the capabilities of at
least Ultra-DMA/66, 7200 rpm and more than 30 GB space. Check to be sure you have DMA
enabled on the hard drive for smooth video capture
• the Batch Capture feature is not enabled for use with Instant DVD. This is a feature for use when
capturing from a digital camcorder to a FireWire card such as the ADS PYRO 1394DV card.
Capture Video
Transfers video from your source
to your hard disk.
Capture Image
Captures a single frame as a still
image from your source to your
hard disk.
Options
Displays a menu allowing you
to modify your capture settings.
Format
Allows you to easily select a file
format to use for saving
captured videos. (MPEG only
when using with Instant DVD)
Driver
Displays the detected capture
device and lists other capture
device drivers installed in your
computer.
VS6-B.p65 6/4/2002, 12:23 PM53
Switch to playback mode
Click to work in Playback
Mode for instant previews.
Scene Detection
Automatically separates captured
video into several files based on
changes in recording date and
time. (Not available when using
Instant DVD).
Capture duration
Sets the length of time for the
capture.
Captured frames
The total number of captured
video frames.
Dropped frames
The total number of lost video
frames while capturing.
Switch to capture mode
Click to work in Capture Mode
and perform capturing tasks.
Page 56

54 VIDEOSTUDIO USER GUIDE
Direct capturing MPEG video
Capturing video directly from your camcorder straight to MPEG format is one of the most
exciting developments in computer video. Capture from Instant DVD straight to MPEG-1
(VCD) or MPEG-2(SVCD or DVD), depending on your needs and skip the task of having to
capture in other formats only to convert it later.
To capture video in MPEG format:
1. Connect your camcorder or VCR to your
Instant DVD. Switch it on and set it to Play
(or VTR / VCR) mode. Check your device
manual for specific instructions.
2. In the Capture Step , be sure MPEG is
selected from the Format list.
3. Instant DVD Capture Plug-in will be
detected automatically. Use only this capture
plug-in when capturing video from Instant
DVD.
4. You should see video playing in the Preview
Window.
5. Click Capture Video to start capturing.
6. Click Capture Video again or press [Esc] to
stop capturing.
Tips:
• Capture menu items are grayed out in the Playback Mode. If this happens in the Capture Mode, check
if your video capture devices are correctly installed.
• A delay in capture may be due to the confirmation dialog box or connection between devices.
It is better to rewind your tape to an earlier point before capturing and just trim the video later.
• The normal number of dropped frames is zero. If any frames are dropped, check if the DMA setting
on your hard drive is enabled.
VS6-B.p65 6/4/2002, 12:23 PM54
Page 57

CAPTURE 55
Capturing still images
In addition to video, VideoStudio also allows you to capture still images. The image format can
be BMP or JPEG, and the size spends on its source video. To choose your image format, click
Settings and Commands : Preferences. In the Preferences dialog box click the Capture
Tab and set the format.
With Instant DVD, the Capture Still images
button on the Interface is greyed out, but you
can still grab a snapshot from any video
frame that has been captured. These
snapshots can be easily imported into DVD
Picture Show to create a DVD or VCD
slideshow you can play on a DVD player.
To capture still images:
1. Connect your camcorder or VCR to Instant
DVD. Switch it on and set it to Play (or VTR /
VCR) mode. Check your device manual for
specific instructions.
2. Open a new project.
3. In the Capture Step , click Capture to record
a video clip. When you finish capture the
clip will be placed in the timeline below the
preview window.
4. Switch from Storyboard mode to Timelime
mode. This will allow you to view each
individual video frame. Double Click on the
video clip to make it the active clip in the
timeline.
5. Play through the video clip to find the frame
you want to capture as a still image. You can
use the single frame advance and rewind
buttons on the video navigator.
6. Click the Save Still Image button to save the
video frame as still image. The image will be
saved at the resolution of the video capture.
For example, if you captured as VCD the
image resolution will be 352 x 240. If you
captured the file in DVD format the image will
have a resolution of 704 x 480.
VS6-B.p65 6/4/2002, 12:23 PM55
Page 58

56 VIDEOSTUDIO USER GUIDE
Storyboard
A storyboard is an outline for a movie. It contains a chronological order of the events that
occur in your story. The bottom half of the VideoStudio interface is simply an electronic
storyboard. You can edit your project either in the Storyboard Mode or Timeline Mode.
Storyboard Mode
Storyboard Mode is the fastest and simplest way to add clips to your movie. Clips can be
moved around by simply dragging them. You may find that starting out in the Storyboard
Mode is the easiest way to get your project rolling. Each picture represents an event in your
movie, an event being a video clip or a transition. Thumbnails show at a glance the chronological order of events in your project.
You can drag and drop clips to insert and arrange them. Transition effects can be inserted
between clips. Selected clips can be trimmed in the Preview Window.
Larger storyboard display
The storyboard display can be maximized to
enjoy a bigger workspace. Click Enlarge to
divide the entire display area between the
storyboard display and the Library. With a
larger workspace, you can arrange clips and
apply effects and transitions more easily.
VS6-B.p65 6/4/2002, 12:23 PM56
Click Minimize to switch back to the
normal Storyboard Mode display.
Page 59

STORYBOARD 57
Timeline Mode
The Timeline Mode allows you to fine tune effects and perform frame accurate trimming and
editing. The Timeline Mode shows exactly when and where events in your story occur based
on the position of clips in each track. Clips are simply dragged from the Library to the
Timeline. They are displayed here as short sequences.
The length of a clip accurately represents its duration in your project. The ruler units, represented by timecodes, can be adjusted to give you precise control over trimming and editing.
Use the Zoom controls or click the Ruler menu to adjust the ruler units.
Click Fit in window to see the entire project displayed on one screen. If you have a mouse
with a scroll button, the scroll button can be used to scroll through the timeline.
Zoom to
Zoom control
Storyboard Mode
Selected clip
Transition effect
Fit in window button
Timeline Mode
Ruler units
Tracks
The Timeline is divided horizontally into the Video, Overlay, Title, Voice, and Music Tracks.
To switch to different tracks:
• Click the Step menu item that corresponds to
the track.
• Click the track’s icon.
• Double-click the track or the clip.
Video
Overlay
Title
Voice
Music
The tracks
VS6-B.p65 6/4/2002, 12:23 PM57
Page 60

58 VIDEOSTUDIO USER GUIDE
The Options Panel
In the Storyboard Step, the Options Panel contains the Video and Filter Tabs. The Video Tab
shown below is displayed when a video clip is selected. Here, you can monitor the length of
your clip, control its volume, save a trimmed clip as a new file, or save a selected frame as an
image file. In the Video Tab, you can also export video clips in various media. When you click
the Filter Tab, the Options Panel displays the list of video filters which have been applied to a
selected video clip and allows you to modify filter settings.
Video mark in / out
Displays the starting / ending
point of a video clip (after
trimming).
Volume
Click the arrow or enter a
value directly to adjust volume.
Save Trimmed Video
Applies any trimming
modifications to a clip and
saves it to a new video file.
Save Still Image
Saves the currently selected
frame to an image file in the
Library.
Export
Displays a drop-down menu
that allows you to output your
clip to Ulead DVD Wizard or as
a Web page, E-mail attachment, Export to Instant DVD
or Greeting Card.
Video duration
Displays the length of time of
the clip. Click a value or an
arrow button for modification.
Fade in / out
Gradually increases / decreases
the volume of the clip for a
smooth transition. Click Settings
and Commands: Preferences to
set the fade in / fade out
duration.
Mute
Disables audio of the selected clip.
Split Video
Breaks a selected video clip in
two.
Properties
Click to display specific
information about a clip.
VS6-B.p65 6/4/2002, 12:23 PM58
Page 61

STORYBOARD 59
SmartRender and Play Project button
SmartRender technology allows “changes-only” rendering which eliminates the need to rerender entire video sequences when only slight changes have been made. This is especially
useful for rendering across transitions, title sequences, or to check the timing of audio clips in
relation to the associated video. It is advisable that projects are rendered regularly to reduce
overall render times.
While editing, you will want to preview your
work frequently to see how your project is
progressing. Play Project allows you to
select between Instant Preview and High
Quality Preview. The first allows you to
preview changes in your project without the
need to create a temporary preview file. The
latter renders a preview file and provides a
quick preview right after.
For faster previews, you may choose to play
only a part of your project. The selected
range of frames to preview is referred to as
the preview area, and it is marked as a red
bar in the Ruler Panel.
Play Project in Navigator
To play the preview area only:
1. Use the Trim Bar or the Mark in/out
buttons to select the preview area.
The Preview range mark in and Preview
range mark out timecodes will then be
displayed in the Options Panel.
2. To preview the selected range of frames, hold
[Shift] and select a preview option (Instant
Preview or High Quality Preview).
Or, when the desired preview option is
already selected, hold [Shift] and click Play
Project.
VS6-B.p65 6/4/2002, 12:23 PM59
Page 62

60 VIDEOSTUDIO USER GUIDE
Preview Files Manager
Use Preview Files Manager to free hard disk space occupied by temporary preview files
used in your project.
To delete temporary preview files:
1. Click Settings and Commands: Preview
Files Manager to display the Preview Files
Manager dialog box. You can also click
Preview Files Manager in the Start Step
Options Panel.
2. Select the VSP project under Project file
name where the temporary preview files you
want to remove are located and click Delete.
This removes only the temporary preview
files and not the actual VSP project.
3. Click Delete All to remove all temporary
preview files of all VSP projects.
4. Click Close.
Tip: Press [Ctrl + S] to quickly save your project from time to time. This ensures that all project settings and file links
are always updated.
Inserting a clip into the Timeline
To add video clips to the Timeline, you can use drag and drop or browse and select, depending
on where your clips are located.
To insert a video clip into the Timeline:
• Select a clip in the Library and drag and drop
it to the Timeline. Multiple clips can be
selected by pressing [Shift] or [Ctrl].
• To insert a clip from a file folder directly to
the Timeline, click Insert Media Files,
located to the left of the Timeline.
VS6-B.p65 6/4/2002, 12:23 PM60
Insert Media Files
Page 63

STORYBOARD 61
Trimming a clip
The best part of editing your movie on your computer is the ease with which you can snip and
trim with frame by frame accuracy.
To trim a clip from the Timeline:
1. Click a clip in the Timeline to select it.
2. Drag the yellow Trim handles on either side
of the clip to change its length. The Preview
Window reflects the position of the Trim
handle in the clip.
3. To trim frame by frame, refer to the Video
mark in / out timecodes in the Options
Panel. These represent precise positions of
frames in the Timeline.
4. Other clips in your project automatically
reposition themselves according to changes
made.
It is most convenient to use the Trim Bar in adjusting your clips. This is the green bar beneath
the Preview Window which represents the selected portion of a clip. If the clip has not been
trimmed, the green bar extends along the entire length.
To trim a clip with the Trim Bar:
1. Select a clip from the Timeline or the Library.
2. Click and drag a Trim handle to set the trim
position.
3. When you have selected the area you want
to trim, click Apply .
4. Hold down [Shift] and click Play Clip to
selectively play only the trimmed portion of
the clip.
For precise control, click on a Trim handle, hold it, and use the left or right arrow keys on
your keyboard to trim one frame at a time. Check the Video mark in / out timecodes in the
Options Panel to monitor your trimming. The Mark in / out points can also be set by pressing
[F3] and [F4], respectively.
You can also use Zoom controls to display each frame of your video in the Timeline and trim
one frame at a time. The Scroll Bar makes navigating through your project quicker and easier.
A wheel mouse can also be used to scroll, and to zoom by pressing [Ctrl].
VS6-B.p65 6/4/2002, 12:23 PM61
Page 64

62 VIDEOSTUDIO USER GUIDE
To trim a clip in the Options Panel:
1. Select a clip from the Timeline or the Library.
2. Click the time in Video duration and the
numbers will blink.
3. Enter a length of time for the clip. Mark in
shows the timecode representing the first
frame of the clip and Mark out shows the
timecode for the last frame.
4. Click Apply.
Note:Changes made in the Video duration box only affect
the Mark out point. The Mark in point remains
unchanged.
Working with clips
Your original video file can be used as a source for creating a number of different clips in the
Library. This type of editing allows you to trim different segments of a video file without
affecting its source file.
Video duration
Displays and sets the
length of time of the
clip.
Arrow buttons
Use these to fine tune
your trimming.
Video mark in / out
Displays the points in
the original clip where
the trimming takes
place.
Reset sets all values
back to defaults.
Apply renders the new
settings made in the
Options Panel to the
selected clip.
To create multiple copies of a single clip:
1. Select a clip from the Library.
2. Click and drag a Trim handle to set the trim
position.
3. Click Apply.
4. Click Load video to reinsert the original video
file into the Library. Therefore, there are now
two copies of a single clip in the Library.
Repeat steps 1 to 4 to add more copies as
needed.
Note:In step 1, if you want to use an existing clip in the
current project, drag a clip from the Timeline into
the Library first.
VS6-B.p65 6/4/2002, 12:23 PM62
Page 65

STORYBOARD 63
Capturing still images in the Storyboard Step
A still image can be captured in the Storyboard Step by selecting a specific frame in the
Timeline and saving it as an image file. In this manner, possible distortions are avoided since
the image is not acquired from a running video, unlike in the Capture Step.
To capture still images:
1. Select a clip in your project.
2. Drag the Preview Bar to the frame you want
to capture.
3. Switch to an image folder in the Library. The
folder can be the default Image folder, or the
one created by yourself.
4. Click Save Still Image in the Options Panel.
The new image file is saved to the hard disk
and is represented as a thumbnail in the
image folder you assigned.
Using color clips
Color clips are simply solid colored backgrounds that are useful for titles and transitions. For
example, black clips can be used for an effective fade to black transition. Place your opening
credits over the top of the color clip and then use a cross fade effect to create smooth
transition into your movie.
You can insert a new color to the Color Library and control its duration just like an image clip.
Once a color clip has been inserted into the Library, you can drag it to the Timeline to put it
into your movie project.
To insert a color clip in the Color Library:
1. Select Color from the folder list or click the
Storyboard menu arrow and select Color.
2. Click Load color to display the New Color
Clip dialog box.
3. Here, click the color box to select a color
either from the Ulead Color Picker or the
Windows Color Picker.
4. Adjust the RGB values if needed.
5. Set Duration.
6. Click OK .
VS6-B.p65 6/4/2002, 12:23 PM63
Page 66

64 VIDEOSTUDIO USER GUIDE
Effect
Transition effects offer creative ways to shift from one scene to the next. They are applied
between clips in the Video Track and their attributes can be modified in the Options Panel to
suit a specific purpose. VideoStudio studio allows you to mix and match a variety of preset
effects while editing your project. Effective use of this feature can add a professional touch to
your work.
Creating effects
The Library provides a wide range of preset transitions from cross fades to explosions. We
will deal with the details of these effects later. For now, you just need a project with two video
clips in it.
To add a transition:
1. Select a category of effects from the Folder
list.
2. Scroll through the effects thumbnails in the
Library. Select and drag an effect to the
Timeline, roughly between two video clips.
Drop your effect and it will snap into place.
You can only drag and drop one clip at a
time.
Note:Transitions work the same way in both the
Storyboard Mode and Timeline Mode. But you may
find it easier to work on transition effects in the
Storyboard Mode.
Drag and drop transition effects right onto the tracks in both Storyboard Mode and Timeline Mode
VS6-C.p65 6/4/2002, 12:23 PM64
Page 67

Customizing effects
If you’ve tried a few simple transitions as outlined on the previous page, you really have
mastered all you need to know. VideoStudio pretty much takes care of all the details to make
your transitions smooth and professional. You can, however, further customize your effects
after adding them to your project. The Options Panel displays the settings of your selected
effects so that you can change their various parameters. This gives you complete control of
exactly how your effects will behave in your movie.
EFFECT 65
Duration
Sets the length of time of the
transition. You can also modify
the duration by using the yellow
Trim handles in the Timeline.
Border / Color
Select a size for the border (in
pixels) on the left and choose a
color by clicking the color box.
Apply
Click to apply changes made
to a selected effect in the
Timeline.
Reset
Click to return to previous
settings if changes have not
been applied. If Apply has
already been clicked, use
Undo to return to previous
settings.
Add
Click to apply a selected
transition effect. Then click
between two clips in the
Timeline where you want to
add the effect.
Soft edge
Soft edge applies to the border of
the effect to blend two clips
together more smoothly. The
soft edge buttons are unavailable
if there no border on the clip.
Direction
These buttons control the
direction of motion in the
transition effect. In this
transition, the two doors can
move in eight different ways.
VS6-C.p65 6/4/2002, 12:23 PM65
Page 68

66 VIDEOSTUDIO USER GUIDE
Overlay
The Overlay Step provides an additional track where you can place videos and images to
enhance introductions and credits. An alpha-channel is automatically applied to clips placed in
this track for transparency. By using an animation style such as fade-in and fade-out, you can
interweave two clips, one in the Storyboard Track and another in the Overlay Track, in one
timeline. You can even have three separate clips playing simultaneously by adding a clip in the
Title Track.
Inserting video/image in the Overlay track
Working in the Overlay Track is similar to working in the Storyboard Track. You can drag and
drop clips and images (color clips are not available in Overlay) to arrange their order. You can
also apply a motion style effect, that controls the way the overlay clip “blends” with the clips
in the Video Track.
To insert a clip to the Overlay Track:
1. Select Video/Image in the Folder list or click
Load video / Load image to browse and select
a file.
2. Drag and drop the selected clip from the
Library to the Overlay Track in the
Timeline.
3. Click Motion, and apply a motion style to
create a blending effect between the selected
clip and the clip simultaneously running in
the Storyboard Track .
In Overlay, you can only use the video and
image galleries. Just like in the Title Step, this
step does not support drag and drop of
multiple clips.
VS6-C.p65 6/4/2002, 12:23 PM66
Page 69

Customizing overlays
Fine tune the attributes and behavior of your overlay clips in the Options Panel.
OVERLAY 67
Mark in / Mark out
Displays the starting / ending
point of the overlay clip after
trimming.
Clip volume
Click the arrow or enter a value
to adjust volume.
Properties
Displays the attributes of a
selected clip.
Note:Settings here can be applied to the whole clip or just
part of it.
Duration
Sets the length of time of the
overlay clip. You can also
modify the duration by using the
two yellow Trim handles in the
Timeline.
Mute
Disables audio for the selected
clip.
Fade in / out
Gradually increases / decreases
the volume of the clip for a
smooth transition. Click Settings
and Commands: Preferences to
set the fade in / fade out duration.
To make Overlay clips with transparent backgrounds, you can also create a 32-bit alpha
channel AVI or Image file with an alpha channel. You can further achieve your desired effects
by using the Motion Tab. Here, you can apply motion styles, set the position of your clip on
the screen, magnify or reduce it, and control its transparency level.
Motion style
Click the arrow to display all
available motion styles.
Choosing Static superimposes
the clip over the storyboard
clip.
Position
Sets the placement of the video
clip/image with reference to the
window. You can choose from 9
set positions, or adjust the clip/
image manually.
Note:These settings are applied to the whole clip.
VS6-C.p65 6/4/2002, 12:23 PM67
Zoom ratio
Magnifies or reduces the video
clip/image accordingly. Click the
arrow or enter a value to adjust the
size.
Transparency
Sets the opacity of the video
clip/image. Click the arrow or
enter a value to adjust transparency.
Page 70

68 VIDEOSTUDIO USER GUIDE
Title
While a picture may be worth a thousand words, text effects in your video productions add
clarity and comprehensibility. Besides, what production-quality movie would be complete
without opening and closing credits? With VideoStudio’s Title Step, professional-looking titles
complete with animation effects can be done in minutes. Use these settings to create the look
of your selected title.
Editing Tab
Each option here applies to the whole text or part of it.
Create Title
Click to create a new title clip of
modify an existing one.
Font face
Use any True Type font
installed on your computer.
Font size
Sets the size of the text in
points.
Font style
Bold, italic and underline.
Border & Shadow
Applies or removes text border
and shadow effects.
Reset
Reverts to original settings.
Line spacing
Sets the spacing, or leading,
between lines of text.
Alignment
Aligns horizontal text to the
left, center, or right. Or, aligns
vertical text to the top, center,
or bottom.
Vertical title
Makes the orientation of the
title vertical or horizontal.
Duration
Sets the length of time for the
title clip. You can also modify
the duration by using the two
yellow Trim handles on the
Timeline.
Character color
Sets the color of the selected
text.
Apply
Applies new settings to the title
clip.
VS6-C.p65 6/4/2002, 12:23 PM68
Page 71

Animation Tab
Each option here applies to the whole text title.
Type
Provides a list of animation
effects to choose from.
Animation options
Determine how the title enters
and exits the scene. The available
options vary, depending on the
type of effect that is selected.
Enable animation
Applies or removes animation
attribute from a title clip.
Creating text titles
Titles determine best what your production is all about. They can be used throughout your
project as opening and closing credits, introduction to chapter points, scene captions, and
many more. VideoStudio ensures that creating your title clips is as easy as clicking a few
buttons and dragging a few clips.
OVERLAY 69
To add a text title:
1. Use the Navigator buttons to scan your
video and select the frame you want to add a
title to.
2. In the Editing Tab in the Options Panel, click
Create Title or click directly in the Preview
Window.
Note:Remember that you cannot create a new title over an
existing title clip.
3. Type in your title in the Preview Window and
use the style buttons to customize fonts.
Options are available in the Editing Tab .
4. To add effects to your title, switch to the
Animation Tab . Then, select an effect from
the Type drop-down list, and choose the
desired animation options in the Options
Panel.
5. Click Add.
VS6-C.p65 6/4/2002, 12:23 PM69
The blue triangle represents
the position of the title clip in
the Timeline.
Page 72

70 VIDEOSTUDIO USER GUIDE
When entering a text title, a faint rectangle is visible in the Preview Window. This is the Title
safe area, and it is the recommended maximum size for your text. Along with the rectangle,
you should see a blinking cursor that indicates the starting point for text entry.
When entering text, you can press [Backspace] to correct mistakes and press [Enter] to start
a new line. Move around the text with the arrow keys as needed. To change the attributes of
text, first highlight the text by selecting it with your mouse and then make revisions.
To modify a text title:
1. Click a title clip in the Timeline.
2. Click Create Title or click directly in the
Preview Window to change the text.
3. Click Apply or move to the next step. To
change the text back to its original state, click
Reset.
Notes:
• Once a title clip has been inserted onto the Timeline,
you can adjust its duration by either dragging the
handles, or entering a duration value on the Editing
Tab.
• To see how the title appears on the underlying video
clip, select the title clip and then click Play Clip or drag
the Preview Bar handle.
• The Library can also be used to store title clips. To add
a title clip to the Library, drag it from the Timeline to
the Library.
A text title being
edited. Note the
Title safe area
around the center
of the window.
Creating vertical text titles
For added flexibility in your text layout, VideoStudio allows you add vertical text titles.
To create a vertical text title:
1.
Click
Create Title or click directly in the
Preview Window to enter the text.
2. Select Vertical title in the Editing Tab .
3. Use the Alignment buttons to align the text
to the top, center or bottom.
4. Click Add.
To change the orientation of the title back to
horizontal, clear the Vertical title option.
VS6-C.p65 6/4/2002, 12:23 PM70
Alignment buttons
Page 73

Using the Library
There are various ready-to-use titles in the Library which you can add to your project and
preset animation effects which you can apply to your text titles.
To add a title from the Library:
1. Select Title from the Folder list. Then, drag a
preset title thumbnail from the Library into
the Title Track .
2. Click the Preview Window to edit the
selected preset text title. Use the Editing Tab
to enter new text or modify font styles. Use
the Animation Tab to add animation effects
to the title.
3. Click Apply.
To apply a preset animation effect:
1. Select a title in the Timeline or create a new
one.
2. Select Animation from the Folder list.
Double-click a preset motion thumbnail in the
Library .
3. Click Apply.
Preset titles
Preset motions
TITLE 71
Rolling & scrolling
One of the most common and effective techniques for presenting closing credits is the rolling
or scrolling credits. With VideoStudio, this is simply a matter of specifying a direction and a
duration for your text. After you have entered some text and inserted it in the Timeline, click
the title clip you have created and click the Animation Tab.
To scroll a text title:
1. Select a text title in the Timeline or create a
new one.
2. On the Animation Tab in the Options Panel,
select Fly from the Type drop-down list.
3. Specify how to scroll the title by choosing
these animation options:
• Start and End units Determine whether the
whole title (Text) moves, or parts of the title
(Char, Word, or Line) scroll one at a time.
VS6-C.p65 6/4/2002, 12:23 PM71
Page 74

72 VIDEOSTUDIO USER GUIDE
• Start and End positions Determine from
what position the title starts to move in and
the final destination where it scrolls out.
4. Specify a Pause setting (No Pause , Short,
Medium , or Long). This makes the title move
into the scene, pause for a moment, and then
scroll out of the scene.
5. Click Apply.
Fading in & out
Another incredibly useful, easy, and effective method of displaying your titles is to fade your
text in from invisible to crisp and clear and then back to invisible again. This works especially
well for opening credits with a slow fade, or as captions with a quicker fade.
To create fading titles:
1. Select a text title or create a new one.
2. On the Animation Tab in the Options Panel,
select Fade from the Type drop-down list.
3. Select a fading option. (Cross fade makes the
title gradually appear and then disappear.)
4. Specify a Pause setting (No Pause , Short,
Medium , or Long).
5. Click Apply.
Putting it all together
To create a long list of credits in a production, it is necessary to insert a series of title clips
into the Timeline.
To create extended credits:
1. Start by creating one clip with multiple lines
of text.
2. Drag a copy of the Title clip from the
Timeline to the Library. This is the easiest
way to maintain consistency on each title’s
attributes.
3. Drag title copies from the Library back to
the Timeline to create new titles.
4. Modify the text in the copied title.
5. Repeat this procedure until all credits have
been added.
VS6-C.p65 6/4/2002, 12:23 PM72
Page 75

Note:You’ll end up with a number of separate, sequential title clips in the Timeline. Try adding a small space between
clips for a brief pause. Anyway you do it, test your titles to ensure that they are readable in the final version of your
movie.
An Autotrim function also allows you to
insert a title clip between two existing clips.
If the space between these clips is not
enough to fit your chosen clip, it will be
automatically trimmed to fit the available
space.
Audio
Audio in the form of music, running narration, and even a sound effect is a critical part of any
video project. VideoStudio provides you with the tools to make sure your audio is as great and
easy to prepare as working with video.
The Audio Step consists of two tracks: Voiceover and Music. Insert your narrations in the
Voice Track and your background music or sound effects on the Music Track . You can even
access your music files from multiple CD-ROMs simultaneously.
AUDIO 73
Insert media files
Details of the Timeline showing the two audio tracks with WAV and MP3 file clips
Click Insert media files to browse, select
and insert WAV, MP3, and CD audio files
stored in your hard disk. You can also store
your audio clips in the Library and drag and
drop them to and from the Timeline. To add
additional clips, click Load audio.
Incidentally, the VideoStudio CD also comes
with several audio clips ready for you to use.
These clips are mostly short sound effects
clips and can be very humorous when used in
your movies, or can be used to create
additional ambience.
VS6-C.p65 6/4/2002, 12:23 PM73
Voice Track
Music Track
Load audio
Page 76

74 VIDEOSTUDIO USER GUIDE
Voiceover Tab
Record
Starts the narration recording
process. Clicking it again stops
recording.
Record with Preview
Plays the video clip when you
click Record. This allows you
to accurately synchronize the
voiceover with the video.
Volume
Click the arrow or enter a
value to adjust the volume.
Music Tab
Disc
Displays the Compact Disc
name currently loaded in the
CD Drive.
Track
Displays the audio track
currently playing.
Record
Records the audio track
currently playing.
Play/Stop
Plays the selected audio CD
track. Clicking it again stops
playback.
Volume
Click the arrow or enter a
value to adjust volume.
Duration
Sets the length of time of the
narration clip. You can also
modify the duration by moving
the two yellow Trim handles on
the Timeline.
Video mark in / out
Displays the start / end point of
a narration clip after trimming.
Fade in / Fade out
Gradually increases / decreases
the volume of the clip for a
smooth transition. Click
Settings and Commands:
Preferences to set the fade in /
fade out duration.
Duration
Sets the length of time of the
music clip. You can also modify
the duration by moving the two
yellow Trim handles on the
Timeline.
Video mark in / out
Displays the start / end point of
an audio clip after trimming.
Fade in / Fade out
Gradually increases / decreases
the volume of the clip for a
smooth transition. Click
Settings and Commands:
Preferences to set the fade in /
fade out duration.
VS6-C.p65 6/4/2002, 12:23 PM74
Page 77

FINISH 75
Finish
In the Finish Step, you can render your project into a movie file format most suitable for your
audience or purpose. This section provides added information on choosing formats. Learn the
procedure of creating a movie in preparation for exporting to various media. Find out also how
easy it is to author a DVD title using the Ulead DVD Wizard, which is fully integrated in
VideoStudio. And finally, you can preview how your final output will exactly look.
You can go directly to the Finish Step without even opening a project. That is, if you simply
want to save a project file which you can work on later.
Creating and saving a video file
Click Play Project and select High Quality Preview to save or render your project at any
time. But if you want to save your project as a new file with the same properties, you need to
click the Finish Step and click Save Project in the Options Panel.
If everything has already been fine tuned, however, and you are ready to finalize your work,
then you can start making your movie.
To render a movie:
1. Click Create Video File in the Options Panel.
The Create Video dialog box appears.
2. Enter a file name for your movie. It will be
saved in the format specified in your project
template settings.
3. Click Save.
Create Video File button
VideoStudio’s SmartRender technology allows “changes-only” rendering which eliminates the
need to re-render entire video sequences when only slight changes have been made.
Tip: Having the same settings for source video files and project saves on rendering time whenever you use Play Project
and select High Quality Preview. However, the best arrangement is to use the same format and settings for source
video (both captured and inserted), project, and movie template.
VS6-C.p65 6/4/2002, 12:23 PM75
Create Video
dialog box for
creating a video
Page 78

76 VIDEOSTUDIO USER GUIDE
Sometimes, you just need to render a part of your project for a quick preview. This is usually
done when fine tuning effects, titles, and synchronizing audio in your projects. VideoStudio
lets you select a portion or range of your project to render as a preview video.
To render partially:
1. Make sure that no clips are selected
(a selected clip has a broken line around it).
Click the ruler at the top of the Timeline to
deselect a clip.
2. The Trim Bar now acts on the entire project.
Use the Trim handles to select a Preview
range. A red line should appear in the
Timeline representing the selected range.
(Another way of selecting a preview range is
to drag the blue triangle along the red line.
Then, press [F3] and [F4] for start and end
points respectively.)
3. Click Create Video File in the Options Panel.
4. In the Create Video File dialog box, enter a
file name and then select Preview range
instead of Entire project .
5. Click Save.
Another way to render partially is to click
Play Project and select High Quality
Video clip with selected preview area in red
Preview while holding down [Shift], even if you’re not in the Finish Step. The selected range
will be rendered and then played in the Preview Window. This method creates a temporary
video file under the folder specified in the Preview Tab of the Preferences dialog box. To free
up hard disk space, delete these from time to time by selecting Setting and Commands:
Preview Files Manager.
VS6-C.p65 6/4/2002, 12:23 PM76
Page 79

Video Save Options
In the Finish Step, you can apply a different format and new set of attributes when saving a
movie file. Click Finish: Create Video File-Custom to display the Create Video File dialog
box. Here, select Options. This will display the Video Save Options dialog box where you
can set your preferences.
When selecting an option, always remember to watch out for possible incompatibility problems. Available options depend on your file format. The following can help you choose options
and set values for files in AVI format.
Note:You can also click Help for further information in the Video Save Options dialog box.
Ulead VideoStudio Tab
Select Preview range to render only a
section of your project. Otherwise, Entire
project is selected by default.
For computer video and Instant DVD, a
Frame-based frame type is commonly used.
FINISH 77
Select Play after creating to watch your
movie immediately after rendering your
project. You can of course play your movie at
any time after rendering with Windows Media
Player.
Select Perform SmartRender to render only
the most recent changes. This saves you time
and hard disk space.
Tip: To maintain the highest possible quality and keep render times to a minimum, it is best to create your video using
the same properties as when they were captured. Thus, you will need to check your captured clip’s properties from
time to time when choosing Video save options. To do this, right-click the clip and select Properties. You can also
select a video clip and click Properties in the Options Panel.
VS6-C.p65 6/4/2002, 12:23 PM77
Video Save Options: Ulead VideoStudio
Page 80

78 VIDEOSTUDIO USER GUIDE
MPEG-1 file for VCD
A VCD is simply a special version of a CDROM. The exciting thing about this format is
that it can be read by CD-ROMs, VCD
players, or even DVD players.
Just about any format: AVI, MPEG-1, or
MPEG-2, can be played back on a computer.
When you want to create a VCD file, however, you need to use a special WhiteBook
standard MPEG-1 file that has
specifications. Fortunately, creating such a
file is easy with Ulead VideoStudio.
To create an MPEG-1 file for VCD:
1. Open your project and click the Finish Step .
2. Click Create Video File arrow to display a
submenu of file types.
3. Choose NTSC VCD or PAL VCD, depending
on your TV standard. The Create Video File
dialog box is displayed. Enter a file name and
click Save to render your movie.
very technical
Create Video File
submenu displays a
list of file types
Note:MPEG-1 is a highly compressed format that maintains very good quality. Once the file is created, you can use Ulead
DVD Wizard to write (burn) the CD on your CD writer. Simply follow the instructions to write your movie to the
correct location on the CD. Keep in mind that the quality of your blank CD can affect the quality of your final
output. Remember also that not all stand-alone players can play VCDs created on your computer.
VS6-C.p65 6/4/2002, 12:23 PM78
Page 81

MPEG-2 file for DVD
MPEG-2 is used on DVDs and digital satellite
television and yields highly compressed files
of extremely high quality.
MPEG-2 files are captured at full broadcast
resolution. NTSC MPEG-2 (DVD) is 704 x
480 pixels, while PAL MPEG-2 (DVD) is 704
x 576 pixels. Thus, MPEG-2 files results in
bigger file sizes compared to MPEG-1.
FINISH 79
MPEG-2 is excellent for any type of movie.
USB Instant DVD and VideoStudio let you
capture directly from your camcorder, VCR
or DVD Player directly in the MPEG-2
format, perform frame-accurate editing, and
create a final movie in the same format. You
can further use the Ulead DVD Wizard to
create a DVD that can be played directly on a
home DVD player or your PC’s DVD-ROM.
To create an MPEG-2 file for DVD:
1. Open your project and click the Finish Step .
2. Click Create Video File arrow to display a
submenu of file types.
3. Choose NTSC DVD or PAL DVD, depending
on your TV standard. The Create Video File
dialog box is displayed. Enter a file name and
click Save to render your movie.
An AVI video clip displayed in the
Preview Window
An MPEG-2 video clip as displayed in the
Preview Window
VS6-C.p65 6/4/2002, 12:23 PM79
Page 82

80 VIDEOSTUDIO USER GUIDE
Creating a DVD / VCD / SVCD Title
In the Finish Step, you can create a DVD / VCD / SVCD compliant MPEG file and directly
output it to Ulead DVD Wizard. Click Create DVD / Create VCD / Create SVCD and
choose between PAL and NTSC standards. The Create Video File dialog box will be displayed. Enter a file name and click Save. After the MPEG file is generated, Ulead DVD Wizard
automatically launches and walks you through the process of creating a DVD / VCD / SVCD
title from the MPEG video file.
Project Playback
Project Playback is used to output your entire project or part of it to a video monitor. This
also gives you a full screen preview of your movie either on a PC or TV monitor if you have a
TV out option on your VGA card. Click Project Playback in the Options Panel of the Finish
Step.
Creating an audio file
Sometimes, you want to save the audio track of your captured clips or entire video project in a
separate audio file. This is especially useful when you want to use the same sound with
another set of images, or when you want to convert the audio of a captured live performance
into sound files. VideoStudio makes it easy for your to create an audio file of your project in
MPA, RM, WAV, or MPA format.
To create an audio file:
1. Open your project and click the Finish Step .
2. Click Create Sound File to display the
Create Sound File dialog box.
3. From the Save as type list, select the audio
format you want to use and select Options to
display the Audio Save Options dialog box.
4. Fine tune your audio attributes and click OK .
5. Enter a file name and click Save.
VS6-C.p65 6/4/2002, 12:23 PM80
Page 83

EXPORTING YOUR MOVIE 81
Exporting your movie
VideoStudio allows you to export your video files in various media formats. You can output
your work in formats like DVD/VCD/SVCD, send it as an e-mail attachment, upload it to your
Web page, convert it to an electronic greeting card, and even record it back to your camcorder
or VCR. Exporting the output can be done by clicking Export in either the Storyboard Step or
Finish Step.
Burning DVD/VCD/SVCD
DVD has become the standard format in producing multimedia files because of its excellent
quality. VideoStudio is fully integrated with the Ulead DVD Wizard to enable you to output
your projects to DVD or VCD and SVCD complete with scene selection menus. The wizard
type workflow will walk you through all the essential elements needed in DVD authoring.
To burn your DVD/VCD/SVCD title in Ulead
DVD Wizard:
1. Launch Ulead DVD Wizard either in the
Storyboard Step or Finish Step.
In the Storyboard Step , click the Video Tab
in the Options Panel. Then click Export and
select Ulead DVD Wizard .
In the Finish Step , click Export in the
Options Panel and select Ulead DVD
Wizard.
2. Select Create scene selection menu in the
Start dialog box. This will give your viewers
instant access to specific scenes in your
video. Click Next.
Note:If this option is not selected, you automatically go
to the Playback Simulation.
VS6-D.p65 6/4/2002, 12:23 PM81
Page 84

82 VIDEOSTUDIO USER GUIDE
3. Select scenes to use in the scene selection
menu in the Add Scenes dialog box. Use the
preview buttons to browse for scenes and
click Add to place them in the Scenes list .
You can select up to 99 scenes. Select Locate
scene frames to search for I-frames only.
Select Add introduction video to insert a
video clip that will be played automatically
when the disc is inserted into the player.
Click Next.
4. Browse and select the DVD / VCD / SVCD
compliant file you want to use for your
introduction video in the Add Introduction
Video dialog box. Click Next.
5. Select a preset template layout in the Select
Menu Template dialog box. You can also
customize the background and enter text
captions. Click Next.
6. Use the remote control to observe the
behavior of your DVD/VCD/SVCD project in
the Playback Simulation dialog box. Click
Next.
7. Select the folder location where to output
files in the Determine Output Options
Settings dialog box. Determine also the
settings of your CD burner. Click Next.
8. Determine the output options you want for
the video file in the Finish dialog box.
9. Click Create DVD/VCD/SVCD to start the
burning process.
VS6-D.p65 6/4/2002, 12:23 PM82
Page 85

SHORTCUTS 83
Recording back to a camcorder or VCR
The most exciting thing about Instant DVD is the ability to send your edited movies back to
your camcorder or VCR in excellent quality.
To record a movie to your camcorder or VCR:
1. Turn on your camcorder and set it to Play mode (or VTR / VCR mode). See your camcorder’s
manual for specific instructions.
2. Select an MPEG-1 or MPEG-2 file from the
Library. If you want to use a project, make
sure you have already rendered it using
Create Video File.
3. Click the Storyboard Step or the Finish Step .
4. Click Export: USB Instant DVD.
5. The USB Instant DVD - dialog box opens.
6. Press Record on your VCR or Camcorder and
Click Click Play in the dialog box to begin
sending the video to your recorder.
7. You may hear the audio from your computer
during playback, but you will not see any
video on your computer screen. You can
monitor the capture via the LCD screen on
your camcorder, or split the audio and video
cables and view on a TV while recording to a
VCR.
8. Click Stop to stop playback. Click Close to
close the dialog box.
Recording Window dialog
Note:Before recording a video file back to your camcorder via Instant DVD, make sure the video is saved with the correct
format. Only MPEG-1 and MPEG-2 files can be exported through Instant DVD to your camcorder or VCR or for
display on a TV. This is because to get the file through the USB cable, it must be highly compressed and the
Instant DVD decoder decodes MPEG streams only.
VS6-D.p65 6/4/2002, 12:23 PM83
Page 86

84 VIDEOSTUDIO USER GUIDE
Shortcuts
Use the following keyboard shortcuts to perform commonly used operations.
Start Step [Ctrl + N] Starts a new video project
[Ctrl + O] Displays the Open dialog box
Finish Step [Ctrl + S] Saves the current project using the same project
Settings and
Commands [F6] Displays the Preferences dialog box
[F1] Starts the online help
[Ctrl + Z] Undoes the last command
[Ctrl + Y] Reapplies the last undone command
Library [Ctrl + C] Copies the selected clip on the timeline or Library
[Ctrl + V] Pastes the copied clip into the Library.
Pressing [Ctrl] while
selecting clips Allows you to select multiple clips
name and overwrites the existing one.
You can only paste a clip to a media type library
similar to it. (e.g. image clip to image library)
Double-clicking on Track Invokes the corresponding step
Double-clicking on Clip Invokes the corresponding step and selects the clip
Pressing [Shift] while selecting clips Allows you to select multiple clips in the same track
Pressing [Shift] while clicking
Play project - Instant playback
in Navigator Plays the trimmed part of the clip
Clicking Play projectInstant playback in Navigator Plays the preview selection within the whole project
Del Deletes the selected area
Esc Stops capturing, recording, rendering,
VS6-D.p65 6/4/2002, 12:23 PM84
or in the Library
or closes dialog boxes without making any changes
Page 87

Need more help?
For technical support on VideoStudio, visit the following Web sites:
America http://support.ulead.com/
Germany http://www.ulead.de/tech/tech.htm
Japan http://www.ulead.co.jp/tech/tech.htm
Taiwan http://www.ulead.com.tw/tech/tech.htm
GLOSSARY 85
VS6-D.p65 6/4/2002, 12:23 PM85
Page 88

86 VIDEOSTUDIO USER GUIDE
Glossary
Analog
A signal that is not digital. Most VCRs, radio/
television broadcasting, AV in/out, S-VIDEO, and
stereos are analog. Computers are digital, dealing in
ones and zeros. Information from an analog source
must be digitized to be used on a computer.
Capture
The recording of video or images to a computer
hard disk.
Clip
A short section or part of a movie. A clip can be
audio, video, still images or a title.
Codec
COmpress and DECompress. All video on a
computer uses a special algorithm or program to
process video. This program is called a codec.
Color Clip
A simple background color used in a movie. It is
often used for titles and credits since they stand
out clearly against the solid color.
Compression
Making a file smaller by removing redundant data.
Nearly all digital video is compressed in some way
or another. Compression is achieved through a
codec.
Data Rate
The amount of data per second that is transferred
from one part of your computer to another. In digital
video, the data rate of your source is very
important: CD-ROMs have lower data rates than
hard disks. The data rate of the Internet is very low.
Effect
In VideoStudio, an effect is a special computer
generated transition between two video clips.
Frame
A single image in a movie.
Frame Rate
The number of frames per second in a video. NTSC
video is commonly 29.97 frames per second (fps),
but smaller video files can be created on the
computer by using lower frame rates, like 15 fps
(not suitable for VCD or DVD).
Library (Ulead VideoStudio)
The Library is the repository for all of your media
clips. You can store video, audio, titles, or color
clips in the Library and instantly retrieve them for
use in a project.
Mark In/Out
Points in a clip that have been marked for editing
and trimming purposes. A section can be selected
from a longer clip by setting its beginning (Mark in)
and ending (Mark out).
MP3
Abbreviation of MPEG Audio Layer-3. MP3 is an
audio compression technology that produces near
CD audio quality at a very small file size, making it
transfer quickly over the Internet.
MPEG-1
A standard for video and audio compression used
in many products like VCD. For NTSC, its video
resolution is 352x240 pixels at 29.97 fps. For PAL,
it works at 352x288 pixels at 25 fps.
Digital
Computer data consisting of ones and zeros.
Contrast digital information with analog.
Driver
A software program that controls the connection
between a specific device and a computer.
VS6-D.p65 6/4/2002, 12:23 PM86
MPEG-2
A subset of MPEG-1. It’s a standard for video and
audio compression used in products like DVD. For
NTSC DVD, its video resolution is 720x480 pixels at
29.97 fps. For PAL DVD, it works at 720x576 pixels
at 25 fps.
Page 89

INDEX 87
NLE
Non Linear Editing. Conventional editing on a VCR is
necessarily linear because you must access clips
on a video tape in order. Computer editing can be
done in any order that is convenient.
NTSC/PAL
NTSC is the video standard in North America,
Japan, Taiwan, and some other regions. Its frame
rate is 29.97 fps. PAL is common in Europe,
Australia, New Zealand, China, Thailand, and some
other Asian places, which has a frame rate of 25
fps. There are other differences. In the world of
DV and DVD, NTSC has the video resolution of
720x480 pixels, while PAL has 720x576 pixels.
Plug-ins
Plug-ins are small utilities in a program that add
special functions or effects. In Ulead VideoStudio,
there are a few output functions that let you send
videos by e-mail, create Web pages or send
multimedia greeting cards.
Project File
In VideoStudio, a project file (*.VSP) contains the
required information to link all associated image,
audio, and video files. You need to open a project
file first before starting video-editing in VideoStudio.
Render
Rendering is the process of making a finished
movie from the source files in a project.
SmartRender
SmartRender technology renders only project
changes, eliminating the need to re-render whole
projects and enabling fast previewing.
Streaming
This is a relatively new Internet technology that
allows large files to be played as they are being
downloaded. Streaming is commonly used for large
video and audio files.
Template
A work pattern in a software program. It includes
predefined formats and settings to save user’s
efforts and reduce risks of making mistakes.
Timecode
The timecode of a video file is a numerical way of
representing the position in a video. Timecodes can
be used to make very accurate edits.
Timeline
The timeline is a graphic representation of your
movie in chronological order. The relative size of
clips on the timeline gives you an accurate idea of
the length of your media clips.
Title
A title can be a movie title, a caption or credit. Any
text, image, or video file that overlays in your movie
can be referred to as titles.
Transition Effect
A transition is a method of sequencing between
two video clips, like fading from one into another. In
Ulead VideoStudio, there are a large variety of
special transitions available, and they are called
Effects.
Trim
The process of editing or cropping a movie clip.
Computer video can be trimmed frame by frame.
Source
The source or origin of your media, usually a
camcorder or VCR. Audio CDs are great sources
for music clips.
Storyboard
A storyboard is a visual representation of your
movie. Individual clips are represented as image
thumbnails on the timeline.
VS6-D.p65 6/4/2002, 12:23 PM87
Video Filters
A video filter is a method of changing the
appearance of a video clip, like mosaic and ripple.
Voiceover
The narration of a video or movie is commonly
called the voiceover. This is most notable in
documentaries such as nature shows.
Page 90

MYDVD 3.5 USER GUIDE
MYDVD 3.5 USER GUIDE
88
MyDVD.p65 6/4/2002, 12:24 PM88
Page 91

MYDVD 3.5 USER GUIDE
MyDVD: Get Started
This application allows you to capture, author & publish MPEG-1 (VCD) & MPEG-2
(DVD) video to CD or DVD disc.
CD-R/RW Discs
VCD on CD: 60-70 minutes of MPEG-1 video
DVD-R/RW or DVD+R/RW Discs
DVD - Up to 2 hours of DVD audio and
video on a 4.7 GB DVD disk. Select from
DVD on CD* - 30-40 minutes of MPEG-2
(DVD) video on CD.
Good, Better or Best Quality video setting.
The higher the quality, the smaller amount of
video will fit on a disc.
*When DVD on CD is selected, a DVD software player is automatically burned on the CD so you can distribute to any Windows
user and they can playback the disk. No need for a DVD-ROM
drive.
Quick Capturing Video with MyDVD
1. Start MyDVD and select Create DVD or
Create VCD
2. The Welcome screen will appear, Click New
MyDVD Project.
3. Select the Background style for your project
and Click Finish.
4. Click the Capture icon and the Capture to disk
screen will appear.
5. Click the CHANGE button to select Line-In for
the audio source.
6. Video Device will be displayed as: “Stream
Machine USB Video”
7. For DVD – select video quality – Good, Better
or Best.
8. To automatically set chapter points – Click
Create Chapter points, set to create chapters in
specified minutes or seconds.
9. Press Play on your camcorder or VCR and
you should see video in the preview Window.
10. Click the RED record button to begin
recording. Click this button again to stop
recording.
11. Click DONE when you are finished capturing
video.
Note: The video source (RCA or S-VHS) will match
your last selection in CapWiz. Example: If you last
used S-VHS as your video input source in CapWiz,
this is the connection that MyDVD will attempt to use
for video capture.
To use RCA video input as your source in MyDVD,
Start CapWiz, change your video input to RCA.
Preview video to confirm then close CapWiz and begin
capture in MyDVD.
89
MyDVD.p65 6/4/2002, 12:24 PM89
Page 92

MYDVD 3.5 USER GUIDE
Video Capture from Instant DVD
This application allows you to capture and burn either
VCD (CD-ROM) or DVD (CD-ROM or DVD disk)
movies. You select the type of video you wish to
publish, select the background template and either
import video or capture video from Instant DVD. Once
you have updated the template and button text to
customize your movie, click “Make Disc” and you will
step through the process to burn your movie to disc.
When capturing video, MyDVD will check for a CD or DVD burner installed on your system and it
will determine how many minutes of VCD or DVD video (depending upon your selection) will fit on
the disk.
If you want to make a DVD on a CD disc (sometimes called “mini-DVD”), a software DVD player
will automatically be burned to the disk so you can distribute to any Windows PC with a CD player.
The DVD player will automatically load so the DVD movie can be played. This is a great way to
distribute high quality DVD video to people who may not have a DVD-ROM on their PC.
If you have a DVD recorder (burner) you can produce DVD videos that will play in most home DVD
players.
With a CD burner you can produce a VCD (MPEG-1) movie that will play in many home DVD
players.
90
MyDVD.p65 6/4/2002, 12:24 PM90
Page 93

MYDVD 3.5 USER GUIDE
Single Step Capture and Burn a CD or DVD disk
MyDVD – Direct to Disk – The Direct to Disk
capability in MyDVD allows you to easily set
up a one step capture and burn sequence.
This is the simplest way to archive your video
tape collection to CD or DVD.
Select Direct to Disk when the MyDVD application is started. You must have a
CD or DVD recorder attached to your PC at the beginning of this procedure and a
new blank disk inserted. Follow the steps and you will be brought to a video
capture dialog screen.
1. Select the hours and minutes you want to record to the disk
2. Select how often you want chapters to be automatically created in minutes or
seconds; i.e. set chapter every 5 minutes.
3. Select video quality (for DVD only) to Good, Better or Best. VCD is a set
quality standard.
4. Click Play on your video device. You will see video playing in the preview
window, then Click the “RED” record button below the video preview area to start
recording.
5. Video will temporarily be stored on your hard drive. At the end of the capture
sequence, the video will automatically be sequenced into chapters and burned to
the disk.
6. The finished disk is automatically ejected when sequence is complete.
MyDVD.p65 6/4/2002, 12:24 PM91
91
Page 94

USB INST ANT DVD HELPFUL HINTS
USB Instant DVD Helpful Hints:
What is the minimum VGA setting?
Recommended screen resolution is 1024 x 768 or higher. This resolution will allow you to properly display the full
resolution MPEG-2 video which is 704 x 480 (NTSC) or 704 x 576 (PAL). Color depth can be set to 16 bit or
higher depending upon Graphic card capabilities?
Video will not preview or is very slow, or gets slow after a few minutes.
Check your display (VGA) settings. If you are set to 1024 x 768 at 32 bit or higher, you may be using your entire
graphic card memory for display and don’t have enough resources for the video overlay. Solution: decrease
color depth to 16 bit.
I hear an echo sound when I capture video.
Check your sound card capabilities and be sure that it is full duplex. Full duplex means that it has the capability
to record and playback audio at the same time.
Check your audio mixer settings. If you have connected the Instant DVD audio cable to “Line-In” be sure that the
Volume or Playback mixer has the line-in muted. Also, check that you have the “Line-In” selected as your
recording source in the Record Mixer. Detailed instructions are in your user guide.
When I playback captured video in Video Studio or Windows Media Player, it has lines across the
screen- it looks interlaced.
This is normal. The MPEG-2 decoder used in Video Studio or Windows Media Player does not de-interlace
MPEG-2 during preview. Video at times will look interlaced or have lines across the screen. Don’t worry, there is
nothing wrong with the video you captured. Your final video project will look great. Try playing the same clip in
PowerDVD or out to a TV and you will see it looks fine.
Where the Capture Wizard?
Click on “Start” -> “Programs” -> “ADS Tech Instant DVD” and then click on “Capwiz”
Can I connect Instant DVD to a USB Hub?
We recommend that you connect directly to the USB Port on the motherboard or a USB PCI add-in card such
as our (USBX-500) 2 Port USB Port card or USB Turbo 2.0 (USBX-2000) to ensure full available USB bandwidth.
You can connect to a “Self Powered” USB Hub (this means that is has it’s own power supply) and Instant DVD
will work fine as long as you don’t have too many devices running at the same time. Our recommendation is the
USB Ultra Hub 4 (USBH-604).
You cannot connect Instant DVD to a Bus Powered Hub (Hub without it’s own external power supply).
Disconnect USB Scanners or other devices that may be using USB bandwidth even if you aren’t using the
device. We have seen some USB scanners and printers interrupt the USB connection for other devices.
92
MyDVD.p65 6/4/2002, 12:24 PM92
 Loading...