


DVD XPRESS DX2 USBAV-714
DVD
Xpress
Xpress
Xpress
DX2
E
G
F


1
Ways to Capture and Edit Video
4
© 2006 ADS Technologies. All Rights Reserved
ADS is a registered trademark of ADS Technologies Inc.
ADS Technologies (ADS) makes no warranty of any kind with regard to this material, including but not limited to, the implied warranties of merchantability and fitness for a particular
or liability for any errors or inaccuracies that may appear herein. ADS makes no commitment to update or to keep current information contained within this document. (rtt)
2
3
4
5
6
G
F


1
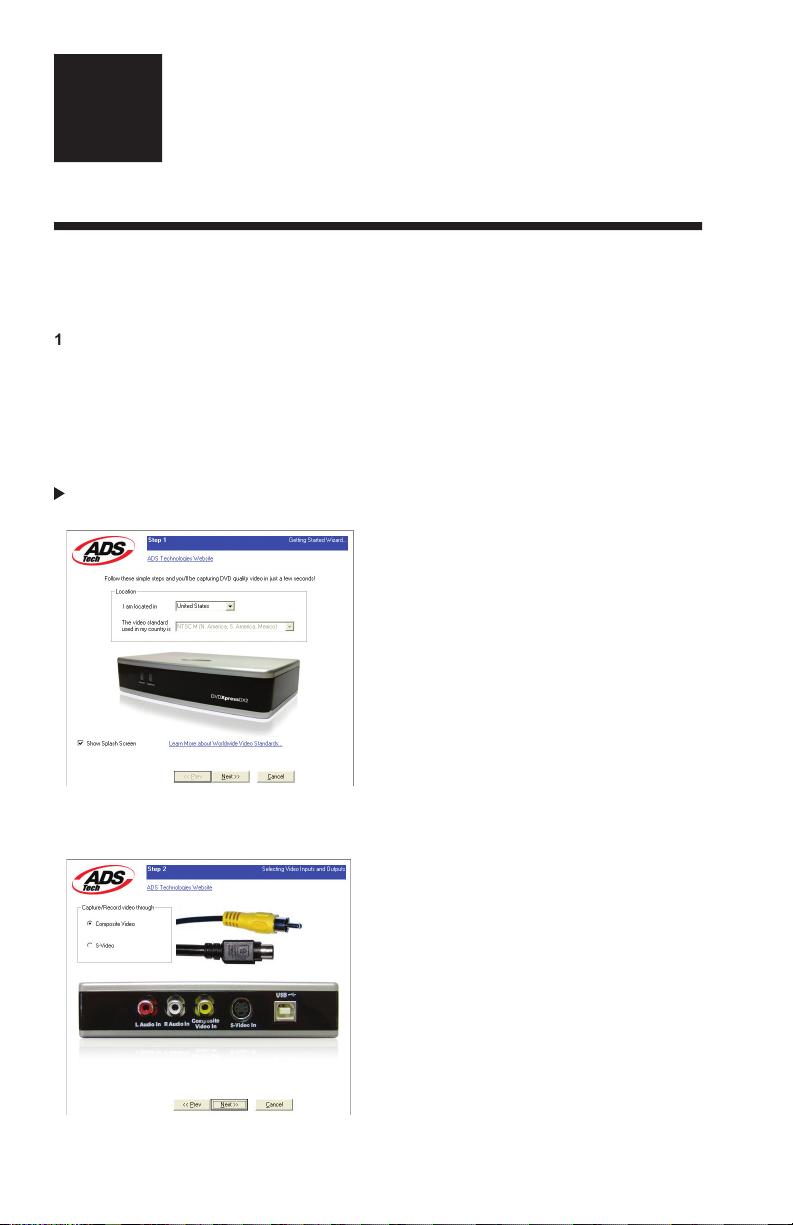
Connect the Audio/Video cables from your video source to DVD Xpress DX2 device.
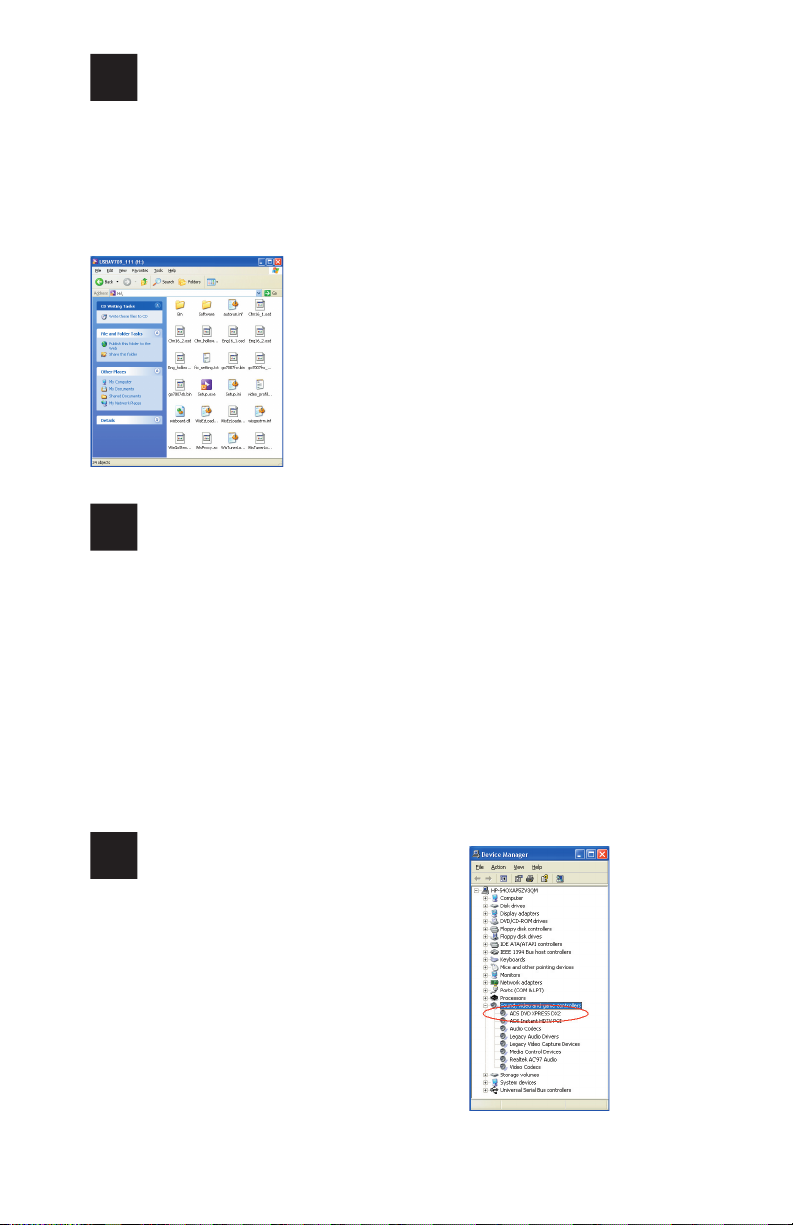
Load the DVD Xpress DX2 CD.
Connect DVD Xpress DX2 to your PC via the USB Port.
Drivers for WinXP and Win2000 are on the root of the CD. Direct Windows to the drivers
on the CD and they will install automatically.
Install CapWiz – CapWiz application must be installed as it installs the key elements for
DVD Xpress DX2 to function.
Install ArcSoft ShowBiz® DVD 2 application.
Double Click the CapWiz icon on your Desktop.
Answer the questions on the
Wizard screens.
Press Play on your video source so you have video playing.
Click Preview on the CapWiz interface and video will appear.
Start capturing your video when ready.
Xpress DX2.

video on a disc, and with better quality.
Want more control? ArcSoft ShowBiz® DVD 2 is easy-to-use software that turns home
videos into fun-to-watch movies! Preserve your precious movies on DVD or CD. Create
video for the Web or mobile devices to share with family and friends. Enhance your movies
with customizable effects, filters and transitions.
video in the right format for your Sony® PSP or Video iPod. Just select the type of video
you want to capture in the Audio/video Format screen and you can start capturing in the
video in DivX video format and playback the video in DivX Certified DVD Players. Just
We want to be sure you receive the greatest benefits from your DVD Xpress DX2
you may just want to archive video to disc in the fastest way possible. Other times you
for the big project you want to have a full featured video editor that gives you the freedom
to be creative.

2
Ways to Capture and Edit Video
your Sony PSP device. Use the Capture Wizard screens to verify your video connections,
video compression format and where you want your video files stored on your computer
ArcSoft ShowBiz® DVD 2
ArcSoft ShowBiz® DVD 2 is a simple yet powerful software application that has everything
you need to edit home video and create professional looking DVDs. The software features
What’s more, the program includes a powerful photo slideshow wizard and a full set of

3
We strongly recommend using
Windows XP or Windows 2000 with
for proper operation of your DVD Xpress DX2 at USB 2.0 connection speeds.
Service Pack 1
We recommend using the USB 1.1 port on your motherboard or from a USB 1.1 add-in
the DVD Xpress DX2 to your PC.
1
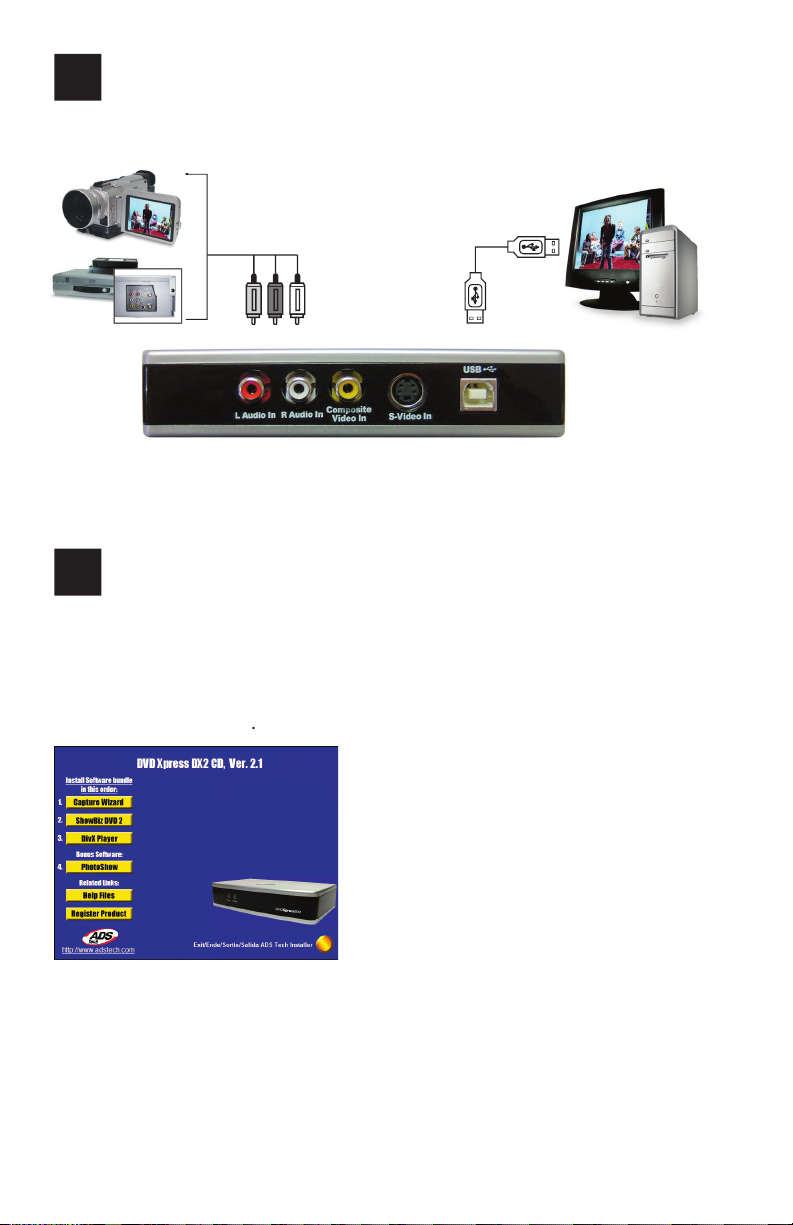
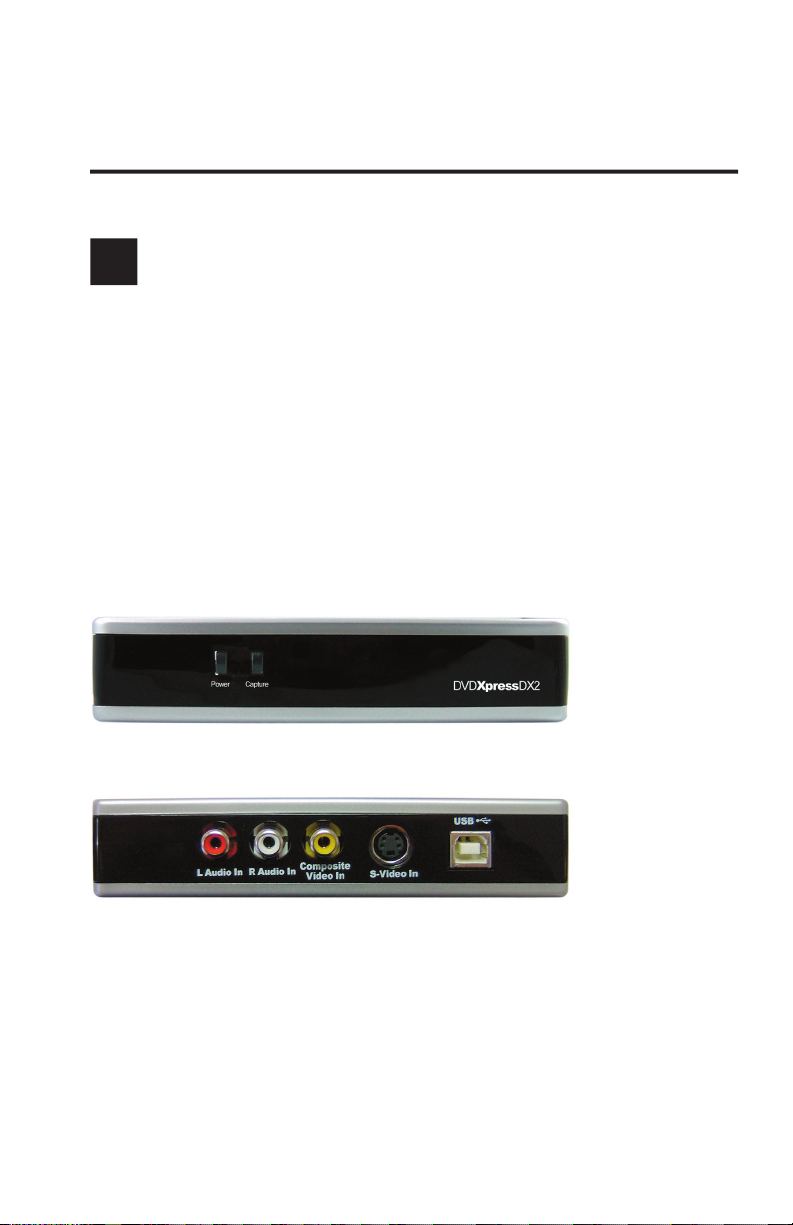
Wire It Up
2
to the DVD Xpress DX2. Connect the 6 ft. A/V In cable to the 3 RCA jacks to your analog
3
Windows XP or Windows 2000
4
Capture Wizard
button to install the
9.0c is required for proper operation of your DVD Xpress DX2. Installation of DirectX 9.0c
may require a re-start of your computer.
Drive icon to bring back the DVD Xpress DX2 Installation screen.
ArcSoft ShowBiz® DVD 2.
Verify Hardware Installation
Windows and is properly installed.
5
6
Windows XP or Windows 2000:
Click Start, Settings, Control Panel.
In Control Panel, click System.
Click on the Hardware Tab.
4
Click Device Manager Button.
Double click the Sound, Video and Game Controllers Device.
ADS DVD Xpress DX2 should be listed.
7
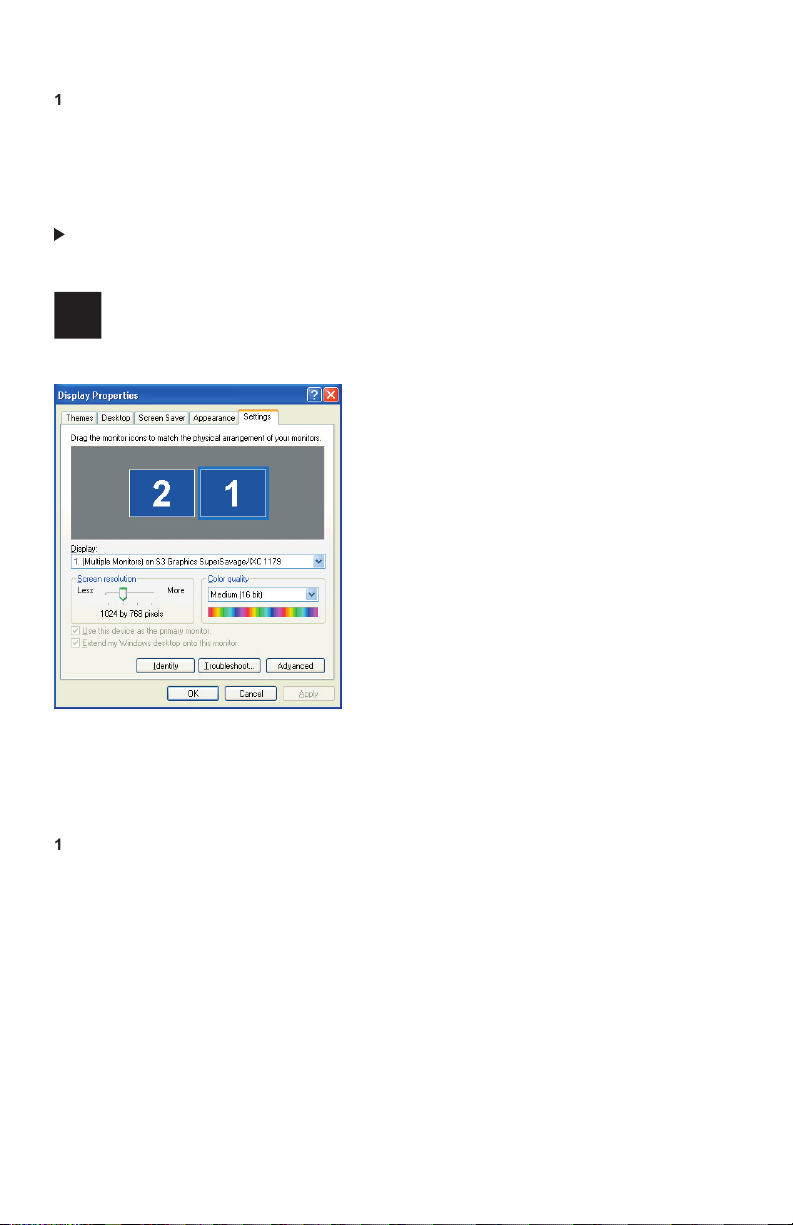
Right click on your desktop
Click Properties
Click on Settings Tab
4
Adjust screen area to 1024 X 768 & 16 Bit Color (or higher if your VGA card and monitor
support higher resolutions and color depth).

writing new files into your Hard Disk. Please keep in mind that this process requires some
your Hard Disk, you can Analyze a volume to see if this step is required.
Double-click My Computer
Right Click and Select Properties on the Hard Disk you want to Save your captured Videos
Click on Tools tab
Click Defragment Now button
Click Analyze button to see if you need to Defragment the Hard Disk
Made all of the Audio and Video connections between DVD Xpress DX2 and your
Audio/Video source.
Connected DVD Xpress DX2 to the USB Port on your PC.
Installed the drivers and verified that the device is properly installed
Installed all necessary software applications required for proper operation.
Optimized your System for best performance.
Now you are ready to Start Capturing Videos to your PC.
8
ArcSoft ShowBiz® DVD 2
We have created a simple getting started Wizard that allows you to verify your connections
9
4
will select NTSC. For Users in Europe and many other countries you will select PAL.
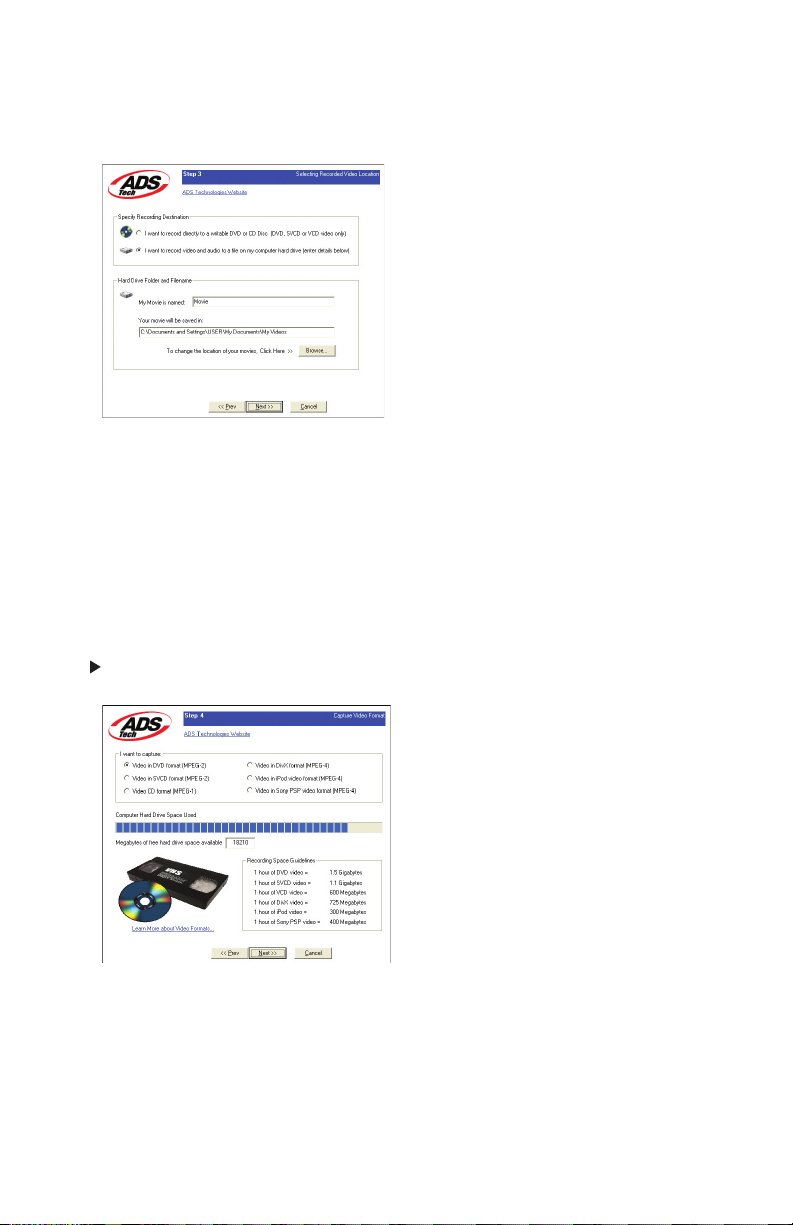
We will automatically select “My Documents\My Videos\” as the location to store your
video files, we also set the file name to “Movies. You can select a different location or file
Wizard interface.
first time
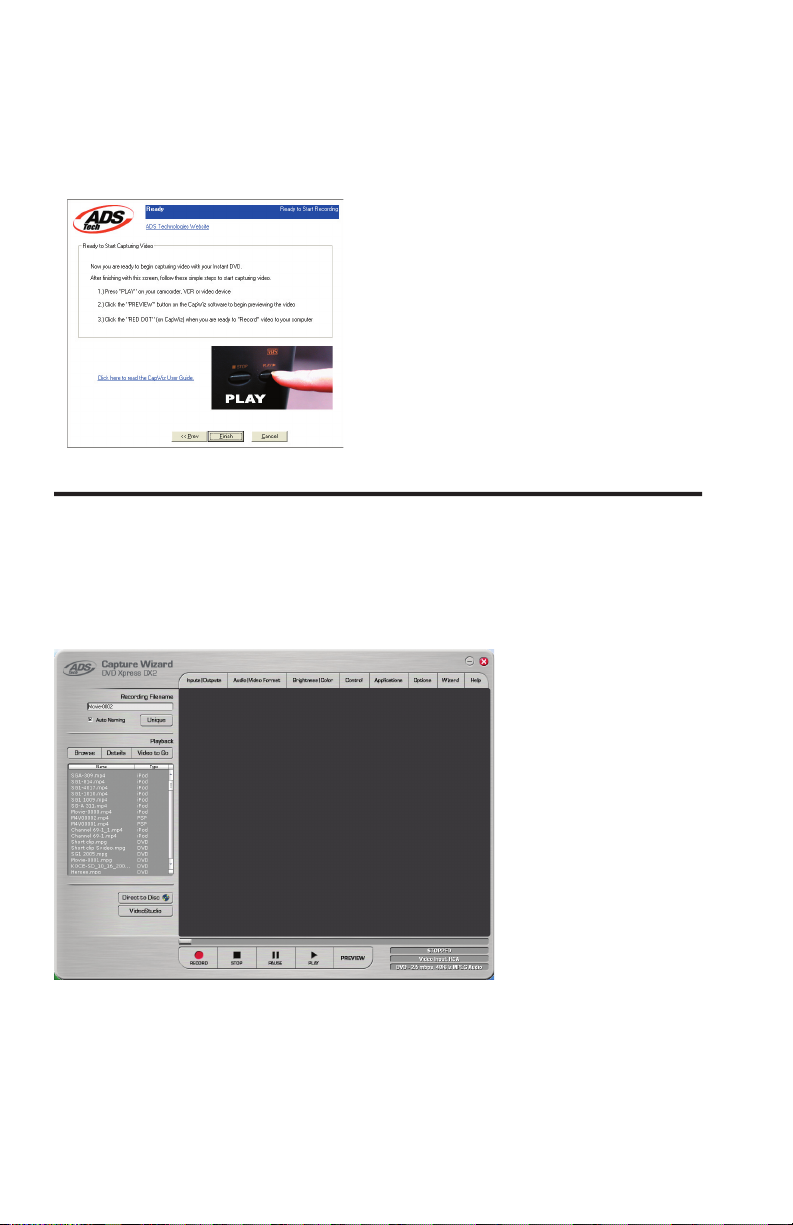
You have just completed the Wizard screens to ensure that you have connected your
video cables, selected your video format and now you are ready to capture video.

Be sure your video device is playing a video
Click “Preview” and you will see video playing in the preview window. You will notice the
status indicator displaying “Preview”.
Click the “Stop” ( ■ ) button or press the “Esc” key on your keyboard to stop video preview.
4
If you Click the Red “Record” (
) button while previewing video, the video will stop
momentarily, then start again. When the video preview starts again, you are recording.
You will notice the status indicator displaying “Recording” and the Time count start.
To Stop recording, press the “Stop” ( ■ ) button or press the “Esc” key on your keyboard.
You will notice that the file name has been added to the playback list box.
Ways to Begin Recording
You can start recording from the Stop or idle status in CapWiz or while you are
previewing video.
Click the red Record (
●
To Stop recording, Click the “Stop” ( ■ ) button or the “Esc” key on your keyboard.
The video will be displayed in the resolution you selected for the video capture.
Click on the file name in the Playback List Box, then click on the “Play” ( ► ) button. You
may also double click on the file name for Instant Playback. You will notice that the
status indicator turns Green and the display changes to Play.
To Stop Playback, Click the Stop ( ■ ) button or press the “Esc” key on your keyboard.
video file and continue playback from that point. This feature is possible for MPEG-2
files only.
Double-click on the file you want to Playback in your computer.
As the video is playing in the screen, use your mouse to drag the playback position
slider to the point you desire.
Once you release the mouse, the file will resume playback.
Advance 1 second (in Pause mode) = right arrow key

Keep this file name if you wish or run the Wizard to use a new file name.
Check the “Auto Naming” box and CapWiz will automatically name each captured file
in sequential order; i.e. if your video file is “Movie”, the first file captured will be named
“Movie-0000”, the second “Movie-0001” and so on.
Every time you stop a capture, the new file name will be displayed in Playback List box.
4
You can also uncheck “auto-naming” and click the “Unique” button and CapWiz will use
the file name you enter in the filename box. You need to provide a new file name for
each video clip captured. If you do multiple captures without changing the unique file
name, the file will be written over each time you capture.
Video bit rate
Audio sampling rate
Audio bit rate
4
Frame rate

Application Links
for the type of project you want in your DVD burner.
the Capture Wizard Screens.
Audio/Video Format
The Audio/Video Format dialog screen allows you to select your video
Video Quality
• DVD (MPEG-2)
• Super Video CD (SVCD)
• Video CD (VCD)
• iPod™ (MPEG-4)
• Sony PSP™ (MPEG-4)
• DivX (MPEG-4)
flexibility in creating capture settings to meet your individual needs. To access the Custom

480 x 480 (SVCD)
Video Encoding Format
• MPEG-1 (VCD only)
• MPEG-2 (DVD or SVCD)
• DivX (MPEG-4)
Audio Encoding Format
• MPEG-1 Layer-2
• WAV (LPCM)
will be able to set the Video Resolution, Video Quality, Audio Frequency or Audio Bit Rate.
Video Resolution
You can select from the following video capture resolutions for MPEG-2 Video
480 x 576 (SVCD)
You can select from the following video capture resolutions for MPEG-4 Video
When MPEG-1 is selected the only Video Resolution allowed is 352 x 240

Audio Frequency
You can select between the following:
• 48.0 KHz (MPEG-1 L2)
• 44.1 KHz (MPEG-1 L2)
Audio Bit Rates
48 kHz for DVD video. We give you the choice to select the audio bit rate for your custom
video captures in the range from 192 kbps to 384 kbps.
We have provided lots of flexibility in the manner in which you can capture video at various
that are
for burning and playing back in players. If not, you may find that you have
VCD, SVCD and DVD Legal Settings (check our web site for FAQ’s and other updates to this list):
VCD
Video Bit Rates
Audio Bit Rates
Click Custom Settings button
When the custom settings dialog box opens, make your selections.
Click OK to save
4
Click “Use Custom Format” to capture with the settings selected.
You can make changes to the Brightness/Color settings while Previewing or recording video.
Move the slider for each setting choice and you will see the adjustment over the next
second or two.
Try adjusting only one control at a time, observe the results in the Preview window and
once you are satisfied with the results go to the next control.
If you mess up, Click Reset to restore factory default settings.
Click OK to close the box.
Make the adjustment during Preview to get the best Video Quality recording.

Applications
Click the Applications menu button
Click on
to jump to the selected application. Capture Wizard
will automatically close when you do this.
Click the Edit button. This will show the default or standard directory path the
applications are normally installed.
To change the directory path click the box with the “…” and you can browse to the
directory path you installed the application.
Wizard application: Click the Options button at the top of the interface to view the
your screen when you start Capture Wizard. To disable, click on “Show Splash” and the
when you start Capture Wizard. To disable, click on “Show Wizard” and the check mark
will disappear.
Click Options at the top of the screen.
Click Playback…
Select the desired Playback Size.
If you select Full Screen (User Resizable), then you can manually drag the playback
window to any size you choose.

You can set up to be warned if you don’t have enough disk space available when you
When you click the Record button you will be presented with a dialog box which allows
you to set the hours, minutes and seconds for recording delay. For example if you want to
video capture.
You can set a time limit for your recording. If you know you want to record for exactly 1
VCR-Style Timer Recording
●
Wizard
About CapWiz…
for the version number and Date.

5
We made it easy and simple for you to capture video for playback in your favorite Portable Media
transfer the video to your Video iPod™ using iTunes or to your Sony PSP™ by just copying the
Video iPod™
Click on the Audio / Video Format button
Select the iPod™ (MPEG-4) option under
Video Quality
Click OK
4
On CapWiz GUI, click Preview to see the video.
The video will be displayed in the resolution format
that is compatible with the Video iPod™ device.
Set your video source to the beginning frame you
want to capture
When ready, press “PLAY” on your video source
and press “RECORD” button on the CapWiz GUI
to start capturing.
Note the name of the video file being captured for
transfer to your player.
When you finish capturing the video, you can plug
in (use the USB cable provided with your iPod)
your Video iPod™ and send the Captured file to
your Video iPod™ using iTunes.
Click on the Audio / Video Format button
2
Select the Sony PSP™ (MPEG-4) option under Video Quality
Click OK
4
On CapWiz GUI, click Preview to see the video. The video will be displayed in the resolution format
that is compatible with the Sony PSP™ device.
Set your video source to the beginning frame you want to capture
When ready, press “PLAY” on your video source and press “RECORD” button on the CapWiz GUI to
start capturing.
Note the name of the video file being captured for transfer to your player.
When you finish capturing the video, you can plug in (use the USB cable provided with your Sony
PSP™) your Sony PSP™ and copy the captured file to your Sony PSP™ using Windows Explorer.

The Creative Zen Vision device supports different video formats which you can select before you start
your video capture. The supported video formats are: MPEG-1, MPEG-2 and DivX (MPEG-4). Follow
the instructions below to capture the video format that you would like to use in your device.
Click on the Audio / Video Format button.
Click Custom Settings… button.
Select your Country in Regional Settings.
4
Select MPEG-1, MPEG-2 or DivX (MPEG-4) under Video Encoding Format.
Set the Audio Encoding Format to MPEG-1 Layer-2.
Compression Tuning (select one of the options below):
Video Resolution
480 x 480 (MPEG-2)
Audio Frequency
44.1 KHz (MPEG-1 L2)
48.0 KHz (MPEG-1 L2)
44.1 KHz (MPEG-1 L2)
44.1 KHz (MPEG-1 L2)
48.0 KHz (MPEG-1 L2)
48.0 KHz (MPEG-1 L2)
Video Quality
Very Good
Very Good
Audio Bit Rates
Click Ok, then click the option for Use Custom Format then click OK.
On CapWiz GUI, click the Preview button to see the video. The video will be displayed in
the resolution format that was chosen.
Set your video source to the beginning frame you want to capture
When ready, press “PLAY” on your video source and press “RECORD” button on the
CapWiz GUI to start capturing.
Note the name of the video file being captured for transfer to your player.
When you finish capturing the video, you can plug in (use the USB cable provided
with your Creative Zen Vision) your Creative Zen Vision, you will be prompted to select
an application to open, select the option: “Synchronize media files to this device using
Windows Media Player”, then press OK.
Move the captured file to Sync List panel and press the Start Sync button to send the
file to your device.
space. Make sure you have enough space in your Portable Media Player device before you
start transferring the video file.

6
You can also load a previously captured MPEG-1 or MPEG-2 video file and burn to disc.
You can select and burn a single video file only to disc, so if you want to edit several clips
your product (ArcSoft ShowBiz® DVD 2). While writing a file to a disc, you will see the
video progress bar advance to let you know the DVD writing progress.
to archive video tape to optical disc and the Direct to Disc Wizard in CapWiz will allow
You can capture to any type of optical media (CD-R, CD-RW, DVD+R, DVD+RW, DVD-R,

to archive video tape to DVD. We have excluded features such as leaving a disc open
for multi-session recording (adding more video files at a later time), editing the DVD, and
the Direct to Disc capability in CapWiz very fast, simple and easy.
What is a Single Session?
video capture session. You can only record video to a blank disc. If there is existing video
that disc. The disc must be blank. Therefore if you are using a re-writable disc with video
the disc) but if you want to capture to that RW disc, you will be forced to erase the video
file before capturing, or you can choose a different disc to record.
• Record to any type of Optical Media
• Select Optical Drive
• Confirmation of Optical drive capabilities
• Confirmation of media type in drive and media condition (disc must be blank to
allow recording)
• Select video compression format
• Display of available video record time based on video compression settings and
disc type
• Create Movie Title (Volume name)
• Create Video Clip name
• Set record duration time (display of available time)
• Set Chapter point interval
• Select menu Background template
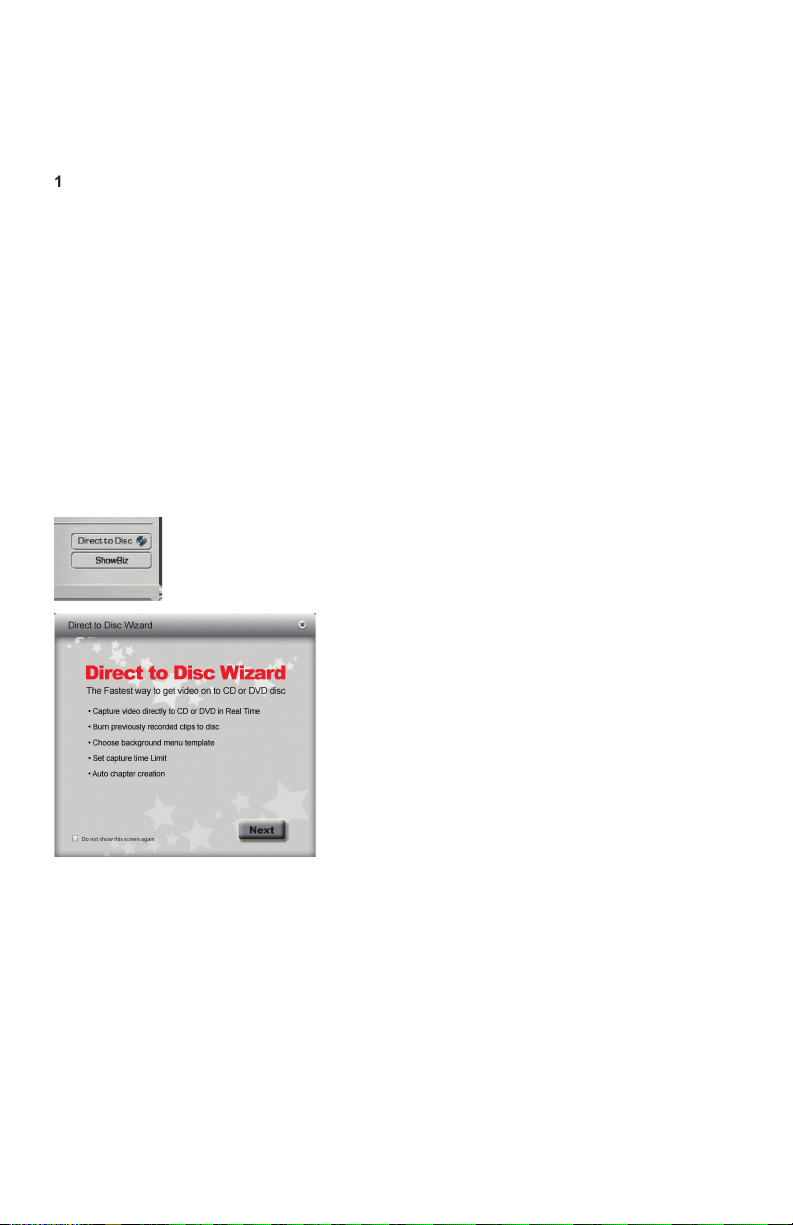
We have tried to make the Direct to Disc Wizard simple to use. You can begin recording
video directly to a disc in as few as 4 Clicks. Here are the quick step by step instructions
to start recording to disc in real time.
Insert a Blank CD or DVD disc your disc drive.
Click the Direct to Disc Wizard button.
Select Capture Direct to Disc or load a file to write to disc.
4
Select the Video format you want to record (VCD, SVCD, DVD)
Choose the disc drive you want to use for recording.
Check disc status information on the Step 1 screen.
Click NEXT.
Type in the name of your movie title and video clip
Set Duration time or choose “None” for manual control
Set Capture point time intervals or “None”
Click Record to Disc
Click ‘Yes’ to begin recording after disc has been initialized.
You will notice that we have added a link button on the lower left hand corner of the
Wizard can be launched while CapWiz is idle (no video preview) or while video is being
you are playing back a previously recorded video file.

your optical media.
Video Compression Settings
you have selected in CapWiz.
 Loading...