

Page 1
USB Instant DVD for MAC
User's Guide : Second Edition
www.adstech.com
Technical Support: 562.926.4338
Technical Support Hours: 8am-5pm M-F PST
USB Instant DVD for MAC
Page 2

USB Instant DVD for Mac 2
USB Instant DVD for Mac 3
Page 3

Table of Contents
Instant DVD for Mac Overview . . . . . . . . . . . . . . . . . . . . . . . . . . . . . . . . . . . . . . . . . . . 4
System Requirements and Contents . . . . . . . . . . . . . . . . . . . . . . . . . . . . . . . . . . . . . . 8
Hardware Installation Guide . . . . . . . . . . . . . . . . . . . . . . . . . . . . . . . . . . . . . . . . . . . . . 9
PixeDV: Overview . . . . . . . . . . . . . . . . . . . . . . . . . . . . . . . . . . . . . . . . . . . . . . . . . . . .12
• Launching PixeDV . . . . . . . . . . . . . . . . . . . . . . . . . . . . . . . . . . . . . . . . . . . . 14
• Capturing Video . . . . . . . . . . . . . . . . . . . . . . . . . . . . . . . . . . . . . . . . . . . . . .16
• Exporting Video . . . . . . . . . . . . . . . . . . . . . . . . . . . . . . . . . . . . . . . . . . . . . . 20
• Importing Video . . . . . . . . . . . . . . . . . . . . . . . . . . . . . . . . . . . . . . . . . . . . . . 21
• Using the Album . . . . . . . . . . . . . . . . . . . . . . . . . . . . . . . . . . . . . . . . . . . . . .22
• Trimming Videos with MPEG Cutter . . . . . . . . . . . . . . . . . . . . . . . . . . . . . . 25
• Exporting Files for use in DVD Studio Pro . . . . . . . . . . . . . . . . . . . . . . . . . .29
Frequently Used Terms . . . . . . . . . . . . . . . . . . . . . . . . . . . . . . . . . . . . . . . . . . . . . . . .32
Capty DVD/VCD: Launch Capty DVD/VCD . . . . . . . . . . . . . . . . . . . . . . . . . . . . . . . . 33
• Creating a Title Menu . . . . . . . . . . . . . . . . . . . . . . . . . . . . . . . . . . . . . . . . . 35
• Setting Markers . . . . . . . . . . . . . . . . . . . . . . . . . . . . . . . . . . . . . . . . . . . . . . 40
• Creating Chapter Menus . . . . . . . . . . . . . . . . . . . . . . . . . . . . . . . . . . . . . . . 41
• Authoring Formation & Disc Playback: DVD Video / Video CD . . . . . . . . . .43
• Editing a Slideshow . . . . . . . . . . . . . . . . . . . . . . . . . . . . . . . . . . . . . . . . . . .49
• Preview to Conrm Writing . . . . . . . . . . . . . . . . . . . . . . . . . . . . . . . . . . . . . 51
• Creating a DVD Video . . . . . . . . . . . . . . . . . . . . . . . . . . . . . . . . . . . . . . . . .53
Button Builder . . . . . . . . . . . . . . . . . . . . . . . . . . . . . . . . . . . . . . . . . . . . . . . . . . . . . . .54
• Creating Buttons . . . . . . . . . . . . . . . . . . . . . . . . . . . . . . . . . . . . . . . . . . . . . 55
• Thumbnail Display frame setting . . . . . . . . . . . . . . . . . . . . . . . . . . . . . . . . . 57
• Special Effects . . . . . . . . . . . . . . . . . . . . . . . . . . . . . . . . . . . . . . . . . . . . . . .57
Glossary . . . . . . . . . . . . . . . . . . . . . . . . . . . . . . . . . . . . . . . . . . . . . . . . . . . . . . . . . . . 58
Service & Warranty . . . . . . . . . . . . . . . . . . . . . . . . . . . . . . . . . . . . . . . . . . . . . . . . . . .60
Copyright Notice
The USB Instant DVD For Mac is an innovative, hassle-free device that is designed to let you edit and archive
your home movies easily. ADS Technologies respects the rights of copyright owners and asks that you do the
same. The Copy Right Act gives owners of copyrights the exclusive right to reproduce and prepare derivative
works as well as to publicly perform, display and distribute their works. This means that you must obtain
permission to engage in any of these activities when using works that are copyrighted by another person.
© 2003 ADS Technologies. All Rights Reserved
Revision 1 January 2003
Apple and Macintosh are registered trademarks of Apple Computer, Inc.
ADS is a registered trademark of ADS Technologies Inc. ADS Technologies (ADS) makes no warranty of any kind with regard to this material,
including but not limited to, the implied warranties of merchantability and tness for a particular purpose. The information furnished within this
written document is for information purposes only and is subject to change without notice. ADS Technologies assumes no responsibility or
liability for any errors or inaccuracies that may appear herein. ADS makes no commitment to update or to keep current information contained
within this document. (rtt)
USB Instant DVD for Mac 3
Page 4
Instant DVD for Mac Overview
USB Instant DVD for Mac 5
Instant DVD for MAC is a fun and easy way to
get DVD and VCD video into your Macintosh
so you can archive your home movies. Instant
DVD then lets you publish the video to CD or
DVD disk or publish to the Internet or send
the video back to a VCR or camcorder for
distribution on Tape.
All the video compression takes place in the
Instant DVD device so when the video comes
through the USB port it is already compressed
in the format you desire such as MPEG-1 for VCD (Video on CD) or MPEG-2 for DVD
(Digital Versatile Disc).
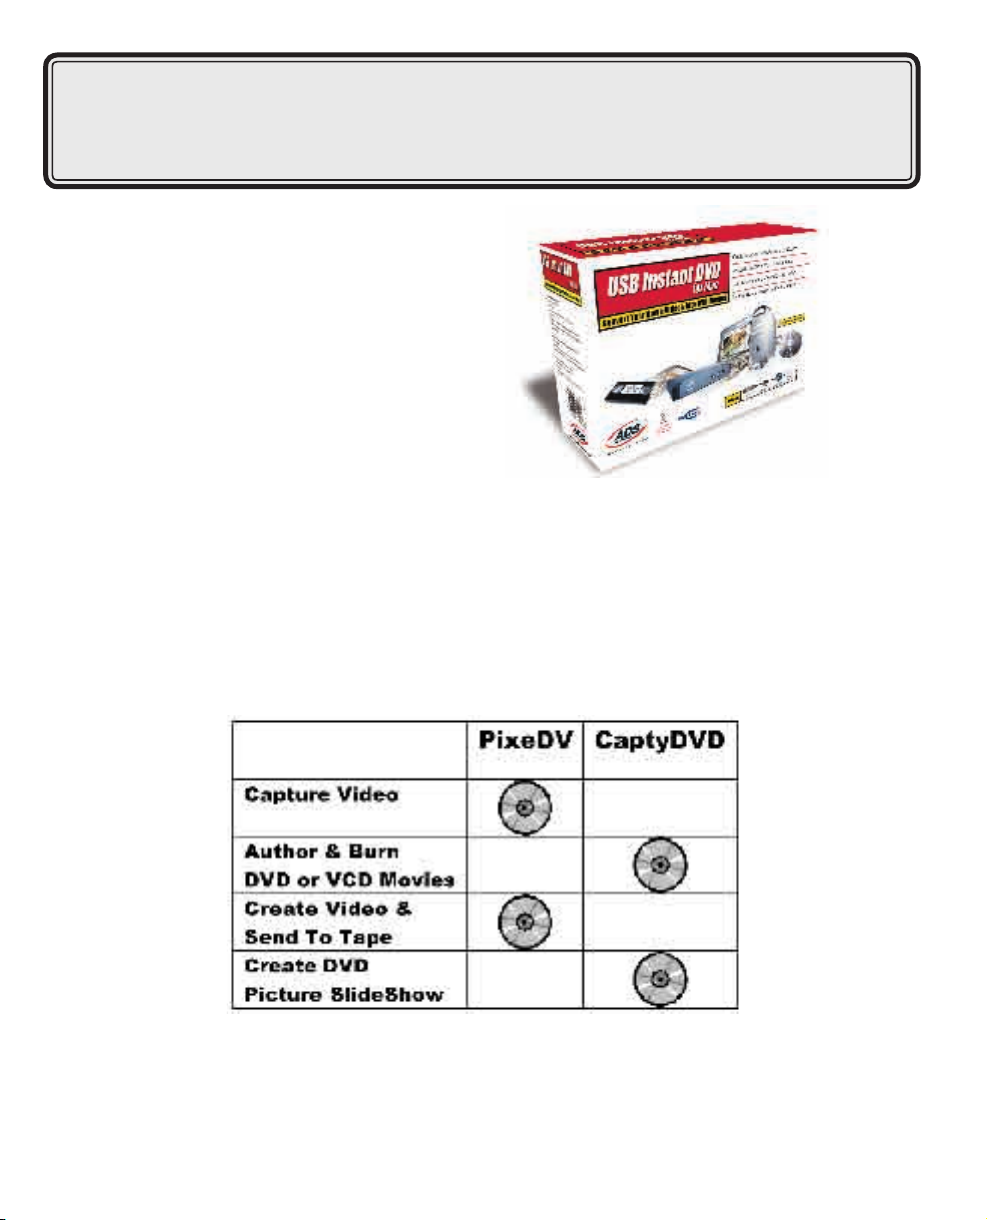
USB Instant DVD includes several exible and dynamic software tools for your video
projects:
USB Instant DVD for Mac 4
Page 5

PixeDV: Capture, Import, Export, Organize Video
PixeDV for Mac is the main application you will be using to Capture video, Organize the video
you captured and even Import video from other sources
PixeDV for Mac, despite its name, DOES NOT CAPTURE DV. It only captures MPEG1 and
MPEG2 les. MPEG les are necessary for the creation of DVD or VCD movies.
Once you install the software and connect the hardware, you will be able to Preview the video
live from any analog source and capture the video into the right bit rates for making a DVD or
VCD Movie.
USB Instant DVD can capture video up to 6 Mbits (6 Megabits per second). Most DVD movies
that you rent or buy today are only encoded at 4 Mbits (4 Megabits per second). The higher the
capture bit rate, the better the quality but you will also take up more hard drive space.
Commercial Blank recordable DVD disks have a capacity of 4.7 GB.
When capturing MPEG-2 video at 4 Megbits of data per second (Mb/sec.) you will use up
approximately 2 GB of hard disk space per hour. This means you can record and burn about 2
hours of MPEG-2 video onto a single DVD disk.
This is very important to know since 3 hours (180 minutes) of video that you capture at 4 Mb/sec.
would result in a le size on your hard drive of:
5400 MB (MegaBytes) or about 5.4 GB (GigaBytes) !!!
This is more than you can record on a 4.7 GB disk!
Audio is one more thing to consider when capturing Mpeg video. The two most common audio
formats for DVD video are MPEG 1 Layer 2 and PCM.
PCM is essentially uncompressed audio recorded at 1.5 Mb/sec. This data rate is added to the
video bit rate to arrive at the total video le size. The PixeDV for Mac software only captures
audio in MPEG-1 Layer 2 format. MPEG 1 Layer 2 is a compressed format and is the cousin of
the more famous MP3 audio format. MPEG-1 Layer 2 is generally captured at
224 Kbit/sec. – 384 Kbit/sec. This data rate is added to the total video le size, but you can see
that it is much smaller than PCM.
Most late model home DVD players in the North America can playback MPEG-1 Layer 2 audio.
The general rule is that if the DVD player supports VCD playback, it will support DVD’s with
MPEG-1 Layer 2 audio format. All European (PAL) DVD players support MPEG-1 Layer 2 audio.
So if your goal is to capture 2 hours of video to burn on a single sided 4.7 GB DVD disk, we
recommend you set your capture rate at 4 Mb/sec.
USB Instant DVD for Mac 5
Page 6

PixeDV: Capture, Import, Export, Organize Video
USB Instant DVD for Mac 7
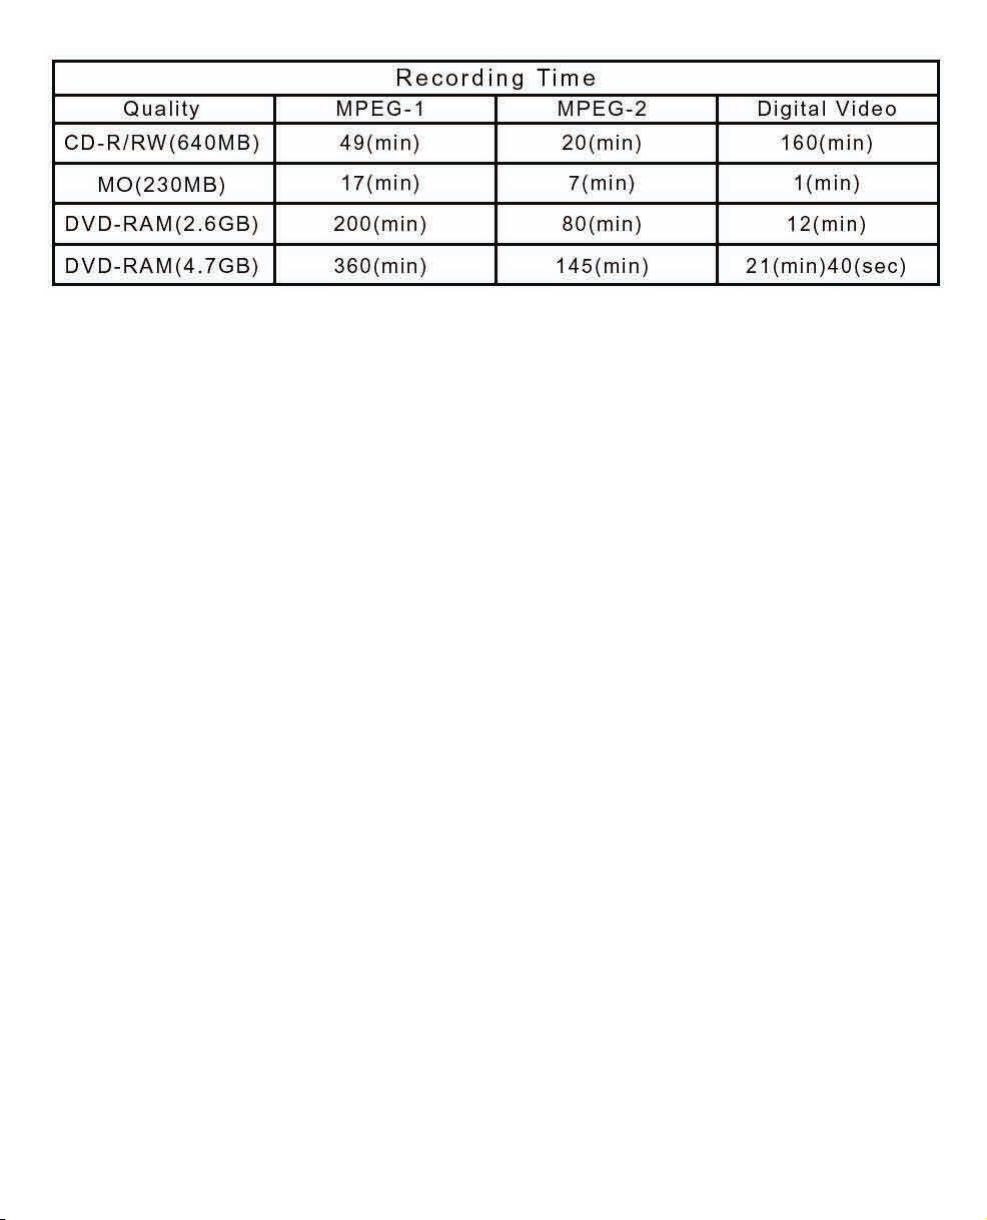
MPEG2 offers the best quality in relation to le size for capturing video.
DV or otherwise know as DIGITAL VIDEO will need 4 GB for every 20 minutes of video. DV is
good for some applications, when you want to capture in DV, Edit in DV and OUTPUT back to
DV. (Back to camcorder). This is why you need rewire for DV. The data being sent back and
forth from a DV camcorder is huge. 25 Megabits per second, thats 3.6 Megabytes per second.
With the USB Instant DVD for Mac, video can be captured at relatively low bit rates but VERY
GOOD quality. For connecting to your Mac, USB 1.1 as an interface is sufcient since USB
offers up to 12 Megabits of throughput per second. Plenty of bandwidth to capture video with
DVD quality.
If you plan to make DVD or VCD movies, USB Instant DVD for Mac is the perfect solution. It
captures in MPEG2, which means you are one step closer to making a DVD disk. Just run
CaptyDVD and author/publish the captured video to DVD.
Other DVD authoring/publishing solutions like Apple’s IDVD software actually capture the video
in DV. It then transcodes, in laymens terms, saves the le as an MPEG2 le. This is a two step
process. Although the transcoding process via software is done very well, it is no comparison
to capturing your video source REAL TIME into an MPEG2 File.
USB Instant DVD for Mac 6
Page 7

CaptyDVD: Author and Publish to DVD
CaptyDVD Starts where you left off with PixeDV. It takes the MPEG2 movies that you
have captured and publishes the MPEG2 les into a DVD Movie.
This process of “making” a DVD movie is known as “AUTHORING”.
Authoring with CaptyDVD provides the easiest, professional level package available in
the market today.
With fully customizable chapter menu’s, backgounds and even a built-in button maker,
CaptyDVD provides the best value compared to IDVD and DVD Studio Pro from Apple.
CaptyDVD has a built-in DVD Burning Engine that allows you to burn your DVD Project
into blank DVD disks by using Apple’s Superdrive or any external rewire DVD Burner.
Currently, every external Firewire DVD Burner that you can buy uses either a Panasonic
or Pioneer drive. You can also take an internal IDE DVD Burner from either Panasonic or
Pioneer and mount them inside an external 1394 enclosure.
You can purchase the PYRO Drive Kit which ADS Technologies also manufactures. This
is an external rewire enclosure that accepts any IDE device (hard drive, cd rom, dvd
rom, dvdr) and convert the devices to rewire.
For more information about the PYRO Drive Kit, please check our website:
www.adstech.com
VCD Authoring
For VCD movies, CaptyDVD can make a VCD volume. Which means you can Author a
VCD Disk but NOT actually burn it. You can simply make and save the VCD volume to
your drive. You can then drag that volume into Roxio’s latest TOAST software for burning
VCD’s on the Mac.
This was intentionally done since Roxio offers better compatibility than any other CDRW
burning software in the market today.
USB Instant DVD for Mac 7
Page 8

System Requirements & Contents
USB Instant DVD for Mac 8
USB Instant DVD for Mac 9
System Requirements:
To Capture MPEG-1 at 30 frames per second:
Any Macintosh with built-in USB
To Capture MPEG-2 at 30 frames per second:
Power Mac G4 4000/AGP or greater
Power Mac G4 Cube
Power Book G4 400 or greater
- Mac OS X
- 256 MB of RAM
- CD-ROM
- 100 MB hard disk space for capture/editting applications
- 3 GB minimum hard disk space recommended for capturing and editing video
- Available USB Port
Additional Requirements for Publihsing VCD ir DVD Disk:
- CD-RW drive required to write/burn VCD or SVCD disk
- DVD-R/RW drive required to write/burn DVD disks
- VCD burning requires Toast Platinum
USB Instant DVD For Mac Includes:
- USB Instant DVD For Mac device
- 6' USB cable
- SVIDEO cable
- Audio/Video connection cables
- CD with Bundled Software: PixeDV Video Capture, CaptyDVD Authoring
- User's Manual
Page 9

Hardware installation Guide
Getting Started
The basic steps are:
1. Check USB Instant DVD package contents
2. Wire it up! - Audio and Video connectors
3. Install Application software
4. Plug it in! - Power and USB connection
5. Verify Hardware Installation
6. Start Making DVD Movies
Check USB Instant DVD Contents
Hardware:
(a) USB Instant DVD device
(b) 5 VDC Power supply
(c) 6 ft. USB Cable
(d) 6 ft. A/V In Cable (RCA video and audio to RCA video and 3.5 mm stereo)
(e) 9 ft. Audio out to TV/VCR cable (3.5 mm stereo w/female 3.5mm Y to R+L RCA audio)
(f) 9 ft. RCA Video cable
(g) 6 ft. SVHS Cable
USB Instant DVD for Mac 9
Page 10
Wire it up!
USB Instant DVD for Mac 11
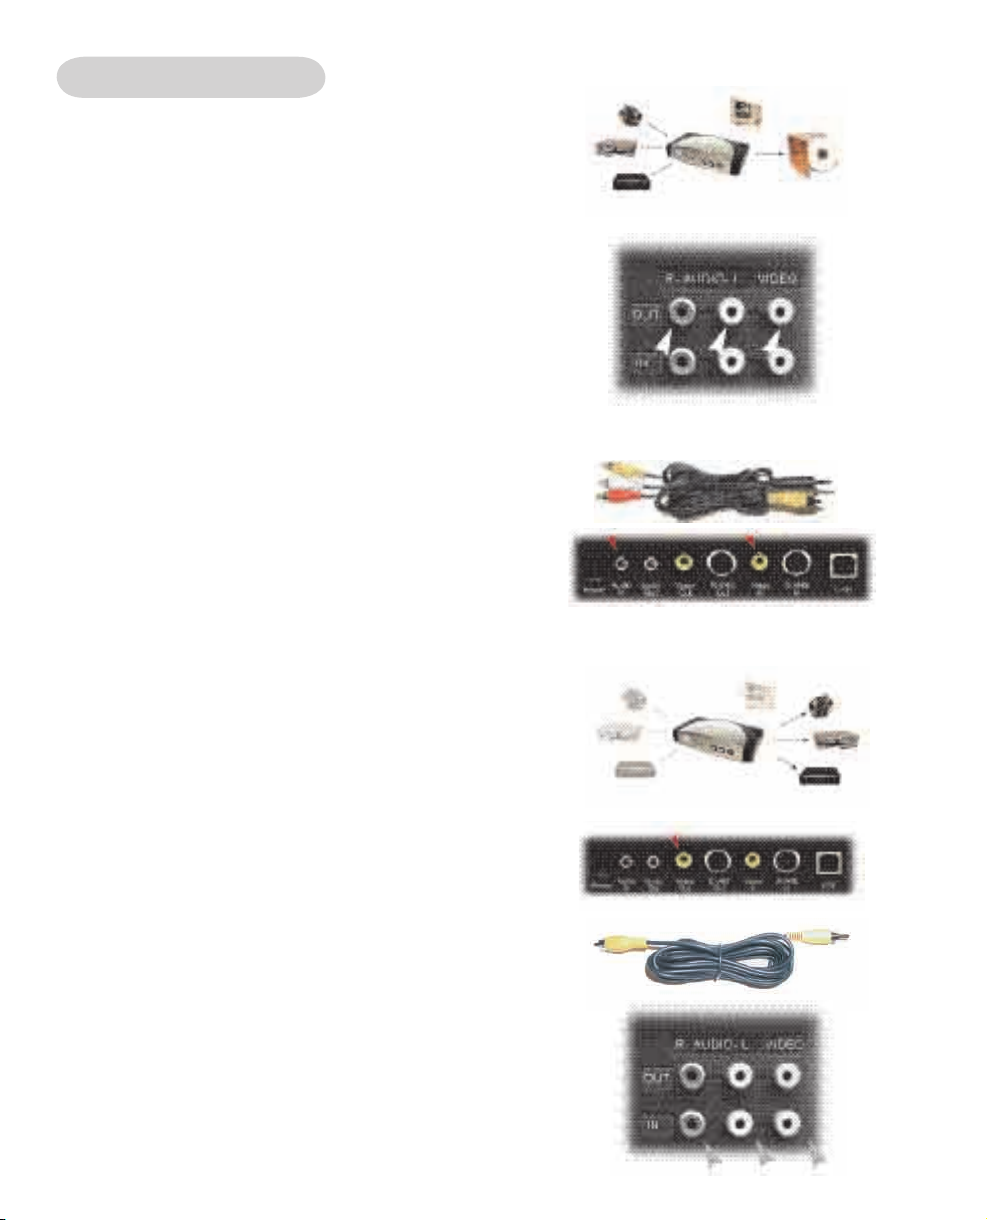
In this section we will connect all audio and video cables
that you will use to capture audio and video and then
send audio and video back to a tTV or VCR for viewing
or recording.
1. Connect your video source (VHS, DVD, Laser Disc
Player, TV. etc.) to your USB Instant DVD.
2. Connect your 6 ft. A/V in cable to the 3 RCA jacks to
your analog audio/video source RCA line out.
The other end connects to the “RCA Video In” jack and
“Audio In” jack on the back of your USB Instant DVD.
This step is optional, if you dont plan to send video
back to tv or vcr, skip to software installation.
Connect your USB Instant DVD to your TV or VCR. This
will send captured or edited video back to your TV or
VCR for viewing or recording.
Connect RCA cable to “Video Out” on Instant DVD
Connect other end to Video IN on your TV or VCR.
Connect the Audio Out of your PC to the Audio In
on your TV or VCR. This will send recorded audio
from your PC out for recording or listening on
your TV or VCR.
USB Instant DVD for Mac 10
Page 11

Install Software
In this section you will Connect USB Instant DVD to your Mac and Install the Application Software
1. Insert the USB Instant DVD CD into your CD ROM DRIVE
2. The USB Instant DVD CD Volume will mount on your desktop
3. Click on the USB Instant DVD CD on your Desktop.
4. Go to the Finder File Menu on the upper left and click duplicate.
5. The CD will now be copied to your desktop.
Plug It In!
In this section you will Connect USB Instant DVD to your Mac
1. Find an available USB Port on your MAC. For better bandwidth, plugging directly to the USB Port in the
Back of the Mac is preferable rather than a USB Hub or the USB Port on your Keyboard.
2. Plug it in!
USB Instant DVD for Mac 11
Page 12
Overview
USB Instant DVD for Mac 13
OVERVIEW
The PixeDV for Mac application allows you to do the following:
• Capture Real-Time from any video source into an MPEG1 or MPEG2 Movie
• Output MPEG1 or MPEG2 Video les to a VCR or TV
• Import other media(QuickTime, DV, Etc) into the PixeDV Album
• Manage and organize your media in the PixeDV Album
• Easily remove unwanted scenes from your captured MPEG movies.
• Built-In players allow you to play MPEG Movies or QuickTime Movies
About MPEG:
MPEG (Moving Picture Experts Group) is the international Standard Organization to generate
standards for digital video and audio compression.
MPEG1 is intended for VideoCD creation with VHS level quality.
MPEG2 features higher quality video and is used for DVD Creation. MPEG2 offers the best Video
quality in relation to le sizes.
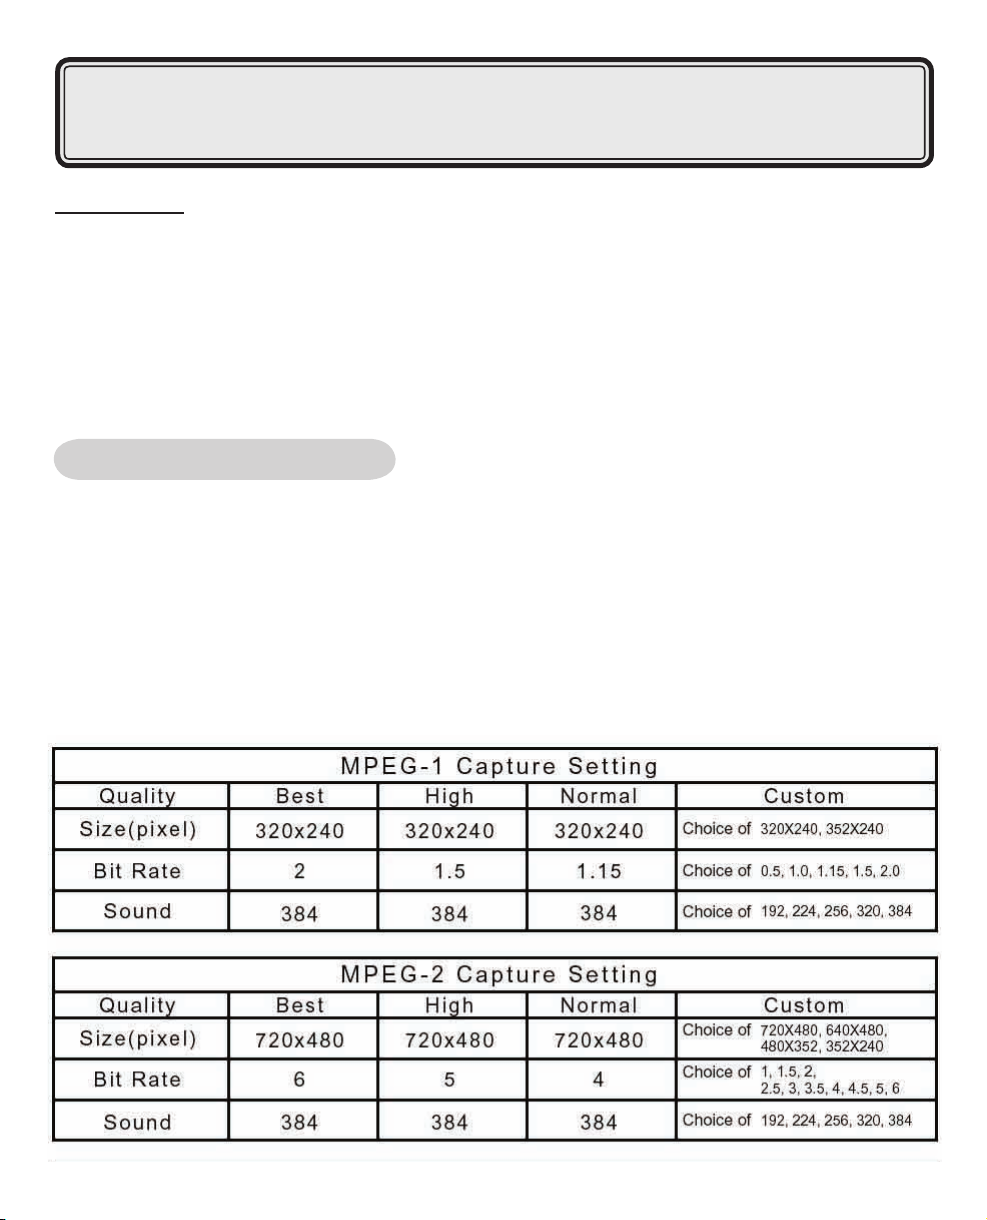
PixeDV Capture Settings
USB Instant DVD for Mac 12
Page 13
USB Instant DVD for Mac 13
Page 14

LAUNCHING PIXEDV
USB Instant DVD for Mac 15
If you plan to capture video, make sure the USB Instant DVD , your video sources and your Macintosh
are all connected properly. Please refer to the HARDWARE INSTALLATION section of this manual
if you need help.
Open the USB Instant DVD folder that you may have copied to your desktop or inside your
Macintosh Hard Drive.
USB Instant DVD for MAC
You will see the following icons:
USB Instant DVD for Mac 14
Page 15
Depending on your View settings for OSX, this may appear as Icons, as a List or display in column mode.
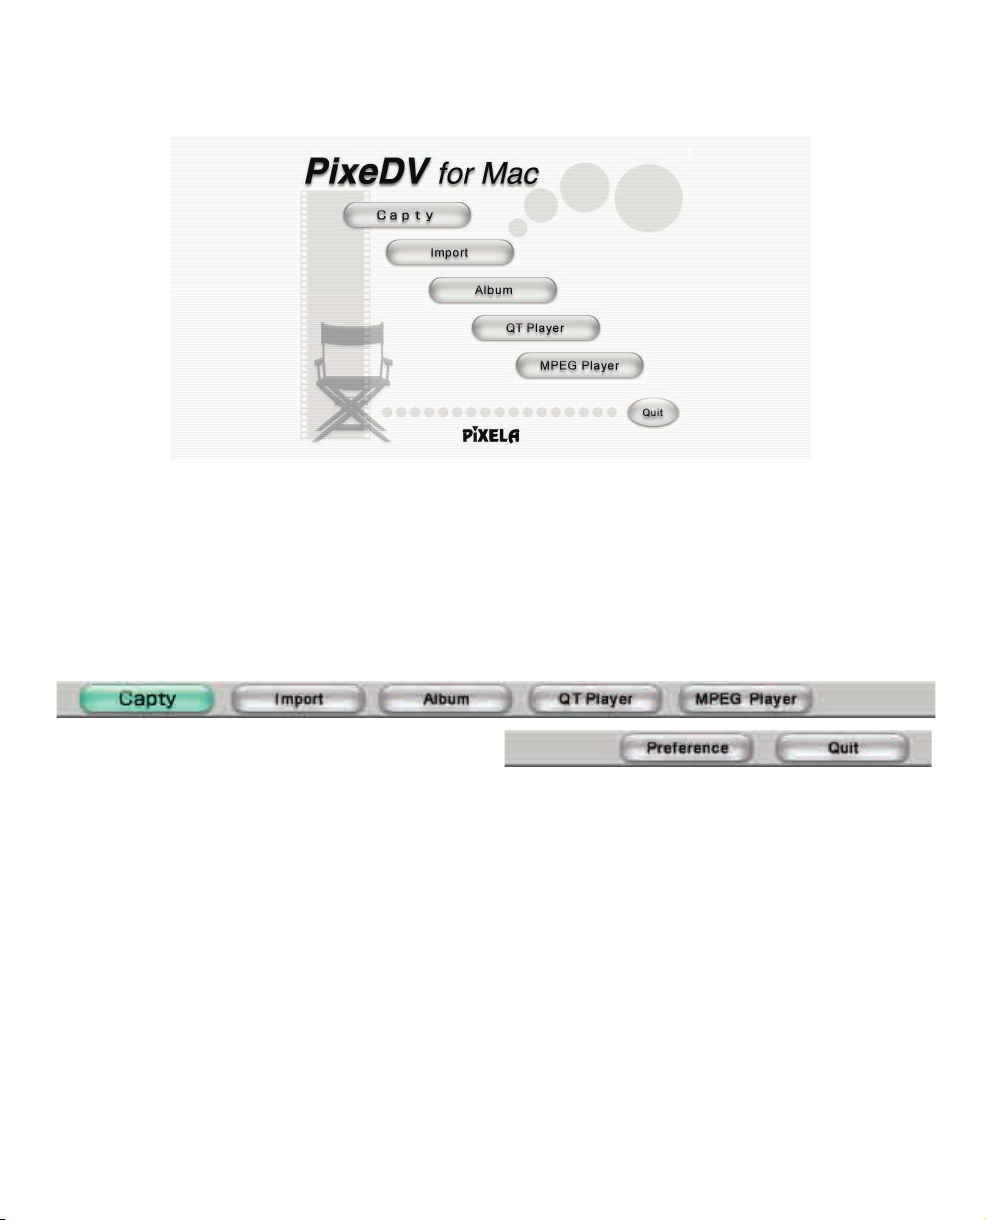
Double Click on the PixeDV Icon on your G3 or G4 Mac. You will see this startup Screen:
You can click on any of the ve functions at any time. The buttons are not sequential. Which means it would
not matter whether you clicked Capty or Album rst.
Clicking Quit will exit the application.
When you click on CAPTY, IMPORT, ALBUM, you will always have a navigation bar on the topmost side of the
screen that can take you to all the various functions of the PixeDV for MAC application as shown below:
For best performance, since you will be dealing with large les when capturing video, turn off the screen
saver and power saving on your Mac. It would also be best that you have no other programs running
when capturing video.
USB Instant DVD for Mac 15
Page 16
CAPTURING VIDEO
USB Instant DVD for Mac 17
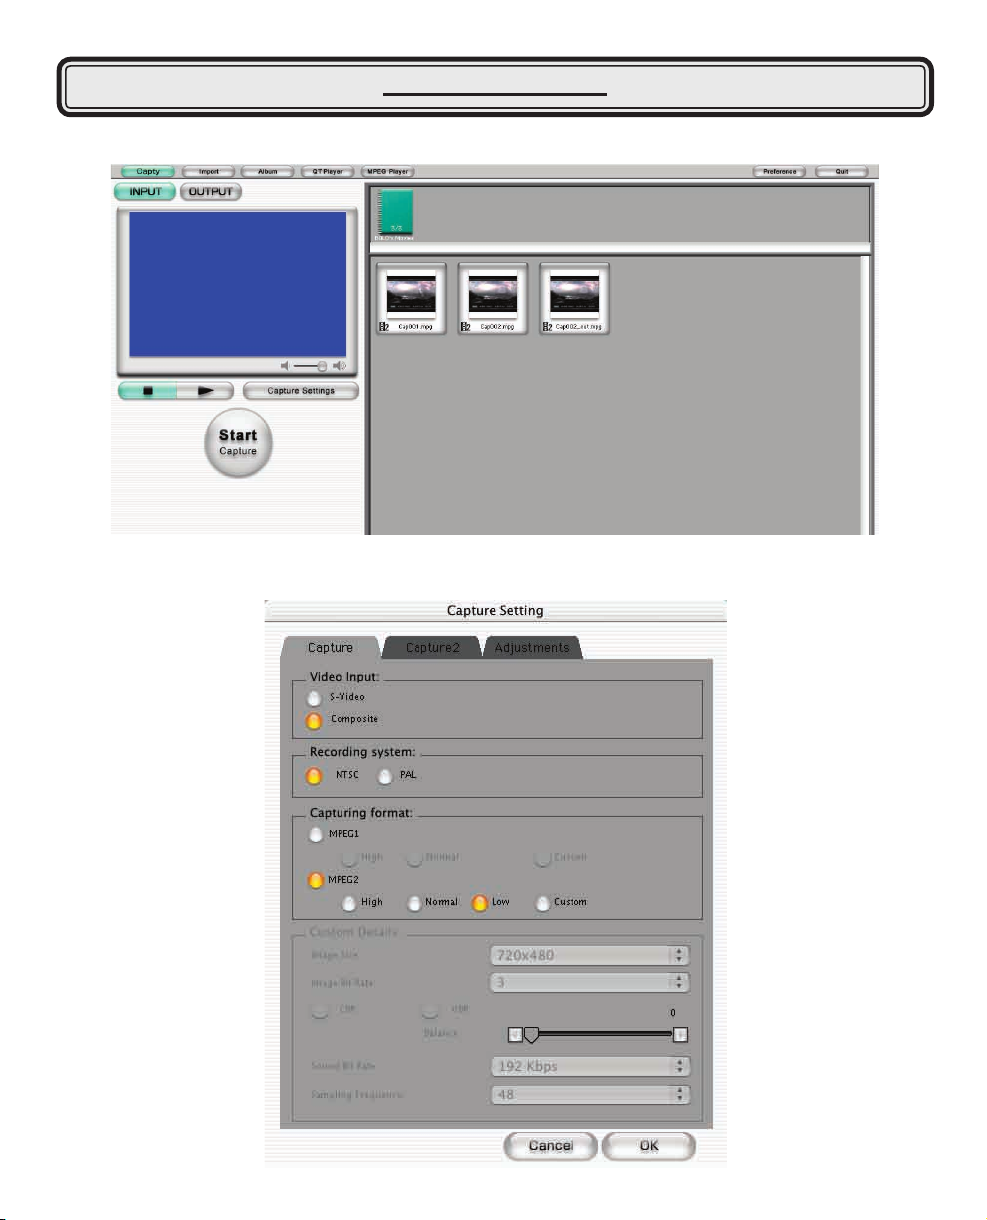
Clicking on the CAPTY button will take you to this window:
The rst step is to check your capture settings. Click on the tab that says capture. This will take you to
this window:
USB Instant DVD for Mac 16
Page 17

From this window you can select:
Video Input
S-Video – Sometimes referred to as SVHS, select this input if you have a video source that is plugged into the
S-Video connector on the USB Instant DVD for MAC
Composite – Sometimes referred to as RCA jacks, select this input if you have a video source that is plugged
into the Composite connector.
Recording System
NTSC - Select if you have an NTSC video source. Countries that use the NTSC Standard are USA,
Canada, Mexico, Japan and the Philippines.
PAL - Select if you have a PAL video source. Countries that use the PAL Standard are Most Parts of
Europe, South America and Most Parts of Asia.
Capturing Format
MPEG1
Select MPEG1 if you plan to create a VCD Movie.
Select your quality level. For a more detailed explanation about Quality Levels, check the Capture Settings
table in the USING PixeDV for MAC Overview section of the MANUAL.
MPEG2
Select MPEG2 if you plan to create a DVD Movie.
Select your quality level. For a more detailed explanation about Quality Levels, check the Capture Settings
table in the USING PixeDV for MAC Overview section of the MANUAL.
Customize
Customize your capture settings. You can select your bit rate, capture image size and change the capture
settings from CBR to VBR. This means:
CBR – Constant Bit Rate
The video stream is always encoded and xed to a constant value. High motion scenes and low motion
scenes are always allocated the same number of bits. A video stream of a an area of the sky which constantly
stays blue gets the same number of bits as a fast action scene.
VBR – Variable Bit Rate.
The video stream is encoded at variable bit rates depending on the scene being captured. High motion scenes
will be allocated more space to capture more detail.
USB Instant DVD for Mac 17
Page 18
Start capturing:
USB Instant DVD for Mac 19
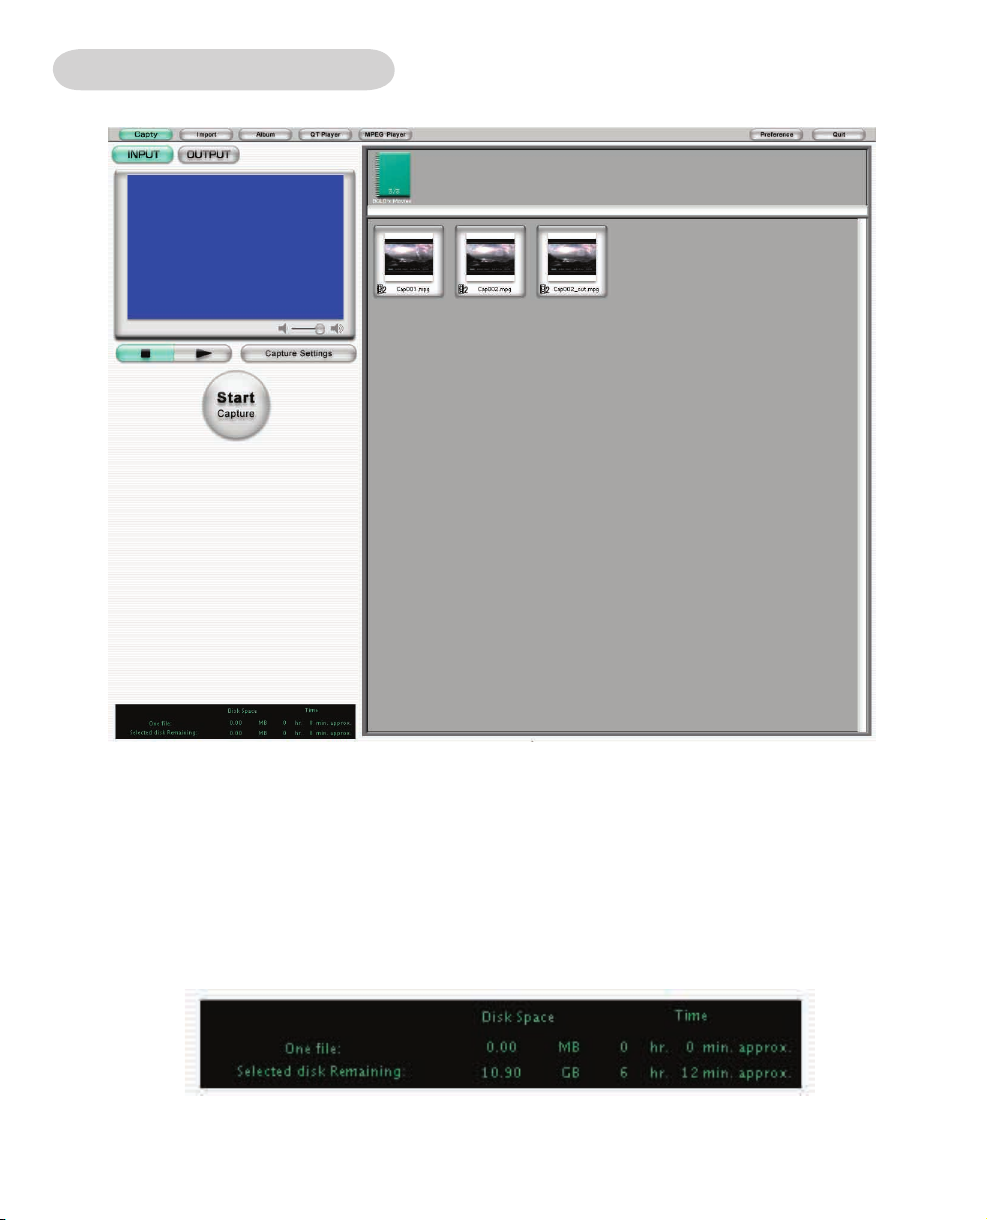
Once you have selected all your settings, you can now click on the Start Capture button to start
the capture process.
Video should start previewing on the blue area of the interface about 1 second after you click Start Capture.
This one second delay should be accounted for when you start capturing video.
With the capture process started, you will notice the status screen will start giving you specications on the le
you are capturing, how large it is and how much hard drive space you have left.
USB Instant DVD for Mac 18
Page 19
To stop the capture process, click on the STOP Capture Button. A thumbnail of the le you just captured
will appear, on the right. In the illustration shown above, 3 thumbnails are shown. This is for illustration
purposes only. When you rst start the program, you would normally not have any thumbnails shown
until after capturing.
The video that you just captured will be placed in the default album folder. Albums can be renamed, deleted,
created etc. This will be explained more under the Album section of this manual.
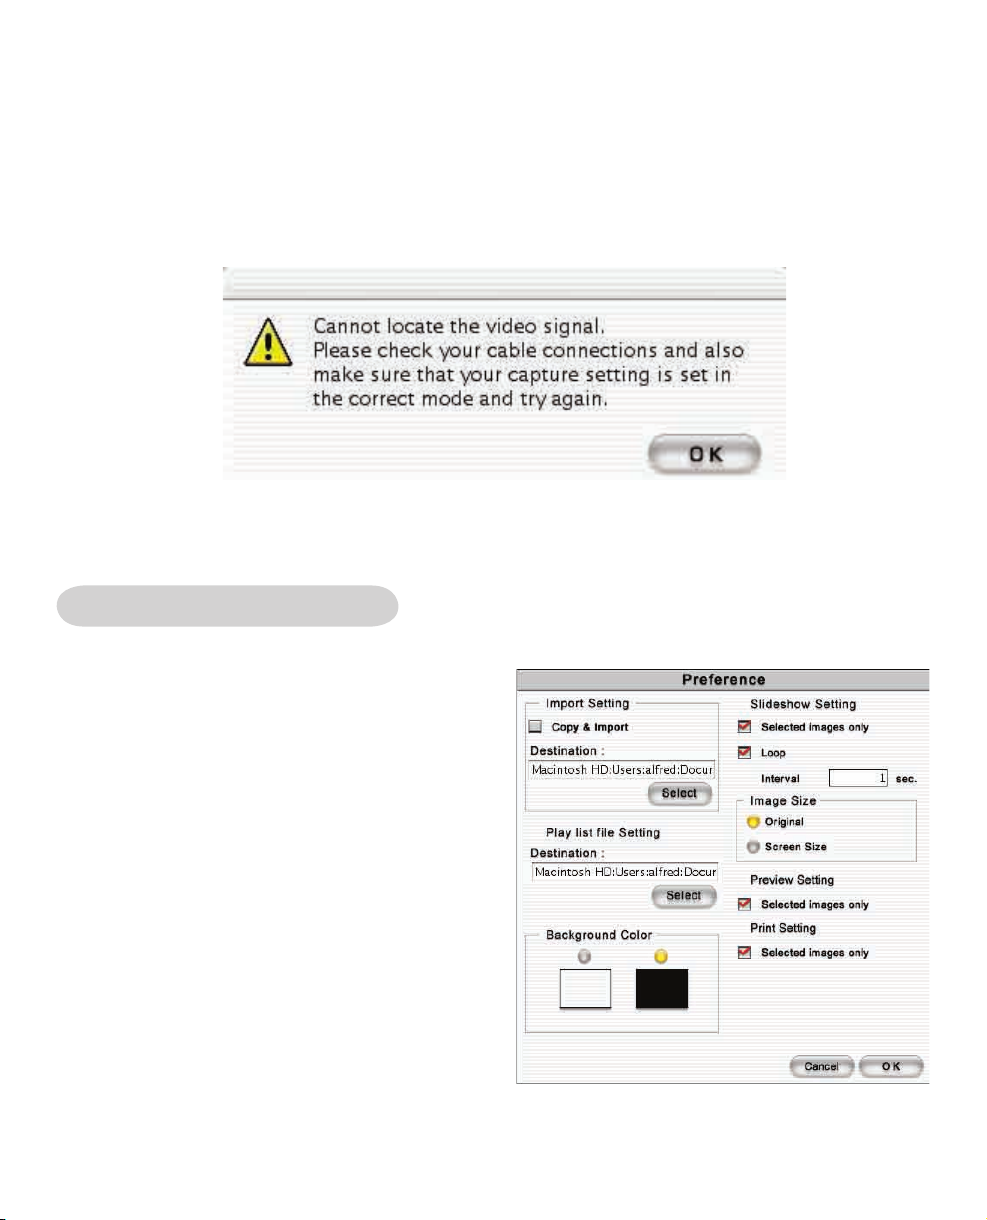
The one error message that you might get during the capture process will be:
This error would normally be caused by selecting the wrong video Source under capture settings. Please
make sure that you select S-Video if you have an S-Video source or Composite if you have a composite
source plugged into the USB Instant DVD.
Global Preference
The Global Preference button that appears on the
upper right side of the capture screen manages:
1 – Import File Locations: Point to the correct directory
on your Mac for importing les
2 – Points to the directory where you want to create
PLAY LIST Files. In the ALBUM section of this
manual you can create play list’s for playing several
les continuously.
3 – Slide Show Settings: You can run a slide show of
the video les or any other les in an album. The rst
frame of every video le will be shown.
USB Instant DVD for Mac 19
Page 20
EXPORTING VIDEO
USB Instant DVD for Mac 21
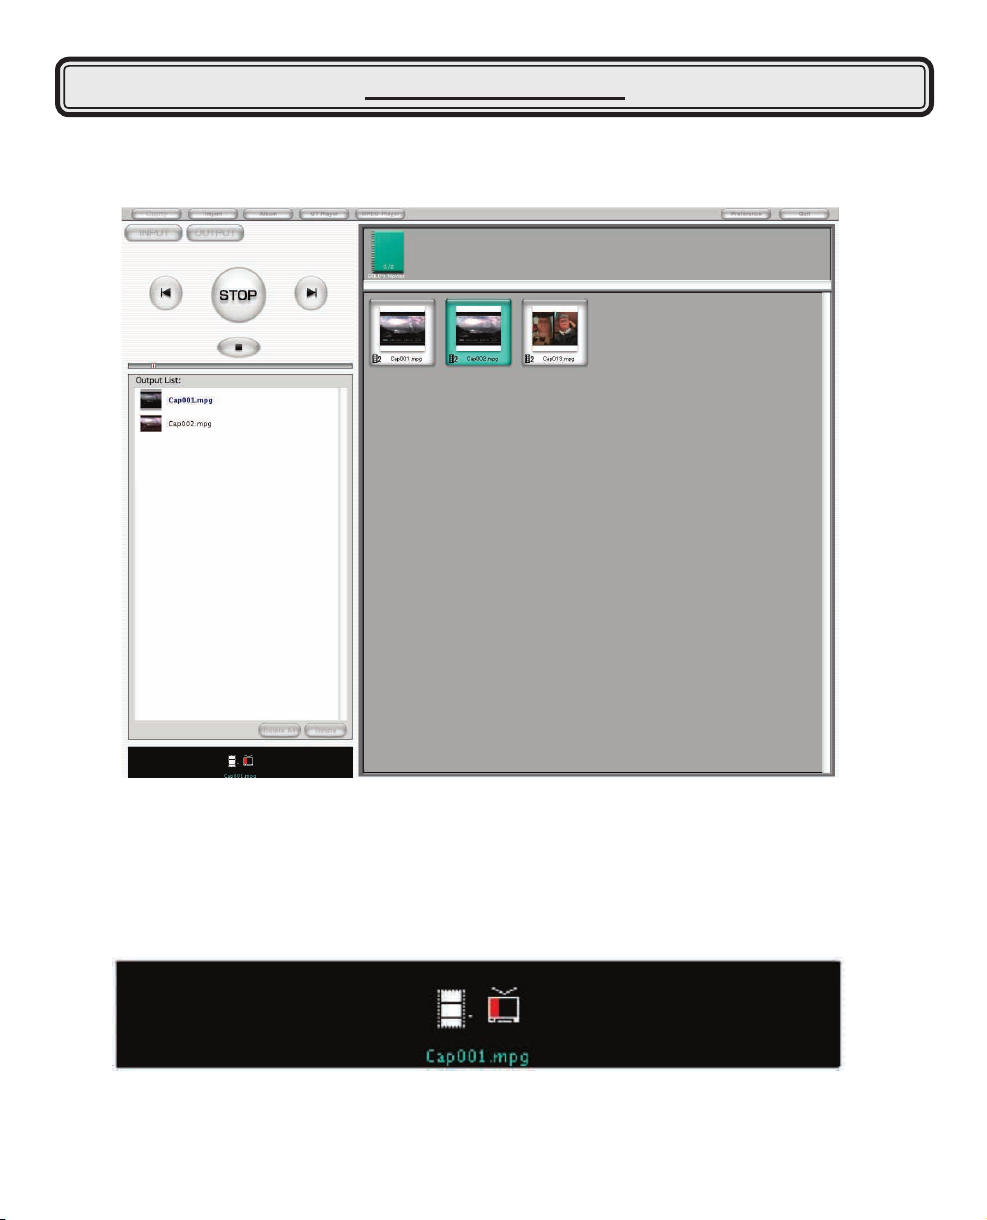
To export video back to a VCR , CAMCORDER or for preview on a TV MONITOR, click on the OUTPUT
Button on the main CAPTY interface. Clicking on OUTPUT will take you to this screen.
Drag thumbnails into the output box. You can drag as many les that you want in whatever order and
play them back.
Click on the START Button to start the export process. Click on the STOP Button to stop.
Once the export process is started, you will see this activity at the bottom left of the screen:
IMPORTANT: If for some reason you don’t see video out to your TV or video is not recording on your VCR,
check your cable connections. Please consult the HARDWARE INSTALLATION GUIDE section of this manual
for more instructions.
USB Instant DVD for Mac 20
Page 21
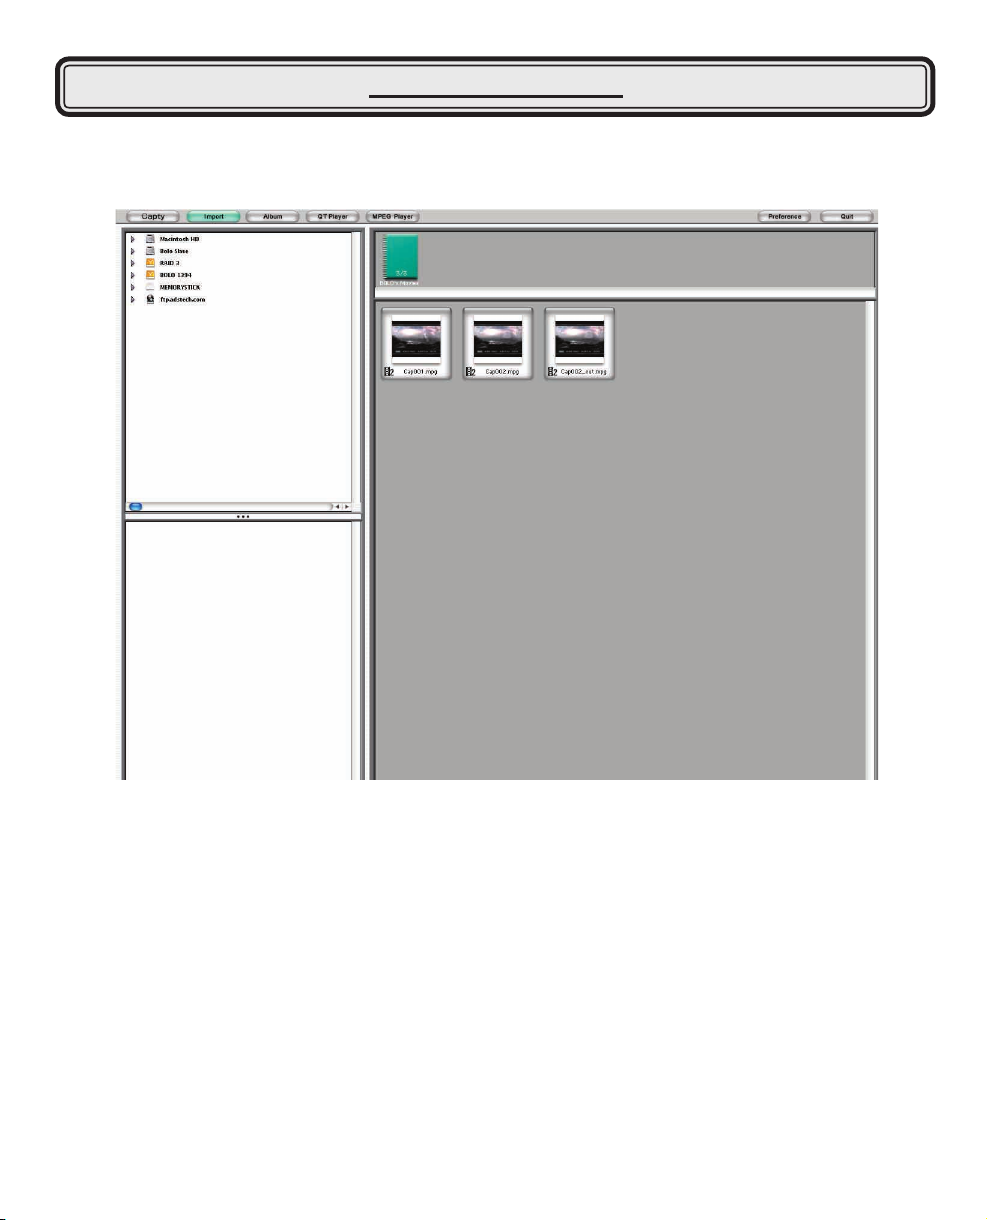
IMPORTING VIDEO
Clicking on the IMPORT button from the MAIN SCREEN or the IMPORT button from MENU BAR will take you
to this screen:
You can browse easily to any directory on any drive (eg: local drive, rewire drives etc) and drag other media
like DV, QUICKTIME, PICTURES or MPEG les into an album.
USB Instant DVD for Mac 21
Page 22
USING THE ALBUM
USB Instant DVD for Mac 23
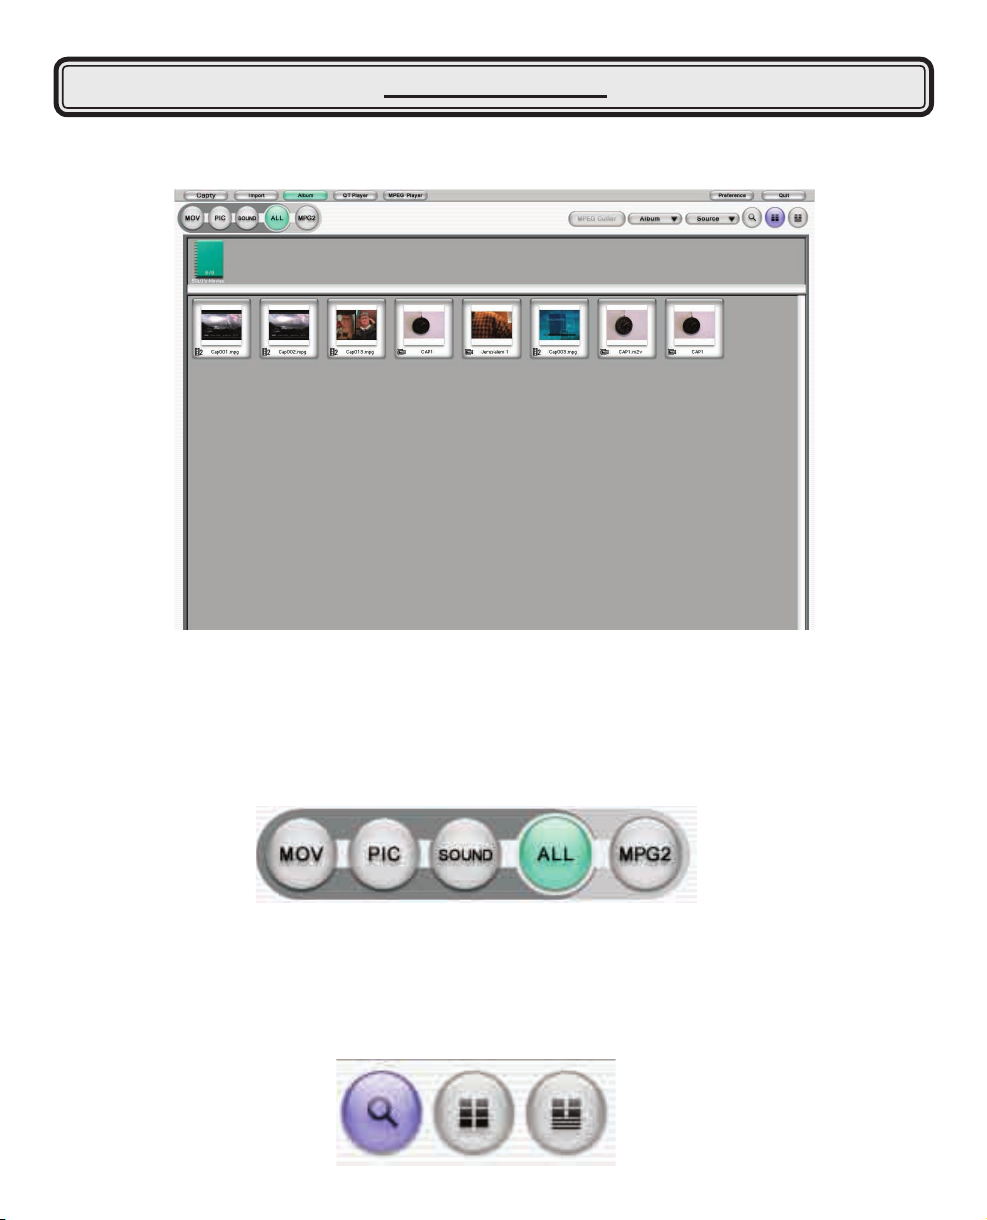
Clicking on the ALBUM button from the MAIN SCREEN or the ALBUM button from MENU BAR will take you
to this screen:
ALBUM lets you organize your captured media and existing media in your Mac. It can see not only your
capture MPEG les but existing DV les, QuickTime compatible les and pictures that you have imported into
PixeDV for Mac via the IMPORT function.
On the top left you can see a series of 5 buttons that can organize the view options of the specic album
you have opened:
Clicking on ALL will show all available media in the ALBUM, click SOUND will show all Sound le in the
ALBUM and so on.
On the top right corner you can all see a series of 3 buttons that can change the view option for a specic le.
USB Instant DVD for Mac 22
Page 23

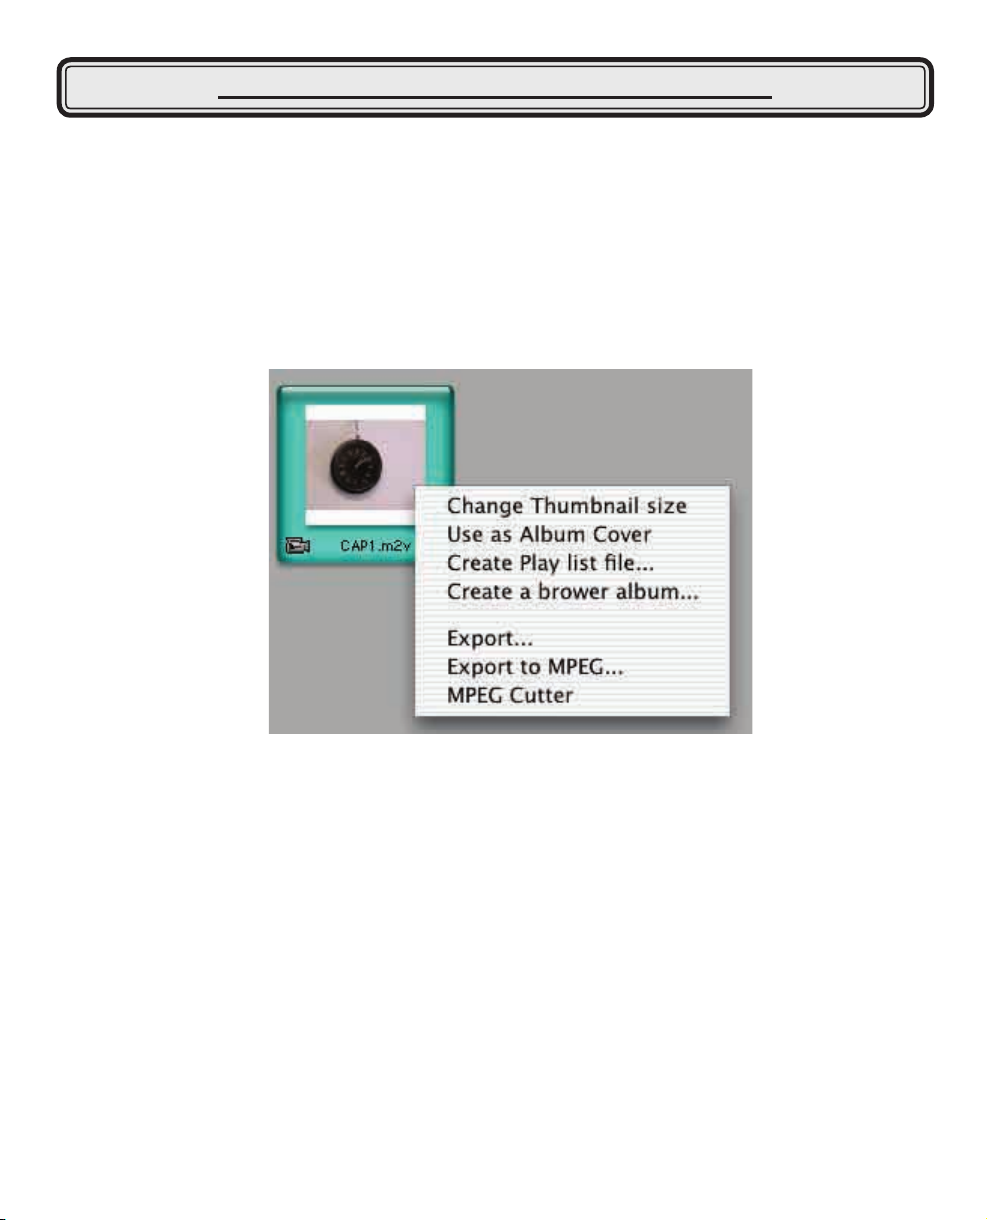
Once you have les that you captured or imported into ALBUM, hold down the CONTROL KEY on the your
KEYBOARD while you click on the thumbnail, the contextual menu options will be shown for that thumbnail:
Change Thumbnail Size – Changes the Physical size of the Thumbnails in your ALBUM
Use a Album Cover – Use the rst frame of the video or picture as your ALBUM cover thumbnail
Create a Play list le – Creates a play list of video les that can be played one after another without user
intervention. For this function to work, two or more les must be hi-lighted.
Create a browser album – Create another ALBUM where you can store, organize and capture video les into
Export – Export the hi-lighted thumbnail to any quicktime supported le format.
For Example:
� MPEG2 to DV
� MPEG2 to FLC
You can also convert existing DV FILES to MPEG2 if you have Apple Computer’s MPEG2 Codec.
For more information, please check Apples website.
Export to MPEG – Please see the Exporting Files for DVD Studio Pro Section of this Manual
MPEG Cutter – Please see the Trimming Videos with MPEG CUTTER Section of this Manual
USB Instant DVD for Mac 23
Page 24
Album Menu Options
USB Instant DVD for Mac 25
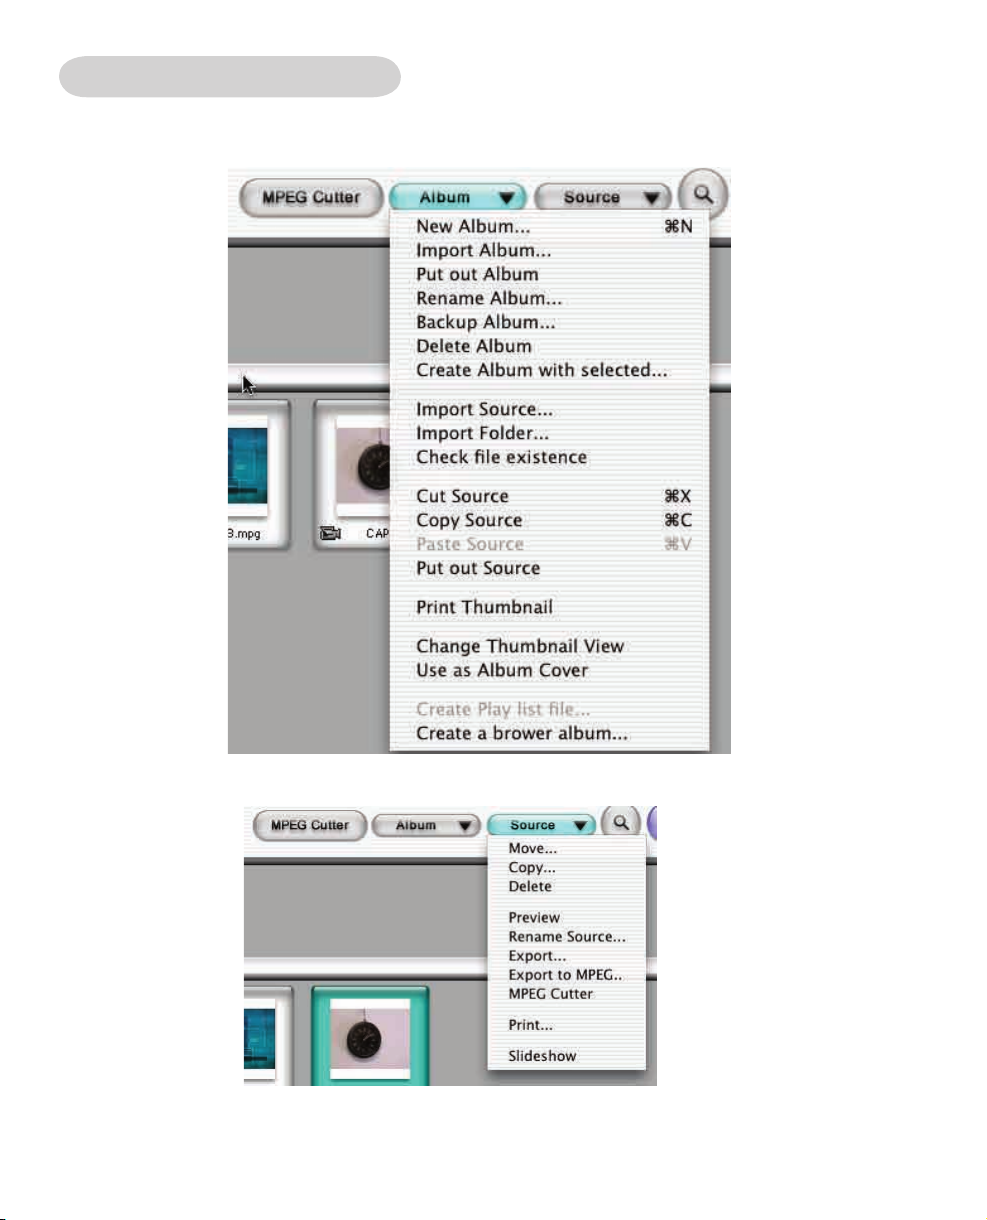
On the upper right section of the ALBUM Screen, you can click on the ALBUM Button to manage your ALBUM.
This is where you can delete the whole ALBUM, make a NEW ALBUM, RENAME ALBUMS ETC.
You can also click on the SOURCE Button to manage the MEDIA Files that you have inside the
hi-lighted ALBUM.
Here you can Move, Copy, Delete, etc, any of the les that you might have in a specic Album.
Please remember that you must click on a le or a group of les rst to enable the SOURCE button.
You can also RUN the SLIDESHOW feature from this MENU.
USB Instant DVD for Mac 24
Page 25
TRIMMING VIDEO’S WITH MPEG CUTTER
Although the PixeDV for Mac application DOES NOT offer EDITING functions where you can ADD transitions
and titles to your Video’s, it does offer the ability to accurately trim and cut MPEG2 les.
Cutting up MPEG2 les is very hard to do and the ability to do this is a very key feature of this software
package.
To open MPEG FILES in MPEG CUTTER, hold down the CONTROL Key and click on the MPEG le that you
want to open in MPEG CUTTER.
1. Click on MPEG Cutter
2. The le will now be imported into MPEG Cutter.
USB Instant DVD for Mac 25
Page 26

Importing a le into MPEG Cutter bring up this interface:
USB Instant DVD for Mac 27
A
B
The video le that got imported into MPEG CUTTER will be shown in the PREVIEW WINDOW.
Drag the Slider to a part of the video (A) where you want to START trimming. A frame will display in this box
(B) where you stopped the slider. Drag that frame into the box labeled START.
Drag the Slider to a part of the video where you want to STOP the trimming
process. A frame will display in this box where you stopped the slider. Drag
that frame into the box labeled END.
The process you just did above is called marking in and marking out.
Click on the scissors icon to make the cut. A record of this mark-in-mark-out
will be displayed on this window
You can undo/delete this cut mark by simply hi-lighting the time code in the
box above and clicking on Delete Selected item.
USB Instant DVD for Mac 26
Page 27
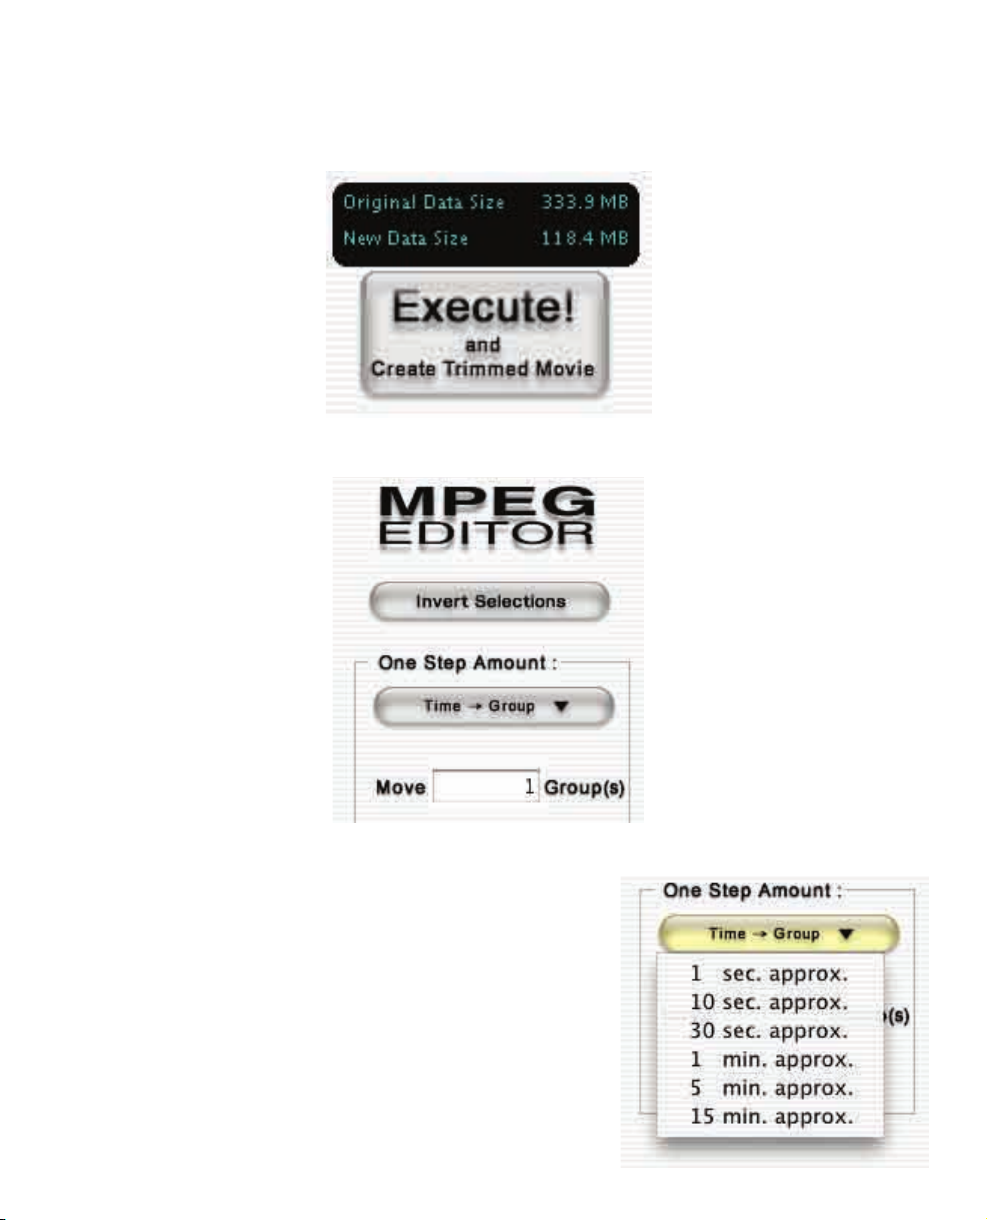
The ORIGINAL File Size versus the le size for the newly created le will be displayed just above
the EXECUTE Button.
To SAVE your trimmed video, you have to click on the EXECUTE Button. This will save the TRIMMED FILE to
your hard drive. The original le will be left untouched.
MPEG CUTTER SETTINGS:
INVERT SELECTIONS – Inverts your START – STOP Trim Selection
USB Instant DVD for Mac 27
Page 28

ONE STEP AMOUNT – Sets your step settings in relation to moving the current video frame via the one step
USB Instant DVD for Mac 29
arrow movement buttons as illustrated below:
Arrows
If you set your Step Amount at 1 Sec, clicking on the arrow Key’s will move the frame in the main PREVIEW
WINDOW forward approximately 1 second. Setting up your Step amount for 1 Minute will moved the frame
forward approximately 1 minute and so on.
Clicking on the PREVIEW Button on the upper left corner will preview the le with all the changes you just did.
USB Instant DVD for Mac 28
Page 29

EXPORTING FILES FOR USE IN DVD STUDIO PRO
The USB Instant DVD for Mac hardware together with the PixeDV for Mac software, can capture analog video
real time into an MPEG2 or MPEG1 le.
The MPEG le that is captured is an industry standard MPEG le that can be used anywhere. Even on PC
based DVD Authoring/Publishing Systems.
Most AUTHORING/PUBLISHING Applications in the market will take a standard MPEG FILE.
Some applications though require something called an ELEMENTARY MPEG2 FILE.
This is a le format where MPEG VIDEO and MPEG AUDIO are on two separate les.
PixeDV for MAC can export the MPEG les that it captures into ELEMENTARY MPEG Streams.
Follow these steps to export MPEG FILES into
elementary MPEG STREAMS:
1. Hold down the CONTROL Key and click on the
MPEG le that you want to export into an
ELEMENTARY FILE FORMAT
2. Click on EXPORT to MPEG
3. Specify where to SAVE the ELEMENTARY MPEG2 VIDEO FILES. Click Start.
USB Instant DVD for Mac 29
Page 30

4. Browse to the location where you saved the ELEMENTARY MPEG2 FILES. PixeDV for Mac will split the
USB Instant DVD for Mac 31
les and sequentially save them in folders called DVD SOURCE FOLDER1 and so on. If you open the
folder, you will see the MPEG2 AUDIO and VIDEO FILES.
The .AIF extension is for AUDIO MPEG FILES. The .M2V extension is for VIDEO MPEG FILES.
The les can now be easily imported into DVD Studio Pro via the File, Import Menu or you can drag the le
into the ASSETS window of DVD Studio Pro.
USB Instant DVD for Mac 30
Page 31
MPEG AND QUICKTIME PLAYERS
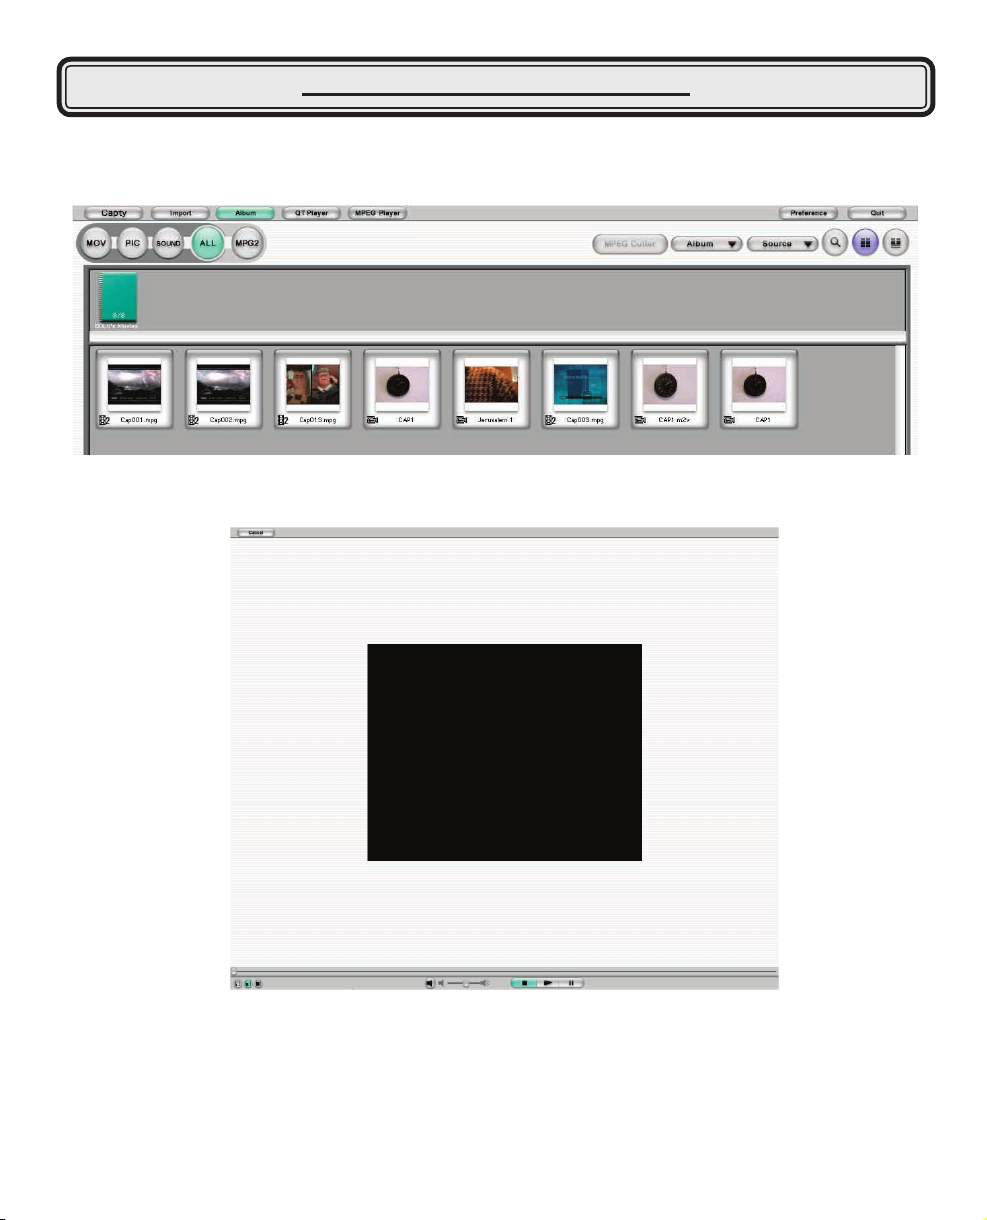
Clicking on the MPEG PLAYER Button from the MAIN SCREEN will take you into ALBUM Mode for MPEG
FILES in your current ALBUM. DV Files, Pictures and other Media will not be shown in this mode.
Double clicking on any of the video thumbnails will play the le in the MPEG PLAYER shown below.
You can resize the window, change the volume level and start, pause and stop the video playback.
The MPEG PLAYER will only PLAYBACK MPEG Files captured by USB Instant DVD for MAC.
The QuickTime player can be accessed from album mode to play back QuickTime compatible les
like DV or MPEG4.
USB Instant DVD for Mac 31
Page 32

Frequently Used Terms
USB Instant DVD for Mac 33
Encode
Authoring
Object
Contents
Thumbnail
Slideshow
Title button
Title menu
Chapter menu
Disc image
Bit rate
Convert a le to a different format using compression.
The process of creating a DVD-Video or Video CD.
A general term used for objects placed on the Title menu or Chapter menu,
such as buttons.
A le such as a picture, sound or movie which will be used for creating a
DVD-Video or Video-CD.
A small image of contents and templates used to preview layout.
Still images displayed continuously on electronic slides.
A button created in the Title menu, which plays a movie or slideshow.
The main screen that appears when you play DVD-Video or Video CD.
A sub menu screen which consists of movie buttons inserted in the Title menu.
An image data le for DVD-Video or Video CD. The image for DVD-Video is
called DVD image. The image for Video CD is called Video CD image.
It is a transfer speed when you send data. For example, 2Mbps means data will be
sent 2M bit per second. Bigger the number, better the quality and bigger the data
size.
Frame
Project
Marker
USB Instant DVD for Mac 32
It is a minimum unit of movie. For example, one second of movie consists of 30
frames (NTSC).
It is a working le before you authorize your contents. CaptyDVD will let you save the
working le as a project le. You can open your project le and nish any time later.
It is a point to begin playback. By inserting these points will allow movie to jump to
the specic scean of the movie.
Page 33
Launch CaptyDVD/VCD
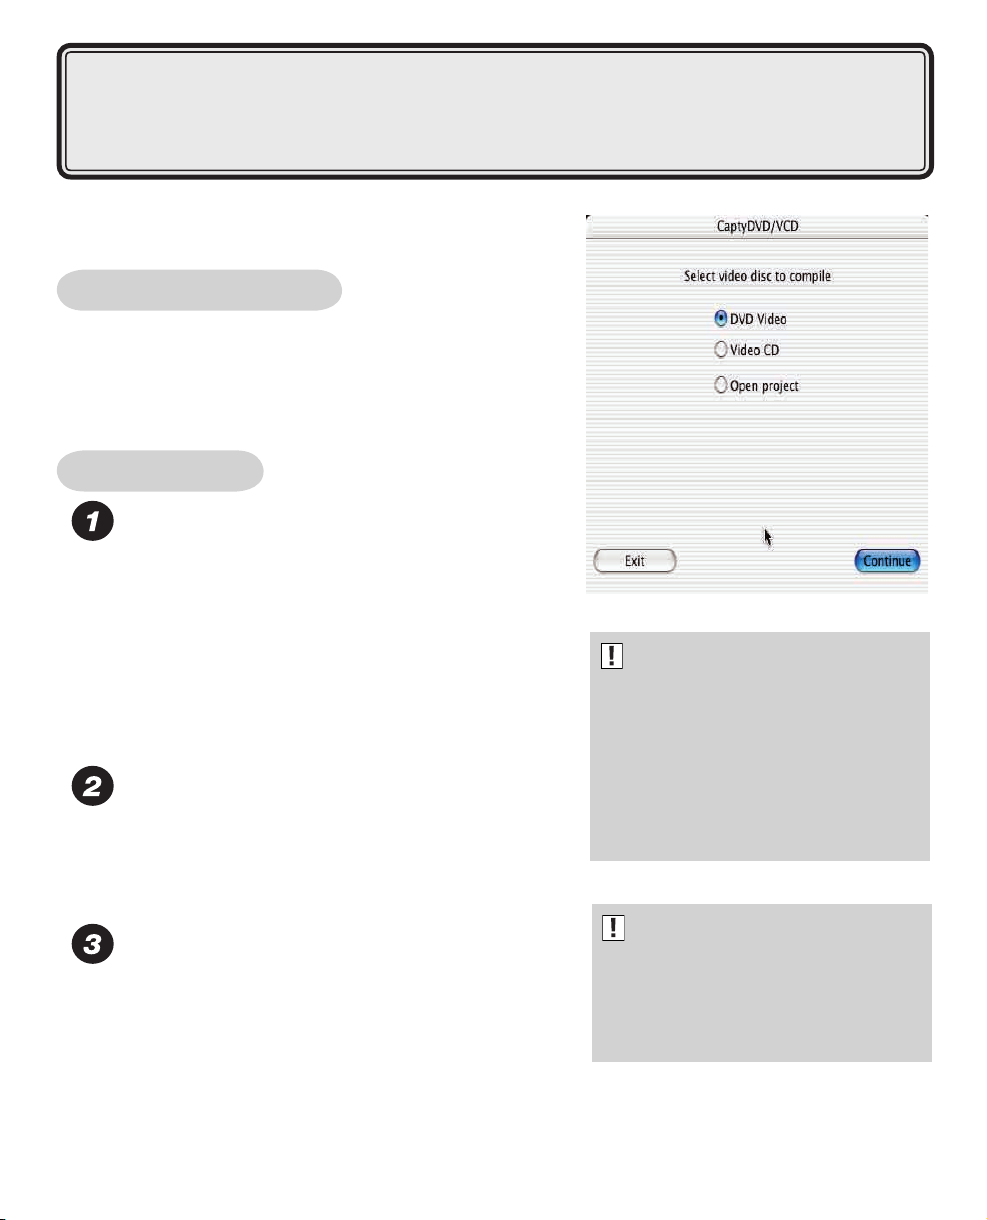
Launch CaptyDVD/VCD
Double-click on the CaptyDVD icon found in the
Applications USB Instant DVD folder.
Project Setting
Select DVD-Video and click Continue.
When you launch CaptyDVD, a project dialog will
appear.
1 Select DVD Video when creating a DVD-Video.
2 Select Video CD when creating a Video-CD.
3 Select Open project when continuing to work on
a saved project.
Select a worldwide video standard based on your
country.
There are two main kinds of video format; NTSC and
PAL. NTSC is mainly used in Japan and U.S.A., and
PAL is mainly used in Europe and China.
Select an Audio format.
CaptyDVD supports Linear PCM and MPEG Audio.
Linear PCM is an audio format without compression
while MPEG audio is a compressed audio format.
Important:
Recording format must be the
same as the content format.
Therefore, if you choose NTSC
for disc format, movie contents
must be produced in the NTSC
format as well.
Important:
All les captured with PixeDV
are in MPEG Audio Format.
Please select MPEG audio only.
USB Instant DVD for Mac 33
Page 34

Select an Encoding format.
USB Instant DVD for Mac 35
MPEG2 video is used for creating a DVD-Video movie. If
you have video les other than MPEG2, the movie les will
be converted to MPEG2. You need to specify the quality for
the MPEG2 format. If you choose High quality, video bit rate
will be set to 8Mbps. If you choose the Normal quality, the
video bit rate will be set to 6Mbps. If you choose the
Low quality, video bit rate will be set to 4Mbps.
Please make sure that the resolutions of your content les
are supported by your recording format such as NTSC and
PAL.
For NTSC:
MPEG2 movie: 704 X 480, 720 X 480,352 X 480, 352 X 240.
MPEG1 movie: 352 X 240.
For PAL:
MPEG2 movie: 704 X 576, 720 X 576, 352 X 576, 352 X 288.
MPEG1 movie: 352 X 288.
If the resolution of your MPEG2 movie is not listed above,
you cannot use the movie le as content. If the resolution
of your MPEG1 movie is not listed above, even if captured
by a Capty series product, you cannot use the movie le
as content.
Encoding Format:
If you captured @ 4Mbits with PixeDV,
please select Low quality. If you
captured @ 6Mbits with PixeDV, please
select Normal quality. Selecting High
quality will encode everything to 8Mbits
and will take a very long time.
DV movies and QuickTime movies need to be encoded
to MPEG format. When you encode les, the
resolution we recommend is 720 X 480 for NTSC
and 720 X 576 for PAL.
Select a location to save your project les.
When a dialog box appears, specify the location where the
project les will be saved. When the project setting is
completed, the Title menu mode will appear.
Select a place on your drive to set apart as a work disk.
Select Preference from the CaptyDVD menu.
USB Instant DVD for Mac 34
Page 35
Creating A Title Menu
The Title menu is the main menu screen that will appear first when you play a DVD-Video in a
DVD player. There are several templates you can choose from for your Title menu. There are varying styles,
backgrounds, B G Ms (Back Ground Music) and many other options that you can choose to make your
original DVD-Video. You can create a maximum of 30 Title menus and 98 title buttons per DVD-R disc,
and one Tiitle menu allows you to insert 6 title buttons at the maximum.
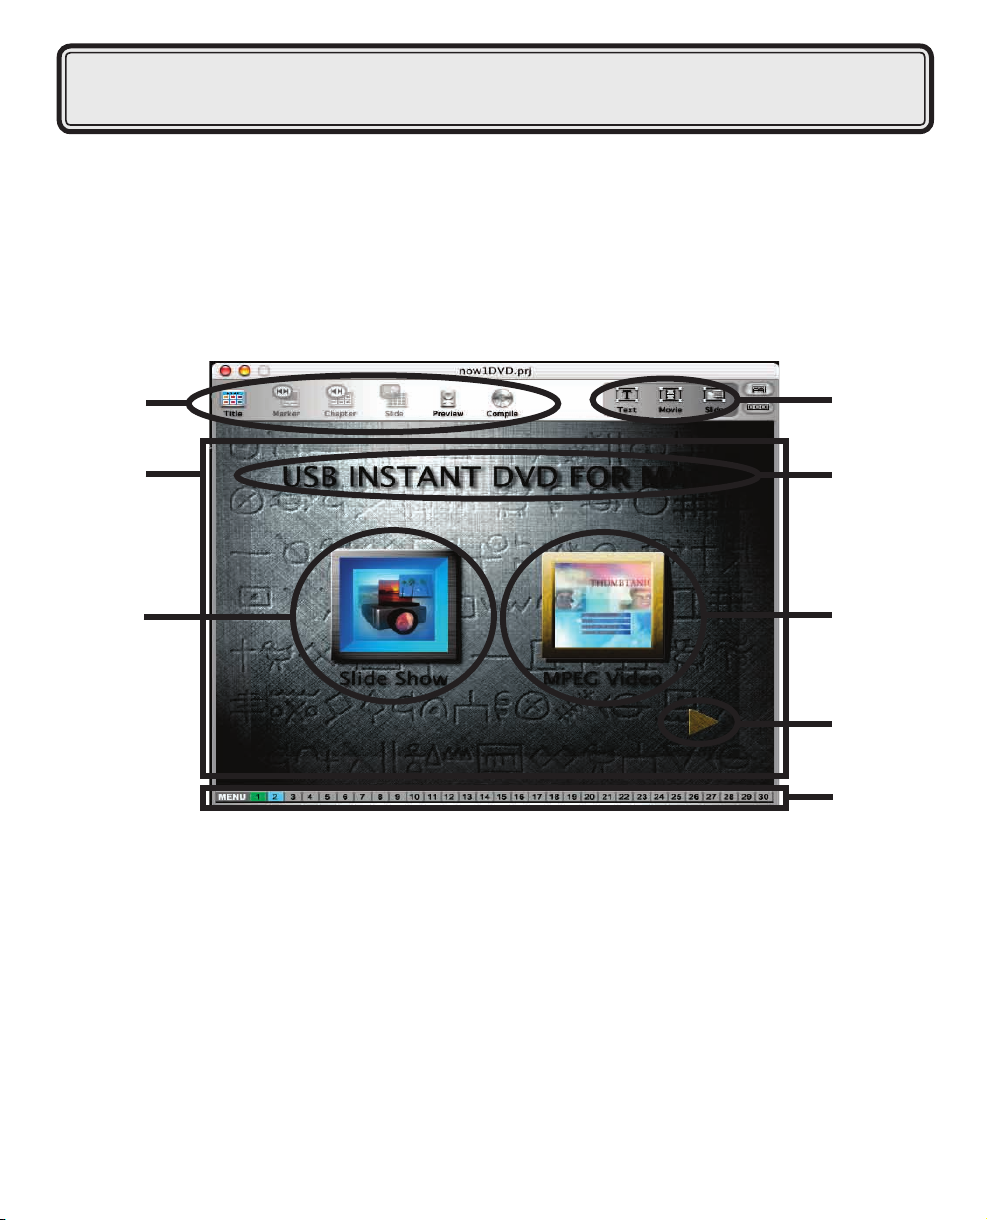
Title menu mode is where you create your Title menu. This is an example screenshot of the Title menu mode.
1
3
5
2
4
6
7
8
1 Mode selection icons:
By clicking on these, you can switch between modes.
2 Layout tools:
By clicking these icons, you can place objects such as text, movies and slides into the main layout
area.
3 Layout area:
Objects that you have selected can be positioned in this window, which shows the TV display area.
This TV display area becomes the title menu during disc playback.
4 Title text:
This is the text object positioned as the Title in the Title menu. Inputting text and text settings are
carried out in the Title menu/Text setup panel.
USB Instant DVD for Mac 35
Page 36
5 Slideshow button:
USB Instant DVD for Mac 37
This button is for viewing still picture content in continuous playback. After positioning this
button, the still picture content is registered in Slideshow edit mode. You can position a
maximum of 6 buttons in the title menu, and including the movie buttons, you can have a
maximum of 98 buttons for the whole disc.
6 Movie button:
Layout movie content positions. You can position a maximum of 6 movie buttons in the title menu.
WIth slideshow buttons, you can have a maximum of 98 buttons for the whole disc. Movie button
setup is carried out in the Title menu/Movie setup panel.
7 Title menu move button:
If several title menus have been setup, clicking this will display the previous or the next title
menu automatically. The settings for this button are applied in the Title menu/move button setup
panel.
8 Title menu selector:
This shows how you move between title menus and the status of the title menus that have been
set up. Title menus are numbered to show order and color-coded to show status: they are
blue if there is a relevant title menu, gray if there is no title menu and light green if the title menu
is currently displayed. Because you can create a maximum of 30
title menus, buttons 1 to 30 are displayed in sequence, and clicking
on them takes you to the corresponding title menu. For example,
if you click on 7, the 7th title menu is displayed.
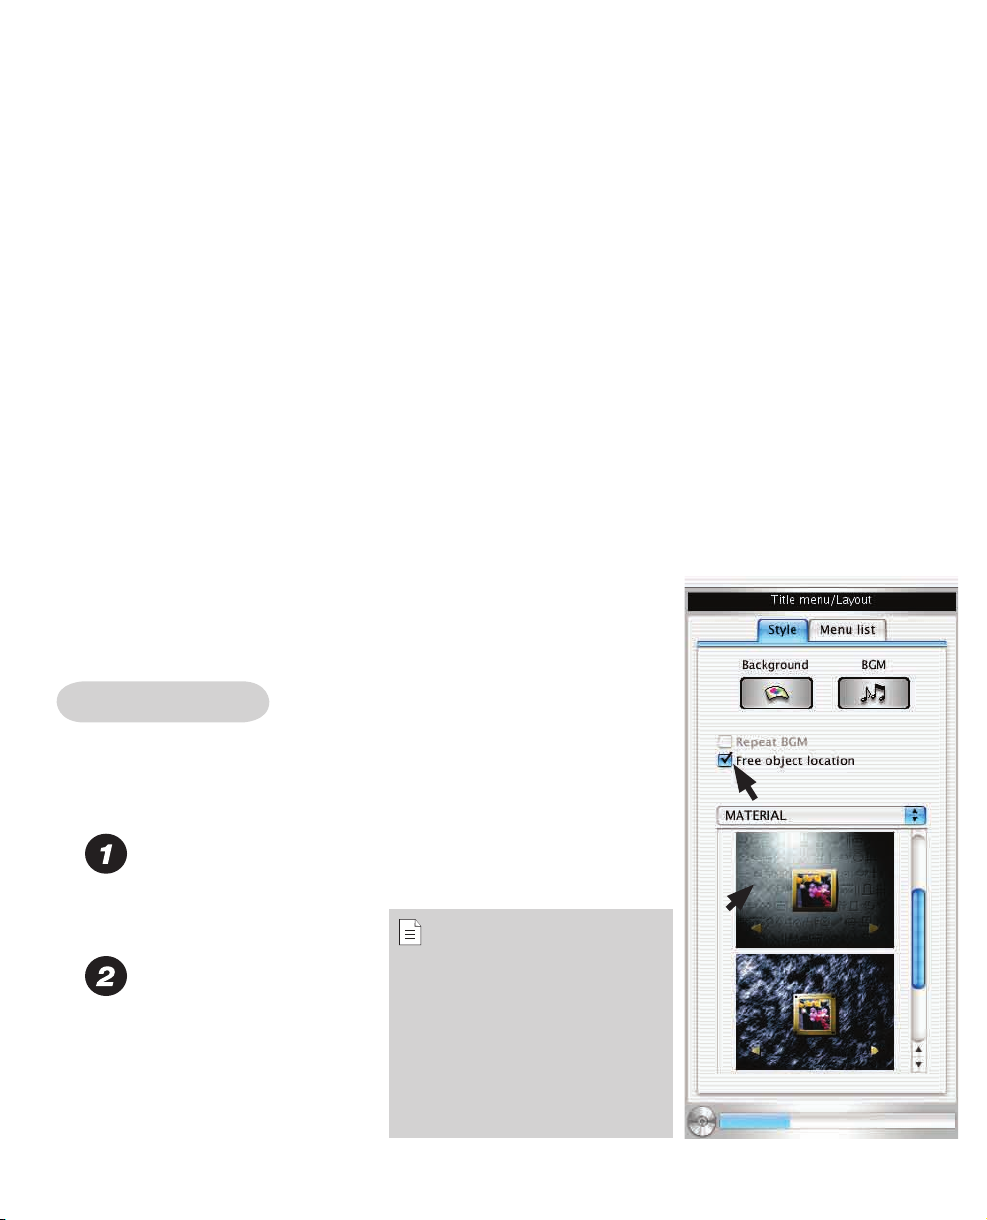
Layout Settings
You can set your Title menu by choosing the style, background, BGM,
objects and etc. with this Title menu/Layout panel.
Display the Title menu/Layout panel.
Click main window or Title icon. The Title menu/Layout panel
will appear.
Note:
Choosing a style.
Click the Style tab in the
pa nel and simply sel ect
an image you like from the
templates given.
USB Instant DVD for Mac 36
If you want to manually place objects
within the Title menu, click the check
box called "Free object location". If it is
not checked (selected), objects will be
automatically placed and you will not
be allowed to move any objects.
Page 37
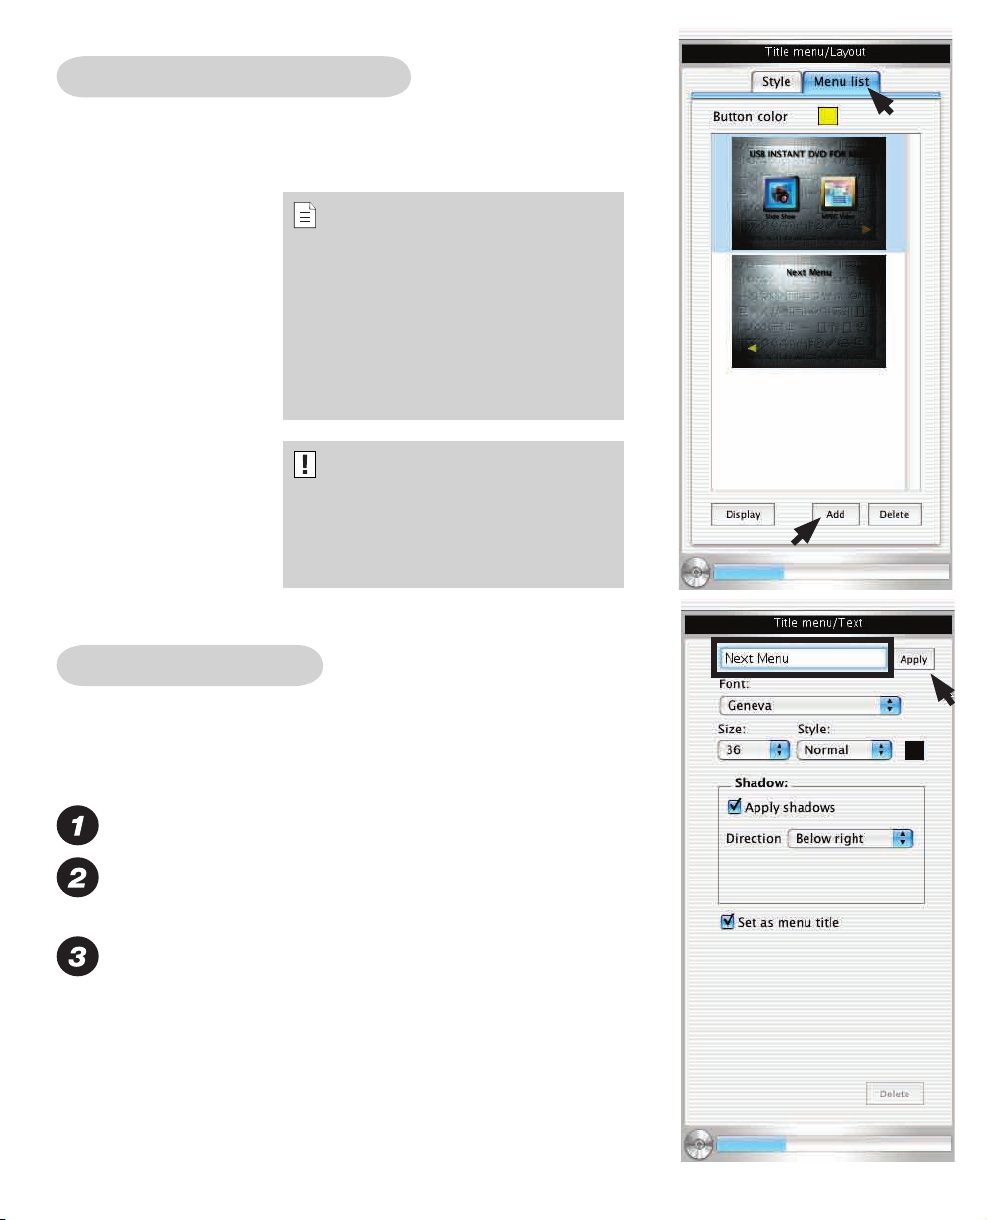
How to create a second Title menu
USB Instant DVD for Mac 37
If you want to create a second Title menu, click the Title menu/
Layout panel. Click on the Menu list tab, then click the Add button.
Note:
If yo u w an t to manual ly pl ace obje ct s
wi th in the Tit le men u, click the c heck
box called "Free object location". If it is
no t ch ec ke d (s el ec ted), o bj ec ts wil l be
automatical ly pl aced and yo u will not be
allowed to move any objects.
Important:
If there is no Title button placed in the rst
Title menu, you cannot create a second
Title menu.
How to add a Text object
When you add text to your title menu, you can also add shadows
or adjust text size.
Click on the Text icon from the Mode selection icons.
Click anywhere in your main window to place the text object.
You are now inserting a Text object into your Title menu.
Select the text object, then type your text in the box located in the
Title menu/Text panel. After you enter new text in the text box, the
Apply button becomes active. Click the Apply button to place your
text.
Page 38

How to add a Movie Button
USB Instant DVD for Mac 39
When you add a movie button, you can also add shadows, choose
thumbnail images, locate title text, and etc..
Click on the Movie icon from the Object layout tools.
Click anywhere on the Main window to place a movie button.
Click Main menu, and a dialog box will appear. Select the
movie le you want to add.
Select the movie button you have placed.
Then Title menu/movie panel will appear.
Scroll slider to select a scene
to be the movie button image.
Note:
You can also add movie les by
using the drag & drop method.
How to resize a button
In order to resize a button, check the "Free object box" under
the Style tab in the Title menu/Layout panel.
How to edit the title of a button
Select a movie button, and click the Text tab from the Title menu/
Movie panel. Enter the new name in the text box then click the
Apply button.
USB Instant DVD for Mac 38
Page 39
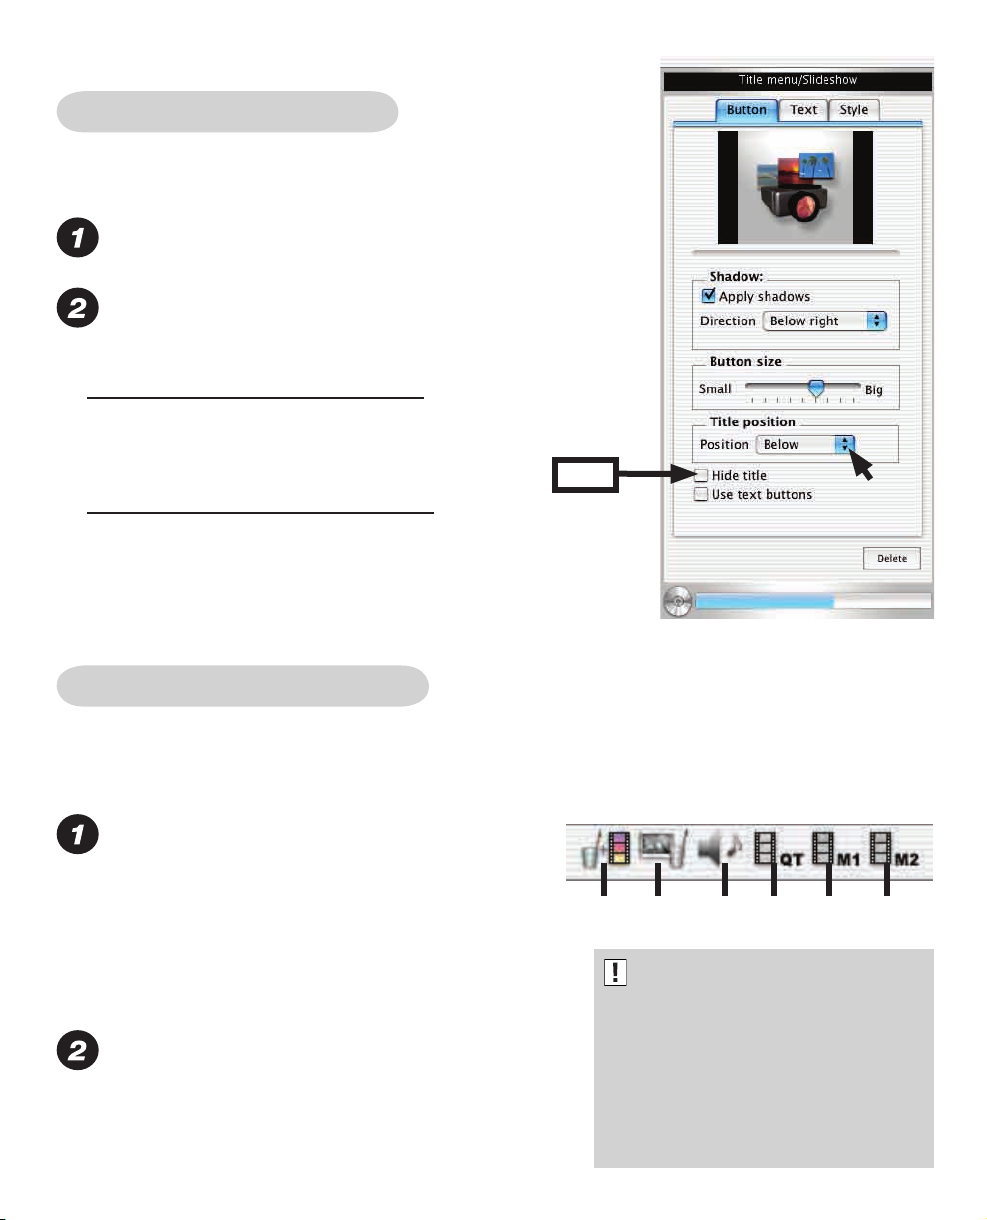
How to add a Slideshow Button
If you want to add still images, you can create a slideshow button.
Click on the Slide icon on the Object layout tools.
Click anywhere on the main window to place a Slideshow button.
How to hide the title of a slideshow button:
Select a Slideshow button, then click on the Hide title box in the
Title menu/Slideshow panel. (see Fig. A)
How to move the title of a slideshow button:
When you click a slideshow button, the Title menu/Slideshow panel
will appear. Select a location for the button to be placed from
the pull down menu in the panel.
How to use the Contents list window
Fig. A
Your album contents within the PixeDV for Mac will be displayed as
thumbnails in the Contents list window.
Icons in the Contents List window:
1 Show all contents
2 Show only still images
3 Show only sound
4 Show only QuickTime movies
5 Show only MPEG1 movie.
6 Show only MPEG2 movie.
Using Drag & Drop method:
You can drag a movie thumbnail from the Contents List
window, and drop it into the Title menu. A movie button
will then be created in the Title menu.
1 2 3 4 5 6
If contents do not appear in the
Contents List window, go to the menu
bar and select File. Then choose
Change Album library. Then select
PixeDV_Libh where the album library
for PixeDV for Mac is located.
Important:
USB Instant DVD for Mac 39
Page 40
Important:
USB Instant DVD for Mac 41
If a movie button is not created after using
the Drag & Drop method, the file may be
missing from the album in the PixeDV for Mac
software.
Note:
You can use the Drag & Drop method directly
from your desktop to the Title menu.
If you use the Drag & Drop method for a still
im age, th e ima ge w ill b e place d as a
background for the Title menu.
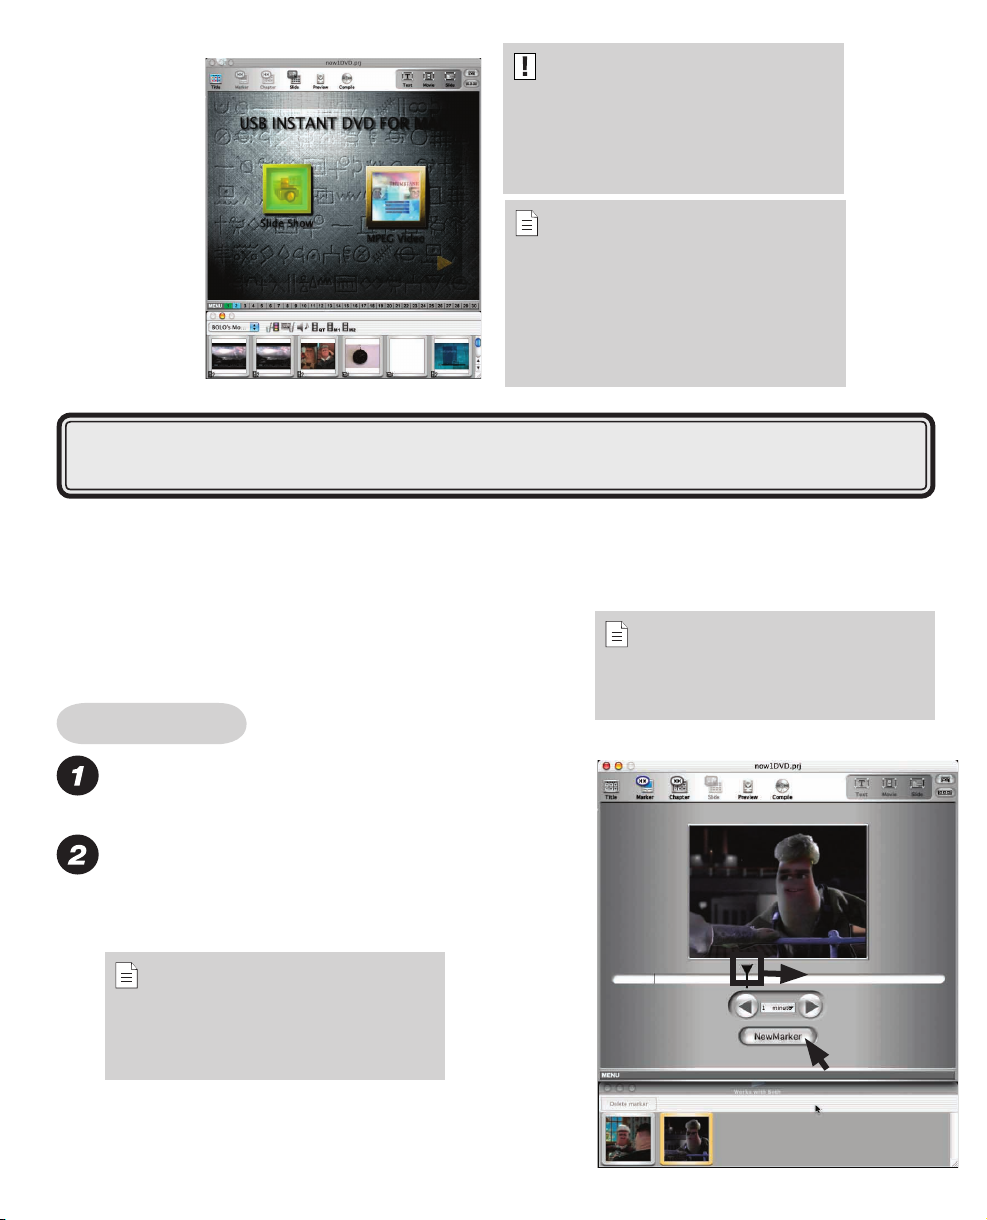
Setting Markers
By inserting markers within a movie, you can quickly access the specic scene you want to view.
You can insert a maximum of 98 markers within one movie.
In order to set markers, double click on a movie button
you have placed in the Title menu.
Marker settings
Click on a New marker button.
Place a marker at the specic scene.
Drag the slider and place a marker at the
scene you wish to insert the marker.
Note:
For adding multiple markers, repeat the
same process.
USB Instant DVD for Mac 40
Note:
Only available within the DVD-Video
mode.
Page 41
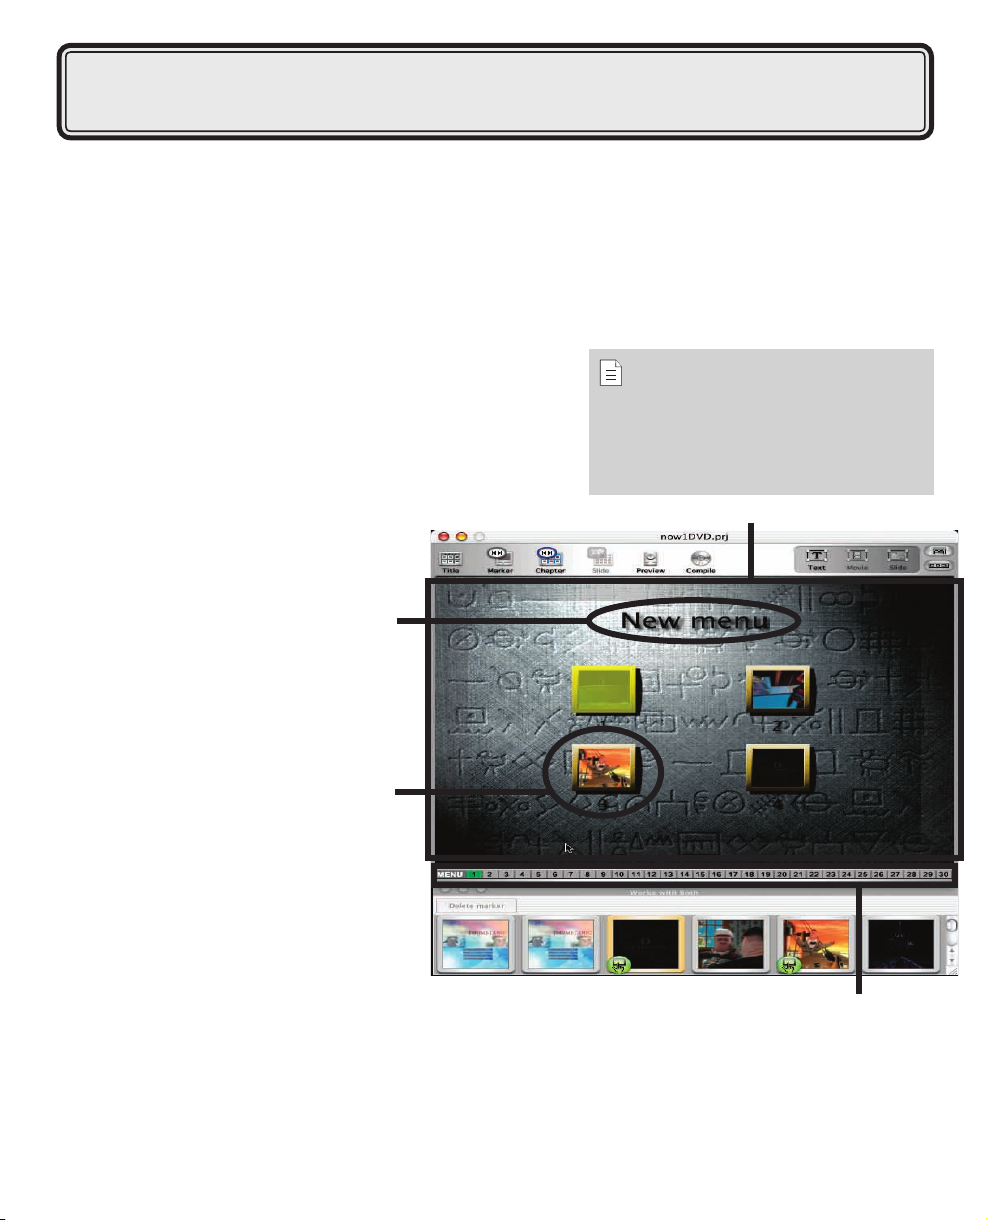
Creating Chapter Menus
A Chapter menu is a sub menu that displays the movie buttons you h ave added ont o the
Title menu. The thumb nails of buttons are the scenes where you hav e inserted markers.
You can create a maximum of 30 chapter menus and 98 chapter buttons per disc. One chapter menu
allows you to insert up to 6 chapter buttons.
When you create the Title menu, click Title from the Mode selection icons.
In order to create chapters, select a movie button you have
placed on the Title menu, and click Chapter from the Mode
selection icons.
1 Layout area:
Objects can be positioned in this window,
which shows the TV display area. This
TV display area becomes the title menu
during disc playback.
2 Text Object:
The text placed in the layout is a called a
text object. Text objects vary from titles of
a chapter menu to regular text objects.
3 Chapter button:
You can position chapter buttons by
dr agg ing an d drop pin g the Marke r
thumbnail in the Mar ker list window
into the Layout. You can have up to 6
chapter buttons in one Chapter menu and
a maximum of 98 chapter buttons in one
movie button.
4 Chapter menu selector:
This is a list of chapter menus shown in numbers. There are 30 available chapter menus you can
create. By clicking a number you will jump to that corresponding chapter menu. If a number is used,
it is colored in blue. If a number is not in use, it is colored in gray. The number of the chapters cur-
rently displayed is colored in light green. For example, if you click 7, it jumps to the 7th chapter menu.
2
3
Note:
You can access this Chapter menu mode
only when markers are set within a movie
button.
1
4
USB Instant DVD for Mac 41
Page 42

Positioning the chapter button
USB Instant DVD for Mac 43
After positioning the chapter buttons, you can replace thumbnail
images, add shadows, re-locate the title of a chapter button, replace
styles, etc..
Drag thumbnails of Marker and drop it into layout.
When a thumbnail is placed in the layout window,
a chapter button will be created.
Add shadows to the Chapter buttons:
Display the Chapter menu/Chapter panel by clicking a chapter
button placed on the layout window. Click the "Apply shadows"
box and choose the shadow direction.
Go back to Title menu.
Click Title from the Mode selection icons to go back to the
Title menu.
USB Instant DVD for Mac 42
Page 43
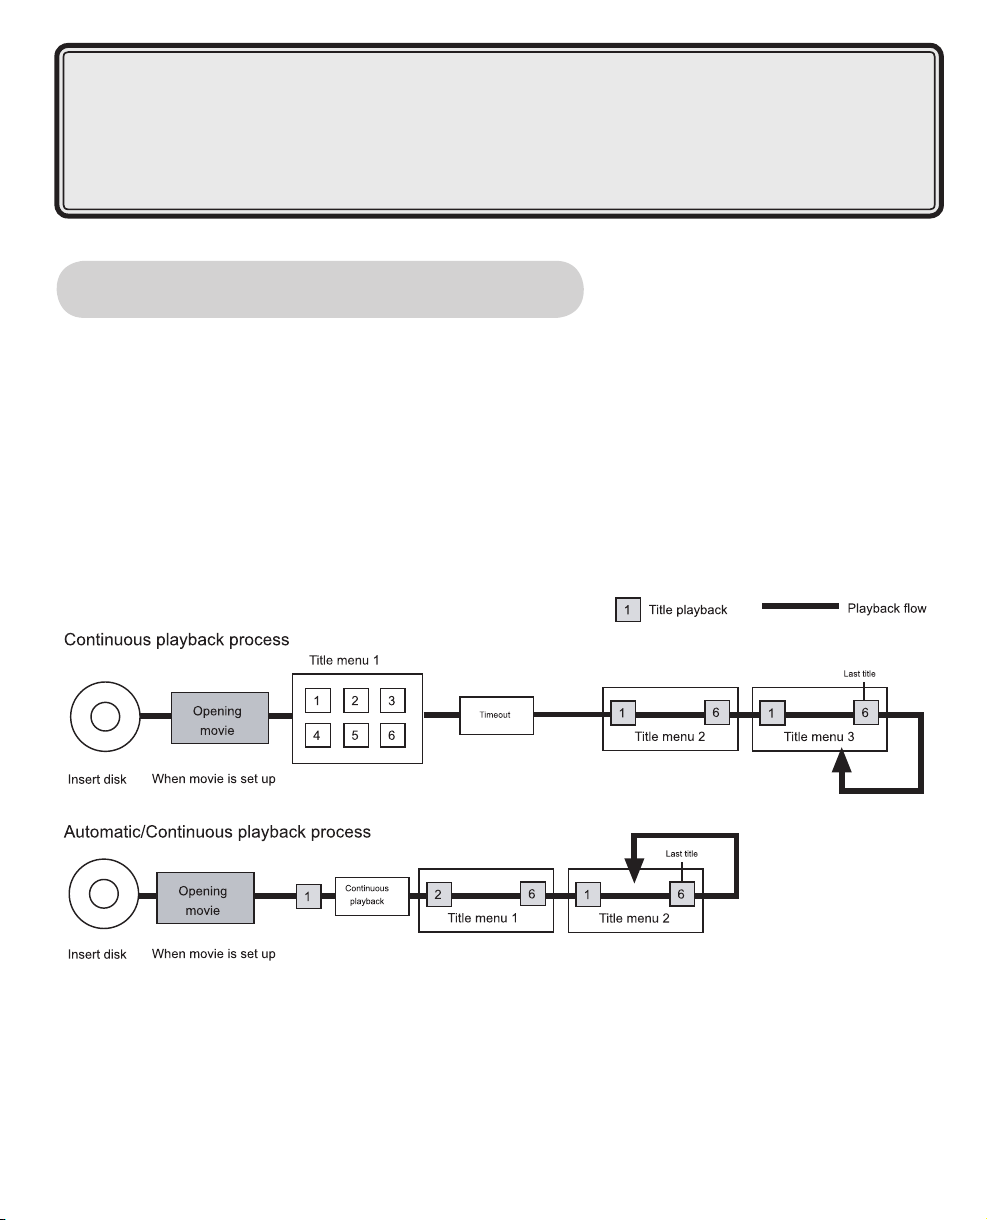
Authoring Formation & Disc Playback:
USB Instant DVD for Mac 43
DVD Video/ Video CD
Automatic & Continuous Playback
In Capty DVD/VCD, you can playback in two ways: automatic or continuous. Below is the process for
both. When the DVD disc is inserted and no action is taken, the rst title starts to play. If playback is set
to play continuously, all of the titles will play continuously. After the last title has nished playing, the title
menu will be displayed (if there are several title menus, then the last title menu will be displayed). As a
result, if you wish to create a disc with looped playback, you should only create one title menu because the
timeout will only be functional for the top title menu. When the title menu is being played in only one disc
and the title menu display is at a timeout, the titles placed on the menu will start playing back
consecutively. When the last title nishes playing, it will return to the title menu.
Page 44

Operation During Title Menu Display
USB Instant DVD for Mac 45
In Capty DVD/VCD, you can set several title menus for placing title buttons of still pictures, slide shows,
and movie titles.
- Select the title button and menu navigate button with the direction keys
- Press the Enter Key to start selected button
Movie button: Play mode
Slide Show button: Play Slide Show
Movie button with chapter menu: Displays chapter menu
Menu navigate button: Moves between menus
- When there are several menus, use the skip keys to move between menus.
- Use the Play key to play-back the title button selected in the menu. However, this key may not function
in some players.
Operation During Movie Title Playback
In Capty DVD/VCD, you can perform the operations listed below during playback of the movie title:
- Skip Back Key: rewind
- Skip Forward Key: Play next title (When marker set point is the last marker play point)
- Skip Back Key to play the previous title (When the marker set point it the rst marker play point)
- Use Play key to start playback from a temporary stop
- Pause key: Stops playback temporarily
- Stop key: Stops disc playback
- TITLE key: Displays the title menu of the title button that is being played
USB Instant DVD for Mac 44
Page 45

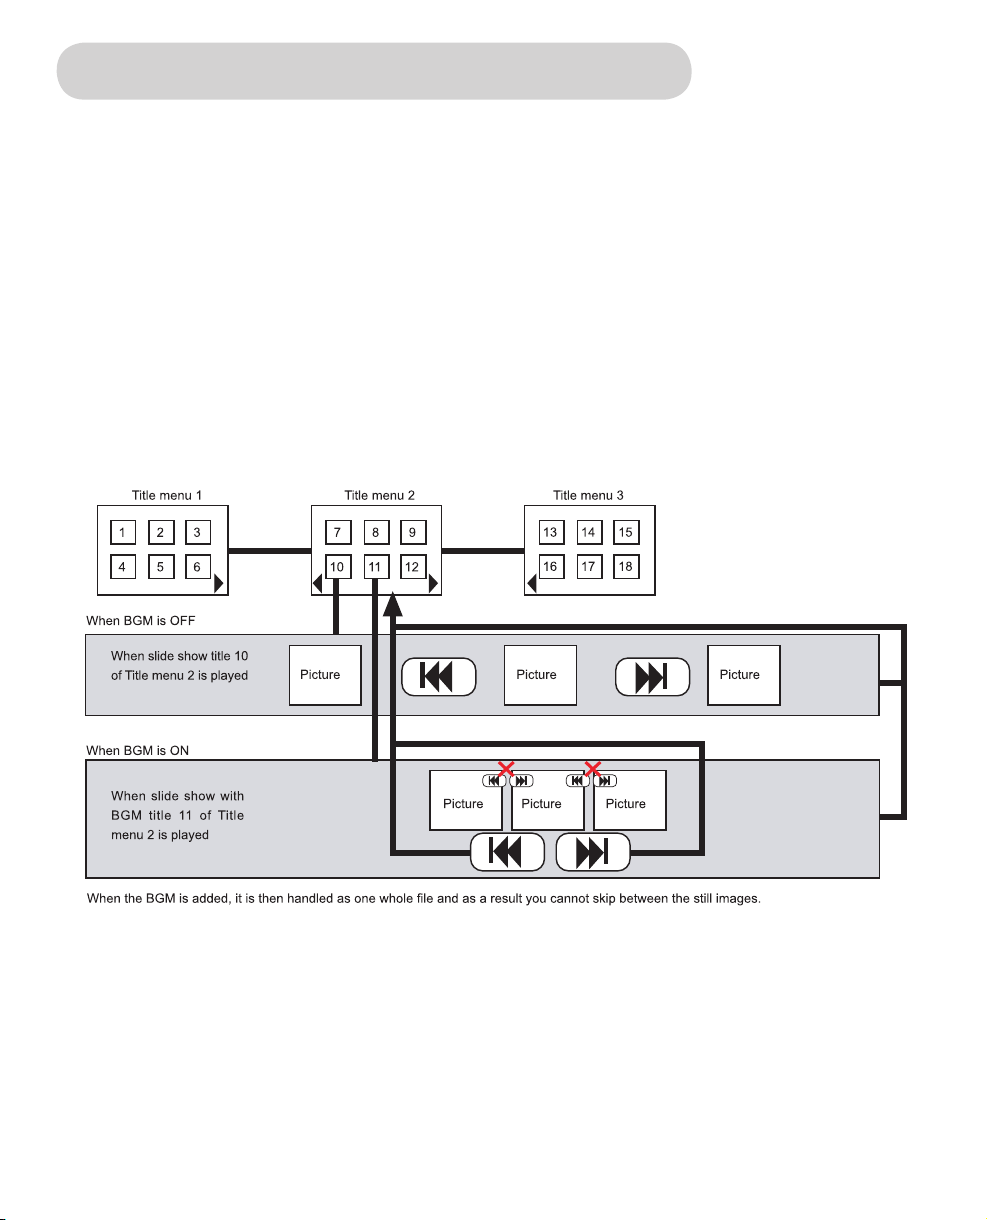
Operation during slideshow title playback
In Capty DVD/VCD, you can perform the operations listed below during playback of a slideshow
movie title.
- Use Skip keys to move to the next or previous image
- Use Skip Forward key to play the next title (When the last still image is played)
- Use Skip Back key to play the previous title (When the rst still image is played)
- Use Play key to start playback from a temporary stop
- Pause key: Stops playback temporarily
- Stop key: Stops disc playback
- TITLE key: displays the title menu of the title button that is being played
Use the Subtitle key to display subtitles ON/OFF: Use to display, or not to display the image title of the
slide show.
USB Instant DVD for Mac 45
Page 46

Operation During Chapter Menu Display
USB Instant DVD for Mac 47
In Capty DVD/VCD, you can set markers to movies titles and create Chapter menus using those
markers. You can perform the operations listed below during display of the Chapter menu.
- Select chapter button and menu navigate button with the Direction keys
- Press the Action key to start selected (highlighted) button
- Stop key: Stops disc playback
- Title key: Displays the title menu of the title button that is being played
- Menu key: Displays top menu of the Chapter menu
USB Instant DVD for Mac 46
Page 47

Operation During Title Menu Display
In Capty DVD/VCD, you can set several title menus by placing title buttons of still pictures, slide
shows and movie titles.
- Use number keys 1 through 6 to play titles
- Stop key: Stops disc playback
- When there are several menus, use the skip keys to move between menus
- Use the Play key to playback the 1st title in the menu
Operation During Movie Title Playback
In Capty DVD/VCD, you can perform the operations listed below during playback of a movie title.
- Play key: Starts playback
- Pause key: Stops playback temporarily
- Stop key: Stops disc playback
- Return key: Displays the title menu of the arranged title button that is playing
USB Instant DVD for Mac 47
Page 48
Operation during slide show title playback
USB Instant DVD for Mac 49
In Capty DVD/VCD, you can perform the operations listed below during playback of slide show
movie titles.
- Use Skip keys to move to the next or previous image.
- Use Play key to start playback from a temporary stop.
- Pause key: Stops playback temporarily.
- Stop key: Stops disc playback
- Return key: Diplays the title menu where the slide show title button is being displayed
USB Instant DVD for Mac 48
Page 49

Editing A Slideshow
CaptyDVD enables you to edit your slideshow and add sounds. CaptyDVD also calculates the
intervals of pictures to be equal with the lengh of your selected audio.
You can use up to 98 still images per slideshow. You can edit in the Slideshow edit mode by
double-clicking a slideshow button you have placed on the title menu, or by clicking the Slide
option while selecting a slideshow button.
Adding still image contents
Simply drag & drop your still image contents into the slide list window to add slides to the
slideshow button.
Note:
You can also drag a le directly from
your desktop.
USB Instant DVD for Mac 49
Page 50

Still image settings
USB Instant DVD for Mac 51
BGM Setting
Click BGM (DEFINE BGM: MIDI) button to select a sound le.
This sound will be played during the slideshow. When Repeat
is checked, the sound will be repeated until the slideshow is
stopped.
Switch time
You can set the playback time for each still image. There is an
amount of time you can select, or manually input, between
4 to 20 seconds.
When Match to BGM is checked, time will be automatically
calculated to t your slideshow length. If the calculation becomes
less than 1 second, this function will not be applied.
Contents order
In the Slideshow, contents will be played in the order of
the thumbnails displayed in the Slide list window.
To change content order, change location of thumbnails.
Manually
Changing one content order:
Simply drag a thumbnail to the location you prefer.
Changing multiple contents (group):
Click one thumbnail and press and hold the [Shift] key
then click the last thumbnail. Afterwards, drag to the
location you prefer.
Changing multiple contents (scattered):
Press and hold the [Command] key and click all
thumbnails you want to select. Then drag to the location
you prefer.
Automatically
Select an item from the sort menu. Thumbnails will be automatically sorted.
USB Instant DVD for Mac 50
Page 51
USB Instant DVD for Mac 51
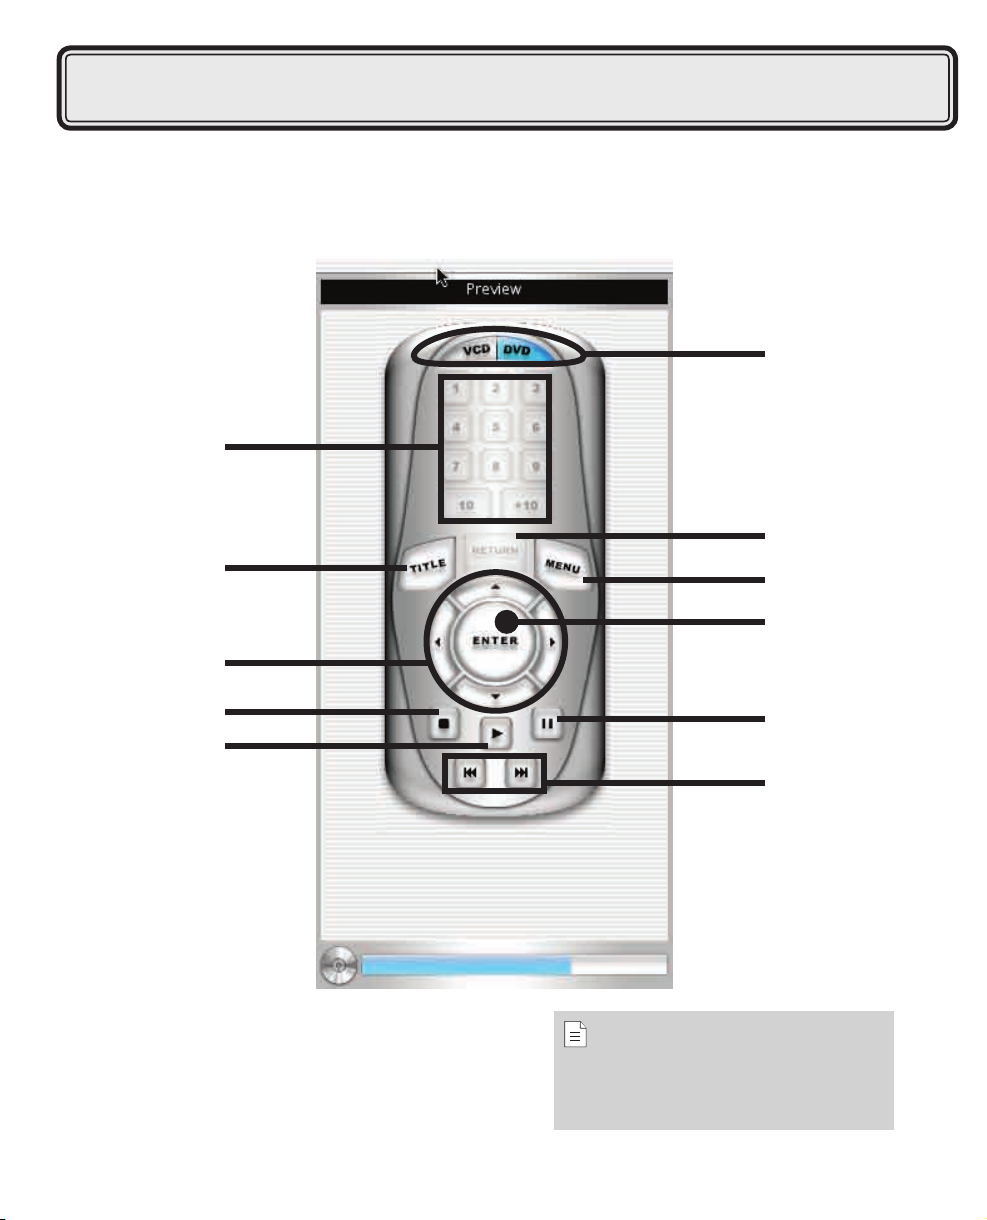
Preview to Conrm Writing
CaptyDVD enables you to preview your contents before you start writing.
When you are ready to write, preview your project to test your menus, buttons, etc.
Use the remote control image just like a real one.
1
2
4
3
5
7
6
8
9
Note:
In the Preview mode, the TV display area
will not be shown.
10
11
Page 52

Click Preview to go to preview mode.
USB Instant DVD for Mac 53
1 Mode display:
This displays DVD when you are compiling a DVD-Video, and VCD when you are
compiling a Video-CD.
2 Number selection key:
Only available for Video-CD. Clicking a number corresponds with the same number of
the title button.
3 Title key:
Only available for DVD-Video. Goes back to the Title menu.
4 Return key:
Only available for Video-CD. Goes back to current Title menu.
5 Menu key:
Only available for DVD-Video. Goes back to Chapter menu.
6 Arrow keys:
Only available for DVD-Video. Moves selection of displayed buttons.
7 Conrm key:
Only available for DVD-Video. Conrms selected button.
8 Stop key:
Stops playback. Preview screen will be black.
9 Play key:
Starts playback for DVD-Video, use arrow keys to select a button.
10 Pause key:
Pause playback.
11 Skip keys:
Jump to the previous or next content. In the DVD-Video, if there are markers inserted,
the scene will be jump to the specied scene during playback.
USB Instant DVD for Mac 52
Page 53

Creating a DVD-Video
CaptyDVD supports direct writing to a DVD-R disc for creating a DVD-Video if you have a
built-in SuperDrive or PIXELA's DVD-RAM/R drive PIX-DVRR/FW series. Also, if you choose
Video TS, you can use it to play with Apple's Apple DVD Player.
This is the nal stage for creating a DVD-Video. You can click on the
Compile icon from the Mode selection icons to go to Compile mode. Please
make sure that the drive you will be using to write with is working properly
before inserting a DVD-R disc.
Enter the name of the disc:
Type a disc name in the box on the Compile panel. Text should
be one bit characters, A to Z alphabet, 0 to 9 numbers and 30
maximum characters.
Click the check box "Compile disc" and select a drive
you will use:
Without a check on Compile disc, it will not start creating your
DVD-Video. Drives currently connected to your Macintosh will be
displayed under the drive list.
Click the check box "Auto Play":
This allows DVD-Video to begin playback automatically when the
disc is inserted to a player.
Click the "Run" button:
When you click the Run button, it begins encoding non-MPEG2
movies to MPEG2 movies before writing a disc. A bar shows you
the progress of writing.
Important:
For writing a disc from a VCD image or
DVD image, you will need Roxio 's Toast.
Point:
If yo u w ant t o use y our
DVD-Vid eo in Apple's Apple
DVD Player for movie playback,
you can click the check box
"V ideo TS " to cr eat e a
Video TS folder.
If you want to create a DVD
image and use Roxio's Toast,
you can click the "Save DVD
Image box".
USB Instant DVD for Mac 53
Page 54
Button Builder
USB Instant DVD for Mac 55
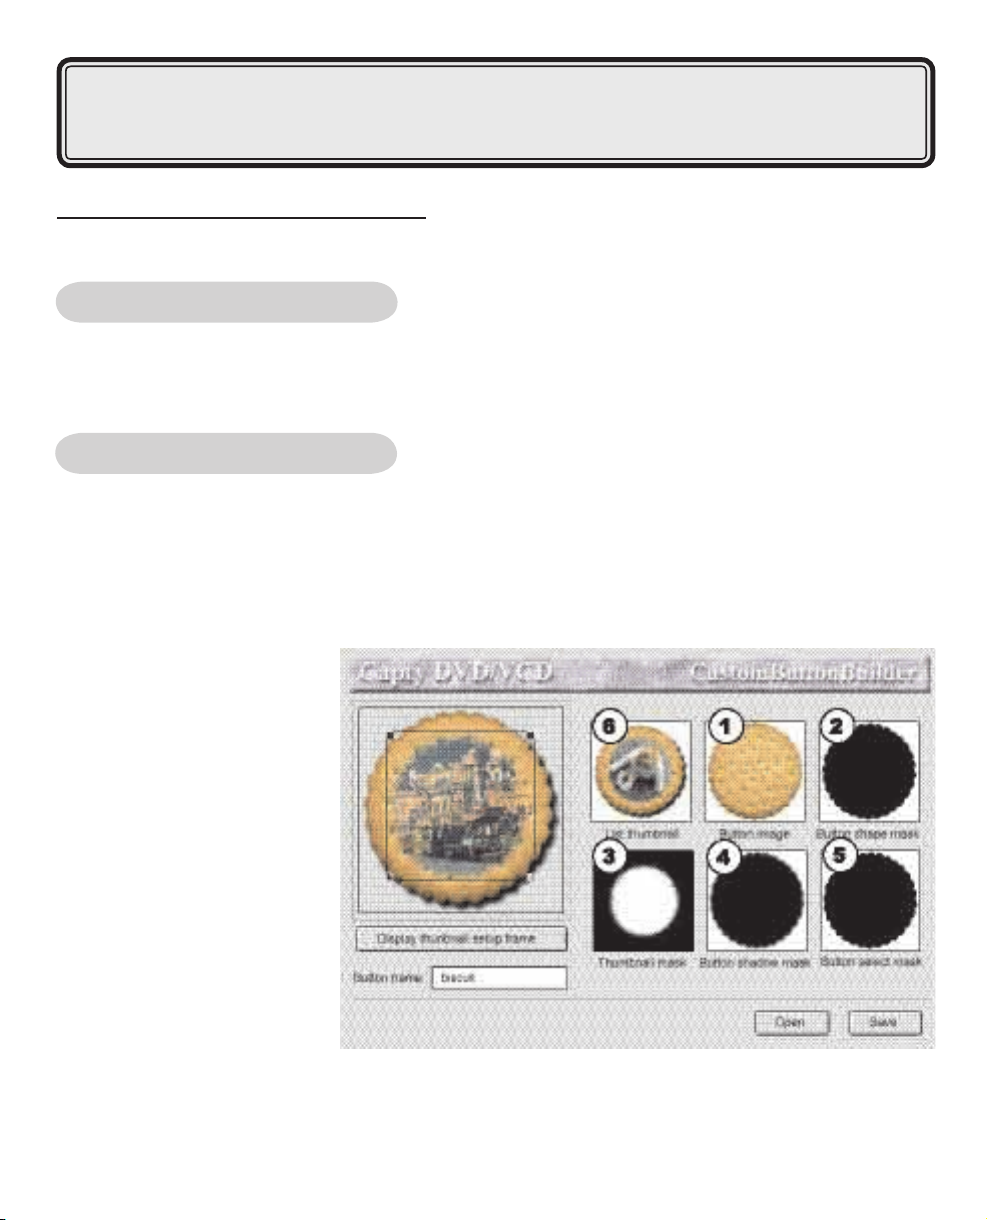
Button Builder Screen Format
Button builder is a software utility you can use to create custom buttons for images you have create.
Features of Button Builder:
• Create random form buttons
• Create shadows for buttons
• Indicate thumbnails position, display size of button and titles (including movies and still
image slides)
Button format:
To create a button, you need at least 3 images.
Create each image with a pixel size of 200 x 200.
1. Button image
The images of the button itself.
2. Mask of button shape
A mask image that specify the
form or shape of the button itself.
The part inside the shape is
black, the deleted outside part is
white. Create this image in
gray scale.
3. Thumbnail mask
This is the image which species
the display portion of the
thumbnail picture in relation to
the button shape. A thumbnail is
a miniature image of the movie
frames and still pictures within a
folder that are registered in the
Capty DVD/VCD menu. Create
this image in gray scale.
4. Mask of button shadow.
This mask indicates the form of the shadow for a particular button. The black area becomes the shadow
portion and the white area is deleted. Create this image in gray scale.
USB Instant DVD for Mac 54
Page 55
5. Mask of selected button.
This mask species that the title in the DVD video menu is being selected. Create this image in gray scale.
6. Listed Thumbnail
This thumbnail image can be used as a custom button in the list of thumbnails that are displayed in the Capty
DVD/VCD button style settings panel.
Indicating thumbnail display
You can indicate the position and display size of all the button thumbnails. If you click the “Display thumbnail
setup frame” button, a bounding box (for adjusting position and size) will appear in the button preview window.
Drag any of the four corners to change the display size. Press the mouse within the box and drag to adjust
the position.
Setting button names.
Type button name in the “Edit Box”. In the recent version, this function cannot be used.
Saving buttons
Click “Save” and create a button from the setting. Indicate the destination folder and name in the save folder
dialog box and save.
Re-editing button
Click “Open”, load the saved button and re-edit.
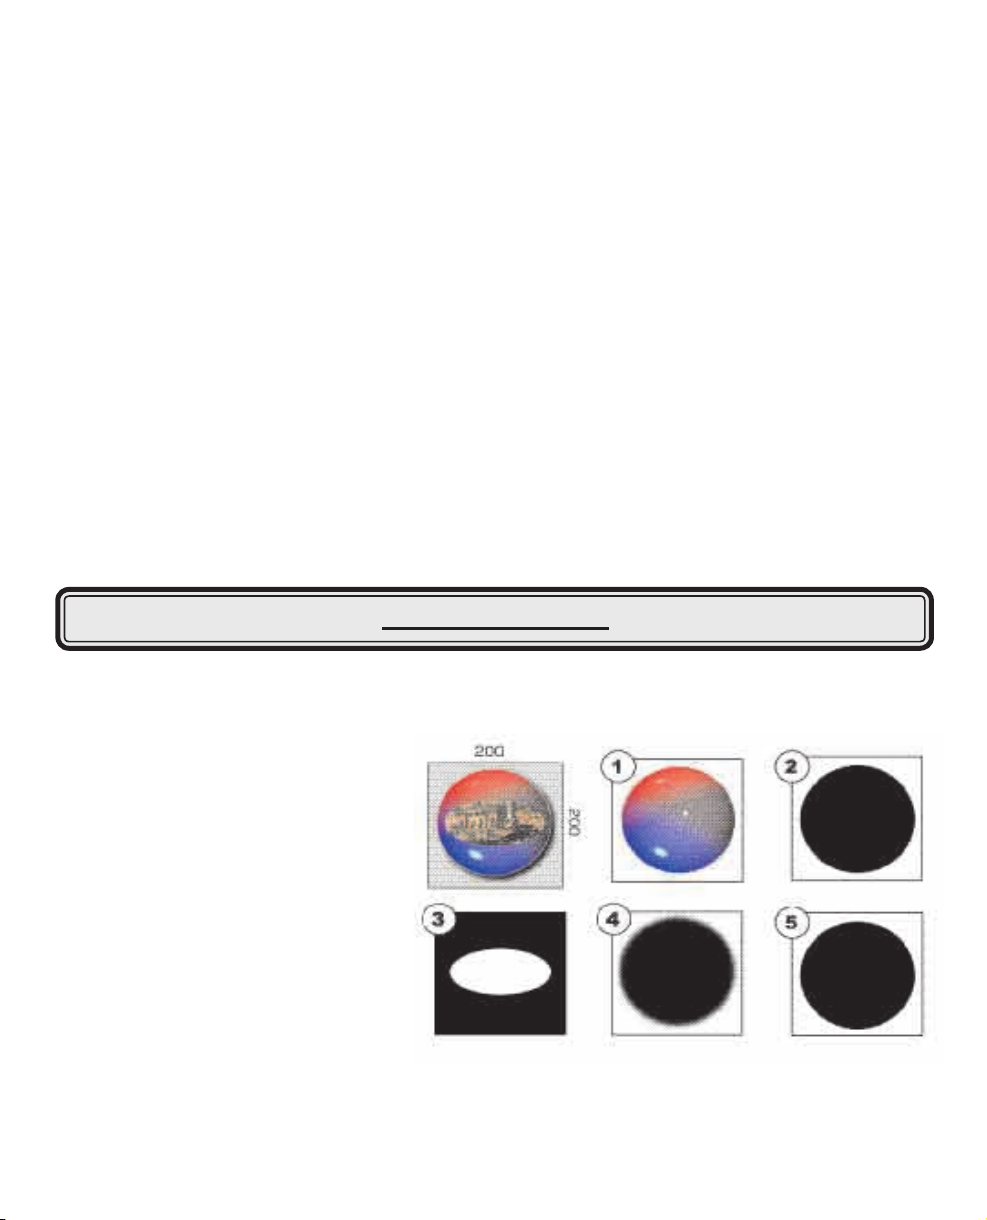
Creating Buttons
Let’s explain how to create a button with button builder using a simple example.
Let’s create a simple button as seen on the right.
1. Create the button image.
Use a graphic software to create
a button images of 200 x 200 pixel.
Use a graphic software to
create the round shaped image.
2. Copy the whole image you
have created.
3. Click within the frame of the
(button image) in button builder.
4. From the edit menu, choose paste.
5. Create the (button shape mask) as you did with the graphic software in step 1. The white area
becomes the cut out or deleted portion. A mask image that species the form or shape of the button
(picture 2).
USB Instant DVD for Mac 55
Page 56

6. Likewise, create the (Thumbnail mask).
USB Instant DVD for Mac 57
A mask image that specify the position of the button, and the form of the displayed thumbnail image.
The white area will be where the thumbnail will be displayed. The white oval shaped becomes this
portion (picture 3).
7. Create the (button shadow mask), if necessary.
Use the (button shape mask) (Picture 2) as a base and add blur to create a shadowy effect
(picture 4). You can even use the (button shape mask) (picture 2) and convert it to bring about a
sharper shadow.
8. Create the (button select mask).
You can convert the normal (button shape mask) (picture 2). This species the highlighted area
when the button is selected for DVD Video playback.
9. Conrm that the button formation is the same as it should be in the preview window button and then
click “Save” to save it.
When you save button image le in the place stated below, you will be able to choose it
from the list in Capty DVD/VCD.
For MacOS 8.6-9
Save in the folder below found within the Capty DVD application folder.
MenuResources/Style/TitleButton(Title button folder)
Menu navigate button
MenuResources/Style/NaviButton/NextNavi/
MenuResources/Style/NaviButton/PrevNavi/
For MacOS X
Open the CaptyDVD application package and save it in the folder stated below.
To open the CaptyDVD application package, click on the CaptyDVD icon while pressing the command key.
Then select “Show package contents” from the menu.
Title Button
CaptyDVD.app/contents/MacOS/MenuResources/Style/TitleButton
Menu navigate button
CaptyDVD.app/contents/MacOS/MenuResources/Style/NaviButton/NextNav/
CaptyDVD.app/contents/MacOS/MenuResources/Style/NaviButton/PrevNavi/
USB Instant DVD for Mac 56
Page 57

Thumbnail display frame setting
On the button’s thumbnail display portion,
set the frame where the image of the movie title
or still image title registered in the CaptyDVD will
be displayed.
Since a thumbnail can be displayed from any
random position, it is possible to create a button as
the one below
.
If you click the “Display thumbnail setup frame”
button, a bounding box (for adjusting position and
size) will appear in the button preview window.
Drag any of the four corners to change the display
size. Press the mouse within the box and drag to
adjust the position.
Special Effects
You can create the mask image in black and white, but if you use the gray scale color, you can be able to
create special effects like semi-transparent buttons.
In the picture below, the thumbnail mask is tted with the shape of the book, a gray scale graduation is used,
and the shadow re-shaped.
USB Instant DVD for Mac 57
Page 58

Glossary
USB Instant DVD for Mac 59
Analog:
A signal that is not digital. Most VCRs, radio/television broadcasting, AV in/out, S-VIDEO, and stereos are analog.
Computers are digital, dealing in ones and zeros. Information from an analog source must be digitized to be used on a
computer.
Capture:
The recording of video or images to a computer hard disk.
CBR (Constant Bit-Rate):
Constant Bit Rate (CBR) encoding is an encoding method that varies the quality level in order to ensure a consistent bit
rate throughout an encoded le.
Clip:
A short section or part of a movie. A clip can be audio, video, still images or a title.
Codec:
COmpress and DECompress. All video on a computer uses a special algorithm or program to process video. This
program is called a codec.
Compression:
Making a le smaller by removing redundant data. Nearly all digital video is compressed in some way or another.
Compression is achieved through a codec.
Data Rate:
The amount of data per second that is transferred from one part of your computer to another. In digital video, the data
rate of your source is very important: CD-ROMs have lower data rates than hard disks. The data rate of the Internet is
very low.
Digital:
Computer data consisting of ones and zeros. Contrast digital information with analog.
Driver:
A software program that controls the connection between a specic device and a computer.
Frame:
A single image in a movie.
Frame Rate:
The number of frames per second in a video. NTSC video is commonly 29.97 frames per second (fps), but smaller
video les can be created on the computer by using lower frame rates, like 15 fps (not suitable for VCD or DVD).
USB Instant DVD for Mac 58
Page 59

Mark In/Out:
Points in a clip that have been marked for editing and trimming purposes. A section can be selected from a longer clip
by setting its beginning (Mark in) and ending (Mark out).
MPEG-1:
A standard for video and audio compression used in many products like VCD. For NTSC, its video resolution is
352x240 pixels at 29.97 fps. For PAL, it works at 352x288 pixels at 25 fps.
MPEG-2:
A subset of MPEG-1. It’s a standard for video and audio compression used in products like DVD. For NTSC DVD, its
video resolution is 720x480 pixels at 29.97 fps. For PAL DVD, it works at 720x576 pixels at 25 fps.
NTSC/PAL:
NTSC is the video standard in North America, Japan, Taiwan, and some other regions. Its frame rate is 29.97 fps. PAL
is common in Europe, Australia, New Zealand, China, Thailand, and some other Asian places, which has a frame rate
of 25 fps. There are other differences. In the world of DV and DVD, NTSC has the video resolution of 720x480 pixels,
while PAL has 720x576 pixels.
Source:
The source or origin of your media, usually a camcorder or VCR. Audio CDs are great sources for music clips.
Streaming:
This is a relatively new Internet technology that allows large les to be played as they are being downloaded.
Streaming is commonly used for large video and audio les.
Template:
A work pattern in a software program. It includes predened formats and settings to save user’s efforts and reduce
risks of making mistakes.
Trim:
The process of editing or cropping a movie clip. Computer video can be trimmed frame by frame.
VBR (Variable Bit-Rate):
Variable Bit Rate (VBR) is an encoding method that ensures consistent high audio quality throughout an encoded le by
making intelligent bit-allocation decisions during the encoding process. VBR encoding produces an overall higher and
more consistent quality level than Constant Bit Rate encoding.
USB Instant DVD for Mac 59
Page 60

Service and Warranty
USB Instant DVD for Mac 61
Service:
If you require assistance with the installation, operation, or application of your ADS Technologies, Inc.
product there are several options available to you as described in the technical support section of this
manual. The ADS Technologies technical support and customer service staff can aid in solving many
problems. Our technical support department is available to repair any ADS Technologies product. You
or your dealer must return products to our factory for repair or warranty replacement.
Return/Replacement:
Each individual computer store or dealer sets product returns policies for their customers.
ADS Technologies, Inc. cannot be responsible for the actions or policies set by our dealers. If you desire
to return the product for a refund, you must get the refund from the dealer or store you purchased the
product from. If you purchased the product directly from ADS please see the
“Terms and Conditions of Sale” on the reverse side of your sales invoice.
Returns to ADS Technologies, Inc. are for repair or warranty replacement only. If you need to return
product to ADS Technologies, Inc. for repair or replacement you must follow these steps:
1. Call our Technical Support department at (562) 926-4338 to obtain a Return Merchandise
Authorization (RMA) number.
2. The RMA number is valid for 30 days.
3. Ship the product to the ADS factory with the RMA number marked on the inside and outside of
the package. If there is no RMA number on the package or the RMA number has expired, the
shipment will be refused. ADS will not be liable for lost or mis-shipped products.
4. Replacement product cannot be shipped to you until the defective product has been
received by ADS.
5. Once the product is received at the factory it will be tested and then repaired or replaced.
6. Turn around time is approximately one week. A repaired or replacement product will be shipped
back to you.
Warranty:
This ADS Technologies, Inc. product comes with a One (1) year hardware warranty. ADS Technologies, Inc.
(ADS) warrants this product against defects in material and workmanship for a period of One (1) year from
the date of original purchase from ADS or an authorized ADS dealer. This warranty applies only to the original
purchase of the product and is not transferable. This warranty does not cover any incompatibilities due to the
user’s computer, hardware, software or other related system conguration in which the product interfaces.
Proof of purchase will be required before any warranty consideration by ADS occurs.
This warranty does not cover any damage caused by negligence, non-authorized modications, or parts
installed without prior written permission from ADS.
This warranty does not apply if the product has been damaged by accident, abuse, or misapplication, nor as a
result of service to the product by anyone other than ADS.
If your ADS product is not in working order, your only recourse is repair or warranty replacement, as
described above. UNDER NO CIRCUMSTANCES will ADS Technologies, Inc. be liable for consequential
damages, including but not limited to any lost savings, lost prots, or any other damages, caused by the use of
any ADS Technologies, Inc. product or inability to use the product, even if the dealer or ADS Technologies, Inc.
has been advised of such liability or other claims. This includes damage to property and, to the extent
permitted by law, damages for personal injury. This warranty is in lieu of all other warranties including implied
warranties of merchantability and tness for a particular purpose.
USB Instant DVD for Mac 60
Page 61

FCC Information
Federal communications Commission Radio Frequency Interference Statement
Note: This equipment has been tested and found to comply with the limits for a class B digital device, pursuant
to Part 15 of the FCC Rules. These limits are designed to provide reasonable protection against harmful
interference when the equipment is operated in a residential installation. This equipment generates, uses and
can radiate radio frequency energy and if not installed and used in accordance with the instruction manual
may cause harmful interference to radio communications. However, there is no guarantee that interference
will not occur in a particular installation. If this equipment does cause harmful interference to radio or television
reception, which can be determined by turning the equipment off and on, the user is encouraged to try to
correct the interference by one or more of the following measures:
* Reorient or relocate the receiving antenna.
* Increase the separation between the equipment and receiver.
* Connect the equipment into an outlet on a circuit different from that to which the receiver is connected.
* Consult the dealer or an experienced radio TV technician for help.
Notice:
(1) The changes or modications not expressly approved by the party responsible for compliance could void
the user’s authority to operate the equipment.
(2) Shielded interface cables and AC power cord, if any, must be used in order comply with the emission
limits.
ADS Technologies
North America Ofce
12627 Hidden Creek Way
Cerritos, CA, 90703
Phone: 562.926.1928
Technical Support: 562.926.4338
Technical Support Hours: M-F 8am-5pm PST
Fax: 562.926.0518
European Ofce
Shannon Industrial Estate
Shannon Co. Clare, Ireland
Phone: +353.61.702042
www.adstech.com
USB Instant DVD for Mac 61
Page 62

USB Instant DVD for Mac 62
Page 63

ADS Technologies
North America Ofce
12627 Hidden Creek Way
Cerritos, CA, 90703
Phone: 562.926.1928
Technical Support: 562.926.4338
Technical Support Hours: M-F 8am-5pm PST
Fax: 562.926.0518
European Ofce
Shannon Industrial Estate
Shannon Co. Clare, Ireland
Phone: +353.61.702042
1750-511
www.adstech.com
USB Instant DVD for MAC
 Loading...