

Page 1

InstantDVD+MP3
E
G
F
Page 2

1
Ways to Capture and Edit Video
4
49
© 2005 ADS Technologies. All Rights Reserved
Adobe is a registered trademark of Adobe Inc.
ADS is a registered trademark of ADS Technologies Inc.
ADS Technologies (ADS) makes no warranty of any kind with regard to this material, including but not limited to, the implied warranties of merchantability and fitness for a particular
or liability for any errors or inaccuracies that may appear herein. ADS makes no commitment to update or to keep current information contained within this document. (rtt)
2
3
4
G
F
Page 3

1
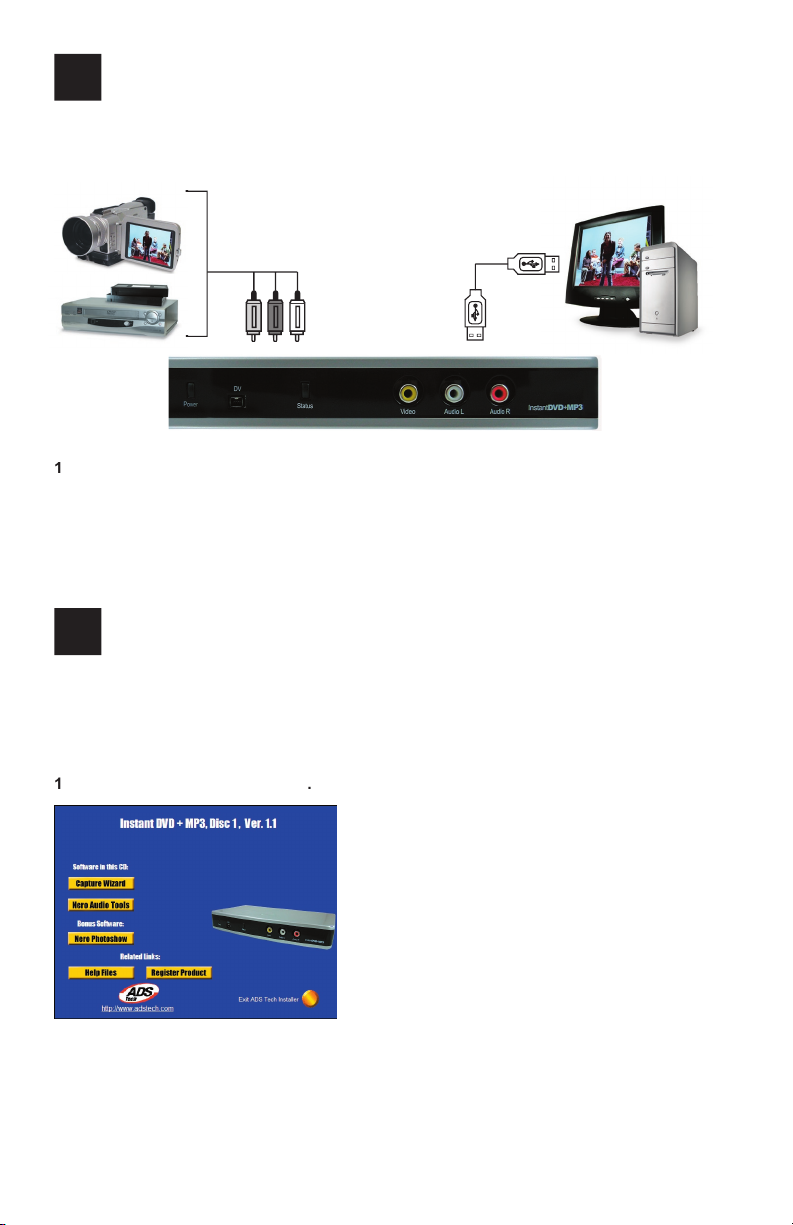
Connect the Audio/Video cables from your video source to Instant DVD+MP3 device.
Load the Instant DVD+MP3 CD.
Plug in the Power adapter and then connect Instant DVD+MP3 to your PC via the USB Port.
Drivers for WinXP and Win2000 are on the root of the CD. Drivers for Win98SE and
WinME are in the Win98SE&WinME folder on the CD. Direct Windows to the drivers and
they will install automatically.
Install CapWiz – CapWiz application must be installed as it installs the key elements for
Instant DVD+MP3 to function.
Install VideoStudio 9 SE DVD application.
Double Click the CapWiz icon on your Desktop.
Answer the questions on the
Wizard screens.
Press Play on your video source so you have video playing.
Click Preview on the CapWiz interface and video will appear.
Start capturing your video when ready.
with Instant DVD+MP3.
Page 4

Instant DVD+MP3 Overview
A powerful tool for converting all your audio and video analog tape media into today’s
your old cassette tapes or vinyl LP* into MP3 or WAV audio files. Recover your old music
We want to be sure you receive the greatest benefits from your Instant DVD+MP3
you may just want to archive video to disk in the fastest way possible. Other times you
for the big project you want to have a full featured video editor that gives you the freedom
to be creative. The good news is that Instant DVD+MP3 lets you do all that. We don’t just
we provide many ways to get video in, out and
Page 5

2
Ways to Capture and Edit Video
You can also capture audio only into MP3 or WAV format. Convert your old tapes or LPs
sure that you have connected audio video cables from the Instant DVD+MP3 to your TV’s
VideoStudio 9 takes you through the movie making process. Main steps are: CAPTURE,
VideoStudio 9 includes a Movie Wizard that lets you easily author and burns your movie
to disc. You can export any single file to the Movie Wizard, or save your edited movies to
Page 6

3
We strongly recommend using
Windows XP or Windows 2000 with
for proper operation of your Instant DVD+MP3 at USB 2.0 connection speeds.
Service Pack 1
the latest versions of USB 2.0 drivers for Win98SE and WinME.
Page 7
We recommend using the USB 1.1 port on your motherboard or from a USB 1.1 add-
1
Page 8
Wire It Up
then send audio and video back to a TV or VCR for viewing or recording.
2
Connect your video source (VHS, DVD, Laser Disc Player, TV. etc.) to your USB Instant
DVD+MP3. Connect the 6 ft. A/V In cable to the 3 RCA jacks to your analog audio/video
source RCA Line Out.
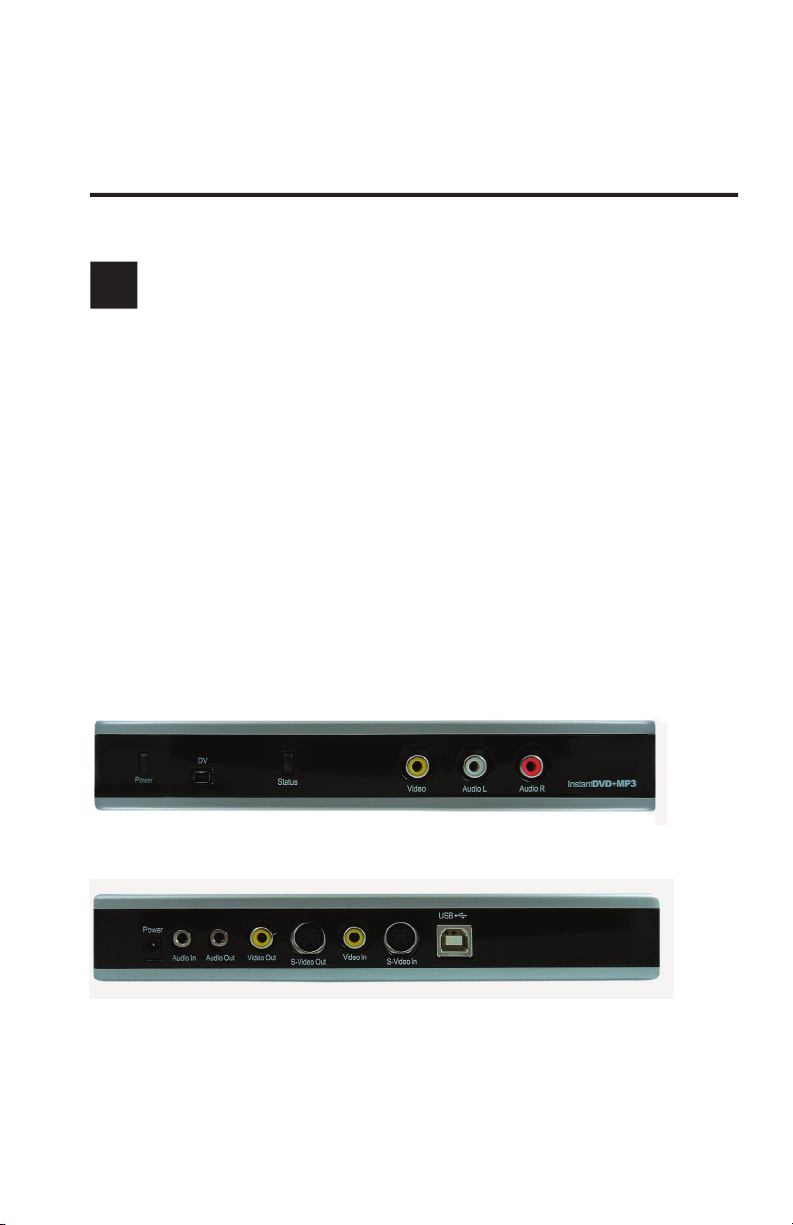
The other end connects to the “RCA Video In” jack and “3.5 mm Audio In” jacks on the
rear of your Instant DVD+MP3.
Insert USB Instant DVD+MP3 CD
Once you see the Instant DVD+MP3 installation screen, plug the power cable into your
USB Instant DVD+MP3, then plug it into a power source.
3
Page 9

the device and ask you for the device drivers.
Windows XP or Windows 2000
your “D” drive. Windows will install the drivers.
Windows 98SE or Windows ME
folder. Windows will then automatically install the drivers.
4
Now that you have installed the device, click the
button
to install the
key software components that make Instant DVD+MP3 work and install the Capture
Wizard capture and playback application.
• If you do not have Microsoft’s DirectX 9.0c installed, it will install automatically. DirectX
9.0c is required for proper operation of your Instant DVD+MP3. Installation of DirectX
9.0c may require a re-start of your computer.
• If your computer restarted, click “My Computer” on your desktop. Double click the CD
Drive icon to bring back the Instant DVD+MP3 Installation screen.
• Continue installing the key bundled software on to your system: Nero Audio Suite and
VideoStudio 9 SE DVD.
Install VideoStudio 9 SE DVD from Disc 2.
Verify Hardware Installation
5
6
Page 10
Windows 98SE or Windows ME:
Click Start, Settings, Control Panel.
In Control Panel, click System.
Click Device Manager tab.
4
Double click the Sound, Video and Game Controllers.
ADS Instant DVD+MP3 should be listed.
Windows XP or Windows 2000:
Click Start, Settings, Control Panel.
In Control Panel, click System.
Click on the Hardware Tab.
Click Device Manager Button.
Double click the Sound, Video and Game Controllers Device.
ADS Instant DVD+MP3 should be listed.
7
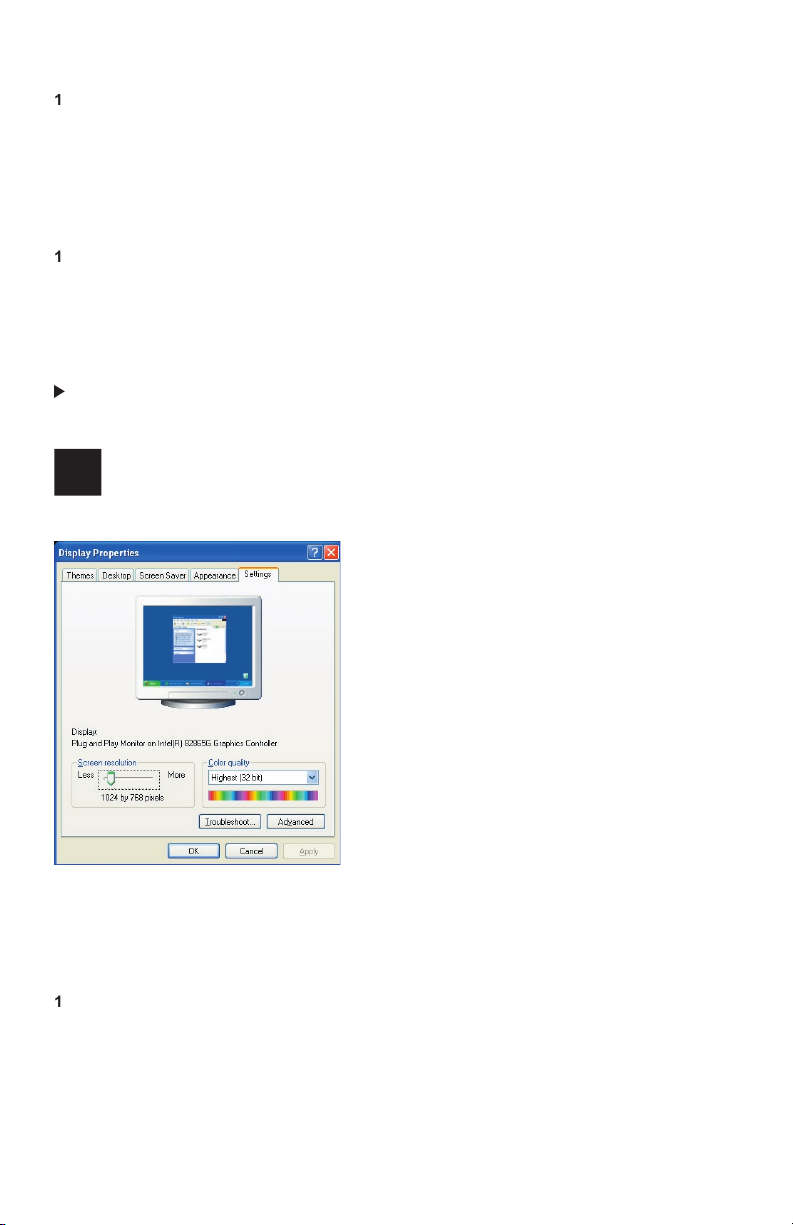
Right click on your desktop
Click Properties
Click on Settings Tab
Adjust screen area to 1024 X 768 & 16 Bit Color (or higher if your VGA card and monitor
support higher resolutions and color depth).
Page 11

writing new files into your Hard Disk. Please keep in mind that this process requires some
your Hard Disk, you can Analyze a volume to see if this step is required.
Double-click My Computer
Right Click and Select Properties on the Hard Disk you want to Save your captured Videos
Click on Tools tab
Click Defragment Now button
Click Analyze button to see if you need to Defragment the Hard Disk
Right click on My Computer
Click Properties
Click on Device Manager
4
Double click Disk Drives
Double click Hard Disk (labeled Generic IDE type XXX)
Click the settings tab
Enable DMA by checking the DMA box
Click OK
Click OK
Your computer will need to reboot after DMA is enabled.
Made all of the Audio and Video connections between Instant DVD+MP3 and your
Audio/Video source.
Connected Instant DVD+MP3 to the Power Supply and USB Port on your PC.
Installed the drivers and verified that the device is properly installed
4
Installed all necessary software applications required for proper operation.
Optimized your System for best performance.
Now you are ready to Start Making DVD Movies.
8
Page 12

video capture and playback of video before moving on to VideoStudio 9 SE DVD.
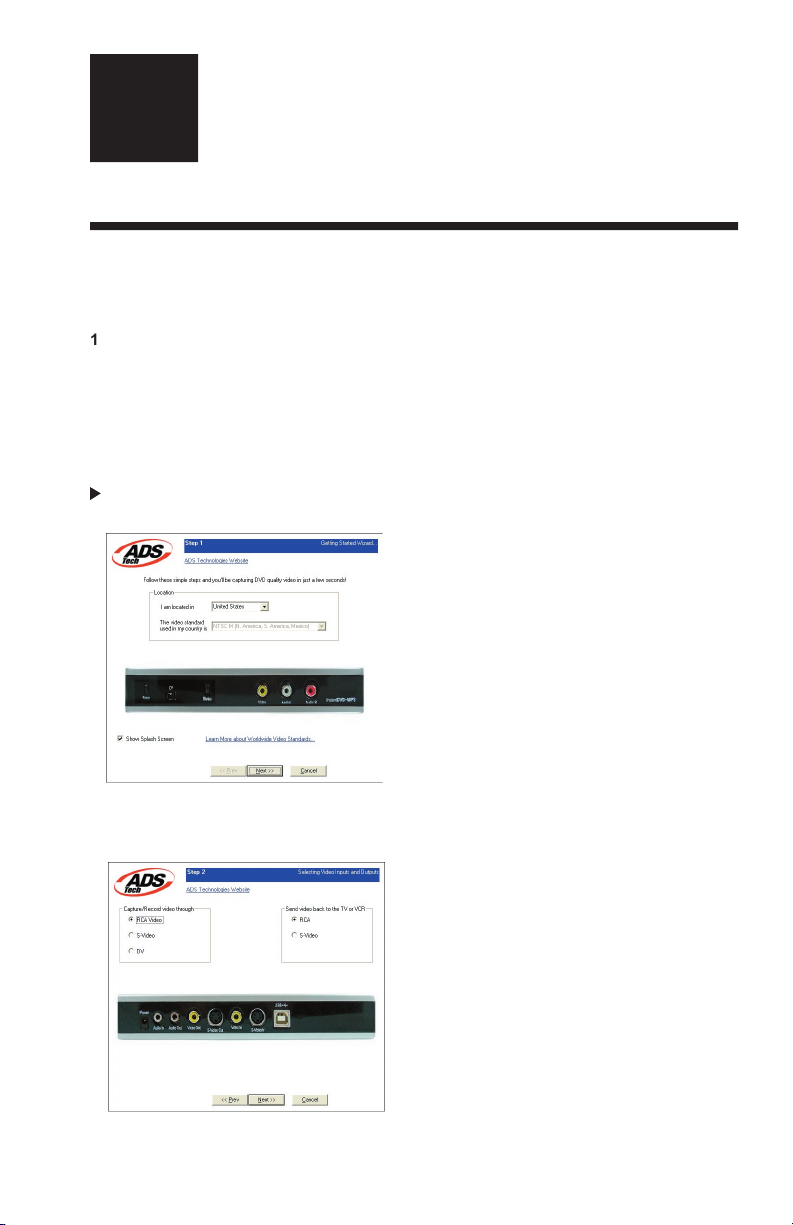
We have created a simple getting started Wizard that allows you to verify your connections
9
Page 13
4
will select NTSC. For Users in Europe and many other countries you will select PAL.
Page 14
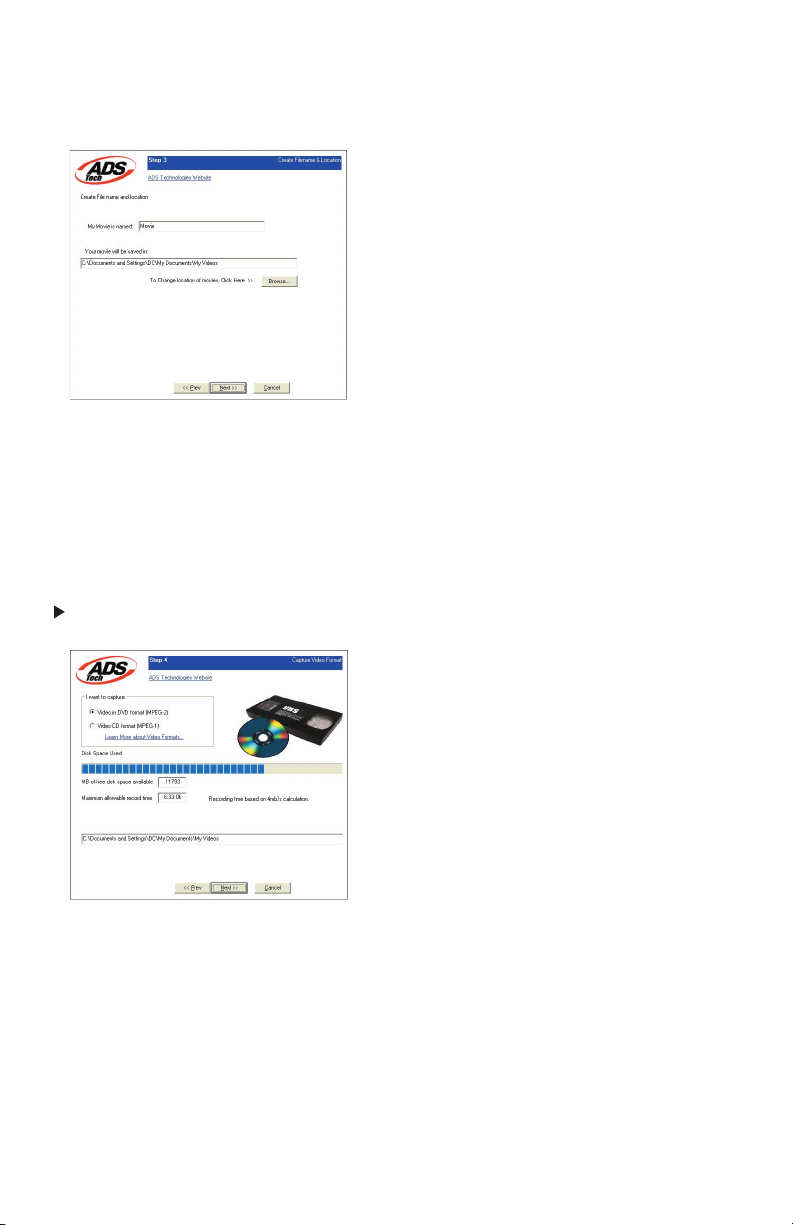
We will automatically select ‘My Documents\My Videos” as the location to store your
video files. You can select a different location if you desire.
Page 15
Wizard interface.
first time
You have just completed the Wizard screens to ensure that you have connected your
video cables, selected your video format and now you are ready to capture video.
Page 16

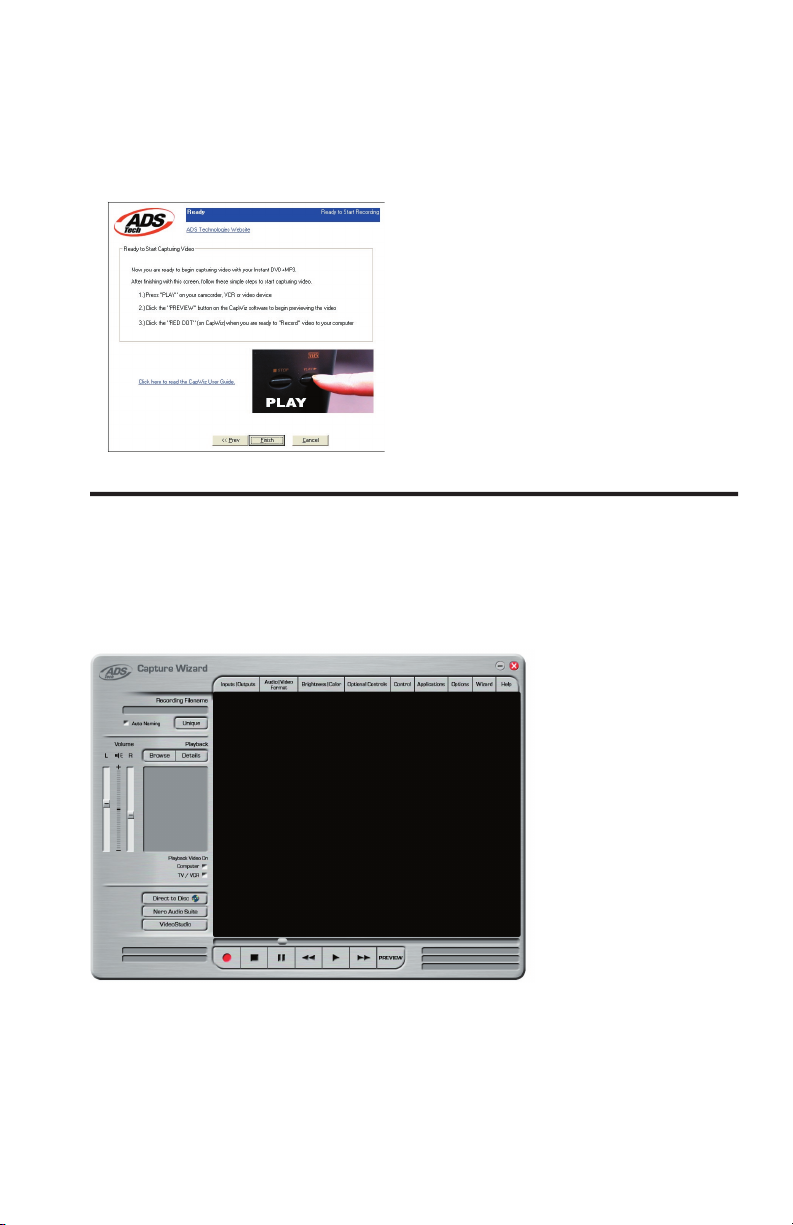
Be sure your video device is playing a video
Click “Preview” and you will see video playing in the preview window. You will notice the
status indicator displaying “Preview”.
Click the “Stop” ( ■ ) button or press the “Esc” key on your keyboard to stop video preview.
4
If you Click the Red “Record” (
●
) button while previewing video, the video will stop
momentarily, then start again. When the video preview starts again, you are recording.
You will notice the status indicator displaying “Recording” and the Time count start.
To Stop recording, press the “Stop” ( ■ ) button or press the “Esc” key on your keyboard.
You will notice that the file name has been added to the playback list box.
While recording video from a source, you can Pause the recording and continue the
recording in a different portion. This is useful if you plan to change tapes and mix
video contents.
While Recording, press the “Pause” (
) button, your Recording will stop while the
source video still plays. You can resume recording when you press “Record” (
) button
or the “Pause” (
This makes it possible to capture different video sources into a single file instead of
multiple files.
Ways to Begin Recording
You can start recording from the Stop or idle status in CapWiz or while you are
previewing video.
Click the red Record (
To Stop recording, Click the “Stop” ( ■ ) button or the “Esc” key on your keyboard.
The video will be displayed in the resolution you selected for the video capture:
• VCD 352 x 240 NTSC / 352 x 288 PAL
• SVCD 480 x 480 NTSC / 480 x 576 PAL
• DVD 720 x 480 NTSC /720 x 576 PAL
Click on the file name in the Playback List Box, then click on the “Play” ( ► ) button. You
may also double click on the file name for Instant Playback. You will notice that the
status indicator turns Green and the display changes to Play.
To Stop Playback, Click the Stop ( ■ ) button or press the “Esc” key on your keyboard.
●
●
Page 17

video file and continue playback from that point.
Double-click on the file you want to Playback in your computer.
As the video is playing in the screen, use your mouse to drag the playback position
slider to the point you desire.
Once you release the mouse, the file will resume playback.
Volume
want to do a short video capture to see if you need to adjust the volume control up or
Advance 1 second (in Pause mode) = right arrow key
You can use CapWiz to export MPEG video files you have captured with Instant
White RCA jacks to your TV or VCR.
Select TV/VCR in the Playback Video on box.
Select the file you would like to play from the list.
Click the PLAY ( ► ) button to begin playback or double click the file name for
Instant playback.
To Stop Playback, Click the Stop ( ■ ) button
Page 18

Keep this file name if you wish or run the Wizard to use a new file name.
Check the “Auto Naming” box and CapWiz will automatically name each captured file in
sequential order; i.e. if your video file is “My Video”, the first file captured will be named
“Movie-0000”, the second “Movie-0001” and so on.
Every time you stop a capture, the new file name will be displayed in Playback List box.
4
You can also uncheck “auto-naming” and click the “Unique” button and CapWiz will use
the file name you enter in the filename box. You need to provide a new file name for
each video clip captured. If you do multiple captures without changing the unique file
name, the file will be written over each time you capture.
Video bit rate
Audio sampling rate
Audio bit rate
4
Frame rate
Page 19

Application Links
VideoStudio, Nero Audio Suite. When you click on an application icon, that application will
for the type of project you want in your DVD burner.
you can choose between RCA, S-Video or DV Inputs and RCA or S-Video Outputs. These
Audio/Video Format
The Audio/Video Format dialog screen allows you to select your video
Video and Audio
For capture from a video source, audio is set to Mpeg 1 Layer-2 format.
Audio Only
For capture from an audio source. You can select the following options:
• Mpeg1 Layer-2 audio format
• WAV (LPCM) audio format
• MP3 audio format
Video Quality
• DVD at Good, Better or Best Quality
• Super Video CD (SVCD)
• Video CD (VCD)
• DivX (MPEG-4)
Page 20

VCD
flexibility in creating capture settings to meet your individual needs. To access the Custom
Video Encoding Format
• MPEG-1 (VCD only)
• MPEG-2
• DivX (MPEG-4)
• None (Audio Only) – select this to capture audio only in WAV or MP3 audio format
Audio Encoding Format
• MPEG1 Layer-2
• WAV (LPCM) available when Audio Only is selected
• MPEG1 Layer-3 (MP3) available when Audio Only is select
• AC-3
Page 21

Video Bit Rates
the Video Resolutions choices automatically change to PAL resolutions.
When MPEG-1 is selected the only Video Resolution allowed is 352 x 240
You can select any Video Capture Resolution and any Video Bit Rate from
You will notice that you have the ability to select a video capture rate of up to 15 Mb/sec.
You will also notice that any bit rate over 9 Mb/sec. is
the highest rate possible and don’t have DVD burning as a project goal. Just keep in mind
that if you want to burn your video onto a CD or DVD disc, don’t use a setting higher than
Video Resolution
You can select from the following video capture resolutions:
VCD
480 x 480
480 x 576
We have provided lots of flexibility in the manner in which you can capture video at various
that are “Legal” for burning and playing back in players. If not, you may find that you have
VCD, SVCD and DVD Legal Settings (check our web site for FAQ’s and other updates to this list):
VCD
Video Bit Rates
Audio Bit Rates
Page 22

Audio Bit Rates
48 kHz for DVD video. We give you the choice to select the audio bit rate for your custom
video captures in the range from 192 kbps to 384 kbps.
Video Shape
frames of video being captured and will automatically increase the bit rate in areas of fast
will result in improved overall quality and an overall smaller file size. The default capture
Video Preprocessing Filters
filter is a low-pass filter. This filter removes part of the high frequency noise components.
two frames of video, usually the current video frame and the previous frame. Because of
What is the best filter to use for your video? There is no magic formula, you will need to
Page 23

video takes a bit more CPU processing power. Some slower PC’s may experience jerky
video. In the custom settings, you have the ability to enable or disable de-interlacing.
Click Custom Settings button.
When the custom settings dialog box opens, make your selections.
Click OK to save.
Click “Use Custom Format” to capture with the settings selected.
Move the slider for each setting choice and you will see the adjustment over the next
second or two.
If you mess up, Click Reset to restore factory default settings.
Click OK to close the box.
Make the adjustment during Preview to get the best Video Quality recording.
to capture from Digital Video directly to MPEG-2. These controls allow you to control the
the camcorder via these controls.
Page 24

Connect your Digital Camcorder with the provided 4 pin to 4 pin DV cable from your
camcorder to the 4 pin DV port on the front of the Instant DVD+MP3 device.
Turn your DV camcorder ON to the VCR/VTR mode. Note: we recommend using the
external power supply for your camcorder for best results rather than running on
battery power.
Click “PLAY” on the Optional Controls to start the camcorder tape.
4
Click “Preview” on the CapWiz interface and you will see video from your digital camcorder.
Click “Stop” on the CapWiz interface to stop previewing video before you click “Stop” on
the Optional Controls to stop the camcorder.
Applications
Click the Applications menu button
Click on VideoStudio or Nero to jump to the selected application. Capture Wizard will
automatically close when you do this.
Click the Edit button. This will show the default or standard directory path the
applications are normally installed.
To change the directory path click the box with the “…” and you can browse to the
directory path you installed the application.
Wizard application: Click the Options button at the top of the interface to view the
your screen when you start Capture Wizard. To disable, click on “Show Splash” and the
when you start Capture Wizard. To disable, click on “Show Wizard” and the check mark
will disappear.
Page 25

Click Options at the top of the screen.
Click Playback…
Select the desired Playback Size.
4
If you select Full Screen (User Resizable), then you can manually drag the playback
window to any size you choose.
You can set up to be warned if you don’t have enough disk space available when you
When you click the Record button you will be presented with a dialog box which allows
you to set the hours, minutes and seconds for recording delay. For example if you want to
You can set a time limit for your recording. If you know you want to record for exactly 1
Page 26

VCR-Style Timer Recording
●
Wizard
About CapWiz…
for the version number and Date.
Page 27

1
Schließen Sie die Audio-/Videokabel von Ihrer Videoquelle an das
Instant-DVD+MP3-Gerät an.
Legen Sie die mit dem Instant DVD+MP3-Gerät mitgelieferte CD in Ihr CD-Laufwerk ein.
Stecken Sie das Netzteil an und verbinden Sie dann den Instant DVD+MP3 über den
USB Port mit Ihrem PC.
Treiber für WinXP und Win2000 befinden sich im Root-Verzeichnis der CD. Treiber für
Win98SE und WinME befinden sich im Ordner „Win98SE&WinME“ auf der CD. Nach
Auswahl der benötigten Treiber werden diese automatisch installiert.
Installieren Sie CapWiz – CapWiz muss installiert werden, da es die von Instant
DVD+MP3 benötigten Dateien installiert.
Installieren Sie die VideoStudio 9 SE DVD Anwendung.
Klicken Sie zweimal rasch hintereinander auf das CapWiz-Symbol auf Ihrem Desktop.
Ein Installationsassistent erscheint. Beantworten Sie die Fragen in den fünf Fenstern.
Drücken Sie die Play-Taste auf Ihrer Videoquelle und lassen Sie ein Video abspielen.
Klicken Sie auf „Preview“ (Vorschau) im CapWiz-Fenster – das Video erscheint auf
dem Bildschirm.
Wenn Sie bereit sind, starten Sie Ihre Videoaufahme.
Page 28

Audiokassetten oder LPs** in MP3- oder WAV-Audiodateien konvertieren können.
Verwenden Sie die mitgelieferte Nero Software zum Schneiden oder um Geräusche zu
tragbaren MP3-Spieler. Stellen Sie Ihre alten Musikerinnerungen wieder her und genießen
Audio oder Film, von Band auf CD- oder DVD-Disc zu übertragen. Eine einfache USB-
Verbindung zu Ihrem PC und Sie sind bereits in der Lage, Ihr gesamtes Material auf
verschieben. Oder Sie möchten ein umfangreiches Projekt erstellen und benötigen
Page 29

2
Video Aufzeichnung und Bearbeitung
für Ihre Dateien auswählen und einsehen.
Verwenden Sie CapWiz (in der Folge auch “Capture Wizard” genannt), wenn Sie Video rasch auf Ihren
Aufnahmedauer festzulegen, mit einer zeitlichen Verzögerung aufzunehmen und die Aufnahme-Bitrate
VideoStudio 9 SE DVD: Umfassende
Videoaufzeichnung & -bearbeitung
VideoStudio führt Sie durch die einzelnen Schritte zur Erstellung eines Films. Die wichtigsten Elemente
VideoStudio können Sie Video aufzeichnen und bearbeiten und anschließend an ein Fernseh- bzw.
Videogerät übertragen oder auf Disk brennen.
VideoStudio 9 beinhaltet Movie Wizard für einfaches Authoring und Brennen Ihres Films auf Disc. Sie
Page 30

3
oder DVD benötigt
WinXP Service Pack 1
Viele USB 2.0-Upgrade-Karten werden mit Treibern geliefert, die nicht von Microsoft
zu Kompatibilitätsproblemen führen. Der USB 2.0-Treiber, den Sie besitzen, funktioniert
funktioniert. Wenden Sie sich an den Hersteller Ihrer USB 2.0 Add-in-Karte und besorgen
Page 31

Wir empfehlen, die USB 1.1-Schnittstelle zu Ihrer Hauptplatine oder zu einer USB 1.1-
Add-in-Karte zu verwenden. Alle USB 1.1-Karten verwenden USB-Treiber von Microsoft.
Wenn Sie Win98SE oder WinME verwenden, empfehlen wir, den USB 1.1-Anschluss Ihres
1
Page 32

Video- und Audiokabel Anschliessen
Audio und Video auf den Computer zu übertragen und anschließend zur Ansicht bzw. zur
Aufnahme an ein Fernseh- oder Videogerät zurückzuschicken.
2
DVD+MP3-Gerät an. Schließen Sie das 2 Meter lange A/V-Eingangskabel (D) an die 3
RCA-Buchsen Ihrer analogen Audio-/Videoquelle an (RCA Line Out).
Das andere Ende wird an die Buchsen „RCA Video In“ und „3,5 mm Audio In“ auf der
Rückseite Ihres Instant-DVD+MP3-Geräts angeschlossen.
Die zu USB Instant DVD+MP3 gehörige CD einlegen
Sobald Sie den Instant-DVD+MP3-Installationsbildschirm sehen, Schließen Sie das
Netzkabel an Ihr Instant-DVD+MP3-Gerät an und stecken Sie den Netzstecker in eine
Steckdose ein.
3
Page 33

Windows erkennt das Gerät und Sie erhalten eine Aufforderung zur Installation der
Windows XP und Win2000
Lassen Sie Windows eine automatische Suche nach den
Win98SE und WinME
Die Treiber für Win98SE/ME befinden sich im Ordner
4
Wizard“
DVD+MP3-Geräts erforderlich sind. Außerdem wird die Capture-Wizard-Software
installiert, mit der Sie Video aufzeichnen und abspielen können.
• Wenn Microsoft DirectX 9.0c nicht bereits auf Ihrem Computer installiert ist, wird es
automatisch installiert. DirectX 9.0c ist erforderlich, damit Ihr Instant-DVD+MP3-Gerät
ordnungsgemäß funktionieren kann. Nach der Installation von DirectX 9.0c müssen Sie
Ihren Computer möglicherweise neu starten.
• Wenn Ihr Computer neu gestartet wurde, klicken Sie auf „Mein Arbeitsplatz“ auf Ihrem
Desktop. Klicken Sie zweimal rasch hintereinander auf das Symbol für Ihr CD
Laufwerk, wodurch der Installationsbildschirm für Instant DVD+MP3 wieder erscheint.
• Fahren Sie mit der Installation der gebündelten Software auf Ihrem System fort: Nero
Audio Suite und VideoStudio 9 SE DVD.
5
6
Page 34

Windows 98, Windows 98SE oder Windows ME:
Klicken Sie auf „Start“, „Einstellungen“, „Systemsteuerung“.
Im Fenster mit der Systemsteuerung auf „System“ klicken.
Klicken Sie auf die Registerkarte „Gerätemanager“.
4
Klicken Sie zweimal rasch hintereinander auf „Sound, Video und Game Controller“
„ADS Instant DVD+MP3“ müsste aufgeführt sein.
Windows XP oder Windows 2000:
Klicken Sie auf „Start“, „Einstellungen“, „Systemsteuerung“.
Im Fenster mit der Systemsteuerung klicken Sie auf „System“.
Klicken Sie auf die Registerkarte „Hardware“.
Klicken Sie auf die Schaltfläche „Gerätemanager“.
Klicken Sie zweimal rasch hintereinander auf „Sound, Video und Game Controller“
„ADS Instant DVD+MP3“ müsste aufgeführt sein.
Wenn USB Instant DVD+MP3 unter „Sound, Video und Game Controller“ aufgeführt ist,
7
VGA-Auflösung
X 768. DVD Video wird mit einer Auflösung von 720 x 480 (720 x 576) PAL aufgezeichnet.
Zu niedrige Bildschirmauflösung bedeutet, dass Sie Ihr Video nicht bei voller Auflösung
Klicken Sie mit der rechten Maustaste auf das Desktop
Klicken Sie auf „Eigenschaften“
Klicken Sie auf die Registerkarte „Einstellungen“
4
Stellen Sie die Bildschirmauflösung auf 1024 X 768 & 16 Bit Color (oder höher,
vorausgesetzt, Ihre VGA-Karte und Ihr Monitor unterstützen eine höhere Auflösung
und Bittiefe).
Page 35

Auf Mein Computer doppelklicken
Die Festplatte, auf der Sie Ihre aufgenommenen Videos speichern wollen, mit der
rechten Maustaste anklicken und Eigenschaften selektieren
Die Karteikarte Tools anklicken
Den Button Jetzt defragmentieren anklicken
Den Button Analysieren anklicken, um festzustellen, ob die Festplatte defragmentiert
werden soll
Videoaufzeichnung. Ist der DMA-Modus nicht aktiviert, müssen Sie damit rechnen, dass
Video-Frames bei der Aufzeichnung ausgelassen werden.
Videoaufnahmen DMA auf ihrer IDE Festplatte aktivieren.
Klicken Sie mit der rechten Maustaste auf „Mein Arbeitsplatz“
Klicken Sie auf „Eigenschaften“
Klicken Sie auf „Gerätemanager“
Klicken Sie zweimal rasch hintereinander auf „Laufwerke“
Klicken Sie zweimal rasch hintereinander auf die Festplatte (trägt in der Regel die
Bezeichnung „Generic IDE type XXX“)
Klicken Sie auf die Registerkarte „Einstellungen“
Aktivieren Sie DMA, indem Sie das DMA-Kästchen mit einem Häkchen versehen.
Klicken Sie auf OK.
Klicken Sie auf OK.
Alle Audio- und Videoverbindungen zwischen dem Instant-DVD+MP3-Gerät und Ihrem
Audio/Video-Gerät hergestellt haben.
Instant DVD+MP3 an eine Stromquelle und an die USB-Schnittstelle Ihres PCs
angeschlossen haben.
USB-Treiber installiert und überprüft haben, dass das Gerät ordnungsgemäß installiert ist.
Alle für den Betrieb erforderlichen Softwareprogramme installiert haben.
Das System ist für beste Leistung optimiert.
Jetzt sind Sie bereit, DVD-Filme zu erstellen.
8
Page 36

von Video beginnen. Capture Wizard (CapWiz) gibt Ihnen die Möglichkeit, Video rasch
Videobearbeitung oder DVD-Authoring auskennen müssen. Capture Wizard gibt Ihnen die
Wir haben einen einfachen Start-Assistenten entwickelt, mit dem Sie Ihre Anschlüsse
Videoaufzeichnung beginnen.
9
Page 37

4
Alternativ können Sie auch auf “Start”, “Programme”, “ADSTech Instant DVD+MP3“ und
Wählen Sie den in Ihrem Land verwendeten Videostandard aus. Der Videostandard in
Wenn Sie nähere Informationen zu diesen Videostandards wünschen, klicken Sie auf
Videoeingänge & -ausgänge auswählen
Wählen Sie je nach verwendeter Videoquelle entweder RCA, S-Video oder DV aus.
Page 38

Als Speicherverzeichnis für Ihre Videodateien wird automatisch “Meine Dateien\Meine
Videos” ausgewählt. Wenn Sie möchten, können Sie ein anderes Speicherverzeichnis
4
Videoformat auswählen
von 3 Mb/s. aufzeichnen.
Wenn Sie nähere Informationen zu den MPEG-Formaten wünschen, klicken Sie auf
Page 39

Wenn Sie das erste Mal mit Capture Wizard arbeiten
Page 40

Video in der Vorschau anzeigen und aufnehmen
Vergewissern Sie sich, dass Ihr Videogerät ein Video abspielt.
Anklicken von „Preview“ (Vorschau) zeigt das aktuelle Video im Vorschaufenster an. Die
Statusanzeigen sind blau und zeigen an, dass Sie sich im Vorschaumodus befinden.
Durch Anklicken von „Stop“ ( ■ ) oder Drücken der Escape-Taste auf Ihrer Tastatur
können Sie die Videovorschau stoppen.
4
Wenn Sie während der Videoschau auf die rote Aufnahmetaste „Record“ (
) klicken,
stoppt das Video für einen kurzen Moment, ehe es erneut startet. Wenn die
Videovorschau wieder startet, wird das Video gleichzeitig aufgezeichnet. Sie werden
feststellen, dass die Statusanzeigen jetzt rot sind und anzeigen, dass das Video
aufgenommen wird.
Sie können den Aufnahmevorgang stoppen, indem Sie entweder die Schaltfläche
„Stop“ ( ■ ) anklicken oder die Escape-Taste auf Ihrer Tastatur drücken.
Sie werden feststellen, dass der Dateiname jetzt in der Playback-Liste erscheint.
Aufnahme anhalten
Während der Aufnahme aus einer Videoquelle können Sie die Aufnahme anhalten und
an einer anderen Stelle fortsetzen. Das ist nützlich, wenn Sie Bänder austauschen und
Videoinhalte mischen wollen.
Drücken Sie während der Aufnahme die „Pause“ (
) Taste, Ihre Aufnahme wird
angehalten während das Quellvideo weiterläuft. Um die Aufnahme fortzusetzen, drücken
Sie die „Aufnahme“ (
) oder die „Pause“ (
) Taste.
Damit können Sie verschiedene Videoquellen in eine einzige Datei aufnehmen statt in
mehrere Dateien.
Aufnahme starten
Der Aufnahmevorgang kann gestartet werden, wenn sich CapWiz im Stop- oder
Bereitschaftszustand befindet, oder während Sie sich Video in der Vorschau ansehen.
Klicken Sie auf die rote Aufnahmetaste (
) um die Aufnahme zu starten.
Klicken Sie auf die Stoptaste (
) oder drücken Sie die Escape-Taste auf Ihrer Tastatur,
um den Aufnahmevorgang zu stoppen.
4
Das Video wird in der Auflösung angezeigt, die Sie zuvor für die Videoaufzeichnung
ausgewählt haben:
• VCD 352 x 240 NTSC / 352 x 288 PAL
• SVCD 480 x 480 NTSC / 480 x 576 PAL
• DVD 720 x 480 NTSC /720 x 576 PAL
Aufgezeichnetes Video abspielen
Aufgezeichnete Videodateien können entweder auf Ihrem Computermonitor angezeigt
Klicken Sie auf den Dateinamen in der Playbackliste und anschließend auf die
Schaltfläche „Play“
.Sie können das Playback auch sofort starten lassen, indem
Sie zweimal rasch hintereinander auf den Dateinamen klicken. Die Statusanzeige wird
grün und zeigt Play.
Sie können das Playback stoppen, indem Sie auf die Schaltfläche „Stop“ ( ■ ) klicken
oder die Escape-Taste auf Ihrer Tastatur drücken.
Page 41

Video durchsuchen
Wenn Sie ein langes Video aufgenommen haben, kann es sein, dass Sie bis zu einem
fortsetzen möchten.
Doppelklicken Sie auf die Datei, die Sie in Ihrem Computer abspielen wollen.
Während das Video auf dem Bildschirm läuft, ziehen Sie den Wiedergabepositionsschi
ber mit der Maus auf die gewünschte Stelle.
Wenn Sie die Maus loslassen, wird die Wiedergabe der Datei fortgesetzt.
Aufnahme lauter oder leiser zu stellen. Machen Sie eine kurze Videoaufnahme, um zu
Vorschau = Eingabetaste
Aufnahme = „R“-Taste
Aufnahme beenden = Escape-Taste
Vorschau beenden = Escape-Taste
Videogerät an.
Wenn Sie das aufgezeichnete Video auf einem Fernsehgerät anschauen bzw. auf
Videoband aufzeichnen möchten, müssen Sie wie folgt vorgehen:
Klicken Sie im Kästchen „Playback Video on“ auf die Option TV/VCR.
Wählen Sie die gewünschte Datei aus.
Klicken Sie auf die Schaltfläche „PLAY“
oder zweimal rasch hintereinander auf den
Dateinamen. Letzteres bewirkt, dass das Playback sofort beginnt.
4
Sie können das Playback jederzeit stoppen, indem Sie auf die Schaltfläche
„Stop“ ( ■ ) klicken.
Page 42

40
Werfen Sie einen Blick in das Kästchen “Recording Filename” (Dateiname für die
Aufzeichnung), ehe Sie mit der Videoaufnahme beginnen. Hier sehen Sie den
Sie können den Dateinamen beibehalten oder den Assistenten aufrufen und einen
neuen Namen eingeben.
Wenn Sie das Kästchen „Auto Naming“ (automatische Namensgebung) mit einem
Häkchen versehen, benennt CapWiz alle aufgezeichneten Dateien automatisch in
aufsteigender Reihenfolge. Wenn also Ihre Videodatei den Namen „Mein Video“ trägt,
erhält der erste aufgezeichnete Clip den Namen „My Video-000“, die zweite
„My Video-001“ usw.
Jedes Mal, wenn Sie den Aufnahmevorgang stoppen, erscheint ein neuer Dateiname in
der Playbackliste.
4
Wenn Sie das Kästchen „Auto Naming“ abwählen und stattdessen auf „Unique“
(einmaliger Dateiname) klicken, verwendet CapWiz den Dateinamen, den Sie in das
Feld „Filename“ eintragen. Hierbei müssen Sie für jeden aufgezeichneten Videoclip
einen neuen Dateinamen eingeben. Wenn Sie die Option „Unique“ ausgewählt haben
und mehrere Videoclips aufnehmen, ohne zwischendurch einen neuen Dateinamen
einzugeben, wird die aufgenommene Datei überschrieben.
Verzeichnis die Dateien gespeichert werden.
Anhand der Schaltfläche “Browse” (Durchsuchen) können Sie zu anderen Verzeichnissen
Anklicken von “Details” gibt Ihnen die Möglichkeit, Einzelheiten zu den Dateien in der
Wenn Sie eine Datei in dieser Dialogbox anklicken und erneut auf “Details” klicken, sehen
Videobitrate
Audio-Samplingrate
Audiobitrate
4
Frame-Rate
Wenn Sie sich im Fenster mit den Dateidetails befinden, können Sie Dateien löschen,
Page 43

wird automatisch geschlossen.
Videoeingabe/-ausgbe
Videoausgabe können Sie zwischen RCA und S-VHS wählen. Die Einstellungen können
Audio-/Videoformat
In der Dialogbox “Audio/Video format“ können Sie das Videoformat von
für Sie richtig ist, rufen Sie den CapWiz-Assistenten auf und lesen Sie sich den Abschnitt
Video und Audio
Für Sicherung von einer videoquelle, wird Audio auf MPEG 1 Format
Für Sicherung von einer Audioquelle. Sie können die folgenden
Wahlen vorwählen:
• Mpeg1 Layer-2 Audioformat
• WAV (LPCM) Audioformat
• Format des Audio MP3
Videoqualität
Videoqualität festlegen. Folgende Optionen stehen zur Auswahl:
• DVD in guter (Good), besserer (Better) oder bester (Best) Qualität.
• Super Video CD (SVCD)
• Video CD (VCD)
• DivX (MPEG-4)
Page 44

Videoaufnahme an:
VCD
Videoformat und Bitrate (4, 6 oder 9 Mb/sec) für DVD-Video wird im Statusbereich auf
Videoformat Sie mit welcher Bitrate aufnehmen.
Videokodierformat
• MPEG-1 (nur VCD)
• MPEG-2
• DivX (MPEG-4)
• Kein Videoformat (Nur Audio) – wählen Sie diese Option, wenn Sie ausschließlich
Audio im WAV- oder MP3-Audioformat aufnehmen wollen.
Audiokodierformat
• MPEG1 Layer-2
• WAV (LPCM) verfügbar, wenn Audio Only (Nur Audio) selektiert wurde
• MPEG1 Layer-3 (MP3) verfügbar, wenn Audio Only (Nur Audio) selektiert wurde
• AC-3
Page 45

43
Videobitraten
Wählen Sie den Videostandard aus, in dem Sie aufnehmen möchten. Der Standard muss
Ist MPEG-1 ausgewählt, kann die Videoauflösung lediglich 352 x 240 (NTSC)
Sie können jede beliebige Auflösung und eine beliebige Videoaufnahmerate
zwischen 1 Mb/s und 15 Mb/s auswählen.
Videoauflösung
VCD
480 x 480
480 x 576
Video in unterschiedlicher Auflösung und mit unterschiedlichen Audio/Video-Bitraten
Video auf CD oder DVD zu brennen, verwenden Sie Auflösungen und Bitraten, die mit
Video nicht abspielen kann.
Zulässige Einstellungen für VCD, SVCD und DVD (Häufig gestellte Fragen und Updates zu dieser
VCD
Video Bit Rates
Audio Bit Rates
Page 46

Audiobitraten
Audio-Samplingrate bei VCD und SVCD automatisch auf 44,1 KHz, bei DVD-Video auf
48 KHz. CapWiz gibt Ihnen die Möglichkeit, bei Ihren nutzerspezifischen Videoaufnahmen
Videoformat
Variable Bitrate verwenden
Wenn Sie Ihr Video mit variabler Bitrate aufzeichnen, entstehen kleinere Dateigrößen
Vorverarbeitungsfilter
Auswahlbereich für diesen Filter liegt zwischen 0 und 7.
Zeitfilter
zwei Video-Frames verteilt sind, normalerweise der aktuelle und der vorherige Video-
Welches ist der beste Filter für Ihr Video? Dafür gibt es leider keine Zauberformel. Sie
Page 47

45
Klicken Sie auf die Schaltfläche „Custom Settings“.
Wählen Sie in der Dialogbox für die nutzerspezifischen Einstellungen die gewünschten
Optionen aus.
Klicken Sie auf „OK“, um die Einstellungen zu speichern.
4
Klicken Sie auf „Use Custom Format“, wenn Video mit den nutzerspezifischen
Einstellungen aufzuzeichnen.
Vorschau ansehen.
Verschieben Sie den Schieberegler der zu ändernden Bildeigenschaft. Die Änderung
macht sich in den nächsten ein bis zwei Sekunden bemerkbar.
vorgegebenen Standardeinstellungen wiederherstellen.
Anklicken von „OK“ schließt die Dialogbox.
4
Für die beste Videoaufnahmequalität nehmen Sie die Einstellung während der Vorschau vor.
von Digital-Video direkt auf MPEG-2. Mit diesen Steuerelementen können Sie den
Page 48

46
Verwenden des
mit einem
Schließen Sie Ihren digitalen Camcorder über das mitgelieferte DV-Kabel (4 Pin auf 4
Pin) von Ihrem Camcorder an den 4-Pin-DV-Anschluss an der Vorderseite des Instant
DVD+MP3-Gerätes an.
Schalten Sie Ihren DV-Camcorder ein und schalten Sie ihn in VCR/VTR-Modus. Hinweis:
Wir empfehlen, den Camcorder nicht mit Batterie, sondern mit Netzstrom zu betreiben.
Klicken Sie auf dem Kontrollfeld für den DV-Camcorder auf „PLAY“. Auf diese Weise
wird das Camcorder-Band gestartet.
4
Anklicken von „Preview“ auf dem CapWiz-Programmbildschirm zeigt das Video vom
digitalen Camcorder an.
Wenn Sie die Vorschau stoppen möchten, klicken Sie zuerst auf die Schaltfläche
„Stop“ ( ■ ) auf dem CapWiz-Programmbildschirm, anschließend auf „Stop“ ( ■ ) auf dem
Kontrollfeld für den DV-Camcorder.
Anwendungsprogramme
Klicken Sie auf die Menüschaltfläche „Applications“.
Anklicken von „Nero“ bzw. „VideoStudio“ ruft das ausgewählte Programm auf. Dabei wird
Capture Wizard automatisch geschlossen.
Klicken Sie auf die Schaltfläche „Edit“ (Bearbeiten). Daraufhin wird der Pfad zu dem
Verzeichnis angezeigt, in dem die Programme standardmäßig installiert werden.
4
Sie können den Verzeichnispfad ändern, indem Sie das Kästchen „…“ anklicken. Suchen
Sie sich den Verzeichnispfad, in dem Sie das Programm installiert haben.
Anklicken der Schaltfläche “Options” oben auf dem Programmbildschirm ruft das
Assistenten anzeigen
Vorschau sofort beim Programmstart
Page 49

Wiedergabe
jeder Standard auflösung für die Wiedergabe abspielen:
Klicken Sie oben im Fenster auf Options (Optionen).
Klicken Sie auf Playback… (Wiedergabe)
Wählen Sie die gewünschte Playback Size (Wiedergabegröße).
Wenn Sie Full Screen (User Resizable) (Vollbild, vom Benutzer veränderbar) selektieren,
dann können Sie das Wiedergabefenster händisch auf die gewünschte Größe ziehen.
Wiedergabe von Videoaufnahmen verändern können. Damit können Sie etwa SVCD (480
x 480) Video mit 720 x 480 abspielen, wenn Sie das wünschen, und so weiter. Sie können
werden eventuell auf der ADS Tech Website andere Skins zum Download zur
Verfügung gestellt.
wählen Sie mit dem Schieberegler die Größe des Festplattenspeichers aus, bei dem Sie
Aufnahme
zur Verfügung:
Aufnahmestart bestätigen
Wenn diese Option aktiviert ist, erhalten Sie jedes Mal, wenn Sie auf die
Aufnahmeschaltfläche „Record“ (
) klicken, eine Aufforderung zur Bestätigung
Aufnahmevorgangs zeitlich genau bestimmen möchten.
●
) anklicken, die Dialogbox „Recording Options“ (Aufnahmeoptionen).
Wenn Sie die Schaltfläche „Record“ (
) klicken, erscheint eine Dialogbox, in der Sie die
Wenn Sie einen längeren Videoclip aufzeichnen, empfiehlt es sich, den Bildschirmschoner
zu deaktivieren. Je nach verwendeter Grafikkarte kann der Bildschirmschoner die
Videoaufzeichnung stören.
Aufnahmedauer
z. B. 1 Stunde Video aufzeichnen möchten, können Sie die Aufnahmedauer genau in
Zeit beendet wird. Aufnahmeverzögerung (Record delay) und Aufnahmedauer (Record
●
Page 50

48
VCR-ähnliche zeitgesteuerte Aufnahme
Aufnahme ein, und selektieren Sie danach die Box “Use start and stop recording times
●
Wizard Schnittstelle.
Wizard
About CapWiz (Programminfo)
About CapWiz... - wählen Sie dieses vor, um Informationen über die CapWiz Anwendung
zu sehen, die Sie haben. Diese Informationen sind wichtig, wenn Sie irgendwelche
Page 51

49
1
vous aider à prendre en main votre périphérique sans délai
Branchez les câbles audio/vidéo de votre source vidéo au périphérique Instant DVD+MP3.
Chargez le CD d’Instant DVD+MP3
Branchez l’adaptateur secteur, puis branchez l’Instant DVD+MP3 à votre PC via le port
USB Port.
Les pilotes pour WinXP et Win2000 se trouvent dans le répertoire de base du CD.Les
pilotes pour Win98SE et WinME se trouvent dans le dossier Win98SE&WinME du CD.
Dirigez Windows vers les pilotes pour en lancer l’installation automatique.
Installez CapWiz – L’application CapWiz est indispensable car elle installe les principaux
éléments requis pour le bon fonctionnement d’Instant DVD+MP3.
Installez le logiciel VideoStudio 9 SE DVD.
Double-cliquez sur l’icône CapWiz située sur le bureau électronique.
Répondez aux questions affichées sur les
écrans de l’assistant de Capture Wizard.
Appuyez sur le bouton de lecture de votre source vidéo pour faire défiler la vidéo.
Cliquez sur le bouton Preview (Aperçu) de l’interface de Capture Wizard (CapWiz) pour
afficher la vidéo.
Quand vous avez fini, lancez la capture de votre vidéo.
Page 52

fichiers numériques aux derniers formats. Il capture et convertit les fichiers vidéo à partir
temps réel. Le logiciel Capture Wizard permet de piloter, en toute facilité, votre caméscope
vos anciennes cassettes ou disques vinyles* en fichiers audio au format MP3 ou WAVE.
vos morceaux de musique et séquences vidéo préférées sur disque optique.
vous voudrez, en effet, simplement archiver vos vidéos sur disques avec rapidité, d’autres
fois vous préférerez exercer votre sens artistique en remettant à plus tard l’essentiel du
façons d’importer et d’exporter vos vidéos et de les enregistrer sur disque.
Page 53

2
Ways to Capture and Edit Video
Vous pouvez, en outre, fixer des paramètres spécifiques pour la résolution vidéo, les débits binaires
vidéo et audio et les débits binaires constants ou variables, et pouvez sélectionner des filtres de
Vous pouvez également capturer uniquement une piste audio dans un fichier au format MP3 ou WAV.
source vidéo externe. Seuls les fichiers MPEG-1 et MPEG-2 peuvent être exportés vers un téléviseur car
sur téléviseur.
VideoStudio 9 SE DVD: Capture et Montage Vidéo Complets
Video Studio 9 vous guide à travers le processus de réalisation d’un film, dont les étapes principales
AUDIO (son) et SHARE (partage). Utilisez VideoStudio si vous souhaitez modifier une vidéo et
y ajouter des effets ou filtres vidéo, des titres, des musiques de fond ou voix off pour créer une
VideoStudio 9 inclut un «Movie Wizard» Assistant Film qui vous permet de créer et graver facilement
votre film sur un disque. Vous pouvez exporter n’importe quel fichier dans l’Assistant Film ou bien
Wizard. Sélectionnez l’Assistant Film en double-cliquant sur l’icône VideoStudio se trouvant sur votre
Page 54

3
Vous pouvez obtenir les pilotes Microsoft Windows USB 2.0 directement auprès
de Windows Update
tiers. Contactez votre fournisseur de carte additionnelle USB 2.0 pour obtenir la dernière
version des pilotes USB 2.0 pour Win98SE et WinME.
Page 55

Véri cation du contenu de la boîte
et audio stéréo 3,5 mm)
1
Avant
Page 56

2
Branchez votre source vidéo (VHS, DVD, lecteur de disque laser, TV, etc.) à votre
périphérique Instant DVD+MP3.Branchez les 3 jacks du câble d’entrée A/V de 1,83 m
aux sorties de ligne RCA de votre source audio/vidéo analogique.
Branchez les autres extrémités à la prise de jack «RCA Video In» et à la prise de jack
«Audio In 3,5 mm» situées au dos de votre Instant DVD+MP3.
Introduction du CD de l’Instant DVD+MP3.
A l’apparition de l’écran d’installation du périphérique Instant DVD+MP3, branchez le
câble électrique à l’Instant DVD+MP3, puis branchez-le dans une prise de courant.
3
Page 57

Windows XP ou Win2000
Laissez Windows faire une recherche automatique des
Win98SE ou WinME
Les pilotes Win98SE/ME se trouvent dans le dossier Win98 du CD
vers l’unité où se trouve le CD (généralement l’unité «D») et double-cliquez sur le dossier
Win98. Windows installera alors automatiquement les pilotes.
4
Maintenant que vous avez installé le périphérique,
Wizard
DVD+MP3 de fonctionner et d’installer l’application de capture et de lecture CapWiz.
• Si DirectX 9.0c de Microsoft n’est pas installé sur votre ordinateur, il s’installera
automatiquement. DirectX 9.0c est requis pour le bon fonctionnement de votre
périphérique Instant DVD+MP3. Après l’installation de DirectX 9.0c, vous devez
réinitialiser votre ordinateur.
• Après la réinitialisation de votre ordinateur, cliquez sur l’icône «Poste de travail»
de votre bureau. Double-cliquez sur l’icône du lecteur de CD pour rappeler l’écran
d’installation de l’Instant DVD+MP3
• Continuez à installer, sur votre système, les principaux logiciels fournis : Nero Audio
Suite et VideoStudio 9 SE DVD.
Installez VideoStudio 9 SE DVD à partir du 2
Vérification de
Allez dans Gestionnaire de périphériques
5
6
Page 58

Windows 98, Windows 98SE, Windows ME:
Cliquez sur Démarrer, Paramètres, Panneau de configuration.
Dans Panneau de configuration, cliquez sur Système.
Cliquez sur l’onglet Gestionnaire de périphériques.
4
Double-cliquez sur Contrôleur son, vidéo et jeux.
«ADS Instant DVD+MP3» devrait y être inscrit.
Windows XP, Windows 2000:
Cliquez sur Démarrer, Paramètres, Panneau de configuration.
Dans Panneau de configuration, cliquez sur Système.
Cliquez sur l’onglet Matériel.
Cliquez sur le bouton Gestionnaire de périphériques.
Double-cliquez sur Contrôleur son, vidéo et jeux
« ADS Instant DVD+MP3» devrait y être inscrit.
7
vidéos DVD sont capturées à une résolution de 704 x 480 (704 x 576 PAL). Si votre
Cliquez sur un endroit vierge du bureau avec le bouton droit de la souris.
Cliquez sur Propriétés Système
Cliquez sur l’onglet Paramètres
Réglez la zone écran sur 1024 x 768 et couleurs 16 bits (ou une résolution supérieure
si votre carte VGA et votre écran prennent en charge des résolutions et profondeur de
bits plus élevées).
Page 59

Double-cliquez sur « Poste de travail »
Faites un clic droit sur le Disque dur sur lequel vous souhaitez enregistrer vos vidéos
capturées et sélectionnez « Propriétés ».
Cliquez sur l’onglet « Outils ».
Cliquez sur le bouton « Défragmenter maintenant ».
Cliquez sur le bouton « Analyser » pour savoir si vous avez besoin ou non de
défragmenter le disque dur.
Activez DMA pour améliorer grandement les capacités de capture vidéo de votre système.
Cliquez sur Poste de travail avec le bouton droit de la souris.
Cliquez sur Propriétés Système.
Cliquez sur Gestionnaire de périphériques.
4
Double-cliquez sur Lecteurs de disque.
Double-cliquez sur Disque dur (marqué Generic IDE type XXX).
Cliquez sur l’onglet Paramètres.
Activez DMA en cochant la boîte DMA.
Cliquez sur OK.
Cliquez sur OK.
Votre ordinateur se réinitialisera et DMA sera activé.
Vous devriez maintenant avoir effectué les opérations suivantes :
Mise en place de toutes les connexions audio et vidéo entre l’Instant DVD+MP3 et votre
source audio/vidéo.
Branchement de l’Instant DVD+MP3 à l’alimentation électrique et au port USB de votre PC.
Installation des pilotes et vérification de la bonne installation du périphérique.
Installation de toutes les applications logicielles requises pour tirer profit du périphérique.
Optimisation du système pour en garantir les meilleures performances possibles.
Vous pouvez maintenant commencer à produire vos films DVD.
8
Page 60

Vous pouvez maintenant commencer à capturer une vidéo. Nous avons créé l’application
vidéo avant d’utiliser VideoStudio 9 SE DVD.
fichier vidéo.
9
Page 61

4
worldwide video standards».
Page 62

video formats».
Page 63

Vous pouvez maintenant commencer à visionner et à capturer des vidéos. Vous devrez
Vous avez suivi toutes les instructions de l’assistant pour bien brancher vos câbles vidéo
Page 64

Vérifiez que votre périphérique vidéo visionne une séquence vidéo.
Cliquez sur le bouton “Preview” (prévisualisation) pour faire défiler la vidéo dans la
fenêtre de prévisualisation. L’indicateur d’état est bleu et affiche le mot «Preview».
Cliquez sur le bouton «Stop» ( ■ ) ou appuyez sur la touche Echap. du clavier pour
arrêter la prévisualisation de la séquence vidéo.
4
Si vous cliquez sur le bouton d’enregistrement rouge «Record» (
●
) pendant la
prévisualisation de la séquence vidéo, la prévisualisation sera momentanément
interrompue avant de reprendre. L’enregistrement est lancé dès la reprise de la
prévisualisation et, à ce moment-là, l’indicateur d’état devient rouge et affiche le
mot «Record».
Pour arrêter l’enregistrement, appuyez sur le bouton «Stop» ( ■ ) ou appuyez sur la
touche Echap. du clavier.
Vous verrez que le nom du fichier a été ajouté à la fenêtre de liste de lecture
«Playback list».
Vous pouvez interrompre l’enregistrement d’un clip vidéo à partir d’une source et le
reprendre à un endroit différent. Cette fonction est utile si vous voulez changer de
cassette et mélanger plusieurs contenus vidéo.
Pendant l’enregistrement, appuyez sur le bouton « Pause » (
) pour arrêter
l’enregistrement alors que la vidéo de la source continue de défiler. Vous pouvez
reprendre l’enregistrement en appuyant sur le bouton « Record » (
) ou le
bouton « Pause » (
Cette fonction vous permet de fusionner différentes sources vidéo sur un seul fichier et
non plusieurs.
Vous pouvez commencer à enregistrer la vidéo à partir d’un moment d’arrêt ou d’une
période d’inactivité dans CapWiz ou pendant la prévisualisation de la vidéo.
Cliquez sur le bouton d’enregistrement rouge « Record » (
) pour lancer
l’enregistrement de la vidéo à n’importe quel moment.
Pour arrêter l’enregistrement, cliquez sur le bouton «Stop» ( ■ ) ou sur la touche Echap.
du clavier.
4
La vidéo sera affichée dans la résolution que vous avez sélectionnée pour la capture :
• VCD 352 x 240 NTSC / 352 x 288 PAL
• SVCD 480 x 480 NTSC / 480 x 576 PAL
• DVD 720 x 480 NTSC /720 x 576 PAL
Cliquez sur le nom de fichier situé dans la fenêtre «Playback List», puis cliquez sur le
bouton de lecture «Play» ( ► ). Vous pouvez également double-cliquer sur le nom du
fichier pour une lecture instantanée. Vous verrez que l’indicateur d’état devient vert et
affiche le mot «Play».
Pour arrêter la lecture, cliquez sur le bouton «Stop» ( ■ ) ou appuyez sur la touche
Echap. du clavier.
●
Page 65

Double-cliquez sur le fichier que vous voulez lire sur votre ordinateur.
Lors du défilement de la vidéo à l’écran, utilisez la souris pour faire glisser le curseur de
lecture à l’endroit voulu.
La lecture du fichier reprendra dès que vous aurez relâché le bouton de la souris.
Volume
volume de lecture. Utilisez le curseur pour augmenter ou baisser le volume pendant la
vidéo pour savoir si vous avez ou non besoin d’augmenter ou de baisser le volume pour
Arrêt de l’enregistrement = Touche Echap.
Arrêt de la prévisualisation = Touche Echap.
Vous pouvez utiliser CapWiz pour exporter des fichiers vidéo MPEG capturés avec
visionner ou à un magnétoscope pour l’enre gistrer :
Cliquez sur TV/VCR dans la fenêtre «Playback Video».
Sélectionnez le fichier que vous aimeriez lire.
Cliquez sur le bouton PLAY ( ► ) pour initialiser la lecture ou double-cliquez sur le nom
du fichier pour une lecture instantanée.
4
Cliquez sur le bouton STOP ( ■ ) pour arrêter la lecture.
Page 66

Avant l’enregistrement, cochez la boîte de dialogue «Recording Filename»
Gardez ce nom de fichier si vous le souhaitez, ou lancez l’assistant pour utiliser un
nouveau nom.
Cochez la case «Auto Naming» (Nommage automatique) pour que CapWiz nomme
automatiquement chaque fichier capturé en ordre séquentiel, c’est-à-dire que si votre
fichier vidéo est intitulé «Ma Vidéo», le premier fichier capturé sera nommé «Ma Vidéo
000», le deuxième «Ma Vidéo-0001» et ainsi de suite.
Chaque fois que vous arrêterez une capture, le nouveau nom de fichier sera affiché
dans la fenêtre «Playback List».
4
Vous pouvez également désélectionner la case «auto-naming» et cliquer sur le bouton
«Unique» pour que CapWiz utilise le nom de fichier que vous aurez tapé dans la boîte
de nom de fichier. Vous avez besoin de fournir un nouveau nom de fichier pour chaque
séquence vidéo capturée. Si vous effectuez plusieurs captures sans changer le nom de
fichier unique, le fichier sera écrasé à chaque nouvelle capture.
trouvant apparaîtront dans la fenêtre «Playback List».
Le débit binaire vidéo
Le taux d’échantillonnage audio
Le débit binaire audio
Le débit d’images par seconde
Vous pouvez supprimer un fichier en cliquant sur le bouton “Remove” situé dans la fenêtre
Page 67

Avant cela, vous aurez besoin d’insérer dans votre graveur DVD le disque correspondant
La boîte de dialogue “Audio/Video format” vous permet de changer
worldwide Video Standards” (En savoir plus sur les normes vidéo universelles).
Vidéo et acoustique
pour la capture d’une source visuelle, l’acoustique est placée au
format de MPEG1 Layer-2
Acoustique Seulement
pour la capture d’une source audio. Vous pouvez choisir les
• format d’acoustique de Mpeg1 Layer-2
• format audio de WAV (LPCM)
• format de l’acoustique MP3
• DVD avec Good Quality (qualité Bonne), Better Quality (qualité Meilleure) ou Best
Quality (qualité Optimale)
• Super Video CD (SVCD)
• Video CD (VCD)
• DivX (MPEG-4)
Page 68

Vous ne pouvez pas choisir de qualité pour les résolutions SVCD et VCD car ce sont des
formats à débit binaire vidéo et audio standard.
VCD
vidéo MPEG-1 à 1.15 MB/s
vidéo MPEG-2 à 2.4 MB/s
vidéo MPEG-2 à 4, 6 or 9 MB/s
vidéo MPEG-1 à 1.15 MB/s
vidéo MPEG-2 à 2.4 MB/s
vidéo MPEG-2 à 2.5, 3 or 4 MB/s*
vidéo et à quel débit binaire vous enregistrez votre vidéo.
vidéo correspondant.
• MPEG-1 (VCD only)
• MPEG-2
• DivX (MPEG-4)
• None (Audio Only) – Sélectionnez cette option pour capturer uniquement l’audio au
format audio WAV ou MP3.
flux Dolby AC-3 (2 canaux) pour garantir la meilleure qualité possible parmi les autres
• MPEG1 Layer-2
• WAV (LPCM) – Disponible si l’option « Audio Only » est sélectionnée.
• MPEG1 Layer-3 (MP3) – Disponible si l’option « Audio Only » est sélectionnée.
• AC-3
Page 69

En cas de sélection de MPEG-1, la seule résolution vidéo permise est 352 x 240
vidéo allant de 1 Mb/s à 15 Mb/s.
Vous pouvez sélectionner n’importe quelle résolution de capture vidéo et
Vous remarquerez que vous avez la possibilité de sélectionner un débit binaire vidéo allant
jusqu’à 15 Mb/s. Vous remarquerez également que tout débit supérieur à 9 Mb/s est en
pour vous avertir qu’un tel débit n’est pas pris en charge par les lecteurs et
vous ne pouvez pas utiliser un débit binaire supérieur à 9 Mb/s et inférieur à 2 Mb/s.
Vous avez le choix entre les résolutions de capture vidéo suivantes :
VCD
480 x 480
480 x 576
Avertissements sur les paramètres personnalisés
votre lecteur ne pourra pas la lire.
VCD
Video Bit Rates
Audio Bit Rates
Page 70

48 kHz pour les vidéos DVD. Nous vous donnons la possibilité de sélectionner pour vos
format d’image 16/9 (écran large) à partir de sources vidéo au format écran large. Grâce à
vidéo à partir de sources vidéo au format écran large.
filtre spatial est un filtre passe-bas qui supprime une partie des bruits de haute fréquence.
Vous devrez expérimenter avec les différents paramètres de filtrage et sélectionner le
Page 71

vidéos par défaut. Lors de la prévisualisation ou de la lecture d’une vidéo entrelacée,
Cliquez sur le bouton «Custom Settings».
Effectuez vos sélections à l’ouverture de la boîte de dialogue «Custom Settings».
Cliquez sur OK pour enregistrer vos sélections.
4
Cliquez sur «Use Custom Format» (Utiliser le format personnalisé) pour effectuer la
capture avec les paramètres sélectionnés.
Avec cette option, vous pouvez changer la luminosité (Brightness), le chromatisme
Faites glisser le curseur au réglage de votre choix, et la modification apparaîtra au bout
d’une ou deux secondes.
Si vous faites une erreur, cliquez sur «Reset» pour restaurer les réglages par défaut.
Cliquez sur OK pour fermer cette fenêtre.
Effectuez le réglage voulu lors de la prévisualisation pour obtenir un enregistrement de
qualité vidéo optimale.
Avec l’Instant DVD+MP3, vous pouvez brancher un caméscope numérique et convertir
Page 72

Avec le câble DV 4 broches/4 broches fourni, branchez le caméscope numérique au port
DV 4 broches situé à l’avant du périphérique Instant DVD+MP3.
Allumez le caméscope et mettez-le en mode VCR/VTR. Remarque : pour un résultat
optimal, nous vous conseillons d’alimenter le caméscope sur le secteur plutôt que
sur batterie.
Cliquez sur le bouton de lecture du panneau de commande du caméscope DV pour
lancer la lecture de la bande du caméscope.
4
Cliquez sur le bouton «Preview» (Prévisualisation) de l’interface CapWiz pour afficher la
vidéo en provenance du caméscope.
Cliquez sur le bouton «Stop» de l’interface CapWiz pour arrêter la prévisualisation de la
vidéo, puis cliquez sur le bouton d’arrêt du panneau de commande du caméscope.
Applications
Cliquez sur le bouton de menu «Applications».
Cliquez sur VideoStudio ou Nero selon l’application que vous voulez sélectionner.
CapWiz se fermera automatiquement à ce moment-là.
Cliquez sur le bouton «Edit» (Edition) pour consulter le chemin de répertoire standard ou
par défaut où sont normalement installées les applications.
4
Pour changer le chemin de répertoire, cliquez sur la case avec «...». Vous pourrez ainsi
consulter le chemin de répertoire où est installée l’application en question.
Afficher Splash
Afficher Wizard
Page 73

Cliquez sur « Options », en haut de l’écran.
Cliquez sur « Playback… » (Lecture).
Sélectionnez la résolution de lecture voulue.
Si vous sélectionnez « Full Screen (User Resizable) » (Plein écran (Redimensionnable
par l’utilisateur), vous pourrez alors changer la taille de la fenêtre manuellement à l’aide
de la souris.
Vous pouvez régler cette option pour que CapWiz vous avertisse, au commencement de
justifiant, selon vous, un avertissement.
fois que vous cliquerez sur le bouton d’enregistrement. Vous pouvez utiliser cette fonction
Activez cette fonction pour faire apparaître la fenêtre « Recording Options » (Options
veille car un écran de veille peut parfois perturber la capture vidéo, selon le type de carte
Vous pouvez fixer une durée d’enregistrement à l’avance. Si vous connaissez la durée
fixée. Vous pouvez utiliser ensemble les options de délai d’enregistrement et de durée
Page 74

fin d’enregistrement spécifiées). Cliquez sur « OK », puis sur le bouton « Record » ( ● ) de
Wizard
Aide
About CapWiz (A propos de)
Page 75

the dealer or store you purchased the product from. If you purchased the product directly from ADS
Call our Technical Support department at +1.562.926.4338 to obtain a Return Merchandise
Authorization (RMA) number.
The RMA number is valid for 30 days.
Ship the product to the ADS factory with the RMA number marked on the inside and outside of the
package. If there is no RMA number on the package or the RMA number has expired, the shipment
will be refused. ADS will not be liable for lost or mis-shipped products.
Replacement product cannot be shipped to you until the defective product has been received by ADS.
Once the product is received at the factory it will be tested and then repaired or replaced.
Turn around time is approximately one week. A repaired or replacement product will be shipped back
to you.
Warranty
This ADS Technologies, Inc. product comes with a One (1) year hardware warranty. ADS Technologies,
year from the date of original purchase from ADS or an authorized ADS dealer. This warranty applies
the product by anyone other than ADS. If your ADS product is not in working order, your only recourse
Technologies, Inc. be liable for consequential damages, including but not limited to any lost savings, lost
fitness for a particular purpose.
Page 76

Wenn Sie bei Installation, Betrieb oder Anwendung Ihres Produktes von ADS Technologies, Inc. Hilfe benötigen, stehen Ihnen verschiedene
für die Aktionen oder Regeln verantwortlich sein, die unsere Händler festlegen. Wenn Sie das Produkt zurückgeben und eine Rückerstattung
das Produkt direkt bei ADS gekauft haben, beachten Sie bitte die “Allgemeinen Geschäftsbedingungen” auf der Rückseite Ihrer Rechnung.
oder Ersatz an ADS Technologies, Inc. zurücksenden wollen, müssen Sie sich an folgende Schritte halten:
Rufen Sie unsere Abteilung Technischer Support unter +353.61.702042, um eine RMA Nummer (Return Merchandise Authorization,
Autorisierung für Warenrückgabe) zu erhalten.
Die RMA Nummer ist 30 Tage lang gültig.
Schicken Sie das Produkt an die ADS Fertigung zurück, vermerken Sie dabei die RMA Nummer auf der Außen- und Innenseite des Pakets.
Wenn auf dem Paket keine RMA Nummer vermerkt ist oder die RMA Nummer abgelaufen ist, wird die Sendung abgewiesen. ADS haftet nicht
für verlorengegangene oder falsch verschickte Pakete.
4
Das Ersatzprodukt kann erst dann an Sie verschickt werden, nachdem das fehlerhafte Produkt bei ADS eingelangt ist. .
Nachdem das Produkt bei der Fertigung eingelangt ist, wird es überprüft und dann entweder repariert oder ersetzt.
Die Bearbeitungszeit beträgt ungefähr eine Woche. Ein repariertes Produkt oder ein Ersatz wird an Sie zurückgeschickt werden.
die sich aus dem Computer des Benutzers, der Hardware, Software oder anderer Systemkonfigurationen ergeben, mit denen das Produkt
zusammenarbeitet. Bevor ADS eine Garantieleistung in Betracht ziehen kann, muss der Kaufnachweis erbracht werden. Diese Garantie erstreckt
sich nicht auf Schäden, die aus Fahrlässigkeit, nicht autorisierten Veränderungen oder ohne schriftliche Genehmigung durch ADS installierten
Teilen entstanden sind. Diese Garantie ist ungültig, wenn das Produkt durch einen Unglücksfall, Missbrauch oder falsche Verwendung
de plusieurs options qui sont décrites dans la rubrique sur le support technique de ce manuel. Le personnel du service clients et du support
technique d’ADS Technologies peut vous aider à résoudre de nombreux problèmes. Notre service de support technique dispose des moyens de
vous adresser au revendeur ou magasin où vous avez acheté le produit. Si vous avez acheté le produit directement auprès d’ADS Technologies,
veuillez consulter les Conditions générales de vente imprimées au verso de votre facture.
devez renvoyer un produit à ADS Technologies en vue d’une réparation ou d’un remplacement, vous devez suivre les instructions données ci-
dessous :
Appelez notre service de support technique au +353.61.702042 pour obtenir un numéro d’autorisation de retour de marchandise (RMA).
2
Le numéro RMA est valide pendant 30 jours.
Envoyez le produit à l’usine ADS Technologies en veillant à marquer le numéro RMA à l’intérieur et à l’extérieur de l’emballage. En l’absence
d’un numéro RMA ou en cas d’expiration de ce numéro, l’usine refusera la livraison du produit. ADS Technologies ne sera pas tenue
responsable de la perte des produits ou de leur envoi à la mauvaise adresse.
ADS Technologies ne peut vous livrer le produit de remplacement avant d’avoir reçu le produit défectueux.
À sa réception à l’usine ADS Technologies , le produit sera mis à l’essai, puis sera réparé ou remplacé.
Il faut compter environ une semaine avant que le produit réparé ou un produit de remplacement vous soit renvoyé.
ou toute autre configuration du système de l’utilisateur avec lesquels le produit interface. Une preuve d’achat sera requise avant toute prise en
ADS ne fonctionne pas, votre seul recours est de le faire réparer ou de le remplacer dans le cadre de la garantie en suivant la procédure
susmentionnée. ADS ne sera EN AUCUN CAS responsable de tous dommages accessoires, y compris mais de façon non limitative les pertes
d’économies, pertes de bénéfices ou tous autres dommages causés par l’utilisation d’un produit ADS ou la privation de l’utilisation d’un tel
garanties implicites de commerciabilité et d’aptitude à un emploi particulier.
Page 77

www.adstech.com/support/support.asp
www.adstech.com
8:00 am - 5:00 pm, PST
www.adstech.com
www.adstech.com/support/support.asp
Support Hours
ADS Tech
Western Business Park
InstantDVD+MP3
ADS Tech
 Loading...