

Page 1
English - German - French - Spanish Manual for
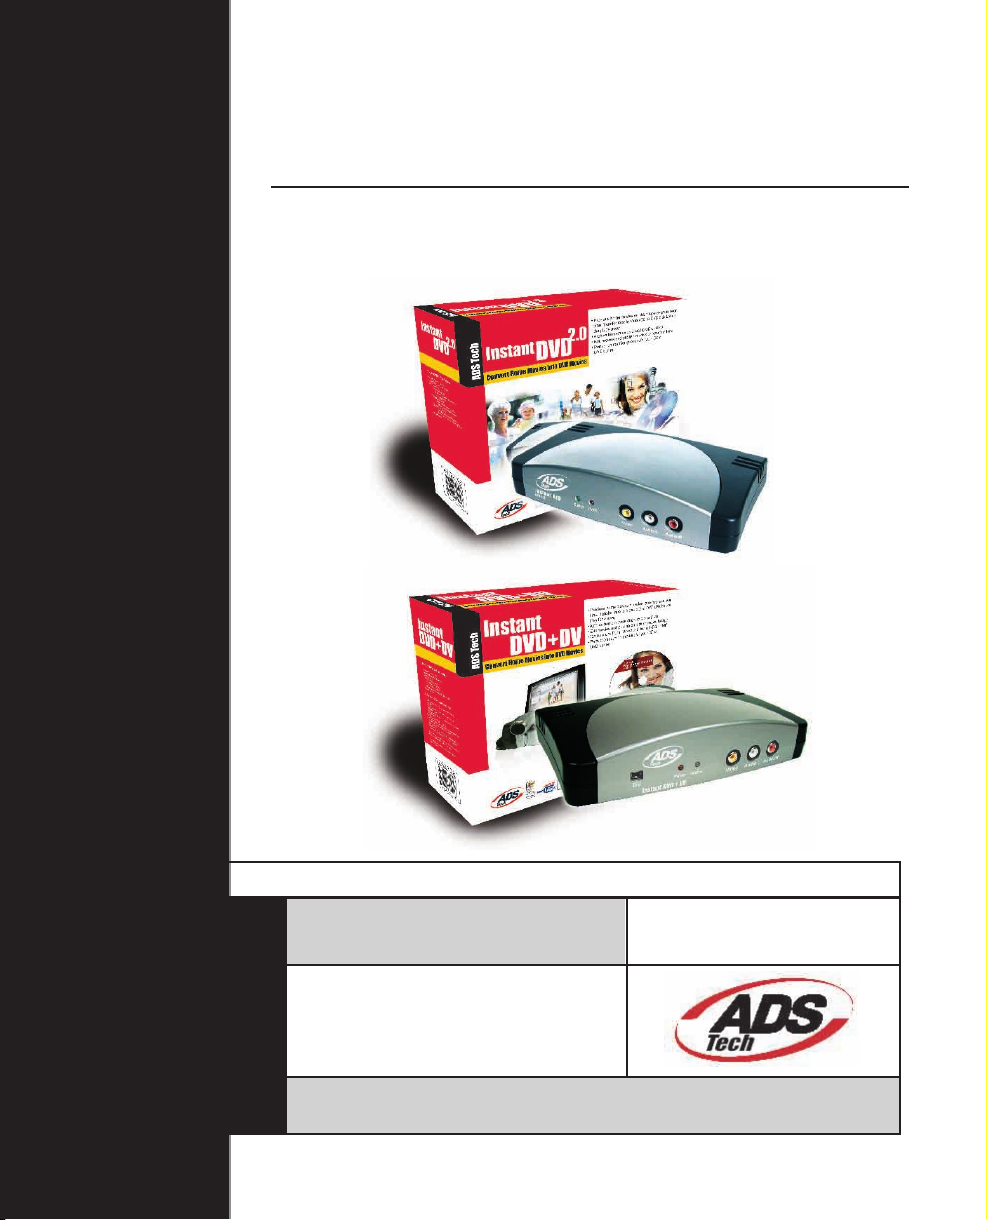
Instant DVD 2.0 / Instant DVD + DV
Convert Home Movies into DVD Movies
User's Guide : First Edition
If you have any problems or questions on this product, please call :
Technical Support 562.926.4338
North America Support Hours:
M-F : 7 am - 6 pm, PST
Email : support@adstech.com
website : www.adstech.com
ADS Tech
Instant DVD 2.0 : Instant DVD + DV
European Technical Support: +353.61.702042
Page 2

INSTANT DVD 2.0 Page 3
ENGLISH
Page 3

Table of Contents
Copyright Notice........................................................................................................................................................4
Quick Setup Steps.....................................................................................................................................................5
Instant DVD 2.0 Overview .........................................................................................................................................6
Ways to Capture and Edit Video .......................................................................................................................7
Instant DVD 2.0 Installation Guide...........................................................................................................................9
System Requirements...............................................................................................................................................9
Getting Started...........................................................................................................................................................9
1. Check Instant DVD 2.0 Contents ..................................................................................................................9
2. Wire It Up! ...................................................................................................................................................11
3. Plug It In ......................................................................................................................................................12
4. Install Device Drivers and Software ............................................................................................................12
5. Install Software Applications .......................................................................................................................12
6. Verify Hardware Installation ........................................................................................................................13
7. Optimize System for Best Performance ......................................................................................................13
8. Installation Summary...................................................................................................................................14
9. Start Making DVD Movies ...........................................................................................................................14
USB Instant DVD Capture Wizard .........................................................................................................................14
Using Capture Wizard Video Capture/Playback tool for the rst time:..............................................................16
ENGLISH
Capture Wizard Feature and Functions.................................................................................................................19
Menu Options...........................................................................................................................................................20
Menu Options: Video Inputs/Outputs ..............................................................................................................20
Menu Options: Video Format .........................................................................................................................20
Menu Options: Brightness/Color .....................................................................................................................22
Menu Options: Optional Controls (for Instant DVD + DV Only).......................................................................22
Menu Options: For Instant DVD + DV Only.....................................................................................................23
Menu Options: Contol .....................................................................................................................................23
Menu Options: Applications.............................................................................................................................23
Menu Options: Options ...................................................................................................................................24
INSTANT DVD 2.0 Page 3
Page 4

INSTANT DVD 2.0 Page 5
ENGLISH
Help.............................................................................................................................................................................25
Ulead VideoStudio 7..................................................................................................................................................26
How VideoStudio Works...........................................................................................................................................27
ENGLISH
DVD, VCD, and SVCD................................................................................................................................................27
Installing and Running VideoStudio 7 (Disk 2).......................................................................................................28
Setting up for Instant DVD ...............................................................................................................................29
Selecting Instant DVD Capture Plug-In ............................................................................................................29
Getting Around VideoStudio .........................................................................................................................30
The Options Panel ...........................................................................................................................................31
Capture Options Panel............................................................................................................................31
Capture ............................................................................................................................................................32
Checklist for Successful Video Capture..................................................................................................32
Capturing Analog Video ..........................................................................................................................32
Video Capture Property Settings Dialog Box ....................................................................................................33
Ulead DVD MovieFactory 2.......................................................................................................................................34
Welcome to Ulead DVD MovieFactory 2..................................................................................................................35
Getting Around Ulead DVD MovieFactory 2............................................................................................................35
Which task should you choose..........................................................................................................................36
Working on a project .........................................................................................................................................37
Add Videos or Slideshows ......................................................................................................................37
Capturing Videos.....................................................................................................................................37
Capture Settings .....................................................................................................................................38
German Manual..........................................................................................................................................................39
French Manual............................................................................................................................................................74
Spanish Manual........................................................................................................................................................109
Service and Warranty..............................................................................................................................................144
FCC Information ......................................................................................................................................................145
Instant DVD Helpful Hints:......................................................................................................................................146
Copyright Notice
The Instant DVD 2.0 is an innovative, hassle-free device that is designed to let you edit and archive your home movies easily. ADS Technologies respects
the rights of copyright owners and asks that you do the same. The Copy Right Act gives owners of copyrights the exclusive right to reproduce and prepare
derivative works as well as to publicly perform, display and distribute their works. This means that you must obtain permission to engage in any of these
activities when using works that are copyrighted by another person.
© 2003 ADS Technologies. All Rights Reserved
First Edition: April 2003
Microsoft, Windows, & Windows 98 are registered trademarks of Microsoft Corporation. IBM is a registered trademark of the International Business
Machines, Inc.
ADS is a registered trademark of ADS Technologies Inc. ADS Technologies (ADS) makes no warranty of any kind with regard to this material, including but
not limited to, the implied warranties of merchantability and tness for a particular purpose. The information furnished within this written document is for
information purposes only and is subject to change without notice. ADS Technologies assumes no responsibility or liability for any errors or inaccuracies
that may appear herein. ADS makes no commitment to update or to keep current information contained within this document. (rtt)
INSTANT DVD 2.0 Page 4
Page 5

Quick Setup Steps
For impatient people who only want to read one page:
1.) Connect the Audio/Video cables from your video source to
Instant DVD.
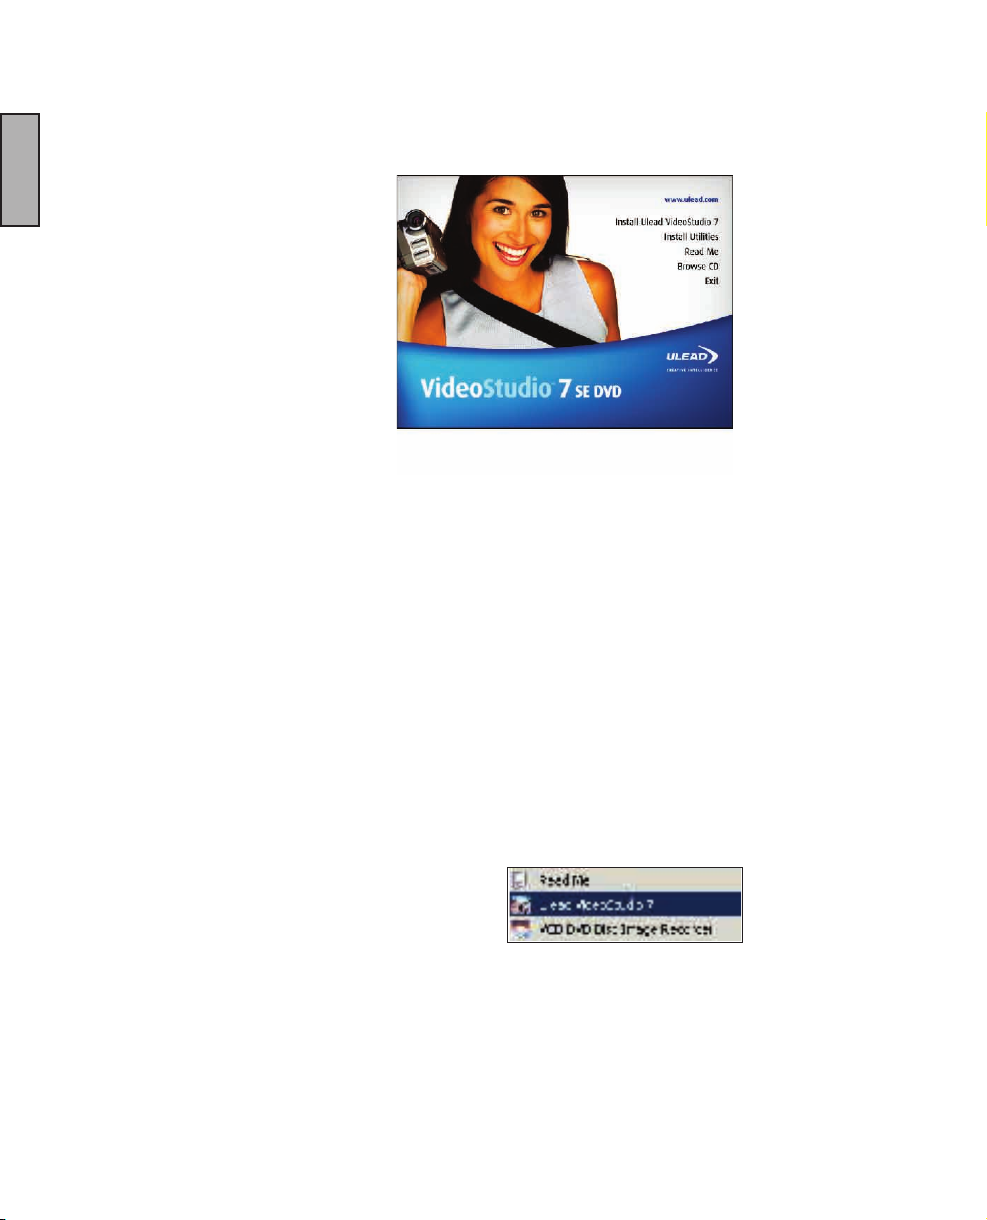
2.) Load the Instant DVD CD - The auto-run screen requires Quicktime.
If you don’t have Quicktime installed, it will install automatically.
No serial number required.
3.) Plug in Power and connect Instant DVD to your USB Port
4.) Drivers for WinXP and Win2000 are on the root of the CD. Drivers for
Win98SE and WinME are in the Win98SE&WinME folder on the CD.
Direct Windows to the drivers and they will install automatically.
5.) Install CapWiz – CapWiz must be installed as it installs the key
elements for Instant DVD to function.
ENGLISH
6.) Double Click the CapWiz icon on your desktop.
7.) Answer the questions on the 5 Wizard screens.
8.) Press Play on your video source so you have video playing.
9.) Click Preview on the CapWiz interface and video will appear.
Play with CapWiz for a while and then install the other valuable software titles
we have included with Instant DVD
INSTANT DVD 2.0 Page 5
Page 6
INSTANT DVD 2.0 Page 7
ENGLISH
Instant DVD Overview
ENGLISH
Instant DVD 2.0
Instant DVD 2.0 is a fun and easy way to get DVD, SVCD and VCD video
into your Windows PC so you can edit or archive your home movies.
Instant DVD then lets you share the video on CD or DVD disk, publish to
the Internet or send the video out through the Instant DVD unit to display
on a TV or to record on a VCR or camcorder for distribution on Tape.
All the video digitizing and compression takes place in the Instant DVD
device so when the video comes through the USB port it is already
compressed in the format you desire such as MPEG-1 for VCD
(Video on CD), or MPEG-2 for SVCD (Super Video CD) and DVD
(Digital Versatile Disc).
Powerful Software bundle:
We want to be sure you receive the greatest benets from your Instant DVD purchase so we have included lots of
software to meet your various project goals. Some times you may just want to archive video to disk in the fastest
way possible. Other times you may want to get a bit creative, but you’ll save most of the video editing for a later
time. And for the big project you want to have a full featured video editor that gives you the freedom to be creative.
The good news is that Instant DVD lets you do all that. We don’t just give you one single way to use the product,
we provide many ways to get video in, out and on to disk.
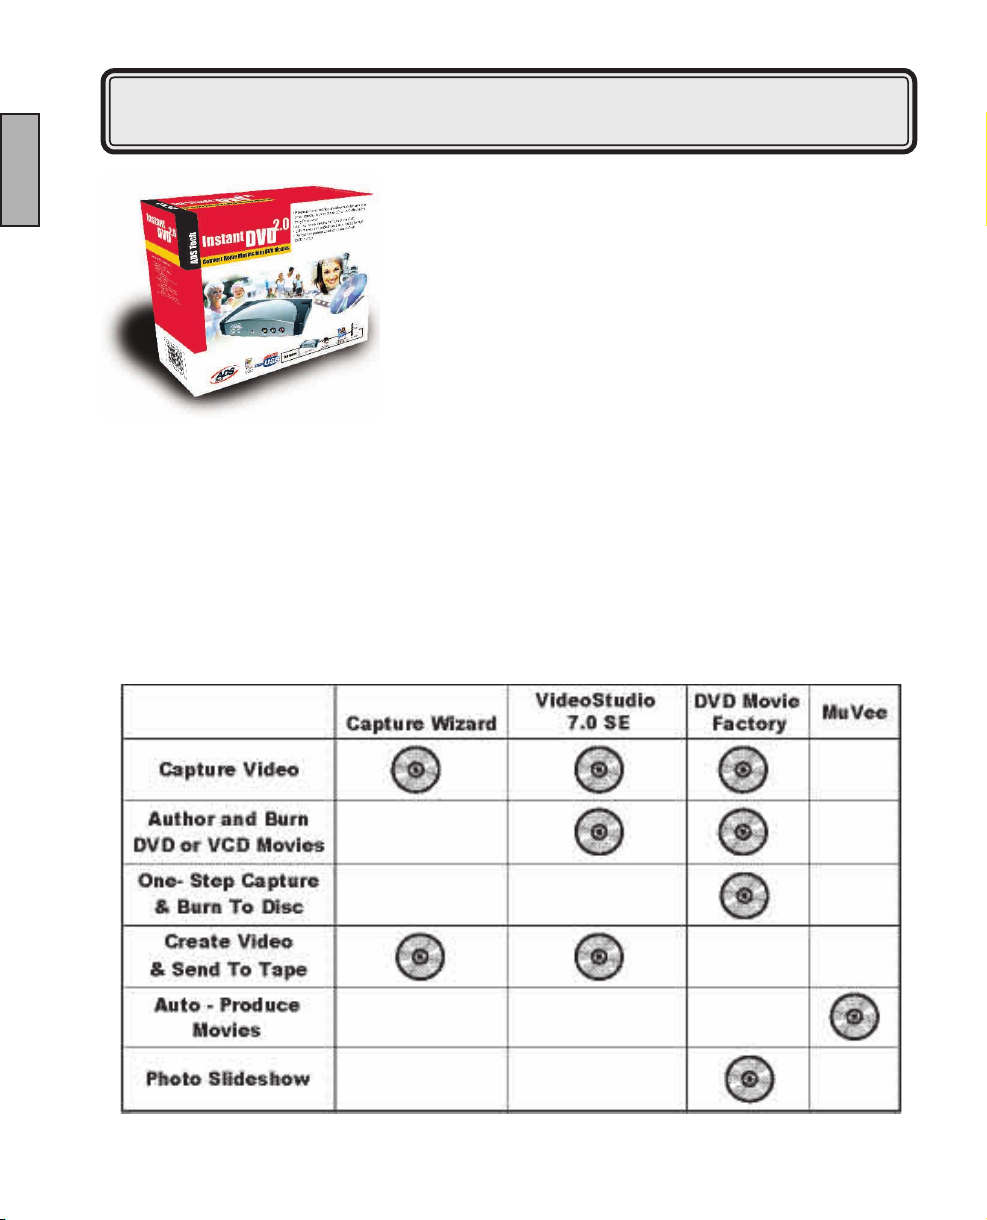
Instant DVD 2.0 includes several exible and dynamic software tools for your video projects:
INSTANT DVD 2.0 Page 6
Page 7

Ways to Capture and Edit Video
CapWiz: EASY VIDEO CAPTURE & PLAYBACK
This is the fastest and easiest way to capture MPEG-1 (VCD) or MPEG-2
(SVCD, DVD) video on your PC. Use the Wizard screens to verify your video
connections, video compression format and where you want your video les
stored on your computer hard drive.
Use CapWiz to quickly capture video or send MPEG video back to a VCR
for recording or a TV for viewing. CapWiz also allows you to set up timed
recordings and delayed recordings and easily select video capture bit rates for
Good, Better or Best DVD video quality. You can even set custom settings for
video resolution, video and audio bit rate, constant or variable bit rates and set
video pre-processing lters to help reduce noise in old VHS tapes.
NOTE: When preparing to display captured video on a TV or recording to video
tape, be sure that you have connected audio video cables from the Instant DVD
to your TV’s audio and video input and that you have selected the external video
source on the TV. Only MPEG-1 and MPEG-2 les can be exported out to TV,
because Instant DVD is an MPEG decoder. If you have saved a movie to a
streaming video format (.wmv) for example, this le type cannot be decoded for
TV display.
VideoStudio 7.0 DVD SE: full video capture & editing
Video Studio steps you through the movie making process. Key steps are;
CAPTURE, EDIT, EFFECT, OVERLAY, TITLE, AUDIO and SHARE. Use Video
Studio if you want to edit video, add effects or video lters, titles, back ground
music or voice overs to create a unique video production. With Video Studio
you can capture, edit and then export video to TV or VCR or publish your movie
to disk.
Video Studio includes a DVD Wizard that lets you easily author and burn your
movie to disk. You can export any single le to the DVD Wizard, or save your
edited movie to a VCD, SVCD or DVD movie and then export it to the DVD
Wizard. You start the DVD Wizard by going to the SHARE step and clicking
“Create Disk”.
VCD and SVCD movies can be burned on a CD-ROM disk. DVD movies can
also be burned on a CD-ROM disk, but you are limited to about 20 minutes
of DVD quality video on a 700MB CD. If you have a DVD recorder, you can
get about 2 hours of DVD quality video on a 4.7 GB DVD disk. Video Studio
also supports publishing SVCD (MPEG-2 at 2.4 megabits/sec.) to a CD-ROM.
SVCD is playable in many home DVD players. You can t about 35-40 minutes
of SVCD content on a 700 MB CD disk.
ENGLISH
INSTANT DVD 2.0 Page 7
Page 8
ENGLISH
INSTANT DVD 2.0 Page 9
ENGLISH
DVD Movie Factory 2.1 SE:
Direct publishing to CD or DVD disks without editing the video
If you just want to archive your video to disk and save the editing for another
time, DVD Movie Factory is the easiest and fastest way to capture “disk ready”
video. Use DVD Movie Factory to capture video in VCD, SVCD or DVD format
and go directly to the Authoring and burning step. You can even use the “Direct
to Disk” * to capture directly to CD or DVD disk in a single step. If you use
re-writable media you can enable “On the Fly” for direct recording to DVD+RW
or DVD-RW media. DVD Movie Factory even lets you import still images to
create VCD or DVD slideshows. You can create custom backgrounds and
menus allowing you to put multiple slideshows on a single disk then add music
to your slideshows to create a multimedia experience.
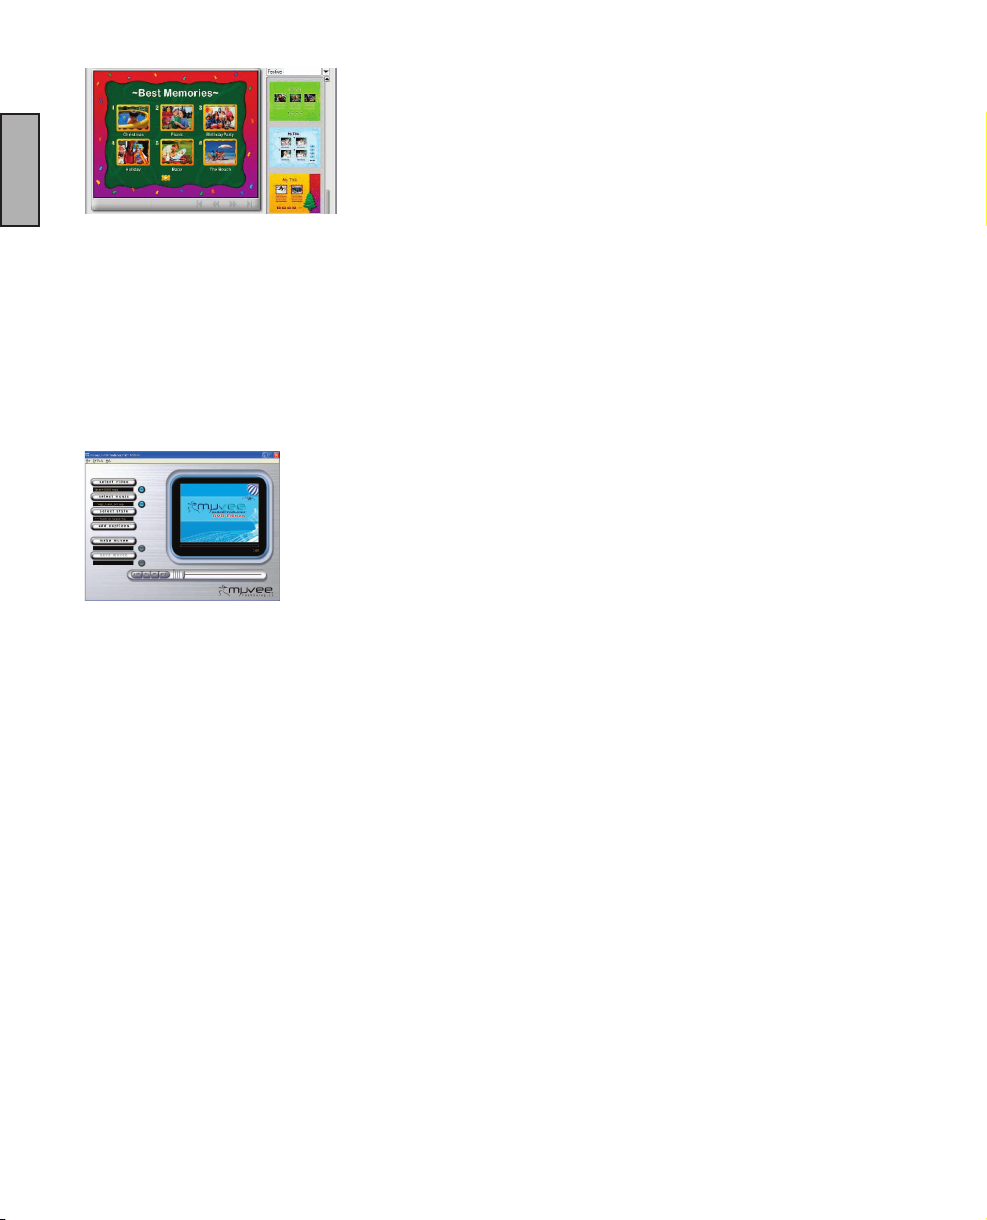
Create an Auto-Muvee!
Muvee autoProducer DVD Edition SE
We all want to create a fun, movie that looks like it was edited by a professional,
but we may not have the patience, the time, or let’s face it the talent to edit
video and have it look great. Muvee autoProducer DVD Edition SE is the
fastest and simplest way to create a nished production from raw video. With
the DVD Edition, you have the added benet of saving your videos as
DVD-ready MPEG-2 les that you can easily import to DVD Movie Factory
and burn to DVD disk. muvee autoProducer DVD Edition takes one minute to
learn and is typically a hundred times faster to use than any other video editing
software. You simply give the program your video, choose any piece of music
(MP3 or WAV) you like, select an editing style and it does the rest.
INSTANT DVD 2.0 Page 8
Page 9
Instant DVD 2.0 Installation Guide
ENGLISH
Getting Started
The basic steps are:
1. Check USB Instant DVD package contents
2. Wire it Up!- Audio and video connections
3. Plug it In!- Power and USB connection
4. Install Device Drivers
5. Install Application software
6. Verify Hardware Installation
7. Optimize System for Best Performance
8. Installation Summary & Diagram
9. Start Making DVD Movies!
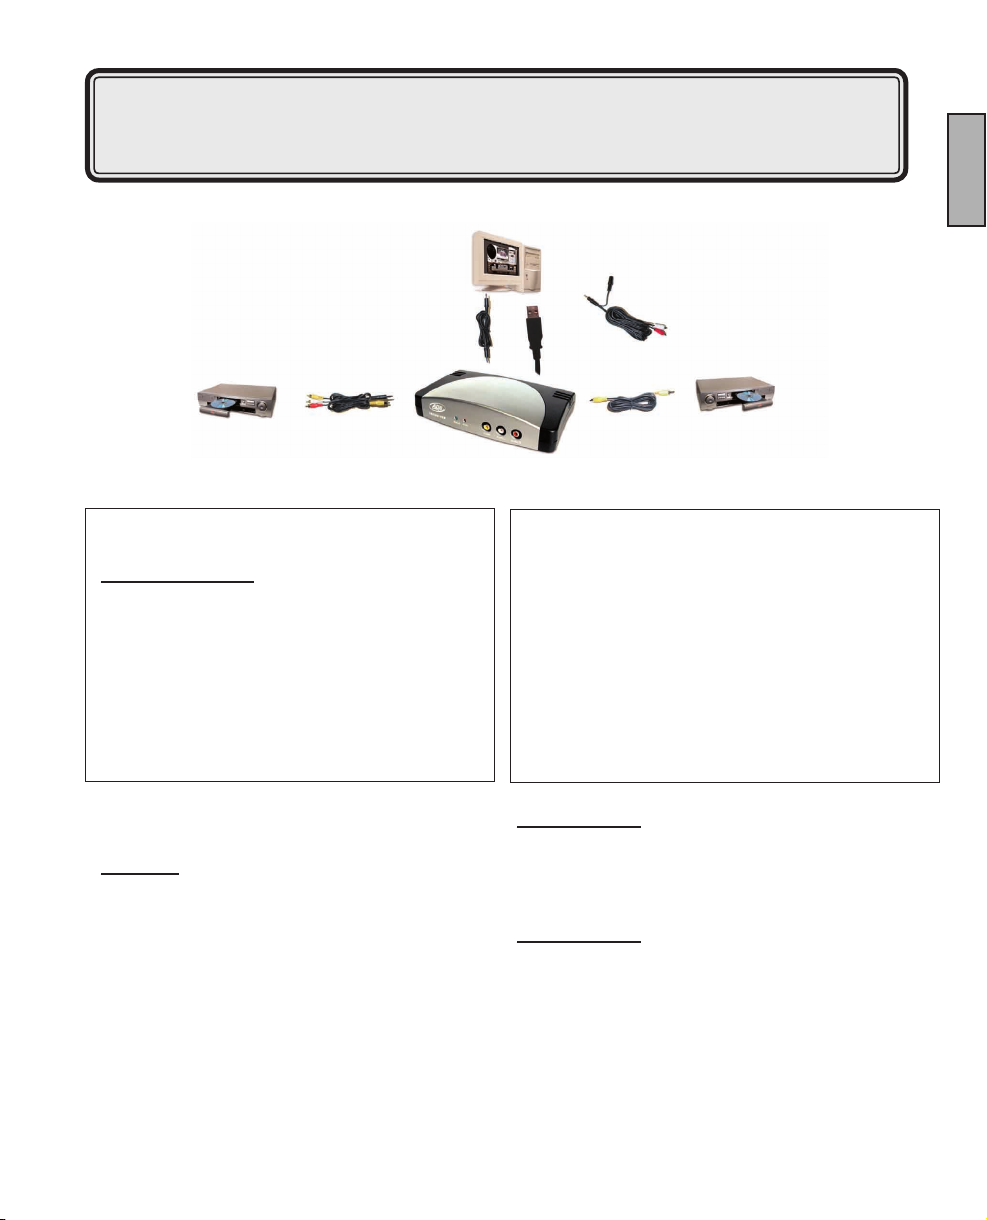
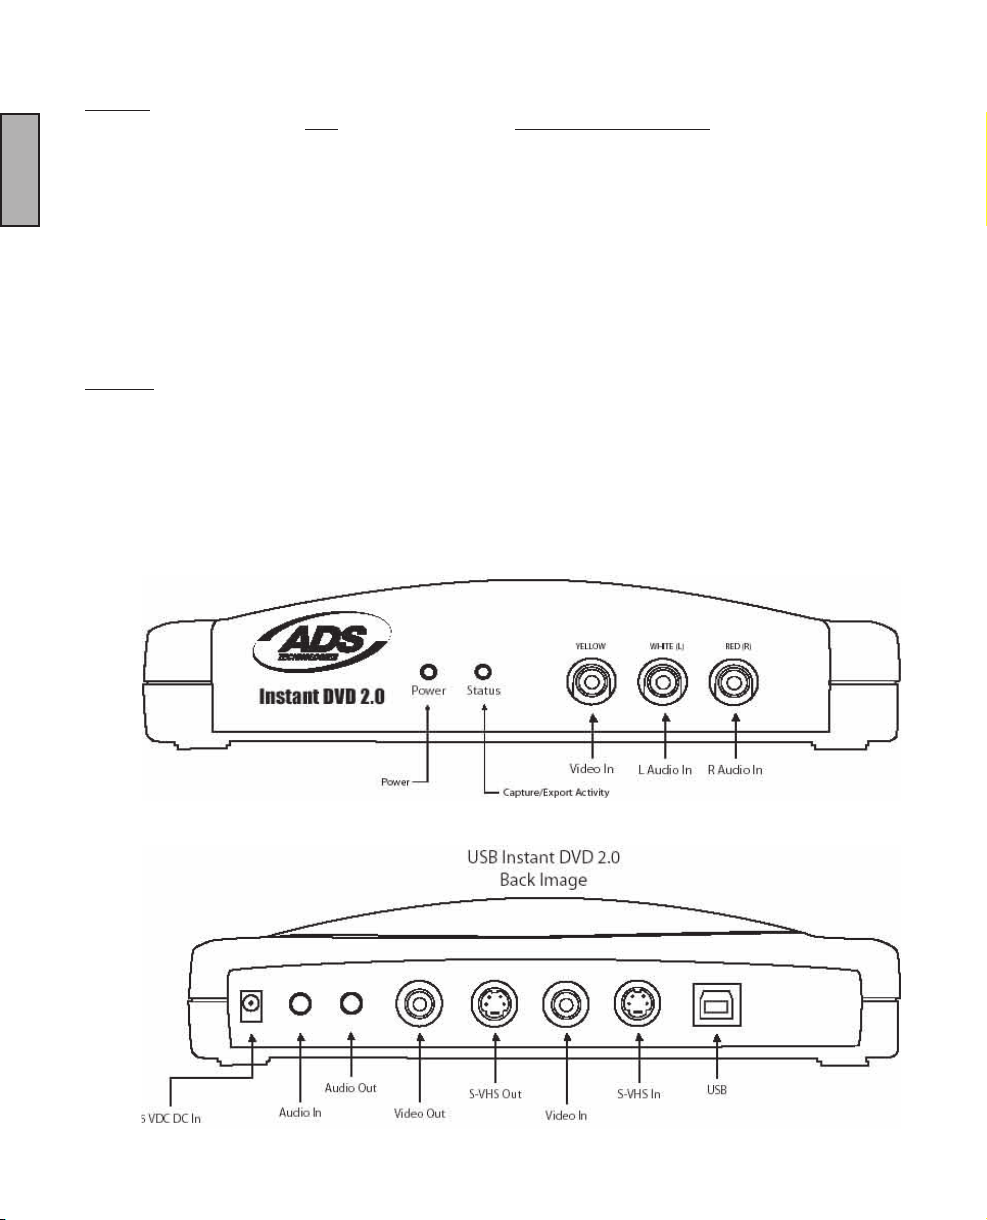
1. Check Instant DVD 2.0 Contents
Hardware:
(A) Instant DVD 2.0 device
(B) 5 VDC Power supply
(C) 6 ft. USB Cable
(D) 6 ft. A/V Out cable (RCA video and (L+ R) Audio to
RCA video and 3.5 mm stereo)
(E) Two (2) Installation CD's
(F) User's Manual
System Requirements
- Intel Celeron 400 MHz or AMD Athlon 600 MHZ or better
- Windows: Win98SE, WinME, Win2000 or WinXP
- 128 MB recommended
- Sound card
- 16 MB AGP video card
- CD-ROM Drive
- 150 MB hard disk space for capture/editing applications
- Disk space for video captures; Video captured at
4 Mb/sec will use approx.1.8 GB per hour
- CD Recordable Drive for making VCD and SVCD disks
- DVD Recordable Drive for making DVD disks
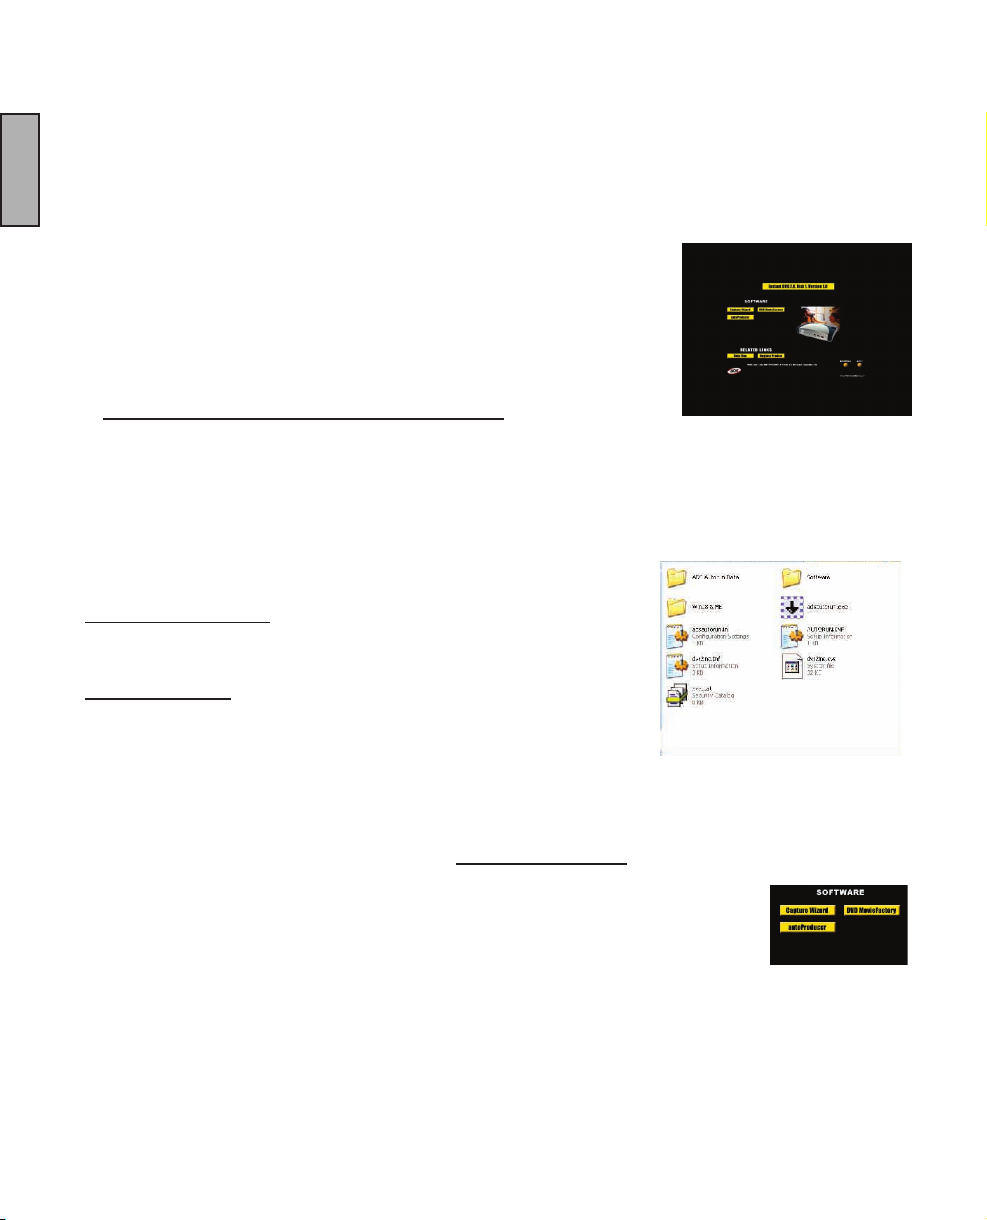
• CD 1 Contains:
- Capture Wizard Capture & Export utility
- USB Instant DVD device drivers
- Ulead DVD Movie Factory 2.0 SE for Instant DVD
- Muvee autoProducer
• CD 2 Contains:
- Ulead VideoStudio 7 SE customized for Instant DVD
INSTANT DVD 2.0 Page 9
Page 10
INSTANT DVD 2.0 Page 11
ENGLISH
USB 1.1 and USB 2.0 connections and drivers
USB 2.0
We strongly recommend using only WinXP or Win2000 with Microsoft USB 2.0 drivers for proper operation of your
Instant DVD at USB 2.0 connection speeds.
Microsoft Windows USB 2.0 drivers can be obtained from Microsoft directly:
WinXP – Included on your new PC, Windows Update,
ENGLISH
Download WinXP Service Pack 1
Win2000 – Download Win2000 Service Pack 3
Many USB 2.0 upgrade cards ship with non-Microsoft, third party drivers. These drivers have many revisions and
may have compatibility issues with some USB 2.0 devices. In many cases the USB 2.0 driver you have may work
ne, but we cannot guarantee proper operation with third party USB 2.0 drivers. Contact your USB 2.0 add-in card
supplier for the latest versions of USB 2.0 drivers for Win98SE and WinME.
USB 1.1
We recommend using the USB 1.1 port on your motherboard or from a USB 1.1 add-in card. All USB 1.1 cards use
the Microsoft USB drivers. If you are using Win98SE or WinME we recommend using the USB 1.1 connection on
your PC for proper operation of Instant DVD.
Hardware Overview:
INSTANT DVD 2.0 Page 10
Page 11
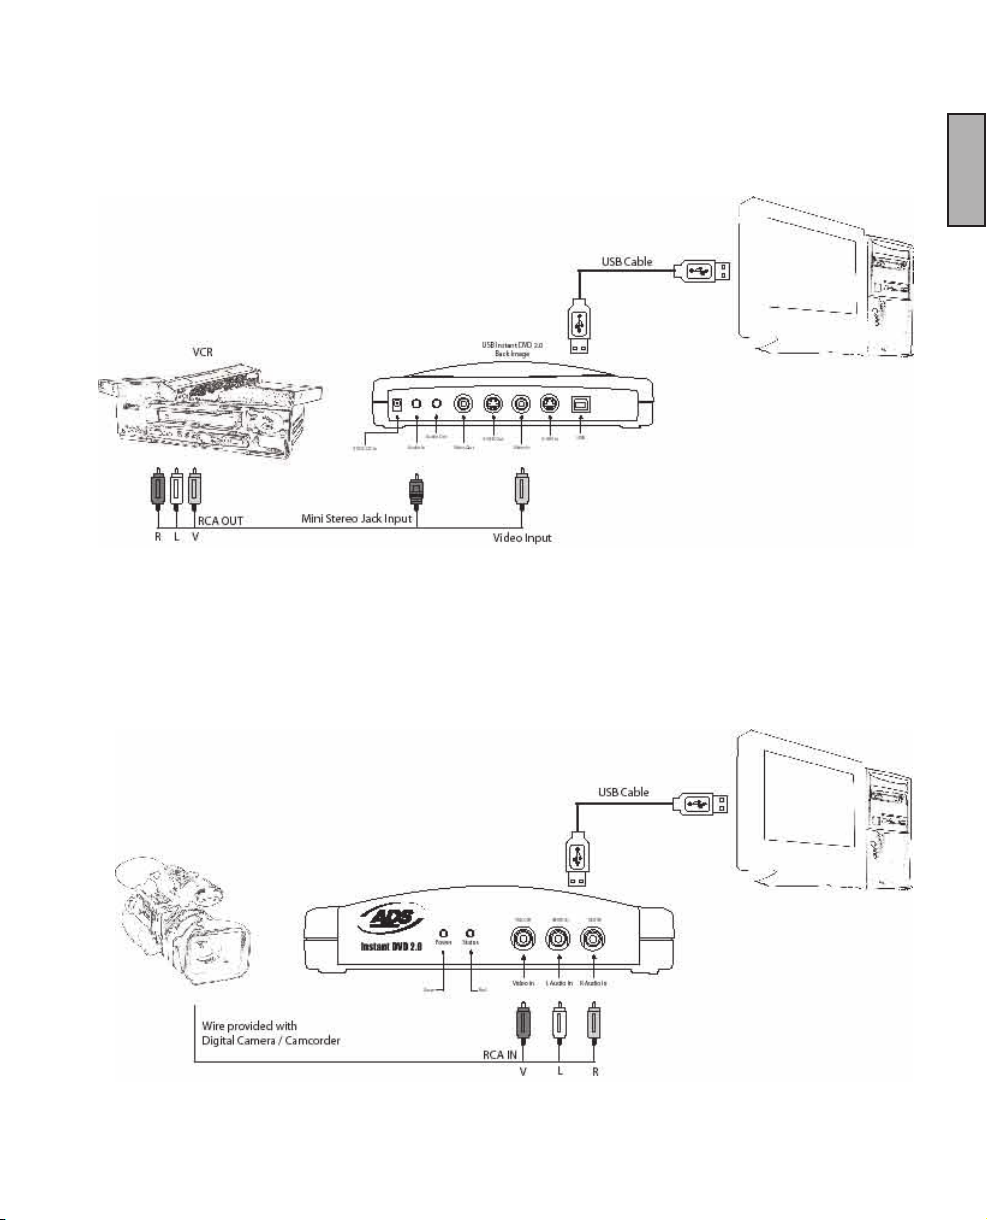
2. Wire It Up!
In this section we will connect audio and video cables that you will use to capture audio and video and then send audio
and video back to a TV or VCR for viewing or recording.
or
ENGLISH
INSTANT DVD 2.0 Page 11
Page 12
INSTANT DVD 2.0 Page 13
ENGLISH
1. Connect your video source (VHS, DVD, Laser Disc Player, TV. etc.) to your USB Instant DVD.
Connect your (D) 6 ft. A/V In cable to the 3 RCA jacks to your analog audio/video source RCA Line Out.
The other end connects to the “RCA Video In” jack and “3.5 mm Audio In” jacks on the rear of your Instant DVD.
ENGLISH
3. Plug It In
In this section you will Connect USB Instant DVD to your PC and Install Software
Drivers. Please read through this section rst, then go back and follow these step
by step instructions to connect your USB Instant DVD and install device drivers
and software applications:
1. Insert USB Instant DVD CD (Apple Quick time is required for our installers to run. If you don’t have
Quicktime Installed, it will install automatically. Click Next on every screen.
No user name, registration or serial number required)
2. Once you see the Instant DVD installation screen,
Plug the power cable into your USB Instant DVD, then plug it into a power source.
4. Install Device Drivers and Software
Now, plug your USB cable into USB Instant DVD and your PC.
Windows will recognize the device and ask you for the device drivers.
Windows XP or Win2000: Let Windows conduct an automatic search for the
drivers. The drivers are located in the root directory of your USB Instant DVD
CD, usually your “D” drive. Windows will install the drivers.
Win98SE or WinME: The Win98SE/ME drivers are located on the Instant
DVD CD in the Win98 folder. When Windows looks for the driver you will want
to direct it the drive your CD is located (usually “D” drive) and double click on
the Win98 folder. Windows will then automatically install the drivers.
5. Install Software Applications
1. Now that you have installed the device, Click the Capture Wizard button to install the key software components
that make Instant DVD work and install the Capture Wizard capture and playback application.
a.) If you do not have Microsoft’s DirectX 9.0 installed, it will install automatically. DirectX 9.0
is required for proper operation of your Instant DVD. Installation of DirectX 9.0 may
require a re-start of your computer.
b.) If your computer restarted, Click “My Computer” on your desktop. Double click the CD
Drive icon to bring back the Instant DVD Installation screen.
c.) Continue installing the key bundled software on to your system; Video Studio 7 and DVD Movie Factory and
Muvee AutoProducer.
2. Install VideoStudio 7 from Disk 2.
INSTANT DVD 2.0 Page 12
Page 13
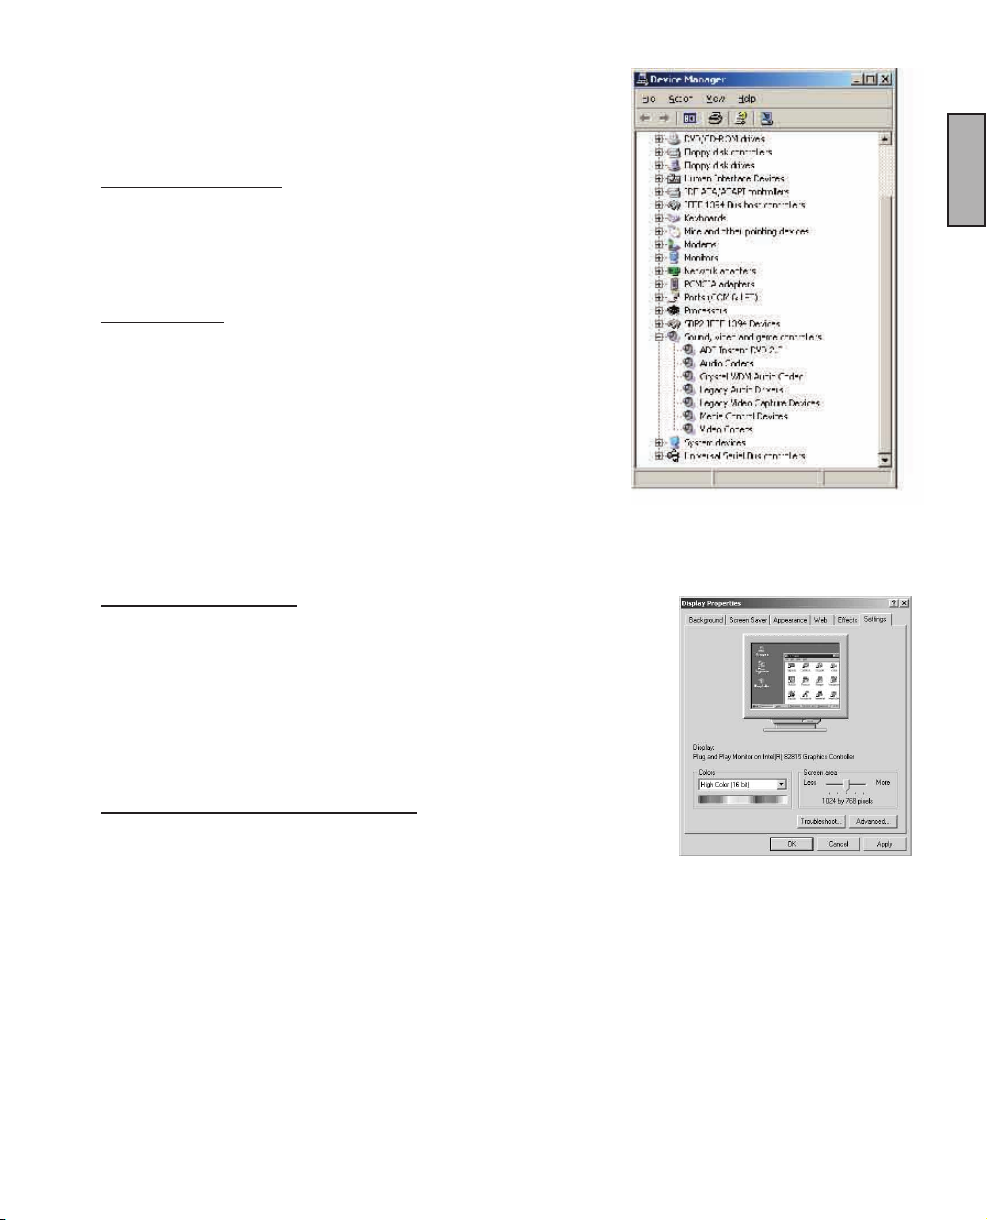
6. Verify Hardware Installation
Check Device Manager to verify that the USB Instant DVD hardware is
recognized by Windows and is properly installed.
Win98, Win98SE, WinME:
1.) Click Start, Settings, Control Panel.
2.) In Control Panel, click System.
3.) Click Device Manager tab.
4.) Double click the Sound, Video and Game Controllers
5.) Instant DVD should be listed.
WinXP, Win2000:
1.) Click Start, Settings, Control Panel.
2.) In Control Panel, click System.
3.) Click on the Hardware Tab.
3.) Click Device Manager Button.
4.) Double click the Sound, Video and Game Controllers Device
5.) Instant DVD should be listed.
If USB Instant DVD is listed under the Sound, Video and Game Controller Device heading, then the device is properly installed.
7. Optimize System For Best Performance
Optimize System for Best Performance
Set your VGA Resolution
1024 X 768 is the optimal resolution for viewing video at full resolution. DVD
video is captured at 720 x 480 (720 x 576) PAL. If your resolution is not high
enough you will not be able to view the video at full resolution.
1. Right click on your desktop
2. Click Properties
3, Click on Settings Tab
4. Adjust screen area to 1024 X 768 & 16 Bit Color (or higher if your VGA card
and monitor support higher resolutions and bit depth).
ENGLISH
Enable DMA to optimize video capture:
Enabling DMA will signicantly improve the video capture capabilities of your
system. If DMA is not enabled you will very likely suffer from dropped video
frames.
For Windows 98SE and WinME: Enable DMA on your IDE hard drive for optimal
video capture (Note: Not all hardware supports DMA access).
1. Right click on My Computer
2. Click Properties
3, Click on Device Manager
4. Double click Disk Drives
5. Double click Hard Disk (labeled Generic IDE type XXX)
6. Click the settings tab
7. Enable DMA by checking the DMA box.
8. Click OK
9. Click OK
Your computer will reboot with DMA enabled.
INSTANT DVD 2.0 Page 13
Page 14
INSTANT DVD 2.0 Page 15
ENGLISH
8. Installation Summary
By now you should have completed the following:
1.) Made all of the Audio and Video connections between Instant DVD and your Audio/Video equipment.
2.) Connected Instant DVD to the Power Supply and USB Port on your PC.
3.) Installed USB drivers and veried the device is properly installed
4.) Installed all necessary software applications required for proper operation.
ENGLISH
5.) Now you are ready to Start Making DVD Movies.
9. Start Making DVD Movies
Now you are ready to start capturing video. We have created the Capture Wizard application to allow you to quickly
capture and export video on your PC without learning how to edit video or author a DVD. Use the Capture Wizard
application to test video capture and playback of video before moving on to Video Studio 7 or DVD Movie Factory.
We have created a simple getting started Wizard that allows you to verify your connections and make the proper
setup choices before capturing video.
USB Instant DVD Capture Wizard
Step One: Open Cap Wiz.
Click the Cap Wiz icon on your Desktop
Or Click “Start” -> “Programs” -> “ADS Tech Instant DVD” and click on
“Capwiz”
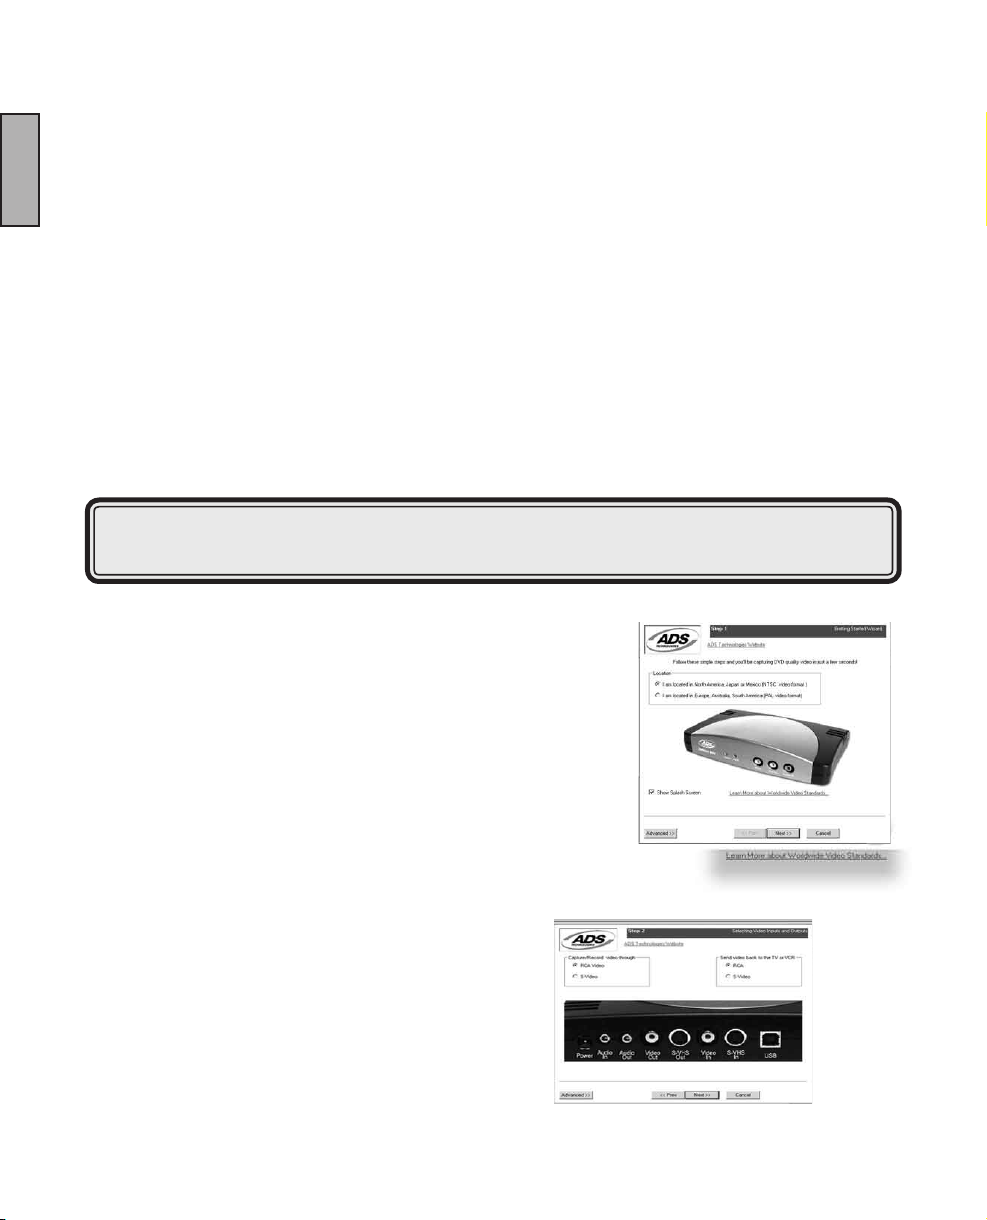
Choose worldwide video standard based on country – For Users in North
America, you will select NTSC. For Users in Europe and many other
countries you will select PAL.
For more information on these standards, click on “Learn more about
worldwide video standards”
Step Two: Select Video Inputs &Outputs
Choose RCA or S-Video based on your video source
INSTANT DVD 2.0 Page 14
Page 15
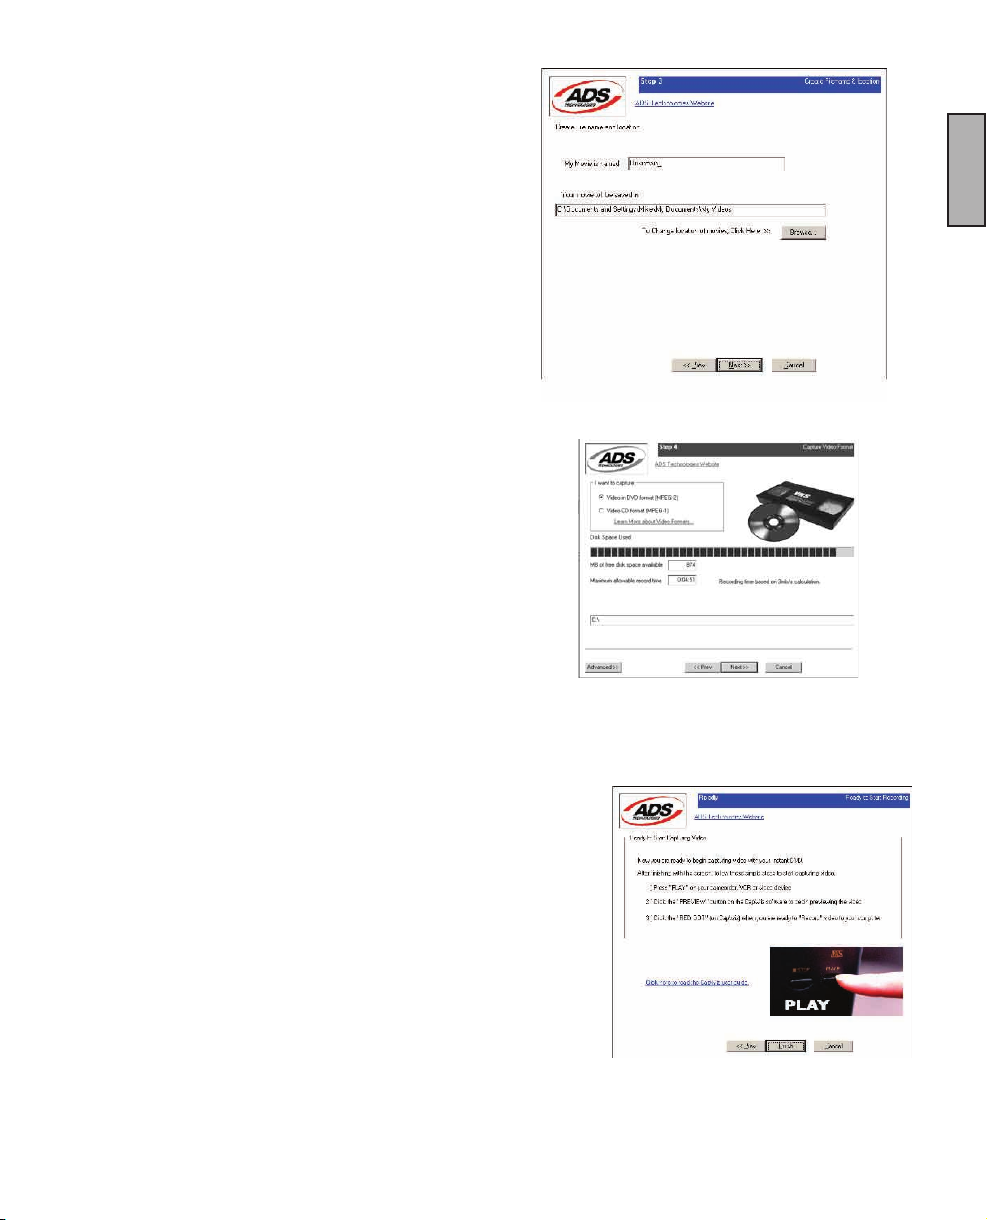
Step Three: Create le name and select le location
We will automatically select ‘My Documents\My Videos” as the
location to store your video les. You can select a different
location if you desire.
Step Four: Choose video format
In this step you will select between MPEG-1 and MPEG-2 video
compression formats. Select MPEG-2 if you wish to capture
video in the highest quality DVD format. Select MPEG-1 if you
want to capture video in the VCD format.
The Disk Space indicator shows the amount of disk space you
have available and an example of how much video you can
capture if you selected MPEG-2 at 3 Mb/sec.
For more information on these MPEG, click on “Learn more about
video formats”
ENGLISH
Ready
Now you are ready to start viewing and capturing video. You will need to
start your camcorder or VCR playing. Press Play on your video source
(VCR, DVD player, etc.).
Click Finish and the Wizard screen will disappear and you will see the
full Capture Wizard interface.
INSTANT DVD 2.0 Page 15
Page 16
INSTANT DVD 2.0 Page 17
ENGLISH
Using Capture Wizard Video Capture/Playback tool for the rst time:
ENGLISH
You have just completed the Wizard screens to ensure that you have connected your video cables, selected your
video format and now you are ready to capture video.
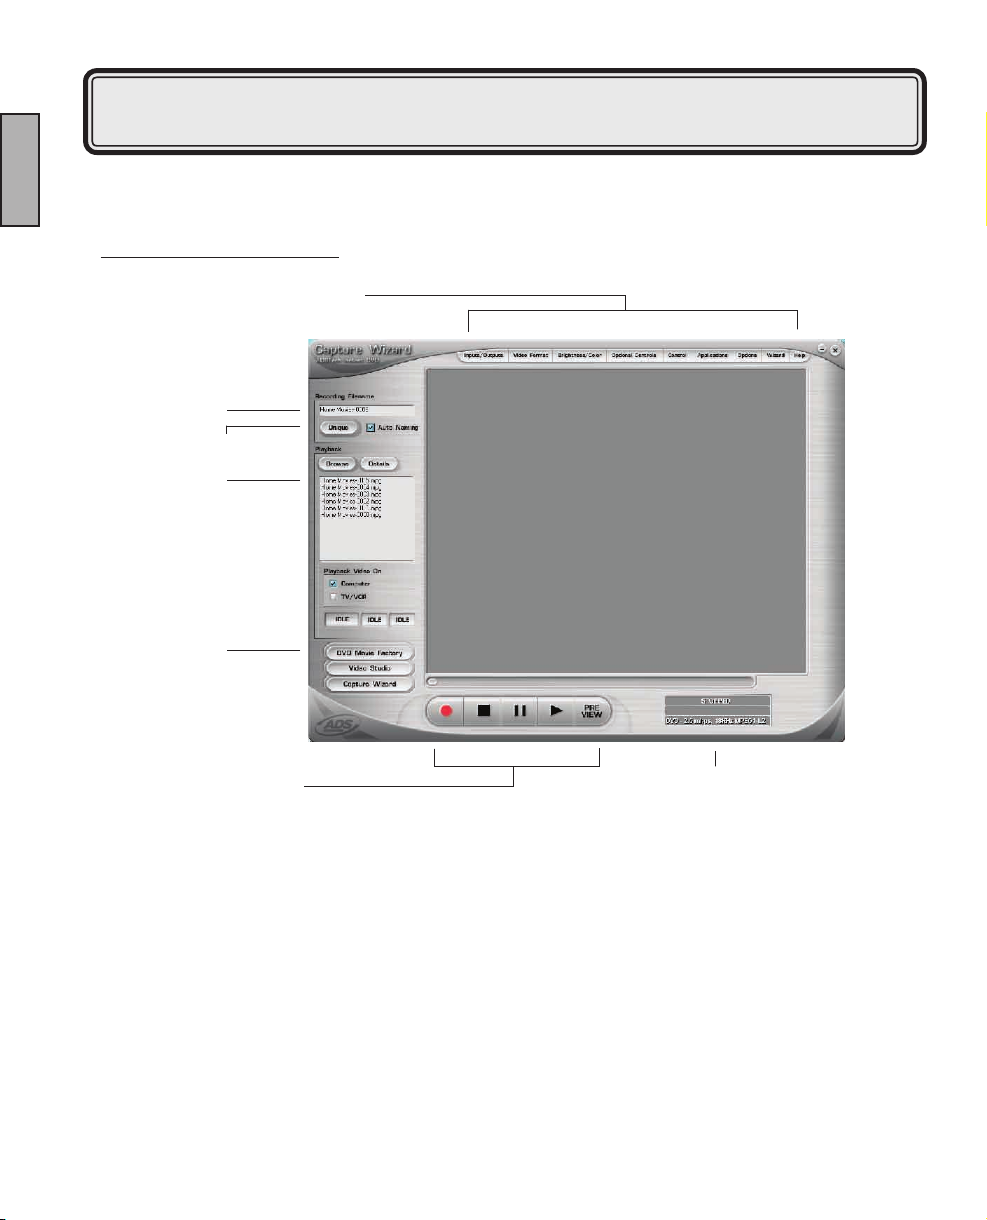
The Capture Wizard Interface
File Name
Auto-Naming/Unique Name
Playback List Box
Application Links
Menu Options
Record/Play Controls
Status Indicator
Preview and Record Video
1.) Be sure your video device is playing a video
2.) Click “Preview” and you will see video playing in the preview window. You will notice the status indicators
are Blue and are displaying “Preview”.
3.) Click the “Stop” ( � ) button or press the “esc” key on your keyboard to stop video preview.
4.) If you Click the Red “Record” ( � ) button while previewing video, the video will stop momentarily, then
start again. When the video preview starts again, you are recording. You will notice the status indicators
have turned red and are displaying “Record”.
5.) To Stop recording, press the “Stop” ( � ) button or press the “esc” key on your keyboard.
6.) You will notice that the le name has been added to the playback list box.
INSTANT DVD 2.0 Page 16
Page 17

Ways to begin Recording
1. You can start recording from the Stop or idle status in CapWiz or while you are previewing video.
2. Click the red record ( � ) button to begin recording at any time.
3. To Stop recording, Click the “Stop” ( � ) button or the “esc” key on your keyboard.
4. The video will be displayed in the resolution you selected for the video capture:
a. VCD 352 x 240 NTSC / 352 x 288 PAL
b. SVCD 480 x 480 NTSC / 480 x 576 PAL
c. DVD 720 x 480 NTSC /720 x 576 PAL
Playback Captured Video
Captured video les can be displayed on your computer monitor or be decoded through Instant DVD for display on a
TV or recorded to video tape. Use the “Playback On” selection to determine where video will be displayed.
Playback on the computer screen:
This is the default setting. Video will be played back at the resolution it was captured in.
1.) Click on the le name in the Playback List Box, then click on the “Play” (�) button. You may also double click on
the le name for Instant Playback. You will notice that the status indicator turns Green and the display changes
to Play.
2.) To Stop Playback, Click the Stop ( � ) button or press the “esc” key on your keyboard.
ENGLISH
INSTANT DVD 2.0 Page 17
Page 18
ENGLISH
INSTANT DVD 2.0 Page 19
ENGLISH
Seek through the video
If you have recorded a long video, you may want to jump ahead to a specic point in the video le and continue
playback from that point.
1.) Click the “Pause” (�) button.
2.) Use your mouse to drag the playback position slider to the point you desire.
3.) Click the “Play” (�) button, or press the “Space” bar on your keyboard to resume playback.
Keyboard Short Cuts:
Preview = Enter key
Record = “R” key
Instant Playback = double click le name
Play/Pause = space bar
Stop Record = esc key
Stop Preview = esc key
Advance 1 second (in Pause mode) = right arrow key
Rewind 1 second (in Pause mode) = left arrow key
Export Conguration – Sending Video to TV or VCR
You can use CapWiz to export MPEG video les you have captured with Instant DVD to display on TV or record back
to video tape. Use the cables included to connect to the Video Out and Audio Out jacks, and then connect the Yellow,
Red and White RCA jacks to your TV or VCR as shown in the illustration below.
OR
Playback to TV or VCR:
If you wish to send the video you have captured back to a TV for viewing or record to a VCR;
1.) Click TV/VCR in the Playback Video on box.
2.) Select the le you would like to play.
3.) Click the PLAY (�) button to begin playback or double click the le name for Instant playback.
4.) To Stop Playback, Click the Stop ( � ) button
INSTANT DVD 2.0 Page 18
Page 19

Capture Wizard Features and Functions
Recording File Name:
Before Recording check the Recording Filename box in the upper left hand corner of the application. The le name
you selected in the Wizard Screen is listed here.
1. Keep this le name if you wish or run the Wizard to use a new le name.
2. Check the “Auto Naming” box and CapWiz will automatically name each captured le in sequential order;
i.e. if your video le is “My Video”, the rst le captured will be named “My Video-000”, the second
“My Video 001” and so on.
3. Every time you stop a capture, the new le name will be displayed in Playback List box.
4. You can also uncheck “auto-naming” and click the “Unique” button and CapWiz will use the le name you enter
in the lename box. You need to provide a new le name for each video clip captured. If you do multiple
captures without changing the unique le name, the le will be written over each time you capture.
Playback List Box
The Playback list box shows the le names of your video captures. This list will match the directory location you
selected in the Capture Wizard screens. If you are unsure of the location you selected, run the Wizard again.
Browse: The Browse button will allow you to browse to other le directories or hard drives. If you select another
directory, any MPEG video les located there will appear in the Playback list box.
Details: The Details button will allow you examine the details of the les in the Playback List box. Click on the
Details Button and a dialog box will open showing detailed information about each le such as: Date, File Size, File
Name and location on your system.
Click on any le in this dialog box and then click Details again and you will see more details about this individual les
such as:
1.) Video bit rate
2.) Audio sampling rate
3.) Audio bit rate
4.) Frame rate
ENGLISH
Deleting a File:
From the detailed information box you can delete a le by clicking the “Remove” button.
CapWiz will ask you if you are sure, click OK and the le is deleted from your system.
Application Links
The icons at the side of the CapWiz screen allow you to easily jump from CapWiz to the bundled applications that
came with your Instant DVD. You can quickly jump to Video Studio, DVD Movie Factory or review the Capture
Wizard screens anytime video is not playing in the preview area. When you click on an application icon, that
application will start and CapWiz will automatically close.
You can repeat the Wizard steps and make changes to your settings by clicking the Capture Wizard icon anytime
video is not playing. The Wizard will run every time you start CapWiz unless you can disable this by clicking Options
at the top of the application and click on “Show Wizard” to uncheck this selection.
1.) Click or uncheck - Show Splash Screen to not have splash screen appear at startup
2.) Click or uncheck - Show Wizard to not have Wizard screens appear at startup.
You can re-enable these features at anytime by re-selecting the options.
INSTANT DVD 2.0 Page 19
Page 20

INSTANT DVD 2.0 Page 21
ENGLISH
Menu Options
This section will describe all settings and choices for all of the menu options along the top of the CapWiz Interface.
ENGLISH
• Video Inputs/Outputs:
This dialog box allows you to quickly change your video input and output choices. Here you can choose between
RCA, S-VHS or DV Inputs (Instant DVD + DV only) and RCA or S-VHS outputs. These settings can also be changed
by running the Capture Wizard Screens.
• Video Format:
The Video format dialog box allows you to quickly change your video format for NTSC or PAL. If you are not sure
of the correct selection, run the Capture Wizard and read the document called “Learn more about worldwide
Video Standards".
The Video format box also allows you to quickly set your video resolution and quality setting. You can choose:
a. DVD at Good, Better or Best Quality
b. Super Video CD (SVCD)
c. VCD
There are no quality settings for SVCD or VCD as these formats have standard video and audio bit rates.
CapWiz will display the following standard video capture settings based upon your USB Connection.
USB 2.0 Connection USB 1.1
DVD Settings - 4, 6 or 9 Megabits per second (Mb/sec.) 2.5, 3 or 4 MB/sec.*
SVCD - MPEG-2 video at 2.4 Mb/sec. Same
VCD - MPEG-1 video at 1.15 Mb/sec. Same
The Video format and bit rate (4, 6 or 9 Mb/sec) for DVD video will be displayed in a status area of the CapWiz
interface so you will always know what video format and bit rate you are recording.
*If connected at USB 1.1 Full Speed the maximum video bit rate is 4 Mb/sec.
Custom User Dened video settings:
CapWiz lets you set custom capture settings. The custom settings give you lots of exibility in creating capture
settings to meet your individual needs. To access the Custom Settings dialog box, click on the “Custom Settings”
button.
Video Bit Rates:
Set the video standard you want to capture in. The standard you select must match the standard of your video player
and video content. When you select PAL, you will notice that the Video Resolutions choices automatically change to
PAL resolutions.
MPEG-1 – When MPEG-1 is selected the only video resolution allowed is 352 x 240 (NTSC) or 352 x 288 (PAL),
however you can select video capture bit rates from 1 Mb/sec. up to 15 Mb/sec.
MPEG-2 – You can select any Video capture resolution and any video capture rate from 1 Mb/sec. to 15 Mb/sec.
INSTANT DVD 2.0 Page 20
Page 21

Video Resolution:
You can select from the following video capture resolutions
NTSC PAL
325 x 240 (VCD) 352 x 288 (VCD)
352 x 480 (1/2 D1) 352 x 576 (1/2 D1)
480 x 480 (SVCD) 480 x 576 ( SVCD)
704 x 480 (DVD) 704 x 576 (DVD)
720 x 480 (DVD) 720 x 576 (DVD)
Video Bit Rate:
You will notice that you have the ability to select a video capture rate of up to 15 Mb/sec. You will also notice that
any bit rate over 9 Mb/sec. is red in color. This is because any bit rate above 9 Mb/sec. is not supported by DVD
players and DVD burners. We allow you to capture at higher rates because some users may want to have the
capability to capture at the highest rate possible and don’t have DVD burning as a project goal. Just keep in mind
that if you want to burn your video onto a CD or DVD disk, don’t use a setting higher than 9 Mb/sec. or lower than
2 Mb/sec.
Custom Settings Caveats
We have provided lots of exibility in the manner in which you can capture video at various resolutions and audio/
video bit rates. We have provided this exibility because many customers have asked for this kind of capability.
However, think about your project goal before you begin recording. If your intent is to capture video to be burned
to CD or DVD disk, then capture at resolutions and bit rates that are “Legal” for burning and playing back in
players. If not, you may nd that you have spent hours capturing video only to nd that it the DVD authoring
software will not directly burn it, or your player will not play it back.
VCD, SVCD and DVD Legal Settings (check our web site for F.A.Q’s and other updates to this list):
Format Video Bit Rates Audio Bit Rates
VCD 1.15 Mb/sec. 224 kbits/sec.
SVCD 1.5 Mb/sec. - 2.5 Mb/sec. 128-384 kbits/sec.
DVD 3 Mb/sec. – 8 Mb/sec. 192 – 448 kbits/sec.
ENGLISH
Audio Bit Rates
The audio format is always compressed in MPEG-1 Layer 2 audio. CapWiz also automatically sets the audio
sampling rate to 44.1 Khz for VCD and SVCD settings and 48 Khz for DVD video. We give you the choice to
select the audio bit rate for your custom video captures in the range from 192 kbits/sec to 384 kbits/sec.
Use Deinterlacing (Preview/Playback)
The MPEG-2 software playback codec that we use does not de-interlace video by default. Interlaced video will
show horizontal lines when you preview or playback the video. This interlacing does not affect video quality. All
NTSC and PAL video is interlaced. You will not see the interlacing when playing back a DVD disk on TV.
De-interlacing the video during preview and playback makes the video quality look better on the computer screen.
The default capture settings have de-interlacing turned on by default. De-interlacing the video takes a bit more
CPU processing power. Some slower PC’s may experience jerky video. In the custom settings, you have the
ability to enable or disable de-interlacing. Experiment with your system and your personal preferences to
determine if you want to preview with de-interlacing enabled or disabled.
Use Variable Bitrate
Capturing with variable bit rate will result in overall smaller le sizes than using constant bit rates. When the
Variable bit rate setting is enabled Instant DVD examines the frames of video being captured and will automatically
increase the bit rate in areas of fast motion or action and decrease the bit rate in areas where not much is
changing. This will result in improved overall quality and an overall smaller le size. The default capture settings
are set to constant bit rate.
INSTANT DVD 2.0 Page 21
Page 22

ENGLISH
INSTANT DVD 2.0 Page 23
ENGLISH
Video Preprocessing Filters
Instant DVD includes video preprocessing lters which provide the ability to remove some of the noise found on old
video tapes, TV reception or other noisy video sources.
Spatial Filtering
This refers to ltering pixel data that are all located in the same video frame. The Spatial lter is a low-pass lter.
This lter removes part of the high frequency noise components. Too much ltering can reduce image sharpness to
the point of looking very smooth or blurry. The selection range for this lter is from 0 to 7.
Temporal Filter
This lter processes pixel data that are located in the same pixel coordinates but across two frames of video, usually
the current video frame and the previous frame. Because of motion in video sequences, and object located in one
position may have moved in the next video frame. Thus, if there is a log of motion, temporal ltering may cause
blurring or introduce other artifacts. The selection range for this lter is from 0 to 255.
What is the best lter to use for your video? There is no magic formula, you will need to experiment with different lter
settings and pick the lter level that removes noise but does not create blur.
Use Deinterlacing (Preview/Playback)
The MPEG-2 software playback codec that we use does not de-interlace video by default. Interlaced video will show
horizontal lines when you preview or playback the video. This interlacing does not affect video quality. All NTSC and
PAL video is interlaced. You will not see the interlacing when playing back a DVD disk on TV.
De-interlacing the video during preview and playback makes the video quality look better on the computer screen.
The default capture settings have de-interlacing turned on by default. De-interlacing the video takes a bit more CPU
processing power. Some slower PC’s may experience jerky video. In the custom settings, you have the ability to
enable or disable de-interlacing. Experiment with your system and your personal preferences to determine if you
want to preview with de-interlacing enabled or disabled.
Setting Custom Capture Settings
1.) Click Custom Settings button
2.) When the custom settings dialog box opens, make your selections.
3.) Click OK to save
4.) Click “Use Custom Format” to capture with the settings selected.
• Brightness/Color
Here you can make changes to Brightness, Chroma, Contrast, Hue and Saturation.
You can make changes to the Brightness/Color settings only while Previewing or recording video.
1. Move the slider for each setting choice and you will see the adjustment over the next second or two.
2. If you mess up, Click Reset to restore factory default settings.
3. Click OK to close the box.
• Optional Controls (for Instant DVD + DV Only) *
This dialog box is for use with and enhanced version of Instant DVD called, “Instant DVD + DV”. The
Instant DVD + DV version allows you to connect a digital camcorder and provides the ability to capture from
Digital Video directly to MPEG-1 or MPEG-2. These controls allow you to control the camcorder via software
so you have the ability to Rewind, Fast Forward, Play and Stop the camcorder via these controls.
INSTANT DVD 2.0 Page 22
Page 23

For Instant DVD + DV Only:
1.) Connect your Digital Camcorder with the provided 4 pin to 4 pin DV cable from your camcorder to the 4 pin
DV port on the front of the Instant DVD + DV device.
2.) Turn your camcorder on and to the VCR/VTR mode. Note: we recommend using the external power supply
for your camcorder for best results rather than running on battery power.
3.) Click “PLAY” on the DV Camcorder control panel to start the camcorder tape.
4.) Click “Preview” on the CapWiz interface and you will see video from your digital camcorder.
5.) Click “Stop” on the CapWiz interface to stop previewing video before you click “Stop” on the DV camcorder
control panel.
*If you wish to upgrade your Instant DVD 2.0 unit to an Instant DVD + DV unit, contact the ADS Tech customer
service department to see if there are any current upgrade offers.
• Control
The Control menu gives you another way to control video recording and playback:
The selections are: Preview, Record, Stop, Pause and Play
• Applications
The Applications menu gives you another way to jump to bundled applications and you can also change the path
of these applications if you happened to install them on a different drive.
1. Click the Applications menu button
2. Click on DVD Movie Factory or Video Studio to Jump to the selected application. Capture Wizard will
automatically close when you do this.
3. Click the Edit button. This will show the default or standard directory path the applications are normally installed.
4. To change the directory path click the box with the “…” and you can browse to the directory path you installed
the application.
ENGLISH
INSTANT DVD 2.0 Page 23
Page 24

ENGLISH
INSTANT DVD 2.0 Page 25
ENGLISH
• Options:
The Options menus provides more selections in customizing your use of the Capture Wizard application:
Click the Options button at the top of the interface to view the Options menu.
Show Splash
If there is a check mark next to this an “ADS” splash screen will appear on your screen when you start Capture
Wizard. To disable, click on “Show Splash” and the check mark will disappear.
Show Wizard
If there is a check mark next to this, the “Capture Wizard” screens will appear on your screen when you start Capture
Wizard. To disable, click on “Show Wizard” and the check mark will disappear.
Preview Immediately at Startup
If this has a check mark next to it; video will begin previewing automatically when you start Capture Wizard.
Audio…
This will open a dialog box which will allow you to set the audio bit rate for your video capture. The default settings
for VCD, SVCD and DVD are 224 kilobits per second, but you can select a range from 112 kbps to 384 kbps.
Playback…
This will allow you to playback captured video at any standard playback resolution regardless of the capture
resolution:
1.) Click Options at the top of the screen.
2.) Click Advanced
3.) Click Playback Options
4.) Select the desired playback resolution.
5.) if you select Full Screen, then you can manually drag the playback window to any size.
Selecting this will open a dialog box that allows you to change the playback resolution of captured video. This will
allow you for example to playback SVCD (480 x 480) video at 720 x 480 if you like, and so forth. You can also set to
playback all video at full screen resolution. When this setting is chosen, a full screen video window will open, but it is
manually sizable by dragging any edge of the window.
Use RenderGraph
This setting is off by default. Only use this setting if you have some trouble using the “Seek” bar for playback.
When this is enabled, CapWiz will use any MPEG decoder that is found on your system. If you have more than one
MPEG software decoder installed there could be some confusion between MPEG decoders. To ensure that you
use the Instant DVD software encoder, uncheck this setting.
Skins…
This will bring up the Skin Chooser. Currently CapWiz includes 2 skins. You can easily choose the skin of your
choice. In the future there may be lots of skins to select.
INSTANT DVD 2.0 Page 24
Page 25

Recording
This presents a Recording Options dialog box with the following selections:
Prompt to Conrm Recording
If this is enabled, you will receive a conrming prompt when ever you click the Record button. This may be used
to more accurately time the beginning of a recording session.
Prompt Delay Record
Enabling this feature will cause the “Recording Options” box to appear when you click the Record Button.
Click “Prompt” Delay Record” again to disable.
When you click the Record button you will be presented with a dialog box with allows you to set the hours,
minutes and seconds for recording delay. For example if you want to start recording in 1 hour, set to one
hour, after one hour, recording will start automatically.
Disable Screen Saver during recording
If you are doing a long capture you may want to disable your screen saver. Sometimes, depending upon the
graphics card you are using, a screensaver, can disrupt the video capture.
Record Duration
You can set a time limit for your recording. If you know you want to record for exactly 1 hour, you can set the
record duration, hours, minutes and seconds exactly. Start recording and walk away knowing that the recording
will stop at the time limit you determine. You can use Record delay and Record duration in combination.
Disk space
You can set up to be warned if you don’t have enough disk space available when you begin recording. Check this
box to enable the feature and set the slider to the amount of disk space you feel comfortable as a warning level.
ENGLISH
• Help
About
The About box so you can check the version number you are running and it will also display the amount of
disk space available on your C: drive.
Help Using CapWiz
This will bring up an Adobe Acrobat le that will display this CapWiz manual.
System Info
This will bring up a dialog box with all of your system information. You can click the copy button and paste this
information in an e-mail and send to the ADS tech support person if he/she requests it.
INSTANT DVD 2.0 Page 25
Page 26

ENGLISH
INSTANT DVD 2.0 Page 27
ENGLISH
This is an abridged version of the ULEAD VideoStudio 7 User Guide.
It's contents have been customized for use with Instant DVD 2.0.
The full edition of the ULEAD VideoStudio 7 User Guide, which is in
the Adobe Acrobat PDF le format, can be found on the Instant DVD
CD by browsing the ULEAD Software folder.
INSTANT DVD 2.0 Page 26
User Guide
ULEAD Systems, Inc.
January 2003
Page 27

How VideoStudio Works
VideoStudio follows a step-by-step paradigm so that editing tasks remain uncomplicated from start to nish.
VideoStudio also offers more than a hundred transition effects, professional titling capabilities and simple soundtrack
creation tools. Learn in seconds, create in minutes.
VideoStudio breaks up your movie into separate tracks, giving you broad creative freedom. Changes to one track do
not affect others.
After transferring footage from your camcorder, you can arrange scenes, apply special effects, overlay images, add
animated titles, sync in a voiceover narration, and use background music from your favorite CDs in formats such as
WAV and MP3. All these can be done using drag-and-drop, cut-and-paste, or select-and-apply operations.
All the tracks in your movie are then organized into a video project le (*.VSP), which contains all the video and audio
information on how your movie is put together.
When everything is all set to go, your computer collects all information needed to create your nal movie le. This
process is called rendering.
You can then output and distribute your movie as a DVD/VCD/SVCD title, streaming Web page video, or an e-mail
attachment. You can also record your movie back to your camcorder or VCR.
Components of a nished project as displayed in Timeline Mode
DVD, VCD, and SVCD
There are several factors to consider in choosing an output format for your project. These include your desired output
quality, target playback device, and viewing screen size, among others. Here are the advantages and disadvantages
that picking each output format entails:
ENGLISH
• Video Compact Disc (VCD) is a special version of a CD-ROM that uses the MPEG-1
format. The quality of the exported movie is almost the same, but usually better than
VHS tape-based movies. A VCD can be played back on a CD-ROM drive, VCD player,
and even on a DVD player.
• Super Video CD (SVCD) is commonly described as an enhanced version of VCD. It is
based on MPEG-2 technology with Variable Bit Rate (VBR) support. The typical running
time of an SVCD is about 30-45 minutes. Although you could extend this to 70 minutes,
you will have to compromise sound and image quality. SVCDs can be played back on
stand-alone VCD/SVCD players, most DVD players, and all CD-ROM/DVD-ROM with a
DVD/SVCD player software.
• Digital Versatile Disc (DVD) is popular in video production because of its quality. Not
only does it guarantee superb audio and video quality, it can also hold several times
more data than VCDs and SVCDs. DVDs make use of the MPEG-2 format, which has
a much bigger le size than MPEG-1, and can likewise be produced as single or dualsided, and single and dual-layered. They can be played on stand-alone DVD players or
on the DVD-ROM drive of your PC.
INSTANT DVD 2.0 Page 27
Page 28
INSTANT DVD 2.0 Page 29
ENGLISH
Installing and running VideoStudio (Disk 2)
To install VideoStudio:
1. Place the VideoStudio CD into your
ENGLISH
CD-ROM drive.
2. When the Setup screen appears,
follow the instructions to install
VideoStudio onto your computer.
Note: If the Setup screen does not
appear after loading the CD, then
you can manually start it by doubleclicking the My Computer icon on
your desktop, then double-clicking
the icon for the CD-ROM drive.
When the CD-ROM window opens,
double-click the Setup icon.
Please install also the following
applications, because they are very
important in making digital video work
well on your computer. The installation
program will walk you through installing:
• QuickTime
• Windows Media Format
• RealPlayer
• Acrobat Reader
Note: Skip this step if you already have newer versions of the above supporting
applications installed in your PC.
To run VideoStudio:
• Double-click the VideoStudio icon on your Windows desktop.
OR,
• Select the VideoStudio icon from the VideoStudio program group on the
Windows Start menu.
VideoStudio installation screen
Running VideoStudio from Windows
Start menu
INSTANT DVD 2.0 Page 28
Page 29
Setting up for Instant DVD
To check the setup of VideoStudio for analog interface:
1. Connect your camcorder, VCR, or other video source device to
your analog capture card.
2. Insert your videotape into the capture device and switch it on.
Make sure it is in the playback mode (usually named VTR or
VCR). See your machine’s manual for specic instructions.
3. Your Capture plug-in will be detected automatically.
4. Click Capture Step and check if your device is displayed in the
Options Panel under Source.
Note: If your capture device supports multiple video sources,
the Input Source dialog box allows you to select your desired
video source such as Composite, Tuner, or S-Video. Likewise,
if you have multiple audio sources, this dialog box allows you
to select your desired audio source.
ENGLISH
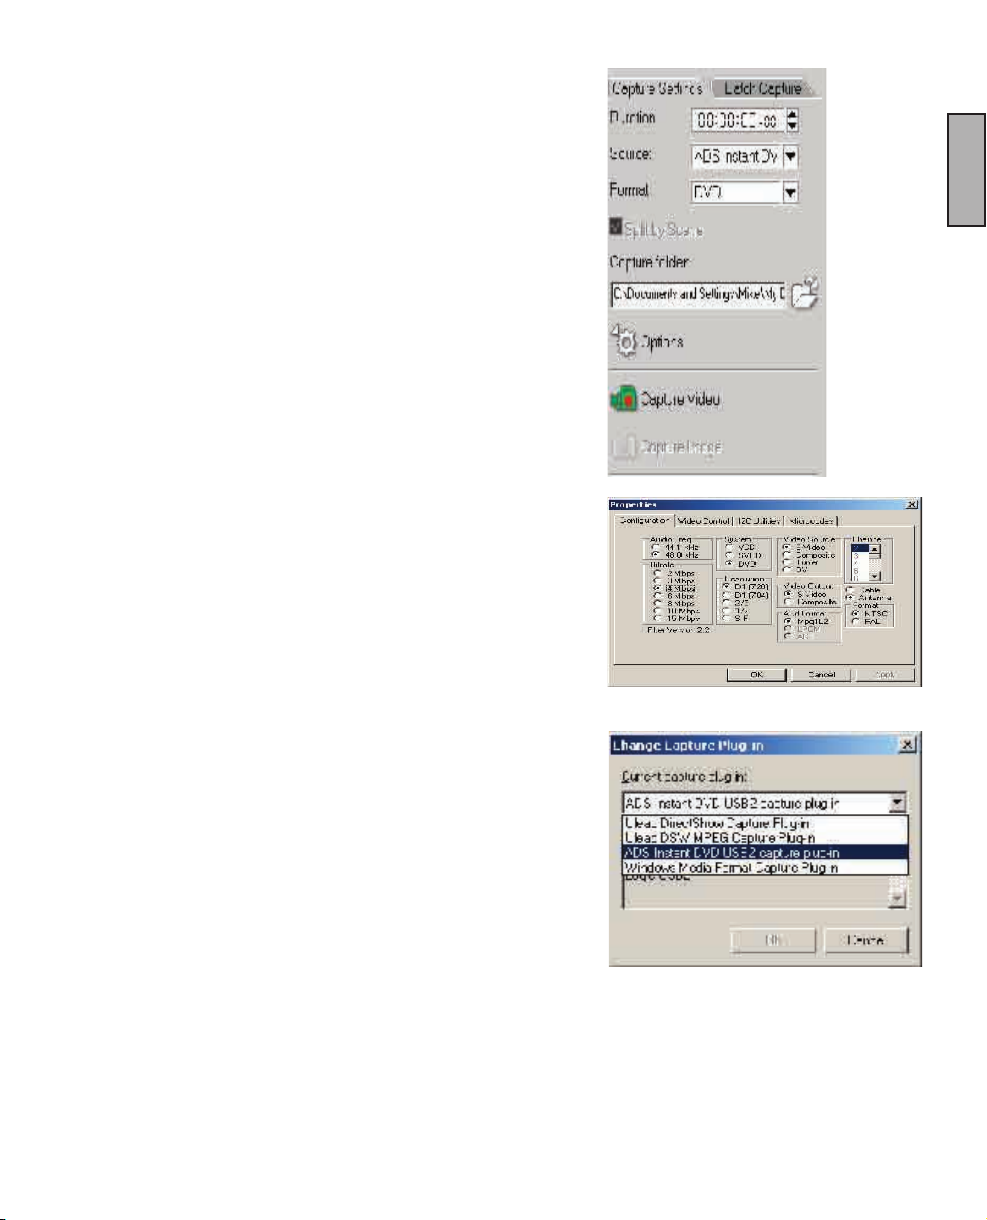
Selecting Instant DVD Capture Plug-in
If you have multiple capture devices connected on your PC, you
may need to manually select the correct Capture Plug-in.
1.) Click "File" at the upper left hand corner of
VideoStudio.
2.) Click "Change Capture Plug-in".
3.) The Change Capture Plug-in dialog box will appear.
Select "ADS Instant DVD USB2 Capture Plug-in".
4.) Click "OK".
5.) If the Instant DVD capture plug-in was already
selected, click "Cancel".
INSTANT DVD 2.0 Page 29
Page 30
ENGLISH
INSTANT DVD 2.0 Page 31
ENGLISH
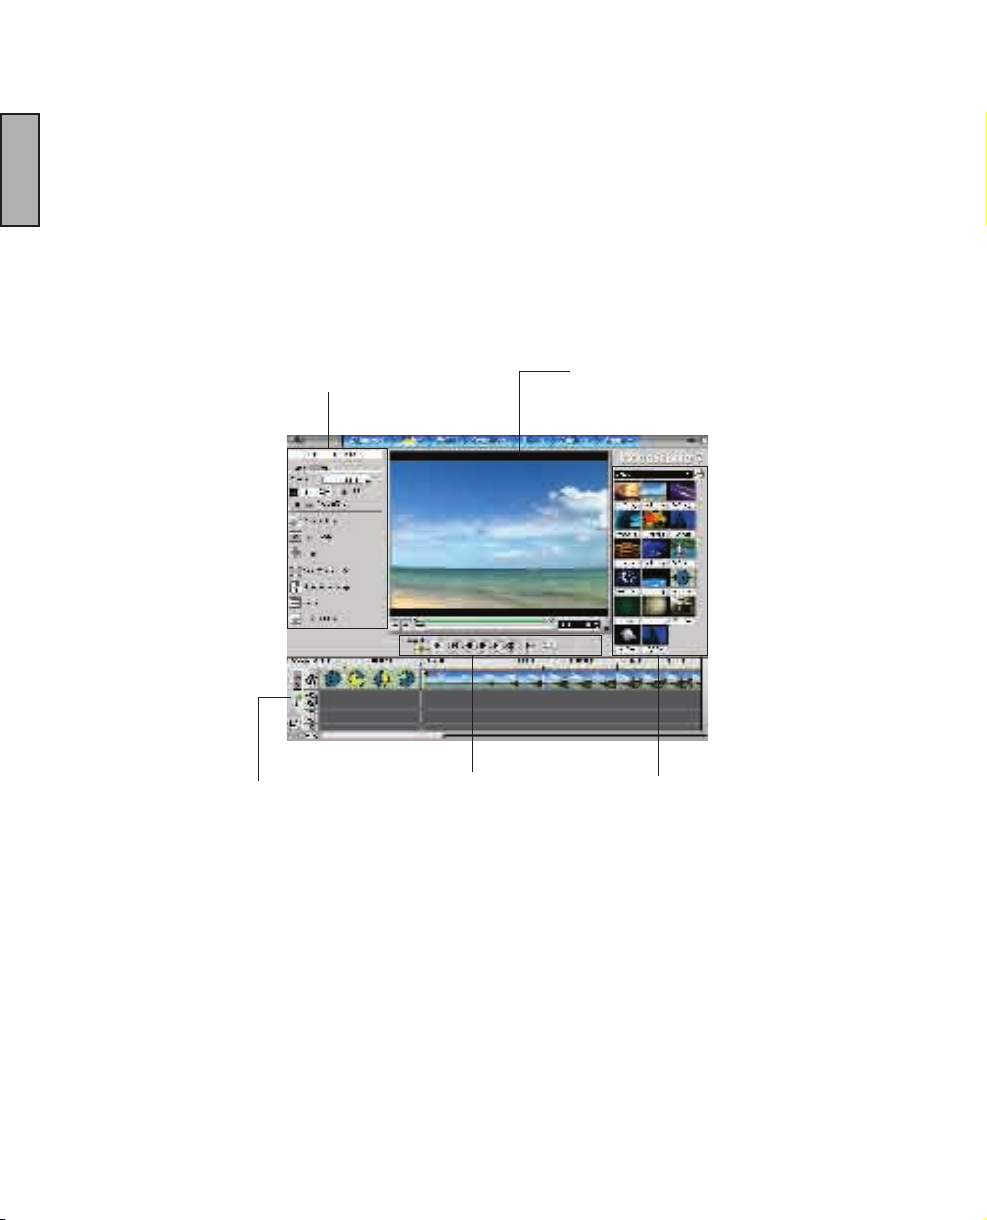
Getting around VideoStudio
The VideoStudio interface has been designed to make the sometimes complicated
task of editing movies on your PC intuitive and enjoyable. This illustration shows the
major components of the program. The next few pages will detail each component’s
specic features and functions.
Options Panel
Contains controls, buttons, and
other information that you could
use to customize the settings of the
selected clip. The contents of this
panel change depending on the step
you are in.
Preview Window
Shows the current clip,
video lter, effect, or title.
Timeline
Displays all the clips, titles, and
effects included in your project.
Select the media track that contains the clip you want to edit.
INSTANT DVD 2.0 Page 30
Navigation Panel
Use these buttons to
go through a selected
clip for precision editing
or trimming.
Library
Stores and organizes all
of your media clips.
Page 31

The Options Panel
The Options Panel changes depending on the program’s mode and the step or track you are working on. The
Options Panel may contain one or two tabs. Information in each tab vary, depending on the selected clip.
Capture Options Panel
Capture Settings tab
• Duration: Sets the length of time for the capture.
• Source: Displays the detected capture device and lists other capture
device drivers installed in your computer.
• Format: Where you select a le format for saving your captured video.
• Split by Scene: Automatically separates captured video into several
les based on changes in recording date and time. (This feature can be
used only when capturing video from a DV camcorder.)
• Capture folder: Where a copy of your captured le is saved.
• Options: Displays a menu allowing you to modify your capture settings.
• Capture Video: Transfers video from your source to your hard disk.
• Capture Image: Captures the displayed video frame as an image.
ENGLISH
INSTANT DVD 2.0 Page 31
Page 32

INSTANT DVD 2.0 Page 33
ENGLISH
Capture
The process of transferring video from your camcorder or other video sources to your computer is called capturing.
When everything is ready to go, the video feed from your source device should be visible in the Preview Window. If
your card supports a television monitor, you should also be able to watch your video on it.
ENGLISH
Once launched, VideoStudio immediately detects the capture settings. If no capture driver is present, you will be
led to the Edit step automatically. You need not switch from capture mode to playback mode anymore.
Checklist for successful video capture
Capturing video is one of the most demanding tasks you will ever ask of your computer. It involves high data rates
and requires huge amounts of disk space. Here are a few things you can do to ensure success:
• Shut down ALL other programs that are running except Windows Explorer and VideoStudio. Remove the
Screen Saver to avoid possible interruption.
• Best results can be achieved by using a dedicated video hard disk, preferably with the capabilities of at
least Ultra-DMA/66, 7200 rpm and more than 30GB space.
• For better manipulation of batch capture and camcorder device control, correct timecode on the DV tape
is a must. To do this, before shooting your video, use the standard playback (SP) mode and shoot a blank
video (for example, leaving the lens cover on while recording) without interruption from start to end of a
tape.
Capturing analog video
To capture video using an analog capture card with audio/video jacks or S-video:
1. Connect your video source device to your capture card. On some cards, you may also
need to connect the audio cables.
2. Open a project and click the Capture Step.
3. Select a capture le format (DV, MPEG or AVI) from the Format list.
4. Scan your video to search the part to capture.
5. When you get to the point you want to record, click Capture Video on the Capture
Settings Tab in the Options Panel.
6. Click Stop Capture or press [Esc] to stop capturing.
Tips:
• A delay in capture may be due to the conrmation dialog box or connection between
devices. It is better to rewind your tape to an earlier point before capturing and just trim
the video later.
• The normal number of dropped frames is zero. If any frames are dropped, check if the
DMA setting is enabled.
If a conrmation dialog box appears, click OK to start the capture process.
To disable this, click File: Preferences. In the Preferences dialog box, click
the Capture Tab and clear Enable press OK to capture.
INSTANT DVD 2.0 Page 32
Page 33

Video Capture Property Settings dialog box
To change video capture properties, click on the Options button.
1.) Select the audio frequency (44.1 kHz or 48 kHz) for your capture
Note: Generally 44.1 kHz is used for VCD and SVCD and 48 kHz is used for DVD.
2.) Select the MPEG Video format you want to capture in; VCD, SVCD or DVD
3.) Select your Video Source; S-Video, Composite or DV
Note: DV is supported in Instant DVD + DV only. A TV tuner is not included on your Instant DVD unit.
You can capture TV signals from a Satellite receiver or VCR via your Composite (RCA) input.
4.) Select the video capture bit rate you desire.
5.) Select the capture resolution.
6.) Select the Video output if you wish to preview video on a TV or output to a VCR.
7.) Format: Select NTSC or PAL video standard.
8.) Click OK and you are ready to capture video in Video Studio.
ENGLISH
Begin Video Capture:
1.) Click the Capture Video icon to begin recording.
2.) Click it once again or click the “esc” key on your keyboard to stop video capture.
INSTANT DVD 2.0 Page 33
Page 34

ENGLISH
INSTANT DVD 2.0 Page 35
ENGLISH
INSTANT DVD 2.0 Page 34
User Guide
Ulead Systems, Inc.
October 2002
Page 35

Welcome to Ulead DVD MovieFactory 2
Ulead DVD MovieFactory provides you with the answer to your video disc authoring needs. No matter if the disc is
a DVD, VCD or SVCD, DVD MovieFactory takes you there instantly with a user-friendly wizard-type process and
specic task-oriented features. With DVD MovieFactory, creating professional-looking video discs has never been
easier!
While all crucial information on how to use DVD MovieFactory is included in this document and the online Help,
you can further receive the latest program updates, tutorials, technology advance (such as the newest hardware
compatibility list), and technical support by visiting your local Ulead Web site.
Getting around Ulead DVD MovieFactory 2
Once you open the program, the rst screen you will see is this:
ENGLISH
Currently
selected task
Four tasks to
choose from
Save your
project, and list
other options
including further
assistance
Note: The availability of the tasks on the left panel will depend on the DVD MovieFactory version that you have.
Project settings
Move to the next step
The current step
you are in
Options for each task
Quick guideline
for each task
Access to online Help
Exit Ulead DVD MovieFactory
INSTANT DVD 2.0 Page 35
Page 36

INSTANT DVD 2.0 Page 37
ENGLISH
Which task should you choose?
Now you have an overall picture of how Ulead MovieFactory looks like. The next thing to do is choose the right task
that ts your need:
• Start Project - New project: Choose this task if you are creating a new DVD MovieFactory project. Please
ENGLISH
select an output disc format, and then click Next to add media clips. (See page 8 for details.)
• Start Project - Existing project: Choose this task if you already have a previous created DVD MovieFactory
project saved on a hard drive or disc. Please use the drop-down list or the browse button to locate a project le
(*.dwz), and then click Next to start editing. (See page 8 for details.)
• Edit Disc: Choose this task if you would like to edit your DVD+R/RW, DVD-R/RW, or an existing DVD
MovieFactory project directly on a recordable disc. Please select the disc location on your computer, and then
click Next to start editing. (See page 18 for details.)
• Direct to Disc: Choose this task if you want to capture videos straight from your video device and burn a disc
immediately. Please select an output disc format, and then click Next to capture videos, setup menus, and
nally burn the disc. (See page 19 for details.)
• Copy Disc: Choose Copy from - Disc if you want to make a disc-to-disc (VCD or SVCD) copy or burn a disc
from a DVD folder located in the hard drive or a disc. You can also choose Copy from - Disc image le to copy
a disc image le and burn onto a disc. Click Next to go to the output step directly. (See page 19 for details.)
INSTANT DVD 2.0 Page 36
Page 37

Working on a project
Ulead DVD MovieFactory is a project-based program. Each project (*.dwz) le saves the latest information on your
video and menu editing as well as the settings you have made for that project. So, you can always stop or resume
your task at your convenience.
Note: You can only work on one project at a time in Ulead DVD MovieFactory.
Add videos or slideshows
Now, you have opened a project. The next thing is to insert media clips into it. These media clips can be videos and/or
slideshows. For example, using a compatible video capture card you can capture videos from a video device such as
a DV camcorder. You can also add videos from a disc/hard drive, or create slideshows using a series of still images.
Once these clips are inserted, you can make further editing and set up selection menus later.
Tip: You can change the
playback sequence by moving
a thumbnail using the dragand-drop method in the Media
clip list.
Use any of these
buttons to add
videos or
slideshows.
Select this to create
an introduction to your
movie. The rst play
video is always playbacked rst automatically after the disc is
inserted into a player.
Add/Edit Media Clip step
Tip: Select Save [Ctrl+S] frequently to safeguard the latest update
of your project.
Media clip list
(Click a thumbnail to select it.)
Click the text description
for editing as needed.
ENGLISH
Capturing videos:
1 Click Capture. The Capture Video dialog box opens.
2 Use the navigation controls to locate the starting point of the
video you want to capture.
3 Click Capture Video.
4 Press [Esc] to stop. Repeat steps 2 to 4 as needed to
capture more videos.
5 Click OK.
Notes:
• All captured videos are stored in the default capture folder. To
change the folder, click the browse button.
• The Capture Video dialog box is strictly for video capturing.
Playing a captured video clip is only possible in the Media clip
list of the main window.
INSTANT DVD 2.0 Page 37
Page 38

Capture settings
Ulead DVD MovieFactory automatically detects and determines capture settings for you. However, if you need to
customize the settings, click . Here, you will see the menu as depicted below. The menu shows
available options, capture plug-ins, and currently selected input video device. Mostly, you will want to select MPEG
Settings for customization.
ENGLISH
Menu shown after clicking
Capture Settings
In the MPEG Settings dialog box, you can choose from a number of presets or dene your preferred settings from
Special Settings. Also, click Video Bit Rate if you want to set a particular variable bit rate. (See online Help for details.)
Tip: If you experienced dropped frames in your captured video, adjust the Quality level in the MPEG Settings
dialog box to a lower value or turn on the DMA setting of your hard drive.
INSTANT DVD 2.0 Page 38
Page 39

Table of Contents
Schnell-Setup...........................................................................................................................................................41
Instant DVD - Überblick...........................................................................................................................................42
Video Aufzeichnung und Bearbeitung...................................................................................................................43
Instant DVD Installationsanleitung ........................................................................................................................45
Hardware Überblick.................................................................................................................................................43
Software Installieren ...............................................................................................................................................48
Der Capture-Wizard von USB Instant DVD............................................................................................................50
Wenn Sie das erste Mal mit Capture Wizard arbeiten..........................................................................................52
Capture Wizard - Merkmale und Funktionen ........................................................................................................55
Menuoptionen..........................................................................................................................................................56
VideoStudio..............................................................................................................................................................62
DVD Movie Factory 2...............................................................................................................................................71
GERMAN
INSTANT DVD 2.0 Page 39
Page 40

GERMAN
INSTANT DVD 2.0 Page 41
GERMAN
Schnell-Setup
Für ganz Eilige, die nur eine Seite lesen wollen:
1.) Schließen Sie die Audio-/Videokabel von Ihrer Videoquelle an das
Instant-DVD-Gerät an.
2.) Legen Sie die mit dem Instant-DVD-Gerät mitgelieferte CD in Ihr
CD-Laufwerk ein – Für die Autorun-Funktion ist Quicktime erforderlich.
Wenn Quicktime nicht auf Ihrem System installiert ist, wird es
automatisch installiert. Keine Seriennummer erforderlich.
3.) Stecken Sie den Instant-DVD-Netzstecker in eine Steckdose ein und
schließen Sie das Instant-DVD-Gerät an Ihren USB-Port an.
4.) Treiber für WinXP und Win2000 benden sich im Root-Verzeichnis
der CD. Treiber für Win98SE und WinME benden sich im Ordner
“Win98SE&WinME” auf der CD. Nach Auswahl der benötigten Treiber
werden diese automatisch installiert.
5.) Installieren Sie CapWiz – CapWiz muss installiert werden, da es die
von Instant DVD benötigten Dateien installiert.
6.) Klicken Sie zweimal rasch hintereinander auf das CapWiz-Symbol
auf Ihrem Desktop.
7.) Ein Installationsassistent erscheint. Beantworten Sie die Fragen in
den fünf Fenstern.
8.) Drücken Sie die Play-Taste auf Ihrer Videoquelle und lassen Sie ein
Video abspielen.
9.) Klicken Sie auf “Preview” (Vorschau) im CapWiz-Fenster – das Video
erscheint auf dem Bildschirm.
Experimentieren Sie ein wenig mit CapWiz und installieren Sie anschließend
die anderen Softwareprogramme von der CD.
INSTANT DVD 2.0 Page 40
Page 41

INSTANT DVD - ÜBERBLICK
Instant DVD 2.0
Mit Instant DVD 2.0 können Sie DVD-, SVCD- und VCD-Video mühelos und
im Handumdrehen auf Ihren Windows-PC übertragen und dort bearbeiten und
archivieren. Instant DVD gibt Ihnen die Möglichkeit, das übertragene Video
auf CD oder DVD-Disk zu brennen oder ins Internet zu stellen. Außerdem
haben Sie die Möglichkeit, das Video über das Instant-DVD-Gerät auf einem
Fernsehgerät abzuspielen oder mit einem Videogerät oder Camcorder
aufzuzeichnen.
Die Videodigitalisierung und -kompression ndet im Instant-DVD-Gerät statt,
d. h., wenn das Video über die USB-Schnittstelle in Ihren Computer gelangt,
hat es bereits das gewünschte Format, z. B. MPEG-1 für VCD (Video on CD),
MPEG-2 für SVCD (Super Video CD) oder DVD (Digital Versatile Disc).
Leistungsstarkes Softwarebündel:
Damit Sie Ihr Instant-DVD-Gerät optimal ausnutzen können, haben wir mehrere Softwareprogramme mitgeliefert.
Möglicherweise möchten Sie ein Video einfach nur so schnell wie möglich auf Disk archivieren. Oder Sie möchten Ihr
Video ein wenig bearbeiten, die Hauptarbeit der Videobearbeitung aber auf einen späteren Zeitpunkt verschieben.
Oder Sie möchten ein umfangreiches Projekt erstellen und benötigen einen leistungsstarken Video Editor, mit dem Sie
Ihr Video nach Belieben bearbeiten können. All dies ist mit Instant DVD möglich: Sie haben nicht nur eine, sondern
mehrere Möglichkeiten, um Video auf und von Ihrem Computer zu übertragen und auf Disk zu brennen.
Instant DVD 2.0 includes several exible and dynamic software tools for your video projects:
GERMAN
INSTANT DVD 2.0 Page 41
Page 42

INSTANT DVD 2.0 Page 43
GERMAN
VIDEO AUFZEICHNUNG UND BEARBEITUNG
CapWiz: VIDEO MÜHELOS AUFZEICHNEN UND ABSPIELEN
Dies ist der schnellste und einfachste Weg, um MPEG-1 Video (VCD) oder MPEG-2
Video (SVCD, DVD) auf Ihren PC zu übertragen. Mit dem Assistenten können Sie
Ihre Videoanschlüsse, das Kompressionsformat sowie das Speicherverzeichnis
für Ihre Dateien auswählen und einsehen.
Verwenden Sie CapWiz (in der Folge auch “Capture Wizard” genannt), wenn Sie
Video rasch auf Ihren Computer aufzeichnen möchten oder MPEG-Video entweder
auf einem Fernsehgerät anschauen oder mit einem Videogerät aufnehmen möchten.
CapWiz gibt Ihnen außerdem die Möglichkeit, die Aufnahmedauer festzulegen, mit
GERMAN
einer zeitlichen Verzögerung aufzunehmen und die Aufnahme-Bitrate auszuwählen,
je nachdem ob Sie eine “gute”, “bessere” oder “beste” DVD-Videoqualität wünschen.
Sie können ferner die Videoauösung, die Bitrate für Video und Audio, konstante
bzw. variable Bitraten auswählen und Filter für die Videovorverarbeitung einsetzen,
wodurch sich Geräusche auf älteren VHS-Bändern reduzieren lasen.
HINWEIS: Wenn Sie beabsichtigen, aufgezeichnetes Video auf einem Fernsehgerät
anzusehen bzw. auf ein Videoband aufzunehmen, müssen Sie die Audio-/Videokabel
vom Instant-DVD-Gerät an den Audio- und Videoeingang des Fernsehgeräts
anschließen und beim Fernsehgerät die externe Videoquelle auswählen. Da Instant
DVD ein MPEG-Decoder ist, können nur MPEG-1- und MPEG-2-Dateien an das
Fernsehgerät exportiert werden. Video, das z. B. in einem Streaming-Format (.wmv)
aufgezeichnet wurde, kann nicht zur Darstellung auf einem Fernsehbildschirm
decodiert werden.
VideoStudio 7.0 DVD SE: Umfassende Videoaufzeichnung & -bearbeitung
VideoStudio führt Sie durch die einzelnen Schritte zur Erstellung eines Films.
Die wichtigsten Elemente sind: CAPTURE (Aufzeichnen), EDIT (Bearbeiten),
EFFECT (Effekt), OVERLAY (Overlay), TITLE (Titel), AUDIO und SHARE
(Veröffentlichen). Verwenden Sie VideoStudio, wenn Sie Video individuell
bearbeiten, mit Effekten, Filtern, Titeln, Hintergrundmusik und Voiceover versehen
möchten. Mit VideoStudio können Sie Video aufzeichnen und bearbeiten und
anschließend an ein Fernseh- bzw. Videogerät übertragen oder auf Disk brennen.
VideoStudio beinhaltet einen DVD-Assistenten zum mühelosen Authoring und
Brennen Ihres Videos auf Disk. Sie können entweder die einzelnen Dateien an
den DVD-Assisten übertragen oder Ihren bearbeiteten Film zunächst auf VCD,
SVCD oder DVD speichern und dann an den DVD-Assisten exportieren. Zum
Starten des DVD-Assistenten gehen Sie zum Modul “SHARE” (Veröffentlichen)
und klicken Sie auf “Create Disk” (Disk erstellen).
VCD- und SVCD-Filme können auf CD-ROM gebrannt werden. DVD-Filme
können ebenfalls auf CD-ROM gebrannt werden, wobei jedoch nur 20 Minuten
Video in DVD-Qualität auf eine 700MB fassende CD-ROM passen. Wenn Sie
einen DVD-Recorder haben, können Sie auf eine 4,7 GB fassende DVD-Disk
etwa 2 Stunden Video in DVD-Qualität brennen. VideoStudio unterstützt ferner
das Brennen von SVCD (MPEG-2 bei einer Übertragungsrate von 2,4 Megabit/
Sek.) auf CD-ROM. SVCD lässt sich auf vielen Heim-DVD-Playern abspielen.
Auf eine 700 MB CD-ROM passen etwa 35-40 Minuten SVCD-Inhalt.
**NÄHERE INFORMATIONEN ZU DIESEN PRODUKTEN FINDEN
SIE AUF DER CD**
INSTANT DVD 2.0 Page 42
Page 43

DVD Movie Factory 2.1 SE:
Videos ohne vorherige Bearbeitung direkt auf CD oder DVD brennen
Wenn Sie Ihr Video einfach nur auf Disk brennen möchten, um es zu einem
späteren Zeitpunkt zu bearbeiten, ist DVD Movie Factory der einfachste und
schnellste Weg, “disk-bereites” Video aufzuzeichnen. Verwenden Sie DVD
Movie Factory zum Aufzeichnen von Video im VCD-, SVCD- oder DVD-Format
und gehen Sie direkt zum Modul “Authoring und Brennen”. Anhand der Funktion
“Direct to Disk” * können Sie Ihr Video sogar in einem einzigen Schritt direkt
auf CD oder DVD brennen. Wenn Sie wiederbeschreibbare Speichermedien
verwenden, ermöglicht Ihnen die Funktion “On the Fly”, direkt auf DVD+RW
bzw. DVD-RW-Medien zu brennen. Außerdem gibt Ihnen DVD Movie Factory
die Möglichkeit, unbewegliche Bilder zu importieren und daraus
Bildschirmpräsentation zu erstellen und auf VCD oder DVD zu brennen. Sie
können Hintergründe und Menüs anlegen, mehrere Bildschirmpräsentationen
auf eine einzige Disk brennen, diese mit Musik unterlegen und somit ein echtes
Multimedia-Erlebnis kreieren.
Erstellen Sie einen Auto-Muvee!
Muvee autoProducer DVD Edition SE
Wir alle möchten brillante, professionelle Filme erstellen, haben aber oftmals
nicht die Zeit, die Geduld oder das Talent, ein wirklich gut aussehendes Video zu
machen. In einem solchen Fall benötigen Sie Muvee autoProducer DVD Edition
SE – der schnellste und einfachste Weg zur Erstellung einer fertigen Produktion
aus Rohvideo. Mit der DVD Edition können Sie Ihre Videos zusätzlich als
DVD-fähige MPEG-2-Dateien speichern, die Sie mühelos in DVD Movie Factory
importieren und auf DVD brennen können. Muvee autoProducer DVD Edition
lässt sich in nur einer Minute erlernen und ist in der Anwendung etwa hundert
Mal schneller als jede andere Software zur Videobearbeitung. Sie geben dem
Programm einfach Ihr Video, wählen einen Musiktitel aus (MP3 oder WAV) und
entscheiden sich für einen Bearbeitungsstil. Den Rest erledigt das Programm.
GERMAN
**NÄHERE INFORMATIONEN ZU DIESEN PRODUKTEN FINDEN
SIE AUF DER CD**
INSTANT DVD 2.0 Page 43
Page 44

INSTANT DVD 2.0 Page 45
GERMAN
INSTANT DVD 2.0 INSTALLATIONSANLEITUNG
GERMAN
Erste Schritte
Dies sind die wichtigsten Schritte:
1. Packungsinhalt des USB-Instant-DVD-Geräts
überprüfen
2. Video- und Audiokabel anschließen
3. USB- und Netzanschluss vornehmen
4. Gerätetreiber und Software installieren
5. Anwendungssoftware installieren
6. Hardware-Installation überprüfen
7. System optimieren
8. Installationszusammenfassung & Diagramm
9. Fangen Sie an, Ihre eigenen DVD-Filme zu
erstellen!
1. Überprüfen Sie den Packungsinhalt
des Instant-DVD-2.0 Gerätes
Hardware:
(A) Instant-DVD-2.0-Gerät
(B) 5 VDC Netzteil
(C) 2 Meter USB-Kabel
(D) 2 Meter A/V-Kabel (RCA Video und (L+R) Audio an
RCA-Video und 3,5 mm Stereo)
(E) Zwei (2) Installations-CDs
(F) Handbuch
Systemanforderungen
- Intel Celeron 400 MHz oder AMD Athlon 600 MHZ oder besser
- Windows: Win98SE, WinME, Win2000 oder WinXP
- Empfohlener RAM: 128 MB
- Soundkarte
- 16 MB AGP Videokarte
- CD-ROM-Laufwerk
- 150 MB freier Festplattenspeicher für Aufzeichnungs Bearbeitungssoftware
- Freier Festplattenspeicher für aufgezeichnetes Video. Mit einer
Geschwindigkeit von 4 Mb/Sek. aufgezeichnetes Video
benötigt ca. 1,8 GB pro Stunde
- CD-Brenner-Laufwerk zum Erstellen von VCD- und SVCD-Disks
- DVD-Brenner Laufwerk zum Erstellen von DVD-Disks
• CD 1 enthält:
- Capture Wizard Capture & Export-Utility
- USB-Instant-DVD-Gerätetreiber
- Ulead DVD Movie Factory 2.0 SE für Instant DVD
- Muvee autoProducer
• CD 2 enthält:
- Ulead VideoStudio 7 SE, angepasst an Instant DVD
INSTANT DVD 2.0 Page 44
Page 45

USB 1.1- und USB 2.0-Anschlüsse und Treiber
USB 2.0
Damit Ihr Instant-DVD-Gerät bei USB 2.0-Geschwindigkeiten reibungslos läuft, empfehlen wir, Microsoft USB 2.0Treiber nur mit WinXP oder Win2000 zu verwenden.
Microsoft Windows USB 2.0-Treiber sind von Microsoft erhältlich:
WinXP – Auf Ihrem neuen PC installiert bzw. als Windows-Update: Downloaden Sie WinXP Service Pack 1
Win2000 – Downloaden Sie Win2000 Service Pack 3.
Viele USB 2.0-Upgrade-Karten werden mit Treibern geliefert, die nicht von Microsoft stammen. Diese Treiber sind
stark bearbeitet und können bei einigen USB 2.0-Geräten zu Kompatibilitätsproblemen führen. Der USB 2.0-Treiber,
den Sie besitzen, funktioniert möglicherweise problemlos, wir können jedoch nicht garantieren, dass Ihr
USB-Instant-DVD-Gerät mit USB 2.0-Treibern, die nicht von Microsoft stammen, reibungslos funktioniert.
Wenden Sie sich an den Hersteller Ihrer USB 2.0 Add-in-Karte und besorgen Sie sich die jüngsten Versionen
der USB 2.0-Treiber für Win98SE und WinME.
USB 1.1
Wir empfehlen, die USB 1.1-Schnittstelle zu Ihrer Hauptplatine oder zu einer USB 1.1-Add-in-Karte zu verwenden.
Alle USB 1.1-Karten verwenden USB-Treiber von Microsoft. Wenn Sie Win98SE oder WinME verwenden,
empfehlen wir, den USB 1.1-Anschluss Ihres PCs zu verwenden.
HARDWARE - ÜBERBLICK:
GERMAN
INSTANT DVD 2.0 Page 45
Page 46

INSTANT DVD 2.0 Page 47
GERMAN
2. VIDEO- UND AUDIOKABEL ANSCHLIESSEN
In diesem Abschnitt schließen wir die Audio- und Videokabel an, die benötigt werden, um Audio und Video auf den Computer
zu übertragen und anschließend zur Ansicht bzw. zur Aufnahme an ein Fernseh- oder Videogerät zurückzuschicken.
GERMAN
or
INSTANT DVD 2.0 Page 46
Page 47

1. Schließen Sie Ihre Videoquelle (VHS, DVD, Laser Disc Player, TV usw.) an Ihr USB-Instant-DVD-Gerät an.
Schließen Sie das 2 Meter lange A/V-Eingangskabel (D) an die 3 RCA-Buchsen Ihrer analogen Audio-/Videoquelle
an (RCA Line Out).
Das andere Ende wird an die Buchsen “RCA Video In” und “3,5 mm Audio In” auf der Rückseite Ihres
Instant-DVD-Geräts angeschlossen.
3. USB- und Netzanschluss vornehmen
In diesem Abschnitt schließen Sie das USB-Instant-DVD-Gerät an Ihren PC an und installieren die Software-Treiber.
Lesen Sie sich diesen Abschnitt zunächst ganz durch. Befolgen Sie anschließend
die einzelnen Schritte zum Anschließen des USB-Instant-DVD-Geräts an Ihren
Computer und zur Installation der Gerätetreiber und Software:
1. Die zu USB Instant DVD gehörige CD einlegen -
Die Installationsprogramme benötigen Apple Quicktime. Sollte Quicktime nicht
auf Ihrem Computer installiert sein, wird es automatisch installiert. Anklicken
von “Next” auf den einzelnen Installationsbildschirmen bringt Sie zum jeweils
nächsten Installationsschritt. Kein Nutzername, keine Registrierung und keine
Seriennummer erforderlich)
2. Sobald Sie den Instant-DVD-Installationsbildschirm sehen,
Schließen Sie das Netzkabel an Ihr USB-Instant-DVD-Gerät an und stecken Sie den Netzstecker in eine
Steckdose ein.
4. Gerätetreiber und Software installieren
Schließen Sie als Nächstes das USB-Kabel an das USB-Instant-DVD-Gerät und an Ihren PC an.
Windows erkennt das Gerät und Sie erhalten eine Aufforderung zur Installation der
Gerätetreiber.
Windows XP und Win2000: Lassen Sie Windows eine automatische Suche nach
den Treibern durchführen. Die Treiber benden sich im Root-Verzeichnis der mit
dem USB-Instant-DVD-Gerät gelieferten CD (normalerweise auf dem “D”-Laufwerk).
Windows installiert die Treiber automatisch.
Win98SE und WinME: Die Treiber für Win98SE/ME benden sich im Ordner
“Win98” auf der CD. Wenn Windows nach dem Treiber fragt, klicken Sie auf den
Laufwerksbuchstaben, in dem sich die CD bendet (normalerweise “D”), und klicken
Sie rasch zweimal hintereinander auf den Ordner “Win98”. Windows installiert
daraufhin die Treiber automatisch.
GERMAN
5. Software installieren
1. Nachdem Sie das Gerät installiert haben, klicken Sie auf die Schaltäche “Capture Wizard”. Dies installiert die
Softwarekomponenten, die für den Betrieb des Instant-DVD-Geräts erforderlich sind. Außerdem wird die
Capture-Wizard-Software installiert, mit der Sie Video aufzeichnen und abspielen können.
a.) Wenn Microsoft DirectX 9.0 nicht bereits auf Ihrem Computer installiert ist, wird es automatisch
installiert. DirectX 9.0 ist erforderlich, damit Ihr Instant-DVD-Gerät ordnungsgemäß funktionieren
kann. Nach der Installation von DirectX 9.0 müssen Sie Ihren Computer möglicherweise neu starten.
b.) Wenn Ihr Computer neu gestartet wurde, klicken Sie auf “Mein Arbeitsplatz” auf Ihrem Desktop.
Klicken Sie zweimal rasch hintereinander auf das Symbol für Ihr CD-Laufwerk, wodurch der
Installationsbildschirm für Instant DVD wieder erscheint.
c.) Installieren Sie als Nächstes die gebündelte Software: VideoStudio 7, DVD Movie Factory und Muvee AutoProducer.
2. Installieren Sie VideoStudio 7 von Disk 2.
INSTANT DVD 2.0 Page 47
Page 48

GERMAN
INSTANT DVD 2.0 Page 49
GERMAN
6. Hardware-Installation überprüfen
Überprüfen Sie im Windows-Gerätemanager, ob die USB-Instant-DVDHardware ordnungsgemäß installiert ist und von Windows erkannt wird.
Win98, Win98SE, WinME:
1.) Klicken Sie auf “Start”, “Einstellungen”, “Systemsteuerung”.
2.) Im Fenster mit der Systemsteuerung auf “System” klicken.
3.) Klicken Sie auf die Registerkarte “Gerätemanager”.
4.) Klicken Sie zweimal rasch hintereinander auf “Sound, Video und Game
Controller”
5.) “Instant DVD” müsste aufgeführt sein.
WinXP, Win2000:
1.) Klicken Sie auf “Start”, “Einstellungen”, “Systemsteuerung”.
2.) Im Fenster mit der Systemsteuerung klicken Sie auf “System”.
3.) Klicken Sie auf die Registerkarte “Hardware”.
3.) Klicken Sie auf die Schaltäche “Gerätemanager”.
4.) Klicken Sie zweimal rasch hintereinander auf “Sound, Video und
Game Controller”
5.) “Instant DVD” müsste aufgeführt sein.
Wenn USB Instant DVD unter “Sound, Video und Game Controller”
aufgeführt ist, ist das Gerät ordnungsgemäß installiert.
7. System optimieren
Optimieren Sie als Nächstes Ihr System, um optimal mit dem Instant-DVD-Gerät
arbeiten zu können.
VGA-Auösung
Die optimale Bildschirmauösung zum Anschauen von Video bei voller Auösung
ist 1024 X 768. DVD Video wird mit einer Auösung von 720 x 480 (720 x 576) PAL
aufgezeichnet. Zu niedrige Bildschirmauösung bedeutet, dass Sie Ihr Video nicht bei
voller Auösung ansehen können.
1. Klicken Sie mit der rechten Maustaste auf das Desktop
2. Klicken Sie auf “Eigenschaften”
3. Klicken Sie auf die Registerkarte “Einstellungen”
4. Stellen Sie die Bildschirmauösung auf 1024 X 768 & 16 Bit Color (oder höher,
vorausgesetzt, Ihre VGA-Karte und Ihr Monitor unterstützen eine höhere Auösung
und Bittiefe).
Zur Optimierung der Videoaufzeichnung DMA aktivieren:
Mit der Aktivierung von DMA verbessern Sie die Fähigkeiten Ihres Systems zur
Videoaufzeichnung. Ist der DMA-Modus nicht aktiviert, müssen Sie damit rechnen,
dass Video-Frames bei der Aufzeichnung ausgelassen werden.
Windows 98SE und WinME: Optimieren Sie die Videoaufzeichnung, indem Sie DMA
auf der IDE-Festplatte aktivieren. (Hinweis: Nicht alle Geräte erlauben Zugang zum
DMA-Modus.)
1. Klicken Sie mit der rechten Maustaste auf “Mein Arbeitsplatz”
2. Klicken Sie auf “Eigenschaften”
3. Klicken Sie auf “Gerätemanager”
4. Klicken Sie zweimal rasch hintereinander auf “Laufwerke”
5. Klicken Sie zweimal rasch hintereinander auf die Festplatte (trägt in der Regel
die Bezeichnung “Generic IDE type XXX”)
6. Klicken Sie auf die Registerkarte “Einstellungen”
7. Aktivieren Sie DMA, indem Sie das DMA-Kästchen mit einem Häkchen versehen.
8. Klicken Sie auf OK.
9. Klicken Sie auf OK.
Ihr Computer wird neu gestartet. Nach dem Neustart ist DMA aktiviert.
INSTANT DVD 2.0 Page 48
Page 49

8. Installationszusammenfassung
Bis jetzt sollten Sie:
1.) Alle Audio- und Videoverbindungen zwischen dem Instant-DVD-Gerät und Ihrem Audio/Video-Gerät hergestellt haben.
2.) Instant DVD an eine Stromquelle und an die USB-Schnittstelle Ihres PCs angeschlossen haben.
3.) USB-Treiber installiert und überprüft haben, dass das Gerät ordnungsgemäß installiert ist.
4.) Alle für den Betrieb erforderlichen Softwareprogramme installiert haben.
5.) Jetzt sind Sie bereit, DVD-Filme zu erstellen.
9. Fangen Sie an, Ihre eigenen DVD-Filme zu erstellen
Nachdem Sie die Installation abgeschlossen haben, können Sie mit dem Aufzeichnen von Video beginnen. Capture
Wizard (CapWiz) gibt Ihnen die Möglichkeit, Video rasch und einfach in Ihren PC zu importieren und wieder zu
exportieren, ohne dass Sie sich mit Videobearbeitung oder DVD-Authoring auskennen müssen. Capture Wizard gibt
Ihnen die Möglichkeit, sich mit der Aufzeichnung und dem Abspielen von Video vertraut zu machen, ehe Sie sich
umfangreicheren Programmen wie VideoStudio 7 oder DVD Movie Factory zuwenden.
Wir haben einen einfachen Start-Assistenten entwickelt, mit dem Sie Ihre Anschlüsse überprüfen und die korrekten
Setup-Einstellungen vornehmen können, ehe Sie mit der Videoaufzeichnung beginnen.
Der Capture-Wizard von USB Instant DVD:
Schritt Eins: CapWiz öffnen
Klicken Sie auf das Cap-Wiz-Symbol auf Ihrem Desktop.
Alternativ können Sie auch auf “Start”, “Programme”, “ADS Tech
Instant DVD” und “Capwiz” klicken.
GERMAN
Wählen Sie den in Ihrem Land verwendeten Videostandard aus. Der
Videostandard in Nordamerika ist NTSC. In Europa und vielen anderen
Ländern ist der Videostandard PAL.
Wenn Sie nähere Informationen zu diesen Videostandards wünschen,
klicken Sie auf “Learn more about worldwide Video standards”
Schritt Zwei: Videoeingänge & -ausgänge auswählen
Wählen Sie je nach verwendeter Videoquelle entweder RCA
oder S-Video aus.
INSTANT DVD 2.0 Page 49
Page 50

INSTANT DVD 2.0 Page 51
GERMAN
Schritt Drei: Dateinamen eingeben und
Speicherverzeichnis auswählen
Als Speicherverzeichnis für Ihre Videodateien wird automatisch
“Meine Dateien\Meine Videos” ausgewählt. Wenn Sie möchten,
können Sie ein anderes Speicherverzeichnis auswählen.
GERMAN
Schritt Vier: Videoformat auswählen
In diesem Schritt wählen Sie zwischen den Kompressionsformaten
MPEG-1 und MPEG-2 aus. Wählen Sie MPEG-2, wenn Sie Video
im DVD-Format aufzeichnen möchten (höchste Videoqualität).
Wählen Sie MPEG-1, wenn Sie Video im VCD-Format aufzeichnen
möchten.
Die Anzeige “Disk Space” (freier Festplattenspeicher) zeigt, wie viel
freien Speicherplatz Sie auf Ihrer Festplatte haben, und gibt Ihnen
ein Beispiel, wie viel Video Sie aufzeichnen können, wenn Sie
MPEG-2-Video mit einer Übertragungsgeschwindigkeit von 3 Mb/s.
aufzeichnen.
Wenn Sie nähere Informationen zu den MPEG-Formaten
wünschen, klicken Sie auf “Learn more about Video formats”.
Fertig
Jetzt sind Sie so weit, dass Sie mit dem Ansehen und Aufzeichnen von
Video beginnen können. Dazu müssen Sie Ihren Camcorder bzw. Ihr
Videogerät starten. Drücken Sie einfach die Play-Taste auf Ihrer
Videoquelle (VCR, DVD-Player usw.).
Klicken Sie auf “Finish” (Beenden). Das Setup-Fenster verschwindet und
Sie sehen den Capture-Wizard- Programmbildschim.
INSTANT DVD 2.0 Page 50
Page 51

Wenn Sie das erste Mal mit Capture Wizard arbeiten:
Sie haben gerade das Setup abgeschlossen und dabei Ihre Videoanschlüsse überprüft und Ihr Videoformat
ausgewählt. Sie können jetzt mit der Videoaufzeichnung beginnen.
Der Capture-Wizard-Programmbildschirm
Menu Options
File Name
Auto-Naming/Unique Name
Playback List Box
Application Links
GERMAN
Record/Play Controls
Status Indicator
Video in der Vorschau anzeigen und aufnehmen
1.) Vergewissern Sie sich, dass Ihr Videogerät ein Video abspielt.
2.) Anklicken von “Preview” (Vorschau) zeigt das aktuelle Video im Vorschaufenster an. Die Statusanzeigen
sind blau und zeigen an, dass Sie sich im Vorschaumodus benden.
3.) Durch Anklicken von “Stop” (�) oder Drücken der Escape-Taste auf Ihrer Tastatur können Sie die
Videovorschau stoppen.
4.) Wenn Sie während der Videoschau auf die rote Aufnahmetaste “Record” (�) klicken, stoppt das Video für
einen kurzen Moment, ehe es erneut startet. Wenn die Videovorschau wieder startet, wird das Video
gleichzeitig aufgezeichnet. Sie werden feststellen, dass die Statusanzeigen jetzt rot sind und anzeigen,
dass das Video aufgenommen wird.
5.) Sie können den Aufnahmevorgang stoppen, indem Sie entweder die Schaltäche “Stop” (�) anklicken oder
die Escape-Taste auf Ihrer Tastatur drücken.
6.) Sie werden feststellen, dass der Dateiname jetzt in der Playback-Liste erscheint.
INSTANT DVD 2.0 Page 51
Page 52

INSTANT DVD 2.0 Page 53
GERMAN
Aufnahme starten
1. Der Aufnahmevorgang kann gestartet werden, wenn sich CapWiz im Stop- oder Bereitschaftszustand bendet,
oder während Sie sich Video in der Vorschau ansehen.
2. Klicken Sie auf die rote Aufnahmetaste ( � ) um die Aufnahme zu starten.
3. Klicken Sie auf die Stoptaste ( � ) oder drücken Sie die Escape-Taste auf Ihrer Tastatur, um den
Aufnahmevorgang zu stoppen.
4. Das Video wird in der Auösung angezeigt, die Sie zuvor für die Videoaufzeichnung ausgewählt haben:
a. VCD 352 x 240 NTSC / 352 x 288 PAL
b. SVCD 480 x 480 NTSC / 480 x 576 PAL
c. DVD 720 x 480 NTSC /720 x 576 PAL
GERMAN
Aufgezeichnetes Video abspielen
Aufgezeichnete Videodateien können entweder auf Ihrem Computermonitor angezeigt oder über das Instant-DVDGerät dekodiert und auf einem Fernsehgerät dargestellt bzw. auf Video aufgenommen werden. Über die Option
“Playback On” können Sie auswählen, wo das Video angezeigt wird.
Playback auf dem Computerbildschirm:
Dies ist die Standardeinstellung. Das Video wird mit der gleichen Auösung abgespielt, in der es aufgezeichnet wurde.
1.) Klicken Sie auf den Dateinamen in der Playbackliste und anschließend auf die Schaltäche “Play” (�) .Sie können
das Playback auch sofort starten lassen, indem Sie zweimal rasch hintereinander auf den Dateinamen klicken.
Die Statusanzeige wird grün und zeigt “Play”.
2.) Sie können das Playback stoppen, indem Sie auf die Schaltäche “Stop” ( � ) klicken oder die Escape-Taste
auf Ihrer Tastatur drücken.
INSTANT DVD 2.0 Page 52
Page 53

Video durchsuchen
Wenn Sie ein langes Video aufgezeichnet haben, möchten Sie möglicherweise nicht am Anfang des Videos, sondern
mitten im Video mit dem Playback beginnen.
1.) Klicken Sie auf die Schaltäche “Pause” (�).
2.) Verschieben Sie den Playback-Schieberegler an die gewünschte Stelle.
3.) Klicken Sie auf “Play” (�) oder drücken Sie die Leertaste auf der Tastatur, um mit dem Playback fortzufahren.
Tastaturkürzel:
Vorschau = Eingabetaste
Aufnahme = “R”-Taste
Playback sofort starten = Dateinamen zweimal rasch hintereinander anklicken
Play/Pause = Leertaste
Aufnahme beenden = Escape-Taste
Vorschau beenden = Escape-Taste
1 Sekunde vorspulen (im Pause-Modus) = rechte Pfeiltaste
1 Sekunde zurückspulen (im Pause-Modus) = linke Pfeiltaste
Exportkongurierung – Video an Fernseh- oder Videogerät senden
Mithilfe von CapWiz können Sie MPEG-Videodateien, die Sie mit Instant DVD aufgezeichnet haben, auf einem
Fernsehgerät ansehen oder auf Videoband aufnehmen. Schließen Sie die Kabel, die Sie mit Ihrem Instant-DVD-Gerät
erhalten haben, an den Video- und den Audioausgang des Instant-DVD-Geräts an und schließen Sie anschließend den
gelben, roten und weißen RCA-Stecker an Ihr Fernseh- bzw. Videogerät an (siehe Abbildung unten).
GERMAN
OR
Übertragen an Fernseh- oder Videogerät:
Wenn Sie das aufgezeichnete Video auf einem Fernsehgerät anschauen bzw. auf Videoband aufzeichnen möchten,
müssen Sie wie folgt vorgehen:
1.) Klicken Sie im Kästchen “Playback Video on” auf die Option TV/VCR.
2.) Wählen Sie die gewünschte Datei aus.
3.) Klicken Sie auf die Schaltäche “PLAY” (�) oder zweimal rasch hintereinander auf den Dateinamen.
Letzteres bewirkt, dass das Playback sofort beginnt.
4.) Sie können das Playback jederzeit stoppen, indem Sie auf die Schaltäche “Stop” (�) klicken.
INSTANT DVD 2.0 Page 53
Page 54

INSTANT DVD 2.0 Page 55
GERMAN
Capture Wizard - Merkmale und Funktionen
Dateiname des aufgezeichneten Videoclips:
Werfen Sie einen Blick in das Kästchen “Recording Filename” (Dateiname für die Aufzeichnung), ehe Sie mit der
Videoaufnahme beginnen. Hier sehen Sie den Dateinamen, den Sie zu Anfang mit dem Assistenten für die
aufzunehmende Datei eingegeben haben.
1. Sie können den Dateinamen beibehalten oder den Assistenten aufrufen und einen neuen Namen eingeben.
2. Wenn Sie das Kästchen “Auto Naming” (automatische Namensgebung) mit einem Häkchen versehen,
benennt CapWiz alle aufgezeichneten Dateien automatisch in aufsteigender Reihenfolge. Wenn also Ihre
Videodatei den Namen “Mein Video” trägt, erhält der erste aufgezeichnete Clip den Namen “My Video-000”,
die zweite “My Video-001” usw.
3. Jedes Mal, wenn Sie den Aufnahmevorgang stoppen, erscheint ein neuer Dateiname in der Playbackliste.
4. Wenn Sie das Kästchen “Auto Naming” abwählen und stattdessen auf “Unique” (einmaliger Dateiname)
klicken, verwendet CapWiz den Dateinamen, den Sie in das Feld “Filename” eintragen. Hierbei müssen Sie
GERMAN
für jeden aufgezeichneten Videoclip einen neuen Dateinamen eingeben. Wenn Sie die Option “Unique”
ausgewählt haben und mehrere Videoclips aufnehmen, ohne zwischendurch einen neuen Dateinamen
einzugeben, wird die aufgenommene Datei überschrieben.
Playbackliste
In der Playbackliste sehen Sie die Dateinamen der aufgezeichneten Videoclips. Die Dateien werden in dem
Verzeichnis abgelegt, das Sie zu Anfang im Capture-Assistenten ausgewählt haben. Rufen Sie den Assistenten auf,
wenn Sie nicht sicher sind, in welchem Verzeichnis die Dateien gespeichert werden.
Browse: Anhand der Schaltäche “Browse” (Durchsuchen) können Sie zu anderen Verzeichnissen oder
Festplatten auf Ihrem System navigieren. Wenn Sie ein anderes Verzeichnis auswählen, erscheinen alle
darin enthaltenen MPEG-Videodateien in der Playbackliste.
Details: Anklicken von “Details” gibt Ihnen die Möglichkeit, Einzelheiten zu den Dateien in der Playbackliste
einzusehen. Es erscheint eine Dialogbox mit Dateidetails wie Datum der letzten Änderung, Dateigröße, Dateiname
und Speicherverzeichnis.
Wenn Sie eine Datei in dieser Dialogbox anklicken und erneut auf “Details” klicken, sehen Sie weitere Angaben zu
der Datei, z. B.:
1.) Videobitrate
2.) Audio-Samplingrate
3.) Audiobitrate
4.) Frame-Rate
Datei löschen:
Wenn Sie sich im Fenster mit den Dateidetails benden, können Sie Dateien löschen, indem Sie auf die
Schaltäche “Remove” klicken.
CapWiz fragt Sie, ob Sie sicher sind, dass Sie die Datei löschen möchten. Anklicken von “OK” bewirkt, dass die
Datei von Ihrem System gelöscht wird.
Software-Links
Die Symbole auf der Seite des CapWiz-Bildschirms erlauben Ihnen, von CapWiz aus mühelos die gebündelte
Software aufzurufen, die Sie mit Ihrem Instant-DVD-Gerät erhalten haben. Sie können rasch VideoStudio,
DVD Movie Factory oder den CapWiz-Assistenten aufrufen, wenn nicht gerade Video im Vorschaubereich
abgespielt wird. Anklicken eines Software-Symbols bewirkt, dass CapWiz automatisch schließt und das
ausgewählte Programm aufgerufen wird.
Solange kein Video im Vorschaubereich läuft, können Sie jederzeit den Assistenten aufrufen und die darin
vorgenommenen Einstelllungen ändern. Der Assistent wird bei jedem Neustart von CapWiz automatisch aufgerufen,
es sei denn, Sie möchten diese Funktion abwählen. Klicken Sie dazu auf “Options” am oberen Bildschirmrand und
wählen Sie das Kästchen “Show Wizard” ab.
1.) Durch Auswahl bzw. Abwahl von “Show Splash Screen” können Sie festlegen, ob der Startbildschirm bei
Programmstart angezeigt wird oder nicht
2.) Durch Auswahl bzw. Abwahl von “Show Wizard” können Sie festlegen, ob der Assistent bei Programmstart
aufgerufen wird oder nicht.
Sie können diese Optionen jederzeit neu aufrufen und ändern.
INSTANT DVD 2.0 Page 54
Page 55

Menüoptionen
In diesem Abschnitt werden die Einstellungen und Menüpunkte beschrieben, die Sie am oberen Rand des
CapWiz-Programmbildschirms sehen.
• Video Inputs/Outputs (Videoeingabe/-ausgbe)
In dieser Dialogbox können Sie die Videoquelle bzw. Videoausgabe rasch und mühelos ändern. Für die
Videoeingabe haben Sie die Wahl zwischen RCA, S-VHS und DV (nur Instant DVD + DV), für die Videoausgabe können
Sie zwischen RCA und S-VHS wählen. Die Einstellungen können auch im CapWiz-Assistenten geändert werden.
• Video format (Videoformat)
In der Dialogbox “Video format” können Sie das Videoformat von NTSC auf PAL umstellen und umgekehrt. Wenn
Sie nicht sicher sind, welches Format für Sie richtig ist, rufen Sie den CapWiz-Assistenten auf und lesen Sie sich den
Abschnitt “Learn more about worldwide Video Standards” durch.
In der Dialogbox “Video format” können Sie außerdem die Videoauösung und Videoqualität festlegen. Folgende
Optionen stehen zur Auswahl:
a. DVD in guter (Good), besserer (Better) oder bester (Best) Qualität.
b. Super Video CD (SVCD)
c. VCD
Bei SVCD und VCD gibt es keine Optionen für die Videoqualität, da diese Formate mit Standard-Bitraten für Video und
Audio arbeiten. Je nach USB-Anschluss zeigt CapWiz die folgenden Einstellungen für die Videoaufnahme an:
USB 2.0 USB 1.1
DVD-Einstellungen - 4, 6 oder 9 Megabit pro Sekunde (Mb/s) 2,5, 3 oder 4 MB/s*
SVCD - MPEG-2 Video bei 2,4 Mb/s Identisch
VCD - MPEG-1 Video bei 1,15 Mb/s . Identisch
GERMAN
Videoformat und Bitrate (4, 6 oder 9 Mb/sec) für DVD-Video wird im Statusbereich auf dem CapWiz-Programmbildschirm
angezeigt, d. h., Sie wissen zu jeder Zeit, welches Videoformat Sie mit welcher Bitrate aufnehmen.
*Bei einem “USB 1.1 Full Speed”-Anschluss beträgt die Videobitrate maximal 4 Mb/s.
Custom User Dened video settings (Nutzerspezische Videoeinstellungen):
In CapWiz haben Sie die Möglichkeit, die Einstellungen für die Videoaufzeichnung selbst zu bestimmen. Diese Flexibilität bei
den Aufnahmeeinstellungen gibt Ihnen die Möglichkeit, die Einstellungen auf Ihre spezischen Bedürfnisse anzupassen. Sie
können die Einstellungen ändern, indem Sie die Schaltäche “Custom Settings” anklicken.
Video bit rates (Videobitraten):
Wählen Sie den Videostandard aus, in dem Sie aufnehmen möchten. Der Standard muss Ihrem Videogerät und dem
Videoinhalt entsprechen. Wenn Sie PAL auswählen, werden Sie feststellen, dass die Optionen für die Videoauösung
automatisch auf PAL-Auösung umschalten.
MPEG-1 – Ist MPEG-1 ausgewählt, kann die Videoauösung lediglich 352 x 240 (NTSC) bzw. 352 x 288 (PAL) betragen.
Sie können jedoch Aufzeichnungsbitraten zwischen 1 Mb/s und 15 Mb/s auswählen.
MPEG-2 – Sie können jede beliebige Auösung und eine beliebige Videoaufnahmerate zwischen 1 Mb/s und
15 Mb/s auswählen.
INSTANT DVD 2.0 Page 55
Page 56

INSTANT DVD 2.0 Page 57
GERMAN
Video Resolution (Videoauösung):
Sie können unter den folgenden Auösungen für die Videoaufnahme auswählen:
NTSC PAL
325 x 240 (VCD) 352 x 288 (VCD)
352 x 480 (1/2 D1) 352 x 576 (1/2 D1)
480 x 480 (SVCD) 480 x 576 (SVCD)
704 x 480 (DVD) 704 x 576 (DVD)
720 x 480 (DVD) 720 x 576 (DVD)
Video bit rate (Videobitrate):
Sie werden feststellen, dass Sie Aufnahmeraten von bis zu 15 Mb/s auswählen können. Sie werden außerdem
feststellen, dass Bitraten von mehr als 9 Mb/s rot dargestellt sind. Dies liegt daran, dass Bitraten von mehr als 9 Mb/s
von DVD-Playern und DVD-Brennern nicht unterstützt werden. Sie haben die Möglichkeit, bei höheren Bitraten
aufzunehmen, da nicht alle Nutzer das aufgezeichnete Video auf DVD brennen möchten und daher eine möglichst
GERMAN
hohe Bitrate verwenden wollen. Denken Sie einfach daran, dass Sie nicht mehr als 9 Mb/s und nicht weniger als 2
Mb/s verwenden, wenn Sie Ihr Video auf CD oder DVD brennen möchten.
Nutzerspezische Einstellungen – Bitte beachten
Capture Wizard verfügt über ein hohes Maß an Flexibilität und gibt Ihnen die Möglichkeit, Video in unterschiedlicher
Auösung und mit unterschiedlichen Audio/Video-Bitraten aufzunehmen. Diese Flexibilität wurde auf Wunsch vieler
Nutzer eingerichtet. Denken Sie vor dem Aufzeichnen von Video jedoch immer daran, was Sie mit dem aufgezeichneten
Video machen möchten. Wenn Sie beabsichtigen, das aufgezeichnete Video auf CD oder DVD zu brennen, verwenden
Sie Auösungen und Bitraten, die mit Ihrem Brenner bzw. Player kompatibel sind. Andernfalls besteht die Gefahr, dass
Sie viele Stunden mit dem Aufzeichnen von Video verbringen und hinterher feststellen, dass die DVD-Authoringsoftware
das Video nicht direkt auf DVD brennen oder Ihr DVD-Player das Video nicht abspielen kann.
Zulässige Einstellungen für VCD, SVCD und DVD (Häug gestellte Fragen und Updates zu dieser Liste
nden Sie auf unserer Website):
Format Videobitraten Audiobitraten
VCD 1,15 Mb/s 224 kbit/s
SVCD 1,5 Mb/s – 2,5 Mb/s 128-384 kbit/s
DVD 3 Mb/s – 8 Mb/s 192 – 448 kbit/s
Audio Bit Rates (Audiobitraten):
Das Audioformat ist immer komprimiert auf MPEG-1 Layer 2. Außerdem stellt CapWiz die Audio-Samplingrate bei
VCD und SVCD automatisch auf 44,1 KHz, bei DVD-Video auf 48 KHz. CapWiz gibt Ihnen die Möglichkeit, bei Ihren
nutzerspezischen Videoaufnahmen eine Audiobitrate zwischen 192 kbits/s und 384 kbits/s auszuwählen.
Use Deinterlacing – Preview/Playback (Deinterlacing verwenden – Vorschau/Playback)
Der für das Playback verwendete MPEG-2 Software-Codec führt standardmäßig kein Deinterlacing des Videos aus.
Interlaced Video zeigt horizontale Linien, wenn Sie es in der Vorschau ansehen bzw. abspielen. Die Videoqualität wird
durch dieses Interlacing nicht beeinträchtigt. NTSC- und PAL-Video ist immer interlaced. Wenn Sie eine DVD auf einem
Fernsehgerät abspielen, ist das Interlacing nicht sichtbar. Deinterlacing des Videos während der Vorschau und beim
Playback führt zu einer besseren Bildqualität auf dem Computerbildschirm. Bei den Standardeinstellungen für die
Videoaufzeichnung ist Deinterlacing standardmäßig vorgesehen. Das Deinterlacing des Videos benötigt ein wenig mehr
Prozessorleistung. Bei langsameren PCs kann das Video leicht etwas holprig erscheinen. Bei den nutzerspezischen
Einstellungen haben Sie die Möglichkeit, Deinterlacing zu aktivieren bzw. zu deaktivieren. Experimentieren Sie ein wenig
mit Ihrem System, um herauszunden, ob Sie das Deinterlacing bei der Vorschau aktivieren möchten oder nicht.
Use Variable Bitrate (Variable Bitrate verwenden)
Wenn Sie Ihr Video mit variabler Bitrate aufzeichnen, entstehen kleinere Dateigrößen als bei konstanter Bitrate. Ist
die Option “Variable bit rate” aktiviert ist, analysiert Instant DVD die Frames des aufzuzeichnenden Videos. Bei viel
Bewegung im Bild wird die Bitrate automatisch erhöht, bei nur schwacher Bewegung wird die Bitrate verringert. Auf
diese Weise entsteht eine insgesamt bessere Videoqualität bei geringeren Dateigrößen. Die Standardeinstellung für
die Aufnahme ist “constant bit rate”, d. h. konstante Bitrate.
INSTANT DVD 2.0 Page 56
Page 57

Video Preprocessing Filters (Vorverarbeitungslter)
Instant DVD enthält Video-Vorverarbeitungslter, mit denen sich die Geräusche reduzieren lassen, wie man sie häug
bei älteren Videobändern, Fernsehempfang oder anderen geräuschstarken Videoquellen vorndet.
Spatial Filter (Raumlter)
Dies bedeutet das Herausltern von Pixeldaten, die auf einen Video-Frame beschränkt sind. Der Raumlter ist ein
Low-Pass-Filter (Niedrigpasslter). Dieser Filter entfernt einen Teil der hochfrequenten Geräuschkomponenten. Zu
starkes Filtern kann die Bildschärfe so sehr reduzieren, dass das Video unscharf oder verschwommen aussieht. Der
Auswahlbereich für diesen Filter liegt zwischen 0 und 7.
Temporal Filter (Zeitlter)
Dieser Filter verarbeitet Pixeldaten, die in den gleichen Pixelkoordinaten liegen, aber über zwei Video-Frames verteilt
sind, normalerweise der aktuelle und der vorherige Video-Frame. Aufgrund der Bewegung in Videosequenzen kann
sich ein Gegenstand, der sich in einer Position bendet, im nächsten Video-Frame bewegt haben. Beim Loggen der
Bewegung kann der Zeitlter zu verschwommenen Bildern oder anderen Fremdkörpern im Bild führen. Der
Auswahlbereich für diesen Filter liegt zwischen 0 und 255.
Welches ist der beste Filter für Ihr Video? Dafür gibt es leider keine Zauberformel. Sie müssen mit unterschiedlichen
Filtereinstellungen experimentieren und einen Filterwert auswählen, der Störgeräusche entfernt, ohne das Video
unscharf zu machen.
Use Deinterlacing – Preview/Playback (Deinterlacing verwenden – Vorschau/Playback)
Der für das Playback verwendete MPEG-2 Software-Codec führt standardmäßig kein Deinterlacing des Videos durch.
Interlaced Video zeigt horizontale Linien, wenn Sie es in der Vorschau ansehen bzw. abspielen. Die Videoqualität wird
durch dieses Interlacing nicht beeinträchtigt. NTSC- und PAL-Video ist immer interlaced. Wenn Sie eine DVD auf einem
Fernsehgerät abspielen, ist das Interlacing nicht sichtbar. Deinterlacing des Videos während der Vorschau und beim
Playback führt zu einer besseren Bildqualität auf dem Computerbildschirm. Bei den Standardeinstellungen für die
Videoeinzeichnung ist Deinterlacing standardmäßig vorgesehen. Das Deinterlacing des Videos benötigt ein wenig mehr
Prozessorleistung. Bei langsameren PCs kann das Video leicht etwas holprig erscheinen. Bei den nutzerspezischen
Einstellungen haben Sie die Möglichkeit, Deinterlacing zu aktivieren bzw. zu deaktivieren. Experimentieren Sie ein wenig
mit Ihrem System, um herauszunden, ob Sie das Deinterlacing bei der Vorschau aktivieren möchten oder nicht.
Nutzerspezische Einstellungen für die Videoaufnahme vornehmen
1.) Klicken Sie auf die Schaltäche “Custom Settings”.
2.) Wählen Sie in der Dialogbox für die nutzerspezischen Einstellungen die gewünschten Optionen aus.
3.) Klicken Sie auf “OK”, um die Einstellungen zu speichern.
4.) Klicken Sie auf “Use Custom Format”, wenn Video mit den nutzerspezischen Einstellungen aufzuzeichnen.
GERMAN
• Brightness/Color (Helligkeit/Farbe)
Hier können Sie Helligkeit, Chroma, Kontrast, Farbton und Sättigung ändern.
Helligkeit/Farbe können nur geändert werden, wenn Sie Video aufzeichnen oder in der Vorschau ansehen.
1. Verschieben Sie den Schieberegler der zu ändernden Bildeigenschaft. Die Änderung macht sich in den
nächsten ein bis zwei Sekunden bemerkbar.
2. Wenn Sie einen Fehler machen, können Sie durch Anklicken von “Reset” die vorgegebenen
Standardeinstellungen wiederherstellen.
3. Anklicken von “OK” schließt die Dialogbox.
• Optionale Steuertasten (nur für Instant DVD + DV)*
Diese Dialogbox ist nur für “Instant DVD + DV” gedacht – eine optimierte Version von Instant DVD. Die Version
“Instant DVD + DV” gibt Ihnen die Möglichkeit, einen digitalen Camcorder an Ihren Computer anzuschließen und
digitales Video direkt als MPEG-1- oder MPEG-2-Datei aufzuzeichnen. Mit diesen Schaltächen können Sie den
Camcorder über die Software steuern, d. h. vor- und zurückspulen, abspielen und stoppen.
INSTANT DVD 2.0 Page 57
Page 58

INSTANT DVD 2.0 Page 59
GERMAN
Nur für Version “Instant DVD + DV”:
1.) Schließen Sie Ihren digitalen Camcorder über das mitgelieferte DV-Kabel (4 Pin auf 4 Pin) von Ihrem
Camcorder an den 4-Pin-DV-Anschluss an der Vorderseite des Instant DVD+DV-Gerätes an.
2.) Schalten Sie Ihren Camcorder ein und schalten Sie ihn in VCR/VTR-Modus. Hinweis: Wir empfehlen, den
Camcorder nicht mit Batterie, sondern mit Netzstrom zu betreiben.
3.) Klicken Sie auf dem Kontrollfeld für den DV-Camcorder auf “PLAY”. Auf diese Weise wird das
Camcorder-Band gestartet.
4.) Anklicken von “Preview” auf dem CapWiz-Programmbildschirm zeigt das Video vom digitalen Camcorder an.
5.) Wenn Sie die Vorschau stoppen möchten, klicken Sie zuerst auf die Schaltäche “Stop” auf dem
CapWiz-Programmbildschirm, anschließend auf “Stop” auf dem Kontrollfeld für den DV-Camcorder.
*Wenn Sie Ihr Instant-DVD-2.0-Gerät auf ein Instant-DVD+DV-Gerät aufrüsten möchten, wenden Sie sich an die
Kundendienstabteilung von ADS Tech und erkundigen Sie sich nach Upgrade-Angeboten.
GERMAN
• Control (Steuerung)
Das Control-Menü ist eine alternative Möglichkeit, um Videoaufnahme und -playback zu steuern.
Folgende Optionen stehen zur Auswahl: Preview (Vorschau), Record (Aufnahme), Stop, Pause und Play
• Applications (Anwendungsprogramme)
Das Applications-Menü ist eine alternative Möglichkeit, die gebündelte Software aufzurufen. Außerdem haben Sie die
Möglichkeit, den Pfad zu den Programmen zu ändern, sollten Sie diese auf einem anderen Laufwerk installiert haben.
1. Klicken Sie auf die Menüschaltäche “Applications”.
2. Anklicken von “DVD Movie Factory” bzw. “VideoStudio” ruft das ausgewählte Programm auf. Dabei wird
Capture Wizard automatisch geschlossen.
3. Klicken Sie auf die Schaltäche “Edit” (Bearbeiten). Daraufhin wird der Pfad zu dem Verzeichnis angezeigt, in dem
die Programme standardmäßig installiert werden.
4. Sie können den Verzeichnispfad ändern, indem Sie das Kästchen “…” anklicken. Suchen Sie sich den
Verzeichnispfad, in dem Sie das Programm installiert haben.
INSTANT DVD 2.0 Page 58
Page 59

• Options:
Im Optionsmenü können Sie auswählen, wie Sie mit Capture Wizard arbeiten möchten:
Anklicken der Schaltäche “Options” oben auf dem Programmbildschirm ruft das Optionsmenü auf.
Show Splash (Startbildschirm anzeigen)
Ist die Option “Show splash” ausgewählt, erscheint jedes Mal, wenn Sie Capture Wizard starten, der
ADS-Startbildschirm. Wenn Sie den Startbildschirm nicht sehen möchten, klicken Sie auf “Show Splash”,
woraufhin das Auswahlhäkchen verschwindet.
Show Wizard (Assistenten anzeigen)
Ist die Option “Show Wizard” ausgewählt, erscheint jedes Mal, wenn Sie Capture Wizard starten, der CapWiz-Assistent.
Wenn Sie den Startbildschirm nicht sehen möchten, können Sie “Show Wizard” durch Anklicken abwählen.
Preview Immediately at Startup (Vorschau sofort beim Programmstart)
Ist dies Option “Preview Immediately at Startup” ausgewählt, beginnt Capture Wizard sofort beim Programmstart mit
der Videovorschau.
Audio…
Dies öffnet eine Dialogbox, in der Sie die Audiobitrate für die Videoaufzeichnung auswählen können. Die
Standardeinstellung für VCD, SVCD und DVD ist 224 kbit/s, Sie können jedoch einen Wert zwischen 112 kbit/s
und 384 kbit/s auswählen.
Playback…
Hier haben Sie die Möglichkeit, aufgezeichnetes Video mit jeder Standard-Auösung abzuspielen, unabhängig von
der Auösung, mit der das Video aufgezeichnet wurde.
1.) Klicken Sie auf die Schaltäche “Options” am oberen Bildschirmrand.
2.) Klicken Sie auf “Advanced”
3.) Klicken Sie auf “Playback Options”
4.) Wählen Sie die gewünschte Playback-Auösung aus.
5.) Wenn Sie “Full Screen” auswählen, können Sie anschließend das Playback-Fenster auf jede
gewünschte Größe ziehen.
GERMAN
Auswahl dieser Option öffnet eine Dialogbox, in der Sie die Playback-Auösung des aufgezeichneten Videos ändern
können. Beispielsweise können Sie SVCD-Video (480 x 480) mit einer Auösung von 720 x 480 abspielen usw.
Außerdem können Sie alle Videos bei voller Bildschirmauösung (Full screen) abspielen. Bei dieser Option nimmt
das Videofenster den gesamten Bildschirm ein. Sie können die Größe des Fensters ändern, indem Sie an einer der
Ecken ziehen.
Use RenderGraph (RenderGraph verwenden)
Die Standardeinstellung sieht vor, dass diese Option ausgeschaltet ist. Aktivieren Sie diese Option nur, wenn Sie
beim Playback Probleme mit der Suchfunktion (Seek) haben. Ist die Option aktiviert, verwendet CapWiz jeden
beliebigen MPEG-Decoder, den das Programm auf dem System ndet. Wenn Sie mehr als einen
MPEG-Softwaredecoder installiert haben, können u. U. Probleme auftreten. Durch Abwählen dieser Option
können Sie sicherstellen, dass der zu Instant DVD gehörende Software-Encoder verwendet wird.
Skins… (Layout Benutzeroberäche)
Diese Option ruft den “Skin Chooser” aus. Zurzeit enthält CapWiz 2 Skins, d. h. Layouts für die Benutzeroberäche.
Sie können das gewünschte Skin mühelos auswählen. In Zukunft werden möglicherweise eine Vielzahl von Skins
zur Auswahl stehen.
INSTANT DVD 2.0 Page 59
Page 60

GERMAN
INSTANT DVD 2.0 Page 61
GERMAN
Recording (Aufnahme)
Hier nden Sie die Dialogbox für die Aufnahme. Die folgenden Optionen stehen zur Verfügung:
Prompt to Conrm Recording (Aufnahmestart bestätigen)
Wenn diese Option aktiviert ist, erhalten Sie jedes Mal, wenn Sie auf die Aufnahmeschaltäche “Record” klicken,
eine Aufforderung zur Bestätigung des Aufnahmevorgangs. Diese Option kann nützlich sein, wenn Sie den Beginn
des Aufnahmevorgangs zeitlich genau bestimmen möchten.
Prompt Delay Record (Eingabeaufforderung für die Aufnahmeverzögerung)
Ist diese Option ausgewählt, erscheint jedes Mal, wenn Sie die Aufnahmeschaltäche “Record” anklicken, die
Dialogbox “Recording Options” (Aufnahmeoptionen). Erneutes Anklicken von “Prompt Delay Record” wählt diese
Funktion wieder ab.
Wenn Sie die Schaltäche “Record” klicken, erscheint eine Dialogbox, in der Sie die Stunden, Minuten und
Sekunden für die Aufnahmeverzögerung eingeben können. Wenn Sie den Aufnahmevorgang z. B. erst in einer
Stunde starten möchten, geben Sie 1 Stunde ein. Nach Ablauf der Stunde startet die Aufnahme automatisch.
Disable Screen Saver during recording (Bildschirmschoner während der Aufnahme deaktivieren)
Wenn Sie einen längeren Videoclip aufzeichnen, empehlt es sich, den Bildschirmschoner zu deaktivieren. Je
nach verwendeter Grakkarte kann der Bildschirmschoner die Videoaufzeichnung stören.
Record Duration (Aufnahmedauer)
Hier haben Sie die Möglichkeit, die Aufnahmedauer zeitlich zu beschränken. Wenn Sie z. B. 1 Stunde Video
aufzeichnen möchten, können Sie die Aufnahmedauer genau in Stunden, Minuten und Sekunden eingeben. Sie
können die Aufnahme starten und den Computer anschließend sich selbst überlassen, da die Aufnahme nach der
vorgegebenen Zeit beendet wird. Aufnahmeverzögerung (Record delay) und Aufnahmedauer (Record duration)
können gleichzeitig angewandt werden.
Disk space (Festplattenspeicher)
Sie können zu Beginn des Aufnahmevorgangs eine Warnung anzeigen lassen, wenn nicht genügend freier
Festplattenspeicher vorhanden ist. Aktivieren Sie dieses Kästchen und wählen Sie mit dem Schieberegler die
Größe des Festplattenspeichers aus, bei dem Sie eine Warnung erhalten möchten.
• Help (Hilfe)
About (Programminfo)
Unter “About” können Sie die Versionsnummer des Programms sowie die Menge des verfügbaren
Speicherplatzes auf Ihrer C:-Festplatte einsehen.
Help Using CapWiz (CapWiz-Hilfe)
Öffnet eine Adobe-Acrobat-Datei mit dem hier vorliegenden CapWiz-Handbuch.
System Info (Systeminformationen)
Öffnet eine Dialogbox mit Systeminformationen. Sie können die Schaltäche “Copy” (Kopieren) anklicken, die
Systeminformationen in eine E-Mail einfügen und an das ADS-Supportpersonal schicken, wenn Sie darum
gebeten werden.
INSTANT DVD 2.0 Page 60
Page 61

GERMAN
INSTANT DVD 2.0 Page 61
User Guide
ULEAD Systems, Inc.
January 2003
Page 62

INSTANT DVD 2.0 Page 63
GERMAN
VideoStudio
VideoStudio führt Sie Schritt für Schritt durch die Videobearbeitung, was die Arbeit mit dem Programm kinderleicht
macht. VideoStudio enthält über einhundert Übergangseffekte, eine professionelle Titelfunktion und Tools für die
Erstellung einfacher Soundtracks. Das Programm lässt sich im Handumdrehen erlernen, d. h., Sie können innerhalb
weniger Minuten Ihre ganz persönlichen Videos erstellen.
VideoStudio unterteilt Ihr Video in unterschiedliche Spuren, wodurch Sie ein hohes Maß an kreativem Freiraum
erhalten. Wenn Sie an einer Spur Änderungen vornehmen, bleiben die anderen Spuren davon unberührt.
Nachdem Sie Video vom Camcorder auf Ihren Computer übertragen haben, können Sie die Szenen nach Belieben
arrangieren, Spezialeffekte anwenden, Bilder einfügen und das Video mit animierten Titeln und gesprochenem Text
versehen. Außerdem können Sie Hintergrundmusik – z. B. im WAV- und MP3-Format – von Ihren Lieblings-CDs
GERMAN
hinzufügen. Alle diese Funktionen lassen sich entweder per “Drag-and-drop”, “Ausschneiden-und-Einfügen” oder
“Auswählen-und-Anwenden” durchführen.
Alle Spuren des Films werden dann als Videoprojektdatei (*.VSP) gespeichert. Diese Datei enthält alle Video- und
Audioinformationen des Films.
Wenn alle Komponenten des Videos fertig bearbeitet sind, holt sich der Computer alle Informationen, die zur
Erstellung der endgültigen Videodatei notwendig sind. Die Erstellung der fertigen Videodatei heißt “Rendering”.
Anschließend können Sie eine Ausgabedatei im DVD/VCD/SVCD-Format erstellen, den Film als Streaming Video
auf einer Website veröffentlichen oder als E-Mail-Anhang verschicken. Ferner haben Sie die Möglichkeit, das Video
zurück an Ihren Camcorder bzw. Ihr Videogerät zu übertragen.
Components of a nished project as displayed in Timeline Mode
DVD, VCD und SVCD
Bei der Auswahl des Ausgabeformats für Ihr Projekt gibt es mehrere Faktoren zu erwägen. Dazu gehören die
gewünschte Ausgabequalität, das Playbackgerät, die zur Ansicht verwendende Bildschirmgröße u. a. In der Folge
die Vorteile und Nachteile der einzelnen Ausgabeformate:
• Video Compact Discs (VCD) sind eine besondere Form der CD-ROM und arbeiten mit dem
MPEG-1-Format. Die Qualität des exportieren Videos ist in der Regel ein klein wenig besser
als VHS-Video. VCDs können auf CD-ROM-Laufwerken, VCD-Playern und sogar auf
DVD-Playern abgespielt werden.
• Super Video CD (SVCD) wird häug als eine verbesserte Version von VCD beschrieben. SVCD
arbeitet mit MPEG-2-Technologie und unterstützt Variable Bit Rate (VBR). Die typische Laufzeit
einer SVCD beträgt 30-45 Minuten. Sie können zwar auch 70 Minuten aufzeichnen, müssen
jedoch Kompromisse in Bezug auf die Ton- und Bildqualität hinnehmen. SVCDs können auf
Stand-alone VCD/SVCD-Playern, den meisten DVD-Playern und über eine DVD/SVCD-Player
software auf allen CD-ROM/DVD-ROM-Laufwerken abgespielt werden.
• Digital Versatile Discs (DVD) sind wegen der hohen Videoqualität in der Videoproduktion äußerst
populär. Neben ihrer hervorragenden Audio- und Videoqualität können DVDs ein Vielfaches der
Datenmenge einer VCD oder SVCD speichern. DVDs arbeiten mit dem MPEG-2-Format,
welches eine wesentlich größere Dateigröße als MPEG-1 erlaubt, außerdem können sie ein- und
doppelseitig sowie ein- und doppelschichtig bespielt werden. DVDs lassen sich auf DVD-Playern
bzw. auf dem DVD-ROM-Laufwerk eines Computers abgespielen.
INSTANT DVD 2.0 Page 62
Page 63

VideoStudio (Disk 2) installieren und aufrufen
VideoStudio installieren:
1. Legen Sie die VideoStudio-CD in Ihr
CD-ROM-Laufwerk ein.
2. Wenn der Setup-Bildschirm erscheint,
folgen Sie den Installationsanweisungen.
Hinweis: Sollte nach Einlegen der CD der
Setup-Bildschirm nicht erscheinen, können
Sie die Installation von Hand starten.
Klicken Sie auf Ihrem Desktop zweimal
rasch hintereinander auf “Mein Arbeitsplatz”
und doppelklicken Sie anschließend auf das
Symbol für das CD-ROM-Laufwerk. Klicken
Sie im CD-ROM-Fenster zweimal rasch
hintereinander auf das Setup-Symbol.
Installieren Sie bitte auch die unten
aufgelisteten Programme. Diese sind
wichtig, damit Ihr Computer mit digitalem
Video arbeiten kann. Das Installationsprogramm führt Sie nacheinander
durch die Installation der folgenden
Programme:
• QuickTime
• Windows Media Format
• RealPlayer
• Acrobat Reader
Hinweis: Lassen Sie diesen Schritt aus, wenn Sie bereits neuere Versionen der oben genannten
Programme auf Ihrem PC installiert haben.
VideoStudio aufrufen:
VIDEOSTUDIO Installationsbildschirm
GERMAN
• Klicken Sie zweimal rasch hintereinander auf das VideoStudio-Symbol auf dem Windows-Desktop.
ODER
• Gehen Sie zum Windows-Startmenü und wählen Sie VideoStudio aus der VideoStudio-Programmgruppe aus.
VideoStudio über das Windows
Startmenü aufrufen
INSTANT DVD 2.0 Page 63
Page 64

GERMAN
INSTANT DVD 2.0 Page 65
GERMAN
VideoStudio für Instant DVD einrichten
Setup von VideoStudio für die analoge Schnittstelle überprüfen:
1. Schließen Sie Ihren Camcorder, Videorekorder oder eine
andere Videoquelle an Ihre analoge Capture-Karte an.
2. Legen Sie Ihr Videoband in das Gerät ein und schalten Sie
das Gerät ein. Sorgen Sie dafür, dass sich das Gerät im
Playback-Modus bendet (normalerweise als “VTR” oder
“VCR” bezeichnet). Nähere Einzelheiten können Sie dem
Gerätehandbuch entnehmen.
3. Das Capture-Plugin wird automatisch entdeckt.
4. Klicken Sie auf “Capture Step” und überprüfen Sie, ob das
Gerät im Optionsfeld unter “Source” (Videoquelle)
aufgelistet ist.
Hinweis: Wenn Ihr Aufnahmegerät mehrere Videoquellen unterstützt,
können Sie in der Dialogbox “Input Source” die gewünschte
Videoquelle auswählen, z. B. “Composite”, “Tuner” oder “S-Video”.
Außerdem können Sie in dieser Dialogbox die gewünschte Audioquelle
auswählen, wenn Sie über mehrere Audioquellen verfügen.
Das Instant DVD Capture-Plugin auswählen
Wenn Sie mehrere Aufnahmegeräte (auch Capture-Geräte
genannt) an Ihren PC angeschlossen haben, müssen Sie das
korrekte Capture-Plugin von Hand auswählen.
1.) Klicken Sie links oben auf dem VideoStudio-Bildschirm
auf “File” (Datei).
2.) Klicken Sie “Change Capture Plug-in”
(Capture-Plugin ändern).
3.) Es erscheint die Dialogbox zum Ändern des Capture-Plugin.
Wählen Sie “ADS Instant DVD USB2 Capture Plug-in” aus.
4.) Klicken Sie auf “OK”.
5.) Ist das Instant DVD Capture-Plugin bereits ausgewählt,
klicken Sie auf “Cancel”, wodurch der Vorgang abgebrochen
wird.
INSTANT DVD 2.0 Page 64
Page 65

Mit VideoStudio arbeiten
Die Benutzerschnittstelle von VideoStudio ist so konzipiert, dass die manchmal
komplizierte Arbeit bei der Videobearbeitung auf PC einfach und intuitiv wird. Die
folgende Abbildung zeigt die wichtigsten Programmkomponenten. Auf den nächsten
Seiten werden die Merkmale und Funktionen der einzelnen Komponenten
ausführlicher beschrieben.
Optionsanzeige
Enthält Steuertasten, Schaltächen und andere
Informationen, um nutzerspezische Einstellungen an
dem ausgewählten Videoclip vorzunehmen. Der Inhalt
dieser Anzeige ändert sich, je nachdem, welchen
Arbeitsschritt Sie gerade durchführen.
GERMAN
Vorschaufenster
Zeigt den aktuellen Videoclip, Videolter,
Effekt oder Titel an.
Timeline
Zeigt alle zu Ihrem Projekt
gehörenden Videoclips, Titel
und Effekte an. Wählen Sie die
Spur aus, auf der sich der zu
bearbeitende Clip bendet.
Navigationsfeld
Anhand dieser
Schaltächen können
Sie sich vorwärts und
rückwärts durch einen
Videoclip bewegen und
an der gewünschten
Stelle bearbeiten bzw.
zuschneiden.
Library
Hier sind alle Ihre Mediaclips
gespeichert und kategorisiert.
INSTANT DVD 2.0 Page 65
Page 66

GERMAN
INSTANT DVD 2.0 Page 67
GERMAN
Das Optionsfeld
Das Optionsfeld ändert sich, je nachdem, in welchem Modus Sie sich benden, welchen Arbeitsschritt Sie gerade
durchführen bzw. mit welcher Spur Sie gerade arbeiten. Das Optionsfeld kann eine oder zwei Registerkarten
enthalten. Die Informationen unter den Registerkarten können je nach verwendetem Clip unterschiedlich sein.
Optionsfeld “Capture”
Registerkarte “Capture-Settings”
• Duration (Dauer): Hier können Sie die Dauer und Uhrzeit für die
Videoaufzeichnung festlegen.
• Source (Quelle): Zeigt das ausgewählte Capture-Gerät sowie die anderen
auf Ihrem Computer installierten Capture-Geräte an.
• Format: Hier können Sie auswählen, in welchem Dateiformat Sie das
aufgezeichnete Video speichern möchten.
• Split by Scene (Szenengliederung): Untergliedert das aufgezeichnete Video
automatisch in mehrere Dateien, und zwar ausgehend von
Aufzeichnungsdatum und -uhrzeit. (Diese Funktion lässt sich nur beim
Übertragen von Video von einem DV-Camcorder verwenden.)
• Capture folder (Speicherverzeichnis): Der Ordner, in dem das
aufgezeichnete Video als Datei gespeichert wird.
• Options (Optionen): Zeigt ein Menü, in dem Sie die Einstellungen für die
Videoaufzeichnung modizieren können.
• Capture Video (Video aufzeichnen): Überträgt Video von der Videoquelle
auf Ihre Festplatte.
• Capture Image (Bild aufzeichnen): Zeichnet den angezeigten Video-Frame
als Einzelbild auf.
INSTANT DVD 2.0 Page 66
Page 67

Capture
Das Übertragen von Video von Ihrem Camcorder oder einer anderen Videoquelle auf den Computer wird
“Capturing” genannt (Aufnehmen, aufzeichnen). Wenn alle richtigen Vorbereitungen getroffen wurden, sollte das
von der Videoquelle ausgegebene Video im Vorschaufenster sichtbar sein. Wenn Ihre Videokarte einen
Fernsehmonitor unterstützt, müssten Sie außerdem in der Lage sein, sich das aufgezeichnete Video auf
dem Fernsehgerät anzusehen.
Nach dem Programmstart entdeckt VideoStudio automatisch die Aufnahmeeinstellungen. Ist kein Gerätetreiber
vorhanden, werden Sie automatisch zum Schritt “Edit” (Bearbeiten) geleitet. In diesem Fall brauchen Sie nicht
vom Aufnahmemodus auf den Playbackmodus umzuschalten.
Checkliste für die Videoaufzeichnung
Das Aufzeichnen von Video ist eine der anspruchsvollsten Aufgaben, die Sie Ihrem Computer je abverlangen
werden. Es beinhaltet riesige Datenmengen und sehr viel Speicherplatz auf Ihrer Festplatte. Hier ein paar Tipps
für die erfolgreiche Videoaufzeichnung:
• Schließen Sie ALLE anderen Programme mit Ausnahme von Windows Explorer und VideoStudio.
Deaktivieren Sie den Bildschirmschoner, um mögliche Unterbrechungen zu vermeiden.
• Die besten Ergebnisse erzielen Sie mit einer speziellen Videofestplatte, am besten mit mindestens
Ultra-DMA/66, 7200 RPM und mehr als 30GB Speicherplatz.
• Für eine reibungslose Stapelaufzeichnung und Camcorder-Kontrolle ist ein korrekter Timecode auf dem
DV-Band unerlässlich. Ehe Sie Ihr Video lmen, sollten Sie daher den Standard-Playbackmodus (SP)
auswählen und ein leeres Video lmen (z. B., indem Sie bei der Aufnahme die Abdeckung auf der Linse
lassen und ohne Unterbrechung von Anfang bis Ende des Bandes lmen).
Analogvideo aufzeichnen
Zum Aufzeichnen von Video über eine analoge Capture-Karte mit Audio/Video-Steckern
oder S-Video gehen Sie wie folgt vor:
1. Schließen Sie Ihre Videoquelle an die Capture-Karte an. Bei manchen Karten
müssen Sie u. U. außerdem die Audiokabel anschließen.
2. Öffnen Sie ein Projekt und klicken Sie auf “Capture”.
3. Wählen Sie ein Dateiformat (DV, MPEG oder AVI) aus der Formatliste aus.
4. Gehen Sie im Video an die Stelle, wo Sie mit der Aufnahme starten möchten.
5. Wenn Sie die Stelle erreicht haben, von der aus Sie das Video übertragen
möchten, klicken Sie in der Registerkarte “Capture Settings” (Einstellungen
für die Aufzeichnung) im Optionsfeld auf den Befehl “Capture Video”. Die
Videoaufzeichnung beginnt.
6. Sie können den Übertragungsvorgang stoppen, indem Sie auf “Stop Capture”
klicken oder die Escape-Taste auf Ihrer Tastatur drücken.
Tipps:
• Sollte die Aufzeichnung später als gewünscht beginnen, kann dies entweder
daran liegen, dass Sie die Aufnahme zunächst bestätigen müssen, oder an
den Kabelverbindungen zwischen den Geräten. Es empehlt sich, das Band
etwas zurückzuspulen und das Video ggf. hinterher zuzuschneiden.
• Normalerweise werden keine Frames ausgelassen. Sollten Frames
ausgelassen werden, sollten Sie überprüfen, ob DMA aktiviert ist.
Wenn eine Dialogbox zum Bestätigen erscheint,
klicken Sie auf “OK”, um den Aufnahmevorgang
zu starten. Sie können diese Dialogbox auch
deaktivieren, indem Sie auf “File” -> “Preferences”
klicken. Klicken Sie in der Dialogbox mit den
Präferenzen auf die Registerkarte “Capture” und
wählen Sie “Enable press OK to capture” ab.
GERMAN
INSTANT DVD 2.0 Page 67
Page 68

INSTANT DVD 2.0 Page 69
GERMAN
Dialogbox “Video Capture Property Settings”
(Einstellungen für die Videoaufzeichnung)
GERMAN
Die Aufzeichnungseinstellungen können über die Schaltäche “Options” geändert werden.
1.) Wählen Sie die Audiofrequenz für die Aufnahme aus (44.1 kHz oder 48 kHz)
Hinweis: Normalerweise wird für VCD und SVCD 44,1 kHz verwendet, für DVD 48 kHz.
2.) Wählen Sie das MPEG-Videoformat aus, in dem Sie das Video aufzeichnen möchten: VCD, SVCD oder DVD.
3.) Wählen Sie die Videoquelle aus: S-Video, Composite oder DV.
Hinweis: DV wird nur in der Version “Instant DVD + DV” unterstützt. Das Instant DVD-Gerät keine Option zum
Aufzeichnen von einem Fernsehgerät. Sie können Fernsehsignale von einem Satellitenempfänger oder
Videogerät über Ihren Composite-Eingang (RCA) aufzeichnen.
4.) Wählen Sie die gewünschte Bitrate für die Videoaufzeichnung aus.
5.) Wählen Sie die Auösung für die Aufzeichnung aus.
6.) Wählen Sie den Videoausgang, wenn Sie das Video auf einem Fernsehgerät anschauen oder auf einen
Videorekorder übertragen möchten.
7.) Format: Wählen Sie den Videostandard (NTSC oder PAL) aus.
8.) Klicken Sie auf OK. Sie sind jetzt bereit, Video in VideoStudio aufzuzeichnen.
Videoaufzeichnung starten:
1.) Anklicken des “Capture Video”-Symbols startet die Aufnahme.
2.) Sie können den Aufnahmevorgang stoppen, indem Sie entweder erneut auf das “Capture Video”-Symbol
klicken oder die Escape-Taste auf Ihrer Tastatur drücken.
**NÄHERE INFORMATIONEN ZU DIESEN PRODUKTEN FINDEN SIE AUF DER CD**
INSTANT DVD 2.0 Page 68
Page 69

GERMAN
INSTANT DVD 2.0 Page 69
User Guide
Ulead Systems, Inc.
October 2002
Page 70

INSTANT DVD 2.0 Page 71
GERMAN
Willkommen bei Ulead DVD MovieFactory 2
Ulead DVD MovieFactory bietet Ihnen alle benötigten Funktionen zum Authoring Ihrer Video-Disk. Gleichgültig,
ob es sich um eine DVD, VCD oder SVCD handelt – DVD MovieFactory zeigt Ihnen, wie es geht – mit einem
nutzerfreundlichen Layout nach Art eines Assistenten und aufgabenspezischen Funktionen. Mit DVD MovieFactory
ist das Erstellen professioneller Video-Disks so einfach wie noch nie!
Dieses Dokument und die Online-Hilfe enthält alle wichtigen Informationen zur Arbeit mit DVD MovieFactory.
Programm-Updates, Tutorials, technische Informationen (z. B. eine aktuelle Hardware-Kompatibilitätsliste) und
technische Unterstützung nden Sie auf der Ulead-Website.
GERMAN
Die zurzeit
ausgewählte
Aufgabe
Vier Aufgaben,
unter denen
Sie wählen
können
Projekt
speichern,
Auistung
weiterer
Optionen und
Hilfestellungen
Ulead DVD MovieFactory 2 im Überblick
Wenn Sie das Programm starten, sehen Sie als Erstes den folgenden Bildschirm:
Der aktuelle
Arbeitsschritt
Optionen für jede Aufgabe
Eine kurze
Anleitung für
jede Aufgabe
Zugang zur Online-Hilfe
Projekteinstellungen
Hinweis: Die Verfügbarkeit der Aufgaben im linken Bildschirmbereich hängt davon ab, mit welcher Version von
DVD MovieFactory Sie arbeiten.
INSTANT DVD 2.0 Page 70
Weiter zum
nächsten Schritt
Ulead DVD MovieFactory beenden
Page 71

Welche Aufgabe für welche Zwecke?
Nachdem Sie sich einen Überblick über Ulead MovieFactory verschafft haben, gilt es, auszuwählen, welche Aufgabe
für welchen Zweck die richtige ist:
• Start Project - New project: Wählen Sie diese Aufgabe, wenn Sie ein neues Projekt in DVD MovieFactory anlegen
möchten. Wählen Sie das Ausgabeformat für die Disk aus. Anklicken von “Next” gibt Ihnen die Möglichkeit,
Mediaclips zu Ihrem Projekt hinzuzufügen. (Nähere Einzelheiten siehe Seite 8.)
• Start Project - Existing project: Wählen Sie diese Aufgabe, wenn Sie ein zu einem früheren Zeitpunkt auf Festplatte
oder Disk gespeichertes DVD-MovieFactory-Projekt bearbeiten möchten. Wählen Sie die Projektdatei (*.dwz) aus
der Dropdown-Liste aus oder über die Schaltäche “Browse”. Klicken Sie auf “Next”, um mit der Bearbeitung zu
beginnen. (Nähere Einzelheiten siehe Seite 8.)
• Edit Disc: Wählen Sie dies Aufgabe, wenn Sie Ihre DVD+R/RW, DVD-R/RW oder ein bereits vorhandenes
DVD- MovieFactory-Projekt direkt auf einer beschreibbaren Disk bearbeiten möchten. Wählen Sie das Laufwerk
aus, in dem sich die Disk bendet, und klicken Sie auf “Next”, um mit der Bearbeitung zu beginnen. (Nähere
Informationen siehe Seite 18.)
GERMAN
• Direct to Disc: Wählen Sie diese Aufgabe, wenn Sie Video direkt von Ihrem Videogerät auf Disk brennen möchten.
Wählen Sie ein Ausgabeformat aus und klicken Sie auf “Next”, um die Videoaufzeichnung zu starten, Menüs
einzurichten und das Video auf Disk zu brennen. (Nähere Einzelheiten siehe Seite 19.)
• Copy Disc: Wählen Sie “Copy from – Disc”, wenn Sie eine Disk auf eine andere Disk (VCD oder SVCD) kopieren
oder einen auf Festplatte oder Disk bendlichen DVD-Ordner auf eine andere Disk brennen möchten. Mit der
Option “Copy from - Disc image le” können Sie eine Disk-Image-Datei (d. h. ein genaues Abbild der Disk) kopieren
und auf Disk brennen. Anklicken von “Next” bringt Sie direkt zum Ausgabeschritt. (Nähere Einzelheiten siehe Seite 19.)
INSTANT DVD 2.0 Page 71
Page 72

INSTANT DVD 2.0 Page 73
GERMAN
Ein Projekt bearbeiten
Ulead DVD MovieFactory arbeitet mit so genannten “Projekten”. Jede Projektdatei (*.dwz) speichert die
aktuellsten Änderungen Ihrer Video- und Menübearbeitung sowie die Einstellungen, die Sie für das jeweilige
Projekt vorgenommen haben. Das heißt, Sie können die Arbeit an einem Projekt zu jeder Zeit beenden und zu
einem späteren Zeitpunkt wieder aufnehmen.
Hinweis: In Ulead DVD MovieFactory können Sie immer nur an einem Projekt gleichzeitig arbeiten.
Videos oder Bildschirmpräsentationen hinzufügen
Nachdem Sie ein Projekt geöffnet haben, werden als Nächstes die Mediaclips hinzugefügt. Bei den Mediaclips kann es
sich um Videos oder Bildschirmpräsentationen (auch “Slideshows” genannt) handeln. Wenn Sie z. B. eine kompatible
Video-Capture-Karte haben, können Sie Video von einem Videogerät wie z. B. einem DV-Camcorder hinzufügen. Sie
können außerdem Videos von einer Disk/Festplatte hinzufügen oder aus einer Reihe unbeweglicher Bilder eine
Bildschirmpräsentation erstellen. Nachdem Sie die einzelnen Clips hinzugefügt haben, können Sie diese weiter
GERMAN
bearbeiten und Auswahlmenüs anlegen.
Mit diesen Schaltächen
können Sie Videos und
Bildschirmpräsentationen
zu Ihrem Projekt
hinzufügen.
Tipp: Zum Ändern der Reihenfolge,
in der die Mediaclips gespielt
werden, können Sie die
Miniaturbilder in der MediaclipListe einfach an eine andere Stelle
ziehen.
Mediaclip-Liste
(Durch Anklicken eines Miniaturbildes
wird dieses ausgewählt.)
Mit dieser Funktion
können Sie eine
Einführung für Ihren Film
erstellen. Das “First-play
Video” wird automatisch
immer abgespielt, sobald
die Disk in den Player
eingelegt wird.
Mediaclip hinzufügen/bearbeiten
Tipp: Speichern Sie Ihr Projekt regelmäßig, indem Sie [Ctrl+S]
drücken.
Durch Anklicken des
Beschreibungstextes lässt
sich der Text ändern.
Video aufzeichnen:
1.) Klicken Sie auf “Capture”, woraufhin die Dialogbox “Capture Video”
geöffnet wird.
2.) Gehen Sie anhand der Navigationstasten zu der Stelle auf dem Video,
wo Sie mit der Aufnahme beginnen möchten.
3.) Klicken Sie auf “Capture Video”.
4.) Zum Beenden des Aufnahmevorgangs die Escape-Taste drücken.
Wiederholen Sie die Schritte 2 bis 4, wenn Sie weitere Videoclips
aufzeichnen möchten.
5.) Klicken Sie auf “OK”.
Hinweis:
• Alle aufgezeichneten Videoclips werden im Standard-Capture-Ordner
gespeichert. Wenn Sie einen anderen Ordner verwenden möchten, klicken Sie auf “Browse” und suchen
Sie sich den gewünschten Ordner.
• Über die Dialogbox “Capture Video” kann Video lediglich aufgezeichnet werden. Das Abspielen eines
aufgezeichneten Videoclips ist nur über die Mediaclip-Liste im Hauptbildschirm möglich.
INSTANT DVD 2.0 Page 72
Page 73

Einstellungen für die Videoaufzeichnung
Ulead DVD MovieFactory nimmt die Einstellungen für die Aufzeichnung automatisch selbst vor. Sie können die Einstellungen ändern, indem Sie auf ( ) klicken. Dies bringt Sie zum unten abgebildeten Menü. Das Menü
zeigt die verfügbaren Optionen, Capture-Plugins und das zurzeit ausgewählte Videogerät. In erster Linie werden Sie
hier vermutlich Änderungen an den MPEG-Einstellungen (MPEG Settings...) vornehmen.
Menü nach Anklicken von
“Capture Settings”
In der Dialogbox “MPEG Settings” können Sie unter mehreren vorgegebenen Einstellungen auswählen bzw. unter
“Special Settings” Ihre eigenen Einstellungen vornehmen. Anklicken von “Video Bit Rate” gibt Ihnen ferner die
Möglichkeit, eine bestimmte variable Bitrate auszuwählen. (Einzelheiten nden Sie in der Online-Hilfe.)
Tipp: Wenn bei der Videoübertragung Frames ausgelassen wurden, sollten Sie die Videoqualität (Quality) in der Dialogbox
“MPEG Settings” verringern oder DMA auf Ihrer Festplatte aktivieren.
GERMAN
**NÄHERE INFORMATIONEN ZU DIESEN PRODUKTEN FINDEN SIE AUF DER CD**
INSTANT DVD 2.0 Page 73
Page 74

INSTANT DVD 2.0 Page 75
FRENCH
Table of Contents
Etapes d’installation rapide....................................................................................................................................75
Presentation d'Instant DVD ....................................................................................................................................76
Instant DVD 2.0 Installation Guide.........................................................................................................................79
Presenatation Du Materiel ......................................................................................................................................80
Installation des applications logicielles................................................................................................................82
CapWiz pour Instant DVD .......................................................................................................................................84
FRENCH
Utilisation de l'outil de capture/lecture video CapWiz pour la premiere fois ....................................................86
Caracteristiques et fonctions de CapWiz..............................................................................................................89
Options de menu .....................................................................................................................................................90
VideoStudio..............................................................................................................................................................97
DVD Movie Factory 2.............................................................................................................................................104
INSTANT DVD 2.0 Page 74
Page 75

French : Etapes d’installation rapide
Pour les impatients qui ne veulent consulter qu’une seule page :
1) Branchez les câbles audio/vidéo de votre source vidéo au périphérique
Instant DVD.
2) Chargez le CD d’Instant DVD - L’écran d’exécution automatique nécessite
Quicktime. Si Quicktime n’est pas déjà installé sur l’ordinateur, il s’installera
alors automatiquement.
Aucun numéro de série n’est requis.
3) Mettez le périphérique sous tension et branchez-le au port USB.
4) Les pilotes pour WinXP et Win2000 se trouvent dans le répertoire de base
du CD.Les pilotes pour Win98SE et WinME se trouvent dans le dossier
Win98SE&WinME du CD. Dirigez Windows vers les pilotes pour en lancer
l’installation automatique.
5) Installez CapWiz – L’application CapWiz est indispensable car elle installe
les principaux éléments requis pour le bon fonctionnement d’Instant DVD.
FRENCH
6) Double-cliquez sur l’icône CapWiz située sur le bureau électronique.
7) Répondez aux questions afchées sur les 5 écrans de l’assistant de Capture
Wizard.
8) Appuyez sur le bouton de lecture de votre source vidéo pour faire déler la
vidéo.
9) Cliquez sur le bouton Preview (Aperçu) de l’interface de Capture Wizard
(CapWiz) pour afcher la vidéo.
Expérimentez un peu avec CapWiz, puis installez les autres logiciels très
utiles qui vous sont fournis avec l’Instant DVD.
INSTANT DVD 2.0 Page 75
Page 76

FRENCH
INSTANT DVD 2.0 Page 77
FRENCH
PRESENTATION D’INSTANT DVD
Instant DVD 2.0
L’Instant dvd offre un moyen facile et amusant d’importer des vidéos DVD,
SVCD et VCD dans votre PC (sous Windows) an d’éditer et d’archiver
vos vidéos amateurs. Il vous permet ensuite de publier la vidéo sur un
disque CD ou DVD ou sur Internet, de l’afcher sur un téléviseur ou de
l’enregistrer sur un magnétoscope ou un caméscope pour la distribuer sur
cassette.
Lorsqu’elle passe par le port USB, la vidéo est déjà compressée dans le
format de votre choix, MPEG-1 pour le VCD (Video on CD) ou MPEG-2
pour pour le SVCD (Super Video CD) et le DVD (Digital Versatile Disk), car
toutes les opérations de numérisation et de compression ont lieu dans le
périphérique Instant DVD.
Groupe de logiciels puissants:
Comme nous voulons que vous tiriez le meilleur parti possible de votre Instant DVD, nous avons inclus plusieurs
logiciels répondant à divers objectifs de projet. Certaines fois vous voudrez, en effet, simplement archiver vos
vidéos sur disques avec rapidité, d’autres fois vous préférerez exercer votre sens artistique en remettant à plus
tard l’essentiel du montage vidéo. Pour les projets importants, vous aurez également besoin d’un programme de
montage vidéo complet, vous donnant la liberté de faire appel à votre créativité. Vous avez de la chance,
l’Instant DVD vous permet de réaliser toutes ces opérations. Nous ne vous offrons pas qu’une seule méthode
d’utiliser ce produit, mais de nombreuses façons d’importer et d’exporter vos vidéos et de les enregistrer sur disque.
Instant DVD 2.0 includes several exible and dynamic software tools for your video projects:
INSTANT DVD 2.0 Page 76
Page 77

Ways to Capture and Edit Video
Capture Wizard (CapWiz) : CAPTURE & LECTURE VIDEO EN TOUTE FACILITE
La solution la plus facile et la plus rapide pour capturer une vidéo en MPEG-1
(VCD) ou MPEG-2 (SVCD, DVD) sur votre PC. Utilisez les écrans Wizard pour
vérier vos connexions vidéo, le format de compression vidéo et le répertoire
dans lequel vous souhaitez enregistrer vos chiers vidéo sur le disque dur de
l’ordinateur.
Utilisez CapWiz pour capturer une vidéo rapidement ou pour retransmettre
une vidéo MPEG à un magnétoscope an de l’enregistrer ou à un poste de
télévision an de la regarder. CapWiz vous permet également d’arranger des
enregistrements chronométrés et différés et de sélectionner en toute facilité les
débits binaires de capture vidéo pour une qualité de vidéo DVD bonne,
supérieure ou optimale. Vous pouvez, en outre, xer des paramètres
spéciques pour la résolution vidéo, les débits binaires vidéo et audio et les
débits binaires constants ou variables, et pouvez sélectionner des ltres de
prétraitement vidéo pour réduire les parasites présentes sur les vieilles
cassettes VHS.
REMARQUE : Lorsque vous vous préparez à afcher une vidéo capturée sur
un poste de télévision ou à l’enregistrer sur une cassette vidéo, vériez que
vous avez bien branché les câbles audio/vidéo de l’Instant DVD aux entrées
audio et vidéo de votre téléviseur et que vous avez sélectionné sur le téléviseur
la source vidéo externe. Seuls les chiers MPEG-1 et MPEG-2 peuvent être
exportés vers un téléviseur car l’Instant DVD est un décodeur MPEG. Si vous
avez, par exemple, enregistré un lm sous un format de vidéo pour diffusion
en streaming (.wmv), ce type de chier ne peut pas être décodé en vue d’un
afchage sur téléviseur.
VideoStudio 7.0 DVD SE : capture et montage vidéo complets
Video Studio vous guide à travers le processus de réalisation d’un lm, dont
les étapes principales sont : CAPTURE (capture), EDIT (montage), EFFECT
(effet) OVERLAY (overlay), TITLE (titrage), AUDIO (son) et SHARE (partage).
Utilisez VideoStudio si vous souhaitez modier une vidéo et y ajouter des effets
ou ltres vidéo, des titres, des musiques de fond ou voix off pour créer une
production audiovisuelle unique. Avec VideoStudio, vous pouvez capturer et
monter une vidéo an de l’exporter vers un téléviseur ou un magnétoscope ou
an de la publier sur disque.
VideoStudio comprend un DVD Wizard qui vous permet de convertir et de
graver votre lm sur disque. Vous pouvez soit exporter un chier quelconque
vers le DVD Wizard, soit enregistrer le lm monté sur un VCD, SVCD ou DVD
avant de l’exporter vers le DVD Wizard. Pour lancer le DVD Wizard, allez à
l’étape SHARE et cliquez sur "Create Disk" (Créer disque).
Vous pouvez graver les lms VCD et SVCD sur un disque CD-ROM. Vous
pouvez également graver des lms DVD sur un disque CD-ROM, tout en
sachant que vous ne pourrez enregistrer qu’environ 20 minutes de vidéo de
qualité DVD sur un CD de 700 Mo. Si vous possédez un graveur DVD, vous
pouvez enregistrer environ 2 heures de vidéo de qualité DVD sur un disque
DVD de 4,7 Go. VideoStudio prend également en charge la copie d’un SVCD
(MPEG-2 à 2,4 mégabits/s) sur un CD-ROM. De nombreux lecteurs DVD de
salon peuvent lire les SVCD. Vous pouvez faire tenir environ 35 à 40 minutes de
vidéo SVCD sur un CD de 700 Mo.
FRENCH
**VEUILLEZ CONSULTER LE CD POUR EN SAVOIR PLUS SUR
CES PRODUITS **
INSTANT DVD 2.0 Page 77
Page 78

INSTANT DVD 2.0 Page 79
FRENCH
DVD Movie Factory 2.1 SE:
Copie directe sur disques CD ou DVD sans éditer la vidéo
Si vous souhaitez archiver votre vidéo sur disque et en remettre le montage à plus
tard, DVD Movie Factory est le moyen le plus simple et le plus rapide de capturer
une vidéo "prête à passer sur disque". Utilisez DVD Movie Factory pour capturer
la vidéo dans un format VCD, SVCD ou DVD et passer directement aux étapes
d’authoring et de gravure. Vous pouvez même utiliser l’option "Direct to Disk" pour
effectuer la capture, l’encodage et la gravure simultanés d’une vidéo sur un disque
CD ou DVD en un seul pas. Si vous utilisez un support réinscriptible, vous pouvez
activer l’option "On the Fly" pour enregistrer directement la vidéo sur le disque
DVD+RW ou DVD-RW. DVD Movie Factory vous permet même d’importer des
images xes an de créer des diaporamas sur VCD ou DVD. Vous pouvez réaliser
des arrière-plans et menus personnalisés vous permettant d’enregistrer plusieurs
diaporamas sur un seul disque, puis d’ajouter une bande musicale à vos diaporamas pour produire une expérience multimédia.
FRENCH
Créez un Auto-Muvee!
Muvee autoProducer DVD Edition SE
Nous voulons tous réaliser des lms amusants qui ont l’air d’avoir été montés
par un professionnel, mais nous n’en avons ni la patience, ni le temps, et il faut
bien l’admettre que le talent nous fait également défaut. Muvee autoProducer
DVD Edition SE est le moyen le plus rapide et le plus simple de créer une
production nie à partir d’une vidéo brute. Avec DVD Edition, vous avez
l’avantage de pouvoir enregistrer vos vidéos sous des chiers DVD-ready
MPEG-2 qui peuvent être facilement importés dans DVD Movie Factory et
gravés sur un disque DVD. L’apprentissage de Muvee autoProducer DVD
Edition prend une minute seulement et est, en général, des centaines de fois
plus rapide à utiliser que tout autre logiciel de montage vidéo. Il vous suft de
soumettre votre vidéo au programme, de choisir un morceau de musique (MP3
ou WAV) que vous aimez et de sélectionner un style de montage ; le logiciel se
charge du reste.
**VEUILLEZ CONSULTER LE CD POUR EN SAVOIR PLUS SUR
CES PRODUITS **
INSTANT DVD 2.0 Page 78
Page 79

Instant DVD 2.0 Installation Guide
FRENCH
Prise en main
Les étapes de base sont les suivantes:
1. Vérication du contenu de la boîte Instant DVD
2. Câblage. Connecteurs audio et vidéo
3. Branchement. Alimentation et connexion USB
4. Installation des pilotes du périphérique
5. Installation des logiciels d’application
6. Vérication de l’installation matérielle
7. Optimisation du système pour en tirer le meilleur
parti possible
8. Résumé & diagramme d’installation
9. Lancez-vous dans la création de lms DVD!
1. Vérication du contenu de la boîte
Instant DVD 2.0
Matériel:
(A) Périphérique Instant DVD 2.0
(B) Alimentation 5 volts en continu
(C) Câble USB de 1,83 m
(D) Câble d’entrée A/V de 1,83 m (RCA vidéo et audio
(Droite + Gauche) à RCA vidéo et audio stéréo
3,5 mm)
(E) Deux (2) CD d’installation
(F) Manuel de l’utilisateur
Conguration requise
- Processeur Intel Celeron de 400 MHz ou AMD Athlon
de 600 MHz ou plus
- Windows : Win98SE, WinME, Win2000 ou WinXP
- 128 Mo de mémoire préférable
- Carte son
- Carte vidéo AGP de 16 Mo
- Lecteur de CD-ROM
- 150 Mo d’espace libre sur le disque dur pour les
applications de capture/d’édition
- Espace disque pour les captures vidéo : la capture vidéo à
4 Mb/s utilisera 1,8 Go par heure
- Graveur de CD pour la création de disques VCD et SVCD
- Graveur de DVD pour la création de disques DVD
• Le 1er CD contient:
- Utilitaire de capture et d’exportation CapWiz
- Pilotes de périphérique Instant DVD
- Ulead DVD Movie Factory 2.0 SE pour Instant DVD
- Muvee autoProducer
• Le 2e CD contient:
- Ulead VideoStudio 7 SE personnalisé pour Instant DVD
INSTANT DVD 2.0 Page 79
Page 80

INSTANT DVD 2.0 Page 81
FRENCH
Connexions et pilotes USB 1.1 et USB 2.0
USB 2.0
Nous vous conseillons vivement d’utiliser WinXP ou Win2000 uniquement avec les pilotes Microsoft USB 2.0 pour
garantir le bon fonctionnement de l’Instant DVD à des vitesses de connexion USB 2.0.
Vous pouvez obtenir les pilotes Microsoft Windows USB 2.0 directement auprès de Microsoft :
WinXP – Inclus dans votre nouveau PC. Téléchargez WinXP Service Pack 1 à partir de Windows Update
Win2000 – Téléchargez Win2000 Service Pack 3
De nombreuses cartes de mise à jour USB 2.0 sont livrées avec des pilotes tiers ne provenant pas de Microsoft. Ces
pilotes font l’objet de révisions multiples et ont parfois des problèmes de compatibilité avec certains périphériques USB
2.0. Dans de nombreux cas, le pilote USB 2.0 dont vous disposez ne posera aucun problème, mais nous ne pouvons
pas garantir le bon fonctionnement du périphérique avec des pilotes USB 2.0 tiers. Contactez votre fournisseur de
carte additionnelle USB 2.0 pour obtenir la dernière version des pilotes USB 2.0 pour Win98SE et WinME.
FRENCH
USB 1.1
Nous vous conseillons d’utiliser le port USB 1.1 de votre carte mère ou d’une carte additionnelle USB 1.1. Toutes les
cartes USB 1.1 utilisent des pilotes USB Microsoft. Si votre ordinateur tourne sous Win98SE ou WinME, nous vous
conseillons d’utiliser la connexion USB 1.1 de votre PC pour assurer le bon fonctionnement de l’Instant DVD.
PRESENTATION DU MATERIEL:
INSTANT DVD 2.0 Page 80
Page 81

2. Câblage !
Dans cette section, nous connecterons tous les câbles audio et vidéo dont vous aurez besoin pour la capture audiovisuelle et pour
la retransmission de la séquence audiovisuelle sur une télévision pour la regarder ou sur un magnétoscope pour l’enregistrer.
or
FRENCH
INSTANT DVD 2.0 Page 81
Page 82

INSTANT DVD 2.0 Page 83
FRENCH
1. Branchez votre source vidéo (VHS, DVD, lecteur de disque laser, TV, etc.) à votre périphérique Instant DVD.
Branchez les 3 jacks du câble d’entrée A/V de 1,83 m (D) aux sorties de ligne RCA de votre source audio/vidéo
analogique. Branchez les autres extrémités à la prise de jack "RCA Video In" et à la prise de jack "Audio In 3,5 mm"
situées au dos de votre Instant DVD.
3. Branchement
Cette section explique comment brancher votre Instant DVD à votre PC et comment
installer les pilotes de périphérique. Veuillez commencer par lire toute la section,
puis revenez au début et suivez les instructions pas à pas qui vous sont données
pour brancher l’Instant DVD et installer les pilotes et les applications logicielles:
1. Introduction du CD de l’Instant DVD (Apple QuickTime est nécessaire au fonctionnement de nos installateurs. Si
QuickTime n’est pas installé sur votre ordinateur, il s’installera automatiquement.
Cliquez sur le bouton Suivant (Next) de chaque écran.
Ni le nom d’utilisateur ni le numéro d’enregistrement ou de série ne sont pas requis
FRENCH
2. A l’apparition de l’écran d’installation du périphérique Instant DVD, branchez le câble électrique à
l’Instant DVD, puis branchez-le dans une prise de courant.
4. Installation des pilotes de périphérique et des logiciels
Branchez maintenant le câble USB à l’Instant DVD et au PC.
Windows reconnaîtra le périphérique et en demandera les pilotes.
Windows XP ou Win2000 : Laissez Windows faire une recherche
automatique des pilotes. Ils se trouvent dans le répertoire de base du CD de
l’Instant DVD. Windows installera les pilotes.
Win98SE ou WinME : Les pilotes Win98SE/ME se trouvent dans le dossier
Win98 du CD de l’Instant DVD. Lorsque Windows recherchera le pilote, dirigez
le programme vers l’unité où se trouve le CD (généralement l’unité "D") et
double-cliquez sur le dossier Win98. Windows installera alors
automatiquement les pilotes.
5. Installation des applications logicielles
1. Maintenant que vous avez installé le périphérique, cliquez sur le bouton Capture Wizard pour installer les
principaux éléments logiciels qui permettent à l’Instant DVD de fonctionner et d’installer
l’application de capture et de lecture CapWiz.
a.) Si DirectX 9.0 de Microsoft n’est pas installé sur votre ordinateur, il s’installera
automatiquement. DirectX 9.0 est requis pour le bon fonctionnement de votre
périphérique Instant DVD. Après l’installation de DirectX 9.0, vous devez réinitialiser
votre ordinateur
b.) Après la réinitialisation de votre ordinateur, cliquez sur l’icône "Poste de travail" de votre bureau.
Double-cliquez sur l’icône du lecteur de CD pour rappeler l’écran d’installation de l’Instant DVD
c) Continuez à installer, sur votre système, les principaux logiciels fournis : VideoStudio 7, DVD Movie Factory
et Muvee AutoProducer.
2. Installez VideoStudio 7 à partir du 2e CD.
INSTANT DVD 2.0 Page 82
Page 83

6. Vérication de l’installation matérielle
Allez dans Gestionnaire de périphériques pour vérier que le périphérique
Instant DVD est reconnu par Windows et est proprement installé.
Win98, Win98SE, WinME :
1) Cliquez sur Démarrer, Paramètres, Panneau de conguration.
2) Dans Panneau de conguration, cliquez sur Système.
3) Cliquez sur l’onglet Gestionnaire de périphériques.
4) Double-cliquez sur Contrôleur son, vidéo et jeux.
5) Instant DVD devrait y être inscrit.
WinXP, Win2000 :
1) Cliquez sur Démarrer, Paramètres, Panneau de conguration.
2) Dans Panneau de conguration, cliquez sur Système.
3) Cliquez sur l’onglet Matériel.
3) Cliquez sur le bouton Gestionnaire de périphériques.
4) Double-cliquez sur Contrôleur son, vidéo et jeux
5) Instant DVD devrait y être inscrit.
Si Instant DVD est inscrit sous le titre Contrôleur son, vidéo et jeux, cela
signie qu’il est bien installé dans votre système.
7. Optimisation du système pour en tirer le meilleur parti possible
Optimisation du système pour en tirer le meilleur parti possible
Sélectionnez votre résolution VGA
1024 x 768 est la résolution optimale pour visionner une vidéo en pleine
résolution. Les vidéos DVD sont capturées à une résolution de 704 x 480
(704 x 576 PAL). Si votre résolution est insufsante, vous ne pourrez pas
consulter votre vidéo en pleine résolution.
1. Cliquez sur un endroit vierge du bureau avec le bouton droit de la
souris.
2. Cliquez sur Propriétés Système
3. Cliquez sur l’onglet Paramètres
4. Réglez la zone écran sur 1024 x 768 et couleurs 16 bits (ou une
résolution supérieure si votre carte VGA et votre écran prennent en
charge des résolutions et profondeur de bits plus élevées).
FRENCH
Optimisation de la capture vidéo avec DMA
Activez DMA pour améliorer grandement les capacités de capture vidéo de votre
système. Si vous n’activez pas DMA, vous perdrez probablement des trames
vidéo.
Pour Windows 98SE et WinME : Activez DMA sur votre disque dur IDE pour
optimiser la capture vidéo (Remarque : tous les matériels ne prennent pas tous
en charge l’accès DMA).
1. Cliquez sur Poste de travail avec le bouton droit de la souris.
2. Cliquez sur Propriétés Système.
3, Cliquez sur Gestionnaire de périphériques.
4. Double-cliquez sur Lecteurs de disque.
5. Double-cliquez sur Disque dur (marqué Generic IDE type XXX).
6. Cliquez sur l’onglet Paramètres.
7. Activez DMA en cochant la boîte DMA.
8. Cliquez sur OK.
9. Cliquez sur OK.
Votre ordinateur se réinitialisera et DMA sera activé.
INSTANT DVD 2.0 Page 83
Page 84

INSTANT DVD 2.0 Page 85
FRENCH
8. Résumé de l’installation
Vous avez maintenant terminé toutes les opérations suivantes :
1) Câblage audio/vidéo entre l’Instant DVD et votre matériel audiovisuel.
2) Branchement de l’Instant DVD à l’alimentation électrique et au port USB de votre PC.
3) Installation des pilotes USB et vérication de la bonne installation du périphérique.
4) Installation de toutes les applications logicielles requises pour un bon fonctionnement.
5) Vous pouvez maintenant commencer à réaliser des lms DVD.
9. Production de lms DVD
Vous pouvez maintenant commencer à capturer une vidéo. Nous avons créé l’application Capture Wizard spécialement
pour vous permettre de capturer et d’exporter rapidement un chier vidéo sur votre PC sans avoir à apprendre comment
monter une vidéo ou créer un DVD. Utilisez l’application Capture Wizard pour faire un essai de capture et de lecture
vidéo avant d’utiliser VideoStudio 7 ou DVD Movie Factory.
Nous avons créé un guide de prise en main simple pour vous aider à vérier vos connexions et à effectuer les bons
FRENCH
choix de conguration avant de capturer votre chier vidéo.
CapWiz pour Instant DVD
ère
1
étape : Ouvrir CapWiz.
Cliquez sur l’icône CapWiz de votre bureau électronique ou cliquez sur
Démarrer -> Programmes -> ADS Tech Instant DVD et cliquez sur CapWiz.
Choisissez le standard vidéo universel en fonction de votre pays. Les
utilisateurs vivant en Amérique du Nord sélectionneront NTSC et ceux qui
vivent en Europe et dans de nombreux autres pays sélectionneront PAL.
Pour en savoir plus sur les standard de diffusion vidéo, cliquez sur "Learn
more about worldwide video standards".
2e étape : Sélectionner les entrées et sorties vidéo
Choisissez RCA ou S-Video en fonction de votre source vidéo.
INSTANT DVD 2.0 Page 84
Page 85

3e étape : Créer un nom de chier et sélectionner un
répertoire de chier
Nous sélectionnerons automatiquement "Mes Documents\Mes
Vidéos" comme répertoire dans lequel stocker les chiers
vidéo, mais vous pouvez sélectionner un autre répertoire de
votre choix.
4e étape : Choisir un format vidéo
Dans cette étape, vous devez choisir entre les formats de compression vidéo MPEG-1 et MPEG-2. Sélectionnez MPEG-2 si
vous souhaitez capturer une vidéo dans le format DVD de qualité
optimale, et sélectionnez MPEG-1 si vous voulez capturer une
vidéo dans le format VCD.
L’indice d’espace disque montre le volume d’espace disque libre
et donne un exemple de la durée de vidéo que vous pouvez
capturer en sélectionnant MPEG-2 à 3 Mb/s.
FRENCH
Pour en savoir plus sur ces formats MPEG, cliquez sur "Learn
more about video formats".
Prêt à l’emploi
Vous pouvez maintenant commencer à visionner et à capturer des
vidéos. Vous devrez démarrer la lecture de votre caméscope ou
magnétoscope en appuyant sur le bouton de lecture de votre source
vidéo (magnétoscope, lecteur DVD, etc.).
Cliquez sur "Finish" pour faire disparaître l’assistant CapWiz et pour
afcher l’interface de Capture Wizard dans son intégralité.
INSTANT DVD 2.0 Page 85
Page 86

INSTANT DVD 2.0 Page 87
FRENCH
Utilisation de l’outil de capture/lecture vidéo CapWiz pour la première fois:
Vous avez suivi toutes les instructions de l’assistant pour bien brancher vos câbles vidéo et sélectionner le format
vidéo. Vous pouvez maintenant commencer à capturer une séquence vidéo.
L’interface de CapWiz
Menu Options
FRENCH
File Name
Auto-Naming/Unique Name
Playback List Box
Application Links
Record/Play Controls
Prévisualisation et enregistrement d’une séquence vidéo
1) Vériez que votre périphérique vidéo visionne une séquence vidéo.
2) Cliquez sur le bouton "Preview" (prévisualisation) pour faire déler la vidéo dans la fenêtre de
prévisualisation. L’indicateur d’état est bleu et afche le mot "Preview".
3) Cliquez sur le bouton "Stop" ( � ) ou appuyez sur la touche Echap. du clavier pour arrêter la
prévisualisation de la séquence vidéo.
4) Si vous cliquez sur le bouton d’enregistrement rouge "Record" ( � ) pendant la prévisualisation de la
séquence vidéo, la prévisualisation sera momentanément interrompue avant de reprendre.
L’enregistrement est lancé dès la reprise de la prévisualisation et, à ce moment-là, l’indicateur d’état
5) Pour arrêter l’enregistrement, appuyez sur le bouton "Stop" ( � ) ou appuyez sur la touche Echap. du clavier.
6) Vous verrez que le nom du chier a été ajouté à la fenêtre de liste de lecture "Playback list".
Status Indicator
devient rouge et afche le mot "Record".
INSTANT DVD 2.0 Page 86
Page 87

Lancement de l’enregistrement
1. Vous pouvez commencer à enregistrer la vidéo à partir d’un moment d’arrêt ou d’une période d’inactivité dans
CapWiz ou pendant la prévisualisation de la vidéo.
2.
Cliquez sur le bouton d’enregistrement rouge ( � ) pour lancer l’enregistrement de la vidéo à n’importe quel moment.
3. Pour arrêter l’enregistrement, cliquez sur le bouton Stop ( � ) ou sur la touche Echap. du clavier.
4. La vidéo sera afchée dans la résolution que vous avez sélectionnée pour la capture :
a. VCD 352 x 240 NTSC / 352 x 288 PAL
b. SVCD 480 x 480 NTSC / 480 x 576 PAL
c. DVD 720 x 480 NTSC /704 x 576 PAL
Lecture de vidéo capturée
Les chiers video capturés peuvent être afchés sur un écran d’ordinateur ou peuvent être décodés par l’Instant DVD
an d’être visualisés sur un téléviseur ou d’être enregistrés sur une cassette vidéo. Utilisez l’option "Playback On" pour
déterminer l’endroit où sera afchée la vidéo.
Lecture sur l’écran de l’ordinateur :
Il s’agit du réglage par défaut. La vidéo sera visionnée à la résolution de capture.
1) Cliquez sur le nom de chier situé dans la fenêtre "Playback List", puis cliquez sur le bouton de lecture "Play" (�)
Vous pouvez également double-cliquer sur le nom du chier pour une lecture instantanée. Vous verrez que
l’indicateur d’état devient vert et afche le mot "Play".
2) Pour arrêter la lecture, cliquez sur le bouton "Stop" ( � ) ou appuyez sur la touche Echap. du clavier.
FRENCH
INSTANT DVD 2.0 Page 87
Page 88

FRENCH
INSTANT DVD 2.0 Page 89
FRENCH
Positionnement dans la vidéo
Si vous avez enregistré une séquence vidéo assez longue, vous pouvez avancer à un point spécique du chier vidéo
et continuer la lecture à partir de ce point.
1) Cliquez sur le bouton "Pause" (�).
2) Utilisez la souris pour faire glisser le curseur de positionnement de la lecture jusqu’au point d’entrée voulu.
3) Cliquez sur le bouton "Play" (�) ou appuyez sur la barre d’espace du clavier pour reprendre la lecture.
Raccourcis de clavier :
Prévisualisation = Touche Retour
Enregistrement = Touche "R"
Lecture instantanée = Double-clic sur le nom du chier
Lecture/Pause = Barre d’espace
Arrêt de l’enregistrement = Touche Echap.
Arrêt de la prévisualisation = Touche Echap.
Rembobinage d’une seconde vers l’avant (en mode Pause) = touche échée droite
Rembobinage d’une seconde vers l’arrière (en mode Pause) = touche échée gauche
Conguration d’exportation – Transmission d’une vidéo à un téléviseur ou un magnétoscope
Vous pouvez utiliser CapWiz pour exporter des chiers vidéo MPEG capturés avec l’Instant DVD an de les afcher
sur un téléviseur ou de les enregistrer sur une cassette vidéo. Utilisez les câbles fournis pour la connexion aux jacks
de sortie vidéo et de sortie audio, puis branchez les prises de jack RCA jaune, rouge et blanche au téléviseur ou au
magnétoscope selon l’illustration ci-dessous.
OR
Lecture sur téléviseur ou magnétoscope:
Si vous souhaitez retransmettre la vidéo capturée à un poste de télévision pour la visionner ou à un magnétoscope pour l’enregistrer :
1) Cliquez sur TV/VCR dans la fenêtre "Playback Video".
2) Sélectionnez le chier que vous aimeriez lire.
3) Cliquez sur le bouton PLAY (�) pour initialiser la lecture ou double-cliquez sur le nom du chier pour une lecture
instantanée.
4) Cliquez sur le bouton STOP (�) pour arrêter la lecture.
INSTANT DVD 2.0 Page 88
Page 89

Caractéristiques et fonctions de CapWiz
Enregistrement du nom du chier :
Avant l’enregistrement, cochez la boîte de dialogue "Recording Filename" (Enregistrement du nom de chier) située dans
l’angle supérieur gauche de l’application. Le nom du chier que vous avez sélectionné dans l’écran de l’assistant CapWiz
s’y trouve.
1. Gardez ce nom de chier si vous le souhaitez, ou lancez l’assistant pour utiliser un nouveau nom.
2. Cochez la case "Auto Naming" (Nommage automatique) pour que CapWiz nomme automatiquement chaque chier
capturé en ordre séquentiel, c’est-à-dire que si votre chier vidéo est intitulé "Ma Vidéo", le premier chier capturé sera
nommé "Ma Vidéo-000", le deuxième "Ma Vidéo-0001" et ainsi de suite.
3. Chaque fois que vous arrêterez une capture, le nouveau nom de chier sera afché dans la fenêtre "Playback List".
4. Vous pouvez également désélectionner la case "auto-naming" et cliquer sur le bouton "Unique" pour que CapWiz
utilise le nom de chier que vous aurez tapé dans la boîte de nom de chier. Vous avez besoin de fournir un nouveau
nom de chier pour chaque séquence vidéo capturée. Si vous effectuez plusieurs captures sans changer le nom de
chier unique, le chier sera écrasé à chaque nouvelle capture.
Fenêtre "Playback List"
La fenêtre de liste de lecture contient le nom de chier de toutes vos captures vidéo. Cette liste correspondra au
répertoire que vous avez sélectionné dans les écrans de l’assistant CapWiz. Si vous ne vous rappelez plus du répertoire
sélectionné, remettez l’assistant CapWiz en marche.
"Browse" : Le bouton "Browse" (Parcourir) vous permet de consulter les autres répertoires de chiers et disques durs. Si
vous sélectionnez un autre répertoire, tous les chiers vidéo MPEG s’y trouvant apparaîtront dans la fenêtre
"Playback List".
"Details" : Le bouton "Details" vous permettra d’examiner les détails des chiers de la fenêtre "Playback List".
Cliquez sur le bouton "Details" pour ouvrir une boîte de dialogue donnant des informations détaillées sur chaque chier
comme la date (Date), la taille du chier (File Size), le nom de chier (File Name) et le répertoire de stockage sur votre
système.
Cliquez sur un chier de cette boîte de dialogue, puis cliquez de nouveau sur "Details" pour faire apparaître d’autres
informations sur ces chiers comme :
1) Le débit binaire vidéo
2) Le taux d’échantillonnage audio
3) Le débit binaire audio
4) Le débit d’images par seconde
FRENCH
Suppression d’un chier :
Vous pouvez supprimer un chier en cliquant sur le bouton "Remove" situé dans la fenêtre d’informations détaillées.
CapWiz vous demandera de conrmer que vous voulez vraiment supprimer le chier. Cliquez sur OK pour supprimer le chier de votre système.
Liens d’application
Les icônes se trouvant sur le côté de l’écran CapWiz vous permettent de passer facilement de CapWiz aux autres
applications fournies avec l’Instant DVD. Vous pouvez donc passer rapidement à Video Studio et DVD Movie
Factory ou consulter les écrans de CapWiz lorsque aucune vidéo ne déle dans la zone de prévisualisation. Cliquez
sur une icône d’application pour lancer l’application et fermer automatiquement CapWiz.
Vous pouvez répéter les étapes de l’assistant CapWiz et apporter des changements à vos paramètres en cliquant
sur l’icône de CapWiz à n’importe quel moment où la vidéo ne déle pas. L’assistant CapWiz s’exécutera à chaque
fois que vous lancerez CapWiz, sauf si vous le désactivez en cliquant sur Options en haut de l’application puis sur
"Show Wizard" pour le désélectionner.
1) Cliquez ou désélectionnez "Show Splash Screen" pour empêcher l’apparition de l’écran splash lors du lancement
de CapWiz.
2) Cliquez ou désélectionnez "Show Wizard" pour empêcher l’apparition des écrans de l’assistant CapWiz lors du
lancement de CapWiz.
Vous pouvez revalider ces fonctions à n’importe quel moment en les sélectionnant une nouvelle fois.
INSTANT DVD 2.0 Page 89
Page 90

INSTANT DVD 2.0 Page 91
FRENCH
Options de menu
Cette section décrit tous les paramètres et choix disponibles pour toutes les options de menu situées en haut de
l’interface CapWiz.
• Entrées/Sorties vidéo :
Cette boîte de dialogue vous permet de changer rapidement vos sélections d’entrée et de sortie vidéo. Vous avez le
choix entre une entrée RCA, S-VHS ou DV (Instant DVD + DV uniquement) et une sortie RCA ou S-VHS. Vous pouvez
également changer ces paramètres en lançant les écrans de CapWiz.
• Format vidéo :
La boîte de dialogue "Video format" vous permet de changer rapidement le format vidéo en sélectionnant NTSC ou
PAL. Si vous ne savez pas quelle référence choisir, lancez CapWiz et consultez le document intitulé "Learn more about
FRENCH
worldwide Video Standards" (En savoir plus sur les normes vidéo universelles).
Cette boîte de dialogue vous permet également de régler rapidement la résolution et la qualité de la vidéo. Vous avez
le choix entre :
a. DVD avec une qualité Good (Bonne), Better (Meilleure) ou Best (Optimale)
b. Super Video CD (SVCD)
c. VCD
Vous ne pouvez pas choisir de qualité pour les résolutions SVCD et VCD car ce sont des formats à débit binaire vidéo
et audio standard.
CapWiz afchera les paramètres de capture vidéo standard suivants en fonction de votre connexion USB :
Connexion USB 2.0 USB 1.1
Paramètres DVD - 4, 6 or 9 mégabits par seconde (Mb/s.) 2,5, 3 ou 4 Mb/s.*
SVCD - vidéo MPEG-2 à 2,4 Mb/s Idem
VCD - vidéo MPEG-1 à 1,15 Mb/s Idem
Le format vidéo et le débit binaire (4, 6 ou 9 Mb/s) d’une vidéo DVD seront afchés dans une zone d’état de l’interface
CapWiz pour que vous sachiez toujours dans quel format vidéo et à quel débit binaire vous enregistrez votre vidéo.
*En cas de connexion à USB 1.1. grande vitesse, le débit binaire vidéo maximum est de 4 Mb/s.
Paramètres vidéo dénis par l’utilisateur :
CapWiz vous permet de xer des paramètres de capture spéciques. Vous disposez d’une grande souplesse pour
créer des paramètres de capture répondant à vos exigences personnelles. Pour accéder à la boîte de dialogue
"Custom Settings", cliquez sur le bouton "Custom Settings".
Débits binaires vidéo :
Sélectionnez le standard vidéo à utiliser pour effectuer la capture. Le standard choisi doit correspondre au standard
de votre magnétoscope et du contenu de la vidéo. Si vous sélectionnez PAL, vous verrez que les choix de résolution
vidéo deviennent automatiquement des résolutions PAL.
MPEG-1 – En cas de sélection de MPEG-1, la seule résolution vidéo permise est 352 x 240 (NTSC) ou 352 x 288
(PAL), mais vous pouvez sélectionner un débit binaire de capture vidéo allant de 1 Mb/s à 15 Mb/s.
MPEG-2 – Vous pouvez sélectionner n’importe quelle résolution de capture vidéo et n’importe quel débit binaire entre
1 Mb/s et 15 Mb/s.
INSTANT DVD 2.0 Page 90
Page 91

Résolution vidéo :
Vous avez le choix entre les résolutions de capture vidéo suivantes :
NTSC PAL
325 x 240 (VCD) 352 x 288 (VCD)
352 x 480 (1/2 D1) 352 x 576 (1/2 D1)
480 x 480 (SVCD) 480 x 576 ( SVCD)
704 x 480 (DVD) 704 x 576 (DVD)
720 x 480 (DVD) 720 x 576 (DVD)
Débit binaire vidéo :
Vous remarquerez que vous avez la possibilité de sélectionner un débit binaire vidéo allant jusqu’à 15 Mb/s. Vous
remarquerez également que tout débit supérieur à 9 Mb/s est en couleur rouge pour vous avertir qu’un tel débit
n’est pas pris en charge par les lecteurs et graveurs de DVD. Nous offrons ces débits élevés au cas où certains
utilisateurs, qui n’ont pas pour objectif un projet de gravure sur DVD, voudraient capturer leur vidéo au débit le plus
élevé possible. N’oubliez pas que si vous voulez graver votre vidéo sur un disque CD ou DVD, vous ne pouvez pas
utiliser un débit binaire supérieur à 9 Mb/s et inférieur à 2 Mb/s.
Avertissements sur les paramètres personnalisés
Nous offrons un nombreux choix de résolutions et de débits binaires audio/vidéo pour la capture vidéo en réponse
à la demande de nos clients qui favorisent une telle souplesse d’utilisation. Nous vous conseillons, cependant, de
bien considérer l’objectif de votre projet avant d’entamer l’enregistrement. Si vous avez l’intention de capturer une
vidéo pour la graver sur un disque CD ou DVD, vous devrez effectuer la capture à des résolutions et des débits
binaires qui sont « légaux » pour la gravure ou la lecture de disque. Sinon, vous risquez de passer des heures à
capturer une vidéo avant de vous apercevoir que le logiciel d’authoring de DVD ne vous permettra pas de la graver
directement sur disque ou que votre lecteur ne pourra pas la lire.
Réglages légaux VCD, SVCD et DVD (rendez-vous sur notre site Web pour consulter notre forum à questions
(FAQ) et d’autres mises à jour de cette liste) :
Format Débits binaires vidéo Débits binaires audio
VCD 1,15 Mb/s 224 kbits/s
SVCD 1,5 Mb/s - 2,5 Mb/s 128-384 kbits/s
DVD 3 Mb/s – 8 Mb/s 192 – 448 kbits/s
FRENCH
Débits binaires audio
Le format audio est toujours compressé en MPEG-1 Layer 2 audio. En outre, CapWiz règle automatiquement le
taux d’échantillonnage à 44,1 kHz pour les VCD et SVCD et à 48 kHz pour les vidéos DVD. Nous vous donnons la
possibilité de sélectionner pour vos captures vidéo personnalisées un débit binaire audio situé entre 192 kbits/s et
384 kbits/s.
Utilisation du désentrelacement (Preview/Playback)
Le codec de lecture de logiciel MPEG-2 que nous utilisons ne désentrelace pas les vidéos par défaut. Lors de la
prévisualisation ou de la lecture d’une vidéo entrelacée, des lignes horizontales apparaissent sur l’écran. Cet
entrelacement ne compromet pas la qualité vidéo. Toutes les vidéos NTSC et PAL sont entrelacées. Vous ne verrez
pas l’entrelacement lors de la lecture d’un disque DVD sur un téléviseur. Le désentrelacement de la vidéo pendant
la prévisualisation et la lecture améliore la qualité vidéo sur l’écran d’ordinateur.
Les paramètres de capture par défaut mettent implicitement en fonction le désentrelacement. Celui-ci requiert une
puissance de traitement UC légèrement supérieure. Avec certains PC plus lents, les vidéos apparaissent parfois
saccadées. Dans les paramètres personnalisés vous avez la possibilité d’activer ou de désactiver le
désentrelacement. Expérimentez avec votre système pour découvrir si vous préférez activer ou désactiver le
désentrelacement avant toute prévisualisation.
Utilisation de débit binaire variable
La capture effectuée à un débit binaire variable produira des tailles de chier généralement plus petites que la
capture à un débit binaire constant. Si l’option de débit binaire variable est activée, Instant DVD examine les trames
de la vidéo capturée et augmente automatiquement le débit lors d’images d’action ou de mouvement rapide et le
réduit lorsque les changements sont minimes, d’où amélioration de la qualité globale et réduction de la taille du
chier. Par défaut, c’est le débit binaire constant qui est mis en fonction.
INSTANT DVD 2.0 Page 91
Page 92

FRENCH
INSTANT DVD 2.0 Page 93
FRENCH
Filtres de prétraitement vidéo
L’Instant DVD comprend des ltres de prétraitement vidéo permettant de supprimer le bruit présent sur les vieilles
cassettes vidéo, dans les transmissions télévisées ou autres sources vidéos bruyantes.
Filtre spatial
Il s’agit du ltrage des données de pixel qui se trouvent dans une même trame vidéo. Le ltre spatial est un ltre
passe-bas qui supprime une partie des bruits de haute fréquence. Un ltrage trop intense peut réduire la netteté de
l’image au point où elle paraît très lisse ou oue. La fourchette de sélection de ce ltre s’étend de 0 à 7.
Filtre temporel
Ce ltre traite les données de pixel qui se trouvent aux mêmes coordonnées de pixel mais à travers deux images de la
vidéo, en général l’image active et l’image précédente. En raison du mouvement présent dans les séquences vidéo, il
est possible qu’un objet situé à une position spécique se soit déplacé et se retrouve dans l’image vidéo suivante. Par
conséquent, en cas de création de registres de mouvement, le ltrage temporel peut entraîner une atténuation de la
vidéo ou introduire d’autres artéfacts. La fourchette de sélection de ce ltre s’étend de 0 à 255.
Quel est le meilleur ltre à utiliser pour votre vidéo ? Il n’existe pas de formule magique. Vous devrez expérimenter
avec les différents paramètres de ltrage et sélectionner le niveau de ltrage qui permet de supprimer le bruit sans
rendre la vidéo oue.
Utilisation du désentrelacement (Preview/Playback)
Le codec de lecture de logiciel MPEG-2 que nous utilisons ne désentrelace pas les vidéos par défaut. Lors de la
prévisualisation ou de la lecture d’une vidéo entrelacée, des lignes horizontales apparaissent sur l’écran. Cet
entrelacement ne compromet pas la qualité vidéo. Toutes les vidéos NTSC et PAL sont entrelacées. Vous ne verrez
pas l’entrelacement lors de la lecture d’un disque DVD sur un téléviseur. Le désentrelacement de la vidéo pendant la
prévisualisation et la lecture améliore la qualité vidéo sur l’écran d’ordinateur.
Les paramètres de capture par défaut mettent implicitement en fonction le désentrelacement. Celui-ci requiert une
puissance de traitement UC légèrement supérieure. Avec certains PC plus lents, les vidéos apparaissent parfois
saccadées. Dans les paramètres personnalisés vous avez la possibilité d’activer ou de désactiver le désentrelacement.
Expérimentez avec votre système pour découvrir si vous préférez activer ou désactiver le désentrelacement avant
toute prévisualisation.
Sélection des paramètres de capture personnalisés
1) Cliquez sur le bouton "Custom Settings".
2) Effectuez vos sélections à l’ouverture de la boîte de dialogue "Custom Settings".
3) Cliquez sur OK pour enregistrer vos sélections.
4) Cliquez sur "Use Custom Format" (Utiliser le format personnalisé) pour effectuer la capture avec les
paramètres sélectionnés.
• Brightness/Color (Luminosité/couleur)
Avec cette option, vous pouvez changer la luminosité (Brightness), le chromatisme (Chroma), le contraste (Contrast),
la teinte (Hue) et la saturation (Saturation).
Vous ne pouvez modier les paramètres de luminosité et de couleur que pendant la prévisualisation ou
l’enregistrement de la vidéo.
1. Faites glisser le curseur au réglage de votre choix, et la modication apparaîtra au bout d’une ou deux secondes.
2. Si vous faites une erreur, cliquez sur "Reset" pour restaurer les réglages par défaut.
3. Cliquez sur OK pour fermer cette fenêtre.
• Commandes facultatives (uniquement pour Instant DVD + DV) *
Cette fenêtre est réservée à une version améliorée de l’Instant DVD intitulée "Instant DVD +DV" qui permet de brancher
un caméscope numérique et de capturer une vidéo numérique pour la convertir en format MPEG-1 ou MPEG-2.
Ces commandes vous permettent, par le biais d’un logiciel, de contrôler le caméscope en effectuant les opérations de
rembobinage, d’avance rapide, de lecture et d’arrêt.
INSTANT DVD 2.0 Page 92
Page 93

Réservé à l’Instant DVD + DV :
1) Avec le câble DV 4 broches/4 broches fourni, branchez le caméscope numérique au port DV 4 broches situé
à l’avant du périphérique Instant DVD +DV.
2) Allumez le caméscope et mettez-le en mode VCR/VTR. Remarque : pour un résultat optimal, nous vous
conseillons d’alimenter le caméscope sur le secteur plutôt que sur batterie.
3) Cliquez sur le bouton de lecture du panneau de commande du caméscope DV pour lancer la lecture de la
bande du caméscope.
4) Cliquez sur le bouton "Preview" (Prévisualisation) de l’interface CapWiz pour afcher la vidéo en provenance
du caméscope.
5) Cliquez sur le bouton "Stop" de l’interface CapWiz pour arrêter la prévisualisation de la vidéo, puis cliquez
sur le bouton d’arrêt du panneau de commande du caméscope.
*Si vous souhaitez passer du périphérique Instant DVD 2.0 à l’Instant DVD + DV, contactez le service d’assistance
clients ADS Tech pour connaître les offres de mise à niveau existantes.
• Control (Contrôle)
Le menu "Control" vous fournit une autre méthode de contrôle de l’enregistrement et de la lecture de votre vidéo.
Les sélections sont : Preview (Prévisualisation), Record (enregistrement), Stop (arrêt), Pause (pause), Play (lecture).
• Applications
Le menu "Applications" est une autre méthode vous permettant de passer aux applications intégrées. Vous pouvez
également changer la voie d’accès de ces applications si vous les avez installées sur une autre unité.
1. Cliquez sur le bouton de menu "Applications".
2. Cliquez sur DVD Movie Factory ou VideoStudio selon l’application que vous voulez sélectionner. CapWiz se
fermera automatiquement à ce moment-là.
3. Cliquez sur le bouton "Edit" (Edition) pour consulter le chemin de répertoire standard ou par défaut où sont
normalement installées les applications.
4. Pour changer le chemin de répertoire, cliquez sur la case avec "...". Vous pourrez ainsi consulter le chemin
de répertoire où est installée l’application en question.
FRENCH
INSTANT DVD 2.0 Page 93
Page 94

FRENCH
INSTANT DVD 2.0 Page 95
FRENCH
• Options:
Les menus sous Options vous fournissent de nombreuses autres possibilités de personnaliser l’utilisation de
l’application CapWiz : Cliquez sur le bouton Options situé en haut de l’interface pour afcher le menu déroulant des
Options.
Show Splash (Afcher Splash)
Si cette option est cochée, un écran splash "ADS" apparaîtra sur votre écran au lancement de CapWiz. Pour
désactiver cette option, cliquez sur "Show Splash" et l’encoche disparaîtra.
Show Wizard (Afcher Wizard)
Si cette option est cochée, les écrans de l’assistant CapWiz apparaîtront sur votre écran au lancement de CapWiz.
Pour désactiver cette option, cliquez sur "Show Wizard" et l’encoche disparaîtra.
Preview Immediately at Startup (Prévisualisation dès le lancement)
Si cette option est cochée, la prévisualisation de la vidéo commencera automatiquement dès le lancement de
CapWiz.
Audio…
Cette option ouvrira une fenêtre vous permettant de sélectionner le débit binaire audio de votre capture vidéo. Le
paramètre par défaut pour les disques VCD, SVCD et DVD est 224 kilobits par seconde, mais vous pouvez choisir
un autre paramètre situé entre 112 kb/s et 384 kb/s.
Playback… (Lecture...)
Cette option vous permettra de lire la vidéo capturée à une résolution de lecture standard sans tenir compte de la
résolution de capture :
1) Cliquez sur "Options", en haut de l’écran.
2) Cliquez sur "Advanced".
3) Cliquez sur "Playback Options".
4) Sélectionnez la résolution de lecture voulue.
5) Si vous sélectionnez "Full Screen" (Plein écran), vous pourrez alors changer la taille de la fenêtre manuellement à
l’aide de la souris.
Sélectionnez cette option pour ouvrir une fenêtre vous permettant de changer la résolution de lecture de la vidéo
capturée. Vous pourrez ainsi effectuer la lecture d’une vidéo SVCD (480 x 480) à une résolution de 720 x 480, par
exemple. Vous pouvez également choisir de lire toutes les vidéos dans une résolution à plein écran, auquel cas une
fenêtre de plein écran s’ouvrira et vous pourrez en changer la taille manuellement en étirant l’un de ses bords avec
la souris.
Use RenderGraph (Utiliser RenderGraph)
Cette option est désactivée par défaut. Ne l’utilisez que si vous avez de la difculté à utiliser la barre "Seek" pour la
lecture. Lorsque cette option est activée, CapWiz utilise n’importe quel décodeur MPEG de votre système. Il risque
d’y avoir confusion si plusieurs décodeurs de logiciel MPEG sont installés sur votre système. Pour bien utiliser
l’encodeur de logiciel d’Instant DVD, désactivez donc cette option.
Skins…(" Peaux...")
Cette option appelle le sélecteur de "peau". Actuellement CapWiz inclut 2 peaux. Vous pouvez facilement
sélectionner la peau de votre choix. A l’avenir, vous disposerez sans doute un grand nombre de "peaux"
parmi lesquelles choisir.
INSTANT DVD 2.0 Page 94
Page 95

Recording (Enregistrement)
Cette option fait surgir une « Recording Options » offrant les choix suivants :
Prompt to Conrm Recording (Conrmation d’enregistrement)
Si cette option est cochée, vous verrez apparaître un message de conrmation à chaque fois que vous cliquerez
sur le bouton d’enregistrement. Vous pouvez utiliser cette fonction pour déterminer avec précision le moment de
lancement de la séance d’enregistrement.
Prompt Delay Record (Conrmation du délai d’enregistrement)
Activez cette fonction pour faire apparaître la fenêtre « Recording Options » (Options d’enregistrement) lorsque
vous cliquez sur le bouton d’enregistrement. Cliquez de nouveau sur « Prompt Delay Record » pour désactiver
cette fonction. Lorsque vous cliquez ensuite sur le bouton d’enregistrement, une boîte de dialogue apparaît pour
vous permettre de xer les heures, les minutes et les secondes de l’enregistrement différé. Si vous voulez, par
exemple, lancer l’enregistrement dans une heure, xer le délai à une heure et l’enregistrement commencera
automatiquement au bout d’une heure.
Disable Screen Saver during recording (Désactiver l’écran de veille pendant l’enregistrement)
En cas de capture de longue durée, vous souhaiterez peut-être désactiver l’écran de veille car un écran de veille
peut parfois perturber la capture vidéo, selon le type de carte graphique utilisée.
Record Duration (Durée d’enregistrement)
Vous pouvez xer une durée d’enregistrement à l’avance. Si vous connaissez la durée exacte pendant laquelle
vous voulez enregistrer la vidéo, vous pouvez xer cette durée en heures, minutes et secondes. Après cela, vous
pouvez entamer l’enregistrement et quitter votre ordinateur en sachant que l’enregistrement s’arrêtera à la n de
la durée xée. Vous pouvez utiliser ensemble les options de délai d’enregistrement et de durée d’enregistrement.
Disk space (Espace disque)
Vous pouvez régler cette option pour que CapWiz vous avertisse, au commencement de l’enregistrement, que
vous n’avez pas sufsamment d’espace libre sur le disque. Cochez cette case pour activer la fonction et réglez le
curseur sur la quantité d’espace de disque justiant, selon vous, un avertissement.
FRENCH
• Help (Aide)
About (A propos de)
Cette option vous permet de vérier le numéro de version de l’application en cours d’utilisation et afche la quantité
d’espace libre sur votre unité C:.
Help Using CapWiz (Aide)
Cette option permet d’extraire le chier Adobe Acrobat qui afche ce manuel CapWiz.
System Info (Infos système)
Cette option fera apparaître une boîte de dialogue contenant toutes les informations concernant votre système.
Vous pouvez cliquer sur le bouton copier, puis collez ces informations dans un e-mail pour l’envoyer au service
d’assistance technique ADS sur sa demande.
INSTANT DVD 2.0 Page 95
Page 96

FRENCH
INSTANT DVD 2.0 Page 97
FRENCH
User Guide
ULEAD Systems, Inc.
January 2003
INSTANT DVD 2.0 Page 96
Page 97

Mode d’emploi de VideoStudio
VideoStudio suit une procédure pas à pas pour assurer la simplicité des tâches de montage vidéo du début jusqu’à
la n. Il offre également plus d’une centaine d’effets de transition, de capacités de titrage professionnel et d’outils de
création de bande sonore d’une grande convivialité. Il suft de quelques secondes d’apprentissage pour effectuer un
montage en quelques minutes.
VideoStudio divise votre lm en plusieurs pistes pour vous donner une grande liberté artistique. Les changements
apportées à une piste n’ont aucun effet sur les autres pistes.
Après le transfert d’une séquence à partir d’un caméscope, vous pouvez changer les scènes de place, appliquer
des effets spéciaux, superposer plusieurs images, ajouter des titres animés, synchroniser une voix off et utiliser une
musique de fond provenant de vos CD favoris dans des formats WAV et MP3. Tout cela peut s’effectuer à l’aide
d’opérations glisser-déposer, couper et coller ou encore sélectionner et appliquer.
Toutes les pistes du lm sont ensuite organisées dans un chier de projet vidéo (*.VSP) contenant toutes les
informations vidéo et audio permettant de monter le lm selon vos instructions précédentes.
Quand tout est prêt, l’ordinateur rassemble toutes les informations requises pour créer le chier de lm dénitif. Ce
processus s’appelle le rendu.
Vous pouvez alors sortir et distribuer votre lm sous forme de titre de DVD/VCD/SVCD, de vidéo en continu sur
page Web ou d’annexe de message électronique. Vous pouvez également enregistrer votre lm sur caméscope ou
magnétoscope.
Components of a nished project as displayed in Timeline Mode
DVD, VCD, and SVCD
Lors du choix du format de sortie de votre projet, vous devez tenir compte de plusieurs facteurs, y compris la
qualité de sortie voulue, le périphérique de lecture choisi et la taille de l’écran d’afchage. Voici les avantages et les
inconvénients que présente chacun de ces formats de sortie :
• Le Video Compact Disc (VCD) est une version spéciale du CD-ROM qui utilise le format
MPEG-1. La qualité du lm exporté est presque la même, mais généralement meilleure,
que celle des lms sur cassette VHS. Le VCD peut tourner sur les lecteurs CD-ROM et
VCD ainsi que sur certains lecteurs DVD.
• Le Super Video CD (SVCD) est souvent décrit comme une version améliorée du VCD.
Il est basé sur la technologie MPEG-2 et la méthode de codage VBR (débit binaire
variable). La durée type d’un SVCD est d’environ 30 à 45 minutes. Il est possible de la
prolonger jusqu’à 70 minutes, mais à condition de compromettre la qualité de l’image
et du son. Le SVCD peut tourner sur les lecteurs de salon VCD/SVCD, la plupart des
lecteurs DVD et tous les lecteurs CD-ROM/DVD-ROM à l’aide d’un logiciel de lecteur
DVD/SVCD.
• Le Digital Versatile Disc (DVD) est fort plébiscité dans la production de vidéo en raison
de sa qualité. Non seulement il garantit une qualité du son et de l’image superbe, mais il
peut stocker un nombre de données beaucoup plus important que le VCD et le SVCD.
Le DVD utilise le format MPEG-2, dont la taille de chier est bien plus grande que celle
du MPEG-1, et l’écriture est possible sur les deux faces à couche simple ou double. Il
se lit sur les lecteurs de salon DVD ou sur les lecteurs DVD-ROM de votre PC.
INSTANT DVD 2.0 Page 97
FRENCH
Page 98

INSTANT DVD 2.0 Page 99
FRENCH
Installation et lancement de VideoStudio (2e CD)
Pour installer VideoStudio :
1. Placez le CD VideoStudio dans le
lecteur de CD-ROM.
2. A l’apparition de l’écran de
conguration, suivez les instructions
données pour l’installation de
VideoStudio sur votre ordinateur.
Remarque : Si l’écran de
conguration n’apparaît pas après
le lancement du CD, vous pouvez le
démarrer manuellement en doublecliquant sur l’icône Poste de travail
du bureau et en double-cliquant
FRENCH
sur l’icône du lecteur de CD-ROM.
A l’ouverture de la fenêtre du CDROM, double-cliquez sur l’icône de
conguration.
Veuillez également installer les applications suivantes qui sont très importantes
pour assurer le bon fonctionnement de la vidéo numérique sur votre ordinateur. Le
programme d’installation vous aidera à installer :
• QuickTime
• Windows Media Format
• RealPlayer
• Acrobat Reader
Remarque : Ignorez cette étape si vous avez déjà installé des versions
ultérieures de ces applications sur votre PC.
Pour lancer VideoStudio :
• Double-cliquez sur l’icône VideoStudio situé sur le bureau Windows ;
OU,
• Dans le menu Démarrer de Windows, sélectionnez l’icône VideoStudio se
trouvant sous le groupe de programmes VideoStudio.
Ecran d’installation VIDEOSTUDIO
Lancement de VideoStudio à partir du
menu Démarrer de Windows
INSTANT DVD 2.0 Page 98
Page 99

Conguration pour l’Instant DVD
Pour vérier la conguration de VideoStudio pour une interface
analogique :
1. Branchez votre caméscope, magnétoscope ou autre
périphérique de source vidéo à votre carte de capture
analogique.
2. Introduisez la cassette vidéo dans le périphérique de capture
et allumez celui-ci. Vériez qu’il est bien en mode de lecture
(indiqué en général par VTR ou VCR). Consultez le manuel du
périphérique pour de plus amples instructions.
3. Votre module d’extension de capture sera automatiquement
détecté.
4. Cliquez sur le bouton " Capture Step " et vériez si votre
périphérique est afché dans " Options Panel " sous " source ".
Remarque : Si votre périphérique de capture prend en
charge plusieurs sources vidéo, la bo”te de dialogue Ç Input
Source È vous permet de sélectionner la source vidéo voulue
comme Composite, Tuner ou S-Video. De m me, si vous
disposez de plusieurs sources audio, cette bo”te de dialogue
vous permettra de sélectionner celle de votre choix.
Sélection du module d’extension de
capture d’Instant DVD
Si vous avez plusieurs périphériques de capture connectés à votre
PC, vous devrez peut-être sélectionner manuellement le module
d’extension de capture voulu.
FRENCH
1.) Cliquez sur " File " (Fichier) dans l’angle supérieur gauche
de VideoStudio.
2.) Cliquez sur " Change Capture Plug-in " (Changer le
module d’extension de capture).
3.) La fenêtre " Change Capture Plug-in " apparaît.
Sélectionnez " ADS Instant DVD USB2 Capture Plug-in ".
4.) Cliquez sur " OK ".
5.) Si le module d’extension de capture de l’Instant DVD était
déjà sélectionné, cliquez sur " Annuler ".
INSTANT DVD 2.0 Page 99
Page 100

INSTANT DVD 2.0 Page 101
FRENCH
Interface de VideoStudio
L’interface de VideoStudio a été conçue pour rendre intuitif et amusant le
montage de lm sur PC qui s’avère parfois compliqué. Cette illustration montre les
éléments principaux du programme. Les quelques pages suivantes détaillent les
caractéristiques et fonctions de chacun de ces éléments.
Panneau Options
Il contient des commandes, des boutons et d’autres
informations pouvant servir à personnaliser les
paramètres du clip sélectionné. Le contenu de ce
panneau change selon l’étape du montage à laquelle
vous vous trouvez.
Fenêtre de prévisualisation
Elle afche le clip, le ltre vidéo, l’effet ou
le titre actif.
FRENCH
Chronologie
Elle afche tous les clips et
tous les effets inclus dans le
projet. Sélectionnez la piste de
matériel qui contient le clip que
vous souhaitez modier.
Panneau de navigation
Utilisez ces boutons
pour parcourir un clip
sélectionné en vue de
le modier ou de le
découper avec précision.
Cinémathèque
Elle permet de stocker et de classer
tous vos clips de matériel.
INSTANT DVD 2.0 Page 100
 Loading...