

Page 1

EXTENDING DREAMWEAVER
ADOBE® DREAMWEAVER® CS
3
Page 2

© 2007 Adobe Systems Incorporated. All rights reserved.
Adobe® Dreamweaver® CS3 Extending Dreamweaver for Windows® and Macintosh
If this guide is distributed with software that includes an end user agreement, this guide, as well as the software described in it, is furnished under license and may be used or
copied only in accordance with the terms of such license. Except as permitted by any such license, no part of this guide may be reproduced, stored in a retrieval system, or transmitted, in any form or by any means, electronic, mechanical, recording, or otherwise, without the prior written permission of Adobe Systems Incorporated. Please note that the
content in this guide is protected under copyright law even if it is not distributed with software that includes an end user license agreement.
The content of this guide is furnished for informational use only, is subject to change without notice, and should not be construed as a commitment by Adobe Systems Incorporated. Adobe Systems Incorporated assumes no responsibility or liability for any errors or inaccuracies that may appear in the informational content contained in this guide.
Please remember that existing artwork or images that you may want to include in your project may be protected under copyright law. The unauthorized incorporation of such
material into your new work could be a violation of the rights of the copyright owner. Please be sure to obtain any permission required from the copyright owner.
Any references to company names in sample templates are for demonstration purposes only and are not intended to refer to any actual organization.
Adobe, the Adobe logo, ActionScript, ColdFusion, Dreamweaver, HomeSite, Fireworks, and Flash are either registered trademarks or trademarks of Adobe Systems Incorporated
in the United States and/or other countries.
Mac OS and Macintosh is a trademark of Apple Computer Inc., registered in the United States and other countries. ActiveX, Microsoft, and Windows are either registered trademarks or trademarks of Microsoft Corporation in the United States and/or other countries. Java is a trademark or registered trademark of Sun Microsystems, Inc. in the United
States and other countries. All other trademarks are the property of their respective owners.
This product includes software developed by the Apache Software Foundation (http://www.apache.org/). The Graphics Interchange Format © is the Copyright property of
CompuServe Incorporated. GIF(sm) is a Service Mark property of CompuServe Incorporated. MPEG Layer-3 audio compression technology licensed by Fraunhofer IIS and
Thomson Multimedia (http://www.mp3licensing.com). You cannot use the MP3 compressed audio within the Software for real time or live broadcasts. If you require an MP3
decoder for real time or live broadcasts, you are responsible for obtaining this MP3 technology license. Speech compression and decompression technology licensed from Nellymoser, Inc. (www.nellymoser.com). Flash CS3 video is powered by On2 TrueMotion video technology. © 1992-2005 On2 Technologies, Inc. All Rights Reserved.
http://www.on2.com. This product includes software developed by the OpenSymphony Group (http://www.opensymphony.com/) Sorenson™ Spark™ video compression and
decompression technology licensed from Sorenson Media, Inc.
Adobe Systems Incorporated, 345 Park Avenue, San Jose, California 95110, USA. Notice to U.S. Government End Users. The Software and Documentation are “Commercial
Items,” as that term is defined at 48 C.F.R. §2.101, consisting of “Commercial Computer Software” and “Commercial Computer Software Documentation,” as such terms are used
in 48 C.F.R. §12.212 or 48 C.F.R. §227.7202, as applicable. Consistent with 48 C.F.R. §12.212 or 48 C.F.R. §§227.7202-1 through 227.7202-4, as applicable, the Commercial
Computer Software and Commercial Computer Software D ocumentation are being licensed to U.S. Government end users (a) only as Commercial Items and (b) with only those
rights as are granted to all other en d users pursuant to the terms and conditions herein. Unpublished-rights reserved under the copyright laws of the United States. Adobe Systems
Incorporated, 345 Park Avenue, San Jose, CA 95110-2704, USA. For U.S. Government End Users, Adobe agrees to comply with all applicable equal opportunity laws including,
if appropriate, the provisions of Executive Order 11246, as amended, Section 402 of the Vietnam Era Veterans Readjustment Assistance Act of 1974 (38 USC 4212), and Section
503 of the Rehabilitation Act of 1973, as amended, and the regulations at 41 CFR Parts 60-1 through 60-60, 60-250, and 60-741. The affirmative action clause and regulations
contained in the preceding sentence shall be incorporated by reference.
Page 3

Contents
Chapter 1: Introduction
Background . . . . . . . . . . . . . . . . . . . . . . . . . . . . . . . . . . . . . . . . . . . . . . . . . . . . . . . . . . . . . . . . . . . . . . . . . . . . . . 1
Installing an extension . . . . . . . . . . . . . . . . . . . . . . . . . . . . . . . . . . . . . . . . . . . . . . . . . . . . . . . . . . . . . . . . . . . . 2
Creating an extension . . . . . . . . . . . . . . . . . . . . . . . . . . . . . . . . . . . . . . . . . . . . . . . . . . . . . . . . . . . . . . . . . . . . . 2
Additional resources for extension writers . . . . . . . . . . . . . . . . . . . . . . . . . . . . . . . . . . . . . . . . . . . . . . . . . 3
What’s new in Dreamweaver . . . . . . . . . . . . . . . . . . . . . . . . . . . . . . . . . . . . . . . . . . . . . . . . . . . . . . . . . . . . . . 3
Conventions used in this guide . . . . . . . . . . . . . . . . . . . . . . . . . . . . . . . . . . . . . . . . . . . . . . . . . . . . . . . . . . . . 3
Chapter 2: Customizing Dreamweaver
Ways to customize Dreamweaver . . . . . . . . . . . . . . . . . . . . . . . . . . . . . . . . . . . . . . . . . . . . . . . . . . . . . . . . . . 5
Customizing Dreamweaver in a multiuser environment . . . . . . . . . . . . . . . . . . . . . . . . . . . . . . . . . . . 12
Changing FTP mappings . . . . . . . . . . . . . . . . . . . . . . . . . . . . . . . . . . . . . . . . . . . . . . . . . . . . . . . . . . . . . . . . . 14
Extensible document types in Dreamweaver . . . . . . . . . . . . . . . . . . . . . . . . . . . . . . . . . . . . . . . . . . . . . . 15
Changing keyboard shortcut mappings . . . . . . . . . . . . . . . . . . . . . . . . . . . . . . . . . . . . . . . . . . . . . . . . . . 28
iii
Chapter 3: Customizing Code view
Code hints . . . . . . . . . . . . . . . . . . . . . . . . . . . . . . . . . . . . . . . . . . . . . . . . . . . . . . . . . . . . . . . . . . . . . . . . . . . . . . . 31
Code coloring . . . . . . . . . . . . . . . . . . . . . . . . . . . . . . . . . . . . . . . . . . . . . . . . . . . . . . . . . . . . . . . . . . . . . . . . . . . 43
Code validation . . . . . . . . . . . . . . . . . . . . . . . . . . . . . . . . . . . . . . . . . . . . . . . . . . . . . . . . . . . . . . . . . . . . . . . . . . 66
Changing default HTML formatting . . . . . . . . . . . . . . . . . . . . . . . . . . . . . . . . . . . . . . . . . . . . . . . . . . . . . . . 69
Chapter 4: Extending Dreamweaver
Types of Dreamweaver extensions . . . . . . . . . . . . . . . . . . . . . . . . . . . . . . . . . . . . . . . . . . . . . . . . . . . . . . . . 71
Configuration folders and extensions . . . . . . . . . . . . . . . . . . . . . . . . . . . . . . . . . . . . . . . . . . . . . . . . . . . . . 72
Extension APIs . . . . . . . . . . . . . . . . . . . . . . . . . . . . . . . . . . . . . . . . . . . . . . . . . . . . . . . . . . . . . . . . . . . . . . . . . . . 74
Localizing an extension . . . . . . . . . . . . . . . . . . . . . . . . . . . . . . . . . . . . . . . . . . . . . . . . . . . . . . . . . . . . . . . . . . 76
Working with the Extension Manager . . . . . . . . . . . . . . . . . . . . . . . . . . . . . . . . . . . . . . . . . . . . . . . . . . . . . 77
Chapter 5: User interfaces for extensions
Designing an extension user interface . . . . . . . . . . . . . . . . . . . . . . . . . . . . . . . . . . . . . . . . . . . . . . . . . . . . 78
Dreamweaver HTML rendering control . . . . . . . . . . . . . . . . . . . . . . . . . . . . . . . . . . . . . . . . . . . . . . . . . . . 79
Using custom UI controls in extensions . . . . . . . . . . . . . . . . . . . . . . . . . . . . . . . . . . . . . . . . . . . . . . . . . . . 80
Adding Flash content to Dreamweaver . . . . . . . . . . . . . . . . . . . . . . . . . . . . . . . . . . . . . . . . . . . . . . . . . . . 88
Chapter 6: The Dreamweaver Document Object Model
Which document DOM? . . . . . . . . . . . . . . . . . . . . . . . . . . . . . . . . . . . . . . . . . . . . . . . . . . . . . . . . . . . . . . . . . . 91
The Dreamweaver DOM . . . . . . . . . . . . . . . . . . . . . . . . . . . . . . . . . . . . . . . . . . . . . . . . . . . . . . . . . . . . . . . . . . 91
Chapter 7: Insert bar objects
How object files work . . . . . . . . . . . . . . . . . . . . . . . . . . . . . . . . . . . . . . . . . . . . . . . . . . . . . . . . . . . . . . . . . . . . 99
The Insert bar definition file . . . . . . . . . . . . . . . . . . . . . . . . . . . . . . . . . . . . . . . . . . . . . . . . . . . . . . . . . . . . . 100
Modifying the Insert bar . . . . . . . . . . . . . . . . . . . . . . . . . . . . . . . . . . . . . . . . . . . . . . . . . . . . . . . . . . . . . . . . 106
A simple insert object example . . . . . . . . . . . . . . . . . . . . . . . . . . . . . . . . . . . . . . . . . . . . . . . . . . . . . . . . . . 108
Page 4

The objects API functions . . . . . . . . . . . . . . . . . . . . . . . . . . . . . . . . . . . . . . . . . . . . . . . . . . . . . . . . . . . . . . . 116
Chapter 8: Browser compatibility check issues API
How detection works . . . . . . . . . . . . . . . . . . . . . . . . . . . . . . . . . . . . . . . . . . . . . . . . . . . . . . . . . . . . . . . . . . . 120
An Issues example . . . . . . . . . . . . . . . . . . . . . . . . . . . . . . . . . . . . . . . . . . . . . . . . . . . . . . . . . . . . . . . . . . . . . . 121
The issues API functions . . . . . . . . . . . . . . . . . . . . . . . . . . . . . . . . . . . . . . . . . . . . . . . . . . . . . . . . . . . . . . . . . 123
Chapter 9: Commands
How commands work . . . . . . . . . . . . . . . . . . . . . . . . . . . . . . . . . . . . . . . . . . . . . . . . . . . . . . . . . . . . . . . . . . . 126
Adding commands to the Commands menu . . . . . . . . . . . . . . . . . . . . . . . . . . . . . . . . . . . . . . . . . . . . . 127
A simple command example . . . . . . . . . . . . . . . . . . . . . . . . . . . . . . . . . . . . . . . . . . . . . . . . . . . . . . . . . . . . 127
The commands API functions . . . . . . . . . . . . . . . . . . . . . . . . . . . . . . . . . . . . . . . . . . . . . . . . . . . . . . . . . . . 133
Chapter 10: Menus and menu commands
About the menus.xml file . . . . . . . . . . . . . . . . . . . . . . . . . . . . . . . . . . . . . . . . . . . . . . . . . . . . . . . . . . . . . . . 137
Changing menus and menu commands . . . . . . . . . . . . . . . . . . . . . . . . . . . . . . . . . . . . . . . . . . . . . . . . . 143
Menu commands . . . . . . . . . . . . . . . . . . . . . . . . . . . . . . . . . . . . . . . . . . . . . . . . . . . . . . . . . . . . . . . . . . . . . . . 146
A simple menu command example . . . . . . . . . . . . . . . . . . . . . . . . . . . . . . . . . . . . . . . . . . . . . . . . . . . . . . 148
A dynamic menu example . . . . . . . . . . . . . . . . . . . . . . . . . . . . . . . . . . . . . . . . . . . . . . . . . . . . . . . . . . . . . . . 151
The menu commands API functions . . . . . . . . . . . . . . . . . . . . . . . . . . . . . . . . . . . . . . . . . . . . . . . . . . . . . 157
iv
Chapter 11: Toolbars
How toolbars work . . . . . . . . . . . . . . . . . . . . . . . . . . . . . . . . . . . . . . . . . . . . . . . . . . . . . . . . . . . . . . . . . . . . . . 162
A simple toolbar command file . . . . . . . . . . . . . . . . . . . . . . . . . . . . . . . . . . . . . . . . . . . . . . . . . . . . . . . . . . 164
The toolbar definition file . . . . . . . . . . . . . . . . . . . . . . . . . . . . . . . . . . . . . . . . . . . . . . . . . . . . . . . . . . . . . . . 166
Too lba r ite m tags . . . . . . . . . . . . . . . . . . . . . . . . . . . . . . . . . . . . . . . . . . . . . . . . . . . . . . . . . . . . . . . . . . . . . . . 170
Item tag attributes . . . . . . . . . . . . . . . . . . . . . . . . . . . . . . . . . . . . . . . . . . . . . . . . . . . . . . . . . . . . . . . . . . . . . . 175
The toolbar command API functions . . . . . . . . . . . . . . . . . . . . . . . . . . . . . . . . . . . . . . . . . . . . . . . . . . . . . 180
Chapter 12: Reports
Site reports . . . . . . . . . . . . . . . . . . . . . . . . . . . . . . . . . . . . . . . . . . . . . . . . . . . . . . . . . . . . . . . . . . . . . . . . . . . . . 188
Stand-alone reports . . . . . . . . . . . . . . . . . . . . . . . . . . . . . . . . . . . . . . . . . . . . . . . . . . . . . . . . . . . . . . . . . . . . . 191
The reports API functions . . . . . . . . . . . . . . . . . . . . . . . . . . . . . . . . . . . . . . . . . . . . . . . . . . . . . . . . . . . . . . . 193
Chapter 13: Tag libraries and editors
Tag library file format . . . . . . . . . . . . . . . . . . . . . . . . . . . . . . . . . . . . . . . . . . . . . . . . . . . . . . . . . . . . . . . . . . . 198
The Tag Chooser . . . . . . . . . . . . . . . . . . . . . . . . . . . . . . . . . . . . . . . . . . . . . . . . . . . . . . . . . . . . . . . . . . . . . . . . 201
A simple example of creating a new tag editor . . . . . . . . . . . . . . . . . . . . . . . . . . . . . . . . . . . . . . . . . . . 203
The tag editor APIs functions . . . . . . . . . . . . . . . . . . . . . . . . . . . . . . . . . . . . . . . . . . . . . . . . . . . . . . . . . . . . 207
Chapter 14: Property inspectors
Property inspector files . . . . . . . . . . . . . . . . . . . . . . . . . . . . . . . . . . . . . . . . . . . . . . . . . . . . . . . . . . . . . . . . . 210
How Property inspector files work . . . . . . . . . . . . . . . . . . . . . . . . . . . . . . . . . . . . . . . . . . . . . . . . . . . . . . . 211
A simple Property inspector example . . . . . . . . . . . . . . . . . . . . . . . . . . . . . . . . . . . . . . . . . . . . . . . . . . . . 212
The Property inspector API functions . . . . . . . . . . . . . . . . . . . . . . . . . . . . . . . . . . . . . . . . . . . . . . . . . . . . 215
Chapter 15: Floating panels
How floating panel files work . . . . . . . . . . . . . . . . . . . . . . . . . . . . . . . . . . . . . . . . . . . . . . . . . . . . . . . . . . . . 219
Page 5

A simple floating panel example . . . . . . . . . . . . . . . . . . . . . . . . . . . . . . . . . . . . . . . . . . . . . . . . . . . . . . . . 220
The floating panel API functions . . . . . . . . . . . . . . . . . . . . . . . . . . . . . . . . . . . . . . . . . . . . . . . . . . . . . . . . . 224
Chapter 16: Behaviors
How Behaviors work . . . . . . . . . . . . . . . . . . . . . . . . . . . . . . . . . . . . . . . . . . . . . . . . . . . . . . . . . . . . . . . . . . . . 231
A simple behavior example . . . . . . . . . . . . . . . . . . . . . . . . . . . . . . . . . . . . . . . . . . . . . . . . . . . . . . . . . . . . . 232
The behaviors API functions . . . . . . . . . . . . . . . . . . . . . . . . . . . . . . . . . . . . . . . . . . . . . . . . . . . . . . . . . . . . . 236
Chapter 17: Server behaviors
Dreamweaver architecture . . . . . . . . . . . . . . . . . . . . . . . . . . . . . . . . . . . . . . . . . . . . . . . . . . . . . . . . . . . . . . 244
A simple server behavior example . . . . . . . . . . . . . . . . . . . . . . . . . . . . . . . . . . . . . . . . . . . . . . . . . . . . . . . 245
How the server behavior API functions are called . . . . . . . . . . . . . . . . . . . . . . . . . . . . . . . . . . . . . . . . 247
The server behavior API . . . . . . . . . . . . . . . . . . . . . . . . . . . . . . . . . . . . . . . . . . . . . . . . . . . . . . . . . . . . . . . . . 248
Server behavior implementation functions . . . . . . . . . . . . . . . . . . . . . . . . . . . . . . . . . . . . . . . . . . . . . . 253
Editing EDML files . . . . . . . . . . . . . . . . . . . . . . . . . . . . . . . . . . . . . . . . . . . . . . . . . . . . . . . . . . . . . . . . . . . . . . . 255
Group EDML file tags . . . . . . . . . . . . . . . . . . . . . . . . . . . . . . . . . . . . . . . . . . . . . . . . . . . . . . . . . . . . . . . . . . . . 256
Participant EDML files . . . . . . . . . . . . . . . . . . . . . . . . . . . . . . . . . . . . . . . . . . . . . . . . . . . . . . . . . . . . . . . . . . . 262
Server behavior techniques . . . . . . . . . . . . . . . . . . . . . . . . . . . . . . . . . . . . . . . . . . . . . . . . . . . . . . . . . . . . . 279
Chapter 18: Data sources
How data sources work . . . . . . . . . . . . . . . . . . . . . . . . . . . . . . . . . . . . . . . . . . . . . . . . . . . . . . . . . . . . . . . . . 286
A simple data source example . . . . . . . . . . . . . . . . . . . . . . . . . . . . . . . . . . . . . . . . . . . . . . . . . . . . . . . . . . . 288
The data sources API functions . . . . . . . . . . . . . . . . . . . . . . . . . . . . . . . . . . . . . . . . . . . . . . . . . . . . . . . . . . 295
v
Chapter 19: Server formats
How data formatting works . . . . . . . . . . . . . . . . . . . . . . . . . . . . . . . . . . . . . . . . . . . . . . . . . . . . . . . . . . . . . 301
When the data formatting functions are called . . . . . . . . . . . . . . . . . . . . . . . . . . . . . . . . . . . . . . . . . . . 302
The server formats API functions . . . . . . . . . . . . . . . . . . . . . . . . . . . . . . . . . . . . . . . . . . . . . . . . . . . . . . . . 303
Chapter 20: Components
Component basics . . . . . . . . . . . . . . . . . . . . . . . . . . . . . . . . . . . . . . . . . . . . . . . . . . . . . . . . . . . . . . . . . . . . . . 306
Extending the Components panel . . . . . . . . . . . . . . . . . . . . . . . . . . . . . . . . . . . . . . . . . . . . . . . . . . . . . . . 307
How to customize the Components panel . . . . . . . . . . . . . . . . . . . . . . . . . . . . . . . . . . . . . . . . . . . . . . . 307
Components panel files . . . . . . . . . . . . . . . . . . . . . . . . . . . . . . . . . . . . . . . . . . . . . . . . . . . . . . . . . . . . . . . . . 308
Components panel API functions . . . . . . . . . . . . . . . . . . . . . . . . . . . . . . . . . . . . . . . . . . . . . . . . . . . . . . . . 310
Chapter 21: Server models
How customizing server models works . . . . . . . . . . . . . . . . . . . . . . . . . . . . . . . . . . . . . . . . . . . . . . . . . . 319
The server model API functions . . . . . . . . . . . . . . . . . . . . . . . . . . . . . . . . . . . . . . . . . . . . . . . . . . . . . . . . . . 320
Chapter 22: Data translators
How data translators work . . . . . . . . . . . . . . . . . . . . . . . . . . . . . . . . . . . . . . . . . . . . . . . . . . . . . . . . . . . . . . 326
Determining what kind of translator to use . . . . . . . . . . . . . . . . . . . . . . . . . . . . . . . . . . . . . . . . . . . . . . 327
Adding a translated attribute to a tag . . . . . . . . . . . . . . . . . . . . . . . . . . . . . . . . . . . . . . . . . . . . . . . . . . . . 328
Inspecting translated attributes . . . . . . . . . . . . . . . . . . . . . . . . . . . . . . . . . . . . . . . . . . . . . . . . . . . . . . . . . 329
Locking translated tags or blocks of code . . . . . . . . . . . . . . . . . . . . . . . . . . . . . . . . . . . . . . . . . . . . . . . . 329
Creating Property inspectors for locked content . . . . . . . . . . . . . . . . . . . . . . . . . . . . . . . . . . . . . . . . . 331
Finding bugs in your translator . . . . . . . . . . . . . . . . . . . . . . . . . . . . . . . . . . . . . . . . . . . . . . . . . . . . . . . . . . 333
Page 6

A simple attribute translator example . . . . . . . . . . . . . . . . . . . . . . . . . . . . . . . . . . . . . . . . . . . . . . . . . . . . 334
A simple block/tag translator example . . . . . . . . . . . . . . . . . . . . . . . . . . . . . . . . . . . . . . . . . . . . . . . . . . . 337
The data translator API functions . . . . . . . . . . . . . . . . . . . . . . . . . . . . . . . . . . . . . . . . . . . . . . . . . . . . . . . . 341
Chapter 23: C-level extensibility
How integrating C functions works . . . . . . . . . . . . . . . . . . . . . . . . . . . . . . . . . . . . . . . . . . . . . . . . . . . . . . 345
C-level extensibility and the JavaScript interpreter . . . . . . . . . . . . . . . . . . . . . . . . . . . . . . . . . . . . . . . 347
Data types . . . . . . . . . . . . . . . . . . . . . . . . . . . . . . . . . . . . . . . . . . . . . . . . . . . . . . . . . . . . . . . . . . . . . . . . . . . . . . 347
The C-level API . . . . . . . . . . . . . . . . . . . . . . . . . . . . . . . . . . . . . . . . . . . . . . . . . . . . . . . . . . . . . . . . . . . . . . . . . . 348
File access and multiuser configuration API . . . . . . . . . . . . . . . . . . . . . . . . . . . . . . . . . . . . . . . . . . . . . . 355
Calling a C function from JavaScript . . . . . . . . . . . . . . . . . . . . . . . . . . . . . . . . . . . . . . . . . . . . . . . . . . . . . 361
Chapter 24: The Shared folder
The Shared folder contents . . . . . . . . . . . . . . . . . . . . . . . . . . . . . . . . . . . . . . . . . . . . . . . . . . . . . . . . . . . . . . 364
Using the Shared folder . . . . . . . . . . . . . . . . . . . . . . . . . . . . . . . . . . . . . . . . . . . . . . . . . . . . . . . . . . . . . . . . . 369
Index . . . . . . . . . . . . . . . . . . . . . . . . . . . . . . . . . . . . . . . . . . . . . . . . . . . . . . . . . . . . . . . . . . . . . 371
vi
Page 7

Chapter 1: Introduction
This guide describes the Adobe® Dreamweaver® CS3 framework and application programming
interface (API) that lets you build extensions to Dreamweaver. It provides information about
how each type of extension works; the API functions that Dreamweaver calls to implement the
various objects, menus, floating panels, server behaviors, and so on, that make up the features of
Dreamweaver; and a simple example of each type of extension. This guide also explains how to
customize Dreamweaver by editing tags in various HTML and XML files to add menu items or
document types.
To add an object, menu, floating panel, or other feature to Dreamweaver, you must code the
functions that the particular type of extension requires. This guide describes the arguments that
Dreamweaver passes to these functions and also the values that Dreamweaver expects these
functions to return.
For information on the utility and general-purpose JavaScript™ APIs that you can use to perform
various support operations in your Dreamweaver extensions, see the Dreamweaver API
Reference. If you plan to create extensions that work with databases, you might also want to
review the topics in Using Dreamweaver about making connections to databases.
Background
Most Dreamweaver extensions are written in HTML and JavaScript. This guide assumes that you
are familiar with Dreamweaver, HTML, XML, and JavaScript programming. If you are implementing C extensions, the guide assumes that you know how to create and use C dynamic link
libraries (DLLs). If you are writing extensions for building web applications, you should also be
familiar with server-side scripting on at least one platform, such as Active Server Pages (ASP),
ASP.net, PHP: Hypertext Preprocessor (PHP), Macromedia® ColdFusion® from Adobe®, or
JavaServer Pages (JSP).
Page 8

DREAMWEAVER CS3
Extending Dreamweaver
Installing an extension
To become familiar with the process of writing extensions, you might want to explore the extensions and resources
that are available on the Adobe Exchange website at http://www.adobe.com/go/exchange. Installing an existing
extension introduces you to some of the tools that you need to work with in your own extensions.
To install an extension:
Download and install the Adobe® Extension Manager, which is available on the Adobe Downloads website at
1
http://www.adobe.com/go/downloads.
2 Log on to the Adobe Exchange website at http://www.adobe.com/go/exchange.
3 From the available extensions, select one that you want to use. Click the Download link to download the extension
package.
4 Save the extension package in the Dreamweaver/Downloaded Extensions folder of your installed Dreamweaver
folder.
5 In the Extension Manager, select File > Install Extension. In Dreamweaver, select Commands >
Manage Extensions to start the Extension Manager.
The Extension Manager automatically installs the extension from the Downloaded Extensions folder into Dreamweaver.
2
Some extensions need Dreamweaver to restart before you can use them. If you are running Dreamweaver when you
install the extension, you might be prompted to quit and restart the application.
To view basic information on the extension after its installation, go to the Extension Manager (Commands > Manage
Extensions) in Dreamweaver.
Creating an extension
Before you create a Dreamweaver extension, go to the Adobe Exchange website at
http://www.adobe.com/go/exchange to see if the extension you plan to create already exists. If you do not find an
extension that meets your needs, you then perform the following steps to create the extension:
• Determine the type of extension you want to create. For more information about the extension types, see “Types
of Dreamweaver extensions” on page 71.
• Review the documentation for the type of extension you plan to create. To become familiar with creating that type
of extension, it’s a good idea to create the simple extension example in the appropriate topic.
• Determine which files you need to modify or create.
• Plan the user interface (UI), if any, for the extension.
• Create the necessary files and save them in the appropriate folders.
• Restart Dreamweaver so that it recognizes the new extension.
• Test the extension.
• Package the extension so that you can share it with others. For more information, see “Working with the Extension
Manager” on page 77.
Page 9

DREAMWEAVER CS3
Extending Dreamweaver
Additional resources for extension writers
To communicate with other developers who are involved in writing extensions, you might want to join the Dreamweaver extensibility newsgroup. You can access the Adobe website for this newsgroup at
http://www.adobe.com/support/dreamweaver/extend/form/.
What’s new in Dreamweaver
Dreamweaver CS3 includes the following new features and interfaces that are extensible. Each of these features has
new related functions, which are listed in the Dreamweaver API Reference.
• Communication with the Bridge application
• Mobile device emulation
• Spry XML data set creation
• Spry widget editing and inserting
• Browser compatibility check
For information on the new functions that have been added to the Utility API and the JavaScript API, see the
Dreamweaver API Reference.
3
Documentation Resource Center
Improve your Dreamweaver skills with books from Adobe. Check out the latest content written by the experts at
http://www.adobe.com/support/documentation/buy_books.html.
Deprecated functions
In Dreamweaver CS3, several functions have been deprecated. For information on the functions that have been
removed from the Utility and JavaScript APIs, see the Dreamweaver API Reference.
Conventions used in this guide
The following typographical conventions are used in this guide:
• Code font indicates code fragments and API literals, including class names, method names, function names, type
names, scripts, SQL statements, and both HTML and XML tag and attribute names.
• Italic code font indicates replaceable items in code.
• The continuation symbol (¬) indicates that a long line of code has been broken across two or more lines. Due to
margin limits in this guide’s format, what is otherwise a continuous line of code must be split. When copying the
lines of code, eliminate the continuation symbol, and type the lines as one line.
• Curly braces ({ }) that surround a function argument indicate that the argument is optional.
• Function names that have the prefix dreamweaver. (as in dreamweaver.funcname) can be abbreviated to
dw.funcname when you are writing code. This manual uses the full dreamweaver. prefix when defining the
function and in the index. Many examples use the shorter
dw. prefix, however.
Page 10

The following naming conventions are used in this guide:
• You The developer who is responsible for writing extensions
• The user The person using Dreamweaver
• The visitor The person who views the web page that the user created
DREAMWEAVER CS3
Extending Dreamweaver
4
Page 11

Chapter 2: Customizing Dreamweaver
In addition to creating and using Adobe Dreamweaver CS3 extensions, you can customize
Dreamweaver in many ways, which lets you work in a manner that’s familiar, comfortable, and
efficient for you.
Ways to customize Dreamweaver
There are several general approaches to customizing Dreamweaver. Some of these approaches
are covered in Using Dreamweaver. These approaches let you customize your workspace. You can
also change settings in dialog boxes in Dreamweaver. You can set preferences in a variety of areas,
including accessibility, code coloring, fonts, highlighting, and previewing in browsers, using the
Preferences panel (Edit > Preferences, or Dreamweaver > Preferences (Mac OS X)). You can also
change keyboard shortcuts, using the Keyboard Shortcut Editor (Edit > Keyboard Shortcuts) or
by editing a configuration file.
The following list describes some of the ways you can customize Dreamweaver by editing configuration files:
• Rearrange the objects in the Insert bar, create new tabs to reorganize the objects, or add new
objects. See “Modifying the Insert bar” on page 106.
• Change the names of menu items, add new commands to menus, and remove existing
commands from menus. See “Menus and menu commands” on page 136.
• Change how third-party tags (including ASP and JSP tags) appear in the Document window’s
Design view. See “Customizing the interpretation of third-party tags” on page 8.
• Change keyboard shortcut mappings for your non-U.S. English keyboard. See “Changing
keyboard shortcut mappings” on page 28.
In addition, you can tailor Dreamweaver to meet your needs by doing the following:
• “Customizing default documents” on page 6
• “Customizing page designs” on page 6
Page 12

DREAMWEAVER CS3
Extending Dreamweaver
• “Customizing the appearance of dialog boxes” on page 6
• “Changing the default file type” on page 7
• “Customizing the interpretation of third-party tags” on page 8
• “Customizing workspace layouts” on page 23
• “Customizing the Coding toolbar” on page 27
Customizing default documents
The DocumentTypes/NewDocuments folder contains a default (blank) document of each type that you can create
using Dreamweaver. When you create a new blank document by selecting File > New and selecting an item from the
Basic Page, Dynamic Page, or Other categories, Dreamweaver bases the new document on the appropriate default
document in this folder. To change what appears in a default document of a given type, edit the appropriate
document in this folder.
Note: If you want all th e pages in your site to cont ain c ommon elem ents (su ch as a copy rig ht noti ce) or a comm on layout,
it’s better to use templates and library items than to change the default documents. For more information about
templates and library items, see Using Dreamweaver).
Customizing page designs
Dreamweaver provides a variety of predesigned Cascading Style Sheets, framesets, and page designs. You can create
pages based on these designs by selecting File > New.
6
To customize the available designs, edit the files in BuiltIn/css, BuiltIn/framesets, BuiltIn/Templates, and
BuiltIn/TemplatesAccessible folders.
Note: The designs listed in the Page Designs and Page Designs (Accessible) categories are Dreamweaver template files;
for more information on templates, see Using Dreamweaver.
You can also create custom page designs by adding files to the subfolders of the BuiltIn folder. To make a description
of the file appear in the New Document dialog box, create a Design Notes file (in the appropriate _notes folder) that
corresponds to the page design file.
Customizing the appearance of dialog boxes
The dialog box layouts for objects, commands, and behaviors are specified as HTML forms; they reside in HTML
files in the Configuration folder within the Dreamweaver application folder. You edit these forms as you would edit
any form in Dreamweaver. For more information, see Using Dreamweaver.
Note: In a multiuser operating system, you should edit copies of configuration files in your user Configuration folder
rather than editing Dreamweaver configuration files. For more information, see “Multiuser Configuration folders” on
page 73.
To change the appearance of a dialog box:
In Dreamweaver, select Edit > Preferences, and then select the Code Rewriting category.
1
2 Deselect the Rename Form Items When Pasting option.
Deselecting this option ensures that form items retain their original names when you copy and paste them.
3 Click OK to close the Preferences dialog box.
Page 13

DREAMWEAVER CS3
Extending Dreamweaver
4 On your hard disk, find the appropriate HTM file in the Configuration/Objects, Configuration/Commands, or
Configuration/Behaviors folder.
5 Make a copy of the file somewhere other than the Configuration folder.
6 Open the copy in Dreamweaver, edit the form, and save it.
7 Quit Dreamweaver.
8 Copy the changed file back to the Configuration folder in place of the original. (It’s a good idea to first make a
backup of the original, so you can restore it later if needed.)
9 Restart Dreamweaver to see the changes.
You should change only the appearance of the dialog box, not how it works; it must still contain the same types of
form elements with the same names, so that the information Dreamweaver obtains from the dialog box can still be
used in the same way.
For example, the Comment object takes text input from a text area in a dialog box and uses a simple JavaScript
function to turn that text into an HTML comment and insert the comment into your document. The form that
describes the dialog box is in the Comment.htm file in the Configuration/Objects/Invisibles folder. You can open
that file and change the size and other attributes of the text area, but if you remove the
change the value of its name
attribute, the Comment object does not work properly.
textarea tag entirely, or
7
Changing the default file type
By default, Dreamweaver shows all the file types it recognizes in the File > Open dialog box. You can use a pop-up
menu in that dialog box to limit the display to certain types of files. If most of your work involves a specific file type
(such as ASP files), you can change the default display. Whatever file type is listed on the first line of the
Dreamweaver Extensions.txt file becomes the default.
Note: If you want to see all file types in the File > Open dialog box (even the files Dreamweaver can’t open), you must
select All Files (*.*). This is different from All Documents, which shows only the files Dreamweaver can open.
To change the Dreamweaver default File > Open file type:
1 Make a backup copy of the Extensions.txt file in the Configuration folder.
2 Open Extensions.txt in Dreamweaver or in a text editor.
3 Cut the line corresponding to the new default and paste it at the beginning of the file so that it becomes the first
line of the file.
4 Save the file.
5 Restart Dreamweaver.
To see the new default, select File > Open, and look at the pop-up menu of file types.
To add new file types to the menu in the File > Open dialog box:
Make a backup copy of the Extensions.txt file in the Configuration folder.
1
2 Open Extensions.txt in Dreamweaver or in a text editor.
3 Add a new line for each new file type.
a In capital letters, enter the filename extensions that the new file type can have, separated by commas.
b Add a col on and a br ief des criptio n to show i n th e pop -up me nu for file typ es th at app ear in t he File > Op en di alog
box.
Page 14
DREAMWEAVER CS3
Extending Dreamweaver
For example, for JPEG files, enter the following: JPG,JPEG,JFIF:JPEG Image Files
4 Save the file.
5 Restart Dreamweaver.
To see the changes, select File > Open, and click the pop-up menu of file types.
Customizing the interpretation of third-party tags
Server-side technologies such as ASP, ColdFusion, JSP, and PHP use special non-HTML code in HTML files; servers
create and serve HTML content based on that code. When Dreamweaver encounters non-HTML tags, it compares
them with information in its third-party tag files, which define how Dreamweaver reads and displays non-HTML
tags.
For example, in addition to regular HTML, ASP files contain ASP code for the server to interpret. ASP code looks
al mos t li ke an HT ML t ag, but is mar ked by a pai r of del imiter s: it beg ins wit h
Configuration/ThirdPartyTags folder contains a file named Tags.xml, which describes the format of various thirdparty tags, including ASP code, and defines how Dreamweaver displays that code. Because of the way ASP code is
specified in Tags.xml, Dreamweaver does not try to interpret anything between the delimiters; instead, in Design
view, it displays an icon that indicates ASP code. Your own tag database files can define how Dreamweaver reads and
displays your tags. Create a new tag database file for each set of tags, to tell Dreamweaver how to display the tags.
<% and ends with %>. The Dreamweaver
8
Note: This section explains how to define the way Dreamweaver displays a custom tag, but doesn’t describe how to
provide a way to edit the content or properties of a custom tag. For information on how to create a Property inspector to
inspect and change the properties of a custom tag, see “Property inspectors” on page 210.
Each tag database file defines the name, type, content model, rendering scheme, and icon for one or more custom
tags. You can create any number of tag database files, but all of them must reside in the
Configuration/ThirdPartyTags folder to be read and processed by Dreamweaver. Tag database files have the .xml file
extension.
If you are working on several unrelated sites at once (for example, as a freelance developer), you can put all the tag
specifications for a particular site in one file. Then simply include that tag database file with the custom icons and
Property inspectors that you hand over to the people who will maintain the site.
You define a tag specification with an XML tag called
fication for a tag named
<tagspec tag_name="happy" tag_type="nonempty" render_contents="false" content_model=
"marker_model" icon="happy.gif" icon_width="18" icon_height="18"></tagspec>
happy:
tagspec. For example, the following code describes the speci-
You can define two kinds of tags using tagspec:
• Normal HTML-style tags
The
happy tag example is a normal HTML-style tag. It starts with an opening <happy> tag, contains data between
opening and closing tags, and ends with a closing
</happy> tag.
• String-delimited tags
String-delimited tags start with one string and end with another string. They are like empty HTML tags (such as
in that they don’t surround content and don’t have closing tags. If the
specification would include the
starts with the string
<% and ends with the string %>, and it has no closing tag.
start_string and end_string attributes. An ASP tag is a string-delimited tag; it
happy tag were a string-delimited tag, the tag
img)
Page 15

DREAMWEAVER CS3
Extending Dreamweaver
The following information describes the attributes and valid values for the tagspec tag. Attributes marked with an
asterisk (*) are ignored for string-delimited tags. Optional attributes are marked in the attribute lists with curly
{}); all attributes not marked with curly braces are required.
braces (
<tagspec>
Description
Provides information about a third-party tag.
Attributes
tag_name, {tag_type}, {render_contents}, {content_model}, {start_string}, {end_string},
{detect_in_attribute}, {parse_attributes}, icon, icon_width, icon_height, {equivalent_tag},
{is_visual}, {server_model}
• tag_name is the name of the custom tag. For string-delimited tags, tag_name is used only to determine whether
a given Property inspector can be used for the tag. If the first line of the Property inspector contains this tag name
with an asterisk on each side, the inspector can be used for tags of this type. For example, the tag name for ASP
ASP. Property inspectors that can examine ASP code should have *ASP* on the first line. For information
code is
on the Property inspector API, see “Property inspectors” on page 210.
• tag_type determines whether the tag is empty (as the img tag is), or whether it contains anything between its
opening and closing tags (as the
It’s ignored for string-delimited tags because they’re always empty. Valid values are
code tag does). This attribute is required for normal (nonstring-delimited) tags.
"empty" and "nonempty".
• render_contents determines whether the contents of the tag should appear in the Design view or whether the
specified icon should appear instead. This attribute is required for nonempty tags and is ignored for empty tags.
(Empty tags have no content.) This attribute applies only to tags that appear outside attributes. The contents of
tags that appear inside the values of attributes of other tags are not rendered. Valid values are
"true" and "false".
9
• content_model describes what kinds of content the tag can contain and where in an HTML file the tag can
appear. Valid values are
"block_model", "head_model", "marker_model", and "script_model".
• block_model specifies that the tag can contain block-level elements such as div and p, and that the tag can
appear only in the body section or inside other body-content tags such as
div, layer, or td.
• head_model specifies that the tag can contain text content and that it can appear only in the head section.
• marker_model specifies that the tag can contain any valid HTML code, and that it can appear anywhere in an
HTML file. The HTML validator in Dreamweaver ignores tags that are specified as
marker_model. However,
the validator doesn’t ignore the contents of such a tag; so even though the tag itself can appear anywhere, the
contents of the ta g may result in invalid HTML in ce rtain places. For exampl e, pl ain text c annot appear (out side
a valid head element) in the head section of a document, so you can’t place a
marker_model tag that contains
plain text in the head section. (To place a custom tag containing plain text in the head section, specify the tag’s
content model as
inline (inside a block-level element such as
head_model instead of marker_model.) Use marker_model for tags that should be displayed
p or div—for example, inside a paragraph). If the tag should be
displayed as a paragraph of its own, with line breaks before and after it, don’t use this model.
• script_model lets the tag exist anywhere between the opening and closing HTML tags of a document. When
Dreamweaver encounters a tag with this model, it ignores all of the tag’s content. Use this tag for markup (such
as certain ColdFusion tags) that Dreamweaver shouldn’t parse.
• start_string specifies a delimiter that marks the beginning of a string-delimited tag. String delimited tags can
appear anywhere in the document where a comment can appear. Dreamweaver does not parse tags or decode
entities or URLs between
start_string and end_string. This attribute is required if end_string is specified.
Page 16

DREAMWEAVER CS3
Extending Dreamweaver
• end_string specifies a delimiter that marks the end of a string-delimited tag. This attribute is required if
start_string is specified.
• detect_in_attribute indicates whether to ignore everything between start_string and end_string (or
between opening and closing tags if those strings are not defined) even when those strings appear inside attribute
names or values. You should generally set this to
"true" for string-delimited tags. The default is "false". For
example, ASP tags sometimes appear inside attribute values, and sometimes contain quotation marks ("). Because
the ASP tag specification specifies
detect_in_attribute="true", Dreamweaver ignores the ASP tags,
including the internal quotation marks, when they appear inside attribute values.
• parse_attributes indicates whether to parse the attributes of the tag. If this is set to "true" (the default),
Dreamweaver parses the attributes; if it’s set to
angle bracket that appears outside quotation marks. For example, this attribute should be set to
cfif (as in <cfif a is 1>, which Dreamweaver cannot parse as a set of attribute name/value pairs).
such as
"false", Dreamweaver ignores everything until the next closing
"false" for a tag
• icon specifies the path and filename of the icon associated with the tag. This attribute is required for empty tags,
and for nonempty tags whose contents do not appear in the Document window’s Design view.
• icon_width specifies the width of the icon in pixels.
• icon_height specifies the height of the icon in pixels.
• equivalent_tag specifies simple HTML equivalents for certain ColdFusion form-related tags. This is not
intended for use with other tags.
• is_visual indicates whether the tag has a direct visual effect on the page. For example, the ColdFusion tag
cfgraph doesn’t specify a value for is_visual (so the value defaults to "true"); the ColdFusion tag cfset is
specified as having
is_visual set to "false". Visibility for server markup tags is controlled by the Invisible
Elements category of the Preferences dialog box; visibility for visual server markup tags can be set independently
of visibility for nonvisual server markup tags.
• server_model, if specified, indicates that the tagspec tag applies only on pages that belong to the specified
server model. If
for ASP and JSP tags are the same, but the
server_model is not specified, the tagspec tag applies on all pages. For example, the delimiters
tagspec tag for JSP specifies a server_model of "JSP", so when
Dreamweaver encounters code with the appropriate delimiters on a JSP page, it displays a JSP icon. When it
encounters such code on a non-JSP page, it displays an ASP icon.
10
Contents
None (empty tag).
Container
None.
Example
<tagspec tag_name="happy" tag_type="nonempty" render_contents="false" content_model=
"marker_model" icon="happy.gif" icon_width="18" icon_height="18"></tagspec>
How custom tags appear in the Design view
The way that custom tags appear in the Design view of the Document window depends on the values of the
tag_type and render_contents attributes of the tagspec tag. If the value of tag_type is "empty", the icon
specified in the
icon attribute appears. If the value of tag_type is "nonempty" but the value of render_contents
is "false", the icon appears as it would for an empty tag. The following example shows how an instance of the happy
tag defined earlier might appear in the HTML:
Page 17

DREAMWEAVER CS3
Extending Dreamweaver
<p>This is a paragraph that includes an instance of the <code>happy</code>
tag (<happy>Joe</happy>).</p>
Because render_contents is set to "false" in the tag specification, the contents of the happy tag (the word Joe)
are not rendered. Instead, the start and end tags and their contents appear as a single icon.
11
For nonempty tags that have a
instead, the content between the opening and closing tags (such as the text between the tags in
the content between the opening and closing tags</mytag>
render_contents value of "true", the icon does not appear in the Design view;
<mytag>This is
) appears. If View > Invisible Elements is
enabled, the content is highlighted using the third-party tag color specified in Highlighting preferences.
(Highlighting applies only to tags defined in tag database files.)
To change the highlighting color of third-party tags:
Select Edit > Preferences, and select the Highlighting category.
1
2 Click the Third-Party Tags color box to display the color picker.
3 Select a color, and click OK to close the Preferences dialog box. For information about selecting a color, see Using
Dreamweaver.
Avoiding rewriting third-party tags
Dreamweaver corrects certain kinds of errors in HTML code. For details, see Using Dreamweaver. By default,
Dreamweaver refrains from changing HTML in files with certain filename extensions, including .asp (ASP), .cfm
(ColdFusion), .jsp (JSP), and .php (PHP). This default is set so that Dreamweaver does not accidentally modify the
code contained in any such non-HTML tags. You can change the Dreamweaver default rewriting behavior so that it
rewrites HTML when it opens such files, and you can add other file types to the list of types that Dreamweaver does
not rewrite.
Dreamweaver encodes certain special characters by replacing them with numerical values when you enter them in
the Property inspector. It’s usually best to let Dreamweaver perform this encoding because the special characters are
more likely to display correctly across platforms and browsers. However, because such encoding can interfere with
third-party tags, you may want to change the Dreamweaver encoding behavior when you’re working with files that
contain third-party tags.
To allow Dreamweaver to rewrite HTML in more kinds of files:
1 Select Edit > Preferences, and select the Code Rewriting category.
2 Select either of the following options:
• Fix Invalidly Nested And Unclosed Tags
• Remove Extra Closing Tags
3 Do one of the following:
• Delete one or more extensions from the list of extensions in the Never Rewrite Code: In Files With Extensions
option.
• Deselect the Never Rewrite Code: In Files With Extensions option. (Deselecting this option lets Dreamweaver
rewrite HTML in all types of files.)
To add file types that Dreamweaver should not rewrite:
1 Select Edit > Preferences, and select the Code Rewriting category.
2 Select either of the following options:
Page 18

DREAMWEAVER CS3
Extending Dreamweaver
• Fix Invalidly Nested And Unclosed Tags
• Remove Extra Closing Tags
3 Make sure the Never Rewrite Code: In Files With Extensions option is selected, and add the new file extensions
to the list in the text field.
If the new file type doesn’t appear in the file-types pop-up menu in the File > Open dialog box, you might want to
add it to the Configuration/Extensions.txt file. For details, see “Changing the default file type” on page 7.
To turn off Dreamweaver encoding options:
Select Edit > Preferences, and select the Code Rewriting category.
1
2 Deselect either or both Special Characters options.
For information on the other Code Rewriting preferences, see Using Dreamweaver.
Customizing Dreamweaver in a multiuser environment
You can customize Dreamweaver in a multiuser operating system such as Microsoft® Windows® 2000, Windows XP,
or Mac OS® X. Dreamweaver prevents any user’s customized configuration from affecting any other user’s
customized configuration. To accomplish this goal, the first time you run Dreamweaver in a multiuser operating
system that it recognizes, Dreamweaver copies various configuration files into a user Configuration folder for you.
When you customize Dreamweaver by using dialog boxes and panels, the application modifies your user Configuration files instead of modifying the Dreamweaver Configuration files. To customize Dreamweaver by editing a
configuration file in a multiuser environment, edit the appropriate user Configuration file, rather than editing the
files in the Dreamweaver Configuration folder. To make a change that affects most users, you can edit a
Dreamweaver Configuration file, but users who already have corresponding user Configuration files do not see the
change. In general, if you want to make a change that affects all the users, it’s best to create an extension and install
it using the Extension Manager.
12
Note: In older operating systems (Windows 98, Windows ME, and Mac OS 9.x), a single set of Dreamweaver
Configuration files is shared by all users, even if the operating system is configured to support multiple users.
The location of the user’s Configuration folder depends on the user’s platform.
Windows 2000 and Windows XP platforms use the following location:
hard disk:\Documents and Settings\username\Application Data\Adobe\Dreamweaver 9\Configuration
Note: In Windows XP, this folder may be inside a hidden folder.
Mac OS X platforms use the following location:
hard disk:Users/username/Library/Application Support/Adobe/Dreamweaver 9/Configuration
Note: To install extensions that all users can use in a multiuser operating system, you must be logged in as Administrator
(Windows) or root (Mac OS X).
The first time you run Dreamweaver, it copies only some of the configuration files into your user Configuration
folder. (The files that it copies are specified in the version.xml file in the Configuration folder.) When you customize
Dreamweaver from within the application (for example, when you modify one of the predesigned code snippets in
the Snippets panel), Dreamweaver copies the relevant files into your user Configuration folder. The version of a file
in your user Configuration folder always takes precedence over the version in the Dreamweaver Configuration
folder. To customize a configuration file that Dreamweaver has not copied into your user Configuration folder, first
Page 19

DREAMWEAVER CS3
Extending Dreamweaver
copy the file from the Dreamweaver Configuration folder to the corresponding location inside your user
Configuration folder. Then edit the copy in your user Configuration folder.
Deleting configuration files in a multiuser environment
When working in a multiuser operating system, if you do something within Dreamweaver that would delete a configuration file (for example, deleting a predesigned snippet from the Snippets panel), Dreamweaver creates a file in your
user Configuration folder called mm_deleted_files.xml. When a file is listed in mm_deleted_files.xml, Dreamweaver
behaves as if that file doesn’t exist.
To deactivate a configuration file:
1 Quit Dreamweaver.
2 Using a text editor, edit mm_deleted_files.xml in your user Configuration folder; add an item tag to that file,
giving the path (relative to the Dreamweaver Configuration folder) of the configuration file to deactivate.
Note: Do not edit mm_deleted_files.xml in Dreamweaver.
3 Save and close mm_deleted_files.xml.
4 Start Dreamweaver again.
13
About mm_deleted_files.xml tag syntax
The mm_deleted_files.xml file contains a structured list of items that specify configuration files that Dreamweaver
is to ignore. These items are specified by XML tags, which you can edit in a text editor.
The following sections describe the syntax of the mm_deleted_files.xml tags. Optional attributes are marked in the
attribute lists with curly braces (
<deleteditems>
{}); all attributes not marked with curly braces are required.
Description
Container tag that holds a list of items that Dreamweaver should treat as deleted.
Attributes
None.
Contents
This tag must contain one or more
item tags.
Container
None.
Example
<deleteditems>
<!-- item tags here -->
</deleteditems>
<item>
Description
Specifies a configuration file that Dreamweaver should ignore.
Page 20

DREAMWEAVER CS3
Extending Dreamweaver
Attributes
name
The name attribute specifies the path to the configuration file, relative to the Configuration folder. In Windows,
use a backslash (\) to separate parts of the path; on the Macintosh®, use a colon (:).
Contents
None (empty tag).
Container
This tag must be contained in a
deleteditems tag.
Example
<item name="snippets\headers\5columnwith4links.csn" />
Reinstalling and uninstalling Dreamweaver in a multiuser environment
After you install Dreamweaver, if you later reinstall it or upgrade to a later version, Dreamweaver automatically
makes backup copies of existing user configuration files, so that if you’ve customized those files, you can still access
the changes you made. When you uninstall Dreamweaver from a multiuser system (which you can do only if you
have administrative privileges), Dreamweaver can remove each user Configuration folder for you.
14
Changing FTP mappings
The FTPExtensionMap.txt file (Windows) and the FTPExtensionMapMac.txt file (Macintosh) map filename extensions to FTP transfer modes (ASCII or BINARY).
Each line in each of the two files includes a filename extension (such as GIF) and either the word ASCII or the word
BINARY, to indicate which of the two FTP transfer modes should be used when transferring a file with that
extension. On the Macintosh, each line also includes a creator code (such as DmWr) and a file type (such as TEXT).
When you download a file with the given filename extension on the Macintosh, Dreamweaver assigns the specified
creator and file type to the file.
If a file that you are transferring doesn’t have a filename extension, Dreamweaver uses the BINARY transfer mode.
Note: Dreamweaver cannot transfer files in Macbinary mode. If you need to transfer files in Macbinary mode, you must
use another FTP client.
The following example shows a line (from the Macintosh file) that indicates that files with the extension .html should
be transferred in ASCII mode:
HTML DmWr TEXT ASCII
In both the FTPExtensionMap.txt file and FTPExtensionMapMac.txt file (Macintosh), all elements on a given line
are separated by tabs. The extension and the transfer mode are in uppercase letters.
To change a default setting, edit the file in a text editor.
To add information about a new filename extension:
1 Edit the extension-map file in a text editor.
2 On a blank line, enter the filename extension (in uppercase letters) and press Tab.
Page 21
DREAMWEAVER CS3
Extending Dreamweaver
3 On the Macintosh, add the creator code, a tab, the file type, and another tab.
4 Enter ASCII or BINARY to set an FTP transfer mode.
5 Save the file.
Extensible document types in Dreamweaver
XML provides a rich system for defining complex documents and data structures. Dreamweaver uses several XML
schemas to organize information about server behaviors, tags and tag libraries, components, document types, and
reference information.
When you create and work with extensions in Dreamweaver, there are many instances in which you create or modify
existing XML files to manage the data that your extension uses. In many cases, you can copy an existing file from the
appropriate subfolder within the Configuration folder to use as a template.
Document type definition file
The central component of extensible document types is the document type definition file. There might be several
definition files, all of which are located in the Configuration/DocumentTypes folder. Each definition file contains
information about at least one document type. For each document type, essential information such as server model,
color coding style, descriptions, and so forth, is described.
15
Note: Do not confuse Dreamweaver document type definition files with the XML document type definition (DTD).
Document type definition files in Dreamweaver contain a set of
documenttype elements, each of which defines a
predefined collection of tags and attributes that are associated with a document type. When Dreamweaver starts, it
parses the document type definition files and creates an in-memory database of information regarding all defined
document types.
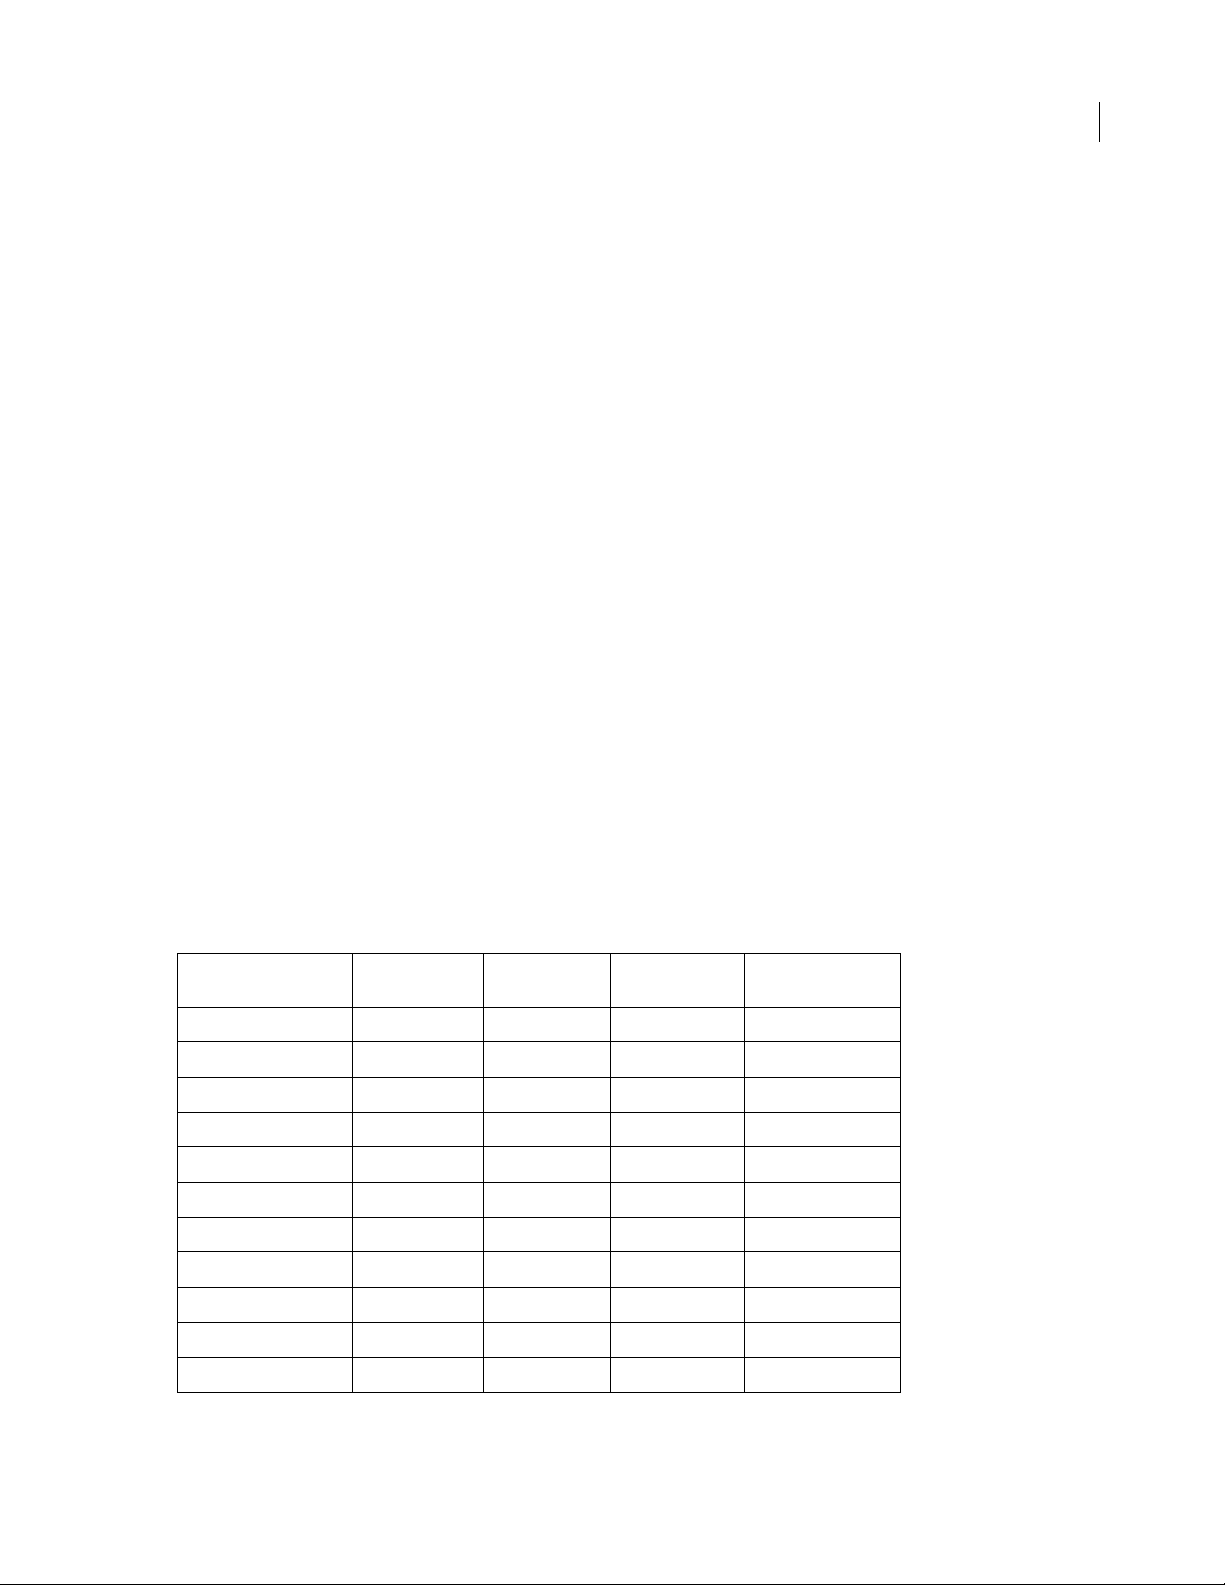
Dreamweaver provides an initial document type definition file. This file, named MMDocumentTypes.xml, contains
the document type definitions provided by Adobe:
Document type Server model Internal type File extensions Previous server
ASP.NET C# ASP.NET-Csharp Dynamic aspx, ascx
ASP.NET VB ASP.NET-VB Dynamic aspx, ascx
ASP JavaScript ASP-JS Dynamic asp
ASP VBScript ASP-VB Dynamic asp
ColdFusion ColdFusion Dynamic cfm, cfml UltraDev 4 ColdFusion
ColdFusion Component Dynamic cfc
JSP JSP Dynamic jsp
PHP PHP Dynamic php, php3
Library Item DWExtension lbi
ASP.NET C# Template DWTemplate axcs.dwt
model
ASP.NET VB Template DWTemplate axvb.dwt
Page 22
DREAMWEAVER CS3
Extending Dreamweaver
16
Document type Server model Internal type File extensions Previous server
ASP JavaScript Template DWTemplate aspjs.dwt
ASP VBScript Template DWTemplate aspvb.dwt
ColdFusion Template DWTemplate cfm.dwt
HTML Template DWTemplate dwt
JSP Template DWTemplate jsp.dwt
PHP Template DWTemplate php.dwt
HTML HTML htm, html
ActionScript Text as
CSharp Text cs
CSS Text css
Java Text java
JavaScript Text js
VB Text vb
VBScript Text vbs
Tex t Tex t tx t
EDML XML edml
model
TLD XML tld
VTML XML vtm, vtml
WML XML wml
XML XML xml
If you need to create a new document type, you can either add your entry to the document definition file that Adobe
provides (MMDocumentTypes.xml) or add a custom definition file to the Configuration/DocumentTypes folder.
Note: The NewDocuments subfolder resides in the Configuration/DocumentTypes folder. This subfolder contains default
pages (templates) for each document type.
Structure of document type definition files
The following example shows what a typical document type definition file might look like:
<?xml version="1.0" encoding="utf-8"?>
<documenttypes xmlns:MMString="http://www.Macromedia.com/schemes/data/string/">
<documenttype
id="dt-ASP-JS"
servermodel="ASP-JS"
internaltype="Dynamic"
winfileextension="asp,htm, html"
macfileextension=asp, html"
previewfile="default_aspjs_preview.htm"
file="default_aspjs.htm"
priorversionservermodel="UD4-ASP-JS" >
Page 23
DREAMWEAVER CS3
Extending Dreamweaver
<title>
<loadString id="mmdocumenttypes_0title" />
</title>
<description>
<loadString id="mmdocumenttypes_0descr" />
</description>
</documenttype>
...
</documenttypes>
Note: Color coding for document types is specified in the XML files that reside in the Configuration/CodeColoring folder.
17
In the previous example, the
loadString element identifies the localized strings that Dreamweaver should use for
the title and description for ASP-JS type documents. For more information about localized strings, see “Localized
strings” on page 21.
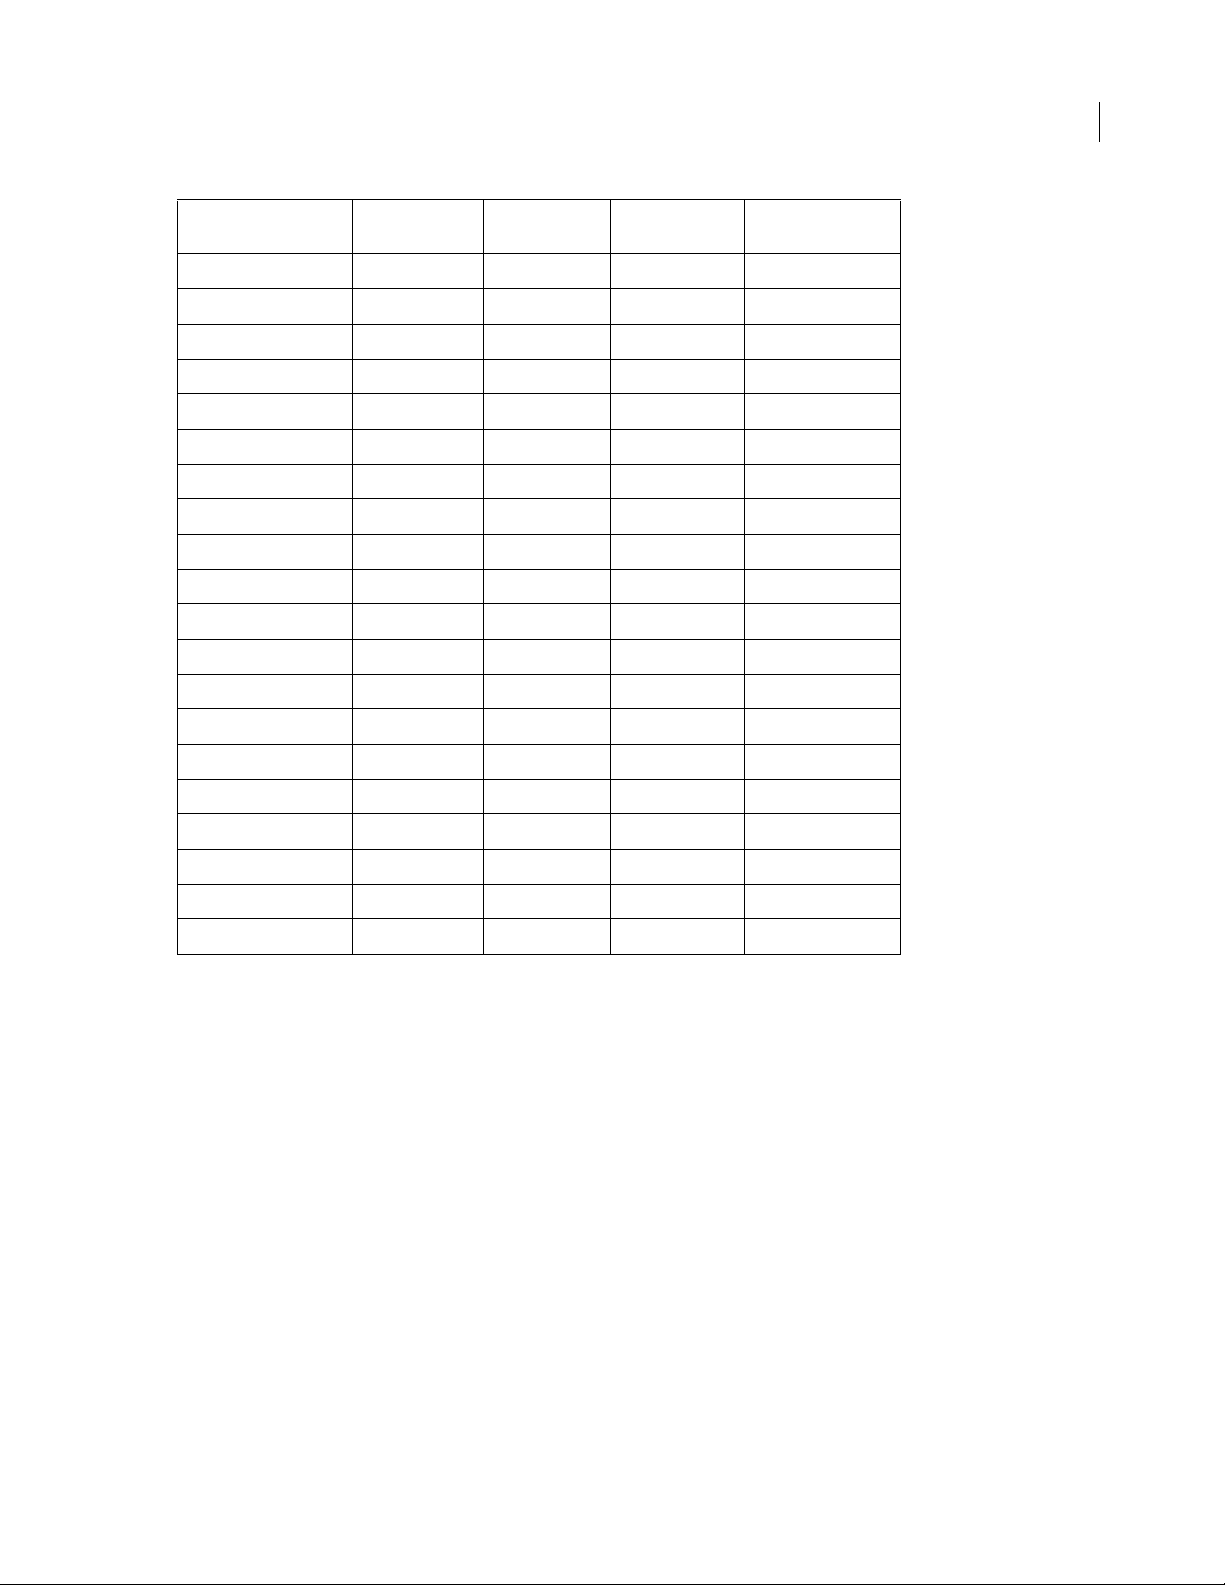
The following table describes the tags and attributes that you can use within a document type definition file.
Element Type Required Description
Tag At tr ib ut e
documenttype
(root)
id
servermodel
Yes Parent node.
Yes Unique identifier across all document type definition files.
No Specifies the associated server model (case-sensitive); by default,
the following values are valid:
ASP.NET C#
ASP.NET VB
ASP VBScript
ASP JavaScript
ColdFusion
JSP
PHP MySQL
A call to the getServerModelDisplayName() functions
returns these names. The server model implementation files are
located in the Configuration/ServerModels folder.
Extension developers can create new server models extending this
list.
Page 24
Element Type Required Description
Tag At tr ib ut e
DREAMWEAVER CS3
Extending Dreamweaver
18
internaltype
dynamicid
winfileextension
Yes A broad classification of how Dreamweaver treats a file. The
internaltype identifies whether the Design view is enabled
for this document and handles special cases such as
Dreamweaver templates or extensions.
The following values are valid:
Dynamic
DWExtension
(has special display regions)
DWTemplate (has special display regions)
HTML
HTML4
(Code view only)
Text
XHTML1
(Code view only)
XML
All server model-related document types should map to
Dynamic. HTML should map to HTML. Script files (such as CSS, JS,
VB, and CS) should map to Text.
If internaltype is DWTemplate, you should also specify
dynamicid. If you omit dynamicid in this case, the new blank
template that the New Document dialog box creates is not a recognized document type by the Server Behavior or Bindings panel.
Instances of this template are simply an HTML template.
No A reference to the unique identifier of a dynamic document type.
This attribute is meaningful only when internaltype is
DWTemplate. This attribute lets you associate a dynamic
template with a dynamic document type.
Yes The file extension that is associated with the document type on
Windows. You specify multiple file extensions by using a commaseparated list. The first extension in the list is the extension that
Dreamweaver uses when the user saves a documenttype document.
If two nonserver model-related docum ent types have the same file
extension, Dreamweaver recognizes the first one as the document
type for the extension.
macfileextension
previewfile
file
priorversionservermodel
Yes The file extension that is associated with the document t ype on the
No The file that is rendered in the Preview area of the New Document
Yes The file that is located in the DocumentTypes/NewDocuments
No If this document’s server model has a Dreamweaver UltraDev 4
Macintosh. You specify multiple file extensions by using a commaseparated list. The first extension in the list is the extension that
Dreamweaver uses when the user saves a documenttype document.
If two nonserver model-associated document types have the same
file extension, Dreamweaver recognizes the first one as the document type for the extension.
dialog box.
folder that contains template content for new
documents.
equivalent, specify the name of the older version of the
server model.
UltraDev 4 ColdFusion is a valid prior server model.
documenttype
Page 25
Element Type Required Description
Tag At tr ib ut e
DREAMWEAVER CS3
Extending Dreamweaver
19
title
(subtag)
description
(subtag)
Yes The string that appears as a category item under Blank Document
in the New Document dialog box. You can place this string directly
in the definition file or point to it indirectly for localization
purposes. For more information on localizing this string, see “Localized strings” on page 21.
Formatting is not allowed, so HTML tags cannot be specified.
No The string that describes the document type. You can place this
string directly in the definition file or point to it indirectly for localization purposes. For more information on localizing this string, see
“Localized strings” on page 21.
Formatting is allowed, so HTML tags can be specified.
Note: When the user saves a new document, Dreamweaver examines the list of extensions for the current platform that
are associated with the document type (
winfileextension and macfileextension). Dreamweaver selects the first
string in the list and uses it as the default file extension. To change this default file extension, you must reorder the extensions in the comma-separated list so the new default is listed first.
When Dreamweaver starts, it reads all document type definition files and builds a list of valid document types.
Dreamweaver treats any entries within the definition files that have nonexistent server models as nonserver model
document types. Dreamweaver ignores entries that have bad contents or IDs that are not unique.
If, while scanning the Configuration/DocumentTypes folder, Dreamweaver finds no document type definition files
or if any of the definition files appear to be corrupt, Dreamweaver closes with an error message.
Dynamic templates
You can create templates that are based on dynamic document types. These templates are called dynamic templates.
The following two elements are essential to defining a dynamic template:
• The value of the internaltype attribute for the new document type must be DWTemplate.
• The dynamicid attribute must be set, and the value must be a reference to the identifier of an existing dynamic
document type.
The following example defines a dynamic document type:
<documenttype
id="PHP_MySQL"
servermodel="PHP MySQL"
internaltype="Dynamic"
winfileextension="php,php3"
macfileextension="php,php3"
file="Default.php">
<title>PHP</title>
<description><![CDATA[PHP document]]></description>
</documenttype>
Now, you can define the following dynamic template, which is based on this PHP_MySQL dynamic document type:
Page 26

DREAMWEAVER CS3
Extending Dreamweaver
<documenttype
id="DWTemplate_PHP"
internaltype="DWTemplate"
dynamicid="PHP_MySQL"
winfileextension="php.dwt"
macfileextension="php.dwt"
file="Default.php.dwt">
<title>PHP Template</title>
<description><![CDATA[Dreamweaver PHP Template document]]></description>
</documenttype>
When a Dreamweaver user creates a new blank template of type DWTemplate_PHP, Dreamweaver lets the user
create PHP server behaviors in the file. Furthermore, when the user creates instances of the new template, the user
can create PHP server behaviors in the instance.
In the previous example, when the user saves the template, Dreamweaver automatically adds a .php.dwt extension to
the file. When the user saves an instance of the template, Dreamweaver adds the .php extension to the file.
Document extensions and file types
By default, Dreamweaver shows all the file types it recognizes in the File > Open dialog box. After creating a new
document type, extension developers need to update the appropriate Extensions.txt file. If the user is on a multiuser
system (such as Windows XP, Windows 2000, or Mac OS X), the user has another Extensions.txt file in the user
Configuration folder. The user must update the Extensions.txt file because it is the instance that Dreamweaver looks
for and parses.
20
The location of the user’s Configuration folder depends on the user’s platform.
Windows 2000 and Windows XP platforms use the following location:
hard disk:\Documents and Settings\username\Application Data\Adobe\Dreamweaver 9\Configuration
Note: In Windows XP, this folder may be inside a hidden folder.
Mac OS X platforms use the following location:
hard disk:Users/username/Library/Application Support/Adobe/Dreamweaver 9/Configuration
If Dreamweaver cannot find the Extensions.txt file in the user’s Configuration folder, Dreamweaver looks for it in
the Dreamweaver Configuration folder.
Note: On multiuser platforms, if you edit the copy of Extensions.txt that resides in the Dreamweaver Configuration
folder and not the one in the user’s Configuration folder, Dreamweaver is not aware of the changes because
Dreamweaver parses the copy of the Extensions.txt file in the user’s Configuration folder, not the file in the Dreamweaver
Configuration folder.
To create a new document extension, you can either add the new extension to an existing document type or create a
new document type.
To add a new extension to an existing document type:
1
Edit MMDocumentTypes.xml.
2 Add the new extension to the winfileextension and macfileextension attributes of the existing document
type.
Page 27

DREAMWEAVER CS3
Extending Dreamweaver
To add a new document type:
Make a backup copy of the Extensions.txt file in the Configuration folder.
1
2 Open Extensions.txt in Dreamweaver or a text editor.
3 Add a new line for each new file type. In capital letters, enter the filename extensions that the new file type can
have, separated by commas; then add a colon and a brief descriptive phrase to show in the pop-up menu for file types
that appears in the File > Open dialog box.
For example, for JPEG files, enter
JPG,JPEG,JFIF:JPEG Image Files
4 Save the Extensions.txt file.
5 Restart Dreamweaver.
To see the changes, select File > Open and click the pop-up menu of file types.
To change the Dreamweaver default File > 0pen file type:
1 Make a backup copy of the Extensions.txt file in the Configuration folder.
2 Open Extensions.txt in Dreamweaver or a text editor.
3 Cut the line that corresponds to the new default, and paste it at the beginning of the file, to make it the first line
of the file.
4 Save the Extensions.txt file.
21
5 Restart Dreamweaver.
To see the changes, select File > Open and click the pop-up menu of file types.
Localized strings
Within a document type definition file, the <title> and <description> subtags specify the display title and
description for the document type. You can use the
for providing localized strings for the two subtags. This process is similar to server-side scripting where you specify
a particular string to use in your page by using a string identifier as a placeholder. For the placeholder, you can use
a special tag or you can specify a tag attribute whose value is replaced.
To provide localized strings:
1 Place the following statement at the beginning of the document type definition file:
<?xml version="1.0" encoding="utf-8"?>
2 Declare the MMString namespace in the <documenttypes> tag:
<documenttypes
xmlns:MMString="http://www.Macromedia.com/schemes/data/string/">
3 At the location in the document type definition file where you want to provide a localized string, use the
MMString:loadstring directive to define a placeholder for the localized string. You can specify this placeholder in
one of the following ways:
<description>
<loadstring>myJSPDocType/Description</loadstring>
</description>
or
<description>
<loadstring id="myJSPDocType/Description" />
</description>
MMString:loadstring directive in the subtags as a placeholder
Page 28

DREAMWEAVER CS3
Extending Dreamweaver
In these examples, myJSPDocType/Description is a unique string identifier that acts as a placeholder for the
localized string. The localized string is defined in the next step.
4 In the Configuration/Strings folder, create a new XML file (or edit an existing file) that defines the localized string.
For example, the following code, when placed in the Configuration/Strings/strings.xml file, defines the
DocType/Description
<strings>
...
<string id="myJSPDocType/Description"
value=
"<![CDATA[JavaServer Page with <em>special</em> features]]>"
/>
...
</strings>
string:
myJSP-
Note: String identifiers, such as myJSPDocType/Description in the previous example, must be unique within the
application. Dreamweaver, when it starts, parses all XML files within the Configuration/Strings folder and loads these
unique strings.
Rules for document type definition files
Dreamweaver lets document types that are associated with a server model share file extensions. For example, ASPJS and ASP-VB can claim .asp as their file extension. (For information on which server model gets preference, see
“canRecognizeDocument()” on page 320.)
22
Dreamweaver does not let document types that are not associated with a server model share file extensions.
If a file extension is claimed by two document types where one type is associated with a server model and the other
is not, the latter document type gets preference. Suppose you have a document type called SAM, which is not
associated with a server model, that has a file extension of .sam, and you add this file extension to the ASP-JS
document type. When a Dreamweaver user opens a file that has a .sam extension, Dreamweaver assigns the SAM
document type to it, not ASP-JS.
Opening a document in Dreamweaver
When a user opens a document file, Dreamweaver follows a series of steps to identify the document type based on
the file’s extension.
If Dreamweaver successfully finds a unique document type, Dreamweaver uses that type and loads the associated
server model (if any) for the document that the user is opening. If the user has selected to use Dreamweaver
UltraDev 4 server behaviors, Dreamweaver loads the appropriate UltraDev 4 server model.
If the file extension maps to more than one document type, Dreamweaver performs the following actions:
• If a static document type is among the list of document types, it gets preference.
• If all the document types are dynamic, Dreamweaver creates an alphabetical list of the server models that are
associated with these document types and then calls the
model (see “canRecognizeDocument()” on page 320). Dreamweaver collects the return values and determines
which server model returned the highest valued positive integer. The document type whose server model returns
the highest integer is the document type that Dreamweaver assigns to the document being opened. If, however,
more than one server model returns the same integer, Dreamweaver goes through the alphabetical list of those
server models, picks the first in the list, and uses that document type. For example, if both ASP-JS and ASP-VB
canRecognizeDocument() function in each server
Page 29

DREAMWEAVER CS3
Extending Dreamweaver
claim an ASP document and if their respective canRecognizeDocument() functions return equal values, Dreamweaver assigns the document to ASP-JS (because, alphabetically, ASP-JS is first).
If Dreamweaver cannot map the file extension to a document type, Dreamweaver opens the document as a text file.
Customizing workspace layouts
Dreamweaver lets you customize the workspace layout, including which panels are in the specified layout, as well as
other attributes such as the positions and sizes of the panels, their collapsed or expanded states, the position and size
of the application window, and the position and size of the Document window.
The workspace layout is specified in XML files stored in the Configuration/Workspace layouts folder. The following
sections describe the syntax of the XML tags. Optional attributes are marked in the attribute lists with curly braces
{}); all attributes not marked with curly braces are required.
(
<panelset>
Description
Outermost tag, which signals the start of the panel set description.
Attributes
None.
23
Contents
This tag may contain one or more
application, document, or panelset tags.
Container
None.
Example
<panelset>
<!-- panelset tags here -->
</panelset>
<application>
Description
Specifies the application window’s initial position and size.
Attributes
rect, maximize
• rect specifies the position and size of the application window. The string is in the form “left top right bottom”
specified as integers.
• maximize is a Boolean value: true if the application window should be maximized on startup; false otherwise.
The default value is
true.
Contents
None.
Container
This tag must be contained in a
panelset tag.
Page 30

DREAMWEAVER CS3
Extending Dreamweaver
Example
<panelset>
<application rect="0 0 1000 1200" maximize="false">
</application>
</panelset>
<document>
Description
Specifies the Document window’s initial position and size.
Attributes
rect, maximize
• rect specifies the position and size of the Document window. The string is in the form “left top right bottom”
specified as integers. If the
maximize value is true, the rect value is ignored.
• maximize is a Boolean value: true if the Document window should be maximized on startup; false otherwise.
The default value is
true.
Contents
None.
24
Container
This tag must be contained in a
panelset tag.
Example
<panelset>
<document rect="100 257 1043 1200" maximize="false">
</document>
</panelset>
<panelframe>
Description
Describes an entire panel group.
Attributes
x, y, {width, height}, dock, collapse
• x specifies the left position of the panel group. Its value can be an integer or a value that is relative to the screen.
If the integer value is not on the screen, the panel group appears in the closest screen position possible to make it
visible on the screen. Relative values can be “left” or “right”; these values indicate which edge of the panel group
to align with which edge of the virtual screen.
• y specifies the top position of the panel group. Its value can be an integer or a value that is relative to the screen.
If the integer value is not on the screen, the panel group appears in the closest screen position possible to make it
visible on the screen. Relative values can be “top” or “bottom”; these values indicate which edge of the panel group
to align with which edge of the virtual screen.
• width is the width, in pixels, of the panel group. This attribute is optional. If the width is not specified, the built-
in default for the panel group is used.
• height is the height, in pixels, of the panel group. This attribute is optional. If the height is not specified, the built-
in default for the panel group is used.
Page 31

DREAMWEAVER CS3
Extending Dreamweaver
• dock is a string value that specifies to which edge of the application frame to dock the panel group. This attribute
is ignored on the Macintosh because panel groups cannot be docked.
• collapse is a Boolean value: true indicates that the panel group is collapsed: false indicates that the panel
group is expanded. This attribute is ignored on the Macintosh because panels are floating.
Contents
This tag must contain one or more
panelcontainer tags.
Container
This tag must be contained in a
panelset tag.
Example
<panelset>
<panelframe rect="196 453 661 987" visible="true" dock="floating">
<!-- panelcontainer tags here -->
</panelframe>
</panelset>
<panelcontainer>
Description
Describes an entire panel group.
25
Attributes
expanded, title,{ height,} activepanel, visible, maximize, maxRestorePanel, maxRestoreIndex,
maxRect, tabsinheader
• expanded is a Boolean value: true if the panel is expanded; false otherwise.
• title is a string that specifies the title of the panel.
• height is an integer that specifies the height of the panel in pixels. This attribute is optional. If height is not
specified, the build-in default for each panel is used.
Note: Width is inherited from the parent.
• activepanel is a number that is the ID of the front panel.
• visible is a Boolean value: true if the panel is visible; false otherwise.
• maximize is a Boolean value: true if the panel should be maximized when it appears initially; false otherwise.
• maxRestorePanel is a number that is the ID of the panel to restore to.
• maxRect is a string that indicates the position and size of the panel when it is maximized. The string is in the form
“left top right bottom”, specified as integers.
• tabsinheader is a Boolean value: true indicates that tabs should be positioned in the header instead of below
the header bar;
false otherwise.
Contents
This tag must contain one or more
panel tags.
Container
This tag must be contained in a
panelframe tag.
Page 32

Example
<panelset>
<panelframe rect="196 453 661 987" visible="true" dock="floating">
<panelcontainer title="Color" height="250" visible="true" expanded="true"
activepanel="20">
<!-- panel tags here --->
</panelcontainer>
</panelframe>
</panelset>
<panel>
Description
Specifies the panel that appears in the panel container.
Attributes
id, visibleTab
• id is a number that indicates the ID for the panel. The following table contains a list of values:
Software ID Panel
DREAMWEAVER CS3
Extending Dreamweaver
26
Adobe® Flash® 1 Properties
2Actions
3 Align
4Behaviors
5 Components
6 Component Inspector
7 Color Mixer
8 Color Swatches
9History
10 Info
11 Library
12 Movie Explorer
13 Output
14 Properties
15 Project
16 Transform
17 Scene
18 Strings
19 Debugger
Page 33

Software ID Panel
101–110 Library
Dreamweaver 1 Properties
Flex Builder 1 Properties
• visibleTab is a Boolean value: true if the tab and the panel should be visible; false otherwise.
Contents
None.
Container
This tag must be contained in a
panelcontainer tag.
Example
<panelset>
<panelframe rect="196 453 661 987" visible="true" dock="floating">
<panelcontainer title="Color" height="250" visible="true" expanded="true"
activepanel="20">
<panel id="20"></panel>
</panelcontainer>
</panelframe>
</panelset>
DREAMWEAVER CS3
Extending Dreamweaver
27
Customizing the Coding toolbar
The Coding toolbar displays 15 buttons initially. This is a subset of the buttons that are available. You can customize
the Coding toolbar by changing the buttons that appear on the toolbar and the order in which they appear by editing
the file Configuration/Toolbars/Toolbars.xml. You can also insert your own buttons into the toolbar through the
Extension Manager.
To change the order of buttons:
Open the file Configuration/Toolbars/toolbars.xml.
1
2 Locate the Code view toolbar section by searching for the following comment:
<!-- Code view toolbar -->
3 Copy and paste the button tags so that they appear in the order you want on the toolbar.
4 Save the file.
To remove a button:
Open the file Configuration/Toolbars/toolbars.xml.
1
2 Locate the Coding toolbar section by searching for the following comment:
<!-- Code view toolbar -->
3 Surround the button you want to remove with a comment.
The following example shows a button that is surrounded by comments so that it does not appear on the toolbar:
Page 34

DREAMWEAVER CS3
Extending Dreamweaver
<!-- remove button from Coding toolbar
<button id="DW_ExpandAll"
image="Toolbars/images/MM/T_ExpandAll_Sm_N.png"
disabledImage="Toolbars/images/MM/T_ExpandAll_Sm_D.png"
tooltip="Expand All"
domRequired="false"
enabled="dw.getFocus(true) == 'textView' || dw.getFocus(true) == 'html'¬
"command="if (dw.getFocus(true) == 'textView' || dw.getFocus(true) ¬
== 'html') dw.getDocumentDOM().source.expandAllCodeFragments();"
update="onViewChange" />
-->
4 Save the file.
To make any buttons that are not visible in the toolbar appear, you remove the comment that surrounds a button in
the XML file.
Changing keyboard shortcut mappings
Dreamweaver includes many keyboard shortcuts to Dreamweaver features. The default keyboard shortcuts are listed
in the menus.xml file and are created for the U.S. keyboard. Due to the number of shortcuts provided in Dreamweaver, certain nonalphanumeric shortcuts (characters other than a-z or 0-9) require remapping for international
keyboards. For this purpose, Dreamweaver comes with a number of XML files that define keyboard shortcut
mappings for international keyboards. These files are located in the Configuration\Menus\Adaptive Sets folder.
When Dreamweaver detects an international keyboard connected to the computer, it automatically resets the
keyboard shortcuts to the mappings file for that keyboard. If the appropriate file is not available for the keyboard
layout, Dreamweaver removes any shortcuts that do not work on that keyboard layout.
28
The keyboard shortcut mappings files are named using a two-letter language code of the keyboard layout they
represent. For example, the file for the German keyboard layout is
de.xml. If a language has different keyboard
layouts for different countries, then the mappings file uses the two-letter language code followed by a dash (“-”) and
a two-letter country code as its file name. For example,
fr-ca.xml is the file name for the Canadian French keyboard
layout. The two-letter language codes are defined in ISO 639 (http://en.wikipedia.org/wiki/List_of_ISO_639_codes)
and the country codes are defined in ISO 3166 (http://en.wikipedia.org/wiki/ISO_3166-1_alpha-2).
When the active keyboard language setting changes in your computer, Dreamweaver checks whether an appropriate
keyboard shortcut mappings file exists for that keyboard’s country and language. Dreamweaver checks for a countryspecific mappings file first, and then if the file does not exist, Dreamweaver checks for a file for that language. For
example, if you have connected a Canadian French keyboard to your computer, Dreamweaver first looks for
fr-ca.xml for Canadian French ke yboard layout. If it does not exist, Dreamweaver looks for fr.xml. The following
table lists the mappings files provided with Dreamweaver.
Filename Windows platform Macintosh platform
ca.xml Catalan Catalan
de.xml German (Germany, Austria) Austrian, German
de-ch.xml German (Switzerland) Swiss German
es.xml Spanish (International Sort)
Spanish (Traditional Sort)
Spanish
Spanish - ISO
Page 35

Filename Windows platform Macintosh platform
fr.xml French (France) French
fr-ca.xml French (Canada) Canadian - CSA
fr-ch.xml French (Switzerland) Swiss French
DREAMWEAVER CS3
Extending Dreamweaver
29
it.xml Italian (Italy)
Italian (Switzerland)
it-mac.xml N/A Italian
ja.xml Japanese Japanese
nl-be.xml Dutch (Belgium)
French (Belgium)
zh-cn.xml Chinese (PRC)
Chinese (Singapore)
Italian - Pro
Belgian
Simplified Chinese
If you are using a keyboard layout other than those provided by Dreamweaver, you can create a mappings file for
your specific keyboard and place it in the Configuration\Menus\Adaptive Sets folder.
To create a keyboard mappings file:
Make a copy of one of the keyboard mappings files in the Configuration\Menus\Adaptive Sets folder, and name
1
the file using the appropriate 2-letter language name for your keyboard layout with .xml extension.
When making a copy of an existing file, you should copy a keyboard mappings file that is close to your keyboard
layout. For example, if you are creating a keyboard mappings file for the Swedish keyboard, you might want to copy
the de.xml because the Swedish keyboard layout is similar to the German keyboard layout.
2 Move the new keyboard mappings file you just created to a folder other than the Configuration\Menus\Adaptive
Sets folder.
3 Open the keyboard mappings file in Dreamweaver.
4 Remove or add shortcut tags for your keyboard layout.
To help you decide on the keyboard shortcut tags you want to modify, you can compare the shortcuts set for the U.S.
keyboard with those set for your language. (The next procedure describes comparing shortcuts from two keyboard
layouts.)
5 After making your changes to the keyboard shortcuts, save the file and move it back to the Configu-
ration\Menus\Adaptive Sets folder.
To help you determine the keyboard shortcut tags you want to modify:
Switch the active keyboard language setting of your computer to your language, if it is not already set. (This is set
1
through the operating system of your computer. For example, in Windows you can select the language through the
Control Panels.)
2 Start the Dreamweaver Keyboard Shortcut Editor by selecting Edit > Keyboard Shortcuts.
3 Click the third image button in the upper right of the dialog box. (If you place the pointer over the button, you
will see the tooltip "Export set as HTML.")
The Save As HTML file dialog appears prompting you to enter a name for the keyboard shortcut summary file of
your current keyboard layout.
4 After saving the summary file dismiss the Keyboard Shortcut Editor dialog box.
Page 36

DREAMWEAVER CS3
Extending Dreamweaver
5 Switch the keyboard layout to the U.S. keyboard (through your computer’s the operating system).
6 Start the Dreamweaver Keyboard Shortcut Editor by selecting Edit > Keyboard Shortcuts.
7 Click the third image button in the upper right of the dialog box to export the set as an HTML file.
8 After saving the summary file, close the Keyboard Shortcut Editor dialog box.
9 Now you can print the two keyboard shortcut summary files and compare them to see all the shortcuts that
Dreamweaver removed for your language keyboard layout. These are the shortcuts that you have to reassign with
new shortcuts using keys only available on your keyboard layout.
With the information you get from comparing the two files, you can update your keyboard layout mappings file by
adding or removing shortcut tags for each shortcut that you want to reassign.
The keyboard layout mapping XML files
The following example shows the format of the French keyboard mappings file (fr.xml):
<shortcutset language="French">
<shortcut key="Cmd+[" newkey="Cmd+ù"/>
<shortcut key="Cmd+]" newkey="Cmd+)"/>
<shortcut platform="win" key="Cmd+Shift+>" newkey="Cmd+Opt+Shift+,"/>
<shortcut platform="mac" key="Cmd+Shift+>" newkey="Cmd+<"/>
<shortcut platform="win" key="Cmd+Shift+<" newkey="Cmd+Shift+,"/>
<shortcut key="Cmd+'" newkey="Cmd+Shift+=" />
...
</shortcutset>
30
The syntax for the keyboard layout XML file:
<shortcutset language="language_name">
<shortcut key="key_combination" newkey="key_combination"/>
<shortcut platform="op_system" key="key_combination" newkey="key_combination"/>
</shortcutset>
Where:
• language_name is the language of the keyboard, such as French, Spanish, German, etc.
• key_combination is the keyboard shortcut, such as Cmd+[, Cmd+Shift+>, Ctrl+$.
• key specifies the keyboard shortcut to be replaced.
• newkey specifies the keyboard shortcut to replace the key.
• platform=op_system is the system for which the shortcut applies. Specify either win or mac. If no platform is
specified, the shortcut applies to both platforms.
Page 37

Chapter 3: Customizing Code view
Adobe Dreamweaver CS3 uses two devices in Code view that help you enter code quickly and
make your code readable and accurate. These two devices are code hints and code coloring. In
addition, Dreamweaver validates your code for the target browsers that you specify and allows
you to change default HTML formatting.
You can customize code hints and code coloring by modifying the XML files that implement
them. You can add items to the Code Hints menus by adding entries to the CodeHints.xml or
SpryCodeHints.xml file. You can modify color schemes by modifying the code coloring style file,
Colors.xml, or you can change code coloring schemes or add new ones by modifying one of the
code coloring syntax files, such as CodeColoring.xml. You can also modify the Cascading Style
Sheet (CSS) profile file for your target browser to affect how Dreamweaver validates CSS
properties and values. You can also change the Dreamweaver default HTML formatting through
the Preferences dialog box. The following sections describe how to customize these features.
Code hints
Code hints are menus that Dreamweaver opens when you type certain character patterns in the
Code view. Code hints offer a typing shortcut by providing a list of strings that potentially
complete the string you are typing. If the string you are typing appears in the menu, you can
scroll to it and press Enter or Return to complete your entry. For example, when you type
pop-up menu shows a list of tag names. Instead of typing the rest of the tag name, you can select
the tag from the menu to include it in your text. Dreamweaver also provides code hints for the
Spry framework.
<, a
Dreamweaver loads Code Hints menus from the CodeHints.xml file and any other xml files in
the Configuration/CodeHints folder. You can add Code Hints menus to Dreamweaver by
defining them in your own XML files using the XML schema format described in this topic, and
placing them in the Configuration/CodeHints folder.
Page 38

DREAMWEAVER CS3
Extending Dreamweaver
After Dreamweaver loads the contents of a code hints file, you can also add new Code Hints menus dynamically
through JavaScript. For example, JavaScript code populates the list of session variables in the Bindings panel. You
can use the same code to add a Code Hints menu, so when a user types
"Session." in Code view, Dreamweaver
displays a menu of session variables. For information on using JavaScript to add or modify a Code Hints menu, see
“Code Functions” in the Dreamweaver API Reference.
Dreamweaver cannot express some types of Code Hints menus through the XML file or the JavaScript API. The
CodeHints.xml file, the SpryCodeHints.xml file, and the JavaScript API expose a useful subset of the Code Hints
engine, but some Dreamweaver functionality is not accessible. For example, there is no JavaScript hook to open a
color picker, so Dreamweaver cannot express the Attribute Values menu using JavaScript. You can only open a menu
of text items from which you can insert text.
Note: When you insert text, the insertion point is placed after the inserted string.
The CodeHints.xml file
The CodeHints.xml file contains the following entities:
• A list of all the menu groups
Dreamweaver displays the list of menu groups when you select the Code Hints category from the Preferences dialog
box. You can open the Preferences dialog box by selecting Edit > Preferences. Dreamweaver MX provides the
following menu groups or types of Code Hints menus: Tag Names, Attribute Names, Attribute Values, Function
Arguments, Object Methods and Variables, and HTML Entities.
32
• The description for each menu group
The description appears in the Preferences dialog box for the Code Hints category when you select the menu group
in the list. The description for the selected entry appears below the menu group list.
• Code Hints menus
A menu consists of a pattern that triggers the Code Hints menu and a list of commands. For example, a pattern such
& could trigger a menu such as &, >, <.
as
The following example shows the format of the CodeHints.xml file (The tags in bold are described in “The
CodeHints.xml file” on page 32):
<codehints>
<menugroup name="HTML Entities" enabled="true" id="CodeHints
<description>
<![CDATA[ When you type a '&', a drop-down menu shows
a list of HTML entities. The list of HTML entities
is stored in Configuration/CodeHints.xml. ]]>
</description>
<menu pattern="&">
<menuitem value="&" texticon="&"/>
<menuitem value="<" icon="lessThan.gif"/>
</menu>
</menugroup>
<menugroup name="Tag Names" enabled="true" id="CodeHints
<description>
<
DREAMWEAVER CS3
Extending Dreamweaver
<a href="javascript:dw.popupTagLibraryEditor()"> Tag Library
Editor </a>]]>
</description>
</menugroup>
<menugroup name="Function Arguments" enabled="true"
id="CodeHints
<description>
...
</description>
<function pattern="ArraySort(array, sort
doctypes="CFML"/>
<function pattern="Response.addCookie(Cookie cookie)"
doctypes="JSP"/>
</menugroup>
</codehints>
_Function_Arguments">
_type, sort_order)"
JavaScript code hinting
Dreamweaver supports code hinting for the Spry framework. The Spry code hinting file (SpryCodeHints.xml) has
the same basic format as CodeHints.xml. It uses certain new keywords, such as
classpattern to associate the class member list with the class (for example, Spry.Data.XMLDataSet). The class
member list for the classes is nested inside the menu (methods, properties, and events).
method, and there is a new attribute
33
<method> tag and its attributes are similar to the function tag and its attributes, but the parent menu tag needs
The
to have the
event tag for events, and they are represented by their corresponding icons in the Code Hint pop-up menu. There
are also
classpattern attribute to drive the association. Also there is a property tag for properties and an
parammenu and parammenuitem tags to support parameter hinting.
The following example shows the format of a Spry CodeHints.xml file. (The tags in bold are described in “The
CodeHints.xml file” on page 32.):
<function pattern="XMLDataSet(xmlsource, xpath, {options})"
caseSensitive="true" />
<menu classpattern="Spry.Data.XMLDataSet">
<property pattern="url" icon="shared/mm/images/hintMisc.gif" />
<property pattern="xpath" icon="shared/mm/images/hintMisc.gif" />
...
...
<method pattern="getData()" icon="shared/mm/images/hintMisc.gif" />
<method pattern="getData()" icon="shared/mm/images/hintMisc.gif" />
<method pattern="loadData()" icon="shared/mm/images/hintMisc.gif" />
<method pattern="getCurrentRow()" icon= ".../hintMisc.gif" />
<method pattern="setCurrentRow(rowID)" icon= ".../hintMisc.gif" />
<method pattern="setCurrentRowNumber(rowNumber)" icon= ".../hintMisc.gif" />
<method pattern="getRowNumber(rowObj)" icon= ".../hintMisc.gif" />
<method pattern="setColumnType(columnName, columnType)" icon= ".../hintMisc.gif" />
<parammenu pattern='"' name="columnName" index="0" type="spryDataReferences">
</parammenu>
<parammenu pattern='"' name="columnType" index="1" type="enumerated">
<parammenuitem label="integer" value="integer" icon=".../hintMisc.gif"/>
<parammenuitem label="image" value="image" icon=".../hintMisc.gif"/>
<parammenuitem label="date" value="date" icon=".../hintMisc.gif"/>
<parammenuitem label="string" value="string" icon=".../hintMisc.gif"/>
</parammenu>
Page 40

Extending Dreamweaver
</method>
<method pattern="getColumnType(columnName)" icon= ".../hintMisc.gif" />
<method pattern="distinct()" icon= ".../hintMisc.gif" />
<method pattern="getSortColumn()" icon= ".../hintMisc.gif" />
<method pattern="sort()" icon= ".../hintMisc.gif" />
...
...
<event pattern="onCurrentRowChanged" icon= ".../hintMisc.gif" />
<event pattern="onDataChanged" icon= ".../hintMisc.gif" />
...
...
</menu>
<function pattern="Accordion(element,{options})" caseSensitive="true" />
<menu classpattern="Spry.Widget.Accordion">
<method pattern="openNextPanel()" icon= ".../hintMisc.gif" />
<method pattern="openPreviousPanel()" icon= ".../hintMisc.gif" />
<method pattern="openFirstPanel()" icon= ".../hintMisc.gif" />
...
...
</menu>
</function>
<function pattern="XMLDataSet(xmlsource, xpath, {options})" caseSensitive="true">
<parammenu pattern='{,' name="options" index="2" type="optionArray"
allowwhitespaceprefix="true">
<parammenuitem label="sortOnLoad" value="sortOnLoad:"
icon="shared/mm/images/hintMisc.gif" datatype="string"/>
<optionparammenu pattern="sortOrderOnLoad" label="sortOrderOnLoad"
value="sortOrderOnLoad:" icon="shared/mm/images/hintMisc.gif"
type="enumerated" datatype="string">
<optionparammenuitem label="ascending" value="ascending"
icon="shared/mm/images/hintMisc.gif"/>
<optionparammenuitem label="descending" value="descending"
icon="shared/mm/images/hintMisc.gif"/>
</optionparammenu>
</parammenu>
</function>
DREAMWEAVER CS3
34
Declaring classes
The following format declares a class by associating a variable to the class:
<variablename>[space][= operator][new keyword][space]<classname>
For example:
var dsFoo = new Spry.Data.XMLDataSet("products.xml", "products/product");
var fooAccordion = new Spry.Widget.Accordion("accordionDivId");
In the case of the Spry.XML.DataSet class name, you must redeclare it in the ColorCoding.xml file so that the
coloring state engine recognizes that it is an instance of a class and takes the variable name defined on the left side
of the declaration and stores it in the list of variables with their corresponding class types for that page (such as the
variable
fooAccordion and the class type Spry.Widget.Accordion from the previous example).
The syntax for redeclaring the class name in CodeColoring.xml:
Page 41

DREAMWEAVER CS3
Extending Dreamweaver
<classlibrary name="Spry Keywords" id="CodeColor_JavascriptSpry">
<class>Spry.Data.XMLDataSet</class>
<class>Spry.Widget.Accordion</class>
</classlibrary>
Where:
• classlibrary is a new tag to group the classes into the color id "CodeColor_JavascriptSpry"
class is used to list each individual class available in the class library. The list of classes can grow to include other
spry classes from different spry packages (such as: Debug, Data, Utils, Widgets, and Effects), or other Asynchronous
JavaScript and XML
(Ajax) toolkits or JavaScript libraries.
Crosstag attributes code hinting
Dreamweaver provides code hinting for the Spry attribute names and values. Since these attributes are common
across tags, instead of opening each tag.vtm file and adding the Spry attribute list, Dreamweaver has a new xml
format for attribute groups (for example: spry:region, spry:repeat) and tag groups which can be applied in a single
VTM file named Spry.vtm in the Configuration/TagLibraries directory.
Spry attribute grouping format
The following code shows the format of the .vtm file. This format allows you to specify the attributes that apply to
certain tags.
35
Note: The format for Spry attribute grouping can also be used outside the Spry framework.
<crosstag_attributes>
<attributegroup id=”group_id_1” name=”group_name_1”>
<attrib name = "fooAttr1">
<attrib name = "barAttr1">
...
<taggroup>
<tag name = "fooTag1">
<tag name = "barTag1">
...
</taggroup>
</attribgroup>
<attributegroup id=”group_id_2” name=”group_name_2”>
<attrib name = "fooAttr2">
<attrib name = "barAttr2">
...
<taggroup>
<tag name = "fooTag2">
<tag name = "barTag2">
...
</taggroup>
</attribgroup>
</crosstag_attributes>
Where:
• attributegroup lists the attributes for the tag group that follows.
• taggroup lists the tags to which the preceding attributes apply.
Page 42

Example
<crosstag_attributes>
<attribgroup id="spryRegionAttrs" name="Spry1.2">
<attrib name="spry:region" type="spryDataSet" allowmultiplevalues="yes"/>
<attrib name="spry:detailregion" type="spryDataSet" allowmultiplevalues="yes"/>
<attrib name="spry:content"/>
<attrib name="spry:if"/>
<attrib name="spry:choose">
<attrib name="spry:when"/>
<attrib name="spry:default"/>
<attrib name="spry:state" type="Enumerated">
<attriboption value="read" caption="read"/>
<attriboption value="loading" caption="loading"/>
<attriboption value="failed" caption="failed"/>
</attrib>
<taggroup>
<tag name="div"/>
<tag name="span"/>
...
</taggroup>
</attribgroup>
<attribgroup id="spryBehaviorAttrs" name="Spry1.2">
<attrib name="spry:hover" type="cssStyle"/>
<attrib name="spry:select" type="cssStyle"/>
<attrib name="spry:odd" type="cssStyle"/>
<attrib name="spry:even" type="cssStyle"/>
<taggroup>
<tag name="a"/>
<tag name="abbr"/>
<tag name="acronym"/>
...
</taggroup>
</attribgroup>
</crosstag_attributes>
DREAMWEAVER CS3
Extending Dreamweaver
36
Code hints tags
The code hints XML files use the following tags, which define Code Hints menus. You can use these tags to define
additional Code Hints menus.
<codehints>
Description
codehints tag is the root of the CodeHints.xml and SpryCodeHints.xml files.
The
Attributes
None.
Contents
One or more
Container
None.
menugroup tags.
Page 43

DREAMWEAVER CS3
Extending Dreamweaver
Example
<codehints>
<menugroup>
Description
menugroup tag corresponds to a type of menu. You can see the menu types that Dreamweaver defines by
Each
selecting the Code Hints category from the Preferences dialog box. Select Preferences from the Edit menu to display
the Preferences dialog box.
You can create a new menu group or add to an existing group. Menu groups are logical collections of menus that the
user might want to enable or disable using the Preferences dialog box.
Attributes
name, enabled, id
• The name attribute is the localized name that appears in the list of menu groups in the Code Hints category of the
Preferences dialog box.
• The enabled attribute indicates whether the menu group is currently checked or enabled. A menu group that is
enabled appears with a check mark next to it in the Code Hints category of the Preferences dialog box. Assign a
true value to enable the menu group or a false value to disable a menu group.
• The id attribute is a nonlocalized identifier that refers to the menu group.
37
Contents
description, menu, and function tags.
The
Container
The
codehints tag.
Example
<menugroup name="Session Variables" enabled="true" id="Session_Code_Hints">
<description>
Description
description tag contains text that Dreamweaver displays when you select the menu group from the Prefer-
The
ences dialog box. The description text displays below the list of menu groups. The description text might optionally
contain a single
a tag where the href attribute must be a JavaScript URL that Dreamweaver executes if the user clicks
the link. Use the XML CDATA construct to enclose any special or illegal characters in the string so that Dreamweaver
treats them as text.
Attributes
None.
Contents
Description text.
Container
menugroup tag.
The
Page 44

DREAMWEAVER CS3
Extending Dreamweaver
Example
<description>
<![CDATA[ To add or remove tags and attributes, use the
<a href="javascript:dw.tagLibrary.showTagLibraryEditor()">Tag Library Editor</a>.]]>
</description>
<menu>
Description
This tag describes a single pop-up menu. Dreamweaver opens the menu whenever the user types the last character
of the string in the pattern attribute. For example, the menu that shows the contents of a Session variable might have
a pattern attribute that is equal to "
Session.".
Attributes
pattern, doctypes, casesensitive, classpattern
• The pattern attribute specifies the pattern of typed characters that cause Dreamweaver to open the Code Hints
menu. If the first character of the pattern is a letter, number, or underscore, Dreamweaver displays the menu only
if the character that precedes the pattern in the document is not a letter, number, or underscore. For example, if
the pattern is "
Session.", Dreamweaver does not display the menu if the user types "my_Session.".
• The doctypes attribute specifies that the menu is active only for the specified document types. This attribute lets
you specify different lists of function names for ASP-JavaScript (ASP-JS), Java Server Pages (JSP), Macromedia
ColdFusion, and so on. You can specify the
doctypes attribute as a comma-separated list of document type IDs.
See the Dreamweaver Configuration/Documenttypes/MMDocumentTypes.xml file for a list of Dreamweaver
document types.
• The casesensitive attribute specifies whether the pattern is case-sensitive. The possible values for the
casesensitive attribute are true, false, or a subset of the comma-separated list that you specify for the
doctypes attribute. The list of document types lets you specify that the pattern is case-sensitive for some
document types but not for others. The value defaults to
attribute is a value of
pattern that the pattern attribute specifies. If the
true, the Code Hints menu will open only if the text that the user types exactly matches the
casesensitive attribute is a value of false, the menu appears
false if you omit this attribute. If the casesensitive
even if the pattern is lowercase and the text is uppercase.
• The classpattern attribute associates the class member list with the class.
38
Contents
menuitem tag.
The
Container
menugroup tag.
The
Example
<menu pattern="CGI." doctypes="ColdFusion">
<menuitem>
Description
This tag specifies the text for an item in a Code Hints pop-up menu. The
insert into the text when you select the item.
menuitem tag also specifies the value to
Page 45

DREAMWEAVER CS3
Extending Dreamweaver
Attributes
label, value, {icon}, {texticon}
• The label attribute is the string that Dreamweaver displays in the pop-up menu.
• The value attribute is the string that Dreamweaver inserts in the document when you select the command. When
the user selects the item from the menu and presses Enter or Return, Dreamweaver replaces all the text that the
user typed since the menu opened. The user typed the pattern-matching characters before the menu opened, so
Dreamweaver does not insert them again. For example, if you want to insert
ampersand (&), you can define the following
<menu pattern="&">
<menuitem label="&" value="amp;" texticon="&"/>
menu and menuitem tags:
&, which is the HTML entity for
The value attribute does not include the ampersand (&) character because the user typed it before the menu opened.
• The icon attribute, which is optional, specifies the path to an image file that Dreamweaver displays as an icon to
the left of the menu text. The location is expressed as a URL, relative to the Configuration folder.
• The texticon attr ibut e, whi ch is opt ional, sp ecifie s a te xt stri ng to appear in the icon are a instead of an i mage f ile.
This attribute is used for the HTML Entities menu.
Contents
None.
39
Container
The
menu tag.
Example
<menuitem label="CONTENT_TYPE" value=""CONTENT_TYPE")
" icon="shared/mm/images/hintMisc.gif" />
<function>
Description
Used in the CodeHints.xml file. This tag replaces the menu tag for specifying function arguments and object
methods for a Code Hints pop-up menu. When you type a function or method name in Code view, Dreamweaver
opens a menu of function prototypes, displaying the current argument in bold. Each time you type a comma, Dreamweaver updates the menu to display the next argument in bold. For example, if you typed the function name
ArrayAppend in a ColdFusion document, the Code Hints menu would display ArrayAppend(array, value).
After you type the comma following
array, the menu updates to show ArrayAppend(array, value).
For object methods, when you type the object name, Dreamweaver opens a menu of the methods that are defined
for that object.
The recognized functions are stored in the XML files in the Configuration/CodeHints folder.
Attributes
pattern, doctypes, casesensitive
Page 46

DREAMWEAVER CS3
Extending Dreamweaver
• The pattern attribute specifies the name of the function and its argument list. For methods, the pattern attribute
describes the name of the object, the name of the method, and the method’s arguments. For a function name, the
Code Hints menu appears when the user types
function. For an object method, the Code Hints menu appears when the user types
functionname(. The menu shows the list of arguments for the
objectname. (including the
period). This menu shows the methods that have been specified for the object. After that, the Code Hints menu
opens a list of the arguments for the method in the same way it does for a function.
• The doctypes attribute specifies that the menu is active only for the specified document types. This attribute lets
you specify different lists of function names for ASP-JavaScript (ASP-JS), Java Server Pages (JSP), Macromedia
ColdFusion, and so on. You can specify the
doctypes attribute as a comma-separated list of document type IDs.
For a list of Dreamweaver document types, see the Dreamweaver
Configuration/Documenttypes/MMDocumentTypes.xml file.
• The casesensitive attribute specifies whether the pattern is case-sensitive. The possible values for the
casesensitive attribute are true, false, or a subset of the comma-separated list that you specify for the
doctypes attribute. The list of document types lets you specify that the pattern is case-sensitive for some
document types but not for others. The value defaults to
attribute is a value of
pattern that the pattern attribute specifies. If the
true, the Code Hints menu appears only if the text that the user types exactly matches the
casesensitive attribute is a value of false, the menu appears
false if you omit this attribute. If the casesensitive
even if the pattern is lowercase and the text is uppercase.
40
Contents
None.
Container
The
menugroup tag.
Example
// function example
<function pattern="CreateDate(year, month, day)" DOCTYPES="ColdFusion" />
// object method example
<function pattern="application.getAttribute(String name)" DOCTYPES="JSP" />
<method>
Description
Used for the Spry framework. This tag replaces the menu tag for specifying methods for a Code Hints pop-up menu.
When you type a method name in Code view, Dreamweaver opens a menu of method prototypes that provides a list
of parameters for the method and tracks the sequence of parameters as they are being filled. For methods that don't
have parameters, Dreamweaver closes the method call by adding the parentheses "()" characters.
The current argument is displayed t in bold. Each time you type a comma, Dreamweaver updates the menu to display
the next argument in bold. For object methods, when you type the object name, Dreamweaver opens a menu of the
methods that are defined for that object.
Attributes
pattern, icon
Page 47

DREAMWEAVER CS3
Extending Dreamweaver
• The pattern attribute specifies the name of the method and its argument list. The pattern attribute describes the
name of the object, the name of the method, and the method’s arguments. The menu shows the list of arguments
for the method. The Code Hints menu appears when the user types
objectname. (including the period). This
menu shows the methods that have been specified for the object. After that, the Code Hints menu opens a list of
the arguments for the method in the same way it does for a function.
• The icon attribute specifies the icon to be used.
Contents
None.
Container
The
menu tag.
<parammenu>
Description
Used for any object (JavaScript) to specify parameter hinting for the parameters that the method or function takes.
Attributes
pattern, name, index, type
41
• The pattern attribute specifies the character(s) that trigger the code hint menu. This argument is required.
• The name attribute specifies the name of the parameter. This argument is required.
• The index attribute specifies the index number of the parameter being hinted (zero-based). This argument is
required.
• The type attribute specifies the data type. The following data types are supported:
• enumerated (the default), which indicates a list of nested <optionparammenuitem> to display.
• spryDataReferences, which indicates a lists of Spry data set columns.
• cssStyle, which indicates a list of CSS classes available to the page.
• cssId, which indicates a list of CSS selector ID rules available to the page.
• optionArray, which indicates a list of nested <optionparammenu> and <parammenuitem> to display (used to
support options array parameter type).
Contents
None.
Container
method or function tag.
The
<parammenuitem>
Description
Used for any object (javascript) to specify parameter hinting for the parameters that the method or function takes.
Attributes
label, value, icon, datatype
Page 48

DREAMWEAVER CS3
Extending Dreamweaver
• The label attribute specifies the name to display. This argument is required.
• The value attribute specifies the value to drop when the item is selected in the code hint menu. This argument is
required.
• The icon attribute specifies the icon to be used in the code hint menu. This argument is required.
• The datatype attribute allows you to specify string, which indicates that closing quotation marks are to be
added when the user selects a value from the code hint menu. This argument is optional.
Contents
None.
Container
The
parammenu tag.
<optionparammenu>
Description
Used for any object (javascript) to specify options array hinting for the arguments that the method or function takes.
An options array is an argument that can have subarguments in the form of
option:value. Most Spry objects use
an options array argument to allow users to configure the behavior of an object (for example, a data set, widget, or
effect). Options arrays generally appear as
{option1: value1, option2: value2, option3: value3, ...}
42
Attributes
pattern, label, value, icon, type
• The pattern attribute specifies the character(s) that trigger the Code Hint menu. This argument is required.
• The label attribute specifies the name of the parameter. This argument is required.
• The value attribute specifies the value of the parameter to insert when the user selects the code hint. This
argument is required.
• The icon attribute specifies the icon to be used. This argument is required.
• The type attribute specifies the data type. The following data types are supported:
• enumerated (the default), which indicates a list of nested optionparammenuitem to display.
• spryDataReferences, which indicates a lists of Spry data set columns.
• cssStyle, which indicates a list of CSS classes available to the page.
• cssId, which indicates a list of CSS selector ID rules available to the page.
Contents
None.
Container
parammenu tag of type optionArray.
The
<optionparammenuitem>
Description
Used for any object (javascript) to specify parameter hinting for the parameters that the method or function takes.
Page 49

DREAMWEAVER CS3
Extending Dreamweaver
Attributes
label, value, icon, datatype
• The label attribute specifies the name to display. This argument is required.
• The value attribute specifies value to drop when the item is selected in the code hint menu. This argument is
required.
• The icon attribute specifies the icon to be used in the code hint menu. This argument is required.
• The datatype attribute allows you to specify string, which indicates that closing quotation marks are to be
added when the user selects a value from the Code Hint menu. This argument is optional.
Contents
None.
Container
<optionparammenu> tag.
The
<property>
Description
This tag describes properties/fields of an object and has the following standard attributes.
43
Attributes
label, value, icon
• The label attribute is the string that Dreamweaver displays in the pop-up menu.
• The value attribute is the string that Dreamweaver inserts in the document when you select the command. When
the user selects the item from the menu and presses Enter or Return, Dreamweaver replaces all the text that the
user typed since the menu opened. The user typed the pattern-matching characters before the menu opened, so
Dreamweaver does not insert them again.
• The icon attribute, which is optional, specifies the path to an image file that Dreamweaver displays as an icon to
the left of the menu text. The location is expressed as a URL, relative to the Configuration folder.
Contents
None.
Container
menu tag.
The
Code coloring
Dreamweaver lets you customize or extend the code coloring schemes that you see in Code view so that you can add
new keywords to a scheme or add code coloring schemes for new document types. If you develop JavaScript
functions to use in your client-side script, for example, you can add the names of these functions to the keywords
section so that they display in the color that is specified in the Preferences dialog box. Likewise, if you develop a new
programming language for an application server and you want to distribute a new document type to help Dreamweaver users build pages with it, you could add a code coloring scheme for the document type.
Page 50

DREAMWEAVER CS3
Extending Dreamweaver
Dreamweaver provides the JavaScript function dreamweaver.reloadCodeColoring(), which enables you to
reload code coloring XML files that might have been edited manually. For more information on this function, see
the Dreamweaver API Reference.
To update a code coloring scheme or add a new scheme, you must modify the code coloring definition files.
Code coloring files
Dreamweaver defines code coloring styles and schemes in XML files that reside in the Configuration/CodeColoring
folder. A code coloring style file defines styles for fields that are defined in syntax definitions. It has a root node of
<codeColors>. A code coloring scheme file defines code coloring syntax and has a root node of <codeColoring>.
The code coloring style file that Dreamweaver provides is Colors.xml. The code coloring syntax files that Dreamweaver provides are CodeColoring.xml, ASP JavaScript.xml, ASP VBScript.xml, ASP.NET CSharp.xml, and
ASP.NET VB.xml.
The following excerpt from the Colors.xml file illustrates the hierarchy of tags in a code coloring style file:
44
Colors are specified in red-green-blue (RGB) hexadecimal values. For example, the statement
preceding XML code assigns a blue-green (teal) color to the ID
"CodeColor_JavascriptNative".
text="009999" in the
Page 51

DREAMWEAVER CS3
Extending Dreamweaver
The following excerpt from the CodeColoring.xml file illustrates the hierarchy of tags in a code coloring scheme file,
and it also illustrates the relationship between the code coloring styles file and the code coloring scheme file:
45
Notice that the
value. The
defaultTag tag in the CodeColoring.xml excerpt has an id of "CodeColor_HTMLComment". In the Colors.xml file,
id value of "CodeColor_HTMLComment" is assigned a text= value of "#999999", which is gray.
the
Dreamweaver includes the following code coloring schemes: Default, HTML, JavaScript, ASP
_VBScript, JSP, and ColdFusion. The Default scheme has an id value equal to "Text". Dreamweaver uses the
ASP
syntaxColor and tagColor tags in the Colors.xml file assign color and style values to an id string
id value is then used in the CodeColoring.xml file to assign a style to a scheme tag. For example, the
_JavaScript,
Default scheme for document types that do not have a defined code coloring scheme.
A code coloring file contains the following tags, described below:
scheme, blockEnd, blockStart, brackets, charStart, charEnd, charEsc, commentStart,
commentEnd, cssImport/, cssMedia/, cssProperty/, cssSelector/, cssValue/, defaultAttribute,
defaultTag, defaultText/, endOfLineComment, entity/, functionKeyword, idChar1, idCharRest,
ignoreCase, ignoreMMTParams, ignoreTags, isLocked, keyword, keywords, numbers/, operators,
regexp, sampleText, searchPattern, stringStart, stringEnd, stringEsc, tagGroup
<scheme>
Description
scheme ta g sp eci fie s co de co lor ing fo r a block of code t ext . You can have mu ltipl e sc hem es w ith in a file to s pec ify
The
different coloring for different scripting or tag languages. Each scheme has a priority that lets you nest a block of text
with one scheme inside a block of text with a different scheme.
Page 52

DREAMWEAVER CS3
Extending Dreamweaver
Attributes
name, id, priority, doctypes
• name="scheme_name" A string that assigns a name to the scheme. Dreamweaver shows the scheme name in the
Edit Coloring Scheme dialog box. Dreamweaver shows a combination of scheme name and field name, such as
HTML Comment. If you do not specify a name, the fields for the scheme do not appear in the Edit Coloring Scheme
dialog box. For more information about the Edit Coloring Scheme dialog box, see “Editing schemes” on page 62.
• id="id_string" Required. An identifier string that maps color and style to this syntax item.
• priority="string" The value ranges from "1" to "99". Highest priority is "1". Specifies the precedence of the
scheme. Blocks that are inside blocks with higher priority are ignored; blocks that are inside blocks with the same
or lower priority take precedence. The priority has the default value of "50" if you do not specify one.
• doctypes="doc_list" Optional. Specifies a comma-separated list of the document types to which this code
coloring scheme applies. This value is necessary to resolve conflicts in which different start and end blocks use the
same extensions.
Contents
blockEnd, blockStart, brackets, charStart, charEnd, charEsc, commentStart, commentEnd,
cssProperty/, cssSelector/, cssValue/, defaultAttribute, defaultText/, endOfLineComment,
entity/, functionKeyword, idChar1, idCharRest, ignoreCase, ignoreMMTParam, ignoreTags,
keywords, numbers/, operators, regexp, sampleText, searchPattern, stringStart, stringEnd,
stringEsc, urlProtocol, urlProtocols
46
Container
The
codeColoring tag.
Example
<scheme name="Text" id="Text" doctypes="Text" priority="1">
<blockEnd>
Description
Optional. Text values that delimit the end of the text block for this scheme. The
must be paired and the combination must be unique. Values are not evaluated as case-sensitive. The
can be one character. Multiple instances of this tag are allowed. For more information on
blockEnd and blockStart tags
blockEnd value
blockEnd strings, see
“Wildcard characters” on page 59.
Attributes
None.
Example
<blockEnd><![CDATA[--->]]></blockEnd>
<blockStart>
Description
Optional. Specified only if the coloring scheme can be embedded inside a different coloring scheme. The
Start
and blockEnd tags must be paired, and the combination must be unique. Values are not evaluated as casesensitive. The
For more information on
blockStart scheme attribute, see “Scheme block delimiter coloring” on page 57.
blockStart va lue mu st b e two or mor e chara cte rs i n le ngth. Mult iple in sta nces of thi s ta g are al low ed.
blockStart strings, see “Wildcard characters” on page 59. For information on the
block-
Page 53

DREAMWEAVER CS3
Extending Dreamweaver
Attributes
canNest, doctypes, id, name, scheme
• canNest Specifies whether the scheme can nest inside itself. Values are Yes or No. The defaultvalue is No.
• doctypes="doc_type1, doc_type2,…" Required. Specifies a comma-separated list of document types into
which you can nest this code coloring scheme. Document types are defined in the Dreamweaver
Configuration/Document Types/MMDocumentTypes.xml file.
• id="id_string" Required when scheme="customText". An identifier string that maps color and style to this
syntax item.
• name="display_name" A string that appears in the Edit Coloring Scheme dialog box when
scheme="customText".
• scheme Required. This defines how the blockStart and blockEnd strings are colored. For information on the
possible values for the scheme attribute, see “Scheme block delimiter coloring” on page 57.
Example
<blockStart doctypes="ColdFusion,CFC" scheme="innerText" canNest="Yes"><![CDATA[<!---]]>
</blockStart>
<brackets>
47
Description
A list of characters that represent brackets.
Attributes
name, id
• name="bracket_name" A string that assigns a name to the list of brackets.
• id="id_string" Required. An identifier string that maps color and style to this syntax item.
Example
<brackets name="Bracket" id="CodeColor_JavaBracket"><![CDATA[{[()]}]]>
</brackets>
<charStart>
Description
Contains a text string that represents the delimiter of the start of a character. You must specify the
charEnd tags in pairs. Multiple charStart … charEnd pairs are allowed.
Attributes
None.
Example
<charStart><![CDATA[']]></charStart>
charStart and
Page 54

<charEnd>
Description
Contains a text string that represents the delimiter of the end of a character. You must specify the
charEnd tags in pairs. Multiple charStart … charEnd pairs are allowed.
Attributes
None.
Example
<charEnd><![CDATA[']]></charEnd>
<charEsc>
Description
Contains a text string that represents an escape character. Multiple
charEsc tags are allowed.
Attributes
None.
Example
<charEsc><![CDATA[\]]></charEsc>
DREAMWEAVER CS3
Extending Dreamweaver
charStart and
48
<commentStart>
Description
A text string that delimits the start of a comment block. You must specify the
in pairs. Multiple
commentStart…/commentEnd pairs are allowed.
Attributes
None.
Example
<commentStart><![CDATA[<%--]]></commentStart>
<commentEnd>
Description
A text string that delimits the end of a comment block. You must specify the
in pairs. Multiple
commentStart…/commentEnd pairs are allowed.
Attributes
None.
Example
<commentEnd><![CDATA[--%>]]></commentEnd>
<cssImport/>
commentStart and commentEnd tags
commentStart and commentEnd tags
Description
An empty tag that indicates the code coloring rule for the
@import function of the style element in a CSS.
Page 55

Attributes
name, id
• name="cssImport_name" A string that assigns a name to the CSS @import function.
• id="id_string" Required. An identifier string that maps color and style to this syntax item. <
Example
<cssImport name="@import" id="CodeColor_CSSImport" />
<cssMedia/>
Description
An empty tag that indicates the code coloring rule for the
@media function of the style element in a CSS.
Attributes
name, id
• name="cssMedia_name" A string that assigns a name to the CSS @media function.
• id="id_string" Required. An identifier string that maps color and style to this syntax item.
Example
<cssMedia name="@media" id="CodeColor_CSSMedia" />
DREAMWEAVER CS3
Extending Dreamweaver
49
<cssProperty/>
Description
An empty tag that indicates CSS rules and holds code coloring attributes.
Attributes
name, id
• name="cssProperty_name" A string that assigns a name to the CSS property.
• id="id_string" Required. An identifier string that maps color and style to this syntax item.
Code Color Preference
CSS Property
Example
<cssProperty name="Property" id="CodeColor_CSSProperty" />
<cssSelector/>
Description
An empty tag that indicates CSS rules and holds code coloring attributes.
Attributes
name, id
• name="cssSelector_name" A string that assigns a name to the CSS Selector.
• id="id_string" Required. An identifier string that maps color and style to this syntax item.
Page 56

DREAMWEAVER CS3
Extending Dreamweaver
Example
<cssSelector name="Selector" id="CodeColor_CSSSelector" />
<cssValue/>
Description
An empty tag that indicates CSS rules and holds code coloring attributes.
Attributes
name, id
• name="cssValue_name" A string that assigns a name to the CSS value.
• id="id_string" Required. An identifier string that maps color and style to this syntax item.
Example
<cssValue name="Value" id="CodeColor_CSSValue" />
<defaultAttribute>
Description
Optional. This tag applies only to tag-based syntax (that is, where
ignoreTags="No"). If this tag is present, then all
tag attributes are colored according to the style assigned to this tag. If this tag is omitted, then attributes are colored
the same as the tag.
50
Attributes
name
• A string that assigns a name to the default attribute.
Example
<defaultAttribute name="Attribute"/>
<defaultTag>
Description
This tag is used to specify the default color and style for tags in a scheme.
Attributes
name, id
• name="display_name" A string that Dreamweaver displays in the code color editor.
• id="id_string" Required. An identifier string that maps color and style to this syntax item.
Example
<defaultTag name="Other Tags" id="CodeColor_HTMLTag" />
<defaultText/>
Description
Optional. If this tag is present, all text that is not defined by any other tag is colored according to the style assigned
to this tag. If this tag is omitted, black text is used.
Page 57

DREAMWEAVER CS3
Extending Dreamweaver
Attributes
name, id
• name="cssSelector_name" A string that assigns a name to the CSS Selector.
• id="id_string" Required. An identifier string that maps color and style to this syntax item.
Example
<defaultText name="Text" id="CodeColor_TextText" />
<endOfLineComment>
Description
A text string that delimits the start of a comment that continues until the end of the current line. Multiple
endOfLineComment…/endOfLineComment tags are allowed.
Attributes
None.
Example
<endOfLineComment><![CDATA[//]]></endOfLineComment>
51
<entity/>
Description
An empty tag that indicates that HTML special characters should be recognized and hold coloring attributes.
Attributes
name, id
• name="entity_name" A string that assigns a name to the entity.
• id="id_string" Required. An identifier string that maps color and style to this syntax item.
Example
<entity name="Special Characters" id="CodeColor_HTMLEntity" />
<functionKeyword>
Description
Identifies keywords that define a function. Dreamweaver uses these keywords to perform code navigation. Multiple
functionKeyword tags are allowed.
Attributes
name, id
• name="functionKeyword_name" A string that assigns a name to the functionKeyword block.
• id="id_string" Required. An identifier string that maps color and style to this syntax item.
Example
<functionKeyword name="Function Keyword"
id="CodeColor_JavascriptFunction">function</functionKeyword>
Page 58

<idChar1>
Description
A list of characters, each of which Dreamweaver can recognize as the first character in an identifier.
Attributes
name, id
• name="idChar1_name" A string that assigns a name to the list of identifier characters.
• id="id_string" Required. An identifier string that maps color and style to this syntax item.
Example
<idChar1>_$abcdefghijklmnopqrstuvwxyzABCDEFGHIJKLMNOPQRSTUVWXYZ</idChar1>
<idCharRest>
Description
A list of characters that are to be recognized as the remaining characters in an identifier. If
idChar1 is not specified,
all characters of the identifier are validated against this list.
Attributes
name, id
DREAMWEAVER CS3
Extending Dreamweaver
52
• name="idCharRest_name" A string that assigns a name to the stringStart block.
• id="id_string" Required. An identifier string that maps color and style to this syntax item.
Example
<idCharRest name="Identifier" id="CodeColor_JavascriptIdentifier">
_$abcdefghijklmnopqrstuvwxyzABCDEFGHIJKLMNOPQRSTUVWXYZ0123456789</idCharRest>
<ignoreCase>
Description
Specifies whether case should be ignored when comparing tokens to keywords. Values are
Yes.
Yes or No. The default is
Attributes
None.
Example
<ignoreCase>Yes</ignoreCase>
<ignoreMMTParams>
Description
Specifies whether the
specially. Values are
MMTInstance:Param, <!-- InstanceParam, or <!-- #InstanceParam tag should be colored
Yes and No; the default is Yes. This handles proper coloring in pages that use templates.
Attributes
None.
Page 59

DREAMWEAVER CS3
Extending Dreamweaver
Example
<ignoreMMTParams>No</ignoreMMTParams>
<ignoreTags>
Description
Specifies whether markup tags should be ignored. Values are
is for tag markup language that is delimited by
< and >. Set to Yes when syntax is for a programming language.
Yes and No; the default is Yes. Set to No when syntax
Attributes
None.
Example
<ignoreTags>No</ignoreTags>
<isLocked>
Description
Specifies whether the text that is matched by this scheme is locked from being edited in the Code view. Values are
Yes and No. Default is No.
53
Attributes
None.
Example
<isLocked>Yes</isLocked>
<keyword>
Description
A string of text that defines a keyword. Multiple
but subsequent characters may only be
a-z, A-Z, 0-9, _, $, or @.
The code color is specified by the containing
keyword tags are allowed. A keyword may start with any character,
keyword tags.
Attributes
None.
Example
<keyword>.getdate</keyword>
<keywords>
Description
List of keywords for type specified in category attribute. Multiple
keywords tags are allowed.
Attributes
name, id
• name="keywords_name" A string that assigns a name to the list of keywords.
• id="id_string" Required. An identifier string that maps color and style to this syntax item.
Page 60

Contents
<keyword></keyword>
Example
<keywords name="Reserved Keywords" id="CodeColor_JavascriptReserved">
<keyword>break</keyword>
<keyword>case</keyword>
</keywords>
<numbers/>
Description
An empty tag that specifies numbers that should be recognized and also holds color attributes.
Attributes
name, id
• name="number_name" A string that assigns a name to the numbers tag.
• id="id_string" Required. An identifier string that maps color and style to this syntax item.
Example
<numbers name="Number" id="CodeColor_CFScriptNumber" />
DREAMWEAVER CS3
Extending Dreamweaver
54
<operators>
Description
A list of characters to be recognized as operators.
Attributes
name, id
• name="operator_name" A string that assigns a name to the list of operator characters.
• id="id_string" Required. An identifier string that maps color and style to this syntax item.
Example
<operators name="Operator" id="CodeColor_JavaOperator"><![CDATA[+*/%<>!?:=&|^~]]></operators>
<regexp>
Description
Specifies a list of
searchPattern tags.
Attributes
name, id, delimiter, escape
• name="stringStart_name" A string that assigns a name to the list of search pattern strings.
• id="id_string" Required. An identifier string that maps color and style to this syntax item.
• delimiter The character or string that starts and ends a regular expression.
Page 61

DREAMWEAVER CS3
Extending Dreamweaver
• escape The character or string that signals special character processing, known as the escape character or
string.
Contents
<searchPattern></searchPattern>
Example
<regexp name="RegExp" id="CodeColor_JavascriptRegexp" delimiter="/" escape="\\">
<searchPattern><![CDATA[(\s*/\e*\\/]]></searchPattern>
<searchPattern><![CDATA[=\s*/\e*\\/]]></searchPattern>
</regexp>
<sampleText>
Description
Representative text that appears in the Preview window of the Edit Coloring Scheme dialog box. For more information on the Edit Coloring Scheme dialog box, see “Editing schemes” on page 62.
Attributes
doctypes
55
• doctypes="doc_type1, doc_type2,..." The document types for which this sample text appears.
Example
<sampleText doctypes="JavaScript"><![CDATA[/* JavaScript */
function displayWords(arrayWords) {
for (i=0; i < arrayWords.length(); i++) {
// inline comment
alert("Word " + i + " is " + arrayWords[i]);
}
}
var tokens = new Array("Hello", "world");
displayWords(tokens);
]]></sampleText>
<searchPattern>
Description
A string of characters that define a regular search pattern using supported wildcard characters. Multiple
Pattern
tags are allowed.
Attributes
None.
Container
The
regexp tag.
search-
Example
<searchPattern><![CDATA[(\s*/\e*\\/]]></searchPattern>
Page 62

DREAMWEAVER CS3
Extending Dreamweaver
<stringStart>
Description
These tags contain a text string that represents the delimiter of the start of a string. You must specify the
stringStart and stringEnd tags in pairs. Multiple stringStart … stringEnd pairs are allowed.
Attributes
name, id, wrap
• name="stringStart_name" A string that assigns a name to the stringStart block.
• id="id_string" Required. An identifier string that maps color and style to this syntax item.
• wrap="true" or "false". Defines whether code coloring recognizes text strings that wrap to the next line. The
default is
"true".
Example
<stringStart name="Attribute Value" id="CodeColor_HTMLString"><![CDATA["]]></stringStart>
<stringEnd>
Description
Contains a text string that represents the delimiter of the end of a code string. You must specify the
stringEnd tags in pairs. Multiple stringStart … stringEnd pairs are allowed.
and
stringStart
56
Attributes
None.
Example
<stringEnd><![CDATA["]]></stringEnd>
<stringEsc>
Description
Contains a text string that represents the delimiter of a string escape character. Multiple
Attributes
None.
Example
<stringEsc><![CDATA[\]]></stringEsc>
<tagGroup>
Description
This tag groups one or more tags to which you can assign a unique color and style.
Attributes
id, name, taglibrary, tags
stringEsc tags are allowed.
• id="id_string" Required. An identifier string that maps color and style to this syntax item.
• name="display_name" A string that Dreamweaver displays in the code color editor.
Page 63

DREAMWEAVER CS3
Extending Dreamweaver
• taglibrary="tag_library_id" The identifier of the tag library to which this group of tags belongs.
• tags="tag_list" A tag or comma-separated list of tags that comprise the tag group.
Example
<tagGroup name="HTML Table Tags" id="CodeColor_HTMLTable" taglibrary="DWTagLibrary_html"
tags="table,tbody,td,tfoot,th,thead,tr,vspec,colw,hspec" />
Scheme block delimiter coloring
The blockStart sch eme a ttr ibut e co ntr ols the co lori ng of block openi ng an d cl osing string s or block deli mite rs. Th e
following values are valid values for the
blockStart attribute.
57
Note: Do not confuse the
blockStart.scheme attribute with the scheme tag.
innerText
This value tells Dreamweaver to color the block delimiters the same as the default text of the scheme inside them.
The Template scheme provides an example of the effect of this scheme. The Template scheme matches blocks of readonly code that are colored gray because you cannot edit them. The block delimiters, which are the
<!-- #EndEditable --> and <!-- #BeginEditable "..." --> strings, are also colored gray because they also
are not editable.
Sample code
<!-- #EndEditable -->
<p><b><font size="+2">header</font></b></p>
<!-- #BeginEditable "test" -->
<p>Here's some editable text </p>
<p> </p>
<!-- #EndEditable -->
Example
<blockStart doctypes="ASP-JS,ASP-VB, ASP.NET_CSharp, ASP.NET_VB, ColdFusion,CFC, HTML,
JSP,LibraryItem,PHP_MySQL" scheme="innerText"><![CDATA[<!--\s*#BeginTemplate]]>
</blockStart>
customText
This value tells Dreamweaver to use custom colors to color the block delimiters.
Sample code
The delimiters for blocks of PHP script, which appear in red, provide an example of the effect of the
value:
<?php
if ($loginMsg <> "")
echo $loginMsg;
?>
Example
<blockStart name="Block Delimiter" id="CodeColor_JavaBlock" doctypes="JSP"
scheme="customText"><![CDATA[<%]]></blockStart>
customText
Page 64

DREAMWEAVER CS3
Extending Dreamweaver
outerTag
The outerTag value specifies that both the blockStart and blockEnd tags are complete tags and that Dreamweaver should color them as tags would be colored in the scheme that surrounds them.
58
The JavaScript scheme, in which
<script> and </script> strings are the blockStart and blockEnd tags,
provides an example of this value. This scheme matches blocks of JavaScript code, which does not recognize tags, so
the delimiters need to be colored by the scheme that surrounds them.
Sample code
<script language="JavaScript">
// comment
if (true)
window.alert("Hello, World");
</script>
Example
<blockStart doctypes="PHP_MySQL" scheme="outerTag">
<![CDATA[<script\s+language="php">]]></blockStart>
innerTag
This value is identical to the outerTag value, except that the tag coloring is taken from the scheme inside the delimiters. This is currently used for the
html tag.
nameTag
This value specifies that the blockStart string is the opening of a tag and blockEnd string is the closing of a tag,
and these delimiters are to be colored based on the tag settings of the scheme.
This type of scheme displays tags that can be embedded inside other tags, such as the
cfoutput tag.
Sample code
<input type="text" name="zip"
<cfif newRecord IS "no">
<cfoutput query="employee"> Value="#zip#" </cfoutput>
</cfif>
>
Example
<blockStart doctypes="ColdFusion,CFC" scheme="nameTag">
<![CDATA[<cfoutput\n]]></blockStart>
nameTagScript
This value is identical to the nameTag scheme; however, the content is script, such as assignment statements or
expressions, as opposed to attribute
name=value pairs.
This type of scheme displays a unique type of tag that contains script inside the tag itself, such as the ColdFusion
cfset, cfif, and cfifelse tags, and can be embedded inside other tags.
Sample Code
See the sample text for “nameTag” on page 58.
Page 65

DREAMWEAVER CS3
Extending Dreamweaver
Example
<blockStart doctypes="ColdFusion,CFC"
scheme="nameTagScript"><![CDATA[<cfset\n]]></blockStart>
Scheme processing
Dreamweaver has three basic code coloring modes: CSS mode, Script mode, and Tags mode.
In each mode, Dreamweaver applies code coloring only to particular fields. The following chart indicates which
fields are subject to code coloring in each mode.
Field CSS Tags Script
defaultText X X
defaultTag X
defaultAttribute X
comment X X X
string XXX
cssProperty X
59
cssSelector X
cssValue X
character X X
function keyword X
identifier X
number X X
operator X
brackets X X
keywords X X
To make the process of defining schemes more flexible, Dreamweaver lets you specify wildcard and escape
characters.
Wildcard characters
The following is a list of wildcard characters that Dreamweaver supports, along with the strings to specify them and
descriptions of their usage.
Page 66

DREAMWEAVER CS3
Extending Dreamweaver
60
Wildcard Escape
Wildcard \* Skip all characters in the rule until the character that follows the wildcard is
Wildcard with escape
character
Optional whitespace \s* This matches zero or more white space or newline characters.
Required whitespace \s+ This matches one or more white -space or newline characters.
string
\e*x Where
Description
found. For examp le, use
to match all tags of this type that have the name attribute specified.
<MMTInstance:Editable name=”\*”>
x is the escape character.
This is the same as the wildcard, except that an escape character can be
specified. The character following any escape character is ignored. This lets
the character following the wildcard appear in the string without matching
the criteria to end wildcard processing.
For example, /\e*\\/ is used to recognize a JavaScript regular expression that starts and ends with a forward slash (/) and can contain forward
slashes that are preceded by a backslash (\). Because the backslash is the
code coloring escape character, you must precede it with a backslash when
you specify it in code coloring XML.
For example, <!--\s*#include is used to match ASP include directives whether they have any white space preceding the #include token
or not because either case is valid.
The white-space wildcards match any combination of white space and
newline characters.
For example, <!--#include\s+virtual is used to match ASP
include directives with any combination of white space between
#include and virtual. White space must be specified between these
tokens, but it can be any combination of valid white-space characters.
The white-space wildcards match any combination of white space and
newline characters.
Escape characters
The following is a list of escape characters that Dreamweaver supports, along with the strings to specify them and
descriptions of their usage.
Escape character Escape
string
Backslash \\ The backslash character (\) is the code coloring escape character, so it must
White space \s This escape character matches any non-visible characters, except those
Newline \n This escape character matches the newline (also known as linefeed) and
Description
be escaped to be specified in a code coloring rule.
listed that match the newline escape character, such as space and tab characters.
The optional white-space and required white-space wildcards match both
the white-space and newline characters.
carriage-return characters.
Maximum string length
The maximum length allowed for a data string is 100 characters. For example, the following blockEnd tag contains
a wildcard character.
Page 67

DREAMWEAVER CS3
Extending Dreamweaver
<blockEnd><![CDATA[<!--\s*#BeginEditable\s*"\*"\s*-->]]></blockEnd>
Assuming the optional white space wildcard strings (\s*) are a single space character, which Dreamweaver generates
automatically, then the data string is 26 characters long, plus a wildcard string (
<!-- #BeginEditable "\*" -->
\*) for the name.
This leaves an editable region name that can be as many as 74 characters, which is the maximum of 100 characters
minus 26.
Scheme precedence
Dreamweaver uses the following algorithm to color text syntax in Code view:
1 Dreamweaver determines the initial syntax scheme based on the document type of the current file. The file
document type is matched against the
scheme.documentType = "Text" is used.
scheme.documentType attribute. If no match is found, the scheme where
2 Schemes can be nested if they specify blockStart…blockEnd pairs. All nestable schemes that have the current
file extension listed in one of the
blockStart.doctypes attribute are enabled for the current file and all others are
disabled.
61
Note: All
Schemes can nest within another scheme only if the
blockStart/blockEnd combinations should be unique.
scheme.priority is equal to or greater than the outer scheme.
If the priority is equal, the scheme can nest only in the body state of the outer scheme. For example, the
<script>...</script> block can nest only inside the <html>...</html> block where tags are legal—not inside
a tag, attribute, string, comment, and so on.
Schemes with a higher priority than the outer scheme can nest almost anywhere within the outer scheme. For
example, in addition to nesting in the body state of the
<html>...</html> block, the <%...%> block can also nest
inside a tag, attribute, string, comment, and so on.
The maximum nesting level is 4.
3 When matching blockStart strings, Dreamweaver always uses the longest match.
4 After reaching the blockEnd string for the current scheme, syntax coloring returns to the state where the
blockStart string is detected. For example, if a <%...%> block is found within an HTML string, then coloring
resumes with the HTML string color.
Page 68

DREAMWEAVER CS3
Extending Dreamweaver
Editing schemes
You can edit the styles for a code coloring scheme either by editing the code coloring file or by selecting the Code
Coloring category in the Dreamweaver Preferences dialog box, as shown in the following figure:
62
For fields that you can specify more than once, such as
stringStart, specify color and style settings only on the first
tag. Data will be lost when you split color and style settings across tags and you later edit the colors or styles by using
the Preferences dialog box.
Note: Adobe recommends that you create backup copies of all XML files before you make changes. You should verify all
manual changes before you edit color and style settings using the Preferences dialog box. Data will be lost if you edit an
invalid XML file using the Preferences dialog box.
Page 69

DREAMWEAVER CS3
Extending Dreamweaver
To edit styles for a scheme using the Code Coloring category in the Preferences dialog box, double-click a document
type, or click the Edit Coloring Scheme button, to open the Edit Coloring Scheme dialog box.
63
To edit the style for a particular element, select it in the Styles For list. The items listed in the Styles For pane include
the fields for the scheme being edited and also the schemes that might appear as blocks within this scheme. For
example, if you edit the HTML scheme, the fields for CSS and JavaScript blocks are also listed.
The fields listed for a scheme correspond to the fields defined in the XML file. The value of the
scheme.name
attribute precedes each field listed in the Styles For pane. Fields that do not have a name are not listed.
The style or format for a particular element includes bold, italic, underline, and background color in addition to code
coloring. After you select an element in the Styles For pane, you can change any of these style characteristics.
The Preview area displays how sample text would appear with the current settings. The sample text is taken from the
sampleText setting for the scheme.
Select an element in the Preview area to change the selection in the Styles For list.
If you change the setting for an element of a scheme, Dreamweaver stores the value in the code coloring file and
overrides the original setting. When you click OK, Dreamweaver reloads all code coloring changes automatically.
Code coloring examples
The following code coloring examples illustrate the code coloring schemes for a cascading style document and a
JavaScript document. The lists of keywords in the JavaScript example are abbreviated for the sake of keeping the
example short.
CSS code coloring
<scheme name="CSS" id="CSS" doctypes="CSS" priority="50">
<ignoreCase>Yes</ignoreCase>
<ignoreTags>Yes</ignoreTags>
<blockStart doctypes="ASP-JS,ASP-VB,ASP.NET_CSharp,ASP.NET_VB,ColdFusion,
CFC,HTML,JSP,LibraryItem,DWTemplate,PHP_MySQL" scheme="outerTag">
<![CDATA[<style>]]></blockStart>
<blockEnd><![CDATA[</style>]]></blockEnd>
Page 70

Extending Dreamweaver
<blockStart doctypes="ASP-JS,ASP-VB,ASP.NET_CSharp,ASP.NET_VB,ColdFusion,
CFC,HTML,JSP,LibraryItem,DWTemplate,PHP_MySQL" scheme="outerTag">
<![CDATA[<style\s+\*>]]></blockStart>
<blockEnd><![CDATA[</style>]]></blockEnd>
<commentStart name="Comment" id="CodeColor_CSSComment"><![CDATA[ /*]]></commentStart>
<commentEnd><![CDATA[*/]]></commentEnd>
<endOfLineComment><![CDATA[<!--]]></endOfLineComment>
<endOfLineComment><![CDATA[-->]]></endOfLineComment>
<stringStart name="String" id="CodeColor_CSSString"><![CDATA["]]></stringStart>
<stringEnd><![CDATA["]]></stringEnd>
<stringStart><![CDATA[']]></stringStart>
<stringEnd><![CDATA[']]></stringEnd>
<stringEsc><![CDATA[\]]></stringEsc>
<cssSelector name="Selector" id="CodeColor_CSSSelector" />
<cssProperty name="Property" id="CodeColor_CSSProperty" />
<cssValue name="Value" id="CodeColor_CSSValue" />
<sampleText doctypes="CSS"><![CDATA[/* Comment */
H2, .head2{
font-family : 'Sans-Serif';
font-weight : bold;
color : #339999;
}]]>
</sampleText>
</scheme>
DREAMWEAVER CS3
64
CSS sample text
The following sample text for the CSS scheme illustrates the CSS code coloring scheme:
/* Comment */
H2, .head2{
font-family : 'Sans-Serif';
font-weight : bold;
color : #339999;
}
The following lines from the Colors.xml file provide the color and style values that are seen in the sample text and
were assigned by the code coloring scheme:
<syntaxColor id="CodeColor_CSSSelector" text="#FF00FF" />
<syntaxColor id="CodeColor_CSSProperty" text="#000099" />
<syntaxColor id="CodeColor_CSSValue" text="#0000FF" />
Page 71

JavaScript code coloring
<scheme name="JavaScript" id="JavaScript" doctypes="JavaScript" priority="50">
<ignoreCase>No</ignoreCase>
<ignoreTags>Yes</ignoreTags>
<blockStart doctypes="ASP-JS,ASP-VB,ASP.NET_CSharp,ASP.NET_VB,ColdFusion,
CFC,HTML,JSP,LibraryItem,DWTemplate,PHP_MySQL" scheme="outerTag">
<![CDATA[<script>]]></blockStart>
<blockEnd><![CDATA[</script>]]></blockEnd>
<blockStart doctypes="ASP-JS,ASP-VB,ASP.NET_CSharp,ASP.NET_VB,ColdFusion,
CFC,HTML,JSP,LibraryItem,DWTemplate,PHP_MySQL" scheme="outerTag">
<![CDATA[<script\s+\*>]]></blockStart>
<blockEnd><![CDATA[</script>]]></blockEnd>
<commentStart name="Comment" id="CodeColor_JavascriptComment">
<![CDATA[/*]]></commentStart>
<commentEnd><![CDATA[*/]]></commentEnd>
<endOfLineComment><![CDATA[//]]></endOfLineComment>
<endOfLineComment><![CDATA[<!--]]></endOfLineComment>
<endOfLineComment><![CDATA[-->]]></endOfLineComment>
<stringStart name="String" id="CodeColor_JavascriptString">
<![CDATA["]]></stringStart>
<stringEnd><![CDATA["]]></stringEnd>
<stringStart><![CDATA[']]></stringStart>
<stringEnd><![CDATA[']]></stringEnd>
<stringEsc><![CDATA[\]]></stringEsc>
<brackets name="Bracket" id="CodeColor_JavascriptBracket">
<![CDATA[{[()]}]]></brackets>
<operators name="Operator" id="CodeColor_JavascriptOperator">
<![CDATA[+-*/%<>!?:=&|^]]></operators>
<numbers name="Number" id="CodeColor_JavascriptNumber" />
<regexp name="RegExp" id="CodeColor_JavascriptRegexp" delimiter="/" escape="\\">
<searchPattern><![CDATA[(\s*/\e*\\/]]></searchPattern>
<searchPattern><![CDATA[=\s*/\e*\\/]]></searchPattern>
</regexp>
<idChar1>_$abcdefghijklmnopqrstuvwxyzABCDEFGHIJKLMNOPQRSTUVWXYZ</idChar1>
<idCharRest name="Identifier" id="CodeColor_JavascriptIdentifier">
_$abcdefghijklmnopqrstuvwxyzABCDEFGHIJKLMNOPQRSTUVWXYZ0123456789</idCharRest>
<functionKeyword name="Function Keyword" id="CodeColor_JavascriptFunction">
function</functionKeyword>
<keywords name="Reserved Keywords" id="CodeColor_JavascriptReserved">
<keyword>break</keyword>
. . .
</keywords>
<keywords name="Native Keywords" id="CodeColor_JavascriptNative">
<keyword>abs</keyword>
. . .
DREAMWEAVER CS3
Extending Dreamweaver
65
Page 72

</keywords>
<keywords id="CodeColor_JavascriptNumber">
<keyword>Infinity</keyword>
<keyword>Nan</keyword>
</keywords>
<keywords name="Client Keywords" id="CodeColor_JavascriptClient">
<keyword>alert</keyword>
. . .
</keywords>
<sampleText><![CDATA[/* JavaScript */
function displayWords(arrayWords) {
for (i=0; i < arrayWords.length(); i++) {
// inline comment
alert("Word " + i + " is " + arrayWords[i]);
}
}
var tokens = new Array("Hello", "world");
displayWords(tokens);
]]></sampleText>
</scheme>
DREAMWEAVER CS3
Extending Dreamweaver
66
JavaScript sample text
The sample text for the JavaScript scheme illustrates the JavaScript code coloring scheme as follows:
/* JavaScript */
function displayWords(arrayWords) {
for (i=0; i < arrayWords.length(); i++) {
// inline comment
alert("Word " + i + " is " + arrayWords[i]);
}
}
var tokens = new Array("Hello", "world");
displayWords(tokens);
The following lines from the Colors.xml file provide the color and style values that are seen in the sample text and
were assigned by the code coloring scheme:
<syntaxColor id="CodeColor_JavascriptComment" text="#999999" italic="true" />
<syntaxColor id="CodeColor_JavascriptFunction" text="#000000" bold="true" />
<syntaxColor id="CodeColor_JavascriptBracket" text="#000099" bold="true" />
<syntaxColor id="CodeColor_JavascriptNumber" text="#FF0000" />
<syntaxColor id="CodeColor_JavascriptClient" text="#990099" />
<syntaxColor id="CodeColor_JavascriptNative" text="#009999" />
Code validation
When opening a document in Code view, Dreamweaver automatically validates that the document is not using any
tags, attributes, CSS properties, or CSS values that are not available in the target browsers that the user selected.
Dreamweaver underlines errors with a wavy red line.
Dreamweaver also has a new browser compatibility check feature that locates combinations of HTML and CSS that
can trigger browser rendering problems.
Page 73

DREAMWEAVER CS3
Extending Dreamweaver
Dreamweaver stores browser profiles in the Browser Profile folder inside the Dreamweaver Configuration folder.
Each browser profile is defined as a text file that is named for the browser. For example, the browser profile for
Internet Explorer version 6.0 is Internet_Explorer_6.0.txt. To support target browser checking for CSS, Dreamweaver stores CSS profile information for a browser in an XML file whose name corresponds to the browser profile
but with a suffix of _CSS.xml. For example, the CSS profile for Internet Explorer 6.0 is
Internet_Explorer_6.0_CSS.xml. You might want to make changes to a CSS profile file if you find that Dreamweaver
is reporting an error that you do not want.
67
The CSS profile file consists of three XML tags:
describe these tags.
<css-support>
Description
This tag is the root node for a set of
property and value tags that are supported by a particular browser.
Attributes
None.
Contents
The
property and value tags.
Container
None.
Example
<css-support>
. . .
</css-support>
<property>
css-support, property, and value. The following sections
Description
Defines a supported CSS property for the browser profile.
Attributes
name, names, supportlevel, message
• name="property_name" The name of the property for which you are specifying support.
• names="property_name, property_name, ..." A comma-separated list of property names for which you are
specifying support.
The
names attribute is a kind of shorthand. For example, the following names attribute is a shorthand method of
defining the
name attribute that follows it:
Page 74

DREAMWEAVER CS3
Extending Dreamweaver
<property names="foo,bar">
<value type="named" name="top"/>
<value type="named" name="bottom"/>
</property>
<property name="foo">
<value type="named" name="top"/>
<value type="named" name="bottom"/>
</property>
<property name="bar">
<value type="named" name="top"/>
<value type="named" name="bottom"/>
</property>
• supportlevel="error", "warning", "info", or "supported" Specifies the level of support for the
property. If not specified,
omit the message attribute, Dreamweaver uses the default message, “CSS property name
"supported" is assumed. If you specify a support level other than "supported" and
property_name is not
supported.”
• message="message_string" The message attribute defines a message string that Dreamweaver displays when
it finds the property in a document. The message string describes possible limitations or workarounds for the
property value.
Contents
value
68
Container
css-support
Example
<property name="background-color" supportLevel="supported">
<value>
Description
Defines a list of values supported by the current property.
Attributes
type, name, names, supportlevel, message
• type="any", "named", "units", "color", "string", or "function" Specifies the type of value. If you
"named", "units", or "color", then either the name or names attribute must specify the value IDs to
specify
match for this item. The
the names attribute.
• name="value_name" A CSS value identifier. No spaces or punctuation are allowed other than a hyphen (-). The
name of one of the values that are valid for the CSS property is named in the parent property node. This can
identify either a specific value or a units specifier.
• names="name1, name2, . . ." Specifies a comma-separated list of value IDs.
• supportlevel="error", "warning", "info", or "supported" Specifies the level of support for this value
in the browser. If not specified, the value
"units" value matches a numeric value, followed by one of the units values specified in
"supported" is assumed.
Page 75

DREAMWEAVER CS3
Extending Dreamweaver
• message="message_string" The message attribute defines a message string that Dreamweaver displays when
it finds the property value in a document. If the
string of “
value_name is not supported.”
message attribute is omitted, Dreamweaver displays a message
Contents
None.
Container
property
Example
<property name="margin">
<value type="units" name="ex" supportlevel="warning"
message="The implementation of ex units is buggy in Safari 1.0."/>
<value type="units" names="%,em,px,in,cm,mm,pt,pc”/>
<value type="named" name="auto"/>
<value type="named" name="inherit"/>
</property>
69
Changing default HTML formatting
To change general code formatting preferences, use the Code Format category of the Preferences dialog box. To
change the format of specific tags and attributes, use the Tag Library Editor (Edit > Tag Libraries). For more information, see Using Dreamweaver on the Dreamweaver Help menu.
You can also edit the formatting for a tag by editing the VTM file that corresponds to the tag (in a subfolder of the
Tag Libraries configuration folder), but it’s much easier to change formatting within Dreamweaver.
If you add or remove a VTM file, you must edit the TagLibraries.vtm file; Dreamweaver ignores any VTM file that
is not listed in TagLibraries.vtm.
Note: Edit this file in a text editor, not in Dreamweaver.
Page 76

Chapter 4: Extending Dreamweaver
Typically, you create an Adobe Dreamweaver CS3 extension to perform one of the following
types of tasks:
• Automating changes to the user’s current document, such as inserting HTML, CFML, or
JavaScript; changing text or image properties; or sorting tables
• Interacting with the application to automatically open or close windows, open or close
documents, change keyboard shortcuts, and more
• Connecting to data sources, which lets Dreamweaver users create dynamic, data-driven pages
• Inserting and managing blocks of server code in the current document
You might want to write an extension to handle a commonly used, and therefore repetitive, task.
Or you might have a unique requirement that you can satisfy only by writing an extension for
th at speci fic sit uation . In bot h ca ses , Dr eamwe aver prov ides an e xtensi ve s et of to ols that yo u can
use to add to or customize its functionality.
When you create a Dreamweaver extension, you should follow the steps outlined in “Creating an
extension” on page 2.
The following features of Dreamweaver let you create extensions:
• An HTML parser (also called a renderer), which makes it possible to design user interfaces
(UIs) for extensions using form fields, absolutely positioned elements, images, and other
HTML elements. Dreamweaver has its own HTML parser.
• A tree of folders that organize and store the files that implement and configure Dreamweaver
elements and extensions.
• A series of application programming interfaces (APIs) that provide access to Dreamweaver
functionality through JavaScript.
• A JavaScript interpreter, which executes the JavaScript code in extension files. Dreamweaver
uses the Netscape JavaScript version 1.5 interpreter. For more information about changes
between this version of the interpreter and previous versions, see “How Dreamweaver
processes JavaScript in extensions” on page 74.
Page 77

DREAMWEAVER CS3
Extending Dreamweaver
Types of Dreamweaver extensions
The following list describes the types of Dreamweaver extensions that are documented in this guide:
Insert Bar object extensions create changes in the Insert bar. An object is typically used to automate inserting code
into a document. It can also contain a form that gathers input from the user and JavaScript that processes the input.
Object files are stored in the Configuration/Objects folder.
Command extensions can perform almost any specific task, with or without input from the user. Command files are
typically invoked from the Commands menu, but they can also be called from other extensions. Command files are
stored in the Configuration/Commands folder.
Menu Command extensions expand the command API to accomplish tasks related to calling a command from a
menu. The menu commands API also lets you create a dynamic submenu.
Toolbar extensions can add elements to existing toolbars or create new toolbars in the Dreamweaver UI. New
toolbars appear below the default toolbar. Toolbar files are stored in the Configuration/Toolbars folder.
Report extensions can add custom site reports or modify the set of prewritten reports that come with Dreamweaver.
You can also use the Results Window API to create a stand-alone report.
Tag Library and Editor extensions work with the associated tag library files. Tag Library and Editor extensions can
modify attributes of existing tag dialogs, create new tag dialogs, and add tags to the tag library. Tag Library and Editor
extension files are stored in the Configuration/TagLibraries folder.
71
Property Inspector extensions appear in the Property inspector panel. Most of the inspectors in Dreamweaver are
part of the core product code and cannot be modified, but custom Property inspector files can override the built-in
Dreamweaver Property inspector interfaces or create new ones to inspect custom tags. Inspectors are stored in the
Configuration/Inspectors folder.
Floating Panel extensions add floating panels to the Dreamweaver UI. Floating panels can interact with the
selection, the document, or the task. They can also display useful information. Floating panel files are stored in the
Configuration/Floaters folder.
Behavior extensions let users add JavaScript code to their documents. The JavaScript code performs a specific task
in response to an event when the document is viewed in a browser. Behavior extensions appear on the Plus (+) menu
of the Dreamweaver Behaviors panel. Behavior files are stored in the Configuration/Behaviors/Actions folder.
Server Behaviors extensions add blocks of server-side code (ASP, JSP, or ColdFusion) to the document. The server-
side code performs tasks on the server when the document is viewed in a browser. Server behaviors appear on the
+) menu of the Dreamweaver Server Behaviors panel. Server behavior files are stored in the
Plus (
Configuration/Server Behaviors folder.
Data Source extensions let you build a connection to dynamic data stored in a database. Data source extensions
appear on the Plus (
+) menu of the Bindings panel. Data source extension files are stored in the Configuration/Data
Sources folder.
Server Format extensions let you define formatting for dynamic data.
Component extensions let you add new types of components to the Components panel. Components is the term that
Dreamweaver uses to refer to some of the more popular and modern encapsulation strategies, including web
services, JavaBeans, and ColdFusion components (CFCs).
Page 78

DREAMWEAVER CS3
Extending Dreamweaver
Server model extensions let you add support for new server models. Dreamweaver supports the most common
server models (ASP, JSP, ColdFusion, PHP, and ASP.NET). Server model extensions are needed only for custom
server solutions, different languages, or a customized server. Server model files are stored in the Configuration/ServerModels folder.
Data translator extensions convert non-HTML code into HTML that appears in the Design view of the document
window. These extensions also lock the non-HTML code to prevent Dreamweaver from parsing it. Translator files
are stored in the Configuration/Translators folder.
Other ways to extend Dreamweaver
You can also extend the following elements of Dreamweaver to expand its capabilities or tailor it to your needs.
Document types define how Dreamweaver works with different server models. Information about document types
for server models is stored in the Configuration/DocumentTypes folder. For more information, see “Extensible
document types in Dreamweaver” on page 15.
Code snippets are reusable blocks of code that are stored as code snippet (CSN) files in the Dreamweaver Configu-
ration/Snippets folder and which Dreamweaver makes accessible in the Snippets panel. You can create additional
code snippet files and install them into the Snippets folder to make them available.
Code Hints are menus that offer a typing shortcut by displaying a list of strings that potentially complete the string
you are typing. If one of the strings in the menu matches the string that you started to type, you can select it to insert
it in place of the string that you are typing. Code Hints menus are defined in the codehints.xml file in the Configuration/CodeHints folder, and you can add new code hints menus to it for new tags or functions that you have defined.
72
Menus are defined in the menus.xml file in the Configuration/Menus folder. You can add new Dreamweaver menus
for your extensions by adding the menu tags for them to the menus.xml file. For more information, see “Menus and
menu commands” on page 136.
Configuration folders and extensions
The folders and files that are stored in the Dreamweaver Configuration folder contain the extensions that come with
Dreamweaver. When you write an extension, you must save the files in the proper folder for Dreamweaver to
recognize them. For example, if you create a Property inspector extension, you save the files in the Configuration/Inspectors folder. If you download and install an extension from the Adobe Exchange website
(www.adobe.com/go/exchange), the Extension Manager automatically saves the extension files to the proper folders.
You can use the files in the Dreamweaver Configuration folder as examples, but these files are generally more
complex than the average extension that is available on the Adobe Exchange website. For more information on the
contents of each subfolder within the Configuration folder, see the Configuration_ReadMe.htm file.
The Configuration/Shared folder does not correspond to a specific extension type. It is the central repository for
utility functions, classes, and images that are used by more than one extension. The files in the Configuration/Shared/Common folder are designed to be useful to a broad range of extensions. These files are useful as
examples of JavaScript techniques and as utilities. Look here first for the functions that perform specific tasks, such
as creating a valid Document Object Model (DOM) reference to an object, testing whether the current selection is
inside a particular tag, escaping special characters in strings, and more. If you cre ate co mmon fil es, you should cre ate
a separate subfolder in the Configuration/Shared/Common folder, which is shown in the following figure, and store
them there.
Page 79
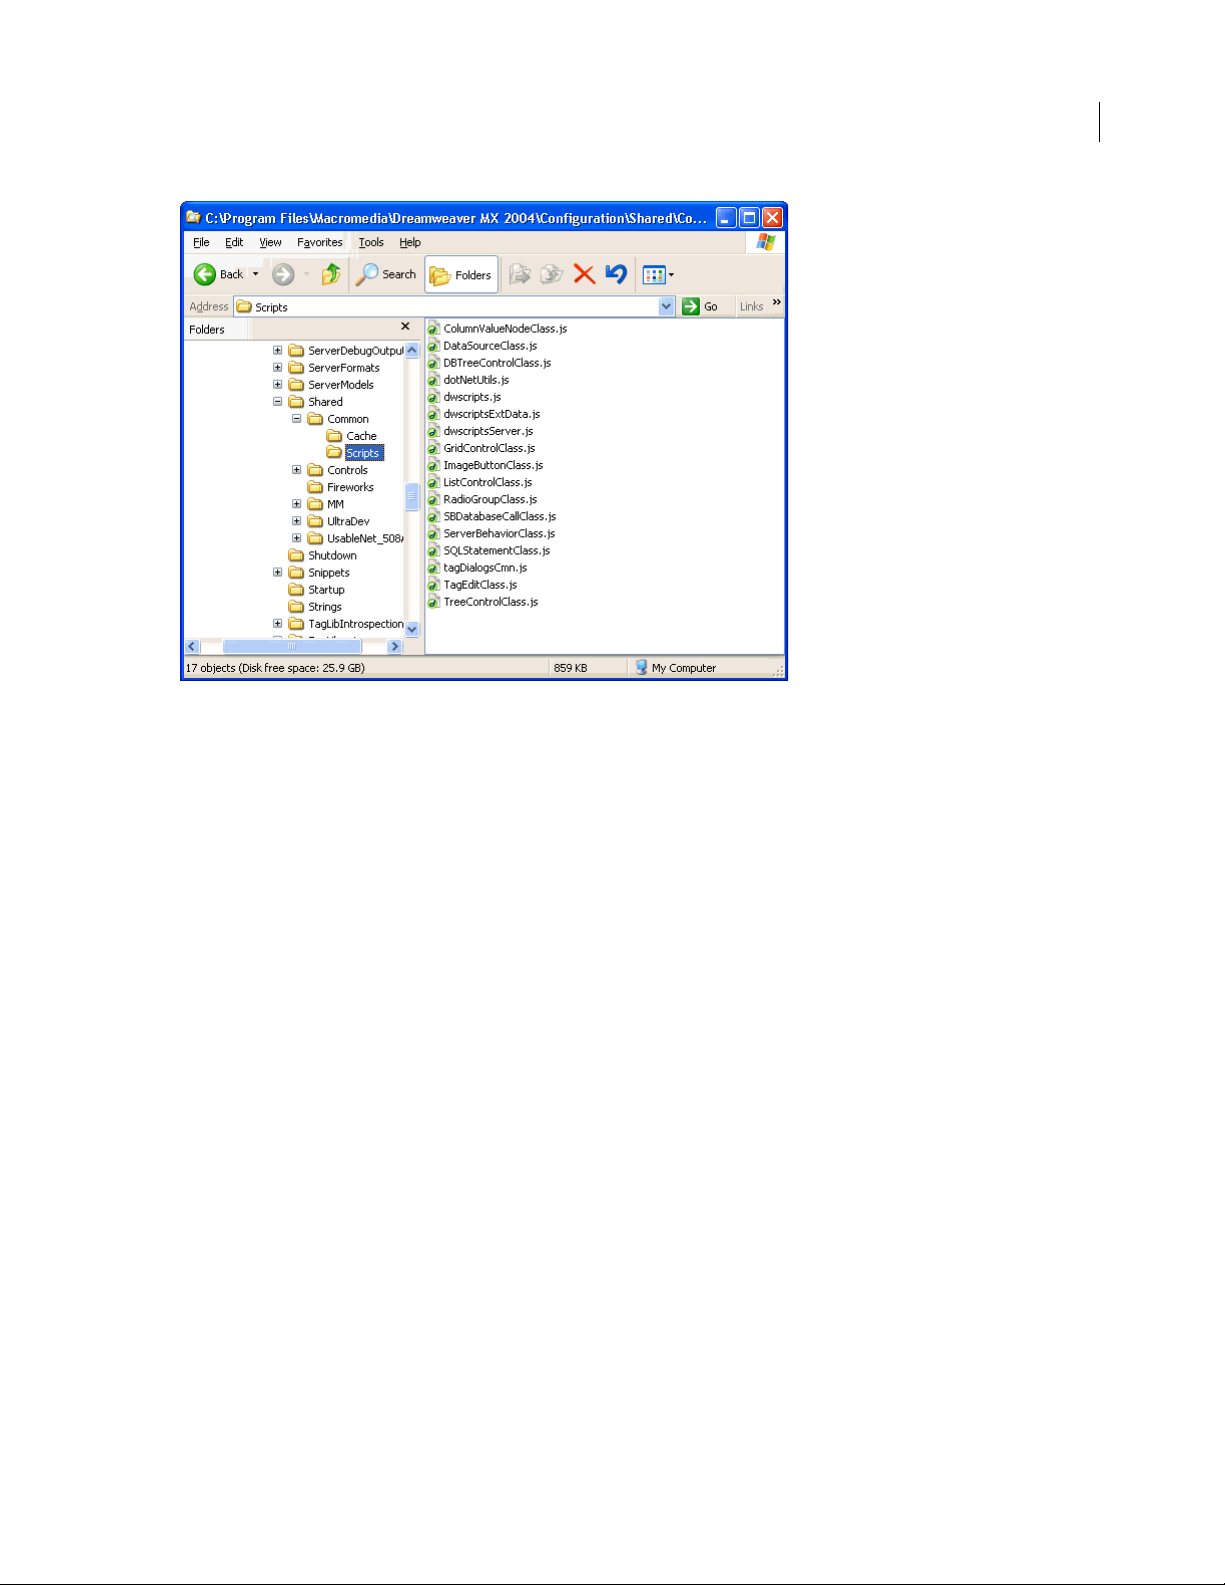
DREAMWEAVER CS3
Extending Dreamweaver
73
Configuration/Shared/Common/Scripts folder structure
For more information about the Shared folder, see “The Shared folder” on page 364.
Multiuser Configuration folders
For the multiuser operating systems of Windows XP, Windows 2000, and Macintosh OS X, Dreamweaver creates a
separate Configuration folder for each user in addition to the Dreamweaver Configuration folder. Any time Dreamweaver or a JavaScript extension writes to the Configuration folder, Dreamweaver automatically writes to the user
Configuration folder instead. This practice lets each Dreamweaver user customize configuration settings without
disturbing the configuration settings of other users. For more information, see “Customizing Dreamweaver in a
multiuser environment” on page 12 and “File Access and Multiuser Configuration API” in the Dreamweaver API
Reference.
Running scripts at startup or shutdown
If you place a command file in the Configuration/Startup folder, the command runs as Dreamweaver starts up.
Startup commands load before the menus.xml file, before the files in the ThirdPartyTags folder, and before any other
commands, objects, behaviors, inspectors, floating panels, or translators. You can use startup commands to modify
the menus.xml file or other extension files. You can also show warnings, prompt the user for information, or call the
dreamweaver.runCommand() function. However, from within the Startup folder, you cannot call a command that
expects a valid Document Object Model (DOM). For information about the Dreamweaver DOM, see “The Dreamweaver Document Object Model” on page 90.
Similarly, if you place a command file in the Configuration/Shutdown folder, the command runs as Dreamweaver
shuts down. From the shutdown commands, you can call
or prompt the user for information, but you cannot stop the shutdown process.
dreamweaver.runCommand() function, show warnings,
For more information about commands, see “Commands” on page 126. For more information about the
weaver.runCommand()
function, see the Dreamweaver API Reference.
dream-
Page 80

DREAMWEAVER CS3
Extending Dreamweaver
Reloading extensions
If you make a change to an extension while you are working in Dreamweaver, you can reload the extensions so that
Dreamweaver recognizes the change.
To reload extensions
Control-click (Windows) or Option-click (Macintosh) the Categories menu in the Insert bar’s title bar.
1
2 Select Reload Extensions.
Note: Remember that in a multiuser operating system you should edit copies of configuration files in your user Configuration folder rather than editing master configuration files. For more information, see “Configuration folders and
extensions” on page 72.
74
Extension APIs
The extension APIs provide you with the functions that Dreamweaver calls to implement each type of extension. You
must write the bodies of these functions as described for each extension type and specify the return values that
Dreamweaver expects.
If you are a developer who wants to work directly in the C programming language, there is a C extensibility API that
lets you create dynamic link libraries (DLLs). The functionality that is provided in these APIs wraps your C DLLs in
JavaScript so that your extension can work seamlessly in Dreamweaver.
The documentation of extension APIs outlines what each function does, when Dreamweaver calls it, and what value
Dreamweaver expects it to return.
See the Dreamweaver API Reference for information about the Utility API and the JavaScript API, which provide
functions that you can use to perform specific tasks in your extensions.
How Dreamweaver processes JavaScript in extensions
Dreamweaver checks the Configuration/extension_type folder during startup. If it encounters an extension file
within the folder, Dreamweaver processes the JavaScript by completing the following steps:
• Compiling everything between the beginning and ending SCRIPT tags
• Executing any code within SCRIPT tags that is not part of a function declaration
Note: This procedure is necessary during startup because some extensions might require global variables to initialize.
Dreamweaver performs the following actions for any external JavaScript files that are specified in the
SCRIPT tags:
of
SRC attributes
• Reads in the file
• Compiles the code
Page 81

• Executes the procedures
Note: If any JavaScript code in your extension file contains the string "
string as an ending
into pieces and concatenate them like this:
script tag and reports an unterminated string literal error. To avoid this problem, break the string
"<' + '/SCRIPT>".
DREAMWEAVER CS3
Extending Dreamweaver
</SCRIPT>", the JavaScript interpreter reads the
75
Dreamweaver executes code in the
onLoad event handler (if one appears in the body tag) when the user selects the
command or action from a menu for the Command and Behavior action extension types.
Dreamweaver executes code in the
onLoad event handler in the body tag if the body of the document contains a form
for object extensions.
Dreamweaver ignores the
onLoad handler on the body tag in the following extensions:
• Data translator
• Property inspector
• Floating panel
For all extensions, Dreamweaver executes code in other event handlers (for example,
required field.')"
) when the user interacts with the form fields to which they are attached.
onBlur="alert('This is a
Dreamweaver supports the use of event handlers within links. Event handlers in links must use syntax, as shown in
the following example:
<a href=”#” onMouseDown=alert(‘hi’)>link text</a>
Plug-ins (set to play at all times) are supported in the BODY of extensions. The document.write() statement, Java
applets, and Microsoft ActiveX controls are not supported in extensions.
Displaying Help
The displayHelp() function, which is part of several extension APIs, causes Dreamweaver to do the following two
things when you include it in your extension:
• Add a Help button to the interface.
• Call displayHelp() when the user clicks the Help button.
You must write the body of the
function determines how your extension displays Help. You can call the
displayHelp() function to display Help. How you code the displayHelp()
dreamweaver.browseDocument()
function to open a file in a browser or devise a custom way to display Help such as displaying messages in another
absolutely positioned element in alert boxes.
The following example uses the
ument()
// The following instance of displayHelp() opens a browser to display a file
// that explains how to use the extension.
function displayHelp() {
}
:
var myHelpFile = dw.getConfigurationPath() + "ExtensionsHelp/myExtHelp.htm";
dw.browseDocument(myHelpFile);
displayHelp() function to display Help by calling dreamweaver.browseDoc-
Page 82

DREAMWEAVER CS3
Extending Dreamweaver
Localizing an extension
Use the following techniques to make it easier to translate your extensions into local languages.
• Separate extensions into HTML and JavaScript files. The HTML files can be replicated and localized; the JavaS-
cript files are not localized.
• Do not define display strings in the JavaScript files (check for alerts and UI code). Extract all localizable strings
into separate XML files in the Dreamweaver Configuration/Strings folder.
• Do not write JavaScript code in the HTML files except for required event handlers. This eliminates the need to fix
a bug multiple times for multiple translations after the HTML files are replicated and translated into other
languages.
XML string files
Store all strings in XML files in the Dreamweaver Configuration/Strings folder. If you install many related extension
files, this lets you share all strings in a single XML file. If applicable, this also lets you refer to the same string from
both C++ and JavaScript extensions.
You could create a file called myExtensionStrings.xml. The following example shows the format of the file:
<strings>
<!-- errors for feature X -->
<string id="featureX/subProblemY" value="There was a with X when you did Y. Try not to
do Y!"/>
<string id="featureX/subProblemZ" value="There was another problem with X, regarding Z.
Don't ever do Z!"/>
</strings>
76
Now your JavaScript files can refer to these translatable strings by calling the dw.loadString() function, as shown
in the following example:
function initializeUI()
{
...
if (problemYhasOccured)
{
alert(dw.loadString("featureX/subProblemY");
}
}
You can use slash (/) characters in your string identifiers, but do not use spaces. Using slashes, you can create a
hierarchy to suit your needs, and include all the strings in a single XML file.
Note: Files that begin with cc in the Configuration/Strings folder are Contribute files. For example, the file
ccSiteStrings.xml is a Contribute file.
Localizable strings with embedded values
Some display strings have values embedded in them. You can use the errMsg() function to display these strings. You
can find the
ration/Shared/MM/Scripts/CMN folder. Use the placeholder characters percent sign (
values should appear in the string and then pass the string and variable names as arguments to
example:
errMsg() function, which is similar to the printf() function in C, in the string.js file in the Configu-
%) and s to indicate where
errMsg(). For
Page 83

DREAMWEAVER CS3
Extending Dreamweaver
<string id="featureX/fileNotFoundInFolder" value="File %s could not be found in folder
%s."/>
The following example shows how the string, along with any variables to embed, is passed to the alert() function.
if (fileMissing)
{
alert( errMsg(dw.loadString("featureX/fileNotFoundInFolder"),fileName,
folderName) );
}
Working with the Extension Manager
If you create extensions for others us ers, you must package them according to the guidelines on the Adobe Exchange
website (www.adobe.com/go/exchange) under the Help > How to Create an Extension category. After you have
written and tested an extension in the Extension Manager, select File > Package Extension. After the extension is
packaged, you can submit it to the Exchange from the Extension Manager by selecting File > Submit Extension.
The Adobe Extension Manager comes with Dreamweaver. Details about its use are available in its Help files and on
the Adobe Exchange website.
77
Page 84

Chapter 5: User interfaces for extensions
Most extensions are built to receive information from the user through a user interface (UI). For
example, if you create a Property inspector extension for the
way for the user to specify attributes like direction and height. If you plan to submit your
extension for Adobe certification, you need to follow the guidelines that are available within the
Extension Manager files on the Adobe Exchange website (www.adobe.com/go/exchange). These
guidelines are not intended to limit your creativity. Their purpose is to ensure that certified
extensions work effectively within the Adobe Dreamweaver CS3 user interface (UI) and that the
extension UI design does not detract from its functionality.
Designing an extension user interface
Typically, you create an extension to perform a task that users encounter frequently. Certain
parts of the task are repetitive; by creating an extension, you can automate the repetitive actions.
Some steps in the task can change, or specific attributes of the code that the extension processes
can change. To receive user inputs for these variable values, you build a UI.
marquee tag, you need to create a
For example, you might create an extension to update a web catalog. Users periodically need to
change values for image sources, item descriptions, and prices. Although the values change, the
procedures for getting these values and formatting the information for display on the website
remain the same. A simple extension can automate the formatting while letting users manually
input the new, updated values for image sources, item descriptions, and prices. A more robust
extension can retrieve these values periodically from a database.
The purpose of your extension UI is to receive information that the user inputs. This information
handles the variable aspects of a repetitive task that the extension performs. Dreamweaver
supports HTML and JavaScript form elements as the basic building blocks for creating extension
UI controls and displays the UI using its own HTML renderer. Therefore, an extension UI can
be as simple as an HTML file that contains a two-column table with text descriptions and form
input fields.
Page 85

DREAMWEAVER CS3
Extending Dreamweaver
When you design an extension, you should determine what variables are necessary and what form elements can best
handle them.
Consider the following basic guidelines when you design an extension UI:
• To name your extension, place the name in the title tag of your HTML file. Dreamweaver displays the name in
the extension title bar.
• Keep text labels on the left side of your UI, aligned right, with text boxes on the right side, aligned left. This
arrangement lets the user’s eyes easily locate the beginning of any text box. Minimal text can follow the text box
as explanation or units of measure.
• Keep check box and radio button labels on the right side of your UI, aligned left.
• For readable code, assign logical names to your text boxes. If you use Dreamweaver to create your extension UI,
you can use the Property inspector or the Quick Tag Editor
to assign names to the fields.
In a typical scenario, after you create the UI, you test the extension code to see that it properly performs the following
UI-related tasks:
• Getting the values from the text boxes
• Setting default values for the text boxes or gathering values from the selection
• Applying changes to the user document
79
Dreamweaver HTML rendering control
In earlier versions of Dreamweaver (up to Dreamweaver 4), Dreamweaver rendered more space around form
controls than Microsoft Internet Explorer and Netscape Navigator do. Form controls in extension UIs are rendered
with extra space around them because Dreamweaver uses its HTML rendering engine to display extension UIs.
In later versions of Dreamweaver, the form-control rendering more closely matches the browsers. To take advantage
of the rendering improvements, you must use one of three new
in the following examples:
<!DOCTYPE HTML SYSTEM "-//Macromedia//DWExtension layout-engine 5.0//dialog">
<!DOCTYPE HTML SYSTEM "-//Macromedia//DWExtension layout-engine 5.0//floater">
<!DOCTYPE HTML SYSTEM "-//Macromedia//DWExtension layout-engine 5.0//pi">
In most cases, DOCTYPE statements must go on the first line of a document. However, to avoid conflicts with
extension-specific directives that, in previous versions, were required to be on the first line of a file (such as the
comment at the top of a Property inspector file, or the
statements and directives can now be in any order as long as they appear before the opening
In addition to letting you make extension UIs more closely match the built-in dialog boxes and panels, the new
DOCTYPE statements also let you view your extensions in the Dreamweaver Design view so that you can see them as
they would appear when viewed by users.
You can see three examples where the dialog case is used in the following files in the Configuration/Commands
folder: CFLoginWizard.htm, TeamAdminDlgDates.html, and TeamAdminDlgDays.html
DOCTYPE statements in your extension files, as shown
MENU-LOCATION=NONE directive in a command), DOCTYPE
html tag.
The following examples show the Base Property inspector without the
control rendering, and then with the
DOCTYPE statement.
DOCTYPE statement, which improves form-
Page 86

DREAMWEAVER CS3
Extending Dreamweaver
The Base Property inspector as it appears in Design view without the DOCTYPE statement.
The Base Property inspector as it appears in Design view with the DOCTYPE statement (and after a few adjustments to accommodate the
new rendering).
Using custom UI controls in extensions
In addition to the standard HTML form elements, Dreamweaver supports custom controls to help you create
flexible, professional-looking interfaces, as described in the following list:
80
• Editable select lists (also known as combo boxes) that let you combine the functionality of a select list with that of
a text box
• Database controls that facilitate the display of data hierarchies and fields
• Tree controls that organize information into expandable and collapsible nodes
• Color button controls that let you add color picker interfaces to your extensions
Editable select lists
Extension UIs often contain pop-up lists that are defined using the select tag. In Dreamweaver, you can make popup lists in extensions editable by adding
editText attribute and the value that you want the select list to display.
The following example shows the settings for an editable select list:
<select name="travelOptions" style="width:250px" editable="true" editText="other
(please specify)">
<option value="plane">plane</option>
<option value="car">car</option>
<option value="bus">bus</option>
</select>
When you use select lists in your extensions, check for the presence and value of the editable attribute. If no value is
present, the select list returns the default value of
As with standard, noneditable select lists, editable select lists have a
properties, and methods of the Dreamweaver DOM” on page 91). This property returns -1 if the text box is selected.
editable="true" to the select tag. To set a default value, set the
false, which indicates that the select list is not editable.
selectedIndex property (see “Objects,
To read the value of an active editable text box into an extension, read the value of the
editText property returns the string that the user entered into the editable text box, the value of the editText
attribute, or an empty string if no text has been entered and no value has been specified for
editText property. The
editText.
Page 87

Extending Dreamweaver
Dreamweaver adds the following custom attributes for the select tag to control editable pop-up lists:
Attribute name Description Accepted values
DREAMWEAVER CS3
81
editable Declares that the pop-up list has an editable text area A Boolean value of true or
editText Holds or sets text within the editable text area A string of any value
false
Note: Editable select lists are available in Dreamweaver.
The following example creates a Command extension that contains an editable select list using common JavaScript
functions:
To create the example:
1 Create a new blank file in a text editor.
2 Enter the following code:
<html>
<head>
<title>Editable Dropdown Test</title>
<script language="javascript">
function getAlert()
{
var i=document.myForm.mySelect.selectedIndex;
if (i>=0)
{
alert("Selected index: " + i + "\n" + "Selected text " +
document.myForm.mySelect.options[i].text);
}
else
{
alert("Nothing is selected" + "\n" + "or you entered a value");
}
}
function commandButtons()
{
return new Array("OK", "getAlert()", "Cancel", "window.close()");
}
</script>
</head>
<body>
<div name="test">
<form name="myForm">
<table>
<tr>
<td colspan="2">
<h4>Select your favorite</h4>
</td>
</tr>
<tr>
<td>Sport:</td>
<td>
<select name="mySelect" editable="true" style="width:150px"
Page 88

DREAMWEAVER CS3
Extending Dreamweaver
editText="Editable Text">
<option> Baseball</option>
<option> Football </option>
<option> Soccer </option>
</select>
</td>
</tr>
</table>
</form>
</div>
</body>
</html>
3 Save the file as EditableSelectTest.htm in the Dreamweaver Configuration/Commands folder.
To test the example:
1 Restart Dreamweaver.
2 Select Commands > EditableSelectTest.
When you select a value from the list, an alert message displays the index of the value and the text. If you enter a
value, an alert message indicates that nothing is selected.
82
Database controls
Using Dreamweaver, you can extend the HTML select tag to create a database tree control. You can also add a
variable grid control. The database tree control displays database schema, and the variable grid control displays
tabular information.
Page 89

DREAMWEAVER CS3
Extending Dreamweaver
The following figure shows an advanced Recordset dialog box that uses a database tree control and a variable grid
control:
83
Adding a database tree control
The database tree control has the following attributes:
Attribute name Description
name Name of the database tree control
control.style Width and height, in pixels
type Type of control
connection Name of the database connection that is defined in the Connection Manager; if empty,
noexpandbuttons When this attribute is specified, the tree control does not draw the expand Plus (+) or
showheaders When this attribute is specified, the tree control displays a header at the top that lists
Any option tags that are placed inside the
To add a database tree control to a dialog box, you can use the following sample code with appropriate substitutions
for quoted variables:
<select name="DBTree" style="width:400px;height:110px" ¬
type="mmdatabasetree" connection="connectionName" noexpandbuttons showHeaders></select>
the control is empty.
collapse Minus (-)
is useful for drawing multicolumn list controls.
the name of each column.
indicators or the associated arrows on the Macintosh. This attribute
select tag are ignored.
Page 90

DREAMWEAVER CS3
Extending Dreamweaver
You ca n c han ge th e connection attribute to retrieve selected data and display it in the tree. You can use the
DBTreeControl attribute as a JavaScript wrapper object for the new tag. For more examples, see the DBTreeCon-
trolClass.js file in the Configuration/Shared/Common/Scripts folder.
Adding a variable grid control
The variable grid control has the following attributes:
Attribute name Description
name Name of the variable grid control
style Width of the control, in pixels
type Type of control
columns Each column must have a name, separated by a comma
84
columnWidth Width of each column, each separated by a comma. The columns are of equal width if
you do not specify widths.
The following example adds a simple variable grid control to a dialog box:
<select name="ParamList" style="width:515px;" ¬
type="mmparameterlist columns"="Name,SQL Data ¬
Type,Direction,Default Value,Run-time Value" size=6></select>
The following example creates a variable grid control that is 500 pixels wide, with five columns of various widths:
<select
name="ParamList"
style="width:500px;"
type="mmparameterlist"
columns="Name,SQL Data Type,Direction, Default Value,Run-time Value"
columnWidth="100,25,11,"
size=6>
This example creates two blank columns that are 182 pixels wide. (The specified columns total 136. The total width
of the variable grid control is 500. The remaining space after the first three columns are placed is 364. Two columns
remain; 364 divided by 2 is 182.)
This variable grid control also has a JavaScript wrapper object that should be used to access and manipulate the
variable grid control’s data. You can find the implementation in the GridControlClass.js file in the
Configuration/Shared/MM/Scripts/Class folder.
Page 91

DREAMWEAVER CS3
Extending Dreamweaver
Adding tree controls
Tree controls display data in a hierarchical format and let users expand and collapse nodes in the tree. The
MM:TREECONTROL tag lets you create tree controls for any type of information; unlike the database tree control that
is described in “Adding a database tree control” on page 83, no association with a database is required. The Dreamweaver Keyboard Shortcuts editor uses the tree control, as shown in the following figure:
85
Creating a tree control
The MM:TREECONTROL tag creates a tree control and can use one or more tags to add structure, as described in the
following list:
• MM:TREECOLUMN is an empty, optional tag that defines a column in the tree control.
• MM:TREENODE is an optional tag that defines a node in the tree. It is a nonempty tag that can contain only other
MM:TREENODE tags.
MM:TREECONTROL tags have the following attributes:
Attribute name Description
name Name of the tree control
size Optional. Number of rows that show in the control; default is 5 rows
theControl Optional. If the number of nodes in the theControl attribute exceeds the value of
multiple Optional. Allows multiple selections; default is single-selection
style Optional. Style definition for height and width of tree control; if specified, takes prece-
noheaders Optional. Specifies that the column headers should not appear
the size attribute, scrollbars appear
dence over the size attribute
Page 92

MM:TREECOLUMN tags have the following attributes:
Attribute name Description
name Name of the column
value String to appear in column header
width Width of the column in pixels (percentage not supported); default is 100
DREAMWEAVER CS3
Extending Dreamweaver
86
align Optional. Specifies whether the text in the column should be aligned left, right, or
state Specifies whether the column is visible or hidden
For readability,
TREECOLUMN tags should follow immediately after the MM:TREECONTROL tag, as shown in the
center; default is left
following example:
<MM:TREECONTROL name="tree1">
<MM:TREECOLUMN name="Column1" width="100" state="visible">
<MM:TREECOLUMN name="Column2" width="80" state="visible">
...
</MM:TREECONTROL>
The MM:TREENODE attributes are described in the following table:
Attribute name Description
name Name of the node
value Contains the content for the given node. For more than one column, this is a pipe-
state Specifies that the node is expanded or collapsed with the strings "expanded" or
selected You can select multiple nodes by setting this attribute on more than one tree node, if
delimited string. To specify an empty column, place a single space character before the
pipe (|).
"collapsed".
the tree has a MULTIPLE attribute.
icon Optional. The index of built-in icon to use, starting with 0:
0 = no icon; 1 = Dreamweaver document icon; 2 = multidocument icon
For example, the following tree control has all its nodes expanded:
<mm:treecontrol name="test" style="height:300px;width:300px">
<mm:treenode value="rootnode1" state="expanded">
<mm:treenode value="node1" state="expanded"></mm:treenode>
<mm:treenode value="node3" state="expanded"></mm:treenode>
</mm:treenode>
<mm:treenode value="rootnode2"0state="expanded">
<mm:treenode value="node2" state="expanded"></mm:treenode>
<mm:treenode value="node4" state="expanded"></mm:treenode>
</mm:treenode>
</mm:treecontrol>
Page 93

DREAMWEAVER CS3
Extending Dreamweaver
Manipulating content within a tree control
Tree controls and the nodes within them are implemented as HTML tags. They are parsed by Dreamweaver and
stored in the document tree. These tags can be manipulated in the same way as any other document node. For more
information on
Adding nodes To add a node to an existing tree control programmatically, set the innerHTML property of the
MM:TREECONTROL tag or one of the existing MM:TREENODE tags. Setting the inner HTML property of a tree node
creates a nested node.
The following example adds a node to the top level of a tree:
var tree = document.myTreeControl;
//add a top-level node to the bottom of the tree
tree.innerHTML = tree.innerHTML + ‘<mm:treenode name="node3" value="node3">’;
Adding a child node To add a child node to the currently selected node set the innerHTML property of the selected
node.
The following example adds a child node to the currently selected node:
var tree = document.myTreeControl;
var selNode = tree.selectedNodes[0];
//deselect the node, so we can select the new one
selnode.removeAttribute("selected");
//add the new node to the top of the selected node’s children
selNode.innerHTML = '<mm:treenode name="item10" value="New item11" expanded selected>' + ¬
selNode.innerHTML;
DOM functions and methods, see “The Dreamweaver Document Object Model” on page 90.
87
Deleting nodes To delete the currently selected node from the document structure, use the innerHTML or
outerHTML properties.
The following example deletes the entire selected node and any children:
var tree = document.myTreeControl;
var selNode = tree.selectedNodes[0];
selNode.outerHTML = "";
A color button control for extensions
In additi on to the standard input t ypes such as text, check b ox, and button, Dreamwe aver supports mmcolorbutton,
an additional input type in extensions.
Specifying
default color for the color picker by setting a value attribute on the input tag. If you do not set a value, the color picker
appears grey by default and the value property of the input object returns an empty string.
The following example shows a valid
<input type="mmcolorbutton" name="colorbutton" value="#FF0000">
<input type="mmcolorbutton" name="colorbutton" value="teal">
A color button has one event, onChange, which is triggered when the color changes.
You might want to keep a text box and a color picker synchronized. The following example creates a text box that
synchronizes the color of the text box with the color of the color picker:
<input type = "mmcolorbutton" name="fgcolorPicker"
onChange="document.fgcolorText.value=this.value">
<input type = "test" name="fgcolorText" onBlur="document.fgColorPicker.value=this.value">
<input type="mmcolorbutton"> in you r code caus es a color picker to app ear in the U I. You can set the
mmcolorbutton tag:
Page 94

DREAMWEAVER CS3
Extending Dreamweaver
In this example, when the user changes the value of the text box and then tabs or clicks elsewhere, the color picker
updates to show the color that is specified in the text box. Whenever the user selects a new color with the color picker,
the text box updates to show the hex value for that color.
Adding Flash content to Dreamweaver
Flash content (SWF files) can display in the Dreamweaver interface either as part of an object or command. This
Flash support is especially useful if you build extensions that use Flash forms, animations, ActionScript or other
Flash content.
Basically, you leverage the ability for Dreamweaver objects and commands to display dialogs (see “Insert bar objects”
on page 99 for more information about building objects and “Commands” on page 126 for information about
commands) using the
A simple Flash dialog box example
In this example, you use Dreamweaver to create a new command that displays a SWF file called myFlash.swf when
the user clicks the command in the Commands menu. For specific information about creating commands before
trying this example, see “Commands” on page 126.
form tag with the object tag to embed your Flash content in a Dreamweaver dialog box.
88
Note: This example assumes you already have a SWF file called myFlash.swf in the Configuration/Commands folder of
your Dreamweaver application installation folder. To test this with your own SWF file, save the SWF file to the application Commands folder, and substitute your filename in all instances of myFlash.swf.
In Dreamweaver, open a new basic HTML file (this will be your Command definition file). Between the opening and
title tags, enter My Flash Movie so the head of your page reads as follows:
closing
<!DOCTYPE HTML PUBLIC "-//W3C//DTD HTML 4.01 Transitional//EN">
<html>
<head>
<title>My Flash Movie</title>
<meta http-equiv="Content-Type" content="text/html; charset=iso-8859-1">
</head>
Now, save the file as My Flash Movie.htm in the application Configuration/Commands folder (but do not close the
file yet). You save the file at this point so you can embed your Flash content with a relative path; otherwise Dreamweaver will try to use an absolute path.
Back in the HTML document, between the opening and closing
Then, within the
form tags, use the Insert > Media > Flash menu option to add your Flash content to the Command
body tags, add an opening and closing form tag.
definition file. When prompted, select the SWF file in the Commands folder, and click OK. Your Command
definition file should now look like the following example (of course, the
width and height attributes might differ,
depending on your SWF file properties):
<!DOCTYPE HTML PUBLIC "-//W3C//DTD HTML 4.01 Transitional//EN">
<html>
<head>
<title>My Flash Movie</title>
<meta http-equiv="Content-Type" content="text/html; charset=iso-8859-1">
</head>
Page 95

DREAMWEAVER CS3
Extending Dreamweaver
<body>
<body>
<form>
<object classid="clsid:D27CDB6E-AE6D-11cf-96B8-444553540000" codebase="http:
//download.Macromedia.com/pub/shockwave/cabs/flash/swflash.cab#version=6,0,29,0"
width="200" height="100">
<param name="movie" value="myFlash.swf">
<param name="quality" value="high">
<embed src="myFlash.swf" quality="high" pluginspage="http://www.Macromedia.com/go/
getflashplayer" type="application/x-shockwave-flash" width="200" height="100"></embed>
</object>
</form>
</body>
</html>
Save the file again. Next, exit and restart Dreamweaver. Select the Command > My Flash Movie menu option, and
your Flash content appears in a Dreamweaver dialog box, as shown in the following figure:
89
This example shows a simple implementation of Dreamweaver’s Flash content support. After you are familiar with
building objects and commands as well as more sophisticated forms, you can integrate Flash content into your
Dreamweaver extensions for a more dynamic user experience. For more information, see “Commands” on page 126
about writing a
commandButtons() function to add buttons to the dialog box that displays your Flash content.
Page 96

Chapter 6: The Dreamweaver Document Object Model
In Adobe Dreamweaver CS3, the Document Object Model (DOM) is a critically important
structure for extension builders. It lets you access and manipulate elements within a user’s
document and within the extension file.
A DOM defines the composition of documents that are created using a markup language. By
representing tags and attributes as objects and properties, the DOM lets programming languages
access and manipulate documents and their components.
The structure of an HTML document can be seen as a document tree. The root is the
and the two largest trunks are the
title, style, script, isindex, base, meta, and link tags. Offshoots of the body tag
the
include headings (
elements (
attributes such as
In a DOM, the tree structure is preserved and presented as a hierarchy of parent nodes and child
nodes. The root node has no parent, and leaf nodes have no children. At each level within the
HTML structure, the HTML element can be exposed to JavaScript as a node. Using this
structure, you can access the document or any element within it.
In JavaScript, you can refer to any object in the document by name or by index. For example, if
a Submit button with the name or ID "myButton" is the second element in the first form in the
document, both of the following references to the button are valid:
• By name, as in document.myForm.myButton
• By index, as in document.forms[0].elements[1]
Objects with the same name, such as a group of radio buttons, are collapsed into an array. You
can access a particular object in the array by incrementing the index with zero as the origin (for
example, the first radio button with the name “myRadioGroup” inside a form called “myForm”
is referenced as
br, img, and so on), and other element types. Leaves on these offshoots include
h1, h2, and so on), block-level elements (p, div, form, and so on), inline
width, height, alt, and others.
document.myForm.myRadioGroup[0]).
head tag and the body tag. Offshoots of the head tag include
html tag,
Page 97

DREAMWEAVER CS3
Extending Dreamweaver
Which document DOM?
It is important to distinguish between the DOM of the user’s document and the DOM of the extension. The information in this topic applies to both types of Dreamweaver documents, but the way that you reference each DOM is
different.
If you are familiar with JavaScript in browsers, you can reference objects in the active document by writing
document. (for example, document.forms[0]). In Dreamweaver, document refers to the extension file;
document.forms[0] refers to the first form in the extension UI. To reference objects in the user’s document, you
must call
object.
dw.getDocumentDOM(), dw.createDocument(), or another function that returns a user document
91
For example, to refer to the first image in the active document, you can write
dw.getDocumentDOM().images[0].
You can also store the document object in a variable and use that variable in future references, as shown in the
following example:
var dom = dw.getDocumentDOM(); //get the dom of the current document
var firstImg = dom.images[0];
firstImg.src = “myImages.gif”;
This kind of notation is common in files throughout the Configuration folder, especially in command files. For more
information about the
dw.getDocumentDOM() method, see the dreamweaver.getDocumentDOM() function in the
Dreamweaver API Reference.
The Dreamweaver DOM
The Dreamweaver DOM contains a subset of objects, properties, and methods from the World Wide Web
Consortium (W3C) DOM Level 1 specification, which are combined with some properties of the Microsoft Internet
Explorer 4.0 DOM.
Objects, properties, and methods of the Dreamweaver DOM
The following table lists the objects, properties, methods, and events that the Dreamweaver DOM supports. Some
properties are read-only when they are accessed as properties of a specific object. A bullet (•) indicates properties
that are read-only when they are used in the listed context.
Object Properties Methods Events
window navigator •
navigator platform • None None
document •
innerWidth •
innerHeight •
screenX •
screenY •
alert()
confirm()
escape()
unescape()
close()
setTimeout()
clearTimeout()
setInterval()
clearInterval()
resizeTo()
onResize
Page 98

DREAMWEAVER CS3
Extending Dreamweaver
Object Properties Methods Events
92
document forms • (an array of form objects)
images • (an array of image objects)
layers • (an array of LAYER, ILAYER,
and absolutely positioned elements)
child objects by name •
nodeType •
parentNode •
childNodes •
previousSibling •
nextSibling •
documentElement •
body •
URL •
all tags/
elements
parentWindow •
nodeType •
parentNode •
childNodes •
tagName •
previousSibling •
nextSibling •
attributes by name
innerHTML
outerHTML
form In addition to the properties that are available
for all tags:
tags:elements • (an array of
button, checkbox, password,
radio, reset, select, submit,
text, file, hidden, image,
and
textarea objects)
mmcolorbutton
child objects by name •
getElementsByTagName()
onLoad
getElementsByAttributeName()
getElementById()
hasChildNodes()
getAttribute()
setAttribute()
removeAttribute()
getElementsByTagName()
getElementsByAttributeName()
hasChildNodes()
Only those methods available to all tags None
layer In addition to the properties that are available
for all tags:
visibility
left
top
width
height
zIndex
image In addition to the properties that are available
for all tags:
src
button
reset
submit
checkbox
radio
In addition to the properties that are available
for all tags:
form •
In addition to the properties that are available
for all tags:
checked
form •
Only those methods that are available to all
tags
Only those methods that are available to all
tags
In addition to the methods that are available for
all tags:
blur()
focus()
In addition to the methods that are available for
all tags:
blur()
focus()
None
onMouseOver
onMouseOut
onMouseDown
onMouseUp
onClick
onClick
Page 99

DREAMWEAVER CS3
Extending Dreamweaver
Object Properties Methods Events
93
password
text
file
hidden
In addition to the properties that are available
for all tags:
form •
value
image (field)
textarea
select In addition to the properties that are available
for all tags:
form •
options •
(an array of option objects)
selectedIndex
option In addition to the properties that are available
for all tags:
text
mmcolorbutton In addition to the properties that are available
for all tags:
name
value
array
Matches Netscape Navigator 4.0 Matches Netscape Navigator 4.0 None
boolean
date
function
math
number
object
string
regexp
In addition to the methods that are available for
all tags:
onBlur
onFocus
blur()
focus()
select()
In addition to the methods that are available for
all tags:
blur() (Windows only)
focus() (Windows only)
Only those methods that are available to all
tags
None onChange
onBlur
(Windows only)
onChange
onFocus
(Windows only)
None
text nodeType •
hasChildNodes() None
parentNode •
childNodes •
previousSibling •
nextSibling •
data
comment nodeType •
hasChildNodes() None
parentNode •
childNodes •
previousSibling •
nextSibling •
data
NodeList length • item() None
NamedNodeMap length • item() None
Properties and methods of the document object
The following table details the properties and methods of the document object that are supported in Dreamweaver.
A bullet (•) marks read-only properties.
Page 100

Property or method Return value
nodeType • Node.DOCUMENT_NODE
parentNode • null
DREAMWEAVER CS3
Extending Dreamweaver
94
parentWindow • The JavaScript object that corresponds to the document’s parent window.
(This property is defined in the Microsoft Internet Explorer 4.0 DOM, but is not
part of DOM Level 1 or 2.)
childNodes • A NodeList that contains all the immediate children of the document
object. Typically the document has a single child, the HTML object.
previousSibling • null
nextSibling • null
documentElement • The JavaScript object that corresponds to the html tag. This property is
shorthand for getting the value of document.childNodes and
extracting the HTML tag from the NodeList.
body • The JavaScript object that corresponds to the body tag. This property is
shorthand for calling document.documentElement.childNodes
and extracting the body tag from the NodeList. For frameset documents,
this property returns the node for the outermost frameset.
URL • The file://URL for the document or, if the file has not been saved, an
empty string.
getElementsByTagName(tagName) A NodeList that can be used to step through tags of type tagName (for
example, img, div, and so on).
If the tagName argument is “LAYER”, the function returns all LAYER and
ILAYER tags and all absolutely positioned elements.
If the tagName argument i s “INPUT”, the function returns all form elements.
(If a name attribute is specified for one or more tagName objects, it must
begin with a letter, which the HTML 4.01 specification requires, or the length
of the array that this function returns is incorrect.)
getElementsById(Id) Gets the element node with the specified id. Where id is a string containing
the ID of the element to get.
var dom = dw.getDocumentDOM();
var contObj = dom.getElementById('content');
alert("The element with the id 'content' is a " +
contObj.tagName);
getElementsByAttributeName(attrName) A NodeList that can be used to step through elements with an attribute
attrName (for example, all elements with the attribute "for"). Not part of
DOM Level 1 or 2.
getElementById(id) The HTML element with the specified ID.
hasChildNodes() true
Properties and methods of HTML
The following table lists the properties and methods of HTML elements in Dreamweaver, along with their return
values or explanations. A bullet (•) marks read-only properties.
 Loading...