Adidas ADP3268, ADP6018, ADP6085, ADP6093 Instruction manual

ANALOG
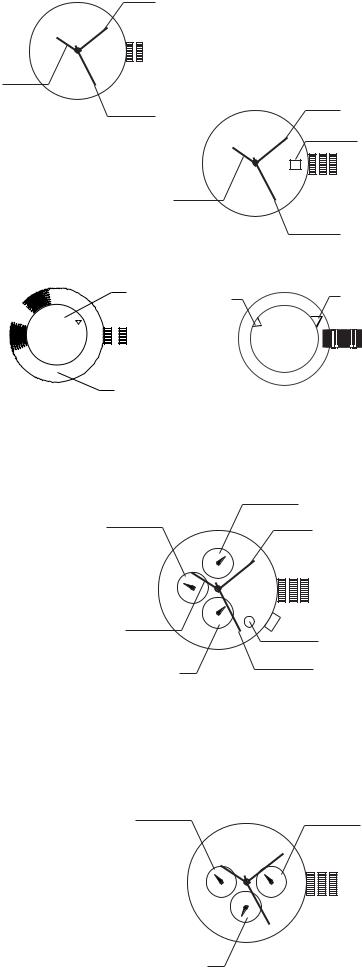
TIME SETTING (3 HAND)
1.Pull crown out to position 2.
2.Turn counter-clockwise to advance the time and continue until the day changes to the present day.
3. Set to the correct time.
4. Push crown back to position 1
DATE SETTING (3 HAND DATE)
1.Pull the crown out to position 2.
2.Turn the crown either clockwise or counter-clockwise and set the date for the previous day.
The direction that moves the date varies on different watch models.
TIME SETTING
1.Pull crown out to position 2.
2.Turn counter-clockwise to advance the time and continue until the day changes to the present day.
3.Set to the correct time.
4.Push crown back to position 1
MINUTE HAND
1 2
SECOND HAND
HOUR HAND
MINUTE DISC |
HOUR DISC |
|
TIME SETTING 2 HAND (DISC)
1.Pull crown out to position 2.
2.Turn the crown either clockwise or counter-clockwise
3.Set to the correct time.
4.Push crown back to position 1
DUALTIME/ DAY/ DATE(3 EYE WITH DATE)
DAY/ TIME SETTING
1.Pull crown out to position 3.
2.Turn crown clockwise to set day and time.
3.Return crown to position 1.
NOTE: If the date is set between the hours of around 9:00 PM and 1:00 AM, the date may not change on the following day.
DATE SETTING
1.Pull crown out to position 2.
2.Turn crown clockwise to set date.
3.Return crown to position 1.
1 2
HOUR DISC
DAY OF WEEK
HOUR HAND
DUAL TIME SETTING |
|
1. Press A to set dual time hand forward in 15 minute increments. |
DUAL TIME |
2.Press B to set dual time hand backward in 15 minute increments.
NOTE: Dual time hand can be advanced rapidly by continuously pressing A or B.
CHRONOGRAPH STOPWATCH (3 EYE WITH DATE)
TIME AND DATE SETTING
1. Before setting the time, make sure the chronograph is stopped and set to zero [12:00] position. 2. Pull crown out to position 2.
3. Turn crown clockwise until the previous day’s date is displayed.
4.Pull crown out to position 3 when the second hand is at the 12:00 position.
5.Turn crown to set time.
Note: 24-hour hand moves correspondingly with the hour and minute hands. When setting the time be sure to check that the 24-hour hand is set properly.
6. Return crown to position 1.
Note: When the crown is in position 2, do not press the pushers. Otherwise the chronograph hands will move.
MINUTE HAND
DATE WINDOW
1 |
2 |
3 |
SECOND HAND
MINUTE DISC
1 2
24 HOUR
MINUTE HAND
 A
A
1 2 3
B
DATE WINDOW
SECOND HAND
24 HOUR HAND
 A
A
1 2 3

 B
B
CHRONO SECOND HAND

CHRONOGRAPH
1.Press A to start/stop the chronograph.
2.Press B to reset to zero.
CHRONOGRAPH ZERO RESET
1.If either of the chronograph hands is not at the zero (12:00) position, pull crown out to position 3.
2.Press A to move hands clockwise; press B to move hands counter-clockwise.
3.Return crown to position 1.
CHRONOGRAPH 2 EYE WITH DATE (WITH OR WITHOUT DATE)
TIME AND DATE SETTING
1. Before setting the time, make sure the chronograph is stopped and set to zero [12:00] position.
2. Pull crown out to position 2.
3. Turn crown clockwise until the previous day’s date is displayed. 4. Pull crown out to position 3 when the second hand is at the 12:00 position.
5. Turn crown to set time.
Note: 24-hour hand moves correspondingly with the hour and minute hands.
When setting the time be sure to check that the 24-hour hand is set properly. 6. Return crown to position 1.
Note: When the crown is in position 2, do not press the pushers. Otherwise the chronograph hands will move.
CHRONOGRAPH
1. Press B to start/stop the chronograph.
3. Press A for Split time, Press A again to restart 2. Press A to reset to zero.
CHRONOGRAPH ZERO RESET
1.If either of the chronograph hands is not at the zero (12:00) position, pull crown out to position 3.
2.Press A to move hands clockwise; press B to move hands counter-clockwise.
3.Return crown to position 1.
CHRONO MINUTE HAND
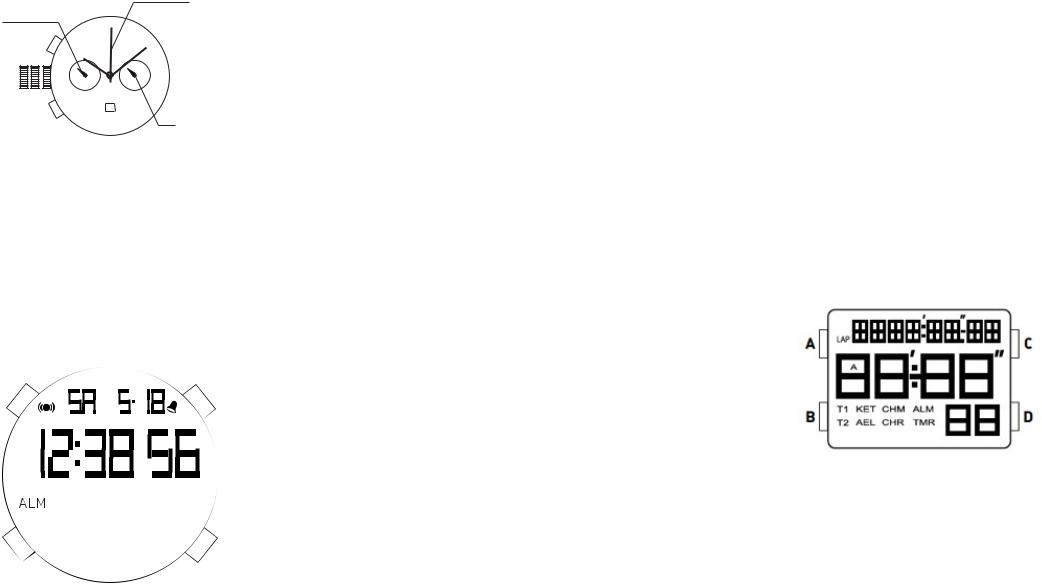
CALAGARY (QFL769BB/QFL873AC)
NORMAL TIME DISPLAY
1. Press A for EL.
2. Press C to select T1 or T2 format.
3. Press D to toggle chime on/off.
TIME/CALENDAR SETTING
1.In time mode, press and hold D for 2 seconds to enter time setting; hour will begin flashing.
2.Press C to increase setting value. Press D to decrease setting value.
3.Press B to enter next setting field.
4.Setting sequence is hour, minute, second, year month, date,12/24 Hr.
5.Press A to exit setting mode.
CHRONOGRAPH MODE
1.Press B to enter chrono mode.
2.Press D to select split or lap mode. Split mode will display the full time of all records after each split. Lap mode will display only the new lap time after each record has been recorded.
3.Press C to start chrono.
4.Press C again to split time.
5.Repeat step 4 until desired number of laps have been reached (maximum 10).
6.Press D to stop chrono.
7.To review, press B to enter recall mode before resetting.
8.Press D again to reset chrono.
RECALL MODE
1.Press C to recall each lap (10 maximum).
2.Press D to return to chrono.
ALARM MODE
1.Press B to enter alarm mode.
2.Press C to toggle alarm on/off.
3.Press D to select T1 Alarm 1 or T2 Alarm 2.
ALARM SETTING
1.Press and hold D for 2 seconds to enter alarm setting; hour will begin flashing.
2.Press C to increase setting value. Press D to decrease setting value.
3.Press B to set minutes.
4.Press A to exit setting mode.
NOTE: Alarm turns on automatically when exiting setting mode.
TIMER MODE
1.Press C to start countdown timer.
2.Press D to stop countdown timer. Press D again to reset timer.
TIMER SETTING
1.Press B to enter timer mode.
2.Press and hold D to enter setting mode; hour will begin flashing.
3.Press C to increase setting value. Press D to decrease setting value.
4.Press B to enter next setting field.
5.Setting sequence is hour, minute, second.
6.Press A to exit setting mode.
PEACHTREE (FL145GB)
NORMAL TIME DISPLAY
1.Press A for EL in any mode.
2.Press C to toggle between Time 1 and Time 2.
3.Press and hold C to set Time 1 or Time 2 as the default timer.
4.Press D to toggle chime on/off.
TIME/CALENDAR SETTING
1.In normal time display, press and hold A to enter setting mode; chime will begin flashing.
2.Press C to increase setting value. Press D to decrease setting value.
3.Press B to set and advance to next setting value.
4.Setting sequence is chime, 12/24-hour time, hour, minute, second, year, month, date, Auto EL.
5.Press A to save data and exit setting mode.
CHRONOGRAPH MODE
1.Press B to change to chronograph mode.
2.Press C to start chronograph; press D for lap when the chronograph is running.
3.Press D to change views while chronograph is running.
4.Press C to stop chronograph.
NOTE: When running, there is a maximum of 10 laps, afterward last lap will be overwritten each time additional lap is recorded.
RECALL MODE
1.Press A to recall the memory when the chronograph is stopped.
2.Press A to view the next lap.
3.Press C or D to exit Recall Mode and go back to chronograph mode.
 Loading...