


NH03
Copyright
The user is responsible for all results. FNet Co., Ltd owns this product and its relative
information; we grant you no right to this product. FNet Co., Ltd. also owns all unauthorized rights in
this book.
All rights reserved. No part of the FNet PCClone EX Std may be copied without the writing permission
or authorization of FNet Co., Ltd, who prohibits the sell、rental、exchange、lending、exhibition
revision、destruction, etc. of the product, as there actions could infringe on FNet's rights. FNet also
prohibits anyone from re-compiling or reverse engineering of the software, or decoding of our
product. Covering or removing the copyright and trademark description is not allowed.
FNet Co., Ltd. owns the FNet PCClone EX Std's copyright and patent. This product and its manual
possess multiple countries' copyright & patent. The trademarks of FNet PCClone EX Std and FNet are
registered by FNet Co., Ltd. and Future Net U.S.A. Corporation.MS-DOS、Microsoft Windows 7,
Windows Vista, Windows 2003, Windows XP, Windows 2000, Windows NT, Windows ME, Windows 98,
Windows 95, Windows 3.1 are trademarks of Microsoft Corporation.Other pictures, product and
、
company names, mentioned herein may be the trademarks of their respective owners.
The information in this document is subject to change at anytime without notice. All the product
names used herein are own by FNet Co., Ltd unless otherwise noted.
FNet Corporation Copyright © 2008. All Rights Reserved

User Notice
If this product is defective, please return it to the dealer from whom the product was originally
The type of file system of USB external HDD attached FNet PCCloneEX Std. can be either FAT32
In order to preventing an improper backup/restore operating, please check up the "bad sector"
• Except in case of improper use, we provide a 1-year guarantee of free service.
•
purchased, together with your original sales receipt for replacement.
• FNet Co., Ltd. is not liable for any consequential, incidental or indirect damages(including
damages for indirect personal injury, loss of business profits, business interruption, loss of
business information and the like) arising out of the use or inability to use this product.
• FNet Co., Ltd. will not accept returns of opened packages.
Read before installation
•
or NTFS.
• FNet PCCloneEX Std. only supports administrator login, the other entries are not available.
•
to the USB external hard disk before using FNet PCCloneEX Std..
System Requirements
•
Pentium computers or 100% compatible computers.
• Support OS: Microsoft Windows 7, Vista, XP, 2000, ME, 98SE.
• CPU Pentium or above.
• 128 MB RAM.
• Display card: compatible with VESA standard.
• CD-ROM driver.
• An external USB hard disk.
2
FNet Corporation Copyright © 2008. All Rights Reserved
Software installation
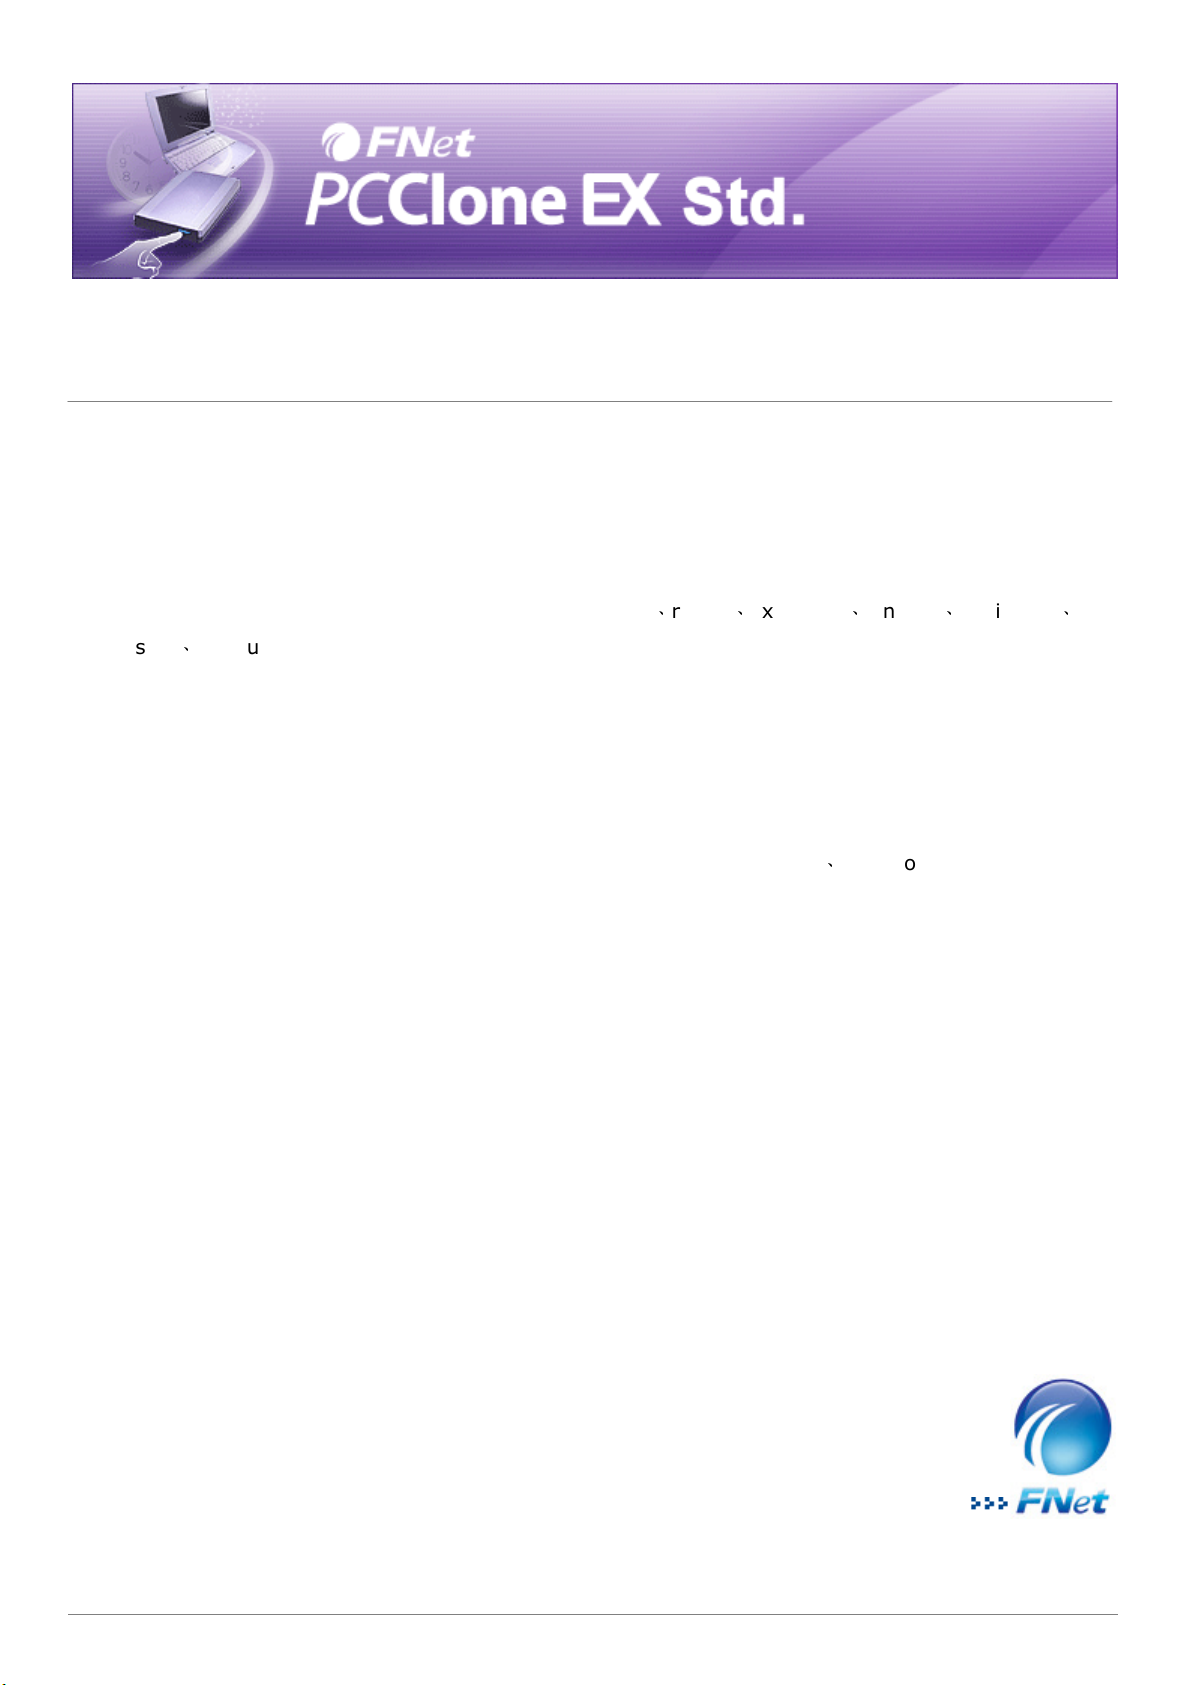
Insert PCCloneEX Std. installation
installation Wizard doesn't
1.
CD into the CD drive, it will
automatically access PCCloneEX
Wizard.
(If the
appear, please click the CD-drive
icon in My Computer to execute
the "Setup.exe")
2. Click "install".
3. Before installing, please read the
License and Warranty Agreement.
4. Click "Next" after accepting
agreement.
3
5. Key in digital characters that is
shown on the yellow label of
license code.
FNet Corporation Copyright © 2008. All Rights Reserved

The icon of "PCClone EX Std." will
click your mouse
6. Click “Install” to next.
7. FNet PCClone EX Std. installation
is completed, and click “ OK” to
quit.
4
8.
be displayed on the taskbar after
installing, user can double-click
the icon or right-
to execute FNet PCCloneEX Std.
FNet Corporation Copyright © 2008. All Rights Reserved
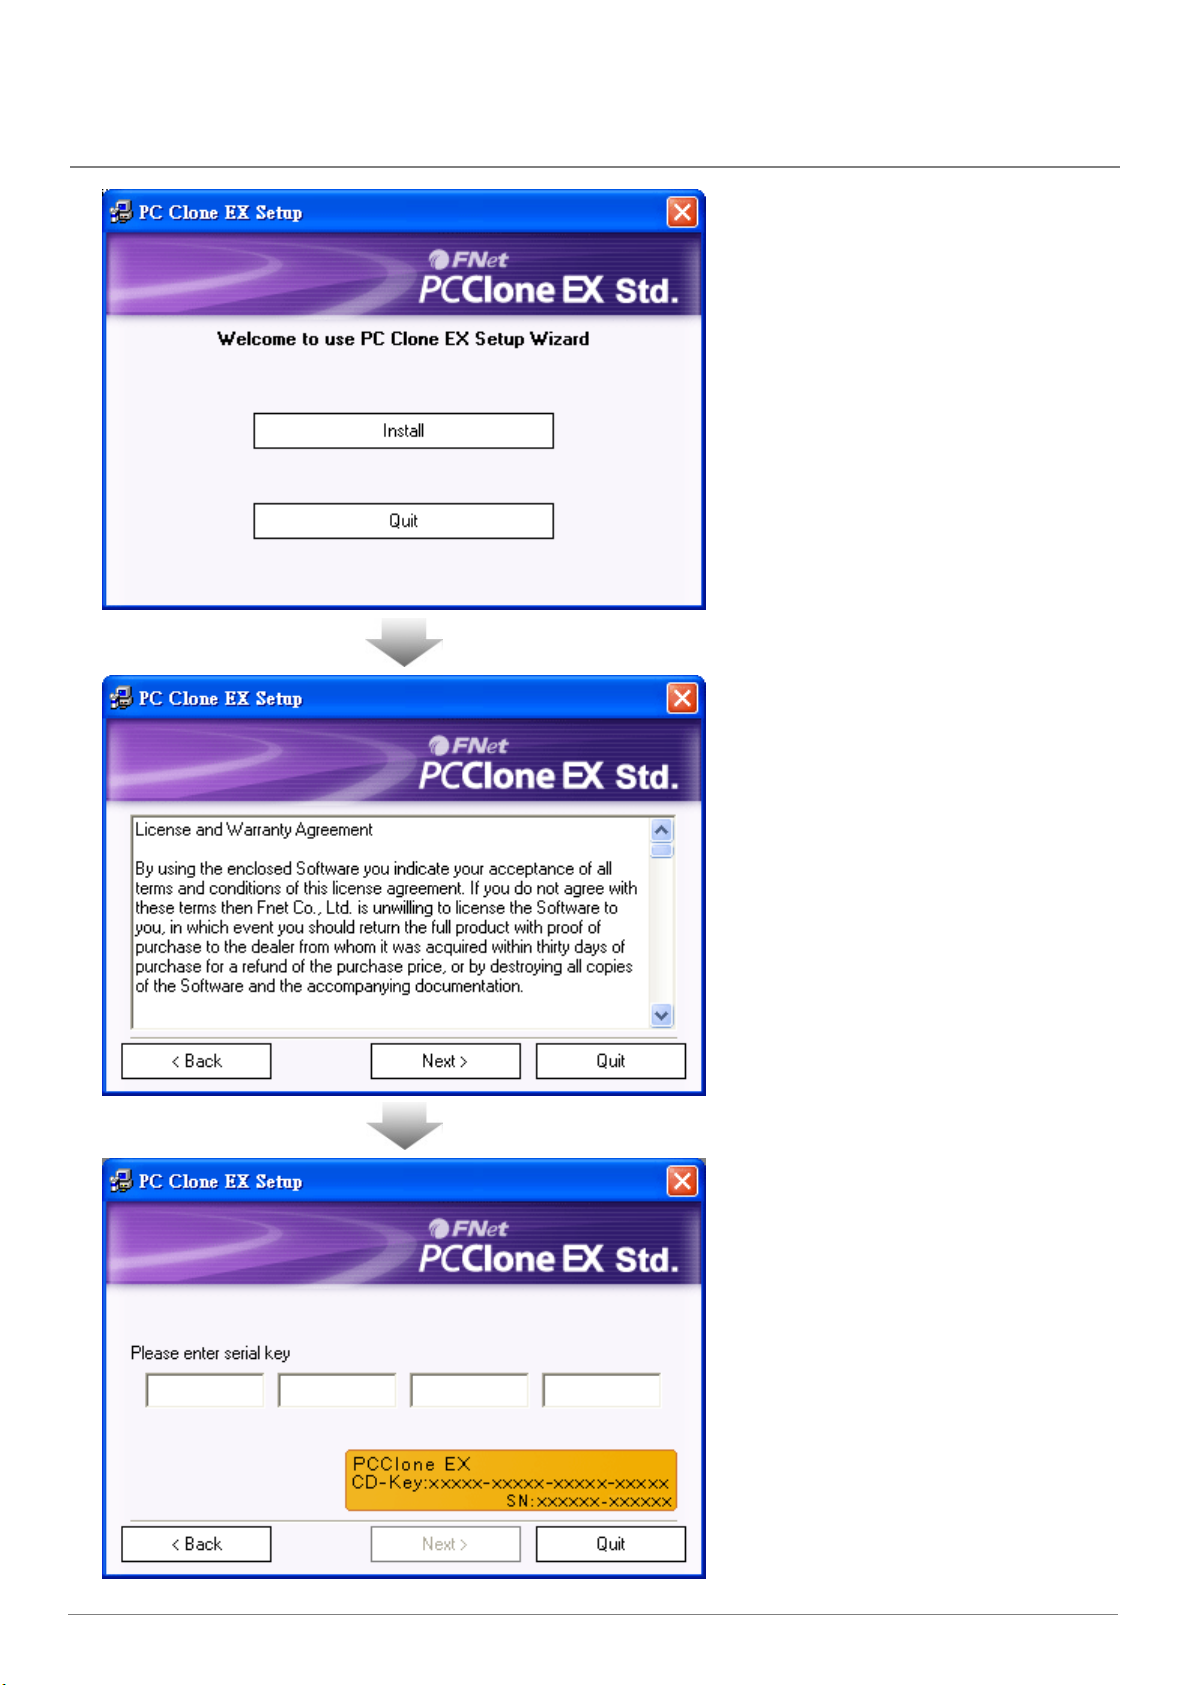
Create Partitions
already and the drive letter can be
nallocated"
If your USB HDD has partitioned already, please skip below and go on next section.
Steps
1. Please put the plug of the USB
HDD in your computer and then
turn on the USB power.
2. Right-click "My Computer", and
select "manage" as the left
window. (Or, click "start" -->
Control panel --> Administrative
tools --> Computer management
instead of.)
(If the USB drive has partitioned
displayed, please skip "Create
Partitions" and go on next
section.)
3. Click the "Disk Management" as
the left highlight, and then all of
your drive partitions will be
displayed as the right side.
4. Right-click the disk of
"Unallocated", and click the "New
Partition".
(You can try to take the plug of
USB drive off and put the plug
again in your computer to make
sure the partition of "U
is USB drive.)
5
FNet Corporation Copyright © 2008. All Rights Reserved

5. Follow up the indication of New
Partition Wizard to complete "Disk
for FNet PCCloneEX
Management" and "Format
Partition".
6. There is an utility named "FNet
FAT32 Utility"
Std. users. (The relevant
information please refer to the
Help file.)
6
FNet Corporation Copyright © 2008. All Rights Reserved
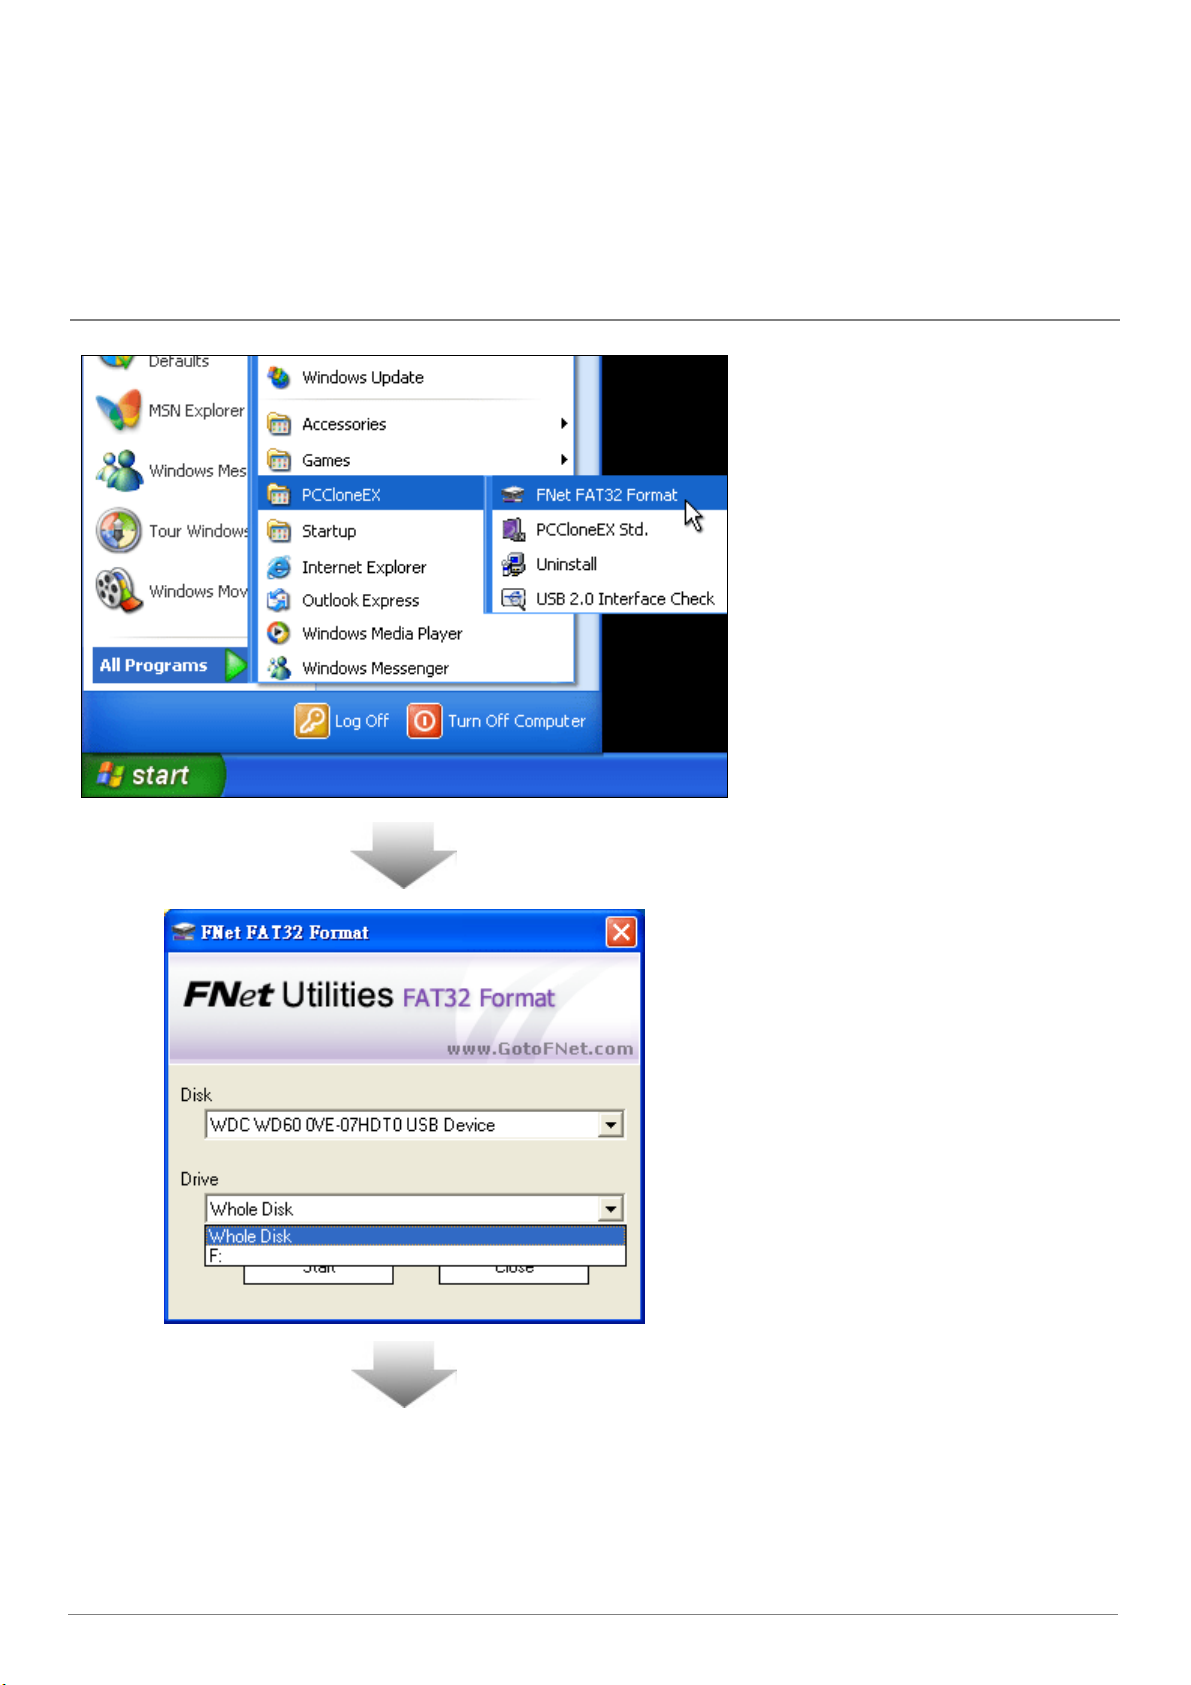
FAT32 Format Utility
sers want to have bigger capacity of USB external HDD to keep their myriad data day after day.
Put the plug of the USB HDD in the
computer and turn on USB device
Most PC u
Generally, Windows 2000 / XP built-in a format utility, FAT32, which formats the maximum of capacity
under 32GB. But FNet PCCloneEX Std. attached a format utility named FNET FAT32 Format Utility can
quick and complete to format your larger HDD (over 32GB) which is able to support the maximum of
capacity of HDD up to 4TB (4000GB).
(Note: all data in your selected USB drive will be deleted after clicking this "Format" button.)
1.
power.
2. The operating can select "Start"
--> "Programs" --> "PCCloneEX
Std." --> " FNet FAT32 Format" .
3. When you see the interface of
FNET FAT32 Format utility, click
"start" after selecting USB device
and drive you are formatting.
7
FNet Corporation Copyright © 2008. All Rights Reserved
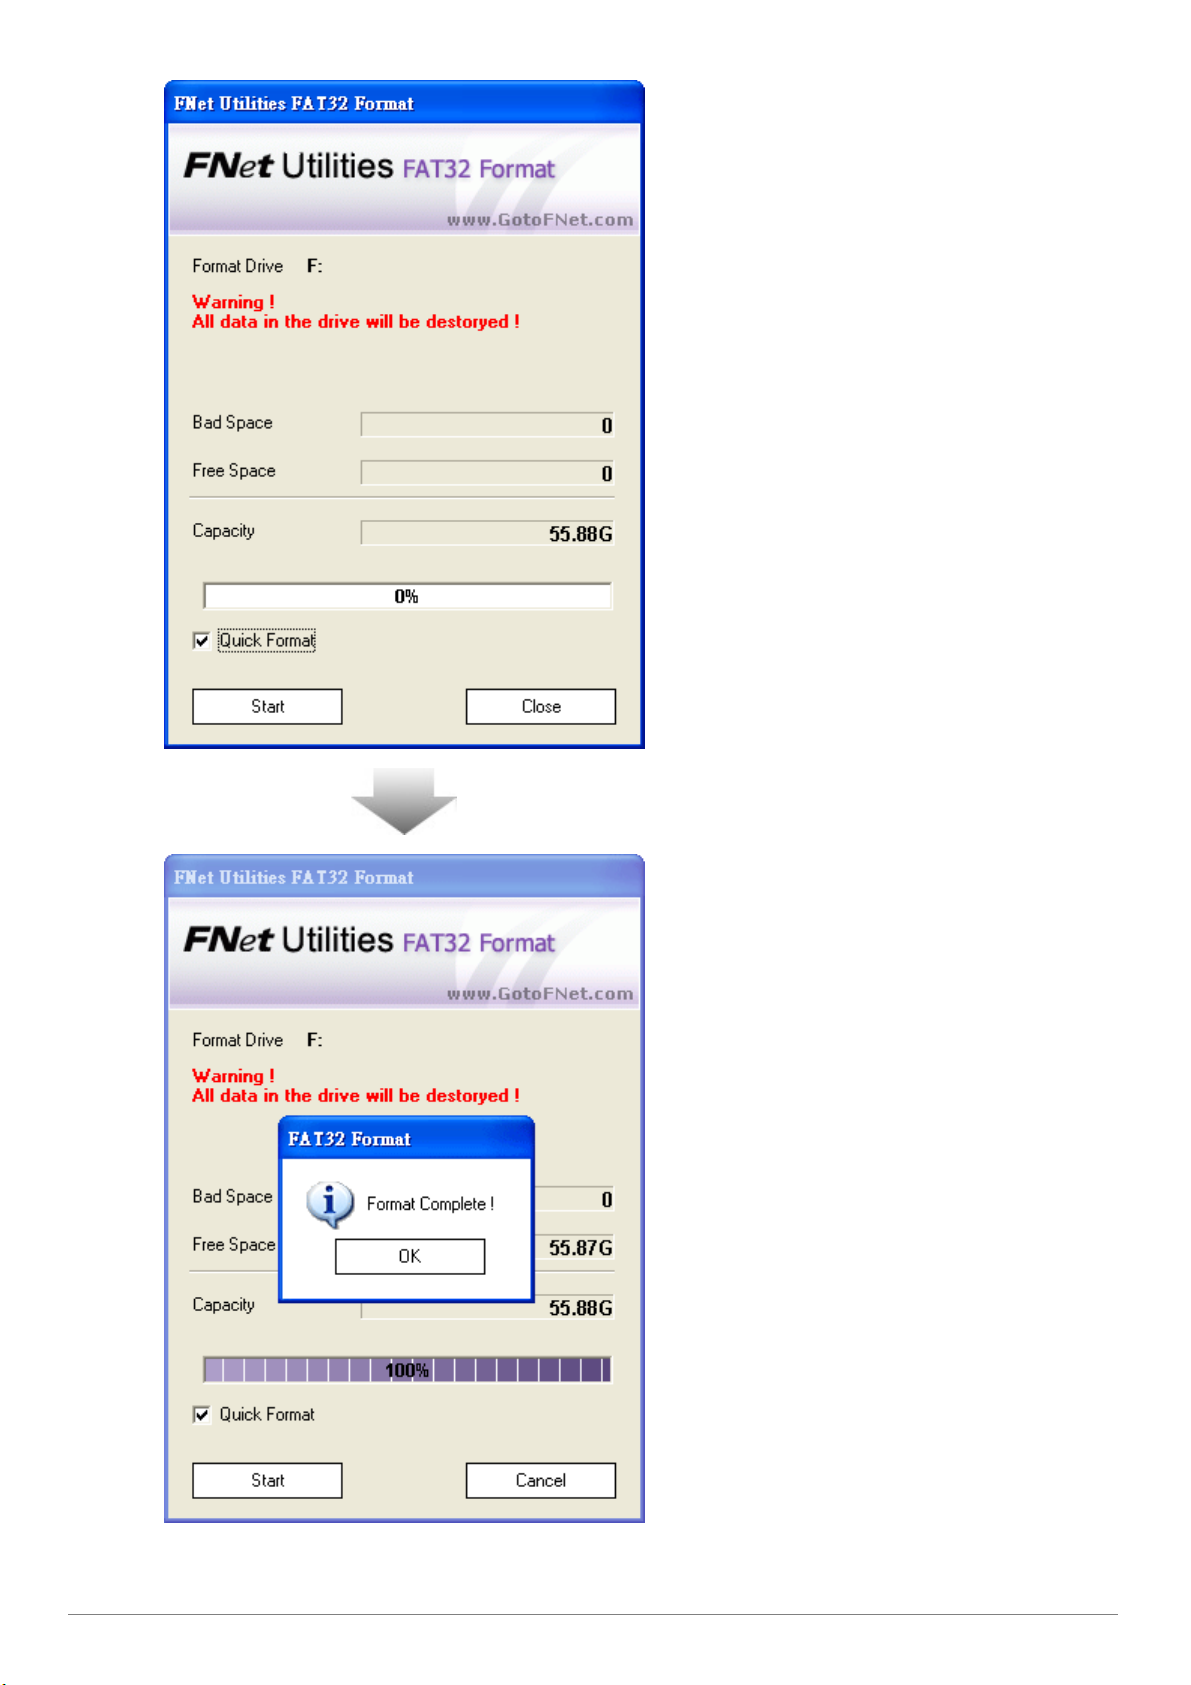
4. The format drive letter is
(The utility has formatted the USB
displayed, you can check "Quick
Format" to speed up the
format. And click "Start" for
next.
(Warning: all data in USB drive
will be destroyed after
formatting.)
5. Click "OK" after completing.
drive you select to be FAT32 file.)
8
FNet Corporation Copyright © 2008. All Rights Reserved

One Button File Backup
execute
CloneEX Std. must be installed already and the icon
"
erefore,
on USB
Press the button again or click the
One Button backup function only supports the external HDD enclosure with the button design--
file backup by pressing the button on the USB enclosure without complicated operating.
Note: when you do the backup by buttons, FNet PC
of FNet PCCloneEX Std.has displayed on the taskbar. (if you are a new user, please go on "File backup
and "Setup" in advance.)
The USB driver of Win 98SE/ME to the button trigger support do not have identical standard, th
the button trigger support under the Win98SE/Me workstation is uncertainly available.
1. Connect USB HDD with your
computer and then power
HDD.
2. Execute PCClone EX Std..
3. Press the button on the external
enclosure.
(If your external device has two
buttons , click the button of "File
Backup" .)
4.
"start" when the dialog window
pops up.
9
FNet Corporation Copyright © 2008. All Rights Reserved
 Loading...