

Page 1
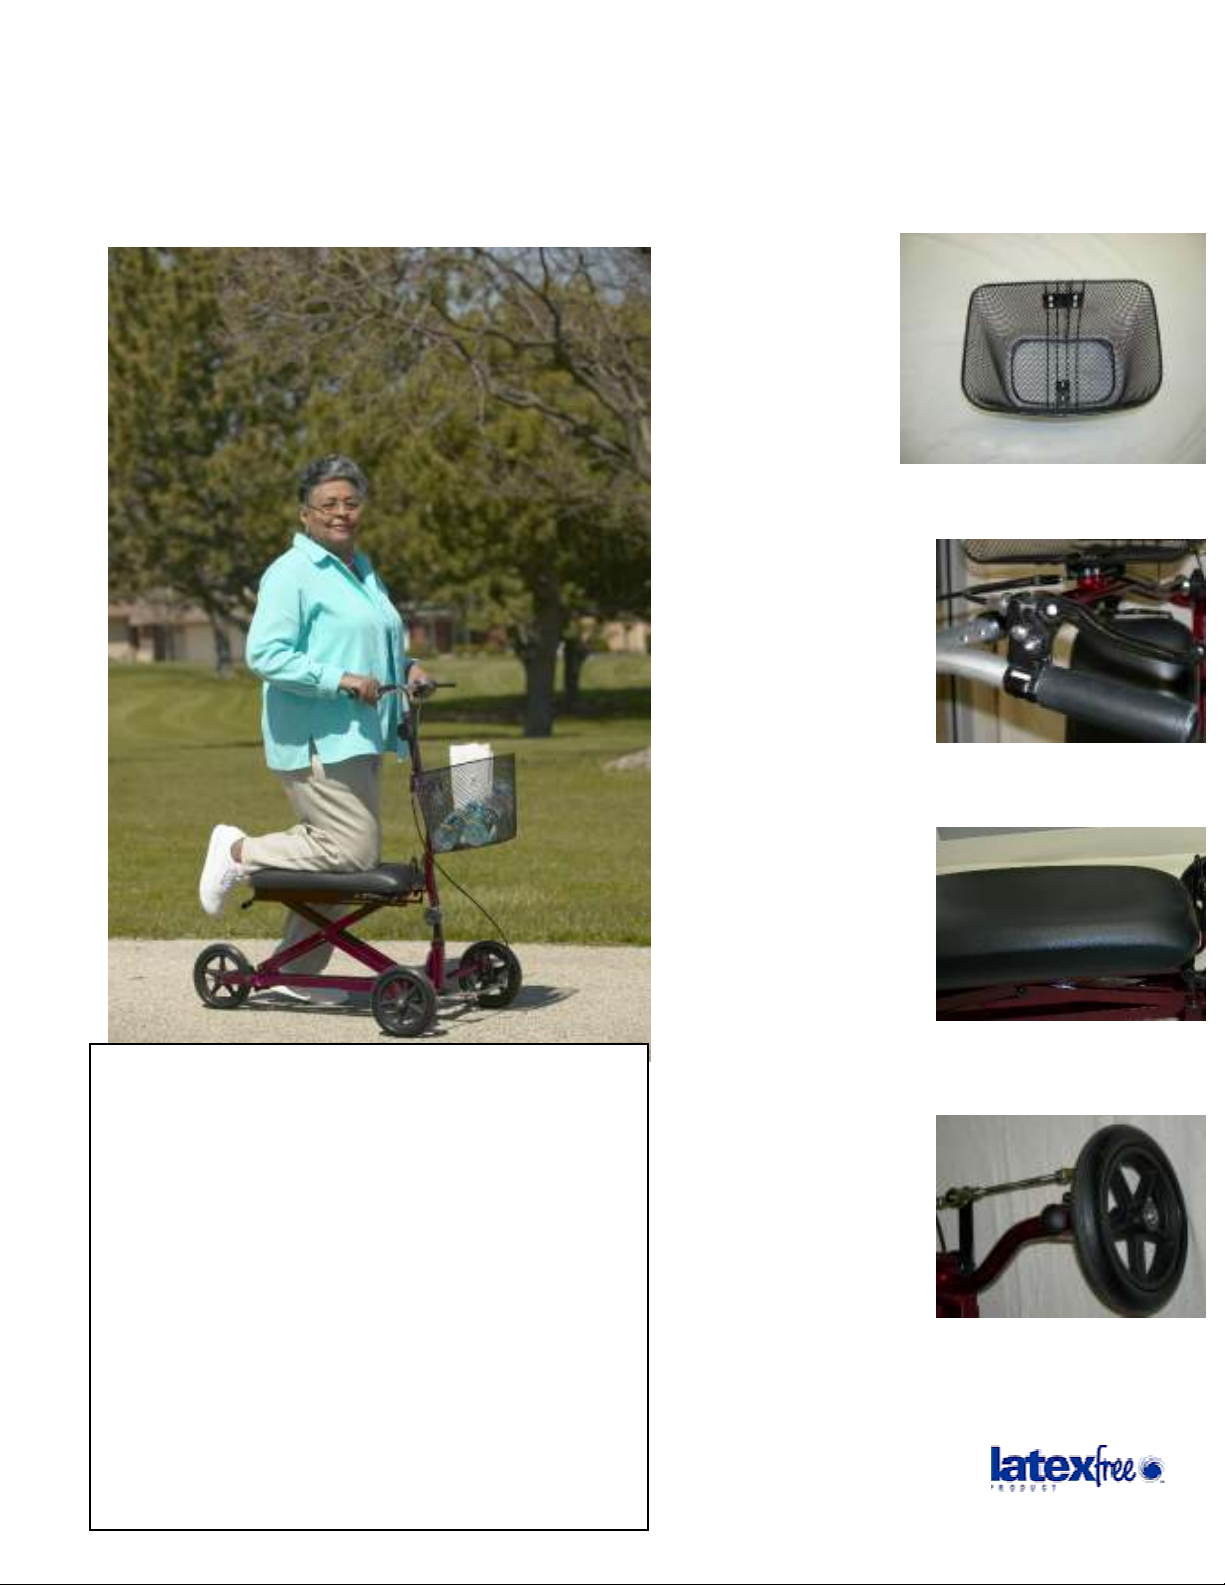
Weil Knee Walker
Added Large
Basket For
Storage
Locking Brakes
For Safety
Full Length,
Thick Padded
Seat
The Weil Knee Walker Features:
• Locking breaks
• Large basket (11” x 9.5” x 9.25”)
• Wheels provide easy maneuvering
• Height adjustment from 4’10” thru 6’4”
• Thicker padded seat for comfort
• Attractive burgundy color
• Weight Capacity 400 lbs.
• Knee walker is 36” long x 22.5” wide at
front. Knee rest is 8.5” W x 20.5” long.
8” Wheels
For Easy
Maneuvering
1
Page 2

MDS86000 WEIL KNEE WALKER
Use and Care Guide
SAFETY INSTRUCTIONS
TO ENSURE YOUR SAFETY IN USING THE WEIL KNEE WALKER, THE FOLLOWING
WARNING SAFETY INFORMATION AND INSTRUCTIONS MUST BE FOLLOWED.
GENERAL WARNINGS & SAFETY INSTRUCTIONS
• DO NOT use this product without first reading and understanding the
instructions contained in this booklet. If you are unable to understand the
Warnings, Cautions or Instructions, contact a healthcare professional, dealer or
technical personnel before use - otherwise serious bodily injury or product
damage may occur.
• DO NOT lean forward, backward, or to either side while using.
• DO NOT use unless seat lock lever is securely locked into place.
• DO NOT lean forward while applying the brakes.
• DO NOT perform any adjustments to the knee walker while it is in use.
• DO NOT use the seat to transport people or objects.
• DO NOT sit on the knee walker while it is being loaded into a vehicle or while it
is being transported in a vehicle.
• DO NOT sit on the knee rest unless the brakes and padded knee rest are in the
locked position.
• DO NOT exceed the maximum weight capacity (including basket contents) or
serious injury could result.
2
Page 3

GENERAL WARNINGS & SAFETY INSTRUCTIONS
• DO NOT hang anything from the knee walker handles or frame at any time
(other than the Medline provided basket in the position described). This may
cause the knee walker to tip, resulting in bodily injury or knee walker damage.
• DO NOT walk backwards while using knee walker.
• DO NOT use the knee walker on stairs, curbs, obstacles, etc. Serious risk of fall
or injury may occur.
• BEFORE EACH use make sure the padded knee rest is in locked position.
Check the brakes for proper operation. Make sure that all parts are secure and
that moving parts are in good working order.
• ALL WHEELS must be in contact with the floor at ALL TIMES. This will
ensure the knee walker is properly balanced.
• ONLY USE accessories and spare parts authorized by Medline Industries.
• WHEN TURNING, exercise caution and only turn while at a slow rate of
movement.
• CONSULT WITH your doctor, physical or occupational therapist, or other
qualified professional regarding the proper height adjustment for maximum
support and correct brake activation.
• KNEE WALKERS are for individual use only and are NOT to be used as a
wheelchair. Do NOT attempt to push the knee walker while someone is sitting
in the seat. Do NOT self propel the knee walker while seated. Serious injury to
the user and/or damage to the knee walker frame or wheels may result from
improper use.
• EXERCISE CARE when using knee walker on gradients or pitched surfaces.
• ALWAYS KEEP both hands on the handle grips when in use.
3
Page 4

PROPER FITTING
INSTRUCTIONS
1. Proper fitting height is determined when standing. Your
good leg should be straight and your injured leg should be
resting comfortably in the center of the cushion. There
should be equal pressure on your good foot and the knee of
the injured leg. Your hips must be level with your back
straight.
2. Handlebars should be in a straight up position for use.
Angling the tiller more than 10 degrees from top center may
cause damage to unit and/or possible falls.
3. Attach basket by lining up the bracket on basket with the
prongs on the knee walker.
To Adjust Angle of Tiller:
• Locate Knob on lower section of tiller.
• Loosen knob.
• Raise tiller to the perpendicular setting.
• Tighten knob.
To Adjust Height of Handlebars:
• Locate Knob at top of tiller.
• Remove Knob, Spacer, and Bolt.
• Extend handlebars up to desired
• height, align holes in tiller.
• Insert bolt through tiller.
• Put spacer and then knob onto the
bolt extending out from the tiller.
• Tighten knob.
4
Page 5

To Adjust Height of Knee Rest:
• Locate seat height adjustment handle under the back of
knee rest.(Figure A)
• While holding front of knee rest, squeeze lever up
towards seat.
• Raise knee rest to proper height by pulling up on knee
rest from front and back evenly. (Figure B)
• Release hand lever shown in Figure A.
• Check that the cross-frame is firmly seated into the desired
slot on the height adjustment lever. (Figure C)
• Verify that the knee rest is securely locked into place by Figure A
applying pressure firmly on the knee rest with both hands.
• To Lower, squeeze lever, lift up on seat, and then lower while keeping the lever activated.
Figure B Figure C
Check that all fittings, knobs, and adjustments are secure.
Read all warnings/safety instructions prior to use.
Weil Knee walker Height Setting Slot 1 Slot 2 Slot 3 Slot 4 Slot 5
Approximate floor to knee height Transport -12" 17.5" 20" 22" 24"
Warning! Before using the Weil Knee Walker make sure the knee rest is securely locked into place.
Warning! Failure to follow proper fitting instructions may result in serious injuries.
5
Page 6

After you have sized the Weil Knee Walker to fit your height (making sure there is equal pressure on your good
foot and the knee of the injured leg and that your hips are level with your back straight), you should use your good
foot to propel in forward direction.
OPERATING INSTRUCTIONS
METHODS FOR PROPER USE
1. Engage brake on handle bars.
Place knee on knee rest.
2.
3. Release brake.
4. Use Remaining leg to propel forward.
Engage brake to slow down or turn.
5.
Figure D
TURNS
The Weil Knee Walker will make turns by simply moving the handle bars with a minimum amount of effort.
Turns should only be performed while at a slow rate of movement. To turn right, rotate handlebars to the right. To
turn left, rotate handlebars to the left.
BRAKE / PARKING BRAKE
The unit comes standard with two hand brakes and two button push down locking brakes. Use the hand brake to
control your speed, just as you would do on a bicycle. Use the locking brake when you wish to remain stationary or
if you choose to sit on the knee rest to relax. Having two brake options will eliminate the problems that occur if a
user has little to no strength in one hand.
To Operate the Brakes:
• To slow down, squeeze the brake handles.
• To lock the brakes, squeeze the brake handles and
depress silver button on brake handle. (Figure E)
If the brakes have been adjusted but the rear wheel
on the knee walker moves while the brakes are in
the locked position, DO NOT use the knee walker.
Please call our toll-free customer service number at
1-800-377-8033 for returns or repairs.
• To release the brakes from the locked position, simply
squeeze the brake handles.
Figure E
Caution: After making any adjustments to the Weil Knee Walker brakes, you must test the brakes before
the knee walker is used. See Maintenance instructions.
6
Page 7

MAINTENANCE:
The Weil Knee Walker by Medline should be checked periodically to ensure the brakes, seat lever, steering, and
wheels are functioning properly and that all parts are secure.
Always test the brakes by both walking and squeezing the brakes and by stopping, pushing down on the brakes to a
locked position, and then trying to push the knee walker. If the brakes do not lock the wheels, the brakes need to be
adjusted. If adjustment does not tighten the brakes, DO NOT use the knee walker.
Check that seat lever is secure and functioning as it should. Steering should be tight, check for “slop” and if
handlebars are aligned correctly. Check that all three wheels spin normally.
To Adjust the Brake Tension:
1. Locate coupler where the two upper cables combine to form one brake cable
(middle of tiller)
2. Hold brake couple tightly and pull down on single brake cable coming out of
bottom of coupler.
3. If you need to tighten the brakes, screw the adjustment sleeve located at bottom
of coupler away from coupler. When at desired tightness, adjust lock nut up
against coupler.
4. If you need to loosen the brakes, screw the adjustment lock nut tight against top
of adjustment screw and rotate adjustment screw closer to coupler.
Medline Limited Warranty:
Your Medline Product is warranted to be free of material defects in materials and workmanship for the lifetime
of the consumer. This device was built to precise standards and carefully inspected prior to shipment. This
Lifetime Limited Warranty is an expression of our confidence in the material and workmanship of our products
and assures years of convenient, dependable service. This warranty does not extend to non-durable components
such as handgrips, pushbuttons, leg riggings and any other wearable part which carry a one (1) year warranty.
In the event of a defect or failure covered by this warranty, contact us at 1-800-377-8033. Medline will, at its
option, repair or replace your Medline product. This warranty does not extend to damage or failure occurring as
a result of owner misuse or negligence, normal wear and tear, or other causes unrelated to the manufacture and
design of the product. This express warranty is Medline’s sole and exclusive warranty and your sole remedy in
the event of default or failure. Medline is not responsible for any consequential or incidental damages or costs
arising from use of the warranted products, or any defect therein or failure thereof. Medline disclaims all other
warranties including but not limited to the implied warranties of merchantability and fitness for a particular
purpose.
Contact us at 1-800-377-8033, Monday – Friday 8:00 am to 5:00 pm PST if you encounter any problems or for information
regarding repairs or maintenance.
7
 Loading...