


The Original
Backnobber® II Tool
User Guide
Self Care
Deep Muscle Therapy

About the Author: Denise M. Miller, OTR
Denise M. Milleris an occupational therapist, an independent consultant and a technical writer. She teaches, lectures and conducts seminars for health care professionals worldwide on topics in industrialtherapy and ergonomic applications. In addition, she has numerous written contributions in a variety of publications. Ms. Milleris active in the American Occupational Therapy Association (AOTA) and the Occupational Injury Prevention and Rehabilitation Society (OIPRS). She
is a graduate of the College of St. Catherine in St. Paul, MNand a native of Southern California.
About the Artist: Jill Otto
Jill Otto received her B.F.A. in art from the Universityof Iowa, witha major in drawingand minors in printmaking and photography. She created all of the illustrations,layout and design of this handbook. Ms. Otto lives in Eagan, Minnesota with her husband, son and daughter.

Forward
Within all of us is a strong desire to be healthy and free of pain and toxic stress. By using Pressure Positive products, you have taken a positive step in that direction.
When used as intended, The Original Backnobber II tool, in combination with simple stretching and strengthening exercises, helps ease the symptoms of muscle fatigue, back, neck and shoulder discomfort and headaches. Such symptoms can result from injury as well as chronic conditions including arthritis, tendinitis and fibromyalgia.
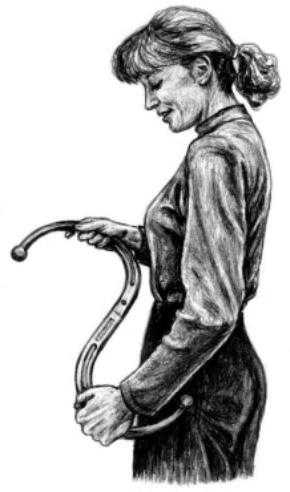
The natural shape and dimensions of The Original Backnobber II tool allow you to apply pressure for as long as required to achieve its remarkable effects. The Original Backnobber
 II tool is made of a highly durable polymer composite molded in the shape of an "S." This shape allows the user to hook it over the shoulder or under the arm so that one of the two ends can be pressed into any of the posterior muscles of the neck and shoulders, upper, middle or lower back and the hips, buttocks and thighs.
We hope our products will assist you in managing and reducing muscular pain and discomfort, enhance your ability to function and contribute to your goal of painless and stress free good health.
Bernard L. Gladieux, Jr.
President
The Pressure Positive Company
The Pressure Positive Staff |
Workshop and Offices |
1
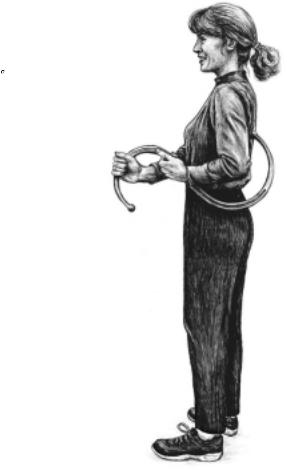
Table of Contents
1What is a Trigger Point? 3
2Self Care 4
3 |
Precautions |
5 |
|
|
|
|
4 |
Using The Original Backnobber |
II Tool |
6 |
|||
|
Locking Mechanism |
8 |
|
|
|
|
|
Storage |
9 |
|
|
|
|
|
Techniques 10 |
|
|
|
|
|
5 |
Trigger Points and Exercises |
14 |
|
|
||
|
Neck and Shoulder |
15 |
|
|
|
|
|
Shoulder and Upper Back |
18 |
|
|
||
|
Midand Low Back |
22 |
|
|
|
|
|
Hip, Buttocks and Lower Extremity |
27 |
||||
6 |
A Word from Satisfied Customers |
31 |
|
|||
7 |
Frequently Asked Questions |
32 |
|
|
||
8 |
Resources |
34 |
|
|
|
|
9 |
About our Products 35 |
|
|
|
|
|
2
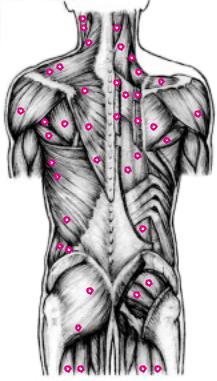
What is a Trigger Point?
Tender spots in taut bands of muscles are referred to as "trigger points," according to Janet G. Travell, MD, a noted pioneer in the field of myofascial pain and dysfunction. These tender spots may occur actively in the affected muscle, produce additional tender spots or refer pain to other muscles in the body.
Throughout our lifetimes, we all experience some
muscle pain and discomfort. This pain and tenderness may be a direct result of injuryor disease or it may have occurred following a strenuous sport activity, or as a result
of lifting or repetitive work. Whatever the cause, most of us are susceptible to
trigger points in our muscles.
A trigger point may feel like a hard "lump", knot or band in the muscle. Or you may experience broad muscle soreness. Applying pressure to the muscle almost always
alleviates pain, even though the pressure itself can be somewhat uncomfortable when applied. If you do not experience immediate results, try applying deeper pressure
for a longer time and to the muscles |
Typical Trigger Point Locations |
|
|
surrounding the most affected area. |
|
Please note that the various diagrams throughout this book show only |
|
common or typical trigger point locations. The exact sites of these areas of soreness can vary widely from person to person .
3

Self Care
It is important to pay attention to the responses our bodies produce when stressed or in pain and to follow-up with stretching, relaxation and other exercises which help to reduce discomfort and tenderness. Be particularly mindful when using The Orginal Backnobber II tool to keep your body as relaxed as possible, especially in the area where you are applying pressure. In addition, strengthening and resistance exercises to build and tone the muscles, along with proper nutrition and sleep will produce noticeable benefits.
The goals of trigger point therapy are to reduce pain and stiffness, restore function, increase range of motion and improve strength, posture and balance. The Original Backnobber II tool and this guide will help you to achieve these goals.
Start slowly until you are familiar with the technique of
using The Original Backnobber II tool.
4
Precautions
1 Only use The Original Backnobber  II tool for its intended purpose. This product is designed for use on all large and small muscles that can be comfortably reached.
2 Do not use The Original Backnobber II tool without a physician's consultation if (1) you recently experienced an injury or (2) suffer from a serious medical ailment or (3) are currently under a physician's or therapist's care.
3If you recently underwent surgery, consult your physician and/or therapist before initiating massage and exercises with The Original Backnobber II tool.
4If bruising occurs, or if you experience residual pain, discontinue use until symptoms subside completely. Reduce the amount of pressure when resuming application.
5Following use, if the area is swollen or red, apply cold packs. Consult a physician if inflammation persists more than two days.
6Do not apply directly to the bones of the spinal column.
7Stretching the muscles after
using The Original Backnobber II tool reduces soreness and inflammation.
8Remember to pay attention to the signals your body is sending you. Only apply pressure that you can comfortably tolerate. Although you may experience some soreness and discomfort after initial use, these symptoms will subside as overall health improves.
5
Using The Original Backnobber  II Tool
Trigger points can occur in any muscle. Remember that every person is unique, and that you are the best judge of your pain and discomfort. Regular use of The Original Backnobber II tool can help you better understand the source and nature of such problems and can be an exceptionally valuable aid in your pursuit of a healthy, pain free lifestyle. The guidelines listed below can be followedwhen using The Original Backnobber
 II tool on any muscle in the body.
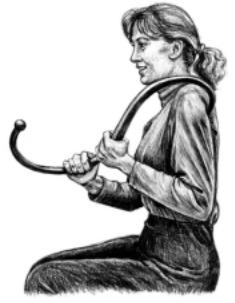
1 Isolate a trigger point by pressing firmly with your fingertips or The Original Backnobber  II tool over a specific part of the neck, shoulders, upper, middle or lower back, buttocks or thighs.
2 When you feel a hard knot (like a lump) or soreness, apply pressure to determine the level of tenderness in the area. Some sensation of pain is to be expected from the pressure; although for many people, this sensation is quite pleasurable and satisfying. Experiment to determine a tolerable level of pressure.
3Once you have located the trigger point and know how it feels, you're ready to begin using The Original Backnobber  II tool. As you become more accustomed to detecting trigger points on your body and how to apply pressure, you can begin immediately with The Original Backnobber
 II tool instead of performing the preliminary search.
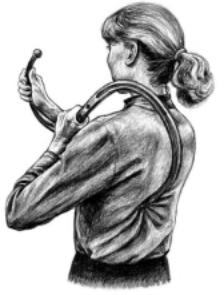
4The Original Backnobber II tool can be hooked over the shoulder
or under the arm. Apply direct, steady, pressure to the trigger point in the muscle.
5Pressure preferences vary widely among professionals and patients alike, but for many, pressure can be effectivley applied for between 5 and 30 seconds. It often takes time for muscles to begin to "trust" the pressure, so the first 20 seconds may be a mere beginning. In general it is best to start slowly and gradually increase pressure as desired following your own best intuition and feelings.
6
6Apply pressure firmly to the affected muscle. Move along the muscle band
at one-inch intervals. Stop and apply longer or deeper pressure to any knots or lumps as you work. Although almost any pressure on a muscle will usually have some releasing effect, it is best to apply pressure along
the entire muscle from one end to the other, in approximately one inch intervals, and then stretch before moving onto
another area.
7Harmony and balance between both sides of the body are vital to achieving proper posture and function. It is best to work both sides of the body, just in
case any pain is referred to the other side after being "detriggered."
8Remember to breathe! Sit back, relax and take some deep breathes both before, during and after using The Original Backnobber II tool.
9Specific concentration on breathing can enhance the desired
results of the trigger point technique. Take a deep breath and begin applying pressure as you exhale. Continue deep breathing as you perform this trigger point technique.
10In addition to using The
Original Backnobber  II tool, paying attention to healthy lifestyle habits may also produce noticeable and desired results. Drink plenty of water, participate in physical activity
at least 30 minutes a day, eat properly and get plenty of sleep. As you notice improvement in function and movement, you may also find yourself relaxing and enjoying life more than ever before!
7
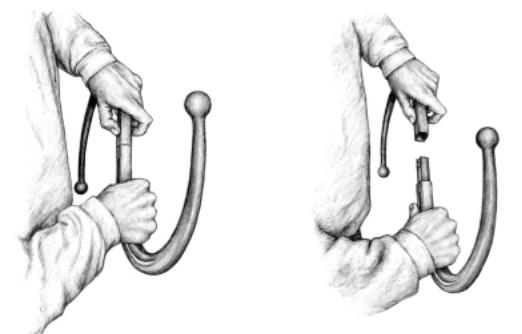
THE ORIGINAL BACKNOBBER II TOOL LOCKING MECHANISM
The Original Backnobber II tool is equipped with a built in, patented mechanism that allows it to be taken apart for easy transport and storage. Press the buttons on each side of The Original Backnobber
 II tool, located directly in the center of the mechanism and gently pull apart.
To reassemble, just fit the two ends and push gently until they click together. To ensure proper assembly of the parts and the locking mechanism, pull on both ends after each assembly. The two ends cannot be pulled apart, unless the buttons are pressed.
8
TAKING THE ORIGINAL BACKNOBBER® II TOOL WITH YOU.
It is ideal for travelers, sports enthusiasts and others on the go.
The Original Backnobber II tool is made of a highly durable, polymer composite making it a reliable travel companion.
The Original Backnobber II tool will easily fit into a normal size briefcase, overnight bag, or gym bag.
9
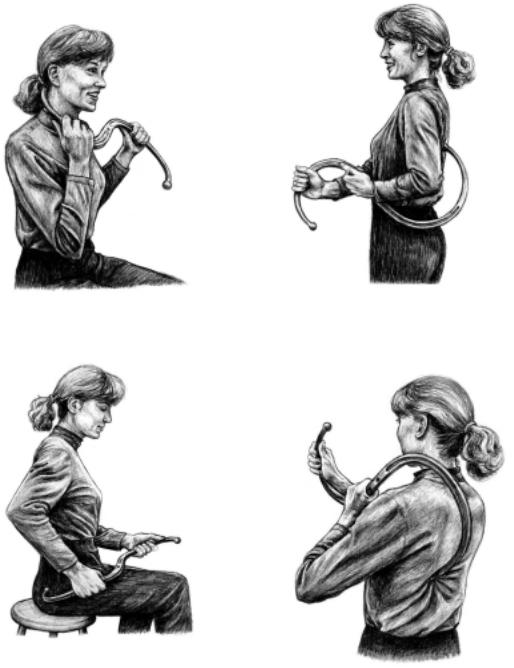
TECHNIQUES WITH ORIGINAL BACKNOBBER ® II TOOL
Working the muscles around the neck and shoulders can relieve simple headaches.
The larger end of The Original Backnobber II tool can reach over the shoulder or under an arm and into the middle back area.
Experiment with different positions until you find the ones that work best for you.
10
 Loading...