

Page 1

Saunders Lumbar
Traction Devices
User’s Guide
SAUNDERS LUMBAR HOMETRAC DELUXE (PN 101099A)
SAUNDERS STX LUMBAR TRACTION DEVICE (PN 100799)
US Patents
#6,059,548
#6,506,174
#D415,254
#7,108,671
Other Patents Pending
active forever
.com
Page 2

SECTION ONE: GENERAL GUIDELINES AND PRECAUTIONS
Congratulations on your purchase of a Saunders Lumbar Traction
Device.
Your new traction device is designed to provide safe and effective
traction (stretching) to the lumbar region (low back). Your traction
device requires minimal assembly and is nearly ready to use out of
the case.
Read these instructions completely before proceeding.
Indications And Contraindications For Use
Depending upon the advice of your health care provider, traction can
be used to treat these conditions:
• osteoarthritis
• headaches
• herniated discs
• muscle tightness
• joint stiffness
• nerve root compression
Traction should not be used to treat these conditions:
• acute or traumatic injury
• spinal instability
• fracture
• rheumatoid arthritis
• spinal cord compression
• infections and i
• malignancy
• any other conditions that may be made worse by movement
ammatory diseases
WARNING: The sale of this device is restricted to individuals by or on
the order of a licensed health care provider. The instructions provided
by your health care provider should be followed precisely. Do not
exceed the recommendations of your health care provider. Exceeding
these recommendations may aggravate an existing condition or cause
additional injury. Traction should never cause pain. A stretching
sensation or some slight discomfort may be felt during treatment.
Improper application of traction or the use of excessive force may
aggravate an existing condition or cause additional injury. If pain is
increased in the neck, back, arms or legs, or if you experience
dizziness, nausea or any other type of pain or discomfort during or
after treatment, discontinue use immediately and consult your hea
care provider before further use.
lth
2
Page 3
Before You Begin
Review the guidelines you received from your healthcare provider
regarding the:
• amount of traction recommended (never so much that it hurts)
• duration (amount of time) of each treatment
• hold and relax times if intermittent traction is recommended
• number of treatments recommended per week or per day
For lumbar (low back) traction, remove clothing, belts and accessories
around the trunk and lower back area. The upper and lower stabilization
belts will stay more secure if they are in contact with bare skin.
Therefore, for best results, rem
ove your shirt and slide your pants
down below your hips or remove them.
SECTION TWO: SET-UP AND USE - LUMBAR HOMETRAC
DELUXE
This section is for set-up and use of the Saunders Lumbar HomeTrac
Deluxe. If you have purchased a Saunders STx®Lumbar Traction
Device, proceed to Section Four on page 9.
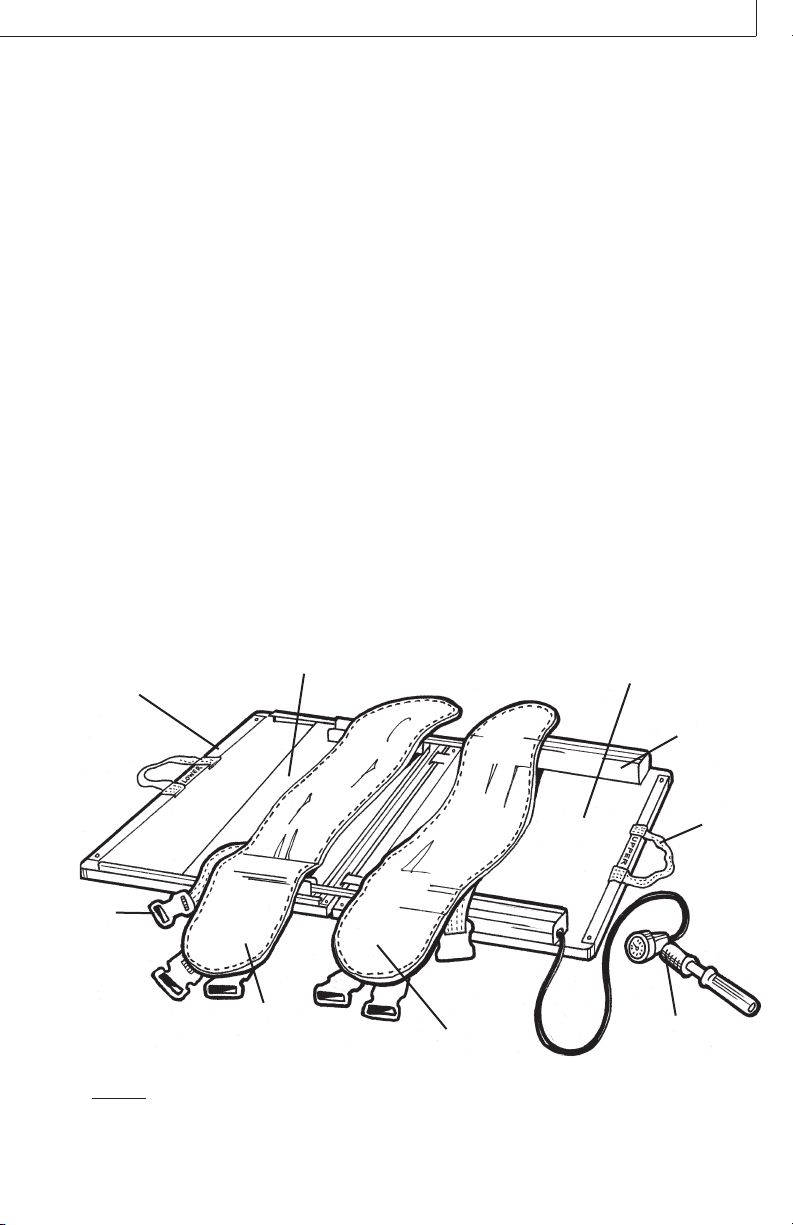
Components - Lumbar HomeTrac Deluxe
Fixed Lower surface
(Labeled ‘Lower’)
Buckles
Lower Stabilization Belt
Moveable
Lower Surface
Upper Stabilization Belt
Fixed Upper Surface
(Labeled ‘Upper’)
Hand Pump
with Gauge
®
Air Cylinder
Carrying
Handle
Figure 1. Components of the Lumbar HomeTrac Deluxe.
Page 4

Set-up - Lumbar HomeTrac Deluxe
1. Remove the Saunders Lumbar HomeTrac Deluxe from the carrying
case. Place the Lumbar HomeTrac Deluxe on a rm surface.
2. Lay the Lumbar HomeTrac Deluxe out at. Figure 2 shows how the
“J” tabs on the upper surface easily t into the slots on the lower
end.
3. Remove the hand pump from the foam enclosure. Place the hand
pump on the oor next to the unit as shown.
4. Open the buckles on the stabilization belts.
Position the belts so that their edges are
barely overlapping, lower belt over upper
belt.
5. Have a clock, timer or wrist watch available
to time your treatment.
Figure 2. J tabs.
Applying Traction in Supine (Back-Lying) Position - Lumbar
HomeTrac Deluxe
1. Kneel on hands and knees in an “all fours” position, on one side
of the Saunders Lumbar HomeTrac Deluxe, with you
r head toward
the UPPER end.
2. Slowly turn your body and sit on the LOWER surface just below
the lower stabilization belt.
3. Gently lower yourself so that you are lying on your side on top of
the stabilization belts. Make sure the belts are still in the correct
position, edges barely overlapping. Now, roll over onto your back.
(Your waistline should rest on the area where the belts overlap).
4. If desired, or as instructed by your health care provider, place
pillows, wedges or bolsters under your knees, back and/or head
(Figure 3).
5. Secure the lower stabilization belt over your bare skin rst. Click
the buckles on the straps closed. Tighten the straps as snugly as
possible. Now secure the upper stabilization belt the same way.
4
The top buckle does not have to be buckled if it is uncomfortable.
Page 5

6. NOTE: It is important that both belts t quite snugly – as tight as
possible without discomfort. Retighten both belts now, if needed.
7. Apply traction using the pump as described in Section Three.
NOTE: Your health care provider may instruct you to:
• use several pillows (or bolster) under your knees for more exion
(forward bending) of your lower back
• position your legs fully straightened for less exion, or;
• place a small towel (or wedge) under the lower (pelvic) belt for
neutral or slight extension (backward bending) of your lower
back.
Refer to Figure 3 for instruction in the various position options.
A. Bolster under the knees for more lower back
(forward bending)
B. Legs straight for less lower back
C.Wedge under lower stabilization belt for neutral low back
position or slight back extension (backward bending)
Figure 3. Position Options in Supine (Back-Lying).
5
Page 6

Applying Traction in Prone (Stomach-Lying) Position - Lumbar
HomeTrac Deluxe
Follow instructions for Supine (Back-Lying) Position, with the following
exceptions:
1. Once you are lying on the Lumbar HomeTrac surface, place pillows
under your ankles and a small towel under your head for comfort.
2. Have a partner secure the stabilization belts over your bare skin
as described in Step 5 on page 6.
SECTION THREE: HAND PUMP OPERATION
Once you are secure and comfortable in your Saunders Lumbar Traction
Device, you will apply traction by pumping air into the cylinders using a
hand pump (Figure 4).
A
Figure 4. Hand pump operation.
A) Close-up of gauge housing;
B) Both in and out motions of the
pump the cylinder with air.
B
First, rotate the gauge housing of the hand pump to the “PUMP” position.
Begin SLOWLY pumping air into the cylinder by stroking the pump handle
all the way out and all the way in. Observe the gauge to make sure you
are staying within the guidelines provided by your health care provider.
DO NOT OVER-INFLATE.
NOTE: If you give too much traction, rotate the gauge housing to the
“RELEASE” position to let some air out of the system. Begin again by
rotating the gauge housing to the “PUMP” position.
When you have reached the desired amount of stretch, rotate the
gauge housing to the “HOLD” position. Begin timing you
6
now, following the instructions of your health care provider.
r treatment
Page 7

Do not exceed the level of traction prescribed by your health care
provider. The stretch provided by traction should never cause pain.
Relax . . . let your traction device do the work.
When the treatment is complete, release the traction by rotating the
gauge housing to the “RELEASE” position. Slacken the belts, then
release the buckles. You should rest and relax for a few moments
before getting out of the traction device.
Return the Lumbar HomeTrac to the starting position by lifting the
UPPER end to a 90˚ angle and gentl
y applying downward pressure.
For the STx, lift the LOWER section.
Review of Hand Pump Operation
1. “HOLD” - holds traction force at desired level.
2. “PUMP” -
the cylinder with air, increasing the traction force.
3. “RELEASE” - empties air from the cylinder during or after treatment
and prior to use.
SECTION FOUR: SET-UP AND USE - STX®LUMBAR
TRA CTION DEVICE
This section is for set-up and use of the Saunders STx®Lumbar
Traction Device. After you have secured yourself comfortably in the
STx Lumbar Traction Device, go back to Section Three for operation of
the hand pump.
Components - STx Lumbar Traction De vice
Upper Stabilization Belt
Lower Stabilization Belt
Hinge
Lower belt anchor
Carrying
Handle
Moveable
Lower Surface
Figure 5. Components of the Saunders STx Lumbar Traction Device.
Buckles
Cylinder Rods
Air Cylinders
Fixed Upper
Surface
from
Hand Pump
with Gauge
Left and Right Anchors for
Optional Unilateral
Attachment
Storage
Compartment
7
Page 8

Set-up - STx Lumbar Traction Device
1. Place the STx on a rm surface. Open the closure straps that
secure the STx in a closed position and lay it out at.
2. Remove the stabilization belts (2) and hand pump from the storage
compartment. Place the hand pump on the oor next to the unit.
3. Attach the lower and upper stabilization belts to the lower and
upper anchor hooks as shown (Figure 5). Position the belts so
that their edges are overlapping. NOTE: For one-sided (unilateral)
traction, the upper belt can be attached to the left or right anchor
attachment as instructed by your health care provider.
4. Have a clock, timer or wrist watch available to time your treatment.
Applying Traction - STx Lumbar Traction Device
Positioning yourself and securing the stabilization belts on the STx
Lumbar Traction Device are the same as previously described in the
Applying Traction section beginning on Page 6. Go back to Section
Three for operation of the hand pump.
SECTION FIVE: MAINTENANCE AND TROUBLESHOO TING
Maintenance
If you believe your Saunders Lumbar Traction Device requires
maintenance, contact your authorized Saunders Traction Products
dealer or contact the Saunders Group, Inc.®at 1-800-966-4308 or
(952) 368-9214 or sales1@thesaundersgroup.com.
Cleaning
All surfaces of your Saunders traction device may be cleaned with a
mild detergent or disinfectant. Do not immerse unit in water. The
Saunders Lumbar HomeTrac®Deluxe and STx®Lumbar Traction
Devices should be left in the “open” position to air dry. If unit is
transferred between different users, all surfaces should be cleaned
using standard cleaning techniques paying particular attention to the
components that come in contact with the body.
8
Page 9

Storage
Your Saunders Lumbar HomeTrac should be stored in its protective
case. Replace the pump in the protective foam enclosure. Fold all
belts, closing buckles where applicable. Your Saunders STx should be
stored in the closed or folded position with all components stored in
the storage compartment.
Troubleshooting
Saunders Lumbar Traction Devices feature a very accurate, sensitive
gauge. The pump is speci cally designed not to leak in the “HOLD”
position. If you notice a drop in the gauge reading when in the “HOLD”
position it is probably because you have relaxed or moved slightly. If
this happens, return to the “PUMP” position and pump back to the
desired force, then reset to “HOLD”. If the traction device loses air rapidly,
there may be a leak in the system.
Questions to Ask:
• Is the pump in the “PUMP” position when pumping?
• Is the pump in the “HOLD” position when receiving treatment?
• Are you lying still? (Any movement will cause
• Are you pumping slowly?
• Are all the connections tight (i.e. hose cap, lens cap)
If the unit is leaking air, try the following:
• Check the air hose connections at the hand pump
and gently tighten as necessary. Do not over-tighten as the
threads may strip.
• Tighten the hand pump shaft sleeve cap located above the
serial number label.
ctuation).
active forever
www.ActiveForever.com
.com
 Loading...