

Page 1

MGB-150
Installation Guide
2019/09/23
Page 2

www.acti.com
Installation Guide
Table of Contents
Part 1: Camera Placement................................................................ 4
Lighting .......................................................................................... 5
Angle of Capture ............................................................................ 6
Pixel Size of Target ........................................................................ 7
Part 2: Camera installation: ............................................................. 8
Part 3: Camera setting ...................................................................... 9
2
Page 3

www.acti.com
Installation Guide
Precautions
Trademarks
ACTi and ACTi logo are registered trademarks of ACTi Corporation. All other names and
products used in this manual are registered trademarks of their respective companies.
Liability
Every reasonable care has been taken during the writing of this manual. Please inform your
local office if you find any inaccuracies or omissions. ACTi will not be held responsible for any
typographical or technical errors and reserves the right to make changes to the product and
manuals without prior notice.
Disclaimer
Every reasonable care has been taken during the writing of this manual. Please inform your
local office if you find any inaccuracies or omissions. ACTi will not be held responsible for any
3
Page 4
www.acti.com
Installation Guide
Thank you for purchasing ACTi products and solutions. The following documentation covers
basic installation instructions of cameras that will be used with your MGB device.
NOTE: The accuracy of the analytics algorith may be affected by different environmental
factors or inappropriate installation. Please follow the procedures in this guide. ACTi will not be
liable for inaccuracies resulting from the aforesaid causes.
Part 1: Camera Placement
License plate recognition accuracy is highly dependent on the video input quality. If a human
cannot read the license plate characters, then any software will not be able to accurately read
the characters, as well. If the camera is properly set up, high accuracy is most likely. If the
camera cannot clearly capture license plates, then the results may be less accurate.
Test your camera. First, try to freeze a frame as a car drives past and try to read the license
plates. If you cannot do this easily, the License Plate Recognition (LPR) system will not be
successful. Even if the plate numbers are legible, make sure the camera is properly configured
for LPR.
In the image below, the license plate appears to be legible. We can read **. The image
contrast however is very poor so the characters appear blurry with gray blending into the plate
background and other characters. The LPR system will struggle to accurately read this kind of
license plates.
4
Page 5

www.acti.com
Installation Guide
The same license plate is shown below, with the camera zoomed in and lighting is better.
Camera placement and video quality are the two most important factors that affect the
accuracy of LPR systems. To achieve the highest possible performance, make sure to
optimize the following:
1. Lighting
2. Angle of capture
3. Pixel size of target
4. Camera image settings
Lighting
In order to clearly capture license plates of moving vehicles, adequate lighting is a MUST.
Fast-moving objects require more amount of lighting. Cameras can be configured to
automatically adjust their shutter speed based on the amount of available light.
Shutter speed is very important because it correlates to the sharpness of a moving vehicle. A
faster shutter would be able capture a moving vehicle without motion blur; therefore a clear
license plate image can be obtained. A slow shutter speed would result in blurry image of a
moving vehicle thus the license plate will not be easily readable.
5
Page 6

www.acti.com
Installation Guide
However, increasing the shutter speed is not enough to to get accurate results. Enough
lighting is still required.
If the camera has day and night function and has an IR cut filter, use an external infrared
illuminator and point it towards the direction of the vehicle. The filter will remove the headlights,
leaving the dimmer license plates clearly visible. You can also use spotlights or white LED
lights, as alternatives.
Angle of Capture
The viewing angle when capturing the license plates is very important to achieve accurate
results. Accuracy is lessened when the camera is tilted by more than 30-degree horizontal or
vertical angle. It is recommended to mount the camera with enough height and slightly angled
downwards to avoid direct headlight or taillight glare.
To decrease the tilt angle, use a zoom camera. You can install the camera farther from the
target position and zoom in on the field of view. A camera installed parallel to the road will
achieve more accurate results than a wide viewing angle perpendicular to the road.
6
Page 7

www.acti.com
Installation Guide
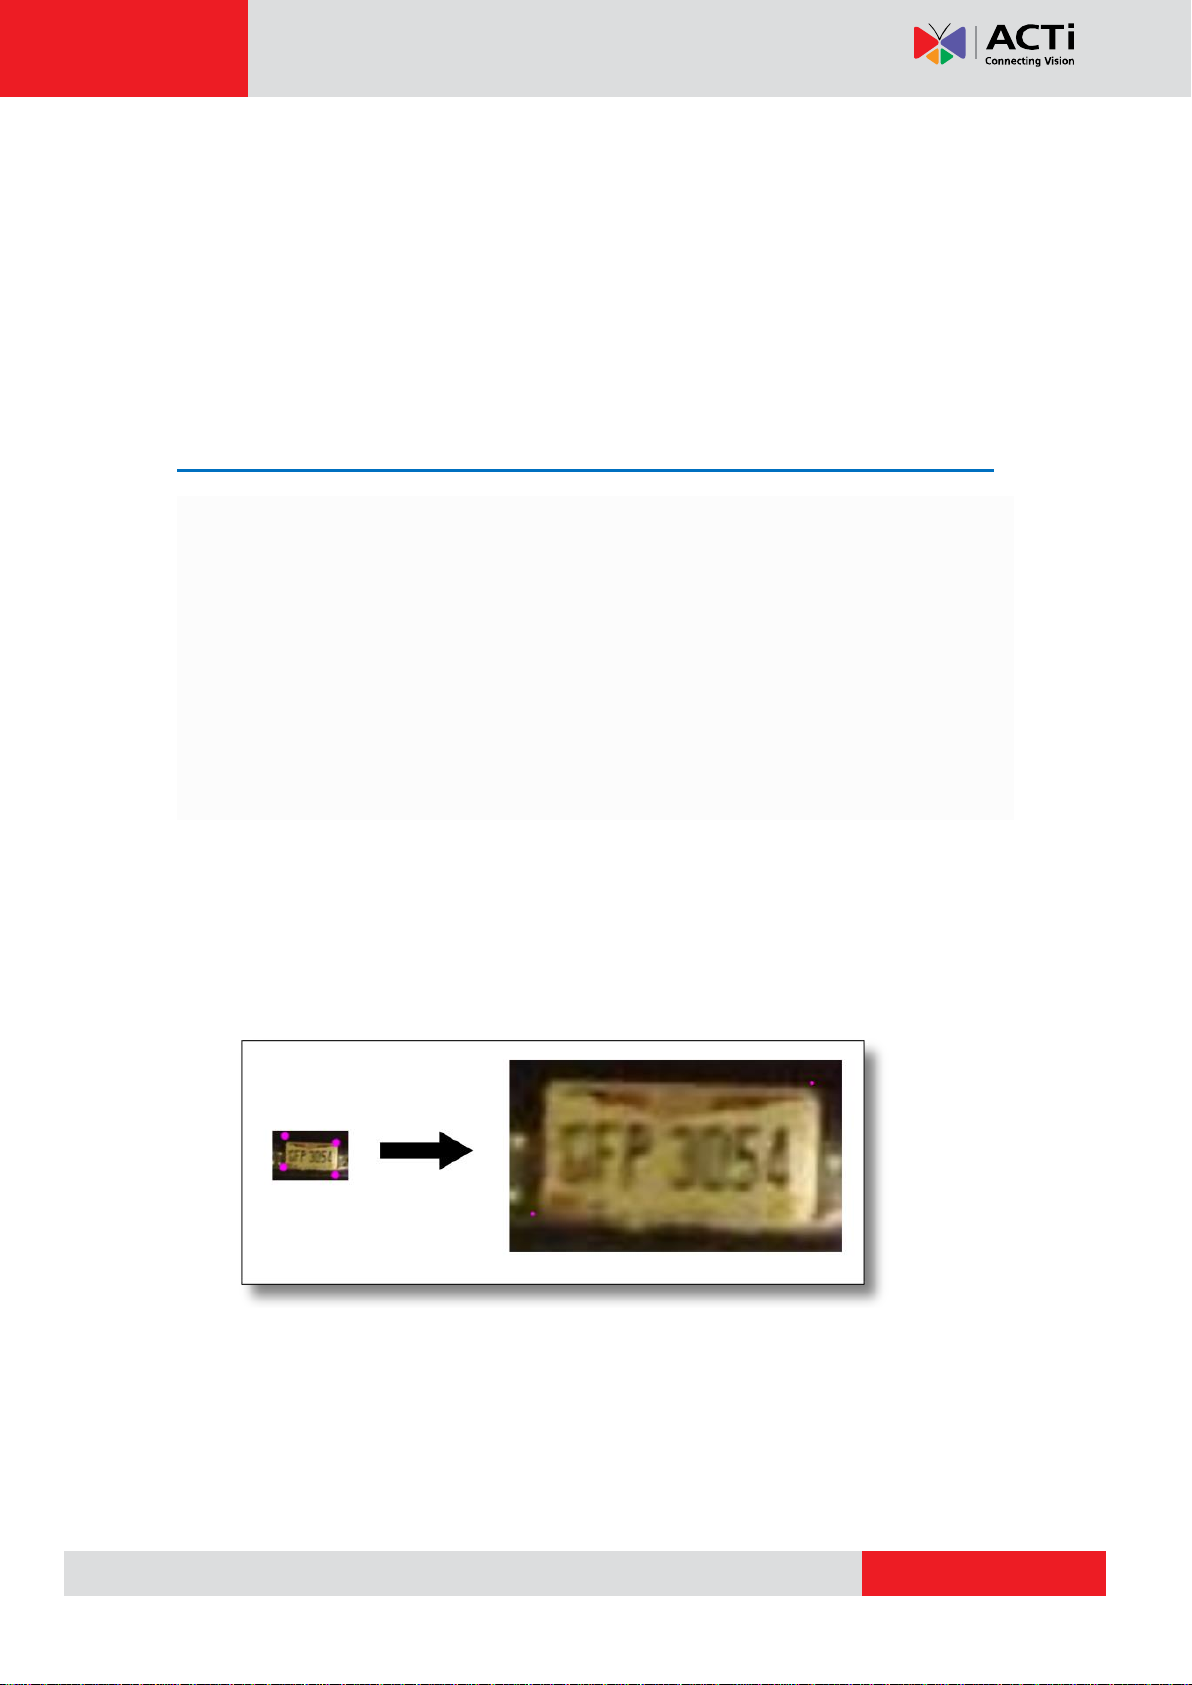
Pixel Size of Target
To increase the pixel size of the target, zoom in on the target view where the license plates will
be captured and increase the camera resolution. The screenshots below compare a camera
with a wide field of view to a camera zoomed to the area of the license plates. Both
approaches will work because the pixel width is sufficient in each shot; however, plate
recognition will be more accurate in the zoomed example.
Adjusting your camera’s resolution can also increase the pixels for each plate. However,
increasing the number of pixels will also increase the processing time. Therefore, if CPU
resources are not infinite, increasing the resolution too much may decrease accuracy. We
recommend setting the camera resolution no higher than 720p, making sure the plates still
have enough pixels to be detected. If the camera is sufficiently zoomed, further decreasing the
resolution may, counterintuitively, improve accuracy.
7
Page 8

www.acti.com
Installation Guide
Part 2: Camera installation:
Mount the camera at a maximum range of 40 pixels per foot (or 131 pixels per meter) to
ensure enough pixels on target (divide the horizontal camera resolution by 40 or 131 =
maximum distance in feet/meter respectively). Use the pixel counter feature (see Focus &
Zoom settings) to ensure at least 100 horizontal pixels (USA) or 150 (EU) and at least 80
vertical pixels on the plate.
Keep the angle of capture less than 40 degrees horizontally and vertically. The more you can
minimize the angle the better the results will be. If possible mount the camera high enough and
angled slightly downward so as to avoid direct headlight/taillight and solar roof/hood/boot
glare.
Maximum Vertical Angle
Maximum Horizontal Angle
8
Page 9

www.acti.com
Installation Guide
Ideal Horizontal Angle
Part 3: Camera setting
Resolution/Frame Rate = 720p (1280x720) and 20 frames per second are a good
starting point depending on how far away the camera is to the plate. Remember your
pixels on target equation above to determine maximum distance of the camera. The more
you increase the resolution the more CPU processing power is required.
Camera Capture Mode
o Wide Dynamic Range(WDR) = Off. This feature adds noise to the image which affects
accuracy in low light conditions.
Image Appearance
o Color level = default setting
o Brightness = default setting
o Sharpness = 60% - 65%
o Contrast = 60 - 75%
White Balance
o White balance = Automatic
o White balance window = Automatic
Exposure Settings
o Exposure value = 70%
o Exposure control = Automatic
o Maximum Exposure Time =1/1000 second
o Backlight compensation = off
o Exposure zone = Auto
o Shutter Speed = Fixed @ 1/2000 - for slow speed; 1/4000 + for highway speed.
o Gain = Auto
o Max Gain = +12 (day) +24 db (night). Avoid excessive gain settings which will add
noise to the image.
9
Page 10

www.acti.com
Installation Guide
Image Settings
o Enable automatic iris adjustment = yes
Day/Night
o IR cut filter = On (during Day), Off (Night)
IR Illumination (if required)
o Enable IR illumination = yes
10
Page 11

Copyright © 2019, ACTi Corporation All Rights Reserved
7F, No. 1, Alley 20, Lane 407, Sec. 2, Ti-Ding Blvd., Neihu District, Taipei, Taiwan 114, R.O.C.
TEL : +886-2-2656-2588 FAX : +886-2-2656-2599
Email: sales@acti.com
 Loading...