

Page 1

Media Display Station
User Manual
MDS-100
2020/03/17
Page 2
www.acti.com
Hardware Manual
Table of Contents
Precautions ........................................................... 5
Safety Instructions ................................................................................. 7
Introduction ........................................................... 8
Package Contents ................................................................................... 8
Prerequisites ........................................................................................... 8
Physical Description .............................................................................. 8
Setting Up the Player ............................................ 9
Connect the Player ................................................................................. 9
Create an Account ................................................................................ 10
Register the Player on Your Account .................................................. 10
Create the Content ................................................................................ 11
ACTi Media Management Application ............... 12
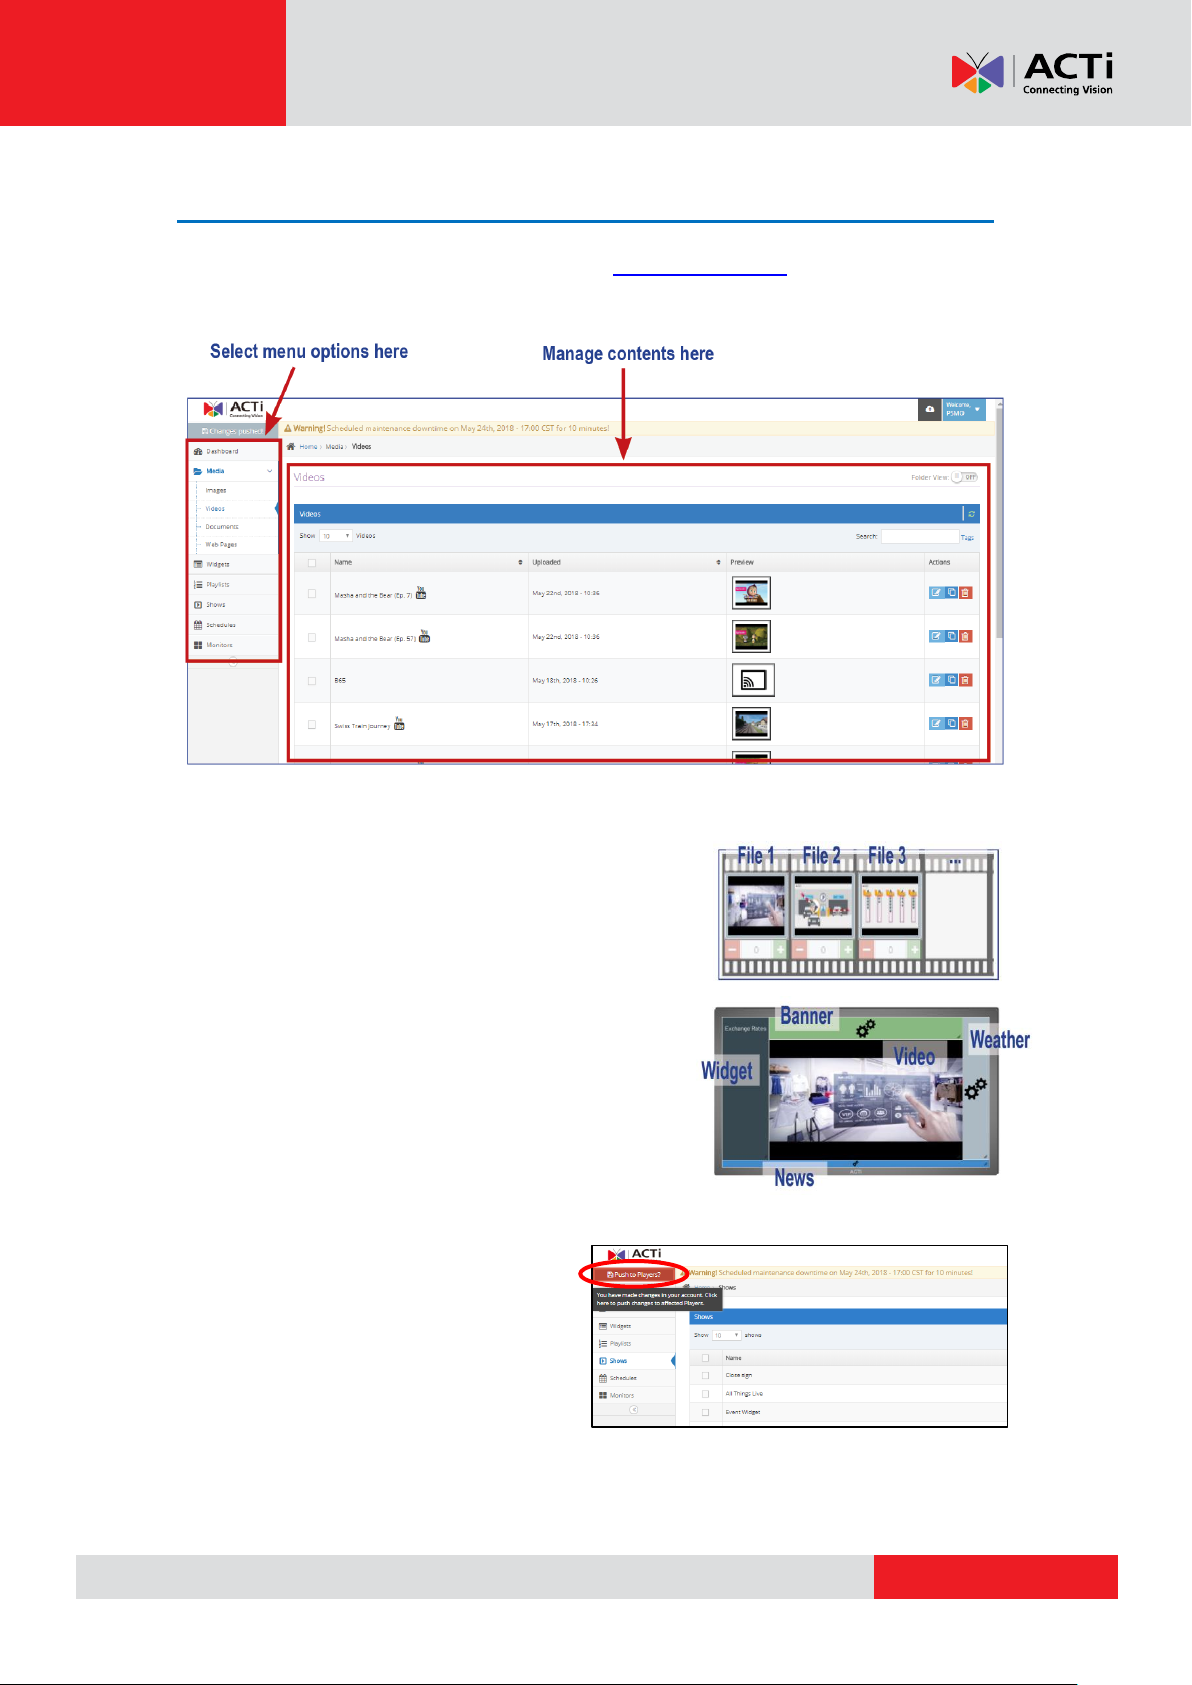
Overview of the Application Portal ...................................................... 12
Main Menu ......................................................................................... 12
Main Area ........................................................................................... 12
Settings Menu .................................................................................... 13
Upload Progress & Help Icons ........................................................... 13
Pushing Changes to Monitors ............................................................ 13
The Dashboard ...................................................................................... 14
Monitor Status (A) .............................................................................. 14
Monitor Locations (B) ......................................................................... 14
Remember the Basics (C) .................................................................. 14
Media ..................................................................................................... 15
Images ............................................................................................... 15
2
Page 3

www.acti.com
Hardware Manual
Videos ................................................................................................ 20
Documents ......................................................................................... 25
Web Pages ........................................................................................ 31
Widgets .................................................................................................. 34
Managing Widgets ............................................................................. 34
Standard Widgets .............................................................................. 35
Custom Widgets ................................................................................. 38
Playlists ................................................................................................. 39
Managing Playlists ............................................................................. 39
Managing Playlists with Folder View .................................................. 41
Playlist within Playlist ......................................................................... 43
Tag Based Playlist .............................................................................. 44
Shows (Layouts) ................................................................................... 46
Managing Shows ............................................................................... 46
Turned Off Show (Turn Your TV On and Off) ..................................... 49
Schedules .............................................................................................. 51
Managing Schedules.......................................................................... 51
Monitors................................................................................................. 55
Adding a Monitor ................................................................................ 55
User Settings ......................................................................................... 62
My User Profile .................................................................................. 62
Account Settings .................................................................................. 64
Users .................................................................................................. 64
Workspaces ....................................................................................... 66
Playback Reports ............................................................................... 70
User - Custom Roles and Permissions .............................................. 73
Custom Widget Developer’s Guide ................... 78
Introduction to Custom Widgets ......................................................... 78
Options for building a Custom Widget ................................................ 78
Quick Comparison of Custom Widget options .................................... 79
Building a Web Widget ......................................................................... 80
Why Develop a Web Widget? ............................................................ 80
What are the requirements? ............................................................... 80
Creating a Web Widget ...................................................................... 80
Building HMTL Widget .......................................................................... 82
Why Develop an HTML Widget? ........................................................ 82
3
Page 4

www.acti.com
Hardware Manual
Tutorial – Your 1st Widget ................................................................... 84
How Content Transition Works ........................................................... 93
HTML Widget Reference .................................................................... 94
UI Form Definition for Custom Widgets ............................................ 102
Web Scripting Engine ....................................... 107
Scripting Engine Reference ............................................................... 108
Syntax (MUST-READ) ...................................................................... 108
Available Commands ....................................................................... 109
Selectors .......................................................................................... 111
Tutorial – Google Analytics ................................................................ 112
Useful Scripts To Use ......................................................................... 114
Scripting FAQ ...................................................................................... 116
Scripting Templates ............................................................................ 117
Mask Your Credentials at the Scripting Engine Text Field .............. 117
Basic Information (Must Read) ......................................................... 117
Security ............................................................................................ 118
4
Page 5

www.acti.com
Hardware Manual
Precautions
Read these instructions
You should read all the safety and operating instructions before using this product.
Heed all warnings
You must adhere to all the warnings on the product and in the instruction manual. Failure to
follow the safety instruction given may directly endanger people, cause damage to the system
or to other equipment.
Servicing
Do not attempt to service this video device yourself as opening or removing covers may
expose you to dangerous voltage or other hazards. Refer all servicing to qualified service
personnel.
Trademarks
All names used in this manual are probably registered trademarks of respective companies.
Liability
Every reasonable care has been taken during the writing of this manual. Please inform your
local office if you find any inaccuracies or omissions. We cannot be held responsible for any
typographical or technical errors and reserve the right to make changes to the product and
manuals without prior notice.
5
Page 6

www.acti.com
Hardware Manual
Federal Communications Commission Statement
This equipment has been tested and found to comply with the limits for a
class B digital device, pursuant to Part 15 of the FCC Rules. These limits are
designed to provide reasonable protection against harmful interference in a
residential installation. This equipment generates, uses, and can radiate radio frequency
energy and, if not installed and used in accordance with the instructions, may cause harmful
interference to radio communications. However, there is no guarantee that interference will not
occur in a particular installation. If this equipment does cause harmful interference to radio or
television reception, which can be determined by turning the equipment off and on, the user is
encouraged to try to correct the interference by one or more of the following measures:
Reorient or relocate the receiving antenna.
Increase the separation between the equipment and receiver.
Connect the equipment into an outlet on a circuit different from that to which the
receiver is connected.
Consult the dealer or an experienced radio/TV technician for help.
Warning: Changes or modifications to the equipment that are not expressly approved by the
responsible party for compliance could void the user’s authority to operate the equipment.
European Community Compliance Statement
This product has been tested and found to comply with the limits for Class B
Information Technology Equipment according to European Standard EN 55022
and EN 55024. In a domestic environment, this product may cause radio interference in which
cause the user may be required to take adequate measures.
6
Page 7

www.acti.com
Hardware Manual
Safety Instructions
Cleaning
Disconnect this video product from the power supply before cleaning.
Attachments
Do not use attachments not recommended by the video product manufacturer as they may
cause hazards.
Do not use accessories not recommended by the manufacturer
Install the device, power supply and other accessories in a dry place protected from weather.
Servicing
Do not attempt to service this video product yourself. Refer all servicing to qualified service
personnel.
Damage Requiring service
Disconnect this video product from the power supply immediately and refer servicing to
qualified service personnel under the following conditions.
1) When the power-supply cord or plug is damaged
2) If liquid has been spilled, or objects have fallen into the video product.
3) If the inner parts of video product have been directly exposed to rain or water.
4) If the video product does not operate normally by following the operating Instructions in
this manual. Adjust only those controls that are covered by the instruction manual, as an
improper adjustment of other controls may result in damage, and will often require
extensive work by a qualified technician to restore the video product to its normal
operation.
Safety Check
Upon completion of any service or repairs to this video product, ask the service technician to
perform safety checks to determine if the video product is in proper operating condition.
7
Page 8
www.acti.com
Introduction
Hardware Manual
Package Contents
Check the package and make sure all items are present.
Media Display Station (MDS) or herein referred to as the “Player”
MicroSD card
HDMI cable
Power adapter
Power plug converter
Prerequisites
Aside from the items that came with the package, the items below might also be needed:
HDMI screen (TV or PC monitor)
Ethernet cable
Internet access
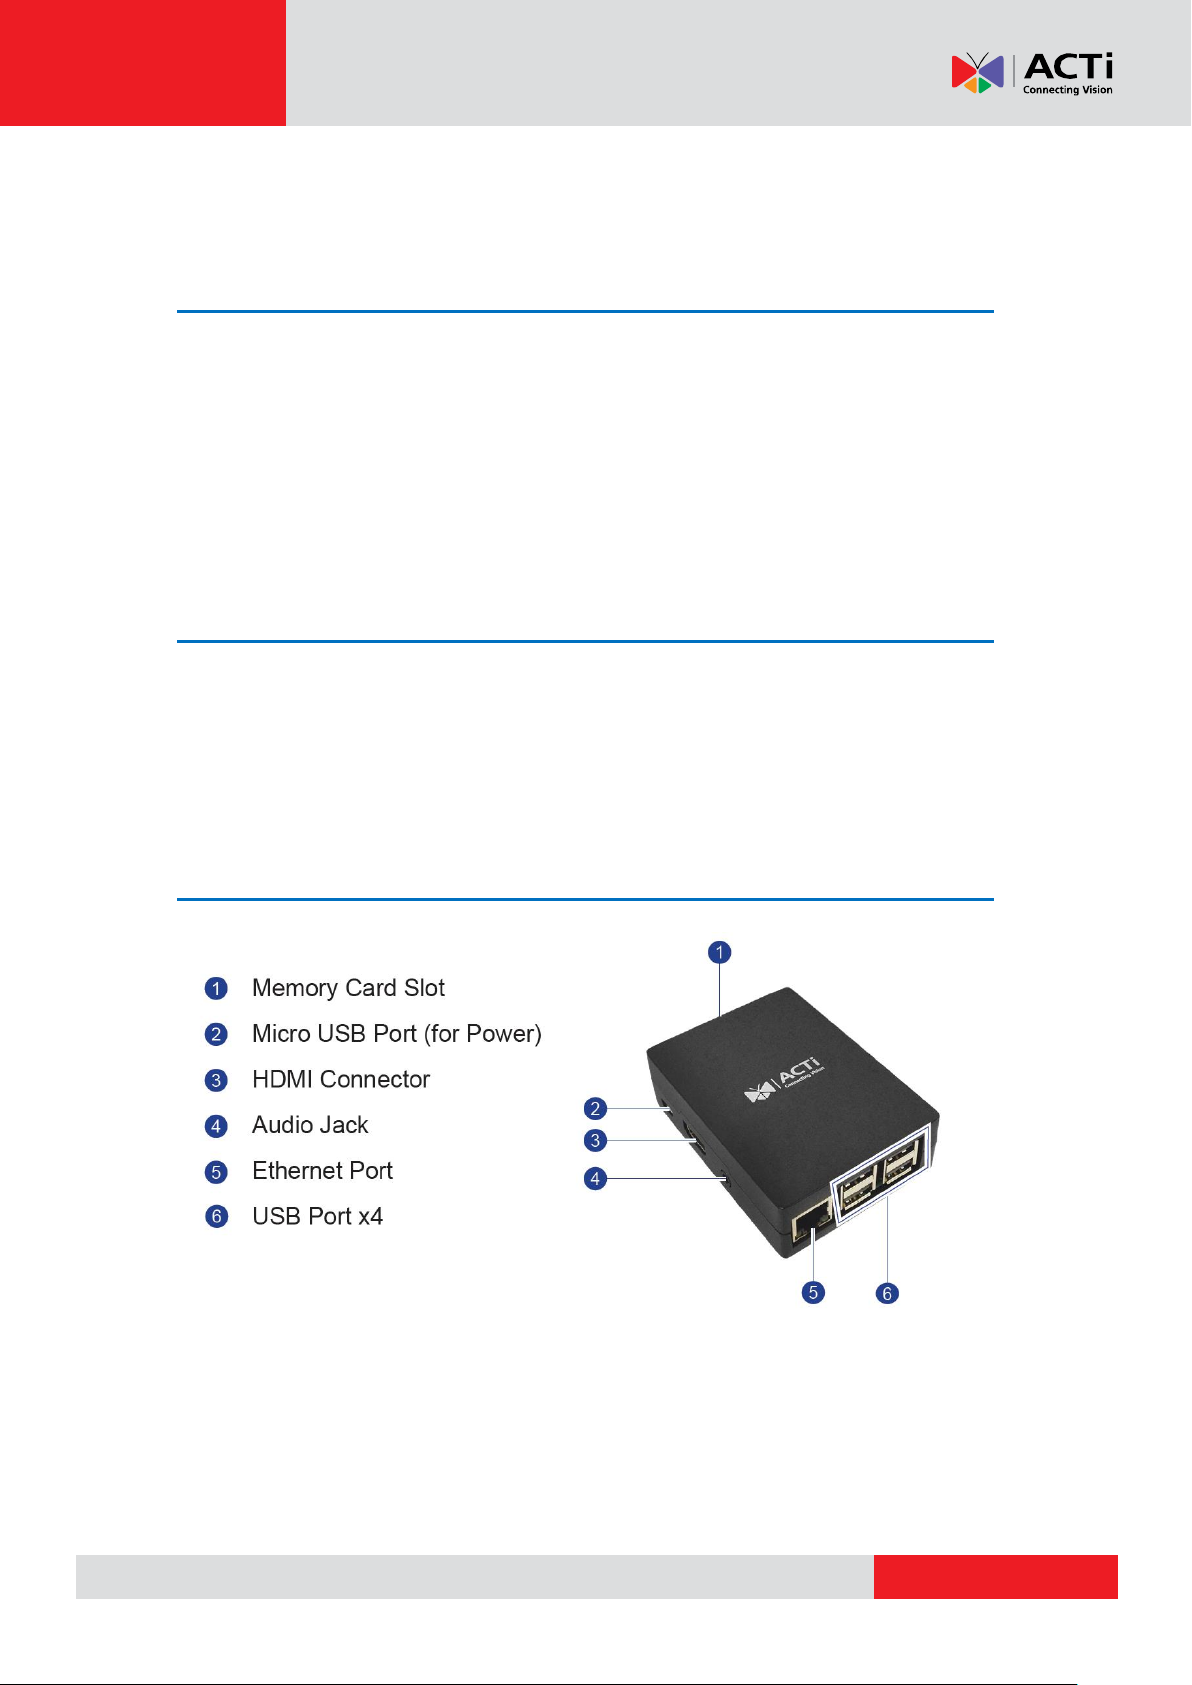
Physical Description
8
Page 9
www.acti.com
Hardware Manual
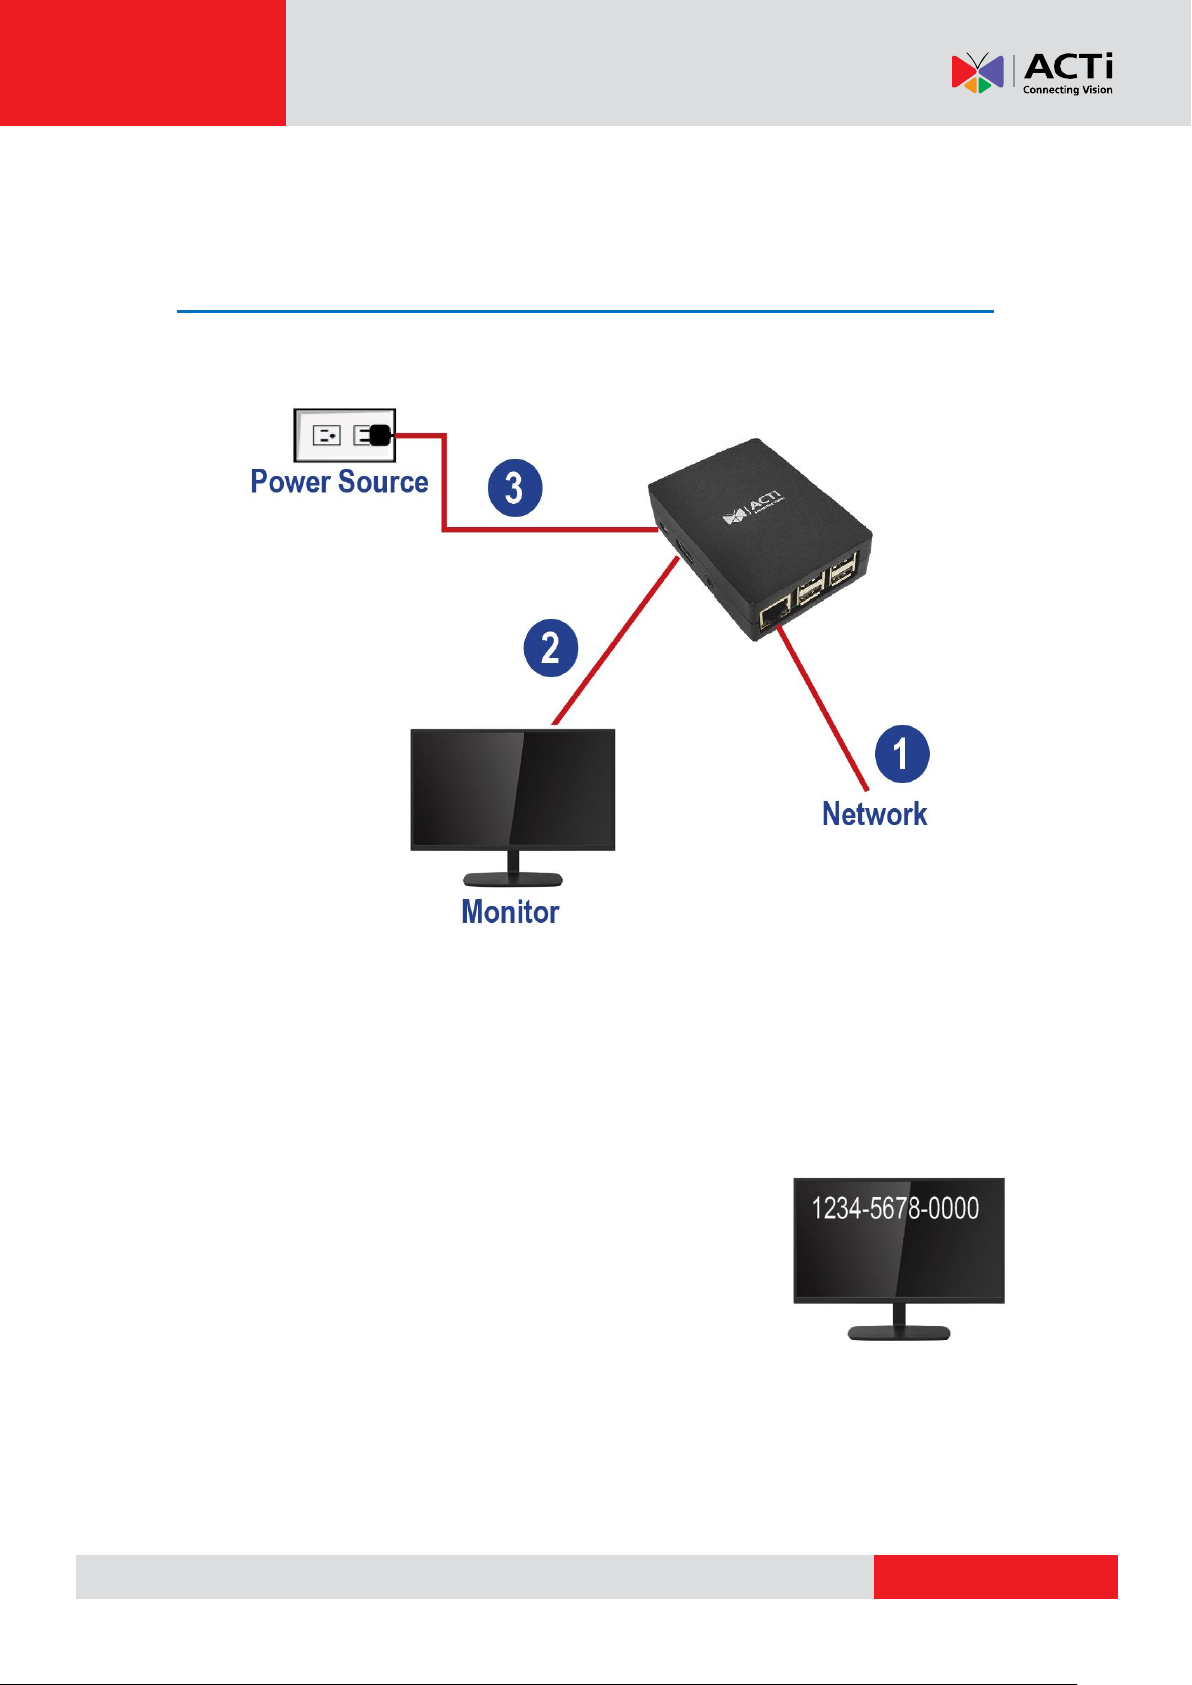
Setting Up the Player
Connect the Player
Follow the sequence of steps below to connect peripheral devices to the MDS.
1. Connect MDS-100 to the network via Ethernet cable.
2. Connect the monitor to the MDS via HDMI cable, then power up the monitor.
NOTE: Make sure to follow this step before powering up MDS to ensure the media
display station adapts the monitor resolution.
3. Connect the device to the power source.
4. The devices will boot up. After the system initializes, a
registration number will appear on the monitor. Write down
this number.
9
Page 10
www.acti.com
Hardware Manual
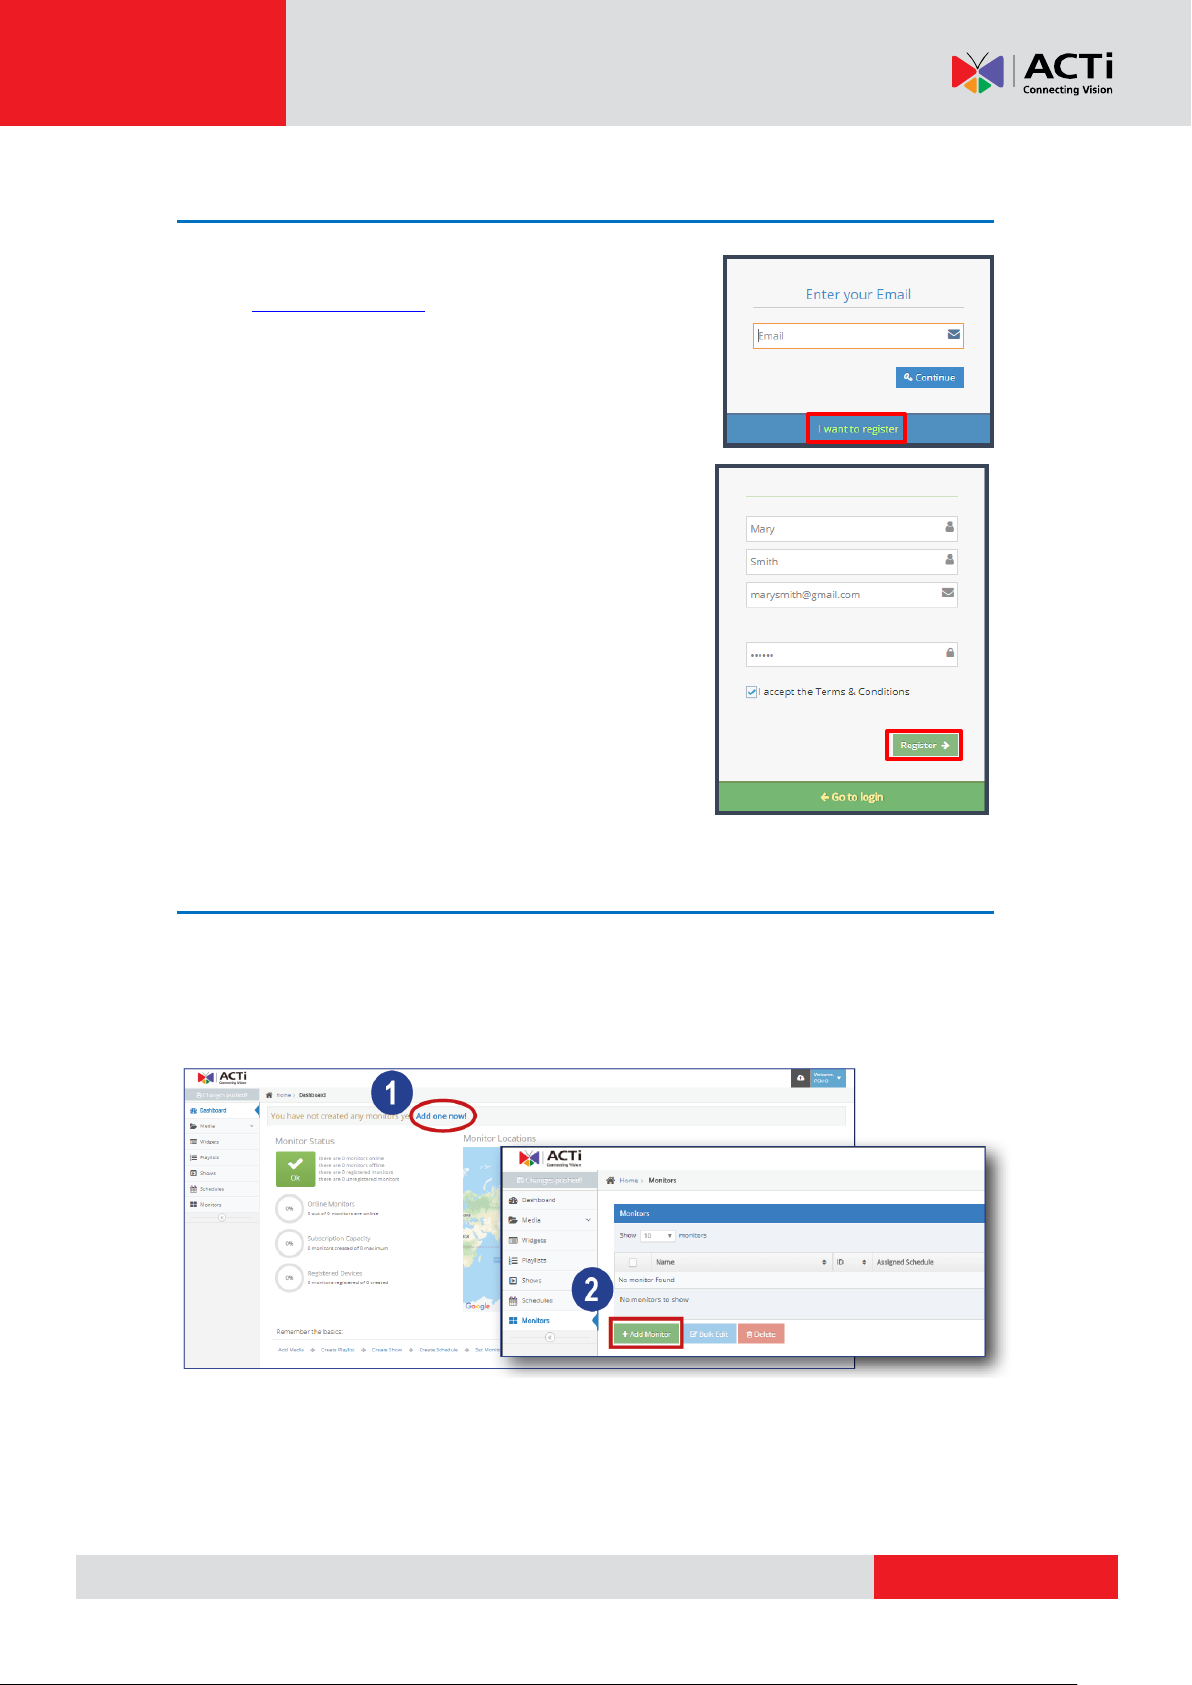
Create an Account
1. Open a web browser and type
https://app.acti.com on the URL bar.
2. Click I want to register.
3. Input the First Name, Last Name, Email and
Password.
4. Click I accept the Terms & Conditions, and
click Register.
Register the Player on Your Account
After creating an account, the ACTi Media Management Application automatically logs you in
and takes you to its Dashboard.
Click Add one now! Add Monitor, then enter the registration number.
NOTE: Monitor quota is a paid monthly service. Contact your sales agents for more information.
10
Page 11
www.acti.com
Hardware Manual
Create the Content
Access the ACTi Media Management Application (https://app.acti.com) interface to create your
digital signage content.
1. Add Media like videos, images, documents, etc.
2. Create a Playlist. Add the media files you want to
display into one playlist.
3. Create a Show. A show determines the layout or
how your contents will be displayed on the
monitor. It can include playlist, individual media
files and widgets (news, RSS feeds, etc.).
4. Create a Schedule. Set the schedule to play the show.
5. After creating any contents, click
Push to Players?.
The contents are pushed to the MDS
and the monitor will display the
contents based on the set schedule.
For detailed information on how to manage your contents, refer to the next section.
11
Page 12

www.acti.com
Hardware Manual
ACTi Media Management Application
This section describes what ACTi Media Management Application can do and how you can
customize your contents.
Overview of the Application Portal
The Application Portal allows you to manage your content and Players. On the left side
of the Portal, there is a main menu which provides all the navigation you need during the
day-by-day usage of the MDS.
Main Menu
This main menu includes the following sections:
Media: Upload your Media files to be used by the Players
Playlists: Setup Playlist, sequences of Media and Widgets, that are shown one
after the other in a timely manner
Widgets: Use Widgets, which are small applications design to show information,
like RSS tickers, clocks, texts, and more
Shows: Create layouts, arranging Playlists, Media or Widgets on a virtual screen
Schedules: Create a date/time-based Schedule for overriding which Show should
be displayed
Monitors: Setup your Players and assign them with a Default Show to use and,
optionally, a Schedule for time-based overrides
These are the sections you will be using in order to manage your content and your
Players.
Main Area
In the middle area of the Application Portal, you see the respective parts of the Portal
when you will be on them. These include listings (lists of Media, Playlists and other entities
you have created) as well as other configuration forms that you may use throughout the
Portal.
12
Page 13
www.acti.com
Grey button, saying "Changes pushed!"
Flashing red button, saying "Push to Players?"
Hardware Manual
Settings Menu
In the top-right corner, there is a drop-down configuration menu. This contains all the stuff that
you rarely access:
My User Profile: Settings that have to do with you, as a User of your Account (your
own timezone, your name and email, etc)
Account Settings
Users
Logout
Upload Progress & Help Icons
Right next to the Settings Menu, you will see a dropdown icon. This icon provides you with a
progress indicator for Media uploads (an encoding, if applicable).
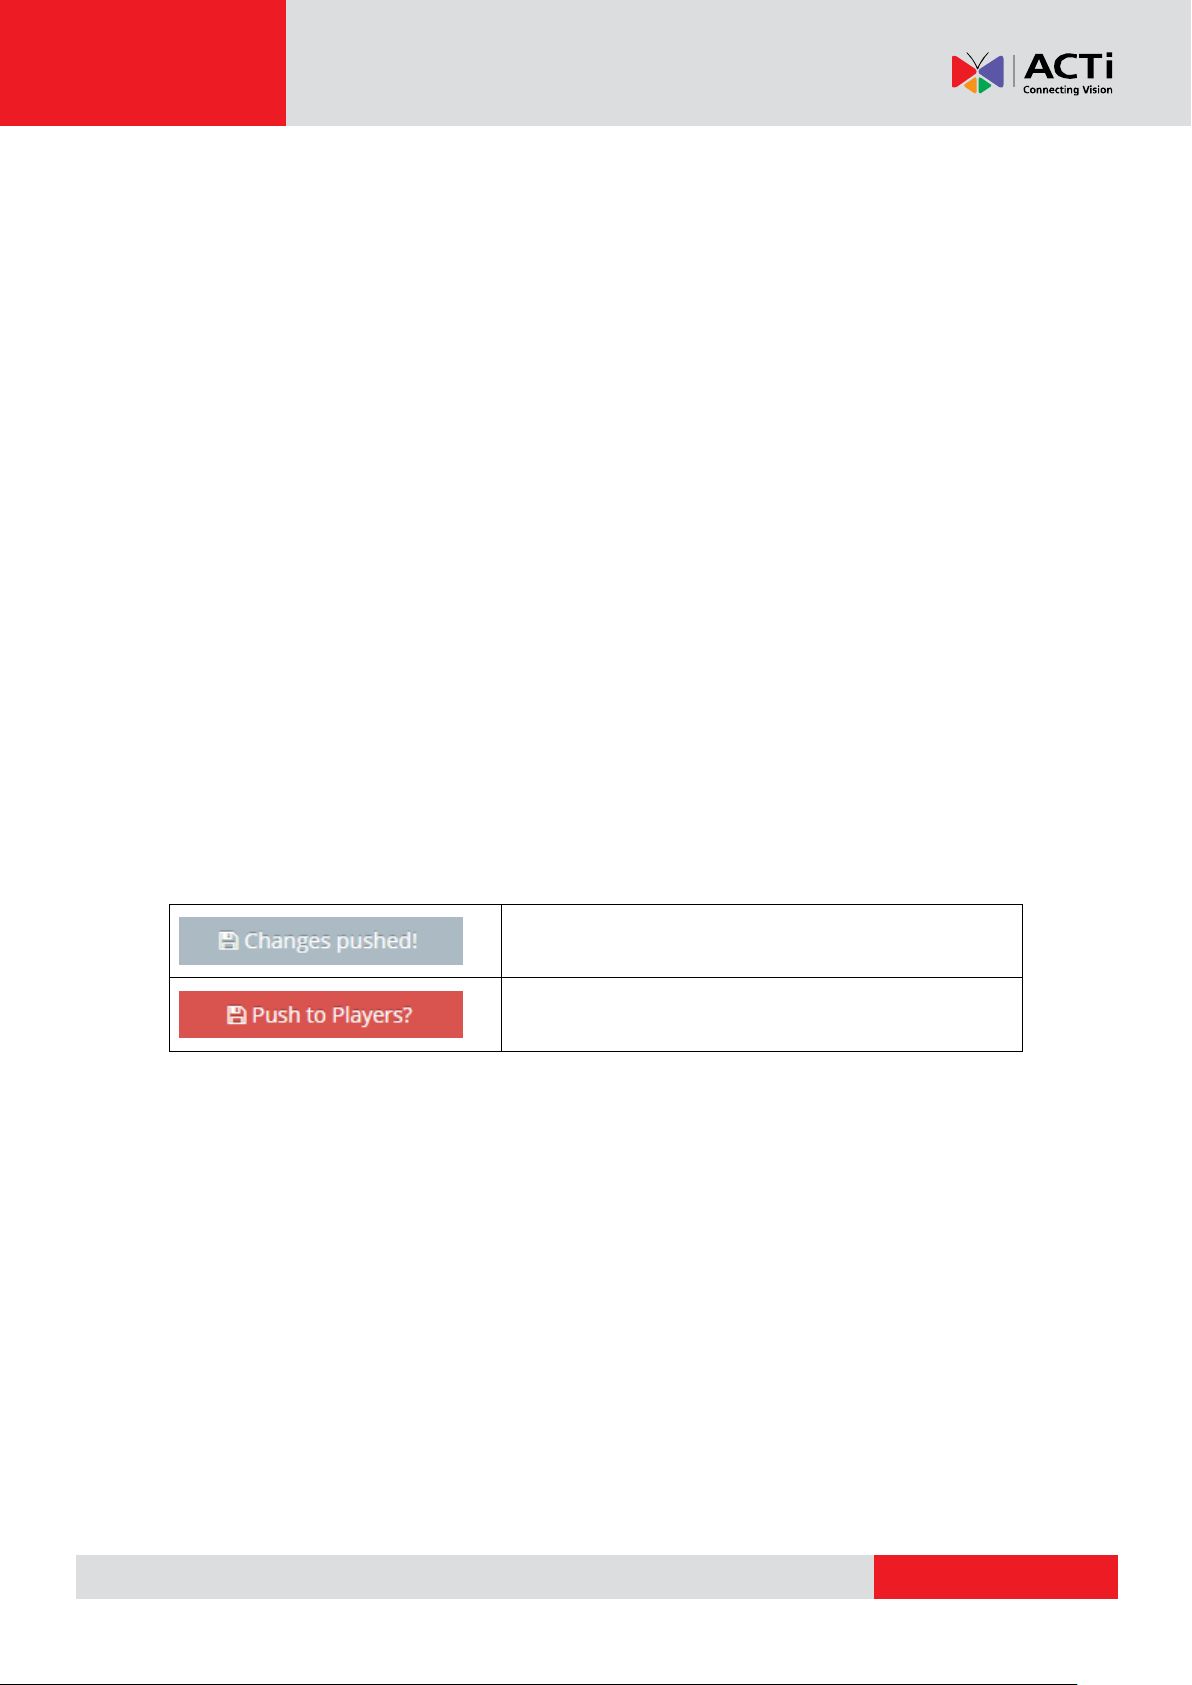
Pushing Changes to Monitors
It is very important that every time you make changes to any items within your account,
you have to click on the red flashing button "Push to Players" on the left side on top of
the Main Menu in order for these changes to take place in the affected players.
Above the Main Menu, you will find a button that will be either:
Whenever you make any changes within your account, the button will turn red and flash,
saying "Push to Players?". After you conclude all changes in your account, you need to
push the button to deliver the changes to the affected players. All Players affected by
your changes will download the required content and restart playback. Players not
affected by your changes will not be notified on the update.
Force Pushing
Even if the button is grey and saying "Changes pushed!", you might need to force a
"push" to all Players in your account. This might be needed as a troubleshooting tool, to
make sure everything works as expected.
By clicking the button when grey, you will notify all Players that they need to update
content, and all Players will re-check and restart Playback.
13
Page 14
www.acti.com
A B C
Hardware Manual
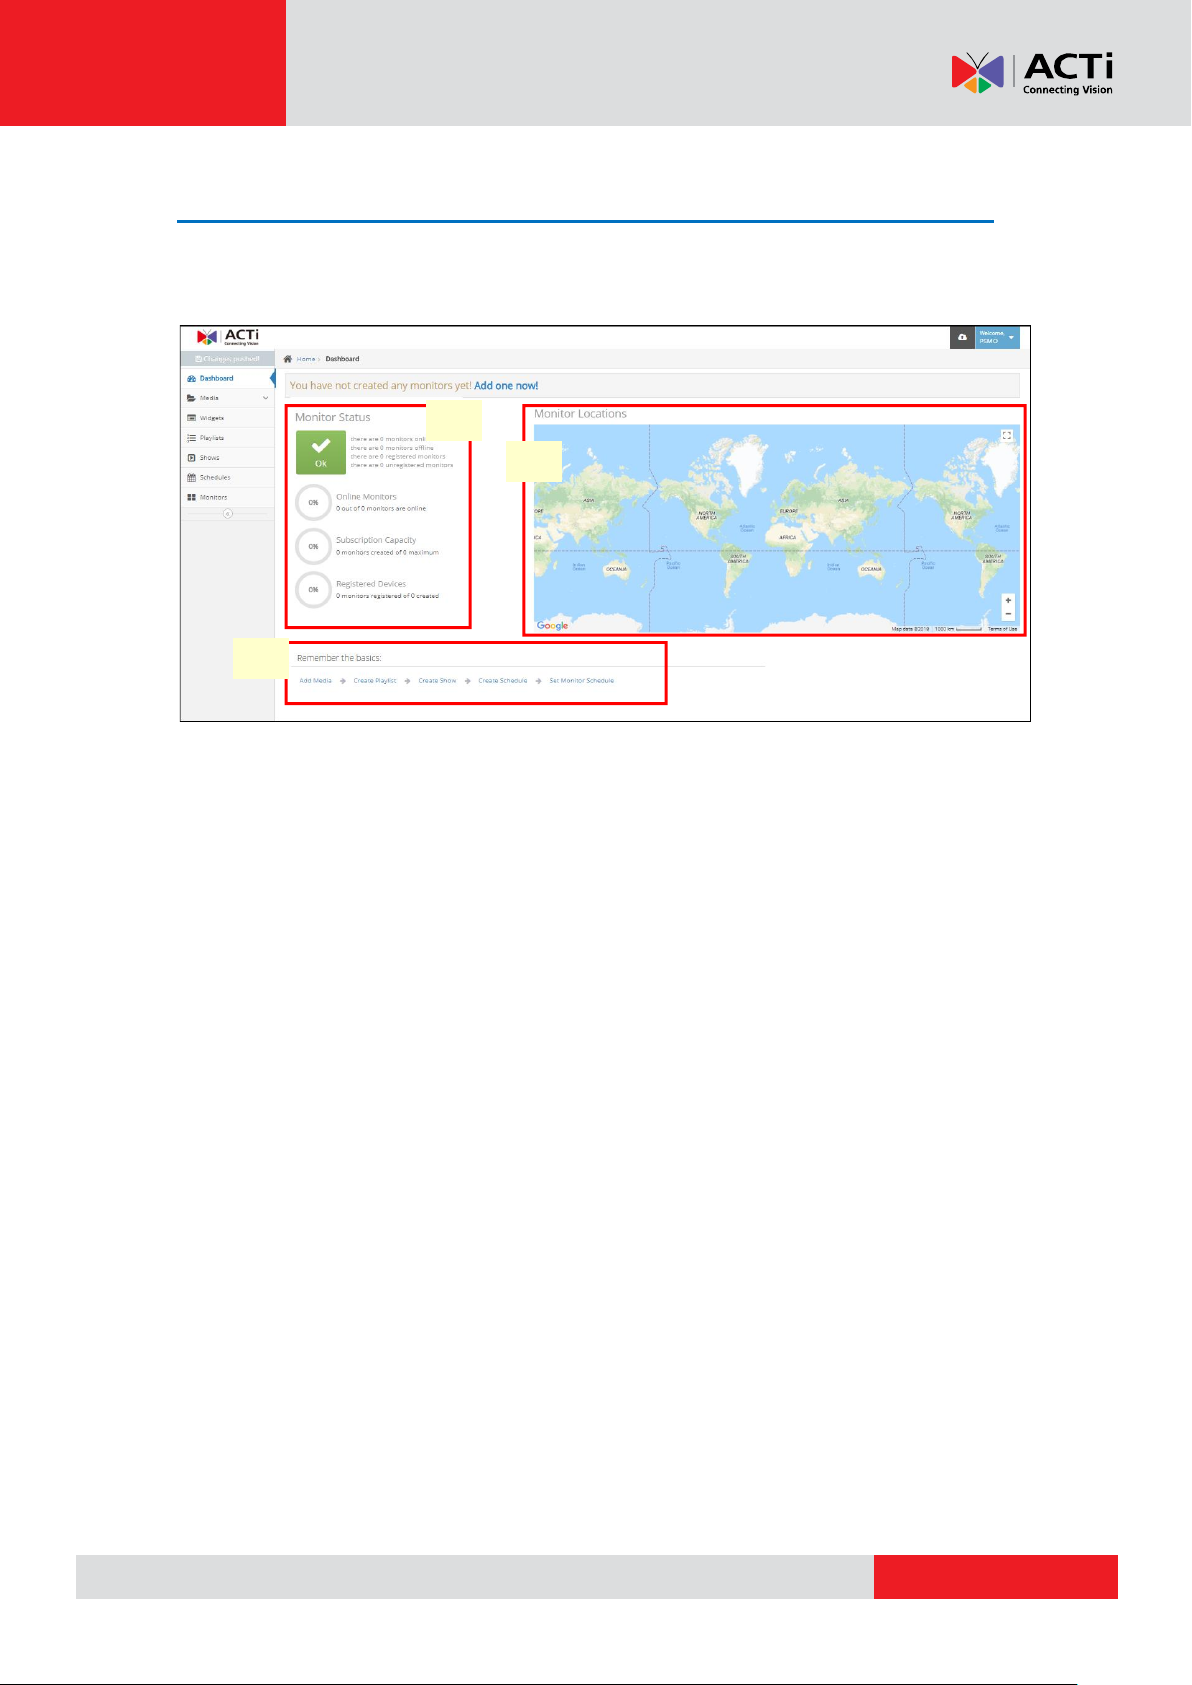
The Dashboard
The Dashboard allows you to control the overall status and set the location of your monitors. It
provides basic guidance to create your contents.
Monitor Status (A)
Online Monitors: This shows how many of your monitors are online and displaying, at the
time you log into the portal.
Subscription Capacity: Depending on the plan you have selected (i.e. how many screens
you want to deploy), this indicates the number of monitors you have created in the portal.
Registered Devices: This indicates how many of your screens have been "paired" to their
players.
Monitor Locations (B)
In this section, you can set the location of each your monitors on Google Maps.
Remember the Basics (C)
This section is a guided procedure on creating a content for your Player. This serves a
"shortcut" to the same options as the main menu (i.e add a media file, create playlist,
create show), allowing you to do the same actions but faster.
14
Page 15

www.acti.com
Hardware Manual
Media
This section will guide you on how to upload a variety of media files:
Image files
Videos
Web pages
PDF files
REMEMBER: After making changes in your account, you need to Push Changes to the
monitors.
Images
Your Player supports any image file type that can be used for playback on your Players. This
include JPEG, PNG and GIF (including light animations). Images are not resized automatically,
they are delivered and played back exactly as you have uploaded them. It is not recommended
to use images with higher resolution than 1920 x 1080, because they can slow down the
playback. In this case, try to resize them before uploading.
Managing Images
In the "Images" section, you can see a listing of the images currently uploaded into your
account. It provides the following columns:
Name of the Image
Timestamp (date and time) that the Image was uploaded
Preview (thumbnail) of the actual image
Actions column, with buttons for making changes
On this page, you can:
Preview the Image by clicking on the thumbnail in the "Preview" column.
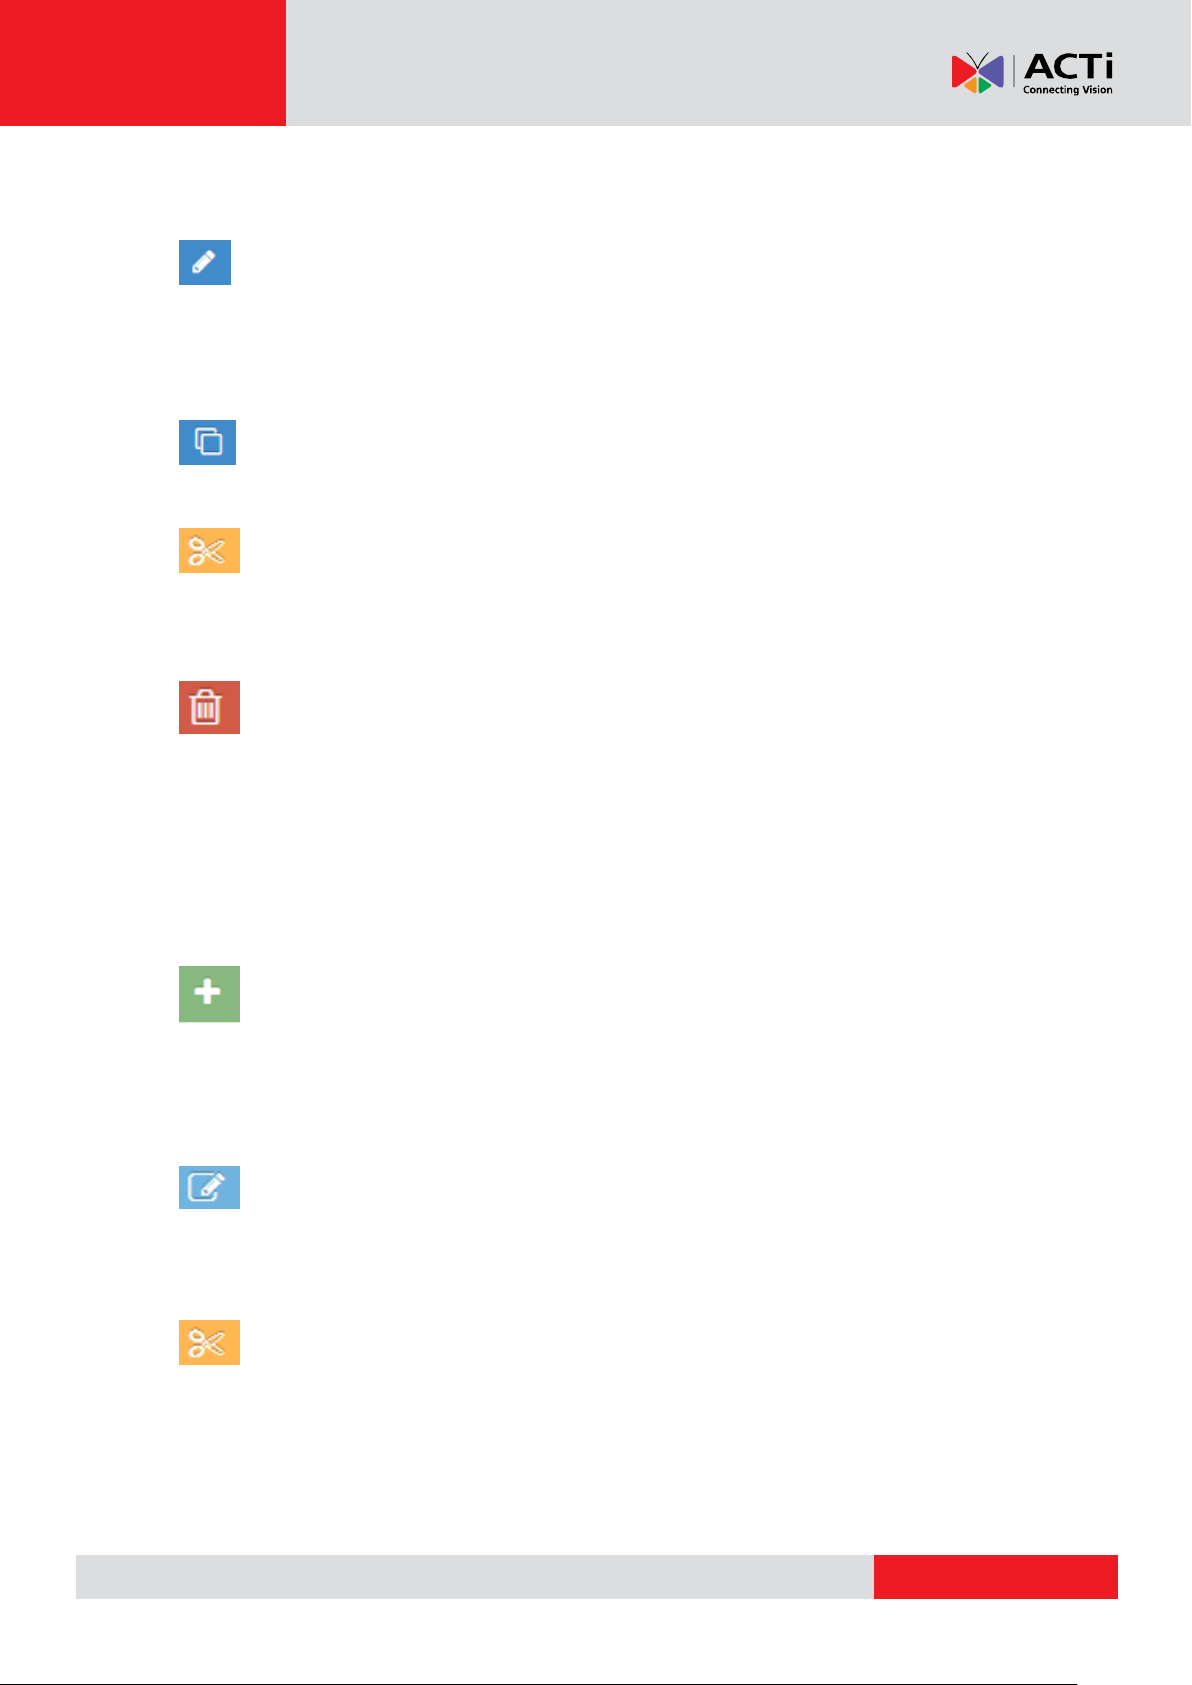
Duplicate the Image, by creating a copy
Change the details of an Image by clicking the blue "Edit" button. Here, you
can also substitute the actual image, and it will be changed wherever it is used.
Check out the "Adding an Image" section below for details on the fields.
Delete a single image. The image will be removed from any Playlists or
Shows that was previously used, and it will not be available in the portal for future
use.
Delete multiple images. Click on the images you want and press on the delete
button of just one.
15
Page 16
www.acti.com
Hardware Manual
Search for specific image using the search tool.
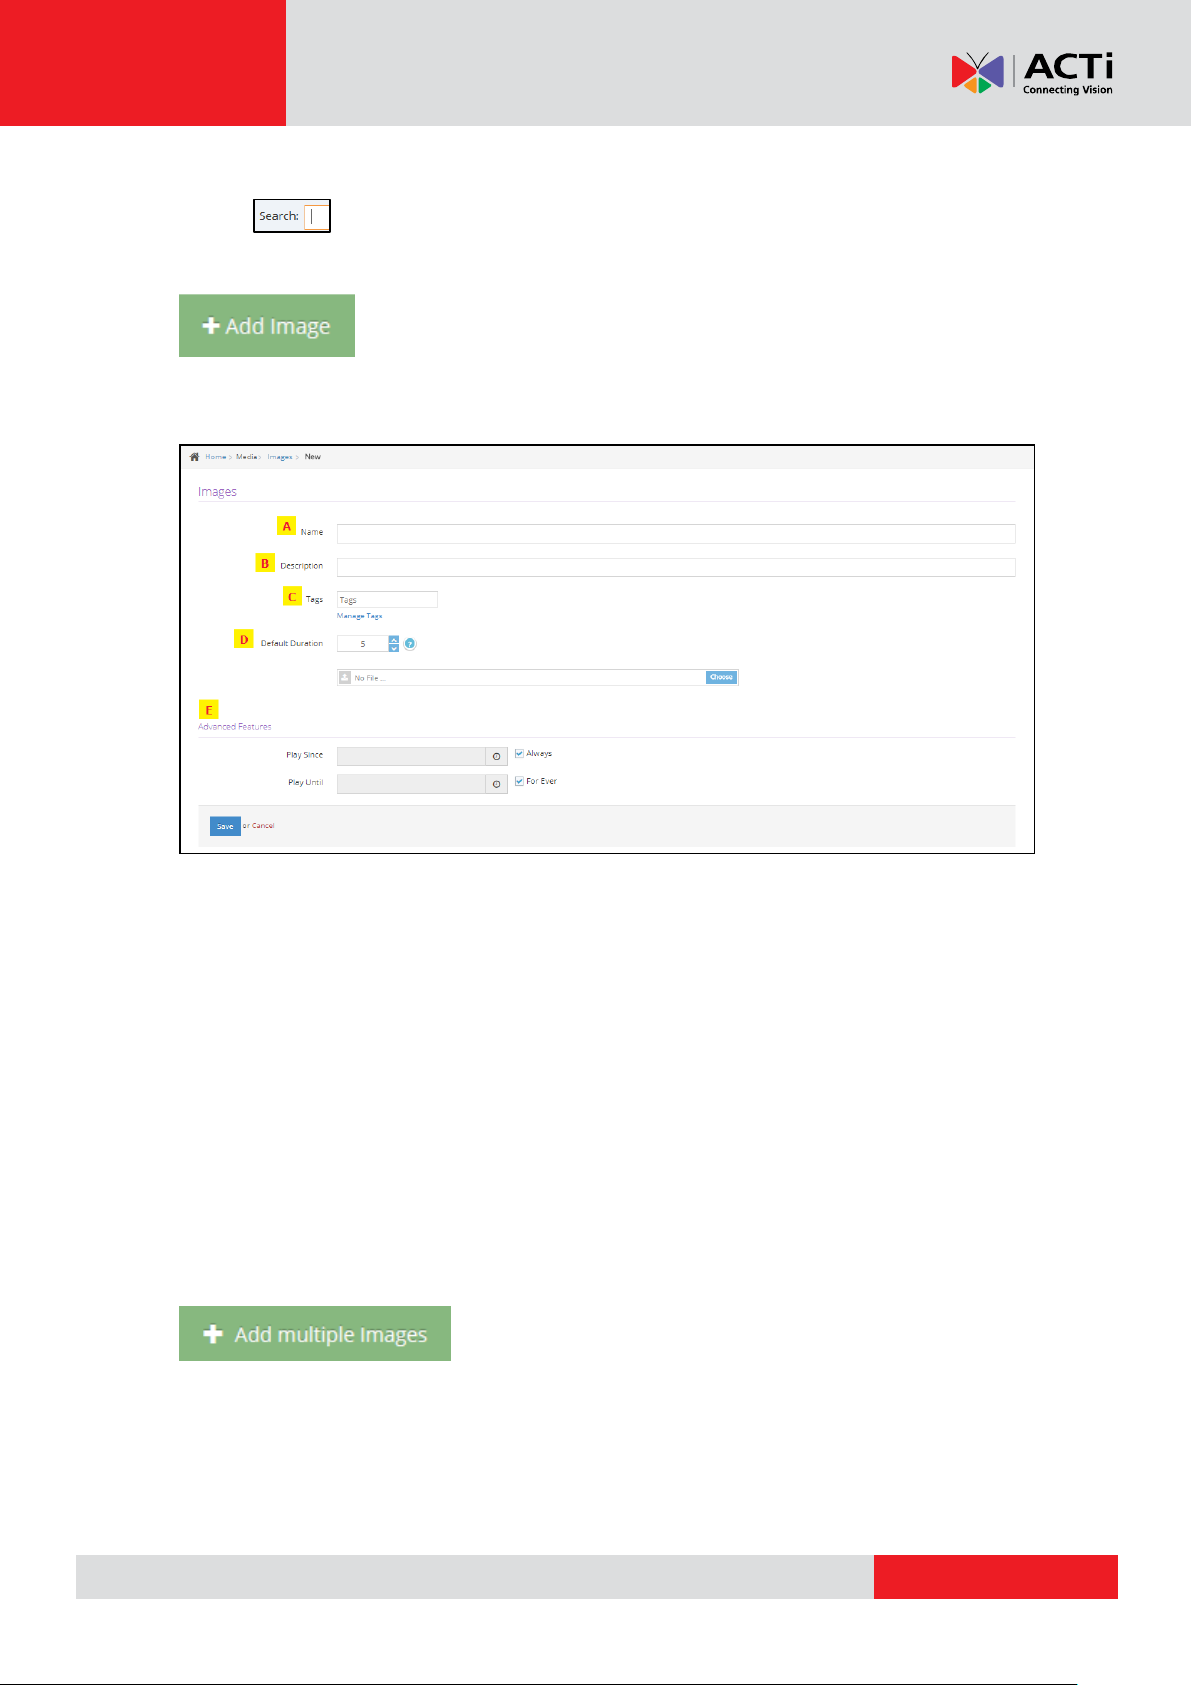
Adding an Image
To add a single image, you click on the "+ Add a New Image" button found at the bottom
of the Images listing.
A. the Name of the image
B. an optional Description for it
C. you can add Tags to the uploaded image
D. the actual image file, where you select the image you want to upload
E. From the advanced features you can set the Play Since /Play Until. In other words,
you can set the expiration date, which means that you can choose the exact date and
time that this image will display at your playlist or show or you can set the "Always"
and "For ever" setting and the image will never expire.
Clicking "Save" will upload the image.
Adding Multiple Images
To add multiple images at once, click on the "+ Add Multiple Images" button. In the File
selection dialog that shows up, keep the Ctrl button on your keyboard pressed to select
multiple images. All selected images will be automatically uploaded.
16
Page 17
www.acti.com
Hardware Manual
REMEMBER: After making changes in your Account, you need to Push Changes to your
Monitors
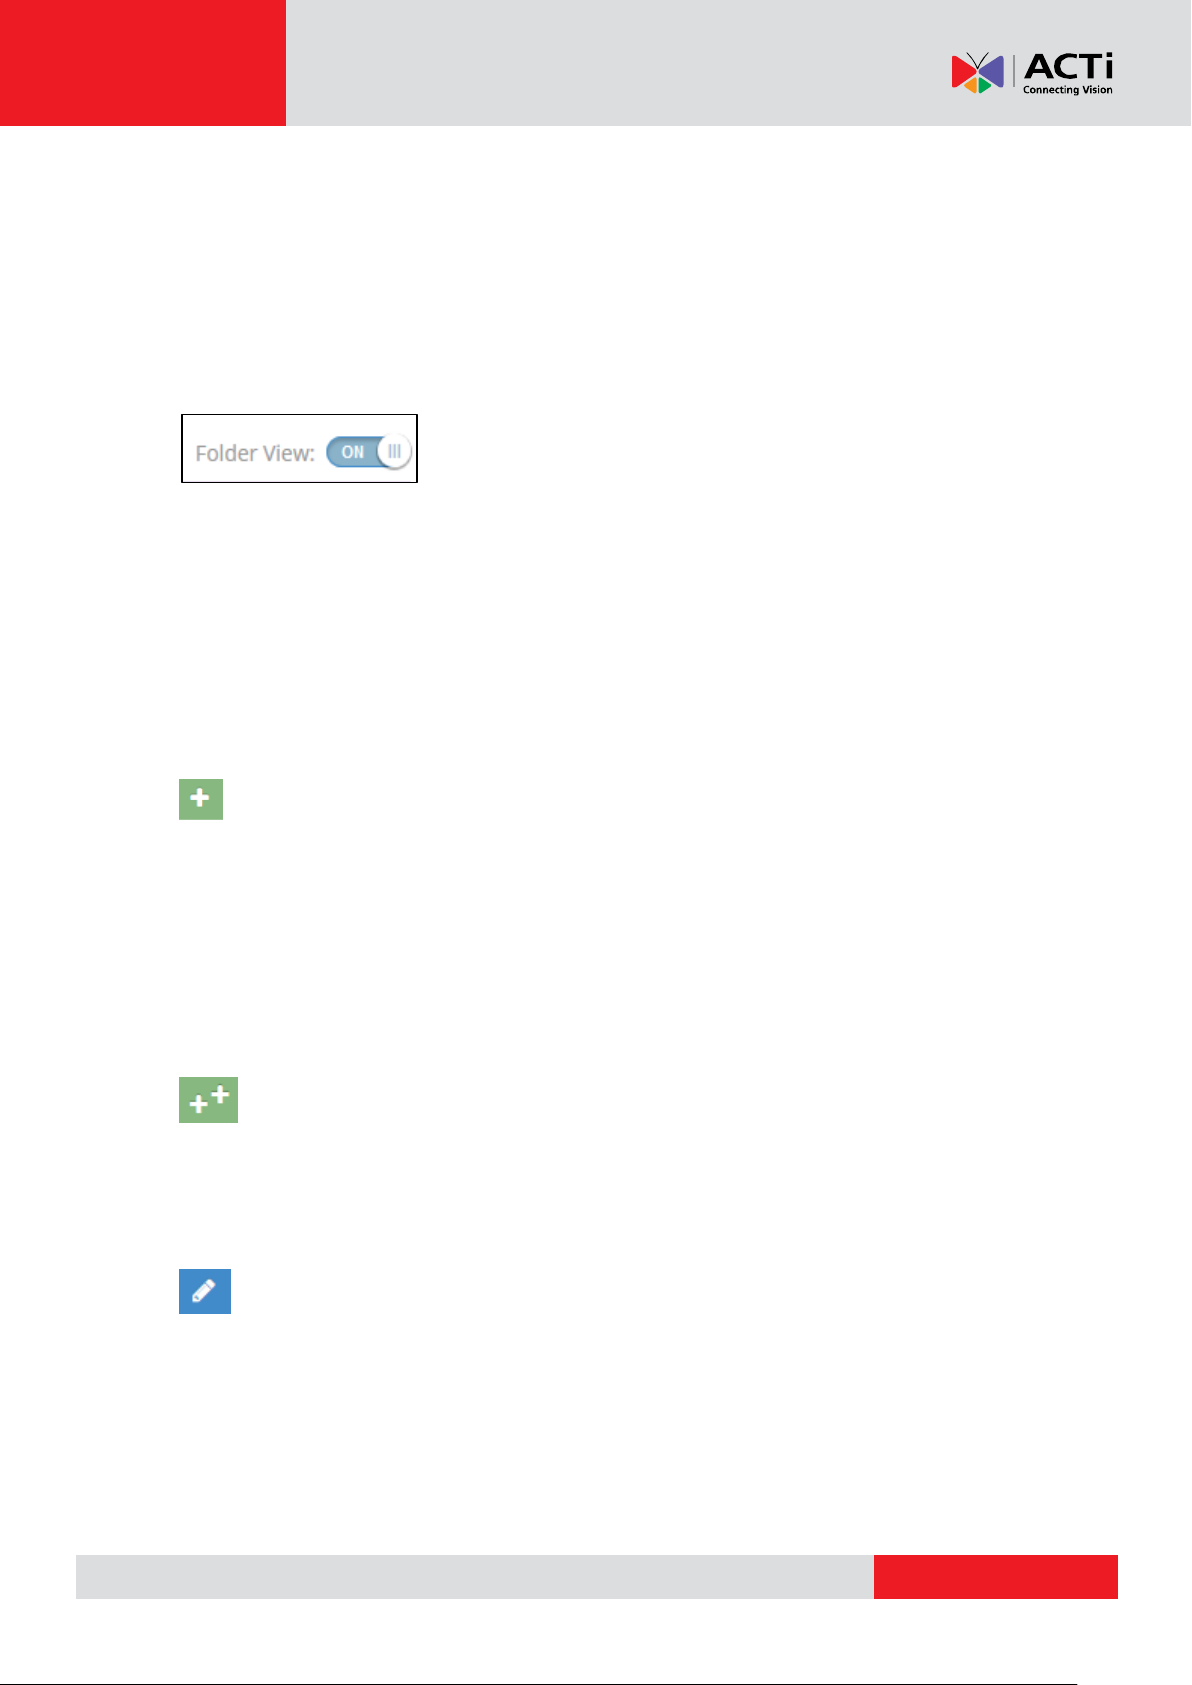
Images Folder View
By activating folder view, you have the potential to easily organize and manage numerous
image files.
Moving from left to right, you can see your "Media Folders" on the left, the "Folder Images"
in the middle and "Image Actions" / "Folder Actions" on the right.
1. Media Folders. In this section all the created folders can be viewed.
2. Folder Images. The content of each selected folder is displayed in this section.
You also have the ability to search for a specific image file using the search tool.
Image Actions
Adding an Image to a folder
To add a single image to a folder, you click on the "+ Add a New Image" button found on the
right side of your screen. As a next step you are requested:
the name of the image
an optional description for it
a "choose" button where you actually select the image you want
Clicking "Save" will upload the image on the folder.
Adding Multiple Images to a folder
To add multiple images at once to a folder, click on the "+ ADD MULTIPLE IMAGES" button. By
keeping the Ctrl button pressed select as many images as you want and they will be
automatically uploaded.
Editing an Image in a folder
You can rename the image, change its description or simply substitute it for another image file
under the same name. By doing so, the specific image will be automatically replaced by the
new one on any playlist or show that it has been already added to.
17
Page 18

www.acti.com
Hardware Manual
Editing Multiple Images in a Folder (Bulk Edit)
To edit multiple images at once in a folder, check the images that you want to edit and click the
Edit button in one of them. By doing so, a new window will pop up with all the settings (Remove
Tags, Add tags, Play Since, Play Until)
Duplicate the image
By clicking this button, you can duplicate a selected image to make another copy.
Moving selected item/image from one folder to another
With this button you can move the image of your choice to another folder by clicking on the
image, then select new destination folder and click "move".
Deleting an Image/Multiple Images from a folder
Click on the "delete image" after selecting an image to be deleted. By deleting an image from a
folder, it will not be available in the portal for future use. It will be also automatically removed by
any playlist or show that contains it. You can also delete multiple images. Click on the images
you want and press on the delete button.
Folder Actions
Adding a New Folder
To add a new folder, simply click on the green relevant-action button on the right bottom side of
the screen, name your folder and click "ok". With this feature you can create either a new
folder on the Base Folder, or a sub-folder in an existing folder.
Renaming a Folder
To rename a folder click on it first, then click on the "rename current folder" button, fill in the
new name under which you want it to appear and press "ok".
Moving a Folder
Click on the "move folder" action in order to move the selected item to the Base folder (if not
already there) or to another folder as a sub-folder.
18
Page 19
www.acti.com
Hardware Manual
Delete Current Folder and Contents
To delete a folder or sub-folder together with its contents/images, click on the "delete current
folder and contents" button on the right bottom side of the screen. This will permanently
remove the folder and the images included from the portal.
REMEMBER: After making changes in your Account, you need to Push Changes to your
Monitors.
19
Page 20
www.acti.com
Hardware Manual
Videos
In the videos section you can upload and manage a wide variety of video formats. Videos that
you upload on your Player are automatically converted to industry-standard formats (H.264
with AAC audio).
Supported Formats
YouTube videos are supported out-of-the-box, so they just get downloaded in the best
possible quality (up to 720p right now).
Live Streaming Videos (YouTube, UStream, or custom HLS or RTMP/RTSP streams).
These will have to be delivered by the stream in H.264 format to make sure they will
be played back on your Players.
PowerPoint files converted to videos on our servers, retaining all transitions and
animations.
Managing Videos
In the "Videos" section, you can see a listing of the videos currently uploaded into your account.
It provides the following columns:
Name of the video
Timestamp (date and time) that the video was uploaded
Preview (thumbnail) of the actual video
Actions column, with buttons for making changes
On this page, you can:
Preview the video by clicking on the thumbnail in the "Preview" column.
Change the details of a video by clicking the blue "Edit" button. Here, you
can also substitute the actual video, and it will be changed wherever it is used.
Check out the "Adding a Video" section below for details on the fields.
Duplicate the video, by creating a copy
Delete a single video. The video will be removed from any Playlists or Shows
that was previously used, and it will not be available in the portal for future use.
Delete multiple video files. Click on the videos you want and press on the delete
button of just one.
Search for specific video using the search tool.
20
Page 21
www.acti.com
Hardware Manual
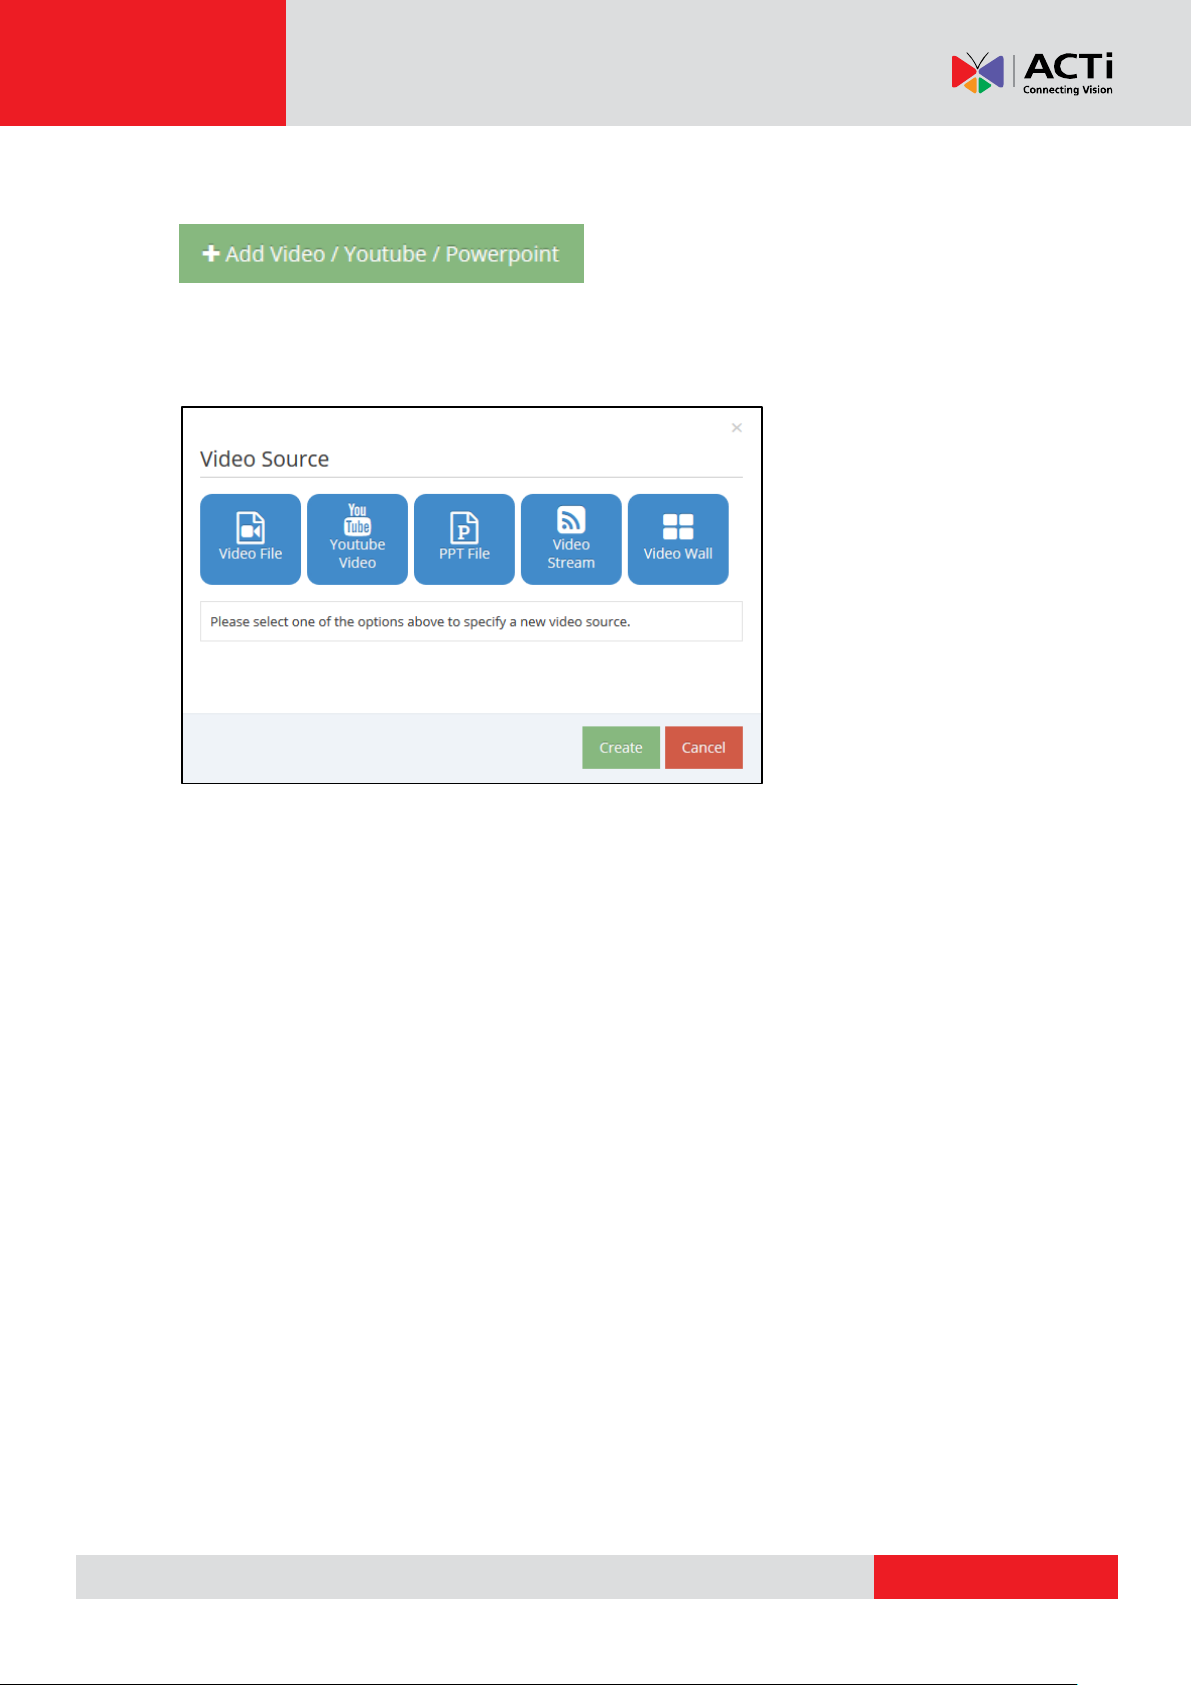
Adding a Video
To add a single video file, you click on the "+ Add Video/Youtube/Powerpoint" button
found on the bottom of the Videos listing. You then need to select the type of the Video
source. You can choose from:
Video File - upload one or more Video files from your computer to your account
YouTube Video - use a link to a YouTube video which the Player will then
download directly from YouTube and playback locally
PPT File - upload one or more PowerPoint (PPT or PPTX) files from your computer
- they get converted to a video on your account retaining all animations and
transitions
Video Stream - use a Live Video Stream from the Internet or a local source,
including YouTube Live, uStream, and UDP/RTP/HLS streams
Video Wall - read instructions on how to set up a Video Wall with your Player
After you provide the Video source, you need to also provide the name of the video and an
optional description for it.
Clicking "Save" will upload (or just save) the video on your account.
NOTE: In regards to the "Video Upload" source type, there is an option to upload the
exact file for playback and not the normalized version. This option is generally
recommended for advanced users only since playback of the original video file might fail.
Enabling this option while uploading will inhibit encoding, decreasing the time required for
the video to be available, but also prevent from creating thumbnail for the video.
21
Page 22

www.acti.com
Hardware Manual
Advanced Options for Videos (All Types)
For all Video source types (uploads, YouTubes, live streams, etc), you have the following
advanced options:
Play Since / Play Until: At the advanced features you can set the Play Since
/Play Until. In other words you can set the expiration date which means that you
can choose the exact date and time that Video will display at your playlist/show or
you can set "Always" and "For ever" and the Video will never expire.
Fix Video Orientation: This option allows you to set the correct orientation for a
Video. This is for the specific Video alone. This way, you can use Videos that where
originally saved with the wrong orientation. So, if you have a video that is not
displayed properly, you can use this setting to show it correctly. Keep in mind that
this setting only affects playback and does not actually rotate the Video file itself.
Crop Video: This option allows you to set crop margins for a Video. This is for the
specific Video alone. You can crop out by percentage for any side of the video. For
example, if you set the "Right" cropping to 10%, then 10% of the video's width will
be cropped out during playback. Same goes for all edges. Keep in mind that this
setting only affects playback and does not actually crop the Video file itself.
REMEMBER: After making changes in your Account, you need to Push Changes to your
Monitors.
22
Page 23
www.acti.com
Hardware Manual
Video Folder View
By activating folder view, you have the potential to easily organize and manage numerous
video files.
Moving from left to right, you can see your "Media Folders" on the left, the "Folder Videos"
in the middle and "Video Actions" / "Folder Actions" on the right.
Media Folders. In this section all the created folders can be viewed.
Folder Videos. The content of each selected folder is displayed in this section.
You also have the ability to search for a specific image file using the search tool.
Video Actions
Adding a Video to a folder
To add a single video to a folder, you click on the "+ Add a New Video" button found on the
right side of your screen. As a next step you are requested:
the name of the video
an optional description for it
a "choose" button where you actually select the video you want
Clicking "Save" will upload the video on the folder.
Editing a Video in a folder
You can rename the video file, change its description or simply substitute it for another video
file under the same name. By doing so, the specific video will be automatically replaced by the
new one on any playlist or show that it has been already added to.
Editing Multiple Videos in a Folder (Bulk Edit)
To edit multiple videos at once in a folder, check the videos that you want to edit and click the
Edit button in one of them. By doing so, a new window will pop up with all the settings (Remove
Tags, Add tags, Play Since, Play Until)
Duplicate the Video
By clicking this button, you can duplicate a selected video to make another copy.
23
Page 24
www.acti.com
Hardware Manual
Moving selected video file from one folder to another
With this button you can move the video of your choice to another folder by clicking on the
video, then select new destination folder and click "move".
Deleting a Video/Multiple Videos from a folder
Click on the "delete video" after selecting a video to be deleted. By deleting a video from a
folder, it will not be available in the portal for future use. It will be also automatically removed by
any playlist or show that contains it. You can also delete multiple videos. Click on the videos
you want and press on the delete button.
Folder Actions
Adding a New Folder
To add a new folder, simply click on the green relevant-action button on the right bottom side of
the screen, name your folder and click "ok". With this feature you can create either a new
folder on the Base Folder, or a sub-folder in an existing folder.
Renaming a Folder
To rename a folder click on it first, then click on the "rename current folder" button, fill in the
new name under which you want it to appear and press "ok".
Moving a Folder
Click on the "move folder" action in order to move the selected item to the Base folder (if not
already there) or to another folder as a sub-folder.
Delete Current Folder and Contents
To delete a folder or sub-folder together with its contents/videos, click on the "delete current
folder and contents" button on the right bottom side of the screen. This will permanently
remove the folder and the contents included from the portal.
REMEMBER: After making changes in your Account, you need to Push Changes to your
Monitors.
24
Page 25
www.acti.com
Hardware Manual
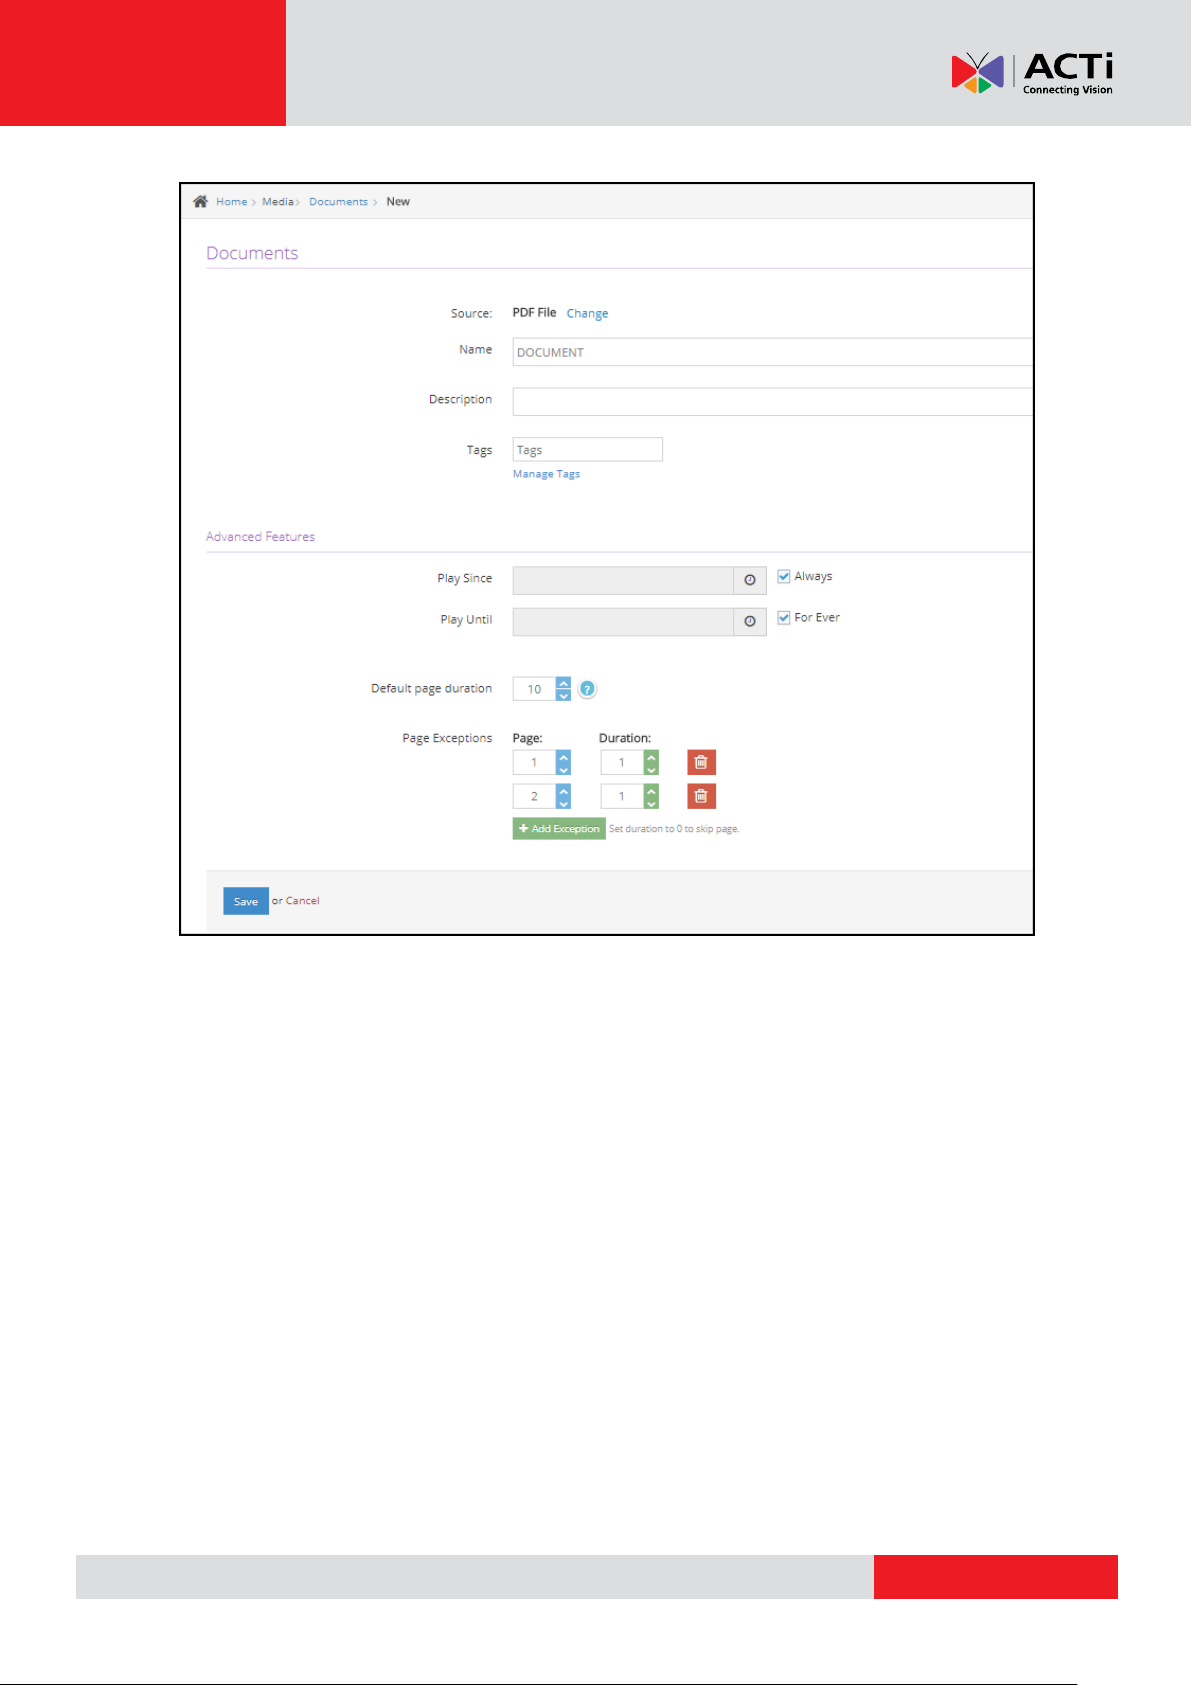
Documents
In the "Document" section you can upload and manage document files like, PDF, Word,
Excel and Power Point files, that you want to play on your Players.
Managing Document Files
In the "Document" section, you can see a listing of the files currently uploaded into your
account. It provides the following columns:
Name of the file
Timestamp (date and time) that the document was uploaded
Preview (thumbnail) of the document.
Actions column, with buttons for making changes
On this page, you can:
Preview the document file by clicking on the thumbnail in the "Preview" column.
Change the details of a document file by clicking the blue "Edit" button. Here,
you can also substitute the actual document file, and it will be changed wherever it
is used. Check out the "Adding a Document" section below for details on the
fields.
Duplicate the document file, by creating a copy
Delete a single document file. The document file will be removed from any
Playlists or Shows that was previously used, and it will not be available in the portal
for future use.
Delete multiple document files. Click on the document files you want and press on
the delete button of just one.
Search for specific document file using the search tool.
25
Page 26

www.acti.com
Hardware Manual
Adding a Document
To add a single document, you click on the "+ Add Document" button found at the bottom of
the listing. As a next step you are requested for the following:
Name of the document (If you want to change it from its original name)
an optional Description for it
you can add Tags to the uploaded document
you can set the Play Since /Play Until . In other words you can set the expiration
date which means that you can choose the exact date and time that the document will
display at your playlist/show or you can set "Always" and "For Ever" and the document
will never expire.
Default page duration: the default duration of each slide/page is set to 10 seconds.
However, you can change this for ALL pages included in the document.
Page Exceptions: When you want specific slides/pages of the file to be skipped or
have different duration "Add Exception" and set the number of the page, as well as the
desired duration. In case you want to skip a page completely simply set its duration to
"0".
Clicking "Save" will upload the document.
26
Page 27
www.acti.com
Hardware Manual
27
Page 28
www.acti.com
Hardware Manual
Adding Multiple Document Files
To add multiple document files at once, click on the "+ Add Document" button. In the File
selection dialog that shows up, keep the Ctrl or Shift button on your keyboard pressed to
select multiple files. All selected files will be automatically uploaded.
REMEMBER: After making changes in your Account, you need to Push Changes to your
Monitors.
Document Folder View
By activating folder view, you have the potential to easily organize and manage numerous
Document files.
Moving from left to right, you can see your "Media Folders" on the left, the "Folder
Documents" in the middle and "Document Actions" / "Folder Actions" on the right.
Media Folders. In this section all the created folders can be viewed.
Folder Documents. The content of each selected folder is displayed in this section.
You also have the ability to search for a specific Document file using the search tool.
Document Actions
Adding a Document to a folder
To add a single file to a folder, you click on the "+ Add Document" button found on the right side
of your screen. As a next step you are requested:
the name of the document
an optional description for it
a "choose" button where you actually select the document you want
Clicking "Save" will upload the document on the folder.
To add multiple document files at once to a folder, click on the “+ Add Document” button found
on the right side of your screen. By keeping the Ctrl or Shift button pressed, select as many
document files as you want and they will be automatically be uploaded.
Editing a Document File in a folder
You can rename the document file, change its description or simply substitute it for file under
the same name. By doing so, the specific document file will be automatically replaced by the
28
Page 29
www.acti.com
Hardware Manual
new one on any playlist or show that it has been already added to.
Editing Multiple Document Files in a Folder (Bulk Edit)
To edit multiple document files at once in a folder, check the files that you want to edit and click
the Edit button in one of them. By doing so, a new window will pop up with all the settings
(Remove Tags, Add tags, Play Since, Play Until)
Duplicate the Document File
By clicking this button, you can duplicate a selected file to make another copy.
Moving selected Item/Document from one folder to another
With this button you can move the file of your choice to another folder by clicking on the file,
then select new destination folder and click "move".
Deleting a Document/Multiple Document Files from a folder
Click on the "Delete Document" after selecting an item to be deleted. By deleting a document
file from a folder, it will not be available in the portal for future use. It will be also automatically
removed by any playlist or show that contains it. You can also delete document files. Click on
the files you want and press on the delete button.
Folder Actions
Adding a New Folder
To add a new folder, simply click on the green relevant-action button on the right bottom side of
the screen, name your folder and click "ok". With this feature you can create either a new
folder on the Base Folder, or a sub-folder in an existing folder.
Renaming a Folder
To rename a folder click on it first, then click on the "rename current folder" button, fill in the
new name under which you want it to appear and press "ok".
Moving a Folder
Click on the "move folder" action in order to move the selected item to the Base folder (if not
already there) or to another folder as a sub-folder.
29
Page 30

www.acti.com
Hardware Manual
Delete Current Folder and Contents
To delete a folder or sub-folder together with its contents/videos, click on the "delete current
folder and contents" button on the right bottom side of the screen. This will permanently
remove the folder and the contents included from the portal.
REMEMBER: After making changes in your Account, you need to Push Changes to your
Monitors.
30
Page 31

www.acti.com
Hardware Manual
Web Pages
In the Web Pages section, you can upload and manage any web page you want.
Managing Web Pages
In the “Web Pages” section, you can see a listing of the web pages currently uploaded into
your account. It provides the following columns:
Name of the web page
Timestamp (date and time) that the web page was created in the account
Address of the web page
Preview (thumbnail) of the web page
Actions column, with buttons for making changes
On this page, you can:
Preview the web page by clicking on the thumbnail in the "Preview" column and
open the web page on another tab.
Change the details of a web page by clicking the blue "Edit" button. Here,
you can also substitute the web page, and it will be changed wherever it is used.
Check out the "Adding a Web Page" section below for details on the fields.
Editing Multiple Web-pages (Bulk Edit). To edit multiple web-pages at once,
check the web-pages that you want to edit and click the Edit button in one of them. By
doing so, a new window will pop up with all the settings (Remove Tags, Add tags, Play
Since, Play Until)
Duplicate the web page, by creating a copy
Delete a web page. The web page will be removed from any Playlists or
Shows that was previously used, and it will not be available in the portal for future
use.
Delete multiple web pages. Click on the web pages you want and press on the
delete button of just one.
Search for a specific web page using the search tool.
31
Page 32

www.acti.com
Hardware Manual
Adding a Web Page
To add a web page click on the “+ Add a Web Page” button found at the bottom of the Web
Pages listing. As a next step you have to:
Enter the Name of the web page
Enter an optional Description for it
Fill in the Web Page address on the required field.
Clicking “Save” will upload the web page.
Note that you can choose between the following Advanced options under this section:
Play Since / Play Until. In other words you can set the expiration date which means
that you can choose the exact date and time that Web-page will display at your
playlist/show or you can set "Always" and "For Ever" and the Web-page will never
expire.
Zoom factor (%), which is set on 100% by default. By altering it you zoom in (>100)
or out (<100) the webpage by the given percentage.
Auto Adjust Zoom, which is also enabled by default, to adjust zoom for monitors
32
Page 33

www.acti.com
Hardware Manual
with width other than 1920 pixel so that they look the same.
Disable Private Browsing: Web pages by default open in private browsing mode to
prevent caching issues. You can use the toggle to disable it.
Enable Chrome: Some modern webpages do not work properly with webkit.
Currently, when using chromium, the webpage can't have transparency.
Enable Flash Player: By default this feature is disabled when using chromium. You
can click on the toggle to enable it.
Scripting Engine (Run Custom Script): You can click on the toggle to enable the
scripting engine feature, where you can actually add scripts to run after a webpage is
loaded in order to modify and navigate it as you wish. For more information please
check out the Web Scripting Engine section on the user manual.
REMEMBER: After making changes in your Account, you need to Push Changes to your
Monitors
33
Page 34

www.acti.com
Hardware Manual
Widgets
Widgets are small applications that display useful information like Ticker (RSS feed or scrolling
text), Rich text (static text), weather display, clock etc.
In this section you can add a widget from our existing collection, or create and upload your own
widget.
Managing Widgets
In the "Widgets" section, you can see a listing of the widgets currently uploaded into your
account. It provides the following columns:
the Name of the Widget
the Type of the Widget
an Actions column, with 3 buttons for making changes
On this page, you can:
Change the details of a Widget by clicking the blue "Edit" button. Here, you
can also substitute the actual widget, and it will be changed wherever it is used.
Check out the "Adding a Widget" section below for details on the fields.
Duplicate the widget, by creating a copy
Delete a single widget. The widget will be removed from any Playlists or
Shows that was previously used, and it will not be available in the portal for future
use.
Delete multiple widgets. Click on the widgets you want and press on the delete
button of just one.
Search for a specific widget using the search tool.
Adding a Widget
To add a widget click on "Add Widget" button found on
the bottom of the Widgets listing.
Then you have to choose between
Standard Widget
Custom Widget
REMEMBER: After making changes in your Account,
you need to Push Changes to your Monitors
34
Page 35

www.acti.com
Hardware Manual
Standard Widgets
This is our collection of ready-to use widgets.
Adding a Ticker
Click on the Ticker option and fill in the widget details as follows:
A Name is required for the widget and an optional description for it.
Choose the speed of your Ticker. (Edge to edge duration in seconds.
Larger is slower).
Set the background color of your ticker by clicking on the icon and choosing a color and
shading.
Type the content that you want to be displayed. You can add multiple contents by clicking
''Add Items''.
You can set the Play Since /Play Until . In other words, you can set the expiration date,
which means that you can choose the exact date and time that this widget will play at your
playlist or show or you can set the "Always" and "For ever" setting and the widget will never
expire.
Click "Save" and your widget is ready to use.
Adding a Rich Text
Click on the Rich Text option and fill in the widget details as follows:
A name is required for the widget and an optional description for it.
Set the background color of your rich text by clicking on the icon and
choosing a color and shading.
On the space below write down your text in the format you want it to be.
You can set the Play Since /Play Until. In other words, you can set the expiration date,
which means that you can choose the exact date and time that this widget will play at your
playlist or show or you can set the "Always" and "For ever" setting and the widget will never
expire.
Click "Save" and your widget is ready to use.
Adding Online Slideshow
Click on the Online Slidehow option and fill in the widget details as
follows:
A name is required for the widget and an optional description for it.
Choose the format and the animation of your widget.
35
Page 36

www.acti.com
Hardware Manual
Set the background color of your Online Slideshow by clicking on the icon and choosing a
color and shading.
Click to ''Add'' to add the URL of your images and also choose the duration of them. You
can add multiple URLs.
You can set the Play Since /Play Until. In other words, you can set the expiration date,
which means that you can choose the exact date and time that this widget will play at your
playlist or show or you can set the "Always" and "For ever" setting and the widget will never
expire.
Click "Save" and your widget is ready to use.
Adding Current Weather
Click on the Weather Current option and fill in the widget details as
follows:
A name is required for the widget and an optional description for it.
Choose the date and time you want for your widget to be displayed.
Set the background color of your Weather Current by clicking on the icon and choosing a
color and shading.
Choose the language and the units ( Celsius or Fahrenheit )
Use this ONLY if location is not detected correctly. Read instructions here on how to get
your location number.
Click "Save" and your widget is ready to use.
Adding Hourly Weather
Click on the Weather Hourly option and fill in the widget details as follows:
A name is required for the widget and an optional description for it.
You can set the Play Since /Play Until. In other words, you can set the
expiration date, which means that you can choose the exact date and
time that this widget will play at your playlist or show or you can set the "Always" and "For
ever" setting and the widget will never expire.
Set the background color of your Weather Current by clicking on the icon and choosing a
color and shading.
Choose the language and the units ( Celsius or Fahrenheit )
Use this ONLY if location is not detected correctly. Read instructions here on how to get
your location number.
Click "Save" and your widget is ready to use.
36
Page 37

www.acti.com
Hardware Manual
Adding Digital Clock
Click on Digital clock widget to add it and fill in the widget details as
follows:
A a name is required for the widget and an optional description for it.
Then set your background and font colors.
After you set your font settings too (family, style and weight).
You can set the Play Since /Play Until. In other words, you can set the expiration date,
which means that you can choose the exact date and time that this widget will play at your
playlist or show or you can set the "Always" and "For ever" setting and the widget will never
expire.
Click "Save" and your widget is ready to use.
Adding Analog Clock
Click on Analog clock widget to add it and fill in the widget details as
follows:
A name is required for the widget and an optional description for it.
Set the background, dial, hands and frame colors.
Set Widht and Height of your clock.
Choose your country (Timezone)
You can set the Play Since /Play Until. In other words, you can set the expiration date,
which means that you can choose the exact date and time that this widget will play at your
playlist or show or you can set the "Always" and "For ever" setting and the widget will never
expire.
Click "Save" and your widget is ready to use.
REMEMBER: After making changes in your Account, you need to Push Changes to your
Monitors
37
Page 38

www.acti.com
Hardware Manual
Custom Widgets
In order to upload your own custom
widgets, click on "Manage" and then
on "Create" button.
As a next step you are requested:
the Name of the widget
choose an icon for your
widget
an optional Description for it
define the Zoom Factor (%)
toggle Auto Adjust Zoom
choose if you want to Enable Chromium
upload your ZIP file
write down the UI Configuration
Click "Save" to upload your custom widget.
You can check our Custom Widget Developer’s Guide for further instructions on how to
create your own widgets.
REMEMBER: After making changes in your Account, you need to Push Changes to your
Monitors.
38
Page 39

www.acti.com
Hardware Manual
Playlists
You can create and manage playlists by combining media files and widgets already available
in your account.
Managing Playlists
In this section, you can see a listing of the playlists currently uploaded into your account. It
provides the following columns:
Name of the playlist
Description of the playlist
Timestamp (date and time) that the playlist was either created or lastly modified
Media Types column showing what kind of media files are used in the playlist
Actions column, with buttons for making changes
On this page, you can:
Change the details of a Playlist by clicking the blue "Edit" button. Here, you
can make changes in the contents of the playlist by removing and/or adding items.
You can also substitute the actual Playlist, and it will be changed wherever it is
used. Check out the "Adding a Playlist" section below for details on the fields.
Duplicate the playlist, by creating a copy
Delete a single playlist. The playlist will be removed from any Shows that was
previously used, and it will not be available in the portal for future use.
Delete multiple playlists. Click on the plalists you want and press on the delete
button of just one.
Search for a specific playlist using the search tool.
Adding a Playlist
To add a playlist, you click on the "+ Add Playlist" button found at the bottom of the Playlists
listing. As a next step you are requested:
the Name of the Playlist and
an optional Description for it
39
Page 40

www.acti.com
Hardware Manual
Playlist-drag from library to fill
-You can see an empty filmstrip where you will add your media files.
Below the filmstrip, your account library with all the media files is available for you. You can
see them ALL or you can locate them under their category (Images, Videos, Web Pages,
Widgets). Also, you can use the search button to find your media file.
-By pointing on any media file from the library you can click on the preview (zoom icon), or the
arrow to upload it on the playlist. Alternatively you can drag and drop the item to the filmstrip
to upload it.
-You can change the position of the media files by 'drag-and-drop' so that they are in the order
you want.
By default, Widgets and Web Pages have a duration in the playlist of 20 seconds.
You can change this on the filmstrip under the preview of the media file, either by
typing the duration yourself or using the "+" /"-" respectively.
By default, Images also have a duration in the playlist of 5 seconds.You can change
this on the filmstrip under the preview of the media file, either by typing the duration
yourself or using the "+" /"-" respectively.
By default, Videos have a fixed displayed time (the itself duration of the video)
Clicking "Save" will create the Playlist.
Creating / Editing Playlists with large number of media files
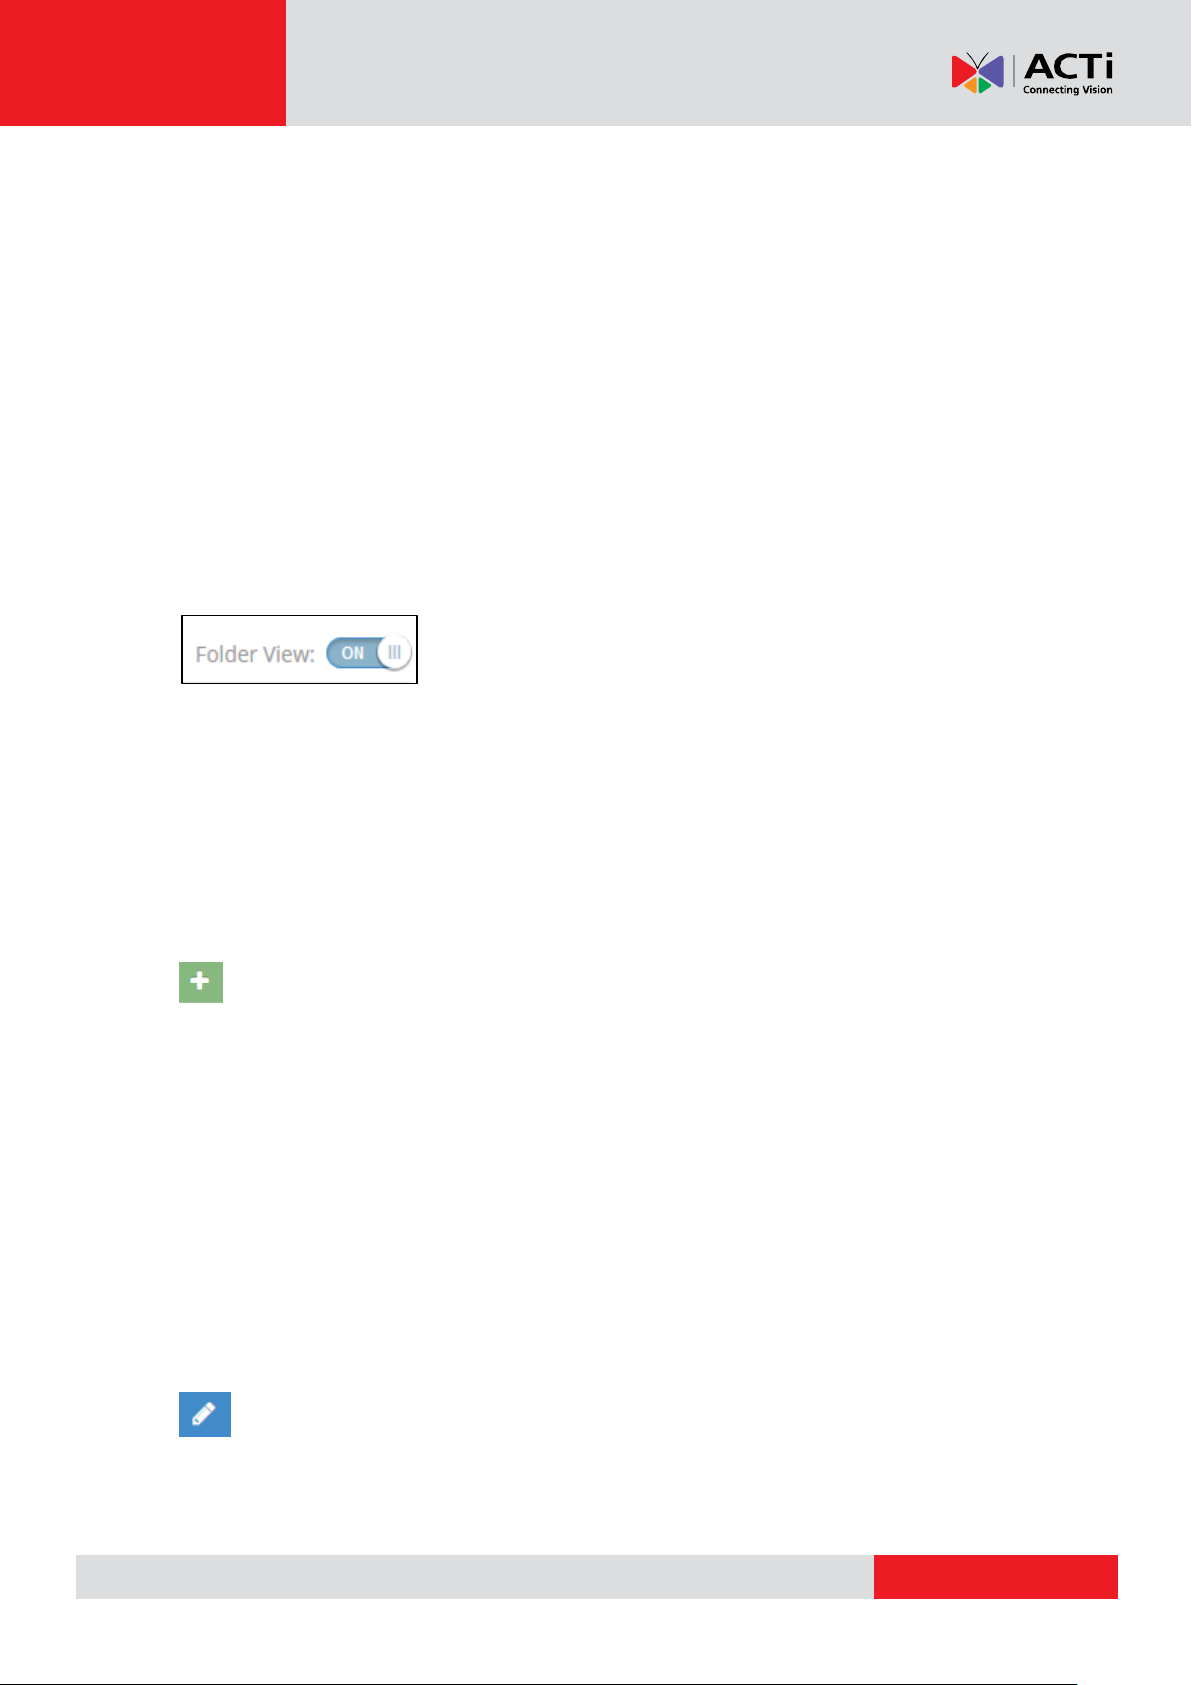
In case your playlists contain numerous media files, you have the option to activate Folder
View for your ease.
To see in detail how you manage playlists with the Folder View on the next page.
REMEMBER: After making changes in your Account, you need to Push Changes to your
Monitors.
40
Page 41

www.acti.com
Hardware Manual
Managing Playlists with Folder View
When you handle a large number of media files,activating Folder view can be very helpful.
As with the Folder View option deactivated, the name and description fields also appear for
you to fill in the information.
Below, moving from left to right, there are three (3) columns:
Media Folders, where all folders and sub-folders appear
The contents of the selected folder appear (Title of folder and media file names
below)
The actual Playlist contents appear on the third column list on the right.
How to Manage the Contents of the Folder / Subfolder
To preview the media file you want click on the zoom icon or click on the arrow
to upload it on the playlist.
You can search a specific media file on the folder/sub-folder
To upload at once a number of media files to the playlist, click on the arrow of just
one of the selected items
To upload ALL items of a folder /sub-folder, tick the box next to the name of the folder
and click on the arrow of just one of the items.
How to Manage the Contents of the Playlist
Once uploaded, the media files are listed on the right column.
To preview one or all items on the playlist, just click on the zoom icon of one of
the media files. Using the arrows on the slideshow you can preview everything.
To delete a single media file just click the button next to it.
To delete multiple media files from the playlist, first tick on the boxes of the files you
want to remove and then click the button next to just one of them.
To delete ALL media files just tick on the Playlist box, all items will be selected, then
click the button next to just one of them.
41
Page 42

www.acti.com
Hardware Manual
To change the position of the media files just 'drag-and-drop' them in the order you
want.
To change the default duration of Image files' display on the playlist (5 secs), either
type the right one or use the blue arrows "UP/DOWN" respectively.
To change the default duration of Media display on the playlist (in secs), either type the
right one or use the blue arrows "UP/DOWN" respectively.
Click "Save" to create your playlist.
REMEMBER: After making changes in your Account, you need to Push Changes to your
Monitors.
42
Page 43

www.acti.com
Hardware Manual
Playlist within Playlist
NOTE: Creating a playlist within a playlist, hereon will be called a sub-playlist, is available only
on the Enterprise plan.
Adding a Sub-Playlist
To add a sub-playlist, click on the "+ Add Playlist" button found at the bottom of the Playlists
listing. As a next step you are requested to provide:
the Name of the Playlist and
an optional Description for it
After you filled the above information, you will see an extra tab called “Playlists”. You can find
all the available* Playlists in your account.
* NOTE: If your user has the permission to view playlists – Workspaces feature
Just click the white arrow inside the Playlist’s icon and place them inside the filmstrip. After
finishing the sub-playlist edit, click the “Save” button.
43
Page 44

www.acti.com
Hardware Manual
Tag Based Playlist
NOTE: Tag Based Playlist is available only on the Enterprise plan.
Adding a Tag Based Playlist
To add a tag based playlist, you click on the "+ Add Tag based Playlist” button found at the
bottom of the Playlists list. As a next step you are requested to:
Provide the Name of the Playlist and
Add an optional Description for it
Add Black gaps between videos if you want
Choose the Workspace that you want the playlist to shuffle play the media
(Enterprise plan only).
After completing the above steps you will see that “All media selected” from the whole
Workspace is activated. If you do not want to add all the media, there is filtering system in
order for you to choose which media you want to include or exclude. If you click “Add filter” you
will see the below example.
The example below shows the media that contains the items below:
44
Page 45

www.acti.com
Hardware Manual
Include Tags
Mountains & Hiking tag (Will include Media that have both tags)
Animals & Dogs tag (Will include Media that have both tags)
Birds tag (Will include Media that have the Birds tag)
You can include more tags if you want, just by clicking the Or button.
Exclude Tags
You will notice that some media were excluded from the playlist that have the following
tags:
Sea & Rivers tag (Will exclude Media that have both tags)
Dolphins & Whales tag (Will exclude Media that have both tags)
Fish tag (Will exclude Media that have the Fish tag)
You can exclude more tags if you want, just by clicking the Or button.
After you complete your setup just click the “Save” button and your Tag based Playlist is
ready to play.
45
Page 46

www.acti.com
Hardware Manual
Shows (Layouts)
In this section you create the final shows (layouts) to be displayed on your screens by
combining already created playlists, uploaded media files and widgets.
Managing Shows
In the "Shows" section you can see a listing of the shows already created in your account. It
provides the following columns:
the Name of the Show
the Timestamp (date and time) that the Show was created or lastly modified
an Actions column, with buttons for making changes
On this page, you can:
Change the details of a Show by clicking the blue "Edit" button. Here, you
can also substitute the actual show, and it will be changed wherever it is used.
Check out the "Adding a Show" section below for details on the fields.
Duplicate the show, by creating a copy
Delete a single show. The show will be removed and it will not be available in
the portal for future use.
Delete multiple shows. Click on the shows you want and press on the delete
button of just one.
Search for a specific show using the search tool.
Adding a Show
To add a show, you click on the "+ Add Show" button found at the bottom of the Shows listing.
First you are requested to name your new Show.
Below the "Name" box, there are three buttons where all of your Playlists, Media
files and Widgets can be found in order to add them to the show you are about to create.
46
Page 47

www.acti.com
Hardware Manual
To add a Playlist/Media file/Widget click on the relevant icon and a window will appear where
you are requested to:
Select the playlist/media file/widget of your choice
Choose the fitting options on the screen.
Your options are:
"Fit", show the whole content within the area assigned (may add some empty space
or black bars at the edges, again not distorting images or videos)
"Crop", zoom-in so that it covers the whole area assigned (may crop some edges, but
it will not distort images or videos)
"Stretch", show the whole content, stretching it to match the area assigned (no
cropping, empty spaces or black bars, but it might distort images and videos)
Optionally, Enable Transparency of the region. This is useful for content with
transparency and for the "fit" option above.
Once selected, you can "Preview" your item on the simulation of the screen below and you
can Delete it by clicking button or Edit it by clicking on the button.
You can use the arrows on the screen to change its size and/or location. Alternatively on
the "Show Editor" section, you can be as accurate as you wish by entering manually
the Top/Width, Left/Height measurements.
You also have the option to disable or Enable the Grid on your simulation screen, which will
alter the way you place the item by dragging it. By disabling the grid you can literally place the
item anywhere on the simulation screen.
47
Page 48

www.acti.com
Hardware Manual
Under the "Layering" section all the items (playlists, widgets, media files) added on the show
are listed in the order you added them, the first on "top layer" being the last added. This order
of layering is very easily modified by dragging and dropping in the order you want.
Example from the above Layering setup:
The RSS CNN Ticker, is at the top of the Layering setup, having the highest priority and
covering any Media.
On the other hand, Apples Image is at the bottom of the Layering setup, having the lowest
priority and will be covered by any Media.
Clicking "Save" will save the show.
REMEMBER: After making changes in your Account, you need to Push Changes to your
Monitors.
48
Page 49

www.acti.com
Hardware Manual
Turned Off Show (Turn Your TV On and Off)
You can turn the TV ON and OFF by using the special "Turned Off" Show. Keep in mind that
the Player uses the "Default Content" assigned to it and overrides it with the "Schedule to
Playback". If your TV supports the CEC Option (*check info on next page) and also is
enabled, you can directly assign the Turned Off Show to your device. You can find the Turned
off Show, if you enter to one of your monitors settings and by clicking to change the Default
Content you will see the Turned Off Show.
Scheduled Turned Off Show
If you go to "Schedules", you can create a new Schedule and add an entry there for the
"Turned Off" Show. Whenever this Show (Turned Off) is scheduled, the TV will be turned off.
When the next Show will start displaying it will Turn On your TV and start displaying the
Assigned Show.
So lets see a Scheduled example of the Turned Off Show:
From the above images
Added "Turned Off" Show which will play from 22:00:00 to 07:00:00.~TV will be Turned
Off~
Added "Full Screen" Show which will play from 07:00:00 to 15:00:00. ~TV will be Turned
On~
Added "Show 1" Show which will play from 15:00:00 to 22:00:00. ~TV will still be On~
The "Turned Off" Show will start playing again. ~TV will be Turned Off~
49
Page 50

www.acti.com
Hardware Manual
After saving the schedule, make sure you have assigned it to your Monitor from the Monitor
configuration. Do not forget to press the "Push to Players" button.
Example of the above configuration:
Keep in mind that the default show of the Monitor will only be used to fill in any empty
time-slots in the assigned Schedule.
* CEC Option
The Player includes a CEC adapter on its HDMI monitor port. CEC is a standard
communication protocol supported by most major TV manufacturers. It allows for a playback
device to power on, power off, and switch video inputs on a CEC-enabled TV.
If your monitor does not support CEC (e.g. you have a computer monitor), the Player turns off
the HDMI port to allow for the monitor to power-down by itself. This function is supported by all
current computer monitors, even some TVs.
If you are using a PC as the Player, CEC is not supported at all. The software will attempt to
turn off the HDMI/VGA port, but this might not be supported by your hardware. Same goes if
you use an HDMI-to-VGA adapter on your Player.
50
Page 51

www.acti.com
Hardware Manual
Schedules
In this section, you can create schedules that will allow you to display the shows you created
on specific dates and times, managing the frequency of their displays.
Managing Schedules
In the "Schedules" section, you can see a listing of the schedules currently created into your
Account. It provides the following columns:
the Name of the Schedule
the Timestamp (date and time) that the Show was uploaded or lastly modified
an Actions column, with 3 buttons for making changes
On this page, you can:
Change the details of a Schedule by clicking the blue "Edit" button. Here,
you can also substitute the actual schedule, and it will be changed wherever it is
used. Check out the "Adding a Schedule" section below for details on the fields.
Duplicate the schedule, by creating a copy.
Delete a single schedule. The schedule will be removed and it will not be
available in the portal for future use.
Delete multiple schedules. Click on the schedules you want and press on the
delete button of just one.
Search for a specific schedule using the search tool.
Adding a Schedule
To add a new schedule click on "+ Add Schedule" button found on the bottom of the
Schedules listing.
As a next step you are requested to name your new schedule and then set the shows.
There is a calendar appearing that gives you the option to view the month, week or even
day of your choice, by clicking on the relevant buttons. By default you can see the current
date, however you can move to the previous or next month/week/day by clicking on the
arrows next to the "today" button.
51
Page 52

www.acti.com
Hardware Manual
On the right side of the screen there is the "Shows" column under which you can find all of
the Shows that you will assign and use within a specific Schedule.
As a next step, click on "+Add" button and select the show you want on the
"New Event" window appearing.
-To change the show or media or playlist you want to schedule, click on the arrow next to
the "Show" option.
-To set the Start Date and Time of the display of your show fill in the information on the
"First Start" box. Regarding time, click on the clock icon
-To set the End Date and Time of the display of your show again fill in the information on
the "First Stop" box. Regarding time, click on the clock icon
-The next box "Repeat" indicates the frequency your show will be displayed. Click
choosing one of the options provided:
Once, if you want your Show to play back during specific hours on a specific
day/date only.
Daily, if you want to set which days of the week you want your Show to play back
.
Weekly, if you want your Show to be displayed once per week.
Monthly, if you want your Show to be displayed once per month.
Yearly, if you want your Show to be displayed once per year.
52
Page 53

www.acti.com
Hardware Manual
-Finally, " Repeat Until" indicates the time-frame you want to set your schedules for. You
can either set a specific date and time or click "End of time" so that your schedule will be
always displayed as indicated. Below you can see an example setup:
The Turned Off Show will play Daily (you can choose the days that the show will play) from
16:12:48 until 17:12:48 and repeat until "End of time".
Clicking "Save" will create your schedule.
Another Schedule Example:
After creating a schedule, you should go to the Monitor settings and set the schedule of the
Monitor to the one you have created as seen below.
Keep in mind that the default show of the Monitor will only be used to fill in any empty
time-slots in the assigned Schedule.
1. Added an event from 9:00 AM - 5:00 PM for "show5".
2. Added another event from 12:00 PM to 12:15 PM for "show_all". Making sure to
adjust the order of the shows on the right, so that the "show_all" has greater
priority than "show5", as seen below:
53
Page 54

www.acti.com
Hardware Manual
3. After saving the new schedule, make sure you have assigned it to your Monitor
from the Monitor configuration. Do not forget to press the "Push to Players"
button.
With the above configuration :
the show5 will play from 9:00-12:00
show_all will play from 12:00-12:15 and (because the show_all has greater
priority over show5)
show5 will continue to play from 12:15 until 5:00
Regarding the priority that you give to your Schedule, the "show_all" will overlap the
"show5" when it comes the time to start playing.
Schedules have priority over Default Shows. If a Show is assigned as Default Show to the
Monitor and a Schedule is also assigned, the Default Show will be displayed on the
screen between the gaps of the Schedule.
Turning On/Off Your Screen
In the Schedule section, the first show that appears in the listing of all available/created Shows
in your account is the “Turned Off” show. By setting this in a Schedule results in automatically
turning off your monitor.
REMEMBER: After making changes in your Account, you need to Push Changes to your
Monitors.
54
Page 55

www.acti.com
Hardware Manual
Monitors
In this section you can manage your created monitors. Note that you can create as many
monitors in the portal as your subscription allows you to. You can even manage unregistered
monitors (i.e. not paired with an actual player) but the content cannot be pushed to an actual
screen and be displayed.
In the initial screen, you can see a listing of the monitors currently created into your Account. It
provides the following columns:
the Name of the Monitor
the ID of the monitor
the Assigned scheduled pushed to the monitor
the Default Show that will be displayed when there is no schedule active
the Status of the Monitor (Online, Offline, Initialized, Waiting)
an Actions column, with 2 buttons for making changes
On this page, you can:
Change the details of a Monitor by clicking the blue "Edit" button. Check out
the "Adding a Monitor" section below for details on the fields.
Delete a single monitor.
Delete multiple monitors. Click on the monitors you want and press on the delete
button of just one.
Search for a specific monitor using the search tool.
Adding a Monitor
When you click “Add Monitor” you will be prompted to a new page. The new page contains all
the required information of your monitor. The Tabs that you will see are 8.
Basic Info, Wireless, 3G/4G/LTE, Static IPs, Proxy, Advanced, Status and Location.
Basic Info
Screen ID: A unique ID helping Tech Support to troubleshoot any issue
Name: The Name of you Monitor
Tags: Tag monitor for easy categorization
Registration Code: If you type the registration code that has been displayed at your screen
and click Save, the device with this registration code is tied with your account. When you click
55
Page 56

www.acti.com
Hardware Manual
save the system deletes the code because the connection between the device and your
account has been made and this code is no need anymore. If you delete the monitor entry from
your account , a new registration code will come up to the corresponding screen.
Schedule to Playback: Choose the Schedule that you want your monitor to display.
Default Content: Choose the Default Content that you want your monitor to display. You can
choose to display a single Media or Playlist or Show.
Monitor Orientation: You can choose the orientation of your monitor. You can find more
information here.
Continent (or Country): Choose your Country
City (or Zone): Choose your City or Timezone
56
Page 57

www.acti.com
Hardware Manual
Wireless
Enable WiFi: Toggle to enable or disable the WiFi service
WiFi Network Name: Type your router's/access point WiFi name.
NOTE: Keep in mind that WiFi network names are case-sensitive and they must be exactly the
same
WiFi Key: Type your router's/access point security code
WiFi Mode: Choose the security mode that you router's/access point is using
WiFi Network is hidden: Toggle to enable the hidden network service, that isn't
broadcasting its networkID (SSID)
3G/4G/LTE
Use 3G / 4G / LTE USB Dongle: Toggle to
enable 3G / 4G / LTE service
SIM PIN: Type the PIN of your SIM if the SIM card is
locked
APN: Type your access point name gateway
Username: Type the Username
Password: Type the Password
Advanced Configuration: Contact Customer Help
Desk (CHD) for the advanced configuration.
57
Page 58

www.acti.com
Hardware Manual
Static IPs
You can set a static IP address at your device just by
filling the relative fields.
IP Address, Netmask, Gateway and DNS, both in
Wired and in Wireless connection.
Use Google DNS as Primary: Toggle to Enable or
Disable the default Google DNS addresses.
Proxy
You can set the device to pass first from your own
proxy server just by filling the relative fields:
HTTP/HTTPS, Port, Username and Password.
58
Page 59

www.acti.com
Hardware Manual
Advanced
NOTE: These are advanced settings, if you have any queries please contact our
Customer Help Desk (CHD) before you do any custom configuration.
Remote Support Password: Type the
desired password for remote access like
SSH (Secure Socket Shell). By default is an
8 alphanumeric password. The private
password that you will type will be hashed.
Disable Firewall Reconfiguration: Toggle
to disable reapplying firewall rules during
configuration. By default only port 22/tcp is
open
Disable Diagnostics screen: Toggle to
disable the diagnostics screen
Disable turning off screen
message: Toggle to disable the turning off
screen message
Disable screen messages: Toggle to disable screen messages
Use only icons for screen messages: Toggle to use only icon messages to show at the
bottom right of your screen when Downloading, Configuring or Loading
Disable remote support (VPN): Players are 24/7 connected to our remote access
service (VPN). Toggle to disable this service
Allow Raspberry config.txt Override: Toggle to enable the config.txt
Raspberry config.txt Override Directives: Contact our Customer Help Desk (CHD) and let
them know what settings you want to be configured to your player
Advanced Player Directives: Contact our Customer Help Desk (CHD) and let them know
what settings you want to be configured to your player
NTP Servers (comma separated): Set your custom NTP servers
Status
The below status report is from an already registered device, if you don't register the device and
59
Page 60

www.acti.com
Hardware Manual
click the status tab you will see just a blank report with null values.
Status last updated: Displays the last status update. The Status report is refreshed every 2
hours, either you logged in or not.
Screen Resolution: The
resolution of the screen that the
device is connected via HDMI
Storage: The total and available
free storage
Uptime: Measuring the time that
your device is online and been
working
Wi-Fi status: Displaying the
SSID, Quality and the Signal
from you WiFi connected
network
HDMI Connected: Indicates
that an HDMI cable is already
connected to the device and the
screen
TV Status: You will see 3 messages ON, OFF and ?, the last one means that the device
couldn't get a report from your TV if it is online or not
Power Supply: You will see 2 messages:
The Green status and the Red warning status. The warning status means that the RPi is
running at low voltage and the PSU needs to be changed.
CPU Temperature: Indicates the CPU Temperature
CPU Load: Indicates the CPU stress
Wlan0: Displays the IP and other wireless network information about your device
Eth0: Displays the IP and other wired network information about your device
Location
Auto Detect Location: Toggle to enable locating the monitor coordinates using
60
Page 61

www.acti.com
Hardware Manual
Geo-location based on the latest IP Address of the device
Position (Lat,Lng): Enter manually the coordinates of your device, if the Auto Detect is not
pointing the correct coordinates.
61
Page 62

www.acti.com
Hardware Manual
User Settings
In the top-right corner, there is a drop-down configuration menu. This contains the user
account settings: My User Profile and Users.
My User Profile
Basic Info
To change your personal information like your first and last name or your e-mail, make the
relevant changes on the corresponding boxes providing this information under this section.
When you change your e-mail, a verification e-mail will be sent to your new e-mail address.
In this section you can also set/change your Continent/Country and/or your City/Zone.
Clicking "Save" will upload the changes in your account.
Notifications
Here you can enable or disable the option of notifying you by an e-mail when a device gets
offline. Whenever a player is offline, i.e not connected to our server, you will get a first
notification e-mail in 5 hours and a second one in 24 hours, if the issue has not been
resolved by then.
Clicking "Save" will upload the changes in your account.
Password
In this section you can change your current password with a new one.
Clicking "Save" will upload the changes in your account.
62
Page 63

www.acti.com
Hardware Manual
Two-Factor Authentication
NOTE: This feature is available on Enterprise plan only.
Two-step verification or two-step authentication is a method of confirming a user’s claimed
identity by utilizing something they know (password) and a second factor other than something
they have or something they are. An example of a second step is the user repeating back
something that was sent to them through an out-of-band mechanism. Or the second step
might be a 6 digit number generated by an app that is common to the user and the
authentication system.
First of all, download an Authenticator app either to your PC/Laptop (WinAuth) or to your
browser (Authenticator). You can also download an app from the Google Play Store for your
Android phone.
1. Login to your Account and go to "My User profile"
2. Click the "Two Factor" tab
3. When you enable the Two-Factor Authentication, a QR Code will be generated
with a Secret Key. If you have a camera you can scan the QR code and you will get a
new 6-digit code.
If you don't have a camera for scanning the code, use the Secret key with your
Authenticator app.
4. When you click the "Save" button, a new window will pop up. Enter the 6-digit code
that has been generated from the app you have installed on your
PC/Laptop/Browser/Cell Phone and click OK.
If the procedure is successful you will see a relevant message and your Two factor
Authentication is ready to use.
63
Page 64

www.acti.com
Hardware Manual
Account Settings
In this section, you can change any default settings to your choice and fully customize your
account.
Below you can see a full list from the Account Settings options.
Users
In this section, you can add users to your account with different levels of access. You can see
the listing of all your existing users in the account by their e-mail addresses, together with their
assigned permissions.
There is one user defined as the "Owner" of the account who can add (invite) more users. The
"Owner" cannot be deleted at any point. However, the additional users can be either edited or
deleted, with the corresponding buttons on the right field under the "Actions" column.
To add a new user, click on the "Invite User" button. In the screen that appears there are the
User Details to be added or edited in the event of an existing user. The following fields appear
under "User Details":
First Name
Last Name
E-mail.
64
Page 65

www.acti.com
Hardware Manual
Password
Below this information, there is a table that allows you to set permissions on the new user or
change the existing permission setting on an existing user:
Administrator: For the user to have access to all fields, manage and edit items in the
account and behave as an Admin user, click on the "All" box next to the "Is Admin"
column. By clicking on this box, all boxes will be automatically clicked too.
Manage Users: To have a user only dealing with new users or editing/deleting users,
click on the box next to the column.
Manage Subscription: To have a user only dealing with the subscription and billing
details of the account just click on the box next to this column,
Media: To have a user managing the whole range of activities within media files, click
“All”. Next to the "All" column, there are four (4) more columns determining specified
access to users. The user can View, Change, Create, and Delete media files.
Playlists: To have a user managing the whole range of activities within playlists, click
“All”. Next to the "All" column, there are four (4) more columns determining specified
access to users. The user can View, Change, Create, and Delete playlists.
Shows: To have a user managing the whole range of activities within shows, click “All”.
Next to the "All" column, there are four (4) more columns determining specified access
to users. The user can View, Change, Create, and Delete shows.
Schedules: To have a user managing the whole range of activities within schedules,
click “All”. Next to the "All" column, there are four (4) more columns determining
specified access to users. The user can View, Change, Create, and Delete schedules.
Monitors: To have a user managing the whole range of activities within shows, click
“All”. Next to the "All" column, there are four (4) more columns determining specified
access to users. The user can View, Change, Create, and Delete monitors.
You will notice that, in many cases, clicking one box automatically clicks other boxes too.
This happens because some categories contain items belonging to other categories and
therefore one cannot exist without the other. Also, some actions cannot take place without
other actions also occurring.
Example 1
If you give a user the authority to "View" Schedules by clicking on the relevant box, it
automatically means that the user will also be able to view Media files, Playlists and Shows,
since they are all contained in schedules. Hence, by clicking "View" schedules, "view" will be
automatically selected for Media, Playlists and Shows.
65
Page 66

www.acti.com
Hardware Manual
Example 2
If you give a user the authority to "Change" Shows, it automatically means that the user will also
be able to view them and since Shows contain Playlists and Media files, that user will be able to
view those files too. Therefore, clicking "Change" Shows will automatically select "View" on
Shows, Playlists and Media.
Workspaces
NOTE: This feature is available on Enterprise plan only.
Workspaces provide an advanced way to setup detailed access permissions. With
Workspaces, you can assign Users specific access rights to specific content items (Media,
Playlists, etc) or specific Monitors. The Workspaces feature allows you to define multiple sets
of Content+Screens and then assign access rights to Users for these sets.
Imagine you are a company with multiple branches, each with some screens. You want to
manage some of the content centrally, but also allow your local store managers to partially
manage some content (e.g. playlist) based on their local audience. This is a typical case where
you setup one Workspace per local store, and assign each manager access to the matching
Workspace, while giving an HQ employee access to all Workspaces.
The Workspaces feature is flexible enough that it allows you to implement any kind of access
restriction scenario. If you have difficulty setting it up on your own, please reach out and we will
help you optimize your use of our Enterprise Plan.
66
Page 67
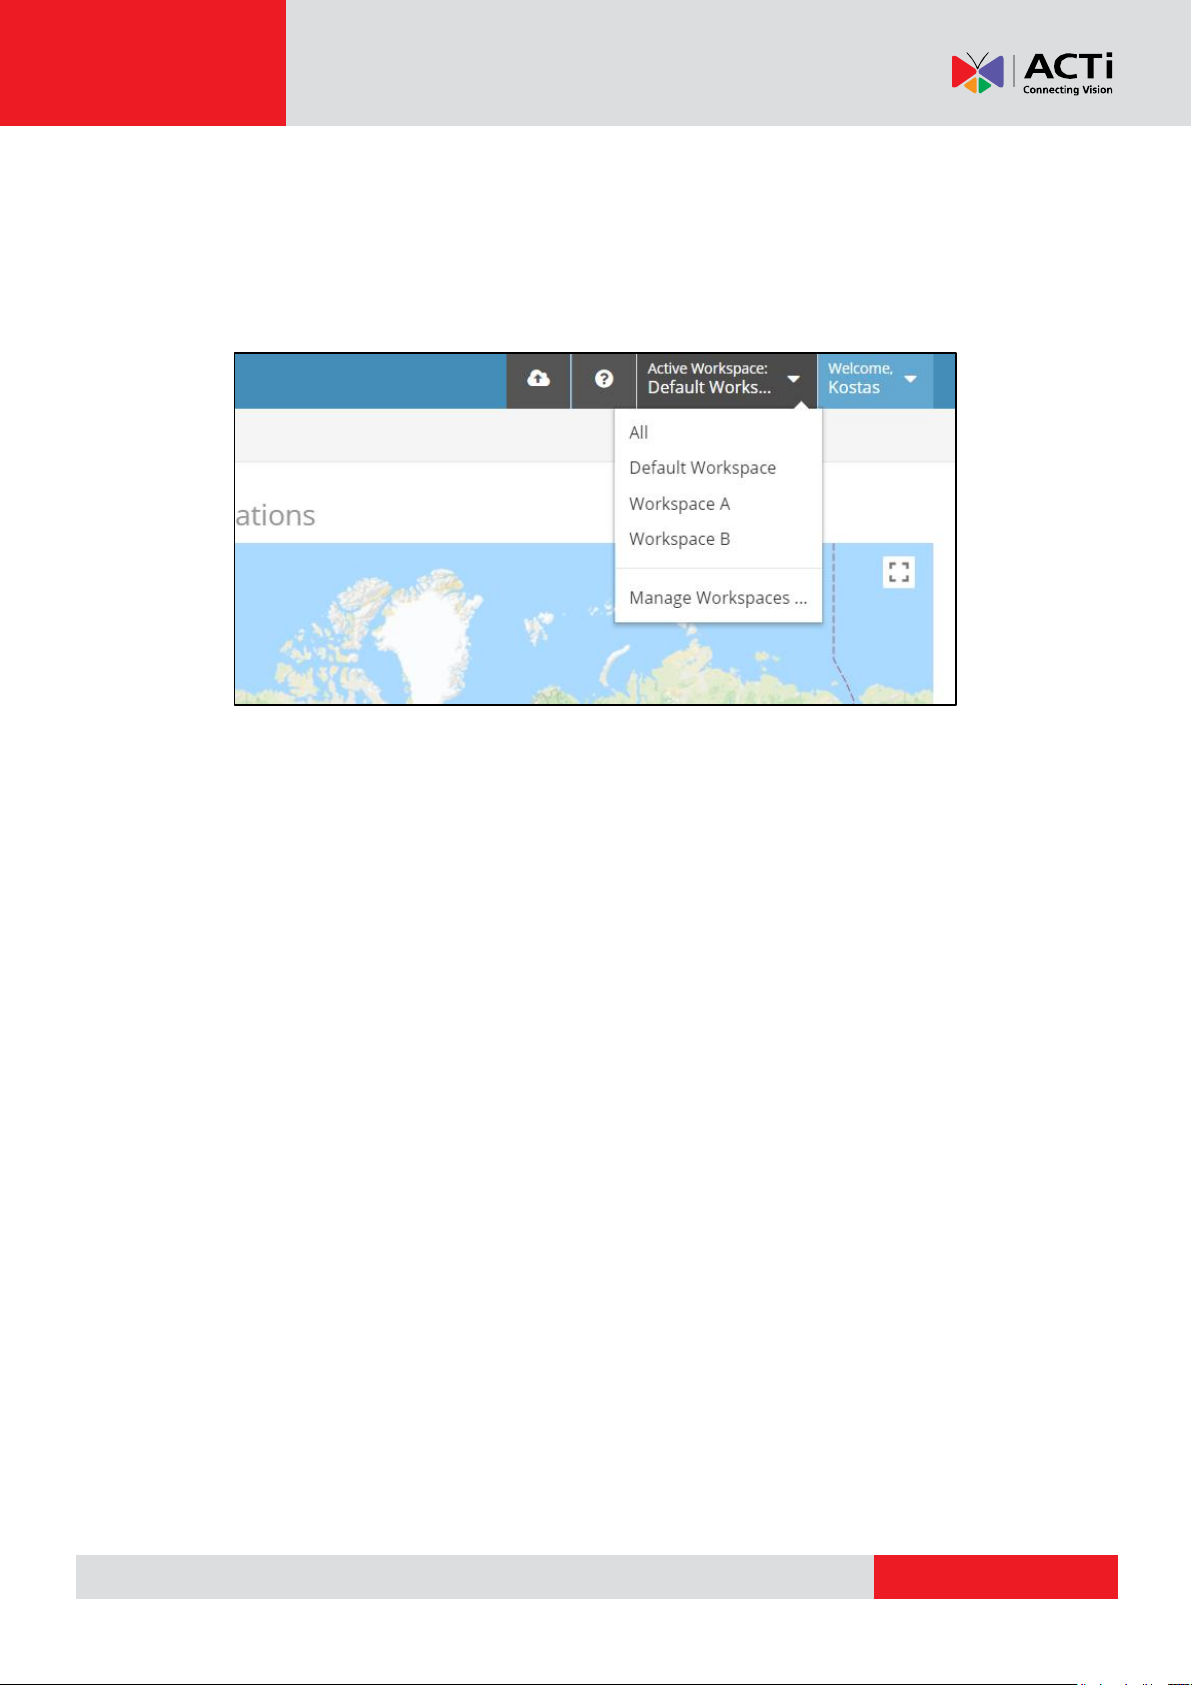
www.acti.com
Hardware Manual
The "Active Workspace" Menu
With the "Workspaces" feature available in your Account, a drop-down menu appears in the
top-right corner of the user interface. This menu allows you to select the Workspace you want
to work on, as well as manage Workspaces (creating, editing, or deleting them).
When you select a Workspace from the drop-down menu:
You will only see the content items (Media, Widgets, Playlists, Shows, Schedules) and
Monitors that are placed within that Workspace, and
Any item that you create will be placed in the currently selected Workspace
Also, when creating or editing items that reference other items, like
Playlists referencing Media and other Playlists
Shows referencing Media and Playlists
Schedules referencing Shows, Media and Playlists
Monitors referencing a Schedule and a Show, Playlist or Media
In the selection area, you see all items from across Workspaces that you have, at least, "read"
access to. So, for example, if you have read/write access to Workspace A and read-only
access to Workspace B, and try to create a Playlist in Workspace A, then you will be able to
use any Media from both Workspaces A and B. To find out more on how to assign specific
access rights to Workspaces, check out Roles in Workspaces on page 75 , after you have
completed reading all sections below.
67
Page 68

www.acti.com
Hardware Manual
Using "All"
If you select "All", then you will see the items (Media, Playlists, Monitors, etc.) from all
Workspaces that you have at least "Read" access to.
This is especially useful if you have access to multiple Workspaces, as it allows you to see
items across Workspaces and easily find what you are looking for. Note that "All" is the
pre-selected option when you login to the portal.
If you try to create an item while "All" is select, then a pop-up will appear urging you to
select a Workspace to place the new item.
The "Default Workspace"
The "Default Workspace" is the Workspace where all your content resides when you
subscribe to the "Enterprise" Plan. Since the other plans do not have the Workspaces
feature, all content items that existed before you upgrade to the "Enterprise" Plan are
placed in the "Default Workspace". Then, you can move the items that you want from the
"Default Workspace" to the Workspaces you create later on.
The "Default Workspace" also serves another purpose; whenever you delete a
Workspace, all items left in that Workspace are automatically placed in the "Default
Workspace". The same applies when you downgrade from the "Enterprise" Plan to the
"Standard" or "Pro" Plans; all Workspaces are deleted and all items in your account are
placed in the "Default Workspace".
Keep in mind that the "Default Workspace" is just another Workspace; you can assign
permissions to it and place items in it, just like you can do with any other Workspace. You
just can't rename or delete it, it is always there.
Your Workspaces
After the "Default Workspace" entry, the Workspaces that you have created follow in
alphabetical order.
As an Admin, you can see all Workspaces in your Account. But as a regular User, you
might not have access to all Workspaces in your Account (including the "Default
Workspace"). In the drop-down menu, you only see Workspaces that you have access to.
In the case of a non-Admin User having access only to a single Workspace (or any
Workspace at all), then they will not see the "Active Workspace" menu. This is to make the
user interface much easier to use for simple Users without complex access.
68
Page 69

www.acti.com
Hardware Manual
Using "Manage Workspaces ..."
The last item in the "Active Workspace" Menu is the "Manage Workspaces ..." item.
Clicking here gets you to the Workspace Management screen, which is detailed in the
following paragraph.
Managing Workspaces
In the Workspace Management section, you can create as many Workspaces as you
need. The only thing to provide is a Name (which appears in the drop-down list) and a
Description with any extra details you might need. As soon as you add your Workspaces,
you will see them appear in the "Active Workspace" dropdown menu. Some tips:
The Workspace Management screen is only available to the Users with "Admin"
permission, including the Account Owner (who always has "Admin" permission).
You can later change the Name and Description of the Workspaces, so there's no
need to worry about choosing a name and description.
The "Active Workspace" drop-down menu always shows the "All" and "Default
Workspace" items first. Then, all Workspaces you create are listed in alphabetical
order. If you want to show Workspaces in a specific order, just prefix their names with
numbers in ascending order.
Keep in mind that, if you delete a Workspace, all items in it will be moved to the
"Default Workspace".
69
Page 70

www.acti.com
Hardware Manual
Assigning Users Roles in Workspaces
Having Workspaces without restricting access to them does not make much sense. As an
Admin, you can assign Users in your Account specific access rights to each Workspace.
If the Workspaces feature is available in your Account, then the User Management screen
changes. You are then able to assign Users specific Roles in specific Workspaces. Check out
the section called Custom Roles on page 76.
Playback Reports
NOTE: This feature is available on Enterprise plan only.
Playback Reports (also known as "Proof-of-Play") provide complete records of all playback
that has actually happened in your Players. Combined with Media Tags and Player Tags, it
allows you to create complex aggregate reports.
Raw Playback Reports are made available as downloadable CSV files that can be
produced Daily, Weekly or Monthly.
You can find the Playback Reports in the Account settings (click on the top right of your
screen). You can enable Playback Reports by just toggling the ON/OFF button and then
choosing how often you want the CSV files to be exported.
70
Page 71

www.acti.com
Hardware Manual
Report Files
After configuring your Playback Reports, there is another tab called "Report Files". In this
tab you can see all the available CSV files generated in your account. You can download
them locally to your PC if you want, by clicking the "Download" button.
Also, you can filter the CSV files by setting the time and date of your choice in the filter
fields.
Playback Reports Retention
Currently, original Playback Reports are deleted from our database (we store data for up to
3 months), but generated CSV files are not deleted. In the future, this might change. In all
cases, we will retain all data and CSV files for up to 3 months. Make sure you download
the generated reports if you want to keep them for future reference.
CSV File
Below, we have attached a CSV File example from the above generated Playback Report.
In this example, we have added a playlist with 16 Media items in our test monitor named
“Monitor 1”. The red line indicates the playback loop (Playlist started again from the
beginning).
Reported Date: The time & date the player reported the playback to our system
Monitor ID: The ID of the Monitor
71
Page 72

www.acti.com
Hardware Manual
Monitor UUID: The UUID of the Monitor
Monitor Name: The name of the Monitor
Monitor Tags: The tags assigned to the Monitor
Media ID: The ID of the Media
Media Name: The Name of the Media
Playback Date: The time & date the media was played by the Player
Media Duration: The Duration of the media (Measured in milliseconds)
1,000 Milliseconds =1 Second
100,000 Milliseconds =1.666 Minutes
Media Tags: The tag assigned to the Media
How are Playback Reports calculated?
For the following Media types:
Videos, except live streams
Audio assets, except live streams
Documents, except those with 1 page/slide
Playback records are generated as follows:
A Playback Record is generated every time the Media completes one full playback of
all its content.
If the playback is interrupted (e.g. due to scheduling), a Playback Record is not
generated.
For the following Media types:
Images
Documents with only 1 page/slide
Websites
Widgets
Playback records are generated as follows:
If the Media is part of a Playlist with 2 or more items:
o A Playback Record is generated every time the Media completes one full
playback as instructed by the timing on a Playlist
o If the playback is interrupted (e.g. due to scheduling), a Playback Record is not
generated
If the Media is not part of a Playlist, or is part of a Playlist with only 1 item:
o A Playback Record is generated every time the Media is displayed for 300
seconds. In other words, every 300 seconds you will have one playback entry of
72
Page 73

www.acti.com
Hardware Manual
the Media in the CSV file
o If the playback is interrupted during the 300 second interval (e.g. due to
scheduling), a Playback Record is generated for the elapsed amount of time
from the last Playback Record
User - Custom Roles and Permissions
Roles and Permissions define the access rights a User has to specific parts of your Account.
All of these features are available under the "Users" section, accessible from the top-right
menu of the User Interface.
Permissions
There are two distinct permissions that a User can be assigned:
Administrator: This Permission provides unrestricted access to the whole Account.
Beyond that, the “Administrator” permission is required for a User to:
o manage other Users of the Account (creating, editing, or deleting them)
o manage Workspaces (creating, editing, or deleting them)
o manage Custom Roles (creating, editing, or deleting them)
o create or delete Devices (editing is allowed for other authorized Users as well,
check out Roles below)
o manage Tags (creating, editing, or deleting them)
o manage global settings for the Account (Password Policy and SAML)
o receive all email notifications for devices going offline/online
Manage Subscription: This Permission provides access to the Subscription-related
screens of the Account. It can be useful to allow access to Purchasing or Accounting
departments, so that they can see billing history, invoices, and so on, and also be able
to change the subscription. Users with this Permission:
o have access to all subscription-related screens
o can upgrade/downgrade/modify the subscription
o can see the billing history, invoices, credit card charges, and so on
o receive emails that have to do with purchasing and billing (orders, failed charges,
shipping tracking code notifications, etc)
The above two Permissions are set per User and have nothing to do with Roles or
Workspaces.
73
Page 74

www.acti.com
All Access
Full access to everything
Content Viewer
Read-only access to content-related items (Media, Playlists, Shows,
Schedules, etc)
Content
Manager
Read/Write access to content-related items (Media, Playlists, Shows,
Schedules, etc)
Content
Publisher
Same as "Content Manager", but also allowed to click "Push to Players"
Media Creator
Only upload new Media or change existing Media in-place
Media Manager
Read/Write access to Media
IT Manager
Only read/write Device configuration
Publisher
Only view Content (no Write access), but also allowed to click "Push to
Players"
Hardware Manual
Standard Roles
To make it easy for the vast majority of our Users, we have defined a set of standard Roles. In
the “Standard” and “Pro” Plans, you can assign only one Role to each User, while in the
“Enterprise” Plan you can assign a User one Role per Workspace (see the “Roles in
Workspaces” section below).
Here is a short description of each of the Standard Roles:
74
Page 75

www.acti.com
Media,
Playlists,
Device
Push to
Device
Manage
All Access
Read/Write
Read/Write
Read/Write
Yes
Read/Write
Read/Write
Content Viewer
View-only
View-only
View-only
Content
Read/Write
Read/Write
Read/Write
Content
Read/Write
Read/Write
Read/Write
Yes
Media Creator
Upload-only
Media Manager
Read/Write
IT Manager
Read/Write
Publisher
View-only
View-only
View-only
Yes
Hardware Manual
Here is a detailed description of each of the Standard Roles and the access it provides:
Roles in Workspaces
NOTE: This feature is for Enterprise plan only.
If you have Workspaces available in your Account, then you can assign Users one Role per
Workspace.
Clicking the “Add” button located in the Workspace Permissions” section will display a pop-up
that allows you to assign the User a Role in a specific Workspace.
75
Page 76

www.acti.com
Hardware Manual
This way, a User may have full access to a Workspace, while having limited Read-Only access
to another Workspace. Therefore, you can create flexible structures that allow you to delegate
access based on your exact needs.
Note that you cannot assign a User more than 1 Role per Workspace. If you need to do so, you
might need to create a Custom Role (see next section).
Custom Roles
NOTE: This feature is for Enterprise account only.
If you need to provide a User with customized Permissions, then you need to create a Custom
Role.
IMPORTANT: Keep in mind that if a new feature with a new permission is added, then your
Custom Roles will not have this new permission.
To access the Role Management screen:
1. Go to the “Users” section, accessible from the top-menu of the user interface.
2. Click “+User”
3. In the “Workspace Permissions” section, click the “Add” button.
4. In the pop-up window that appears, click on the “Manage Roles” link.
In this section you can see all the Standard Roles as well as the Custom Roes that you have
created.
76
Page 77

www.acti.com
Hardware Manual
You can add a Custom Role and define the detailed Permissions that this Role will provide.
For the Standard Roles, clicking on the magnifying glass button shows you the detailed
Permission for that Role.
77
Page 78

www.acti.com
Hardware Manual
Custom Widget Developer’s Guide
Here you can find all the details on how to build and deploy your own Widget to your Account.
Custom Widgets are the standard way to customize your Player. You can code your own
Widget using HTML5 and Javascript or using our Scripting Engine and provide completely
customized behavior for your screens.
Introduction to Custom Widgets
Custom Widgets allow you to create your own small applications or automated online web
pages and publish this as a Widget within Your Account. To do this, there are several options
and technologies that you can use. Each has advantages and disadvantages and you should
investigate which better fits your case.
Options for building a Custom Widget
Here is a quick list of all current options for developing a Custom Widget.
Web Widget
A Web Widget is based on an online web page (a URL) and uses our scripting engine to
automate and modify that web page.
Some examples that we already provide are the Baremetrics, ChartMogul, Google Calendar,
Google Analytics, and Instagram Widgets. These Widgets load up a web page from the
respective service, they log in, then navigate to the selected page and show the data that you
need.
78
Page 79

www.acti.com
Web Widget
HTML Widget
Internet Access
Required
Optional
Code
Scripting Engine +
Javascript (optionally)
HTML + Javascript
Difficulty
Easy and fast
Needs coding skills and time
Upload Required
No
Yes
Can Access Filesystem
and GPIO pins
No
Yes
Cross-origin Requests
Restricted
Unrestricted
Hardware Manual
HTML Widget
An HTML Widget is based on a ZIP package with HTML files that you upload to Your Device.
This package is then unzipped inside Your Players and is displayed locally.
Quick Comparison of Custom Widget options
Each Widget type has its pros and cons.
79
Page 80

www.acti.com
Hardware Manual
Building a Web Widget
Why Develop a Web Widget?
Web Widgets are displayed on each Player, so they have several
benefits over providing the same experience over an online HTML web
page.
Web Widget pros:
They are online, so they will reload automatically and display the latest info.
Have no CORS restrictions. You can create Widgets that pull in data from any
online web site. E.g. retrieve stock market prices from an online web page without
any prior arrangement and show them as you wish.
Are playback-aware, so they are notified when they are "loaded", "shown", and
"hidden". This makes better use of bandwidth.
Web Pages can store data that survive a reboot.
Can log in to any web page that requires an Authorization and display any graph or
report of your choice
What are the requirements?
Required skills
Anyone who can develop an HTML5/Javascript web page can develop a Widget. No
special skills are required. We also provide you with some required tools:
full documentation on how Widgets work
complete examples you can download and test
Creating a Web Widget
Make sure you read the next section of the Developer's guide to create your Widget or use
one of our samples. After you are done, then you can upload it to your Account.
To create an HTML Widget, go to "Custom Widgets" and select to add a new HTML widget.
In the form that appears:
Type in the Name of the widget
Add an optional Description for it
Add the Web page's URL
Choose an icon for your widget
Set the Zoom factor (%), which is set to 100% by default. By altering it you zoom
in (>100) or out (<100) of the web-page by the given percentage.
80
Page 81

www.acti.com
Hardware Manual
Auto-Adjust Zoom, which is also enabled by default, to adjust the zoom for
monitors with a width other than 1920 pixels so that they look the same.
Disable Private Browsing: Web pages by default open in private browsing mode
to prevent caching issues. You can use the toggle to disable it.
Enable Chrome: Some modern web-pages do not work properly with WebKit.
Currently, when using Chromium, the web-page can't have transparency.
5.1 Retain Session Data: By default, this feature is disabled when using Chromium.
If you want to keep the same session for this web-page, you can click on the toggle
to enable it. Upon enabling this option, the "Disable Private Browser" option will be
enabled as well.
5.2 Enable Flash Player: By default, this feature is disabled when using Chromium.
If a web-page requires a flash player to display the web-page content, you can click
on the toggle to enable it.
Scripting Engine (Run Custom Script): You can click on the toggle to enable the
scripting engine feature, where you can actually add scripts to run after a web-page
is loaded in order to modify and navigate it as you wish. For more information
please check out the Web Scripting Engine section in this user manual.
Write down the UI Configuration
Click "Save" to upload your custom widget.
81
Page 82

www.acti.com
Hardware Manual
Building HMTL Widget
Why Develop an HTML Widget?
HTML Widgets get downloaded to each Player, so they have several
benefits over providing the same experience over an online HTML web
page or Web Widgets.
HTML Widgets are great because of they:
are local, so they load even without a working Internet
connection.
have no CORS restrictions. You can create Widgets that pull in data from any online
web site. E.g. retrieve stock market prices from an online web page without any prior
arrangement and show them as you wish.
are playback-aware, so they are notified when they are "loaded", "shown", and
"hidden". This makes better use of bandwidth.
will soon have access to an API that will enable you to directly interact with the
playback engine.
What are the requirements?
Required skills
Anyone who can develop an HTML5/Javascript web page can develop a Widget. No special
skills are required. We also provide you with some required tools:
full documentation on how Widgets work
complete examples you can download and test
Creating an HTML Widget
Make sure you read the next section of the Developer's guide to create your Widget or use one
of our samples. After you are done, then you can upload it to Your Account.
To create an HTML Widget, go to "Custom Widgets" and select to add a new HTML widget. In
the form that appears:
type in the Name of the widget
choose an icon for your widget
add an optional Description for it
define the Zoom Factor (%)
toggle Auto Adjust Zoom
choose if you want to Enable Chromium
upload your ZIP file
82
Page 83

www.acti.com
Hardware Manual
How to ZIP your custom widget
Make sure to ZIP your custom widget's files without being in any folder on your PC's desktop.
write down the UI Configuration
Click "Save" to upload your custom widget.
REMEMBER: After making changes in your Account, you need to PUSH CHANGES to
your Monitors
83
Page 84

www.acti.com
Hardware Manual
Tutorial – Your 1st Widget
In this guide, you will build your first Custom Widget, the "Simple Clock". This is a very quick
example, to show you all the steps required to create a Widget.
The tutorial goes through the following steps:
1. Quickly create a simple Widget, without any type of configuration, to see the minimum
steps required. This Widget is a simple digital clock.
2. We then add two configuration options to the Simple Clock; the font size and an option
to show seconds or not. We create the code needed as well as the definition for the
configuration options, so that the user can easily define the configuration through the
UI.
3. Following this step, is a small modification to enhance performance. The clock should
only start when actually shown on screen, and it should stop when the Widget goes off
screen.
4. Finally, we show you some basic CSS code on how you can have a transparent
background for your Widget.
84
Page 85

www.acti.com
Index.html
1
2
3
4
5
6
7
8
9
10
11
12
13
14
15
16
17
18
19
20
21
22
23
24
25
26
27
28
<!DOCTYPE html>
<html>
<head>
<script>
function startTime() {
var today = new Date();
var h = today.getHours();
var m = today.getMinutes();
var s = today.getSeconds();
m = checkTime(m);
s = checkTime(s);
document.getElementById('txt').innerHTML =
h + ":" + m + ":" + s;
var t = setTimeout(startTime, 500);
}
function checkTime(i) {
if (i < 10) {i = "0" + i}; // add zero in front of numbers < 10
return i;
}
</script>
</head>
<body onload="startTime()">
<div id="txt" style="font-size: 48px"></div>
</body>
</html>
Hardware Manual
The Simple Clock Widget
In this guide, you will build your first Custom Widget, a simple digital clock.
1. Create the index.html
Every Widget has a single entry point, the "index.html" file. The web viewer loads up this HTML
file locally from the storage of the Player.
Let's create a sample. Using your favorite editor, create a file called "index.html" with the
following contents:
2. Create the zip package
Every Widget is packaged as a zip archive. You add the "index.html" and any other file you
want in that zip archive. Keep in mind that the "index.html" file must be in the main folder of the
zip archive and all related resources must use relative paths.
Since we do not have any other file, just add the "index.html" file you create above to a new zip
file called "SimpleClock.zip".
3. Upload your Custom Widget to your Account
To use your newly created Custom Widget, you need to upload it to the Portal.
1. Log in to your Account.
2. On the main menu on the left, click on "Widgets".
85
Page 86

www.acti.com
Hardware Manual
3. Click on the button in the lower-right corner saying "Upload Custom Widget".
4. Click on the "Create" button to upload your new Custom Widget.
5. Fill out the form:
a) Name: Type "Simple Clock". That's the name of your Custom Widget, which your
users will see when they try to add a new instance of your Custom Widget. Try
keeping this as short as possible, 2-3 words max.
b) Description: Type in a description for your Custom Widget, so that your users
can read and understand what this Widget does exactly.
c) Zoom Factor (%) and Auto Adjust Zoom have the same meaning as for Web
Pages. Skip them for this example.
d) Click on the New ZIP file field and select the zip archive "SimpleClock.zip" you
created above.
e) The UI Configuration field is used only if you want your users to supply
configuration parameters to your Widget. Since your Widget does not have any
parameters (yet), leave this blank.
6. Click the "Save" button to upload and create your new Custom Widget.
4. Use your Custom Widget
Your Custom Widget should now be available for use. First, create an instance of your Custom
Widget.
1. Log in to your Account.
2. On the main menu on the left, click on "Widgets".
3. Click on the button saying "Add Widget". In the drop-down menu that appears, you
should select "Simple Clock".
4. A form will appear. Since we do not have any configuration parameters yet for our
Custom Widget, the only (always there) parameters are:
a) Name: a name for this Widget instance you are creating. Use "My Clock no1".
b) Description: a more detailed description, if needed.
5. Click on the "Save" button to create the new instance of your Widget.
Now, go ahead to your Show and add the Widgets instance to show it on screen!
86
Page 87

www.acti.com
Index.html
1
2
3
4
5
6
7
8
9
10
11
12
13
14
15
16
17
18
19
20
21
22
23
24
25
26
27
28
29
30
31
32
33
34
35
<!DOCTYPE html>
<html>
<head>
<script>
var use_seconds = true;
function startTime() {
var today = new Date();
var h = today.getHours();
var m = today.getMinutes();
var s = 0
m = checkTime(m);
txtEl = document.getElementById('txt')
if(use_seconds){
s = today.getSeconds();
s = checkTime(s);
txtEl.innerHTML = h + ":" + m + ":" + s;
}
else{
txtEl.innerHTML = h + ":" + m;
}
var t = setTimeout(startTime, 500);
}
function checkTime(i) {
if (i < 10) {i = "0" + i}; // add zero in front of numbers < 10
return i;
}
function init_widget(config) {
if (!config) {
return;
}
if("clock_font_size" in config){
var pixels = config.clock_font_size + "px"
Hardware Manual
Add Options to the Clock
Most Widgets will require some form of configuration options. This configuration can be
different for each instance of your Widget (that is, each time you actually use your Widget).
For our Simple Clock Widget, let's say we want to add the following configuration options:
Clock Font Size: specify the exact font size in pixels (Integer)
Show Seconds: an option to show the seconds part of the clock or not (Boolean)
To add these options to your Widget, you need to do 3 things:
1. Modify the Widget code to accept the configuration values.
2. Add an init_widget(config) function that is called by the player when the widget has
finished loading and passes the json configuration parameters.
3. Provide a UI form specification, so that Your Account will create a form for editing
these options for your Widget instances.
Modify the Widget Code
Modify the Widget code as follows:
87
Page 88

www.acti.com
36
37
38
39
40
41
42
43
44
45
46
47
48
49
50
51
52
53
document.getElementById('txt').style.fontSize = pixels;
}
if("use_seconds" in config){
use_seconds = config.use_seconds;
}
startTime()
}
</script>
</head>
<body>
<div id="txt" style="font-size: 48px"></div>
</body>
</html>
UI Configuration
1
2
3
4
5
6
7
8
9
10
11
12
13
14
15
16
17
18
19
20
21
22
23
24
25
{
"fields": [
"clock_font_size",
"use_seconds"
],
"schema": {
"clock_font_size": {
"editorAttrs": {
"max": 999,
"min": 1,
"step": 1
},
"title": "Clock Font Size",
"type": "Number",
"validators": [
"required",
"number"
]
},
"use_seconds": {
"title": "Use Seconds",
"type": "Checkbox"
}
}
}
Hardware Manual
Zip the updated index.html file and re-upload the zip file to your "Simple Clock" Custom
Widget.
As you can see, we added the "init_widget" function, which takes the arguments and uses
them to properly configure the Widget.
Provide a UI Configuration Form
To allow your Device to configure your Widget, you must provide a detailed specification of
your configuration fields. To do this, you use JSON Schema. You just paste the JSON Schema
text to the text area.
For the 2 configuration values we need now,
the "schema" value defines the editors for each of your fields,
the "fields" value is optional and defines the order the fields will appear in the form.
Here is the JSON Schema to use:
88
Page 89

www.acti.com
Hardware Manual
Go to your "Simple Clock" Custom Widget and paste the above code into the "UI
Configuration" textarea, and click Save.
Test it out
Try adding a new instance of your "Simple Clock" Widget. It should now appear with the 2
fields you added above. Try using it and add the Widget to a Show to get it on a screen, and
test it out.
Making the Clock Efficient
Just like all content types, Widgets are pre-loaded during playback. This means that it may
take several seconds (or even minutes) between loading the Widget instance on the Player's
Web Viewer, and actually getting the Widget to show on screen. This has two effects:
If your Widget is not static (e.g. you show a playlist of images), then you need to know when
your Widget is displayed, so that you can start your sequence.
If your Widget is resource-heavy, then you are wasting Player resources that could result in a
bad playback experience.
In the "Simple Clock" case, none of the above applies, but let's say that you wanted to start the
clock once the Widget is shown, and stop the clock once the Widget is hidden.
89
Page 90

www.acti.com
Hardware Manual
Index.html
1
2
3
4
5
6
7
8
9
10
11
12
13
14
15
16
17
18
19
20
21
22
23
24
25
26
27
28
29
30
31
32
33
34
35
36
37
38
39
40
41
42
43
44
45
46
47
48
49
50
51
52
53
54
55
56
57
58
59
60
61
62
63
64
<!DOCTYPE html>
<html>
<head>
<script>
var use_seconds = true;
function startTime() {
var today = new Date();
var h = today.getHours();
var m = today.getMinutes();
var s = 0
m = checkTime(m);
txtEl = document.getElementById('txt')
if (use_seconds) {
s = today.getSeconds();
s = checkTime(s);
txtEl.innerHTML = h + ":" + m + ":" + s;
}
else {
txtEl.innerHTML = h + ":" + m;
}
window.t = setTimeout(startTime, 500);
}
function checkTime(i) {
if (i < 10) {i = "0" + i}; // add zero in front of numbers < 10
return i;
}
function init_widget(config) {
if (!config) {
return;
}
if("clock_font_size" in config){
var pixels = config.clock_font_size + "px"
document.getElementById('txt').style.fontSize = pixels;
}
if("use_seconds" in config){
use_seconds = config.use_seconds;
}
}
function start_widget(){
startTime()
}
function stop_widget(){
if(window.t){
clearTimeout(window.t);
}
}
</script>
</head>
<body>
<div id="txt" style="font-size: 48px"></div>
</body>
</html>
Modify the Widget code as follows:
90
Page 91

www.acti.com
Transparency CSS
html, body {
background-color: transparent;
}
Index.html
1
2
3
4
5
6
7
8
9
10
11
12
13
14
15
16
17
<!DOCTYPE html>
<html>
<head>
<style type="text/css">
html, body {
background-color: transparent;
}
</style>
<script>
var use_seconds = true;
function startTime() {
var today = new Date();
var h = today.getHours();
var m = today.getMinutes();
var s = 0
Hardware Manual
Zip the updated index.html file and re-upload the zip file to your "Simple Clock" Custom
Widget.
Modifications explained
As you can see, we now do not start the clock on page load, and we added two functions:
The start_widget function is called just before the Widget is shown on screen. At that
point, we start our clock.
The stop_widget function is called just after the Widget is removed from screen. At that
point, we stop our clock.
The second call is not really necessary in our case, since the Web Viewer will terminate and all
resources will be freed, but it is good to know. Some Widgets require finalization calls to
backend services in order to save their state.
Adding Transparency
If the user activates the transparency checkbox, then the Widget is rendered in an offscreen
buffer, and then copied to the screen. This results in a low refresh rate for the Widget contents.
Keep that in mind when you create Widgets.
Keep in mind that this does NOT work with the "Chromium" web rendering engine. You
need to have that toggle disabled in order to support transparency.
To enable background transparency in your Widget, just add the following CSS to your Widget
code.
For the Simple Clock, modify the Widget code as follows:
91
Page 92

www.acti.com
18
19
20
21
22
23
24
25
26
27
28
29
30
31
32
33
34
35
36
37
38
39
40
41
42
43
44
45
46
47
48
49
50
51
52
53
54
55
56
57
58
59
60
61
62
63
64
65
66
m = checkTime(m);
txtEl = document.getElementById('txt')
if (use_seconds) {
s = today.getSeconds();
s = checkTime(s);
txtEl.innerHTML = h + ":" + m + ":" + s;
}
else {
txtEl.innerHTML = h + ":" + m;
}
window.t = setTimeout(startTime, 500);
}
function checkTime(i) {
if (i < 10) {i = "0" + i}; // add zero in front of numbers < 10
return i;
}
function init_widget(config) {
if (!config) {
return;
}
if("clock_font_size" in config){
var pixels = config.clock_font_size + "px"
document.getElementById('txt').style.fontSize = pixels;
}
if("use_seconds" in config){
use_seconds = config.use_seconds;
}
}
function start_widget(){
startTime()
}
function stop_widget(){
if(window.t){
clearTimeout(window.t);
}
}
</script>
</head>
<body>
<div id="txt" style="font-size: 48px"></div>
</body>
</html>
Hardware Manual
Zip the updated index.html file and re-upload the zip file to your "Simple Clock" Custom Widget.
The Simple Clock should now have a transparent background.
92
Page 93

www.acti.com
Hardware Manual
How Content Transition Works
In order to provide seamless transitions, the Player performs preloading of the content that
follows. Every time a content item is shown on screen, the next item in the Playlist is loaded,
so that the transition is as fast as possible.
Think of a Playlist with the following contents:
1. Video1
2. Widget1
3. Widget2
4. Image1
5. Widget3
Let's say that Widget1 is on screen. For each transition between two content items (e.g.
Widget1 and Widget2, in this case), the Player performs the following steps:
1. Widget2 is shown on-screen.
2. Widget1 is hidden off-screen.
3. Widget2 is started.
4. Widget1 is stopped.
5. Widget1 is destroyed (resources released).
6. Image1 is preloaded off-screen.
For the next transition, the same sequence will occur.
1. Image1 is shown on-screen.
2. Widget2 is hidden off-screen.
3. Image1 is started.
4. Widget2 is stopped.
5. Widget2 is destroyed (resources released).
6. Widget3 is preloaded off-screen.
Content transitions work (almost) the same for all content types, so you should follow these
guidelines whenever you create custom Content Viewers or Custom Widgets.
93
Page 94

www.acti.com
Hardware Manual
HTML Widget Reference
The Player needs to notify the Widget of the current state of playback. The Player calls several
hooks during playback, so that the Widget can properly update its status. Also, the Player
provides an API to allow the Widget to perform actions or retrieve additional information from
the Player.
Sequence of Calls
In order to provide seamless transitions, the Player performs preloading of the content that
follows. Every time a content is shown on screen, the next item in the Playlist is loaded, so that
the transition is as fast as possible.
The standard sequence of events is the following:
1. The Widget is loaded on the Player's web viewer.
2. The init_widget hook is called. (called right after the Widget loading has
completed)
3. The Widget awaits preloaded to be shown on screen.
4. The show_widget hook is called. (called just before the Widget is shown on
screen)
5. The start_widget hook is called. (called just after the Widget is shown on
screen)
6. The Widget is playing back normally.
7. The hide_widget hook is called. (called just before the Widget is removed
from screen)
8. The stop_widget hook is called. (called just after the Widget is removed on
screen)
9. The Widget awaits to be destroyed.
10. The Player's web viewer is destroyed.
HTML Widget Hooks
init_widget
Initialization hook for the Widget.
init_widget(config)
This is the most frequently used hook. This hook is called right after the Widget has
completed loading. The config argument is an object, which carries all the Widget
configuration options that have been defined for the Widget.
If a Widget does not provide any configuration options, then you can safely skip providing
this function in your Widget code. Note that this hook is called just after the onload() call
completes.
94
Page 95

www.acti.com
Hardware Manual
show_widget
Widget show hook for the Widget.
show_widget()
When playback stops, content on Player is first hidden and stopped, in order to provide a
much more seamless transition between content (stopping may take more time than
hiding). This hook is called right before the Widget viewer is destroyed. This hook might be
needed in the following cases:
The Widget saves some state on a backend server when it finishes, so it needs to
do some work before it is terminated.
The Widget might use CPU or bandwidth until the web viewer is actually destroyed,
so these resources can be saved in the meantime.
You can safely skip providing this function in your Widget code, if you do not need it.
start_widget
Playback start hook for the Widget.
start_widget()
Content on Player is preloaded before it shows up on screen, in order to provide a much
more seamless transition between content. This hook is called right after the Widget has
been shown on screen. This hook might be needed in the following cases:
The Widget is CPU intensive, so you can use it to prevent unnecessary CPU load
during the time between loading the Widget and showing the Widget.
The Widget might need to know when to start playback., e.g. in the case that it
needs to playback a series of images.
The Widget might use bandwidth to update its data, so bandwidth can be saved if
updates do not occur when the Widget is not visible.
You can safely skip providing this function in your Widget code, if you do not need it.
Keep in mind that this hook should be kept minimal and with zero delays, since it
may disrupt transitions.
95
Page 96

www.acti.com
Hardware Manual
hide_widget
Widget hide hook for the Widget.
hide_widget()
This hook is called right before the Widget viewer is moved off-screen. The use cases for
this hook are very rare.
You can safely skip providing this function in your Widget code, if you do not need it.
Keep in mind that this hook should be kept minimal and with zero delays, since it
may disrupt transitions.
stop_widget
Playback stop hook for the Widget.
stop_widget()
This hook is called right after the Widget viewer has been moved off screen. This hook
might be needed in the following cases:
The Widget saves some state on a backend server when it finishes, so it needs to
do some work before it is terminated.
The Widget might use CPU or bandwidth until the web viewer is actually destroyed,
so these resources can be saved in the mean time.
You can safely skip providing this function in your Widget code, if you do not need it.
HTML Widget API Calls
exit_widget
Notify the Player that the Widget has finished playback.
exit_widget()
This function allows your Widget to notify the Player that the Widget has completed
playback and the viewer should terminate. This allows your Widget to get the Player to
proceed to the next content item in the current Playlist.
Note that this function just notifies the Player; it does not cause the Widget to exit instantly.
The Player will go through the transition flow, calling all required hooks detailed above.
96
Page 97

www.acti.com
1
2
3
function init_widget(config){
auth_token = config.player_params['auth_token']
}
Hardware Manual
Player HTTP API
The player offers an HTTP API that custom HTML widgets can use. It provides information
about the player, allows requests proxying, caching and widget storage.
The HTTP server is available at the following URL: http://localhost:9999
Keep in mind that the server only serves local connections and it doesn't bind to any public
interfaces of the player.
Authentication
When a widget is launched, it is provisioned with an access token that can be used when
authenticating with the HTTP server. This can be retrieved from init_widget hook function:
When making requests to the HTTP API, provide an Authorization header that has the value
"widget <token>" where <token> is the token received from the configuration passed to the
init_widget hook as seen above.
For more information for the custom widget, hook functions check our HTML Widget API.
Available Endpoints
DEVICE INFORMATION ENDPOINT
This endpoint provides basic information for the player.
Available Methods: GET
/device : Returns information for the specific player. A JSON object containing the ID, Name,
and Location of the player. Example: {"id": 12345, "location": [40.4280106, -3.6990943],
"name": "test device"}
/device/name : Returns the player's name as a JSON string. Example: "test device"
/device/id : Returns the player's ID as a JSON integer. Example: 12345
/device/location : Returns the player's locations as a JSON array containing two floats (the
latitude and the longitude). Example response: [40.4280106, -3.6990943]
REQUEST PROXY / CACHING PROXY
This endpoint allows you to proxy requests via the local HTTP server when calling an external
API from a custom widget. The endpoint offers a mechanism to cache the responses from the
external server. This can be quite useful when you have custom widgets in playlists, as this
can reduce the requests to your external server and also simplify your widget's code. It also
provides a way for widgets to keep working correctly (even with stale data) if the player is
97
Page 98

www.acti.com
Hardware Manual
unable to access the Internet or your API.
Available Methods: POST
Path: /request
Request Body: A JSON object containing:
url: The url to be requested
method: The HTTP method that will be used when requesting the url
headers: A JSON object with any headers to be used when requesting the url (can be
omitted)
body: The body to be provided to the request (can be omitted). Only UTF-8 data are allowed
in this field.
b64_body: If you need to pass arbitrary binary data as the body for your request, you can
use b64_body. Just make sure your data is first encoded to Base64.
cache: The number of seconds that the response should be cached. Any subsequent requests
will be served the same data during this time-frame. If you don't need your requests to be
cached, you can just omit this option or set it to 0.
Caching:
When the cache option is provided, the proxy will cache any GET requests for the specified
time. Any subsequent requests to the same url with the same headers, will be served from
the cache and will not reach the final server. When a cached response is served, a response
header "X-Cached-Date" provides the Date that the response was originally cached. If the
cache time-frame passes, the proxy will try to reach the final server to get a fresh response. If
fresh data is received, the proxy will serve the new data and cache it again. If the final server
cannot be reached or a non 2XX response is received, the old stale data is served. A response
header "X-Stale" (with value "true") is sent to denote the stale data.
Caching allows minimizing the requests to the final server when your widget is reloaded
multiple times. The typical case is when the custom widget is in a playlist. The stale data
feature allows your widget to continue working even when the player is offline or unable to
reach the final server.
The cache is kept in memory and will be automatically released when it is not used anymore. If
you need persistent storage that can survive across reboot, check the Widget
storage endpoint below.
98
Page 99

www.acti.com
Hardware Manual
WIDGET STORAGE
This endpoint provides simple key-value storage for your custom widget. It can support any
Content-Type. The storage is persistent and will survive across reboots. Each widget instance
is able to access its own data only.
Saving data
Method: POST
Path: /storage/<key>
Body: <your_data>
Response code: 201
Create or update the specific <key> . Make sure that you provide a Content-Type header to
denote the type of <your_data>.
Retrieving data
Method: GET
Path: /storage/<key>
Response code: 200 or 404 if <key> is not found
Get the specified <key> from the widget storage. The Content-Type that was specified
when previously creating the <key> will be available in the Content-Type header.
Listing available keys
Method: GET
Path: /storage/
Response code: 200 or 404 if there are no keys in storage.
Get a list of the available keys in the storage.
Deleting Data
Method: DELETE
Path: /storage/<key>
Response code: 200 or 404 if <key> is not found
Delete the specified <key> from the widget storage.
Deleting All Data (for the specific widget instance)
Method: DELETE
Path: /storage/
Response code: 200
Delete all keys from the widget storage.
99
Page 100

www.acti.com
Hardware Manual
HTML Widget Packaging
All Widgets must be packaged in a ZIP file. This ZIP file is delivered to all Players that are
using the Widget, just like other files shown on screen (images, videos, etc).
Example Folder Structure
The ZIP file is extracted in the local storage of the Player and the Web Viewer loads
the index.html file found in the base folder of the ZIP file.
Minimum Required:
(ZIP base folder)
|_______ index.html
Example with some assets:
(ZIP base folder)
|_______ index.html
|_______ css
|_______ base.css
|_______ custom.css
|_______ images
|_______ image1.jpg
|_______ image2.png
Any links or references to asset files (like, js, CSS, or image files), should always be relative so
that they work properly after the ZIP file is extracted.
Wrong Zipping Method
If you have copied your custom widget with all the required files to a folder named "BlaBla"
and try to ZIP that folder, the player will not be able to read the index.html file and therefore will
not display your widget on your TV screen. If your Custom widget is shown as the below image
on your PC's RAR archiver, then you need to delete that folder and ZIP only the required files
as we mention above.
! Wrong Zipping method
100
 Loading...