

Page 1
BIOMETRIC FINGERPRINT TECHNOLOGY
TQ100 Terminal User Manual
Page 2

2 timeQplus BIOMETRIC™ Terminal User Manual timeQplus BIOMETRIC™ Terminal User Manual 43
Page 3

Chapter One: Introduction
1.1 Operating Environment………………………..….....
1.2 System Description …………………………….........
1.3 Enclosed Items …………………………………........ 4
4
4
Chapter Two: Hardware Setup
2.1 Terminal Installation ………………………………......
2.2 Keyboard …………………………………………….......
5
5
Chapter Three: Menu Structure
3.1 Data Management………………………………......…
3.2 Setup…………………………………………………........
3.3 System Info …………………………………………......
7
8
9
Chapter Four: Communications
4.1 Communication Interfaces ………………………....
4.2 Communication Options……………………………....
4.2.1 RS232 Serial Communication……………............
4.2.2 RS485 Network Communication……......…........
4.2.3 Ethernet Communication………………….............
10
10
11
12
13
Chapter Five: Fingerprint Registration/Enrollment
5.1 Enrollment Method………………………..…...........
5.2 Fingerprint Registration……………………............
14
16
Chapter Six: Terminal Usage and Punching In/Out
6.1 Successful validation when punching In/Out.....
6.2 Unsuccessful validation when punching In/Out..
20
21
Chapter Seven: Administrator Functions
7 .1 Data Management……………………………...........
7.2 Setup………………………………………………...........
7.3 System Info ……………………………………...........
23
29
36
Chapter Eight: Appendix
8.1 RS232 Interface ………………………………...........
8.2 RJ45 Interface…………………………..……............
37
38
Page 4

Chapter One: Introduction
Thank you for your recent purchase of the TQ100, a data collection
terminal for timeQplus BIOMETRIC™ time and attendance system. This user
manual provides specific information that will help you better understand the
functionality of the terminal (TQ100). Some key areas that are important to
the terminal’s (TQ100) performance are the operating environment, the
system overview, communication options and enrollment.
1.1 Operating Environment
Please read the manual carefully before using the product. The terminal
operates most efficiently by following these recommendations:
1. DO NOT expose the TQ100 to direct sun light. Direct sunlight may
impact the fingerprint reader optics and affect enrollment, quality
of the templates, and performance of the fingerprint recognition process.
2. TQ100 operating temperature is 39F-110F. Do not operate the terminal
outdoors. High temperature and humidity may affect its performance.
1.2 System Description
The timeQplus BIOMETRIC™ time and attendance system consists
of two parts:
1. Fingerprint terminal TQ100
2. AttendanceRx, the time and attendance management software that
runs on the PC.
The TQ100 terminal’s main function is to register employees’ fingerprints
and record daily time and attendance. The PC software is used to manage
the TQ100 and process employee information using a set of attendance
rules defined by the Administrator. The PC software interacts with the
terminal TQ100, calculates time, and generates reports. The time and
attendance PC software application compatible with the TQ100 is called
AttendanceRx.
Three communication options are available between the TQ100 terminal and
the PC software: serial (RS232) and network (RS485, Ethernet).
1.3Enclosed Items
1. Quick Start timeQplus BIOMETRIC installation guide
2. Time and attendance software CD, AttendanceRx
3. TQ100 biometric terminal
4. Hardware user manual for the TQ100
5. Serial RS232 cable, 30 feet (9 m)
6. CAT5 Ethernet cable, 6 feet (2 m)
7. Power adapter
8. Mounting plate and screws
Page 5

Chapter Two: Hardware Setup
2.1 Terminal Installation
To power up the TQ100 biometric terminal:
A) Unwrap the package and take out the terminal and accessories.
B) Using the screws supplied, fasten the mounting plate on the wall in an
appropriate place. Avoid areas with strong magnetic and/or electric fields.
C) Attach the terminal to the mounting plate.
D) Plug in the power supply and turn the terminal on (Press button).
2.2 Keyboard image and functions
Keypad configuration is presented in Figure 2.1:
1 2 3 ESC
4 5 6 ▲
7 8 9
•
Figure 2.1
The keypad functionality is described below
ESC
MENU
OK
0 - 9
To perform EXIT, CANCEL, IGNORE when using the menu
To access the Menu structure
To confirm and save the selection
Power switch
Scroll-up button for menu operations
Scroll-down button for menu operations
Keys to use when operating or performing system
setup or entering User ID or password
0 OK MENU
▼
timeQplus BIOMETRIC™ Terminal User Manual 540 timeQplus BIOMETRIC™ Terminal User Manual
Page 6
Chapter Three:
TQ100 Biometric Terminal Menu Structure
The terminal uses function and number keys to navigate through the
menu options and to access system settings. Level-1 menus include:
Data management, Settings and System Information. Each menu consists
of subordinate level-2 menus such as User Registration and View Punches.
Level-3 menu include enrollment method selection, sensitivity settings, etc.
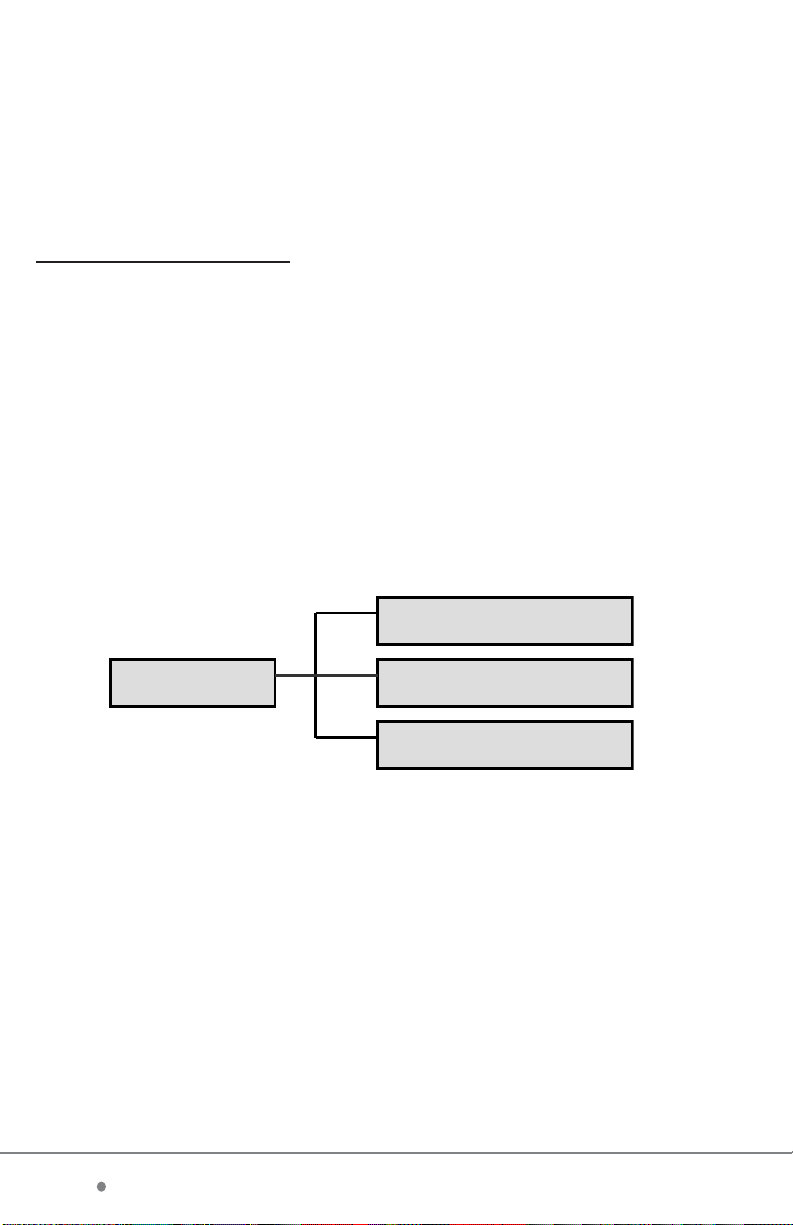
Menu structure contains:
a. Data Management: to setup, change or delete data (e.g. enroll fingerprints,
passwords, administrators, delete records, track attendance); to perform audits
for system changes and set up sensitivity levels for the fingerprint reader.
b. Setup: to set up the TQ100 to communicate with the PC software application.
c. System Information: to examine the information recorded in the terminal
and view statistical data.
The structural diagram of the menu is illustrated as follows:
Menu
Data Management
Setup
System Information
Level 1
Page 7

3.1 Data Management
With Data Management option highlighted, press OK to access
Data Management level-2 menu and browse through the seven items
available. Some of the items have corresponding sub-items, the level-3
menu, as shown below:
Level-1 Menu Level-2 Menu Level-3 Menu
User
Registration
Administrator
Registration
or Password
Fingerprint
Password
Fingerprint
Sensitivity
Data Management
Sensitivity
Level Setting
Delete Registration Data
V iew Punches
View Admin Record
Delete All Records
User Setting
Global Setting
timeQplus BIOMETRIC™ Terminal User Manual 738 timeQplus BIOMETRIC™ Terminal User Manual
Page 8
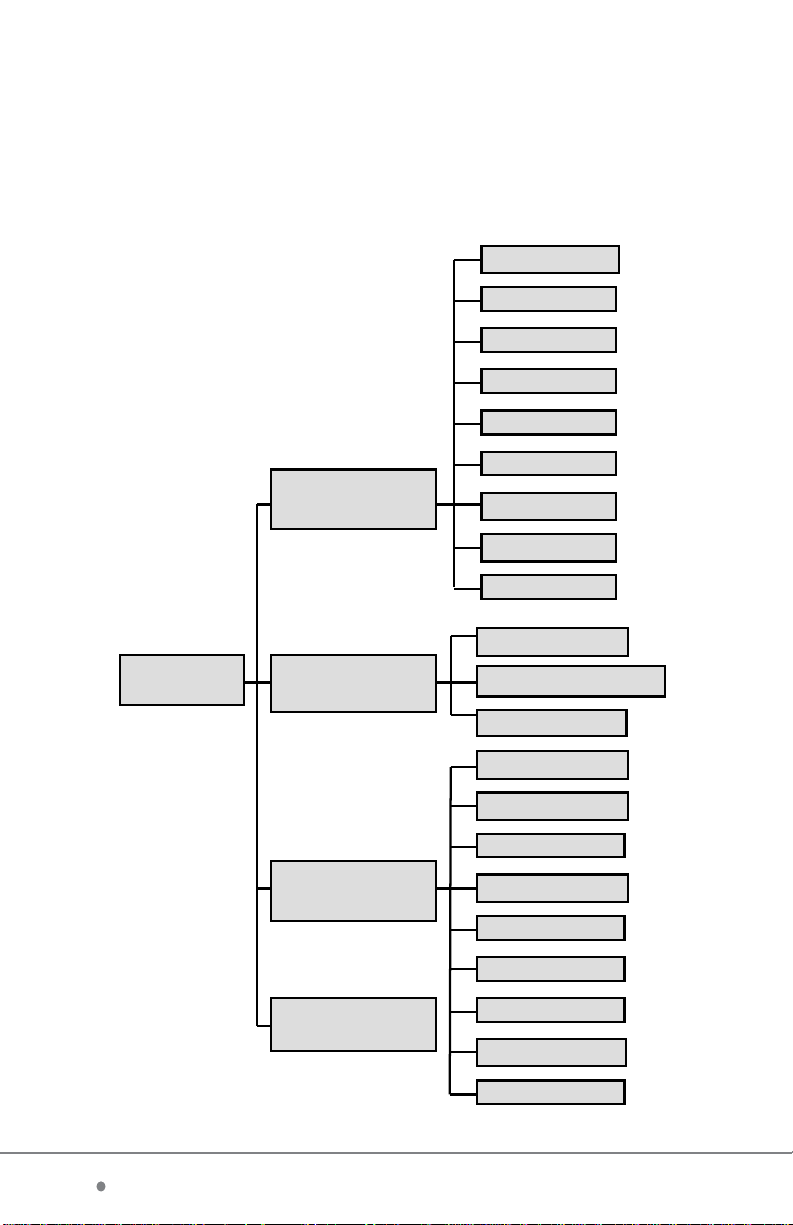
3.2 Setup
With Setup highlighted, press OK to access the Setup level-2 menus
and browse the four items available. There are a total of 18 level-3
menus as per the diagram below. For more information on each
menu, please refer to page 26.
Level-1 Menu Level-2 Menu Level-3 Menu
Admin max number
Language
Time
Date Format
AM/PM
Voice Out
System Setting
Unlock
Auto Shutdown
Card*
Admin Record
Setup
Record Setting
Communication
Setting
Display
Adjustment
Total Punches Alert
Duplicate Punches
Device ID
Baud rate
Port number
Password
IP Address
Subnet Mask
Default
RS485
Ethernet
*The card option is not available on standard units.
Page 9
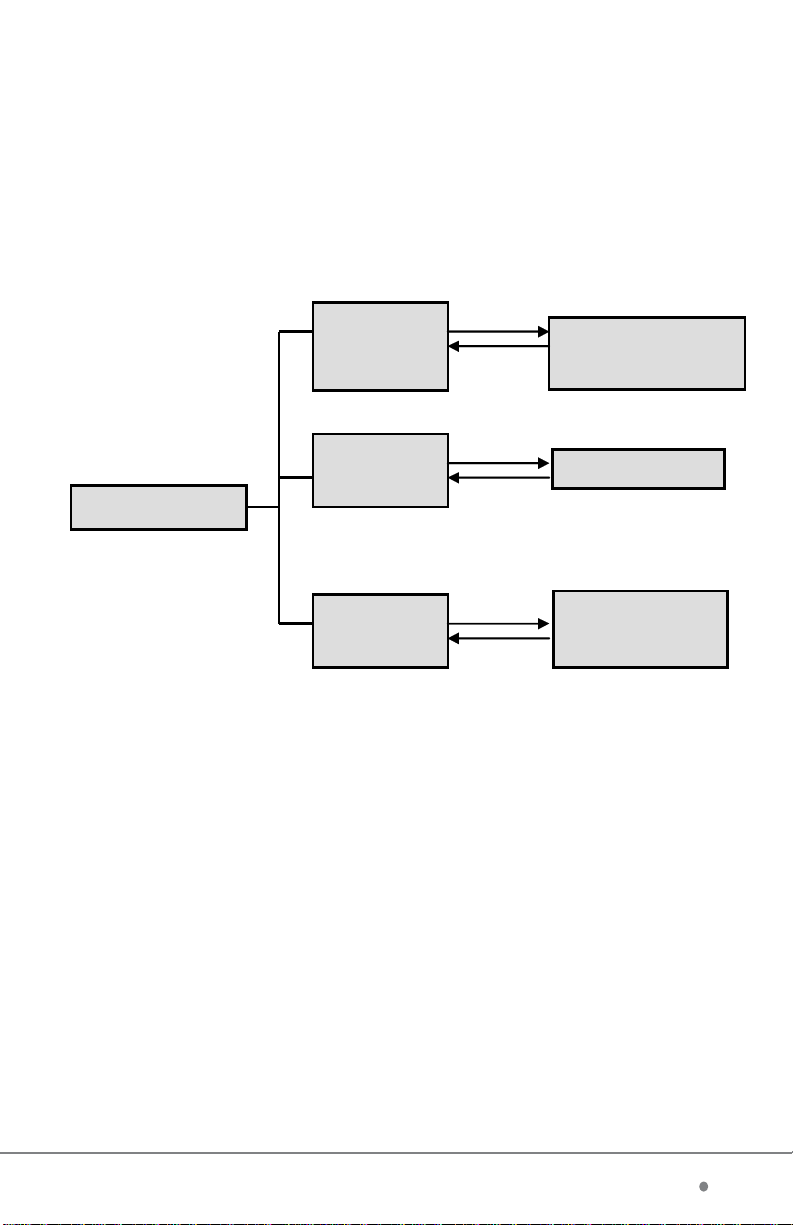
3.3 System Info
With System Information highlighted, press OK to access System
Information level-2 menus. You will see three menu items displayed.
Press OK in each menu to display the corresponding item as follows:
Level-1 Menu Level-2 Men u Level-2 Menu
Registration
System Info
Note: When User is selected, pressing OK switches between User and
Admin. The other items work in a similar way.
User
(# of users)
Fingerprint
T otal
(# Punches)
Press OK
Press OK
Press OK
Administrator
(# of Administrators)
Password
Admin Recs
(# Admin Recs)
timeQplus BIOMETRIC™ Terminal User Manual 936 timeQplus BIOMETRIC™ Terminal User Manual
Page 10

Chapter Four: Communications
4.1 Communication Interfaces
There are two communication interfaces available for the TQ100 terminal:
9-pin RS232 interface and RJ45 interface, as illustrated in the Figure 4.1.
The RS232 interface provides RS232 communication, while the RJ45 interface
provides RS485 and Ethernet communication, see Figure 4.1 below.
Figure 4.1
RJ45 Interface
Attention:
1. Maximum communication distance of RS232 cable is 50 feet (15 m).
2. RS485 communication can connect multiple terminals
(up to 32 terminals) and the maximum communication distance
can reach 1000 feet (300 m). For optimal performance it is
recommended
to use up to 10 terminals in a RS485 network installation.
3. Ethernet communication mode belongs to Ethernet network connection.
It can be used to connect any terminals in the LAN.
RS232 Interface
4.2Communication Options
Choose from three communication options:
1. Direct Connection using RS232 with RS232 communications.
2. RS485 network connection using RJ45 interface
3. Network Connection using Ethernet communication function
with RJ45 interface.
Page 11

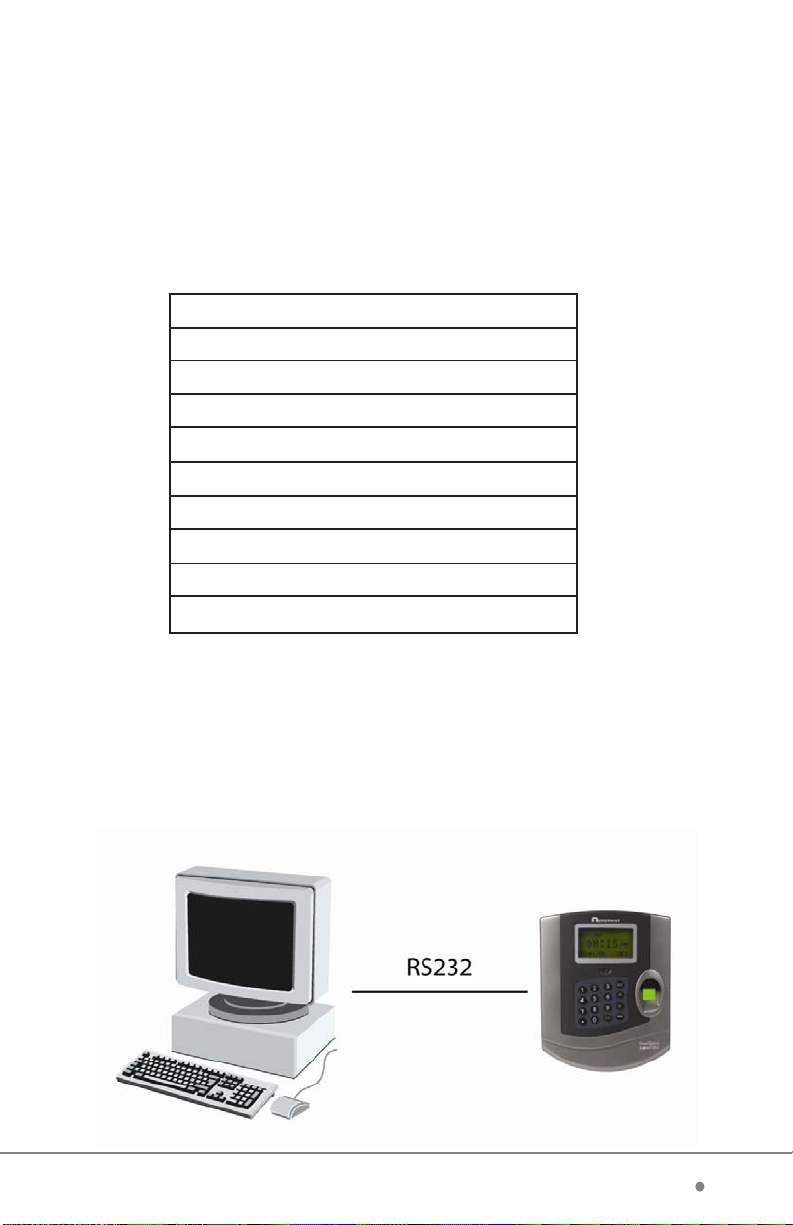
4.2.1 Direct Connection using RS232 with
RS232 communications
A) In Communication Setting, press Scroll-down button. The default
display is as follows:
Note: RS232 is used to directly
connect one terminal per
Communication Settings
Device ID
Baud Ratio
Port No
38400
80
computer. In this case, default
1
setting is recommended. For
network configurations using
multiple terminals, the device ID
number must not be repeated and
must be set to different numbers.
B) Turn off the TQ100 terminal.
C) Turn off your PC.
D) Using the thirty foot (9 m) RS232 serial cable included in your package
connect one end to your PC communication serial port and the other end to
TQ100 terminal.
E) Power on the PC, then the terminal.
timeQplus BIOMETRIC™ Terminal User Manual 1134 timeQplus BIOMETRIC™ Terminal User Manual
Page 12

4.2.2 RS485 network connection using RJ45 interface
The TQ100 terminal can
be connected using
RS485. [Please Note:
Due to the low demand
for this type of
connection, the RS232/
RS485 converter is not
included in the standard
package. See the
Appendix at the end of
this manual for details of
the installation and setup
of the RS485
configuration].
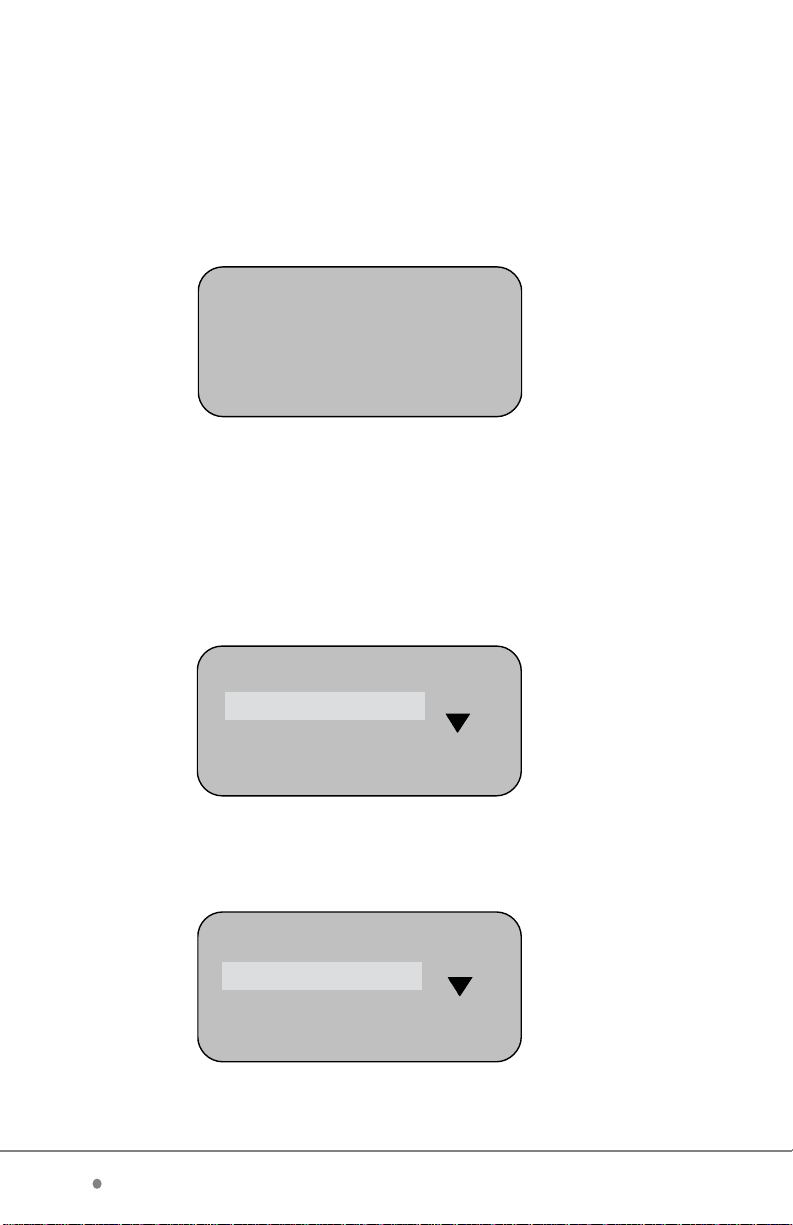
A) In Communication Setting, press Scroll-down button and set
RS485 communication to “Yes” and Ethernet to “No,” displayed as
follows:
Communication Setting
Device ID
Baud Rate
38400
Port No
B) Turn the terminal off.
C) Connect the CAT5 Ethernet cable supplied in the package to the
RS485/RS232 converter (Please refer to Appendix 8.2 for definition
of cables, connectors and wire connections).
D) Connect RS485/RS232 converter to the serial port of the PC and
the other end to the RJ45 interface of the terminal.
E) Restart the terminal.
Note: Device ID number and Baud
Rate should be consistent to the PC
1
settings. RS232/ RS485 converter is
not included in standard
80
configuration.
Page 13
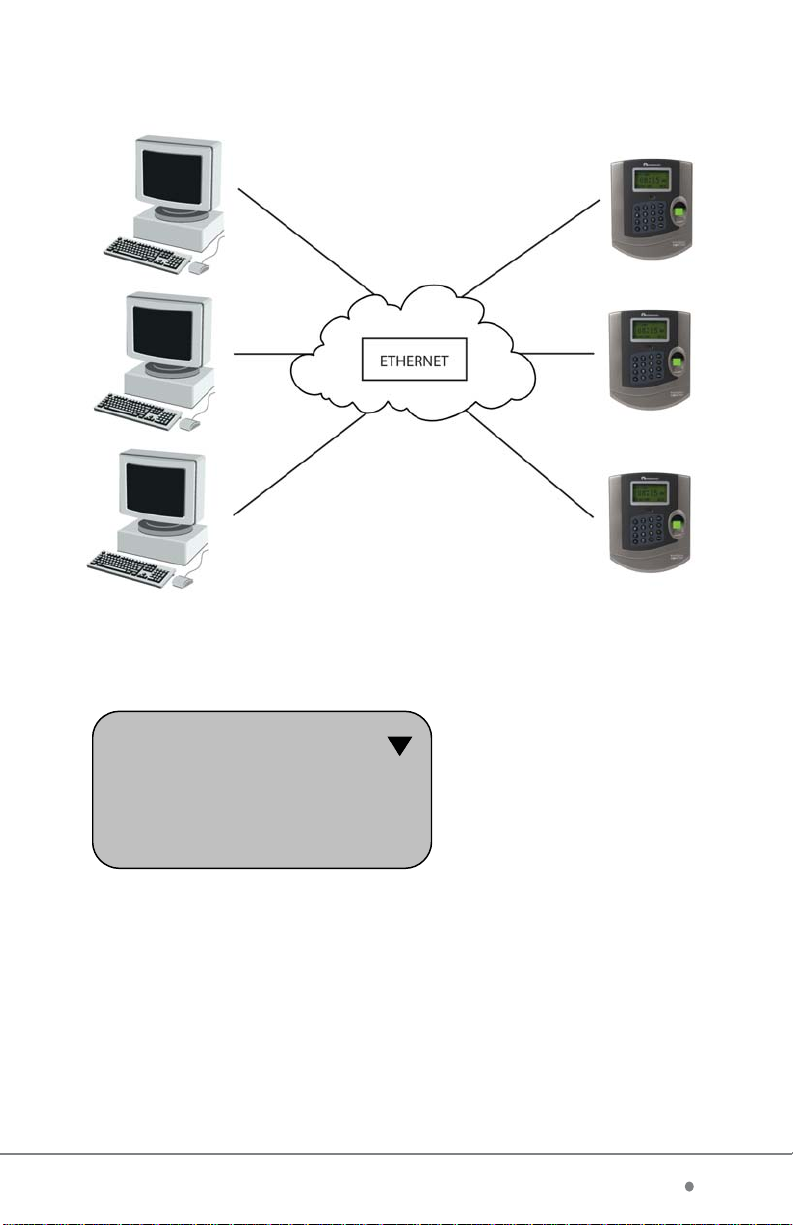
4.2.3 Network Connection using Ethernet communication
function with RJ45 interface
A) In Communication Setting, press Scroll-down to set RS485
communication to “No” and set Ethernet to “Yes”, displayed as follows:
Communication
Default gateway
RS485
Ethernet
B) Set the IP address, subnet mask and default gateway to those of
the LAN. The IP address must be unique. The same password must
be used both in the terminal setup and PC software.
C) Turn the terminal off.
D) Connect the network cable of the LAN to the RJ45 interface
of the terminal.
E) Turn on the terminal.
No
Yes
Note: A 6 ft Ethernet cable
is included in the standard
package.
timeQplus BIOMETRIC™ Terminal User Manual 1332 timeQplus BIOMETRIC™ Terminal User Manual
Page 14

Chapter Five: Fingerprint Registration/Enrollment
When the TQ100 terminal and AttendanceRx software installation is complete,
fingerprints will first be enrolled and then validated.
For a network installation with multiple terminals a user’s enrollment is only
needed on one terminal. Any timeQplus administrator can enable the enrolled
user to use any terminal in the network.
5.1 Enrollment Method
Correct enrollment method:
One or multiple fingerprints can be enrolled for every employee.
It is recommended to use the index finger and/or middle finger for enrollment.
Position your finger in the middle of the sensor. Apply light pressure.
Tips for improving the quality of fingerprint read:
Dirty or Dry Finger Clean your finger with a moisturized soap;
Wipe your finger with a pre- moisturized tissue
(alcohol-free wipes, preferably enriched to
hydrate the skin)
How to choose your finger Use the index or middle finger to enroll; try left
hand fingers if the right hand (index or middle
finger) fingerprints are faded, worn or missing.
Incorrect positioning Place your finger in the middle on the sensor;
keep you finger flat on the sensor and apply
pressure trying to cover as much of the sensor
window as possible; DO NOT touch the sensor
in an angled or tilted position, DO NOT slide
your finger.
Fingerprint image changes Re-enroll your finger if your fingerprint changes
as a result of an injury, etc.
Fingerprint difficult to read Use one (1:1) identification method. Key in
your PIN number and place your finger on
the sensor.
Other reasons Use password registration as backup for people
with hard to read fingerprints.
Page 15

The correct finger positioning method is illustrated below,
front and side view.
Correct
Not flat
Tilted
timeQplus BIOMETRIC™ Terminal User Manual 1530 timeQplus BIOMETRIC™ Terminal User Manual
Off center
Too Low
Page 16
5.2 Fingerprint Registration
There are two registration modes available for the terminal: fingerprint and
password.
A unique ID number per user is required for enrollment. For each ID number
you can enroll up to 10 fingerprints and 1 password. When the terminal is
powered up, the interface looks similar to below:
Welcome
9:00 A M
04/28/06 FRI
With the terminal powered on, please follow the detailed instructions below to
enroll an employee’s fingerprint:
Select the Menu option; once that is displayed you will see the following image,
and then select Data Management.
Menu
Data Management
Setup
System Info
Press OK to display the following:
Data Management
User
Admin
Sensitivity
Page 17

Press OK to display the following:
User
Finger
Password
FP+PW
Press OK to display the following:
Finger
New Enroll?
No-ESC Yes-OK
Figure A
Press OK to display the following:
New Enroll
ID 00001
ESC Set-OK
Note: ID range can
be any combination
of numbers from
00001 - 65535
In the process of enrolling employee’s passwords, when the user ID is
introduced, the zero digits located at the beginning of the number
sequence are not required to key in. Example: If the user ID number is
“0050”, the user needs to key in only “50”.
Accept the user ID displayed or key in a user ID and press OK to display
the following:
New Enroll
Place Finger #1
timeQplus BIOMETRIC™ Terminal User Manual 1728 timeQplus BIOMETRIC™ Terminal User Manual
Page 18

Press finger on the sensor window and remove it following the instructions on
the screen. Press the same finger a second time and third time according to the
instructions displayed.
If the registration fails, the screen displays the message below and the previous
step needs to be repeated.
New Enroll
Try Again
If the registration is successful, the following message is displayed:
Note: 00001 - 1
Ign - ESC Save - OK
Press OK to save and go to the screen below; press ESC to redo the
fingerprint enrollment (Fig A).
New Enroll
<Id> -- 1
The digit following the
hypen (-) represents the
first fingerprint for this
employee. You can enroll
up to 10 fingerprints per
employee.
Finger
Check FP?
No - ESC Yes - OK
Press OK to check registration per below; press ESC to continue enrol ling
fingerprints (Fig A).
Finger
Place Finger
Page 19

It is recommended to perform a fingerprint check to confirm its
validity. If it validates, it means that your enrolled fingerprint is
of good quality and the message in Figure B below is displayed.
If the fingerprint fails, the enrolled fingerprint is not clear and
validation errors are likely to occur in the future, see Figure C;
in this case enrollment should be redone and/or a different
finger used.
Finger
Finger
FP Check OK
Figure B Figure C
Next the screen is displayed and a new enrollment cycle begins
as shown below.
Finger
FP Check NG
New Enroll?
No - ESC Yes - OK
Press OK to continue enrolling new users; press ESC to enroll
backup (multiple) fingerprints for a user (Fig D)
Backup
ID 00001
ESC Set - OK
Figure D
If you want to enroll fingerprint backups for existing users, enter
the user ID number of the employee you want to add fingerprint
backups for. For password registration, an explanation will be
given in “Chapter Seven: Administrator Functions,” 7.1.1
and 7.1.2.
timeQplus BIOMETRIC™ Terminal User Manual 1926 timeQplus BIOMETRIC™ Terminal User Manual
Page 20

Chapter Six: Terminal Usage and Punching In/Out
6.1 Successful validation when punching In/Out
For every successful punch, the message on the interface displays as below,
and if activated, a voice prompt saying “Thank you” is heard.
“MP” Validated
“Name”
“Status”
Total: “Total PP” as of “mm/dd/yy” “hr:min”
A) “MP” = method of punch; FP = fingerprint; PW = password
B) “Name” = employee last name and initial of first name
C) “Status” = IN /OUT
D) “Total PP” = total number of hours worked in the current pay period
as of the last update cycle
E) “mm/dd/yy” and “hr:min” = date and time of the last update cycle,
see “Total PP” above
Example:
Attention:
1. When the user punches the terminal, make sure that the fingerprint
used to punch has been previously enrolled and the finger is properly
pressed on the reader, see page 15.
2. For the terminals set with the Duplicate Punch Interval option
enabled, if the user punches the terminal multiple times during the
time interval that has been set up, the interface of the terminal will
display “Double Punch” and a long beep is heard; Attention: only
the first successful punch recorded within that window frame will
be saved.
“FP” Validated
Smith J
OUT
Total: 28 hrs 37’ as of 10/04/05 09:35
Page 21

6.2 Unsuccessful validation when punching In/Out
A.
When fingerprint validation method is used:
If the fingerprint validation fails, the user will hear a vocal message saying
“Please try again”.
The message displayed will show:
FP Check Failed
Try again!
Refer to Chapter Five to ensure that the correct fingerprint method is used.
B.
When the password validation is used:
If the password validation fails, the user will hear a vocal message saying
“Please try again”, the following message is displayed:
PW Check
Enter again
timeQplus BIOMETRIC™ Terminal User Manual 2124 timeQplus BIOMETRIC™ Terminal User Manual
Page 22

Chapter Seven: Administrator Functions
Attention:
If there are no administrators enrolled, administrator settings can be accessed and
modified by any user. The administrators must be enrolled and validated. Before any
set up changes are performed, the administrator must be enrolled
and validated. Then the administrator can perform administrative as well as time and
attendance functions. The users without administrative rights can only use the time
and attendance function.
At the terminal, administrators can perform setup changes, enroll and delete
users, and visualize records, but the punches can only be edited at the PC
using AttendanceRx software.
Press MENU to display the menu structure; if no administrator is enrolled the
following will be displayed:
Menu
Data Management
Setup
System Information
Administrators can be enrolled following the steps detailed in 7.1.2.
When one or more administrators are enrolled on the terminal, the following
message is displayed:
Administrator?
11:45 AM
04/28/06 FRI
When administrator validation fails (incorrect fingerprint or password), the message
“Invalid” or “Not Found” is displayed. The administrator validation process should be
restarted. If successful, the administrator is able to access
the menu interface.
To log in as Administrator:
1. For administrators enrolled with fingerprint, press MENU first and then
press the finger you want to validate on the sensor window. Upon successful
validation, the menu interface is displayed.
2. For administrators enrolled with passwords, press MENU first, then key in
the User ID Number, press OK, and then key in the password followed by OK.
If validated, the menu interface will be displayed.
If the terminal can not be accessed because the Admin information is missing
(like unknown fingerprint or password), please take the following steps to unlock
the terminal: power off the terminal, keep the “Esc” key pressed, power on the
terminal, read the baud rate and terminal ID info from the screen that is displayed.
To revert to normal operation press any other key on the keypad. Then you need
to connect the terminal to the software running on your PC via RS232 connection,
add the terminal and remove all data to clear the Admin information.
Page 23

7.1 Data Management
Press the Scroll-down button to browse the menu structure.
Select Data Management and press OK to enter the level-2 menu interface
as follows:
Data Management
User
Admin
Sensitivity
Data Management
Delete
ViewPunch
ViewAdmin
Data Management
View Management Record
Delete All Rec
There are a total of seven level-2 menus in Data Management, namely
User registration, Administrator registration, Sensitivity level setting, Delete
registration data, View punches, View admin record, and Delete all records.
7.1.1 Select User registration menu and then press OK to enter the
level-3 menu as follows:
User
Finger
Password
FP+PW
Select fingerprint registration and then press OK; refer to Chapter Five
for fingerprint enrollment.
Select password registration and press OK to display the following:
Password
ID 00002
ESC Set-OK
timeQplus BIOMETRIC™ Terminal User Manual 2322 timeQplus BIOMETRIC™ Terminal User Manual
Page 24

Press OK or enter the corresponding ID number of the person and press
OK to display the following:
Password
PW In
ESC Set-OK
Enter password and then press OK to display the following:
Password
Note:
4 digits is the
PW In ****
maximum length for
password.
Confrm Save-OK
After the password is confirmed, press OK to display the following:
Password
Note:
User ID-P
Ign-ESC Save-OK
User ID-P
Letter P means that the
registration type is
password.
Press OK to save. If the registration is successful, the following screen prompts
the user for next enrollment.
Password
ID 00003
ESC Set-OK
Press OK to continue enrolling new passwords for other User ID numbers,
press ESC to exit.
Page 25

7.1.2 Select Administrator Registration menu by pressing Admin and
press OK to access the level-3 menu as follows:
Admin
Finger
Password
FP+PW
Refer to Chapter Five for fingerprint enrollment and 7.1.1 for
password registration.
7.1.3 Select Sensitivity Level Setting menu and press OK to access
the level-3 menu as follows:
Sensitivity
Sensitivity
User
Global
Note:
- User setting value range = 0-50; the default value is 27.
- Global setting value range = 1-4; the default value is
27
1
1.
The Sensitivity Level Setting is a balanced value of FAR (False Accept Rate)
and FRR (False Reject Rate). FAR indicates that the machine accepts the
fingerprint of user A as the identity of user B; while FRR means that the
machine rejects a fingerprint that has been enrolled. Global setting value
is based on the sensitivity level value of all the users while User setting
value is based on the sensitivity level value of each individual.
In general use, Global setting value based on all users can be set (default
value is 1). For individuals who are difficult to pass validation, the password
registration method can be used.
If the fingerprint of a certain user is faint or hard to read, the User setting
value can be reduced to improve the validation pass rate by selecting the
highlighted option above and changing the default value.
timeQplus BIOMETRIC™ Terminal User Manual 2520 timeQplus BIOMETRIC™ Terminal User Manual
Page 26

7.1.4 Select Delete Registration Data menu and press OK to access
the level-3 menu as follows:
Delete
ID 00000
Input the User ID to be deleted, e.g. number 00001, and then press OK
to display the following:
Delete
ID 00001-1
Press OK to confirm:
Note:
the last
digit indicates
the first fingerprint.
Delete
Delete?
No-ESC Yes-OK
Press OK to delete. A “click” sound will be sent out with a prompt of
“Enroll Empty.” Then it will return to the delete user interface as below;
press ESC to cancel and exit.
Delete
Continue?
No-ESC Yes-OK
Page 27

7.1.5 Select ViewPunch option in the menu and press OK to access the
level-3 menu as follows:
ViewPunch
ID 00000
ESC Confirm -OK
Input the ID number to be viewed (e.g. 0001) and then press OK to display
the following:
ViewPunch C-00001
N-00001
05/05/20 02:45 V_F
ESC Confirm -OK
Note: C-00001: total number of punches is 1
N-00001: indicates the latest record
05/05/20 02:45: validation time
V_F: indicates registration type is fingerprint
The interface displays the total number of punches validated with fingerprint,
the detailed time of each occurrence (punch), user registration number
and type of each validation.
timeQplus BIOMETRIC™ Terminal User Manual 2718 timeQplus BIOMETRIC™ Terminal User Manual
Page 28

7.1.6 Select View Admin Records menu and press OK to access the
level-3 menu as follows:
ViewAdmin
ID 00000
ESC Confirm -OK
After entering the administrator user ID number, press OK to display
the following:
ViewAdmin T-00001
L-00001
05/05/20 02:45 E_M
ESC Confirm -OK
Note: T-00001: Total number of admin events is 1
L-00001: The last recorded admin event
05/05/20 20:45: Admin/setup time
E_M: indicates type of admin operation
performed (see 7.1.8 below)
The interface displays the total occurrences when the administrator has
managed/setup the machine, the detailed time of each occurrence,
and type of operation performed.
7.1.7 Select Delete All Records menu and press OK to access the
level-3 menu as follows:
Delete All Rec
Delete?
No-ESC Yes-OK
Press OK to delete all records, press ESC to cancel and exit.
Note: When the
command “Delete all
records” is confirmed,
all the records stored
on the terminal will
be deleted.
Page 29
7.1.8 Display Messaging
1. When viewing punches, the initials displayed on the interface have
the following meanings:
V_F: The registration type is fingerprint
V_P: The registration type is password
2. When viewing admin records, the initials on the interface have the
following meanings:
E_U: General User Registration
E_M: Administrator Registration
E_DF: Delete Fingerprint Registration Record
E_DP: Delete Password Registration Recor d
D_L: Delete All Record Data
S_T: Time Setting
S_S: System Setting
S_L: Record Setting
S_C: Communication Setting
7.2 Setup
Press MENU to enter and select Setup menu. Then press OK to access
the level-2 menu with the following display:
Setup
System
Record
Communication
The Setup menu consists of System Setting, Record Setting, Communication
Setting and Display Adjustment Setting.
7.2.1 System Setting
In System Setting, press OK to display the following:
System
Admin Max 5
Language ENG
Time
Setup
Record Setting
Communication
Display Adjust
System
Voice Out Yes
Unlock Yes
Auto Off No
timeQplus BIOMETRIC™ Terminal User Manual 2916 timeQplus BIOMETRIC™ Terminal User Manual
Page 30

There are a total of six level-3 menus in the System Setting:
Total Number of Administrators, Language, Time Setting, Voice Out,
Unlock and Auto Shutdown, defaulted as below:
1. Total Number of Administrators
Setup Value Explanation
1-10 Set the total number of the administrators
for the terminal
Factory Setting 5
2. Language
Setup Value Explanation
ENG Content of the interface is displayed in English
Factory Setting English
3. Time Setting
Setup Value Explanation
Time Time setting for the terminal.
Factory Setting Time setting of the terminal is consistent to
the settings of the PC. It can also be set up
using the PC software.
4. Voice Out
Setup Value Explanation
Yes/No Set the voice out option
Factory Setting Yes
Page 31
5. Unlock*
Setup Value Explanation
Yes/No Set the door lock option
Factory Setting No
*Note: this function is not supported in the AttendanceRx software.
6. Auto Off
Setup Value Explanation
1-255 Set the Auto shutdown option
Factory Setting No
7.2.2 Record Setting
Select Record Setting menu, press OK to enter the level-3 menu as follows:
Record
ARecAlert 100
PRecAlert 1000
DupPunches No
There are three level-3 menus in Record Setting: Administrator Record Alert,
Total Punches Record Alert and Punch Interval setting, defaulted as per below:
1. Admin Record Alert
Setting Items Explanation
No
1 - 255
Factory Setting
Note: The user is prompted through the message on the display that the
management record space is reaching the maximum capacity.
The terminal will not give out an alert when the admin
records have overflowed. If the admin records surpass
the maximum storage capacity, then the terminal will
not store any new admin records. The maximum storage
capacity for administrator records is 1000.
The terminal will give out alert according to the value set
to inform the overflow of management records. If the value is
100, then the alert will be given out from the 900th record.
100
timeQplus BIOMETRIC™ Terminal User Manual 3114 timeQplus BIOMETRIC™ Terminal User Manual
Page 32

2. Total Punches Alert
Setting Items Explanation
No
Indicates that the terminal will not give out alert when
punches stored on the terminal are overflowed. If the
total punches surpass the maximum storage capacity ,
then the terminal will not store any new punches. The
maximum storage capacity is 30,000 punches.
1 - 1500
The terminal will inform that the records are
overflowed according to the value set. If the value
is 1000, then the alert will be given out from
the 29,000th record.
Factory Setting
Note: The user is prompted through the message on the display that the
punch storage space is reaching maximum capacity. Once the alert is given out,
download the records as soon as possible.
3. Punch Interval (duplicate punches)
1000
Setting Items Explanation
No
Indicates the terminal will record all punches,
including duplicate punches.
1 - 255
Indicates the terminal will disregard duplicate punches
for subsequent punches received within the period of
time that has been set up. The unit of measure is one
minute.
Factory Setting No
Note: If the user punches the terminal repeatedly within the set up interval
defined, no duplicate records will be stored.
Page 33

7.2.3 Communication Setting
Select Communication Setting menu and press OK to access the level-3
menu displayed as follows:
Communication
Device ID
Baud Rate
Port No
Communication Setting
Subnet mask
1
38400
5005
Communication
Password
IP Address
Subnet Mask
1
0
Default gateway
RS485 Communication
Ethernet
There are nine level-3 options available for System Setting: Device ID,
Baud Rate, Port Number, Password, IP Address, Subnet Mask, Default Gateway,
RS485 and Ethernet connections.
1. Device ID (machine number)
Setting Items Explanation
1 - 255 To set the ID number for machines.
Factory Setting 1
Note: Machine number is the unique ID for each machine. If there are two machines
with the same machine number in the network, they will not work properly and the PC
software will be confused when polling the terminals. Unique ID numbers need to be
allocated for network use.
No
Yes
2. Baud Rate
Setting Items Explanation
9600
19200
38400 (default)
Factory Setting
Note: The value must be set consistent with the communication ports of the PC
Administration Machine. No communication can be achieved otherwise.
The Baud Rate of Communication Port is set to 9600bps
The Baud Rate of Communication Port is set to 19200bps
The Baud Rate of Communication Port is set to 38400bps
38400
timeQplus BIOMETRIC™ Terminal User Manual 3312 timeQplus BIOMETRIC™ Terminal User Manual
Page 34

3. Port Number
Setting Items Explanation
1 - 9999
To set the software port of the Ethernet communication
of the terminal.
Factory Setting
Note: The port number must be consistent to port number of the software in
the PC administration machine. No communication can be made otherwise.
4. Password
5005
Setting Items Explanation
0 - 999999
Factory Setting
5. IP Address
Set the access password of Ethernet communication
No
Setting Items Explanation
192.168.1.224
Set the IP address of the machine when access through
Ethernet communication.
Factory Setting
Note: The IP address in the LAN must be unique.
6. Subnet Mask
192.168.1.224
Setting Items Explanation
255.255.255.0
Set the subnet mask of the LAN when using Ethernet
communication.
Factory Setting
Note: Subnet mask must be consistent to the LAN IP address of the device.
255.255.255.0
Page 35

7. Default Gateway
Setting Items Explanation
192.168.1.1
Set the default gateway of the LAN when using the
Ethernet communication.
Factory Setting
Note: The default gateway must be consistent to the LAN settings.
8. RS485 Communication
192.168.1.1
Setting Items Explanation
Yes
Factory Setting
9. Ethernet
Make the RS485 communication available.
No
Setting Items Explanation
Yes
Factory Setting
Make the Ethernet communication available.
Yes
timeQplus BIOMETRIC™ Terminal User Manual 3510 timeQplus BIOMETRIC™ Terminal User Manual
Page 36

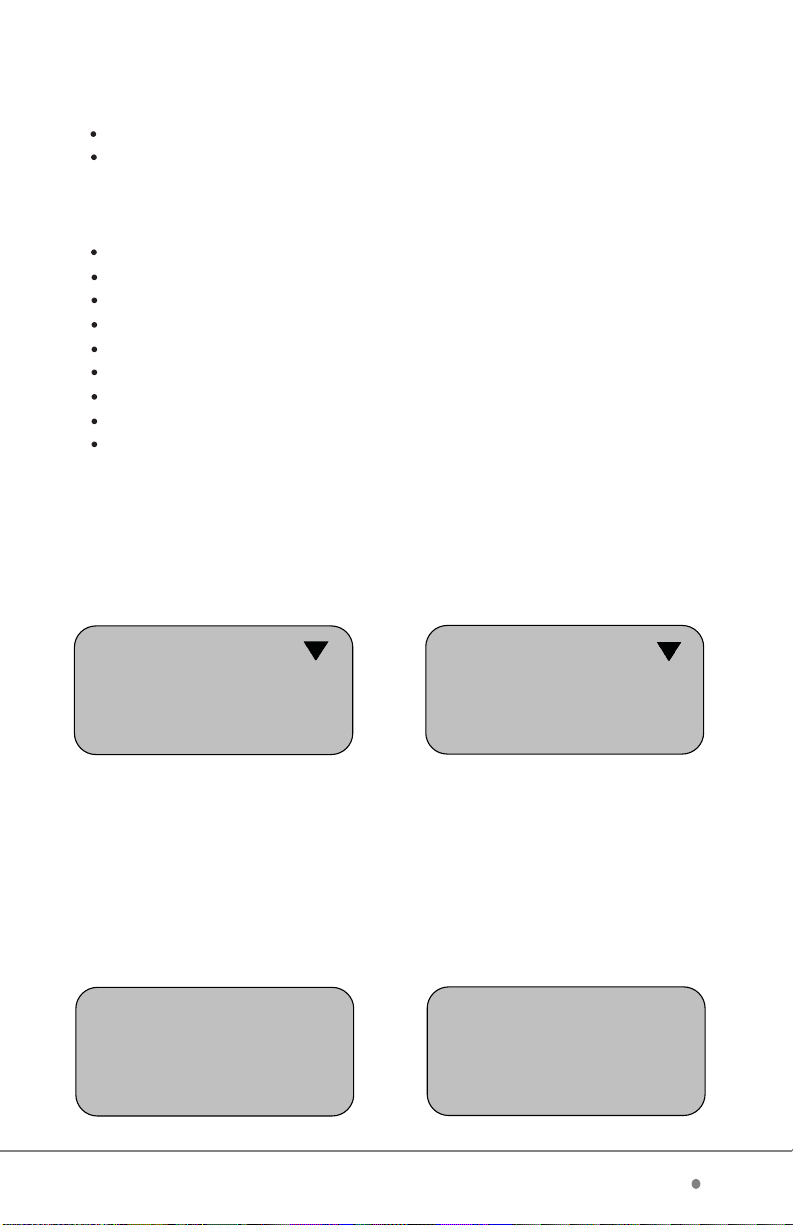
7.2.4 Display Adjustment Setting
Select Setup menu and press OK to display the following:
Setup
System
Record
Communication
Display Adjust
Select Display Adjust and press OK. A “click” sound will be produced
indicating that the brightness auto match function of the sampling
instrument in the machine is complete. The software will search for the
optimal brightness value for the display.
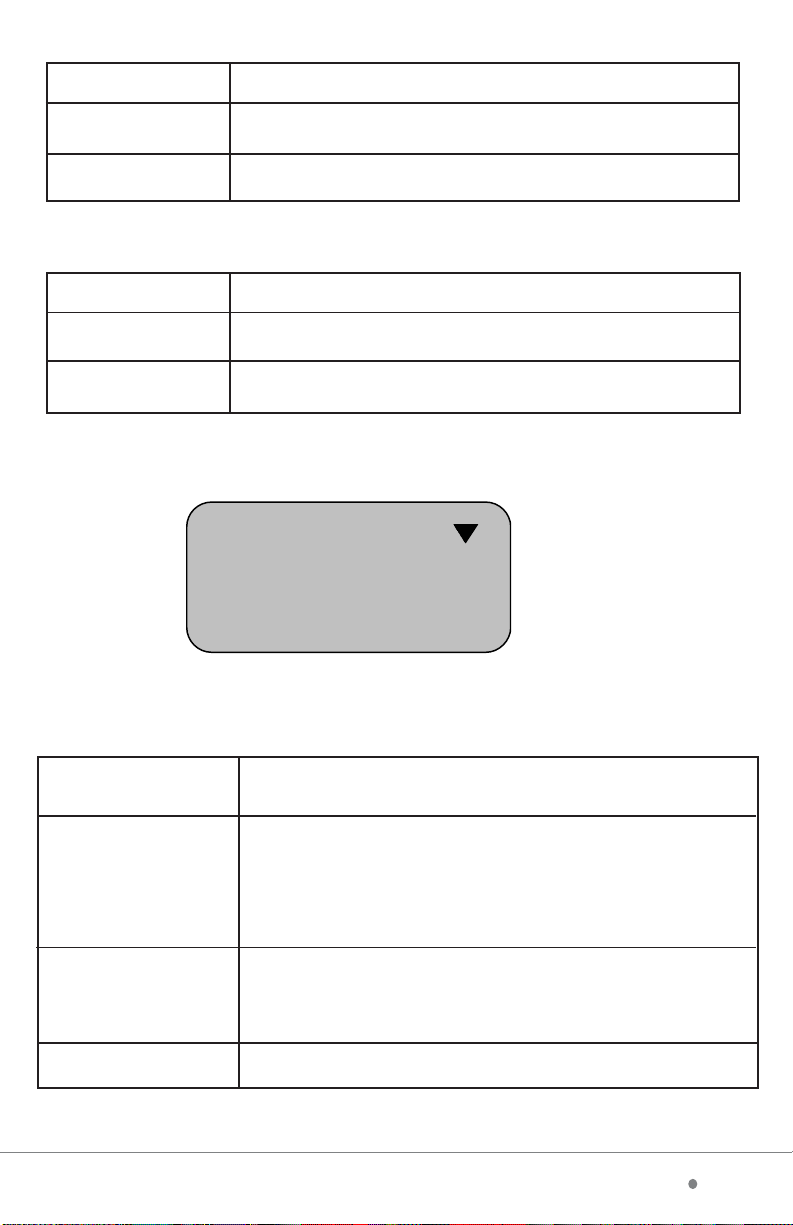
7.3 System Info
Select System Information menu and press OK to access the level-3
menu as follows:
System Info
User
Finger
Punches
There are 6 level-3 menus in System Information, namely User
registration, Administrator registration, Fingerprint registration, Password
registration, total Punches and Administrator Records. These items can be
alternated using the OK button.
1) User Registration: to view the total number of users registered.
2) Administrator Registration: to view the total number of
administrators registered.
3) Fingerprint Registration: to view the total number of
fingerprints registered.
4) Password Registration: to view the total number of
passwords registered.
5) Total Punches: to view the total number of punches recorded.
6) Administrator records: to view the total number of admin records.
5
5
10
System Info
Admin
Password
Admin Recs
1
0
7
Page 37
Chapter Eight: Appendix
Two types of interfaces are available in the terminal: 9-pin RS232 interface
(for direct RS232 serial communication) and an RJ45 interface (for RS485
and TCP/IP over Ethernet communications).
8.1 RS232 Interface
The RS232 interface (refer to page 10 figure 4.1) provides RS232
communication, Lock and Wiegand entrance guide function with 9 pins
in total. Definitions of each pin are listed in the following table:
PIN Definition
1 Reserved
2 RS232 TX
3 RS232 RX
4 LOCK Data 1
5 GND
6 Reserved
7 Data ()
8 Reserved
9 Reserved
Note: For door access and/or access control applications: connect with
the pins four and five when using the simple entrance guard;
white connect pins four five and seven when adopting Wiegand output.
A typical RS232 connections diagram looks like the figure below:
RS232 Communication Diagram
timeQplus BIOMETRIC™ Terminal User Manual 378 timeQplus BIOMETRIC™ Terminal User Manual
Page 38

8.2 RJ45 Interface
The RJ45 interface provides RS485 and Ethernet communication.
The wiring diagram of the supplied RJ45 connection cable is as follows:
PIN Definition
1 TCP_TX+
2 TCP_TX3 TCP_RX+
4
5
6 TCP_RX7 RS485A
8 RS485B
Page 39

RS485 Connection
For the RS485 communication, TQ100 only uses two wires in the cable,
the Brown (8) and the Brown/White (7).
The RS485 communication setup requires the following steps:
1. Take the CAT5 Ethernet cable supplied in the box and cut one end,
exposing the wires.
2. Attach an RJ11 connector to the bare end of the cable; looking at the RJ11
connector (see the RS485 wiring diagram below) the Brown wire goes to
the leftmost pin. The Brown/White wire goes to the rightmost pin of the
RJ11 connector.
3. Connect the cable above one end at the RJ45 Interface of terminal and the
RJ11 connector to a Junction Box; the Black wire in the Junction Box should
go to the Brown (8) wire in the CAT5 cable, and the Yellow wire in the
Junction Box should go to the Brown/White (7) wire.
4. Connect the last Junction Box to a RS485/RS232 converter using a standard
phone cable.
5. Connect the RS232 interface to the PC.
RS485 Communication Design
timeQplus BIOMETRIC™ Terminal User Manual 396 timeQplus BIOMETRIC™ Terminal User Manual
Page 40
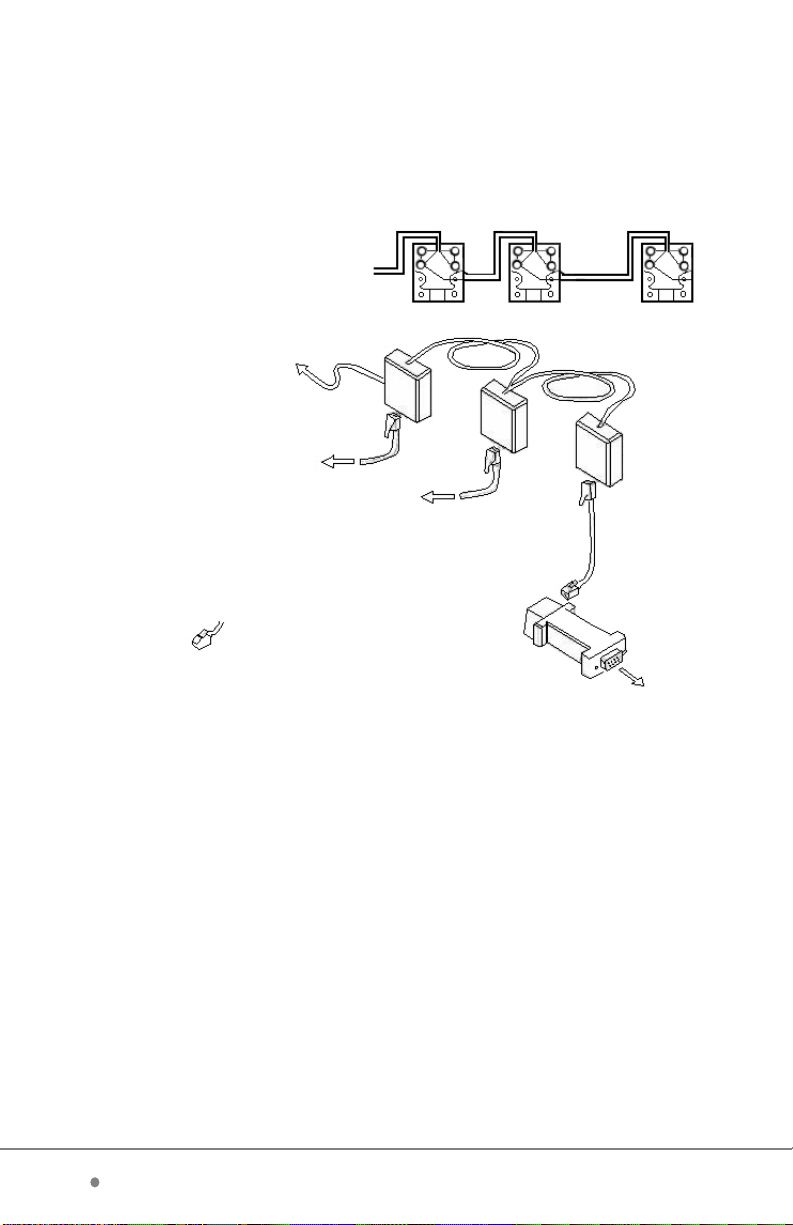
RS485
Wiring Diagram
Junction Box
Terminal 2
To Terminals 3 - 32
To Terminal 2
To Terminal 1
(short as possible)
Junction Box
Attach an RJ11 connector to the Cat5 cable
terminated with an RJ45 connector and supplied
with the standard package. Looking at the RJ11
connector pictured above the Brown wire goes to
the leftmost PIN and the Brown/White wire
goes to the rightmost PIN.
Terminal 1
PC
Teflon Cable
Junction
Box
RJ11 Cable
RS232/RS485
Converter
To serial port
on host computer
Page 41
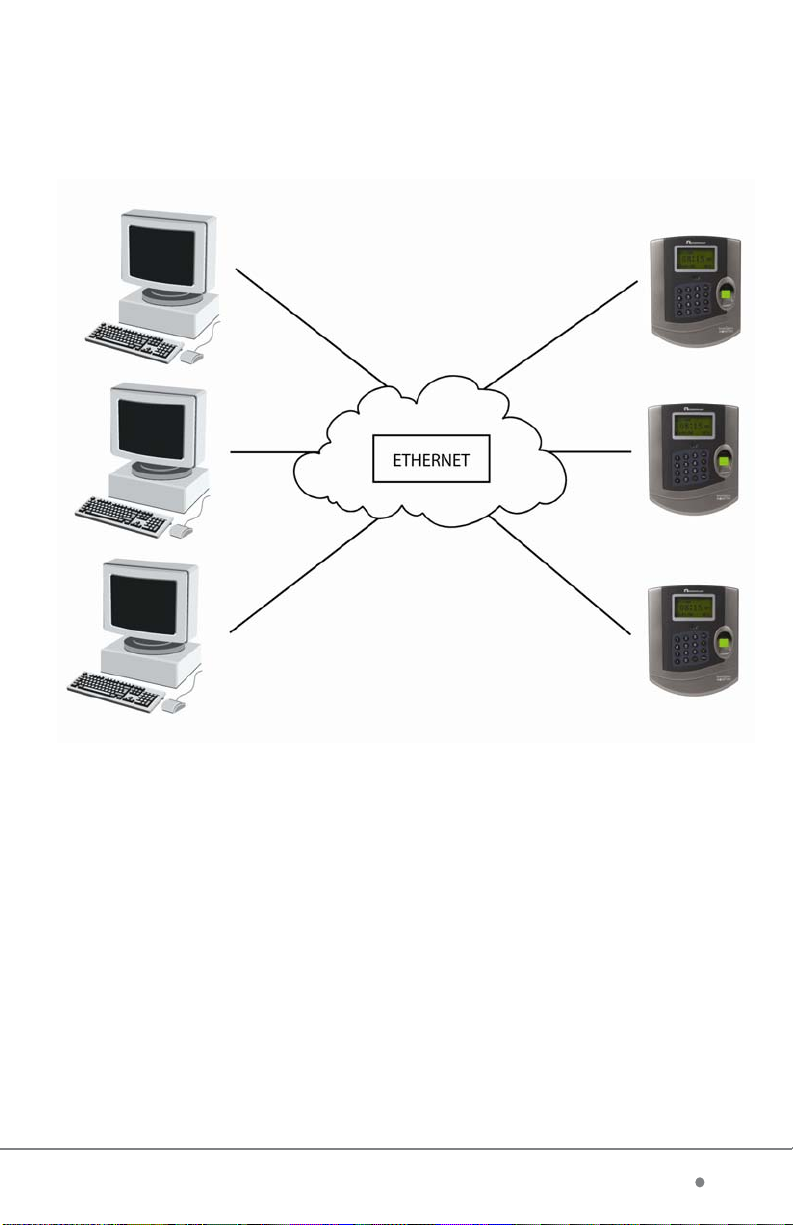
Ethernet Communication Diagram
timeQplus BIOMETRIC™ Terminal User Manual 414 timeQplus BIOMETRIC™ Terminal User Manual
Page 42

Product Reference Guide
Additional terminals, product upgrades and cables are available.
Please contact Acroprint at 1.800.334.7190 to order today.
Part Number: 01-0229-000
TQ100 terminal
Part Number: 01-0229-001
TQ100b - Terminal with operational back-up battery
Part Number: 08-0140-086
25 employee user upgrade
Part Number: 87-0106-000
FIU optical overlay
Part Number: 72-0203-000
485 cable for timeQplus Biometric (6 ft)
Part Number: 25-0134-000
485/232 Converter assembly (RJ11/9 PIN)
42 timeQplus BIOMETRIC™ Terminal User Manual timeQplus BIOMETRIC™ Terminal User Manual 3
Page 43

Page 44

FIREWALL INFORMATION
Attention Microsoft Windows XP and Windows 2003 Users!
Microsoft Windows Firewall:
Microsoft has included firewall protection on Windows XP with Service Pack
2 and on Windows 2003 Server with Service Pack 1. If y ou will be installing
your timeQplus BIOMETRIC server on either of these two operating
systems you will need to grant access on the firewall to the following
applications and services after your installation is complete.
• Attendance Rx Note: You will be prompted to unblock this
application after the installation is complete, or you can grant
access via the firewall.
• arxsvc.exe
• ARXTQ100N.exe
• File and Printer Sharing
Other Firewalls:
Some firewalls block ports, and authorized applications can be granted
access to use specific ports. If you have this type of firewall you should
open the following ports:
• TCP Open ports 49183 to 49188
• UDP Open ports 49211 to 49212
NOTE: This equipment has been tested and found to comply with the limits for a Class B digital
device, pursuant to Part 15 of the FCC Rules. These limits are designed to provide reasonable
protection against harmful interference in a residential installation. This equipment generates,
uses and can radiate radio frequency energy and, if not installed and used in accordance with
the instructions, may cause harmful interference to radio communications. However, there is
no guarantee that interference will not occur in a particular installation. If this equipment does
cause harmful interference to radio or television reception, which can be determined by turning
the equipment off and on, the user is encouraged to try to correct the interference by one or
more of the following measures: Reorient or relocate the receiving antenna; Increase the
separation between the equipment and receiver; Connect the equipment into an outlet on a
circuit different from that to which the receiver is connected; Consult the dealer or an
experienced radio/TV technician for help.
PN: 06-0349-000 Rev C.
44 timeQplus BIOMETRIC™ Terminal User Manual
 Loading...