

Page 1

Time Q
User Manual
Page 2

FCCRadio FrequencyInterferenceStatement(USA):
This equipment has been tested and found to comply with the limits for a Class A
digital device, pursuant to part 15 of FCC Rules. These limits are designed to
provide reasonable protection against harmful interference when the equipment
generates, uses, and can radiate radio frequency energy and, if not installed and
used in accordance with the instruction manual, may cause harmful interference to
radio communications. Operation of this equipment in a residential area is likely to
cause harmful interference in which case the user will be required to correct the
interference at his or her own expense.
DeclarationOf ConformityAccordingToEMCDirective89/336/EEC
We declare under our sole responsibility that the magnetic stripe and/or bar code
reading and/or data recording equipment Time Q to which this declaration relates
arein conformity with the followingstandards: EN55022:1987, EN50082-1, IEC 8012,IEC 801-3, IEC 801-4, IEC 801-5. I,the undersigned, herebydeclare that the
equipment specified above conforms to the above directive and standards.
Raleigh,North Carolina USA ______________________________
July24, 2000 W . Glenn Robbins
2
Page 3

Table of Contents
1. Introduction
1.1 Product Overview ........................................................................................ 4
1.2 Capacity ....................................................................................................... 4
1.3 Employee Use .............................................................................................. 5
1.4 Managed Memory........................................................................................ 5
1.5Planning Program.......................................................................................... 5
2. Set up
2.1 Site Requirements......................................................................................... 6
2.2 Unpacking and Inspection ............................................................................ 6
2.3 Initial Setup .................................................................................................. 7
2.4 Printer Connections ...................................................................................... 9
2.5 Printer Test................................................................................................. 10
3. Programming
3.1 Introduction................................................................................................ 11
3.2 Supervisor's Menu Map ............................................................................ 12
4. Tutorial
4.1 Introduction................................................................................................ 16
4.2 Supervisor's Menu ..................................................................................... 16
4.3 Reports ....................................................................................................... 16
4.4 Add Employees to the System................................................................... 17
4.5 Punch In and Out ....................................................................................... 17
4.6 Re-initialize ................................................................................................ 17
5. Factory Settings .................................................................................... 18
6. Functions
6.1 Introduction................................................................................................ 20
6.2 Supervisor Badges ...................................................................................... 20
6.3 Set Time and Date ...................................................................................... 21
6.4 Setup .......................................................................................................... 22
6.5 Edit Shift Rules .......................................................................................... 29
6.6 Add/Edit Employee .................................................................................... 34
7. Reports
7.1 Time Card Report ...................................................................................... 36
7.2 Hours Summary Report ............................................................................. 38
7.3 Employee Profile Report ........................................................................... 39
7.4 Clock Rules Report .................................................................................... 40
7.5 Who's In, Who's Out Report...................................................................... 41
8. Edit Time Totals..................................................................................... 42
9. Test Features ........................................................................................ 43
10. Troubleshooting/Error Messages ...................................................... 44
Appendix A Definitions .............................................................................. 49
Companion Products ................................................................................ 56
Index........................................................................................................... 58
3
Page 4

1. Introduction
1.1 Product overview
TheTimeQ is a microprocessor based TimeandAttendance System,
whichusesmagneticallyencodedbadgestorecordemployee arrrival and
departuretimes.TheTimeQ does not requireaPC and must be
connecteddirectlytoan80-columndotmatrixprintertoprint reports.
TimeCard reports and Hours Summaryreportscanbeprintedandfiled
forfuturereference.
1.2 Capacity
TheTimeQ may be programmedtohandle up to 120 employees. It has
thecapacity to store over 21,000 transactions. When theclockhas the
maximum120employeesloaded,the following is a typical average of
punchesperemployee:
Typical Punches Typical Punches
PAY PERIOD Per Pay Period Per Week
WEEKLY 96 96
BIWEEKLY 128 64
SEMIMONTHLY 128 56
MONTHLY 144 32
Thepunchcountwillincreaseforsome employees if others punch less or
iftherearefeweremployeesusingtheclock.
4
Introduction
Page 5

1.3 Employee Use
WhenemployeeswhohavebeenenteredintheTimeQ swipe their
badge to punch IN;asingle beep is heard and the name assignedto the
badgeisdisplayedalongwith the word IN. The next time the badge is
swiped,adoublebeepis heard and the name is displayed along with the
wordOUT.Time worked and the accumulated time for the pay period
aredisplayedafterallpunches.
1.4 Managed Memory
TheTimeQwill maintain all programanddatainformationduring a
powerlossor if unplugged. Memorywilleventuallyfillas punches
accumulate(approximately21,000punches).The TimeQcanhold two
fullpayperiods.Therefore,thesupervisor should print either a
“CompletedHOURSSUMMARYREPORT”oran“ALL
EMPLOYEESTIMECARDREPORT”for thepreviouspayperiod
afterits end. When the next payperiodstart date is reached, the oldest
payperiod’sdata is dumped, and anewpay period begins.As a safety
feature,olddatacannot be dumped if it has not been reported in full.
Thesereports are yourpermanent records, please keepthem on
file.
1.5 Planning Program
Itisrecommendedthatparameterssettingsforpayperiod,length,start
date,shift start/stop times, etc. be listed on paperpriortostart of
programmingoryoumaywishtoprintaCLOCKRULESREPORT
andselectonly those items to be changed. See Section Five for the
featuresthat are preset at the factory.
Note:Theway you enter an employee's name is the way it will appear
on all reports. Werecommendthatyou enter the last name first,
followedby the first name or initials,i.e. Jones, Frank.
Introduction
5
Page 6
2. Setup
2.1 Site Requirements
TimeQ can be installedinanynormalofficeenvironment. No special
wiringorcoolingisrequired.However,do not use the TimeQunderthe
followingconditions:
•extremelyhighor low temperature
[temperature range:0-500C(32-1220F) required]
•extremely high or lowhumidity
[humidityrange:0-90%RHrequired]
•areasofhighdustconcentration
•areaswith chemical fume concentration
•areaswithextremevibrationorwhenplaced on an unstable
orunlevelsurface.
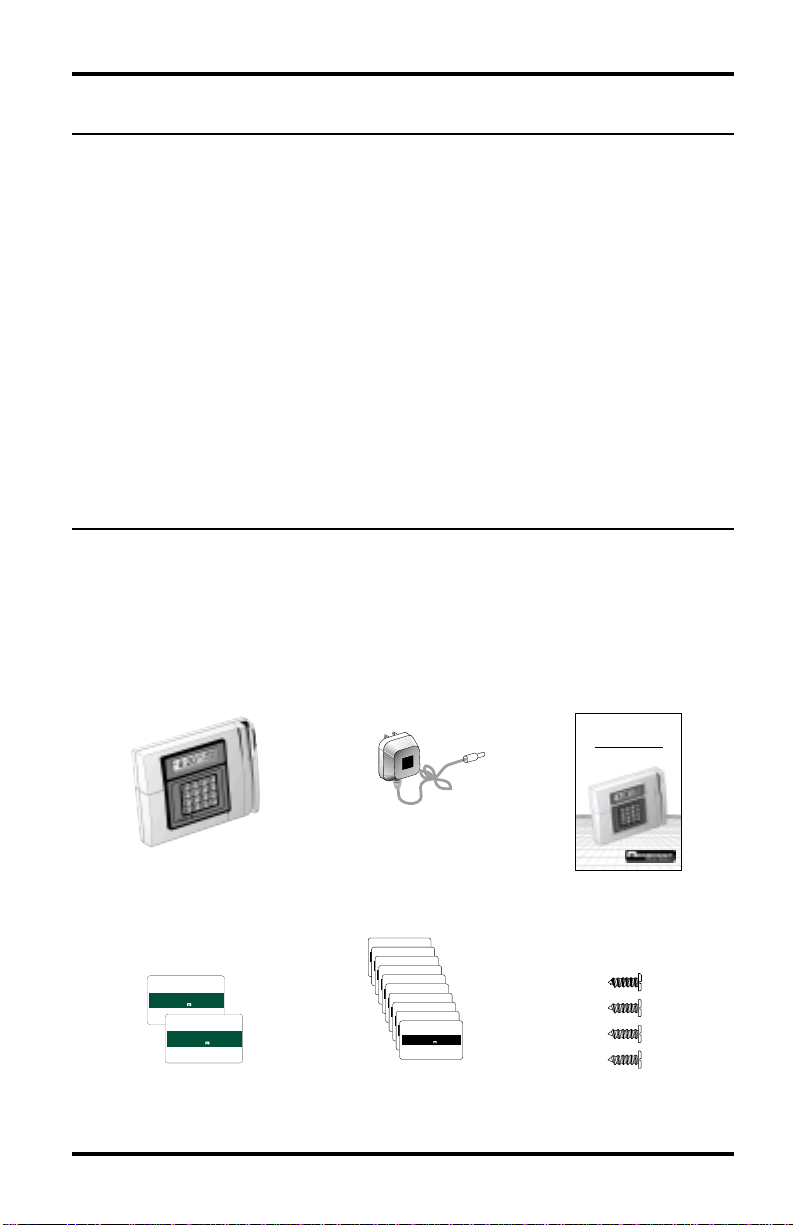
2.2 Unpacking and Inspection
Opentheshippingcartonandcarefullyremovethecontents. Inspectthe
TimeQ and accessoriesfordamage.Report damage or shortages to the
companyfromwhichtheunitwaspurchased.Completethe
registrationcardandreturnittoAcroprintto ensure theTimeQ
warranty.
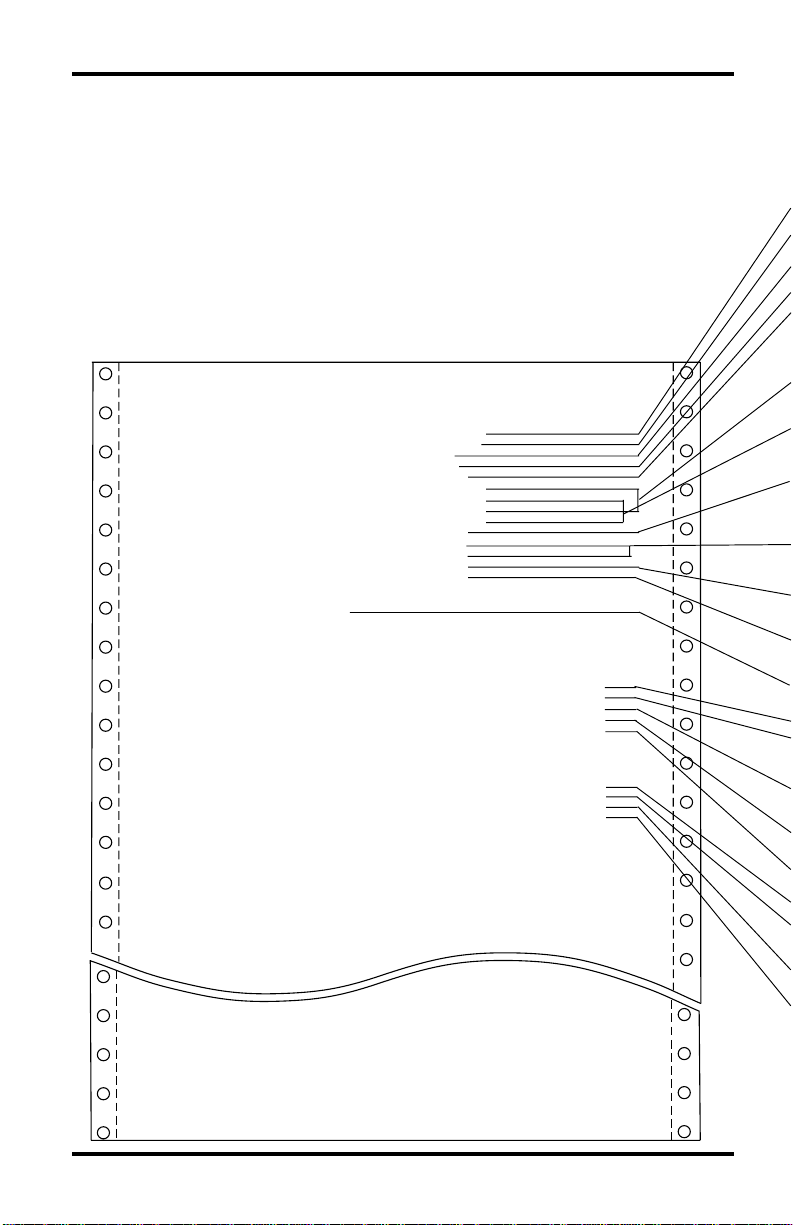
2 SUPERVISOR
BADGES
6
Setup
TIME Q
S
upervisor Badge
C
O
R
S
upervisor Badge
Time Q
User Manual
POWER
CABLE
USER
MANUAL
0001
0001
Identification Badge
CROPRINT
0001
Identification Badge
Supervisor
Badge
CROPRINT
0001
Identification Badge
Supervisor
Badge
CROPRINT
0001
Identification Badge
Supervisor
Badge
CROPRINT
0001
Identification Badge
Supervisor
Badge
CROPRINT
0001
Identification Badge
Supervisor
I
N
T
PR
I
C
N
T
O
PR
R
50 EMPLOYEE
CROPRINT
Identification Badge
Supervisor
CROPRINT
Identification Badge
Supervisor
CROPRINT
Identification Badge
Supervisor
Identification Badge
Supervisor
Supervisor
Badge
0001
Badge
0001
Badge
0001
Badge
CROPRINT
Badge
CROPRINT
Badge
4 SCREWS
BADGES
Page 7
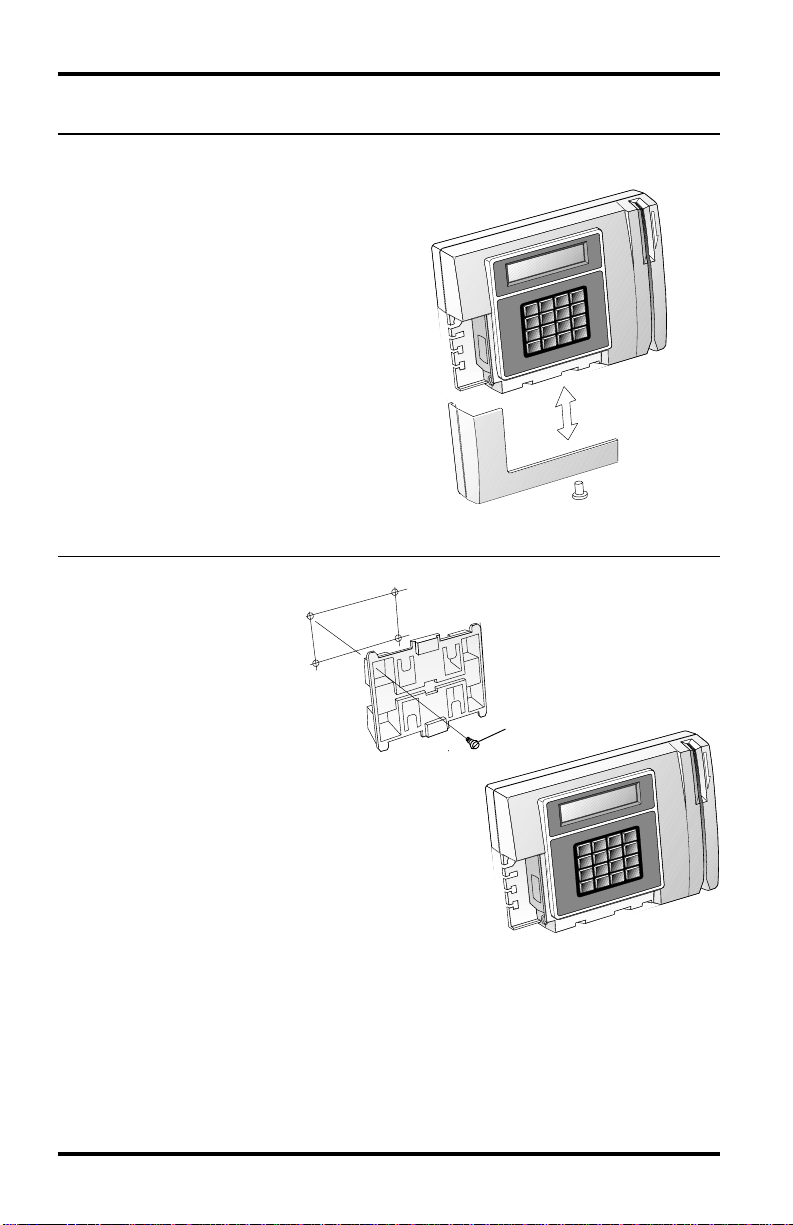
2.3 Initial Setup
Removing the Access Door:
Unscrewthescrew located on the
lowerfrontpaneloftheunitto
removethe access door.
Access Door
Reversible Bracket
Wall Mounting of Time Q:
TheTimeQ has a
reversiblebracketonthe back of the unit.
Theunitissuppliedwiththebracketin a
tiltpositionforsittingon a desk. Withthe
access door removed, you are ableto
removethe bracket. Reverse the bracket
forwallmounting.Securethebracketto
thewallwiththefourscrews.Note that
thebrackethasmoldedwireroutingslots
andacenterhubforsecuring wires using
nylonties.After the bracket is secured to
thewall,hangtheTimeQunitonthe
bracket.
screw
Setup
7
Page 8
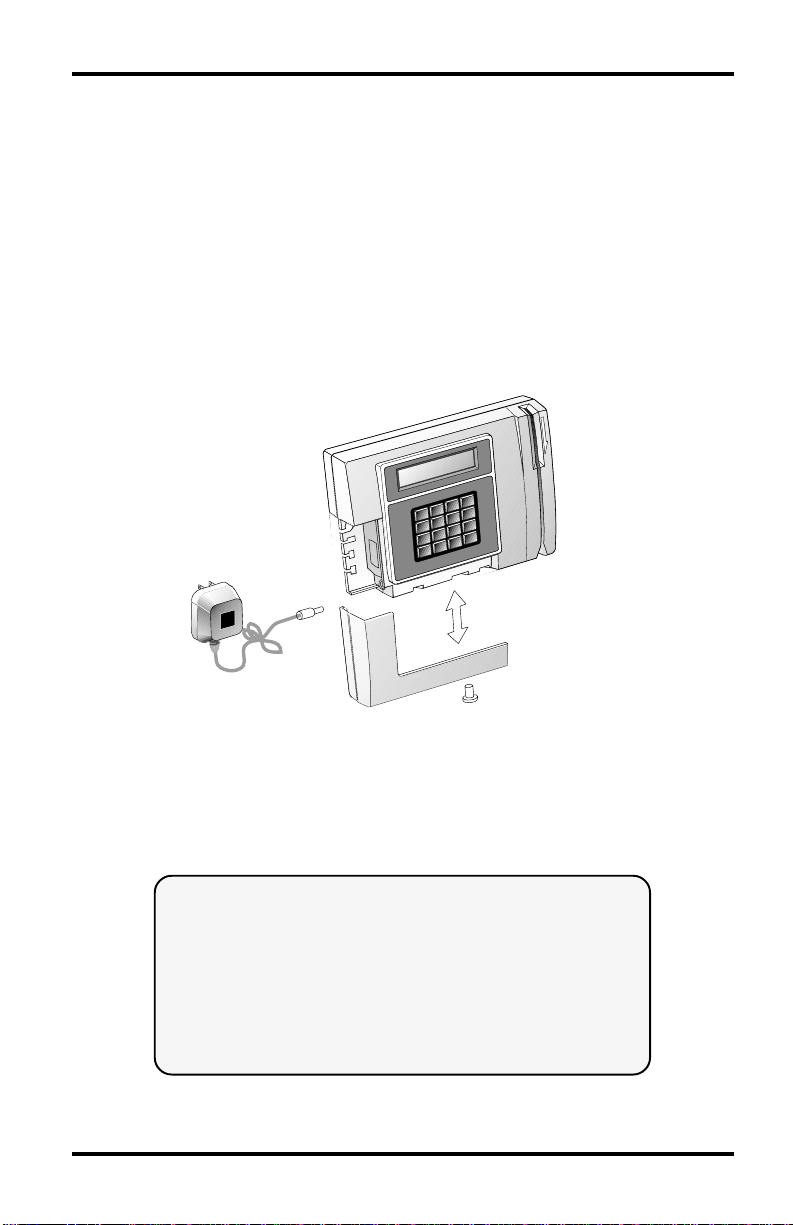
Connecting Power Cord and Securing the Access Door:
Pluginthepower cord coming from the wall mount transformerinto
theTimeQ terminal. Toreattach the access door and secure the unit
tothereversiblebracket, screw on the lower front panel of the unit.
Thiswilltightenthe access door.
Power
Cord
Access Door
NOTE: Please keep all the packing
materials so they may be usedshould
you wish to transport the Time Q in the
future. They are specifically designed to
protect your Time Q during shipment.
8
Setup
Page 9

2.4 Printer Connections
To printReports,the Time Q must be connectedto an 80 column
printer. Most printersuse a parallel connection.
Parallel Printer Connection:
Theparallelportis typically used for
connectiontoaparallelprinter.Aparallel
interfacecableisshownabove.Sincethis
is the same cable that isused to connect an IBM-PC orPC
compatiblecomputertoaprinter,it can be bought atmostcomputer
dealersoff-the-shelf.Simplyconnectthe25-pinconnectorendofthe
printercableintotheside port of theTimeQ Terminal.Theother end
ofthecable,the36-pinCentronics-typeconnector,is plugged into the
printer(shownbelow .)
Serial Printer Connection:
Theserialcableisuniqueduetothe
phonejackinterface.ContactAcroprint
toorder this cable. Once the correct
cableisobtained,connectthecable into
theRS-232 port. Follow the
procedurefor
removingthe
access door.
NOTE:Ifa serial printer is used, the printer port must first be set up.
See 6.4 Set up #14 (Functions, page 28.)
Setup
9
Page 10
NOTE: Some ink jet printers may be connected
to the Time Q. The printer must be reset to the
ASCII format in order to print reports. Consult the
printer’s operating manual or contact the printer
manufacturer for more details. Sorry, Acroprint
does not support printers used in conjunction
with the Time Q system.
2.5 Printer Test
OncetheTimeQ is connectedtothe printer and both units are powered
up,theTime Q will displaythecurrenttimeanddate(EasternTime
Zone).
1. Swipeasupervisorbadgethrough the slot. The unit will
display "MAIN MENU".
2. Use the up or down menu keys toscrollto TEST FEA TURES.
3. Press ENTER.
4. Now scroll to PRINTER TEST,and press ENTER.
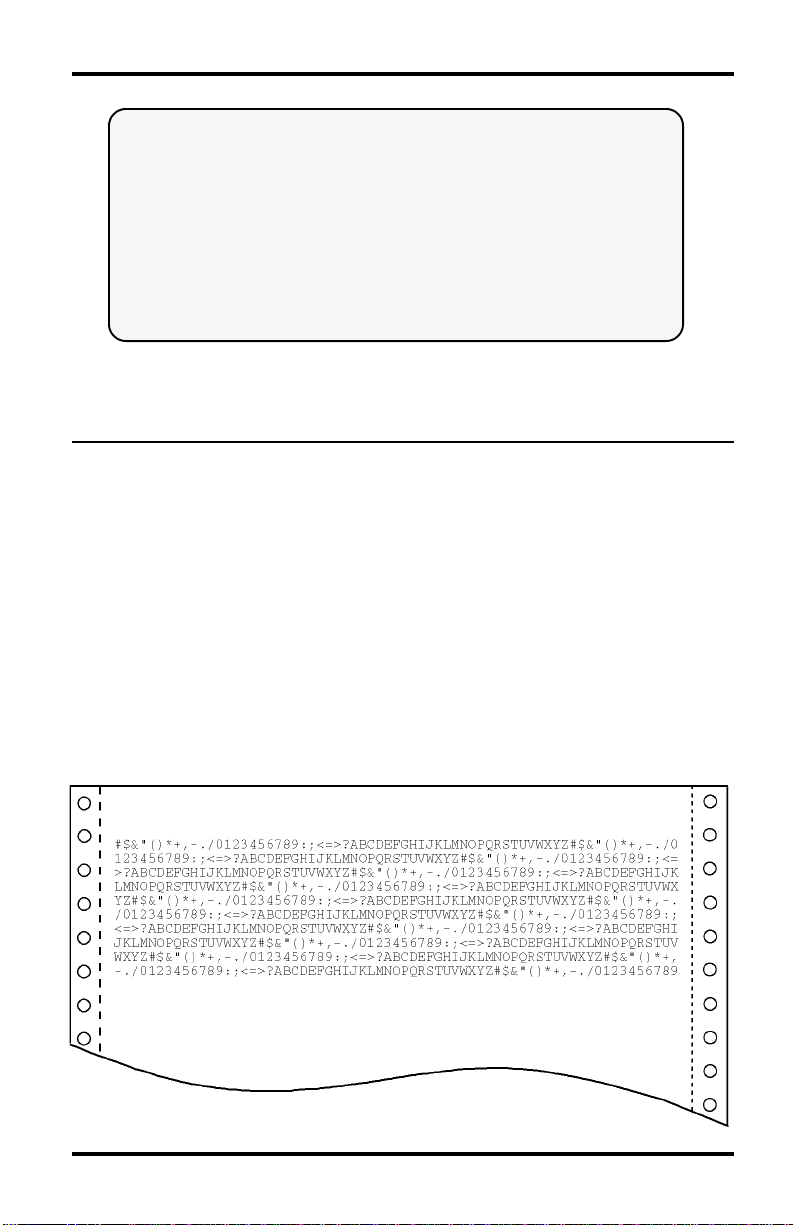
Theprinterwill print:
10 Setup
Page 11

3. Programming
3.1 Introduction
TheTime Q is primarily self-prompting tosupervisors.TheMain Menu
isactivatedbyswipingaSupervisorBadge.Theheadingsforeachgroup
onthe next four pages are the choices whichappearin theMainMenu.
Themenukey (either up or down) is used toreachthemenusubject
desired.PressingENTERopensthespecifictask menu. The following
Supervisor'sMenuMapshowsmenusandchoicesavailable.
Allbranchesinthemenucanbe reached by simply using the ARROW
andENTERkeys. The CLEARkey will move you to the previous
menu.
Apromptforfurtherinputmayappearafterafunctionhasbeenselected.
TheARROWkeyscan still be used, but the TimeQprovidesthe
convenienceofanumerical pad. Ifpromptedfor a Badge Number or
to select an employee, the option of swiping the badge may be
used.
Afteracritical function or data has been entered, an >ENTER TO
CONFIRM<prompt is used to protect against unwanted entries.
T ypically, theTimeQ will display the programmed data onthebottom
lineofthedisplayastheselectionsarebeingscrolledthroughonthetop
line.The data programmed into the TimeQcanbereviewedinthis
fashion.Ifthereare any doubts about what has been programmed,
simplyprinttheappropriatereport.
NOTE: This section is designed to be a general
overview of the main menu and choices. The
Tutorial in Section 4 goes into more depth.
However, for step-by-step instructions for each
function, please refer to section 6,
Section 7,
to obtain each report.
Reports
, illustrates step-by-step how
Functions
Programming
.
11
Page 12
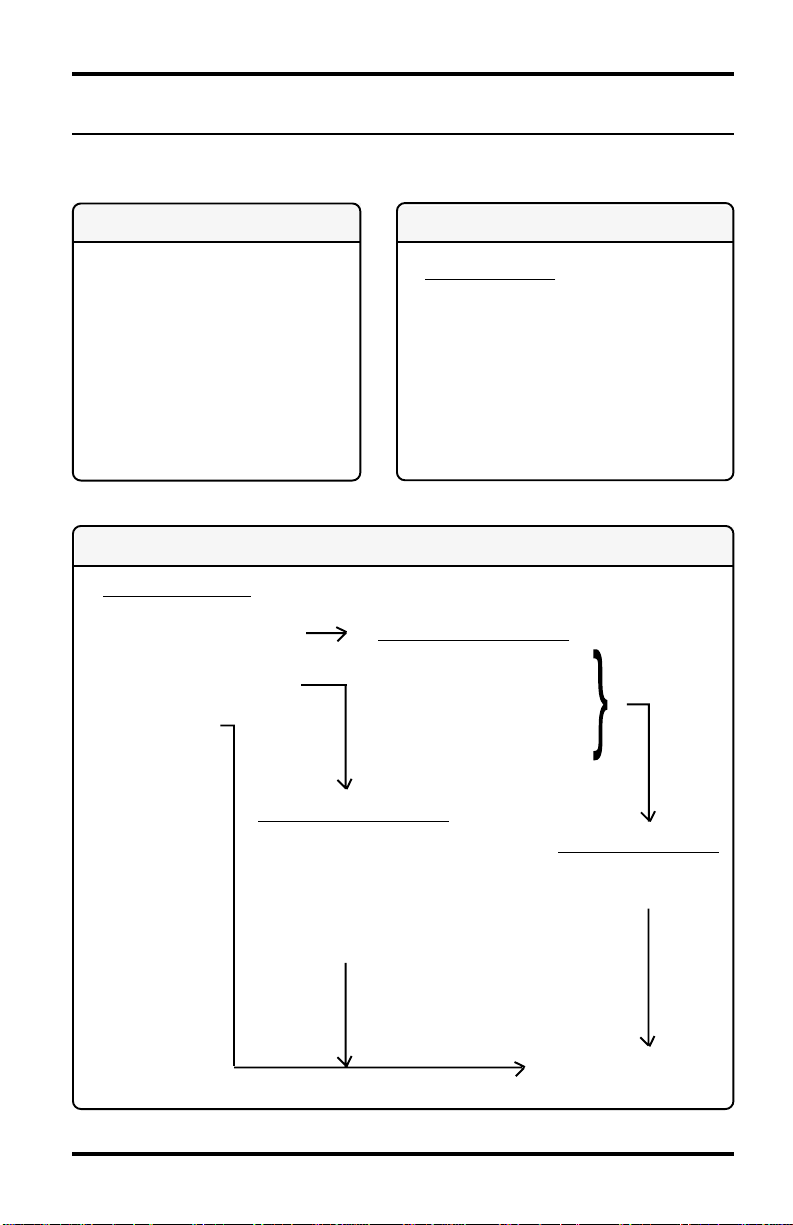
3.2 Supervisor's Menu Map
MAIN MENU
REPORTS
ADD/EDITEMPLOYEE
EDITTIMETOTALS
EDIT SHIFT RULES
SUPERVISOR CARDS
TIME AND DATE
SETUP
TESTFEATURES
SELECT A REPORT
HOURSSUMMARY
TIMECARDS
WHO’S IN, WHO’S OUT
EMPLOYEEPROFILES
CLOCKRULES
REPORTS
}
}
TEST FEATURES
SELECT A TASK
BADGE READER TEST
DISPLAY TEST
KEYBOARD TEST
AUDIO TEST
PRINTER TEST
SELECT REPORT FILTER
ALLEMPLOYEES
INDIVIDUALSHIFT
SELECTA SHIFT
INDIVIDUALEMPLOYEE
SELECTAN EMPLOYEE
12
Programming
SELECT REPORT FILTER
ALLEMPLOYEES
INDIVIDUALSHIFT
SELECTA SHIFT
INDIVIDUALEMPLOYEE
SELECTAN EMPLOYEE
SELECT PAY PERIOD
CURRENT
PREVIOUS
REPORT SUBMITTED
Page 13
ADD/EDIT EMPLOYEE
SELECT A TASK
ADD AN EMPLOYEE
EDIT AN EMPLOYEE
DELETEAN EMPLOYEE
SELECTAN EMPLOYEE
SELECTAN EMPLOYEE
SELECTAN EMPLOYEE
{EMPLOYEENAME}
{EMPLOYEENAME}
EDIT TIME TOTALS
CURRENTREGULAR HRS
CURRENT OVERTIME 1
CURRENT OVERTIME 2
PREVIOUS REGULAR HRS
PREVIOUSOVERTIME 1
PREVIOUSOVERTIME 2
ENTER BADGENUMBER
EMPLOYEENAME
EMPLOYEENUMBER
SHIFTNUMBER
SUPER VISOR CARDS
SELECT A TASK
ADD SUPERVISOR BADGE
DELETEA SUPERVISOR
}
ENTER BADGENUMBER
Programming
13
Page 14
EDIT SHIFT RULES
SELECTA SHIFT SHIFT RULES = DISABLED
SHIFT RULES = ENABLED
SHIFTSTARTTIME
SHIFTSTART ROUND
SHIFTSTART GRACE
SHIFTSTARTDOCK
SHIFTSTOP TIME
SHIFTSTOPROUND
SHIFTSTOPGRACE
SHIFTSTOP DOCK
SHIFTLUNCH RULES = DISABLED
SHIFTLUNCH RULES = ENABLED
LUNCH WINDOW BEGIN
LUNCH WINDOW END
LUNCH DURATION
AUTOLUNCH AFTER
TIME AND DATE
SELECT ATASK
SETTHETIME ENTERTIME OF DAY
SETTHE DATE
TIMEFORMAT 12 HOUR
DATE FORMAT DAY MONTH YEAR
TIMETOTALS FORMAT MINUTES
24 HOUR
DAY YEAR MONTH
MONTH DAY YEAR
MONTH YEAR DAY
YEAR DAY MONTH
YEAR MONTH DAY
HUNDREDTHS
14 Programming
Page 15
SETUP
MAX TIME ON CLOCK ENTER ELAPSED TIME
PAY INTERVAL ROUND SELECT PAY INTERVAL
1MINUTE(S)
5MINUTE(S)
6MINUTE(S)
10 MINUTE(S)
15 MINUTE(S)
PAY PERIOD LENGTH SELECT PAY PERIOD
WEEK PAY PERIOD
TWO WEEK PAY PERIOD
SEMIMONTHLY PERIOD
MONTHLY PAY PERIOD
PAY PERIOD START
DAY CHANGEOFFSET ENTER TIME OFFSET
OVERTIME RULES 1ST DAILY OT AFTER
DAYLIGHT SAVINGS ENABLED
SETUP PRINTER SELECT PRINTER TYPE
COMM PORTBAUD RATE SELECT BAUD RATE
REMOVE ALL PUNCHES
RE-INITIALIZE SYSTEM
1ST WEEKLY OT AFTER
2ND DAILY OT AFTER
2ND WEEKLY OT AFTER
7TH DAY OVERTIME
DISABLED
DAYLIGHT SAVE START
DAYLIGHT SAVINGS END
DISABLED
PARALLEL
SERIAL
NONE
19200
38400
300
600
1200
2400
4800
9600
Programming
15
Page 16

4. Tutorial
4.1 Introduction
Thissectionisdesignedtohelp you feel comfortable with how the TimeQ
works.ItisimportanttounderstandthattheTimeQhasare-initialize
functionthatwillclear all punches and return the program variables to
theiroriginalfactory settings. Withthis in mind, youshouldfeelfreeto
experimentwiththesupervisor's menu map. Tryprinting some reports,
settingvariables,settingthetime and date, or playing with any feature or
functionthatarousesyourcuriosity .For step-by-step instructions, please
consult sections 6, Functions, and 7,Reports.
4.2 Supervisor's Menu
Swipethe supervisors badge to access the MAIN MENU. You will
noticethatone line of thedisplaywillbeflashing.Aflashingdisplay
typicallyindicatesthatyoucanusethemenukeystoaccessanother
option.Ifyou want to choose a flashing option, press the enter key.To
returntoapreviousmenu, press the clear key.Thesevisual clues are
consistentthroughoutthe menu, which means that“settingthetime,”for
example,willhavethesame format as setting any other variable. Some
functionsaremoreinvolvedbecausemorechoicesarerequired,but
accessingtheflashingoptions by the menu keys and selecting themby
usingtheenterkeywill be the same throughout the menu structure.
Detailedmenumapsareincluded in section 3, Programming.
4.3 Reports
Thereare(5) basic reports available from the TimeQ;HOURS
SUMMARY,TIME CARDS, WHO'SIN WHO'SOUT,
EMPLOYEEPROFILES,andCLOCKRULES.Theeasiest report
toprintistheHOURSSUMMARY.Tryprinting this report by swiping
thesupervisor's badge to access the MAIN MENU,thenpress ENTER
fourtimes.When settinguptheTime Q, the EMPLOYEE PROFILES
andCLOCKRULES reports will be important so that you can double
checkyourentries.Besidesshowingvarioussettings,theCLOCK
RULESreportgivesyou a convenient list of the variables available in the
16
Tutorial
Page 17

TimeQ program. Detailed instructions how to printeachofthefive
reportsare included in section 7, Reports.
4.4 Add Employees to the System
EachemployeebadgeprovidedwiththeTimeQ has a unique number.
T oassign a specific badge to a certain employee, swipe the supervisor's
badge to access the MAINMENU. Press the MENUkey to access the
ADD/EDITEMPLOYEE functions and press ENTER twice. Toenter
thebadgenumber,you can use the numerical pad, menu keys, or simply
swipetheemployeebadgeyouwishto assign. Press ENTER twice.
TheENTERNAME prompt will be displayed. Use the MENU key to
scrollthroughthe alphabet; then the red arrow key to go to the next
letter.Whenyouhave completed the name, press ENTER, and press
ENTERagaintoconfirm. Entering the employee number and shiftare
optionalatthispoint.
4.5 Punch In and Out
Swipesomeoftheemployeebadgeswhichhavebeenassigned.Thefirst
swipepunchestheemployeein.Thenameassignedtothatbadgeis
displayedalongwiththe word IN and a single beep tone sounds.
Swipingthebadgeagainpunchesthe employee out. The employee
name,OUT,andthe time accumulated is displayed and a double beep
tonesounds.Print out several timecard reports and see how they were
affectedbythepunches.
(An Employee Badge Function)
4.6 Re-initialize
T oreset theTimeQ variables and clear punch data, re-initialize theTime
Qasfollows: swipe the Supervisor Badge, press the Menu up key twice,
pressENTER, press the Menu up key once,and press ENTER twice.
Re-initializingremovestest employee transactions whichcouldotherwise
causeconfusionlater.
Tutorial
17
Page 18
5. Factory Settings
If your Time Q just came out of the factory box, or if you have
reinitialized and set the time and date, your TimeQ will be set as follows:
The pay period length will be one week, beginning on Monday, and the
totals will be derived by adding together the actual elapsed time between
in and out punches.Anyone who stays on the clock for over 12 hours will
be automatically punched out because they have exceed the MAX TIME
ON CLOCK setting of 12 hours. If your pay period length is two weeks,
semimonthly or monthly, change the setting. If your pay period starts on a
day other than Monday, enter the NEXT pay period start date. An
example of the CLOCK RULES report settings follows.
CLOCK RULES 2/15/01 12:24 PM PAGE 1 C
============================================================================ L
O
CLOCK RULES: C
K
MAX TIME ON CLOCK 12:00 HOURS
PAY INTERVAL-ROUND 01 MINUTES R
PAY PERIOD WEEKLY U
NEXT PAY PERIOD START DATE 2/19/01 L
DAY CHANGE TIME 12:00 AM E
FIRST DAILY OVERTIME AFTER 24:00 HOURS S
FIRST WEEKLY OVERTIME AFTER 40:00 HOURS
SECOND DAILY OVERTIME AFTER 24:00 HOURS
SECOND WEEKLY OVERTIME AFTER 168:00 HOURS
7TH DAY OVERTIME DISABLED
DST START DATE 4/01/01
DST END DATE 10/28/01 2
TIME Q PRINTER PARALLEL /
COM PORT BAUD RATE 9600 1
5
SUPERVISOR BADGES: /
NO SUPERVISOR BADGES ASSIGNED 0
1
SHIFT RULES:
SHIFT 1 SHIFT 2 SHIFT 3 1
---------------- ---------------- ---------------- 2
SHIFT RULES DISABLED DISABLED DISABLED :
START TIME - - - 2
ROUND - - - 4
GRACE - - DOCK - - - P
STOP TIME - - - M
ROUND - - GRACE - - DOCK - - LUNCH RULES DISABLED DISABLED DISABLED
START TIME - - STOP TIME - - DURATION - - AUTO AFTER - - -
------------------------------------------------------------------------CLOCK RULES 2/15/01 12:24 PM PAGE 2 C
============================================================================ L
O
SHIFT RULES:(CONT.) C
K
SHIFT 4 SHIFT 5 SHIFT 6
---------------- ---------------- ---------------- R
SHIFT RULES DISABLED DISABLED DISABLED U
LUNCH RULES DISABLED DISABLED DISABLED L
1
SYSTEM INFORMATION: 2
LAST CHANGE: 2/13/97 12:11 PM :
2
SOFTWARE REVISION: TSW 0010 - VERSION 3.00 4
P
M
.................. END CLOCK RULES.............................................
18
Factory Settings
Page 19

• Max Time on Clock - The Time Q assumes that an employee has missed a punch after
the maximum time on the clock has beenexceeded.
• Pay Interval Round - One minute is the smallest increment of time used to calculate
time worked totals. Options are 1, 5, 6, 10 or 15 minutes.
• Pay Period - The length of time during which time worked totals will accumulate for a
timecard.
• Next Pay Period Start Date - The date the NEXT pay period will start.
• Day Change Time - By default, the day change time — the time a new day begins — is
set at midnight. Use the day change offset feature to move the day change time forward
or backward from midnight so that time worked totals will be credited to the day
intended.
• Daily Overtime After - The amount of time worked in a day, after which, overtime will
begin to accumulate. NOTE: Leave at 24 hours if you pay overtime based on a 40 hour
week only. This can be set to two different levels.
• Weekly Overtime After - The amount of time worked in a week, after which, overtime
will begin to accumulate. Weekly overtime does not apply to semimonthly or monthly
pay periods. This can be set to two different levels.
• 7th Day Overtime - Disabled. When enabled, forces all hours worked on the 7th
consecutive worked day of a pay period to be promoted to the next highest pay level
(Overtime 1 or Overtime 2) provided that the seven consecutive days start at the
beginning of the first or second week of the weekly or biweekly pay period.
• Daylight Savings Time - Enabled, the Time Q will automatically assign the first
Sunday inApril and last Sunday in October as the beginning and ending dates of daylight
savings (current U.S. law). The time change will occur at 2:00 a.m.
• Time Q Printer - Printed reports may be directed to either the parallel port (the large
external port on the right) or to the serial port (the internal modular connector labeled RS-
232).
• Com Port Baud Rate - When the serial port is selected, the baud rate must be entered. 8
bit words, no parity and 1 stop bit are assumed.
• Supervisor Badges - Lists additional badges assigned as supervisor badges.
• Shift Start Time - The time of day employees are to begin work.
• Shift Round - The minutes before the Start Time or after the Stop Time during which
employee punches will be treated as if they had occurred exactly on the Start and Stop
Times.
• Shift Grace - The minutes after the Start Time or before the Stop Time during which
employee punches will be treated as if they had occurred exactly on the Start and Stop
Times.
• Shift Dock - The minimum minutes the employee will lose from time worked totals if
punching in after the Start Time (plus grace) or before the Stop Time (minus grace).
• Shift Stop Time - The time of day employees can stop working.
• Lunch StartTime - The earliest time of day at which an employee can punch out for
lunch.
• Lunch StopTime - The latest time of day at which an employee should punch back in
from lunch.
• Lunch Duration - The number of minutes for lunch which will be subtracted from time
worked totals.
• Auto Lunch After - After this number of hours and minutes following an in-punch, the
Time Q will assume an employee has taken lunch. The Lunch Duration will then be
subtracted from the time worked totals.
Factory Settings
19
Page 20

6. Functions
6.1 Introduction
Thissectionwill walk you through anexampleofeachfunction.
NOTE:At any point one can back out ofanyMENU by repeatedly
pressingtheCLEARkey.
Thedisplayhas two lines of characters.Aflashing display typically
indicatesyoucanusethemenukeystoaccessanotheroption.Flashing
characters are enclosed within .
6.2 Supervisor Badges
Your unit includes two Supervisor Badges which allow access to the
keypadto make program changes. Place onebadge in a safe place for
futureoremergencyuse.The TimeQ terminal can be programmed to
recognizeaspecificemployeebadgeasaSupervisorbadge(if you desire
morethan one person to have program/edit access), but it canneverbe
programmednottorecognizetheoriginalsupervisorbadges.Tomakea
newsupervisorbadge:
PROGRAM FUNCTION DISPLAY SHOWS
1. Swipe Supervisor badge MAIN MENU
REPORTS
2. Scroll Main Menu Up/Down MAIN MENU
to SUPERVISOR cards
3. Press ENTER SELECT A TASK
ADD SUPERVISOR BADGE
4. Press ENTER ENTER BADGE NUMBER
0
5. Enter Badge Number ENTER BADGE NUMBER
(or swipe a badge) 3
6. Press ENTER 0003
enter to confirm
7. Press ENTER
Unit beeps twice to accept. The employee badge now
functions as a supervisor badge.
20
Functions
Page 21

6.3 SetTime and Date:
PROGRAM FUNCTION DISPLAY SHOWS
1. Swipe Supervisor badge MAIN MENU
REPORTS
2. Scroll Up/Down to MAIN MENU
TIME AND DATE
3. Press ENTER SELECT A TASK
SET THE TIME
4. Press ENTER ENTER Time of day
03:49 PM (example)
5. Set correct hours and minutes ENTER TIME of day
using number or menu keys 10:25 AM (example)
(use the LEFT or RIGHT Arrow
keys to shift a digit). With cursor
on AM/PM, use Up/Down to
scroll to current setting.
6. Press ENTER 10:25 AM
enter to confirm
7. Press ENTER to confirm. Select a Task
The unit beeps twice. Set the Time
(example)
8. Scroll Up/Down to SELECT A TASK
SET THE DATE
9. Press ENTER year month day
01 January 21 (example)
10. Use number or menu keys year month day
to set the year, month and 01 February 02 (example)
day.
11. Press ENTER 01 February 02
enter to confirm
12. Press ENTER to confirm. select a task
The unit beeps twice. set the date
Functions
21
Page 22
6.4 Setup:
For definitions of terms used, see Appendix A.
SETUP:Coversgeneraltimekeeping,payperiodandclockrulesfor
computingtimeworked.
PROGRAM FUNCTION DISPLAY SHOWS
1. Swipe Supervisor badge MAIN MENU
REPORTS
2. Scroll Up/Down to MAIN MENU
SETUP
3. Press ENTER MAX TIME ON CLOCK
= 12:00
a. 12 hours are typical, ENTER elapsed time
to change press ENTER
b. Use number Keys to ENTER elapsed TIME
Select 00* to 99* hours 14:00
c. Press ENTER 14
12:00 (example)
(example)
ENTER TO CONFIRM
d. Press ENTER. The unit MAX TIME ON CLOCK
beeps twice. = 14:00
* Entering 00 will set the Maximum time on the clock to 99
hours, effectively disabling it.
4. PAY INTERVAL is the smallest increment of time in minutes used to
calculate time worked totals. Options are 1, 5, 6, 10 or 15 minutes.
Scroll Up/Down to PAY INTERVAL ROUND
=1
a. Press ENTER SELECT PAY INTERVAL
1 MINUTE(S)
b. Use menu key to scroll SELECT PAY INTERVAL
(example)
22
Functions
to select 15 MINUTE(S)
Page 23

PROGRAM FUNCTION DISPLAY SHOWS
c. Press ENTER 15 Minute(s)
enter to confirm
d. Press ENTER. The pay interval round
unit beeps twice. =15
5. Scroll Up/Down to Pay Period Length
=WEEK PAY PERIOD
a. Press ENTER SELECT PAY PERIOD
WEEK PAY PERIOD
b. Scroll to week, two week, SELECT PAY PERIOD
semimonthlyormonthly TWO WEEK PAY PERIOD
pay period
c. Press ENTER two week pay period
enter to confirm
d. Press ENTER. The unit pay period length
beeps twice. =two week pay period
6. Scroll Up/Down to PAY PERIOD START
= February 04, 01
a Press ENTER year month day
01 February 05 (example)
b. Set to Start of Next Pay Year month day
Period with menu and 01 February 05
RIGHT/LEFT arrow key
c. Press ENTER 01 February 05
ENTER TO CONFIRM
d. Press ENTER. The unit pay period start
beeps twice. February 05, 01
(example)
23Functions
Page 24

7. DAY CHANGE, for calculation purposes, is the time a new day
begins. By default it is set at midnight. However, it is sometimes helpful
to move the day change time forward or backward from midnight so
time worked with be credited to the desired day’s time worked totals.
The DAY CHANGE OFFSET is the amount of time the day change
is moved forward or backwards from the midnight default.
PROGRAM FUNCTION DISPLAY SHOWS
Scroll Up/Down to DAY CHANGE offset
=00:00
a. Press ENTER ENTER TIME offset
±00:00
b. Use menu and RIGHT/LEFT ENTER TIME offset
arrow keys to set time ±01:00
c. Press ENTER ±01:00 (example)
ENTER TO CONFIRM
d. Press ENTER. day change offset
The unit beeps twice. =01:00
8. DAILY OVERTIME AFTER is the number of hours worked each
day, after which Overtime will accumulate. NOTE: Leave at 24 hours
if you pay overtime based on a 40 hour week only.
(example)
Scroll Up/Down to overtime rules
a. Press ENTER 1st daily ot after
=24:00
b. Press ENTER and ENTER ELAPSED TIME
set desired hours
c. Press ENTER 08:00 (example)
d. Press ENTER. 1st daily ot after
The unit beeps twice. =08:00
e. ScrollUp/Down to 2nd daily ot after
24
Functions
08:00 (example)
ENTER TO CONFIRM
=24:00
Page 25

PROGRAM FUNCTION DISPLAY SHOWS
f. Press ENTER Enter elapsed time
24:00
g. Set desired hours ENTER ELAPSED TIME
16:00 (example)
h. Press ENTER 16:00 (example)
ENTER TO CONFIRM
i. Press ENTER. 2nd daily ot after
The unit beeps twice. =16:00
9. WEEKLY OVERTIME AFTER is the number of regular hours
worked each week, after which, Overtime will accumulate.
ScrollTo 1st WEEKly ot AFTER
=040:00
a. Press ENTER ENTER ELAPSED TIME
040:00 (example)
b. Set desired hours ENTER ELAPSED TIME
040:00
(example)
c. Press ENTER 040:00 (example)
ENTER TO CONFIRM
d. Press ENTER. 1st weekly ot after
The unit beeps twice. =040:00
e. ScrollTo 2nd Weekly ot After
=168:00
f. Press ENTER Enter elapsed time
168:00 (example)
g. Set desired hours Enter elapsed time
080:00
(example)
h. Press ENTER 080:00 (example)
enter to confirm
25Functions
Page 26

PROGRAM FUNCTION DISPLAY SHOWS
i. Press ENTER. 2nd weekly ot after
The unit beeps twice. =080:00
10. 7TH DAY OVERTIME — When this feature is enabled, all hours
worked on the seventh consecutive worked day will promoted to the
next highest pay level provided that the seven consecutive days start at
the beginning of the first or second week of the weekly or biweekly
pay period. This feature does not affect weekly overtime calculations
and will not override weekly overtime thresholds. The default setting
for this feature is disabled.
ScrollTo 7th day overtime
=disabled
a. Press ENTER ENABLED
enter to confirm
b. Press ENTER. 7th day overtime
The unit beeps twice. =enabled
11. DAYLIGHT SAVINGS TIME has been set to be enabled. When
enabled, the Time Q will automatically advance time 1 hour at 2:00AM
the first Sunday in April and return time 1 hour on the last Sunday in
October. (Current U.S. Law) These dates can be edited if necessary.
If you do not want to have Daylight Savings Time on the Time Q,
disable the function.
Scroll Up/Down to DAYLIGHT SAVINGS
=ENABLED
a. Press ENTER disabled
enter to confirm
b. Press ENTER. DAYLIGHT SAVINGS
The unit beeps twice. =DISABLED
NOTE: Timeworked totals will not automatically adjust for DSTbut time
cards will indicate that time did change.
26
Functions
Page 27

PROGRAM FUNCTION DISPLAY SHOWS
12. To change the Daylight Savings Start Date:
ScrollTo Daylight save start
=April 01, 01
a. Press ENTER Year Month Day
01 April 01
b. Use the menu keys and Year Month Day
RIGHT/LEFT arrow keys 01 April 08
to set the desired start date.
c. Press ENTER 01 April 08
enter to confirm
d. Press ENTER. daylight save start
The unit beeps twice. =april 08, 01
13. To change Daylight Savings End Date:
Scrollto Daylight savings end
=october 28, 01
a. Press ENTER Year Month Day
01 October 28
(example)
b. Use the menu keys and Year Month Day
RIGHT/LEFT arrow keys 01 october 21
to set the desired start date.
c. Press ENTER 01 October 21
enter to confirm
d. Press ENTER. Daylight Savings end
The unit beeps twice. =October 21, 01
Functions
(example)
27
Page 28

PROGRAM FUNCTION DISPLAY SHOWS
14. Scroll Up/Down to SET UP PRINTER
=PARALLEL
a. Press ENTER. SELECT PRINTER TYPE
PARALLEL
b. Use menu key to select
Parallel, Serial, or none.
c. Press ENTER Parallel
enter to confirm
d. Press ENTER. SET UP PRINTER
The unit beeps twice. = PARALLEL
NOTE: If you select a serial printer, the comm port baud rate must be set.
Skip this step if you have selected parallel printer.
15. Scroll to COMM PORT BAUD RATE
=9600
a. Press ENTER SELECT BAUD RATE
=9600
(example)
b. Use menu to scroll
through Baud Rates.
c. Press ENTER 9600
enter to confirm
d. Press ENTER. COMM PORT BAUD RATE
Unit beeps twice. =9600
(example)
16. REMOVE ALL PUNCHES: Removes all employee punch
information while leaving the setup, shift rules and employee
profiles at their current setting.
17. RE-INITIALIZE SYSTEM: Will CLEAR ALL punches and
employee profiles and resets all Setup and Shift Rules to their
factory settings.
28
Functions
Page 29

6.5 Edit Shift Rules
PROGRAM FUNCTION DISPLAY SHOWS
1. Swipe Supervisor Badge MAIN MENU
REPORTS
2. Scroll Up/Down to MAIN MENU
EDIT SHIFT RULES
3. Press ENTER. Use menu SELECT A SHIFT
keys to select a shift. 1
a. Press ENTER SHIFT RULES
=DISabled
b. Press ENTER enabled
enter to confirm
c. Press ENTER. SHIFT RULES
Unit beeps twice. =ENabled
4. Use DOWN menu key to SHIFT START TIME
select =08:00 AM
a. Press ENTER ENTER TIME OF DAY
08:00 AM
b. Use menu key and ENTER TIME of day
RIGHT/LEFT arrow keys 07:30 AM
to set time
c. Press ENTER 07:30 AM
ENTER TO CONFIRM
d. Press ENTER. shift start time
Unit beeps twice. =07:30 AM
5. Use DOWN menu key to SHIFT STOP TIME
select =05:00 PM
a. Press ENTER ENTER TIME OF DAY
05:00 PM
b. Use menu key and ENTER TIME of day
RIGHT/LEFT arrow keys 04:00 PM
to set time.
Functions
29
Page 30

PROGRAM FUNCTION DISPLAY SHOWS
c. Press ENTER 04:00 PM
ENTER TO CONFIRM
d. Press ENTER. shift stop time
The unit beeps twice. =04:00 pm
6. SHIFT ROUND: The minutes before the Start Time or after the Stop
Time during which employee punches will be treated as if they had
occurred exactly on the Start and Stop Times.
Use DOWN menu key SHIFT start ROUND
to select =30
a. Press ENTER ENTER MINUTES
030
b. Use menu key and ENTER minutes
RIGHT/LEFT arrow keys 015
to set minutes
c. Press ENTER 015
ENTER TO CONFIRM
d. Press ENTER. shift start round
The unit beeps twice. =15
e. Scroll to Shift Stop Round
=30
f. Follow steps a-d to set
7. SHIFT GRACE: The minutes after the Start Time or before the Stop
Time during which employee punches will be treated as if they had
occurred exactly on the Start and Stop Times.
Use DOWN menu key SHIFT start GRACE
to select =5
a. Press ENTER ENTER MINUTES
005
b. Use menu key and ENTER minutes
RIGHT/LEFT arrow keys 005
to set minutes
30
Functions
Page 31

PROGRAM FUNCTION DISPLAY SHOWS
c. Press ENTER 005
ENTER TO CONFIRM
d. Press ENTER. shift start grace
The unit beeps twice. =5
e. Scroll to Shift Stop Grace
=0
f. Follow steps a-d to set
8. SHIFT DOCK is the minimum minutes an employee will lose from
time worked totals if the IN punch is after Shift Start Time plus the
Shift Grace Time or before the Shift Stop Time less the Shift Grace
Time. This is normally equal to one Pay Interval (see 6.4 Setup.)
Use DOWN menu key SHIFT start DOCK
to select =0
a. Press ENTER ENTER MINUTES
000
b. Use menu key and ENTER minutes
RIGHT/LEFT arrow keys 000
to set minutes
c. Press ENTER 000
ENTER TO CONFIRM
d. Press ENTER. shift start dock
The unit beeps twice. =0
e. Scroll to Shift Stop Dock
=0
f. Follow steps a-d to set
9. Scroll Up/Down to SHIFT LUNCH RULES
=DISabled
a. Press ENTER enabled
enter to confirm
b. Press ENTER. SHIFT LUNCH RULES
The unit beeps twice. =ENABLED
Functions
31
Page 32

PROGRAM FUNCTION DISPLAY SHOWS
10. Use DOWN menu key LUNCH WINDOW BEGIN
to select =11:00 AM
a. Press ENTER ENTER Time of day
11:00 AM (example)
b. Use menu key and RIGHT/ ENTER TIME of day
LEFT arrow keys to set 11:30 AM
the earliest time an employee
may punch out for lunch.
c. Press ENTER 11:30 AM
ENTER TO CONFIRM
d. Press ENTER. Lunch window begin
The unit beeps twice. =11:30 am
NOTE: The Lunch Window Begin and Lunch Window End define a
period of time during which a punch-out for lunch and then punch-in back
to work should occur. If Lunch Duration equals the difference between
Lunch WindowBegin and LunchWindowEnd, then the lunch schedule will
occur at a specific fixed time.
Any punches which occur outside of the boundaries defined by Shift Start
and Stop and which are not within the Lunch Window, will be flagged on
the time cards by an exclamation mark. Time worked totals involving those
punches will be calculated to the actual punch time or to the closest Pay
Interval. HOWS
11. Use DOWN menu key LUNCH WINDOW END
to select =02:00 PM
a. Press ENTER ENTER TIME OF DAY
02:00 PM
b. Use menu key and ENTER TIME of day
RIGHT/LEFT arrow keys 02:00 PM
to set the latest time an
employee may return from lunch.
c. Press ENTER 02:00 PM
ENTER TO CONFIRM
d. Press ENTER. Lunch window end
The unit beeps twice. =02:00 pm
32
Functions
Page 33

12. LUNCH DURATION is the nominal lunch period and is the amount
of time which will be deducted from work totals.
PROGRAM FUNCTION DISPLAY SHOWS
Use DOWN menu key LUNCH DURATION
to select =60
a. Press ENTER ENTER minutes
060
b. Use menu key and ENTER minutes
RIGHT/LEFT arrow keys 060
to set the time.
c. Press ENTER 060
ENTER TO CONFIRM
d. Press ENTER. lunch duration
The unit beeps twice. =60
13. AUTO LUNCH AFTER is the hours and minutes after a punch IN
that the lunch duration will be automatically deducted from total hours
worked that day.
Use DOWN menu key AUTO LUNCH AFTER
to select =99:59
a. Press ENTER ENTER ELAPSED TIME
99:59
b. Use menu key and ENTER elapsed time
RIGHT/LEFT arrow keys 06:00
to set the time.
c. Press ENTER 06:00
ENTER TO CONFIRM
d. Press ENTER. auto lunch after
The unit beeps twice. =06:00
14. Repeat Steps 1 through 13 above to set rules for shifts 2-12,
if desired.
Functions
33
Page 34

6.6 Add/Edit Employee
PROGRAM FUNCTION DISPLAY SHOWS
1. Swipe Supervisor Badge MAIN MENU
REPORTS
2. Scroll Main Menu Up/Down MAIN MENU
ADD/EDIT EMPLOYEE
3. Press ENTER SELECT A TASK
ADD AN EMPLOYEE
4. Press ENTER ENTER BADGE NUMBER
0
6
a. Enter Badge Number ENTER BADGE NUMBER
(or swipe a badge) 7
b. Press ENTER 70
c. Scroll to EMPLOyee name
d. Press ENTER ENTER NAME
0
ENTER TO CONFIRM
=(Blank)
e. Use menu keys to select ENTER NAME
number or letter use JONES, A.B.
LEFT/RIGHT arrow keys to
position next space
f. Press ENTER JONES, A.B.
ENTER TO CONFIRM
g. Press ENTER. employee name
The unit beeps twice. =Jones, A.B.
h. Scrollto EMPLOYEE number
=0
i. Press ENTER Enter employee #
0
34
Functions
(Employee Number may
be up to 9 digits)
Page 35

PROGRAM FUNCTION DISPLAY SHOWS
j. Use number keys to select ENTER employee #
number and LEFT/RIGHT 123456789
arrow keys to position next
space
k. Press ENTER 123456789
ENTER TO CONFIRM
l. Press ENTER. employee number
The unit beeps twice. =123456789
m. Scroll to Shift Number
=1
n. Press ENTER ENTER SHIFT NUMBER
1
o. Use number keys to enter ENTER SHIFT NUMBER
shift number 1-12, 2
and press ENTER
p. Press ENTER 2
ENTER TO CONFIRM
q. Press ENTER. shift number
The unit beeps twice. =2
Press CLEAR. Repeat STEPS3&4toENTER Next Employee.
5. Edit an employee by scrolling menu to EDITAN EMPLOYEE and
following Step 4 as required.
6. Delete an employee by scrolling the menu to DELETE AN
EMPLOYEE and select the employee with the menu keys or by
swiping a badge. Then press the ENTER key.
HINT: The employee badges have a signature panel on the
front. The employee’s name may be printed on the signature
panel using a permanent marker. Allow ink to dry before use to
prevent smearing. Other options include using a preprinted
adhesive label or printing your own label and taping it onto the
badge with clear tape.
Functions
35
Page 36

7. Reports
7.1 Time Card
TIME CARD - This is a listing by employee of All IN-OUT punches
along with hours worked totals. This may be for the current or previous
pay period. The report may be for one employee, employees on a specific
shift, or for all employees.
To obtain a TIME CARD Report:
PROGRAM FUNCTION DISPLAY SHOWS
1. Swipe Supervisor Badge MAIN MENU
REPORTS
2. Press ENTER SELECT A REPORT
HOURS SUMMARY
3. Scroll Up/Down to SELECT A REPORT
select desired report TIME CARDS
4. Press ENTER select report filter
ALL EMPLOYEES
5. Scroll menu to select All select report filter
Employees,IndividualShift ALL EMPLOYEES
or Individual Employee.Ifyou
choose an Individual Shift or
anIndividualEmployee, you
will be prompted to select the
shift number or employee name.
6. Press ENTER. Scroll to SELECT PAY PERIOD
select pay period. current= 2/10/97
7. Press ENTER Report Submitted
REPEAT STEPS (1 - 7) FOR OTHER REPORTS
NOTE: All of the data for the Previous Pay Period must be
reported before the Time Q can consider dumping the old data.
Failure to do so will result in employees being locked out of the
clock. This is a safety feature to avoid loss or tampering of
unreporteddata.
36
Reports
Page 37

When a TIME CARD report has punch times with an “!” exclamation
mark beside them, this indicates that the punch is either too early or too late
to conform to shift or lunch rules that were enabled. If the words “TIME
CHANGE” are printed underneath a punch in time, that indicates the real
time clock in the Time Q was changed while that person was punched in.
(Note:A Daylight Savings Time adjustment will cause this if someone is on
the clock at 2:00 a.m.) The word “missed,” followed by an “*” asterisks,
will appear in the place of a punch out time if “MAX TIME ON CLOCK”
has been exceeded. Note that the asterisks will also appear beside the
totals and summaries of any employees who have missed a punch.
TIME CARDS : SELECTED EMPLOYEES 2/15/01 10:46 AM PAGE 1 T
============================================================================ I
M
ADAMS, LINDA #000000121 SHIFT-01 PAY PERIOD ENDING - 2/11/01 E
PUNCH DATE TIME IN/OUT HOURS DAY TOTAL WEEK TOTAL C
-------- ------------ --------- ------ ----------- ----------- ----------- A
MON FEB 5 8:00AM IN R
MON FEB 5 12:00PM OUT 4:00 D
MON FEB 5 1:00PM IN S
MON FEB 5 5:00PM ___OUT 4:00 MON 8:00
TUE FEB 6 7:45AM IN
TUE FEB 6 12:45PM OUT 5:00
TUE FEB 6 1:15PM IN
TUE FEB 6 4:15PM ___OUT 3:00 TUE 8:00
WED FEB 7 8:00AM IN 2
WED FEB 7 12:30PM OUT 4:30 /
WED FEB 7 1:30PM IN 1
WED FEB 7 5:00PM ___OUT 3:30 WED 8:00 5
THU FEB 8 7:30AM IN /
THU FEB 8 12:00PM OUT 4:30 0
THU FEB 8 12:30PM IN 1
THU FEB 8 4:00PM ___OUT 3:30 THU 8:00
FRI FEB 9 8:00AM IN
FRI FEB 9 11:30AM OUT 3:30 1
FRI FEB 9 12:30PM IN 0
FRI FEB 9 5:00PM ___OUT 4:30 FRI 8:00 40:00 REG :
0:00 OT1 4
0:00 OT2 6
------------------------------------------------------------------------ A
PAY PERIOD: HOURS (+/-)EDITS TOTAL ADJUSTED M
----------- ----------- ----------- ---------- REGULAR 40:00 40:00 ________REG
FIRST LEVEL OVERTIME 0:00 0:00 ________OT1
SECOND LEVEL OVERTIME 0:00 0:00 ________OT2
SUPERVISOR:__________________________ EMPLOYEE:___________________________
ADAMS, LINDA
TIME CARD STATUS: COMPLETE
.................. END TIME CARDS:SELECTED EMPLOYEES...........................
Reports
37
Page 38

7.2 Hours Summary Report
HOURS SUMMARY - This report list hours worked totals by regular and
overtime hours. This may be for an individual employee, a specific shift, or
all employees; for the current or previous pay period. If an employee has a
missed punch, the HOURS SUMMARY TOTAL will be noted with an * .
HOURS SUMMARY : ALL EMPLOYEES 2/15/01 9:44 AM PAGE 1 H
============================================================================ O
U
PAY PERIOD ENDING: 2/11/01 R
S
NAME NUMBER BADGE SHIFT REGULAR OVERTIME 1 OVERTIME 2
----------------- --------- ----- ----- ---------- ---------- ---------- S
ADAMS, LINDA 000000121 0005 01 40:00 0:00 0:00 U
ELLIS, STEVEN 000000176 0015 02 40:00 0:00 0:00 M
JOHNSON, JAMES 000000160 0017 03 40:00 1:00 0:00 M
JONES, CAROL 000000207 0006 02 40:00 0:00 0:00 A
MARTIN, LARRY 000000213 0011 01 * 32:00 0:00 0:00 R
SMITH, ROBERT 000000189 0032 01 40:00 2:00 0:00 Y
TAYLOR, ROBERT 000000151 0023 03 40:00 0:00 0:00
THOMAS, KATHERI 000000100 0002 01 32:00 0:00 0:00
TUCKER, DONALD 000000202 0016 03 40:00 0:00 0:00 2
WEBSTER, BETTY 000000175 0003 01 40:00 0:00 0:00 /
WILLIAMS, MARTI 000000110 0007 01 * 36:00 0:00 0:00 1
WILSON, MELVIN 000000182 0012 02 40:00 0:00 0:00 5
/
REGULAR OVERTIME 1 OVERTIME 2 0
---------- ---------- ---------- 1
PAY PERIOD TOTAL HOURS: * 460:00 3:00 0:00
PAY PERIOD STATUS: COMPLETE
9
TOTAL EMPLOYEES: 12/12 :
4
SYSTEM INFORMATION: 4
LAST CHANGE: 2/10/97 12:07 PM
A
SOFTWARE REVISION: TSW 0010 - VERSION 3.00 M
.................. END HOURS SUMMARY:ALL EMPLOYEES.............................
38
Reports
Page 39

7.3 Employee Profile Report
This report lists all employees who have been programmed into the Time
Q with their assigned employee number, badge number and shift number.
EMP PROFILES : ALL EMPLOYEES 2/15/01 9:30 AM PAGE 1 E
============================================================================ M
P
EMPLOYEES:
P
NAME NUMBER BADGE SHIFT R
----------------- --------- ----- ----- O
ADAMS, LINDA 000000121 0005 01 F
ELLIS, STEVEN 000000176 0015 02 I
JOHNSON, JAMES 000000160 0017 03 L
JONES, CAROL 000000207 0006 02 E
MARTIN, LARRY 000000213 0011 01 S
SMITH, ROBERT 000000189 0032 01
TAYLOR, ROBERT 000000151 0023 03
THOMAS, KATHERI 000000100 0002 01
TUCKER, DONALD 000000202 0016 03 2
WEBSTER, BETTY 000000175 0003 01 /
WILLIAMS, MARTI 000000110 0007 01 1
WILSON, MELVIN 000000182 0012 02 5
/
TOTAL EMPLOYEES: 12/12 0
1
SYSTEM INFORMATION:
LAST CHANGE: 2/10/97 12:07 PM
SOFTWARE REVISION: TSW 0010 - VERSION 3.00 9
:
3
0
A
M
.................. END EMP PROFILES:ALL EMPLOYEES..............................
Reports
39
Page 40

7.4 Clock Rules Report
CLOCK RULES - This report lists ALL of the programmed setup, shift,
and lunch rules.
CLOCK RULES 2/15/01 12:24 PM PAGE 1 C
============================================================================ L
O
CLOCK RULES: C
K
MAX TIME ON CLOCK 12:00 HOURS
PAY INTERVAL-ROUND 01 MINUTES R
PAY PERIOD WEEKLY U
NEXT PAY PERIOD START DATE 2/19/01 L
DAY CHANGE TIME 12:00 AM E
FIRST DAILY OVERTIME AFTER 24:00 HOURS S
FIRST WEEKLY OVERTIME AFTER 40:00 HOURS
SECOND DAILY OVERTIME AFTER 24:00 HOURS
SECOND WEEKLY OVERTIME AFTER 168:00 HOURS
7TH DAY OVERTIME DISABLED
DST START DATE 4/01/01
DST END DATE 10/28/01 2
TIME Q PRINTER PARALLEL /
COM PORT BAUD RATE 9600 1
5
SUPERVISOR BADGES: /
NO SUPERVISOR BADGES ASSIGNED 0
1
SHIFT RULES:
SHIFT 1 SHIFT 2 SHIFT 3 1
---------------- ---------------- ---------------- 2
SHIFT RULES DISABLED DISABLED DISABLED :
START TIME - - - 2
ROUND - - - 4
GRACE - - DOCK - - - P
STOP TIME - - - M
ROUND - - GRACE - - DOCK - - LUNCH RULES DISABLED DISABLED DISABLED
START TIME - - STOP TIME - - DURATION - - AUTO AFTER - - -
------------------------------------------------------------------------CLOCK RULES 2/15/01 12:24 PM PAGE 2 C
============================================================================ L
O
SHIFT RULES:(CONT.) C
K
SHIFT 4 SHIFT 5 SHIFT 6
---------------- ---------------- ---------------- R
SHIFT RULES DISABLED DISABLED DISABLED U
LUNCH RULES DISABLED DISABLED DISABLED L
------------------------------------------------------------------------- E
S
SHIFT 7 SHIFT 8 SHIFT 9
---------------- ---------------- --------------- SHIFT RULES DISABLED DISABLED DISABLED
LUNCH RULES DISABLED DISABLED DISABLED 2
------------------------------------------------------------------------- /
1
5
SHIFT 10 SHIFT 11 SHIFT 12 /
---------------- ---------------- ---------------- 0
SHIFT RULES DISABLED DISABLED DISABLED 1
LUNCH RULES DISABLED DISABLED DISABLED
------------------------------------------------------------------------ 1
SYSTEM INFORMATION: 2
LAST CHANGE: 2/13/97 12:11 PM :
2
SOFTWARE REVISION: TSW 0010 - VERSION 3.00 4
P
M
.................. END CLOCK RULES.............................................
40 Reports
Page 41

7.5 Who's In, Who's Out Report
WHO’S IN, WHO’S OUT - This report lists all employees or a specific
shift of names by who is punched IN or punched OUT.
IN/OUT : SELECTED EMPLOYEES 2/15/01 8:22 AM PAGE 1 I
============================================================================ N
/
SHIFT 1: O
U
IN OUT T
------------------------ ----------------------- ADAMS, LINDA THOMAS, KATHERI
MARTIN, LARRY WEBSTER, BETTY
SMITH, ROBERT
WILLIAMS, MARTI
SHIFT 2:
IN OUT
------------------------ ----------------------- ELLIS, STEVEN JONES, CAROL 2
WILSON, MELVIN /
SHIFT 3: 1
5
IN OUT /
------------------------ ------------------------ 0
JOHNSON, JAMES 1
TAYLOR, ROBERT
TUCKER, DONALD
TOTAL EMPLOYEES: 12/12
5 IN 8
7 OUT :
2
2
A
M
.................. END IN/OUT:SELECTED EMPLOYEES...............................
Reports
41
Page 42

8. Edit Time Totals
Time TOTALS may be edited to correct errors caused by missed
punches or other employee punching errors. Time totals may be edited for
either regular hours, overtime 1 or overtime 2 hours, and for either the
previous or current pay period.
PROGRAM FUNCTION DISPLAY SHOWS
1. Swipe Supervisor Badge MAIN MENU
REPORTS
2. Scroll Up/Down to MAIN MENU
Edit Time Totals
3. Press ENTER select an employee
Jones A.B.
4. Use the menu key to select Select an Employee
an employee SMITH B.C.
5. Press ENTER current regular hrs
=±000:00
(example)
(example)
6. Press ENTER enter time adjust
=±000:00
7. Use menu keys and LEFT/ enter time adjust
RIGHT arrow keys to edit =+002:00
time totals
8. Press ENTER +002:00
enter to confirm
9. Press ENTER Current regular hrs
=±002:00
10. Scroll menu to make changes
to current overtime 1, current
overtime 2, previous regular
hours, previous overtime1,
previous overtime 2, if desired;
and repeat steps 5-9 above.
42
Edit Time Totals
Page 43

9. Test Features
PROGRAM FUNCTION DISPLAY SHOWS
1. Swipe Supervisor Badge MAIN MENU
Reports
2. Scroll Up/Down to Main Menu
Test Features
3. Press ENTER Select a Task
Badge Reader Test
4. Scroll menu to select a test
5. Press ENTER and proceed
as instructed.
TEST DESCRIPTIONS
Badge Reader: This test will display the badge number that is swiped
through the slot. This test may help identify a defective
badge.
Display: The display will scroll through the various characters.
Keyboard: The display will show which key is being pushed.
Press clear twice to end the test.
Audio: The internal speaker will beep at graduated
frequencies for this test.
Printer: Outputs a patterned character string to the printer.
Test Features
43
Page 44

10. Troubleshooting/Error Messages
These are error messages you may encounter while using the clock.
BADGE OUT OF RANGE
The badge number is not 1-9999 or one of the three special supervisor
badges.
BADGE READER TEST
INVALID DATA
Errant badge read during badge reader test.
CAN’T COMPLETE TASK
1. Response when database failed to remove all punches.
2. Record verification prior to deleting an employee failed. Simply
try again.
3. Database access problem.
4. An attempt was made to modify a setting to an invalid value.
CAN’T COMPLETE TASK
BADGE NOT FOUND
The badge number is not entered on the clock.
CAN’T COMPLETE TASK
BADGE NOT ON FILE
The badge number is not entered on the clock as either an employee, or a
supervisor.
CAN’T COMPLETE TASK
DATE OUT OF RANGE
The pay period start date must be beyond the current date and time set on
the clock and it must be within one pay period’s duration from the current
time and date.
CAN’T COMPLETE TASK
EMPLOYEE FOUND
Attempting to add a supervisor or employee badge to the clock that is
already programmed as an employee’s badge.
44 Troub leshooting/Error Messages
Page 45

CAN’T COMPLETE TASK
INVALID BADGE
Attempting to add/delete a supervisor or employee badge that is outside of
the acceptable badge number range (1-9999).
CAN’T COMPLETE TASK
INVALID DATE
1. An invalid date was entered by the users. An example of an
invalid date is Feb. 30, 1997.
2. Whenmanuallyenteringdaylight savings time thresholds, the
dates must be beyond the current date and time and it must be
within 400 days of the current date and time.
CAN’T COMPLETE TASK
INVALID DAY
For monthly pay periods, the pay period start day must be between 1-28.
For semimonthly pay periods, the two pay period start days must be
between 1-28. The second day must be greater than the first.
CAN’T COMPLETE TASK
INVALID ELAPSED TIME
1. Max time on the clock, lunch after, and daily overtime thresholds
must be in the range of 0-5999 minutes.
2. Weekly overtime thresholds must be in the range of 0-29,999 minutes.
3. Edit time totals must be in the range of -29,999 to 29,999 minutes.
4. A shift round, grace or dock value is out of range.
5. A lunch duration is out of range.
CAN’T COMPLETE TASK
INVALID NAME
The employee’s name contains characters that are not capital letters,
spaces, periods or commas.
CAN’T COMPLETE TASK
INVALID NUMBER
Attempting to add an employee number to the clock that is outside of the
acceptable range (0-999,999,999).
T roubleshooting/Error Messages
45
Page 46

CAN’T COMPLETE TASK
INVALID SHIFT
Attempting to set a shift number that is outside of the acceptable range
(1-12).
CAN’T COMPLETE TASK
INVALID TIME
An invalid time of day was entered by the users. An example of an invalid
timeis25:00:00.
CAN’T COMPLETE TASK
MEMORY FULL
Employee cannot clock in/out. The memory is full. Reporting previous pay
period data will not correct the problem, because the old pay period is not
old enough to dump or is already empty.
CAN’T COMPLETE TASK
NO EMPLOYEES DEFINED
1. Edit employee, delete employee, or edit time totals selected when there
are no employees on clock.
2. Submitting a report for individual employees when there are no
employees on the clock.
CAN’T COMPLETE TASK
NO SUPERVISOR BADGES
Delete supervisor selected when there are no user-programmed supervisor
badges on the clock.
CAN’T COMPLETE TASK
REPORT IN PROGRESS
Attempted to change a setting on the clock while a report was in progress.
CAN’T COMPLETE TASK
SELECT_PRINTER_TYPE
Generating a report when printer type is none.
46 T roubleshooting/Error Messages
Page 47

CAN’T COMPLETE TASK
SUPERVISOR FOUND
Attempting to add a supervisor or employee badge to the clock that is
already programmed as a supervisor’s badge.
CAN’T COMPLETE TASK
TOO MANY WAITING
Attempted to submit a report when the report queue is full. Wait for some
of the reports to finish printing, then try again.
CAN’T COMPLETE TASK
TRY AGAIN PLEASE
Database access errors while attempting a transaction.
CRYSTAL/RTC TEST
FAIL:HANDSHAKE/INT
The real time clock and the crystal are tested by comparing them against
each other. This indicates a failure in the test.
DATA MAY BE CORRUPT
PRESS A KEY
This is caused by a power failure while writing to the database. Print all
reports if possible. Re-initialize the system if required.
DATABASE ACCESS ERROR
An internal database access error occurred.
LOCKED OUT
REPORT OLD DATA 1ST
Employee cannot clock in. The pay periods need to roll over first. Before
they can roll over, the data in the previous pay period must be reported.
MEMORY FULL
REPORT OLD DATA 1ST
Employee cannot clock in/out. Reporting previous pay period will allow the
clock to dump that data and free up memory.
T roubleshooting/Error Messages
47
Page 48

PC COMM ERROR
DEVICE=SERIAL
An error occurred when passing information between the PC and the
Time Q.
RAM MEMORY TEST
FAIL:DATA
A data error occurred during the RAM test.
ROM MEMORY TEST
FAIL:DATA
A data error occurred during the EPROM test.
REPORT OUTPUT ERROR
DEVICE= PARALLEL
An error was detected while printing to the parallel port.
REPORT OUTPUT ERROR
DEVICE= SERIAL
An error was detected while printing to the serial port.
REPORT TIMEOUT ERROR
No activity was detected on the port for an extended period of time.
TRY AGAIN PLEASE
Errant badge read.
TRY AGAIN PLEASE
FAIL:DATA
Database access failure when attempting to validate a badge.
UNRECOVERABLE ERROR
PRESS A KEY
Catastrophic database error notification. The system will perform a system
initialization.
48
T roubleshooting/Error Messages
Page 49

Appendix A
Definitions...
grouped according to MAIN MENU selections
REPORTS:
Hours Summary:
Report listing hours worked by regular and overtime hours. This may be for
an individual employee, a specific shift, or for all employees; for current or
previous pay period. If the employee has missed a punch, the HOURS
SUMMARYTOTAL will be noted with an *.
Time Cards:
This report is a listing by employee of all IN-OUT punches along with
hours worked totals. This may be for the current or previous pay period.
The report may be for one employee, employees on a specific shift, or for
all employees.
Who's In, Who's Out:
Report listing all employees or a specific shift of names by who is punched
IN or punched OUT.
Employee Profiles:
Report listing all employees who have been programmed into the TimeQ
with their employee number,badge number and shift number.
Clock Rules:
Report listing all of the programmed setup, shift, and lunch rules.
EMPLOYEE:
Employee name:
The employee name is associated with a particular badge number.This
entry is accomplished by using the up and down arrow key to scroll through
the alphabet. The employee name will show up in reports and on the Time
Q display when the employee punches in or out. Reports will be sorted
alphabetically. Enter last names first if reports are required to be sorted by
last name.
49Appendix
Page 50

Employee number:
The number to be associated with an employee. This is typically a Social
Security number.
Badge number:
The badge number is the number from the magnetic stripe badge assigned
to the employee. It is the key to all employee information. The Time Q
stores all punch information by badge number. This number must be unique
and between 1 and 9999. If an employee's badge is lost or no longer
functions properly, simply assign the employee to a new badge number. No
data will be lost.
Shift number:
The shift number (1 - 12) defines which set of rules are to be
associated with a particular employee.
TIME TOTALS:
Regular Changes:
The regular time which has been added or subtracted from the selected
employee's TIMECARD and HOURS SUMMARY reports. Time totals
can be edited for either the previous or current pay periods.
Overtime Changes:
The overtime which has been added or subtracted from the selected
employee's TIMECARD and HOURS SUMMARY reports. Overtime
changes can be made to Overtime 1 or Overtime 2 categories. Overtime
totals can be edited for either the previous or current pay periods.
SHIFT RULES:
Shift Start Time:
The time of day employees are to begin work.
Shift Stop Time:
The time of day employees can stop working.
50
Appendix
Page 51

Shift Round:
The minutes before the Start Time or after the Stop Time during which
employee punches will be treated as if they had occurred exactly on the
Start and Stop Times.
Shift Grace:
The minutes after the Start Time or before the Stop Time during which
employee punches will be treated as if they had occurred exactly on the
Start and Stop Times.
Shift Dock:
The minimum minutes the employee will lose from time worked totals if
punching in after the Start Time (plus grace) or before the Stop Time
(minus grace).
Note: The Shift Start Times, along with the Shift Round and Shift Grace,
define a period of time during which a in-punch will be used for time
worked totals as if the punch occurred exactly on the Start Time. Stop
Time affects calculated totals in the same fashion, except that Shift Round
comes into effect after the Stop Time and Grace allows for early
departure. Shift Dock penalizes late punch-ins and early punch-outs by
calculating time worked totals as if the Start and Stop were offset by the
number of minutes defined by the Dock.
Lunch Window Begin:
The earliest time of day at which an employee can punch out for lunch.
Lunch Window End:
The latest time of day at which an employee should punch back in from
lunch.
Lunch Duration:
The number of minutes for lunch which will be subtracted from time
worked totals.
Auto Lunch After:
After this number of hours and minutes following an in-punch, the Time Q
will assume an employee has taken lunch. The Lunch Duration will then be
subtracted from the time worked totals.
51Appendix
Page 52

Note: The Lunch Window Begin and Lunch Window End define a period
of time during which an out-punch for lunch and then an in-punch back to
work should occur. Shift Rules (Start and Stop Times, etc.) do not have to
be enabled for lunch to be programmed.
SUPERVISOR:
Supervisor Badge:
A Supervisor Badge is one that is programmed to access the main menu of
the Time Q. Supervisor badges are usually kept by those in managerial
positions. There are two permanent Supervisor badges shipped with each
Time Q. Other badges may be programmed as Supervisor badges provided
they are not already assigned to employees. It is not necessary to purchase
additional Supervisor badges. These badges can later be deleted from the
Time Q.
TIME AND DATE:
Time Format:
The Time of Day Format selection allows the time to be kept based on a
12 hour format or a 24 hour format.
Date Format:
The date format may be edited to display the month, day and year in the
order which you prefer.
Time Totals Format:
This selection allows time totals to be reported to the minute or to
hundredths. The default is set to minutes.
SETUP:
Max Time on Clock:
The Time Q assumes that an employee has missed a punch after the
maximum time on the clock has been exceeded. This allows the clock to
gain some control over missed punches. The Time Q will punch the
employee out with zero accumulated time for that punch pair. It will note
the missed punch on the time card and hour summary report. The default
value for “Max Time on Clock” is twelve hours.
52
Appendix
Page 53

Pay Interval Round:
This function causes the time worked totals to be calculated as if the punch
occurred at one of the hour divisions chosen.
Pay Period Length:
The length of time during which time worked totals will accumulate for a
timecard. Generally,how often an employee will get paid.
Pay Period Start:
The date the NEXT pay period will start.
Day Change Offset:
By default, the day change time — the time a new day begins — is set at
midnight. Since the punch-in time determines to which day the subsequent
time worked totals will be added, it is sometimes helpful to move the day
change time forward or backward from midnight. The day change offset
feature allows the day change time to be easily changed from the midnight
default. The feature is used in the rare case of companies which have a
Shift Start Timenear midnight. If an employee then comes in late for that
shift, but prior to the day change time; the time worked will still be
accounted to the intended day.
Daily Overtime After:
The amount of time worked in a day,after which, overtime will begin to
accumulate. A second level of daily overtime is provided for those
situations in which hours accumulated in a day are treated differently than
the regular hours or those worked during the first daily overtime period. For
example, hours worked between 8-12 hours might be paid at time and a
half, but any hours worked over 12 would be paid at double time. NOTE:
the default setting of 24 hours effectively disables the daily overtime
features.
53Appendix
Page 54

Weekly Overtime After:
The amount of time worked in a week, after which, overtime will begin to
accumulate. The “overtime” week starts at the beginning of a weekly pay
period, at the beginning and middle of a two week pay period. Weekly
overtime does not apply to semimonthly or monthly pay periods. The
default value for “First Weekly Overtime After” is 40 hours. The default
value for “Second Weekly Overtime After” is 168 hours. The second level
provides another tier of overtime accounting. For example, 40 hours or less
would be paid at the regular rate; 40-60 hours would be paid at time and a
half. Any hours worked over 60 would then be paid at a different rate,
possiblydoubletime.
7th Day Overtime:
When this feature is enabled, all hours worked on the seventh consecutive
worked day will be promoted to the next highest pay level (Overtime 1 or
Overtime 2), provided that the seven consecutive days start at the
beginning of the first or second week of the weekly or biweekly pay
period. This feature does not affect weekly overtime calculations and will
not override weekly overtime thresholds. The default setting for this
feature is disabled.
California Overtime:
To comply with California Overtime Labor Regulations, use the following
settings for Daily Overtime, Weekly Overtime, and 7th Day Overtime:
Daily Overtime1Threshold: 8 hours
Daily Overtime 2Threshold: 12 hours
Weekly Overtime 1 Threshold: 40Hours
Weekly Overtime 2 Threshold: 168hours (disabled)
7th Day Overtime: Enabled
Daylight Savings Time:
When this function is enabled, theTimeQ will automatically assign the first
Sunday inApril and the last Sunday in October as the beginning and ending
dates of daylight savings (current U.S. law). If necessary, the Daylight
Savings Start and End dates can be edited. The time change will occur at
2:00 a.m. Time worked totals will not automatically adjust for the loss or
addition of an hour, but timecards will indicate that there was a time
change.
54
Appendix
Page 55

Daylight Savings Start:
The date the Time Q will “spring” forward. This date can be edited if
necessary.
Daylight Savings End:
The date the Time Q will “fall” back. This date can be edited if necessary.
Setup Printer Port:
This function allows the user to set up the printer port on the Time Q.
Printed reports can be directed to either the parallel port (the large external
port on the right) or to the serial port (the internal modular connector
labeled RS-232). The default value is parallel. When the serial port is
selected, the baud rate must be entered. 8 bit words, no parity, and 1 stop
bit are assumed. This function applies only to the printer port on the Time
Q. It has nothing to do with your PC printer.
Comm Port Baud Rate:
The rate at which data will pass through the RS-232 serial port. This may
already be set if printed reports are directed through the port as mentioned
above. If a computer is connected to this port, the baud rate should match
the setting of the computer port. The default setting for the Time Q is 9600
baud. Use slower rates for longer distances.
Remove All Punches:
This function removes all employee punchinformationwhileleavingthe
Setup, Shift Rules and Employee Profiles at their current settings.
Re-Initialize System:
This function will clear all punches and employee profiles, and reset all
Setup and Shift Rules to their factory settings. The clock/calender will
default to 12:00 a.m. Jan. 01, 1996.
55Appendix
Page 56

Companion Products
Description/Illustration Part Number
80 Column 74-0110-000
Impact Dot Matrix Printer
ParallelCommunication
Battery Back-Up 74-0105-000
120VAC to 9VAC 56-0113-000
Power Supply
230VAC to 9AC 56-0116-000
Power Supply
European
240VAC to 9VAC 56-0117-000
Power Supply
British
230VAC to 9VAC 56-0118-000
Power Supply
Parallel Blades
56
Companion Products
Page 57

Description/Illustration Part Number
DB-9 RS-232 Host Cable Assembly
Includes DB-9 (RS-232/host) to RJ-11 female
adapter and “Standard” Modular Cable
length – 7 feet 25-0016-004
–50 feet 25-0116-008
DB-25 RS-232 Host Cable Assembly
Includes DB-25 (RS-232/host) to RJ-11
female adapter and “Standard” Modular Cable
length – 7 feet 25-0016-000
–50 feet 25-0016-007
Parallel Cable length – 10 feet 75-0163-000
40 Pocket Badge Rack (Plastic) 81-0117-000
(8-1/4" wide x 22-5/8" high)
2 - 12 Pocket Badge Racks (Plastic) 81-0116-003
(3-7/8" wide x 14" high)
Head Cleaning Badges
10 cleaning badges 14-0111-002
Extra Magnetic Identification Badges
50 badges encoded 51-100 14-0113-002
50 badges encoded 101-150 14-0113-003
Companion Products
57
Page 58

Index
A
add employee 12, 13, 17,34
Audio Test 12, 43
auto lunch after 14, 19, 33, 51
B
Badge Reader Test 12, 43, 44
C
Clock Rules Report
5, 12, 16, 18, 40,49
Com Port Baud Rate 15, 19, 28, 55
Companion Products 56, 57
D
Daily Overtime After 15, 19, 24, 53
date format 14, 52
Day Change Offset
15, 19, 24, 25, 26, 27, 28, 53
Day Change Time 19, 53
Daylight Savings 15, 19, 26, 27,54
Daylight Savings End
15, 26, 27,55
Daylight Savings Start 15, 26, 55
enabled/disabled 15, 26
delete employee 13, 35
Display Test 12, 43
E
edit employee 12, 13, 17, 34, 35
employee 49, 50
add/edit 12, 13, 17,34
badge 16, 34, 44, 45
badge number 34, 44, 50
delete 35
edit 35
name 34, 49
number 34, 50
punch in and out 17
shift number 35, 50
Employee Profiles Report
12, 16, 39, 49
error messages 44, 45, 47
F
factory settings 18
H
Hours Summary Report
5, 12, 38, 49, 50
K
Keyboard Test 12, 43
L
locked out 47
lunch duration 14, 19, 32, 33, 51
lunch rules.
lunch window begin 14, 19, 32, 51
lunch window end 14, 19, 32, 51
See also
shift lunch rules
M
Max Time on Clock 15, 19, 22, 52
memory full error message 46, 47
menu maps 12, 13, 14, 15
mounting the terminal 7,8
O
Overtime Rules 15, 24, 25, 26, 53
Daily Overtime After 15, 24, 53
Weekly Overtime After
15, 25, 26, 54
P
Pay Interval 22
Pay Interval Round 15, 19, 22
Pay Period Length 15, 19, 23, 53
Pay Period Start 15, 19, 23, 53
printer connections 9
printer port 19, 55
Printer Setup 15, 19, 28, 55
Printer Test 10, 12, 43
58
Index
Page 59

R
Re-initialize System 15, 17, 28, 55
Remove all Punches 15, 28, 55
reports 12, 16, 49
Clock Rules 5, 12, 16, 18, 40,49
Employee Profiles 12, 16, 39, 49
Hours Summary 5, 12, 38, 49, 50
Time Cards 12, 16, 36, 49, 50
Who's In, Who's Out 12, 16, 41, 49
S
Setup 12, 15, 53
Com Port Baud Rate 15, 28, 55
Daily Overtime After 15, 19, 24, 53
Day Change Offset
15, 19, 24, 25, 26, 27, 28, 53
Day Change Time 19, 53
Daylight Savings 15, 26, 27,55
Max Time on Clock 15, 19, 22, 52
Overtime Rules 15, 24, 25, 26, 53
Pay Interval Round 15, 19, 22
Pay Period Length 15, 19, 23, 53
Pay Period Start 15, 19, 23, 53
Printer 15, 19, 28, 55
Re-initialize System 15, 17, 28, 55
Remove all Punches 15, 28, 55
Weekly Overtime After
15, 19, 25, 26, 54
Setup, physical 6, 7,8
shift lunch rules 14, 33, 51
auto lunch after 14, 19, 33, 51
lunch duration 14, 19, 33, 51
lunch window begin 14, 19, 32, 51
lunch window end 14, 19, 32, 51
shift number 35
shift rules 12, 14, 29, 30, 31, 50
disabled 14, 29
enabled 14, 29
shift dock 19, 51
shift grace 19, 51
shift round 19
shift start dock 14, 31, 51
shift start grace 14, 30,51
shift start round 14, 30
shift start time 14, 19, 29, 50,51
shift stop dock 14, 31, 51
shift stop grace 14, 31, 51
shift stop round 14, 30
shift stop time 14, 19, 29
supervisor badge
12, 13, 19, 20, 46, 52
add 13, 20
delete 13, 46
T
test features 12, 43
Audio Test 12, 43
Badge Reader Test 12, 43, 44
Display Test 12, 43
Keyboard Test 12, 43
Printer Test 10, 12, 43
time and date 12, 14, 21, 52
date format 14, 52
date set 14, 21
time format 14, 52
time set 14, 21
time totals format 14, 52
Time Cards Report
12, 16, 36, 49, 50
time format 14, 52
W
Weekly Overtime After
15, 19, 25, 26, 54
Who's In, Who's Out Report
12, 16, 41, 49
Index
59
Page 60

5640 Departure Drive
Raleigh, NC 27616
Phone: 919.872.5800
IN USA 800.334.7190
Fax: 919.850.0720
Time Q™ is a registered trademark of Acroprint Time Recorder Co. The color
Green™ is a trademark of Acroprint Time Recorder Company as applied to job
time recorders, attendance systems, electronic time recorders, and attendance
recorders. IBM®is a registered trademark of International Business Machines.
Manual P/N 06-0260-000
 Loading...