

Page 1

Acroprint Time Recorder Company®
QuickBooks® Integration Instructions
for timeQplus Software
Publication: TQP-001
Date of Publication: May 18, 2011
Revision: A
Page 2

Introduction
QuickBooks Integration from timeQplus Software allows you to save valuable time by
limiting the amount of manual entry that occurs during payroll processing. With QuickBooks
Integration, you will be able to import your employee information from QuickBooks, export
the employee time data into QuickBooks, and add employees to QuickBooks from timeQplus
Software.
timeQplus QuickBooks Integration is compatible with QuickBooks Pro and Premier
2002 – 2011. QuickBooks Basic does not currently support payroll integration. The Company
File can reside either on the local machine or a shared location on the same network with a
mapped drive (timeQplus software must be able to browse the QB Company File from My
Computer). Both applications must be able to run from the same computer, as client, server
or standalone installation.
2
Page 3

Table of Contents
Introduction..................................................................................................................................... 2
Table of Contents........................................................................................................................... 3
Importing Employees with the timeQplus Setup Wizard............................................... 4
Importing Employees through timeQplus System Utilities.......................................... 8
Setting up QB for Employees to use time data................................................................... 13
Exporting from timeQplus into QuickBooks........................................................................ 17
Appendix........................................................................................................................................... 22
Conrming your QuickBooks Company File Location.......................................... 22
Obtaining the QuickBooks Payroll Item Codes....................................................... 25
Allowing timeQplus to always access QuickBooks................................................ 27
Troubleshooting............................................................................................................................. 29
3
Page 4

Importing from QuickBooks into timeQplus
There are two methods for importing your data from QuickBooks into timeQplus. If you are
just setting up the system, it is best to follow the rst method of importing during the setup
wizard. If you have been using the system and would like to interface with QuickBooks,
follow the second method for importing. This step IS NOT a requirement for exporting
successfully to QuickBooks.
While QuickBooks accepts employees’ middle names spelled out, or as an initial with or
without punctuation, timeQplus software accepts employees’ names as the following:
First Name, Middle Initial (with no punctuation) and Last Name. To ensure a successful
import please review the middle name to conrm that it is an initial without punctuation.
Importing Employees with the timeQplus Setup Wizard
After completing the timeQplus Setup Wizard, you will be asked how you would like to enter
your employees. Select the second option for “Import Employees from Intuit QuickBooks” as
shown in Figure 1-1. You must be logged into QuickBooks as a single user with administrator
privileges. The company le should be open with all work windows closed. Click Next and
then
Finish on the next screen.
Figure 1-1
4
Page 5

Select your Company File as shown in Figure 1-2; refer to the Appendix if you have diculty
locating this le.
Figure 1-2
Highlight the Company File; in this case it is Acroprint Time Recorder Company. Click
“Open” to begin the import. QuickBooks will prompt you with a security warning as shown
in Figure 1-3. If you select
le is open, then QuickBooks will always have to be open in order to successfully export.
Selecting Yes, always; allow access even if QuickBooks is not running will allow you to export
to QuickBooks without QuickBooks being open.
Yes, prompt each time or Yes, whenever this QuickBooks company
5
Page 6

Figure 1-3
Selecting Yes, always; allow access even if QuickBooks is not running will display the
message shown in Figure 1-4.
Figure 1-4
6
Page 7

Select Yes in Figure 1-4. Figure 1-5 will appear, select Done then Figure 1-6 will display,
click OK. Your importing setup is complete.
Figure 1-5
Figure 1-6
7
Page 8
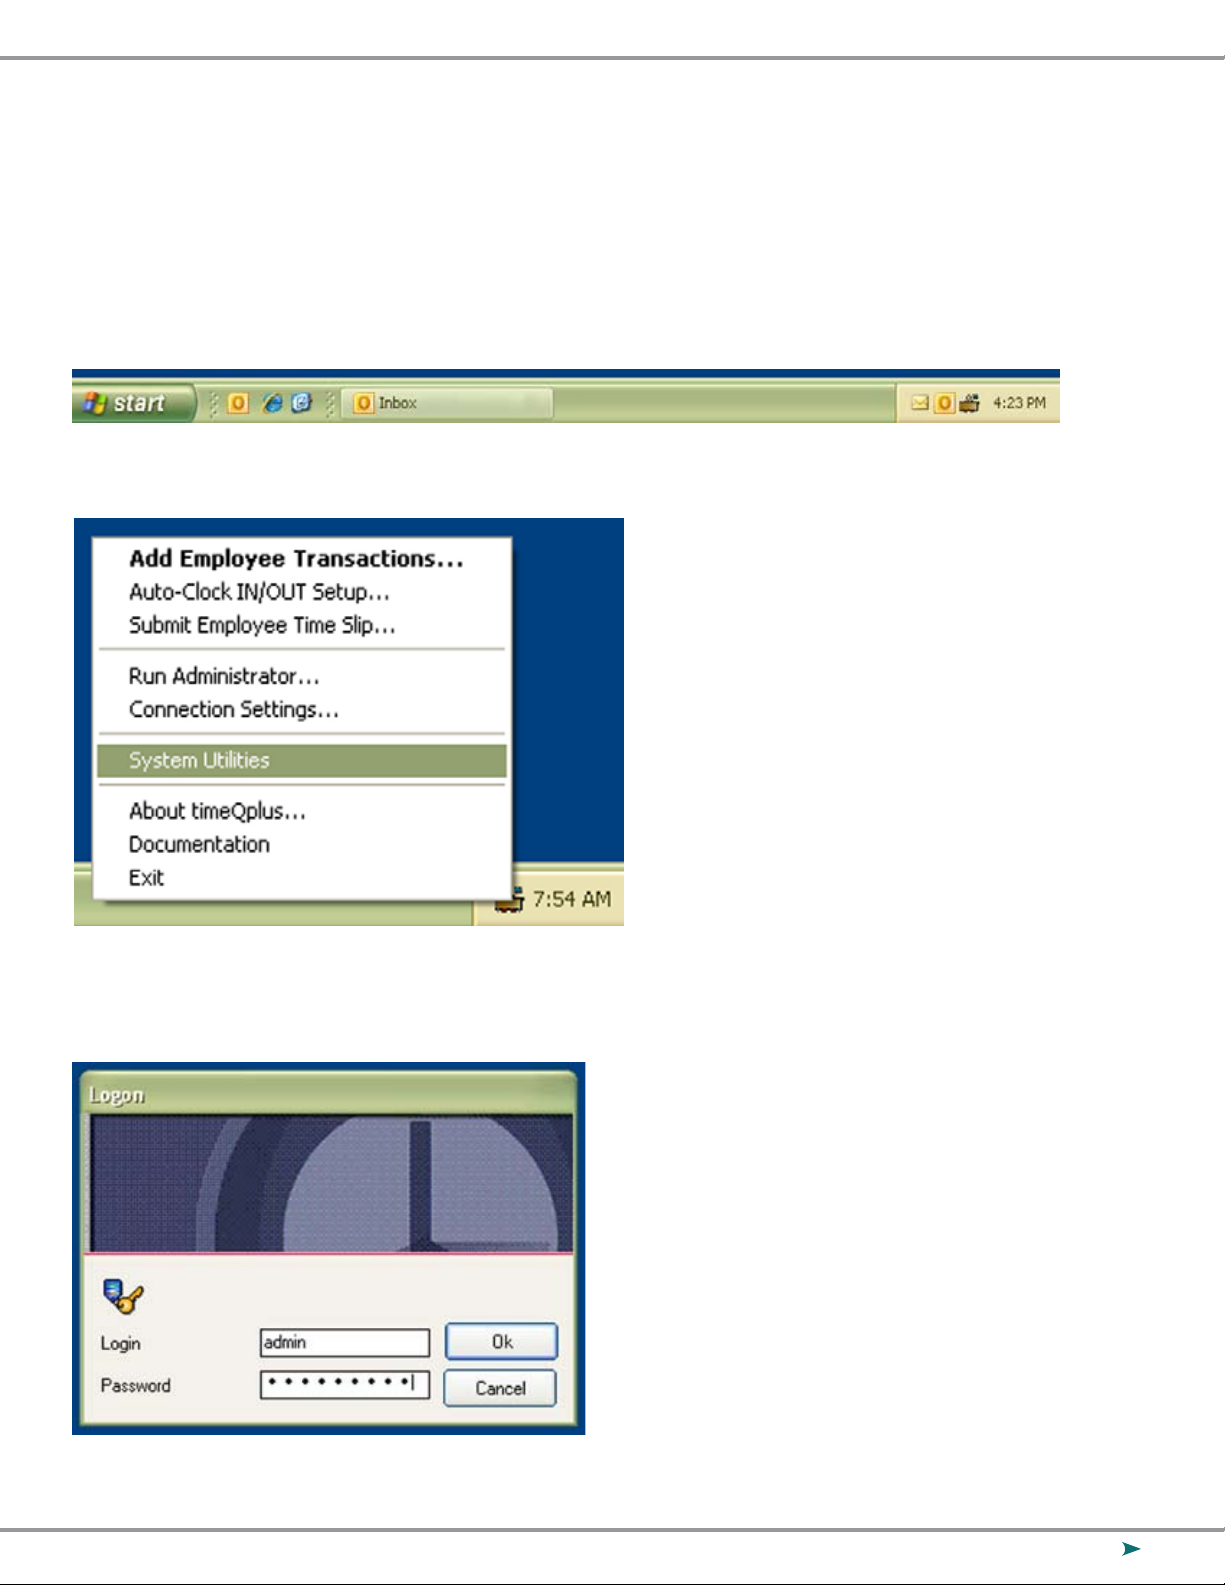
Importing Employees through timeQplus System Utilities
Right Click on the System Tray Icon for timeQplus (as shown in Figure 2-1) and select
System Utilities (as shown in Figure 2-2).
Figure 2-1
Figure 2-2
Enter your Login and Password (as shown in Figure 2-3).
Figure 2-3
8
Page 9
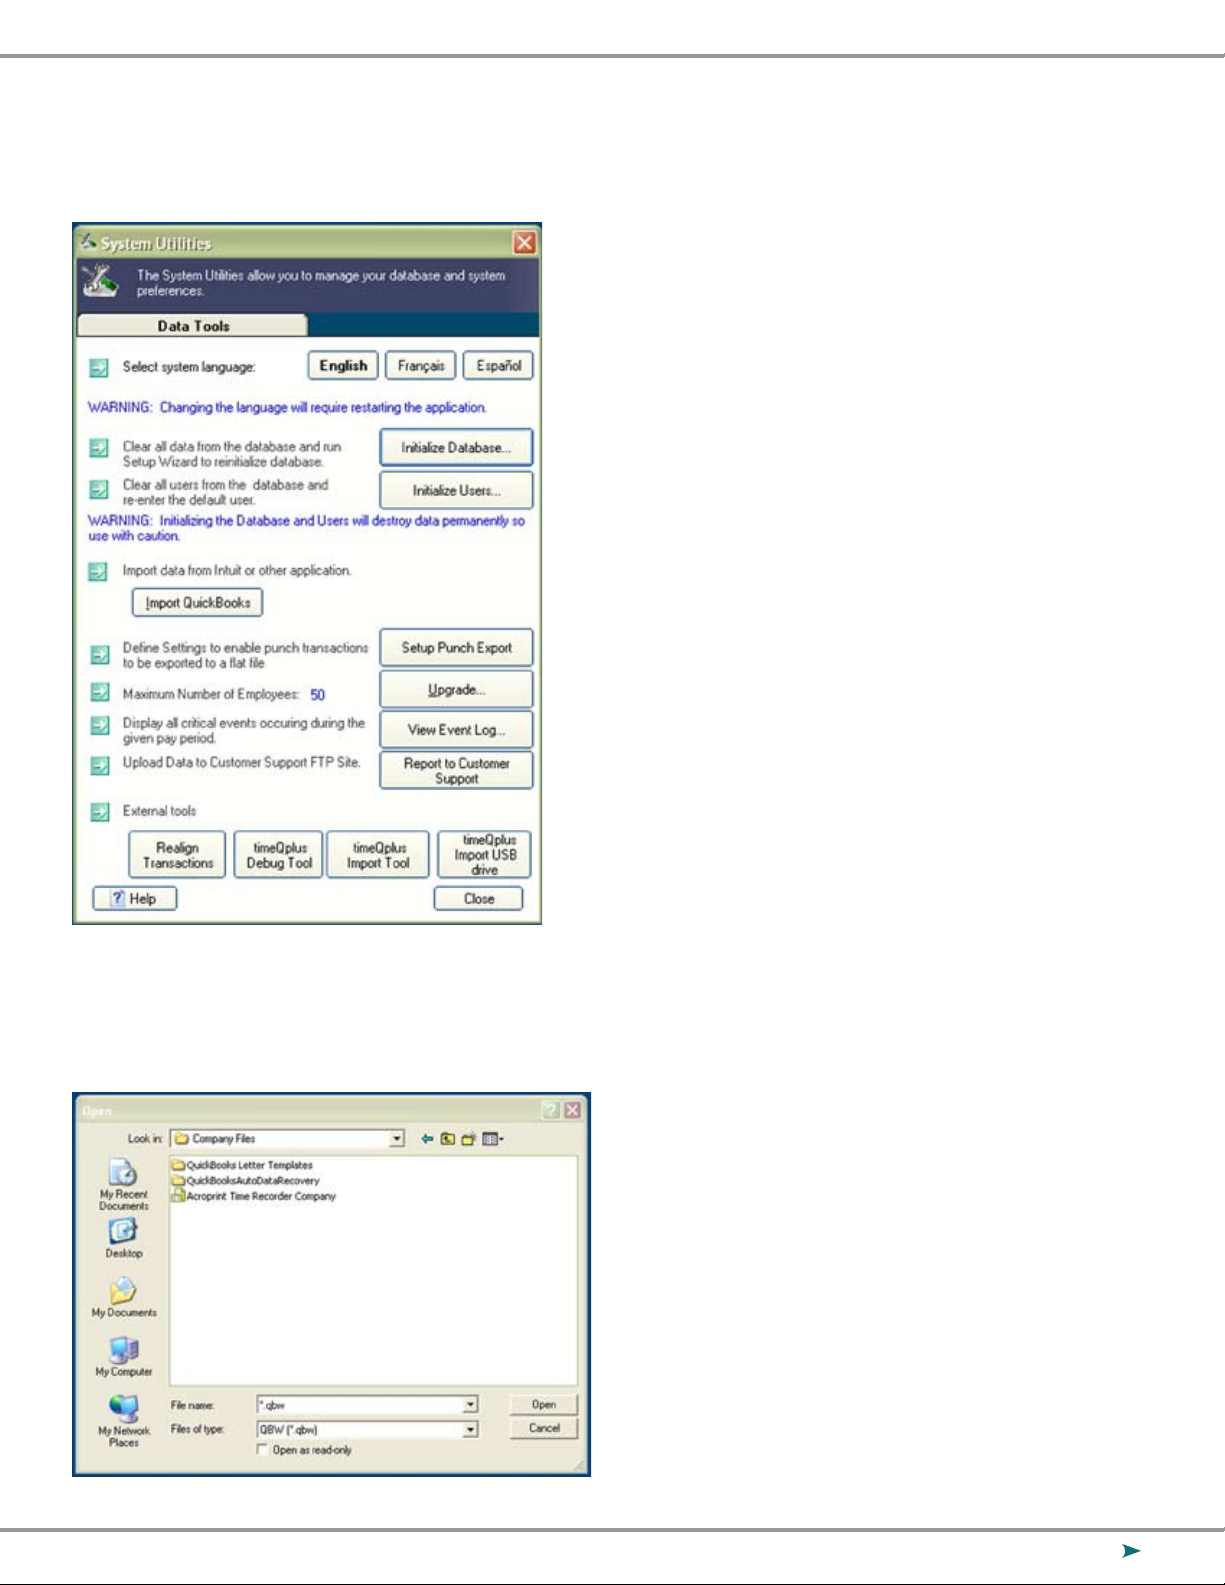
In the System Utilities window (Figure 2-4) click the Import QuickBooks button.
Figure 2-4
Select your Company File as shown in Figure 2-5; refer to the Appendix if you have
diculty locating this le.
Figure 2-5
9
Page 10

Click “Open” to begin the import. QuickBooks will prompt you with a security warning
as shown in Figure 2-6. You must select one of the Yes options in order to proceed;
selecting Yes, always; allow access even if QuickBooks is not running will allow you to
export to QuickBooks without QuickBooks being open.
Figure 2-6
10
Page 11

Selecting Yes, always; allow access even if QuickBooks is not running will display the
message shown in Figure 2-7.
Figure 2-7
Select
Figure 2-8
Yes to continue and Figure 2-8 will appear.
11
Page 12

Select Done then Figure 2-9 will appear.
Figure 2-9
12
Page 13

Setting up QuickBooks for Employees to use time data
In order for QuickBooks to accept time data for payroll, you must enable Time Tracking.
Click on Edit and select Preferences as shown in Figure 3-1.
Figure 3-1
In the Preferences window (Figure 3-2), select Time & Expenses and go to the Company
Preferences tab. Click Yes for the Question “Do You Track Time?” Enter the appropriate
day for the rst day of your work week.
Figure 3-2
13
Page 14

Now you will need to set the Employee Defaults to use time data to create paychecks.
This will ensure that all new employees will have this feature enabled automatically.
Select Payroll & Employees as shown in Figure 3-3.
Figure 3-3
On the Company Preferences tab, click Employee Defaults.
Figure 3-4
Place a check in the “Use time data to create paychecks” checkbox as shown in Figure 3-4.
14
Page 15

Click OK to close the Employee Defaults window.
Click OK to close the Preferences window.
You will now need to change all of your existing employees to use time data as well.
Select Employees and then Employee Center (Figure 3-5). It will then take you to a list
of your Employees which is seen in Figure 3-6.
Figure 3-5
Figure 3-6
Double click on the employee and an Edit Employee screen will appear, which is Figure 3-7.
15
Page 16

Figure 3-7
Choose Payroll and Compensation Info from the Change tabs: drop down list, which will
then give you Figure 3-8.
Figure 3-8
Place a check in the “Use time data to create paychecks” checkbox as shown in Figure 3-8.
Click OK to go back to the Employee List and perform this for each employee on the list.
16
Page 17

Exporting from timeQplus into QuickBooks
After you have completed your rst pay period, you will be able to export your employee
information and employee time data into QuickBooks Pro or Premier. With timeQplus
Administrator open, click on Export on the left hand menu.
Using Figure 4-1 as an example set the Pay Periods drop down to the Previous pay period.
Select the employees you want to export, either All Employees, Individual Employee(s) or
an Individual Shift. Set the Output Format to QuickBooks Integration. Click Setup to begin
the QuickBooks Integration setup (make sure the codes are setup the same in timeQplus
and QuickBooks).
Figure 4-1
17
Page 18

The Setup screen is seen in Figure 4-2.
Figure 4-2
1) Enter the Payroll Item Codes for timeQplus. It is recommended to have QuickBooks
open at this time and copy and paste from QuickBooks into the setup screen.
If there is no corresponding entry in QuickBooks, be sure to clear the entry elds
in timeQplus’s QuickBooks Integration setup screen. It is necessary to make sure
that all elds are identical in QuickBooks and timeQplus.
2) Press Select to choose your QuickBooks Company File. Once the folder is located,
highlight the le and then select open. Click Save to save your QuickBooks
Integration settings. See Figure 4-3 for an example. If you need any additional
help in getting this le and/or getting the Payroll Item Codes please refer to the
Appendix or QuickBooks literature.
18
Page 19

Figure 4-3
You will then be brought back to Figure 4-4. Click Export.
Figure 4-4
QuickBooks may prompt you with a security warning as shown in Figure 4-5. If you select
Yes, prompt each time or Yes, whenever this QuickBooks company le is open, then QuickBooks
will always have to be open in order to successfully export. Selecting Yes, always; allow access
even if QuickBooks is not running will allow you to export to QuickBooks without QuickBooks
being open.
19
Page 20

Figure 4-5
Selecting Yes, always; allow access even if QuickBooks is not running will display the message
shown in Figure 4-6.
Figure 4-6
Select Yes to continue and Figure 4-7 will appear.
20
Page 21

Figure 4-7
An export progress monitor will display, advising of successful export upon completion.
Hours worked will now show in Employee’s Weekly Timecard in QuickBooks. Individual
employee hours may be veried in QuickBooks by selecting Employees then Enter Time
and nally Use Weekly Timesheet.
21
Page 22

Appendix
Conrming your QuickBooks Company File Location (2 options)
Option 1
Click File – Open Previous Company
Figure A-1
The top of the list is the full address of where the company le is located.
22
Page 23

Option 2
Click File – Open or Restore Company
Figure A-2
In Figure A-3 you can see that our test le is named
If you click the down arrow next to QuickBooks Pro in the Look In: drop down menu, you can
see the entire le path of the QuickBooks Company File. Looking at Figure A-4 will show you
that our company le is located at C:\QuickBooks\Company Files. Be sure to write down the
le path where your QuickBooks Company le is located.
Acroprint Time Recorder Company.qbw.
23
Page 24

Figure A-3
Figure A-4
24
Page 25

Obtaining the QuickBooks Payroll Item Codes
timeQplus has payroll item codes for each of the following categories
(as you can see in Figure B-1):
Regular Pay Code Holiday Pay Code
Overtime Level 1 Pay Code Sick Pay Code
Overtime Level 2 Pay Code Other Pay Code
Vacation Pay Code
Figure B-1
To locate Payroll Item Codes in QuickBooks, follow these instructions:
Select Edit, and then Preferences, as you see in Figure B-2.
Figure B-2
25
Page 26

Figure B-3
Choose Payroll & Employees and select the Company Preferences tab. You will then select
the Employee Defaults button.
In Figure B-4, you will see under the Earnings section, there is a drop down option that will
allow you to add, delete or edit Payroll Item Code names.
Figure B-4
26
Page 27

Each of the pay categories in timeQplus has a Payroll Item Code and they must be the same
in QuickBooks. Print out the screen or write down these Payroll Item Codes to enter it into
timeQplus or QuickBooks. The Payroll Item Codes are case-sensitive.
If there are further questions regarding this process, please consult your QuickBooks documentation for instructions on how to add, delete and edit them.
Allowing timeQplus to always access QuickBooks
In order for timeQplus to access QuickBooks without QuickBooks being open, you must
give timeQplus Permission to always access QuickBooks. Click Edit – Preferences as shown
in Figure C-1.
Figure C-1
Click on Integrated Applications and go to the Company Preferences tab as shown in Figure
C-2. Be sure that neither of the check boxes on this screen is checked. timeQplus should
have a check in the Allow Access column. Highlight timeQplus and select Properties.
27
Page 28

Figure C-2
Check the “Allow this application to access this company le” checkbox and the
“Allow this application to login automatically” checkbox as shown in Figure C-3.
Figure C-3
Click OK to close the Properties window. Click OK to close the Preferences window.
You are no longer required to be logged into QuickBooks to perform the timeQplus
Integration.
28
Page 29

Troubleshooting
Error Solution
“The Company File couldn’t be found or
QuickBooks will not allow timeQplus to
access File. You must launch QuickBooks
and then return to timeQplus and retry the
export”
“The following employees were found in
timeQplus but were not Found in Quick
Books.”
-
Be sure timeQplus is accessing the correct Company
File and that QuickBooks is allowing les to access
it. timeQplus does not allow the le name to contain
commas. If your Company File contains commas or
special characters, please remove them. Check that
QuickBooks is open as an Admin/Single User with all
other work windows closed.
If you manually entered the Employee Names,
make sure all of your names are spelled and
capitalized exactly as they are in QuickBooks
including Middle Initials. QuickBooks accepts
employees’ middle names spelled out, or as
an initial with or without punctuation, while
timeQplus only allows for one (1) initial with no
punctuation. John A. Smith is not the same as
John A Smith.
The time exported from timeQplus does
not match the time that shows up in
QuickBooks.
Edited totals are not showing up correctly
in QuickBooks.
Verify the time totals format in timeQplus. You
may have timeQplus set in Hundredths while
QuickBooks displays in hours and minutes.
Verify the pay cycles have the same start and/or
end dates in both applications.
If the total number of hours in one edit is greater
than 24, the hours will not show up correctly. Large
edits should be done on a per day basis within the
punch editor. Editing of totals should account for
small blocks of time added or subtracted at the end
of the week.
29
Page 30

Acroprint Time Recorder Company
5640 Departure Drive I Raleigh, NC 27616
In USA: 919.872.5800 I Toll Free: 800.334.7190
Email: supportdept@acroprint.com I Fax: 919.872.5967
www.acroprint.com
 Loading...