

Page 1

ES1000
USER’S MANUAL
Page 2

WARNING
This equipment has been tested and found to comply with the limits for a Class A digital
device, pursuant to Part 15 of FCC Rules. These limits are designed to provide reasonable
protection against harmful interference when the equipment is operated in a commercial
environment. This equipment generates, uses and can radiate radio frequency energy and, if
not installed and used in accordance with the instruction manual, may cause harmful
interference to radio communications. Operation of this equipment in a residential area is
likely to cause harmful interference in which case the user will be required to correct the
interference at his or her own expense.
Caution: Changes or modifications not expressly approved by the party responsible for
compliance could void the user’s authority to operate the equipment.
THIS DIGITAL APPARATUS DOES NOT EXCEED THE CLASS A LIMITS FOR RADIO
NOISE EMISSIONS FROM DIGITAL APPARATUS AS SET OUT IN THE RADIO
INTERFERENCE REGULATIONS OF THE CANADIAN DEPARTMENT OF
COMMUNICATIONS.
LE PRÉSENT APPAREIL NUMÉRIQUE NÉMET PAS DE BRUITS
RADIOÉLECTRIQUES DÉPASSANT LES LIMITES APPLICABLES AUX APPAREILS
NUMÉRIQUES DE CLASSE A PRESCRITES DANS LE RÈGLEMENT SUR LE
BROUILLAGE RADIOÉLECTRIQUE ÉDICTÉ PAR LE MINISTÈRE DES
COMMUNICATIONS DU CANADA.
Information contained in this manual is company private to Acroprint Time Recorder Co., and shall
not be modified, used, copied, reproduced or disclosed in whole or in part without the written
consent of Acroprint.
Contents herein are current as of the date of publication. Acroprint reserves the right to change the
contents without prior notice.
This manual has been carefully prepared to cover all aspects of this unit. However, if any
explanations are inadequate, unclear, or difficult to understand, please contact Acroprint.
We recommend that you carefully read this manual to maximize the use of this unit.
© 2008 Acroprint Time Recorder Co. All Rights Reserved.
Page 3

Table of Contents
Alert Definitions ........................................................................................ iii
Precautions ............................................................................................... iii
GETTING STARTED .............................................................................. 1
Introduction ............................................................................................... 1
Features ................................................................................................... 1
Package Contents .................................................................................... 2
Ribbon Installation .................................................................................... 3
Power the ES1000 .................................................................................... 6
Atomic Synchronization ............................................................................ 7
PROGRAM THE ES1000 ...................................................................... 8
Front Cover Removal ............................................................................... 8
Programming Method ............................................................................... 8
Front Cover Installation ............................................................................ 9
PROGRAM SETTINGS ........................................................................... 10
Reports ..................................................................................................... 10
Timecard Maintenance (Transferring and Resetting) ............................... 10
Time Zone ................................................................................................. 10
Daylight Saving Time ................................................................................ 11
Hour Display Format ................................................................................. 11
Hour Print Format ..................................................................................... 11
Day Print Format ...................................................................................... 11
Language .................................................................................................. 11
Date and Time .......................................................................................... 12
Signals (Bells and Horns) ......................................................................... 12
Enable Override Switch ............................................................................ 16
Enable Transfer Switch ............................................................................ 16
Pay Period Rules ...................................................................................... 16
Pay Period Type/Start ........................................................................... 16
Overtime ................................................................................................ 17
Day Advance Time ................................................................................ 17
Minute Print Format ............................................................................... 17
Ribbon Color Change ............................................................................ 18
Maximum Time on the Clock ................................................................. 20
Rounding ............................................................................................... 20
Auto Break Length ................................................................................ 21
Reset To Factory Defaults ..................................................................... 21
ES1000 User’s Manual i
Page 4

RESTART BUTTON .............................................................................. 21
E
MPLOYEE OPERATIONS ..................................................................... 22
Clocking In and Out .................................................................................. 22
Working Across the Day ........................................................................... 22
Transfer a Timecard ................................................................................. 22
Symbols on a Timecard ............................................................................ 22
HARDWARE ........................................................................................ 23
Wall Mounting ........................................................................................... 23
Battery Installation .................................................................................... 24
Signal Wiring ............................................................................................ 26
APPENDIX ........................................................................................... 29
Job Costing and Alternate Length Pay Periods ....................................... 29
Troubleshooting ........................................................................................ 29
Specifications ............................................................................................ 30
PRODUCT REGISTRATION
ii
Page 5
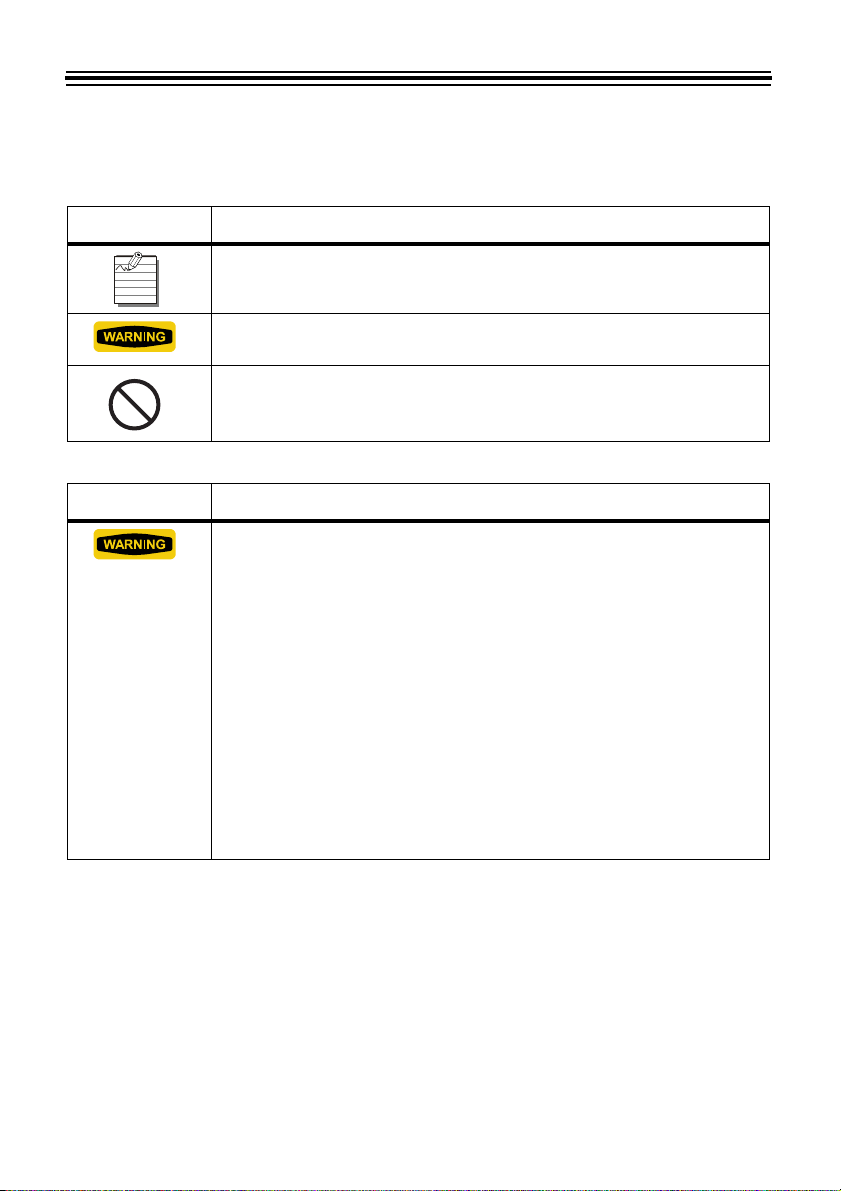
Alert Definitions
For your safety and the protection of the ES1000, the following alerts are used throughout this
manual.
READER ALERT MEANING
Alerts you to supplementary information and helpful tips.
Alerts you to possible data loss or that failure to take or avoid a specific
action might result in physical harm to you or to the hardware.
Alerts you “do not” perform an action.
Precautions
LERT DESCRIPTION
A
• Insert the power plug as far as it will go. Improper insertion of the plug
may result in fire or electric shock.
• If any anomaly occurs, for example, heat or smoke is generated or an
odor is emitted, unplug the unit immediately and contact your dealer
for servicing. There is a danger that further use may cause a fire or
electric shock.
• If foreign matter should get in the unit (including a piece of metal,
water, or liquid), disconnect the plug from the outlet immediately and
contact your dealer for servicing. There is a danger that further use may
cause a fire or electric shock.
• Remove the line cord plug from the outlet before transferring the unit,
or it may damage the cord. This may lead to a fire or electric shock.
• If the unit should be dropped or the case is broken, unplug the unit and
contact your dealer for servicing. Further use may lead to a fire or
electric shock.
ES1000 User’s Manual iii
Page 6

LERT DESCRIPTION
A
• Do not disassemble or modify the unit. High voltage is present inside
that may lead to an electric shock.
• Do not use any voltage of the power source other than designated.
• Do not share a single outlet with another plug. This may lead to a fire or
electric shock.
• Do not damage, break, or modify the power cord.
• Do not put heavy objects on, pull, or forcefully bend the cord. These
may damage the cord, possibly resulting in a fire or electric shock.
• Do not plug or unplug the unit with a wet hand. This may lead to an
electric shock.
• Do not place the unit on an uneven or tilted surface. This may result in
injuries due to the unit dropping or falling off.
• Do not put a water-filled container or a metal object on top of the unit. If
water is spilled or the metallic object slips inside, a fire or electric shock
may occur.
• Do not install the unit in a humid or dusty environment. This may result
in damage or malfunction.
• Do not place the unit near a kitchen counter or humidifier. Oil, smoke,
or steam generating from them may cause fire or electric shock.
• Do not yank the power cord to disconnect from the outlet. Hold the plug
with your hand to do so, or the cord may be damaged. This may lead to
a fire or electric shock.
• Do not insert or drop any other timecard than specified into the slot.
Such misuse may result in damage or malfunction.
• Do not come in contact with the print head. This may result in personal
injury.
iv
Page 7

GETTING STARTED
Introduction
Thank you for purchasing an Acroprint Model ES1000 Totalizing Payroll Recorder. We are
confident this unit will give you full satisfaction. Items such as the time and date are preset at the
factory. Acroprint recommends reading this manual before you start using this unit.
Refer to the Product Registration Card in the back of this manual to register your ES1000.
Features
• Atomic Synchronization Sets Time and Date Automatically
• Automatic Daylight Saving Time (DST)
• Automatic Date, Month Year Change to 2099
• Durable Snap-in Ribbon Cartridge
• Prints in three languages
• Two-color printing, showing early and late punches
• Prints in standard AM/PM hours or 24-hour format with date or day of week
• Totals are formatted to minutes or 1/100 hours
• Calculates actual/rounded time
• Automatically calculates time between punches and totals time
• Calculates weekly and daily overtime
• Handles up to 100 employees on weekly, bi-weekly, semi-weekly or monthly pay periods
• Automatically deducts break time from totals
• Signal control for external bells or horns
• Available reports from payroll recorder:
o Hours Summary
o Clock Rules
o Timecards in Use
• Desktop or Wall Mount
• Optional battery backup for printing during power outages
• Requires ES1010 timecard
ES1000 User’s Manual 1
Page 8
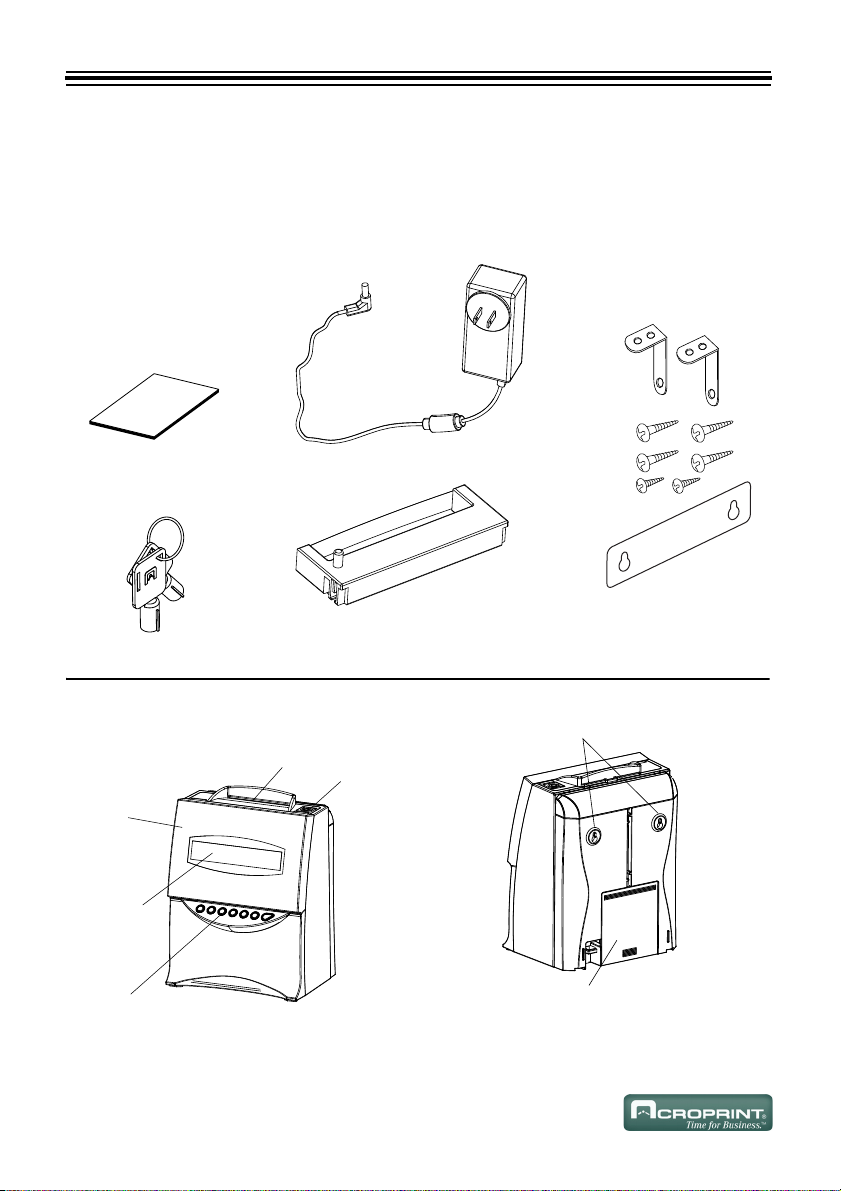
Package Contents
8BMMNPVOUJOHIPMFT
&YUFSOBMTJHOBMBOEGVMMPQFSBUJPO
CBUUFSZPQUJPOBMDPNQBSUNFOU
Unpack the ES1000 and check its contents to ensure the time recorder and all accessories shown
below are included. If equipment has been damaged in transit, immediately report the extent of
damage to the transportation company and to Acroprint. Order replacement equipment, if necessary.
Equipment
ES1000 Manual (1) Power Supply (1)
ES1000
'SPOUDPWFS
%JTQMBZ
'VODUJPOCVUUPOT
Front View Back View
2
$BSETMPU
Ribbon Cassette (1)
(may be installed)
,FZIPMF
Wall-Mount Screws,
Brackets and
Templat eKeys (2)
Page 9
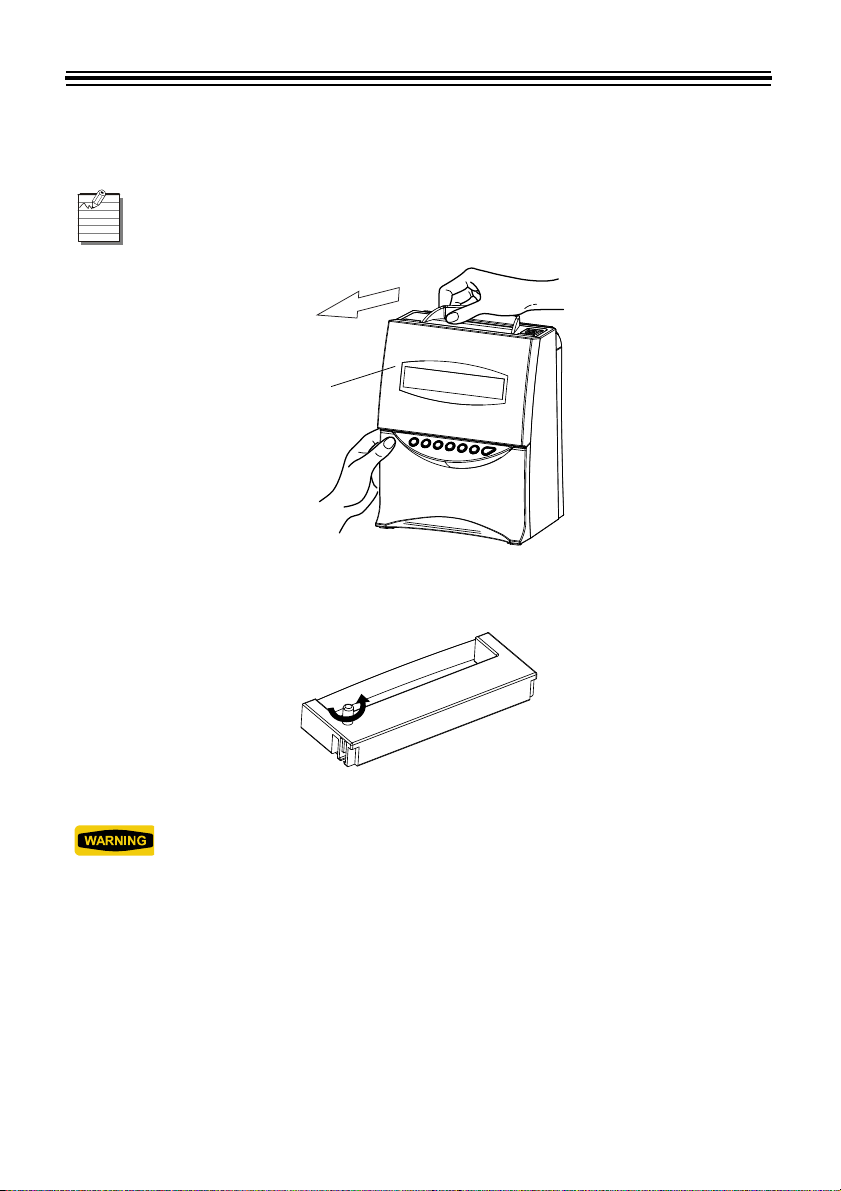
Ribbon Installation
'SPOUDPWFS
1. Insert key and turn counter-clockwise to unlock. Pull top of card slot up and towards you.
The ribbon may be pre-installed in the ES1000.
Open Unit
2. Turn the knob on the cassette as indicated and tighten.
ES1000 User’s Manual 3
Make Ribbon Taut
Only turn the knob counter-clockwise or the ribbon may be damaged.
Page 10
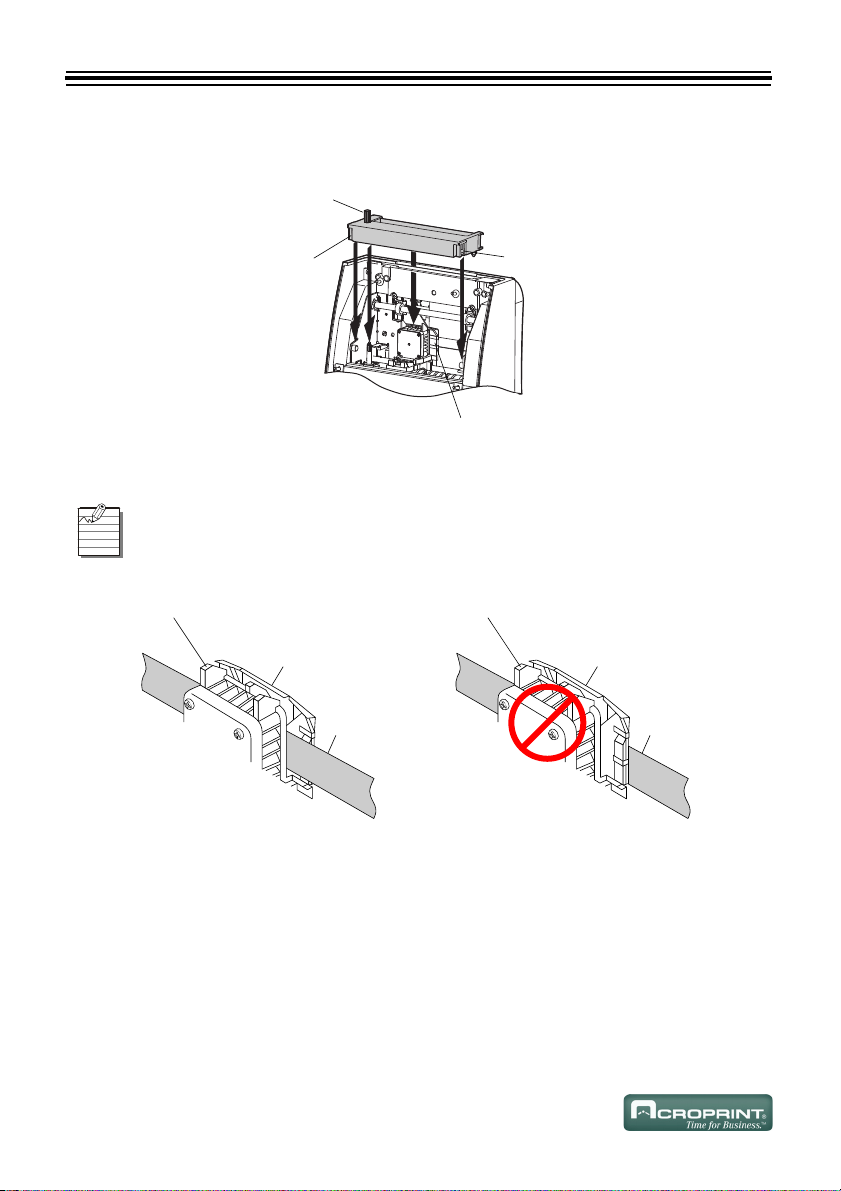
3. Install the ribbon cassette by threading the ribbon between the print head and ribbon mask.
,OPC
$MBTQ
$MBTQ
1SJOUIFBE
1SJOUIFBE
3JCCPONBTL
3JCCPO
1SJOUIFBE
3JCCPONBTL
3JCCPO
$PSSFDU *ODPSSFDU
Insure the ribbon is fully seated by pressing and snapping into place.
Install Ribbon Cassette
If it is difficult to insert the ribbon cassette, insert it while turning the knob.
Install Ribbon Cassette
4
Page 11
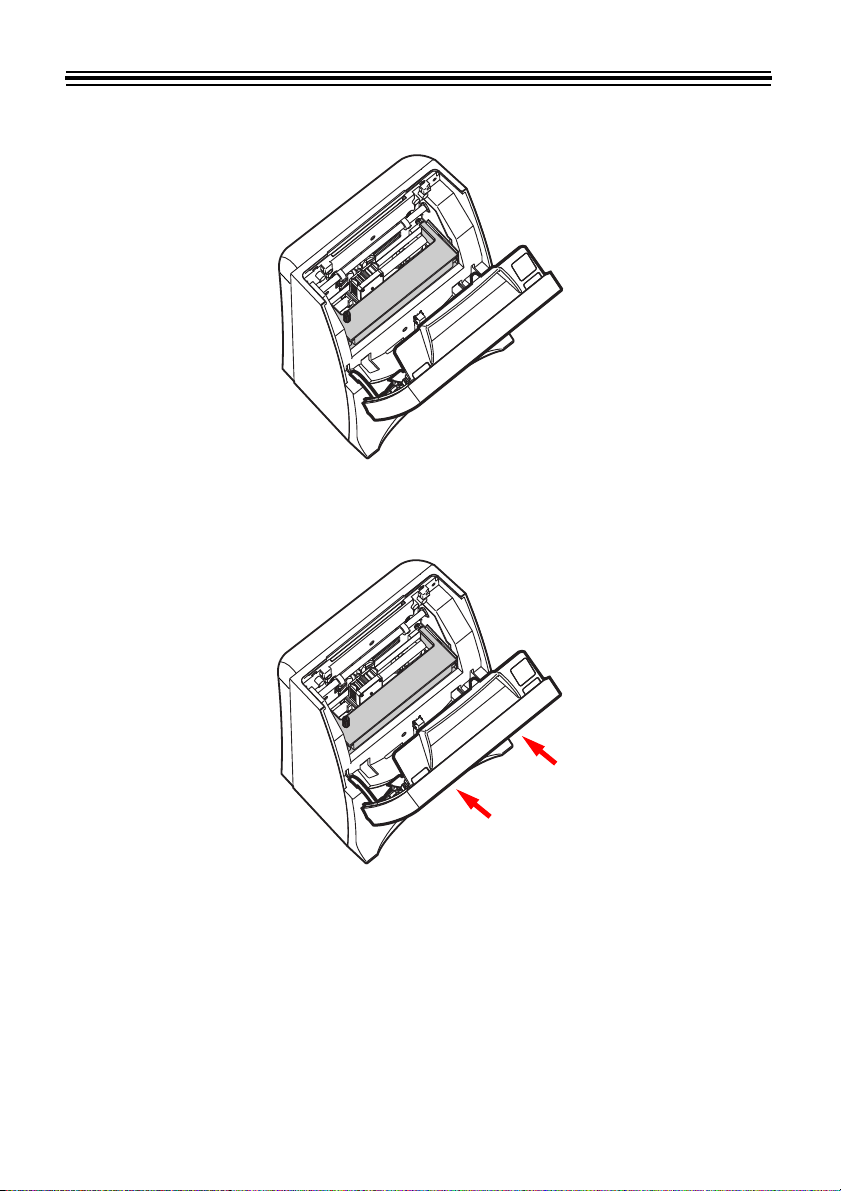
4. Turn the knob of the ribbon cassette counter-clockwise to tighten.
Tighten the Ribbon
5. Close the cover letting it snap into place.
Close Unit
ES1000 User’s Manual 5
Page 12
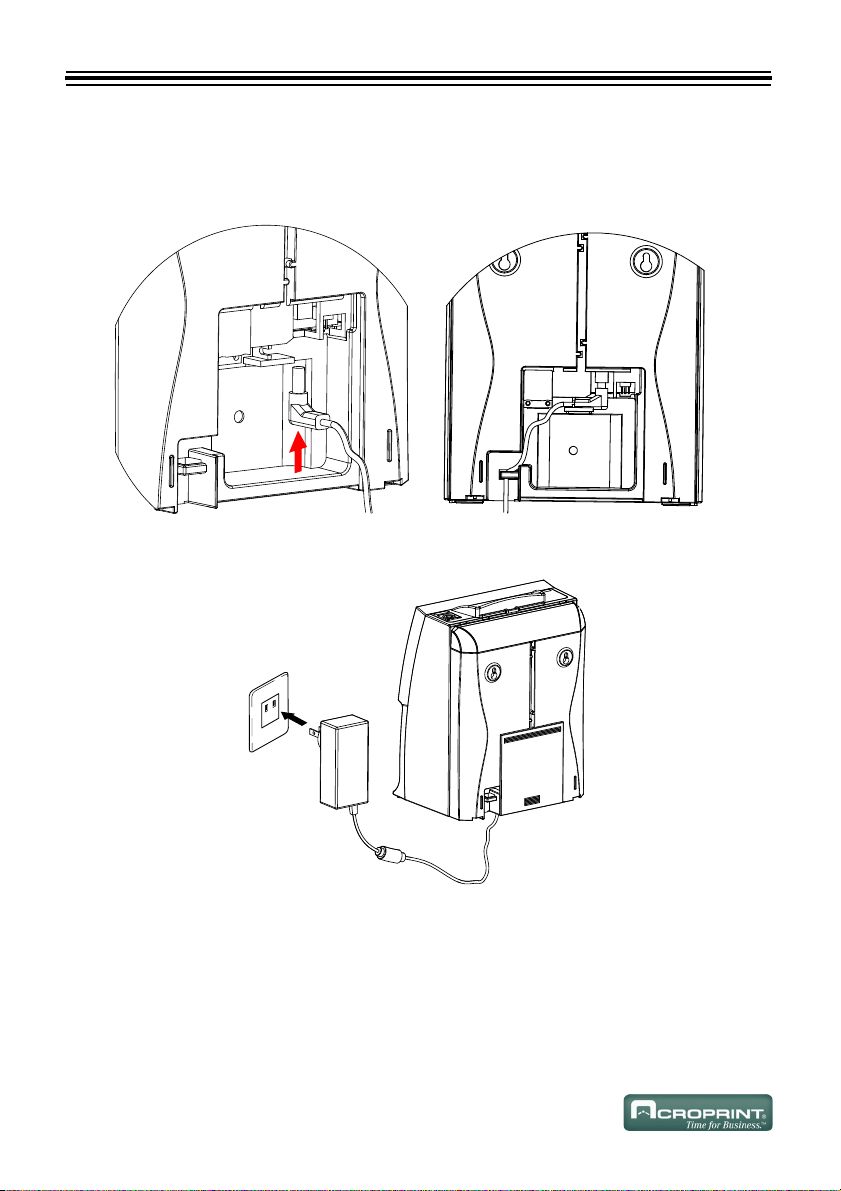
Power the ES1000
$&DGDSWHU
$&RXWOHW
Remove cover to insert jack into the ES1000 and route the wire as shown. Replace cover and plug
the transformer into the AC outlet.
Insert Jack Route Cable
6
Power the ES1000
Page 13

Atomic Synchronization
The ES1000 receives the NIST WWVB Signal which will automatically set the time and date.
For more information about the WWVB Radio Signal (Atomic Signal), visit NIST’s
website at: www.boulder.nist.gov
When the ES1000 is searching for the Atomic Signal, the following characters will alternate on
the display:
When the ES1000 has found the Atomic Signal and set the time and date, the Atomic Symbol will
remain on:
If the Atomic Symbol is not on and steady, try repositioning the ES1000 for better signal
reception. If no symbol is on, you will need to set the time and date manually.
Set your time zone (refer to “Time Zone” on page 10) for the Atomic Synchronization to
perform properly.
.
The Atomic Synchronization will automatically adjust for the Daylight Saving Time
(DST).
ES1000 User’s Manual 7
Page 14

PROGRAM THE ES1000
,FZ
'SPOU$PWFS
3URJUDPPLQJ
%XWWRQV
+
–
NEXT
Front Cover Removal
You must remove the front cover to change settings.
1. Insert key and turn counter-clockwise to unlock.
2. Remove Front Cover as shown.
Remove Front Cover
Programming Method
The three buttons used to program the ES1000 are:
The and buttons change the value of the setting. The button scrolls to the next setting.
Reinstall the cover at anytime to return to normal operation.
8
Page 15

Front Cover Installation
Fit the tabs on the bottom of the cover into the holes on the ES1000. Press the top of the cover
closed as shown.
5BCT
)PMFT
)PMFT
Replace Front Cover
ES1000 User’s Manual 9
Page 16

PROGRAM SETTINGS
+
NEXT
+
NEXT
The ES1000 provides on-screen guidance for programming. We have summarized the settings and
how they can be useful to your business. When needed, additional details are provided.
Reports
Press so the display shows YES. Press to scroll through the options.
The following reports are available:
• Current Hours Summary: Prints a summary of active timecards.
• Previous Hours Summary: Prints a summary of timecards that have been closed out.
• Timecards in Use Report: Provides a list of the timecard numbers that are active.
• Clock Setup Report: Provides a summary of the current settings in the ES1000.
In the Previous Report, all timecards are marked with a “P” except an individual timecard
that was reset during the current pay period.
Timecard Maintenance (Transferring and Resetting)
Press so the display shows YES. Press to scroll through the following options:
• Transfer a Timecard: Allows you to move data from a full, lost or damaged card to a new card.
• Reset a Timecard: Allows you to manually reset the timecard so that it can be reused.
• Reset All Timecards: Can be used with alternate length pay periods or job costing.
Time Zone
Select your time zone for the Atomic Clock Synchronization.
Example Time Zones
10
ISPLAY
D
TIME ZONE
-04 Atlantic Standard Time
ES-05
(Default)
CS-06 Central Standard Time
-07 Mountain Standard Time
PS-08 Pacific Standard Time
AS-09 Alaska Standard Time
HS-10 Hawaiian Standard Time
DESCRIPTION
Eastern Standard Time
Page 17

Daylight Saving Time
NEXT
The following Daylight Saving Time options are available:
• Automatic: The Atomic Feature of the ES1000 will automatically adjust for Daylight Saving
Time.
• Manual: If you are not receiving the Atomic Signal, this option allows you to manually set
Daylight Saving Time. The ES1000 uses a perpetual calendar and will not need to
be reset each year. Press to enter the start/end date for DST.
• Off: If you do not observe Daylight Saving Time, this option turns DST off.
An “*” is printed after the daily total when Daylight Saving Time affects this total.
Hour Display Format
The hour can be displayed as:
•AM/PM
• 24 Hour Format
Hour Print Format
The hour can be printed as:
•AM/PM
• 24 Hour Format
Day Print Format
The day can be printed as:
• Day (of week)
•Date
Language
The Display and Timecard Print will show the selected language.
Choose from the following languages:
• English
• Spanish
•French
ES1000 User’s Manual 11
Page 18

Date and Time
+
NEXT
+
–
NEXT
+
–
NEXT
+–+
–
NEXT
If the ES1000 is unable to receive the “Atomic Synchronization” signal, you will need to set the
time and date manually.
Plug in the ES1000 and set the Time Zone (refer to “Time Zone” on page 10). Leave the
ES1000 plugged in overnight. If the Atomic Symbol is showing steady in the morning,
the time and date are set correctly.
Signals (Bells and Horns)
The signal menu schedules the ringing of bells or sounding of horns. Up to 48 signals can be set
with different times, durations and days of the week.
SIGNAL MENU
= NO
• Press to select YES.
•Press .
SIGNAL #01
OFF
At this point, if you press or , you will scroll through each of the Signals and view
their current settings.
•Press .
SIGNAL #01 DURATION
= OFF
• Press or to select the number of seconds (1-9).
•Press .
SIGNAL #01 DAYS
= _MTWTF_
• Press to turn the day on and to turn the day off. As you press or , you will scroll
through each day.
•Press .
12
Page 19

SIGNAL #01 TIME
+
–
NEXT
+
–
NEXT
+
–
+
–
NEXT
HOUR = 12AM
• Press or to select the hour of the signal.
•Press .
SIGNAL #01 TIME
MINUTE = 00
• Press or to select the minute of the signal.
•Press .
NEXT SIGNAL
= YES
• Press or to select YES or NO. Select YES to continue to add signals or NO to exit and
continue with other settings.
You can scroll through the signals with or and press to edit the settings.
ES1000 User’s Manual 13
Page 20

The following table may be helpful in laying out your Signal Schedule:
Signal Schedule
IGNAL #TIME DURATION DAYS OF WEEK
S
1
2
3
4
5
6
7
8
9
10
11
12
13
14
14
15
16
17
18
19
20
21
22
23
24
Page 21

IGNAL #TIME DURATION DAYS OF WEEK
S
25
26
27
28
29
30
31
32
33
34
35
36
37
38
39
40
41
42
43
44
45
46
47
48
ES1000 User’s Manual 15
Page 22

Enable Override Switch
The Override button (OVR) allows employees who have worked past the “Day Advance Time” to
punch out on the same line and have their time totaled for the previous day. A “V” is printed after
the out punch for Override.
Enable Transfer Switch
The Transfer button allows employees to change timecards without losing their time totals. This
feature is useful for full cards, damaged cards, and job cost tracking.
Pay Period Rules
The following options are in the Set Pay Period menu:
• “Type of Pay Period”
• “Start of Pay Period”
• “Week Overtime Threshold”
• “Daily Overtime Threshold”
• “Day Advance Time”
• “Minute Print Format”
• “Ribbon Color Change”
• “Maximum Time on the Clock”
• “Rounding Type”
• “Rounding Unit”
• “Auto Break Length”
• “Auto Break Elapsed Time”
• “Reset To Factory Defaults”
Changing these options will reset your timecards. These options should be set before
using the clock or before the start of the next pay period.
Type of Pay Period
Set the pay period to one of the following choices:
• Weekly
• Bi-Weekly
• Semi-Monthly
• Monthly
• Off – This option allows the clock to be used for alternate length pay periods or job costing.
16
Page 23

Start of Pay Period
Hundredths print allows for simpler payroll calculations; however, it can be
confusing to employees.
• Weekly: Set the day of the week the pay period starts.
• Bi-Weekly: Set the start date of the pay period.
• Semi-Monthly: Set the start date of the first pay period and set the start date of the
second pay period. You may select the last day of the month by selecting LAST; there are also options for LAST -1 through LAST -5.
• Monthly: Set the start date of the pay period start. You may select the last day of
the month by selecting LAST; there are also options for LAST -1
through LAST -5.
Week Overtime Threshold
Set the total regular hours worked per week after which the hours are calculated as overtime
(typically 40 hours, time over this setting is calculated as overtime).
Daily Overtime Threshold
Set the total hours worked per day after which the hours are calculated as overtime
(typically 8 hours, time over this setting is calculated as overtime).
Day Advance Time
Allows you to change the time when the day advances to the next day. Punches after the Day
Advance Time are new punches; open punches from the previous day will not be totaled. This
is useful if you have shifts/employees who work through the night.
Minute Print Format
Controls hows the totals are printed:
• Minutes
• Hundredths
ES1000 User’s Manual 17
Page 24

Ribbon Color Change
RIBBON COLOR CHANGE
MENU = NO
+
NEXT
COLOR CHANGE #01
OFF
At this point, if you press or , you will scroll through each of the Color
Changes and view their current settings. Press to edit the settings.
+
–
NEXT
+
–
NEXT
RIBBON COLOR #01 TIME
HOUR = 12AM
+
–
NEXT
RIBBON COLOR #01 TIME
MINUTE = 00
+
–
NEXT
NEXT COLOR CHANGE
= YES
+
–
The Ribbon Color Change menu sets up color changes that help identify irregular punches.
Up to 12 color changes can be set.
• Press to select YES.
•Press .
• Press or to select RED, BLACK , or OFF.
•Press .
• Press or to select the hour of the color change.
•Press .
• Press or to select the minute of the color change.
•Press .
• Press or to select YES or NO. Select YES to continue to add color changes or
NO to exit and continue with other settings.
18
Page 25

You can scroll through the color changes with or and press to edit the
+
–
NEXT
settings.
Use the following table to set-up Color Changes:
Color Change Schedule
OLOR CHANGE #RED/BLACK TIME
C
1
2
3
4
5
6
7
8
9
10
11
12
ES1000 User’s Manual 19
Page 26

Maximum Time on the Clock
7RWDO
30
$0
287
,1
30
$0
5RXQGV
7RWDO
30
$0
287
,1
5RXQGV
Limits the total hours an employee can be clocked in before applying it as a missed punch.
If the Maximum Time on the Clock is exceeded, the punch is moved to the next line as an “In”
punch and the previous line is not totaled.
Rounding Type
The following options are available:
• Punch – To calculate the total time, each punch is rounded and then totaled.
• Hours – To calculate the total time, the punches are subtracted and the total is rounded.
Examples
Punch Rounding with a Five Minute Rounding Unit
Hours Rounding with a Five Minute Rounding Unit
Rounding Unit
You may select from the following Rounding Units:
• None
•5 Minute
•6 Minute
• 10 Minute
• 15 Minute
The time rounds forward if the time is greater than half the rounding interval; otherwise, the
time rounds back.
Six Minute Examples
20
5:01, 5:02, 5:03 rounds to 5:00
5:04 and 5:05 rounds to 5:06
Page 27

Auto Break Length
3FTUBSUCVUUPO
When an employee has been punched in for at least the Auto Break Elapsed Time or longer,
the Auto Break Length will be subtracted from the worked time total.
When an Auto Break is taken, an “*” will print next to the resulting day total.
Example
Auto Break After = 6 Hours
Auto Break Length = 60 Minutes
,1
287
'$,/<727$/
$
3
Reset To Factory Defaults
Restores the ES1000 settings to the factory defaults.
You will lose all programming and timecard data.
If the clock malfunctions and you would like to restart the ES1000 without losing the
program settings and timecard data, press the Restart Button as shown on the next
page.
RESTART BUTTON
If the ES1000 malfunctions, press the Restart Button. This will restart the ES1000, but you will
not lose your settings and the timecard data.
ES1000 User’s Manual 21
Restart Button
Page 28

EMPLOYEE OPERATIONS
IN
OUT
OVR
TRANSFER
Clocking In and Out
Typically, the employee can clock In and Out by simply dropping their timecard into the slot.
However, if an employee forgets to punch Out for lunch or In for the day, they may want to force
their next punch to an In or Out. To accomplish this, the employee must press or , then
insert their timecard.
Override
It is a special case when an employee works across the Day Change. If this occurs, the employee
must press , then insert their timecard to punch Out. A “V” will print next to the Out punch to
indicate Override.
The Override feature must first be enabled in setup.
Transfer a Timecard
If an employee’s timecard is full prior to the end of the Pay Period, they can extend punching to a
new card. Select , insert the original full card, then insert the new timecard. The timecard totals will transfer to the new timecard.
The Transfer feature must first be enabled in setup.
Symbols on a Timecard
Symbols are used on the timecard to indicate certain features.
A “V” is printed after the Out punch for Override.
An “*” is printed after the Daily Total for Auto Break. The “*” is also used when Daylight Saving
Time effects the total.
22
Page 29

HARDWARE
:DOO0RXQW7HPSODWH
:DOO
6FUHZV
´
Wall Mounting
The ES1000 should be mounted on 1/2 inch drywall using two ST4x20 screws and
fasteners.
1. Install two of the supplied wall anchors and long screws into a wall 10 cm apart using the
template. The recommended height from the floor to the bottom of the unit is 45".
Be sure to keep 1/8 inch of the screw head away from the wall.
ES1000 User’s Manual 23
Install Wall-Mount Screws
Page 30

2. Install the wall mount brackets to the base of the unit with the two short screws. Hang the unit
on the wall and secure the brackets to the wall with the remaining wall anchors and long
screws.
Mount Wall Mount Brackets
Battery Installation
This option allows printing in the event of a power failure.
Optional Battery Pack – Acroprint Part Number 58-0108-000
24
Remove Battery Compartment Cover
Page 31

.
Position Battery/Attach the Connector
Make sure the wires are not caught when replacing the cover.
Replace Cover
ES1000 User’s Manual 25
Page 32

Signal Wiring
9$& 1HXWUDO
1HXWUDO
+RW
9&ODVV
([WHUQDO
5HOD\
(6
,QWHUQDO
5HOD\
([WHUQDO
%HOORU
+RUQ
7
7
Connecting an External Bell or Horn Relay
If external signal(s) are required, the addition of a relay (not supplied) will be necessary.
Please consult your local electrician for installation, safety, and compliance to
local codes and regulations.
When a signal is activated, the internal contacts close completing the circuit. These internal
contacts are “dry” and supply no voltage. Voltage applied to these contacts must not exceed 30
volts. An external relay must be used to activate signaling devices.
Acroprint Relay
An Acroprint Relay Part Number 01-0230-000 should be used for external signal(s).
Connections Shown for Acroprint Relay Part Number 01-0230-000
Be sure to unplug the unit from the wall outlet before wiring. Improper connection
may cause a malfunction of the unit. Also make sure to secure wires with the wire
clamp.
26
Page 33

:LUHFODPS
Remove Battery Compartment Cover
Remove Two Screws Holding Wire Clamp
ES1000 User’s Manual 27
Page 34

Insert Wires/Tighten Screws/Tuck Cord
Secure Wire Clamp with Screws
Make sure the wires are not caught when installing the cover.
28
Replace Cover
Page 35

APPENDIX
Job Costing and Alternate Length Pay Periods
When Pay Periods is turned OFF, the timecards will no longer periodically reset.
For Alternate Length Pay Periods, use the “Reset All Timecards” in Timecard Maintenance at the
end of the Pay Period.
You can also reset an individual timecard. This is helpful when using timecards to represent jobs
with independent durations.
Troubleshooting
ERROR MESSAGE CORRECTIVE ACTION
ERROR
REVERSE CARD
MISFEED
TRY AGAIN
ERROR SAVING DATA
SEE MANUAL
ERROR: CARD SENSOR
CHECK RIBBON
ERROR: PRINT MOTOR
CHECK RIBBON
ERROR: COLOR CHANGE
CHECK RIBBON
ERROR: CARD MOVEMENT
CHECK RIBBON
ERR: PRINT HEAD MOTOR
CHECK RIBBON
ERROR
BAD CARD
ERROR
DUPLICATE PUNCH
MEMORY FULL
RESET UNUSED CARDS
CARD IS FULL
TRANSFER TO NEW CARD
ERROR
NOT CURRENTLY IN
ERROR
MAXIMUM HOURS
Insert the card correctly.
Insure the card is aligned properly and try inserting the card
again.
Call Acroprint at (800) 334-7190 (USA).
Remove ribbon, turn knob counter-clockwise to insure no
jamming, reinstall properly.
Check timecard for damage; retry card; if error persists, transfer
card.
Wait at least one minute before punching Out.
Reset one or more unused cards to free up memory.
Use the Transfer feature to move Totals to a new card.
The employee is either not In or has exceeded Maximum Time.
Press Out to force an Out punch and manually calculate the time.
Change to a new timecard or reset timecard.
ES1000 User’s Manual 29
Page 36

Specifications
Clock Accuracy Monthly accuracy ± 15 sec. (at room temperature)
Calendar Year up to 2099. No adjustment required for Leap Year, Start or
Month or Daylight Saving Time.
Printing System Dot matrix, 9 Pin.
Power Failure
Compensation
Print at Power Failure Optional battery, 100-time printing or 24 hours Acroprint part
Battery Back-up Internal Lithium
Timecards Acroprint timecard (Form Number: ES1010)
External Bell/Horn Control External time signal
Operating Environment Temperature: -5° to +45°C, +25° to +113°F
Dimensions 7.17" (w) x 9.53" (h) x 5.51" (d)
Weight Approx. 4.9 lbs. (2.2 kg)
Rating The ES1000 is rated 12 VDC, 4 W. The external power supply
Three years of cumulative power failure hours after the date of
shipment.
number 58-0108-000
(Part Number: 09-9111-000)
Dry Relay Contacts (no voltage supplied), 30 V, Class 2, Settings
Duration from 1-9 seconds
Humidity: 20 to 80%, no condensation
The unit operates at temperatures of 5°C (25°F) or below, but the
print density and display are inferior to those at normal
temperature operation.
182 (w) x 242 (h) x 140 (d) mm
rating is typically 100-240 VAC, 50-60 Hz, 0.55A Input and an
Output of 12 VDC, 2A.
30
Page 37

Product Registration Card
Mail, Fax to 919.850.0720, or Register Online at www.acroprint.com
ES1000
Model No. Serial No.
First Name Last Name
Title
Company Name
Address
City State Zip
Daytime Phone with Area Code Email Address Fax#
Purchased From Purchase Date
So that we may serve you better, please indicate your primary business activity:
Manufacturing Hotel/Motel
Wholesale Banking/Financial
Retail Medical/Dental
Government Construction
University/School Other
Restaurant
Number of Employees using this product:
1-10 50-75
11-25 76-100
26-49 100+
Annual Sales in dollars:
Under $100,000 $500,000 – 1,000,000
$100,000 – 250,000 $1,000,000 – 5,000,000
$250,000 – 500,000 $5,000,000+
Are you interested in receiving information on any other Acroprint products:
(check all that apply)
Manual Time Clocks Human Resources Software
Electronic Time Clocks Data Collection Terminals
Time Stamps Biometrics
Time and Attendance Software
How likely is it that you would recommend Acroprint to a friend or colleague?
0 1 2 3 4 5 6 7 8 9 10
Not at all likely Neutral Extremely likely
Cut Here
Page 38

Page 39

Page 40

5640 Departure Drive
Raleigh, NC 27616 USA
919.872.5800
800.334.7190 (in USA)
919.850.0720 (Fax)
www.acroprint.com
sales@acroprint.com
P/N 06-0367-000 Rev. A
 Loading...