

Page 1
Page 2

ATR9800 Reference Manual
Manual Revision A
Published JUNE 2000
ACROPRINT TIME RECORDER CO.
5640 DEPARTURE DRIVE
RALEIGH, NC 27616
Printed in the United States of America
Copyright 1999 ACROPRINT TIME RECORDER CO.
All Rights Reserved
No part of this publication may be copied, distributed, stored in a retrieval system, translated into
human or computer language, transmitted, in any form or by any means, without the prior written
consent of ACROPRINT TIME RECORDER CO.
ATR9800 is a trademark of ACROPRINT TIME RECORDER CO.
Acroprint makes no warranty or representation, either express or implied, with respect to this pr ogram or documentation,
including its quality, performance, merchantability or fitness for a particular purpose.
Because programs are inherently complex and may not be completely free from errors, you are advised to validate your
work. In no event will Acroprint be liable for direct, indirect, special, incidental or consequential damage arising out of the
use or in ability to use the program or documentation, even if advised of the possibility of such damages. Specifically,
Acroprint is not responsible for any costs including, but not limited to, those incurred as a result of lost profits or revenue,
loss of use of the computer program, loss of data, the costs of r ecovering such programs or data, the costs of an y substitute
program, claims byat third parties or for other similar costs. In n o case shall Acroprint liability exceed the costs of the
license fee.
The warranty and remedies set forth above are exclusive and in lieu of all others, oral or written, expressed or implied. No
Acroprint dealer, distributor, agent or employee is authorized to make any modification or addition to th is warranty.
Page 3

ATR9800 User Guide
Table of Contents
Customer S upport...........................................................................................................................4
Source of Support ..........................................................................................................................4
Your Dealer................................................................................................................................4
ATR9800 Customer Assistance ...................................................................................................4
System Integrity & Backups ...........................................................................................................5
Overview.......................................................................................................................................5
Methods and T radeoffs ..................................................................................................................5
Floppy Disks ..............................................................................................................................5
Tape Drives................................................................................................................................5
Servers.......................................................................................................................................5
RSD............................................................................................................................................ 6
What Files to Backup and How Often?...........................................................................................6
Acroprint's Data Files................................................................................................................6
Add/Edit Employee .........................................................................................................................7
Assignments ..................................................................................................................................8
Schedules...................................................................................................................................8
Departments...............................................................................................................................9
Wages......................................................................................................................................10
Multiple Badges .......................................................................................................................11
PINS.........................................................................................................................................11
Categories......................................................................................................................................12
Departments ..................................................................................................................................13
Holidays.........................................................................................................................................14
Users ..............................................................................................................................................15
Rights..........................................................................................................................................15
Defined Users..............................................................................................................................16
Groups .........................................................................................................................................17
Assignments ................................................................................................................................17
Time Transactions .........................................................................................................................18
Add/Edit T ransactions..................................................................................................................20
Global Add..................................................................................................................................21
Miscellaneous Entry.....................................................................................................................21
Clocks.............................................................................................................................................22
Polling........................................................................................................................ .................22
Archiving/Unarchiving Transactions............................................................................................23
Archiving..................................................................................................................................... 23
Table of Contents 1
Page 4

ATR9800 User Guide
Schedules........................................................................................................................................24
Automatic Deducts.......................................................................................................................25
Punched Break/LunchParameters ................................................................................................26
Break/Lunch Window Parameters ................................................................................................26
Overtime......................................................................................................................................27
Fixed Shifts and Time Rounding.................................................................................................. 28
Holiday Parameters...................................................................................................................... 31
Exception Report Parameters........................................................................................................32
In O n Service...............................................................................................................................32
Out On Service.............................................................................................................................32
Per Diem......................................................................................................................................33
Lockouts.........................................................................................................................................34
For lockouts to work correctly:.....................................................................................................34
Bells................................................................................................................................................36
For Bells to work correctly:.......................................................................................................... 36
Access Control ............................................................................................................................... 37
For Access Control to work you must:..........................................................................................37
Autopoll..........................................................................................................................................38
Messaging.......................................................................................................................................40
For messaging to work you must:.................................................................................................40
Job Costing ....................................................................................................................................41
To setup Job Costing you must:....................................................................................................41
InputValidation.............................................................................................................................42
Clocks.............................................................................................................................................43
Connection...................................................................................................................................44
Job Costing..................................................................................................................................44
Access Control............................................................................................................................. 44
Fingerprint Unit.............................................................................................................................45
ClockConfigurations.....................................................................................................................46
General........................................................................................................................................46
Functions Definition.....................................................................................................................46
Parameters Configuration .............................................................................................................46
Timeouts......................................................................................................................................47
Ports Configuration......................................................................................................................47
BadgeDetails...............................................................................................................................47
Display Messages.........................................................................................................................48
Print Setup...................................................................................................................................48
2 Table of Contents
Page 5

ATR9800 User Guide
Reports...........................................................................................................................................49
Report Menu................................................................................................................................50
Report Ranges .............................................................................................................................50
Pay Period, Special, Yesterday.................................................................................................51
Starting/Ending........................................................................................................................51
Show Legends...........................................................................................................................51
Print Minutes in Hundredths.....................................................................................................51
Sample Reports..............................................................................................................................52
TimeCard....................................................................................................................................52
Hours Report...............................................................................................................................53
Who's In ......................................................................................................................................54
Who is in by Shift........................................................................................................................55
Shift Report.................................................................................................................................56
Category Summary......................................................................................................................57
Department Category Summary...................................................................................................58
Group HourlySummary...............................................................................................................59
Job Hourly Report........................................................................................................................60
Report MissingPunches ...............................................................................................................61
Benefit Report.............................................................................................................................62
Export Time Card Data................................................................................................................63
Generic ASCII Export..................................................................................................................64
Glossary.........................................................................................................................................65
Table of Contents 3
Page 6

ATR9800 User Guide
Customer Support
Source of Support
Acroprint has support services availableto help in case you have a problem with your
ATR9800 system. The following are suggested places to turn for support.
Your Dealer
If you encounter difficulty, begin by contacting the person who sold you your ATR9800
system. Your dealer is familiar with your needs and equipment and should be able to
provide you with the information you want.
ATR9800 Customer Assistance
If your dealer is unable to answer your questions, Acroprint has an ATR9800 customer
assist service available from 8AM-5PM (ET), Monday-Friday. (919) 872-5800. Support is
billable on a per call basis of $75 per hour or you may purchase an annual agreement
for $575. (If you have the optional job costing module, the annual cost is $995.) The
annual agreemen t provides for unlimited phone assistance on software only.
4 Customer Support
Page 7

ATR9800 User Guide
System Integrity & Backups
Overview
Systems integrity and data backups cannot be stressed enough. Should you experience a hard
disk crash, you will be very glad you maintained proper system backups. Without a backup,
restoring data to the hard disk is difficult, often impossible, and very expensive.
In short, keeping frequent system backups of not just the ATR9800 system, but of all programs
and data on your PC will protect you should disaster strike. Remember Murphy's Law: If it can
happen, it will happen and at the worst possible time! PCs are electrical devices just like radios,
televisions and toasters; eventually they all fail.
Methods and Tradeoffs
There are many methods for backing up data from PCs: floppy disks, tape, server, RSD
(Removable Storage Drive) and others.
Floppy Disks
Floppy disks are a quick and easy solution for small amounts of data. However, since most
programs create megabytes of data, floppies are not always a viable method of file backup.
Tape Drives
Tape drives have the initial disadvantage of being expensive, costing anywhere between
$300 and $1,500. But the initial higher cost is quickly paid for in shorter backup times. A
20 Megabytes drive, which takes almost an hour to backup with floppy disks, can be
backed up in as little as 10 minutes. As typical disk capacities increase further to 4GB,
8GB and 12GB, your only realistic backup medium is tape.
Servers
For PCs on a network, backup over the network is a viable alternative to using removable
drives. This type of scheme is sometimes used in small- to medium-size businesses as a
way of protecting PCs without the expensive of tape drives or removable storage. The idea
is fairly simple, copy data from one PC to another over the network. Duplicating each PC's
information provides a way to protect each individual PC.
In a way, this type of backup is most similar to in-place hard disk duplication in terms of
how it works. It is simple in the same way, and can be automated. It addresses some of the
concerns about that method since there is not the same single point of failure in terms of
virus attack or hardware failure. However, depending on the location of the two PCs, theft,
disaster and sabotage can still be a big problem. If the two PCs are sitting on different
desks in the same office, you have not gained much protection against these threats. Also,
remember that viruses can travel over a network.
System Integrity & Backups 5
Page 8

ATR9800 User Guide
RSD
In the last few years, a whole new class of storage devices has sprung up and become very
popular — removable storage drives. While these have existed in various forms for many
years, recently they have taken the market by storm. Their popularity rests in their ability
to provide removable storage at a reasonable price and with good performance. Many of
these drives are also very suitable to use for backups. There are so many different drives,
and they differ in so many different ways, that a complete look at all of them (at least one
that would be fair) is far beyond the scope of this section. The drives fall into several
categories, which we will only mention:
♦ Removable Hard Disk Equivalent Drives
♦ CD-Recordable
♦ Large Floppy Disk Equivalent Drives
♦ CD-Rewriteable
What Files to Backup and How Often?
Ideally, all data files should be backed up at the end of each workday. If this practice is adhered
to, at most, only one day of data could be lost and have to be reentered manually. At the very
minimum, all data files should be backed up weekly.
Program files do not require the same backup frequency as data files because they never
change. They should be backed up when a new version is placed in the system. However, a full
backup of all files makes the job much easier if a hard drive fails.
Acroprint's Data Files
Acroprint maintains numerous data files that are critical for the operation of the system and
to your company's payroll health. All of these files should be backed up daily. All data files
Acroprint uses have the file extension of .DBF and .CDX. They are located in the root of
the ATR9800 directory in a folder called Data. Copying the Data folder will effectively
backup all data files in the Acroprint data directory to the drive of your choice.
The best way to maintain your backup data sets is to reserve a tape for each day of the
week. Each backup tape would be marked Monday, Tuesday, Wednesday, etc. For each
day of the week, a corresponding tape is used for the new current backup. Reserving a tape
for each day of the week gives you the capability to go back multiple days if necessary.
Suppose you only keep one backup data set and you backed up your data today.
Tomorrow, when you arrive at work, you find that you inadvertently deleted a number of
important records. With only one backup data set, the data you deleted is gone forever. If
you had maintained multiple backup sets, you could go back to the previous day’s backup
data and retrieve the deleted records.
6 System Integrity & Backups
Page 9
Add/Edit Employee
ATR9800 User Guide
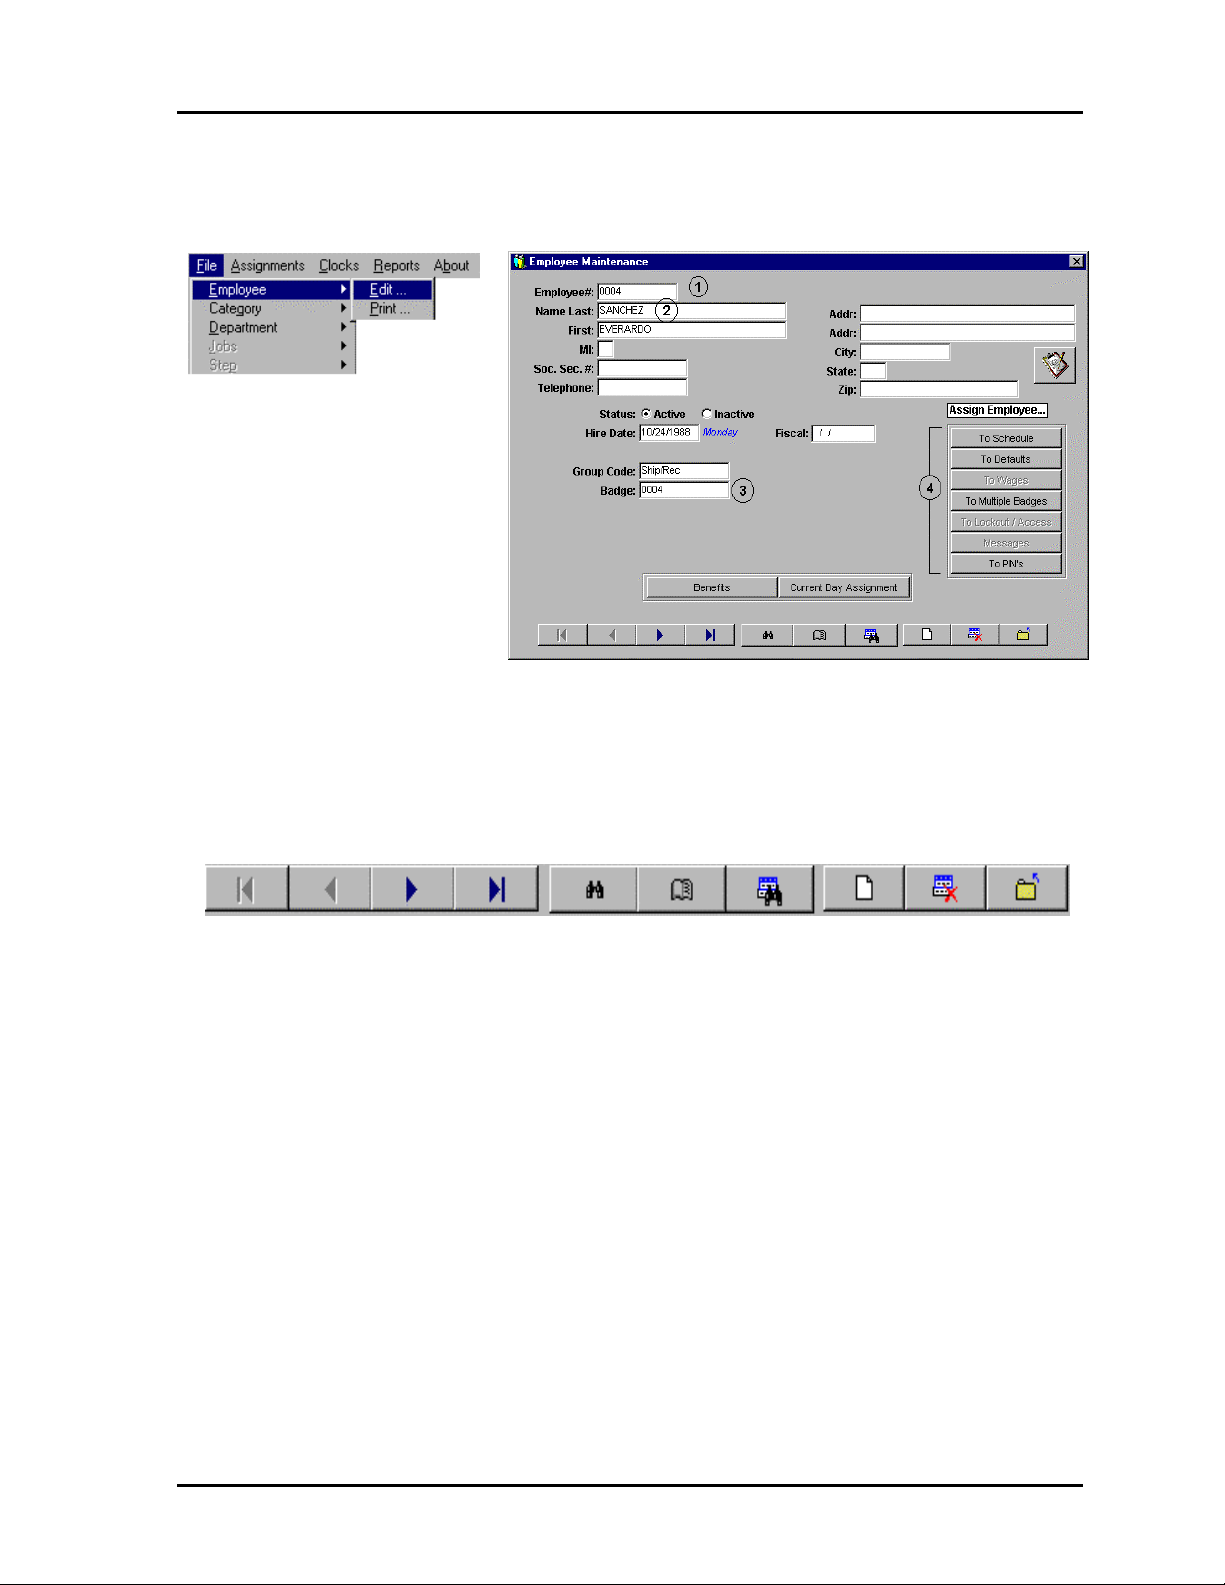
This is where you add employees to the system. The employee file defines and stores basic
information about each employee in the system. To add an employee click the add icon (white
paper with folded corner). To delete an employee click the delete icon (red X). Clicking the disk
icon (shown during actual adding) saves additions. Clicking on the yellow folder saves edits.
The required entries are the (1) employee number, (2) employee name and (3) badge number. All
employees must also be assigned to a schedule (4). The length of the employee number and
badge number should not be changed once the system is in operation.
For ease of administration, employees can be marked active or inactive. An active employee is
one who is currently scheduled and punching in/out on the system. For any reason, should this
employee stop punching (maternity leave, disability, temporary relocation) for an extended period
of time, that person can be marked inactive. Their information will be retained in the system so
that when they return all that is required is that they are marked active. Inactive employees can be
omitted from any reports. This setting is found under File\Company Setup\Setup\Settings.
Display inactive on search.
The ATR9800 system has several ways of grouping employees. One method is to assign
Employees to groups. To assign an employee to a group requires the group be preconfigured in
the system. This is done under File\Groups\Edit. Enter the group code for the corresponding
group.
Add/Edit Employee 7
Page 10
ATR9800 User Guide
Assignments
Schedules
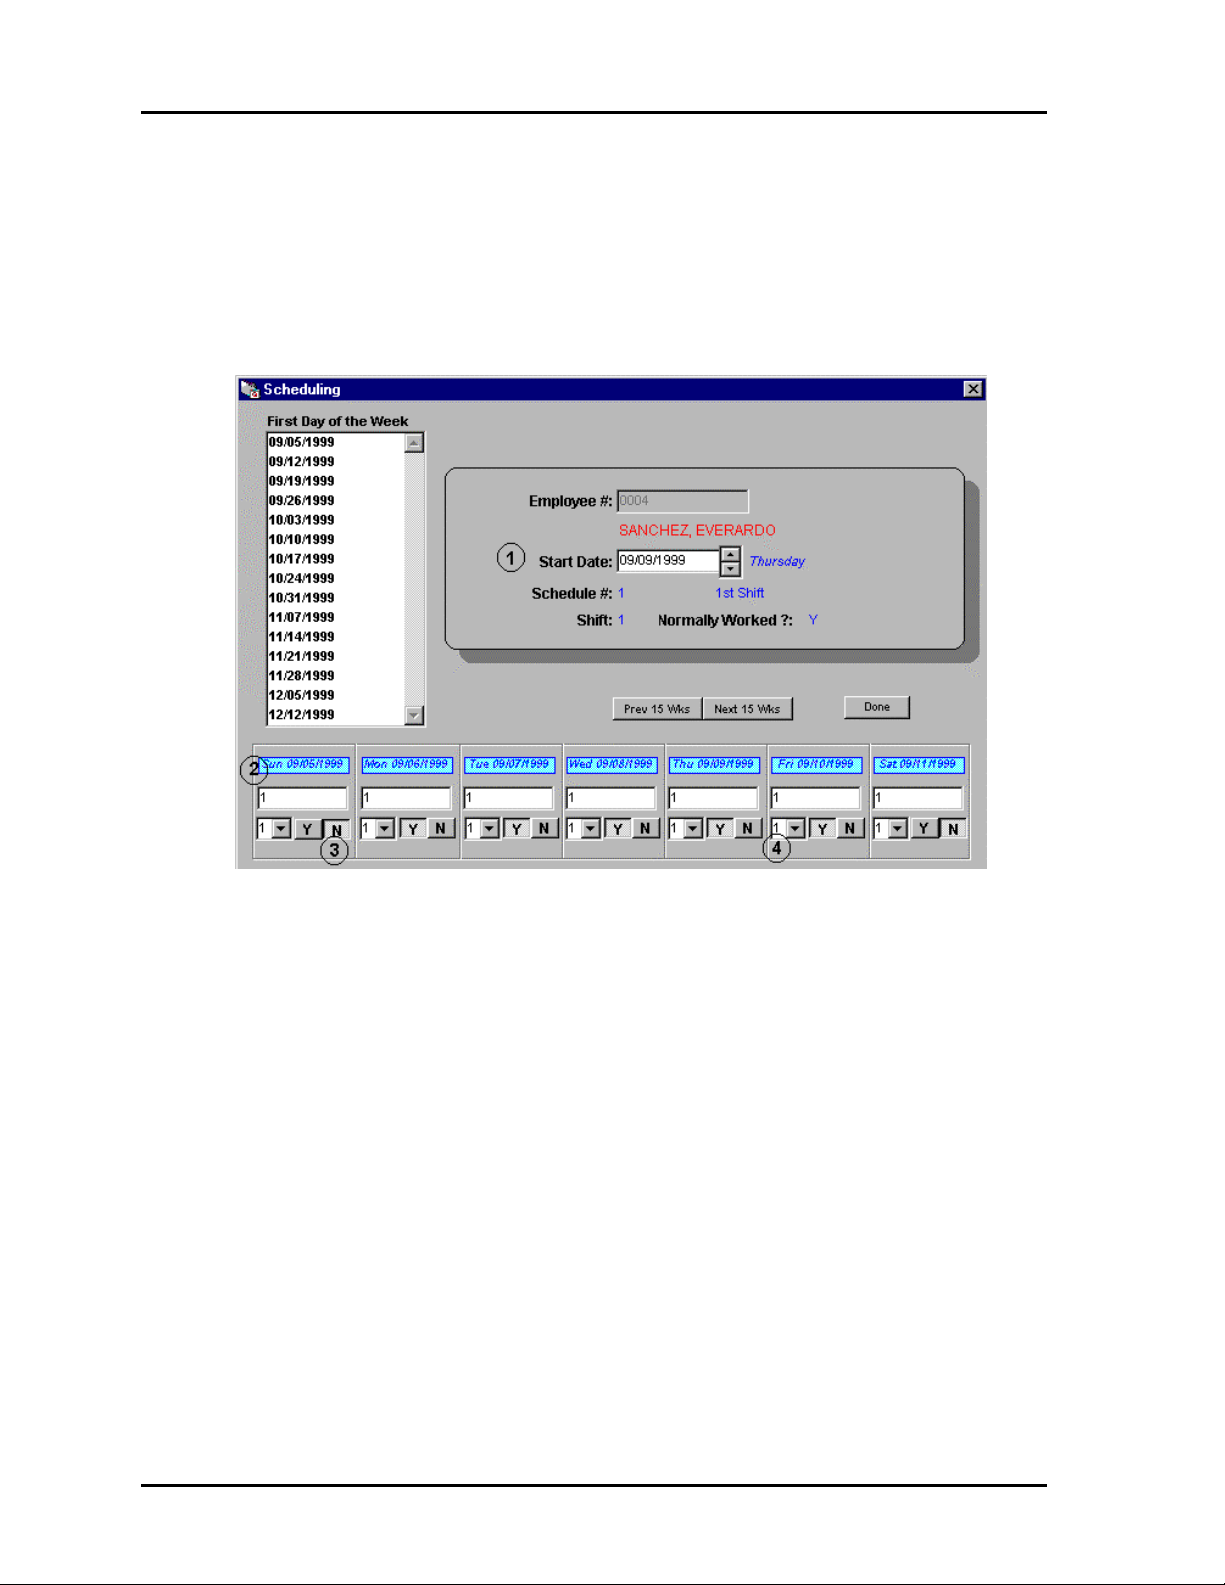
All employees entered in the system must be assigned to a schedule. Employees must be
scheduled every day of the week, even days they are not required to work. Indicate they are
not required to work by selecting no below the scheduling field (3).
Enter the start date (1) that theemployee begins this schedule. Start dates should be
approximately one week before date of hire. This insures the employee is not working
during any period in which they are not assigned. Before an employee can be assigned to a
schedule, the schedule must exist within the system. Fill in the schedule number (2) the
employee is assigned for each day of the week. If the schedule is a fixed shift schedule,
indicate the shift (4) the employee is working.
Employees can be assigned to multiple schedules. For example “employee A” could be
assigned to schedule 1, M-F that could be considered the regular schedule, and schedule 2
on S-S, which could be setup as a weekend schedule.
8 Add/Edit Employee
Page 11
Departments
ATR9800 User Guide
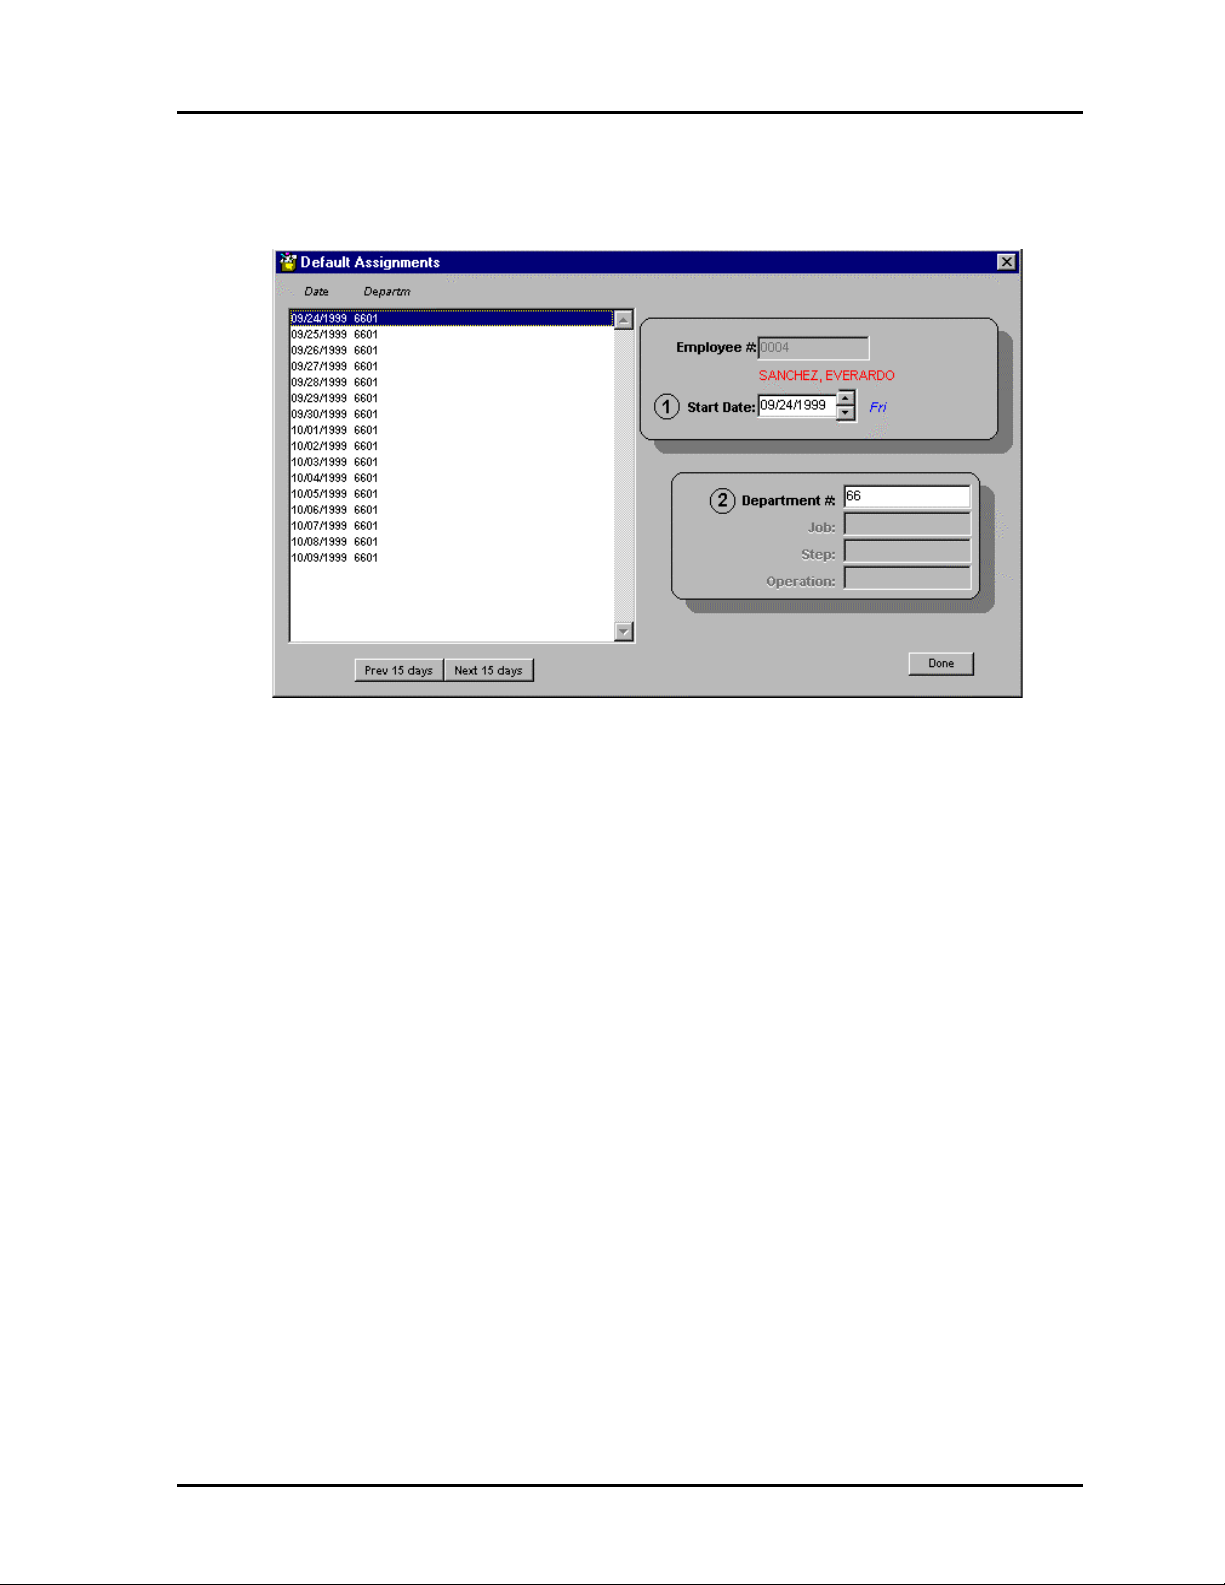
Departments provide another way of grouping employees. Before an employee can be
assigned to a department, the department must be defined in the system. To assign an
employee to a department, enter the starting date (1) on which they are assigned to this
department, and then enter the department number. (Note: right-clicki ng the department
field can access a list of defined departments.)
By default the ATR9800 allows transfers between departments. This ability is separate
from job costing. To perform department level transfers, employees must be assigned to a
non-swipe and go schedule.
Add/Edit Employee 9
Page 12
ATR9800 User Guide
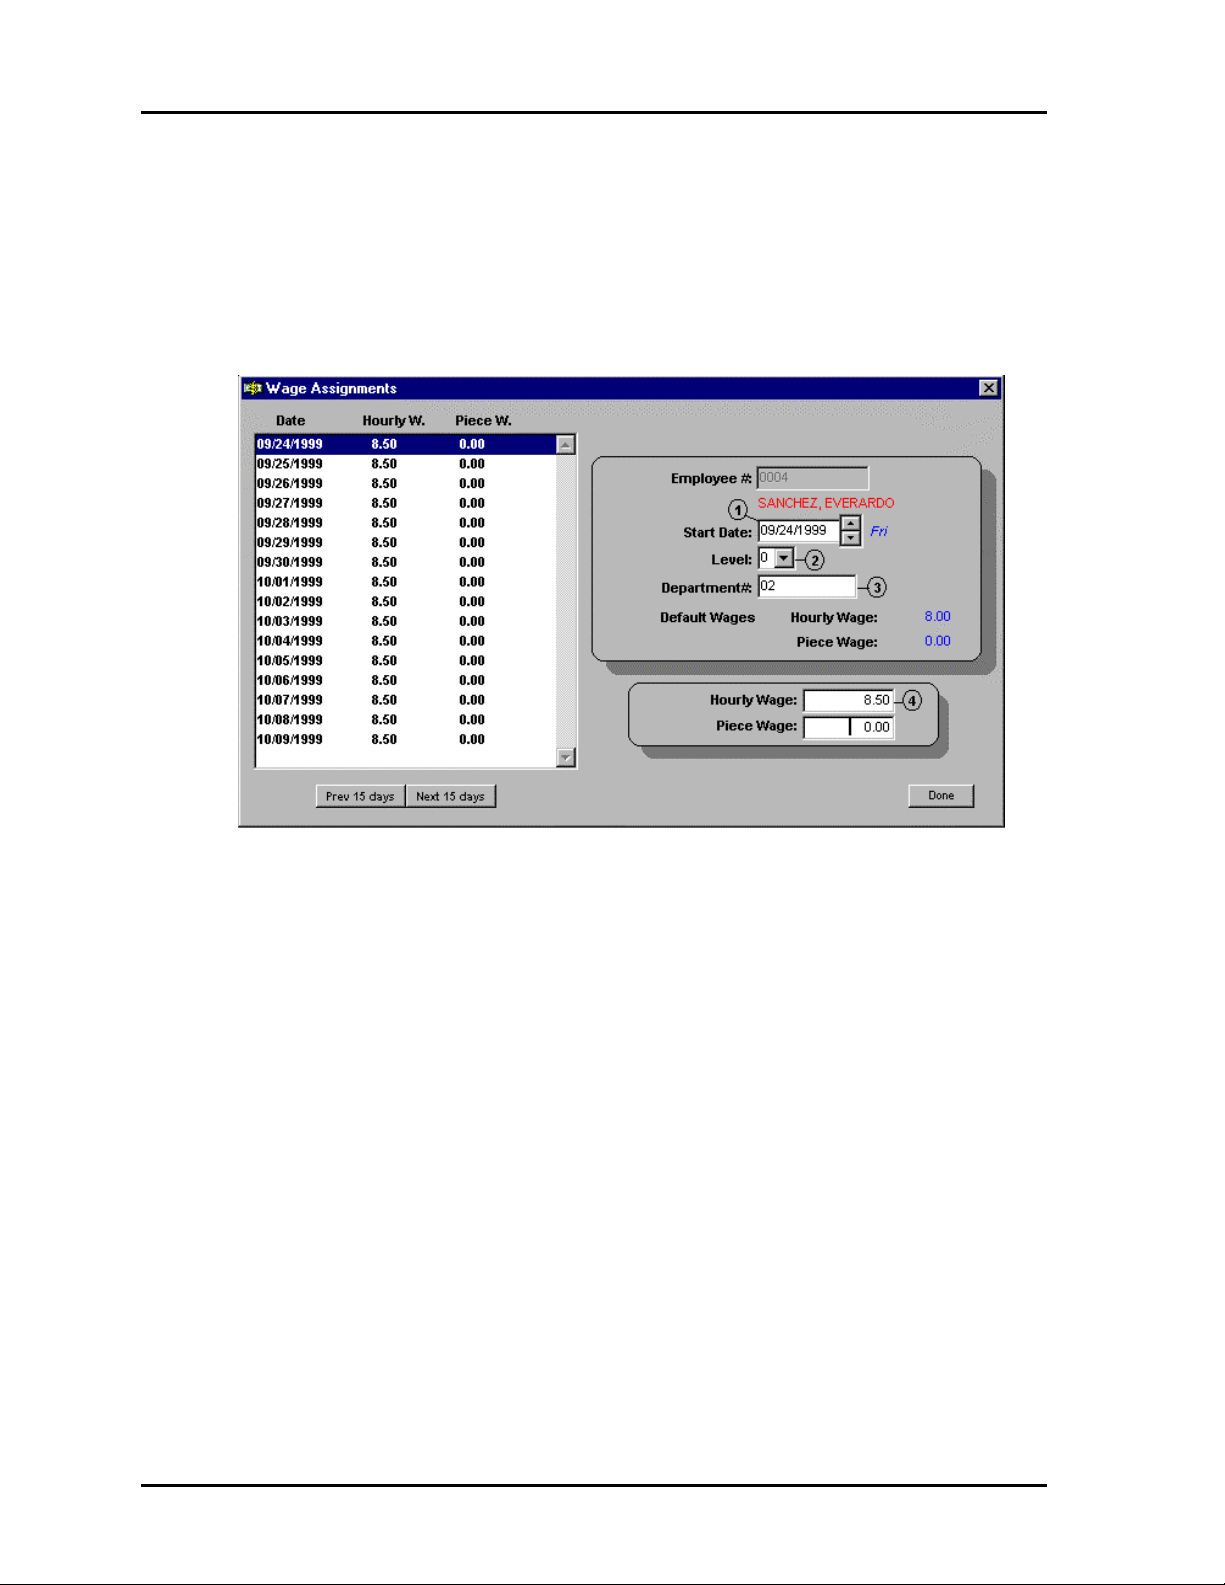
Wages
The employee screen is used to assign individual wages. To use this feature, the use flag
for wages has to be checked under Settings in Company Setup. This is a gross wage based
on hours worked. The tracking of this information can be used in forecasting departmental
expenditures and budgets. ATR9800 does not allow for payroll deductions when using
wages.
To assign an employee to a wage, enter the start date (1) the employee is to be assigned
this wage. Enter the system level (2) this wage will be applied to. In systems without job
costing this will always be level 0. In systems with job costing, a wage can be assigned for
each level in the system. Enter the department number (3) to which this wage applies. If an
employee is working in other than his default department, the wage assigned to that
department is used. Enter the wage (4) the employee is to be assigned. If assigned to a
department using wages, this entry supercedes the department entry.
10 Add/Edit Employee
Page 13
ATR9800 User Guide
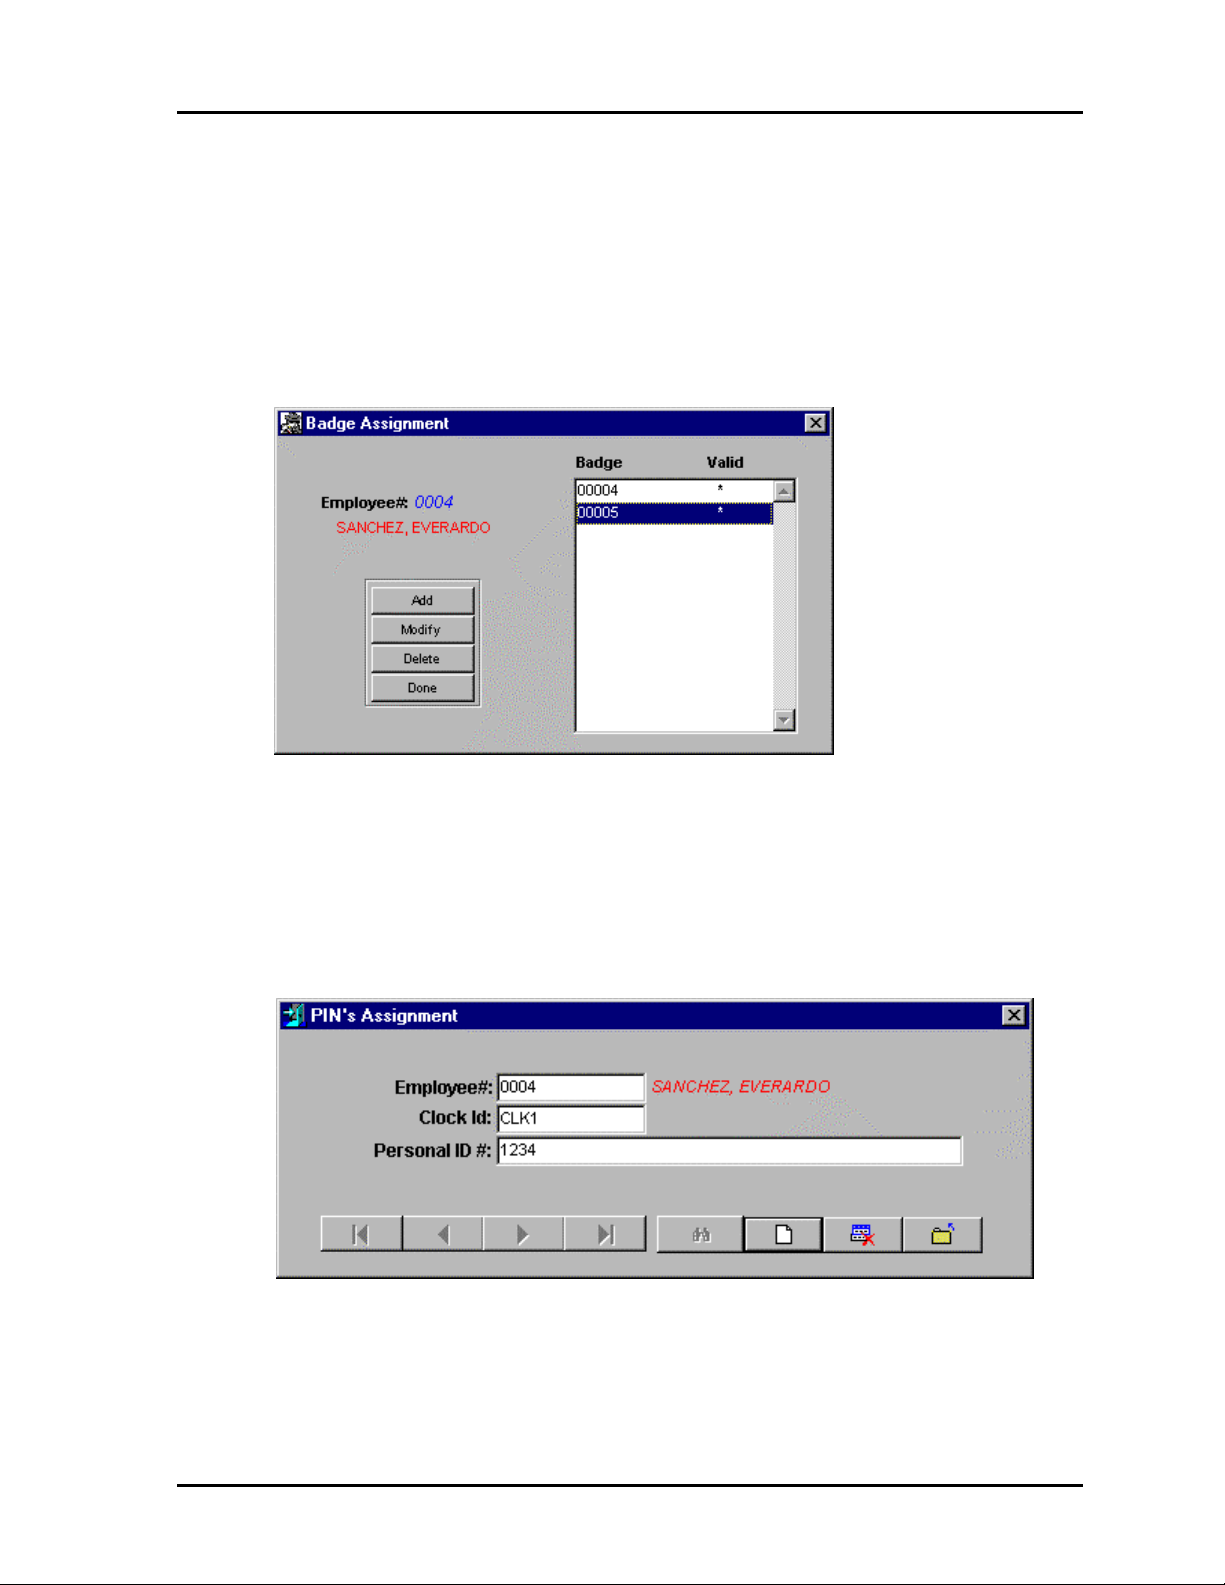
Multiple Badges
Employees are assigned their initial badge number on the employee setup screen. If
necessary, they can be assigned an additional badge. Each badge can be used in the system
simultaneously. This should be used only in very limited circumstances. To delete an
employee or reassign an employee badge, the badge number must first be deleted from the
owner of the badge. If this is not done, the badge will be locked in the system and will not
be able to be reassigned.
PINS
Pin numbers provide a low-level form of system security. They can be used with other
methods of system security to provide very strict system access. Pins function similar to
ATM and bankcards. After an employee swipes his or her badge, he or she is prompted to
enter his or her pin number. To use this feature the clock or clocks used must be configured
to use pin numbers.
Add/Edit Employee 11
Page 14
ATR9800 User Guide
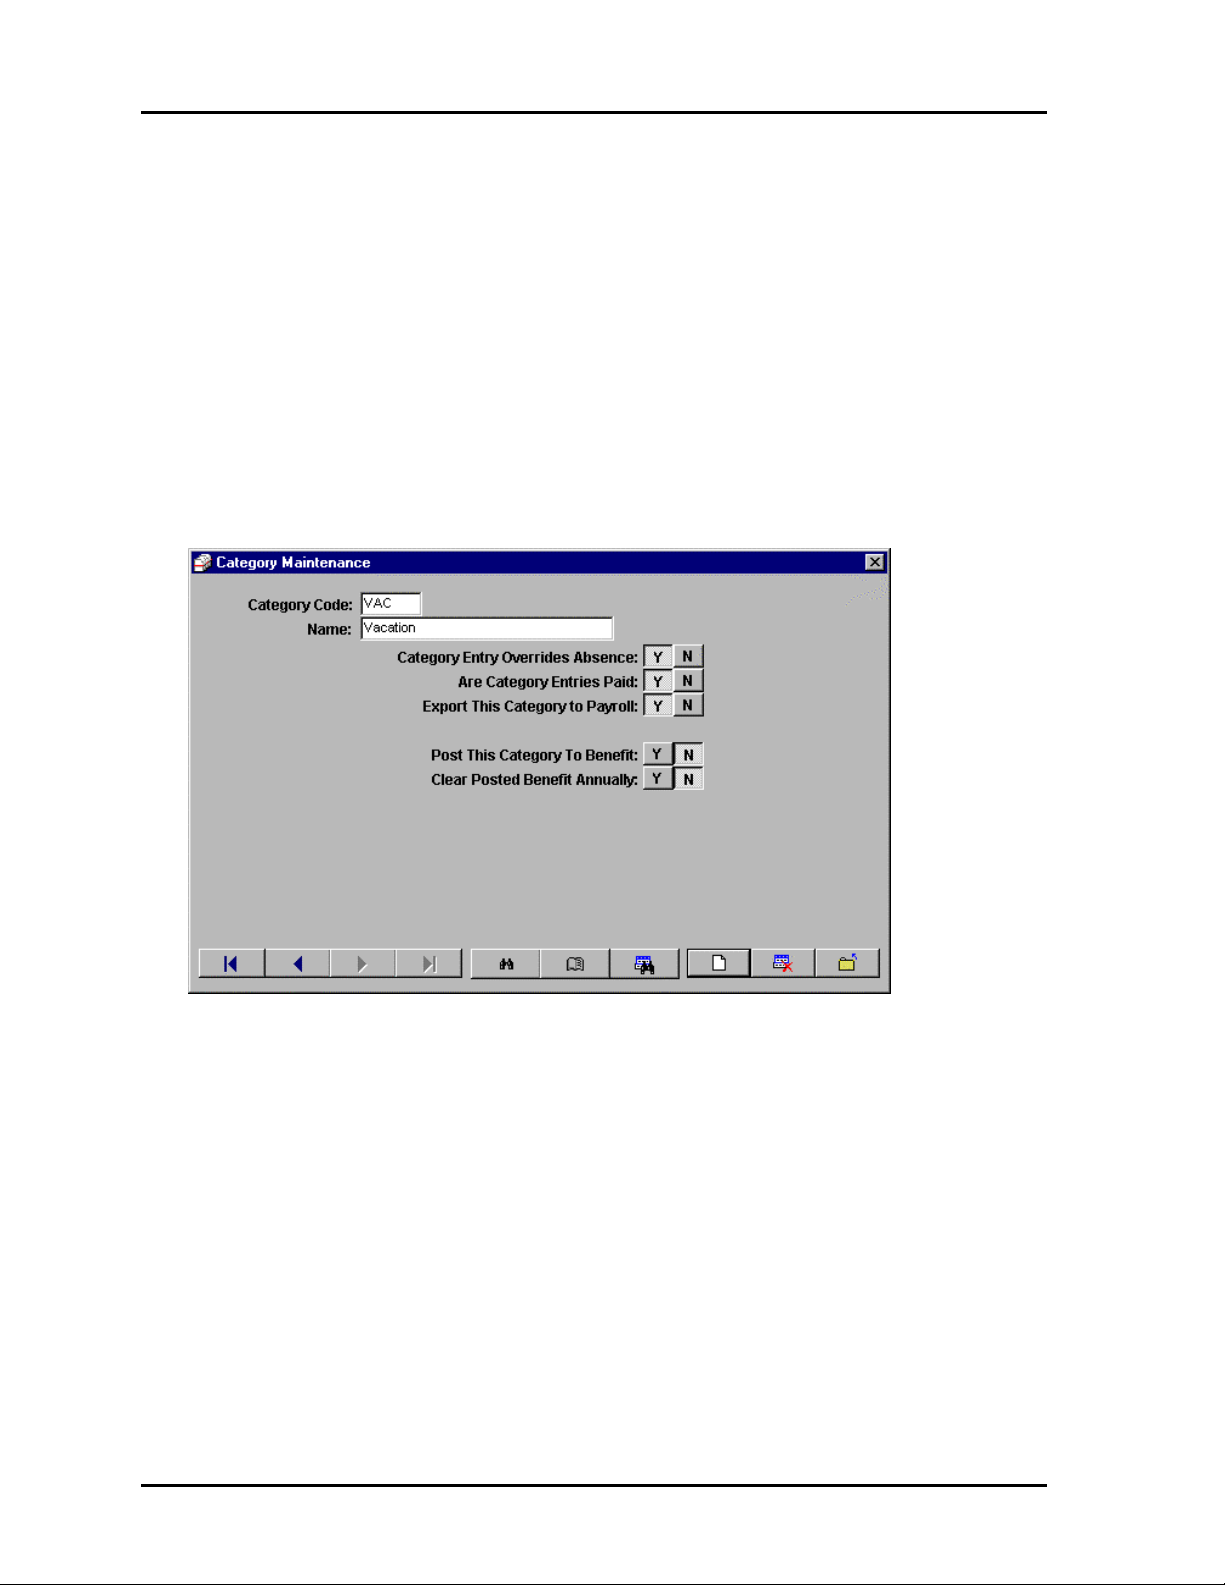
Categories
Categories are used to group t ime into special blocks for administrative reasons. The ATR9800
system has 12 predefined categories: Break, Holiday, Lunch, Other Time, Personal, Per Diem #1,
Per Diem #2, Regular, Sick Hours, Tip #1, Tip #2, and Vacation. The ATR9800 will accept an
unlimited number of user-defined categories. With the exception of Break, Holidays, Lunch, Per
Diem, Regular, and Tips, all categories are entered manually in the system under Time
Transactionmaintenance.
The number of times a category occurred shows on the Category Count Report. By using the
Category Count Report, miscellaneous transactions can be used to track items other than time and
attendance. Examples of user-defined categories are Jury Duty, Bonus Days, Floating Holidays,
and Bereavement.
If the flag for exports is not set under Company Setup, this will be the default Category screen.
You must run a Category Count Report and check (Yes) to Post Categories for the employee
benefits window to be updated.
Category entry overrides absence: If category entry is made and the employee has not worked
that day, this entry overrides the absence. If employee A did not work a specific day and you
want to add hours for this category on that day, this entry would override the fact that they did not
work. Setting this to N for no would bar you from assigning hours to the category VAC unless the
employee worked.
Are category entries paid: Will hours added to this category be paid or will this category be
usedonlytotrackthetime?
Export this category to payroll: When running export time card data report, this category's time
will be included.
12 Categories
Page 15
ATR9800 User Guide
Post this category to benefit: Any miscellaneous entries for this category will be posted and
added to the totals in the benefit entitlement window on the employee maintenance screen.
Entries can optionally be posted during the running of the category count report.
Clear posted benefit annually: Any miscellaneous entries to this category will be cleared from
the benefits entitlement window on the employee’s fiscal date.
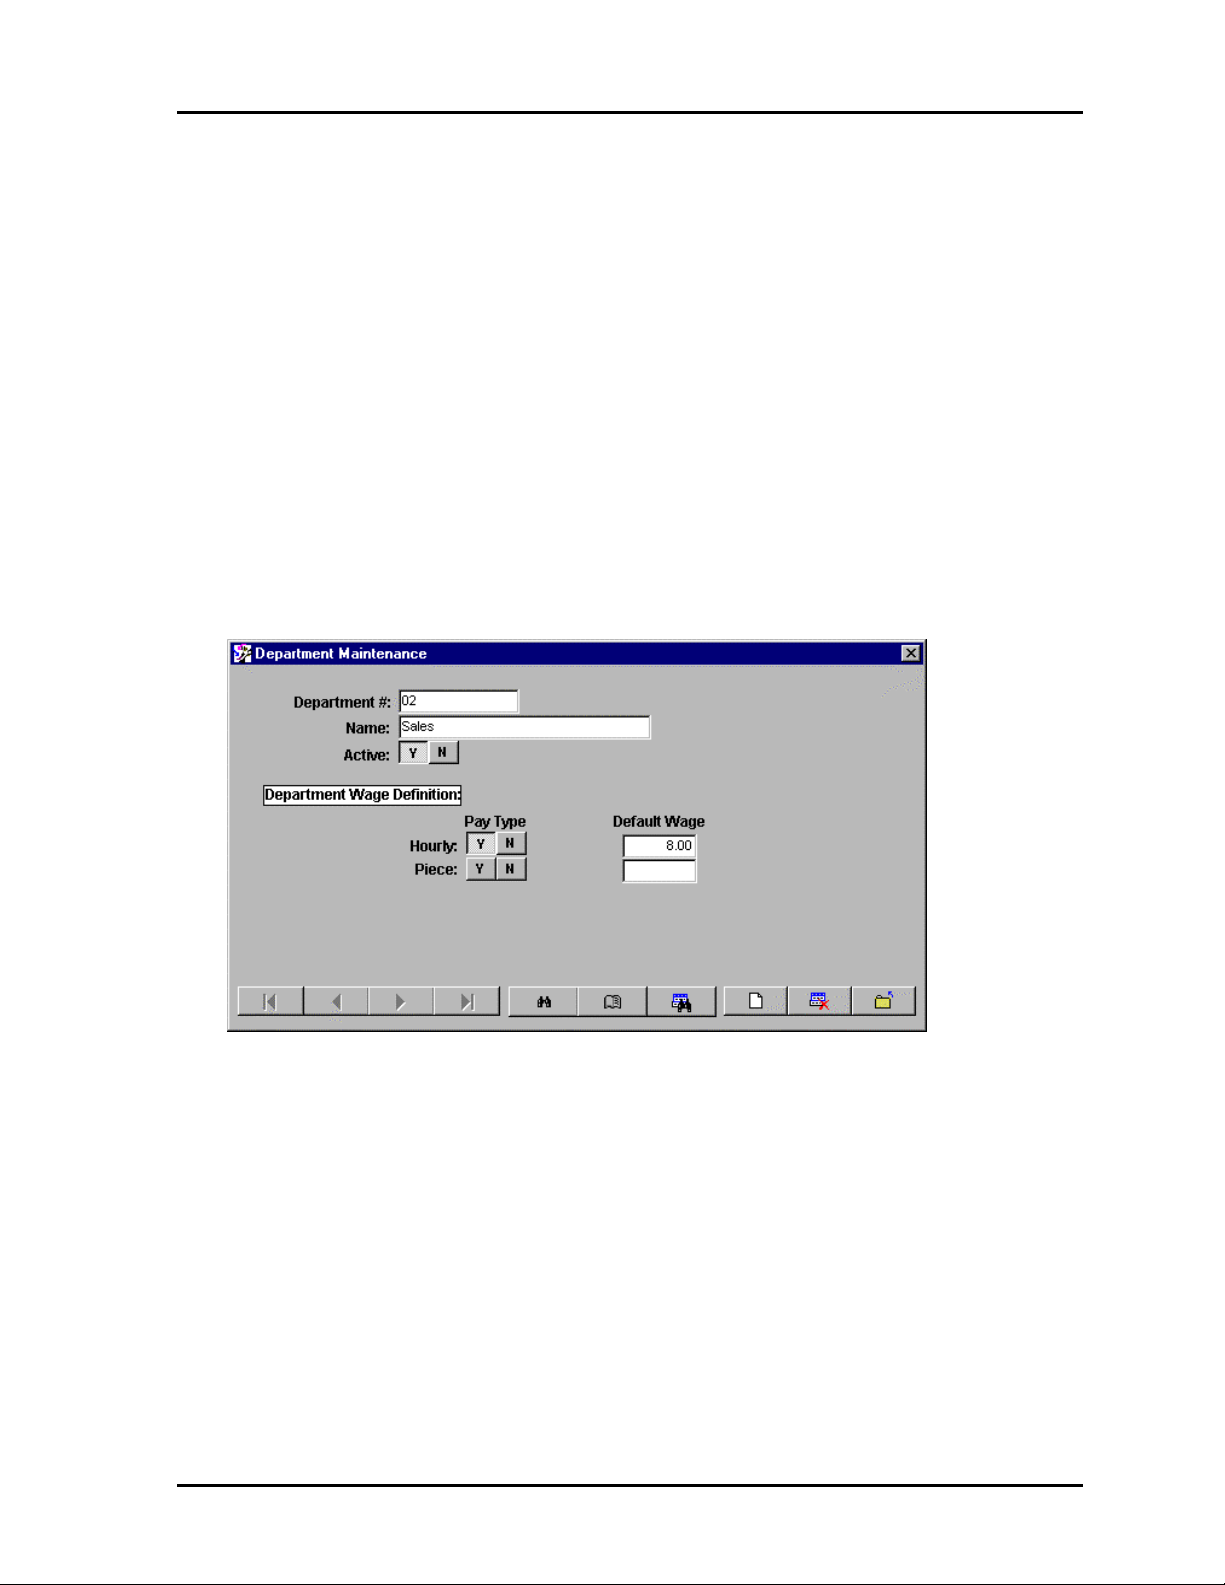
Departments
Another source of grouping employees provided by the ATR9800 is departments. You will be
given the option to sort by departments when printing reports. This gives you the ability to print
Reports only for a particular department.
When adding a department you are required to enter the department number, name and specify
whether the department is active or inactive. If the department is active, it is ready for use and
employees can be assigned to this department or transfer into this department. By default, the
ATR9800 supports department level transfers. If employees are a ssigned to a non-swipe and go
schedule, they can use the clock keypad to transfer to different departments.
If the flag for wages is checked under Company Setup you will see the information for wage
entry under Department Wage Definition. Any employee who accrues time in this department
will be assigned this wage unless they have been assigned a personal wage that is their default
and supercedes any department level wages in the system.
Departments 13
Page 16
ATR9800 User Guide
Holidays
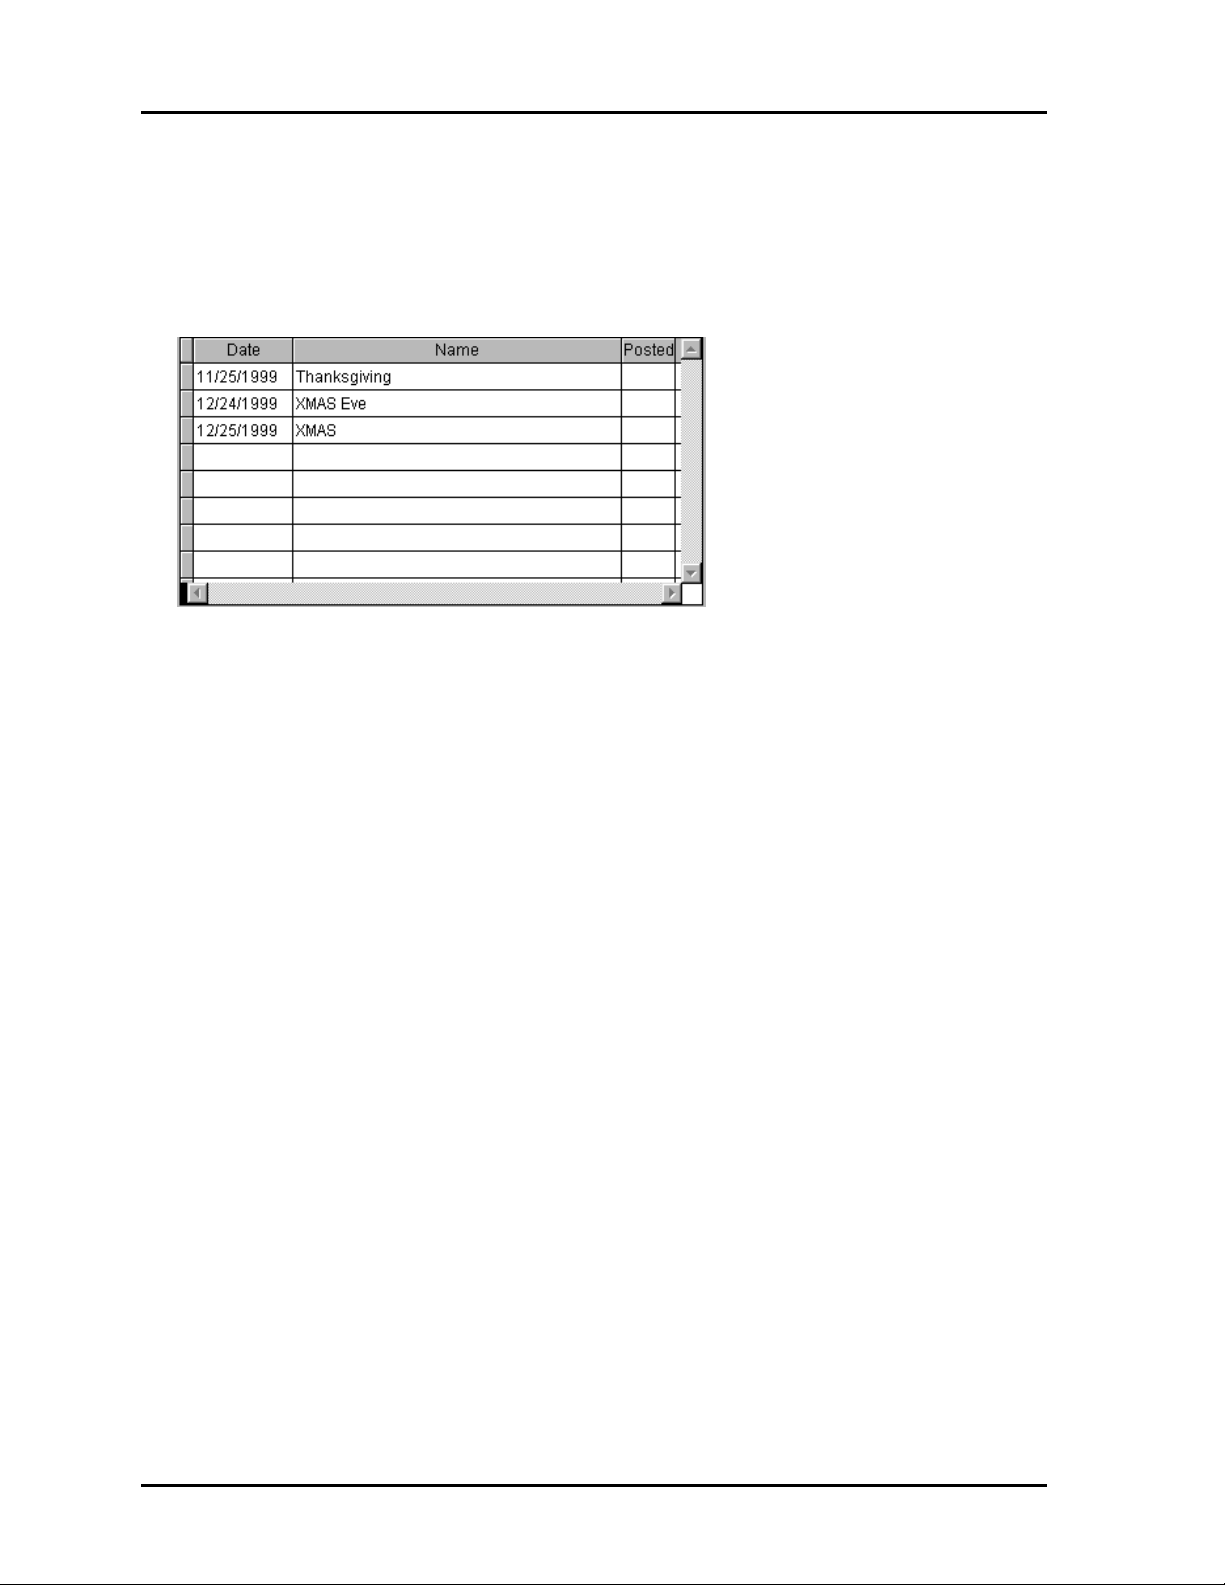
To post holidays automatically to reports and benefits, enter the holiday into the ATR9800
system. Enter the date and a description for the holiday. The employee's assigned schedule must
be flagged to pay non-worked holidays for the time to post.
14 Holidays
Page 17
ATR9800 User Guide
Users
Rights
The ATR9800 system was created to provide user-level security. Individual passwords and
rights can be defined to allow different levels of access to system modules by individuals,
groups, or administrators. The ATR9800 comes with one preset user account, Sysop.The
password for this account is “password”.
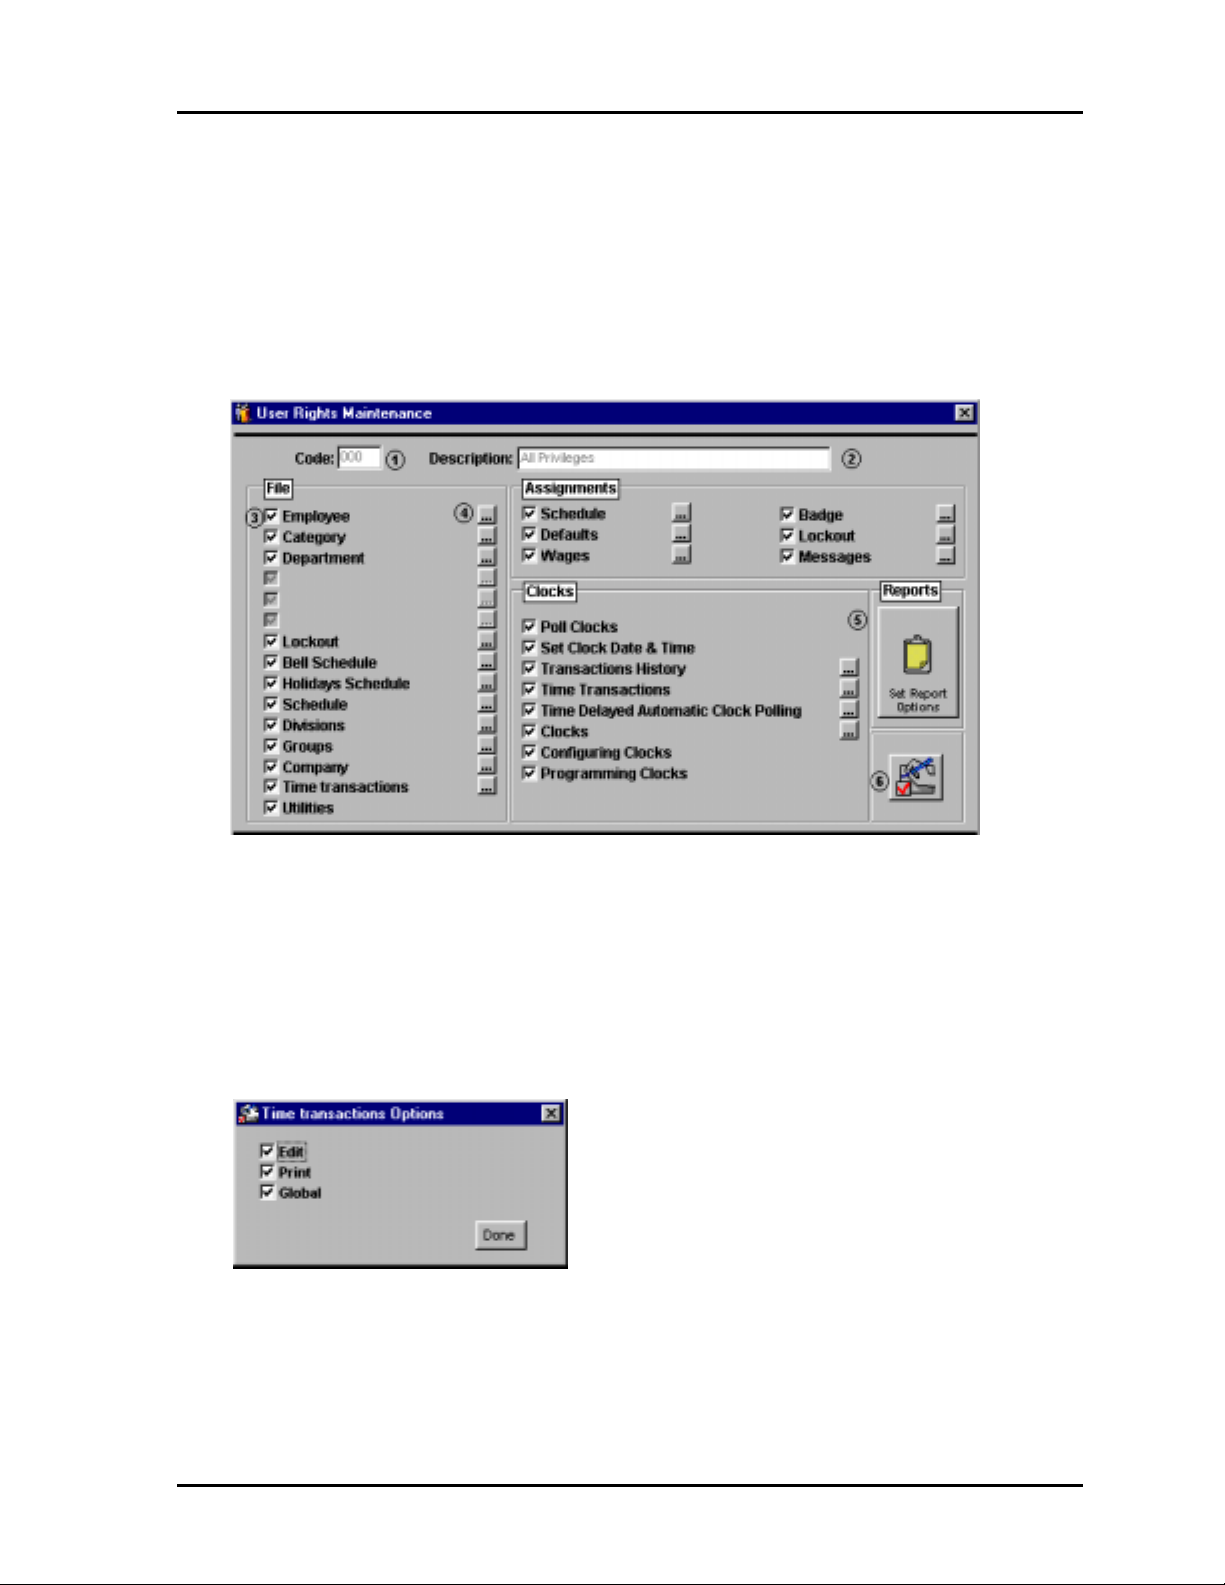
To setup users, first you must define the level of access to be applied. Go to File\Users\Rights
to setup the rights. Enter a three-digit code (1) to identify these rights. Enter an easy to
remember description (2) to further help remember the level of access of these rights. Checking
the box (3) to the left of the module name gives access to this part of the system. In the above
example, all boxes are checked indicating the individual given these rights has total access to
the system. Clicking the build button to the right of the checkbox (4) lets you pick what actions
can be taken on the specified module.
Above is the popup screen for the Time Transaction build button. Once Time Transaction is
checked, the action of Edit, Print and Globally assign transactions can be given. The popup
screens for each module may vary depending on what actions are associated with that module;
the functionality for each remains the same.
Users 15
Page 18
ATR9800 User Guide
Clicking the yellow clipboard (5) icon gives you access to the report screen. Access to different
systems reports can be granted here. Clicking the red check (6) in the bottom right portion of
the screen turns on all rights.
Defined Users
After the access rights are setup within the system, user accounts and passwords are setup.
During this process the rights are linked with the password. Whenever there is a login into the
systemwith the password, the rights associated with that password are in effect.
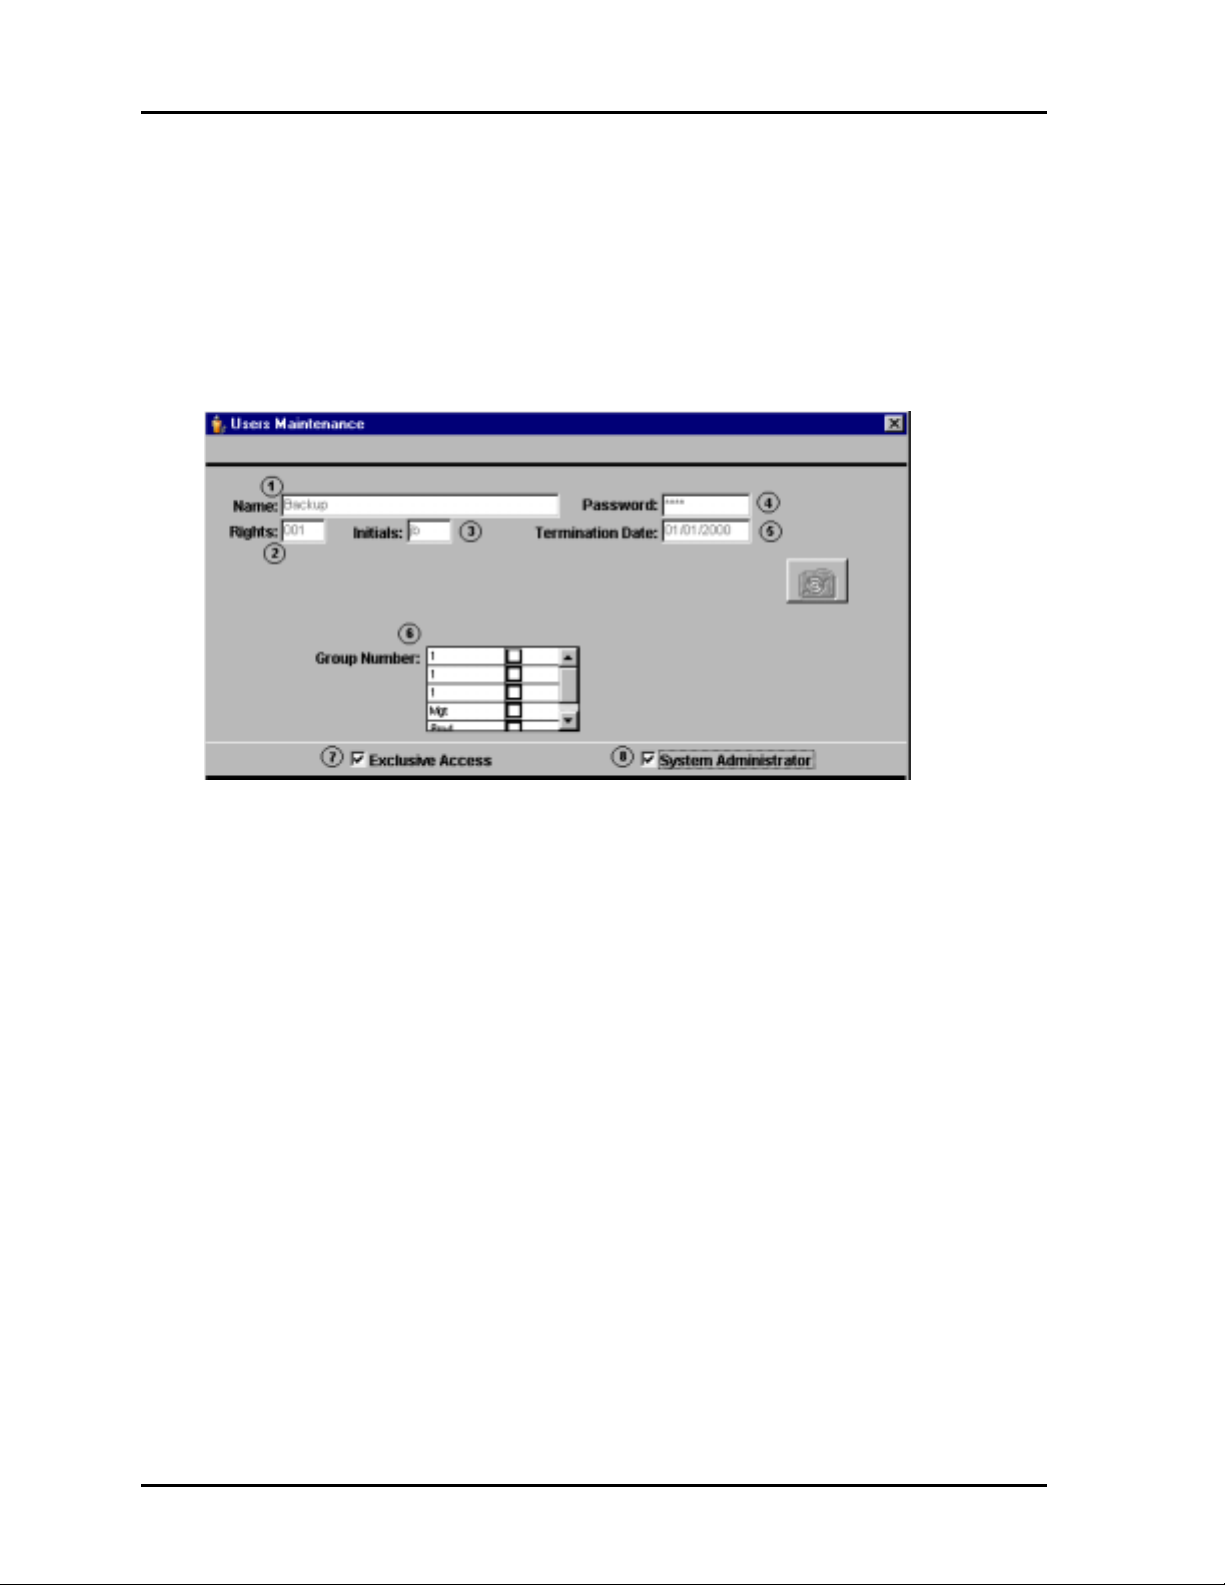
Enter the name (1) for this account. This name will appear on the login screen when the system
is initialized. Enter the rights code (2) to be associated with this account. Enter the (5)
termination date of this password; left blank the system views this password as being in effect
for as long as the account exists.
Initials (3) are applied to changes made with the system, indicating who changed what in the
system. Group number (6) will allow the individual who logs in with this password to only see
this particular group. This is useful in allowing supervisors to see only their group. Exclusive
access (8) means this account has total and lone access to the system. No one else can login
while this account is active in the system. System Administrator (7) gives this account all rights
to the system.
* For users and passwords to be used, the use flag for passwords under Company Setup
must be flagged on*
16 Users
Page 19
ATR9800 User Guide
Groups
As discussed under employee maintenance, employees can be added to groups. The use of
groups can make some functions quicker and easier because they can be applied to a whole
group instead of an individual. If group A could not clock in on the system due to a power
failure, then you can globally assign a clock in time to the whole group instead of each member
of the group. Reports can be sorted by group and given to the group supervisor. Login access
can be given to a supervisor, allowing him or her to see only their group. Grouping can be a
very useful tool. It is simple to add groups to the system.
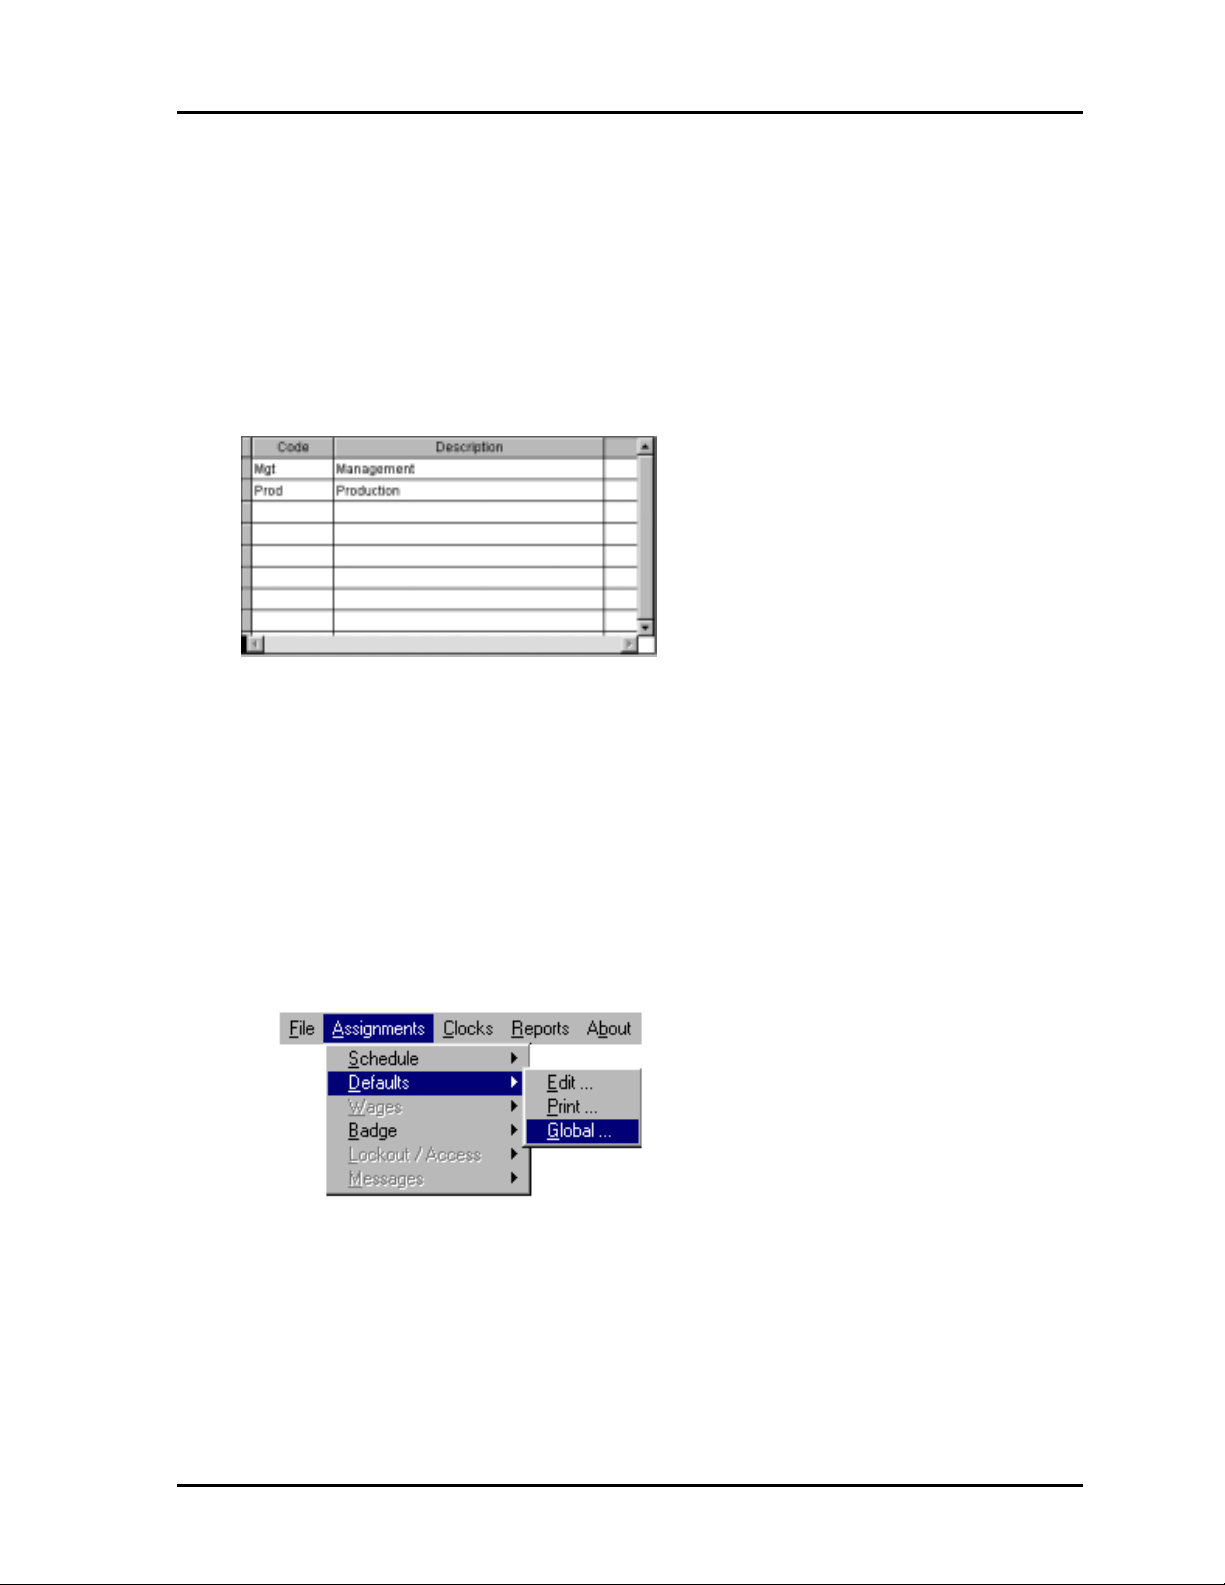
Enter the group code to be used to identify this group. Enter a description to help identify the
group. Employees must be individually assigned to groups on the employee maintenance
screen.
Assignments
We have already explained assignments under employee maintenance. However, we will
briefly highlight the differences between accessing assignments from the employee screen and
the main menu. If accessing assignments from the main menu, you also have the option to
globally assign certain modules and to print the assignments. This can be very useful in
troubleshooting problems. Employees can be assigned individually here just as in employee
maintenance. It is user preference how they desire to accomplish this.
Users 17
Page 20

ATR9800 User Guide
Time Transactions
The time transaction maintenance module allows you to add new time transactions, change time
transactions, globally assign transactions and print a transaction list either in employee number
order or time/date order. Transactions originate from two sources, either polled transactions (from
the clock) or manual entries (from the software.) Supervisor cards can be used to enter
transactions at the clock. These are still considered polled transactions. This is discussed in the
following section on Clocks.
The time transaction module can be accessed either by clicking on File\Time Transactions\Edit or
Clocks\Time Transactions\Edit.
You will be prompted to select an employee. Enter the employee number or right-click the
employee number box to access the employee popup list.
Enter the date the transaction occurred or accept the default and scroll through the dates on the
transactionmaintenance to select the transaction to add or edit.
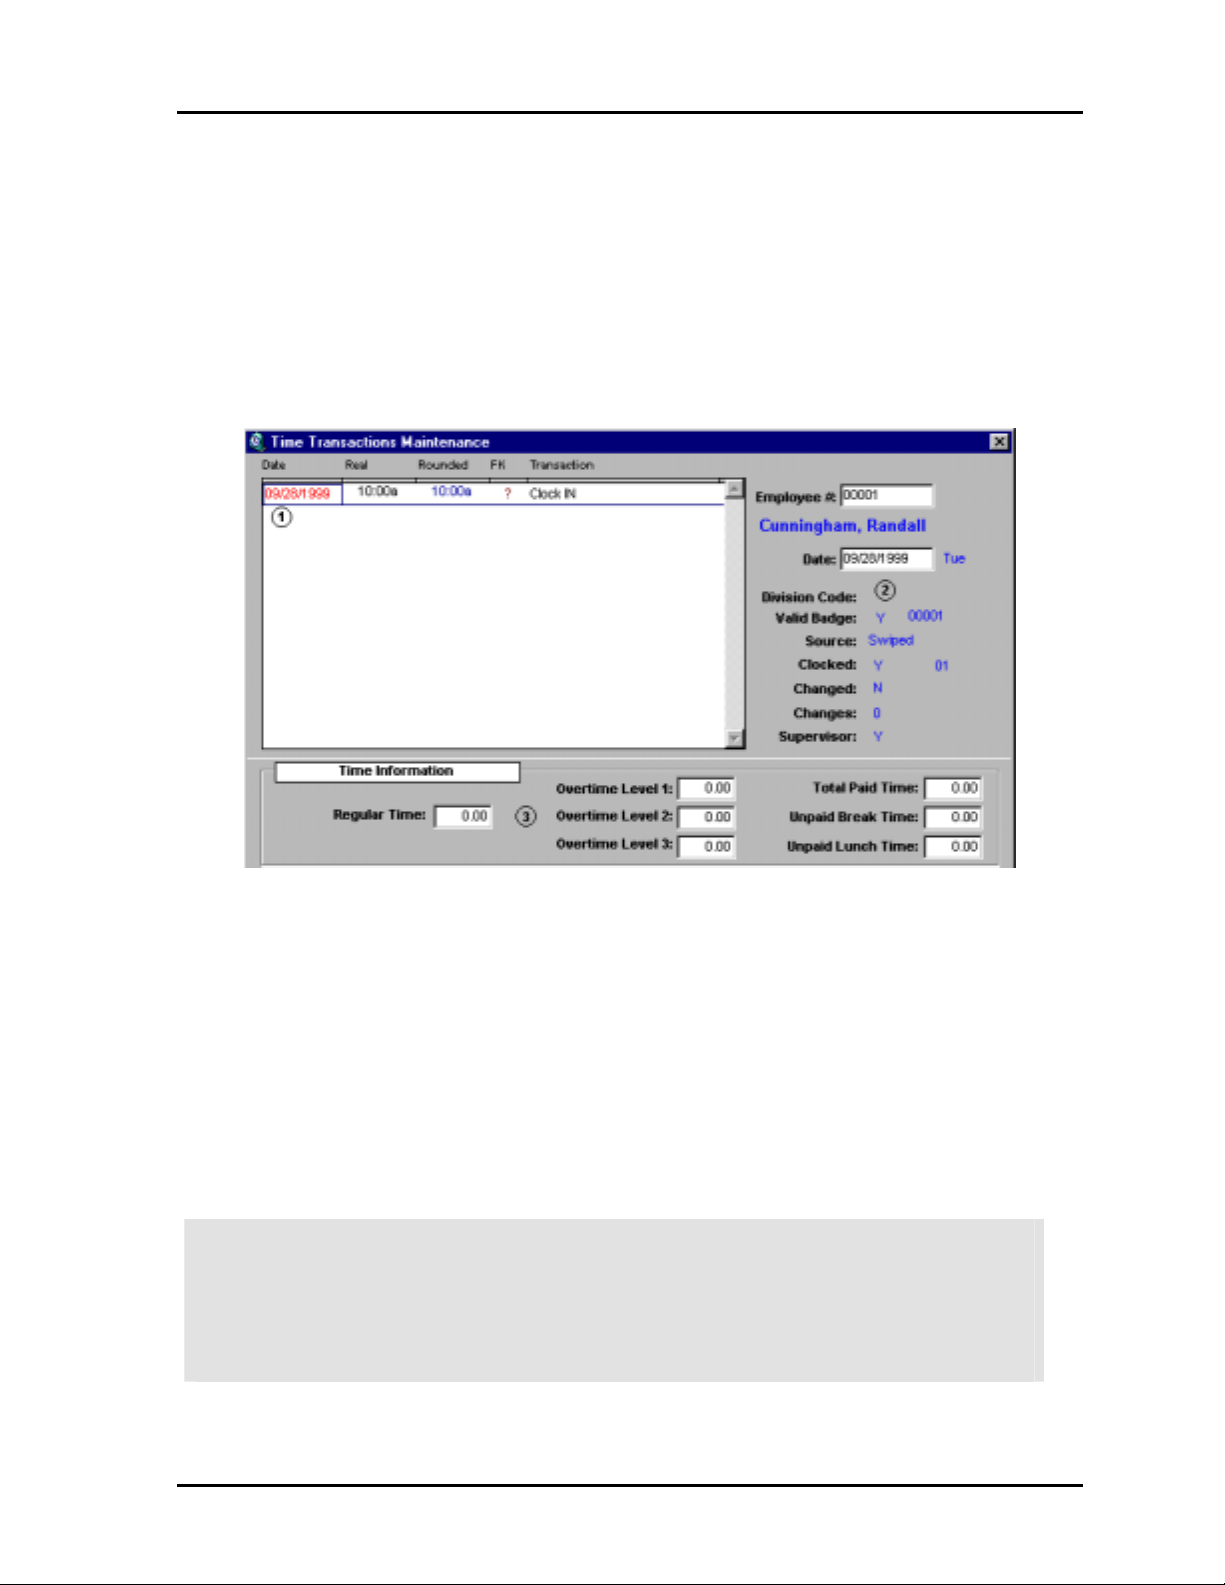
The time transaction maintenance screen shows the transaction data, employee data and time
information associated with each transaction. Transactions are grouped according to the days on
which they occurred. Depending on the employee's assigned schedule configuration, transaction
dates may not all be the same.
The transaction data (1) includes the transaction date, real, which is the actual transaction punch
time. Next is the rounded punch time, which is based on the employees assigned schedule rules.
FK denotes the transaction function followed by the description of that function.
18 Time Transactions
Page 21
ATR9800 User Guide
The employee data includes the employee number, name and the transaction date being viewed in
the display window. It also includes detailed information about the transaction.
DivisionCode: Indicates the division the employee is assigned. The division number is linked
to the employee's assigned schedule.
Valid Badge: Indicates the badge is valid in the system and shows the badge number.
Source: Indicates the source of the transaction. Swiped denotes it was polled from the clock.
Manual denotes it is a manual entry entered from this screen.
Clocked: Y indicates the transaction came from the clock, N indicates it came from the
computer.
Changed: Indicates this transaction has been changed or edited.
Changes: T he actual number of times this transaction has been changed.
Supervisor: Y indicates the transaction was entered at the time clock by a supervisor badge
through supervisor entry mode. N indicates a normal transaction. The maintenance screen also
shows time totals applied to that day’s transaction. It is calculated on the transactions shown
only in the transaction window. Any add/edits made to time transactions reflect an immediate
change in the time totals.
Totals are based on the employee's assigned schedule and are calcula ted according
to that schedule's rules. Totals may appear to be incorrect, so please refer to the
employees' schedule to check schedule rules. Do not make changes to schedules
unless you are sure of their function.
Time Transactions 19
Page 22

ATR9800 User Guide
Add/Edit Transactions
Click on the respective icon to add a transaction. The edit punch screen appears. The date
textbox defaults to the date of the transactions in the transaction window. If this date is not
correct, edit and change to the correct date.
Enter the time for this transaction. When entering the time, hours, minutes and seconds must be
entered. Enter the clock number for the clock the employee punches. If the clock number is not
known, enter a random character and press TAB key to access clock popup window. The clock
can then be selected directly from that window. Enter the function for this transaction.
Functions tell the system how to use the transaction.
Function Description
SG Swipe & Go
IN Clock IN
OUT Clock OUT
M Miscellaneous
0 Department Transfer
1JobTransfer
2StepTransfer
3OperationTransfer
4 Out To Lunch
5 Cash Tips/Credit Tips
6InFromLunch
7OutForBreak
8 OPEN
9 In FromBreak
To delete a transaction, select the transaction in the transaction window and click the respective
icon.
20 Time Transactions
Page 23

ATR9800 User Guide
Global Add
The process for the global addition of a transaction is the same as adding a single employee
with one difference. During the global addition process, you can supply parameters for starting
and ending employee and starting and ending group. If everyone is to receive the same
transaction, those fields can be left blank to indicate all employees and all groups.
Miscellaneous Entry
Miscellaneous entries are used to add/subtract hours/dollars from a selected employee. The
actions are applied to specific categories and the changes are reflected on employee reports. To
add or edit a miscellaneous transaction, the category must be definedin the ATR9800 system.
To add or edit a miscellaneous transaction, place a ‘M’ in the function text box on the edit
punch screen.
Category Code: Enter the code for the category the hours for this transaction are to be applied
to.
Hours or Dollars: Is this entry an hour or dollar amount?
Add/Subtract: Is this entry an addition or subtraction of hours?
Accrue Towards Overtime: Can this time be applied to overtime?
Pay at OT Level: 0- Regular Time
OT1
OT2
OT3
The levels of overtime must be defined in the employee’s schedule for level selections to take
affect.
Amount: Amount of hours to be added or subtracted. Hours are a rounded amount. Seconds
are not used.
*Note: Polled transactions cannot be edited into miscellaneous transactions. The
miscella neous transaction mu st be added as a separate entry. All sections of the
miscella neous transaction must be completed.
Time Transactions 21
Page 24

ATR9800 User Guide
Clocks
Polling
Punch information is received from the time clock via a process called polling. Polling is a
manual process that must be performed by the user. Reports in the system are only accurate to
the last polling. For example, if you poll the clock after the 8:00 am shift clocks in and then
decide to run a report after lunch, the report will only reflect punch information up until the
8:00 am polling. You must poll the clock again for the system to retrieve the punches acquired
since8:00 am.
Depending on the modules included with your software, your clock screen may appear
different than below.
Go to Clocks\Poll Clocks to poll clocks. Enter the clock ID of the clock to be polled. To poll
all clocks, clear the ID textbox and press enter. “All” will appear to the right of the box
indicating all clocks will be polled.
During the polling process you will be given the choice to:
Set Clocks Date & Time: The clock's date a nd time can be set either at the clock with the
configuration badge or through the software. If time is set during polling, the clock time
will be only as accurate as your PC time. You are not required to set the time each time
you poll.
ProgramClocks: Programming clocks loads information about each clock stored in the
clock file and the clock configuration file. Programming of clocks is normally
accomplished during installation and they should not require reprogramming. If you feel
you should program your clocks, please refer to your dealer or support provider.
Clear Clocks Transactions: Checking this item will prompt the clock to delete all stored
transactions. During polling a copy of all transactions is copied into the software. The
Acroprint Data Collection terminal will store appr oximately5000 to 7000 transactions
depending on the configuration and loaded modules. It is not required to clear all
transactions during each polling.
* Should the message “ Clock Memory Full” appear on the terminal display, poll clock
and check “Clear Clocks Transaction ” to clear memory space. *
22 Clocks
Page 25

ATR9800 User Guide
Archiving/Unarchiving Transactions
Archiving
Archiving transactions allows you to remove transactions from the punch file reducing the
overall size of the file. Depending on the number of transactions archived you should notice an
increase in systemresponse time.
The archivefile is called“Punch$.DBF”. It is locatedin C:\Atr9800\Data\ directory.
To archive transactions: From the main menu select “Utilities”. On the utility screen select
“Punches” from the table listings on the right. Click the archive icon and the archive parameter
screen appears. Fill in the desired parameters and click the check button. The selected
transactions will then be removed from the punch file and placed in the “Punch$.dbf” file.
There will be no visual indication that this has taken place.
If transactions are archived and put on another medium they must be put back in the
Atr9800\Data directory before they can be unarchived. They must be replaced with the same
file name.
Archiving/Unarchiving Transactions 23
Page 26

ATR9800 User Guide
Schedules
Schedules determine the basis for all employee reports and must be defined carefully. These
schedules determine the pay-period, lunch rules, overtime, time rounding and more. If using fixed
shifts, it is important to remember that each schedule contains three (3) shifts. If you have more
than three shifts you need to setup an additional schedule to accommodate the shifts. You can
have an unlimited number of schedules and shifts. If at anytime your company rules change, you
can readjust your schedules parameters to reflect that change. In order for that change to take
affect you must recalculate your time transactions. The new changes will only apply to the
transactions you specify.
The flags on the right turn on following related screens. If you wish to use a feature, check the
appropriate box and the screen to enter the parameters is made available. Press next screen to see
additional screens.
Note: An employee must be assigned to a schedule for transactions to be calculated and
shown on reports.
The following is a brief description of each schedule parameter. These entries may or may not
reflect your current schedule and should be used only as a guide.
Schedule Num b er: Enter a unique number to identify this schedule. Entries may be either
numeric or alphanumeric.
Description: Enter a description to identify this schedule.
Frequency: W - Weekly, B - Bi-Weekly, S - Semi-Monthly, M - Monthly
24 Schedules
Page 27

ATR9800 User Guide
Start Date: Start dates for the schedules are determined by the entries for pay-periods under
company setup. This field entry cannot be changed under schedules.
Next Day: Determines what day punches that cross the day change time will appear on in
reports. For example, someone clocking in at 10:00 pm on Sunday and clocking out at 08:00
am on Monday can have their times show up as Sunday or Monday’s transactions. Setting this
to N, the transactions would show up as Sunday’s transactions, setting this to Y, the
transactions would show up as Monday’s.
Next Day Limi t: Determines the cut-off point at which transactions are moved to the next day.
It is used in conjunction with the next day setting. When next day is set to Y, any transactions
that occur between the next day limit and the day change time are moved to the next calendar
day. If you have an evening shift that crosses the day change time, this value is usually one
hour before that shifts start time.
Apply To Punches: Used to determine what types of punches are moved to the next day. For
swipe and go schedules this field will be SG as shown in the picture on the previous page.
MaxLinkBackTime: Used to link punches to the first punch of the day, so they are
physically grouped on the same day. This mainly applies to punches that cross the day change
time,i.e.3
depending on your individual rules.
rd
shift. A usual number here is 10:00 hours. This value may need to be adjusted
Apply To Punches: Used to determine what type of punches are linked to the first punch. For
swipe and go schedules this field will be SG as shown in the picture on the previous page.
Missing Punch Limit: Used to set a limit at which the system will automatically insert a
missing punch.
Will Default To: Used in conjunction with missing punch limit. Specifies the amount of time
that will be given to an employee if they fail to clock out within the missing punch limit.
Set First Level Change since first IN Punch: If you are using job costing and want the
employees time to start to accrue from the days IN punch set this to yes. If you want the time to
start to accrue from the first level change set this to no.
Automatic
With Automatic Deductions, when a set amount of time is worked, this time is deducted from an
employees worked time. Up to three deductions can be made in a single work period. Elapsed
time starts from a clock in and resets on a clock out. All auto deductions are shown under their
respective categories, break under BRK and lunch under LUNCH.
After Elapsed Time Worked: Enter elapsed time as the amount of timethat must pass before
this deduction will be taken.
Deducts
Amount Of Time to Deduct: Enter the total amount of time to be deducted from the total if
the elapsed time limit is met.
Schedules 25
Page 28

ATR9800 User Guide
Punched Break/Lunch Parameters
Break/Lunch Duration: Duration time is the amount of time scheduled for the break/lunch.
Minimum: The amount of time that must elapse for this break/lunch to take affect, otherwise
this time is added back to the regular total time.
Maximum: Enter the maximum time for break/lunch, if exceeded the entire break will be
deducted from the regular hours and will not be reported as break/lunch.
Grace: Enter grace time as the amount of time that the break/lunch duration can be exceeded
and the employee not be penalized.
Paid: This setting tells the system if the duration is paid or not.
Min. Work Time: Enter the minimum amount of time that must be worked before a
break/lunch can be taken.
MaximumAllowed: Enter the maximum number of breaks/lunches allowed in a single work
period.
Break/Lunch Window Parameters
When using break/lunch windows, the system does not look at how long the employee has
worked;itsaysmydeductperiodhasastartandastoptime.Youmayormaynotpayfor
punch time outside the deduct window. This can be used in any combination.
In this mode, you define a window of time. Any punches that occur in this window tell the
system the employee is punching for lunch/break. Up to three windows may be defined per
shift.
26 Schedules
Page 29

ATR9800 User Guide
Start Time: Enter the time the auto deduct window starts.
Stop Time: Enter the time the auto deduct window stops.
Lunch/Break: Enter how you would like this deduction to be applied.
Pay Window: This entry tells the system whether the time worked during the window is paid
or not.
Round OUT: Enter the number of minutes to determine the out for lunchtime rounding.
Round IN Every: is used to tell the system what part of the accounting unit will be rounded
forward. If your Round In is set to 15 and your Round Forward back is set to 8, and the
employee punches the clock at 09:08, that timeis rounded forward to 09:15.
Grace Back: is used to tell the system what part of the accounting unit will be rounded back. If
your Round In is set to 15 and your Grace back is set to 7, and the employee punches the clock
at 09:07, that timeis rounded back to 09:00.
Overtime
Pay Rate Multipliers (1-3): Enter the pay rate multiplier for overtime. Ex., 1.50 for time and a
half, 2.00 for double-time.
OT Cycle: W – Weekly, B – Bi-Weekly, S – Semi-Monthly, M – Monthly
Daily Limit: Enter the threshold at which overtime is accrued on a daily limit.
Schedules 27
Page 30

ATR9800 User Guide
Period Limit: Enter the threshold at which overtime is accrued on a period limit.
Force Overtime for IN punch es Between: Forces any time accrued between the start and stop
time to be accrued as overtime. This can be used to setup blocks of time outside the normal
shift time that employees can accrue overtime.
At overtime level: Sets the overtime level at which this time will be accrued.
Force Overtime for time outside of defined shifts: Ca uses any timeaccrued outsideof the
employees defined shift start and stop time to be accrued as overtime. For example, their
schedule has one shift 08:00 to 17:00. They clock in at 07:00 and clock out at 18:00. They will
accrue 2 hours of overtime (07:00 – 08:00 and 17:00 – 18:00)
At level: Sets the overtime level at which this time will be accrued.
Force Overtime by Day of the Week: Forcesanytimeaccruedonthespecifieddaytobe
accrued towards overtime.
Keep in level over day change: Forces overtime to be accrued until the employee clocks out.
If left unchecked and employees are on the clock when a new day occurs and that day is not
flagged to pay overtime, their overtime accrual will stop at the day change time.
Fixed Shifts and Time Rounding
Fixed shifts define the start and stop time for employees. There are three shifts per schedule.
Start/Stop: Enter the start time and stop time for the shift.
28 Schedules
Page 31

ATR9800 User Guide
Cut-Off : The cutoff determines the logical cutoff for a shift. An employee clocking in between
the shift start time and the cut-off is said to be clocking in late for the assigned shift. An
employee clocking between the cut-off and the stop time is said to be clocking in early for the
next shift.
Diff.: Check if shift differential is paid.
Math: + if the differential will be added. * if the differential will be multiplied.
Add/Multi.: Enter the value that will be added or multiplied.
Round In Every: This is used to round time outside of the shift start/stop window. This can
be considered your pay interval round or your accounting unit. If you pay every five minutes
the employees are on the clock enter 5 here, if you pay every 15 minutes enter 15 here.
Grace Back: is used to tell the system what part of the accounting unit will be rounded back. If
your Round In is set to 15 and your Grace back is set to 7, and the employee punches the clock
at 09:07, that timeis rounded back to 09:00.
Round Forward: is used to tell the system what part of the accounting unit will be rounded
forward. If your Round In is set to 15 and your Round Forward back is set to 8, and the
employee punches the clock at 09:08, that timeis rounded forward to 09:15.
The process for Round Out Every is exactly the same as rounding the IN punch except it
occurs for the out punch.
IN-PunchGrace Back: GracebackisusedtoroundINpunchesbacktotheshiftstarttime.
Employee punches that occur within the grace period will be treated as if they occurred exactly
on the start time. This is separate from Gr ace Back on the Pay Interval. IN punches that occur
within the grace period will reported as graced in on the Attendance Summary on the time
cards.
Round Forward: This is used to round punches outside the shift sta rt time up to the shift start.
This is separate from Round In Every. For example, the shift star ts at 08:00 and employees
routinely clock in as early as 07:25 to keep from being late. Setting the round in to 45 minutes
will round any IN punches that occur between 07:15 and 08:00 up to 08:00 so that time is not
accrued as regular time.
Dock Forward: The minimum minutes an employee will lose from time worked totals if they
clock in after the shift start time plus the grace period. For example, the shift starts at 08:00, the
grace is 5 minutes and the dock is 15 minutes. If the employee clocks in at 08:05, his or her
time is rounded back to 08:00 and he or she is considered on time. If the employee clocks in at
08:06, he or she is considered late. His or her time is rounded forward to 08:15 and starts to
accrueat that time.
Out-Punch Grace Forward: Grace forward is used to round OUT punches forward to the
shift stop time. Employee punches that occur within the grace period will be treated as if they
occurred exactly on the stop time. This is separate from Round Out Every Grace on the Pay
Interval.
Schedules 29
Page 32

ATR9800 User Guide
Round Back: This is used to round punches outside the shift stop time back to the shift stop.
This is separate from Round OUT Every. For examplethe shift stops at 16:00 and employees
clock out a s late as 16:20 because of clean up. Setting the round back in to 30 minutes will
round any OUT punches that occur between 16:00 and 16:30 back to 16:00 so that timeis not
accrued as overtime.
Dock Back: The minimum minutes an employee will lose from time worked totals if they
clock out before the shift stop timeplus the grace period. For example the shift stops at 16:00,
the grace is 5 minutes and the dock is 15 minutes. If the employeeclocks out at 15:55, his or
her time is rounded forward to 16:00 and he or she is considered on time. If the employee
clocks out at 15:54, he or she is considered to be early. The time is rounded back to 15:45 and
theystop accruing timeat that time.
Is Differential Pay Fixed By Initial Shift Worked: If using differentials and this is set to yes
an employee does not accrue time at the new level if his time crosses into another shift. If set to
no and the employee’s time crosses into the next shift’s time, the employee will accrue time at
the level of the next shift. For example an employee is assigned to shift 1. Shift 1 does not have
a differential pay rate. Shift 2 has a differential pay rate of .50 cents. If employee one worked
his regular shift and then worked 2 hours into shift 2 and this entry is set to yes, the 2 hours
will be paid at his regular pay rate. If this value is set to no they will accrue their normal rate
for shift 1 and accrue an additional .50 cents an hour for the 2 hours they worked in shift 2.
30 Schedules
Page 33

Holiday Parameters
ATR9800 User Guide
Pay Rate Multiplier If Holiday is Worked: The pay rate multiplier is taken directly from the
overtime setup of this schedule. Chose the level you want to pay if the employees assigned to
this schedule work on a holiday.
MinimumDays of Employment to Qualify: Minimum days of employment before
employees assigned to this schedule can be paid for non-worked holidays.
Required to Work Both the Scheduled Day Before & After: B indicates employees are
required to work both the scheduled day before and after a holiday to receive non-worked
holiday pay. O indicates they are required to work either the scheduled day before or after to
receive non-worked holiday pay. N indicates they are not required to work either the scheduled
day before or after to receive non-worked holiday pay.
Number of Days Before Posting Holidays: Number of days after a holiday has passed before
the system will check to see who receives non-worked holiday pay. An entry of 0 will tell the
system to post holidays the very next day.
Hours To Add for Each Worked Holiday: Hours to add if an employees works on a holiday.
This is given to an employee in addition to the actual hours worked.
Accrue Towards Overtime: Can these additional hours accrue towards overtime? If so,
At Level: What OT level will these hours accrue at?
Hours to Add for Each Non-worked Holiday: Hours to add for each non-worked holiday.
An employee must meet two previous qualifiers to receive non-worked holiday pay. (Min. days
to qualify and required to work scheduled day before and after.)
Schedules 31
Page 34

ATR9800 User Guide
Accrue Towards Overtime: Can these additional hours accrue towards overtime? If so,
At Level: What OT level will these hours accrue at?
Exception Report
Exception report parameters are used to identify employees who do not follow punch rules.
Consecutive Hours Worked: Enter the number of consecutive hours worked, that if an
employee exceeds that amount it will be reported.
Overtime Hours Worked: Enter the number of consecutive overtime hours worked, that if an
employee exceeds that amount it will be reported.
Exception report intervals define a period of time in which the system reports the occurrence of
certain punches. Up to eight different report intervals can be defined. Report intervals can only
be used with keypad entries; this feature is not available for swipe and go. You can set up an
interval to see who is punching in too early, who is punching out late, etc.
Punch Type: Enter I to have this interval report an IN punch or O to have this interval report
an OUT punch.
Start Time: Enter the start time of the interval to report on a specific punch.
Stop Time: Enter the stop time of the interval to report on a specific punch.
In
On
Service
Parameters
MinimumHours: Enter the minimum hours an employee will be given for coming in using a
function key setup to be In On Service.
Accrue at Overtime: Y indicates the total time the employee is on service accrues to overtime.
Pay Overtime Level: Enter a pay rate overtime level.
Out
On Service
MinimumHours: Enter the minimum hours an employee will be given for going out in using
afunctionkeysetuptobeOutOnService.
Accrue at Overtime: Y indicates the total time the employee is on service accrues to overtime.
Pay Overtime Level: Enter a pay rate overtime level.
In On Service Punch Negates The Previous: Y indicates if an employee returns to work after
leaving work, the given Out On service hours are eliminated.
32 Schedules
Page 35

ATR9800 User Guide
Per Diem
This feature is used to give an employee a set amount of dollars on a specific day of the week.
Per Diem will be shown on the employee’s time card report, and in the categories called PRD1
and PRD2. This amount will be added to all dollar amounts on reports.
Day of the Week: Enter the day of the week per diem is to be given when an employee clocks
in.
Amount: Enter the amount, in dollars and cents, to add to the employee total.
Schedules 33
Page 36

ATR9800 User Guide
Lockouts
Profiles Lockouts are used to lockout, warn, or just provide messages to employees according to
thetime they punch as compared to thetable that is set up in eachprofile. Each tablecontains
eight (8) time zones. Each time zone is associated with one of fifteen messages to display along
with the amount of time a message will be displayed, tone to sound, whether to lockout the
employee, and can the supervisor override the lockout.
For lockouts to work correctly:
♦ The lockout number must be assigned to a clock under clock maintenance.
♦ The employee must be assigned to a profile.
♦ The corresponding function key is configured under clock configurations.
♦ The changes are programmed into the clock.
To setup a profile click the Add icon (1). Enter a number for this profile. Enter a description for
this profile. By default you start with table one. Click the save icon. Tables hold time zone
parameters (4). Each pr ofile has fifteen tables allowing up to 15 unique time zonetables.
Add the desired messages for the time zones by clicking the ADD Message icon (2). The
Message Edit screen appears. You can enter up to 15 different messages (5). The same
messages can be used for each of the fifteen time zone tables.
Message: The message to be displayed at the clock when the employee enters their badge
number.
Time: The amount of time the message is to be displayed.
Tone: What type of tone to will be generated at the clock. (A = Accept, R = Reject, N = None)
Lockout: Lock the employee from finishing transaction.
34 Lockouts
Page 37

ATR9800 User Guide
Supervisor: Can the supervisor override this lockout?
Add the desired time zones by clicking the ADD Time Zone icon (3). Each table (4) holds 8
time zones. Time zones cannot overlap. (Ex., a time zone cannot end at 06:04 and the next one
start at 06:03). Time zones must encompass the entire 24-hour day. If a time zone starts at
08:00 am the last timezone must end at 07:59 am.
Start: Starttimeforthetimezone.
End: Endtimeforthetimezone.
Message: Enter the number of the message from (5) to be associated with this time zone.
Lockouts 35
Page 38

ATR9800 User Guide
Bells
Bell schedules allow for clocks to generate predefined audible signals. The bell module allows for
an unlimited number of bell schedules. A signal can be generated for every minute of the day.
For Bells to work correctly:
♦ The bell schedule number must be assigned to a clock under clock maintenance.
♦ The Acroprint relay kit must be attached to the clock and the switch in use set to bell.
♦ The bell schedule must be programmed into the clock.
To add a bell schedule, click the Add icon (1). Enter a number for this schedule. Enter a
description for this schedule. Click the Add Schedule icon (2) to add a signal time to the
schedule. Bell times are entered by:
Time: The time the signal is to sound.
Duration: The length of the signal.
Sun-Sat: The day of the week the signal is to sound.
36 Bells
Page 39

ATR9800 User Guide
Access Control
Access control is used to control external security devices such as security doors.
For Access Control to work you must:
♦ Configure the access parameters under clock maintenance.
♦ Configure the appropriate function key under clock configurations.
♦ Assign the employee/employees to the access table.
♦ Have the Acroprint relay kit attached to clock.
Access Only Clock: Check if the clock will only be used for access and not to store time
transactions.
Access Control: Check if the clock will be used for access control.
Always Open Start Time: Used in conjunction with “Open on Sun-Sat” to define a period of
time in which access is always granted.
Open on Sun-Sun: Used to define days of the week in which access is always granted.
Access Duration : Length of time relay signal is active.
All Badges: If using profiles in conjunction with access control, checking this block tells the
clock to allow access to all badges that pass the profile check. If unchecked the clock will act
as normal and first check to see if the badge is in the profile table. If found the clock will then
check to see if the badge is in the access table and if it is found there the relay will activate and
allow access.
Access Control 37
Page 40

ATR9800 User Guide
Autopoll
Autopoll/Report allows automatic polling and reporting of time transaction information at a
predetermined time without any user intervention. The only requirement is that the computer be
left in autopoll. Autopoll can be programmed to print reports after programming is completed. If
autoreporting is used, a printer must be available for the software to print to.
To setup autopoll, go to Main Menu\Clocks\Time Delayed Polling & Reporting. Click the add
iconat the bottom of the screen.
Time: The time you wish this polling to occur.
SMTWTFS: The day/days of the week you wish this polling to occur.
Type: C – clocks. To poll one or all clocks.
D – To poll all clocks in a specified division.
F – to run a n external file such as an external tape backup program.
Clock ID: If C is chosen enter the clock ID of the clock to be polled. If polling all clocks press
enter and ALL will automatically be inserted for you.
File: If F is chosen enter the full path to the file to be executed. The file may either be a batch
(.BAT) or an executable (.EXE).
Retry: The number of times to retry if clock communications errors out.
CLR: Checkto clear all clock transactions after polling, Leave blank to leave transactions intact.
Tset: Check to set clocks time to computers date/time.
Bells: Check to download bell schedule to the clock after polling.
38 Autopoll
Page 41

ATR9800 User Guide
Acc: Check to download access control table to the clock after polling.
Prof: Check to download employee profile table to clock after polling.
Mess: Check to download employee messages to the clock after polling.
Val: Check to download validation tables to the clock after polling.
ARep: Check if you want the system to automatically print the reports after polling.
If ARep is checked you will then be prompted with the report selection screen. Refer to Page 50
on Reports for instructions on report configuration.
Autopoll 39
Page 42

ATR9800 User Guide
Messaging
Messaging allows for individual or group messages to be viewed by your employees at the clock.
When an employee inputs his or her badge number the programmed message appears on the
screen for the specified amount of time. The messagecan be any 16-character message.
For messaging to work you must:
♦ Assign the employee/employees to the desired message.
♦ Program the message table into the clock.
Employee #: Employee number of the employee you wish to assign this message to.
All Clocks: If you have multiple clocks and employees swipe any clock, you can have this
message appear on all clocks.
Clock Id: If you have only one clock or if you have multiple clocks and want the message to
appear on only one clock, enter that clock’s ID number.
Display Messages: Check if you want the message to be displayed on the clock. Unchecked
and the message will not be displayed for this employee.
Default Message to Name: Check to default the message to employee’s name. If checked the
employee’s name will be displayed in the message box. Each time the employee swipes the
clock his or her name will be displayed.
Message: T ype the messageto be displayed. You are limitedto 16 alphanumeric characters.
40 Messaging
Page 43

ATR9800 User Guide
Job Costing
The Job Costing module allows for four levels of labor tracking, each with it’s own user-defined
name. By default the Department level is active upon initialization of the system. The levels
allow for additional breakdown of information. Each level can be assigned its own wage or piece
rate. If you use wages, Departments must be used also. Employees may be assigned to a default
department where they will automatically be assigned and accrue time when they clock in.
The levels in t he ATR9800 are Department, Job, Step and Operation. You can have an unlimited
number of functions at each particular level. For example, you can have an unlimited number of
jobs, an unlimited number of steps and also operations.
To setup Job Costing you must:
♦ Add level code and description for each level in the system.
♦ Turn on under Company Setup the levels you wish to use.
♦ Add the tasks for each level to the system.
♦ Setup the clock configuration for keypad entry and define a range of badges that will access
the keypad.
Once you enter the level numbers into the system and setup the clock configuration you must
reprogram the clock.
Employees who wish to enter any of the defined levels must press the appropriate key on the
clock. When that key is pressed they will be prompted to enter the appropriate level number. At
that time they start to accrue time in that level and if a wage is assigned to that level, at that
wage.
An example of a department that has an hourly pay type and a default wage of $8.00 is shown
above. Any employee who accrues time in this department will accrue it at $8.00 an hour
unless they have been assigned an individual wage. Individual wages override level wage
assignments. (See employee section). This department is selected to be downloaded to the
clock for validation. Any employee who transfers to this department must enter the correct
number “01” at the clock or the transfer will not take place.
Job Costing 41
Page 44

ATR9800 User Guide
Input Validation
The validation allows downloading of level numbers to the data collection terminal. The terminal
can verify these level numbers at time of entry, rejecting bad numbers and accepting good
numbers displaying the level name.
On the setup screens for Department, Job, Step and Operation you will see the prompt to
download to the clock for validation. If Y is selected, the job number is downloaded to the clock.
When keying job numbers at the clock, only numbers downloaded will be accepted.
42 Input Validation
Page 45

ATR9800 User Guide
Clocks
To add a clock to the system go to Clocks\Clocks\Edit. On the Icon Bar select the add icon.
Clock ID: Up to 10 alphanumeric characters. Use the clock ID when selecting this clock
throughout the software.
Terminal ID: Enter the internal number of the actual clock that this entry represents. Each clock
entered on the system must have a unique internal ID number.
Termin al Name: Up to 20 alphanumeric characters. Enter a nameor a description to help
identify this clockin the software.
Configuration: Enter in the configuration to be used with this clock. The configuration must
already exist in clock configurations. A clock can be assigned only one configuration. If you have
multiple clocks they can all share one configuration or they can be assigned an individual
configuration. A case in which they would use one configuration is if each clock will have the
same display prompt and will function identically.
Lockout: If using the Profile Lockout Module this entry block will be visible. Enter the profile
number to download to the clock.
Bell Schedule: If using the Bell Schedules Module this entry block will be visible. Enter the bell
schedule number to download to the clock.
Time Diff. Between Comp. & Clock: Since the computer is used to set the clocks and the
computer may not always reside in the same time zone as the clock, this field allows you to enter
the time differences between the computer and clocks. Upon setting the clock time, the system
Clocks 43
Page 46

ATR9800 User Guide
takes the computer time + or – the timeentered in this field and sets the clock time with the
result.
Enter the time difference, in hours, between the polling computer and the clock using (+) sign if
clock is to be set ahead of the computer clock, and (-) if behind. i.e.: If the clock is in a time zone
one hour prior to the computer enter a –1 in this field. An entry without a plus sign prior to the
hour will be taken as a plus.
Connection
Serial Port: If connecting to a serial port on the back of your PC check this button and from
the pull down menu to the right select the corresponding serial port to be used.
Using Modem: Check this button if you are using a modem to communicate with this clock
and enter in the phone number that will be dialed to access this clock in the field to the right. If
you dial an access code or number to connect to an outside line enter that number before the
phone number, follow it by a comma. Ex. 9, 8721234.
TCP/IP Address: If you are using an Ethernet terminal, check this button and enter a unique
IP address for the terminal. You may need to contact your network administrator for an
appropriate address to use.
TCP/IP Port: Enter t he port number that the clock is setup to use. This number defaults to
10000. This number must match what is set internally in the clock.
Termina l Mode: If you have one terminal connected directly to your PC serial port, check
single terminal. If you have multiple clocks connected to directly to a serial port on your PC,
check 485 LAN. If you are connecting via modem and you are using an internal or external
modem check the appropriate button.
Signal Enhancer Duration: If using an external signal enhancer, enter the amount of time in
tenths of a second the enhancer is to be active; i.e., 1 sec = 10.
Use PIN Control: Check if you wish to use PIN numbers as a form of security with this clock.
At the clock the employees will be promptedto enter their PIN number to validate any punch
transaction.
Job Costing
With the Job Costing tab you can use the clock for a particular job level. By default, the
department level is active in the system. With the Job Costing module you can access the other
levels of Job Costing and use the clock only for a particular level. Check the appropriate level
and enter the level number to be used at this clock.
Access Control
44 Clocks
See the section access control to describe this tab.
Page 47

ATR9800 User Guide
Fingerprint Unit
If you are using the fingerprint unit in conjunction with the clock, the fingerprint parameters must
be entered at this tab. With the FIU unit (Fingerprint Identification Unit) each transaction is
validated with the employee fingerprint before the transaction is processed.
Fingerprint Unit Use Level: This entry turns on the FIU circuitry within the clock. It also sets
the reader sensitivity level, 5 being the most sensitive and 1 being the least sensitive.
Max. of Fingerprints: Indicates the maximum number of fingerprints to use. This entry can be
from 1 to 999.
# of fingerprints per Badge: Each badge can be used with up to three fingerprints. If badges are
assigned more than one fingerprint, the maximum number is decreased. Using two fingerprints
per badge, the maximum number that can be used is 499; with three fingerprints per badge, the
maximum number is 333.
FIU Security Code: This number is used to identify the reader that is attached to a particular
clock. Once programmed with this number that reader must remained attached to that clock. If
another FIU reader is used with the clock an error will occur.
Timeout to Read Fingerprint: Indicates the maximum amount of time the FIU reader will
attempt to recognize the fingerprint. This entry is entered in tenths of a second. Example: an entry
of 10 = 1 second.
Fingerprint Unit 45
Page 48

ATR9800 User Guide
Clock Configurations
Clock configurations are used to configure and control how each clock functions. Clocks can
share a common configuration or they can each have a unique configuration. Before a
configuration can be utilized, it must be programmed into the clock. Under configurations you
can program the clock function keys, change the display prompts, set initial source inputs and
many more controls.
General
To add a configuration, click on add, give the configuration a name and click save & exit. To
delete or modify a configuration, make sure the configuration is highlighted in the main
window and click the appropriate button.
You must select save and exit before any configuration changes are saved.
Functions Definition
The Function Definitions tab is used to customize the individual keys on the clock keypad.
These keys can be used to input information such as piece counts, tips etc. Please consult with
Acroprint Time Recorder technical support for information on function key customization.
Parameters Configuration
Parameter configuration tab is used to set the clocks initial input source. The initial source can
be set at the clock or via the software.
46 Clock Configurations
Page 49

ATR9800 User Guide
Timeouts
The timeouts tab is used to set the clock timeout settings. The three main categories of timeouts
are the general timeout for data input, message timeout and communications timeout. The
general timeout for data input is the amount of time the clock will wait after it prompts you to
put in information. For example, if you are prompted to enter badge number, the clock will
wait this amount of time before timing out.
Message timeout is the amount of time any messages displayed by the clock will be visible.
This entry is separate and will not override any entries made in the Profile Lockout module,
which has it’s own separate message display timeouts.
Communications timeout is the amount of time before the system stops its attempt to
communicate with the clock and starts to retry. This entry is entered in milliseconds.
Ports Configuration
The ports configuration tab is used to set the communications speed of the clock’s internal
ports.
Modem Answer Window: defines a window that indicates the time of day in which the clock
modem will answer an incoming call.
Modem Ring Delay: indicates the number of rings at which the modem will pickup an
incoming call.
Baud Rate: sets the baud rates of the clocks internal ports and modem. For RS-232 and
RS-485 this setting is always 9600.
Badge Details
Stored Last Characters: tells the clock to read the badge number from right to left the amount
of digits setup under Company Setup/Descriptions/Badge Length.
Max.BadgeforSwipe&Go:tells then clock the maximum badge number to used for swipe
and go. Any badge number below this entry will be considered a swipe and go badge. With
swipe and go badges the employee swipes the badge and the system decides whether it is an IN
or OUT punch.
Supervisor Prefix: indicates the badge prefix that will activate the clocks supervisor mode.
Any badge numbers with this prefix will put the clock in supervisor mode.
Security Prefix: indicates the badge prefix the clock uses to validate employee transactions.
The clock will accept any badges with this prefix.
Prox. Reader Facility Code: indicates the facility code used by the proximity badges. If using
proximity badges this number is provided by the vendor.
PIN Length: if using PIN numbers as a level of security, this entry sets the length of the PIN
numbers.
Clock Configurations 47
Page 50

ATR9800 User Guide
Display Messages
The display messages tab is used to change the default clock messages. Each field will allow
for 20 alphanumeric characters.
The “Idle Prompt Top and Bottom Lines” are what is displayed on the clock display.
“Invalid Source ” is displayed when tryingto use an input source that has been disabled.
“Invalid Badge” is displayed when using a badge of invalid length.
“Please Try Again” is displayed when the clock misreads a registration attempt.
“Enter Function” is displayed when a badge above the max swipe and go number is swiped.
Access Always On- is displayed during the period that access is always granted. This period is
defined under Clocks/ Access Control.
Access Always Off- is displayed during the period that access is always denied. This period is
defined under Clocks/ Access Control.
Print Setup
The print setup tab is used when printing clock transactions at the clock. This is used to print
the transactions and does not take the place of the printer attached to the PC. When using an
attached printer you can:
Print Transactions - indicates to the clock to print each transaction.
Up to 2 Header Lines- these lines can be used as descriptors for departments, jobs, etc.
# of lines for Line Feed - indicates the number of lines to fed after printing each
transaction.
48 Clock Configurations
Page 51

ATR9800 User Guide
Reports
All time card reports are driven from the report menu. When running reports and summaries, we
recommend running the missing punch report first. Once ran, if any missing transactions are
shown, correct the time card by adding, deleting or changing the transactions; then rerun the time
card. With the time card correct, all other reports will now total correctly. If the time card is
missing transactions, all other reports will total incorrectly.
The following is a list of available reports/summaries and a description:
Report Description
Time Card Report Shows an employee punches, total and daily hours
Hours Report Shows an employee regular and overtime hours (summary)
Daily Hours Report Shows an employee hours broken down by day (summary)
Who’s In Report Shows which employees are clocked in at a selected date/time
Who’s In by Shift Shows which employees are clocked in by shift (if using shifts)
Shift Report Shows totals broken down by shift (if using shifts)
Category Report Shows totals broken down by category
Dept/Category Summary Shows category totals by level # and category
Category Count Report Shows category count totals such as TIP1 and TIP2
Group Hourly Summary Shows totals broken down by group
Group Wage Summary Shows employee wages broken down by group
Division Summary Shows totals broken down by division
Job Hourly Summary Shows totals by employee and levels, user definable
Job Wage Summary Shows wages by employee and levels
Piece Wage Report Shows piece wage totals
Approaching Overtime Report Shows employees scheduled hours vs. actual worked hours
Attendance Report Reports In’s/Out’s/Absents/Unscheduled days
Attendance Count Report Shows employees adherence to attendance policies
Punch Exceptions Report employees’ adherence to punching according to policy
Missed Punch Shows missing punches for employees
Duplicate Punches Shows duplicate punches for employees
Opposing Punches Shows opposing punches for employees
Use of invalid badge Shows punches made with invalid badge
Schedule Exceptions Reports employees’ adherence to schedule policies
Consecutive Hours Shows employees working over a set straight hours
Overtime Hours Shows employees working to many overtime hours
Punch Interval Shows employees punching between set times
Benefit Report Shows employees benefit entitlement
Quantity Report Shows quantities a ccepted and rejected
Function Key Report Reports custom functions not supported by the ATR9800
Access Report Shows employees access attempts (Access module required)
ADP Export Creates an output file(ASCII) to payroll service
Paychex Export Creates an output file(ASCII) to payroll service
ExportTimeCardData Exportstimecarddatatoafileinfieldlengthsensitiveor
comma-delimited form
Generic Export Exports employee schedule and department assignments and
employee total hours
Reports 49
Page 52

ATR9800 User Guide
Report Menu
Depending on system configuration, certain report selections may not be available.
Report Ranges
Due to the number the number of reports provided, we only discuss the similarities between the
reports. Depending on the reports selected, some screen items will appear on some screens but
not others.
Beforeactually startingthe report program, select the report parameters to specify the
information to be contained in the report. These parameters will be common entries on all
reports, except the “Who’s In Report,” which asks for a reference date/time.
50 Reports
Page 53

ATR9800 User Guide
Pay Period, Special, Yesterday
P - Pay period reports will report actual pay period and overtime totals, which may be
used to calculate payroll. Enter up to two numeric digits, relative to today, of the pay
period to report. 0 is the current pay period, 1 is the past pay period, and so on.
S - Special date reports may not report correct overtime totals, since overtime is based
upon pay periods. Special reports are a snapshot of time between two date ranges.
Y - Prints the previous day’s transaction information.
Starting/Ending
Enter the starting and ending parameters to use for your selection criteria. When entering
report parameters the ending parameter must always be equal to or greater than the
beginning parameter.
Show Legends
Causes the legends to print at the top of every page of the report. If no is selected, the
legends will print only on the first page of the reports. Legends are the ranges selected
above and shown on the top left of every report.
Print Minutes in Hundredths
Causes report totals to be printedin hundredths of minute increments. Selecting no causes
theprint format to be in regular minutes.
Reports 51
Page 54

ATR9800 User Guide
Sample Reports
Time Card
Acroprint Time Recorder Page #: 1
TIME CARD 09/29/1999
Date Range: 09/24/1999 --> 09/29/1999
Employee Range: 00001 --> 00001
Group Range: All
Department Range: All
Division Range: All
Employee Name Social Sec Group Division
3:39:14
1
00001 Cunningham, Randall Mgt
Time Function Time Function
09/24/1999 Fri 08:00a Clock IN --MP 001
09/25/1999 Sat 00:00a --0:00a 001
09/26/1999 Sun 00:00a --0:00a 001
09/27/1999 Mon 08:00a Clock IN --1:00a Clock OUT 001
09/28/1999 Tue 08:00a Clock IN--1:00a Clock OUT 001
09/29/1999 Wed 08:00a Clock IN--1:00a Clock OUT 001
Pair Punches Sch Reg Ot1 Ot2 Ot3 Brk Lunch
0.00 0.00 0.00 0.00 0.00 0.00
0.00 0.00 0.00 0.00 0.00 0.00
0.00 0.00 0.00 0.00 0.00 0.00
12:00p Clock IN --5:00p Clock OUT 001
8.00 0.00 0.00 0.00 0.00 0.00
12:00p Clock IN--5:00p Clock OUT 001
8.00 0.00 0.00 0.00 0.00 0.00
12:00p Clock IN--5:00p Clock OUT 001
8.00 0.00 0.00 0.00 0.00 0.00
Total by Employee: 24.00 0.00 0.00 0.00 0.00 0.00
52 Sample Reports
Page 55

Hours Report
ATR9800 User Guide
Acroprint Time Recorder Page #: 1
HOURS REPORT 15:06:42
Date Range: 09/24/1999 --> 09/29/1999
Employee Range: 00001 --> 00005
Group Range: All
Department Range: All
Division Range: All
Employee Name Reg OT1 OT2 OT3 Total
00001 Cunningham, Randall 27.00 0.00 0.00 0.00 27.00
00005 Lambert, Jack 27.00 0.00 0.00 0.00 27.00
00002 Montana, Joe 27.00 0.00 0.00 0.00 27.00
00004 Romonowsky, Steve 27.00 0.00 0.00 0.00 27.00
00003 Taylor, Lawrence 26.00 0.00 0.00 0.00 26.00
Global Total: 134.00 0.00 0.00 0.00 134.00
Total Of Employee Processed: 5
09/29/1999
Sample Reports 53
Page 56

ATR9800 User Guide
Who's In
Acroprint Time Recorder Page #: 1
WHO’S IN 09/29/1999
Date: 09/28/1999 10:00
Employee Range: 00001 --> 00005
Group Range: All
Department Range: All
Division Range: All
15:20:16
Employee Name IN Punches Department: Last Transaction Function Last
00001 Cunningham, Randall 09/28/1999 08:00a 09/28/1999 17:00:00 OT
00005 Lambert, Jack 09/28/1999 08:00a 09/28/1999 17:00:00 OT
00002 Montana, Joe 09/28/1999 08:00a 09/28/1999 17:00:00 OT
00004 Romonowsky, Steve 09/28/1999 08:00a 09/28/1999 17:00:00 OT
00003 Taylor, Lawrence 09/28/1999 08:00a 09/28/1999 17:00:00 OT
Total IN Punches: 5
Total Of Employee Processed: 5
Date Time Date Time
54 Sample Reports
Page 57

ATR9800 User Guide
WhoisinbyShift
Acroprint Time Recorder Page #: 1
WHO IS IN BY SHIFT 10/04/1999
Date: 09/29/1999 --> 09/29/1999
Employee Range: 00001 --> 00002
Group Range: All
Department Range: All
Division Range: All
Employee Name IN Punches
Date Time
Shift: 1
00001 Cunningham, Randall 09/29/1999 08:00a
Total by Employee: 1 Punches
Shift: 1
13:07:46
00002 Montana, Joe 09/29/1999 08:00a
Total by Employee: 1 Punches
Total by Shift: 2 Punches
Sample Reports 55
Page 58

ATR9800 User Guide
Shift Report
Acroprint Time Recorder Page #: 1
SHIFT REPORT 10/04/1999
13:37:39
Date Range: 09/29/1999 --> 09/29/1999
Employee Range: 00001 --> 00003
Group Range: All
Department Range: All
Division Range: All
Employee Name Reg OT1 OT2 OT3 Total
Shift:1
00001 Cunningham, Randall 3.00 0.00 0.00 0.00 3.00
00002 Montana, Joe 3.25 0.00 0.00 0.00 3.25
Total by Shift: 6.25 0.00 0.00 0.00 6.25
Shift:2
00003 Taylor, Lawrence 6.00 0.00 0.00 0.00 6.00
Total by Shift: 6.00 0.00 0.00 0.00 6.00
Global Total: 12.25 0.00 0.00 0.00 12.25
Total Of Employee Processed: 3
56 Sample Reports
Page 59

ATR9800 User Guide
Category Summary
Acroprint Time Recorder Page #: 1
CATEGORY SUMMARY 10/04/1999
13:50:16
Date Range: 09/15/1999 --> 09/29/1999
Employee Range: All
Group Range: All
Department Range: All
Division Range: All
Employee Name Reg OT1 OT2 OT3 Dlls
Category: PERS
00001 Cunningham, Randall 4:00 0:00 0:00 0:00 0.00
00003 Taylor, Lawrence 8:00 0:00 0:00 0:00 0.00
Total by Category: 12:00 0:00 0:00 0:00 0.00
Category: SICK
00004 Romonowsky, Steve 8:00 0:00 0:00 0:00 0.00
Total by Category: 8:00 0:00 0:00 0:00 0.00
Category: VAC
00005 Lambert, Jack 4:00 0:00 0:00 0:00 0.00
Total by Category: 4:00 0:00 0:00 0:00 0.00
Global Total: 00:00 0:00 0:00 0:00 0.00
Total Of Employee Processed: 4
Sample Reports 57
Page 60

ATR9800 User Guide
Department Category Summary
Acroprint Time Recorder Page #: 1
DEPARTMENT CATEGORY SUMMARY 10/04/1999
14:22:48
Date Range: 09/15/1999 --> 09/29/1999
Employee Range: All
Group Range: All
Department Range: All
Division Range: All
Employee Name Reg Ot1 Ot2 Ot3 Dlls
Category: PERS
Department:
00001 Cunningham, Randall 4:00 0:00 0:00 0:00 0.00
00003 Taylor, Lawrence 8:00 0:00 0:00 0:00 0.00
Total by Category: 12:00 0:00 0:00 0:00 0.00
Category: SICK
Department:
00004 Romanowski, Steve 8:00 0:00 0:00 0:00 0.00
Total by Category: 8:00 0:00 0:00 0:00 0.00
Category: VAC
Department:
00005 Lambert, Jack 4:00 0:00 0:00 0:00 0.00
Total by Category: 4:00 0:00 0:00 0:00 0.00
Global Total: 00:00 0:00 0:00 0:00 0.00
Total Of Employee Processed: 4
58 Sample Reports
Page 61

ATR9800 User Guide
Group Hourly Summary
Acroprint Time Recorder Page #: 1
GROUP HOURLY SUMMARY 10/04/1999
14:33:23
Date Range: 09/15/1999 --> 09/29/1999
Employee Range: All
Group Range: All
Department Range: All
Division Range: All
Employee Name Reg OT1 OT2 OT3 Total
Group: Mgt
00001 Cunningham, Randall 10.00 0.00 0.00 0.00 10.00
00002 Montana, Joe 3.25 0.00 0.00 0.00 3.25
Total by Group: 13.25 0.00 0.00 0.00 13.25
Group: Prod
00003 Taylor, Lawrence 14.00 0.00 0.00 0.00 14.00
00004 Romonowsky, Steve 8.00 0.00 0.00 0.00 8.00
Total by Group: 22.00 0.00 0.00 0.00 22.00
Group: Sales
00005 Lambert, Jack 7.00 0.00 0.00 0.00 7.00
Total by Group: 7.00 0.00 0.00 0.00 7.00
Global Total: 42.25 0.00 0.00 0.00 42.25
Total Of Employee Processed: 5
Sample Reports 59
Page 62

ATR9800 User Guide
Job Hourly Report
Acroprint Time Recorder Page #: 1
JOB HOURLY REPORT 10/04/1999
Date Range: 09/29/1999 --> 09/29/1999
Employee Range: 00001 --> 00001
Group Range: All
Department Range: All
Division Range: All
Employee Name
1st 2nd 3rd 4th 5th 6th
Reg OT1 OT2 OT3 Total by
Emp Dep Job Ste Ope
Employee: 00001 Cunningham, Randall
Department: 02 Prod
Job:01 IBM
Step: 01 ASSY
Operation: 01 chasis 3.00 0.00 0.00 0.00 3.00
Total by Step: 3.00 0.00 0.00 0.00 3.00
Total by Job: 3.00 0.00 0.00 0.00 3.00
Total by Department: 3.00 0.00 0.00 0.00 3.00
Total by Employee: 3.00 0.00 0.00 0.00 3.00
Global Total: 3.00 0.00 0.00 0.00 3.00
14:51:05
Total Of Employee Processed: 1
60 Sample Reports
Page 63

ATR9800 User Guide
Report Missing Punches
Acroprint Time Recorder Page #: 1
REPORT MISSING PUNCHES 09/29/1999
Date Range: 09/24/1999 --> 09/29/1999
Employee Range: 00001 --> 00005
Group Range: All
Department Range: All
Division Range: All
Probable Corresponding Punch
Employee Name Date Time Badge Missing Punch
15:43:12
00005 Lambert, Jack 09/27/1999 12:00p 00005 INSERT OT PUNCH
00002 Montana, Joe 09/27/1999 05:00p 00002 INSERT OT PUNCH
Total Of Employee Processed: 2
Total by Employee: 1 Exceptions
Total by Employee: 1 Exceptions
2 Exceptions
Sample Reports 61
Page 64

ATR9800 User Guide
Benefit Report
Acroprint Time Recorder Page #: 1
Employee Range: All
Group Range: All
Department Range: All
Division Range: All
BENEFIT REPORT 10/04/1999
15:29:55
Employee Name Allowed Taken Left Count
00001 Cunningham, Randall 40.00 8.00 32.00 3
00003 Taylor, Lawrence 40.00 16.00 24.00 3
00004 Romonowsky, Steve 40.00 16.00 24.00 3
Code PERS Personal
Total by Benefit 80.00 24.00 56.00 6
Code SICK Sick Hours
Total by Benefit 40.00 16.00 24.00 3
Global Total: PERS 80.00 24.00 56.00 6
SICK 40.00 16.00 24.00 3
Total Of Employee Processed: 3
62 Sample Reports
Page 65

ATR9800 User Guide
Export Time Card Data
0000 00001 Mgt 01 001 NR0 REG 3.0019990924 08:00N 0 0YN+ 0.00
0000 00001 Mgt 01 001 NR0 REG 3.0019990927 08:00N 0 0YN+ 0.00
0000 00001 Mgt 01 001 NR0 REG 5.0019990927 12:00N 0 0YN+ 0.00
0000 00001 Mgt 01 001 NR0 REG 3.0019990928 08:00N 0 0YN+ 0.00
0000 00001 Mgt 01 001 NR0 REG 5.0019990928 12:00N 0 0YN+ 0.00
0000 00001 Mgt 01 001 NR0 REG 3.0019990929 08:00N 0 0YN+ 0.00
0000 00001 Mgt 01 001 NR0 REG 5.0019990929 12:00N 0 0YN+ 0.00
Field Length Description
C 4 Division Number
E 10 Employee Number
G 10 Group Code
0 10 Level 0 Number
1 10 Level 1 Number
2 10 Level 2 Number
3 10 Level 3 Number
P 10 Schedule #
W 1 Shift Number Currently Working
A 1 Shift Number assigned
H 1 Holiday Y for yes, No for no
T 1 R-Reg, H-Hol, M-Misc, L-Lnch, B-Brk
I 1 O-Regular, 1-OT1, 2-OT2, 3-OT3
C 4 Category Code
T 8 Hours (Text Form)
Y 4 Year
M 2 Month
D 2 Day
H 3 Hour
: 1 Always a colon(:)
M 2 Minute
Q 1 Contains quantities Y for yes, N for no
A 10 Quantity Accepted
R 10 Quantity Rejected
P 1 Is this record paid (Y) or unpaid (N)
D 1 Shift differential Y for yes, N for no
X 1 Multiplier
R 6 Rate of multiplier to include a decimal point
Sample Reports 63
Page 66

ATR9800 User Guide
Generic ASCII Export
00000,0000000001,0000000001,0000000001,12,02700
00000,0000000002,0000000001,0000000001,12,01900
00000,0000000003,0000000001,0000000001,12,02600
00000,0000000004,0000000001,0000000001,12,02800
00000,0000000005,0000000001,0000000001,12,02200
Field Code
Department Number
Schedule Number
EmployeeNumber
Company Number
Amount
64 Sample Reports
Page 67

ATR9800 User Guide
Glossary
Access Control – controlled access to an area. Requires clock interface with related software
which provides the ability to define scheduled times of access.
Active – an item defined in the system that is currently in use. May be an employee
or department.
Autopoll – process of automatically retrieving punch information from the terminal.
Autopoll is user configurable. (Requires additional related software.)
Badge– plastic card that contains numerical data, either in the form of a bar code or
magnetic stripe, used for registering transactions at the time clock.
Benefit – entitlement madeavailable in accordance with business rules, such as paid
vacation, sick time, etc.
Category – categories are transactions other than employee punches even though
employee punches can be grouped into categories. Categories are user
defined and includesuch items as bereavement pay, unpaidbreaks and
floating holidays.
Departm ent – a method of grouping employees in the ATR9800 system. Also, when using
job
costing, it is the first level for time accrual in the job costing hierarchy.
Day Change – the time a new day begins. Day change time is normally midnight, but can
be changed to insure that time worked totals can be accredited to the day
intended.
Dock – The minimum minutes an employee will lose from time worked totals if
punching in after the S tart Timeor before the S top Time.
Exception – a transaction that is in violation of the schedule policy or business rules to
which they are assigned. For example, a missed punch or an early punch.
Fixed Shift – a shift that has a definite start and stop time and contains rules to which
employees must adhere.
Grace – the minutes after the Start Time or before the Stop Time during which
employee punches will be treated as if they occurred on the Start and Stop
times.
Group – a method of grouping employees in the ATR9800 system.
Inactive – an item defined in the system that is currently not in use. Used mainly to
identify employees who are temporarily not using the system or unused
departments.
Sample Reports 65
Page 68

ATR9800 User Guide
Job Costing – a hierarchical method of tracking time. Time is accrued in multiple levels in
the system. The user can associate lower level jobs with higher-level jobs to
design their own systemfor effective cost control. The ATR9800 supports
three levels of job costing. (Requires related software.)
Lockouts – lockouts are used to warn or provide messages to employees according to
the time they punch the clock. Lockouts are used to grant or deny access to
the system. Not to be confused with the actual messaging. (Requires related
software.)
Messaging – messaging allows the assignment of individual or group messages seen at
the clock when the badge is swiped. Messages can easily be changed and
programmed by the user. (Requires related software.)
Pay period – the lengthof time whichtime worked totals will accumulate for a timecard.
Pins – pins are numbers assigned to employees to use in conjunction with their
employee badges to register a transaction. They provide a low-level form of
systemsecurity.
Punch – the process of registering a transactioninto a timerecording device.
Associated with the earlier electro-mechanical clocks in which time s were
stamped on a time card. Today transactions are normally swiped, scanned,
or input via keypad.
Polling – process in which punch data is retrieved from the time clock for processing
by the software. The user initiates polling.
Programming – process in which instructions for transaction handling are loaded into the
clock. Only qualified individuals should perform programming.
Programming errors can result in lost punch data.
Rounding – increments of time by which employees are paid. Used to keep totals as
whole numbers for easy calculating and checking. Actual punch time shows
on reports, but the times used for totals calculations will be rounded.
Schedule – rules contained in the software that determine how transactions are to be
processed. Employees can be assigned to multiple schedules to
accommodate work demands.
Swipe& Go – process of punching where the transaction ends at the employee entering the
badge number. The software determines how the punch is processed.
Time & Attendance – the reporting of employee hours and other information for payroll purposes.
66 Sample Reports
 Loading...